

Page 1

User Manual
X14310 (MD 31350) / X14911 (MD 31351) / X15512 (MD 31352) / X16513 (MD 31353)
MEDION® LIFE
®
Ultra HD Smart-TV
Page 2

Contents
1. About these Instructions ..................................................................................................... 4
1.1. Explanation of symbols .........................................................................................................................4
1.2. Proper use ...................................................................................................................................................5
1.3. Ultra HD .......................................................................................................................................................5
2. Package contents .................................................................................................................. 6
3. Safety instructions ............................................................................................................... 7
3.1. Operating safety .......................................................................................................................................7
3.2. Set-up location ........................................................................................................................................8
3.3. Repairs .........................................................................................................................................................9
3.4. Environmental temperature ................................................................................................................9
3.5. Safety when connecting .......................................................................................................................9
3.6. Handling batteries ................................................................................................................................ 10
4. Declaration of conformity .................................................................................................. 11
4.1. Information on WLAN ..........................................................................................................................12
5. Overview of the device ....................................................................................................... 13
5.1. Front .......................................................................................................................................................... 13
5.2. Rear and right-hand side .................................................................................................................... 14
5.3. Remote control ......................................................................................................................................15
6. Using the device for the first time ..................................................................................... 17
6.1. Unpacking ............................................................................................................................................... 17
6.2. Mounting ................................................................................................................................................. 17
6.3. Inserting batteries in the remote control ..................................................................................... 18
6.4. Connecting the antenna .................................................................................................................... 18
6.5. Connecting the power supply .........................................................................................................18
6.6. Switching the smart TV on and off ................................................................................................. 18
6.7. Channel search when switching on for the first time .............................................................. 19
7. Multimedia connections .................................................................................................... 23
7.1. Use of the multimedia connections ............................................................................................... 23
8. Operation ............................................................................................................................ 25
8.1. Channel selection ................................................................................................................................. 25
8.2. Sound settings ....................................................................................................................................... 25
8.3. Screen settings....................................................................................................................................... 25
8.4. Displaying information ....................................................................................................................... 26
8.5. Opening the favourites list ................................................................................................................ 26
8.6. Selecting the source ............................................................................................................................27
8.7. Wireless Display ..................................................................................................................................... 27
9. Teletext ................................................................................................................................ 28
9.1. Using the teletext .................................................................................................................................28
10. Via the OSD menu ............................................................................................................... 29
10.1. Navigating in the menu ...................................................................................................................... 29
10.2. The Q. MENU button ............................................................................................................................ 30
10.3. The menu system in detail .................................................................................................................31
11. EPG – Programme guide .................................................................................................... 53
12. Media portal ........................................................................................................................ 54
13. HbbTV system ..................................................................................................................... 55
14. Internet ................................................................................................................................ 55
15. MEDION® Life Remote App ................................................................................................ 55
16. Data protection MEDION® Smart TV ................................................................................. 56
2
Page 3

17. Troubleshooting ................................................................................................................. 57
17.1. Do you need more help? .................................................................................................................... 59
17.2. LCD TV pixel faults ................................................................................................................................59
18. Cleaning .............................................................................................................................. 60
19. Storage when not in use.....................................................................................................60
20. Disposal ............................................................................................................................... 61
21. Technical data ..................................................................................................................... 62
21.1. Information on trademarks ...............................................................................................................65
21.2. Product data sheet ...............................................................................................................................65
22. Service information ............................................................................................................ 66
23. Legal Notice......................................................................................................................... 66
24. Index .................................................................................................................................... 67
3
EN
Page 4
1. About these Instructions
Please be sure to read these operating instructions carefully and follow all instructions
given. The instructions will help you to operate the device reliably and help increase its
service life. Always store these instructions near the device. Keep these operating instructions so that you can pass them on with the device if you sell it.
1.1. Explanation of symbols
If a block of text is marked with one of the warning symbols listed below, the hazard described in
that text must be avoided to prevent the potential consequences described there from occurring.
DANGER!
Warning of immediate mortal danger!
WARNING!
Warning of possible risk of fatal injury and/or serious irreversible injuries!
CAUTION!
Warning: risk of minor or moderate injuries!
NOTICE!
Please follow the instructions to avoid property damage!
Additional information on using the device!
NOTICE!
Please follow the instructions in the operating instructions!
WARNING!
Warning of risk of electric shock!
WARNING!
Warning: danger due to loud volume!
• Bullet point/information on steps during operation
Instructions to be carried out
Declaration of conformity (see section “Declaration of conformity”): Products that feature this symbol meet the requirements of the EC directives.
4
Page 5
Safety class II
Electrical appliances in protection class II are electrical appliances that permanently have double or reinforced insulation and do not have any connection options for a
protective earth. The housing of an electrical appliance in protection class II that is enclosed in insulated material can partially or fully act as the additional or reinforced insulation.
1.2. Proper use
This is an information technology device and is also suitable for multimedia applications. This device is used to receive and play back television programmes. The range of different connections
supplied makes it possible to expand the input and output sources (receiver, DVD player, DVD recorder, video recorder, PC, etc.). Your device offers a number of options for usage.
The device is intended for private use only and not for industrial/commercial use.
• Please note that we shall not be liable for damage caused by improper use.
• Do not modify the device without our consent and do not use any auxiliary equipment that we
have not approved or supplied.
• Use only spare parts and accessories that we have supplied or approved.
• Heed all the information in these operating instructions, especially the safety information. Any
other use is deemed improper and can cause personal injury or property damage.
• Do not use the device in extreme environmental conditions.
• This device is intended for use in dry, indoor areas only.
• This device is not designed to be used as a data monitor for office workplaces
1.3. Ultra HD
Your smart TV is equipped with the feature “Ultra HD”. This means that it can generally display high
resolution pictures with four times the level of detail as Full HD. The prerequisite for this is an Ultra
HD TV signal.
1.3.1. HDR (High Dynamic Range)
HDR technology offers a higher dynamic range with respect to the brightness values of the displayed colours. This means that each of the colour values can be displayed in 1024 steps instead
of the previous maximum of 256 steps. This quadrupling of the dynamic range makes the darkest areas of the picture even darker and the brightest areas even brighter. It creates a more realistic impression and enables you to see details that were previously unrecognisable with a smaller brightness range. HDR must be supported by the channel, streaming service or hardware of the
connected device and the Blue Ray.
.
For the HDMI inputs, go to the SOURCES menu and select the ENHANCED setting if you
wish to play back content with HDR.
5
EN
Page 6
2. Package contents
Please check your purchase to ensure that all the items are included and contact us within 14 days
of purchase if any parts are missing.
The following items are supplied with your product:
• Smart TV
• Remote control (RC4995) incl. 2 x 1.5V batteries (type LR03/AAA)
• AV adapter
• Stand including fastening screws and plastic caps (optional)
• Documentation
DANGER!
Risk of suffocation!
Packaging film can be swallowed or used improperly. Therefore, there is a risk of
suffocation!
Keep packaging material such as plastic film or plastic bags away from children.
6
Page 7
3. Safety instructions
3.1. Operating safety
− Check the device for damage before using it for the first time. A defective or damaged
device must not be placed into operation.
− This device may be used by children over the age of 8 and by persons with reduced
physical, sensory or mental abilities or by those without experience and knowledge, if
they are supervised or have been instructed in the safe use of the device and have understood the dangers that result from it.
− Children must not be allowed to play with the device. Cleaning and user maintenance
must not be carried out by children unless they are supervised.
DANGER!
Risk of suffocation!
Packing material is not a toy! Packaging film can be swallowed or used improperly.
Therefore, there is a risk of suffocation!
Keep packaging material such as plastic film or plastic bags away from children.
WARNING!
Risk of electric shock!
Risk of electric shock, short circuit and fire!
Never open the housing of the Smart TV and never insert any objects through
the slots and openings into your Smart TV.
WARNING!
Overheating! Risk of fire!
Overheating can damage your Smart TV and lead to a risk of fire!
The slots and openings on the TV are for ventilation purposes. Do not cover
these openings e.g. with newspapers, table cloths, curtains, etc.
− Do not put any pressure on the display. There is a risk that the glass on the screen may
break.
− The universal remote control has a class 1 infrared diode. Never use optical devices to
look at the LED.
CAUTION!
Risk of injury!
There is a risk of injury if the display is broken!
To avoid damaging the display, do not touch it with fingers or sharp objects.
Pick up the shattered pieces wearing protective gloves.
Then wash your hands with soap because chemicals may have leaked out.
Send the broken parts to your Service Centre for professional disposal.
− Disconnect the device from the mains network immediately in the event of an emer-
gency and only use it again when it has been checked by a qualified person or customer services. Emergency situations include e.g. when smoke or unusual noises are
coming from the device, water has penetrated into it or the mains cable or housing is
damaged.
7
EN
Page 8
Contact customer services if:
− The power cable is burnt or damaged
− Liquid has penetrated the device
− The device is not operating correctly
− The device has fallen, or the housing is damaged
− Smoke is rising from the device
3.2. Set-up location
− In the first few hours of use, new devices can give off a typical, unavoidable but totally
harmless smell which wears off with time. We recommend that you ventilate the room
at regular intervals to counteract the smell.
We have taken appropriate measures during
the development of this device to ensure that levels
are significantly below legal limits.
− Keep your Smart TV and all connected appliances away from moisture and avoid dust,
heat and direct sunlight. Non-compliance with these instructions can lead to faults or
damage to the Smart TV.
− Do not use the device outdoors as it could be damaged by rain, snow, etc.
− The device must not be exposed to dripping or sprayed water. Do not place vessels
filled with liquid (vases or similar) on or in the vicinity of the device. The container may
tip over and the liquid may impair the electrical safety of the product.
NOTICE!
Risk of damage!
There is a risk of injury with candles and other open flames.
Keep candles and other open flames away from this device at all times in order
to prevent the spread of fire.
− Make sure that there is enough clearance from the sides of the furniture unit. Ensure a
minimum clearance of 10 cm around the device for sufficient ventilation.
− Avoid dazzle, reflections and strong bright-dark contrast in order to protect your eyes.
− The optimal viewing distance is 3 times the screen diagonal.
DANGER!
Risk of injury! Mortal danger!
Only set up your TV on a stable surface. Televisions that tip over could cause serious injuries or death. Lots of injuries, especially to children, can be avoided by observing the following safety precautions.
Operate all components on a stable, level and vibration-free base, to prevent the
Smart TV from falling over.
Only use the stand and screws supplied with the TV.
− Only use furniture that guarantees the safe use of the TV.
− Ensure that the TV does not hang over the edges of the furniture.
− Do not place the TV on higher or high furniture such as wall cabinets or shelves with-
out ensuring that both the furniture and the TV are safely and securely held in place.
− In order to guarantee the stability of the TV, do not place any sheets or similar under it.
− Advise children of the dangers of climbing up furniture in order to reach the TV or its
operating elements.
If you are storing or moving the TV, also observe the aforementioned safety instructions.
8
Page 9

3.3. Repairs
− Repairs to your Smart TV should only be carried out by qualified specialists.
− If a repair must be carried out, please only contact our authorised service partner.
− Make sure that only replacement parts provided by the manufacturer are used. The
use of unsuitable replacement parts may damage the device and lead to a risk of fire.
3.4. Environmental temperature
− The device can be operated at an ambient temperature of +5°C to +35°C with a rela-
tive humidity of 20% - 85% (non-condensing).
− When switched off, the Smart TV can be stored at temperatures from -20°C to +60°C.
− Keep the product at least one metre away from sources of high-frequency and mag-
netic interference (television set, loudspeakers, mobile telephones, etc.) in order to
avoid malfunctions.
− During thunderstorms or if the device is not going to be used for long periods, remove
the plug from the socket and the aerial cable from the aerial socket.
NOTICE!
Risk of damage!
Large changes in temperature or fluctuations in humidity can cause moisture to
build up due to condensation within the Smart TV, which can cause an electrical
short circuit.
After transporting the Smart TV, wait until the appliance has reached ambient
temperature before switching it on.
3.5. Safety when connecting
3.5.1. Power supply
− Even when deactivated, some components of the device are live. To disconnect the
power from your Smart TV or to completely isolate the device from voltage sources,
disconnect the device completely from the mains network. Disconnect the mains plug
from the mains socket for this purpose.
DANGER!
Risk of electric shock!
There is a risk of death due to an electric shock when the housing is open!
Do not open the housing of the device. It does not contain any parts requiring
maintenance.
− Only plug the Smart TV into earthed 220–240 V~ 50 Hz sockets. Contact your electrici-
ty provider if you are not sure if the socket is earthed or not.
− The socket must always be easily accessible so that the mains plug can be quickly dis-
connected from the socket in the event of an emergency.
− To disconnect the power supply to your TV, disconnect the mains plug from the mains
socket.
9
EN
Page 10

− For extra safety, we recommend using an over-voltage protection device to prevent
your Smart TV sustaining damage as a result of power surges or lightning strikes.
− Position the cables so that they cannot be stepped on or tripped over.
− Do not place any objects on the cables as they may be damaged.
− Do not touch the plug with wet hands.
− Always hold the plug by its housing and never pull it out of the socket using the cable.
− Please note that the TV also continues to consume power in standby mode (see here
the power consumption in standby mode in the section “Product data sheet”).
If the device shuts down and restarts due to an electrostatic discharge while in USB
mode (media player), optional HbbTV mode or optional LAN/WiFi operation (media
player/portal), it will not be able to independently restore the last operating mode.
Please restart the respective media or applications.
The last user settings you entered may not be restored following an electrostatic
discharge that causes the TV to shut down because these settings are only saved 5
minutes after switching channels.
All multimedia devices, which are connected to the corresponding ports of the TV,
must comply with the requirements of the Low Voltage Directive.
3.6. Handling batteries
WARNING!
Risk of explosion!
Batteries may contain combustible materials and leak, heat up excessively, ignite or
even explode.
Avoid improper handling of the batteries to prevent damage to your device and your
health.
Please follow the safety advice below closely:
− Keep batteries away from children.
If batteries are swallowed, consult a doctor immediately.
− Never charge batteries (unless they are designed to be recharged).
− Never empty the batteries by means of high power output.
− Never short-circuit the batteries.
− Never expose the batteries to excessive heat, such as sunlight, fire or similar sources of
heat!
− Do not dismantle or deform the batteries.
You could injure your hands or fingers, or battery fluid could come into contact with
your eyes or skin. If this happens, rinse the affected areas with plenty of clean water
and consult a doctor immediately.
− Avoid heavy impacts and vibrations.
− Always observe the correct polarity.
− Make sure that the plus (+) and minus (−) poles are correctly inserted to avoid short
circuits.
− Do not mix up new and old batteries or different types of batteries.
This could cause your device to malfunction. In addition, the weaker batteries would discharge too much.
− Remove spent batteries from the device immediately.
10
Page 11
− Remove the batteries from the device if you do not intend to use it for a long period of
time.
− Replace all of the old batteries in a device with new batteries of the same type.
− Cover the contacts of the batteries with sticky tape if you want to store or dispose of them.
− If necessary, clean the battery and device contacts before insertion.
− If the batteries have leaked, wear protective gloves and clean the contacts thoroughly.
4. Declaration of conformity
This device is supplied with the following wireless features:
• Wireless LAN (optional)
• Bluetooth (optional)
Use is only permitted inside buildings in all EU countries due to the 5 GHz frequency band of the inbuilt Wireless LAN solution. Always observe the relevant legal regulations in the country of use.
Medion AG hereby declares that this device conforms to all of the required regulations in the EU
and the fundamental requirements and the remaining relevant regulations of:
• RE Directive 2014/53/EU
• Ecodesign Directive 2009/125/EC
• RoHS Directive 2011/65/EU
Full declarations of conformity are available at www.medion.com/conformity.
AT BE BG CZ DK
EE FR DE IS IE
IT EL ES CY LV
LI LT LU HU MT
NL NO PL PT RO
SI SK TR FI SE
CH UK HR
AT = Austria, BE = Belgium, CZ = Czech Republic, DK = Denmark, EE = Estonia, FR = France, DE =
Germany, IS = Iceland, IE = Ireland, IT = Italy, EL = Greece, ES = Spain, CY = Cyprus, LV = Latvia,
LT = Lithuania, LU = Luxembourg, HU = Hungary, MT = Malta, NL = Netherlands, NO = Norway,
PL = Poland, PT = Portugal, RO = Romania, SI = Slovenia, SK = Slovakia, TR = Turkey, FI = Finland,
SE = Sweden, CH = Switzerland, UK = United Kingdom, HR = Croatia
11
EN
Page 12

4.1. Information on WLAN
WLAN
Frequency range 2,4 GHz/ 5 GHz
Wi-Fi standard 802.11 a/b/g/n
Encryption WEP/WPA/WPA2
Frequency range/MHz Channel
Max. transmission power/
dBm
2400 – 2483,5 1 - 13 19,9
5150 – 5250 36 – 48 22,4
5250 – 5350 52 – 64 22,5
5470 – 5725 100 – 140 22,5
12
Page 13

5. Overview of the device
5.1. Front
MD 31350 / MD 31351 / MD 31352
3
2
1
OFF/ON
MD 31353
3
2
1
OFF/ON
1) LCD screen
2) Mains switch
3) Infrared sensor: Reception field for the infrared TV signals.
Operating light: Lights up when the device is in standby mode.
13
EN
Page 14
5.2. Rear and right-hand side
12
SIDE AV
MODE - / I
- O +
USB
5Vdc
Max. 500mA
USB
5Vdc
Max. 500mA
1
6
8
9
10
11
2
2
3
4
5
SPDIF
(ARC)
Optic. out
13 Vdc/18 Vdc
300mA Max.
7
1) COMMON INTERFACE (CI+): Card slot for connecting pay TV cards
2) USB (5V
, 500 mA max.): USB connection for media playback
3) SIDE AV: Audio/video input (yellow): for connecting a device via AV adapter 3.5 mm jack > 3 x
cinch
4)
: For connecting headphones with 3.5 mm jack
5) MODE: Multifunction button for channel switching, input source selection or volume adjustment. Settings are made by tilting upwards (+) or downwards (-). Pressing the button briefly
switches between functions. A long press switches the device into standby mode or operating mode.
6) HDMI 1-3: HDMI connection for devices with a HDMI output (HDMI 1 can be used for CEC/
ARC)
7) LNB (13 V/18 V
, 300 mA max.): For connecting the antenna (satellite)
8) ANT.: For connecting an aerial (analogue, DVB-T or DVB-C)
9) VGA: VGA port for connecting a PC or a YUV adapter
10) Optic. OUT: Digital audio output (optical)
11) LAN: Network connection to connect to the Internet
12) Fixing holes for a wall mount
14
Page 15

5.3. Remote control
OK
V
V
P
P
LANG. SUBT.
EPG
TXT
Q.
MENU
MENUBACK
EXIT
2
1
.,/@
3
ABC4DEF
5
GHI
JKL
6
MNO
7
PQRS8TUV
0
TV
9
WXYZ
1
2
3
4
5
6
7
8
10
12
13
14
16
15
17
18
19
27
26
24
25
11
20
21
23
22
9
1) : Switch smart TV on/off (switch standby mode on/off)
2)
NETFLIX: Call up Netflix site
3) Number buttons:
TV: programme selection, teletext: page selection
4)
(SWAP): Set previous TV programme
5)
MENU: Open and close menu
6)
: Internet button
7)
P-/+: Programme selection buttons
TV: select next (+) / previous (−) programme;
teletext: select next (+) / previous (−) page
8)
OK: Confirm selection in certain menus
9)
EXIT: Exiting the menu
10)
(SOURCE): Select input signal of connected devices
15
EN
Page 16

11)
TXT
: Activate teletext
Press 2 x = set transparent;
Press 3 x = close
12) Q. MENU: Access the quick menu (OPTION MENU) to quickly call up basic options
13)
: Switching between DVB-S, DVB-T and DVB-C channels / multifunction button for programme channel or input source
14) Red button: For teletext or menus
Green button: For teletext or menus
Yellow button: For teletext or menus
Blue button: For teletext or menus
15)
(SIZE): Select picture format
16) Media buttons
: Fast rewind;
: Fast forward;
: No function;
: Stop playback;
: Start playback;
: Pause playback
17) LANG.: Analogue TV: stereo/mono ;
Digital TV: select audio language (if available)
18) SUBT.: Subtitles on/off (if available)
19)
: Open the MEDION® portal /multifunction button for channel position or input source
20)
(MEDIA): Call up the media browser
21)
EPG
(EPG): Digital TV: call up the electronic programme guide
22) i (INFO): Digital TV: show information (e.g. current channel number)
23)
: Mute
24)
V-/+ : Increase (+) or decrease (−) volume.
25) Direction button : Move up in menu
Digital TV: Select info bar for the current programme, teletext: select next page;
Direction button : Move down in menu
Digital TV: Select info bar for the current programme, teletext: select previous page;
Direction button : Move left in menu
Teletext: Call up subpages;
Direction button : Move right in menu
Teletext: Call up subpages
26) BACK: Go one level back in menus
27)
TV
:
Switch to TV operation/call up information on channel-specific button functions
.
5.3.1. Programming the multifunction buttons and
The and buttons can be programmed to any channel position or a particular input source
Start by selecting the function you require and then hold down the corresponding button for 5
seconds until
MY BUTTON IS SET appears on the screen. This confirms the new programming.
After each INITIAL INSTALLATION your customised button programming is delet-
ed and reset to the factory defaults
16
Page 17
6. Using the device for the fi rst time
Before using for the first time, be sure to read the section “Safety instructions”.
6.1. Unpacking
• Select a suitable place for setting up the device before unpacking.
• Open the box very carefully to avoid damaging the device. The device could be damaged if you
use a knife with a long blade to open the box.
• The box contains a number of small items (including batteries). Keep these out of the reach of
children as they represent a choking hazard.
• Store the packaging material in a safe place; only use this box to transport the TV.
DANGER!
Risk of suffocation!
Packaging film can be swallowed or used improperly. Therefore, there is a risk of
suffocation!
Keep packaging material such as plastic film or plastic bags away from children.
6.2. Mounting
Attach the stand as shown in the illustration. Carry out this step before connecting the smart TV.
1
2
3x
3x
(optional)
Be sure to install the plastic caps on the feet of the smart TV to prevent damage to the
surface of your television cabinet, table, etc.! (optional)
17
EN
Page 18

6.3. Inserting batteries in the remote control
Loose the screw of the battery compartment cover on the back of the remote control and re-
move the cover.
Insert two LR03 (AAA) 1.5 V batteries in the battery compartment of the remote control. Check
the battery polarity (inscribed on the bottom of the battery compartment).
Close the battery compartment by fixing the cover with the screw.
NOTICE!
Risk of damage!
The remote control can be damaged by leaking batteries if not used for a long period of time!
Remove the batteries from the remote control if the device is not going to be
used for a long period.
6.4. Connecting the antenna
Your smart TV supports different antenna signals.
You can feed the following picture signals via the connection labelled ANT.:
• via analogue cable/an analogue house antenna,
• via a DVB-T/ DVB-T 2
1
antenna or
• via a DVB-C
2
connector (digital cable)
Connect the antenna cable from either the house aerial/the analogue cable connection, the
DVB-T antenna or the DVB-C connection to the antenna connection on the smart TV
You also have the option of connecting a digital satellite system to the connection labelled LNB.
Screw the F connector of a coaxial antenna cable onto the connection on the smart TV.
To receive encrypted/subscription channels you will need to use a CI module and
an appropriate card. Insert a CI module (available in specialist shops) into the slot
provided for this purpose on the left-hand side of the device (Common Interface).
You can then insert the card from your provider into the CI module.
6.5. Connecting the power supply
Connect the mains plug on the device to an easily accessible 220 - 240 V ~ 50 Hz mains socket.
6.6. Switching the smart TV on and off
Set the power switch on the bottom of the device to ON. The device switches to standby mode
and the display on the front will light up.
To switch on the device, press
− on the remote control: the Standby/On button
, one of the number buttons or one of the
P-/+ buttons;
− on the device: the multifunction button MODE.
Use the Standby/On button
on the remote control to switch the device back into standby
mode. Although the device has been switched off, it will continue to consume electricity.
Use the mains switch to turn off the device (OFF position). The device will continue to consume
power as long as it is connected to the mains network.
If the device is not receiving an input signal, it will automatically switch to standby mode after five minutes. A countdown timer will appear on the screen until this
time. This function is not available for all sources
.
1
This service must be available in your region.
18
Page 19
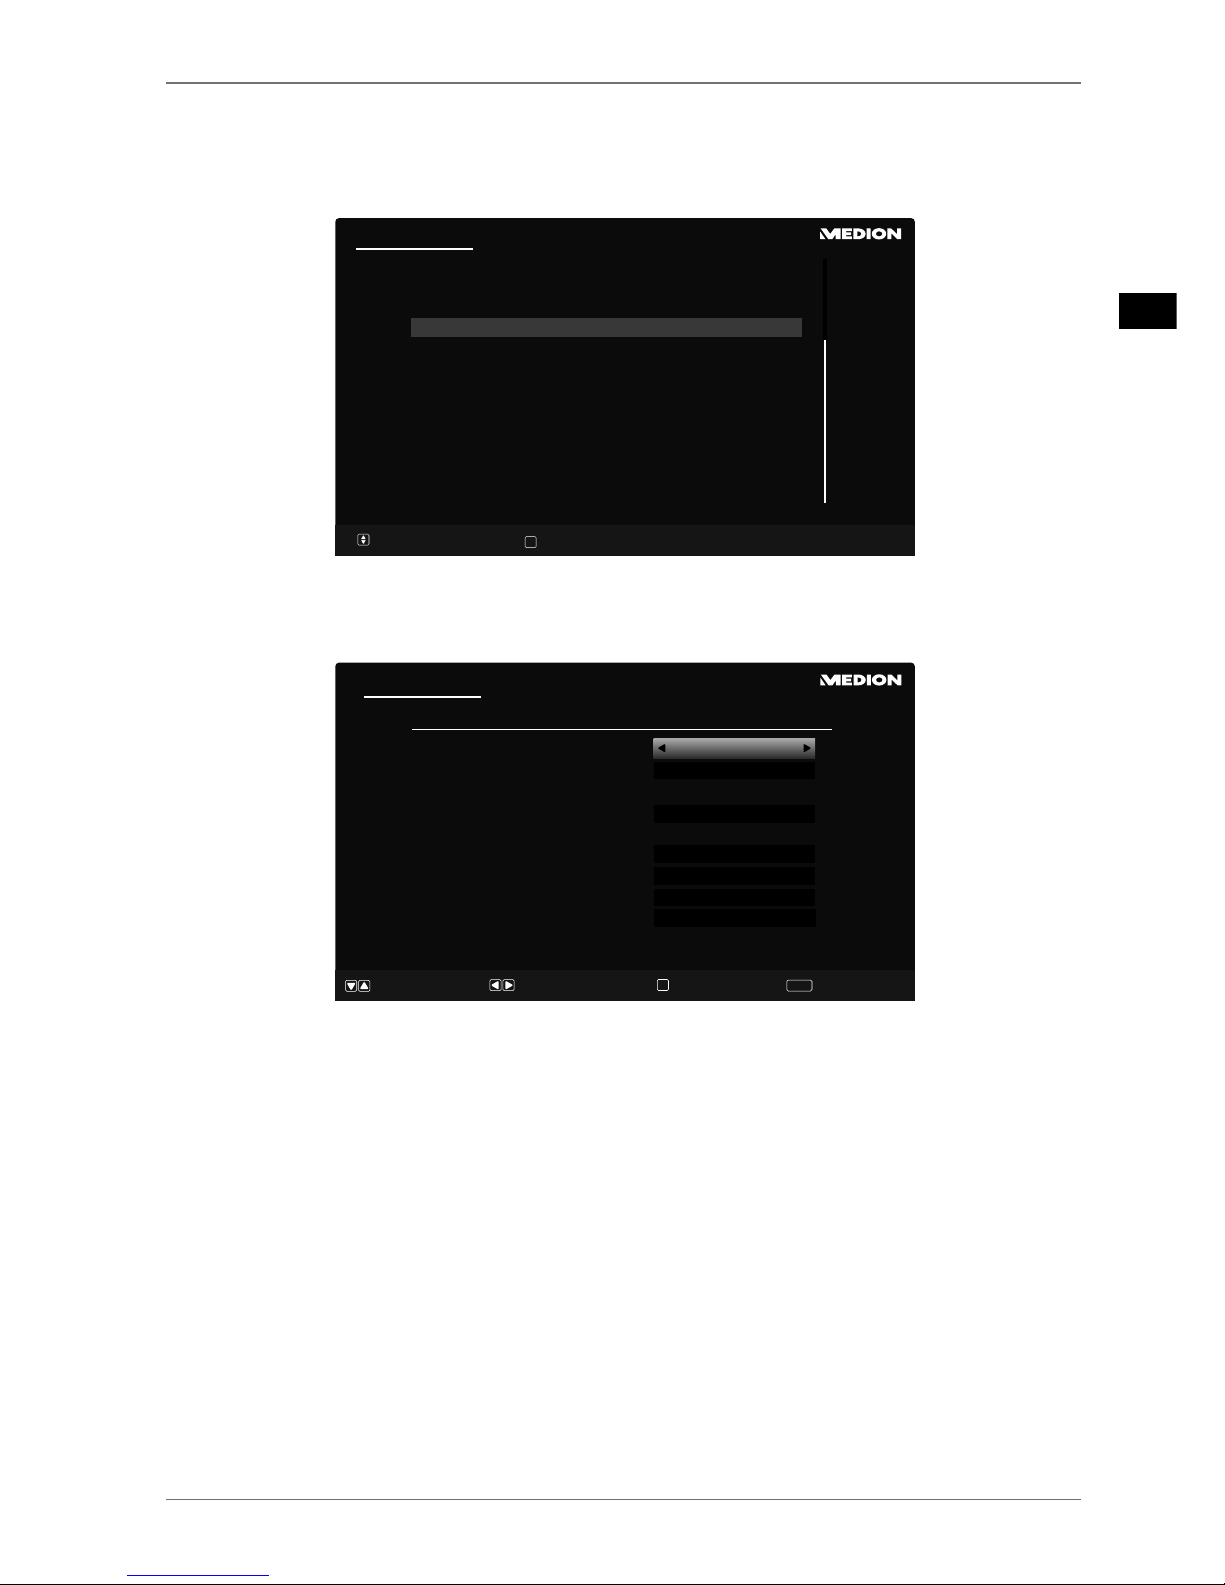
6.7. Channel search when switching on for the fi rst time
When you switch the device on for the first time, you will be guided through the FIRST TIME IN-
STALLATION
menu.You can call up and carry out the first-time installation again at any time via the
menu
INSTALLATION > FIRST TIME INSTALLATION .
First time installation
Velkommen, vælg venligst et sprog! Dansk
Willkommen, Wählen Sie bitte Ihre Sprache aus! Deutsch
Tere tulemast, palun valige oma keel! Eesti
Welcome please select your language! English
Bienvenido, seleccione un idioma Español
Καλώς ήλΘατε, παρακαλούμε επιλέξτε τη γλώσσα σας! Ελληνικά
Bienvenue ! Veuillez choisir une langue. Français
Fáilte roghnaigh do theanga, led‘ thoil! Gaeilge
Dobro došli, molim izaberite svoj jezik! Hr vatski
Benvenuti, Selezionate la vostra luingua! Italiano
Esiet sveicināts, lūdzu, izvlts. savu vald.! Latviešu
Sveiki! Pasirinkite savo kalbą Lietuvių k.
Select language
Set language
OK
You can move up or down in the menu and select the required language using the direction but-
tons .
After confirming the selected language with OK the initial installation will begin
First time installation
Country
Scan Encrypted Channels
Select favourite network type
Select Broadcast Type:
Digital Aerial
Digital Cable
Satellite
Analogue
Welcome!
Navigate
Continue
Choose your country
OK
Back
BACK
Germany
On
None
O
O
O
O
Use to select the desired country. The country setting will influence the order in which the
channels are stored. Also, there are a number of options preset for the individual countries.
If Siyou would also like to search for encrypted channels, set the option to
ON.
Now use the direction buttons to select the preferred reception type:
DIGITAL AERIAL,
DIGITAL CABLE, SATELLITE
or ANALOGUE. This reception mode will set to ON in the corre-
sponding options. After the channel scan, the preferred reception type will be activated.
If you want to activate other reception types, use the direction buttons to select the recep-
tion type
DIGITAL AERIAL, DIGITAL CABLE, SATELLITE or ANALOGUE and then use to
select ON for the desired reception type.
Afterwards, press
OK to continue.
Then you will be prompted to accept the MEDION® Smart TV privacy policy. This is necessary if
you intend to make use of the network/Internet services. In this case, answer the query with
YES.
If you select
NO you will not be able to use these services without subsequently agreeing to the
terms.
Now a query appears asking whether you want to make network/Internet settings. Select
NO if
you want to skip this step. If you have selected NO here, you cannot subsequently use any network/Internet/HbbTV services.
19
EN
Page 20

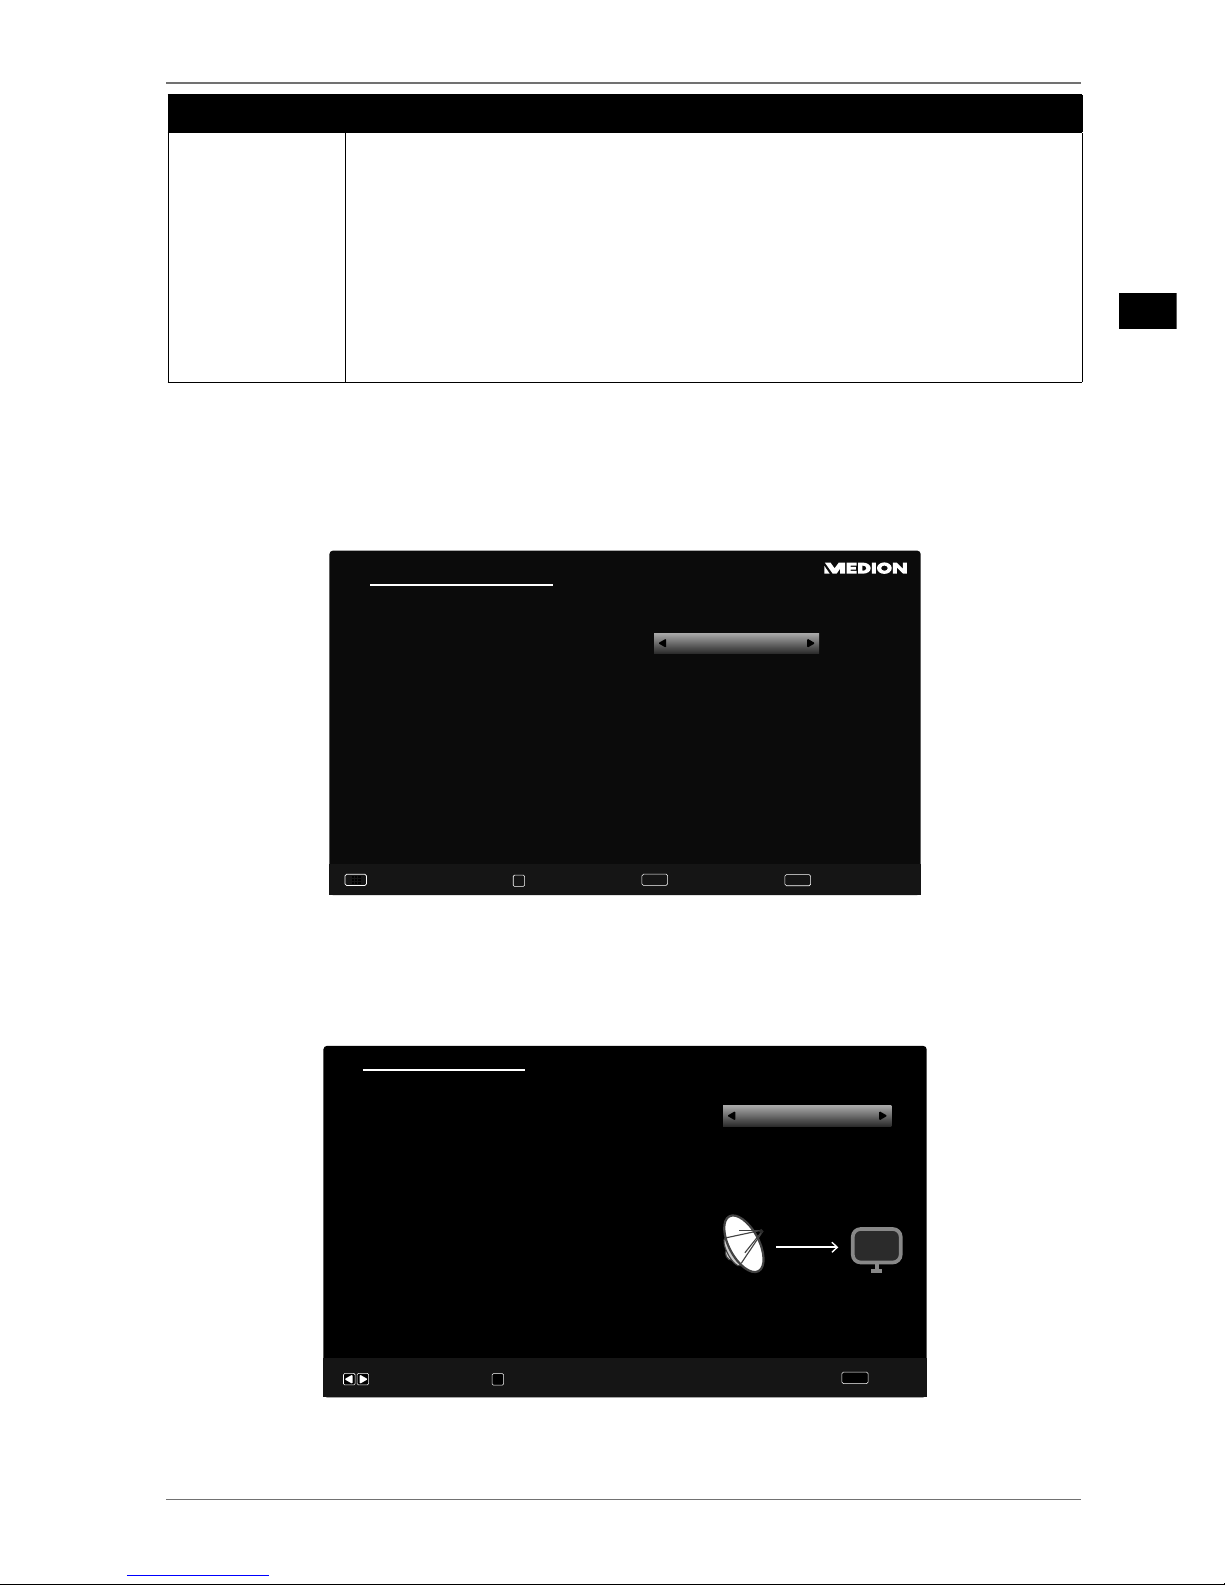
6.7.1. Network/Internet settings
Network/Internet Settings
Network Type
Press WPS on your wi router
Internet Speed Test
Advanced Settings
Wake On
Connected
48:6d:bb:b0:dc:65
Navigate
Continue
Change Value
OK
Back
BACK
Skip
Wireless Device
OK
OK
OK
On
Wi-Fi
Delete Saved Wi Prole
Network settings
NETWORK
TYPE
Here you select the network type: WIRELESS DEVICE or WIRED DEVICE. Af-
ter making a selection with the direction buttons and confirming with
the OK button, an overview of all available networks appears. Make a selection and confirm with the OK button. If a password is required for a network, a
virtual keyboard appears which you can use to enter this with the help of the
direction buttons and the OK button. After entering the password,
select OK on the keyboard and confirm with the OK button.
PRESS WPS
ON YOUR WI-
FI ROUTER
(only for WLAN)
This option enables you to quickly establish a WPS connection via a wireless
network (Wi-Fi). Hold down the WPS button on your router and confirm this
option OK using the OK button. Then the WPS connection will be made.
INTERNET
SPEED TEST
Press the OK button in order to test the Internet speed.
ADVANCED
SETTINGS
Press the OK button to call up further network configuration options.
CONFIGURATION
Choose the setting AUTOMATIC IP or MANUAL IP. If
you select MANUAL IP, three additional lines appear
in which you can manually enter the data for the
IP
ADRESS, SUBNET MASK
and DEFAULT GATEWAY
using the direction buttons and the number buttons.
CONFIGURATION
Select here between AUTOMATIC DNS or MANUAL
DNS
. If you select MANUAL DNS, two additional lines
appear in which you can manually enter the data for
the
DNS SERVER 1 and DNS SERVER 2 using the di-
rection buttons and the number buttons.
An existing network connection can be terminated by pressing
the red button.
20
Page 21
Network settings
WAKE ON
Activate/deactivate the Wake-On LAN/Wake-On Wireless LAN function (WoL/
WoWLAN). This enables you to switch on the smart TV via a different device
(e.g. a smartphone with the MEDION® Life Remote App). Both devices must be
connected to the same network via LAN or Wi-Fi for this purpose. Select the
ON setting to activate this function. The device being used as a remote control needs to be connected to the TV once when it is switched on. The control
function only works when the TV is in standby mode. If the TV is turned off
and on again at the mains switch, the connection between the two devices
will be automatically restored.
Exit the network settings by pressing OK.
After exiting the network settings, the channel search will start for your previously selected pre-
ferred reception type. Also pay attention to any other information that is displayed on the screen
depending on your selection.
6.7.2. Cable digital
Automatic channel scan - Digital Cable
Network
Frequency
Network ID
Search Step
Continue
Change Value
OK
Back
BACK
Unitymedia
346,00 MHz
9999
8000
Exit
MENU
123
456
789
If you have previously activated the reception type DIGITAL CABLE, you can now make settings
for the network search. If it should be necessary, you can adjust the NETWORK, FREQUENCY, the
NETWORK ID and the SEARCH STEP correspondingly.
6.7.3. Satellite
First time installation
Direct
Continue
OK
Anntenna type
For direct connection of the device to one LNB choose Direct.
Choose antenna type
Back
BACK
If you have previously activated the reception type SATELLITE, you can now make settings for the
antenna type.
21
EN
Page 22

To set the antenna type, select one of the following antenna types:
−
DIRECT: Select this antenna type if you have a single receiver and a satellite antenna. Press
the OK button and then choose the desired satellite (you can also call up the transponder list
using the blue button). Afterwards, press the OK button again to start the search. After that,
decide whether or not the channel list should be loaded.
−
UNICABLE: Select this antenna type if you have multiple receivers and a single-cable system.
Press the OK button and make all the necessary settings regarding SATELLITE POSITION
1/2, USER BAND and BAND FREQUENCY (here you can also call up the transponder list
using the blue button). Afterwards, press the OK button again to start the search. After that,
decide whether or not the channel list should be loaded.
−
DISEQC SWITCH: Select this antenna type if you have multiple satellite antennas and a DiSE-
qC switch. Press the OK button and activate the desired DISEQC switch 1 - 4 (here you can
also call up the corresponding transponder list using the blue button). Afterwards, press the
OK button again to start the search. After that, decide whether or not the channel list should
be loaded.
Afterwards, press
OK to continue.
Scan statistics
Network Type
DVB-T
DVB-C
DVB-S
Analogue
TV / Radio
Exit
OK
51 / 0
0/0
966/158
29
After the end of the automatic channel storage, an overview of the number of found channels appears for the corresponding reception types.
Press the
OKbutton to close the list and complete the search. The device now switches to the
channel of the previously selected preferred reception type. At the same time, the channel list is
displayed. If the list is not processed further, it closes after a few minutes.
If the channel list does not close automatically, press the
MENUbutton to exit the function.
The initial installation described here corresponds to the FIRST TIME INSTALLA-
TION
option in the INSTALLATION menu.
22
Page 23

7. Multimedia connections
7.1. Use of the multimedia connections
CAUTION!
Risk of damage!
Incorrect operation can lead to damage to the equipment used.
Before wiring and use, also read the operating instructions of the devices you
are connecting.
CAUTION!
Risk of damage!
If plugs and sockets are connected incorrectly it can cause damage to the contacts.
Ensure that the plugs and corresponding sockets fit together precisely in order
to avoid any damage to the contacts. Due to the arrangement of the contacts,
the plug will only fit into the socket in one position.
7.1.1. AV
AV transmission (composite) works via three RCA jacks in which one carries the video signal (yellow)
and two carry the stereo audio signal (red/white). Use a commercially available AV cable.
Connect the AV inputs and outputs of the equipment with an AV cable.
If any of the connected devices have AV connections to mini jack, please use an appropriate AV
adapter (3x RCA > mini jack) (optional).
7.1.2. HDMI
HDMI (high definition multimedia interface) is an interface for digital video and audio transmission.
It has the highest quality of transmission and can also play Ultra HD resolution (from version 2.0).
Use a commercially available HDMI cable.
Connect the corresponding HDMI ports of the devices used with an HDMI cable.
7.1.3. HDMI ARC
If you want to use a television as a signal receiver AND signal source (to transmit an audio signal to
an audio receiver), you should use an HDMI port with audio return channel (ARC). The HDMI connection to the TV set then works in both directions. Video and audio signals can be received from a
video device and the audio signal of the TV can also be sent to the audio receiver via the audio return channel.
Connect the video device (e.g. Blu-ray player) to the audio receiver via HDMI.
Connect the audio receiver to the TV set via HDMI/ARC.
Make sure that the speaker control of the TV set is routed to the external amplifier.
7.1.4. HDMI CEC
If you connect different devices via CEC-enabled HDMI connections, you can control certain functions of the entire HDMI network with a single remote control (e.g. standby or record functions):
Connect all devices via CEC-enabled HDMI ports with HDMI cables.
Make sure that the CEC functions are enabled for all ports and that all devices are connected ac-
cordingly.
23
EN
Page 24

7.1.5. USB
A USB port can be used to connect and read storage media such as USB sticks or external hard
drives. Use a suitable USB cable. If a suitable USB cable is included in delivery, you should use this
(e.g. for hard drives).
Connect the corresponding USB ports of the devices used with a USB cable. Whenever possible,
do not use a USB extension cord as this can cause problems (depending on the voltage).
7.1.6. SPDIF
SPDIF (Sony®/Phillips digital interface) is an interface for transferring digital stereo or multi-channel
audio signals between various devices. Usually, the digital audio signal is output via a coaxial (RCA)
or an optical connection. Use a suitable, commercially available cable.
Connect the SPDIF ports of the devices used with a corresponding SPDIF cable.
7.1.7. VGA (PC)
Using the VGA port, you can connect a PC with a monitor/TV set to transmit the video signal. Use a
commercially available VGA cable.
Connect the VGA ports of the devices used with a VGA cable.
7.1.8. VGA (YPbPr)
The VGA connection of your TV set can be used for the transmission of the YPbPr video signal. Use a
suitable YPbPr adapter.
Connect the VGA port of your TV set to the YPbPr RCA connections (red/blue/green) of the video
device. Use a suitable YPbPr adapter.
Use the AV audio connections of your TV set (red/white) for sound transmission and connect
them with the YPbPr audio connections of the video device (red/white). Use a commercially
available stereo RCA cable.
If the TV set has AV connections to mini jack, please use an appropriate AV adapter (RCA > mini
jack) (optional).
7.1.9. LAN
You have the possibility to connect the device to the Internet via the LAN connection and receive
online content (e.g. streaming services) on your device.
Connect the LAN ports of the devices used with a network cable (Ethernet cable).
Make all the necessary network settings on the devices.
7.1.10. Headphone out
The headphone socket is used for connecting a pair of headphones with a stereo mini jack connection.
Connect the headphones to the stereo mini jack of the device. On some devices, this will mute
the speakers.
Otherwise, you should perform all necessary settings in the sound menu to coordinate the
speaker and headphone signals.
WARNING!
Risk of hearing damage!
To prevent possible damage to your hearing, avoid listening at high volume over
long periods of time.
Before pressing play, set the volume to the lowest setting.
Start playback and increase the volume to a comfortable level.
24
Page 25

8. Operation
8.1. Channel selection
To select a channel, either press one of the P -/+ buttons on the remote control, use the multifunction button MODE on the device or select the channel directly using the number buttons.
Use the (SWAP) button to select the last channel played.
By pressing the
OK button on the remote control you can call up the channel list, select the
channel with the and buttons and confirm with OK.
8.2. Sound settings
Use the V-/+ volume buttons on the remote control or increase or decrease the volume in the
volume mode of the MODEswitch on the device.
Use the
mute button to switch the volume fully off and on again.
Pressing the LANG. button will display the current audio language.
8.3. Screen settings
Depending on the programme, the pictures are transmitted in the formats 4:3 or 16:9. Use the
(SIZE) button to adjust the picture format:
AUTO: The format displayed is automatically adjusted to match the input signal.
FULL (only in HDMI mode and for HD TV programmes re-
ceived via cable): Pixel-exact reproduction of the picture
(1:1).
16:9: For undistorted screen display in 16:9 format
SUBTITLE: With this function, a widescreen image (pic-
ture format 16:9) with subtitles is zoomed to full screen
size.
SUBTITLESUBTITLE
14:9: This option sets the 14:9 picture format.
14:9 ZOOM: With this function, a wide image (picture
format 14:9) is zoomed to the upper and lower edges of
the screen.
4:3: Is used to view a standard image (picture format
4:3) as this is its original format.
CINEMA: With this function, a widescreen image (picture
format 16:9) is zoomed to full screen size.
25
EN
Page 26

You can also change the picture format setting in the menu PICTURE > ADVANCED SETTINGS >
PICTURE ZOOM.
You can move the screen content up or down by pressing the / buttons if the
picture format
14:9 ZOOM, KINO or SUBTITLE is selected.
Please note that not all picture formats are available depending on the chosen image source.
8.4. Displaying information
Now: Next:
10:36-11:04 The Big Bang Theory
08:476 ProSieben
TXT
;
DVB-T2
S
Q
11:04-11:30 How I Met Your Mother
;;
HD
CH25
100%
97%
A/V Sharing
Press the i (INFO) button to show information about the current channel.
You can get the same information when you switch over to a different channel.
If you press the i (INFO) button twice, a description of the TV programme you are current-
ly watching will be displayed (if available). This automatically scrolls through the text. If the information changes too quickly, you can use the and arrow buttons to scroll up and down
through the text yourself.
8.5. Opening the favourites list
In the CHANNEL LIST menu you can add individual channels to up to four different favourites lists.
Press the MENU button and use the and buttons to select the CHANNEL LIST menu and
then press the OK button. The EDIT CHANNEL LIST menu opens. Alternatively, you can press
the OK button during operation (the CHANNEL LIST opens). Then press the green button AD-
VANCED.
Now use the and buttons to select the channel that you want to add to one or more fa-
vourites lists. If you want to add several channels to the favourites simultaneously, select these
using the yellow button. Then press the
OK button. The CHANNEL EDIT OPTIONS menu
opens.
Now use the and buttons to select the
ADD/REMOVE FAVOURITES option and press the
OK button.
In the
FAVOURITE LISTS menu you can now assign the marked channels to the desired favour-
ites lists (LIST 1 - 4). To do this, select the entry ON for the corresponding list. Now press the
OK or EXIT button.
If you press the Q. MENU button, you can use the option EDIT FAVOURITES in the
OPTION MENU to add the currently selected channel to a favourites list (LIST 1 -
4).
To call up a favourites list, open the EDIT CHANNEL LIST menu again as described
above. Then choose the FILTER option with the blue button and select the required favourites
list (LISTE 1 - 4) under FAVOURITES. When you open the CHANNEL LIST with the OK button,
only the channels in the favourites list are displayed and you can switch between them.
If you press the Q. MENU button, you can also select one of the favourites lists
from the
FAVOURITES in the OPTION MENU.
When you call up the channel list with the OK button, the favourites list will automatically be shown if you are in one of the four favourites lists. In this case, you can
alternatively use the and buttons to select your favourites and call them up
with the
OK button.
26
Page 27

8.6. Selecting the source
Please note that when connecting with the (SOURCE) button the source (the
connected device) will only be recognised if it has been activated in the menu
SET-
TINGS
, submenu SOURCES.
Use the (SOURCE) Tbutton to select the inputs of the connected devices. When the
SOURCE menu is open, you can press the corresponding digit to select the desired source directly.
1. TV
TV operation (plays back antenna and cable signals)
2. SIDE AV
Audio/Video input on the side of the device via an adapter (AV)
3. HDMI1
HDMI input 1 (HDMI 1 can be used for CEC/ARC)
4. HDMI2
HDMI input 2
5. HDMI3
HDMI input 3
6. YPBPR
Device on the VGA input using adapter (YUV)
7. VGA/PC
Device on PC input
8. WIRELESS DISPLAY
Playback of content from another signal source device
If the CEC function is enabled, the source HDMI1 could be renamed from the signal source device if necessary.
You can also make the source selection in source mode using the
MODE switch on
the device.
Use the direction buttons to go to the desired source.
Confirm your selection with the
OK button.
8.7. Wireless Display
Via wireless display you have the option of playing content from a signal source device (e.g. tablet
PC, smartphone, etc.) via the television. The signal source device must have at least Android version
4.2 installed.
Select
WIRELESS DISPLAY as source. The display “Ready for Connection” appears.
You must activate screen mirroring on the signal source device. The signal source device detects the
available TVs with which a connection can be established. The detected device will be displayed
on the TV screen.
After selecting the TV, a connection is established. The display “Connecting to Wireless Display” appears. Then the TV will mirror the screen content of the signal source device.
Wireless display can only be used if the mobile device supports this feature.
The detection and connection processes differ depending on the programs you
use. Please refer to the operating instructions of your signal source device.
Android-based mobile devices should have the software version 4.2 or higher.
Due to the great variety of different devices, correct functioning cannot be guaranteed.
27
EN
Page 28

9. Teletext
Teletext is a free service broadcast by most channels and contains the latest news, weather, TV programmes, share prices, subtitles and other information. Your TV offers many useful functions for using teletext including multipage text, subpage saving and high-speed navigation.
9.1. Using the teletext
Your remote control has special teletext buttons for operating the teletext.
Select a TV channel that broadcasts teletext.
Press the
TXT
button once to display the start/index page for the teletext.
Pressing
TXT
again makes the text transparent in front of the TV image.
Pressing the
TXT
button a third time switches the device back into TV mode.
9.1.1. Selecting a teletext page
Number buttons
Enter the number of the desired teletext page as a three digit number using the number but-
tons.
The selected page number is displayed in the top left corner of the screen. The teletext counter
searches as long as it takes to find the selected page number.
Scrolling through pages
Using the channel selector buttons or the direction buttons and you can scroll back and
forth through the teletext pages.
Colour buttons
If coloured text entries are displayed at the lower edge of the screen then you can select the con-
tents directly by pressing the appropriately coloured button RED, GREEN, YELLOW and BLUE.
Subpages
Some teletext pages have subpages. The lower edge of the screen may contain something like 1/3,
for example. The subpages are displayed one after another at an interval of about half a minute. You
can also call up these subpages yourself by pressing the or button. A four digit input box appears in which you can enter the number of the sub-page (e.g. 0002). Alternatively you can scroll
through the subpages using the direction buttons .
INDEX
Use the
BACK button to select the index page that has a list of the teletext content.
28
Page 29

10. Via the OSD menu
10.1. Navigating in the menu
Press the MENU button to activate the OSD.
You can use the direction buttons to select the options from the main menu.
Press
OK to call up the selected option from the main menu.
You can use the direction buttons to select the options from a menu.
Use the
BACK button to move back one menu screen and back to the main menu.
Use the direction buttons to enter a value or make another selection.
Use the
EXIT or MENU buttons to close the menu.
Please note that, depending on the presets, the menu closes automatically if no button is pressed.
The OSD menu also displays the available options along the bottom.
You can select the following main menus:
•
PICTURE menu
•
SOUND menu
•
SETTINGS menu
•
INSTALLATION menu
•
CHANNEL LIST menu
•
MEDIA BROWSER menu
Due to technical changes, the menus described here may differ from the menus
actually displayed on your screen.
Not all menus are available, depending on the source you selected. If VGA/PC is selected as the source, other options will appear in the picture settings.
29
EN
Page 30

10.2. The Q. MENU button
Access the quick menu ( OPTION MENU) to quickly call up basic options.
Option Menu
Picture Mode
Equalizer Settings
Favourites
Edit Favourites
Sleep Timer
Energy Saving
Navigate
Exit
Change Value
MENU
Natural
User
None
OK
O
Maximum
Menu Item Settings
PICTURE MODE
Select picture mode: NATURAL, CINEMA, SPORTS, DYNAMIC.
EQUALIZER
SETTINGS
You can select the presets MUSIC, MOVIE, SPEECH, FLAT, CLASSIC and
USER in the equaliser menu.
FAVOURITES
If you press the Q. MENU button, you can also select one of the favourites
lists from the FAVOURITES in the OPTION MENU.
EDIT FAVOURITES
If you press the Q. MENU button, you can use the option EDIT FAVOUR-
ITES
in the OPTION MENU to add the currently selected channel to a fa-
vourites list (
LIST 1 - 4) by switching the option of the desired list to ON.
SLEEP TIMER
You can use the SLEEP TIMER to programme the device to switch off automatically. You can set the time in 30-minute increments (maximum 2 hours).
The sleep timer countdown begins immediately after the setting has been
made. Select OFF to deactivate the function.
ENERGY SAVING
Here you can activate the energy saving mode. Select OFF, MINIMUM, MEDI-
UM,
MAXIMUM, SCREEN OFF or AUTO, to set the brightness of the TV or
switch off the screen.
In DYNAMIC picture mode, the MAXIMUM setting cannot be
selected.
30
Page 31

10.3. The menu system in detail
10.3.1. Picture menu
Mode
- Contrast
- Brightness
- Sharpness
- Colour
Energy Saving
Backlight
Advanced Settings
Reset
Picture Settings
Maximum
OK
OK
Natural
95
50
50
60
Navigate
Back
Exit
Change Value
MENU
BACK
50
Menu Item Settings
MODE
Select picture mode: NATURAL, CINEMA, SPORTS, DYNAMIC.
The picture mode can also be set in the quick menu. Press the Q.MENU
button to call it up.
CONTRAST
Increase or decrease contrast (on a scale of 0 – 100).
BRIGHTNESS
Increase or decrease brightness (on a scale of 0 – 100).
SHARPNESS
Increase or decrease sharpness (on a scale of 0 – 100).
COLOUR
Increase or decrease colour saturation (on a scale of 0 – 100).
ENERGY SAVING
Here you can activate the energy saving mode. Select OFF, MINIMUM, ME-
DIUM,
MAXIMUM, CUSTOM, SCREEN OFF or AUTO to set the bright-
ness of the TV or switch off the screen.
In DYNAMIC picture mode, the MAXIMUM setting cannot
be selected.
BACKLIGHT
If you have selected CUSTOM under the setting ENERGY SAVING, you
can set your preferred brightness level for the energy saving mode (scale 0
– 100).
31
EN
Page 32

Menu Item Settings
ADVANCED
SETTINGS
Advanced Picture Settings
Dynamic Contrast
Noise Reduction
Colour Temp
White Point
Picture Zoom
Film Mode
Skin Tone
Colour Shift
HDMI Full Range
Medium
GR
5-5
Navigate
Back
Exit
Change Value
MENU
BACK
Low
Normal
Auto
Auto
O
DYNAMIC CONTRAST
Set dynamic contrast: LOW, MEDIUM, HIGH, OFF.
NOISE REDUCTION
With this function you can reduce the image noise and
improve the image quality in weak analogue signals.
Select between OFF, LOW, MEDIUM and HIGH.
COLOUR TEMP
Select the colour tone: NORMAL, WARM, COOL
and CUSTOM.
WHITE POINT
If you have selected the setting CUSTOM under
the option
COLOUR TEMP, you can set the colour
temperature to any value between warm and cold.
PICTURE ZOOM
Set the picture format here.
This function corresponds to the (SIZE) button.
FILM MODE
To play back films taken on a video camera without
judder, switch the film mode to the AUTO position.
SKIN TONE
Set skin tone
COLOUR SHIFT
Set colour shift
HDMI FULL
RANGE
HDMI FULL RANGE (optional): If the picture is com-
ing in via an HDMI input, this option is available in the
Picture Settings menu.
You can use this feature to boost the black of the images. You can set this function to
ON to activate HDMI
True Black mode.
RESET
Press OK to reset all picture settings to the factory defaults.
32
Page 33

10.3.2. Picture menu in VGA/PC mode
Picture Settings
Contrast
Brightness
Sharpness
Colour
Energy Saving
Backlight
Advanced Settings
PC Position
Reset
OK
OK
OK
50
50
50
O
50
Navigate
Back
Exit
Change Value
MENU
BACK
50
Menu Item Settings
CONTRAST
Increase or decrease contrast (scale of 0 – 100).
BRIGHTNESS
Increase or decrease brightness (scale of 0 – 100).
SHARPNESS
Increase or decrease sharpness (on a scale of 0 – 100).
COLOUR
Increase or decrease colour saturation (scale of 0 – 100).
ENERGY SAVING
Here you can activate the energy saving mode. Select OFF, MINIMUM, ME-
DIUM,
MAXIMUM, CUSTOM, SCREEN OFF or AUTO to set the bright-
ness of the TV or switch off the screen.
BACKLIGHT
If you have selected CUSTOM under the setting ENERGY SAVING, you can
set your preferred brightness level for the energy saving mode (scale 0 –
100).
ADVANCED
SETTINGS
Advanced Picture Settings
Dynamic Contrast
Colour Temp
White Point
Picture Zoom
Film Mode
Normal
16:9
Auto
O
Back
Exit
Change Value
MENU
BACK
Navigate
DYNAMIC CONTRAST
Set dynamic contrast: LOW, MEDIUM, HIGH, OFF.
COLOUR TEMP
Select the colour tone: NORMAL, WARM, COOL and
CUSTOM.
33
EN
Page 34

Menu Item Settings
WHITE POINT
If you have selected the setting CUSTOM under
the option
COLOUR TEMP, you can set the colour
temperature to any value between warm and cold.
PICTURE ZOOM
Set the picture format here.
This function corresponds to the
button (SIZE).
FILM MODE
To play back films taken on a video camera without
judder, switch the film mode to the AUTO position.
PC POSITION AUTO POSITION
If you want to move the image, select the AUTO PO-
SITION entry and press OK to move it back to the cen-
tre. This should be done in the full image mode to ensure the settings match.
H POSITION
You can use to adjust the horizontal position of
the picture.
V POSITION
You can use to adjust the vertical position of the
picture.
DOT CLOCK
With this setting the picture signal is synchronised to
match with the monitor's pixel rate. This corrects errors
that can appear as vertical stripes in pixel-dense images (like tables or text with small fonts). Set the frame
rate using .
PHASE
If the PC picture is not clear, you can use to adjust
the picture signal to correspond to the smart TV pixels.
This will result in a clear image with an even, sharp display.
RESET
Use or OK to reset all picture settings to the factory defaults.
34
Page 35

10.3.3. Sound menu
Sound Settings
Volume
Equalizer
Balance
Headphone
Sound Mode
Audio Link
AVL
Headphone/Lineout
Dynamic Bass
DTS TruSurround
Digital Out
User
14
0
20
Back
Exit
Change Value
MENU
BACK
Navigate
Stereo
Disabled
O
Headphone
O
O
PCM
Menu Item Settings
VOLUME
Standard volume settings when switching on (scale of 0–100) Select a moderate volume.
EQUALIZER
You can select the presets MUSIC, MOVIE, SPEECH, FLAT, CLASSIC and
USER in the equaliser menu. The settings in the equaliser menu can only be
changed if the equaliser mode is set to USER.
BALANCE
Set the balance between the left and right speakers (scale of -50 to +50).
HEADPHONE
Set the headphone volume here. This can only be changed if the setting
HEADPHONE has been selected under the HEADPHONE/LINE OUT op-
tion.
CAUTION!
Risk of damage to your hearing!
To prevent possible damage to your hearing, avoid listening at
high volume over long periods of time.
Before pressing play, set the volume to the lowest setting.
Start playback and increase the volume to a comfortable level.
SOUND MODE
Standard setting STEREO. If the current programme supports DUAL mode
(e.g.
dual-language broadcasts), you can also choose here between DUAL-I
and DUAL-II
(original language and dubbed language).
35
EN
Page 36

AUDIO LINK
Here you can enable or disable the Bluetooth® function of the device. With
Audio Link enabled, it is possible to pair the TV set wirelessly with Bluetooth®
speakers (e.g. a soundbar).
DEVICE
Select the ENABLED setting if you want to connect the
device to an external speaker via Bluetooth®.
DISCOVER
Press the green button to search for available Bluetooth® connections. All
found connections are then displayed. Use the buttons to select the desired device and press OK to pair the speaker or speaker system with the TV
set.
Due to the great variety of different Bluetooth® devices, correct
functioning cannot be guaranteed. Please also read the operating
instructions of the device that you wish to connect to the TV. The
device that you want to connect must be in discoverable mode.
DISCONNECT
Press the yellow button to terminate the connection.
REMOVE
To remove a device from the list, select it using the buttons and press
the red button. Confirm the following query with
YES. The device is then de-
leted from the list.
AVL
This function compensates for the different volume levels between different
programmes. Set to OFF to return to the original volume settings. Set to ON
to hear a constant volume.
HEADPHONE/
LINE OUT
Select the audio signal for the headphones. The HEADPHONE setting allows
volume control of the signal. In the LINE OUT setting the signal has a prede-
fined volume which cannot be changed. If this setting is selected, an external
amplifier can be connected to the device.
DYNAMIC BASS
Set the bass enhancement to ON or OFF.
DTS
TRUSURROUND
Activate/deactivate the surround sound effect.
DIGITAL OUT
Set the audio type for the digital output here.
36
Page 37

10.3.4. Settings menu
Settings
Conditional Access
Language
Parental
Timers
Date/Time
Sources
Network/Internet Settings
Accessibility
Netix
More...
Menu Item Settings
CONDITIONAL
ACCESS
If you want to watch subscription channels, you must firstly register with the
corresponding provider. You will receive a Conditional Access Module (CA
module) and a special card from your provider after registration. You will find
information about the settings in the documentation supplied with the module.
Install the CI components on your television in the following way:
Switch the television off and pull out the mains plug.
Insert first of all the CI module into the slot on the side of the smart TV. Then
insert the card.
Please note that you may only insert or remove the CI module
when the device has been disconnected from the mains electricity network.
NOTICE!
Risk of damage!
The CI module or the television could be damaged if you attempt to use force to insert the CI module.
The CI module must be inserted correctly; it cannot be inserted if
aligned incorrectly.
Connect the television to the electricity supply, switch it on and wait for a
moment until the card is recognised.
Some CI modules require additional set-up steps, which you can carry out in
the
CONDITIONAL ACCESS menu.
If no module is inserted, the message
NO COMMON INTERFACE MODULE
DETECTED appears on the screen.
37
EN
Page 38

Menu Item Settings
LANGUAGE
All language settings are
shown and set in the
LAN-
GUAGE SETTINGS menu.
Set language used in menus
Menu
Preferred
Primary Audio Language
Secondary Audio Language
Primary Subtitle Language
Secondary Subtitle Language
Teletext
Guide
Current
Audio
Subtitle
Language Settings
English
English
English
English
English
West
English
German (AAC)
None
Navigate
MENU
Here you can choose the language for the OSD menu, in other
words, for the on-screen displays.
The language changes immediately. Do not set a language you do
not understand.
PREFERRED
These settings will be used if available. Otherwise the current settings will be used.
PRIMARY AUDIO
LANGUAGE
If a programme, e.g. a film, is broadcast in several languages, you can select the spoken language
here (e.g. original language).
SECONDARY
AUDIO
LANGUAGE
Select your second preferred language here.
PRIMARY
SUBTITLE
LANGUAGE
If the programme includes subtitles for the hardof-hearing, you can set the preferred language
here.
SECONDARY
SUBTITLE
LANGUAGE
Select your second preferred subtitle language
here.
TELETEXT
The default setting is WEST. If you are in another language region, you can change the language
setting: WEST, EAST, CYRILLIC, TURK/GRE or
ARABIC.
GUIDE
If there are several languages available for the programme guide, you can use this option to select
your preferred language.
CURRENT AUDIO
Here you can set the audio language of the current
programme (if more than one language is supported).
SUBTITLE
Here you can set the subtitles for the current programme (if available).
38
Page 39

Menu Item Settings
PARENTAL
If you confirm this with OK,
a dialogue box will open.
A password (or the locking
key) is requested. Please use
the password entered during the initial installation.
On delivery of the product, this password is set to
0000. If the password is
entered correctly, the dialogue box for security settings opens.
Parental Settings
Menu lock
Maturity Lock
Child Lock
Set PIN
Default CICAM PIN
Select Setting
Back
Exit
Change Value
MENU
BACK
O
O
O
****
********
MENU LOCK
The MENU LOCK setting locks or unlocks menu access.
You can block access to the installation menu or disable
the entire menu system.
MATURITY LOCK
If this option is selected, it calls up age information from
the broadcaster. If the corresponding age group is disabled in the device, access to the programme is blocked.
CHILD LOCK
If the child lock is activated, the TV can only be operated
via the remote control. In this case, the multifunction button MODE is deactivated.
To switch the TV back on, you will need the remote control. When a button is pressed, the message
CHILD LOCK
IS ON appears on the screen while the menu remains hid-
den.
SET PIN
Set a new PIN number. Use the number buttons to add a
new PIN number. You must re-enter the new PIN code to
confirm.
Make a note of the new PIN. Otherwise the
device must be reset to the factory defaults
and all settings and channel listings will be
lost.
DEFAULT CICAM
PIN
(optional)
Here, you can enter the PIN of the CI card to record the
channels of the pay TV card you are using (if the provider
supports this).
39
EN
Page 40

Menu Item Settings
TIMERS
You can use the SLEEP TIMER to programme the device to switch off automatically. You can set the time in 30-minute increments (maximum 2 hours). The
sleep timer countdown begins immediately after the setting has been made.
Select
OFF to deactivate the function.
If a timer has been programmed via the EPG, the
corresponding programme will be displayed in
the timer menu. The timer
then switches to the relevant programme. However,
it is not possible to output
the signal (e.g. to an external recorder). The displayed
timer can now be selected
and deleted using the red
button. Press the green
button if you want to edit
the timer. The
ADD TIMER
menu will then open.
Add Timer 10:55 Tue 20/02/2018
Network Type
Timer Type
Channel
Record Type
Date
Start
End
Duration
Repeat
Change/Delete
Playback
arte HD
Save
Navigate
Discard
Exit
Change Value
MENU
BACK
OK
All
Record
14 - arte HD
Time
20/02/2018
11:00
12:00
60 min
Once
Allowed
Use parental settings
NETWORK TYPE
Setting the reception type (DVB-T, DVB-C, DVB-S or analogue).
TIMER TYPE
This is preset and cannot be changed.
CHANNEL
Select the channel.
RECORD TYPE
This is preset and cannot be changed.
DATE
Enter the date. Use the number buttons to change digits
in the square brackets.
START
Enter the start time.
END
Enter the end time.
DURATION
The duration is determined automatically.
REPEAT
Select the intervals at which the timer is to be repeated.
CHANGE/
DELETE
If DISALLOWED is selected, a lock icon appears. In this
case, you can only open the entry with the PIN.
Please note that a storage medium must be connected.
40
Page 41

Menu Item Settings
DATE/TIME
Here you can change the time settings.
DATE / TIME: Display the set date and time. The entries cannot be changed.
TIME SETTING MODE: If you change the setting from AUTO to MANUAL,
you can, in terms of full hours, adjust the selected time zone forwards or backwards.
GMT: Only active if the previous point has been set to MANUAL.
Select the value with . The current time will be changed accordingly.
SOURCES
In this menu you can activate/deactivate or select sources. Deactivate a source
by selecting it and pressing . Deactivated sources do not appear in the
pick list that opens when you press the (SOURCE) button.
HDMI connections can be activated (indicated by
REGULAR) and deactivated.
The
ENHANCED setting means that the selected connection is operated with
HDMI 2.0 and the displayed colour range will be increased, insofar as this is
supported by the connected device.
Select the ENHANCED setting when you want to play content
with a HDR (High Dynamic Range). HDR will then be displayed
in the info bar.
If you want to rename a source, press the red button. Afterwards, you can then
change the name using the direction buttons .
NETWORK/
INTERNET
SETTINGS
If you did not agree to the MEDION® Smart TV privacy policy
during initial installation, you will be prompted again to do this
here. Otherwise, you will not be able to use the network/Internet services.
NETWORK TYPE
Here you select the network type: WIRELESS DEVICE,
WIRED DEVICE or DISABLED. After making a selection
and confirming with the OK button, an overview of all
available networks appears. Make a selection and confirm with the OK button. If a password is required for
a network, a virtual keyboard appears which you can
use to enter this with the help of the direction buttons
and the OK button. After entering the pass-
word, select
OK on the keyboard and confirm with the
OK button.
PRESS WPS
ON YOUR WIFI
ROUTER
(only for WLAN)
This option enables you to quickly establish a WPS connection via a wireless network (Wi-Fi). Hold down the
WPS button on your router and confirm this option
OK
using the OK button. Then the WPS connection will be
made
INTERNET SPEED
TEST
Press the OK button in order to test the speed of the Internet connection.
41
EN
Page 42

Menu Item Settings
ADVANCED
SETTINGS
Press the OK button to call up further network configuration options.
CONFIGURATION
Choose the setting AUTOMATIC IP or
MANUAL IP. If you select MANUAL IP,
three additional lines appear in which
you can manually enter the data for the
IP ADRESS, SUBNET MASK and DEFAULT GATEWAY using the direction
buttons and the number buttons.
CONFIGURATION
Select here between DYNAMIC DNS
or MANUAL DNS. If you select MANU-
AL DNS, two additional lines appear in
which you can manually enter the data
for the
DNS SERVER 1 and DNS SERV-
ER 2
using the direction buttons
and the number buttons.
WAKE ON
Activate/deactivate the Wake-On LAN/Wake-On Wireless
LAN function (WoL/WoWLAN). This enables you to switch
on the smart TV via a different device (e.g. a smartphone
with the MEDION® Life Remote App). Both devices must
be connected to the same network via LAN or Wi-Fi for
this purpose. Select the
ON setting to activate this func-
tion. The device being used as a remote control needs
to be connected to the TV once when it is switched on.
The control function only works when the TV is in standby mode. If the TV is turned off and on again at the mains
switch, the connection between the two devices will be
automatically restored.
An existing network connection can be terminated by pressing
the red button.
ACCESSABILITY
Here you can adjust the settings for visually or hearing impaired users, in order
to be able to receive additional supporting signals.
HARD OF HEARING
If the channel broadcasts special audio signals for the
hearing impaired, you can change the setting to ON to
receive these signals.
AUDIO
DESCRIPTION
If the channel broadcasts special audio signals for the visually impaired, you can change the setting to ON to receive
these signals.
42
Page 43

Menu Item Settings
NETFLIX
Calling up the Netflix app allows streaming of many movies and series directly
via the Internet.
Netflix is a subscription service that allows its members to
stream movies and series over the Internet on “Netflix-compatible devices”. The use, warranty and liability limitations of the
software are subject to the terms and conditions of Netflix International B.V.
Press the OK button to deactivate Netflix. The device will then be logged out
and access will be released again.
Press the
NETFLIX button on the remote control to open Netflix.
MORE...
Weitere Einstellungen
Menü-Einblendungsdauer
HBBTV
Aktuelle Software / Update
Anwendungsversion
Automatische TV Abschaltung nach
Biss-Key Verschlüsselungssystem
Audio-Video-Sharing
Einschalt Modus
Virtuelle Fernbedienung
CEC
CEC Automatisches Einschalten
Lautsprechersteuerung
Smart-Remote
Land : Deutschland
Navigieren
Verlassen
Wert ändern
MENU
Aus
Ein
V.2.6.0.0 MED
V.2.6.0.0 MED
4 Stunden
OK
Aktiviert
Letzter Zustand
Aktiviert
Aktiviert
Deaktiviert
TV
Deaktiviert
Other Settings
Menu Timeout
Standby LED
HBBTV
Software upgrade
Application Version
Auto TV OFF
Biss Key
Audio Video Sharing
Power Up Mode
Virtual Remote
CEC
CEC Auto Power On
Speakers
Smart Remote
OSS
Country : Germany
Navigate
Exit
Change Value
MENU
O
On
On
V.3.62.4.1 MED
V.3.62.4.1 MED
4 Hours
OK
Enabled
Last State
Enabled
Enabled
Disabled
TV
Disabled
OK
MENU TIMEOUT
Here you can set the time after which the OSD menu automatically closes.
STANDBY LED
Enable/disable the Standby LED.
HBBTV
Select the setting ON to enable the option of viewing HbbTV content via the Internet.
This service must be available in your region
SOFTWARE
UPGRADE
You can search for the latest software for the television here
and update it.
AUTOMATIC
SCANNING
Enable/disable the automatic search.
EDIT UPGRADE FOR
SATELLITE
Here you can change the satellite upgrade
settings.
SCAN FOR
UPGRADE
Start the Internet search for updated software.
The update takes approx. 30 minutes. Do not interrupt this
process. The progress of the search will be displayed.
APPLICATION
VERSION
Version display
43
EN
Page 44

Menu Item Settings
AUTO TV OFF
Here you can set the time interval for the auto shutdown
function. Once the interval is reached, the TV will switch off.
BISS KEY
Manual activation of programmes. Setting only available for
satellite programmes.
AUDIO VIDEO
SHARING
Toggle audio-video sharing. This function allows data exchange with other multimedia devices such as PCs, smartphones, cameras, etc. Read the section “Video audio sharing
– using network service” on page 54.
If you disable the AUDIO VIDEO SHARING
function, you will no longer be able to display
audio, video or photo files on the smart TV. The
DMR function (digital media renderer) is then
switched off.
POWER UP
MODE
Select the power-on mode STANDBY or LAST STATE.
When you press the Power button, this turns the device on
in standby mode or retrieves the most recently selected setting.
VIRTUAL REMOTE
Activate/deactivate the virtual remote control. This allows
the operation of the TV via other devices.
CEC
(consumer electronics control)
Enable this function to enable the communication of all devices that are connected via HDMI. In this way, you can, for
example, control all devices within an HDMI network using only one remote control. Enable this function if you also
want to specify settings under the following option:
SPEAK-
ERS.
Enable the CEC function first and select
HDMI1 as the
source. If you have already connected a CEC-enabled device, the name of the device is listed instead of HDMI1.
The basic functions of the device can then be automatically controlled by using the remote control of the smart
TV.
If the CEC feature is enabled and HDMI1 was
selected as the source (CEC-enabled device
connected), the OSD menu of the smart TV can
no longer be called up via the MENU button.
Due the great variety of different devices, correct functioning cannot be guaranteed.
44
Page 45

Menu Item Settings
CEC AUTO
POWER ON
This function allows you to turn on the TV with the connected HDMI-CEC-compatible device and automatically switch
to the input source. Select
ACTIVATE if you want to use this
function.
SPEAKERS
(ARC)
The default setting for the speakers is
TV, so that only the in-
ternal speakers are used for the sound output. This setting
can only be changed if you have previously enabled the CEC
function. If you have done so, it is possible to select the
AM-
PLIFIER setting and integrate an external amplifier into a
CEC network via the HDMI1 port. The internal speakers are
muted in this case. The volume buttons on the remote control now control the device connected to the HDMI1 port
(no OSD display of the volume bar).
Due the great variety of different devices, correct functioning cannot be guaranteed.
SMART
REMOTE
Here you can enable or disable the Smart Remote function
of the device. You should enable the Smart Remote function
if you want to establish a Bluetooth® connection with a Bluetooth® remote control.
Due to the great variety of different devices, correct
functioning cannot be guaranteed.
MODE
Select the ENABLED setting if you want to
connect the device via Bluetooth® with a
Bluetooth® remote control.
DISCOVER
Press the green button to search for available Wi-Fi connections. All found connections are then displayed. Use the
buttons to select the desired device and press OK to
establish the connection.
REMOVE
To remove a device from the list, select it using the buttons and press the red button. Confirm the following query
with YES. The device is then deleted from the list.
OSS
Display the licence information on Open Source Software.
45
EN
Page 46

10.3.5. Installation menu
Installation
Automatic channel scan
Manual channel scan
Network channel scan
Analogue ne tune
Satellite Settings
Installation Settings
Signal Information
First time installation
Menu Item Settings
AUTOMATIC
CHANNEL SCAN
The automatic channel search function helps you to search for and save
new channels on your TV.
A number of search options are available.
Once you have selected the search option, press OK. Confirm the query
with
YES and press OK to start the channel search.
Press MENU to cancel the search prematurely. In this case, any found
channels will not be saved.
MANUAL
CHANNEL SCAN
This function is used for the direct entry of channels.
NETWORK CHANNEL SCAN
Selection between digital cable or DVB-T channel groups. This searches for related channels of the currently selected station. The information
sent in this respect depends on the selected channel and leads to different results.
The existing channel list is replaced when the network
search is started.
ANALOGUE
FINE TUNE
Here you can fine-tune analogue channels.
SATELLITE
SETTINGS
SATELLITE LIST
Display satellite list.
Press the yellow button to add a new satellite.
To delete a satellite from the list, press the blue but-
ton.
Press the OK button to edit the selected satellite.
ANTENNA
INSTALLATION
In this section, you can change the antenna settings
and search satellites for new channels.
SATELLITE
CHANNEL
TABLE
This menu item allows you to export or import the
existing satellite channel list. Connect a removable
storage medium (USB stick) in order to save the satellite channel list onto it or update the list from the
storage medium.
46
Page 47

Menu Item Settings
INSTALLATION
SETTINGS
Here you can make additional installation settings.
STANDBY
SEARCH
If this function is set to ON, the TV will search for
available channels while it is in standby mode. When
the device finds new or not yet available channels, a
menu will be displayed that you can use to accept or
reject the changes.
DYNAMIC
CHANNEL UPDATE
If you select the ENABLED setting, the channel list is
updated automatically.
SIGNAL
INFORMATION
Displays further data about the received signal.
FIRST TIME
INSTALLATION
This function corresponds to the initial installation steps that occur after
switching on for the first time.
Carrying out the first-time installation again will reset all
settings back to factory defaults, including the PIN.
10.3.6. Channel list menu
Navigate
Edit Channel List
Jump
Back
Options
Page UP/DOWN
Exit
123
456
789
OK
MENU
BACK
P -/+
Tag/Untag channel
Tag/Untag All
Filter
1. Das Erste HD
2. ZDF HD
3. RTL Televisi
4. SAT.1
5. kabel eins
6. ProSieben
7. RTL2
8. VOX
9. SUPER RTL
10. SPORT1
DTV
DTV
DTV
DTV
DTV
DTV
DTV
DTV
DTV
DTV
The channel list is the place where you manage your channels. The EDIT CHANNEL LIST menu can
also be opened by pressing the OK button during operation (the CHANNEL LIST opens) and then
pressing the green button (ADVANCED).
In this menu, the following options are available:
47
EN
Page 48

Taste Eintrag Funktion
OK
OPTIONS
If you press the OK button, the following options appear for editing
the currently selected channel:
WATCH: Pressing the OK button switches the device to the previ-
ously selected channel.
MOVE: This function enables you to move the currently selected
channel (or all marked channels) to a different position in the channel list. Press the OK button and then enter the new channel position with the number buttons. Press the OK button again and confirm the subsequent prompt with YES. The channel will be assigned
to the desired channel position and all other channels are shifted accordingly.
DELETE: With this function, you can delete the currently selected
channel (or all marked channels). Press the OK button and confirm
the subsequent prompt with YES. The channel with then be permanently deleted. Select NO if you want to cancel this step.
EDIT NAME: With this function, you can rename the currently se-
lected channel (or all marked channels). Press the OK button and
use the buttons to select the position and the buttons to
select the desired character. When you press the OK button, the new
name is applied directly
LOCK/UNLOCK: With this function, you can lock or unlock the cur-
rently selected channel (or all marked channels). You can use the
lock function to password protect access to certain channels. Press
the OK button and then enter the required password (on delivery:
0000). A lock icon will open after the channel name. Do the same to
unlock the channel.
To lock a channel, you have to know the password (Default password on delivery: 0000, it can be changed in
the
SETTINGS > PARENTAL menu).
ADD/REMOVE FAVOURITES: You can create up to four favour-
ites lists that you can call up later. If you press the
OK button, you
can add the currently selected channel (or all marked channels) to
one or more favourites lists. To do
this, select ON for the required list
and then press the
OK button (or EXIT).
To remove a channel from a
favourites list, select the OFF entry accordingly. If a channel is assigned to the favourites list, a corresponding symbol appears after
the channel name. For more information, read the section “Opening
the favourites list” on page 26.
NAVIGATE
Use the direction buttons to select the previous or next channel.
P+/-
PAGE UP/
DOWN
To scroll pages up or down 10 at a time, you can use the P+ button
or the P- button.
Yellow
button
TAG/UNTAG
CHANNEL
You can use this button to mark the currently selected channel. A
check mark will appear in front of the corresponding channel name.
Pressing the button again will remove the check mark.
48
Page 49

Taste Eintrag Funktion
Blue button
FILTER
Here you will find filter functions with which you can customize the
appearance of the channel list:
NETWORK TYPE: Only the channels for the selected reception type
will be displayed.
TV/RADIO: Select here whether you want to display only TV, only
radio or all of the channels in the list.
FREE/CAS: Select here whether you want to display only free chan-
nels, only encrypted channels or all of the channels in the list.
A - Z: Here you can individually select each letter of the alphabet
and then only the channels beginning with the appropriate letter
will be displayed in the channel list.
SORT: Select the type of sorting (ALPHABETICAL or NUMERIC).
HD/SD: Select whether only HD, SD or all channels are displayed.
FAVOURITES: Select whether one of the four possible favourites
lists is to be displayed.
PROFILE OPTIONS: Here you can make pay TV settings (is not,
however, currently supported by the pay TV providers).
SATELLITE LIST (optional): If you want to call up channels from in-
dividual satellites in the channel list, you can select which ones you
want here. After pressing the OK button, the channels of the selected satellite appear in the channel list.
Even after closing the channel list and re-opening it with
the OK button, the previously filtered results continue to
appear. To return to the full channel list, you must reset the
corresponding filter. If, however, you call up the channel
list during operation via the OK button and then use the
FILTER option, this option acts more like a search function.
This means that the complete channel list is displayed the
next time you press the OK button after closing the chan-
nel list. The previously filtered results are not retained.
BACK
BACK
Press the BACK button to move back one step in the menu.
Number
buttons
JUMP
To jump to a desired channel, you can enter the channel number directly using the number buttons.
MENU
EXIT
Press the MENU button to exit the channel list.
Green
button
TAG/UNTAG
ALL
You can use this button to mark all channels. A check mark will appear in front of all the channel names. Pressing the button again will
remove the check mark.
49
EN
Page 50

10.3.7. Media browser menu
If you connect a USB data medium to the smart TV, you can play music files, images and videos.
Information on using USB
Certain types of USB devices (MP3 player) may not be compatible with this smart TV.
Connect the USB device directly.
Do not use a separate cable as compatibility problems may arise.
Never remove the USB device while a file is being played.
NOTICE!
Risk of damage!
Quick and repeated connection and disconnection of USB devices is dangerous and
can lead to physical damage to the USB device and, in particular, to the smart TV itself.
In particular, you should not plug in and unplug the USB device several times in
quick succession.
Connect the USB data medium and press the button (MEDIA) on the remote control. The media
browser screen appears. In addition, you can also open the media browser via the function of the
same name in the main menu. The following selection options are available:
• VIDEOS - To play back video files
0..9: Jump
OK: Play selection
RED BUTTON: Sort by name
LANG.: Play preview
(SWAP): Device selection (if several USB
or network drives are available)
: Navigation
: Playback
GREEN BUTTON: Loop/Shuffle
BLUE BUTTON: Change media type
Change Media
Videos
Navigate
Jump
Play Preview
Media Browser
Video 1
Play
Play This
Loop/Shue
Sort By Name
Device Selection
123
456
789
OK
LANG
0001. Video 1
0002. Video 2
0003. Video 3
0004. Video 4
a0
• PHOTOS - To play back photo files
: Navigation
0..9: Jump
OK: View in full screen
: Slideshow
GREEN BUTTON: Thumbnails
RED BUTTON: Sort by date
BLUE BUTTON: Change media type
(SWAP): Device selection (if several USB
or network drives are available)
Change Media
Navigate
Jump
Slideshow
View in full screen
Thumbnails
Sort By Date
Photo 1
PhotosMedia Browser
Device Selection
123
456
789
OK
0001. Photo 1
0002. Photo 2
0003. Photo 3
0004. Photo 4
a0
50
Page 51

• MUSIC - for playing music files
: Navigation
: Play
: Stop
(SWAP): Device selection (if several USB
or network drives are available)
: Previous/next
0..9: Jump
OK: Play selection
: Pause
RED BUTTON: Sort
GREEN BUTTON: Loop/Shuffle
BLUE BUTTON: Change media type
Change Media
Navigate
Jump
a0
Play
Play This
Sort
Loop/Shue
00:20
Previous/Next
Stop
Pause
Device Selection
MusicMedia Browser
Title 1
123
456
789
OK
0001. Title 1
0002. Title 2
0003. Title 3
0004. Title 4
If a certain file type is not available on the USB data medium, a corresponding message will be displayed.
The
(SWAP) option will only be displayed if several USB connections and/or
networks are available.
• ALL2 - Play back all media types
•
RECORDINGS - In this option, the recorded programmes on the connected USB stick/USB hard
drive can be displayed and played back.
•
SETTINGS - Go to the settings for the media browser
VIEW STYLE
Select the playback style FLAT or FOLDER.
SLIDESHOW INTERVAL
Select the display time for images in the slide show (5 to 30 seconds).
SHOW SUBTITLE
Activate/deactivate subtitles
SUBTITLE LANGUAGE
Select subtitle language.
SUBTITLE POSITION
Select the subtitle position.
SUBTITLE FONT SIZE
Select the font size for the subtitles.
Depending on the selected option, various different functions are available. These are shown on the
lower part of the screen.
To exit the media browser, press the MENU button.
2
This selection menu appears if the option FOLDER is set in the SETTINGS menu under the option VIEW STYLE.
51
EN
Page 52

Using an audio video sharing network service
The audio video sharing network service allows a data exchange between devices if they support
the audio video sharing function.
Connect the smart TV to a network.
Switch on the smart TV and open the
MEDIA BROWSER via the menu.
Select the
SETTINGS option.
Under
VIEW STYLE, select the option FOLDER.
Press the
BACK button to return to the main menu of the media browser.
Select the desired media type and confirm with
OK. All available networks are listed.
Select the desired media servers or the network you want to access. All available files are dis-
played.
The available commands are shown on the lower edge of the screen.
52
Page 53

11. EPG – Programme guide
Use the
EPG
(EPG) button to open the electronic programme guide.
You will see the current and the next programme for the available channels in the table.
Use
to select a channel and scroll through the channel offering with .
The programme information displayed is created by the broadcaster. If no programme information is displayed, this does not mean that your smart TV is not
working properly.
The following table shows the options for the GUIDE:
Button Entry Function
NAVIGATION
You move through the programme guide using the direction buttons.
Red button
NOW/NEXT
SCHEDULE
Select the NOW/NEXT SCHEDULE view. This shows only
the current and the next programme for all channels. Use
the yellow button to get back to the
TIMELINE SCHED-
ULE
.
Green button
LIST SCHEDULE
In the LIST SCHEDULE view, only the broadcasts on the
selected channel within a time window of two hours are
shown. Use the green button to call up the next time period and the red button takes you back to the previous period. Programmes from the past are not displayed here. The
NOW/NEXT SCHEDULE can be called up from here using
the blue button and the FILTER function with the
TXT
but-
ton. Use the yellow button to get back to the TIMELINE
SCHEDULE.
Yellow button
ZOOM
Shrink time window
Blue button
FILTER
If you are looking for a specific programme, you can use a
filter to restrict the selection.
SUBT.
HIGHLIGHT
GENRE
Set the category for the displayed programmes.
OK
OPTIONS
While the selected channel is running, only the option
SELECT CHANNEL
is available. Press the OK button to
change the channel.
If the selected programme is in the future, the option
SET
TIMER ON EVENT is also available. Select this option to
add this channel to the timer.
i
(INFO)
EVENT DETAILS
Displays a detailed description of the marked programme
(if available).
Press i
(INFO) again to hide the description.
If the description is a little longer, scroll through the text
using the +P- buttons.
P+/-
NEXT/PREV
DAY
Calls up the channel info for the following/previous day.
This is only possible up to the current day. Channel info
from the past is not displayed. If you have previously
pressed the i (INFO) button to call up information about
a programme, these buttons can be used to navigate
through the EVENT DETAILS.
53
EN
Page 54

Button Entry Function
TXT
SEARCH
Search for programmes Set the day here as well as the category.
(SWAP)
NOW
Jump back to the current timeline.
/
REC./STOP
Starting/stopping recording
12. Media portal
After pressing the Internet button , you can use the direction buttons and to select
from Netflix, YouTube, the media portal or other services. Confirm your selection by pressing the OK
button. In the media portal, you have access to news, games, shopping and much more via the preinstalled applications. An Internet connection is required for this function.
Use the direction buttons
and to scroll through the different apps and confirm your selec-
tion by pressing the OK button.
Bitte wählen Sie Ihre Sprache
OK
Nederlands
English
Français
Willkommen auf Ihrem Smart TV Portal
After selecting the media portal, please choose the desired language.
The start view of the media portal appears only on first use or after a reset of the
media portal under SETTINGS.
Afterwards, the home screen of the media portal appears where a preselection of certain apps is
displayed. The following options can be selected here:
Green button
ADD TO HOMESCREEN
(My Apps)
(optional)
Press the green button to add the currently selected app to
your favourites.
Yellow button
SETTINGS
Here you can specify which language areas the apps should
be selected from. In addition, you can reset the portal so
that the home screen of the portal is reset to the factory default.
You can press the Internet button
(or the BACK button) at any time to exit the currently selected app and return to the home screen. Use the EXIT button (or the (SOURCE) button)
to exit the media portal and return to normal TV mode.
54
Page 55

13. HbbTV system
HbbTV (Hybrid Broadcast Broadband TV) enables a combination of broadcasting and Internet content that can usually be accessed and displayed by pressing the red button on the remote control.
HbbTV services include standard radio/TV stations, catch-up TV, video on demand, EPG, interactive
advertising, customisation options, polls, games, social networks and other multimedia applications.
HbbTV applications cannot be called up unless the broadcaster sends these signals and there is an
Internet connection on the TV. The scope and operation vary depending on the channel and the
broadcaster.
Whether a broadcaster offers HbbTV applications or not, is shown via a brief on-screen display.
The exact form and the location is dependent on the individual applications. Use the red button
to open and close the application pages. Navigation within the applications is carried out by using
the colour buttons on the remote control, but this can vary depending on the channel and the programme. Pay attention to the messages within the applications.
14. Internet
The Open Browser function is an app in the media portal and provides you access the Internet. After opening, predefined web pages and their logos are shown that you can select directly. You can
use the keyboard function to enter URL addresses directly or control web pages via the activated
search function. Use the arrow buttons on the remote control to navigate through the options
and confirm your selection with OK.
Note that Internet pages with Flash content are not supported by the Open Browser. It is also not possible to download content.
15. MEDION® Life Remote App
The MEDION® Life Remote app is the innovative way to operate your MEDION® television from your
smartphone via your home network.
The MEDION® Life Remote application makes use of the properties of your mobile phone – such as
touch screen capability and G sensor – to provide easy-to-use, convenient and improved options
for operating your MEDION® smart TV. Not only that: you also have the option of operating your television via touch pad and directly entering text when calling up Internet pages.
Please note that the television to be controlled must be in the same network as the
smartphone.
Apple QR code Android QR code
Scan the QR code to install the app directly onto
your smartphone or tablet.
55
EN
Page 56

16. Data protection MEDION® Smart TV
Your Internet-capable TV has an Internet service function (HbbTV, portal and open browsing). These
functions enable you to access services, content, software and products provided by third parties
on the Internet. In addition, you have access to open Internet content. Your device checks automatically via this route whether new software versions are available for your device. When doing so,
your device sends out the IP address, the software version and the MAC address of the device. This
data is required to make use of the software update service.
Access to applications in the portal or via HbbTV may, depending on the provider, require a registration, setting up a user account and/or a subscription when using certain services. Registration
may require the provision of your personal data and the selection of a unique and secret password.
Please check the privacy policy of the provider beforehand.
MEDION shall not be liable if the HbbTV, the portal or a service does not comply with the user’s requirements, nor does it guarantee that safe and error-free use of such services can always occur
without restrictions, or continuously, at the required time.
MEDION shall not be liable for the information or content provided via HbbTV, the portal or the
open Internet, nor for its use and reliability. When you purchase your Smart TV, special guarantees
are provided. The validity of these guarantees, including the related disclaimers, remains in force.
If you have any further questions on the subject of data protection when using your Smart TV,
please contact the respective provider of the Internet service function or contact MEDION® directly
on www.medion.com under the heading Data Protection.
56
Page 57

17. Troubleshooting
Malfunctions can sometimes have quite trivial causes, but they may also be the result of defective
components. We have included a brief troubleshooting guide below which may help to solve any
problems. If these tips don’t solve the problem then we’ll be more than pleased to help you out.
Just give us a call!
Error Measures
There is no picture and no
sound.
• Check if the power cable is inserted properly into the socket.
• Check if signal reception is set to
TV.
• Check whether the power switch on the bottom of the device
is turned on.
There is no AV picture. • Check to ensure that the contrast and brightness settings are
correct.
• Check to ensure that all external devices have been connected properly.
• Check to ensure that you have selected the correct AV source.
• Any input source that you want to select with MODE or
(SOURCE
) must be marked in the SOURCES menu.
There is no sound. • Ensure that the volume has not been set to the minimum lev-
el.
• Ensure the mute setting is not active. Do this by pressing the
button in the top left of the remote control with the crossed
out loudspeaker symbol.
There is no picture and no
sound. I can hear noise,
though.
• The reception might be poor. Check if the antenna is connected properly.
The picture is not clear. • The reception might be poor.
• Check if the antenna is connected properly.
The picture is too bright or
too dark.
• Check the settings for contrast and brightness.
The picture is not sharp. • The reception might be poor.
• Check if the antenna is connected properly.
• Check the settings for sharpness and noise reduction in the
PICTURE menu.
There is a double/triple picture.
• Check if the antenna is aligned properly.
• Waves might be reflected off buildings or mountains.
The picture is pixellated. • There might be interference from cars, trains, power lines,
neon lights, etc.
• There might be interference between the antenna and power
cables. Position the cables further apart.
There are stripes on the
screen or the colours are
faded.
• Is there interference from another device?
• Transmission antennae on radio stations, ham radios and portable phones can also cause interference.
• Operate the device as far away as possible from the device
that might be causing the interference.
The MODE multifunction
button on the device is not
working.
• The child lock might be on.
57
EN
Page 58

TV switches off • Check whether the automatic TV switch off function is activat-
ed under MORE...
No reception/poor reception
via a wireless network connection (WLAN).
• Ensure that all necessary settings have been made.
WIRELESS DISPLAY cannot
be established.
• Check that all necessary settings have been
made. Read the
section “Wireless Display”.
The remote control is not
working.
• Check whether the batteries in the remote control are functional and have been inserted the right way round.
• Ensure the sensor field is not exposed to strong light.
• Turn the device off and on again using the power switch on
the bottom of the device.
Menu cannot be opened. • Check whether CEC is enabled. In this case, the menu cannot
be opened. This is not a defect. In some cases, the menu of the
device connected via HDMI1 opens. This is dependent on the
source device and must be supported accordingly.
• Change the input source.
Filter function of the channel list does not work permanently.
• To set a "permanent" filter, you need to call up the channel list
with the
OK button and then the expanded channel list with
the green button.
• Call up the expanded channel list via
MENU > CHANNEL
LIST
and then use the FILTER function.
If, however, you call up the channel list during operation via the OK button and then use the FILTER
option, this option acts more like a search function.
This means that the complete channel list is displayed the next time you press the OK button after
closing the channel list. The previously filtered results are not retained.
No Bluetooth® connection • Make sure that all settings have been correctly specified on
the device and that the Bluetooth® function is enabled.
• Check whether the device to be connected is switched on and
is in discoverable mode.
• Make sure that all settings have been correctly specified on
the device to be connected and that the Bluetooth® function
is enabled. Consult the operating instructions of the corresponding device, if necessary.
HDR content from a player
connected via HDMI is not
played in HDR.
• In the
SETTINGS > SOURCES menu, set the HDMI input be-
ing used to
ENHANCED.
58
Page 59

17.1. Do you need more help?
If the suggestions in the previous section did not solve your problem, please contact us. To make it
easier for us to help you, please have the following information to hand:
• What external devices are connected?
• What messages appear on the screen?
• When operating the device, at which step did the problem occur?
• If you have a PC connected to the device:
− How is your computer configured?
− What software were you using when the problem occurred?
• What steps have you already taken to try and rectify the problem?
• Please provide us with your customer number if you have one.
17.2. LCD TV pixel faults
Despite the state-of-the-art production methods, in rare
cases there may be individual or multiple pixel drop-outs
(dead pixels) due to the highly complex technology.
For active matrix TFTs with a resolution of 3840 x 2160
pixels, which are each made up of three sub-pixels (red,
green, blue, white), there are a total of approx. 24.9 mil-
lion control elements in use. Occasionally pixels or individual sub-pixels can fail or become incorrectly controlled
because of this very high number of transistors and the extremely complex manufacturing process used in this context.
Pixel fault class Defect type 1
Continuously lit
pixel
Defect type 2
Continuously black
pixel
Defect type 3
Defective sub-pixel
lit black
00 0 00
I1 1 2
1
0
1
3
5
II 2 2 5
5-n*
0
0
2xn*
10
III 5 15 50
50-n*
0
0
2xn*
100
IV 50 150 500
500-n*
0
0
2xn*
1000
n*=1.5
The permitted number of defects for every type named above in each class of pixel defect refers to
one million pixels and must be converted accordingly to match the physical resolution of the display.
Your device complies with the European ISO 9241-307 Class II standard (pixel fault class).
5 Pixel
blue
5 Pixel
Rows
Sub-Pixel
Pixel
green
red
white
59
EN
Page 60

18. Cleaning
DANGER!
Risk of electric shock!
There is a risk of death due to an electric shock when the housing is open and you
touch parts inside the device!
Do not open the housing of the device. It does not contain any parts requiring mainte-
nance. Always unplug the device and disconnect all cables before cleaning!
You can increase the lifespan of your Smart TV by taking the following measures:
• In order to protect the television from scratches, protective film has been applied to the highgloss finish. Remove the film after you have set up the TV correctly.
• If the high-gloss finish becomes dirty, wipe off the dust first. Then wipe down gently with a
cleaning cloth. If you do not wipe off the dust first, or wipe the high-gloss finish too vigorously
you could scratch the high-gloss finish.
• Do not use solvents, corrosive or gaseous cleaning agents.
• Clean the screen with a soft, lint-free cloth.
• Ensure that no water droplets remain on the Smart TV. Water can cause permanent discolouration.
• In order to avoid damage to the device, water must not penetrate into the interior of the device
under any circumstances.
• Do not place the screen in strong sunlight or near ultraviolet light.
• Store the packaging material in a safe place and only use this packaging to transport the Smart
TV.
19. Storage when not in use
If the TV is going to be out of use for an extended period of time, store it in a cool, dry place and
make sure that it is protected against dust and extreme fluctuations in temperature. Remove all
connections and take the batteries out of the remote control in advance.
60
Page 61

20. Disposal
Packaging
The product has been packaged to protect it from damage in transit. The packaging is
made of materials that can be recycled in an environmentally friendly manner.
Device
The adjacent symbol showing a crossed out wheelie bin means that the device is subject to Directive 2012/19/EU. Old devices may not be disposed of with normal household
waste. If you can no longer use your electrical device, dispose of it in accordance with the
legal provisions applicable in your area. This involves separating the materials in the device for the purpose of recycling and minimising the environmental impact.
Take old devices to a collection point for electrical scrap or a recycling centre. Before doing so, remove the batteries from the device and take them to a separate collection point
for used batteries.
Contact your local waste disposal company or your local authority for more information
on this subject.
Batteries
Do not dispose of used batteries with household waste. Batteries must be disposed of
correctly. Retailers that sell batteries and local collection points provide containers in
which you can dispose of them.
Contact your local waste disposal company or your local authority for more information
on this subject.
61
EN
Page 62

21. Technical data
Smart-TV X14310 (MD 31350)
Device name X14310 (MD 31350)
Nominal voltage 220 - 240 V ~ 50 Hz
Screen size 108 cm (43“) LCD; 16:9 display
Power consumption Max. 120 Watt
Power consumption in standby
mode
≤ 0.50 W
Power consumption in off mode < 0.30 W
Power consumption in networked
standby mode (WAKE-ON mode)
≤ 3.00 W
Speaker output 2 x 8 Watt RMS, DTS HD-compatible
Physical resolution 3840 x 2160
TV system Pal
Channel positions 199 (ATV), 10.000 (DTV)
Smart-TV X14911 (MD 31351)
Device name X14911 (MD 31351)
Nominal voltage 220 - 240 V ~ 50 Hz
Screen size 123,2 cm (49“) LCD; 16:9 display
Power consumption Max. 120 Watt
Power consumption in standby
mode
≤ 0.50 W
Power consumption in off mode < 0.30 W
Power consumption in networked
standby mode (WAKE-ON mode)
≤ 3.00 W
Speaker output 2 x 10 Watt RMS, DTS HD-compatible
Physical resolution 3840 x 2160
TV system Pal
Channel positions 199 (ATV), 10.000 (DTV)
Smart-TV X15512 (MD 31352)
Device name X15512 (MD 31352)
Nominal voltage 220 - 240 V ~ 50 Hz
Screen size 138,8 cm (55“) LCD; 16:9 display
Power consumption Max. 140 Watt
Power consumption in standby
mode
≤ 0.50 W
Power consumption in off mode < 0.30 W
Power consumption in networked
standby mode (WAKE-ON mode)
≤ 3.00 W
Speaker output 2 x 10 Watt RMS, DTS HD-compatible
Physical resolution 3840 x 2160
TV system Pal
Channel positions 199 (ATV), 10.000 (DTV)
62
Page 63

Smart-TV X16513 (MD 31353)
Device name X16513 (MD 31353)
Nominal voltage 220 - 240 V ~ 50 Hz
Screen size 163,8 cm (65“) LCD; 16:9 display
Power consumption Max. 200 Watt
Power consumption in standby
mode
≤ 0.50 W
Power consumption in off mode < 0.30 W
Power consumption in networked
standby mode (WAKE-ON mode)
≤ 3.00 W
Speaker output 2 x 12 Watt RMS, DTS HD-compatible
Physical resolution 3840 x 2160
TV system Pal
Channel positions 199 (ATV), 10.000 (DTV)
Kanäle
VHF (channels I/III)
UHF (BAND U)
HYPERBAND
CABLE TV (S1-S20) / (S21-S41)
HD DVB-T
DVB-T2 HD
HD DVB-C
DVB-S2
Anschlüsse
Antenna connection (analogue TV, DVB-T/DVB-T2 or DVB-C)
Satellite port (DVB-S/S2)
2 x USB connection
1 x LAN RJ-45
Video
3 x HDMI 2.0 In with HDCP 2.2 decryption
1 x VGA (15 pin D-Sub, YUV)
AV In (3.5 mm mini jack to cinch adapter)
Audio
Stereo audio in for AV / YUV / VGA
(3.5 mm mini jack to cinch adapter)
Headphone output (3.5 mm jack)
Digital audio out (SPDIF) (optical)
Drives/storage media
Drives USB, Common Interface (CI+) slot
Supported formats via USB
3
Photo: JPG, JPEG, JPE, BMP, PNG
Music: MP3, WMA, WAV
Films: MPEG 1/2/4, MKV, Xvid, MOV, MP4, DAT, VOB, H263, FLV,
HEVC
Capacities USB max. 1 TB
3
The playback of all formats cannot be guaranteed due to the large number of di erent codecs.
63
EN
Page 64

Remote control
Transmission type Infrared
LED classification 1
Battery type 2 x 1.5V AAA R03/LR03
Ambient temperatures
Permissible ambient temperature +5°C to +35°C
Permissible relative humidity 20% - 85%
Dimensions/weight X14310 (MD 31350)
Dimensions without stand
(W x H x D)
approx. 976 x 572 x 92 mm
Dimensions with stand
(W x H x D)
approx. 976 x 636 x 276 mm
Weight without stand approx. 8.1 kg
Weight with stand approx. 8.4 kg
Wall mounting Vesa standard, hole spacing 200 x 200 mm
4
Dimensions/weight X14911 (MD 31351)
Dimensions without stand
(W x H x D)
approx. 1110 x 657 x 92 mm
Dimensions with stand
(W x H x D)
approx. 1110 x 712 x 275 mm
Weight without stand approx. 10,4 kg
Weight with stand approx. 10,7 kg
Wall mounting Vesa standard, hole spacing 200 x 200 mm
4
Dimensions/weight X15512 (MD 31352)
Dimensions without stand
(W x H x D)
approx. 1247 x 735 x 96 mm
Dimensions with stand
(W x H x D)
approx. 1247 x 787 x 275 mm
Weight without stand approx. 13.9 kg
Weight with stand approx. 14.3 kg
Wall mounting Vesa standard, hole spacing 200 x 400 mm
4
Dimensions/weight X16513 (MD 31353)
Dimensions without stand
(W x H x D)
approx. 1460 x 846 x 74 mm
Dimensions with stand
(W x H x D)
approx. 1460 x 895 x 345 mm
Weight without stand approx. 23.5 kg
Weight with stand approx. 24.1 kg
Wall mounting Vesa standard, hole spacing 400 x 400 mm
4
www.tuv.com
ID 1000000000
4
Wall mount not supplied. When mounting the device, make sure that you use M6 screws. The length of the screws corresponds to the thickness
of the wall bracket plus 10 mm.
64
Page 65

21.1. Information on trademarks
DTS, the logo and DTS together with the logo are registered trademarks of DTS, Inc.
You can find more information about DTS patents at http://patents.dts.com
The HDMI logo and the name High-Definition Multimedia Interface are registered trademarks of
HDMI Licensing LLC.
Produced under licence from Dolby Laboratories. Dolby and the double-D symbol are registered
trademarks of Dolby Laboratories.
Blu Ray, USB, Android, Apple and other trademarks are the property of their respective owners.
21.2. Product data sheet
According to Directive 1062/2010
Trademarks
MSN no.
30024549 30024560 30024561 30024562
Model no. (MD)
MD31350 MD31351 MD31352 MD31353
Energy efficiency class
A+ A+ A+ A+
Visible screen size
(diagonal, approx.)
108 cm
(43“)
123,2 cm
(49“)
138,8 cm
(55“)
163,8 cm
(65“)
Average power consumption
when switched on (Watt)
53 64 80 104
Annual power consumption
(kWh/year)
77 93 116 151
Power consumption in standby
(Watt)
0,48 0,48 0,48 0,48
Power consumption when
switched off (Watt)
0,01 0,01 0,01 0,01
Display resolution (px)
3840 x 2160 3840 x 2160 3840 x 2160 3840 x 2160
65
EN
Page 66

22. Service information
Please contact our Customer Service team if your device ever stops working the way you want or
expect it to. There are several ways for you to contact us:
• In our Service Community, you can meet other users, as well as our staff, and you can exchange
your experiences and pass on your knowledge there.
You will find our Service Community at http://community.medion.com.
• Alternatively, use our contact form at www.medion.com/contact.
• You can also contact our Service team via our hotline or by post.
Opening times Hotline number UK
Mon – Fri: 08.00 –
20.00
Sat – Sun: 10.00 –
16.00
0333 3213106
Hotline number Ireland
1 800 992508
Service address
MEDION Electronics Ltd.
120 Faraday Park, Faraday Road, Dorcan
Swindon SN3 5JF, Wiltshire
United Kingdom
You can download this and many other sets of operating instructions from our service portal at
www.medion.com/gb/service/start/.
You will also find drivers and other software for a wide range of devices there.
You can also scan the QR code on the side of the screen, to download the operating
instructions onto your mobile device from the service portal.
23. Legal Notice
Copyright © 2018
Date: 14.05.2018
All rights reserved.
These operating instructions are protected by copyright.
Mechanical, electronic and any other forms of reproduction are prohibited without the written permission of the manufacturer.
Copyright is owned by the distributing company:
MEDION AG
Am Zehnthof 77
45307 Essen
Germany
Please note that you cannot use the address above for returns. Please always contact our Customer
Service team first.
66
Page 67

24. Index
B
Batteries ...................................................................... 61
Bluetooth ................................................................... 58
C
Cable digital .............................................................. 21
CEC ................................................................................ 44
Channel search ......................................................... 46
Child lock .................................................................... 48
Cleaning ...................................................................... 60
Connection ...................................................................9
Aerial ...................................................................... 20
Power supply ....................................................... 18
D
Declaration of conformity .................................... 11
Disposal ...................................................................... 61
E
Environmental temperature ...................................9
F
Factory setting .......................................................... 47
Favourites list ............................................................ 26
First time installation .............................................. 19
H
HbbTV .......................................................................... 55
HDR (High Dynamic Range) ............................5
, 41
Headphones ....................................................... 35
, 36
I
Information on WLAN ............................................ 12
Inserting batteries ................................................... 18
Internet ....................................................................... 55
L
Language ................................................................... 38
Life Remote App ...................................................... 55
M
Media browser .......................................................... 50
Media portal .............................................................. 54
Mounting ................................................................... 17
Multimedia connections ....................................... 23
N
Network/Internet settings ............................ 20, 41
O
Operation ................................................................... 25
Options menu ........................................................... 30
OSD menu .................................................................. 29
Channel list menu ............................................. 47
Image ..................................................................... 31
Installation menu ............................................... 46
Picture menu ....................................................... 31
Picture menu in VGA/PC mode ..................... 33
Settings menu ..................................................... 37
Sound menu ........................................................ 35
Overview of the device ......................................... 13
P
Password .................................................................... 39
Pixel faults .................................................................. 59
Power supply ..........................................9
, 18, 62, 63
Programme guide ................................................... 53
Proper use ..................................................................... 5
R
Remedy ....................................................................... 57
Remote control ........................................................ 15
S
Safety information
Connection .............................................................9
Installation location .............................................8
Operating safety ...................................................7
Power supply ..........................................................9
Safety instructions .....................................................7
Batteries ................................................................ 10
Repairs ......................................................................9
Safety when connecting ....................................9
Set-up location ......................................................8
Satellite ....................................................................... 21
Screen settings ......................................................... 25
Selecting the source ............................................... 27
Service information ................................................ 66
Sound settings ......................................................... 25
T
Technical data .................................................... 62, 65
Teletext ........................................................................ 28
Timer ............................................................................ 40
Troubleshooting ...................................................... 57
U
Unpacking .................................................................. 17
USB ........................................................................ 14
, 50
W
Wireless Display ....................................................... 27
67
EN
Page 68

 Loading...