

Page 1
82339 DVD-Autoradio DE Content.book Seite 1 Mittwoch, 29. April 2009 8:41 08
Inhaltsverzeichnis
Inhaltsverzeichnis. . . . . . . . . . . . . . . . . . . . . . . . . . . . . 3
Übersicht. . . . . . . . . . . . . . . . . . . . . . . . . . . . . . . . . . . 3
Bedienteil. . . . . . . . . . . . . . . . . . . . . . . . . . . . . . . . . . . . . . 3
Hinter dem Bedienteil . . . . . . . . . . . . . . . . . . . . . . . . . . . . . 4
Fernbedienung . . . . . . . . . . . . . . . . . . . . . . . . . . . . . . . . . . 5
Fernbedienung in Betrieb nehmen . . . . . . . . . . . . . . . . . . . . 7
Sicherheitshinweise . . . . . . . . . . . . . . . . . . . . . . . . . . . 8
Elektrische Geräte nicht in Kinderhände . . . . . . . . . . . . . . . . . 8
Verwendungszweck . . . . . . . . . . . . . . . . . . . . . . . . . . . . . . . 8
Verkehrssicherheit . . . . . . . . . . . . . . . . . . . . . . . . . . . . . . . . 8
Einbau . . . . . . . . . . . . . . . . . . . . . . . . . . . . . . . . . . . . . . . . 8
Niemals selbst reparieren . . . . . . . . . . . . . . . . . . . . . . . . . . . 9
Sonneneinstrahlung. . . . . . . . . . . . . . . . . . . . . . . . . . . . . . . 9
Der CD-/DVD-Spieler . . . . . . . . . . . . . . . . . . . . . . . . . . . . . . . 9
Laufwerke und Anschlüsse . . . . . . . . . . . . . . . . . . . . . . . . . . 9
Umgang mit Batterien . . . . . . . . . . . . . . . . . . . . . . . . . . . . 10
Das Gerät reinigen . . . . . . . . . . . . . . . . . . . . . . . . . . . . . . . 10
Lieferumfang . . . . . . . . . . . . . . . . . . . . . . . . . . . . . . . 11
DE
Einbau . . . . . . . . . . . . . . . . . . . . . . . . . . . . . . . . . . . 12
Einbauhinweise. . . . . . . . . . . . . . . . . . . . . . . . . . . . . . . . . 12
ISO-Schacht und -Anschlüsse . . . . . . . . . . . . . . . . . . . . . . . 13
Den Einbaurahmen montieren . . . . . . . . . . . . . . . . . . . . . . 13
Anschlüsse an der Radiorückseite . . . . . . . . . . . . . . . . . . . . 15
Autoradio einsetzen. . . . . . . . . . . . . . . . . . . . . . . . . . . . . . 18
Bedienteil. . . . . . . . . . . . . . . . . . . . . . . . . . . . . . . . . . . . . 18
Reset . . . . . . . . . . . . . . . . . . . . . . . . . . . . . . . . . . . . . . . . 19
Das Gerät ausbauen . . . . . . . . . . . . . . . . . . . . . . . . . . . . . . 19
Erläuterungen zu den Kabeln . . . . . . . . . . . . . . . . . . . . . . . 20
Allgemeine Funktionen . . . . . . . . . . . . . . . . . . . . . . . . 23
Uhrzeit . . . . . . . . . . . . . . . . . . . . . . . . . . . . . . . . . . . . . . . 23
DE-1
Page 2

82339 DVD-Autoradio DE Content.book Seite 2 Mittwoch, 29. April 2009 8:41 08
Ein-/ausschalten . . . . . . . . . . . . . . . . . . . . . . . . . . . . . . . . 23
Lautstärke. . . . . . . . . . . . . . . . . . . . . . . . . . . . . . . . . . . . . 23
Betriebsart („Mode“) . . . . . . . . . . . . . . . . . . . . . . . . . . . . . 23
Reset . . . . . . . . . . . . . . . . . . . . . . . . . . . . . . . . . . . . . . . . 24
Grundeinstellungen für das Autoradio (MENU) . . . . . . . . . . . . 24
Radiobetrieb: Grundfunktionen . . . . . . . . . . . . . . . . . . 26
Bandbereich wählen . . . . . . . . . . . . . . . . . . . . . . . . . . . . . 26
Sender suchen . . . . . . . . . . . . . . . . . . . . . . . . . . . . . . . . . . 26
Sender speichern . . . . . . . . . . . . . . . . . . . . . . . . . . . . . . . . 27
Sender aufrufen. . . . . . . . . . . . . . . . . . . . . . . . . . . . . . . . . 28
Radiobetrieb: Radio Data System . . . . . . . . . . . . . . . . . 29
Alternative Frequenzen (Taste AF). . . . . . . . . . . . . . . . . . . . . 29
TA – Verkehrsfunk . . . . . . . . . . . . . . . . . . . . . . . . . . . . . . . 30
PTY-Funktionen . . . . . . . . . . . . . . . . . . . . . . . . . . . . . . . . . 30
Betrieb mit Datenträgern (DVDs, Audio-CDs, MP3, USB, SD/MMC,
AV IN) . . . . . . . . . . . . . . . . . . . . . . . . . . . . . . . . . . . . 33
Das CD-/DVD-Laufwerk . . . . . . . . . . . . . . . . . . . . . . . . . . . . 33
Der USB-Anschluss . . . . . . . . . . . . . . . . . . . . . . . . . . . . . . . 35
Das SD/MMC-Kartenlesengerät . . . . . . . . . . . . . . . . . . . . . . . 35
Der AV IN-Anschluss . . . . . . . . . . . . . . . . . . . . . . . . . . . . . . 35
DVD-Betrieb . . . . . . . . . . . . . . . . . . . . . . . . . . . . . . . . . . . 36
Wiedergabefunktionen . . . . . . . . . . . . . . . . . . . . . . . . . . . . 36
Wiedergabeinformationen aufrufen . . . . . . . . . . . . . . . . . . . 41
Das DVD-Setup. . . . . . . . . . . . . . . . . . . . . . . . . . . . . . . . . . 42
Wenn Störungen auftreten . . . . . . . . . . . . . . . . . . . . . 45
Technische Daten . . . . . . . . . . . . . . . . . . . . . . . . . . . . 46
Entsorgungshinweise . . . . . . . . . . . . . . . . . . . . . . . . . 47
DE-2
Page 3
82339 DVD-Autoradio DE Content.book Seite 3 Mittwoch, 29. April 2009 8:41 08
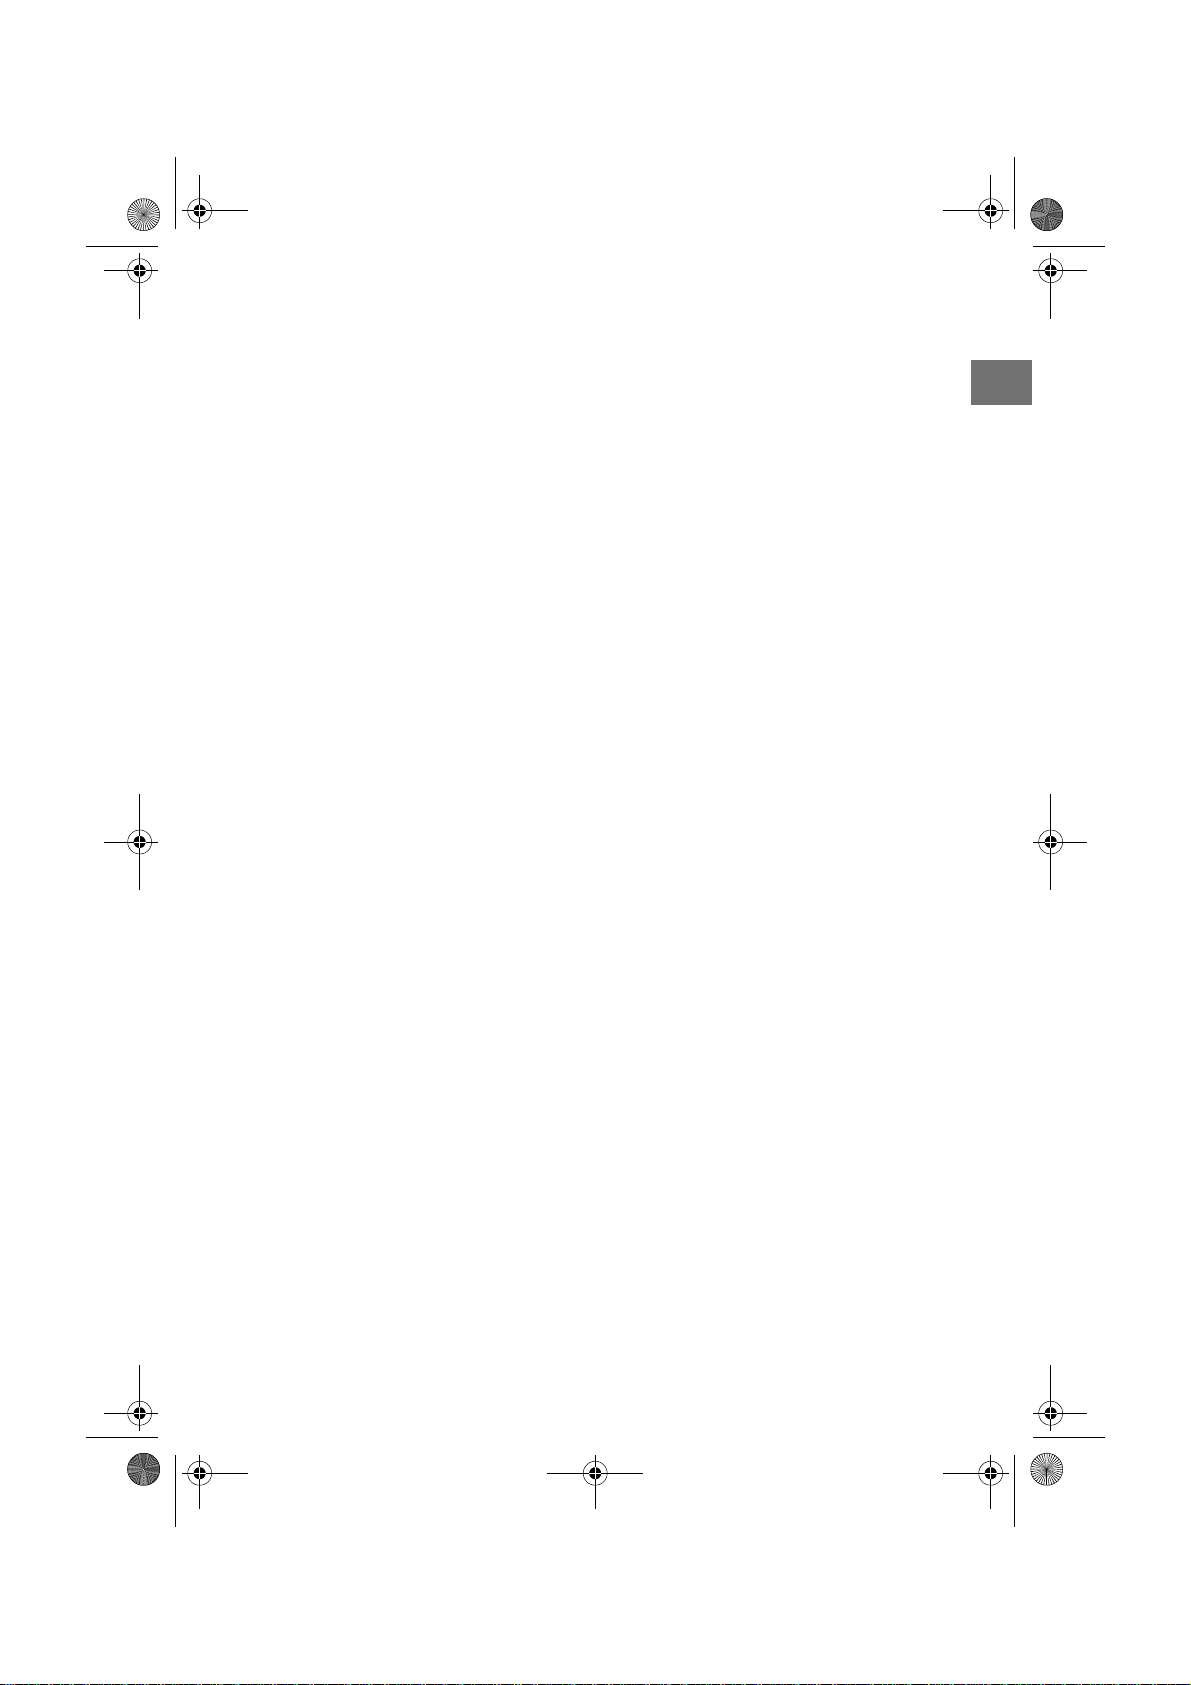
Übersicht
Bedienteil
1. : Ein paar Sekunden gedrückt halten, um das Gerät auszuschalten (einschalten mit jeder Taste außer und möglich) ; MODE: durch wiederholtes Drücken Betriebsmodus wählen
2. : Beim Drücken dieser Taste klappt das Bedienteil elektrisch gesteuert nach vorne und der Diskschacht wird sichtbar. Falls eine Disk eingelegt ist, wird diese ausgeworfen.
3. BAND: Bandbereichsauswahl im Radiomodus
MW2
)
4. : Bedienteil lösen
5. VOL: Lautstärke anheben (
6. AS/PS: 2 Sekunden drücken für die automatische Senderspeicherung
7. MENU : Einstellungsmenü des Autoradios öffnen
8. Display und TFT-Bildschirm
9. IR: Infrarotsensor für die Fernbedienung
10. : USB-Anschluss
11. AV IN: Weiteres Audio-/Videogerät mit Klinkenstecker anschließen
12. : Sendersuche vorwärts; zum nächsten Titel; länger drücken für Schnelllauf vorwärts
13. RPT („Repeat“): Wiederholfunktion bei Datenträgern
14. : Pause und Wiedergabe bei Datenträgern
) bzw. senken ()
(
FM 1, FM2, FM3, MW1,
DE
DE-3
Page 4
82339 DVD-Autoradio DE Content.book Seite 4 Mittwoch, 29. April 2009 8:41 08
15. : Sendersuche rückwärts; zum Titelanfang und vorherigen Titel; länger drücken für Schnelllauf rückwärts
16. PTY („Program Type"): Sender mit bestimmten Programminhalten suchen; LOC: Etwas gedrückt halten, um zwischen lokalen (LOC) und entfernten Sendern (DX) umzuschalten (siehe Seite 27).
17. AF („Alternative Frequency") / REG: Kurz drücken, um den AF-Modus ein- und auszuschalten; länger drücken, um Regionalmodus im AF-Modus ein- und auszuschalten; siehe Seite 29
18. TA („Traffic Announcement"): Verkehrsfunksender aktivieren (siehe Seite 30); ST: Zwischen Stereo und Mono umschalten
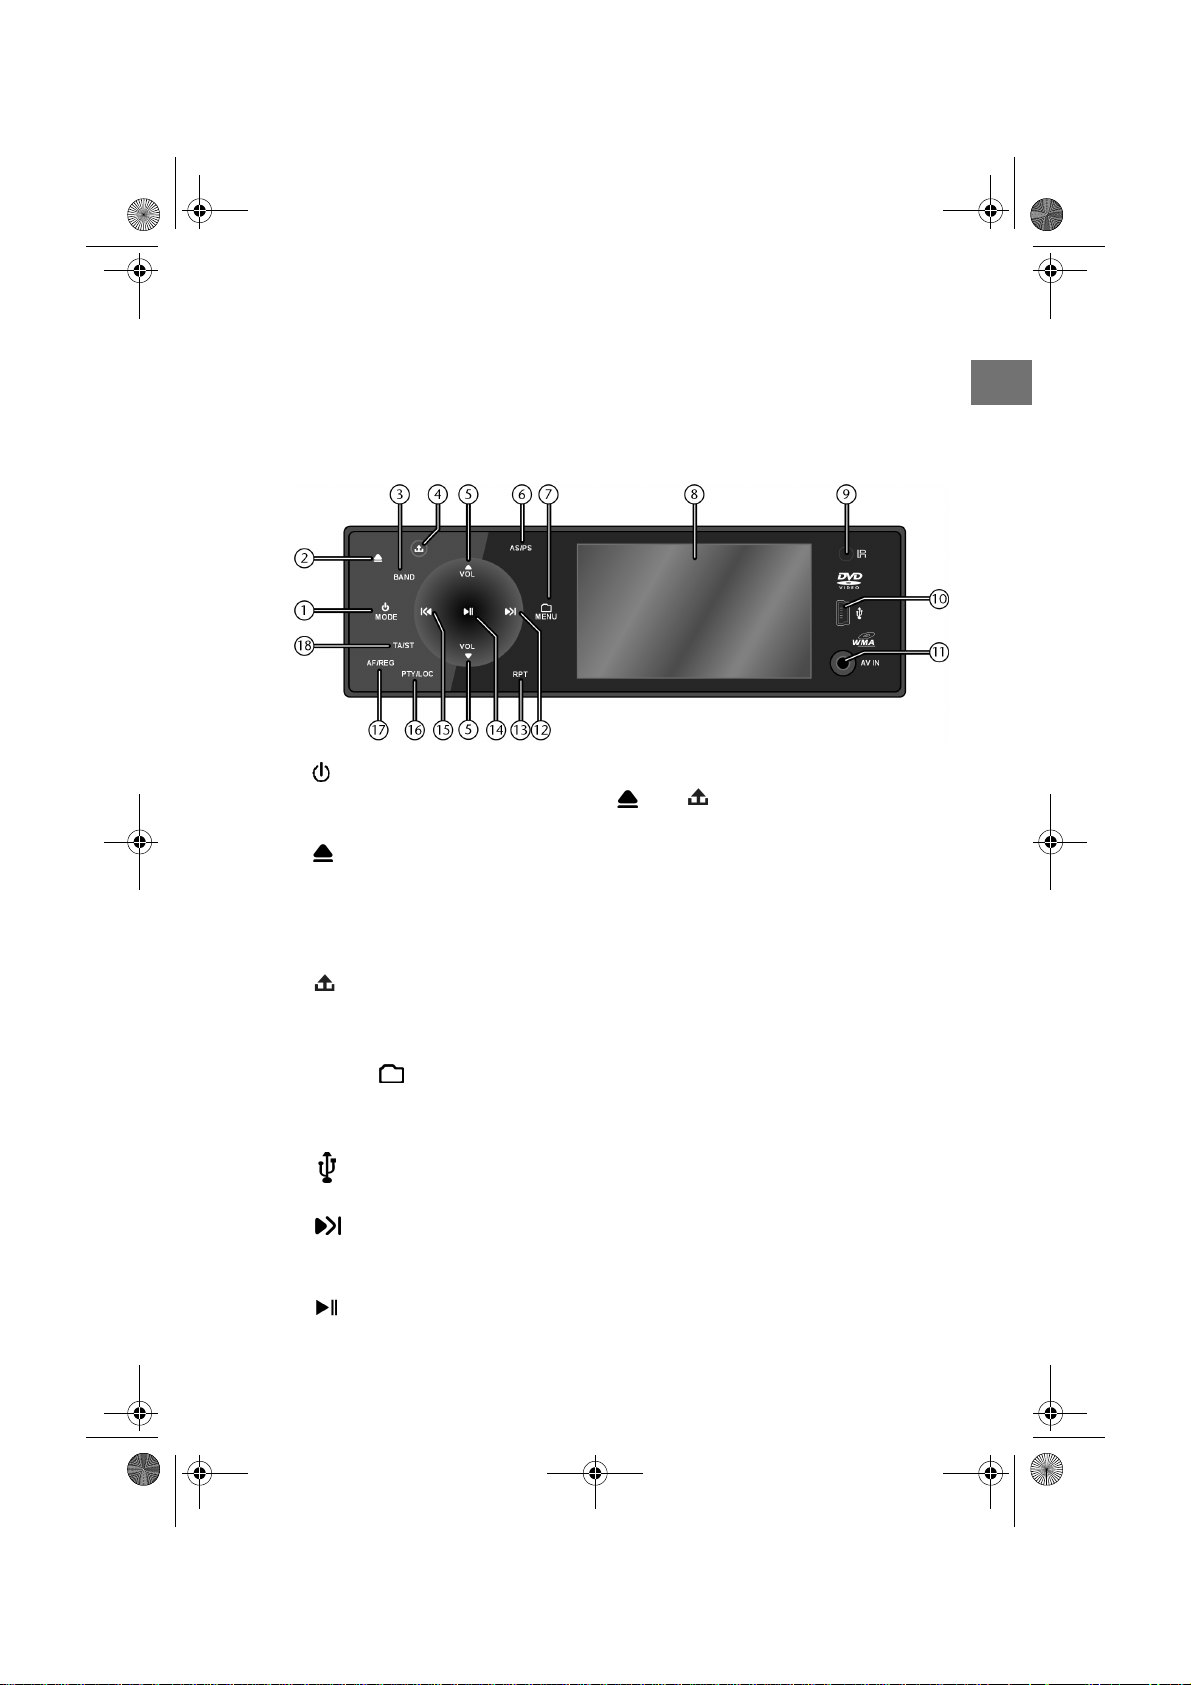
Hinter dem Bedienteil
1. Kontakte
2. CD-/DVD-Fach (nur bei elektrisch geöffnetem Bedienteil – Taste – zu
sehen)
3. Rote Leuchtdiode (Diebstahlschutz)
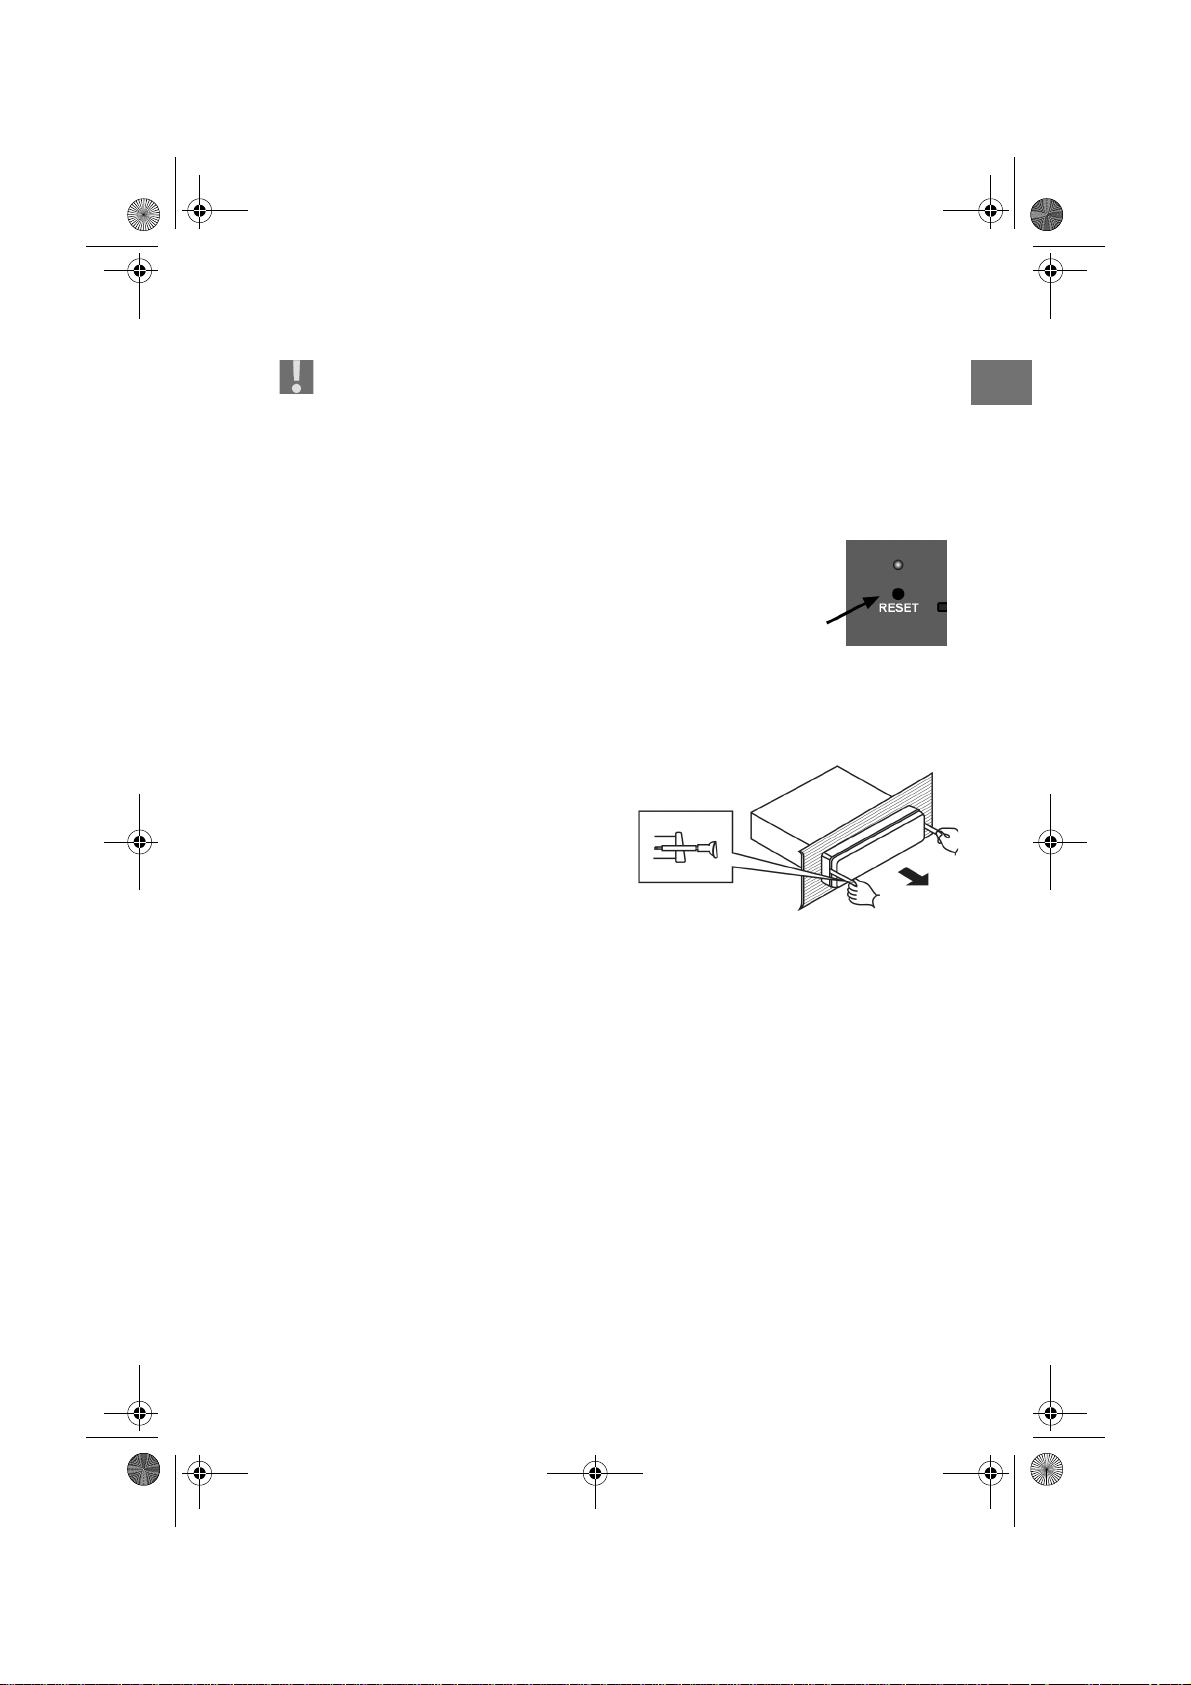
4. RESET-Öffnung: Auf Werkseinstellungen zurückstellen
5. Schlitz für eine SD/MMC-Karte
DE-4
Page 5
82339 DVD-Autoradio DE Content.book Seite 5 Mittwoch, 29. April 2009 8:41 08
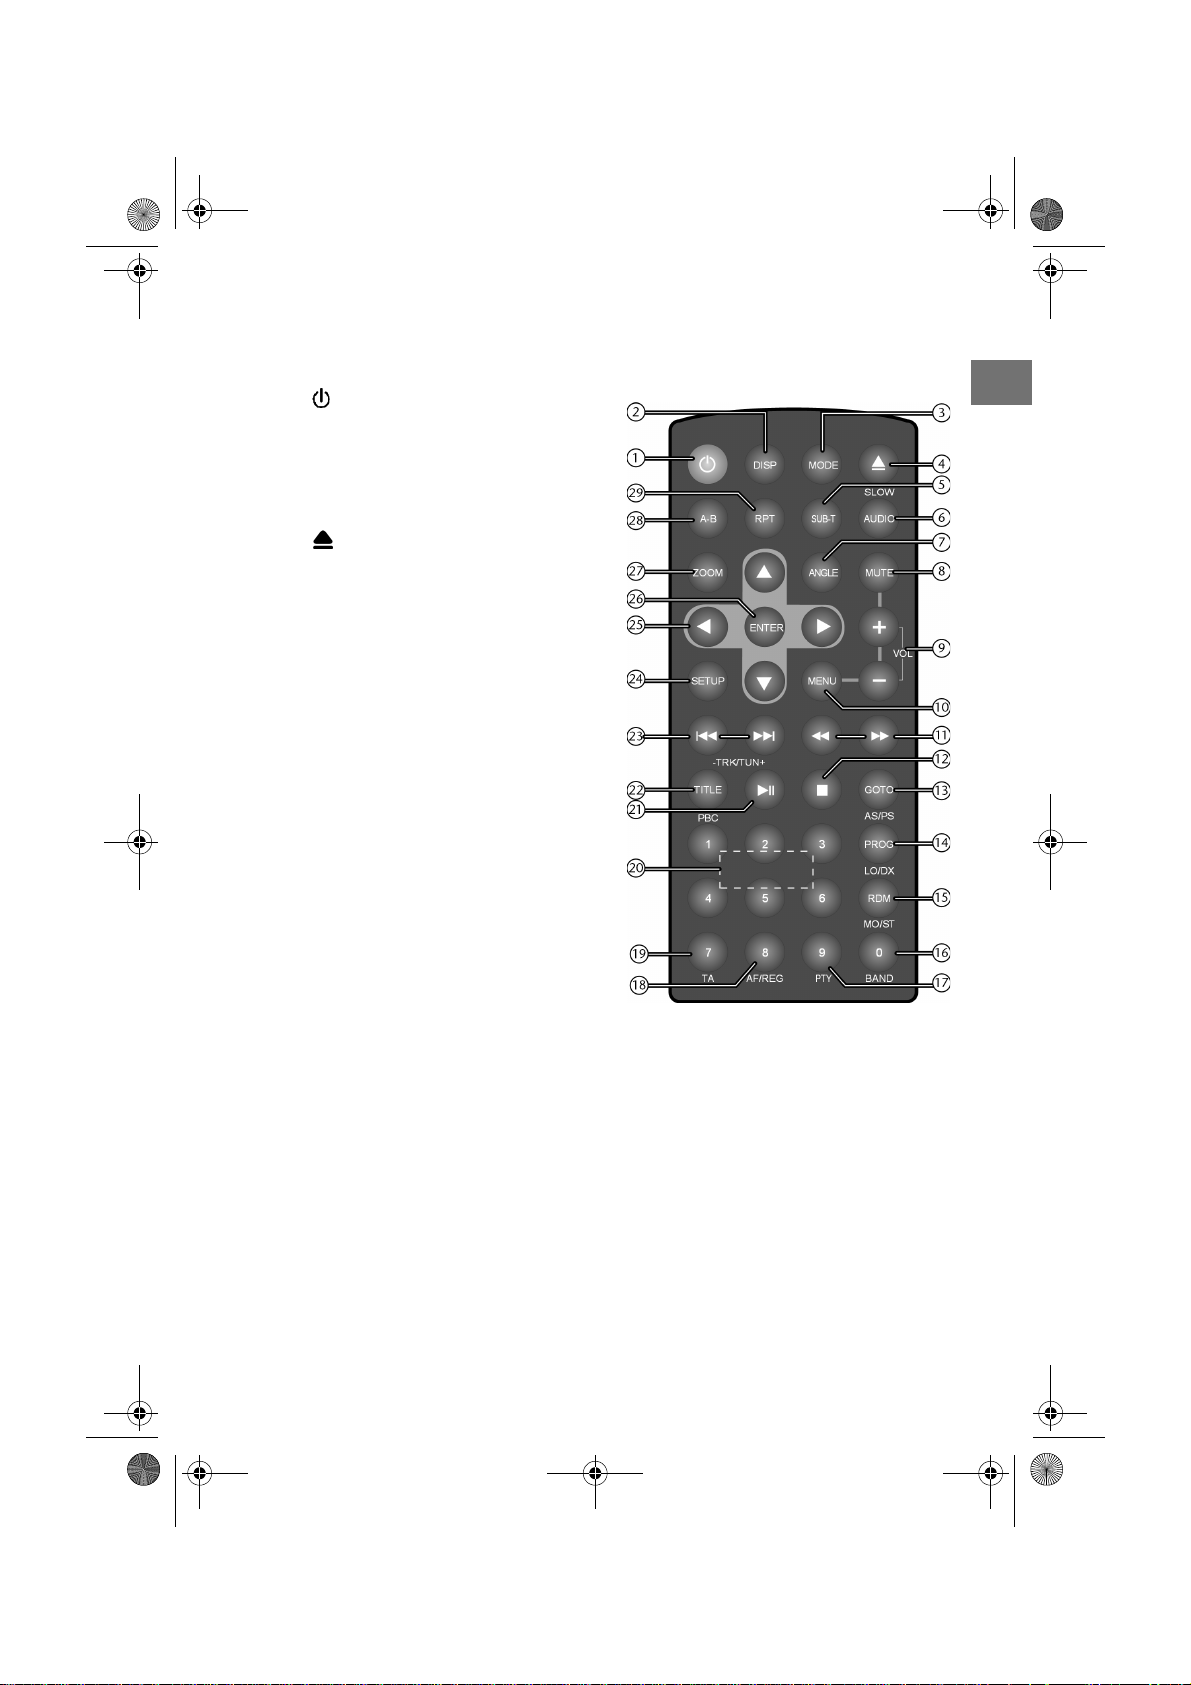
Fernbedienung
1. : Gerät ein- und ausschalten
2. DISP: Informationen für die
aktuelle Betriebsart anzeigen
3. MODE: durch wiederholtes
Drücken Betriebsmodus wählen
4. : Auswurftaste für Disk (nicht im DVD-Modus); SLOW: Zeitlupe (DVD)
5. SUB-T: Untertitel (DVD)
6. AUDIO: Audio-Einstellungen (DVD)
7. ANGLE: Kameraperspektiven (DVD)
8. MUTE: Stumm schalten
9. VOL+ / –: Lautstärke anheben
bzw. senken;
im Menü: Wert einstellen
10. MENU: Einstellungsmenü des Autoradios öffnen
11.
: Schnelllauf rückwärts ,
Schnelllauf vorwärts
(Datenträger)
12.
: Wiedergabestopp
13. GOTO: Bestimmte Stelle suchen (Disk); AS/PS: Automatische Senderspeicherung
14. PROG: Titelprogrammierung; LO/DX: Zwischen lokalen (LOC) und entfernten Sendern (DX) umschalten (siehe Seite 27).
15. RDM („Random“): Zufallswiedergabe (Datenträger); MO/ST: Zwischen Stereo und Mono umschalten
16. 0: Zifferntaste 0;
BAND: Bandbereichsauswahl im Radiomodus
)
MW2
(
FM 1, FM2, FM3, MW1,
DE
DE-5
Page 6

82339 DVD-Autoradio DE Content.book Seite 6 Mittwoch, 29. April 2009 8:41 08
17. 9: Zifferntaste 9;
PTY („Program Type"): Sender mit bestimmten Programminhalten
suchen
18. 8: Zifferntaste 8; AF („Alternative Frequency") / REG: Kurz drücken, um den AF-Modus ein- und auszuschalten; länger drücken, um Regionalmodus im AF-Modus ein- und auszuschalten; siehe Seite 29
19. 7: Zifferntaste 7; TA („Traffic Announcement"): Verkehrsfunksender aktivieren (siehe Seite 30);
20. Zifferntasten 1 - 6: Stationstasten für gespeicherte Radiosender
21.
: Wiedergabe und Wiedergabepause
22. TITLE: Titelmenü aufrufen (DVD): PBC: Playback Control (Video-CDs 2.0)
23.
/ TRK TUN –/+: : Sendersuche rückwärts/vorwärts; zum
Titelanfang und vorherigen Titel/nächsten Titel; länger drücken für
Schnelllauf rückwärts/vorwärts
24. SETUP: Setup-Menü des DVD-Player aufrufen
25. Pfeiltasten
: Im Menü navigieren
26. ENTER: Auswahl bestätigen
27. ZOOM: Bild vergrößern/verkleinern (DVD)
28. A-B: Definierten Abschnitt wiederholen (DVD)
29. RPT („Repeat“): Wiederholfunktion bei Datenträgern
DE-6
Page 7
82339 DVD-Autoradio DE Content.book Seite 7 Mittwoch, 29. April 2009 8:41 08
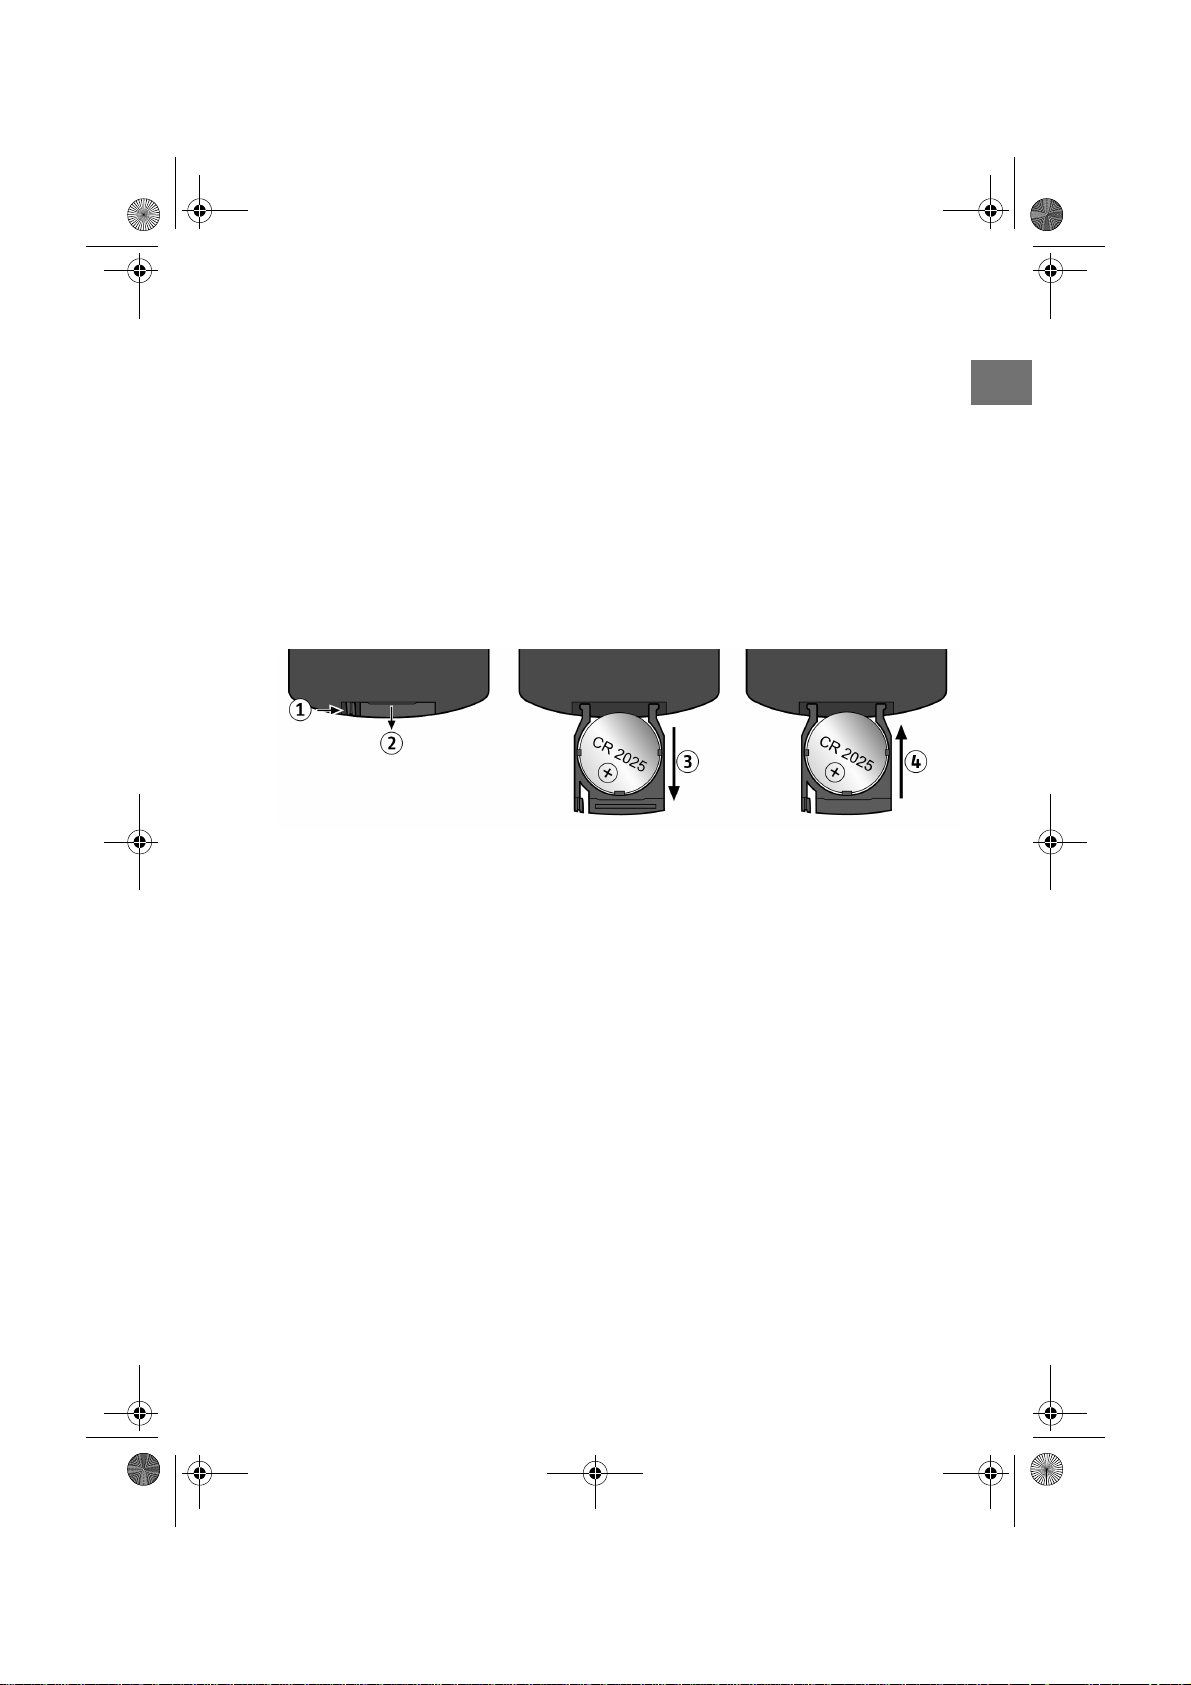
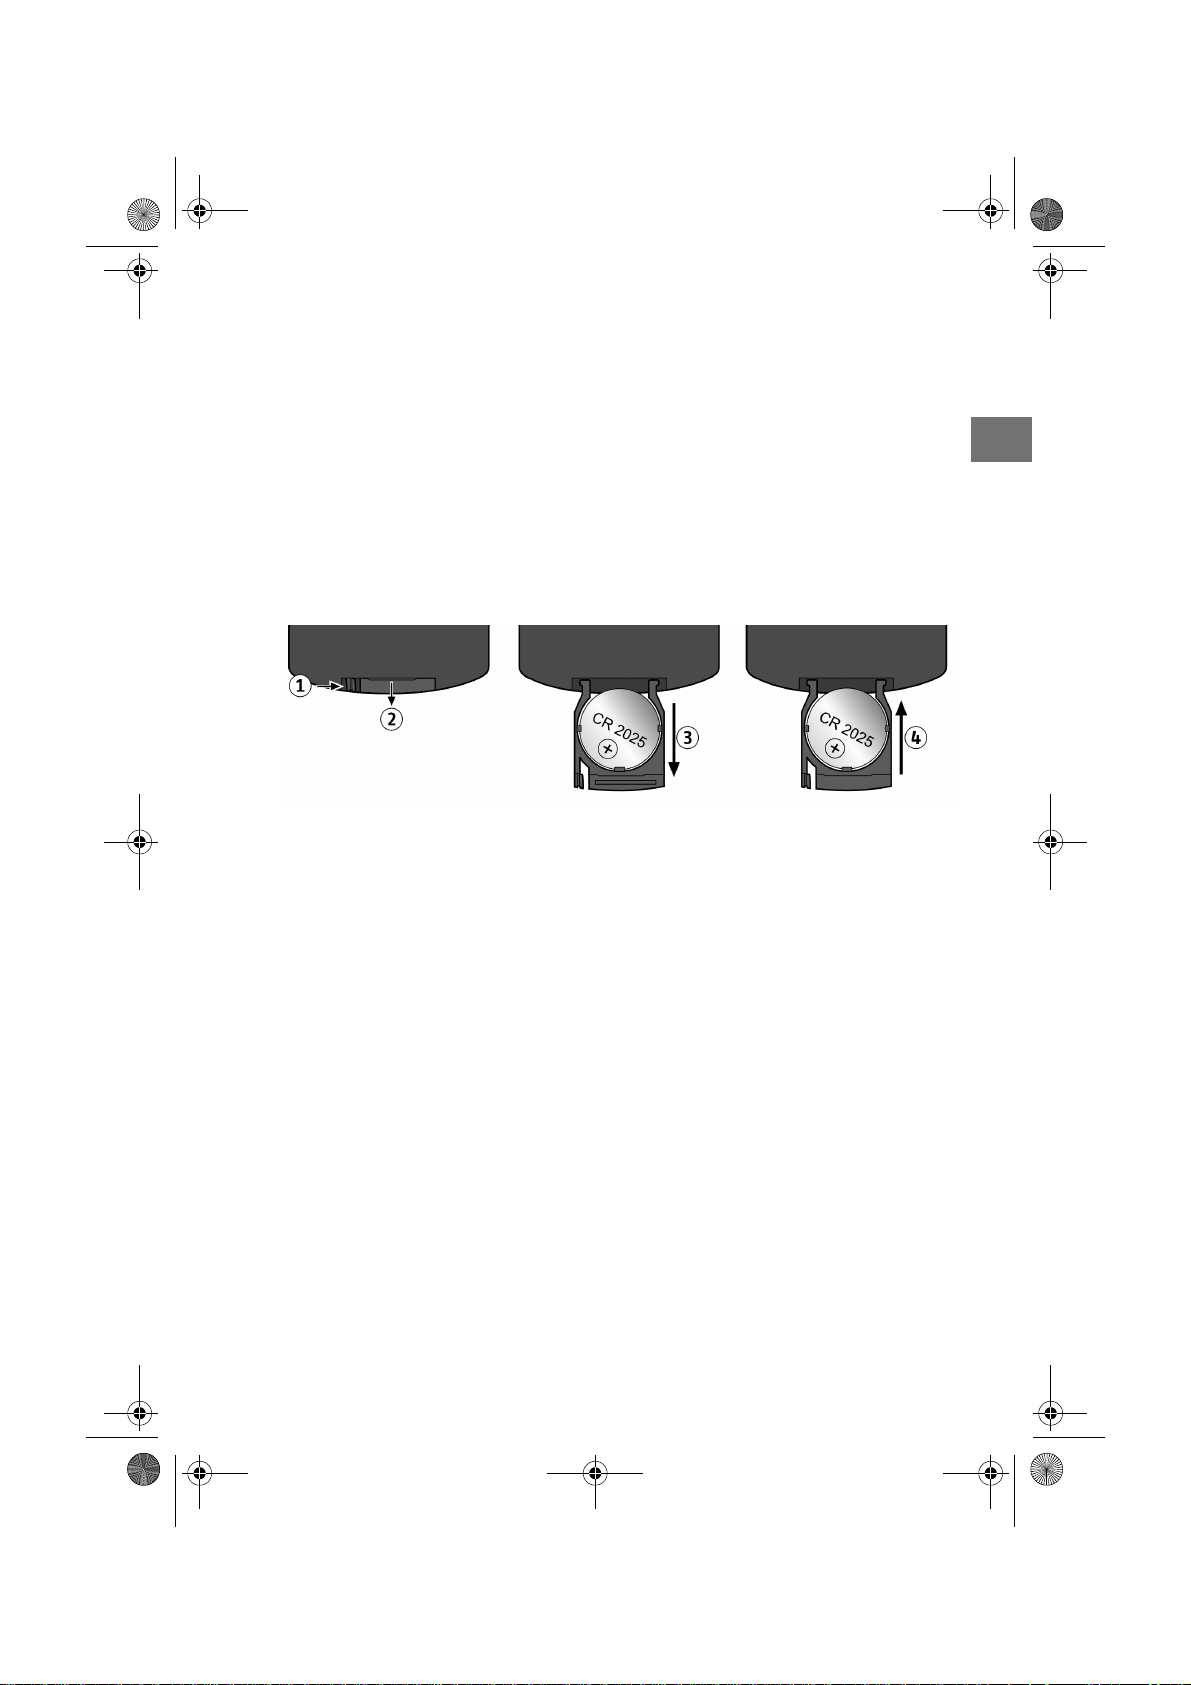
Fernbedienung in Betrieb nehmen
Die Fernbedienung wird mit installierter Lithium-Batteriezelle (CR 2025, 3 V)
ausgeliefert. Als Transportschutz ist eine Plastikfolie zwischen die Kontakte
gelegt.
` Schieben Sie den Clip (1) etwas nach innen.
` Ziehen Sie das Batteriefach heraus (2).
` Im Erstgebrauch: Ziehen Sie die Folie ab.
` Batteriewechsel: Nehmen Sie die alte Batteriezelle heraus und legen Sie
eine neue in das Fach. Die Batterie liegt unter den Halteklipsen mit der beschriftetet Seite nach oben (3).
` Schieben Sie das Batteriefach wieder ein (4).
DE
DE-7
Page 8
82339 DVD-Autoradio DE Content.book Seite 8 Mittwoch, 29. April 2009 8:41 08
Sicherheitshinweise
Zu dieser Anleitung
Lesen Sie vor Inbetriebnahme die Sicherheitsvorschriften aufmerksam durch. Beachten Sie die Warnungen auf dem Gerät und
in der Bedienungsanleitung.
Bewahren Sie die Bedienungsanleitung im Auto auf. Wenn Sie
das Autoradio verkau
dingt auch diese Anleitung aus.
Elektrische Geräte nicht in Kinderhände
Lassen Sie Kinder niemals unbeaufsichtigt elektrische Geräte benutzen.
Halten Sie auch die Verpackungsfolien von Kindern fern. Es besteht Erstik-
kungsgefahr.
Verwendungszweck
Das Autoradio ist nur für den Einbau und den Betrieb in Pkws vorgesehen.
fen oder weitergeben, händigen Sie unbe-
Verkehrssicherheit
Die Verkehrssicherheit ist oberstes Gebot. Bedienen Sie Ihr Autoradio nur, wenn es die Verkehrslage zulässt. Machen Sie sich vor
Fahrtantritt mit dem Gerät vertraut.
Akustische Signale von Polizei, Feuerwehr und anderen Rettungsdiensten müssen im Fahrzeug rechtzeitig wahrgenommen werden können. Regeln Sie deshalb die Lautstärke niemals so hoch,
dass Sie die Warnsirenen der Rettungsfahrzeuge erst verspätet
hören könnten.
Sie dürfen die Bildausgabe am Display des DVD-Autoradios nur
im stehenden Fahrzeug betreiben. Deshalb muss das Handbremsenkabel am ISO-Block an die Handbremsenanlage des Fahrzeugs angeschlossen werden (siehe “Handbremsenkabel anschließen”, Seite 16).
Einbau
Wenn Sie Ihr Autoradio selbst einbauen möchten, lesen Sie die Einbau- und
Anschlusshinweise in dieser Anleitung. Wir empfehlen Ihnen, den Einbau des
Gerätes durch eine Fachkraft vornehmen zu lassen. Damit stellen Sie sicher,
DE-8
Page 9
82339 DVD-Autoradio DE Content.book Seite 9 Mittwoch, 29. April 2009 8:41 08
dass das Gerät einwandfrei funktioniert. Eine fehlerhafte Verkabelung kann zu
Schäden am Gerät und Ihrem Auto führen.
Niemals selbst reparieren
Kontrollieren Sie vor dem Einbau Kabel und Gerät auf Beschädigungen. Benutzen Sie das Gerät nicht, wenn Gehäuse oder Kabel
beschädigt sind.
Versuchen Sie auf keinen Fall, das Gerät selber zu öffnen und/
oder zu reparieren. Es besteht die Gefahr eines elektrischen
Schlags. Wenden Sie sich im Störungsfall an unser Service Center
oder eine andere geeignete Fachwerkstatt.
Sonneneinstrahlung
Wenn sich das Fahrzeuginnere, z. B. durch längere Sonneneinstrahlung, stark
aufgeheizt hat, nehmen Sie das Autoradio nicht sofort in Betrieb.
Warten Sie, bis das Auto eine Weile gefahren wurde und das Autoradio abkühlen konnte.
Der CD-/DVD-Spieler
Der CD-/DVD-Spieler ist ein Laserprodukt der Klasse 1. Das
Gerät ist mit einem Sicherheitssystem ausgerüstet, das das
Austreten von gefährlichen Laserstrahlen während des normalen Gebrauchs verhindert. Um Augenverletzungen zu
vemeiden, manipulieren oder beschädigen Sie niemals das Sicherheitssystem des Geräts.
DE
Laufwerke und Anschlüsse
Führen Sie keinerlei Fremdkörper in die Öffnungen des Autoradios (Diskfach,
USB-Anschluss, Kartenschacht, AV IN-Anschluss) ein. Die Fächer und Anschlüsse können dadurch beschädigt werden.
Schieben Sie CDs/DVDs immer mit der beschrifteten Seite nach oben in das
Diskfach. Wenden Sie niemals große Kraft an, wenn Sie eine Disk einlegen,
eine Karte einschieben oder ein externes Gerät anschließen. Wenn Sie einen
Widerstand spüren, versuchen Sie es auf eine andere Weise bzw. mit einem
anderen Medium.
DE-9
Page 10
82339 DVD-Autoradio DE Content.book Seite 10 Mittwoch, 29. April 2009 8:41 08
Umgang mit Batterien
Die Fernbedienung wird mit einer Batterie betrieben. Batterien können
brennbare Stoffe enthalten. Bei unsachgemäßer Behandlung können Batterien auslaufen, sich stark erhitzen, entzünden oder gar explodieren.
Befolgen Sie folgende Hinweise:
Halten Sie Kinder von Batterien fern.
Sollten Batterien verschluckt worden sein, melden Sie dies sofort Ihrem
Arzt.
Laden Sie niemals Batterien (es sei denn, dies ist ausdrücklich angegeben).
Tauschen Sie immer beide Batterien gleichzeitig aus.
Vertauschen Sie niemals die Polarität (+ / –).
Entladen Sie die Batterien niemals durch hohe Leistungsabgabe.
Schließen Sie die Batterien niemals kurz.
Setzen Sie Batterien niemals übermäßiger Wärme wie durch Sonnen-
schein, Feuer oder dergleichen aus!
Zerlegen oder verformen Sie die Batterien nicht.
Ihre Hände oder Finger könnten verletzt werden oder Batterieflüssigkeit
könnte in Ihre Augen oder auf Ihre Haut gelangen. Sollte dies passieren,
spülen Sie die entsprechenden Stellen mit einer großen Menge klaren Wassers und informieren Sie umgehend Ihren Arzt.
Vermeiden Sie starke Stöße und Erschütterungen.
Reinigen Sie bei Bedarf Batterie- und Gerätekontakte vor dem Einlegen.
Entfernen Sie verbrauchte Batterien sofort aus dem Gerät.
Entfernen Sie die Batterien aus Ihrem Gerät, wenn dieses über einen länge-
ren Zeitraum nicht benutzt wird.
Isolieren Sie die Kontakte der Batterien mit einem Klebestreifen, wenn Sie
Batterien lagern oder entsorgen wollen.
Das Gerät reinigen
Verwenden Sie für die Reinigung ein trockenes, weiches Tuch. Benutzen Sie
keine chemischen Lösungs- und Reinigungsmittel, weil diese die Oberfläche
und/oder die Beschriftungen des Geräts beschädigen können.
Schützen Sie das Gerät vor Feuchtigkeit. Berühren Sie das Gerät
nicht mit feuchten Händen. Es besteht die Gefahr eines elektrischen Schlags!
DE-10
Page 11
82339 DVD-Autoradio DE Content.book Seite 11 Mittwoch, 29. April 2009 8:41 08
Lieferumfang
Bitte überprüfen Sie die Vollständigkeit der Lieferung und benachrichtigen Sie
uns bitte innerhalb von 14 Tagen nach dem Kauf, falls die Lieferung nicht
komplett ist. Mit dem von Ihnen erworbenen Produkt haben Sie erhalten:
DVD-Autoradio
Bedienteil
Fernbedienung inkl. Batterie
USB-Adapterkabel
ISO-Buchse mit Kabeln
Etui
Einbaurahmen (aufgesteckt)
2 Schlüssel zum Abziehen des Einbau-
rahmens und Herausziehen des Gerätes
Weiteres Befestigungsmaterial für den in-
dividuellen Einbau
Diese Bedienungsanleitung
Garantiekarte
DE
DE-11
Page 12
82339 DVD-Autoradio DE Content.book Seite 12 Mittwoch, 29. April 2009 8:41 08
Einbau
Einbauhinweise
Klemmen Sie vor dem Einbau den Minuspol an der Autobatterie ab!
Es besteht die Gefahr des Kurzschlusses und des Stromschlags!
Das Handbremsenkabel und das Kabel für die Ruckfahrkamera (siehe
Seite 16) dürfen nur von Fachleuten angeschlossen werden. Lassen Sie
diese Installation in einer Fachwerkstatt durchführen, wenn Sie nicht
über die notwendigen Kenntnisse verfügen!
` Kontrollieren Sie, ob die Anschlussbelegung Ihres Fahrzeugs mit der Bele-
gung am Autoradio übereinstimmt (siehe “Belegung des ISO-Blocks”,
S. 13).
` Verlegen Sie die Kabel nicht unter Zug, nicht über scharfe Kanten, oder in
der Nähe von Teilen, die sich erhitzen können. Achten Sie darauf die Kabel
nicht zu knicken, oder zu verdrehen.
` Setzen Sie das Gerät in den dafür vorgesehenen Schacht ein, oder wählen
Sie einen Platz für die Montage des Geräts, an dem es die normalen Fahraufgaben des Fahrers nicht behindert.
` Schließen Sie kurz die Kabel an, bevor Sie das Gerät endgültig einbauen.
Stellen Sie sicher, dass diese richtig eingesteckt sind und dass das System
richtig funktioniert.
` Falls Änderungen am Fahrzeug erforderlich sind, wenden Sie sich an Ihren
Fahrzeughändler/-fachwerkstatt.
` Bauen Sie das Gerät so ein, dass keine Verletzungen bei starkem Bremsen
entstehen können.
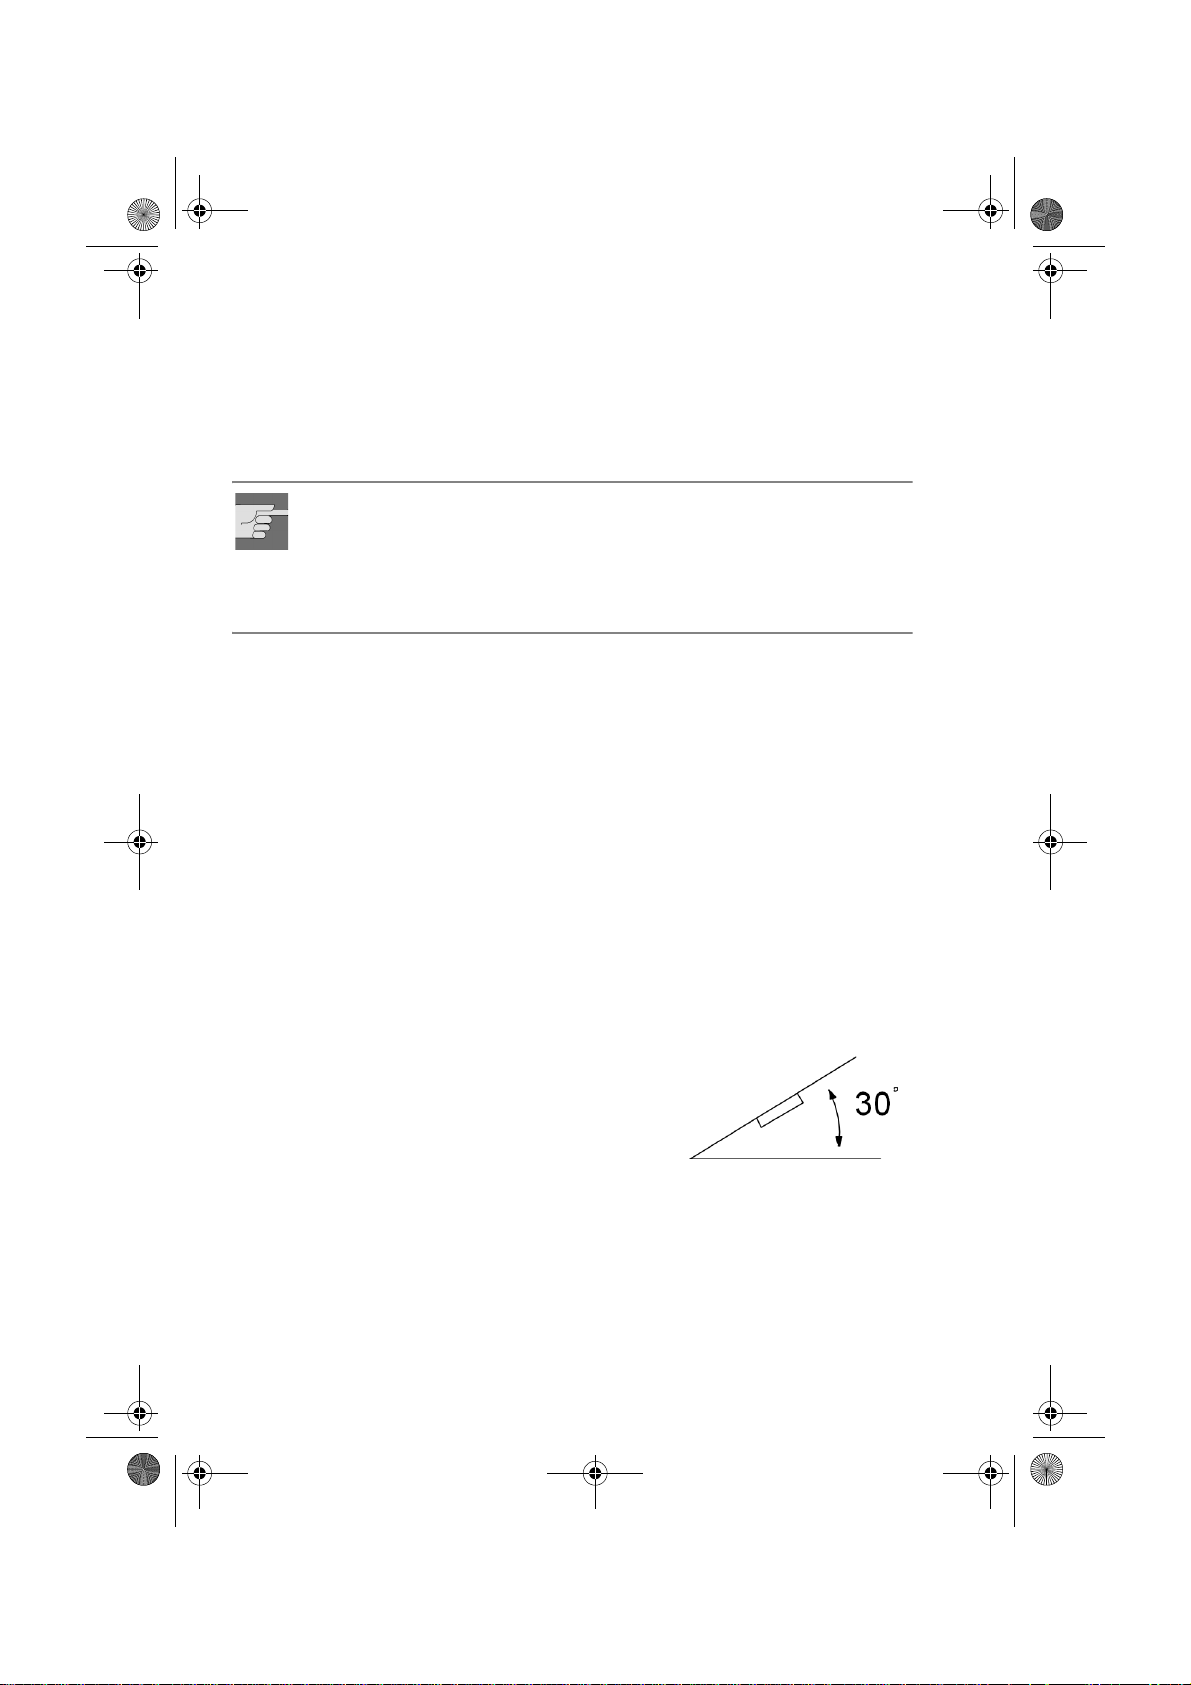
` Wenn das Gerät mehr als 30° aus der Waage-
rechten eingebaut wird, kann es seine optimale Leistung verlieren.
` Vermeiden Sie den Einbau des Gerätes in der
Nähe hoher Temperaturen (z. B. direkte Sonneneinstrahlung oder Heizungsluft), Staub,
Schmutz oder übermäßige Erschütterungen.
Das Gerät kann dadurch beschädigt werden.
` Halten Sie sich bei der Montage genau an die Anweisungen dieser Anlei-
tung. Kontrollieren Sie, bevor Sie die Autobatterie wieder anklemmen, alle
Anschlüsse.
Maximaler Einbauwinkel
DE-12
Page 13
82339 DVD-Autoradio DE Content.book Seite 13 Mittwoch, 29. April 2009 8:41 08
ISO-Schacht und -Anschlüsse
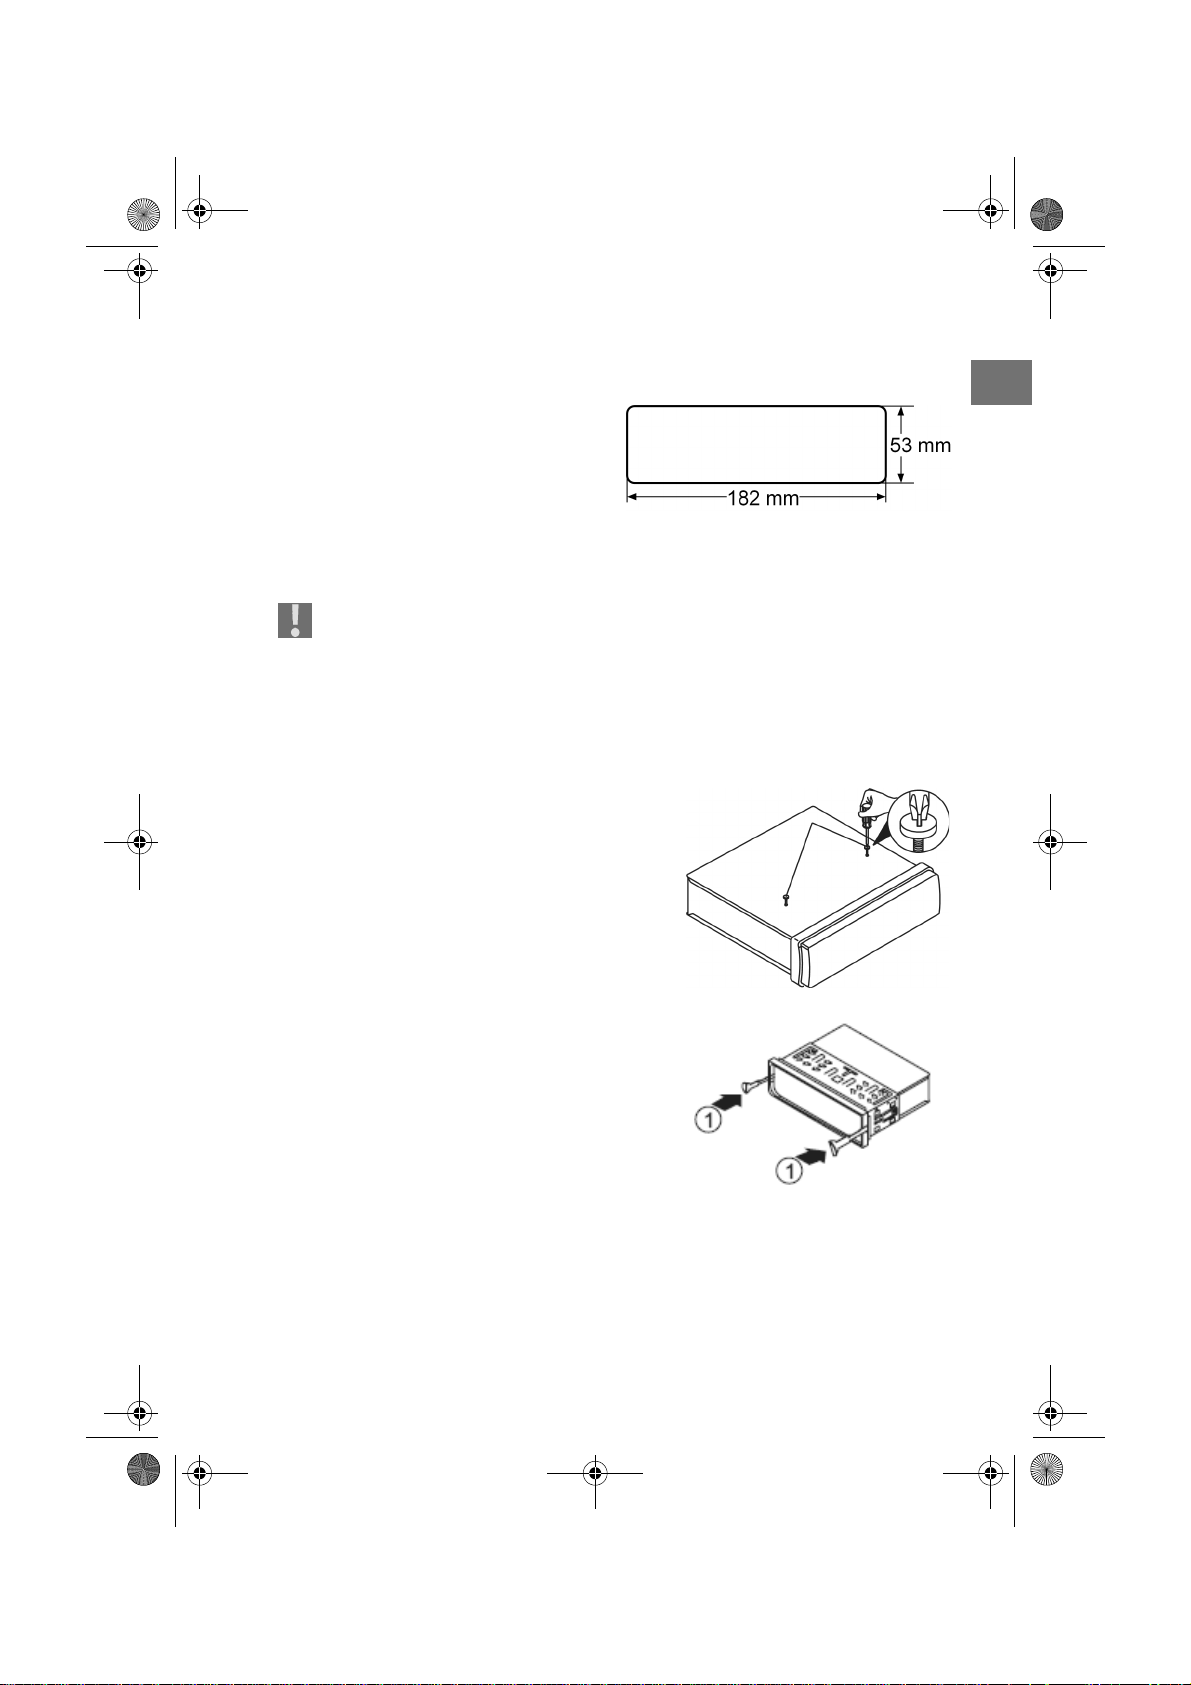
Das Autoradio ist zum Einbau in einen Standard-ISO-Einbauschacht
vorgesehen. Er muss mindestens die
Größe 53 x 182 mm haben.
Der ISO-Schacht ist normalerweise mit zwei ISO-Buchsen und einem Antennenstecker ausgestattet.
Sollte Ihr Kraftfahrzeug keinen ISO-Einbauschacht besitzen bzw. nicht
mit den Anschlüssen ausgestattet sein, können die mitgelieferten Kabelbuchsen verwendet werden. Wenden Sie sich an Ihre Fachwerkstatt,
den Fachhandel oder die Fachabteilungen der Warenhäuser. Vgl.
hierzu das Kapitel “Erläuterungen zu den Kabeln”, Seite 20.
Den Einbaurahmen montieren
` Entfernen Sie vor der Montage die
beiden Transportsicherungsschrauben mit einem Kreuzschraubendreher vom oberen Radiogehäuse (durch
gelbe Fähnchen gekennzeichnet)!
DE
Im Auslieferungszustand ist der Einbaurahmen über das Autoradio gezogen.
Ziehen Sie zunächst den Einbaurahmen
vom Gehäuse des Autoradios ab.
` Hierfür schieben Sie die beiden mitge-
lieferten Schlüssel links und rechts
zwischen Gerät und Einbaurahmen
(1), bis die Schlüssel einrasten.
DE-13
Page 14
82339 DVD-Autoradio DE Content.book Seite 14 Mittwoch, 29. April 2009 8:41 08
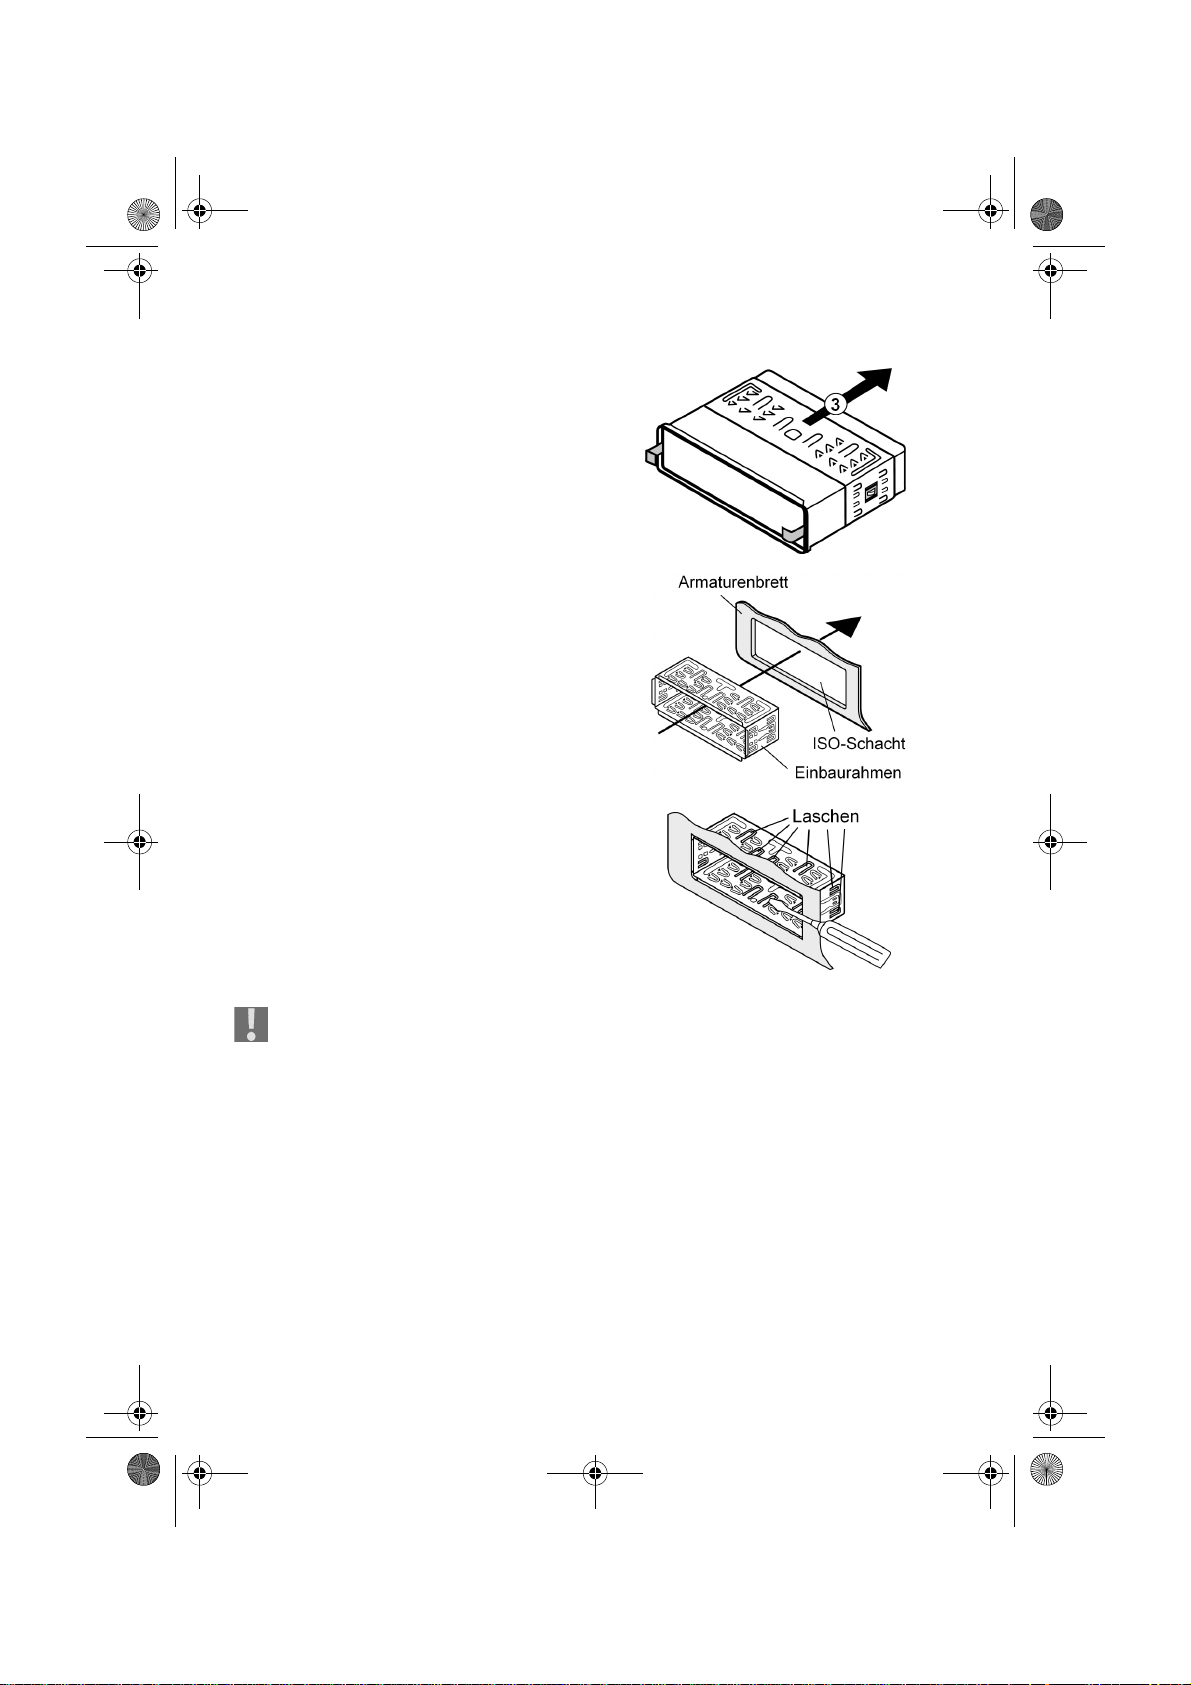
` Dann schieben Sie den Einbaurahmen
mithilfe der Schlüssel nach hinten über
das Gerät (3).
` Stecken Sie den Einbaurahmen in den ISO-
Einbauschacht.
` Um den Einbaurahmen im Einbauschacht
zu fixieren, biegen Sie möglichst viele Laschen mit einem Schraubendreher nach
außen. Wählen Sie diejenigen Laschen
aus, die sich fest mit dem Gehäuse des Einbauschachts verbinden.
Überprüfen Sie anschließend den Einbaurahmen auf festen Halt. Der
Rahmen muss fest fixiert sein, so dass er sich auch bei starkem Bremsen
nicht lösen kann.
DE-14
Page 15
82339 DVD-Autoradio DE Content.book Seite 15 Mittwoch, 29. April 2009 8:41 08
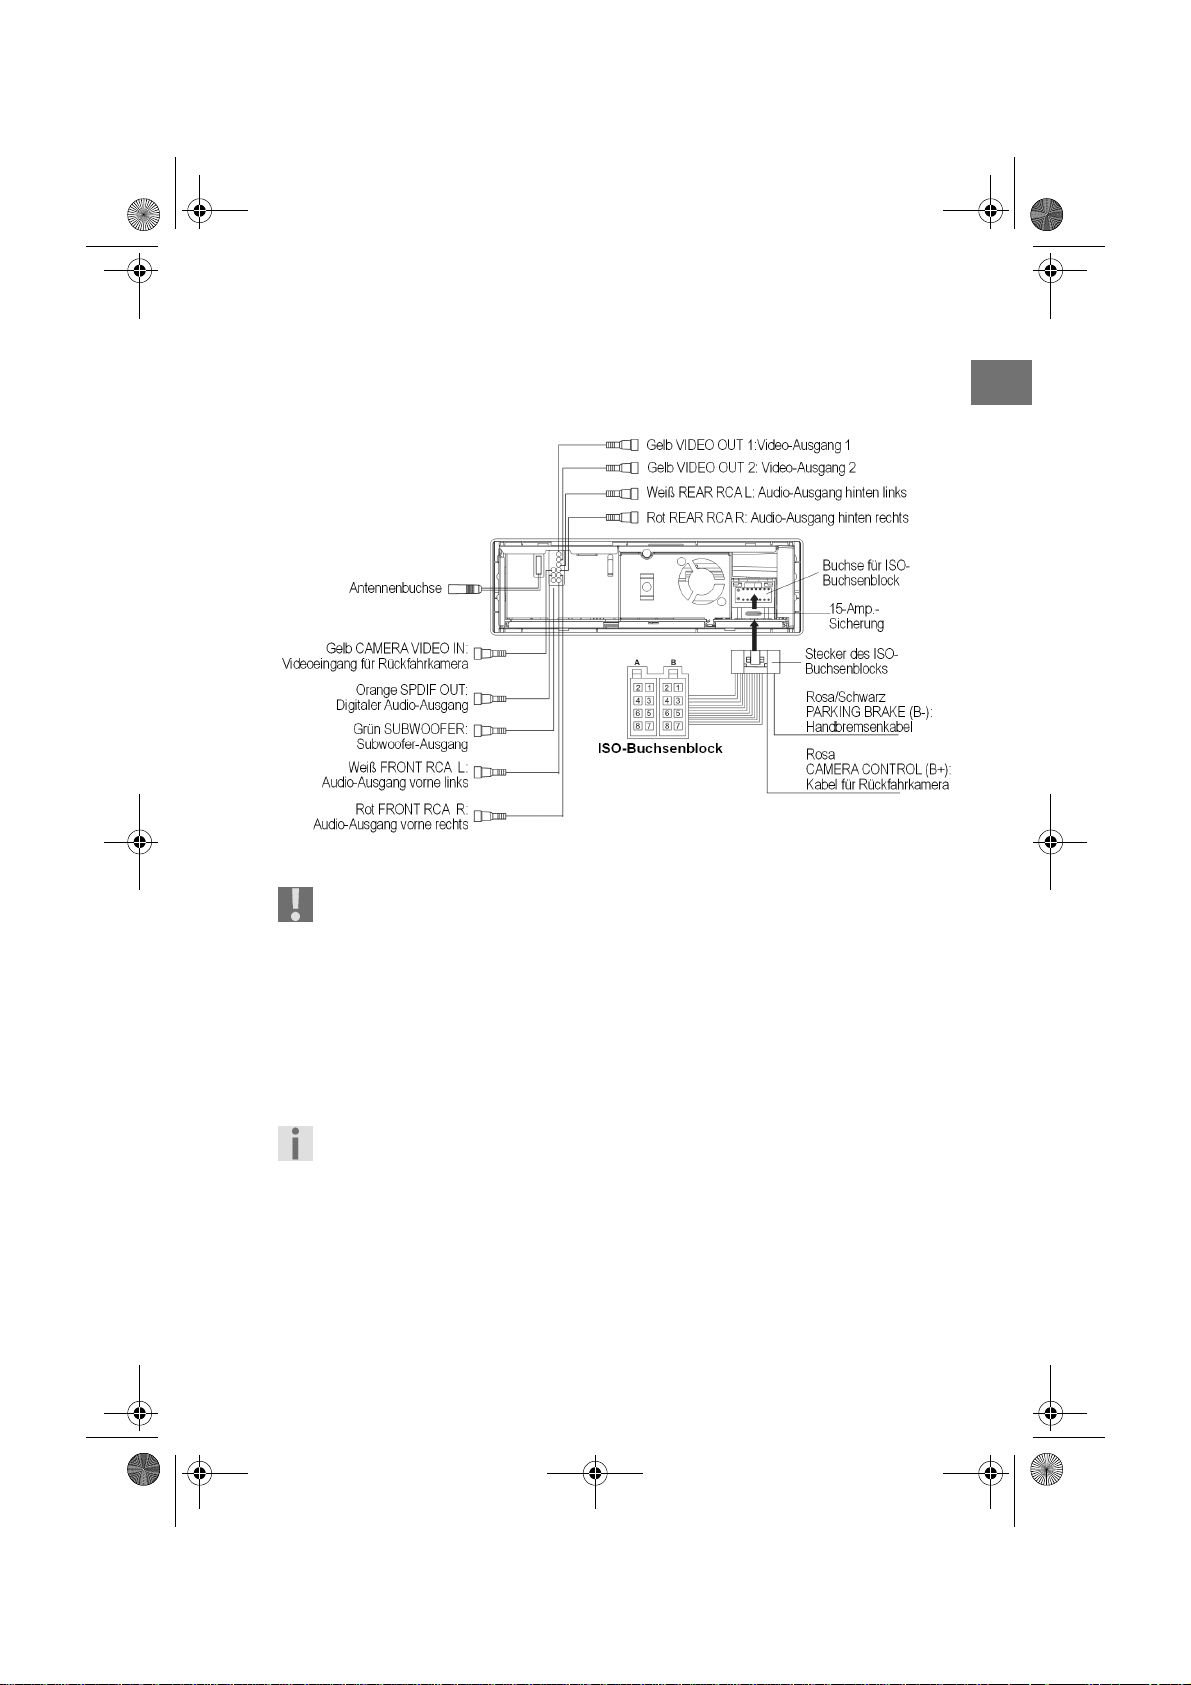
Anschlüsse an der Radiorückseite
Die Rückseite des Autoradios im Überblick:
Kabelverbindungen vorbereiten
Entfernen Sie nicht die Fähnchen an den Kabeln. Sie benötigen sie für
den richtigen Anschluss.
` Ziehen Sie die Anschlüsse, die sich im ISO-Schacht Ihres Autos befinden, so-
weit heraus, dass Sie sie mit den Anschlüssen am Autoradio verbinden können.
DE
Kabelverbindungen vornehmen
Benutzen Sie beim Einbau den ISO-Steckerblock des Autoradios. – Falls die
ISO-Stecker Ihres Fahrzeugs nicht auf die ISO-Buchsen des Autoradios passen
sollten, können Sie in Fachwerkstätten, im Fachhandel oder in den Fachabteilungen der Warenhäuser entsprechende Adapter erwerben.
Mit den beiden ISO-Steckern Ihres Fahrzeugs (für die Lautsprecher und
für Stromverbindungen) sind sichere und richtige elektrische Verbindungen hergestellt. Für den Fall, dass Sie die Kabel jedoch individuell
verlegen lassen möchten, erläutern wir am Ende dieses Kapitels die Bedeutung der Kabel im Einzelnen.
1. Verbinden Sie den Stecker des ISO-Buchsenblocks mit der Buchse für den ISO-Buchsenblock an der Rückseite des Autoradios.
DE-15
Page 16
82339 DVD-Autoradio DE Content.book Seite 16 Mittwoch, 29. April 2009 8:41 08
2. Verbinden Sie die beiden ISO-Stecker des Fahrzeugs mit den beiden ISOBlöcken des Autoradios (A für Strom und B für die Lautsprecher).
3. Verbinden Sie den Antennenstecker der Fahrzeugantenne mit der Antennenbuchse des Autoradios.
4. Verbinden Sie Kabel mit den farbigen Buchsen entsprechend der
Kennzeichnung mit den entsprechenden Steckern im Auto (siehe auch
folgendes Kapitel).
Wenn Sie einen externen Verstärker einsetzen, können Sie ihn mit den
rot/weißen Audio-Cinch-Buchsen verbinden. Beachten Sie hierzu auch
die Bedienungsanleitung des Verstärkers.
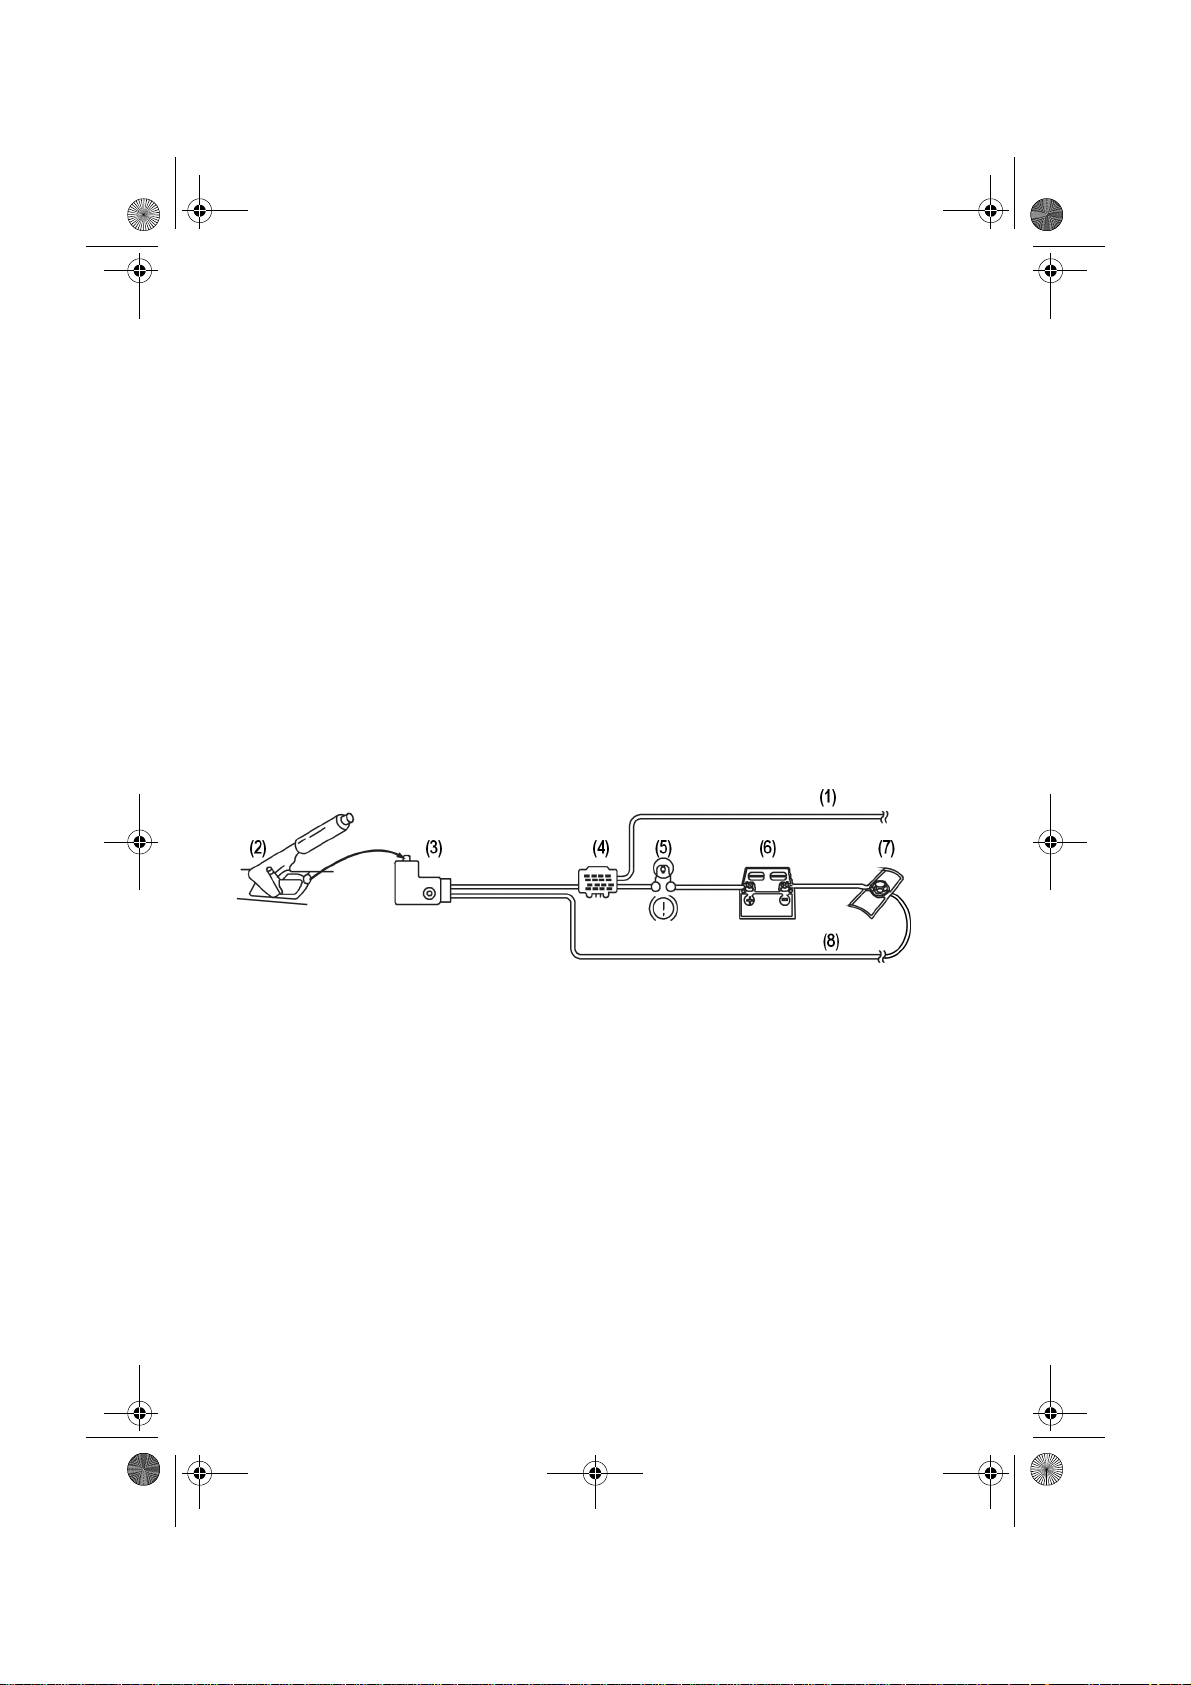
Handbremsenkabel anschließen
Der DVD-Player darf nur im stehenden Fahrzeug bei angezogener Handbremse betrieben werden. Deshalb muss das rosa-schwarze Handbremsenkabel an die Handbremse angeschlossen werden.
Schematische Darstellung des Anschlusses –
nur von Fachleuten durchführen lassen:
1. Rosa-schwarzes Handbremsenkabel „PARKING BRAKE (B–)“ am
Autoradio
2. Handbremse
3. Handbremsenschalter für Handbremsenanzeige am Armaturenbrett
4. Klemme zum Anklemmen des rosa-schwarzen Kabels
5. Handbremsenanzeige am Armaturenbrett
6. Autobatterie
7. K aross er i e
8. Vorhandenes Massekabel (mit Karosserie verbunden)
DE-16
Page 17
82339 DVD-Autoradio DE Content.book Seite 17 Mittwoch, 29. April 2009 8:41 08
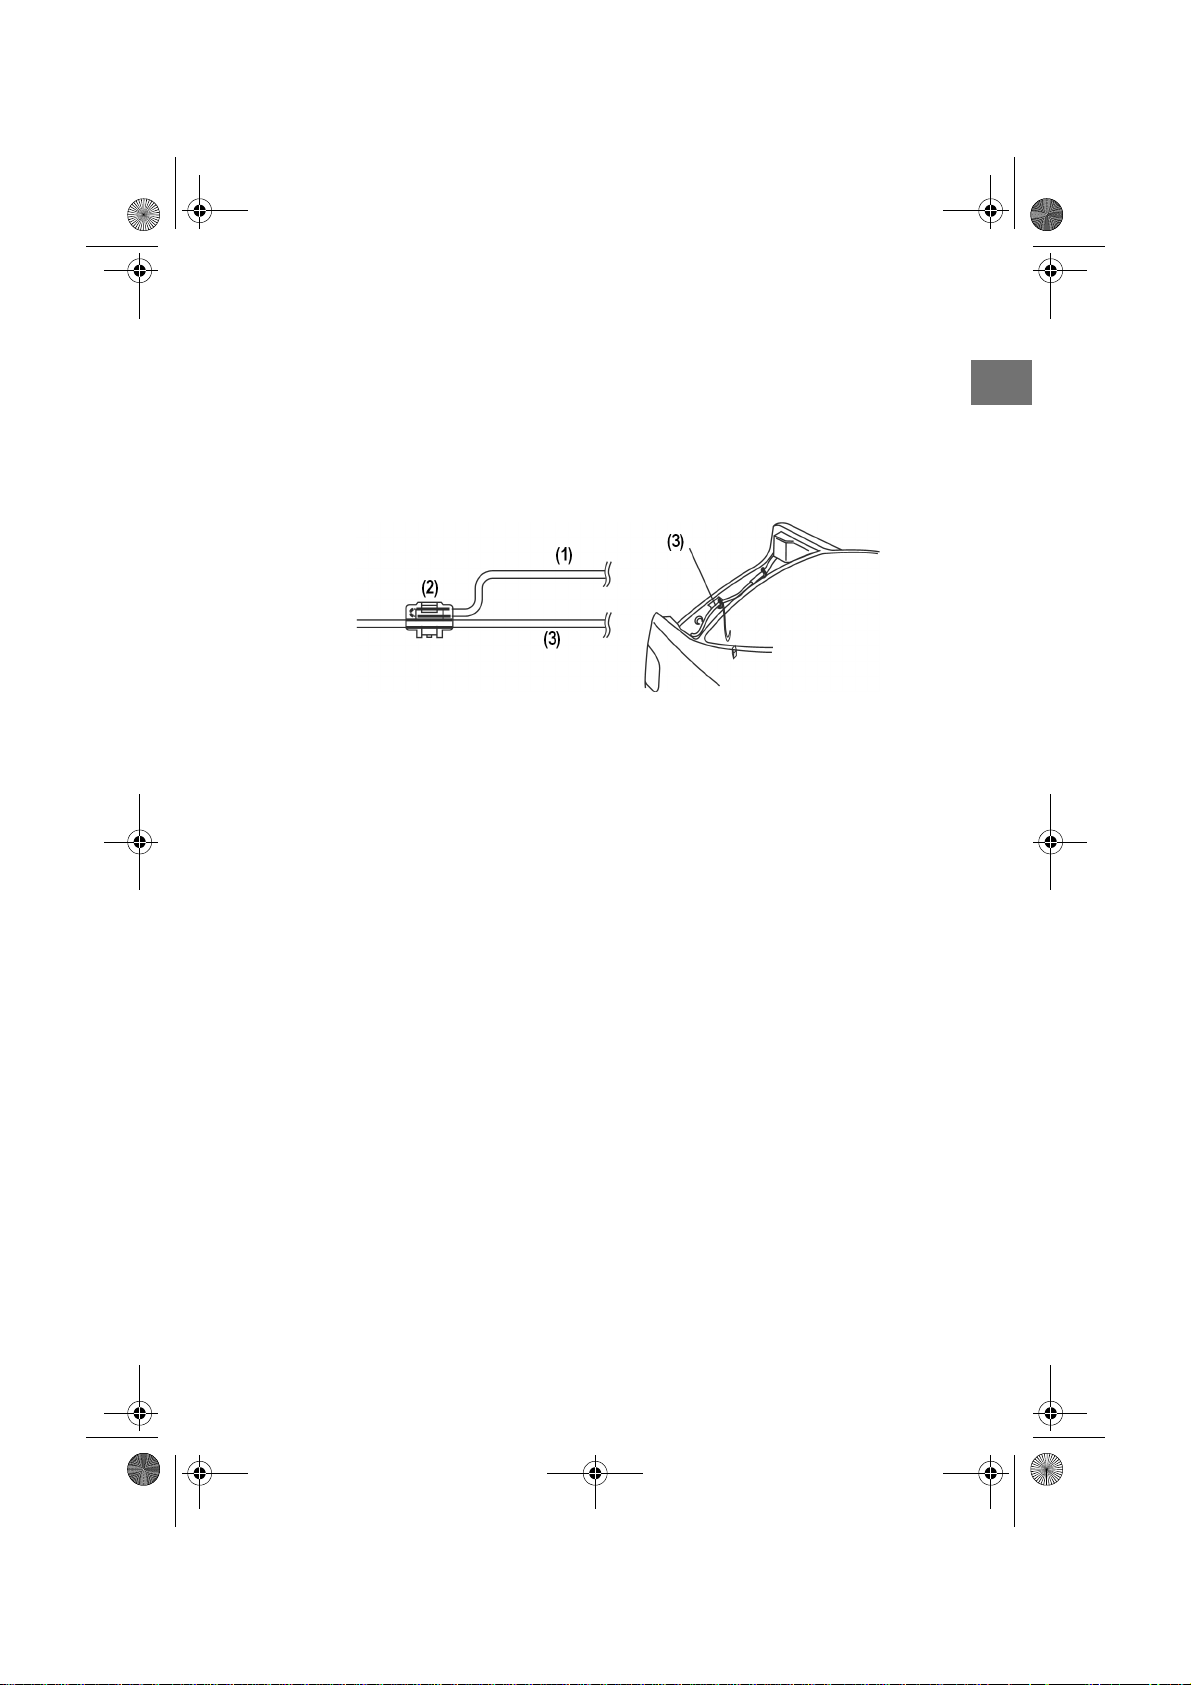
Rückfahrkamerakabel anschließen
Falls Ihr Fahrzeug mit einer Rückfahrkamera ausgestattet ist, können Sie das
Bild dieser Kamera im Rückwärtsgang auf das Display des Autoradios übertragen. Hierzu müssen Sie das rosa Rückfahrkamerakabel anschließen:
Schematische Darstellung des Anschlusses –
nur von Fachleuten durchführen lassen:
1. Rosa Rückfahrkamerakabel „CAMERA CONTROL (B+)“ am Autoradio
2. Klemme zum Anklemmen des rosa Kabels
3. Vorhandenes Rückfahrscheinwerferkabel
Senderspeicher testen
In einigen Fahrzeugmodellen ist im ISO-Stecker für den ISO-Block A die standardmäßige Belegung der Kabel Dauerplus und Schaltplus werkseitig vertauscht (vgl. hierzu “Belegung des ISO-Buchsenblocks am Autoradio”,
Seite 22). Dies bewirkt, dass die Senderspeicherung nicht funktioniert.
Bevor Sie das Autoradio endgültig einbauen, probieren Sie folgendermaßen
aus, ob Sie die Sender gespeichert bleiben:
` Klemmen Sie die Autobatterie wieder an.
` Schalten Sie die Zündung des Fahrzeugs ein.
` Schalten Sie das Radio ein.
` Führen Sie eine automatische Senderspeicherung durch, indem Sie die Ta-
ste Taste AS/PS für etwa zwei Sekunden lang gedrückt halten (vgl. hierzu
auch “Automatisch speichern”, Seite 27).
` Schalten Sie die Zündung des Fahrzeugs aus.
` Schalten Sie die Zündung wieder ein und stellen Sie fest, ob die Sender
noch gespeichert sind (drücken Sie hierzu die Stationstasten 1 bis 6).
` Wenn die Sender gespeichert sind, können Sie das Radio einbauen.
` Sind die Sender nicht mehr gespeichert, sollten Sie einen Adapter einset-
zen, der im Fachhandel erhältlich ist, oder in einer Fachwerkstatt eine An-
DE
DE-17
Page 18
82339 DVD-Autoradio DE Content.book Seite 18 Mittwoch, 29. April 2009 8:41 08
passung der Kabel vornehmen lassen. Beachten Sie für diesen Fall das Kapitel “Erläuterungen zu den Kabeln”, Seite 20.
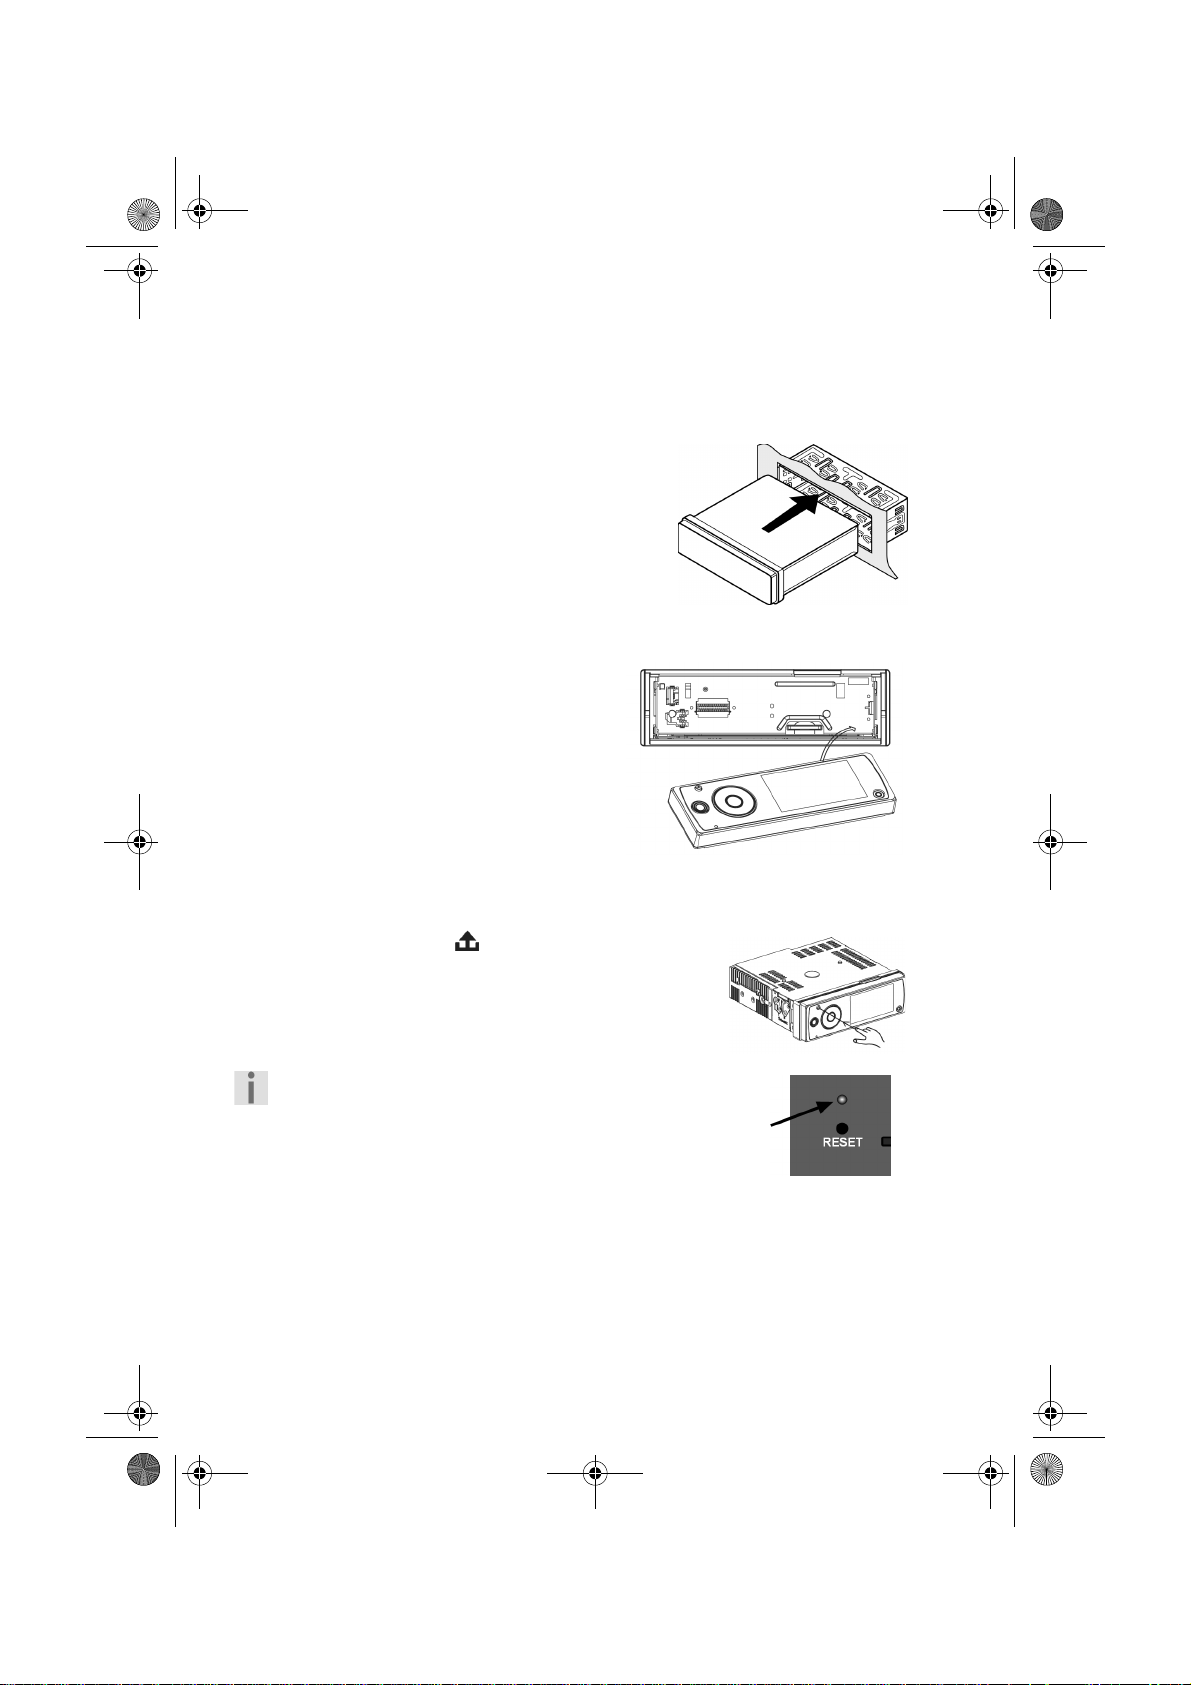
Autoradio einsetzen
` Schieben Sie das Autoradio vorsichtig in den
Einbaurahmen, bis es einrastet.
Beachten Sie beim Einschieben die Verlegung
der Kabel; sie dürfen nicht geknickt, gequetscht
oder unter Spannung gesetzt werden.
Bedienteil
Bedienteil einsetzen
` Setzen Sie das Bedienteil zuerst mit der
rechten in den Rahmen
` Drücken Sie dann die linke Seite vor-
sichtig fest, bis sie einrastet.
Überprüfen Sie, dass das Bedienteil richtig
und fest auf seinem Platz sitzt. Ist das Bedienteil nicht richtig eingebaut, erscheinen im Display Fehlinformationen und/
oder einige Tasten haben Fehlfunktionen.
Bedienteil abnehmen
` Drücken Sie die Taste . Das Bedienteil löst sich
und sie können es abnehmen.
Diebstahlsicherung
Wenn das Bedienteil nicht in den Rahmen eingesetzt
ist, blinkt am Gerät die Diebstahlschutz LED.
Kontakte
Bei abgenommenen Bedienteil liegen die Kontakte am Bedienteil und am Radio frei.
DE-18
Page 19
82339 DVD-Autoradio DE Content.book Seite 19 Mittwoch, 29. April 2009 8:41 08
Achten Sie darauf, dass die frei liegenden Kontakte nicht verschmutzen.
Das Autoradio könnte dann nicht einwandfrei funktionieren. Bewahren
Sie das Bedienteil zum Schutz immer im Etui auf.
Reinigen Sie die Kontakte ggf. mit einem sauberen, fusselfreien und trockenen Tuch.
Reset
` Um das Radio in Betrieb zu nehmen, drücken Sie mit der
Mine eines Kugelschreibers oder einem anderen spitzen
Gegenstand in die RESET-Öffnung.
` Wenn das Autoradio eine Fehlfunktion aufweist, die sich
durch Ausschalten und Einschalten nicht beheben lässt,
drücken Sie mit der Mine eines Kugelschreibers oder einem anderen spitzen Gegenstand in die Taste RESET-Öffnung.
Das Gerät ausbauen
` Nehmen Sie das Bedienteil ab.
` Ziehen Sie den Blendrahmen ab.
` Führen Sie den rechten und den lin-
ken Schlüssel in den jeweiligen
Schlitz an den Seiten des Gerätes
ein. Die beiden Haltelaschen sind
nun zurückgebogen und Sie können das Gerät herausziehen.
DE
DE-19
Page 20
82339 DVD-Autoradio DE Content.book Seite 20 Mittwoch, 29. April 2009 8:41 08
Erläuterungen zu den Kabeln
Die Erläuterungen zu den Kabeln dienen für den Fall, dass die Kabel
individuell verlegt werden müssen. Wenden Sie sich hierfür an eine
Fachwerkstatt und geben Sie die mitgelieferten ISO-Stecker und die
Informationen dieses Kapitels an die Fachwerkstatt weiter.
Um das Radio mit den ISO-Steckern Ihres Fahrzeugs anzuschließen, benötigen Sie die folgenden Erläuterungen nicht.
Es sind zwei ISO-Stecker mit Kabeln mitgeliefert:
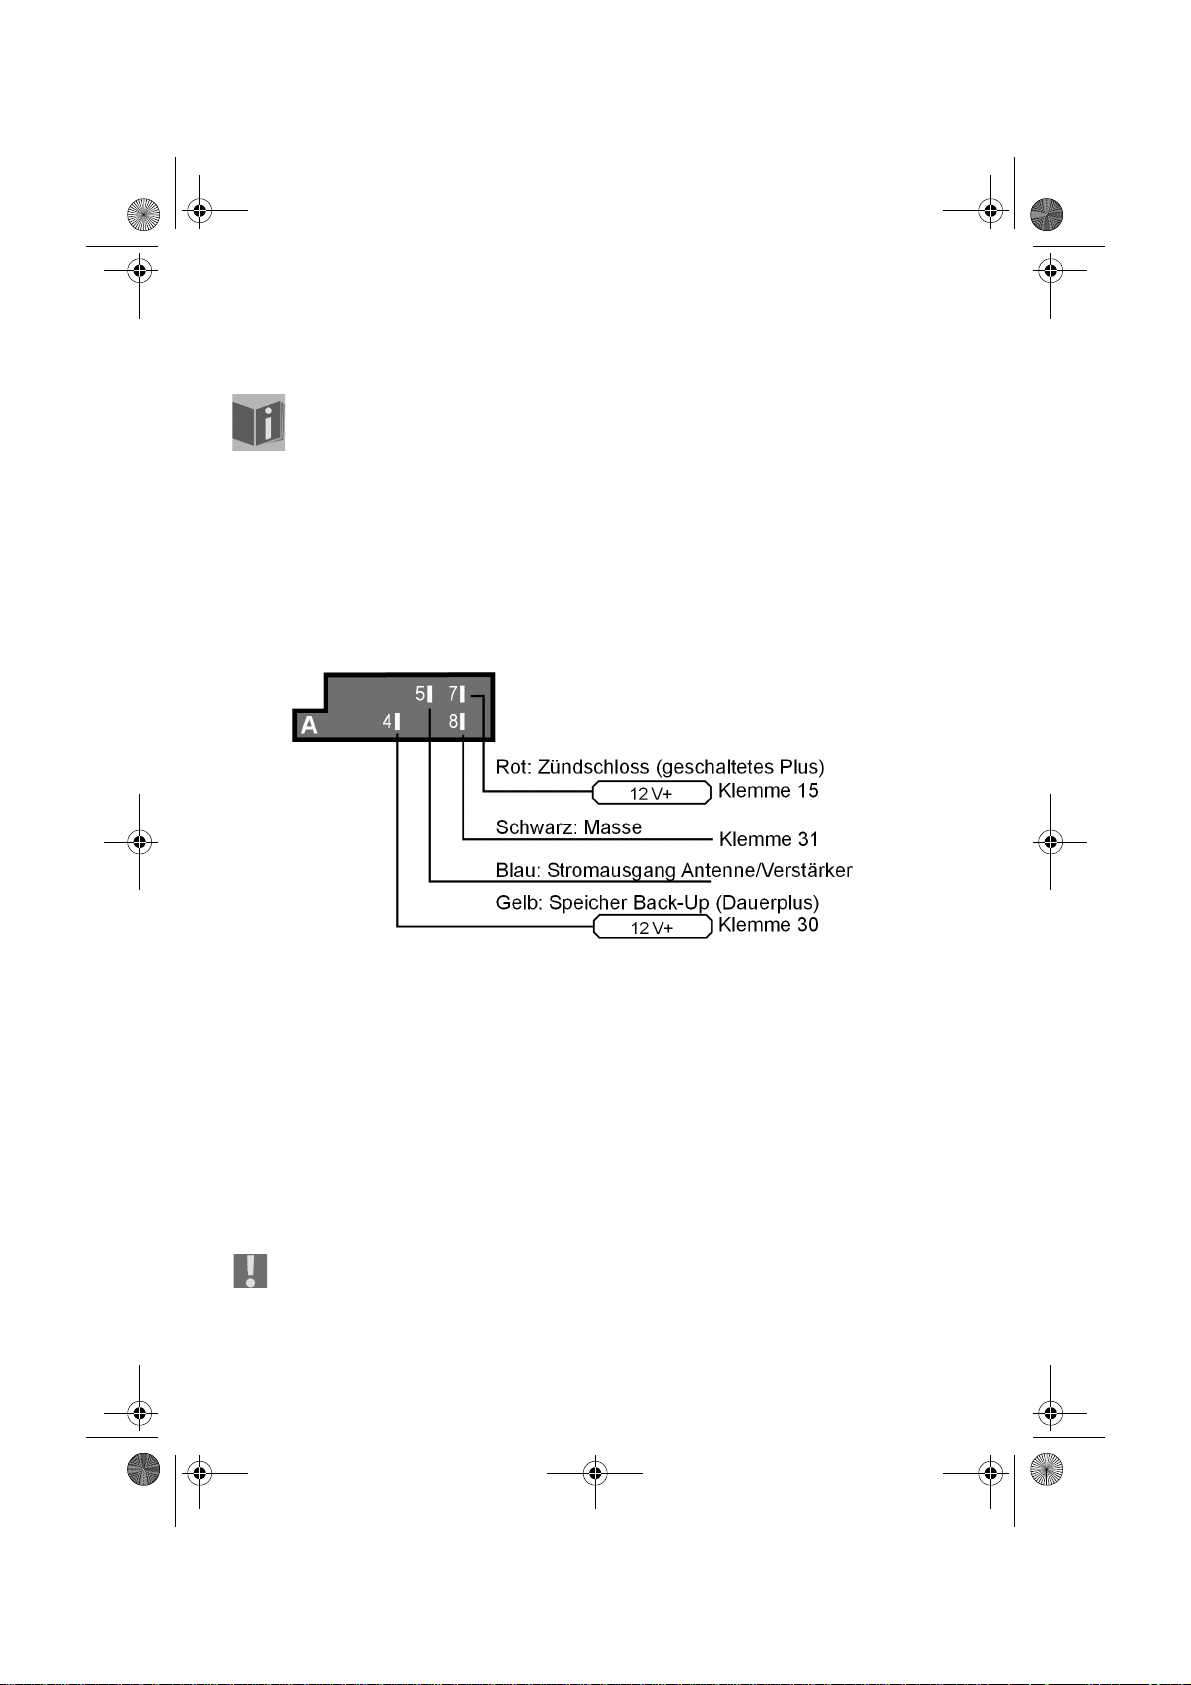
Stecker mit Stromkabeln für ISO-Buchsenblock A
Stecker mit Lautsprecherkabeln für ISO-Buchsenblock B
Übersicht ISO-Stecker A: Strom
Speicher Back-up (gelb)
Das gelbe Speicher-Back-up-Kabel muss mit Dauerplus verbunden werden.
Die Senderspeicherung funktioniert sonst nicht (vgl. “Belegung des ISO-Buchsenblocks am Autoradio”, Seite 22).
Antennen-Relais-Kabel (blau)
Das blaue Kabel steht für eine Relais-gesteuerte Antenne zur Verfügung. Das
Relais fährt die Antenne automatisch aus, wenn das Radio angeschaltet wird.
Beim Ausschalten fährt die Antenne wieder ein.
Dieses Relais-Kabel kann auch zum Steuern eines externen Verstärkers benutzt werden. Zum genauen Anschluss ziehen Sie bitte die Bedienungsanleitung des Verstärkers hinzu.
Verbinden Sie das blaue Kabel niemals mit dem Motorkabel der Relaisgesteuerten Antenne; dies kann Schäden am Radio verursachen!
DE-20
Page 21
82339 DVD-Autoradio DE Content.book Seite 21 Mittwoch, 29. April 2009 8:41 08
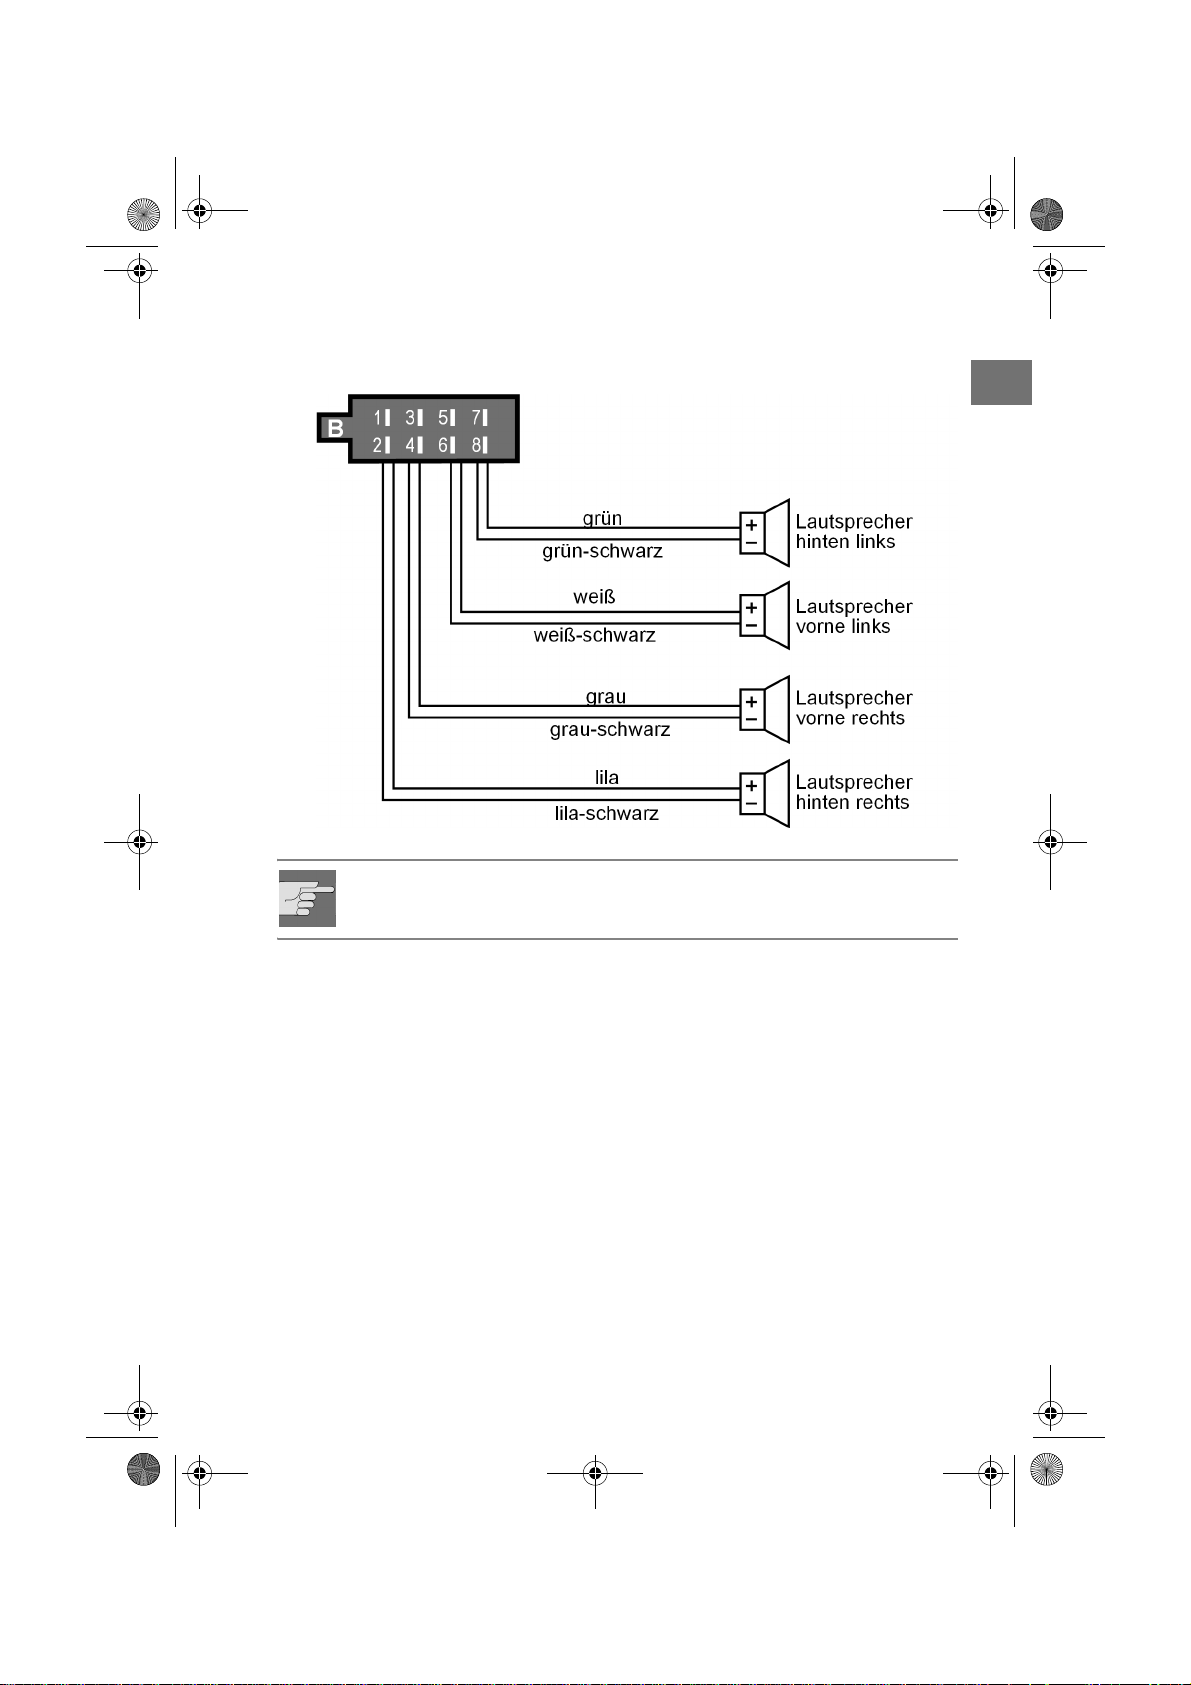
Übersicht ISO-Stecker B: Lautsprecher
Wenn das Fahrzeug nur vordere Lautsprecher hat und die Kabel für die
hinteren Lautsprecher nicht benötigt werden, müssen die freiliegenden
Enden dieser Kabel fachgerecht isoliert werden.
DE
DE-21
Page 22
82339 DVD-Autoradio DE Content.book Seite 22 Mittwoch, 29. April 2009 8:41 08
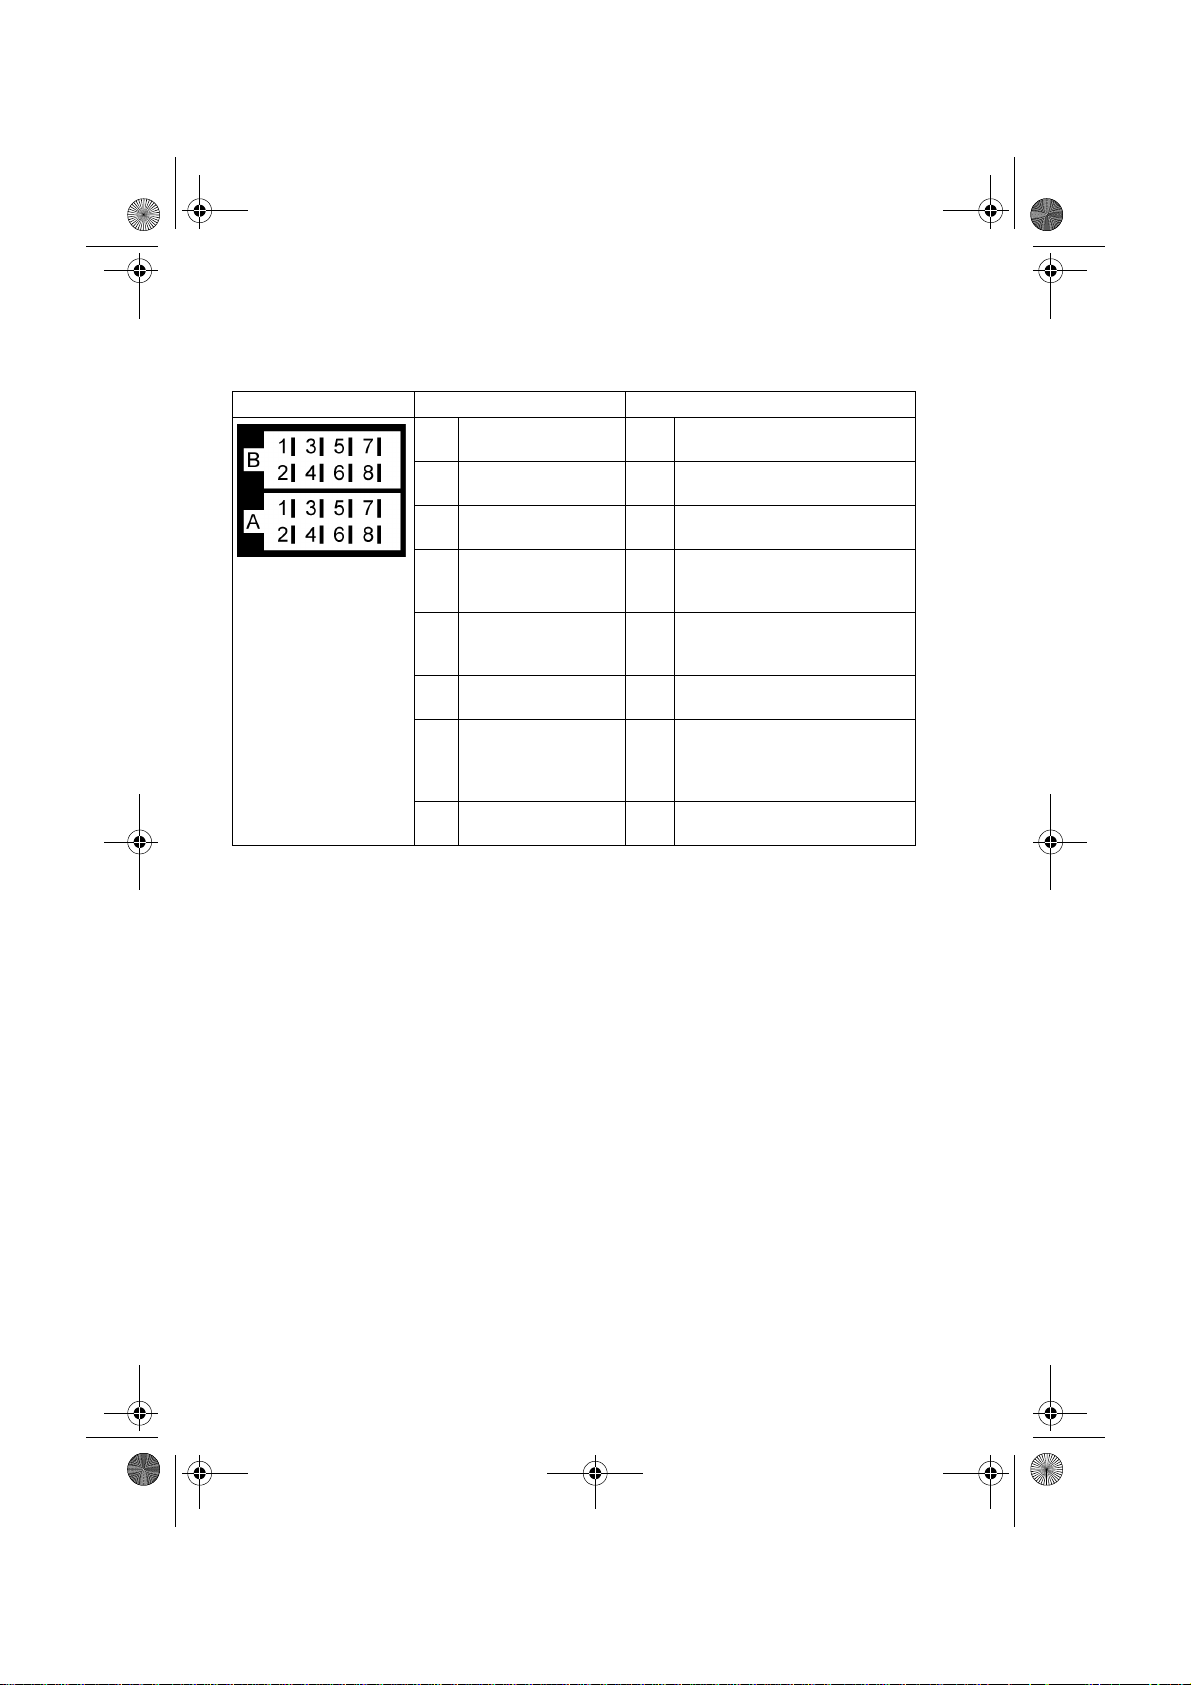
Belegung des ISO-Buchsenblocks am Autoradio
ISO-Block BLOCK B - Lautsprecher BLOCK A - Stromversorgung
1Violett:
rechts hinten +
2Violett/Schwarz:
rechts hinten -
3Grau:
rechts vorne +
4Grau/Schwarz:
rechts vorne -
5Weiß:
links vorne +
6Weiß/Schwarz:
links vorne -
7 Grün:
links hinten +
8Grüm/Schwarz:
links hinten -
1
2
3
4Gelb:
Dauerplus (permanente 12V-Bordspannung) B+
5Blau:
Auto-Antenne (auch für
externen Verstärker usw.)
6
7Rot:
Schaltplus (geschaltet 12-VSpannung, über Zündschloss)
8Schwarz: Masse B-
Probleme durch Kabelvertauschung
In einigen Fahrzeugmodellen ist im ISO-Stecker für den ISO-Block A die standardmäßige Belegung der Kabel Dauerplus und Schaltplus werkseitig vertauscht. Wenn dies der Fall ist, sind manche Funktionen beeinträchtigt, z. B.
geht die Senderspeicherung verloren.
Zur Abhilfe müssen das Kabel für Schaltplus (rot) und das Kabel für Dauerplus
(gelb) im ISO-Buchsenblock getauscht werden. Hierfür geeignete Adapter
sind im Fachhandel erhältlich.
DE-22
Page 23
82339 DVD-Autoradio DE Content.book Seite 23 Mittwoch, 29. April 2009 8:41 08
Allgemeine Funktionen
Schalten Sie das Radio nicht über einen längeren Zeitraum ohne laufenden Motor ein. Die Autobatterie kann sich dadurch entladen und
das Fahrzeug kann nicht mehr gestartet werden.
Uhrzeit
Ihr Autoradio ist mit einer RDS-gesteuerten Uhr ausgestattet. Sie wird automatisch über den RDS-Sender gestellt und läuft auch bei ausgeschaltetem Radio weiter.
Über das Menü können Sie die Uhr auch manuell einstellen (siehe unten).
Ein-/ausschalten
` Sie können das Radio mit jeder Taste außer außer und einschalten.
` Das Radio schaltet sich auch ein, wenn eine Disk oder eine Karte eingelegt
oder ein USB-Stick angeschlossen wird.
` Halten Sie die Taste Ein paar Sekunden gedrückt, um das Gerät auszu-
schalten.
Lautstärke
` Drücken Sie die Tasten VOL(+) bzw. VOL (–), um die Lautstärke an-
zuheben bwz. zu senken.
` Drücken Sie MUTE, um den Ton ganz aus- und wieder einzuschalten.
DE
Stellen Sie die Lautstärke immer nur so hoch ein, dass Sie die akustischen
Signale von Notfahrzeugen jederzeit noch deutlich hören können!
Betriebsart („Mode“)
` Drücken Sie die Taste MODE wiederholt, um zwischen Radioempfang, CD-
/DVD-Betrieb, USB-Betrieb, Kartenbetrieb und AV IN-Betrieb zu wechseln.
Bitte beachten Sie, dass ein Datenträger eingelegt bzw. angeschlossen sein
muss, um in den jeweiligen Modus wechseln zu können.
DE-23
Page 24
82339 DVD-Autoradio DE Content.book Seite 24 Mittwoch, 29. April 2009 8:41 08
Reset
` Um das Autoradio in den Auslieferungszustand zurückzu-
setzen, drücken Sie mit einem spitzen Gegenstand, z. B. einem Kugelschreiber, in die RESET-Öffnung. Sie befindet
sich hinter dem Bedienteil.
` Betätigen Sie das RESET
– bei der ersten Inbetriebnahme nach Anschluss der Kabel,
– wenn nicht alle Funktionstasten funktionieren,
– bei Erscheinen einer Fehlermeldung im Display.
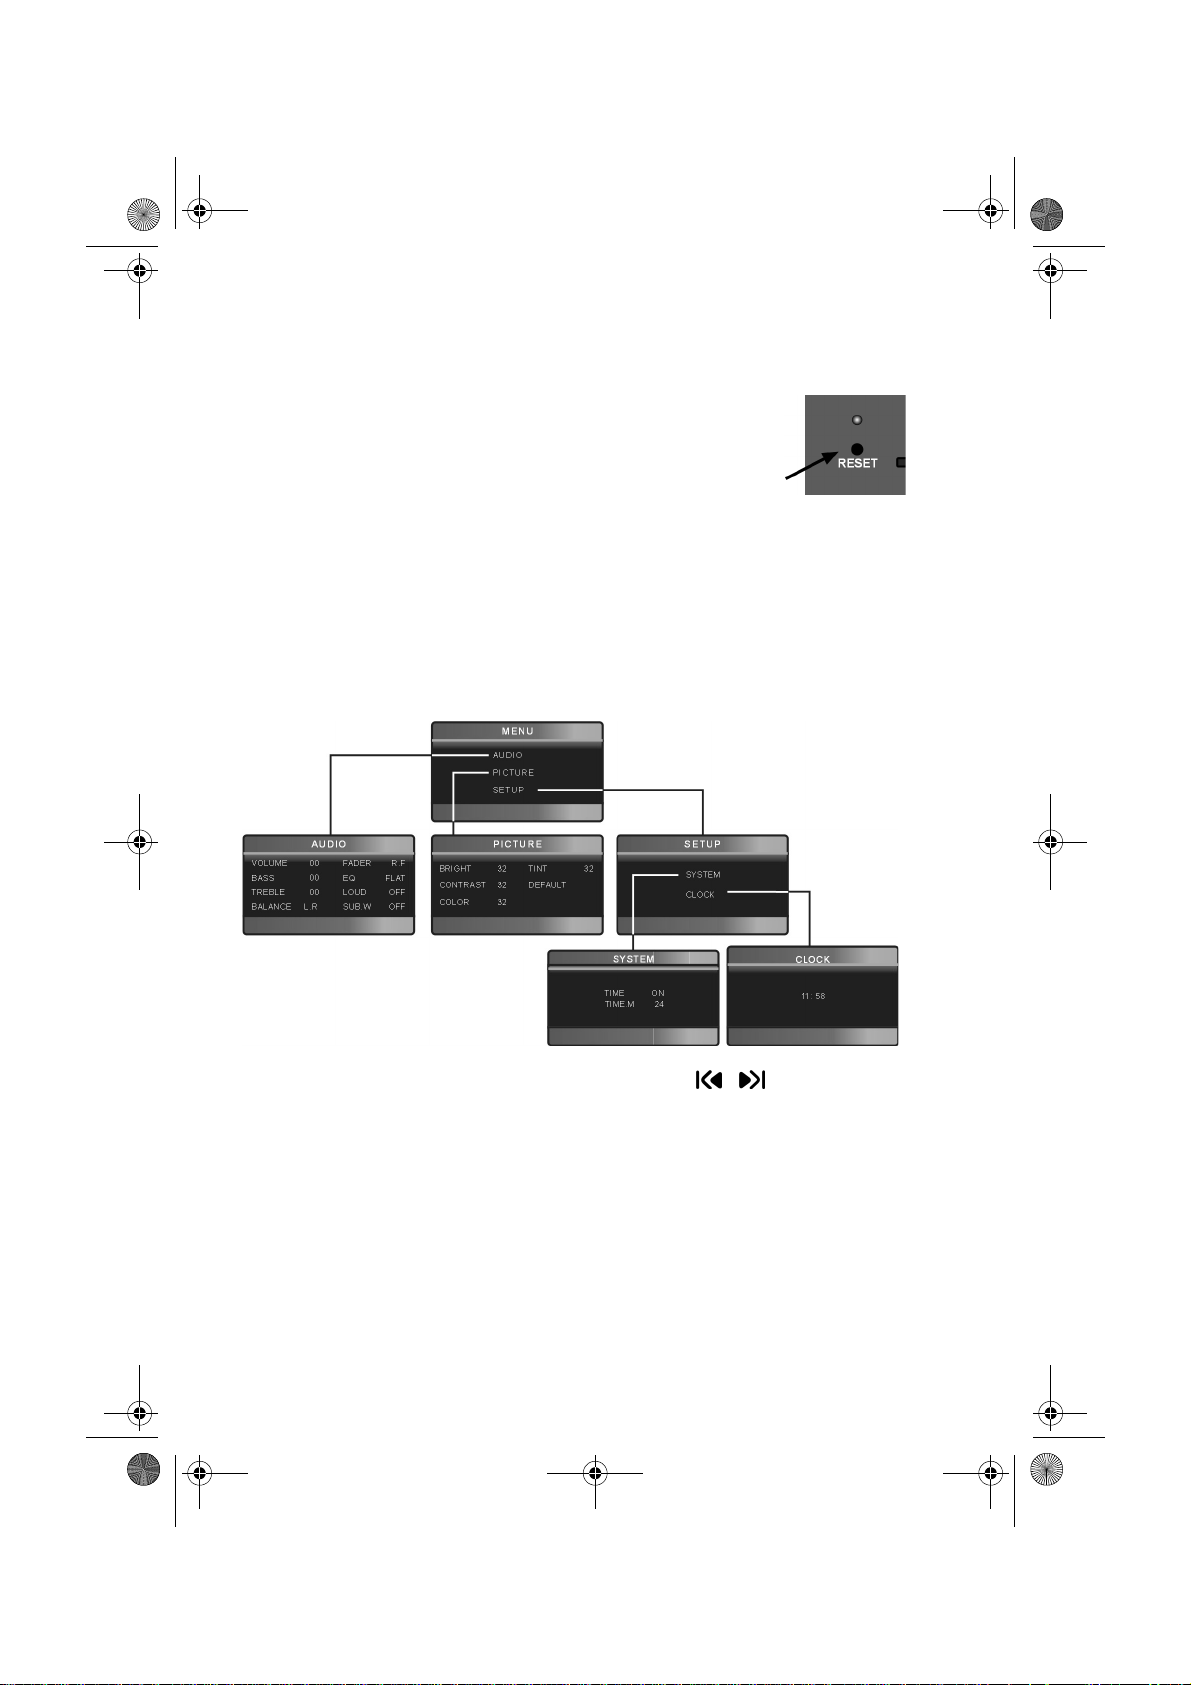
Grundeinstellungen für das Autoradio (MENU)
` Drücken Sie die Taste MENU, um das Einstellungsmenü für das Autoradio
zu öffnen. Das Menü ist auf Englisch. Es besteht aus den folgenden Bildern:
` Um einen Menüeintrag anzuwählen, drücken Sie am Hauptgerät
oder die Pfeiltasten
` Um die Auswahl zu bestätigen und z. B. das gewählte Untermenü zu öff-
nen, drücken Sie MENU am Hauptgerät oder ENTER auf der Fernbedienung.
` Um einen Wert einzustellen, drücken Sie
bzw. VOL– auf der Fernbedienung.
` Um einen Schritt zurück zu gehen bzw. das Menü zu verlassen, drücken Sie
einmal oder mehrmals MODE.am Hauptgerät oder ZOOM auf der Fernbedienung.
DE-24
auf der Fernbedienung
am Hauptgerät oder VOL+
Page 25
82339 DVD-Autoradio DE Content.book Seite 25 Mittwoch, 29. April 2009 8:41 08
AUDIO: Tonmenü
VOLUME Lautstärke. Sie können hier die Grundlautstärke, mit der
sich das Autoradio einschaltet, einstellen.
BASS
TREBLE
BALANCE L.R
FADER R.F
Bässe
Höhen
Balance zwischen linken und rechten Lautsprechern
Fader; Balance zwischen vorderen und hinteren Lautspre-
chern
EQ Equalizer: FLAT (Normal) und Voreinstellungen Klassik,
Rock, Pop
LOUD Loudness; betont hohe und tiefe Frequenzen bei geringer
SUB.W
Lautstärke
Falls ein Subwoofer angeschlossen ist, können Sie den Sub-
woofer hier aktivieren.
PICTURE: Bildmenü
BRIGHT Helligkeit.
CONTRAST
COLOR
TINT
DEFAULT
Kontrast.
Farben.
Tönungen.
Bildeinstellungen auf den Werkszustand zurückstellen.
SETUP
Dieses Menü hat die Untermenüs SYSTEM und CLOCK.
DE
SYSTEM: Uhreinstellungen
TIME Zeitanzeige ein- oder ausstellen.
TIME.M
Zeitmodus: 12-Stunden-Modus oder 24-Stunden-Modus.
Im 12-Stunden-Modus erscheint „
und „
PM“ für die Nachmittagsstunden.
AM“ für die Vormittags-
CLOCK: Die Uhr stellen
` Wählen Sie mit die Stunden an. Stellen Sie die Stunden mit ein.
` Wählen Sie mit
die Minuten an. Stellen Sie die Minuten mit ein.
DE-25
Page 26
82339 DVD-Autoradio DE Content.book Seite 26 Mittwoch, 29. April 2009 8:41 08
Radiobetrieb: Grundfunktionen
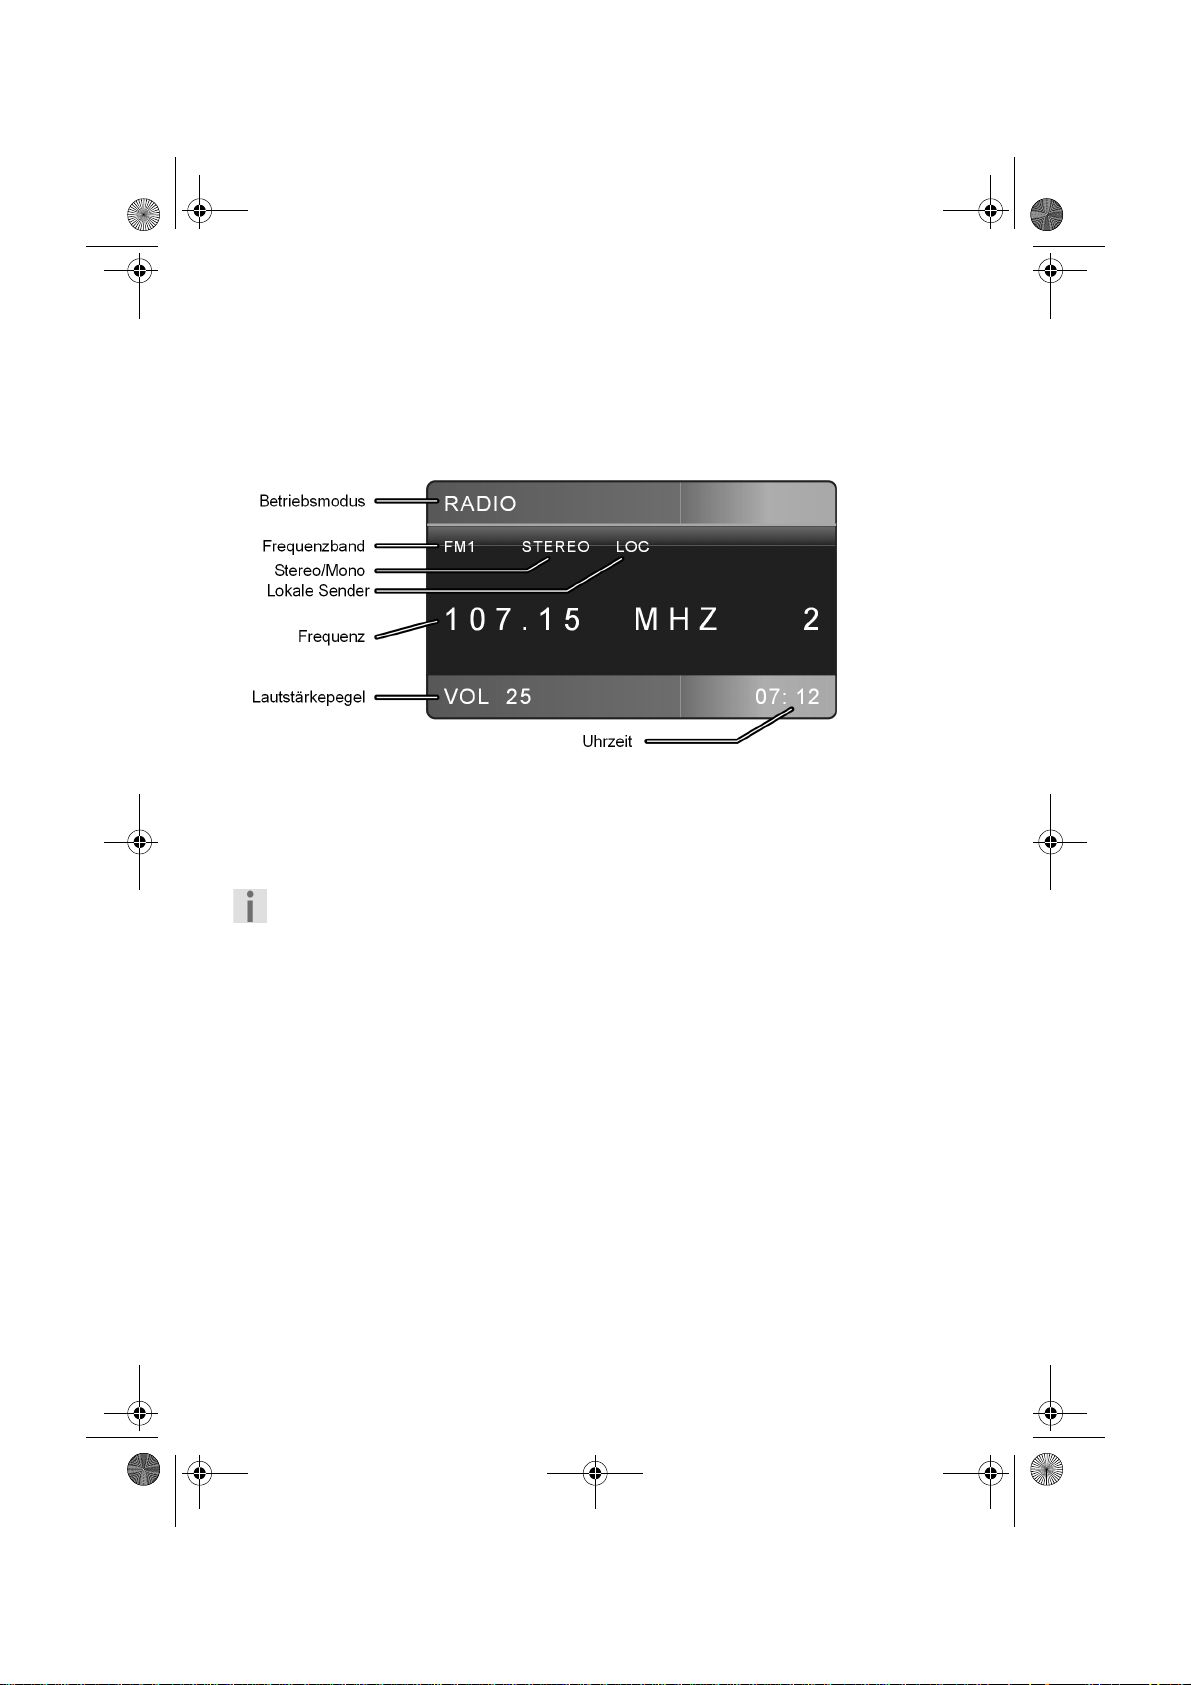
In der Radiofunktion stellt sich das Grunddisplay folgendermaßen dar:
Bandbereich wählen
` Drücken Sie die Taste BAND, um zwischen UKW (FM1, FM2, FM3), Mittel-
welle (MW1 und MW2) zu wechseln. In jedem Bereich können Sie sechs
Sender speichern.
Die drei Bandbereiche FM1, FM2 und FM3 und die beiden Bandbereiche MW1 und MW2 decken jeweils den selben Frequenzbereich ab. Auf
diese Weise können Sie bis zu 18 Sender im UKW-Bereich und 12 Sender
im MW-Bereich speichern.
Sender suchen
Automatisch suchen
` Drücken Sie eine der Tasten oder kurz, um die automatische Sender-
suche auszulösen. Das Gerät sucht nun automatisch den nächsten Sender.
` Um die Suche anzuhalten, drücken Sie wiederum
Manuell suchen
` Wenn Sie eine der Tasten etwas länger gedrückt halten, schalten Sie
die manuelle Sendersuche ein. Im Display erscheint MANU.
` Verändern Sie den Wert wiederum mit
DE-26
.
.
Page 27
82339 DVD-Autoradio DE Content.book Seite 27 Mittwoch, 29. April 2009 8:41 08
Stereo und Mono
UKW-Sender werden in Stereo gesendet. Falls der Empfang schlecht ist, können Sie ihn u. U. verbessern, indem Sie mit ST auf Mono umschalten.
Lokaler Suchmodus
Sie können verhindern, dass bei einer automatischen Sendersuche zu viele
Sender gefunden werden, indem Sie den lokalen Suchmodus (LOC) einstellen. In diesem Modus werden nur Sender mit starken Signalen gefunden.
` Um auch entferntere Sender zu finden, schalten Sie mit LOC (LO/DX) den
Modus LOC aus. Jetzt ist der Modus DX aktiviert.
AF-Sender suchen
Im AF-Modus wechselt das Radio im UKW-Band automatisch zu einer Station
mit einer alternativen Frequenz, die dasselbe Programm ausstrahlt, wenn der
Empfang der ursprünglichen Frequenz zu schwach wird („AF“ = „Alternative
frequency“) (vgl. auch die Erläuterung “Alternative Frequenzen (Taste AF)”,
Seite 29).
` Um den AF-Modus einzuschalten, drücken Sie die Taste AF einmal. Im Dis-
play erscheint die AF-Anzeige.
` Drücken Sie dann in einem der drei Bandbereiche FM1, FM2 oder FM3 die
Taste
oder, um den UKW-Bandbereich nach Sendern zu durchsuchen,
die ein AF-Signal ausstrahlen.
Der Suchlauf hält bei jedem gefundenen Sender an.
` Um den AF-Modus zu deaktivieren, drücken Sie AF erneut. Die Anzeigen
erlöschen.
Bei der Auslieferung oder nach einem Reset ist der AF-Modus eingeschaltet.
DE
Sender speichern
Manuell speichern
` Nachdem der Suchlauf einen Sender gefunden hat, drücken Sie für ca. zwei
Sekunden eine der Stationstasten 1 bis 6. In jedem Bandbereich (FM1,
FM2, FM3, MW1 und MW2) können Sie sechs Sender speichern.
Das Gerät schaltet nach ein paar Sekunden wieder in die automatische Sendersuchfunktion um.
Automatisch speichern
` Halten Sie die Taste AS/PS etwa zwei Sekunden lang gedrückt. Der aktu-
elle Bandbereich wird nach den sechs stärksten Sendern durchsucht. Die
DE-27
Page 28
82339 DVD-Autoradio DE Content.book Seite 28 Mittwoch, 29. April 2009 8:41 08
gefundenen Sender werden automatisch auf den Programmplätzen 1 bis
6 gespeichert. Die gefundenen Sender werden für ca. 5 Sekunden angespielt. Danach wird der auf Speicherplatz 1 ablegte Sender gespielt.
` Falls Sie die Suche stoppen möchten, drücken Sie eine der Stationstasten
1 bis 6.
Sender aufrufen
Einzelne Sender aufrufen
` Wählen Sie mit BAND den Bandbereich.
` Durch Drücken einer der Stationstasten 1 bis 6 rufen Sie die gespeicherten
Sender wieder auf.
Gespeicherte Sender durchlaufen
Sie können die gespeicherten Sender des aktuellen Sendebereichs aufrufen.
` Wählen Sie mit BAND den Bandbereich.
` Drücken Sie kurz die Taste AS/PS. Alle Sender werden für ca. fünf Sekun-
den angespielt.
` Wenn Sie den gewünschten Sender hören möchten, drücken Sie kurz die
Taste AS/PS.
DE-28
Page 29
82339 DVD-Autoradio DE Content.book Seite 29 Mittwoch, 29. April 2009 8:41 08
Radiobetrieb: Radio Data System
Das Radio Data System ist ein Service der Rundfunkanstalten. Neben herkömmlichen Musik- und Sprachbeiträgen werden Zusatzinformationen in
Form verschlüsselter Digitalsignale ausgesendet, die vom Autoradio angezeigt werden können. Diese Informationen – wie etwa der Sendername oder
der Titel der gerade gespielten Musik – werden im Display angezeigt.
Wenn der Sender keine RDS-Signale sendet, erscheint statt des Sendernamens die Frequenz.
Falls der Sender, der RDS-Signale sendet, auch Verkehrsinformationen zur
Verfügung stellt, erscheint im Display die Anzeige „TP“ („Traffic Program“ =
Verkehrsprogramm).
Alternative Frequenzen (Taste AF)
Eine Funktion des RDS ist die AF-Funktion im UKW-Band („AF“ = „Alternative
Frequenzen“). Im RDS-Modus wird beim Verlassen des Bereiches einer Sendestation automatisch auf eine andere Frequenz gewechselt. Der Wechsel ist
nur dann erfolgreich, wenn auch der PI-Code übereinstimmt (der PI-Code ist
die Programm-Identifikation, der Programme und Senderketten eindeutig
kennzeichnet). So wird vermieden, dass das Radio auf eine Frequenz wechselt, die an diesem Punkt von einem anderen Programm belegt ist.
` Drücken Sie die Taste AF kurz, um die AF-Funktion für den Radio Data Sy-
stem-Modus ein- oder auszuschalten. Im Display erscheint bei eingeschal-
teter Funktion „AF“.
Die AF-Anzeige im Display blinkt, wenn keine Radio Data System-Informationen verfügbar sind.
DE
DE-29
Page 30
82339 DVD-Autoradio DE Content.book Seite 30 Mittwoch, 29. April 2009 8:41 08
Regionalprogramm-Modus
Einige Sender strahlen zu bestimmten Tageszeiten Regionalprogramme aus.
Im Regionalprogramm-Modus kann das Radio nicht auf eine Frequenz wechseln, die ein anderes regionales Programm ausstrahlen.
` Um den Regionalprogramm-Modus ein- oder auszuschalten, halten Sie die
Taste AF für länger als zwei Sekunden gedrückt. Im Display erscheint
„REG“.
TA – Verkehrsfunk
„TA“ („Traffic Announcement“) ist der Verkehrsfunk-Modus. Wenn der Sender
RDS-Signale sendet und Verkehrsfunk zur Verfügung stellt, wird bei eingeschalteter TA-Funktion sofort von anderen Betriebsarten (z. B. CD) auf das Radio umgeschaltet, wenn Verkehrsfunk übertragen wird. Der Lautstärkepegel
wird bei Verkehrsdurchsagen angehoben, sofern er zu niedrig war.
Sender, die Verkehrsdurchsagen übertragen, sind im Display durch „TP“ gekennzeichnet.
` Drücken Sie die Taste TA, um die TA- Funktion ein- oder auszuschalten. Im
Verkehrsfunk-Modus erscheint im Display „TA“, wenn ein Sender mit Verkehrsfunk erreichbar ist. „TA“ blinkt, wenn kein Verkehrsfunksender erreichbar ist.
` Wenn die Verkehrsdurchsage erfolgt, leuchtet die Anzeige „TRAFFIC“ per-
manent.
` Wenn das Radio aus dem CD/MP3-Modus, aus dem USB-Modus oder von
einem Sender ohne Verkehrsdurchsage auf einen Sender mit Verkehrsdurchsage umschaltet, können Sie diesen Vorgang unterbrechen. Drücken
Sie hierzu die Taste TA kurz. Die TA-Funktion wird nun unterbrochen, ohne
dass der TA-Modus abgeschaltet wird. Im Display erscheint XXXXXXX.
` Drücken Sie wiederum TA, um diese Anzeige auszublenden.
Bei eingeschalteter TA-Funktion können während der Sendersuche nur
Sender gefunden bzw. gespeichert werden, die ein Verkehrsfunksignal
ausstrahlen.
PTY-Funktionen
„PTY“ („Program Type Code“) ist eine Funktion, bei der das Autoradio gezielt
nach Sendern mit vorwählbarem Programminhalt sucht. Dieser Service wird
von den Rundfunkanstalten zunehmend unterstützt.
DE-30
Page 31

82339 DVD-Autoradio DE Content.book Seite 31 Mittwoch, 29. April 2009 8:41 08
` Um das PTY-Menü zu aktivieren, drücken Sie die Taste PTY. Es erscheint
das folgende Display:
` Führen Sie mit den Tasten
oder ( auf der Fernbedienung) eine Su-
che nach PTY-Sendern durch.
Nach ein paar Sekunden beginnt die Sendersuche. Die Suche stoppt, wenn
ein Sender gefunden wurde; wird kein Sender gefunden, geht das Gerät in
den Normalbetrieb zurück.
` Sie können die Suche mit jeder Taste abbrechen.
DE
DE-31
Page 32

82339 DVD-Autoradio DE Content.book Seite 32 Mittwoch, 29. April 2009 8:41 08
Folgende Programmtypen sind möglich:
NEWS
: Nachrichten
AFFAIRS: Aktuelle Ereignisse
INFO: Ratgeber, Infos
SPORT: Sportereignisse
EDUCATE: Erziehung
DRAMA: Hörspiele
CULTURE: Kultur
SCIENCE: Naturwissenschaft und Technologie
VARIED: Verschiedenes
POP M: Popmusik
ROCK M: Rockmusik
EASY M: Leichte Musik
LIGHT M: Leichte klassische Musik
CLASSICS: Klassik
OTHER M: andere Musik
WEATHER: Wetter
FINANCE: Finanzen, Börse
CHILDREN: Kinderprogramme
SOCIAL: Soziales, Aktivitäten
RELIGION: Religion, Ethik
PHONE IN: Sender mit Anrufmöglichkeit
TRAVEL: Reise
LEISURE: Freizeitaktivitäten
JAZZ: Jazz
COUNTRY: Countrymusik
NATION M: Musik anderer Länder
OLDIES: Oldie-Musik
FOLKS M: Folk-Musik
DOCUMENT: Nachrichten-Berichterstattung
TEST: Notfalltest
ALARM: Katastrophenmeldungen
Bitte beachten Sie, dass diese Informationen von der Region, der Rundfunkanstalt und dem Sender abhängig sind.
DE-32
Page 33

82339 DVD-Autoradio DE Content.book Seite 33 Mittwoch, 29. April 2009 8:41 08
Betrieb mit Datenträgern (DVDs, AudioCDs, MP3, USB, SD/MMC, AV IN)
Das Autoradio verfügt über verschiedene Laufwerke und Anschlüsse und
kann verschiedene Formate abspielen:
Laufwerke und Anschlüsse Datenträger und Formate
CD-/DVD-Laufwerk Für DVDs und Video-CDs. Nur im stehendem
Auto. Abspielbare Formate: MPEG4, DVD+R,
DVD-RW, DVD-R, DVD-RW, JPEG-Disks.
Selbst erstellte DVDs müssen finalisiert sein.
Für kommerzielle Audio-CDs und eigene CDs mit
MP3- oder WMA-Dateien. Die CDs können auch
das Format CD-R und CD-RW haben.
USB-Anschluss Für USB-Sticks* oder MP3-Player*
SD/MMC-Kartenlesegerät für SD/MMC-Speicherkarten* mit MP3- oder
WMA-Dateien
AV IN-Anschluss Zum Anschluss externer Audiogeräte, z. B. eines
CD-Spielers, über einen 3,5 mm-Klinkenstecker
* Die Kompatibilität zu allen am Markt
erhältlichen MP3-Playern, USB-Sticks oder
Speicherkarten kann nicht garantiert werden.
DE
Die Wiedergabefunktionen der verschiedenen Audio-Datenträger
sind weitgehend identisch und werden in dieser Anleitung zusammen beschrieben (siehe Seite 36).
Das CD-/DVD-Laufwerk
Sie Das Disk-Laufwerk befindet sich hinter dem Bedienteil.
Disks einlegen und herausnehmen
` Drücken Sie die Taste (Auswurf) am Hauptgerät. Das Bedienteil fährt
nach unten.
` Schieben Sie die Disk mit der beschrifte-
ten Seite nach oben in den Schlitz. Die
Daten werden eingelesen. Im Display erscheinen das Startbild und die Anzeige
READ.
DE-33
Page 34

82339 DVD-Autoradio DE Content.book Seite 34 Mittwoch, 29. April 2009 8:41 08
` Dann beginnt die Wiedergabe.
Es erscheint ein Bildschirm wie hier abgebildet:
` Zum Herausnehmen der Disk drücken Sie wieder die Taste am Haupt-
gerät. Die Disk wird ausgeworfen. Das Autoradio schaltet in den Radio-Modus um.
` Schließen Sie das Bedienteil wieder, indem Sie die Taste am herunterge-
fahrenen Bedienteil antippen.
Die -Taste auf der Fernbedienung können Sie nicht im DVD-Modus als
Auswurftaste benutzen. Schalten Sie im DVD-Betrieb mit MODE auf einen anderen Betrieb um, wenn Sie das Diskfach mit der Fernbedienung
öffnen möchten.
Fahren Sie nicht mit einer herausgefahrenen CD.
Entnehmen Sie die CD sofort.
Kein „Springen“ bei Erschütterungen
Das Gerät ist mit einer Funktion ausgestattet, die Erschütterungen, z. B. auf
unebenen Straßen, ausgleicht und eine unterbrechungsfreie Wiedergabe
auch bei Bewegung des Geräts gewährleistet. Beim Einschalten des Geräts
füllt sich der Speicher automatisch mit Daten:
– bei DVDs für 5 Sekunden;
– bei Audio-CDs für 10 Sekunden;
– bei MP3-CDs für 120 Sekunden;
– bei WMA-CDs für 150 Sekunden.
DE-34
Page 35

82339 DVD-Autoradio DE Content.book Seite 35 Mittwoch, 29. April 2009 8:41 08
Der USB-Anschluss
Sie können einen MP3-Player oder einen anderen USB-Datenträger an den
USB-Anschluss an der Gerätefront anschließen.
USB-Gerät anschließen
` Verbinden Sie Ihr USB-Gerät (z. B. einen USB-Stick oder einen MP3-Player)
mit dem Anschluss. Setzen Sie ggf. das mitgelieferte USB-Adapterkabel für
den Mini-USB-Anschluss ein.
Das Autoradio sucht nach MP3- oder WMA-Dateien auf dem Datenträger
und im Display erscheint die Meldung USB.
` Wenn das Gerät in einem anderen Modus ist (Radio, CD), können Sie den
USB-Anschluss mit MODE anwählen.
` Die Bedienung zum Abspielen von Dateien auf dem externen Datenträger
sowie die Suchfunktion funktionieren genau wie bei MP3-CDs.
Ziehen Sie das USB-Gerät niemals ab, während Daten noch wiedergegeben werden. Stoppen Sie vorher die Wiedergabe bzw. schalten Sie
mit MODE auf einen anderen Betrieb um.
Das SD/MMC-Kartenlesengerät
Das SD/MMC-Laufwerk befindet sich hinter dem Bedienteil.
Karte einlegen und herausnehmen
` Drücken Sie die Taste , um das Bedienteil zu lösen.
` Schieben Sie die Speicherkarte mit den Kontakten nach unten und der ab-
gekanteten Ecke nach rechts in den Kartenschlitz.
` Setzen Sie das Bedienteil wieder ein.
Das Autoradio sucht nach MP3- oder WMA-Dateien auf dem Datenträger
und im Display erscheint die Meldung SD/MMC.
` Wenn das Gerät in einem anderen Modus ist (Radio, CD), können Sie den
USB-Anschluss mit MODE anwählen.
DE
Der AV IN-Anschluss
Sie können ein weiteres Audiogerät, z. B. einen MPEG4-Player, mit einem
3,5 mm-Klinkenstecker an die AV IN-Buchse des Autoradios anschließen.
` Wenn das Gerät in einem anderen Modus ist (Radio, CD), können Sie den
USB-Anschluss mit MODE anwählen. Im Display erscheint die Meldung AV
IN.
` Steuern Sie die Wiedergabe am angeschlossenen Gerät.
DE-35
Page 36

82339 DVD-Autoradio DE Content.book Seite 36 Mittwoch, 29. April 2009 8:41 08
DVD-Betrieb
Sie dürfen nur im stehenden Aufo bei angezogener Handbremse
Video-CDs betreiben. Wenn Sie eine DVD bei nicht angezogener
Handbremse einlegen, erfolgt die englischsprachige Meldung:
„DISABLED WHILE DRIVING“ – „Während des Fahrens nicht in Betrieb“.
Über DVDs
Video-DVDs sind in Titel und Kapitel unterteilt. Eine DVD kann mehrere Titel
haben, die wiederum aus mehreren Kapiteln bestehen können. Titel und Kapitel sind jeweils fortlaufend nummeriert:
Mit dem DVD-Player in Ihrem Autoradio können Sie DVDs mit dem
Regionalcode 2 (Europa) und 0 (geeignet für jeden DVD-Player) abspielen.
DVD starten
` Legen Sie eine DVD ein wie auf Seite 33 beschrieben. Die Wiedergabe star-
tet automatisch.
` Wählen Sie ggf. mit MODE den DVD-Betrieb.
Wiedergabefunktionen
Viele der hier beschriebenen Funktionen können nur mit den Tasten auf
der Fernbedienung aktiviert werden.
DE-36
Page 37

82339 DVD-Autoradio DE Content.book Seite 37 Mittwoch, 29. April 2009 8:41 08
MP3/WMA-Display
` Drücken Sie die Taste DISP. Es erscheint ein Bildschirm wie hier abgebildet:
Auf der linken Seite erscheinen die Ordner, auf der rechten Seite die Titel.
` Wählen Sie mit den Pfeiltasten einen Ordner oder einen Titel und drücken
Sie ENTER, um den Ordner oder Titel abzuspielen.
Anzeige der Dateitypen
Audiodateien
JPEG: Bilddateien
Videodateien
DE
Pause und Wiedergabe
` Die Wiedergabe können Sie mit der Taste oder unterbrechen. Wäh-
rend der Pause erscheint „PAUSE“ im Display.
` Drücken Sie die Taste noch mal, um die Wiedergabe wieder aufzuneh-
men.
` Drücken Sie
zweimal, um die Wiedergabe ganz zu stoppen.
Titel überspringen
` Mittels der Tasten oder können Sie den nächsten bzw. den vorherigen
Titel wählen. Die Titelnummer wird im Display angezeigt.
DE-37
Page 38

82339 DVD-Autoradio DE Content.book Seite 38 Mittwoch, 29. April 2009 8:41 08
Schneller Rück-/Vorlauf
` Drücken Sie bzw. wiederholt, um den Schnelllauf in mehreren Stufen
zu steigern: 2X > 4X > 8X > 20X > normale Wiedergabe.
` Auch mit kommen Sie zur normalen Wiedergabe zurück.
Zeitlupe (DVD, VCD, SVCD)
` Drücken Sie die Taste /SLOW wiederholt, um die Zeitlupe in mehreren
Stufen zu steigern: 1/2 > 1/3 > 1/4 > 1/5 > > 1/6 > 1/7.
Im DVD-Betrieb kann die Disk nicht mit der Taste auf der Fernbedienung ausgeworfen werden. Wechseln Sie in eine andere Betriebsart, bevor Sie die Disk auswerfen.
` Mit kommen Sie zur normalen Wiedergabe zurück.
Wiederholen (CD, MP3, VCD, SVCD)
` Drücken Sie die Taste RPT einmal. Im Display erscheint REP 1. Der aktuelle
Titel wird wiederholt.
` Drücken Sie die Taste REP ein zweites Mal.
Bei MP3-Datenträgern erscheint im Display REP DIR. Das aktuelle Verzeichnis wird wiederholt.
Bei anderen Datenträgern erscheint im Display REP ALL. Alle Titel werden
wiederholt.
` Drücken Sie bei MP3-Datenträgern die Taste ein drittes Mal, um alle Titel
zu wiederholen (REP ALL).
` Ein erneuter Tastendruck setzt die normale Wiedergabe in Gang.
Wiederholen (DVD)
` Drücken Sie RPT wiederholt, um zwischen folgenden Wiederholungen zu
wählen:
REP CHAPTER (Kapitel wiederholen) > REP TITLE (Titel wiederholen) >
REP OFF (keine Wiederholung).
Wiederholung A-B (DVD)
Mit dieser Funktion können Sie einen selbstgewählten Abschnitt wiederholen.
` Drücken Sie A-B, um den Anfang des Abschnitts festzulegen.
` Drücken A-B erneut, um das Ende des Abschnitts festzulegen. Der Ab-
schnitt wird endlos wiederholt.
` Drücken Sie A-B ein weiteres Mal, um zur normalen Wiedergabezurückzu-
kehren.
DE-38
Page 39

82339 DVD-Autoradio DE Content.book Seite 39 Mittwoch, 29. April 2009 8:41 08
Zufallswiedergabe aller Titel
` Drücken Sie die Taste RDM. Es wird eine zufallsgesteuerte Wiedergabe ge-
startet.
` Ein erneuter Tastendruck setzt die normale Wiedergabe in Gang.
Sprachauswahl/Untertitelauswahl (DVD)
Falls die DVD mehrere Sprachen oder Untertitel hat, können Sie mit der Taste
AUDIO eine andere Sprache und mit der Taste SUB-T eine andere Untertitelsprache auswählen.
Bitte beachten Sie, dass es von der DVD abhängt, ob diese Funktionen möglich sind. Eventuell müssen Sie die Sprache über das LANGUAGE SETUP
(Seite 43) ändern.
Audio-Funktion (VCDs/S-VCDs)
Einige Video-CDs oder Super-Video-CDs haben mehrere Audiokanäle. Bei diesen können Sie mit der Taste AUDIO die Kanäle wählen:
STEREO > MONO L (nur linker Kanal) > MONO R (nur rechter Kanal).
Kameraperspektiven (DVD)
Einige DVDs enthalten Szenen, die aus mehreren Perspektiven gefilmt worden sind. Bei diesen können Sie mit der Taste ANGLE die Perspektiven umschalten.
Bitte beachten Sie, dass es von der DVD abhängt, wie diese Funktion genau
realisiert wird.
Zoomfunktion
` Drücken Sie die Taste ZOOM wiederholt, um das Bild in folgenden Stufen
zu vergrößern und zu verkleinern: ZOOM2 > ZOOM3 > ZOOM4 > ZOOM1/
2 > ZOOM1/3 > ZOOM1/4 > OFF (normale Bildgröße).
` Beim vergrößerten Bild können Sie mit
len.
einen Bildausschnitt wäh-
DE
Titelmenü (DVD)
` Mit der Taste TITLE (Taste MENU am Hauptgerät) öffnen Sie das Titelmenü
der DVD. Hier können Sie mit den Pfeiltasten
fen und mit ENTER bestätigen.
` Falls Sie eine VCD mit PBC (Playback control) abspielen, können Sie das
Menü ebenfalls mit TITLE öffnen.
eine Auswahl tref-
DE-39
Page 40

82339 DVD-Autoradio DE Content.book Seite 40 Mittwoch, 29. April 2009 8:41 08
Titelprogrammierung
Drücken Sie die Taste PROG während der Wiedergabe, um das Programmierungsmenü zu öffnen.
VCD/SVCD/Audio-CD DVD/MP3/MPEG4
` Gehen Sie mit den Pfeiltasten
` Geben Sie mit den Zifferntasten den gewünschten Titel ein. Bei DVDs ge-
ben Sie den Titel („T“) und das Kapitel („C“), in dem sich der Titel befindet,
ein.
` Wenn Ihre Liste komplett ist, gehen Sie mit den Pfeiltasten auf PLAY und
drücken Sie ENTER, um die Titel abzuspielen.
auf den ersten Programmplatz.
GOTO-Funktion
Mit der Taste GOTO können Sie eine bestimmte Stelle auf der Disk direkt anwählen.
DVD
VCD/CD/MP3
` Wählen Sie mit den Pfeiltasten
möchten: TT (Titel), CH (Kapitel), TRK (Track) oder (Zeit).
` Geben Sie mit den Zifferntasten den gewünschten Wert ein.
` Drücken Sie dann ENTER zur Bestätigung; die Disk startet an der eingege-
benen Stelle.
die Kategorie, die Sie anwählen
DE-40
Page 41

82339 DVD-Autoradio DE Content.book Seite 41 Mittwoch, 29. April 2009 8:41 08
Wiedergabeinformationen aufrufen
` Halten Sie die Taste SUB-T ein oder zweimal gedrückt, um Informationen
über den aktuellen Wiedergabestatus einzublenden.
DVD
VCD/CD/MP3/JPEG
Bedeutung der Anzeigen
1
2
DVD / VCD
TT 1/3 Aktueller Titel / Gesamtzahl der Titel
CH
1/1 Aktuelles Kapitel / Gesamtzahl der Kapitel
TRK 09/18 Aktueller Track / Gesamtzahl der Tracks
3 Zeit
4 Audio
/ T / C
–/T–/ C–
1/1 ENG
5.1 CH
5
6 Kameraperspektive
1/4 ENG
Diskart
Abgelaufene Zeit des Titels / des Kapitels
Verbleibende Zeit des Titels / des Kapitels
Aktuelle Sprache / Anzahl der Sprachen
5.1-Kanal
Aktuelle Untertitelsprache / Anzahl der Untertitel-
sprachen
DE
7 Stummschaltung
DE-41
Page 42
82339 DVD-Autoradio DE Content.book Seite 42 Mittwoch, 29. April 2009 8:41 08
8
9
Wiederholung
PBC
Playbackcontrol; nur bei VCD 2.0 mit PBC
Ein Titel wird wiederholt
Ein Ordner wird wiederholt
Die ganze Disk wird wiederholt
Wiederholungsmodus verlassen
Das DVD-Setup
Mit der Taste SETUP rufen Sie das DVD-Setup auf. Hier können Sie Einstellungen für den DVD-Betrieb vornehmen.
Das DVD-Setup wird hier in englischer Sprache wiedergegeben. Sie
können aber auch eine andere Sprache wählen; siehe Seite 43.
Das DVD-Setup besteht aus vier Menüs:
Systemmenü
Sprachmenü
Audiomenü
Digitalmenü
Im DVD-Setup navigieren
` Wenn SYSTEM SETUP markiert ist, können Sie mit den Pfeiltasten
ein anderes Menü wählen.
` Mit gehen
` Um die Einstellung der gewählten Option zu ändern, drücken Sie
ENTER. Wählen Sie wiederum mit eine Option im Untermenü aus und bestätigen Sie mit ENTER.
` Um das DVD-Setup zu schließen, drücken Sie wieder SETUP.
Sie in die Optionsliste, mit wählen Sie eine Option an.
oder
SYSTEM SETUP: Systemeinstellungen
TV SYSTEM: Das TV-Ausgabestandard. PAL: in europäischen Ländern
üblches Farbformat; NTSC: in Nordamerika übliches Farbformat.
AUTO SELECT: Das Farbformat wird automatisch erkannt.
SCREEN SAVER: Bildschirmschoner ON (aktiviert) oder OFF (nicht aktiviert).
Der aktivierte Bildschirmschoner erscheint, wenn sich das
Bild einige Minuten nicht bewegt.
DE-42
Page 43

82339 DVD-Autoradio DE Content.book Seite 43 Mittwoch, 29. April 2009 8:41 08
TV TYPE: TV-Bildformat. Stellen Sie den Bildschirm entsprechend der
DVD ein. 4:3 PS („Pan Scan“), 4:3 LB („Letterbox“) oder
16:9.
PASSWORD: Passwort. Es wird für den nächsten Punkt „Elternkontrolle“
benötigt. Das werkseitige Passwort ist „0000“. Um es zu än-
dern, geben Sie dieses Passwort mit den Zifferntasten ein
und bestätigen Sie mit ENTER. Geben Sie dann, wenn Sie
dazu aufgefordert werden, ein neues vierstelliges Passwort
ein.
Notieren Sie sich ein neues Passwort an sicherer Stelle, weil es nicht auf
die Werkeinstellung zurückgesetzt werden kann.
RATING: Elternkontrolle. Hier stellen Sie die Freigabeklasse für DVDs
ein. Klasse 1: auch für kleine Kinder geeignet; Klasse 8: nur
für Erwachsene.
DEFAULT: Rücksetzen aller Einstellungen auf die Werkseinstellungen.
Ein neues Passwort und die Freigabeklasse bleiben erhalten.
LANGUAGE SETUP: Sprachmenü
OSD LANGUAGE:Die Sprache des DVD-Menüs und der anderen Bildschir-
meinblendungen.
AUDIO LANG.: Voreinstellung für die gesprochene Sprache auf der DVD,
sofern auf der DVD verfügbar.
SUBTITLE LANG.:Voreinstellung für die Untertitelsprache auf der DVD, so-
fern auf der DVD verfügbar.
MENU LANG.: Voreinstellung für die Menüsprache auf der DVD, sofern
auf der DVD verfügbar.
DE
AUDIO SETUP: Audioeinstellungen
AUDIO OUT: SPDIF OFF: Der koaxiale digitale Ausgang ist nicht akti-
viert.
SPDIF RAW: Zur Ausgabe eines digitalen 2.0-Kanal-Datenstroms.
SPDIF PCM: Standardformat zur Ausgabe eines Stereoformats.
KEY: Bässe (B, -4, -2) oder Höhen verstärken (+2, +4, #).
DE-43
Page 44

82339 DVD-Autoradio DE Content.book Seite 44 Mittwoch, 29. April 2009 8:41 08
DIGITAL SETUP: Digitaleinstellungen
OP MODE: LINE OUT: Der Lautstärkeunterschiede werden angepasst.
RF REMOD: Der Ton wird in der Lautstärke unverändert
wiedergegeben.
DYNAMIC RANGE: Hier können Sie die Dynamik des Tons in (siehe OP
MODE) in einzelnen Stufen einstellen. OFF: Der Ton wird
in der Lautstärke unverändert wiedergegeben. FULL: Laute
Stellen werden leiser, leise Stellen lauter wiedergegeben.
DUAL MONO: Zweikanalton. STEREO: Stereo-Signal über linken und
rechten Lautsprecher. L-MONO: Linker Mono-Kanal über
linken Lautsprecher. R-MONO: Rechter Mono-Kanal über
rechten Lautsprecher. MIX-MONO: Linker und rechter
Mono-Ton über linken und rechten Lautsprecher.
DE-44
Page 45

82339 DVD-Autoradio DE Content.book Seite 45 Mittwoch, 29. April 2009 8:41 08
Wenn Störungen auftreten
PROBLEM MÖGLICHE URSACHE / ABHILFE
Das Gerät lässt sich nicht
einschalten.
Die CD wird nicht geladen oder ausgeworfen.
Kein Ton. Die Lautstärke steht auf Minimum.
Funktionstasten funktionieren nicht.
Die CD springt. Der Einbauwinkel übersteigt 30°.
Gerät am USB-Anschluss
funktioniert nicht.
Radio und/oder die automatische Senderspeicherung funktionieren nicht.
Senderspeicher funktioniert nicht.
DVD-spezifisch
Schlechtes Bild Wurde das richtige Farbformat (PAL/NTSC) gewählt?
Die Disk wird nicht abge-
spielt
Die Zündung ist nicht eingeschaltet.
Eine der Sicherungen ist defekt.
Es befindet sich bereits eine CD im Autoradio.
Die CD ist verkehrt herum eingelegt worden.
Die CD ist verschmutzt oder defekt.
Die Temperaturen im Auto sind zu hoch. Warten, bis
sich die Umgebungstemperatur normalisiert hat.
Kondensation. Das Autoradio ein paar Stunden aus-
schalten und es dann erneut versuchen.
Die Kabel sind nicht richtig angeschlossen.
Der eingebaute Microcomputer kann wegen Rau-
schens nicht funktionieren. Einen Reset durchführen
(in die Reset-Öffnung drücken).
Das Bedienteil sitzt nicht korrekt.
Die CD ist sehr schmutzig oder defekt.
Fehler bei selbstgebrannten CDs. Die selbstgebrannte
CD in einem anderen Abspielgerät überprüfen.
Der USB-Anschluss ist für Geräte, die nach der USB-
Norm funktionieren, bestimmt. Nicht alle am Markt
erhältliche Gerät erfüllen diese Norm. Unter Umständen ist ein Gerät, das nicht nach USB-Norm funktioniert, angeschlossen.
Das Antennenkabel ist nicht korrekt angeschlossen.
Die Sendersignale sind zu schwach. Die Sender
manuell einstellen.
Das Kabel für Dauerplus (gelb) ist nicht richtig ange-
schlossen. Beachten Sie hierzu das Kapitel “Einbau”,
Seite 12.
Hat die DVD den Ländercode 2 oder 0?
DE
DE-45
Page 46

82339 DVD-Autoradio DE Content.book Seite 46 Mittwoch, 29. April 2009 8:41 08
Technische Daten
Allgemein
Betriebsspannung: DC12 V, Negative Masseverbindung
Gerät-Abmessungen: 180 x 175 x 55 mm (B x T x H)
TFT-LCD-Display: 3,5 Zoll (960 x 240 Pixel)
Ausgangsleistung: max. 4 x 15 Watt (RMS)
Sicherungen: 15 Ampère (blau)
Radio
UKW (FM): 87,5 bis 108 MHz
Mittelwelle (MW): 522 bis 1620 kHz
CD/MP3-Player
Laserleistung: Laser Klasse 1
Frequenzbereich: 40 Hz - 18 kHz
MPEG-Rate: 64 - 320 k
MP3-Playback: ISO 9660 & Joliet Format of MP3
Anschluss
AV IN: 3,5 mm Klinkenstecker
Unterstützte Formate
CD: Audio-CDs, CD-Rs,
CD-RWs
DVD, Video-CD: MPEG4, DVD+R, DVD-RW,
DVD-R, DVD-RW, JPEG
USB-Datenträger: 1.1 und 2.0 bis 8 GB (getestet)
Speicherkarten: SD bis 1 GB
MMC bis 512 MB
SDHC bis 16 GB (getestet)
Es gibt heute viele, zum Teil nicht standardisierte CD-Aufnahme- und
Kopierschutzverfahren sowie unterschiedliche CD-R und CD-RW-Rohlinge.
Darum kann es in Einzelfällen zu Einlesefehlern oder -Verzögerungen
kommen. Dies ist kein Defekt des Geräts.
Dieses Gerät ist zugelassen nach der Richtlinie 2004/104/EG
(zuletzt geändert durch die Richtlinie 2006/28/EG) -
"Elektromagnetische Verträglichkeit" (sog. E-Zulassung).
Technische Änderungen vorbehalten!
DE-46
Page 47

82339 DVD-Autoradio DE Content.book Seite 47 Mittwoch, 29. April 2009 8:41 08
Entsorgungshinweise
Verpackung
Nicht mehr benötigte Verpackungen und Packhilfsmittel sind recyclingfähig und sollten grundsätzlich der Wiederverwertung zugeführt
werden.
Gerät
Werfen Sie das Autoradio am Ende seiner Lebenszeit keinesfalls in den
normalen Hausmüll. Erkundigen Sie sichnach Möglichkeiten einer
umwelt- und sachgerechten Entsorgung.
Batterien
Verbrauchte Batterien gehören nicht in den Hausmüll. Die Batterien
müssen bei einer Sammelstelle für Altbatterien abgegeben werden.
DE
DE-47
Page 48

82339 DVD-Autoradio DE Content.book Seite 48 Mittwoch, 29. April 2009 8:41 08
Page 49

82339 DVD-Autoradio DE Content.book Seite 1 Mittwoch, 29. April 2009 8:41 08
Content
Overview . . . . . . . . . . . . . . . . . . . . . . . . . . . . . . . . . . 3
Control panel . . . . . . . . . . . . . . . . . . . . . . . . . . . . . . . . . . . 3
Behind the control panel . . . . . . . . . . . . . . . . . . . . . . . . . . . 4
Remote control . . . . . . . . . . . . . . . . . . . . . . . . . . . . . . . . . . 5
Operating the remote control . . . . . . . . . . . . . . . . . . . . . . . . 7
Safety instructions . . . . . . . . . . . . . . . . . . . . . . . . . . . . 8
Keep electrical equipment out of the reach of children . . . . . . 8
Road safety . . . . . . . . . . . . . . . . . . . . . . . . . . . . . . . . . . . . 8
Installation . . . . . . . . . . . . . . . . . . . . . . . . . . . . . . . . . . . . 8
Never carry out repairs on your own . . . . . . . . . . . . . . . . . . . 9
Sunlight . . . . . . . . . . . . . . . . . . . . . . . . . . . . . . . . . . . . . . 9
CD/DVD player . . . . . . . . . . . . . . . . . . . . . . . . . . . . . . . . . . . 9
Drives and connections . . . . . . . . . . . . . . . . . . . . . . . . . . . . 9
Handling the batteries . . . . . . . . . . . . . . . . . . . . . . . . . . . . 9
Cleaning the device . . . . . . . . . . . . . . . . . . . . . . . . . . . . . . 10
Included in the box . . . . . . . . . . . . . . . . . . . . . . . . . . .11
Installation . . . . . . . . . . . . . . . . . . . . . . . . . . . . . . . . .12
Installation instructions . . . . . . . . . . . . . . . . . . . . . . . . . . . 12
ISO installation slot and connections . . . . . . . . . . . . . . . . . . 13
Fit the installation frame . . . . . . . . . . . . . . . . . . . . . . . . . . 13
Connections at the rear . . . . . . . . . . . . . . . . . . . . . . . . . . . 15
Inserting the car radio . . . . . . . . . . . . . . . . . . . . . . . . . . . . 18
Control panel . . . . . . . . . . . . . . . . . . . . . . . . . . . . . . . . . . 18
Reset . . . . . . . . . . . . . . . . . . . . . . . . . . . . . . . . . . . . . . . . 19
Removing the unit . . . . . . . . . . . . . . . . . . . . . . . . . . . . . . 19
Explanation for cable use . . . . . . . . . . . . . . . . . . . . . . . . . . 20
EN
General functions . . . . . . . . . . . . . . . . . . . . . . . . . . . .23
Time . . . . . . . . . . . . . . . . . . . . . . . . . . . . . . . . . . . . . . . . 23
Switching on/off . . . . . . . . . . . . . . . . . . . . . . . . . . . . . . . . 23
Volume . . . . . . . . . . . . . . . . . . . . . . . . . . . . . . . . . . . . . . 23
Operation mode . . . . . . . . . . . . . . . . . . . . . . . . . . . . . . . . 23
EN-1
Page 50

82339 DVD-Autoradio DE Content.book Seite 2 Mittwoch, 29. April 2009 8:41 08
Basic settings for the menu . . . . . . . . . . . . . . . . . . . . . . . . 24
Radio operation: basic functions . . . . . . . . . . . . . . . . . .26
Select the band . . . . . . . . . . . . . . . . . . . . . . . . . . . . . . . . . 26
Searching for a station . . . . . . . . . . . . . . . . . . . . . . . . . . . . 26
Save stations . . . . . . . . . . . . . . . . . . . . . . . . . . . . . . . . . . 27
Selecting stations . . . . . . . . . . . . . . . . . . . . . . . . . . . . . . . 28
Radio mode: Radio Data System . . . . . . . . . . . . . . . . . . 29
Alternative frequencies (AF button) . . . . . . . . . . . . . . . . . . . 29
TA – Traffic announcement . . . . . . . . . . . . . . . . . . . . . . . . . 30
PTY functions . . . . . . . . . . . . . . . . . . . . . . . . . . . . . . . . . . 31
Operation with data media (DVDs, Audio CDs, MP3, USB,
SD/MMC and AV IN) . . . . . . . . . . . . . . . . . . . . . . . . . . . . 33
The CD/DVD drive . . . . . . . . . . . . . . . . . . . . . . . . . . . . . . . . 33
The USB connection . . . . . . . . . . . . . . . . . . . . . . . . . . . . . . 35
The SD/MMC card reader device . . . . . . . . . . . . . . . . . . . . . . 35
The AV IN connection . . . . . . . . . . . . . . . . . . . . . . . . . . . . . 35
DVD operation . . . . . . . . . . . . . . . . . . . . . . . . . . . . . . . . . . 36
Playback functions . . . . . . . . . . . . . . . . . . . . . . . . . . . . . . 36
Calling up playback information . . . . . . . . . . . . . . . . . . . . . 41
The DVD setup . . . . . . . . . . . . . . . . . . . . . . . . . . . . . . . . . . 42
Troubleshooting . . . . . . . . . . . . . . . . . . . . . . . . . . . . . 44
Technical data . . . . . . . . . . . . . . . . . . . . . . . . . . . . . . 45
Disposal information . . . . . . . . . . . . . . . . . . . . . . . . . . 46
EN-2
Page 51

82339 DVD-Autoradio DE Content.book Seite 3 Mittwoch, 29. April 2009 8:41 08
Overview
Control panel
1. : Press and hold for a few seconds to turn device off (the device can be turned on with any button except and ); MODE: Press repeatedly to select operation mode.
2. : When pressing this button, the control panel slides out electronically and the disc slot becomes visible. If a disc was inserted, it will now be ejected.
3. BAND: In radio mode: Press BAND repeatedly to select the radio frequency: FM 1, FM2, FM3, AM1, AM2
4. : Release control panel
5. VOL–/VOL+: Increase (
6. AS/PS: Press and hold for 2 more seconds: the radio will search for six stations and store them into the preset memory 1-6
7. MENU : Opening the settings menu of the car radio
8. Display and TFT screen
9. IR: Infrared sensor for the remote control
10. : USB connection
11. AV IN: Connect another audio or video device with phone jack
12. : Tune up; track up; press and hold for fast forward
13. RPT : Repeat function with media
14. : Pause and start playback with media
) and decrease () volume
EN
EN-3
Page 52

82339 DVD-Autoradio DE Content.book Seite 4 Mittwoch, 29. April 2009 8:41 08
15. : Tune down; track down; press and hold for fast reverse
16. PTY: Find station with certain programme type LOC: Press and hold to switch between local (LOC) and remote (DX) station (see page 27).
17. AF ("Alternative Frequency") / REG: Press briefly to turn the AF mode on and off; press and hold to turn the regional mode within the AF mode on and off; see page 29
18. TA : Active traffic announcement (see page 30); ST: Switch between stereo and mono
Behind the control panel
1. Contacts
2. CD-/DVD compartment (only visible with electrically opened control
panel – – button)
3. Red LED as anti-theft function
4. RESET opening: reset to factory settings
5. SD/MMC slot (card reader)
EN-4
Page 53

82339 DVD-Autoradio DE Content.book Seite 5 Mittwoch, 29. April 2009 8:41 08
Remote control
1. : Turn the device on and off
2. DISP: Display information for
the current operation mode
3. MODE: Press repeatedly to
select operation mode
4. : Eject disc (not in DVD mode); SLOW: Slow motion (DVD)
5. SUB-T: Subtitle (DVD)
6. AUDIO: Audio selection (DVD)
7. ANGLE: Camera angle (DVD)
8. MUTE: Mute the sound
9. VOL+ / –: Increase or decrease
volume;
in menus: set a value
10. MENU: Open the car radio setup
11.
: Fast reverse, fast forward
(with media)
12.
: Stop playback
13. GOTO: Go to a defined point on a disc; AS/PS: Search and store in preset memory
14. PROG: Title programming; LO/DX: Switch between local (LOC) and remote (DX) stations (see page 27).
15. RDM: Random playback (with media); MO/ST: Switch between stereo and mono reception in FM radio mode
16. 0: Number key 0;
BAND: Select frequency band in radio mode
AM2
)
17. 9: Number key 9; PTY ("Programme Type"): Find stations with specific programme contents
(
FM 1, FM2, FM3, AM1,
EN
EN-5
Page 54

82339 DVD-Autoradio DE Content.book Seite 6 Mittwoch, 29. April 2009 8:41 08
18. 8: Number key 8;
AF ("Alternative Frequency") / REG: Press briefly to turn the AF mode on
and off; press and hold to turn the regional mode within the AF mode on
and off; see page 29
19. 7: Number key 7; TA : Activate traffic announcement (see page 30);
20. Number keys 1 - 6: Memory station keys for stored radio stations
21.
: Playback start and pause
22. TITLE: Open title menu (DVD): PBC: Playback Control (Video CDs 2.0)
23.
/ TRK TUN –/+: : Station search backward/forward; skip title
backward and forward; press and hold for fast reverse/forward
24. SETUP: Open DVD setup menu
25. Arrow keys
: Navigate in a menu
26. ENTER: Confirm selection
27. ZOOM: Enlarge/reduce picture (DVD)
28. A-B: Repeat a defined sequence (DVD)
29. RPT : Repeat function (with media)
EN-6
Page 55
82339 DVD-Autoradio DE Content.book Seite 7 Mittwoch, 29. April 2009 8:41 08
Operating the remote control
The remote control is supplied with a lithium battery cell (CR 2025, 3 V).
Plastic film was placed between the contacts as transport protection.
` Push the clip (1) a bit to the inside.
` Pull out the battery compartment (2).
` For first-time use: Remove the film.
` Changing the battery: Take out the old battery cell and insert a new one in
the compartment. The battery is under the holding clips and the side with
the lettering is pointing up (3).
` Slide the battery compartment shut (4).
EN
EN-7
Page 56

82339 DVD-Autoradio DE Content.book Seite 8 Mittwoch, 29. April 2009 8:41 08
Safety instructions
About these instructions
Please read these instructions carefully before using the device.
Note the warnings on the device and in the operating
instructions.
Store the operating instructions in the car. If you sell
car radio away, please ensure that you also pass on these
instructions.
Keep electrical equipment out of the reach of children
The appliance is not intended for use by young children or infirm persons
without supervision.
Young children should be supervised to ensure that they do not play with the
appliance.
or give the
Road safety
Road safety should be your top priority. Use your car radio only
in suitable traffic conditions. Please ensure that you are familiar
with the radio before setting off.
You should always be able to hear police, fire and other
emergency service sirens immediately while you are in your
vehicle. For this reason, please play your radio at an appropriate
volume while driving.
You may only operate the video display of the DVD car radio
when the vehicle is standing still. That is why the hand brake
cable at the ISO block must be connected to the hand brake
system of the vehicle (see “Connect the hand brake cable” on
page 16).
Installation
If you wish to install the car radio yourself, make sure to read the mounting
and installation instructions in this manual.
EN-8
Page 57

82339 DVD-Autoradio DE Content.book Seite 9 Mittwoch, 29. April 2009 8:41 08
We recommend that you have this product installed by a qualified installer.
The supplier will not be liable for any damages caused to this product or to
other devices in the car as a result of incorrect installation
Never carry out repairs on your own
Check the cable and the device for signs of damage before the
installation. Do not use the device if the casing or the cable is
damaged
Under no circumstances should you attempt to open and/or
repair this unit on your own. Risk of electric shock. If there is a
fault, contact our Service Centre or another appropriate
professional repair shop.
Sunlight
If the inside of the vehicle, e. g. longer period of sunlight, has become rather
heated, do not operate the car radio immediately.
Wait until you have driven a while and the car radio has had a chance to cool
down.
EN
CD/DVD player
The CD player is a Class 1 laser product. The device has a
safety system that prevents dangerous laser rays from
esc aping fro m the d evice during nor mal u se. In orde r to av oid
injury to the eyes, never interfere with or damage the unit's
security system.
Drives and connections
Never place any foreign objects into the openings of the car radio (disc
compartment, USB jack, card slot, AV IN connection). Otherwise you might
damage the slots and connections.
Handling the batteries
Batteries may contain combustible materials. If misused, this may cause
battery leakage, heat, explosion or ignition, which will cause injuries or
damage to the device.
Please observe strictly the following matters:
Keep children away from batteries.
If by any chance the batteries are swallowed, consult a doctor immediately.
EN-9
Page 58

82339 DVD-Autoradio DE Content.book Seite 10 Mittwoch, 29. April 2009 8:41 08
Do not charge batteries (except rechargeable batteries).
Do not reverse the positive (+) and negative (–) terminals to avoid a short-
circuit.
Do not forcibly discharge batteries.
Do not short-circuit batteries.
Do not heat or dispose of in fire.
Do not disassemble or deform the batteries.
Your hands and fingers may be injured, or the liquid of the battery may get
into your eyes or adhere to your skin. If this happens, rinse with a large
quantity of water immediately and consult a doctor.
Do n ot expose ba tteries to strong impac t such as droppin g or throwin g the
batteries.
Check that the contacts in the device and on the batteries are clean before
inserting the batteries; otherwise clean as necessary.
Promptly remove used batteries from the device.
Insulate the terminal parts with tape or similar when storing or disposing
of the batteries.
Cleaning the device
Use a soft, dry cloth to clean the device. Avoid the use of chemical solutions
and cleaning products, because these may damage the unit's surface and/or
the labels on it.
The device must not get wet. Do not touch the device with wet
or moist hands. Risk of electric shock!
EN-10
Page 59

82339 DVD-Autoradio DE Content.book Seite 11 Mittwoch, 29. April 2009 8:41 08
Included in the box
Please check that the contents listed below are supplied with your package
and notify us within 14 days of purchase if this is not the case.
The following are included in the delivery pack:
DVD car radio
Control panel
Remote control incl. batteries
USB adaptor cable
ISO connector with blank wires
Control panel case
Mounting frame (clipped on)
2 fitting wrenches for pulling off the
mounting frame and pulling out the car
radio once it is fitted
Further attachment material for individual
installation
This manual
Warranty card
EN
EN-11
Page 60

82339 DVD-Autoradio DE Content.book Seite 12 Mittwoch, 29. April 2009 8:41 08
Installation
Installation instructions
Before the installation, disconnect the car battery! Risk of short-circuit
and electric shock!
The hand brake cable and the cable for the rear view camera (see
page 16) may only be connected by specialists. Have this installation
performed by an authorised workshop if you do not have the necessary
skills!
` Check if the terminal assignment of your vehicle matches the assignment
at the car radio (see "ISO block assignment", pg. 13).
` Do not install the cables under tension, not across sharp edges or close to
parts that could become heated. Make sure you do not kink the cables or
twist them.
` Insert the device into the proper slot or choose an installation location that
will not affect the driver's normal ability to drive.
` Connect the cable shortly before finally installing the device. Ensure it has
been connected correctly and that the system is working properly.
` If changes have to be made to the vehicle, consult your vehicle dealer/
specialist garage.
` Make sure that device is installed in such a way that injuries cannot occur
due to heavy braking.
` If the device is installed at an angle of over 30°
off the horizontal, this may reduce its optimal
output capacity.
` Avoid installing the device near strong heat
(e.g. direct sunlight or heated air), dust, dirt or
strong vibrations. This can damage the device.
` You must follow these instructions precisely
during the assembly. Before reconnecting the car battery, check all of the
connections.
Maximum installation angle
EN-12
Page 61

82339 DVD-Autoradio DE Content.book Seite 13 Mittwoch, 29. April 2009 8:41 08
ISO installation slot and connections
The car radio is designed to be fitted
in a standard ISO installation slot. The
dimensions of this slot are 182 mm x
53 mm.
The ISO installation slot is normally equipped with two ISO plugs and an
antenna plug.
If your vehicle has no ISO installation slot, or is not equipped with the
connections, you may use the supplied cable sockets. Please consult a
specialist garage, dealer, or the specialist department of a large store.
Fit the installation frame
` Before installation, always use a Phillips
head screwdriver to remove the two
transport safety screws in the top part of
the radio casing (marked with yellow
flags)!
EN
The car radio is delivered with the installation
frame fitted over it. First remove the
mounting frame from the car radio casing.
` To do so, push down the two clips at the
sides of the car radio (1) and push the
mounting frame off the radio from the rear
(2).
EN-13
Page 62
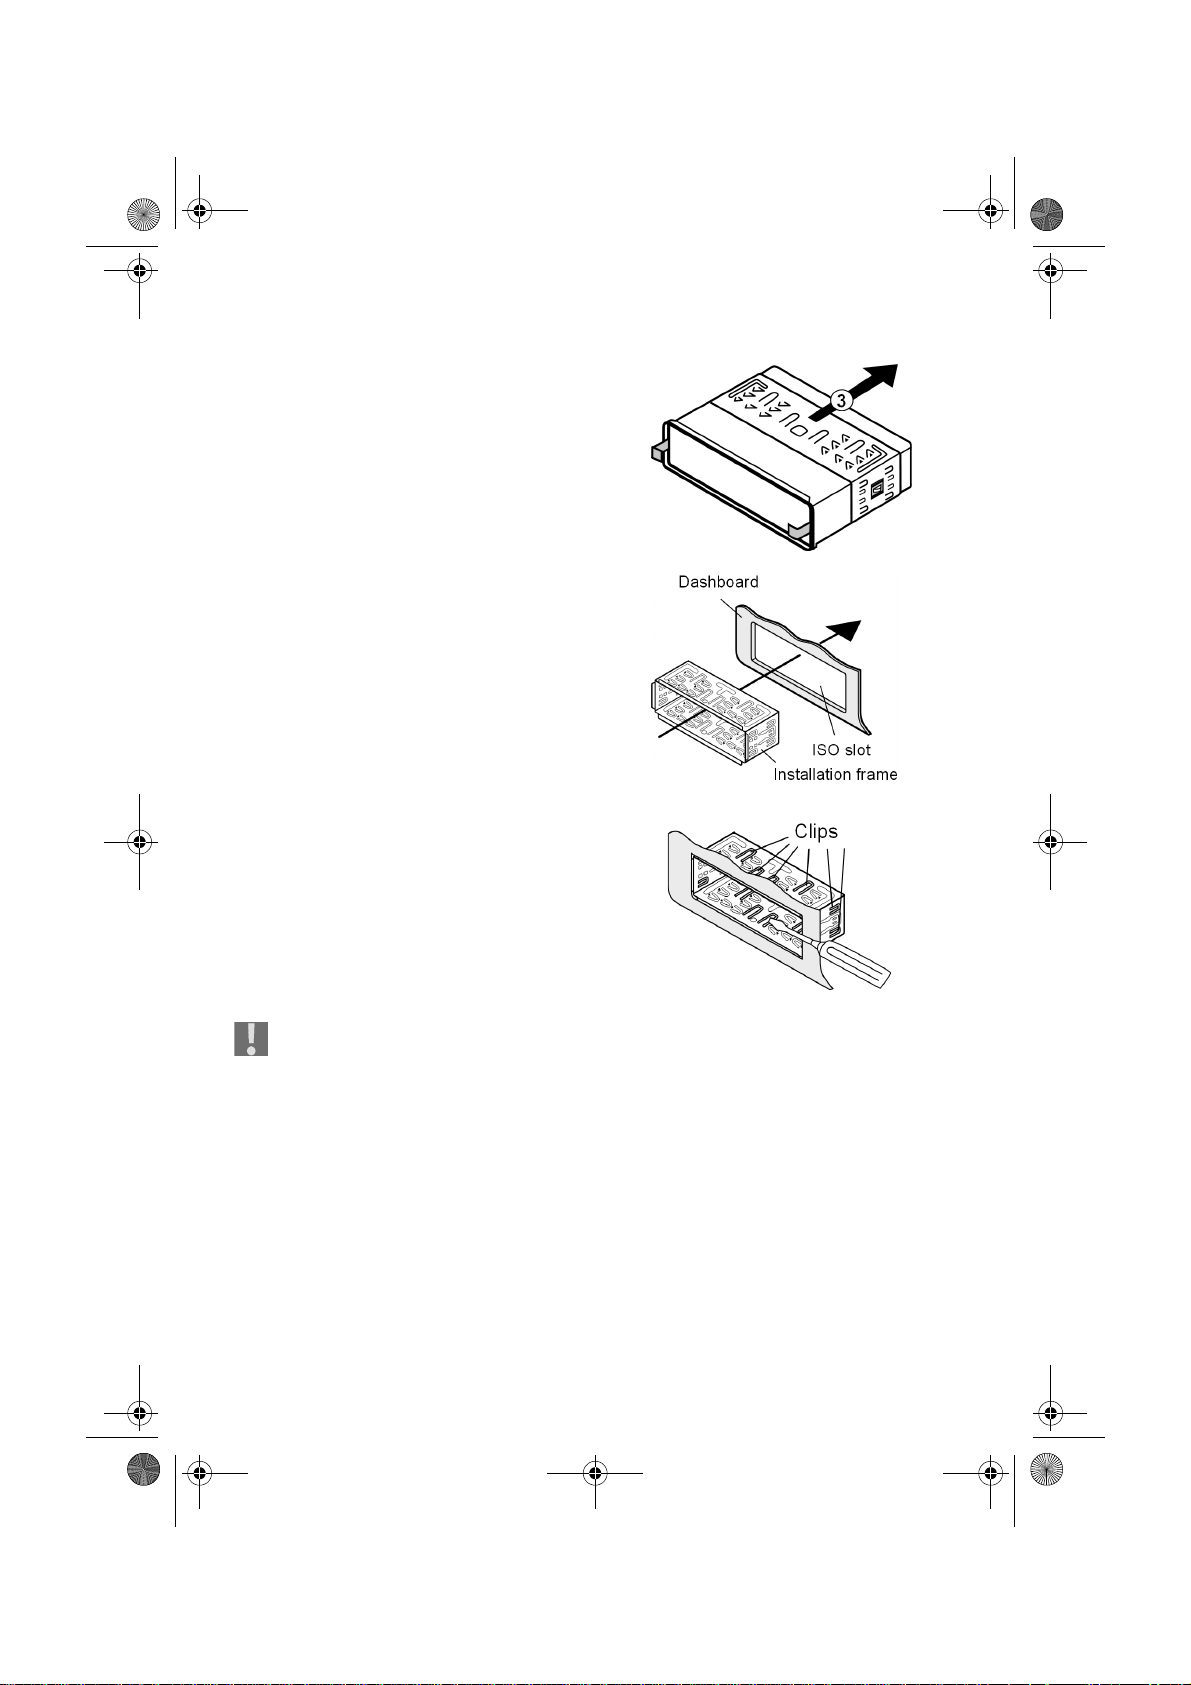
82339 DVD-Autoradio DE Content.book Seite 14 Mittwoch, 29. April 2009 8:41 08
` Then use the key to slide the installation
frame over the device towards the rear (3).
` Insert the mounting frame in the ISO
installation slot.
` To fix the mounting frame in the
installation slot, use a screwdriver to bend
down as many clips as possible. Choose
the clips which fit tightly against the
installation slot casing.
Next, make sure the frame fits tightly. The frame must be tightly fitted
to prevent it from coming loose if the driver brakes sharply.
EN-14
Page 63
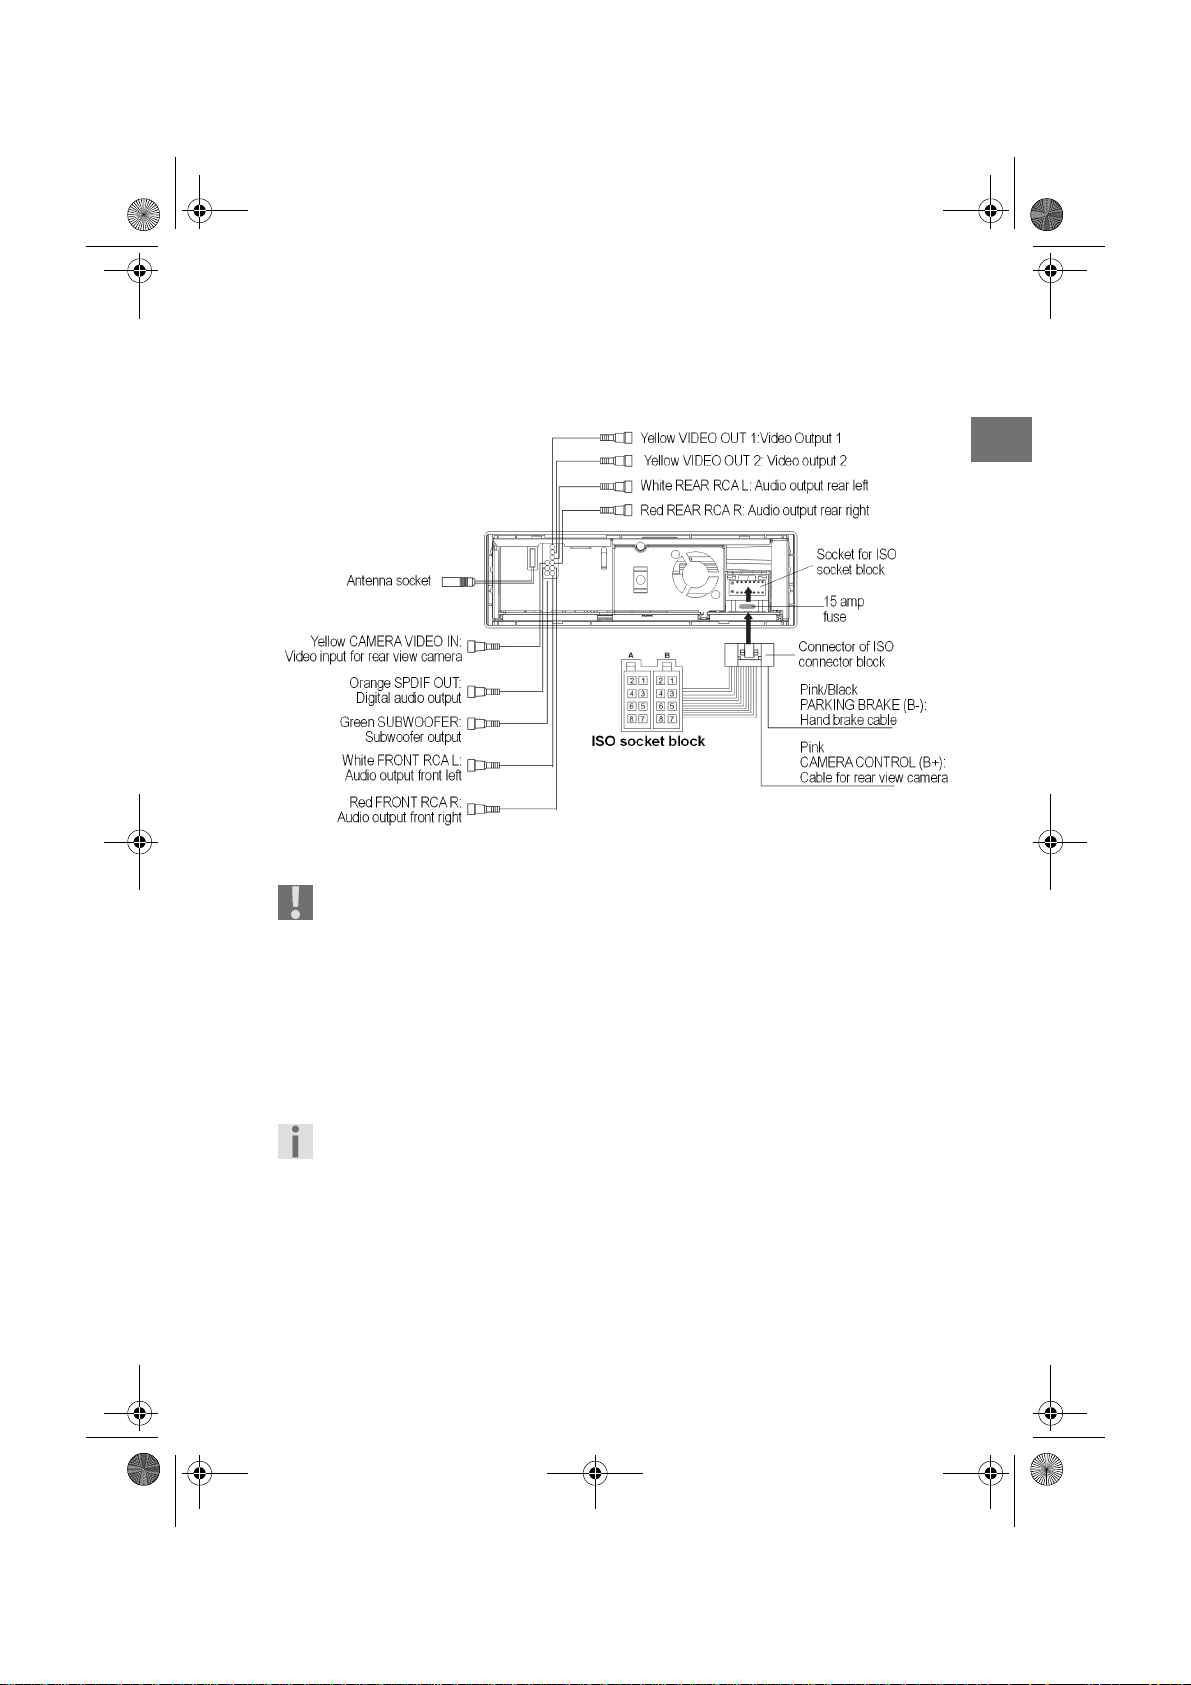
82339 DVD-Autoradio DE Content.book Seite 15 Mittwoch, 29. April 2009 8:41 08
Connections at the rear
Overview of the connections at the rear:
EN
Prepare the cable connections
Do not remove the flags from the cables. These are required for the
correct connection.
` Pull out the connections in your car ISO slot far enough for you to join
them to the ones from the car radio
.
Connect the cables
Please use the car radio ISO block for installation. Never disconnect the ISO
block - If your car ISO plugs do not fit the car radio ISO sockets, you can buy
suitable adapters in specialist garages, from dealers and the specialist
departments of large stores.
Secure, proper electrical connections are provided by both car ISO
plugs (for the loudspeakers and the power connections). In case you
still wish to lay the cables yourself, we explain in detail the uses of the
cables at the end of this chapter.
1. Connect the connector of the ISO socket block to the socket for the ISO socket block at the rear of the car radio.
2. Connect the both vehicle ISO plugs (one ISO plug for ISO Block A and one for ISO-Block B) to the car radio ISO block.
EN-15
Page 64

82339 DVD-Autoradio DE Content.book Seite 16 Mittwoch, 29. April 2009 8:41 08
3. Connect the vehicle antenna plug to the radio antenna socket.
4. Connect the cable with the coloured sockets to the appropriate
connectors in the car according to the identification (also refer to the
following chapter).
If you use an external amplifier, you can connect it to the red/white RCA
audio sockets. Please also refer to your instructions for the amplifier.
Connect the hand brake cable
The DVD player may only be operated when the vehicle is standing and the
hand brake is activated. For this purpose, the pink-black hand brake cable
must be connected to the hand brake.
Schematic diagram of connection –
may only be performed by specialists:
1. Pink-black hand brake cable "PARKING BRAKE (B–)" to car radio
2. Hand brake
3. Hand brake switch for hand brake display in dashboard
4. Terminal to connect the pink-black cable
5. Hand brake display to dashboard
6. Car battery
7. Car body
8. Existing earthing cable (connected to car body)
Connect rear view camera cable
If your vehicle is equipped with a rear view camera, you can transfer the
image of this camera while in reverse to the display of the car radio. To do so,
connect the pink rear view camera cable:
EN-16
Page 65

82339 DVD-Autoradio DE Content.book Seite 17 Mittwoch, 29. April 2009 8:41 08
Schematic diagram of connection –
may only be performed by specialists:
1. Pink rear view camera cable "CAMERA CONTROL (B+)" to car radio
2. Terminal to connect the pink cable
3. Existing reversing light cable
Test station memory
The standard arrangement for the standard plus and permanent plus cables
in some vehicle models has been switched in the factory (see“Arrangement of
the ISO block” on page 22). This may cause the station memory not to work.
Before you finally install the car radio, try the following to find out if you
stored the stations.
` Reconnect the car battery.
` Turn on the ignition.
` Switch on the radio.
` Go through the automatic station saving process, holding down the AS/PS
button for approx. two seconds (see also“Automatic saving” on page 27).
` Switch off the radio.
` Switch on the ignition again and find out if the stations were been stored
(press the station buttons 1 to 6).
` If the stations were stored, you can install the radio.
` If the stations are no longer in the memory, you should use an adapter
(obtainable from the specialist store) or have the cable adapted in a
specialist garage. If this is the case, refer to Chapter “Explanation for cable
use” on page 20.
EN
EN-17
Page 66

82339 DVD-Autoradio DE Content.book Seite 18 Mittwoch, 29. April 2009 8:41 08
Inserting the car radio
` Push the car radio carefully into the slot until
it engages.
While pushing the radio in, be careful of how
you fit the cables; they should not be kinked,
crushed or stretched.
Control panel
Inserting the control panel
` First, place the right side of the control
unit into the frame.
` Then carefully press the left side until it
engages.
Make sure the control panel is positioned
properly and securely. If the control panel
is not fitted properly, error messages
appear in the display and/or several
buttons will not function properly.
Removing the control panel
` Press the button. The control panel will be
released and you can take it off.
Anti-theft protection
If the control unit has not been inserted in the frame,
the anti-theft LED on the unit will flash.
Contacts
Removing the control panel will expose the contacts at the
control panel and the radio.
Make sure the exposed contacts are not contaminated. The car radio
might not function properly afterwards.
For protection, always keep the control unit in its case.
EN-18
Page 67

82339 DVD-Autoradio DE Content.book Seite 19 Mittwoch, 29. April 2009 8:41 08
Reset
` To start radio operation, press the RESET button with the
point of a ballpoint pen or other sharp object.
` If the car radio shows a defect that cannot be remedied
through switching off and back on, press the cartridge of
a ballpoint pen or other sharp object in the RESET button
opening.
Removing the unit
` Remove the control unit.
` Pull out the frame.
` Insert the right and left keys in the
slots on the sides of the set. The
flaps will be folded back and you
can remove the set.
EN
EN-19
Page 68

82339 DVD-Autoradio DE Content.book Seite 20 Mittwoch, 29. April 2009 8:41 08
Explanation for cable use
The explanatory notes for cable use are intended for individual cable
fitting cases. Consult a specialist garage and pass on the information
contained in this chapter.
You do not need these explanatory notes when connecting the radio to your
vehicle ISO plugs.
Two ISO connectors with cables are supplied:
Connecter with electric cables for ISO socket block A
Connecter with loudspeaker cables for ISO socket block B
Overview ISO connector A: Power
Notes on fitting cables.
Memory back-up (yellow)
The yellow memory back-up cable must be connected to the permanent plus.
Otherwise the station memory will not work (see “Arrangement of the ISO
block” on page 22).
Antenna relay cable (blue)
The blue cable is available for a relay-controlled antenna. The relay
automatically extends the antenna when the radio is switched on. When it is
switched off, the antenna is retracted.
This relay cable can also be used to control an external amplifier. Please refer
to the amplifier operating instructions for the correct connections.
Never connect the blue cable to the engine cable; this could damage the
radio!
EN-20
Page 69

82339 DVD-Autoradio DE Content.book Seite 21 Mittwoch, 29. April 2009 8:41 08
Overview ISO connector B: Loudspeaker
EN
If the vehicle only has front loudspeakers and the cables for the rear
loudspeakers are not needed, you must professionally insulate the
exposed ends of these cables.
EN-21
Page 70

82339 DVD-Autoradio DE Content.book Seite 22 Mittwoch, 29. April 2009 8:41 08
Arrangement of the ISO block
BLOCK B – speakers BLOCK A – electricity supply
1right rear + 1
2right rear - 2
3right front + 3
4 right front - 4 Permanent plus
5 left front + 5 Car antenna (also for
6 left front - 6
7 left rear + 7 Switched plus (switched 12
8left rear - 8 Earth
(permanent 12 V supply
from main electrical
system)
external amplifiers, etc.)
V voltage, via ignition)
Problems due to switched cables
In some vehicle models, the standard arrangement of cables and in the ISO
block A are switched at the factory. If this is the case with your vehicle, certain
functions may be impaired: stations may not be stored properly, for example.
To solve this, reverse the red cable (switched plus) and the yellow cable
(permanent plus) in the ISO block. The specialist dealer has the appropriate
adapters for this.
EN-22
Page 71

82339 DVD-Autoradio DE Content.book Seite 23 Mittwoch, 29. April 2009 8:41 08
General functions
Do not switch on the radio for long periods of time when the motor
is switched off. This could cause the car battery to discharge and the
vehicle can no longer be started.
Time
Your car radio is equipped with an RDS controlled clock. This is set
automatically by the RDS station and keeps running even when the radio is
switched off.
You can also use the menu to manually set the clock (see below).
Switching on/off
` You can switch on the radio with any button except and .
` The radio will also be turned on when a disc or a card is inserted or an USB
stick is connected.
` Press and hold the button for a few seconds and the device will turn off.
Volume
` Press the buttons VOL(+) or VOL (–) to increase or decrease the
volume.
` Press MUTE to turn off the sound and turn it on again.
Always set the volume so that you can still clearly hear the sirens from
emergency vehicles!
EN
Operation mode
` Press the MODE button repeatedly to switch between radio reception, CD/
DVD operation, USB operation, memory card operation and AV IN
operation.
Note that media must be inserted or connected to make the mode accessible.
EN-23
Page 72

82339 DVD-Autoradio DE Content.book Seite 24 Mittwoch, 29. April 2009 8:41 08
RESET
` To reset the car radio to the factory settings, press the
RESET button, which is located behind the control
panel, with a pointed object such as a pen.
` Press RESET
- before first use, after connecting the cable,
- if not all function keys are working,
- when an error message appears in the display.
Basic settings for the menu
` Press MENU to open the setting menu for the car radio. You will find the
following screens:
` To select a menu entry, press on the main unit or the arrow keys
on the remote control.
` To confirm the selection and, if possible, open the subgenus, press MENU
on the main unit or ENTER on the remote control.
` To set a value, press
control.
` Press MODE to access the previous screen or press MODE on the main unit
or ZOOM on the remote control repeatedly to exit the settings menu.
EN-24
on the main unit or VOL+ /VOL– on the remote
Page 73

82339 DVD-Autoradio DE Content.book Seite 25 Mittwoch, 29. April 2009 8:41 08
AUDIO menu
VOLUME Adjust the basic volume of the device here. When
switched on, the radio will play at this volume level.
BASS
TREBLE
BALANCE L-R
FADER R.F
Basses
Trebles
Balance between the left and the right speakers.
Balance between the front and the rear speakers.
EQ Equalizer: FLAT and preadjustments for CLASSIC, ROCK,
POP
LOUD Loudness; emphasises high and low frequencies at a low
SUB.W
volume level
If a subwoofer is connected, you can now activate the
subwoofer here.
PICTURE menu
BRIGHT Brightness.
CONTRAST
COLOUR
TINT
DEFAULT
Contrast.
Colours.
Colour tints.
Set the picture menu to default settings.
EN
SETUP
This menu has the submenus SYSTEM and CLOCK.
SYSTEM: Clock settings
TIME Turn the time display on or off.
TIME.M
Time mode: 12-hour or 24-hour mode.
In 12 hour mode, "
AM" or "PM" will appear resp.
CLOCK: Set the clock
` Select the hours with . Set the hours with .
` Select the minutes with
. Set the minutes with .
EN-25
Page 74

82339 DVD-Autoradio DE Content.book Seite 26 Mittwoch, 29. April 2009 8:41 08
Radio operation: basic functions
In radio operation, the basic display will look similar to the following:
Select the band
` Press the BAND button to switch between FM (FM1, FM2, FM3), and AM
(AM1 and AM2). You can store six stations in each band.
The three bands FM1, FM2 and FM3 and the two band AM1 and AM2
each cover the same frequency width. This allows you to store up to 18
FM stations and up to 12 AM stations.
Searching for a station
Automatic search
` Briefly press the or scan buttons. The set will search for the next
station.
` To stop the search, press
Manual search
` Press and hold or scan buttons to start a manual station search. The
display shows MANU.
` Increase or decrease the value by briefly pressing
Stereo and Mono
FM stations are broadcast in stereo. If you have bad reception, it can
sometimes be improved by switching to MONO with the ST button.
EN-26
or again.
or .
Page 75

82339 DVD-Autoradio DE Content.book Seite 27 Mittwoch, 29. April 2009 8:41 08
Local searching mode
In the local searching mode (LOC), the automatic search will only find
stations with a strong signal. You thus avoid finding too many stations in an
area where many stations are broadcast.
` With the LOC (LO/DX) button, switch off the LOC mode (activate the DX
mode) to also find more remote stations.
Searching for an AF station
In AF mode, the radio in the VHF band automatically changes to a station with
an alternative frequency which transmits the same programme when the
reception of the initial frequency is too weak ("AF" = "Alternative frequency")
(also refer to the explanation “Alternative frequencies (AF button)” on
page 29).
` To turn on the AF mode, press AF once. The AF display will appear.
` In one of the three band ranges FM1, FM2 or FM3, then press the key
or
to find stations in the VHF band ranges that are broadcasting an AF
signal.
The search will stop each time a station is found.
` To deactivate the AF mode, press AF again. The display will blank out.
The AF mode is switched on in the delivered condition, or after a reset.
EN
Save stations
Manual saving
` After the search function has found a station, press and hold one of the 1-
6 station buttons for about two seconds.
The radio will switch back into automatic search mode after a few seconds.
Automatic saving
` Press and hold the AS/PS button for about two seconds. The current band
is scanned for the six strongest stations. The found stations are
automatically stored on the station buttons 1-6. The scan stops for five
seconds each time a station is found. The the station on station button 1
will be played.
` To stop the scan, press one of the station buttons 1 to 6.
EN-27
Page 76

82339 DVD-Autoradio DE Content.book Seite 28 Mittwoch, 29. April 2009 8:41 08
Selecting stations
Selecting individual stations
` Select the radio frequency by pressing BAND.
` You can open one of the stored stations by pressing one of the station
buttons 1-6.
Running through stored stations
You can call up the stored stations for the current transmission areas.
` Select the radio frequency by pressing BAND.
` Press AS/PS briefly. All stations are now played for approx.. 5 seconds.
` When you hear the station you require, briefly press AS/PS.
EN-28
Page 77
82339 DVD-Autoradio DE Content.book Seite 29 Mittwoch, 29. April 2009 8:41 08
Radio mode: Radio Data System
Radio Data System is a service provided by radio stations. In addition to
traditional music and voice services, they also broadcast additional
information in the form of encrypted digital signals that can be displayed by
the car radio. This information - like the station name or the title of the track
currently being played - is shown in the display.
If the station does not broadcast RDS signals, the frequency will appear
instead of the station name.
If the station that transmits RDS signals also provides traffic information, you
will see "TP" ("Traffic Program" = traffic programme) in the display.
Alternative frequencies (AF button)
One function of RDS is the AF function in the VHF band ("AF" = "Alternative
Frequencies"). In RDS mode, once you leave the range of one transmitting
station, you will be automatically switched to another frequency. The change
is only successful if the PI codes are identical (the PI code is the Programme
Identification which clearly identifies the programmes and transmitting
chains). This avoids switching to a frequency that is occupied by a different
programme.
` Briefly press the AF button to switch the AF functions for the Radio Data
System mode on or off. If the function is activated, you will see "AF" in the
display.
The AF indicator in the display flashes if no Radio Data System
information is available.
EN
EN-29
Page 78

82339 DVD-Autoradio DE Content.book Seite 30 Mittwoch, 29. April 2009 8:41 08
Regional programme mode
Some stations transmit regional programmes at certain times. In the regional
programme mode, the radio cannot switch to a frequency that is being
broadcast by another regional programme.
` To switch the regional programme mode on or off, hold down the AF
button for more than two seconds. "REG" appears in the display.
TA – Traffic announcement
„TA" ("Traffic Announcement") is the traffic announcement mode. If the
station transmits RDS signals and provides traffic announcement, the
activated TA function will immediately switch from other operating modes
(e. G. CD) to the radio when traffic announcements are being broadcast.
During traffic announcements, the volume level is increased if its was too low
before.
Stations that broadcast traffic announcements are identified by "TP" in the
display.
` Press the TA button to switch the TA function on or off. In the traffic
announcement mode you will see "TA" in the display when a station with
traffic announcement is available. „TA" will flash when no traffic
announcement station is available.
` During the traffic announcement, "TRAFFIC" is lit continuously.
` You can interrupt the radio if it switches from the CD/MP3 mode, the USB
mode or from a station without traffic announcement to a station with
traffic announcement. To do so, briefly press the TA button. The TA
function is now paused without the TA mode being switched off. The
display shows XXXXXXX.
` Press TA again to hide this display.
If the TA function is activated, you can only find or store stations that
broadcast a traffic announcement signal during the station search.
EN-30
Page 79

82339 DVD-Autoradio DE Content.book Seite 31 Mittwoch, 29. April 2009 8:41 08
PTY functions
"PTY" ("Program Type Code") is a function where the car radio specifically
searches for stations with a pre-set programme content. This is a service that
is being increasingly supported by the radio stations.
` To activate the PTY menu, press the PTY button. The following display will
appear:
EN
` Use keys
The station search will begin after a few seconds. The search stops when a
station is found; the device will return to its normal mode if no station is
found.
` Use any button to cancel the search.
or ( on the remote control) to search for PTY stations.
EN-31
Page 80

82339 DVD-Autoradio DE Content.book Seite 32 Mittwoch, 29. April 2009 8:41 08
The following programme types are possible:
NEWS
: news
AFFAIRS: Current events
INFO: Advise, information
SPORT: Sports events
EDUCATE: Education
DRAMA: Radio dramas
CULTURE: Culture
SCIENCE: Natural science and technology
VARIED: Miscellaneous
POP M: Pop music
ROCK M: Rock music
EASY M: Easy music
LIGHT M: Light classical music
CLASSICS: Classic
OTHER M: Other music
WEATHER: Weather
FINANCE: Finances, stock market
CHILDREN: Children's programmes
SOCIAL: Social events, activities.
RELIGION: Religion, ethnics
PHONE IN: Station with calling option
TRAVEL: Travelling
LEISURE: Recreational activities
JAZZ: Jazz
COUNTRY: Country music
NATION M: Music of other countries
OLDIES: Oldie music
FOLKS M: Folk music
DOCUMENT: News reports
TEST: Emergency test
ALARM: Disaster reports
Please note that this information depends on the region, the broadcaster and
the station.
EN-32
Page 81

82339 DVD-Autoradio DE Content.book Seite 33 Mittwoch, 29. April 2009 8:41 08
Operation with data media (DVDs, Audio CDs, MP3, USB, SD/MMC and AV IN)
The car radio has several drives and connections and can play back different
formats:
Drives and connections Data media and formats
CD/DVD drive For DVDs and video CDs. Only when car is
standing still. Playable formats: MPEG4, DVD+R,
DVD-RW, DVD-R, DVD-RW, JPEG disks.
DVDs you created yourself must be
finalised.
For commercial audio CDs and own CDs with
MP3 or WMA files. The CDs can also have a CD-R
and CD-RW format.
USB connection For USB flash drives* or MP3 players*
SD/MMC card reader For SD/MMC memory cards* with MP3 or WMA
files
AV IN connection To connect external audio devices, e. g. a CD
player, using a 3.5 mm jack plug
EN
* Compatibility with all MP3 players, USB
flash drives or memory cards currently
available on the market cannot be
guaranteed.
The playback functions of the different audio data media are mostly
identical and are described together in these instructions (see
page 36).
The CD/DVD drive
The disc drive is located behind the control panel.
Inserting and removing discs
` Press the button (Eject) on the main unit. The control panel will move
down.
` Insert the disc with the labelled side up
into the slot. The data will be read. The
display shows the start image and the
indicator READ.
EN-33
Page 82

82339 DVD-Autoradio DE Content.book Seite 34 Mittwoch, 29. April 2009 8:41 08
` Playback then begins.
You will see a display as depicted here:
` To remove the disc, press the button again on the main unit. The disc
will be ejected. The car radio will change back to radio mode.
` Close the control panel again by tapping on the button on the lowered
control panel.
The button on the remote control cannot be used as eject button in
the DVD mode. Use MODE to switch to a different mode if you want to
open the disc compartment with the remote control.
Do not drive with a CD protruding from the device.
Remove the CD immediately.
ESP Electric Shock Protection
The device is equipped with an anti-shock function. This function
compensates for vibrations, for instance, from a bumpy road and ensures
playback without interruption even if the player is moving around.. When
the player is switched on, the memory is automatically filled with data:
- with DVDs for 5 seconds;
- with audio CDs for 10 seconds;
- with MP3 CDs for 120 seconds;
- with WMA CDs for 150 seconds.
EN-34
Page 83

82339 DVD-Autoradio DE Content.book Seite 35 Mittwoch, 29. April 2009 8:41 08
The USB connection
You can connect an MP3 player or other data medium to the USB connection
to the front of the unit.
Connecting a USB device
` Connect your USB device (e. g. a USB flash drive or MP3 player) to the
connection. If necessary, use the supplied USB adapter cable for the mini
USB connection.
The car radio searches for MP3 or WMA files on the data medium and the
message USB appears in the display.
` If the device is in an other mode (radio, CD), you can select the USB
connection by pressing MODE .
` Search and playback functions for files on an external storage medium
work in the same way as for MP3 CDs.
Never remove the USB device while playing back data. First stop the
playback, or use MODE to switch to another operation.
The SD/MMC card reader device
The SD/MMC drive is located behind the control panel.
EN
Inserting and removing cards
` Press the button to release the control panel.
` Insert the memory card into the card slot with the contacts facing down
and the bevelled corner pointing to the right.
` Re-insert the control panel.
The car radio searches for MP3 or WMA files on the data medium and the
message SD/MMC appears in the display.
` If the device is in an other mode (radio, CD), you can select the USB
connection by pressing MODE .
The AV IN connection
You can connect another audio device, e. g. an MPEG4 player, with a 3.5 mm
jack plug to the AV IN socket of the car radio.
` If the device is in an other mode (radio, CD), you can select the USB
connection by pressing MODE . The message AV IN appears in the display.
` Control the playback at the connected device.
EN-35
Page 84

82339 DVD-Autoradio DE Content.book Seite 36 Mittwoch, 29. April 2009 8:41 08
DVD operation
Only operate video CDs when the car is standing still
and the hand brake is activated. If you insert a DVD and the hand
brake is off, you will see the following message in English:
"DISABLED WHILE DRIVING".
About DVDs
Video DVDs are divided into titles and chapters. A DVD may contain several
titles, which may in turn be made up of several chapters. Titles and chapters
are each numbered sequentially
With the DVD player in your car radio, you can play back DVDs with
regional code 2 (Europe) and 0 (suitable for every DVD player).
Starting the DVD
` Insert a DVD as described on page 33. Playback will start automatically.
` If necessary, use MODE to select DVD operation.
Playback functions
Many of the functions described here can only be activated using the
buttons on the remote control.
EN-36
Page 85
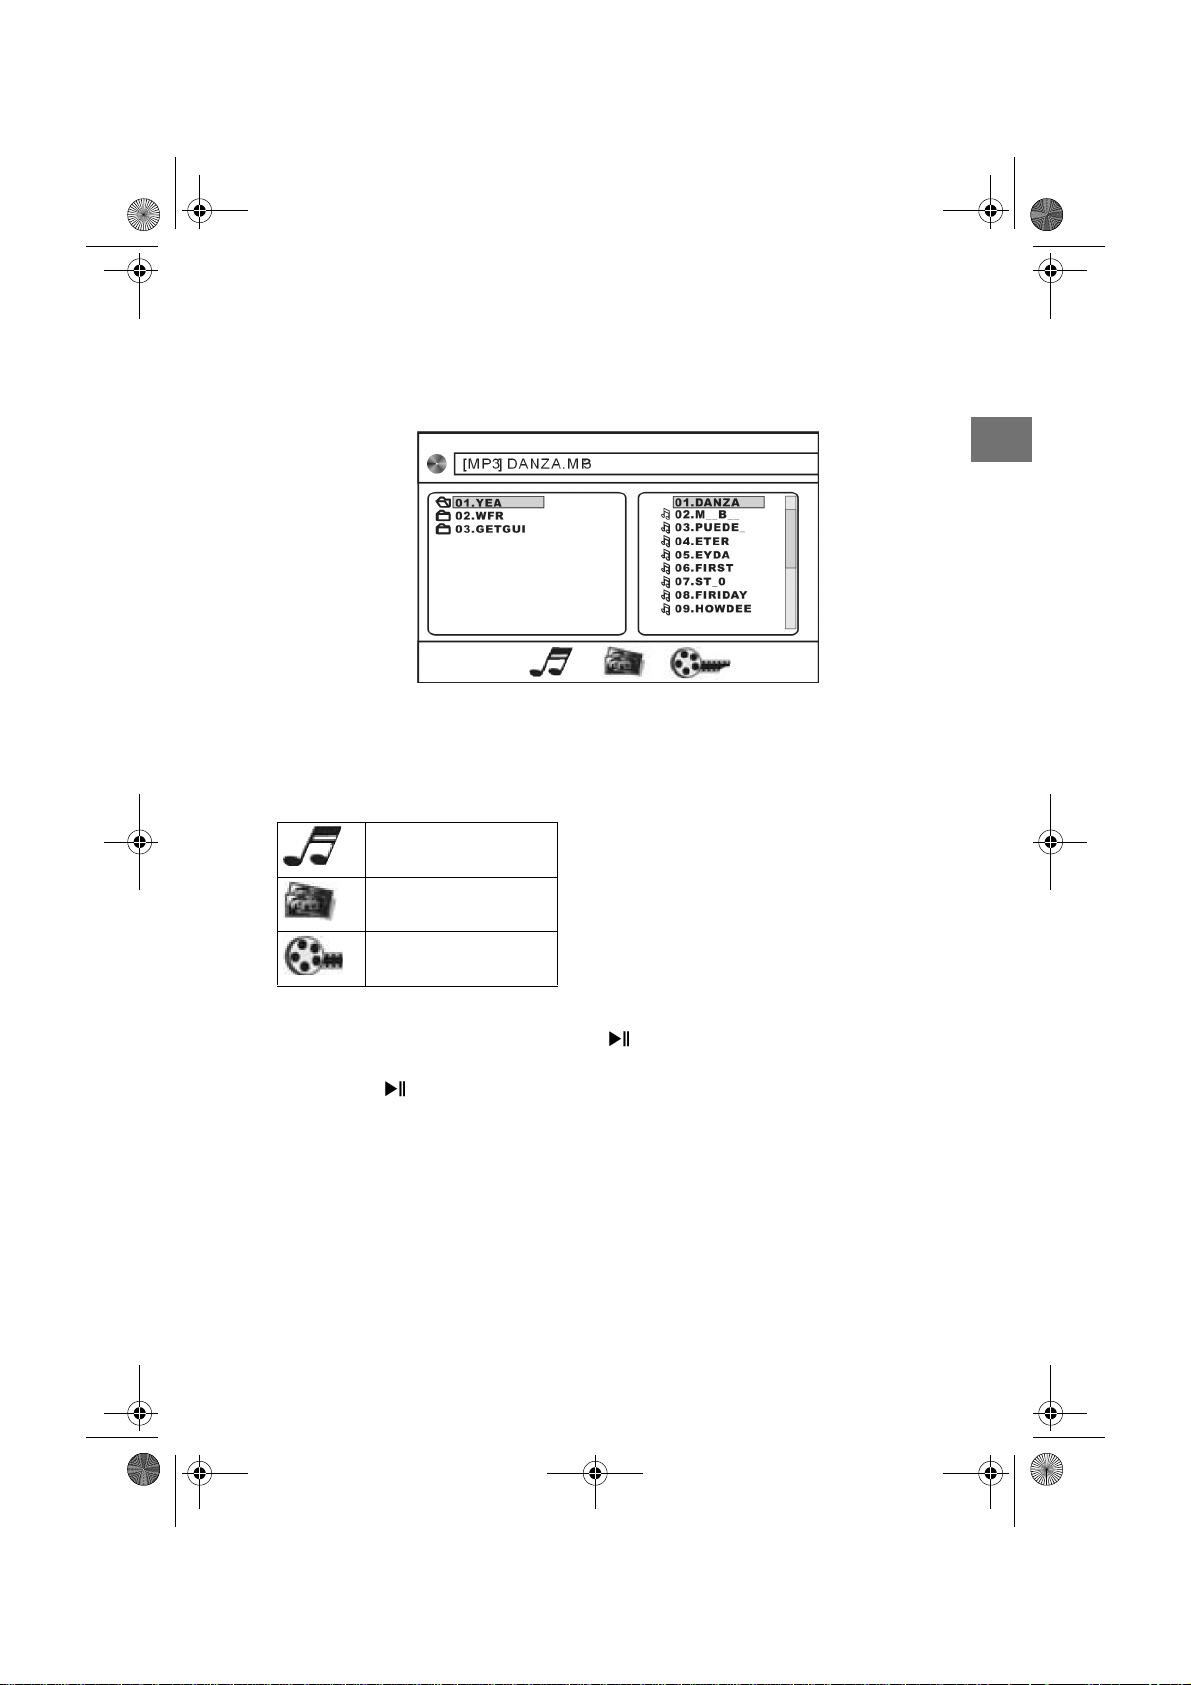
82339 DVD-Autoradio DE Content.book Seite 37 Mittwoch, 29. April 2009 8:41 08
MP3/WMA display
` Press the DISP button. You will see a display as shown here:
Folders appear on the left, and tracks on the right.
` Use the arrow keys to select a folder or a track and press ENTER to play
back the folder or the track.
EN
Displaying the file types
Audio files
JPEG: picture files
Video files
Pause and playback
` You can pause playback using the or button. During the pause,
"PAUSE" appears in the display.
` Press the button again to continue the playback.
` Press
twice to stop playback completely.
Skipping tracks
` Use or to select the next or previous track. The track number is shown
on the display.
Fast forward/rewind
` Press or repeatedly to increase fast forward in several increments: 2X
> 4X > 8X > 20X > normal playback.
EN-37
Page 86

82339 DVD-Autoradio DE Content.book Seite 38 Mittwoch, 29. April 2009 8:41 08
` Also use to return to normal playback.
Slow motion (DVD, VCD an d S V C D )
` Press the /SLOW button repeatedly to increase slow motion in several
increments: 1/2 > 1/3 > 1/4 > 1/5 > > 1/6 > 1/7.
In DVD mode, the disc cannot be ejected with the button on the
remote control. Switch to another operating type before ejecting the
disc.
` Use to return to normal playback.
Repeat (CD, MP3, VCD and SVCD)
` Press the RPT button once. REP 1 appears in the display. The current track
will then be repeated.
` Press the REP button twice.
REP DIR. appears in the display for MP3 data media. The current directory
will be repeated.
REP ALL appears for other data media. All tracks will be repeated.
` For MP3 data media, press the button a third time to repeat all tracks (REP
ALL).
` Pressing the button again will change the playback mode back to normal.
Repeat (DVD)
` Press RPT repeatedly to choose between the following repeats:
REP CHAPTER (repeat chapter) > REP TITLE (repeat title) > REP OFF (no
repeat).
Repeat A-B (DVD)
Use this function to repeat a section you chose yourself.
` Press A-B to establish the beginning of the section.
` Press A-B again to establish the end of the section. The section will be
repeated endlessly.
` Press A-B one more time to return to normal playback.
Random track playback
` Press the RDM button. This starts playback in random order.
` Pressing the button again will change the playback mode back to normal.
Language selection/subtitle selection (DVD)
If the DVD has several languages or subtitles, you can use the AUDIO button
to choose another language, and the SUB-T button to choose another
subtitle language.
EN-38
Page 87

82339 DVD-Autoradio DE Content.book Seite 39 Mittwoch, 29. April 2009 8:41 08
Please note that it depends on the DVD whether these functions are possible
or not. You might have to change the language using LANGUAGE SETUP
(page 43).
Audio function (VCDs/S-VDSs)
Some video CDs or super video CDs have several audio channels. You can use
the AUDIO button to choose the channels here:
STEREO > MONO L (only left channel) > MONO R (only right channel).
Camera perspectives (DVD)
Some DVDs have scenes that were filmed from several different perspectives.
You can use the ANGLE button to change the perspectives.
Please note that the exact implementation of this function depends on the
DVD.
Zoom function
` Press the ZOOM button repeatedly to magnify and reduce the image in the
following increments: ZOOM2 > ZOOM3 > ZOOM4 > ZOOM1/2 > ZOOM1/
3 > ZOOM1/4 > OFF (normal video size).
` With a magnified image, you can use
to choose an image section.
EN
Title menu (DVD)
` With the TITLE button (MENU button on the main unit), open the title
menu of the DVD. Make your selection using the
confirm with ENTER.
` If you play back a VCD with PBC (playback control), you can also open the
menu by pressing TITLE.
arrow keys and
Title programming
Press the PROG button during playback to open the programming menu.
VCD/SVCD/Audio CD DVD/MP3/MPEG4
` Use the arrow keys
to move to the first programme position.
EN-39
Page 88

82339 DVD-Autoradio DE Content.book Seite 40 Mittwoch, 29. April 2009 8:41 08
` Use the numeric keypad to enter the relevant title. For DVDs, enter the title
("T") and the chapter ("C" which contains the title.
` When your list is complete, use the arrow keys to move to PLAY and press
ENTER to play back the titles.
GOTO function
The GOTO button enables you to directly select a particular location on the
disc.
DVD
VCD/CD/MP3
` Use the arrow keys
to choose the category you would like to
select: TT (Title), CH (chapter), TRK (track), or (time).
` Use the numeric keypad to enter the relevant value.
` Then press ENTER as confirmation; the discs starts at the location you
entered.
EN-40
Page 89

82339 DVD-Autoradio DE Content.book Seite 41 Mittwoch, 29. April 2009 8:41 08
Calling up playback information
` Press down the SUB-T once or twice to show information about the
current playback status.
DVD
VCD/CD/MP3/JPEG
EN
Meaning of the indicators
1
2
DVD / VCD
TT 1/3
CH 1/1
TRK 09/18
3 time
4 Audio
/ T / C
–/T–/ C–
1/1 ENG
5.1 CH
5
6 Camera perspective
7Mute
8
1/4 ENG
PBC
Disc type
Current title / Total number of titles
Current chapter / Total number of chapters
Current track / Total number of tracks
Elapsed time for the title / chapter.
Elapsed time for the title / chapter.
Current language / Number of languages
5.1 channel
Current subtitle language / Number of subtitle
languages
Playback control; only for VCD 2.0 with PBC
EN-41
Page 90

82339 DVD-Autoradio DE Content.book Seite 42 Mittwoch, 29. April 2009 8:41 08
9
Repeat
A track will be repeated
A folder will be repeated
The entire disc will be repeated.
Exit repeat mode
The DVD setup
Use the SETUP button to call up the DVD setup. You can make settings for
DVD operation here.
The DVD setup consists of four menus:
SYSTEM SETUP
LANGUAGE SETUP
AUDIO SETUP
DIGITAL SETUP
Navigating in the DVD setup
` If SYSTEM SETUP is highlighted, you can select another menu using the
arrow keys
` Use
to get to the options list, use to select an option.
` To change the setting of the selected option, press
select an option in the submenu and confirm by pressing ENTER.
` To close the DVD setup, press SETUP again.
.
or ENTER. Now
SYSTEM SETUP
TV SYSTEM: The TV output standard. PAL: Usual colour format for
European countries; NTSC: Usual colour format for North
America.
AUTO SELECT: The colour format is detected
automatically.
SCREEN SAVER: Screen saver ON (activated) or OFF (not activated). The
activated screen saver appears if the image does not move
for several minutes.
TV TYPE: TV picture format. Set the display according to the DVD. 4:3
PS ("Pan Scan"), 4:3 LB ("Letterbox" or 16:9.
PASSWORD: Password. "Parental control" is required for the next point.
The factory configured password is "0000". To change this,
use the numeric keypad to enter this password and confirm
EN-42
Page 91

82339 DVD-Autoradio DE Content.book Seite 43 Mittwoch, 29. April 2009 8:41 08
by pressing ENTER. Then enter a new four-digit password
when prompted.
Write down your new password and keep in a safe place, because it
cannot be reset to the factory settings.
RATING: Parental control. Here you can set the authorisation level for
DVDs. Class 1: Suitable even for small children; Class 8: For
adults only.
DEFAULT: Reset all settings to the factory settings.
A new password and the authorisation level will be
retained.
LANGUAGE SETUP: Language menu
OSD LANGUAGE:The language of the DVD menu and other screen
information.
AUDIO LANG.: Default setting for the spoken language on the DVD, if
available on the DVD.
SUBTITLE LANG.:Default setting for the subtitle language on the DVD, if
available on the DVD.
MENU LANG.: Default setting for the menu language on the DVD, if
available on the DVD.
EN
AUDIO SETUP
AUDIO OUT: SPDIF OFF: The coaxial digital output is not activated.
SPDIF RAW: To output a digital 2.0 channel data stream.
SPDIF PCM: Standard format to output a stereo format.
KEY: Boost the basses (B, -4, -2) or boost the trebles(+2, + 4, #)
DIGITAL SETUP
OP MODE: LINE OUT: Volume differences are adapted. RF REMOD:
Sound is played back without changes to the volume.
DYNAMIC RANGE: Here you can set the dynamics of the sound (see OP
MODE) in single steps. OFF: Sound is played back without
changes to the volume. FULL: Loud parts are played
quietly, quiet parts are played more loudly.
DUAL MONO: Two-channel sound. STEREO: Stereo signal over left and
right loudspeaker. L-MONO: Left mono channel over left
loudspeaker. R-MONO: Right mono channel over right
loudspeaker. MIX-MONO: Left and right mono sound over
left and right loudspeaker.
EN-43
Page 92

82339 DVD-Autoradio DE Content.book Seite 44 Mittwoch, 29. April 2009 8:41 08
Troubleshooting
PROBLEM POSSIBLE CAUSE / SUGGESTION
The device cannot
be switched on.
The CD cannot be
loaded or is
ejected.
No sound! The volume has been set to minimum.
Function buttons
do not work.
The CD skips. The installation angle is more than 30°.
Radio and/or
automatic search
do not work.
Station memory
does not work.
Device connected
to the USB
connection does
not work.
Card reader is not
reading the card
DVD-related problems
Poor image Was the correct colour format (PAL/NTSC) selected?
The disc is not
played
The ignition is not switched on.
One of the fuses is defective.
There is already a CD in the car radio.
The CD has been put in incorrectly.
The CD is dirty or damaged.
The temperature in the car is too high. Wait until the
environmental temperature has become normal.
Condensation! Switch the car radio off for a few hours and
then retry.
Cables are not properly connected.
The integrated microcomputer cannot work because of
interference. Press the
The control panel is not properly fitted.
The disc is very dirty or damaged.
Errors on CDs you have burned yourself.
The antenna cable is not connected properly.
The transmission signals are too weak.
The cable for the permanent plus (yellow) is not
connected properly.
The USB connection is intended for devices that conform
to the USB standard. Not all devices available on the
market comply with this standard. It is possible that a nonstandard USB device is connected.
Card is possibly damaged, dirty or incorrectly inserted.
Is the country code of the DVD 2 or 0?
RESET button:
EN-44
Page 93

82339 DVD-Autoradio DE Content.book Seite 45 Mittwoch, 29. April 2009 8:41 08
Technical data
General
Operating voltage: DC 12 V, negative earth connection
Casing dimensions: 180 x 175 x 55 mm (W x D x H)
TFT-LCD Display: 3.5 inch (960 x 240 pixel)
Output power: 4 x 15 watt max (peak music output)
Fuses: 15 ampere (blue)
Radio
FM: 87.5 – 108 MHz
AM: 522 – 1620 kHz
Disc player
Laser output: Class 1 laser product
Frequency range: 40 Hz – 18 kHz
MPEG rate 64 - 320 kbps
MP3 playback ISO 9660 & Joliet MP3 format
Connection
AV IN: 3.5 mm phono jack
Supported formats
CD: Audio CDs, CD-R, CD-RW
DVD, Video CD: MPEG4, DVD+R, DVD-RW,
DVD-R, DVD-RW, JPEG
USB storage medium: 1.1 and 2.0 up to 8 GB (tested)
Memory cards: SD up to 1 GB
MMC up to 512 MB
SDHC up to 16 GB (tested)
EN
These days there are many non-standard CD recording and copy
protection procedures in use and a wide range of CD-R and CD-RW discs
on the market. This can occasionally lead to read errors or delays. This
does not mean the device is faulty.
Subject to technical changes!
EN-45
Page 94

82339 DVD-Autoradio DE Content.book Seite 46 Mittwoch, 29. April 2009 8:41 08
Disposal information
Packaging
All packaging and packaging materials that are no longer required
can and should be recycled.
Device
At the end of its life, the radio should not be disposed of as household
garbage. Enquire about the options for proper, environmentallyfriendly disposal.
Batteries
Do not dispose of used batteries in the household rubbish! They must
be deposited at a collection point for used batteries.
EN-46
Page 95

82339 DVD-Autoradio DE Content.book Seite 1 Mittwoch, 29. April 2009 8:41 08
Sommaire
Vue d'ensemble . . . . . . . . . . . . . . . . . . . . . . . . . . . . . . 3
Panneau de commande . . . . . . . . . . . . . . . . . . . . . . . . . . . . 3
Derrière le panneau de commande . . . . . . . . . . . . . . . . . . . . 4
Télécommande. . . . . . . . . . . . . . . . . . . . . . . . . . . . . . . 5
Mise en service de la télécommande . . . . . . . . . . . . . . . . . . . 7
Consignes de sécurité . . . . . . . . . . . . . . . . . . . . . . . . . . 8
Ne pas laisser d'appareils électriques
entre les mains des enfants . . . . . . . . . . . . . . . . . . . . . . . . . 8
Destination . . . . . . . . . . . . . . . . . . . . . . . . . . . . . . . . . . . . 8
Sécurité routière . . . . . . . . . . . . . . . . . . . . . . . . . . . . . . . . . 8
Montage . . . . . . . . . . . . . . . . . . . . . . . . . . . . . . . . . . . . . . 9
Ne jamais réparer soi-même l'appareil . . . . . . . . . . . . . . . . . 9
Rayonnement solaire . . . . . . . . . . . . . . . . . . . . . . . . . . . . . 9
Le lecteur de CD . . . . . . . . . . . . . . . . . . . . . . . . . . . . . . . . . 9
Lecteurs et prises . . . . . . . . . . . . . . . . . . . . . . . . . . . . . . . . 9
Consignes de sécurité relatives à la manipulation des piles . . 10
Nettoyage de l'appareil . . . . . . . . . . . . . . . . . . . . . . . . . . . 10
FR
Contenu de la livraison . . . . . . . . . . . . . . . . . . . . . . . . 11
Montage . . . . . . . . . . . . . . . . . . . . . . . . . . . . . . . . . . 12
Consignes de montage . . . . . . . . . . . . . . . . . . . . . . . . . . . 12
Compartiment et fiches ISO . . . . . . . . . . . . . . . . . . . . . . . . 13
Installation du support de montage . . . . . . . . . . . . . . . . . . 13
Branchements au dos de l'autoradio . . . . . . . . . . . . . . . . . . 15
Mise en place de l'autoradio . . . . . . . . . . . . . . . . . . . . . . . 18
Panneau de commande . . . . . . . . . . . . . . . . . . . . . . . . . . . 18
Reset . . . . . . . . . . . . . . . . . . . . . . . . . . . . . . . . . . . . . . . . 19
Démontage de l'appareil . . . . . . . . . . . . . . . . . . . . . . . . . . 19
Explication des câbles . . . . . . . . . . . . . . . . . . . . . . . . . . . . 20
FR-1
Page 96

82339 DVD-Autoradio DE Content.book Seite 2 Mittwoch, 29. April 2009 8:41 08
Fonctions générales . . . . . . . . . . . . . . . . . . . . . . . . . . 23
Heure . . . . . . . . . . . . . . . . . . . . . . . . . . . . . . . . . . . . . . . 23
Allumer/éteindre . . . . . . . . . . . . . . . . . . . . . . . . . . . . . . . . 23
Volume . . . . . . . . . . . . . . . . . . . . . . . . . . . . . . . . . . . . . . 23
Sélection du mode . . . . . . . . . . . . . . . . . . . . . . . . . . . . . . 23
Reset . . . . . . . . . . . . . . . . . . . . . . . . . . . . . . . . . . . . . . . . 24
Réglages de base pour l'autoradio (MENU) . . . . . . . . . . . . . . 24
Mode Radio : fonctions de base . . . . . . . . . . . . . . . . . . 26
Sélection de la bande de réception . . . . . . . . . . . . . . . . . . . 26
Recherche des stations . . . . . . . . . . . . . . . . . . . . . . . . . . . 26
Mémorisation des stations . . . . . . . . . . . . . . . . . . . . . . . . . 27
Sélection d'une station . . . . . . . . . . . . . . . . . . . . . . . . . . . 28
Mode Radio : Radio Data System. . . . . . . . . . . . . . . . . . 29
Fréquences alternatives (touche AF) . . . . . . . . . . . . . . . . . . . 29
TA – informations routières . . . . . . . . . . . . . . . . . . . . . . . . 30
Fonctions PTY . . . . . . . . . . . . . . . . . . . . . . . . . . . . . . . . . . 31
Fonctionnement avec supports de données (DVD, CD audio,
MP3, USB, SD/MMC, AV IN). . . . . . . . . . . . . . . . . . . . . . . 33
Le lecteur de CD/DVD . . . . . . . . . . . . . . . . . . . . . . . . . . . . . 34
La prise USB . . . . . . . . . . . . . . . . . . . . . . . . . . . . . . . . . . . 35
Le lecteur de cartes SD/MMC . . . . . . . . . . . . . . . . . . . . . . . . 35
La prise AV IN . . . . . . . . . . . . . . . . . . . . . . . . . . . . . . . . . . 36
Mode DVD . . . . . . . . . . . . . . . . . . . . . . . . . . . . . . . . . . . . . 36
Fonctions de lecture . . . . . . . . . . . . . . . . . . . . . . . . . . . . . 37
Afficher les informations sur la lecture . . . . . . . . . . . . . . . . . 41
La menu du DVD . . . . . . . . . . . . . . . . . . . . . . . . . . . . . . . . 42
Fonctions de recherche avec les supports MP3 et WMA . . . . . . 44
En cas de problèmes . . . . . . . . . . . . . . . . . . . . . . . . . . 45
Caractéristiques techniques . . . . . . . . . . . . . . . . . . . . . 46
Recyclage . . . . . . . . . . . . . . . . . . . . . . . . . . . . . . . . . 47
FR-2
Page 97

82339 DVD-Autoradio DE Content.book Seite 3 Mittwoch, 29. April 2009 8:41 08
Vue d'ensemble
Panneau de commande
1. : maintenir enfoncée quelques secondes pour éteindre l'appareil
(allumage possible avec n'importe quelle touche, excepté et )
MODE : choisir le mode
2. : en appuyant sur cette touche, le panneau de commande s'ouvre
électriquement vers l'avant, dévoilant le compartiment à disque. Si un
disque est inséré, celui-ci est éjecté.
3. BAND : sélection de la bande de réception en mode Radio
FM3, MW1, MW2)
4. : Détachement du panneau de commande
5. VOL+/–: augmenter (
6. AS/PS: maintenir enfoncée deux secondes pour la mémorisation
automatique des stations
7. MENU : ouvrir le menu de réglage de l'autoradio
8. Afficheur et écran TFT
9. IR : capteur infrarouge de la télécommande
10. . Prise USB
11. AV IN : raccorder un autre appareil audio ou vidéo avec connecteur jack
12. : recherche de stations vers l'avant ; passer au titre suivant ; pression
longue pour une avance rapide
13. RPT (« Repeat ») : fonction de répétition sur supports de données
) ou baisser () le volume.
(FM 1, FM2,
FR
FR-3
Page 98

82339 DVD-Autoradio DE Content.book Seite 4 Mittwoch, 29. April 2009 8:41 08
14. : pause et lecture sur supports de données
15. : recherche de stations vers l'arrière ; aller au début du titre et passer au titre suivant ; pression longue pour un retour rapide
16. PTY (« Program Type ») : rechercher des stations diffusant un type de programme précis ; LOC : maintenir enfoncée pour commuter entre stations locales (LOC) et éloignées (DX) (voir page 27)
17. AF (« Alternative Frequency ») : presser brièvement pour activer et désactiver le mode AF ; presser longtemps pour activer et désactiver le mode régional en mode AF ; voir page 29
18. TA (« Traffic Announcement ») : activer les stations émettant des informations routières (voir page 30); ST commutation stéréo/mono sur la bande FM. En cas de mauvaise réception stéréo, le réglage sur MONO peut apporter une amélioration.
Derrière le panneau de commande
1. Contacts
2. Compartiment à CD/DVD (visible uniquement si panneau de commande
ouvert électriquement – touche )
3. Témoin lumineux rouge (protection antivol)
4. Orifice de RESET : restaurer les réglages d'usine
5. Fente pour une carte SD/MMC
FR-4
Page 99

82339 DVD-Autoradio DE Content.book Seite 5 Mittwoch, 29. April 2009 8:41 08
Télécommande
1. : Allumer et éteindre l'appareil
2. DISP : afficher les informations pour le mode actuel
3. MODE : appuyer plusieurs fois pour sélectionner le mode
4. : touche d'éjection du disque (pas en mode DVD); SLOW : ralenti (DVD)
5. SUB-T : sous-titres (DVD)
6. AUDIO : réglages audio (DVD)
7. ANGLE : angles de vue de la caméra (DVD)
8. MUTE: presser brièvement pour couper et allumer le son
9. VOL+ / – : augmenter ou baisser
le volume ;
dans le menu : régler la valeur
10. MENU: ouvrir le menu de réglage de l'autoradio
11.
: retour rapide, avance
rapide (support de données)
12.
: Arrêt de la lecture
13. GOTO: rechercher un certain passage (disque) ; AS/PS : mémorisation automatique des stations
14. PROG : programmation de titres ; LO/DX : commuter entre stations locales (LOC) et éloignées (DX) (voir page 27).
15. RDM (« Random ») : lecture aléatoire sur supports de données ; MO/ST : commutation stéréo/mono sur la bande FM
FR
FR-5
Page 100

82339 DVD-Autoradio DE Content.book Seite 6 Mittwoch, 29. April 2009 8:41 08
16. 0 : touche numérique 0;
BAND : sélection de la bande de réception en mode Radio
FM3, MW1, MW2
)
(
FM 1, FM2,
17. 9 : touche numérique 9;
PTY (« Program Type ») : rechercher des stations diffusant un type de
programme précis
18. 8 : touche numérique 8; AF (« Alternative Frequency ») / REG : presser brièvement pour activer et désactiver le mode AF ; presser longtemps pour activer et désactiver le mode régional en mode AF ; voir page 29
19. 7 : touche numérique 7 ; TA (« Traffic Announcement ») : activer les stations émettant des informations routières (voir page 30)
20. 1 - 6 : Touches numériques et de rappel de station
21.
: pause et lecture sur supports de données
22. TITLE : ouvrir le menu des titres (DVD) : PBC : Playback Control (CD Vidéo 2.0)
23.
/ TRK TUN –/+ : recherche de stations vers l'arrière / recherche de
stations vers l'avant ; aller au début du titre et passer au titre précédent/
suivant ; pression plus longue pour avance/retour rapide
24. SETUP: afficher le menu de configuration du lecteur de DVD
25. Touches fléchées
: naviguer dans le menu
26. ENTER : valider la sélection
27. ZOOM : agrandir l'image (DVD)
28. A-B: répéter un passage défini (DVD)
29. RPT : (« Repeat »): fonction de répétition avec les supports de données
FR-6
 Loading...