

Page 1

Inhalt
Übersicht. . . . . . . . . . . . . . . . . . . . . . . . . . . . . . . . . . . 4
Sicherheitshinweise . . . . . . . . . . . . . . . . . . . . . . . . . . . 8
Elektrische Geräte nicht in Kinderhände . . . . . . . . . . . . . . . . . 8
Verwendungszweck . . . . . . . . . . . . . . . . . . . . . . . . . . . . . . . 8
Verkehrssicherheit . . . . . . . . . . . . . . . . . . . . . . . . . . . . . . . . 8
Niemals selbst reparieren . . . . . . . . . . . . . . . . . . . . . . . . . . . 8
Sonneneinstrahlung. . . . . . . . . . . . . . . . . . . . . . . . . . . . . . . 9
Der CD-Spieler . . . . . . . . . . . . . . . . . . . . . . . . . . . . . . . . . . . 9
Laufwerke und Anschlüsse . . . . . . . . . . . . . . . . . . . . . . . . . . 9
Das Gerät reinigen . . . . . . . . . . . . . . . . . . . . . . . . . . . . . . . . 9
Einbau . . . . . . . . . . . . . . . . . . . . . . . . . . . . . . . . . . . . . . . . 9
Lieferumfang . . . . . . . . . . . . . . . . . . . . . . . . . . . . . . . 10
Einbau . . . . . . . . . . . . . . . . . . . . . . . . . . . . . . . . . . . 11
Einbauhinweise. . . . . . . . . . . . . . . . . . . . . . . . . . . . . . . . . 11
ISO-Schacht und -Anschlüsse . . . . . . . . . . . . . . . . . . . . . . . 12
Den Einbaurahmen montieren . . . . . . . . . . . . . . . . . . . . . . 12
Anschlüsse an der Radiorückseite . . . . . . . . . . . . . . . . . . . . 14
Autoradio einsetzen. . . . . . . . . . . . . . . . . . . . . . . . . . . . . . 15
Bedienteil. . . . . . . . . . . . . . . . . . . . . . . . . . . . . . . . . . . . . 16
Reset . . . . . . . . . . . . . . . . . . . . . . . . . . . . . . . . . . . . . . . . 17
Das Gerät ausbauen . . . . . . . . . . . . . . . . . . . . . . . . . . . . . . 17
Erläuterungen zu den Kabeln . . . . . . . . . . . . . . . . . . . . . . . 18
DE
Allgemeine Funktionen . . . . . . . . . . . . . . . . . . . . . . . . 21
Ein-/Ausschalten und stumm schalten . . . . . . . . . . . . . . . . . 21
Toneinstellungen mit PUSH/SEL . . . . . . . . . . . . . . . . . . . . . . 21
Erweiterte Einstellungen mit PUSH/SEL . . . . . . . . . . . . . . . . . 22
Display . . . . . . . . . . . . . . . . . . . . . . . . . . . . . . . . . . . . . . . 24
Betriebsart („Mode“) . . . . . . . . . . . . . . . . . . . . . . . . . . . . . 24
Reset . . . . . . . . . . . . . . . . . . . . . . . . . . . . . . . . . . . . . . . . 24
MD 82309 DE-1
Page 2

Radiobetrieb: Grundfunktionen . . . . . . . . . . . . . . . . . . 25
Bandbereich wählen . . . . . . . . . . . . . . . . . . . . . . . . . . . . . 25
Sender suchen . . . . . . . . . . . . . . . . . . . . . . . . . . . . . . . . . . 25
Sender speichern . . . . . . . . . . . . . . . . . . . . . . . . . . . . . . . . 26
Sender aufrufen. . . . . . . . . . . . . . . . . . . . . . . . . . . . . . . . . 26
Radiobetrieb: Radio Data System . . . . . . . . . . . . . . . . . 27
Alternative Frequenzen (Taste AF). . . . . . . . . . . . . . . . . . . . . 27
TA – Verkehrsfunk . . . . . . . . . . . . . . . . . . . . . . . . . . . . . . . 28
PTY - Program Type Code (Programm Typ/ Kennung) . . . . . . . . 29
Betrieb mit Datenträgern
(Audio-CDs, MP3, USB, SD/MMC, AUX) . . . . . . . . . . . . . . . 31
Das CD-Laufwerk . . . . . . . . . . . . . . . . . . . . . . . . . . . . . . . . 31
Der USB-Anschluss . . . . . . . . . . . . . . . . . . . . . . . . . . . . . . . 32
Das SD/MMC-Kartenlesegerät . . . . . . . . . . . . . . . . . . . . . . . . 33
Der AUX IN-Anschluss . . . . . . . . . . . . . . . . . . . . . . . . . . . . . 33
Wiedergabefunktionen . . . . . . . . . . . . . . . . . . . . . . . . . . . . 33
Suchfunktionen bei MP3- und WMA-Datenträgern . . . . . . . . . 34
Aufnahmefunktion . . . . . . . . . . . . . . . . . . . . . . . . . . . 37
Von Audio-CD aufnehmen . . . . . . . . . . . . . . . . . . . . . . . . . . 37
MP3-Dateien kopieren . . . . . . . . . . . . . . . . . . . . . . . . . . . . 38
Vom Radio oder Audioeingang aufnehmen . . . . . . . . . . . . . . 38
Aufnahmen löschen . . . . . . . . . . . . . . . . . . . . . . . . . . . . . . 39
Bluetooth-Funktion benutzen . . . . . . . . . . . . . . . . . . . 40
Telefon mit dem Autoradio koppeln („Pairing“) . . . . . . . . . . . 40
Anruf annehmen/beenden . . . . . . . . . . . . . . . . . . . . . . . . . 41
Anruf abweisen . . . . . . . . . . . . . . . . . . . . . . . . . . . . . . . . . 41
Wahlwiederholung, Anruferliste. . . . . . . . . . . . . . . . . . . . . . 41
Anruf auf das Mobiltelefon schalten . . . . . . . . . . . . . . . . . . . 41
Sprachwahl . . . . . . . . . . . . . . . . . . . . . . . . . . . . . . . . . . . . 42
Verbindung löschen . . . . . . . . . . . . . . . . . . . . . . . . . . . . . . 42
Telefonkonferenz . . . . . . . . . . . . . . . . . . . . . . . . . . . . . . . . 42
Audio-Streaming (A2DP) . . . . . . . . . . . . . . . . . . . . . . . . . . . 42
AVRCP (Audio Video Remote Control Profile) . . . . . . . . . . . . . . 43
DE-2
Page 3

Wenn Störungen auftreten. . . . . . . . . . . . . . . . . . . . . . 44
Sicherung erneuern . . . . . . . . . . . . . . . . . . . . . . . . . . . . . . 45
Entsorgungshinweise . . . . . . . . . . . . . . . . . . . . . . . . . 45
Technische Daten . . . . . . . . . . . . . . . . . . . . . . . . . . . . 46
Konformitätsinformation . . . . . . . . . . . . . . . . . . . . . . . 47
DE
MD 82309 DE-3
Page 4
Übersicht
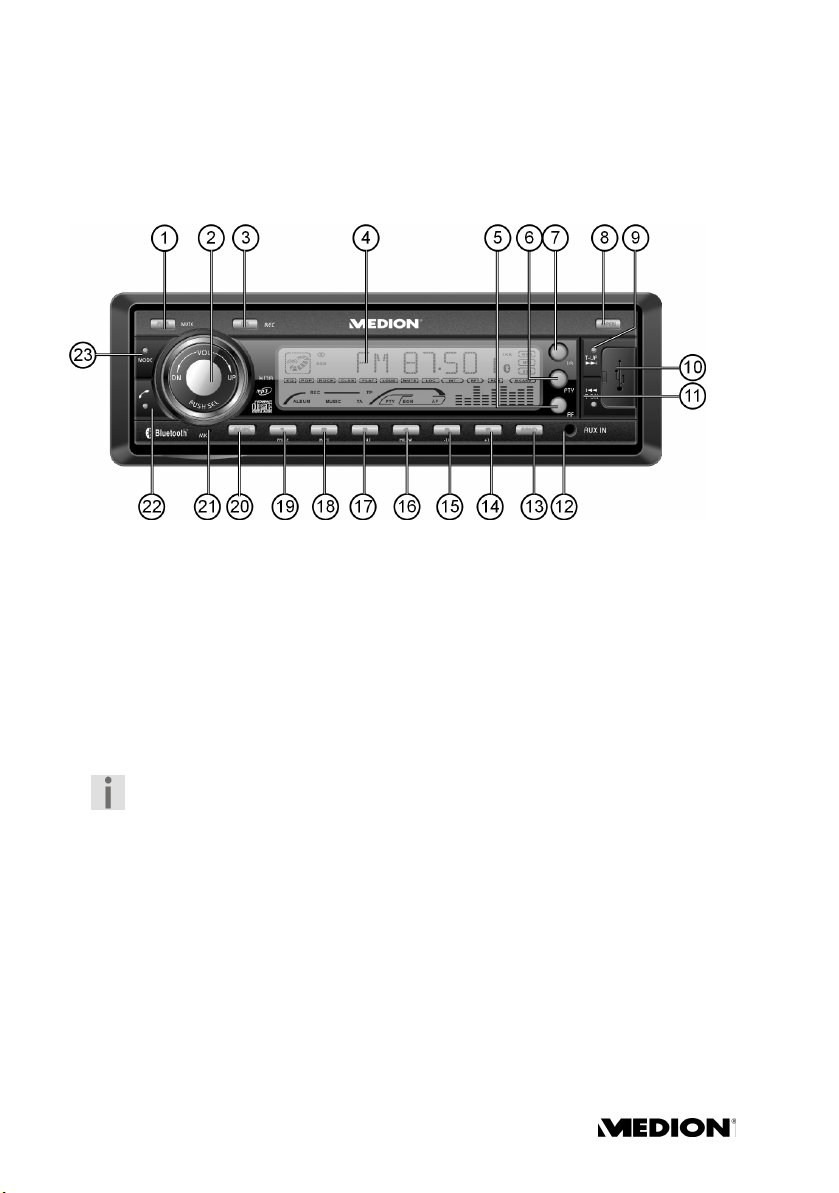
Bedienteil
1. PWR: Ein paar Sekunden gedrückt halten, um das Gerät ein- und auszuschalten; MUTE: Kurz drücken, um den Ton aus- und einzuschalten.
2. VOL+/–: Multiregler zum Einstellen der Lautstärke.
PUSH/SEL („Push/Select“): Wenn Sie den Multiregler wiederholt drücken,
rufen Sie nacheinander andere Modi auf. Diese Modi können Sie dann
durch Drehen des Knopfes einstellen.
PUSH/SEL-Rad drehen nach Drücken der Taste AS/PS bei der Suchfunktion auf Datenträgern: Zeichen und Zahlen eingeben.
Jede Einstellung bleibt nur ein paar Sekunden aktiv, bevor sie wieder
in die Grundeinstellung Lautstärke („
nen die Einstellung auch durch Drücken der Taste ENT beenden.
Multiregler kurz drücken, um folgende Audio-Einstellungen zu wählen:
VOL: Lautstärke, BAS: Bass, TRE: Höhen, BAL: Balance des linken und rechten
Lautsprechers,
Multiregler länger drücken, um eine andere Folge von Modi für Radio-
funktion, Zeiteinstellung und anderes aufzurufen. Innerhalb dieser Folge
schalten Sie durch kurzes Drücken zum jeweils nächsten Modus.
FAD: Fader (Tonstärke der Rücklautsprecher).
INVOL 17: Einstellung der Lautstärke, mit der sich das Radio einschaltet (17
in der Grundeinstellung).
ADJ00:00 (00:00 steht für die Zeit): Zeiteinstellung; siehe Seite 22.
VOL“) zurückschaltet. Sie kön-
DE-4
Page 5

TAVOL: Einstellung der Grundlautstärke für Verkehrsnachrichten. Siehe
Seite 22.
EON ON: „EON“-Funktion ein- und ausschalten (OFF). Siehe “Radiobetrieb:
Radio Data System”, Seite 27.
Rec: MP3 (MP3) oder WMA (wma) als Aufnahmeformat einstellen. Siehe
Seite 23.
TELVOL: Grundlautstärke des Telefons bei Bluetooth-Betrieb. Siehe Blue-
tooth-Betrieb auf Seite 23.
DSP NONE: Wählen Sie hier mit dem Multiregler zwischen den Audioein-
stellungen
FLAT (normal), CLASSIC, ROCK und POP (siehe auch Seite 21).
LOUD off: Loudness einschalten, um Bässe und Höhen anzuheben (ON)
oder ausschalten (
OFF) (nur im Radiomodus).
LOC: Lokaler Suchmodus (siehe Seite 23). OFF: Normaler Empfang.
STEREO: Im UKW-Band Stereo oder Monomodus (MONO) wählen. Bei
schlechtem Stereoempfang kann die Einstellung
bessern (nur im FM-Radiomodus).
3. DIS („Display“): Informationen für die aktuelle Betriebsart anzeigen; REC: Aufnahmefunktion einstellen (siehe Seite 37)
4. Display
5. AF („Alternative Frequency"): Kurz drücken, um den AF-Modus ein- und auszuschalten; länger drücken, um Regionalmodus im AF-Modus ein- und auszuschalten; siehe Seite 27
6. PTY („Program Type"): Sender mit bestimmten Programminhalten suchen
7. TA („Traffic Announcement"): Verkehrsfunksender aktivieren (siehe Seite 28)
8. OPEN: Bedienteil öffnen
9. T-UP: Sendersuchlauf vorwärts;
10. USB-Anschluss
11. T-DN: Sendersuchlauf rückwärts;
12. AUX IN: Weiteres Audiogerät mit Klinkenstecker anschließen
13. BAND: Bandbereichsauswahl im Radiomodus
MW2)
;
ENTER: Eingaben bestätigen
MONO den Empfang ver-
(FM 1, FM2, FM3, MW1,
DE
MD 82309 DE-5
Page 6

14. 6: Ziffern- und Stationstaste 6; / +10: zehn Titel nach oben bei Datenträgern (CD, MP3, SD/MMC, USB)
15. 5: Ziffern- und Stationstaste 5;
-10: zehn Titel nach unten bei Datenträgern (CD, MP3, SD/MMC, USB)
16. 4: Ziffern- und Stationstaste 4;
RDM („Random“): Zufallswiedergabe bei Datenträgern (CD, MP3, SD/
MMC, USB)
17. 3: Ziffern- und Stationstaste 3;
INT („
Intro“): Anspielfunktion bei Datenträgern (CD, MP3, SD/MMC, USB)
18. 2: Ziffern- und Stationstaste 2;
RPT („Repeat“): Wiederholfunktion bei Datenträgern (CD, MP3, SD/
MMC, USB)
19. 1: Ziffern- und Stationstaste 1; PAUSE: Pause und Wiedergabe bei Datenträgern (CD, MP3, SD/MMC, USB)
20. AS/PS: Automatische Senderspeicherung / SCH („Search“): Titelsuche bei Datenträgern (CD, MP3, SD/MMC, USB);
21. MIC: Mikrofon
22. TALK: Sprechen (Bluetooth-Funktion)
23. MODE: Betriebsmodus wählen: Radio - CD/MP3 - USB - SD/MMC - AUX;
DE-6
Page 7
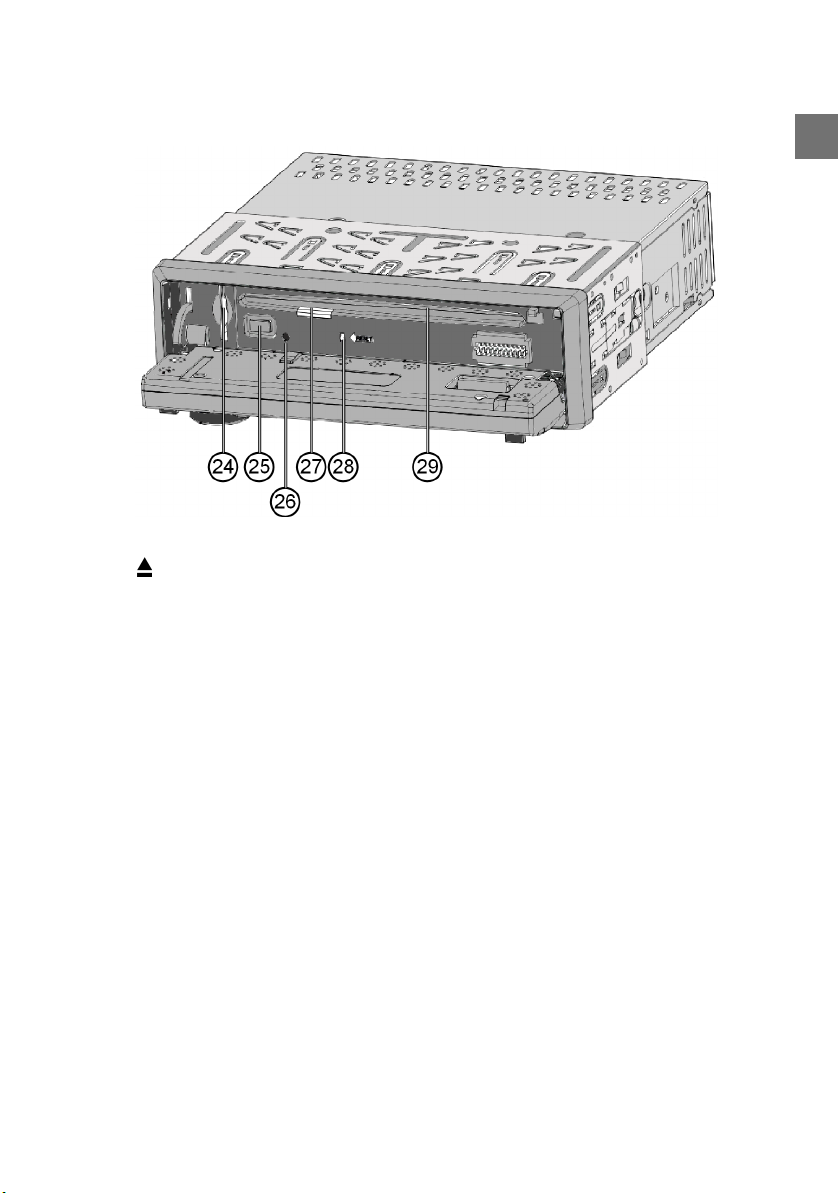
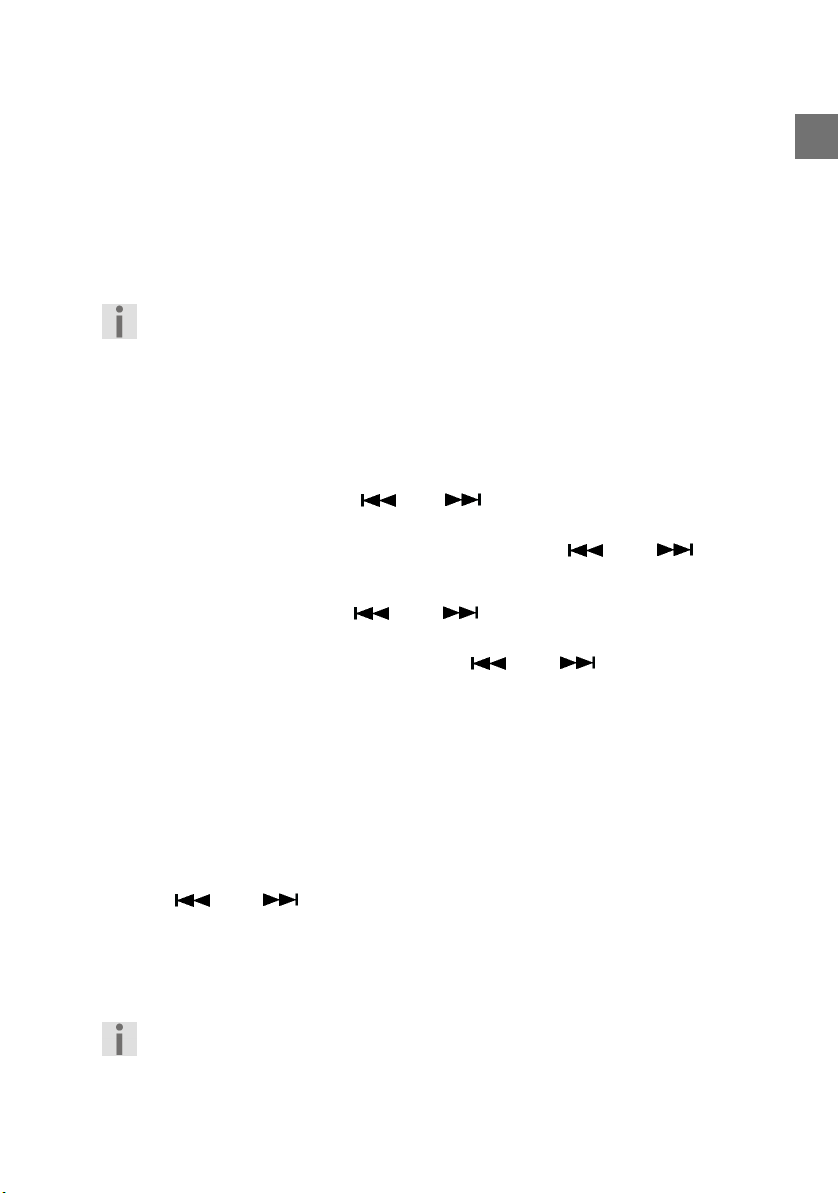
Hinter dem Bedienteil
24. Schlitz für eine SD/MMC-Karte
25. : CD-Auswurf
26. Rote Leuchtdiode (Diebstahlschutz)
27. Betriebs-LED des CD-Laufwerks
28. Reset-Öffnung: Auf Werkseinstellungen zurückstellen
29. CD-Fach
DE
MD 82309 DE-7
Page 8
Sicherheitshinweise
Zu dieser Anleitung
Lesen Sie vor Inbetriebnahme die Sicherheitsvorschriften aufmerksam durch. Beachten Sie die Warnungen auf dem Gerät und
in der Bedienungsanleitung.
Bewahren Sie die Bedienungsanleitung im Auto auf. Wenn Sie
das Autoradio verkau
dingt auch diese Anleitung aus.
Elektrische Geräte nicht in Kinderhände
Lassen Sie Kinder niemals unbeaufsichtigt elektrische Geräte benutzen.
Halten Sie auch die Verpackungsfolien von Kindern fern. Es besteht Erstik-
kungsgefahr.
Verwendungszweck
Das Autoradio ist nur für den Einbau und den Betrieb in Pkws vorgesehen.
Verkehrssicherheit
Die Verkehrssicherheit ist oberstes Gebot. Bedienen Sie Ihr Autoradio nur, wenn es die Verkehrslage zulässt. Machen Sie sich vor
Fahrtantritt mit dem Gerät vertraut.
Akustische Signale von Polizei, Feuerwehr und anderen Rettungsdiensten müssen im Fahrzeug rechtzeitig wahrgenommen werden können. Regeln Sie deshalb die Lautstärke niemals so hoch,
dass Sie die Warnsirenen der Rettungsfahrzeuge erst verspätet
hören könnten.
fen oder weitergeben, händigen Sie unbe-
Niemals selbst reparieren
Kontrollieren Sie vor dem Einbau Kabel und Gerät auf Beschädigungen. Benutzen Sie das Gerät nicht, wenn Gehäuse oder Kabel
beschädigt sind.
Versuchen Sie auf keinen Fall, das Gerät selber zu öffnen und/
oder zu reparieren. Es besteht die Gefahr eines elektrischen
Schlags. Wenden Sie sich im Störungsfall an unser Service Center
oder eine andere geeignete Fachwerkstatt.
DE-8
Page 9
Sonneneinstrahlung
Wenn sich das Fahrzeuginnere, z. B. durch längere Sonneneinstrahlung, stark
aufgeheizt hat, nehmen Sie das Autoradio nicht sofort in Betrieb.
Warten Sie, bis das Auto eine Weile gefahren wurde und das Autoradio abkühlen konnte.
Der CD-Spieler
Der CD-Spieler ist ein Laserprodukt der Klasse 1. Das Gerät ist
mit einem Sicherheitssystem ausgerüstet, das das Austreten
von gefährlichen Laserstrahlen während des normalen Gebrauchs verhindert. Um Augenverletzungen zu vemeiden,
manipulieren oder beschädigen Sie niemals das Sicherheitssystem des Geräts.
Laufwerke und Anschlüsse
Führen Sie keinerlei Fremdkörper in die Öffnungen des Autoradios (Diskfach,
USB-Anschluss, Kartenschacht, AUX-Anschluss) ein. Die Fächer und Anschlüsse können dadurch beschädigt werden.
Schieben Sie CDs immer mit der beschrifteten Seite nach oben in das Diskfach. Wenden Sie niemals große Kraft an, wenn Sie eine Disk einlegen, eine
Karte einschieben oder ein externes Gerät anschließen. Wenn Sie einen Widerstand spüren, versuchen Sie es auf eine andere Weise bzw. mit einem anderen Medium.
DE
Das Gerät reinigen
Verwenden Sie für die Reinigung ein trockenes, weiches Tuch. Benutzen Sie
keine chemischen Lösungs- und Reinigungsmittel, weil diese die Oberfläche
und/oder die Beschriftungen des Geräts beschädigen können.
Schützen Sie das Gerät vor Feuchtigkeit. Berühren Sie das Gerät
nicht mit feuchten Händen. Es besteht die Gefahr eines elektrischen Schlags!
Einbau
Wenn Sie Ihr Autoradio selbst einbauen möchten, lesen Sie die Einbau- und
Anschlusshinweise in dieser Anleitung. Wir empfehlen Ihnen, den Einbau des
Gerätes durch eine Fachkraft vornehmen zu lassen. Damit stellen Sie sicher,
dass das Gerät einwandfrei funktioniert. Eine fehlerhafte Verkabelung kann zu
Schäden am Gerät und Ihrem Auto führen.
Page 10
Lieferumfang
Bitte überprüfen Sie die Vollständigkeit der Lieferung und benachrichtigen Sie
uns bitte innerhalb von 14 Tagen nach dem Kauf, falls die Lieferung nicht
komplett ist. Mit dem von Ihnen erworbenen Produkt haben Sie erhalten:
Autoradio
2 ISO-Buchsen mit Kabeln
Bedienteil
Etui
Einbaurahmen (aufgesteckt)
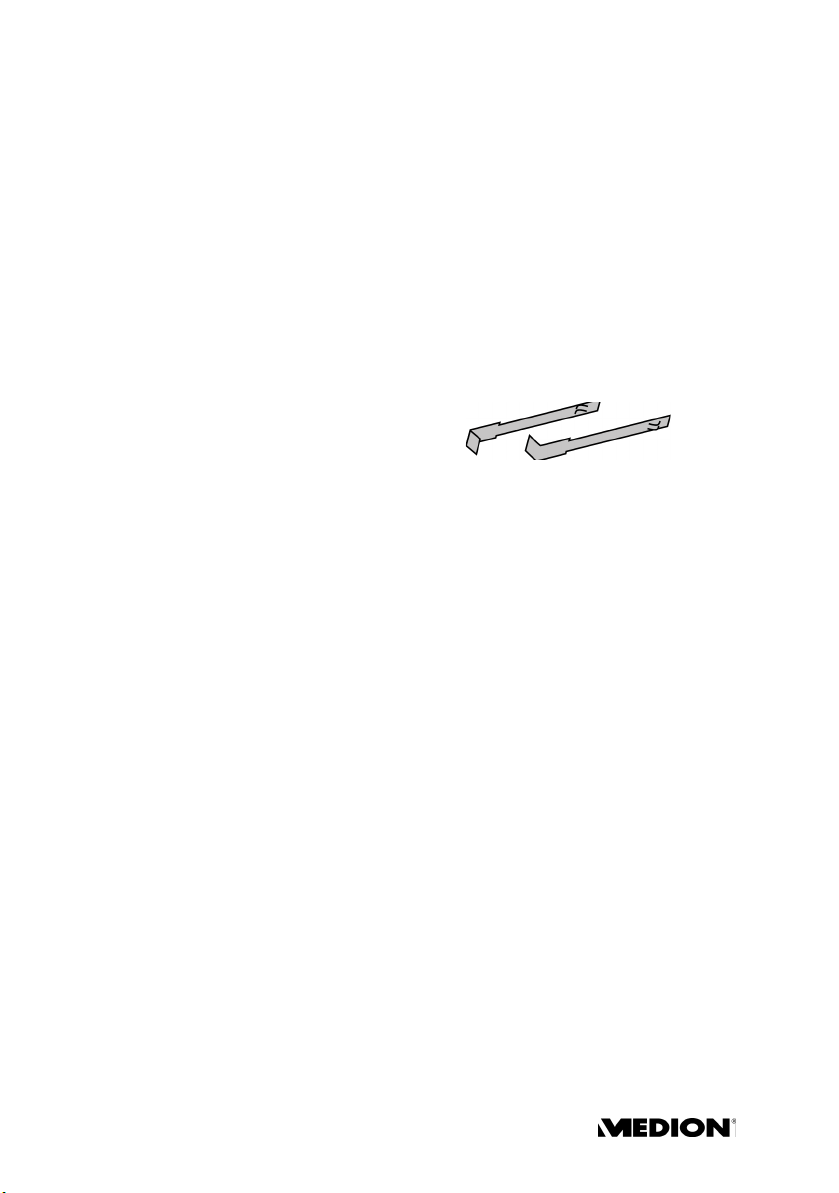
2 Schlüssel zum Abziehen des Einbau-
rahmens und Herausziehen des Gerätes
Weiteres Befestigungsmaterial für den individuellen Einbau
Diese Bedienungsanleitung
Garantiekarte
Page 11
Einbau
Einbauhinweise
Klemmen Sie vor dem Einbau den Minuspol an der Autobatterie ab!
Es besteht die Gefahr des Kurzschlusses und des Stromschlags!
` Kontrollieren Sie, ob die Anschlussbelegung Ihres Fahrzeugs mit der Bele-
gung am Autoradio übereinstimmt (siehe “Belegung des ISO-Blocks”,
S. 13).
` Verlegen Sie die Kabel nicht unter Zug, nicht über scharfe Kanten, oder in
der Nähe von Teilen, die sich erhitzen können. Achten Sie darauf die Kabel
nicht zu knicken, oder zu verdrehen.
` Setzen Sie das Gerät in den dafür vorgesehenen Schacht ein, oder wählen
Sie einen Platz für die Montage des Geräts, an dem es die normalen Fahraufgaben des Fahrers nicht behindert.
` Schließen Sie kurz die Kabel an, bevor Sie das Gerät endgültig einbauen.
Stellen Sie sicher, dass diese richtig eingesteckt sind und dass das System
richtig funktioniert.
` Falls Änderungen am Fahrzeug erforderlich sind, wenden Sie sich an Ihren
Fahrzeughändler/-fachwerkstatt.
` Bauen Sie das Gerät so ein, dass keine Verletzungen bei starkem Bremsen
entstehen können.
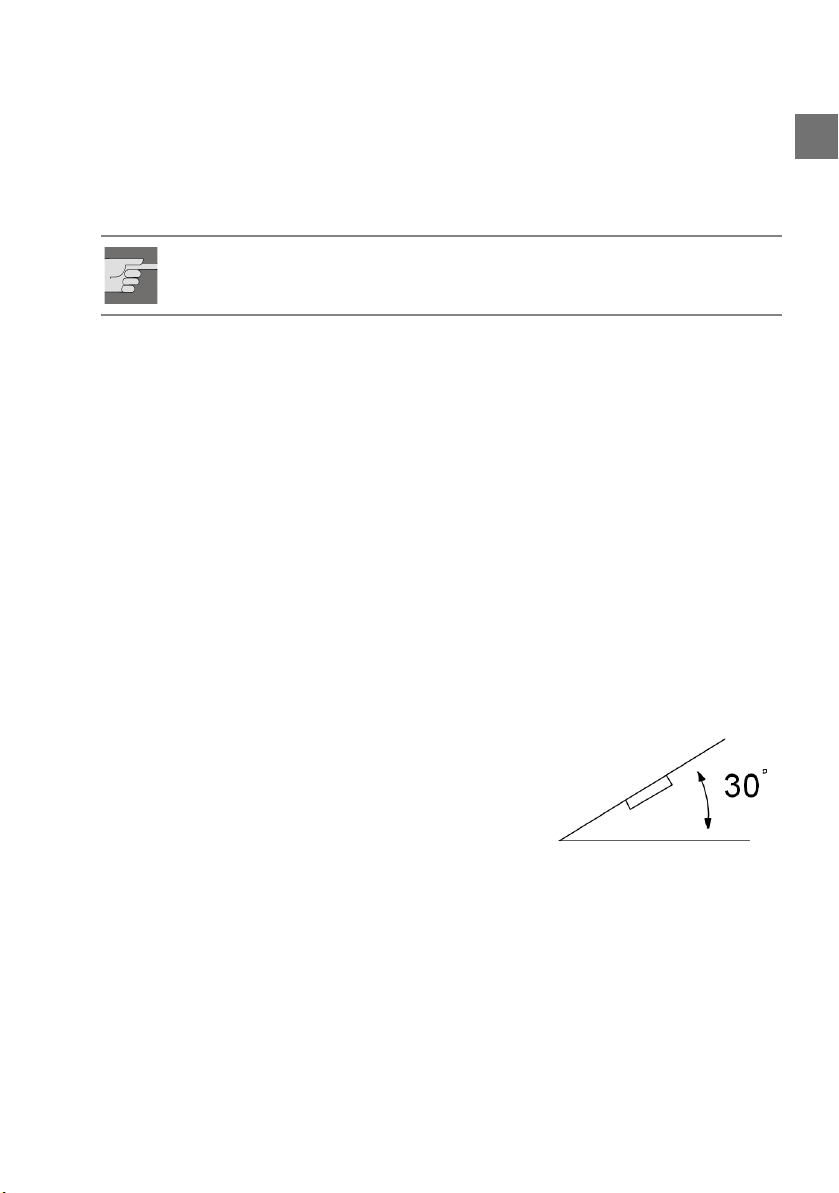
` Wenn das Gerät mehr als 30° aus der Waage-
rechten eingebaut wird, kann es seine optimale Leistung verlieren.
` Vermeiden Sie den Einbau des Gerätes in der
Nähe hoher Temperaturen (z. B. direkte Sonneneinstrahlung oder Heizungsluft), Staub,
Schmutz oder übermäßige Erschütterungen.
Das Gerät kann dadurch beschädigt werden.
` Halten Sie sich bei der Montage genau an die Anweisungen dieser Anlei-
tung. Kontrollieren Sie, bevor Sie die Autobatterie wieder anklemmen, alle
Anschlüsse.
Maximaler Einbauwinkel
DE
Page 12
ISO-Schacht und -Anschlüsse
Den Einbaurahmen montieren
`
`
Page 13
`
DE
`
`
Überprüfen Sie anschließend den Einbaurahmen auf festen Halt. Der
Rahmen muss fest fixiert sein, so dass er sich auch bei starkem Bremsen
nicht lösen kann.
Page 14
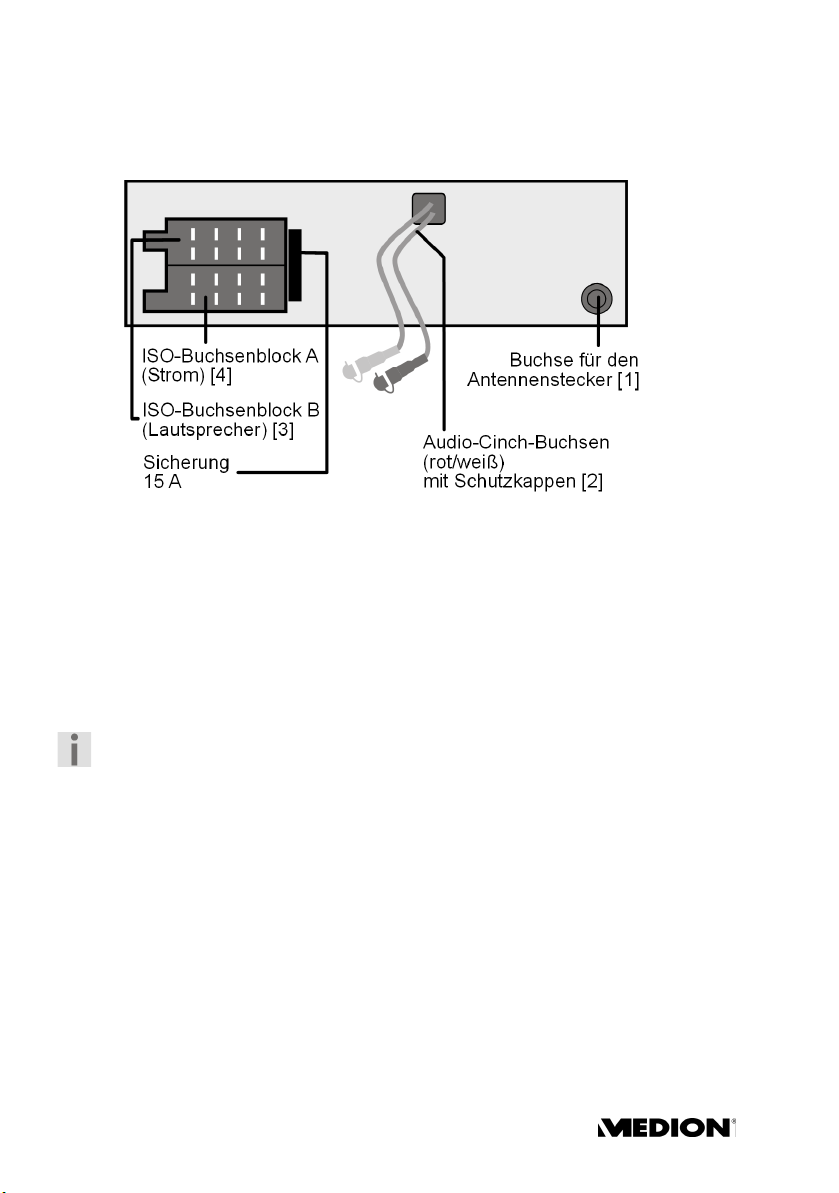
Anschlüsse an der Radiorückseite
Die Rückseite des Autoradios im Überblick:
Kabelverbindungen vorbereiten
` Ziehen Sie die Anschlüsse, die sich im ISO-Schacht Ihres Autos befinden, so-
weit heraus, dass Sie sie mit den Anschlüssen am Autoradio verbinden können.
Kabelverbindungen vornehmen
Benutzen Sie beim Einbau den ISO-Steckerblock des Autoradios. – Falls die
ISO-Stecker Ihres Fahrzeugs nicht auf die ISO-Buchsen des Autoradios passen
sollten, können Sie in Fachwerkstätten, im Fachhandel oder in den Fachabteilungen der Warenhäuser entsprechende Adapter erwerben.
Mit den beiden ISO-Steckern Ihres Fahrzeugs (für die Lautsprecher und
für Stromverbindungen) sind sichere und richtige elektrische Verbindungen hergestellt. Für den Fall, dass Sie die Kabel jedoch individuell
verlegen lassen möchten, erläutern wir am Ende dieses Kapitels die Bedeutung der Kabel im Einzelnen.
[1] Verbinden Sie den Antennenstecker der Fahrzeugantenne mit der Antennenbuchse des Autoradios.
[2] Wenn Sie einen externen Verstärker einsetzen, können Sie ihn mit den rot/
weißen Audio-Cinch-Buchsen verbinden. Beachten Sie hierzu auch die Bedienungsanleitung des Verstärkers.
[3][4] Verbinden Sie die beiden ISO-Stecker des Fahrzeugs mit den beiden
ISO-Blöcken des Autoradios (A für Strom und B für die Lautsprecher).
Page 15
Senderspeicher testen
In einigen Fahrzeugmodellen ist im ISO-Stecker für den ISO-Block A die standardmäßige Belegung der Kabel Dauerplus und Schaltplus werkseitig vertauscht (vgl. hierzu “Belegung des ISO-Buchsenblocks am Autoradio”,
Seite 20). Dies bewirkt, dass die Senderspeicherung nicht funktioniert.
Bevor Sie das Autoradio endgültig einbauen, probieren Sie folgendermaßen
aus, ob die Sender gespeichert bleiben:
` Klemmen Sie die Autobatterie wieder an.
` Schalten Sie die Zündung des Fahrzeugs ein.
` Schalten Sie das Radio ein.
` Führen Sie eine automatische Senderspeicherung durch, indem Sie die
Taste AS/PS für etwa zwei Sekunden lang gedrückt halten (vgl. hierzu
auch “Automatisch speichern”, Seite 26).
` Schalten Sie die Zündung des Fahrzeugs aus.
` Schalten Sie die Zündung wieder ein und stellen Sie fest, ob die Sender
noch gespeichert sind (drücken Sie hierzu die Stationstasten 1 bis 6).
` Wenn die Sender gespeichert sind, können Sie das Radio einbauen.
` Sind die Sender nicht mehr gespeichert, sollten Sie einen Adapter einset-
zen, der im Fachhandel erhältlich ist, oder in einer Fachwerkstatt eine Anpassung der Kabel vornehmen lassen. Beachten Sie für diesen Fall das Kapitel “Erläuterungen zu den Kabeln”, Seite 18.
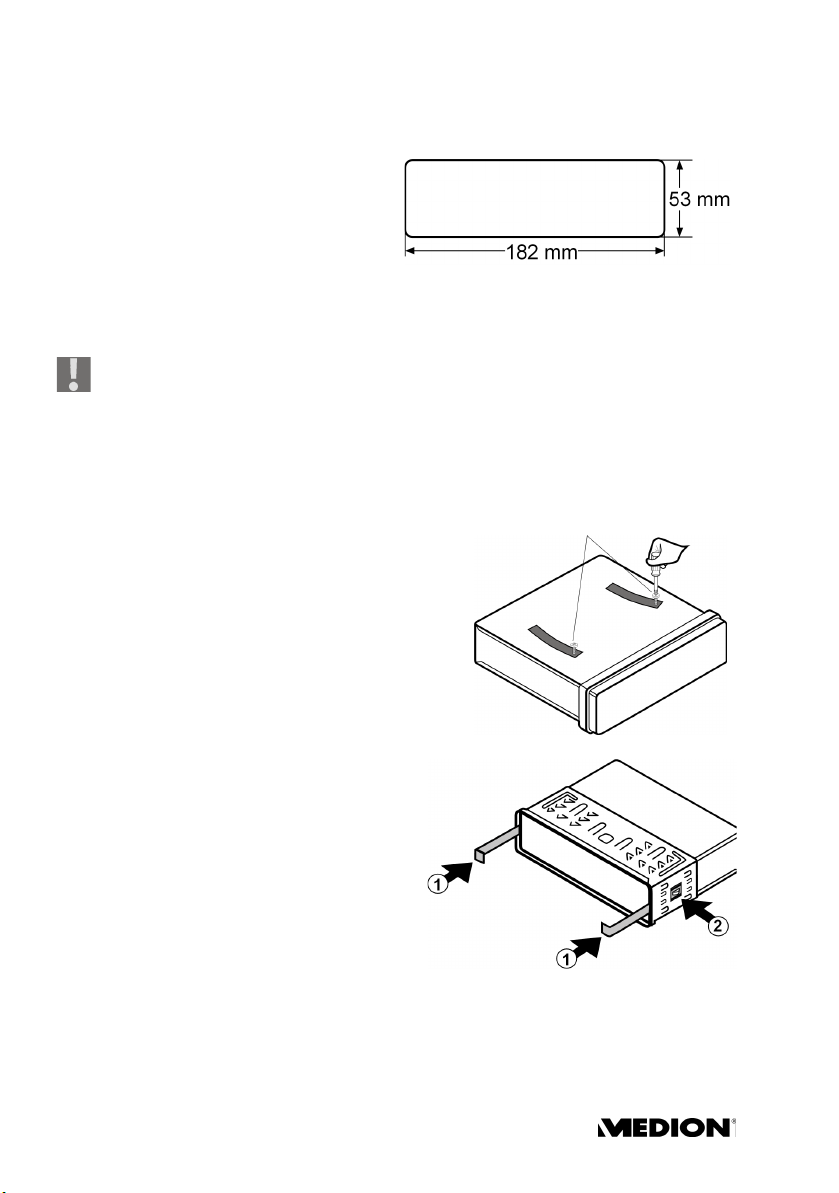
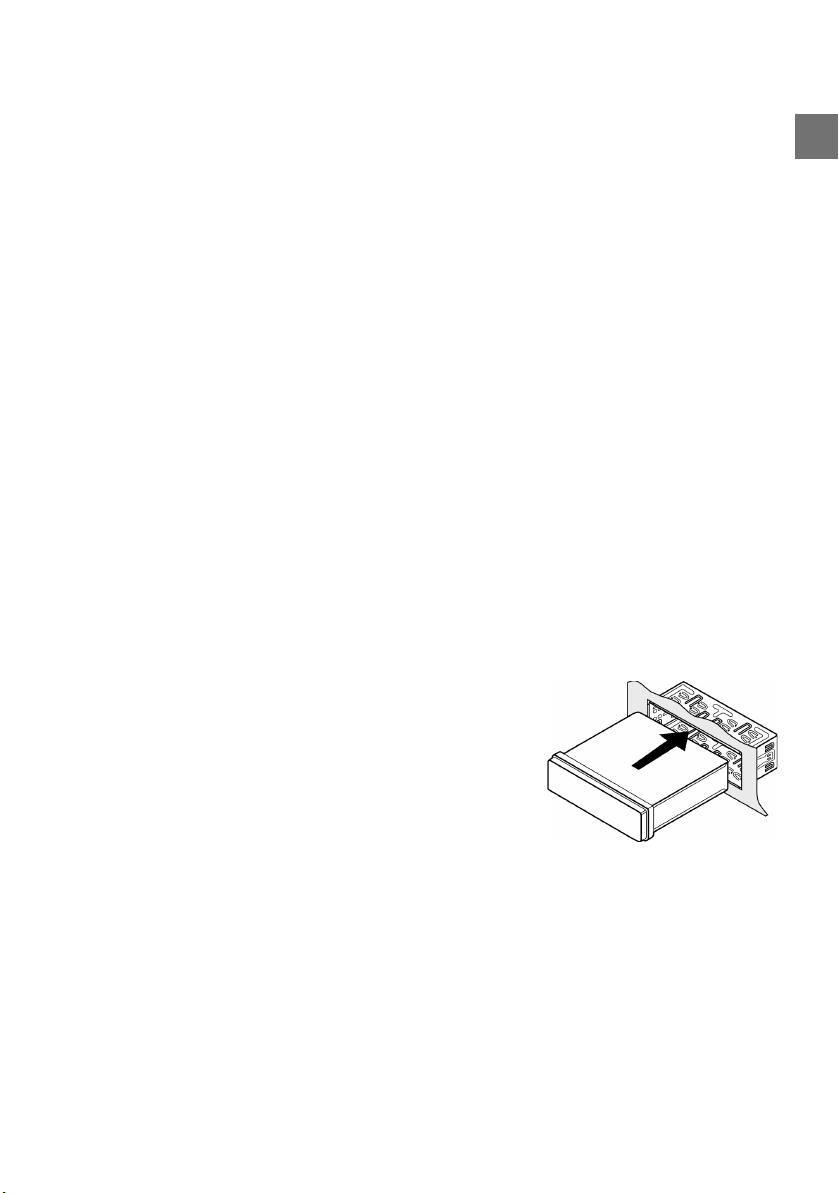
Autoradio einsetzen
` Schieben Sie das Autoradio vorsichtig in den
Einbaurahmen, bis es einrastet.
Beachten Sie beim Einschieben die Verlegung
der Kabel; sie dürfen nicht geknickt, gequetscht
oder unter Spannung gesetzt werden.
DE
Page 16
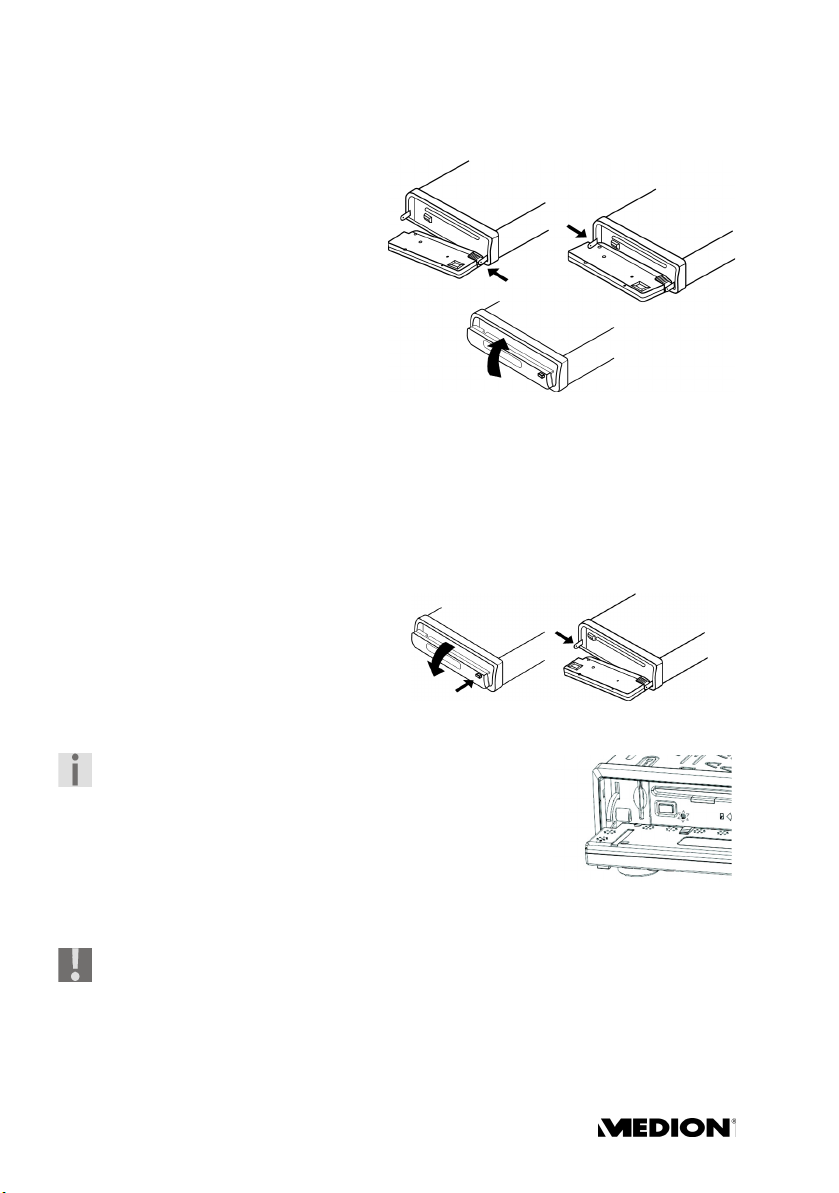
Bedienteil
Bedienteil einsetzen
` Setzen Sie das Bedienteil zuerst
mit der rechten unteren Ecke auf
den Stift rechts unten im Rahmen
(wie in nebenstehender Abbildung). Sie können das Bedienteil
auch zuerst mit der linken unteren Ecke auf den Stift in den Rahmen setzen.
` Drücken Sie dann die linke Seite
(bzw. rechte Seite) unten fest, bis
sie einrastet.
` Klappen Sie das Bedienteil nach oben.
Überprüfen Sie, dass das Bedienteil richtig und fest auf seinem Platz sitzt. Ist
das Bedienteil nicht richtig eingebaut, erscheinen im Display Fehlinformationen und/oder einige Tasten haben Fehlfunktionen.
Bedienteil abnehmen
` Drücken Sie die Taste OPEN.
` Drücken Sie das Bedienteil etwas
nach rechts oder links und ziehen
Sie dann erst die eine, dann die an-
dere Seite ab.
Diebstahlsicherung
Wenn das Bedienteil nicht in den Rahmen eingesetzt ist, blinkt am Gerät die Diebstahlschutz LED.
Kontakte
Bei abgenommenen Bedienteil liegen die Kontakte am Bedienteil und am Radio frei.
Achten Sie darauf, dass die frei liegenden Kontakte nicht verschmutzen.
Das Autoradio könnte dann nicht einwandfrei funktionieren. Bewahren
Sie das Bedienteil zum Schutz immer im Etui auf.
Reinigen Sie die Kontakte ggf. mit einem sauberen, fusselfreien und trockenen Tuch.
Page 17
Reset
` Um das Radio in Betrieb zu nehmen, drücken Sie
mit der Mine eines Kugelschreibers oder einem
anderen spitzen Gegenstand in die RESET-Öff-
nung.
` Wenn das Autoradio eine Fehlfunktion aufweist,
die sich durch Ausschalten und Einschalten nicht
beheben lässt, drücken Sie mit der Mine eines Kugelschreibers oder einem anderen spitzen Gegenstand in die Taste RESET-Öffnung.
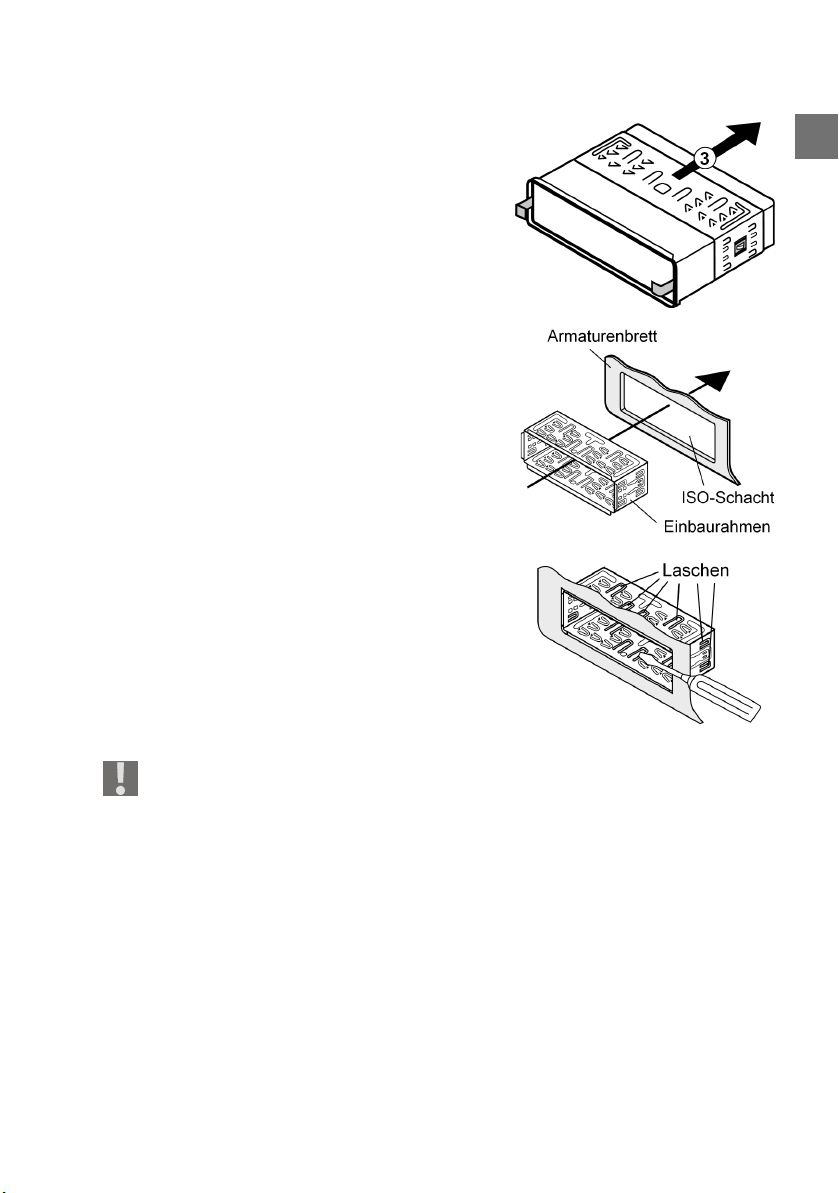
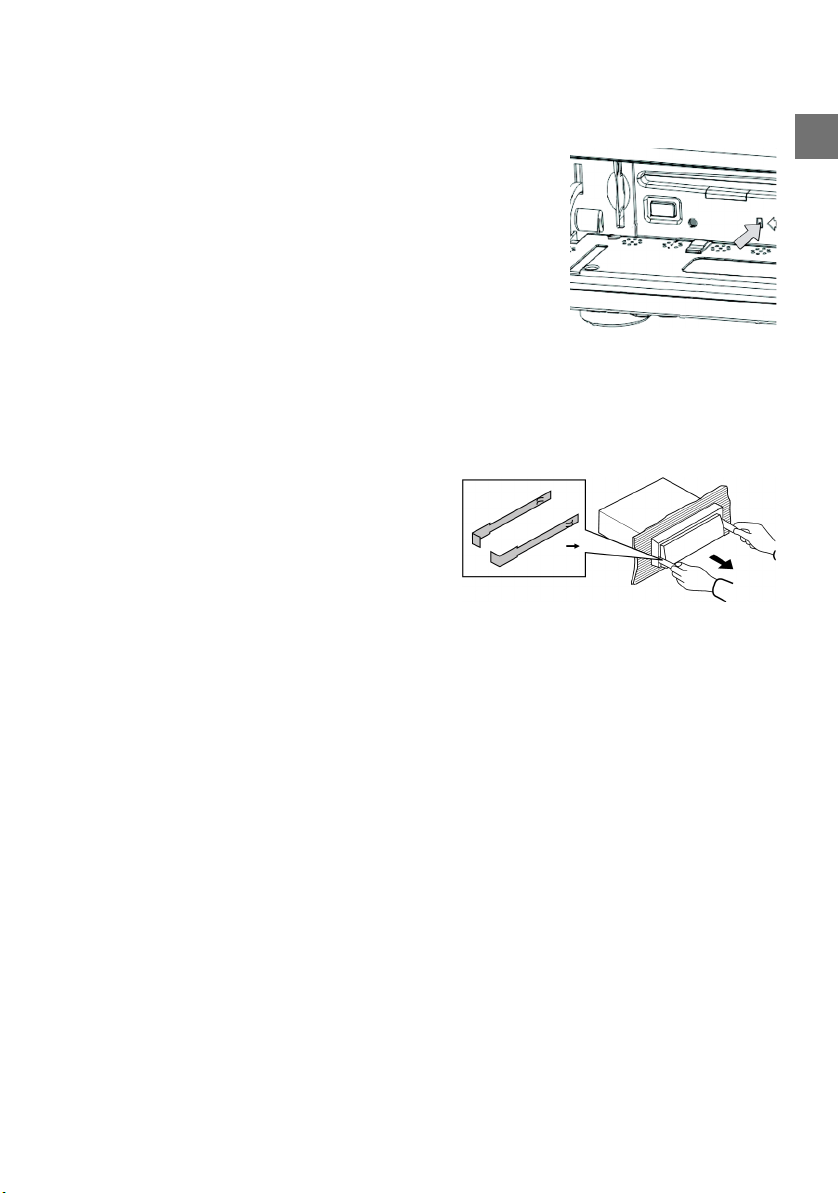
Das Gerät ausbauen
` Nehmen Sie das Bedienteil ab.
` Ziehen Sie den Blendrahmen ab.
` Führen Sie den rechten und den lin-
ken Schlüssel in den jeweiligen
Schlitz an den Seiten des Gerätes
ein. Die beiden Haltelaschen sind
nun zurückgebogen und Sie können das Gerät herausziehen.
DE
Page 18
Erläuterungen zu den Kabeln
Die Erläuterungen zu den Kabeln dienen für den Fall, dass die Kabel
individuell verlegt werden müssen. Wenden Sie sich hierfür an eine
Fachwerkstatt und geben Sie die mitgelieferten ISO-Stecker und die
Informationen dieses Kapitels an die Fachwerkstatt weiter.
Um das Radio mit den ISO-Steckern Ihres Fahrzeugs anzuschließen, benötigen Sie die folgenden Erläuterungen nicht.
Es sind zwei ISO-Stecker mit Kabeln mitgeliefert:
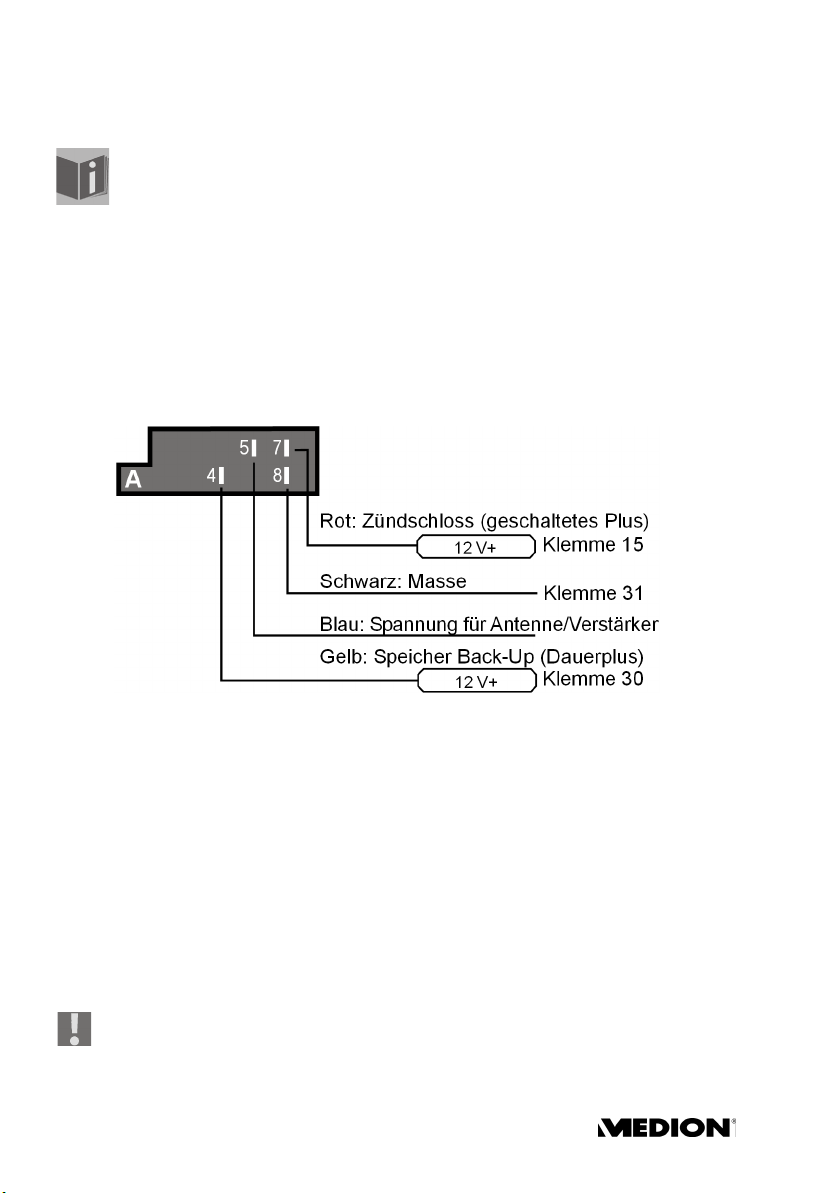
Stecker mit Stromkabeln für ISO-Buchsenblock A
Stecker mit Lautsprecherkabeln für ISO-Buchsenblock B
Übersicht ISO-Stecker A: Strom
Speicher Back-up (gelb)
Das gelbe Speicher-Back-up-Kabel muss mit Dauerplus verbunden werden.
Die Senderspeicherung funktioniert sonst nicht (vgl. “Belegung des ISO-Buchsenblocks am Autoradio”, Seite 20).
Antennen-Relais-Kabel (blau)
Das blaue Kabel steht für eine Relais-gesteuerte Antenne zur Verfügung. Das
Relais fährt die Antenne automatisch aus, wenn das Radio angeschaltet wird.
Beim Ausschalten fährt die Antenne wieder ein.
Dieses Relais-Kabel kann auch zum Steuern eines externen Verstärkers benutzt werden. Zum genauen Anschluss ziehen Sie bitte die Bedienungsanleitung des Verstärkers hinzu.
Verbinden Sie das blaue Kabel niemals mit dem Motorkabel der Relaisgesteuerten Antenne; dies kann Schäden am Radio verursachen!
Page 19
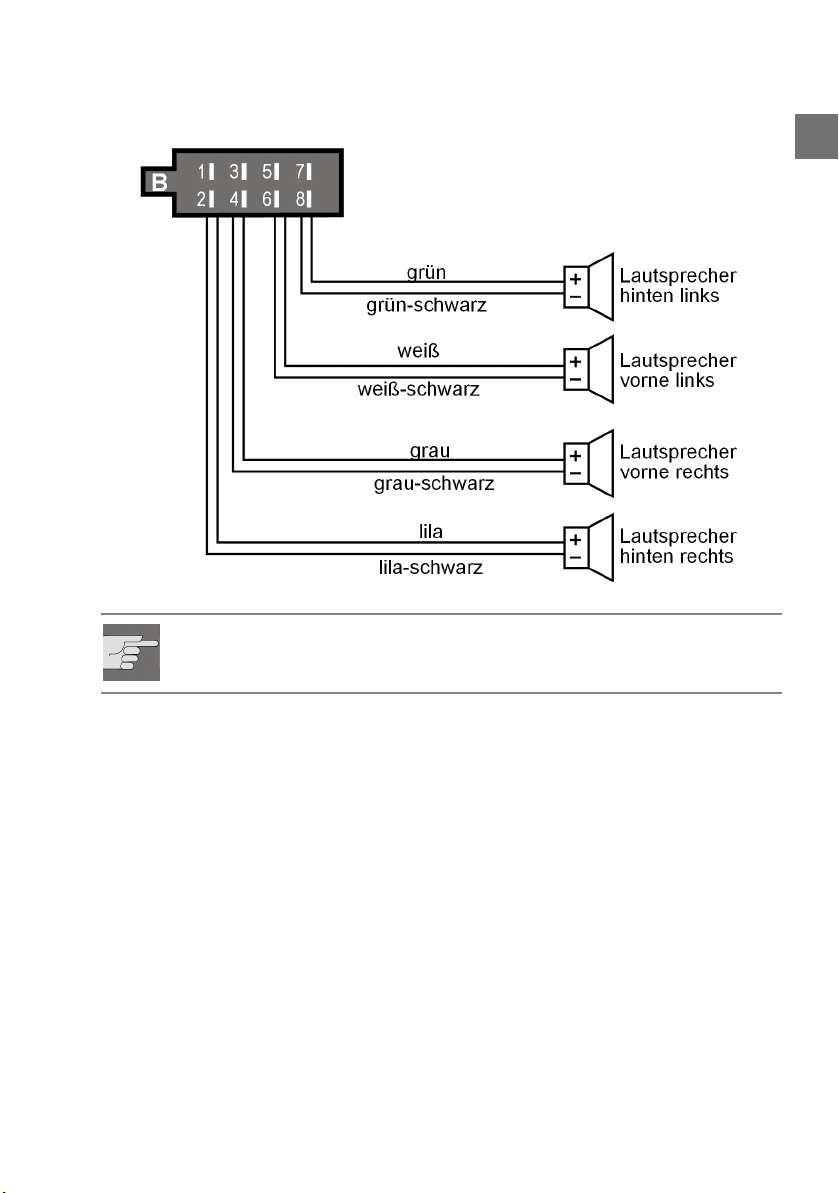
Übersicht ISO-Stecker B: Lautsprecher
Wenn das Fahrzeug nur vordere Lautsprecher hat und die Kabel für die
hinteren Lautsprecher nicht benötigt werden, müssen die freiliegenden
Enden dieser Kabel fachgerecht isoliert werden.
DE
MD 82309 DE-19
Page 20
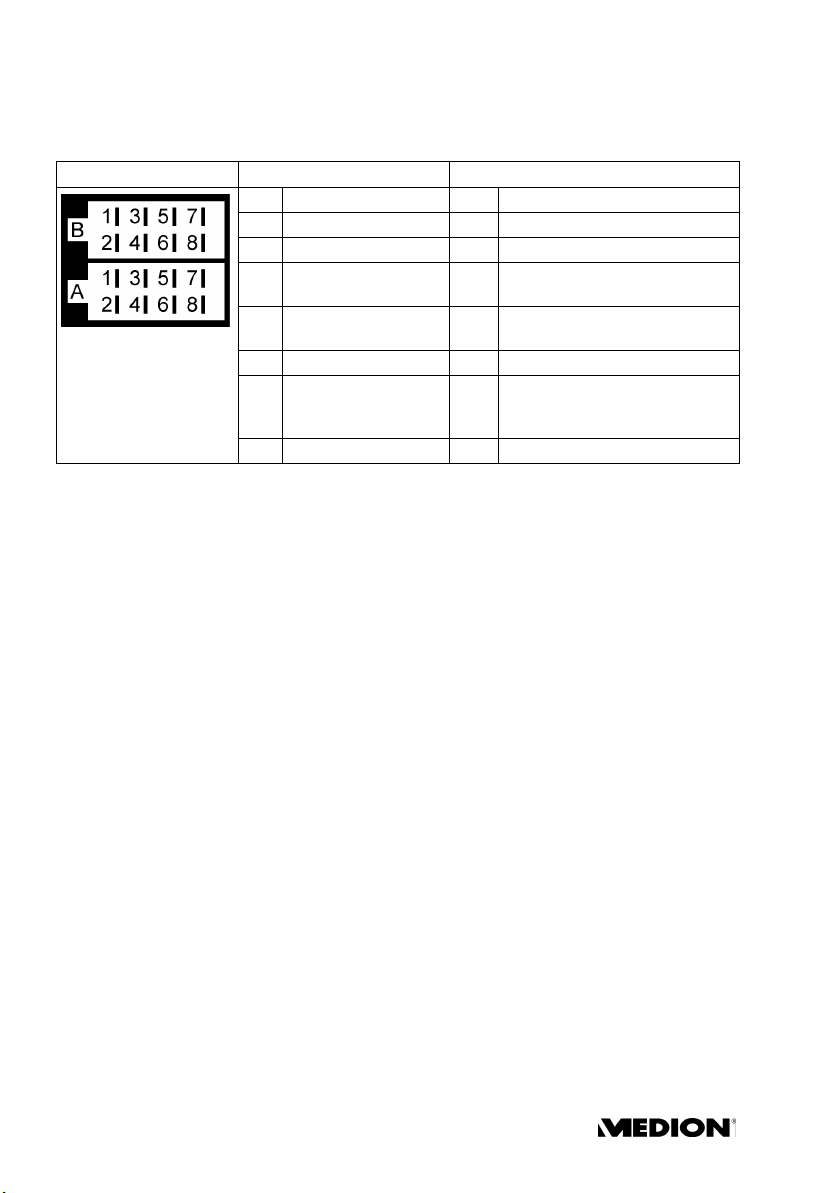
Belegung des ISO-Buchsenblocks am Autoradio
ISO-Block BLOCK B - Lautsprecher BLOCK A - Stromversorgung
1 rechts hinten + 1
2 rechts hinten - 2
3 rechts vorne + 3
4 rechts vorne - 4 Dauerplus (permanente 12-
5 links vorne + 5 Auto-Antenne (auch für
6links vorne - 6
7 links hinten + 7 Schaltplus (geschaltet 12-V-
8 links hinten - 8 Masse
V-Bordspannung)
externen Verstärker usw.)
Spannung, über Zündschloss)
Probleme durch Kabelvertauschung
In einigen Fahrzeugmodellen ist im ISO-Stecker für den ISO-Block A die standardmäßige Belegung der Kabel Dauerplus und Schaltplus werkseitig vertauscht. Wenn dies der Fall ist, sind manche Funktionen beeinträchtigt, z. B.
geht die Senderspeicherung verloren.
Zur Abhilfe müssen das Kabel für Schaltplus (rot) und das Kabel für Dauerplus
(gelb) im ISO-Buchsenblock getauscht werden. Hierfür geeignete Adapter
sind im Fachhandel erhältlich.
DE-20
Page 21
Allgemeine Funktionen
Schalten Sie das Radio nicht über einen längeren Zeitraum ohne laufenden Motor ein. Die Autobatterie kann sich dadurch entladen und
das Fahrzeug kann nicht mehr gestartet werden.
Ein-/Ausschalten und stumm schalten
` Halten Sie die Taste PWR/MUTE ein paar Sekunden gedrückt, um das Ge-
rät ein- und auszuschalten.
` Das Gerät schaltet sich auch ein, wenn eine beliebige Taste, ausser der Ta-
ste OPEN gedrückt wird.
` Wenn Sie die Taste PWR/MUTE kurz drücken, schalten Sie nur den Ton ein-
und aus („MUTE“ = stumm schalten).
` Drücken Sie PWR/MUTE ein weiteres Mal, um den Ton wieder einzuschal-
ten.
Toneinstellungen mit PUSH/SEL
Lautstärke
Der Multiregler PUSH/SEL ist in der Grundfunktion (ohne Tastendruck) der
Lautstärkeregler (VOL+/VOL–).
` Drehen Sie das Rad nach links oder rechts, um die Lautstärke zu senken
oder zu heben.
DE
Stellen Sie die Lautstärke immer nur so hoch ein, dass Sie die akustischen
Signale von Notfahrzeugen jederzeit noch deutlich hören können!
Bass/Höhen/Balance/Fader
` Drücken Sie wiederholt den Multiregler PUSH/SEL, um die aktuelle Ein-
stellung von Bass (
zeigen.
` Drehen Sie den Multiregler PUSH/SEL, um die Einstellungen zu ändern.
Die Bässe und Höhen können nicht eingestellt werden, wenn beim
Equalizer die Einstellung
MD 82309 DE-21
BAS), Höhen (TRE), Balance (BAL) und Fader (FAD) anzu-
DSP NONE verändert wurde (s. u., „Equalizer“).
Page 22

Erweiterte Einstellungen mit PUSH/SEL
Über den Multiregler PUSH/SEL können Sie zusätzlich die Einstellung von
Einschaltlautstärke, Uhrzeiteinstellung, Lautstärke des Verkehrsfunks, EONFunktion, Aufnahmeformat, Equalizer, Loudness, Empfangsempfindlichkeit
und Stereosignal vornehmen.
` Halten Sie den Multiregler PUSH/SEL für etwa 2 Sekunden lang gedrückt
und drücken Sie ihn dann mehrmals, um folgende Einstellungen aufzurufen:
INVOL - Einschaltlautstärke einstellen
` Drehen Sie den Multiregler PUSH/SEL, um die Grundlautstärke einzustel-
len, mit der sich das Radio einschalten soll.
ADJ - Uhrzeit einstellen
Ihr Autoradio ist mit einer RDS-gesteuerten Uhr ausgestattet. Die Uhr stellt
sich bei eingeschalteter EON-Funktion automatisch und läuft auch bei ausgeschaltetem Radio weiter. Wenn Sie kein RDS-Signal empfangen, können Sie
hier die Uhrzeit auch manuell einstellen.
` Drehen Sie den Multiregler PUSH/SEL nach rechts, um die Stunden einzu-
stellen und nach links, um die Minuten einzustellen.
TAVOL - Lautstärke für Verkehrsfunk einstellen
Sie können den Vekehrsfunk auf eine höhere Lautstärke einstellen, damit Sie
die Verkehrsnachrichten auch dann deutlich hören, wenn die Radiolautstärke
niedrig ist.
` Drehen Sie den Multiregler PUSH/SEL, um die Lautstärke einzustellen, mit
der Verkehrsnachrichten eingeschaltet werden sollen.
EON - Ein-/Ausschalten der EON-Funktion
Mit den erweiterten Sendeinformationen „EON“(Enhanced other network)
stehen Ihnen zusätzliche Funktion beim Finden eines Verkehrsfunksenders
zur Verfügung. Insbesondere schaltet das Gerät auch dann auf einen Sender
mit Verkehrsfunk (oder einem bestimmten PTY-Typen) um, wenn Sie einen
Sender hören, der keinen Verkehrsfunk ausstrahlt. Nach der Verkehrsmeldung wird wieder auf den vorherigen Senderplatz umgeschaltet.
` Drehen Sie den Multiregler PUSH/SEL um die EON-Funktion ein- (
oder auszuschalten (
Im Auslieferungszustand oder nach einem Reset ist
DE-22
EON OFF).
EON ON aktiviert.
EON ON)
Page 23

REC - Aufnahmeformat einstellen
` Drehen Sie den Multiregler PUSH/SEL, um das Aufnahmeformat für die
Aufnahme auf SD/MMC bzw. USB-Datenträgern auf
oder
WMA (WindowsMedia-Audio) einzustellen.
MP3 (MP3-Dateien)
TELVOL - Telefonlautsärke einstellen
` Drehen Sie den Multiregler PUSH/SEL, um die Grundlautstärke einzustel-
len, mit der sich ein Telefongespräch einschalten soll.
DSP - Equalizer einstellen
Sie können für die Tonausgabe eine Klangeinstellung hinzuschalten.
` Drehen Sie den Multiregler PUSH/SEL, um zwischen den Einstellungen
CLAS, ROCK, POP, FLAT und NONE zu wählen.
In der Einstellung
Wenn Sie eine andere Einstellung als die Grundeinstellung
wählen, können Sie die Höhen und Tiefen nicht mehr separat regeln
(siehe “Toneinstellungen mit PUSH/SEL” auf Seite 21).
FLAT sind alle Equalizer-Einstellungen auf Null gesetzt.
DSP NONE
LOUD - Loudness-Funktion ein-/ausschalten
` Drehen Sie den Multiregler PUSH/SEL, um die Loudnessfunktion ein-
(
LOUD ON) oder auszuschalten (LOUD OFF).
Die Loudnessfunktion bewirkt ein Anheben der Tieftöne bei niedriger Lautstärke.
LOC - Empfangsempfindlichkeit einstellen (nur im Radiomodus)
` Drehen Sie den Multiregler PUSH/SEL, um die Empfangsempfindlichkeit
des Antenneneingangs zu dämpfen (
lichkeit einzustellen (
Wenn bei der Senderabstimmung nur starke Lokalsender empfangen
werden sollen ist die eingeschaltete Funktion bei FM-Sendern wirksam.
Um eine zu starke Dämpfung des Antennensignals auf Dauer zu verhindern, stellen Sie nach dem Ende der Sendersuche wieder eine normale
Empfindlichkeit ein (
LOC OFF).
LOC OFF).
LOC ON) oder eine normale Empfind-
DE
STEREO Stereo- oder Monoempfang einstellen (nur im FM-Radiomodus)
Die meisten FM-Sender werden in Stereo ausgestrahlt. Bei Stereoempfang erscheint die Anzeige im Display. Bei ungünstigen Empfangsbedingungen
kann es erforderlich sein den Monoempfang einzustellen, um die Empfangsqualität zu verbessern.
` Drehen Sie den Multiregler PUSH/SEL, um entweder Stereo- (
Monoempfang (
MD 82309 DE-23
MONO) einzustellen.
STEREO) oder
Page 24
Display
` Durch wiederholtes Drücken der Taste DIS/REC können Sie die Anzeige im
Display folgendermaßen umschalten:
Während des Radiobetriebs: „
> Radiofrequenz **> RDS-Anzeige.
Im CD-Betrieb: „
Frequenz** > RDS-Anzeige > Wiedergabe- bzw. CD-/MP3-Informationen.
Im USB- oder Karten-Betrieb: „
> Frequenz** > RDS-Anzeige > Wiedergabeinformationen des USB-Daten-
trägers oder der SD/MMC-Karte
Im AUX-Betrieb: „
Frequenz** > RDS-Anzeige > Anzeige „
* Die PTY-Funktionen werden von den Sendeanstalten in unterschiedlichem
Umfang gesendet; siehe auch Kapitel “Radiobetrieb: Radio Data System”,
Seite 27.
Wenn Sie keine RDS- oder PTY-Informationen empfangen, erscheint
im Display. Jede Anzeige erscheint nur für ein paar Sekunden.
** Wenn keine Frequenz empfangen wird, erscheint
CT“ (Clocktime) Uhrzeit > PTY-Einstellungen* >
CT“ (Clocktime) Uhrzeit > PTY-Einstellungen* >
CT“ (Clocktime) Uhrzeit > PTY-Einstellungen*
CT“ (Clocktime) Uhrzeit > PTY-Einstellungen*
AUX“.
PTY none
PS None im Display
Betriebsart („Mode“)
` Drücken Sie die Taste MODE wiederholt, um zwischen Radioempfang, CD-
Betrieb (
(
AUX) zu wechseln.
Bitte beachten Sie, dass ein Datenträger eingelegt bzw. angeschlossen sein
muss, um in den jeweiligen Modus wechseln zu können.
CD), Kartenbetrieb (SD/MMC), USB-Betrieb (USB) und AUX-Betrieb
Reset
` Um das Autoradio in den Auslieferungszustand
zurückzusetzen, drücken Sie mit einem spitzen
Gegenstand, z. B. einem Kugelschreiber, in die
RESET-Öffnung. Sie befindet sich hinter dem Be-
dienteil.
` Betätigen Sie das RESET
– bei der ersten Inbetriebnahme nach Anschluss
der Kabel,
– wenn nicht alle Funktionstasten funktionieren,
– bei Erscheinen einer Fehlermeldung im Display.
DE-24
Page 25
Radiobetrieb: Grundfunktionen
Bandbereich wählen
` Drücken Sie die Taste BAND, um zwischen UKW (FM1, FM2, FM3), Mittel-
welle (MW1 und MW2) zu wechseln. In jedem Bereich können Sie sechs
Sender speichern.
Die drei Bandbereiche FM1, FM2 und FM3 und die beiden Bandbereiche MW1 und MW2 decken jeweils den selben Frequenzbereich ab. Auf
diese Weise können Sie bis zu 18 Sender im UKW-Bereich und 12 Sender
im MW-Bereich speichern.
Sender suchen
Automatisch suchen
` Drücken Sie eine der Tasten oder kurz, um die automatische Sender-
suche auszulösen. Das Gerät sucht nun automatisch den nächsten Sender.
` Um die Suche anzuhalten, drücken Sie wiederum oder .
Manuell suchen
` Wenn Sie eine der Tasten oder etwas länger gedrückt halten,
schalten Sie die manuelle Sendersuche ein. Im Display erscheint
` Verändern Sie den Wert wiederum mit oder .
AF-Sender suchen
Im AF-Modus wechselt das Radio im UKW-Band automatisch zu einer Station
mit einer alternativen Frequenz, die dasselbe Programm ausstrahlt, wenn der
Empfang der ursprünglichen Frequenz zu schwach wird („AF“ = „Alternative
frequency“) (Siehe “Alternative Frequenzen (Taste AF)”, Seite 27).
` Um den AF-Modus einzuschalten, drücken Sie die Taste AF einmal. Im Dis-
play erscheint die AF-Anzeige.
` Drücken Sie dann in einem der drei Bandbereiche FM1, FM2 oder FM3 die
Taste oder , um den UKW-Bandbereich nach Sendern zu durchsu-
chen, die ein AF-Signal ausstrahlen.
Der Suchlauf hält bei jedem gefundenen Sender an.
` Um den AF-Modus zu deaktivieren, drücken Sie AF erneut. Die Anzeigen
erlöschen.
Bei der Auslieferung oder nach einem Reset ist der AF-Modus eingeschaltet.
MANUAL.
DE
MD 82309 DE-25
Page 26

Sender speichern
Manuell speichern
` Nachdem der Suchlauf einen Sender gefunden hat, drücken Sie für ca. zwei
Sekunden eine der Stationstasten 1 bis 6. In jedem Bandbereich (FM1,
FM2, FM3, MW1 und MW2) können Sie sechs Sender speichern.
Das Gerät schaltet nach ein paar Sekunden wieder in die automatische Sendersuchfunktion um.
Automatisch speichern
` Halten Sie die Taste AS/PS etwa zwei Sekunden lang gedrückt. Der aktu-
elle Bandbereich wird nach den sechs stärksten Sendern durchsucht. Die
gefundenen Sender werden automatisch auf den Programmplätzen 1 bis
6 gespeichert. Die gefundenen Sender werden für ca. 5 Sekunden angespielt. Danach wird der auf Speicherplatz 1 ablegte Sender gespielt.
` Falls Sie die Suche stoppen möchten, drücken Sie eine der Stationstasten
1 bis 6.
Sender aufrufen
Einzelne Sender aufrufen
` Wählen Sie mit BAND den Bandbereich.
` Durch Drücken einer der Stationstasten 1 bis 6 rufen Sie die gespeicherten
Sender wieder auf.
Gespeicherte Sender durchlaufen
Sie können die gespeicherten Sender des aktuellen Sendebereichs aufrufen.
` Wählen Sie mit BAND den Bandbereich.
` Drücken Sie kurz die Taste AS/PS. Alle Sender werden für ca. fünf Sekun-
den angespielt.
` Wenn Sie den gewünschten Sender hören möchten, drücken Sie kurz die
Taste AS/PS.
DE-26
Page 27

Radiobetrieb: Radio Data System
Das Radio Data System ist ein Service der Rundfunkanstalten. Neben herkömmlichen Musik- und Sprachbeiträgen werden Zusatzinformationen in
Form verschlüsselter Digitalsignale ausgesendet, die vom Autoradio angezeigt werden können. Diese Informationen – wie etwa der Sendername oder
der Titel der gerade gespielten Musik – werden im Display angezeigt.
Wenn der Sender keine RDS-Signale sendet, erscheint statt des Sendernamens die Frequenz.
Falls der Sender, der RDS-Signale
sendet, auch Verkehrsinformationen zur Verfügung stellt, erscheint
im Display die Anzeige „TP“ („Traf-
fic Program“ = Verkehrsprogramm).
Alternative Frequenzen (Taste AF)
Eine Funktion des RDS ist die AF-Funktion im UKW-Band („AF“ = „Alternative
Frequenzen“). Im RDS-Modus wird beim Verlassen des Bereiches einer Sendestation automatisch auf eine andere Frequenz gewechselt. Der Wechsel ist
nur dann erfolgreich, wenn auch der PI-Code übereinstimmt (der PI-Code ist
die Programm-Identifikation, der Programme und Senderketten eindeutig
kennzeichnet). So wird vermieden, dass das Radio auf eine Frequenz wechselt, die an diesem Punkt von einem anderen Programm belegt ist.
` Drücken Sie die Taste AF kurz,
um die AF-Funktion für den Radio
Data System-Modus ein- oder
auszuschalten. Im Display erscheint bei eingeschalteter Funktion „AF“.
Die AF-Anzeige im Display blinkt, wenn keine Radio Data System-Informationen verfügbar sind.
DE
MD 82309 DE-27
Page 28

Regionalprogramm-Modus
Einige Sender strahlen zu bestimmten Tageszeiten Regionalprogramme aus.
Im Regionalprogramm-Modus kann das Radio nicht auf eine Frequenz wechseln, die ein anderes regionales Programm ausstrahlen.
` Um den Regionalprogramm-Mo-
dus ein- oder auszuschalten, halten Sie die Taste AF für länger als
zwei Sekunden gedrückt. Beim
Einschalten erscheint im Display
kurz
REG ON.
TA – Verkehrsfunk
„TA“ („Traffic Announcement“) ist der Verkehrsfunk-Modus. Wenn der Sender
RDS-Signale sendet und Verkehrsfunk zur Verfügung stellt, wird bei eingeschalteter TA-Funktion sofort von anderen Betriebsarten (z. B. CD) auf das Radio umgeschaltet, wenn Verkehrsfunk übertragen wird. Der Lautstärkepegel
wird bei Verkehrsdurchsagen auf die Lautstärkehöhe angehoben, die unter
der Funktion TA VOL eingestellt ist, sofern er sich unter dieser Schwelle befunden hatte (im Auslieferungszustand „16“; siehe Seite 22).
Sender, die Verkehrsdurchsagen übertragen, sind im Display durch „
kennzeichnet.
` Drücken Sie die Taste TA, um die TA- Funktion ein- oder auszuschalten. Bei
Sendern, die Verkehrsdurchsagen übertragen, blinkt im Display „TA“
Bei Sendern, die keine Verkehrsdurchsagen übertragen, erscheint die Anzeige „TA“ dauerhaft.
` Wenn die Verkehrsdurchsage erfolgt, leuchtet die Anzeige „TA“ perma-
nent. Bei Sendern, die keine Verkehrsdurchsagen übertragen, wechselt die
Radiowiedergabe zum Sender, auf dem die Verkehrsdurchsage erfolgt.
` Wenn das Radio aus dem CD/MP3-Modus, aus dem USB-Modus, aus dem
SD/MMC-Modus oder von einem Sender ohne Verkehrsdurchsage auf einen Sender mit Verkehrsdurchsage umschaltet, können Sie diesen Vorgang unterbrechen. Drücken Sie hierzu die Taste TA kurz. Die TA-Funktion
wird nun unterbrochen, und das Gerät schaltet zurück in die zuletzt gewählte Betriebsart, ohne dass der TA-Modus abgeschaltet wird.
Bei eingeschalteter TA-Funktion können während der Sendersuche nur
Sender gefunden bzw. gespeichert werden, die ein Verkehrsfunksignal
ausstrahlen.
TP“ ge-
.
DE-28
Page 29
PTY - Program Type Code (Programm Typ/ Kennung)
„PTY“ ist eine Funktion, bei der das Autoradio gezielt nach Sendern mit vorwählbarem Programminhalt sucht.
` Um die PTY-Suche zu aktivieren, drücken Sie die Taste PTY. Im Display er-
scheint „
` Bei der Sendersuche mit den Tasten oder werden nun nur Sender
der aktuell gewählten PTY-Kennung (siehe Auflistung auf der nächsten
Seite) berücksichtigt.
` Um die PTY-Suche zu deaktivieren, drücken Sie die Taste PTY erneut.
PTY-Kennung einstellen
` Halten Sie die Taste PTY länger gedrückt und drehen Sie dann den Multi-
regler PUSH/SEL, um die gewünschte PTY-Kennung einzustellen.
Sender anhand von PTY-Kennung suchen
Wenn Sie während der Anzeige einer PTY-Kennung kurz die Taste PTY oder
die Tasten oder drücken, startet sofort ein Suchlauf nach Sendern,
die dieser PTY-Kennung entsprechen.
PTY“.
Wenn das Radio keine PTY-Informationen empfängt, erscheint am Ende
der Suche
eingestellten Sender.
NOT FND im Display. Danach endet der Suchlauf beim zuletzt
DE
MD 82309 DE-29
Page 30

Folgende Programmtypen sind möglich:
NEWS: Nachrichten
AFFAIRS: Aktuelle Ereignisse
INFO: Ratgeber, Infos
SPORT: Sportereignisse
EDUCATE: Erziehung
DRAMA: Hörspiele
CULTURE: Kultur
SCIENCE: Naturwissenschaft und Technologie
VARIED: Verschiedenes
POP M: Popmusik
ROCK M: Rockmusik
EASY M: Leichte Musik
LIGHT M: Leichte klassische Musik
CLASSICS: Klassik
OTHER M: andere Musik
WEATHER: Wetter
FINANCE: Finanzen, Börse
CHILDREN: Kinderprogramme
SOCIAL: Soziales, Aktivitäten
RELIGION: Religion, Ethik
PHONE IN: Sender mit Anrufmöglichkeit
TRAVEL: Reise
LEISURE: Freizeitaktivitäten
JAZZ: Jazz
COUNTRY: Countrymusik
NATION M: Musik anderer Länder
OLDIES: Oldie-Musik
FOLK M: Folk-Musik
DOCUMENT: Nachrichten-Berichterstattung
TEST: Notfalltest
ALARM: Alarmmeldungen
Bitte beachten Sie, dass diese Informationen von der Region, der Rundfunkanstalt und dem Sender abhängig sind.
DE-30
Page 31

Betrieb mit Datenträgern (Audio-CDs, MP3, USB, SD/MMC, AUX)
Das Autoradio verfügt über verschiedene Laufwerke und Anschlüsse und
kann verschiedene Audioformate abspielen:
Laufwerke und Anschlüsse Datenträger und Formate
CD-Laufwerk Für kommerzielle Audio-CDs und eigene CDs mit
USB-Anschluss Für USB-Sticks* oder MP3-Player*
SD/MMC-Kartenlesegerät Für SD/MMC-Speicherkarten* mit MP3- oder
AUX IN-Anschluss Zum Anschluss externer Audiogeräte, z. B. eines
A2DP-Modus
Die Wiedergabefunktionen der verschiedenen Datenträger sind weitgehend identisch und werden in dieser Anleitung zusammen beschrieben (siehe Seite 33).
MP3- und WMA-Dateien haben eigene Such- und Anzeigefunktionen (siehe Seite 34).
MP3- oder WMA-Dateien. Die CDs können auch
das Format CD-R und CD-RW haben.
WMA-Dateien
CD-Spielers, über einen 3,5 mm-Klinkenstecker
Die Audiodateien werden vom Bluetooth-Gerät
auf das Radio übertragen.
* Die Kompatibilität zu allen am Markt
erhältlichen MP3-Playern, USB-Sticks oder
Speicherkarten kann nicht garantiert werden.
DE
Das CD-Laufwerk
Das CD-Laufwerk befindet sich hinter dem Bedienteil. Neben kommerziellen
Audio-CDs kann das Autoradio auch das CD-R- und das CD-RW-Format abspielen.
CDs einlegen und herausnehmen
` Drücken Sie die Taste OPEN, um das Bedienteil herunterzuklappen.
` Schieben Sie die CD mit der beschrifteten Seite nach oben in den Schlitz.
MD 82309 DE-31
Page 32

` Schließen Sie das Bedienteil wieder. Die Daten werden eingelesen (vgl.
nächsten Abschnitt „ Anzeigen beim Einlesen“); dann beginnt die Wiedergabe.
` Zum Herausnehmen der CD öffnen Sie wiederum das Bedienteil. Drücken
Sie die Taste OPEN und (Auswurf). Die CD wird ausgeworfen. Das Autoradio schaltet in den Radio-Modus um.
Fahren Sie nicht mit einer herausgefahrenen CD.
Entnehmen Sie die CD sofort.
Anzeigen beim Einlesen
Während die Daten eingelesen werden, erscheint im Display „TOC READ“ = Inhaltsverzeichnis lesen („TOC“ = „Table of Contents“ = Inhaltsverzeichnis).
Wenn der Datenträger keine Daten enthält, erscheint „
teien).
NO FILES“ (= keine Da-
Kein „Springen“ bei Erschütterungen
Das Gerät ist mit einer Funktion ausgestattet, die Erschütterungen, z. B. auf
unebenen Straßen, ausgleicht und eine unterbrechungsfreie Wiedergabe
auch bei Bewegung des Geräts gewährleistet. Beim Einschalten des Geräts
füllt sich der Speicher automatisch mit Daten:
– bei Audio-CDs für 8 Sekunden;
– bei MP3-CDs für 100 Sekunden.
Der USB-Anschluss
Sie können einen MP3-Player oder einen anderen USB-Datenträger an den
USB-Anschluss an der Gerätefront anschließen.
Ihr Autoradio kann USB-Datenträger bis zu 8 GB (geprüft) verarbeiten.
Dabei darf die Verzeichnisstruktur maximal 99 Ordner und 990 Dateien ent-
halten.
USB-Gerät anschließen
` Verbinden Sie Ihr USB-Gerät (z. B. einen USB-Stick oder einen MP3-Player)
mit dem Anschluss. Im Display erscheint
nach MP3- oder WMA-Dateien auf dem Datenträger und im Display erscheint die Meldung
` Wenn das Gerät in einem anderen Modus ist (Radio, CD), können Sie den
USB-Anschluss mit der MODE Taste anwählen.
DE-32
USB.
TOC READ. Das Autoradio sucht
Page 33

` Die Bedienung zum Abspielen von Dateien auf dem externen Datenträger
sowie die Suchfunktion funktionieren genau wie bei MP3-CDs.
Das SD/MMC-Kartenlesegerät
Das SD/MMC-Laufwerk befindet sich hinter dem Bedienteil.
Karte einlegen und herausnehmen
` Drücken Sie die Tasten OPEN, um das Bedienteil herunterzuklappen.
` Schieben Sie die Speicherkarte mit den Kontakten zur rechten Seite und
der abgekanteten Ecke nach oben in den Kartenschlitz. Das Autoradio
sucht nach MP3- oder WMA-Dateien auf dem Datenträger und im Display
erscheint die Meldung
` Wenn das Gerät in einem anderen Modus ist (Radio, CD), können Sie den
USB-Anschluss mit der Taste MODE anwählen.
SD/MMC.
Der AUX IN-Anschluss
Sie können ein weiteres Audiogerät, z. B. einen CD-Spieler, mit einem
3,5 mm-Klinkenstecker an die AUX IN-Buchse des Autoradios anschließen.
Im Display erscheint die Meldung
` Wenn das Gerät in einem anderen Modus ist (Radio, CD), können Sie den
USB-Anschluss mit der Taste MODE anwählen.
` Die Bedienung zum Abspielen von Dateien auf dem externen Datenträger
sowie die Suchfunktion funktionieren genau wie einer Audio-CD bzw. einer MP3-CD.
AUX.
DE
Wiedergabefunktionen
Für die Wiedergabe über Mobiltelefon s. a. “Audio-Streaming (A2DP)”,
Seite 42.
Pause und Wiedergabe
` Die Wiedergabe können Sie mit der Taste PAUSE (Zifferntaste 1) unterbre-
chen. Während der Pause blinkt die Anzeige im Display.
` Drücken Sie die Taste erneut, um die Wiedergabe wieder aufzunehmen.
Titel überspringen
` Mittels der Tasten oder können Sie den nächsten bzw. den vorhe-
rigen Titel wählen. Die Titelnummer wird im Display angezeigt.
` Mit den Tasten –10 und +10 (Zifferntasten 5 und 6) können Sie zehn Titel
rückwärts bzw. vorwärts überspringen.
MD 82309 DE-33
Page 34

Schneller Rück-/Vorlauf
` Halten Sie die Tasten oder etwas länger gedrückt, um einen
schnellen Rück- oder Vorlauf zu starten. Lassen Sie die Tasten los, um den
Schnelllauf zu beenden.
Wiederholen
` Drücken Sie die Taste RPT (Zifferntaste 2) einmal. Im Display erscheint RPT.
Der aktuelle Titel wird wiederholt.
` Ein erneuter Tastendruck setzt die normale Wiedergabe in Gang.
Titel kurz anspielen
` Drücken Sie die Taste INT (Zifferntaste 3). Es werden nacheinander alle Titel
für ca. zehn Sekunden angespielt.
` Ein erneuter Tastendruck setzt die normale Wiedergabe in Gang.
Zufallswiedergabe aller Titel
` Drücken Sie die Taste RDM (Zifferntaste 4). Es wird eine zufallsgesteuerte
Wiedergabe gestartet.
` Ein erneuter Tastendruck setzt die normale Wiedergabe in Gang.
Einen Titel suchen
` Drücken Sie die Taste AS/PS. Im Display blinkt die aktuelle Titelnummer.
` Drehen Sie den Multiregler PUSH/SEL oder drücken Sie die Tasten
/ , um eine andere Titelnummer einzustellen.
` Bei mehrstelligen Titelnummern drehen Sie den Multiregler PUSH/SEL,
um die letzte Stelle einzugeben und drücken Sie dann den Multiregler
PUSH/SEL, um die nächste Stelle anzuzeigen usw.
` Bei der gewünschten Titelnummer drücken Sie die Taste BAND, um den Ti-
tel abzuspielen.
Suchfunktionen bei MP3- und WMA-Datenträgern
Das MP3-Format verfügt über besondere Suchfunktionen. Außer nach Titelnummern kann auch nach Titelnamen und nach Verzeichnisnamen gesucht
werden.
Diese Funktion und die anderen MP3-spezifischen Funktionen sind maßgeblich abhängig von der MP3-CD. Bitte beachten Sie dies schon beim Erstellen
dieser CDs (siehe nächster Abschnitt).
Es können alle gängigen MP3-Kodierungen abgespielt werden.
DE-34
Page 35

Erstellung von MP3-Datenträgern; ID3-TAGs
Datenträger mit MP3-Dateien (CD-ROMs, USB-Sticks etc.) können wie
Daten-CDs Einzeltitel oder Verzeichnisse enthalten. Bitte beachten Sie
bei der Erstellung des Datenträgers, dass Sie Titel nicht auf derselben
Ebene wie Verzeichnisse, sondern nur in den Verzeichnissen abspeichern. Ein Vermischen von Titeln und Verzeichnissen auf derselben
Ebene könnte zu Problemen beim Abspielen führen.
Beim Erstellen der MP3-Dateien können Sie außerdem so genannte „ID3-
Tags“ abspeichern (zur Eingabe empfehlen wir einen ID3-Tag-Editor). Dies ist
ein Informationsblock in einer MP3-CD, der in der MP3 hinter der eigentlichen
Musikinformation liegt. Dies können z. B. Informationen über den Interpreten, Titel, Albumname, Erscheinungsjahr und ein kurzer Kommentar sein.
Das Autoradio kann diesen Informationsblock auslesen und im Display anzeigen. In einer Laufschrift werden die verschiedenen Informationen nacheinander angezeigt.
Suche nach Titeln
Titelnummern suchen
Eine Titelnummer wird genau wie bei einer Audio-CD gesucht (siehe “Einen
Titel suchen” auf Seite 34). Dabei werden nicht nur die Titel in der obersten
Verzeichnisebene, sondern alle Titel auf dem Datenträger angezeigt.
Titelnamen suchen (Zeichen)
` Drücken Sie die Taste AS/PS zweimal. Die erste Stelle blinkt.
` Sie können jetzt innerhalb des aktuellen Verzeichnisses nach dem Anfang
eines Titels suchen, indem Sie mit dem Multiregler PUSH/SEL oder den
Tasten / ein Zeichen aussuchen.
` Wenn Sie den ersten Buchstaben des Titels gefunden haben, drücken Sie
PUSH/SEL. Der Buchstabe erscheint im Display und die nächste Stelle
blinkt.
` Suchen Sie mit dem Multiregler PUSH/SEL oder den Tasten /
nach dem zweiten Buchstaben des Titels und drücken Sie den Multiregler
PUSH/SEL, wenn Sie ihn gefunden haben. Der zweite Buchstabe erscheint
im Display und die dritte Stelle blinkt.
` Suchen Sie mit dem Multiregler PUSH/SEL oder den Tasten /
nach dem dritten Buchstaben des Titels und drücken Sie den Multiregler
PUSH/SEL, wenn Sie ihn gefunden haben. Der dritte Buchstabe erscheint
im Display.
` Am Schluss drücken Sie die Taste BAND, um den Titel abzuspielen.
DE
MD 82309 DE-35
Page 36

Suche nach Verzeichnissen
Vom Root-Verzeichnis aus suchen
` Drücken Sie AS/PS dreimal. Das oberste Verzeichnis („Root“-Verzeichnis)
erscheint.
` Mit dem Multiregler PUSH/SEL oder den Tasten / können Sie
jetzt durch alle Verzeichnisse und Titel scrollen und ein Verzeichnis auswählen.
` Drücken Sie BAND, um die Titel dieses Verzeichnisses abzuspielen.
DE-36
Page 37

Aufnahmefunktion
Hinweis: Bitte beachten Sie die an Ihrem Wohnort gültigen rechtlichen
Bestimmungen zum Anfertigen von Kopien von urheberrechtlich geschützten Werken. In Zweifelsfällen wenden Sie sich bitte an einen Fachmann in Ihrer Nähe.
Von Audio-CD aufnehmen
Sie können mit Ihrem Autoradio Daten vom CD-Player auf den externen USBDatenträger oder eine SD/MMC-Karte aufnehmen.
` Halten Sie im CD-Modus die Taste DIS/REC gedrückt.
Die Anzeige
(Beim Aufnahmeziel SD/MMC erscheint
` Drücken Sie die Taste
USB/MMC-ALL (Alle Titel aufnehmen) oder USB/MMC -ONE (einen Titel
aufnehmen) auszuwählen.
` Starten Sie die Aufnahme, indem Sie die Taste BAND drücken.
Die Audiodaten werden nun im vorher eingestellten Format (MP3 oder WMA,
siehe “REC - Aufnahmeformat einstellen” auf Seite 23) auf dem Datenträger
gespeichert. Zu Beginn der Aufnahme erscheint im Display kurz die Meldung
RECORD.
Anschließend signalisiert ein vorangestelltes „
Hinweis: Wenn der USB-Datenträger voll ist, wechselt die Aufnahme
automatisch auf den Kartenleser, sofern eine Speicherkarte eingelegt ist
(s. folgendes Kapitel).
` Um die Aufnahme vorzeitig zu beeenden, drücken Sie nochmals kurz die
Taste BAND. Nachdem im Display kurz
nahme gespeichert. Die Aufnahme wird auch beendet, wenn Sie in einen
anderen Modus (Radio, Aux, ...) wechseln.
` Sie können die Daten wieder abspielen, indem Sie mit der Taste MODE in
den USB- oder SD/MMC-Modus schalten und dann den entsprechenden
Titel vom Datenträger aufrufen.
USB ALL erscheint
SD/MMC ALL).
DIS/REC mehrmals um entweder die Aufnahmeoption
R“ die Aufnahme.
WAIT angezeigt wird, ist die Auf-
DE
MD 82309 DE-37
Page 38

MP3-Dateien kopieren
Sie können einzelne Titel einer MP3-CD auf den externen USB-Datenträger
oder eine SD/MMC-Karte kopieren.
` Halten Sie während der Wiedergabe eines Titels von einer MP3-CD die Ta-
ste DIS/REC gedrückt.
Die Anzeige
` Drücken Sie die Taste DIS/REC mehrmals um entweder die Kopieroption
COPY MMC erscheint.
COPY USB (auf USB-Datenträger kopieren) oder COPY MMC (auf SD/MMC-
Karte kopieren) auszuwählen.
Hinweis: Wenn sich nur ein Datenträger im Gerät befindet, startet der
Kopiervorgang sofort! Der Kopiervorgang wird beendet, wenn Sie in ei-
nen anderen Modus (Radio, Aux, ...) wechseln.
` Starten Sie den Kopiervorgang, indem Sie die Taste BAND drücken.
Während des Kopiervorgangs erscheint im Display
gabe von 01 - 100, die den Kopierfortschritt anzeigt. Nach der Anzeige
COPY und eine Prozentan-
COPY 100 ist der Kopiervorgang beendet und Wiedergabe des MP3-Titels wird
fortgesetzt.
Vom Radio oder Audioeingang aufnehmen
Sie können mit Ihrem Autoradio auch Daten von Radio bzw. dem Audioeingang auf einen USB-Stick oder eine Speicherkarte aufnehmen.
` Legen Sie ein Speichermedium in das Kartenfach oder den USB-Anschluss
ein und wählen Sie mit der Taste MODE den Radiomodus oder die Betriebsart
AUX.
Starten Sie gegebenenfalls die Wiedergabe des externen Audiogerätes.
` Halten Sie die Taste DIS/REC gedrückt.
Die Anzeige
` Drücken Sie die Taste DIS/REC mehrmals um entweder die Aufnahmeop-
tion
Speicherkarte aufnehmen) auszuwählen.
` Starten Sie den Kopiervorgang, indem Sie die Taste BAND drücken.
` Um die Aufnahme zu beenden, drücken Sie nochmals kurz die Taste BAND.
Die Aufnahme wird auch beendet, wenn Sie in einen anderen Modus (Radio, CD, ...) wechseln. Nachdem im Display kurz
Aufnahme gespeichert.
REC MMC erscheint.
USB (Auf USB Speichermedium aufnehmen) oder MMC (auf SD/MMC
WAIT angezeigt wird, ist die
DE-38
Page 39

Hinweis zu den Aufnahmedateien
Die Aufnahmen werden mit folgenden Bezeichnungen auf dem Daten-
träger gespeichert:
Audio-CD Aufnahmen: TRAC01, TRAC02 ...
MP3-CD Aufnahmen: MUSIC01, MUSIC02 ...
Radioaufnahmen: TUNER01, TUNER02 ...
AUX-Aufnahmen: AUXIN01, AUXIN02...
Audio-CD- und Radioaufnahmen werden in Stereo und mit einer Bitrate
von 128 kbps bzw. einer Samplingfrequenz von 44 kHz aufgenommen.
Beim Kopieren von MP3-Dateien wird das Aufnahmeformat der Kopier-
quelle übernommen.
Aufnahmen löschen
Sie können Aufnahmen und Titel im MP3/WMA-Format von einem USB- oder
SD/MMC-Datenträger löschen.
Wählen Sie mit der Taste MODE den USB- oder SD/MMC-Modus und starten
Sie die Wiedergabe der Datei, die Sie löschen wollen.
` Halten Sie die Taste DIS/REC gedrückt.
Die Anzeige
` Halten Sie die Taste DIS/REC gedrückt, wenn Sie den Löschvorgang abbre-
chen wollen.
` Drücken Sie die Taste BAND, um den Titel zu löschen.
DELETE erscheint.
DE
MD 82309 DE-39
Page 40

Bluetooth-Funktion benutzen
Das Autoradio verfügt über eine Bluetooth-Funktion, die Ihnen ermöglicht,
das Radio als Freisprechanlage für Ihr Mobiltelefon zu benutzen.
Voraussetzung ist natürlich, dass Ihr Mobiltelefon (Handy) die BluetoothFunktion unterstützt und mit dem Autoradio kompatibel ist.
Bluetooth-Anzeige
Das Bluetooth-Symbol im Display signalisiert den Status der Bluetooth Verbindung:
Langsames Blinken (alle 5 Sekunden): Standby
Schnelles Blinken (jede Sekunde): Verbindungsaufbau
Dauerhafte Anzeige: Verbindung aktiv
Telefon mit dem Autoradio koppeln („Pairing“)
` Führen Sie an Ihrem Mobiltelefon die Suche nach Bluetooth-Geräten
durch.
Nach erfolgreicher Suche erscheint für das Autoradio der Eintrag CAR RADIO
im Display des Mobiltelefons.
` Wählen Sie diesen Eintrag zur Verbindung aus und geben Sie bei der an-
schließenden Passwortabfrage das Passwort 0000 für das Autoradio ein.
Eventuell müssen Sie den Verbindungsaufbau noch einmal bestätigen.
` Nach erfolgreicher Kopplung erscheint im Display des Autoradios kurz
CONNECT und das Bluetooth Symbol im Display erscheint dauerhaft.
Automatischer Verbindungsaufbau
Beim Einschalten des Autoradios wird das zuletzt am Autoradio angemeldete
Mobiltelefon mit dem Autoradio gekoppelt. Wenn nach einer Minute keine
Verbindung zum Mobiltelefon aufgebaut werden kann, wird der Verbindungsaufbau abgebrochen.
` Wenn sich die Bluetooth Verbindung in Standby befindet (keine Verbin-
dung zum Mobiltelefon aktiv), drücken Sie die Taste TALK für etwa 2 Se-
kunden lang. Das Autoradio versucht nun mit dem zuletzt am Autoradio
angemeldeten Mobiltelefon eine Verbindung aufzubauen.
DE-40
Page 41

Anruf annehmen/beenden
Bei einem eingehenden Anruf hören Sie das Anrufsignal über die Lautsprecher des Autos, während im Display des Autoradios die Anrufernummer angezeigt wird.
` Nehmen Sie einen ankommenden Anruf an, indem Sie die Taste TALK an
der Vorderseite des Geräts drücken.
` Beenden Sie das Telefonat, indem Sie die Taste TALK an der Vorderseite des
Geräts erneut drücken.
Anruf abweisen
` Drücken Sie bei einem eingehenden Anruf für länger als 2 Sekunden die Ta-
ste TALK an der Vorderseite des Geräts, um den Anruf abzuweisen.
Wahlwiederholung, Anruferliste
` Drücken Sie die Taste TALK, um das Bluetooth-Menü aufzurufen.
` Drehen Sie anschließend den Multiregler PUSH/SEL, um einen der folgen-
den beiden Einträge auszuwählen. Wählen Sie einen Eintrag aus, indem Sie
die Taste TALK kurz drücken:
L-DIAL (Wahlwiederholung)
Nach Auswahl der Wahlwiederholung erscheint der Eintrag REDIAL. Nach einem weiteren Drücken der Taste TALK wird die letzte Rufnummer aus der
Rufnummernliste des Mobiltelefons gewählt.
CALL LST (Anruferliste)
Dieser Eintrag erscheint nur, wenn bereits Anrufe eingegangen sind.
DE
` Nach einem weiteren Drücken der Taste TALK, wird der zuletzt eingegan-
gene Anruf angezeigt.
` Drehen Sie den Multiregler, um weitere eingagangene Anrufe anzuzeigen.
` Drücken Sie die Taste TALK, um eine Anrufernummer zu wählen.
` Drücken Sie die Taste TALK länger als 2 Sekunden, um das Bluetooth-
Menü zu verlassen.
Anruf auf das Mobiltelefon schalten
` Drücken Sie während eines Gesprächs die Taste TALK länger als 2 Sekun-
den, um den Anruf auf das Mobiltelefon zu schalten.
Die Bluetooth-Verbindung wird hierfür unterbrochen. Nach Ende des Gesprächs wird die Verbindung wieder hergestellt.
MD 82309 DE-41
Page 42

Sprachwahl
Hinweis: Am Mobiltelefon muss eventuell die Sprachwahl (Voice
Dialing) eingestellt werden. Lesen Sie dazu unbedingt auch in der Bedienungsanleitung Ihres Mobiltelefons.
` Drücken Sie die Taste TALK länger als 2 Sekunden, bis der Eintrag
VOICE DIAL im Display erscheint.
` Sprechen Sie nach dem Signalton den Namen des Teilnehmers aus dem Te-
lefonverzeichnis des Mobiltelefons, um die Rufnummer zu wählen
Verbindung löschen
` Wenn keine Bluetooth-Verbindung aktiv ist, drücken Sie kurz die Taste
TALK. Im Display erscheint der Eintrag
Das zuletzt am Autoradio angemeldete Mobiltelefon wird nun gelöscht und
wird nicht mehr automatisch verbunden.
DEL PAIR.
Telefonkonferenz
` Wenn während eines Gesprächs ein weiterer Anruf eingeht, drücken Sie
kurz die Taste TALK, um das Gespräch anzunehmen.
Mit der Taste MODE können Sie zwischen beiden Teilnehmern wechseln.
Audio-Streaming (A2DP)
Ihr Autoradio verwendet das A2DP-Profil (Advanced Audio Distribution Profile) und kann somit Audiodaten Ihres Mobiltelefons wiedergeben.
Wählen Sie an Ihrem Mobiltelefon eine Audiodatei aus und starten Sie die
Wiedergabe.
Im Display des Autoradios erscheint der Eintrag A2DP und die Audiodatei
wird über die Lautsprecher des Autoradios wiedergegeben.
Hinweis
Am Mobiltelefon muss eventuell die Wiedergabe über Bluetooth Stereo-
Headset umgestellt werden.
Lesen Sie dazu unbedingt auch in der Bedienungsanleitung Ihres Mobil-
telefons.
Bei einigen wenigen Mobiltelefonen wechselt das Autoradio nicht auto-
matisch in den A2DP-Modus. Wechseln Sie in diesem Fall in den A2DPModus, indem Sie mehrmals die Taste MODE drücken, bis im Display
die Anzeige A2DP erscheint.
DE-42
Page 43

AVRCP (Audio Video Remote Control Profile)
AVRCP ist ein Bluetooth-Profil zur Fernsteuerung von Audio- oder Videogeräten.
Über die Taste PAUSE (Zifferntaste 1) können Sie die Wiedergabe der Audiodatei auf dem Mobiltelefon anhalten bzw. erneut starten.
Über die Tasten oder können Sie die vorherige oder nächste Audiodatei auf dem Mobiltelefon aufrufen.
DE
MD 82309 DE-43
Page 44

Wenn Störungen auftreten
PROBLEM MÖGLICHE URSACHE / ABHILFE
Das Gerät lässt sich nicht
einschalten.
Die CD wird nicht geladen oder ausgeworfen.
Kein Ton. Die Lautstärke steht auf Minimum.
Funktionstasten funktionieren nicht.
Die CD springt. Der Einbauwinkel übersteigt 30°.
Gerät am USB-Anschluss
funktioniert nicht.
Radio und/oder die automatische Senderspeicherung funktionieren nicht.
Senderspeicher funktioniert nicht.
Ihr Mobiltelefon wird
nicht erkannt.
Die Zündung ist nicht eingeschaltet.
Eine der Sicherungen ist defekt.
Es befindet sich bereits eine CD im Autoradio.
Die CD ist verkehrt herum eingelegt worden.
Die CD ist verschmutzt oder defekt.
Die Temperaturen im Auto sind zu hoch. Warten, bis
sich die Umgebungstemperatur normalisiert hat.
Kondensation. Das Autoradio ein paar Stunden aus-
schalten und es dann erneut versuchen.
Die Kabel sind nicht richtig angeschlossen.
Der eingebaute Microcomputer kann wegen Rau-
schens nicht funktionieren. Einen Reset durchführen
(in die Reset-Öffnung drücken).
Das Bedienteil sitzt nicht korrekt.
Die CD ist sehr schmutzig oder defekt.
Fehler bei selbstgebrannten CDs. Die selbstgebrannte
CD in einem anderen Abspielgerät überprüfen.
Der USB-Anschluss ist für Geräte, die nach der USB-
Norm funktionieren, bestimmt. Nicht alle am Markt
erhältliche Gerät erfüllen diese Norm. Unter Umständen ist ein Gerät, das nicht nach USB-Norm funktioniert, angeschlossen.
Das Antennenkabel ist nicht korrekt angeschlossen.
Die Sendersignale sind zu schwach. Die Sender
manuell einstellen.
Das Kabel für Dauerplus (gelb) ist nicht richtig ange-
schlossen. Beachten Sie hierzu das Kapitel “Einbau”,
Seite 11.
Das Mobiltelefon ist nicht kompatibel mit der Bluetooth-Einheit.
DE-44
Page 45

Sicherung erneuern
Das Autoradio verfügt auf der Rückseite über eine 15 A Sicherung, die auslöst,
wenn es zu Spannungsspitzen oder einem Kurzschluss kommen sollte.
Ersetzen Sie die Sicherung in diesem Fall durch einen gleichwertigen, in den
technischen Daten angegebenen Typ mit gleicher Abschaltcharakteristik.
Stellen Sie vor einem erneuten Einschalten des Autoradios die Ursache für das
Auslösen der Sicherung ab.
Entsorgungshinweise
Verpackung
Nicht mehr benötigte Verpackungen und Packhilfsmittel sind recyclingfähig und sollten grundsätzlich der Wiederverwertung zugeführt
werden.
Gerät
Werfen Sie das Autoradio am Ende seiner Lebenszeit keinesfalls in den
normalen Hausmüll. Erkundigen Sie sich nach Möglichkeiten einer
umwelt- und sachgerechten Entsorgung.
DE
MD 82309 DE-45
Page 46

Technische Daten
Allgemein
Betriebsspannung: DC12 V, Negative Masseverbindung
Gerät-Abmessungen: 178 x 175 x 50 mm (B x T x H)
Ausgangsleistung: max. 4 x 15 Watt (RMS)
Sicherungen: 15 Ampère
Radio
UKW (FM): 87,5 bis 108 MHz
Mittelwelle (MW): 522 bis 1620 kHz
Bluetooth-Version: 2.0
CD/MP3-Player
Laserleistung: Laser Klasse 1
Frequenzbereich: 40 Hz - 18kHz
MPEG-Rate: 64 - 320 k
MP3-Playback: ISO 9660 & Joliet Format of MP3
Anschluss
AUX: 3,5 mm Klinkenstecker
Unterstützte Formate
CD: Audio-CDs, CD-Rs,
CD-RWs
USB-Datenträger: 1.1 und 2.0 bis 8 GB
(geprüft)
Speicherkarten: SD bis 4 GB (SDHC > 4GB)
MMC bis 512 MB
Es gibt heute viele, zum Teil nicht standardisierte CD-Aufnahme- und
Kopierschutzverfahren sowie unterschiedliche CD-R und CD-RW-Rohlinge.
Darum kann es in Einzelfällen zu Einlesefehlern oder -Verzögerungen
kommen. Dies ist kein Defekt des Geräts.
Dieses Gerät ist zugelassen nach der Richtlinie 2004/104/EG
(zuletzt geändert durch die Richtlinie 2006/28/EG) -
"Elektromagnetische Verträglichkeit" (sog. E-Zulassung).
Technische Änderungen vorbehalten!
DE-46
Page 47

Konformitätsinformation
Hiermit erklärt Medion AG, dass sich das Gerät MD 82309 in Übereinstimmung mit den grundlegenden Anforderungen und den anderen relevanten
Vorschriften der der europäischen Richtlinie für Funkanlagen und Telekommunikationseinrichtungen (R&TTE 1999/5/EG) befindet.
Auf Wunsch erhalten Sie weitere Informationen zur Konformitätserklärung
von unserem Service-Center.
DE
MD 82309 DE-47
Page 48

DE-48
Page 49

Content
Overview . . . . . . . . . . . . . . . . . . . . . . . . . . . . . . . . . . . 4
Safety instructions . . . . . . . . . . . . . . . . . . . . . . . . . . . . 7
Keep electrical equipment out of reach of children . . . . . . . . . 7
Purpose . . . . . . . . . . . . . . . . . . . . . . . . . . . . . . . . . . . . . . . 7
Road safety. . . . . . . . . . . . . . . . . . . . . . . . . . . . . . . . . . . . . 7
Correct repair procedure . . . . . . . . . . . . . . . . . . . . . . . . . . . . 7
Sunlight . . . . . . . . . . . . . . . . . . . . . . . . . . . . . . . . . . . . . . . 8
The CD player . . . . . . . . . . . . . . . . . . . . . . . . . . . . . . . . . . . 8
Drives and connections. . . . . . . . . . . . . . . . . . . . . . . . . . . . . 8
Cleaning the unit. . . . . . . . . . . . . . . . . . . . . . . . . . . . . . . . . 8
Installation. . . . . . . . . . . . . . . . . . . . . . . . . . . . . . . . . . . . . 8
Contents of package . . . . . . . . . . . . . . . . . . . . . . . . . . . 9
Installation . . . . . . . . . . . . . . . . . . . . . . . . . . . . . . . . 10
Installation instructions . . . . . . . . . . . . . . . . . . . . . . . . . . . 10
ISO slot and connections. . . . . . . . . . . . . . . . . . . . . . . . . . . 10
Assembling the mounting frame . . . . . . . . . . . . . . . . . . . . . 11
Connections on the back of the radio . . . . . . . . . . . . . . . . . . 12
Use car radio. . . . . . . . . . . . . . . . . . . . . . . . . . . . . . . . . . . 14
Control panel . . . . . . . . . . . . . . . . . . . . . . . . . . . . . . . . . . 14
Reset . . . . . . . . . . . . . . . . . . . . . . . . . . . . . . . . . . . . . . . . 15
Removing the unit. . . . . . . . . . . . . . . . . . . . . . . . . . . . . . . 15
Information on the cables . . . . . . . . . . . . . . . . . . . . . . . . . 16
UK
General functions . . . . . . . . . . . . . . . . . . . . . . . . . . . . 19
Switching on/off and mute . . . . . . . . . . . . . . . . . . . . . . . . . 19
Sound settings with PUSH/SEL . . . . . . . . . . . . . . . . . . . . . . . 19
Advanced settings with PUSH/SEL . . . . . . . . . . . . . . . . . . . . . 20
Display . . . . . . . . . . . . . . . . . . . . . . . . . . . . . . . . . . . . . . . 22
Mode . . . . . . . . . . . . . . . . . . . . . . . . . . . . . . . . . . . . . . . . 22
Reset . . . . . . . . . . . . . . . . . . . . . . . . . . . . . . . . . . . . . . . . 22
MD 82309 UK-1
Page 50

Radio mode: Basic functions . . . . . . . . . . . . . . . . . . . . 23
Selecting the waveband . . . . . . . . . . . . . . . . . . . . . . . . . . . 23
Searching for a station . . . . . . . . . . . . . . . . . . . . . . . . . . . . 23
Storing stations . . . . . . . . . . . . . . . . . . . . . . . . . . . . . . . . . 24
Calling up stations . . . . . . . . . . . . . . . . . . . . . . . . . . . . . . . 24
Radio mode: Radio Data System . . . . . . . . . . . . . . . . . . 25
Alternative frequencies (AF button). . . . . . . . . . . . . . . . . . . . 25
TA – traffic announcement . . . . . . . . . . . . . . . . . . . . . . . . . 26
PTY - Programme Type Code . . . . . . . . . . . . . . . . . . . . . . . . 26
Operation with data media
(Audio CDs, MP3, USB, SD/MMC, AUX) . . . . . . . . . . . . . . . 29
The CD drive . . . . . . . . . . . . . . . . . . . . . . . . . . . . . . . . . . . 29
USB slot . . . . . . . . . . . . . . . . . . . . . . . . . . . . . . . . . . . . . . 30
SD/MMC card reader . . . . . . . . . . . . . . . . . . . . . . . . . . . . . . 30
AUX IN connection . . . . . . . . . . . . . . . . . . . . . . . . . . . . . . . 31
Playback functions . . . . . . . . . . . . . . . . . . . . . . . . . . . . . . . 31
Search functions for MP3 and JPEG data carriers. . . . . . . . . . . 32
Recording function . . . . . . . . . . . . . . . . . . . . . . . . . . . 34
Record from audio CD . . . . . . . . . . . . . . . . . . . . . . . . . . . . . 34
Copying MP3 files. . . . . . . . . . . . . . . . . . . . . . . . . . . . . . . . 35
Recording from radio or audio input . . . . . . . . . . . . . . . . . . 35
Deleting photos . . . . . . . . . . . . . . . . . . . . . . . . . . . . . . . . . 36
Using Bluetooth function. . . . . . . . . . . . . . . . . . . . . . . 37
Pairing the telephone with the car radio . . . . . . . . . . . . . . . 37
Starting/ending call . . . . . . . . . . . . . . . . . . . . . . . . . . . . . . 37
Reject call . . . . . . . . . . . . . . . . . . . . . . . . . . . . . . . . . . . . . 38
Redialling, caller list. . . . . . . . . . . . . . . . . . . . . . . . . . . . . . 38
Switching call to mobile telephone . . . . . . . . . . . . . . . . . . . 38
Voice dialling . . . . . . . . . . . . . . . . . . . . . . . . . . . . . . . . . . 38
Deleting pairing. . . . . . . . . . . . . . . . . . . . . . . . . . . . . . . . . 39
Conference call . . . . . . . . . . . . . . . . . . . . . . . . . . . . . . . . . 39
Audio streaming (A2DP) . . . . . . . . . . . . . . . . . . . . . . . . . . . 39
AVRCP (Audio Video Remote Control Profile) . . . . . . . . . . . . . . 39
UK-2
Page 51

Troubleshooting . . . . . . . . . . . . . . . . . . . . . . . . . . . . . 40
Replacing fuse. . . . . . . . . . . . . . . . . . . . . . . . . . . . . . . . . . 41
Disposal information. . . . . . . . . . . . . . . . . . . . . . . . . . 41
Technical data . . . . . . . . . . . . . . . . . . . . . . . . . . . . . . 42
Declaration of conformity . . . . . . . . . . . . . . . . . . . . . . 43
UK
MD 82309 UK-3
Page 52

Overview
Control panel
1. PWR: Hold down for a few seconds to switch the device on and off; MUTE: Press briefly to switch the sound on and off.
2. VOL+/–:Multipurpose control to set the volume.
PUSH/SEL (“Push/Select”): When you press the multipurpose control
repeatedly you call up other modes in succession. You can then set these
modes by turning the button.
Turn PUSH/SEL wheel after pressing the AS/PS button for the search
function on data media: Enter characters and numbers.
Each setting only stays active for a few seconds before it switches
back to the default volume setting (“
by pressing the ENT button.
Press multipurpose control briefly to select the following audio settings:
VOL: Volume, BAS: Bass, TRE: Treble BAL: Balance of the left and right
speaker,
Press multipurpose control for longer to call up a different sequence of
modes for radio function, time setting etc. Within this sequence switch to
the next mode by briefly pressing it.
FAD: Fader (volume of the rear speakers).
INVOL 17: Set the volume for when the radio switches on (17 in the default
setting).
ADJ00:00 (00:00 represents the time): Time setting, refer to page 20.
VOL”). You can end the setting
UK-4
Page 53

TAVOL: Set the default volume for traffic messages. Refer to page 20.
EON ON: Switch “EON” function on and off (OFF). Refer to “Radio mode:
Radio Data System”, page 25.
Rec: Set MP3 (MP3) or WMA (wma) as the recording format. Refer to page 21.
TELVOL: Default volume for the telephone for Bluetooth operation. Refer to
Bluetooth operation on page 21.
DSP NONE: Use the multipurpose control to select between the audio
settings
FLAT (normal), CLASSIC, ROCK and POP (refer also to page 19).
LOUD off: Switch on loudness to increase bass and treble (ON) or switch off
(
OFF) (only in radio mode).
LOC: Local search mode (see page 21). OFF: Normal reception.
STEREO: In FM band select stereo or mono mode (MONO). The MONO setting can
improve the reception if stereo reception is poor (only in FM radio mode).
3. DIS (“Display”): Display information for the current mode; REC: Set recording function (refer to page 34)
4. Display
5. AF (“Alternative frequency"): Press briefly to switch AF mode on and off; Hold down to switch regional mode in AF mode on and off; refer to page 25
6. PTY (“Program Type"): Search for stations with certain program content
7. TA ("Traffic announcement"): Activate the TA function (refer to page 26)
8. OPEN: Open control panel
9. T-UP: Search for next channel;
10. USB slot
11. T-DN: Search for previous channel;
12. AUX IN: Connect another audio device with jack plug
13. BAND: Select band in radio mode
ENTER: Confirm entries
14. 6: Number and station button 6;/ +10: ten tracks up for data media (CD, MP3, SD/MMC, USB)
15. 5: Number and station button 5;
-10: ten tracks down for data media (CD, MP3, SD/MMC, USB)
16. 4: Number and station button 4; RDM (“Random”): Random playback of data media (CD, MP3, SD/MMC, USB)
(FM 1, FM2, FM3, MW1, MW2)
;
UK
MD 82309 UK-5
Page 54

17. 3: Number and station button 3;
media (CD, MP3, SD/MMC, USB)
18. 2: Number and station button 2; RPT (“Repeat”): Repeat function for data media (CD, MP3, SD/MMC, USB)
19. 1: Number and station button 1; PAUSE: Pause and playback for data media (CD, MP3, SD/MMC, USB)
20. AS/PS: Automatic station memory/ SCH (“Search”): Title search for data media (CD, MP3, SD/MMC, USB);
21. MIC: Microphone
22. TALK:Speak (Bluetooth function)
23. MODE: Select operating mode: Radio - CD/MP3 - USB - SD/MMC - AUX;
INT (“
Intro”): Intro function for data
Behind the control panel
24. Slot for an SD/MMC card.
25. : Eject CD
26. Red LED (anti-theft protection)
27. Operating LED for CD drive
28. Reset opening: reset to factory settings
29. CD compartment
UK-6
Page 55

Safety instructions
About these instructions
Please read these instructions carefully before using the device.
Note the warnings on the device and in the operating
instructions
Store the operating instructions in the car. If you sell
car radio away, please ensure that you also pass on these
instructions.
or give the
Keep electrical equipment out of reach of children
Never allow children to use electrical devices without supervision.
Keep plastic packaging out of reach of children. There is a risk of asphyxiation.
Purpose
The car radio has been designed for assembly into and operation in cars.
Road safety
Road safety should be your top priority. Use your car radio only
in suitable traffic conditions. Please ensure that you are familiar
with the radio before setting off.
You should always be able to hear police, fire and other
emergency service sirens in good time while in your vehicle.
Never set the volume so high that you only hear the warning
signals of emergency vehicles too late.
UK
Correct repair procedure
Before assembly check the cable and device for damage. Do not
use the device if the casing or cable is damaged.
Never try to open and/or repair the appliance yourself. There is a
risk of electric shock. If there is a fault, contact our Service Centre
or another suitable professional repair shop.
MD 82309 UK-7
Page 56

Sunlight
If the interior of the vehicle has heated up strongly e. g. when standing in
sunlight for a long period of time, do not start up the car radio immediately.
Wait until you have driven the car for a while and the car radio has cooled
down.
The CD player
The CD player is a class 1 laser product. The device has a
safety system that prevents dangerous laser rays escaping
from the device during normal use. In order to avoid injury to
the eyes, never tamper with or damage the unit's safety
system.
Drives and connections
Do not insert any foreign bodies into the openings of the car radio (disk
compartment, USB slot, card slot, AUX slot). This could damage the
compartments and slots.
Always insert disks into the disk compartment with the title side upwards.
Never apply great force to insert a disk or card or connect an external device.
If you feel resistance try a different method or medium.
Cleaning the unit
Use a dry, soft cloth to clean the device. Do not use chemical solutions and
cleaning products because these may damage the unit's surface and/or
inscriptions.
Protect the appliance from moisture and heat. Do not touch the
device with wet hands. There is a risk of electric shock!
Installation
If you wish to install your car radio yourself, please refer to the installation and
connection instructions in this manual. We recommend that the device is
installed by a trained technician. This ensures that the device will work
perfectly. Incorrect cabling may result in damage to the device and your car.
UK-8
Page 57

Contents of package
Please check your purchase to ensure all items are included and contact us
within 14 days of purchase if any components are missing. With the product
that you purchased you receive:
Car radio
2 ISO sockets with cables
Control panel
Case
Mounting frame (inserted)
2 keys to remove the mounting frame and
remove the device
Other fixing material for individual assembly
These operating instructions
Warranty card
UK
MD 82309 UK-9
Page 58

Installation
Installation instructions
Before mounting disconnect the minus pole from the car battery!
There is a risk of short-circuit and electric shock!
` Check whether the connections on your vehicle match those of the car
radio (refer to “Arrangement of the ISO block”, P. 13).
` Do not lay the cables under tension, over sharp edges or near parts that
could heat up. Ensure that you do not bend or twist the cable.
` Insert the unit into the proper slot or select a location to install the unit that
will not affect the driver's ability to drive.
` Connect the cable shortly before finally installing the device. Ensure that
this has been connected correctly and that the system works properly.
` If changes have to be made to the vehicle, consult your vehicle dealer/
specialist workshop.
` Install the unit in such a manner that no injury can be caused during heavy
braking.
` If the unit is installed out of balance by over
30° from horizontal it may affect the output.
` Avoid installing the unit near strong heat
sources (e. g. direct sunlight or heating air),
dust, pollution or excessive shocks. This could
damage the device.
` During assembly comply with all the
instructions in these operating instructions.
Check all connections before re-attaching the car battery.
Maximum installation angle!
ISO slot and connections
The car radio has been designed for
assembly in a standard ISO slot. The
size must be at least 53 x 182 mm.
UK-10
Page 59

The ISO slot normally has two ISO sockets and one antenna socket.
If your vehicle does not have an ISO slot or the connections, the cable
sockets supplied can be used. Contact your specialist workshop, retailer
or departments in department stores. Refer also to the “Information on
the cables”, page 16 chapter.
Assembling the mounting frame
` Before installation remove the two
transportation safety screws in the
top radio casing (recognizable
because of their red flags) with a
Phillips screwdriver!
On delivery the mounting frame is
pulled over the car radio. First remove
the mounting frame from the casing of
the car radio.
` To do so insert the two keys supplied
to the left and right between the
device and mounting frame (1) until
the keys click into place (2).
UK
` Then push the mounting frame
backwards over the device using the keys
(3).
MD 82309 UK-11
Page 60

` Insert the mounting frame in the ISO
installation slot.
` To fix the mounting frame in the
installation slot use a screwdriver to bend
as many flaps as possible outwards. Select
the flaps that you want to connect with the
housing of the installation slot.
Then check that the frame is held
securely. The frame must be fixed firmly so that it can not release even
if the car breaks heavily.
Connections on the back of the radio
Overview of the back of the radio:
UK-12
Page 61

Prepare cable connections
` Pull the connections in the ISO slot in your car so
connect them to the connections on the car radio.
far out that you can
Connect the cables
Please use the car radio's ISO block for installation. - If your car’s ISO plug
does not match the car radio’s ISO sockets you can buy appropriate adapters
in specialist workshops, retailers or department stores.
The two ISO plugs in your vehicle create safe and correct electrical
connections (for the speakers and power connections). If however you
want to lay cables individually we will explain the relevance of the
cables at the end of this chapter.
[1] Connect the vehicle's antenna plug to the car radio's antenna socket.
[2] If you want to use an external amplifier you can connect it with the red/
white audio cinch sockets. Please refer to your instructions for the amplifier.
[3][4] Connect the two ISO plugs on the vehicle with the two ISO blocks on
the car radio (A for power and B for the speakers).
Test station memory
In some types of vehicle the default assignment of the permanent plus and
alternating plus has been exchanged by the factory for the ISO block A in the
ISO plug (refer to “Assignment of the ISO socket block on the car radio”,
page 18). This means that the station memory does not work.
Before finally inserting the car radio use the following procedure to check
whether the channels stay saved:
` Re-connect the car battery.
` Switch the vehicle's ignition on.
` Switch the radio on.
` Save stations automatically by holding down the AS/PS button for around
two seconds (on this also refer to “Automatic saving”, page 24).
` Switch the vehicle's ignition off.
` Switch the ignition on again and test whether the stations are still saved (to
do so press the station buttons 1 to 6).
` If the stations have been saved you can insert the radio.
` If the stations are no longer saved you should use an adapter that is
available from specialist retailers or arrange for a specialist workshop to
modify the cables. In this case refer to the “Information on the cables”,
page 16 chapter.
UK
MD 82309 UK-13
Page 62

Use car radio
` Push the car radio carefully into the slot until
it clicks into place.
While pushing the radio, take care to ensure
that the cables are not bent, squashed or under
tension during the process.
Control panel
Inserting the control panel
` First insert the control panel with
the bottom right corner on the
pin to the bottom right of the
frame (as shown in the diagram).
You can also insert the operating
panel first with the bottom left
corner on the pin in the frame.
` Then press the left (or right) side
until it clicks into place.
` Flip the control panel upwards.
Check that the control panel is properly in place and secure. If the control
panel is not fitted properly, error messages appear in the display and/or
several keys will not function properly.
Removing the control panel
` Press the OPEN button.
` Press the control panel somewhat
to the right or left and then pull one
and then the other side away.
Anti-theft
When the panel is not attached, the LED anti-theft
protection light will flash on the unit.
Contacts
If the control panel is removed the contacts in the control panel and radio are
free.
UK-14
Page 63

Ensure that contacts that are free do not get dirty. This would affect the
proper operation of the car radio. For protection, always keep the
control panel in its case.
Clean the contacts if necessary with a clean, lint-free dry cloth.
Reset
` To start up the radio use the tip of a pen or other
sharp object to press the RESET opening.
` If the car radio does not work properly and this
can not be resolved by switching it off and on,
press the tip of a pen or other sharp object into
the RESET opening.
Removing the unit
` Remove the control unit.
` Pull the blind frame away.
` Insert the left and right keys into the
relevant gaps on the sides of the
device. The two holding flaps will
be bent back and you can remove
the unit.
UK
MD 82309 UK-15
Page 64

Information on the cables
The information on the cables is to be used if the cables are to be laid
individually. To do so, contact a specialist workshop and hand over
the supplied ISO plug and the information from this chapter.
You do not need the following information to connect the radio to the
ISO plugs in your vehicle.
Two ISO sockets are supplied with cables:
Plugs with power cables for ISO socket block A
Plugs with speaker cables for ISO socket block B
Overview of ISO socket A: power
Memory back-up (yellow)
The yellow memory back-up cable must be connected with the permanent
plus.
Otherwise the station memory function does not work (refer to
“Assignment of the ISO socket block on the car radio”, page 18).
Antenna relay cable (blue)
The blue cable is available for a relay-controlled antenna. The relay extends
the antenna automatically when the radio is switched on. When it is switched
off the antenna is retracted.
This relay cable can also be used to control an external amplifier. Please refer
to the amplifier's operating instructions for the correct connections.
Never connect the blue cable to the engine cable of the relay controlled
antenna; this could damage the radio!
UK-16
Page 65

Overview of ISO socket B: Speakers
If the vehicle only has front speakers and the cables for the rear speakers
are not required the free ends of these cables must be insulated properly.
UK
MD 82309 UK-17
Page 66

Assignment of the ISO socket block on the car radio
ISO block BLOCK B – Speakers BLOCK A – Electricity supply
1 rear right + 1
2 rear right - 2
3 front right + 3
4 front right - 4 Permanent plus
5 front left + 5 Car antenna (also for
6 front left - 6
7 rear left+ 7 Switched plus (switched
8 rear left - 8 Earth
(permanent 12V supply
from main electrical
system)
external amplifiers, etc.)
12V voltage, via ignition)
Problems due to incorrect cable connections
In some types of vehicle the default assignment of the permanent plus and
alternating plus has been exchanged by the factory for the ISO block A in the
ISO plug. If this is the case in your vehicle, certain functions may be impaired:
stations may not be stored properly, for example.
To solve this, the red cable (switched plus) and the pink cable (permanent
plus) will need to be reversed in the ISO block. Appropriate adapters are
available from specialist retailers for this.
UK-18
Page 67

General functions
Do not switch the radio on for longer periods of time if the engine is
not running. This could discharge the car battery and the car would
no longer start.
Switching on/off and mute
` Hold down the PWR/MUTE button for a few seconds to switch the device
on and off.
` The device also switches on if you press any button except the OPEN open
button.
` If you press the PWR/MUTE button briefly you only switch the sound on
and off (“MUTE” = switch to mute).
` Press PWR/MUTE again to turn the sound back on.
Sound settings with PUSH/SEL
Volume
The PUSH/SEL multipurpose control has the basic function (without
pressing the button) of controlling the volume (VOL+/VOL–).
` Turn the wheel to the left or right to turn the volume up or down.
Always set the volume such that you can still clearly hear the sirens of
emergency vehicles!
Bass/treble/balance/fader
` Press the PUSH/SEL multipurpose control to display the current settings
for bass (
` Turn the PUSH/SEL multipurpose control to modify the settings.
BAS), treble (TRE), balance (BAL) and fader (FAD).
The bass and treble can not be set if the equalizer
modified (refer to “Equalizer” below).
DSP NONE setting was
UK
MD 82309 UK-19
Page 68

Advanced settings with PUSH/SEL
Using the PUSH/SEL multipurpose control you can also set the initial
volume, time setting, volume of the traffic announcement, EON function,
recording format, equalizer, loudness, reception sensitivity and stereo signal.
` Hold down the PUSH/SEL multipurpose control for around 2 seconds and
then press it repeatedly to open the following settings:
INVOL – set initial volume
` Turn the PUSH/SEL multipurpose control to set the default volume with
which the radio should switch on.
ADJ - Set clock time
Your car radio is fitted with an RDS controlled clock. The time is set
automatically if the EON function is active and will still function even when
the radio is switched off. If you are unable to receive an RDS signal, you can
adjust the time displayed manually.
` Turn the PUSH/SEL multipurpose control to the right to set the hours and
to the left to set the minutes.
TAVOL – Set volume for traffic announcements
You can set a louder volume for traffic announcements so that you can clearly
hear the announcements when the radio volume is set to low.
` Turn the PUSH/SEL multipurpose control to set the volume for the traffic
announcements.
EON – Switch EON function on/off
The extended other network information EON provides additional functions
for locating a station with traffic announcements. Specifically, the device also
switches to a station with traffic announcements (or a particular PTY type) if
you are listening to a station that does not provide travel announcements.
After the announcement it switches back to the previous station.
` Turn the PUSH/SEL multipurpose control to switch the EON function on
(
EON ON) or off (EON OFF).
On delivery and after a reset
UK-20
EON ON is active.
Page 69

REC – Set recording format
` Turn the PUSH/SEL multipurpose control to set the format for recording
MP3 or WMA (WindowsMedia-Audio) files on SD/MMC or USB media.
TELVOL – set telephone volume
` Turn the PUSH/SEL multipurpose control to set the default volume for a
telephone call.
DSP – Set equalizer
You can add a sound setting for the sound.
` Turn the PUSH/SEL multipurpose control to select between the
CLAS,
ROCK, POP, FLAT and NONE settings.
In the
FLAT setting all equalizer settings are set to zero.
If you want to select a different setting to the default
no longer control the treble and bass separately (see “Sound settings
with PUSH/SEL” on page 19).
DSP NONE you can
LOUD – Switch loudness function on/off
` Turn the PUSH/SEL multipurpose control to switch the loudness function
on (
EON ON) or off (EON OFF).
The loudness function increases the bass sounds at low volume.
LOC – Set reception sensitivity (only in radio mode)
` Turn the PUSH/SEL multipurpose control to dampen the reception
sensitivity at the antenna input (
).
OFF
If you only want to receive local stations when locating stations if the
function is switched on it is active for FM stations. To prevent strong
dampening of the antenna signal after the station search, reset normal
sensitivity (
LOC OFF).
LOC ON) or to set it to normal sensitivity (LOC
UK
STEREO
Set stereo or mono reception (only in FM radio mode)
Most FM stations transmit in stereo. The display will show for stereo
reception. If the reception conditions are unfavourable it may be necessary
to set mono to improve the reception quality.
` Turn the PUSH/SEL multipurpose control to either set stereo (
mono (
MD 82309 UK-21
MONO) reception.
STEREO) or
Page 70

Display
` By pressing the DIS/REC button repeatedly you can change the screen
display as follows:
During radio operation: “
frequency **> RDS indicator.
During CD operation: “
Frequency** > RDS indicator > Playback or CD/MP3 information.
In USB or card operation: “
**> RDS indicator.> Playback information for the USB data media or the SD/
MMC card
In AUX mode: “
Frequency** > RDS indicator > Indicator “
* The PTY functions are sent in differing scope by different stations; see also
the “Radio mode: Radio Data System”, page 25chapter.
If no RDS or PTY information is received
Each message appears for just a few seconds.
** If no frequency is received
CT” (Clock time) time > PTY settings* >
CT” (Clock time) time > PTY settings* > Radio
CT” (Clock time) time > PTY settings* >
CT” (Clock time) time > PTY settings* > Frequency
AUX”.
PTY none is displayed on the screen.
PS None is displayed on the screen.
Mode
` Press the MODE button repeatedly to switch between radio reception, CD
operation (
operation (
Please note that a medium must be inserted or connected before you can
switch into that mode.
CD), card operation (SD/MMC), USB operation (USB) and AUX
AUX).
Reset
` To reset the car radio to the factory settings press
the RESETbutton with a pointed object, such as
a pen. It is located behind the control panel.
` Press RESET
- before first use, after connecting the cable,
- if not all function keys are working,
- when an error message appears in the display.
UK-22
Page 71

Radio mode: Basic functions
Selecting the waveband
` Press the BAND button to switch between FM (F1, F2, F3) and medium
wave (MW1 and MW2). You can store up to 6 stations in each band.
The three bands FM1, FM2 and FM3 and the two bands MW1 and MW2
each cover the same frequency range. This is how you can save up to 18
stations in the FM band and 12 stations in the MW band.
UK
Searching for a station
Search automatically
` Briefly press either the or button to start the automatic station
search. The device will search for the next station automatically.
` To stop the function, press or again.
Manual search
` If you hold down the or button for a bit longer the radio switches
to manual search mode. The display shows
` Change the value again with or .
Searching for an AF station
In AF mode the radio automatically changes to a station in the FM band with
an alternative frequency which transmits the same programme when
reception of the original frequency is too weak (“AF” = “Alternative
frequency”) (Refer to “Alternative frequencies (AF button)”, page 25).
` To turn AF mode on press the AF button once. The display will show the
AF indicator.
` In one of the bands FM1, FM2 or FM3 press the or button to search
the FM band in order to find stations that are broadcasting an AF signal.
The search stops each time a station is found.
` To deactivate AF mode press the AF button again. The indicators
disappear.
On delivery or after a reset AF mode is switched on.
MANUAL.
MD 82309 UK-23
Page 72

Storing stations
Saving manually
` After the search function has found a station press one of the 1 to 6 buttons
for around two seconds. In each band (FM1, FM2, FM3, MW1 and MW2)
you can save 6 stations.
The radio will switch back into automatic search mode after a few seconds.
Automatic saving
` Press the AS/PS button for around two seconds. The current band is
searched for the six strongest stations. The stations found are automatically
saved to memory spaces 1 to 6. The stations founds are played in
succession for about five seconds. Then the station that is saved in memory
space 1 is played.
` If you want to stop the search press one of the station buttons
1 to 6.
Calling up stations
Calling up individual stations
` Use BAND to select the band.
` You can start one of the saved stations by pressing the relevant station
button 1 to 6.
Running through saved stations
You can call up the saved stations for the current transmission areas.
` Use BAND to select the band.
` Press the AS/PS button briefly. All stored stations will be played one after
another for about five seconds.
` When you hear the station you want to listen to press the AS/PS button
briefly.
UK-24
Page 73

Radio mode: Radio Data System
The Radio Data System is a service provided by radio stations. In addition to
traditional music and voice services they also broadcast additional
information in the form of encrypted digital signals and these are displayed
by the car radio. This information – such as the station’s name or name of the
track being played – is shown on the screen.
If the station does not send any RDS signals, the frequency is shown rather
than the station’s name.
If the station that sends RDS signals
also provides traffic
announcements “TP” (“Traffic
Programme”) is shown on the
screen.
Alternative frequencies (AF button)
One function of RDS is the AF function in the FM band (“AF” = “Alternative
Frequencies”). In RDS mode if you leave the range of a transmitting station
you switch automatically to another frequency. The change is only successful
if the PI codes match (the PI code is the programme identification that
uniquely marks the programmes and station chains). This avoids switching to
a frequency which is occupied by a different programme.
` Briefly press the AF button to
switch the AF function for the
RDS mode on or off. If the
function is on the display shows
“AF”.
The AF indicator in the display flashes when no RDS information is
available.
UK
MD 82309 UK-25
Page 74

Regional programme mode
Some stations transmit regional programmes at certain times. In regional
programme mode the radio can not switch to a frequency that is
broadcasting another regional programme.
` To switch the regional
programme mode on or off hold
down the AF button for longer
than 2 seconds. When switching
on the display briefly shows
.
ON
REG
TA – traffic announcement
“TA ("Traffic Announcement"). If the station sends RDS signals and provides
traffic announcements and the TA function is switched on, the radio switches
automatically from other modes (e. g. CD) if a traffic announcement is
broadcast. The volume level for traffic announcements is raised to the level set
in the TA VOL function if it is below this level (on delivery “16”; refer to
page 20).
Stations that broadcast traffic announcements are shown by
` Press the TA button to switch the TA function on or off. For stations that
transmit traffic announcements “TA” flashes on the screen
For stations that do not transmit traffic announcements “TA” is displayed
permanently.
` When the traffic announcement is broadcast the "TA” lights up
permanently. For stations that do not transmit traffic announcements the
radio switches to the station broadcasting the traffic announcement.
` You can interrupt the radio if it changes from CD/MP3 mode, SD/MMC
mode or from a channel without traffic announcements to a channel with
traffic announcements. To do so press the TA button briefly. The TA
function is now paused and the device switches back to the previously
selected mode without the TA mode being switched off.
When the TA function is switched on during the station search only
stations that broadcast a traffic announcement signal are found and
saved.
TP on the screen.
.
PTY - Programme Type Code
“PTY” is a function using which the car radio searches for stations with
preselected programme contents.
UK-26
Page 75

` To activate the PTY search, press the PTY button. The display reads PTY.
` When searching for stations using the or button only channels
with the currently selected PTY code are considered (refer to list on next
page).
` To deactivate the PTY search, press the PTY button again.
Set PTY code
` Hold down the PTY button and then turn the PUSH/SEL multipurpose
control to select the desired PTY code.
Search for stations using the PTY code
If when displaying a PTY code you briefly press the PTY button, the or
buttons, a search starts for stations that match this PTY code.
If no PTY information is received
the search ends with the last station set.
NOT FND is displayed on the screen. Then
UK
MD 82309 UK-27
Page 76

The following programme types are possible:
NEWS: News
AFFAIRS: Current affairs
INFO: Advice, info
SPORT: Sport events
EDUCATE: Education
DRAMA: Radio drama
CULTURE: Culture
SCIENCE: Science and technology
VARIED: Miscellaneous
POP M: Pop music
ROCK M: Rock music
EASY M: Easy listening
LIGHT M: Light classical music
CLASSICS: Classical
OTHER M: Other music
WEATHER: Weather
FINANCE: Finance, stock market
CHILDREN: Children’s programmes
SOCIAL: Social, activities
RELIGION: Religion, ethics
PHONE IN: Phone in stations
TRAVEL: Travel
LEISURE: Leisure activities
JAZZ: Jazz
COUNTRY: Country music
NATION M: Music from other countries
OLDIES: Oldie music
FOLK M: Folk music
DOCUMENT: News reporting
TEST: Emergency test
ALARM: Alarm messages
Please note that this information will depend on the region, the
broadcaster and the station.
UK-28
Page 77

Operation with data media (Audio CDs, MP3, USB, SD/MMC, AUX)
The car radio has various drives and connections that can play various audio
formats:
Drives and connections Data media and formats
CD drive For commercial audio CDs and own CDs with
USB slot For USB sticks* or MP3 players*
SD/MMC card reader For SD/MMC memory cards* with MP3 or WMA
AUX IN connection To connect external audio devices, e. g. a CD
A2DP mode
The playback functions of the various data media are mostly identical
and are described in these instructions (refer to page 31).
MP3 and WMA files have their own search and display function (refer
to page 32).
MP3 or WMA files. The CDs can also have the CDR and CD-RW format.
files
player, via a 3.5 mm jack plug
The audio files are transferred from the Bluetooth
device to the radio.
* The system cannot be guaranteed
compatible with all MP3 players, USB sticks
and memory cards available on the market
UK
The CD drive
The CD drive is located behind the control panel. In addition to commercial
audio CDs the car radio can also play CD-R and CD-RW formats.
Inserting and removing CDs
` Press the OPEN button to fold down the control panel.
` Insert the CD into the slot with the labelled side upwards.
` Close the control panel again. The data is read (refer to the next section
“display when reading in”); then playback starts.
MD 82309 UK-29
Page 78

` To remove the CD open the control panel again. Press the OPEN button
und (eject). The CD will be ejected. The car radio will change back to
radio mode.
Do not drive with a CD projecting from the device.
Remove the CD first.
Display when reading in
When the data is being read “TOC READ” = (TOC =Table of Contents”) = reading
table of contents is displayed.
If the data carrier does not contain any data “
NO FILES” is displayed.
No “jumping” on impact
This function compensates for vibrations, for instance from a bumpy road,
and ensures playback without interruptions. When the device is switched
on the memory is automatically filled with data:
- for audio CDs for 8 seconds;
- for MP3 CDs for 100 seconds;
USB slot
You can connect an MP3 player or another data medium to the USB slot on
the front of the unit.
Your car radio can process USB data media up to 8 GB (certified).
For this the directory structure may contain a maximum of 99 folders and 990
files.
Connect the USB device
` Connect your USB device (e. g. a USB stick or MP3 player) to the slot. The
display shows
storage medium and
` If the device is in another mode (radio, CD, you can select the USB slot with
the MODE button.
` Search and playback functions for files on an external storage medium
work in the same way as for MP3 CD’s.
TOC READ. The radio will search for MP3 or WMA files on the
USB will appear on the display.
SD/MMC card reader
The SD/MMC drive is located behind the control panel.
UK-30
Page 79

Inserting and removing cards
` Press the OPEN button to fold down the control panel.
` Insert the memory card with the contacts to the right and the bevelled
corner upwards in the card slot. The radio will search for MP3 or WMA files
on the storage medium and
` If the device is in another mode (radio, CD), you can select the USB slot
with the MODE button.
SD/MMC will appear on the display.
AUX IN connection
You can connect another audio device, e. g. a CD player with a 3.5 mm jack
plug to the car radio’s AUX IN socket.
The display now shows
` If the device is in another mode (radio, CD), you can select the USB slot
with the MODE button.
` Search and playback functions for files on an external storage medium
work in the same way as for audio CD and MP3 CDs.
AUX.
Playback functions
To playback via the mobile phone refer also to “Audio streaming (A2DP)”,
page 39.
Playback and pause
` You can pause the playback by pressing the PAUSE button (1). During the
pause the screen flashes.
` Press the button again to start playing again.
UK
Skipping tracks
` By pressing the or buttons, you can select the previous or next
track on the CD. The track number is shown on the display.
` Press the -10 and +10 buttons (number keys 5 and 6) to jump forward or
backwards 10 tracks.
Fast forward/rewind
` Hold down the or buttons for longer to start fast forward or
backwards. Release the buttons to end fast forward or backward.
Repeat
` Press the RPT button (number key 2) once. RPT appears in the display. The
current track will then be repeated.
` Pressing the button again will change the playback mode back to normal.
MD 82309 UK-31
Page 80

Preview track
` Press the INT button (number key 3). All tracks are played in succession for
around 10 seconds each.
` Pressing the button again will change the playback mode back to normal.
Random track playback
` Press the RDM button (number key 4). The player will "shuffle" through the
tracks, playing them in a random order.
` Pressing the button again will change the playback mode back to normal.
Search for a track
` Press the AS/PS button. The current track number flashes on the screen.
` Turn the PUSH/SEL multipurpose control or press the
/ button to play a different track.
` For multiple digit track numbers turn the PUSH/SEL multipurpose control
to enter the last digit and then press the PUSH/SEL multipurpose control
to display the next digit etc.
` When you have the desired track number press the BAND button to
playback the track.
Search functions for MP3 and JPEG data carriers
The MP3 format has special search functions. In addition to track numbers
you can also search on track names and directory names.
The use of this function and other MP3-specific functions will depend to some
degree on the MP3 CD itself. Please bear this in mind when producing this
type of CD (refer to next chapter).
All common MP3 encodings can be played back.
Producing MP3 CDs; ID3 tags
As with data CDs, MP3 files (CD-ROMs, USB sticks etc.) may contain
individual tracks or folders. When producing a data carrier please
ensure that you only save the tracks in folders and that none are saved
on the same level as the folders. Mixing tracks and folders at the same
level may produce playback problems.
When producing an MP3 files you can also save so-called "ID3 tags" (we
recommend using an ID3 tag editor for entries). This is a block of information
stored on an MP3 CD lying "behind" the actual music information of the MP3.
This may include such items as the artist, track, album name, year of
publication and a short comment.
UK-32
Page 81

The car radio can read this block of information and show it on the display.
The various pieces of information are displayed in succession in scrolling text.
Track search
Search for track numbers
A track number is searched in the same way as for an audio CD (see “Search
for a track” on page 32). Not only the tracks in the highest directory level but
rather all tracks on the data carrier are displayed.
Search for track name (characters)
` Press the AS/PS button twice. The first position flashes.
` You can search in the current directory for the beginning of the title by
choosing a letter with the PUSH/SEL multipurpose control or the /
buttons.
` When you have found the first letter of the track press PUSH/SEL. The
letter is shown on the screen and the next position flashes.
` Use the PUSH/SEL multipurpose control or the / buttons to find
the second letter of the track and press the PUSH/SEL multipurpose
control when you have found it. The second letter is shown on the screen
and the third position flashes.
` Use the PUSH/SEL multipurpose control or the / buttons to find
the third letter of the track and press the PUSH/SEL multipurpose control
when you have found it. The third letter is shown on the display.
` Finally press the BAND button to playback the track.
Searching for directories
Searching from root directory
` Press AS/PS three times. The top directory (root directory) appears.
` With the multipurpose control PUSH/SEL or the / button you
can now scroll through all the directories and tracks and select a directory.
` Press BAND to play back the tracks in this directory.
UK
MD 82309 UK-33
Page 82

Recording function
Note: Please observe the legal regulations applicable where you live for
producing copies of copyrighted works. If you have any doubts, please
contact a local expert.
Record from audio CD
You can also use your car radio to record data from the CD player onto the
external USB data medium or an SD/MMC card.
` Hold down the DIS/REC button in CD mode.
USB ALL is displayed.
(If the destination for the recording is SD/MMC
` Press
` Start the recording by pressing the BAND button.
Audio data is now stored on the USB drive in the selected format (MP3 or
WMA, see “REC – Set recording format” on page 21). During recording
DIS/REC several times to select either recording option USB/MMC-ALL
(record all tracks) or USB/MMC -ONE (record one track).
RECORD will appear on the display.
Then an “
` To stop the recording ahead of time, briefly press the BAND button again.
The recording is saved after
recording is also ended if you switch to another mode (radio, AUX,...).
` You can play back the data by switching to the USB or SD/MMC mode with
the MODE button and calling up individual titles from the USB drive.
R” in front signifies the recording.
Note: When the USB data medium is full the recording
switches automatically to the card reader if a memory card has been
inserted (refer to next chapter).
WAIT is displayed briefly on the screen. The
SD/MMC ALL is displayed).
UK-34
Page 83

Copying MP3 files
You can also copy individual tracks from an MP3-CD onto the external USB
data medium or an SD/MMC card.
` When playing a track from an MP3-CD hold down the DIS/REC button.
COPY MMC is displayed.
` Press the DIS/REC several times to select either the copy option
(copy to USB data medium) or
Note: If only one data medium is in the device the copy process starts
immediately! The copy process is ended if you switch to another mode
(radio, AUX,...).
` Start the copying process by pressing the BAND button.
During the copying process
from 01 to 1000 indicating the progress of copying. After displaying
COPY MMC (copy to SD/MMC card).
COPY is displayed on the screen with a percentage
COPY USB
COPY 100 the copy process is complete and the MP3 track playback is
continued.
Recording from radio or audio input
You can also use your car radio to record data from the radio or audio input
to a USB stick or memory card.
` Insert the memory medium into the card compartment or the USB slot and
use the MODE button to select the radio or
If necessary start playback of the external audio device.
` Hold down the DIS/REC button.
REC MMC is displayed.
` Press the DIS/REC several times to select either the record option
(record to USB data medium) or
` Start the copying process by pressing the BAND button.
` To stop the recording, briefly press the BAND button again. The recording
is also ended if you switch to another mode (radio, AUX,...). The recording
is saved after
WAIT is displayed briefly on the screen.
MMC (record to SD/MMC card).
AUX mode.
USB
UK
MD 82309 UK-35
Page 84

Notes on recording files
The recordings are saved on the data medium with the following names:
Audio-CD recordings: TRAC01, TRAC02 ...
MP3 CD recordings: MUSIC01, MUSIC02 ...
Radio recordings: TUNER01, TUNER02 ...
AUX recordings: AUXIN01, AUXIN02...
Audio CD and radio recordings are recorded in stereo and with a bit rate
of 128 kbps or a sampling frequency of 44 Khz.
When copying MP3 files the recording format of the source is
transferred.
Deleting photos
You can delete recordings and tracks in MP3/WMA format from a USB or SD/
MMC data medium.
Use the MODE button to select the USB or SD/MMC mode and start playing
the file that you want to delete.
` Hold down the DIS/REC button.
DELETE is displayed.
` Hold down the DIS/REC button to cancel the deletion process,
` Press the BAND button to delete the track.
UK-36
Page 85

Using Bluetooth function
The car radio has a Bluetooth function that enables you to use the radio as a
hands-free device for your mobile phone.
Of course this requires a mobile phone that supports the Bluetooth function
and is compatible with the car radio.
Bluetooth symbol
The Bluetooth symbol on the screen indicates the status of the Bluetooth
connection:
Flashing slowly (every 5 seconds): Standby
Flashing quickly (every second): Establishing connection
Permanently on: Connection active
Pairing the telephone with the car radio
` Search for Bluetooth devices on your mobile phone.
After a successful search the entry CAR RADIO is shown on the mobile phone
screen.
` Select this entry for pairing and enter the password 0000 for the car radio
in the subsequent password query. You may need to confirm establishing
the connection again.
` After successful pairing the car radio screen briefly shows
CONNECT and the Bluetooth symbol appears permanently on the screen.
Establishing automatic connection
When switching on the car radio the most recently registered mobile phone
is paired with the car radio. If after a minute no connection can be made to
the mobile phone the connection set up is aborted.
` If the Bluetooth connection is in standby (no connection to mobile phone
active) press the TALK button for around 2 seconds. The car radio now tries
to set up a connection with the most recently registered mobile phone.
UK
Starting/ending call
An incoming call is indicated by the call signal via the car’s loudspeaker and
the caller’s number is displayed on the car radio’s screen.
MD 82309 UK-37
Page 86

` You accept the incoming call by pressing the TALK button on the front of
the device.
` You end the call by pressing the TALK button on the front of the device
again.
Reject call
` To reject an incoming call press the TALK button on the front of the device
for more than 2 seconds.
Redialling, caller list
` Press the TALK button to call up the Bluetooth menu.
` Turn the PUSH/SEL multipurpose control to select one of the two
following entries. Select an entry by briefly pressing the TALK button:
L-DIAL (redial)
After selecting redial REDIAL is displayed. After pressing the TALK button again
the last number called from the mobile phone is dialled.
CALL LST (call list)
This entry is only shown if calls have already been received.
` After pressing the TALK button again the last call received is displayed.
` Turn the multipurpose control to display other calls.
` Press the TALK button to stop playback.
` Press the TALK button for longer than 2 seconds to leave the Bluetooth
menu.
Switching call to mobile telephone
` Press the TALK button for longer than 2 seconds to switch the call to the
mobile phone.
This cancels the Bluetooth connection. When the call is ended, the
connection is established again.
Voice dialling
Note: Voice dialling may need to be set up on the mobile phone. Read
the instructions for your mobile phone for how to do this.
` Press the TALK button for longer than 2 seconds until the entry
VOICE DIAL is shown on the screen.
UK-38
Page 87

` After the beep say the name of the person in the mobile phone’s telephone
directory to dial the number.
Deleting pairing
` If no Bluetooth connection is active briefly press the TALK button. The
screen displays the
The mobile phone that was most recently paired is now deleted and will no
longer be connected automatically.
DEL PAIR entry.
Conference call
` If another call is received during a call briefly press the TALK button to
accept it.
Use the MODE button to switch between the calls.
Audio streaming (A2DP)
Your car radio uses the A2DP profile (Advanced Audio Distribution Profile)
and can therefore playback the audio data of your mobile phone.
On your mobile phone select an audio file and start playback.
The car radio’s screen shows the entry A2DP and the audio file is played back
via the car radio’s speakers.
Note
On the mobile phone it may be necessary to switch playback to via a
Bluetooth stereo headset.
Read the instructions for your mobile phone for how to do this.
The car radio does not switch to A2DP mode automatically for some
mobile pho nes. In this case switch to A2DP mod e by pres sing the MODE
repeatedly until A2DP is shown on the screen.
UK
AVRCP (Audio Video Remote Control Profile)
AVRCP is a Bluetooth profile to remotely control audio and video devices.
Use the PAUSE button (number pad 1) to stop and restart playback of the
audio file on the mobile phone.
Use the or buttons to open the previous or next audio file on the
mobile phone.
MD 82309 UK-39
Page 88

Troubleshooting
PROBLEM POSSIBLE CAUSE/SOLUTIONS
The device cannot be
switched on.
The CD cannot be loaded
or is ejected.
No sound The volume has been set to minimum.
Function buttons do not
work.
The CD skips. The installation angle is more than 30°.
Device connected to the
USB slot does not work.
Radio and/or automatic
search do not work.
Station memory does not
work.
Your mobile phone is not
recognised.
The ignition is not switched on.
One of the fuses is defective.
There is already a CD in the car radio.
The CD has been put in the wrong way round.
The disk is contaminated or damaged.
The temperature in the car is too high. Wait until the
environmental temperature has normalised.
Condensation! Switch the player off for a few hours
and then retry.
Cables are not properly connected.
The integrated microcomputer cannot work because
of interference. Reset (press a sharp object into the
reset opening).
The control panel is not properly fitted.
The disk is contaminated or damaged.
Errors on CDs you have created yourself. Check the
CD in another playback device.
The USB slot is intended for devices that conform to
the USB norm. Not all devices available on the market
comply with these norms. Possibly the attached
device does not comply with these norms.
The antenna cable is not connected properly.
The station signals are too weak. Set the station
manually.
The cable for the permanent plus (yellow) is not
connected properly. For this, refer to the
“Installation”, page 10 chapter.
The mobile phone is not compatible with the
Bluetooth unit.
UK-40
Page 89

Replacing fuse.
The car radio has a 15 A fuse on the back that is released if there are voltage
peaks or a short circuit.
In this case replace the fuse with one of the same type of switch off
characteristics as the one stated in the technical data.
Before switching on the car radio again ensure that the problem that tripped
the fuse has been resolved.
Disposal information
Packaging
All packaging and packaging materials that are no longer required
can and should be recycled.
Appliance
At the end of its life, the radio should not be disposed of in household
rubbish. Enquire about the options for environmentally-friendly and
appropriate disposal.
UK
MD 82309 UK-41
Page 90

Technical data
General features
Operating voltage: DC 12V, negative earth connection
Device dimensions: 178 x 175 x 50mm (W x D x H)
Output power: 4 x 15 Watt (RMS)
Fuses: 15 amp
Radio
VHF (FM): 87.5 – 108 MHz
Medium wave (MW): 522 to 1620 kHz
Bluetooth version: 2.0
CD/MP3 player
Laser output: Class 1 laser product
Frequency range: 40 Hz – 18kHz
MPEG rate 64 - 320kbps
MP3 playback ISO 9660 & Joliet MP3 format
Connection
AUX: 3.5 mm jack plug
Supported formats
CD: Audio-CDs, CD-Rs,
CD-RWs
USB storage medium: 1.1 and 2.0 up to 8 GB
(certified)
Memory cards: SD up to 4 GB (SDHC > 4GB)
MMC up to 512 MB
These days there are many non-standard CD recording and copy protection
procedures in use and a wide range of CD-R and CD-RW disks on the
market. This can occasionally lead to read errors or delays. This does not
mean the player is faulty.
This device has been approved in accordance with Directive
2004/104/EEC (last amended by Directive 2006/28/EC) on
"Electromagnetic compatibility" (so-called e approval).
Subject to technical modifications.
UK-42
Page 91

Declaration of conformity
MEDION AG hereby declares that the device MD 82309 conforms to the
fundamental requirements and other regulations of the relevant European
Directive on Radio and Telecommunications Equipment (R&TTE 1999/5/EC).
Further information on the Declaration of Conformity can be obtained from
our Service Centre on request.
UK
MD 82309 UK-43
Page 92

UK-44
Page 93

Table des matières
Vue d'ensemble. . . . . . . . . . . . . . . . . . . . . . . . . . . . . . 4
Consignes de sécurité . . . . . . . . . . . . . . . . . . . . . . . . . . 8
Ne pas laisser d'appareils électriques entre les mains
des enfants. . . . . . . . . . . . . . . . . . . . . . . . . . . . . . . . . . . . . 8
Emploi prévu. . . . . . . . . . . . . . . . . . . . . . . . . . . . . . . . . . . . 8
Sécurité routière . . . . . . . . . . . . . . . . . . . . . . . . . . . . . . . . . 8
Ne jamais réparer soi-même l'appareil. . . . . . . . . . . . . . . . . . 9
Rayonnement solaire . . . . . . . . . . . . . . . . . . . . . . . . . . . . . . 9
Le lecteur de CD. . . . . . . . . . . . . . . . . . . . . . . . . . . . . . . . . . 9
Lecteurs et prises. . . . . . . . . . . . . . . . . . . . . . . . . . . . . . . . . 9
Nettoyage de l'appareil . . . . . . . . . . . . . . . . . . . . . . . . . . . . 9
Montage. . . . . . . . . . . . . . . . . . . . . . . . . . . . . . . . . . . . . . 10
Contenu de la livraison . . . . . . . . . . . . . . . . . . . . . . . . 10
Montage . . . . . . . . . . . . . . . . . . . . . . . . . . . . . . . . . . 11
Consignes de montage . . . . . . . . . . . . . . . . . . . . . . . . . . . . 11
Compartiment et fiches ISO . . . . . . . . . . . . . . . . . . . . . . . . . 12
Installer le support de montage. . . . . . . . . . . . . . . . . . . . . . 12
Branchements au dos de l'autoradio . . . . . . . . . . . . . . . . . . 14
Mettre l'autoradio en place. . . . . . . . . . . . . . . . . . . . . . . . . 15
Panneau de commande . . . . . . . . . . . . . . . . . . . . . . . . . . . 16
Reset . . . . . . . . . . . . . . . . . . . . . . . . . . . . . . . . . . . . . . . . 17
Démonter l'appareil. . . . . . . . . . . . . . . . . . . . . . . . . . . . . . 17
Explications des câbles . . . . . . . . . . . . . . . . . . . . . . . . . . . . 18
F
Fonctions générales . . . . . . . . . . . . . . . . . . . . . . . . . . 21
Allumer/éteindre et mettre en sourdine . . . . . . . . . . . . . . . . 21
Réglages du son avec PUSH/SEL . . . . . . . . . . . . . . . . . . . . . . 21
Réglages étendus avec PUSH/SEL . . . . . . . . . . . . . . . . . . . . . 22
Écran . . . . . . . . . . . . . . . . . . . . . . . . . . . . . . . . . . . . . . . . 24
Sélection du mode (« Mode ») . . . . . . . . . . . . . . . . . . . . . . . 24
Reset . . . . . . . . . . . . . . . . . . . . . . . . . . . . . . . . . . . . . . . . 24
MD 82309 F-1
Page 94

Mode Radio : fonctions de base . . . . . . . . . . . . . . . . . . 25
Sélection de la bande de réception. . . . . . . . . . . . . . . . . . . . 25
Recherche des stations . . . . . . . . . . . . . . . . . . . . . . . . . . . . 25
Mémorisation des stations . . . . . . . . . . . . . . . . . . . . . . . . . 26
Sélection des stations . . . . . . . . . . . . . . . . . . . . . . . . . . . . . 26
Mode Radio : Radio Data System. . . . . . . . . . . . . . . . . . 27
Fréquences alternatives (touche AF) . . . . . . . . . . . . . . . . . . . 27
TA – radioguidage . . . . . . . . . . . . . . . . . . . . . . . . . . . . . . . 28
PTY - Program Type Code
(identification du type de programme) . . . . . . . . . . . . . . . . . 29
Fonctionnement avec supports de données
(CD audio, MP3, USB, SD/MMC, AUX) . . . . . . . . . . . . . . . . 31
Le lecteur de CD . . . . . . . . . . . . . . . . . . . . . . . . . . . . . . . . . 31
La prise USB. . . . . . . . . . . . . . . . . . . . . . . . . . . . . . . . . . . . 32
Le lecteur de cartes SD/MMC. . . . . . . . . . . . . . . . . . . . . . . . . 33
La prise AUX IN. . . . . . . . . . . . . . . . . . . . . . . . . . . . . . . . . . 33
Fonctions de lecture . . . . . . . . . . . . . . . . . . . . . . . . . . . . . . 33
Fonctions de recherche avec les supports MP3 et WMA . . . . . . 34
Fonction d'enregistrement . . . . . . . . . . . . . . . . . . . . . 37
Enregistrer à partir d'un CD audio . . . . . . . . . . . . . . . . . . . . 37
Copier des fichiers MP3 . . . . . . . . . . . . . . . . . . . . . . . . . . . . 38
Enregistrement à partir de la radio ou de l'entrée audio. . . . . 38
Effacer des enregistrements . . . . . . . . . . . . . . . . . . . . . . . . 39
Utilisation de la fonction Bluetooth . . . . . . . . . . . . . . . 40
Connecter le téléphone sur l'autoradio (pairage) . . . . . . . . . . 40
Prendre un appel/y mettre fin . . . . . . . . . . . . . . . . . . . . . . . 41
Rejeter un appel . . . . . . . . . . . . . . . . . . . . . . . . . . . . . . . . 41
Recomposition de numéro, liste des appelants . . . . . . . . . . . 41
Commuter un appel sur le portable . . . . . . . . . . . . . . . . . . . 41
Sélection de la langue . . . . . . . . . . . . . . . . . . . . . . . . . . . . 42
Effacer la connexion. . . . . . . . . . . . . . . . . . . . . . . . . . . . . . 42
Téléconférence . . . . . . . . . . . . . . . . . . . . . . . . . . . . . . . . . 42
Streaming audio (A2DP) . . . . . . . . . . . . . . . . . . . . . . . . . . . 42
AVRCP (Audio Video Remote Control Profile) . . . . . . . . . . . . . . 43
F-2
Page 95

En cas de problèmes . . . . . . . . . . . . . . . . . . . . . . . . . . 44
Remplacer le fusible. . . . . . . . . . . . . . . . . . . . . . . . . . . . . . 45
Consignes de recyclage . . . . . . . . . . . . . . . . . . . . . . . . 45
Données techniques . . . . . . . . . . . . . . . . . . . . . . . . . . 46
Informations relatives à la conformité . . . . . . . . . . . . . . 48
F
MD 82309 F-3
Page 96

Vue d'ensemble
Panneau de commande
1. PWR: maintenir enfoncée quelques secondes pour allumer et éteindre l'appareil. MUTE: presser brièvement pour couper et allumer le son.
2. VOL+/–: bouton rotatif de réglage du volume.
PUSH/SEL (« Push/Select »): si vous appuyez plusieurs fois sur le bouton
rotatif, vous affichez d'autres modes successivement. Vous pouvez alors
régler ces modes en tournant le bouton.
Faire tourner la mollette PUSH/SEL après avoir pressé la touche AS/PS
pendant la fonction de recherche sur supports de données : entrer
caractères et chiffres.
Chaque réglage reste activé quelques secondes seulement avant de
repasser au réglage par défaut du volume («
également quitter le réglage en pressant la touche ENT.
Presser brièvement le bouton rotatif pour choisir les réglages audio
suivants :
VOL: volume, BAS: basses, TRE: aigus, BAL: balance entre haut-parleurs
gauche et droit,
Presser le bouton rotatif plus longtemps pour afficher une autre
séquence des modes pour la fonction radio, le réglage de l'heure et
autres. Dans cette séquence, une pression brève vous permet de passer
au prochain mode respectif.
FAD: fader (volume des haut-parleurs arrière).
VOL »). Vous pouvez
F-4
Page 97

INVOL 17: réglage du volume de la radio lorsque vous l'allumez (réglage
par défaut sur 17).
ADJ00:00 (00:00 représente l'heure) : réglage de l'heure ; voir page 22.
TAVOL: réglage du volume de base pour les informations routières. Voir
page 22.
EON ON: activer et désactiver la fonction « EON » (OFF). Voir “Mode Radio :
Radio Data System”, page 27.
Rec: régler MP3 (MP3) ou WMA (wma) comme format d'enregistrement.
Voir page 23.
TELVOL: volume de base du téléphone en fonctionnement Bluetooth. Voir
fonctionnement Bluetooth à la page 23.
DSP NONE: choisissez ici avec le bouton rotatif entre les réglages audio FLAT
(normal),
CLASSIC, ROCK et POP (voir aussi page 21).
LOUD off: activer (ON) l'intensité sonore pour augmenter les basses et les
aigus ou la désactiver (
OFF) (uniquement en mode Radio).
LOC: mode de recherche local (voir page 23). OFF : réception normale.
STEREO : commutation stéréo/mono sur la bande FM (MONO). Si la
réception stéréo est mauvaise, le réglage
amélioration (uniquement en mode Radio FM).
3. DIS (« écran »): afficher les informations pour le mode actuel ; REC: régler la fonction d'enregistrement (voir page 37)
4. Écran
5. AF (« Alternative Frequency ») : pression brève pour activer et désactiver le mode AF ; pression longue pour activer et désactiver le mode régional en mode AF ; voir page 27
6. PTY (« Program Type ») : rechercher des stations diffusant un type de programme précis
7. TA (« Traffic Announcement ») : activer les stations diffusant des informations routières (voir page 28)
8. OPEN: ouvrir le panneau de commande
9. T-UP: recherche de stations vers l'avant
10. Prise USB
11. T-DN: recherche de stations vers l'arrière
12. AUX IN: raccorder un autre appareil audio avec connecteur jack
MONO peut apporter une
F
MD 82309 F-5
Page 98

13. BAND: sélection de la bande de réception en mode Radio
FM3, MW1, MW2)
ENTER : confirmer les saisies
14. 6: touche numérique et de rappel de station 6 ; / +10: dix titres vers le haut sur supports de données (CD, MP3, SD/MMC, USB)
15. 5: touche numérique et de rappel de station 5 ;
-10: dix titres vers le bas sur supports de données (CD, MP3, SD/MMC,
USB)
16. 4: touche numérique et de rappel de station 4 ; RDM (« Random »): lecture aléatoire sur supports de données (CD, MP3, SD/MMC, USB)
17. 3: touche numérique et de rappel de station 3 ;
INT («
Intro
»)
: fonction Intro sur supports de données (CD, MP3, SD/MMC,
USB)
18. 2: touche numérique et de rappel de station 2 ; RPT (« Repeat »): fonction de répétition sur supports de données (CD, MP3, SD/MMC, USB)
19. 1: touche numérique et de rappel de station 1 ; PAUSE : pause et lecture sur supports de données (CD, MP3, SD/MMC, USB)
20. AS/PS: mémorisation automatique des stations / SCH (« Search »): recherche de titres sur supports de données (CD, MP3, SD/MMC, USB) ;
21. MIC: microphone
22. TALK: parler (fonction Bluetooth)
23. MODE: choisir le mode : Radio - CD/MP3 - USB - SD/MMC - AUX ;
(FM 1, FM2,
F-6
Page 99

Derrière le panneau de commande
24. Fente pour une carte SD/MMC
25. : éjection du CD
26. Témoin lumineux rouge (protection antivol)
27. Témoin de fonctionnement du lecteur de CD
28. Orifice de RESET : restaurer les réglages d'usine
29. Compartiment à CD
F
MD 82309 F-7
Page 100

Consignes de sécurité
À propos de ce mode d'emploi
Lisez attentivement les consignes de sécurité avant de mettre
l'appareil en marche. Tenez compte des mises en garde qui
figurent sur l'appareil et dans le mode d'emploi.
Conservez le mode d'emploi à bord de votre véhicule. Si vous
ven
dez ou donnez l'autoradio, remettez aussi impérativement le
présent mode d'emploi.
Ne pas laisser d'appareils électriques entre les mains des enfants
Ne laissez jamais des enfants utiliser des appareils électriques sans
surveillance.
Conservez également les matériaux d'emballage hors de la portée des
enfants. Ils pourraient s'étouffer !
Emploi prévu
L'autoradio est prévu uniquement pour être installé et utilisé dans des
voitures particulières.
Sécurité routière
La sécurité routière a la priorité absolue. Utilisez votre autoradio
uniquement lorsque les conditions de circulation s'y prêtent.
Familiarisez-vous avec l'appareil avant de démarrer.
Dans votre véhicule, vous devez pouvoir entendre à temps les
sirènes de la police, des pompiers et d'autres services de secours.
Ne réglez donc jamais le volume si haut que vous risquiez
d'entendre trop tard les sirènes des véhicules de secours.
F-8
 Loading...