

Page 1

NAVIGATION SOFTWARE
MEDION-Navigator
- Version 2.0 -
USER’S GUIDE
25849MD0303
®
2003 MEDION
©
COPYRIGHT
Page 2

®
MS-DOS
Pentium
, Windows®, ActiveSync®, Outlook® are registered trademarks of Microsoft®.
®
is a registered trademark of Intel®.
Other trademarks are the property of their respective owners.
2
Page 3

TABLE OF CONTENTS
WELCOME ............................................................................................................................................ 6
NEW PROGRAM FUNCTIONS......................................................................................................... 6
ABOUT THIS USER’S GUIDE......................................................................................................... 6
SIGNIFICANCE OF DIFFERENT FONTS AND SYMBOLS ...................................................... 7
Part 1: Installing MEDION-Navigator
CHAPTER 1 IMPORTANT USER INFORMATION ...................................................................... 9
1.1 SYSTEM REQUIREMENTS ........................................................... 10
1.2 MAP MATERIAL..................................................................... 10
1.3 INFORMATION ABOUT SAFETY ..................................................... 11
1.3.1 Safety information concerning navigation 11
1.3.2 Safety information about the GPS receiver 11
1.3.3 Safety information for installation in the vehicle 11
1.4 SERVICE ADDRESSES .............................................................. 12
1.5 ACCESSING ONLINE HELP FOR THE MEDION-NAVIGATOR....................... 12
1.6 DISPLAYING THE MEDION-NAVIGATOR VERSION NUMBER ...................... 13
CHAPTER 2 INSTALLING THE SOFTWARE AND GETTING STARTED.................. 14
2.1 INSTALLING THE CAR HOLDER WITH POCKET PC ................................. 15
2.2 INSTALLING THE GPS RECEIVER .................................................. 15
2.2.1 Installation 15
2.2.2 Initialising the GPS receiver 15
2.2.3 Possible sources of error when initialising the GPS receiver 16
2.3 INSTALLING THE PROGRAM FILES ................................................. 17
2.3.1 MapExport Tool and MEDION-Navigator 17
2.3.2 Map 17
Part 2: Working with the MEDION-Navigator software
CHAPTER 1 GENERAL USER INFORMATION.................................................. 19
1.1 STARTING AND ENDING THE MEDION-NAVIGATOR.............................. 20
1.1.1 Starting the MEDION-Navigator 20
1.1.2 Ending the MEDION-Navigator 20
1.2 MAIN MENU ........................................................................ 20
1.3 DISPLAYING THE GPS STATUS.................................................... 20
1.4 DISPLAYING THE GPS WINDOW .................................................. 21
CHAPTER 2 SETTINGS.............................................................................. 22
2.1 OPENING THE SETTINGS WINDOW ................................................ 23
2.2 PRESETTINGS FOR NAVIGATION ................................................... 23
2.3 PRESETTINGS FOR ITINERARY ..................................................... 24
3
Page 4

PRESETTINGS FOR THE GPS RECEIVER ........................................... 24
2.4
2.5 PRESETTING THE VOLUME ......................................................... 24
2.6 PRESETTING THE FORMAT ......................................................... 25
CHAPTER 3 NAVIGATION .......................................................................... 26
3.1 GENERAL INFORMATION ABOUT GPS ............................................. 27
3.2 ENTERING A DESTINATION ........................................................ 27
3.2.1 Selecting a destination from the database of place names 27
3.2.2 Selecting special destinations in the vicinity of the current position (Local search)29
3.2.3 Selecting saved destinations 30
3.2.4 Selecting a destination from the Contact list 31
3.3 STARTING NAVIGATION............................................................ 31
3.4 NAVIGATION MODE ................................................................ 33
3.4.1 User interface and controls in the navigation mode 33
3.4.2 Toolbar in navigation mode 37
3.5 CHANGING THE SCALE OF THE MAP AND THE MAP SECTION ...................... 37
3.5.1 Interrupting navigation 38
3.5.2 Continuing navigation 38
3.5.3 Reaching the destination 38
CHAPTER 4 DISPLAYING THE CURRENT POSITION ....................................... 39
CHAPTER 5 SELECTING THE MAP ............................................................... 40
CHAPTER 6 ROUTE PLANNING ................................................................... 41
6.1 OPENING ROUTE PLANNING ....................................................... 42
6.2 SEARCHING FOR TOWNS, STREETS AND SPECIAL DESTINATIONS ................ 42
6.3 SELECTING SAVED DESTINATIONS ................................................ 44
6.4 SEARCHING FOR SPECIAL DESTINATIONS IN THE VICINITY (LOCAL SEARCH) ... 45
6.5 SELECTING AN ADDRESS FROM THE CONTACTS LIST ............................. 46
6.6 FINAL CHECKING OF THE ROUTE .................................................. 47
6.7 STARTING ROUTE CALCULATION................................................... 47
6.7.1 Failed route calculation 48
6.7.2 Displaying the route on the route list 49
6.7.3 Simulation of the route 49
6.8 USING THE TOOLBAR IN THE ITINERARY MODE ................................... 49
6.9 CHANGING THE SCALE OF THE MAP AND THE MAP SECTION ...................... 50
6.10 SPECIAL FEATURES WHEN USING THE ROUTE PLANNER WITH A GPS RECEIVER.51
6.10.1 Using route points and route lists for navigation 51
CHAPTER 1 INTRODUCTION ...................................................................... 54
Part 3: MapExport Tool for MEDION-Navigator
1.1 MAPEXPORT TOOL PROPERTIES ................................................... 55
1.2 THE USER INTERFACE OF MAPE XPORT T OOL ..................................... 55
1.2.1 Main menu 55
4
Page 5

Standard window 57
1.2.2
CHAPTER 2 WORKING WITH THE MAP ........................................................ 59
2.1 OPENING A MAP.................................................................... 60
2.1.1 Basic map 60
2.1.2 Customised maps 60
2.1.3 Standard maps 61
2.2 CHANGING THE SCALE OF THE MAP AND THE MAP SECTION ...................... 62
2.2.1 Shifting the map 62
2.2.2 Enlarging or reducing the map 62
CHAPTER 3 MAP TRANSFER....................................................................... 63
3.1 GENERAL INFORMATION ........................................................... 64
3.2 MAP TRANSFER .................................................................... 64
3.2.1 Exporting customised maps to the hard disk of the PC 64
3.2.2 Transferring customised maps 65
3.2.3 Transferring a standard map 65
CHAPTER 4 BASIC FUNCTIONS .................................................................. 66
4.1 SELECTING A ROUTE WITH CORRIDOR ............................................ 67
4.1.1 Selecting route points 67
4.1.2 Entering the radius around the route points 70
4.1.3 Entering the corridor width 70
4.1.4 Selecting the route options 71
4.1.5 Final route check 71
4.1.6 Exporting the route with corridor 72
4.2 SELECTING AN AREA............................................................... 73
4.2.1 Selecting and marking an area 73
4.2.2 Checking and changing the marked area 74
4.2.3 Exporting the area 75
4.3 MAP ARCHIVE ...................................................................... 76
4.3.1 Opening the window MAP ARCHIVE 76
4.3.2 Management of customised maps 77
4.3.3 Viewing and transferring a standard map 80
APPENDIX WHAT DO I DO IF…? ................................................................. 82
INDEX .................................................................................................................................................. 84
5
Page 6

Welcome
Welcome to MEDION-Navigator, the navigation software for your Pocket PC.
MEDION-Navigator will give you voice directions as well as providing map and arrow displays
to guide you to your destination so that you can relax, safe in the knowledge that you will
arrive at the right place. It can also be used as an electronic street map outside the car.
Beside the functions already known from the previous version of the MEDION-Navigator like
manual block of road sections, import of adresses from the Contacts folder in your Pocket PC,
route planning with vias etc., with the new version you can now search for special destinations
in the vicinity of your car or to enter a postal code for the destination town instead of its name.
The system is ready for use in any vehicle within a few seconds, the enclosed car holder is
quick and easy to install. When fitting it in your vehicle, make sure the car holder is attached
firmly and that it is outside the reach of airbags.
New program functions
Local search
When planning your route you can search for special destinations in the vicinity of your
current position.
Entering postal codes
When searching for a location, you can enter both the name or the postal code of the
town.
Selection of countries
Before entering the destination place, you may select the destination country. After this
only the places of the selected country will be displayed.
Error tolerant input of places
The system also finds incompletely entered place names, e.g. "Bradford" will be found
when only "ford" is entered.
Indication of miles or kilometres
You can choose whether you want the distances to be shown in kilometres/metres or in
miles/yards.
Selection of maps
The program finds all maps on all kind of data media (including memory extension
cards) and displays them in a list. The desired map can then be easily selected from the
list.
About this user’s guide
This user’s guide is set out in three parts:
ART 1 contains information about the following topics:
P
Important user information
Installing the software and getting started
ART 2 describes the operation of the MEDION-NAVIGATOR software:
P
General user information
Settings
Navigation
Selecting the map
Displaying the current position
Route planning
6
Page 7

ART 3 describes how to work with the MapExport Tool:
P
Introduction
Working with the map
Map transfer
Basic functions
Significance of different fonts and symbols
Different fonts and graphic symbols are used in this user’s guide to highlight particular sections
of the text and to make it easier to work with the guide and to read it:
1.
2.
Designations of input fields, keys on the keyboard, menu items and buttons are shown in
bold.
3.
The names of windows are written in
4.
References to related topics are written in italics and underlined
points in the pdf user’s guide to go straight to the relevant topic in the document.
This symbol, together with a framed text, indicates important information about
the function and operation of the program.
SMALL CAPITALS.
. You can click on these
7
Page 8

P
A
R
P
A
R
T
T
1
1
IINNSSTTAALLLLIINNGG
MMEEDDIIOONN--N
N
AAVVIIGGAATTOOR
R
8
Page 9

CHAPTER 1
MPORTANT USER INFORMATION
I
Topics covered in this chapter:
1.1 System requirements page 10
1.2 Map material page 10
1.3 Information about safety page 11
1.4 Service addresses page 12
1.5 Accessing online help for the MEDION-Navigator page 12
1.6 Displaying the MEDION-Navigator version number page 13
9
Page 10

1.1 System requirements
›
ActiveSync® – Software for communicating between been the Desktop PC and the Pocket
PC
›
12 MB memory for installation on the Pocket PC
›
Free memory for map material
›
Recommended: Memory expansion card (Secure Digital (SD) card or MMC card)
›
Cigarette lighter socket in vehicle
For MapExport Tool
›
Pentium processor 233 MHz or more
›
MS® Windows 98SE/2000/ME/XP
›
Random access memory: 64 MB RAM (256 MB recommended for exporting large map
sections, e.g. entire countries)
›
SVGA graphics card with at least 32,000 colours (minimum resolution 800 x 600 pixels)
›
Microsoft-compatible mouse / trackball
›
Free USB port for connecting the Pocket PC docking station to the Desktop PC
›
approx. 35 MB free hard disk space
For the map (optional)
›
approx. 280 MB when loading the map from the hard disk.
1.2 Map material
Map Great Britain + Ireland with major road network of Europe:
This map from Navigation Technologies
Kingdom (map GB + Ireland). In this map, navigation down to the level of house numbers is possible in all cities
and larger towns.
The map GB + Ireland contains the following data:
›
415,450 kilometres of road
›
24,740 centres of towns and villages
›
68,845 special destinations (car parks, petrol stations etc.)
Besides, the map includes the major road network of the countries Austria, Belgium, Czech
Repub
lic, Denmark, Finland, France, Germany, Italy, Liechtenstein, Luxemburg, The
Netherlands, Norway, Portugal, Slova
This road network connects all larger places of the mentioned countries and allows you to
navigate between and through all larger cities of Europe.
1
is fully updated and contains detailed map data of the United
kia, Spain, Sweden and Switzerland.
1
Based upon Ordnance Survey electronic data and used with the permission of The Controller of Her
Majesty´s Stationary Office © Crown Copyright, 1995
10
Page 11

1.3 Information about safety
1.3.1 Safety information concerning navigation
›
Drivers use MEDION-Navigator at their own risk.
›
To protect yourself and others from accidents please do not operate the navigation system
while driving.
›
If you have not understood the voice directions or if you are not sure what to do at the
next crossroads, you can quickly check by referring to the map or arrow display.
›
However, you should only look at the display when it is safe for you to do so!
›
The road layout and traffic signs take precedence over the directions given by the
navigation system.
›
Only follow the MEDION-Navigator instructions if the traffic situation and regulations
permit! MEDION-Navigator will guide you to your destination even if you have to deviate
from the planned route.
›
It is best to plan your route before you set off. If you want to enter a new route when you
are already travelling, simply pull off at the next car park or services.
1.3.2 Safety information about the GPS receiver
›
Do not paint over the GPS receiver. This might interfere with the reception of satellite
signals.
›
Do not use any harsh solvents for cleaning the GPS receiver. A damp cloth is sufficient!
›
Do not immerse the GPS receiver in water. Although the unit is spray-water protected,
irreparable damage might be caused if it is immersed in water.
›
Do not remove the plug by pulling the cable!
›
Do not bend the cable and make sure that it cannot be damaged by any sharp objects.
›
Do not install the cable immediately next to safety-critical equipment and supply lines.
›
After installation, test all the safety-critical equipment in the vehicle.
1.3.3 Safety information for installation in the vehicle
›
Do not fix the car holder in the airbag deployment area.
›
When installing the car holder, make sure that the holder does not constitute a safety
hazard even in the event of an accident.
11
Page 12

1.4 Service addresses
MEDION Electronics Ltd.
130 Faraday Park
Faraday Road
Dorcan
Swindon SN3 5JF
Wilts
Hotline
Phone: 0870 7270370
Fax: 01793 715716
E-Mail: hotline@medion.co.uk
Call Center:
Monday. - Friday.: 08:00 - 20:00
Saturday / Sunday.: 10:00 - 16:00
:
1.5 Accessing online help for the MEDION-Navigator
For the navigation software:
›
If you need help with a particular function, just use the stylus to click on the Help button
in the M
For the MapExport Tool:
›
Press F1 or click on the Help button in the M AIN MENU.
This pulls down the Welcome window for the online help.
You can use one of the following methods to search for help on a specific topic:
›
Browse the Contents in the left-hand help window. Click on the appropriate topic for
information.
AIN MENU of the MEDION-Navigator program.
›
Click on the Index and type in the keyword you are looking for. Choose the topic that
interests you from the list shown.
›
Click on Search to start a full text search. Type in a keyword and select the topic you want
information on from the list shown.
12
Page 13
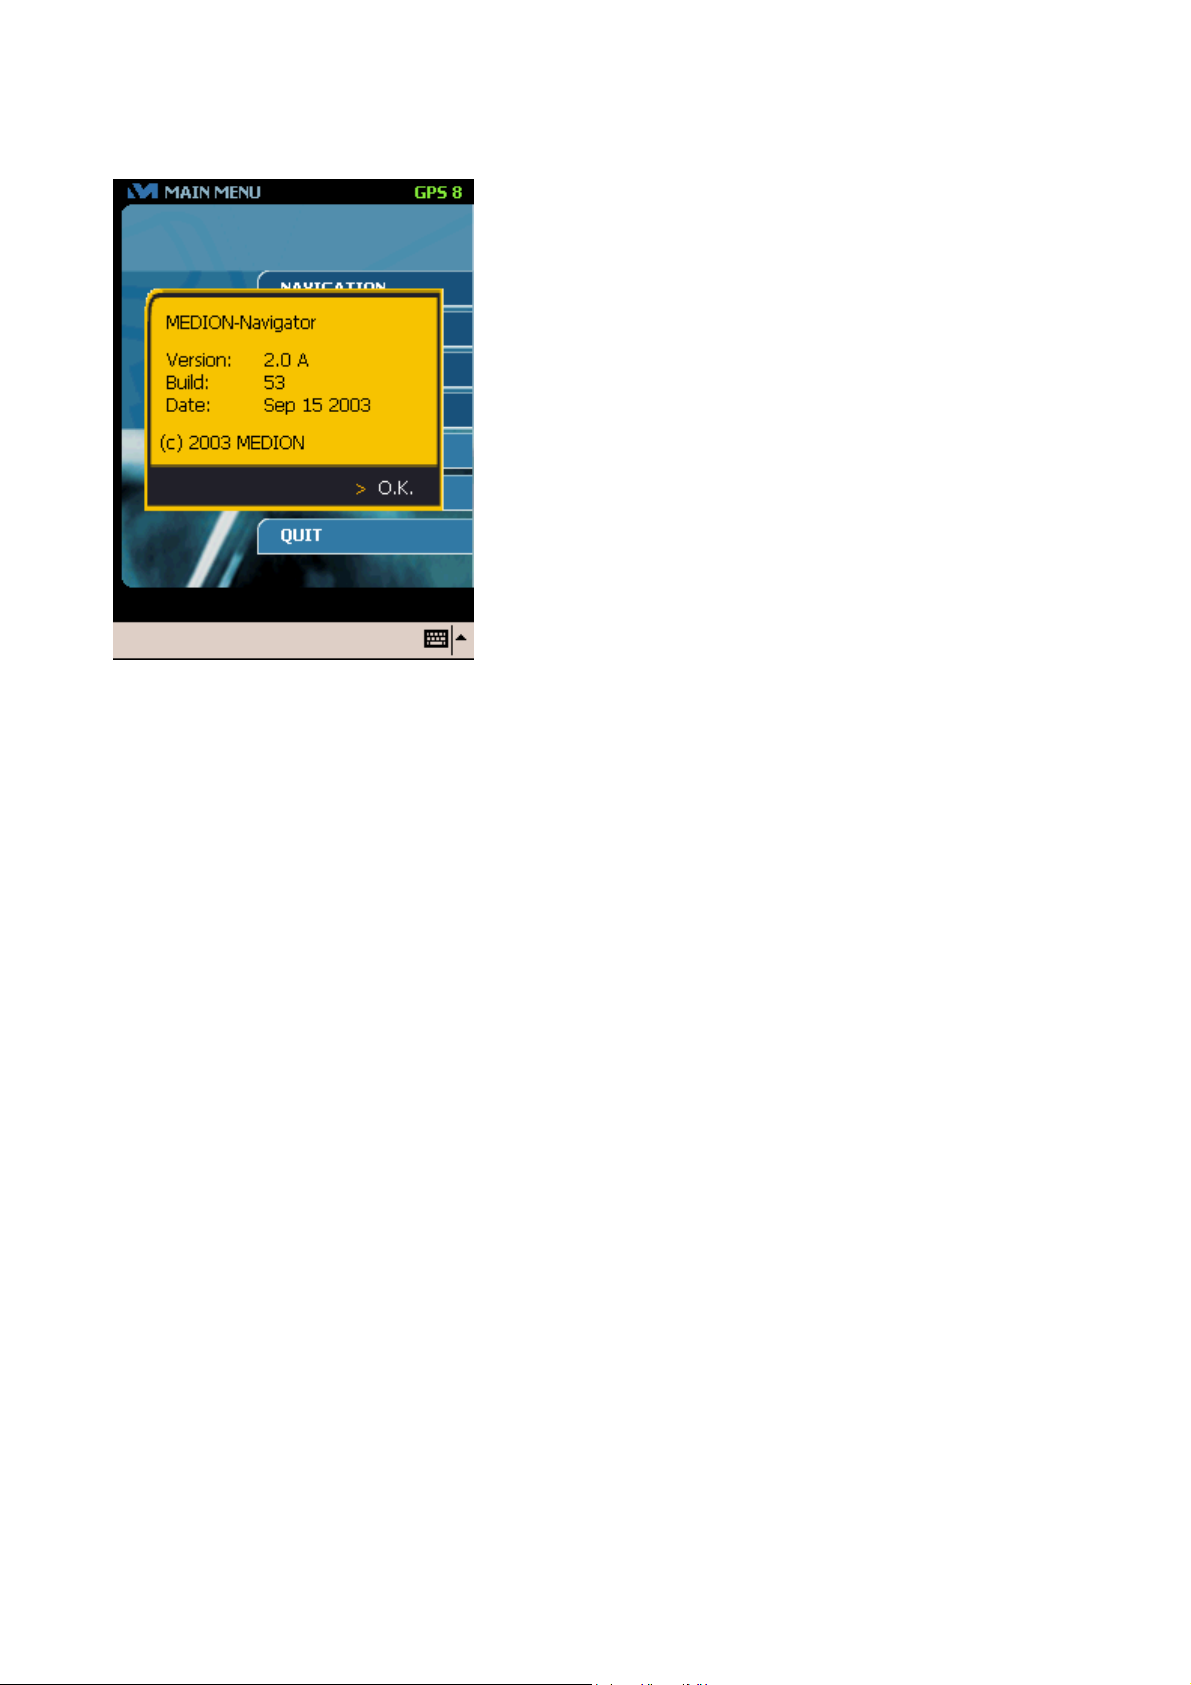
1.6 Displaying the MEDION-Navigator version number
› In the M AIN M ENU window press V on the
keyboard to open the window shown here. This
shows the version number of the software.
Click on OK to close the dialog field.
13
Page 14

CHAPTER 2
NSTALLING THE SOFTWARE AND GETTING
I
STARTED
Topics covered in this chapter:
2.1 Installing the car holder with Pocket PC page 15
2.2 Installing the GPS receiver page 15
2.3 Installing the program files page 17
14
Page 15
2.1 Installing the car holder with Pocket PC
Firmly click the bracket for the Pocket PC into the swan-neck attachment with the suction cup.
›
Attach the swan-neck attachment to the windscreen using the suction cup: first make sure
the windscreen and the suction are clean.
›
Place the Pocket PC firmly in the bracket and press both jaws of the bracket together so
that the Pocket PC is held firmly in place.
›
Connect the adapter to the bottom of the Pocket PC.
2.2 Installing the GPS receiver
2.2.1 Installation
The GPS receiver is designed to be installed inside the vehicle.
Important - please note!
GPS reception may be subject to interference if the windscreen is a heated windscreen, if a
windscreen aerial is fitted or if the windscreen is metallised.
›
Place the GPS receiver as far forwards as possible under the windscreen. Lay it flat on the
instrument panel and fix it in position on the instrument panel with Velcro tape. To do this
fix one side of the Velcro tape to the instrument panel and the other side to the GPS
receiver.
›
Insert the GPS connector cable in the socket that connects the receiver to the Pocket PC
and the power supply.
›
Push the power supply plug into the cigarette lighter socket.
Important - please note!
Take the plug for the power supply to the GPS receiver out of the cigarette lighter socket
at the end of the journey or if you are leaving the car parked for a longer period. Failure to
do so might result in a flat battery.
2.2.2 Initialising the GPS receiver
Please switch on the Pocket PC at the main switch.
When starting up the GPS receiver for the very first time, leave it connected to the power
supply for 1 to 2 hours after initialisation to make sure that the battery is fully charged.
This will ensure that the GPS receiver is ready for operation within just a few seconds the
next time you want to use it.
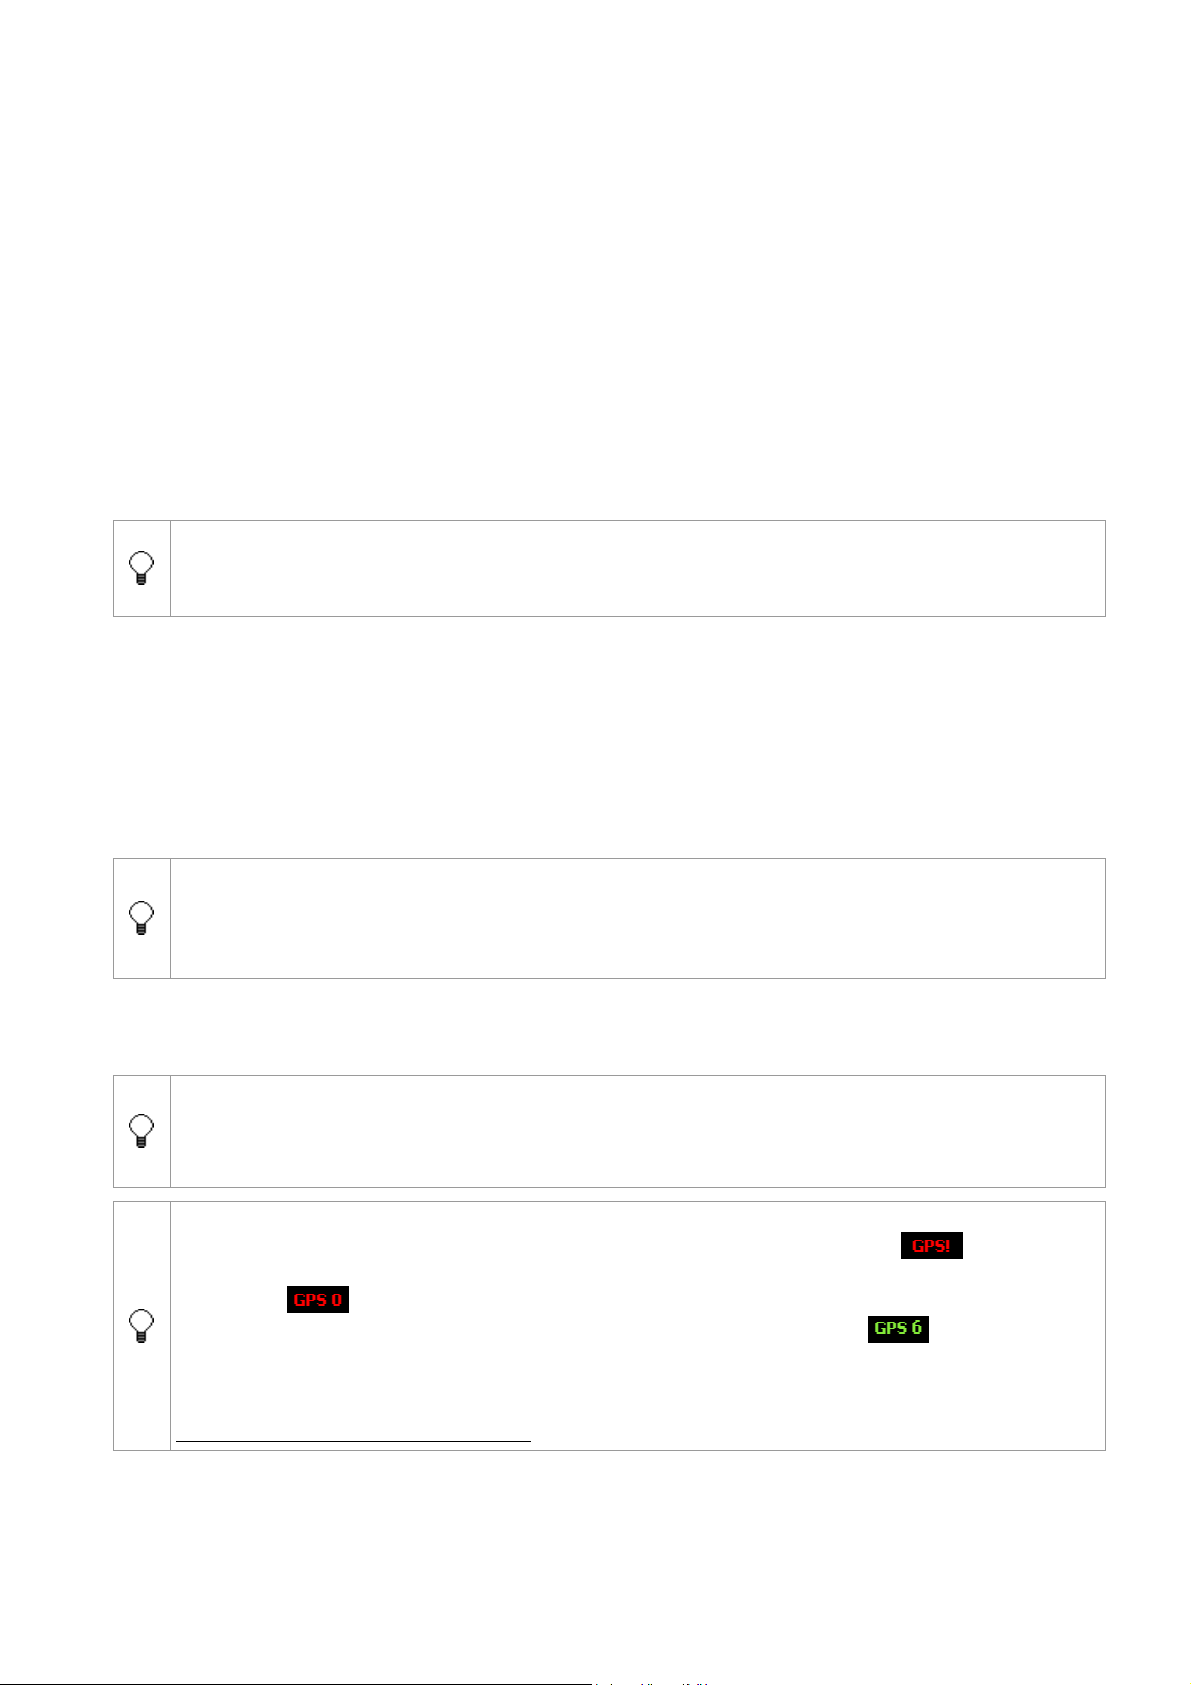
The GPS symbol shown in the upper right-hand corner of the title bar indicates the state of
initialisation. An exclamation mark after a red symbol (symbol No GPS ) here
indicates that the system has not found a receiver; a red symbol with a number (symbol
No signal ) indicates that a receiver has been found but that the signal is not strong
enough for navigation; a green symbol with a number (symbol GPS
the receiver is ready for operation and that you can start your journey. The number shown
beside the two symbols No Signal and GPS indicates the number of received satellites
and consequently the quality of the GPS signal. For further information please refer to
Displaying the GPS status, page 20
) indicates that
15
Page 16
The GPS receiver must be initialised before the navigation system is used for the first time.
This process is run automatically as soon as you have connected the GPS receiver and the
power supply is established. If the GPS receiver has been connected to COM 1, the GPS
symbol in the top right-hand corner will change from No GPS
within 5 seconds.
As soon as the GPS symbol has changed from No Signal
has been completed and you can start your journey. Please note that the GPS receiver may
require up to 20 minutes to determine your position when it is first initialised. The power
supply should not be interrupted during this process, as this would also interrupt the reception
of satellite data. You would then have to start again from the beginning the next time you
switch the unit on. We recommend that you wait at least 15 minutes when you use the GPS
receiver for the first time, even if the symbol for a GPS signal being present
displayed.
This initialisation process only gas to be carried out once when you first use the system. After
this is will take no more than 30 seconds before a GPS signal is present.
If the GPS receiver has not been used for a longer period (about one week) it may require
re-initialisation. However, it will take 2 minutes max. to initialise the receiver.
to No signal
to GPS , initialisation
is
2.2.3 Possible sources of error when initialising the GPS receiver
If the symbol No GPS is still displayed even though the system has been correctly
installed, this may be due to one of two reasons:
A. The GPS receiver is connected to a different port – not COM 1
›
Touch Settings in the MAIN MENU.
›
Select GPS configuration from the drop-down menu in the SETTINGS window.
›
Select another COM port from the second dropdown list and tap on Save changes. If the
GPS symbol shown in the top right-hand corner changes from No GPS
or GPS , you have selected the correct COM port and can start your journey.
›
Otherwise, repeat these steps by selecting the next COM port in the list.
B. The vehicle does not have a permanent power supply
›
It is possible that the vehicle does not have a permanent power supply if the GPS symbol
No GPS
COM ports.
is displayed in the S ETTINGS window even after you have checked all the
to No Signal
› Close the program, switch on the ignition and restart the navigation software.
The symbol GPS
ignition first and then restart the navigation software.
should be shown after a short while. In future always switch on the
16
Page 17

2.3 Installing the program files
2.3.1 MapExport Tool and MEDION-Navigator
There are two steps involved in installing the navigation system:
1. Installing the MapExport Tool and the MEDION-Navigator program files on the
computer – this is called Pre-installation.
2. Installation on the Pocket PC.
Installation procedure:
During the installation procedure the program will prompt you to select the installation
type.
Select Full installation, if you wish to save the basic map on the hard disk, or select
›
›
›
Minimal installation, if you wish to run the map from the CD-ROM.
If ActiveSync® has not yet been installed, install ActiveSync® now on your Desktop PC or
Laptop.
Connect the Pocket PC docking station to your Desktop PC.
Establish a connection via ActiveSync® between your Desktop PC and your Pocket PC. For
detailed information about these topics please refer to the user’s guide for your Pocket PC.
›
Insert the MEDION-Navigator CD-ROM in your CD-ROM drive. The installation process
will start automatically. Follow the instructions of the installation assistant.
›
If installation does not start automatically, select Start > Run and type E:\Setup.exe in
the input window, with “E” being the drive letter of your CD-ROM drive.
As soon as MapExport Tool has been installed and the pre-installation process has been
completed on your Desktop PC or Notebook the window I
NSTALLING APPLICATIONS will
open.
›
Click on the Yes button.
The program will now be installed on your Pocket PC.
If your Pocket PC was not connected to your computer during the installation process, the
window S
›
Click on OK to install the MEDION-Navigator software on your Pocket PC.
OFTWARE will automatically open as soon as a connection has been established.
2.3.2 Map
The map UK with major road network of Europe can be run from the hard disk or from the CDROM. It requires approx. 280 MB free hard disk space.
17
Page 18

P
A
R
P
A
R
T
T
2
2
W
OORRKKIINNGG WWIITTHH TTHHEE
W
E
SSOOFFTTWWAARRE
MMEEDDIIOONN--N
N
AAVVIIGGAATTOORR
18
Page 19

CHAPTER 1
ENERAL USER INFORMATION
G
Topics covered in this chapter:
1.1 Starting and ending the MEDION-Navigator page 20
1.2 Main menu page 20
1.3 Displaying the GPS status page 20
1.4 Displaying the GPS window page 21
19
Page 20

1.1 Starting and ending the MEDION-Navigator
1.1.1 Starting the MEDION-Navigator
Before you can start the MEDION-Navigator you must first transfer a map using the
MapExport Tool. See Part 3, 3.2 Map transfer, page 64
›
Select Start > Programs > MEDION-Navigator
-or-
›
click on the MEDION-Navigator icon on the desktop of your Pocket PC.
This will take you to the M
AIN MENU from which can call up all the program functions.
1.1.2 Ending the MEDION-Navigator
›
Tap on Quit in the MAIN MENU.
If you are in a different window, you will first have to go to the M
›
Touch the MAIN MENU button.
›
Touch Quit in the M AIN MENU.
.
AIN MENU:
1.2 Main menu
When you start the program you are in the MAIN MENU.
All the program functions available can only be called up from this window. For instance, if you
are in route planning mode and want to change your settings, you must first return to the
AIN MENU window and open the SETTINGS menu from there. The only exception is when
M
changing from route planning mode to navigation mode if a GPS receiver is connected (see
6.10.1 Using route points and route lists for navigation, page 51
All the program functions available are started from the M
)
AIN MENU:
Navigation
Route planning
Current position
Map
Settings
Help
Quit
1.3 Displaying the GPS status
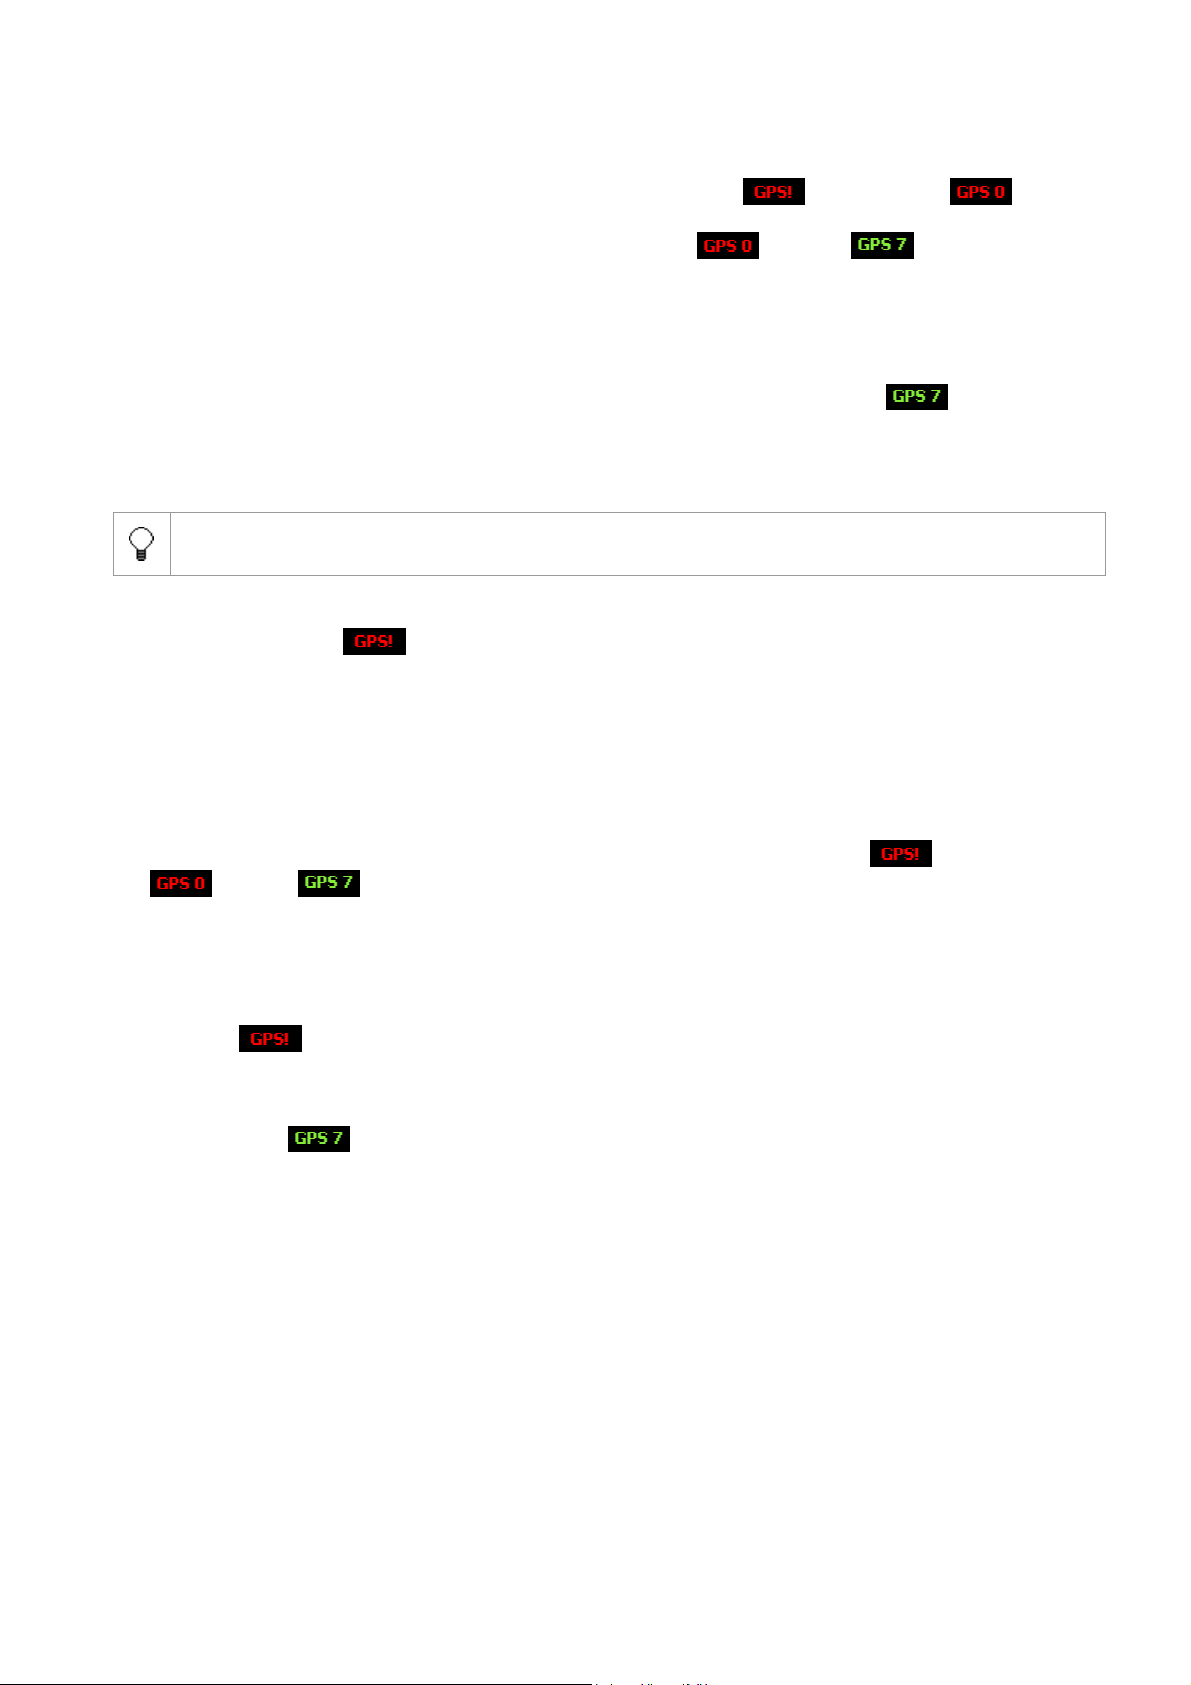
As soon as you start the MEDION-Navigator the GPS symbol will appear in the right-hand
corner of the title bar in the M
This indicates the current GPS status. If a GPS receiver is connected, the number of satellite
received is also shown. If you touch the GPS symbol, the GPS window will open (see
1.4 Displaying the GPS window, page 21
GPS status.
No GPS receiver
No GPS signal
GPS
See also: 2.2.2 Initialising the GPS receiver, page 15
AIN MENU.
), to show additional information about the current
Red symbol with exclamation mark: no GPS receiver
connected or the power supply is interrupted.
Red symbol + number of satellites received: a GPS receiver is
connected, but the signal is not suitable for navigation. This
may be the case if you are in an enclosed building.
Green symbol + number of satellites received: a GPS signal is
present. Navigation can be started.
20
Page 21
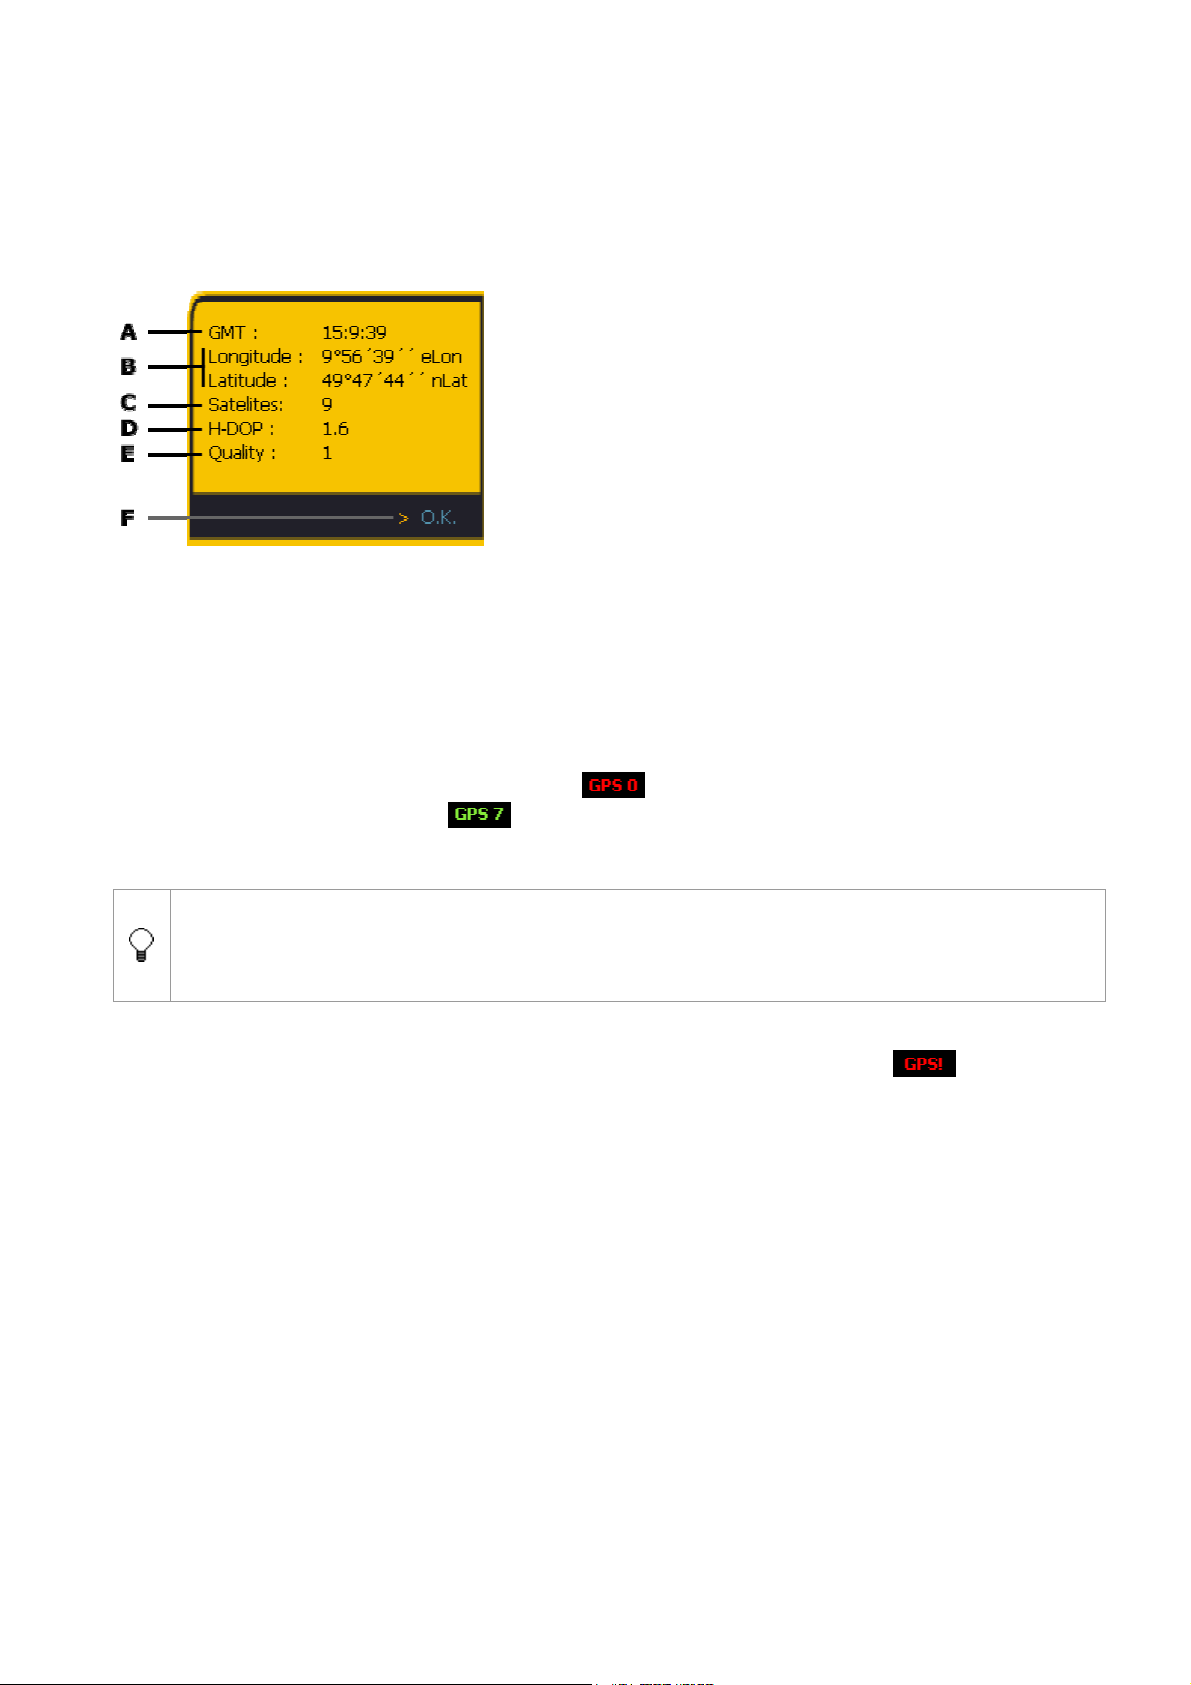
1.4 Displaying the GPS window
The GPS window can be opened from any window:
› Touch the GPS symbol in the upper right-hand corners of the title bar.
The following information is displayed about the current GPS status:
A. Greenwich Mean Time: London time without
summer time
B. Current Position: Degrees of longitude east and
degrees of latitude north
C. Number of satellites received
D. H-DOP (Horizontal Dilution of Precision): This
indicates the quality of position determination.
Theoretically any value from 0 to 50 is possible,
with the following being applicable: the smaller the
value, the more accurate the position determination
(value 0 = no deviation from the actual position). In
practice any value < 0.8 is not possible using a GPS
receiver; the value of 0.8 is considered to be very
accurate, while values up to 8 are acceptable.
E. Quality Index: This indicates whether the GPS receiver is providing a signal that is
suitable for navigation. It can only accept values of 0 or 1. A Quality Index value of 1
indicates that an adequate signal is present, while a value of 0 indicates that the signal is
not suitable for navigation. The value is also reflected in the GPS symbol display: If the
value equals zero, the symbol No signal
one, the green symbol GPS
is shown.
(red symbol) appears, if the value equals
F. Closes the GPS window.
The Quality Index and H-DOP may be useful indicators for troubleshooting if problems
should arise with your GPS receiver and you want to use our customer support service. We
therefore recommend that you write down these values as well as all the other information
displayed in the GPS window before contacting customer support.
Please note:
If no GPS receiver is connected or if the power supply is interrupted (symbol
), this
window merely shows the information that no GPS receiver has been found.
21
Page 22

CHAPTER 2
ETTINGS
S
Topics covered in this chapter:
2.1 Opening the Settings window page 23
2.2 Presettings for navigation page 23
2.3 Presettings for itinerary page 24
2.4 Presettings for the GPS receiver page 24
2.5 Presetting the volume page 24
2.6 Presetting the format page 25
22
Page 23
2.1 Opening the Settings window
›
Select Navigation from the drop-down menu to determine the settings for navigation.
›
Select Route planning from the drop-down menu to determine the settings for route
planning.
›
Select GPS configuration from the drop-down menu if you have connected the GPS
receiver to a COM port other than COM1.
›
Select Volume from the drop-down menu if you want to increase or decrease the
volume.
›
Select Format from the drop-down menu to determine the unit of length and the time
format to be used in the navigation software.
›
You can change the settings by enabling the relevant option buttons and check boxes:
Enabled:
/ Disabled: /
› Touch Save changes.
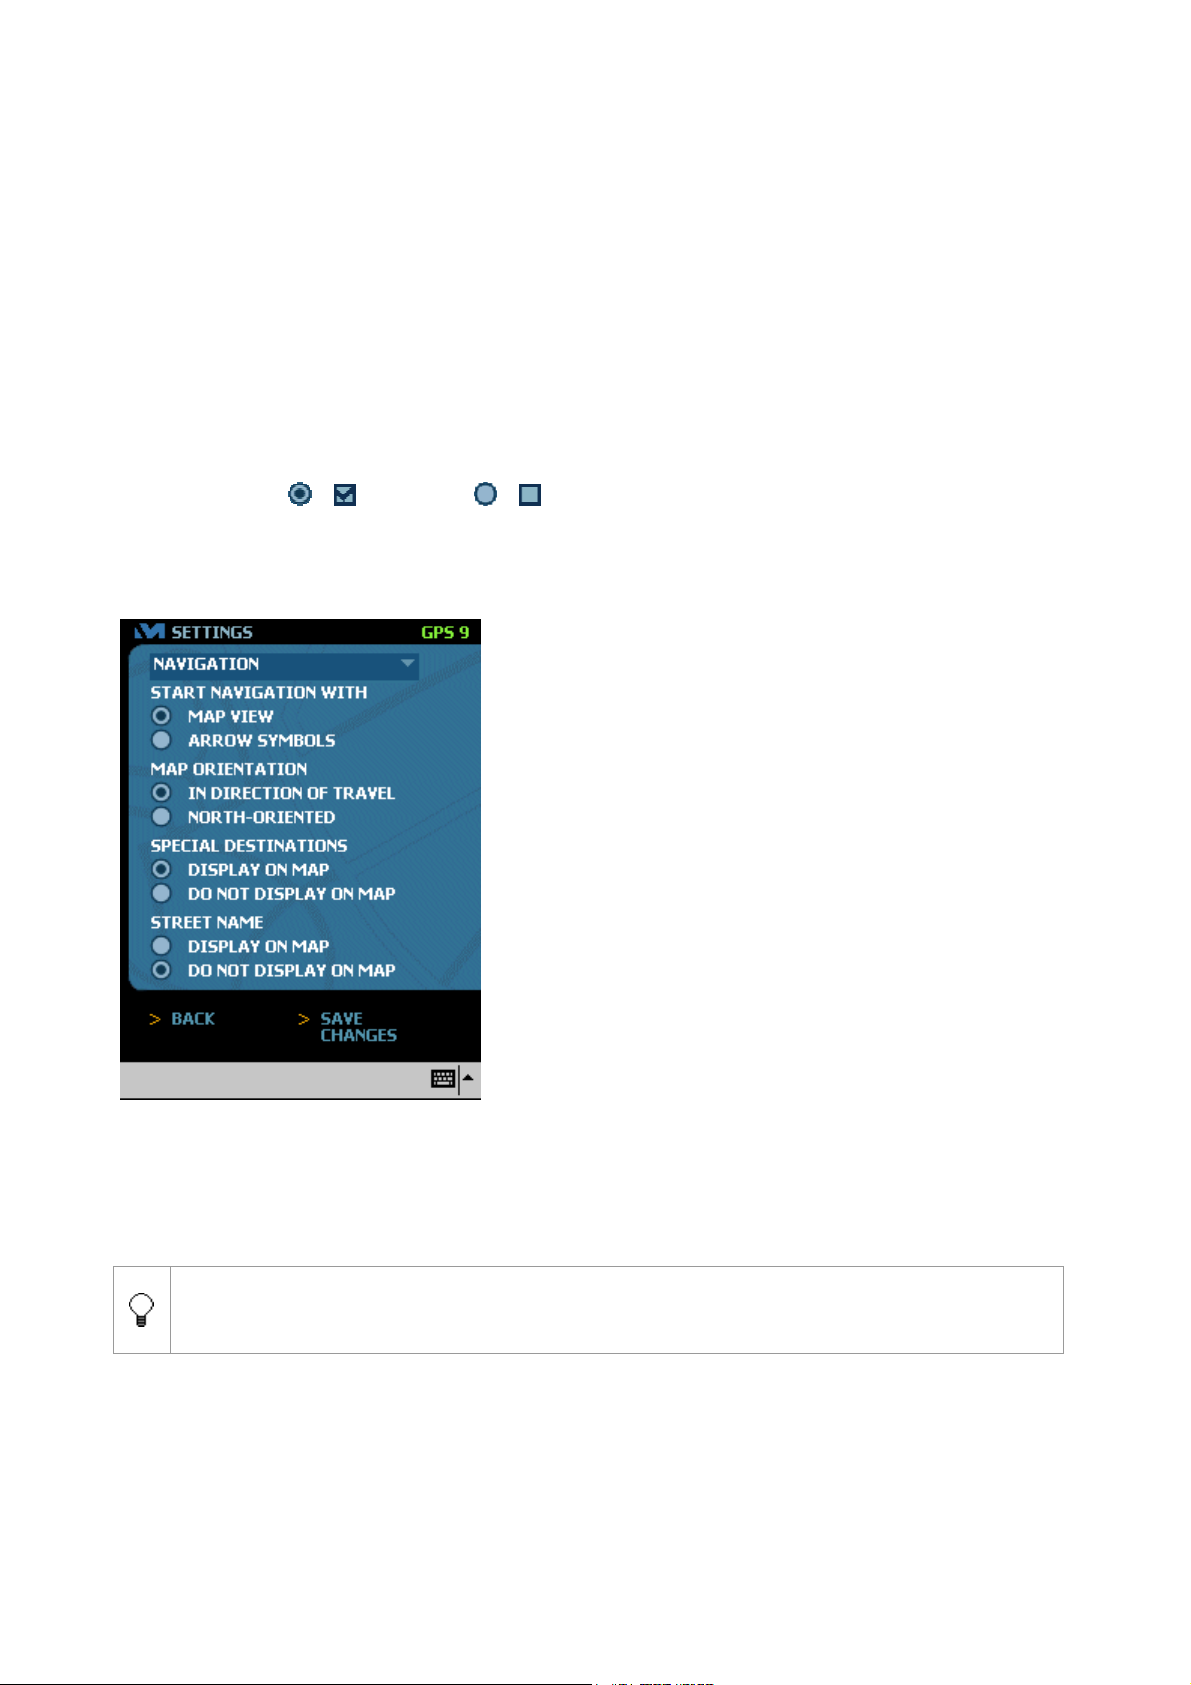
2.2 Presettings for navigation
The following settings are available:
›
Start navigation with arrow symbols
(schematic view of crossroads) or with map
view
This determines the view with which the navigation
mode opens. The default value is map view.
›
Map north-oriented or rotated in direction of
travel
The default setting is for the map to be rotated in the
direction of travel. If you want to have the map northoriented, enable the North-oriented button.
›
Display / Do not display special destinations
on map
To avoid overloading the map with information you can
choose not to have special destinations, e.g. car parks,
petrol stations etc., shown on the map. The default
setting is a map showing those symbols.
›
Display / Do not display street names on map
The default setting is for street names not to be shown
on the map during navigation. If you want the street
names to be shown on the map, enable the option
button Display on map.
Whether or not the special destination symbols are shown has no influence on the
database, i.e. you can select special destinations as destination points even if these
are not displayed on the map.
23
Page 24
2.3 Presettings for itinerary
›
Display / do not display special destination on map
To avoid overloading the map with information you can choose not to have special
destinations, e.g. car parks, petrol stations etc., shown on the map. The default setting is a
map showing those symbols.
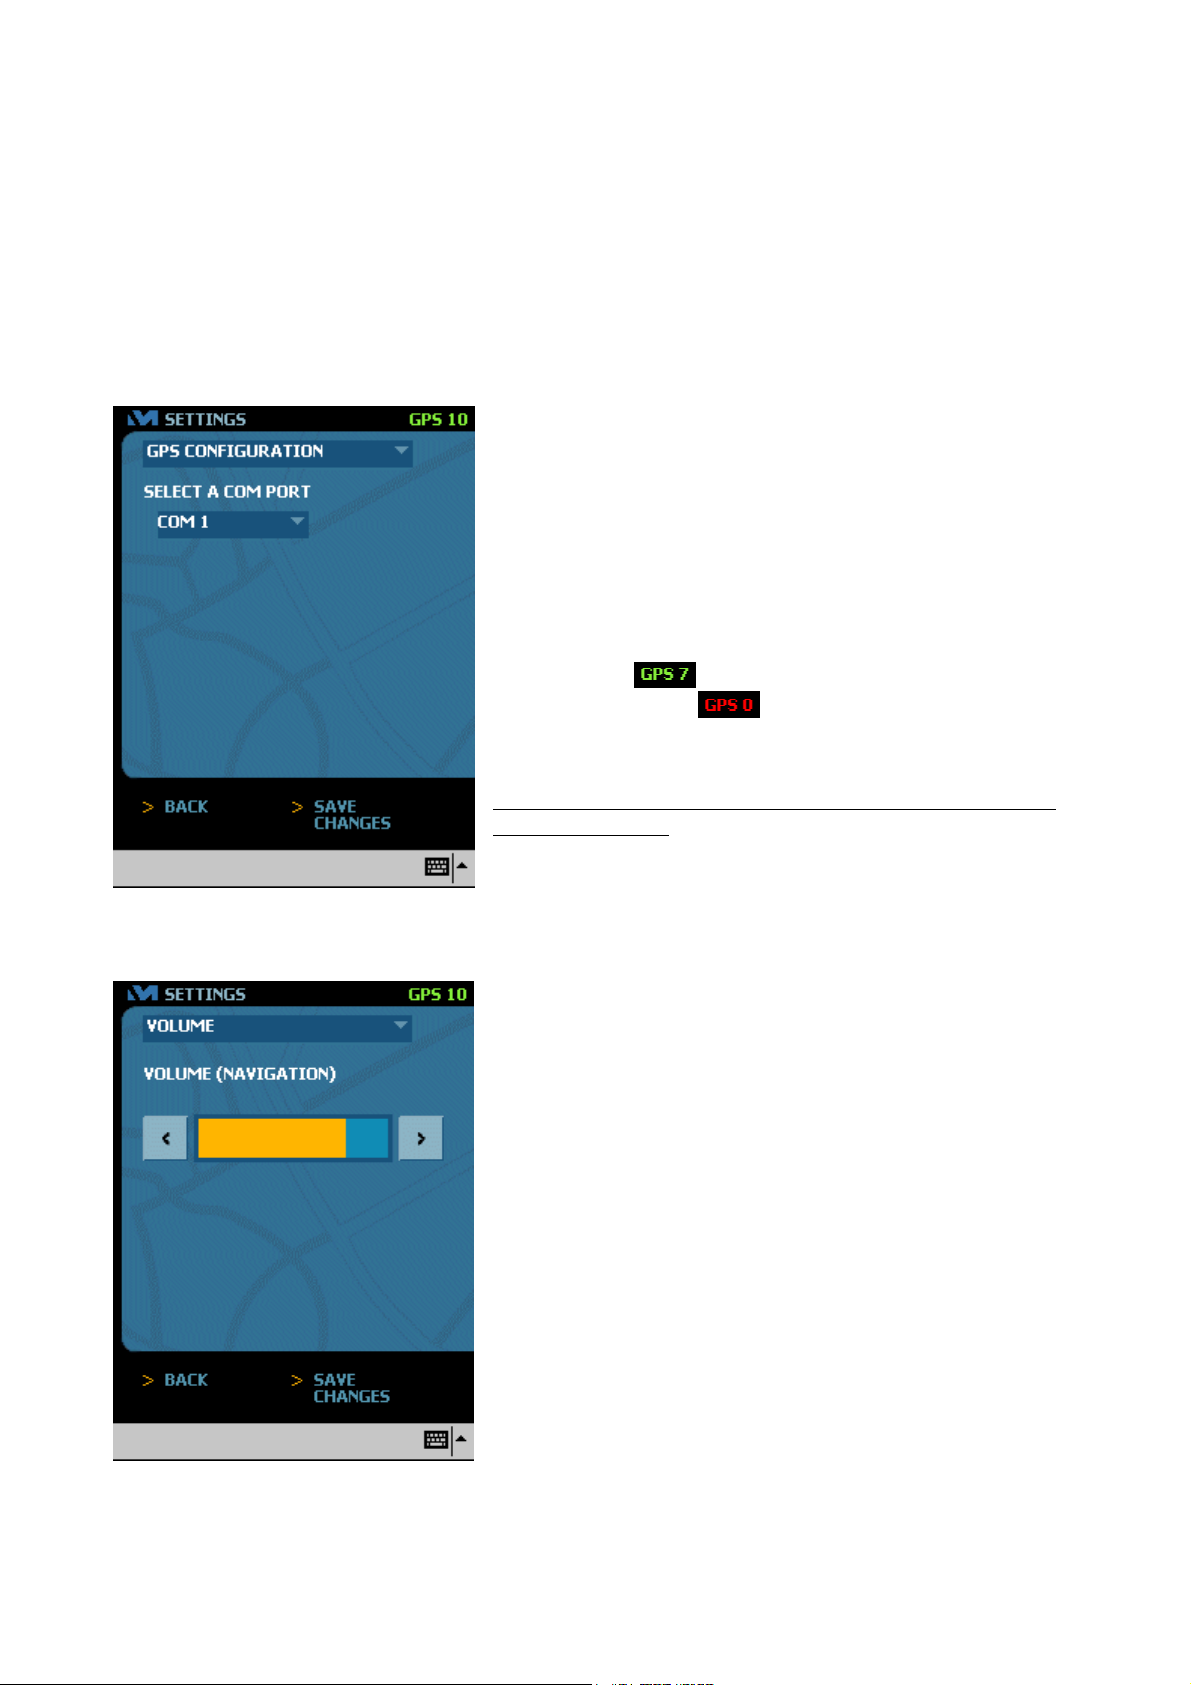
2.4 Presettings for the GPS receiver
›
Selecting the COM port
If you have connected the GPS receiver to a COM port other
than COM 1, you must let the program know this so that the
GPS receiver will function properly and allow you to start the
navigation process.
›
Select GPS configuration from the first drop-down menu.
›
Then select the appropriate COM port from the second
drop-down menu. You can check that you have selected
the correct port by looking at the GPS symbol shown in the
top right-hand corner:
If the symbol
signal or No signal
the correct port and can start your journey.
See also:
2.2.3 Possible sources of error when initialising the GPS
receiver, page 16
2.5 Presetting the volume
This allows you to set the volume of voice directions during the
navigation process. This setting only applies until you exit the
program. When you exit the program the volume returns to
the default value.
›
›
›
This closes the settings window and you will return to the
M
is shown to indicate the presence of a GPS
is shown, then you have selected
Touch the Arrow left button to decrease the volume.
Touch the Arrow right button to increase the volume.
Touch Back if you do not want to make any changes or do
not want to save the changes you have made.
AIN MENU.
›
Touch Save changes to save the current settings and to
close the window.
This takes you back to the M
24
AIN MENU.
Page 25
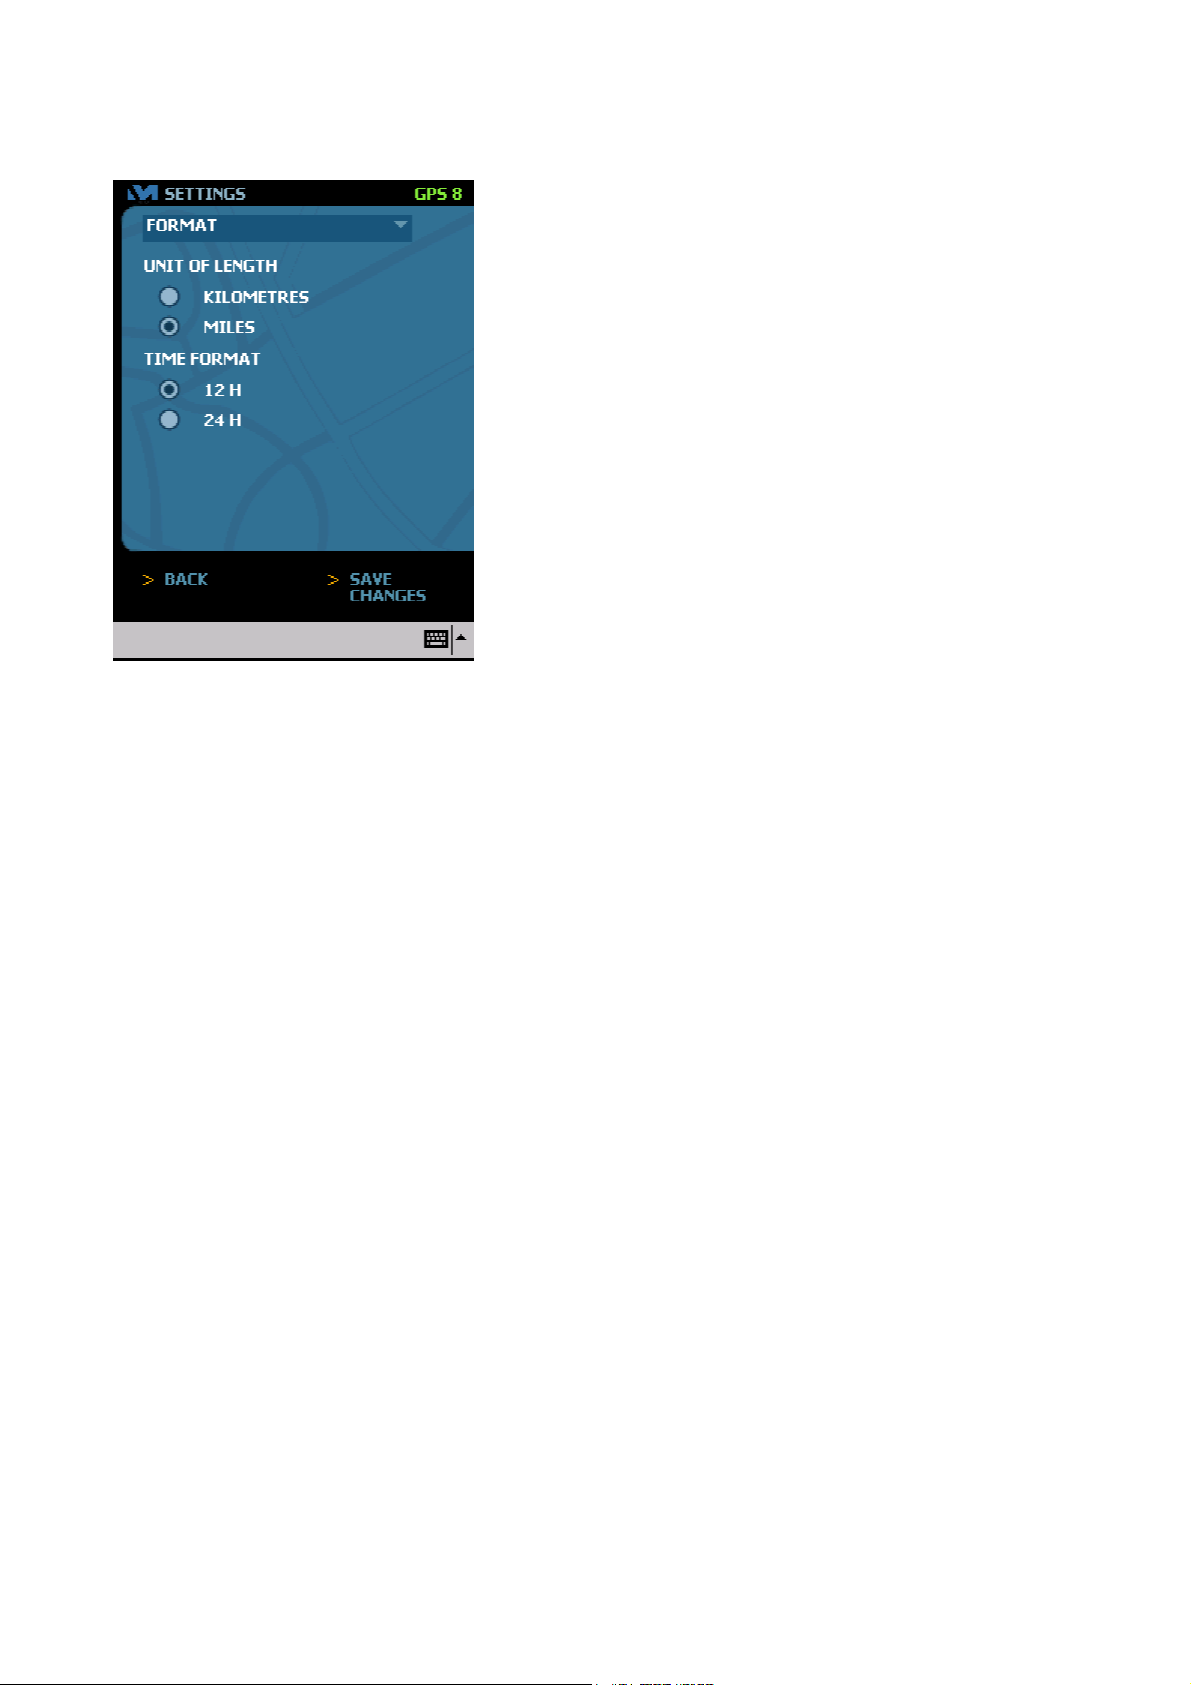
2.6 Presetting the format
The following settings are available:
Unit of length in kilometres or miles
This allows you to choose whether you want the distances to
be shown in kilometres/metres or in miles/yards.
Time format 12h/24h
This allows you to specify the time format of the estimated
time of arrival that is displayed in navigation mode.
›
This closes the settings window and you will return to the
M
›
This takes you back to the M
Touch Back if you do not want to make any changes or do
not want to save the changes you have made.
AIN MENU.
Touch Save changes to save the current settings and to
close the window.
AIN MENU.
25
Page 26

CHAPTER 3
AVIGATION
N
Topics covered in this chapter:
3.1 General information about GPS page 27
3.2 Entering a destination page 27
3.3 Starting navigation page 31
3.4 Navigation mode page 33
3.5 Changing the scale of the map and the map section page 37
26
Page 27

3.1 General information about GPS
The Global Positioning System, or GPS for short, is a satellite-based system used to determine
the geographical position of a GPS receiver on the earth’s surface.
The system is based on 24 satellites that circle the earth along defined paths. They send out
signals that are received by the GPS receiver, allowing the receiver to calculate its position in
terms of geographical longitude and latitude.
The receiver needs at least 3 satellites for an initial fix on the position. However, while
travelling, the GPS receiver can determine the position even if there are fewer than 3 satellites
within range for a few seconds, provided that it has already calculated a position before that.
To be able to determine the position correctly, the receiver needs to receive direct signals from
the GPS satellites, without any delay. In other words, the GPS receiver needs a “clear view” of
the satellites. Metallic materials, such as the car roof, screen out these signals, high-rise
buildings on both sides reduce the receiver’s coverage and glass surfaces may reflect the
satellite signals, which could reduce the receiver’s performance. Dense foliage, e.g. an avenue
of trees, may also reduce the quality of reception on account of the water in the leaves.
Map material is also required to allow the GPS signals to be used for navigation. This map
material must be available in a digitised, vectorised form so that the route can be calculated
with the aid of mathematical functions. This involves the map data being reconciled with the
incoming signal so that the route to a defined destination point can be calculated.
3.2 Entering a destination
›
Touch Navigation in the M AIN MENU.
›
The E NTER DESTINATION window opens.
There are four available options for inputting the destination:
You can select a destination from the database for place names.
You can select special destinations in the vicinity of the car.
You can select saved destinations.
You can select a destination from the MS Outlook Contacts list.
Once you have planned your route in the route planning mode, you can also define one of the
points on the route as the destination point if the GPS receiver is connected. This can be done
either with or without the route having been calculated in advance.
For detailed instructions please refer to:
6.10 Special features when using the route planner with a GPS receiver, page 51
3.2.1 Selecting a destination from the database of place names
The display and availability of destinations depend on the map currently selected. If you
want to check which map is currently selected or if you want to select a different map,
proceed as described in Chapter 5 Selecting the map, page 40
.
.
Selecting the place and street
›
If you open the ENTER DESTINATION window, the country currently selected is displayed
in the Country field and the cursor is already in the Town/Postal Code field.
›
If you want to select a different country, select the country from the drop-down menu. If
not, you can start inputting the place name immediately.
If you want to be able to choose route points in all countries included in the map, simply
select All Countries from the Country drop-down list.
Note that the selection of this option will disable the possibility to search a place by
entering a postal code instead o name. At the same time, the name of the Town/Postal
Code field will change to Town.
27
Page 28

›
Key in the postal code or the name of your destination in the Town/Postal Code field and
select that destination from the drop-down menu. The postal code and area shown after
the place name make it easier for you to choose between towns of the same name. If one
town has several postal code, the one for the town centre is shown.
›
The Street/Special destination field is automatically enabled once you have selected the
town. Key in the street in the Street/Special destination field and select that street from
the dropdown list. The associated postal code and the district of the town are shown in
brackets after the street name.
›
Please make sure that the entry Streets only is selected in the Special destination
category. This entry is the second in the list of available options.
›
If the database includes house numbers for the street you have selected, the cursor will
automatically move to the house number field to the right of the Street/Special
destination field and you can input the house number. The field is disabled if the database
does not contain any house numbers for the street selected.
›
If you want to see the destination you have selected on the map, touch the Show on map
button.
This opens up a new window in which the destination is shown as a yellow and black flag and
the street of your destination is highlighted in blue on the map. You also have an opportunity
here of selecting a new destination on the map. For an illustration and description of this
window please see Route calculation failed, page 32
.
If you have selected the Streets only entry in the Special destination category
field, only the available streets are listed in the Street/Special destination dropdown menu.
If you want to be able to select both streets and special destinations, then select the
Streets and Special destinations in the Special destination category field. This is
the first and default option in the list of available options.
Selecting the place and special destination
›
If you are searching for a special destination in a particular country, select that country
from the Country drop-down list.
If you want to be able to search for a special destination in all the countries included in the
map, select All Countries from the Country drop-down list. However, the possibility to
search a place by entering its postal code will then be disabled.
›
In the same way as selecting the street, you first need to select the town where you want
to search for special destinations:
›
In the Town/Postal Code field key in the name of the place where you want to search for
special destinations, then select this from the drop-down menu. If the All countries option
is not selected from the Country field, you may also enter the postal code of the place.
›
From the Special destination category list, select the category of special destinations
you want to search (petrol stations, hospitals, restaurants etc.).
All the special destinations in this category are then listed in the Street/Special destination
drop-down menu for the town you have selected.
Depending on the selected town it may happen, however, that for some categories (e.g.
border crossing/ airport) there are no special destinations displayed on the list.
›
Select the desired special destination from the list.
›
If you want to see the special destination you have selected on the map, touch the Show
on map button.
This opens a window where the special destination is shown as a yellow and black flag on the
map.
28
Page 29

You can also enter a new destination by pressing the
map, in this window and then touching the stylus to the map at the desired point. For an
illustration and description of this window please Route calculation failed, page 32
See also:
Saving destinations, page 30
3.3 Starting navigation, page 31
button, Select destination on
.
3.2.2 Selecting special destinations in the vicinity of the current position (Local search)
In conjunction with a GPS receiver this function offers you the possibility to search for special
destinations in the vicinity of your current position. All destinations of a previously specified
category, which are located within a maximum radius of 15 kilometers around your current
position, are then displayed in a list and can be selected as destinations. This function is
available both for navigation and route planning, assuming that there is an adequate GPS
signal available. If there is no GPS signal availabe, this function will be disabled.
›
Tap on Navigation in the MAIN MENU.
›
Tap on Local search.
›
In the LOCAL SEARCH window, select from the
POI category list the category of special
destinations you want to search (petrol station,
garage, restaurant etc.).
›
Select from the Radius dropdown list the radius
around your current position, within which you
want to search for special destinations. (max.15
kilometers.)
All destinations, which correspond to your selection
are then displayed in a list, starting with the nearest
destination and indicating the name of the place, the
name of the destination and the distance to your
current position (linear distance).
›
Select the special destination that you want to use
as destination.
›
Tap on OK.
This closes the window and the adress is then transferred to the corresponding input fields in
NTER DESTINATION window.
the E
›
If you want to see the special destination you have selected on the map, touch the Show
on map button.
29
Page 30

3.2.3 Selecting saved destinations
Three lists with saved destinations are available:
1. Recent destinations:
Your ten last destinations are saved automatically and can be selected using the Last
destinations button.
2. Personal destinations:
All destinations that you have saved by pressing the Save destination button.
3. Map-specific destinations:
All points on the route that were selected in MapExport Tool when planning the route are
available as predefined destinations. No predefined destinations are available after an area has
been exported.
The display of these destinations is dependent on the map selected in each case.
To select a saved destination, carry out the following steps:
›
Click on Navigation in the M AIN MENU.
›
Touch Recent destinations, Personal destinations or Map-specific destinations.
›
Touch the stylus to the destination to select it.
›
Touch the OK button.
The saved data are then transferred to the input fields.
›
If you want to see the destination you have selected on the map, touch the Show on map
button.
This opens up a new window in which the destination is shown as a yellow and black flag and
the street of your destination is highlighted in blue on the map. You can also enter a new
destination by pressing the
button, Select destination on map, in this window and then
touching the stylus to the map at the desired point. For an illustration and description of this
window please see Route calculation failed, page 32.
Delete saved destination
›
Touch Navigation in the M AIN MENU.
›
Click on Recent destinations, Personal destinations or Map-specific destinations.
›
Highlight the destination you want to delete by touching the stylus to it.
›
Touch the Delete destination button.
The destination cannot be used for navigation if it is located outside the map you have
selected. In the E
NTER DESTINATION window select a map that covers the destination.
Saving destinations
If you want to save an address to use at a later time, enter a new destination in the E
DESTINATION
window, then touch the Save destination button.
NTER
› Touch OK.
The address is now saved to the list of Personal destinations and you can now call it up
again at any time by selecting the Personal destinations button in the E
DESTINATION window.
30
NTER
Page 31

3.2.4 Selecting a destination from the Contact list
All addresses in your Contacts program can be incorporated and subsequently used as
destination points for navigation or as route points when planning your route.
This address should include the details of the town with postal code, the street and the house
number so that it can be uniquely allocated.
Please note that only the addresses contained in the map data stock can be incorporated. If an
address cannot be uniquely allocated, e.g. if the map contains several locations with the same
place name, these will be listed together with the postal code and district. Highlight the
appropriate location and touch OK.
If an address cannot be allocated at all, e.g. because no town was specified or because the
town was not found on the map, a message appears to indicate that the address was not
found. If this happens the address will not appear in the Contacts list.
If the name of the street was not specified for a contact, but the town was found, then the
centre of that town is used as the address.
›
Touch Navigation in the M AIN MENU.
›
Touch Contacts.
The C
business address and a home address, the business address will be shown first.
ONTACTS window now opens, showing a list of all addresses. If the same person has a
›
Highlight the address you want to use as your
destination.
›
If you have a long list of addresses, you can enter
the first letter of the surname. This displays the
first entry in the list starting with that letter and
highlights it automatically.
›
Touch OK.
›
This closes the window and the address has
already been entered in the input fields in the
NTER DESTINATION window.
E
›
If you want to see the destination you have
selected on the map, touch the Show on map
button.
This opens up a new window in which the destination
is shown as a yellow and black flag and the street of
your destination is highlighted and shown at the
centre of the map. You also have an opportunity here
of selecting a new destination on the map. For an
illustration and description of this window please see
Route calculation failed, page 32
.
3.3 Starting navigation
Once you have selected a destination from the database of place names, the Contacts list or
from a list with saved destinations, you need to carry out the following steps:
›
Touch the Start navigation button.
›
In the ROUTE OPTIONS window select the route you want to be calculated by pressing
the appropriate option buttons. You have a choice between the Quick route and the Short
route.
›
You can enable the options Avoid interstates, Avoid ferries and Avoid toll ways to
determine whether these should be included or avoided, if possible, when planning the
route. The default setting is for these three options to be included when calculating the
route.
31
Page 32

If you are in a rural area, we recommend selecting the Quick route.
› Touch the Start navigation button.
If your destination is located in a pedestrian precinct you will hear the message
“Attention, the destination is in an area with restricted vehicle access”. The route
is then calculated up to the specified destination point.
The program calculates the route and switches to navigation mode.
Route calculation failed
Very occasionally the route cannot be calculated, e.g. if the destination is located in an isolated
zone without any vehicle access. An error message is generated if this happens and you have
the opportunity to view the destination on the map and to select a new destination by using
the pen.
› Touch the Show on map button in the lower right-hand section of the error message
window.
The following window opens:
A. Display of destination street (highlighted in blue) and the destination point (yellow and
black flag)
B. Opens the ENTER DESTINATION window so that you can key in a new destination.
C. Starts the route calculation.
D. Toolbar: Touch the stylus to Select destination on map to enter a new destination
directly on the map:
›
Search the map for the street where you want to set your new destination.
›
Touch the stylus to the correct place on the map to set the new destination point.
›
Then touch Calculate route to start the route calculation process with a new destination.
E. Display of the GPS status (see 1.3 Displaying the GPS status, page 20).
32
Page 33

3.4 Navigation mode
Important - please note:
Please comply with the safety information set out below to avoid accidents to you and others!
›
Never operate the system while driving!
›
Only look at the display if you can do so safely.
›
Stop in a suitable place if you have to look at the display for any length of time.
›
Only change the settings and enter new destinations when the vehicle is stationary!
3.4.1 User interface and controls in the navigation mode
Navigation is available in schematic intersection view or map view.
The complete user interface acts as a button, making it easier for you to toggle between
arrow view and map view during the navigation process. Simply touch the screen with your
finger or the stylus to switch between arrow view and map view.
Schematic intersection view
The following information is shown in the schematic intersection view:
Name of the next street
Distance remaining to the next turn (this is replaced by a distance bar just before the
manoeuvre)
Type of next manoeuvre in a schematic view of the crossroads
Name of the current street
Distance / Duration / Arrival
For an illustration of the schematic intersection view in navigation mode please see
Navigation screen with schematic intersection view, page 35
.
To switch between the display of Distance, Duration and Arrival touch the stylus to the
information currently being shown on the lower right-hand section of the screen.
Map view
Initially a map section of 200 x 200 metres around your current position is displayed.
For an illustration of the map display in navigation mode please see
Navigation screen with map view, page 34.
The following information is also displayed on the screen:
Current position as a red arrow on the route (highlighted)
Name of the next street
Distance remaining to the next turn (this is replaced by a distance bar just before the
manoeuvre)
Name of the current street
Distance / Duration / Arrival
To switch between the display of Distance, Duration and Arrival touch the stylus to the
information currently being shown on the lower right-hand section of the screen.
33
Page 34

Navigation screen with map view
A. Name of the street into which you should turn next.
B. Distance bar: this appears after the voice announcement that you will need to turn shortly
and replaces the distance display in km/m to the next turn (see Fig. 2). The bar fills with
orange until the actual turn is reached. When the bar is filled completely with orange it means
that you now need to turn off.
C. Route (highlighted in green if the map colours are set to “Night”, and in blue if they are set to
“Day”)
D. Red arrow: marks your current position on the map.
E. Name of the street you are on at the moment.
F. Opens a window with the option to input a new destination or to end navigation
(see also: 3.5.1 Interrupting navigation, page 38
G. Opens a window to permit manual blocking of a section of the route determined by you from
your current position. (see Manual blocking, page 36
H. The total length of the route, the time remaining to the destination and the estimated time of
)
arrival are displayed here one after the other. You can switch between the individual displays
by touching the stylus to the relevant display.
I. Toolbar (minimised): contains buttons for changing the map display
(see 3.4.2 Toolbar in navigation mode, page 37
). This can be minimised and maximised by
dragging it with the pen.
K. Display of the GPS status (see 1.3 Displaying the GPS status, page 20). Touch the stylus to the
GPS symbol to open the window in which the information about the current GPS status is
displayed.
L. Distance display in km/m to the next turn. This is displayed until the distance bar is shown.
34
Page 35

Navigation screen with schematic intersection view
A. Name of the street into which you should turn next.
B. Distance bar: this appears after the voice announcement that you will need to turn
shortly and replaces the distance display to the next turn (see Fig. 2). The bar fills with
orange until the actual turn is reached. When the bar is filled completely with orange it
means that you now need to turn off.
C. Schematic intersection view: Illustration of the actual layout of the crossroads. This is
displayed as soon as you have had the voice announcement that a turn is coming up. The
wide orange arrow indicates the direction in which you have to turn next. The red bar
symbolises the streets you are not allowed to drive down (one-way streets, pedestrian
precincts etc.); the blue bar shows other roads at the crossroads. Before the schematic
view of the crossroads is displayed. this window merely shows an arrow pointing straight
ahead (see Fig. 2).
D. Name of the street you are on at the moment.
E. Interrupts the navigation (see also: 3.5.1 Interrupting navigation, page 38)
F. Opens a window to permit manual blocking of a section of the route determined by you
from your current position. (see Manual blocking, page 36
G. The total length of the route, the time remaining to the destination and the estimated time
)
of arrival are displayed here one after the other. Click to change between the different
displays.
H. The last instruction is repeated if you touch this button.
I. Display of the GPS status (see 1.3 Displaying the GPS status, page 20). Touch the stylus
to the GPS symbol to open the window in which the information about the current GPS
status is displayed.
K. Distance before the next turn. This is displayed until the distance bar is shown.
35
Page 36

Manual blocking
You can manually block a section of the route ahead. The route is then recalculated so that
you can avoid the section you have blocked.
The block applies only to the current navigation process, not to any new navigation
process or after restarting the program.
Assuming that you are on the motorway and hear a traffic announcement on the radio about a
5 km traffic jam near your current position. If you wish to avoid this you should carry out the
following steps:
›
Touch Block road (see item G, Navigation screen with map view, page 34)
The following window appears:
›
Input how many kilometres you want to block from your
current position.
›
You can do this by overwriting the default value of 5.0
(km) or using the arrow up or arrow down buttons on the
screen or the appropriate arrow keys on the keyboard to
increase or decrease the distance shown. You can input
any distance from 0.1 km to 100 km.
When the values are < 5.0 the arrow keys will reduce or
increase the figure by increments of 0.1, when the values ≥
5.0 < 10.0 increments of 0.5 are used and where the values
≥10.0 ≤ 100 the increments are 1.0.
› Touch OK.
The route is recalculated and displayed on the map. The blocked section of road is highlighted
in red.
If there is no alternative route or if the detour is disproportionately long, parts of the
blocked section may be used when recalculating the route.
Lifting the block:
› Touch Block road.
The following window appears:
36
Page 37

If there is no alternative route or if the detour is
disproportionately long, parts of the blocked section may be
used when recalculating the route.
› Touch Yes.
The block is lifted and the program again uses the route
that was calculated initially.
3.4.2 Toolbar in navigation mode
The Toolbar is found in the lower right-hand section of the screen and can be maximised and
minimised as required by touching .
Schematic intersction view
If you have selected the arrow view, only the function
Repeat the last
announcement
is available.
Map view
If you are in navigation mode and have selected the map view, the Toolbar will contain the
following commands:
S TANDARD ENABLED F UNCTION
Day / Night screen mode
Map north-oriented / rotated in direction
of travel
Repeat the last announcement
Zoom in
Zoom out
Display entire route
3.5 Changing the scale of the map and the map section
You can enlarge or reduce the map section and you can shift the map section.
The following options are available for this:
1. The Toolbar contains the two symbols . These are used to zoom in and out of the
current map section, keeping the centre the same. Depending on the zoom factor selected,
the streets will also be shown with different widths.
2. Shifting the map section using the cursor key on your device:
The map can be shifted in any direction by pressing the cursor key to the right, left, up or
down.
During the navigation process, the integrated Autozoom function automatically and
within a short time readjusts the changed map view in line with your speed. At a slow
speed, for instance in a city, a reduced map section will be enlarged automatically to show
more details on the map. As with the manual zoom-in and zoom-out functions, the width
of the streets shown is adapted to the zoom factor.
37
Page 38

3.5.1 Interrupting navigation
1. Switching the device off during navigation
If you switch your device off before you reach your destination, for instance to fill up with
petrol, the program will remain open and navigation will be paused.
You can simply continue your journey as soon as you switch the device on again.
2. Switching the device on again at a different location
If you switch your device on again at a different location, the navigation system will
automatically detect that your position has changed and will recalculate the route. Once the
route has been calculated and a GPS signal is available, you can stop the navigation process
and continue with a new starting point.
3. Interrupting the navigation process using the “End navigation”
button
If you press the Stop button during navigation, a window will open and several options will be
shown:
Enter new destination:
›
Touch New destination to open the ENTER DESTINATION window.
Continue navigation:
›
Touch the Continue button.
Go to the main menu:
›
Touch Main menu.
Navigation to the next via when the route has already been calculated:
›
Touch Next destination.
See: 6.10.1 Using route points and route lists for navigation, page 51
.
3.5.2 Continuing navigation
Continuing navigation without ending the program
Navigation always continues automatically when you have switched off the device without first
having ended MEDION-Navigator.
If you interrupted the navigation process using the Stop button, you can continue your
journey by touching the Continue button.
3.5.3 Reaching the destination
As soon as you have reached your destination you will hear the message “You have reached
your destination”.
The previous map display will be replaced by a map showing only your current position marked
with a red arrow. Since the section of the map shown changes constantly (this is known as a
moving map), your current position is always shown as near the centre of the map as possible.
The destination is still marked with a flag.
›
To end the program or to enter a new destination, touch the Stop button and select the
option Main menu or New destination.
› If you have planned a route with several vias, touch Next destination to start the
navigation to the next via.
See 6.10 Special features when using the route planner with a GPS receiver, page 51
38
)
Page 39

CHAPTER 4
ISPLAYING THE CURRENT POSITION
D
If you have connected a GPS receiver and this is already configured, you can have your
current position displayed on the map.
› In the MAIN MENU touch the Location button.
OCATION window opens:
The L
A. Display of GPS status (see: 1.3 Displaying the GPS status, page 20). Touch the stylus to
the GPS symbol to open the window in which the information about the current GPS status
is displayed.
B. Your current position is marked as a red arrow on the map. Since the section of the map
shown changes constantly, your current position is always shown as near the centre of the
map as possible.
C. Touch Back to return to the MAIN MENU.
39
Page 40

CHAPTER 5
ELECTING THE MAP
S
›
Touch Map in the MAIN MENU.
The M
The program finds all maps on all kind of data media (including memory extension cards) and
displays them in a list.
AP window opens.
›
Select the desired map from the list.
›
Touch OK.
40
Page 41

CHAPTER 6
OUTE PLANNING
R
Topics covered in this chapter:
6.1 Opening route planning page 42
6.2 Searching for towns, streets and special destinations page 42
6.3 Selecting saved destinations page 44
6.4 Searching for special destinations in the vicinity (Local search) page 45
6.5 Selecting an address from the Contacts list page 46
6.6 Final checking of the route page 47
6.7 Starting route calculation page 47
6.8 Using the Toolbar in the itinerary mode page 49
6.9 Changing the scale of the map and the map section page 50
6.10 Special features when using the route planner with a GPS receiver page 51
41
Page 42

With the help of the route planning function, which can also be used without GPS, you can
create routes with a starting point, any number of vias (intermediate points) and a destination
point. Every route point is added to the list of route points and can be used, if the GPS receiver
is connector, directly as a target point for navigation without prior route calculation. Once the
route options have been determined, the route is calculated and shown with a coloured
background on the map. A Toolbar appears in the lower right-hand section of the map and this
can be used to change the map display. The route can be shown on the map or detailed in the
route list. This provides details of the distance and the travel time (duration) from one route
point to the next, as well as the total distance and duration. If GPS reception has been
established, the navigation process can also be started from here to the appropriate
highlighted entry.
6.1 Opening route planning
› In the MAIN MENU touch the Route planning button.
If you have already entered route points, the R
of all the route points already selected.
If the list does not yet contain any route points or if these were deleted from the list, the
NTER DESTINATION window will open so that you can enter a new route points from the
E
database of place names.
The first route point selected is always the starting point, while the last one selected is the
destination point. All the other points are vias (intermediate points) on the route.
OUTE POINTS window will open, showing a list
6.2 Searching for towns, streets and special destinations
The display and availability of destinations depend on the map currently selected. If you
want to check which map is currently selected or if you want to select a different map,
proceed as described in Chapter 5 Selecting the map, page 40
›
If the list of R OUTE POINTS appears when route planning opens, touch Enter
destination to move to the E
›
If route planning opens with the ENTER DESTINATION window, the Country field shows
the country in which you can search for places, streets and special destinations. The cursor
is already in the Town/Postal Code field.
›
If you want to select a different country, select the country from the Country drop-down
menu.
If you want to be able to choose route points in all the countries included in the map,
simply select All Countries from the Country drop-down list. Note that selection of this
option will disable the possibility to search a place by entering its postal code instead of its
name. At the same time, the name of the dropdown list Town/Postal code will then
change to Town.
›
Key in the name of starting point or its postal code in the Town/Postal Code field and
select that starting point from the drop-down menu. The postal code and area shown after
the place name make it easier for you to choose between towns of the same name. If one
town has several postal codes, the one for the town centre is shown.
NTER DESTINATION window.
.
›
The Street/ Special destination field is automatically enabled once you have selected
the town. Key in the street in the Street/ Special destination field and select that street
from the drop-down menu. In addition the postal code and the district in which the street
is located are shown after the street name. Please make sure that the entry Streets only
is selected in the Special destination category. This is the second entry in the list of
available options.
›
If the database includes house numbers for the street you have selected, the cursor will
automatically move to the house number field to the right of the Street/ Special
destination field and you can input the house number. The field is disabled if the database
does not contain any house numbers for the street selected.
42
Page 43

›
Touch OK.
›
The route point is incorporated in the list of route points.
›
Touch Enter destination again to enter further route points.
›
Select the town and street as described above.
Listing of streets and special destinations:
If you have selected the Streets only entry in the Special destination category field,
only all the available streets are listed in the Street/ Special destination drop-down
menu.
If you want to be able to select both streets and special destinations, then select the
Streets and Special destinations in the Special destination category field. This
entry is the first option of those listed and is selected as default in this field.
Saving route points
You have the opportunity to save route points so that you can use them again for navigation:
›
Once you have entered the route point, touch the Save destination button to save the
point in the list of Personal destinations.
›
Touch OK.
Selecting special destinations
›
If you are searching for a special destination in a particular country, select that country
from the Country drop-down list. If you want to be able to search for a special destination
in all the countries included in the map of Europe, select All Countries from the Country
drop-down list. However, the possibility of searching for a place by entering its postal code
will then be disabled.
In the same way as selecting the street, you first need to select the town where you want to
search for special destinations:
›
In the Town/Postal Code field key in the name of the place where you want to search for
special destinations, then select this from the drop-down menu.
›
From the Special destination category list, select the category of special destinations
you want to search (petrol stations, restaurants etc.).
All the special destinations in this category are then listed in the Street/Special destination
drop-down list for the town you have selected.
Depending on the selected town it may happen, however, that for some categories (e.g.
border crossing/ airport) there are no special destinations displayed on the list.
› Select the desired special destination from the list.
43
Page 44

6.3 Selecting saved destinations
Three lists with saved destinations are available:
1. Recent destinations:
Your ten last destinations are saved automatically and can be selected using the Last
destinations button.
2. Personal destinations:
All destinations that you have saved by pressing the Save destination button.
3. Map-specific destinations:
All points on the route that were selected in MapExport Tool when planning the route are
available as predefined destinations. No predefined destinations are available after an area
has been exported.
The display of these destinations is dependent on the map selected in each case.
To select a saved destination, carry out the following steps:
›
Touch Route planning in the MAIN MENU.
›
If route planning opens with the ENTER DESTINATION window, touch Recent
destinations, Personal destinations or Map-specific destinations.
›
If the list of R OUTE POINTS appears when route planning opens, touch Enter destination
to move to the E
destinations or Map-specific destinations.
›
Touch the stylus to the destination to select it.
›
Touch OK.
The saved data are then transferred to the input fields.
NTER DESTINATION window, then touch Recent destinations, Personal
44
Page 45

6.4 Searching for special destinations in the vicinity (Local
search)
In conjunction with a GPS receiver this function offers you the possibility to search for special
destinations in the vicinity of your current position. All destinations of a previously specified
category, which are located within a maximum radius of 15 kilometers around your current
position, are then displayed in a list and can be selected as destinations. This function is
available both for navigation and route planning, assuming that there is an adequate GPS
signal available. Otherwise, the function will be disabled.
› Tap on Local search in the E NTER DESTINATION window.
›
In the LOCAL SEARCH window, select from the
POI category list the category of special
destinations you want to search (petrol station,
garage, restaurant etc.).
›
Select from the Radius dropdown list the radius
around your current position, within whose you
want to search for special destinations. (max.15
kilometers.)
All destinations, which correspond to your selection
are then displayed in a list, starting with the nearest
destination and indicating the name of the place, the
name of the destination and the distance to your
current position (linear distance).
›
Select the destination that you wish to use as
destination.
›
Tap on OK.
This closes the window and the adress is then transferred to the corresponding input fields in
NTER DESTINATION window.
the E
›
If you want to see the special destination you have selected on the map, touch the Show
on map button.
45
Page 46

6.5 Selecting an address from the Contacts list
All addresses in your Contacts program can be incorporated in MEDION-Navigator and
subsequently used as route points for route planning or as destination points for navigation.
See also: 3.2.4 Selecting a destination from the Contact list, page 31
› Touch Contacts in the E NTER DESTINATION window.
The C
business address and a home address, the business address will be shown first.
ONTACTS window now opens, showing a list of all addresses. If the same person has a
›
Highlight the address you want to add as a route
point.
›
If you have a long list of addresses, you can find
the address quickly by entering the first letter of
the surname. The first entry with a surname
starting with that letter is shown in the list and
highlighted automatically.
›
Touch OK.
This closes the window and the address has already
been entered in the input fields in the E
DESTINATION
window.
NTER
›
Touch OK to add the route point to the list of
route points.
›
If you want to see the destination you have
selected on the map, touch the Show on map
button.
This opens up a new window in which the destination is shown as a yellow and black flag and
the street of your destination is highlighted and shown at the centre of the map. You also have
an opportunity here of selecting a new destination on the map. For an illustration and
description of this window please see
6.7.1 Failed route calculation, page 48.
46
Page 47

6.6 Final checking of the route
Once you have entered all the route points and they have incorporated in the list of route
points, you can change the sequence of those points along the route and delete individual
route points before the route is calculated.
› To shift a route point up or down, highlight the entry in the list and touch the arrow up or
down symbol
›
If you want to delete a route point, highlight it in the list and touch Delete destination.
›
To delete all route points from the list, touch Delete all.
on the lower left-hand border of the route points list.
6.7 Starting route calculation
›
Once you have determined all the route points, touch the Calculate route button.
›
The ROUTE OPTIONS window now opens.
›
Use the option buttons to select whether you want to calculate the Quick route or the
Short route.
›
You can select the relevant boxes beside the options Avoid interstates, Avoid ferries
and Avoid toll ways to determine whether these should be included or avoided, if
possible, when planning the route.
If you are in a rural area, we recommend selecting the Quick route.
›
Touch the Show on map button.
The route is calculated and highlighted on the map with a coloured background, showing the
starting and destination points as well as all vias.
The distance to the destination and the approximate travel time are displayed in the upper
left-hand section of the screen. The Toolbar is shown in the lower right-hand section of the
map.
›
Touch Show route list if you want to see the route in the route list.
See also: 6.7.2 Displaying the route on the route list, page 49
)
47
Page 48

6.7.1 Failed route calculation
Very occasionally the route cannot be calculated, e.g. if the destination is located in an isolated
zone without any vehicle access. An error message is generated if this happens and you have
the opportunity to view the destination on the map and to select a new destination using the
stylus.
› Touch the Show on map button in the lower right-hand section of the error message
window.
A. Display of destination street (highlighted in
blue) and the destination point (yellow and
black flag)
B. Opens the ENTER DESTINATION window
so that you can key in a new destination.
C. Toolbar: Touch the stylus to
Destination on map to enter a new
destination directly on the map using the
stylus:
›
Search the map for the street where you
want to set your new destination.
›
Touch the stylus to the correct place on the
map to set the new destination point.
›
Then touch Back.
The new route point is already shown in the
input fields.
›
Touch OK to add the route point to the list
of route points.
›
The restart route calculation by touching
Calculate route.
D. Display of GPS status
(see: 1.3 Displaying the GPS status,
page 20).
48
Page 49

6.7.2 Displaying the route on the route list
To open the route list touch Show route list after the route has been calculated and shown
on the map. The following window opens:
The distance and travelling time (duration) from
one route point to the next are shown in the list.
At the end of the list the total distance and total
duration of the route are shown.
› To display a specific section of the route on
the map, highlight the desired section (as
illustrated) and touch Display map.
› To show the whole route on the map, highlight
the last entry in the list and touch Display
map.
›
If you would like to see a simulation of the
navigation process for the section highlighted
in the list, touch Start simulation.
6.7.3 Simulation of the route
Once the route has been calculated, you can have a simulated navigation process displayed for
the route point highlighted in the Route list.
›
Touch the Start simulation button.
The program calculates the route and after a short time switches to simulation mode.
›
Touch the Stop button if you want to interrupt the simulation.
6.8 Using the Toolbar in the itinerary mode
The Toolbar is on the bottom right of the screen. Before it can be used, it must be maximised
by touching .
S TANDARD E NABLED
F UNCTION
Display street names (by tapping with the stylus)/
Move the map (by dragging the stylus)
Day / Night screen mode
Zoom in
49
Zoom out
Display destination point
Display entire route
Display starting point
Page 50

6.9 Changing the scale of the map and the map section
The following options are available for this:
1. The two buttons
starting the the centre of the map. If you enlarge the map (zoom in), the street names on
the map also become visible and the steets are shown as wider than on the reduced map
section. .
2. Dragging the stylus:
in the Toolbar are used to enlarge or reduce the map section,
› Tap with the stylus on the map and drag the stylus in the desired direction.
3. Using the cursor keys on the Pocket PC:
The map can be moved in any direction by pressing the cursor key to the left, right, up and
down.
50
Page 51

6.10 Special features when using the route planner with a GPS
receiver
6.10.1 Using route points and route lists for navigation
In conjunction with a GPS receiver you can use all route points directly as destination points
for the navigation process, without first having to display the route on the map. Since all the
entered route points are saved in a list that remains stored if you have exited the program and
then restart it, you can plan a route at home if you wish, and then use it for navigation.
Assuming that you calculated a route with several vias the night before and now want to use
that route for navigation, you should proceed as follows:
› Touch Route planning in the M AIN MENU.
A list opens up showing the route points that you have
used to calculate your route (see illustration).
›
Highlight the first route point and touch Start
navigation. Please note that the highlighted
point is always used as the destination point!
›
Select the desired route option.
route
›
Touch the Start navigation button again.
›
MEDION-Navigator now calculates the route from
your current position to the first route point
(Würzburg, Berliner Platz, see illustration) and
switches to navigation mode.
›
If no valid GPS signal is available at this stage, a
yellow message window will open to tell you that
this is the case. As soon as a suitable GPS signal is
A route is now calculated from your current position to the next route point in the list
(Würzburg, Haafstraße).
›
Repeat this process until you have reached the destination point, i.e. until you have
navigated to the last route point in the list.
If you now touch Stop, the entry Next destination will no longer be displayed.
After calculating the route
present, the window closes automatically and
navigation starts.
›
As soon as you have reached your destination,
touch Stop.
›
Then touch Next destination.
If you want to have the route calculated before you start navigation so that you can look at the
map, you should proceed as follows:
›
Touch Calculate route.
›
Select the desired route options.
›
Touch the Show on map button.
The route is calculated and displayed on the map.
51
Page 52

›
Touch Show route list to open the route list.
›
Highlight the first route section in the list and
touch Start navigation.
MEDION-Navigator now calculates a route from
your current position to the first, highlighted entry in
the route list.
Please note that the starting point of the route
(Würzburg, Rennweger Ring) is replaced by your
current position, i.e. a route is calculated from your
current position to Würzburg, Berliner Platz.
If no valid GPS signal is available at this stage, a
yellow message window will open to tell you that
this is the case. As soon as a suitable GPS signal is
present, the window closes automatically and
navigation starts.
›
As soon as you have reached your destination,
touch Stop.
›
Then touch Next destination.
A route is now calculated from your current position
to the next route point in the list (Würzburg,
Haafstraße).
›
Repeat this process until you have reached the
destination point, i.e. until you have navigated to
the last route point in the list.
If you now touch Stop, the entry Next destination
will no longer be displayed.
52
Page 53

P
A
R
P
A
R
T
T
3
3
M
M
P
AAP
E
XXPPOORRTT
E
T
OOOOLL FFOORR
T
MMEEDDIIOONN--N
N
AAVVIIGGAATTOOR
R
53
Page 54

CHAPTER 1
NTRODUCTION
I
Topics covered in this chapter:
1.1 MapExport Tool properties page 55
1.2 The user interface of MapExport Tool page 55
54
Page 55

1.1 MapExport Tool properties
The MapExport Tool allows you to select a map area from the map GB+Ireland with major road
network of Europe supplied. You can then export this and store it on the hard disk and on a
Pocket PC as a user-defined section of the map.
Two functions are available for generating new maps:
Selecting a route with corridor, page 67
Selecting an area, page 73
The generated maps are managed and transferred to the Pocket PC in the MAP ARCHIVE
window. In this window you can also transfer the supplied Standard map – an already
exported map delivered with your MEDION-Navigator software kit - to the Pocket PC.
1.2 The user interface of MapExport Tool
1.2.1 Main menu
All available MapExport functions are accessed from the MAIN MENU. They are started with
the icons (A. – C.) on the left-hand side of the window. You can change the default directories
for user-generated maps (D.) and for the basic map (E.) in the lower section of the window.
Fig. 1 Main Menu
55
Page 56

A. Opens the MAP ARCHIVE window. Customised maps and supplied map sections that have
already been generated can be managed here.
B. Opens the AREA window. A new map in the shape of a rectangle can be generated here
from the basic map.
C. Opens the CORRIDOR window. A new map in the shape of a corridor can be generated
here from the basic map. This corridor is determined with the aid of route planning
facilities.
D. Opens the S ELECT DIRECTORY dialog box to select a different basic directory for
customised maps.
E. Opens the S ELECT DIRECTORY dialog box to select a different directory for the basic
map.
F. Opens an About box with information about the installed program version.
G. Opens online help.
H. Closes the program.
56
Page 57

p
1.2.2 Standard window
The appropriate window opens after you have clicked one of the three possible buttons
(A. – C.
right.
Map window
The map window shows the map or a section of the map that is currently loaded. All objects
that can be selected as destination points can be displayed on the map. In addition to towns
and roads, these also include the special destinations and points of interest stored in the town
database.
A number of buttons are shown in the top right-hand corner. These can be used to navigate
within the map and to define sections of the map.
). This window shows a Map window on the left and a Function window on the
Rectangle – Zoom in: enables you to draw a rectangle on the
map with the mouse. That rectangle is then shown centralised
and in map window size.
Shift the map: enables you to shift the map in every
direction by simply pressing the left mouse key and dragging
the map with the mouse to the desired direction.
Mark area: Enables you to draw with the mouse a
rectangle on the map while pressing the left mouse key.
This area can be changed in size by dragging the small
rectacles. In the window on the right, information on the
marked area is displayed.
Set route point: Enables you to set a route point directly
on the map by simply clicking with the mouse on the
desired
Search place or special destination: Opens a window where
you can search for locations, streets and special destinations.
Zoom in: Enlarges the currently displayed map segment, starting
from the center point of the map. The more you zoom into the
map, the more details will be displayed on the map.
Zoom out: Reduces the currently displayed map segment. The more
you zoom out, the less details are displayed on the map.
Centre marked area: centres the marked area and
displays it in map window size.
Show complete map: enables you to view the entire map in the
map window.
lace, street or special destination.
Shifting the map: click with the mouse on one of the arrow buttons
on the edge of the map to shift the map in the indicated direction.
Fig. 2 Menu bar buttons
57
Page 58

See also:
2.2.1 Shifting the map, page 62
2.2.2 Enlarging or reducing the map, page 62
Function window
The elements shown in this window vary in accordance with what you have selected in the
AIN MENU. In the top right-hand corner of all winders there is a Help button that
M
opens the online help and in the bottom left-hand corner there is the
opens the M
AIN MENU.
button that
For detailed information about the individual windows please refer to the relevant chapters:
4.1 Selecting a route with corridor, page 67
4.2 Selecting an area, page 73
4.3 Map archive, page 76
To switch to a different input window, you must first return to the M
›
Click on the Main menu button.
›
In the MAIN MENU click on the appropriate button.
AIN MENU.
58
Page 59

CHAPTER 2
ORKING WITH THE MAP
W
Topics covered in this chapter:
2.1 Opening a map page 60
2.2 Changing the scale of the map and the map section page 62
59
Page 60

2.1 Opening a map
2.1.1 Basic map
During the installation routine you are prompted to specify whether you wish to run the map from the
hard drive or the CD-ROM.
When you open MapExport you will see the specified directory for the basic map in the Basic
map field on the right-hand side of the MAIN MENU (see ). This map is used to
generate new maps and is shown on the left of the screen when you open the A
ORRIDOR window (Fig.1, item B. und C.)
C
Changing the standard directory
If you want to move the map GB+Ireland with major road network of Europe to a different
directory on your hard disk at a later stage, you need to carry out the following steps:
›
Create the directory you want to move the map to on your hard disk.
›
Cut out the entire map folder and paste it into the newly created directory.
›
In the MapExport M AIN MENU click on the Select button (Fig.1, item E.) to the right of
the Basic map field.
Fig.1, item E.
REA or
›
In the SEARCH FOR FOLDER window select the map folder, e.g. E:\Basicmap\UK and
click on OK.
The new path is now shown in the Basic map field.
If you have not yet saved the basic map on your hard disk, copy the complete map directory
on the CD-ROM and paste it into a directory on your hard disk. Enter then the new path in the
MapExport M
AIN MENU as described above.
2.1.2 Customised maps
Customised maps are ones you have generated from the basic map by cutting out a corridor
from a route or by cutting out a rectangle. These are stored on the hard disk of your PC in the
directory that you have designated as basic (default) directory in the M
Standard directory for customised maps (Fig.1, item D.
your hard disk even if they were transferred to your Pocket PC or to a memory expansion unit
via a map-reading device.
To open one of these maps, carry out the following steps:
›
In the MAIN MENU click on the Customised maps button
(Fig.1, item A.
The C
USTOMISED MAPS window opens.
)
). These maps remain stored on
AIN MENU in the field
›
On the right of the screen highlight the map you want to view in the Customised maps list.
The selected map is then displayed on the left side of the screen.
For further information please refer to:
3.2.2 Transferring customised map, page 65
4.3 Map archive, page 76
60
Page 61

Changing the standard directory
The standard directory for customised maps is also defined and created during the installation
process. All the maps that you have generated by cutting out a corridor from a route or by
cutting out a rectangle from the basic map are then saved in this directory.
If you want to change the standard (default) directory for customised maps, proceed as
follows:
› Create the directory in which you want to save your customised maps on your hard disk.
› In the MapExport M AIN MENU click on the Select button (Fig.1, item D.) to the right of
the field Standard directory for customised maps.
›
In the SELECT DIRECTORY dialog box select the map folder, e.g. E:\Custom_Maps and
click on OK.
The new path is now shown in the Standard directory for customised maps field.
2.1.3 Standard maps
Standard maps are already exported map sections included in the delivery, which you can
transfer directly from the CD-ROM to your Pocket PC. The present version comes complete
with a standard map of UK with major road network of Europa.(CD-ROM 2).
To open one this map, carry out the following steps:
›
In the MAIN MENU click on the Map archive button.
The M
AP ARCHIVE window opens.
› On the right of the screen select the map in the lower list Standard maps.
If the map CD-ROM (CD-ROM 2) is not inserted in your CD-ROM drive, you will be prompted to
insert it. The selected map is then displayed on the left side of the screen.
For further information please refer to
4.3.3 Viewing and transferring a standard map, page 80
.
61
Page 62

2.2 Changing the scale of the map and the map section
In all windows in which a map is displayed, there are different ways of moving around the map
and displaying the map with different levels of zoom.
2.2.1 Shifting the map
Shift facility Action
›
Click on the Shift map button.
The mouse pointer changes to a hand shape.
›
Keep the left mouse button pressed and drag
Shift map button
Arrow key buttons
the hand symbol in the direction in which you
want to shift the map.
›
Release the mouse button if you do not want
to shift the map any further.
› Click on one of the arrows on the edge of the
map window to shift the map in the indicated
direction.
You can use the arrow keys on the keyboard to
shift the map up, down, right or left.
Keyboard
(Same as clicking on the arrows on the outer
edge of the map.)
2.2.2 Enlarging or reducing the map
You can use different methods to enlarge (zoom in) or reduce (zoom out) the map:
Zoom facility Action
Click on the Zoom in / Zoom out
Zoom in and Zoom out buttons
buttons to view the map in more (+)
or less (-) detail.
Display entire map button
Keyboard
Click on the Display entire map
button to view the entire map.
Press the Num+ key to view more details
in a smaller area.
Keyboard
Mouse wheel
62
Press the Num- key to view fewer details
in a larger area.
Zoom in by moving the mouse wheel down,
zoom out by moving the mouse wheel up.
Page 63

CHAPTER 3
AP TRANSFER
M
Topics covered in this chapter:
3.1 General information page 64
3.2 Map transfer page 64
63
Page 64

3.1 General information
Maps are transferred using the MapExport Tool, which generates the map data for use in
®
Windows Pocket PC 2002/2003.
MS
The map transfer is a two-step operation:
1. Storing the generated map on the PC’s hard disk (map export)
2. Transferring the map from the hard disk to the Pocket PC or to a memory expansion unit
via a map reading device (map transfer).
These two steps may be carried out directly one after the other, but this is not essential. Since
every map that is generated is stored on your PC’s hard disk, you can transfer the map to the
Pocket PC at a later stage if you wish. This might be sensible if you are generating several map
sections first and want to save them on the hard disk before transferring them to the Pocket
PC.
Two progress bars indicate the progress of the map export. Depending on the data volume and
your PC’s performance it may take several hours to generate a map. The subsequent transfer
to the Pocket PC or to a Pocket PC memory expansion unit via a map reading device takes up
to 2 hours.
If you want to transfer the supplied and already exported map of GB+Ireland with major road
network of Europe to your PDA, you can do this by transferring it directly to the PDA from
the relevant map CD-ROM, i.e. without first storing the map section on the hard drive of your
Desktop PC.
3.2 Map transfer
3.2.1 Exporting customised maps to the hard disk of the PC
› Select the desired map section using the MapExport Tool.
See also:
4.1 Selecting a route with corridor, page 67
4.2 Selecting an area, page 73
› Click on the Create map button to export the map into the standard (default) directory for
Customised maps (see also: 2.1.2 Customised maps, page 60
The M
the map generation status.
As soon as the map has been saved on your hard disk, another window opens, asking you
whether you want to transfer the map now:
AP IS BEING CREATED window appears. A progress bar acts as a constant indicator of
).
›
Click on Yes if you want to transfer the map now to the Pocket PC or to a memory
expansion unit via a map reading device. The M
can start the map transfer.
›
Click on No if you want to transfer the map at a later time.
In that case the program returns to the previous screen and you can select further maps and
save them to the PC’s hard disk.
64
AP ARCHIVE window then opens and you
Page 65

3.2.2 Transferring customised maps
The M AP ARCHIVE window opens if you have answered Yes to the question about whether
you want to transfer the map.
› To transfer the map to a Pocket PC, proceed as described in:
1. Transfer to the Pocket PC, page 78
› To transfer the map to a Pocket PC memory expansion unit via a map reading device,
proceed as described in:
2. Transfer via a memory card reader, page 79
3.2.3 Transferring a standard map
A standard map section is transferred directly from the map CD-ROM to the Pocket PC.
For further information on this subject please refer to
4.3.3 Viewing and transferring a standard map, page 80
.
65
Page 66

CHAPTER 4
ASIC FUNCTIONS
B
Topics covered in this chapter:
4.1 Selecting a route with corridor page 67
4.2 Selecting an area page 73
4.3 Map archive page 76
66
Page 67

4.1 Selecting a route with corridor
You can use this function to cut out a route-based corridor from the basic map and export it.
The selection is made by choosing route points and entering the corridor width and the radius
around the individual route points. The route points are stored with the route and can be
selected as destination points (
Map-specific destinations
In the MAIN MENU click on the Corridor button (see Fig.1, item C) ›
The C
ORRIDOR window opens: the basic map selected in the MAIN MENU is shown on the
left of the screen, while the right side contains the Route points list and the buttons and
information required for making the selection.
The selection along a route is carried out in 6 steps:
▪ Selecting route points
▪ Entering the radius around the route points
).
▪ Entering the corridor width
▪ Selecting the route options
▪ Final route check
▪ Exporting the route with corridor
4.1.1 Selecting route points
Searching for towns and/or streets
Click on the button Search for place or special location . ›
The window S
EARCH FOR PLACE OR SPECIAL LOCATION opens.
Fig. 3: Window S EARCHING FOR TOWN OR SPECIAL DESTINATION
67
Page 68

› From the Country drop-down list (Fig.3, item A), select the country in which you want to
search for a route point. After this the drop-down lists for Location/Postal Code, Street
and Special target (Point of Interest) will only contain the entries for the country you
have selected.
›
If you want to be able to choose route points in all the countries included in the map of
Europe, simply select All Countries from the Country drop-down list. When selecting this
option, the place cannot be searched any more by its postal code, but only by its name.
›
In the Location/Postal Code input field (Fig.3, item B) enter the name of the town or
the letter the name of the town starts with. You can also enter the postal code of the
location, if All countries has not been selected in the Country field.
›
Select the town you are searching for from the drop-down menu by clicking on it with the
mouse or by highlighting the town using the Arrow up or Arrow down key, then press
the Enter key. The area shown after the place name make it easier for you to choose
between towns of the same name.
›
If you want to view the town on the map, click on the Show button
(Fig.3, item J
The map showing the town and enlarged to map window size is then displayed, with the centre
of the town in a central position on the map.
).
› If you want to accept this point as a route point, click on the Set route point button
(Fig.3, item K
The point is then entered in the Route points list in the C
(see Fig.4, item A
).
ORRIDOR window
).
Selecting a street
If you want to select a street as a route point, you should proceed as follows:
› If the Street option button is not enabled, enable it now by clicking on it with the mouse
(Fig.3, item C
).
› Select a street in the Street input field, just as described in searching for a town
(Fig.3, item E
If the database contains house numbers for the selected street, you can enter a house number
in the No. field to specify the route point in greater detail (Fig.3, item F
number entered exists, the lamp turns green; if the lamp turns red, this means that the house
number you have entered does not exist.
The No. field is disabled if the database does not contain any house numbers for the street
selected.
).
). If the house
There are house numbers for the street selected.
The house number entered exists for the street selected.
There are no house numbers for the street selected.
› If you want to view the street on the map, click on the Show button
(Fig.3, item J
The street is then shown in a central position and highlighted in red on the map. If a house
number has been entered, it will be marked by a red circle.
)
› If you want to accept this street as a route point, click on the Set route point button
(Fig.3, item K
68
)
Page 69

The point is then entered in the Route points list in the C
). If you have already had the point displayed on the map, you will see a flag with a number,
A
indicating the destination sequence for the route. This number is the same as the one in the
No. column of the route points list.
Searching for a special destination
›
If you are searching for a special destination in a particular country, select that country
from the Country drop-down list. If you want to be able to search for a special destination
in all the countries included in the map of Europe, select All Countries from the Country
drop-down list. If selected, the possibility to search a place by postal code is no longer
available.
›
In the same way as selecting the street, you first need to select the town where you want
to search for special destinations.
›
In the Location/Postal Code input field enter the name of the town or the letter the
name of the town starts with
(Fig.3, item B
›
Select the town you are searching for from the drop-down menu by clicking on it with the
mouse or by highlighting the town using the Arrow up or Arrow down key, then press
the Enter key. The area shown after the place name make it easier for you to choose
between towns of the same name.
›
If the Special target option button is not enabled, enable it now by clicking on it with the
mouse (Fig.3, item G
).
).
ORRIDOR window (see Fig.4, item
› In the Special target field enter the special destination category and/or select it from the
drop-down menu (Fig.3, item H
›
In the Name drop-down list all the special destinations in that category are then listed in
alphabetical order. Depending on the selected town it may happen, however, that for some
categories (e.g. border crossing/ airport) there are no special destinations displayed on the
list.
›
Select the desired special destination from the Name dropdown-list (Fig.3, item I).
).
› If you want to view the special destination on the map, click on the Show button
(Fig.3,item J
The special destination is then shown on the map in a central position and highlighted by a red
circle.
).
› If you want to accept the special destination as a route point, click on the Set route point
button (Fig.3,item K
ORRIDOR window (see Fig.4, item A). If you have already had the point displayed on
C
the map, you will see a flag with a number, which indicates the route sequence, on the
map. This number is the same as the one in the No. column of the route points list.
Setting route points directly on the map
You can use the Set route point
). This enters the route point in the route points list in the
button to set route points directly on the map.
›
On the map search for the point that you want to set as a route point. You may need to
zoom into the map to do this.
›
Click on the Set route point button on the upper edge of the map. A flag appears
on the mouse pointer.
› Move the mouse pointer to the place on the map where you want to set a route point.
69
Page 70

› With the left mouse button click on the town, the street or the special destination to set the
point as a route point. If you click on a point that is not accessible by vehicle, the route
point will be positioned on the nearest street.
At the same time the point is accepted in the Route points list in the C
(see Fig.4, item A
) and indicated on the map by a purple flag containing a number.
ORRIDOR window
Fig. 4: Window C ORRIDOR
4.1.2 Entering the radius around the route points
A circular section with a specified radius is exported for every route point. This ensures that
any navigation can also be carried out at a later stage away from the route and in the starting
or destination area.
›
Use the two arrow keys to the right of the Radius column to enter the desired radius for
each particular route point. You can choose any distance between 3 km and 50 km max.
The default value is 10 km (see Fig.4, item B
).
4.1.3 Entering the corridor width
A route may be recalculated within the corridor if the driver has left the route.
›
Enter the corridor width around the route in the Corridor width input field. This width
must not be less than 2 km. The default value is a corridor width of 10 km
(see Fig.4, item E
).
70
Page 71

4.1.4 Selecting the route options
› Click on the Route options button to open the window of the same name
(see Fig.4, item D
›
If you do not select an option, the standard route calculated is the Quick route and
motorways, ferries and toll roads are included in the route calculation.
).
›
Click on one of the option buttons – Quick
route / Short route – to specify the route
type to be calculated.
›
You can enable the options Avoid
motorways, Avoid ferries and Avoid toll
roads to determine whether these should
be included or avoided, if possible, when
planning the route.
›
Click on the Show corridor button (see Fig.4, item F) to calculate the route based on
your inputs so far and to display the results on the map. Route calculation is optional. If no
route calculation is carried out before exporting, the program automatically calculates the
route as soon as you start the exporting process by clicking on the Create map button.
The route is highlighted in blue, with the radius and corridor width (hatched in grey) being
displayed on the map Fig.4, item N
(Fig.4, item O
the Duration column of the route points list beside each route point (see Fig.4, item A
The total length (distance) and total duration of the route are shown underneath the last route
point to the right of the Total field (see Fig.4, item C
). At the same time the distance and time to the next route point is shown in
). The flags shown on the map mark the route points
).
).
› The Information field contains information about the memory requirement (Max. data
volume) for the selected route (see
If the calculated memory requirement is greater than 490 MB, a message window appears,
prompting you to reduce the size of the map by deleting route points or by decreasing the
corridor width.
Fig.4, item G
4.1.5 Final route check
You can make changes to the route both before and after it has been calculated. You can add
more route points, delete route points and alter their sequence along the route.
Adding route points
).
› Select additional route points and incorporate these in the route points list as described in
Selecting route points, page 67
Deleting a route point
›
Highlight the route point in the route points list by clicking on the appropriate line.
›
Click on the Delete from list button to the right of the route points list
(see Fig.4, item K
71
).
.
Page 72

Changing the sequence of route points
A number is shown in the No. column to the left of the route points in the route points list. The
first selected route point is allocated the number 1 and represents the starting point. The last
selected route point with the highest number represents the destination point. All the other
route points are vias (intermediate points) on the route.
To change this sequence, carry out the following steps:
›
Highlight the route point that you want to move to a different position.
›
Click on the Move entry up button to move the route point up one
(see Fig.4, item J
Click on the Move entry down button to move the route point one line down (see
›
Fig.4, item M
).
).
Displaying the route point on the map
You can view any route point in the list in a central position on the map.
›
Highlight the route point that you want to view on the map.
›
Click on the Display entry on map button (see Fig.4, item L).
The route point is then centred and displayed on the map with the appropriate flag symbol.
4.1.6 Exporting the route with corridor
Once you have entered all the route points with the corridor and radius and have carried out
the route calculation, you can start to create the map.
› Enter a name for the map in the appropriate input field (see Fig.4, item H).
› Click on the Create map button (see Fig.4, item I) to export the map into the Standard
directory for customised maps (see Fig.1, item D
If you have not yet carried out a route calculation by clicking on the Show corridor button
(see Fig. 4, item F
the memory required.
), the program will now calculate the size of the selected route to check
If the calculated memory requirement is greater than 490 MB, a message window appears,
prompting you to reduce the size of the map by deleting route points or by decreasing the
corridor width.
If, after the map export, you want to transfer the map from your PC’s hard disk to the Pocket
PC or to a memory expansion unit via a memory card reader, you should proceed as described
in: Transferring a customised map, page 78
.
If you want to generate further maps and only transfer them at a later stage, carry out the
following steps after exporting the map:
).
›
Click on the No button in the dialog window asking you whether you want to transfer the
map now.
In that case the program returns to the previous screen and you can select further maps and
save them to the PC’s hard disk.
›
If you are subsequently ready to transfer the maps, open the MAP ARCHIVE window from
the M
See 4.3 Map archive, page 76
AIN MENU and start the map transfer from there.
.
72
Page 73

4.2 Selecting an area
You can use this function to cut out a rectangular area from the basic map and export it. The
area can be selected by drawing a rectangle with the aid of the mouse and using the Mark
area
›
In the MAIN MENU click on the Cut out area button Fig.1, item B.
The A
button.
REA window now opens: the basic map selected in the MAIN MENU is shown on the left
of the screen, while the right side contains the associated command buttons and information.
4.2.1 Selecting and marking an area
The Section – zoom in button may be useful for an initial rough search and orientation
within the map as a whole. This button is already enabled when the A
allows you to draw a rectangle on the map with the mouse. That rectangle is then shown
centralised and in map window size.
If the area is to include specific towns or special destinations, you can also search for these in
the database:
›
Click on the Search for place or special location button and search as described
in
4.1.1 Selecting route points, page 67
›
Once you have determined the area you want to export, click on the Mark area
.
button.
REA window opens. This
›
With the left mouse key, drag the rectangle over the desired area on the map.
The area is now marked and can be exported.
In the Information field (see Fig.5, item A
) the size (area in km2) of the area is shown as
soon as you have marked the area. If you have enabled the Calculate automatically option
button, the amount of memory required (Max. data size) is also calculated and shown in the
information field. If this option is not enabled, you can calculate the amount of memory
required by clicking on the Calculate button.
Please remember that the maximum volume of data that can be transferred must not exceed
490 MB! If you try to transfer greater volumes than this, a message window will appear,
prompting you to reduce the size of the area.
73
Page 74

Fig. 5: Window AREA
4.2.2 Checking and changing the marked area
› To make it easier to check the marked area, you can click on the Centre marked area
button to centre the area and to display it in map window size.
Changing the size of the area
To change the size of area, position the mouse pointer over one of the small squares on the
border of the marking. If a double arrow
button pressed and drag the area to the desired size.
Shifting the area
To shift the area on the map, place the cursor inside the marked area. If the symbol
appears at the mouse pointer, keep the left mouse button pressed and drag the area to the
desired position in the map.
appears at the mouse pointer, keep the left mouse
74
Page 75

4.2.3 Exporting the area
Once you have marked the area, you can start to generate the map.
› Enter a name for the map in the appropriate input field (see Fig.5, item B).
› Click on the Create map button (see Fig.5, item C.) to export the map into the standard
(default) directory for customised maps.
If, after the map export, you want to transfer the map from your PC’s hard disk to the Pocket
PC or to a memory expansion unit via a map reading device, you should proceed as described
in Transferring a customised map, page 78
If you want to generate further maps and only transfer them at a later stage, carry out the
following steps after exporting the map:
›
Click on the No button in the dialog window asking you whether you want to transfer the
map now.
In that case the program returns to the previous screen and you can select further maps and
save them to the PC’s hard disk.
›
If you are subsequently ready to transfer the maps, open the MAP ARCHIVE window from
the M
See: 4.3 Map archive, page 76
AIN MENU and start the map transfer from there.
.
.
75
Page 76

4.3 Map archive
The M AP ARCHIVE window fulfils two functions:
1. Management of customised maps
This facility allows you to check, rename, transfer and, if required, delete maps you
have already created.
2. Transfer of supplied map sections (Standard maps) to the Pocket PC.
4.3.1 Opening the window MAP ARCHIVE
In the MAIN MENU click on the Map archive button (see Fig.1, item A.). ›
The M
AP ARCHIVE window opens.
Fig.6: Window M AP ARCHIVE
On the right of the screen the upper list – Customised maps (Fig.6, item A
) – shows all the
customised maps in the selected standard directory, together with information about the map
size. If you click on the name of a map in the list, this map is shown on the left side of the
screen.
The lower list – Standard maps (
Fig.6, item B
) – contains the name of the already exported
map section supplied as part of the package, together with information about the map size. If
you click on the map name, that map will be shown on the left part of the screen as soon as
you have inserted the appropriate map CD-ROM (CD-ROM2) in your CD-ROM drive.
If you click on the name of a map in the list, this map is shown on the left side of the screen.
76
Page 77

4.3.2 Management of customised maps
Deleting a customised map
›
In the list Customised maps, mark the map that you want to delete.
›
Click on the Delete button (Fig.6, item E).
›
When prompted about whether you are sure you want to delete the map, confirm by
clicking on Yes.
The map is then deleted from the list and from the standard directory on your hard disk.
Renaming a customised map
›
In the list Customised maps, mark the map that you want to rename.
›
Click on the Rename button (Fig.6, item F).
›
In the entry field enter a new name for
the highlighted map (see illustration on
the left).
›
Click on the OK button.
77
Page 78

Transferring a customised map
1. Transfer to the Pocket PC
›
Establish a connection via ActiveSync® between your Desktop PC and your Pocket PC.
›
In the Customised maps list (Fig.6, item A) highlight the map you want to transfer to
the Pocket PC.
› Click on the Transfer to Pocket PC button (Fig.6, item C).
The S
ELECT DIRECTORY window opens.
›
Open the Pocket PC directory by clicking
on the Plus symbol.
›
Select the directory where you want to
add the map data.
›
Click on OK to start the map transfer.
›
If you want to create a new map folder,
click on the New folder button.
›
Enter the desire folder name, then click
on OK.
›
In the SELECT DIRECTORY window click on OK to start the map transfer.
The MAP IS BEING CREATED window appears.
The progress bars allow you to check on the status of the transfer.
As soon as the map transfer has been completed, a message appears to tell you that the map
has been copied successfully.
78
Page 79

2. Transfer via a memory card reader
›
Connect the memory card reader to your PC and insert the memory expansion unit.
›
In the list, highlight the map you now want to transfer (Fig.6, item A).
The selected map is now displayed on the left side of the map window.
› Click on the Transfer to PC button (Fig.6, item D).
The S
›
›
›
The M AP IS BEING CREATED window appears.
The progress bars allow you to check on the status of the transfer.
As soon as the map transfer has been completed, a message appears to tell you that the map
has been copied successfully.
ELECT DIRECTORY dialog box opens.
Select the directory in the memory expansion unit where you want to save the map.
If you want to create a new map folder, click on the New folder button.
Enter the desire folder name, then click on OK.
Click on OK to start the map transfer.
79
Page 80

4.3.3 Viewing and transferring a standard map
Opening a standard map
› In the Standard maps list Fig.6, item B), highlight the name of the map you want to
display in the map window.
The window I
insert the relevant map CD-ROM (CD-ROM 2) in your CD-ROM drive.
The S
›
ELECT DIRECTORY dialog box appears.
Select your CD-ROM drive.
NSERT INSTALLATION CD now appears. In this window you are prompted to
›
Insert the CD-ROM in your CDROM drive and click on OK.
›
If the drive letter of your CDROM drive has changed since
you installed the MapExport
software, click on the
Alternative directory button.
›
Click on the OK button.
Then in the I
The map is then displayed in the map window.
Transfering a standard map
1. Transfering a standard map via a memory card reader
›
Connect the memory card reader to your PC and insert the memory expansion unit.
›
Open the required map section as described in Opening a standard map, page 80.
NSERT INSTALLATION CD window click on the OK button.
› Click on the button Transfer to PC (Fig.6, item D).
The S
›
›
›
The M AP IS BEING CREATED dialog box appears. The progress bar allows you to check on
the status of the transfer.
As soon as the map transfer has been completed, a message appears to tell you that the map
has been copied successfully.
ELECT DIRECTORY dialog box opens.
Select the directory in the memory expansion unit where you want to save the map.
If you want to create a new map folder, click on the New folder button.
Enter the desire folder name, then click on OK.
Click on OK to start the map transfer.
2. Transfering a standard map to the Pocket PC
›
Establish a connection via ActiveSync® between your Desktop PC and your Pocket PC.
›
Open the map section as described in Opening a standard map, page 80.
› Click on the button Transfer to PocketPC (Abb.6, item C),
The S
ELECT DIRECTORY window opens.
80
Page 81

›
Open the Pocket PC directory by
clicking on the Plus symbol.
›
Select the directory where you want to
add the map data.
›
Click on OK to start the map transfer.
The M AP IS BEING CREATED dialog box appears. The progress bar allows you to check on
the status of the transfer.
As soon as the map transfer has been completed, a message appears to tell you that the map
has been copied successfully.
81
Page 82

Appendix
W
HAT DO I DO IF…?
Here are some possible solutions to the problems most frequently reported to our customer support
service in relation to the MEDION-Navigator software.
If the symbol No GPS is still displayed even though the system has been correctly
installed and the GPS receiver has been correctly connected, this may be due to one of the
following reasons:
A. Check that the LED on the connector inserted in the cigarette lighter socket is lit. If not,
please check the fuse in the connector.
The initialisation of the COM port was not successful:
›
Touch Settings in the MAIN MENU.
›
Select GPS configuration from the drop-down menu in the SETTINGS window.
›
Reactivate COM1.
›
Touch Save changes.
B. The GPS receiver is connected to a different port – not COM 1:
›
Touch Settings in the MAIN MENU.
›
Select GPS configuration from the drop-down menu in the SETTINGS window.
›
Enable COM1 – COM6 ports one after the other while keeping an eye on the GPS symbols
shown in the top right-hand corner: if this changes from
have selected the correct COM port.
to or you
› Touch Save changes.
The symbol does not change to .
A. When you first use the MEDION-Navigator it can take up to 20 minutes before the GPS
receiver has found all satellites and has been initialised.
See also: 2.2.2 Initialising the GPS receiver, page 15
B. GPS reception may be subject to interference if the windscreen is a heated windscreen or
if the windscreen is metallised. Using a GPS receiver inside the car can therefore impair
the function of the navigation system considerably and is not recommended. You should
use a GPS receiver that can be fitted on the outside of the vehicle.
.
The symbol frequently changes to .
To be able to determine the position correctly, the receiver needs to receive direct signals from
the GPS satellites, without any delay. In other words, the GPS receiver needs a “clear view” of
the satellites. Metallic materials, such as the car roof, screen out these signals, high-rise
buildings on both sides reduce the receiver’s coverage and glass surfaces may reflect the
satellite signals, which could reduce the receiver’s performance. Dense foliage, e.g. an avenue
of trees, may also reduce the quality of reception on account of the water in the leaves.
82
Page 83

The list of destinations is not accepting addresses from Outlook/Contacts
A. Please note that only the addresses contained in the map data stock can be incorporated.
If an address cannot be uniquely allocated, e.g. if the map contains several locations with
the same place name, these will be listed together with the postal code and district.
Highlight the appropriate location and touch OK. If an address cannot be allocated at all,
e.g. because no town was specified or because the town was not found on the map, a
message appears to indicate that the address was not found. If this happens the address
will not appear in the Contacts list.
B. Please note that the following information
First name and surname
Town and postal code
Street and house number
must have been entered in the correct fields of your Outlook/Contacts directory. The
MEDION-Navigator tries to allocate the entries in the above-mentioned fields to locations on
the map. For instance, if you have also entered the details of the town and the postal code in
the Street field in Outlook/Contacts, MEDION-Navigator will not be able to find this entry in
the map. Consequently it cannot allocated the address to a destination.
When I export the map the MapExport Tool no longer responds to inputs
The MapExport Tool has to carry out a large number of complicated algorithms to export the
map to the Pocket PC. The MapExport Tool is intensely busy with the algorithms and is not
accepting any inputs because of the PC’s performance. Wait until MapExport has exported the
map section, the routes or the entire map.
Please note that exporting an entire map can take several hours, depending on the computing
power of the PC.
The installation on the Pocket PC was unsuccessful, even though a link was
established with ActiveSync®
Install the MEDION-Navigator on the Pocket PC as follows:
›
In the ACTIVESYNC® window click on the Extras/Software menu.
›
Enable the check box for “MEDION-Navigator”.
›
Click on OK.
®
If the installation is still not carried out, please reinstall the ActiveSync
program.
MEDION-Navigator is very slow during route planning and navigation and is
very sluggish on entries
›
Please exit MEDION-Navigator.
›
Then check how much program memory is available on your Pocket PC (see user’s guide
for your Pocket PC).
To function properly, the MEDION-Navigator requires at least 10 MB free program
memory on your Pocket PC.
›
If necessary, carry out a soft reset on the Pocket PC.
83
Page 84

Index
A
Adding route points .................................................................................... 71
Autozoom function ..................................................................................... 37
Avoid ferries......................................................................................... 31, 47
Avoid interstates .................................................................................. 31, 47
Avoid toll ways ..................................................................................... 31, 47
B
Basic map ................................................................................................... 60
Blocking ..................................................................................................... 36
lifting the block ..........................................................................................36
C
Changing the scale of the map and the map section
MapExport .................................................................................................62
MobileNavigator .........................................................................................37
Changing the sequence of route points ...................................................... 72
COM port
Selecting the COM port.......................................................................... 16, 24
Contacts ............................................................................................... 31, 46
Current position ......................................................................................... 39
Customised maps ....................................................................................... 60
delete .......................................................................................................77
management of customised maps .................................................................77
rename .....................................................................................................77
transfer.....................................................................................................78
D
Decreasing the area ................................................................................... 74
Delete
saved destination .......................................................................................30
Deleting route points.................................................................................. 71
Display of current position ......................................................................... 39
Display special destinations ................................................................. 23, 24
Display street names .................................................................................. 23
Distance bar ................................................................................................ 34
Distance display........................................................................................... 34
Distance to next maneuver......................................................................... 35
E
Ending the MEDION-Navigator ................................................................... 20
Entering corridor width .............................................................................. 70
84
Page 85

Entering house numbers............................................................................. 68
Entering radius........................................................................................... 70
Exporting the area...................................................................................... 75
Exporting the route .................................................................................... 72
F
Failed route calculation .............................................................................. 48
FAQ list....................................................................................................... 82
Frequently asked questions........................................................................ 82
Function window ........................................................................................ 58
G
GPS receiver
Initialisation...............................................................................................15
Possible sources of error during initialisation...................................................16
GPS status .................................................................................................. 20
GPS window ............................................................................................... 21
H
Help (Online).............................................................................................. 12
Help (Support) ........................................................................................... 12
I
Import of addresses from the contacts folder ............................................ 31
Importing addresses ............................................................................ 31, 46
Increasing the area .................................................................................... 74
Initialisation............................................................................................... 15
Possible sources of error..............................................................................16
Installation
car holder with Pocket PC ............................................................................15
GPS receiver ..............................................................................................15
Map ..........................................................................................................17
Program files .............................................................................................17
L
List of route points ..................................................................................... 51
Local search ............................................................................................... 29
Local Search ............................................................................................... 45
M
Main menu
MapExport Tool ..........................................................................................55
MobileNavigator .........................................................................................20
Manual blocking ......................................................................................... 36
Map
85
Page 86

open basic map ..........................................................................................60
Shifting the map................................................................................... 37, 62
Zooming in and zooming out .................................................................. 37, 50
Map archive ................................................................................................ 76
Map in direction of travel............................................................................ 23
Map material .............................................................................................. 10
Map north-oriented .................................................................................... 23
Map transfer
General information ....................................................................................64
Saving customised maps to the hard disk of the PC .........................................64
transfer customised maps from the hard disk to memory expansion unit ............79
transfer customised maps from the hard disk to the Pocket PC ..........................78
transfer standard maps from the hard disk to memory expansion unit................80
Transfer standard maps from the hard disk to the Pocket PC.............................80
Map window ............................................................................................... 57
MapExport Tool
standard maps ...........................................................................................61
Map-specific destinations ................................................................30, 44, 67
N
Navigation
continuing navigation ..................................................................................38
enter destination ........................................................................................27
interrupting navigation ................................................................................38
reaching the destination ..............................................................................38
route options .............................................................................................31
Routing options ..........................................................................................31
saved destinations ......................................................................................30
selecting the map .......................................................................................27
Navigation mode ........................................................................................ 33
map view ..................................................................................................33
schematic intersection view..........................................................................33
Next destination ......................................................................................... 51
O
Online help ................................................................................................. 12
P
Personal destinations ........................................................................... 30, 44
Position ...................................................................................................... 39
Preferences ................................................................................................ 23
R
Recent destinations.............................................................................. 30, 44
Route list.............................................................................................. 49, 52
86
Page 87

Route options ............................................................................................. 31
Route planning
add address from the Contacts list ................................................................46
Add saved destinations................................................................................44
Changing the sequence of route points ..........................................................47
Checking the route .....................................................................................47
Contacts list...............................................................................................46
Deleting a route point .................................................................................47
entering starting point and destination point...................................................42
Failed route calculation................................................................................48
List of route points......................................................................................51
next destination .........................................................................................51
opening.....................................................................................................42
Route calculation ........................................................................................47
Route list............................................................................................. 49, 52
Routing options ..........................................................................................47
Selecting special destinations .......................................................................43
Start simulation..........................................................................................49
using a GPS receiver ...................................................................................51
Route points list ......................................................................................... 51
Routing options .......................................................................................... 47
Routingoptionen......................................................................................... 31
S
Safety information
about the GPS receiver................................................................................11
concerning navigation .................................................................................11
for installation in the vehicle.........................................................................11
Save
destinations ...............................................................................................30
Saving destination...................................................................................... 43
Saving route points .................................................................................... 43
Searching for a street................................................................................. 68
Searching for special destinations .............................................................. 69
Searching for towns ................................................................................... 67
Select destination
from the Contacts folder ..............................................................................31
Selecting a map section.............................................................................. 73
Selecting a route with corridor ................................................................... 67
Selecting a street ....................................................................................... 68
Selecting an area........................................................................................ 73
Selecting route options .............................................................................. 71
Selecting route points ................................................................................ 67
Selecting the map................................................................................. 27, 40
Setting route points with the mouse .......................................................... 69
87
Page 88

Settings ...................................................................................................... 23
for GPS receiver .........................................................................................24
for itinerary ...............................................................................................24
for navigation.............................................................................................23
format ......................................................................................................25
volume......................................................................................................24
Shifting the area on the map ...................................................................... 74
Shifting the map......................................................................................... 37
Show on map.............................................................................................. 32
Simulation .................................................................................................. 49
Standard maps ........................................................................................... 61
open .........................................................................................................80
transfer ...................................................................................................80
Start
MobileNavigator PDA...................................................................................20
navigation .................................................................................................31
Supplied maps
open .........................................................................................................80
transfer ...................................................................................................80
Support (Contact) ...................................................................................... 12
Support (Online) ........................................................................................ 12
System requirements ................................................................................. 10
For MapExport Tool .....................................................................................10
For MEDION-Navigator ................................................................................10
For the map...............................................................................................10
T
Time format................................................................................................ 25
Toolbar ....................................................................................................... 49
Troubleshooting ......................................................................................... 82
U
Unit of length ............................................................................................. 25
User interface of MapExport Tool ............................................................... 55
V
Volume
presetting the volume .................................................................................24
88
 Loading...