

Page 1
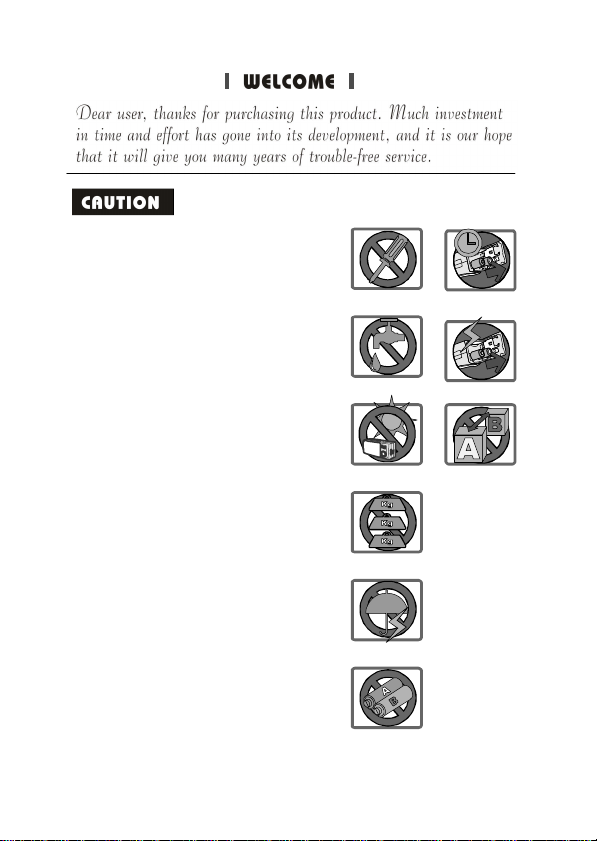
Donotdrop,punctureordisassemble
1.
thecamera;otherwisethewarrantywill
bevoided.
Avoidallcontactwithwateranddry
2.
handsbeforeusing.
Donotexposethecameratohigh
3.
temperatureorleaveitindirectsunlight.
Doingsomaydamagethecamera.
Usethecamerawithcare.Avoid
4.
pressinghardonthecamerabody.
Foryourownsafety,avoidusingthe
5.
camerawhenthereisastormor
lightning.
Avoidusingbatteriesofdifferent
6.
brandsortypesatthesametime.
Thereispotentialofexplosionbydoing
that.
Removebatteriesduringlongperiods
7.
betweenusage,asdeteriorated
batteriesmayaffectthefunctionalityof
thecamera.
Removebatteriesiftheyshowsignsof
8.
leakingordistortion.
Wesuggestusingonlytheaccessories
9.
suppliedbythemanufacturer.
1
2
3
4
5
6
7
8
9
Page 2
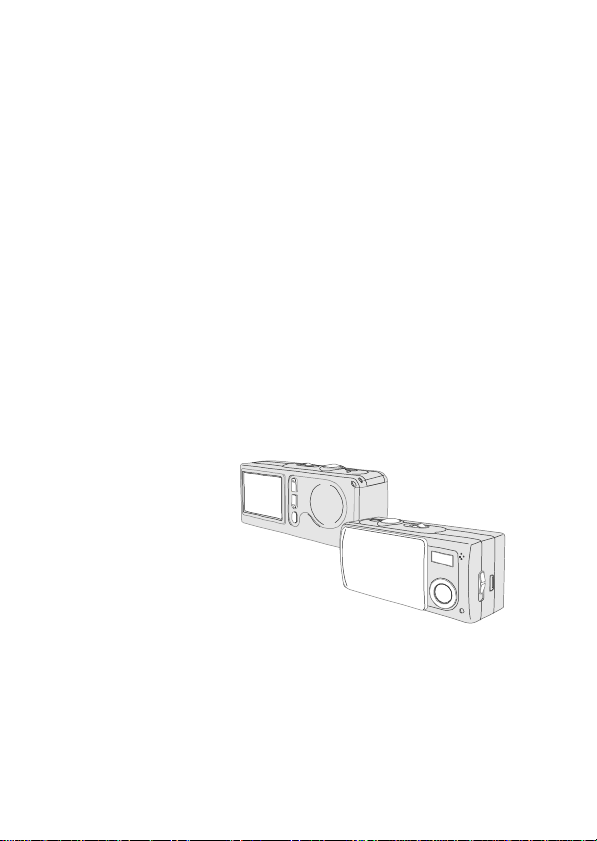
UserManual
Page 3

Contents
GettingStarted
1.Yourcameraparts
2.Loadingthebattery
3.InsertingandremovingtheSD/MMCcard(optional)
Insertingthecard
Removingthecard
4.Attachingthestrap(optional)
5.Usingthetripod(optional)
Basicoperation
1.Poweringonandoff
UsingtheLenscover
UsingthePowerbutton
2.SettingtheModeswitch
3.Takingstillpictures
Snapshot
Focus
Zoomin/out
Flashstrobeandself-timer
TheLCDdisplayundermode
4.Recordingmovies
TheLCDdisplayundermode
PlayingYourImagesontheLCDatOnce
1.Viewingpicturesandmovies
TheLCDdisplayundermode
2.Deletingthepictureandmovie
3
3
4
5
5
5
6
6
7
7
7
7
7
8
8
8
8
9
9
10
10
11
11
11
12
~1~
Page 4

AdvancedOperationandSettings
1.UsingtheMENUbutton
MENUundermode
MENUundermode
MENUundermode
2.Configuringsettings
EnjoyingViewingYourImagesonaPC
1.InstallingtheMD40820Driver
2.Connectingyourcameratoyourcomputer
3.Copyingpicturesandmoviestoyourcomputer
4.Viewingonyourcomputer
UsingthePCCameraFunctionforFun
1.InstallingtheMD40820Driver
2.Connectingyourcameratoyourcomputer
3.Capturingimmediateimagestoyourcomputer
4.Advancedsettings
Formatsettings
Propertiessettings
Troubleshooting
13
13
13
14
15
16
17
17
20
21
23
24
24
24
26
28
28
29
30
OtherInformation
1.Lifeofbattery
2.LEDindicatorevents
3.StorageCapacity
4.Moreonflicker
5.Specification
32
32
32
33
33
34
~2~
Page 5
GettingStarted
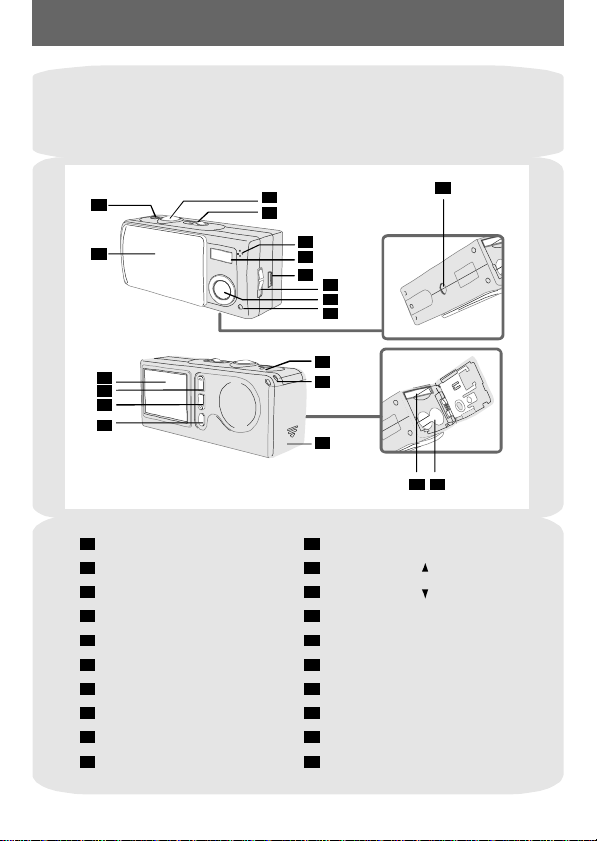
1.Yourcameraparts
Knowingyourcamerapartswellbeforeusingitwillhelpyouoperateit
moreeasily.
1
2
11
12
13
14
1
Powerbutton
2
Lenscover
3
Shutter/QuickExitbutton
4
Modeswitch
Microphone
5
6
Flashstrobe
7
USBport
8
Focusswitch
9
Lens
10
Self-TimerLEDindicator
3
4
5
6
7
8
9
10
15
16
17
11
LCDdisplay
12
Controlbutton(Zoomin)
13
Controlbutton(Zoomout)
14
MENU/OKbutton
15
LEDindicator
16
Strapholder
17
Battery/SD/MMCcardcover
18
Tripodport
19
SD/MMCcardslot
18
192020
Batterysection
~3~
Page 6
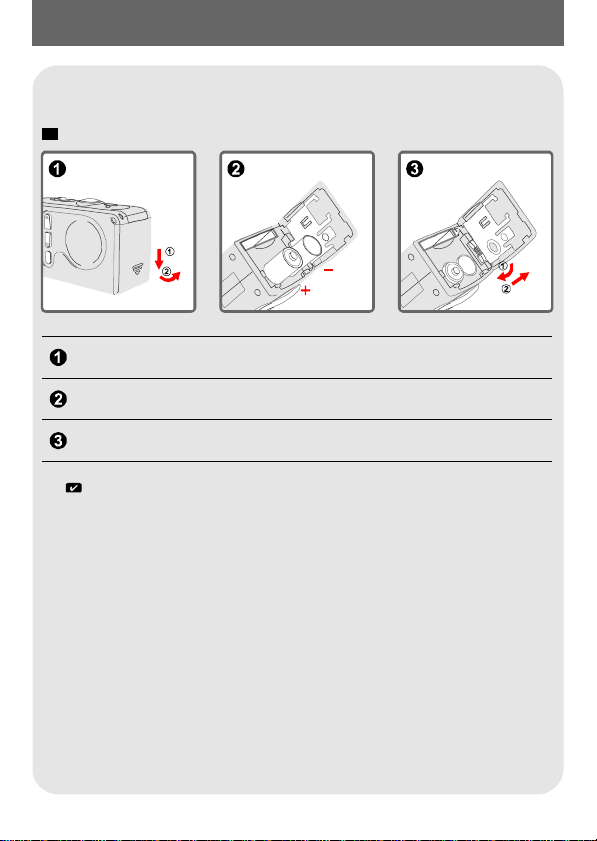
2.Loadingthebattery
PleaseusetwoAAA1.5Vbatteries.
!
Werecommendyoutousealkalinebatteries.
Slidetheinthedirectionoftheindicationtoopenit.battery/cardcover
FollowtheindicationtoloadtwoAAAbatteries.
Closeinwardthetolockit.battery/cardcoverandslideupward
Fordetailsofthebatterylife,seethe"Lifeofbattery"sectiononpage32.
~4~
Page 7
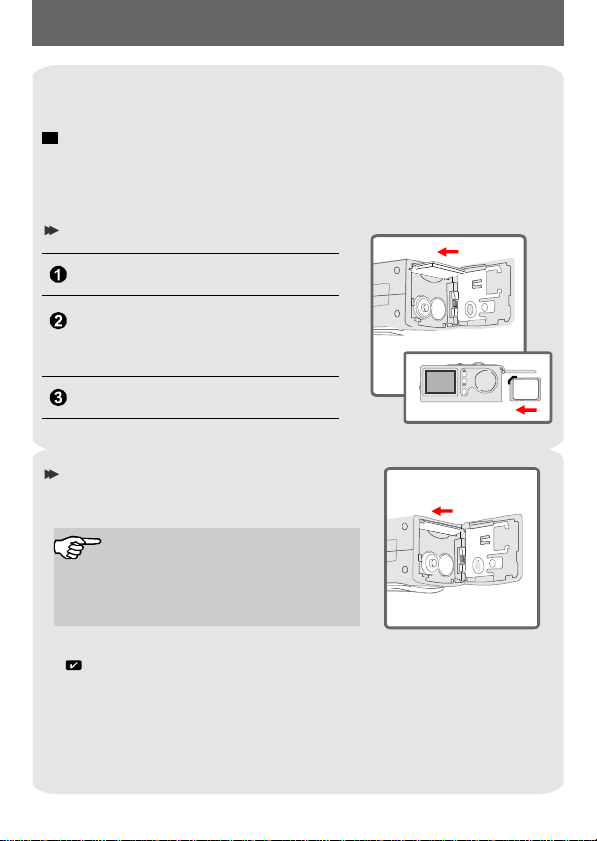
3.InsertingandremovingtheSD/MMCcard (Optional)
!
NeverejecttheSD/MMCcardwhilethecameraisprocessingdata.
(TheLEDindicatorlightsredwhilethecameraisprocessingdata.
FormoreinformationontheLEDmessages,pleaseseethe"LED
indicatorevents"sectiononpage32)
Insertingthecard
Openthe.battery/cardcover
Insertthecardinthedirectionofthe
indicatiorandpushitintilltheendof
thecardplot.
Closethe.battery/cardcover
Removingthecard
Pushthecardtoremoveit.inandrelease
Thecameracomeswith16MBflash
memorybuiltinsideforstorage.If
youdonotinsertaSD/MMCcard,the
datawillbesavedinthebuilt-inflash
memoryautomatically.
FordetailsofthestoragecapacityoftheSD/MMCcardandinternalmemory
(16MBflashmemory),pleaseseethe"Storagecapacity"sectiononpage33.
~5~
MENU/OK
Page 8

4.Attachingthestrap(Optional)
Forconvenienceandsafety,youmaywishto
attachthecarryingstrap.
Threadthestraploopthroughtheholderinthe
directionindicated.
Fastenthestrapasindicated.
5.Usingthetripod(Optional)
Thetripodcanbeattachedtoyourcameratominimizecameramovement
andensureoptimalimagequality,particularlywhiletakingself-portraits,
longermoviesorinamacromode.
Tight
Loose
Serratedwheel
Attachthetripodtotheportonthebottomofthecameraandrotatethe
serratedwheeltolockit.
Unfoldthelegstosetup.
Adjustthealignmenttothedesiredposition.
~6~
Page 9
BasicOperation
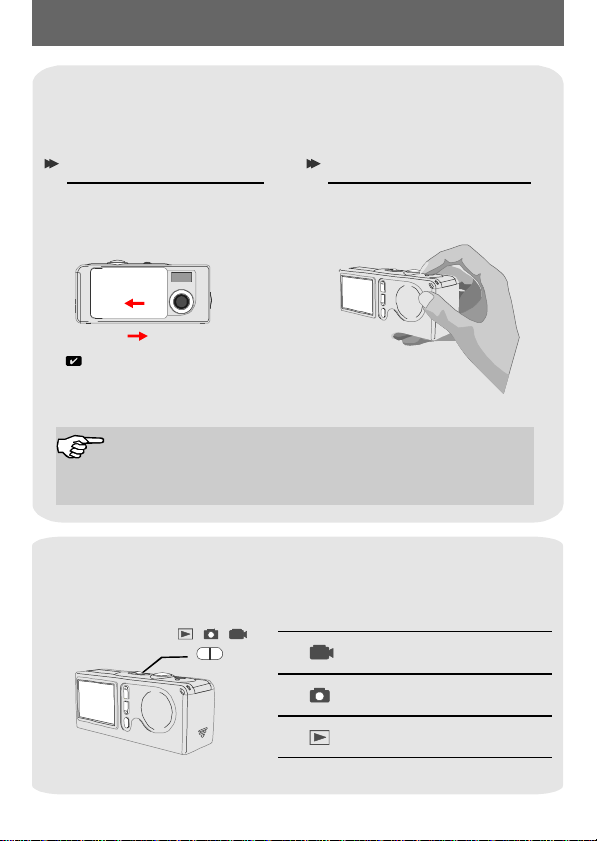
1.Poweringonandoff
Slidetheorpressthetopoweronoroffthe
camera.
LenscoverPowerbutton
UsingtheLenscover UsingthePowerbutton
Slidetheinthe
Lenscover
directionofthearrowtoturnthe
poweronoroff.
ON
OFF
Whiletheisopen,you
Lenscover
canalsopresstheto
deactivateyourcamera.
Ifthecameraisidleforover60seconds,theLCDdisplaywillbe
turnedofftoconservebatterypower;pressanykeytowakeup
thecamera
downautomatically.
Powerbutton
.Ifitisidleforover3minutes,thecamerawillshut
Pressthetoturn
thepoweronoroff.
Powerbutton
2.SettingtheModeswitch
Thiscameraprovidesthreemodestouse.Pushtheto
selectthemodethatyouwanttouse.
Modeswitch
~7~
Moviemode
StillPicturemode
Playbackmode
Page 10
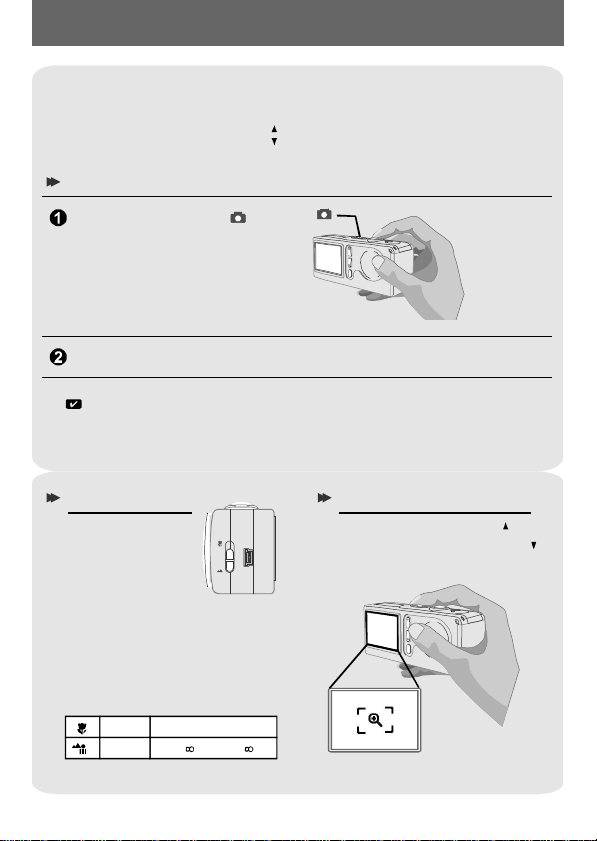
3.Takingstillpictures
Followthestepstosnapstills.Alsousethe
andthetoadjustzoominorzoomoutsothat
focus
Controlbuttons
youcangetbestresult.
Snapshot
Settheto.Modeswitch
Pressthetotakepictures.Shutterbutton
WhiletheLEDindicatorisflashingred,theimageisbeingcaptured;whiletheLED
turnsgreen,thepictureprocessingisdone.(FormoreinformationoftheLEDmessage,
pleaseseethe"LEDindicatorevents"sectiononpage32.)
Focusswitch
tosetthe
Focus
Adjustthefocus
beforetakingthe
stillpicture.Push
the,
Focusswitch
thenselectthe
modebestforyourpicture.The
followingtabletellsyouwhich
focusmodeyoumaychoose
withthedistancefromthe
object.
Macro
12"~24"(30cm~60cm)
Micro
24"~(60cm~)
USB
Zoomin/out
Presstheto
zoominorthe
tozoomout.
~8~
Controlbutton
Controlbutton
Page 11
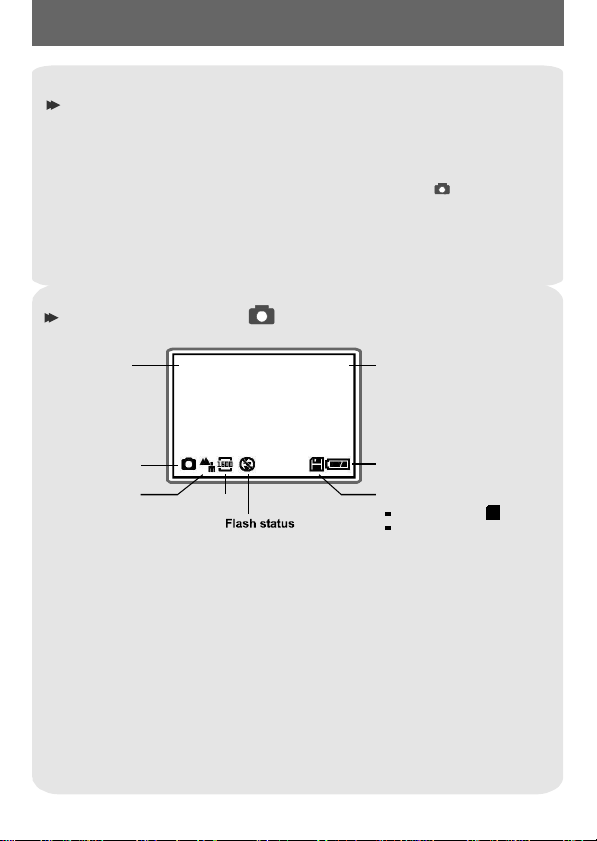
Flashstrobeandself-timer
Thestrobeandself-timerareprovidedtooffermoreconvenientutilities
whentakingpictures.Youcanusethestrobeifthelightisnotadequate.
Theself-timerfunctionisusefulincertainsituations(ex.takingself-portait
photo).Thereareothersettingsintheundermodetoaffect
theresultofimage,i
ncludingsize,exposure,whitebalance,andeffect.
MENU
Fordetailsonoperationandinformation,pleaseseepage13-14.
TheLCDdisplayundermode
Zoom Numberofpictures
Still
pictures
mode
Focus
mode
1.0X 20
Resolution
~9~
andmoviestaken
Lifeofbattery
Storagemode
SD/MMCcard:
Flashmemory:non-icon
Page 12

4.Recordingmovies
Settheto.Modeswitch
Pressthetostartrecording.Shutterbutton
Presstheagaintostoptherecording.Shutterbutton
Youcanalsoadjusttheundermode.(Pleaserefertothe"Focus"
sectiononpage8.)
Theresolutionofmovieis320*240pixels.
Focusswitch
TheLCDdisplayundermode
Numberof
20
pictures
andmovies
taken
Movie
mode
Focus
mode
~10~
Lifeofbattery
Storagemode
SD/MMCcard:
Flashmemory:non-icon
Page 13

PlayingYourImagesontheLCDatOnce
1.Viewingpicturesandmovies
Settheto.Modeswitch
ThelastimagetakenwillbehighlightedfirstontheLCDdisplay.
Pressthetoselectthepreviousorthenextimage,
Controlbuttons
thenviewitontheLCDdisplay.
Whileplayingamovieonthe
camera,soundplaybackisnot
available.Pleasecopythe
movietoyourcomputer(for
details,seepage17)toviewit
withsoundplayback.
Controlbuttons
TheLCDdisplayundermode
Thetype
youare
viewing
Picture:
Movie:
Playback
mode
1/20
~11~
Pictureandmovie
number
Numberofpictures
andmoviestaken
Lifeofbattery
!
Itappearsunderthe
statusoflowbatteryonly.
Storagemode
SD/MMCcard:
Flashmemory:non-icon
Page 14

2.Deletingthepictureandmovie
Followthestepsifyouwanttodeleteonepictureormovie.
Controlbuttons
MENU/OKbutton
Pushtheto,thenpressthetopick
ModeswitchControlbuttons
theimageyouwanttodelete.
Pressthetoenterthe.MENU/OKbutton MENU
Pressthetochoose"",thenpressthe
MENU/OKbutton
Pick""withthe,thenpressthe
tocompletetheactionofdeletion.
Presstheifyouwanttoquickexittheatanytime.Shutter/QuickExitbutton MENU
ControlbuttonsDeleteOne
.
YesControlbuttonsMENU/OKbutton
~12~
Page 15

AdvancedOperationandSettings
1.UsingtheMENUbutton
Theprovidesmoreadvancedfeaturesforyoutofine-tunethe
MENU
camera.
ControlbuttonsMENU/OKbutton
confirm.Thenusethetoexitimmediately.
Usethetoenterthe.Pressthe
MENU/OKbutton
MENU
tohighlighttheitem.Usetheto
Shutter/QuickExitbutton
MENUundermode
Theisforeither
MENU/OKbutton
enteringtheorexecutingan
action.
Selecttheicontoexit;orpressthe
MENU
toquickexit.Shutter/QuikExitbutton
Item Option
Size
Strobe
SelfTimer
2048x1536
1600x1200
1280x960
Auto
Off
On
Off
Icon
MENU
Description
LCD
display
Thisitemallowsyoutochangetheresolutionof
thepicture.Selectthe"1600x1200"or
"2048x1536"typewhenyouwanttodevelop4x6
photos;selectthe"1280x960"whenyouwantto
develop3x5photos.
Thisitemallowsyoutosettheflashstrobe.
Whenyouarenotsureifthelightisadequate,
selectthe"Auto"mode.Thestrobewillfire
automaticallyifmorelightisneeded.Ifyou
haveproblemswhenusingthestrobe,please
referto"Troubleshooting".
Thisitemallowsyoutospecifythedelayfor10
secondsbeforetheshutterfires.Ifyouwantto
usetheself-timer,setthe"On"mode,pressthe
N/A
Shutterbutton
Self-TimerLEDindicator
,thenwaitfor10secondswith
flashingred.
~13~
Page 16

Exposure
Auto
BackLight
Thisitemallowsyoutosettheexposure-
N/A
meteringmode.Whenyouarenotsurethe
sourceoflightorwhentheobjectfacesthelight,
selectthe"Auto"mode.Whentheobjectis
againstthelight,selectthe"BackLight"mode.
White
Balance
[WB]
Effect
Setting
Auto
Sunny
Cloudy
Fluorescent
Tungsten
Normal
B&W
Classic
Solarize
Seepage16fordetails.
MENUundermode
Item Option
Effect
Setting
Normal
B&W
Seepage16fordetails.
Icon
MENU
Thisitemallowsyoutosetthecolor
N/A
temperaturewiththelightinthecertain
environment.Ifyouknowthecolorconditions
ofyourshootingenvironment,suchasthe
"sunny"(bright),"cloudy"(dim),"fluorescent"
(highcolorcondition)and"tungsten"(lowcolor
condition)situations,selectthemodeyou
considermostappropriate.Selectthe"Auto"
modeifyouarenotsurethecolorconditionof
theenvironment.
Thisitemoffersfourscenesofphotoimaging,
suchasthe"Normal"(noeffect),"B&W"(black
andwhite),"Classic"(oldpicture),and
N/A
"Solarize"(over-exposed)effects.
Description
LCD
display
Thisitemallowsyoutosettheeffectofthe
image,suchasthe"Normal"(noeffect)and
N/A
"B&W"(blackandwhite)effects.
~14~
Page 17

MENUundermode
Item Option
Delete
One
Delete
All
Format
Setting
Yes
No
Yes
No
Yes
No
Seepage16fordetails.
Icon
MENU
Description
LCD
display
Thisitemallowsapictureoramoviestoredin
yourbuilt-inflashmemoryortheSD/MMC
N/A
cardtobedeleted.
Thisitemallowsallfilesstoredinyourbuilt-in
flashmemoryortheSD/MMCcardtobe
N/A
deleted.
Thisitemallowsallfilesstoredinyourbuilt-in
flashmemoryortheSD/MMCcardwillbe
N/A
deletedandformatted.Notethatallstored
fileswillbegoneandcannotberestored.
~15~
Page 18

2.Configuringsettings
Highlighttheiconwiththeinthefor
configuration.Thefollowingfiguresarethedisplaysunderthe
threemodes.Thetableisthedescriptionofallitemsinthe.
Settingundermode Settingundermode Settingundermode
Controlbuttons MENU
Setting
Setting
ThedescriptionoftheitemsSetting
Icon
Item
Time
Beep
Display
DateStamp
Flicker
Language
Default
Option
Year
Month
Day
Hour
Minute
On
Off
On
Off
On
Off
50HZ
60HZ
English
Duestch
Yes
No
Function
Thisitemallowsyoutosetthetimeofthe
camera.Usethetochange
thenumberofsettings.Pressthe
N/A
button
Thisitemdetermineswhetherthebeepsounds
whenoperatingthecamera.
Thisitemdetermineswhetherthesmallicons
forillustrationwillappearontheLCDscreen.
Thisitemdetermineswhetheradatestampwill
appearonthepicturestaken.
Thisitemallowsyoutosettheflickertoprevent
nosieandgetthebestimage.Thedefaultflicker
valueisbasedonyourcountry.Seethe"More
onflicker"sectiononpage33fordetails.
Thisitemallowsyoutosettheusageof
languageontheLCDdisplay.
Thisitemdetermineswhetherallyoursettings
willbereturnedtotheoriginalfactorydefault.
Controlbuttons
toconfirm.
MENU/OK
~16~
Page 19

EnjoyingViewingYourImagesonaPC
1.InstallingtheMD40820Driver
Installthebeforeconnectingyourcameratoyour
computerforthefirsttime.Pleasefollowthestepstocompletethe
installation.
! ForWindowsXPusers: Skip(InstallingtheMD40820Driver)andgoto
MD40820Driver
(Connectingyourcameratoyourcomputer)ifyoudonotusethePC
step2.
Camerafunction.
Turnonyourcomputer.
!
DonotconnecttheUSBcabletoyourcomputeratthisstage.
!
Turnoffotherapplicationsrunningonyourcomputer.
PlacethesuppliedCDintotheCD-ROMdrive.
Movethemouseto""andclickit.MD40820Driver
step1.
Thetitleappearsonthescreenin
afewseconds.
Clickthe""item.MD40820Driver
Ifnotitleappearsonthescreen
Pleasefollowthesteps:
Double-clickthe""icon.
Double-clicktheCD-ROMdriveicon("").
*ThenameofCD-ROMdrivechangesdependingonhowyour
computerissetup.
Mycomputer
MD40820(E:)*
~17~
Page 20

The""dialogboxisoccurringandtheautomatic
InstallShieldWizard
installationbegins.WhenawindowasFig1appears,click"".
Fig1
Next
NoticeforWindows2000users
The""dialogboxmightshowtwice.
DigitalSignatureNotFound
Pleasesimplyclick"".ThiscameraworkswellforWindows
2000.
Yes
Followtheon-screeninstructionsandclick"".Finish
Donotrestartyourcomputeratthisstep.
~18~!~19~
Page 21

WhenawindowasFig2appears,pleaseclick""or""accordingto
YesNo
yourcircumstance.
IfyouarenotaWindowsXPuser,orneverinstallDirectX8.0orabove,click"".Yes
IfyouareaWindowsXPuser,oryoualreadyinstalledDirectX8.0orabove,click
"".No
Fig2
WhenawindowasFig3orFig4appears,pleaseclick""or""to
FinishOk
completetheinstallation.
Fig3
Thedriverwillbeavailableafterrestartingyourcomputer.
TaketheCDout.
Fig4
Page 22

2.Connectingyourcameratoyourcomputer
Turnonyourcomputer.
Settheonyourcameratoor.Modeswitch
InserttheUSBcabletotheUSBportonyourcomputer.
InserttheotherendoftheUSBcabletotheUSBportonyourcamera.
~20~
Page 23

3.Copyingpicturesandmoviestoyour computer
ForWindowsXPusers
Afterconnectingyourcamera
withthecomputer,awindow
willautomaticallyappear(as
Fig5).Selectthe"
foldertoviewfilesusing
WindowsExplorer
click"".
Ok
ForWindows2000/ME/98SEusers
Double-click"",thendouble-clickthenew"
"icon.
Disk
Double-clickthe""filefolder.DCIM
ForWindowsXPusers ForWindows2000/ME/98SEusers
Open
"itemand
MycomputerRemovable
Fig5
~21~
Page 24

Double-clickthe""filefolder.100MEDIA
ForWindowsXPusers
ForWindows2000/ME/98SEusers
Dragthepicturetothe""filefoldertocopyyourpictureor
MyDocuments
movietothecomputer.
ForWindowsXPusers ForWindows2000/ME/98SEusers
Thestoragepositionsof
thepicturesandmovies
Youcanfindthefilesofyour
picturesandmoviesasFig6.
Fig6
~22~
Page 25

4.Viewingonyourcomputer
Double-click"".MyDocuments
ForWindowsXPusers ForWindows2000/ME/98SEusers
Selectthedesiredfileanddouble-clickittoviewyourpictureormovie.
ForWindowsXPusers
Noticeondisconnectingthecamerafromthe
computerforWindows2000/MEusers
Todisconnectyourcamerafromthecomputer,pleasefollowthese
steps:
Double-clickonthetaskbar.
Click(USBDisk),thenclick"".
Confirmthedevice()ontheconfirmationscreenand
click"".
Ok
Followtheon-screeninstructiontodisconnectyourcamerafrom
yourcomputercorrectlyandsafely.
MD40820
ForWindows2000/ME/98SEusers
Stop
~23~
Page 26

UsingthePCCameraFunctionforFun
1.InstallingtheMD40820Driver
YouneedtoinstallDriverbeforeusingPCCameraorVideo
Conferencingfunction.
!
Skip(InstallingtheMD40820Driver)andgoto(Connectingyour
step1.step2.
cameratoyourcomputer)ifyouhavealreadyinstalleddriver.
IfyouneverinstallDriver,pleasefinishtheinstallationfirst.Fordetails,
!
pleaseseeinthe"EnjoyingViewingYourImageonaPC"sectiononpage
17.
MD40820
MD40820
MD40820
step 1.
2.Connectingyourcameratoyourcomputer
Turnonyourcomputer.
Settheonyourcamerato.Modeswitch
Slidetheonyourcameratoprepareforcapturingimages.Lenscover
InserttheUSBcabletotheUSBportonyourcomputer.
InserttheotherendoftheUSB
cabletotheUSBportonyour
camera.
~24~
Page 27

NoticeforWindows2000/ME/98SEuserswhenusingPC
camerafunctionforthefirsttime
WhenusingPCCamerafunction(orVideoConferencing)forthefirst
time,pleasefollowthestepsbelow.
ForWindows2000users
Thedialogbox""mightappeartwice,
pleasesimplyclick"".ThiscameraworkswellforWindows
2000.
DigitalSignatureNotFound
Yes
ForWindowsMEusers
Pleaseselect"
forabetterdriver
windowasFig7appears.
Automaticsearch
"whena
ForWindows98SEusers
Click""whenawindow
Next
asFig8appears.
Select"
Searchforabest
driverforyourdevice
click""whenawindowas
Next
Fig9appears.
Selectthepositionwhereyour
Windows98SEdriveris.You
mightbeaskedtoinsertthe
licensedWindows98SECDROMinyourCD-ROMdrive.
Followtheon-screen
instructionstocompletethe
installation.
Fig7
"and
Fig8
Fig9
~25~
Page 28

3.Capturingimmediateimagestoyourcomputer
Aftertheinstallationofdriverandhardware,youcanstarttousethePC
CamerafunctionorrunotherVideoConferencingapplications.(This
manualprovidesinformationrelatedtoPCcamerafunctiononly.)
Double-clickthe""icononthedesktoptoexecutethe
program,thenyoucanbegintocaptureimmediateimagesonyour
computer.
OR
Clickthe""menuandgoupto"",thengotothefolder
named""andclickit.
MD40820
MD40820
MD40820
StartPrograms
MD40820
IfyouwanttouseVideoConferencingfunction
OpentheNetMeetinginterfaceorotherVideoConferencingapplication
andthenstarttouseit.
~26~
Page 29

PresstheiconatthebottomonthePCcamerapaneltousethefunctions.
PreviewWindow
Record
StopRecordings
Snapshot
Format
Setting
PrevieworStopPreview
OpenAlbum
VideoSource
ViewingyourpicturesandmovieswithPCcamera
interface
Clickthe""iconatthebottomonthePC
camerapanel,orgotothefollowpathtofindthefiles.
OpenAlbum
C:\ProgramFiles\MD40820\WorkTemp
~27~
Page 30

4.Advancedsettings
Clickthe""and""icononthePCcamerapaneltobring
upadvancedsettings.
FormatSetting
Formatsettings
ColorSpace/Compression
Selectoneofthefollowingfunctions
accordingtoyourneeds.
RGB24:Betterimagequality.
I420:Thefilewillbe
compressedtoadd
advantageforfasterspeedtransformation.
OutputSize
Setoutputsizetochangethesize
ofthepreviewwindow.The
defaultsizeis320x240.Select
largerpixelswhenyouneeda
largerpreviewwindow.
~28~
Page 31

Propertiessettings
VideoSetting
BandingFilter
IfthescreenofyourcomputerflickerswhenusingPCCamera
function,changethe"BandingFilter"itemonthe"VideoSetting"tab
toavoidnoise.Select"50Hz"or"60Hz"untilthescreenstops
flickering.Ifyouwanttorestorethedefaultsetting,select"NormalAE".
Bandwidth
IfthecontrollerhasnoenoughbandwidthavailablefortheMD40820
USBcamera,selectasmallervalueinthe"Bandwidth"itemonthe
"VideoSetting"tab.Thesmallerthebandwidthvalueis,thelessthe
bandwidthisoccupied.
CustomSetting
Youcanusethedefaultsettings
orchangethesettingsof
brightness,contrast,saturation,
sharpness,andhueonyourown.
~29~
Page 32

Troubleshooting
Question Answer
Whenusingthecamera
Thecamerahasnopower. Thebatteriesmaybeoutofpower,
Cannotpoweronmy
cameraeventhough
batteriesisinstalled.
pleasechangethebatteries.
Makesurethatthebatteryisinstalled
correctly.
Makesurethatthebatteryisinstalled
correctly.
Ifitisidleover3minutes,thecamera
willshutdownautomatically,please
presstheorslidethe
Powerbutton
Lenscover
topoweronthecamera.
Cannottakepicturesand
movieswhenpressingthe
Ididnotdeletethepicture
andmovie,butcannotfind
thedataintheSD/MMC
card.
Cannotsetthestrobetothe
"On"mode.
.Shutterbutton
Makesurethattheisopen.
Thestorageisfull.Pleasefreesome
spaceoftheSD/MMCcardorflash
memory.
Checkifthecameraisunderthestatus
ofchargingbatteries.
CheckiftheSD/MMCcardissetto
"protected".
Ifthe""message
MEMORYERROR
showsontheLCDdisplay,pleaseset
thetomodeformat
Modeswitch
thecard.
Checkifyourfilesarestoredinthe
camera'sbuilt-inmemory.Ifthereisa
iconattherightbottomsectiononthe
LCDdisplay,itmeansyouareusingthe
camerawithaSD/MMCcard.Please
removethecardtofindthedatainthe
flashmemory.(Fordetails,seethe
"Removingthecard"sectiononpage6)
Chargingtheflashstroberequiresmore
powerofbatteries.Whenthebatteryis
underthestatusoflowpower,thestrobe
cannotbeset.Pleasechangethe
On
batteries.
Lenscover
~30~
Page 33

Theimageistooblurred.
Pleaseadjustthefocus(seepage8).
Theimageonistoodark.
Soundplaybackisnot
availablewhenviewingthe
movieontheLCDdisplay.
Noiseoccursonmycamera
whenviewingtheimageon
theLCDdisplayoronthe
computer.
Youmayneedtotakepicturesormovies
intheplacewithadequatelightorusethe
flashstrobe.
Thissituationisnormal.Ifyouwantthe
moviewithsoundplayback,pleasecopy
themovietoyourcomputerandviewiton
thecomputer.
Setthefiltermatchingtheplaceyouare.
Pleaserefertothe"Moreonflicker"
sectiononpage33.
Whenconnectingthecameratoyourcomputer
Thedriverinstallationfailed.
Aconflictwithother
installedcameraorcapture
device.
Themoviecannotbe
playedonmycomputer.
Noiseoccursonmy
computerwhenusingVideo
Conferencing.
Pleaseremovethedriverandother
relatedprograms.Followtheinstallation
stepsinthismanualtoreinstall.
Installthedriverbeforeinsertingthe
USBcable.
Ifyouhaveanyothercameraorcapture
device,completelyremovethecamera
anditsdriverformthecomputertoavoida
driverconflict.
PleaseinstallDirectX8.0orabove.(See
the"InstallingtheMD40820Driver"
sectiononpage17ordownloadDirectX
8.0andgetmoreinformationonMicrosoft
website.)
Setthefiltermatchingtheplaceyouare.
Pleaserefertothe"BandingFilter"section
onpage29.
~31~
Page 34

OtherInformation
1.Lifeofbattery
Number
Condition
Number
ofimages
Batterylife
(minutes)
TakingStillPictures
1600x1200
(withoutflashstrobe)
*Dataaisforusingalkalinebatteriesandin25C,withpicturestakeneveryfour
bove
seconds.
!
Notes:
1.Lifeofbatterywillbeshorteninthefollowingconditions.
(1)Takingsnapshotatlowtemperature.
(2)Turnon/offpowerrepeatedly.
2.Thetableisforreferenceonly.above
3.Usingtheflashlightwilldecreasethenumberofpicturestobetaken.
650 45
2.LEDindicatorevents
Condition LEDcolor
Status
(LEDindicator)
Flash
(LEDindicator)
Data
transformation
(LEDindicator)
Self-Timer
(Self-Timer
indicator)
!
NeverejectthecardorremovethebatterieswhiletheLEDindicatorislitupred.
Red
Green
Red
Green
Red
Green
Red(regularly) Counting
Meanings
Busy(storage,orcapture)modechange,
Ready(waitingforcommand)
Chargingflash
Ready (waitingforcommand)
Datatransformation
Ready (waitingforcommand)
CapturingthepictureRed(rapidly)
~32~
Page 35

3.Storagecapacity
Memory
Flashmemory(16MB)
SD/MMCcard(32MB)
SD/MMCcard(64MB)
SD/MMCcard(128MB)
SD/MMCcard(256MB)
SD/MMCcard(512MB)
!
Notes:
1.Actualnumberofpicturesstoredmayvary(upto+30%)dependingon
theresolutionandcolorsaturation.
2.Thetableisforreferenceonly.above
Stillpicture Movie
96
96
192
384
768
Maximum
recordingtime
2048x1536 1600x1200 1280x960
40
40
80
160
320
640 960 1536 64
60
60
120
240
480
4
4
8
16
32
4.Moreonflicker
Thedefaultflickersettingofyourcameraisbasedonyourcountry.When
usingthecameraabroad,pleaserefertothetablebelowtomatchtheflicker
settingwiththeplaceyougo.
Country
Setting
Country
Setting
England Germany
50Hz
Portugal
50Hz
50Hz
America
France
Taiwan China
Italy Spain
50Hz 50Hz60Hz
50Hz60Hz60Hz
~33~
50Hz
Japan
50/60Hz
Netherlands
Korea
60Hz
Page 36

5.Specification
Hardwareresolution
Sensoreffectiveresolution
Internalmemory
Externalmemory
Digitalstillcamera
Digitalvideocamcorder MotionJPEG(AVI)Format
Videoconferencing
LCDdisplay
Digitalzoom
Exposure
Whitebalance
Imageeffect
Lens
SelfTimer
Interface
Powersaving
Built-inmicrophone
Built-inspeakers
Built-inflashstrobe
Battery
Dimension
2048x1536(3.1Megapixels)
1600x1200(2)Megapixels
Built-in16MBSDRAM(buffer)
32MBflashmemory(storage)
Built-inSD/MMCslot(maximum:512MB)
JPEGFormat
2048x1536(3.1);1600x1200(2);
1280x960(1.3)
QVGA(320x240pixels)/upto20fps
VGA(640x480pixels)/upto10fps
QVGA(320x240pixels)/upto20fps
1.5"ColorTFTLCD
4x(forstillpicturesonly)
Auto/Backlight
Auto/Sunny/Cloudy/Fluorescent/Tungsten
4modesforstillpicturesand2modesforvideos
F=3.5,8.5mm
10seconds
USB1.1(USB2.0compatible)
Autopower-offifidleforover3minutes
Yes
No
Yes
AAAx2(alkalinerecommended)
3.4"x1.6"x1.2"
MegapixelsMegapixels
Megapixels
~34~
 Loading...