

Page 1

1
1
7
7
I
I
N
N
C
C
H
H
F
LLAATT
F
P
P
NEELL
AAN
LLCCD
D
M
M
UULLTTI
I
M
--M
EEDDIIAA
D
IISSPPLLAAY
D
Y
Page 2

© 2003 All rights reserved.
Trademarks:
MS-DOS
Pentium
Other trademarks are the property of their respective owners.
We
not limited to, the implied warranties of merchantability and fitness for a particular purpose.
We
connection with the furnishing, performance, or use of this material.
We assume no responsibility for the use or reliability of its software on equipment that is not
furnished by our company.
This document contains proprietary information that is protected by copyright. All rights are
reserved. No part of this document may be photocopied, reproduced, or translated to another
language without the prior written consent of our company.
The information in this document is subject to change without notice.
®
and Windows® are registered trademarks of Microsoft®.
®
is a registered trademark of Intel®.
make no warranty of any kind with regard to this material, including, but
will not be liable for errors contained herein or for incidental or consequential damages in
ii
Page 3

Contents:
English Deutsch Nederlands Français Dansk Italiano Español Svenska
1. SAFETY AND PRECAUTIONS .............................................. 1
Operating Safety ................................................................. 1
Repair .............................................................................. 2
Notes for Service Engineers ................................................. 2
Point of use ..................................................................... 3
Environmental conditions .................................................... 3
Connecting...................................................................... 4
Standards/Electro-Magnetic Compatibility ................................ 5
Precautions........................................................................ 6
Important Additional Safety Instructions .................................... 6
2. INTRODUCTION .............................................................. 7
Service............................................................................. 7
Performance Characteristics ................................................... 7
Encluded Equipment............................................................. 9
3. CONNECTING EXTERNAL DEVICES ................................... 10
4. CONTROLS AND LOCATION............................................. 12
5. REMOTE CONTROL........................................................ 13
6. A.P.S. FIRST TIME INSTALLATION.................................... 16
7. GENERAL CONTROLS & ADJUSTMENT............................... 17
Turning the LCD display On and Off ........................................ 17
Viewing the Menus and On-Screen Displays .............................. 17
Switching between TV/PC/AV................................................ 18
Volume Control................................................................. 18
Menu Items ..................................................................... 19
Setting the Sleep Timer ...................................................... 19
Contrast and Brightness Settings ........................................... 20
Setup Menu Settings .......................................................... 21
Audio Menu Settings .......................................................... 22
iii
Page 4

8. TV MODE ADJUSTMENT .................................................. 23
Altering the TV Settings ...................................................... 23
Automatic Search Programmes ............................................. 24
Manual Search Programmes ................................................. 25
Programme List Settings ..................................................... 26
Change or edit Names ....................................................... 27
Delect the programme ........................................................ 27
Insert the programme ........................................................ 27
Setting the CHILD LOCK...................................................... 28
NICAM/IGR Broadcast Selection ............................................ 29
Colour/Sharpness Settings ................................................... 29
9. TELETEXT..................................................................... 31
10. PC MODE ADJUSTMENT ................................................ 34
Image Settings ................................................................. 34
Colour Settings ................................................................. 36
11. VIEWING PICTURE-IN -PICTURE (PIP) ............................ 37
Quick Way to activate PIP.................................................... 37
PIP Setup menu ................................................................ 37
12. AV MODE ADJUSTMENT ................................................ 39
13. OTHER FUNCTIONS...................................................... 40
14. TROUBLESHOOTING..................................................... 41
15. DIMENSIONS .............................................................. 43
16. PC INPUT PRESET TIMING TABLE ................................... 44
17. SPECIFICATIONS ......................................................... 45
iv
Page 5
English Deutsch Nederlands Français Dansk Italiano Español Svenska
.
S
11.
Please read through this section carefully and follow the instructions to maximize the reliable operation and lifetime of your LCD
display. Always keep these instructions handy and close by your
LCD display. Keep the instructions and the packaging so that if you
sell or give away your LCD display you can give them to the new
owner.
AAFFEETTYY AANNDD
S
P
RREECCAAUUTTIIOONNS
P
S
OPERATING SAFETY
• Never open the housing of the LCD display
/power supply! When the housing is open there is
a danger of injury from electric shock!
• Do not insert any objects through the slots and openings of the
monitor. This may lead to an electrical short-circuit or even fire
resulting in damage to your LCD display.
• Slots and openings in the LCD display are for venti-
lation purpose. Do not cover these openings, as
this may lead to overheating.
• Do not allow children to play unattended with electrical
equipment. Children may not always correctly recognize
danger.
• This LCD display is intended for personal use only. It not in-
tended for commercial use in a heavy industry environ-
ment.
• An injury hazard exists when the display breaks. Wear pro-
tective gloves to pack the broken parts and send them into
your service center for proper disposal. Then wash your hands
with soap, because it is possible for chemicals to escape.
• Never exert pressure on the display. This could break the monitor.
• Do not touch the display with your fingers or with sharp objects
to avoid damage.
S
SSAAFFEETTYY AANNDD PPRREECCAAUUTTIIOONNS
1
Page 6

Contact the Call Center immediately in any of the following situations. Do NOT plug in or turn on your display:
♦ if the power cable/power supply overheats or is damaged
♦ if liquid has gotten into the monitor
♦ if the LCD display is dropped or the housing damaged
REPAIR
• Leave all repairs of your LCD display to authorized and
qualified personnel only.
• Should a repair be necessary, please contact one of our author-
ized service partners only.
NOTES FOR SERVICE ENGINEERS
• Before opening the housing, disconnect the product from all
power sources and remove any connecting cables. If the dis-
play has not been disconnected from the power outlet before being
opened, there is a danger to life through electric shock. There is
also a risk of damage to the components.
• Internal components of the LCD display may be damaged by electrostatic discharge (ESD). Carry out repairs in an ESD-protected
workshop. If no such workshop is available, wear an antistatic
wrist strap or touch a highly conductive metal object. We can re-
pair damage sustained by inappropriate handling for a fee.
• Use only original spare parts.
2
E
E
NNGGLLIISSH
H
Page 7

POINT OF USE
• Keep your LCD display and all units connected to it away from
moisture and avoid dust, heat and direct sunlight. Failure
to observe these instructions can lead to malfunctions or damage to the LCD display.
• Place and operate all units on a stable, level and vibra-
tion-free surface in order to avoid the LCD display from
falling.
ENVIRONMENTAL CONDITIONS
• The LCD display can be operated most reliably at ambient tem-
peratures between +41°F and +95°F (5° C to 35° C) and at a
relative humidity between 20% and 85% (without condensation).
• When switched off, the monitor can be stored most reliably be-
tween -4°F and +140°F (-20° C - +60° C), up to the maximum height of 39,000 ft (12,000 m) above sea level at a relative humidity between 10% and 85% (without condensation).
• After transporting your LCD display please wait until it has
assumed the ambient temperature before connecting and
switching it on. Extremely high variations in the temperature
or humidity may result in condensation forming on the inside of the LCD display which could cause an electrical
short-circuit.
English Deutsch Nederlands Français Dansk Italiano Español Svenska
S
SSAAFFEETTYY AANNDD PPRREECCAAUUTTIIOONNS
3
Page 8

CONNECTING
Observe the following instructions to connect your LCD display
properly:
POWER SUPPLY
• Do not open the power supply housing. An open
housing presents a lethal hazard from electrical
shock. There are no parts inside to be cleaned or ser-
• Operate your LCD display only with grounded outlets with AC 100-
240V~/ 50-60 Hz. If you are not sure about the power supply at
your location, check with your power company.
• Use only the power supply and power connection cable provided.
• For additional safety we recommend use of a surge protector to
protect your LCD display from damage resulting from voltage
surges or lightning.
• To remove the LCD display from the power supply, disconnect the
plug from the AC outlet.
• The power outlet must be in the vicinity of your LCD display and
within reach of the power cables. DO NOT stretch the power
cables tightly to reach a power outlet.
viced.
• You should arrange the LCD display cables in a manner that no
one can trip over or step on them.
• To avoid damage of cable do not place any objects or furniture
on the cable.
4
E
NNGGLLIISSH
E
H
Page 9

STANDARDS/ELECTRO-MAGNETIC COMPATIBILITY
Your display fulfils the requirements for electro-magnetic compatibility
and electrical safety specified in the following standards:
EN 55022, EN 55024, EN 60950, EN 61000-3-2, EN 61000-3-3
• When connecting ensure that Guidelines for Electro-Magnetic Com-
patibility (EMC) are observed.
• Provide a space of at least three feet from high-frequency and
magnetic sources of interference (television sets, loudspeakers,
mobile telephones, etc.) in order to avoid malfunctions.
ERGONOMICS
• This display complies with all relevant regulations such as DIN EN ISO
9241-3, DIN EN ISO 9241-7 and DIN EN ISO 9241-8.
• For ergonomic reasons we suggest not to use dark text with a blue back-
ground. This would cause bad readability and would increase eye strain.
• While working with display you should take breaks periodically to
avoid tension and fatigue.
• In order to protect your eyes and to create a pleasant working area you
should avoid glare, reflections and strong contrasts on the screen.
ELECTRICAL SAFETY
EN 60950
• The connection of devices is limited to equipment that complies with
EN60950 “Safety of information technology equipment” or EN60065
“Audio, video and similar electronic apparatus. Safety requirements”
Safety of information technology equipment.
English Deutsch Nederlands Français Dansk Italiano Español Svenska
TRANSPORT AND RECYCLING
• Keep the original packaging and use it to protect the LCD display dur-
ing transport or storage.
S
SSAAFFEETTYY AANNDD PPRREECCAAUUTTIIOONNS
5
Page 10

PRECAUTIONS
 Caution! There are no parts which can be ser-
viced or cleaned inside of the monitor housing.
You can increase the life of your LCD display by taking the following precautions:
• Before cleaning always disconnect the power line and all
connection cables.
• Do not use any solvents, caustic or gaseous cleaning
agents.
• Clean the display with a soft, lint-free cloth.
• Ensure that no water droplets remain on the screen. Water
can cause permanent discoloration.
• Do not expose the screen to bright sunlight or ultraviolet
radiation.
IMPORTANT ADDITIONAL SAFETY INSTRUCTIONS
When using any electronic equipment, basic safety precautions should
always be taken. Following the guidelines below can reduce the risk of
fire, electric shock and injury to person:
• Do not use this product near water (e.g., near a bathtub, wash
bowl, kitchen sink or laundry tub, in a wet basement or near a
swimming pool).
• Avoid using a telephone/modem (other than a cordless type) during an electrical storm. There may be a remote risk of electric
shock from lightning.
• Do not use the telephone/modem to report a gas leak in the vicinity of the leak.
• Use only the power cord indicated in this manual. Do not dispose
of batteries in a fire. They may explode. Check with local codes
for possible special disposal instructions.
•
Keep batteries away from children at all times.
6
E
E
NNGGLLIISSH
H
Page 11

English Deutsch Nederlands Français Dansk Italiano Español Svenska
.
I
NNTTRROODDUUCCTTIIOONN
22.
I
Thank you for purchasing our LCD Multi-display. We thank you for
your confidence in our products and are pleased to greet you as a
new customer.
We focused on great features, ease of use and reliability in manufacturing your LCD display.
SERVICE
Your display comes with a one-year limited warranty and toll-free
customer support. Please see the limited warranty card included
with your display for details.
This manual contains a separate chapter on the subject of Troubleshooting on page 41.
PERFORMANCE CHARACTERISTICS
Advantages in relation to CRT (cathode ray tube) displays:
¾ Less space required
¾ Lower weight
¾ Power savings
High image quality
¾ WXGA standard: resolution up to 1280 x 768
S
SSAAFFEETTYY AANNDD PPRREECCAAUUTTIIOONNS
7
Page 12

Further features
¾ The LCD display is a plug and play device which is automati-
cally recognized by your operating system.
¾ The power management fulfills the VESA DPMS standard. Dur-
ing idle times (OFF mode) the power consumption is automatically reduced by up to 95%.
¾ The terminals include Tuner receiving terminal, PC Input,
SCART (Video & RGB), Video, S-Video and Component (YCbCr
/ YPbPr) Input.
¾ Rotate and tilt features for optimizing the viewing position.
¾ Easy-to-use remote control.
¾ Easy-to-use on-screen menu system
¾ PIP, picture in picture, double screen: PC display(Main) and
Video display (Sub) on the same screen.
¾ Normal, Panscan, Zoom and Full screen format available by
pressing ARC button.
¾ Headphone socket for private listening.
¾ Built-in dual channel speakers.
¾ A built-in NICAM/IGR sound decoder for stereo and bilingual
listening.
¾ Automatic programming system (A.P.S.) .
¾ A sleep timer.
¾ Child lock function.
¾ Full function Teletext.
8
E
NNGGLLIISSH
E
H
Page 13
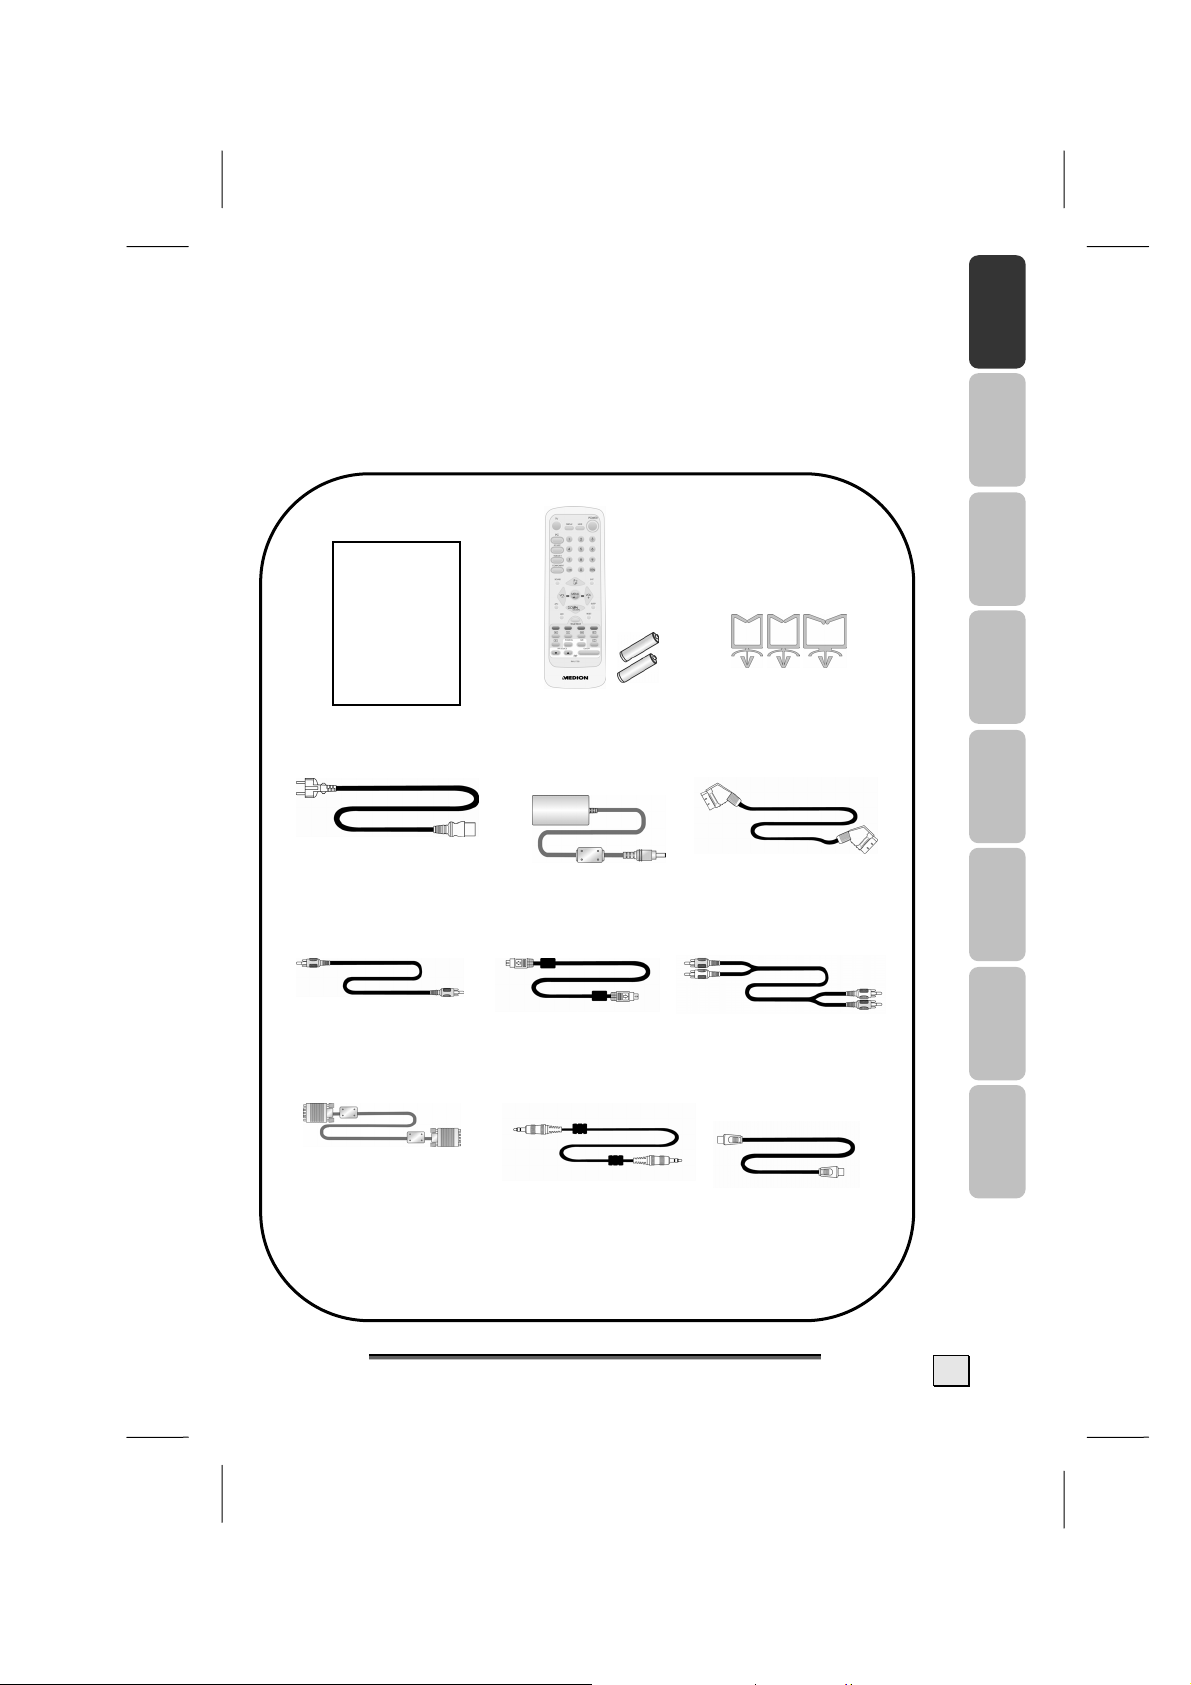
ENCLUDED EQUIPMENT
Please make sure the following items are included with your LCD
Display. Notify us within 14 days after purchase if it is not
complete. With you LCD Display you receive:
User’s Manual
AC Cord
Remote Control &
Betteries(AAA X2)
AC Adapter
Cable Clamp
(One big, two small)
Scart Cable
English Deutsch Nederlands Français Dansk Italiano Español Svenska
Video Cable S-Video Cable
15 Pin D-sub
Signal Cable
SSAAFFEETTYY AANNDD PPRREECCAAUUTTIIOONNS
PC audio Cable
Audio Cable
Antenna Cable
S
9
Page 14
33.
.
C
OONNNNEECCTTIINNGG
C
E
XXTTEERRNNAALL
E
D
EEVVIICCEESS
D
10
E
E
NNGGLLIISSH
H
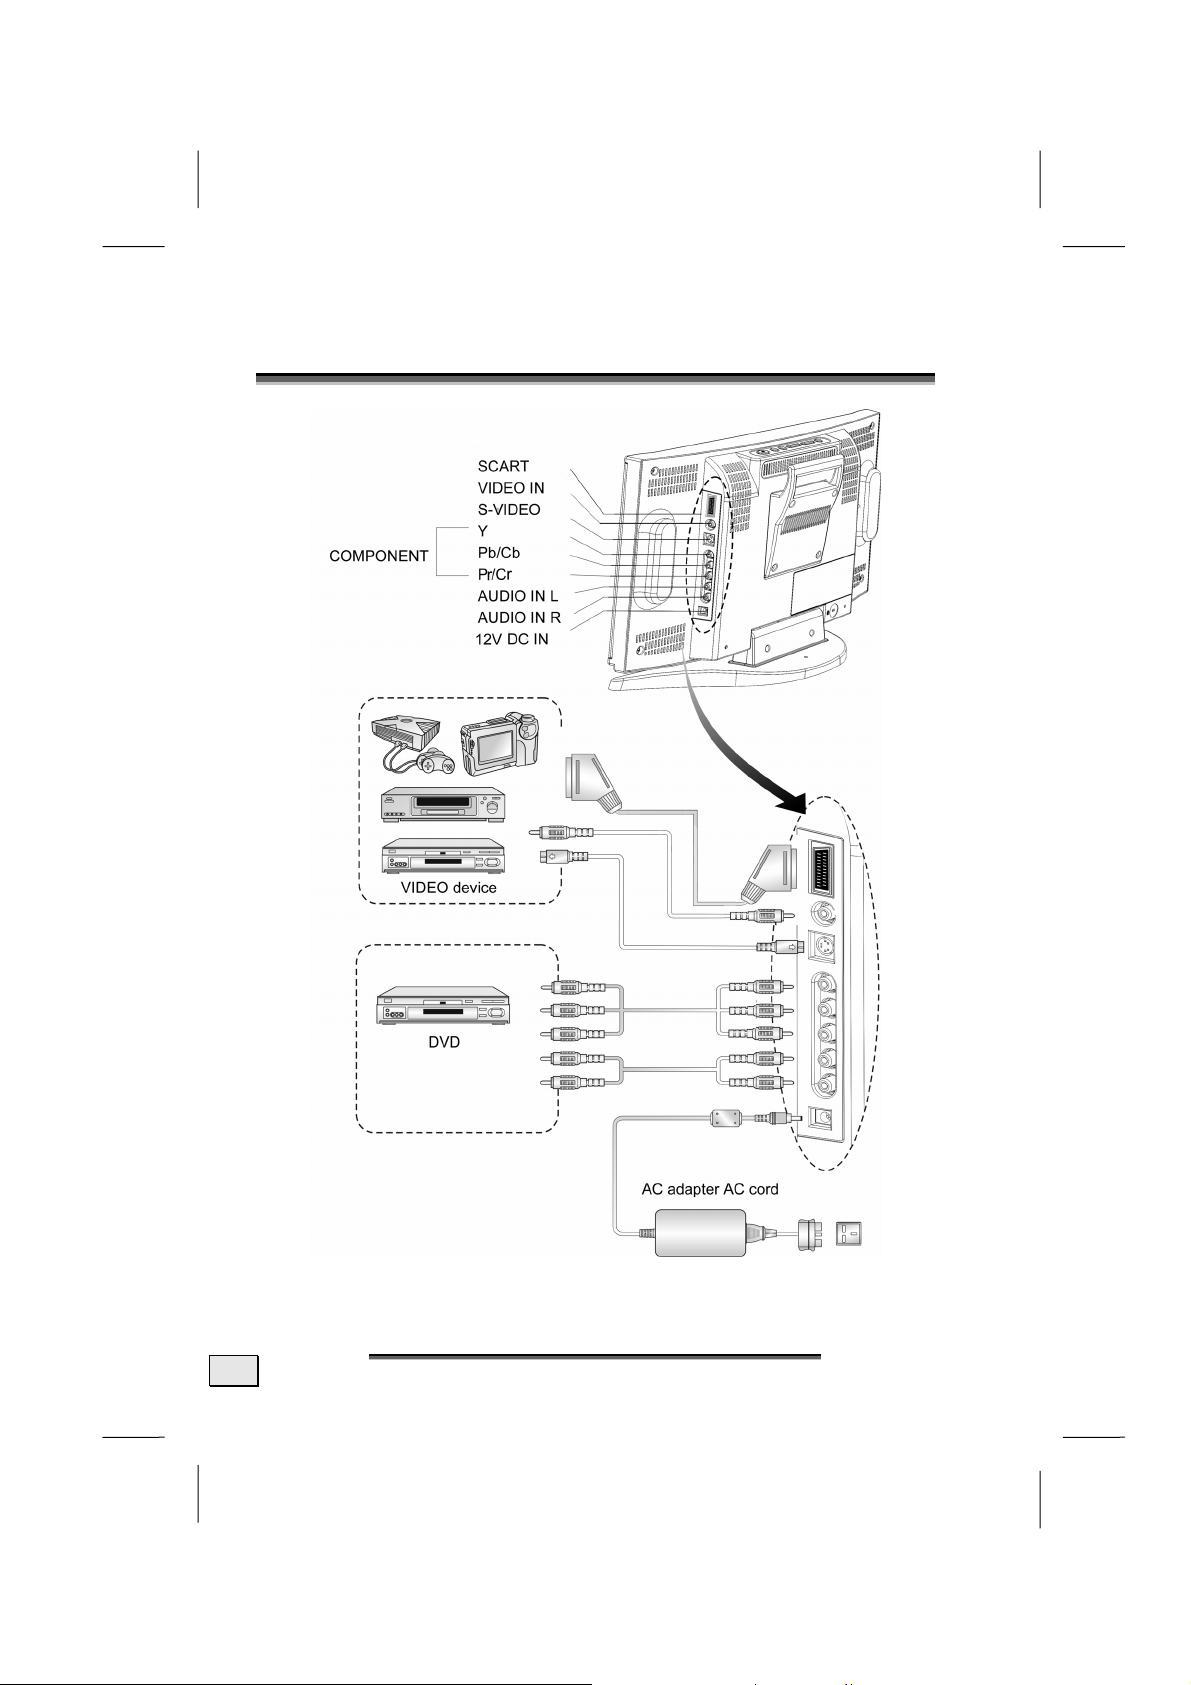
Page 15
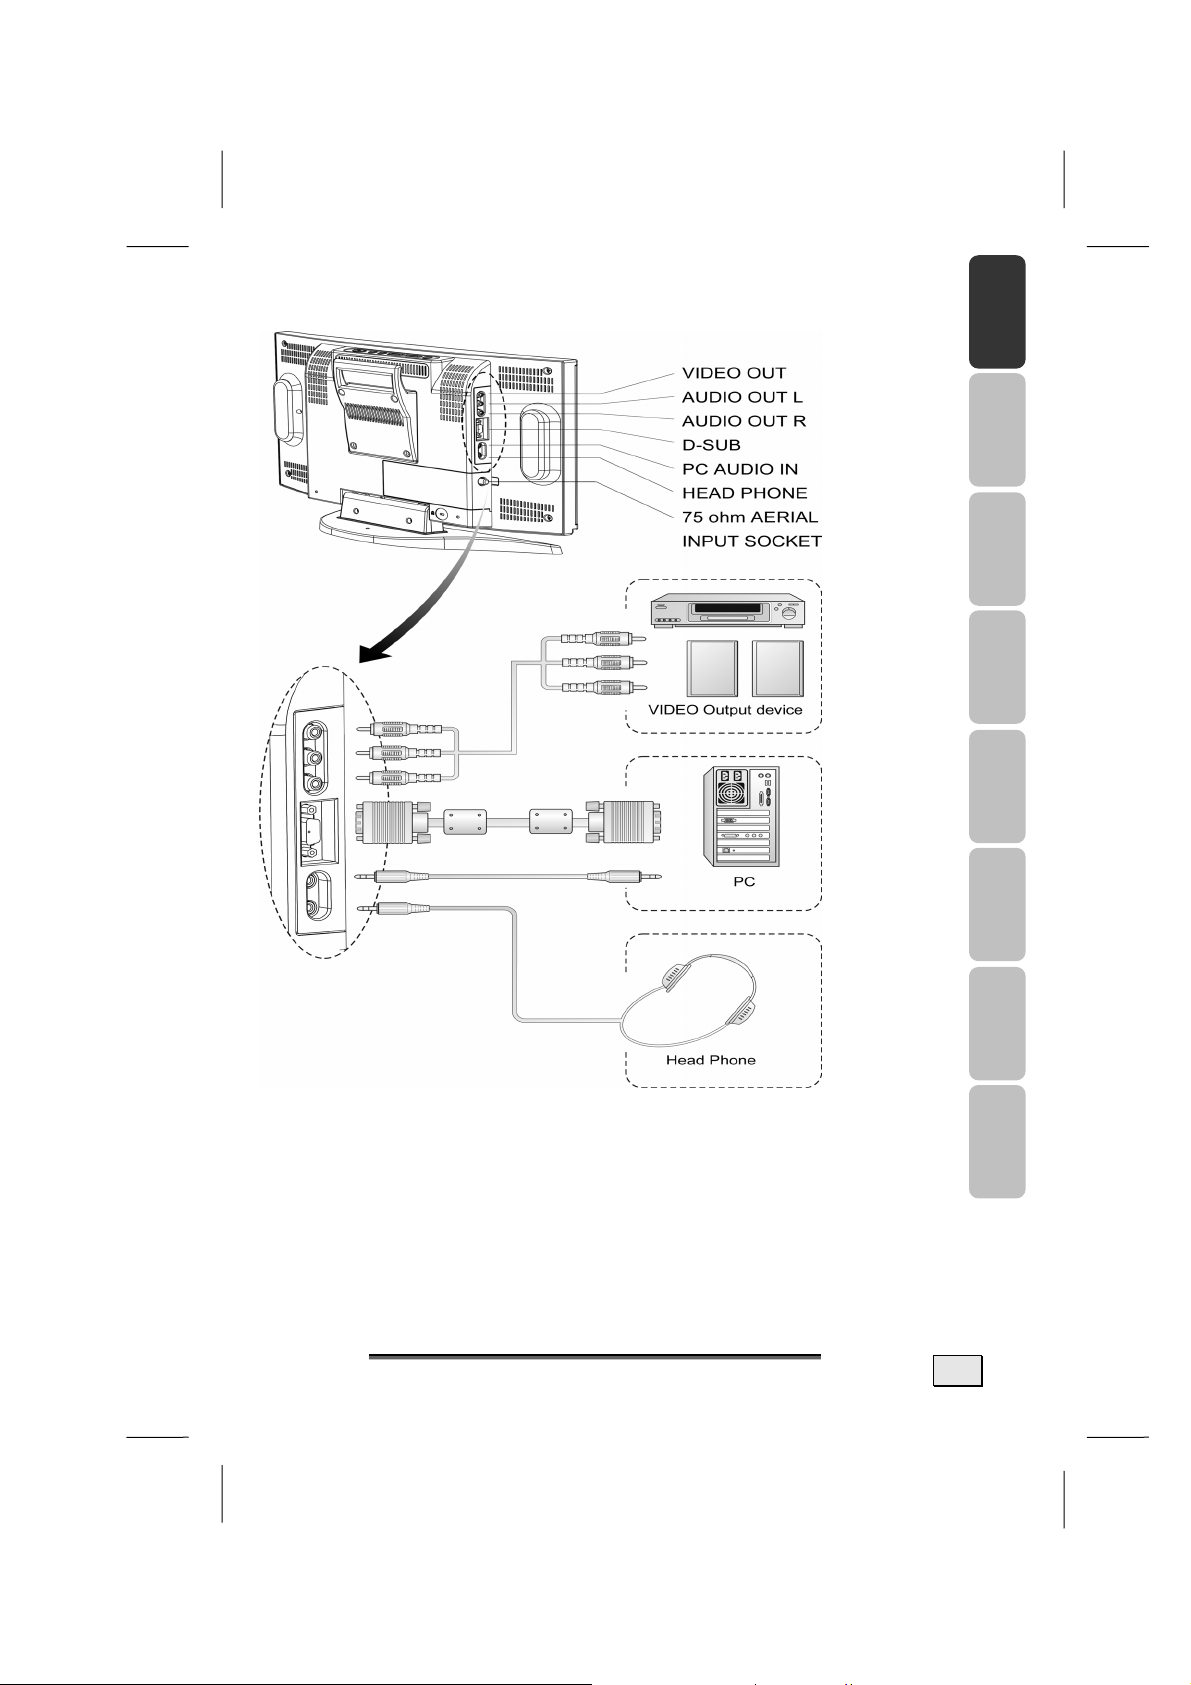
(TV only)
(PC Input)
Note:
Audio out L/R:The level of audio output cannot be changed using the volume,
VCR Recording:The main display must set to TV mode in order to use the audio
PIP sound :When using the PIP feature in PC mode, to hear the Sub display
treble, and bass controls on your display. This connector should
be used with an external audio amplifier that can be used to
control the volume.
and video output to record a programme using a VCR.
sound you must set the sound to “sub“?
English Deutsch Nederlands Français Dansk Italiano Español Svenska
S
SSAAFFEETTYY AANNDD PPRREECCAAUUTTIIOONNS
11
Page 16

r
.
C
44.
These buttons control your display’s basic features, including the
on-screen menu.To use the more advanced features, you must
use the remote control.
POWER : turn on or turn off the LCD display.
SOURCE : select input source (PC, TV, SCART Video/
SCART RGB, Video, S-Video, Component).
MENU : display the main menu.
CHANNEL (down/up) : change channels.
VOLUME (-/+) : turn up or turn down the volume.
ASPECT RATIO : set up the display (Normal, Panscan, Zoom or Full.)
ASPECT RATIO VOLUME( -/+ ) CHANNEL(down/up) MENU SOURCE POWER
OONNTTRROOLLSS AANNDD LLOOCCAATTIIOON
C
Speaker
Remote sensor window
Aim the remote control towards this region on the LCD
display.
Power indicato
A green indicator lights when the power is
on and a red indicator lights when in the
standby mode (the indicator will not light
when the main power is off).
N
Speaker
12
E
NNGGLLIISSH
E
H
Page 17

.
R
55.
The remote control pad works almost same as ordinary TV remote
control that includes the basic function needed while viewing a
live video.
EEMMOOTTEE
R
DISPLAY: Display the current source or programme digits.
C
OONNTTRROOLL
C
English Deutsch Nederlands Français Dansk Italiano Español Svenska
S
SSAAFFEETTYY AANNDD PPRREECCAAUUTTIIOONNS
13
Page 18

SUMMARY OF CONTROL BUTTONS
Selecting the Signal Source
TV
PC
SCART
VIDEO/S-V
COMPONENT
DISPLAY
Menu Setting
MENU/ENTER
UP/DOWN
VOL- / VOL+
EXIT
Changing Channels
P- / P+
0 ~ 9
DISPLAY
RTN
Sound Control
VOL+ / VOL-
MUTE
SOUND
Teletext Control
TELETEXT
INDEX
HOLD
UPDATE
14
Switch to the TV mode.
Switch to the PC mode.
Switch to the Video mode or RGB mode from SCART.
Switch to the Video mode from RCA socket or S-Video mode.
Switch to the Component mode (YPbPr or YCbCr).
Display the current source.
Display the main on-screen menu or enter the next menu.
Press to select the item you want to adjust in the OSD menu.
Press to decrease or increase the value in the OSD control bar.
Exit from the menu.
Press P- or P+ to change Programmes in TV mode or Teletext page in
TELETEXT mode.
To select programmes directly in TV mode.
Display the current programme digits.
Press to return to the previous programme.
Press to turn up or turn down the volume.
Press to switch the sound on or off.
Press to choose Stereo, Bilingual and Monaural broadcasts.
Press to show the Teletext Service. Press again to return to TV Viewing.
Press “ INDEX“ button to show the list of teletext contents.
Press “ HOLD“ button to stop the automatic page change.
Press “ UPDATE“ button to switch to TV while waiting for the next text page.
E
NNGGLLIISSH
E
H
Page 19

MENU
RTN
PIP Control g
ON / OFF
PIP Source
SIZE
POSITION
REVEAL
EXPAND
SUB-PAGE/TIME
Press “REVEAL“ button to display concealed information, such as
solutions of riddles or a quiz.
Press “EXPAND“ button to enlarge the top half or bottom half of the
Teletext page.
Press “SUB-PAGE/TIME“ button to access to the sub-page you
required.
Press to display the Teletext subtitles directly in TELETEXT mode.
(Subtitle available or not depends on broadcast.)
Press to return to the previous viewed Teletext page.
Press to watch one of the video sources on Sub-display, whilst in
PC mode. Press again to turn off the Sub-display.
Press to select the PIP window input source as :
Press ▲ button : TV→ SCART Video→ SCART RGB→ Video→
S-Video→ Component
Press ▼ button : Component→ S-Video → Video→ SCART RGB
→ SCART Video→ TV
To make the PIP window double, large or small.
NOTE: When you set Main-display at 1280x768/1024x768 resolution of PC mode and Sub-display
YPbPr, the screen will appear “Not Available“ You should reduce the PC resolution to 800 X
600 or 640 X 480. The PIP function will then work.
Other Function
RESET
ARC
APC
SLEEP
SUB-PAGE/TIME
Reset to the original factory settings, such as the Luminance/Contrast/
Color Temp.
Set the picture window to Normal(4:3) → Panscan→ Zoom→ Full
(16:9)
To select Clear,Dark, Nomal mode for picture control.
Press to select a preset time interval for automatic power off .
Press “Sub-Page/Time“ To display the digital clock in TV mode.
English Deutsch Nederlands Français Dansk Italiano Español Svenska
S
SSAAFFEETTYY AANNDD PPRREECCAAUUTTIIOONNS
15
Page 20

.
66.
AA..PP..SS.
1. After removing the LCD display packaging, ensure the product
is installed in a safe and well ventilated position.
2. Insert two AAA type batteries into battery compartment on the
rear of the remote control.
3. Make sure the 75 ohm external aerial and AC cord are properly
connected.
4. Press the POWER button to switch the set on.
5. The Automatic Search menu will appear when switching on the
TV first time.
6. Select Country with UP/DOWN button, then press MENU button to select the country you are now located.
7. Select Language with UP/DOWN button, then press MENU
button. Select a menu language with UP/DOWN button, press
MENU button, and the selected language will be highlighted.
Select EXIT to return to the previous screen.
8. Select Start with UP/DOWN button, then press MENU button
to start APS.The APS(Automatic Programming System) menu
will appear on the screen.
.
F
IIRRSSTT
F
T
T
Automatic Search
Country
Language
Start
Exit
IIMMEE
I
NNSSTTAALLLLAATTIIOON
I
N
*To cancel APS,press the EXIT button.
9. After APS is finalised, the Programme List will appear on the
screen. You can rename, delect, insert programmes within the
Programme List.(For details, see ”Programme List Settings”.)
10.Use the number buttons to directly access the programme. For
example, to select programme 27, press ”2” then “7” .The TV
will change programme when you press the second number.You
can also press
grammes.
16
APS RUNNING PLEASE WAIT
P-/P+ button on remote control to change pro-
E
E
NNGGLLIISSH
H
Page 21

77.
.
G
EENNEERRAALL
G
C
OONNTTRROOLLSS
C
&
A
DDJJUUSSTTMMEENNT
&
A
T
TURNING THE LCD DISPLAY ON AND OFF
Press the POWER button on the Remote Control. You can
also use the POWER button on the top of the panel.
Notice: To turn the unit on, the POWER button must be
held down at least 0.5 seconds before it is released. This is
to prevent the unit from being turned on accidentally.
VIEWING THE MENUS AND ON-SCREEN DISPLAYS
1. With the power on, press the MENU button. The main menu
appears on the screen.
Main Menu Screen
English Deutsch Nederlands Français Dansk Italiano Español Svenska
2. Use the UP/DOWN button to select one of the menu options,
and then press the MENU button to access to the Sub-menu.
3. Press the MENU button to return to the previous screen or
press the EXIT button to exit from the menu.
Note: The menu varies with which input source is selected.
Main Display
Sub Display
Contrast/Brightness
Auto Image Adjust
Image
Colour
Menu Setup
Audio
PIP Setup
Reset
Exit
SSAAFFEETTYY AANNDD PPRREECCAAUUTTIIOONNS
S
17
Page 22

SWITCHING BETWEEN TV/PC/AV
1. Turn on the power of the connected video equipment.
2. Press the applicable button.
z Press TV button to switch to TV mode.
z Press PC button to switch to PC mode.
z Press SCART button once to switch to SCART Video mode
(Composite Signal Input via SCART).
z Press SCART button again to switch to SCART RGB mode
(RGB Signal Input via SCART).
z Press VIDEO/S-V button once to switch to Video mode
(Composite Signal Input Via RCA Socket).
z Press VIDEO/S-V button again to switch to S-Video mode.
z Press COMPONENT button to switch to YCbCr or YPbPr.
VOLUME CONTROL
Using Volume Control
Press VOL-/ VOL+ button to turn up or turn down the sound volume.
Using Mute
At any time, you can temporarily turn off the sound by pressing
the MUTE button.
1. Press the MUTE button and the sound cuts off.
2. Press the MUTE again or VOL- / VOL+ button to turn the
sound back to the previous level.
Note: The mute function is automatically turned off if VOL- / VOL+ is
pressed .
18
E
NNGGLLIISSH
E
H
Page 23

MENU ITEMS
1. Press the MENU button to display the main menu screen.
2. Press UP/DOWN button to select the desired menu item.
3. Press VOL- / VOL+ to make adjustments.
4. Press the MENU button to return to the previous screen or
press the EXIT button to exit.
MMaaiinn MMeennuu SSccrreeeenn
Main Display
Sub Display
Contrast/Brightness
Auto Image Adjust
Image
Colour
Menu Setup
Audio
PIP Setup
Reset
Exit
SETTING THE SLEEP TIMER
English Deutsch Nederlands Français Dansk Italiano Español Svenska
You can set the Sleep Timer to automatically turn off the TV view
of LCD display.
1. Press the SLEEP button to display the Sleep Timer screen.
2. Press the SLEEP button repeatedly to change the sleep time
(in minutes).
The time can be set to 30 minutes , 60 minutes or 90 minutes.
30 min → 60 min → 90 min → off
Note : The Sleep Timer screen automatically disappears in 3 se-
conds.
S
SSAAFFEETTYY AANNDD PPRREECCAAUUTTIIOONNS
19
Page 24

CONTRAST AND BRIGHTNESS SETTINGS
You may need to perform separate adjustments for brightness
and contrast for the different video modes. Typically, PC mode
will be best viewed with lower brightness and contrast settings
than are appropriate for the other modes.
1. Press the MENU button to display the main menu .
2. Press the UP/DOWN button to move cursor to Contrast /
Brightness.
3. Press the MENU button to enter Contrast / Brightness.
4. Press the VOL- / VOL+ button to set the Brightness or Contrast.
5. Press the MENU button to return to the previous screen or
press the EXIT button to exit.
MMaaiinn MMeennuu SSccrreeeenn
Main Display
Sub Display
Contrast/Brightness
Auto Image Adjust
Image
Colour
Menu Setup
Audio
PIP Setup
Reset
Exit
CCoonnttrraasstt // BBrriigghhttnneessss
Brightness
Contrast
Exit
CCoonnttrraasstt
00 110000
CCoonnttrraasstt // BBrriigghhttnneessss
Brightness
Contrast
Exit
BBrriigghhttnneessss
20
--5500 5500
E
E
NNGGLLIISSH
H
Page 25

SETUP MENU SETTINGS
1. Press the MENU button to display the main menu screen.
2. Press the UP/DOWN button to move the cusor to Menu Setup.
3. Press the MENU button to enter Setup Menu.
4. This adjusts the blue background of the menu screens.
5. Decrease or increase the transparence of Menu.
6. Press the MENU button to return to the previous screen
or press the EXIT button to exit.
MMaaiinn MMeennuu SSccrreeeen
Main Display
Sub Display
Contrast/Brightness
Auto Image Adjust
Image
Colour
Menu Setup
Audio
PIP Setup
Reset
Exit
Transparence
Exit
MMeennuu SSeettuupp
TTrraannssppaarreenncceeee
00 1155
SSAAFFEETTYY AANNDD PPRREECCAAUUTTIIOONNS
n
S
English Deutsch Nederlands Français Dansk Italiano Español Svenska
21
Page 26

AUDIO MENU SETTINGS
1. Press the MENU button to display the main menu screen.
2. Press the UP/DOWN button to move the cusor to Audio Menu.
3. Press the MENU button to enter Audio Menu.
4. Press the UP/DOWN button to select the desired item
(Bass, Treble or Sound Source).
5. Press the MENU button to enter the desired item
(Bass, Treble or Sound Source).
6. Press the MENU button to return to the previous screen or
press the EXIT button to exit.
n
Note:
When using the PIP feature in PC
mode, you can listen to the sound of
the sub screen instead of the main
screen. To do so:
1.Select “Audio“
2.Select “Sound Source“
3.Select “Sub“
Then adjust the volume of the Subdisplay using VOL+ / VOL-.
Main Display
Sub Display
Contrast/Brightness
Auto Image Adjust
Image
Colour
Menu Setup
Audio
PIP Setup
Reset
Exit
Bass
Treble
Sound Source
Exit
--55 ++55
--55 ++55
Bass
Treble
Sound Source
Exit
Main
Sub
Exit
MMaaiinn MMeennuu SSccrreeeen
AAuuddiioo
BBaassss
TTrreebbllee
AAuuddiioo
SSoouunndd SSoouurrccee
22
E
E
NNGGLLIISSH
H
Page 27

88.
.
TTV
V
MMOODDEE
A
DDJJUUSSTTMMEENNT
A
T
ALTERING THE TV SETTINGS
1. Use the remote control TV button to set the input source to
"TV" mode.
2. Press the MENU button to display the main menu screen.
3. Press the UP/DOWN button to select Programmes.
4. Press the MENU button to enter.
5. Press the UP/DOWN button to the desired item.
6. Press the MENU button to set the desired item.
7. Select EXIT to return to the main menu screen or press the
EXIT button to exit.
n
MMaaiinn MMeennuu SSccrreeeen
English Deutsch Nederlands Français Dansk Italiano Español Svenska
Main Display
Contrast/Brightness
Colour/Sharpness
Menu Setup
Audio
Programmes
Child Lock
Reset
Exit
PPrrooggrraammmmeess
Automatic Search
Manual Search
Programme List
Exit
SSAAFFEETTYY AANNDD PPRREECCAAUUTTIIOONNS
S
23
Page 28

AUTOMATIC SEARCH PROGRAMMES
1. Press the MENU button to display the main menu screen.
2. Press the UP/DOWN button to select Programmes and press
MENU button.
3. Select Country you are now located and the menu language,
and then press Start.
*To cancel APS,press the EXIT button.
(For details, please see “A.P.S. First Time Installation” on page 16)
4. After APS is finalised, the Programme List will appear on the
screen.
5. You can rename, delect or insert programmes within the Pro-
gramme List.(For detail, please see “Programme List Settings”
on page 26)
6. Select EXIT to return to the main menu screen or press EXIT
button to exit.
APS RUNNING PLEASE WAIT
n
MMaaiinn MMeennuu SSccrreeeen
24
Main Display
Contrast/Brightness
Colour/Sharpness
Menu Setup
Audio
Programmes
Child Lock
Reset
Exit
PPrrooggrraammmmeess
Automatic Search
Manual Search
Programme List
Exit
AAuuttoommaattiicc SSeeaarrcchh
country
Language
Start
Exit
E
E
NNGGLLIISSH
H
Page 29

MANUAL SEARCH PROGRAMMES
To programme a channel in a TV’s programme number manually :
1. Press MENU button to display the main menu.
2. Press UP / DOWN button to select Programmes , and then press
MENU button .
3. Press UP / DOWN button to select Manual Search , and then press
MENU button .
4. Press UP / DOWN button to select Programme , and then press VOL-
/ VOL+ button to select the programme number where you want the
tuned channel to be stored .
5. Press UP / DOWN button to select System , and then press VOL-/
VOL+ button to set to B/G, D/K, I or L/L’ .
6. Press UP / DOWN button to select Search , and then press VOL- /
VOL+ button .
z Press VOL+ button to search forwards. If the found programme
isn’t the desired one, press VOL+ button again to search next available programme .
z Press VOL - button to search backwards. If the found programme isn’t
the desired one , press VOL- button again to search previous available programme .
z To stop searching before a channel is found , press the reverse direc-
tion button . For
example , when the TV is searching forward with VOL+ button , press
VOL- button to stop searching.
7. Press UP / DOWN button to select Store , and then press MENU but-
ton to store the searched channel to the programme number you set .
8. Press EXIT to exit from the menu.
PPrrooggrraammmmeess
Automatic Search
Manual Search
Programme List
Exit
MMaannuuaall SSeeaarrcchh
Programme 02
System B/G, D/K, I
Search
Store
Exit
English Deutsch Nederlands Français Dansk Italiano Español Svenska
S
SSAAFFEETTYY AANNDD PPRREECCAAUUTTIIOONNS
25
Page 30

PROGRAMME LIST SETTINGS
Programme List is used to display the Programme numbers and
names . You can use this list to Rename / Edit name , Delete , or
Insert programmes .
1. Press MENU button to display the main menu.
2. Press UP / DOWN button to select Programmes , and then
press MENU button .
3. Press UP / DOWN button to select Programme List , and then
press MENU button . All the programme names of the tuned
channels will be shown by the yellow colour .
4. Press P+ / P- / VOL- / VOL+ button to select programme .
The selected Programme number will be shown by the Green
colour .
Automatic Search
Manual Search
Programme List
Exit
PPrrooggrraammmmeess
1. ARD--
2. ZDF--
3. RTL--
4. RTL2-
5. SAT1-
6. -----
7. -----
8. -----
9. -----
10. -----
Name Delete
Insert
PPrrooggrraammmmee LLiisstt
11. -----
12. -----
13. -----
14. -----
15. -----
16. -----
17. -----
18. -----
19. -----
20. -----
26
E
E
NNGGLLIISSH
H
Page 31

CHANGE OR EDIT NAMES
1. Move to the programme number you want to rename or edit name by
pressing P+ / P- / VOL- / VOL+ button.
2. Press RED button .
3. Press P+ / P- button repeatedly to select a letter , and then press
VOL- / VOL+ button to select the position .(Each programme name
could be edited with 5 characters )
4. Press RED button again to Store.
Store P+
V- V+
P-
DELETE THE PROGRAMME
1. Move to the programme number you want to delete by pressing P+ /
P- / VOL- / VOL+ button. The selected programme number will be
shown by the Green colour.
2. Press GREEN button. The corresponding channel will be deleted and
all the other channels below this programme number will be moved
one programme number up.
3. Press GREEN button again to Store.
English Deutsch Nederlands Français Dansk Italiano Español Svenska
Store P+
V- V+
P-
INSERT THE PROGRAMME
1. Move to the programme to be inserted by pressing P+ / P- / VOL- /
VOL+ button. The selected programme number will be shown by the
Green colour .
2. Press YELLOW button .
3. Press P+ / P- / VOL- / VOL+ button to move the selected programme to the desired programme number.
4. Press YELLOW button again to move off.
Move off P+
SSAAFFEETTYY AANNDD PPRREECCAAUUTTIIOONNS
V- V+
P-
S
27
Page 32

SETTING THE CHILD LOCK
The CHILD LOCK feature automatically locks out the programme
that you selected.
SETTING UP YOUR PERSONAL ID NUMBER (PIN)
1. Press the MENU button to display the main menu .
2. Press the UP/DOWN button to move the cursor to Child Lock,
and then press the MENU button.
3. The ”Please Enter Pin” screen will appear. At first time, you
must enter 1111 (initial code).
4. Select Channel Lock.
5. Press MENU button. “on” will appear on the right side and the
current programme will be locked
6. Press MENU button again. ”off” will appear on the right side
and the current programme will be unlocked.
7. Select Change Pin, if you want to change the Pin. As soon as
the 4-digits are entered, the “Confirm new Pin” screen appears.
Re-enter the same 4-digits. When the Confirm screen disappears, your PIN has been memorized. Press the EXIT button to
exit.
n
MMaaiinn MMeennuu SSccrreeeen
28
Main Display
Contrast/Brightness
Colour/Sharpness
Menu Setup
Audio
Programmes
Child Lock
Reset
Exit
Please Enter Pin
- - - -
Channel Lock On
Change Pin
Exit
E
E
NNGGLLIISSH
H
Page 33

NICAM/IGR BROADCAST SELECTION
Depending on the particular programme being broadcast, you can
press the SOUND button to listen to stereo, bilingual or monaural.
1. Press the SOUND button directly to display the three states on
the top right of the screen.
2. Press the SOUND button repeatedly to select the following
states.
English Deutsch Nederlands Français Dansk Italiano Español Svenska
STEREO BROADCAST
● Each time you press SOUND, the mode changes between “Ste-
reo” and “Mono”.
● When”Mono” is selected, the TV sound is output monaurally.
-In stereo reception, if the stereo signal is weak, you can switch
to “Mono”.
BILINGUAL BROADCAST
● Each time you press SOUND, the mode changes as follows:
A → B → A/B → Mono
-A sends the primary broadcast language to the loudspeakers.
-B sends the secondary broadcast language to the loudspeakers.
-A/B sends a seperate language to each loudspeaker.
MONAURAL BROADCAST (FOR NICAM BROADCASTS)
● Each time you press SOUND the mode changes between “Ni-
cam” and “Mono”.
COLOUR/SHARPNESS SETTINGS
1. Press the MENU button to display the main menu screen.
2. Press the UP/DOWN button to move the cusor to Co-
lour/Sharpness.
3. Press the MENU button to enter.
4. Press the UP/DOWN button to the desired item (Colour Satu-
ration or Sharpness).
S
SSAAFFEETTYY AANNDD PPRREECCAAUUTTIIOONNS
29
Page 34

5. Press the MENU button to set the desired item (Colour Satura-
tion or Sharpness).
6. Select EXIT to return to the main menu screen.
n
MMaaiinn MMeennuu SSccrreeeen
Main Display
Contrast/Brightmess
Colour/Sharpness
Menu Setup
Audio
programmes
Child Lock
Reset
Colour Saturation
Sharpness
Exit
CCoolloouurr//SShhaarrppnneessss
00 110000
CCoolloouurr SSaattuurraattiioonn
SShhaarrppnneessss
--55 ++55
30
E
E
NNGGLLIISSH
H
Page 35

English Deutsch Nederlands Français Dansk Italiano Español Svenska
.
T
99.
Teletext is a free service broadcast by most TV stations which
gives up-to-the-minute information news, weather, television
programmes, share prices, subtitles, and many other topics .
Note : No OSD adjustment apart from volume control will be
In teletext mode, NUMBER buttons, MENU, P+/P- and
EELLEETTEEXXT
T
available in teletext mode .
RTN buttons are used for Teletext function.
T
TO OPERATE TELETEXT
* Select a TV station on which Teletext is being transmitted .
* Press the TELETEXT button once to appear the teletext screen
-Two page numbers, TV station name, date, and time are displayed on
the screen headline. The first page number indicates your selection ,
while the second shows the current page displayed.
* Press the TELETEXT button again to switch off teletext . The previous
programme reappears.
TELETEXT PAGE SELECTION
1. Enter the required Teletext page as a three digit numbers.
-The selected page number is displayed at the top left corner of the
screen. The Teletext page counter searches until the selected page
number is located , so that the desired page is displayed on the
screen.
2. The P+ / P- button can be used to select the preceding or following
page .
3. Fastext movement by the 4 coloured buttons .
-Four subject-heading pages can be selected quickly by pressing the
corresponding coloured button Red, Green, Yellow, or Blue on the
remote control handset.
S
SSAAFFEETTYY AANNDD PPRREECCAAUUTTIIOONNS
31
Page 36

TO OPERATE SUBTITLE
(SUBTITLE AVAILABLE OR NOT DEPENDS ON BROADCAST)
1. Select a required TV programme.
2. Press the TELETEXT button.
3. Press the MENU button to display subtitle directly.
USEFUL FEATURES FOR TELETEXT
INDEX
* Press this button to select the index page that displays the list of tele-
text contents .
HOLD
The teletext page you have selected may contain more information than
what is on the screen ; the rest of the information will be displayed after
a period of time on a sub-page.
* Press HOLD button to stop the automatic page change.
-The HOLD symbol will be displayed at the top left-hand corner on the
screen and the automatic page change will be stopped.
* Press HOLD button again to continue.
UPDATE
In the Teletext mode, pressing UPDATE button will switch the screen to
the TV mode while waiting for the next text page.
* Select required page number in Teletext mode.
* Press UPDATE button to switch to TV mode while waiting for the text
page. A small blue box in which “---“ shows appears on the upper left
corner .
* When the required text page is found, the required page number ap-
pears in the blue box.
* Press UPDATE button again to revert to Teletext mode.
REVEAL
* Press this button once to display concealed information, such as soluti-
ons of riddles, puzzles, or a quiz.
* Press this button again to conceal the revealed answers.
32
E
NNGGLLIISSH
E
H
Page 37

EXPAND
Select double height text.
* Press this button to enlarge the top half of the page.
* Press this button again to enlarge the bottom half of the page.
* Press this button once more to return to the normal display.
SUB-PAGE / TIME
In Teletext mode , sub pages are subsections of long Teletext pages that
can only be displayed on the screen one section at a time .
* Select the required teletext page. (e.g. 524)
* Press SUB-PAGE button. “S****“will be display on the upper left cor-
ner.
* Select the required sub page number by pressing four digit buttons
(e.g. 0001).
-If the selected sub page is not displayed in a short time , press
UPDATE button . TV programme will be displayed on the screen.
* Teletext page number will be displayed on the upper left corner of the
screen when the selected page is found.
* Press SUB-PAGE button twice to return to normal page sequence.
In TV mode
* While watching a TV programme with Teletext transmission press TIME
button. The current time information will be displayed on the upper
right corner of the screen .
* The time information will disappear after pressing TIME button again .
, press this button to display the time .
English Deutsch Nederlands Français Dansk Italiano Español Svenska
S
SSAAFFEETTYY AANNDD PPRREECCAAUUTTIIOONNS
33
Page 38

.
C
1100.
Press the PC button to directly switch to PC mode. If PC input
timing isn’t the LCD TV’s preset timing (refer to page 44), press
Auto Image Adjust to optimize the image. If it still has Horizontal
interference on screen, adjust Fine Tune to correct the phase.
PPC
MMOODDEE
A
DDJJUUSSTTMMEENNT
A
T
IMAGE SETTINGS
1. Press the MENU button to display the main menu screen.
2. Press UP/DOWN button to move the cusor to Image.
3. Press the MENU button to enter Image adjust.
4. Press the UP/DOWN button to the desired item
(H. /V. Position, H. Phase, Fine Tune ).
5. Press the MENU button to set the desired item
(H. /V. Position, H. Phase,Fine Tune ).
6. Press the MENU button to return to the previous screen or
press the EXIT button to exit.
MMaaiinn MMeennuu SSccrreeeenn
34
Main Display
Sub Display
Contrast/Brightness
Auto Image Adjust
Image
Colour
Menu Setup
Audio
PIP Setup
Reset
Exit
E
NNGGLLIISSH
E
H
Page 39

H. /V. Position
H. Phase
Fine Tune
Exit
IImmaaggee
English Deutsch Nederlands Français Dansk Italiano Español Svenska
H. Position
V. Position
Exit
HH..//VV.. PPoossiittiioonn
HH.. PPoossiittiioonn
VV.. PPoossiittiioonn
MMAAXX
MMAAXX
H. /V. Position
H. Phase
Fine Tune
Exit
HH.. PPhhaassee
IImmaaggee
MMAAXX
IImmaaggee
H. /V. Position
H. Phase
Fine Tune
Exit
FFiinnee TTuunnee
MMAAXX
S
SSAAFFEETTYY AANNDD PPRREECCAAUUTTIIOONNS
35
Page 40

COLOUR SETTINGS
1. Press the MENU button to display the main menu screen.
2. Press the UP/DOWN button to move the cusor to Colour.
3. Press the MENU button to enter Colour.
4. Press the UP/DOWN button to the desired item (Cool, Neutral,
Warm,or User Colour).
5. Press the MENU button to set the desired item (Cool, Neutral,
Warm,or User Colour).
6. Press the MENU button to return to the previous screen or
press the EXIT button to exit.
MMaaiinn MMeennuu SSccrreeeenn
Main Display
Sub Display
Contrast/Brightness
Auto Image Adjust
Image
Colour
Menu Setup
Audio
PIP Setup
Reset
Cool
Neutral
Warm
User Colour
Exit
Red
Green
Blue
Exit
CCoolloouurr
UUsseerr CCoolloouurr
RReedd
MMAAXX
36
E
E
GGrreeeenn
BBlluuee
NNGGLLIISSH
H
MMAAXX
MMAAXX
Page 41

English Deutsch Nederlands Français Dansk Italiano Español Svenska
.
V
1111.
PIP: When you select PC source as main display, you can also
select another source TV, SCART, Video, S-Video, or Component
(YPbPr/YCbCr) as sub-display.
You can use the PIP feature to watch two video sources simultaneously . (This function works in PC mode only.)
IIEEWWIINNGG
V
P
IICCTTUURRE
P
E
-
-
IINN
P
IICCTTUURREE
--P
((PPIIPP))
QUICK WAY TO ACTIVATE PIP
1. Press PIP ON/OFF Button on the remote control
2. Select a Signal Source for PIP:
Press the PIP SOURCE UP/DOWN button repeatedly to
cycle through all of the available signal sources :
TV, SCART, Video, S-Video, Component (YPbPr/YCbCr).
3. Change the Position of the PIP Window:
When you press the PIP POSITION button repeatedly,
the PIP window moves from corner to corner on theTV
screen.
4. Change the Size of the PIP Window:
Press the PIP SIZE button to alternate between a smaller
and Larger PIP window.
PIP SETUP MENU
Simply press the ON/OFF Button on the remote control or select
sub display sources in the menu.
1. Press the MENU button to display the main menu screen.
2. Press the UP/DOWN button to select the PIP Setup.
3. Press the MENU button to enter PIP Setup.
4. Press the UP/DOWN button to the desired item (PIP Position,
PIP Border Width, PIP Border Color, PIP H/V Ratio).
5. Press the MENU button to return to the previous screen or
press the EXIT button to exit.
S
SSAAFFEETTYY AANNDD PPRREECCAAUUTTIIOONNS
37
Page 42

p
R
p
MMaaiinn MMeennuu SSccrreeeenn
Main Display
Sub Display
Contrast/Brightness
Auto Image Adjust
Image
Colour
Menu Setup
Audio
PIP Setup
Reset
Exit
PPIIPP SSeettuupp
PIP Position
PIP Border Width
PIP Border Colour
PIP H/V Ratio
Exit
PPIIPP PPoossiittiioonn
PIP H Position
PIP V Position
Exit
PPIIPP HH PPoossiittiioonn
PPIIPP VV PPoossiittiioonn
PPIIPP SSeettuupp
PIP Position
PIP Border Width
PIP Border Colour
PIP H/V Ratio
Exit
PPIIPP BBoorrddeerr WWiiddtthh
PIP Position
PIP Border Width
PIP Border Colour
PIP H/V Ratio
Exit
PPIIPP BBoorrddeerr CCoolloouurr
White
Blue
Yellow
Green
Red
Black
Brown
Gray
Orange
Exit
PIP Position
PIP Border Width
MMAAXX
PIP Border Colour
PIP H/V Ratio
Exit
MMAAXX
MMAAXX
PPIIPP SSeettu
PPIIPP SSeettu
PPIIPP HH//VV R
p
u
p
u
aattiioo
MMAAXX
38
E
NNGGLLIISSH
E
H
Page 43

.
V
1122.
The Video sources include SCART Video/SCART RGB, Video, SVideo, YCbCr/YPbPr. You can select by pressing SCART, Vi-
deo/S-V, or COMPONENT button.
AAV
MMOODDEE
A
DDJJUUSSTTMMEENNTT
A
ALTERING THE VIDEO ADJUST SETTINGS :
1. Press the MENU button to display the main menu screen.
2. Press the UP/DOWN button to move the cusor to the desired
item.
3. Press the MENU button to enter and adjust it.
4. Press the MENU button to return to the previous screen or
press the EXIT button to exit.
English Deutsch Nederlands Français Dansk Italiano Español Svenska
Note:
1. ALL the adjustment items in AV Menu are described in TV mode me-
nu, so please refer to the TV mode Adjustment.
2.Using the PIP function with Component mode (YCbCr, YPbPr)as the
sub-display requires that the PC resolution be set at no higher than 800
x 600.
MMaaiinn MMeennuu SSccrreeeenn
Main Display
Contrast/Brightness
Colour/Sharpness
Menu Setup
Audio
Reset
Exit
S
SSAAFFEETTYY AANNDD PPRREECCAAUUTTIIOONNS
39
Page 44

.
O
1133.
1. To use “Channel up/down“ on the unit control panel as function but-
2. TO use “-VOL+“ as level control buttons
3. To use “-VOL+“ as Mute control buttons
4.“Aspect“ button (Screen Aspect Ratio)
TTHHEERR
O
tons
-When you press “MENU“ to go into OSD, “CH up/down“ will beco-
me the up/down function control buttons.
-When you press “MENU“ to go into the sub control bar, then the le-
vel can be adjusted by the “-VOL+“ buttons.
-When you press both “VOL+“ and “VOL-“ buttons on the upper
control panel simultaneously, the sound will be muted.
-If you need to switch on the sound again, then either press
“MUTE“ button on the remote control unit or press any “VOL+“ or
“VOL-“ button on the remote control unit or on the LCDTV itself.
ARC - Aspect Ratio Control
* Normal: This sets the aspect ration to 4:3 for traditional TV pro-
grammes. There will be black bars at either side of the screen.
* Panscan: Expands 4:3 video sources to fit the 16:9 screen by
magnifying the image at the edges of the screen. This creates less
distortion at the center of the screen.
* Zoom: Some DVD movies may not fill the top and bottom of the
screen. The zoom function extends the height to fill the screen.
* Full: This mode expands the width of 4:3 video sources evenly to fill
the 16:9 screen. There will be distortion at the center of the screen
as well as the edges.
F
UUNNCCTTIIOONNS
F
S
5. “APC“control button (Automatic Picture Control)
-Press “APC“ button on the remote control repeatedly to cycle through
the APC settings. These settings are “Normal“, “Clear“or “Dark“. For
example, when the screen is showing night scene or darker screen,
you can use APC to change the screen to “Clear“ and get a brighter
picture. If the screen is too bright, you can use this APC button to
change the screen to “Normal“ or “Dark“.
40
E
NNGGLLIISSH
E
H
Page 45

.
T
1144.
Many times, problems have simple causes. We would like to give
you some tips to solve some common problems. Should these tips
not help, please call us!
There is no picture or sound.
z Make sure the AC adapter is properly inserted in the power outlet.
z Make sure the input mode is set to TV.
z Make sure the main power switch of the main unit is on.
There is no picture. There is no picture from AV.
z Make sure the Contrast/Brightness is properly adjusted.
z Make sure all external devices are connected properly.
There is no sound.
z Make sure the volume is not set to minimum .
z Make sure the sound is not set to mute.
z Make sure that headphones are not connected.
There is no picture or sound, just noise.
z The reception may be weak.
z Make sure the aerial is not disconnected.
Picture is not clear.
z The reception may be weak.
z Make sure the aerial is not disconnected.
Picture is too light.
z Check colour adjustment.
z Check colour system setting.
The picture is too dark.
RROOUUBBLLEESSHHOOOOTTIINNG
T
G
English Deutsch Nederlands Français Dansk Italiano Español Svenska
z Check if the APC button is set to ”Dark”.
z Check Contrast/Brightness adjustment.
Remote control does not work.
z Check the batteries in the remote control are not flat.
z Make sure the remote sensor window is not under strong lighting.
S
SSAAFFEETTYY AANNDD PPRREECCAAUUTTIIOONNS
41
Page 46

The picture is not sharp.
z The reception may be weak.
z Make sure the aerial is not disconnected.
The picture moves.
z The reception may be weak.
z Make sure the aerial is not disconnected.
The picture is doubled or tripled.
z Make sure the aerial is facing the right direction.
z There may be reflected electric waves from mountains or buildings.
The picture is spotted.
z There may be interference from automobiles,trains, high voltage lines, neon
light, etc.
z There may be interference between the antenna cable and power cable. Try
possible them further apart.
There are stripes on the screen or colours fade.
z Is the unit receiving interference from other devices?
Transmission antennas of radio broadcasting station and transmission antennas of amateur radio and cellular phones may also cause interference.
z Use the unit as far apart as possible from device that may cause possible
interference.
42
E
E
NNGGLLIISSH
H
Page 47

English Deutsch Nederlands Français Dansk Italiano Español Svenska
1155.
.
D
IIMMEENNSSIIOONNS
D
S
Unit : inch (mm)
Note:
A: Attach small cable clamp here
B: Attach large cable clamp here
C: Kensingtone slot
SSAAFFEETTYY AANNDD PPRREECCAAUUTTIIOONNS
S
43
Page 48

1166.
.
PPC
C
I
NNPPUUTT
I
P
RREESSEETT
P
T
IIMMIINNGG
T
T
T
E
AABBLLE
Analog Input
Mode
No.
1
2
Mode Name
Re s olution
VGA 70HZ
640*350
VGA 60HZ
640*480
H.Freq.(KHZ)
V. F r e q . ( H Z)
31.469
70.087
31.469
59.941
H. Polarity
V. P o l a ri t y
+
_
_
_
Pixe l
CLK
(MHZ)
25.175
25.175
3
4
5
6
7
8
9
10
11
12
13
14
15
VGA 72HZ
640*480
VGA 75HZ
640*480
SVGA 56HZ
800*600
SVGA 60HZ
800*600
SVGA 72HZ
800*600
SVGA 75HZ
800*600
XGA 60HZ
1024*768
XGA 70HZ
1024*768
XGA 75HZ
1024*768
MAC VGA
640*480
MAC VGA
832*624
US TEXT
720*400
WXGA 60HZ
1280*768
37.861
72.81
37.5
75.0
35.16
56.25
37.879
60.317
48.077
72.188
46.875
75.0
48.363
60.004
56.476
70.069
60.023
75.029
35.0
66.667
49.725
74.550
31.469
70.087
47.733
60.042
_
_
_
_
+
+
+
+
+
+
+
+
_
_
_
_
+
+
_
_
_
_
_
+
_
_
31.5
31.5
36.0
40.0
50.0
49.5
65.0
75.0
78.75
30.24
57.283
28.322
80
44
E
E
NNGGLLIISSH
H
Page 49

.
S
1177.
Display
TV Function
Video I / O
PC I / P
Audio O / P
Other Functions
Power
Panel Tilt
Dimension
Weight (net)
Accessories
PPEECCIIFFIICCAATTIIOONNS
S
S
ITEMS SPECIFICATION
Screen Size 17” TFT-LCD Panel
Aspect Ratio 16 : 9
Resolution 1280 x 768 (WXGA)
Display colors 262,144 colors
Contrast Ratio 400 : 1 (typical)
Brightness 400 cd / m
Viewing Angle 160o (Hor.) / 160o ( Ver.)
Response Time Tr = 15ms / Tf = 10ms
OSD Language English, French, German, Spanish, Italian
TV Standard (CCIR) B/G , D/K , I and L/L’ ( Multi-Europe)
Color system PAL / SECAM
Sound system NICAM / A2 (IGR)
Teletext 10 pages ( FLOF/TOP)
Video Color System PAL / SECAM / NTSC
AV1 ( In / Out ) 21-pin Scart (RGB & Composite) x 1
Video (Composite ) x 1
AV2 ( In)
AV3 ( Out) Video Out (Composite) x 1 (TV only)
Signal I/P Analog: D-Sub 15 pin (detachable cable)
PnP compatibility DDC / 2B
I/P Frequency
Recommended Analog : 1024 x 768 ( 60Hz)
HDTVready (via D-Sub 15Pin)
Audio O / P : L / R
PIP under PC mode , Child lock , VESA Flat Panel Wall Mounting .
Power Supply
Power Consumption < 60 W
Forwards / Backwards / Rotation - 5
W x H x D 520 x 303 x 72 mm /
W x H x D (with stand ) 520mm x 338mm x 200mm
Kg ( w/o Accessories ) 6.5 Kg
User’s Manual , Warranty Card , Remote Control , Batteries , AC cord, Adapter ,
SCART Cable , Video Cable , S-Video Cable , Audio Cable , D-sub Signal Cable, PC
audio Cable, RF Cable , Cable Clamps .
S-Video x 1
YCbCr&YPbPr (480i,480p) x 1
Analog : f
HDTV
Speaker (built-in) : 3.5W + 3.5W (rms)
Headphone Mini-jack for stereo (3.5φ)
Line Out (RCA L/R)
DC12V , 5A
AC 110V~240V, 50/60Hz (external AC adapter)
2
(typical)
: 31.5KHz to 60KHz
H
f
: 56Hz to 75Hz
V
SYSTEM : 720P , 1080I
o /
o /
+ 20
± 180
Audio L/R
x 1
o
English Deutsch Nederlands Français Dansk Italiano Español Svenska
S
SSAAFFEETTYY AANNDD PPRREECCAAUUTTIIOONNS
45
Page 50

46
E
E
NNGGLLIISSH
H
 Loading...