

Introduction
Please read these instructions carefully before using the sy-
i
stem and note the warnings in the operating instructions. If
you sell the heart rate monitor or give it away, please ensure that you also pass on these instructions.
The heart rate monitor is wrapped in packaging to
protect it against transportation damage.
Packaging is raw material and can be re-used or added to
the recycling system.
When you have unpacked everything, check that the
parts below have been included:
- Heart rate monitor brief instructions
- These operating instructions Warranty card
This monitor runs on a battery. Please note the following on
i
handling batteries:
• Keep children away from the battery.
• Do not throw the battery into a fire, do not short-circuit it and do not dismantle it.
• If necessary clean the battery and device contacts
before insertion.
• Please note the polarity (+/-) when inserting the battery.
• If the monitor is not going to be used for long periods, remove the batteries.
• Remove an empty battery immediately from the heart rate monitor! There is an increased risk of leakage! Remove a leaking battery from the monitor
immediately.
• Do not expose the battery to extreme conditions; for
example do not place the monitor on radiators! There is an increased risk of leakage!
• If this is not adhered to the battery may be discharged beyond its final voltage and leak! Remove the
battery immediately to avoid damage.
• Remove the battery if the device is not used for a longer period of time.
• Never try to recharge non-rechargeable batteries.
There is a risk of an explosion!
• Replace the batteries only with the same or equivalent type.
• Contact a doctor immediately if a battery is swallowed.
• Clean the contacts before inserting a new battery.
There is a risk of skin irritations from battery acid! If
battery acid leaks out it is essential to avoid contact
with the skin, eyes and mucous membranes! If the
acid does come into contact with skin, immediately
rinse the affected areas with plenty of clear water
and contact a doctor immediately.
Note!
i
There is a risk of explosion if the battery is not exchanged
properly!
Batteries should not be disposed in the household rubbish. Each consumer is legally obliged to dispose of batteries properly at the appropriate disposal points.
At the end of its life, the heart rate monitor should not be
disposed of with the household rubbish. Enquire about the
options for environmentally-friendly disposal. Before disposal always remove the battery from the monitor!
Abbreviations and Symbols
BPM - Beats per minute
BMI - Body mass index
MHF - Maximum heart frequency
SATURDAY (SAT) - Saturday
SUNDAY (SUN) - Sunday
MONDAY (MON) - Monday
TUESDAY (TUE) - Tuesday
WEDNESDAY (WED) - Wednesday
THURSDAY (THU) - Thursday
FRIDAY (FRI) - Friday
DAILY - Every day
IMPERIAL - British measurements
METRIC - Metric measurements
OFF - Alarm deactivated
HI - Upper limit
LO - Lower limit
R-001 - 1st reading
R-012 - 12th reading
CHIME - Hourly signal
ST - Start
1
2
STP - Stop
FIT - Fitness training area
FAT - Fat burning training area
HLT - Health maintenance
USER - Training area: user
LAP 1 - Lap 1
CH. MEM - Stopwatch memory
AVERAGE - Average
RST - Pause (Rest)
TMR-CS - Timer countdown stop
TMR-CR - Timer countdown repeat
Cnt - Counter
HR - Heart rate
BMI - Body mass index
kcal - Kilocalories
Pulse and heart frequency
Pulse rate
The pulse rate or “pulse frequency” describes the
number of blood impulses leaving the heart. This is frequently measured by feeling any available artery (neck,
groin, wrist).
Heart rate
The term “heart rate” describes the number of electrical excitations emitted by the heart. This can therefore be measured electrically, e.g. with an
electrocardiogram (ECG).
In general the heart rate matches the pulse rate. With cer-
i
tain types of arrhythmia the pressure of the heart contractions may be too low and thus produce no measurable pulse
rate.
About this appliance
Those who want to live in a healthy manner should eat
a balanced diet and exercise adequately. It is also advisable to continuously check your general health with
a doctor. You can support this by measuring your pulse accurately yourself. After all the pulse is an excellent indicator of fitness. You can read your current
pulse with the fitness watch. Therefore the fitness
watch is the ideal companion for those who enjoy fitness, sportspeople etc.
But please note
that the fitness watch is not a medical heart rate monitor! It
i
can and must not replace a doctor!
Only use it to aid daily fitness checking.
For heart patients, those who are ill, older people or those
starting to train: always consult your doctor before using the
fitness watch!
Do not use the heart rate monitor when swimming or playing
sports that could result in injury. The monitor casing is
splash-proof but not waterproof!
Resting pulse and training range
training area
3
4
Resting pulse
The healthier and fitter your heart, the quieter is its
beat, even at rest. Why? Regular movement trains
the heart. This increases its performance and it can
move more blood with fewer beats. Therefore the resting pulse is an important indicator for physical fitness. Our tip: measure your resting pulse regularly,
either just before sleeping or immediately after waking
up.
Caution: Certain heart illnesses result in a very slow pulse.
i
Before using your fitness watch it is essential for you to consult a doctor!
Training range
Your heart beat should remain inside the training range throughout training. The heart rate training range
is recommended at 50-75% of maximum heart range. This is calculated individually as follows:
220 minus age.
An example:
At an age of 32: 220-32=188.
The ideal aerobic training range is between 94 and
141 (50% and 75%) beats per minute.
Do not train for less than 20-30 minutes. However, it is ba-
i
sically true that if it is pleasant it is healthy. Do not overdo it!
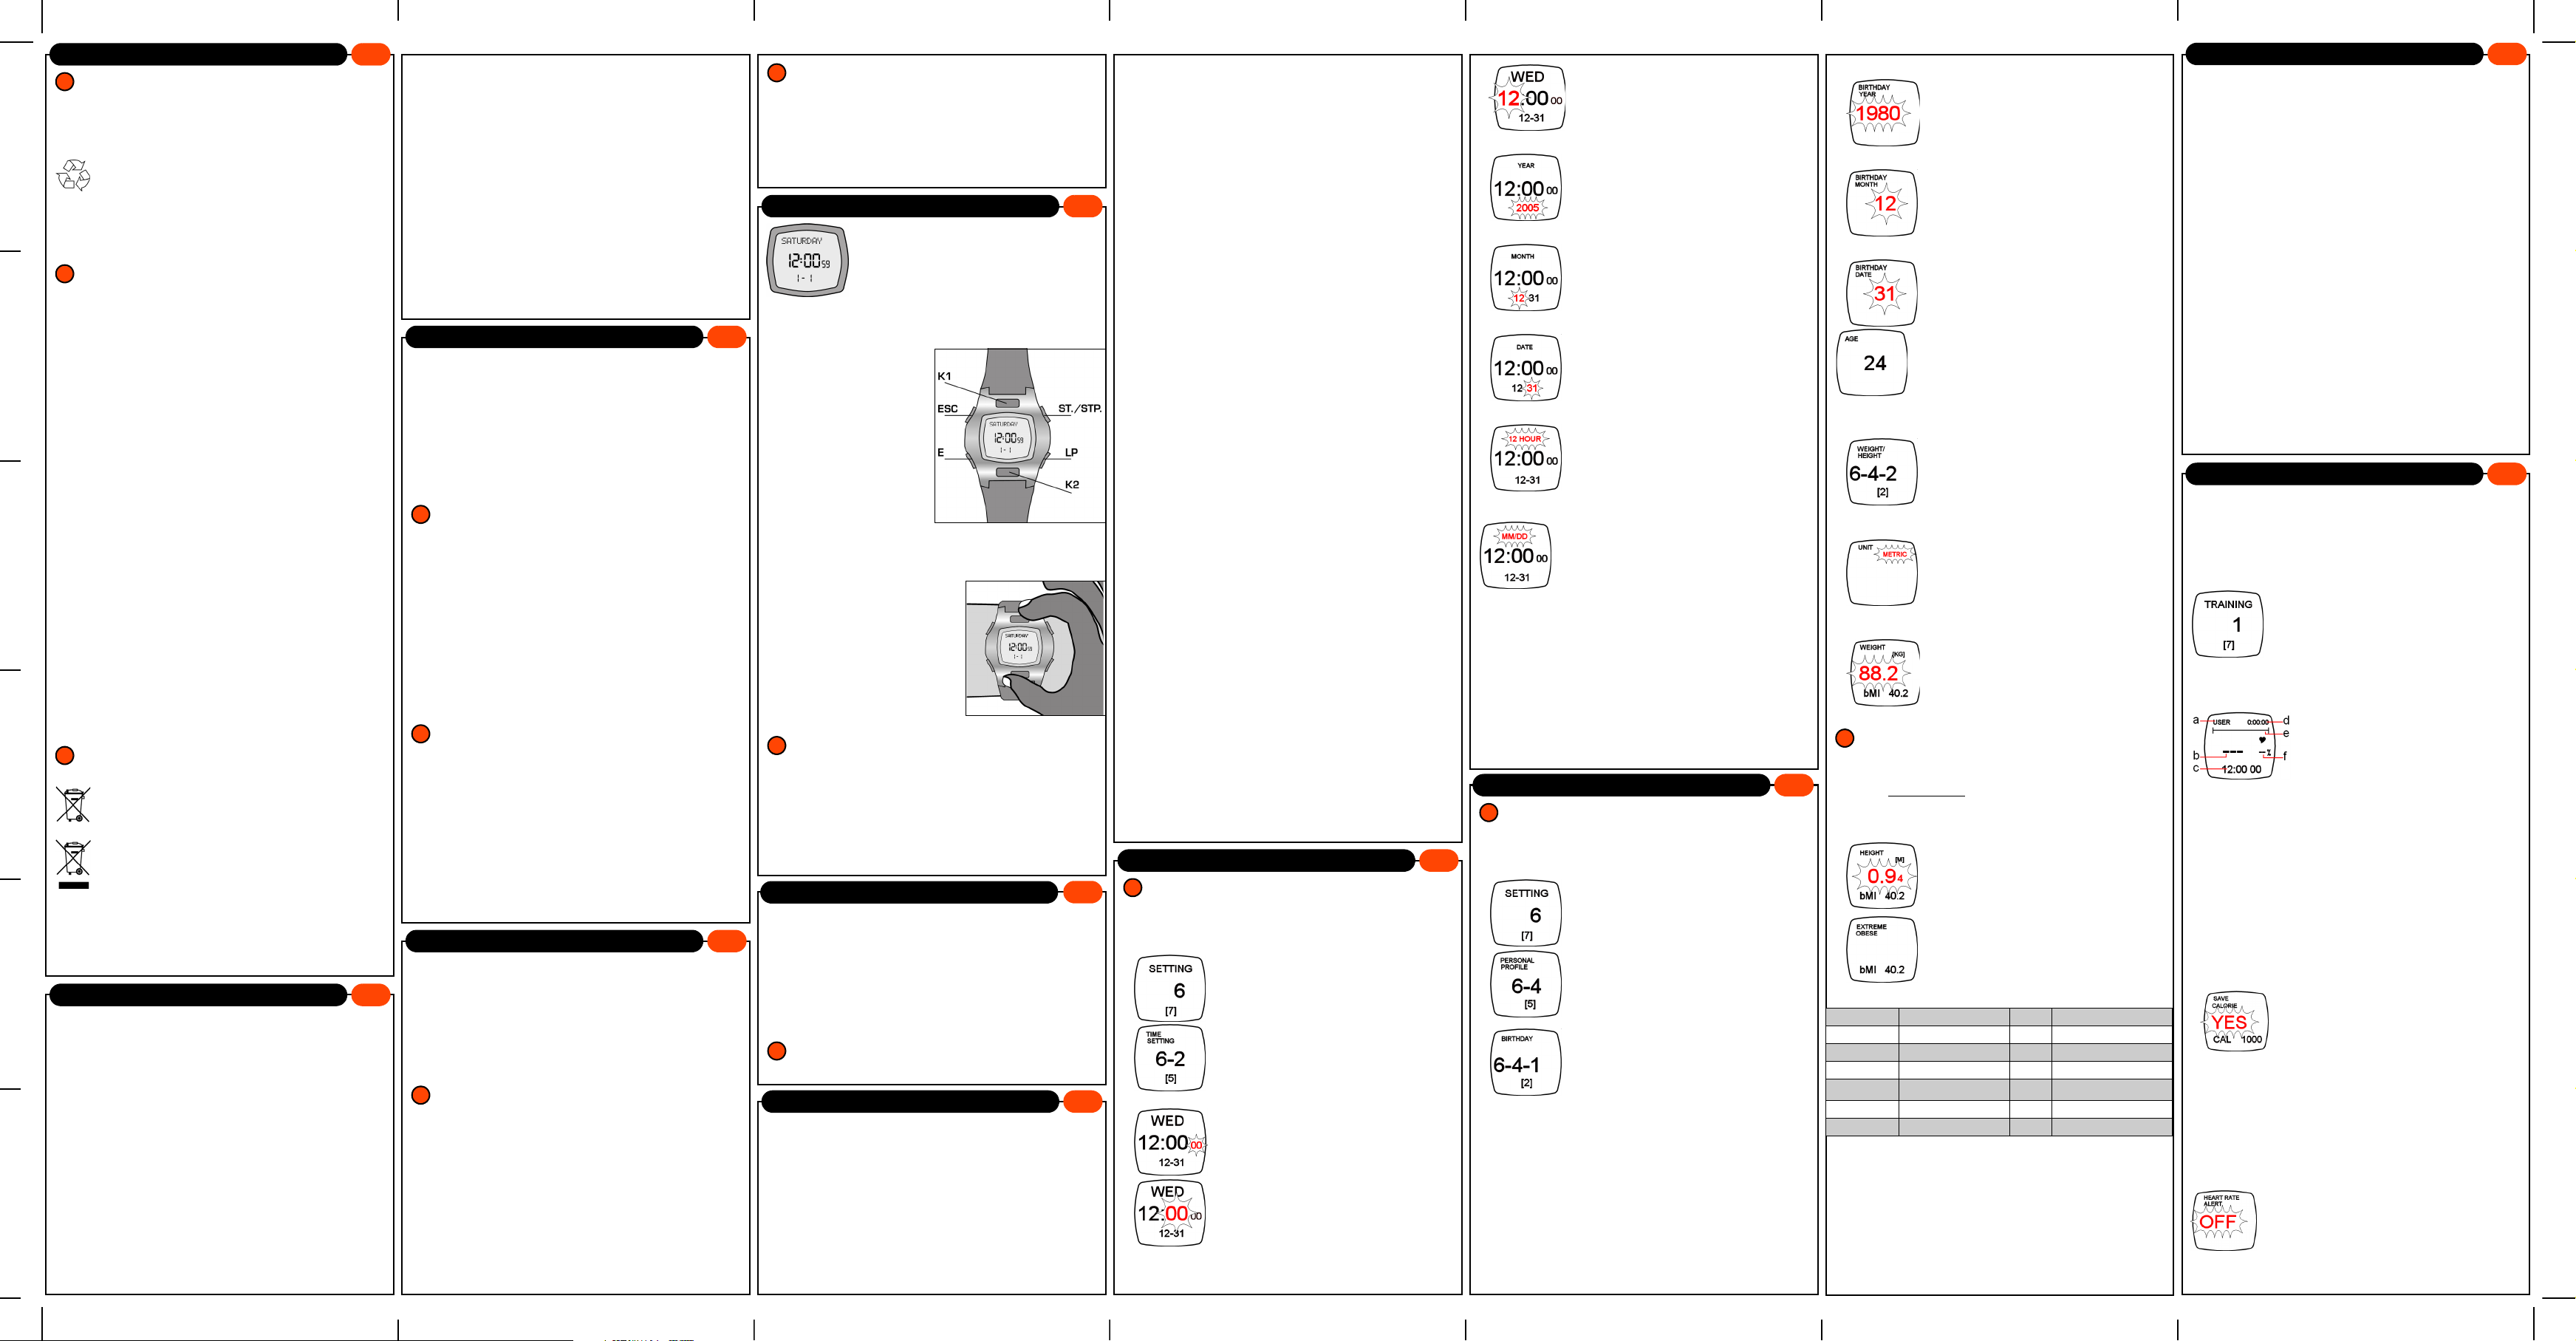
Button functions
When the watch is in the default
screen it shows the time, date and day
of the week. If a mode is no longer used
the fitness watch returns to the default
state after one minute. You can also
return to the initial display at any time
by holding down ESC for approx. 2 seconds.
ESC:
Hold down for 2 seconds
to switch on background
lighting. When in a menu
press this button to leave
the menu.
ST./STP.
Start/stop training/
time. Change value -,
(vice versa).
LP (LAP/RESET)
Stop next lap. Change value +, (vice versa).
E (ENTER):
Open a menu. Change the settings in the menus.
K1 und K2
The watch starts measuring
the heart rate automatically
when you press K1 with your
index finger and K2 with your
thumb at the same time. You
can open this function at any
time except during entry (display flashes) During the measuring process the heart
symbol on the screen flashes.
At the start of heart rate measurement, there may be diffe-
i
rent or fluctuating measurement values. Therefore only start
training when the values displayed on the screen have normalised.
Menus and training mode
TRAINING (1)*: Start/stop training
CHRONO (2)* - Stopwatch mode
TIMER (3)* - Countdown Mode
PACER (4)* - Pacemaker mode
MEMORY (5) - Memory mode (heart rate memory)
SETTING (6) – Personal training settings
REST HR (7) – Measure resting pulse
*Training mode
A graphical depiction of the menu guidance is located on the
i
inside of the flap.
Overview of functions
5
6
7
Switch background lighting on/off
You can light up the display on your fitness watch. For
this press ESC for approx. 2 seconds. The light
switches itself off automatically after a few seconds.
Time function
In addition to the date and time you can also set a second time zone. You can also set up to 8 alarms daily
or for a particular day of the week.
Monitoring training
You can monitor training using the preset (FITNESS,
FAT BURN or HEALTH. HLT) or individually set (USER)
training range.
Measuring the heart beat
It is possible to measure the heart beat in each
function except during entry (display flashes). The
heart beat is measured from 40 to 200 bpm.
If the heart beat measured exceeds 200 the screen
no longer shows the heart beat.
You can select an alarm tone that will sound when you
exceed the upper or lower limit.
During the measuring process the heart symbol on
the screen flashes. Once the heart beat has been
successfully measured a tone is emitted and the value
is shown on the screen. The current heart beat is
displayed on the screen for a further 5 seconds when
you release the K2 button. If no signal is received for
more than 5 seconds the screen displays the mode
that is currently set.
Stopwatch and countdown
You can use your fitness watch to set a stopwatch and
lap time measurement or to countdown during
training.
Pacemaker
To monitor your training you can set a pacemaker that
sounds at a pre-set interval.
Resting pulse memory
You can save up to 60 measured values as your
resting pulse.
Calling up memory
The saved values can be called up and shown
graphically with the relevant date. A weekly summary
also allows you to display the highest value or average
value for a week.
Calorie counter
The calories burned are counted in the training menu
during training. In addition, the watch calculates and
displays the calories burned from fat using the heart
beat.
You can also state a target calorie number and the unused calories can be called up after each training session. For this the heart beat must be measured
regularly.
Setting time and date
First set the date and time so that you can assign the pulse
i
measured during training to a time and date.
• If necessary, you can also return to the initial display
at any time by holding down ESC for approx. 2 seconds.
• To set the date and time press the
ST./STP.
ting
menu by pressing E.
• Use ST./STP.
Time Setting (6-2) entry and con-
firm by pressing E.
The time is displayed and the second
digits flash.
• Use ST./STP.
onds to zero. Move to the next setting
by pressing E.
The minute digits flash.
• Use the ST./STP.
move the value up or down. Move to
the next setting by pressing E.
The hour digit flashes.
or LP button until the Set-
(6) entry appears and select the
or LP to select the
and LP to set the sec-
and LP buttons to
8
• Use the ST./STP. and LP buttons to
move the value up or down. Move to
the next setting by pressing E.
The year digit flashes.
• Use the ST./STP. and LP buttons to
move the value up or down. Move to
the next setting by pressing E.
The month digit flashes.
• Use the ST./STP.
move the value up or down. Move to
the next setting by pressing E.
The date digit flashes.
• Use the ST./STP.
move the value up or down. Move to
the next setting by pressing E.
The 12h/24h mode flashes.
• Use the ST./STP. and LP buttons to
set the display to 24 HOUR or 12
HOUR
. In 12h mode the hours before
midday are shown with an A and for
the afternoon with P before the time.
The date format will flash.
Leave the menu by pressing ESC or set the values
again. The settings are saved directly and do not need
to be confirmed.
Move to the next setting by pressing E.
Use the ST./STP.
the format to DD/MM (day/month) or
MM/DD (month/day) (American date for-
mat).
After pressing the E button the date and
time setting restarts.
Enter personal data
It is necessary to enter such personal data as age, weight
i
and height; these are used to calculate your training range.
• If necessary, you can also return to the initial display
at any time by holding down ESC for approx. 2 seconds.
• To enter your personal values press
ST./STP.
entry appears and select the menu by
pressing E.
• Use ST./STP.
Personal Profile (6-4) entry and
confirm by pressing E.
or LP until the Setting(6)
and LP buttons to
and LP buttons to
and LP buttons to set
9
or LP to select the
Enter date of birth
• Use ST./STP. or LP to select the
Birthday (6-4-1) entry and confirm
by pressing E.
The year of birth digit flashes.
• Use the ST./STP. and LP buttons to
move the value up or down. Move to
the next setting by pressing E.
The month digit flashes.
• Use the ST./STP. and LP buttons to
move the value up or down. Move to
the next setting by pressing E.
The date digit flashes.
• Use the ST./STP. and LP buttons to
move the value up or down. Move to
the next setting by pressing E.
When you leave the menu by pressing
ESC the screen briefly displays the word
AGE with your age.
Enter weight
• In thePersonal Profile profile
menu use the ST./STP. or LP button
to select the Weight/Height (6-4-
2) entry and confirm this by pressing
E.
The measurement system flashes.
• Use the ST./STP. and LP buttons to
increase or decrease the value in order to select the British (IMPERIAL)
or metric (METRIC) system. Move to
the next setting by pressing E.
The weight digits flash.
• Use the ST./STP.
move the value up or down. Move to
the next setting by pressing E.
In addition, the lower screen also shows the BMI (Body
i
Mass Index) calculated from the height and weight. The BMI
measures a person's bodyweight in relation to the square of
his height. The watch calculates this as follows:
Weight
BMI =
Height x Height
The digits for the body height flash.
BMI Level Displayed
<18,5 Underweight 0 Underweight
18.8-24.9 Normal 5 Normal
25.0-29.9 Overweight 4 Overweight
30.0-34.9
35.0-39.9 Adipositas level I 2 Obese
>40 Adipositas level III 1 Extreme Obese
a.Adipositas = obese; body weight is over 20% above target
weight.
Adipositas level I
• Use the ST./STP.
move the value up or down. Move to
the next setting by pressing E.
• When you leave the menu by pressing ESC the screen briefly displays the
BMI calculated. The 6 BMI steps are
classified as follows:
a
and LP buttons to
and LP buttons to
3 Obese
Notes on training
After entering the data required to calculate your
training range you can start training or make other
settings as described in the menus.
10
Training process
• In the training menu select the training range that is
appropriate to you (FITNESS, FAT BURN,
HEALTH. HLT.
your doctor (menu SETTING> MISC. SETTING> USER
HEART RATE ZONE, Point 16).
Here the pre-set training ranges are calculated as
follows:
Health maintenance (HEALTH. HLT.):
Lower limit: MHR* x 0.50;
Upper limit: MHR x 0.65.
Fat burning training (FAT BURN):
Lower limit: MHR x 0.65;
Upper limit: MHR x 0.80.
Fitness training (FITNESS):
Lower limit: MHR x 0.80;
Upper limit: MHR x 0.95.
*maximum heart frequency (calculated automatically based on the age
entry)
TRAINING menu
The first menu TRAINING handles the training watch
function, the selection of the training range, activating
the training range alarm and saving the calories
burned after training has finished.
• If necessary, you can also return to the initial display
at any time by holding down ESC for approx. 2 seconds.
Training time
You can display the following information:
• Start the training watch by pressing the ST./STP.
button.
The training watch now starts and from the first heart
beat measurement counts the calories used every 10
seconds. The most recently measured pulse is shown
on the screen on the cursor bar and on the b and g
displays.
• Press LP to swap between the time and calories.
The calorie display shows the total calories burned
since training started.
Stop the training watch by pressing the ST./STP. button again.
• Otherwise use the ST./STP. and LP buttons to select the
saving.
Setting the training range
• Hold down the E button for approx. 2 seconds to
make settings for the training range. Each additional
heart beat measurement will then be interpreted with
these settings no matter the selected training mode.
The setting for the training range alarm flashes.
The setting for the training range flashes.
NO entry to save the training session without
) or set a range in consultation with
11
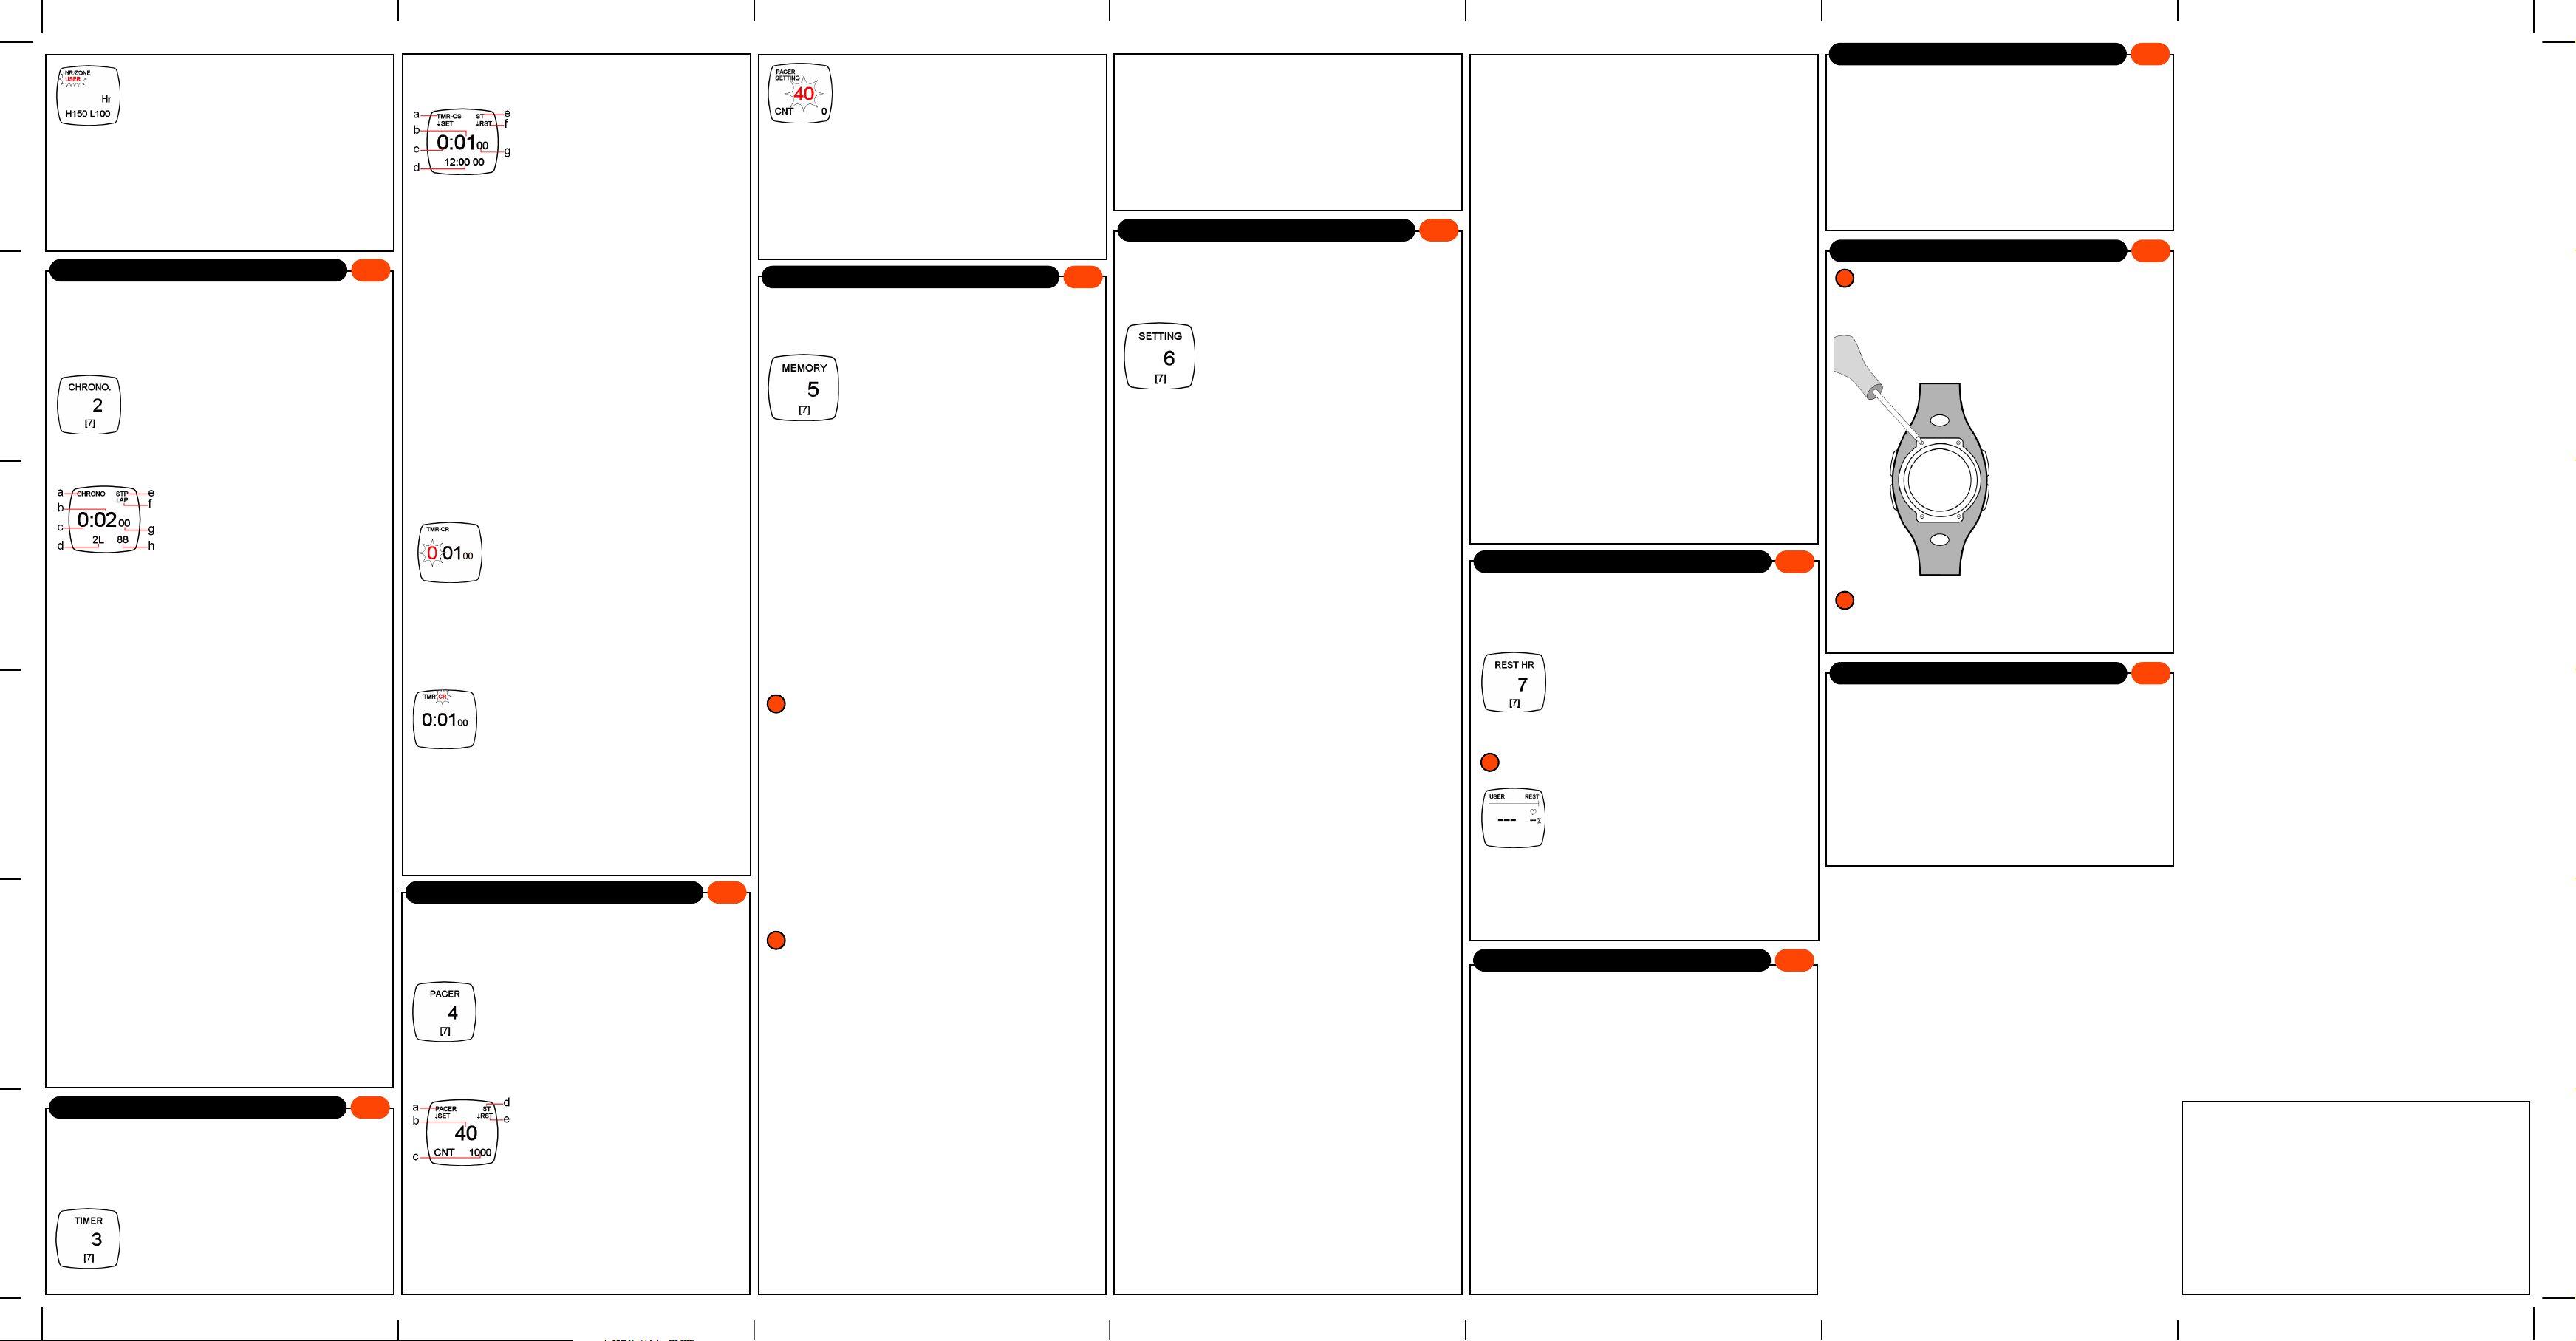
• To open the
the ST./STP. or LP button until the
Training(1) entry appears and select
the menu by pressing E.
• The training time is displayed.
a. Trainings mode
b. Heart beat (pulse)
c. Time or calorie display
d. Time completed
e. Cursor bar
f. Percentage of
maximum heart beat
• To end the training press ESC. The
screen then displays a query whether to
save the calorie values calculated. Press
E to select the
calories.
• Use the ST./STP.
select the ON entry so that leaving the
training range is signalled by two beeps.
Otherwise select OFF. Move to the next
setting by pressing E.
TRAINING menu press
YES entry and save the
and LP buttons to
• Use the ST./STP. and LP buttons to
select one of theUSER, FITNESS, FAT
BURN
or HEALTH.HLT. settings (refer to
Point 10).
lower limits. Please refer to Point 16 "User Heart
Rate zone" on setting your personal training range
(USER).
• To display the training watch again press the ESC
button.
CHRONO menu
The second menu CHRONO covers a stopwatch
function with lap counter. The maximum measurable
time is 99 hours 59 minutes and 59.99 seconds. It
can save up to 100 lap times.
• If necessary change to the initial display by holding
ESC for approx. 2 seconds.
The training range sets the upper and
12
• To open the
ST./STP. or LP button until the
Chrono(2) entry appears and select the
menu by pressing the E button.
The stopwatch is displayed.
CHRONO menu press the
Stopwatch
The following information can be displayed on screen:
a. Stopwatch mode
b. Minutes
c. Hours
d. Laps
ST: Start by pressing ST.STP
e.
STP: Stop by pressing ST.STP
f. LAP: Lap taking place
RST: Lap paused
g. Seconds
h. Tenth of seconds
• Start the stopwatch by pressing ST./STP..
The stopwatch starts and the message
STP.
• To stop the stopwatch press the ST./STP. button
again.
• To stop the lap times, whilst the stopwatch is
running press LP; to reset the stopwatch hold the LP
button for approx. 2 seconds.
The 1L message stops flashing and the current
stopped lap time is displayed whilst the stopwatch
continues in the background. After a few seconds the
display changes again to the stopwatch and the
message 2L flashes to indicate that the second lap
has started.
ST changes to
Display lap times
To change to the lap time memory, when the
stopwatch has stopped press E.
Use the ST./STP.
individual times.
CH MEM: Lap time with the supplement 1L, 2L, 3L
etc. (if no lap times were stopped this is the total time)
CH MEM TOTAL: Total stopped time
CH MEM AVERAGE: Average stopped lap time. (if no
lap times were stopped, this is the total time)
To display the stopwatch again press the ESC button
again.
TIMER menu
The 3rd menu TIMER covers the countdown function
with preset or self-defined times. The countdown can
be set to once only or repeating.
• If necessary, you can also return to the initial display
at any time by holding down ESC for approx. 2
seconds.
and LP buttons to view the
13
• To open the
ST./STP. or LP button until the
Timer(3) entry appears and select the
menu by pressing E.
The countdown time is displayed.
TIMER menu press the
Countdown time
You can display the following information:
a. TMR-CS: Stop mode
TMR-CR: Repeat mode
b. Minutes
c. Hours
d. Time
ST: Start by pressing ST./STP.
e.
STP: Stop by pressing ST./STP.
RST: Pause lap
f.
g. Seconds
• When the timer is stopped press the LP button
repeatedly to use the preset time for the countdown.
The pre-set times are: 1 min, 5 min, 10 min, 30 min,
1h, 2h.
• Start the countdown by pressing the ST./STP.
button.
The countdown starts and the
STP. At the end of each minute a beep sounds.
During the last 5 seconds of the countdown a beep
sounds each second. The end of the countdown is
indicated by a longer beep.
• To stop the countdown press the ST./STP. button
again.
• Hold down the LP button for approx. 2 seconds to
reset the countdown.
ST display changes to
Set the timer by making entries
• When the timer is stopped hold down the E for
approx. 2 seconds. The hour digit flashes.
• Use the ST./STP. and LP buttons to
move the value up or down. Move to the
next setting by pressing E.
The minute digits flash.
• Use the ST./STP.
up or down. Move to the next setting by pressing E.
The second digits flash.
• Use the ST./STP. and LP buttons to move the value
up or down. Move to the next setting by pressing E.
The timer mode flashes.
• Use the ST./STP.
select the stop mode (countdown happens
once) or the repeat mode (countdown
repeatedly starts again). After pressing
the E button the timer setting restarts
again.
Leave the menu by pressing ESC or set the timer
again.
PACER menu
The 4th menu PACER covers the pacemaker function.
It is possible to set a step frequency of 30 to 180
steps per minute.
• If necessary change to the initial display by holding
ESC for approx. 2 seconds.
• To open the
ST./STP. or LP button until the Pacer(4)
entry appears and select the menu by
pressing the E button.
The step counter is displayed.
and LP buttons to move the value
and LP buttons to
14
PACER menu press the
Pacemaker
You can display the following information:
a. Pacemaker mode
b. Step frequency
(Steps/minute)
c. Step counter
d. ST: Start by pressing ST./STP.
STP: Stop by pressing ST./STP.
RST: Pause lap
e.
Set step counter
• When the step counter is stopped hold down the E
for approx. 2 seconds. The step frequency flashes.
• Use the ST./STP. and LP to set a step
frequency between 30 and 180 steps/
minute. Press ESC to go back to the step
counter.
• Start the step counter by pressing the
ST./STP. button.
For each step you will hear a beep and the number of
steps is indicated on the screen with
• Stop the step counter by pressing the ST./STP.
button again.
• Hold down the LP for approx. 2 seconds to reset
the counter.
MEMORY menu
In the fifth menu MEMORY you can view all the saved
values for heart beat and calorie consumption.
• If necessary change to the initial display by holding
ESC for approx. 2 seconds.
• To open the
ST./STP. or LP button until the
Memory(5) entry appears and select
the menu by pressing the E button.
The first sub-menu is shown.
MEMORY menu press the
Cnt.
15
5.1 Heart Rate Record
• Select the sub-menu by pressing the E button. The
last measurement is shown.
• Use the ST./STP.
individual measurements. The number (e. g. R-003),
date and time is given for each measurement.
• Press E to view the highest (H) and lowest
measurement (L) in succession.
• Press E again to return to the measuring results.
and LP buttons to view the
5.2 Calories
Select the sub-menu by pressing the E button. The
screen shows the consumption of calories or fat in the
last week (WEEKLY TOTAL).
Use the ST./STP. and LP buttons to view the
individual weeks. For each week there is a date with
week number and the calorie and fat consumption.
To record the calorie consumption you must confirm the
i
saving by selecting YES when leaving the TRAINING menu!
Press E repeatedly to display the following analyses in
succession:
WEEKLY TOTAL - calories burned in the week
TARGET REMAIN - remaining caloriess
AVG.CAL.PER DAY - average calories per day
AVG.CAL.PER WEEK - average calories per week
5.3 Rest Heart Rate
• Select the sub-menu by pressing the E button. The
most recently saved resting heart rate is displayed.
• Use the ST./STP. and LP buttons to view the
individual measurements. The date is shown for each
measurement.
In order to query the resting hear rate measurements at
i
least one measurement of the resting pulse must have been
made before in the REST HR menu.
5.4 Average Heart Rate
• Select the sub-menu by pressing the E button. The
average heart rate in the measurements of the past
week is displayed.
• Use ST./STP. and LP buttons to call up the
individual weeks. A date is shown for each
measurement.
5.5 Maximum Heart Rate
• Select the sub-menu by pressing the E button. The
highest heart rate in the measurements of the past
week is displayed.
• Use the ST./STP. and LP buttons to call up the
individual weeks. A date is shown for each
measurement.
Delete memory
• In order to delete the values in the memories, in one
of the sub-menus hold down the E button for approx.
2 seconds and then in the subsequent query use the
ST./STP. and LP buttons to select the YES entry.
• Then press the E button again for 2 seconds.
SETTING menu
In the 6th menu SETTING you can make all the
settings for time, alarm and date as well as the clock
functions and personal data.
• If necessary change to the initial display by holding
ESC for approx. 2 seconds.
• To open the
ST./STP. or LP button until the
Setting(6) entry appears and select
the menu by pressing the E button.
The first sub-menu is shown.
SETTING menu press the
16
6.1 Alarm setting
• Select the sub-menu by pressing the E button. The
first alarm is displayed.
• Use the ST./STP.
individual alarms (Alarm1-Alarm8) and the hourly
alert.
• Press Eto switch the individual alarm or hourly alert
on or off.
• Hold down E for approx. 2 seconds to set the alarm.
The hour digit flashes.
• Use the ST./STP.
value up or down. Press E to move to the next setting.
The minute digit flashes.
• Use the ST./STP. and LP buttons to adjust the
value up or down. Press E to move to the next setting.
The alarm setting flashes.
• Use the ST./STP. and LP buttons to set the rule for
when the alarm should ring:
DAILY: Daily SUN: Sundays
MON: Mondays TUE: Tuesdays
WED: Wednesdays THU: Thursdays
FRI: Fridays SAT: Saturdays
• Then close the setting by pressing the ESC button -
the alarm is now saved.
and LP buttons to open the
and LP buttons to adjust the
6.2 Time Setting
- Setting time and date
Please refer to Point 8 on entering the time and date.
6.3 Dual Time Setting
- Setting the second time zone
• Select the sub-menu by pressing the E button. The
second hour digit flashes in the display.
• Use the ST./STP. and LP buttons to adjust the
value up or down. Press E to move to the next setting.
The minute digit flashes.
• Use the ST./STP. and LP buttons to adjust the
value up or down.
• Close the setting by pressing ESC - the second time
is now saved.
6.4 Personal Profile - personal data
Please refer to Point 9 on entering personal data.
6.5 Misc. settings
Set calorie target
• Select the sub-menu by pressing the E button. The
screen displays the pre-set objective of 1000 calories.
• Use the ST./STP.
to between 100 and 99900.
• The outstanding calories to the target calorie
number can be seen from the
MEMORY>CALORIES>TARGET REMAIN menu.
Set user heart rate zone
• Select the sub-menu by pressing the E button. The
training range determined from your personal data is
displayed.
• Use the ST./STP.
and LP buttons to set the calories
and LP buttons to change
between displaying percentage and heart beat.
• Press the E button to set the upper limit with the
ST./STP.
• Press the E button to set the lower limit with the
ST./STP.
• Then close the setting with the ESC - the USER
training range is now saved.
and LP buttons.
and LP buttons.
Switch key tones on/off
• Select the sub-menu by pressing the E button. The
key tone setting flashes on the screen.
• Use the ST./STP.
between the ON and OFF settings.
• Then leave the menu by pressing ESC to adopt the
setting.
and LP buttons to switch
Set LCD contrast
• Select the sub-menu by pressing the E button. The
contrast setting flashes on the screen.
• Use the ST./STP.
contrast to between 1 (low) and 10 (high).
• Then leave the menu by pressing ESC to adopt the
setting.
REST HR menu
In the 7th menu
heart rate and the results can then be opened in the
MEMORY>REST HEART RATE menu.
• If necessary change to the initial display by holding
ESC for approx. 2 seconds.
• To open the
ST./STP. or LP button until the Rest
HR
by pressing the E button.
The last resting heart rate is displayed (if
no previous measurement was made no
value is displayed).
Take the resting heart rate either immediately before
i
sleeping or directly after waking up.
• The resting heart rate is measured in
the same way was a normal heart rate
measurement. Press K1 and K2 until the
result of the measurement is displayed.
can be viewed from the resting heart rate menu, as
stated above.
• Leave the menu again by pressing the ESC button.
The measurement result is now saved and
Error recovery
and LP buttons to set the
17
REST HR you can measure resting
REST HR menu press the
(7) entry appears and select the menu
18
The display is blank:
• The battery is dead. Get a watchmaker to change
the battery or contact our service.
The watch no longer responds when buttons
are pressed:
• Reset all the settings to the factory settings by
holding down the E, ST./STP. and LP buttons for 3
seconds.
The display is black:
• The ambient temperature is outside the operating
range (0° to 55°).
Cleaning and care
• Clean the watch after each training session.
• Wipe the watch with a damp cloth and mild soap solution.
Disposal
Only remove the battery when you want to dispose of the
i
watch. If you try to exchange the battery you may damage
seals or components, which results in the warranty becoming void.
• To do so, loosen the 4
screws on the rear of the
device using an appropriate
screwdriver.
• Remove the battery and
dispose of the watch and
battery separately.
Be careful when removing the battery! There is a risk of in-
i
jury!
Technical data
Battery: CR 2032
Subject to technical changes!
19
20
21
 Loading...