

Page 1

Índice
Advertencias de seguridad ......................................... 4
Uso apropiado .................................................................... 4
Seguridad de funcionamiento ............................................. 4
Lugar de emplazamiento .................................................... 6
Reparación ......................................................................... 7
Entorno previsto ................................................................. 7
Alimentación de corriente ................................................... 7
Manejo con las pilas ........................................................... 8
Volumen de suministro ............................................ 10
Esquema del aparato ............................................... 11
Parte frontal ...................................................................... 11
Parte posterior .................................................................. 12
Mando a distancia ............................................................ 13
Puesta en funcionamiento ....................................... 15
Desembalar ...................................................................... 15
Colocar el pie ................................................................... 17
Conexión de la toma de corriente ..................................... 18
Encender y apagar el aparato ........................................... 19
Colocar la tarjeta de memoria ........................................... 19
Funcionamiento ....................................................... 21
Imágenes .......................................................................... 21
Mostrar el calendario ........................................................ 22
Realización de ajustes .............................................. 25
Resumen del menú ........................................................... 25
Ajustar la hora y la fecha ................................................... 26
Ajustar la alarma ............................................................... 26
Ajustes de fábrica .............................................................. 27
Solución de fallos ............................................................. 28
Eliminación .............................................................. 31
Especificaciones técnicas .......................................... 32
ES
3
Page 2

Advertencias de seguridad
¡Antes de la primera puesta en funcionamiento, lea
atentamente este manual de instrucciones y
respete ante todo las advertencias de seguridad!
Todas las operaciones en y con este aparato deben
realizarse tal y como están descritas en este manual
de instrucciones.
Guarde este manual de instrucciones para su uso
en el futuro. Si cede el aparato a otra persona, le
rogamos que adjunte también las presentes
instrucciones de uso.
Uso apropiado
Este aparato sirve para representar imágenes.
Este aparato está diseñado para su utilización solamente en
estancias interiores secas. Este aparato no es adecuado como
monitor de datos para puestos de trabajo en oficinas.
Este aparato está previsto exclusivamente para el uso privado y
no con fines industriales o comerciales. El uso bajo condiciones
ambientales extremas puede causar daños en su aparato.
Seguridad de funcionamiento
Para asegurarse de que los niños no jueguen con el
aparato, vigílelos. Este aparato no ha sido concebido para
ser utilizado por personas (niños incluidos) con
discapacidad física, sensorial o psíquica, o por aquéllas
que no tengan la suficiente experiencia o conocimientos, a
no ser que, por su propia seguridad, sean supervisadas por
una persona responsable o reciban de ésta las
correspondientes instrucciones sobre su utilización.
4
Page 3

Mantenga también alejados de los niños el material de
embalaje, como p.ej. los plásticos. Existe el peligro de
asfixia.
¡No abra nunca la carcasa del aparato (descarga eléctrica,
cortocircuito y peligro de incendio)!
¡No introduzca ningún objeto en el interior del aparato a
través de las ranuras y aberturas (descarga eléctrica,
cortocircuito y peligro de incendio)!
Las ranuras y aberturas del aparato sirven para su
ventilación. ¡No tape estas aberturas (sobrecalentamiento,
peligro de incendio)!
No ejerza presión sobre la pantalla. Existe el peligro de que
la pantalla se rompa.
El mando a distancia dispone de un diodo de infrarrojos de
la clase 1. No mire el LED con aparatos ópticos.
¡Atención! Si la pantalla se rompe existe peligro de
lesiones. Empaquete las piezas rotas utilizando guantes de
seguridad y envíelas a su centro de servicio para su debida
eliminación. A continuación lávese las manos con jabón,
ya que no se puede excluir que salgan sustancias
químicas.
No toque la pantalla con los dedos o con objetos de
cantos vivos para evitar desperfectos.
ES
5
Page 4

Diríjase al servicio de postventa si: el cable de red está
fundido superficialmente o dañado, ha penetrado líquido
en el aparato, el aparato no funciona debidamente, el
aparato se ha caído o la carcasa está dañada.
Lugar de emplazamiento
Durante las primeras horas de funcionamiento, los
aparatos nuevos pueden desprender un olor típico,
inevitable y no peligroso que con el transcurso del tiempo
disminuye. Para contrarrestar la formación de olores, le
recomendamos ventilar el espacio regularmente. Durante
el desarrollo de este producto hemos tratado de
permanecer claramente por debajo de los valores límite
vigentes.
Mantenga su aparato alejado de focos de humedad y evite
polvo, calor y rayos de sol directos. La inobservancia de
estas advertencias puede causar averías y desperfectos en
el aparato.
No utilice su aparato al aire libre ya que las influencias
exteriores, como la lluvia, la nieve, etc. podrían dañar el
aparato.
No se debe exponer el aparato a gotas de agua o
salpicaduras. No coloque recipientes llenos de líquido,
(jarrones o similares) sobre el aparato. El recipiente puede
volcar y el líquido puede perjudicar la seguridad eléctrica.
No coloque ninguna fuente de fuego (velas o similares)
sobre el aparato.
Para evitar que el aparato pueda caerse, colóquelo sobre
una base estable, nivelada y libre de vibraciones.
6
Page 5

Reparación
Las reparaciones siempre deben ser efectuadas por
personal cualificado para evitar accidentes.
Si fuera necesario reparar el aparato, diríjase a uno de
nuestros servicios de reparación autorizados.
ES
Entorno previsto
Guarde por lo menos una distancia de un metro frente a
fuentes de interferencias de alta frecuencia y magnéticas
(televisor, altavoces, teléfono móvil) para evitar problemas
de funcionamiento.
Después del transporte de su aparato, espere hasta que el
aparato tenga la temperatura ambiental antes de ponerlo
en funcionamiento.
En caso de grandes variaciones de temperatura o
humedad, por condensación puede formarse humedad
dentro del aparato y ésta puede causar un cortocircuito
eléctrico.
Si no va a utilizar el aparato durante algún tiempo o
durante una tormenta, desenchufe la clavija de la toma de
corriente.
Alimentación de corriente
Por favor, tenga en cuenta lo siguiente: Aunque el
interruptor de red esté apagado, algunas piezas del
aparato se encuentran bajo tensión. Para interrumpir la
alimentación eléctrica a su aparato o desconectar el
aparato completamente, desenchúfelo de la red.
Enchufe el aparato exclusivamente a fuentes de corriente
de 230 V~ 50 Hz y con toma de tierra. Si tuviera dudas
7
Page 6

sobre la corriente en el lugar donde piensa colocar su
aparato, pregunte a su suministrador de energía.
Para la seguridad adicional le recomendamos que utilice
una protección contra sobretensiones, de este modo
protegerá su aparato frente a daños por puntas de tensión
o rayos en la red eléctrica.
Para interrumpir la alimentación eléctrica de su pantalla,
desenchúfela de la toma de corriente.
Dicha toma de corriente debe estar cerca del aparato y ser
fácilmente accesible.
Coloque el cable de forma que nadie pueda pisarlo ni
tropezar con él.
No ponga ningún objeto encima de los cables, ya que
éstos podrían dañarse.
Manejo con las pilas
Las pilas pueden contener sustancias inflamables. En caso
de un manejo inadecuado las pilas pueden derramar
líquidos tóxicos, calentarse demasiado, inflamarse o hasta
explotar, lo que puede causar daños en su aparato y su
salud.
Por favor, observe en cualquier caso las siguientes
indicaciones:
Mantenga las pilas alejadas de los niños.
Si alguien se tragara una pila accidentalmente, acuda
inmediatamente a un médico.
No intente nunca recargar las pilas (solamente en el caso
de que esto esté expresamente permitido).
No descargue nunca las pilas mediante una alta potencia
absorbida.
No ponga las pilas en cortocircuito.
8
Page 7

¡Nunca exponga las pilas a un calor excesivo como
radiación solar, fuego o similares!
No deforme o desmonte las pilas.
Puede dañarse las manos o los dedos o el líquido de las
pilas puede entrar en sus ojos o manchar su piel. En caso
de contacto con el ácido de las pilas, enjuagar
inmediatamente las zonas afectadas con abundante agua
limpia y acudir inmediatamente a un médico.
Evite golpes fuertes y sacudidas.
Tenga en cuenta la polaridad de las pilas.
Preste atención a que los polos positivos (+) y negativos (-)
estén colocados correctamente para evitar cortocircuitos.
Retire inmediatamente del aparato las pilas descargadas.
Si no va a utilizar el aparato durante un tiempo
prolongado, extraiga las pilas del mismo.
Aísle los contactos de las pilas con una cinta adhesiva si
desea guardarlas o eliminarlas.
ES
9
Page 8
Volumen de suministro
Compruebe que el suministro está completo, y, si no fuera este
el caso, avísenos dentro de un plazo de 14 días después
de su compra.
Con el producto adquirido ha recibido:
Marco de fotos digital
Pie para el marco
Mando a distancia incl. 1 pila CR2025 / 3V
Adaptador de red con cable de red (EA100EE0)
Documentación de la garantía
Manual de instrucciones
ATENCIÓN
No permita que los niños pequeños jueguen con el
plástico. ¡Existe peligro de asfixia!
10
Page 9
Esquema del aparato
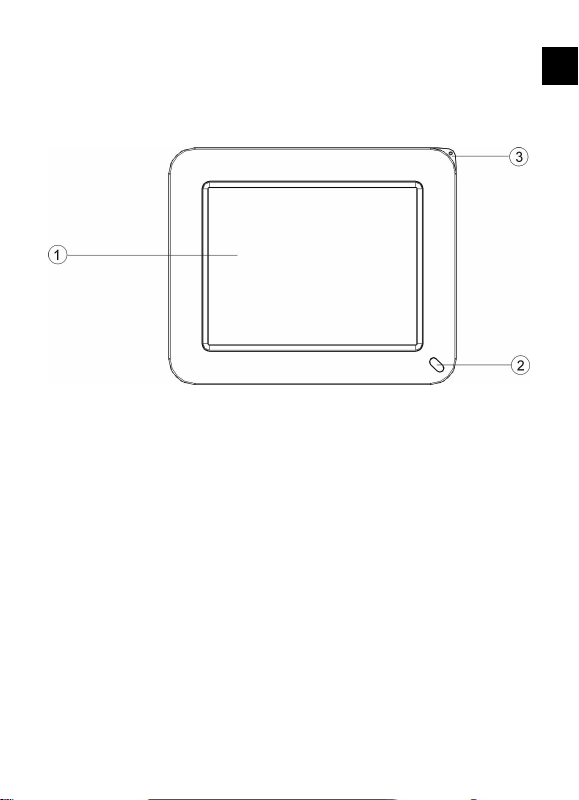
Parte frontal
ES
1 Pantalla LCD
2 Sensor de infrarrojos
3 Tecla de conexión/desconexión
11
Page 10
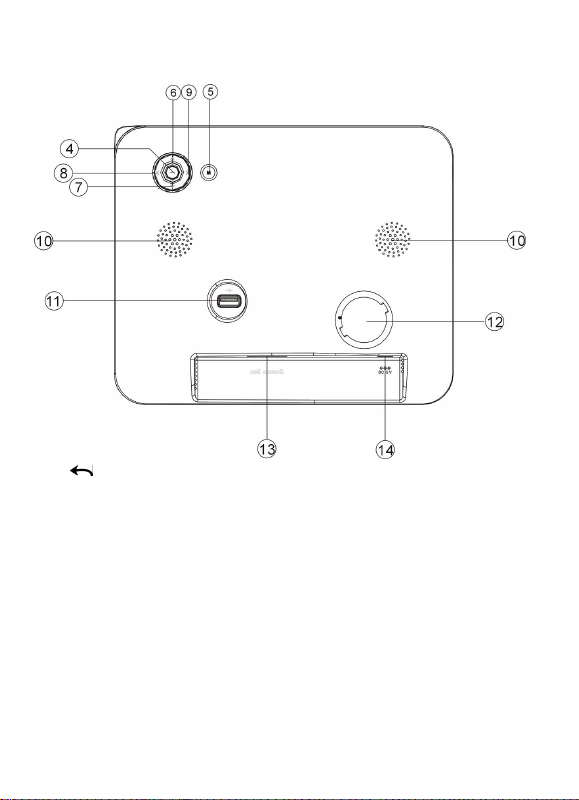
Parte posterior
4
/ ENTER
5 MENU
6 ^ Tecla de flecha arriba
7 ? Tecla de flecha abajo
8 ? Tecla de flecha izquierda
9 ? Tecla de flecha derecha
10 Ranuras de ventilación
11 Conexión USB
12 Sujeción del pie
13 Ranura para la tarjeta de memoria
14 Conexión del adaptador de red DC IN
12
Page 11
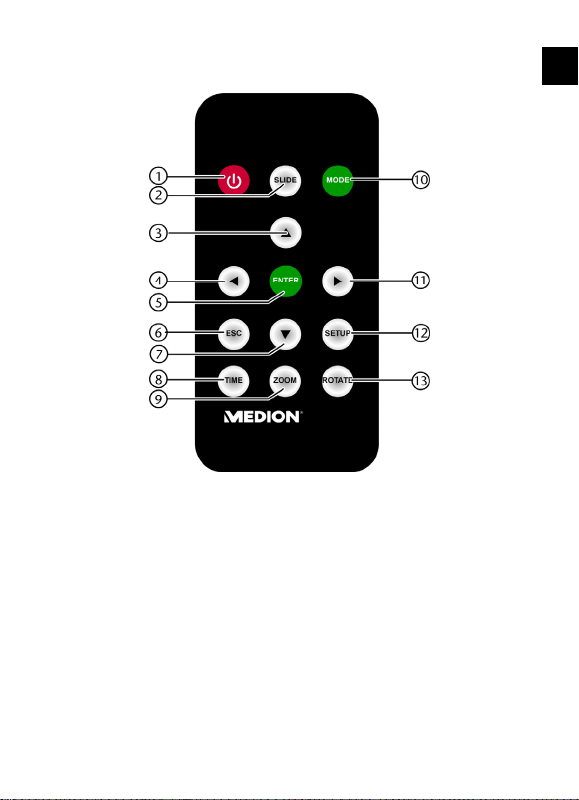
Mando a distancia
ES
1 Tecla de conexión y desconexión
2 SLIDE: Iniciar la representación de diapositivas
3 Menú: mover la marcación hacia arriba
4 Modo de imagen: saltar a la imagen anterior
5 ENTER: Confirmar la introducción
Modo de imagen: Detener/reanudar la representación de
diapositivas
6 Tecla ESC, volver al menú anterior
7 Menú: mover la marcación hacia abajo
13
Page 12

8 TIME: abrir el calendario
9 ZOOM: Aumentar la imagen
10 MODO: modificar el modo de visualización
11 Modo de imagen: saltar a la imagen siguiente
12 SETUP: abrir el menú de ajuste
13 ROTATE: Modo de imagen: Girar la imagen en el sentido
de las agujas del reloj
14
Page 13
Puesta en funcionamiento
Desembalar
Antes de desembalar el aparato, elija un lugar adecuado
para su colocación.
Abra el cartón con sumo cuidado para evitar un posible
daño del aparato. Esto puede ocurrir si para abrir se utiliza
un cuchillo con una hoja demasiado larga.
Dentro del embalaje se encuentran diferentes piezas
pequeñas (pilas, y otros). Manténgalas alejadas de los
niños; existe peligro de que se las traguen.
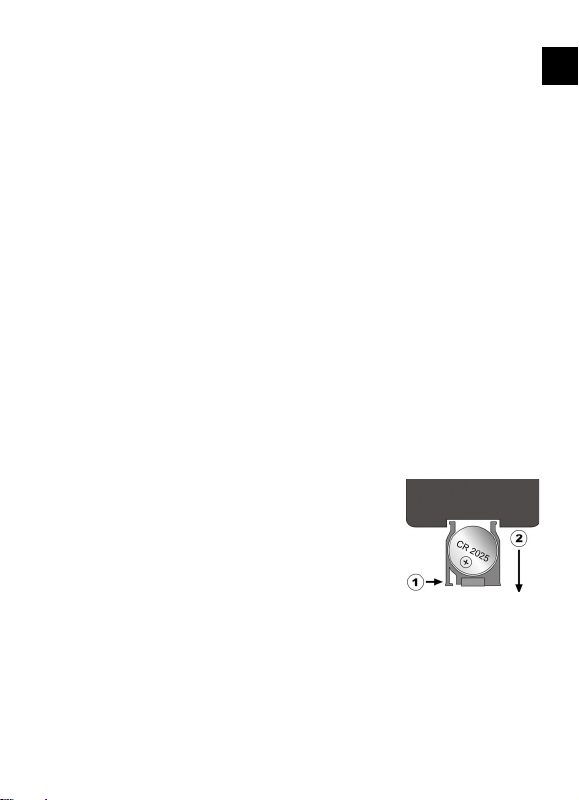
Colocar/cambiar la pila
En el mando a distanca se encuentra una pila de litio del tipo
CR 2025, 3V.
Si el aparato no reacciona o reaciona mal al mando a distancia
se debe cambiar la pila. Proceda como se indica a
continuación:
Presione la palanca de bloqueo (1) y
retire el soporte de la pila junto con la
pila (2) del mando a distancia. Elimine
la pila gastada según las directivas
legales.
Coloque la pila nueva del tipo CR 2025,
3V en el soporte de tal forma que el polo positivo señale
hacia arriba. Al colocarla, asegúrese de la correcta
polaridad.
Introduzca el soporte con la pila completamente en el
mando a distancia.
ES
15
Page 14

ATENCIÓN
En caso de un manejo inadecuado al cambiar las
pilas, existe peligro de explosión. Sustitúyalas sólo
con el mismo o equivalente tipo. Observe las
indicaciones para las pilas en la página 8.
16
Page 15
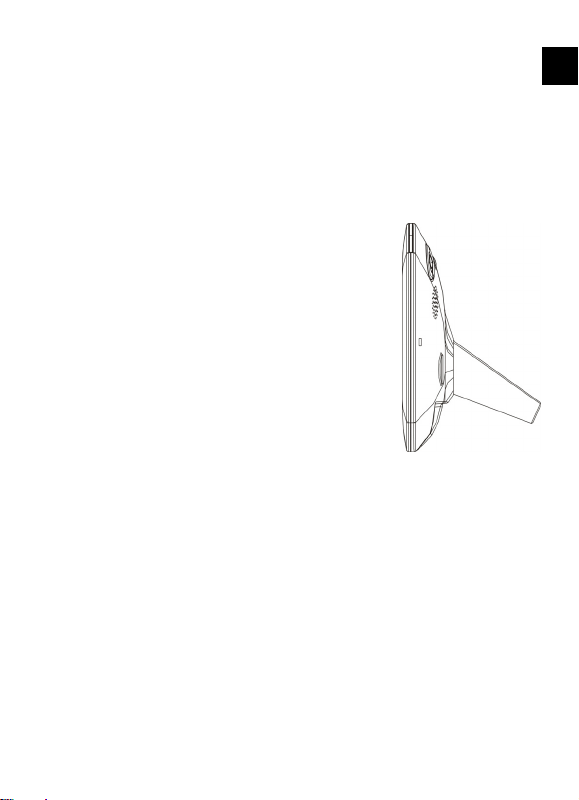
Colocar el pie
Se puede colocar el marco de fotos digital de forma vertical o
horizontal. Para ello se coloca el pie suministrado en la posición
correspondiente.
Coloque el pie de la siguiente forma:
Coloque el aparato con su dorso hacia arriba sobre una
superficie plana.
Coloque el pie cuidadosamente con
sus pestañas de soporte en el
alojamiento previsto.
Gire el pie 180° en el sentido de las
agujas del reloj hasta que el pie
engatille. Ahora se puede colocar el
aparato de forma horizontal.
Gire el pie 45° contra el sentido de las
agujas del reloj hasta que el pie
engatille. Ahora se puede colocar el
parato de forma vertical.
ES
17
Page 16
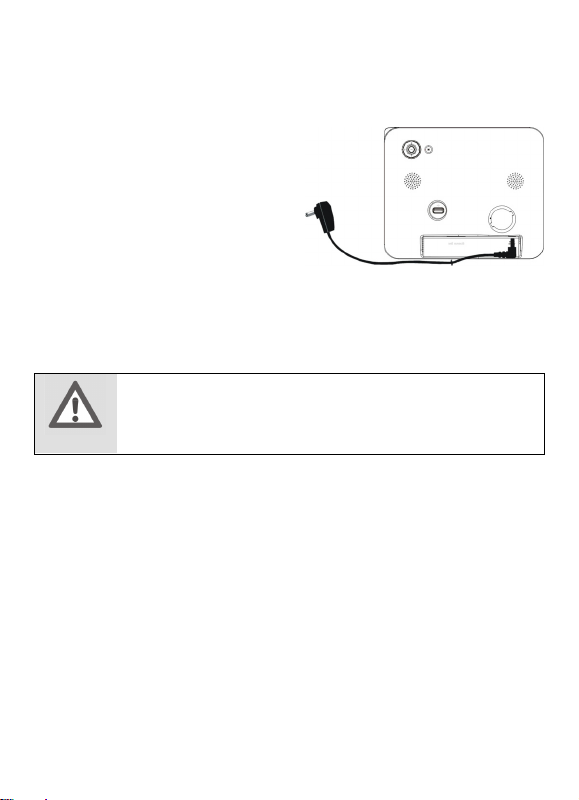
Conexión de la toma de corriente
Su aparato se entrega con un adaptador de red. Observe las
advertencias de seguridad para
la alimentación de corriente de
la página 7.
Conecte el cable de
corriente continua del
adaptador de red en la
conexión DC del dorso del
aparato.
Enchufe adaptador de red a una toma de corriente de 230
V ~ 50 Hz bien accesible.
La alimentación de corriente se interrumpe completamente
sólo cuando se desenchufa el cable de red.
ATENCIÓN
Utilice exclusivamente el adaptador de red
suministrado para el funcionamiento del aparato.
18
Page 17
Encender y apagar el aparato
Una vez conectado a la alimentación de corriente y haber
instalado el pie se puede encender el aparato.
Mantenga pulsada la tecla de conexión/desconexión
durante aprox. 1- 2 segundos.
Ahora se puede conectar y desconectar el aparato
con la TECLA DE CONEXIÓN/DESCONEXIÓN del
mando a distancia.
Para separar el aparato completamente de la corriente,
desenchúfelo. Después de haberlo desenchufado, todos los
ajustes, la hora y la fecha se mantendrán.
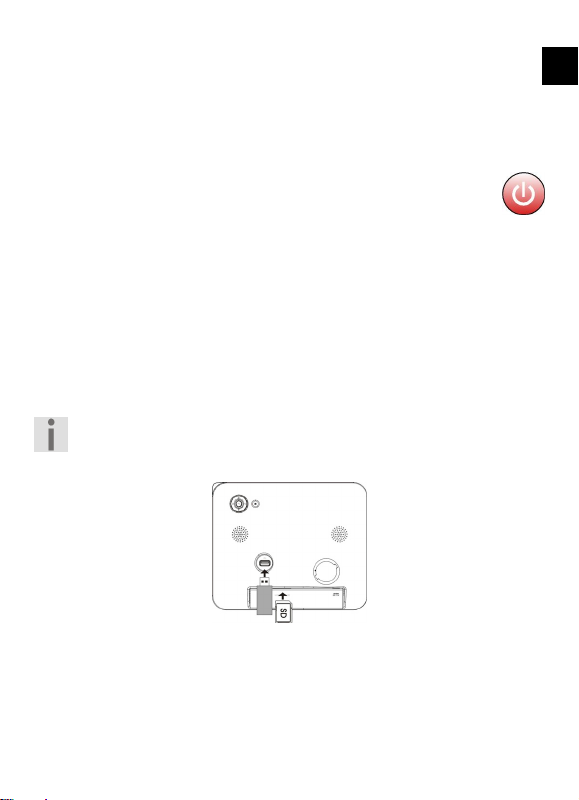
Colocar la tarjeta de memoria
Para visualizar las imágenes de una tarjeta de memoria o de un
stick de memoria USB, colóquela en la ranura para la tarjeta o
utilice una conexión USB.
Solamente se pueden usar aquellas tarjetas de memoria
que son compatibles con el aparato. Los tipos
compatibles los encontrará en la página 31.
ES
Usted tiene tres posibilidades para colocar una tarjeta de
memoria o un stick de memoria USB:
Introduzca una tarjeta de memoria SD/MMC en la ranura
para la tarjeta. Los contactos metálicos deben señalar en
dirección a la pantalla.
19
Page 18
Coloque la tarjeta de memoria MS de tal forma que el lado
superior de la tarjeta quede opuesto a la pantalla.
Introduzca el stick de memoria USB en la toma USB.
Para retirar una tarjeta de memoria o un stick de memoria
USB del lector de tarjetas, tire ligeramente de la tarjeta y
retírela.
ATENCIÓN
¡No utilice la fuerza al colocar la tarjeta de
memoria o el stick USB! Las tarjetas sólo se
pueden colocar en una dirección. Tarjetas de
memoria incorrectamente colocadas pueden
dañar el aparato y la misma tarjeta de memoria.
20
Page 19
Funcionamiento
Todos los pasos descritos en este capítulo indican el manejo
del mando a distancia. Las teclas del aparato coinciden en su
mayoría; de modo que en la mayoría de los casos también se
puede efectuar el manejo en el propio aparato. Encontrará más
información acerca de las teclas del aparato en el capítulo de la
página 11.
Imágenes
Control de menús
Pulse la tecla MENÚ para abrir el menú principal. Aquí
aparecen los símbolos de la imagen, de los ajustes, de las
fuentes y del calendario.
Pulse la teclaopara seleccionar el símbolo.
Para acceder al menú siguiente, pulse la tecla
ENTER.
Al menú anterior se accede siempre con la tecla M del
aparato o con la tecla ESC del mando a distancia.
Imagen
Calendario
Fuente
Ajustes
/
ES
21
Page 20

Iniciar la representación de diapositivas
Una vez conectado el aparato, aparece el menú principal.
Seleccione el modo de imagen y pulse la tecla ENTER del
mando a distancia o / ENTER del aparato.
Seleccione la imagen que desea que aparezca.
Para iniciar la representación de diapositivas pulse la tecla
SLIDE del mando a distancia.
Para finalizar la representación de diapositivas, pulse la tecla
MENU del aparato o la tecla ESC del mando a distancia.
Mostrar el calendario
Usted puede hacer que el calendario aparezca con la hora
actual. Con ello además se mostrará una representación de
diapositivas con las imágenes contenidas en una tarjeta de
memoria o en un stick de memoria USB introducidos .
Primero, ajuste la fecha y la hora como se indica en la
página 26.
Pulse la tecla MENU.
Seleccione con las teclas de flecha el símbolo para el
calendario.
Pulse ENTER en el mando a distancia o
aparato para que aparezca el calendario.
En el calendario se puede saltar con las teclas de
flecha,al mes anterior/siguiente, con las teclas de
flecha o al año anterior/siguiente.
Se abandona el calendario pulsando la tecla MENU del
aparato o la tecla ESC del mando a distancia.
/ ENTER en el
22
Page 21

Mostrar el índice de imágenes
Las imágenes contenidas en el medio de memoria seleccionado
se pueden mostrar como un índice de imágenes. Se muestran
12 imágenes al mismo tiempo. La duración de la composición
de la imagen puede variar según el tamaño de la imagen y la
resolución.
Seleccione en el menú principal el modo de imagen y
confirme con la tecla ENTER del mando a distancia o con
la tecla
Aparecerá un índice de imágenes. Navegue con las teclas
de flecha por el índice. La imagen marcada está
realzada.
Mostrar imágenes individuales
Se puede visualizar imágenes individuales sin una
representación de diapositivas.
Seleccione una imagen con el índice de imágenes (véase el
capítulo anterior) y pulse ENTER, para que aparezca en
pantalla completa.
Se cambia con a la imagen anterior, con a la imagen
siguiente.
Inicie la representación de diapositivas pulsanda la tecla
SLIDE o ENTER.
Vuelva a pulsar la tecla ENTER del mando a distancia para
interrumpir la representación de diapositivas.
Con la tecla ROTATE se gira la imagen 90°, 180°, 270° en
el sentido de las agujas del reloj.
Con la tecla ZOOM del mando a distancia se puede
ampliar la imagen hasta 5 veces.
Con la tecla MENU del aparato o con la tecla ESC del
mando a distancia se vuelve al índice de imágenes.
/ENTER del aparato.
ES
23
Page 22

Aumentar la imagen
Al visualizar las imágenes o durante una representación de
diapositivas se puede ampliar la imagen mostrada.
Pulse ZOOM para aumentar la imagen paso a paso. Cada
pulsación de la tecla amplia la imagen en factores
consecutivos (x1, x2, x3, x4, x5 APAGADO).
24
Page 23

Realización de ajustes
En el menú Setup se puede realizar los ajustes y así configurar
el aparato.
Pulse la tecla SETUP. Aparecerá el menu Setup.
Para seleccionar una opción, pulse las teclas de flecha o
y confirme con ENTER.
Para modificar el ajuste, pulse las teclas de flecha o y
confirme con ENTER.
Pulse la tecla MENÚ para abandonar el menú.
Resumen del menú
Idioma
Mostrar
imagen
Efecto de
transición de
la imagen
Intervalo de
la
representació
n de
diapositivas
Collage
Brillo
Fecha/hora/al
arma
Seleccione el idioma deseado
Ajustar el formato de la imagen: Imagen
completa, tamaño orig., Pan scan.
Seleccione el efecto de transición de una
imagen a la siguiente en caso de
representaciones de diapositivas.
Ajuste la duración de permanencia de una
imagen durante una representación de
diapositivas: 5s, 10s, 30s, 1 min.
Se pueden mostrar hasta 4 imágenes
simultáneamente en la representación de
diapositivas.
Configure el brillo de la pantalla. Las
opciones posibles son 0, 1, 2, 3, 4, 5, 6, 7,
8, 9, 10.
Aquí se ajustan la hora, la fecha y la hora de
la alarma.
ES
25
Page 24

Ajustes de
V
fábrica
ersión
Restablece todos los ajustes al ajuste de
fábrica.
Indica la versión actual del software.
Ajustar la hora y la fecha
Para poder utilizar las funciones de calendario y alarma, ajuste
primero la fecha y la hora.
Pulse la tecla SETUP. Aparecerá el menu Setup.
Seleccione con las teclas de flecha o la posición
Ajuste fecha/hora/alarma y pulse la tecla ENTER.
Seleccione con / el valor a modificar y pulse la tecla
ENTER del mando a distancia o la tecla
aparato.
Ajuste con las teclas de flecha o el valor deseado y a
continuación, confirme pulsando la tecla ENTER.
Proceda con los ajustes restantes de este modo hasta que estén
ajustadas la hora y la fecha correctamente.
/ENTER del
Ajustar la alarma
Pulse la tecla SETUP. Aparecerá el menu Setup.
Seleccione con las teclas de flecha o la posición
Ajuste fecha/hora/alarma y pulse la tecla ENTER.
Seleccione con / la hora o el minuto y pulse la tecla
ENTER para modificar la hora de la alarma con las teclas de
flecha o .
Ahora marque con / el horario y seleccione con o
una de las siguientes entradas:
Desactivado: La función de alarma está desactivada.
Diariamente: La alarma se repite cada día.
Una vez: La alarma sonará una vez.
A continuación confirme con ENTER.
26
Page 25

El ajuste de la hora de la alarma se encuentra en el
menú del ajuste de la hora/fecha. Ajuste la hora de la
alarma en el capítulo OSD “Alarma”.
Ajustes de fábrica
Pulse la tecla SETUP. Aparecerá el menu Setup.
Seleccione con las teclas de flecha o la posición
Ajustes de fábrica y pulse la tecla ENTER.
Seleccione con las teclas de flecha / si desea o no
desea restablecer el aparato al ajuste de fábrica.
ES
27
Page 26

Solución de fallos
Fallo Causa Solución
No aparecen
algunas
imágenes de
la tarjeta de
memoria o el
stick USB.
A pesar de
que la tarjeta
de memoria
está
colocada, el
aparato no la
reconoce.
La tarjeta de
memoria no es
compatible con el
aparato.
El formato de
archivo no es
compatible.
La tarjeta de
memoria no es
compatible con el
aparato.
La tarjeta de
memoria no está
colocada
correctamente.
Se ha colocado
también un stick
USB.
Utilice una tarjeta de
memoria que sea
compatible con el
aparato.
Utilice solamente
imágenes en formato
JPEG con una
resolución máxima
de 4000 x 4000
píxeles.
Utilice una tarjeta de
memoria que sea
compatible con el
aparato.
Coloque la tarjeta de
memoria como se
describe en la página
19 .
Si se ha colocado una
tarjeta de memoria y
un stick de memoria
USB, se lee solamente
el stick de memoria.
Retire el stick de
memoria.
28
Page 27

El formato de
archivo no es
compatible.
Utilice solamente
imágenes en formato
JPEG con una
resolución máxima
de 8000 x 8000
píxeles.
ES
29
Page 28

Algunas
imágenes
aparecen más
deprisa que
otras.
En la pantalla
no aparece
nada.
El adaptador de red
Las imágenes de
una alta resolución
se cargan más
despacio.
El aparato no está
conectado.
no está conectado.
Utilice imágenes de
poca resolución para
acelerar la
composición de la
imagen.
Enciende el
interruptor de red de
la parte trasera del
aparato (“ON”).
Compruebe la
conexión del
adaptador de red con
el aparato.
30
Page 29
Eliminación
Embalaje
Su aparato está embalado para protegerlo contra
eventuales daños durante el transporte. Los embalajes
están hechos a partir de materiales que pueden
desecharse de forma ecológica y ser entregados al
circuito de reciclaje.
Aparato
No tire bajo ningún concepto el aparato al final de su
vida útil a la basura doméstica normal. Infórmese sobre
las posibilidades de las que dispone para eliminarlo de
forma respetuosa con el medio ambiente.
Pilas
¡No tire las pilas usadas a la basura doméstica! Deben ser
depositadas en un punto de recogida para pilas usadas.
ES
31
Page 30

Especificaciones técnicas
Pantalla 8“ TFT LCD, 800 x 600 píxeles
Alimentación de corriente Adaptador de red EA 100EEO
Entrada: 100~240V AC, 50/60 Hz
Salida: 5V DC, 2A
Conexión USB USB 2.0, para sticks de memoria USB
compatibles
Tarjetas de memoria compatibles
Secure Digital Card (SD),
MultiMedia Card (MMC),
Memory Stick (MS),
Formatos compatibles
Imagen
JPEG
Resolución máxima 8000 x 8000 píxeles
Dimensiones aprox. 216 x 182 x 28,3 mm
Peso aprox. 603 g
Reservado el derecho a realizar modificaciones
técnicas y errores de impresión.
32
Page 31

Contents
Safety instructions ..................................................... 4
Proper use .......................................................................... 4
Operational safety .............................................................. 4
Installation location ............................................................ 6
Repairs ................................................................................ 6
Correct environment .......................................................... 7
Power supply ..................................................................... 7
Battery usage ...................................................................... 8
Contents of package ................................................. 10
Product overview ..................................................... 11
Front................................................................................. 11
Rear .................................................................................. 12
Remote control ................................................................. 13
Start-up .................................................................... 15
Unpacking the product ..................................................... 15
Inserting/changing the battery ......................................... 15
Fitting the stand ............................................................... 16
Switching the product on and off ..................................... 18
Inserting the memory card ............................................... 18
Operation ................................................................ 20
Pictures ............................................................................. 20
Displaying the calendar .................................................... 21
Selecting the settings ............................................... 24
Menu overview ................................................................. 24
Setting the time and date ................................................. 25
Setting the alarm .............................................................. 25
Factory setting .................................................................. 26
Troubleshooting ............................................................... 27
Disposal ................................................................... 29
Technical data .......................................................... 30
EN
3
Page 32

Safety instructions
Please read these operating instructions carefully
and follow the safety instructions before using the
product for the first time.
This product should only be used as designated
and described in these instructions.
Please keep these instructions in a safe place for
future reference. Always include these instructions
if passing the product on.
Proper use
This product is designed to display pictures.
This product is suitable for inside use only in dry conditions.
This product is not suitable for use as a monitor at office
workstations.
This product is intended for private use and not for industrial or
commercial use. If used in extreme ambient conditions the
product may get damaged.
Operational safety
Children should be supervised to ensure they do not play
with this product. This product is not intended for use by
people (including children) with reduced physical, sensory
or mental abilities or for those without experience and/or
knowledge, unless they are supervised by a person
responsible for their safety or they have been instructed on
its use.
Keep the packaging material, e.g. plastic bags, out of reach
of children. There is a risk of suffocation if used improperly.
4
Page 33

Never open the machine casing (risk of electric shock,
short circuit and fire)!
Never insert any objects into the product through the slots
and openings (risk of electric shock, short circuit and fire)!
The slots and openings are for ventilation purposes. Do
not cover these openings (risk of overheating and fire)!
Do not put any pressure on the monitor. There is a risk
that the screen may break.
The remote control contains a laser class 1 infrared diode.
Do not use optical devices to look at the LED.
Caution! There is a risk of injury if the screen is broken.
Gather together all the broken pieces using protective
gloves and send them to your Service Centre for proper
waste disposal. Then wash your hands with soap because
chemicals may have leaked out.
To avoid damaging the screen, do not touch it with your
fingers or with sharp objects.
EN
5
Page 34

Contact customer services if: the mains cable is scorched
or damaged, liquid has penetrated into the product, the
product is not working properly, the product has been
dropped or the casing is damaged.
Installation location
In the first few hours of use new products can give off a
typical, unavoidable but totally harmless smell, which
reduces with time. To help reduce the amount of odour
build-up, we recommend that you ventilate the room at
regular intervals. We have taken appropriate measures
during the development of this product to ensure that
levels are well below legal limits.
Do not expose the product to damp, dust, heat or direct
sunlight. Failure to follow these instructions may result in
damage to the product or cause it to malfunction.
Do not operate the product outdoors as it may get
damaged by rain, snow, etc.
Do not expose the product to water in droplet or spray
form. Do not place any objects filled with water (such as
vases) on the product. The container may tip over and the
liquid may impair the electrical safety of the product.
Do not place any naked flames (candles or similar) on the
product.
Operate the product on a stable, level and vibration-free
surface in order to prevent the product from falling over.
Repairs
Always have the product repaired by qualified
professionals in order to avoid safety risks.
6
Page 35

If a repair must be carried out please contact our
authorised service partners only.
Correct environment
Keep the product at least one metre away from high
frequencies and magnetic sources of interference
(television, loudspeakers, mobile telephones, etc.) to avoid
malfunctioning.
After transporting the product wait until it has reached
ambient temperature before switching it on.
Major changes in temperature or fluctuations in humidity
can cause moisture to build up due to condensation within
the product, which can cause an electrical short circuit.
During storms, or if the appliance is not going to be used
for prolonged periods, remove the plug from the mains
socket.
Power supply
Please note: Even when the mains switch is off some
components of the product are live. Unplug the product
completely to cut off the power supply to the product or
to de-energise the product fully.
Operate the product on 230 V~ 50 Hz earthed sockets
only. Contact your electricity provider if you are not sure
about the power supply voltage at the place of use.
For extra safety, we recommend using an overvoltage
protection device to prevent the product from sustaining
damage as a result of power surges or lightning strikes.
To disconnect the power supply to your screen, pull the
mains adapter from the socket.
EN
7
Page 36

The socket must be close to the product and easily
accessible.
Position the cable so that it cannot be stepped on or
tripped over.
Do not place any objects on the cable to avoid damage.
Battery usage
Batteries may contain combustible materials. If not
handled properly, batteries may leak, heat up intensely,
ignite or even explode, which could harm the product and
your health.
It is essential to follow the instructions below:
Keep batteries away from children.
If batteries are swallowed, consult your doctor
immediately.
Never charge batteries (unless it is expressly specified).
Never flatten the batteries by subjecting them to high
power output.
Never short-circuit the batteries.
Never expose the batteries to excessive heat, such as
sunshine, fire or similar sources.
Do not dismantle or deform the batteries.
Your hands or fingers could be injured or battery fluid
could come into contact with your eyes or skin. If this
should happen, rinse the affected areas with plenty of
clean water and contact your doctor immediately.
Avoid heavy impacts and vibrations.
Always insert the batteries correctly.
Make sure that the plus (+) and minus (-) poles are
correctly matched in order to avoid short circuits.
Remove flat batteries from the product immediately.
8
Page 37

Remove the batteries from the product if you do not
intend to use it for a prolonged period of time.
Cover the contacts of the batteries with sticky tape if you
want to store them or dispose of them.
EN
9
Page 38

Contents of package
Please check your purchase to ensure all items are included and
contact us within 14 days of purchase if any components
are missing.
The following items are supplied with the product:
Digital photo viewer
Stand for the viewer
Remote control incl. 1x CR2025 / 3V battery
Mains adapter with power lead (EA100EE0)
Warranty documentation
Operating instructions
CAUTION
Do not allow babies and small children to play with
plastic. There is a risk of suffocation!
10
Page 39

Product overview
Front
EN
1 LC display
2 Infrared sensor
3 On/Off button
11
Page 40

Rear
4 / ENTER
5 MENU
6 ˄ Up arrow key
7 ˅ Down arrow key
8 ˂ Left arrow key
9 ˃ Right arrow key
10 Vents
11 USB port
12 Stand holder
13 Memory card slot
14 DC IN mains connection
12
Page 41

Remote control
EN
1 On/Off button
2 SLIDE: Start slide show
3 Menu: Scroll up
4 Picture mode: Back to previous picture
5 ENTER: Confirm entry
Picture mode: Stop/continue slide show
6 ESC button: Back to previous menu
7 Menu: Scroll down
8 TIME: Open calendar
13
Page 42

9 ZOOM: Enlarge image
10 MODE: Change display mode
11 Picture mode: Skip to next picture
12 SETUP: Open settings menu
13 ROTATE: Picture mode: Rotate picture clockwise
14
Page 43

Start-up
Unpacking the product
Select a suitable place to unpack the product.
Open the box very carefully to avoid damaging the
product. The product may be damaged if you use a knife
with a long blade to open the box.
The box contains a number of small items (batteries, etc.).
Keep these away from children to prevent the risk of
swallowing.
Inserting/changing the battery
The remote control is fitted with a 3V lithium battery CR 2025.
The battery needs to be changed if the product fails to respond
or is slow to respond to the remote control.
Proceed as follows to change the battery:
Press the catch (1) and remove the battery
holder complete with battery (2) from the
remote control. Comply with the legal
requirements when disposing of the used battery.
Insert a new 3V CR 2025 battery in the holder with the
positive terminal facing upwards. Always make sure the
battery is the right way up.
Push the battery holder complete with battery back into
the remote control as far as it will go.
CAUTION
Risk of explosion if batteries are replaced
incorrectly. Always replace the battery with the
same type or an equivalent type. Note the battery
instructions on page 8.
EN
15
Page 44

Fitting the stand
You can set up the digital viewer to display your photos in
portrait or landscape format. The format is set by the
positioning of the stand provided.
Proceed as follows to attach the stand:
Place the product rear side up on an even surface.
Place the arm on the back of the stand
carefully in the holder provided.
Rotate the stand 180° clockwise until it
clicks into place. The pictures can now
be viewed in landscape format.
Rotate the stand 45° anticlockwise until
it clicks into place. The pictures can
now be viewed in portrait format.
16
Page 45

Mains connection
The product is supplied with a mains adapter. Please note the
power supply safety
instructions on page 7.
Insert the DC mains lead in
the DC connection on the
back of the product.
Plug the mains adapter
into an easily accessible
230 V ~ 50Hz mains
socket.
The power supply will only be fully disconnected when the
mains lead is removed from the socket.
CAUTION
Do not operate the product with a mains adapter
other than the one supplied.
EN
17
Page 46

Switching the product on and off
Once the power supply is connected and the stand is fitted, if
required, the product can be switched on:
Press the On/Off button on the product for approx. 1 -2
seconds.
The product can now be switched on and off with
the red ON/OFF BUTTON on the remote control.
Unplug the product to cut off the power supply completely.
When the product is disconnected from the mains, all the
settings will be saved, including the time and date.
Inserting the memory card
In order to view pictures from a memory card or USB memory
stick, place the card in the slot or use the USB port.
The product can only process memory cards which are
compatible with the product. The types supported by
the product are listed on page 29.
There are three possible ways in which to insert a memory card
or a USB memory stick:
Insert an SD/MMC memory card in the slot provided. The
metal contacts should be facing towards the viewer.
Insert an MS memory card with the top of the card facing
away from the viewer.
Insert a USB memory stick into the USB socket.
18
Page 47

Pull gently on the memory card or USB stick to remove
from the card reader.
CAUTION
Do not use force when inserting memory cards
and the USB stick. The cards can only be
inserted one way. Incorrectly inserted memory
cards can damage the product and the memory
card.
EN
19
Page 48

Operation
All the steps in this section relate to operating the viewer with
the remote control. The buttons on the viewer are largely the
same therefore, in most cases, the same steps can be carried
out on the product.
For more information about the buttons on the viewer see the
overview on page 11.
Pictures
Menu navigation
Press the MENU button to open the main menu. The icons on
display relate to the picture, setup, source and calendar.
Pressorto select the relevant icon.
Press
To return to the previous menu you can press M on the
viewer or ESC on the remote control.
/ ENTER to access the next menu.
Picture
Calendar
Source
Settings
20
Page 49

Starting the slide show
The main menu is displayed when you have switched on
the viewer.
Select the Picture mode and press ENTER on the remote
control or
Select the picture which you want to be displayed.
Press SLIDE on the remote control to start the slide show.
To end the slide show and display an index of pictures, press
the MENU button on the viewer or the ESC button on the
remote control.
/ ENTER on the viewer.
Displaying the calendar
You can set up a calendar display with the current time. The
display will also feature a slide show of pictures which may be
stored on an inserted memory card or a USB stick.
Set the date and time as instructed on page 26.
Press the MENU key.
Use the arrow keys to select the calendar icon.
Press ENTER on the remote control or
viewer to display the calendar.
In the calendar display, you can use theandarrow keys
to skip to the previous/next month and the or arrow
keys to skip to the previous/next year.
To quit the calendar, press MENU on the viewer or ESC on
the remote control.
/ ENTER on the
EN
Displaying the picture index
The pictures on the selected data carrier can be displayed in
index form. Up to 12 pictures can be shown at the same time.
21
Page 50

The time taken to display the image may vary depending on
the size and resolution of the picture.
Select the Picture mode in the main menu and confirm
your selection by pressing ENTER on the remote control
or /ENTER on the viewer.
A picture index will be displayed. Use the arrow
keys to navigate through the index. The picture selected at
any given time will be highlighted.
Displaying individual pictures
You can view a series of individual pictures without setting up a
slide show.
Select a picture from the index (see previous section) and
press ENTER to have it displayed in full view.
Use thekey to return to the previous picture and
thekey to go to the next picture.
You can start the slide show by pressing SLIDE or ENTER.
Press ENTER on the remote control again to pause the
slide show.
The ROTATE button can be used to turn the picture 90°,
180° or 270° clockwise.
The ZOOM button on the remote control can be used to
enlarge the picture up to five times.
You can return to the picture index by pressing the MENU
button on the viewer or the ESC button on the remote
control.
22
Page 51

Enlarging the image
You can enlarge the image on the screen while viewing a series
of pictures or during a slide show.
Press ZOOM to enlarge the image step by step. Each time
you press the button, the zoom factor will increase by one
increment (x1, x2, x3, x4, x5 OUT).
EN
23
Page 52

Selecting the settings
r
V
You can change the settings and configure the viewer in the
Setup menu
Press the SETUP key. The Setup menu will appear.
To select an option, press the or arrow keys and press
ENTER to confirm.
To change the setting, press the or arrow keys and
press ENTER to confirm.
Press the MENU key to exit the menu.
Menu overview
Language
Picture
display
Transition
effect
Slide show
interval
Collage
Brightness
Date/time/ala
m setting
Factory
setting
ersion
Select the language you require.
Set picture format: full screen, original size,
pan/scan.
Select the transition effect from one picture
to the next in slide shows.
Set the display duration for each picture
during a slide show: 5s, 10s, 30s, 1 min.
Up to four pictures can be shown at the
same time in the slide show.
Set the brightness of the display. The
options are 0, 1, 2, 3, 4, 5, 6, 7, 8, 9, 10.
You can use this facility to set the time, date
and, if required, the alarm.
Return all settings back to the factory
settings.
Display the current software version.
24
Page 53

Setting the time and date
You have to set the date and time first before you can use the
calendar and alarm functions.
Press the SETUP key. The Setup menu will appear.
Use the or arrow keys to select Date/time/alarm
setting and press ENTER.
Use / to select the setting you wish to change and
then press ENTER on the remote control or
on the viewer.
Use the or arrow keys to enter the required setting
and then press ENTER to confirm.
Proceed in the same way with the other settings until the time
and the date settings are correct.
/ENTER
Setting the alarm
Press the SETUP key. The Setup menu will appear.
Use the or arrow keys to select Date/time/alarm
setting and press ENTER.
Use the / keys to highlight the hour or the minute and
press ENTER in order to be able to change the alarm time
with the or arrow keys.
Highlight the time using the / keys and select one of
the following settings using the or keys:
Off: The alarm function is deactivated.
Daily: The alarm will go off every day.
Once: The alarm will go off once.
Press ENTER to confirm.
The alarm setting is in the menu for the time/date
setting. Set the alarm time in the “Alarm” section of
the OSD.
EN
25
Page 54

Factory setting
Press the SETUP key. The Setup menu will appear.
Use the or arrow keys to select the Factory setting
option and press ENTER.
Use the / arrow keys to select whether the viewer
should be reset to the factory setting or not.
26
Page 55

Troubleshooting
Fault Cause Remedy
Some of the
pictures on
the memory
card or USB
stick are not
being
displayed.
The memory
card is
inserted but
is not
detected by
the viewer.
The memory card is
not supported by
the viewer.
The file format is
not supported.
The memory card is
not supported by
the viewer.
The memory card
has not been
inserted properly.
A USB stick is also
inserted.
The file format is
not supported.
Use a memory card
which is compatible
with the viewer.
Use images in JPEG
format only with a
maximum resolution
of 4000 x 4000
pixels.
Use a memory card
which is compatible
with the viewer.
Insert the memory
card as instructed on
page 19.
If a memory card and
a USB stick are
inserted, the viewer
will only read the
memory stick.
Remove the memory
stick.
Use images in JPEG
format only with a
maximum resolution
of 8000 x 8000
pixels.
EN
27
Page 56

Some
pictures are
displayed
more quickly
than others.
The screen is
blank.
The mains adapter
Pictures with a
higher resolution
take longer to load.
The viewer is not
switched on.
is not connected.
Use pictures with a
lower resolution to
speed up the display.
Turn on the mains
switch on the rear of
the viewer (“ON”).
Check that the mains
adapter is connected
to the viewer.
28
Page 57

Disposal
Packaging
Your device has been packaged to protect it from
damage in transit. The packaging is suitable for
environmentally friendly disposal and can be
recycled.
Product
At the end of its service life, the product should not
be disposed of with the household rubbish. Please
enquire about the options for environmentally
friendly disposal.
Batteries
Do not dispose of used batteries in the household
rubbish. They should be taken to a collection point
for used batteries.
EN
29
Page 58

Technical data
Display 8” TFT LCD, 800 x 600 pixels
Power supply Mains adapter EA 100EEO
Input: 100~240V AC, 50/60 Hz
Output: 5V DC, 2A
USB socket USB 2.0, USB memory sticks
supported
Memory cards supported Secure Digital Card (SD)
MultiMedia Card (MMC)
Memory Stick (MS)
Supported formats
Picture
JPEG
Max. resolution 8000 x 8000 pixels
Dimensions Approx. 216 x 182 x 28.3 mm
Weight Approx. 603 g
Subject to misprints and technical modifications.
30
Page 59

Inhalt
Sicherheitshinweise ................................................... 4
Bestimmungsgemäßer Gebrauch ....................................... 4
Betriebssicherheit ................................................................ 4
Aufstellort ........................................................................... 6
Reparatur ............................................................................ 7
Stromversorgung ............................................................... 7
Umgang mit Batterien ........................................................ 8
Lieferumfang ........................................................... 10
Geräteübersicht ....................................................... 11
Vorderseite ....................................................................... 11
Rückseite .......................................................................... 12
Fernbedienung ................................................................. 13
Inbetriebnahme ....................................................... 15
Auspacken ........................................................................ 15
Einlegen/Wechseln der Batterie ........................................ 15
Aufsteller anbringen ......................................................... 17
Stromversorgung anschließen .......................................... 18
Gerät ein- und ausschalten ............................................... 19
Speicherkarte einlegen ..................................................... 19
Bedienung ............................................................... 21
Bilder ................................................................................ 21
Anzeigen des Kalenders .................................................... 22
Einstellungen vornehmen ........................................ 25
Menü-Übersicht ................................................................ 25
Uhrzeit und Datum einstellen ........................................... 26
Alarm einstellen ................................................................ 26
Werkseinstellung .............................................................. 27
Fehlerbehebung ............................................................... 28
Entsorgung .............................................................. 29
Technische Daten ..................................................... 30
DE
3
Page 60

Sicherheitshinweise
Lesen Sie vor der ersten Inbetriebnahme diese
Bedienungsanleitung gründlich durch und befolgen Sie unbedingt die Sicherheitshinweise!
Alle Tätigkeiten an und mit diesem Gerät dürfen
nur soweit ausgeführt werden, wie sie in dieser
Bedienungsanleitung beschrieben sind.
Bewahren Sie diese Bedienungsanleitung für den
weiteren Gebrauch auf. Falls Sie das Gerät einmal
weitergeben, legen Sie bitte auch diese Bedienungsanleitung dazu.
Bestimmungsgemäßer Gebrauch
Dieses Gerät dient zur Darstellung von Bilder.
Dieses Gerät ist nur für den Gebrauch in trockenen Innenräumen geeignet. Dieses Gerät ist nicht als Datenmonitor für Büroarbeitsplätze geeignet.
Dieses Gerät ist für den Privatgebrauch gedacht und nicht für
industrielle oder kommerzielle Nutzung vorgesehen. Die Nutzung unter extremen Umgebungsbedingungen kann die Beschädigung Ihres Gerätes zur Folge haben.
Betriebssicherheit
Kinder sollen beaufsichtigt werden um sicherzustellen,
dass sie nicht mit dem Gerät spielen. Dieses Gerät ist nicht
dafür bestimmt, durch Personen ( einschließlich Kinder )
mit eingeschränkten physischen, sensorischen, oder geistigen Fähigkeiten oder mangels Erfahrung und/oder mangels Wissen benutzt zu werden, es sei denn, sie werden
durch eine für Ihre Sicherheit zuständige Person beaufsich-
4
Page 61

tigt oder erhielten von Ihnen Anweisungen, wie das Gerät
zu benutzen ist.
Halten Sie das Verpackungsmaterial, wie z.B. Folien von
Kindern fern. Bei Missbrauch könnte Erstickungsgefahr bestehen.
Öffnen Sie niemals das Gehäuse des Gerätes (elektrischer
Schlag, Kurzschluss- und Brandgefahr)!
Führen Sie keine Gegenstände durch die Schlitze und Öff-
nungen ins Innere des Gerätes (elektrischer Schlag, Kurzschluss und Brandgefahr)!
Schlitze und Öffnungen des Gerätes dienen der Belüftung.
Decken Sie diese Öffnungen nicht ab (Überhitzung,
Brandgefahr)!
Üben Sie keinen Druck auf das Display aus. Es besteht die
Gefahr, dass der Bildschirm bricht.
Die Fernbedienung besitzt eine Infrarot-Diode der Klasse 1.
Betrachten Sie die LED nicht mit optischen Geräten.
Achtung! Bei gebrochenem Display besteht Verletzungsge-
fahr. Packen Sie mit Schutzhandschuhen die geborstenen
Teile ein und senden Sie diese zur fachgerechten Entsorgung an Ihr Service Center. Waschen Sie anschließend Ihre
Hände mit Seife, da nicht auszuschließen ist, dass Chemikalien austreten können.
Berühren Sie nicht das Display mit den Fingern oder mit
kantigen Gegenständen, um Beschädigungen zu vermeiden.
DE
5
Page 62

Wenden Sie sich an den Kundendienst, wenn: das Netzka-
bel angeschmort oder beschädigt ist, Flüssigkeit in das Gerät eingedrungen ist,das Gerät nicht ordnungsgemäß
funktioniert, das Gerät gestürzt, oder das Gehäuse beschädigt ist.
Aufstellort
Neue Geräte können in den ersten Betriebsstunden einen
typischen, unvermeidlichen, aber völlig ungefährlichen
Geruch abgeben, der im Laufe der Zeit abnimmt. Um der
Geruchsbildung entgegenzuwirken, empfehlen wir Ihnen,
den Raum regelmäßig zu lüften. Wir haben bei der Entwicklung dieses Produktes Sorge dafür getragen, dass geltende Grenzwerte deutlich unterschritten werden.
Halten Sie das Gerät von Feuchtigkeit fern und vermeiden
Sie Staub, Hitze und direkte Sonneneinstrahlung. Das
Nichtbeachten dieser Hinweise kann zu Störungen oder
zur Beschädigung des Gerätes führen.
Betreiben Sie Ihr Gerät nicht im Freien, da äußere Einflüsse
wie Regen, Schnee etc. das Gerät beschädigen könnten.
Das Gerät darf nicht Tropf- oder Spritzwasser ausgesetzt
werden. Stellen Sie keine mit Flüssigkeit gefüllten Gefäße
(Vasen oder ähnliches) auf das Gerät. Das Gefäß kann umkippen und die Flüssigkeit kann die elektrische Sicherheit
beeinträchtigen.
Stellen Sie keine offenen Brandquellen (Kerzen oder ähnli-
ches) auf das Gerät.
Betreiben Sie das Gerät auf einer stabilen, ebenen und
vibrationsfreien Unterlage, um Stürze des Gerätes zu vermeiden.
6
Page 63

Reparatur
Überlassen Sie die Reparatur Ihres Gerätes ausschließlich
qualifiziertem Fachpersonal, um Gefährdungen zu vermeiden.
Im Falle einer notwendigen Reparatur wenden Sie sich
bitte ausschließlich an unsere autorisierten Servicepartner.
Vorgesehene Umgebung
Wahren Sie mindestens einen Meter Abstand von hochfre-
quenten und magnetischen Störquellen (Fernsehgerät,
Lautsprecherboxen, Mobiltelefon usw.), um Funktionsstörungen zu vermeiden.
Warten Sie nach einem Transport des Gerätes solange mit
der Inbetriebnahme, bis das Gerät die Umgebungstemperatur angenommen hat.
Bei großen Temperatur- oder Feuchtigkeitsschwankungen
kann es durch Kondensation zur Feuchtigkeitsbildung innerhalb des Gerätes kommen, die einen elektrischen Kurzschluss verursachen kann.
Ziehen Sie während eines Unwetters oder wenn das Gerät
für längere Zeit nicht benutzt wird den Stecker aus der
Steckdose.
Stromversorgung
Bitte beachten Sie: Auch bei ausgeschaltetem Netzschalter
sind Teile des Gerätes unter Spannung. Um die Stromversorgung zu Ihrem Gerät zu unterbrechen oder das Gerät
gänzlich von Spannung frei zuschalten, trennen Sie das
Gerät vollständig vom Netz.
Betreiben Sie das Gerät nur an geerdeten Steckdosen mit
230 V~ 50 Hz. Wenn Sie sich der Stromversorgung am
DE
7
Page 64

Aufstellort nicht sicher sind, fragen Sie bei Ihrem Energieversorger nach.
Wir empfehlen zur zusätzlichen Sicherheit die Verwendung
eines Überspannungsschutzes, um Ihre Gerät vor Beschädigung durch Spannungsspitzen oder Blitzschlag aus dem
Stromnetz zu schützen.
Um die Stromversorgung zu Ihrem Bildschirm zu unter-
brechen, ziehen Sie den Netzstecker aus der Steckdose.
Die Steckdose muss sich in der Nähe des Gerätes befinden
und leicht erreichbar sein.
Verlegen Sie die Kabel so, dass niemand darauf treten oder
darüber stolpern kann.
Stellen Sie keine Gegenstände auf die Kabel, da diese sonst
beschädigt werden könnten.
Umgang mit Batterien
Batterien können brennbare Stoffe enthalten. Bei unsach-
gemäßer Behandlung können Batterien auslaufen, sich
stark erhitzen, entzünden oder gar explodieren, was Schäden für Ihr Gerät und Ihre Gesundheit zur Folge haben
könnte.
Bitte befolgen Sie unbedingt folgende Hinweise:
Halten Sie Kinder von Batterien fern.
Sollten Batterien verschluckt worden sein, melden Sie dies
bitte sofort Ihrem Arzt.
Laden Sie niemals Batterien (es sei denn, dies ist ausdrück-
lich angegeben).
Entladen Sie die Batterien niemals durch hohe Leistungs-
abgabe.
Schließen Sie die Batterien niemals kurz.
8
Page 65

Setzen Sie Batterien niemals übermäßiger Wärme wie
durch Sonnenschein, Feuer oder dergleichen aus!
Zerlegen oder verformen Sie die Batterien nicht.
Ihre Hände oder Finger könnten verletzt werden oder Batterieflüssigkeit könnte in Ihre Augen oder auf Ihre Haut gelangen. Sollte dies passieren, spülen Sie die entsprechenden Stellen mit einer großen Menge klaren Wassers und
informieren Sie umgehend Ihren Arzt.
Vermeiden Sie starke Stöße und Erschütterungen.
Vertauschen Sie niemals die Polarität.
Achten Sie darauf, dass die Pole Plus (+) und Minus (-)
korrekt eingesetzt sind, um Kurzschlüsse zu vermeiden.
Entfernen Sie verbrauchte Batterien sofort aus dem Gerät.
Entfernen Sie die Batterien aus Ihrem Gerät, wenn dieses
über einen längeren Zeitraum nicht benutzt wird.
Isolieren Sie die Kontakte der Batterien mit einem Klebe-
streifen, wenn Sie Batterien lagern oder entsorgen wollen.
DE
9
Page 66

Lieferumfang
Bitte überprüfen Sie die Vollständigkeit der Lieferung und benachrichtigen Sie uns innerhalb von 14 Tagen nach dem
Kauf, falls die Lieferung nicht komplett ist.
Mit dem von Ihnen erworbenen Produkt haben Sie erhalten:
Digitaler Bilderrahmen
Aufsteller für den Rahmen
Fernbedienung inkl. 1 Batterie CR2025 / 3V
Netzadapter mit Netzkabel (EA100EE0)
Garantieunterlagen
Bedienungsanleitung
ACHTUNG
Lassen Sie kleine Kinder nicht mit Folie spielen. Es
besteht Erstickungsgefahr!
10
Page 67

Geräteübersicht
Vorderseite
DE
1 LC- Display
2 Infrarot-Sensor
3 Ein- / Austaste
11
Page 68

Rückseite
4 / ENTER
5 MENU
6 ˄ PfeiltasteHoch
7 ˅ Pfeiltaste Runter
8 ˂ Pfeiltaste Links
9 ˃ Pfeiltaste Rechts
10 Lüftungsschlitze
11 USB Anschluß
12 Standfußarretierung
13 Speicherkartenslot
14 DC IN Netzteilanschluß
12
Page 69

Fernbedienung
DE
1 Taste zum Ein- und Ausschalten
2 SLIDE: Diaschau starten
3 Menü: Markierung nach oben bewegen
4 Bild-Modus: zum vorherigen Bild springen
5 ENTER: Eingabe bestätigen
Bild-Modus: Diashow anhalten/fortsetzen
6 ESC: Taste Zurück zum vorherigen Menü
7 Menü: Markierung nach unten bewegen
8 TIME: Kalender öffnen
13
Page 70

9 ZOOM: Bilder vergrößern
10 MODE: Anzeigemodus ändern
11 Bild-Modus: zum nächsten Bild springen
12 SETUP: Einstellungsmenü öffnen
13 ROTATE: Bild-Modus: Bild im Uhrzeigersinn drehen
14
Page 71

Inbetriebnahme
Auspacken
Wählen Sie vor dem Auspacken einen geeigneten Platz
zum Aufstellen.
Öffnen Sie den Karton sehr vorsichtig, um eine mögliche
Beschädigung des Gerätes zu verhindern. Dies kann passieren, wenn zum Öffnen ein Messer mit einer langen
Klinge verwendet wird.
In der Verpackung befinden sich verschiedene Kleinteile
(Batterien, u. a.). Halten Sie diese von Kindern fern, es besteht Verschluckungsgefahr.
Einlegen/Wechseln der Batterie
In der Fernbedienung ist eine Lithiumbatterie Typ CR 2025, 3V
eingesetzt.
Wenn das Gerät nicht oder schlecht auf die Fernbedienung
reagiert, muss die Batterie ausgetauscht werden. Verfahren Sie
dazu wie nachfolgend beschrieben:
Drücken Sie den Arretierungshebel (1)
und ziehen Sie die Batteriehalterung
mit der Batterie (2) aus der Fernbedienung heraus. Entsorgen Sie die Altbatterie entsprechend den gesetzlichen
Bestimmungen.
Legen Sie eine neue Batterie Typ CR 2025, 3V mit dem
Pluspol nach oben zeigend in die Halterung ein. Achten Sie
beim Einlegen auf die richtige Polarität.
Schieben sie die Halterung mit der Batterie vollständig in
die Fernbedienung.
DE
15
Page 72

ACHTUNG
Explosionsgefahr bei unsachgemäßem Auswechseln
der Batterie. Ersatz nur durch denselben oder einen
gleichwertigen Typ. Beachten Sie die Batteriehinweise auf Seite 8.
16
Page 73

Aufsteller anbringen
Sie können den digitalen Bilderrahmen im Hoch- oder Querformat aufstellen. Dazu wird der mitgelieferte Aufsteller in die
entsprechende Position gebracht.
Bringen Sie den Aufsteller wie folgt an:
Legen Sie das Gerät mit der Rückseite nach oben auf eine
ebene Oberfläche.
Setzen Sie den Aufsteller mit den Hal-
tenasen vorsichtig in die dafür vorgesehene Aufnahme.
Drehen Sie den Aufsteller um 180° im
Uhrzeigersinn bis der Aufsteller einrastet. Das Gerät kann nun im Querformat
aufgestellt werden.
Drehen Sie den Aufsteller um 45° ge-
gen den Uhrzeigersinn bis der Aufsteller einrastet. Das Gerät kann nun im
Hochformat aufgestellt werden.
DE
17
Page 74

Stromversorgung anschließen
Ihr Gerät wird mit einem Netzadapter ausgeliefert. Beachten Sie
die Sicherheitshinweise zur
Stromversorgung auf Seite 7.
Schließen Sie das Gleich-
stromkabel des Netzadapters am Anschluss DC an
der Rückseite des Gerätes
an.
Verbinden Sie den Netz-
adapter mit einer gut erreichbaren Netzsteckdose 230 V ~
50 Hz.
Die Stromversorgung wird erst dann vollständig unterbrochen,
wenn das Netzkabel aus der Steckdose gezogen wird.
ACHTUNG
Verwenden Sie ausschließlich das mitgelieferte
Netzteil für den Betrieb des Gerätes.
18
Page 75

Gerät ein- und ausschalten
Nachdem die Stromversorgung angeschlossen ist und ggf. der
Aufsteller installiert wurde, kann das Gerät eingeschaltet werden:
Halten Sie den An/Aus Taster am Gerät ca. 1 -2 Sekunden
gedrückt.
Das Gerät kann nun mit der roten EIN-/AUS-
TASTE an der Fernbedienung ein- und ausgeschal-
tet werden.
Um das Gerät vollständig vom Strom zu trennen, ziehen den
Netzstecker. Nach dem Trennen vom Netz bleiben alle Einstellungen, die Uhrzeit und das Datum erhalten.
Speicherkarte einlegen
Um Bilder von einer Speicherkarte oder einem USBSpeicherstick abzuspielen, legen Sie diese in den Karteneinschub ein oder verwenden den USB-Anschluss.
Es können nur diejenigen Speicherkarten verarbeitet
werden, die mit dem Gerät kompatibel sind. Die unterstützten Typen finden Sie auf Seite30.
DE
Sie haben drei Möglichkeiten, eine Speicherkarte oder einen
USB-Speicherstick einzulegen:
19
Page 76

Legen Sie eine SD/MMC- Speicherkarte in den Kartenein-
schub ein. Die metallenen Kontakte zeigen dabei in Rich-
tung des Displays.
Legen Sie eine MS-Speicherkarte so ein, sodass die Obersei-
te der Karte vom Display abgewandt ist.
Stecken Sie einen USB-Speicherstick in den USB-Anschluss.
Um eine Speicherkarte oder USB-Speicherstick aus dem
Kartenleser zu entfernen, ziehen Sie leicht an der Karte und
entnehmen Sie.
ACHTUNG
Wenden Sie beim Einlegen der Speicherkarten
und des USB-Sticks keine Gewalt an! Die Karten
lassen sich nur in eine Richtung einlegen. Falsch
eingelegte Speicherkarten können das Gerät
und die Speicherkarte beschädigen.
20
Page 77

Bedienung
Alle in diesem Abschnitt beschriebenen Schritte bezeichnen die
Bedienung mit der Fernbedienung. Die Tasten am Gerät sind
weitgehend übereinstimmend, sodass in den meisten Fällen die
Bedienung auch am Gerät möglich ist.
Weitere Informationen zu den Gerätetasten finden Sie im Abschnitt Geräteübersicht auf Seite 11.
Bilder
Menüführung
Drücken Sie die Taste MENU, um das Hauptmenü zu öffnen.
Das Bild-, das Setup- , das Quellen- und Kalender-Symbol werden hier angezeigt.
Drücken Sie die Tasteoderum das Symbol auszuwäh-
len.
Um in das nächste Menü zu gelangen, drücken Sie die
Taste
Das vorige Menü erreichen Sie immer mit der Taste M am
Gerät oder mit der Taste ESC an der Fernbedienung.
/ ENTER.
Bild
Kalender
Quelle
Einstellungen
DE
21
Page 78

Diaschau starten
Nachdem Sie das Gerät eingeschaltet haben, erscheint das
Hauptmenü.
Wählen Sie den Bild Modus und drücken Sie die Taste
ENTER auf der Fernbedienung oder / ENTER am Ge-
rät.
Wählen Sie das Bild aus welches angezeigt werden soll.
Um die Diaschau zu starten, drücken Sie die Taste SLIDE
auf der Fernbedienung.
Um die Diaschau zu beenden und einen Bildindex anzuzeigen,
drücken Sie die Taste MENU am Gerät oder die Taste ESC auf
der Fernbedienung.
Anzeigen des Kalenders
Sie können einen Kalender mit der aktuellen Uhrzeit anzeigen
lassen. Dabei wird außerdem eine Diashow mit Bildern angezeigt, die ggf. auf einer eingelegten Speicherkarte oder einem
USB-Speicherstick abgelegt sind.
Stellen Sie zunächst Datum und Uhrzeit wie auf Seite 26
beschrieben ein.
Drücken Sie die Taste MENU.
Wählen Sie mit den Pfeiltasten das Symbol für den Kalen-
der aus.
Drücken Sie ENTER auf der Fernbedienung oder
ENTER am Gerät, um den Kalender anzuzeigen.
In der Kalenderanzeige können Sie mit den Pfeiltasten
,zum vorherigen/nächsten Monat, mit den Pfeiltasten
oder zum vorherigen/nächsten Jahr springen.
Sie verlassen den Kalender, indem Sie die Taste MENU auf
dem Gerät oder die Taste ESC auf der Fernbedienung drü-
cken
/
22
Page 79

Bildindex anzeigen
Die Bilder im gewählten Speichermedium können als Bildindex
angezeigt werden. Es werden bis zu 12 Bilder gleichzeitig angezeigt. Die Dauer des Bildaufbaus kann je nach Bildgröße und
Auflösung variieren.
Wählen Sie im Hauptmenü den Bild Modus aus und bestä-
tigen Sie mit der Taste ENTER auf der Fernbedienung oder
mit der Taste
Es wird ein Bildindex angezeigt. Navigieren Sie mit den
Pfeiltasten durch den Index. Das jeweils markierte
Bild ist hervorgehoben.
Einzelne Bilder anzeigen
Sie können einzelne Bilder durchsehen, ohne eine Diaschau
anzuzeigen.
Wählen Sie ein Bild im Bildindex (siehe voriges Kapitel) aus
und drücken Sie ENTER, um es in der Großansicht anzu-
zeigen.
Sie wechseln mit zum vorigen, mit zum nächsten
Bild.
Starten Sie die Diashow, indem Sie auf die Taste SLIDE
oder ENTER drücken.
Drücken Sie die ENTER Taste auf der Fernbediehnung
erneut um die Diashow zu pausieren.
Mit der Taste ROTATE drehen Sie das Bild um jeweils 90°,
180°, 270°mit dem Uhrzeigersinn.
Mit der Taste ZOOM auf derFernbedienung können Sie das
Bild bis zu 5 mal vergrößern.
Mit der Taste MENU am Gerät oder mit der Taste ESC auf
der Fernbedienung kehren Sie zurück zum Bildindex.
/ENTER am Gerät.
DE
23
Page 80

Bild vergrößern
Während des Durchsehens von Bildern oder während einer
Diaschau können sie das dargestellte Bild vergrößern
Drücken Sie ZOOM, um das Bild schrittweise zu vergrö-
ßern. Jeder Tastendruck vergrößert das Bild um einen wei-
teren Faktor (x1, x2, x3, x4, x5 AUS).
24
Page 81

Einstellungen vornehmen
Im Setup-Menü können Sie die Einstellungen anpassen und das
Gerät konfigurieren.
Drücken Sie die Taste SETUP. Das Setup-Menü erscheint.
Um eine Option auszuwählen, drücken Sie die Pfeiltasten
oder und bestätigen mit ENTER.
Um die Einstellung zu ändern, drücken Sie die Pfeiltasten
oder und bestätigen mit ENTER.
Drücken Sie die Taste MENU am Gerät oder die Taste ESC
auf der Fernbedienung um das Menü zu verlassen.
Menü-Übersicht
Sprache
Bildanzeige
Bildübergangseffekt
Diashow - Intervall
Collage
Helligkeit
Einstellung
Dat/Zeit/Alarm
Wählen Sie die gewünschte Sprache
Bildformat einstellen: Vollbild, Orig. grö.,
Pan Scan.
Wählen Sie den Übergangseffekt bei
Diashows von einem Bild zum nächsten.
Stellen Sie die Anzeigedauer eines Bildes
während einer Diashow ein: 5s, 10s,
30s, 1 Min.
Es können bis zu 4 Bilder gleichzeitig in
der Diaschau angezeigt werden.
Konfigurieren Sie die Helligkeit des Bildschirms. Mögliche Optionen sind 0, 1, 2,
3, 4, 5, 6, 7, 8, 9, 10.
Hier stellen Sie die Uhrzeit, das Datum
und ggfs. die Alarmzeit ein.
DE
25
Page 82

Werkseinstel-
V
lung
ersion
Setzt alle Einstellungen auf die Werkseinstellungen zurück.
Zeigt die aktuelle Software Version an.
Uhrzeit und Datum einstellen
Um die Funktionen Kalender und Alarm nutzen zu können,
stellen Sie zunächst das Datum und die Uhrzeit ein.
Drücken Sie die Taste SETUP. Das Setup-Menü erscheint.
Wählen Sie mit den Pfeiltasten oder den Punkt
Einstellg. Dat/Zeit/Alarm aus und drücken Sie die ENTER
Taste.
Wählen Sie mit / den zu ändernden Wert und drücken
Sie die Taste ENTER auf der Fernbedienung oder die Taste
/ENTER am Gerät.
Stellen Sie mit den Pfeiltasten oder den gewünschten
Wert ein und bestätigen Sie anschließend indem Sie die
Taste ENTER drücken.
Verfahren Sie mit den restlichen Einstellungen auf diese Weise
bis die Zeit, und das Datum richtig eingestellt sind.
Alarm einstellen
Drücken Sie die Taste SETUP. Das Setup-Menü erscheint.
Wählen Sie mit den Pfeiltasten oder den Punkt
Einstellg. Dat/Zeit/Alarm aus und drücken Sie die ENTER
Taste.
Markieren Sie mit / die Stunde oder die Minute und
drücken Sie die Taste ENTER um mit den Pfeiltasten oder
die Weckzeit zu ändern.
Markieren Sie nun mit / den Zeitplan und wählen Sie
mit oder einen der folgenden Einträge:
Aus: Die Alarmfunktion ist deaktiviert.
26
Page 83

Täglich: Der Alarm wird täglich wiederholt.
Einmal: Der Alarm wird einmalig ausgeführt.
Bestätigen Sie abschließend mit ENTER.
Die Alarmzeitseinstellung befindet sich im Menü der
Uhrzeit/Datumseinstellung. Stellen Sie die Alarmzeit im
OSD Abschnitt „Alarm“ ein.
Werkseinstellung
Drücken Sie die Taste SETUP. Das Setup-Menü erscheint.
Wählen Sie mit den Pfeiltasten oder den Punkt
Werkseinstellung aus und drücken Sie die ENTER Taste.
Wählen Sie mit den Pfeiltasten / ob das Gerät in die
Werkseinstellung zurückgesetzt werden soll oder nicht.
DE
27
Page 84

Fehlerbehebung
Fehler Ursache Lösung
Einige Bilder
von der Speicherkarte
oder dem
USB-Stick
werden nicht
angezeigt.
Trotz eingelegter Speicherkarte
wird diese
vom Gerät
nicht erkannt.
Die Speicherkarte
wird vom Gerät
nicht unterstützt.
Das Dateiformat
wird nicht unterstützt.
Die Speicherkarte
wird vom Gerät
nicht unterstützt.
Die Speicherkarte
ist nicht korrekt
eingelegt.
Es ist zusätzlich ein
USB-Stick eingelegt.
Das Dateiformat
wird nicht unterstützt.
Nutzen Sie eine Speicherkarte, die mit
dem Gerät kompatibel ist.
Verwenden Sie nur
Bilder im Format JPEG
bei einer maximalen
Auflösung von 8000
x 8000 Pixeln.
Verwenden Sie eine
Speicherkarte, die mit
dem Gerät kompatibel ist.
Legen Sie Speicherkarte wie auf Seite 19
beschrieben ein.
Wenn eine Speicherkarte und ein USBSpeicherstick eingelegt sind, wird nur
der Speicherstick
gelesen. Entfernen
Sie den Speicherstick.
Verwenden Sie nur
Bilder im Format JPEG
bei einer maximalen
Auflösung von 8000
x 8000 Pixeln.
28
Page 85

Einige Bilder
werden
schneller
angezeigt als
andere.
Der Bildschirm zeigt
nichts an.
Der Netzadapter ist
Bilder mit einer
höheren Auflösung
laden langsamer.
Das Gerät ist nicht
eingeschaltet.
nicht angeschlossen.
Entsorgung
Verpackung
Ihr Gerät befindet sich zum Schutz vor Transportschäden in einer Verpackung. Verpackungen sind aus
Materialien hergestellt, die umweltschonend entsorgt
und einem fachgerechten Recycling zugeführt werden können.
Gerät
Werfen Sie das Gerät am Ende seiner Lebenszeit keinesfalls in den normalen Hausmüll. Erkundigen Sie
sich nach Möglichkeiten einer umweltgerechten
Entsorgung.
Batterien
Verbrauchte Batterien gehören nicht in den Hausmüll! Sie müssen bei einer Sammelstelle für Altbatterien abgegeben werden.
Nutzen Sie Bilder in
einer geringeren
Aufllösung, um den
Bildaufbau zu beschleunigen.
Schalten Sie den
Netzschalter rechts
Oben am Gerät ein
(„ON“).
Prüfen Sie die Verbindung des Netzadapters zum Gerät.
DE
29
Page 86

Technische Daten
Display: 8“ TFT LCD, 800 x 600 Pixel
Stromversorgung: Netzadapter EA 100EEO
Eingang: 100~240V AC, 50/60 Hz
Ausgang: 5V DC, 2A
USB-Anschluss: USB 2.0, USB-Speichersticks werden
unterstützt
Unterst. Speicherkarten: Secure Digital Card (SD),
MultiMedia Card (MMC),
Memory Stick (MS),
Unterstützte Bildformate: JPEG
max. Auflösung: 8000 x 8000 Pixel
Abmessungen: ca. 216 x 182 x 28,3 mm
Gewicht: ca. 603 g
Druckfehler und technische Änderungen vorbehalten.
30
Page 87

Conteúdo
Indicações de segurança ............................................ 4
Utilização correcta .............................................................. 4
Segurança de funcionamento ............................................. 4
Local de instalação .............................................................. 6
Reparação ........................................................................... 7
Ambiente previsto .............................................................. 7
Alimentação de corrente ..................................................... 7
Manuseamento das pilhas .................................................. 8
Volume de fornecimento ......................................... 10
Vista geral do aparelho ............................................ 11
Parte da frente .................................................................. 11
Verso ................................................................................ 12
Telecomando.................................................................... 13
Colocação em funcionamento .................................. 15
Tirar da embalagem .......................................................... 15
Colocar dispositivo de colocação ...................................... 17
Ligar alimentação de corrente ........................................... 18
Ligar e desligar o aparelho ................................................ 19
Colocar cartão de memória ............................................... 19
Utilização ................................................................. 21
Imagens............................................................................ 21
Apresentação do calendário .............................................. 22
Efectuar configurações ............................................ 25
Vista Geral de Menus ........................................................ 25
Ajustar hora e data ............................................................ 26
Configurar alarme ............................................................ 27
Definição de fábrica .......................................................... 27
Reparação de avarias ........................................................ 28
Eliminação ............................................................... 30
Dados técnicos ......................................................... 31
PT
3
Page 88

Indicações de segurança
Antes da primeira colocação em funcionamento
leia este manual de instruções com atenção e siga
estritamente as indicações de segurança!
Todos os trabalhos efectuados no e com este
aparelho devem ser efectuados como descritos
neste manual.
Guarde este manual para uso posterior. Se
pretender entregar este aparelho, por favor juntelhe o manual de instruções.
Utilização correcta
Este aparelho está destinado para a apresentação de imagens.
Este aparelho destina-se apenas a uma utilização em espaços
interiores secos. Este aparelho não é apropriado como monitor
de dados para locais de trabalhos de escritórios.
Este aparelho foi pensado para o uso provado e não é previsto
para o aproveitamento industrial ou comercial. A utilização em
condições ambientais extremas pode conduzir a danos no seu
aparelho.
Segurança de funcionamento
As crianças têm de estar sob vigilância para se certificar
que estas não brincam com o aparelho. Este aparelho não
se destina a ser utilizado por pessoas (incluindo crianças)
com capacidades físicas, sensoriais ou mentais limitadas ou
com falta de experiência e/ou conhecimento, a não ser
que se encontrem sob vigilância de uma pessoa
responsável pela sua segurança ou se dela obtiverem
instruções sobre como utilizar o aparelho.
4
Page 89

Mantenha o material da embalagem, como por exemplo,
películas, afastadas das crianças. Em caso de uma
utilização incorrecta, poderia resultar perigo de asfixia.
Nunca abra a caixa do aparelho (descarga eléctrica, curto-
circuito e perigo de incêndio)!
Não insira objectos nas ranhuras e aberturas para o interior
do aparelho (descarga eléctrica, curto-circuito e incêndio)!
As ranhuras e as aberturas do aparelho servem para a
ventilação do aparelho. Não cubra estas aberturas
(sobreaquecimento, perigo de incêndio)!
Não exerça pressão sobre o visor. Existe o perigo de o ecrã
se partir.
O telecomando possui um díodo emissor de
infravermelhos da classe 1. Não olhe para o LED com
aparelhos ópticos.
Atenção! Caso o visor se parta, existe o perigo de
ferimentos. Utilizando luvas de protecção, apanhe as peças
partidas e envie-as para uma eliminação correcta para o
centro de serviço. De seguida, lave as mãos com sabão,
uma vez que não se pode excluir que tenha havido o
contacto com produtos químicos.
Não toque no visor com os dedos ou com objectos
afiados, de modo a evitar danos.
PT
5
Page 90

Informe-se junto do apoio ao cliente, caso: o cabo de rede
esteja derretido ou danificado, caso tenha entrado líquido
dentro do aparelho, o aparelho não funcionar
correctamente, caso o aparelho tenha caído ou o exterior
esteja danificado.
Local de instalação
Os aparelhos novos podem emitir, nas primeiras horas de
funcionamento, um cheiro típico, que não pode ser
evitado e completamente inofensivo, que se vai reduzindo
à medida que o tempo vai passando. De forma a reagir
contra esta formação de cheiro, recomendamos a
ventilação regular do espaço. Ao desenvolvermos este
produto, preocupámo-nos em ficar consideravelmente
abaixo dos valores-limite válidos.
Mantenha o aparelho afastado de humidade e evite pó,
calor e raios solares directos. A inobservância destas
indicações pode conduzir a avarias ou a danos no
aparelho.
Não coloque o seu aparelho a funcionar ao ar livre, uma
vez que as influências exteriores como a chuva, a neve,
etc. podem danificar o aparelho.
O aparelho não pode ser exposto a gotas ou salpicos de
água. Não coloque recipientes com líquido (vasos ou algo
semelhante) em cima do aparelho. O vaso pode tombar e
o líquido pode prejudicar a segurança eléctrica do
aparelho.
Não coloque fontes de combustão (velas ou algo
semelhante) no aparelho.
Coloque o aparelho sobre uma base estável, plana e sem
vibrações, de forma a evitar a queda do aparelho.
6
Page 91

Reparação
A reparação do seu aparelho deve ser feita exclusivamente
por técnicos especializados para evitar perigos.
Caso seja necessária uma reparação, dirija-se apenas a um
dos nossos parceiros de assistência autorizados.
Ambiente previsto
Guarde no mínimo um metro de distância relativamente a
fontes de elevada frequência e magnéticas que causem
perturbações (televisores, colunas, telemóveis, etc.), de
forma a evitar avarias no funcionamento.
Espere após o transporte com a primeira colocação em
funcionamento até o aparelho se adaptar à temperatura
ambiente.
A elevadas oscilações da temperatura ou da humidade
pode haver formação de humidades dentro do aparelho
provocada pela condensação, a qual pode causar um
curto-circuito eléctrico.
Durante o mau tempo ou caso o aparelho não seja
utilizado durante um longo período, retire a ficha da
tomada.
Alimentação de corrente
Tenha em atenção: Mesmo com o interruptor de corrente
desligado, algumas peças do aparelho continuam sob
tensão. Para interromper a alimentação de corrente para o
seu aparelho ou para manter o aparelho totalmente livre
de qualquer tensão, desligue o aparelho completamente
da rede.
Coloque o aparelho a funcionar apenas ligado a tomadas
com ligação à massa de 230 V~ 50 Hz. Se não tiver a
PT
7
Page 92

certeza quanto à alimentação de corrente existente no
local da instalação, pergunte à empresa fornecedora de
energia.
Para uma maior segurança, recomendamos a utilização de
uma protecção contra sobretensão, de forma a proteger o
seu aparelho de danos provocados por pios de tensão ou
por relâmpagos que passam pela corrente eléctrica.
Para interromper a alimentação de corrente para o seu
ecrã, retire a ficha da tomada.
A tomada deve encontrar-se perto do aparelho e ser de
fácil acesso.
Coloque os cabos de forma que ninguém tropece ou
escorregue neles.
Não coloque objectos no cabo, uma vez que estes podem
ser danificados.
Manuseamento das pilhas
As pilhas podem conter materiais inflamáveis. Em caso de
um manuseamento inadequado, as pilhas podem verter,
aquecerem-se bastante, inflamar-se ou mesmo explodir, o
que pode representar danos para o seu aparelho e para a
sua saúde.
Cumpra impreterivelmente as seguintes indicações:
Mantenha as pilhas fora do alcance das crianças.
Caso uma pilha seja engolida, consulte imediatamente o
seu médico.
Não carregue as pilhas (a não ser que tal seja
expressamente indicado).
Não descarregue as pilhas utilizando uma potência mais
elevada.
Não curte-circuite as pilhas.
8
Page 93

Nunca exponha as pilhas a um calor excessivo, como
através de raios solares, fogo ou semelhante!
Não decomponha ou deforme as pilhas.
Pode ferir as suas mãos ou os seus dedos ou pode entrar
para os olhos ou para a pele o líquido das pilhas. Caso
alguma destas situações aconteça, limpe as respectivas
áreas afectadas com bastante água limpa e informe
imediatamente o seu médico.
Evite choques fortes e vibrações.
Não troque a polaridade.
Tenha atenção a que os pólos positivos (+) e negativo (-)
estão correctamente colocados, de forma a evitar curtocircuitos.
Retire imediatamente as pilhas gastas do aparelho.
Retire as pilhas do seu aparelho, caso este não seja
utilizado durante algum tempo.
Isole os contactos das pilhas com fita adesiva quando
pretender guardar ou retirar as pilhas.
PT
9
Page 94

Volume de fornecimento
Verifique a integridade da entrega e informe-nos dentro de
14 dias após a compra, caso o volume de fornecimento não
esteja completo.
Juntamente com o seu produto, recebeu:
Moldura digital
Suporte para a moldura
Telecomando incl. 1 pilha CR2025/3V
Adaptador de rede com cabo de rede (EA100EE0)
Documentos de garantia
Manual de instruções
ATENÇÃO
Nunca deixar crianças pequenas brincar com a
película de plástico. Existe o perigo de asfixia!
10
Page 95

Vista geral do aparelho
Parte da frente
PT
1 Visor LCD
2 Sensor de Infravermelhos
3 Botão lig /deslig.
11
Page 96

Verso
4
/ ENTER
5 MENU
6 ˄ Seta para cima
7 ˅ Seta para baixo
8 ˂ Seta para a esquerda
9 ˃ Seta para a direita
10 Ranhuras de ventilação
11 Ligação USB
12 Dispositivo de bloqueio da base de apoio
13 Compartimento do cartão de memória
14 DC IN ligação da fonte de alimentação
12
Page 97

Telecomando
PT
1 Botão para ligar e desligar
2 SLIDE: Iniciar uma apresentação de diapositivos
3 Menu: Mover marca para cima
4 Modo de imagem: Saltar para a imagem anterior
5 ENTER: Confirmar introdução
Modo de imagem: Parar apresentação de
diapositivos/prosseguir
6 Tecla ESC retroceder para o menu anterior
7 Menu: Mover marca para baixo
13
Page 98

8 TIME: Abrir calendário
9 ZOOM: Ampliar as imagens
10 MODE: Alterar modo de indicação
11 Modo de imagem: Saltar para a próxima imagem
12 SETUP: Abrir menu de configuração
13 ROTATE: Modo de imagem: Rodar imagem no sentido
dos ponteiros do relógio.
14
Page 99

Colocação em funcionamento
Tirar da embalagem
Antes do desembalamento, seleccione um local
apropriado para a instalação.
Abra com bastante cuidado a caixa, evitando possíveis
danos para o aparelho. Isto pode acontecer, caso utilize
uma faca com uma lâmina comprida para abrir a caixa.
Na embalagem encontram-se várias pequenas peças
(pilhas, entre outros). Mantenha estas peças fora do
alcance das crianças, pois existe o perigo de as engolirem.
Colocar/substituir a pilha
No telecomando está colocada uma pilha de lítio do tipo CR
2025, 3V.
Se o aparelho reagir mal ou não reagir de todo ao
telecomando, deverá substituir esta pilha. Proceda conforme
descrito de seguida:
Pressione a alavanca de bloqueio (1) e
retire o suporte das pilhas com a pilha
(2) do telecomando. Elimine a pilha
antiga de acordo com as disposições
legais.
Coloque uma nova pilha tipo CR 2025,
3V com o pólo positivo para cima no suporte. Tenha em
atenção durante a colocação quanto à polaridade correcta.
Desloque o suporte com a pilha completamente para
dentro do telecomando.
PT
15
Page 100

ATENÇÃO
Perigo de explosão caso a substituição da pilha não
for efectuada correctamente! Substituição apenas
pela mesma pilha ou tipo equivalente. Tenha
atenção às indicações das pilhas na página 8.
16
 Loading...