

Page 1

Contents
Chapter 1: Getting started
Introducing HP QuickWeb (select models only) . . . . . . . . . . . . . . . . . . . . . . . . . . . . . . . . 1
TouchPad . . . . . . . . . . . . . . . . . . . . . . . . . . . . . . . . . . . . . . . . . . . . . . . . . . . . . . . . . . . . . . 1
Sharing optical drives . . . . . . . . . . . . . . . . . . . . . . . . . . . . . . . . . . . . . . . . . . . . . . . . . . . . . 1
Connecting to the Internet. . . . . . . . . . . . . . . . . . . . . . . . . . . . . . . . . . . . . . . . . . . . . . . . . . 2
Protecting your computer from viruses . . . . . . . . . . . . . . . . . . . . . . . . . . . . . . . . . . . . . . . 2
Locating the electronic manuals . . . . . . . . . . . . . . . . . . . . . . . . . . . . . . . . . . . . . . . . . . . . . 2
Finding more information. . . . . . . . . . . . . . . . . . . . . . . . . . . . . . . . . . . . . . . . . . . . . . . . . . 3
Turning off the computer . . . . . . . . . . . . . . . . . . . . . . . . . . . . . . . . . . . . . . . . . . . . . . . . . . 3
Chapter 2: Windows desktop
Identifying the Windows desktop features . . . . . . . . . . . . . . . . . . . . . . . . . . . . . . . . . . . . . 5
Identifying the software on the computer. . . . . . . . . . . . . . . . . . . . . . . . . . . . . . . . . . . . . . 6
Updating the software installed on the computer. . . . . . . . . . . . . . . . . . . . . . . . . . . . . . . . 6
Installing software from the Internet . . . . . . . . . . . . . . . . . . . . . . . . . . . . . . . . . . . . . . . . . 6
TouchPad . . . . . . . . . . . . . . . . . . . . . . . . . . . . . . . . . . . . . . . . . . . . . . . . . . . . . . . . . . . . . . 7
Turning the TouchPad on and off. . . . . . . . . . . . . . . . . . . . . . . . . . . . . . . . . . . . . . . . 8
Navigating. . . . . . . . . . . . . . . . . . . . . . . . . . . . . . . . . . . . . . . . . . . . . . . . . . . . . . . . . . 8
Clicking. . . . . . . . . . . . . . . . . . . . . . . . . . . . . . . . . . . . . . . . . . . . . . . . . . . . . . . . . . . . 8
Using TouchPad gestures . . . . . . . . . . . . . . . . . . . . . . . . . . . . . . . . . . . . . . . . . . . . . . 9
Chapter 3: Using HP QuickWeb (select models only)
Setting up HP QuickWeb for the first time. . . . . . . . . . . . . . . . . . . . . . . . . . . . . . . . . . . . 12
Starting Microsoft Windows. . . . . . . . . . . . . . . . . . . . . . . . . . . . . . . . . . . . . . . . . . . . . . . 13
Identifying the QuickWeb control buttons . . . . . . . . . . . . . . . . . . . . . . . . . . . . . . . . . . . . 13
Identifying the LaunchBar icons. . . . . . . . . . . . . . . . . . . . . . . . . . . . . . . . . . . . . . . . 14
Identifying the notification icons . . . . . . . . . . . . . . . . . . . . . . . . . . . . . . . . . . . . . . . 15
Using the Settings panel . . . . . . . . . . . . . . . . . . . . . . . . . . . . . . . . . . . . . . . . . . . . . . . . . . 16
Configuring the network. . . . . . . . . . . . . . . . . . . . . . . . . . . . . . . . . . . . . . . . . . . . . . . . . . 16
Playing music . . . . . . . . . . . . . . . . . . . . . . . . . . . . . . . . . . . . . . . . . . . . . . . . . . . . . . . . . . 16
Browsing photos . . . . . . . . . . . . . . . . . . . . . . . . . . . . . . . . . . . . . . . . . . . . . . . . . . . . . . . . 17
Creating instant messages with Chat . . . . . . . . . . . . . . . . . . . . . . . . . . . . . . . . . . . . . . . . 17
Making Internet phone calls with Skype (select models only). . . . . . . . . . . . . . . . . . . . . 17
Disabling and enabling HP QuickWeb. . . . . . . . . . . . . . . . . . . . . . . . . . . . . . . . . . . . . . . 18
Chapter 4: Connecting to the Internet
Choosing the type of Internet access . . . . . . . . . . . . . . . . . . . . . . . . . . . . . . . . . . . . . . . . 19
Using an ISP . . . . . . . . . . . . . . . . . . . . . . . . . . . . . . . . . . . . . . . . . . . . . . . . . . . . . . . . . . . 19
Connecting to a wired network. . . . . . . . . . . . . . . . . . . . . . . . . . . . . . . . . . . . . . . . . . . . . 20
Connecting to an existing wireless network . . . . . . . . . . . . . . . . . . . . . . . . . . . . . . . . . . . 21
Setting up a new wireless network . . . . . . . . . . . . . . . . . . . . . . . . . . . . . . . . . . . . . . . . . . 21
Notebook Essentials iii
Page 2

Contents
Step 1: Purchase and install a wireless router . . . . . . . . . . . . . . . . . . . . . . . . . . . . . 22
Step 2: Configure the computer to connect to the wireless network . . . . . . . . . . . . 23
Connecting to a WWAN (select models only). . . . . . . . . . . . . . . . . . . . . . . . . . . . . . . . . 24
Bluetooth connections (select models only). . . . . . . . . . . . . . . . . . . . . . . . . . . . . . . . . . . 24
Bluetooth and Internet Connection Sharing (ICS) . . . . . . . . . . . . . . . . . . . . . . . . . . 25
Chapter 5: Backup and recovery
Using Roxio BackOnTrack . . . . . . . . . . . . . . . . . . . . . . . . . . . . . . . . . . . . . . . . . . . . . . . 27
Creating a copy of the hard drive . . . . . . . . . . . . . . . . . . . . . . . . . . . . . . . . . . . . . . . 28
Performing a recovery . . . . . . . . . . . . . . . . . . . . . . . . . . . . . . . . . . . . . . . . . . . . . . . 28
Using the Disaster Recovery utility . . . . . . . . . . . . . . . . . . . . . . . . . . . . . . . . . . . . . 28
Using the Instant Restore utility . . . . . . . . . . . . . . . . . . . . . . . . . . . . . . . . . . . . . . . . 30
Using HP Recovery Manager. . . . . . . . . . . . . . . . . . . . . . . . . . . . . . . . . . . . . . . . . . . . . . 30
Backing up your information . . . . . . . . . . . . . . . . . . . . . . . . . . . . . . . . . . . . . . . . . . 31
Creating a set of recovery discs . . . . . . . . . . . . . . . . . . . . . . . . . . . . . . . . . . . . . . . . 31
Performing a recovery . . . . . . . . . . . . . . . . . . . . . . . . . . . . . . . . . . . . . . . . . . . . . . . . . . . 32
Recovering using the recovery discs . . . . . . . . . . . . . . . . . . . . . . . . . . . . . . . . . . . . 32
Recovering using the partition on the hard drive (select models only) . . . . . . . . . . 33
Using Windows Backup and Restore. . . . . . . . . . . . . . . . . . . . . . . . . . . . . . . . . . . . . . . . 33
Using system restore points . . . . . . . . . . . . . . . . . . . . . . . . . . . . . . . . . . . . . . . . . . . 34
Chapter 6: Keeping your computer safe
Protecting the computer from viruses. . . . . . . . . . . . . . . . . . . . . . . . . . . . . . . . . . . . . . . . 35
Using Windows Security Center . . . . . . . . . . . . . . . . . . . . . . . . . . . . . . . . . . . . . . . 35
Protecting your system files . . . . . . . . . . . . . . . . . . . . . . . . . . . . . . . . . . . . . . . . . . . . . . . 35
Protecting your privacy . . . . . . . . . . . . . . . . . . . . . . . . . . . . . . . . . . . . . . . . . . . . . . . . . . 36
Protecting the computer from power surges. . . . . . . . . . . . . . . . . . . . . . . . . . . . . . . . . . . 36
Using the computer safely . . . . . . . . . . . . . . . . . . . . . . . . . . . . . . . . . . . . . . . . . . . . . . . . 36
Appendix A: Routine care
Cleaning the display . . . . . . . . . . . . . . . . . . . . . . . . . . . . . . . . . . . . . . . . . . . . . . . . . . . . . 39
Cleaning the TouchPad and keyboard . . . . . . . . . . . . . . . . . . . . . . . . . . . . . . . . . . . . . . . 39
Traveling and shipping. . . . . . . . . . . . . . . . . . . . . . . . . . . . . . . . . . . . . . . . . . . . . . . . . . . 39
Appendix B: Problem meets solution
Troubleshooting resources . . . . . . . . . . . . . . . . . . . . . . . . . . . . . . . . . . . . . . . . . . . . . . . . 41
Quick troubleshooting . . . . . . . . . . . . . . . . . . . . . . . . . . . . . . . . . . . . . . . . . . . . . . . . . . . 41
The computer is unable to start up . . . . . . . . . . . . . . . . . . . . . . . . . . . . . . . . . . . . . . 41
The computer screen is blank . . . . . . . . . . . . . . . . . . . . . . . . . . . . . . . . . . . . . . . . . . 42
Software is functioning abnormally . . . . . . . . . . . . . . . . . . . . . . . . . . . . . . . . . . . . . 42
The computer is on but is not responding . . . . . . . . . . . . . . . . . . . . . . . . . . . . . . . . 42
The computer is unusually warm . . . . . . . . . . . . . . . . . . . . . . . . . . . . . . . . . . . . . . . 42
An external device is not working . . . . . . . . . . . . . . . . . . . . . . . . . . . . . . . . . . . . . . 43
The wireless network connection is not working. . . . . . . . . . . . . . . . . . . . . . . . . . . 43
Appendix C: Specifications
iv Notebook Essentials
Page 3

Index
Contents
Operating environment . . . . . . . . . . . . . . . . . . . . . . . . . . . . . . . . . . . . . . . . . . . . . . . . . . . 45
Input power. . . . . . . . . . . . . . . . . . . . . . . . . . . . . . . . . . . . . . . . . . . . . . . . . . . . . . . . . . . . 45
Notebook Essentials v
Page 4

Contents
vi Notebook Essentials
Page 5

Chapter 1: Getting started
After you set up and register your computer, there are important next steps to take before you
begin using your computer . First r ead this chapter completely, because it explains what to do
and where to find additional information. For example, this guide provides specific
instructions for connecting to wired and wireless networks. You will also find practical
information to help you protect, maintain, and back up the computer. Then, read the specific
chapters for additional information.
For help in identifying specific components of the computer, refer to the user guide. Click
Start, click Help and Support, and then click User Guides, or refer to the User Guides disc
included with some models.
Introducing HP QuickWeb (select models only)
After you set up your computer, you can activate HP QuickWeb. QuickWeb provides
immediate access to your music, digital photos, and the W eb without waiting for the
Windows® operatin g system to start. Refer to Chapter 3, “Using HP QuickWeb (select
models only),” for additional information.
TouchPad
To move the pointer, slide your finger across the TouchPad surface in the direction you want
the pointer to go. Use the TouchPad’s lower left and right buttons like the corresponding
buttons on an external mouse. The TouchPad supports a variety of TouchPad gestures.
TouchPad gestures are not available from within HP QuickWeb. For additional
✎
information about using the TouchPad and TouchPad gestures, refer to Chapter 2,
“TouchPad,” for more information.
Sharing optical drives
Although your computer does not have an integrated optical drive, you can easily access
software, install programs, and access information by sharing an optical drive connected to
another computer in your network. Drive sharing is a feature of the Windows® operating
system that allows a drive on one computer to be accessible to other computers on the same
network.
You must have a network set up in order to share an optical drive. Refer to Help and
✎
Support for information on setting up a network.
Some discs, such as DVD movies and game discs, may be copy-protected and therefore
✎
unusable through DVD or CD sharing.
Notebook Essentials 1
Page 6

Chapter 1: Getting started
To share an optical drive:
1. From the computer with the optical drive you want to share, click Start, and then click
My Computer.
2. Right-click the optical drive you want to share, and then click Properties.
3. Click the Sharing tab, and then click Share this folder.
4. Type a name for the optical drive in the Share name text box.
5. Click Apply, and then click OK.
6. To view the shared optical drive on your computer, click Start, click Control Panel,
click Network and Internet, and then click Network Connections.
Connecting to the Internet
After you set up your computer, you can connect to a wireless or wired network so that you
can connect to the Internet and send and receive e-mail. Refer to Chapter 4, “Connecting to
the Internet,” for more information.
Protecting your computer from viruses
After you have connected to the Internet, manage your computer’s defenses with Norton
Internet Security. HP also recommends that you alwa ys update the antivirus software.
Antivirus software helps protect your computer from damage caused by viruses. Refer to
Chapter 6, “Keeping your computer safe,” for more information.
Locating the electronic manuals
For detailed information about your computer, such as power management, drives, memory ,
security, and other features, click
Guides
. You do not need to connect to the Internet to access the user guides in Help and
Support.
The desktop of your computer may look slightly different from the illustration in this
✎
section.
2 Notebook Essentials
Start
, click
Help and Support
, and then click
User
Page 7

Finding more information
In addition to the user guide, Help and Support also provides information abou t the operating
system, drivers, troubleshooting tools, and technical support. To access Help and Support,
click Start, and then click Help and Support. For country- or region-specific support, go to
http://www.hp.com/support, select your country or region, and follow the on-screen
instructions.
WARNING: To reduce the risk of serious injury, read the Safety & Comfort Guide. It
Å
describes proper workstation setup and proper posture, health, and work habits for
computer users. The Safety & Comfort Guide also provides important electrical and
mechanical safety information for HP computers. To access this document, click
Start, click Help and Support, and then click User Guides, or refer to the User
Guides disc included with some models.
available on the Web at http://www.hp.com/ergo.
Chapter 1: Getting started
The Safety & Comfort Guide is also
For more safety and regulatory information, and for battery disposal information, refer to the
Regulatory, Safety and Environmental Notices. To access the notices, click Start, click Help
and Support, and then click User Guides, or refer to the User Guides disc included with
some models.
Turning off the computer
To turn off the computer:
1. Save your work and close all programs.
2. Click Start, click Turn Off Computer, and then click Turn Off.
Notebook Essentials 3
Page 8

Chapter 1: Getting started
4 Notebook Essentials
Page 9

Chapter 2: Windows desktop
Identifying the Windows desktop features
The Windows desktop is where you start when you turn on your computer. It includes the
notification area at the far right of the taskbar, icon shortcuts that are used to start programs,
and the Start menu.
The desktop of your computer may look slightly different from the illustration in this
✎
section.
Icon Name Description
Norton Internet Security Displays the status of Norton Internet Security
antivirus software.
HP Wireless Assistant
(select models only)
Network status Displays the status of your network connection.
Wireless network status Displays the status of your wireless network
HP Connection Manager
(select models only)
Notebook Essentials 5
Displays the status of your wireless device.
connection and opens the Wireless Network
Connection window.
Displays the status of HP Connection Manager and
opens the HP Connection Manager window.
(Continued)
Page 10

Chapter 2: Windows desktop
Icon Name Description
Synaptics Pointing Devices Opens the Mouse Properties window.
Volume control Opens the Volume Control window.
QuickSync Synchronizes and migrates e-mail, contacts,
calendars, files, folders, and browser bookmarks to
your mobile storage de vices.
Intel® Graphics Media
Accelerator Driver for
Mobile
Power Meter Displays the current power status and opens the
Opens the Intel Graphics window.
Power Meter windo w.
Identifying the software on the computer
To see a list of the software preinstalled on the computer, follow these steps:
» Click Start, and then click All Programs. Click the name of a program to open it.
For details about using software included with the computer, refer to the software
✎
manufacturer’s instructions, which may be provided with the software or on the
manufacturer’s Web site.
Updating the software installed on the computer
Most software, including the operating system, is updated frequently by the manufacturer or
provider. Important updates to the software included with the computer may have been
released since the computer left the factory.
Some updates may affect the way the computer responds to optional software or external
devices. Many updates provide security enhancements.
Update the operating system and other software installed on the computer as soon as the
computer is connected to the Internet. T o access links for updating installed software, refer to
Help and Support.
Installing software from the Internet
To install software from the Internet, go to the software manufacturer’s Web site and follow
the instructions.
CAUTION: Software downloaded from the Internet may contain viruses. Refer to
Ä
Chapter 6, “Keeping your computer safe,” for more information.
6 Notebook Essentials
Page 11
Chapter 2: Windows desktop
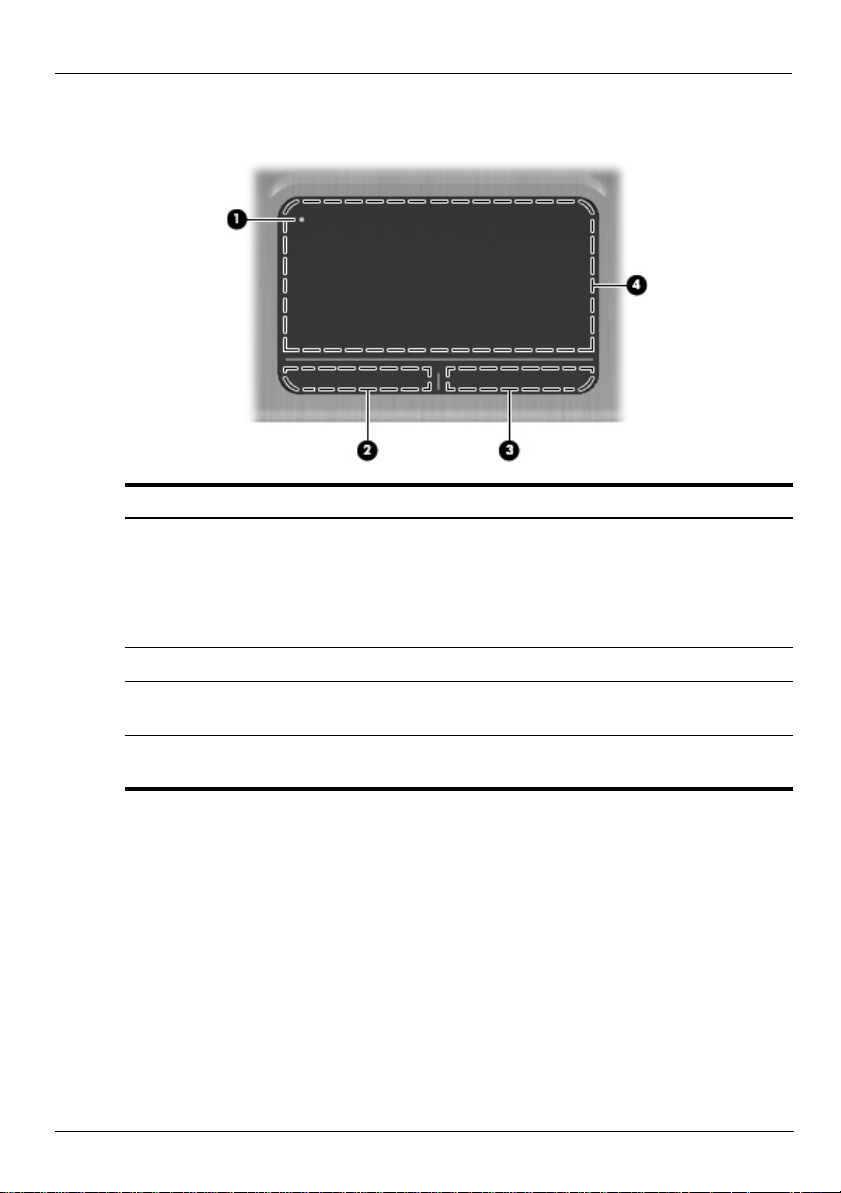
TouchPad
Component Description
1
2
3
4
TouchP ad off indicator To turn the TouchPad on and off , quic kly d oub le-tap
the TouchPad off indicator.
When the light is off, the TouchPad is
✎
enabled. When the light is on (amber), the
TouchPad is disabled.
Left TouchPad button Functions like the left button on an external mouse.
Right TouchPad button Functions like the right button on an external
mouse.
TouchP ad zone Moves the pointer and s elects or ac tivates items on
the screen.
Notebook Essentials 7
Page 12
Chapter 2: Windows desktop
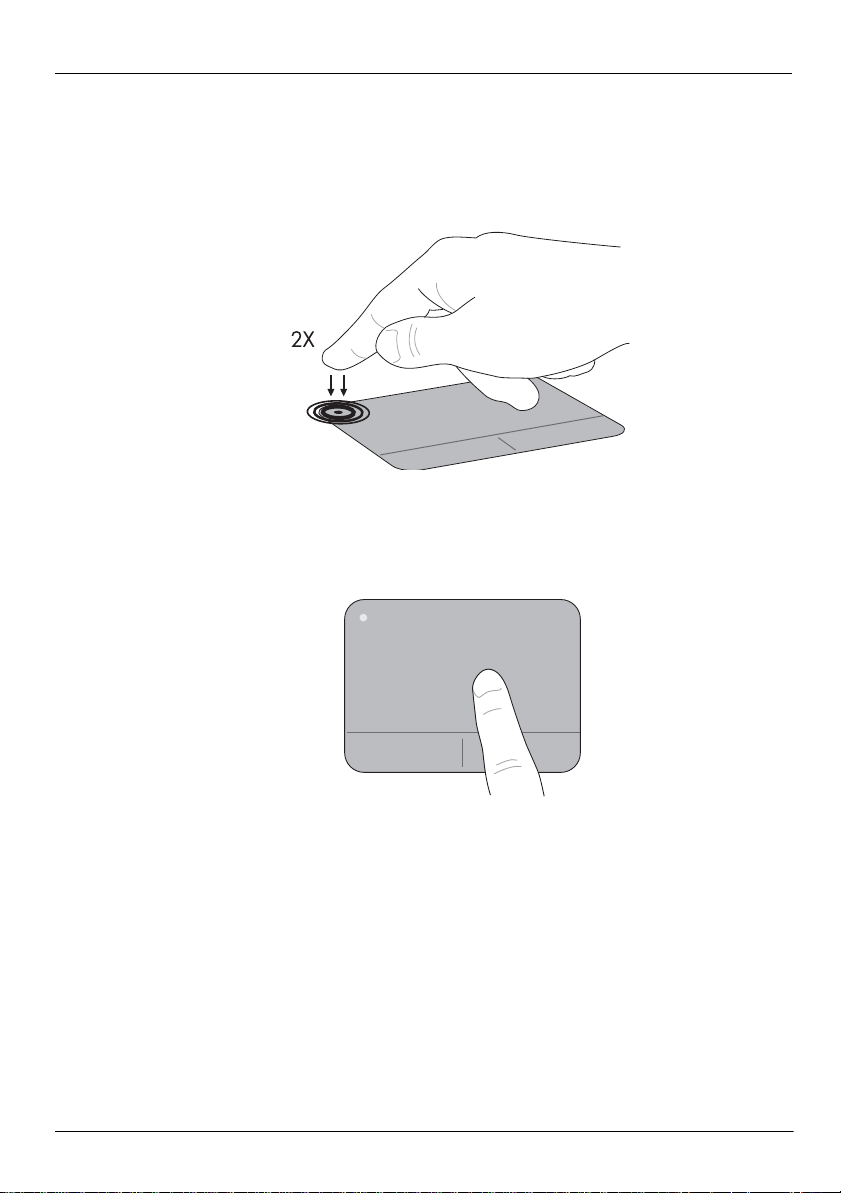
Turning the TouchPad on and off
The T ouchP ad is turned on at the f actory. When the TouchPad is on, the light is of f. When the
TouchPad is off, the light is on (amber).
To turn the TouchPad on and off, quickly double-tap the TouchPad off indicator.
Navigating
To move the pointer, touch and slide one finger across the TouchPad surface in the direction
you want the pointer to go.
Clicking
Use the left and right TouchPad buttons like the corresponding b uttons on an e xternal mouse.
8 Notebook Essentials
Page 13
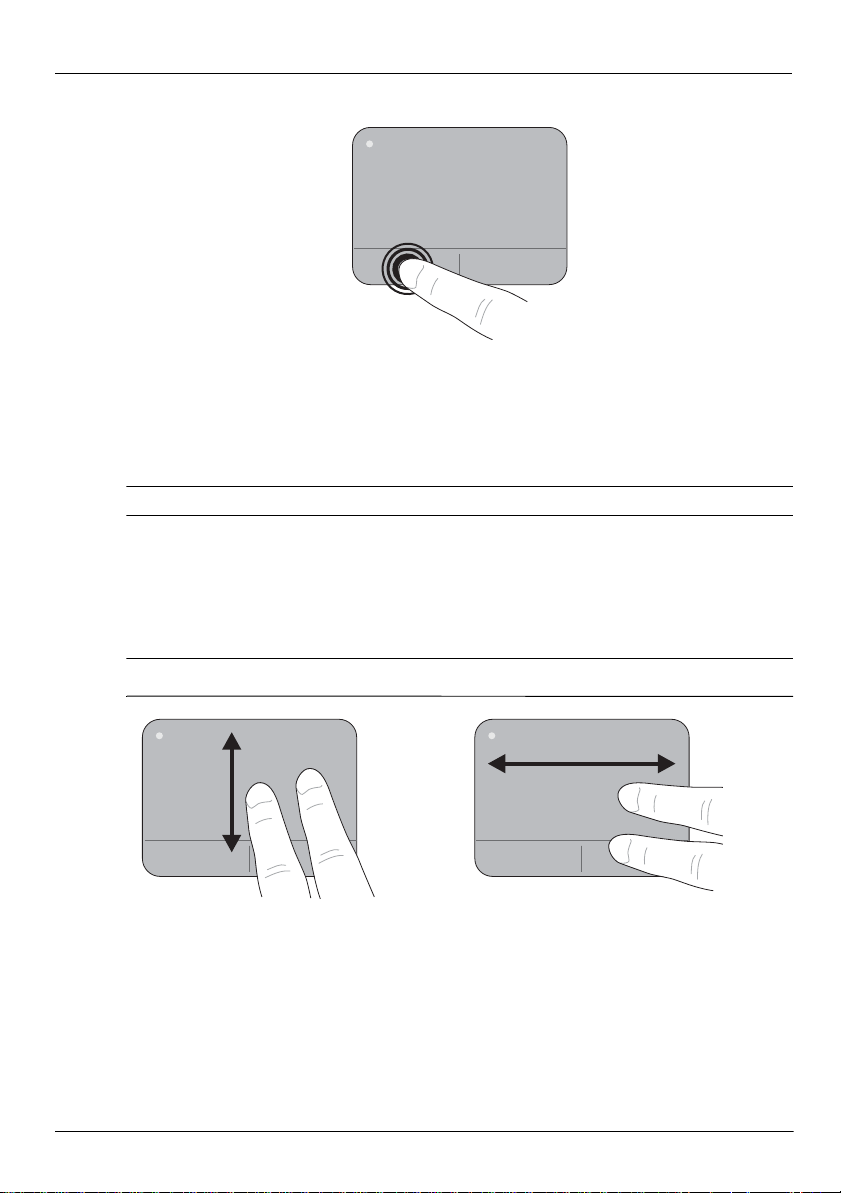
Using TouchPad gestures
The T ouchPad supports a v ariety of gestures that make it easy and fun to work with images or
pages of text. To activate the TouchPad gestures, place two fingers on the TouchPad at the
same time as described in the following sections.
You can scroll and pinch anywhere on the TouchPad surface.
✎
Scrolling
Scrolling is useful for moving around a page or image. To scroll, place two fingers slightly
apart on the T ouchPad, and then drag them across the TouchPad in an up, down, left, or right
motion.
Chapter 2: Windows desktop
Scrolling speed is controlled by finger speed.
✎
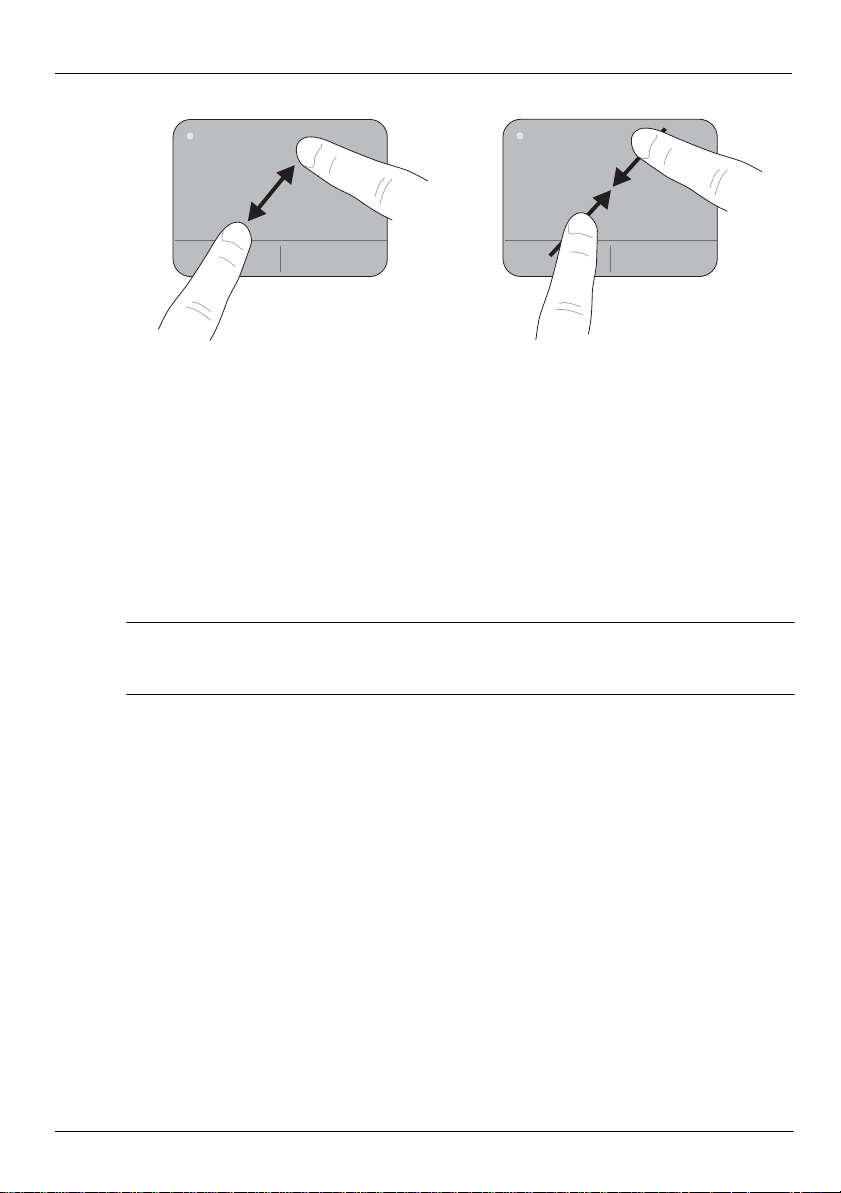
Pinching/Zooming
Pinching allows you to zoom in or out on images or text.
■ Zoom in by placing two fingers together on the TouchPad, and then moving them apart
to gradually increase the object’s size.
■ Zoom out by placing two fingers apart on the TouchP ad, and then moving them together
to gradually decrease the object’s size.
Notebook Essentials 9
Page 14
Chapter 2: Windows desktop
Setting TouchPad preferences
Scrolling and pinching are enabled at the factory. Your computer also supports additional
TouchPad gestures that are disabled at the factory.
To disable or enable TouchPad gestures, or to explore other TouchPad gestures:
1. Double-click the Synaptics icon in the notification area, at the far right of the taskbar,
and then click the Device Settings tab.
2. Select the device, and then click Settings.
3. Select the gesture that you want to disable or enable.
4. Click Apply, and then click OK.
For additional information about using the TouchPad, refer to the user guide. To access
✎
this guide, click Start, click Help and Support, and then click User Guides, or refer to
the User Guides disc included with some models.
10 Notebook Essentials
Page 15

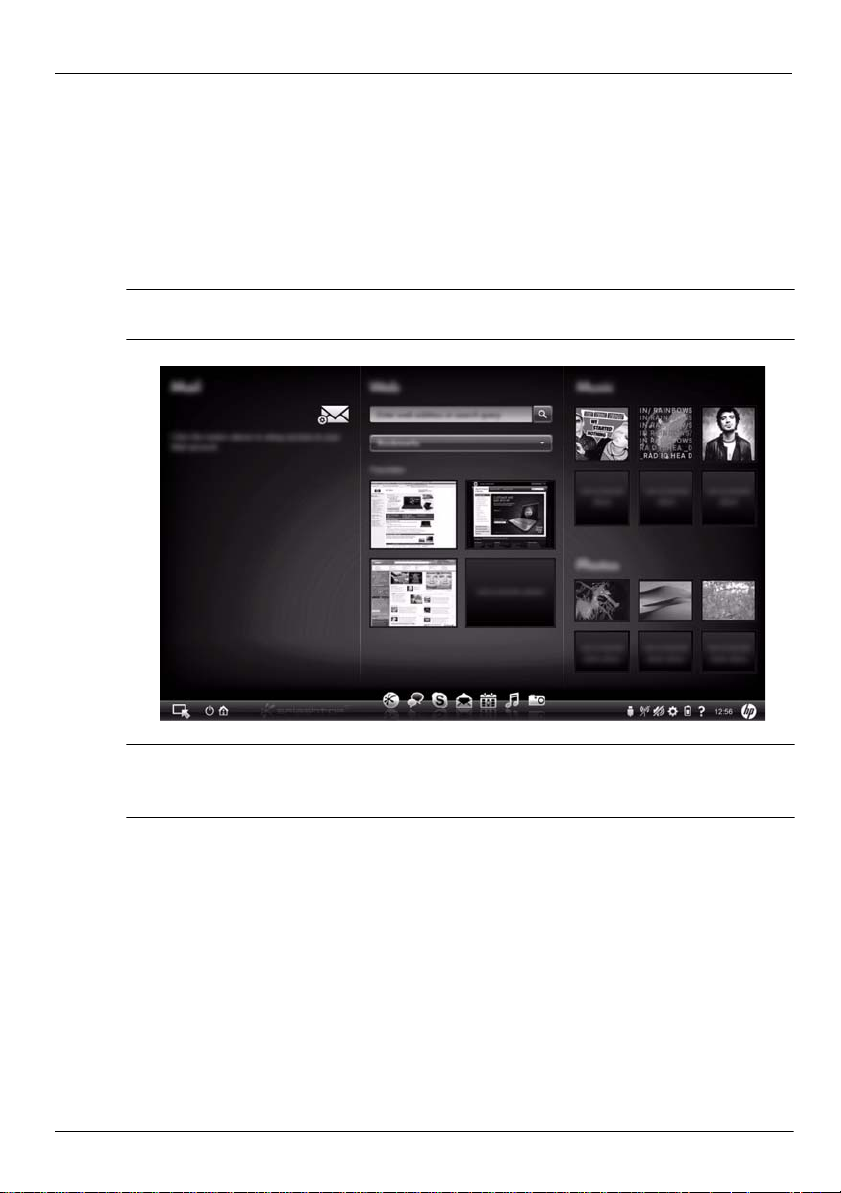
Chapter 3: Using HP QuickWeb
(select models only)
HP QuickW eb is an optional, instant-on environment that is separate from your Windows
operating system. QuickW eb allows you to rapidly access a Web browser , and other
communication and multimedia programs, without the need to start Windows. QuickWeb is
ready to go within seconds of sliding the power switch and includes the following features:
■ Web browser—Search and browse the Internet, and create links to your favorite
Web sites.
■ Chat—Chat with friends on multiple instant messaging programs, such as Google Talk,
Windows Live Messenger, Yahoo! Messenger, and other providers.
■ Skype (select models only)—Skype is a v oice ov er Internet protocol (VoIP) that lets you
communicate free of charge with other Skype users. With Skype, you can have a
conference call or a video chat with one or more people at a time. You can also make
long-distance phone calls to land lines.
■ Web e-mail—View and send e-mail using Yahoo, Gmail, and other Web e-mail
providers.
■ Web calendar—Display , edit, and organize your schedule using your favorite online
calendar program.
■ Music Player—Listen to your favorite music and create playlists.
■ Photo Viewer—Browse through photos, create albums, and view slide shows.
Notebook Essentials 11
Page 16
Chapter 3: Using HP QuickWeb (select models only)
Setting up HP QuickWeb for the first time
The first time you turn on your computer after completing the Windows setup process, the
QuickWeb setup screens appear. Follow the on-screen instructions to activate QuickWeb. At
the end of the setup process, you are given the choice to start Windows or to continue to
QuickWeb for the current session. If you select the option to start QuickWeb, the QuickWeb
Home screen appears. Click an icon on the QuickWeb Home screen to launch a program.
The QuickWeb Home screen may look slightly different from the illustration in this
✎
section.
The following section assumes that you have completed the QuickWeb setup process
✎
and enabled QuickWeb. For more information, refer to the HP QuickWeb software
Help.
QuickWeb allows you to access a Web browser, and other communication and multimedia
programs, within seconds, without starting Windows. To start QuickWeb when the computer
is turned off:
1. Turn on your computer. The HP QuickWeb Home screen appears.
2. Click an icon on the QuickWeb Home screen to launch a program.
12 Notebook Essentials
Page 17

Chapter 3: Using HP QuickWeb (select models only)
Starting Microsoft Windows
If QuickWeb is activated, it starts every time you turn on your computer. To start
✎
Microsoft® Windows, you must click the Windows Start icon in the QuickWeb Home
screen.
To start Microsoft Windows:
1. Turn on your computer. The HP QuickWeb Home screen appears.
2. Click the Windows Start icon at the far left of the QuickWeb Home screen.
3. A dialog box appears, asking if you are sure you want to start Windows. Click Yes.
Clicking Make Windows your default Power On expe ri ence in this dialog box
✎
disables QuickWeb. To enable QuickWeb, refer to the section “Disabling and enabling
QuickWeb,” later in this chapter.
Identifying the QuickWeb control buttons
The following table shows and describes the QuickWeb control buttons.
Icon Description
Launches the Windows operating system.
Shuts the computer down.
Returns to the Home screen.
Notebook Essentials 13
Page 18

Chapter 3: Using HP QuickWeb (select models only)
Identifying the LaunchBar icons
The following table shows and describes HP QuickWeb icons.
Icon Description
Launches the Web browser. You can bookmark your favorite Web sites and
view Web pages .
Launches the Chat application. This is compatible with Google Talk, Windows
Live Messenger, Yahoo! Messenger, and other providers.
Launches Skype (select models only). This is a vo ice over Internet protocol
(VoIP) that lets you communicate free of charge with other Skype users.
Launches Web e-mail so y ou can vi ew y our W eb-based e -mail prog rams , such
as Gmail, Hotmail, Yahoo, and other Web e-mail providers.
Launches the Web calendar so you can schedule and manage your activities
using your favorite online calendar progr am.
Launches Music Player. Select and play music stored on your hard drive or
external drives. Su pports .mp3 files.
Launches Photo Viewer. Browse photos stored on your hard drive or external
drive. Supports .bmp, .gif, .jpg, and .png file types.
14 Notebook Essentials
Page 19

Identifying the notification icons
The following table shows and describes the notification icons.
Icon Description
Indicates that a USB drive is present. If a USB drive is inserted, the File
Manager window containing a USB icon appears. Click the USB icon to open
the File Manager window. Right-click the USB icon to open a menu to safely
eject the device.
Indicates that the network is connected. Click the Network icon to open the
Network dialog box.
Indicates that the network is disconnected.
Controls volume for speakers and the microphone. Click the Volume Control
icon to open the Volume Control dialog box.
Indicates that sound is muted. Click the icon to restore sound.
Launches the Settings panel. Use the Settings panel to modify QuickWeb
settings such as date and time.
Indicates that the computer is connected to AC power. When the computer is
connected to AC power, the icon is a battery with a power cord. This icon also
controls power settings.
Chapter 3: Using HP QuickWeb (select models only)
Indicates the charge state of the battery and that the computer is not
connected to AC power. When the computer is running on battery power, the
icon is abattery.
The state of charge is indicated by the color of the icon:
■ Green: charged
■ Yellow: low
■ Red: critical low
Click the Battery icon to display a menu for controlling power settings and to
see information about battery capacity.
Displays the QuickWeb software Help.
Notebook Essentials 15
Page 20

Chapter 3: Using HP QuickWeb (select models only)
Using the Settings panel
1. After turning on the computer, click the Settings icon.
The Settings panel selection box is displayed.
2. Click the icon that corresponds to the system setting you want to modify. Choose from
any of the following:
❏ Date and Time
❏ Input Language
❏ Language and Keyboard
❏ Network
❏ Environm ent Settings
❏ Screen Settings
❏ Volume Control
❏ Applications
For more information on changing settings in the Settings panel, refer to the HP
✎
QuickWeb software Help.
Configuring the network
QuickWeb can be configured to set up a wireless connection by using the HP QuickWeb
Configuration Tool. To access this tool, click the Settings icon, click Network, and then
select the Enable Wi-Fi check box. For more information on setting up a wireless connection
using HP QuickWeb and Windows, refer to Chapter 4, “Connecting to the Internet,” and to
the HP QuickWeb softwa re Help.
Playing music
To play music:
1. Click the Music icon on the LaunchBar.
Music Player is displayed.
2. On the left side of the Music Player window, navigate to the directory that contains your
music files. The directory can be on either your hard drive or an external drive.
3. Click a music file you want to play from the list on the right side of the window.
4. When you are finished making your music selection, click the Play icon at the bottom
right of the window.
16 Notebook Essentials
Page 21

Chapter 3: Using HP QuickWeb (select models only)
Browsing photos
To view photos:
1. Click the Photos icon on the LaunchBar.
Photo Viewer is displayed.
2. On the left side of the Photo Vie wer windo w, navigate to the directory that contains your
photos. The directory can be on either your hard drive or an external drive. The right
side of the Photo Viewer window displays thumbnail views of all the photos in the
selected directory.
3. Double-click the thumbnail of the photo you want to view.
The photo thumbnail views appear at the bottom right of the Photo Viewer window. A
larger view of the selected photo appears above the thumbnails.
4. Navigate the thumbnail views by pressing the right arrow key or left arrow key, or by
clicking the next thumbnail image you want to see enlarged.
Creating instant messages with Chat
Chat is an instant messaging program that is compatible with Google Talk, Yahoo!
Messenger, and other providers.
To start an instant messaging session:
1. Click the Chat icon on the LaunchBar. The buddy list window and a configuration tool
are displayed.
2. In the buddy list window, click Help to get information on configuring Chat for your
instant messaging protocol and setting up your account. You can also configure Chat to
work with an existing instant messaging account.
Making Internet phone calls with Skype (select models only)
Skype is a voice over Internet protocol (VoIP) that lets you communicate free of charge with
other Skype users. You can also make long-distance phone calls to land lines at lower costs
than many long-distance carriers charge.
To start a conference call or video chat with Skype if you already have a Skype account set
up:
1. Click the Skype icon on the LaunchBar. A Sign in to Skype window is displayed.
2. Type your Skype name and password, and then click Sign in.
3. Follow the on-screen instructions to begin your conference call or video chat.
T o start a conference call or vid eo chat with Skype if you do not ha v e a Sk ype account set up:
1. Click the Skype icon on the LaunchBar. A Sign in to Skype window is displayed.
2. Click the Don't have a Sk ype Name yet? link.
Notebook Essentials 17
Page 22

Chapter 3: Using HP QuickWeb (select models only)
3. Before you proceed, read the information provided by the links at the bottom of the
Create Account window, to be sure that you understand the terms and possible charges
you can incur from using Skype.
For more information on using Skype, refer to the software Help.
✎
Disabling and enabling HP QuickWeb
To disable or reenable QuickWeb from within the Windows operating system:
1. Click Start, click All Programs, and then click HP QuickWeb. The HP QuickWeb
Installer folder is displayed. Click HP QuickWeb Configuration Tool.
2. Select the Enable QuickWeb check box.
3. Click OK.
The HP QuickWeb Configuration Tool can also be accessed by clicking Start, clicking
✎
Control Panel, and then clicking Switch to Classic View.
18 Notebook Essentials
Page 23

Chapter 4: Connecting to the Internet
Internet hardware and software features vary depending on the computer model and
✎
your location.
Choosing the type of Internet access
The computer supports the following types of Internet access:
■ Wired—You can access the Internet by connecting to a broadband network using the
RJ-45 (network) jack. To learn how to connect to a wired network, refer to the
“Connecting to a wired network” section.
■ Wireless—For mobile Internet access, you can use a wireless connection, such as a
WLAN, WWAN, or Bluetooth®. To learn about these connections, and about adding
the computer to an existing network or setting up a wireless network, refer to the
“Connecting to an existing wireless network” section or the “Setting up a new wireless
network” section.
The networking features of the computer enable you to access high-speed broadband Internet
service providers with the following types of connections:
■ Cable modem
■ Digital Subscriber Line (DSL)
■ Satellite
■ Other services
Broadband access may require additional hardware or software provided by your Internet
service provider (ISP).
Using an ISP
The following features will help you set up a new Internet account or configur e the computer
to use an existing account:
■ Choosing an ISP: You must set up Internet service before you can connect to the
Internet. Contact a local ISP to purchase Internet service and a modem. The ISP will
help set up the modem, install a network cable to connect your wireless computer to the
modem, and test the Internet service.
Your ISP will give you a user ID and password to access the Internet. Record
✎
this information and store it in a safe place.
■ Internet Services & Offers (avai lable in some loc a tions) : This utility assists with
signing up for a new Internet account and configuring the computer to use an existing
account. T o access this utility, click Start, click All Programs, click Online Services,
and then click Get Online.
This utility is not available from within HP QuickWeb.
✎
Notebook Essentials 19
Page 24

Chapter 4: Connecting to the Internet
■ ISP-provided icons (av ailable in some locations): These icons may be displayed either
individually on the Windows desktop or grouped in a desktop folder named Online
Services. To set up a new Internet account or configure the computer to use an existing
account, double-click an icon, and then follow the on-screen instructions.
These icons are not available from within QuickWeb.
✎
■ Windows Connect to the Internet Wizard: You can use the Windows Connect to the
Internet Wizard to connect to the Internet in any of these situations:
❏ You already hav e an account with an ISP.
❏ You have a disc from an ISP.
❏ You do not have an Internet account and want to select an ISP from the list provided
within the wizard. (The list of ISP providers is not available in all regions.)
❏ You hav e selected an unlisted ISP, and the ISP has provided you with information
such as a specific IP address and POP3 and SMTP settings.
To access the Windows Connect to the Internet Wizard and instructions for using it,
click Start, click Help and Support, and then search for Connect to the Internet wizard.
If you are prompted within the wizard to choose between enabling or disabling
✎
Windows Firewall, choose to enable the firewall.
The Windows Connect to the Internet Wizard is not available from within HP
✎
QuickWeb.
Connecting to a wired network
Connecting to a wired network requires a network cable (purchased separately). If the cable
contains noise suppression circuitry 1, which prevents interference from TV and radio
reception, orient the circuitry end of the cable 2 toward the computer.
To connect the cable:
WARNING: To reduce the risk of electric shock, fire, or damage to the equipment,
Å
do not plug a modem or telephone cable into the RJ-45 (network) jack.
1. Connect the network cable to the RJ-45 (network) jack 1 on the computer.
2. Connect the other end of the network cable to a network wall jack 2.
20 Notebook Essentials
Page 25

Chapter 4: Connecting to the Internet
Connecting to an existing wireless network
To connect the computer to an existing wireless network in Windows, follow these steps:
1. Click Start, click Connect To, and then click Wireless Network Connection.
2. Select the network to which you want to connect.
3. Click Connect.
4. If required, enter the security key.
To connect the computer to an existing wireless network in HP QuickWeb, follow these
steps:
1. Click the Network icon in the notification area.
2. Select the Enable Wi-Fi check box, if Wi-Fi is not enabled. Select the network to which
you want to connect.
3. Click Connect.
4. If required, enter the password.
Setting up a new wireless network
This section describes how to use a wireless computer to set up a typical home or small of fice
wireless network, which is also called a wireless local area ne twork (WLAN).
To set up a wireless network and to connect to the Internet, you need the following
equipment:
■ A broadband modem (either DSL or cable) and high-speed Internet service purchased
from an Internet service provider (ISP)
■ A wireless router (purchased separately)
■ Your new wireless computer
The following illustration shows an example of a completed wireless network installation
that is connected to the Internet and to a wired computer. As this network grows, additional
wireless and wired computers can be connected to the network to access the Internet.
Notebook Essentials 21
Page 26

Chapter 4: Connecting to the Internet
Step 1: Purchase and install a wireless router
Read this section carefully before you install the wireless router using the router
manufacturer’s instructions and your wireless computer. If you need technical assistance
during the router installation, contact the router manufacturer.
It is recommended that you temporarily connect your new wireless computer to the
✎
router by using the network cable provided with the router. This will ensure that the
computer can access the Internet.
If HP QuickWeb has been activated, it starts every time you turn on your computer. To
✎
start Microsoft Windows, you must click the Windows Start icon in the QuickWeb
Home screen. The following section assumes that QuickWeb is enabled. To disable
QuickWeb, refer to Chapter 3, “Using HP QuickWeb (select models only).”
1. If the computer is off, turn it on. The HP QuickWeb Home screen appears. Start the
Windows operating system either by waiting until the automatic timer above the Start
Windows icon counts to zero, or by clicking the Start Windows icon on the far left of
the QuickW eb Home screen.
For more information on the QuickWeb timer and changing the timer settings,
✎
refer to the HP QuickWeb software Help.
2. Be sure that the wireless light on the computer is off. If the wire less devi ce is on (white),
press the wireless action key (
to the Mini User Guide in Help and Support, or refer to the User Guides disc included
with some models.
3. During the router installation, the router manufacturer’s software allows you to change
the network name (SSID) and enable security to protect the privacy of your wireless
network. Many routers are shipped with a default network name and with security
22 Notebook Essentials
f12) to turn it off. For help locatin g the wireless light, refe r
Page 27

Chapter 4: Connecting to the Internet
disabled. If you change the default network name or enable security during the router
setup, record the information and store it in a safe place. You will need this information
when you configure the computer and any other existing computers to access the router.
If you do not enable security, an unauthorized wireless user can access the
✎
information on the computer and use your Internet connection without your
knowledge. For more information on securing your wireless network, refer to
the Mini User Guide in Help and Support, or refer to the User Guides disc
included with some models.
The Windows operating system also provides tools to help you set up your wireless network
for the first time. To use the W indo ws tools to set up your netw ork, click Start, click Control
Panel, click Network and Internet Connections, click Network Connections, and then
click Create a new connection. Click Wireless networ ks in range to view the available
wireless connections.
Step 2: Configure the computer to connect to the wireless network
To connect the computer to an existing wireless network in Windows, follow these steps:
If QuickWeb is enabled, it starts every time you turn on your computer. To start
✎
Microsoft Windows, you must click the Windows Start icon in the QuickWeb Home
screen. The following section assumes that QuickWeb is enabled. To disable
QuickWeb, refer to Chapter 3, “Using HP QuickWeb (select models only).”
1. If the computer is off, turn it on. The HP QuickWeb Home screen appears. Start
Windows either by waiting until the automatic timer above the Start Windows icon
counts to zero, or by clicking the Windows Start icon on the far left of the QuickWeb
Home screen.
For more information on the QuickWeb timer and changing the timer settings,
✎
refer to the HP QuickWeb software Help.
2. Be sure that the wireless light on your computer is on (white). If the wireless light is off,
press the wireless action key (
wireless light, refer to the Mini User Guide in Help and Support, or refer to the User
Guides disc included with some models.
3. Connect the computer to the wireless network:
a. Click Start, click Connect To, and then click Wireless Network Connection.
b. Select the network to which you want to connect.
c. Click Connect.
d. If required, enter the security key.
4. Te st the wireless network by opening your Web browser and accessing a Web site.
To connect the computer to an existing wireless network in HP QuickWeb, follow these
steps:
1. If the computer is off, turn it on. HP QuickWeb starts if it is enabled.
For more information on enabling QuickWeb, refer to Chapter 3, “Using HP
✎
QuickWeb (select models only).”
f12) to turn the wireless device on. For help locating the
Notebook Essentials 23
Page 28

Chapter 4: Connecting to the Internet
2. Click the Network icon in the notification area.
3. Select the Enable Wi-Fi check box, if Wi-Fi is not enabled. Select the network to which
you want to connect.
4. Click Connect.
5. If required, enter the password.
6. Te st the wireless network by opening your Web browser and accessing a Web site.
Connecting to a WWAN (select models only)
A WWAN is a wireless technology that provides access to information wherever mobile
network operator service is available. In a WWAN, each mobile device communicates to a
mobile network operator’s base station. Mobile network operators install networks of base
stations (similar to cell phone towers) throughout large geographic areas, effectively
providing coverage across entire states, regions, or even countries.
WWAN service must be configured in Windows before it can be accessed in HP
✎
QuickWeb.
To activate WWAN service in Windows, follow these steps:
1. Click Start, click All Programs, click HP, and then click HP Connection Manager.
2. Select your WWAN provider and follow the onscreen instructions.
To enable WWAN service in HP QuickWeb, after WWAN service has been successfully
activated in Windows, follow these steps:
1. Click the Network icon in the notification area.
2. Click the WWAN (3G) pane on the left side of the Network configuration dialog box.
3. Click Connect.
For more information, refer to the Connection Manager software help or to your
✎
WWAN provider’s software Help.
Bluetooth connections (select models only)
The Bluetooth module in your computer is a device that creates a personal area netwo rk
(PAN) to connect to other Bluetooth-enabled devices such as computers, phones, printers,
headsets, speakers, and cameras. In a PAN, each device communicat es directly with other
devices, and devices mustbe relatively close together—typically within 10 meters
(approximately 33 feet) of each other.
A Bluetooth device provides short-range wireless communications that replace the physical
cable connections that traditionally link electronic devices such as the following:
■ Computers (desktop, notebook, PDA)
■ Phones (cellular, cordless, smart phone)
■ Imaging devices (printer, camera)
■ Audio devices (headset, speakers)
24 Notebook Essentials
Page 29

Chapter 4: Connecting to the Internet
Bluetooth devices provide peer -to-peer capability that allows you to set up a personal area
network (PAN) of Bluetooth devices. For information on configuring and using Bluetooth
devices, refer to the Bluetooth software Help.
Bluetooth and Internet Connection Sharing (ICS)
HP does not recommend setting up one computer with Bluetooth as a host and using it as
a gateway through which other computers may connect to the Internet. When two or more
computers are connected using Bluetooth, and Internet Connection Sharing (ICS) is enabled
on one of the computers, the other computers may not be able to connect to the Internet using
the Bluetooth network. The strength of Bluetooth is in synchronizing information transfers
between your computer and wireless devices including cellular phones, printers, cameras,
and PDAs. The inability to consistently connect two or more computers to share the Internet
through Bluetooth is a limitation of Bluetooth and the Windows operating system.
Bluetooth technology is not supported in HP QuickWeb. Your Windows operating
✎
system supports Bluetooth. For more information, refer to the Mini User Guide in Help
and Support in Windows, or refer to the User Guides disc included with some models.
Notebook Essentials 25
Page 30

Chapter 4: Connecting to the Internet
26 Notebook Essentials
Page 31

Chapter 5: Backup and recovery
T o protect your information, back up your files and folders. In case of system failure, you can
use the backup files to restore your computer.
CAUTION: In the event of a hard drive failure, you cannot use your computer to access
Ä
the Disaster Recovery utility. Therefore, HP recommends that you download the Disaster
Recovery utility SoftPaq, and then extract it to a USB flash drive as soon as possible
after software setup. For details, refer to “Downloading and extracting the Disaster
Recovery utility” later in this chapter. For detailed information, perform a search for this
topic in Help and Support.
Note the following guidelines when backing up your information:
■ Store personal files in the My Documents folder and back up this folder regularly.
■ Back up templates stored in their associated programs.
■ Save customized settings in a window, toolbar, or menu bar by taking a screen shot of
your settings. The screen shot can be a time-saver if you have to reset your preferences.
To copy the screen and paste it into a word-processing document, follow these steps:
a. Display the screen.
b. Copy the screen:
To copy the active window, press
To copy the entire screen, press
c. Open a word-processing document, click Edit, and then click Paste.
d. Save the document.
Depending on your computer model, you may have one or more of the following backup and
recovery solutions:
■ Roxio BackOnTrack
■ HP Recovery Manager
■ Windows Backup and Restore
alt+fn+prt sc.
fn+prt sc.
For detailed information, perform a search for these topics in Help and Support.
✎
Using Roxio BackOnTrack
Successful recovery after a system failure depends on whether you have completely backed
up your files. If Roxio BackOnTrack is preinstalled on your computer, BackOnTrack allows
you to create a backup of your computer image. You should create the initial backup
immediately after software setup. As you add new software and data files, you should
continue to back up your system on a regular basis to maintain a reasonably current backup.
Notebook Essentials 27
Page 32

Chapter 5: Backup and recovery
Creating a copy of the hard drive
The back up drive function of BackOnTrack creates a Disaster Recovery Set that is an exact
image of your hard drive data. You can back up the image to an external hard drive
(purchased separately).
To create a Disaster Recovery Set using BackOnTrack, follow these steps:
Be sure that the computer is connected to AC power before starting the backup process.
✎
1. Click Start, click All Programs, and then click Roxio.
2. Click BackOnT rack, click BackOnTrack Home, and then click Disaster Recovery.
3. Click Backup drive.
4. Select a drive to back up.
5. Add a comment to describe the backup.
Comments are optional, but adding comments can help you remember the
✎
purpose of the backup. The date and list of drives being backed up are
automatically included in the description.
6. Select a destination for the Disaster Recovery Set.
The destination cannot be a network drive.
✎
7. Click the action button at the bottom-right of the computer screen.
8. Follow the on-screen instructions.
Performing a recovery
In case of system failure or instability, the computer provides the following ways to recover
your files:
■ BackOnTrack Disaster Recovery utility: You can use Disaster Recovery to recover
your hard drive image (including your files, programs, and operating system) after a
hard drive failure.
■ BackOnTrack Instant Restore utility: You can use Instant Restore to quickly restore
your computer to a working state if a software-related problem occurs. The Instant
Restore utility automatically creates working states periodically. You can also define
a working state by saving the current computer state manually.
For more information about computer system states, refer to the BackOnTrack
✎
software Help.
Using the Disaster Recovery utility
To perform a recovery with Disaster Recovery, you need a USB flash drive (purchased
✎
separately). For optimum performance, the capacity of the drive should be no larger
than 2 GB.
Disaster Recovery recovers data from a Disaster Recove ry Set that you previously created
with Roxio BackOnTrack. Disaster Recovery is available from the HP Web site in a
compressed file called a SoftPaq.
28 Notebook Essentials
Page 33

Running the SoftPaq makes the USB drive bootable.
✎
Before performing a disaster recovery, you must download the Disaster Recovery utility and
extract it to a USB flash drive.
Downloading and extracting the Disaster Recovery utility
To download and extract Disaster Recovery, follow these steps:
1. Connect a bootable USB flash drive or external drive to a USB port on your computer.
2. Open your Web browser, go to http://www.hp.com/support, and select your country or
region.
3. Enter the Roxio BackOnTrack 3 Disaster Recovery Boot Utility in the Search box,
enter, and then sele ct Roxio BackOnTrack 3 Disaster Recovery Boot Utility
press
from the Search results.
4. Click Download only to save the file to your computer.
5. When prompted, click Save, and then select the external drive from the list of storage
locations.
6. After the file is downloaded, navig a te to the location where you saved the SoftPaq, and
then double-click the SoftPaq file to format the USB flash drive and extract the Disaster
Recovery files.
7. If prompted to do so, restart your computer after the installation is comple te.
Restoring your hard drive image
Chapter 5: Backup and recovery
To restore your hard drive image using Disaster Recovery, follow these steps:
1. Connect the external hard drive containing the Disaster Recovery Set to your computer.
2. Connect the bootable USB flash drive containing the extracted Disaster Reco ver y utility
to a USB port on your computer.
3. Change the boot device order by turning on or restarting the computer, and then
pressing
4. Use the arrow keys to select the USB flash drive, and then press enter.
5. At the Roxio BackOnTrack Disaster Re covery screen, select Disaster Recovery, and
then click Next.
6. Browse to the external hard drive containing the Disaster Recovery Set, and then
click Next.
7. Click Next to proceed with the recovery.
✎
8. After a message on the screen reports a successful recovery, click Finish.
Notebook Essentials 29
f9.
This process may take several minutes.
Page 34

Chapter 5: Backup and recovery
Using the Instant Restore utility
You can restore your computer from Windows when the operating system is functioning. If
the operating system is not functioning, you can also access the utility by restarting your
computer.
For more information about the Instant Restore utility, refer to the BackOnTrack
✎
software Help.
Using the Instant Restore utility when the operating system is functioning
T o reco v er informatio n when the operati ng system is functioning properly, follow these steps:
1. Save and close all open documents and close any open programs.
2. Click Start, click All Programs, and then click Roxio.
3. Click BackOnT rack, click BackOnTrack Home, and then click Instant Restor e.
4. Click Restore State, and then select a restore state.
5. Click the action button in the bottom-right corner of the computer screen.
6. Click Yes to confirm your selected restore state.
When the restore process is complete, the computer restarts and a notification message is
displayed.
Using the Instant Restore utility when the operating system is not functioning
To recover information when the operating system is not functioning, follow these steps:
1. Restart the computer.
If the operating system has stopped responding and the computer screen is blue,
✎
restart the computer by sliding the power switch off and then on.
2. When the computer logo is displayed on the screen, press the
Windows status bar is displayed.
3. When the Roxio BackOnTrack screen is displayed, follow the on-screen instructions.
f6 key repeatedly until the
Using HP Recovery Manager
If your computer includes HP Recovery Manager , tools provided b y the operating system and
by HP Recovery Manager software are designed to help you with the following tasks for
safeguarding your information and restoring it in case of a system failure:
■ Backing up your information
■ Creating a set of recovery discs
■ Creating system restore points
■ Recovering a program or driver
■ Performing a full system recovery
30 Notebook Essentials
Page 35

Backing up your information
As you add new software and data files, you should back up your system on a regular basis to
maintain a reasonably current backup. Back up your system at the following times:
■ At regularly scheduled times
Set reminders to back up your information periodically.
✎
■ Before the computer is repaired or restored
■ Before you add or modify hardware or software
Note the following when backing up:
■ Create system restore points using the Windows System Restore feature, and
periodically copy them to a disc.
■ Store personal files in the Documents library, and periodically back up this folder.
■ Back up templates stored in their associated programs.
■ Save the customized settings in a window, toolbar, or menu bar by taking a screen shot
of the settings. The screen shot can be a time-saver if you have to reset your preferences.
To copy the screen and paste the image into a word-processing document:
a. Display the screen.
b. Copy the screen:
To copy only the active window, press alt+prt sc.
To copy the entire screen, press prt sc.
c. Open a word-processing document, click Edit, and then click Paste.
d. Save the document.
■ You can back up your information to an optional external hard drive, thumb drive, or
discs.
■ When backing up to discs, use any of the following types of discs (purchased
separately): CD-R, DVD+R, or D VD-R. The discs you use depend on the type of optical
drive you are using.
The external optical drive must be connected to the USB port on the computer,
✎
not to a USB port on another external device, such as a hub or docking station.
DVDs store more information than CDs, so using them for backup reduces
✎
the number of recovery discs required.
■ When backing up to discs, number each disc before inserting it into an optica l drive.
Chapter 5: Backup and recovery
Creating a set of recovery discs
HP recommends that you create recovery discs to be sure that you can restore your system to
its original factory state if you experience serious system failure or instability. Create these
discs after setting up the computer for the first time.
This task will require an optional external optic al dri ve. The externa l op tical driv e must
✎
be connected to the USB port on the computer, not to a USB port on another external
device, such as a hub or docking station.
Notebook Essentials 31
Page 36

Chapter 5: Backup and recovery
Handle these discs carefully and keep them in a safe place. The software allows the creation
of only one set of recovery discs.
Note the following guidelines before creating recovery discs:
■ You will need high-quality DVD-R, DVD+R, or CD-R discs. All these discs are
purchased separately. D VDs ha ve a lar ger storage capacity than CDs. If you use CDs, up
to 20 discs may be required, whereas only a few DVDs are required.
Double-layer discs and read-write discs—such as CD-RW and DVD±RW,
✎
discs—are not compatible with the Recovery Manager software.
■ The computer must be connected to AC power during this process.
■ Only one set of recovery discs can be created per computer.
■ Number each disc before inserting it into an optical drive.
■ If necessary, you can exit the program before you have finished creating the recovery
discs. The next time you open Recovery Manager, you will be prompted to continue the
disc creation process.
To create a set of recovery discs:
1. Click Start, click All Programs, click Recovery Manager, and then click Recovery
Disc Creation.
2. Follow the on-screen instructions.
Performing a recovery
You can recover only files that you have previously backed up. HP recommends that
✎
you use Recovery Manager to create a set of recovery discs (entire drive backup) as
soon as you set up your computer.
Recovery Manager software allows you to repair or restore the system if you experience
system failure or instability . Reco v ery Manager w or ks from recovery discs that you create or
from a dedicated recovery partition (select models only) on the hard drive. However,
computers that include a solid-state drive (SSD) may not have a recovery partition.
Windows has its own built-in repair features, such as System Restore. If you have not
✎
already tried these features, try them before using Recovery Manager. For more
information on these built-in repair features, click Start, and then click Help and
Support.
Recovery Manager recovers only the software that was preinstalled at the factory.
✎
Software not provided with this computer must be downloaded from the manufacturer’s
Web site or reinstalled from the disc provided by the manufacturer.
Recovering using the recovery discs
To restore the system files from the recovery discs:
1. Back up all personal files.
32 Notebook Essentials
Page 37

Chapter 5: Backup and recovery
2. Insert the first recovery disc into an optional optical drive, and restart the computer.
The external optical drive must be connected to the USB port on the computer,
✎
not to a USB port on another external device, such as a hub or docking station.
3. Follow the on-screen instructions.
Recovering using the partition on the hard drive (select models only)
On some models, you can perform a recovery from the partition on the hard drive, which is
accessed by pressing either the Start button or f11. This restores the computer to its factory
condition.
This method of recovery is also an HP Recovery Manager solution.
✎
Computers with an SSD may not have a recovery partition. If the computer does not
✎
have a recovery partition, you will not be able to recover using this procedure.
To restore the system from the partition, follow these steps:
1. Access Recovery Manager in either of the following ways:
❏ Click Start, click All Programs, click Recovery Manager, and then click
Recovery Manager.
– or –
a. Turn on or restart the computer.
b. Press f11 (HP Recovery).
It may take several minutes for Recovery Manager to load.
✎
2. In the Recovery Manager window, click System Recovery.
3. Follow the on-screen instructions.
Using Windows Backup and Restore
To create a backup using Windows Backup and Restore, follow these steps:
Be sure that the computer is connected to AC power before you start the backup
✎
process. The backup process may take over an hour, depending on file size and the
speed of the computer.
1. Click Start, click All Programs, click Accessories, click System Tools, and then click
Backup.
2. Follow the on-screen instructions to set up and create a backup.
Windows® includes the User Account Control feature to improve the security of
✎
your computer. You may be prompted for your permission or password for tasks
such as installing software, running utilities, or changing Windows settings. Refer
to Help and Support for more information.
Notebook Essentials 33
Page 38

Chapter 5: Backup and recovery
Using system restore points
When you back up your system, you are creating a system restore point. A system restore
point allows you to save and name a snapshot of your hard drive at a specific point in time.
You can then rev e rt back to that point if you want to reverse subsequent changes made to
your system.
Recovering to an earlier restore point does not affect data files saved or e-mails created
✎
since the last restore point.
You also can create additional restore points to provide increased protection for your system
files and settings.
When to create restore points
■ Before you add or extensively modify software or hardware.
■ Periodically, whenever the system is performing optimally.
If you revert to a restore point and then change your mind, you can reverse the
✎
restoration.
Creating a system restore point
1. Click Start, click All Programs, click Accessories, click System Tools, and then click
System Restore.
2. Select Create a restore point and then, click Next.
3. Enter a Restore point description and then, click Create.
4. When the new restore point is created, click Close.
Restoring to a previous date and time
To revert to a restore point (created at a previous date and time) when the computer was
functioning optimally, follow these steps:
1. Click Start, click All Programs, click Accessories, click System Tools, and then click
System Restore.
2. Select Restore my computer to an earlier time and then, click Next.
3. Choose a date and the restore point and then, click Next.
4. Follow the on-screen instructions.
34 Notebook Essentials
Page 39

Chapter 6: Keeping your computer safe
Your Windows files must be backed up on a regular basis and you must guard against viruses,
privacy violations, and issues caused by power surges. The following sections address the
importance of protecting your computer as you use your computer and the Windows
operating system.
Protecting the computer from viruses
When you use the computer for e-mail or Internet access, you expose it to computer viruses
that can disable the Windows operating system, programs, or utilities or cause them to
function abnormally. Antivirus software can detect most viruses, destroy them, and in most
cases, repair damage they have caused. To provide ongoing protection against newly
discovered viruses, antivirus software must be kept up to date.
Norton Internet Security, an antivirus program, is preinstalled on the computer.
■ Your version of Norton Internet Security includes 60 days of free updates. It is strongly
recommended that you protect the computer against new viruses beyond 60 days by
purchasing extended update service. Instructions for using and updating Norton Internet
Security software and for purchasing extended update service are provided within the
program.
■ To access Norton Internet Security, or to get more information about it, cli ck Start,
click All Programs, and then click Norton Internet Security.
For more information about computer viruses, type viruses in the Search box in Help
✎
and Support.
Using Windows Security Center
Windows Security Center manages your computer’s defenses. To manage Windows Firewall
and automatic update settings, follow these steps:
1. Click Start, click Control Panel, and then click Security Center.
2. Click Internet Options to define the lev el of security your computer should employ.
3. Click the Privacy tab to determine which embedded programs your browser should
allow.
Protecting your system files
The backup and recovery process allows you to back up your files and recover optimal
system functionality. For information, refer to Chapter 5, “Backup and recovery.”
Notebook Essentials 35
Page 40

Chapter 6: Keeping your computer safe
Protecting your privacy
When you use the computer for e-mail, or for network or Internet access, it is possible for
unauthorized persons to obtain information about you or the computer. To optimize the
privacy protection features of the computer, follow these guidelines:
■ Keep Wind ows and other software updated. Many software updates contain security
enhancements.
■ Use a firewall. Firewall software monitors incoming network traf fic on the computer to
block messages that do not meet specific security criter ia. Some firewalls also monitor
outgoing traffic.
Protecting the computer from power surges
T o protect the computer from power surges that may be caused by an uncertain power supply
or an electrical storm, observe these practices:
■ Plug the computer power cord into a high-quality surge protector (purchased
separately). Surge protectors are available from most consumer hardware or electronics
retailers.
■ During an electrical storm, either run the computer on battery power or shut down the
computer and unplug the power cord.
Using the computer safely
WARNING: To reduce the risk of electric shock or damage to your equipment, observe
Å
these practices:
■ Plug the power cord into an AC outlet that is easily accessible at all times.
■ Disconnect power from the computer by unplugging the power cord from the AC
outlet (not by unplugging the power cord from the computer).
■ If provided with a 3-pin attachment plug on your power cord, plug the cord into a
grounded (earthed) 3-pin outlet. Do not disable the power cord grounding pin, for
example, by attaching a 2-pin adapter. The grounding pin is an important safety
feature.
WARNING: To reduce the possibility of heat-related injuries or of overheating the
Å
computer, do not place the computer directly on your lap or obstruct the computer
air vents. Use the computer only on a hard, flat surface. Do not allow another hard
surface, such as an adjoining optional printer, or a soft surface, such as pillows or
rugs or clothing, to block airflow. Also, do not allow the AC adapter to contact the
skin or a soft surface, such as pillows or rugs or clothing, during operation. The
computer and the AC adapter comply with the user-accessible surface temperature
limits defined by the International Standard for Safety of Information Technology
Equipment (IEC 60950).
36 Notebook Essentials
Page 41

Chapter 6: Keeping your computer safe
WARNING: To reduce potential safety issues, use only the AC adapter or battery
Å
provided with the computer, a replacement AC adapter or battery provided by HP,
or a compatible AC adapter or battery purchased as an accessory from HP.
For more safety and regulatory information, and for battery disposal information, refer to the
Regulatory, Safety and Environmental Notices. To access the notices, click Start, click Help
and Support, and then click User Guides, or refer to the User Guides disc included with
some models.
Notebook Essentials 37
Page 42

Chapter 6: Keeping your computer safe
38 Notebook Essentials
Page 43

Appendix A: Routine care
Cleaning the display
CAUTION: To prevent permanent damage to the computer, never spray water, cleaning
Ä
fluids, or chemicals on the display.
To remove smudges and lint, frequently clean the display with a soft, damp, lint-free cloth.
If the screen requires additional cleaning, use premoistened antistatic wipes or an antistatic
screen cleaner.
Cleaning the TouchPad and keyboard
Dirt and grease on the Tou chPad can cause the pointer to jump around the screen. To avoid
this, clean the TouchPad with a damp cloth, and wash your hands frequently when using the
computer.
WARNING: To reduce the risk of electric shock or damage to internal components,
Å
do not use a vacuum cleaner attachment to clean the keyboard. A vacuum cleaner
can deposit household debris on the keyboard surface.
Clean the keyboard regularly to prev ent keys from sticking and to remove dust, lint, and
particles that can become trapped beneath the keys. A can of compressed air with a straw
extension can be used to blow air around and under the keys to loosen and remove debris.
Traveling and shipping
For best results, follow these traveling and shipping tips:
■ Prepare the computer for traveling or shipping:
1. Back up your information.
2. Remove all digital cards.
CAUTION: To reduce the risk of damage to the computer or loss of information,
Ä
remove the digital card from the computer before shipping, storing, or
traveling.
3. Turn off and then disconnect all external devices.
4. Shut down the computer.
■ Take along a backup of your information. Keep the backup separate from the computer.
■ When traveling by air, carry the computer as hand luggage, and do not check it in with
the rest of your bags.
Notebook Essentials 39
Page 44

Appendix A: Routine care
CAUTION: Avoid exposing a drive to magnetic fields. Security devices with
Ä
magnetic fields include airport walk-through devices and security wands. The
airport security devices that check carry-on luggage, such as conveyor belts,
use X-rays instead of magnetism and will not damage a drive.
■ In-flight computer use is at the discretion of the airline. If you plan to use the computer
during a flight, check with the airline in advance.
■ If the computer will be unused and disconnected from external power for more than
2 weeks, remove the battery pack and store it separately.
■ If you are shipping the computer or a drive, use suitable protective packaging and label
the package “FRAGILE.”
■ If the computer has a wireless device or a cell phone device installed, such as an
802.11b/g, a Global System for Mobile Communications (GSM), or a General Packet
Radio Service (GPRS) device, the use of these dev ices may be restricted in some
environments. Such restrictions may apply onboard aircraft, in hospitals, near
explosives, and in hazardous locations. If you are uncertain of the policy that applies to
the use of a particular device, ask for authorization to use it before you turn it on.
■ If you are traveling internationally, follow these suggestions:
❏ Check the computer-related customs regulations for each country or region on your
itinerary.
❏ Check the power cord and adapter requirements for each location in which you plan
to use the computer. Voltage, frequency, and plug configurations vary.
WARNING: To reduce the risk of electric shock, fire, or damage to the
Å
equipment, do not attempt to power the computer with a voltage converter kit
sold for appliances.
40 Notebook Essentials
Page 45

Appendix B: Problem meets solution
Troubleshooting resources
If you experience computer problems, perform these troubleshooting steps in the order
provided until the problem is resolved:
■ Refer to “Quick troubleshooting,” the next section in this chapter.
■ Access Web site links and additional information about the computer through Help and
Support. Click Start, and then click Help and Support.
Although many checkup and repair tools require an Internet connection, other
✎
tools, like Help and Support, can help you fix a problem when the computer is
offline.
■ Contact technical support:
1. Click Start.
2. Click Help and Support, click Contact A Technician, and then click Chat with
an online support technician after y o u buy .
3. Click Notebook and Tablet PCs.
4. Follow the on-screen instructions to start a chat session with a support specialist.
When technical support chat is not available in a particular language, it is
✎
available in English.
– or –
Refer to the Worldwide Telephone Numbers booklet, included with the computer,
for more contact information.
Quick troubleshooting
The computer is unable to start up
If the computer does not turn on when you slide the power switch, the following suggestion s
may help you determine why the computer will not start up:
■ If the computer is plugged into an AC outlet, plug another electrical device into the
outlet to be sure that the outlet is providing adequate power.
Use only the AC adapter provided with the computer or one approved by HP
✎
for this computer.
■ If the computer is running on battery power or is plugged into an external po wer source
other than an AC outlet, plug the computer into an AC outlet using the AC adapter. Be
sure that the power cord and AC adapter connections are secure.
Notebook Essentials 41
Page 46

Appendix B: Problem meets solution
The computer screen is blank
If the screen is blank, the computer may not be set to display the image on the computer
screen. To transfer the image to the computer screen, press the f4 action key.
Software is functioning abnormally
If the software is unresponsive or responds abnormally, follow these suggestions:
■ Restart the computer by clicking Start, clicking Turn Off Computer , and then clicking
Restart.
If you cannot restart the computer using this procedure, refer to the next section, “The
computer is on but is not responding.”
■ Run a virus scan. For information about using the antivirus resources on the computer,
refer to the “Protecting the computer from viruses” section in Chapter 6.
The computer is on but is not responding
If the computer is on but is not responding to software or keyboard commands, try the
following emergency shutdown procedures, in the sequence provided, until shutdown occurs:
CAUTION: Emergency shutdown procedures result in the loss of unsaved information.
Ä
1. Slide and hold the power switch on the computer for at least 5 seconds.
2. Disconnect the computer from external power and remove the battery.
The computer is unusually warm
It is normal for the computer to feel warm to the touch while it isin use. But if the computer
feels unusually warm, it may be overheating because a v e nt is blocked.
If you suspect that the computer is overheating, allow the computer to cool to room
temperature. Then be sure to keep all vents free from obstructions while you are using the
computer.
WARNING: To reduce the possibility of heat-related injuries or of overheating the
Å
computer, do not place the computer directly on your lap or obstruct the computer
air vents. Use the computer only on a hard, flat surface. Do not allow another hard
surface, such as an adjoining optional printer, or a soft surface, such as pillows or
rugs or clothing, to block airflow. Also, do not allow the AC adapter to contact the
skin or a soft surface, such as pillows or rugs or clothing, during operation. The
computer and the AC adapter comply with the user-accessible surface temperature
limits defined by the International Standard for Safety of Information Technology
Equipment (IEC 60950).
The fan in the computer starts up automatically to cool internal components and prevent
✎
overheating. It is normal for the internal fan to cycle on and off during operation.
42 Notebook Essentials
Page 47

Appendix B: Problem meets solution
An external device is not working
Follow these suggestions if an external device does not function as expected:
■ Turn on the de vice according to the manufacturer’s instr uctions.
■ Be sure that all device connections are secure.
■ Be sure that the device is receiving electrical power.
■ Be sure that the device, espe cially if it is olde r, is compatible with the operating syst em.
■ Be sure that the correct drivers are installed and updated.
The wireless network connection is not working
If a wireless network connection is not working as expected, follow these suggestions:
■ Be sure that the wireless light on your computer is on (white). If the wireless light is off
(white), press the
■ Be sure that the device wireless antennas are free from obstructions.
■ Be sure that the DSL or the cable modem and its power cord are properly connected and
the lights are on.
■ Be sure that the wireless router or access point is properly connected to its power
adapter and the DSL or cable modem, and that the lights are on.
■ Disconnect and then reconnect all cables, and turn the power off and then back on.
For more information on wireless technology, refer to the relevant help topics and Web
✎
site links in Help and Support.
f12 action key to turn it on.
For information on activating mobile broadband service (select models only), refer to
✎
the mobile network operator information included with your computer.
Notebook Essentials 43
Page 48

Appendix B: Problem meets solution
44 Notebook Essentials
Page 49

Appendix C: Specifications
Operating environment
The operating environment information in the following table may be helpful if you plan to
use or transport the computer in extreme environments.
Factor Metric U.S.
Temperature
Operating 5°C to 35°C 41°F to 95°F
Nonoperating -20°C to 65°C -4°F to 149°F
Relative humidity (noncondensing)
Operating 10% to 90% 10% to 90%
Nonoperating 5% to 95% 5% to 95%
Maximum altitude (unpressurized)
Operating -15 m to 3,048 m -50 ft to 10,000 ft
Nonoperating -15 m to 12,192 m -50 ft to 40,000 ft
Input power
The power information in this section may be helpful if you plan to travel internationally
with the computer.
The computer operates on DC power, which can be supplied by an A C or a DC po wer source.
The AC power source must be rated at 100–240 V, 50–60 Hz.
Although the computer can be powered from a standalone DC power source, it should be
powered only with an AC adap ter or a DC po wer source supplied and approv ed by HP for use
with this computer.
The computer can operate on DC power within the following specifications.
Input power Rating
Operating voltage 19.5 V dc @ 2.05A - 40W
Operating current 2.05 A
This product is designed for IT power systems in Norway with phase-to-phase voltage
✎
not exceeding 240 V rms.
Notebook Essentials 45
Page 50

Appendix C: Specifications
The computer operating voltage and current can be found on the system regulatory
✎
label, located under the bottom panel of the computer.
46 Notebook Essentials
Page 51

Index
A
altitude specifications 45
antivirus software 2, 35
B
BackOnTrack
Disaster Recovery utility 28
disaster recovery utility download 29
Instant Restore utility 30
performing a system recovery 28
restore hard drive image 29
BackOnTrack backup software 28
backup, system 27
blank screen, troubleshooting 42
C
cable, modem 19
cables and cords, power 41
Chat 11
cleaning
display 39
keyboard 39
TouchPad 39
connecting to a wired network 20
connecting to an existing wireless network
21
D
display, cleaning 39
E
electric shock 36, 39, 40
environmental specifications 45
external monitor 43
F
finding information 3
firewall 36
H
Help and Support 43
HP QuickWeb 1, 11
HP Recovery Manager 32
backing up 31
creating recovery discs 31
Using hard drive partition 33
using recovery discs 32
HP Recovery Manager, using 30
humidity specifications 45
I
identifying software 6
input power specifications 45
installing software 6
Internet
choosing an ISP 19
choosing type of access 19
connecting 2
wireless access 19
Internet service provider (ISP) 19
K
keyboard, cleaning 39
L
LaunchBar icons, identifying 14
M
Microsoft Windows
default power on 13
starting 13
modem, surge protection 36
Music Player 11
O
operating environment 45
optical drive
external 31
sharing 1
overheating problems 42
overheating, device 42
P
performing a recovery 32
personal files, protecting 35
Photo viewer 11
pinching, TouchPad 9
power 45
Notebook Essentials 47
Page 52

Index
power specifications 45
power surges 36
privacy, protecting 36
Q
QuickWeb
browsing photos 17
Chat 17
configuring the network 16
disabling or enabling 18
identifying control buttons 13
playing music 16
setting up 12
Settings panel 16
Skype 17
using 12
R
Recovery Manager 32, 33
recovery, system 27, 28
regulatory information notices 37
Regulatory, Safety and
Environmental Notices 3
resources 41
Roxio BackOnTrack, Using 27
S
safe computing practices 36
safeguarding information 35
scrolling, TouchPad 9
shipping the device 39
Skype 17
software
identifying 6
installing 6
updating 6
software problems and troubleshooting 42
specifications
altitude 45
humidity 45
input power 45
operating environment 45
temperature 45
startup problems, troubleshooting 41
surge protection 36
system recovery 27
T
temperature
safety considerations 42
specifications 45
troubleshooting 42
TouchPad 1
cleaning 39
identifying 7
navigating 8
turning on and off 8
TouchPad buttons, identifying 7
TouchPad gestures
pinching 9
scrolling 9
using 9
TouchPad off indicator, identifying 7
TouchPad zone, identifying 7
traveling 39
traveling with the device 39
troubleshooting
blank screen 42
display problems 42
overheating problems 42
startup problems 41
virus problems 42
turning on the device 41
U
unresponsive device, troubleshooting 42
user guides 2
V
vents, precautions 42
viruses 35
W
Web browser 11
Web calendar 11
Web e-mail 11
Windows backup and recovery
using system restore points 34
Windows Backup and Restore
using 33
Windows desktop, identifying 5
wireless Internet access 19
wireless network connection 21, 24
wireless network problems 43
48 Notebook Essentials
Page 53

wireless network problems,
troubleshooting 43
Z
zooming, TouchPad 9
Index
Notebook Essentials 49
Page 54

Index
50 Notebook Essentials
 Loading...