

Page 1
Ultimate
Gebrauchsanleitung ........................... 08
Instructions for Use ............................ 12
Mode d’emploi ...................................... 16
Manuale di utilizzazione ................... 20
Gebruiksaanwijzing ............................ 24
Használati utasítás .............................. 28
Návod k použití .................................... 32
Návod na použitie ............................... 36
Instrucţiuni de utilizare ..................... 40
Instrukcja obsługi ................................ 44
Kullanım kılavuzu ................................ 48
Instrucciones de uso .......................... 52
®
M17133_Livington_PrimeULTIMATE_Manual_Ab MP13687_20181123_BA.indd 1 23.11.18 10:11
Page 2
DE: LESEN SIE DIE GESAMTE GEBRAUCHSANWEISUNG, BEVOR SIE MIT DEM
AUFBAU BEGINNEN UND DAS GERÄT IN BETRIEB NEHMEN.
EN: PLEASE READ THIS MANUAL THOROUGHLY PRIOR TO USE AND KEEP IT
FOR FUTURE REFERENCE
FR: VEUILLEZ LIRE ATTENTIVEMENT CE MODE D’EMPLOI AVANT D’UTILISER
L’APPAREIL ET LE CONSERVER POUR LE CONSULTER ULTÉRIEUREMENT
IT: SI PREGA DI LEGGERE ATTENTAMENTE QUESTE ISTRUZIONI PER L’USO
PRIMA DI UTILIZZARE L’APPARECCHIO E DI CONSERVARLE IN UN LUOGO
SICURO PER POTERLE SEMPRE REPERIRE IN UN SECONDO MOMENTO
NL: DEZE HANDLEIDING VÓÓR GEBRUIK ZORGVULDIG DOORLEZEN EN
BEWAREN OM OOK LATER NOG IETS OP TE KUNNEN ZOEKEN
HU: KÉRJÜK, HOGY A KÉSZÜLÉK HASZNLATA ELŐTT OLVASSA EL FIGYELMESEN
A JELEN HASZNÁLATI UTASÍTÁST ÉS ŐRIZZE MEG KÉSŐBBI FELHASZNÁLÁSRA
SK: PRED POUŽÍM SI POZORNE PREČÍTAJTE TENTO NÁVOD AUSCHOVAJTE HO
K NAHLIADNUTIU
CZ: TENTO NÁVOD K POUŽITÍ SI PŘED POUŽITÍM PEČLIVĚ PROSTUDUJTE A
ULOŽTE SI JEJ K POZDĚJŠÍMU NAHLÉDNUTÍ
RO: VĂ RUGĂM CA ÎNAINTE DE UTILIZARE SĂ CITIŢI ACESTE INSTRUCŢIUNI ŞI
SĂ LE PĂSTRAŢI PENTRU CONSULTARE ULTERIOARĂ
TR: LÜTFEN KULLANMADAN ÖNCE BU KILAVUZU DİKKATLİCE OKUYUN VE
DAHA SONRA BAŞVURMAK İÇİN SAKLAYIN
ESP: ANTES DE UTILIZAR EL APARATO LEER ATENTAMENTE ESTAS
INSTRUCCIONES DE USO Y GUARDARLAS PARA FUTURAS CONSULTAS.
PL: PRZED PRZYSTĄPIENIEM DO UŻYTKOWANIA PRODUKTU UWAŻNIE
PRZECZYTAJ NINIEJSZĄ INSTRUKCJĘ I PRZECHOWAJ JĄ DO PÓŹNIEJSZEGO
WYKORZYSTANIA
2
M17133_Livington_PrimeULTIMATE_Manual_Ab MP13687_20181123_BA.indd 2 23.11.18 10:11
Page 3
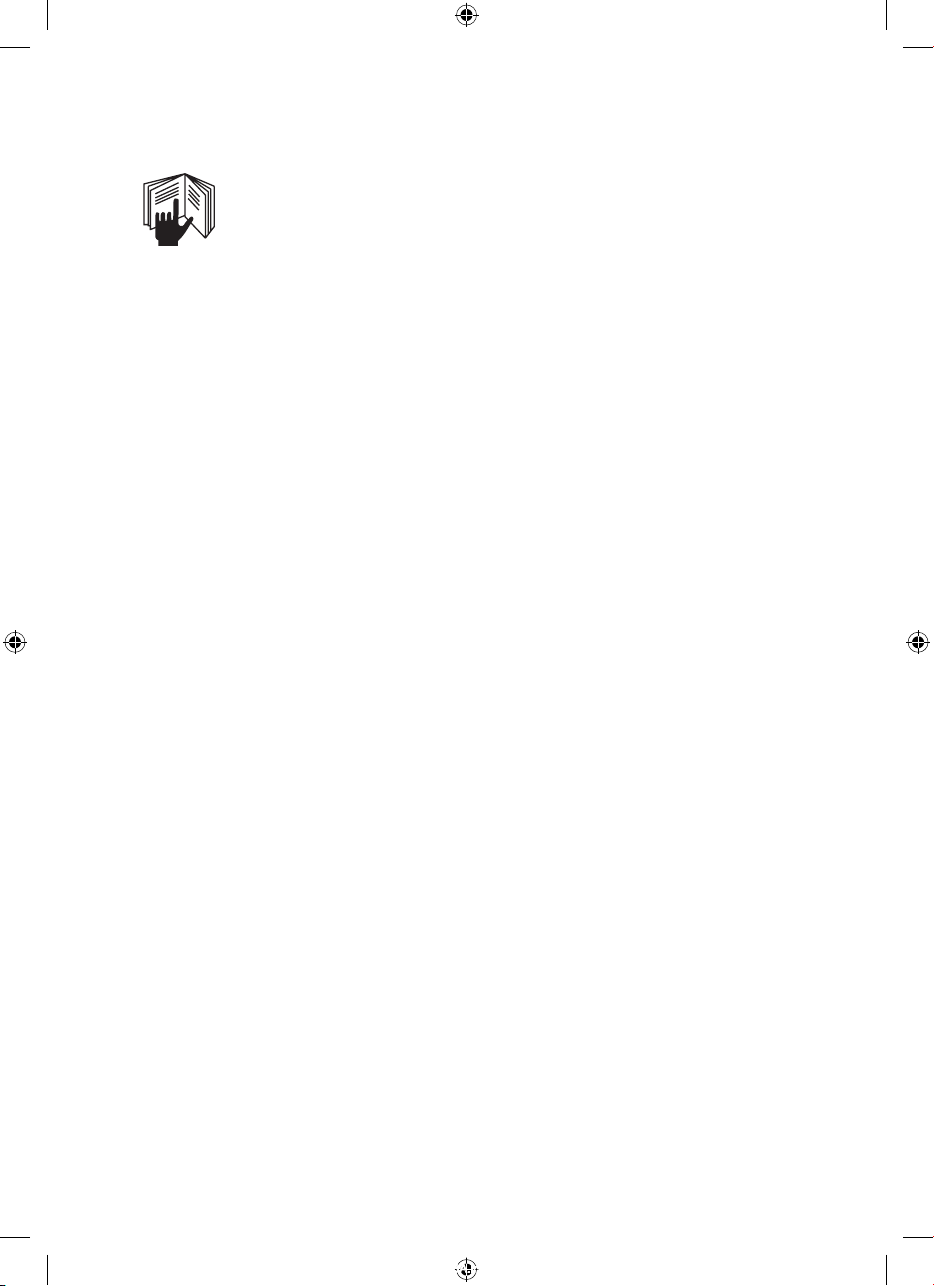
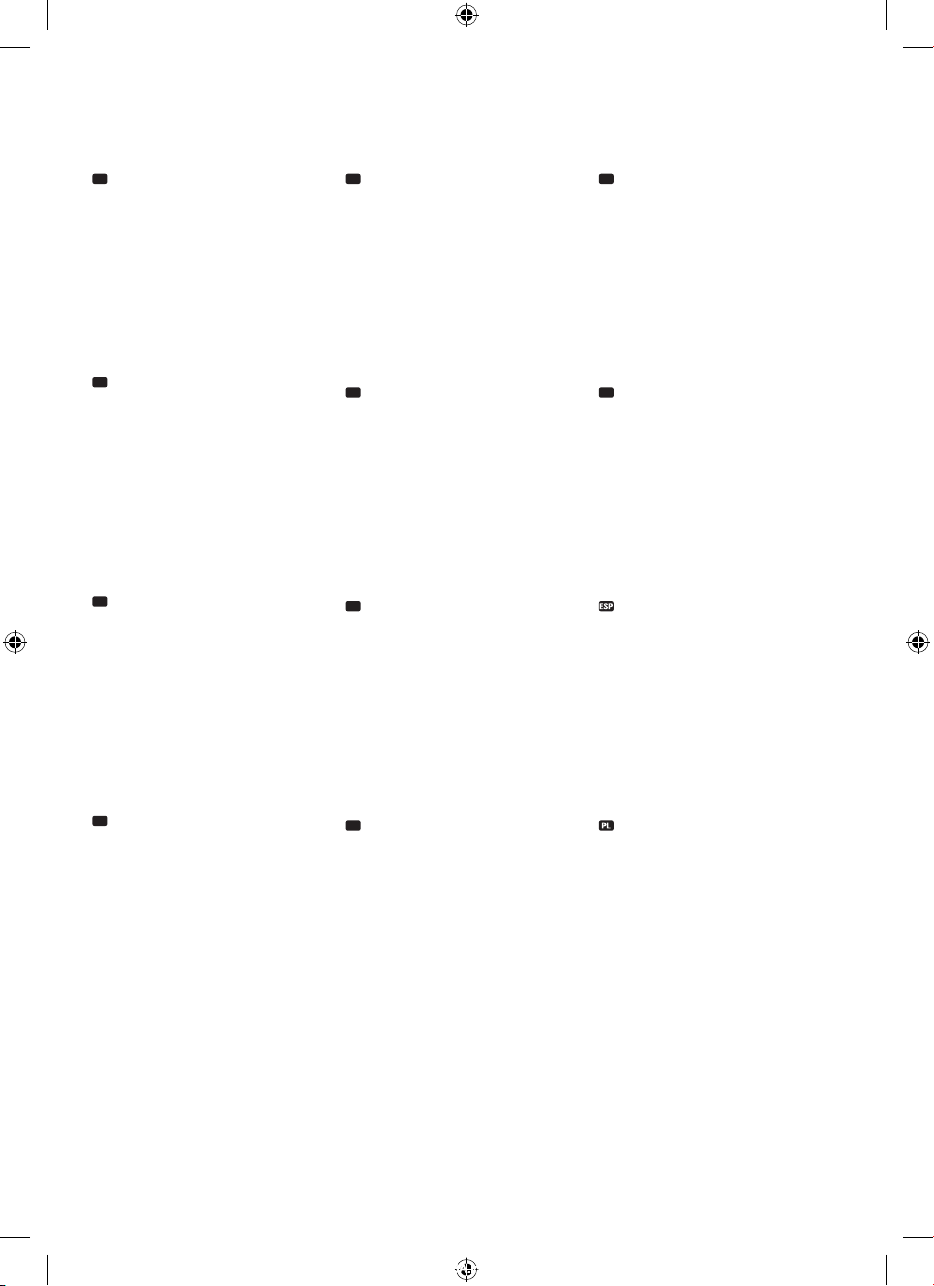
Bezeichnung der Produktteile und schematische Darstellung
Description of product parts and diagrammatical presentation | Désignation des pièces et illustration schématique
delle parti del prodotto e rappresentazione schematica
leírása és vázlatos ábrázolása l Označenie častí produktu aschematické znázornenie l Názvy dílů výrobku a schématické zobrazení
Denumirea pieselor produsului şi reprezentarea schematică
componentes y representación gráfica | Opis części i widok schematyczny
l
Namen van de onderdelen en schematekening
l
Ürün parçalarının açıklaması ve şematik görünüm
l
l
A termék részegységeinek
Denominazione
l
Denominación de los
l
6
7
DE
1. LED-ANZEIGE
2. EIN-/AUSTASTE
3. AKKU
4. STAUBFANGBEHÄLTER
5. ENTRIEGLER
6. LUFTFILTERABDECKUNG
7. ABLUFTFILTER
EN
1. LED-DISPLAY
2. ON/OFF BUTTONS
3. RECHARGEABLE BATTERY
4. DUST COLLECTION
CONTAINER
5. LOCKING MECHANISM
6. AIR FILTER COVER
7. EXHAUST AIR FILTER
FR
1. LAMPES A LED
2. BOUTON MARCHE / ARRET
3. ACCU
4. BAC A POUSSIÈRE
5. DÉVERROUILLAGE
6. RECOUVREMENT DU FILTRE
A AIR
7. FILTRES DE SORTIE D‘AIR
1
IT
1. INDICATORE A LED
2. TASTO ON/OFF
3. BATTERIA
4. SERBATOIO DI
RACCOGLIMENTO DELLA
POLVERE
5. SBLOCCO
6. COPERCHIO DEL FILTRO
DELL’ARIA
7. FILTRO DI SCARICO
NL
1. LED-INDICATIELAMPJE
2. AN/UIT-KNOP
3. ACCU
4. STOFRESERVOIR
5. ONTGRENDELING
6. LUCHTFILTERAFDEKKING
7. UITLAATFILTER
HU
1. LED-KIJELZŐ
2. BE-/KIKAPCSOLÓ
3. AKKU
4. PORTÁROLÓ
5. NYITÓ RETESZ
6. LÉGSZŰRŐ FEDÉL
7. KIMENETI LEVEGŐSZŰRŐ
2
SK
1. LED-DISPLEJ
2. TLAČIDLO ZAP./VYP.
3. BATÉRIA
4. NÁDOBA NA
ZACHYTÁVANIE PRACHU
5. BLOKOVAČ
6. KRYT VZDUCHOVÉHO
FILTRA
7. VÝSTUPNÝ FILTER
CZ
1. KONTROLKA LED
2. TLAČÍTKO ZAP/VYP
3. AKUMULÁTOR
4. NÁDOBA K ZÁCHYTU
PRACHU
5. ODBLOKOVACÍ PRVEK
6. KRYT VZDUCHOVÉHO
FILTRU
7. VÝSTUPNÍ FILTR
RO
1. AFIŞAJ LED
2. BUTON PORNIRE/OPRIRE
3. ACUMULATOR
4. REZERVOR DE PRAF
5. DESCHIZĂTOR
6. CAPAC DE FILTRU AER
7. FILTRU DE EVACUARE
3
5
4
TR
1. LED GÖSTERGESİ
2. AÇMA KAPAMA TUŞU
3. AKÜ
4. TOZ SAKLAMA KABI
5. KİLİT AÇICI
6. HAVA FİLTRESİ KAPAĞI
7. HAVA ÇIKIŞ FILTRESI
1. ILOTO LED
2. BOTÓN ENCENDER/
APAGAR
3. BATERÍA
4. RECIPIENTE COLECTOR DE
POLVO
5. BOTÓN DESBLOQUEO
6. TAPA FILTRO DE POLVO
7. FILTROS DE ESCAPE
1. WSKAŹNIK DIODOWY
2. WŁĄCZNIK/WYŁĄCZNIK
3. AKUMULATOR
4. ZBIORNIK NA
NIECZYSTOŚCI
5. ELEMENT ZWALNIAJĄCY
6. OSŁONA FILTRA
POWIETRZA
7. FILTR WYLOTOWY
3
M17133_Livington_PrimeULTIMATE_Manual_Ab MP13687_20181123_BA.indd 3 23.11.18 10:11
Page 4
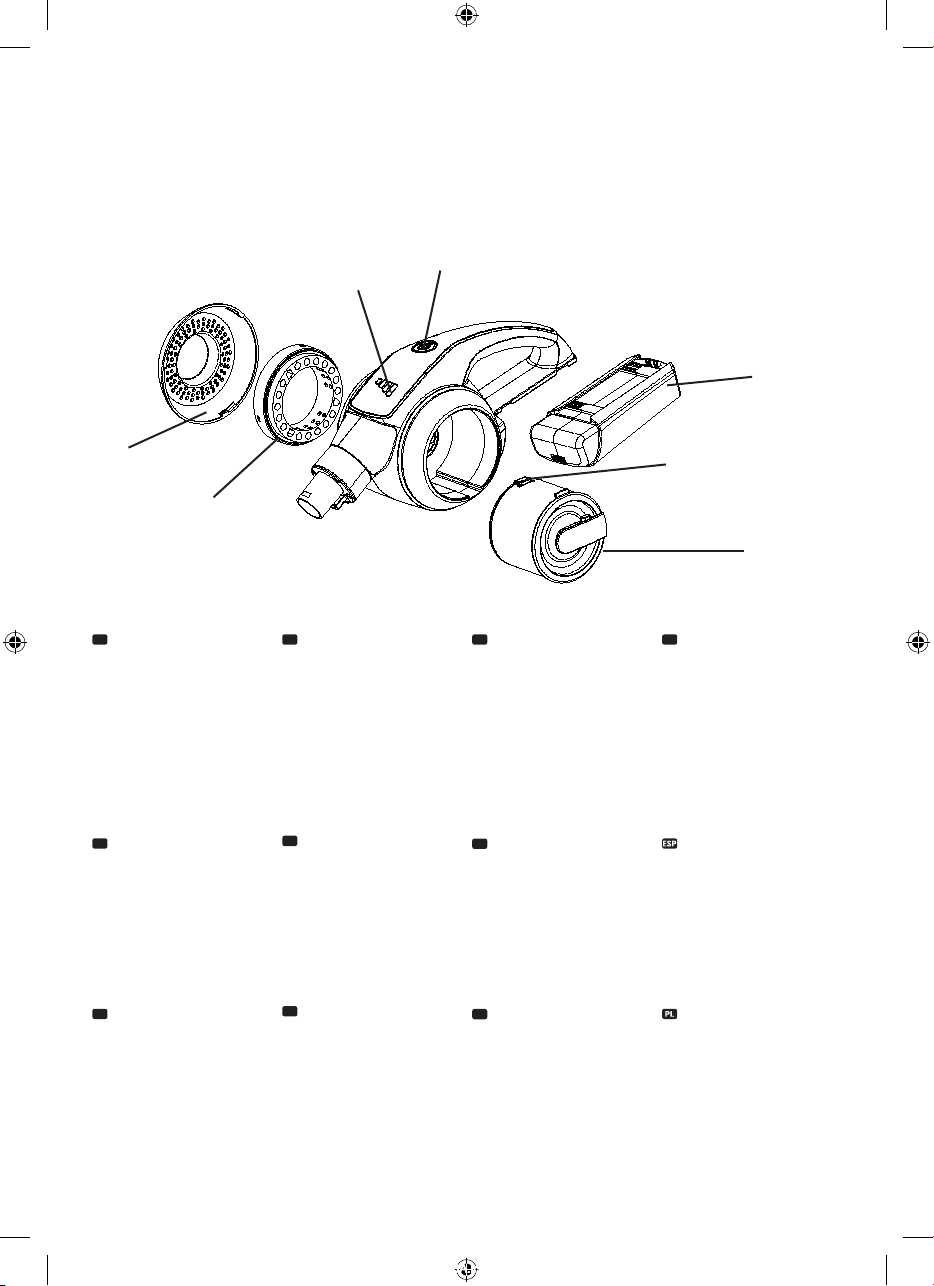
Zubehör und schematische Darstellung
Accessories and diagrammatical presentation
Accessori e rappresentazione schematica
duktu aschematické znázornenie
görünüm | Accesorios y representación gráfica | Akcesoria i widok schematyczny
l
l
Accessoires et illustration schématique
l
Toebehoren en schematekening l Tartozékok vázlatos ábrázolása l Označenie častí pro-
Příslušenství a schématické zobrazení
lAccesorii şi diagrama schematică l
3
l
Accessori e rappresentazione schematica
Aksesuar ve şematik
2
l
1
4
6
5
8
7
9
4
M17133_Livington_PrimeULTIMATE_Manual_Ab MP13687_20181123_BA.indd 4 23.11.18 10:11
Page 5
DE
1. BÜRSTENVERRIEGELUNG
2. KNICKGELENK
3. TURBOBÜRSTE
4. STROMZUFUHR TURBOBÜRSTE
5. ROLLBÜRSTE
6. ROLLBÜRSTENENTRIEGLER
7. 3IN1KOMBIBÜRSTE
8. WANDHALTERUNG
INKL. LADESTATION
9. SAUGROHRHALTERUNG
EN
1. INTERCONNECTING BRUSHES
2. ARTICULATED CONNECTIONS
3. TURBO BRUSH
4. POWER SUPPLY TURBO BRUSH
5. ROLLER BRUSH
6. ROLLER BRUSH LOCKING
MECHANISM
7. 3-IN-1- COMBINATION BRUSH
8. WALL MOUNT INCL. CHARGING
STATION
9. SUCTION TUBE HOLDER
FR
1. VERROUILLAGE DES BROSSES
2. ARTICULATION
3. BROSSE TURBO
4. ALIMENTATION BROSSE TURBO
5. BROSSE A ROULETTES
6. DÉVERROUILLAGE BROSSE A
ROULETTES
7. BROSSE COMBINÉE 3 EN 1
8. FIXATION MURALE INCL. STATION
DE CHARGE
9. SUPPORT POUR TUBE D‘ASPIRATION
IT
1. DISPOSITIVO DI BLOCCO DELLA
SPAZZOLA
2. ARTICOLAZIONE A SNODO
3. TURBOSPAZZOLA
4. TURBO SPAZZOLA ALIMENTAZIONE
5. SPAZZOLA ROTANTE
6. DISPOSITIVO DI SBLOCCO DELLA
SPAZZOLA ROTANTE
7. SPAZZOLA COMBI 3-IN-1
8. MONTAGGIO A PARETE INCL.
STAZIONE DI RICARICA
9. SUPPORTO DEL TUBO DI
ASPIRAZIONE
NL
1. BORSTELVERGRENDELING
2. KNIKGEWRICHT
3. TURBOBORSTEL
4. VOEDING TURBOBORSTEL
5. ROLBORSTEL
6. ROLBORSTELONTGRENDELING
7. 3-IN-1-COMBIBORSTEL
8. WANDMONTAGE INCL.
LAADSTATION
9. ZUIGBUISHOUDER
HU
1. KEFE ZÁRÓRETESZ
2. BEPATTINTHATÓ CSUKLÓS
CSATLAKOZÓ
3. TURBÓ KEFE
4. TÁPELLÁTÁS TURBO KEFE
5. KÖRKEFE
6. KÖRKEFE NYITÓ RETESZ
7. 3-AZ-1-BEN TÖBB FUNKCIÓS KEFE
8. FALI TARTÓ HOZZÁ: TÖLTŐÁLLOMÁS
9. SZÍVÓCSŐ TARTÓ
SK
1. LED-DISPLEJ
2. TLAČIDLO ZAP./VYP.
3. BATÉRIA
4. PRÍVOD EL. PRÚDU TURBO KEFY
5. BLOKOVAČ
6. BLOKOVANIE SACEJ TRUBICE
7. KRYT VZDUCHOVÉHO FILTRA
8. DRŽIAK NA STENU VRÁTANE
NABÍJACEJ STANICE
9. DRŽIAK SACEJ TRUBICE
CZ
1. BLOKOVÁNÍ KARTÁČŮ
2. OHEBNÝ KLOUB
3. TURBOKARTÁČ
4. NÁPÁJENÍ KARTÁČ TURBO
5. OTÁČIVÝ KARTÁČ
6. PRVEK K ODBLOKOVÁNÍ OTÁČIVÉHO
KARTÁČE
7. KOMBINOVANÝ KARTÁČ 3 V 1
8. MONTÁŽ NA STĚNU VČETNĚ.
Nabíjecí stanice
9. DRŽÁK VYSÁVACÍ TRUBICE
RO
1. ÎNCHIZĂTOR PERII
2. ARTICULAŢIE FLEXIBILĂ
3. PERIE TURBO
4. ALIMENTARE CURENT PENTRU
PERIE TURBO
5. PERIE CU ROLE
6. ÎNCHIZĂTOR PERIE CU ROLE
7. PERIE COMBI 3-ÎN-1
8. SUPORT DE PERETE INCL. STAŢIE DE
ÎNCĂRCARE
9. SUPORT TUB ASPIRARE
TR
1. FIRÇA KİLİDİ
2. BÜKÜLEBİLİR EKLEM
3. TURBO FIRÇA
4. GÜÇ KAYNAKLI TURBO FIRÇA
5. DÖNER FIRÇA
6. DÖNER FIRÇA KİLİT AÇICI
7. 3‘Ü 1 ARADA ÇOK FONKSİYONLU
FIRÇA
8. DUVARA MONTAJ DAHİL ŞARJ
İSTASYONU
9. EMME BORUSU TUTUCUSU
1. BLOQUEO CEPILLOS
2. ARTICULACIÓN
3. TURBO-CEPILLO
4. CEPILLO TURBO DE SUMINISTRO DE
ENERGÍA
5. CEPILLO GIRATORIO
6. BOTÓN DESBLOQUEO CEPILLO
GIRATORIO
7. CEPILLO COMBINADO 3 EN 1
8. SOPORTE DE PARED INCL. ESTACIÓN
DE CARGA
9. SOPORTE DEL TUBO DE ASPIRACIÓN
1. BLOKADA SZCZOTKI
2. PRZEGUB
3. TURBOSZCZOTKA
4. ZASILANIE TURBOSZCZOTKI
5. SZCZOTKA Z ROLKĄ
6. ELEMENT ZWALNIAJĄCY SZCZOTKĘ
Z ROLKĄ
7. SZCZOTKA 3-IN-1
8. UCHWYT ŚCIENNY Z STACJĄ
ŁADUJĄCĄ
9. UCHWYT RURY SSĄCEJ
5
M17133_Livington_PrimeULTIMATE_Manual_Ab MP13687_20181123_BA.indd 5 23.11.18 10:11
Page 6

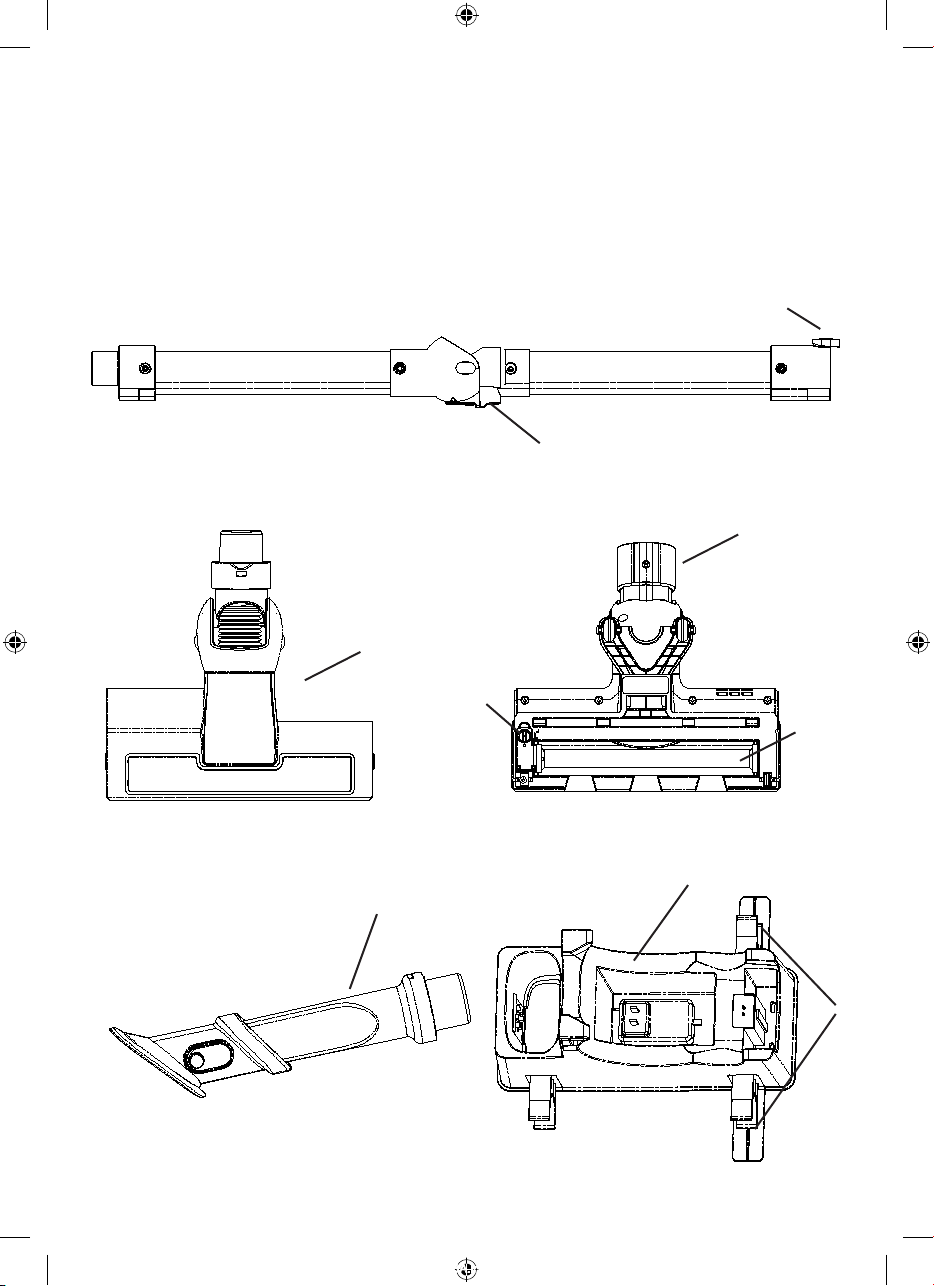
Abbildung 1 | Illustration 1 | Figure 1 | Figura 1 | Afbeelding 1 | 1. ábra |
Obrázek 1 | Obrázok 1 | Figura 1 | Rys. 1 | Resim 1 |
Abbildung 2 | Illustration 2 | Figure 2 | Figura 2 | Afbeelding 2 | 2.
ábra | Obrázek 2 | Obrázok 2 | Figura 2 | Rys. 2 | Resim 2 |
Abbildung 3 | Illustration 3 | Figure 3 |
Figura 3 | Afbeelding 3 | 3. ábra | Obrázek 3
| Obrázok 3 | Figura 3 | Rys. 3 | Resim 3 |
Abbildung 6 | Illustration 6 | Figure 6 |
Figura 6 | Afbeelding 6 | 6. ábra | Obrázek 6
| Obrázok 6 | Figura 6 | Rys. 6 | Resim 6 |
6
Abbildung 4 | Illustration 4 | Figure 4 |
Figura 4 | Afbeelding 4 | 4. ábra | Obrázek 4
| Obrázok 4 | Figura 4 | Rys. 4 | Resim 4 |
Abbildung 7 | Illustration 7 | Figure 7 |
Figura 7 | Afbeelding 7 | 7. ábra | Obrázek 7
| Obrázok 7 | Figura 7 | Rys. 7 | Resim 7 |
Abbildung 9 | Illustration 9 | Figure 9 |
Figura 9 | Afbeelding 9 | 9. ábra | Obrázek 9
| Obrázok 9 | Figura 9 | Rys. 9 | Resim 9 |
Abbildung 5 | Illustration 5 | Figure 5 |
Figura 5 | Afbeelding 5 | 5. ábra | Obrázek 5
| Obrázok 5 | Figura 5 | Rys. 5 | Resim 5 |
Abbildung 8 | Illustration 8 | Figure 8 |
Figura 8 | Afbeelding 8 | 8. ábra | Obrázek 8
| Obrázok 8 | Figura 8 | Rys. 8 | Resim 8 |
Abbildung 10 | Illustration 10 | Figure 10
| Figura 10 | Afbeelding 10 | 10. ábra |
Obrázek 10 | Obrázok 10 | Figura 10 |
Rys. 10 | Resim 10 |
M17133_Livington_PrimeULTIMATE_Manual_Ab MP13687_20181123_BA.indd 6 23.11.18 10:11
Page 7
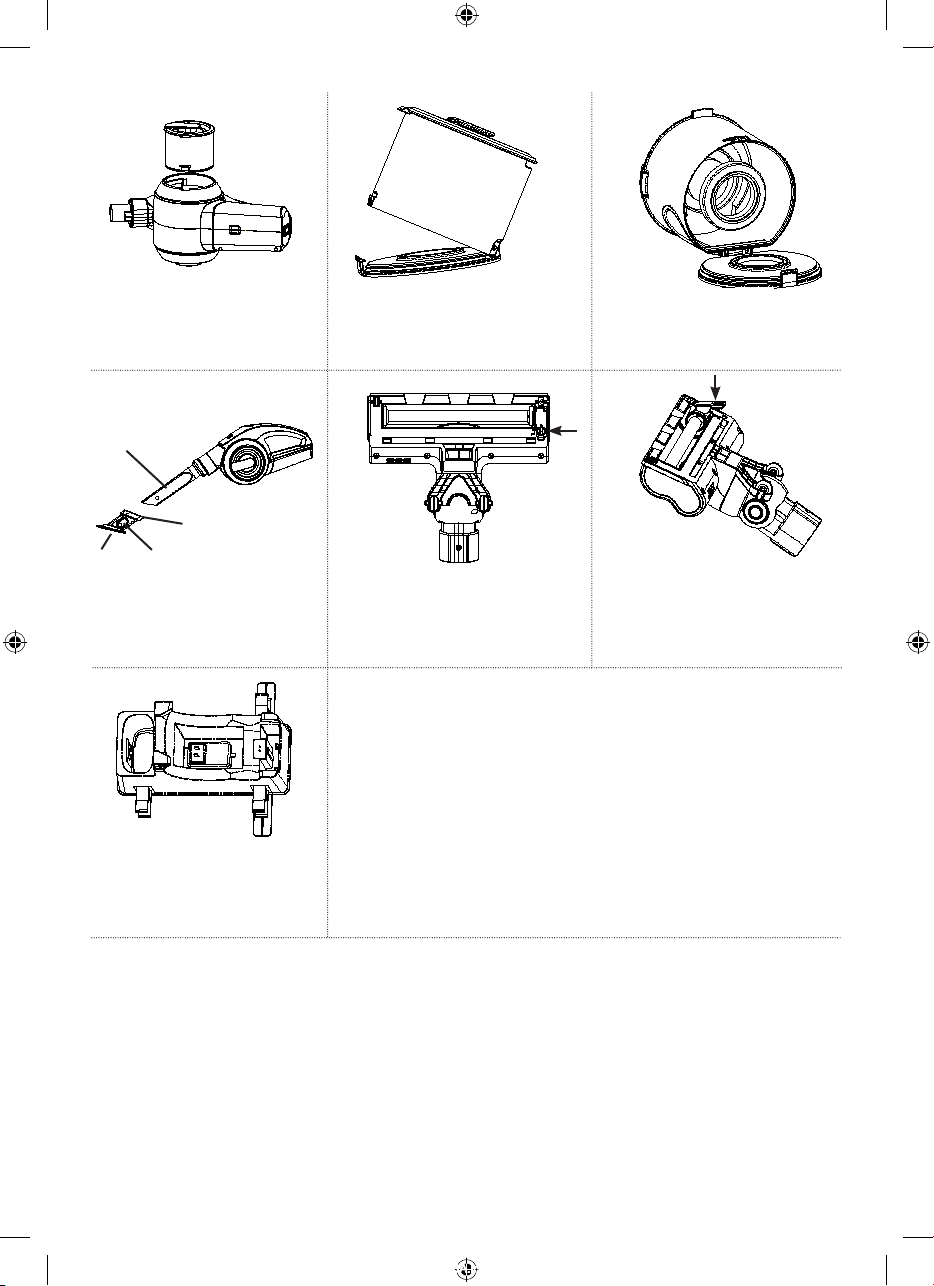
Abbildung 11 | Illustration 11 | Figure 11
| Figura 11 | Afbeelding 11 | 11. ábra |
Obrázek 11 | Obrázok 11 | Figura 11 |
Rys. 11 | Resim 11 |
a
b
c
d
Abbildung 14 | Illustration 14 | Figure 4
| Figura 14 | Afbeelding 14 | 14. ábra |
Obrázek 14 | Obrázok 14 | Figura 14 |
Rys. 14 | Resim 14 |
Abbildung 17 | Illustration 17 | Figure 17
| Figura 17 | Afbeelding 17 | 17. ábra |
Obrázek 17 | Obrázok 17 | Figura 17 |
Rys. 17 | Resim 17 |
Abbildung 12 | Illustration 12 | Figure 12
| Figura 12 | Afbeelding 12 | 12. ábra |
Obrázek 12 | Obrázok 12 | Figura 12 |
Rys. 12 | Resim 12|
Abbildung 15 | Illustration 15 | Figure 15
| Figura 15 | Afbeelding 15 | 15. ábra |
Obrázek 15 | Obrázok 1 5| Figura 15 |
Rys. 15 | Resim 15 |
Abbildung 13 | Illustration 13 | Figure 13
| Figura 13 | Afbeelding 13 | 13. ábra |
Obrázek 13 | Obrázok 13 | Figura 13 |
Rys. 13 | Resim 13 |
Abbildung 16 | Illustration 16 | Figure 16
| Figura 16 | Afbeelding 16 | 16. ábra |
Obrázek 16 | Obrázok 16 | Figura 16 |
Rys. 16 | Resim 16 |
7
M17133_Livington_PrimeULTIMATE_Manual_Ab MP13687_20181123_BA.indd 7 23.11.18 10:11
Page 8
DE
SICHERHEITSHINWEISE
I. Bitte diese Anleitung vor Gebra uch genau durchlesen.
II. Bitte beachten Sie diese Anleitung genau, eine unsachgemäße Handhabung
kann zu Verletzungen führen und das Gerät beschädigen.
Warnhinweis:
Kleinteile in dieser Box dürfen nicht als Spielzeug verwendet werden,
Kunststoffbeutel stets von Babys und Kindern fernhalten – Erstickungsgefahr.
III. Stromversorgung:
1. Dieses Gerät arbeitet mit 100 - 240 V Wechselstrom.
2. Bitte keine andere Anschlussleistung für dieses Gerät verwenden.
3. Erweist sich das Stromkabel oder der Stecker als beschädigt, bitte dieses
Produkt nicht mehr verwenden. Wenden Sie sich zum Austauschen des
Stromkabels an unseren Kundendienst; den Stecker festhalten, das
Stromkabel nicht verdrehen.
4. Bitte beim Abstecken des Kabels auf trockene Hände achten, sonst könnte
es zu einem Stromschlag kommen; sollten Sie dieses Gerät über längere Zeit
nicht verwenden, am Hauptschalter ausschalten, Kabel abstecken. Bitte keine
andere Anschlussleistung für das Gerät verwenden.
IV. Akku:
1. Zum Laden kein anderes Ladegerät verwenden, sonst könnte das Gerät
beschädigt werden.
2. Bitte das Ladegerät nach vollem Aufladen herausziehen, um eine verkürzte
Lebensdauer des Akkus und Leistungsabfall zu vermeiden.
3. Den Akku keinesfalls auseinandernehmen; keinesfalls ins Feuer werfen,
Explosionsgefahr.
4. Die Pole nicht kurzschließen oder vertauschen; das Gehäuse nicht öffnen;
den Akku an keinem feuchten oder heißen Ort lagern.
5. Keinesfalls Benzol, Essigsäure und andere Lösungsmittel zum Reinigen des
Akkus verwenden; bei abnormer Temperatur oder Leckage sofort außer
Betrieb nehmen; nicht auf den Akku drücken oder schlagen, sonst könnte er
heiß werden und Feuer fangen.
V. Einsatzbereiche:
Dieses Produkt ist nur zum Hausgebrauch geeignet und darf nicht im Freien
oder gewerblich eingesetzt werden; nicht zulässig ist die Verwendung an
Bekleidung, Fingern, Kopf oder Haar. Es handelt sich um ein elektronisches Gerät;
um Störungen des Geräts zu vermeiden, das Gerät nicht Regen, Wasser oder
8
M17133_Livington_PrimeULTIMATE_Manual_Ab MP13687_20181123_BA.indd 8 23.11.18 10:11
Page 9

Feuchtigkeit aussetzen (z.B. Badezimmer, Waschküche usw.).
Keinesfalls Flüssigkeiten einsaugen. Das Gerät nicht in potentiell gefährlicher
Umgebung verwenden, z.B. nahe Gasanlagen, Öltanks, Chemikalien und sonstigen
entzündlichen und explosiven Stoffen; dieses Gerät nicht zum Aufnehmen von
Asche, brennenden Zigaretten oder Zündhölzern verwenden – Feuergefa hr.
Dieses Produkt nicht zum Beseitigen entzündlicher oder flüchtiger Flüssigkeiten
wie Benzin, Kerosin, Farblacken, Reiniger, Alkohol, Parfum, Teppich-,
Bodenreiniger, usw. verwenden. Dieses Produkt nicht zum Beseitigen von
Farbpulver oder Toner im Laserdrucker oder Kopiergerät verwenden, um Feuer
oder Explosion vermeiden.
VI. Sonstiges:
Dieses Gerät kann von Kindern ab 8 Jahren und darüber, sowie von Personen mit
verringerten physischen, sensorischen oder mentalen Fähigkeiten oder Mangel
an Erfahrung und Wissen benutzt werden, wenn sie beaufsichtigt oder bezüglich
des sicheren Gebrauchs des Gerätes unterwiesen wurden und die daraus
resultierenden Gefahren verstehen. Kinder dürfen nicht mit dem Gerät spielen.
Reinigung und Benutzerwartung dürfen nicht von Kindern ohne Beaufsichtigung
durchgeführt werden.
GEBRAUCHSANLEITUNG
Befestigung der Ladestation:
Sollten Sie die Ladestation nicht an der Wand befestigen wollen, können Sie die Ladestation selbstverständlich
auch einfach am Boden platzieren.
1. Ladestation an die gewünschte Stelle der Wand halten und mit einem Bleistift die Bohrlöcher markieren
(Abb. 1). Mit einem elektrischen Bohrer mit 6-mm-Einsatz drei Löcher bohren.
2. Die für Ihre Wand passenden Dübeln (nicht im Lieferumfang enthalten) in die Montagelöcher einschlagen
und die Ladestation mit Schrauben an der Wand befestigen (Abb. 2).
3. Die Halterungen für die Rohre bzw. Bürsten wie in Abb. 7 dargestellt in die dafür vorgesehene
Aussparung schieben. Dabei darauf achten, dass die beiden längeren Halterungen oben befestigt werden.
4. Setzen Sie den Ersatz-Akku (nicht im Lieferumfang enthalten) in die Ladestation für den Ersatz-Akku ein
(Abb. 3).
5. Das Handgerät in die Ladestation stecken und den Akku mit den Kontakten in der Ladestation
zusammenführen (Abb. 4).
6. Den Stecker des Adapters einsetzen wie in (Abb. 5) gezeigt.
1. Ladestation anschließen: Ladestation an das Stromnetz anstecken
2. Ladestation: Ersatz-Akku (nicht im Lieferumfang enthalten) und Handgerät in die Ladestation stecken
– siehe Abb. 5; die rote Ladeanzeige beginnt zu blinken. Ist der Akku im Staubsauger voll aufgeladen,
beginnt sich der Ersatz-Akku aufzuladen und das rote Lämpchen an der Ladestelle beginnt zu blinken.
Die blauen Balken am Staubsauger-Display zeigen den aktuellen Ladestand an. Wenn alle Balken blau
leuchten, ist der Ladevorgang abgeschlossen. Ist die Ladeanzeige nach 5 Stunden grün, bedeutet
das, dass beide Akkus voll aufgeladen sind.
Vorsichtsmaßnahmen bei Gebrauch
• Bitte vor dem fünfstündigen Laden den Staubsauger zweimal gebrauchen, Ziel: volle Aktivierung der Akkuaktivität.
• Sinkt die Akkuspannung ab, blinkt das erste der vier LEDs und weist darauf hin, dass der Akku bald
aufgeladen werden muss.
9
M17133_Livington_PrimeULTIMATE_Manual_Ab MP13687_20181123_BA.indd 9 23.11.18 10:11
Page 10

• Wird das Gerät längere Zeit nicht verwendet, sinkt die Akkuleistung; bitte alle sechs Monate ein- oder
zweimal aufladen.
3. Rohr anschließen: Das Aluminiumrohr in das Gerät einschieben (Abb. 8), dabei die zwei Stifte
entsprechend den beiden Löchern am Gerät halten, dann das Aluminiumrohr damit fest sichern.
4. Bürste anschließen: Bürste in das Rohr stecken (Abb. 9); dabei die zwei Stifte entsprechend den beiden
Löchern im Rohr halten, dann die Bürste damit fest sichern.
5. LED-Anzeige: EIN-/AUS-TASTE zum Einschalten des Saugers betätigen, das Gerät beginnt zu saugen, die
vier blauen LEDs leuchten auf; nach 7 bis 8 Minuten erlischt die erste blaue LED aus, nach 13 bis 14 Minuten
die zweite und nach 17 bis 18 Minuten das dritte und vierte. Den Filter nach jedem Gebrauch reinigen. Dann
den Sauger neu starten, damit er wieder richtig läuft.
6. Reinigen des Staubfangbehälters inkl. HEPA-Filter:
Den Staubsauger zu einem Abfalleimer bringen, danach den Staubfangbehälter am Griff herausziehen
(Abb. 11) und den Staub entleeren, Schale reinigen und sofort wieder am Gerät anbringen; Klickgeräusche
zeigen an, dass die Schale wieder eingerastet ist (Abb. 12-13). Im Uhrzeigersinn drehen, um den HEPA-Filter
abzunehmen und zu reinigen, danach im Uhrzeigersinn wieder einsetzen.
7. 3-in-1-Kombibürste:
Dieses Gerät ist mit einer 3-in-1-Kombibürste ausgestattet, dazu gehört die Fugendüse (a), der Bürstenaufsatz
(b) und die Möbelbürste (c) - siehe (Abb. 14). Den Entriegler (d) betätigen, um den Bürstenkopf abzunehmen;
die Düse lässt sich dann zum Reinigen von Ritzen verwenden; der Bürstenaufsatz lässt sich zB. für
Computertastaturen verwenden und die Rückseite kann als Möbelbürste verwendet werden.
8. Knickgelenk:
Um das Knickgelenk zu entriegeln (s. Darstellung Seite 4), kurz auf den Entriegler drücken und das Rohr leicht
nach vorne knicken. Sperre ist gelöst. Nach Gebrauch Sperre wieder einrasten lassen.
VORSICHTSMASSNAHMEN
1. Ist der Akku in der Ladestation eingelegt, blinkt das rote Licht und zeigt den Ladevorgang an, das grüne
Licht bedeutet „voll geladen“.
2. Wird das Gerät längere Zeit nicht verwendet, sinkt der Ladezustand des Akkus ab; bitte den Akku alle
sechs Monate ein- bis zweimal aufladen.
REINIGUNG UND WARTUNG
I. Reinigung des Geräts:
1. Alle routinemäßigen Wartungs- und Reparaturarbeiten sind nach Ausstecken des Ladegeräts
durchzuführen.
2. Nach jeder Anwendung ist der Staubfangbehälter zu reinigen.
3. Bei Nichtgebrauch das Gerät an einem kühlen und trockenen Ort abstellen, nicht direkter
Sonnenbestrahlung oder Feuchtigkeit aussetzen.
4. Sicherstellen, dass das Gerät von der Stromzufuhr getrennt und die EIN-/AUS-TASTE ausgeschaltet ist; mit
einem feuchten Baumwolltuch abwischen (mit Wasser oder einem neutralen Reiniger), ohne dass Wasser
oder Reiniger eindringen und Schaden verursachen.
II. Reinigung der Bürste:
Wie in Abb. 15 gezeigt, eine Münze in die Rollensperre einführen, im Uhrzeigersinn drehen und entriegeln, die
Rollendeckplatte (Abb. 16) öffnen, die Bürstenrolle entfernen und Haare und Schmutz von der Rolle entfernen.
Lange Haare können auch vor dem Entfernen mit einer Schere aufgeschnitten werden. Danach die Bürste
wieder einsetzten und die Rollensperre mit der Münze verschließen.
LAGERUNG DES GERÄTS
• Das Gerät bei Nichtgebrauch in die Ladestation hängen (Abb. 6).
• Die flache Saugbürste an den linken Haken des Geräts hängen, das Saugrohr auf den rechten Haken
schieben und die Bürste anstecken.
FEHLERBEHEBUNG
Anm.: Nehmen Sie eines der folgenden Probleme wahr, schalten Sie das Gerät bitte sofort aus, um es nicht zu
beschädigen und weitere Schäden zu verhindern.
10
M17133_Livington_PrimeULTIMATE_Manual_Ab MP13687_20181123_BA.indd 10 23.11.18 10:11
Page 11
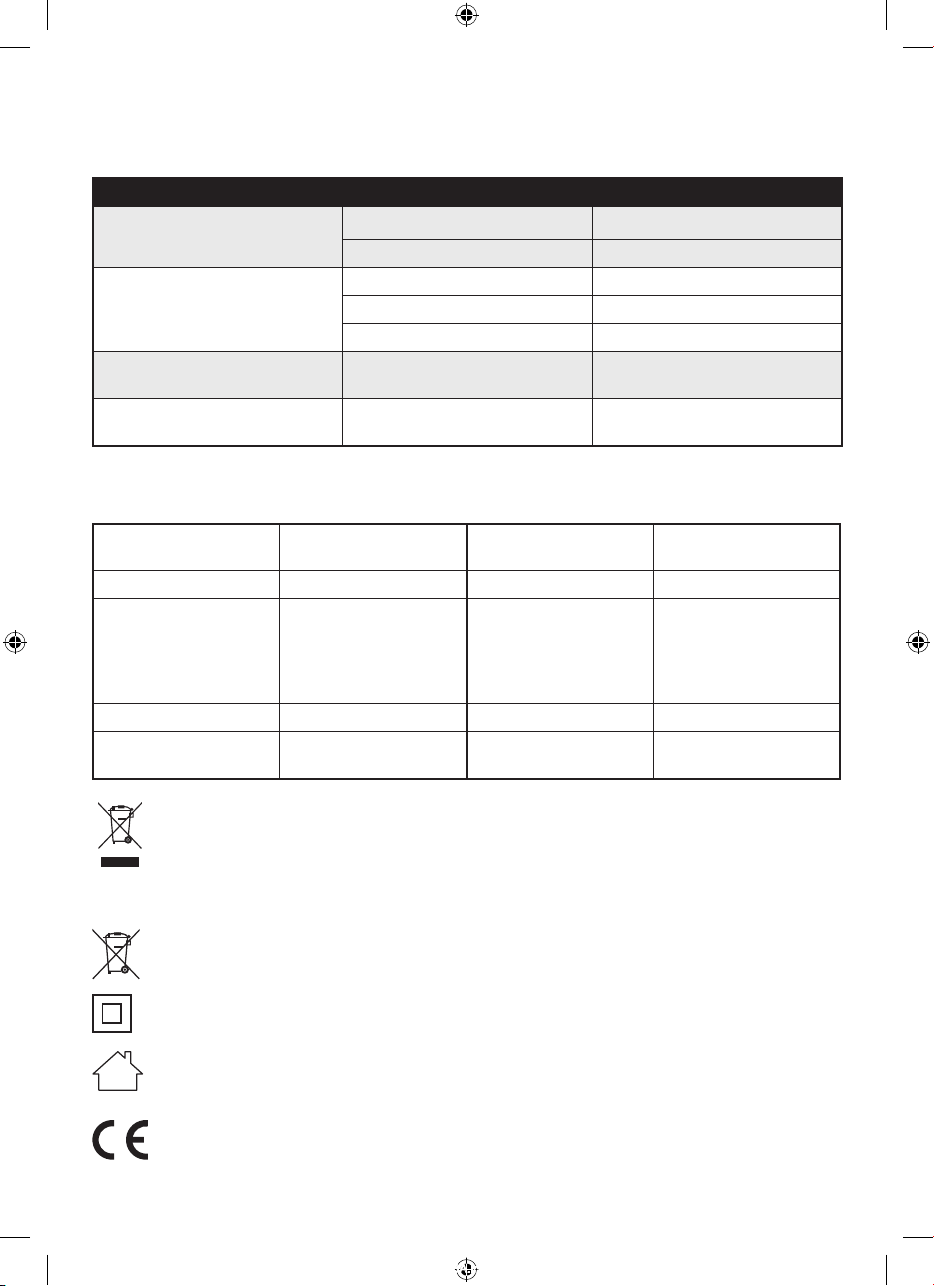
Fehler Mögliche Ursache Lösung
Läuft nicht mehr
Saugkraft lässt nach
Staub tritt während des Betriebs aus Abluftfilter verschmutzt
Bürste rotiert nicht Erstes Licht blinkt
Akku schwach Akku aufladen
Schalter nicht betätigt Schalter auf EIN stellen
Staubfangbehälter ist voll Staubfangbehälter ausleeren
Ansaugöffnung verstopft Verstopfung entfernen
Filter verstopft Filter säubern
Gerät ausschalten und Filter
reinigen
Bürste reinigen und Gerät wieder
einschalten
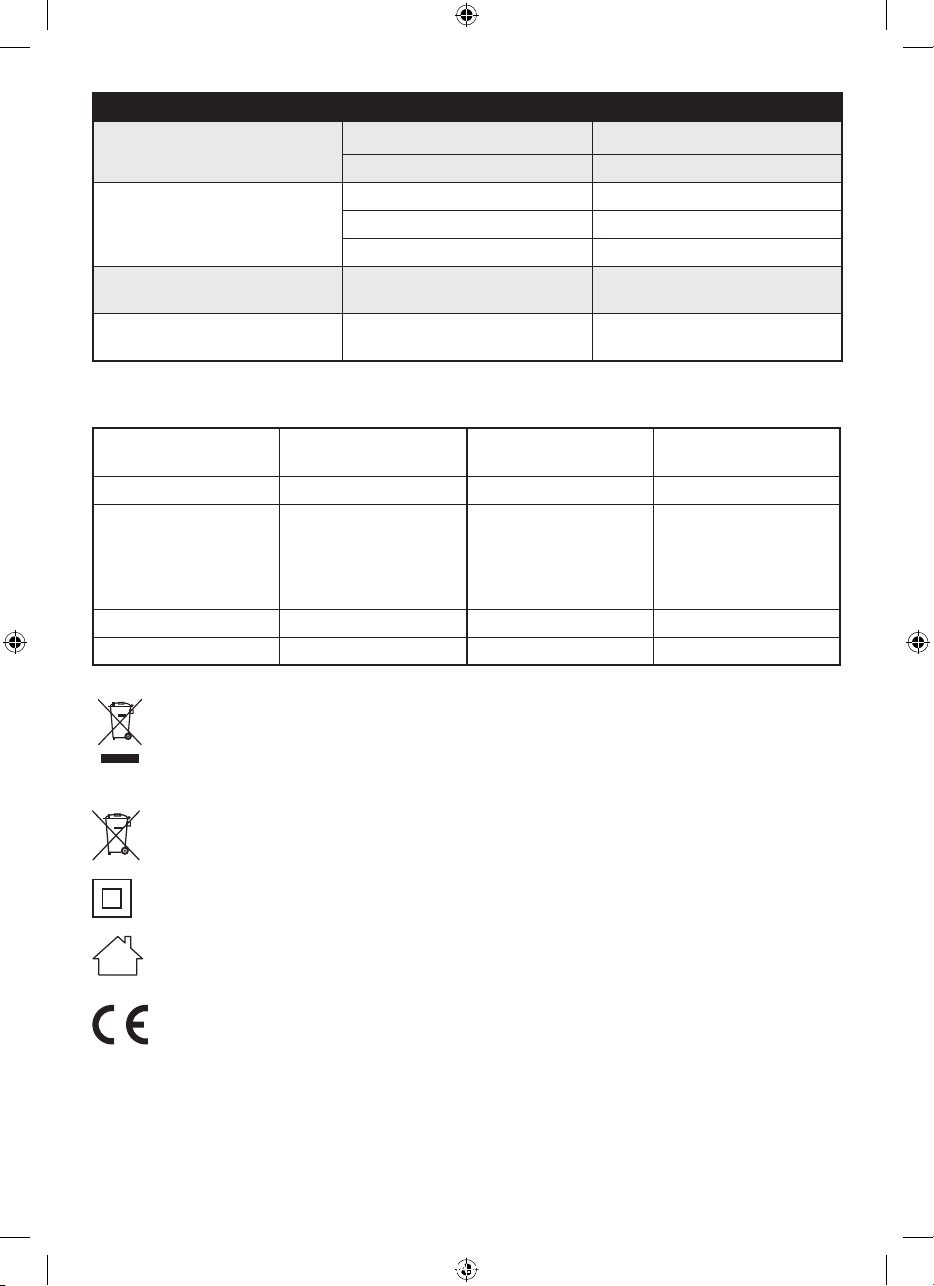
TECHNISCHE PRODUKTDATEN
Produktkategorie
Nennspannung 18,5V Motorleistung 130W
Ladegerät Spannung
& Parameter
Akku Li-Ion 2200mAh Fassungsvermögen 0,5 l
Gewicht 2 kg Dauerbetrieb 18 min
Aufladbarer
DC-Staubsauger
Spannungsversorgung:
100-240V,
Frequenz: 50/60 Hz
Ausgangsleistung:
24V 500mA
Produkttype
Schallpegel ≤72 dB
MC-603-A
Entsorgen Sie das Produkt am Ende seiner Lebensdauer nicht mit dem normalen Hausmüll. Bringen Sie es zu
einer Sammelstelle zum Recycling von elektrischen und elektronischen Geräten. Dies wird durch dieses Symbol
auf dem Produkt, in der Bedienungsanleitung und auf der Verpackung angegeben. Informieren Sie sich über
Sammelstellen, die von Ihrem Händler oder der lokalen Behörde betrieben werden. Die Wiederverwertung und
das Recycling von Altgeräten ist ein wichtiger Beitrag zum Schutz unserer Umwelt.
Batterien gehören nicht in den Hausmüll. Bringen Sie diese zu einer autorisierten Sammelstelle.
Schutzklasse II
Nur zur Verwendung in Innenräumen.
Dieses Produkt entspricht den Europäischen Richtlinien.
11
M17133_Livington_PrimeULTIMATE_Manual_Ab MP13687_20181123_BA.indd 11 23.11.18 10:11
Page 12

EN
SAFETY INSTRUCTIONS
I. Please read the manual thoroughly prior to use.
II. Please bear this manual in mind, as inappropriate handling can lead to injuries
and damage the appliance.
Warning Notice:
Small parts in this box must not be used as toys, and plastic bags are a danger
and can cause suffocation, and must always be kept away from babies and
children.
III. Power Supply:
1. This appliance operates with a 100-240V- alternating current.
2. Please do not use any other connecting cable for this appliance.
3. Should the electrical cable or plug turn out to be defective, please do not
continue to use the product. Contact our customer service depart ment for
an exchange of cable; keep a hold of the plug and do not twist the electrical
cable; beware of the danger of electrical shock; please switch off and remove
the electrical cable.
4. Please pay attention to dry hands when unplugging the cable, otherwise an
electric shock could occur; If you should not use this device for a long time,
switch it off at the main switch, unplug the cable. Please do not use any other
connection power for the device.
IV. Rechargeable Battery
1. Do not use any other charging appliance, otherwise it may damage the
appliance.
2. Please remove the charging appliance following full charge, in order to avoid
a reduced lifespan of the battery and a decrease in performance.
3. On no account can the battery be disassembled, nor thrown in a fire, as this
would be a danger of explosion.
4. The terminals should not be short-circuited or exchanged; the housing must
not be opened; the battery cannot be stored in any damp or hot location.
5. On no account should benzol, acetate or any other solvent be used to
clean the battery; in the event of abnormal temperatures or leakage stop
immediately; do not put pressure on or strike the battery as this may cause
heat and start a fire.
V. Operating Conditions
This product is only suitable for home use and must not be deployed outdoors or
for commercial purposes; nor is its use authorized on clothing, fingers, the head
or hair. It is an electronic appliance, and in order to avoid faults, it should not be
12
M17133_Livington_PrimeULTIMATE_Manual_Ab MP13687_20181123_BA.indd 12 23.11.18 10:11
Page 13

exposed to rain, water or dampness (for example, the bathroom, laundry etc).
On no account should fluids be absorbed. The appliance must not be used in
potentially dangerous surroundings, for example, in the vicinity of gas plants, oil
tanks, chemicals and other inflammable and explosive materials; neither should
this appliance be used for the removal of ash, burning cigarettes or matches –
danger of fire.
Do not use this product to remove flammable or volatile liquids
such as gasoline, kerosene, paint, cleaner, alcohol, perfume, carpet, floor cleaner,
etc. use. Do not use this product to remove paint powder or toner in the laser
printer or copier so as to avoid fire or explosion.
VI. Further Points:
This appliance may be used by children from the age of 8 years, as well as
by people of reduced physical, sensory or mental capabilities or lacking
in experience and knowledge, provided they are supervised or have been
instructed with regard to the safe use of the appliance and understand the
possible resulting dangers. Children must not play with the appliance.
Cleaning and user maintenance must not be carried out by children
without supervision.
USER MANUAL
Affixing the charging station: If you do not want to affix the charging station to the wall, you can of course
simply place the charging station on the ground.
1. Hold the charging station in the desired position on the wall and mark the drill holes with a pencil (Illu. 1).
Drill three holes with an electric drill with 6mm insert.
2. Insert the dowels (not included in the delivery contents) into the mounting holes and fasten the charging
station to the wall with screws (Illu. 2).
3. Slide the tube or brush brackets into the recess provided as shown in Illu.. 7. Make sure that the two longer
brackets are fastened at the top.
4. Insert the replacement battery (not included in delivery contents) into the charging slot (
5. Insert the handset into the charging point and bring the battery into contact with the charging point guide
(
Illu.
4).
6. Insert the adapter plug as shown in (Illu. 5).
Illu.
3).
1. Connecting the charging station: connect the charging station to the power grid
2. Charging station: plug the spare battery (not included in delivery contents) and the handset into the device
– see Fig. 5; the red charging indicator starts flashing. When the battery in the vacuum cleaner is fully charged,
the replacement battery begins to charge and the red light at the charging point starts to flash.
The blue bars on the vacuum display indicate the current charge status. The charging process is complete
when all bars are blue.
If the charge indicator turns green after 5 hours, it means that both batteries are fully charged.
Precautions on Use
• Please use the vacuum cleaner twice before charging for five hours, aim: full activation of the battery activity
• If the battery voltage drops, the first of the four LEDs will flash, indicating that the battery needs to be
recharged soon.
• Device not used for a long time, the battery reduces its activity; Please recharge once or twice every six months.
3. Tube Connection:
Insert the aluminum tube into the appliance (Illu. 8), holding the two pins corresponding to the two holes on
the appliance, then firmly secure the aluminum tube.
13
M17133_Livington_PrimeULTIMATE_Manual_Ab MP13687_20181123_BA.indd 13 23.11.18 10:11
Page 14

4. Brush Connection:
press the ON/OFF BUTTON to switch on the vacuum cleaner, then the appliance starts to suck, the four blue
LEDs light up; after 7 to 8 minutes, the first blue light goes out, after 13 to 14 minutes the second and after
17 to 18 minutes the third and fourth. Clean the filter after each use. Then restart the sucker so that it runs
properly again.
5. LED-Display:
Move the vacuum cleaner to a trash can, then pull out the dust collector on the handle (Illu. 11) and empty the
dust, clean the bowl, and immediately replace it; Clicking sounds indicate that the shell is snapped in again
(Illu. 12-13). Turn clockwise to remove and clean the HEPA filter, then reinsert clockwise.
6. Cleaning of the Dust Collection Container, including HEPA-Filter:
1. Pull the dust container out of its holder: Hold the white tab in the middle in place with two fingers and pull
the container out (Illu. 21).
2. Open the dust container over a dustbin, by unlocking the flap underneath the dust container, in order to
empty the dust out (Illu. 22).
3. To clean the filter turn it in an anti-clockwise direction and brush it off, then reattach it to the dust
container by turning it in a clockwise direction.
4. After cleaning, reinsert the dust container by sliding it directly into the appliance with a firm push.
7. 3-in-1 Combination Brush:
This appliance is equipped with a 3-in1-combination brush, consisting of a grout nozzle for narrow gaps (a),
brush attachments (b) and the furniture brush (c) – see (Illu. 14). press the locking mechanism to remove
the brushes head; the nozzle can be used for cleaning narrow gaps; brush attachments can be used for the
cleaning of, for example, computer keyboards and the rear-side can be used as a furniture brush.
8. Flexible tubing:
In order to to release the flexible tubing (See illustration page 4), press briefly on the release knob and gently
bend the tube forwards. The lock is then detached. Following use, let the lock click back into place.
PRECAUTIONARY MEASURES
1. When the battery is inserted in the charging station, the red light flickers and shows the charging process,
ending with the green light, which means „fully-charged“.
2. If the appliance is not in use for a long period of time, the charge level of the battery will decrease; please
recharge the battery, once or twice, every six months.
CLEANING AND MAINTENANCE
I. Cleaning the Appliance:
1. All routine maintenance and repair tasks should be carried out following display of a charged appliance.
2. Following every period of use the dust collection container should be cleaned.
3. When not in use, the appliance should be kept in a cool and dry place, and not be exposed to direct
sunlight or dampness.
4. Ensure that the appliance is kept separate from the power supply and the ON/OFF buttons switched off;
wipe it down with a damp, cotton towel (with water or a neutral cleaner), without letting water or cleaner
get inside and causing defects.
II. Brush Cleaning:
Insert a coin into the roller lock as shown in Illu. 15, turn clockwise and unlock, open the roller cover plate (Illu.
16), remove the brush roller and remove hair and dirt from the roller. Long hair can also be cut up with scissors
before removal. Then replace the brush and close the roller lock with coin.
STORAGE OF THE APPLIANCE
When not in use, hang the device in the charging station (Illu. 6). • Hang the flat suction brush against the left
hook of the device, slide the suction tube onto the right hook and plug in the brush.
14
M17133_Livington_PrimeULTIMATE_Manual_Ab MP13687_20181123_BA.indd 14 23.11.18 10:11
Page 15
TROUBLESHOOTING
NB: if you are aware of one of the following problems, immediately switch off the appliance, in order to not
damage and to prevent further defects.
Faults Possible Cause Solution
No longer functions
Deterioration of suction
Dust escaping while in operation Dust filter is dirty
Brush does not rotate First light is flickering
Rechargeable battery is weak Recharge the battery
Switch is not on Turn the switch to ON
Dust collection container is full Empty the dust collection container
Suction hole is clogged
Filter is clogged
Clear the blockage
Clean the filter
Switch off the appliance and clean
the filter
Clean the brush and restart the
appliance
TECHNICAL PRODUCT DATA
Product Category
Rated Voltage
Recharger Device
& Parameter
Rechargeable Battery Li-Ion 2200mAh Capacity 0,5 l
Weight 2kg
Rechargeable
DC-Vacuum Cleaner
18,5V
Input Circuit
100-240V.
Frequency: 50/60Hz
Output Power:
24V 500mA
Product Type MC-603-A
Motor Output 130W
Noise Level
Continuous
Operation
≤72 dB
18 min
Do not dispose this product at the end of its service life through normal domestic waste. It has to be
disposed through a collection agency that recycles electric and electronic devices. This is pointed
out by the symbol on the product, in the instruction manual, and on the packaging. Please inquire
about local collection agencies that may be operated by your distributor or your municipal
administration. By recycling, making use of the materials, or other forms of recycling old units you
are making an important contribution to protecting our environment.
Batteries are not part of your household waste and must be taken to an authorized collection point.
Safety Class II
For indoor use only
This product complies with the European directives.
15
M17133_Livington_PrimeULTIMATE_Manual_Ab MP13687_20181123_BA.indd 15 23.11.18 10:11
Page 16

FR
CONSIGNES DE SÉCURITÉ
I. Veuillez lire attentivement ce mode d’emploi avant d’utiliser l’appareil.
II. Observez scrupuleusement ce mode d’emploi, car une manipulation non
conforme peut causer des blessures et endommager l’appareil.
Consigne d’avertissement:
Les petites pièces contenues dans cette boîte ne doivent pas être utilisées comme
jouets, tenir toujours les sacs en plastique hors de portée des bébés et des
enfants– risque d‘étouffement.
III. Alimentation électrique:
1. Cet appareil fonctionne sur courant alternatif 100-240V.
2. N’utilisez aucune puissance de raccordement autre pour cet appareil.
3. Ne plus utiliser le produit si le cordon électrique ou la prise s’avère en
dommagé. Veuillez vous adresser à notre service clientèle pour le rempla
cement du cordon électrique; tenir fermement la prise, ne pas torsa der le
cordon électrique; veiller à avoir les mains sèches quand vous raccordez
l’appareil; il existe sinon un risque de décharge électrique; débrancher et tirer
le cordon électrique.
4. Veillez à avoir les mains bien sèches lorsque vous débranchez le câble, sinon
une électrocution risque de se produire ; si vous n‘utilisez pas cet appareil
pendant une longue période, éteignez-le à l‘aide de l‘interrupteur principal et
débranchez le câble. Veuillez ne pas utiliser d‘autres sources de connexion
pour l‘appareil.
IV. Accu:
1. Ne pas utiliser un autre chargeur pour charger l’appareil, car ce dernier
pourrait alors être endommagé.
2. Retirer le chargeur après le chargement complet pour éviter une durée de vie
moindre de l’accu et une perte de puissance.
3. Ne démonter l’accu en aucun cas; ne le jeter en aucun cas au feu, dan ger
d’explosion.
4. Ne pas court-circuiter les pôles ou les intervertir; ne pas ouvrir le boîtier; ne
stocker pas l’accu dans un endroit humide ou brûlant.
5. N’utiliser en aucun cas du benzène, de l’acide acétique ou d’autres sol vants
pour nettoyer l’accu; arrêter immédiatement en cas de température anormale
ou de fuite; ne pas appuyer sur l’accu ou frapper dessus, car il pourrait
chauffer et prendre feu.
16
M17133_Livington_PrimeULTIMATE_Manual_Ab MP13687_20181123_BA.indd 16 23.11.18 10:11
Page 17

V. Applications:
Ce produit est uniquement destiné à l’usage domestique et ne doit pas être utilisé
à l’extérieur ou à des fins professionnelles; l’usage pour des vêtements, les doigts,
la tête ou les cheveux n’est pas autorisé. Il s’agit d’un appareil électronique; ne pas
exposer l’appareil à la pluie, à l’eau ou à l’humidité
(par exemple dans une salle de bains, une buanderie etc.) pour éviter des
dysfonctionnements de l’appareil.
N’aspirer en aucun cas du liquide. Ne pas utiliser l’appareil dans un
environnement potentiellement dangereux, par exemple à proximité d’installations
à gaz, de réservoirs de pétrole, de produits chimiques et de différentes substances
inflammables et explosives; ne pas utiliser cet appareil pour aspirer la cendre, des
cigarettes ou des allumettes incandescentes – danger de feu.
N‘utilisez pas ce produit pour retirer des liquides inflammables ou volatils
comme de l‘essence, du kérosène, de la peinture, du détergent, de l‘alcool, du
parfum, des nettoyants pour sols et moquette, etc. N‘utilisez pas ce produit pour
enlever de la poudre de peinture ou le toner d‘une imprimante laser ou d‘un
copieur afin d‘éviter un incendie ou une explosion.
VI. Divers :
Cet appareil peut être utilisé par des enfants de 8 ans et plus et par des
personnes aux capacités physiques, sensorielles ou mentales réduites ou
manquant d’expérience et de savoir s’ils sont surveillés ou ont été
instruits de l’utilisation sûre de l’appareil et comprennent les dangers qui
en résultent. Les enfants ne doivent pas jouer avec l’appareil. Le nettoyage
et l’entretien ne doivent pas être effectués par des enfants sans
surveillance.
MODE D‘EMPLOI
Fixation de la station de charge : Si vous ne voulez pas fixer la station de charge au mur, vous pouvez
simplement placer la station de charge au sol.
1. Tenez la station de chargement dans la position souhaitée sur le mur et marquez les trous de perçage à
l‘aide d‘un crayon (Fig. 1). Percer trois trous avec une perceuse électrique avec insert de 6 mm.
2. Insérez les chevilles (non comprises dans la livraison) dans les trous de montage et fixez la station de
charge au mur à l‘aide de vis (Fig. 2).
3. Faites glisser les supports du tube ou de la brosse dans la cavité prévue à cet effet, comme illustré à la
figure 7. Assurez-vous que les deux supports les plus longs sont fixés en haut.
4. Insérez la batterie de rechange (non fournie) dans la fente de chargement (Fig. 3).
5. Insérez le combiné dans la station de charge et mettez la batterie en contact direct avec le port de
chargement (Fig. 4).
6. Insérez la fiche de l‘adaptateur comme indiqué sur la (Fig. 5).
1. Brancher la station de charge : Raccorder la station de charge au courant électrique.
2. Station de charge : insérer la batterie de rechange (non incluse) et l‘appareil portatif dans la station de
charge. – voir illustr. 5 ; le témoin de charge rouge commence à clignoter. Lorsque la batterie de l‘aspirateur
est entièrement chargée, la batterie de rechange commence à se charger et la lumière rouge de la station de
charge commence à clignoter.
17
M17133_Livington_PrimeULTIMATE_Manual_Ab MP13687_20181123_BA.indd 17 23.11.18 10:11
Page 18

Les bâtonnets bleus sur l‘écran de l‘aspirateur indiquent l‘état de charge actuel. Lorsque tous les bâtonnets
bleus sont allumés, le processus de charge est terminé.Si le témoin de charge devient vert après 5 heures, cela
signifie que les deux batteries sont complètement chargées.
Précautions d‘utilisation
• Veuillez utiliser l‘aspirateur deux fois avant de charger pendant cinq heures. But : activation complète de la
puissance de la batterie
• Si la tension de la batterie baisse, le premier des quatre voyants clignote, indiquant que la batterie doit
bientôt être rechargée
• Lorsque l‘appareil n‘est pas utilisé depuis longtemps, la puissance de la batterie baisse ; Veuillez recharger
une ou deux fois tous les six mois.
3. Raccorder le tube:
Insérez le tube en aluminium dans l‘appareil (Fig. 8) en tenant les deux broches correspondant aux deux trous
de l‘appareil, puis fixer fermement le tube en aluminium.
4. Raccorder la brosse:
Insérez la brosse dans le tuyau (Fig. 9) ; Tenez les deux broches correspondant aux deux trous dans le tube,
puis fixez fermement la brosse.
5. Lampes à LED:
appuyez sur le bouton MARCHE / ARRÊT pour allumer l‘aspirateur, puis l‘appareil commence à aspirer, les
quatre LED bleues s‘allument ; après 7 à 8 minutes, la première lumière bleue s‘éteint, après 13 à 14 minutes
la seconde et après 17 à 18 minutes la troisième et la quatrième. Nettoyez le filtre après chaque utilisation.
Ensuite, redémarrez l‘aspirateur afin qu‘il fonctionne à nouveau correctement.
6. Nettoyage du bac à poussière et du HEPA-filtre:
Maintenez l‘aspirateur au-dessus d‘une poubelle, puis retirez le collecteur de poussière de la poignée (Fig. 11)
et videz la poussière, nettoyez le bol et replacez-le immédiatement. Un clic indique que le réceptacle est de
nouveau enclenché (Fig. 12-13). Tournez dans le sens des aiguilles d‘une montre pour retirer et nettoyer le filtre
HEPA, puis réinsérez-le dans le sens des aiguilles d‘une montre.
7. Brosse combinée 3 en 1:
Cet appareil est équipé d’une brosse 3 en 1 comprenant la brosse pour joints (a), l’embout à brosse (b) et la
brosse à meubles (c) - Voir (Fig. 14) Actionner le déverrouillage (d) pour retirer la tête de la brosse; la buse
peut ensuite être utilisée pour nettoyer les interstices; l’embout à brosse peut par exemple être utilisé pour
nettoyer les claviers d’ordinateur et le dos comme brosse à meubles.
8. Articulation:
Pour déverrouiller l‘articulation (Voir illustration page 4), appuyer brièvement sur le déverrouillage et plier
légèrement le tube vers l’avant. Le verrouillage est déverrouillé. Encliqueter de nouveau le verrouillage après
utilisation.
MESURES DE PRÉCAUTION
1. La lampe rouge clignote lorsque l’accu est inséré dans la station de charge et indique la procé dure de
charge en cours. La lampe verte signifie «entièrement rechargé».
2. Le niveau de charge de l’accu diminue si l’appareil n’est pas utilisé pendant une longue période;
recharger l’accu une à deux fois tous les six mois.
NETTOYAGE ET ENTRETIEN
I. Nettoyage de l’appareil:
1. Tous les travaux de routine d’entretien et de réparation sont à effectuer après débranche ment du chargeur.
2. Nettoyer le bac à poussière après chaque utilisation.
3. En cas de non-utilisation de l’appareil, le ranger dans un endroit frais et sec et ne pas l’ex poser à
l’insolation directe ou à l’humidité.
4. S’assurer que l’appareil a été débranché de l’alimentation électrique et que le BOUTON MARCHE/ARRET
est sur ARRET; essuyer avec un chiffon en coton humide (avec de l’eau ou un nettoyant neutre), sans que
l’eau ou le nettoyant pénètre et cause des dommages.
II. Nettoyage de la brosse:
Insérez une pièce dans le verrou comme indiqué sur la Fig. 15, tournez dans le sens des aiguilles d‘une montre
et déverrouillez, ouvrez le couvercle de la brosse (Fig. 16), retirez la brosse et retirez les cheveux et la poussière
de la brosse. Les cheveux longs peuvent également être coupés avec des ciseaux avant d‘être retirés. Ensuite,
replacez la brosse et fermez le verrou du rouleau avec une pièce de monnaie.
18
M17133_Livington_PrimeULTIMATE_Manual_Ab MP13687_20181123_BA.indd 18 23.11.18 10:11
Page 19

STOCKAGE DE L’APPAREIL
• ELorsque vous n‘utilisez pas l‘appareil, suspendez-le dans la station de charge (Fig. 6).
• Accrochez la brosse plate contre le crochet gauche de l‘appareil, glissez le tuyau d‘aspiration sur le crochet
droit et accrochez la brosse.
ÉLIMINATION DES PANNES
Remarque : arrêtez immédiatement l’appareil si vous remarquez l’un des problèmes suivants pour ne pas
l’endommager et ainsi prévenir d’autres dommages.
Défaut Cause possible Solution
Ne marche plus
Puissance d’aspiration faiblit
De la poussière s’échappe pendant le
fonctionnement
La brosse ne tourne pas Première lampe clignote
Accu faible Recharger l’accu
Bouton non actionné Mettre le bouton sur MARCHE
Le bac à poussière est plein Vider le bac à poussière
Orifice d’aspiration bouché Enlever l’engorgement
Filtre bouché Nettoyer le filtre
Filtre à poussière encrassé Arrêter l’appareil et nettoyer le filtre
Nettoyer la brosse et remettre l’appa
reil en marche
-
INFORMATIONS TECHNIQUES
Catégorie du
produit
Tension nominale
Puissance moteur
Chargeur
Tension & paramètres
Accu Li-Ion 2200mAh Contenance 0,5 l
Poids 2 kg Fonctionnement continu 18 min
Aspirateur courant triphasé
rechargeable
18,5V
Circuit d’entrée :
100-240 V,
Fréquence : 50/60 Hz
Puissance de sortie :
24V 500 mA
Type de produit MC-603-A
Puissance moteur 130W
Niveau sonore ≤72 dB
Ne jetez pas le produit aux déchets ménagers à la fin de sa durée de vie. Apportez-le à un point de collecte
pour le recyclage des appareils électriques et électroniques. Cela est indiqué par le symbole présent sur le
produit, le mode d’emploi et l’emballage. Informez-vous des points de collecte mis à disposition par votre
commerçant ou l’autorité locale. La réutilisation et le recyclage des appareils usagés sont une contribution
importante à la protection de notre environnement.
Ne pas jeter les piles aux déchets ménagers. Les apporter à un point de collecte agréé.
Classe de protection II
Uniquement pour utilisation dans des pièces intérieures
Ce produit satisfait aux normes européennes.
19
M17133_Livington_PrimeULTIMATE_Manual_Ab MP13687_20181123_BA.indd 19 23.11.18 10:11
Page 20

IT
AVVISI DI SICUREZZA
I. Leggere attentamente queste istruzioni prima di utilizzare l‘apparecchio.
II. Si prega di osservare scrupolosamente queste istruzioni, poiché l’uso non
conforme può essere causa di ferite e danni all‘apparecchio.
Avvertenza:
Le particelle contenute in questo apparecchio non devono essere utilizzate come
giocattoli: tenere i sacchetti di plastica fuori dalla portata dei bambini – pericolo di
soffocamento.
III. Alimentazione elettrica:
1. Questo apparecchio funziona con corrente alternata da 100-240V.
2. Non utilizzare altri tipi di alimentazione per questo apparecchio.
3. Qualora il cavo di corrente o la spina fossero danneggiati, si prega di non
utilizzare questo prodotto. Contattare il nostro servizio di assistenza per la
sostituzione del cavo di corrente; tenere la spina ben salda, non torcere il
cavo di corrente; quando si collega la spina allapresa di corrente, assicurarsi
di avere le mani asciutte, poiché in caso contrario sussiste il pericolo di
folgorazione; si prega di spegnere prima l’apparecchio e successivamente
estrare la spina dalla presa.
4. Assicurassi di avere le mani asciutte quando si scollega il cavo, altrimenti si
potrebbe verificare una scarica elettrica; Se non si utilizza questo dispositivo
per un lungo periodo di tempo, spegnerlo dall’interruttore principale,
scollegare il cavo. Si prega di non utilizzare nessuna altra alimentazione di
connessione per il dispositivo.
IV. Batteria:
1. Non utilizzare altri caricabatteria, poiché potrebbero danneggiare
l‘apparecchio.
2. Una volta completata la ricarica, rimuovere la stazione di carica onde evitare
di ridurre la durata della vita della batteria e il rendimento dell‘apparecchio.
3. Non smontare mai la batteria e non gettarla nel fuoco (pericolo di esplosione).
4. Non cortocircuitare o invertire i poli della batteria; non aprire la cassa della
batteria; nonconservare la batteria in luoghi umidi o troppo caldi.
5. Non utilizzare in alcun caso benzolo, acetato di etile e altri solventi per pulire
la batteria; in caso di surriscaldamento estremo o perdite, spegnere subito
l’apparecchio; non premere o colpire la batteria, poiché potrebbe surriscald
arsi e provocare un incendio.
V. Ambiti di applicazione:
Questo prodotto è concepito esclusivamente per l’uso domestico e non deve
20
M17133_Livington_PrimeULTIMATE_Manual_Ab MP13687_20181123_BA.indd 20 23.11.18 10:11
Page 21

essere utilizzato all’aperto o per uso industriale; non è consentito l’uso su capi di
abbigliamento, dita, testa o capelli. Il presente è un apparecchio elettrico: onde
evitare di danneggiarlo, tenere l’apparecchio lontano da acqua o altri liquidi
(ad es. bagni, cucine ecc.).
Non aspirare mai dei liquidi. Non utilizzare l’apparecchio in ambienti pericolosi,
ad esempio in prossimità di impianti a gas, cisterne di combustibile, prodotti
chimici e altre sostanze infiammabili ed esplosive; quest’apparecchio non è
concepito per raccogliere cenere, sigarette accese o fiammiferi – pericolo di
incendio.
Non utilizzare questo prodotto per rimuovere liquidi infiammabili o volatili
come benzina, cherosene, vernice, detergente, alcool, profumo, moquette,
detergente per pavimenti ecc.. Non utilizzare questo prodotto per rimuovere la
polvere di vernice o il toner nella stampante laser o nella fotocopiatrice per evitare
incendi o esplosioni.
VI. Altro:
Quest’apparecchio può essere utilizzato dai bambini di età superiore a 8
anni e da persone con ridotte capacità fisiche, sensoriali o mentali solo in
presenza della supervisione di un adulto o dopo essere stati
opportunamente istruiti sull’uso sicuro dell’apparecchio e sui pericolo ad
esso collegati. I bambini non devono giocare con l’apparecchio. Pulizia e
manutenzione possono essere effettuate da parte dei bambini
esclusivamente con la supervisione di un adulto.
ISTRUZIONI PER L‘USO
Riparazione della stazione di ricarica: se non si desidera fissare la stazione di ricarica al muro, è possibile
posizionare la stazione di ricarica sul pavimento.
1. Tenere la stazione di ricarica nella posizione desiderata sul muro e contrassegnare i fori con una matita
(Fig. 1). Praticare tre fori con un trapano elettrico con inserto da 6 mm.
2. Inserire i tasselli (non inclusi nella fornitura) nei fori di montaggio e fissare la stazione di ricarica alla
parete con le viti (Fig. 2).
3. Far scorrere le staffe del tubo o della spazzola nella rientranza in dotazione, come mostrato nella figura 7.
Assicurati che le due staffe più lunghe siano fissate in alto.
4. Inserire la batteria di ricambio (non inclusa) nello slot di ricarica (Fig. 3) .
5. Inserire il portatile nel punto di ricarica e portare la batteria a contatto con la guida del punto di ricarica (Fig. 4).
6. Inserire la spina dell’adattatore come mostrato in (Fig. 5).
1. Collegare la stazione di ricarica: allacciare la stazione di ricarica alla rete elettrica
2. Stazione di ricarica: inserire la batteria di ricambio (non compresa nel contenuto della confezione) e il
portatile nella stazione di ricarica. - vedere fig. 5; l‘indicatore di carica rosso inizia a lampeggiare. Quando la
batteria dell‘aspirapolvere è completamente carica, la batteria di ricambio inizia a caricarsi e la luce rossa del
punto di ricarica inizia a lampeggiare. Le barre blu del display dell‘aspirapolvere indicano lo stato di carica
attuale. Il processo di ricarica è concluso quando tutte le barre sono accese con luce blu.
Se l‘indicatore di carica diventa verde dopo 5 ore, significa che entrambe le batterie sono completamente
cariche.
Precauzioni per l’uso
• Utilizzare l’aspirapolvere due volte prima di caricarlo per cinque ore, mirare: piena attivazione dell’attività
della batteria.
21
M17133_Livington_PrimeULTIMATE_Manual_Ab MP13687_20181123_BA.indd 21 23.11.18 10:11
Page 22

• Se la tensione della batteria diminuisce, il primo dei quattro LED lampeggia, indicando che la batteria deve
essere ricaricata presto.
• Dispositivo non utilizzato per un lungo periodo, la batteria riduce la sua attività; Si prega di ricaricare una
volta o due volte ogni sei mesi.
3. Montare il tubo:
inserire il tubo di alluminio nell’apparecchio (Fig. 8), tenendo i due perni corrispondenti ai due fori
sull’apparecchio, quindi fissare saldamente il tubo di alluminio.
4. Montare le spazzole:
inserire la spazzola nel tubo (Fig. 9); Tenere i due perni corrispondenti ai due fori nel tubo, quindi fissare
saldamente la spazzola.
5. Indicatori LED:
premere il TASTO ON / OFF per accendere l’aspirapolvere, quindi l’apparecchio inizia a aspirare, i quattro LED
blu si accendono; dopo 7/8 minuti, la prima luce blu si spegne, dopo 13-14 minuti il secondo e dopo 17-18
minuti il terzo e il quarto. Pulire il filtro dopo ogni utilizzo. Quindi riavviare l‘aspiratore in modo che funzioni di
nuovo correttamente.
6. Pulire il serbatoio dell’aspirapolvere comprensivo di HEPA-filtro:
spostare l’aspirapolvere in un bidone della spazzatura, quindi estrarre il raccogli polvere sulla maniglia (Fig.
11) e svuotare la polvere, pulire la ciotola e sostituirla immediatamente; Facendo clic sui suoni si indica che
la shell è stata inserita di nuovo (Fig. 12-13). Girare in senso orario per rimuovere e pulire il filtro HEPA, quindi
reinserirlo in senso orario.
7. Spazzola combi 3 in 1:
Questo apparecchio è dotato di una spazzola combi 3 in 1, oltre che di un ugello per le fughe (a), uno
spazzolino (b) e una spazzola per i mobili (c) – vedi Fig. 14. Azionare lo sblocco (d), per rimuovere la testa della
spazzola; ora è possibile utilizzare l’ugello per pulire le fessure, lo spazzolino, ad es., per pulire le tastiere dei PC;
la parte posteriore è utilizzabile come spazzola per i mobili.
8. Raccordo girevole:
Per sbloccare il raccordo girevole (Vedere l’illustrazione a pagina 4), premere brevemente lo sblocco e piegare il
tubo leggermente in avanti. Ora il raccordo è sbloccato. Dopo l’uso, far scattare di nuovo il blocco in posizione.
MISURE DI SICUREZZA
1. Se la batteria è collegata alla stazione di carica, la luce RED rossa lampeggia e mostra lo stato della
ricarica, mentre la luce verde indica che la batteria è “completamente carica”.
2. In caso di prolungato inutilizzo dell’apparecchio, il livello di carica della batteria si riduce notevolmente; si
prega di ricaricare la batteria 1-2 volte ogni 6 mesi.
PULIZIA E MANUTENZIONE
I. Pulire l‘apparecchio:
1. Prima di effettuare tutte le operazioni di manutenzione e pulizia, scollegare la stazione di carica.
2. Dopo ogni utilizzo, pulire il serbatoio di raccolta della polvere.
3. In caso di inutilizzo dell’apparecchio, conservarlo in un luogo fresco e asciutto, non esporlo ai raggi solari
diretti e al riparo dall’umidità.
4. Assicurarsi che l’apparecchio sia scollegato dalla rete elettrica e che il tasto di accensione/ spegnimento
sia posizionato su OFF; strofinare l’apparecchio con un panno di cotone inumi dito (con acqua o
detergente neutro), evitando che l’acqua o il detergente possano danneggiare l’apparecchio.
II. Pulizia della spazzola:
Pulizia della spazzola: inserire una moneta nel blocco del rullo come mostrato in Fig. 15, ruotare in senso orario
e sbloccare, aprire la piastra di copertura del rullo (Fig. 16), rimuovere il rullo della spazzola e rimuovere i capelli
e la sporcizia dal rullo.
I capelli lunghi possono anche essere tagliati aperti con le forbici prima della rimozione. Quindi sostituire la
spazzola e chiudere il blocco del rullo con la moneta.
COME CONSERVARE IL PRODOTTO
• Quando non in uso, appendere il dispositivo nella stazione di ricarica (Fig. 6)
• Appendere la spazzola di aspirazione piatta contro il gancio sinistro del dispositivo, far scorrere il tubo di
• aspirazione sul gancio destro e inserire la spazzola.
22
M17133_Livington_PrimeULTIMATE_Manual_Ab MP13687_20181123_BA.indd 22 23.11.18 10:11
Page 23

RISOLUZIONE DEI PROBLEMI
Attenzione: qualora si verificasse uno dei problemi riportati di seguito, spegnere immediatamente l‘apparecchio
onde evitare di danneggiarlo o di provocare ulteriori danni.
Errore possibile causa Soluzione
L’apparecchio non funziona più
Il potere aspirante è diminuito
Durante il funzionamento, della polve
re fuoriesce dall‘apparecchio
La spazzola non ruota La prima luce lampeggia
Batteria quasi scarica Ricaricare la batteria
Interruttore su OFF Posizionare l’interruttore su ON
Il serbatoio dell’aspirapolvere è pieno Svuotare il serbatoio
L’apertura di aspirazione è otturata Rimuovere le ostruzioni
Filtro intasato Pulire il filtro
Filtro della polvere sporco Spegnere l’apparecchio e pulire il filtro
Pulire la spazzola e
riaccendere l‘apparecchio
DATI TECNICI DEL PRODOTTO
Categoria del
prodotto
Tensione nominale
Stazione di carica Tensi-
one e parametri
Batteria Ioni di litio 2200mAh Capacità
Peso
Aspirapolvere
DC ricaricabile
18,5V
Tensione in entrata:
100-240V,
Frequenza: 50/60Hz
Potenza di uscita:
24V 500mA
2 kg
Tipologia di
prodotto
Potenza del motore
Livello sonoro
Funzionamento
continuo
MC-603-A
130W
≤72 dB
0,5 l
18 min
Al termine della sua durata della vita, il prodotto non deve essere smaltito con i normali rifiuti domestici. Si
prega di portarlo in un centro di raccolta per il riciclaggio di apparecchiature elettriche ed elettroniche. Tale
procedura è segnalata anche da questo simbolo presente sul prodotto, nelle istruzioni per l’uso e sulla
confezione dello stesso. Si prega di informarsi sui centri di raccolta gestiti dal proprio rivenditore o dalle autorità
locali. La riutilizzazione e il riciclaggio di vecchi apparecchi costituiscono un contributo importante per la tutela
dell’ambiente.
Non gettare le batterie nei rifiuti comuni. Smaltirle in un centro di raccolta autorizzato.
Classe di protezione II
Solo per uso interno
Questo prodotto è conforme alle normative europee.
23
M17133_Livington_PrimeULTIMATE_Manual_Ab MP13687_20181123_BA.indd 23 23.11.18 10:11
Page 24

NL
VEILIGHEIDSINSTRUCTIES
I. Deze handleiding vóór gebruik zorgvuldig doorlezen.
II. Volg de aanwijzingen in deze handleiding precies op. Onjuist handelen kan
letsel en schade aan het apparaat tot gevolg hebben.
Waarschuwing:
Kleine delen in deze verpakking mogen niet als speelgoed gebruikt worden.
Plastic zakken altijd uit de buurt van baby‘s en kinderen houden vanwege het
verstikkingsgevaar.
III. Stroomvoorziening:
1. Dit apparaat werkt met 100-240V-wisselstroom.
2. Geen andere spanning voor dit apparaat gebruiken.
3. Als het netsnoer of de stekker beschadigd zijn, dit artikel niet meer gebruiken.
Neem contact met onze klantenservice op als het netsnoer ver vangen moet
worden; niet het snoer maar altijd de stekker vastpakken; zorg dat het snoer
niet gedraaid zit; de stekker alleen insteken met droge handen, om een
elektrische schok te voorkomen; het apparaat eerst uitzetten en dan pas de
stekker van het netsnoer uittrekken.
4. Let op droge handen wanneer u de kabel loskoppelt, anders kan een
elektrische schok optreden; indien u dit apparaat gedurende langere tijd niet
zult gebruiken, schakel het dan uit met de hoofdschakelaar, ontkoppel de
kabel. Gebruik alstublieft geen ander aansluitvermogen voor het apparaat.
IV. Accu:
1. Geen andere oplader gebruiken om op te laden. Gebruik van een andere
oplader kan schade aan het apparaat veroorzaken.
2. De oplader na volledig opladen uittrekken, om verkorting van de levensduur
van de accu en prestatievermindering te voorkomen.
3. De accu nooit uit elkaar halen; de accu nooit in vuur werpen – explosiegevaar.
4. De polen niet kortsluiten of verwisselen; de behuizing niet openmaken; de
accu niet op een vochtige of hete plek plaatsen.
5. In geen geval benzeen, azijnzuuresters of andere oplosmiddelen gebruiken
om de accu schoon te maken; bij abnormale temperatuur of lekkage meteen
stoppen; niet op de accu duwen of slaan, om heet worden en vlam vatten te
voorkomen.
V. Beoogd gebruik
Dit apparaat is uitsluitend bedoeld voor particulier gebruik binnenshuis en mag
niet buiten of bedrijfsmatig gebruikt worden; het apparaat mag niet gebruikt
worden voor kleding, vingers, hoofd of haar. Het gaat om een elektrisch apparaat;
24
M17133_Livington_PrimeULTIMATE_Manual_Ab MP13687_20181123_BA.indd 24 23.11.18 10:11
Page 25

om storingen aan het apparaat te voorkomen, het apparaat niet blootstellen aan
regen, water of vocht (bijv. niet gebruiken in badkamer, waskeuken etc.).
In geen geval vocht of vloeistof opzuigen. Het apparaat niet gebruiken in een
potentieel gevaarlijke omgeving, zoals in de buurt van gasinstallaties, olietanks,
chemicaliën en andere brandbare of explosieve stoffen; dit apparaat niet
gebruiken voor het opruimen van as, brandende sigaretten of lucifers –
brandgevaar.
Gebruik dit product niet om ontvlambare of vluchtige vloeistoffen te verwijderen
zoals benzine, kerosine, verf, schoonmaakmiddel, alcohol, parfum, tapijt- en
vloerreiniger, enz. Gebruik dit product niet om inktpoeder of toner te verwijderen van
of uit een laserprinter of kopieerapparaat om brand of ontploffing te voorkomen.
VI. Overige informatie:
Dit apparaat kan gebruikt worden door kinderen vanaf 8 jaar. Het apparaat mag
ook gebruikt worden door personen met verminderde fysieke,
zintuiglijke of geestelijke vermogens of gebrek aan ervaring, op
voorwaarde dat ze het apparaat onder toezicht gebruiken of instructie gehad
hebben over veilig gebruik van het apparaat en ze de met gebruik van het
apparaat verbonden gevaren begrijpen. Kinderen mogen niet spelen met het
apparaat. Schoonmaken en gebruikersonderhoud mag niet uitgevoerd worden
door kinderen zonder toezicht.
GEBRUIKSAANWIJZING
Het oplaadstation bevestigen: als u het laadstation niet aan de muur wilt bevestigen, kunt u het laadstation
natuurlijk ook gewoon op de grond plaatsen.
1. Houd het laadstation in de gewenste positie op de muur en markeer de boorgaten met een potlood
(
Afbeelding
2. Steek de voor de wand geschikte pluggen (niet bij de levering inbegrepen) in de montagegaten, en
bevestig het laadstation met schroeven aan de muur (Afbeelding 2).
3. Schuif de buis- of borstelbeugels in de daarvoor bestemde uitsparing, zoals weergegeven in Afbeelding 7.
Zorg ervoor dat de twee langere beugels aan de bovenkant zijn bevestigd.
4. Plaats de vervangende batterij (niet meegeleverd) in de oplaadsleuf (Afbeelding 3).
5. Plaats de handset in het oplaadpunt en breng de batterij in contact met de laadpuntgeleider (Afbeelding 4).
6. Steek de adapterstekker in zoals getoond in (Afbeelding 5).
1).
Boor drie gaten met een elektrische boormachine met een inzetstuk van 6 mm.
1. Laadstation aansluiten: laadstation verbinden met het stroomnet
2. Laadstation: reserveaccu (niet meegeleverd) en handtoestel in het laadstation steken - zie afbeelding
5: het rode laadmeldlampje begint te branden. Als de accu in de stofzuiger helemaal is opgeladen, begint
de reserveaccu te laden en begint het rode lampje op het oplaadpunt te knipperen. De blauwe balk op
het stofzuigerscherm geeft de huidige laadtoestand aan. Wanneer alle balkjes branden in de accu volledig
opgeladen. Als het indicatielampje na 5 uur groen wordt, betekent dit dat beide accu‘s volledig zijn opgeladen.
Voorzorgsmaatregelen bij gebruik
• Gebruik de stofzuiger twee keer voordat u vijf uur op wilt laden, doel: volledige activering van de
batterijactiviteit
• Als de batterijspanning daalt, knipperen de eerste van de vier LEDs, wat aangeeft dat de batterij
binnenkort moet worden opgeladen.
• De activiteit van een batterij van een apparaat dat lange tijd niet wordt gebruikt, vermindert; Laad een of
twee keer per halfjaar op.
25
M17133_Livington_PrimeULTIMATE_Manual_Ab MP13687_20181123_BA.indd 25 23.11.18 10:11
Page 26

3. Buis aansluiten:
Steek de aluminium buis in het apparaat (Afbeelding 8), houd de twee pinnen vast die overeenstemmen met de
twee gaten in het apparaat en zet vervolgens de aluminium buis stevig vast.
4. Borstel opzetten:
steek de borstel in de buis (Afbeelding 9); Houd de twee pinnen vast die overeenkomen met de twee gaten in
de buis en zet de borstel vervolgens stevig vast.
5. Led-indicatielampje:
druk op de AAN / UIT-KNOP om de stofzuiger in te schakelen, het apparaat begint te zuigen, de vier blauwe
LEDs lichten op; na 7 tot 8 minuten gaat het eerste blauwe licht uit, na 13 tot 14 minuten de tweede en na 17
tot 18 minuten de derde en vierde. Reinig de filter na elk gebruik. Start de stofzuiger opnieuw zodat deze weer
correct werkt.
6. Schoonmaken van het stofreservoir inclusief HEPA-Filter:
Verplaats de stofzuiger naar een vuilnisbak en trek vervolgens de stofvanger van de handgreep naar buiten (fig.
11) en verwijder het stof, maak de schaal schoon en plaats deze onmiddellijk terug; Klikgeluiden geven aan dat
de schaal opnieuw is vastgeklikt (Afbeelding 12-13). Draai in wijzerzin om de HEPA-filter te verwijderen en te
reinigen, en plaats de filter vervolgens opnieuw in wijzerzin.
7. 3-in-1-combiborstel:
Dit apparaat heeft een 3-in-1-combiborstel met kierenzuigmond (a), borstelopzetstuk (b) en
meubelmondstuk (c) – zie Afbeelding 14. Gebruik de ontgrendeling (d) om het borstelopzetstuk te verwijderen;
het mondstuk is dan te gebruiken voor het schoonmaken van spleten en kieren. Het borstelopzetstuk is
handig voor bijvoorbeeld het toetsenbord van de computer en de andere kant kan gebruikt worden als
meubelzuigmond.
8. Knikgewricht:
Om het knikgewricht te ontgrendelen (Zie illustratie bladzijde 4) kort op de ontgrendelingsknop drukken en de
buis licht naar voren knikken. De vergrendeling is los. Na gebruik de vergrendeling weer vastklikken.
VOORZORGSMAATREGELEN
1. Als de accu in het oplaadstation zit, knippert het rode licht als aanduiding dat het opladen bezig is. Het
groene licht betekent ‚volledig opgeladen‘.
2. Als het apparaat langere tijd niet gebruikt wordt, dan raakt de accu leeg; de accu dient per zes maanden
één tot twee keer opgeladen te worden.
SCHOONMAKEN EN ONDERHOUD
I. Schoonmaken van het apparaat:
1. Gebruikersonderhoud en reparatiewerkzaamheden altijd pas uitvoeren nadat de oplader uit het
stopcontact gehaald is.
2. Na ieder gebruik het stofreservoir leegmaken en schoonmaken.
3. Het apparaat opbergen op een koele droge plek, buiten bereik van directe zonnestralen en vocht.
4. Controleer of het apparaat losgekoppeld is van de stroomvoorziening en of de AAN/UIT-KNOP
uitgeschakeld is; afvegen met een vochtige katoenen doek (vochtig gemaakt met water of een neutraal
reinigingsmiddel). Voorkom schade en zorg dat water en reinigingsmiddel niet in het apparaat kunnen
binnendringen.
II. Schoonmaken van de borstel:
Borstelreiniging: Steek een munt in de rolvergrendeling, zoals weergegeven in Afbeelding 15, draai in wijzerzin
en ontgrendel, open de rolafdekplaat (Afbeelding 16), verwijder de borstelrol en verwijder haar en vuil van de
rol. Lang haren kunnen ook voor het verwijderen met een schaar worden opgesneden. Plaats vervolgens de
borstel terug en sluit de rolvergrendeling met een munt.
APPARAAT OPBERGEN
Als het apparaat niet gebruikt wordt, met de 3-in-1-combiborstel en de borstel in het oplaadstation hangen,
zoals in Afbeelding 25.
OPLOSSEN VAN PROBLEMEN
• Hang het apparaat wanneer het niet wordt gebruikt in het laadstation (Afbeelding 6)
• Hang de platte zuigborstel tegen de linker haak van het apparaat, schuif de zuigbuis op de rechter haak
en breng de borstel aan.
26
M17133_Livington_PrimeULTIMATE_Manual_Ab MP13687_20181123_BA.indd 26 23.11.18 10:11
Page 27

Fout Mogelijke oorzaak Oplossing
Werkt niet meer
Zuigkracht wordt minder
Tijdens gebruik komt er
stof uit
Borstel roteert niet Eerste licht knippert
Accu zwak Accu opladen
Schakelaar niet in juiste stand gezet Schakelaar op AAN zetten
Stofreservoir is vol Stofreservoir leegmaken
Aanzuigopening verstopt Verstopping verwijderen
Filter verstopt Filter schoonmaken
Stoffilter vuil
TECHNISCHE PRODUCTGEGEVENS
Productcategorie
Nominale spanning
Oplader spanning
& parameters
Accu Li-ion 2200mAh Capaciteit
Gewicht
Oplaadbare
DC-stofzuiger
18,5V
Ingangscircuit:
100-240V,
frequentie: 50/60Hz
Uitgaand vermogen:
24V 500mA
2 kg
Apparaat uitzetten en filter
schoonmaken
Borstel schoonmaken en
apparaat weer inschakelen
Producttype MC-603-A
Motorvermogen
Geluidsniveau
Looptijd
130W
≤72 dB
0,5 l
18 min
Werp het product aan het eind van zijn levensduur daarom niet bij het normale huisvuil. Breng het naar een
verzamelpunt voor het recyclen van elektrische en elektronische apparaten. Dit wordt aangegeven door het
symbool op het product in de gebruiksaanwijzing en op de verpakking. Informeer naar verzamelpunten die door
uw dealer of uw gemeente bedreven worden. Het hergebruik en de recycling van oude apparaten levert een
belangrijke bijdrage aan de bescherming van ons milieu.
Batterijen horen niet bij het huisvuil. Breng ze naar een geautoriseerd inzamelpunt.
Veiligheidsklasse II
Alleen geschikt voor gebruik binnenshuis.
Dit product voldoet aan de Europese richtlijnen.
27
M17133_Livington_PrimeULTIMATE_Manual_Ab MP13687_20181123_BA.indd 27 23.11.18 10:11
Page 28

HU
BIZTONSÁGI FIGYELMEZTETÉSEK
I. Kérjük, olvassa el figyelmesen a használati utasítást a használat előtt.
II. Kérjük, tartsa be a jelen használati utasításban leírtakat, mert a nem megfelelő
használat sérülésekhez és a készülék károsodásához vezethet.
Figyelmeztetés:
A dobozban található kis alkatrészeket nem szabad játékként használni, a
műanyag zacskókat mindig tartsa távol csecsemőktől és kis gyermekektől fulladásveszély.
III. Áramellátás:
1. Ez a készülék 100-240V váltóárammal működik.
2. Kérjük, ne használja a készüléket más teljesítményű áramforrással.
3. Ha a hálózati kábel vagy a hálózati csatlakozó meg van sérülve, akkor ne
használja többé a készüléket. Vegye fel a kapcsolatot az ügyfélszolgálatunkkal,
hogy a hálózati kábel ki legyen cserélve; fogja erősen a csatlakozót, ügyeljen
arra, hogy a kábel ne gubancolódjon össze.
4. A kábelek kihúzásakor ügyeljen rá, hogy száraz legyen a keze, ellenkező
esetben áramütés érheti; Ha hosszabb ideig nem használja ezt az eszközt,
kapcsolja ki a főkapcsolónál, húzza ki a kábelt. Kérjük, ne használjon más
csatlakozóvezetéket a készülékhez.
IV. Akku:
1. A töltéshez ne használjon más töltőt, mert különben károsodhat a készülék.
2. Kérjük, húzza ki a konnektorból a töltőt az akku teljes feltöltése után, hogy
ezzel elkerülhető legyen az akku élettartamának a megrövidülése és a
teljesítményének a csökkenése.
3. Semmiképpen ne szedje szét az akkut; és ne dobja tűzbe - robbanásveszély.
4. Ne zárja rövidre a pólusokat vagy cserélje fel azokat; az akku házát ne nyissa
ki; ne tárolja az akkut forró vagy nedves helyen.
5. Semmiképpen ne használjon benzolt, ecetsav-észtereket és más oldószert az
akku tisztításához; és azt azonnal hagyja abba, ha szokatlan hőmérsékletet
vagy szivárgást tapasztal, különben előfordulhat, hogy túlmelegedik és
kigyullad.
V. Alkalmazási területek:
Ez a termék házon belüli használatra alkalmas és nem szabad a szabadban vagy
nagyüzemi üzemeltetésre használni; ne használja úgy, hogy a ruházatát,
az ujjait, a fejét vagy a haját szívó hatás érje. Ez egy elektromos készülék; annak
érdekében, hogy elkerülhetők legyenek zavarok a készülékben ne tegye azt ki eső,
víz vagy nedvesség hatásának (pl. fürdőszobában, mosókonyhában stb.).
28
M17133_Livington_PrimeULTIMATE_Manual_Ab MP13687_20181123_BA.indd 28 23.11.18 10:11
Page 29

Semmilyen körülmények között ne szívjon fel vele folyadékot. Ne használja
a készüléket esetlegesen veszélyes környezetben pl. gázüzemű készülékek,
olajtartályok, vegyi anyagok és más gyúlékony berendezés vagy anyag közelében;
a készülék nem alkalmas hamu, égő cigaretta csikkek vagy gyufa felszívására tűzveszély.
Ne használja ezt a terméket a gyúlékony vagy illékony folyadékok eltávolítására,
mint benzin, kerozin, festék, tisztítószer, alkohol, parfüm, szőnyeg, padlótisztító stb.
Ne használja a terméket festékpor vagy festék eltávolításához a lézernyomtatóban
vagy a fénymásolóban, hogy elkerülje a tüzet vagy robbanást.
VI. Egyéb:
Ezt a készüléket 8 év feletti gyermekek és csökkent fizikai, érzékszervi
vagy mentális képességű emberek, vagy olyan személyek, akik annak
kezelését nem sajátították el, csak akkor használhatják, ha felügyelet alatt
állnak vagy kaptak a kezelésre vonatkozó kiképzést és tisztában vannak
a nem megfelelő használatból eredő kockázatokkal. Gyermekek nem
játszhatnak a készülékkel. A tisztítást és karbantartást nem végezhetik
felügyelet nélküli gyermekek.
HASZNÁLATI UTASÍTÁS
A töltõállomás rögzítése: Ha nem akarja a töltõállomást a falhoz rögzíteni, egyszerűen helyezze a töltõállomást a földre.
1. Helyezze a töltõállomást a falon a kívánt helyen, és a furatlyukakat ceruzával jelölje be (1. ábra) Fúrjon
három lyukat egy 6 mm-es betétes elektromos fúróval.
2. Üsse be a falhoz megfelelő tipliket (nem tartozék) a szerelőfuratokba, és csavarokkal rögzítse a
töltőállomást a falra (2. ábra).
3. A csövek ill kefék tartóit a 7. ábrán látható módon tolja be az arra szolgáló horonyba. Eközben ügyeljen
arra, hogy a két hosszabb tartó fent kerüljön rögzítésre.
4. Helyezze be a csereakkumulátort (nincs a szállítási terjedelemben) a töltőnyílásba (3. ábra)
5. Helyezze be a kézi készüléket a töltési pontba, és helyezze az akkumulátort a töltési pont vezetővel az
érintkezőbe (4. ábra).
6. Helyezze be az adapter dugóját az (5. ábra) szerint
1. Töltőállomás csatlakoztatása: dugja be a töltőállomás csatlakozódugóját a hálózatra
2. Töltőállomás: helyezze be a csereakkumulátort (a csomag nem tartalmazza) és a kézi készüléket a
töltőállomás nyílásába. – lásd 5. ábra; a piros töltésjelző villogni kezd. Ha a porszívóban lévő akkumulátor
teljesen fel van töltve, megkezdődik a csereakkumulátor feltöltése, és a töltési ponton lévő piros fény villogni
kezd. A porszívó kijelzőjén a kék oszlopok jelzik az aktuális töltöttségi állapotot. Ha minden oszlop kéken villog,
akkor a töltés befejeződött. Ha a töltéskijelző 5 óra elteltével zöld színűvé válik, ez azt jelenti, hogy mindkét
akkumulátor teljesen fel van töltve.
Elővigyázatossági intézkedések használat során
• Az öt órás töltés előtt használja a porszívót kétszer. Ennek célja az akkumulátor működésének teljes
aktiválása
• Ha az akkumulátor feszültsége csökken, a négy LED közül az első villogni kezd, jelezve, hogy az
akkumulátort fel kell tölteni hamarosan.
• Ha hosszú ideig nem használják a készüléket, az akkumulátor csökkenti az aktivitását; Kérjük, töltse fel hat
havonta egyszer vagy kétszer.
3. A cső csatlakoztatása:
Tolja az alumínium csövet a készülékbe (8. ábra), eközben tartsa a két csapot a készülék két furatához, majd
erősen rögzítse azokkal az alumínium csövet.
29
M17133_Livington_PrimeULTIMATE_Manual_Ab MP13687_20181123_BA.indd 29 23.11.18 10:11
Page 30

4. A kefe csatlakoztatása:
Helyezze be a kefét a csőbe (9. ábra), eközben tartsa a két csapot a cső két furatában, majd erősen rögzítse
azokkal a kefét.
5. LED-kijelző:
Nyomja meg a BE / KI gombot a porszívó bekapcsolásához, ekkor a készülék elkezd szívni, a négy kék LED
világít; 7 - 8 perc után az első kék fény kialszik, 13-14 perc után a második és 17-18 perc után a harmadik
és a negyedik. Minden használat után tisztítsa meg a szűrőt. Ezután indítsa be újra a porszívót, hogy ismét
megfelelően működjön.
6. A HEPA-szűrős portároló tisztítása:
Helyezze a porszívót egy szemetesvödörhöz, majd húzza ki a porgyűjtőt a fogantyúval (11. ábra), és ürítse ki a
port. Tisztítsa meg az edényt, és helyezze vissza. A kattanó hang azt jelzi, hogy az edény bekattant a helyére.
(12-13. Ábra). Az óramutató járásával egyező irányba forgatva távolítsa el és tisztítsa meg a HEPA szűrőt, majd
helyezze vissza az óramutató járásával megegyező irányba
7. 3-az-1-ben több funkciós kefe
Ez a készülék rendelkezik egy 3-az-1-ben több funkciós kefével, amihez tartozik egy fúga fúvóka (a), egy
kefe (b) és egy bútortisztító kefe (c) (14. ábra). ábra. A csereakkumulátort (nem tartozék) és a kézi készüléket
csatlakoztassa a töltőállomáshoz - lásd 5. ábra; így a fúvókával réseket tud tisztítani; a kefés tartozékkal pl. a
számítógép billentyűjét tudja tisztítani és a hátsó részét bútorkefének használhatja.
8. Csuklós csatlakozó:
A csuklós csatlakozó (Lásd az ábrát a 4. oldalon) kilazításához nyomja meg enyhén a nyitógombot és tolja előre
finoman a csövet. A zár ki van nyitva. Használat után újra pattintsa be a zárat.
ÓVATOSSÁGI INTÉZKEDÉSEK
1. Ha az akku be van helyezve a töltőbe, akkor a piros lámpa villogva jelzi a töltést a zöld folyamatosan
világító lámpa jelzi, hogy az akku „teljesen fel van töltve”.
2. Ha a készüléket hosszabb időn keresztül nem használják, akkor lecsökken az akku folyamatosan; kérjük,
hogy az akkut félévente egy-két alkalommal töltse fel.
TISZTÍTÁS ÉS KARBANTARTÁS
I. A készülék tisztítása:
1. Minden rutinszerű tisztítási és karbantartási munkálat előtt áramtalanítsa a készüléket.
2. Minden használat után tisztítsa ki a portárolót.
3. Használat után a készüléket egy hűvös, száraz helyen tárolja, óvja közvetlen napsugárzástól és
nedvességtől.
4. Gondoskodjon róla, hogy a készülék le legyen választva az áramforrásról és a BE-/KIKAPCSOLÓ kikapcsolt
állapotban legyen, egy nedves (vizes, vagy egy semleges tisztító szeres) pamut ronggyal törölje le,
folyamatosan arra, hogy a víz vagy a tisztítószer ne jusson be a készülékbe és károsíthassa azt.
II. A kefe tisztítása:
Kefe tisztítása: Helyezzen be egy érmet a görgõzárba a 15. ábrán látható módon, forgassa el az óramutató
járásával megegyezõ irányba, és oldja ki, nyissa ki a görgõ fedõlapját (16. Ábra), vegye le a kefehengert és
távolítsa el a hajat és a szennyezõdést a görgõrõl. A hosszú hajszálakat ollóval is le lehet vágni az eltávolítás
előtt. Ezután helyezze vissza a kefét, és zárja le a görgős zárat érmével.
A KÉSZÜLÉK TÁROLÁSA
• Ha nincs használatban, akassza be a készüléket a töltőállomásba (6. ábra).
• Dugja be a lapos szívókefét a készülék bal horgába, csúsztassa a szívócsövet a jobb horogra, és dugja be a kefét.
HIBAJAVÍTÁS
Vagyis: Ha a következő gondok valamelyikével találkozik, akkor azonnal kapcsolja ki a készüléket, hogy az ne
károsodjon és elkerülhető legyen további problémák felmerülése.
30
M17133_Livington_PrimeULTIMATE_Manual_Ab MP13687_20181123_BA.indd 30 23.11.18 10:11
Page 31

Hiba Lehetséges ok Megoldás
Nem működik
Csökken a szívóhatás
Por távozik a készülékből üzemeltetés
közben
A kefe nem forog Az első lámpa villog
Az akku gyenge Töltse fel az akkut
A kapcsolót nem kapcsolta be A kapcsolót állítsa a BE állásba
A portároló tele van Ürítse ki a portárolót
A szívónyílás el van tömítődve Szüntesse meg az eltömítődést
A szűrő el van tömítődve Tisztítsa meg a szűrőt
A porszűrő szennyezett
MŰSZAKI TERMÉKADATOK
Termékkategória
Névleges feszültség
A töltő feszültsége
és paraméterei
Akku Li-Ion 2200mAh Kapacitás
Súly
Feltölthető
DC-porszívó
18,5V
Bemeneti áramkör:
100-240V,
Frekvencia: 50/60Hz
Kimenő teljesítmény:
24V, 500mA
2 kg
Kapcsolja ki a készüléket és tisztítsa
meg a szűrőt
Tisztítsa meg a kefét és újra kapcsolja
be a készüléket
Termék típusa
Motorteljesítmény
Zajerősség
Folyamatos működés
MC-603-A
130W
≤72 dB
0,5 l
18 min
A terméket élettartama végén ne ártalmatlanítsa a normál háztartási hulladékkal együtt. Vigye el az elektromos
és elektronikus készülékek újrahasznosítását célzó gyűjtőhelyre. Utóbbit ez a szimbólum jelzi a terméken, a
használati utasításon és a csomagoláson. Tájékozódjon a kereskedője vagy a helyi hatóság által üzemeltetett
gyűjtőhelyekről. A régi készülékek újrahasználata és újrahasznosítása fontos hozzájárulást jelent környezetünk
védelméhez.
Az elemeket ne a háztartási hulladék közé dobja! Vigye el azokat egy a begyűjtésre felhatalmazott gyűjtőhelyre.
Védelmi osztály II
Csak beltéri használatra.
Ez a termék megfelel az európai irányelveknek.
Garancia: A termékre feltétel nélküli, 2 éves garancia érvényes előállítási- és anyaghibák esetében. Ez a garancia nincs
kihatással törvényes jogaira.
31
M17133_Livington_PrimeULTIMATE_Manual_Ab MP13687_20181123_BA.indd 31 23.11.18 10:11
Page 32

SK
BEZPEČNOSTNÉ POKYNY
I. Pred použitím si pozorne prečítajte tento návod na obsluhu.
II. Postupujte podľa pokynov v tomto návode, inak to môže viesť k zraneniam a
poškodeniu zariadenia.
Upozornenie:
Malé diely vbalení sa nesmú používať ako hračky, uchovávajte igelitové vrecká
mimo dosahu detí – nebezpečenstvo udusenia.
III. Napätie:
1. Toto zariadenie pracuje so striedavým prúdom 100-240V.
2. Nepoužívajte stýmto zariadením žiadne iné napájanie.
3. Ak sa javí elektrický kábel alebo zásuvka ako poškodená, tento výrobok
viac nepoužívajte. Obráťte sa na naše služby zákazníkom ohľadne výmeny
elektrického kábla; držte zástrčku pevne, elektrický kábel neskrúcať; pri
zapájaní do siete dbajte na suché ruky, inak vzniká riziko zasiahnutia
elektrickým prúdom; vypnite aelektrický kábel vytiahnite.
4. Pri odpájaní kábla dbajte na to, aby ste mali suché ruky, inak by mohlo dôjsť
k zásahu elektrickým prúdom. Ak toto zariadenie nebudete používať dlhšiu
dobu, vypnite ho pomocou hlavného vypínača a odpojte kábel. Nepoužívajte
pre zariadenie iný príkon.
IV. Batéria:
1. Pre nabitie batérie nepoužívajte žiadne iné nabíjacie zariadenie, inak môže
dôjsť k poškodeniu zariadenia.
2. Plne nabité zariadenie vytiahnite von, aby ste predišli krátkej životnosti astrate
výkonu akumulátora.
3. Batériu vžiadnom prípade nerozoberajte; vžiadnom prípade nezahadzujte do
ohňa, nebezpečenstvo výbuchu.
4. Póly neskratovať alebo nezamieňať; kryt neotvárať; batériu neskladujte na
vlhkom alebo teplom mieste.
5. Na čistenie batérie vžiadnom prípade nepoužívajte benzol, ester kyseliny
octovej ainé čistiace prostriedky; pri abnormálnych teplotách alebo úniku
ihneď zastaviť; Na batériu netlačte alebo po nej nebúchajte, inak sa môže
zahriať a zapáliť.
V. Oblasť použitia:
Tento produkt je určený len na požitie vdomácnosti anesmie sa používať vonku
alebo na komerčné účely; nie je povolené použitie na odev, prsty, hlavu alebo vlasy.
Ide oelektronické zariadenie; aby ste zabránili skratovaniu zariadenia, nevystavujte
ho dažďu, vode alebo vlhkosti (napr. kúpeľne, práčovne atď.).
32
M17133_Livington_PrimeULTIMATE_Manual_Ab MP13687_20181123_BA.indd 32 23.11.18 10:11
Page 33

Vžiadnom prípade nevysávajte tekutiny. Zariadenie nepoužívajte vpotenciálne
nebezpečnom prostredí, napr. vblízkosti plynových zariadení, olejových nádrží,
chemikálií ainých zápalných avýbušných látok; zariadenie nepoužívajte na
vysávanie popola, horiacich cigariet alebo zápaliek – nebezpečenstvo požiaru.
Tento výrobok nepoužívajte na odstraňovanie horľavých ani prchavých kvapalín,
ako sú benzín, petrolej, farby, čistiace prostriedky, alkohol, parfumy, čistiace
prostriedky na koberce a podlahu a pod. Nepoužívajte tento výrobok na
odstraňovanie práškových farieb ani tonera v laserovej tlačiarni alebo kopírovacom
zariadení, aby ste predišli vzniku požiaru alebo výbuchu.
VI. Iné:
Zariadenie môžu používať deti od 8 rokov ako aj osoby so zníženými fyzickými,
senzorickými alebo mentálnymi schopnosťami alebo s nedostatkom skúseností a
znalostí, keď dodržiavajú, alebo boli poučení obezpečnom používaní zariadenia
aztoho vyplývajúcich rizikách. Deti sa so zariadením nesmú hrať. Čistenie
aužívateľskú údržbu nesmú deti vykonávať bez dozoru.
NÁVOD NA POUŽITIE
Upevnenie nabíjacej stanice: Ak nechcete nabíjaciu stanicu pripevniť na stenu, môžete samozrejme nabíjaciu
stanicu umiestniť jednoducho na podlahu.
1. Podržte nabíjaciu stanicu v požadovanej polohe na stene a ceruzkou označte otvory na vyvŕtanie (obrázok 1).
Pomocou elektrickej vŕtačky so 6 mm vrtákom vyvŕtajte tri otvory.
2. Do montážnych otvorov zasuňte hmoždinky vhodné pre váš typ steny (nie sú súčasťou dodávky) a upevnite
nabíjaciu stanicu na stenu pomocou skrutiek (obrázok 2).
3. Do určených vybraní zasuňte držiaky na rúrky, resp. kefky podľa znázornenia na obrázku 7. Dbajte pritom
na to, aby sa oba dlhšie držiaky upevnili v hornej časti.
4. Vložte náhradný akumulátor (nie je súčasťou dodávky) do nabíjacieho otvoru (obrázok 3).
5. Vložte ručnú jednotku do nabíjacieho držiaka a uveďte akumulátor do kontaktu s vodiacou drážkou
nabíjacieho držiaka (obrázok 4).
6. Zasuňte zástrčku adaptéra podľa obrázka (obrázok 5).
1. Pripojenie nabíjacej stanice: pripojte nabíjaciu stanicu k elektrickej sieti
2. Nabíjacia stanica: do nabíjacej stanice zastrčte náhradný akumulátor (nie je súčasťou balenia) a ručnú
jednotku - pozri obr. 5. Červený indikátor nabíjania začne blikať. Ak je akumulátor vo vysávači úplne nabitý,
začne sa nabíjať náhradný akumulátor a červená svetelná kontrolka v nabíjacom držiaku začne blikať.
Modré pásiky na displeji vysávača znázorňujú aktuálny stav nabitia. Keď svietia všetky pásiky namodro, je
proces nabíjania dokončený.
Ak po 5 hodinách bude indikátor nabíjania svietiť nazeleno, znamená to, že sú oba akumulátory úplne nabité.
Bezpečnostné opatrenia pri používaní
• Pred päťhodinovým nabíjaním vysávač dvakrát použite, cieľ: úplne aktivovanie činnosti akumulátora.
• Ak napätie akumulátora klesne, bude blikať prvý zo štyroch LED indikátorov, čím signalizuje, že akumulátor
sa musí čoskoro znova nabiť.
• Ak sa zariadenie dlhší čas nepoužíva, akumulátor znižuje svoju činnosť. Nabite ho raz alebo dvakrát za šesť
mesiacov.
3. Pripojenie trubice:
Hliníkovú trubicu zasuňte do zariadenia (obrázok 8), podržte pritom dva kolíky podľa dvoch otvorov na
zariadení, potom pomocou nich pevne pripevnite hliníkovú trubicu.
4. Pripojenie kefy:
Kefu zasuňte do trubice (obrázok 9); podržte pritom dva kolíky podľa dvoch otvorov v trubici, potom pomocou
nich pevne zaistite kefu.
33
M17133_Livington_PrimeULTIMATE_Manual_Ab MP13687_20181123_BA.indd 33 23.11.18 10:11
Page 34

5. LED-Displej:
Stlačením tlačidla vypínača ON/OFF zapnite vysávač, potom začne zariadenie vysávať, rozsvietia sa štyri modré
LED indikátory; po 7 až 8 minútach zhasne prvý modrý indikátor, po 13 až 14 minútach druhý a po 17 až 18
minútach tretí a štvrtý indikátor. Po každom použití vyčistite filter. Potom znova spustite vysávač, aby opäť
fungoval správne.
6. Čistenie zachytávača prachu vrátane HEPA-filtra:
Vysávač umiestnite k nádobe na odpad, potom vytiahnite nádobu na zachytávanie prachu pomocou rukoväti
(obr. 11) a vysypte z nej prach, vyčistite nádobu a ihneď ju znova pripevnite k zariadeniu; cvaknutia signalizujú,
že sa nádoba opäť zaistila (obrázok 12 – 13). Otáčaním v smere hodinových ručičiek vyberte filter HEPA a
vyčistite ho, potom ho vložte späť otáčaním v smere hodinových ručičiek.
7. 3-v-1-kombinová kefa:
Tento prístroj je vybavený kombinovanou kefou 3-v-1, kčomu patrí štrbinovitá tryska (a),
nadstavec na kefy (b) akefa na nábytok (c) - viď Obrázok 14. Stlačte blokovač (d), aby ste odstránili hlavu
kefy; tryska môže byť použitá potom na čistenie štrbín;nadstavec na kefu je možné, napr. použiť na počítačové
klávesnice a zadná strana sa môže použiť ako kefa na nábytok.
8. Kĺb/ohyb:
Pre uvoľnenie kĺbu (pozri obrázok na str. 4), stlačte krátko blokovač a rúru vysuňte mierne vpred. Uzáver sa
uvoľní. Po použití uzáver znovu zasuňte.
BEZPEČNOSTNÉ OPATRENIA
1. Ak je vložená batéria do nabíjačky, červené svetlo bliká pre indikáciu dobíjanie, z elené svetlo znamená
„plne nabitá“.
2. Ak sa prístroj dlhšiu dobu nepoužíva, stav nabitia batérie klesne; prosím dobite batériu každých šesť
mesiacov jeden až dvakrát.
ČISTENIE A ÚDRŽBA
I. Čistenie zariadenia:
1. Všetky rutinné údržbové práce aopravy sa vykonávajú po odpojení nabíjačky.
2. Po každom použití je potrebné zberný zásobník na prach vyčistiť.
3. Pokiaľ ho nepoužívate, uložte zariadenie na chladné a suché miesto, nevystavujte priamemu slnečnému
žiareniu alebo vlhkosti.
4. Uistite sa, že prístroj je odpojený od napájania a tlačidlo pre zapnutie / vypnutie je vypnuté; utrite ho
vlhkou bavlnenou handričkou (s vodou alebo neutrálnym čistiacim prostriedkom), bez preniknutia vody
alebo čistiaceho prostriedku a spôsobenia škody.
II. Čistenie kefy:
Vyčistenie kefy: Podľa znázornenia na obr. 15 vložte mincu do zámku valčeka, otáčaním v smere hodinových
ručičiek ho odblokujte, otvorte kryt valčeka (obrázok 16), vyberte kefový valček a odstráňte z neho vlasy a
nečistoty. Dlhé vlasy je možné pred odstránením prestrihnúť aj pomocou nožníc. Potom kefu znova vložte do
zariadenia a pomocou mince zatvorte zámok valčeka.
SKLADOVANIE ZARIADENIA
• Keď sa zariadenie nepoužíva, zaveste ho do nabíjacej stanice (obrázok 6)
• Plochý kefový nástavec zaveste na ľavý hák zariadenia, saciu trubicu zasuňte na pravý hák a nasaďte kefu.
RIEŠENIE PROBLÉMOV
Pozn.: Považujte nasledujúce problémy za dôležité, prístroj okamžite vypnite, aby nedošlo k jeho poškodeniu a
zabráňte ďalším škodám.
34
M17133_Livington_PrimeULTIMATE_Manual_Ab MP13687_20181123_BA.indd 34 23.11.18 10:11
Page 35

Chyba Možná príčina Riešenie
Už viac nefunguje
Sacia sila klesá
Prach vychádza
počas prevádzky
Kefa sa neotáča Prvý svetelný indikátor bliká
Vybitá batéria Batéria je vybitá
Prepínač nie je aktivovaný Prepínač do polohy ON
Zberač prachu je plný Vyprázdniť zberač prachu
Sací otvor je upchatý Odstrániť upchatie
Filter je upchatý Vyčistiť filter
Prachový filter je znečistený Zariadenie vypnúť afilter vyčistiť
TECHNICKÉ INFORMÁCIE O PRODUKTE
Kategória výrobku
Menovité napätie
Napätie nabíjacej stanice
a parametre
Batéria Li-Ion 2200mAh Kapacita
Hmotnosť
Nabíjateľný
DC-vysávač
18,5V
Príkon:
100-240V,
Frekvencia: 50/60Hz
Výkon:
24V 500mA
2 kg
Druh výrobku
Výkon motora
Hladina hluku
Doba trvania
prevádzky
Vyčistiť kefy azariadenie
opäť zapnúť
MC-603-A
130W
≤72 dB
0,5 l
18 min
Nevyhadzujte výrobok po ukončení jeho životnosti do komunálneho odpadu. Zaneste ho na zberné miesto na
recykláciu elektrických a elektronických zariadení. Toto je udané symbolom na výrobku, v návode na použitie a
na obale. Informujte sa o zberných miestach, ktoré sú prevádzkované Vašim obchodníkom alebo miestnymi
úradmi. Ďalšie zhodnotenie a recyklácia starých zariadení je dôležitým prínosom k ochrane nášho životného
prostredia.
Batérie nepatria do domáceho odpadu. Odneste ich do autorizovaného zberu takéhoto odpadu.
Trieda ochrany
Len pre použitie v interiéri.
Tento výrobok zodpovedá európskym normám.
Záruka: Na tento výrobok sa vzťahuje neobmedzená dvojročná záruka na všetky vady výroby a materiálu. Táto
záruka nijako neovplyvňuje vaše zákonné právo.
M17133_Livington_PrimeULTIMATE_Manual_Ab MP13687_20181123_BA.indd 35 23.11.18 10:11
II
35
Page 36

CZ
BEPEČNOSTNÍ POKYNY
I. Před použitím si pečlivě prostudujte návod k použití.
II. Postupujte přesně podle tohoto návodu, nesprávná manipulace může vést
Ke zranění a k poškození přístroje.
Varování:
Malé součásti v této krabici se nesmí používat jako hračky, plastový sáček vždy
umístěte mimo dosah dětí - nebezpečí udušení.
III. Napájení:
1. Tento přístroj je napájen střídavým proudem 100-240 V.
2. Nepoužívejte pro tento přístroj žádné jiné připojovací vedení.
3. Pokud se zdá, že je poškozen napájecí kabel nebo zástrčka, výrobek nadále
nepoužívejte. S žádostí o výměnu napájecího kabelu se obraťte na náš záka
znický servis. Podržte zástrčku, napájecí kabel nepřekrucujte. Dbejte na to,
abyste při zasouvání do zástrčky mělo suché ruce, jinak existuje riziko zásahu
elektrickým proudem. Vypněte a pak vytáhněte napájecí kabel ze zásuvky.
4. Při odpojování kabelu dbejte na suché ruce, jinak by mohlo dojít k úrazu
elektrickým proudem; Pokud byste toto zařízení neměli používat po
dlouhou dobu, vypněte jej na hlavním vypínači a odpojte kabel. Pro zařízení
nepoužívejte žádné jiné napájení.
IV. Akumulátor:
1. K nabíjení nepoužívejte žádnou jinou nabíječku, jinak by mohlo dojít k
poškození přístroje.
2. Nabíječku po úplném nabití vytáhněte ze zásuvky, zamezíte tak zkrácení
životnosti akumulátoru a poklesu výkonu.
3. Akumulátor v žádném případě nerozebírejte a nevhazujte do ohně, hrozí
nebezpečí výbuchu.
4. Póly nezkratujte ani nevyměňujte, neotvírejte plášť a akumulátor neskladujte
na vlhkém ani horkém místě. V žádném případě nepoužívejte k čištění aku
mulátorů benzen, ester kyseliny octové ani jiná rozpouštědla. V případě ab
normální teploty nebo prosakování okamžitě vypněte. Na akumulátor netlačte
ani do něj netlučte, mohl by se zahřát na vysokou teplotu a vzplanout.
V. Oblasti použití:
Tento výrobek je určen pouze k domácímu použití a nesmí se používat venku
nebo ke komerčním účelům. Používání na oděvech, prstech, hlavě nebo vlasech
není přípustné. Jedná se o elektronický přístroj. Aby se zamezilo jeho poruchám,
nevystavujte přístroj dešti, vodě nebo vlhkosti (např. v koupelně, prádelně, atd.).
V žádném případě nevysávejte tekutiny. Nepoužívejte přístroj v potenciálně
36
M17133_Livington_PrimeULTIMATE_Manual_Ab MP13687_20181123_BA.indd 36 23.11.18 10:11
Page 37

nebezpečném prostředí, např. v blízkosti plynových spotřebičů, olejových nádrží,
chemikálií a jiných zápalných nebo výbušných látek. Nepoužívejte tento přístroj k
vysávání popela, hořících cigaret nebo zápalek - nebezpečí požáru.
Tento výrobek nepoužívejte k odstraňování hořlavých nebo těkavých kapalin, jako
je benzín, petrolej, barevný lak, čistič, alkohol, parfém, koberec, čisticí prostředek
na podlahu atd. použít. Nepoužívejte tento výrobek k odstranění prášku nebo
toneru v laserové tiskárně nebo kopírce, abyste zabránili vzniku požáru nebo
výbuchu.
VI. Různé:
Tento přístroj mohou používat děti od 8 let a kromě toho i osoby se
sníženými fyzickými, senzorickými nebo mentálními schopnostmi nebo
nedostatkem zkušeností a vědění, pokud tak činí pod dozorem nebo byly
poučeny o bezpečném používání přístroje a o nebezpečích, která při
používání přístroje mohou nastat. Děti si nesmí s přístrojem systémem
hrát. Čištění a uživatelskou údržbu nesmí provádět děti bez dozoru.
NÁVOD K POUŽITÍ
Upevnění nabíjecí stanice: Pokud nechcete fixovat nabíjecí stanici na stěnu, můžete samozřejmě jednoduše
umístit nabíjecí stanici na zem.
1. Podržte nabíjecí stanici v požadované poloze na stěně a tužkou vyznačte otvory pro vrtání (obr. 1). Vyvrtejte
tři otvory elektrickým vrtákem s vložkou 6 mm.
2. Zasuňte hmoždinky (nejsou součástí dodávky) do montážních otvorů a připevněte nabíjecí stanici ke stěně
pomocí šroubů (obr. 2).
3. Zasuňte držáky trubek nebo kartáčů do vybraných spárů, jak je znázorněno na obrázku 7. Ujistěte se, že
dvě delší konzoly jsou upevněny nahoře.
4. Vložte náhradní baterii (není součástí dodávky) do nabíjecího slotu (obr. 3) .
5. Vložte ruční přístroj do nabíjecího místa a vložte baterii do kontaktu s vedením nabíjecího místa (obr. 4).
6. Zasuňte zástrčku adaptéru podle obrázku (obr. 5).
1. Připojení nabíjecí stanice: Zapojte nabíjecí stanici do elektrické sítě
2. Nabíjecí stanice: zapojte do nabíjecí stanice náhradní baterii (není v obsahu balení) a ruční přístroj – viz
obr. 5; začne blikat červená kontrolka nabíjení. Je-li baterie ve vysavači plně nabitá, začne se nabíjet náhradní
baterie a začne blikat červená žárovka v nabíjecím bodě. Modré pruhy na disleji vysavače zobrazují aktuální stav
nabití. Pokud pruhy svítí modře, je proces nabíjení dokončený.
Pokud je kontrolka nabíjení po 5 hodinách zelená, znamená to, že jsou obě baterie plně nabité.
Bezpečnostní opatření při používání
• Použijte vysavač dvakrát před nabíjením po dobu pěti hodin za účelem plné aktivace činnosti baterie.
• Pokud dojde k poklesu napětí baterie, začne blikat první ze čtyř LED, což znamená, že baterie musí být brzy
nabitá.
• Pokud se zařízení nepoužívá delší dobu, baterie snižuje svoji činnost; Dobijte jednou nebo dvakrát za šest
měsíců.
3. Připojení trubky:
Vložte hliníkovou trubku do zařízení (obr. 8), držte dva kolíky odpovídající dvěma otvory na zařízení a tím pevně
zajistěte hliníkovou trubku.
4. Připojení kartáče:
Vložte kartáč do hadice (obr. 9); držte dva kolíky odpovídající dvěma otvory v trubce a pevně zajistěte kartáč.
37
M17133_Livington_PrimeULTIMATE_Manual_Ab MP13687_20181123_BA.indd 37 23.11.18 10:11
Page 38

5. Kontrolka LED:
stisknutím tlačítka ON / OFF zapněte vysavač, poté začne vysávat, rozsvítí se čtyři modré LED; po 7 až 8
minutách zmizí první modré světlo, po 13 až 14 minutách druhé a po 17 až 18 minutách třetí a čtvrté. Po
každém použití vyčistěte filtr. Potom znovu spusťte vysavač tak, aby znovu běžel správně.
6. Čištění nádoby k zachycení prachu s HEPA-filtrem:
Přemístěte vysavač k odpadkové nádobě, vytáhněte prachový sběrač na rukojeti (obr. 11) a vyprázdněte prach, vyčistěte
misku a okamžitě ji vyměňte; Klepavé zvuky znamenají, že se miska znovu zasune (
hodinových ručiček odstraňte a vyčistěte filtr HEPA a znovu jej vložte ve směru hodinových ručiček.
7. Kombinovaný kartáč 3 v 1:
Tento přístroj je vybaven kombinovaným kartáčem 3 v 1, patří k němu úzký násadec (a), kartáčový násadec (b)
a kartáč na nábytek (c) - viz Obr. 14. Stiskněte odblokovací prvek (d) pro uvolnění kartáčové hlavice. Hubici pak
lze použít k čištění štěrbin, kartáčový násadec lze použít např. k čištění klávesnice počítače a zadní stranu jako
kartáč na nábytek.
8. Ohebný kloub:
Ohebný kloub (Viz obrázek na straně 4) odblokujete krátkým stiskem odblokovacího prvku a mírným ohnutím
trubky dopředu. Blokování je uvolněno. Po použití nechejte blokování opět zaklapnout.
obr.
12-13). Otočením ve směru
BEZPEČNOSTNÍ OPATŘENÍ
1. Když je akumulátor vložen do nabíjecí stanice, bliká červená kontrolka a oznam průběh nabíjení, zelená
kontrolka znamená „plně nabito“.
2. Pokud se přístroj delší dobu nepoužívá, stav nabití akumulátoru poklesne. Akumulátory každých 6 měsíců
jedenkrát až dvakrát dobijte.
ČIŠTĚNÍ A ÚDRŽBA
I. Čištění a údržba:
1. Veškeré práce na údržbě a opravě provádějte až po odpojení nabíječky od elektrické sítě.
2. Po každém použití je třeba nádobu k zachycení prachu vyčistit.
3. Když se přístroj nepoužívá, uložte jej na chladném a suchém místě, aby nebyl vystaven přímému
slunečnímu záření nebo působení vlhkosti.
4. Zajistěte, aby byl přístroj oddělen od přívodu proudu a tlačítko ZAP/VYP bylo ve vypnuté poloze, otřete jej
bavlněným hadříkem navlhčeným vodou nebo neutrálním čisticím prostředkem) bez proniknutí vody nebo
čisticího prostředku dovnitř, což by způsobilo škody.
II. Čištění kartáče:
Čištění kartáče: Vložte minci do zámku, jak je znázorněno na obr. 15, otočte ve směru hodinových ručiček a
odemkněte, otevřete krytku válce (obr. 16), vyjměte kolečko a odstraňte vlasy a nečistoty z válce.
Dlouhé vlasy lze také před vyjmutím zastřihnout nůžkami. Potom vyměňte kartáč a zavřete zámek válce mincí.
SKLADOVÁNÍ PŘÍSTROJE
• Při nepoužívání zařízení zavěste do nabíjecí stanice (obr. 6).
• Zavěste plochý sací kartáč na levý hák přístroje, nasuňte nasávací trubku na pravý hák a zasuňte kartáč.
ŘEŠENÍ PROBLÉMŮ
Poznámka: Pokud zjistíte některý z následujících problémů, přístroj ihned vypněte, aby nedošlo k poškození a k
dalším škodám.
38
M17133_Livington_PrimeULTIMATE_Manual_Ab MP13687_20181123_BA.indd 38 23.11.18 10:11
Page 39

Problém Možná příčina Řešení
Neběží
Pokles sacího výkonu
Z vysavače vychází za provozu prach Znečištěný prachový filtr Vypněte spotřebič a vyčistěte filtr
Kartáč se netočí První světlo bliká
Akumulátor je téměř vybitý Akumulátor nabijte
Spínač není zapnutý Přepněte spínač do polohy ZAP
Nádoba k zachycení prachu je plná
Ucpaný sací otvor Odstraňte ucpání
Ucpaný filtr Vyčistěte filtr
Vyprázdněte nádobu k
zachycení prachu
Kartáč vyčistěte a spotřebič opět
zapněte
TECHNICKÉ PARAMETRY VÝROBKU
Výrobková
kategorie
Jmenovité napětí
Napětí a parametry
nabíječky
Akumulátor
Hmotnost
Nabíjecí
stejnosměrný
vysavač
18,5V
Napájecí obvod:
100-240V,
Kmitočet: 50/60Hz
Výstupní výkon:
24V 500mA
Li-Ion 2200mAh
2 kg
Typ výrobku
Výkon motoru
Hladina hluku
Objem nádoby
Nepřerušovaný provoz
MC-603-A
130W
≤72 dB
0,5 l
18 min
Po ukončení životnosti neodhazujte výrobek do domovního odpadu. Odevzdejte jej na sběrném místě k recyklaci
elektrických a elektronických přístrojů. Je to vyznačeno tímto symbolem na výrobku, v návodu k obsluze a na
obalu. Informujte se o sběrných místech, provozované vaším prodejcem nebo místními úřady. Opětovné
zhodnocení a recyklace odpadních přístrojů jsou důležitým příspěvkem k ochraně našeho životního prostředí.
Baterie nepatří do odpadků. Odneste je na autorizované sběrné místo.
Třída ochrany
Používejte pouze ve vnitřních prostorách.
Tento výrobek odpovídá evropským směrnicím.
Záruka: Na tento výrobek se vztahuje neomezená dvouletá záruka na všechny vady z výroby a na vady
materiálu. Tato záruka nijak neovlivňuje vaše zákonná práva.
M17133_Livington_PrimeULTIMATE_Manual_Ab MP13687_20181123_BA.indd 39 23.11.18 10:11
II
39
Page 40

RO
INSTRUCŢIUNI DE SIGURANŢĂ
I. Citiţi cu atenţie aceste instrucţiuni Înainte de utilizare.
II. Vă rugăm să respectaţi cu stricteţe aceste instrucţiuni, deoarece manevrarea
neconformă poate produce vătămări şi deteriorarea aparatului.
Atenționare:
Piesele de mici dimensiuni nu trebuie folosite ca jucării, punga din material plastic
trebuie întotdeauna să fie ţinută departe de bebeluşi şi copii - pericol de sufocare.
III. Alimentare cu curent electric:
1. Acest aparat funcionează cu curent alternativ 110-240 V.
2. Vă rugăm să folosiţi alt cablu de alimentare pentru acest aparat.
3. Dacă cablul de alimentare sau ştecherul se deteriorează, vă rugăm să nu mai
folosiţi acest produs. Pentru înlocuirea cablului de alimentare ad resaţi-vă
serviciului nostru clienţi; ţineţi de ştecher, nu rotiţi cablul de alimentare; la
introducerea în priză să aveţi mâinile uscate, în caz contrar există pericol de
electrocutare; vă rugăm să opriţi aparatul şi apoi să de conectaţi cablul de
alimentare.
4. Vă rugăm să fii ateni atunci când trageţi cablul din priză să aveţi mâinile
uscate, în caz contrar s-ar putea ajunge la electrocutare; dacă nu trebuie să
utilizai acest dispozitiv pentru o perioadă mai lungă de timp, deconectaţi-l de
la întrerupătorul principal, trageţi cablul din priză. Nu utilizai nici o altă putere
de racordare pentru aparat.
IV. Acumulator:
1. Nu utilizai alt aparat de încărcare în vederea încărcării, deoarece aparatul ar
putea fi deteriorat.
2. După încărcare completă vă rugăm să decuplaţi aparatul de încărcare, pentru
a
evita scurtarea vieţii acumulatorului şi scăderea capacităţii acestuia.
3. Nu demontaţi în niciun caz acumulatorul; nu-l aruncaţi în nicio situaţie în foc,
pericol de explozie.
4. Nu scurtcircuitaţi polii şi respectaţi polaritatea; nu deschideţi carcasa; nu
depozitaţi acumulatorul într-un loc umed sau fierbinte.
5. Nu folosiţi în niciun caz benzol, acid acetic sau alţi solvenţi pentru a curăţa
6. Acumulatorul; în caz de temperatură anormală sau de scurgere, opriţi-vă
imediat; nu apăsaţi şi nu loviţi acumulatorul, deoarece s-ar putea să se
încingă şi să se aprindă.
V. Domenii de utilizare:
Acest produs este destinat utilizării casnice şi nu este permisă utilizarea în aer
liber sau comercială; nu este permisă utilizarea pe îmbrăcăminte, degete, pe cap
40
M17133_Livington_PrimeULTIMATE_Manual_Ab MP13687_20181123_BA.indd 40 23.11.18 10:11
Page 41

sau în păr. Este vorba de un aparat electronic; pentru a evita deranjamentele
aparatului, nu-l expuneţi ploii, apei sau umidităţii (de ex. în baie, în bucătărie etc.).
Nu absorbiţi în niciun caz lichide. Nu utilizaţi aparatul în medii potenţial
periculoase, de ex. aproape de instalaţii de gaz, rezervoare de ulei, chimicale
şi alte substanţe inflamabile şi explozive; nu folosiţi aparatul pentru a absorbi
cenuşa, ţigarete aprinse sau chibrituri - pericol de incendiu.
Nu utilizai acest produs pentru a îndepărta lichide inflamabile sau volatile
cum ar fi benzina, kerosenul, vopseaua, detergenii, alcoolul, parfumul, agenţii
de curăţare pentru covoare şi pardoseli etc. Nu utilizai acest produs pentru a
îndepărta pulberi colorate sau tonerul din imprimanta laser sau copiator pentru a
evita incendiul sau explozia.
VI. Diverse:
Acest aparat poate fi utilizat de copii cu vârsta peste 8 ani şi de persoane
cu capacităţi fizice, senzoriale şi mentale reduse sau fără experienţă, dacă
sunt supravegheate sau dacă au fost instruite cu privire la utilizarea sigură
a aparatului şi dacă înţeleg pericolele rezultate din aceasta. Nu este
permis copiilor să se joace cu aparatul. Curăţarea şi întreţinerea efectuată
de către utilizator nu este permis a fi efectuată de către copii fără
supraveghere.
INSTRUCŢIUNI DE UTILIZARE
Fixarea staiei de încărcare: dacă nu dorii să fixai staţia de încărcare pe perete, putei amplasa, bineîneles,
staia de încărcare pe pardoseală pur şi simplu.
1. inei staia de încărcare pe perete la poziia dorită și marcai orificiile de găurit cu un creion (fig. 1).
Executai trei găuri cu un aparat de găurit electric cu un burghiu de 6 mm.
2. Introducei prin batere diblurile adecvate (care nu sunt incluse în furnitura de livrare) în orificiile de
montare și fixai staia de încărcare la perete cu șuruburi (fig. 2).
3. Glisai suporturile pentru tuburi reaspectiv perii în locașul prevăzut îna cest sens așa cum este reprezentat
în fig. 7. În acest proces acordaţi atenţie ca cele două suporturi mai lungi să fie fixate în partea superioară.
4. Introducei acumulatorul de schimb (nu este inclus în furnitura de livrare) în fanta de încărcare (fig 3) .
5. Introducei aparatul manual în locaşul de încărcare și aducei acumulatorul în contact cu ghidajul locaşului
de încărcare (fig. 4).
6. Introducei fișa adaptorului așa cum se arată în (fig. 5).
1. Racordarea staţiei de încărcare: introduceţi ştecherul staţiei de încărcare în priza reţelei curentului electric
2. Staţie de încărcare: introduceţi acumulatorului de schimb (nu face parte din cuprinsul livrării) şi aparatul
manual în staţia de încărcare – vezi fig. 5; indicatorul roşu de încărcare începe să lumineze intermitent. Când
acumulatorul din aspirator este încărcat complet, începe să se încarce acumulatorul de schimb și luminiţa
roșie de la locaşul de încărcare începe să lumineze intermitent. Barele albastre de la ecranul tip display al
aspiratorului indică gradul actual de încărcare. Atunci când toate barele luminează albastru, înseamnă că
procesul de încărcare este încheiat. Dacă indicatorul luminos este verde după 5 ore, înseamnă că ambele
acumulatoare sunt încărcate complet.
Măsuri de precauţie la utilizare
• Utilizai aspiratorul de două ori înainte de încărcarea timp de cinci ore, scop: activarea completă a
acumulatorului.
• Dacă tensiunea acumulatorului scade, primul dintre cele patru LED-uri luminează intermitent şi atrage astfel
atenţia că acumulatorul trebuie reîncărcat în curând.
41
M17133_Livington_PrimeULTIMATE_Manual_Ab MP13687_20181123_BA.indd 41 23.11.18 10:11
Page 42

• Dacă aparatul nu este utilizat un timp mai îndelungat, atunci acumulatorul îşi reduce activitatea; La fiecare
șase luni reîncărcai o dată sau de două ori.
3. Conectare conductă:
Introducei tubul din aluminiu în aparat (fig.8), pentru aceasta ineţi cele două știfturi corespunzătoare celor
două găuri de la aparat, apoi cu ele fixai ferm tubul din aluminiu.
4. Conectare perie:
introducei peria în eavă (fig. 9); pentru aceasta ţinei cele două știfturi corespunzătoare celor două găuri în
tub, apoi cu ele fixai bine peria.
5. Afişaj LED:
apăsai butonul ON / OFF (pornit/oprit) pentru a porni aspiratorul, apoi aparatul începe să aspire, se aprind cele
patru LED-uri albastre; după 7 - 8 minute prima lumină albastră se stinge, după 13 - 14 minute a doua și după
17 - 18 minute a treia și a patra. Curăai filtrul după fiecare utilizare. Apoi repornii aspiratorul pentru ca să
funcţioneze din nou corect.
6. Curățarea recipientului de praf, inclusiv a filtrului HEPA:
Aduceţi aspiratorul la o găleată de gunoi, apoi scoateţi prin tragere colectorul de praf de la mâner (fig.11) și
golii praful, curăai cuva și imediat o montaţi la aparat; Sunetele de tip clic indică faptul că din nou cuva s-a
înclichetat (fig. 12-13). Rotii în sens orar pentru a scoate și curăa filtrul HEPA, apoi reintroducei în sens orar.
7. Peria combi 3-în-1:
Acest aparat este dotat cu o perie combi 3-în-1, compusă din perie de rosturi (a),
peria suplimentară (b) şi peria pentru mobilă (c) - a se vedea fig. 14. Acţionaţi închizătorul (3),
pentru a scoate capul periei; duza poate fi folosită pentru a curăţa fantele; peria suplimentară se poate folosi de
ex. la tastaturile de computer şi pentru partea posterioară a mobilierului.
8. Articulație:
Pentru a debloca articulaia (v. reprezentarea pag. 4) apăsai scurt pe închizător și apoi împingei conducta spre
înainte.Elementul de blocare este eliberat. După utilizare lăsai elementul de blocare să revină în poziia iniială.
PRECAUŢII
1. Dac
ă acumulatorul este introdus în staia de încărcare, lampa roşie clipeşte şi indică Încărcarea, lampa
verde înseamnă „încărcat complet”.
2. Dacă aparatul nu va fi utilizată o perioadă mai lungă, atunci nivelul de încărcare al acumulatorului scade;
vă rugăm să încărca
ţi acumulatorul la fiecare şase luni odată sau de două ori.
CURĂŢAREA ŞI ÎNTREŢINEREA
I. Curăţarea aparatului:
1. Toate lucrările de rutină de întreţinere şi reparaţie se vor efectua numai după deconectarea încărcătorului.
2. După fiecare utilizare curăţaţi recipientul de praf.
3. În caz de neutilizare, depozitaţi aparatul într-un loc răcoros şi uscat, nu îl expuneţi direct razelor de soare
sau umezelii.
4. Asiguraţi-vă că aparatul este deconectat de la alimentarea cu curent electric şi BUTONUL PORNIT/
OPRIT este oprit; ştergeţi cu o cârpă umedă de bumbac (cu apă sau cu un detergent neutru), evitând
pătrunderea apei sau a detergentului şi producerea de daune.
II. Curăţarea periei:
Curăarea periei: introducei o monedă în blocajul rolei, așa cum se arată în fig. 15, rotii-o în sens orar și
deblocai, deschidei placa de acoperire a rolei (fig.16), scoatei rola periei și îndepărtai părul și murdăria de pe
rolă. Părul lung poate fi şi tăiat cu o foarfecă înainte de a fi îndepărtat. Apoi, montaţi din nou peria și închidei
blocarea rolei cu moneda.
DEPOZITAREA APARATULUI
• Când nu este utilizat, suspendaţi aparatul în staia de încărcare (fig.6)
• Așezai peria plată de aspirare la cârligul stânga al aparatului, împingeţi tubul de aspirare pe cârligul
dreapta și introduceţi peria.
REMEDIEREA ERORILOR
Obs.: Dacă observaţi vreuna dintre următoarele probleme atunci vă rugăm să opriţi aparatul
de îndată, pentru a evita deteriorarea acestuia şi evitarea altor daune.
42
M17133_Livington_PrimeULTIMATE_Manual_Ab MP13687_20181123_BA.indd 42 23.11.18 10:11
Page 43

Defecţiune Cauză posibilă Soluţie
Nu mai funcţionează
Puterea de absorbţie scade
Este eliminat praf în timpul
funcţionării
Peria nu se mai roteşte Prima lampă se aprinde Curăţaţi peria şi reporniţ aparatul
Acumulatorul e slăbit Încărcare acumulator
Butonul nu este acţionat Aduceţi butonul în poziţia PORNIT
Recipientul de praf este plin Goliţi recipientul de praf
Orificiul de absorbţie este înfundat Îndepărtaţi obturaţia
Filtrul este înfundat Curăţaţi filtrul
Filtrul de praf este murdar Opriţi aparatul şi curăţaţi filtrul
DATELE TEHNICE ALE PRODUSULUI
Categoria de produs
Tensiune nominală
Tensiune aparat de
încărcat
şi parametri
Acumulator Li-Ion 2200mAh Capacitatea
Greutate
Aspirator cu curent
continuu
cu acumulator
18,5V
Circuit primar:
100-240V,
Frecvenţă: 50/60Hz
Putere de ieşire:
24V 500mA
2 kg
Tip produs
Putere motor
Nivel de zgomot
Funcţionare continuă
MC-603-A
130W
≤72 dB
0,5 l
18 min
Din acest motiv produsul, la sfârşitul duratei sale de funcţionare ,nu va fi debarasat împreună cu gunoiul
menajer. Predaţi-l la punctele de colectare în vederea reciclării aparatelor electrice şi electronice. Acest lucru
este indicat de acest simbol de pe produs, din instrucţiunile de utilizare şi de pe ambalaj. Informaţi-vă cu privire
la punctele de colectare pe care le administrează distribuitorul sau dumneavoastră locale. Revalorificarea şi
reciclarea aparatelor uzate este o contribuţie importantă la protecţia mediului.
Bateriile nu trebuie aruncate cu gunoiul menajer. Reciclaţi-le la un punct de colectare autorizat.
Clasa de protecie
A se utiliza numai în spaii interioare.
Acest produs corespunde directivelor europene.
M17133_Livington_PrimeULTIMATE_Manual_Ab MP13687_20181123_BA.indd 43 23.11.18 10:11
II
43
Page 44

TR
GÜVENLİK UYARILARI
I. Lütfen kullanımdan önce bu kullanım
kılavuzunu dikkatlice okuyun.
II. Lütfen bu kullanım kılavuzunu dikkate alın, amaca uygun olmayan kullanım
yaralanmalara yol açabilir ve cihaza zarar verebilir.
Uyarı:
Bu kutudaki küçük parçalar oyuncak olarak kullanılmamalıdır, plastik torbayı
her zaman bebekler ve çocuklardan uzak tutun - boğulma tehlikesi.
III. Güç kaynağı:
1. Bu cihaz 100-240V alternatif akımla çalışmaktadır.
2. Lütfen bu cihazı başka voltaj değerinde çalıştırmaya çalışmayın.
3. Elektrik kablosu veya priz hasarlı olduğu takdirde lütfen bu ürünü kullanmaya
devam etmeyin. Elektrik kablosunu değiştirmek için müşteri hizmetlerimize
başvurun; prizi sabit tutun; elektrik kablosunu burmayın; prizi takarken
ellerinizin kuru olmasına dikkat edin, aksi takdirde elektrik çarpma tehlikesi
vardır; lütfen cihazı kapatın ve elektrik kablosunu çekin.
4. Kabloyu çıkarırken ellerinizin kuru olmasına dikkat edin, aksi takdirde elektrik
çarpması meydana gelebilir; bu cihazı uzun süre kullanmayacaksanız, ana
şalterden kapatın, kabloyu fişten çekin. Lütfen cihaz için başka bir bağlantı
gücü kullanmayın.
IV. Akü:
1. Şarj etmek için başka bir şarj aleti kullanmayın, aksi takdirde cihaz hasar
görebilir.
2. Lütfen şarj cihazını yükleme tamamlandıktan sonra akünün kullanım ömrünün
kısa olması ve performansta düşme olmasının önüne geçmek için çıkarın.
3. Aküyü asla parçalarına ayırmayın; asla ateşe atmayın, patlama tehlikesi vardır.
4. Kutuplar arasında kısa devre yapmayın veya kutupları değiştirmeyin; kasayı
açmayın; aküyü nemli ve sıcak bir ortamda muhafaza etmeyin.
5. Hiçbir şekilde benzol, asetik ester ve diğer çözeltileri akünün temizliğinde
kullanmayın; sıcaklıkta normal dışı olduğunda veya sızıntı görüldüğünde
hemen akü bağlantısını kesin; aküye baskı yapmayın veya vurmayın, aksi
takdirde sıcaklığı artabilir ve yangın meydana gelebilir.
V. Kullanım alanları:
Bu ürün yalnızca evde kullanıma uygundur ve açık alanda veya ticari amaçlarla
kullanılamaz; giysiler, tırnaklar, baş ve saç üzerinde kullanımına izin verilmez. Bu
elektronik bir cihazdır; cihazda yaşanabilecek arızaların önüne geçmek için cihazı
yağmur, su veya neme maruz bırakmayın (örn. banyo, mutfak vs.). Hiçbir şekilde
44
M17133_Livington_PrimeULTIMATE_Manual_Ab MP13687_20181123_BA.indd 44 23.11.18 10:11
Page 45

sıvı emdirmeyin. Cihazı potansiyel tehlikelerin bulunabileceği bir ortamda
kullanmayın, örn. gaz sistemlerini, petrol tankları, kimyasal ve diğer yanabilir
maddeler ile patlayıcı maddelerin yakınında; cihazı kül, yanan sigara veya tutuşmuş
tahta parçalarının süpürülmesinde kullanmayın - yangın tehlikesi.
Bu ürünü benzin, gaz yağı, boya, temizlik ürünü, alkol, parfüm, halı ve zemin
temizlik ürünleri gibi yanıcı veya uçucu sıvıları çıkarmak için kullanmayın. Yangın
veya patlamayı önlemek için lazer yazıcıdaki veya fotokopi makinesindeki toz
boyayı veya toneri çıkarmak için bu ürünü kullanmayın.
VI. Diğer:
Bu cihaz 8 yaş ve daha büyük çocuklar ile fiziksel, duyusal veya zihinsel
kabiliyetleri zayıf ya da tecrübe ve bilgileri eksik kişiler tarafından, bu
kişiler cihazın nasıl kullanılacağı ve bunun sonucunda oluşabilecek
tehlikeler bakımından bilgilendirildikleri sürece kullanılabilir. Çocuklar cihazla
oynamamalıdırlar. Temizlik ve kullanıcı tarafından yapılan bakım denetim olmadan
çocuklar tarafından gerçekleştirilmemelidir.
KULLANIM KILAVUZU
Şarj istasyonunu sabitleyin: Şarj istasyonunu duvara sabitlemek istemiyorsanız, pek tabii ki zemine de
yerleştirebilirsiniz.
1. Şarj istasyonunu duvarda istenilen konumda tutun ve matkap deliklerini bir kalemle işaretleyin (Şek. 1).
6 mm‘lik uca sahip bir elektrikli matkap ile üç delik delin.
2. Perçinleri (tedarik kapsamına dahil değildir) montaj deliklerine takın ve şarj istasyonunu vidalarla duvara
sabitleyin (Şek. 2).
3. Boru veya fırça braketlerini Şekil 7‘de gösterildiği gibi sağlanan girintiye doğru kaydırın. İki uzun braketin
üstte sabitlendiğinden emin olun.
4. Yedek pili (dahil değildir) şarj yuvasına takın (Şek. 3).
5. El cihazını şarj noktasına yerleştirin ve bataryayı şarj noktası kılavuzuyla temas ettirin (Şek. 4).
6. Adaptör fişini şekilde (Şek. 5) gösterildiği gibi takın.
1. Şarj istasyonunu bağlayın: Şarj istasyonunu güç kaynağına takın
2. Şarj istasyonu: Yedek aküyü (teslimat kapsamında değildir) ve el cihazını şarj istasyonuna takın – bkz. Şek. 5:
Kırmızı şarj göstergesi yanıp sönmeye başlar. Elektrikli süpürgedeki akü tamamen şarj olduğunda yedek akü
şarj olmaya ve şarj noktasında kırmızı ışık yanıp sönmeye başlar. Elektrikli süpürgenin ekranındaki mavi barlar
güncel şarj durumunu gösterir. Tüm barlar mavi yandığı zaman şarj etme tamamlanmıştır.
Şarj göstergesi 5 saat sonra yeşile dönerse; bu, her iki akünün de tam olarak şarj edildiği anlamına gelir.
Kullanımla İlgili Önlemler
• Lütfen beş saat boyunca şarj etmeden önce elektrikli süpürgeyi iki kez kullanın. Akünün tam aktivasyonu
hedeflenmektedir.
• Akü gerilimi düşerse, dört LED‘den birincisi yanıp sönerek pilin yakında yeniden şarj edilmesi gerektiğini
gösterir.
• Cihaz uzun süre kullanılmadığında akünün çalışma performansı azalır; lütfen altı ayda bir ya da iki kez
aküyü şarj edin.
3. Boruyu bağlayın:
Alet üzerindeki iki deliğe karşılık gelen iki pini tutarak alüminyum boruyu cihaza takın (Şekil 8), daha sonra
alüminyum boruyu sağlam bir şekilde sabitleyin.
4. Fırçayı bağlayın:
fırçayı boruya takın (Şek. 9); borudaki iki deliğe karşılık gelen iki pimi tutarak fırçayı sıkıca sabitleyin.
45
M17133_Livington_PrimeULTIMATE_Manual_Ab MP13687_20181123_BA.indd 45 23.11.18 10:11
Page 46

5. LED Göstergesi:
Elektrikli süpürgeyi çalıştırmak için AÇMA / KAPAMA DÜĞMESİNE basın, ardından cihaz emmeye başlar, dört mavi LED
yanar; 7 ila 8 dakika sonra ilk mavi ışık, 13 ila 14 dakika sonra ve 17 ila 18 dakika sonra üçüncü ve dördüncü ışık söner. Her
kullanımdan sonra filtreyi temizleyin. Ardından düzgün şekilde tekrar çalışması için süpürgeyi yeniden başlatın.
6. HEPA Filtreli süpürgenin temizlenmesi:
Elektrikli süpürgeyi çöp kutusuna taşıyın, ardından toz toplayıcısını tutamağından çekip çıkarın (Şek. 11) ve tozu
boşaltın, kabı temizleyin ve hemen cihaza tekrar yerleştirin; tık sesleri, kapağın yerine yerleştiğini gösterir
(Şek. 12-13). HEPA filtreyi çıkarıp temizlemek için saat yönünde çevirin, ardından saat yönünde tekrar takın.
7. 3‘ü 1 arada çok fonksiyonlu fırça:
Bu cihaz, 3‘ü 1 arada çok fonksiyonlu fırça ile donatılmıştır, buna kenar aparatı (a), fırça aparatı (b) ve mobilya
fırçası (c) dahildir - bkz. Şek. 14. Fırça kafasını çıkarmak için kilit açıcıya basın; kenar aparatını ince kısımların
temizliğinde kullanın; fırça aparatını örn. bilgisayar klavyelerini temizlemede kullanın ve arka taraf da mobilya
fırçası olarak kullanılabilir.
8. Bükme mafsalı:
Bükme mafsalının kilidini çözmek için (Bkz. 4. sayfadaki gösterim) kısaca açıcıya basın ve boruyu hafifçe öne
doğru bükün. Kilit açılır. Kullandıktan sonra kilidi tekrar yerine oturtun.
TEDBİRLER:
1. Akü şarj istasyonuna yerleştirildiği takdirde kırmızı ışık yanıp söner ve şarj yapıldığını gösterir, yeşil ışık
„tamamen şarj edildi“ anlamına gelir.
2. Cihaz uzun süre kullanılmadığı takdirde akünün şarj kapasitesi düşer; lütfen aküyü altı ayda bir, bir ila iki
kez şarj edin.
TEMİZLİK VE BAKIM
I. Cihazın temizliği:
1. Rutin tüm bakım ve tamirat işlemleri şarj cihazı çıkarıldıktan sonra yapılmalıdır.
2. Her kullanımdan sonra toz kabı temizlenmelidir.
3. Cihaz kullanılmadığında serin ve kuru bir yerde muhafaza edilmeli, doğrudan güneş ışığı altında veya
neme maruz bırakılmamalıdır.
4. Cihazın elektrik bağlantısından ayrıldığından ve AÇMA/KAPAMA tuşunun kapalı olduğundan emin olun,
su sızmasına ve hasar oluşmasına izin vermeden nemli, pamuklu bir bezle silin (su veya nötr bir temizleyici
bulunan).
II. Fırçanın temizlenmesi:
Fırçayı temizleyin: Şekil 15‘de gösterildiği gibi rulo fırçanın kilidine jeton yerleştirin, saat yönünde çevirerek kilidi
açın, silindir şeklindeki kapak plakasını açın (Şek. 16), rulo fırçayı çıkarıp üstündeki saç ve kiri temizleyin.
Uzun saçları çıkarmadan önce makasla kesebilirsiniz. Daha sonra fırçayı yerine yerleştirin ve rulonun kilidini
jetonla kapatın.
CİHAZIN SAKLANMASI
• Kullanılmadığında cihazı şarj istasyonuna asın (Şek. 6).
• Düz emme fırçasını cihazın sol kancasına asın, emme borusunu sağ kancaya kaydırın ve fırçayı fişe takın.
SORUNLARIN GİDERİLMESİ
Not: Aşağıdaki sorunlardan biri söz konusu olduğunda hasara yol açmamak ve oluşabilecek
hasarların önüne geçmek için cihazı lütfen derhal kapatın.
46
M17133_Livington_PrimeULTIMATE_Manual_Ab MP13687_20181123_BA.indd 46 23.11.18 10:11
Page 47

Sorun Olası neden Çözüm
Cihaz çalışmıyor
Emme gücü azaldı
Kullanım sırasında dışarı
toz çıkıyor
Fırça dönmüyor İlk ışık yanıp sönüyor
Akü zayıf Aküyü yükleyin
Şaltere basılmıyor Şalteri AÇIK konumuna getirin
Toz kabı dolu Toz kabını boşaltın
Emme açıklığı tıkalı Tıkanmayı ortadan kaldırın
Filtre tıkalı Filtreyi temizleyin
Toz filtresi kirli
TEKNİK ÜRÜN VERİLERİ
Ürün kategorisi
Nominal gerilim
Şarj cihazı gerilimi
ve parametre
AküAkü
Ağırlık
Şarj edilebilir
DC elektrikli
süpürge
18,5V
Giriş voltajı:
100-240V,
Frekans: 50/60Hz
Çıkış gücü:
24V 500mA
Li-Ion 2200mAh
2 kg
Cihazı kapatın ve filtreyi
temizleyin
Fırçayı temizleyin ve cihazı
tekrar açın
Ürün türü
Motor gücü
Ses seviyesi
Kapasite
Sürekli kullanım
MC-603-A
130W
≤72 dB
0,5 l
18 min
Ürünü kullanım ömrünün sonunda normal ev çöpü ile birlikte tasfiye etmeyin. Ürünü daima elektrikli ve elektronik
cihazların geri dönüştürülmesine yönelik toplama noktasına götürün. Bu ürün üzerindeki, kullanım kılavuzundaki ve
ambalaj üzerindeki bu sembol ile belirtilir. Satıcınız ya da yerel makamlar tarafından işletilen toplama noktaları
hakkında bilgi alın. Eski cihazların tekrar değerlendirilmesi ve geri dönüştürülmesi çevre için önemli bir katkıdır.
PİLLERİN tasfiyesi: Piller normal ev çöpüne atılmamalıdır. Bu pilleri yetkili bir toplama yerine götürün.
koruma sınıfı II
Sadece iç alanlarda kullanılabilir.
Bu ürün Avrupa yönetmeliklerine uygundur.
47
M17133_Livington_PrimeULTIMATE_Manual_Ab MP13687_20181123_BA.indd 47 23.11.18 10:11
Page 48

ESP
INDICACIONES DE SEGURIDAD
I. Leer atentamente estas instrucciones antes de utilizar el aparato.
II. Respectar estrictamente las instrucciones; el uso incorrecto puede causar
lesiones y daños en el aparato.
Advertencia:
No utilizar los componentes pequeños de esta caja para jugar; no dejar al alcance
de los niños las bolsas de plástico; peligro de asfixia.
III. Alimentación eléctrica:
1. Este aparato necesita corriente alterna de 100-240V para funcionar.
2. No utilizar fuentes de alimentación con otra potencia.
3. Si el cable de alimentación o el enchufe están dañados, no utilizar este
aparato. Para cambiar el cable de alimentación contacte nuestro servicio
técnico; coger bien el enchufe, no girar el cable de alimentación; asegúrese de
tener las manos secas al conectar el enchufe; peligro de descarga eléctrica;
apagar el aparato y desconectar el enchufe de la toma de corriente.
4. Asegúrese de tener las manos secas al desenchufar el cable, de lo contrario,
podría sufrir una descarga eléctrica. En caso de no usar el dispositivo por
un tiempo prolongado, apáguelo con el interruptor principal y desenchufe el
cable. No use ningún otro cable de conexión con el equipo.
IV. Batería:
1. No utilizar otro cargador, ya que esto podría dañar el aparato.
2. Sacar la batería del cargador una vez esté completamente cargada para
prevenir la disminución de la vida útil de la misma y una pérdida de potencia.
3. Está prohibido desmontar la batería o tirarla al fuego; peligro de explosión.
4. No cortocircuitar y no intercambiar los polos de la batería; no abrir la carcasa;
no guardar la batería en un lugar húmedo o expuesta a temperaturas altas.
5. No utilizar benceno, ácido acético u otros solventes para limpiar la batería;
si se sobrecalienta y tiene pérdidas de líquido interrumpir inmediatamente
el uso; no ejercer presión sobre la batería y no golpearla, ya que podría
sobrecalentarse e incendiarse.
V. Aplicaciones:
Este aparato está destinado para el uso doméstico y no puede utilizarse al aire
libre o en aplicaciones industriales; no se permite su uso para aspirar ropa,
dedos, cabeza o cabello. Es un aparato electrónico; para prevenir averías no
exponerlo a lluvia, agua o humedad (p.ej. en baños, lavaderos, etc). Está prohibido
aspirar líquidos. No utilizar el aparato en medios potencialmente peligrosos, p. ej.
cerca de instalaciones de gas, depósitos de gasolina/aceite, sustancias
48
M17133_Livington_PrimeULTIMATE_Manual_Ab MP13687_20181123_BA.indd 48 23.11.18 10:11
Page 49

químicas y otras sustancias inflamables y explosivas; no utilizar el aparato para
aspirar cenizas, cigarrillos encendidos o cerillas; peligro de incendio.
No utilice este producto para eliminar líquidos inflamables o volátiles
como gasolina, queroseno, pintura, detergente, alcohol, perfume, limpiador de
alfombras y pisos, etc. No utilice este producto para eliminar colorantes en polvo o
tóner de impresoras o copiadoras láser, para evitar así incendios o explosiones.
VI. Otras indicaciones:
Este aparato puede ser utilizado por niños a partir de 8 años de edad y por
personas con discapacidades físicas, sensoriales o mentales o con falta de
experiencia y conocimientos bajo la debida vigilancia o después de haber sido
instruidos acerca del uso seguro del aparato y haber comprendido los peligros
resultantes. Los niños no deben jugar con el aparato. Los niños no deben limpiar
el aparato ni realizar el mantenimiento propio del usuario sin la debida vigilancia.
INSTRUCCIONES DE USO
Montaje de la estación de carga: si no desea fijar la estación de carga a la pared, simplemente puede colocarla
en el suelo.
1. Sostenga la estación de carga en la posición deseada en la pared y marque los orificios de perforación
con un lápiz (Fig. 1). Taladre tres orificios con un taladro eléctrico con mecha de 6 mm.
2. Inserte los pasadores (no incluidos en el volumen de suministro) en los orificios de montaje y sujete la
estación de carga a la pared con los tornillos (Fig. 2).
3. Deslice los soportes para los tubos o cepillos en el hueco previsto como se muestra en la Fig. 7.
Asegúrese de que los dos soportes más largos estén sujetos en la parte superior.
4. Inserte la batería de repuesto (no incluida en el volumen de suministro) en la ranura de carga (Fig. 3) .
5. Coloque el dispositivo portátil en la zona de carga y ponga la batería en contacto con la guía de la zona
de carga (Fig. 4).
6. Inserte el enchufe del adaptador como se muestra en la (Fig. 5).
1. Conexión de la estación de carga: conecte la estación de carga a la red eléctrica
2. Estación de carga: inserte la batería de repuesto (no incluida en el volumen de suministro) y el dispositivo
portátil en la estación de carga – vea la Fig. 5; el indicador de carga rojo comienza a parpadear. Cuando la
batería de la aspiradora está completamente cargada, la batería de repuesto comienza a cargarse y la luz roja
en la zona de carga comienza a parpadear. Las barras azules de la pantalla del aspirador indican el nivel de
carga actual. Cuando todas las barras se iluminen en azul, se habrá completado la carga. Si el indicador de
carga se pone verde después de 5 horas, significa que ambas baterías están completamente cargadas.
Precauciones de uso
• Utilice la aspiradora dos veces antes de cargar la batería durante cinco horas. Objetivo: activar
completamente la batería
• Si el voltaje de la batería se reduce, el primero de los cuatro LED parpadeará, lo que indica que la batería
necesita ser recargada pronto.
• Si el equipo no es utilizado durante mucho tiempo, la batería reduce su vida útil. Recargue la batería una
o dos veces cada seis meses.
3. Conectar el tubo:
inserte el tubo de aluminio en el equipo (Fig. 8), sujetando los dos pasadores correspondientes a los dos
orificios en el equipo, luego asegure firmemente el tubo de aluminio.
4. Conexión del cepillo
inserte el cepillo en el tubo (Fig. 9), sosteniendo los dos pasadores correspondientes a los dos orificios en el
tubo, luego asegure firmemente el cepillo.
49
M17133_Livington_PrimeULTIMATE_Manual_Ab MP13687_20181123_BA.indd 49 23.11.18 10:11
Page 50

5. Piloto LED:
presione el BOTÓN DE ENCENDIDO / APAGADO para encender la aspiradora. El equipo comienza a aspirar, los
cuatro LED azules se encienden. Después de 7 - 8 minutos, se apaga la primera luz azul, después de 13 - 14
minutos, se apaga la segunda y después de 17 - 18 minutos, la tercera y cuarta. Limpie el filtro después de
cada uso. Luego vuelva a encender la aspiradora para que vuelva a funcionar correctamente.
6. Limpiar el recipiente colector de polvo incl. filtro HEPA:
Coloque la aspiradora sobre un cubo de basura, luego saque el colector de polvo del mango (Fig. 11) y vacíe
el polvo. Limpie el recipiente y vuelva a colocarlo inmediatamente. El sonido de „clic“ indica una correcta
colocación de la cubierta (Fig. 12-13). Gire el filtro HEPA en el sentido de las agujas del reloj para quitarlo y
limpiarlo, luego reinsértelo girando nuevamente en el sentido de las agujas del reloj.
7. Cepillo combinado 3 en 1
Este aparato está equipado con un cepillo combinado 3 en 1, que consta de una boquilla para juntas (a), un
cepillo para suelos (b) y un cepillo para muebles (c), ver Fig. 14. Pulsar el botón de desbloqueo (d) para extraer
el cabezal con el cepillo, así podrá utilizar la boquilla para limpiar grietas; Con el cepillo puede limpiar, p. ej.
Teclados y la parte posterior puede servir para limpiar muebles.
8. Articulación flexible:
Para desbloquear la articulación flexible (vea la figura en la página 4) apretar brevemente el botón de
desbloqueo y doblar ligeramente el tubo hacia delante. Ya está desbloqueado. Después de utilizar la aspiradora
volver a bloquearla.
MEDIDAS DE SEGURIDAD
1. Cuando la batería se encuentra en la estación de carga, la lámpara roja parpadea, indicando el proceso
de carga y la lámpara roja indica «completamente cargada».
2. Si el aparato no se utiliza durante un largo periodo de tiempo, la batería se va descargando, por lo que se
debe cargar cada seis meses una o dos veces.
Limpieza y mantenimiento
I. Limpieza del aparato:
1. Una vez sacado el cargador se deben realizar todas las operaciones de mantenimiento y reparación.
2. El recipiente colector de polvo debe limpiarse después de cada uso.
3. Si no va a utilizar el aparato, guárdelo en un lugar fresco y seco, protegido de la luz solar directa y
humedad.
4. Asegúrese que el aparato está desconectado de la corriente y ha sido pulsado el BOTÓN ENCENDER/
APAGAR; limpiar el aparato con un trapo húmedo (con agua o con detergente neutro), cuidando que el
agua o el detergente no penetre en el aparato para no dañarlo.
II. Limpiar el cepillo:
Limpieza de los cepillos inserte una moneda en el bloqueo del rodillo como se muestra en la Fig. 15, gírela en
el sentido de las agujas del reloj y destrabe; abra la placa protectora del rodillo (Fig. 16), retire el rodillo del
cepillo y elimine el cabello y la suciedad del rodillo. El cabello largo también se puede cortar con tijeras antes
de quitarlo. Luego, vuelva a colocar el cepillo y cierre el bloqueo del rodillo con una moneda.
Almacenamiento Del aparato
• Cuando no esté en uso, cuelgue el dispositivo en la estación de carga (Fig. 6).
• Cuelgue el cepillo de aspiración plano del gancho izquierdo del equipo, deslice el tubo de aspiración por
el gancho derecho y coloque el cepillo.
SOLUCIÓN DE PROBLEMAS
Obs.: Si ocurre cualquiera de los siguientes problemas apague inmediatamente el aparato
para prevenir dañarlo u otros daños.
50
M17133_Livington_PrimeULTIMATE_Manual_Ab MP13687_20181123_BA.indd 50 23.11.18 10:11
Page 51

Problema Causa posible Solución
No funciona
El poder de aspiración disminuye
Durante el funcionamiento
sale polvo
El cepillo no gira Primera lámpara parpadea
Batería baja Cargar la batería
Botón de encendido no pulsado Poner el botón en ENCENDIDO
Recipiente colector de polvo lleno Vaciar el recipiente colector de polvo
Orificio de aspiración obturado Eliminar la obturación
Filtro obturado Limpiar el filtro
Filtro de polvo sucio
DATOS TÉCNICOS
Categoría del
producto
Tensión nominal
Tensión del cargador
y parámetros
Batería Li-Ion 2200mAh Capacidad
Peso
Aspiradora cepillo
recargable
18,5V
Gama de tensión:
100-240V,
Frecuencia. 50/60Hz
Potencia de salida:
24V 500mA
2kg
Funcionamiento continuo
Parar el aparato y limpiar
el filtro
Limpiar el cepillo y volver a encender
el aparato
Tipo de producto
Potencia del motor
Nivel sonoro
MC-603-A
130W
≤72 dB
0,5 l
18 min
Al final de su vida útil, no elimine el producto a la basura doméstica. Llévelo a un punto de recogida de aparatos
eléctricos y electrónicos. Esta indicación es representada por un símbolo en el producto, en las instrucciones de
uso y en el embalaje.
Las baterías no pertenecen a la basura doméstica. Llévelos a un punto de recogida autorizado.
clase de protección II
Para uso en interiores solamente.
Este producto cumple con las directivas europeas.
51
M17133_Livington_PrimeULTIMATE_Manual_Ab MP13687_20181123_BA.indd 51 23.11.18 10:11
Page 52

PL
WSKAZÓWKI BEZPIECZEŃSTWA
I. Przed przystąpieniem do użytkowania produktu uważnie przeczytaj niniejszą
instrukcję.
II. Ściśle przestrzegaj niniejszej instrukcji, niewłaściwe postępowanie w
urządzeniem może prowadzić do obrażeń i uszkodzenia urządzenia.
Wskazówka ostrzegawcza:
Drobne części znajdujące się w tym opakowaniu nie mogą służyć jako zabawki,
plastikowe worki trzymać z dala od małych dzieci – niebezpieczeństwo uduszenia.
III. Zasilanie elektryczne:
1. Urządzenie zasilane jest prądem przemiennym 100-240 V.
2. Zasilanie urządzenia innym niż to napięcie jest zabronione.
3. W razie stwierdzenia uszkodzenia kabla zasilającego lub wtyczki, przerwać
użytkowanie produktu. W celu dokonania wymiany kabla zasilającego
zwró cić się do naszego działu obsługi klienta; chwytać za wtyczkę, nie
skręcać kabla zasilającego; upewnić się, czy ręce są suche, w przeciwnym
razie występuje niebezpieczeństwo porażenia prądem; wyłączyć urządzenie i
odłączyć kabel zasilający.
4. Podczas odłączania kabla zwrócić uwagę na suche ręce, w przeciwnym razie
może dojść do porażenia prądem; jeśli urządzenie nie będzie używane przez
dłuższy czas, wyłączyć je włącznikiem głównym i odłączyć kabel. Nie używać
innej mocy przyłączeniowej dla urządzenia.
IV. Akumulator:
1. Nie używać do ładowania żadnych innych ładowarek niż znajdująca się w
zestawie z urządzeniem. Niebezpieczeństwo uszkodzenia urządzenia.
2. Po pełnym naładowaniu odłączyć ładowarkę, w celu uniknięcia skrócenia
żywotności akumulatora i spadku jego wydajności.
3. Nie próbować rozbierać akumulatora na części pierwsze; nie wrzucać go
ognia, niebezpieczeństwo wybuchu.
4. Nie zwierać biegunów, zwracać uwagę na prawidłową polaryzację; nie ot wierać
obudowy; nie odkładać akumulatora w wilgotnym lub gorącym miejscu.
5. Nie używać do czyszczenia akumulatora takich substancji, jak benzen,
estry kwasu octowego i pozostałe rozpuszczalniki; przerwać pracę w razie
tąpienia nietypowej temperatury lub przecieku; nie wywierać nacisku na
wys
akumulator ani nie uderzać w niego, niebezpieczeństwo nagrzania i zapalenia.
V. Obszary zastosowania:
Produkt przeznaczony jest wyłącznie do użytku domowego i nie nadaje się do
użytku zewnętrznego ani komercyjnego; nie używać urządzenia na odzieży,
52
M17133_Livington_PrimeULTIMATE_Manual_Ab MP13687_20181123_BA.indd 52 23.11.18 10:11
Page 53

palcach, głowie lub włosach. Produkt jest urządzeniem elektronicznym; w celu
uniknięcia usterek, nie wystawiać urządzenia na działanie deszczu, wody lub
wilgoci (np. w łazience, pralni itp.). Nie wciągać urządzeniem cieczy. Nie używać
urządzenia w potencjalnie niebezpiecznym urządzeniu, np. w pobliżu instalacji
gazowych, zbiorników z olejem, chemikaliami i innymi łatwopalnymi substancjami;
nie używać urządzenia do wciągania popiołu, palących się papierosów lub zapałek
– niebezpieczeństwo pożaru.
Nie używać opisywanego produktu do usuwania łatwopalnych lub lotnych cieczy,
takich jak benzyna, nafta, farby, środki czyszczące, alkohol, perfumy, wykładziny,
czyściki itp. Nie używać opisywanego produktu do usuwania farby lub tonera w
drukarce laserowej lub kopiarce, aby uniknąć pożaru lub wybuchu.
VI. Pozostałe informacje:
Urządzenie może być użytkowane przez dzieci w wieku od 8 lat, a także przez
osoby o ograniczonej sprawności fizycznej, sensorycznej lub umysłowej bądź
niedostatecznym doświadczeniu i wiedzy, pod warunkiem, że osoby te będą
przebywały pod opieką lub też zostały poinstruowane w zakresie bezpiecznego
użytkowania urządzenia i orientują się w zagrożeniach związanych z użytkowaniem
urządzenia. Urządzenie nie może być używane przez dzieci do zabawy. Dzieci bez
nadzoru nie powinny zajmować się czyszczeniem ani konserwacją urządzenia.
INSTRUKCJA UŻYTKOWANIA
Mocowanie stacji ładującej: jeżeli stacja ładująca nie zostanie przymocowana do ściany, można umieścić ją na
podłożu.
1. Przytrzymaj stację ładującą w żądanej pozycji na ścianie i zaznacz ołówkiem otwory do wywiercenia (rys. 1
Wywierć trzy otwory za pomocą wiertarki elektrycznej z wiertłem o rozmiarze 6 mm.
2. Włóż kołki rozporowe pasujące do ściany (nie należą do zakresu dostawy) do otworów montażowych i
przymocuj stację ładującą do ściany za pomocą śrub (rys. 2).
3. Wsuń wsporniki rurek lub szczotek we wskazane wgłębienie, jak pokazano na rys. 7. Upewnij się, że dwa
dłuższe wsporniki są zamocowane u góry.
4. Włóż akumulator wymienny (nie należy do zakresu dostawy) do gniazda ładowania (rys. 3).
5. Włóż urządzenie do miejsca ładowania i zetknij baterię z prowadnicą styku ładowania (rys. 4).
6. Włóż wtyczkę adaptera w sposób pokazany na (rys. 5).
).
1. Podłączenie stacji ładującej: podłącz stację ładującą do sieci
2. Stacja ładująca: włóż akumulator wymienny (nie należy do zakresu dostawy) i urządzenie do stacji
ładującej – patrz rys. 5; czerwony wskaźnik ładowania zacznie migać. Gdy akumulator w odkurzaczu jest
w pełni naładowany, bateria wymienna zaczyna się ładować, a czerwona lampka w punkcie ładowania zaczyna
migać. Niebieskie słupki na wyświetlaczu odkurzacza pokazują aktualny stan naładowania. Gdy wszystkie
słupki zaświecą się na niebiesko, ładowanie dobiegło końca. Jeśli kontrolka ładowania zacznie świecić na
zielono po 5 godzinach, oznacza to, że oba akumulatory są w pełni naładowane.
Środki ostrożności dotyczące użytkowania
• Przed rozpoczęciem pięciogodzinnego ładowania użyć odkurzacza dwa razy; cel: pełna aktywacja
możliwości akumulatora.
• Jeśli napięcie akumulatora spadnie, pierwsza z czterech diod LED będzie migać, co oznacza, że wkrótce
konieczne będzie ponowne naładowanie akumulatora.
• Jeżeli urządzenie nie będzie używane przez dłuższy czas, wydajność akumulatora się zmniejszy; należy
ładować akumulator raz lub dwa razy w ciągu sześciu miesięcy.
53
M17133_Livington_PrimeULTIMATE_Manual_Ab MP13687_20181123_BA.indd 53 23.11.18 10:11
Page 54

3. Podłączenie rury:
włóż aluminiową rurkę do urządzenia (rys. 8), przytrzymując dwa kołki odpowiadające dwóm otworom na
urządzeniu, a następnie mocno przymocuj aluminiową rurkę.
4. Podłączenie szczotki:
włóż szczotkę do rury (rys. 9); przytrzymaj przy tym dwa kołki odpowiadające dwóm otworom w rurze, a
następnie mocno zamocuj szczotkę.
5. WSKAŹNIK DIODOWY:
naciśnij PRZYCISK WŁ./WYŁ., aby włączyć odkurzacz. Urządzenie zacznie ssać, cztery niebieskie diody LED
zaczną świecić; po upływie 7 do 8 minut pierwsza niebieska lampka gaśnie, po 13 do 14 minut druga i po 17 do
18 minut trzecia i czwarta. Wyczyść filtr po każdym użyciu. Następnie uruchom odkurzacz ponownie, aby znowu
działał prawidłowo.
6. Czyszczenie zbiornika na zanieczyszczenia wraz z filtrem HEPA:
umieść odkurzacz przy koszu na śmieci, a następnie wyciągnij pojemnik na pył, trzymając za uchwyt (rys. 11), i
wysyp kurz, wyczyść pojemnik i zamontuj go ponownie w urządzeniu; dźwięki kliknięcia oznaczają, że pojemnik
jest zatrzaśnięty (rys. 12–13). Przekręć w prawo, aby wyjąć filtr HEPA i go wyczyścić, a następnie włóż go
ponownie zgodnie z ruchem wskazówek zegara.
7. Szczotka 3-in-1:
Urządzenie zostało wyposażone w szczotkę 3-in-1, zawierającą w sobie końcówkę szczelinową (a), nasadkę
ze szczotką (b) i szczotkę do mebli (c) – zobacz Rys. 14. Nacisnąć element zwalniający (d), w celu wyjęcia
końcówki ze szczotką; pozostałą samą końcówką szczelinową można odkurzać trudno dostępne miejsca;
końcówką ze szczotką można odkurzać np. klawiatury komputerowe, natomiast jej odwrotna strona można
służyć do odkurzania mebli.
8. Przegub:
W celu odryglowania przegubu (patrz ilustracja na stronie 4) nacisnąć element zwalniający i zgiąć rurę lekko do
przodu. Blokada zwalnia się. Po użyciu ponownie zatrzasnąć blokadę.
ŚRODKI OSTROŻNOŚCI
1. Po umieszczeniu akumulatora w stacji ładowania miga czerwona lampka, wskazując na trwający proces
ładowania, zaświecenie się zielonej lampki oznacza „pełne naładowanie”.
2. W długo nieużywanym urządzeniu spada stopniowo stan naładowania akumulatora; co sześć miesięcy
naładować akumulator jeden lub dwa razy.
CZYSZCZENIE I KONSERWACJA
I. Czyszczenie urządzenia:
1. Wszystkie regularne prace związane z konserwacją i naprawą przeprowadzać po uprzednim odłączeniu
ładowarki.
2. Po każdym użyciu urządzenia wyczyścić zbiornik na zanieczyszczenia.
3. Nieużywane urządzenie przechowywać w chłodnym i suchym miejscu, zapewniającym ochronę przed
bezpośrednim działaniem promieni słonecznych lub wilgoci.
4. Upewnić się, że urządzenie zostało odłączone od zasilania elektrycznego i wyłączone WŁACZNIKIEM/
WYŁĄCZNIKIEM; wytrzeć wilgotną szmatką bawełnianą (zwilżyć wodą lub środkiem czyszczącym),
zwracając uwagę na to, by woda lub środek czyszczący nie przedostały się do środka urządzenia i nie
spowodowały uszkodzeń.
II. Czyszczenie szczotki:
Czyszczenie szczotką: włóż monetę do blokady rolki, jak pokazano na rys. 15, obróć w prawo i odblokuj, otwórz
pokrywę rolki (rys. 16), wyjmij rolkę szczotki i usuń włosy oraz brud z rolki.
Długie włosy można również rozciąć nożyczkami przed usunięciem. Następnie włóż szczotkę ponownie i
zamknij blokadę rolki, używając monety.
PRZECHOWYWANIE URZĄDZENIA
• Gdy urządzenie nie jest używane, zawieś urządzenie w stacji ładującej (rys. 6).
• Zawieś płaską szczotkę ssącą na lewym haczyku urządzenia, wsuń rurę ssącą na prawy haczyk i wetknij
szczotkę.
54
M17133_Livington_PrimeULTIMATE_Manual_Ab MP13687_20181123_BA.indd 54 23.11.18 10:11
Page 55

USUWANIE BŁĘDÓW
Uwaga: Po stwierdzeniu któregoś z poniższych problemów, jak najszybciej wyłączyć urządzenie, w celu
zapewnia ochrony przed jego uszkodzeniem i doprowadzeniem do poważniejszych szkód.
Błąd Możliwa przyczyna Rozwiązanie
Urządzenie nie pracuje
Spada moc ssania
W czasie pracy z urządzenia wydmuchiwany jest kurz
Szczotka nie obraca się Miga pierwsza lampka
Słaby akumulator Naładować akumulator
Przycisk nie został naciśnięty Ustawić włącznik na WŁ.
Zapełniony zbiornik na zanieczysz
czenia
Zatkany otwór zasysający Usunąć zator
Zatkany filtr Wyczyścić filtr
Zanieczyszczony filtr przeciwpyłkowy Wyłączyć urządzenie i wyczyścić filtr
Opróżnić zbiornik na zanieczyszczenia
Wyczyścić szczotkę i włączyć ponownie urządzenie
DANE TECHNICZNE PRODUKTU
Kategoria produktu
Napięcie nominalne
Napięcie i parametry
ładowarki
Akumulator
Waga
Odkurzacz akumulatoro-
wy DC
18,5V
Obwód zasilania:
100-240V,
Częstotliwość:
50/60Hz
Moc wyjściowa:
24V 500mA
Li-Ion 2200mAh
2 kg
Typ produktu
Moc silnika
Poziom hałasu
Pojemność
Praca ciągła
MC-603-A
130W
≤72 dB
0,5 l
18 min
Zużytego produktu nie usuwać ze zwykłymi odpadami domowymi. Przewieźć do miejsca recyklingu urządzeń
elektrycznych i elektronicznych. Mówi o tym symbol na produkcie, instrukcji obsługi i na opakowaniu. Proszę
zasięgnąć informacji o miejscach zbiórki odpadów, prowadzonych przez Państwa sprzedającego lub lokalne
władze samorządowe. Przetwarzanie surowców wtórnych i recykling zużytych urządzeń jest ważnym wkładem w
ochronę środowiska.
Baterie nie należą do odpadów domowych. Zabierz je do autoryzowanego punktu zbiórki.
Stopień ochrony II
Wyłącznie do stosowania w pomieszczeniach.
Niniejszy produkt odpowiada wytycznym europejskim.
55
M17133_Livington_PrimeULTIMATE_Manual_Ab MP13687_20181123_BA.indd 55 23.11.18 10:11
Page 56

Hergestellt in China | Made in China | Fabriqué en Chine | Fabbricato in Cina | Made in China |
Származási hely: Kína | Vyrobeno v Číně | Vyrobené v Číne | Tara de provenienta: China |
Wyprodukowano w Chinach | Çin malıdır | Fabricado en China
Importeur | Importer | Importateur | Importatore | Importeur | Importőr | Dovozce | Dodávateľ |
Importator | Importer | İthalatçı | Importador:
CH: MediaShop AG | Industriering 3 | 9491 Ruggell | Liechtenstein
EU: MediaShop GmbH | Schwarzottstraße 2a | 2620 Neunkirchen | Austria
TR: Mediashop Dayanıklı Tüketim Malları Pazarlama A.S. | Bayer Cd. Gülbahar Sk. | Perdemsac Plaza No:17/43 |
Kozyatağı | İstanbul | info.tr@mediashop-group.com
office@mediashop-group.com | www.mediashop.tv
DE | AT | CH: 0800 37 6 36 06 – kostenlose Servicehotline
ROW: +423 388 18 00
M17133
Stand: 11/2018
M17133_Livington_PrimeULTIMATE_Manual_Ab MP13687_20181123_BA.indd 56 23.11.18 10:11
 Loading...