

Mediashop Livington Prime operation manual

Betriebsanleitung
PRIME
3-in-1 AKKU-Staubsauger
Boden-, Hand- & Auto-Staubsauger in Einem
Bedienungsanleitung . . . . . 8
User manual . . . . . . . . . 12
Mode d‘emploi . . . . . . . . 16
Istruzioni per l’uso . . . . . . 20
Gebruiksaanwijzing . . . . . 24
Návod k obsluze . . . . . . . 28
Návod na použitie . . . . . . 32
mit Knickgelenk
Instruction Manual | Mode d‘emploi | Istruzioni per l‘uso |
Gebruikshandleiding | Használati utasítás | Návod na obsluhu |
Návod k použití | Instrucţiuni de utilizare | Kullanım kılavuzu |
Instrucciones de uso | Instrukcja eksploatacji
Instrucţiuni de utilizare . . . 36
Használati utasítás . . . . . . 40
Kullanma Kılavuzu . . . . . . 44
Instrukcja obsługi . . . . . . 48
Instrucciones de uso. . . . . 52
BITTE DIESE ANLEITUNG VOR GEBRAUCH GENAU DURCHLESEN UND
FÜR SPÄTERES NACHSCHLAGEN AUFBEWAHREN
www.mediashop.tv

DE: LESEN SIE DIE GESAMTE GEBRAUCHSANWEISUNG, BEVOR SIE MIT DEM
AUFBAU BEGINNEN UND DAS GERÄT IN BETRIEB NEHMEN.
EN: PLEASE READ THIS MANUAL THOROUGHLY PRIOR TO USE AND KEEP IT
FOR FUTURE REFERENCE
FR: VEUILLEZ LIRE ATTENTIVEMENT CE MODE D’EMPLOI AVANT D’UTILISER
L’APPAREIL ET LE CONSERVER POUR LE CONSULTER ULTÉRIEUREMENT
IT: SI PREGA DI LEGGERE ATTENTAMENTE QUESTE ISTRUZIONI PER L’USO
PRIMA DI UTILIZZARE L’APPARECCHIO E DI CONSERVARLE IN UN LUOGO
SICURO PER POTERLE SEMPRE REPERIRE IN UN SECONDO MOMENTO
NL: DEZE HANDLEIDING VÓÓR GEBRUIK ZORGVULDIG DOORLEZEN EN
BEWAREN OM OOK LATER NOG IETS OP TE KUNNEN ZOEKEN
HU: KÉRJÜK, HOGY A KÉSZÜLÉK HASZNLATA ELŐTT OLVASSA EL FIGYELMESEN
A JELEN HASZNÁLATI UTASÍTÁST ÉS ŐRIZZE MEG KÉSŐBBI FELHASZNÁLÁSRA
SK: PRED POUŽÍM SI POZORNE PREČÍTAJTE TENTO NÁVOD AUSCHOVAJTE HO
K NAHLIADNUTIU
CZ: TENTO NÁVOD K POUŽITÍ SI PŘED POUŽITÍM PEČLIVĚ PROSTUDUJTE A
ULOŽTE SI JEJ K POZDĚJŠÍMU NAHLÉDNUTÍ
RO: VĂ RUGĂM CA ÎNAINTE DE UTILIZARE SĂ CITIŢI ACESTE INSTRUCŢIUNI ŞI
SĂ LE PĂSTRAŢI PENTRU CONSULTARE ULTERIOARĂ
TR: LÜTFEN KULLANMADAN ÖNCE BU KILAVUZU DİKKATLİCE OKUYUN VE
DAHA SONRA BAŞVURMAK İÇİN SAKLAYIN
ESP: ANTES DE UTILIZAR EL APARATO LEER ATENTAMENTE ESTAS
INSTRUCCIONES DE USO Y GUARDARLAS PARA FUTURAS CONSULTAS.
PL: PRZED PRZYSTĄPIENIEM DO UŻYTKOWANIA PRODUKTU UWAŻNIE
PRZECZYTAJ NINIEJSZĄ INSTRUKCJĘ I PRZECHOWAJ JĄ DO PÓŹNIEJSZEGO
WYKORZYSTANIA
2

Bezeichnung der Produktteile und schematische Darstellung
Description of product parts and diagrammatical presentation | Désignation des pièces et illustration schématique
delle parti del prodotto e rappresentazione schematica
leírása és vázlatos ábrázolása l Označenie častí produktu aschematické znázornenie l Názvy dílů výrobku a schématické zobrazení
Denumirea pieselor produsului şi reprezentarea schematică
componentes y representación gráfica | Opis części i widok schematyczny
l
Namen van de onderdelen en schematekening
l
Ürün parçalarının açıklaması ve şematik görünüm
l
l
A termék részegységeinek
Denominazione
l
Denominación de los
l
7
8
DE
1. LED-ANZEIGE
2. EIN-/AUSTASTE
3. AKKU
4. STAUBFANGBEHÄLTER
5. ENTRIEGLER
6. SAUGROHR
VERRIEGELUNG
7. LUFTFILTERABDECKUNG
8. ABLUFTFILTER
EN
1. LED-DISPLAY
2. ON/OFF BUTTONS
3. RECHARGEABLE BATTERY
4. DUST COLLECTION
CONTAINER
5. LOCKING MECHANISM
6. INTERLOCKING SUCTION
TUBE
7. AIR FILTER COVER
8. EXHAUST AIR FILTER
FR
1. LAMPES A LED
2. BOUTON MARCHE / ARRET
3. ACCU
4. BAC A POUSSIÈRE
5. DÉVERROUILLAGE
6. VERROUILLAGE DU TUBE
D’ASPIRATION
7. RECOUVREMENT DU FILTRE
A AIR
8. FILTRES DE SORTIE D‘AIR
1
2
6
IT
1. INDICATORE A LED
2. TASTO ON/OFF
3. BATTERIA
4. SERBATOIO DI
RACCOGLIMENTO DELLA
POLVERE
5. SBLOCCO
6. SBLOCCO DEL TUBO
ASPIRANTE
7. COPERCHIO DEL FILTRO
DELL’ARIA
8. FILTRO DI SCARICO
NL
1. LED-INDICATIELAMPJE
2. AN/UIT-KNOP
3. ACCU
4. STOFRESERVOIR
5. ONTGRENDELING
6. ZUIGBUISVERGRENDELING
7. LUCHTFILTERAFDEKKING
8. UITLAATFILTER
HU
1. LED-KIJELZŐ
2. BE-/KIKAPCSOLÓ
3. AKKU
4. PORTÁROLÓ
5. NYITÓ RETESZ
6. SZÍVÓCSŐ ZÁRÓRETESZ
7. LÉGSZŰRŐ FEDÉL
8. KIMENETI LEVEGŐSZŰRŐ
SK
1. LED-DISPLEJ
2. TLAČIDLO ZAP./VYP.
3. BATÉRIA
4. NÁDOBA NA
ZACHYTÁVANIE PRACHU
5. BLOKOVAČ
6. BLOKOVANIE SACEJ
TRUBICE
7. KRYT VZDUCHOVÉHO
FILTRA
8. VÝSTUPNÝ FILTER
CZ
1. KONTROLKA LED
2. TLAČÍTKO ZAP/VYP
3. AKUMULÁTOR
4. NÁDOBA K ZÁCHYTU
PRACHU
5. ODBLOKOVACÍ PRVEK
6. BLOKOVÁNÍ SACÍ TRUBKY
7. KRYT VZDUCHOVÉHO
FILTRU
8. VÝSTUPNÍ FILTR
RO
1. AFIŞAJ LED
2. BUTON PORNIRE/OPRIRE
3. ACUMULATOR
4. REZERVOR DE PRAF
5. DESCHIZĂTOR
6. ÎNCHIZĂTOR CONDUCTĂ
ABSORBŢIE
7. CAPAC DE FILTRU AER
8. FILTRU DE EVACUARE
3
5
4
TR
1. LED GÖSTERGESİ
2. AÇMA KAPAMA TUŞU
3. AKÜ
4. TOZ SAKLAMA KABI
5. KİLİT AÇICI
6. EMME BORUSU KİLİDİ
7. HAVA FİLTRESİ KAPAĞI
8. HAVA ÇIKIŞ FILTRESI
1. ILOTO LED
2. BOTÓN ENCENDER/
APAGAR
3. BATERÍA
4. RECIPIENTE COLECTOR DE
POLVO
5. BOTÓN DESBLOQUEO
6. BLOQUEO TUBO
ASPIRACIÓN
7. TAPA FILTRO DE POLVO
8. FILTROS DE ESCAPE
1. WSKAŹNIK DIODOWY
2. WŁĄCZNIK/WYŁĄCZNIK
3. AKUMULATOR
4. ZBIORNIK NA
NIECZYSTOŚCI
5. ELEMENT ZWALNIAJĄCY
6. BLOKADA RURY SSĄCEJ
7. OSŁONA FILTRA
POWIETRZA
8. FILTR WYLOTOWY
3

Zubehör und schematische Darstellung
Accessories and diagrammatical presentation
Accessori e rappresentazione schematica
l
produktu aschematické znázornenie
şematik görünüm | Accesorios y representación gráfica | Akcesoria i widok schematyczny
l
Accessoires et illustration schématique
l
Toebehoren en schematekening l Tartozékok vázlatos ábrázolása l Označenie častí
l
Příslušenství a schématické zobrazení
l
lAccesorii şi diagrama schematică l
2
3
Accessori e rappresentazione schematica
Aksesuar ve
1
4
6
7
8
5
9
4

DE
1. BÜRSTENVERRIEGELUNG
2. KNICKGELENK
3. TURBOBÜRSTE
4. FIXIERHAKEN für Ladestation
5. ROLLBÜRSTE
6. ROLLBÜRSTENENTRIEGLER
7. 3IN1KOMBIBÜRSTE
8. LADESTATION
9. FIXIERÖSE für Rollbürste
EN
1. INTERCONNECTING BRUSHES
2. ARTICULATED CONNECTIONS
3. TURBO BRUSH
4. FIXING CLAMPS for the Charging
Station
5. ROLLER BRUSH
6. ROLLER BRUSH LOCKING
MECHANISM
7. 3-IN-1- COMBINATION BRUSH
8. CHARGING STATION
9. FIXING LOOPS FOR ROLLER BRUSH
FR
1. VERROUILLAGE DES BROSSES
2. ARTICULATION
3. BROSSE TURBO
4. CROCHET DE FIXATION
pour station de charge
5. BROSSE A ROULETTES
6. DÉVERROUILLAGE BROSSE A
ROULETTES
7. BROSSE COMBINÉE 3 EN 1
8. STATION DE CHARGE
9. ŒILLET DE FIXATION
pour brosse à roulettes
IT
1. DISPOSITIVO DI BLOCCO DELLA
SPAZZOLA
2. ARTICOLAZIONE A SNODO
3. TURBOSPAZZOLA
4. GANCIO DI FISSAGGIO per stazione
di carica
5. SPAZZOLA ROTANTE
6. DISPOSITIVO DI SBLOCCO DELLA
SPAZZOLA ROTANTE
7. SPAZZOLA COMBI 3-IN-1
8. STAZIONE DI CARICA
9. OCCHIELLO DI FISSAGGIO per la
spazzola rotante
NL
1. BORSTELVERGRENDELING
2. KNIKGEWRICHT
3. TURBOBORSTEL
4. VASTZETHAAK voor oplaadstation
5. ROLBORSTEL
6. ROLBORSTELONTGRENDELING
7. 3-IN-1-COMBIBORSTEL
8. OPLAADSTATION
9. VASTKLIKUITSPARING voor rolborstel
HU
1. KEFE ZÁRÓRETESZ
2. BEPATTINTHATÓ CSUKLÓS CSATLAKOZÓ
3. TURBÓ KEFE
4. RÖGZÍTŐ KAMPÓ a töltőhöz
5. KÖRKEFE
6. KÖRKEFE NYITÓ RETESZ
7. 3-AZ-1-BEN TÖBB FUNKCIÓS KEFE
8. TÖLTŐ
9. RÖGZÍTŐ GYŰRŰ A körkeféhez
SK
1. LED-DISPLEJ
2. TLAČIDLO ZAP./VYP.
3. BATÉRIA
4. NÁDOBA NA ZACHYTÁVANIE
PRACHU
5. BLOKOVAČ
6. BLOKOVANIE SACEJ TRUBICE
7. KRYT VZDUCHOVÉHO FILTRA
8. VZDUCHOVÝ FILTER
CZ
1. BLOKOVÁNÍ KARTÁČŮ
2. OHEBNÝ KLOUB
3. TURBOKARTÁČ
4. FIXAČNÍ hák pro nabíjecí stanici
5. OTÁČIVÝ KARTÁČ
6. PRVEK K ODBLOKOVÁNÍ OTÁČIVÉHO
KARTÁČE
7. KOMBINOVANÝ KARTÁČ 3 V 1
8. NABÍJECÍ STANICE
9. FIXAČNÍ OKO pro otáčivý kartáč
RO
1. ÎNCHIZĂTOR PERII
2. ARTICULAŢIE FLEXIBILĂ
3. PERIE TURBO
4. CÂRLIG DE FIXARE pentru staţia de
încărcare
5. PERIE CU ROLE
6. ÎNCHIZĂTOR PERIE CU ROLE
7. PERIE COMBI 3-ÎN-1
8. STAŢIE DE ÎNCĂRCARE
9. INEL De Fixare pentru peria cu role
TR
1. FIRÇA KİLİDİ
2. BÜKÜLEBİLİR EKLEM
3. TURBO FIRÇA
4. Yükleme istasyonu için SABİTLEME
HALKASI
5. DÖNER FIRÇA
6. DÖNER FIRÇA KİLİT AÇICI
7. 3‘Ü 1 ARADA ÇOK FONKSİYONLU
FIRÇA
8. YÜKLEME İSTASYONU
9. Döner fırça için SABİTLEME GÖZÜ
1. BLOQUEO CEPILLOS
2. ARTICULACIÓN
3. TURBO-CEPILLO
4. GANCHOS DE FIJACIÓN para la
estación de carga
5. CEPILLO GIRATORIO
6. BOTÓN DESBLOQUEO CEPILLO
GIRATORIO
7. CEPILLO COMBINADO 3 EN 1
8. ESTACIÓN DE CARGA
9. OJAL DE FIJACIÓN para el cepillo
giratorio
1. BLOKADA SZCZOTKI
2. PRZEGUB
3. TURBOSZCZOTKA
4. HACZYK USTALAJĄCY do stacji
ładowania
5. SZCZOTKA Z ROLKĄ
6. ELEMENT ZWALNIAJĄCY SZCZOTKĘ
Z ROLKĄ
7. SZCZOTKA 3-IN-1
8. STACJA ŁADOWANIA
9. ZACZEP USTALAJĄCY szczotki z rolką
5
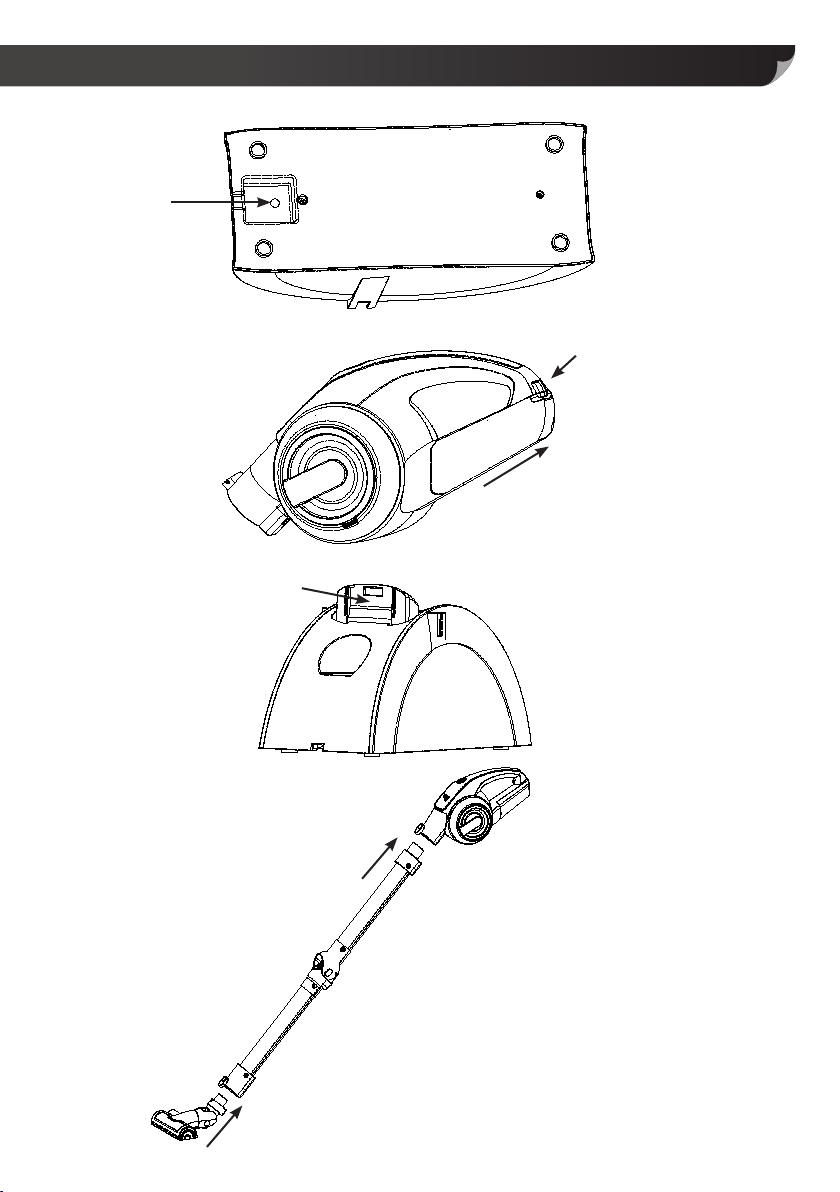
Abb. 16
Abb. 17
Abb. 18
Abb. 19
Abb. 20
6
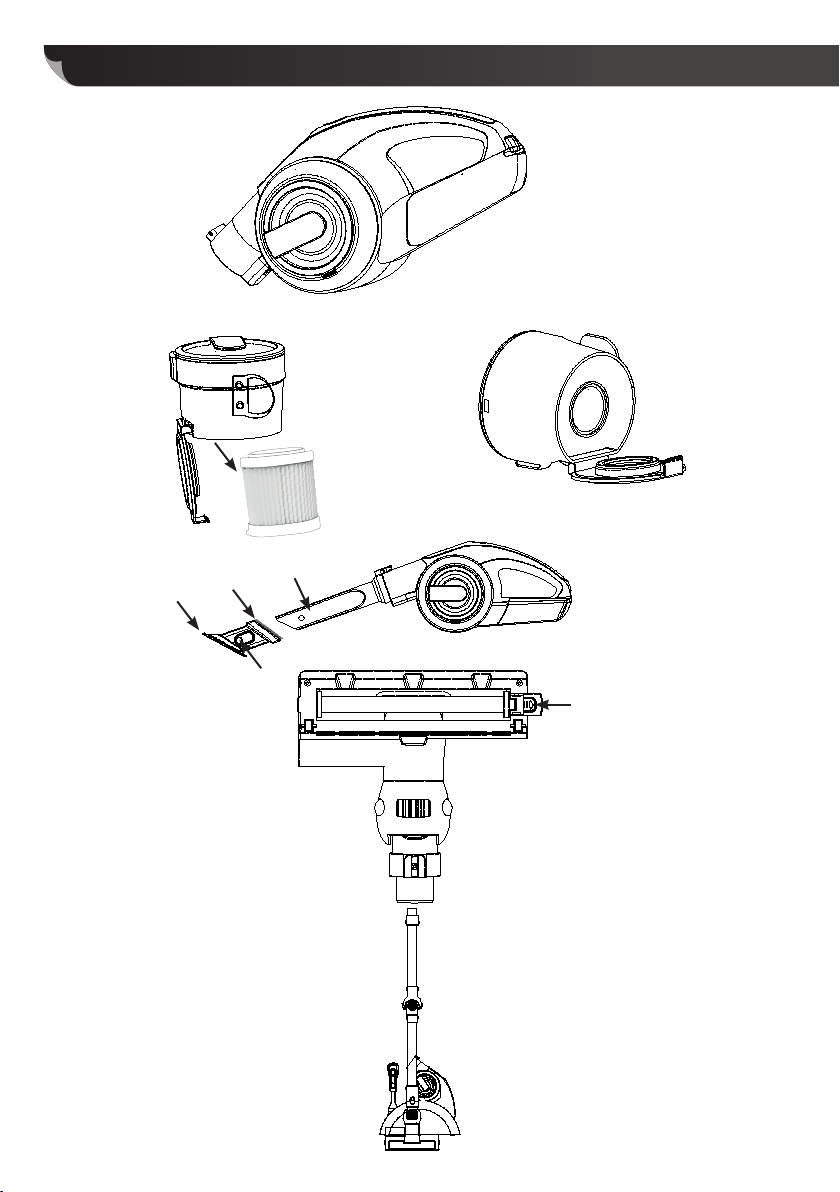
Abb. 21
Abb. 22
Abb. 23
Abb. 24
Abb. 25
b
c
a
d
7

DE
GEBRAUCHSANLEITUNG
1. Ladestation anschließen:
Ladestation ans Stromnetz anstecken - siehe Abb. 16.
2. Akku:
Akku-Entriegelungsknopf betätigen, dann Akku entnehmen - siehe Abb. 17.
3. Ladestation:
Akku in die Ladestation stecken – siehe Abb. 18; die rote Ladeanzeige beginnt zu blinken und
5 Stunden später weist das grüne Licht darauf hin, dass der Akku voll aufgeladen und normal
betriebsbereit ist.
4. Rohr anschließen:
Aluminiumrohr ins Gerät stecken – siehe Abb. 19 - und fixieren.
5. Bürste anschließen:
Die Bürste ins Rohr stecken - siehe Abb. 20 - und fixieren.
6. LED-Anzeige:
EIN-/AUS-TASTE zum Einschalten des Staubsaugers betätigen, das Gerät wird gestartet,
die LED-Anzeige leuchtet auf. Leuchten alle Lichter nicht mehr, ist der Akku leer und das
Gerät hält an. Bitte den Akku entnehmen und in die Ladestation stecken – siehe Abb. 18 und
vollständig aufladen (ca. 5 Std.); Setzt die Bürste 3 Sekunden aus, leuchtet das erste Licht
auf und weist darauf hin, dass die Borsten gereinigt werden müssen (siehe Reinigung und
Wartung II.);
7. Reinigen des Staubfangbehälter inkl. HEPA-Filter:
1. Ziehen Sie den Staubbehälter aus seiner Halterung: halten Sie dazu die weiße Lasche in
der Mitte mit zwei Fingern fest und ziehen Sie den Behälter heraus (Abb. 21)
2. Öffnen Sie den Staubbehälter über einem Mülleimer, indem Sie die Klappe unter dem
Staubbehälter entriegeln, um den Staub zu entleeren (Abb. 22)
3. Zur Reinigung des Filters drehen Sie diesen gegen den Uhrzeigersinn und bürsten ihn ab,
dann bringen Sie ihn erneut durch Drehen im Uhrzeigersinn im Staubbehälter an.
4. Setzen Sie den Staubbehälter nach der Reinigung wieder ein, indem Sie diesen mit festem
Druck direkt in das Gerät schieben.
8. 3-in-1-Kombibürste:
Dieses Gerät ist mit einer 3-in-1-Kombibürste ausgestattet, dazu gehört die Fugendüse (a), die Bürstenaufsatz (b) und die Möbelbürste (c) - siehe Abb. 23. Den Entriegler (d)
betätigen, um den Bürstenkopf abzunehmen; die Düse lässt sich dann zum Reinigen von
Ritzen verwenden; der Bürstenaufsatz lässt sich zB. für Computertasterturen verwenden und
die Rückseite kann als Möbelbürste verwendet werden.
9. Knickgelenk:
Um das Knickgelenk zu entriegeln (Abb.2), kurz auf den Entriegler drücken und das Rohr
leicht nach vorne knicken. Sperre ist gelöst. Nach Gebrauch Sperre wieder einrasten lassen.
8

DE
VORSICHTSMASSNAHMEN
5. Ist der Akku in der Ladestation eingelegt, blinkt das rote Licht und zeigt den Ladevorgang
an, das grüne Licht bedeutet „voll geladen“.
6. Wird das Gerät längere Zeit nicht verwendet, sinkt der Ladezustand des Akkus ab; bitte
den Akku alle sechs Monate ein- bis zweimal aufladen.
REINIGUNG UND WARTUNG
I. Reinigung des Geräts:
1) Alle routinemäßigen Wartungs- und Reparaturarbeiten sind nach Ausstecken
des Ladegeräts durchzuführen.
2) Nach jeder Anwendung ist der Staubfangbehälter zu reinigen.
3) Bei Nichtgebrauch das Gerät an einem kühlen und trockenen Ort abstellen,
nicht direkter Sonnenbestrahlung oder Feuchtigkeit aussetzen.
4) Sichergehen, dass das Gerät von der Stromzufuhr getrennt und die EIN-/AUS-TASTE
ausgeschaltet ist; mit einem feuchten Baumwolltuch abwischen (mit Wasser oder
einem neutralen Reiniger), ohne dass Wasser oder Reiniger eindringen und Schaden
verursachen.
II. Reinigung der Bürste:
Entriegler in Pfeilrichtung schieben und Bürste nach oben entnehmen. Siehe Abb. 24.
LAGERUNG DES GERÄTS
Bei Nichtgebrauch das Gerät wie in Abb. 25 mit dem 3-in-1-Kombibürste und der Bürste in
die Ladestation hängen.
FEHLERBEHEBUNG
Anm.: Nehmen Sie eines der folgenden Probleme wahr, schalten Sie das Gerät bitte sofort
aus, um es nicht zu beschädigen und weitere Schäden zu verhindern.
Fehler Mögliche Ursache Lösung
Läuft nicht mehr
Saugkraft lässt nach
Staub tritt während des
Betriebs aus
Bürste rotiert nicht Erstes Licht blinkt
Akku schwach Akku aufladen
Schalter nicht betätigt Schalter auf EIN stellen
Staubfangbehälter ist voll Staubfangbehälter ausleeren
Ansaugöffnung verstopft Verstopfung entfernen
Filter verstopft Filter säubern
Abluftfilter verschmutzt
Gerät ausschalten und Filter
reinigen
Bürste reinigen und Gerät
wieder einschalten
9

DE
SICHERHEITSHINWEISE
I. Bitte diese Anleitung vor Gebra uch genau durchlesen.
II. Bitte beachten Sie diese Anleitung genau, nicht gemäßes Handeln kann zu
Verletzungen führen und das Gerät beschädigen.
Warnhinweis:
Kleinteile in dieser Box dürfen nicht als Spielzeug verwendet werden,
Kunststoffbeutel stets von Babys und Kindern fernhalten – Erstickungsgefahr.
III. Stromversorgung:
1) Dieses Gerät arbeitet mit 100-240V-Wechselstrom.
2) Bitte keine andere Anschlussleistung für dieses Gerät verwenden.
3) Erweist sich das Stromkabel oder der Stecker als beschädigt, bitte dieses
Produkt nicht mehr verwenden. Wenden Sie sich zum Austauschen des
Stromkabels an unseren Kundendienst; den Stecker festhalten, das Stromkabel
nicht verdrehen; beim Anstecken auf trockene Hände achten, sonst besteht
Stromschlaggefahr; bitte abschalten und das Stromkabel herausziehen.
IV. Akku:
1) Zum Laden kein anderes Ladegerät verwenden, sonst könnte das Gerät
beschädigt werden.
2) Bitte das Ladegerät nach vollem Aufladen herausziehen, um eine verkürzte
Lebensdauer des Akkus und Leistungsabfall zu vermeiden.
3) Den Akku keinesfalls auseinandernehmen; keinesfalls ins Feuer werfen,
Explosionsgefahr.
4) Die Pole nicht kurzschließen oder vertauschen; das Gehäuse nicht öffnen;
den Akku an keinem feuchten oder heißen Ort lagern.
5) Keinesfalls Benzol, Essigsäure und andere Lösungsmittel zum Reinigen des
Akkus verwenden; bei abnormer Temperatur oder Leckage sofort aufhören;
nicht auf den Akku drücken oder schlagen, sonst könnte er heiß werden und
Feuer fangen.
V. Einsatzbereiche:
Dieses Produkt ist nur zum Hausgebrauch geeignet und darf nicht im
Freien oder gewerblich eingesetzt werden; nicht zulässig ist die Verwendung an
Bekleidung, Fingern, Kopf oder Haar. Es handelt sich um ein elektronisches Gerät;
um Störungen des Geräts zu vermeiden, das Gerät nicht Regen, Wasser oder
Feuchtigkeit aussetzen (z.B. Badezimmer, Waschküche usw.).
Keinesfalls Flüssigkeiten einsaugen. Das Gerät nicht in potentiell gefährlicher
10
DE
Umgebung verwenden, z.B. nahe Gasanlagen, Öltanks, Chemikalien und sonstigen
entzündlichen und explosiven Stoffen; dieses Gerät nicht zum Aufnehmen von
Asche, brennenden Zigaretten oder Zündhölzern verwenden – Feuergefa hr.
VI. Sonstiges:
Dieses Gerät kann von Kindern ab 8 Jahren und darüber, sowie von
Personen mit verringerten physischen, sensorischen oder mentalen
Fähigkeiten oder Mangel an Erfahrung und Wissen benutzt werden,
wenn sie beaufsichtigt oder bezüglich des sicheren Gebrauchs des
Gerätes unterwiesen wurden und die daraus resultierenden Gefahren
verstehen. Kinder dürfen nicht mit dem Gerät spielen. Reinigung und
Benutzerwartung dürfen nicht von Kindern ohne Beaufsichtigung
durchgeführt werden.
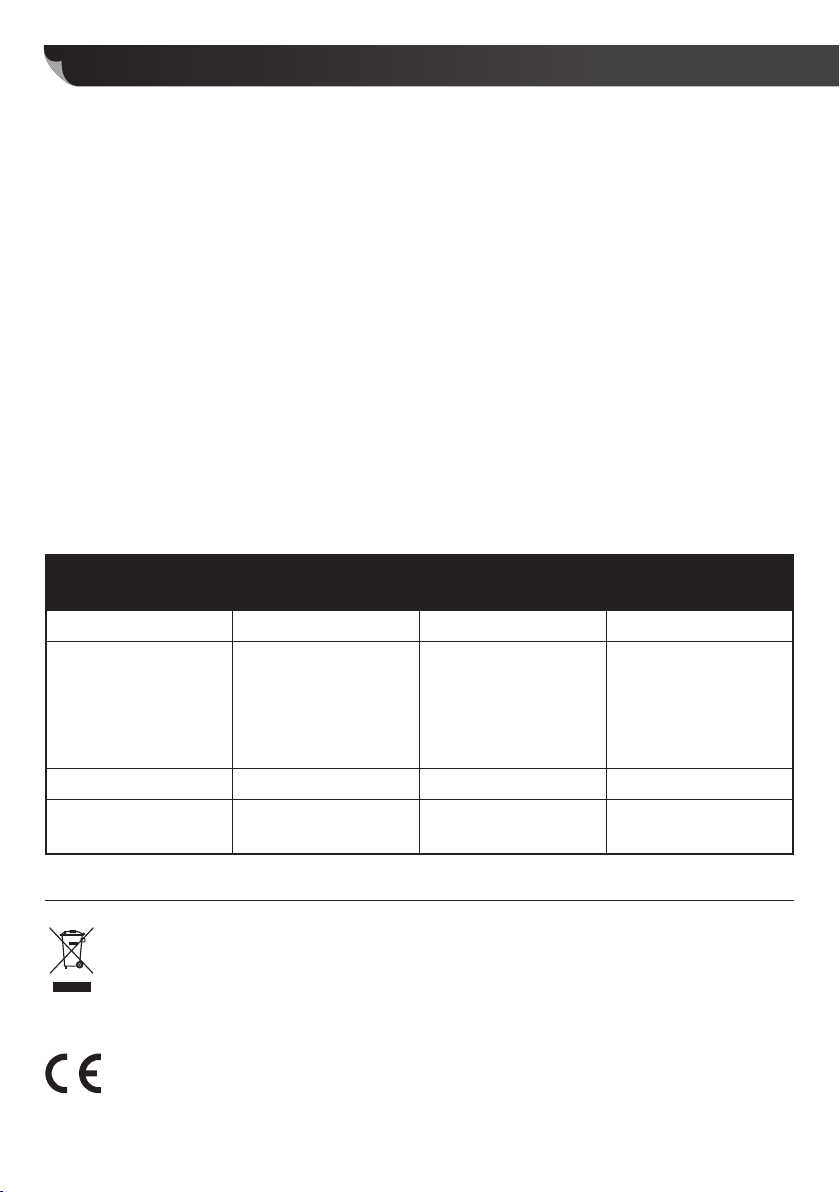
TECHNISCHE PRODUKTDATEN
Produktkategorie
Nennspannung 14,8V Motorleistung 100W
Ladegerät Spannung
& Parameter
Akku Li-Ion 2150mAh Fassungsvermögen 0,5 l
Gewicht 2,3 kg Dauerbetrieb 18 min
Aufladbarer
DC-Staubsauger
Eingabekreis:
100-240V,
Frequenz: 50/60 HZ
Ausgangsleistung:
18V 500mA
Produkt Type MC-603
Schallpegel ≤72 dB
Entsorgung und Umweltschutzbestimmungen
Entsorgen Sie das Produkt am Ende seiner Lebensdauer desshalb nicht mit dem normalen Hausmüll. Bringen Sie es zu
einer Sammelstelle zum Recycling von elektrischen und elektronischen Geräten. Dies wird durch dieses Symbol
auf dem Produkt, in der Bedienungsanleitung und auf der Verpackung angegeben. Informieren Sie sich über
Sammelstellen, die von Ihrem Händler oder der lokalen Behörde betrieben werden. Die Wiederverwertung und das
Recycling von Altgeräten ist ein wichtiger Beitrag zum Schutz unserer Umwelt.
Dieses Produkt entspricht den Europäischen Richtlinien.
11

EN
EN
USER MANUAL
1. Connecting the Charging Station:
Plug the charging station into the mains power supply – see figure 16.
2. Rechargeable Battery:
Check battery’s release knob, then remove it – see figure 17.
3. Charging Station
Plug the battery into the charging station – see figure 18; the red charging indicator will begin to
flicker and 5 hours later the green light will indicate that the battery is fully charged and ready for
normal operation.
4. Tube Connection:
Insert the aluminium tube into the appliance – see figure 19 – and secure.
5. Brush Connection:
Connect the brush to the tube – see figure 20 – and secure.
6. LED-Display:
Press the ON/OFF button to switch the vacuum cleaner on; the appliance will start and the LED
display will illuminate. Should all lights cease to illuminate, the battery is flat and the appliance will
come to a stop. Please remove the battery and place it in the charging station – see figure 18 and
charge it fully (approximately 5 hours); if the brush pauses for 3 seconds, the first light will light up
to indicate that the bristles require cleaning (see cleaning and maintenance II.);
7. Cleaning of the Dust Collection Container, including HEPA-Filter:
1. Pull the dust container out of its holder: Hold the white tab in the middle in place with two
fingers and pull the container out (illustration 21).
2. Open the dust container over a dustbin, by unlocking the flap underneath the dust container, in
order to empty the dust out (illustration 22).
3. To clean the filter turn it in an anti-clockwise direction and brush it off, then reattach it to the
dust container by turning it in a clockwise direction.
4. After cleaning, reinsert the dust container by sliding it directly into the appliance with a firm
push.
8. 3-in-1 Combination Brush:
This appliance is equipped with a 3-in1-combination brush, consisting of a grout nozzle for narrow
gaps (a), brush attachments (b) and the furniture brush (c) – see figure 23. press the locking
mechanism to remove the brushes head; the nozzle can be used for cleaning narrow gaps; brush
attachments can be used for the cleaning of, for example, computer keyboards and the rear-side
can be used as a furniture brush.
9. Flexible tubing:
In order to to release the flexible tubing (diagram 2), press briefly on the release knob and gently
bend the tube forwards. The lock is then detached. Following use, let the lock click back into place.
12
EN
EN
PRECAUTIONARY MEASURES
1. When the battery is inserted in the charging station, the red light flickers and shows
the charging process, ending with the green light, which means „fully-charged“.
2. If the appliance is not in use for a long period of time, the charge level of the battery
will decrease; please recharge the battery, once or twice, every six months.
CLEANING AND MAINTENANCE
1. Cleaning the Appliance:
1) All routine maintenance and repair tasks should be carried out following display of
a charged appliance.
2) Following every period of use the dust collection container should be cleaned.
3) When not in use, the appliance should be kept in a cool and dry place, and not be
exposed to direct sunlight or dampness.
4) Ensure that the appliance is kept separate from the power supply and the ON/OFF
buttons switched off; wipe it down with a damp, cotton towel (with water or a
neutral cleaner), without letting water or cleaner get inside and causing defects.
II. Brush Cleaning:
Push the lock in the direction of the arrow and remove the brush from the top. See figure 24.
STORAGE OF THE APPLIANCE
In the event of non-use, store the appliance, as in figure 25, with the 3-in-1 combination brush and
the additional brush in the charging station.
TROUBLESHOOTING
NB: if you are aware of one of the following problems, immediately switch off the appliance, in
order to not damage and to prevent further defects.
Faults Possible Cause Solution
No longer functions
Deterioration of suction
Dust escaping while in operation
Brush does not rotate First light is flickering
Rechargeable battery is weak Recharge the battery
Switch is not on Turn the switch to ON
Dust collection container is
full
Suction hole is clogged
Filter is clogged
Dust filter is dirty
Empty the dust collection
container
Clear the blockage
Clean the filter
Switch off the appliance and
clean the filter
Clean the brush and restart
the appliance
13

EN
SAFETY INSTRUCTIONS
I. Please read the manual thoroughly prior to use.
II. Please bear this manual in mind, as inappropriate handling can lead to injuries
and damage the appliance.
Warning Notice:
Small parts in this box must not be used as toys, and plastic bags are a danger
and can cause suffocation, and must always be kept away from babies and
children.
III. Power Supply:
1) This appliance operates with a 100-240V- alternating current.
2) Please do not use any other connecting cable for this appliance.
3) Should the electrical cable or plug turn out to be defective, please do
not continue to use the product. Contact our customer service
depart ment for an exchange of cable; keep a hold of the plug and do not
twist the electrical cable; beware of the danger of electrical shock; please
switch off and remove the electrical cable.
IV. Rechargeable Battery
1) Do not use any other charging appliance, otherwise it may damage the
appliance.
2) Please remove the charging appliance following full charge, in order to
avoid a reduced lifespan of the battery and a decrease in performance.
3) On no account can the battery be disassembled, nor thrown in a fire, as
this would be a danger of explosion.
4) The terminals should not be short-circuited or exchanged; the housing
must not be opened; the battery cannot be stored in any damp or hot
location.
5) On no account should benzol, acetate or any other solvent be used to
clean the battery; in the event of abnormal temperatures or leakage stop
immediately; do not put pressure on or strike the battery as this may
cause heat and start a fire.
V. Operating Conditions
This product is only suitable for home use and must not be deployed outdoors or
for commercial purposes; nor is its use authorized on clothing, fingers, the head
or hair. It is an electronic appliance, and in order to avoid faults, it should not be
exposed to rain, water or dampness (for example, the bathroom, laundry etc).
14
EN
On no account should fluids be absorbed. The appliance must not be used in
potentially dangerous surroundings, for example, in the vicinity of gas plants, oil
tanks, chemicals and other inflammable and explosive materials; neither should
this appliance be used for the removal of ash, burning cigarettes or matches –
danger of fire.
VI. Further Points:
This appliance may be used by children from the age of 8 years, as well as
by people of reduced physical, sensory or mental capabilities or lacking
in experience and knowledge, provided they are supervised or have been
instructed with regard to the safe use of the appliance and understand the
possible resulting dangers. Children must not play with the appliance.
Cleaning and user maintenance must not be carried out by children
without supervision.
TECHNICAL PRODUCT DATA
Product Category
Rated Voltage
Recharger Device
& Parameter
Rechargeable Battery Li-Ion 2150mAh Capacity 0,5 l
Weight 2,3 kg
Rechargeable
DC-Vacuum Cleaner
14,8V
Input Circuit
100-240V.
Frequency: 50/60HZ
Output Power:
18V 500mA
Product Type
Motor Output 100W
Noise Level
Continuous
Operation
MC-603
≤72 dB
18 min
Waste Disposal and Environmental Regulation
At the end of its lifespan, do not dispose of the product within the normal household refuse. Take it to a recycling point for
electrical and electronic appliances.
These will be indicated by means of a symbol on the product, within the service manual and on the packaging.
Find out about recycling points, which will be operated by your retailer or the local authority. The re-use and recy-
cling of old appliances is an important contribution to the protection of our world’s environment.
This product conforms to European guidelines.
15

FR
MODE D‘EMPLOI
1. Raccorder la station de charge:
Brancher la station de charge au secteur - Voir Fig. 16.
2. Accu:
Actionner le bouton de déverrouillage de l’accu, puis retirer ce dernier – Voir Fig. 17.
3. Station de charge:
Insérer l’accu dans la station de charge – Voir Fig. 18; le témoin de charge rouge commence à
clignoter et 5 heures plus tard la lampe verte indique que l’accu est entièrement chargé et
normalement prêt à l’emploi.
4. Raccorder le tube:
Ficher le tube en aluminium dans l’appareil – Voir Fig. 19 – et le fixer.
5. Raccorder la brosse:
Ficher la brosse dans le tube – Voir Fig. 20 – et la fixer.
6. Lampes à LED:
Actionner le bouton MARCHE/ARRET pour mettre l’aspirateur en marche, l’appareil est mis en
marche et la lampe à LED s’allume. Si toutes les lampes ne sont plus allumées, l’accu est vide et
l’appareil s’arrête. Retirer alors l’accu, l’insérer dans la station de charge – Voir Fig. 18 et le
recharger entièrement (env. 5 h); si la brosse s’arrête 3 secondes, la première lampe s’allume et
indique que les crins doivent être nettoyés (Voir nettoyage et entretien II.) ;
7. Nettoyage du bac à poussière et du HEPA-filtre:
1. Sortez le bac à poussière de son emplacement : Saisissez à deux doigts la languette blanche au
centre puis tirer le bac vers l‘extérieur (Fig. 21)
2. Au-dessus d‘une poubelle, ouvrez le bac à poussière en déverrouillant la trappe située audessous du bac à poussière pour vider la poussière (Fig. 22)
3. Pour nettoyer le filtre, tournez-le dans le sens antihoraire puis brossez-le, remettez-le en place
dans le bac à poussière en tournant dans le sens horaire.
4. Remettre le bac à poussière en place en appuyant fermement solidement le bac à poussière
directement dans l‘appareil après le nettoyage.
8. Brosse combinée 3 en 1:
Cet appareil est équipé d’une brosse 3 en 1 comprenant la brosse pour joints (a), l’embout à
brosse (b) et la brosse à meubles (c) - Voir Fig. 23. Actionner le déverrouillage (d) pour retirer la
tête de la brosse; la buse peut ensuite être utilisée pour nettoyer les interstices; l’embout à brosse
peut par exemple être utilisé pour nettoyer les claviers d’ordinateur et le dos comme brosse à
meubles.
9. Articulation:
Pour déverrouiller l‘articulation (Fig. 2), appuyer brièvement sur le déverrouillage et plier
légèrement le tube vers l’avant. Le verrouillage est déverrouillé. Encliqueter de nouveau le
verrouillage après utilisation.
MESURES DE PRÉCAUTION
1. La lampe rouge clignote lorsque l’accu est inséré dans la station de charge et indique la procé
16

FR
dure de charge en cours. La lampe verte signifie «entièrement rechargé».
2. Le niveau de charge de l’accu diminue si l’appareil n’est pas utilisé pendant une longue période;
recharger l’accu une à deux fois tous les six mois.
NETTOYAGE ET ENTRETIEN
I. Nettoyage de l’appareil:
1) Tous les travaux de routine d’entretien et de réparation sont à effectuer après débranche
ment du chargeur.
2) Nettoyer le bac à poussière après chaque utilisation.
3) En cas de non-utilisation de l’appareil, le ranger dans un endroit frais et sec et ne pas l’ex
poser à l’insolation directe ou à l’humidité.
4) S’assurer que l’appareil a été débranché de l’alimentation électrique et que le BOUTON
MARCHE/ARRET est sur ARRET; essuyer avec un chiffon en coton humide (avec de l’eau ou
un nettoyant neutre), sans que l’eau ou le nettoyant pénètre et cause des dommages.
II. Nettoyage de la brosse:
Pousser le déverrouillage dans le sens de la flèche et retirer la brosse par le haut. Voir Fig. 24.
STOCKAGE DE L’APPAREIL
En cas de non-utilisation de l’appareil, accrocher la brosse combinée 3 en 1 et la brosse dans la
station de charge comme indiqué à la Fig. 25.
ÉLIMINATION DES PANNES
Remarque : arrêtez immédiatement l’appareil si vous remarquez l’un des problèmes suivants pour
ne pas l’endommager et ainsi prévenir d’autres dommages.
Défaut Cause possible Solution
Ne marche plus
Puissance d’aspiration faiblit
De la poussière s’échappe
pendant le fonctionnement
La brosse ne tourne pas Première lampe clignote
Accu faible Recharger l’accu
Bouton non actionné Mettre le bouton sur MARCHE
Le bac à poussière est plein Vider le bac à poussière
Orifice d’aspiration bouché Enlever l’engorgement
Filtre bouché Nettoyer le filtre
Filtre à poussière encrassé
Arrêter l’appareil et nettoyer
le filtre
Nettoyer la brosse et remettre
l’appareil en marche
17
 Loading...