

Page 1
Gebrauchsanleitung ........................ 06
Instructions for Use .........................09
Mode d’emploi .................................12
Manuale di utilizzazione .................. 15
Gebruiksaanwijzing ........................18
Használati utasítás ..........................21
Návod k použití ................................24
Návod na použitie ............................27
Instrucţiuni de utilizare ...................30
Page 2
A
F
G
B
H
J
C
I
D
E
K
1 x Livington InstaChill, 1 x F ernbedienung
1 x Livington InstaChill, 1 x Remote control
1 x Livington InstaChill, 1 x Télécommande
1 x Livington InstaChill, 1 x Telecomando
1 x Livington InstaChill, 1 x Afs tandsbediening
1 x Livington InstaChill, 1 x Távirányító
1 x Livington InstaChill, 1 x dálkové ovládání
1 x Livington InstaChill, 1 x diaľkové ovládanie
1 x Livington InstaChill, 1 x telecomandă
Lieferumfang
Contents
Volume de livraison
Contenuto della confezione
Inhoud van de verpakking
Szállítási terjedelem
Obsah balení
Obsah balenia
Cuprinsul furniturii
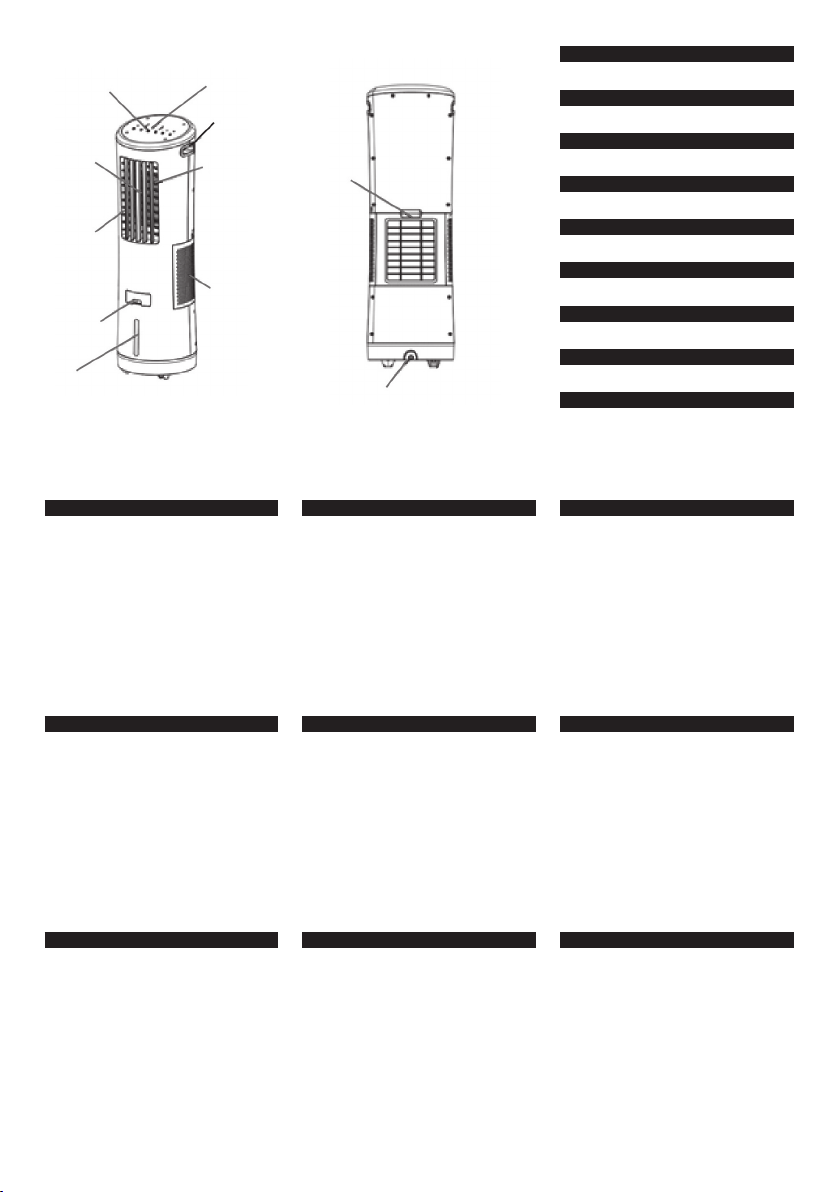
Bezeichnung der Teile
A. Bedienfeld
B. L uftauslass
C. S chwenkendes Gitter
D. Schublade für Was serzufuhr
E. Was serstandsanzeige
F. LED-Lampe
G. Griff
H. Manuell verstellbares Git ter
I. L ufteinlass
J. Hintere A bdeckung
K. Wasserablas skappe
Description of part s
A. Control panel
B. Air outlet
C. P ivoting grill
D. Charge for water supply
E. Water level indicator
F. LED light
G. Handle
H. Manually adjustable grille
I. Air inlet
J. Rear cover
K. Water drainage cap
Description des pièces
A. Panneau de commande
B. Sor tie d‘air
C. Gr ille pivotante
D. Tiroir pour alimentation en eau
E. Affichage du niveau d‘e au
F. Voyant à LED
G. Poignée
H. Grille à réglage manuel
I. Entrée d‘air
J. Couvercle infér ieur
K. Bouchon de purge d‘eau
Denominazione dei pezzi
A. Pannello di controllo
B. Sc arico aria
C. Gr iglia girevole
D. Cas setto per alimentazione acqua
E. Indic atore del livello dell‘acqua
F. Lampada a LED
G. Impugnatura
H. Griglia regolabile manualmente
I. Ingre sso dell‘aria
J. Coper tura posteriore
K. Coperchio di scar ico dell‘acqua
Beschrijving van de onderdelen
A. Bedieningspaneel
B. L uchtuitlaag
C. Dr aaibaar rooster
D. Lasd de water toevoer op
E. A anduiding waterstand
F. Led-lampje
G. Greep
H. Handmatig verstelbaar rooster
I. L uchtinlaat
J. Achter plaat
K. Wateraflaatklepje
A részegységek leírása
A. Kezelőpanel
B. L evegő kilépés
C. Billenő r ács
D. Víztáplálás rekesze
E. Vízszint jel ző
F. LED-lámpa
G. Fogant yú
H. Manuálisan állítható rác s
I. L evegő bevezetés
J. Hátsó bur kolat
K. Vízleengedés fedele
Označení dílů
A. Panel ovládání
B. V ýstup vzduchu
C. Otočná mř ížka
D. Přihrádk a pro přívod vody
E. Ukaz atel stavu vody
F. Kontrolka LED
G. Rukojeť
H. Ručně nastavitelná mř ížka
I. Vs tup vzduchu
J. Zadní k ryt
K. Víčko odtoku vody
Popis častí
A. Ovládací panel
B. V ýstup vzduchu
C. Otočná mr iežka
D. Priehradk a na prívod vody
E. Indikátor hladiny vody
F. LED kontrolka
G. Rukoväť
H. Manuálne nastaviteľná mr iežka
I. Prívod vzduc hu
J. Zadný k ryt
K. Viečko na v ypúšťanie vody
Denumirile pieselor
A. Câmp de operare
B. Evacuare aer
C. Gr ilaj oscilant
D. Rezervor pentr u alimentarea apei
E. Indic ator nivel apă
F. Lampă LED
G. Mâner
H. Grilaj reglabil manual
I. A dmisie aer
J. Acoper ire spate
K. Capac scurgere apă
2
Page 3

6 5 4 3 2 1
Funktionen Bildschirm
1. EIN/AUS
2. SCHWENKEN (Link s-Rechts)
3. GESCHWINDIGK EIT
(Niedrig/Mittel/Hoch)
4. ANIONEN
5. TIMER (1 Std / 2 Std / 4 Std)
6. KÜHLEN
1. ON/OFF
2. SWING (Left-Right)
3. SPEED
4. ANION
5. TIMER (1H / 2H / 4H)
6. COOL
1. MARCHE/ARRÊT
2. PIVOTEMENT (gauc he-droite)
3. VITESSE
4. ANIONS
5. MINUTERIE (1 h / 2 h / 4 h)
6. REFROIDISSEMENT
1. ON/OFF
2. ROTAZIONE (sinistra-des tra)
3. VELOCITÀ
4. ANIONI
5. TIMER (1 ora/ 2 ore/ 4 ore)
6. RAFFREDDAMENTO
1. AAN/ UIT
2. ROTEREN (links-rechts)
3. SNELHEID
4. ANIONEN
5. TIMER (1 uur / 2 uur / 4 uur)
6. KOELEN
Screen functions
(Low / Medium / High)
Fonctions écran
(basse/moyenne/élevée)
Funzioni schermo
(bassa/media/alta)
Functies beeldscherm
(laag, gemiddeld,hoog)
1. BE/KI
2. FORGATÁS (Bal-Jobb)
3. SEBESSÉG
4. ANIONOK
5. IDŐZÍTŐ (1 óra / 2 óra / 4 óra)
6. HŰTÉS
7.
1. ZAP/ VYP
2. OTÁČET (vlevo-vpravo)
3. RYCHLOST
4. ANIONTY
5. ČASOVAČ (1 hod/2 hod/4 hod)
6. CHLA ZENÍ
1. ZAPNUT IE/VYPNUTIE
2. OTÁČANIE (doľava-doprava)
3. RÝCHLOSŤ
4. ANIÓNY
5. ČASOVAČ (1 hod / 2 hod / 4 hod)
6. CHLADENIE
1. EIN/AUS (PORNIT/OPRIT)
2. OSCIL ARE (stânga-dreapta)
3. VITEZĂ
4. ANIONI
5. TIMER/CEA S PROGRAMATOR
6. RĂCIRE
Képernyő funkciók
(Alacsony/Közép/Maga s)
Funkce displeje
(nízká/střední/vysoká)
Funkcie obrazovky
(nízka/stredná/vysoká)
Funcţii ecran
(scăzută/medie/ridicată)
(1 oră / 2 ore / 4 ore)
1
3
5
Funktionen Fernbedienung
1. EIN/AUS
2. KÜHLEN
3. GESCHWINDIGK EIT
4. SCHWENKEN
5. TIMER
6. ANIONEN
Remote control functions
1. ON/OFF
2. COOL
3. SPEED
4. SWING
2
4
6
5. TIMER
6. ANION
Fonctions télécommande
1. MARCHE/ARRÊT
2. REFROIDISSEMENT
3. VITESSE
4. PIVOTEMENT
5. MINUTERIE
6. ANIONS
Funzioni telecomando
1. ON/OFF
2. RAFFREDDAMENTO
3. VELOCITÀ
4. ROTAZIONE
5. TIMER
6. ANIONI
Functies afstandsbediening
1. AAN/ UIT
2. KOELEN
3. SNELHEID
4. ROTEREN
5. TIMER
6. ANIONEN
1. BE/KI
2. HŰTÉS
3. SEBESSÉG
4. FOR GATÁS
5. IDŐZÍTŐ
6. ANIONOK
7.
1. ZAP/ VYP
2. CHLA ZENÍ
3. RYCHLOST
4. OTÁČENÍ
5. ČASOVAČ
6. ANIONTY
1. ZAPNUT IE/VYPNUTIE
2. CHLADENIE
3. RÝCHLOSŤ
4. OTÁČANIE
5. ČASOVAČ
6. ANIÓNY
1. PORNIT/OPRIT
2. RĂCIRE
3. VITEZĂ
4. OSCIL ARE
5. TIMER/CEA S PROGRAMATOR
6. ANIONI
Távvezérlő funkciói
Funkce dálkového ovládání
Funkcie diaľkového ovládania
Funcţii telecomandă
3
Page 4

DE
BITTE LESEN SIE DIESE
BEDIENUNGSANLEITUNG SORGFÄLTIG,
BEVOR SIE DAS PRODUKT BENUTZEN.
SICHERHEITSHINWEISE:
1. Seien Sie vorsichtig, dass kein Wasser
überschwappt, wenn Sie das Gerät umstellen.
2. Legen Sie keine Gegenstände oben auf den
Luftkühler und verlegen Sie die Luft-Eingangsund Ausgangsöffnungen nicht.
3. Stecken Sie keinen Gegenstand in die
Entlüftungsöffnung, während das Gerät in
Betrieb ist.
4. Ziehen Sie vor dem Reinigen oder Befüllen den
Stecker des Gerätes.
5. Schalten Sie bei Fehlfunktionen das Gerät
sofort aus, beispielsweise wenn das
Stromkabel beschädigt ist, und wenden Sie sich
an unseren Kundendienst. Ein Zerlegen oder
eine Reparatur des Gerätes durch den Benutzer
wird nicht empfohlen.
6. Nur sauberes Wasser ver wenden. Bei stark
verkalktem Wasser destilliertes Wasser
verwenden.
7. Das Produkt funktioniert am besten in sauberen
Bereichen. Große Staub-/Schmutzpartikel
können die Lebensdauer des Gerätes
beeinträchtigen.
8. Wir empfehlen den Einsatz nur in trockenen
Bereichen. Bei Verwendung in feuchter
Umgebung achten Sie darauf, dass kein Wasser
auf das Gehäuse des Produkts gelangt.
9. Gelangt Wasser auf das Produkt, trennen Sie es
von der Stromversorgung und lassen Sie es 24
Stunden trocknen. Dann wieder wie gewohnt
verwenden.
10. Nicht über längere Zeit direktem Sonnenlicht
aussetzen.
11. Stromanschluss oder Kabel nicht mit nassen
Händen anfassen.
12. Das Gerät nicht neben ein Heizgerät stellen.
13. Das Gerät nicht in Durchgangsbereiche
stellen, sodass man darüber stolpern oder es
umwerfen könnte.
14. Das Gerät nicht in Wasser oder sonstige
Flüssigkeiten tauchen.
15. Das Gerät nicht neben offenem Feuer oder
Feuerquellen aufstellen.
16. Das Gerät kann von Kindern ab 8 Jahren sowie
von Personen mit reduzierten physischen,
sensorischen oder mentalen Fähigkeiten
oder Mangel an Erfahrung und/oder Wissen
benutzt werden, wenn sie beaufsichtigt
oder bezüglich des sicheren Gebrauchs des
Gerätes unterwiesen wurden und die daraus
resultierenden Gefahren verstanden haben.
Kinder dürfen nicht mit dem Gerät spielen.
Reinigung und Benutzer-Wartung dürfen nicht
durch Kinder durchgeführt werden, es sei denn,
sie sind älter als 8 Jahre und beaufsichtigt.
Kinder jünger als 8 Jahre sind vom Gerät und
der Anschlussleitung fernzuhalten. Äußerste
Vorsicht ist geboten, wenn ein Gerät in der Nähe
von Kindern ver wendet wird und wenn man es
unbeaufsichtigt laufen lässt.
17. Der Hersteller übernimmt keine Verantwor tung
für Schäden, die infolge der Nichtbefolgung
dieser Anleitungen entstehen.
BEDIENUNGSANLEITUNG :
1. Füllen Sie vor dem Einschalten des Gerätes den Tank mit Wasser.
Hinweis: Je kälter das verwendete Wasser, umso kühler ist
der Effekt. Sie können daher auch Eiswasser oder Was ser mit
Eiswürfel ver wenden.
2. Die Schublade für die Wasser zufuhr, an der Vorderseite des
Luftkühlers, her ausziehen und mit kaltem Wasser bis zur
MAX-Linie befüllen (Wa sserstandsanzeige E). Hinweis: Der
Wasserstand dar f die Grenze der MAX-Linie nicht übersteigen,
um ein Überschwappen des Wassers beim Umstellen de s
Luftkühlers zu vermeiden.
4
Page 5

3. Lassen Sie d as Wasser nach jedem Gebrauch, mit Hilfe der
Wasserablasskappe (K ), aus dem Tank und reinigen Sie die
Spezial-Filter und den Wassert ank regelmäßig.
4. Verwenden Sie bei jedem Gebrauch frische s Wasser.
5. Füllen Sie den Tank nur mit sauberem Wasser, gießen Sie keine
andere Flüssigkeit in den Tank.
FUNKTIONEN:
KÜHLEN
Das Kühlen-Symbol ‚Cool‘ auf dem Bedienfeld oder auf der
Fernbedienung drücken, um den Kühlmodus zu star ten. Zum
Ausschalten des Kühlmodus das Symbol erneut dr ücken.
Hinweis: Wenn man das Gerät einschaltet, ist die Kühlfunk tion
(Wasser wird in die Filter gepumpt) nicht ak tiv. Das KühlenSymbol muss jedes Mal nach dem Einschalten gedrück t werden.
STROMVERSORGUNG
Das Ein-/Aus-Symbol auf dem Bedienfeld oder auf der
Fernbedienung drücken, um den Luf tkühler einzuschalten, das
entsprechende Lämpchen leuchtet auf. Dieses Symbol er neut
drücken, um das Gerät auszuschalten, das L ämpchen erlischt.
SCHWENKEN
Das Schwenken-Symbol auf dem Bedienfeld oder auf der
Fernbedienung drücken, um das senkrechte, vordere Git ter
automatisch schwenken zu lassen, das entsprechende L ämpchen
leuchtet auf. Dieses Symbol erneut drücken, um den Schwenkmodus
zu stoppen, das Lämpchen erlischt. Die hinteren Git ter können Sie
je nach Bedarf manuell einstellen, um den Luft strom von oben nach
unten zu lenken.
GESCHWINDIGKEIT
Das Geschwindigkeits-Symbol drücken, sodass das Geblä se
mit der niedrigsten Geschwindigkeit (1) star tet. Das Symbol auf
dem Bedienfeld oder auf der Fernbedienung erneut drücken, um
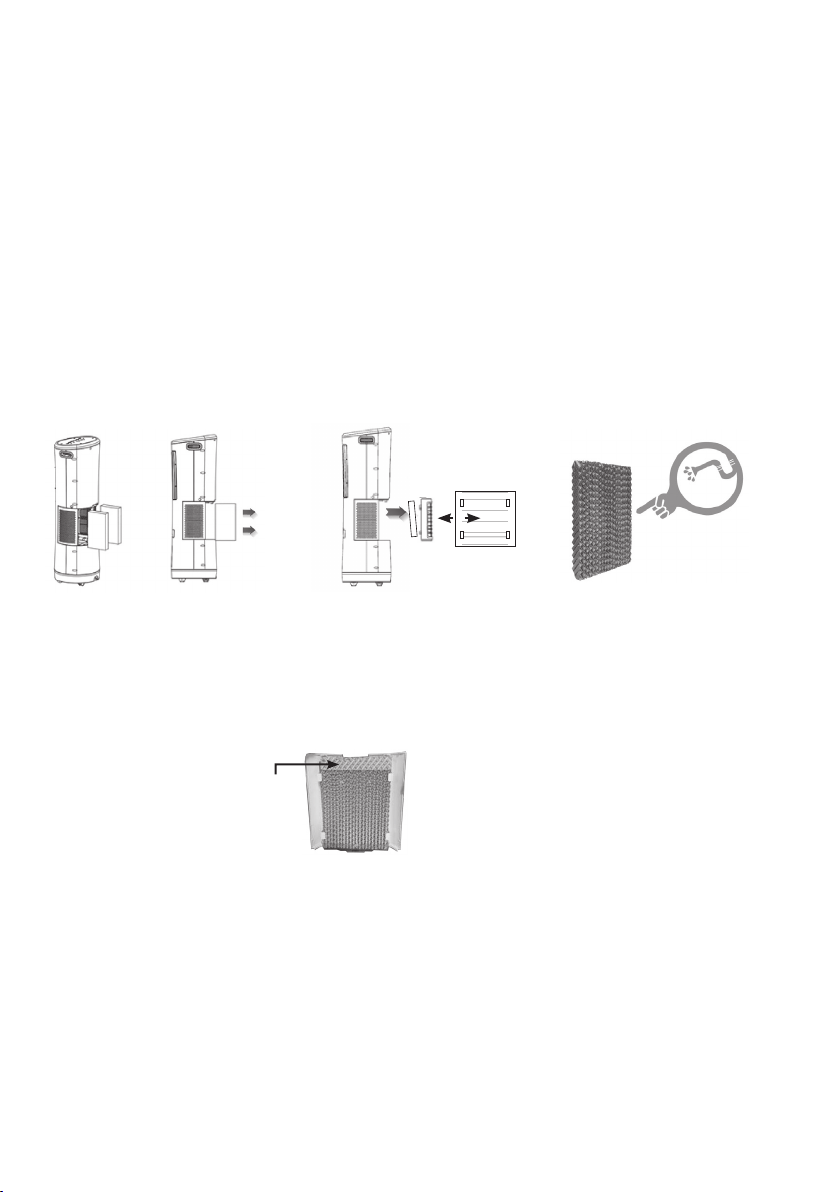
Reinigung und Wartung (3 teiliger Spezial-Filter)
die Geschwindigkeit von niedrig (1) auf mittel (2) oder hoch (3)
einzustellen.
ANIONEN
Das Anionen-Symbol auf dem Bedienfeld oder auf der
Fernbedienung drücken: Zum Stoppen des Anionenmodus das
Symbol erneut drücken. ANIONEN ist ein System zum Abtöten von
Bakterien im Wasser tank. Die Anionen-Funktion fügt dem Wasser
eine negative Ladung hinzu, die das Wachstum von Bakter ien uvm.
verhindern soll und Staub anzieht. Die Funktion ent spricht der
Wirkungsweise eines Luf treinigers.
TIMER
Das Timer-Symbol auf dem Bedienfeld oder auf der Fernbedienung
drücken, um den Timer einzustellen. Bei jedem Betätigen des
Symbols ändert sich die Einstellung: Von 1er bis 7 Stunden
aufsteigend. Zum Ausschalten danach erneut dr ücken.
WICHTIGE TIPPS:
• Die Kühlfunktion funktionier t am besten bei geringer
Luftfeuchtigkeit. Ist die Luf tfeuchtigkeit sehr hoch, kann die
Temperatur nicht so stark abgesenkt werden.
• Bei jedem Gebrauch kühles, frische s Wasser verwenden. Je
kälter das Wasser, desto besser ist der Kühleffekt . Es können
ebenso kleine Eiswürfel in das Was ser gemischt werden, um
einen noch besseren Effekt zu er zielen.
• 20 – 30 Minuten vor dem Abschalten, die Kühlfunk tion („Cool“)
ausschalten und das Gerät weiterlaufen las sen, sodass die
Spezial-Filter trocknen können. So vermeiden Sie sc hlechte
Gerüche, Ablagerungen und Sc himmelbildung.
• Hinweis: Wenn man das Gerät einschaltet, ist die Kühlfunk tion
(Wasser wird in die Filter gepumpt) nicht ak tiv. Das KühlenSymbol muss jedes Mal nach dem Einschalten gedrück t werden.
1 2 3
1. Abdeckung (J) auf der Rück seite abnehmen.
2. Die Spezial-Filter in Pfeilrichtung her ausziehen (1).
3. Entfernen der Spezial-Filter aus der vorderen Öffnung : Halten
Sie das Gehäuse mit einer Hand fest. Ziehen Sie es mit der
anderen Hand vorsichtig auf eine Seite und nach oben aus der
Einfassung (2).
4. Die Spezial-Filter regelmäßig mit normalem Wasser reinigen
und den Schmutz mit einer weichen Bürste oder einem Tuch
abwischen (3).
5. Beim Einsetzen der Filter auf die Größe achten. Die Filter sind
unterschiedlich groß und müssen auch
dementsprechend wieder eingesetzt
werden. Ebenfalls müssen Sie darauf
achten, dass die Filter an der oberen Seite
eine Formänderung aufweisen. Diese muss
beim Einsetzen immer nach oben zeigen.
Sind die Filter stark verschmut zt, sollten
diese ausgetauscht werden, bei
regelmäßiger Benutzung mindestens aber alle 6 Monate.
Hinweis: Wenn eine Entkalkung notwendig scheint, die Filter
vorab unbedingt entfernen.
WASSER ABLASSK APPE
Um das Wasser aus dem Gerät zu entfernen, stellen Sie ein Gef äß
unterhalb der Wasserablass kappe (K) an der unteren Rückseite
des Gerätes oder stellen Sie es in die Dusche/Badewanne. Öffnen
Sie die Wasserablassk appe (K) danach vorsichtig und achten Sie
darauf, dass kein Wasser überschwappt, um den Boden nic ht zu
beschädigen.
Hergestellt in China
5
Page 6

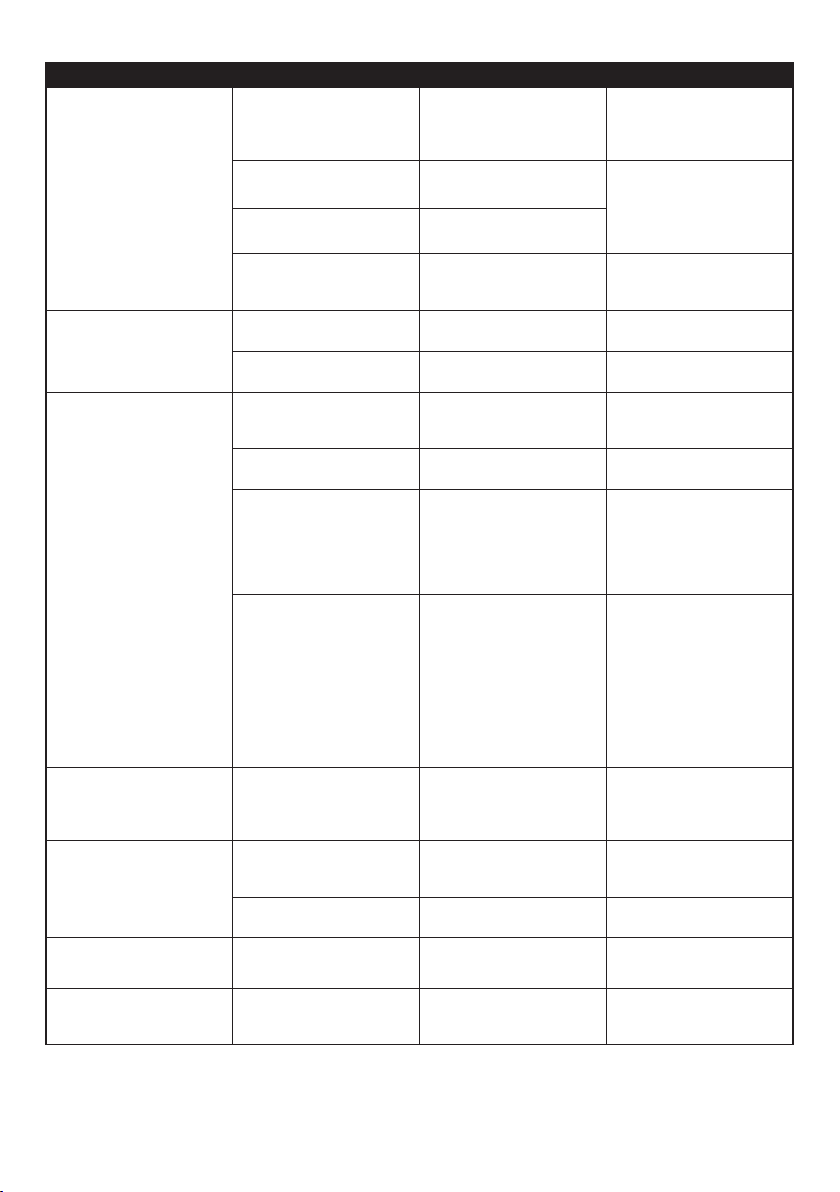
Fehlerbehebung:
Problem Mögliche Ursache Abhilfe Anmerkungen
Es wird empfohlen, ein
Spannungsmessgerät zu
benutzen, um die richtige
Spannung zu erhalten.
Bei stark kalkhaltigem Was ser
zukünftig destillier tes Wasser
verwenden.
Der Verdunstungsluftkühler
funktioniert nicht und r eagiert
nicht auf das Drücken von
Knöpfen.
Es fließt keine Luft vom Gerät,
obwohl die Maschine in Betrieb
ist.
Die Pumpe funktioniert, aber
das Gerät kühlt nicht.
Die Pumpe funktioniert, aber
wälzt kein Wasser um, oder
die Spezial-Filter enthalten zu
wenig Wasser.
Aus dem Gerät spritzt Was ser.
Unangenehmer Geruch.
Weiße Ablagerungen im
Wassertank .
Stromausfall oder fehlerhafter
Stromanschluss.
Die Batterien der
Fernbedienung sind leer.
Die Fernbedienung oder das
Bedienfeld ist beschädigt.
Die Fernbedienung
funktioniert nicht.
Der Motor ist beschädigt.
Der Thermoschutz im Motor
wurde ausgelöst.
Die Kühlfunktion (Wasser wir d
in die Filter gepumpt) ist nicht
eingeschaltet.
Die Spezial-Filter sind verstopft
oder schmutzig.
Die Spezial-Filter sind trocken
oder enthalten nicht genug
Wasser.
Zu hohe relative
Luftfeuchtigkeit.
Das obere Wasser verteilgefäß
ist verstopft.
Die Spezial-Filter oder die
hintere Abdeckung (J) sitzen
nicht an der richtigen Stelle.
Das obere Wasser verteilgefäß
ist verstopft.
Der Wasserbehälter oder die
Spezial-Filter sind verschmutzt.
Das Wasser hat einen
zu hohen Kalkgehalt.
Die Eingangsspannung
messen und das Gerät an eine
dafür bestimmte Stromquelle
anschließen.
Die Batterien auswechseln.
Bitte wenden Sie sich an
unseren Kundendienst.
Die Fernbedienung muss direkt
auf das Gerät zeigen.
Bitte wenden Sie sich an
unseren Kundendienst.
Das Gerät ausgeschaltet lassen,
bis der Motor abgekühlt ist.
Das Kühlen-Symbol muss jedes
Mal nach dem Einschalten
gedrückt werden.
Die Spezial-Filter reinigen oder
austauschen.
Das obere Wasser verteilgefäß
prüfen und feststellen, ob e s
eine Verstopfung gibt.
Kühl-Funktion ist deaktiv iert bitte aktivieren.
Wenn der
Verdunstungsluftkühler über
einen langen Zeitraum benutzt
wird, ist die Luftfeuchtigkeit
im Raum sehr hoch, daher
kann die Temperatur nicht so
stark abgesenkt werden. Den
Kühlmodus auf eine niedrigere
Stufe drehen oder deaktivieren,
bis die Luftfeuchtigkeit
gesunken ist.
Das obere Wasser verteilgefäß
reinigen.
Die Spezial-Filter oder die
hintere Abdeckung (J) richtig
anbringen.
Das obere Wasser verteilgefäß
reinigen.
Den Wassertank und die
Spezial-Filter reinigen.
Den Wassertank ablas sen
und die Spezial-Filter und den
Tank häufiger reinigen bzw.
entkalken.
6
Page 7

EN
PLEASE READ THIS MANUAL CAREFULLY
BEFORE USING THE PRODUCT.
SAFETY INSTRUCTIONS:
1. Be careful not to spill any water when moving
the unit.
2. Do not put anything on top of the air cooler or
obstruct the air inlet and outlet.
3. Do not insert any object into the vent while
the device is in operation.
4. Unplug the device before cleaning.
5. In the event of malfunction, for example if
the power cable is damaged, immediately
switch off the device and contact our customer
services. It is not recommended that the user
attempts to disassemble or repair the machine.
6. Use only clean water. In areas of heavily
calcified water, use distilled water.
7. The product works best in clean areas. Large
dust/dirt particles can affect the working life
of the device.
8. We recommend using only in dry areas. When
used in a humid environment, make sure
that no water condensation forms upon the
product‘s housing.
9. If water gets on the product, disconnect it
from the power supply and allow it to dry for
24 hours. Then continue use as usual.
10. Do not expose to direct sunlight for extended
periods of time.
11. Never touch the power connection or cable
with wet hands.
12. Do not place the unit next to any kind of
heating appliance.
13. Do not place the appliance in pathways
where it could pose a tripping hazard or be
knocked over.
14. Do not immerse the device in water or other
liquids.
15. Do not set up the appliance near an open
flame or source of fire.
16. The device may only be used by children from
8 years of age, or by persons with reduced
physical, sensory or mental capabilities
or lack of experience and/or knowledge if
they have been supervised or instructed
in the safe use of the device and have
understood the hazards arising therefrom.
Children should not play with the appliance.
Cleaning and user maintenance must never
be performed by children unless they are
over 8 years old and supervised. Children
younger than 8 years of age are to be kept
away from the machine and the connecting
cable. Extreme caution is advised when using
the device near children and when leaving
unattended.
17. The manufacturer assumes no responsibility
for any damage resulting from noncompliance with these instructions.
OPERATING INSTRUC TIONS:
1. Fill the tank with water before switching on the device. Note : The
colder the water used, the cooler the effect. You may therefore
wish to use iced water or water with ice cubes.
2. Pull out the water supply drawer on the front of the air cooler
and fill with cold water to the MA X line (water level indicator ‚E‘).
Note: The water level must not exceed the MA X line, in order to
prevent the water from spilling over when moving the air cooler.
3. Empty the water out of the tank after each use w ith the aid of the
water drainage cap (K), and clean the cooling pads and water
tank on a regular basis.
4. Use fresh water with each use.
5. Fill the tank with clean water only, and never place any other
liquid in the tank.
FUNCTIONS:
COOL
Press the ‚Cool‘ symbol on the control panel or on the r emote control
to start the cooling mode. To turn off the Cool mode, press the
symbol once again.
Note: When you turn on the unit, the c ooling function (water being
pumped to the filters) does not automatically ac tivate. The cooling
symbol must be pressed each time af ter switching on.
POWER
Press the On/Off symbol on the control panel or the remote control
to turn on the air cooler. Its light illuminates. Press this symbol again
to turn off the device. Its light will turn off.
7
Page 8
SWING
Press the swing symbol on the control panel or on the remote
control to automatically pan the vertical fr ont grille, and the
corresponding light will turn on. Pre ss this symbol again to stop
the swing mode, and the light will turn off. The rear grilles c an
be adjusted manually to direct the air flow from top to bottom as
needed.
SPEED
Press the speed symbol so that the fan with the lowest speed (1)
starts up. Pr ess the symbol on the control panel or on the remote
control again to switch the speed between low (1), medium (2) and
high (3).
ANION
Press the anion symbol on the control panel or on the remote
control. To stop the anion mode, press the symbol again. ANION is a
system to kill the bacteria in the water t ank. The anion function adds
a negative charge to the water, which inhibits the growth of bacteria
and other pathogens, and attract s dust. The function corresponds to
that of an air cleaner.
Cleaning & Maintenance (3-piece special filter)
1 2 3
TIMER
Press the timer symbol on the control panel or the remote control to
set the timer. The setting changes with every pres s of the symbol.
From 1 to 7 hours, in ascending order. To turn it off, press again.
IMPORTANT TIPS:
• The cooling function work s best at low humidity. If there is a very
high level of humidity, the temperature cannot be significantly
reduced.
• Use cool, fresh water with each use. The colder the water, the
greater the cooling effect. Small ice cubes can also be added to
the water to improve the effect even further.
• Switch off the cooling function („Cool“) 20 to 30 minut es before
switching off and allow the unit to continue running so that the
cooling pads can dry. This helps avoid bad odours, deposits and
mildew.
• Note: When you turn on the unit, t he cooling function (water
being pumped to the filters) does not automatically ac tivate. The
cooling symbol must be pressed each time af ter switching on.
1. Remove the cover (J) on the back.
2. Pull out the special filter in the direction of the arrow (1).
3. Removing the special filter from the front opening: Hold the
housing with one hand. Gently pull it with the other hand on one
side and up out of the frame (2).
4. Regularly clean the special filter with ordinar y water and wipe off
any dirt with a soft br ush or cloth (3).
5. Pay attention to the dimensions when inserting the filter. The
filters are different sizes and must be fitted
correspondingly. You will see that the
filters have an irregular shape on the upper
side. This must always point upwards when
inserting. If the filters are ver y dirty, they
should be replaced: with regular use this
should be at least every 6 months.
Note: If de-scaling is required, make sure that you remove the
filters beforehand.
WATER DRAINAGE CAP
To remove the water from the unit, place a container below the water
drainage cap (K) on the lower part of the re ar of the unit, or place it
in the shower/bathtub. Then carefully open the water drainage cap
(K), ensuring that no water spills over so as not to damage the floor.
Made in China
8
Page 9
Troubleshooting:
Problem Possible Cause Corrective Ac tion Remarks
Power failure or faulty power
connection.
Measure the input voltage
and connect the device to a
dedicated power source.
It is recommended to use a
voltmeter to determine the
precise voltage.
The evaporative air cooler
does not work and does not
respond to the buttons being
pressed.
There is no air flow from the
unit, even though the machine is
in operation.
The pump works, but the
appliance does not cool.
The remote control batteries
are empty.
The remote control or the
control panel is damaged.
The remote control.
The motor is damaged.
The thermal protection in the
motor has been triggered.
The cooling function (water
being pumped to the filters) is
not switched on.
The special filter is clogged or
has become dirty.
The special filter is dry or does
not contain enough water.
The relative humidity is
excessively high.
Change the batteries.
Please contact our customer
services.
The remote control must
be pointed directly at the
appliance.
Please contact our customer
services.
Turn off the appliance until the
motor has cooled down.
The cooling symbol must be
pressed again each time after
switching on.
Clean or replace the special
filter.
Check the upper water
distribution tray, and determine
if there is a blockage.
The cooling function is
deactivated - please activ ate
When the evaporative air cooler
is used for an extended period
of time, the humidity in the
room can become very high,
so the temperature can not be
reduced to as great an extent.
Turn the cooling mode to a
lower level or deactivate it until
the humidity has decreased.
The pump works, but does not
circulate water, or the special
filters contain too little water.
Water spurts out of the device.
There is an unpleasant odour.
White sediments are visible in
the water tank.
The upper water distribution
tray has become clogged.
The special filter or the rear
cover (J) is not in the right
position.
The upper water distribution
tray has become clogged.
The water tank or the special
filter is dirty.
The water is too hard.
Clean the upper water
distribution tray.
Position the special filter or the
rear cover (J) correctly.
Clean the upper water
distribution tray.
Clean the water tank and the
special filter.
Drain the water tank, and clean
or de-scale the special filters
and tank more frequently.
9
In areas with hard water, use
distilled water in the future.
Page 10

FR
VEUILLEZ LIRE ATTENTIVEMENT LE
PRÉSENT MODE D‘EMPLOI AVANT
D‘UTILISER LE PRODUIT.
CONSIGNES DE SÉCURITÉ :
1. Veillez à ce que l‘eau ne déborde pas lors du
déplacement de l‘appareil.
2. Ne placez pas d‘objets sur le haut du
refroidisseur d‘air et ne déplacez pas les
orifices d‘entrée et de sortie d‘air.
3. N‘insérez pas d‘objets dans l‘orifice de
purge d‘air lorsque l‘appareil est en service.
4. Avant le nettoyage, débranchez la fiche de
l‘appareil.
5. En cas de dysfonctionnements, par exemple
si le câble électrique est endommagé,
mettez immédiatement l‘appareil hors
tension, et adressez-vous à notre service
client. Le démontage ou la réparation de
l‘appareil par l‘utilisateur sont déconseillés.
6. Utiliser uniquement de l‘eau propre. Si
l‘eau est très calcaire, utiliser de l‘eau
déminéralisée.
7. Le produit fonctionne de manière optimale
dans des endroits propres. Les grosses
particules de poussière/de crasse peuvent
altérer la durée de vie de l‘appareil.
8. Nous recommandons une utilisation
uniquement dans des endroits secs. En cas
d‘utilisation dans un environnement humide,
veillez à ce que de l‘eau ne pénètre pas le
boîtier du produit.
9. Si de l‘eau pénètre le produit, débranchez-le de
l‘alimentation électrique et laissez-le sécher 24
heures. Utiliser ensuite comme à l‘habitude.
10. Ne pas exposer à la lumière directe du soleil
pendant une période prolongée.
11. Ne pas manipuler le connecteur
d‘alimentation électrique ou le câble avec
les mains mouillées.
12. Ne pas placer l‘appareil près d‘un radiateur.
13. Ne pas placer l‘appareil dans des zones
de passage de sorte qu‘il soit possible de
trébucher dessus ou de le renverser.
14. Ne pas immerger l‘appareil dans l‘eau ou
d‘autres liquides.
15. Ne pas installer l‘appareil à proximité d‘une
flamme nue ou de sources de flamme.
16. L‘appareil peut être utilisé par des enfants
dès 8 ans ou par des personnes ayant
des capacités physiques, sensorielles ou
mentales réduites ou manquant d‘expérience
et/ou de connaissances, s‘ils ont été
informés ou sont supervisés pour une
utilisation sûre de l‘appareil et ont compris
les dangers qui en découlent. Les enfants ne
sont pas autorisés à jouer avec l‘appareil. Le
nettoyage et la maintenance par l‘utilisateur
ne doivent pas être effectués par des enfants
à moins qu‘ils aient plus de 8 ans et qu‘ils
soient surveillés. Tenir l‘appareil et le câble
de raccordement hors de portée des enfants
de moins de 8 ans. Faites preuve d‘une
extrême vigilance lorsque l‘appareil est
utilisé à proximité d‘enfants et lorsqu‘il est
laissé sans surveillance.
17. Le fabricant décline toute responsabilité
pour les dommages résultant du nonrespect du présent mode d‘emploi.
MODE D‘EMPLOI :
1. Avant de mettre l‘appareil en ser vice, remplissez le réservoir
d‘eau. Remarque : plus l‘eau utilisée est froide, plus l‘effet sera
froid. Vous pouvez pour cela utiliser de l‘eau glacée ou de l‘eau
avec des glaçons.
2. Ouvrir le tiroir pour l‘arr ivée d‘eau sur la face avant du
refroidisseur d‘air et remplir d‘eau froide jusqu‘à la ligne MA X
(affichage du niveau d‘eau E). Remarque : le niveau d‘eau ne
doit pas dépasser la limite de la ligne MA X afin d‘éviter un
débordement de l‘eau lors du déplacement du refroidisseur d‘air.
10
Page 11

3. Purgez l‘eau du réservoir après c haque utilisation à l‘aide du
bouchon de purge d‘eau (K) et nettoyez régulièrement les filtre s
spéciaux et le réservoir d‘eau.
4. Utilisez de l‘eau fraîche à chaque utilisation.
5. Remplissez le réservoir uniquement avec de l‘eau propre, ne
versez aucun autre liquide dans le réservoir.
FONCTIONS :
REFROIDISSEMENT
Appuyer sur le symbole de refroidissement « Cool » sur le
panneau de commande ou la télécommande pour lancer le mode
refroidissement. Appuyer une nouvelle fois sur le symbole pour
désactiver le mode refroidissement.
Remarque : lors de la mise en route de l‘appareil, la fonction
refroidissante (pompage de l‘eau dans le filtre) n‘est pas
automatiquement mise en service. Le symbole Refroidis sement
doit être à chaque fois être actionné.
ALIMENTATION ÉLECTRIQUE
Appuyer sur le symbole marche/arrêt sur le panneau de commande
ou la télécommande pour mettre le refroidisseur d‘air en ser vice,
le témoin correspondant s‘allume. Appuyer une nouvelle fois sur ce
symbole pour mettre l‘appareil hors ser vice, le témoin s‘éteint.
PIVOTEMENT
Appuyer sur le symbole de pivotement sur le panneau de commande
ou la télécommande pour faire pivoter automatiquement la grille
avant verticale, le témoin corre spondant s‘allume. Appuyer une
nouvelle fois sur ce symbole pour arrêter le mode pivotement,
le témoin s‘éteint. Les grilles arr ière peuvent être réglées
manuellement si besoin pour orienter le flux d‘air de haut en bas.
VITES SE
Appuyer sur le symbole pour que la ventilation démarre à la vitesse
la plus basse (1). Appuyer une nouvelle fois sur le symbole sur le
panneau de commande ou la télécommande pour régler la vitesse
de basse (1) à moyenne (2) ou à élevée (3).
Nettoyage et entretien (filtre spécial 3 pièces)
ANIONS
Appuyer sur le symbole anions sur le panneau de commande ou
la télécommande : pour désactiver le mode anions, appuyer une
nouvelle fois sur le symbole. ANIONS est un système pour éliminer
les bactéries dans le réser voir d‘eau. La fonction anions ajoute
une charge négative à l‘eau, qui doit empêcher le développement
de bactéries et bien plus encore et attire la pous sière. La fonction
correspond au fonctionnement d‘un pur ificateur d‘air.
MINUTERIE
Appuyer sur le symbole minuterie sur le panneau de commande ou
la télécommande pour régler la minuterie. À chaque actionnement
du symbole, le réglage est modifié. Le réglage est croiss ant de 1 à 7
heures. Appuyer une nouvelle fois pour désacti ver.
CONSEILS IMPORTANT S :
• La fonction de refroidis sement fonctionne de manière optimale
en cas de faible humidité de l‘air. Si l‘humidité de l‘air est très
élevée, la température ne peut pas être diminuée de manière
aussi importante.
• Utiliser de l‘eau propre et froide à chaque utilisation. Plus l‘eau
est froide, plus l‘effet de refroidissement est optimal . De petits
glaçons peuvent également être mélangés dans l‘eau afin
d‘obtenir un effet encore meilleur.
• 20 à 30 minutes avant la mise hors service, dés activer la
fonction de refroidissement (« Cool ») et lais ser tourner
l‘appareil de sorte que les filtres spéciau x puissent sécher. Cela
permet ainsi d‘éviter les mauvaises odeurs , les dépôts et la
formation de moisissure.
• Remarque : lors de la mise en route de l‘appareil, la fonction
refroidissante (pompage de l‘eau dans le filtre) n‘est pas
automatiquement mise en service. Le symbole Refroidis sement
doit être à chaque fois être actionné.
1 2 3
1. Enlever le couvercle (J) au dos.
2. Extraire le filtre spécial dans le sens de la flèche (1).
3. Retirer le filtre spécial dans l‘ordre suivant : maintenir fermement
le boîtier de l‘appareil à une main. Tirer prudemment le filtre avec
l‘autre main d‘un côté et tirer vers le haut hors de la bordure (2).
4. Nettoyer régulièrement le filtre spécial à l‘eau normale et ôter la
crasse avec une brosse douce ou un chiffon (3).
5. Faire attention à la taille lors de la mise en place des filtre s. Les
filtres ont des tailles différentes et doivent
être replacés en fonction de leur taille.
Assurez-vous également que les filtres
changent de forme sur le côté supérieur.
Ce changement de forme doit toujours se
situer vers le haut. Si les filtres sont très
sales, ils doivent être remplacés, en ca s
d‘utilisation régulière ils se changent au
moins tous les 6 mois.
Remarque : Lorsqu‘un détart rage s‘avère nécessaire, toujours
ôter le filtre préalablement.
BOUCHON DE PURGE D‘EAU
Pour purger l‘eau de l‘appareil, placez un récipient en des sous du
bouchon de purge d‘eau (K) situé sous l‘appareil ou bien placez
l‘appareil dans la douche ou la baignoire. Ouvrez ensuite le bouchon
de purge d‘eau (K) avec précaution et veillez à ce que l‘eau ne
s‘écoule pas sur le sol afin de ne pas abîmer ce dernier.
Fabriqué en Chine
11
Page 12

Dépannage :
Problème Cause possible Mesure correc tive Remarques
Coupure de courant ou
connecteur d'alimentation
électrique défectueux .
Mesurer la tension d'entrée
et raccorder l'appareil à une
source de courant adaptée.
Il est recommandé d'utiliser un
voltmère pour obtenir la tension
correcte.
Le refroidisseur d‘air par
évaporation ne fonctionne pas
et ne réagit pas aux pressions
sur les boutons.
Aucun air ne sort de l‘appareil
bien que la machine soit en
service.
La pompe fonctionne mais
l‘appareil ne diffuse pas de
froid.
La pompe fonctionne mais
aucun air ne circule, ou bien les
filtres spéciaux ne contiennent
pas suffisamment d'eau.
De l‘eau est projetée de
l‘appareil.
Odeur désagréable.
Dépôts blancs dans le réser voir
d‘eau.
Les piles de la télécommande
sont vides.
La télécommande ou le
panneau de commande est
endommagé(e).
La télécommande ne fonctionne
pas.
Le moteur est endommagé.
La protection thermique dans le
moteur s'est déclenchée.
La fonction refroidis sante
(pompage de l'eau dans le
filtre) n'est pas activée.
Les filtres spéciaux sont
obstrués ou sales.
Les filtres spéciaux sont sec s ou
ne retiennent pas suffisamment
d‘eau.
Humidité relative de l‘air trop
élevée.
Le réservoir supérieur diffuseur
d'eau est obstrué.
Les filtres spéciaux ou le
couvercle arrière (J) ne sont
pas montés au bon endroit.
Le réservoir supérieur diffuseur
d'eau est obstrué.
Le réservoir d'eau ou les filtr es
spéciaux sont sales.
L'eau est trop calcaire.
Remplacer les piles.
Veuillez vous adresser à notre
service client.
La télécommande doit pointer
directement vers l'appareil.
Veuillez vous adresser à notre
service client.
Mettre l'appareil hors ser vice
jusqu'à ce que le moteur ait
refroidi.
Le symbole Refroidissement
doit être actionné après chaque
mise en service de l'appareil.
Nettoyer ou remplacer les
filtres spéciaux.
Inspecter le réservoir diffuseur
d‘eau et s‘assurer qu‘il n‘est pas
obstrué.
La fonction Refroidissement
est désactivtée – veuillez la
réactiver.
Lorsque le refroidisseur d‘air
par évaporation est utilisé
pendant une longue période,
l‘humidité de la pièce devient
très élevée et la température a
alors du mal à baisser. Baisser
le mode Refroidissement à
la vitesse inférieure ou bien
désactiver jusqu‘au ce que
l‘humidité de l‘air ait baissé.
Nettoyer le réservoir supérieur
diffuseur d'eau.
Assembler cor rectement les
filtres spéciaux ou le couvercle
arrière (J).
Nettoyer le réservoir supérieur
diffuseur d'eau.
Nettoyer le réservoir d'eau et
les filtres spéciaux.
Vidanger le réservoir d'eau et
nettoyer les filtres spéciaux et
le réservoir plus souvent ou
bien les détartrer.
Si l'eau est très calcair e,
utiliser de l'eau déminéralisée
à l'avenir.
12
Page 13

IT
LEGGERE ATTENTAMENTE LE PRESENTI
ISTRUZIONI PER L‘USO PRIMA DI
UTILIZZARE IL PRODOTTO.
AVVERTENZE DI SICUREZZA:
1. Nello spostare l‘apparecchio, fare
attenzione che l‘acqua non trabocchi.
2. Non appoggiare oggetti sul raffrescatore
d‘aria e non spostare le aperture di ingresso
e uscita dell‘aria.
3. Non inserire oggetti nella presa d‘aria
mentre l‘apparecchio è in funzione.
4. Prima della pulizia estrarre la spina
dell‘apparecchio.
5. In caso di malfunzionamenti, spegnere
immediatamente l‘apparecchio, per
esempio se il cavo elettrico è danneggiato,
e rivolgersi alla nostra assistenza clienti. Si
sconsiglia all‘utente di smontare o riparare
personalmente l‘apparecchio.
6. Utilizzare soltanto acqua pulita. Se l‘acqua è
molto calcarea, utilizzare acqua distillata.
7. Il prodotto funziona al meglio in zone pulite.
Particelle grossolane di polvere e sporco
possono limitare la durata dell‘apparecchio.
8. Si consiglia l‘utilizzo solo in zone asciutte.
In caso di utilizzo in ambiente umido,
fare attenzione che non penetri acqua
nell‘alloggiamento del prodotto.
9. Se il prodotto viene a contatto con acqua,
scollegarlo dall‘alimentazione elettrica e
lasciarlo asciugare per 24 ore. In seguito
utilizzare come di consueto.
10. Non esporre alla luce solare diretta per un
tempo prolungato.
11. Non toccare il collegamento elettrico o il
cavo con le mani bagnate.
12. Non collocare l‘apparecchio accanto a una
stufetta elettrica.
13. Non collocare l‘apparecchio in zone di
passaggio, in cui vi si potrebbe inciampare
o lo si potrebbe rovesciare.
14. Non immergere l‘apparecchio in acqua o
altri liquidi.
15. Non collocare l‘apparecchio vicino a fiamme
libere o sorgenti di calore.
16. L‘apparecchio può essere utilizzato da
bambini di età pari o superiore a 8 anni e
da persone con ridotte capacità fisiche,
sensoriali o mentali o privi delle necessarie
esperienze e/o conoscenze solo sotto
supervisione o solo se istruiti sull‘uso
sicuro dello stesso e ne hanno compreso
i rischi derivanti. I bambini non devono
giocare con l‘apparecchio. La pulizia e la
manutenzione di competenza dell‘utente
non devono essere eseguite dai bambini
a meno che non abbiano più di 8 anni e
siano sotto supervisione. I bambini di
età inferiore agli 8 anni devono essere
tenuti lontani dall‘apparecchio e dal cavo
di collegamento. Prestare la massima
attenzione quando si utilizza l‘apparecchio
in presenza di bambini o lo si lascia
incustodito.
17. Il produttore declina ogni responsabilità per
danni causati dall‘inosservanza di queste
istruzioni.
ISTRUZIONI PER L‘USO :
1. Prima di accendere l‘apparecchio, riempire il ser batoio con
acqua. Nota: più l‘acqua utilizzata è fredda, maggiore sar à
l‘effetto rinfrescante. Per tanto si può usare anche acqua
ghiacciata o acqua con cubetti di ghiaccio.
2. Estrar re il cassetto per l‘alimentazione dell‘acqua sul lato
anteriore del raffrescatore d‘ar ia e riempirlo con acqua fredda
fino alla linea MA X (indicatore di livello E). Nota: il livello
dell‘acqua non deve superare il limite della linea MA X per evitare
che, spostando il raffrescatore d‘ar ia, l‘acqua trabocchi.
13
Page 14

3. Svuotare il serbatoio aprendo il tappo di sc arico dell‘acqua
(K) dopo ogni utilizzo e pulire regolarmente i filtri speciali e il
serbatoio dell‘acqua.
4. Utilizzare acqua pulita a ogni utilizzo.
5. Riempire il serbatoio soltanto con acqua pulita; non vers are altri
liquidi nel serbatoio.
FUNZIONI:
RAFFRES CAMENTO
Premere il simbolo del raffrescamento ‚Cool‘ sul pannello
di comando o sul telecomando per avviare la modalità di
raffrescamento. Premere nuovamente il simbolo per spegnere la
modalità di raffrescamento.
Nota: quando si accende l‘apparecchio, la funzione di
raffrescamento non è attiv a (l‘acqua viene pompata nei filtri). Il
simbolo del raffrescamento deve essere premuto ogni volt a che si
accende l‘apparecchio.
ALIMENTAZIONE ELET TRICA
Premere il simbolo on/off sul pannello di comando o sul
telecomando per accendere il raffrescatore d‘aria, la s pia
corrispondente si accende. Premere nuovamente questo simbolo
per spegnere l‘apparecchio, la spia si spegne.
ROTAZIONE
Premere il simbolo della rotazione sul pannello di comando o sul
telecomando per far ruotare automaticamente la griglia ver ticale
anteriore, la spia corrispondente si accende. Premere nuovamente
questo simbolo per arrestare la modalità di r otazione, la spia si
spegne. Impostare manualmente la griglia posteriore a seconda
delle esigenze per guidare dall‘alto verso il basso la corrente d‘ar ia.
Pulizia e manutenzione (filtro speciale in 3 parti)
VELOCITÀ
Premere il simbolo della velocità, in modo che la ventola si avvii alla
velocità minima (1). Premere nuovamente il simbolo sul pannello di
comando o sul telecomando per regolare la velocità da bassa (1) a
media (2) o alta (3).
ANIONI
Premere il simbolo degli anioni sul pannello di comando o sul
telecomando. Per arrestare la modalità anioni, premere nuovamente
il simbolo. ANIONI è un sistema per eliminare i batteri nel serbatoio
dell‘acqua. La funzione degli anioni aggiunge all‘acqua una caric a
negativa che impedisce la proliferazione di batteri e molto altr o e
attrae la polvere. La funzione equivale all‘effet to di un detergente
dell‘aria.
TIMER
Premere il simbolo del timer sul pannello di comando o sul
telecomando per impostare il timer. L‘impostazione cambia a
ciascun azionamento del simbolo. Crescente da 1 a 7 ore. Per
disattivare premere poi nuovamente.
SUGGERIMENTI IMPORTANTI:
• La funzione di raffresc amento funziona in modo ottimale con
umidità dell‘aria ridotta. Se l‘umidità dell‘ar ia è molto elevata,
non è possibile abbassare molto la temperatur a.
• Utilizzare acqua fredda pulita a ogni utilizzo. Più l‘acqua è fredda,
più l‘effetto di raffrescamento è effic ace. È anche possibile
aggiungere piccoli cubetti di ghiaccio all‘acqua per ottenere un
effetto ancora migliore.
• 20 – 30 minuti prima dello spegnimento, spegnere la funzione di
raffrescamento („Cool“) e lasciare in f unzione l‘apparecchio in
modo che i filtri speciali possano asciugarsi. In ques to modo si
evitano cattivi odor i, depositi e formazione di muffa.
• Nota: quando si accende l‘apparecchio, la funzione di
raffrescamento non è attiv a (l‘acqua viene pompata nei filtri). Il
simbolo del raffrescamento deve essere premuto ogni volt a che
si accende l‘apparecchio.
1 2 3
1. Togliere la copertura (J) sul lato posteriore.
2. Estrar re il filtro speciale nella direzione della freccia (1).
3. Rimuovere il filtro speciale dall‘apertura anter iore: tenere fermo
l‘alloggiamento con una mano. Con l‘altra mano, estrarlo con
cautela verso l‘alto e di lato dalla sua sede (2).
4. Pulire regolarmente il filtro speciale con acqua normale e
rimuovere la sporcizia con una spazzola morbida o un panno (3).
5. Quando si inseriscono i filtri, pres tare attenzione alla misura.
I filtri sono di grandezze diverse e bisogna
reinserirli di conseguenza. Tenere inoltre
presente che i filtri hanno una forma
diversa nella parte superiore c he, durante
l‘inserimento, deve essere rivolta verso
l‘alto. Se i filtri sono molto sporchi,
sostituirli; in caso di impiego regolare
sostituirli almeno ogni 6 mesi.
Nota: Se si ritiene neces sario eliminare il calcare, per prima cosa
rimuovere il filtro.
TAPPO DI SCARICO DELL‘ACQUA
Per togliere l‘acqua dall‘apparecchio, posizionare un recipiente sotto
il tappo di scarico dell‘acqua (K) situato in bas so sul lato posteriore
dell‘apparecchio oppure mettere l‘apparecchio nella doccia/vasc a
da bagno. Aprire quindi con cautela il tappo di scar ico dell‘acqua (K)
assicurandosi di non rovesciare acqua per non danneggiare il fondo.
Fabbricato in Cina
14
Page 15

Risoluzione guasti:
Problema Possibile causa Rimedio Note
Black-out o collegamento
elettrico difettoso.
Misurare la tensione in ingresso
e collegare l'apparecchio a una
sorgente elettrica adeguata.
Si consiglia di utilizzare un
misuratore di tensione per
determinare l'esatta tensione.
Il raffrescatore d‘aria
evaporativo non funziona e
non reagisce alla pressione di
pulsanti.
Dall‘apparecchio non esce aria
nonostante la macchina sia in
funzione.
La pompa funziona ma
l‘apparecchio non raffresca.
La pompa funziona ma l'acqua
non gira oppure i filtri speciali
contengono troppa poca acqua.
L'apparecchio spruzza acqua.
Odore sgradevole.
Depositi bianchi nel serbatoio
dell'acqua.
Le batterie del telecomando
sono scariche.
Il telecomando o il pannello di
comando è danneggiato.
Il telecomando non funziona.
Il motore è danneggiato.
La protezione termica nel
motore è scattata.
La funzione di raffresc amento
(l'acqua viene pompata nei
filtri) non è attivata.
I filtri speciali sono ostruiti o
sporchi.
I filtri speciali sono asciutti o
non contengono abbastanza
acqua.
Umidità dell‘aria relativa
eccessiva.
Il contenitore di distribuzione
dell'acqua superiore è intasato.
I filtri speciali o la copertura
posteriore (J) non sono
posizionati correttamente.
Il contenitore di distribuzione
dell'acqua superiore è intasato.
Il serbatoio dell'acqua o i filtri
speciali sono sporchi.
L'acqua presenta un contenuto
di calcare troppo elevato.
Sostituire le batterie.
Rivolgersi alla nostra
assistenza clienti.
Puntare il telecomando
direttamente verso
l'apparecchio.
Rivolgersi alla nostra
assistenza clienti.
Lasciare spento l'apparecchio
fintanto che il motore si è
raffreddato.
Il simbolo del raffrescamento
deve essere premuto ogni volta
che si accende l'apparecchio.
Pulire o sostituire i filtri speciali.
Controllare che il contenitore
di distribuzione dell‘acqua
superiore non sia ostruito.
La funzione di raffresc amento è
disattivata - atti varla.
Se si utilizza il raffrescatore
d‘aria evaporativo per un
periodo prolungato con
un‘umidità dell‘aria nel locale
molto elevata, non sarà
possibile abbassare molto
la temperatura. Impostare la
modalità di raffrescamento
a una velocità più bassa o
disattivarla finché l‘umidità
dell‘aria è diminuita.
Pulire il contenitore di
distribuzione dell'acqua
superiore.
Posizionare correttamente
i filtri speciali o la copertura
posteriore (J).
Pulire il contenitore di
distribuzione dell'acqua
superiore.
Pulire il serbatoio dell'acqua e i
filtri speciali.
Svuotare il serbatoio dell'acqua
e pulire o decalcificare più
spesso i filtri speciali e il
serbatoio.
In caso di acqua fortemente
calcarea, in futuro utilizzar e
acqua distillata.
15
Page 16

NL
LEES DEZE GEBRUIKSAANWIJZING
ZORGVULDIG DOOR. ALVORENS HET
PRODUCT IN GEBRUIK TE NEMEN.
VEILIGHEIDSINSTRUCTIES:
1. Wees voorzichtig dat er bij het verplaatsen
van het apparaat geen water overloopt.
2. Leg geen voorwerpen boven op de
luchtkoeler en blokkeer de luchtin- en
-uitlaten niet.
3. Steek geen voorwerpen in de
ontluchtingsopening terwijl het apparaat in
werking is.
4. Trek de stekker uit het stopcontact voor u
het apparaat schoonmaakt.
5. Schakel het apparaat meteen uit als er een
storing optreedt, bijvoorbeeld wanneer het
netsnoer is beschadigd. Neem ook meteen
contact op met onze Klantenservice. Het
is ook niet raadzaam dat de gebruiker het
apparaat open maakt of repareert.
6. Gebruik alleen schoon water. Als het
kraanwater veel kalk bevat, gebruik dan
gedistilleerd water.
7. Het apparaat werkt het best in een schone
omgeving. Grote stof- en vuildeeltjes
kunnen de levensduur van het apparaat
negatief beïnvloeden.
8. We adviseren om het apparaat alleen te
gebruiken op droge plaatsen. Als u het
apparaat gebruikt in een vochtige omgeving,
moet u erover waken dat er geen water
binnendringt in de behuizing van het product.
9. Als er water in het product is gesijpeld, trek
dan de stekker uit het stopcontact en laat
het apparaat 24 uur drogen. Daarna kan het
apparaat weer gewoon worden gebruikt.
10. Laat het apparaat niet lange tijd in de zon
liggen.
11. Neem de stekker of het netsnoer nooit vast
met natte handen.
12. Het apparaat mag niet in de buurt van een
verwarmingstoestel worden geplaatst.
13. Plaats het apparaat ook niet op een plaats
met veel doorgaand verkeer. Mogelijk kan
men erover struikelen of kan het apparaat
worden omgegooid.
14. Dompel het apparaat niet onder in water of
in andere vloeistoffen.
15. Het apparaat mag niet naast een open vuur
of in de buurt van ontstekingsbronnen
worden geplaatst.
16. Dit apparaat kan worden gebruikt door
kinderen van 8 jaar of door personen met
verminderde fysieke, sensorische of mentale
capaciteiten of gebrek aan ervaring en/
of kennis, als zij onder toezicht staan of
geïnstrueerd zijn over het veilige gebruik van
het apparaat en de daaruit voortvloeiende
gevaren hebben begrepen. Kinderen mogen
niet met het apparaat spelen. De reiniging
en het gebruikersonderhoud mogen niet
door kinderen worden uitgevoerd, tenzij
ze ouder dan 8 jaar zijn en onder toezicht
staan. Kinderen jonger dan 8 jaar moeten uit
de buurt van het apparaat en het netsnoer
worden gehouden. Uiterste voorzichtigheid
is geboden wanneer een apparaat in de buurt
van kinderen wordt gebruikt en onbewaakt
wordt achtergelaten.
17. De fabrikant kan niet aansprakelijk worden
gesteld voor schade die is opgetreden naar
aanleiding van het oneigenlijk gebruik
van het apparaat, zoals vermeld in deze
gebruiksaanwijzing.
16
Page 17

GEBRUIKSA ANWIJZING:
1. Vul de tank van het apparaat met water voor u het inschakelt.
Tip: hoe kouder het gebruikte water, hoe koeler het effect. U kunt
ook ijswater of water met ijsblokjes gebruiken.
2. Trek de schuiflade voor de watertoevoer aan de voorkant van de
luchtkoeler uit en vul de tank tot aan de MA X-lijn met koud water
(waterpeilweergave E). Tip: het waterpeil mag deze MA X.-grens
niet overschrijden om te voorkomen dat er water uit het apparaat
loop wanneer de luchtkoeler wordt verplaatst.
3. Laat het water na elk gebruik uit de tank lopen met de
wateraflaatklep (K) en maak de speciale filters en de water tank
regelmatig schoon.
4. Gebruik bij elk gebruik vers en koel water.
5. Vul de tank alleen met schoon water, giet nooit andere
vloeistoffen in de tank.
FUNCTIES:
KOELEN
Druk op het pictogram Koelen op het bedieningspaneel of op de
afstandsbediening om de koelmodus in te stellen. Als u nog een keer
op dit pictogram drukt , wordt de koelmodus uitgeschakeld.
Wanneer het apparaat wordt ingeschakeld, is de koelfunctie
niet geactiveerd (water wordt in het filter gepompt). Het
koelpictogram moet telkens opnieuw worden ingeschakeld
wanneer het apparaat wordt aangezet.
STROOMVOORZIENING
Druk op het pictogram Aan/ Uit op het bedieningspaneel of op de
afstandsbediening om de luchtkoeler in te schakelen. Het betreffende
lampje begint te branden. Als u nog een keer op dit pictogram drukt ,
wordt het apparaat uitgeschakeld. Het lampje dooft.
ROTEREN
Druk op het pictogram Roteren op het bedieningspaneel of op de
afstandsbediening om het rechtopstaande voor ste rooster automatisch
te laten roteren. Het betreffende lampje begint te branden. Als u nog
een keer op dit pictogram drukt, wor dt het roteren gestopt. Het lampje
dooft. Het achterrooster kunt u eventueel handmatig instellen om de
luchtstroom van boven naar onder te leiden.
Reiniging en onderhoud (3-delige speciale filter)
SNELHEID
Druk op het pictogram Snelheid om het apparaat op de laagste
snelheid (1) te starten. Als u nog een keer op het pictogram dr ukt
op het bedieningspaneel of op de afstandsbediening wisselt de
snelheid van laag (1), gemiddeld (2) naar hoog (3).
ANIONEN
Druk op het pictogram Anionen op het bedieningspaneel of op de
afstandsbediening. Om de anionenmodus te stoppen, druk t u nog een
keer op het pictogram. ANIONEN is een systeem om bacter iën in de
watertank te doden. Via de anionenfunc tie wordt een negatieve lading
in het water gebracht die ervoor zorgt dat de groei van bac teriën en
nog veel meer verhinderd wordt en dat stof wordt aangetrokken. Deze
functie zorgt ervoor dat de luc ht wordt gereinigd.
TIMER
Druk op het pictogram Timer op het bedieningspaneel of op de
afstandsbediening om de timer in te stellen. Per druk op het
pictogram verandert de ins telling. Stijgend van 1 tot 7 uur. Als u nog
een keer op dit pictogram drukt, wor dt het apparaat uitgeschakeld.
BELANGRIJK E TIPS:
• De koelfunctie werkt het bes t bij een lage luchtvochtigheid.
Wanneer de luchtvochtigheid erg hoog is, zal de temperatuur niet
sterk dalen.
• Gebruik telkens vers en koel water. Hoe kouder het water hoe
groter het koeleffect. Eventueel kunnen kleine ijsblokjes onder
het water worden gemengd voor een nog groter koelvermogen.
• 20 – 30 voor het uitschakelen moet de koelfunctie („Cool“)
worden uitgeschakeld. Laat het apparaat nog een tijdje aan
om de speciale filter helemaal te laten drogen. Zo vermijdt u
slechte geuren, afzettingen en schimmelvorming.
• Wanneer het apparaat wordt ingeschakeld, is de koelfunctie
niet geactiveerd (water wordt in het filter gepompt). Het
koelpictogram moet telkens opnieuw worden ingeschakeld
wanneer het apparaat wordt aangezet.
1 2 3
1. Afdekking (J) aan de achter zijde verwijderen.
2. Trek de speciale filters in de richting van de pijl uit het apparaat (1).
3. Verwijderen van de speciale filters: houd de behuizing met één
hand vast. Trek met de andere hand de speciale filters voorzichtig
langs één zijde en naar boven toe uit het filterhuis (2).
4. Reinig de speciale filters regelmatig met gewoon water.
Verwijder het vuil met een zachte borstel of een doek (3).
5. Let er bij het plaatsen van de filter op dat een filter van de
correcte maat wordt gebruik t. De filters
hebben een verschillende grootte en
moeten dienovereenkomstig worden
gemonteerd. U moet eveneens
controleren of het filter aan een zijde een
vormverandering vertoont. De ze moet bij
het inzetten altijd naar boven wijzen. Als
de filters sterk zijn verv uild, moeten ze
worden vervangen. Bij regelmatig gebruik moet dit minstens om
de 6 maanden gebeuren.
Opmerking: Als ontkalken nodig blijk t, moet u zeker het filter op
voorhand verwijderen.
WATERAFLA ATKLEP
Om het water uit het apparaat te verwijderen, plaatst u een bak je
onder de wateraflaatklep (K) op de onderkant van het appar aat of
plaats u het in de douche/badkuip. Open vervol gens voorzichtig de
wateraflaatklep (K) en zorg ervoor dat er geen water over de vloer
gemorst wordt om beschadiging van de vloer te voorkomen.
Made in China
17
Page 18

Oplossen van fouten:
Probleem Mogelijke oorzaak Oplossing Opmerkingen
Elektriciteits storing of foute
stroomaansluiting.
Meet de ingangsspanning en
sluit het apparaat aan op een
daartoe voorziene stroombron.
Het wordt aanbevolen om een
voltmeter te gebruiken om de
juiste spanning te krijgen.
De luchtkoeler werkt niet en
reageert niet op het drukken op
knoppen.
Er stroomt geen lucht uit het
apparaat, hoewel de machine in
werking is.
De pomp werkt, maar het
apparaat koelt niet.
De batterijen van de
afstandsbediening zijn leeg.
De afstandsbediening of
het bedieningspaneel is
beschadigd.
De afstandsbediening werkt
niet.
De motor is beschadigd. Wend u tot onze klantendienst.
De thermische veiligheid van de
motor werd geactiveerd.
De koelfunctie (water wordt
in het filter gepompt) is niet
ingeschakeld.
De speciale filters zijn verstopt
of zijn vuil.
De speciale filters zijn droog of
bevatten niet genoeg water.
Te hoge relatieve
luchtvochtigheid.
Vervang de batterijen.
Wend u tot onze klantendienst.
De afstandsbediening moet
rechtstreeks op het appar aat
gericht zijn.
Laat het apparaat
uitgeschakeld, tot de motor
afgekoeld is.
Het koelpictrogram moet na
elke inschakelbeurt worden
ingedrukt.
Reinig de speciale filters of
reinig ze.
Controleer het bovenste
waterverdeelreser voir en
controleer of er een verstopping
is.
Koelfunctie is gedeactiveerd gelieve ze te activeren.
Als de verdampingsluchtkoeler
gedurende een lange
tijd gebruikt wordt, is de
luchtvochtigheid in de ruimte
heel hoog, daarom kan de
temperatuur niet zo sterk
worden verminderd. Draai
de koelmodus naar een lager
niveau of deactiveer deze totdat
de luchtvochtigheid is gedaald.
De pomp werkt, maar doet geen
water circuleren of de speciale
filters bevatten te weinig water.
Er lekt water uit het apparaat.
Onaangename geur.
Witte afzettingen in de
watertank.
Het bovenste waterverdeelvat
is verstopt.
De speciale filters of de
achterafdekking (J) zitten niet
op hun juiste plaats.
Het bovenste waterverdeelvat
is verstopt.
Het waterreservoir of de
speciale filters zijn vuil.
Het water heeft een te hoog
kalkgehalte.
Het bovenste waterverdeelvat
reinigen.
Plaats de speciale filters of
de achterafdekking (J) op de
juiste plek.
Het bovenste waterverdeelvat
reinigen.
Maak de watertank en de
speciale filters schoon.
Spui de watertank en de
speciale filter en reinig de tank
vaker, resp. ontkalk hem vaker.
18
Gebruik gedestilleerd water in
plaats van water met een hoog
kalkgehalte.
Page 19

HU
KÉRJÜK FIGYELMESEN OLVASSA EL EZT
A HASZNÁLATI UTASÍTÁST, MIELŐTT A
TERMÉKET HASZNÁLNÁ.
BIZTONSÁGI UTASÍTÁSOK:
1. Legyen óvatos, hogy a készülék
áthelyezésekor ne löttyenjen ki víz.
2. Ne tegyen tárgyakat a hűtő tetejére, és ne
helyezze át a levegő bemeneti és kimeneti
nyílásait.
3. Ne tegyen semmit a szellőzőnyílásba, amíg
a készülék működik.
4. Tisztítás előtt húzza ki a készülékt a
konnektorból.
5. Hibás működés esetén azonnal kapcsolja
ki a készüléket, például ha a tápkábel
sérült, és vegye fel a kapcsolatot
vevőszolgálatunkkal. A készülék
szétszerelése vagy javítása a felhasználó
által nem ajánlott.
6. Csak tiszta vizet használjon. Erősen meszes
víz esetén desztillált vizet használjon.
7. A termék tiszta területeken
működik a legjobban. A nagy por- /
szennyeződésrészecskék hátrányosan
befolyásolhatják a készülék élettartamát.
8. Javasoljuk, hogy csak száraz környezetben
használja. Nedves környezetben történő
használat esetén ügyeljen arra, hogy ne
kerüljön víz a termék házára.
9. Ha víz jut a termékre, húzza ki a
tápegységből, és hagyja száradni 24 órán
keresztül. Ezután ugyanúgy használja
ismét, mint máskor.
10. Ne tegye ki közvetlen napfénynek hosszabb
ideig.
11. Ne érintse meg nedves kézzel a tápegységet
vagy a kábelt.
12. Ne tegye a készüléket fűtőberendezés
közelébe.
13. Ne tegye a készüléket közlekedési
útvonalra, nehogy megbotoljon benne
valaki, vagy felborítsa azt.
14. Ne merítse a készüléket vízbe vagy más
folyadékba.
15. Ne tegye a készüléket nyílt tűz vagy
tűzforrás mellé.
16. Ezt a készüléket 8 évnél fiatalabb
gyermekek vagy csökkent fizikai,
érzékszervi vagy szellemi képességekkel
rendelkező személyek, illetve tapasztalattal
és/vagy tudással nem rendelkező
személyek csak felügyelet mellett
használhatják, vagy ha megértették az
eszköz biztonságos használati módját, és az
abból fakadó veszélyeket. Gyermekek nem
játszhatnak a készülékkel . A tisztítást és a
felhasználói karbantartást gyermekek nem
végezhetik el, kivéve, ha azok több mint 8
évesek és felügyelet alatt állnak. Tartsa
távol a 8 évnél fiatalabb gyermekeket
a készüléktől és a csatlakozókábeltől.
Különös elővigyázatosság szükséges, ha az
eszközt gyerekek közelében használják, és
ha a készülék felügyelet nélkül működik.
17. A gyártó nem vállal felelősséget az ezen
utasítások be nem tartásából eredő
károkért.
KEZELÉSI LEÍRÁS:
1. A készülék bekapcsolása előtt tölt se fel vízzel a tartályt.
Tudnivaló: Minél hidegebb a felhasznált víz, annál erőteljesebb a
hűtés. Ezért jeges vizet vag y jégkockás vizet is használhat.
2. Húzza ki a léghűtő elülső felén lévő vízellátó fiókot, és töltse fel
hideg vízzel a MAX vonalig (vízszintjel ző E). Tudnivaló: A vízszint
nem haladhatja meg a MAX vonal s zintjét, így kerülheti el, hogy a
léghűtő áthelyezésekor a víz kilöttyenjen.
3. Minden használat után engedje ki a vizet a tar tályból a
vízleeresztő kupakkal (E), és rendszere sen tisztítsa meg a
speciális szűrőt és a víztartályt.
19
Page 20

4. Minden használat alkalmával használjon fr iss vizet.
5. Csak tiszta vízzel töltse fel a t artályt, ne öntsön más folyadékot
a tartályba.
FUNKCIÓK:
HŰTÉS
A hűtés üzemmód elindításához nyomja meg a vezérlőpulton vagy
a távirányítón a hűtés ‚Cool‘ ikonját. A hűtési mód kikapc solásához
nyomja meg ismét az ikont.
Tudnivaló: Amikor a készüléket bekapcsolja, a hűtési funkció (víz
szivattyúzása a szűrők be) nem aktív. A hűtés ikont bekapcsolás
után minden alkalommal meg kell nyomni.
ÁRAMELL ÁTÁS
Nyomja meg a be / ki ikont a kezelőpanelen vagy a távirányítón a
léghűtő bekapcsolásához, ekkor a megfelelő lámpa világít. Nyomja
meg ismét ezt az ikont a készülék kikapcsolásához, ekkor a lámpa
elalszik.
FORGATÁS
A függőleges első rács automatikus forgat ásához nyomja meg a
vezérlőpulton vagy a távirányítón lévő forgat ás ikont, és a megfelelő
lámpácska kigyullad. Nyomja meg ismét ezt az ikont a for gató
üzemmód kikapcsolásához, a lámpa elalszik. A hát só rácsok
manuálisan állíthatók be igény szerint, hogy a levegő áramlását
felülről lefelé irányítsák.
SEBESSÉG
Nyomja meg a sebesség szimbólumot, hogy a legalac sonyabb
fordulatszámmal (1) a ventilátor elinduljon. A sebessé g alacsony
(1) - közepes (2) vagy magas (3) közötti beállításához nyomja meg
ismét a kezelőpanel vagy a távirányító ikonját.
Tisztítás és karbantar tás (3-részes speciális szűrő)
ANIONOK
Nyomja meg az Anion ikont a kezelőpanelen vagy a távvezérlőn: Az
anion mód leállításához nyomja meg ismét az ikont. Az ANIONOK
egy baktériumok elpusztításár a szolgáló rendszer a víztartályban.
Az anion-funkció negatív töltést ad a vízhez, ami többek között
megakadályozza a baktériumok növekedését és megköti a port. A
funkció megegyezik egy légszűrő működési módjával.
IDŐZÍTŐ
Az időzítő bekapcsolásához nyomja meg az ór a szimbólumot
a kezelőmezőn vagy a távvezérlőn. A szimbólum minden
megnyomásakor változik a beállítás. 1-től 7 óráig emelkedő
számsorrendben. Az e zt követő kikapcsoláshoz még egyszer
nyomja meg.
FONTOS JAVASLATOK:
• A hűtési funkció legjobban alacsony páratar talom mellett
működik. Ha a páratart alom nagyon magas, akkor a
hőmérsékletet nem lehet erőteljesen csök kenteni.
• Minden felhasználásnál használjon hideg, fris s vizet. Minél
hidegebb a víz, annál jobb a hűtés hatákonysága. A még jobb
hatás elérése érdekében kisméretű jégkocka keverhető a vízbe.
• 20-30 perccel a kikapcsolás előt t kapcsolja ki a hűtési funkciót
(„Cool“) és hagyja, hogy a készülék tovább működjön, hogy
a speciális szűrők kiszáradjanak. Így ker ülheti el a rossz
szagokat, a lerakódásokat és a penészedést .
• Tudnivaló: Amikor a készüléket bekapcsolja, a hűtési funkció
(víz szivattyúzása a szűrők be) nem aktív. A hűtés ikont
bekapcsolás után minden alkalommal meg kell nyomni.
1 2 3
1. Távolítsa el a hátlap fedelét (J).
2. Húzza ki a speciális szűrőket a nyíl irányába (1).
3. A speciális szűrők eltávolítása az elülső nyílásból: Fogja me g
erősen a házat egy kézzel. Óvatosan húzza a másik kezével az
egyik oldalról felfelé a keretből (2).
4. Rendszeresen tisztítsa a speciális s zűrőket normál vízzel, és
törölje le a szennyeződést puha kefével vagy ruhával (3).
5. A szűrők behelyezésekor ügyeljen azok méretére. A szűrők eltérő
méretűek, ennek megfelelően is kell őket
alkalmazni. Ugyancsak ügyeljen ar ra,
hogy a szűrők felső része formázott .
Mindig a formázott oldalnak kell felfelé
mutatnia. Ha a szűrők erősen
elszennyeződtek, akkor ki kell őket
cserélni, rendszeres használat e setén
legalább 6 havonta.
Tudnivaló: Ha vízkőoldás tűnik szükségesnek, előtte
mindenképpen távolítsa el a szűrőket.
VÍZLEERESZTŐ KUPAK
A víznek a készülékből történő eltávolításához tegyen egy edényt a
készüléket alsó hátsó részén levő vízleeresztő kupak (K ) alá, vagy
tegye be az eszközt a zuhany alá/a kádba. Ezután óvatosan nyiss a
ki a vízleeresztő kupakot (K) és ügyeljen ar ra, hogy ne löttyenjen ki
víz, hogy ne sérüljön meg a padlózat.
Származási hely: Kína
20
Page 21

Hibaelhárítás:
Probléma Lehetséges ok Megoldás Megjegyzések
A párologtató levegőhűtő
nem működik és nem reagál
a gombok megnyomására.
A készülék működése ellenére
nem áramlik levegő.
A szivattyú működik, de a
készülék nem hűt.
Mérje meg a bemeneti
Áramkimaradás vagy hibás
hálózati csatlakozás.
A távvezérlő elemei lemerültek. Cserélje ki az elemeket.
A távirányító vagy a kezelőpanel
megsérült.
A távvezérlő nem működik.
A motor megsérült.
A motor hővédelme kioldódott.
A hűtési funkció (víz
szivattyúzása a s zűrőkbe) nincs
bekapcsolva.
A speciális szűrők eldugultak
vagy piszkosak.
A speciális szűrők szárazak
vagy nem tartalmaznak
elegendő vizet.
Túl magas a levegő relatív
páratartalma.
feszültséget, és c satlakoztassa
a készüléket egy megfelelő
áramforráshoz.
Kérjük, forduljon
ügyfélszolgálatunkhoz.
A távvezérlőt közvetlenül a
készülékre irányítsa.
Kérjük, forduljon
ügyfélszolgálatunkhoz.
Kapcsolja ki a kés züléket, amíg
a motor lehül.
A hűtés ikont bekapcsolás után
minden alkalommal meg kell
nyomni.
Tisztítsa meg vagy c serélje ki a
speciális szűrőket.
Ellenőrizze a felső vízelosztó
edényt, és ellenőrizze, hogy
nincs-e dugulás.
A hűtési funkció inaktív - kérjük,
aktiválja.
Ha hosszabb ideig használja
a párologtató levegőhűtőt, a
helyiségben nagyon magas
lesz a páratar talom, tehát
a hőmérsékletet nem lehet
erősen csökkenteni. Állítsa
alacsonyabb szintre a hűtési
módot vagy inaktiválja azt, amíg
a páratartalom le nem c sökken.
Ajánlott voltmérő használata
a megfelelő feszültségér ték
eléréséhez.
A szivattyú működik, de
nem cirkulál vizet, vagy a
speciális szűrők túl kevés vizet
tartalmaznak.
Víz fröcsköl ki a készülékből .
Kellemetlen szagok.
Fehér lerakódások a
víztartályban.
A felső vízelosztó edény
eldugult.
A speciális szűrők vagy a
hátsó burkolat (J) nincsenek a
megfelelő helyen.
A felső vízelosztó edény
eldugult.
A víztartály vagy a speciális
szűrők elszennyeződtek.
Túl magas a víz mésztartalma.
Tisztítsa meg a felső vízelosztó
edényt.
Helyezze be a speciális szűrőket
vagy a hátsó fedelet (J)
megfelelően.
Tisztítsa meg a felső vízelosztó
edényt.
Tisztítsa meg a víztar tályt és a
speciális szűrőket.
Engedje le a víztartályt, és
tisztítsa gyakr abban, ill.
vízkőmentesítse a speciális
szűrőket és a tartályt.
21
Magas mésztartalmú víz e setén
használjon a jövőben desztillált
vizet.
Page 22

CZ
POZORNĚ SI PROSÍM PŘEČTĚTE TENTO
NÁVOD K OBSLUZE, NEŽ ZAČNETE
PRODUKT POUŽÍVAT.
BEZPEČNOSTNÍ POKYNY:
1. Buďte opatrní, aby při přemístění přístroje
nepřetekla žádná voda.
2. Nepokládejte žádné předměty nahoru na
chladič vzduchu a nezakrývejte vstupní a
výstupní otvory vzduchu.
3. Nezasunujte žádný předmět do
odvětrávacího otvoru za provozu přístroje.
4. Před čištěním odpojte zástrčku přístroje.
5. Vypněte ihned přístroj při chybné funkci,
například když je elektrický kabel
poškozený a obraťte se na náš zákaznický
servis. Demontáž nebo opravu přístroje
uživatelem nedoporučujeme.
6. Používejte jen čistou vodu. Při silně vápenité
vodě používejte destilovanou vodu.
7. Produkt funguje nejlépe v čistém prostředí.
Velké částice prachu a nečistot mohou
ovlivnit životnost přístroje.
8. Doporučujeme použití jen v suchých
oblastech. Při použití ve vlhkém prostředí
dbejte na to, aby se na plášť produktu
nedostala voda.
9. Jestliže se na produkt dostane voda, odpojte
jej od elektrického napájení a nechte jej
24 hodin schnout. Potom opět používejte
běžným způsobem.
10. Nevystavujte delší dobu přímému
slunečnímu záření.
11. Nedotýkejte se elektrické přípojky nebo
kabelu mokrýma rukama.
12. Přístroj nestavte vedle topení.
13. Nestavte přístroj do průchozích oblastí,
aby nebylo možné o něj zakopnout nebo ho
převrátit.
14. Přístroj neponořujte do vody nebo jiných
kapalin.
15. Přístroj nestavte vedle otevřeného ohně
nebo zdrojů ohně.
16. Přístroj mohou používat děti ve věku od
8 let nebo osoby se sníženými fyzickými,
smyslovými nebo duševními schopnostmi
nebo nedostatečnými zkušenostmi a/
nebo znalostmi, pokud jsou pod dohledem
nebo pokud byly instruovány o bezpečném
používání přístroje a byly obeznámeny
s nebezpečími z toho plynoucími. Děti
si s přístrojem nesmí hrát. Čištění a
uživatelskou údržbu přístroje nesmí
provádět děti, pokud nejsou starší než 8 let
a nejsou pod dohledem. Neponechávejte
přístroj a připojovací kabel v dosahu
dětí mladších 8 let. Nejvyšší opatrnosti
je zapotřebí, pokud se přístroj používá
v blízkosti dětí, a pokud je ponechán v
provozu bez dozoru.
17. Výrobce nepřebírá odpovědnost za škody,
vzniklé v důsledku nedodržování těchto
návodů.
NÁVOD K OBSLUZE:
1. Před zapnutím přístroje naplňte nádr žku vodou. Upozornění:
Čím chladnější je použitá voda, tím vyšší je chladicí efekt . Můžete
proto použít i ledovou vodu nebo vodu s kostkami ledu.
2. Vytáhněte přihrádk u pro přívod vody na přední straně chladiče
vzduchu a naplňte studenou vodou až k lince MA X (ukazatel
stavu vody E). Upozornění: Stav vody nesmí př ekročit linku
MAX, aby se z abránilo přetečení vody při přemisťování chladiče
vzduchu.
3. Vypusťte vodu z nádržk y po každém použití pomocí víčka odtoku
vody (K) a čistěte pravidelně speciální filtr y a nádržku na vodu.
4. Použijte při každém použití čerst vou vodu.
5. Plňte nádržku pouze čistou vodou, nenalévejte do ní žádnou jinou
kapalinu.
22
Page 23

FUNKCE:
CHLA ZENÍ
Stiskněte symbol chlazení ‚Cool‘ na ovládacím panelu nebo na
dálkovém ovládání, aby se spustil režim chlazení. Pro vypnutí
chladicího režimu znovu stiskněte symbol.
Upozornění: Při zapnutí přístroje není chladicí funkc e (probíhá
čerpání vody do filtrů) akt ivní. Po zapnutí je pokaždé nutné
stisknout symbol chlazení.
PŘÍPOJK A ELEKTRICKÉHO PROUDU
K zapnutí chladiče vzduchu stiskněte symbol Zap/ Vyp na ovládacím
panelu nebo na dálkovém ovládání, rozsvítí se příslušná kontrolka.
Pro vypnutí přístroje tento symbol s tiskněte znovu, kontrolka
zhasne.
OTÁČENÍ
Stiskněte symbol otáčení na ovládacím panelu nebo na dálkovém
ovládání, aby se přední mřížka automaticky ot áčela, příslušná
kontrolka se rozsvítí. Pro zastavení otáč ení tento symbol stiskněte
znovu, kontrolka zhasne. Zadní mřížku můžete podle potřeby
nastavit ručně, aby proud vzduchu proudil shor a dolů.
RYCHLOST
Stiskněte symbol rychlosti, aby se ventilátor spust il s nejnižší
rychlostí (1). Stiskněte symbol na ov ládacím panelu nebo dálkovém
ovládání, aby se rychlost nast avila z nízké (1) na střední (2) nebo
vysokou (3).
Čištění a údržba (3-dílný speciální filtr)
ANIONTY
Stiskněte symbol anionty na ovládacím panelu nebo na dálkovém
ovládání: Pro zastavení režimu aniontů symbol stisk něte znovu.
ANIONTY je symbol pro usmr cení bakterií v nádržce na vodu. Funkce
anionty přidá vodě negativní náboj, kter ý zabrání růstu bakterií a
přitahuje prach. Funkce odpovídá svým účinkem čističce vzduchu.
ČASOVAČ
Stiskněte symbol časovače na ovládacím panelu nebo dálkovém
ovládání pro nastavení časovače. Při každém s tisknutí symbolu se
změní nastavení. Vzestupně od 1 až do 7 hodin. K vypnutí poté opět
stiskněte.
DŮLEŽITÉ TIPY:
• Funkce chlazení pracuje nejlépe při nižší vlhkosti vzduchu.
Jestliže vlhkost vzduchu je velmi vysoká, teplotu nel ze tak silně
snížit.
• Při každém použití použijte chladnou čerst vou vodu. Čím
chladnější voda, tím lepší chladicí účinek. Můžete také do vody
přimíchat malé kostky ledu, aby účinek byl ještě větší.
• 20–30 minut před vypnutím vypněte funkci chlazení („ Cool“) a
přístroj nechte dále běžet, aby mohly speciální filtr y uschnout.
Zabráníte tak nepříjemnému zápachu, usazeninám a t vorbě
plísní.
• Upozornění: Při zapnutí přístroje není chladicí funkc e (probíhá
čerpání vody do filtrů) akt ivní. Po zapnutí je pokaždé nutné
stisknout symbol chlazení.
1 2 3
1. Sejměte kryt ( J) na zadní straně.
2. Vytáhněte speciální filtr y ve směru šipky (1).
3. Odstranění speciálního filtru z předního ot voru: Držte skříň pevně
jednou rukou. Táhněte jej druhou rukou opatrně na jednu stranu a
nahoru z osazení (2).
4. Čistěte speciální filtry prav idelně normální vodou a měkkým
kartáčem nebo utěrkou otřete nečis toty (3).
5. Při použití filtrů pamatujte na správnou velikost. Filtr y mají různé
velikosti a musí být vždy opět používány
příslušné velikosti. Rovněž musíte dbát
na to, aby filtry byly na horní straně
vytvarované. Vyt varování musí při použití
vždy směřovat nahoru. Pokud jsou filtr y
silně znečištěné, měly být vyměněny, při
pravidelném používání ale minimálně
každých 6 měsíců.
Upozornění: Když je nutné odstranění vodního kamene,
bezpodmínečně předem odstraňte filtry.
KRY TKA ODTOKU VODY
K vypuštění vody z přístr oje postavte nádobu pod krytku odtoku
vody (K) na spodní zadní straně přís troje nebo ho postavte do
sprchy/vany. Potom opatrně otevřete krytku odtoku vody (K ) a
dávejte pozor na to, aby voda nepřetekla na podlahu a nepoškodila ji.
ZÁRUKA
Na tento výrobek se vztahuje neomezená dvouletá záruka na
všechny vady z výroby a na vady materiálu. Tato záruka nijak
neovlivňuje vaše zákonná práva.
Vyrobeno v Číně
23
Page 24

Odstraňování poruch:
Problém Možná příčina Náprava Poznámky
Výpadek proudu nebo vadný
přívod elektrického proudu.
Změřte vstupní napětí a přístroj
připojte na určený zdroj
elektrického proudu.
Doporučujeme použít měřič
napětí, aby bylo k dispozici
správné napětí.
Odpařovací vzduchový
ventilátor nefunguje a
nereaguje na stisk knoflíků.
Z přístroje neproudí žádný
vzduch, přestože stroj je v
provozu.
Čerpadlo funguje, ale přístroj
nechladí.
Baterie dálkového ovládání jsou
vybité.
Dálkové ovládání nebo ovládací
panel jsou poškozené.
Dálkové ovládání nefunguje.
Motor je poškozený.
Tepelná pojistka v motoru
vypnula.
Funkce chlazení (voda není
čerpána do filtrů) není zapnutá.
Speciální filtry jsou ucpané
nebo znečištěné.
Speciální filtry jsou suché nebo
neobsahují dostatek vody.
Příliš vysoká relati vní vlhkost
vzduchu.
Vyměňte baterie.
Obraťte se prosím na náš
zákaznický servis.
Dálkové ovládání musí být
nasměrováno přímo na přístroj.
Obraťte se prosím na náš
zákaznický servis.
Nechejte přístroj vypnutý,
dokud motor nevychladne.
Symbol chlazení musí být
stisknut po každém zapnutí.
Vyčistěte nebo vyměňte
speciální filtry.
Zkontrolujte horní rozdělovací
nádržku na vodu a ujistěte se,
jestli není ucpaná.
Funkce chlazení je deaktivovaná
- aktivujte ji prosím
Pokud je odpařovací vzduchový
ventilátor používán delší
dobu, bude vlhkost vzduchu v
místnosti velmi vysoká, proto
teplotu nelze tak intezivně
snížit. Nastavte režim chlazení
na nižší stupeň, dokud neklesne
vlhkost.
Čerpadlo pracuje, ale nedodává
žádnou vodu nebo speciální
filtry obsahují př íliš málo vody.
Z přístroje stříká voda.
Nepříjemný zápach.
Bílé usazeniny v nádržce na
vodu.
Horní rozdělovací nádržka na
vodu je ucpaná.
Speciální filtry nebo zadní kr yt
(J) nejsou usazeny na správném
místě.
Horní rozdělovací vodní nádrž
je ucpaná.
Nádržka na vodu nebo speciální
filtry jsou ucpané.
Voda je příliš vápenitá.
Vyčistěte horní rozdělovací
nádržku na vodu.
Nasaďte správně speciální filtry
nebo zadní kryt (J).
Vyčistěte horní rozdělovací
nádržku na vodu.
Vyčistěte nádržku na vodu a
speciální filtry.
Vypusťte nádržku na vodu
a čistěte častěji speciální
filtry a nádržku nebo ča stěji
odstraňujte vodní kámen.
24
Při silně vápenité vodě příště
použijte destilovanou vodu.
Page 25

SK
PRED POUŽITÍM TOHTO VÝROBKU SI
DÔKLADNE PREČÍTAJTE TENTO NÁVOD
NA OBSLUHU.
BEZPEČNOSTNÉ POKYNY:
1. Pri premiestňovaní zariadenia dávajte
pozor, aby nešpliechala žiadna voda.
2. Neukladajte na hornú stranu chladiča
vzduchu žiadne predmety a nezakrývajte
vstupné a výstupné otvory vzduchu.
3. Kým je zariadenie v prevádzke, nestrkajte
do odvzdušňovacieho otvoru žiaden
predmet.
4. Pred čistením vytiahnite zástrčku zariadenia.
5. Pri chybnom fungovaní zariadenie okamžite
vypnite, napr. keď je poškodený napájací
kábel, a obráťte sa na náš zákaznícky
servis. Rozobratie alebo oprava zariadenia
používateľom sa neodporúča.
6. Používajte iba čistú vodu. Pri veľmi
vápenatej vode použite destilovanú vodu.
7. Výrobok dosahuje najlepšie výsledky v
čistom prostredÍ. Veľké čiastočky prachu/
nečistôt môžu skrátiť životnosť zariadenia.
8. Odporúčame používať iba v suchom
prostredÍ. Pri používaní vo vlhkom prostredí
dávajte pozor, aby sa na plášť výrobku
nedostala žiadna voda.
9. Ak sa na výrobok dostane voda, odpojte ho
od elektrického napájania a nechajte ho
schnúť 24 hodín. Potom opäť používajte ako
obvykle.
10. Nevystavujte dlhší čas priamemu
slnečnému svetlu.
11. Elektrickej prípojky ani kábla sa nedotýkajte
mokrými rukami.
12. Zariadenie neumiestňujte vedľa
vykurovacieho telesa.
13. Neumiestňujte zariadenie do priechodných
oblastí, pretože by sa oň mohol niekto
potknúť alebo by sa mohlo prevrhnúť.
14. Neponárajte zariadenie do vody ani iných
kvapalín.
15. Zariadenie neumiestňujte vedľa otvoreného
ohňa alebo zdrojov ohňa.
16. Zariadenie môžu používať deti vo veku od 8
rokov, ako aj osoby so zníženými fyzickými,
zmyslovými alebo duševnými schopnosťami
alebo nedostatkom skúseností či
vedomostí, pokiaľ sú pod dozorom alebo
boli poučené o bezpečnom používaní
zariadenia a porozumeli z toho vyplývajúcim
nebezpečenstvám. Deti sa nesmú hrať so
zariadením. Čistenie a používateľskú údržbu
nesmú vykonávať deti, ak nie sú staršie ako
8 rokov a nie sú pod dozorom. Zariadenie a
pripájacie káble sa musia uchovávať mimo
dosahu detí mladších ako 8 rokov. Zvýšte
opatrnosť najmä vtedy, keď sa zariadenie
používa v blízkosti detí a keď ho nechávate
zapnuté bez dozoru.
17. Výrobca nepreberá žiadnu zodpovednosť za
škody, ktoré vzniknú nedodržiavaním týchto
pokynov.
NÁVOD NA POUŽITIE:
1. Pred zapnutím zariadenia naplňte nádržk u vodou. Upozornenie:
Čím chladnejšia je použitá voda, tým chladnejší je aj efekt.
Môžete preto používať aj ľadovú vodu alebo vodu s ľadovými
kockami.
2. Vytiahnite priehradku na prívod vod y na prednej strane chladiča
vzduchu a naplňte ju studenou vodou až po čiarku MA X (indikátor
hladiny vody). Upozornenie: Hladina vody nesmie prekročiť limit
čiarky MA X, aby ste predišli pretečeniu vody pri výmene chladiča
vzduchu.
3. Po každom použití vypustite vodu z nádr žky pomocou viečka na
vypúšťanie vody (K) a pravidelne čistite špeciálne filtr e a nádržku
na vodu.
4. Pri každom použití použite čerst vú vodu.
5. Nádržku plňte iba čistou vodou a nelejte do nej žiadnu inú
kvapalinu.
25
Page 26

FUNKCIE:
CHLADENIE
Stlačením symbolu chladenia „Cool“ na ovládacom paneli alebo
diaľkovom ovládaní spustíte režim chladenia. Na vypnutie režimu
chladenia symbol stlačte znova.
Keď zapnete zariadenie, funkcia chladenia (voda sa čer pá do
filtrov) nie je aktívna. Symbol chladenia treba stlačiť po každom
zapnutí.
ELEKTRICKÉ N APÁJANIE
Na zapnutie chladiča vzduchu stlačte symbol zapnutia/vypnutia na
ovládacom paneli alebo diaľkovom ovládaní, rozsvieti sa príslušná
kontrolka. Opätovným stlačením tohto symbolu zariadenie v ypnite
– kontrolka zhasne.
OTÁČANIE
Stlačte symbol otáčania na ovládacom paneli alebo diaľkovom
ovládaní, čím sa automaticky začne otáčať zv islá predná mriežka
a rozsvieti sa príslušná kontrolka. Opätovným stlačením tohto
symbolu zastavíte režim otáčania a kontrolk a zhasne. Podľa potreby
môžete ručne nastaviť zadné mriežk y, ak chcete smerovať prúd
vzduchu zhora nadol.
RÝCHLOSŤ
Stlačte symbol rýchlosti, čím spustíte ventilátor na najnižšej
rýchlosti (1). Opätovným stlačením symbolu na ovládac om paneli
alebo diaľkovom ovládaní nastavíte rýchlosť z nízkej (1) na strednú
(2) alebo vysokú (3).
Čistenie a údržba (3-dielny špeciálny filter)
ANIÓNY
Stlačte symbol aniónov na ovládacom paneli alebo diaľkovom
ovládaní. Na zastavenie režimu aniónov stlačte symbol znova.
ANIÓNY predstavujú systém na ničenie bak térií v nádržke na vodu.
Funkcia aniónov dodá vode negatívny náboj, ktorý má zabrániť r astu
baktérií a pod. a ktor ý priťahuje prach. Táto funkcia zodpovedá
princípu fungovania čističa vzduchu.
ČASOVAČ
Stlačením symbolu časovača na ovládacom paneli alebo diaľkovom
ovládaní nastavíte časovač. Nastavenie s a zmení pri každom stlačení
symbolu. Vzostupne od 1 do 7 hodín. Na vypnutie následne znova
stlačte.
DÔLEŽITÉ TIPY:
• Funkcia chladenia funguje najlepšie pri nízkej vlhkosti vzduchu.
Ak je vlhkosť vzduchu veľmi vysoká, teplota nemôže kle sať veľmi
výrazne.
• Pri každom použití použite studenú čerst vú vodu. Čím chladnejšia
je voda, tým lepší chladiaci účinok dosiahnete. Na dosiahnutie
ešte lepšieho efektu môžete do vody zamiešať aj malé kocky
ľadu.
• 20 – 30 minút pred vypnutím vypnite funkciu chladenia („ Cool“)
a nechajte zariadenie ďalej spustené, aby mohli špeciálne
filtre uschnúť. Zabránite tak zlému zápachu, usadeninám a
plesniveniu.
• Keď zapnete zariadenie, funkcia chladenia (voda sa čer pá do
filtrov) nie je aktívna. Symbol chladenia treba stlačiť po každom
zapnutí.
1 2 3
1. Vyberte kr yt (J) na zadnej strane.
2. Vytiahnite špeciálne filtre v smere šípky (1).
3. Vybratie špeciálnych filtrov z predného otvor u: jednou rukou
pevne držte kryt. Dr uhou rukou ho opatrne ťahajte do strany a
hore von z obruby (2).
4. Špeciálne filtre pravidelne čistite obyčajnou vodou a nečistoty
utrite mäkkou kefou alebo utierkou (3).
5. Pri vkladaní filtrov dávajte pozor na veľkosť. Filtre majú rôzne
veľkosti a podľa toho sa aj musia opätovne
vkladať. Musíte tiež dávať pozor na to, že
filtre sú z hornej strany deformované. Táto
deformácia musí pri vkladaní vždy
smerovať hore. Ak sú filtre veľmi zanesené,
mali by sa vymeniť, no pri pravidelnom
používaní minimálne raz za 6 mesiacov.
Upozornenie: Ak sa zdá, že je potrebné odvápnenie, filtre
predtým bezpodmienečne odstráňte.
VIEČKO NA V YPÚŠŤANIE VODY
Ak chcete zo zariadenia odstrániť vodu, postavte nádobu pod
viečkom na vypúšťanie vody (K) na spodnej zadnej strane
zariadenia alebo zariadenie postavte do sprchy/vane. Následne
opatrne otvorte viečko na v ypúšťanie vody (K) a dávajte pozor, aby
nešpliechala žiadna voda a aby nepoškodila podlahu.
ZÁRUKA
Na tento výrobok sa vzťahuje neobmedzená dvojročná záruka na
všetky vady výroby a materiálu. Táto záruka nijako neovplyvňuje
vaše zákonné právo.
Vyrobené v Číne
26
Page 27

Odstraňovanie porúch:
Problém Možná príčina Náprava Poznámky
Výpadok prúdu alebo chybná
elektrická prípojka.
Odmerajte vstupné napätie a
pripojte zariadenie k určenému
elektrickému zdroju.
Odporúča sa použiť merač
napätia, aby ste získali správne
napätie.
Odparovací chladič nefunguje a
nereaguje na stlačenie tlačidiel.
Zo zariadenia neprúdi žiadny
vzduch, aj keď je prístroj v
prevádzke.
Čerpadlo funguje, ale
zariadenie nechladí.
Batérie diaľkového ovládania
sú vybité.
Diaľkové ovládanie alebo
ovládací panel je poškodený.
Diaľkový ovládač nefunguje.
Motor je poškodený.
Bola aktivovaná tepelná
ochrana v motore.
Funkcia chladenia (voda sa
čerpá do filtrov) nie je zapnutá.
Špeciálne filtre sú upchaté
alebo špinavé.
Špeciálne filtre sú suché alebo
neobsahujú dosť vody.
Príliš vysoká relatívna vlhkosť
vzduchu.
Vymeňte batérie.
Obráťte sa na náš zákazníck y
servis.
Diaľkový ovládač musí smerovať
priamo na zariadenie.
Obráťte sa na náš zákazníck y
servis.
Nechajte zariadenie vypnuté,
kým nevychladne motor.
Symbol chladenia sa musí
stlačiť po každom zapnutí.
Vyčistite alebo vymeňte
špeciálne filtre.
Skontrolujte hornú nádobu na
rozvádzanie vody a zistite, či
nedošlo k upchatiu.
Funkcia chladenia je
deaktivovaná - aktiv ujte ju,
prosím.
Keď sa odparovací chladič
vzduchu používa dlhšiu dobu,
vlhkosť vzduchu v miestnosti
je veľmi vysoká a teplota
tak nemusí veľmi výrazne
klesať. Nastavte chladiaci
režim na nižší stupeň alebo
ho deaktivujte, aby sa znížila
vlhkosť vzduchu.
Čerpadlo funguje, ale
nevymieňa žiadnu vodu,
prípadne obsahujú špeciálne
filtre príliš málo vody.
Zo zariadenia strieka voda.
Nepríjemný zápach.
Biele usadeniny v nádržke na
vodu.
Horná nádoba na rozvádzanie
vody je upchatá.
Špeciálne filtre alebo zadný kryt
(J) nie sú uložené na správnom
mieste.
Horná nádoba na rozvádzanie
vody je upchatá.
Nádržka na vodu alebo
špeciálne filtre sú zašpinené.
Voda je až príliš vápenatá.
Vyčistite hornú nádobu na
rozvádzanie vody.
Správne namontujte špeciálne
filtre alebo zadný kryt (J).
Vyčistite hornú nádobu na
rozvádzanie vody.
Vyčistite nádržku na vodu a
špeciálne filtre.
Vyprázdnite nádržku na vodu
a špeciálne filtre a nádržku
čistite, resp. odvápňujte
častejšie.
27
Pri veľmi vápenatej vode
používajte v budúcnosti
destilovanú vodu.
Page 28

RO
VĂ RUGĂM CITIŢI CU ATENŢIE ACESTE
INSTRUCŢIUNI DE UTILIZARE,
ÎNAINTE DE A FOLOSI PRODUSUL.
INDICAȚII DE SECURITATE:
1. Aveți grijă să nu se reverse apă din balansare
atunci când mutaţi aparatul.
2. Nu aşezaţi niciun obiect sus pe răcitorul de aer
şi nu obturaţi deschiderile de intrare şi ieşire
ale aerului.
3. În timp ce aparatul funcţionează nu introduceţi
niciun obiect în orificiul de refulare a aerului.
4. Înainte de curăţare extrageţi fișa de alimentare
a aparatului din priza de rețea.
5. În cazul unor funcţionări defectuoase,
deconectaţi imediat aparatul de la alimentare,
de exemplu atunci când cablul electric este
deteriorat şi adresaţi-vă serviciului nostru de
clienți. Nu este recomandată o dezmembrare
sau o reparare a aparatului de către utilizator.
6. Utilizați numai apă curată. În cazul unei ape
extrem de calcaroase utilizați pentru aparat
numai apă distilată.
7. Produsul funcționează cel mai bine în medii
cu zone curate. Particulele mari de praf/
murdărie pot afecta durata de viață funcţională
a aparatului.
8. Recomandăm utilizarea aparatului numai în
zone uscate. În cazul utilizării în zone umede
acordați atenție să nu ajungă apă pe carcasa
produsului.
9. Dacă ajunge apă pe produs, deconectați
aparatul de la alimentarea cu tensiune și
lăsați-l să se usuce 24 de ore. Apoi poate fi
utilizat ca de obicei.
10. Nu expuneți aparatul timp îndelungat la radiație
solară directă.
11. Nu atingeți fișa de alimentare sau cablul cu
mâinile umede.
12. Nu amplasaţi aparatul lângă o sursă de
încălzire.
13. Nu amplasați aparatul în zonele de tranzit,
astfel încât să existe risc de împiedicare sau de
răsturnare.
14. Nu scufundaţi aparatul în apă sau în alte lichide.
15. Nu amplasați aparatul lângă foc deschis sau
surse de foc.
16. Acest aparat poate fi utilizat de către copii
începând cu vârsta de 8 ani sau de persoane
având capacități fizice, senzoriale sau mentale
reduse sau cu lipsă de experiență și/sau
cunoștințe, dacă sunt supravegheate sau
instruite în folosirea în siguranță a aparatului
și care au înțeles pericolele care rezultă
din această folosire. Copiilor nu le este
permis să se joace cu aparatul. Curățarea și
întreținerea care trebuie efectuată de către
utilizatori nu este permisă să fie efectuată
de copii decât dacă au vârsta de peste 8
ani și sunt supravegheați. Copiii mai mici
de 8 ani trebuie ţinuţi departe de aparat și
de cablul de alimentare. Este necesară o
precauţie deosebită dacă aparatul este folosit
în apropierea copiilor şi dacă este lăsat să
funcţioneze nesupravegheat.
17. Producătorul nu își asumă nicio
responsabilitate pentru daunele rezultate din
nerespectarea acestor instrucțiuni.
INSTRUCŢIUNI DE UTILIZ ARE:
1. Înainte de a conecta aparatul , umpleți rezervorul cu apă.
Indicaţie: Cu cât mai rece este apa utiliz ată cu atât efectul de
răcire este mai pregnant. As tfel că puteți să folosiți apă cu gheață
sau apă cu cuburi de gheață.
2. Trageţi în afară sertarul pentru aliment are cu apă, aflat pe partea
frontală a răcitorului de aer şi umpleţi rezervor ul cu apă rece
până la linia MAX ( indicator nivel apă E). Mențiune: Nivelul apei
nu este permis să depăşească limita liniei de M AX, pentru e evita
revărsarea apei în cazul schimbăr ii poziției răcitorului de aer.
28
Page 29

3. După fiecare folosire lăsaţi apa să se evacueze din re zervor cu
ajutorul clapetei de scurgere apă (E) şi curăţaţi în mod regulat
filtrele speciale şi rezervorul de apă.
4. Folosiţi apă proaspătă la fiecare utilizare.
5. Umpleţi rezervorul numai cu apă cur ată, nu turnaţi niciun alt
lichid în rezervor.
FUNCŢII:
RĂCIRE
Apăsaţi simbolul de răcire ‚Cool‘ de pe câmpul de operare sau de pe
telecomandă, pentru a porni regimul de răcire. Pentru deconec tarea
modului de funcționare răcire apăsaţi din nou simbolul.
Mențiune: atunci când se conectează apar atul funcţia de răcire nu
este activă (apa es te pompată în filtre). Simbolul Răcire trebuie
apăsat de fiecare dată după conectar ea aparatului.
ALIMENTARE CU ENERGIE ELECTRICĂ
Apăsaţi simbolul Ein/Aus - pornit/oprit de pe câmpul de oper are
sau de pe telecomandă pentru a conecta răcitor ul de aer, indicatorul
corespunzător se aprinde. Apăsaţi din nou acest simbol pentr u a
deconecta aparatul, indic atorul se stinge.
OSCILARE
Apăsaţi simbolul oscilare pe câmpul de operare sau pe telecomandă
pentru ca grilajul frontal ver tical să oscileze automat; se aprinde
beculeţul corespunzător. Apăsaţi acest simbol din nou pentru a
opri regimul de oscilare; beculeţul se stinge. Puteţi regla manual
grilajele din spate în funcţie de necesar pentru a conduce flu xul de
aer de sus în jos.
VITEZĂ
Apăsaţi simbolul vitezei astfel încât suflanta să pornea scă cu viteza
cea mai joasă (1). Apăsaţi din nou simbolul pe câmpul de operare
Curăţare şi întreţinere (filtru special din 3 părţi)
sau pe telecomandă pentru a regla viteza de la scăzută (1) la medie
(2) sau înaltă (3).
ANIONI
Apăsaţi simbolul Anioni de pe câmpul de operare sau de pe
telecomandă, pentru a opri modul de funcționare anioni apăsaţi
din nou simbolul. ANIONI este un sistem de distrugere a bac teriilor
din rezervorul de apă. Funcţia Anioni adăugă apei o sarcină ionică
negativă care trebuie să împiedice dezvoltarea bac teriilor ș.a. şi
să atragă praful. Funcţia corespunde modului de acţionar e a unui
epurator de aer.
TIMER
Apăsaţi simbolul Timer pe câmpul de operare sau pe telecomandă
pentru a regla ceasul programator. La fiecare acţionare a simbolului
se modifică reglajul. De la 1 până la 7 ore, crescător. Pentru
deconectare apăsaţi apoi din nou simbolul.
SFATURI IMPORTANTE:
• Funcţia de răcire prin evaporare funcţionează cel mai bine la o
umiditate redusă a aerului ambiant. Dacă umiditatea aerului e ste
prea ridicată, temperatura nu poate fi scăzută atât de puternic .
• La fiecare folosire, utilizaţi apă rec e, proaspătă. Cu cât apa este
mai rece, cu atât este mai bun efectul de răcire. De asemena se
pot amesteca în apă cuburi mici de gheaţă pentr u a obţine un
efect şi mai bun.
• Cu 20 – 30 minute înainte de deconectare, opriţi funcţia de
răcire („Cool“) şi lăsaţi aparatul să funcţioneze mai depar te
astfel încât filtrele speciale să se poată usca. Evitaţi astf el
mirosurile neplăcute produse de eventualele depuneri sau
formarea de mucegai.
• Mențiune: atunci când se conectează apar atul funcţia de răcire
nu este activă (apa es te pompată în filtre). Simbolul Răcire
trebuie apăsat de fiecare dată după conect area aparatului.
1 2 3
1. Detaşaţi capacul (J) de pe par tea din spate.
2. Trageţi în afară filtrele speciale în sensul săgeţii (1).
3. Îndepărtaţi filtrele speciale din desc hiderea frontală: ţineţi strâns
carcasa cu o mână. Cu ce alaltă mână trageţi cu atenţie pe o parte
şi în sus din montură (2).
4. Curăţaţi filtrele speciale în mod regulat cu apă obişnuită şi
ştergeţi murdăria cu o perie moale sau o lavetă (3).
5. La reintroducerea filtrelor acor daţi atenţie mărimii. Filtrele sunt
diferite ca mărime şi trebuie introduse din
nou în mod corespunzător. De asemenea
trebuie să aveți în vedere faptul că filtrele
prezintă la partea superioară o modific are
a formei. La instalare ac easta trebuie să
fie orientată întotdeauna în sus. Dacă
filtrele sunt puternic impurificate acestea
trebuie înlocuite, iar în cazul folosirii
aparatului în mod regulat, cel puţin la fiecare 6 luni.
Mențiune: Când pare că este necesară o det artrare, obligatoriu
îndepărtaţi în prealabil filtrele.
CAPAC DE SCURGERE APĂ
Pentru a îndepărta apa din apar at, amplasaţi un vas sub capacul
de scurgere apă (K) la partea infer ioară din spate a aparatului sau
plasați aparatul peste un lavoar sau c adă de baie. Apoi deschideţi
cu precauţie clapeta de scurgere apă (K ) şi acordaţi atenţie să nu se
reverse apă pentru a nu deteriora pardose ala.
Tara de provenienta: China
29
Page 30

Remedierea Erorilor:
Problemă Cauză posibilă Remediere Observații
Este recomandată utilizarea
unui voltmetru pentru a măsura
tensiunea corectă.
În cazul unei ape extrem de
calcaroase utilizați în viitor apă
distilată.
Racitorul de aer prin vaporizare
nu funcţionează și nu
reacționează la apăsarea pe
butoane.
Dinspre aparat nu vine curent
de aer, cu toate că aparatul este
în funcţiune.
Pompa funcţionează dar
aparatul nu răceşte.
Pompa funcţionează dar nu
recirculă apa, sau filtrele
speciale conţin prea puţină apă.
Din aparat stropeşte apă.
Miros neplăcut.
Depuneri albe în rezervorul
de apă.
Cădere de tensiune electrică
sau racord de alimentare
defectuos.
Bateriile telecomenzii sunt
descărcate.
Telecomanda sau câmpul de
operare este deteriorat.
Telecomanda nu funcționează.
Motorul este deteriorat.
Protecţia termică în motor a fost
declanşată.
Funcţia de răcire nu este activă
(apa este pompată în filtre).
Filtrele speciale sunt obturate
sau murdare.
Filtrele speciale sunt uscate sau
nu conţin suficientă apă.
Umiditatea relativă a aerului
ambiant este prea ridicată.
Vasul distribuitor de apă
superior este obturat.
Filtrele speciale sau acoperirea
din spate (J) nu stau în locul
corect.
Vasul distribuitor de apă
superior este obturat.
Rezervorul de apă sau filtrele
speciale sunt murdărite.
Apa are un conţinut prea ridicat
de calcar.
Măsuraţi tensiunea de intrare şi
racordaţi aparatul la o sursă de
curent definită în acest scop.
Înlocuiți bateriile.
Vă rugăm adresaţi-vă
serviciului nostru c lienţi.
Telecomanda trebuie orientată
direct către aparat.
Vă rugăm adresaţi-vă
serviciului nostru c lienţi.
Lăsaţi aparatul deconectat până
când motorul s-a răcit.
Simbolul Răcire trebuie apăsat
de fiecare dată după conectare.
Curăţaţi sau înlocuiţi filtrele
speciale.
Verificaţi vasul distribuitor de
apă superior şi constatați dacă
există o obturare.
Funcția de răcire este
dezactivată - vă rugăm să
activați.
Când aparatul de răcire aer
prin vaporizare este utiliz at
pe o perioadă mai lungă de
timp, crește umiditatea aerului
din încăpere, ca urmare
temperatura nu mai poate fi
coborâtă prea puternic. Rotiţi
butonul modului de funcționare
răcire pe o treaptă mai scăzută,
sau dezactivați răcirea până
când umiditatea aerului s-a
redus.
Curăţaţi vasul distribuitor de
apă superior.
Montaţi corect filtrele speciale
sau acoperirea din spate (J).
Curăţaţi vasul distribuitor de
apă superior.
Curăţaţi rezervorul de apă şi
filtrele speciale.
Goliți rezervorul de apă şi
curăţaţi, respectiv, detartr aţi
mai frecvent filtrele speciale şi
rezervorul.
30
Page 31

Technische Daten | Specifications | Caractéris tiques techniques | Dati tecnici | Technische gegevens | Műszaki adatok |
Technické údaje | Technické údaje | Date tehnice:
Modell | Model | Modèle | Modello | Model | Modell | Model | Model | Model ICHILL_09EX
Luftvolumen | Air volume | Volume d‘air | Volume dell‘aria | Lucht volume | Légűrtartalom |
Objem vzduchu | Objem vzduchu | Volum de aer
Deckungsbereich | Area coverage | Zone couver te | Zona di copertura | Dekkingsbereik |
Lefedettségi t artomány | Oblast působení | Oblasť pokrytia | Zonă de acoperire
3
900 m
/Std. | m3/hr |
3
m
/ora. | m3/Std. | m3/óra |
m3/hod. | m3/hod. | m3/oră
2
15m
m3/h. |
Leistung | Power | Puissance | Power | Vermogen | Teljesítmény | Výkon | Výkon | Putere 85W
Eingangsspannung | Input voltage | Tension d‘entrée | Tensione di ingresso | De ingangsspanning |
Bemeneti feszültség | Vstupní napětí | Vstupné napätie | Tensiune de intrare
Schutzklasse | Pr otection class | Classe de protection | Classe di prote zione | Beschermingsklasse |
Védelmi osztály | Třída ochrany | Trieda ochrany | Clasă de protecție
Wassertank volumen | Water tank capacity | Volume du réservoir d‘eau |
Volume del serbatoio dell‘acqua | Volume watertank | A víztart ály űrtartalma | Objem vodní nádržk y |
Objem vodnej nádržky | Volum rezervor de apă
Wasser Dauerbetrieb | Water continuous usage | Fonc tionnement continu eau |
Acqua funzionamento continuato | Gebruiksduur met 1 water tank |
Tartós üzemeltetés esetén a víz akár 12 órán keresztül | Voda trvalý pr ovoz |
Trvalá prevádzka s vodou | Apă pentru funcționare continuă
Wasserverdunstungsr ate | Water evaporation rate | Taux d‘évaporation de l‘eau |
Velocità di evaporazione dell‘acqua | Waterverbruik | Vízpárologt atásiráta | Míra odpařování vody |
Rýchlosť odparovaniavody | Rata de evaporar e a apei
Geschwindigkeit | Speed | Vitesse | Velocità | Snelheid | Sebes ség | Rychlost | Rýchlosť | Viteză 3 Stufen | levels | niveaux |
Entlüftungsgröße | Vent size | Dimensions de la purge d‘air | Grandezza sfiato |
Ontluchtingsoppervlak | Szellőzőnyílás mérete | Velikost odvzdušnění | Veľkosť odvetrania |
Mărimea deschiderii de refulare aer
Gesamtabmessungen | O verall dimensions | Dimensions totales | Dimensioni complessive | Totale
afmetingen | Összméret | Celkové rozměry | Celkové rozmer y | Dimensiuni de gabarit
Nettogewicht | Net weight | Poids net | Peso netto | Net togewicht | Nettósúly | Hmotnost netto |
Čistá hmotnosť | Masa netă
Fernbedienung Batterie | Remote control batter ies | Piles télécommande | Batteria telecomando |
De batterijen van de afstandsbediening | A t ávirányítóba használatos elem | Dálkové ovládání, baterie |
Diaľkové ovládanie batéria | Baterie pentru telecomandă
220-240V ~ 50/60 Hz
2
8,5 Liter | litres | litres |
litri | liter | liter | litru |
litra | litri
bis zu 12 Stunden | hours
| heures | ore | uur |
ekegendő | až 12 hodin |
do 12 hodín | până la 12 ore
0,52-0,65 Liter/Stunde |
litres per hour | litre/heure |
litri/ora | liter per uur |
liter/óra | litru/hodinu |
litra/hodina | litri/oră
livelli | standen | fokozat |
stupně | stupne | trepte
18 x 30 cm
281 x 281 x 913 mm
6,4 kg
CR2025
DE: Entsorgen Sie das Produkt am Ende seiner L ebensdauer nicht mit dem normalen Hausmüll. Bringen Sie es zu einer
Sammelstelle zum Recycling von elektrischen und elek tronischen Geräten. Dies wird durch dieses Symbol auf dem Produkt , in
der Bedienungsanleitung und auf der Verpackung angegeben. Informieren Sie sich über S ammelstellen, die von Ihrem Händler
oder der lokalen Behörde betrieben werden. Die Wiederver wertung und das Recycling von Altgeräten ist ein wichtiger Beitrag
zum Schutz unserer Umwelt.
EN: Do not dispose this product at the end of its ser vice life through normal domestic waste. It has to be disposed through a collection agency
that recycles electric and elec tronic devices. This is pointed out by the symbol on the product, in the instruc tion manual, and on the packaging.
Please inquire about local collection agencies t hat may be operated by your distributor or your municipal administration. By recycling, making
use of the materials, or other forms of recycling old unit s you are making an important contribution to protecting our environment.
FR: Al termine della sua durata della vita, il prodotto non deve e ssere smaltito con i normali rifiuti domestici. Si prega di port arlo in un centro
di raccolta per il riciclaggio di apparecchiature elet triche ed elettroniche. Tale procedura è segnalata anche da questo simbolo presente sul
prodotto, nelle istruzioni per l’uso e sulla confezione dello stes so. Si prega di informarsi sui centri di raccolta gestiti dal propr io rivenditore o
dalle autorità locali. La r iutilizzazione e il riciclaggio di vecchi apparecchi costituiscono un contributo import ante per la tutela dell’ambiente.
IT: Ne jetez pas le produit aux déchet s ménagers à la fin de sa durée de vie. Apportez-le à un point de collecte pour le recyclage des appareils
électriques et électroniques . Cela est indiqué par le symbole présent sur le produit, le mode d’emploi et l’emballage. Informez-vous des
points de collecte mis à disposition par votre commerçant ou l’autorité loc ale. La réutilisation et le recyclage des appareils usagés sont une
contribution importante à la protec tion de notre environnement.
31
Page 32

NL: Werp het product aan het eind van zijn levensduur daarom
niet bij het normale huisvuil. Breng het naar een verz amelpunt
voor het recyclen van elektrische en elek tronische apparaten.
Dit wordt aangegeven door het symbool op het product in
de gebruiksaanwijzing en op de verpakk ing. Informeer naar
verzamelpunten die door uw dealer of uw gemeente bedreven
worden. Het hergebruik en de recycling van oude apparaten lever t
een belangrijke bijdrage aan de bescherming van ons milieu.
HU: A terméket élettart ama végén ne ártalmatlanítsa a normál
háztartási hulladékk al együtt. Vigye el az elektromos és
elektronikus készülékek újrahasznosítását cél zó gyűjtőhelyre.
Utóbbit ez a szimbólum jelzi a terméken, a használati uta sításon és
a csomagoláson. Tájékozódjon a kereskedője vagy a helyi hatóság
által üzemeltetett gyűjtőhelyekről. A régi készülékek újrahasználat a
és újrahasznosítása fontos hozzájár ulást jelent környezetünk
védelméhez.
CZ: Po ukončení životnosti neodhazujte výrobek do domovního
odpadu. Odevzdejte jej na sběrném místě k recyklaci elektr ických
a elektronických přístrojů. Je to v yznačeno tímto symbolem na
výrobku, v návodu k obsluze a na obalu. Informujte se o sběrných
místech, provozované vaším prodejcem nebo místními úřady.
Opětovné zhodnocení a recyklace odpadních přístrojů jsou
důležitým příspěvkem k ochraně našeho životního prostředí.
SK: Nevyhadzujte výrobok po ukončení jeho životnosti do
komunálneho odpadu. Zaneste ho na zberné miesto na rec ykláciu
elektrických a elektronic kých zariadení. Toto je udané symbolom na
výrobku, v návode na použitie a na obale. Informujte sa o zberných
miestach, ktoré sú prevádzkované Vašim obchodníkom alebo
miestnymi úradmi. Ďalšie zhodnotenie a recyklácia st arých zariadení
je dôležitým prínosom k ochrane nášho životného prostredia.
RO: Din acest motiv produsul , la sfârşitul duratei sale de
funcţionare, nu va fi debarasat împreună cu gunoiul menajer.
Predaţi-l la punctele de colectare în vederea recic lării aparatelor
electrice şi electronice. Ace st lucru este indicat de acest simbol de
pe produs, din instrucţiunile de utilizare şi de pe ambalaj. Infor maţivă cu privire la punctele de colec tare pe care le administrează
distribuitorul sau dumneavoast ră locale. Revalorificarea şi
reciclarea aparatelor uzate este o contribuţie impor tantă la protecţia
mediului.
DE: Batterien gehören nicht in den Hausmüll. Bringen
Sie diese zu einer autorisierten Sammels telle.
EN: Batteries are not par t of your household waste and
must be taken to an authorized collection point.
FR: ne pas jeter les piles aux déchets ménager s. Les
apporter à un point de collecte agréé.
IT: non gettare le bat terie nei rifiuti comuni. Smaltirle
in un centro di raccolta autorizzato.
NL: Batterijen horen niet bij het huisvuil. Breng ze naar
een geautoriseerd inzamelpunt.
HU: Az elemeket ne a háztart ási hulladék közé dobja!
Vigye el azokat egy a begyűjtésre felhatalmazot t
gyűjtőhelyre.
CZ: Baterie nepatří do odpadků. Odneste je na
autorizované sběrné místo.
SK: Batérie nepatria do domáceho odpadu. Odneste ich
do autorizovaného zberu takéhoto odpadu.
RO: Bateriile nu trebuie aruncate c u gunoiul menajer.
Reciclaţi-le la un punct de colectare autoriz at.
DE: Dieses Produkt ents pricht den Europäischen
Richtlinien.
EN: This product complies with the European direc tives.
IT: Ce produit satisf ait aux normes européennes.
FR: Questo prodotto è conforme alle nor mative europee.
NL: Dit product voldoet aan de Europese richtlijnen.
HU: Ez a termék megfelel az európai irányelveknek.
CZ: Tento výrobek odpovídá evropským směrnicím.
SK: Tento výrobok zodpovedá európskym normám.
RO: Acest produs core spunde directivelor europene.
DE: Nur zur Verwendung in Innenräumen.
EN: For indoor use only.
FR: Uniquement pour utilisation dans des pièces
intérieures.
IT: Solo per uso interno.
NL: Alleen geschikt voor gebruik binnenshuis.
HU: Csak beltéri használatra.
CZ: Používejte pouze ve vnitřních prostorách.
SK: Len pre použitie v interiéri.
RO: A se utiliza numai în spații interioare.
DE: Schutzklasse II
EN: Protection rating II
FR: Classe de protection II
IT: Classe di protezione II
NL: Veiligheidsklasse II
HU: II-es védelmi osztály
CZ: Ochranná třída II
SK: Trieda ochrany II
RO: Clasa de protecție II
Importeur | Importer | Impor tateur | Importatore | Importeur | Impor tőr | Dovozce | Dodávateľ | Importator:
CH: MediaShop AG | Industriering 3 | 9491 Ruggell | Liec htenstein
EU: MediaShop GmbH | Schneiderstraße 1, Top 1 | 2620 Neunkirchen | Austr ia
Forgalmazó: Telemarketing International Kft. | 9028 Győr | Fehérvári út 75. | Hungar y
DE | AT | CH: 0800 376 36 06 – Kostenlose Servicehotline
CZ: + 420 234 261 900 | SK: + 421 220 990 800
RO: + 40 318 114 000 | HU: + 36 96 961 000
ROW: +423 388 18 00
office@mediashop-group.com | www.mediashop.tv
Stand: 12/2019 | M21360
 Loading...