

Page 1
BEDIENUNGSANLEITUNG
User Manual |
Mode d’emploi | Istruzioni per l’uso | Gebruiksaanwijzing | Használati utasítás
Návod k obsluze | Návod na obsluhu | Instrucţiuni de utilizare | Kullanma Kılavuzu
600Watt Fitmix Manual - M7435+M7438+M7439 _Bedienungsanleitung-fitmix_C_150407_PRINT.indd 1 07.04.15 09:40
Page 2

2
EN
RO
FR
HU
DE
Lieferumfang: 1 × Fitmix, 1 × Deckel mit Ver–
schlusskappe, 1 × Stößel, 1 × Mini-Mixer Aufsatz,
1 × Mini-Mixer Deckel, 1 × Rezeptheft, 1 ×
Gebrauchsanweisung
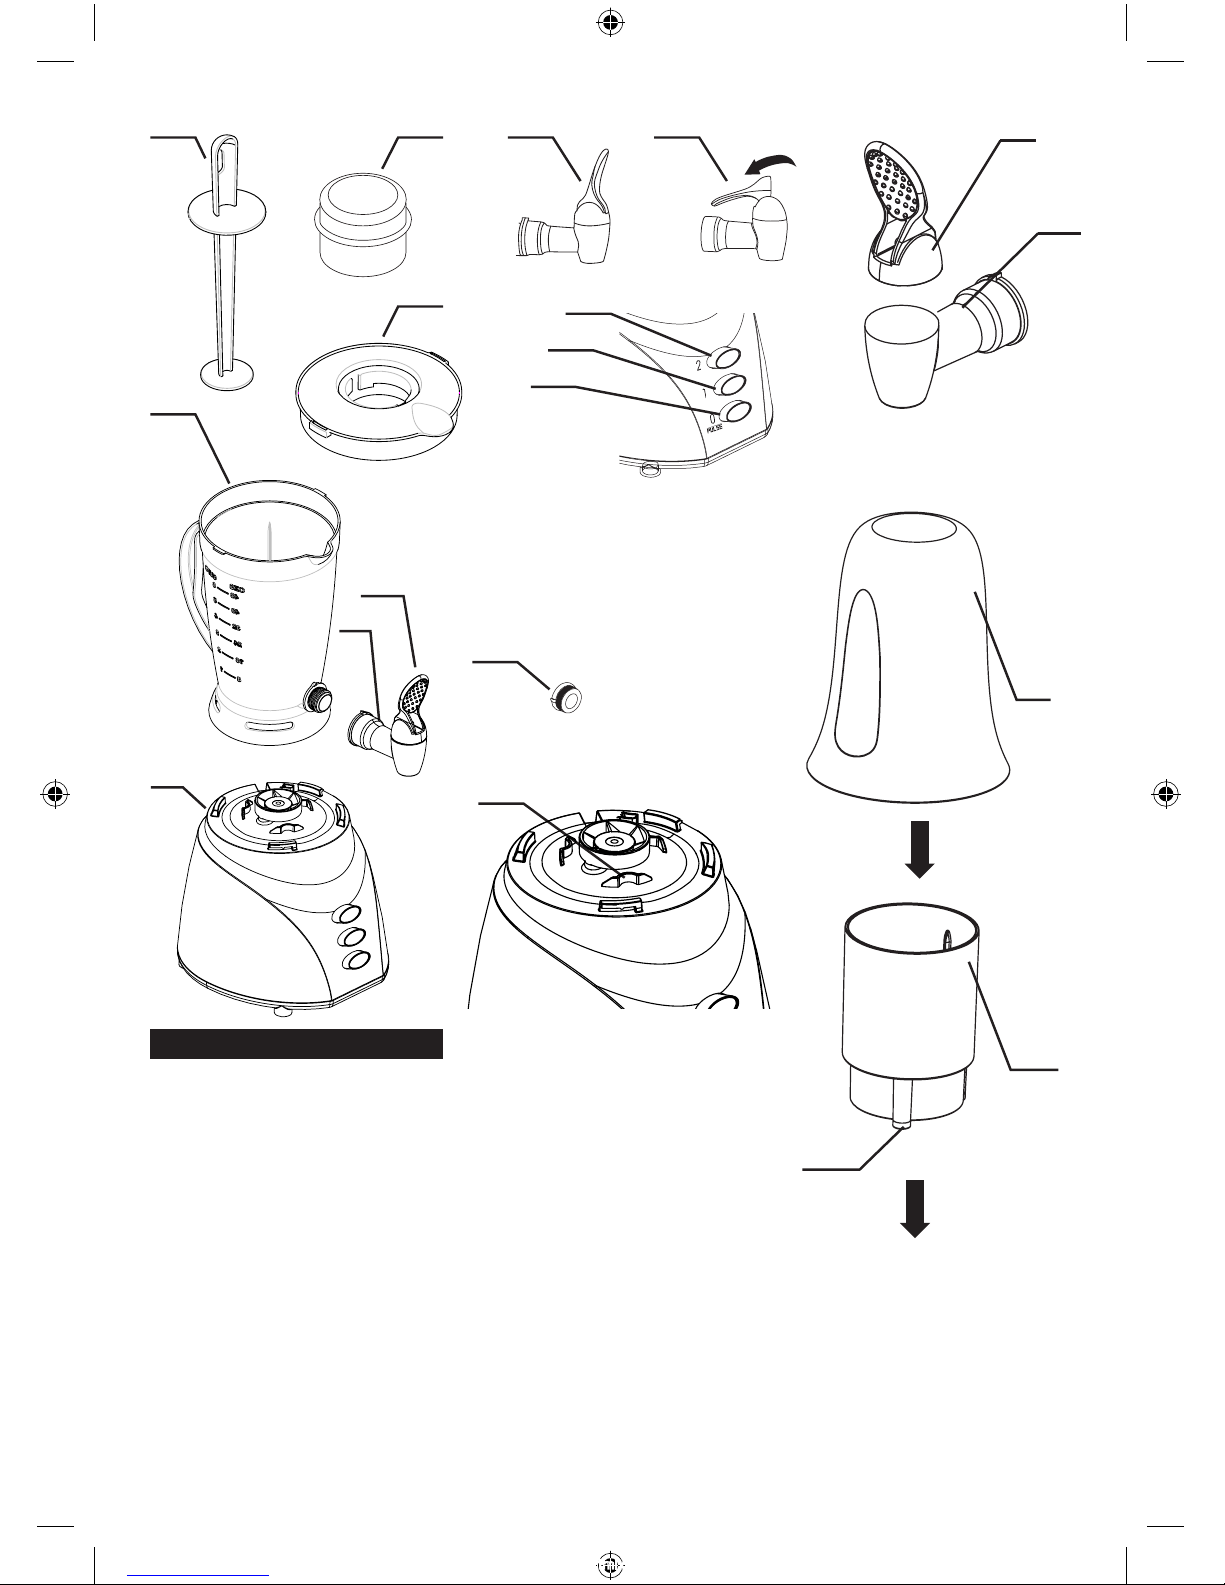
A - Stößel
B - Messbecher
C - Deckel
D - Mixbehälter
E - Zapfhahn
F - Zapfhebel
G - Motoreinheit
H - Zapfhebel AUS-Position
I - Zapfhebel EIN-Position
J - Taste 0/Pulse - Star t/Stop Funktion
K - Taste 1 - mittlere Geschwindigkeit
L - Taste 2 - hohe Geschwindigkeit
M - Mini-Mixer Deckel
N - Mini-Mixer Aufsatz
O - Gumminoppen
P - Einkerbung
Q - Verschlusskappe
R - Anschlussventil
S - Drehverschluß
Package contents: 1 × Fitmix, 1 × lid with cap
1 × stirrer, 1 × Mini-Mixer attachment, 1 ×
Mini-Mixer lid, 1 × recipe booklet, 1 × instruction
manual
A - Stirrer
B - Measuring cup
C - Lid
D - Pitcher
E - Spout
F - Spout lever
G - Power unit
H - Spout lever OFF-position
I - Spout lever ON-position
J - 0/Pulse but ton — star t/stop function
K - 1 button — medium speed
L - 2 button — high speed
M - Mini-Mixer lid
N - Mini-Mixer attachment
O - Rubber knob
P - Indentation
Q - Cap
R - Connection valve
S - Screw top
Contenu du colis : 1 × Fitmix, 1 × couvercle
avec capuchon, 1 × poussoir, 1 × mini-mixer, 1 ×
couvercle pour le mini-mixer, 1 × livre de recettes,
1 × notice d’utilisation
A - Poussoir
B - Réservoir gradué
C - Couvercle
D - Bocal de mixage
E - Robinet
F - Levier
G - Bloc de moteur
H - Levier position off
I - Levier position on
J - Touche 0/Pulse – Fonction Marche-Arrêt
K - Touche 1 – vitesse moyenne
L - Touche 2 – grande vitesse
M - Couvercle du mini-mixer
N - Mini-mixer
O - Picots en caoutchouc
P - Encoche
Q - Capuchon
R - Valve de raccordement
S - Fermeture rotative
IT NL CZ
Contenuto fornito: 1 × Fitmix, 1 × Coperchio con
chiusura, 1 × Spintore, 1 × Adattatore Mini-Mixer,
1 × Coperchio Mini-Mixer, 1 × Ricettario, 1 ×
Istruzioni per l’uso
A - Spintore
B - Bicchiere graduato
C - Coperchio
D - Contenitore Mixer
E - Rubinetto erogatore
F - Leva erogatore
G - Unità motore
H - Leva erogatore in posizione SPENTO
I - Leva erogatore in posizione ACCESO
J - Tasto 0/Pulse – Funzione Start /Stop
K - Tasto 1 – media velocità
L - Tasto 2 – alta velocità
M - Coperchio Mini-Mixer
N - Adattatore Mini-Mixer
O - Aggancio gomma
P - Alloggiamenti
Q - Cappuccio di chiusura
R - Valvola di collegamento
S - Chiusura a vite
De levering bevat: 1 × Fitmix, 1 × deksel met
sluitkap, 1x stamper, 1 × mini-mixer opzetstuk,
1 × mini-mixer deksel, 1 × receptenboek, 1 ×
gebruiksaanwijzing
A - Stamper
B - Messenbeker
C - Deksel
D - Mengbeker
E - Tapkraan
F - Taphendel
G - Motoreenheid
H - UIT-positie taphendel
I - AAN-positie taphendel
J -
Knop 0/puls – st art/stop-functie
K - Knop 1 – gemiddelde snelheid
L - Knop 2 – hoge snelheid
M - Mini-mixer deksel
N - Mini-mixer opzetstuk
O - Rubber noppen
P - Inkerving
Q - Sluitkap
R - Aansluitventiel
S - Draaisluiting
Obsah dodávky: 1 × Fitmix, 1 × víko a uzavírací
krytkou, 1 × pěch, 1 × násadec mini mixer, 1 ×
víko pro mini mixer, 1 × sešit s recepty, 1 × návod
k použití
A - Pěch
B - Odměrka
C - Víko
D - Mixovací nádoba
E - Čepovací kohout
F - Čepovací páčka
G - Jednotka motoru
H - Čepovací páčka v poloze V YP
I - Čepovací páčka v poloze ZAP
J - Tlačítko 0/Pulse - funkce Star t/Stop
K - Tlačítko 1 - střední rychlost
L - Tlačítko 2 - vysoká rychlost
M - víko pro mini mixer
N - násadec mini mixer
O - Gumové výstupky
P - Vrub
Q - Uzavírací krytka
R - Připojovací ventil
S - Šroubovací uzávěr
Set de livrare: 1 × Fitmix, 1 × capac cu închizător,
1 × tachet, 1 × set Mini-Mixer, 1 × capac Mini-Mi
-
xer, 1 × broşură reţete, 1 × instrucţiuni de utilizare
A - Tachet
B - Paharul de măsurare
C - Capac
D - Bol de amestecare
E - Cep cu robinet
F - Pârghie cep
G - Motor
H - Pârghie cep poziţia OPRIT
I - Pârghie cep poziţia PORNIT
J - Buton funcţie 0/Pulse – Start/Stop
K - Buton 1 – viteză medie
L - Buton 2 – viteză ridicată
M - Capac Mini-Mixer
N - Set Mini-Mixer
O - Dop din cauciuc
P - Crestătură
Q - Închizător
R - Supapă de racordare
S - Dop rotativ
SK
Obsah balenia: 1 × mixér Fitmix, 1 × kryt s
vnútorným viečkom, 1 × miešadlo, 1 × nadstavec
mini mixéra, 1 × kry t mini mixéra, 1 × zošit s
receptami, 1 × návod na používanie
A - Miešadlo
B - Odmerka
C - Kry t
D - Mixovacia nádoba
E - Výpustný kohútik
F - Páčka kohútika
G - Jednotka s motorom
H - Páčka kohútika pozícia V YP
I - Páčka kohútika pozícia ZAP
J - Tlačidlo 0/Pulse – funkcia štar t/stop
K - Tlačidlo 1 – stredná rýchlosť
L - Tlačidlo 2 – vysoká rýchlosť
M - Kryt mini mixéra
N - Nadstavec mini mixéra
O - Gumené výčnelky
P - Zárezy
Q - Vnútorné viečko
R - Pripojovací ventil
S - Otočný uzáver
A csomag tartalma: 1 × Fitmix, 1 × fedő, záró
kupakkal, 1 × aprító egység, 1 × mini-mixer
tartozék, 1 × mini-mixer fedő, 1 × receptkönyv, 1 ×
használati utasítás
A - Aprító egység
B - Mérő pohár
C - Fedő
D - Keverőedény
E - Adagoló csap
F - Csap fogantyú
G - Motor egység
H - Csap fogantyú zárt állásban
I - Csap fogantyú nyitott állásban
J - Gomb 0/bekapcsolva – indítás/leállítás
K - Gomb 1 – közepes sebesség
L - Gomb 2 – magas sebesség
M - Mini-mixer fedő
N - Mini-mixer tartozék
O - Gumi rögzítők
P - Vájat
Q - Zárófedő
R - Összekötő szelep
S - Csavaros zár
600Watt Fitmix Manual - M7435+M7438+M7439 _Bedienungsanleitung-fitmix_C_150407_PRINT.indd 2 07.04.15 09:40
Page 3
3
TR
Teslimat kapsamı: 1 × Fitmix, 1 × Kapak, 1 ×
Tokmak, 1 × Mini mikser başlığı, 1 × Mini mikser
kapağı, 1 × Tarif kitapçığı, 1 × Kullanma talimatı
A - Tokma k
B - Ölçüm kabı
C - Kapak
D - Yoğurma kabı
E - Musluk
F - Musluk kolu
G - Motor ünitesi
H - Musluk kolu AUS-(KAPALI) konumda
I - Musluk kolu EIN-(AÇIK) konumda
J - Tuş 0/Puls - Başlat/Durdur İşlevi
K - Tuş 1 - Orta hız
L - Tuş 2 - Yüksek hız
M - Mini mikser kapağı
N - Mini mikser başlığı
O - Lastik ayaklar
P - Yuva
Q - Kapak
R - Bağlantı valfi
S - Döner kapak
A
D
B H I
C
F
E
Q
R
L
K
J
M
N
O
P
G
S
600Watt Fitmix Manual - M7435+M7438+M7439 _Bedienungsanleitung-fitmix_C_150407_PRINT.indd 3 07.04.15 09:40
Page 4

4
DE
GEBRAUCHSANLEITUNG
Sehr geehrter Kunde! Sehr geehrte Kundin!
Vielen Dank, dass Sie sich für Fitmix entschieden haben. Mit
Fitmix haben Sie den ultimativen Helfer in der gesunden Küche!
Weiteres praktisches Zubehör finden Sie unter:
www.mediashop.tv
Haftungsbeschränkung: Die in dieser Bedienungsanleitung
enthaltenen technischen Informationen, Daten und Hinweise für
die Installation, für den Betrieb und für die Pflege entspre
chen dem letzten Stand bei Drucklegung. Es können aus den
Angaben, Abbildungen und Beschreibungen in dieser Anleitung
keine Ansprüche hergeleitet werden. Es wird keine Haftung
vom Hersteller übernommen für Schäden, die aufgrund von
Nichtbeachtung der Anleitung, nicht bestimmungsgemäßer
Verwendung, unsachgemäßen Reparaturen, unerlaubt vorge
nommener Veränderungen oder Verwendung nicht zugelassener Ersatzteile entstehen.
Bestimmungsgemäße Verwendung
WARNHINWEISE
Das Gerät ist nur für den privaten
Gebrauch bestimmt. Das Gerät ist nur
zur Nahrungsmittelzubereitung geeignet. Benutzen Sie das Gerät nicht für
Zwecke, für die es nicht bestimmt ist.
Ansprüche jeglicher Art wegen Schäden aus nicht bestimmungsgemäßer
Verwendung sind ausgeschlossen.
Der Betreiber trägt allein das Risiko.
SICHERHEIT & AUFSTELLEN
Lesen Sie diese Bedienungsanleitung
sorgfältig, bevor Sie den Mixer benutzen! Beachten Sie die Sicherheitshinweise bei der Inbetriebnahme des
Mixers, denn es können Sach- oder
Personenschäden entstehen. Befolgen Sie alle Sicherheitshinweise, um
Schäden wegen falscher Benutzung
zu vermeiden! Bewahren Sie die
Bedienungsanleitung zum späteren
Nachschlagen auf. Sollte der Mixer
an Dritte weitergegeben werden,
so muss diese Bedienungsanleitung
ebenfalls mit ausgehändigt werden.
Hinweise:
• Vor der Verwendung ist der Mixer
auf äußere sichtbare Schäden zu
kontrollieren. Ein beschädigter Mi
-
xer darf nicht verwendet werden.
• Das Typenschild darf nicht entfernt
werden.
• Kinder und Personen mit eingeschränkten physischen, sensorischen oder mentalen Fähigkeiten
sind vom Mixer fernzuhalten.
• Dieser Mixer kann von Personen
mit verringerten physischen, sensorischen oder mentalen Fähigkeiten
oder Mangel an Erfahrung und
Wissen benutzt werden, wenn sie
beaufsichtigt oder bezüglich des
sicheren Gebrauchs des Mixers unterwiesen wurden und die daraus
resultierenden Gefahren verstehen.
Kinder dürfen nicht mit dem Mixer
spielen. Reinigung und Benutzerwartung dürfen nicht von Kindern
ohne Beaufsichtigung durchgeführt
werden.
• Lassen Sie den Mixer niemals unbeaufsichtigt eingeschaltet. Seien
Sie äußerst vorsichtig, wenn Sie
den Mixer in der Nähe von Kindern
und Personen mit eingeschränkten physischen, sensorischen oder
mentalen Fähigkeiten benutzen.
• Ziehen Sie den Netzstecker vor
dem Anbringen und Abnehmen von
600Watt Fitmix Manual - M7435+M7438+M7439 _Bedienungsanleitung-fitmix_C_150407_PRINT.indd 4 07.04.15 09:40
Page 5
5
Teilen am Gerät, nach der Benutzung des Gerätes, vor der Reinigung
des Gerätes, bevor Sie den Raum
verlassen oder wenn ein Fehler auftritt aus der Steckdose. Ziehen Sie
den Netzstecker nicht am Kabel aus
der Steckdose.
• Lassen Sie die Motoreinheit, das
Netzkabel oder den Netzstecker
niemals nass werden. Tauchen Sie
die Motoreinheit, Netzkabel oder
Netzstecker nicht in Wasser oder
andere Flüssigkeiten; halten Sie es
nicht unter fließendes Wasser.
• Reinigen Sie den Mixer und die Zubehörteile vor dem ersten Gebrauch
des Gerätes. Beachten Sie weitere
Informationen im Abschnitt Reinigung.
• Trocknen Sie den Mixer und alle
Zubehörteile, bevor Sie die Teile
anbringen und bevor Sie das Gerät
mit der Stromversorgung verbinden.
• Benutzen Sie das Gerät immer auf
einer stabilen, ebenen, sauberen
und trockenen Oberfläche.
• Kleben Sie keine Fremdkörper an
das Gerät.
• Halten Sie die Hände und Utensilien, abgesehen von dem Stößel,
außerhalb des Mixbehälters, wenn
er sich auf der Motoreinheit befindet.
• Verwenden Sie niemals Zubehörteile, die nicht für den Mixer vorgesehen sind.
• Das Gerät kann nur eingeschaltet
werden, wenn der Stecker mit einer
Steckdose verbunden ist.
• Überprüfen Sie, ob die Netzspannung auf dem Typenschild mit Ihrer
lokalen Versorgungsspannung
übereinstimmt. Die einzige Art, das
Gerät von der Stromversorgung
zu trennen, ist den Netzstecker zu
ziehen.
• Stolpern Sie nicht versehentlich
über das Netzkabel, wenn das Gerät
in Betrieb ist.
• Stellen Sie das Gerät so auf, dass
der Netzstecker immer zugänglich
ist.
• Warten Sie bis der Messerkopf vollständig zum Stillstand gekommen
ist bevor Sie den Mixerbehälter oder
den Mini-Mixer von der Motoreinheit abnehmen.
• Verwenden Sie den Mixer nur mit
aufgesetztem Deckel.
• Verwenden Sie den Stößel nur,
wenn der Deckel auf dem Mixbehälter aufgesetzt ist. Nicht zu
starken Druck am Stößel ausüben,
da er sonst die Messer berühren
könnte.
WARNHINWEISE
• Verpackungsmaterialien dürfen
nicht zum Spielen verwendet werden, da Erstickungsgefahr besteht.
• Beim Reinigen der Messereinheit
müssen Sie besonders vorsichtig vorgehen um Verletzungen zu
vermeiden, da die Klingen extrem
scharf sind.
• Stehen Leitungen oder Bauteile
600Watt Fitmix Manual - M7435+M7438+M7439 _Bedienungsanleitung-fitmix_C_150407_PRINT.indd 5 07.04.15 09:40
Page 6

6
unter Spannung, besteht Lebensgefahr durch elektri schen Strom!
• Vermeiden Sie Schäden am Netzkabel, indem Sie es nicht quetschen,
knicken oder über scharfe Kanten
ziehen. Halten Sie das Netzkabel
von heißen Oberflächen und offenen Flammen fern.
• Benutzen Sie das Gerät niemals,
wenn das Netzkabel oder das Gerät
beschädigt ist.
• Öffnen Sie das Gerät unter keinen
Umständen. Für Schäden aufgrund
von falscher Benutzung wird keine
Haftung übernommen.
• Verwenden Sie keine Werkzeuge
oder Gegenstände im Gerät. Metallgegenstände kön nen einen Kurzschluss verursachen oder zu einem
Stromschlag führen.
BEDIENUNG
1. Entfernen Sie sämtliches Verpackungsmaterial und ent
sorgen Sie es entsprechend den geltenden gesetzlichen
Bestimmungen.
2. Reinigen Sie den Mixer und alle Zubehörteile bevor Sie sie
zum ersten Mal benutzen. (Siehe Reinigung)
3. Wenn Sie mit dem Zapfhahn (E) arbeiten möchten, dann
schrauben Sie den Drehverschluß (S) ab und danach
schrauben Sie den Zapfhahn (E) auf den Mixbehälter (D).
Hinweis: Sie können mit Drehverschluß (S) oder Zapfhahn (E)
den Mixer bedienen.
4. Setzen Sie den Mixbehälter (D) an der Motoreinheit (G) auf
und drehen Sie diesen fest, bis der Mixbehälter fest einras
tet. Stellen Sie sicher, dass der Zapfhebel (F) des Zapfhahns
(E) in der AUS-Position (H) ist.
5. Geben Sie die Zutaten in den Mixbehälter (D). Wir empfeh
len zuerst die festen und danach die flüssigen Zutaten. Dazu
zählen Obst, frisches Joghurt, Milch, Fruchtsäfte, Gemüse,
etc. Sie können auch Eis oder tiefgekühlte Zutaten in den
Mixbehälter geben. Dazu gehören tiefgekühlte Früchte,
tiefgekühltes Joghurt, Eiswürfel, etc. Tipp: Wenn Sie heiße
oder leicht schäumende Flüssigkeiten (z.B. Milch) verwen
den oder tiefgekühlte Zutaten, dürfen Sie den Mixbehälter
maximal bis zur 1000 ml Markierung anfüllen.
6. Platzieren Sie den Deckel (C) auf den Mixbehälter (D)
bevor Sie das Gerät einstecken.
7. Stecken Sie den Netzstecker in die Steckdose.
8. Setzen Sie entweder den Messbecher (B) auf den Deckel
(C) oder setzen Sie den Stößel (A) in die Öffnung ein. Tipp:
Der Stößel kann verwendet werden, wenn dickflüssige
Mischungen verrührt werden oder wenn große Mengen an
tiefgekühlten Zutaten verwendet werden.
9. Drücken Sie die Taste 2 (L) bis zu 30 Sekunden lang, um den
Mischvorgang zu beginnen, drücken Sie dann die Taste 0/
Pulse (J) (Impulsbetrieb) in kurzen Abständen und lassen Sie
die Zutaten so lange vermischen, bis sie gleichmäßig püriert
sind und dann schalten Sie das Gerät ab. Tipp: Verwenden
Sie den Stößel, indem Sie die Zutaten von oben nach unten
in die Flüssigkeit drücken.
10. Zum Ausgießen der Flüssigkeit gibt es zwei Varianten:
Variante 1: Sie können den Mixbehälter (D) von der Motoreinheit (G) mit einer Drehbewegung herunterheben, entfernen den Deckel und gießen die Flüssigkeit in einen Behälter.
Variante 2: Sie stellen einen Behälter unter den Zapfhahn (E)
und drücken den Zapfhebel (F) des Zapfhahns nach unten
in die EIN-Position (I). Wenn der Behälter voll ist, drücken
Sie den Zapfhebel (F) nach oben in die AUS-Position (H).
Tipp: Zum leichteren Zapfen von dickflüssigeren
Flüssigkeiten drücken Sie die Taste 1 (K) und danach
drücken Sie den Zapfhebel des Zapfhahns nach unten
in die EIN-Position (I). Dünnere Flüssigkeiten lassen
sich gewöhnlich zapfen, ohne dass Sie die Motorein
-
heit einschalten müssen.
MINI MIXER
Mit dem Mini Mixer können Sie Gewürze, Nüsse, Kräuter, Käse,
Kaffee uvm. mahlen. Achtung: Mixen Sie trockene Zutaten
(z. B. Gewürze, Nüsse) immer nur im Mini Mixer und nicht im
Mixbehälter.
1. Setzen Sie den Mini Mixer Aufsatz (N) auf die Motoreinheit
(G) auf. Achten Sie dabei, dass die Gumminoppen (O) des
Mini Mixer Aufsatzes (N) in die dafür vorgesehen Einker
-
bungen (P) an der Motoreinheit (G) korrekt platziert werden.
2. Geben Sie die zu mahlenden Zutaten in den Mini Mixer
Aufsatz (N). Füllen Sie diesen maximal bis zu ¾ der möglichen
Füllmenge an.
3. Setzen Sie den Mini Mixer Deckel (M) an der Motorein
heit (G) auf und drehen Sie diesen fest, bis der Mini Mixer
Deckel einrastet.
4. Stecken Sie den Netzstecker in die Steckdose.
5. Drücken Sie die Taste 2 (L) bis zu 10 Sekunden, um den
Mahlvorgang zu beginnen. Drücken Sie dann die Taste 0/
Pulse (J) (Impulsbetrieb) und lassen Sie die Zutaten so lange
mahlen, bis der gewünschten Feinheitsgrad erreicht ist.
6. Heben Sie mit einer Drehbewegung den Mini Mixer Deckel
(M) von der Motoreinheit (G) ab. Dann können Sie den
Mini Mixer Aufsatz (N) von der Motoreinheit heben und die
gemahlenen Zutaten in einen Behälter leeren.
Sicherheitsabschaltung: Der Mixer ist so konstruiert, dass die
Mixfunktion nur bei aufgesetztem Mixbehälter startet.
Hinweise
• Mixen Sie trockene Zutaten (z. B. Gewürze, Nüsse) immer
nur im Mini Mixer und nicht im Mixbehälter.
• Lassen Sie den Mixer nie laufen, wenn er leer ist.
• Verwenden Sie den Mixer niemals kontinuierlich länger als
60 Sekunden.
• Verwenden Sie den Mixer nicht als Vorratsbehälter. Leeren
Sie ihn immer vor und nach der Verwendung.
• Bei manchen Flüssigkeiten, z.B. bei Milch, erhöht sich
das Volumen während des Mixens und es kann Schaum
entstehen. Füllen Sie den Mixbehälter daher nicht allzu voll
(max. 1 Liter) und stellen Sie sicher, dass der Deckel korrekt
aufgesetzt ist.
• Mixen Sie niemals Lebensmittel, die bei dem Einfrieren zu
einer soliden Masse gefroren sind. Brechen Sie sie vor der
600Watt Fitmix Manual - M7435+M7438+M7439 _Bedienungsanleitung-fitmix_C_150407_PRINT.indd 6 07.04.15 09:40
Page 7
7
Zugabe in den Mixbehälter auseinander.
Anwendungstipps
• Bevor Sie den Deckel aufsetzen, drücken Sie die festen
Zutaten mit dem Stößel in die Flüssigkeit.
• Verwenden Sie die 0/PULSE-Taste (Impulsbetrieb), um die
Motoreinheit im Start-Stop-Betrieb zu verwenden, um die
gewünschte Konsistenz Ihres Drinks zu erzielen. Seien Sie
vorsichtig, da dabei automatisch die höhere Geschwindig
keit ausgewählt wird, und dies kann dazu führen, dass die
Flüssigkeit die Wände hinauf zum Deckel des Mixbehälters
hochspritzt.
• Manche Flüssigkeiten können sich bei längerem Stehenlas
sen möglicherweise absetzen. Daher ist es am besten, wenn
Sie diese sofort trinken. Wenn Sie eine Flüssigkeit länger
stehen lassen, sollten Sie diese nochmal umrühren, bevor
Sie diese trinken.
• Um einen dünnflüssigeren Smoothie zu mixen, fügen
Sie mehr Flüssigkeit hinzu. Um einen dickflüssigeren
Smoothie-Drink zu mixen, fügen Sie mehr tiefgekühlte
Zutaten hinzu. Um den letzten Rest eines dickflüssigen
Smoothie-Drinks auszugießen, geben Sie ein paar Esslöffel
Flüssigkeit hinzu, um das Ausgießen zu erleichtern.
REINIGUNG
1. Füllen Sie den Mixbehälter (D) zur Hälfte mit warmem Was
-
ser.
Tipp: Bei starker Verschmutzung einige Tropfen Spülmittel
hinzugeben.
2. Befestigen Sie den Deckel (C) und die Verschlusskappe (B)
am Mixbehälter (D) und geben Sie ihn dann auf die Motor
-
einheit (G).
3. Drücken Sie die Taste 1 (K) und während das Gerät einge
schaltet ist, öffnen Sie den Zapfhahn (Ein-Position (I)) und
lassen Sie Wasser in einen Behälter laufen, um das Ventil zu
reinigen. Wiederholen Sie dies, bis das Wasser klar ist.
4. Danach können Sie den Mixbehälter (D), den Deckel (C), die
Verschlusskappe (B) und den Stößel (A) in der Spülmaschi
-
ne reinigen.
Hinweise
• Lassen Sie die Motoreinheit, das Kabel oder den Stecker
niemals nass werden.
• Nach der Verwendung immer sofort reinigen.
• Lassen Sie Lebensmittel nicht auf dem Mixbehälter trock
-
nen, da dies die Reinigung erschwert.
• Bitte versuchen Sie niemals das Messer zu entfernen oder
zu schärfen. Dies könnte die Funktion beeinträchtigen.
Tipp: Am Boden der Motoreinheit finden Sie eine Kabelaufbe
-
wahrung.
Mini Mixer
Nach der Verwendung können Sie den Mini Mixer Aufsatz
sowie den Mini Mixer Deckel in der Spülmaschine reinigen.
Motoreinheit
Wischen Sie sie mit einem feuchten Tuch ab und trocknen Sie
sie danach ab.
WARNHINWEIS
Schalten Sie das Gerät immer aus
und stecken Sie es aus bevor Sie es
reinigen.
Reinigung des Zapfhahns
Der Zapfhahn sollte regelmäßig zerlegt werden um die Teile
gründlich zu reinigen.
1. Schrauben Sie mit einer Drehbewegung den Zapfhahn (E)
vom Mixbehälter (D) ab.
2. Zerlegen Sie den Zapfhahn (E) indem Sie die Verschluss
kappe (Q) mit einer Drehbewegung vom Anschlussventil (R)
abschrauben.
3. Spülen Sie die Verschlusskappe (Q) und das Anschlussventil
(R) mit warmem Wasser und milder Spülseife und trocknen
Sie sie danach gründlich ab.
4. Setzen Sie den Zapfhahn (E) wieder zusammen, indem sie
die obigen Schritte in umgekehrter Reihenfolge durchfüh
ren. Achten Sie dabei darauf, dass die Dichtungen richtig
auf dem Mixbehälter (D) aufgesetzt sind.
GEWÄHRLEISTUNGSBESTIMMUNG
Von der Gewährleistung ausgenommen sind alle Mängel, die
durch unsachgemäße Behandlung entstehen, z.B. Überhitzung,
Verfärbung, Kratzer, Beschädigung durch Fall auf den Boden,
Reparaturversuche und unsachgemäße Reinigung. Ausgenom
men sind ebenso rein optische Gebrauchsspuren. Dies gilt auch
für den normalen Verschleiß.
ENTSORGUNG & TECHNISCHE DATEN
Umwelthinweis
Entsorgen Sie das Produkt am Ende seiner Lebens
dauer deshalb nicht mit dem normalen Hausmüll.
Bringen Sie es zu einer Sammelstelle zum Recycling
von elektrischen und elektronischen Geräten. Dies
wird durch dieses Symbol auf dem Produkt, in der Bedienungs
-
anleitung und auf der Verpackung angegeben.
Informieren Sie sich über Sammelstellen, die von Ihrem Händler
oder der lokalen Behörde betrieben werden. Die Wiederverwer
tung und das Recycling von Altgeräten ist ein wichtiger Beitrag
zum Schutz unserer Umwelt.
Technische Daten
Dieses Produkt entspricht den Europäischen Richtlinien.
Maße Fitmix: (L×B×H) 17,01 × 26,30 × 40,00 cm
Fassungsvermögen Mixbehälter: 1,5 l
Fassungsvermögen Mini-Mixer Aufsatz: 0,35 l
Motorleistung: 600 W
Netzspannung: 220-240 V / 50 Hz
Umdrehungen: max. 18.000 / Minute
Technische und optische Änderungen vorbehalten.
600Watt Fitmix Manual - M7435+M7438+M7439 _Bedienungsanleitung-fitmix_C_150407_PRINT.indd 7 07.04.15 09:40
Page 8

8
EN
USER INSTRUCTIONS
Dear Customer! Thank you for choosing Fitmix. With Fitmix
you have the ultimate helping hand for a healthy cuisine!
You can find additional handy accessories by visiting
www.mediashop.tv
Limitation of liability: All technical information, data and
instructions on installation, operation and care included in this
instruction manual accord with the latest state at the time of
printing. No claims can be derived from the information, illust
rations and descriptions in these instructions. The manufacturer
does not assume any liability for damages due to non-compli
ance with the instructions, non-intended use, improper repairs,
unauthorized technical modifications, or use of non-approved
spare parts.
Intended use
WARNING: This appliance is
intended for domestic use only. This
appliance is for food preparation only.
Do not use this appliance for any
other purposes than its intended use.
All claims of any type due to non-intended usage are excluded. The risk
is borne solely by the operator.
SAFETY & INSTALLATION
Please read the instruction manual
carefully before using the blender!
Observe the safety guidelines when
operating the blender because personal harm or property damage could
possibly occur. Follow the safety
instructions to avoid damages due
to improper use. Save the instruction
manual for future reference. When
you hand over the blender to the next
owner, the manual must be passed on
as well.
Note
• Check the blender for visible dama-
ge before use. Do not put a damaged blender into operation.
• Do not remove the rating plate.
• Children and persons with restricted physical, sensory or mental
capabilities must not have access to
the blender.
• This blender can be used by persons with restricted physical, sensory or mental capabilities, or lack
of experience and knowledge when
they are supervised or have received instruction on how to safely
operate the blender and understand
the hazards involved. Children are
not allowed to play with the blender.
Cleaning and user maintenance
must not be carried out by unsupervised children.
• Never leave the blender unattended. Be extremely careful when
operating the blender in the vicinity
of children or persons with limited
physical, sensory or mental capabilities.
• Unplug before fitting or removing
parts, after use, before cleaning,
before leaving the room, or when
the blender malfunctions. Do not
pull on the power cord to unplug.
• Never let the power unit, cord or
plug get wet. Do not immerse the
power unit, cord or plug in water
or other liquids; do not rinse under
running water.
• Clean the blender and its components before using it for the first
time. Observe the information in the
600Watt Fitmix Manual - M7435+M7438+M7439 _Bedienungsanleitung-fitmix_C_150407_PRINT.indd 8 07.04.15 09:40
Page 9

9
section titled Cleaning.
• Dry off the blender and all of its
parts before fitting components and
before connecting the unit to the
power supply.
• Always operate the appliance on a
stable, flat, clean and dry surface.
• Do not glue foreign objects onto the
appliance.
• Keep hands and utensils, other than
the stirrer, out of the pitcher when it
is on the power unit.
• Never use attachments that are not
intended for this blender.
• It is only possible to turn on the appliance when the plug is connected
to an electric socket.
• Compare the connection information (voltage and frequency) on the
rating plate with that of your electrical network.
The only way to disconnect the
appliance from the power supply is
to pull the plug from the socket.
• Do not accidentally trip over the
power cord while the appliance is in
operation.
• Set up the appliance so that the
power plug is always accessible.
• Before removing the pitcher or Mini-Mixer from the power unit, wait
until the blades have completely
stopped.
• Only operate the blender with its lid
in place.
• Use the plunger only when the lid is
on the blender jug. Do not put too
much pressure on the plunger, as it
could then touch the blade.
WARNING
• Packing material is not a toy for
children, it is a suffocation hazard!
• When cleaning the cutter assembly,
one has to be especially careful to
avoid injury because the blades are
extremely sharp.
• Touching live lines and parts under
voltage poses a lethal risk of electrocution.
• Avoid damaging the power cord.
Do not crush it, twist it, or pull it
over sharp edges. Keep it away
from hot surfaces or open fire.
• Never use the appliance when the
unit or the power cord is damaged.
• Under no circumstances must the
appliance be opened. The manufacturer assumes no liability for
damages due to improper use.
• Do not use any tools or objects
inside the appliance. Metal objects
can generate an electrical short or
cause an electric shock.
OPERATION
1. Remove all packaging material and discard it in accordance
with local laws and regulations.
2. Clean the blender and all components before using it for the
first time. (See Cleaning)
3. If you want to use the tap(E), then unscrew the screw top(S)
and then screw the tap(E) to the blender(D).
Tip: you can operate the blender using the screw top(S) or tap
(E).
4. Place the pitcher (D) on the power unit (G) and twist until
the pitcher locks into place. Make sure that the spout lever
(F) is in the OFF-position (H).
5. Place the ingredients into the pitcher (D). We recommend
adding solid ingredients first and adding liquids second. You
can use fruits, fresh yoghurt, milk, juice, vegetables, etc.
You can also add ice or frozen ingredients to the pitcher, for
example frozen fruit, frozen yoghurt or ice cream. Tip: When
using hot or frothy liquids (e.g., milk) or frozen ingredients,
the pitcher should only be filled up to the 1000 ml mark.
6. Place the lid (C) on the blender jug (D) before plug
-
600Watt Fitmix Manual - M7435+M7438+M7439 _Bedienungsanleitung-fitmix_C_150407_PRINT.indd 9 07.04.15 09:40
Page 10
10
ging the device in.
7. Connect the unit to the power supply.
8. Either put the measuring cup (B) into the lid (C) or place
the stirrer (A) in the hole. Tip: The stirrer can be used when
blending thick mixtures or when large quantities of frozen
items are used.
9. 9. Press button 2 (L) for up to 30 seconds to begin the
mixing process, then press the 0 key / Pulse (J) (pulse mode)
in short intervals and let the ingredients mix together until
evenly puréed. Switch the device off. Tip: Use the plunger
to push the ingredients from the top into the liquid at the
bottom.
10. There are two ways to pour the liquid: Option 1: Lift the
blender jug (D) off the motor unit (G) with a twisting motion,
remove the lid and pour the liquid into a container.
(2) You place a container underneath the spout (E) and press
the lever (F) down into the ON-position (I). When the cont
-
ainer is full, lift the lever (F) up into the OFF-position (H).
Tip: to help dispense thick liquids, press the 1 button (K) and
then press the spout lever (F) down into the ON-position (I).
Thinner liquids may dispense without having to switch on
the power unit.
MINI MIXER
With the Mini Mixer, you can grind spices, nuts, herbs, cheese,
coffee and much more. Attention: Only grind dry ingredients
(e.g., spices, nuts) in the Mini-Mixer, never in the pitcher.
1. Place the Mini-Mixer attachment (N) on the power unit
(G). Make sure that the rubber knobs (O) of the Mini-Mixer
attachment (N) are correctly aligned with the indentations
(P) of the power unit (G).
2. Place the items to be ground into the Mini-Mixer attachment
(N). Fill it to 3/4 capacity only.
3. Place the Mini-Mixer lid (M) onto the power unit (G) and
twist until it locks into place.
4. Connect the unit to the power supply.
5. Press the 2 button (L) for up to 10 seconds to start the grin
ding process. Afterwards press the 0/Pulse button (J) and
continue until the items are ground to the desired fineness.
6. Turn and lift the Mini-Mixer lid (M) off the power unit (G).
Lift the Mini-Mixer attachment (N) off the power unit and
pour the ground ingredients into a container.
Safety shutdown: The blender is constructed to work only with
an attached mixing container.
Note
• Always blend dry ingredients (e.g., spices, nuts) in the
Mini-Mixer and never in the pitcher.
• Never run the blender when it is empty.
• Never run the blender continuously for longer than 60
seconds.
• Don’t use the blender as a storage container. Keep it empty
before and after each use.
• Avec quelques liquides comme par exemple le lait, le volume
augmente pendant le mixage et de la mousse peut se former.
Ne remplissez pas trop le récipient du mixer (max. 1 litre) et
assurez-vous que le couvercle est correctement en place.
• Never blend food that has formed a solid mass during free
-
zing. Break it up before adding it to the pitcher.
Practical tips:
• Before fitting the lid, use the stirrer to push the solid ingre
-
dients into the liquid.
• Use the 0/Pulse button to operate the power unit in a start
stop action to control the texture of your drink. Take care as
this automatically selects the higher speed and may cause
the liquid to be thrown up the sides and onto the lid of the
pitcher.
• Some liquids may separate on standing; therefore, it is best
to drink them right away. Separated drinks should be stirred
before drinking.
• To make a thinner smoothie drink, add more liquid. To make
a thicker smoothie drink, add more frozen ingredients. To
help dispense the last amount of a thick smoothie drink, add
a few tablespoons of liquid to increase the flow.
CLEANING
1. Fill the pitcher (D) halfway with warm water.
Tip: If the jug is very dirty, add a few drops of detergent
2. Fit the lid (C) and the cap (B) onto the pitcher (D) and then
place it on the power unit (G).
3. Press the 1 button (K) and whilst running, open the spout
(ON-position (I)) and allow the water to drain into a cont
-
ainer to clean the valve. Repeat until the water runs clear.
4. Afterwards, you can place the pitcher (D), the lid (C), the
cap (B) and the stirrer (A) in the dishwasher for cleaning
.
Note
• Never let the power unit, cord or plug get wet.
• Always clean immediately after use.
• Do not let food dry onto the pitcher as this will make clea
-
ning difficult.
• Please do not attempt to remove or sharpen the knife. This
may degrade its performance.
Tip: Underneath the motor unit you will find a cable storage
area.
Mini Mixer
It is safe to clean the Mini-Mixer attachment and the Mini-Mixer
lid in the dishwasher.
Power unit
Wipe with a damp cloth and then dry.
WARNING
Before cleaning, always switch off and
unplug the appliance.
Cleaning the spout
The spout should be dismantled regularly for thorough cleaning.
1. Unscrew the spout (F) from the pitcher (D).
2. Dismantle the spout (E) by unscrewing the cap (Q) from the
connection valve (R).
3. Rinse the cap (Q) and the connection valve (R) with water
and mild detergent, then dry thoroughly.
4. Reassemble the spout (E) by reversing the above procedure.
Make sure that the gasket is properly installed on the pitcher
(D).
WARRANTY
Not included in the warranty are damages that have arisen
due to improper handling, e.g., overheating, discoloration,
scratching, damages caused by dropping it on the floor,
unauthorized repairs and improper cleaning. Excluded are also
purely visual signs of wear and tear or wear and tear in general.
DISPOSAL AND TECHNICAL DATA
600Watt Fitmix Manual - M7435+M7438+M7439 _Bedienungsanleitung-fitmix_C_150407_PRINT.indd 10 07.04.15 09:40
Page 11
11
Environmental instructions
Do not dispose this product at the end of its service
life through normal domestic waste. It has to be
disposed through a collection agency that recycles
electric and electronic devices. This is pointed out by
the symbol on the product, in the instruction manual, and on the
packaging.
Please inquire about local collection agencies that may be
operated by your distributor or your municipal administration.
By recycling, making use of the materials, or other forms of
recycling old units you are making an important contribution to
protecting our environment.
Technical Data
This product complies with the European directives
Measurements Fitmix: (L×W×H) 17,01 × 26,30 × 40,00 cm
Capacity pitcher: 1.5 l
Capacity Mini-Mixer attachment: 0.35 l
Motor output: 600 W
Voltage: 220-240 V / 50 Hz
Max. 18.000 revolutions / minute.
Technical and design features may be subject to change.
FR
MODE D’EMPLOI
Cher client, chère cliente !
Merci d’avoir choisi Fitmix. Avec Fitmix, vous possédez le meil
-
leur assistant pour une cuisine saine !
Vous trouvez d’autres accessoires pratiques à:
www.mediashop.tv
Limitation de responsabilité : Les informations techniques,
données et instructions contenues dans ce mode d’emploi
pour l’installation, l’utilisation et l’entretien répondent à l’état
de connaissance le plus récent au moment de l’impression de
ce manuel. Les mentions, illustrations et spécifications figurant
dans ces instructions ne peuvent donner lieu à aucun recours
juridique. Le fabricant n’assume aucune responsabilité quant
aux dommages qui découleraient d’un non-respect de ces
instructions, d’une utilisation non conforme, de réparations in
appropriées, de modifications non autorisées ou de l’utilisation
de pièces de rechange non conformes.
Utilisation conforme
AVERTISSEMENT : l’appareil est
destiné à un usage privé uniquement.
L’appareil convient uniquement pour
la préparation de denrées alimen
taires. N’utilisez pas l’appareil à des
fins auxquelles il n’est pas destiné.
Toute réclamation, quelle qu’elle soit,
pour des dommages résultant d’une
mauvaise utilisation, est exclue.
L’exploitant seul répond des risques
encourus.
SECURITE & MISE EN SERVICE
Lisez attentivement ce mode d’emploi
avant d’utiliser le mixer! Observez les
consignes de sécurité lors de la mise
en service du mixer, car des dommages matériels ou aux personnes
peuvent survenir. Suivez toutes les
consignes de sécurité, pour éviter les
dommages dus à une mauvaise utilisation ! Conservez le mode d’emploi
pour le consulter à nouveau ultérieurement. Si vous cédez le mixer à un
tiers, vous devez lui remettre également ce mode d’emploi.
Instructions
• Avant d’utiliser le mixer, vérifiez qu’il
ne présente pas de défauts externes visibles. Il ne faut pas utiliser un
mixer endommagé.
• La plaque signalétique ne doit pas
être enlevée.
• Tenez éloignés du mixer les enfants
et les personnes souffrant d’un handicap physique ou mental, ou d’une
déficience sensorielle.
• Ce mixer peut être utilisé par des
personnes dont les capacités
physiques, sensorielles ou menta-
600Watt Fitmix Manual - M7435+M7438+M7439 _Bedienungsanleitung-fitmix_C_150407_PRINT.indd 11 07.04.15 09:40
Page 12

12
les sont réduites ou qui manquent
d’expérience/de connaissances, si
elles sont sous surveillance ou si elles ont été informées de l’utilisation
sécurisée du mixer et des dangers
qui peuvent en résulter. Les enfants
ne doivent pas jouer avec le mixer.
Le nettoyage et l’entretien effectué
par l’utilisateur ne doivent pas être
effectués par des enfants sans surveillance.
• Ne laissez pas le mixer branché
sans surveillance. Soyez extrêmement prudent lorsque vous utilisez
le mixer à proximité d’enfants et de
personnes souffrant d’un handicap
physique ou mental, ou d’une déficience sensorielle.
• Débranchez l’appareil avant de
monter ou d’enlever des pièces,
après utilisation, avant son nettoyage, avant de quitter la pièce ou si
la prise électrique est défectueuse.
Ne retirez pas la fiche de la prise
électrique en tirant sur le cordon
d’alimentation.
• Le bloc moteur, le cordon et la
fiche ne peuvent à aucun moment
être mouillés. Ne plongez jamais le
moteur, le cordon électrique ou la
fiche électrique dans l’eau ou dans
tout autre liquide ; ne les placez pas
sous l’eau courante.
• Nettoyez le mixer et ses accessoires
avant la première utilisation. Veuillez
consulter la rubrique «Nettoyage»
pour plus de détails.
• Séchez soigneusement le mixer et
tous les accessoires avant de monter les divers éléments et avant de
brancher l’appareil.
• N’utilisez l’appareil que sur une surface stable, plane, propre et sèche.
• Ne collez pas de corps étrangers
sur l’appareil.
• A l’exception du poussoir, veillez à
ne pas laisser d’ustensiles– ni de
mettre vos mains - dans le bocal du
mixer lorsqu’il est sur le moteur.
• N’utilisez jamais d’accessoires qui
ne sont pas prévus pour le mixer.
• L’appareil ne peut être mis en route
que lorsqu’il est connecté à la prise
de courant par une fiche.
• Vérifiez si la tension d’alimentation
indiquée sur la plaque signalétique
correspond à votre tension locale.
La seule manière de débrancher
l’appareil est de retirer la prise.
• Veillez à ne pas buter accidentellement sur le cordon d’alimentation
lorsque l’appareil est en marche.
• Placez l’appareil de sorte que la prise
soit toujours accessible.
• Attendez que la tête du couteau soit
complètement arrêtée pour enlever
le bocal du mixer ou le mini-mixer du
bloc moteur.
• N’utilisez jamais le mixer sans le
couvercle correctement positionné.
• Utilisez le pilon uniquement si le
couvercle est en place sur le récipient du mixer. Ne pas exercer une
pression trop forte sur le pilon, car il
pourrait sinon entrer en contact avec
la lame.
600Watt Fitmix Manual - M7435+M7438+M7439 _Bedienungsanleitung-fitmix_C_150407_PRINT.indd 12 07.04.15 09:40
Page 13

13
AVERTISSEMENTS
• Il ne faut pas jouer avec les matériaux d’emballage: risque de suffocation.
• Lors du nettoyage des couteaux, il
s’agit d’être particulièrement prudent afin d’éviter toute blessure: les
lames sont extrêmement tranchantes.
• Tout cordonou composant sous
tension électrique représente un
danger de mort potentiel!
• Evitez d’endommager le cordon
électrique: il ne faut ni l’écraser, ni
le plier, ni le faire glisser sur des
bords saillants. Tenez le câble éloigné des surfaces chaudes et des
sources de chaleur (flammes par
ex.)
• N’utilisez jamais l’appareil si le
cordon ou l’appareil lui-même est
endommagé.
• En aucun cas il ne faut ouvrir l’appareil. Nous n’assumons aucune
responsabilité pour les dommages
résultant d’utilisation erronée.
• Ne mettez pas d’outils ou d’objets
quelconques dans l’appareil. Tout
objet métallique risque de provoquer un court-circuit et une électrocution.
UTILISATION
1. Ôtez soigneusement l’emballage et jetez-le conformément
aux réglementations locales en vigueur.
2. Nettoyez le mixer et toutes les pièces avant de les utiliser
pour la première fois (voir la rubrique Nettoyage).
3. Si vous souhaitez travailler avec le robinet de distribution
(E), dévissez la fermeture rotative (S) puis vissez le robinet
de distribution (E) sur le conteneur de mélangeage (D).
Remarque: vous pouvez commander le mixeur avec la ferme
-
ture rotative (S) ou le robinet de distribution (E).
4. Placez le bocal de mixage (D) sur le bloc moteur (G) et
tournez en exerçant une légère pression jusqu’à l’enclique
tage du bocal de mixage. Assurez-vous que le levier (F) du
robinet (E) soit dans la position off (H).
5. Mettez les aliments dans le bocal de mixage (D). Nous vous
conseillons de commencer par les ingrédients solides puis
de continuer avec les liquides, tels que fruits, yaourt frais,
lait, jus de fruit ou de légumes, etc. Vous pouvez également
y ajouter de la glace ou des ingrédients surgelés, tels que
fruits surgelés, yaourt surgelé, cubes de glace, etc. Conseil
pratique : lorsque vous utilisez des ingrédients très chauds
ou du liquide légèrement moussant (par ex. du lait) ou au
contraire, des aliments surgelés, ne dépassez pas la ligne
des 1000 ml (maximum) lorsque vous remplissez le bocal.
6. Placez le couvercle (C) sur le récipient du mixer (D)
avant de brancher l’appareil.
7. Branchez l’appareil.
8. Mettez soit le Réservoir gradué (B) sur le couvercle (C), soit
le poussoir (A) dans l’ouverture. Conseil pratique : le pous
soir peut être utilisé lorsque la consistance du mélange est
plus épaisse ou lorsque la quantité d’ingrédients surgelés
est importante.
9. Appuyez sur la touche 2 (L) jusqu’à 30 secondes pour lancer
la procédure de mixage, puis sur la touche 0/Pulse (J) (mode
à impulsions) à brefs intervalles et mixez les ingrédients
jusqu’à obtenir une purée homogène, puis débranchez l’ap
pareil. Conseil : utilisez le pilon en pressant les ingrédients
de haut en bas dans le liquide.
10. Il existe deux variantes pour verser le liquide : Variante 1 :
vous pouvez retirer le récipient du mixer (D) du bloc moteur
(G) par un mouvement rotatif, enlever le couvercle et verser
le liquide dans un récipient. b) soit vous placez un récipient
sous le robinet (E) et poussez le levier (F) du robinet vers le
bas (position on (I)). Une fois le récipient rempli, repoussez
le levier (F) vers le haut (position off (H)). Conseil pratique
: pour les liquides de consistance plus épaisse, poussez la
touche 1 (K), puis poussez le levier du robinet vers le bas
(position on (I)). Les liquides plus fluides (moins concentrés)
se laissent en général facilement récupérer sans devoir
enclencher le moteur.
MINI MIXER
Avec le Mini Mixer, vous pouvez moudre des épices, des noix,
des herbes, du fromage, du café etc. Attention: mixez toujours
les ingrédients secs (tels que les épices, noix) dans le mini-mi
-
xer uniquement et non dans le bocal de mixage.
1. Placez le mini-mixer (N) sur le bloc moteur (G). Veillez à ce
que les picots en caoutchouc (O) du mini-mixer (N) soit
correctement placés dans les encoches (P) du bloc moteur (G).
2. Mettez les ingrédients à moudre dans le mini-mixer (N).
Remplissez-le jusqu’au ¾ max.
3. Placez le couvercle du mini-mixer (M) sur le bloc moteur (G)
et tournez-le jusqu’à son encliquetage.
4. Branchez l’appareil.
5. Poussez sur la touche 2 (L) (jusqu’à 10 secondes) afin de dé
marrer la mouture. Poussez ensuite sur la touche 0/Pulse (J)
(régime impulsionnel). Les ingrédients doivent être moulus
jusqu’à atteindre la finesse voulue.
6. Soulevez le couvercle du mini-mixer (M) en le faisant pivoter
(G). Soulevez à présent le mini-mixer (N) du bloc moteur et
versez la mouture dans un récipient.
Arrêt de sécurité : Le mixer est conçu de manière à ce que le
mixage ne débute que lorsque le bocal de mixage est en place.
600Watt Fitmix Manual - M7435+M7438+M7439 _Bedienungsanleitung-fitmix_C_150407_PRINT.indd 13 07.04.15 09:40
Page 14

14
Remarques
• Mélangez toujours les ingrédients secs, tels que les épices,
les noix etc. dans le mini-mixer uniquement et non dans le
bocal de mixage.
• Ne laissez jamais le mixer en état de marche quand il est
vide.
• N’utilisez jamais le mixer sans interruption pendant plus de
60 secondes.
• Le mixer ne doit pas être utilisé pour conserver les aliments.
Il doit être vide avant et après toute utilisation.
• Avec quelques liquides comme par exemple le lait, le volume
augmente pendant le mixage et de la mousse peut se former.
Ne remplissez pas trop le récipient du mixer (max. 1 litre) et
assurez-vous que le couvercle est correctement en place.
• Ne mélangez jamais des aliments surgelés en bloc.
Séparez-les en petits morceaux avant de les mettre dans le
bocal de mixage.
Conseils d’utilisation
• Avant de fixer le couvercle, il est conseillé d’utiliser le pous
-
soir pour faire descendre les solides dans le liquide.
• Utilisez la touche 0/PULSE (régime impulsionnel) afin de
lancer la fonction Marche-Arrêt du moteur et obtenir la
consistance désirée pour votre boisson. Soyez prudent, car
la vitesse est alors automatiquement maximale et le liquide
éclabousse jusqu’au couvercle du bocal de mixage.
• Au repos, certains liquides peuvent former un dépôt. Il est
de ce fait conseillé de consommer directement. Si le liquide
devait reposer plus longtemps, mélangez-le avant de le boire.
• Pour obtenir un smoothie plus liquide, ajoutez-y plus de
liquide. En revanche, pour un smoothie plus épais, ajoutez
plus d’ingrédients surgelés. Pour faciliter et complètement
vider le bocal d’un smoothie plus consistant, ajoutez quel
-
ques cuillères à soupe de liquide.
NET TOYAGE
1. Remplissez à moitié le bocal de mixage (D) avec de l’eau
chaude.
Conseil : ajoutez quelques gouttes de produit vaisselle en
cas de fort encrassement.
2. Fixez correctement le couvercle (C) et le capuchon (B) au
bocal de mixage (D) et placez celui-ci sur le bloc moteur (G).
3. Poussez sur la touche 1 (K) et lorsque l’appareil est en mar
che, ouvrez le robinet (position on (I)) et laissez couler l’eau
dans un récipient afin de nettoyer la valve. Recommencez
jusqu’à ce que l’eau soit claire.
4. Vous pouvez ensuite laver le bocal de mixage (D), le
couvercle (C), le capuchon (B) et le poussoir (A) dans le
lave-vaisselle.
Remarques
• Le moteur, le câble ou la prise ne doivent jamais être
mouillés.
• Nettoyer directement l’appareil après chaque utilisation.
• Pour un nettoyage plus aisé, ne laissez pas sécher des
aliments dans le bocal de mixage.
• N’essayer jamais d’enlever la lame ou de l’aiguiser. Cela
pourrait porter préjudice à la fonction.
Conseil : vous trouvez un emplacement de rangement de câble
sur le fond du bloc moteur.
Mini Mixer
Le mini-mixer et son couvercle peuvent être lavés au lave-vaisselle.
Bloc moteur
Passez un chiffon humide sur le bloc moteur et ensuite
essuyez-le.
MISE EN GARDE
Avant chaque nettoyage de l’appareil,
éteignez-le et enlevez la prise.
Nettoyage du robinet
Le robinet devrait être régulièrement démonté et les différentes
pièces soigneusement nettoyées.
1. Dévissez le robinet (E) et ôtez-le du bocal de mixage (D).
2. Démontez le robinet (E) en dévissant le capuchon (Q) de la
valve de raccordement (R).
3. Nettoyez le capuchon (Q) et la valve de raccordement (R)
à l’eau chaude et au détergent doux et essuyez soigneuse
-
ment.
4. Remontez le robinet (E) en suivant en sens inverse les
étapes indiquées ci-dessus. Veillez à ce que les joints soient
correctement placés sur le bocal de mixage (D).
GARANTIE
Sont exclus de la garantie tous les dommages dus à un trai
tement inadéquat, tel que : surchauffe, décoloration, rayures,
dommages suite à une chute, tentatives de réparation et entre
tien non approprié. De même sont exclues toutes les marques
visibles dues à l’utilisation. Ceci vaut également pour l’usure
normale de l’appareil.
MISE AU REBUT & DONNÉES TECHNIQUES
Consignes en matière d’environnement
A la fin de vie de votre appareil, veuillez ne pas le jeter
avec vos déchets ménagers. Déposez-le dans un site
de récupération spécifique pour appareils électriques
et électroniques. Ce symbole apparaît sur l’appareil,
dans le mode d’emploi ainsi que sur l’emballage.
Informez-vous quant aux sites de récupération tenus par votre
revendeur ou par les autorités locales. Le recyclage des appa
reils usés contribue largement à la protection de l’environnement.
Données techniques
Ce produit est conforme aux directives européennes.
Dimensions du Fitmix : (L×I×H) 17,01 × 26,30 × 40,00 cm
Capacité du bocal de mixage : 1,5 l
Capacité du mini-mixer : 0,35 l
Puissance du moteur : 600 W
Tension secteur : 220-240 V / 50 Hz
Tours : max. 18.000 / minute
Sous réserve de modifications techniques et/ou du design.
IT
ISTRUZIONI PER L’USO
Egregio Cliente! Gentilissima Cliente!
Grazie per aver deciso di acquistare il Fitmix. Con il Fitmix avre
-
600Watt Fitmix Manual - M7435+M7438+M7439 _Bedienungsanleitung-fitmix_C_150407_PRINT.indd 14 07.04.15 09:40
Page 15

15
te un aiutante eccezionale per la Vostra cucina sana!
Troverete altri pratici accessori sul sito: www.mediashop.tv
Limitazioni della responsabilità: le informazioni tecniche
contenute in queste istruzioni per l’uso, nonché i dati e le indi
cazioni d’installazione e di cura dell’apparecchio corrispondono
allo stato più attuale della tecnica al momento della stampa.
Dalle indicazioni, illustrazioni e descrizioni delle presenti istruzi
oni per l’uso non può essere fatto valere alcun diritto. Il
produttore non si assume responsabilità per eventuali danni che
rivengano da una mancata osservanza delle istruzioni, da un
utilizzo non consono alla destinazione d’uso prevista, da ripara
zioni inappropriate, da modifiche intraprese senza autorizzazione, oppure dall’utilizzo di pezzi di ricambio non ammessi.
Utilizzo conforme alla destinazione d’uso:
AVVERTENZE SPECIALI: L’a pp a-
recchio è concepito per il solo uso
privato. L’apparecchio è adatto per la
sola preparazione di generi alimentari.
Non utilizzate l’apparecchio per scopi
per i quali non è stato concepito. Diritti
di qualsivoglia genere a causa di danni
derivanti da un uso improprio sono
tassativamente esclusi. L’utilizzatore si
assume pertanto ogni rischio.
SICUREZZA & MONTAGGIO
Leggete attentamente le presenti
istruzioni per l’uso prima di utilizzare il Mixer! Osservate le indicazioni
per la sicurezza durante la messa in
funzione del Mixer, perché potrebbero
avere origine danni a cose o persone.
Seguite tutte le indicazioni per la sicurezza per evitare danni causati da un
errato utilizzo! Conservate le istruzioni
per l’uso, al fine di poterle consultare
anche in un secondo tempo. Qualora
il Mixer dovesse essere dato ad altri,
dovranno essere consegnate loro anche le presenti istruzioni per l’uso.
Indicazioni
• Prima dell’utilizzo, il Mixer deve
essere controllato per verificare
eventuali danni esterni visibili. Un
Mixer avente dei danni non deve
essere utilizzato.
• L’etichetta recante il tipo non deve
essere asportata.
• I bambini o le persone aventi ridotte
facoltà psichiche, sensoriali o men
tali devono essere tenute lontane
dal Mixer.
• Questo Mixer può essere utilizzato da persone con ridotte facoltà
psichiche, sensoriali o mentali soltanto se sono sorvegliate o se sono
state rese edotte sull’uso sicuro
del Mixer e pertanto capiscono i
pericoli che ne potrebbero derivare.
I bambini non devono giocare con il
Mixer. La pulizia e la manutenzione
utente non devono essere eseguite
da bambini non sorvegliati.
• Non lasciate mai il Mixer acceso
senza sorveglianza. Siate estremamente attenti, qualora utilizziate il
Mixer in prossimità di bambini e di
persone aventi ridotte facoltà psichiche,
sensoriali o mentali.
• Estraete la spina dalla presa prima
di aggiungere o togliere pezzi dell’apparecchio, dopo il suo utilizzo,
prima della sua pulizia, prima di lasciare la stanza o se appare un’avaria. Non tirate via la spina dalla
presa tenendola per il filo elettrico.
• Non fate mai bagnare l’unità moto-
600Watt Fitmix Manual - M7435+M7438+M7439 _Bedienungsanleitung-fitmix_C_150407_PRINT.indd 15 07.04.15 09:40
Page 16

16
re, il cavo elettrico o la spina. Non
immergete mai l’unità motore, il
cavo elettrico o la spina in acqua o
in altri liquidi; non teneteli mai sotto
l’acqua corrente.
• Detergete il Mixer e gli accessori
prima del loro primo utilizzo. Osservate le altre informazioni contenute
nella sezione “Pulizia”.
• Asciugate il Mixer e gli accessori
prima di montarli e prima di collegare l’apparecchio alla rete elettrica.
• Utilizzate l’apparecchio sempre su
una superficie stabile, omogenea,
pulita ed asciutta.
• Non incollate alcun corpo estraneo
all’apparecchio.
• Mantenete le mani e gli utensili,
eccetto lo spintore, all’esterno del
contenitore del Mixer, quando si
trova sopra l’unità motore.
• Non utilizzate mai parti o accessori
che non siano specificamente previsti per il Mixer stesso.
• L’apparecchio può essere acceso
solo quando la spina è inserita nella
presa.
• Verificate se la tensione di rete
locale corrisponde con quella indicata nell’etichetta riportante il tipo.
L’unico modo di staccare l’apparecchio dall’alimentazione elettrica di
rete è staccare la spina dalla presa.
• State attenti a non inciampate
inavvertitamente sul cavo di alimentazione, quando l’apparecchio è in
funzione.
• Posizionate l’apparecchio in modo
tale che la presa elettrica sia sempre accessibile.
• Attendete fino a quando le lame
siano completamente ferme prima
di asportare il contenitore del Mixer
o il Mini-Mixer dall’unità motore.
• Utilizzate il Mixer solo quando ha il
coperchio applicato.
• Utilizzare il pestello solo se il
coperchio è correttamente collocato sul bicchiere del frullatore. Non
spingere troppo in basso il pestello
perché potrebbe entrare in contatto
con le lame.
AVVERTENZE
• I materiali dell’imballaggio non
devono essere utilizzati per giocare,
perché sussiste il pericolo di soffocamento.
• Durante la pulizia delle lame, dovrete procedere con particolare accortezza per evitare ferimenti, perché
le lame sono estremamente affilate.
• Qualora i cavi o i pezzi costruttivi
siano collegati alla rete elettrica, c’è
pericolo di vita a causa della corrente elettrica!
• Evitate danni al cavo elettrico, ad
esempio schiacciandolo, piegandolo, oppure tagliandolo se lo tirate
su angoli appuntiti. Tenete il cavo
elettrico lontano da superfici calde
e da fiamme libere.
• Non utilizzate mai l’apparecchio
quando il cavo elettrico o l’apparecchio stesso siano danneggiati.
600Watt Fitmix Manual - M7435+M7438+M7439 _Bedienungsanleitung-fitmix_C_150407_PRINT.indd 16 07.04.15 09:40
Page 17

17
• Non smontate l’apparecchio in
alcun caso. Il produttore non si
assume alcuna responsabilità per
danni derivanti da utilizzi impropri.
• Non utilizzate utensili o altri oggetti
all’interno dell’apparecchio. Oggetti
metallici possono causare corto
circuito o folgorazione.
UTILIZZO
1. Asportate tutto il materiale d’imballaggio ed effettuatene lo
smaltimento secondo le norme vigenti.
2. Pulite il Mixer e tutte le parti accessorie prima di utilizzarlo
per la prima volta. (Vedere la sezione “Pulizia”.)
3. Se desiderate lavorare con il rubinetto a spillo (E), svitate
il tappo a vite (S) e successivamente avvitate il rubinetto a
spillo (E) sul bicchiere del frullatore (D).
Avviso: potete adoperare il frullatore con il tappo a vite (S) o
con il rubinetto a spillo (E).
4. Posizionate il contenitore del Mixer (D) sull’unità motore (G)
ed avvitatelo fino a quando si fissa. Assicuratevi che la leva di
erogazione (F) del rubinetto di erogazione ( E) sia in posizione
spento (H).
5. Aggiungete gli ingredienti nel contenitore del Mixer (D).
Consigliamo di aggiungere prima gli ingredienti solidi e poi
quelli liquidi. Fra questi rientrano la frutta, lo yoghurt fresco,
il latte, i succhi di frutta, le verdure, ecc. Potete aggiungere
al contenitore del Mixer anche del gelato o degli ingre
dienti surgelati. Ne fanno parte anche la frutta surgelata, lo
yoghurt surgelato, i cubetti di ghiaccio, ecc. Consiglio: se
utilizzate dei liquidi caldi o che schiumano leggermente (ad.
es. il latte), oppure degli ingredienti surgelati, potrete riempi
re il contenitore del Mixer al massimo fino al livello di 1000
ml.
6. Prima di mettere in funzione l’apparecchio, collocare
sempre il coperchio (C) sul bicchiere del frullatore
(D).
7. Inserite la spina nella presa elettrica.
8. Posizionate il Bicchiere graduato (B) sul coperchio (C) oppu
re inserite lo spintore (A) nell’apertura. Consiglio: lo spintore
può essere utilizzato quando si frullano delle miscele oppure
allorquando si utilizzano grandi quantità di ingredienti
surgelati.
9. Tenere premuto il tasto 2 (L) per 30 secondi per avviare la
miscelazione, dopodiché premere il tasto 0/Pulse (J) (fun
zionamento a impulsi) a brevi intervalli e lasciar mescolare
gli ingredienti fino a ottenere una purea omogenea, quindi
spegnere l’apparecchio. Consiglio: utilizzare il pestello per
spingere gli ingredienti dall’alto verso il basso all’interno del
fluido.
10. È possibile versare il fluido in due modi. Modo 1: sollevando
il bicchiere del frullatore (D) dall’unità motore (G) con un
movimento rotatorio, rimuovendo il coperchio e versando il
fluido in un contenitore. Modo 2: posizionate un contenitore
sotto il rubinetto erogatore (E) spingete la leva di erogazione
(F) verso il basso nella posizione ACCESO (I). Quando il
contenitore è pieno, spingete la leva dell’erogatore (F) verso
l’alto nelle posizioni di SPENTO (H). Consiglio: per erogare
più facilmente i liquidi densi, premete il tasto 1 (K) e poi
premete la leva del rubinetto di erogazione verso il basso
nella posizione ACCESO (I). Per quanto riguarda i liquidi
meno densi, generalmente è possibile erogarli senza dover
accendere l’unità motore.
MINI MIXER
Con il Mini Mixer potrete triturare e macinare verdure, noci,
crauti, formaggio, caffè e tanto altro. Attenzione: macinate gli
ingredienti asciutti (come ad es. spezie, noci) sempre e solo nel
Mini Mixer e non nel contenitore del Mixer.
1. Posizionate l’adattatore del Mini Mixer (N) sull’unità motore
(G). Fate attenzione che l’aggancio in gomma (O) dell’adat
tatore del Mini Mixer (N) sia posizionato correttamente negli
alloggiamenti previsti (P) situati nell’unità motore (G).
2. Inserite gli ingredienti da macinare nell’adattatore del Mini
Mixer (N). Riempitelo al massimo fino a ¾ della quantità
massima.
3. Posizionate il coperchio del Mini Mixer (M) sull’unità motore
(G) ed avvitatelo fino a quando questo si aggancia.
4. Inserite la spina elettrica nella presa.
5. Premete il tasto 2 (L) per 10 secondi, al fine di iniziare il pro
cedimento di macinazione. Premete poi il tasto 0/Pulse (J)
(funzionamento a impulsi) e lasciate macinare gli ingredienti
fino a quando non otteniate il grado di finezza che desiderate.
6. Sollevate con un movimento rotatorio il coperchio del
Mini Mixer (M) dall’unità motore (G). Poi potrete sollevare
l’adattatore del Mini Mixer (N) dall’unità motore e svuotare
gli ingredienti macinati in un contenitore.
Spegnimento di sicurezza:
Il Mixer è costruito in modo tale,
che la funzione di frullatore si avvii soltanto quando il contenitore del Mixer è montato.
Indicazione
• Macinate gli ingredienti secchi (ad es. Spezie, noci) sempre
e solo nel Mini Mixer e non nel contenitore del Mixer.
• Non fate mai funzionare il Mixer quando il contenitore è
vuoto.
• Non utilizzate mai il Mixer in modo continuativo per oltre 60
secondi.
• Non utilizzate il mixer come contenitore di scorte. Svuotatelo
sempre prima e dopo l’utilizzo.
• Durante la miscelazione, il volume di alcuni fluidi, come ad
es. il latte, aumenta e può formarsi della schiuma. Pertanto,
non riempire troppo il bicchiere del frullatore (max. 1 litro) e
assicurarsi che il coperchio sia correttamente chiuso.
• Non frullate mai generi alimentari che siano congelati in una
massa solida. Spezzettateli prima di aggiungerli al contenito
-
re del Mixer.
Consigli per l’utilizzo
• Prima di posizionare i coperchio, spingete gli ingredienti
solidi nel liquido con lo spintore.
• Utilizzate il tasto 0/PULSE-Taste (funzionamento ad impulsi),
in modo da utilizzare l’unità motore in modalità Start-Stop,
al fine di ottenere la consistenza che desiderate per il Vostro
drink. Siate accorti perché in questo caso si seleziona la
velocità maggiore e può avvenire che il liquido schizzi verso
l’altro sulle pareti fino al coperchio del contenitore del Mixer.
• Alcuni liquidi possono formare degli strati di posa qualora
siano lasciati a lungo fermi. Pertanto è meglio consumarli
subito. Se lasciate fermo un liquido per un po’ di tempo,
dovreste dargli una miscelata prima di berlo.
• Per frullare uno Smoothie meno denso, aggiungete una
maggior quantità di liquido. Per frullare uno Smoothie più
denso, aggiungete una maggiore quantità di ingredienti. Per
versare l’ultima quantità residua di uno Smoothie denso,
aggiungete un paio di cucchiai di liquido, al fine di facilitare
600Watt Fitmix Manual - M7435+M7438+M7439 _Bedienungsanleitung-fitmix_C_150407_PRINT.indd 17 07.04.15 09:40
Page 18

18
lo svuotamento.
PULIZIA
1. Riempite il contenitore del Mixer (D) di acqua calda fino a
metà.
Consiglio: se il bicchiere del frullatore è molto sporco, aggi
-
ungere alcune gocce di detersivo per i piatti.
2. Fissate il coperchio (C) e il cappuccio di chiusura (B) al cont
-
enitore del Mixer (D) e poi posizionatelo sull’unità motore (G).
3. Premete il tasto 1 (K) e, mentre l’apparecchio è acceso,
aprite il rubinetto di erogazione (posizione EIN-ACCESO (I))
e fate scorrere dell’acqua nel contenitore, per detergere la
valvola. Ripetete l’operazione, fino a quando l’acqua non sia
limpida.
4. Successivamente potete lavare il contenitore del Mixer (D),
il coperchio (C), il cappuccio di chiusura (B) e lo spintore (A)
nella lavastoviglie.
Indicazioni
• Non permettete mai che il cavo elettrico o la spina si bagnino.
• Fare sempre la pulizia dopo ogni utilizzo.
• Non fate mai seccare gli alimenti nel contenitore del Mixer,
perché ciò ne complica la successiva pulizia.
• Non provare mai a rimuovere o ad affilare le lame. Questo
potrebbe alternare il funzionamento dell’apparecchio.
Consiglio: il corpo dell’unità motore è provvisto di avvolgicavo
Mini Mixer
Dopo l’utilizzo, potrete lavare l’adattatore del Mini Mixer e il suo
coperchio in lavastoviglie.
Unità motore
Detergetela con un panno umido e poi asciugate subito.
AVVERTENZA
Spegnete sempre l’apparecchio e
staccatelo dalla rete elettrica
prima di detergerlo.
Pulizia del rubinetto di erogazione
Il rubinetto di erogazione dovrebbe essere smontato a cadenza
regolare in modo da pulire a fondo tutte le sue parti.
1. Svitate con un movimento rotatorio il rubinetto di erogazione
(E) dal contenitore del Mixer (D).
2. Smontate il rubinetto erogatore (E) svitando il cappuccio di
chiusura (Q) dalla valvola di collegamento (R) con un movi
-
mento rotatorio.
3. Sciacquate il cappuccio di chiusura (Q) e la valvola di col
legamento (R) con acqua calda e detersivo non aggressivo,
dopodiché asciugateli molto bene.
4. Ricomponete il rubinetto di erogazione (E), eseguendo la
procedura sopra esposta in modo inverso. Fate attenzione al
fatto che le guarnizioni siano posizionate correttamente sul
contenitore del Mixer (D).
CLAUSOLA DI GARANZIA
Sono esclusi dalla garanzia tutti i difetti che siano stati origi
nati da un utilizzo improprio, come ad es. surriscaldamento,
scolorimento, graffi, danni da caduta sul pavimento, tentativi di
riparazione e pulizia non appropriati. Sono altresì escluse dalla
garanzia le tracce di utilizzo puramente ottiche. Ciò vale anche
per la normale usura dell’apparecchio.
SMALTIMENTO & DATI TECNICI
Informazioni per la tutela dell’ambiente
Al termine del suo ciclo di vita, non smaltite il prodot
to insieme ai rifiuti domestici. Portatelo ad un punto
di raccolta per il riciclaggio degli apparecchi elettrici
ed elettronici. Ciò è indicato sul prodotto attraverso
questo simbolo, ed è indicato altresì nelle Istruzioni d’Uso e
sulla confezione.
Informatevi sui punti di raccolta gestiti dal Vostro rivenditore
o dalle Autorità locali. La rivalorizzazione ed il riciclo di vecchi
apparecchi è un importante contributo per la tutela dell’ambien
-
te che ci circonda.
Dati tecnici
Questo prodotto rispetta le linee direttive dalla UE.
Dimensioni del Fitmix: (Lu×La×Al) 17,01 × 26,30 × 40,00 cm
Capacità del Contenitore del Mixer: 1,5 l
Capacità del Mini-Mixer: 0,35 l
Prestazioni del motore: 600 W
Tensione della rete elettrica: 220-240 V / 50 Hz
Consiglio: il corpo dell’unità motore è provvisto di avvolgicavo.
Giri: max. 18.000 / minuto
Il produttore si riserva di effettuare modifiche tecniche o estetich
NL
GEBRUIKSAANWIJZING
Geachte klant! Hartelijk dank dat u gekozen hebt voor Fitmix.
Met Fitmix hebt u de ultieme helper in de gezonde keuken!
Meer praktische hulpstukken en accessoires op
www.mediashop.tv
Beperking van aansprakelijkheid: Bij het in druk gaan, stemt
de technische informatie, gegevens en instructies voor de
installatie, voor het bedrijf en voor het onderhouden, overeen
met de laatste stand van zaken. Er kunnen geen claims ontleend
worden aan de informatie, afbeeldingen en beschrijvingen in
deze handleiding. Er wordt door de fabrikant geen aansprake
lijkheid aanvaard voor schade ten gevolge van niet-naleving
van de instructies, oneigenlijk gebruik, onbevoegde reparatie,
ongeoorloofde wijzigingen of het gebruik van niet-goedgekeur
-
de reserveonderdelen.
Beoogd gebruik
WAARSCHUWINGEN: Het
apparaat is enkel voor privaat gebruik
bedoeld. Het apparaat is enkel geschikt voor de bereiding van voedingsmiddelen. Gebruik het apparaat
600Watt Fitmix Manual - M7435+M7438+M7439 _Bedienungsanleitung-fitmix_C_150407_PRINT.indd 18 07.04.15 09:40
Page 19

19
niet voor doelen waarvoor het niet
bestemd is. Claims van welke aard
ook voor schade ten gevolge van
onjuist gebruik zijn uitgesloten. Alleen
de gebruiker draagt het risico.
VEILIGHEID & OPSTELLEN
Lees zorgvuldig deze gebruiksaanwijzing, vóór u de mixer gebruikt! Neem
de veiligheidsinstructies in acht bij
de ingebruikname van de mixer, want
er kan schade aan voorwerpen en
letsels aan personen optreden. Volg
de veiligheidsinstructies om schade
wegens verkeerd gebruik te vermijden! Bewaar de gebruikswaanwijzing
voor raadpleging op een later moment. Indien deze mixer aan derden
wordt gegeven, dan moet ook deze
gebruiksaanwijzing mee overhandigd
worden.
Instructies
• Vóór gebruik moet de mixer gecontroleerd worden op zichtbare schade.
Een beschadigde mixer mag niet
gebruikt worden.
• Het typeplaatje mag niet verwijderd
worden.
• Kinderen en personen met beperkte
lichamelijke, zintuiglijke of mentale
vermogens moeten ver uit de buurt
van de mixer worden gehouden.
• Deze mixer kan gebruikt worden
door personen met verminderde
lichamelijke, zintuiglijke of verstandelijke vermogens of gebrek aan
ervaring en kennis als ze onder toezicht staan of worden geïnstrueerd
over het veilig gebruik van de mixer
en begrijpen van de daaruit voortvloeiende risico’s. Kinderen mogen
niet met de mixer spelen. Reiniging
en gebruiksonderhoud mogen niet
uitgevoerd worden door kinderen
zonder toezicht.
• Laat de mixer nooit ingeschakeld zonder toezicht. Wees uiterst
voorzichtig wanneer u de mixer in
de buurt van kinderen en personen
met beperkte lichamelijke, zintuiglijke of mentale vermogens gebruikt.
• Trek het netsnoer uit het stopcontact, vóór u delen aan het apparaat
toevoegt of verwijdert, na gebruik
van het apparaat, vóór de reiniging
ervan, en vóór u de ruimte verlaat
of wanneer er een storing optreedt.
Trek het netsnoer niet aan de kabel
uit het stopcontact.
• Laat de motoreenheid, de netkabel
of de netstekker nooit nat worden.
Dompel de motoreenheid, netkabel
of netstekker niet in water of andere vloeistoffen; hou ze niet onder
stromend water.
• Reinig de mixer en de bijhorende
delen vóór het eerste gebruik van
het apparaat. Neem verdere informatie in de sectie Reiniging in acht.
• Droog de mixer en alle bijhorende
delen, vóór u de delen aanbrengt en
vóór u het apparaat met de elektrische voeding verbindt.
• Gebruik het apparaat steeds op
een stabiel, effen, zuiver en droog
oppervlak.
600Watt Fitmix Manual - M7435+M7438+M7439 _Bedienungsanleitung-fitmix_C_150407_PRINT.indd 19 07.04.15 09:40
Page 20

20
• Kleef geen vreemde voorwerpen
aan het apparaat.
• Hou handen en gebruiksvoorwerpen, behalve de stamper, uit de
mengbeker, wanneer deze zich op
de motoreenheid bevindt.
• Gebruik nooit accessoires die niet
voor de mixer bedoeld zijn.
• Het apparaat kan slechts ingeschakeld worden, wanneer de stekker
met een stopcontact verbonden is.
• Controleer of de netspanning op het
typeplaatje met uw lokale netspanning overeenstemt. De enige manier
om het apparaat te scheiden van de
netspanning, is het uittrekken van
de stekker.
• Struikel niet per ongeluk over het
netsnoer als het apparaat in gebruik
is.
• Stel het apparaat zo op, dat de stekker steeds toegankelijk is.
• Wacht tot de meskop volledig tot
stilstand is gekomen, vóór u de
mengbeker of de mini-mixer van de
motoreenheid afneemt.
• Gebruik de mixer enkel met het
deksel erop.
• Gebruik de stamper alleen als het
deksel op de mengbeker zit. Niet te
hard op de stamper drukken, deze
zou in aanraking met de messen
kunnen komen.
WAARSCHUWINGEN
• Verpakkingsmaterialen mogen niet
gebruikt worden om te spelen, daar
verstikkingsgevaar bestaat.
• Bij het reinigen van de messeneen
heid moet u bijzonder voorzichtig
zijn om letsels te vermijden, omdat
de snijbladen extreem scherp zijn.
• Staan kabels of onderdelen onder
spanning, dan bestaat risico op
overlijden door elektrische schok!
• Vermijd schade aan het netsnoer,
door het niet te knijpen, niet te
buigen of niet over scherpe randen
te trekken. Hou het netsnoer ver
verwijderd van hete oppervlakken
en open vlammen.
• Gebruik het apparaat nooit als het
netsnoer of het apparaat beschadigd
is.
• Open het apparaat in geen geval.
Voor schade ten gevolge van verkeerd gebruik zijn we niet aansprakelijk.
• Gebruik geen werktuigen of voorwerpen in het apparaat. Metallische
voorwerpen kunnen een kortsluiting
of een elektrische schok veroorzaken.
BEDIENING
1. Verwijder al het verpakkingsmateriaal en voer het af volgens
de wettelijk geldende bepalingen.
2. Reinig de mixer en alle accessoires vóór u hem voor het
eerste gebruikt. (zie reiniging)
3. Als u met de tapkraan (E) wilt werken, dan schroeft u de
draaisluiting (S) eraf en daarna schroeft u de tapkraan (E)
op de mixkan (D).
Tip: U kunt de mixer gebruiken met de draaisluiting (S) of met
de tapkraan (E).
4. Plaats de mengbeker (D) op de motoreenheid (G) en draai
deze vast totdat de mengbeker vastklikt. Verzeker u ervan
dat de taphendel (F) van de tapkraan (E) zich in de UIT-posi
-
tie (H) bevindt.
5. Voeg de ingrediënten toe in de mengbeker (D). We bevelen
aan om eerst de vaste en dan de vloeibare ingrediënten
toe te voegen. Daartoe behoren fruit, verse yoghurt, melk,
vruchtsappen, groenten, enz. U kunt ook ijs of diepgevroren
ingrediënten in de mengbeker toevoegen. Daartoe behoren
diepgevroren vruchten, diepgevroren yoghurt, ijsblokjes, enz.
Tip: Indien u hete of lichtjes schuimende vloeistoffen (bijv.
melk) gebruikt of diepgevroren ingrediënten, mag u de
600Watt Fitmix Manual - M7435+M7438+M7439 _Bedienungsanleitung-fitmix_C_150407_PRINT.indd 20 07.04.15 09:40
Page 21

21
mengbeker maximaal tot de 1000 ml markering vullen.
6. Zet het deksel (C) op de mengbeker (D) voor u de
stekker in het stopcontact steekt.
7. Steek de stekker in het stopcontact.
8. Plaats opnieuw de messenbeker (B) op het deksel (C) pf
plaats de stamper (A) in de opening. Tip: De stamper kan
gebruikt worden als visceuze mengsels geroerd worden of
als grote hoeveelheden diepgevroren ingrediënten gebruikt
worden.
9. Houd knop 2 (L) tot 30 seconden ingedrukt om het mengen
te starten, druk dan op knop 0/puls (J) (Impuls) met korte
onderbrekingen. Laat de ingrediënten zo lang mengen, tot
ze gelijkmatig gepureerd zijn en zet dan het apparaat uit.
Tip: Gebruik de stamper om de ingrediënten van boven naar
beneden in de vloeistof te drukken.
10. Het uitschenken van de vloeistof kan op 2 manieren:
Manier 1: Pak de mengbeker (D) met een draaibeweging
van de motoreenheid (G) af, verwijder het deksel en schenk
de vloeistof in een andere beker of kom. Manier 2: Plaats
een beker onder de tapkraan (E) en druk de taphendel (F)
van de tapkraan naar onder in de AAN-positie (I). Wanneer
de beker vol is, drukt u de taphendel (F) naar boven in de
UIT-positie (H). Tip: Voor het vergemakkelijken van het
tappen van visceuze vloeistoffen drukt u op de knop 1 (K) en
daarna drukt u de taphendel van de tapkraan naar onder in
de AAN-positie (I). Dunnere vloeistoffen laten zich gewoon
tappen, zonder dat u de motoreenheid moet inschakelen.
MINI MIXER:
Met de Mini Mixer kunt u specerijen, noten, kruiden, kaas,
koffie en nog veel meer fijnmalen. Opgelet: Meng droge ingre
diënten (bijv. specerijen, noten) altijd alleen in de mini-mixer en
niet in de mengbeker.
1. Plaats het opzetstuk van de mini-mixer (N) op de motoreen
heid (G). Let er daarbij op dat de rubber noppen (O) van het
opzetstuk van de mini-mixer (N) juist in de daartoe voor
ziene inkervingen (P) aan de motoreenheid (G) geplaatst
worden.
2. Voeg de te malen ingrediënten toe in het opzetstuk van de
mini-mixer (N). Vul dit maximaal tot ¾ van de mogelijke
vulhoeveelheid.
3. Plaats het deksel van de mini-mixer (M) op de motoreenheid
(G) en draai deze vast totdat het deksel van de mini-mixer
vastklikt.
4. Steek de stekker in het stopcontact.
5. Druk tot 10 seconden op de knop 2 (L) om het maalproces
te beginnen. Druk dan op de knop 0/puls (I) (impulsbedri
jif) en laat de ingrediënten zo lang malen tot de gewenste
fijnheidsfactor bereikt is.
6. Hef met een draaibeweging het deksel van de mini-mixer
(M) af van de motoreenheid (G). Dan kunt het opzetstuk
van de mini-mixer (N) van de motoreenheid heffen en de
gemalen ingrediënten in een beker ledigen.
Uitschakelen met vergrendeling: De mixer is zo gebouwd dat
de mengfunctie enkel bij een op de motoreenheid geplaatste
mengbeker mogelijk is.
Instructie:
• Meng droge ingrediënten (bijv. specerijen, noten) altijd
alleen in de mini-mixer en niet in de mengbeker.
• Laat de mixer nooit draaien als hij leeg is.
• Gebruik de mixer nooit langer dan 60 seconden onafgebroken.
• Gebruik de mixer niet als voorraadhouder. Ledig hem telkens
vóór en na het gebruik.
• Bij sommige vloeistoffen, bijvoorbeeld bij melk, wordt het
volume groter tijdens het mixen en kan er schuim ontstaan.
Maak de mengbeker niet te vol (max. 1 liter) en zorg dat het
deksel er goed op zit.
• Meng nooit levensmiddelen die bij het invriezen tot een
vaste massa bevroren zijn. Breek ze in stukken vóór u ze
toevoegt aan de mengbeker.
Gebruikstips:
• Druk, vóór u het deksel op de mengbeker plaatst, de vaste
ingrediënten met de stamper in de vloeistof.
• Gebruik de 0/PULS-knop (impulsbedrijf), om de motoreen
heid in start-stop-bedrijf te gebruiken, om de gewenste
consistentie van uw drank te verkrijgen. Wees hierbij
voorzichtig, omdat daarbij automatisch de hogere snelheid
geselecteerd wordt, en dat de vloeistof de wanden op de
wanden gesproeid wordt tot aan het deksel.
• Sommige vloeistoffen, kunnen bij langdurig blijven staan,
eventueel bezinken. Daarom is het beste dat u hem direct
drinkt. Als u een vloeistof langer laat staan, moet u ze nog
-
maals omroeren, vóór u ze drinkt.
• Om te mengen zodat een dunne smoothie ontstaat, moet u
meer vloeistof toevoegen. Om een smoothie-drank te maken
die visceuzer is, voegt u meer diepgevroren ingrediënten
toe. Om de laatste rest van een visceuze smoothie-drank uit
te gieten, voegt u een paar eetlepels vloeistof toe, om het
uitgieten te vergemakkelijken.
REINIGING
1. Vul de mengbeker (D) tot aan de helft met warm water.
Tip: Bij sterke vervuiling kunt u een paar druppeltjes afwas
-
middel in de mengbeker doen.
2. Bevestig het deksel (C) en de sluitkap (B) aan de mengbeker
(D) en plaats deze laatste dan op de motoreenheid (G).
3. Druk op de knop 1 (K) en terwijl het apparaat ingeschakeld
is, opent u de tapkraan (Aan-positie (I)) en laat u het water
in een beker lopen, om het ventiel te reinigen. Herhaal, tot
het water helder is.
4. Daarna kunt u de mengbeker (D), het deksel (C), de sluitkap
(B) en de stamper (A) in de spoelmachine reinigen.
Instructies
• Laat de motoreenheid, de netkabel of de netstekker nooit
nat worden.
• Na het gebruik steeds direct reinigen.
• Laat de levensmiddelen niet in de mengbeker drogen, omdat
dit de reiniging moeilijker maakt.
• Probeer nooit het mes te verwijderen of te slijpen. Dat kan
de werking van het apparaat beïnvloeden.
Tip: Aan de onderkant van de motoreenheid kan het snoer
opgeborgen worden.
Mini-Mixer
Na gebruik kunt u het opzetstuk van de mini-mixer alsook het
deksel van de mini-mixer in de vaatwasmachine reinigen.
Motoreenheid
Maak ze schoon met een vochtige doek en droog daarna af.
WAARSCHUWING
Schakel het apparaat steeds uit en
trek het snoer uit de stekker
vóór u het reinigt.
Reiniging van de tapkraan
600Watt Fitmix Manual - M7435+M7438+M7439 _Bedienungsanleitung-fitmix_C_150407_PRINT.indd 21 07.04.15 09:40
Page 22

22
De tapkraan moet regelmatig gedemonteerd worden om de
delen grondig te reinigen.
1. Schroef met een draaibeweging de tapkraan (E) af van de
mengbeker (D).
2. Demonteer de tapkraan (E) door de sluitkap (Q) met een
draaibeweging van het aansluitventiel (R) af te schroeven.
3. Spoel de sluitkap (Q) en het aansluitventiel (R) met warm
water en milde spoelzeep en droog daarna grondig af.
4. Monteer opnieuw de tapkraan (E), door de bovenstaande
stappen in omgekeerde volgorde uit te voeren. Let er daarbij
op dat de dichtingen juist op de mengbeker (D) geplaatst zijn.
GARANTIEBEPALING
Uitgesloten van garantiebepaling zijn alle defecten die zijn
veroorzaakt door onjuiste behandeling, bijv. oververhitting,
verkleuring, krassen, beschadiging door het laten vallen op de
grond, eigen reparatiepogingen en onjuiste reiniging. Uitgeslo
ten zijn ook louter visuele sporen van gebruik. Dat geldt ook
voor normale slijtage.
AFVOER & TECHNISCHE GEGEVENS
Milieu-instructie
Voer het product aan het einde van zijn levenscy
clus niet af bij het gewone huisvuil. Breng het naar
een recycling-inzamelpunt voor elektrische en
elektronische apparaten. Dit wordt door dit symbool
op het product, in de gebruiksaanwijzing en op de verpakking
weergegeven.
Informeer u over de inzamelpunten die door uw dealer of door
de locale overheid geëxploiteerd worden. Het hergebruik en het
recyclen van oude apparaten is een belangrijke bijdrage aan de
bescherming van ons milieu.
Technische gegevens
Dit product voldoet aan de Europese richtlijnen.
Afmetingen Fitmix: (L×B×H) 17,01 × 26,30 × 40,00 cm
Inhoud van de mengbeker: 1,5 l
Inhoud mini-mixer opzetstuk: 0,35 l
Motorvermogen: 600 W
Netspanning: 220-240 V / 50 Hz
Toeren: max. 18.000 / minuut
Technische en visuele wijzigingen voorbehouden.
HU
HASZNÁLATI UTASÍTÁS
Igen tisztelt Hölgyeim és Uraim!
Köszönjük, hogy a Fitmix megvásárlására meghozták döntésü
ket. A Fitmix eszközzel egy általános konyhai segédeszközt
vásároltak meg.
További praktikus tartozékokat itt talál: www.mediashop.tv
A felelősség korlátozása: Az ebben a használati utasításban
foglalt műszaki információk, adatok és a berendezés üzemel
tetésére, karbantartására és installációjára vonatkozó utalások
a legutolsó idevonatkozó kiadvány tartalmának felelnek meg.
Az ebben a kiadványban szereplő adatokból, képekből, vagy
leírásokból származóan semmilyen igény nem nyújtható be. A
gyártó nem vállal semmilyen felelősséget olyan jellegű károkért,
melyek a használati utasítás figyelmen kívül hagyása miatt, vagy
a berendezés nem megfelelő használata, vagy nem megfelelő
szervízelése miatt, vagy jóváhagyás nélküli változtatások vagy
nem jóváhagyott alkatrészek beépítése miatt jöttek létre.
Rendeltetésszerű használat:
FIGYELMEZTETÉS: A készülék
csak privát használatra lett előirányozva. A készülék csak élelmiszer
készítésére alkalmas. Ne használja a
készüléket a használatra nem ajánlott
célokból. Minden olyan jellegű igény,
ami a nem megfelelő használatból
eredő károkra vezethető vissza
elutasításra kerül. Az üzembehelyező
visel minden az üzemeltetéssel kapcsolatos rizikót.
BIZTONSÁG ÉS ÜZEMBEHELYE
ZÉS
Kérjük, olvassa el figyelmesen a
jelen használati utasítást, mielőtt
a mixert elkezdi használni! Kérjük,
vegye figyelembe a mixer üzembehelyezésével kapcsolatos biztonsági
előírásokat, mert ellenkező esetben
tárgyi vagy személyi károk következhetnek be. Kérjük, tartsa be az összes biztonsági előírást, hogy a nem
megfelelő használat miatt bekövetkezhető károkat elkerülje. Őrizze meg a
használati utasítást, hogy azt később,
ha szükséges, elő tudja venni. Ha a
mixert valakinek továbbadná, kérjük,
ezt a használati utasítást feltétlenül
mellékelje.
Figyelem
600Watt Fitmix Manual - M7435+M7438+M7439 _Bedienungsanleitung-fitmix_C_150407_PRINT.indd 22 07.04.15 09:40
Page 23

23
• A mixer használata előtt ellenőrizze,
hogy nincsenek-e a gépen külsérelmi nyomok. Egy sérült mixert nem
szabad használni.
• A típust jelölő feliratot nem szabad
eltávolítani.
• Gyermekek és csökkent fizikai,
érzékszervi vagy mentális képességű személyek nem kezelhetik a
mixert.
• Ezt a mixert használhatják csökkent
fizikai, érzékszervi vagy mentális
képességű személyek, amennyiben
ezek megfelelő tapasztalatokat és
tudást szereztek a kezeléssel kapcsolatban, ill. ha a mixer használatára
vonatkozó megfelelő biztonságos
felügyelet és útmutatás biztosítva
van, és a nem megfelelő használatból eredő kockázatokkal tisztában
vannak. Gyermekek nem játszhatnak a mixerrel. A készülék tisztítását
és karbantartását gyermekek nem
végezhetik el felnőtt felügyelet nélkül.
• Soha ne hagyja a mixert bekapcsolva felügyelet nélkül. Legyen óvatos,
ha a mixert gyermekek és csökkent
fizikai, érzékszervi vagy mentális
képességű személyek közelében
használja.
• Húzza ki a hálózati kábelt a konnektorból, ha a berendezéshez egységeket hozzászerel, vagy eltávolít, ha
már nem használja azt, vagy mielőtt
tisztítaná, vagy mielőtt elhagyja a
helységet, vagy ha egy hibát észlel.
A dugót a konnektorból ne a kábel
meghúzásával távolítsa el.
• Soha ne hagyja, hogy a motorrész, a
hálózati kábel vagy a hálózati dugó
nedves legyen. Soha ne hagyja,
hogy a motorrész, a hálózati kábel
vagy a hálózati dugó vízbe, vagy
más folyadékba kerüljön, és soha ne
tartsa ezeket folyó víz alá.
• Tisztítsa meg a mixert és a tartozékokat az első használat előtt. Vegye
figyelembe a tisztítás című fejezetben leírt további információkat.
• Szárítsa meg a mixert és a tartozékokat, mielőtt a tartozékokat csatlakoztatja és a készüléket elektromos
árammal ellátja.
• A készüléket mindig stabil, sima,
tiszta és száraz felületre helyezze.
• Ne ragasszon fel semmilyen címkét,
díszt a készülékre.
• Tartsa a kezét és a kellékeket, az
aprító egység kivételével a turmixgép keverőedényétől távol, ha
az a motorra fel van helyezve.
• Soha ne használjon olyan kelléket,
ami nem a mixerhez tartozik.
• A készüléket csak akkor lehet bekapcsolni, ha az elektromos csatlakozója egy konnektorba be lett
dugva.
• Ellenőrizze, hogy a típusjelzést
tartalmazó feliraton található
feszültség megegyezik-e az áramellátás feszültségével. A készüléket csak úgy lehet az áramellátásról leválasztani, ha kihúzza
annak dugóját a konnektorból.
• Ügyeljen arra, hogy ne bukjon fel az
600Watt Fitmix Manual - M7435+M7438+M7439 _Bedienungsanleitung-fitmix_C_150407_PRINT.indd 23 07.04.15 09:40
Page 24

24
elektromos kábelben, ha a készülék
be van kapcsolva.
• Mindig úgy helyezze el a készüléket,
hogy a konnektor elérhető legyen.
• Várja meg, amíg az aprító egység
teljes egészében leállt, mielőtt a
keverőedényt vagy a mini mixert a
motorról levenné.
• A mixert csak zárt fedővel használja.
• Csak akkor indítsa el az aprító
egységet, ha a fedő fel lett helyezve a keverőedényre. Ne nyomja túl
erősen az aprítót, mert az különben
hozzá érhet a késhez.
ÓVINTÉZKEDÉSEK
• A csomagoló anyaggal nem szabad játszani, mert fennáll a fulladás
veszélye.
• A kést tartalmazó egység tisztítása
különös óvatosságot igényel, hogy
esetleges sérülések megelőzhetőek
legyenek, mert a pengék nagyon
élesek.
• Ha a kábelek vagy a készülék áram
alatt vannak, fennáll az elektromos
áram miatti életveszély!
• Vigyázzon arra, hogy az elektromos
kábel ne sérüljön meg, úgy, hogy
azt nem hajlítja vagy nyomja meg,
vagy éles sarkoknál nem vezeti el.
Tartsa az elektromos kábelt forró
felületektől és nyílt lángtól távol.
• Soha ne használja a készüléket, ha
az elektromos kábel vagy a készülék megsérült.
• Semmilyen körülmények között ne
szedje szét a készüléket. A helytelen
használatból eredő károkért nem
vállalunk felelősséget.
• Ne helyezzen semmilyen szerszá
mot vagy más tárgyat a készülékbe.
Fém tárgyak rövidzárlatot okozhatnak és áramütéshez vezethetnek.
HASZNÁLAT
1. Távolítsa el az összes csomagoló anyagot és semmisítse azt
meg a hulladékkezelés előírásainak megfelelően.
2. Tisztítsa meg a mixert és a tartozékokat az első használat
előtt. (lásd tisztítás)
3. Ha a csapot (E) akarja használni, akkor tekerje le a csavaros
zárat (S) és ezt követően tekerje tá a csapot (E) a mixelő
tartályra (D).
Megjegyzés: A mixert a csavaros zárral (S) vagy a csappal (E)
tudja üzemeltetni.
4. Helyezze rá a keverő edényt (D) a motor egységre (G) és
tekerje rá szorosan addig, amíg a helyére kattan. Gondos
kodjon arról, hogy az adagoló csap (E) fogantyúja (F) zárt
állásban (H) legyen.
5. Töltse be a hozzávalókat a keverő edénybe (D). Javasoljuk,
hogy a darabos részekkel kezdje, és ehhez adja hozzá a
folyadékot. Pl. friss gyümölcs, joghurt, tej, gyümölcslevek,
zöldségek stb. Tehet jeget vagy mélyhűtött hozzávalókat is
a keverő edénybe. Pl. mélyhűtött gyümölcsök, mélyhűtött
joghurt, jégkocka stb.
Ötlet: Ha forró vagy enyhén habosodó folyadékot (pl. tej) tölt
be az edénybe, vagy mélyhűtött hozzávalókat használ, akkor
a keverő edényt maximum a 1000 ml jelzésig töltse meg.
6. Tegye rá a fedőt (C) a keverő edényre (D) mielőtt a
gépet bekapcsolja.
7. Csatlakoztassa a tápkábelt a fali aljzatba.
8. Helyezze rá vagy a MérŐ pohár (B) a fedőre (C) vagy
helyezze az aprító egységet (A) a lyukba. Ötlet: Az aprító
egységet akkor használja, ha sűrű pépes hozzávalókból kés
zít turmixot, vagy nagy mennyiségű mélyhűtött hozzávalókat
használ.
9. Nyomja le a 2 (L) gombot 30 másodpercen keresztül, hogy
elkezdje az összekeverést, majd nyomja le többször egymás
után, impulzus szerűen a 0/bekapcsolva (J) gombot (impul
zus mód) és hagyja a hozzávalókat addig keverés alatt, amíg
azok egy egyenletes pépet képeznek, majd kapcsolja ki a
készüléket. Ötlet: Használja az aprító egységet oly módon,
hogy a hozzávalókat fentről lefelé belenyomja a folyadékba.
10. A folyadék kiöntésére két módszer áll rendelkezésre: 1.
módszer: Tekerje le a keverő edényt (D) egy elfordító moz
dulattal a motor egységről (G), vegye le a fedelet és öntse a
folyadékot egy edénybe. 2. módszer: Helyezzen egy edényt
az adagoló csap (E) alá és nyomja le a csap fogantyúját (F)
a nyitott állásba (I). Ha az edény tele van, húzza fel a csap
fogantyúját (F) a kikapcsolt állapotba (H). Ötlet: Sűrű, pépes
folyadék könnyebb adagolásához nyomja le az 1 gombot
(K) és ezt követően nyomja le a csap fogantyúját a nyitott
állásba (I). Hígabb folyadékok esetében az adagoló csapot
a szokásos módon lehet használni és nincs szükség a motor
egység bekapcsolására.
MINI MIXER:
A mini mixerrel fűszereket, dióféléket, fűszernövényeket,
sajtot, kávét stb. tud darálni. Vigyázat: Száraz hozzávalókat (pl.
fűszerek, vagy diófélék) mindig a mini mixerben aprítson, ne a
600Watt Fitmix Manual - M7435+M7438+M7439 _Bedienungsanleitung-fitmix_C_150407_PRINT.indd 24 07.04.15 09:40
Page 25

25
keverő edényben.
1. Helyezze fel a mini mixer tartozékot (N) a motor egységre
(G). Ügyeljen arra, hogy a mini mixer tartozék (N) gumi
rögzítői (O) a motor egységen (G) az erre a célra szolgáló
vájatba (P) megfelelően legyenek behelyezve.
2. Töltse be a darálnivalót a mini mixer tartozékba (N). Ezt
maximum ¾-ig töltse meg.
3. Helyezze rá a mini mixer tetejét (M) a motor egységre (G) és
tekerje rá szorosan addig, amíg a helyére kattan.
4. Csatlakoztassa a tápkábelt a fali aljzatba.
5. Nyomja le a 2 gombot (L) 10 másodpercen keresztül, hogy
elkezdje a darálást. Majd nyomja le a 0/bekapcsolva (J)
gombot (impulzusmód) és hagyja a hozzávalókat addig
darálás alatt, amíg az elegy el nem éri a kívánt finomságot.
6. Tekerje le a mini mixer tartozék fedelét (M) a motor
egységről (G). Ekkor a mini mixer tartozék (N) leemelhető a
motor egységről és a ledarált massza kiüríthető egy edénybe.
Biztonsági kikapcsolás: A mixer úgy lett tervezve, hogy a
turmixolás csak felhelyezett keverő edénnyel végezhető.
Megjegyzés:
• Száraz hozzávalókat (pl. fűszerek, vagy diófélék) mindig a
mini mixerben aprítson, ne a keverő edényben.
• Soha ne kapcsolja be a mixert, ha az üres.
• Soha ne használja a motort 60 másodpercnél hosszabb időn
keresztül.
• Ne használja a mixert tároló edényként. Mindig ürítse ki azt
a használat előtt vagy után.
• Néhány folyadék esetében, pl. tej, a turmixolás közben
megemelkedik a folyadékszint és hab keletkezhet. Ezért ne
töltse teljesen tele a keverő edényt (max. 1 liter) és ügyeljen
arra, hogy a fedő jól fel legyen helyezve.
• Soha ne turmixoljon olyan állagú élelmiszert, ami a mély
hűtés folyamán egy tömbbe összeállt. Aprítsa fel ezt először
kisebb darabokra és úgy helyezze a keverő edénybe.
Felhasználási javaslat:
• Mielőtt felhelyezi a fedőt, nyomja bele a hozzávalókat egy
aprítón keresztül a folyadékba.
• Használja a 0/bekapcsolva gombot (impulzusmód) a motor
egység ki/bekapcsolására, hogy az itala kívánt sűrűségét
elérje. Figyeljen erre oda, mert a készülék mindig automa
tikusan magasabb sebességre vált, ami miatt a folyadék
felcsaphat az edény falára egészen a tetőig.
• Néhány folyadék bizonyos állási idő után leülepszik, a
kiöntéshez adjon hozzá még egy kis folyadékot.
• Hígabb ital kikeveréséhez adjon hozzá több folyadékot. Ha
sűrűbb italt szeretne készíteni, adjon hozzá több mélyhűtött
összetevőt. Utolsó lépésben, a sűrűbb italhoz adjon hozzá
néhány evőkanál folyadékot, hogy a kiöntést megkönnyítse.
TISZTÍTÁS
1. Töltse meg a keverő edényt (D) félig meleg vízzel.
Ötlet: Makacs szennyeződés esetén adjon hozzá néhány
csepp mosogatószert.
2. Helyezze fel a fedelet (C) és a záró kupakot (B) a keverő
edényre (D) és azt helyezze fel a motor egységre (G).
3. Nyomja le a 1 gombot (K) és miközben a gép be van
kapcsolva nyissa ki az adagoló csapot (nyitott állásba (I)) és
hagyja, hogy a víz kifolyjon egy edénybe, hogy ezzel meg
tisztítsa a szelepet. Ismételje meg ezt a folyamatot egészen
addig, amíg a víz teljesen tiszta nem marad.
4. Ezt követően a keverő edényt (D) a fedőt (C) a záró kupakot
(B) és az aprító egységet (A) mosogatógépben elmoshatja.
Figyelem
• Soha ne hagyja, hogy a motorrész, a hálózati kábel vagy a
hálózati dugó nedves legyen.
• Használat után mindig azonnal tisztítsa meg a mixert.
• Ne hagyjon élelmiszert beleszáradni a keverőedénybe, mert
az nehezíti a tisztítást.
• Kérjük, soha ne próbálja meg a kést eltávolítani vagy
megélesíteni. Ez zavart okozhat a készülék működésében.
Ötlet: A motoregység alján talál egy kábeltárolót.
Mini Mixer
Használat után a mini mixer tartozékot és a mini mixer fedőt
mosogatógépben elmoshatja.
Motor egység
Törölje le egy nedves ruhával és ezt követően szárítsa meg.
VIGYÁZAT
Mindig kapcsolja ki a gépet és a
kábelt húzza ki a konnektorból mielőtt
a tisztítást megkezdené
Az adagoló csap tisztítása
Az adagoló csapot rendszeresen szét kell szedni, hogy a részeit
alaposan meg lehessen tisztítani.
1. Tekerje le az adagoló csapot (E) a keverő edényről (D).
2. Szedje szét az adagoló csapot (E), úgy, hogy a záró fedőt (Q)
letekeri az összekötő szelepről (R).
3. Öblítse le a záró fedőt (Q) és az összekötő szelepet (R)
meleg vízzel és kímélő mosogatószerrel, majd ezt követően
gondosan szárítsa meg ezeket.
4. Szerelje össze újra az adagoló csapot (E), úgy hogy az
előzőekben leírt lépéseket fordítva elvégzi. Ügyeljen közben
arra, hogy a tömítések megfelelően helyezkedjenek el a
keverőedényen (D).
GARANCIÁLIS RENDELKEZÉSEK
Nem tartozik a garancia körébe semmilyen olyan meghibásodás,
amely nem megfelelő használat következtében keletkezik, pl.
túlmelegedés, elszíneződés, karcolások, földre ejtés miatt kelet
kezett sérülések, felhasználó által végzett javítási kísérletekből
vagy nem megfelelő tisztításból eredő károk. A garancia szintén
nem érvényes a használat látható nyomaira. Ez vonatkozik a
normális elhasználódás nyomaira is.
MEGSEMMISÍTÉS ÉS MŰSZAKI ADATOK
Környezetvédelmi előírások
Ne dobja ki a készüléket, ha azt már nem tudja
használni a háztartási hulladékkal együtt. Vigye el azt
egy gyűjtőhelyre, ahol az újrahasznosítás céljából ös
-
szegyűjtik az elektromos készülékeket. Erre utal ez a
jelzés a készüléken, a használati utasításban és a csomagoláson.
Tájékozódjon a gyűjtőhelyekről a forgalmazójánál, vagy a helyi
környezetvédelmi hatóságoknál. A használt készülékek környe
zetvédelmi szempontok szerinti megsemmisítése és újrafelhasználása a környezet megóvásának egy fontos szempontja.
600Watt Fitmix Manual - M7435+M7438+M7439 _Bedienungsanleitung-fitmix_C_150407_PRINT.indd 25 07.04.15 09:40
Page 26

26
Műszaki adatok
Ez a termék megfelel az európai uniós előírásoknak
A Fitmix méretei: (H×SZ×M) 17,01 × 26,30 × 40,00 cm
D keverőedény űrtartama: 1,5 l
Mini-mixer tartozék űrtartama: 0,35 l
Motor teljesítmény: 600 W
Hálózati feszültség: 220-240 V / 50 Hz
Fordulat: max. 18.000 / perc
A műszaki és optikai változtatások joga fenntartva.
CZ
NÁVOD K OBSLUZE
Vážený zákazníku, Vážená zákaznice,
děkujeme Vám, že jste se rozhodl/a pro Fitmix. Fitmix bude
vaším skvělým pomocníkem při přípravě zdravých pokrmů!
Další praktické příslušenství naleznete na adrese:
www.mediashop.tv
Omezení ručení: Technické informace, údaje a pokyny pro
instalaci, provoz a údržbu, uvedené v tomto návodu k obsluze,
odpovídají aktuálnímu stavu v době tisku. Z údajů, obrázků a
popisů v tomto návodu nelze vyvozovat žádné nároky. Výrobce
nepřebírá žádnou odpovědnost za škody, vzniklé v důsledku
nerespektování návodu k použití, používání v rozporu s účelem
použití, neodborných oprav, změn provedených bez dovolení
nebo použití neschválených náhradních dílů.
Použití v souladu s účelem použití
VAROVNÁ UPOZORNĚNÍ:
Přístroj je určen pouze k soukromému
používání. Přístroj je určen pouze k
přípravě potravin. Nepoužívejte
přístroj k účelům, k nimž není určen.
Nároky jakéhokoli druhu z důvodu
škod v důsledku používání v rozporu s
účelem použití jsou vyloučeny. Provozovatel nese riziko sám.
BEZPEČNOST A INSTALACE
Před použitím mixéru si pečlivě prostudujte tento návod k použití. Respektujte bezpečnostní pokyny při uvádění
mixéru do provozu, protože jinak by
mohlo dojít ke vzniku materiálních
škod a zranění osob. Respektujte
všechny bezpečnostní pokyny, aby
nedošlo ke vzniku škod v důsledku
nesprávného používání. Uschovejte si
návod k použití pro pozdější nahléd
nutí. Je-li mixér předán třetí osobě, je
nutno jí předat i tento návod k použití.
Upozornění:
• Před použitím je nutno mixér pro-
hlédnout, zda nejeví známky vnějšího poškození. Poškozený mixér se
nesmí používat.
• Typový štítek nesmí být odstraněn.
• Děti a osoby s omezenými fyzický-
mi, senzorickými nebo duševními
schopnostmi je třeba udržovat v
dostatečné vzdálenosti od mixéru.
• Tento mixér mohou používat osoby
se sníženými fyzickými, senzorickými nebo duševními schopnostmi
nebo s nedostatečnými zkušenostmi a vědomostmi, pokud tak činí
pod dozorem nebo byly poučeny
o bezpečném používání mixéru a
chápou rizika s tím spojená. Děti
si s mixérem nesmí hrát. Čištění a
uživatelskou údržbu nesmí provádět
děti bez dozoru dospělých.
• Nenechávejte mixér nikdy bez
dozoru zapnutý. Buďte mimořádně opatrní při používání mixéru v
blízkosti dětí a osob s omezenými
fyzickými, senzorickými nebo duševními schopnostmi.
• Vytáhněte zástrčku ze síťové zásuv-
ky před nasazováním dílů na přístroj
a odstraňováním dílu z přístroje,
po použití přístroje, před čištěním
600Watt Fitmix Manual - M7435+M7438+M7439 _Bedienungsanleitung-fitmix_C_150407_PRINT.indd 26 07.04.15 09:40
Page 27

27
přístroje, před odchodem z místnosti nebo pokud se vyskytne vada na
zásuvce. Při odpojování ze zásuvky
tahejte za zástrčku a ne za kabel.
• Nikdy nepřipusťte, aby došlo k
namočení jednotky motoru, síťového
kabelu nebo síťové zástrčky. Neponořujte jednotku motoru, síťový kabel nebo síťovou zástrčku do vody
nebo do jiných tekutin a nedržte je
pod tekoucí vodou.
• Před prvním použitím mixér a
všechny díly příslušenství vyčistěte.
Respektujte další informace v oddílu
Čištění.
• Vysušte mixér a všechny díly příslušenství, než díly nasadíte nebo
než přístroj připojíte k síťovému
napájení.
• Přístroj používejte vždy na stabilním,
rovném, čistém a suchém povrchu.
• Nelepte na přístroj žádná cizí tělesa.
• Udržujte ruce a potřeby k přípravě
pokrmů kromě pěchu mimo mixovací nádobu, když je na jednotce
motoru.
• Nikdy nepoužívejte díly příslušenství, které nejsou určeny pro mixér.
• Přístroj lze zapnout pouze tehdy,
když je zástrčka v zásuvce.
• Zkontrolujte, zda se síťové napětí
na typovém štítu shoduje s lokálním
napájecím napětím. Jediným
způsobem, jak přístroj oddělit od
proudového napájení, je vytáhnout
zástrčku ze zásuvky.
• Dejte pozor, abyste nedopatřením
nezakopli o síťový kabel, když je
přístroj v provozu.
• Umístěte přístroj tak, aby byla síťová
zástrčka vždy přístupná.
• Vyčkejte, až se hlavice nože zcela
přestane pohybovat před odejmutím
mixovací nádoby nebo mini mixeru z
jednotky motoru.
• Používejte mixer pouze s nasazeným
víkem.
• Používejte pěch pouze tehdy, když
je víko nasazené na mixovací nádobě. Nevyvíjejte na pěch příliš velký
tlak, protože by tím mohlo dojít k
poškození nožů
VAROVNÁ UPOZORNĚNÍ
• Obalové materiály nesmí být použity
k hraní, existuje nebezpečí udušení.
• Při čištění jednotky nože je nutno
postupovat se zvláštní opatrností,
aby nedošlo k poranění, protože
ostří jsou extrémně ostrá.
• Jsou-li vedení nebo součásti pod
napětím, existuje riziko ohrožení
života elektrickým proudem.
• Zabraňte vzniku poškození síťového
kabelu, neskřípněte jej, nezalamujte a netahejte přes ostré hrany.
Udržujte síťový kabel v dostatečné
vzdálenosti od horkých povrchů a
otevřeného ohně.
• Přístroj nikdy nepoužívejte, je-li
síťový kabel poškozený.
• Přístroj za žádných okolností neotvírejte. Za škody v důsledku nesprávného používání nepřebíráme
žádnou záruku.
• Nepoužívejte v přístroji žádné
600Watt Fitmix Manual - M7435+M7438+M7439 _Bedienungsanleitung-fitmix_C_150407_PRINT.indd 27 07.04.15 09:40
Page 28

28
nástroje ani předměty. Kovové předměty mohou způsobit zkrat nebo
vést k zásahu elektrickým proudem.
OBSLUHA
1. Odstraňte veškerý obalový materiál a zlikvidujte jej podle
platných zákonných ustanovení.
2. Před prvním použitím mixér a všechny díly příslušenství
vyčistěte. (Viz čištění)
3. Chcete-li pracovat s čepovacím kohoutem (E), odšroubujte
šroubovací uzávěr (S) a pak přišroubujte čepovací kohout
(E) na nádobu mixéru (D).
Upozornění: Mixér můžete obsluhovat s použitím šroubovacího
uzávěru (S) nebo čepovacího kohoutu (E).
4. Nasaďte mixovací nádobu (D) na jednotku motoru (G) a
pevně přišroubujte do zaklapnutí mixovací nádoby. Zajistěte,
aby byla čepovací páčka (F) čepovacího kohoutu (E) v
poloze VYP (H).
5. Dejte do mixovací nádoby (D) přísady. Doporučujeme dát
do nádoby nejprve pevné a pak tekuté přísady. Patří k nim
ovoce, čerstvý jogurt, mléko, ovocné šťávy, zelenina, atd.
Do mixovací nádoby můžete dát také zmrzlinu nebo hluboce
zmrazené přísady. Patří k nim hluboce zmrazené ovoce,
hluboce zmrazený jogurt, ledové kostky, atd. Tip: Pokud
používáte horké nebo snadno pěnící tekutin (např. mléko)
nebo hluboce zmrazené přísady, lze mixovací nádobu naplnit
maximálně po značku 1000 ml.
6. Nasaďte víko (C) na mixovací nádobu (D) dříve, než
zastrčíte zástr ku přístroje do elektrické zásuvky.
7. Zastrčte síťovou zástrčku do zásuvky.
8. Nasaďte buď na Odměrka (B), nebo na víko uzavíracího
krytu (C), nebo do otvoru vsaďte pěch (A). Tip: Pěch lze
použít při míchání hustých tekutých směsí nebo při použití
velkého množství hluboce zmrazených přísad.
9. Mixování zahajte stiskem tlačítka 2 (L) maximálně na 30 se
kund, pak v krátkých intervalech stiskejte tlačítko 0/ Pulse
(J) (impulzový provoz) a mixujte přísady tak dlouho, dokud
ze všech přísad nevznikne stejnoměrné pyré a pak přístroj
vypněte. Tip: Použijte pěch a stla ujte jím přísady shora dolů
do tekutiny.
10. Existují dvě varianty vylití tekutiny z nádoby. 1. Varianta:
Můžete mixovací nádobu (D) kroutivým pohybem sejmout z
jednotky motoru (G), odstranit víko a vlít tekutinu do nádob.
2. Varianta: Postavíte nádobu pod čepovací kohout (E) a
stiskněte čepovací páčku (F) čepovacího kohoutu dolů
do polohy ZAP (I). Když je nádoba plná, zatlačte čepovací
páčku (F) nahoru do polohy VYP (H). Tip: Pro snadnější
čepování hustých tekutin stiskněte tlačítko 1 (K) a pak stis
kněte čepovací páčku čepovacího kohoutu dolů do polohy
(I). Řidší kapaliny lze obvykle čepovat, aniž by bylo nutno
zapnout jednotku motoru.
MINI MIXER
V Mini Mixeru můžete mlít koření, oříšky, bylinky, sýr, kávu a
mnohé další. Pozor: Mixujte suché přísady vždy pouze v mini
mixeru a ne v mixovací nádobě.
1. Nasaďte násadec mini mixeru (N) na jednotku motoru (G).
Dbejte přitom na to, aby gumové výstupky (O) násadce mini
mixeru (N) správně zapadly do vrubů (P) na jednotce motoru
(P) určených k tomuto účelu.
2. Umístěte rozmělňované přísady do násadce mini mixeru (N).
Naplňte jej maximálně do 3/4 možného plněného množství.
3. Nasaďte víko mini mixeru (M) na jednotku motoru (G) a
pevně přišroubujte do zaklapnutí víka mini mixeru.
4. Zastrčte síťovou zástrčku do zásuvky.
5. Zahajte postup mletí stisknutím tlačítka 2 (L) maximálně
na 10 sekund. Pak stiskněte tlačítko 0/Pulse (J) (impulsový
provoz) a nechejte přísady rozmělňovat tak dlouho, dokud
nebude dosažen požadovaný stupeň jemnosti.
6. Zdvihněte otáčivým pohybem víko mini mixeru (M) z jednotky
motoru (G). Pak můžete násadec mini mixeru (N) zdvihnout z
jednotky motoru a namleté přísady vyprázdnit do nádoby.
Bezpečnostní vypnutí: Mixér je konstruován tak, že se funkce
mixování spustí pouze tehdy, když je nasazena mixovací nádoba.
Upozornění
• Mixujte suché přísady vždy pouze v mini mixeru a ne v mixo
-
vací nádobě.
• Nenechávejte mixér nikdy běžet naprázdno.
• Nepoužívejte nikdy mixér nepřetržitě déle než 60 sekund.
• Nepoužívejte mixér jako zásobní nádobu. Vždy jej vyprázd
-
něte před použitím a po použití.
• U některých tekutin, např. u mléka, se zvýší v průběhu
mixování objem a může vznikat pěna. Proto neplňte mixovací
nádobu zcela (max. 1 litr) a zajistěte, aby bylo víko správně
nasazeno.
• Nikdy nemixujte potraviny, které při zmrazení zmrznou na
pevnou hmotu. Před přidáním do mixovací nádoby je od sebe
rozlomte,
Tipy pro používání
• Před nasazením víka zatlačte pevné přísady pěchem do
tekutiny.
• Použijte tlačítko 0/PULSE (impulsový provoz) k použí
vání jednotky motoru v provozu start - stop k dosažení
požadované konzistence svých drinků. Postupujte opatrně,
protože se tím automaticky navolí vyšší rychlost a to může
vést k tomu, že tekutina po stěnách vystříkne nahoru k víku
mixovací nádoby.
• V některých tekutinách může při delším stání docházet k
usazování- Proto je nejlepší je ihned vypít. Když necháte
tekutinu déle stát, je třeba ji ještě jednou zamíchat, než ji
budete pít.
• Při mixování méně hustého smoothie přidejte více tekutiny.
Při mixování hustšího smoothie přidejte více hluboce zmra
zených přísad. Pro vylití posledních zbytků hustých smoothie
přidejte několik polévkových lžic tekutiny pro usnadnění vylití.
ČIŠTĚNÍ
1. Naplňte mixovací nádobu (D) do poloviny teplou vodou.
Tip: Při silném zne ištění přidejte několik kapek prostředku
na mytí nádobí.
2. Upevněte víko (C) a uzavírací krytku (B) na mixovací nádobu
(D) a pak ji umístěte na jednotku motoru (G).
3. Stiskněte tlačítko 1 (K) a když je přístroj zapnutý, otevřete
čepovací kohout (poloha zap. (I)) a nechejte do nádoby
vytékat vodu, aby se ventil vyčistil. Opakujte to, dokud voda
nebude čirá.
4. Pak můžete mixovací nádobu (D), víko (C), uzavírací krytku
(B) a pěch (A) nechat umýt v myčce nádobí.
Upozornění:
• Nikdy nepřipusťte, aby došlo k namočení jednotky motoru,
kabelu nebo zástrčky.
• Po použití vždy ihned vyčistěte.
• Nenechávejte potraviny v mixovací nádobě zaschnout,
protože se tím ztíží čištění.
• Nikdy se nepokoušejte nůž odstranit nebo nabrousit. Mohla
by tím být narušena jeho funkce.
600Watt Fitmix Manual - M7435+M7438+M7439 _Bedienungsanleitung-fitmix_C_150407_PRINT.indd 28 07.04.15 09:40
Page 29

29
Tip: Na dně jednotky motoru naleznete místo k navinutí kabelu.
Mini Mixer:
Po použití lze násadec mini mixeru a víko mini mixeru mýt v
myčce nádobí.
Jednotka motoru:
Otírejte ji vlhkým hadříkem a pak osušte.
VAROVNÉ UPOZORNĚNÍ:
Před čištěním přístroj vždy vypněte a
vytáhněte síťovou zástrčku ze zásuvky
.
Čištění čepovacího kohoutu:
Čepovací kohout je třeba pravidelně rozkládat, aby bylo možné
díly důkladně vyčistit.
1. Odšroubujte čepovací kohout (E) z mixovací nádoby.
2. Rozložte čepovací kohout (E) tak, že uzavírací krytku (Q)
odšroubujete od připojovacího ventilu (R).
3. Propláchněte uzavírací krytku (Q) a připojovací ventil (R)
teplou vodou s přídavkem jemně působícího saponátového
prostředku a pak ji důkladně vysušte.
4. Čepovací kohout (E) opět sestavte podle výše uvedených
kroků v opačném pořadí. Dbejte přitom na to, aby byla
těsnění správně nasazena na mixovací nádobě (D).
ZÁRUČNÍ USTANOVENÍ
Ze záruky jsou vyloučeny všechny vady, vzniklé v důsledku
nesprávné manipulace, např. přehřátí, zabarvení, škrábance,
poškození pádem na podlahu, pokusy o opravování a nesprávné
čištění. Ze záruky jsou rovněž vyloučeny čistě optické známky
opotřebení. Platí to i pro normální opotřebení.
LIKVIDACE A TECHNICKÉ PARAMETRY
Upozornění k ochraně životního prostředí
Neodhazujte výrobek na konci jeho životnosti do
normálního komunálního odpadu. Odevzdejte jej na
sběrném místě k recyklaci elektrických a elektro
-
nických přístrojů. Je to znázorněno tímto symbolem
na výrobku, v návodu k použití a na obalu.
Informujte se o sběrných místech, provozovaných vaším prodejcem nebo místním úřadem. Opětovné zhodnocení a recyklace starých přístrojů je důležitým příspěvkem k ochraně
našeho životního prostředí.
Technické parametry
Tento výrobek splňuje evropské směrnice.
Rozměry Fitmix: (D׊×V) 17,01 × 26,30 × 40,00 cm
Kapacita mixovací nádoby: 1,5 l
Kapacita násadce mini mixeru 0,35 l
Výkon motoru: 600 W
síťové napětí: 220-240 V / 50 Hz
Otáčky: max. 18 000 / min.
Technické a optické změny vyhrazeny.
SK
NÁVOD NA OBSLUHU
Vážený zákazník, vážená zákazníčka!
Ďakujeme vám, že ste sa rozhodli pre mixér Fitmix. Vďaka
mixéru Fitmix ste získali vynikajúceho pomocníka vrámci
zdravej kuchyne!
Ďalšie praktické príslušenstvo nájdete na:
www.mediashop.tv
Obmedzenie zodpovednosti: Technické informácie, údaje a
pokyny na inštaláciu, prevádzku a starostlivosť uvedené v tomto
návode na obsluhu zodpovedajú najnovšiemu stavu pri tlači. Z
informácií, obrázkov a opisov v tomto návode nie je možné vy
vodiť žiadne nároky. Výrobca nepreberá zodpovednosť za škody,
ktoré vzniknú v dôsledku nedodržiavania návodu, nesprávneho
používania, neodborných opráv, uskutočnených nepovolených
zmien alebo používania neschválených náhradných dielov.
Správne používanie:
INFORMÁCIE O
NEBEZPEČENSTVÁCH: Prístroj je
určený len na domáce používanie.
Prístroj je vhodný na prípravu potravín. Prístroj nepoužívajte na účely, na
ktoré nebol určený. Nároky akéhokoľvek druhu z dôvodu škôd z nesprávneho používania sú vylúčené. Prevádzkovateľ znáša sám riziko.
BEZPEČNOSŤ A UMIESTNENIE
Pred použitím mixéra si pozorne
prečítajte tento návod na obsluhu. Pri
spustení mixéra do prevádzky dodržiavajte bezpečnostné pokyny, pretože
môže dôjsť k materiálnym škodám a
ujmám na zdraví. Dodržiavajte všetky
bezpečnostné pokyny, aby ste zabránili škodám z dôvodu nesprávneho
používania. Uschovajte tento návod
na obsluhu, aby ste doňho mohli
neskôr nazrieť. Ak sa mixér odovzdá
600Watt Fitmix Manual - M7435+M7438+M7439 _Bedienungsanleitung-fitmix_C_150407_PRINT.indd 29 07.04.15 09:40
Page 30

30
tretím osobám, musí sa tento návod
na obsluhu odovzdať spolu s ním.
Upozornenia
• Pred použitím je nutné skontrolovať,
či mixér nie je viditeľne poškodený.
Poškodený mixér sa nesmie používať.
• Typový štítok sa nesmie odstrániť.
• Deti a osoby so zníženými fyzickými, zmyslovými alebo mentálnymi
schopnosťami nesmú mixér používať.
• Tento mixér môžu používať osoby
so zníženými fyzickými, zmyslovými
alebo mentálnymi schopnosťami
alebo s nedostatkom skúseností a
vedomostí vtedy, keď sú pod dozorom alebo keď boli poučené o
bezpečnom používaní mixéru a keď
rozumejú rizikám vyplývajúcim z
používania tohto mixéra.
• Mixér nikdy nenechávajte zapnutý
bez dozoru. Buďte maximálne opatrní, keď mixér používate v blízkosti
detí a osôb so zníženými fyzickými, zmyslovými alebo mentálnymi
schopnosťami.
• Pred pripevňovaním a skladaním
dielov z prístroja, po používaní
prístroja, pred čistením prístroja,
predtým, ako opustíte miestnosť
alebo keď sa vyskytne chyba, vytiahnite zástrčku zo zásuvky. Zástrčku neťahajte zo zásuvky za kábel
• Motor, sieťový kábel alebo zástrčku
nenechajte nikdy zvlhnúť. Motor,
sieťový kábel alebo zástrčku nik-
dy neponárajte do vody alebo inej
kvapaliny; nepridržiavajte ich pod
tečúcou vodou.
• Mixér a príslušenstvo pred prvým
použitím prístroja umyte. Dodržiavajte ďalšie informácie v časti Čistenie.
• Skôr než pripevníte všetky diely a
skôr než prístroj spojíte s napájaním, mixér a príslušenstvo vysušte.
• Prístroj používajte vždy na stabilnej,
rovnej, čistej a suchej ploche.
• Na prístroj nenaliepajte žiadne cudzie predmety.
• Ruky a predmety, okrem miešadla,
držte mimo mixovacej nádoby, keď
sa nachádza na jednotke s motorom.
• Nikdy nepoužívajte príslušenstvo,
ktoré nie je určené pre tento mixér.
• Prístroj môžete zapnúť len vtedy,
keď je zástrčka spojená so zásuvkou.
• Skontrolujte, či sieťové napätie
na typovom štítku súhlasí s vaším
miestnym napájacím napätím.
Jediný spôsob, ako prístroj odpojíte
od napájania, je ten, že vytiahnete
zástrčku.
• Nepotknite sa nedopatrením o
sieťový kábel, keď je prístroj v prevádzke.
• Prístroj umiestnite tak, aby ste mali
vždy prístup k zástrčke.
• Skôr než zložíte mixovaciu nádobu
alebo mini mixér z jednotky smotorom počkajte, kým sa hlava s nožmi
úplne nezastaví.
• Mixér používajte len s nasadením
600Watt Fitmix Manual - M7435+M7438+M7439 _Bedienungsanleitung-fitmix_C_150407_PRINT.indd 30 07.04.15 09:40
Page 31

31
krytom.
• Používajte piest, iba keď je veko
nasadené na nádobe mixéru. Nevytvárajte na piest príliš silný tlak,
ináč by sa mohol dotknúť noža.
INFORMÁCIE O
NEBEZPEČENSTVÁCH
• Obalový materiál sa nesmie používať
na hranie, pretože hrozí riziko udusenia.
• Pri čistení jednotky s nožmi musíte
postupovať obzvlášť opatrne, aby
ste zabránili poraneniam, pretože
čepele sú extrémne ostré.
• Ak je vedenie alebo jednotlivé diely
pod napätím, hrozí nebezpečenstvo
ohrozenia života zásahom elektrického prúdu!
• Zabráňte škodám na sieťovom kábli
tak, že ho nebudete stláčať, zalamovať alebo ťahať cez ostré hrany.
Držte sieťový kábel v dostatočnej
vzdialenosti od horúcich povrchov a
otvoreného ohňa.
• Prístroj nikdy nepoužívajte vtedy,
keď je sieťový kábel alebo prístroj
poškodený.
• Prístroj za žiadnych okolností neotvárajte. Za škody spôsobené nesprávnym používaním nepreberáme
zodpovednosť.
• V prístroji nepoužívajte náradie
alebo predmety. Kovové predmety
môžu spôsobiť skrat alebo viesť k
zásahu elektrickým prúdom.
OBSLUHA
1. Odstráňte všetok obalový materiál a zneškodnite ho v súlade
s platnými zákonnými ustanoveniami.
2. Pred prvým použitím mixér a všetko príslušenstvo umyte.
(pozri časť Čistenie)
3. Ak si prajete pracovať s výpustným kohútikom (E), vtedy
odšraubujte otočný uzáver (S) a našraubujte výpustný kohú
-
tik (E) na nádobu mixéra (D).
Upozornenie: Mixér môžete obsluhovať s otočným uzáverom
(S) alebo výpustným kohútikom (E).
4. Mixovaciu nádobu (D) nasaďte na jednotku s motorom (G)
a otáčajte ňou, kým mixovacia nádoba pevne nezaklapne.
Uistite sa, že páčka (F) výpustného kohútika (E) je v pozícii
VYP (H).
5. Do mixovacej nádoby vložte suroviny (D). Odporúčame
vkladať najprv pevné a potom tekuté suroviny. Patrí knim
ovocie, čerstvý jogurt, mlieko, ovocné šťavy, zelenina, atď.
Do mixovacej nádoby môžete vkladať aj zmrzlinu alebo zmra
zené suroviny, ako napr. mrazené ovocie, mrazený jogurt,
ľadové kocky, atď. Tip: Ak používate horúce alebo mierne
peniace tekutiny (napr. mlieko) či zmrazené suroviny, môžete
mixovaciu nádobu naplniť maximálne po značku 1000 ml.
6. Predtým ako prístroj napojíte, umiestnite veko (C) na
nádobu mixéra (D).
7. Zástrčku zasuňte do zásuvky.
8. Na kryt (C) nasaďte buď Odmerka (B) alebo do otvoru vložte
miešadlo (A). Tip: Miešadlo môžete používať vtedy, keď
potrebujete zamiešať husté zmesi alebo keď používate veľké
množstvá zmrazených surovín.
9. Pre začatie miešania stlačte tlačidlo 2 (L) na najviac 30
sekúnd, potom stláčajte tlačidlo 0/Pulse (J) (impulzná prevád
zka) v krátkych odstupoch a nechajte prísady tak dlho miešať,
pokým sú rovnomerne rozmiešané a následne prístroj vypnite.
Rada: Použite piest na vtlačenie prísad z vrchnej časti na
spodok do tekutiny.
10. Na vyliatie tekutiny existujú dve možosti: Možnosť 1: Nádobu
mixéra (D) môžete otáčavým pohybom oddeliť od časti s
motorom (G), odstránite veko a vlejete tekutinu do nejakej
nádoby.
Možnosť č. 2: Nádobu postavíte pod výpustný kohútik (E)
a stlačíte páčku (F) výpustného kohútika smerom nadol do
pozície ZAP (I). Keď je nádoba plná, stlačíte páčku kohútika
(F) smerom nadol do pozície VYP (H). Tip: Pre jednoduchšie
vypúšťanie hustejších tekutín stlačte tlačidlo 1 (K) a potom
stlačte páčku výpustného kohútika smerom nadol do pozície
ZAP (I). Redšie tekutiny sa dajú zvyčajne vypúšťať bez toho,
aby ste museli zapínať motor.
MINI MIXÉR
S mini mixérom môžete pomlieť koreniny, orechy, bylinky, syr,
kávu a i. Pozor: Suché suroviny (napr. koreniny, orechy) mixujte
vždy v mini mixéri a nie v mixovacej nádobe.
1. Nasaďte nadstavec mini mixéra (N) na jednotku s motorom
(G). Dbajte pritom na to, aby ste gumené výčnelky (O)
nadstavca mini mixéra (N) správne umiestnili do určených
zárezov (P) na spodnej jednotke s motorom (G).
2. Do nadstavca mini mixéra (N) vložte suroviny, ktoré chcete
posekať. Naplňte ho maximálne do ¾ možného objemu nádoby.
3. Kryt mini mixéra (M) nasaďte na jednotku s motorom (G) a
otáčajte ním, kým kryt mini mixéra pevne nezaklapne.
4. Zástrčku zasuňte do zásuvky.
5. Stlačte tlačidlo 2 (L) po dobu 10 sekúnd, aby ste mohli začať
so sekaním. Potom stlačte tlačidlo 0/Pulse (J) (impulzná
prevádzka) a sekajte suroviny tak dlho, kým nedosiahnete
požadovaný stupeň jemnosti.
6. Otočným pohybom zložte kryt mini mixéra (M) z jednotky s
motorom (G). Potom môžete nadstavec mini mixéra (N) nad
-
vihnúť z jednotky s motorom a vyprázdniť znádoby posekané
600Watt Fitmix Manual - M7435+M7438+M7439 _Bedienungsanleitung-fitmix_C_150407_PRINT.indd 31 07.04.15 09:40
Page 32

32
suroviny.
Bezpečnostné vypnutie: Mixér je skonštruovaný tak, aby sa
funkcia mixovania spustila len pri nasadenej mixovacej nádobe.
Upozornenie
• Suché prísady (napr. koreniny, orechy) mixujte vždy len v
mini mixéri a nie v mixovacej nádobe.
• Mixér nikdy nenechávajte bežať vtedy, keď je prázdny.
• Mixér nikdy nepoužívajte dlhšie ako 60 sekúnd.
• Mixér nepoužívajte ako zásobník. Pred používaním a po
používaní ho vždy vyprázdnite.
• Pri niektorých tekutinách, napr. mlieku, sa počas mixovania
zvyšuje objem a može vzniknúť pena. Nanaplňte nádobu
mixéra príliž doplna (max. 1 liter) a uistite sa, či máte správ
-
ne nasadené veko.
• Nikdy nemixujte potraviny, ktoré pri zmrazovaní zamrzli na
pevnú masu. Pred pridaním do mixovacej nádoby túto masu
rozdrvte.
Tipy na používanie
• Skôr než nasadíte kryt, zatlačte pomocou miešadla pevné
suroviny do tekutiny.
• Použite tlačidlo 0/PULSE (impulzná prevádzka), ak chcete
použiť prevádzku štart/stop a docieliť tak požadovanú
konzistenciu nápojov. Buďte opatrní, pretože sa pritom
automaticky zvolí vyššia rýchlosť a môže to viesť k tomu,
že tekutina vystrekne po stenách smerom nahor ku krytu
mixovacej nádoby.
• Niektoré tekutiny sa môžu pri dlhšom státí usadiť. Preto
bude najlepšie, keď ich hneď vypijete. Keď necháte tekutinu
dlhšie stáť, mali by ju ste pred vypitím ešte raz premiešať.
• Ak chcete vymiešať redší nápoj, pridajte viac tekutiny. Ak
chcete vymiešať hustejší nápoj, pridajte viac zmrazených
surovín. Ak chcete vyliať všetky zvyšky hustejšieho nápoja,
pridajte k nápoju zopár polievkových lyžíc tekutiny, aby ste
zjednodušili vylievanie.
ČISTENIE
1. Mixovaciu nádobu (D) naplňte do polovice teplou vodou.
Rada: Pri silnejšom znečistení pridajte zopár kvapiek čistia
-
ceho prostriedku na riad.
2. Na mixovaciu nádobu (D) pripevnite kryt (C) a vnútorné
viečko (B) a nasaďte ju potom na jednotku s motorom (G) .
3. Stlačte tlačidlo 1 (K) a kým je prístroj zapnutý otvorte vý
pustný kohútik (pozícia ZAP (I)) a nechajte vodu vytekať do
nádoby, aby ste vyčistili ventil. Zopakujte tento postup, kým
nebude voda čistá.
4. Potom mixovaciu nádobu (D), kryt (C), vnútorné viečko (B) a
miešadlo (A) umyte v umývačke.
Upozornenia
• Jednotku s motorom, kábel alebo zástrčku nenechajte nikdy
zvlhnúť.
• Hneď po použití prístroj vždy vyčistite.
• Nenechávajte potraviny vyschnúť v mixovacej nádobe,
pretože to sťažuje čistenie.
• Prosím nikdy neskúšajte nôž mixéra odstrániť alebo naostriť.
Mohlo by to obmedziť jeho funkčnosť.
Rada: Na spodku mixéra je priestor na kábel.
Mini mixér
Po použití môžete nadstavec mini mixéra a kryt mini mixéra
umyť v umývačke.
Jednotka s motorom
Utrite ju vlhkou handričkou a potom ju vysušte.
VAROVANIE
Vždy pred čistením prístroj vypnite a
vytiahnite zo zásuvky.
Čistenie výpustného kohútika
Výpustný kohútik by ste mali pravidelne rozoberať, aby ste mohli
dôkladne vyčistiť diely.
1. Otočným pohybom odskrutkujte výpustný kohútik (E) od
jednotky s motorom (D).
2. Rozoberte výpustný kohútik (E) tak, že vnútorné viečko (Q)
otočným pohybom odskrutkujete od pripojovacieho ventilu
(R).
3. Vnútorné viečko (Q) a pripojovací ventil (R) opláchnite
teplou vodou a šetrným prostriedkom na umývanie a potom
ich dôkladne vysušte.
4. Výpustný kohútik (E) znovu poskladajte tak, že kroky
opísané hore vykonáte v opačnom poradí. Dbajte pritom
na to, aby ste na spodnú jednotku s motorom (D) správne
nasadili tesnenia.
USTANOVENIE O ZÁRUKE
Záruka sa nevzťahuje na akékoľvek nedostatky, ktoré vzniknú
z dôvodu neodbornej manipulácie, napr. prehriatia, zafarbenia,
poškriabania, poškodenia pádom na podlahu, pokusov o opravu
a neodborného čistenia. Nevzťahuje sa takisto na čisto vizuálne
známky používania. Platí to aj pre bežné opotrebovanie.
ZNEŠKODNENIE A TECHNICKÉ ÚDAJE
Pokyn týkajúci sa životného prostredia
Nezneškodnite preto produkt na konci jeho životnosti
spolu s bežným komunálnym odpadom. Zaneste ho
na zberné miesto na recykláciu elektrických a elekt
-
ronických prístrojov. Je to uvedené prostredníctvom
symbolu na produkte, v návode na obsluhu a na obale.
Informujte sa o zberných miestach, ktoré prevádzkuje váš
predajca alebo miestny úrad. Opätovné zhodnotenie a recyk
lácia starých prístrojov je dôležitou súčasťou ochrany nášho
životného prostredia.
Technické údaje
Tento produkt zodpovedá európskym smerniciam.
Rozmery mixéra Fitmix: (D׊×V) 17,01 × 26,30 × 40,00 cm
Objem mixovacej nádoby: 1,5 l
Objem nadstavca mini mixéra: 0,35 l
Výkon motora: 600 W
Sieťové napätie: 220 - 240 V / 50 Hz
Obrátky: max. 18 000 / min.
Technické a vizuálne zmeny vyhradené.
600Watt Fitmix Manual - M7435+M7438+M7439 _Bedienungsanleitung-fitmix_C_150407_PRINT.indd 32 07.04.15 09:40
Page 33

33
RO
INSTRUCŢIUNI DE UTILIZARE
Stimate client! Stimată clientă!
Vă mulţumim că v-aţi decis pentru produsul Fitmix. Fitmix este
ajutorul cel mai de preţ în bucătăria sănătoasă!
Alte accesorii practice găsiţi la adresa: www.mediashop.tv
Limitarea răspunderii: Informaţiile tehnice, datele şi indicaţiile
privitoare la instalare, utilizare şi întreţinere, conţinute în
prezentele instrucţiuni de utilizare, corespund nivelului tehnic
de la data tipăririi. Nu este permisă întemeierea unor pretenţii
pe indicaţiile, ilustraţiile şi descrierile din aceste instrucţiuni de
utilizare. Producătorul nu-şi asumă răspunderea pentru daune
ce s-ar produce din cauza nerespectării instrucţiunilor de
utilizare, utilizării neconforme cu destinaţia, reparaţiilor neco
respunzătoare, modificări neaprobate sau utilizarea pieselor de
schimb neaprobate.
Utilizare conform destinaţiei
AVERTISMENTE: Aparatul este
destinat numai utilizării private.
Aparatul este destinat exclusiv preparării alimentelor. Nu utilizaţi aparatul în scopuri pentru care acesta nu
este destinat. Sunt excluse pretenţiile
de orice fel născute din utilizarea
neconformă cu destinaţia. Riscul este
suportat în totalitate de utilizator.
SIGURANŢĂ ŞI AMPLASARE
Citiţi cu grijă aceste instrucţiuni de
utilizare, înainte de a utiliza mixerul!
Respectaţi indicaţiile de siguranţă
atunci când puneţi în funcţiune
mixerul, deoarece în caz contrar s-ar
putea produce daune materiale şi
vătămări de persoane. Urmaţi toate
indicaţiile de siguranţă pentru a evita
daunele cauzate de utilizarea greşită!
Păstraţi instrucţiunile de utilizare pentru consultare ulterioară. Dacă înstrăinaţi mixerul către terţi, atunci aceste
instrucţiuni de utilizare trebuie să fie
de asemenea înmânate.
Indicaţii
• Înainte de utilizarea mixerului,
aceasta trebuie să fie verificat dacă
nu există deteriorări vizibile. Nu este
permisă utilizarea unui mixer deteri
-
orat.
• Nu este permisă îndepărtarea plăcuţei de identificare.
• Copiii şi persoanele cu capacităţi fizice, senzoriale sau mentale limitate
trebuie ţinute departe de mixer.
• Acest mixer poate fi utilizat de
persoane cu capacităţi fizice,
senzoriale sau mentale reduse sau
fără experienţă şi cunoştinţe, dacă
sunt supravegheate şi dacă au fost
instruite cu privire la utilizarea în
siguranţă a mixerului şi dacă înţeleg
pericolele rezultate din utilizare. Nu
este permis copiilor să se joace cu
acest aparat. Curăţarea şi întreţinerea efectuată de către utilizator nu
este permis a fi efectuată de către
copii fără supraveghere.
• Nu lăsaţi niciodată mixerul pornit
nesupravegheat. Aveţi deosebită
grijă atunci când utilizaţi mixerul în
apropierea copiilor şi a persoanelor
cu capacităţi fizice, senzoriale sau
mentale reduse.
• Scoateţi ştecherul din priză înainte
de montarea şi demontarea pieselor
de pe aparat, după utilizarea aparatului, înainte de curăţarea aparatului, înainte de a părăsi încăperea
600Watt Fitmix Manual - M7435+M7438+M7439 _Bedienungsanleitung-fitmix_C_150407_PRINT.indd 33 07.04.15 09:40
Page 34

34
sau dacă apare vreo defecţiune. Nu
scoateţi ştecherul din priză trăgând
de cablu.
• Nu permiteţi niciodată ca motorul,
cablul de alimentare sau ştecherul
să se ude. Nu scufundaţi motorul,
cablul de alimentare sau ştecherul
în apă sau alte lichide; nu se expuneţi la jet de apă.
• Curăţaţi mixerul şi accesoriile înainte de prima utilizare a aparatului.
Ţineţi seama şi de celelalte informaţii din capitolul curăţare.
• Uscaţi mixerul şi toate accesoriile
sale înainte de a le monta şi înainte
de a lega aparatul la alimentarea cu
energie electrică.
• Utilizaţi aparatul întotdeauna pe o
suprafaţă stabilă, dreaptă, curată şi
uscată.
• Nu lipiţi corpuri străine de aparat.
• Cu excepţia tachetului, ţineţi mâinile şi ustensilele în afara bolului de
amestecare atunci când acesta se
găseşte pe motor.
• Nu utilizaţi niciodată accesorii care
nu sunt prevăzute pentru acest
mixer.
• Aparatul poate fi pornit numai
atunci când ştecherul este introdus
într-o priză de curent.
• Verificaţi dacă tensiunea de alimentare de pe plăcuţa de identificare
corespunde cu tensiunea de alimentare din zona dumneavoastră.
Singurul mod de a decupla aparatul
de la alimentarea cu energie electrică, este scoaterea ştecherului din
priză.
• Nu vă împiedicaţi din greşeală de
cablul de alimentare, cât timp aparatul este în funcţiune.
• Aşezaţi aparatul în aşa fel, încât
ştecherul este întotdeauna accesibil.
• Aşteptaţi până la oprirea completă
a cuţitului înainte de a demonta bolul de amestecare sau Mini-Mixerul.
.
• Utilizaţi mixerul numai cu capacul
montat.
• Utilizaţi tachetul numai dacă capacul este aşezat pe bolul de amestecare. Nu aplicaţi forţă ridicată pe
tachet, deoarece acesta ar putea
atinge cuţitul.
AVERTISMENTE
• Nu este permis ca materialele de
ambalare să fie folosite ca jucării,
în caz contrar existând riscul de
sufocare.
• Atunci când curăţaţi cuţitul trebuie
să fiţi deosebit de atenţi pentru a
evita rănirile, deoarece lamele sunt
extrem de ascuţite.
• Dacă conductorii sau piesele se
găsesc sub tensiune, atunci există
pericol de moarte prin electrocutare!
• Evitaţi deteriorarea cablului de
alimentare, prin evitarea strivirii,
îndoirii sau trecerii peste margini
ascuţite. Ţineţi cablul de alimentare
departe de suprafeţele fierbinţi şi
flăcări deschise.
600Watt Fitmix Manual - M7435+M7438+M7439 _Bedienungsanleitung-fitmix_C_150407_PRINT.indd 34 07.04.15 09:40
Page 35

35
• Nu utilizaţi niciodată aparatul, dacă
cablul de alimentare sau aparatul
este deteriorat.
• Nu deschideţi sub nicio formă
aparatul. Pentru daunele rezultate
din utilizarea greşită, nu ne asumăm
răspunderea..
• Nu utilizaţi unelte sau obiecte în
aparat. Obiecte metalice pot provoca scurt-circuite sau electrocutare.
OPERARE
1. Îndepărtaţi toate materialele de ambalare şi reciclaţi-le
conform prevederilor legale în vigoare.
2. Curăţaţi mixerul înainte de prima utilizare. (Vezi curăţarea).
3. Dacă doriţi să lucraţi cu robinetul cepului (E), atunci defile
taţi dopul rotativ (S) iar apoi înfiletaţi robinetul cepului (E)
pe bolul de amestecare (D).
Indicaţie: Puteţi utiliza mixerul cu dopul rotativ (s) sau cu
robinetul cepului (E).
4. Aşezaţi bolul de amestecare (D) pe motor (G) şi rotiţi-l
până când bolul de amestecare se fixează. Asiguraţi-vă că
pârghia (F) a cepului (E) se găseşte în poziţia OPRIT (H)
5. Introduceţi ingredientele în bolul de amestecare (D). Noi
recomandăm introducerea mai întâi a ingredientelor solide,
iar apoi a celor lichide. Din această categorie fac parte fruc
tele, iaurtul proaspăt, laptele, sucurile de fructe, legumele
etc. Puteţi adăuga şi gheaţă sau produse congelate în mixer.
Din această categorie fac parte fructele congelate, iaurtul
congelat, cuburile de gheaţă etc. Sfat: Dacă utilizaţi lichide
fierbinţi sau care fac uşor spumă (de ex. lapte) sau ingre
diente congelate, atunci nu este permisă umplerea bolului
de amestecare peste marcajul 1000 ml.
6. Aşezaţi capacul (C) pe bolul de amestecare (D) înain
-
te de a introduce aparatul în priză.
7. Introduceţi ştecherul în priză.
8. Aşezaţi Paharul de măsurare (B) pe capacul (C) sau intro
duceţi tachetul (A) în orificiu. Sfat: Tachetul poate fi folosit,
dacă trebuie amestecat în amestecuri vâscoase sau dacă se
folosesc cantităţi mari de ingrediente congelate.
9. Apăsaţi butonul 2 (L) până la 30 de secunde, pentru a în
cepe procesul de amestecare, apăsaţi apoi butonul 0/Pulse
(J) (funcţionare tip impuls) la intervale scurte şi permiteţi
ingredientelor să se amestece până când obţineţi un piure
omogen, iar apoi opriţi aparatul. Sfat: Utilizaţi tachetul pent
-
ru apăsarea de sus în jos a ingredientelor în lichid.
10. Pentru turnarea lichidului există două variante: Varianta
1: Puteţi ridica bolul de amestecare (D) de pe motor (G)
printr-o mişcare de rotaţie, îndepărtaţi capacul şi turnaţi
lichidul într-un vas. Varianta 2: Aşezaţi un vas sub cep (E)
şi apăsaţi în jos pârghia (F) cepului (F) în poziţia PORNIT
(I). Când vasul este plin, apăsaţi pârghia cepului (F) în sus
în poziţia OPRIT (H). Sfat: Pentru o scurgere mai bună a
lichidelor mai vâscoase, apăsaţi butonul 1 (K) şi apoi apăsaţi
pârghia cepului în jos, în poziţia PORNIT (I). Lichide mai
puţin vâscoase pot fi curge fără probleme, fără să fie nevoie
să porniţi motorul.
MINI MIXER
Cu ajutorul Mini Mixerului puteţi măcina mirodenii, nuci, ierburi
aromatice, brânză, cafea şi multe altele. Atenţie: Ingredientele
uscate (de ex. mirodeniile, nucile) se amestecă numai în Mini
Mixer, niciodată în bolul de amestecare.
1. Aşezaţi setul Mini Mixer (N) pe motor (G). Asiguraţi-vă că
dopul din cauciuc (O) al setului Mini Mixer (N) este aşezat
corect în crestăturile (P) anume prevăzute ale motorului (G).
2. Introduceţi produsele ce trebuie măcinate în setul Mini Mixer
(N). Umpleţi-l până la maximum ¾ din capacitatea sa de
umplere.
3. Aşezaţi capacul Mini Mixerului (M) pe motor (G) şi rotiţi-l
până când Mini Mixerul se fixează.
4. Introduceţi ştecherul în priză.
5. Apăsaţi butonul 2 (L) până la 10 secunde, pentru a începe
măcinarea. Apăsaţi apoi butonul 0/Pulse (J) (funcţionare tip
impuls) şi lăsaţi ca ingredientele să fie măcinate atâta timp,
până când se atinge gradul de măcinare dorit.
6. Printr-o mişcare de rotaţie, ridicaţi capacul (M) Mini Mixe
rului de pe motor (G). Apoi puteţi să ridicaţi setul Mini Mixer
(N) de pe motor şi să goliţi ingredientele măcinate într-un vas.
Comutator de siguranţă: Mixerul este astfel construit, încât
funcţia de amestecare porneşte numai dacă este montat bolul
de amestecare.
Indicaţie:
• Ingredientele uscate (de ex. mirodeniile, nucile) se amestecă
numai în Mini Mixer, niciodată în bolul de amestecare.
• Nu lăsaţi niciodată mixerul să funcţioneze în gol.
• Nu folosiţi niciodată mixerul încontinuu mai mult de 60 de
secunde.
• Nu utilizaţi niciodată mixerul ca loc de depozitare pentru
alimente. Goliţi-l întotdeauna înainte şi după utilizare.
• În cazul anumitor lichide, de ex. lapte, în timpul amestecării
volumul poate creşte şi se poate produce spumă. Din acest
motiv nu umpleţi bolul de amestecare prea mult (max. 1 litru)
şi asiguraţi aşezarea corectă a capacului.
• Nu amestecaţi niciodată alimente care prin congelare au
devenit o masă compactă. Înainte de introducerea în bolul
de amestecare, separaţi-le.
Sfat de utilizare:
• Înainte de a aşeza capacul, cu ajutorul tachetului apăsaţi
ingredientele solide în lichid.
• Utilizaţi tasta 0/PULSE (funcţionare tip impuls), pentru a uti
liza motorul în regim pornit-oprit, până la atingerea consistenţei dorite a băuturii dumneavoastră. Aveţi grijă, deoarece
în acest fel va fi selectată automat viteza mai ridicată, iar
aceasta poate duce la o urcare a lichidului pe pereţii bolului
de amestecare, până la capacul acestuia.
• Anumite lichide, dacă stau mai mult timp, pot prezenta
depuneri. De aceea este cel mai bine să fie băute de îndată.
Dacă lăsaţi un lichid să stea mai mult timp, atunci ar trebui
să le amestecaţi din nou, înainte de a le bea.
• Pentru a face un smoothie subţire, adăugaţi mai mult lichid.
Pentru a face un smoothie mai gros, adăugaţi mai multe in
grediente congelate Pentru a turna şi ultimele resturi dintr-un
smoothie mai gros, introduceţi câteva linguri de lichid pentru a
uşura scurgerea.
CURĂŢAREA
1. Umpleţi bolul de amestecare (D) până la jumătate cu apă caldă.
Sfat: În cazul unei murdării mai puternice adăugaţi câteva
picături de detergent.
2. Fixaţi capacul (C) şi închizătoarea (B) pe bolul de amesteca
-
600Watt Fitmix Manual - M7435+M7438+M7439 _Bedienungsanleitung-fitmix_C_150407_PRINT.indd 35 07.04.15 09:40
Page 36

36
re (D) şi aşezaţi-l apoi pe motor (G).
3. Apăsaţi butonul 1 (K) şi în timp ce aparatul este pornit,
deschideţi robinetul cepului (poziţia Pornit (I)) şi lăsaţi apa
să se scurgă într-un vas, pentru a curăţa supapa. Repetaţi
procedeul, până când apa iese curată.
4. Apoi puteţi curăţa bolul de amestecare (D), capacul (C),
închizătorul (B) şi tachetul (A) în maşina de spălat vase.
Indicaţii
• Nu permiteţi niciodată ca motorul, cablul de alimentare sau
ştecherul să se ude.
• Curăţaţi de fiecare dată imediat după utilizare.
• Nu permiteţi alimentelor să se usuce în bolul de amestecare,
deoarece aceasta îngreunează curăţarea.
• Vă rugăm să nu încercaţi să îndepărtaţi sau să ascuţiţi
cuţitul. Aceasta ar putea influenţa modul său de funcţionare.
Sfat: Pe fundul motorului se găseşte compartimentul pentru cablu
Mini Mixer
După utilizare puteţi curăţa setul Mini Mixer, precum şi capacul
Mini Mixerului în maşina de spălat vase.
Motorul
Ştergeţi-l cu o cârpă umedă şi uscaţi-l după aceea.
INDICAŢIE DE AVERTIZARE
Înainte de curăţare, opriţi întotdeauna
aparatul şi scoateţi-l din priză
.
Curăţarea robinetului cepului
Robinetul cepului ar trebui să fie demontat în mod regulat,
pentru a curăţa cu grijă piesele componente.
1. Printr-o mişcare de rotaţie, defiletaţi robinetul cepului (E) de
pe bolul de amestecare (D) .
2. Desfaceţi robinetul cepului (E) prin defiletarea închizătorului
(Q) de pe supapa de racordare (R).
3. Clătiţi închizătorul (Q) şi supapa de racordare (R) cu apă
caldă şi detergent delicat şi uscaţi-le apoi cu grijă.
4. Recompuneţi robinetul cepului (E) prin urmarea în ordine
inversă a paşilor descrişi mai sus. Asiguraţi-vă că garniturile
au fost corect montate pe bolul de amestecare (D).
GARANŢIA DE FUNCŢIONARE
Sunt excluse de la garanţia de funcţionare toate defectele
cauzate de utilizarea necorespunzătoare, de ex. supraîncăl
zire, decolorare, zgârieturi, deteriorări cauzate de căzături pe
pardoseală, încercări de reparare şi curăţare necorespunzătoa
re. Sunt de asemenea excluse şi urmele de uzură pur optice.
Acelaşi regim se aplică uzurii normale.
DEBARASARE ŞI DATE TEHNICE
Indicaţii privind mediul
Din acest motiv produsul, la sfârşitul duratei sale de
funcţionare nu va fi debarasat împreună cu gunoiul
menajer. Predaţi-l la punctele de colectare în vederea
reciclării aparatelor electrice şi electronice. Acest
lucru este indicat de acest simbol de pe produs, din instrucţi
-
unile de utilizare şi de pe ambalaj.
Informaţi-vă cu privire la punctele de colectare pe care le ad
ministrează distribuitorul sau autorităţile dumneavoastră locale.
Revalorificarea şi reciclarea aparatelor uzate este o contribuţie
importantă la protecţia mediului.
Date tehnice
Acest produs corespunde directivelor europene.
Dimensiuni Fitmix: (l×L×î) 17,01 × 26,30 × 40,00 cm
Volum bol de amestecare: 1,5 l
Volum set Mini-Mixer: 0,35 l
Putere motor: 600 W
Tensiune de alimentare: 220-240 V~ 50 Hz
Rotaţii: max. 18.000 / minut
Ne rezervăm dreptul de a efectua modificări tehnice şi optice.
TR
KULLANMA KILAVUZU
Sayın müşteri!
Fitmix’i tercih ettiğiniz için çok teşekkürler. Fitmix ile sağlıklı
mutfakta mutlak bir yardımcı edindiniz!
Daha fazla pratik aksesuarı www.mediashop.tv adresinde
bulabilirsiniz
Sorumluluk sınırlaması: Bu kullanma kılavuzunda bulunan
teknik bilgiler, veriler ve kurulum, işletim ve bakım için yardım
amaçlı açıklamalar baskıya giriş zamanındaki son teknolojik
seviyeye uygundur. Bilgiler, şekiller ve tarifler nedeniyle herhangi
bir hak talep edilemez. Kılavuzun dikkate alınmaması, amaç dışı
kullanım, yanlış tamirler, izinsiz değişiklikler veya onaysız yedek
parça kullanımı sonucu doğacak hasarlardan imalatçı herhangi bir
sorumluluk kabul etmez.
Amaca uygun kullanım
UYARI: Cihaz sadece özel amaçlı
kullanım için öngörülmüştür. Cihaz
sadece yiyecek hazırlamak uygundur.
Cihazı öngörülen amaç dışı kullanmayın. Öngörülen amaç dışı kullanım
sonucu doğabilecek herhangi bir
hasar durumunda herhangi bir hak
talebi kabul edilmez. Risk sadece
işleticiye aittir.
GÜVENLIK & KURMA
Mikseri kullanmadan önce kullanma
kılavuzunu dikkatlice okuyun! Mikseri
faaliyete geçirirken güvenlik açıklamalarını göz önünde bulundurun. Zira
600Watt Fitmix Manual - M7435+M7438+M7439 _Bedienungsanleitung-fitmix_C_150407_PRINT.indd 36 07.04.15 09:40
Page 37

37
mal veya can kaybı olabilir. Yanlış
kullanımdan kaçınmak için tüm güvenlik açıklamalarına uyun! Sonradan
başvurmak için kullanma kılavuzunu
saklayın. Mikseri başkalarına verirseniz, bu kullanma kılavuzu da birlikte
verin.
Açıklamalar
• Kullanmadan önce mikseri görülebilir hasarlar konusunda kontrol edin.
Hasarlı bir mikseri kullanmayın.
• Model levhasını çıkartmayın.
• Mikseri çocuklardan, fiziki, duyusal
veya zihni engellilerden kişilerden
uzak tutun.
• Bu mikser, fiziki, duyusal veya zihni
engelliler veya tecrübesiz kişiler,
ancak denetim altında veya güvenli
kullanımı anlatılmışsa kendilerine bilgi verilmiş ve bu durumdan
doğacak tehlikeleri anlamış olmaları
halinde kullanabilir. Çocukların mikserle oynamaları yasaktır. Çocuklara
temizlik ve kullanıcı bakımı yaptırmayın.
• Mikseri asla denetimsiz çalıştırmayın. Mikseri çocukların, fiziki, duyusal
veya zihni engellilerin yanında kullanmanız halinde, çok dikkatli olun.
• Cihazın parçalarını takmadan veya
çıkartmadan önce, cihazı kullandıktan sonra, temizlemeden önce,
siz odadan çıkmadan önce veya
cihazda bir arıza olması halinde fişi
prizden çekin. Fişi, prizden çekerken, kablodan tutup çekmeyin.
• Motor ünitesini, cereyan kablosunu
veya fişi asla ıslatmayın. Motor ünitesini, cereyan kablosunu veya fişi
suya veya başka sıvıya sokmayın,
akar su altına tutmayın.
• Cihazı ilk defa kullanmadan önce
mikseri ve parçalarını temizleyin.
Temizlik kısmında belirtilen diğer
bilgileri de göz önünde bulundurun.
• Tüm parçaları takmadan ve cihazı
cereyana takmadan önce mikseri ve
tüm parçalarını kurutun.
• Cihazı sağlam, düz, temiz ve kuru bir
zemin üzerinde kullanın.
• Cihaza yabancı bir cisim yapıştırmayın.
• Yoğurma kabı mikserin motor
ünitesi üzerinde bulunduğu zaman,
tokmak haricinde elleri ve malzemeleri yoğurma kabının dışında tutun.
• Asla mikser için öngörülmemiş aksesuar parça kullanmayın.
• Cihaz, sadece fişin prize takılmış
halde çalıştırılabilir.
• Model levhasındaki cereyanın yerel
enerjinize uygun olduğunu kontrol
edin. Cihazı cereyandan çekmenin
tek şekli, fişi çekmektir.
• Cihaz çalışırken yanlışlıkla cereyan
kablosuna takılıp tökezlemeyin.
• Cihazı, fişe daima erişilebilecek
şekilde kurun.
• Mikser kabını veya mini mikseri motor ünitesinden çıkartmadan önce
bıçaklı başlık tamamen duruncaya
kadar bekleyin.
• Mikseri sadece takılı kapakla kullanın.
• Tokmağı sadece, kapağın karıştır-
600Watt Fitmix Manual - M7435+M7438+M7439 _Bedienungsanleitung-fitmix_C_150407_PRINT.indd 37 07.04.15 09:40
Page 38

38
ma kabına takılı olması durumunda kullanın. Tokmağa aşırı basınç
uygulamayın, aksi takdirde bıçaklara
temas edebilir.
UYARILAR
• Boğulma tehlikesi olduğundan, ambalaj malzemeleri oyun için kullanılmalıdır.
• Bıçağın uçları çok keskin olduğundan, yaralanmalardan kaçınmak
için bıçak ünitesini temizlerken çok
dikkatli olun.
• Hatlarda veya modüllerde cereyan
olması halinde cereyan çarpması
sonucu ölüm tehlikesi mevcuttur!
• Ezmeyerek, bükmeyerek ve keskin
kenarlar üzerinden çekmeyerek
cereyan kablosunda hasarlardan
kaçının. Cereyan kablosunu sıcak
yüzeyler veya açık alevden uzak
tutun.
• Cereyan kablosunda veya cihazda
hasar olduğu zaman cihazı asla
kullanmayın.
• Cihazın içini kesinlikle açmayın.
Yanlış kullanma sonucu doğacak
hasarlardan sorumluluk kabul edilmez.
• Cihazın içinde takım veya cisim
kullanmayın. Metal cisimler kısa
devreye veya cereyan çarpmasına
sebebiyet verebilir.
KULLANIM
1. Tüm ambalaj malzemesini çıkartın ve geçerli yasal mevzuata
uygun şekilde imha edin.
2. İlk defa kullanmadan önce mikseri ve tüm parçalarını temiz
-
leyin. (Bkz. Temizlik)
3. Musluk (E) ile çalışmak istediğinizde döner kapağı (S) sökün
ve musluğu (E) karıştırma haznesine (D) vidalayın.
Bilgi: Döner kapak (S) veya muslukla (E) karıştırıcıyı kullana
-
bilirsiniz.
4. Yoğurma kabını (D) motor ünitesinin (G) üzerine takın ve
iyice yerine oturuncaya kadar çevirin. Musluğun (E) musluk
kolunun (F) (AUS )-(KAPALI) konumda (H) olmasını sağlay
-
ın.
5. Malzemeleri yoğurma kabına (D) koyun. Önce katı ve sonra
sıvı malzemeleri koymanızı tavsiye ederiz. Meyve, taze
yoğurt, süt, meşrubat, sebze vs. bunlar arasındadır. Karıştır
ma kabına dondurma veya derin dondurulmuş malzemeler
de koyabilirsiniz. Derin dondurulmuş meyve, yoğurt, küp buz
vs. de bunlar arasında bulunmaktadır. Tüyo: Sıcak veya kolay
köpüren sıvılar (örn. süt) veya derin dondurulmuş malzeme
kullanmanız halinde, yoğurma kabını 1000 ml işaretinden
fazla doldurmayın.
6. Cihazı takmadan önce kapağı (C) karıştırma kabına
(D) yerleştirin.
7. Fişi prize takın.
8. Ya Kapağı (B) kapağın (C) üzerine ya da tokmağı (A) oyuğa
takın. Tüyo: Koyu karışımların yoğrulması veya büyük miktar
da derin dondurulmuş malzeme kullanılması halinde tokmak
kullanılabilir.
9. Karıştırma işlemini başlatmak için 2 tuşunu (L) 30 saniye
boyunca basılı tutun, ardından 0/puls tuşuna (J) (impuls
işletimi) kısa aralıklarla basın ve malzemeler eşit biçimde
ezilene kadar malzemeleri karıştırın ve sonrasında cihazı ka
patın. Öneri: Tokmağı, malzemeleri yukarıdan aşağıya doğru
sıvıya bastırarak kullanın.
10. Sıvıları süzmek için iki yöntem vardır: 1. yöntem: Karıştırma
kabını (D) motor ünitesinden (G) bir çevirme hareketli ile
çekebilir, kapağı çıkarabilir ve sıvıyı bir hazneye boşaltabilir
siniz. 2. yöntem: Musluğun (E) altına bir kap koyup musluk
kolunu (F) aşağı basarak AÇIK konumuna (I) getirin. Kap
dolunca musluğun kolunu (F) yukarı kaldırarak, KAPALI
konumuna (H) getirin. Tüyo: Koyu sıvıları kolay doldurmak
için tuş 1’e (K) basın ve ardından musluğun kolunu aşağı
bastırarak AÇIK konumuna (K) getirin. Cıvık sıvılar, motor
ünitesini çalıştırmak zorunda kalmaksızın doldurulabilir.
MINI MIKSER
Mini Mixer ile baharatları, kabuklu yemişleri, otları, peyniri, kah
veyi vs. öğütebilirsiniz. Dikkat: Kuru malzemeleri (örn. baharat,
ceviz) yoğurma kabında değil, daima sadece mini mikserde
karıştırın.
1. Mini mikser başlığını (N) motor ünitesine (G) takın. Bunu
yaparken mini mikser başlığının (N) lastik ayaklarının (O)
motor ünitesindeki (G) oyuklara ()) düzgün takılmasına
dikkat edin.
2. Öğütülecek malzemeleri mini mikser başlığına (N) doldurun.
Bu kabı, doldurma miktarının azami ¾’üne kadar doldurun.
3. Mini mikser kapağını (M) motor ünitesine (G) takın ve mini
mikser kapağı yerine iyice oturuncaya kadara sıkıca çevirin.
4. Fişi prize takın.
5. Öğütmeye başlamak için Tuş 2’ye (L) 10 saniye kadar basın.
Ardından Tuş 0’a/Puls (J) (impuls modu) basın ve istenilen
inceliğe gelinceye kadar öğütün.
6. Mini mikser kapağını (M) çevirerek motor ünitesinden (G)
çıkartın. Ardından mini mikser başlığını (N) motor ünitesinden
(G) çıkartıp, öğütülen malzemeleri bir kaba boşaltabilirsiniz.
Emniyet kapatması: Mikser, yoğurma işlevi sadece yoğurma
kabı takılıyken başlayacak şekilde tasarlanmıştır.
600Watt Fitmix Manual - M7435+M7438+M7439 _Bedienungsanleitung-fitmix_C_150407_PRINT.indd 38 07.04.15 09:40
Page 39

39
Açıklama
• Kuru malzemeleri (örn. baharat, ceviz) yoğurma kabında
değil, daima sadece mini mikserde karıştırın.
• Boşken asla mikseri çalıştırmayın.
• Mikseri asla 60 saniyeden fazla aralıksız çalıştırmayın.
• Mikseri depo olarak kullanmayın. Kullanmadan önce ve
sonra mikseri daima boşaltın.
• Süt gibi bazı sıvılarda karıştırma esnasında hacim yükselebi
lir ve köpük oluşabilir. Bu nedenle kabı çok fazla doldurmayın (maks. 1 litre) ve kapağın doğru bir şekilde takıldığından
emin olun.
• Asla donarak tek parça haline gelmiş yiyecek yoğurmayın.
Yoğurma kabına koymadan önce kırarak parçalara ayırın.
Kullanma tüyoları
• Kapağı takmadan önce katı malzemeleri tokmakla sıvının
içine itin.
• İçeceğinizin i istenilen kıvamda olmasına sağlamak amacıyla
motor ünitesinin başlat/durdur modunu kullanmak için Tuş
0/PULS tuşunu (impuls modu) kullanın. Bunu yaparken
otomatik olarak daha yüksek hız seçildiğinden ve sıvının
duvarlara aşıp yoğurma kabının kapağına sıçradığından,
dikkatli olun.
• Bazı sıvılar uzun süre durunca, muhtemelen çökebilir. Bu
nedenle, bunları hemen içmeniz en iyisidir. Bir sıvıyı uzun
süre bekletirseniz, içmeden önce tekrar karıştırın.
• Cıvık Smoothie’yi karıştırmak için daha fazla sıvı koyun.
Koyu bir Smoothie içecek karıştırmak için, daha fazla derin
dondurulmuş malzeme koyun. Koyu bir Smoothie-İçeceğin
son artığını boşaltmak amacıyla dökmeyi kolaylaştırmak için
bir yemek kaşığı sıvı koyun.
TEMİZLİK
1. Yoğurma kabına (D) yarıya kadar sıcak su doldurun.
Öneri: Yoğun kirlenmelerde birkaç damla deterjan ekleyin.
2. Kapağı (C) ve başlığı (B) yoğurma kabına (D) ve kabı da
motor ünitesine (G) takın.
3. Tuş 1’e (K) basın ve cihaz açıkken musluğu açın (Açık konu
mu (I)) ve musluğu temizlemek için kaba su doldurun. Bunu,
temiz su akıncaya tekrar edin.
4. Sonra yoğurma kabını (D), kapağı (C), kapağı (B) ve tokmağı
bulaşık makinesinde yıkayabilirsiniz.
Açıklamalar
• Motor ünitesini, kabloyu veya fişi asla ıslatmayın.
• Kullandıktan sonra daima hemen temizleyin.
• Temizliği zorlaştırdığından, yiyecekleri yoğurma kabında
kurutmayın.
• Lütfen hiçbir zaman bıçağı çıkarmayı veya bilemeyi dene
-
meyin. Bu durum, işlevi olumsuz etkileyebilir.
Öneri: Motor ünitesinin altında, kablo saklamasını bulabilirsiniz.
Mini Mikser
Kullandıktan sonra mini mikser başlığını ve mini mikser kapağını
bulaşık makinesinde yıkayabilirsiniz.
Motor ünitesi
Nemli bir bezle silin ve ardından kurutun.
UYARI
Temizlemeden önce cihazı daima
kapatın ve fişi çekin.
Musluğun temizlenmesi
Musluk, parçaları iyice temizlemek için düzenli aralıklarla
parçalara ayrılmalıdır.
1. Musluğu (E) çevirerek yoğurma kabından (D) çıkartın.
2. Musluğu (E), başlığı (Q) çevirerek (bağlantı valfinden (R)
çıkartıp parçalara ayırın.
3. Başlığı (Q) ve bağlantı valfini (R) sıcak sabunlu suyla yıkayın
ve ardından iyice kurutun.
4. Yukarıda belirtilen işlemi tersine takip ederek musluğu (E)
tekrar takın. Bunu yaparken contaların yoğurma kabına (D)
düzgün takılmış olmasına dikkat edin.
GARANTİ
Örn. aşırı ısınma, renk değişimi, çizik, yere düşme sonucu
oluşan hasarlar, tamir girişimleri ve yanlış temizleme gibi yanlış
kullanım sonucu oluşan tüm arızalar garanti haricidir. Sadece
optik kullanım izleri de garanti haricidir. Bu, normal aşınma için
de geçerlidir.
İMHA & TEKNİK ÖZELLİKLERİ
Çevre açıklaması
Ürünü, ömrü bitince normal ev çöpüne atarak imha
etmeyip, elektrikli ve elektronik aletlerin yeniden
dönüşümü için bir toplama yerine götürün. Ürün,
kullanma kılavuzu ve ambalaj üzerinde bulunan bu
simgeyle bu belirtilmektedir.
Bayinizin veya yerel makamların işlettiği toplama yerleri
hakkında bilgi edinin. Eski aletlerin tekrar değerlendirilmesi ve
dönüşümü çevremizi korumak için önemli bir katkıdır.
Teknik özellikleri
Bu ürün Avrupa kurallarına uygundur.
Fitmix ebatları: (B×E×Y) 17,01 × 26,30 × 40,00 cm
Yoğurma kabı hacmi: 1,5 l
Mini mikser başlığı hacmi: 0,35 l
Motor gücü: 600 W
Şebeke gerilimi: 220-240 V / 50 Hz
Devir: maks. 18.000 / dk
Teknik ve optik değişiklikler saklıdır.
600Watt Fitmix Manual - M7435+M7438+M7439 _Bedienungsanleitung-fitmix_C_150407_PRINT.indd 39 07.04.15 09:40
Page 40

Importeur | Importer | Importateur | Importatore | Importeur |
Importr | Dovozce | Dodávateľ | Importator | İthalatçı
EU
MediaShop Holding GmbH | Schwarzottstraße 2a 2620 Neunkirchen |
Austria | office@mediashop-group.com
CH
MediaShop AG | Industriering 3 | 9491 Ruggell
Liechtenstein | kundendienst@mediashop.tv
TR
Mediashop Dayanıklı Tüketim Malları Pazarlama A.S. | Bayer Cd. Gülbahar
Sk. | Perdemsac Plaza No:17/43 | Kozyatağı/İstanbul
info.tr@mediashop-group.com
DE/AT/CH: 0800 3763606
Kostenlose Servicehotline
ROW: +423 3881800
www.mediashop.tv
600Watt Fitmix Manual - M7435+M7438+M7439 _Bedienungsanleitung-fitmix_C_150407_PRINT.indd 40 07.04.15 09:40
 Loading...