

Medeli AKX10 Owner’s Manual
INFORMATION FOR YOUR SAFETY!
THE FCC REGULATION WARNING (for USA)
Changes or modications not expressly approved by the
party responsible for compliance could void the user’s
authority to operate the equipment.
This device complies with Part 15 of the FCC Rules. Operation is subject to the following two conditions:
(1) this device may not cause harmful interference, and
(2) this device must accept any interference received, including interference that may cause undesired operation.
This equipment has been tested and found to comply
with the limits for a Class B digital device, pursuant to
Part 15 of the FCC Rules.
These limits are designed to provide reasonable protection against harmful interference in a residential installation. This equipment generates, uses, and can radiate
radio frequency energy and, if not installed and used in
accordance with the instructions, may cause harmful
interference to radio communications. However, there is
no guarantee that interference will not occur in a particular installation.
If this equipment does cause harmful interference to
radio or television reception, which can be determined by
turning the equipment o and on, the user is encouraged
to try to correct the interference by one or more of the
following measures:
■ Reorient or relocate the receiving antenna.
■ Increase the separation between the equipment and
receiver.
■ Connect the equipment into an outlet on a circuit dier-
ent from that to which the receiver is connected.
■ Consult the dealer or an experienced radio/TV techni-
cian for help.
Unauthorized changes or modication to this system can
void the user’s authority to operate this equipment.
PRECAUTIONS
PLEASE READ CAREFULLY BEFORE PROCEEDING
Please keep this manual in a safe place for future reference.
Power Supply
Please connect the designated DC adapter to an AC
outlet of the correct voltage.
Do not connect it to an AC outlet of voltage other than
that for which your instrument is intended.
Unplug the DC power adapter when not using the instrument, or during electrical storms.
Connections
Before connecting the instrument to other devices, turn
o the power to all units. This will help prevent malfunction and / or damage to other devices.
Location
Do not expose the instrument to the following conditions
to avoid deformation, discoloration, or more serious
damage:
■ Direct sunlight
■ Extreme temperature or humidity
■ Excessive dusty or dirty location
■ Strong vibrations or shocks
■ Close to magnetic elds
Interference with other electrical devices
Radios and televisions placed nearby may experience
reception interference. Operate this unit at a suitable
distance from radios and televisions.
Cleaning
Clean only with a soft, dry cloth.
Do not use paint thinners, solvents, cleaning uids, or
chemical-impregnated wiping cloths.
CAUTION
The normal function of the product may be disturbed
by Strong Electro Magnetic Interference. If so, simply
reset the product to resume normal operation by following the owner’s manual. In case the function could
not resume, please use the product in other location.
2
Handling
Do not apply excessive force to the switches or controls.
Do not let paper, metallic, or other objects into the instrument. If this happens, remove the electric plug from the
outlet. Then have the instrument inspected by qualied
service personnel.
Disconnect all cables before moving the instrument.

Contents
Panel & Display
Panel ............................................................................. 6
Main Display .................................................................. 8
Setup
Power Supply ................................................................ 9
Installing the Music Stand ............................................. 9
Connecting the Headphones ........................................ 9
Connecting a Footswitch/Expression Pedal ................. 10
Connecting External Equipment ................................... 11
Basic Operation
Selection Operation ...................................................... 12
Using the Soft Keyboard ............................................... 13
Settings Operation ........................................................ 14
Parameter Adjustment .................................................. 14
Shortcut + ..................................................................... 16
Factory Reset ................................................................ 16
Sounds
Playing Sounds ............................................................. 17
Turning on the Part Switch, Selecting and Playing a
Sounds ..................................................................... 17
Add a Sound to “My Favorites” ................................ 18
Playing a Sound Demo ................................................. 19
Playing Two or Three Sounds Simultaneously .............. 19
Playing Dierent Sounds with Both Hands ................... 20
Setting the Split Point ................................................... 20
Using Keyboard Latch .................................................. 21
Setting the Keyboard Touch Sensitivity ........................ 22
Using Transpose and Octave to Change Pitch ............ 23
Adding Eects to Sounds ............................................. 24
Using the Joystick to Adjust Pitch and Sound ............. 25
Editing Sounds .............................................................. 26
Editable Parameters ................................................. 27
Saving the Edited Sound .............................................. 30
Saving, Deleting or Renaming a User Sound ................ 32
Styles
Using Styles .................................................................. 35
Selecting Various Styles ........................................... 35
Playing the Percussion Tracks of a Style .................. 36
Playing All Tracks of a Style ..................................... 36
Add a Style to “My Favorites” .................................. 37
Split Point Settings ................................................... 37
Chord Basics ............................................................ 38
Chord Reference ........................................................... 40
Setting Chord Detect Mode ..................................... 41
Style Playback .......................................................... 42
Adjusting the Tempo ................................................. 45
Metronome ............................................................... 45
Quick Setting (Q.S.) .................................................. 46
Style Recording ............................................................. 46
Basic Parameters of Styles ...................................... 47
Further Editing a Style .............................................. 52
Style Eect Edit ........................................................ 62
Recording your Performance as a New Style .......... 65
Listen to the Edited Style ......................................... 67
Saving Edited Style .................................................. 67
Setting Style Q.S. (Quick Setting) ............................. 68
Saving, Deleting or Renaming the User Style .......... 69
Songs and Audio
Playing Songs and Audio .............................................. 72
Selecting Songs ....................................................... 72
Playing the Keyboard During Song Playback ........... 72
Operating Song Playback ......................................... 74
Real-time Audio Processing ..................................... 78
Song Recording and Audio Recording ......................... 79
MIDI Recording ............................................................. 79
Editing a Recorded MIDI Song ................................. 84
Audio Recording ....................................................... 87
Saving, Deleting and Renaming the User Song ....... 88
Phrase Pads
Selecting a Phrase Pad Bank ....................................... 91
Playing Phrase Pads ..................................................... 91
Playing One or More Phrase Pads ........................... 91
Stop Playing Phrase Pads ........................................ 92
Set Phrase Pads to Standby Status ......................... 92
Playing Phrase Pads with Chord Mode ........................ 92
Phrase Pad Recording .................................................. 93
Basic Parameters of Phrase Pad .............................. 93
Recording New Phrase Pads ................................... 95
Listen to the Edited Phrase Pad ............................... 96
Save the Edited Phrase Pad ..................................... 96
Albums
Selecting an Album and Playing the Keyboard ............. 97
Sort the Albums ............................................................ 98
Add Albums to “My Favorites” ...................................... 98
Add or Delete an Album ................................................ 99
Add a User Album .................................................... 99
Delete a User Album ................................................. 100
Searching For an Album ............................................... 100
3

Contents
Demo ............................................................................ 102
Mixer
Adjusting Volume and Pan on Keyboard Parts ............. 103
Turn ON/OFF Insert Eect (IFX) .................................... 104
Adjusting Volume of Style, Phrase Pad and Song ........ 105
Adjusting Volume of Input/Output Audio ...................... 105
Control Channel Volume of Style ................................. 106
Control Song Track Volume .......................................... 107
Performance Memory
Selecting a Bank and a Performance Memory ............ 109
Selecting a Performance Memory Bank ................... 109
Bring Up a Performance Memory ...................... 109
Save Settings as a Performance Memory .................... 110
Clear Performance Memory .......................................... 110
View Basic Information of Performance Memory Bank 110
Add the Bank to “My Favorites” ................................... 111
Locking the Settings ..................................................... 112
Saving, Deleting, and Renaming a Performance Memory
Bank .............................................................................. 113
Deleting User Performance Memory Banks .................. 114
DSP Eects
Global Eect ................................................................. 115
Selecting Global Eect ............................................. 115
Adjusting Eect Level ............................................... 117
Adjusting Parameter Values ..................................... 117
Saving and Selecting User Global Eect ................. 118
Insert Eect .............................................................. 119
Global EQ ...................................................................... 124
Selecting Global EQ ................................................. 125
Adjusting EQ Parameters ......................................... 125
Saving and Selecting User EQ ................................. 126
D.A.S. ....................................................................... 127
Channel EQ ................................................................... 127
Global Compressor ....................................................... 128
Turn ON/OFF Compressor ....................................... 128
Adjusting Compressor Parameters .......................... 129
Arpeggio Parameters ................................................ 136
Saving User Arpeggios ............................................. 139
Slicer ............................................................................. 140
Select and Turn On Slicer ......................................... 140
Adjusting Real-time Slicer ........................................ 141
Controllers
Knobs ............................................................................ 142
Selecting Knob Functions ........................................ 143
Resetting Knob Parameters ..................................... 144
Foot Pedals .................................................................. 144
Assignable Switches ..................................................... 146
Joystick ......................................................................... 147
Setting the Pitch Bend Range ....................................... 149
Pitch Bend Range Lock ................................................ 149
Setting the Modulation Rate ......................................... 151
Microphone
Turn On Microphone ..................................................... 152
Selecting Microphone Mode ........................................ 153
Adjusting Basic Microphone Parameters ..................... 154
Turn On and Select Mic Eects ................................... 156
Using Vocoder ............................................................... 157
Using Vocal Harmony ................................................... 158
Scale Tuning
Master Tuning ............................................................... 159
Scale Tuning .................................................................. 160
Turn On and Select Scale ......................................... 160
Preset Temperament Introduction ............................ 161
Custom Scales ......................................................... 162
Saving and Using Special Scales ............................. 162
MIDI I/O
MIDI Introduction .......................................................... 164
The MIDI Interface ........................................................ 164
MIDI IN Settings ............................................................ 164
MIDI OUT Settings ........................................................ 166
Turn O the Local Sound .............................................. 167
Keyboard Part Eects
Harmony ........................................................................ 130
Select and Enable Harmony ..................................... 130
Harmony Types ......................................................... 132
Harmony Adjustment Parameters ............................ 133
Arpeggios ...................................................................... 134
Select and Enable Arpeggio ..................................... 134
Arpeggio Types ......................................................... 135
4
USB Storage Devices
USB Storage Device Compatibility ............................... 168
File Operations .............................................................. 168
View USB Storage Device Usage ............................. 169
Formatting a USB Storage Device ........................... 169
View File Information ................................................ 169
Execute Files ............................................................ 170
Saving, Deleting, and Renaming Files ..................... 170

Utility Settings
Basic Playing Settings .................................................. 172
Metronome Settings ................................................. 172
Fade In/Out Settings ................................................ 173
Tap Tempo Settings .................................................. 173
Speaker Mode Settings ............................................ 174
Personalize Settings .................................................... 174
Adjusting Display Brightness .................................... 175
Selecting High Contrast Mode ................................. 175
Change Theme Color ............................................... 175
Breathing Light Settings ........................................... 176
System Settings ............................................................ 176
Date & Time .............................................................. 176
Auto Power O ......................................................... 177
Language Setting ..................................................... 177
Modify User and Device Name ................................. 177
Clear User Data ........................................................ 178
Expansion
Install Expansion Files ................................................... 179
Check and Use Expansion Data ............................... 181
Export the Instrument Information File ..................... 182
Contents
Troubleshooting .................................................... 183
Specications .......................................................184
Appendices
Sound List ..................................................................... 186
Style List ........................................................................ 208
Song List ....................................................................... 211
Phrase Pad List ............................................................. 212
Part Eect List ............................................................... 214
Global Eect List ........................................................... 215
Insert Eect List ............................................................. 218
Chord List ...................................................................... 219
Controller Function List ................................................. 220
Short Cut+ Chart ........................................................... 223
MIDI Implementation List .............................................. 224
5
123
ASSIGNABLE SWITCH
MASTER VOLUME
CUTOFF
PAN
ATTACK
ASSIGN 1
RESONANCE
REVERB
DECAY
ASSIGN 2
VOLUME
CHORUS
RELEASE
ASSIGN 3
MIXER
CONSOLE
SHORTCUT
TAP
TEMPO
USB
DEVICE
STYLE
SELECT
SONG
SELECT
DEMO
RECORD
QUICK RECORD
METRO.
SONG AUDIO
GLOBAL
SETTINGS
PERFORMANCE MEMORY
STOREBANK
12345678
QUICK SETTING
LOCK
Q
.S.
PART ON / OFF
LR1R2R3
PIANO E.PIANO ORGAN
ACCORDION
GUITAR BASS
STRINGS BRASS
SAX &
WOODWIND
LEAD &
PAD
PERC. &
DRUMS
SFX &
GM
USER
FAVORITE
EXIT
SOUND SELECT
STOP
SELECT
SYNC
123
PHRASE PAD
4
AUTO
FILL IN
FADE
IN/OUT
1
START
SYNC
STOP
INTRO
23
AB
MAIN
CD
BREAK
1
ENDING
23
START / STOP
TRANSPOSE OCTAVE
VOCALPARTINSERT
EFFECT
CHORD
ON/OFF
Q .S.
LINK
SUSTAINMONO
SOUND
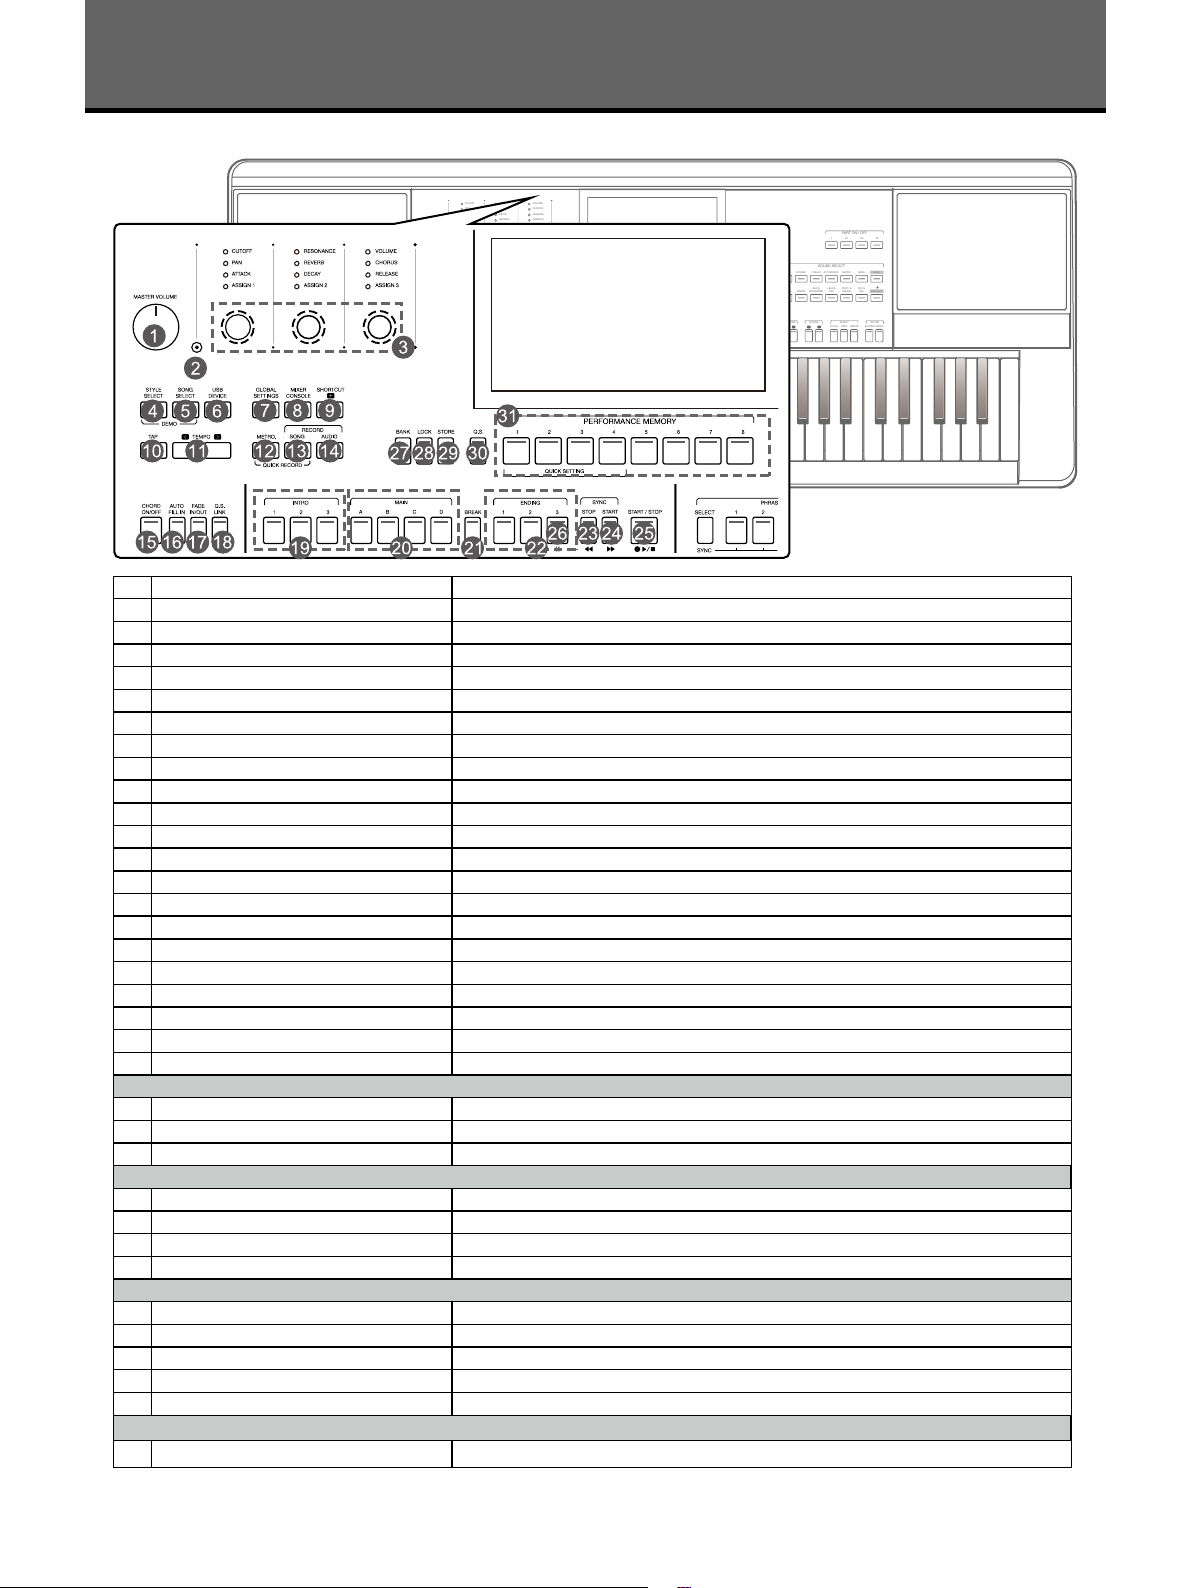
Panel & Display
Panel
1 MASTER VOLUME KNOB Adjust the master volume.
2 SELECT BUTTON Select the GROUP KNOBS eect combinations sequentially.
3 GROUP KNOBS Adjust the parameter of corresponding function.
4 STYLE SELECT BUTTON Enter the STYLE SELECT menu.
5 SONG SELECT BUTTON Enter the SONG SELECT menu.
6 USB DEVICE BUTTON Enter the USB DEVICE menu.
7 GLOBAL SETTINGS BUTTON Enter the GLOBAL SETTINGS menu.
8 MIXER CONSOLE BUTTON Enter the MIXER interface.
9 SHORTCUT+ BUTTON Quick access to specic function menus.
10 TAP BUTTON Press to control the tempo.
11 TEMPO [<], TEMPO [>] BUTTONS Adjust the current tempo.
12 METRO. BUTTON Turn the Metronome on or o.
13 SONG RECORD BUTTON Enter the RECORD SONG menu.
14 AUDIO RECORD BUTTON Arm Audio Recording.
15 CHORD ON/OFF BUTTON Turn CHORD mode on or o.
16 AUTO FILL IN BUTTON Turn AUTO FILL IN on or o.
17 FADE IN/OUT BUTTON Turn FADE IN or OUT on or o.
18 Q.S. LINK BUTTON Turn the Q.S. LINK on or o.
19 INTRO 1, 2, 3 BUTTONS Play the intro part of the selected style.
20 MAIN A, B, C, D BUTTONS Play the main part of the selected style.
21 BREAK BUTTON Play the break of the selected style.
22 ENDING 1, 2, 3 BUTTONS Play the ending of the selected style.
STYLE CONTROL
23 SYNC. STOP BUTTON Turn the SYNC. STOP on or o.
24 SYNC. START BUTTON Turn the SYNC. START on or o.
25 START/STOP BUTTON Start or stop the style playback.
SONG CONTROL
23 RW BUTTON Rewind the song.
24 FF BUTTON Fast forward the song.
25 PLAY/STOP BUTTON Play or stop the song.
26 PAUSE BUTTON Play or pause the song.
PERFORMANCE MEMORY
27 BANK BUTTON Enter the MEMORY menu.
28 LOCK BUTTON Turn the LOCK function on or o.
29 STORE BUTTON Save the current panel setup to one of the memory banks.
30 Q.S. BUTTON Switch to Q.S. function.
31 1-8 BUTTONS Save or recall a panel setting.
QUICK SETTING
31 1-4 (Q.S.1-Q.S.4) BUTTONS Call up the panel settings that match the current style.
6
Panel & Display
123
ASSIGNABLE SWITCH
MASTER VOLUME
CUTOFF
PAN
ATTACK
ASSIGN 1
RESONANCE
REVERB
DECAY
ASSIGN 2
VOLUME
CHORUS
RELEASE
ASSIGN 3
MIXER
CONSOLE
SHORTCUT
TAP
TEMPO
USB
DEVICE
STYLE
SELECT
SONG
SELECT
DEMO
RECORD
QUICK RECORD
METRO.
SONG AUDIO
GLOBAL
SETTINGS
PERFORMANCE MEMORY
STOREBANK
12345678
QUICK SETTING
LOCK
Q
.S.
PART ON / OFF
LR1R2R3
PIANO E.PIANO ORGAN
ACCORDION
GUITAR BASS
STRINGS BRASS
SAX &
WOODWIND
LEAD &
PAD
PERC. &
DRUMS
SFX &
GM
USER
FAVORITE
EXIT
SOUND SELECT
STOP
SELECT
SYNC
123
PHRASE PAD
4
AUTO
FILL IN
FADE
IN/OUT
1
START
SYNC
STOP
INTRO
23
AB
MAIN
CD
BREAK
1
ENDING
23
START / STOP
TRANSPOSE OCTAVE
VOCALPARTINSERT
EFFECT
CHORD
ON/OFF
Q .S.
LINK
SUSTAINMONO
SOUND
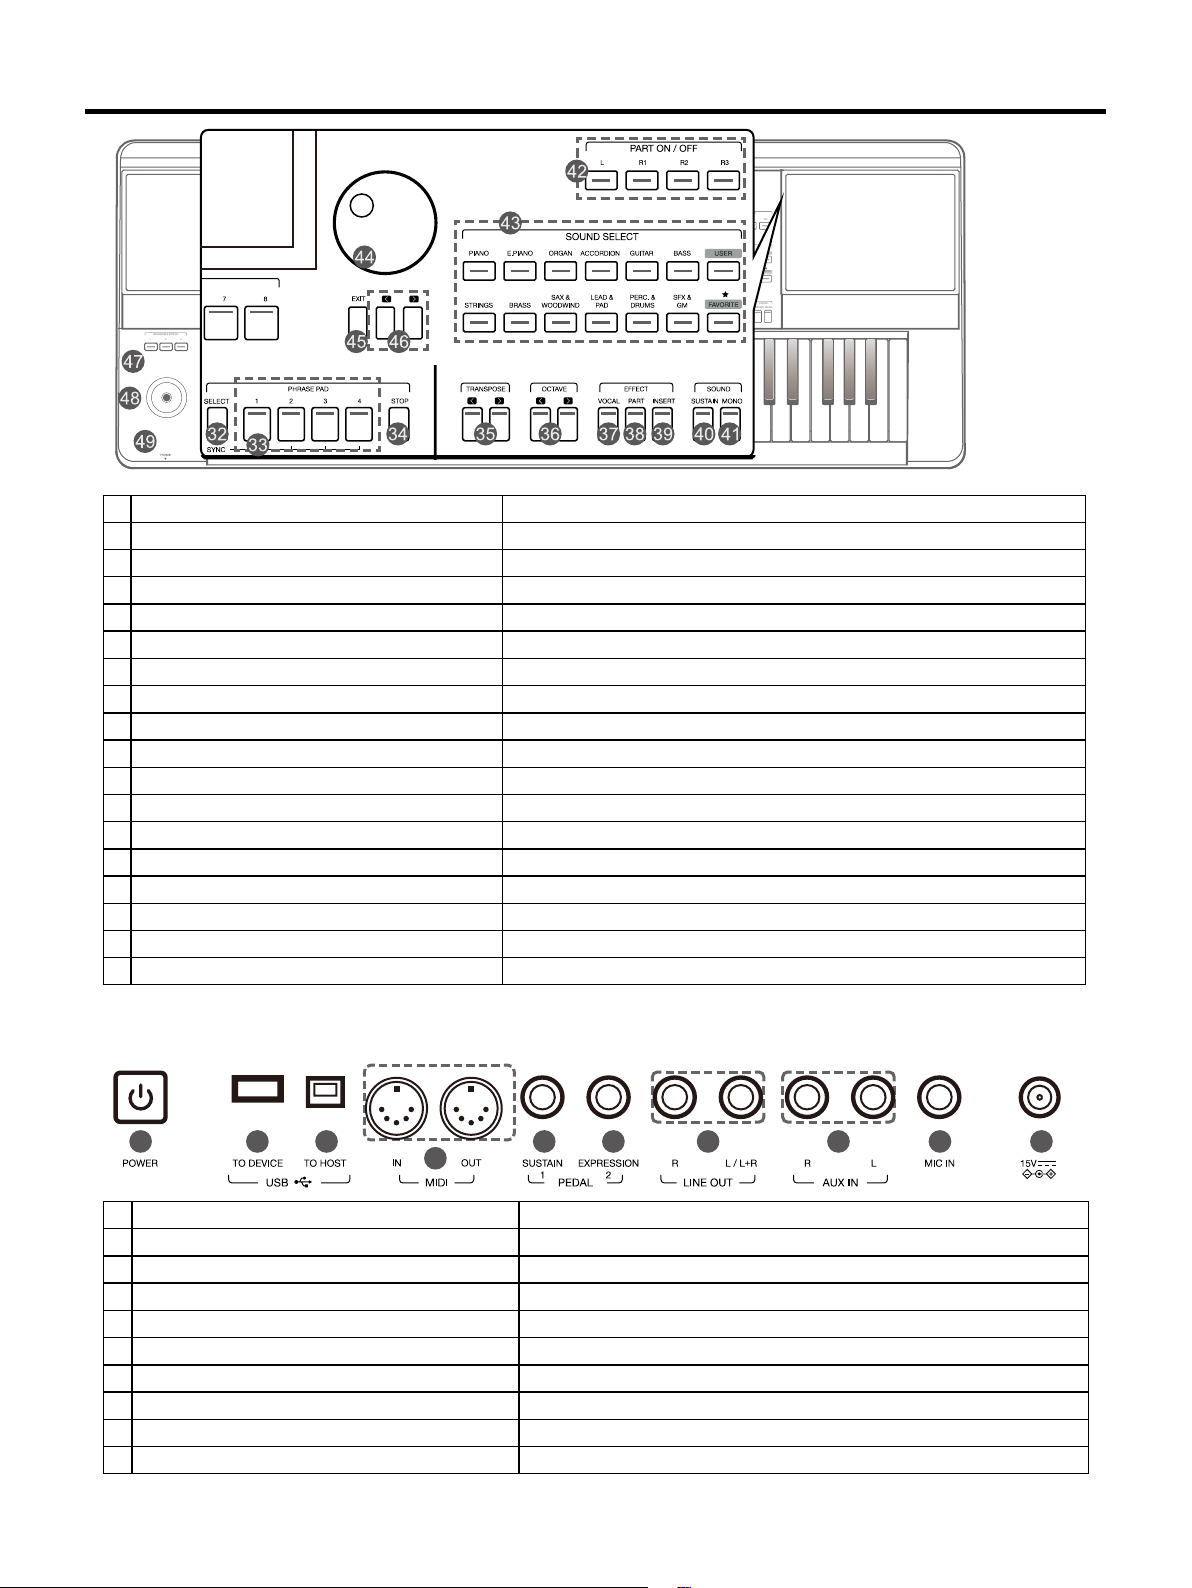
32 PHRASE PAD SELECT BUTTON Enter the PHRASE PAD menu.
33 PHRASE PAD 1, 2, 3, 4 BUTTONS Start the percussion and melodic phrases playback.
34 PHRASE PAD STOP BUTTON Stop the percussion and melodic phrases playback.
35 TRANSPOSE [<], TRANSPOSE [>] BUTTONS Shift the keyboard pitch value in semitone steps.
36 OCTAVE [<], OCTAVE [>] BUTTONS Shift the keyboard pitch value in octave steps.
37 VOCAL EFFECT BUTTON Turn the microphone VOCAL EFFECT on or o.
38 PART EFFECT BUTTON Turn the keyboard PART EFFECT on or o.
39 INSERT EFFECT BUTTON Turn the sound’s INSERT EFFECT on or o.
40 SUSTAIN BUTTON Turn the SUSTAIN on or o.
41 MONO BUTTON Turn MONO on or o.
42 PART L, R1, R2, R3 ON/OFF BUTTONS Turn the keyboard PART L, R1, R2, R3 on or o.
43 SOUND SELECT BUTTONS Enter the SOUND SELECT interface and select sounds.
44 DATA DIAL Change the value of the current selection.
45 EXIT BUTTON Exit the current menu and return to the previous display.
46 [<], [>] BUTTONS Change the value of the current selection.
47 ASSIGNABLE 1, 2, 3 SWITCHES Turn the ASSIGN function on or o.
48 JOYSTICK Control the pitch bend, modulation or assign functions of the keyboard.
49 PHONES Connect headphones.
50 51 52 54 55 56 57 58 59
53
50 POWER ON/OFF BUTTON Turn the power on or o.
51 USB TO DEVICE JACK Connect a USB storage device.
52 USB TO HOST JACK Connect to a computer.
53 MIDI IN/OUT JACKS Connect other MIDI devices or equipment.
54 SUSTAIN PEDAL JACK Connect a sustain pedal.
55 EXPRESSION PEDAL JACK Connect an expression pedal.
56 LINE OUT JACKS Connect to external speakers or mixer.
57 AUX IN JACKS Connect external audio device to play through instrument speakers.
58 MIC IN JACK Connect a microphone.
59 DC IN Connect a standard DC 15V power adapter.
59
7
Panel & Display
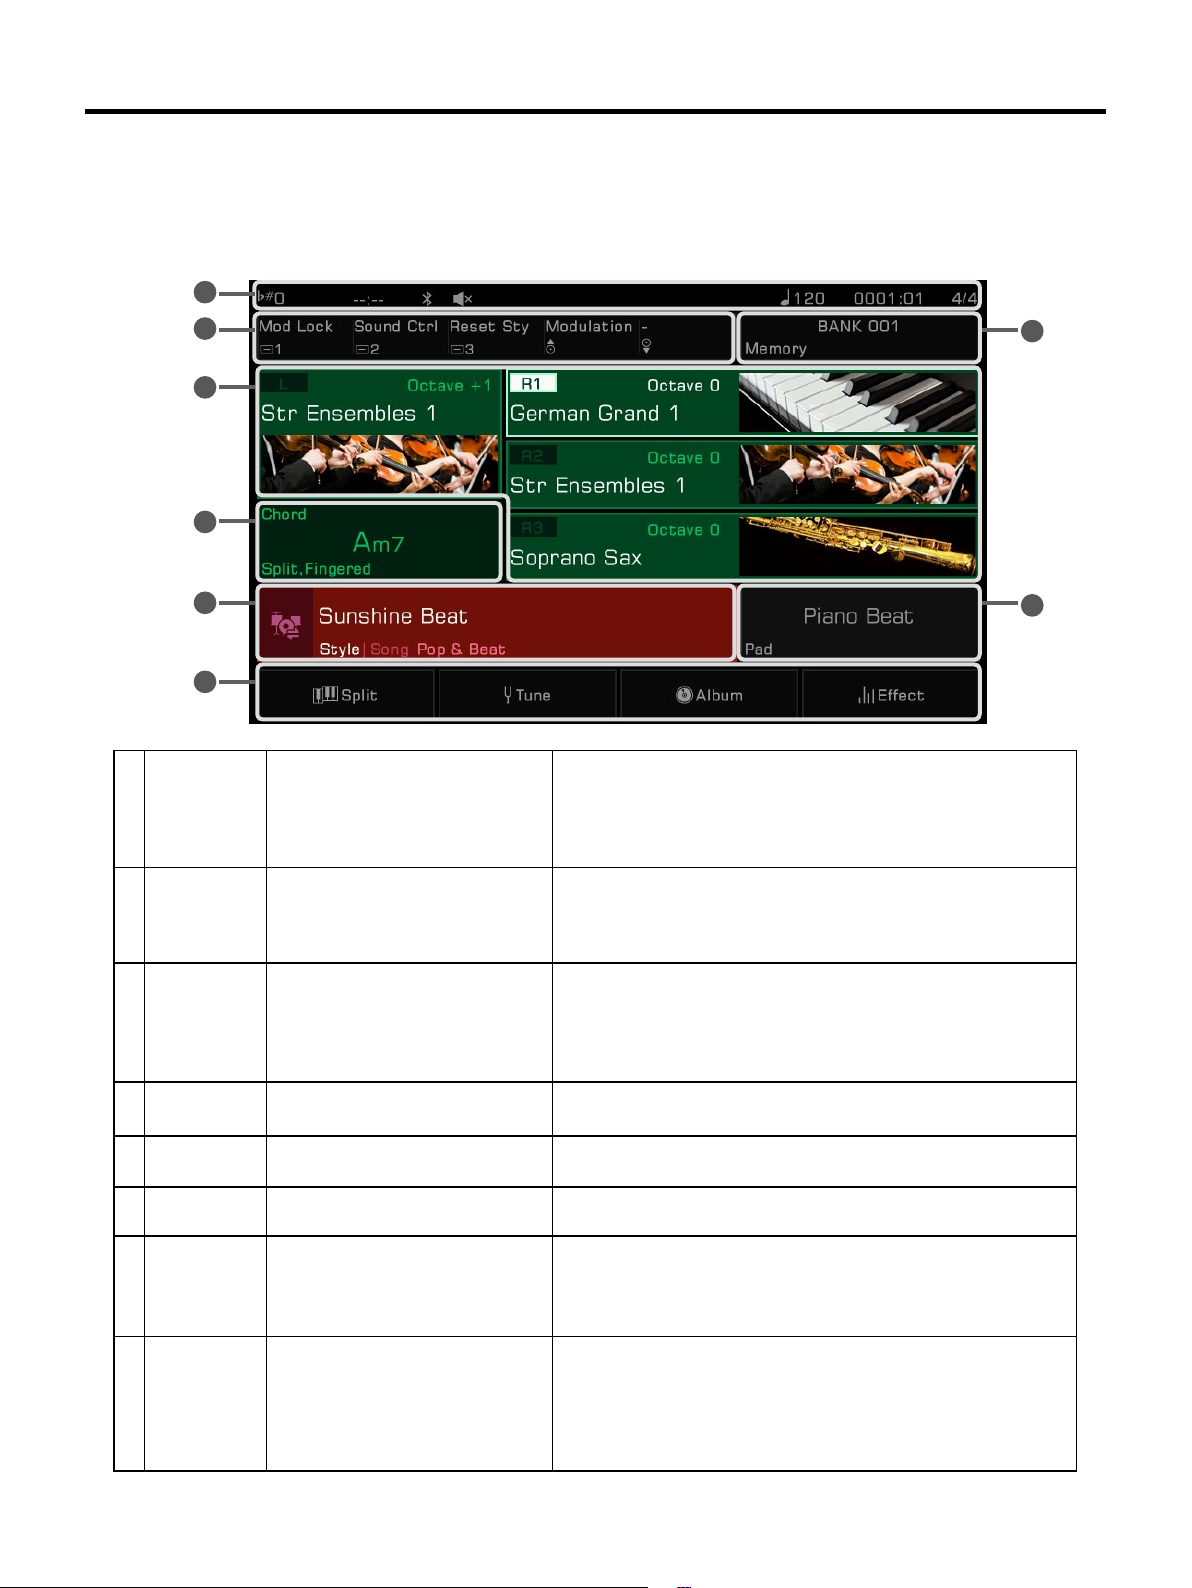
Main Display
The color LCD touch screen shows basic information on all current settings at a glance. Settings can be adjusted by
touching the screen.
8
6
1
2
3
7
1 Sound Displays Sound name and octave
data of each part.
2 Chord Displays the Chord name and
related information.
3 Style & Song Displays the current Style or Song
name.
4 Performance
Memory
5 Phrase Pad Displays the currently selected
6 Controllers Displays the currently assigned
7 Shortcut to
setup pages
Displays the currently selected
Performance Memory name.
Phrase Pad Bank name.
function names of controllers.
Displays quick entries of some
setup pages.
4
5
Use to select the sounds of each part (L, R1, R2, and R3), for
example:
1. Select the R1 part by pressing the R1 display.
2. Press it again to bring up the Sound Selection Display then
select a sound for R1 from the list.
Press the Chord display to view and adjust:
• Chord Name
• Chord Mode
• Split
1. Press the Style/Song icon to switch between the Style mode
and Song mode.
2. Press the Style name (or Song name) to select Style or Song.
3. In Song mode, you can adjust certain parameters with the
function buttons on the right.
Press the Performance Memory name to select a Performance
Memory Bank.
Press the Phrase Pad Bank name to select a Phrase Pad.
Press the Controller name to set the controller function.
Press “Split” to jump to the Split Setting menu.
Press “Tune” to jump to the Tune setting menu.
Press “Album” to jump to the Album display.
Press “Eect” to jump to the Eect Setting menu.
8 Others Displays Transpose, Recording
time, Speaker setup, Bluetooth
connection, Tempo, Current
Position in Style or Song playback,
and Time Signature information.
8
Setup
This section contains information about setting up your instrument and preparing to play.
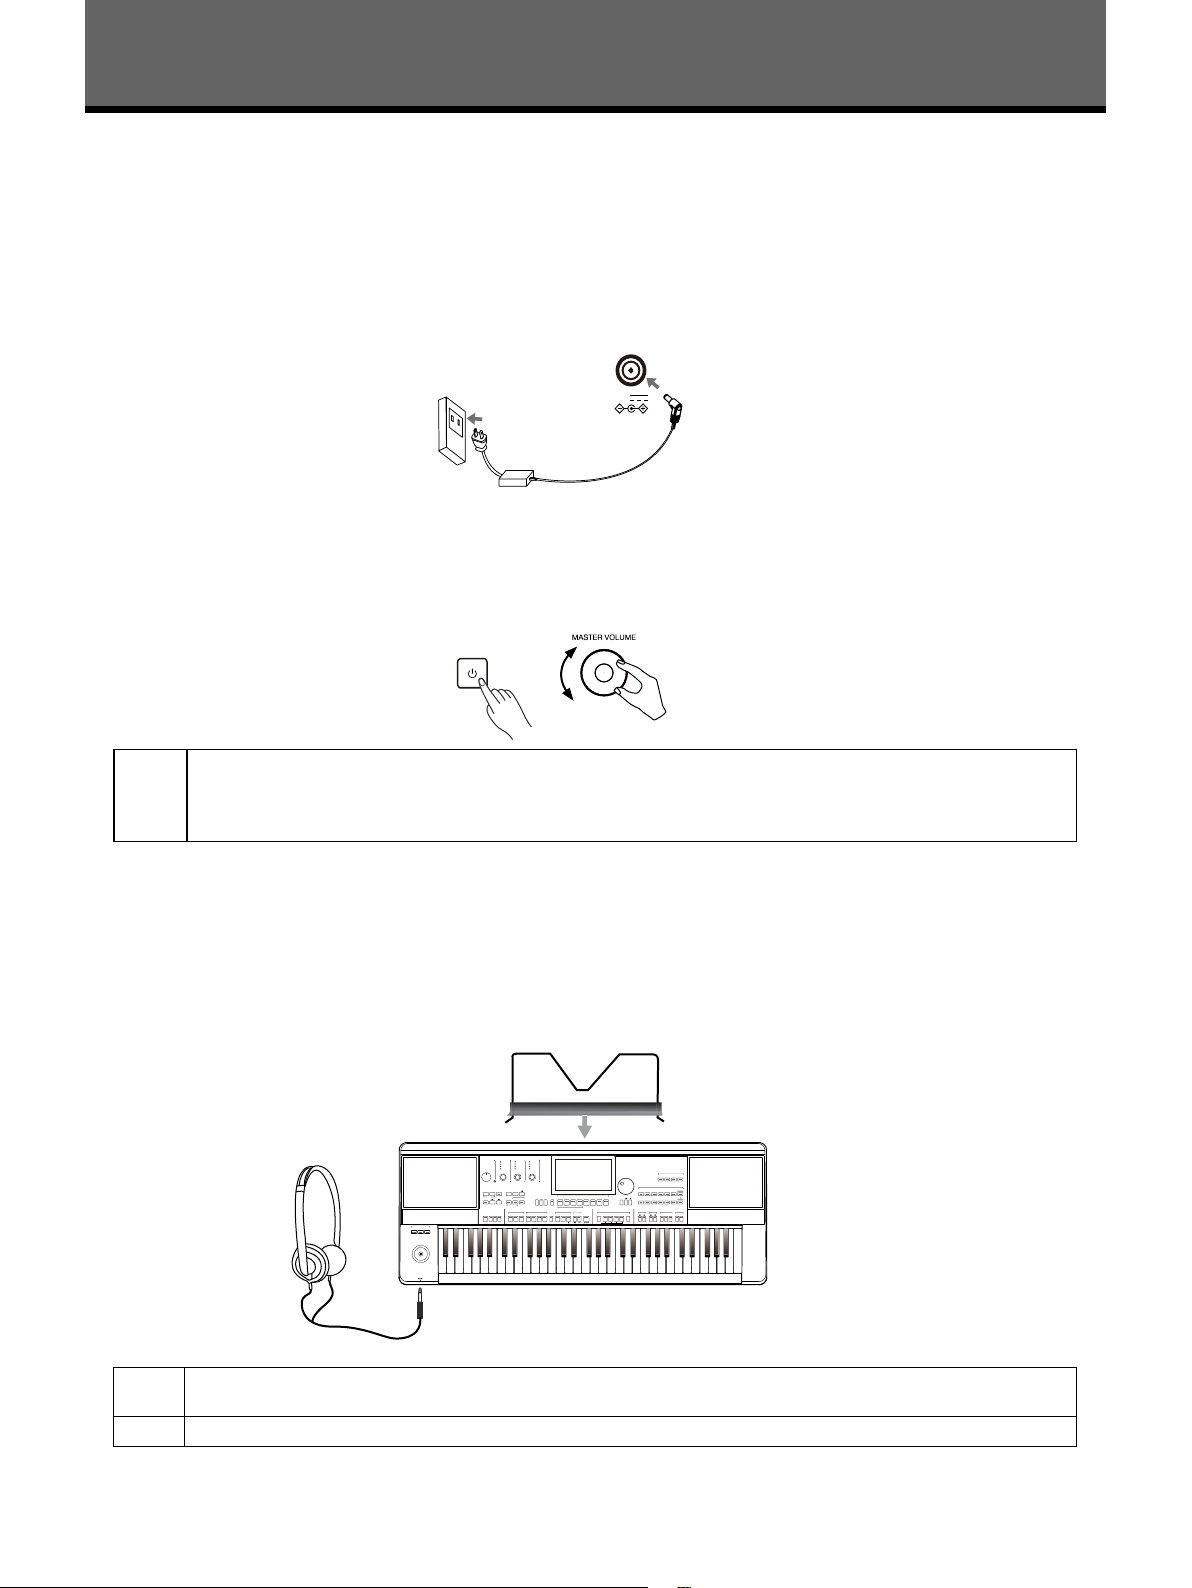
Power Supply
Connecting the Adapter
1. First, set the master volume level of the instrument to minimum.
2. Connect the DC adapter to the power supply jack on the rear panel.
3. Plug the power adapter into a DC outlet.
15V
Turning the Power On
1. Before you turn the instrument on or o, remember to turn the volume all the way down on any connected audio
equipment. This will help prevent damage due to overload.
2. Press the [POWER] switch. The LCD will light up.
3. Rotate the [MASTER VOLUME] knob to set the desired volume level.
Note!
Always turn the instrument on rst before turning on the power of any connected external equipment. Likewise, turn the instrument o before turning o the power of other external equipment.
To prevent damage, unplug the DC power adapter when the instrument is not in use and during electrical
storms.
Installing the Music Stand
A music stand is supplied with the keyboard. Insert it into the slots at the rear panel to attach it to the instrument.
Connecting the Headphones
When a pair of stereo headphones (not included) is connected to the [PHONES] jack, the speakers will automatically
switch o so that sound will only be heard in the headphones. This is ideal for private practice or late-night playing.
CUTOFF
RESONANCE
VOLUME
PAN
REVERB
CHORUS
ATTACK
DECAY
RELEASE
ASSIGN 1
ASSIGN 2
ASSIGN 3
MASTER VOLUME
MIXER
SHORTCUT
USB
STYLE
SONG
GLOBAL
CONSOLE
DEVICE
SELECT
SELECT
SETTINGS
DEMO
TAP
TEMPO
METRO.
QUICK RECORD
CHORD
AUTO
FADE
Q .S.
ON/OFF
FILL IN
IN/OUT
LINK
ASSIGNABLE SWITCH
123
1
PERFORMANCE MEMORY
RECORD
.S.
Q
STOREBANK
LOCK
12345678
SONG AUDIO
QUICK SETTING
SYNC
MAIN
INTRO
ENDING
STOP
AB
CD
START
START / STOP
123
BREAK
23
1
23
SELECT
SYNC
PART ON / OFF
LR1R2R3
SOUND SELECT
PIANO E.PIANO ORGAN
GUITAR BASS
ACCORDION
USER
SAX &
LEAD &
PERC. &
SFX &
EXIT
FAVORITE
STRINGS BRASS
WOODWIND
PAD
DRUMS
PHRASE PAD
GM
TRANSPOSE OCTAVE
EFFECT
SOUND
4
STOP
SUSTAINMONO
VOCALPARTINSERT
Tips:
Note!
If you want the instrument speaker to remain on while using headphones, please refer to the section under
"Utility" on speaker mode settings.
To prevent hearing damage, do not use headphones at high volume or for long periods of time.
9

Setup
Connecting a Footswitch/Expression Pedal
This section will show you how to connect footswitches and pedals to take control of multiple instrument functions.
Connecting a Footswitch
An external footswitch can be plugged into the [SUSTAIN PEDAL] jack to be used to turn sustain on or o. When
pressed on, you will have a natural sustain as you play.
Connect the footswitch to the [SUSTAIN PEDAL] jack as shown below.
Connecting an Expression Pedal
An external expression control pedal can adjust the volume of each part.
Connect the expression pedal to the [EXPRESSION PEDAL] jack as shown below:
Tips:
To assign functions to the pedals you’ve connected, please refer to the sections under “Controllers”.
10
Setup
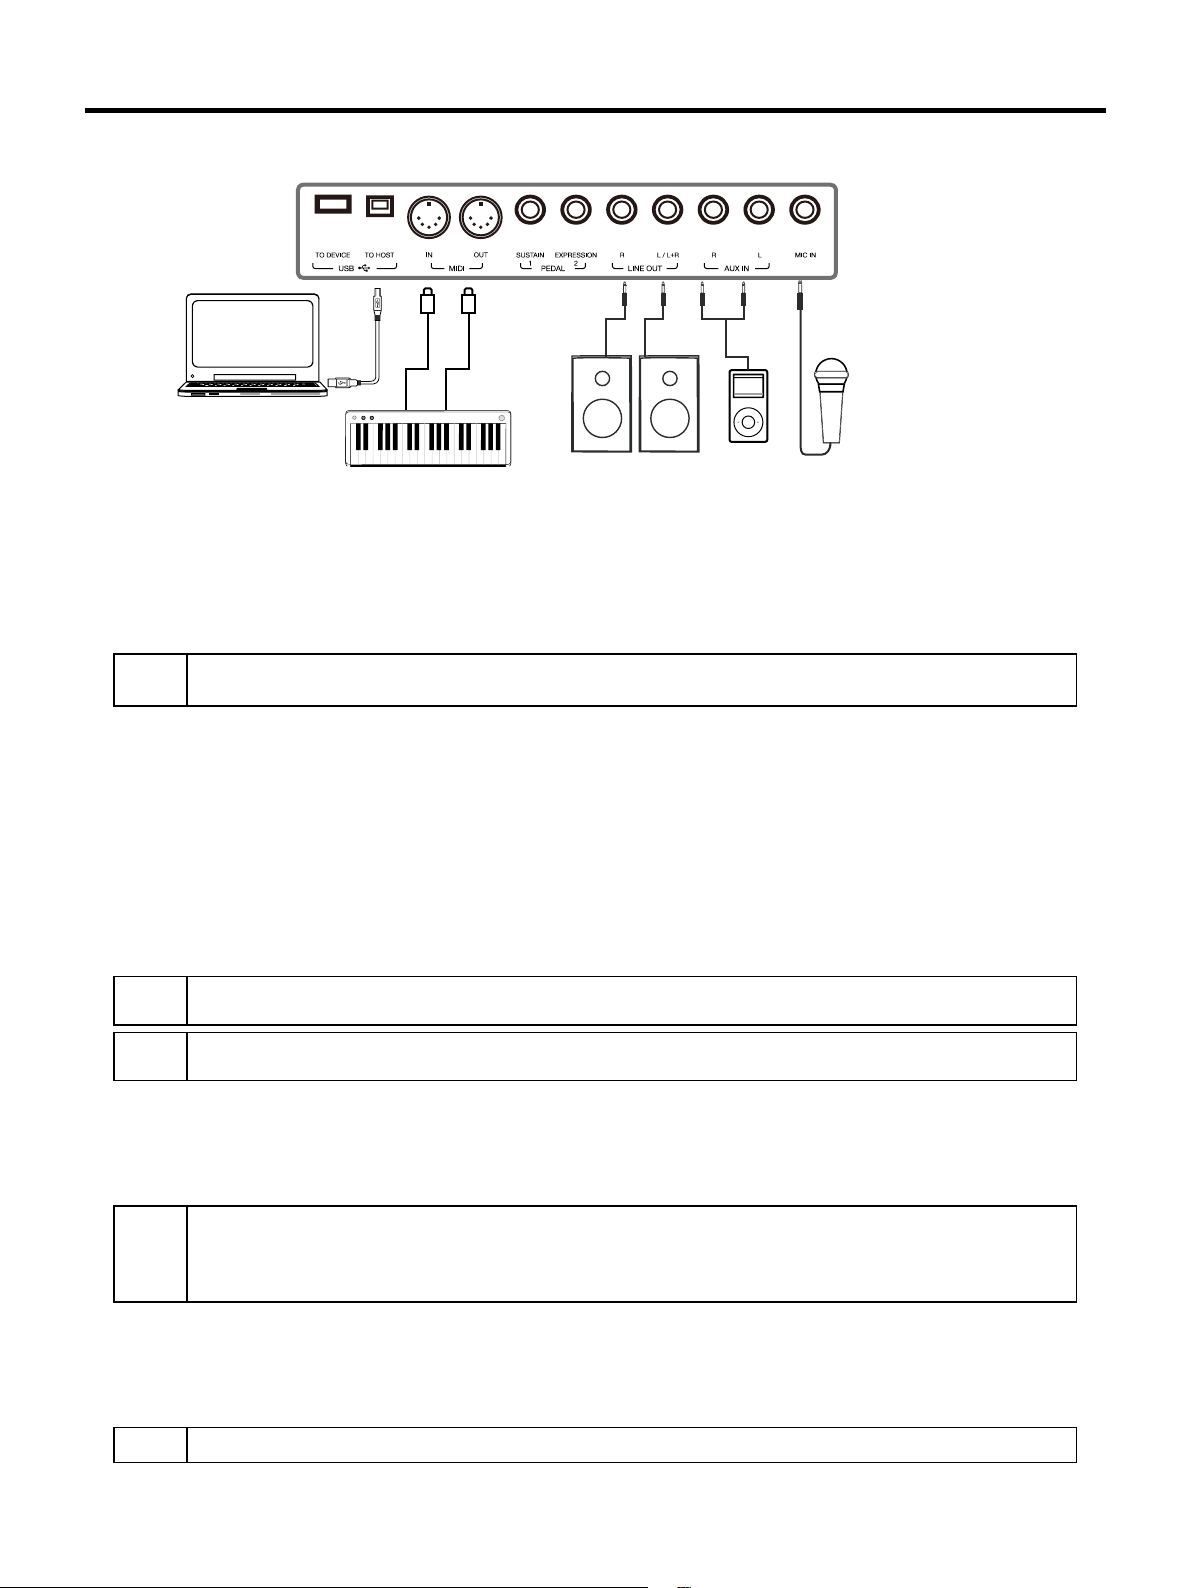
Connecting External Equipment
Connecting Audio Equipment
The [LINE OUT] jack sends the instrument signal output to external audio equipment such as a keyboard amplifer, stereo sound system, mixing console, or recording interface.
When audio equipment is connected to the instrument, you can use the [MASTER VOLUME] knob to adjust the overall
output volume.
If a microphone is plugged into the [MIC IN] jack, the microphone sound can also go out to your connected external
audio equipment.
Note!
Turn o the power to every device before connecting or disconnecting external equipment.
To avoid damaging the speakers, set the master volume level to minimum before turning on the power.
Connecting an MP3/CD Player
Plug an external audio player (MP3, CD, mobile phone) into the [AUX IN] jack to play music or backing tracks through
the instrument’s built-in speakers.
The instrument can also play music from an external audio source via Bluetooth.
Connecting a Microphone
Connect an external microphone to sing through the instrument’s built-in speakers.
1. Before connecting a microphone, make sure the microphone is turned o and its volume is set to minimum.
2. Connect the microphone to the [MIC IN] jack.
3. Turn on the microphone and slowly adjust the volume to optimum level.
Note!
Tips:
Make sure the microphone is turned o and the volume is set to minimum before connecting to the instrument.
To add eects to your sound, please refer to the relevant sections, and select vocal eects in “Mic Settings”
interface.
Connecting a Computer
Connect to a computer using the rear panel [USB TO HOST] jack to transfer MIDI data between the instrument and your
computer. You can also adjust instrument settings with the included software.
Connect the instrument directly to your computer with MIDI cables (not included).
The instrument can also send and receive MIDI data via Bluetooth.
Tips:
The MIDI jacks are set as the default MIDI message connection. However, if USB MIDI or Bluetooth MIDI are
connected, it will automatically switch to one of those.
The instrument supports sending MIDI messages via MIDI, USB, and Bluetooth at the same time.
Please refer to the “MIDI I/O” section for more details.
Connecting External MIDI Devices
By connecting a MIDI keyboard or other MIDI device to the [MIDI IN] and [MIDI OUT] jacks, you can transfer MIDI data
between the instrument and your devices.
• MIDI IN: Receives MIDI messages from an external MIDI device.
• MIDI OUT: Transmits MIDI messages generated by the instrument.
Tips:
Please refer to the “MIDI I/O” section for more details.
11
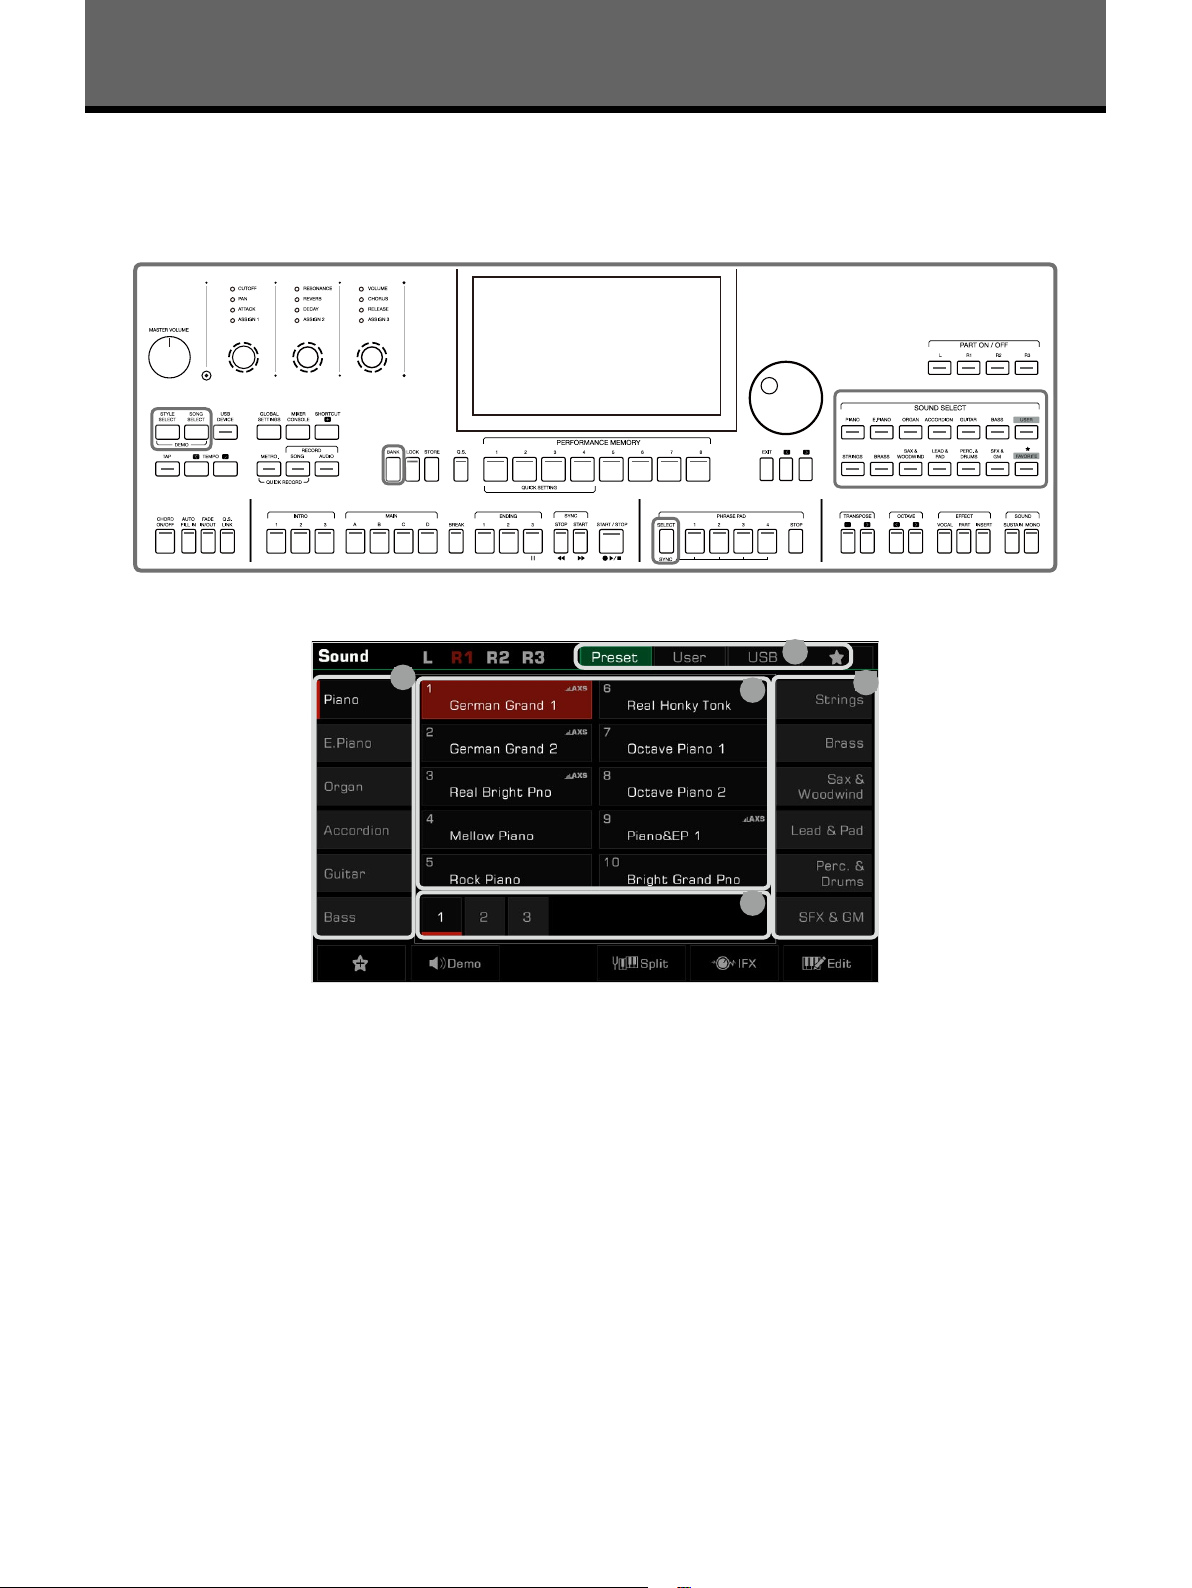
Basic Operation
Selection Operation
The selection menus include: Sound selection, Style selection, Song selection, Phrase Pad Bank selection, Performance Memory selection, and others.
Bring up the selection menus by pressing them on the touch screen or by pressing the panel buttons shown below.
Taking the Sound selection menu as an example, follow these steps to choose a le:
1
2
4
2
3
1. Data Location
Preset: Preset data is stored here.
User: Recorded or edited data is saved here.
USB: Data on a USB storage device is saved here.
My Favorites: Adding commonly used les to My Favorites lets you select them instantly.
2. Data Categories
Files are divided into categories according to type. Select one by pressing its name on the screen.
For example: Pressing “Piano” will select the Piano category.
3. File Browsing
Each page displays 10 les in the center of the screen. Use the page buttons at the bottom to switch to other
pages.
If there are over 80 les in the category, press the Right/Left arrow buttons to scroll through the pages.
4. File Selection
Select a le by pressing the le name on the screen.
12
Using the Soft Keyboard
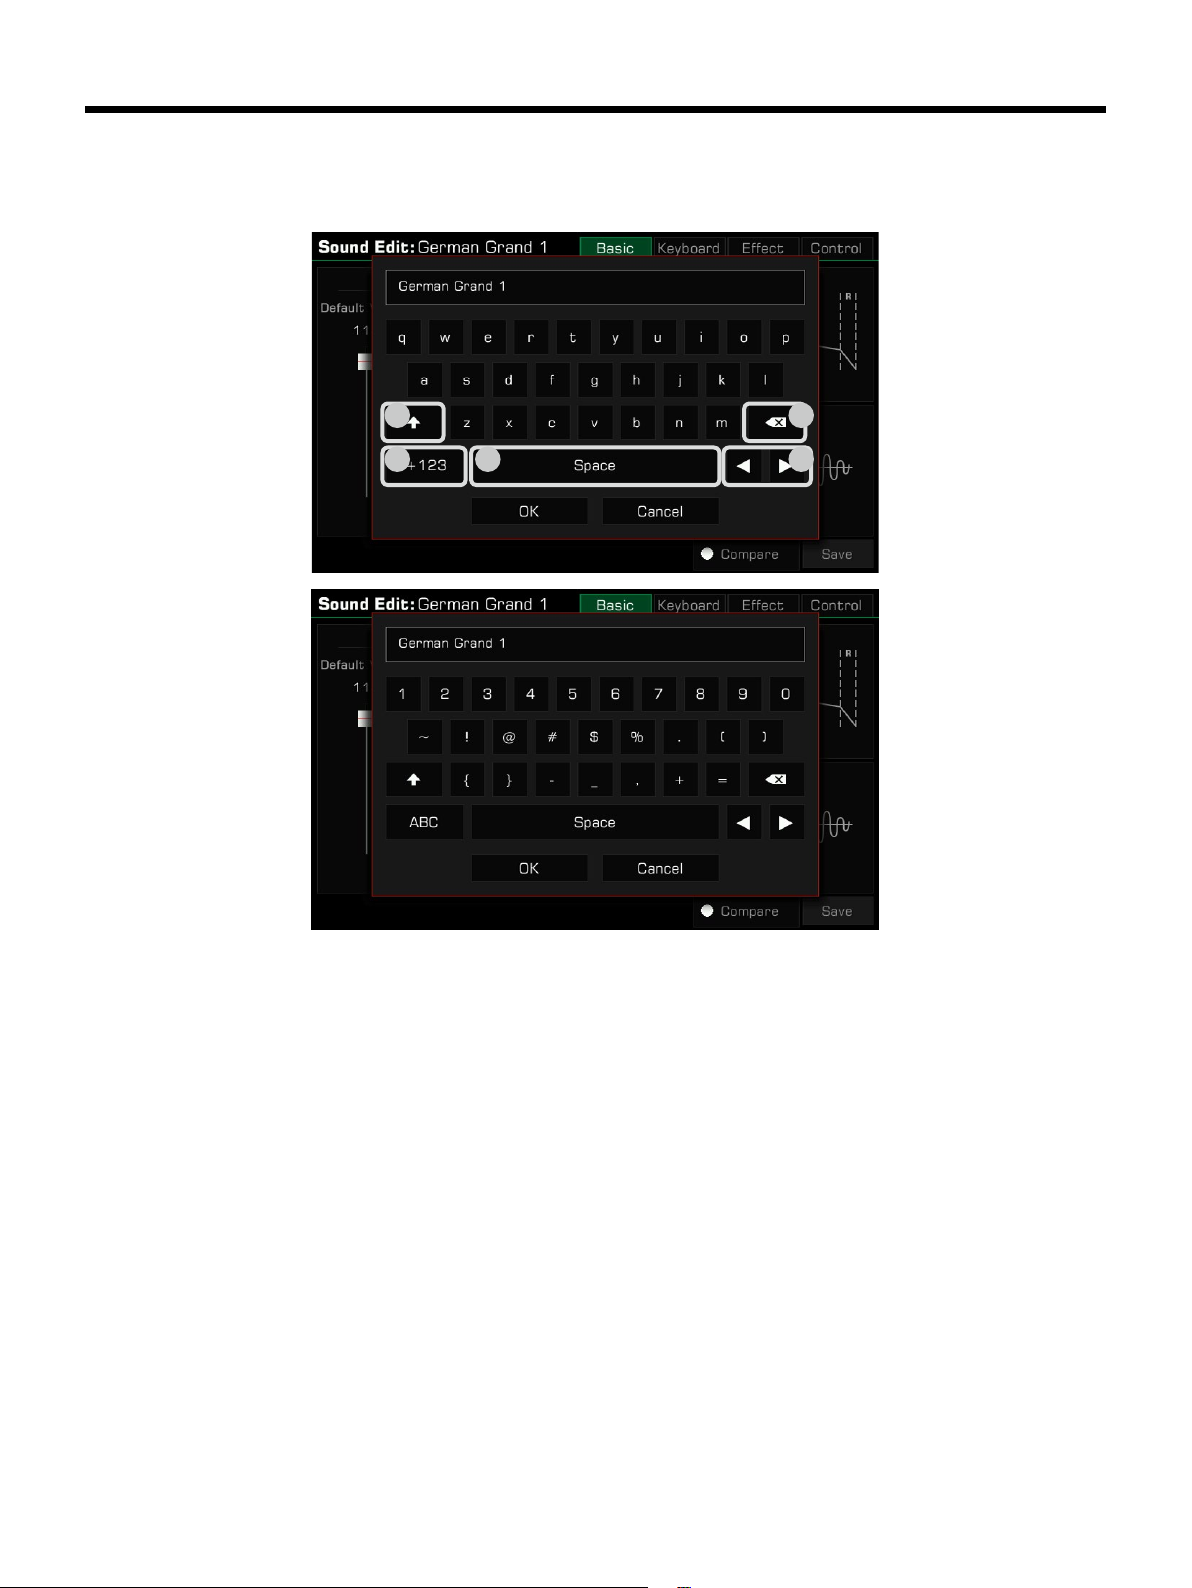
When you need to name or rename a le or a folder, the soft keyboard will be called.
Basic Operation
3
5
1. Deleting characters
Press the delete button to delete the previous character in the input eld.
To delete all characters in the input eld at once, press and hold the delete button.
4
1
2
2. Moving the cursor
Press the right and left arrow buttons to move the cursor.
3. Entering capital letters
Press the CAPS button, and capital letters will be displayed.
4. Entering a space
Press the space button.
5. Entering numbers or symbols
Press the “.+123” button to display numbers and symbols.
After you nish editing, press the OK button to enter the new name and return to the previous display. Or, press the
Cancel button to cancel the edit and return to the previous display.
13
Basic Operation
Settings Operation
The instrument has a touch screen from which you can directly select les, adjust parameters, and change settings.
These operations can also be performed using the [DATA DIAL] and [<]/[>] buttons.
When adjusting parameter values, press the [<] and [>] buttons simultaneously to reset the parameter value.
To return from the current menu to the previous one, press the [EXIT] button. Press it repeatedly to return to the main
menu.
Parameter Adjustment
There are three types of parameters. Each requires a dierent way of operating the touch screen depending on the
parameter.
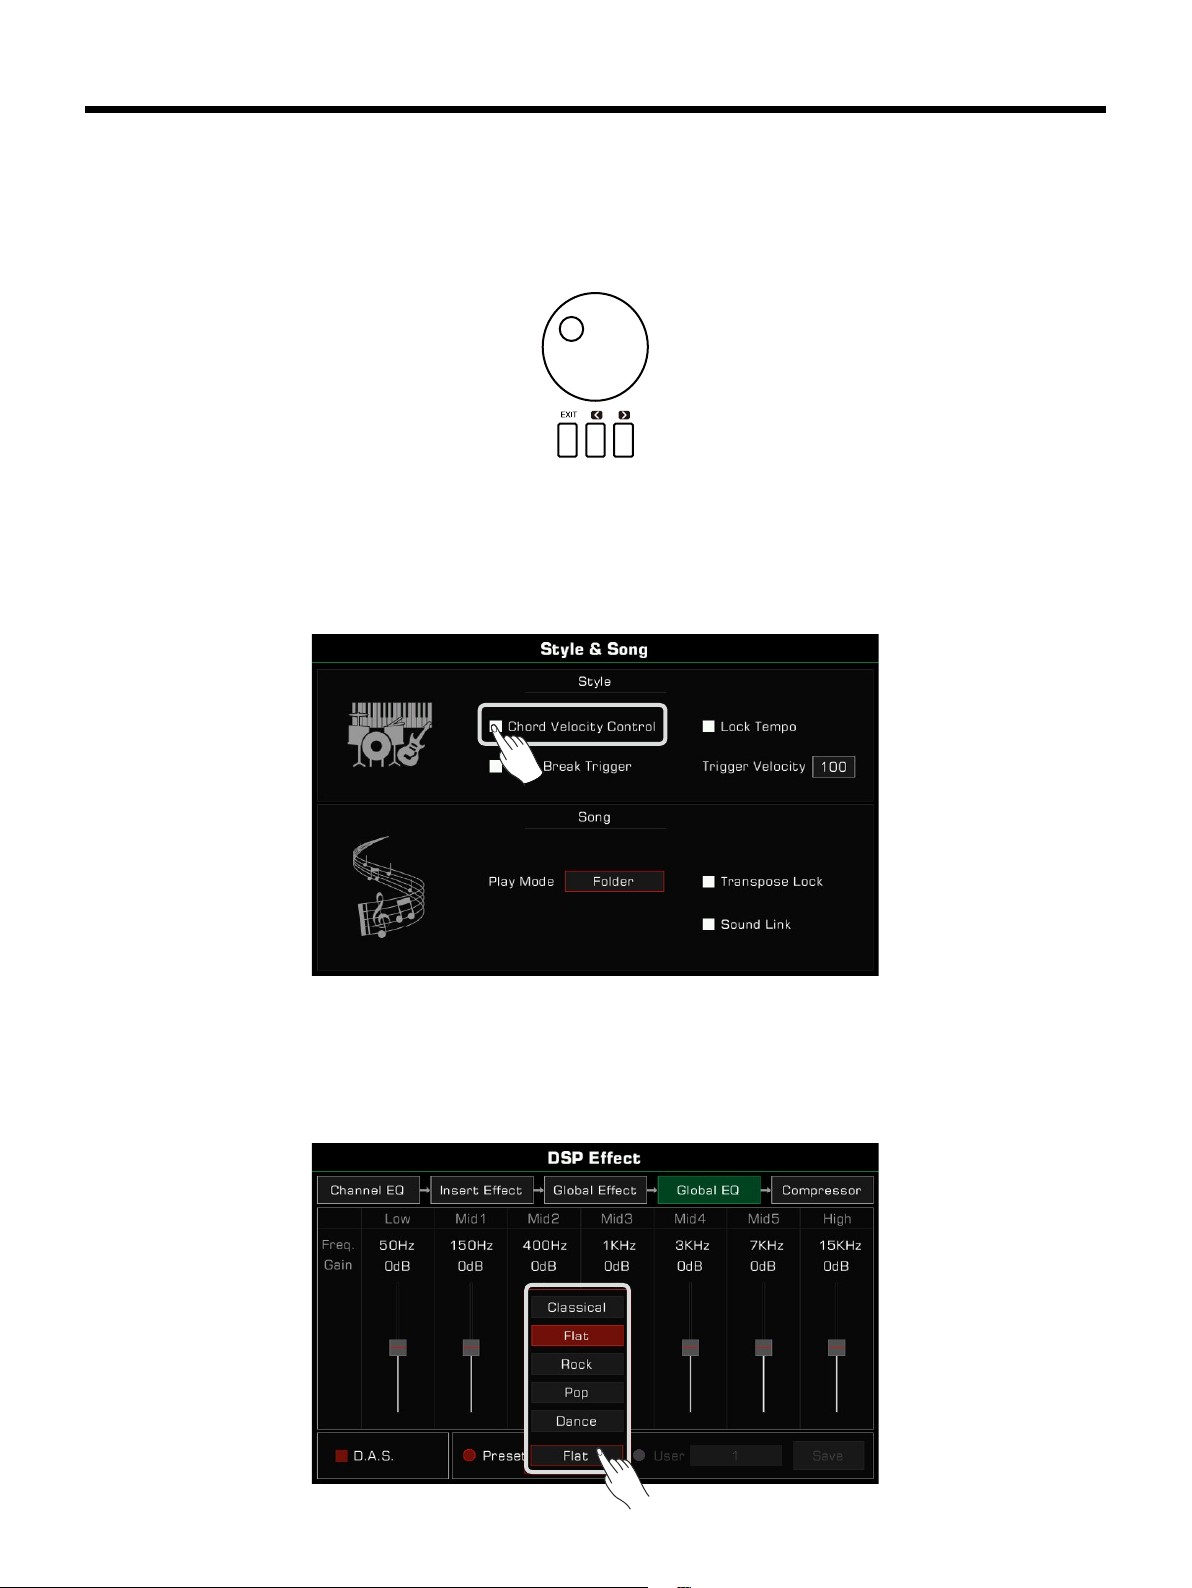
1. ON/OFF
Some parameters (like the “Chord Velocity Control”), feature a checkbox that must be pressed to turn the function
ON or OFF. Press it once to turn it on, press it again to turn it o.
2. LIST
Some parameters (like “EQ”), come up as a list when you press the selection name.
There are three ways to select the parameter:
• Press the name on the touch screen.
• Use the [DATA DIAL].
• Use the [<]/[>] buttons.
The selected parameter will be highlighted. Then, press the parameter name or another area to close the list.
14
Basic Operation
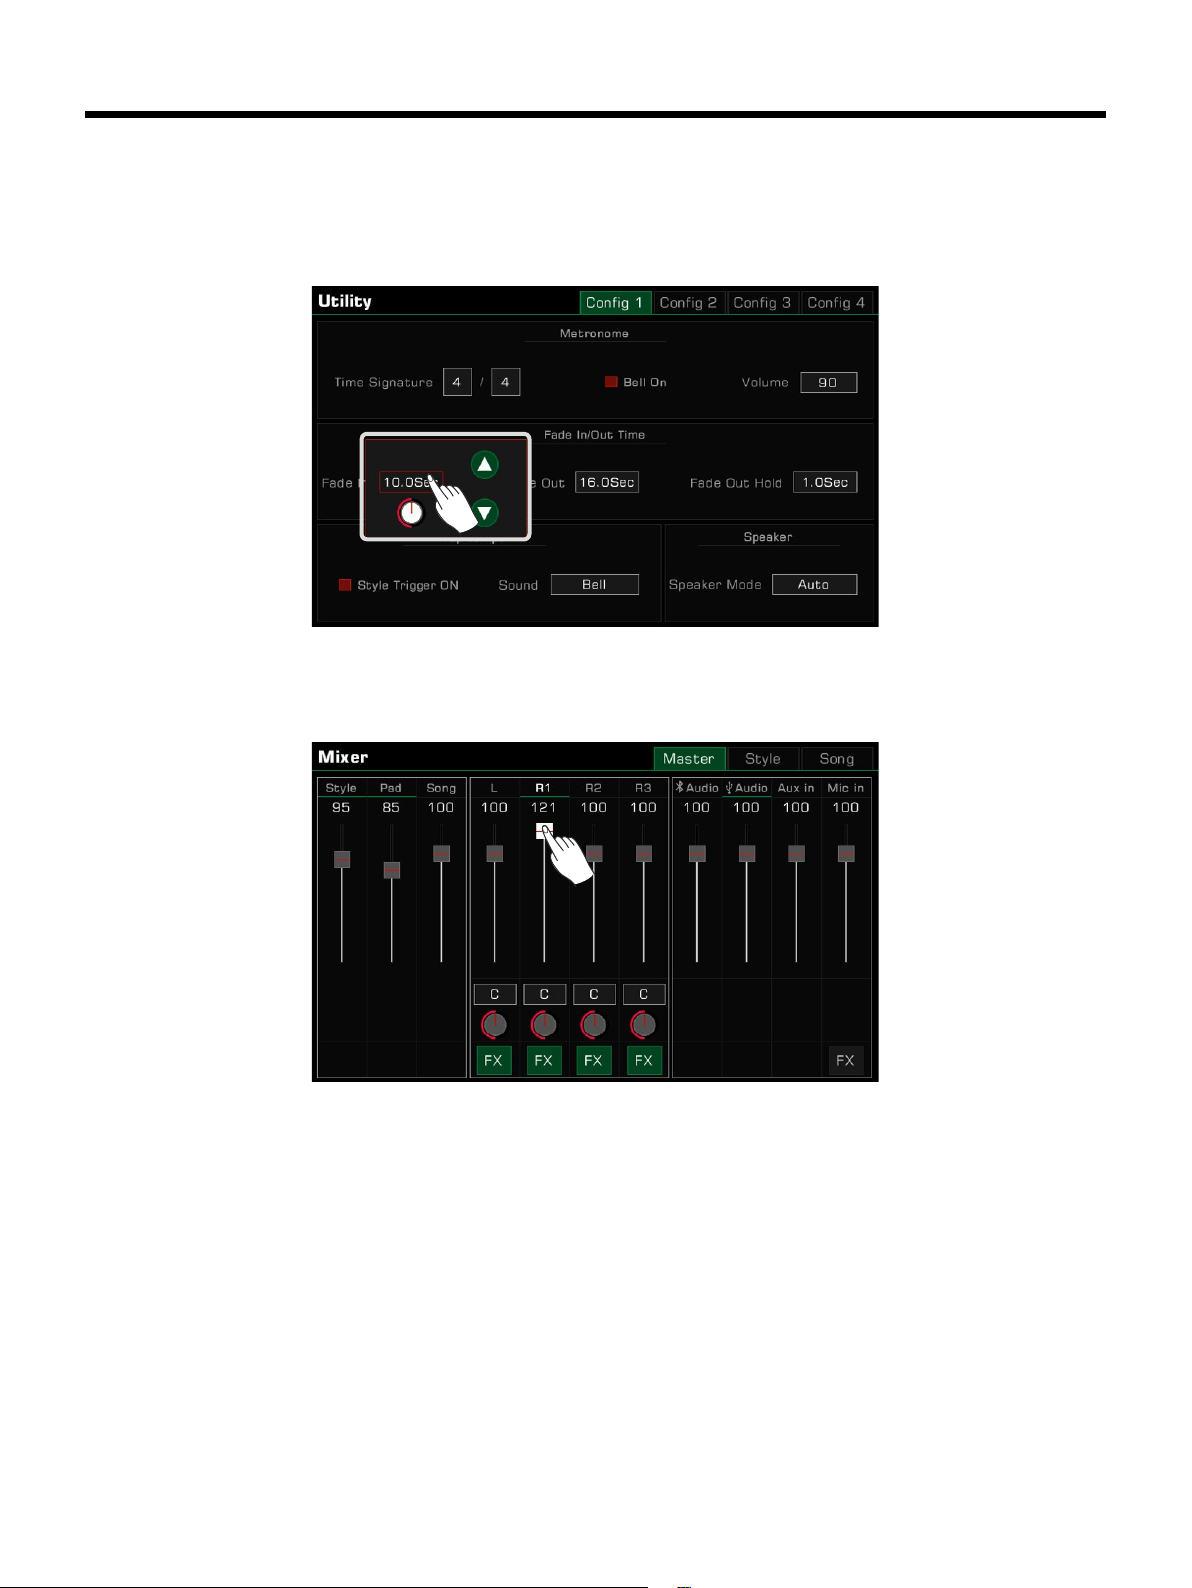
3. DATA
Some parameters (like “Fade In Time”) feature a combo box.
There are three ways to adjust the parameter:
• Press the up/down arrow button on the touch screen.
• Use the [DATA DIAL].
• Use [<]/[>] buttons.
In some menus like “Mixer” or “Master EQ”, you can even use the virtual slider to adjust knob and fader values.
• Press and hold the slider, then move it up or down.
• When the slider is selected, you can also use the [DATA DIAL] or [<]/[>] buttons to adjust the value.
15
Basic Operation
Shortcut +
Although the instrument has many interfaces, you can quickly bring up the interface you need by using the [SHORTCUT+] button.
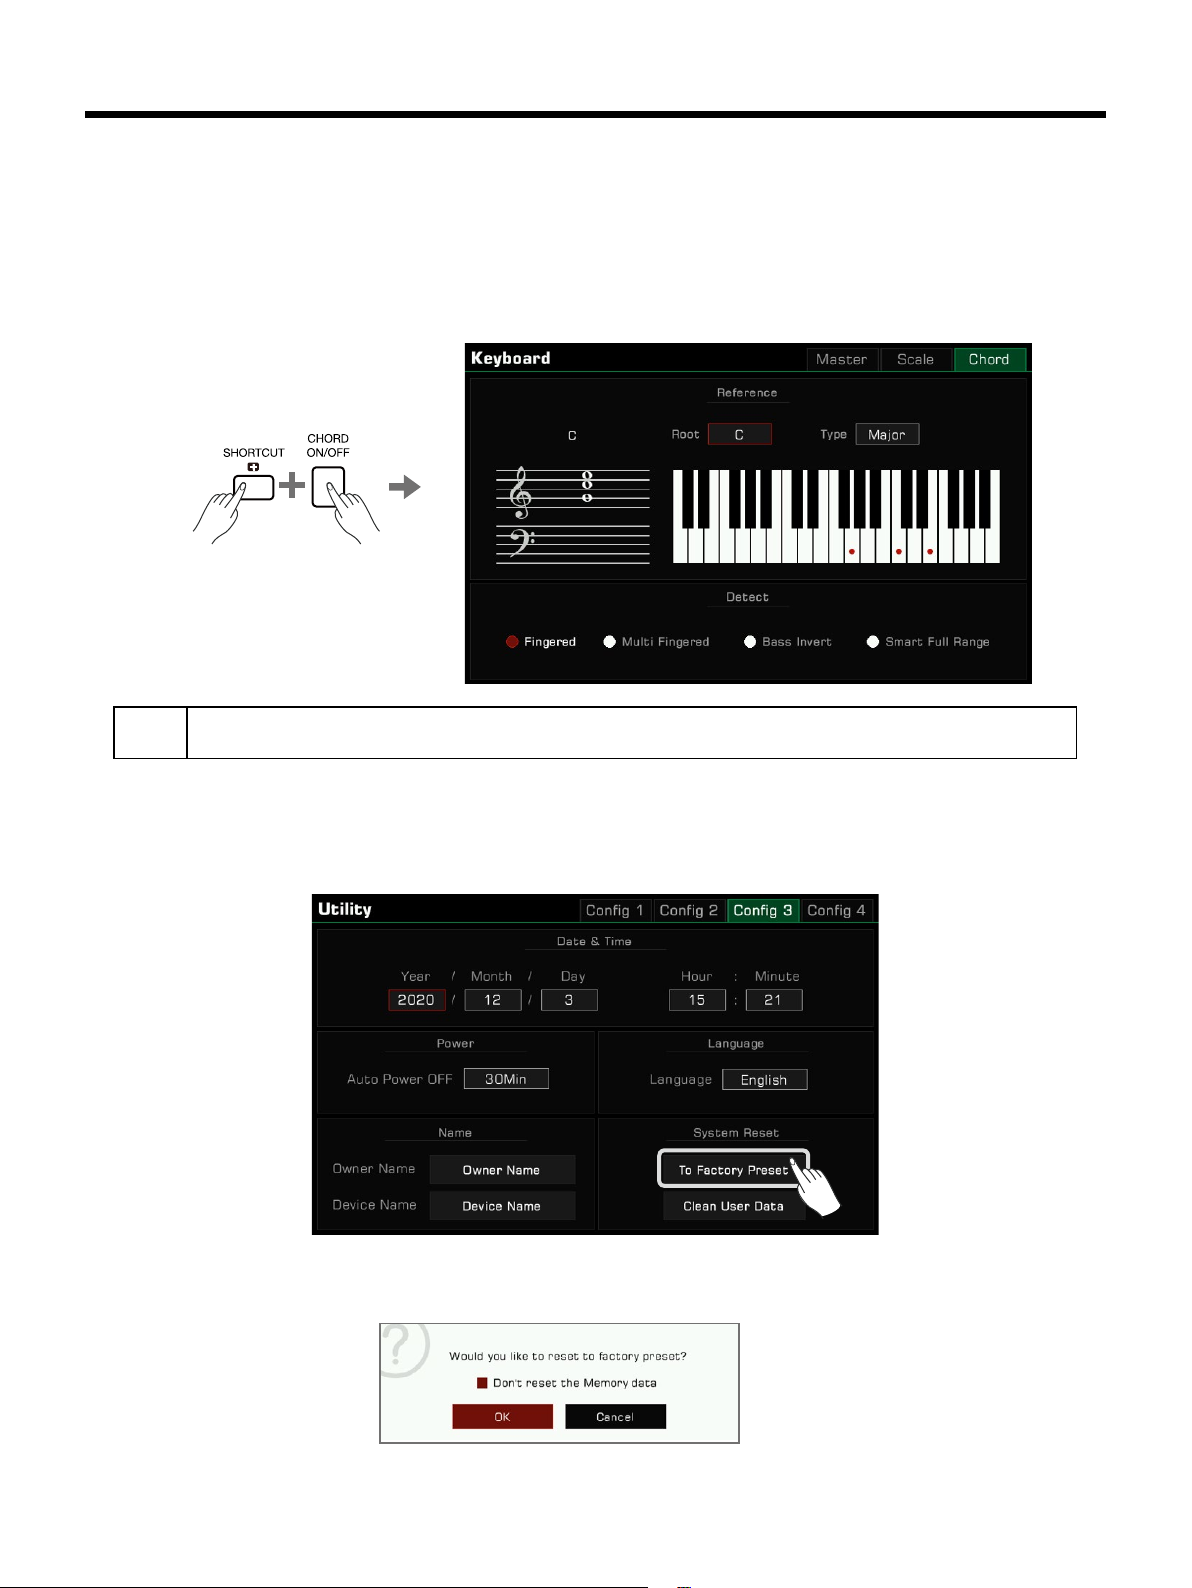
1. Press and hold the [SHORTCUT+] button.
2. Press other buttons while holding the [SHORTCUT+] button.
For example, hold [SHORTCUT+] and press the [CHORD ON/OFF] button to display the chord setting.
Tips:
Hold [SHORTCUT+] and use the keyboard, pedal or joystick to get direct access to those menus. Please
refer to the relevant section of this manual for more details.
Factory Reset
You can restore the instrument to factory settings as follows:
Enter the [GLOBAL SETTINGS] - “Utility” menu and press the “To Factory Preset” button in the “Cong 3” Tab.
When performing a factory reset, you can choose not to reset your Memory data. This option is enabled by default.
16
Sounds
The instrument has four parts: L, R1, R2 and R3.You can use the [PART ON/OFF] button to switch these parts ON or
OFF. Through the combination of dierent parts you can enrich your performance.
Playing Sounds
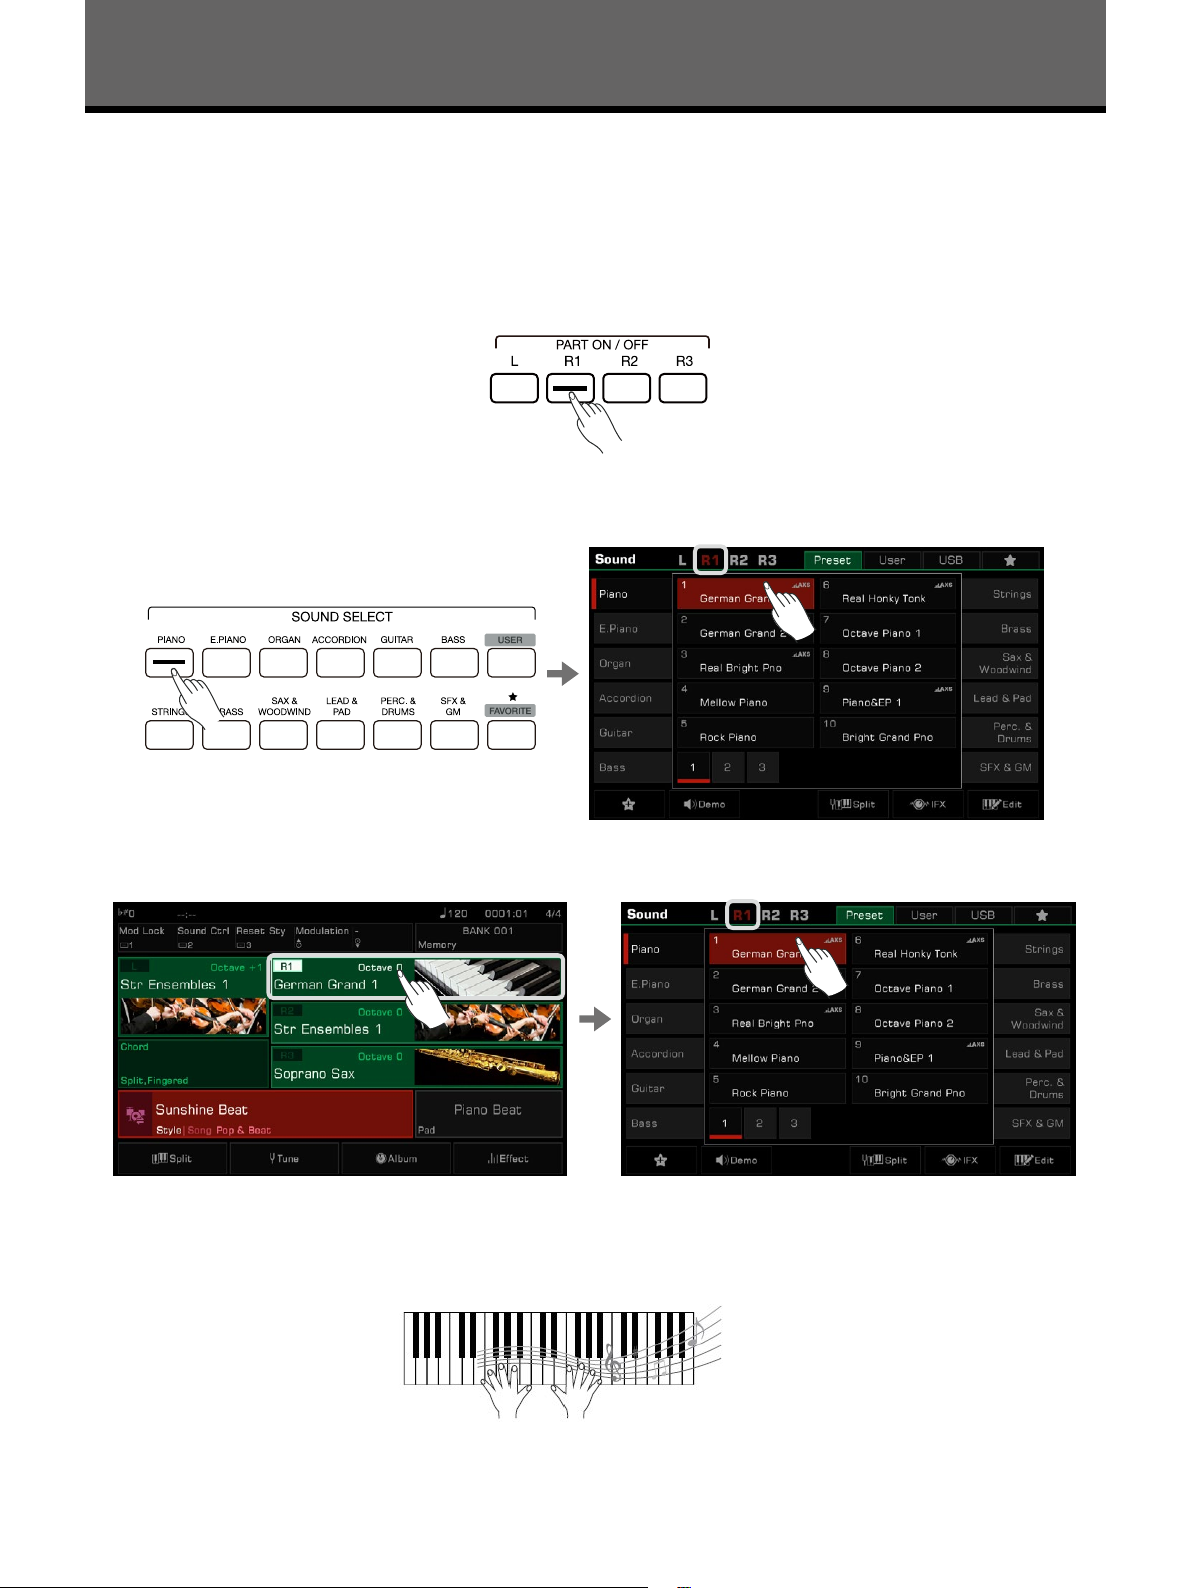
Turning on the Part Switch, Selecting and Playing a Sounds
1. Press the [PART R1 ON/OFF] button to turn it on.
2. There are two ways to select sounds:
• Press one of the [SOUND SELECT] buttons to bring up the corresponding sounds selection menu. From there,
make a selection by pressing the sounds name. Each category will display dierent sounds.
• Press the R1 area in the main display to bring up the corresponding category. From there, switch categories or pages
by using the touch screen.
To select User Sound, press the “User” tab or “USB” tab to bring up that menu.
3. Once the sound is selected, you may begin playing.
17

Sounds
Tips:
All of the presets in this instrument feature high quality sounds. Sounds with an AXS icon are our recommended favorites.
AXS: Acoustic Expression Sound
This is a special term applied to sounds that have samples of articulation or other playing methods (guitar
sounds with nger scratches, etc.) that can be triggered by key o, pedals, or other real-time performance
inputs.
Add a Sound to “My Favorites”
Get quick access to your favorite sounds by adding them to “My Favorites”:
1. Press the “Add to Favorites” star icon button at the bottom. A star will appear to the right of the selected sound
name. Press the button again to remove it from “My Favorites”.
2. Press the “My Favorites” tab to see the list of the sounds you added. You can remove any of the sounds in this menu
anytime.
You can also access this menu by pressing the [FAVORITE] button on the panel.
18
Sounds
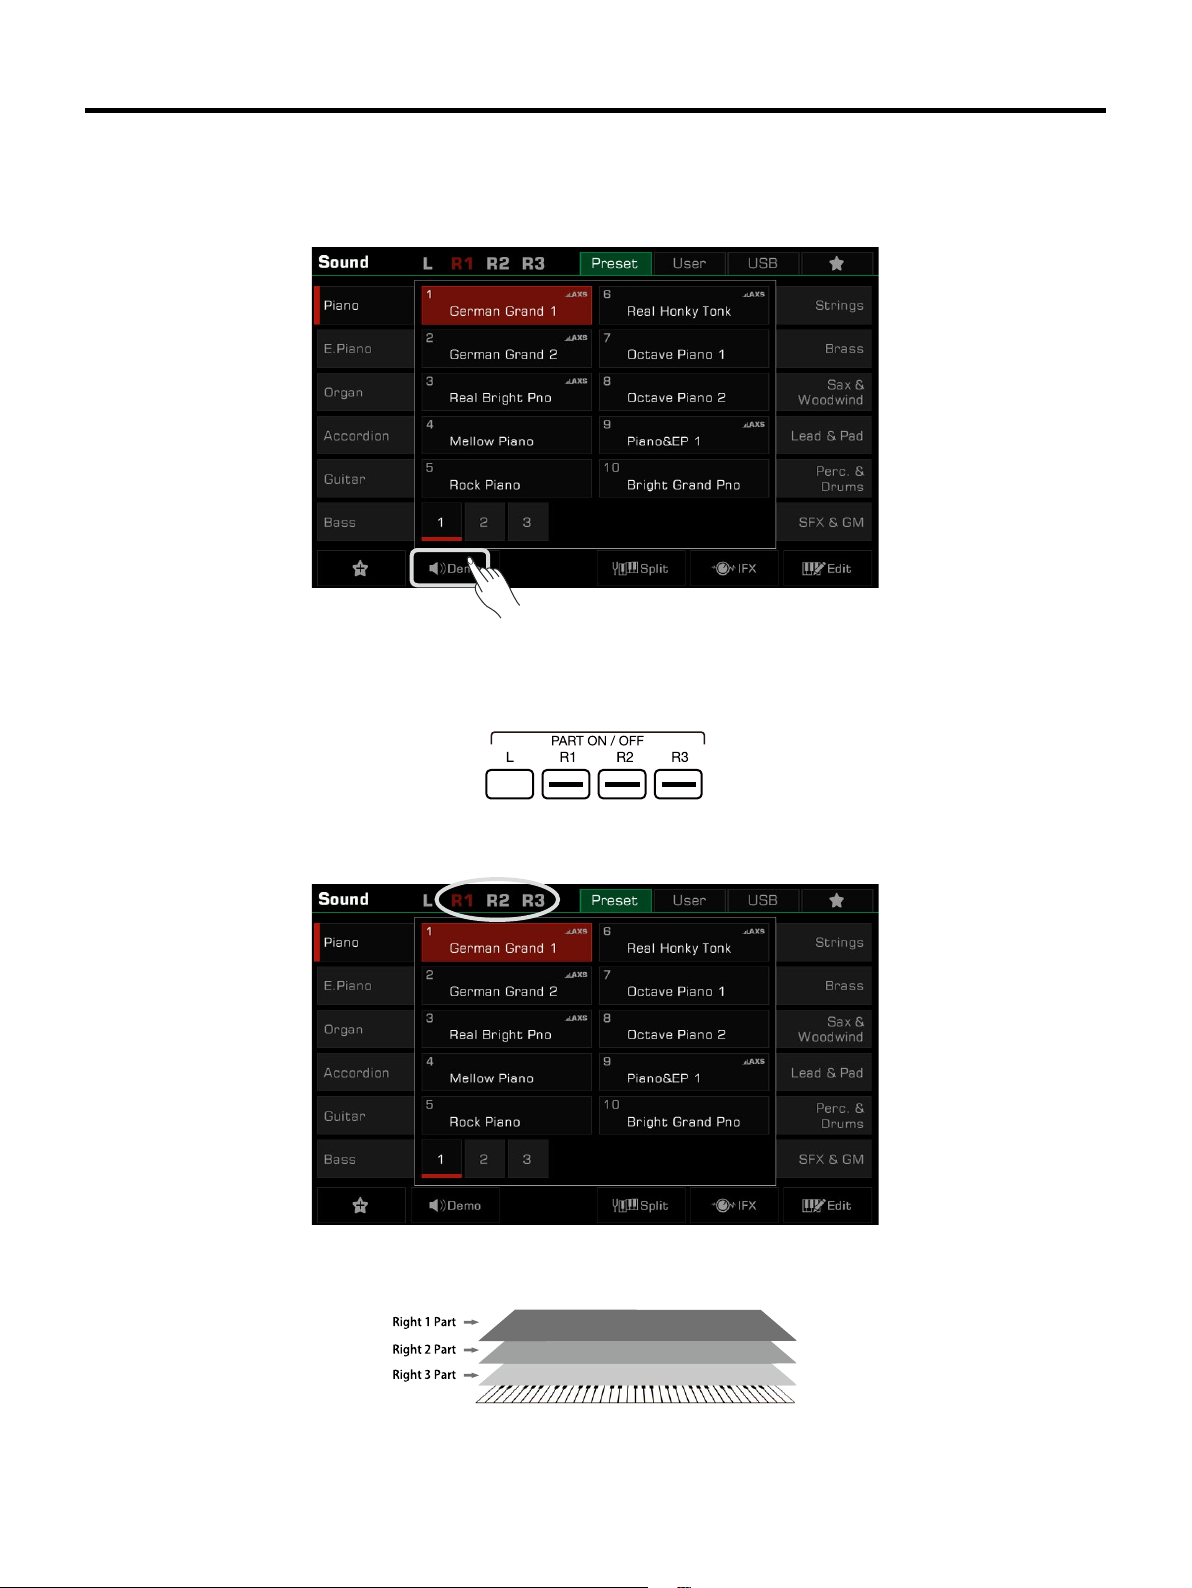
Playing a Sound Demo
Press “Demo” on the Sound selection menu to start playing a demo of the selected sound. Press “Demo” again to stop
it.
The button is disabled if there isn’t a sound demo for the selected sound.
Playing Two or Three Sounds Simultaneously
The instrument allows two or three dierent sounds to be layered together to create a fuller, richer sound.
1. Press the [PART ON/OFF] switch to turn the part on or o.
2. Enter the Sound selection menu. Press the part name on the top left corner to switch the selected part. Then, select
a sound for each part.
3. After selecting a sound for each part, play the keyboard and you will hear a layered, ensemble sound combining
these parts.
19
Sounds
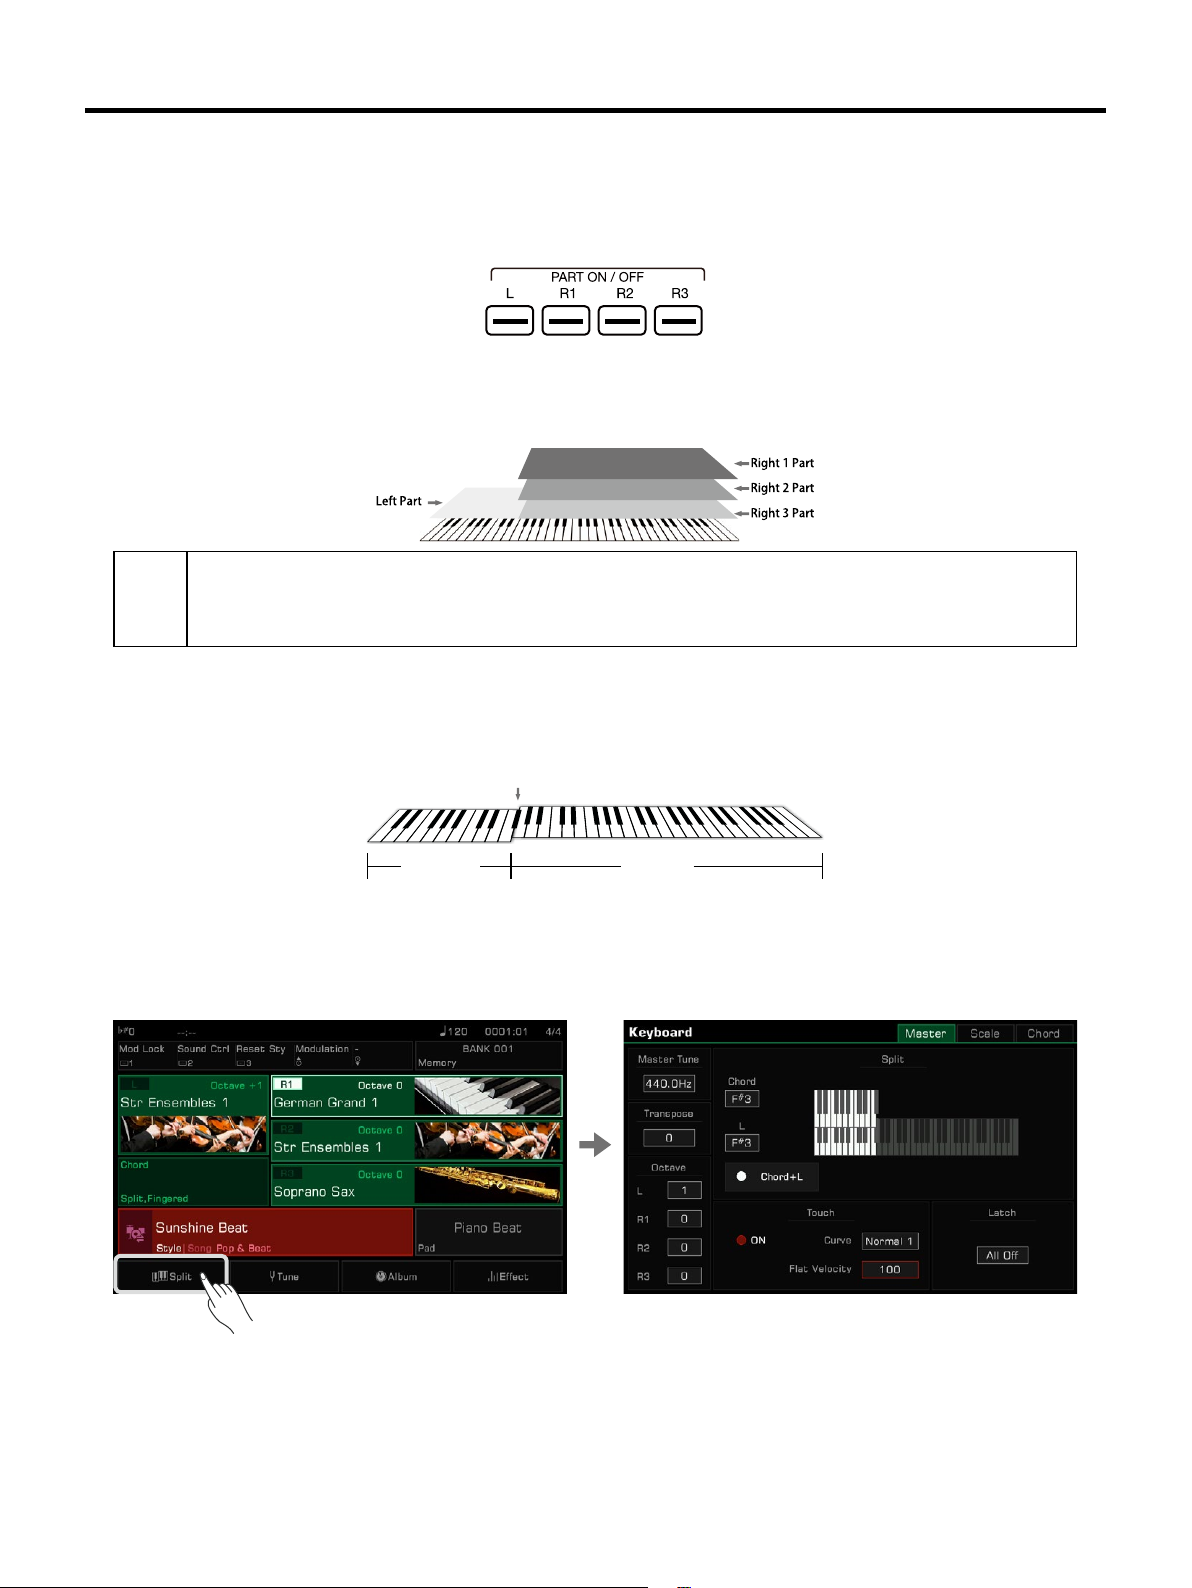
Playing Dierent Sounds with Both Hands
This instrument supports up to 4 parts simultaneously, one for the left hand and three for the right hand.
1. First, turn the upper (R1-R3) parts on.
2. To set a sound for the left hand, make sure the [PART L ON/OFF] button is turned on.
3. Select a left part sound.
4. Play the keyboard in the two areas to hear the dierent sounds played by either hand.
Tips:
When L is turned o, you can play the R sounds across the full keyboard. When L is turned on, the keyboard
separates into two sections, L and R1/R2/R3. This point is called the “split point”.
The split point is set to F#3 by default. However, you can set this to any position you wish.
You can set the volume of each part in the “Mixer” menu.
Setting the Split Point
The point on the keyboard that separates L and R1/R2/R3 is called the “split point”.
The split point is set to F#3 by default.
However, you can set this to any position you wish by following these steps:
1. Press “Split” on the main display or press the [GLOBAL SETTINGS] button and select the “Keyboard” function to
bring up the Split Settings menu.
Split Point: F#3
Sound L Sound R
2. Select the key name in the L window to make it the split point. You can do this on the touch screen or by using the
[DATA DIAL] or the [<]/[>] buttons. Or, press the actual keyboard key to set your desired split point.
20
Sounds
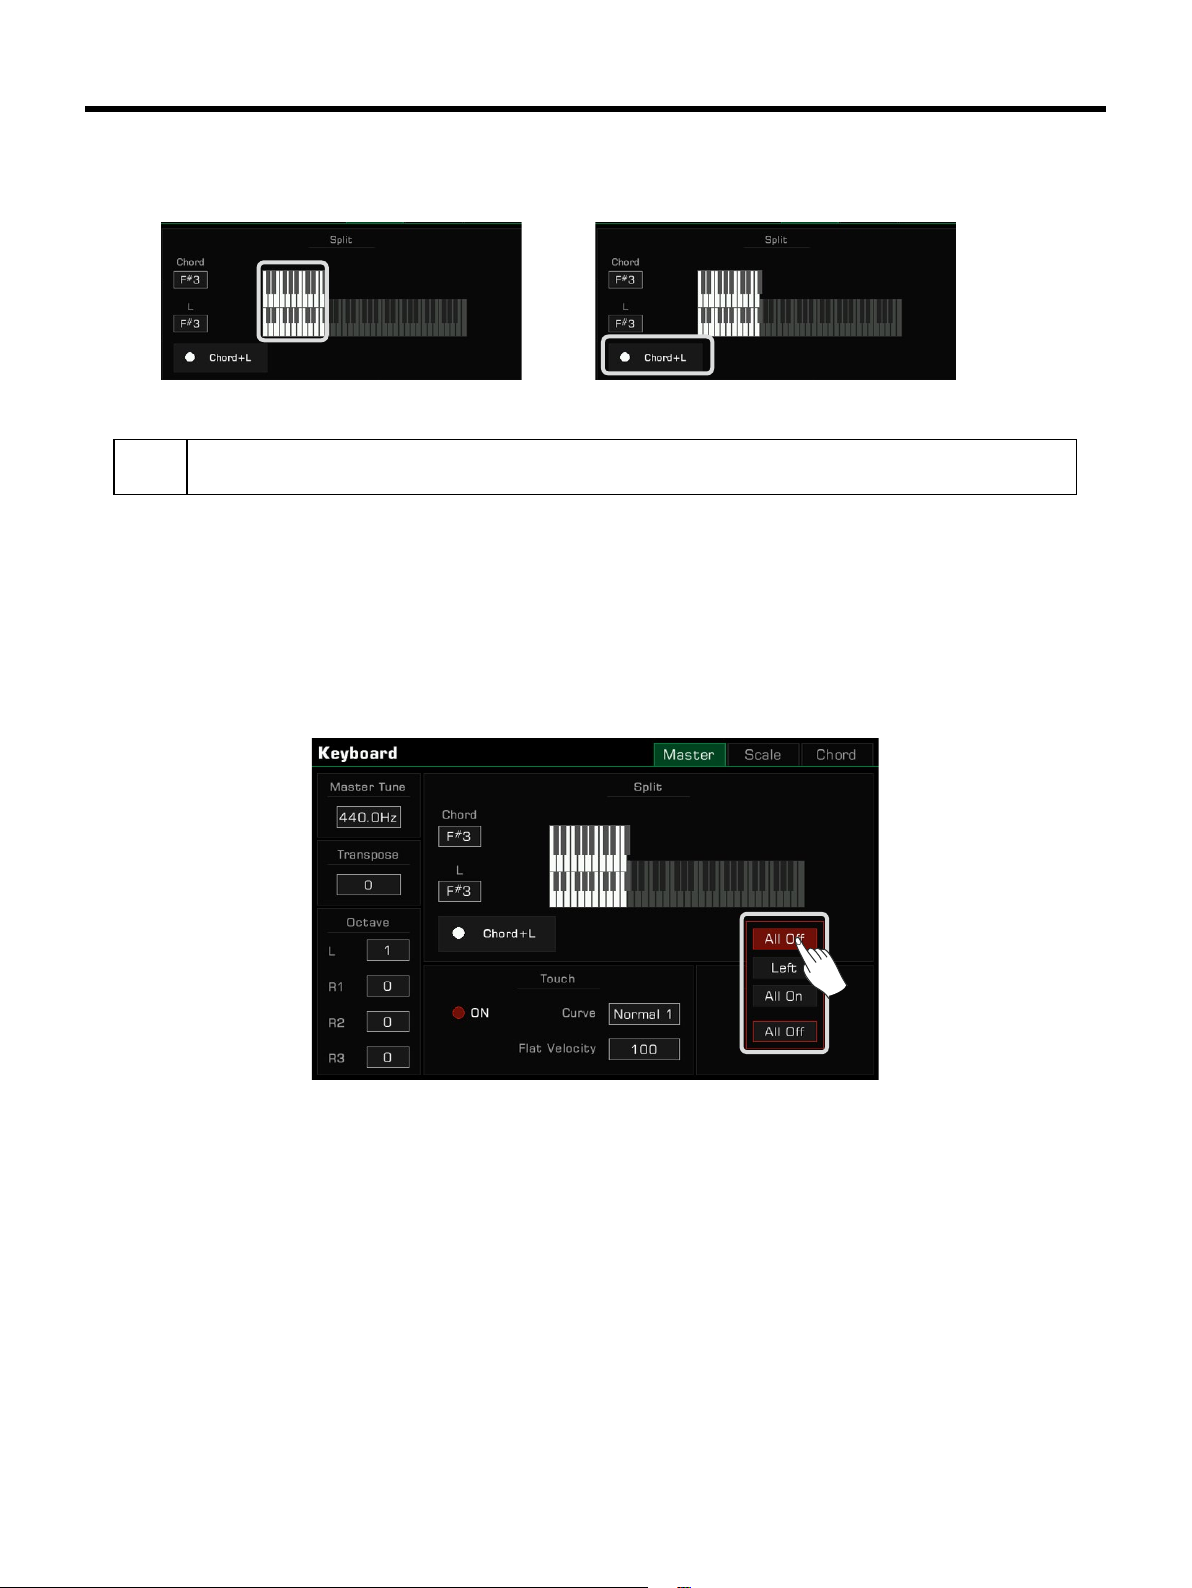
If you want to set the split point for both the left part and chord area, just turn on the “Chord+L” switch. Then you can
set the Split Point (Chord) and the Split Point (Left) at the same time.
Tips:
The Split Point of the LEFT/RIGHT part sections and the Chord Split Point section are generally the same,
but also can be assigned separately. Split Point (Chord) cannot be set higher than Split Point (Left).
Using Keyboard Latch
When you turn the Latch function on, the layer sound will continue playing after you remove your hand from the keyboard.
Select the part you want to latch in the “Latch” options.
• All O: The Latch function will not apply to any sound layers
• Left: The Latch function will only apply to the left part sound layer
• All On: The Latch function will apply to all sound layers
21
Sounds
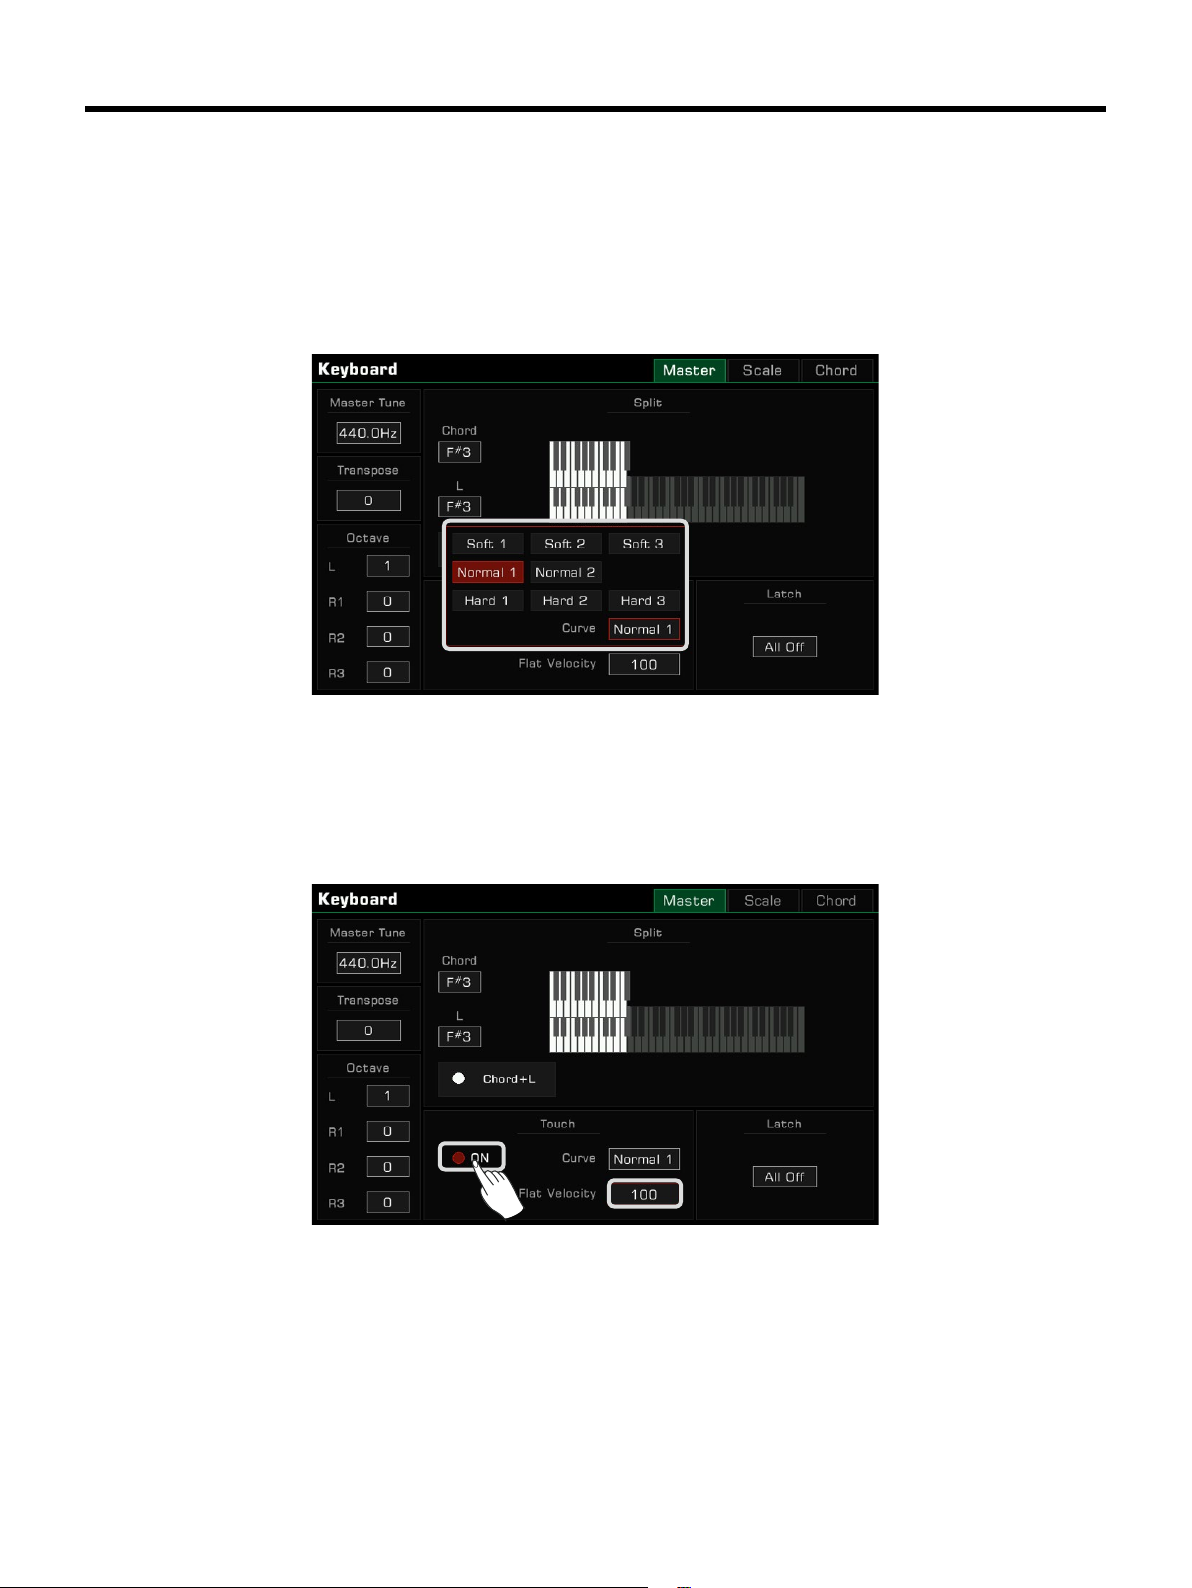
Setting the Keyboard Touch Sensitivity
This instrument features several dierent touch sensitivity curves programmed to simulate the touch response of various model acoustic pianos.
1. Press “Split” on the main display or press the [GLOBAL SETTINGS] button and select the “Keyboard” function to
bring up the touch settings menu.
2. Press “Curve name” and a menu box will appear. Use the [DATA DIAL], the [<]/[>] buttons, or touchscreen to select a
sensitivity curve.
For some particular sounds, such as a clavichord, or pipe organ, etc., you may need to turn o the touch response. You
can turn o the keyboard response to get the same volume no matter what velocity you play at.
1. Do this by unselecting the “ON” button to turn the keyboard touch response OFF in the “Keyboard” menu.
2. Press “Flat Velocity” and a menu box will appear. Use the [DATA DIAL], the [<]/[>] buttons, or touchscreen to set this
parameter.
22
Sounds
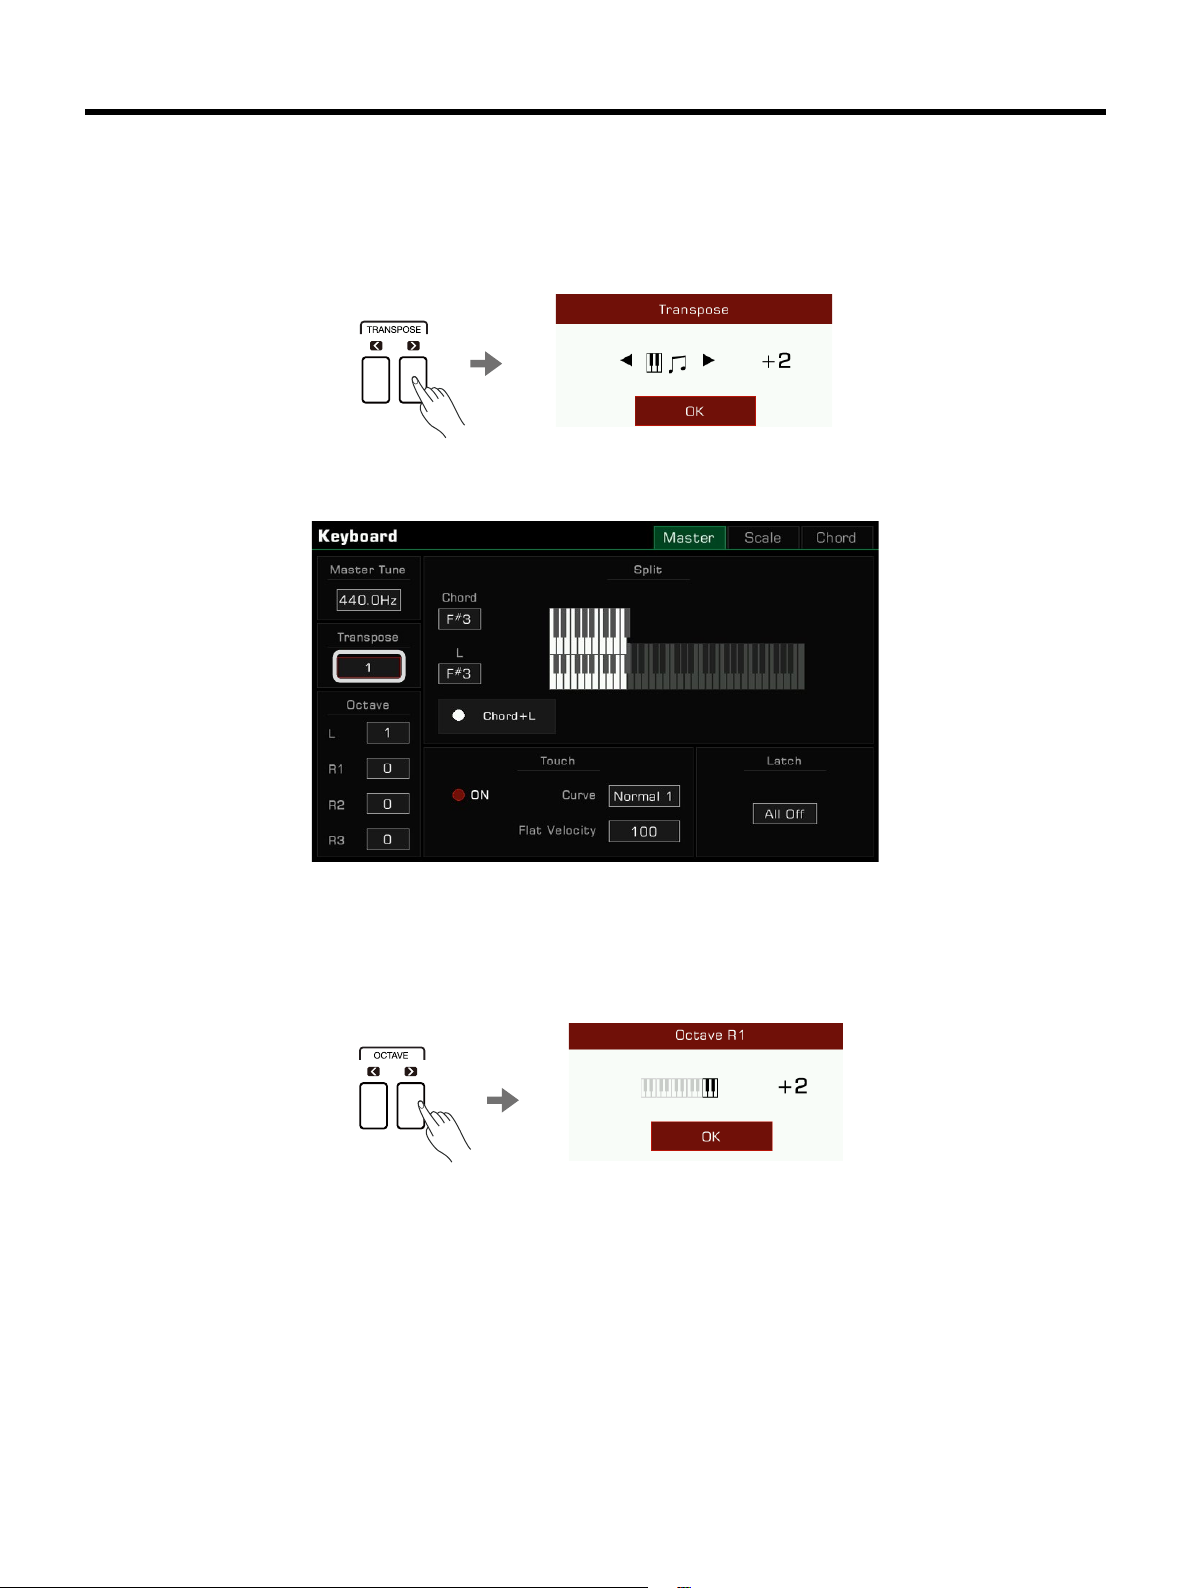
Using Transpose and Octave to Change Pitch
The transpose function allows the overall pitch of the instrument, including Styles and Songs, to be transposed up or
down by a maximum of one octave in semitone steps.
There are two ways to use the Transpose function:
1. Press the [TRANSPOSE <] / [TRANSPOSE >] buttons to edit the transpose setting.
2. Use the [DATA DIAL], [<]/[>] buttons, or touchscreen in the “Keyboard” menu to adjust the keyboard pitch by
semitones.
You can also shift the pitch of a specic part or track up or down by full octaves. Octave shift is not available for Style
and Song modes.
There are two ways to shift the Octave of a part:
1. Press the [OCTAVE <] / [OCTAVE >] buttons to edit the octave of selected part.
23
Sounds
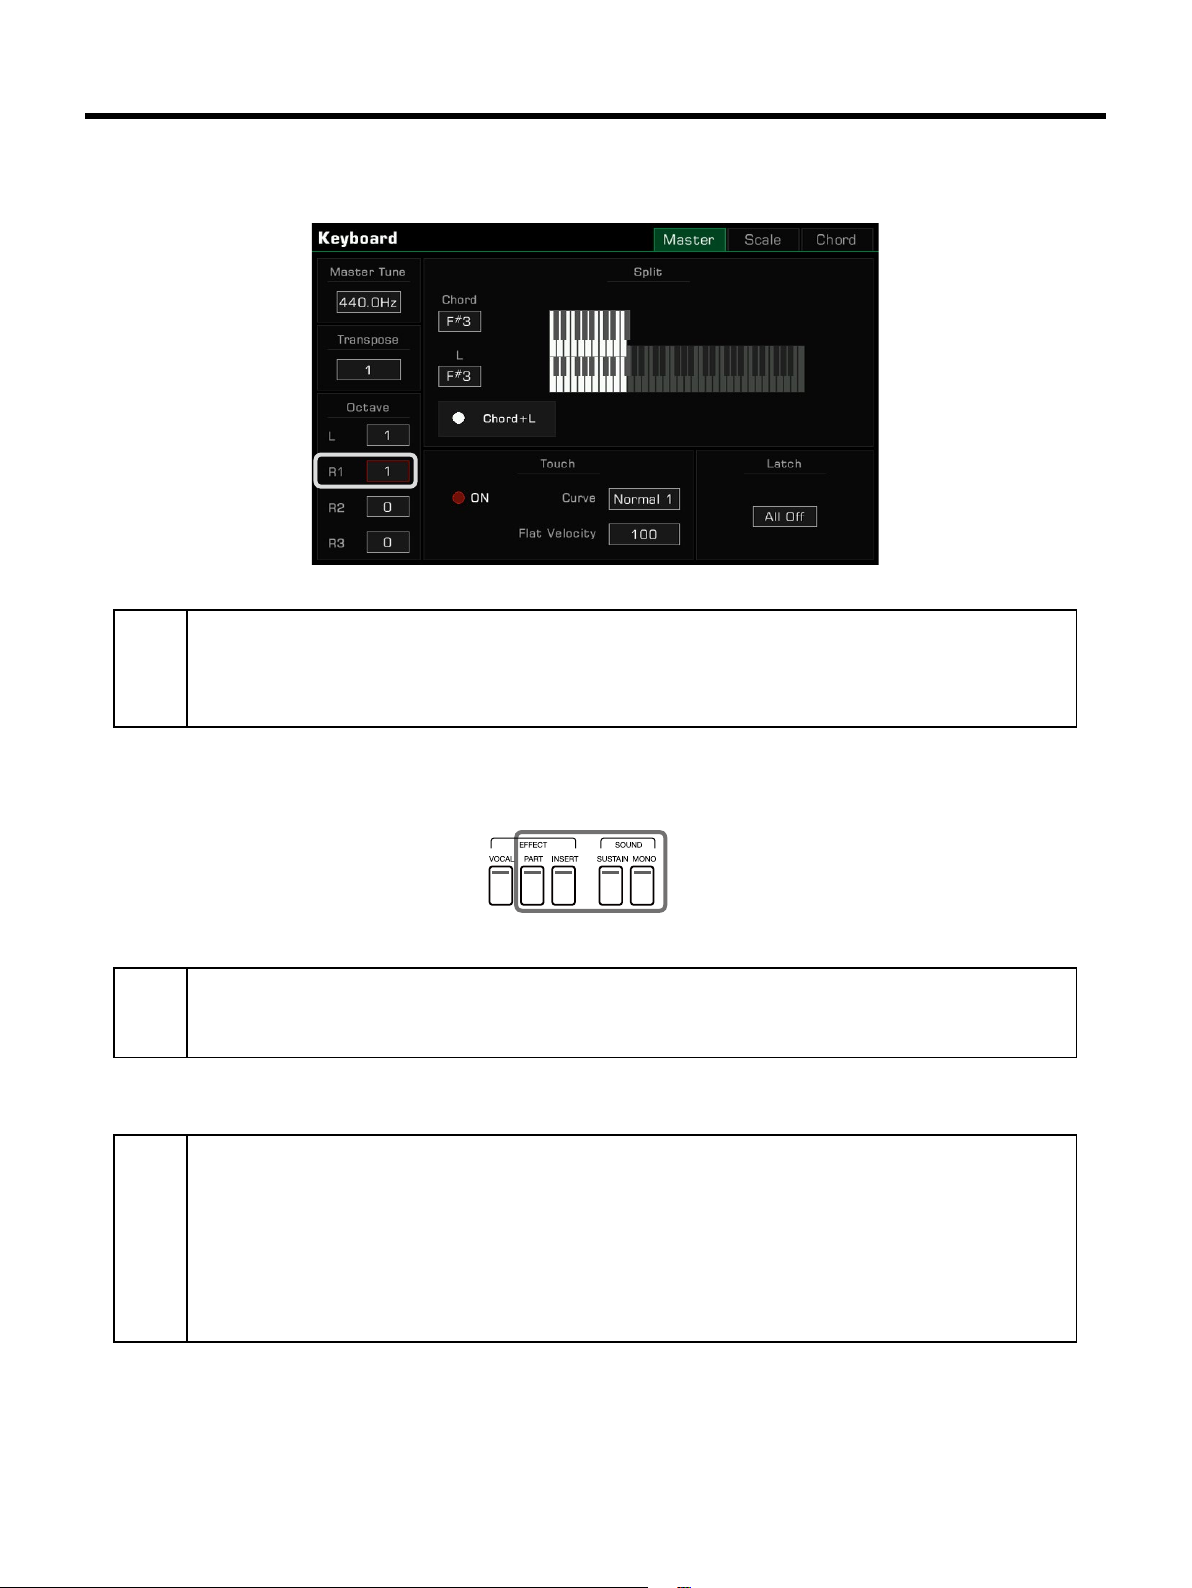
2. Press to select a part. Use the [DATA DIAL], [<]/[>] buttons, or touchscreen in the “Keyboard” menu to shift the
Octave of the selected part.
Tips:
In addition to Transpose and Octave pitch adjustment, you can set the overall instrument pitch by adjusting
the Master Tune frequency.
Generally, the instrument uses twelve-tone equal temperament at a standard pitch of 440.0 Hz. However, you
can set it higher or lower according to performance needs.
Please refer to the section on Master Tuning for more details.
Adding Eects to Sounds
The instrument features several ne-tuned eects that can be used to augment your keyboard parts.
• Sustain: Press the [SUSTAIN SOUND] button to give the notes played on the keyboard longer, realistic sustain. This
eect applies to all the parts.
Tips:
• Part Eect: Press the [PART EFFECT] button to add Arp/Harmony to the notes played. This eect only applies to the
currently selected parts.
Tips:
For a more natural sustain effect, please use the sustain pedal.
You can use the sound edit function to modify the time of panel sustain and pedal sustain.
When using the R1 part to play the no. 1 piano sound, using the sustain pedal allows you to achieve a very
authentic pedal noise and string resonance.
Most harmony eects only work in auto-bass chord mode. For this to work, turn on the CHORD mode and
play the chord in the chord area so that the right hand notes are added to the harmony eect.
Harmony eects only apply to the right hand (R1, R2, R3), and are not supported on the left hand.
When you add arpeggio eects to a keyboard sound, one or more notes played on the keyboard are converted into a series of notes that are played in chronological order according to the arpeggio style. Try dierent
arpeggios to nd the best ones for your style.
A keyboard part can only use either arpeggios or one of the harmony eects. Two part eects cannot be
used at the same time for one keyboard part.
The instrument eects have been optimized for each Sound. To make modications, refer to the section on
Eects.
24
Sounds
• Insert Eect: Press the [INSERT EFFECT] button to add an eect to the Sound. There is a wide selection of insert
eects available. Some of them can enrich the sound; for example, try adding distortion to the guitar sound, or use
some eects to make your performance more realistic like adding delay to an electronic piano. This eect only
applies to the currently selected parts.
Tips:
• Mono: Press the [MONO SOUND] button to make the Sound play monophonically (single notes only). In this mode,
the keyboard will only produce one sound no matter how many keys you press at the same time. This eect only
applies to the currently selected parts.
Tips:
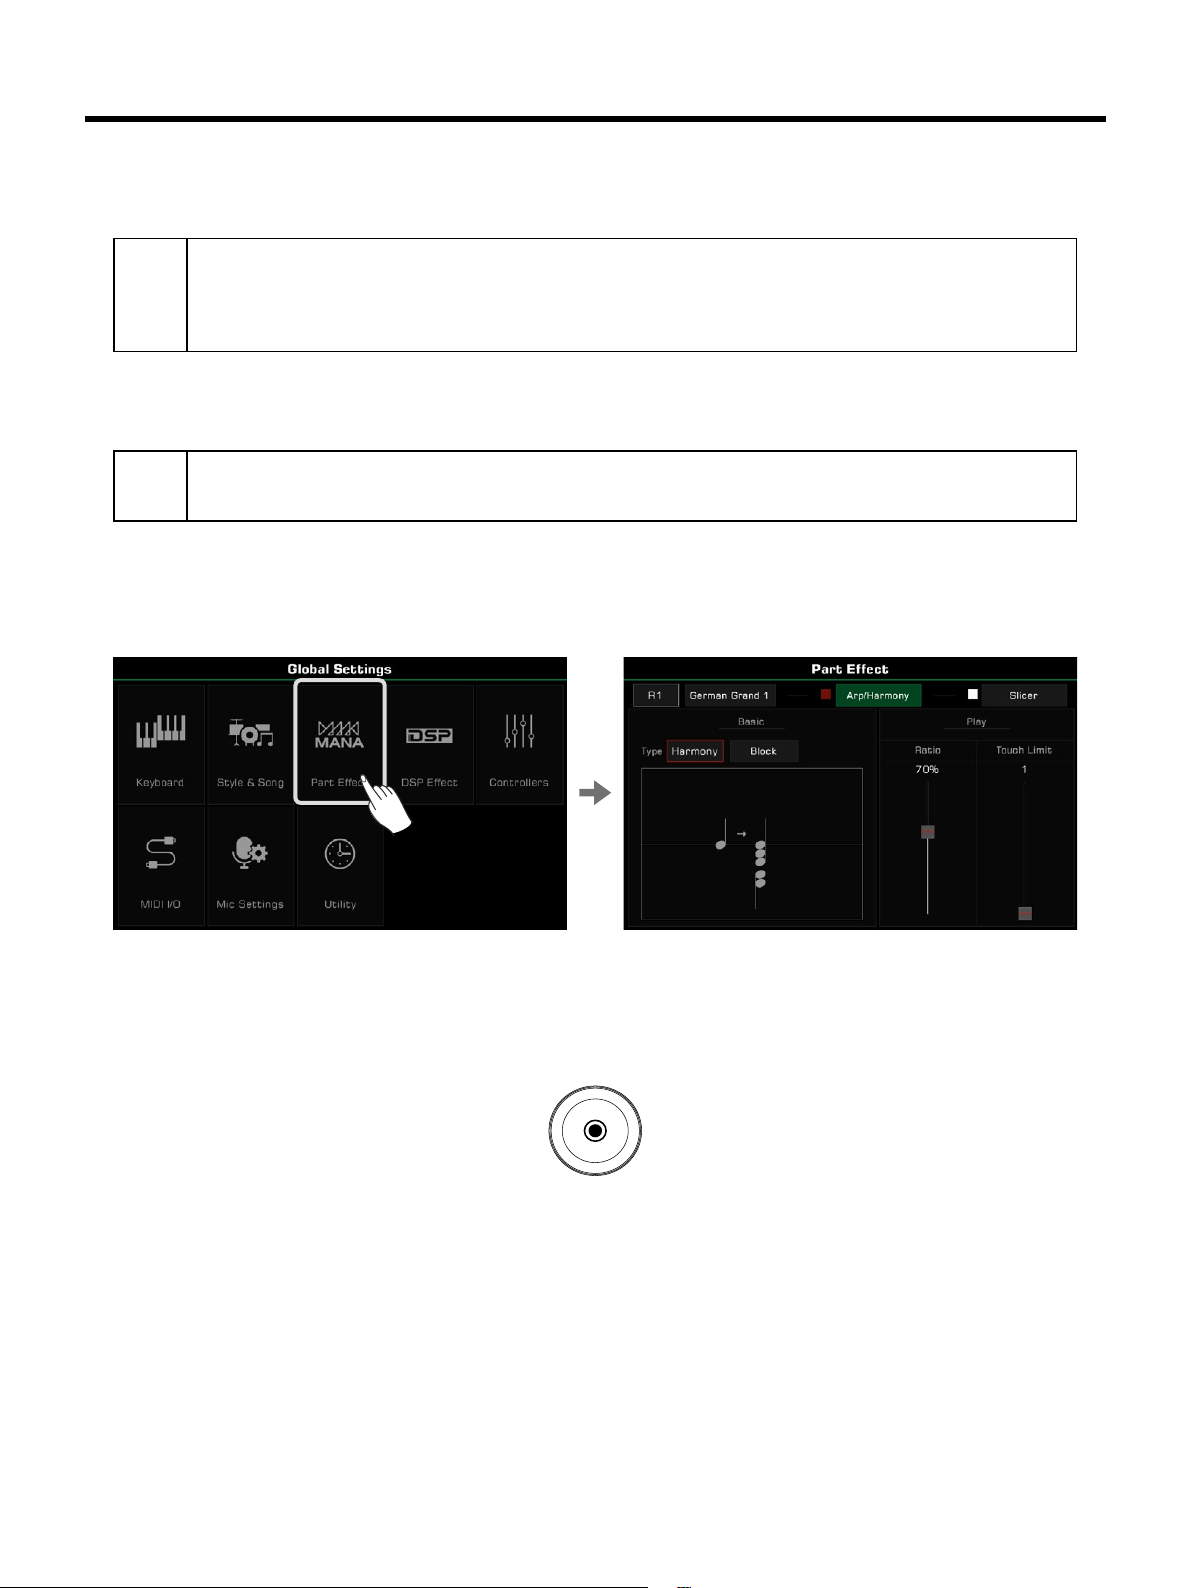
Other built-in part eects like “Slicer” add a chopping eect and note lter. Experiment with the dierent eects to nd
the ones you like best.
Enter the “Part Eect” menu through [GLOBAL SETTINGS] to add more keyboard eects to your playing.
The instrument insert eects have been optimized for each sound. To make modications, refer to the section on Eects in this manual.
You can also quickly turn on/o the insert eect for each part from the mixer interface.
Most of the sounds in this instrument have default insert eects. If you want to modify them, you can use the
sound edit function.
Some sounds are set to Mono by default according to their character. Others also apply a portamento or
legato eect (portamento eect is also applied to some sounds with poly mode).
You can edit the playing mode of sounds by using the sound edit function.
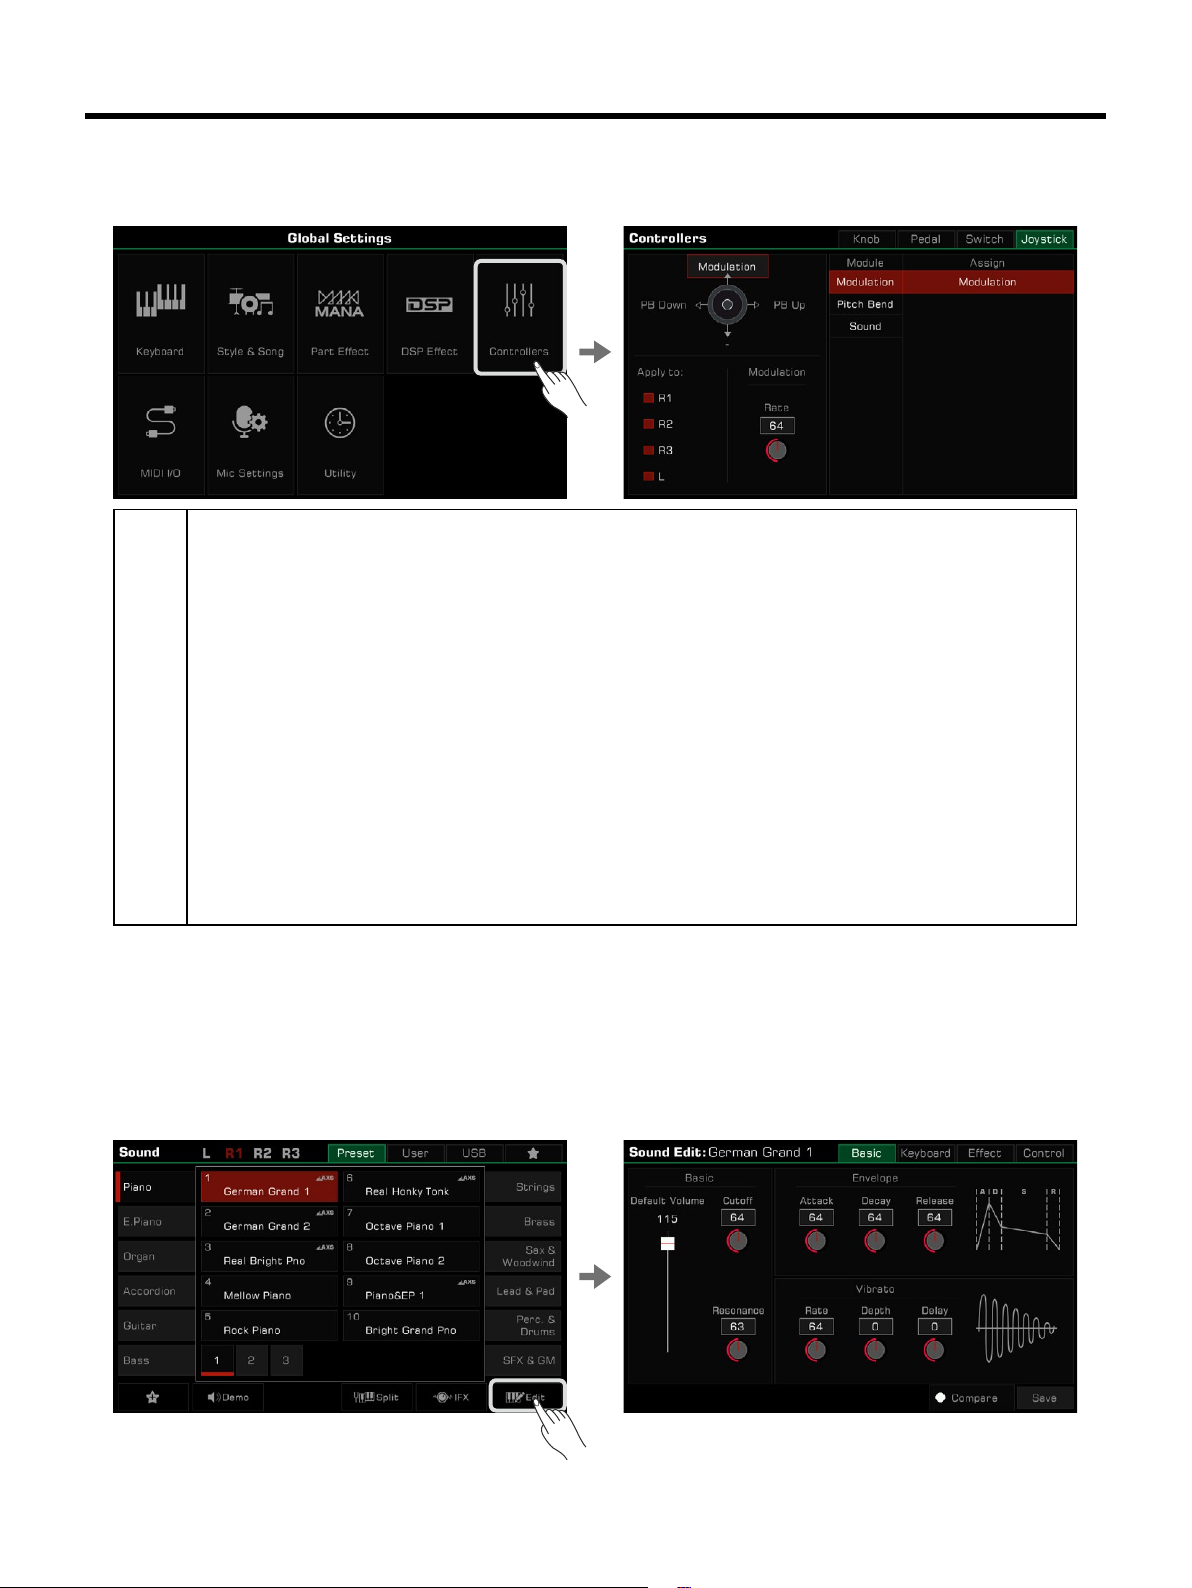
Using the Joystick to Adjust Pitch and Sound
Move the Joystick up, down, left, or right to change keyboard pitch or sound eects. After releasing it, the Joystick will
return to the neutral position.
25
Sounds
The Joystick default function for left and right movement is Pitch Bend, which changes the note pitch lower or higher.
The up direction by default is Modulation; this makes the note play with vibrato.
The Joystick up and down parameters can be assigned in the “Controllers” menu.
Tips:
About Pitch Bend:
With the Joystick you can produce realistic bend eects when you play the sound, which will make the
sounds more exible.
Dierent sounds have dierent default bend ranges. You can change the range through the sound edit function.
All keyboard parts of this instrument can have only one bending range at one time. With several parts enabled at the same time, the bending range of the instrument generally follows the R1 part. If you want to customize the bending range and lock it, use the Pitch Bend Lock feature. Assign the function of switches above
Joystick as Pitch Bend Lock and turn it on, then adjust the Pitch Bend Range in the Joystick Tab.
About Modulation:
When Joystick is pushed upward, the part being played has a vibrato eect. Joystick will return to center
position when released and the vibrato eect will disappear.
But with the Modulation Lock function, you can let Joystick keep the vibrato eect when it returns to center
place. Assign the function of switches above Joystick as Modulation Lock and turn it on.
About Sound Control:
With the Controllers settings you can modify the function of Joystick’s up and down directions to better suit
your playing habits. When the switch function above Joystick is set to Sound Control and turned on, moving
the Joystick up and down can change the insert eect parameters of the sound in real time. Refer to the
“Controllers” and “Sound Edit” sections for more information.
Editing Sounds
The sound edit function enables you to create your own sounds by editing parameters of existing sounds. You can save
up to 500 User Sounds and recall them from the User sound tab.
Select a sound to edit. Press the “Edit” button on the Sound Selection display to call up the Sound Edit menu.
26
Sounds
Editable Parameters
The parameters you can edit are categorized into four tabs at the top of the menu. Press one of the tabs to edit that
parameter.
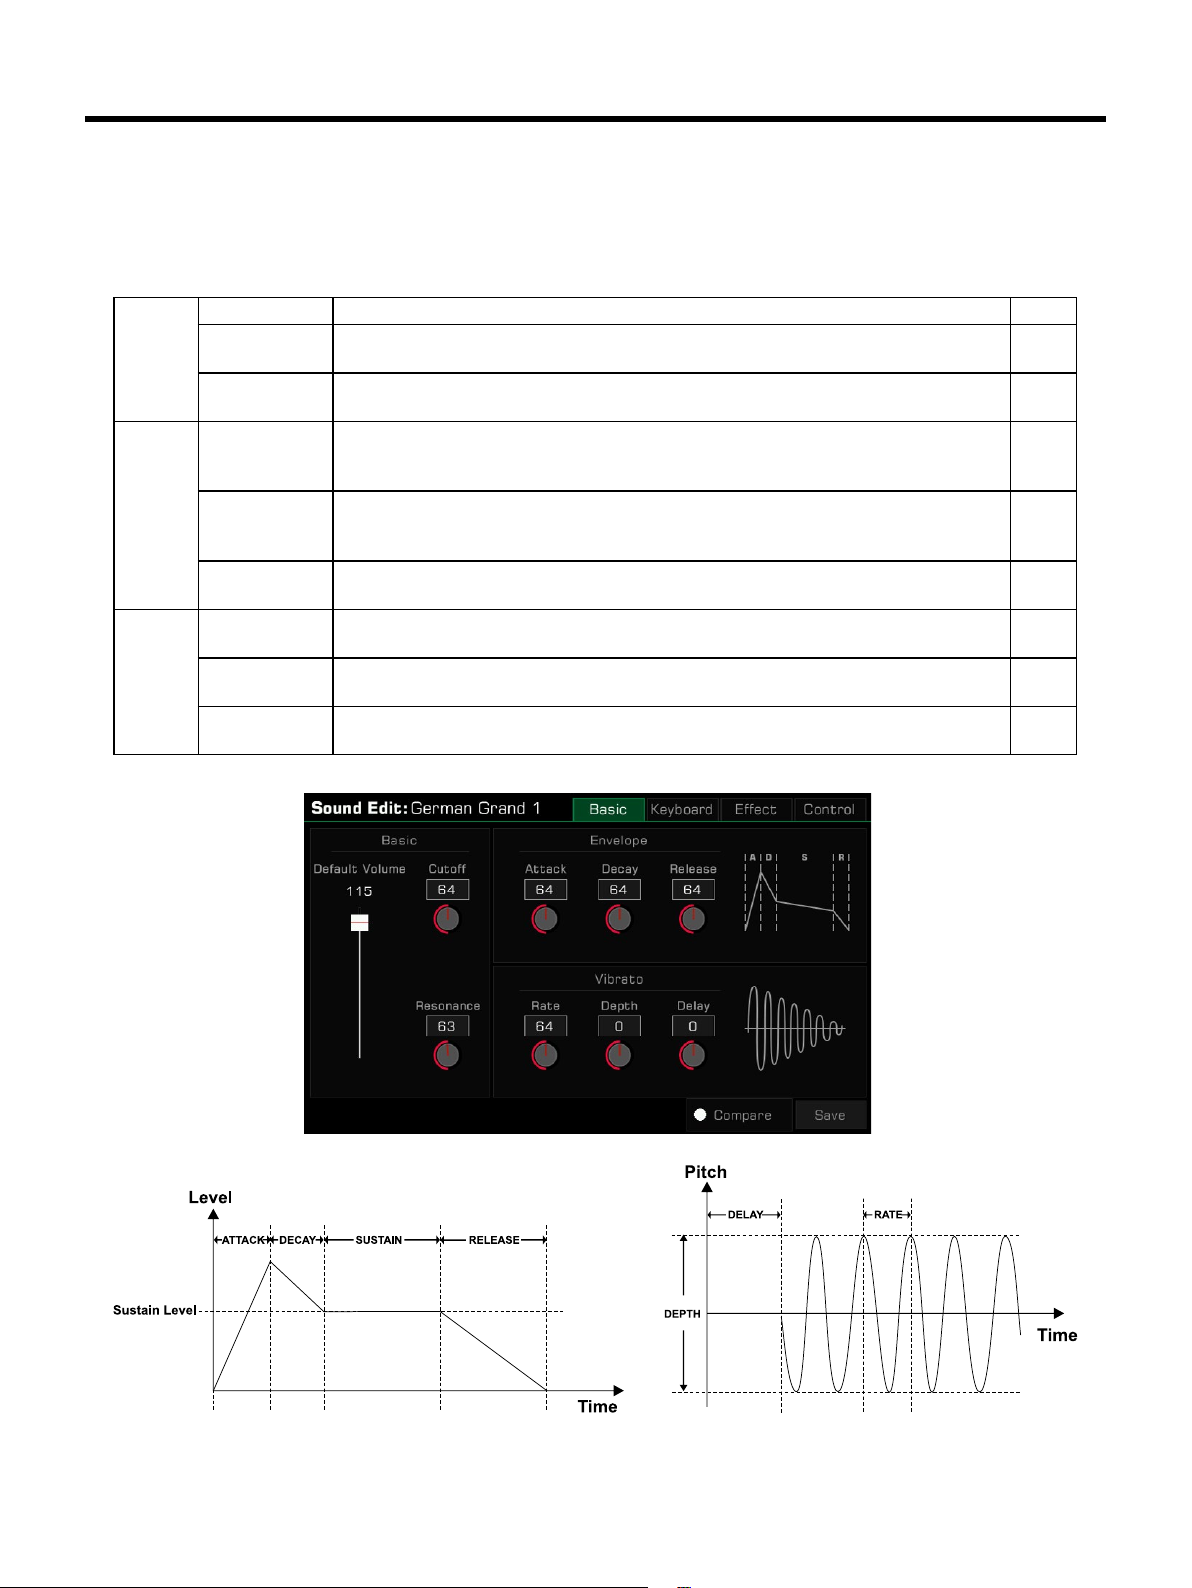
Basic Tab
This menu contains “Basic”, “Envelope”, and “Vibrato” parameters .
Basic Default Volume Change the default volume of the current sound. 0~127
Cuto Adjust the lter cuto of the sound.
As the value is turned higher, the sound becomes brighter.
Resonance Adjust the lter resonance of the sound.
As the value is turned higher, the resonance eect becomes stronger.
Envelope Attack Determines the time it takes for a sound to reach maximum volume after the key is
pressed and sound begins.
As the value is turned lower, the sound begins faster.
Decay Determines the time it takes for a sound to reach its sustain level volume after the
attack.
As the value is turned lower, the sound decays faster.
Release Determines the time from the key is released until the sound decays to silence.
As the value turned lower, the sound disappears faster.
Vibrato Rate Determines how fast one vibrato eect cycle is played.
As the value is turned higher, the vibrato speed becomes faster.
Depth Determines the strength of the vibrato eect.
As the value is turned higher, the eect becomes stronger.
Delay Determines how quickly the vibrato eect starts after the sound begins.
As the value is turned higher, the vibrato starts later.
0~127
0~127
0~127
0~127
0~127
0~127
-64~63
-64~63
27
Sounds
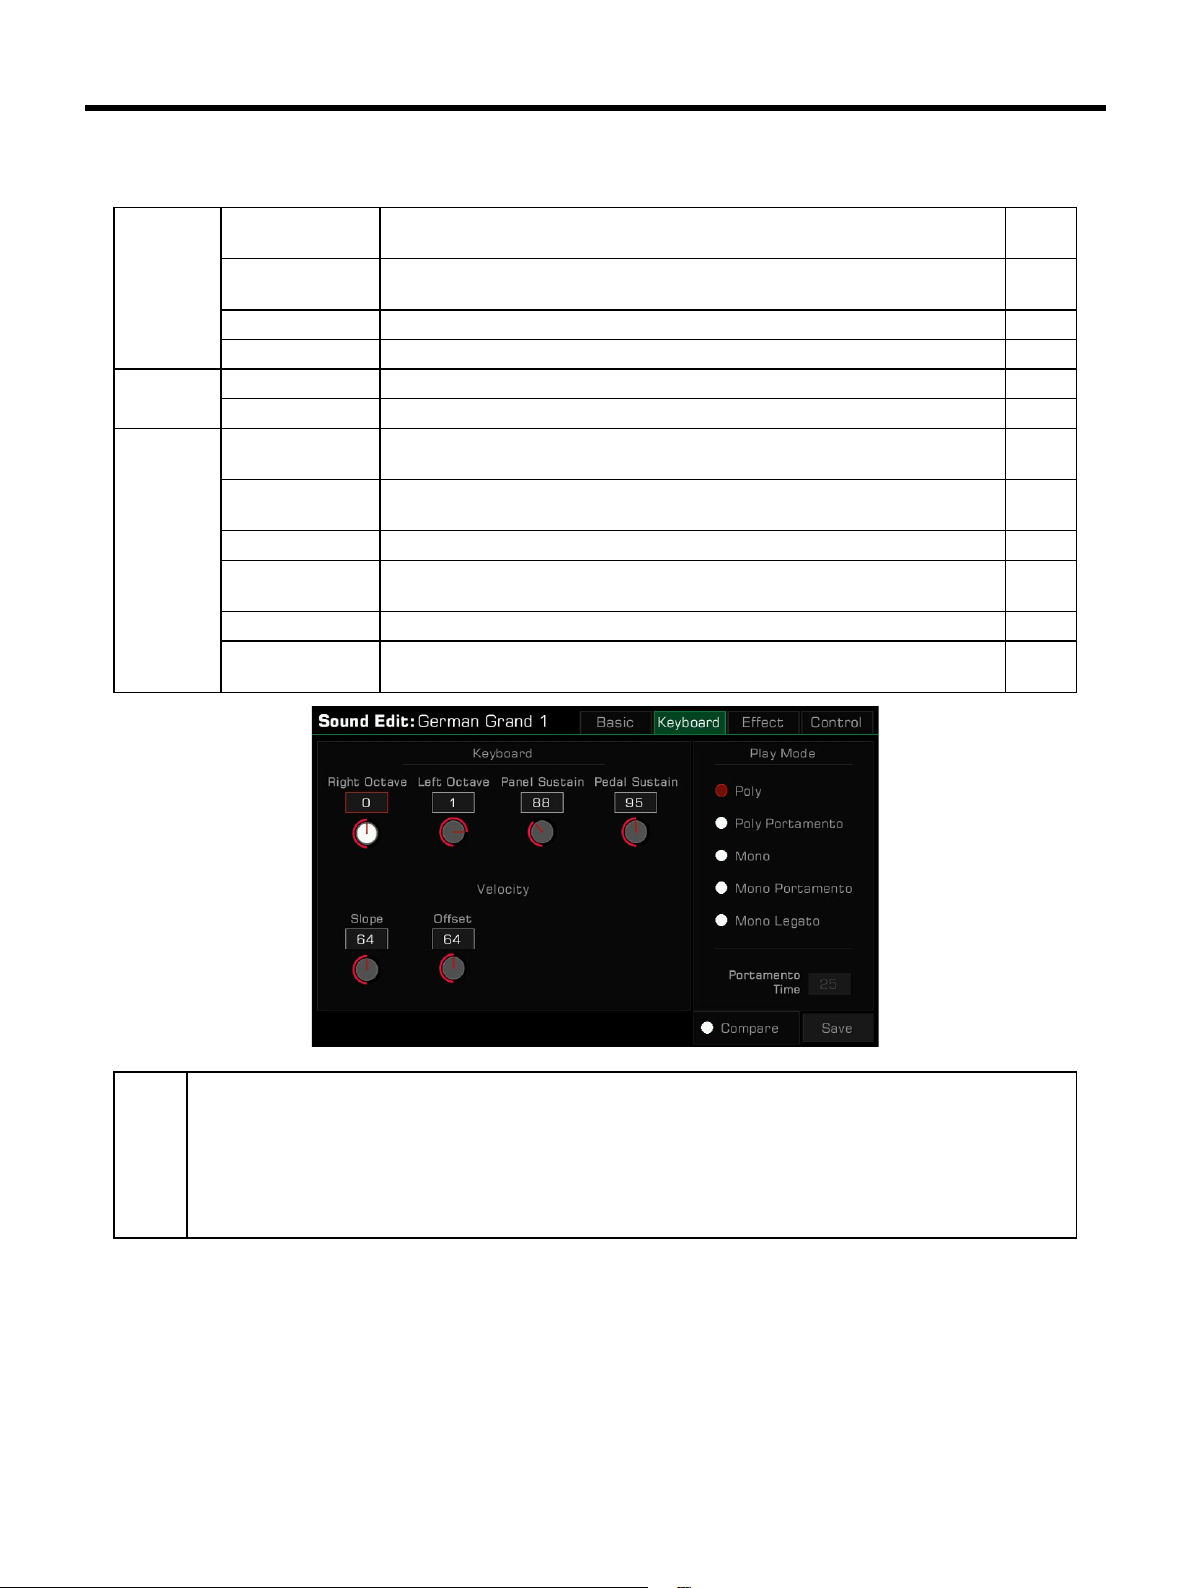
Keyboard Tab
This menu contains “Keyboard”, “Velocity”, and “Play Mode” parameters.
Keyboard Right Octave Determines the default octave shift of the edited sound when used as any of
the RIGHT 1-3 keyboard parts.
Left Octave Determines the default octave shift of the edited sound when used as the
LEFT keyboard part.
Panel Sustain Determines the length of sustain when using Panel Sustain. 64~127
Pedal Sustain Determines the length of sustain when using Pedal Sustain. 64~127
Velocity Slope Adjusts the velocity slope. 0~127
Oset Adjusts the time curves as the velocity varies. 0~127
Play Mode Poly Sets the sound to be played back with multiple simultaneous notes
(polyphonically).
Poly Portamento Sets the sound to be played back with multiple simultaneous notes
(polyphonically). Legato playing triggers the Portamento eect.
Mono Sets the sound to be played back with single notes only (monophonically).
Mono Portamento Sets the sound to be played back with single notes only monophonically).
Legato playing triggers the Portamento eect.
Mono Legato Sets the sound to be played back with legato, and without Portamento.
Portamento Time Sets the transition speed from the rst note played to the next, when the
playing mode is set to Portamento and the notes are played legato.
-2~+2
-2~+2
0~127
Tips:
28
If the play mode is set to “Mono”, only one sound will be produced at a time no matter how many keys you
play at the same time. When using the Harmony eect, you can still hear all harmony notes.
Portamento slides the pitch of one note played on the keyboard into the next note played. You can control
the transition time by adjusting the “Portamento Time”.
Legato is a special mode of monophonic playing. When you press a new key while already holding another
key, the rst note will immediately change to the second note played. Playing some stringed instruments with
Legato can be surprisingly realistic.
Sounds
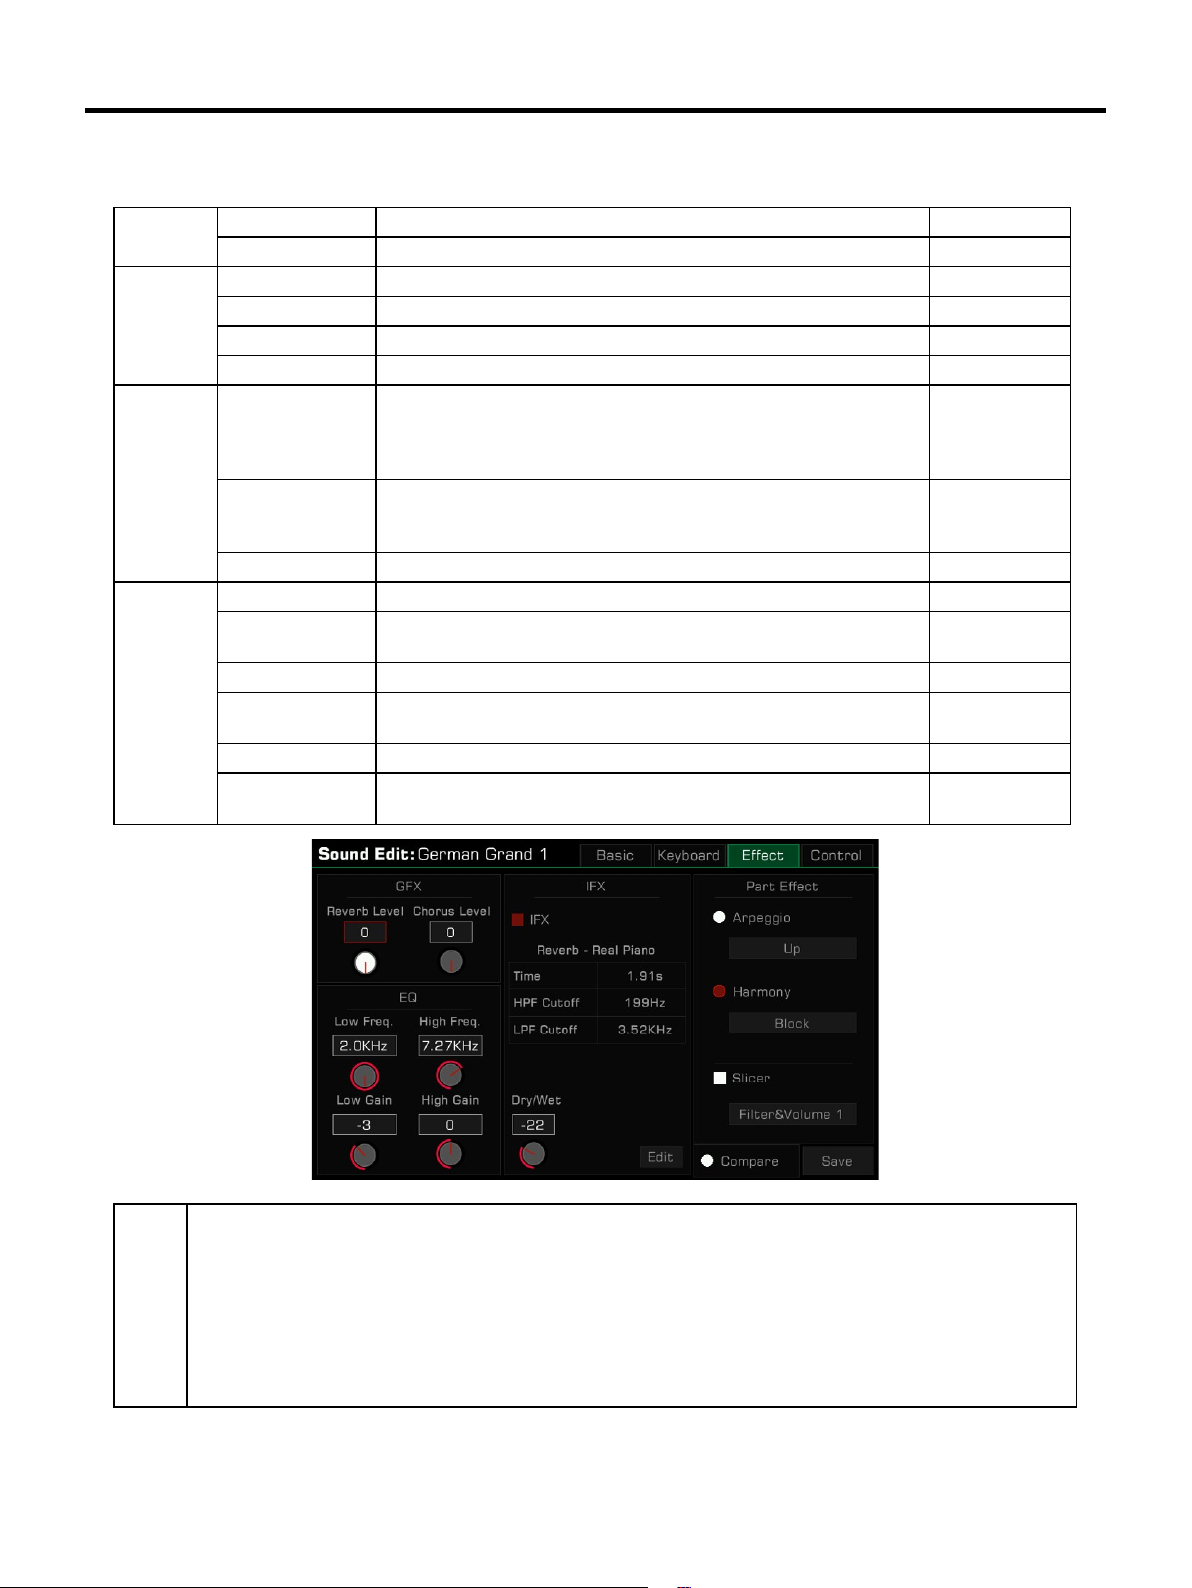
Eect Tab
This menu contains “Global Eect”, “EQ”, “Insert Eect” and “Part Eect” parameters.
GFX Reverb Level Adjust the reverb depth. 0~127
Chorus Level Adjust the chorus depth. 0~127
EQ Low Frequency Adjust the Sound’s Low Frequency level. 32 Hz~2.0 KHz
Low Gain Adjust the Sound’s Low Gain level. -12~+12
High Frequency Adjust the Sound’s High Frequency level. 500 Hz~16 KHz
High Gain Adjust the Sound’s High Gain level. -12~+12
IFX IFX ON/OFF Press to turn the default IFX of your selected sound on/o. You can
also control this function with the IFX button on the panel.
The name and parameters of the currently selected IFX will be displayed under the button.
Dry/Wet Adjust the IFX depth.
If the selected IFX does not support this parameter adjustment, the
knob will not appear.
IFX Edit button Press this button to select IFX for the selected Sound in the pop-up.
Part Eect Arpeggio ON/OFF Press to set Arpeggio as the default keyboard eect.
Arpeggio Type Press the Arpeggio name to bring up the Arp Selection menu. Press
to select an arpeggio type from this list.
Harmony ON/OFF Press to set Harmony as the default keyboard eect.
Harmony Type Press the Harmony name to bring up the Harmony Selection menu.
Press to select a Harmony type from this list.
Slicer ON/OFF Press to turn on the Slicer eect.
Slicer Type Press the Slicer name to bring up the Slicer Selection menu. Press
to select a Slicer type from this list.
-64~+64
Tips:
When a sound is used in R3, the insert eect of that sound may be turned o. This depends on the eect
type used for the sound, as some IFX cannot be used for R3. The insert eects of this instrument can be
freely distributed among the parts of the keyboard. When an insert eect of a part has been taken, the part
may have no eect. Go to the “DSP Eects” section for more information.
Most Harmony eects only work when [CHORD ON/OFF] is turned on. Turn [CHORD ON/OFF] on when editing a sound and listen to the eect while playing a chord.
Arpeggio and Harmony eects can not be used on the same keyboard part at the same time. Slicer can be
used with Arpeggios or Harmonies.
Please refer to the section on Part Eects for more information.
29
Sounds
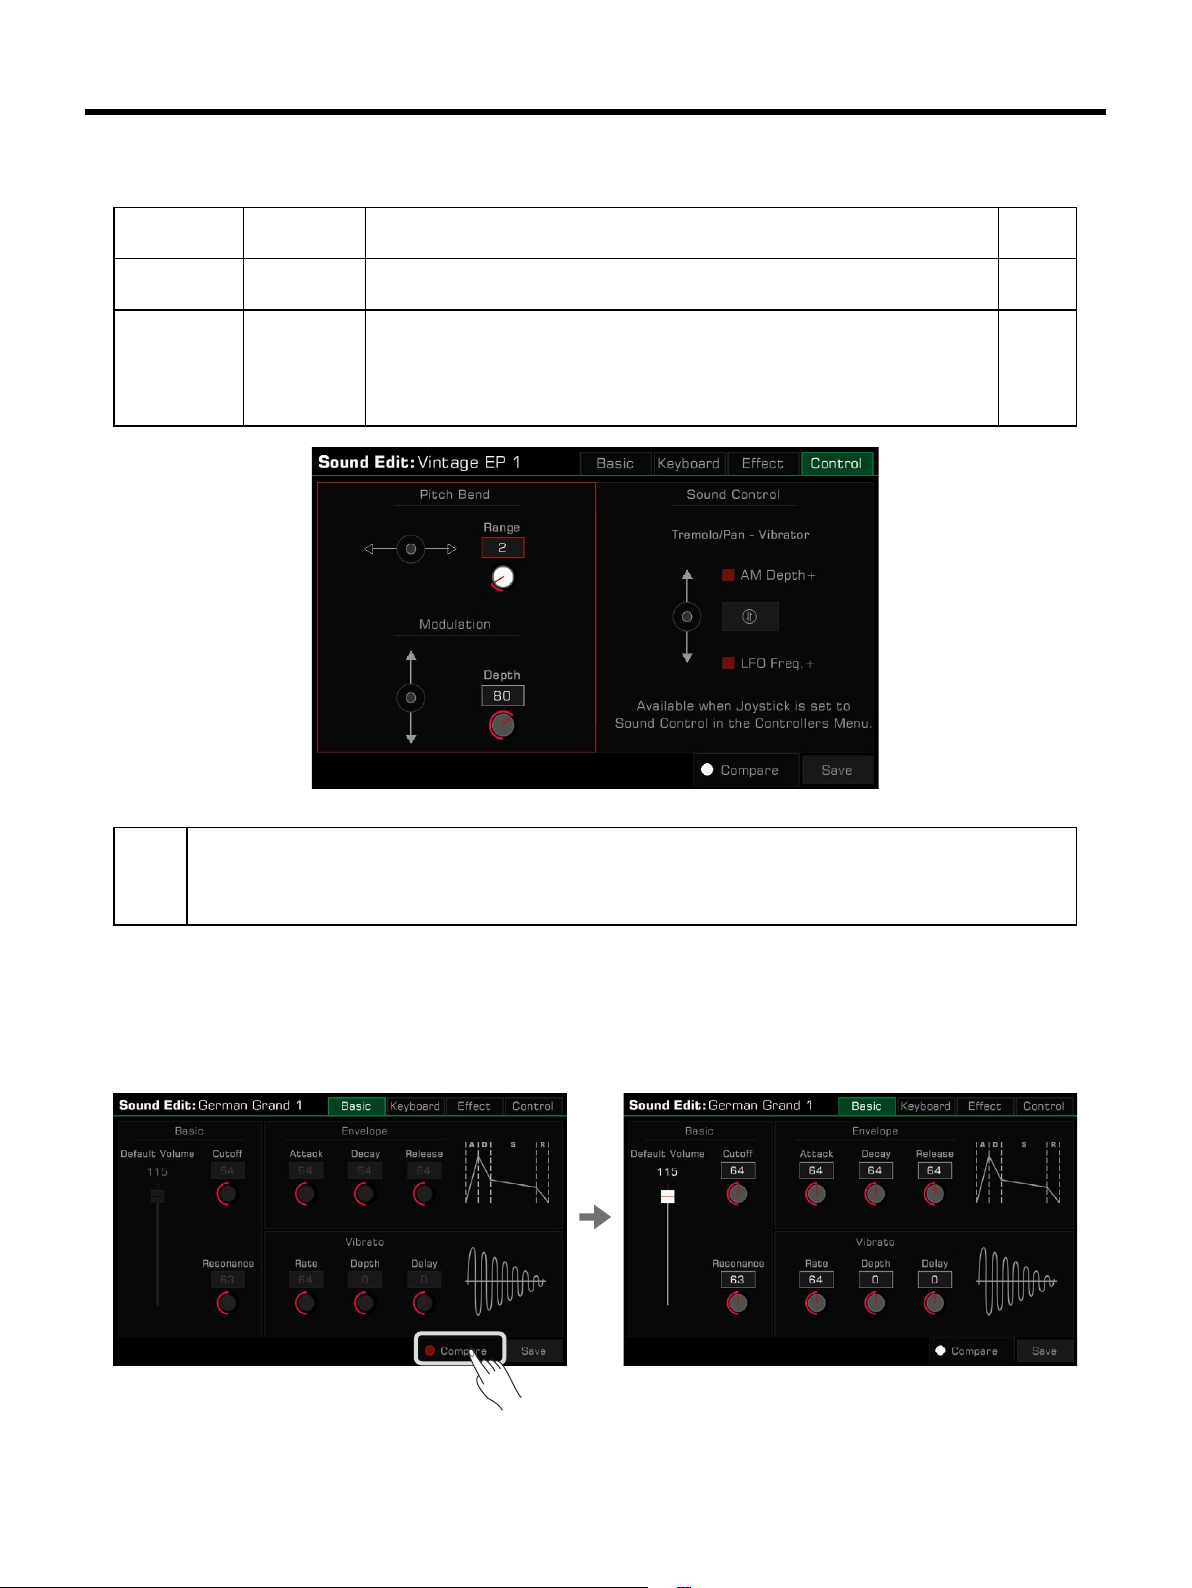
Control Tab
This menu contains “Pitch Bend”, “Modulation” and “Sound Control” parameters.
Pitch Bend Pitch Bend
Range
Modulation Vibrato Depth Determines the strength of the vibrato eect.
Sound Control IFX ON/OFF Control the IFX eect in real time by moving the Joystick up or down. Dierent
Adjust the default Pitch Bend Range of the sound, changing the pitch of
played notes up or down smoothly when the Joystick is moved left or right.
Add Vibrato by moving the Joystick up.
IFX have dierent preprogrammed parameters for the Joystick. The parameter
name for the one selected will be shown here.
Press to turn on the IFX button to assign the Joystick parameters. Press the
“Exchange” button to swap the parameters’ position.
0~12
0~127
Tips:
Only specic insert eects provide the maximum of two eect parameters that can be assigned to the Joystick.
When the switch function above Joystick is set to Sound Control and turned on, move the Joystick up and
down to activate Sound Control. Go to the “Controllers” section for more information.
Saving the Edited Sound
After editing the sound, you can compare your edit to the original sound.
Press the “Compare” button to hear the keyboard set to the original preset sound with default parameter settings.
Press the “Compare” button again to return to your edited sound.
30
 Loading...