

Medela Thopaz Instruction Manual

internen Gebrauch
nur für
Thopaz
Thoraxdrainage-System
-10 kPa /5l/min
™
4 Instruction for use
4 Gebrauchsanweisung
Precious life Progressive care
Te chnical specifications • Te chnische Daten
lowvacuum
-10kPa
-75mmHg
-100 mbar/cm H2O
95 x170 x235 mm
3.74 x6.69 x9.25 inch
70
30
CLASS
kg
106
kPa
75
lowflow
5l/min.
1kg/2,2 lbs
without jar
ohne Behälter
IP33
Operation
Betrieb
Operation
Betrieb
-42,5 dB(A) 1l -2,5 kPa
Max. noise level
Max. Lautstärke
78 dB(A)
Alarm noise level
Alarm Lautstärke
ISO 9001
ISO 13485
CE (93/42/EEC), IIa
+40
Operation
+50
Betrieb
Transport/Storage
Transport /Lagerung
-5
°C
-20
°C
Transport/Storage
95
Transport /Lagerung
20
Switching adapter AC
Netzgerät AC Adapter
Model: TR30RAM120
IEC: 60601-1
Input: 100-240V~, 0.8-0.4A, 47-63Hz
Output: 12V ,2.5A
20 W
12 VDC

EN
Instructions for use
2
DE
Gebrauchsanweisung
22
Caution: Federal law restricts this device to sale by or on the
order of ahealth professional.
11

l
Congratulations
With Thopaz,you have acquired an innovative digital drainage system that has set new stan-
dards for thoracic drainage management.
Thopazis an electronic measuring and monitoring system with optical and acoustical safetyfeatures. The device is adrysystem, which means no fluids arenecessaryfor operation. It has the
capabilityto displaythe course of therapydigitallyand graphically.Upon completion of therapy,
it can be transferred to aPC.
The handysizeand quietness while in operation areother advantages Thopazoffer to the
patients.
ll
Use in accordance with the instructions
Thopazmaintains negative pressureinthe pleural space and collects fluids and/or air.
Thopazis portable and can be operated independent of the mains power source because of
the internal rechargeable battery.The built-in electronics allow you to make the necessary
adjustments and track the effectiveness of therapyduring operation. Acoustical and optical
signals aretriggered byvariances during the course of treatment (XII).
Thopazis intended for use on patients in all stages of the hospital. The unit should onlybe
operated byproperlytrained staff.
Indications
The system is used when negative pressureisrequired in combination with an athoracic drainage catheter.
Contraindications
•Ifanair flow of greater than 5l/min is necessary.Thopazcannot be used.
•Under no circumstances do Medela advise connecting bilateral thoracic drains to asingle
pump. In such cases, the use of two Thopazunits is recommended.
•During in-home use, Medela does not recommend the use of Thopazbypatients who are
visuallyand/or audiblyimpaired.
EN
2

lII
Warnings /Safety instructions
Thopazis approved exclusivelyfor the use as described in these instructions. If Thopazis not
used in combination with the original Medela accessories (disposable canisters; tubing set; carrying strap; mains adapter; and docking station), Medela cannot guarantee the safe function of
the system.
Thopazis EMC-tested in conformitywith the requirements of IEC 60601-1-2:2001. It shall be
used in the vicinityof other EMC-tested devices that fulfill the requirements as outlined in the
IEC 60661-1-2 standard. Untested HF sources, radio networks or the like can influence the
operation of the device and should not be operated in the vicinityof Thopaz.
Please read and observe these warnings and safety instructions before operation.
Warnings
• Beforeyou plug the device into the power supply,please verifythe voltage at the local
power supplyis the same as given on the specification plate of Thopaz.
•Data transfer via USB is not possible while the pump is connected to the patient.
•The device is not for use while bathing, showering nor suitable for ahazardous explosive
environment.
•Donot use Thopazin MRT(Magnetic Resonance To mography).
•Donot dryThopazwith microwaves.
Safety instructions
• Thopazmust remain in an upright position during use.
•The patient should be regularlymonitored according to internal hospital guidelines.
•Thopazis amedical device that requires special safetyprecautions and must be installed
and placed in operation in accordance with the attached EMC information. Portable and
mobile RF communication devices (mobile telephones) can affect Thopaz.
•Areplacement device must alwaysbeavailable for patients for whom abreakdown of the
device can lead to acritical situation.
•Innone of the following cases mayThopazbe placed in operation:
−Ifthe power cordorplug is damaged
−Ifthe device is not functioning properly
−Ifthe device is damaged
−Ifthe device has apparent safetydefects
•Keep the power cordawayfrom hot surfaces.
•Keep the AC adapter connector awayfrom moisture.
•Separation from the power supplyoccurs byunplugging the mains adapter.
These instructions for use must be kept for later reference.
EN
3
IV
Initial setup
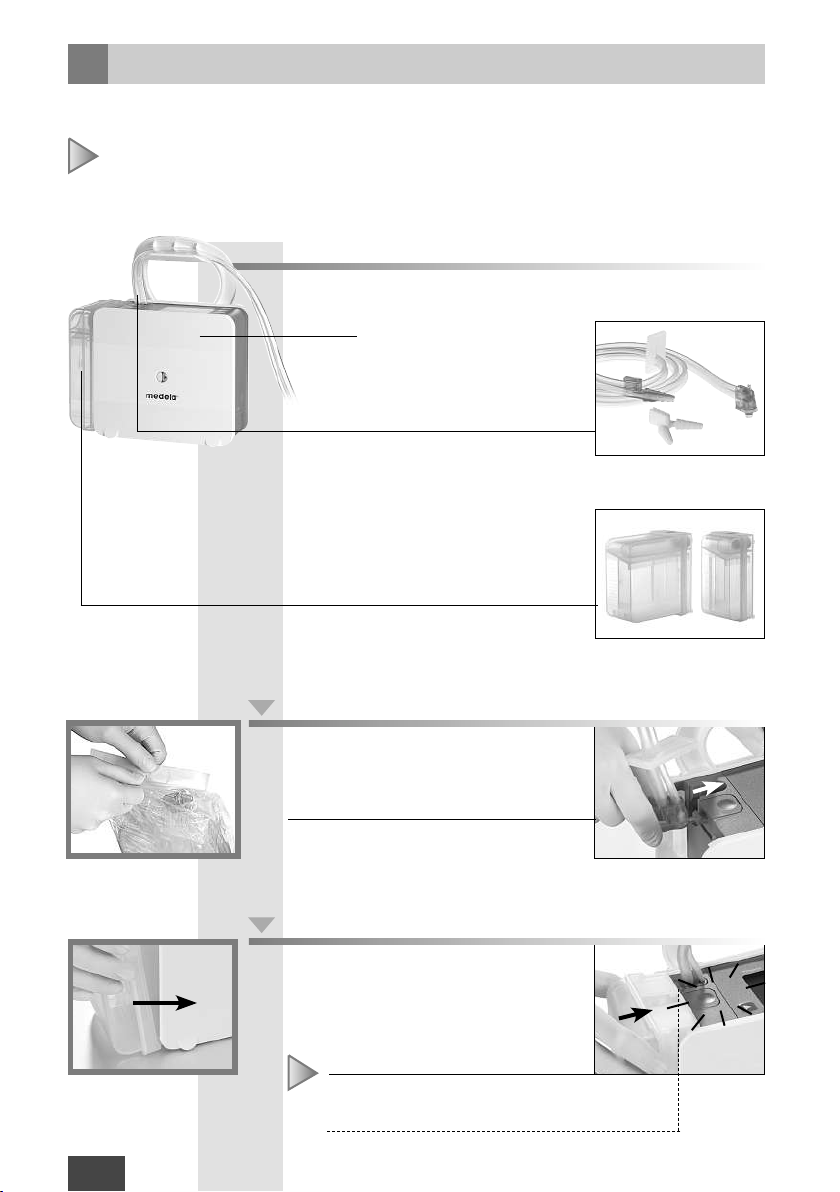
Check the delivery package for completeness and general condition.
Thopaz™
079.0000
Mains adapter
077.0106
Thopaz
Instruction for Use
200.0685
Thopaz-CD
079.0035
Do not switch on Thopaz beforefirst battery charge!
Initial setup
1. Select your plug
EN
4

2. Charge battery beforefirst use
Connect Thopazto mains power,
batteryis being charged
after
max.
3h
Battery is being
charged
The batterymust be fully charged before first use.
a) Disconnect Thopaz from mains power -
pull on the plug housing.
Do not pull on the cable or the anti-bend
protection!
b) Thopazswitches offautomatically
3. Select language
a) Switch Thopazon with [],self test starts.
b) Select language (byfollowing instructions on display), confirm with
c) Switch Thopazoffwith [].Thopazis now readyfor use.
Battery is fully
charged
“Ok”.
If Thopaz was switched on before batterywas fully charged (step 2),
follow the instruction on the display.
Cleaning
4.
Classification according to RKI* guideline: non-critical.
Disinfection
Thopazcan be disinfected with the disinfecting agent group “alcohol”.
Do not use other cleaning agents (e.g. Te rralin) as theycan damage the plastic
housing.
Immersion disinfection, thermal disinfection and ultrasound cleaning arenot permitted.
Sterilization
Thopazand Thopazaccessoryparts arenot sterilizable.
*Robert Koch Institute, Berlin, Germany
EN
5
V
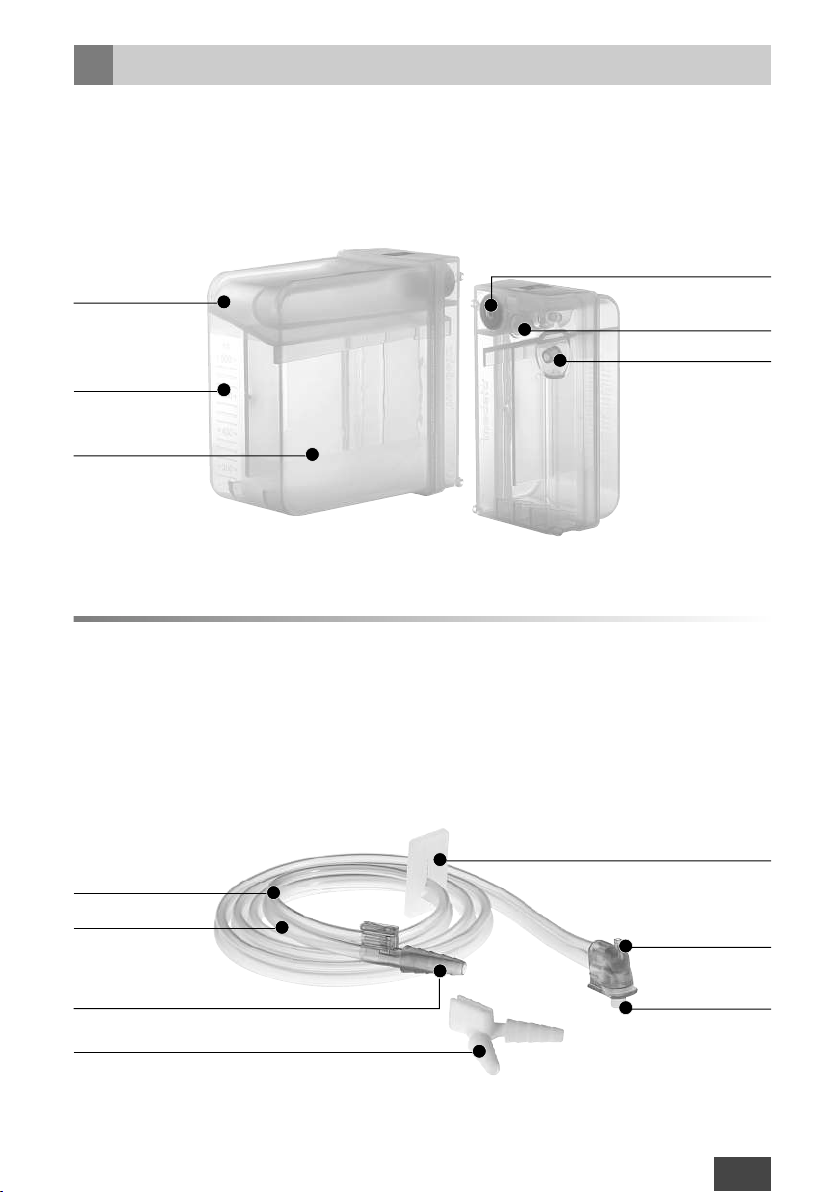
Operating elements
Suction port
Release button
Canister (ill. 0.3 l)
Tubing guide
Display
USB port
Specification plate
Carrying handle
Standardrail holder
Batterycharging status
Displayfield
Mains adapter port
Vacuum port with seal
Bed holder
Information field
On /Off
Pressureindicator
Selection button
Instructions /alarms
Therapynumber
6
EN
Navigation field
VI
Disposables
Canister 0.3 Lund 0.8 L
Material: Polypropylene
Accuracyof graduation: +/- 2.5% (in the upright position)
Safetychamber
Graduation
Suction chamber
Capacity0.3 L
and 0.8 L
overflow protection /
bacteria filter
Pressurerelief valve
Sealing cap
Double lumen tubing with single /double connection
Material: PVC (medical grade)
Length: 1.5 m
Ø: 5mm
Measuring tubing
Patient tubing
Patient single connection
Patient double connection
Clamp
Connection
to pump
Connection
to canister
EN 7
VII
Preparation for use
Use only after instruction by trained personnel.
“pressure“ generally implies “negative pressure”
1
2
Check necessary parts
•Thopaz
•Tubing (single /double)
•Canister
(usable capacityin upright
position 0.3 l/0.8 l)
Connect tubing
Open external packaging.
Byinsertion of smallest connection into
pump, lock tubing in the direction of the
arrow.
3
8
EN
Click in canister
Unpack canister and position the openings up, insert the lower portion of
canister into place.
Push the canister into Thopaz
until you hear aclick.
Canister secures tubing
click
4
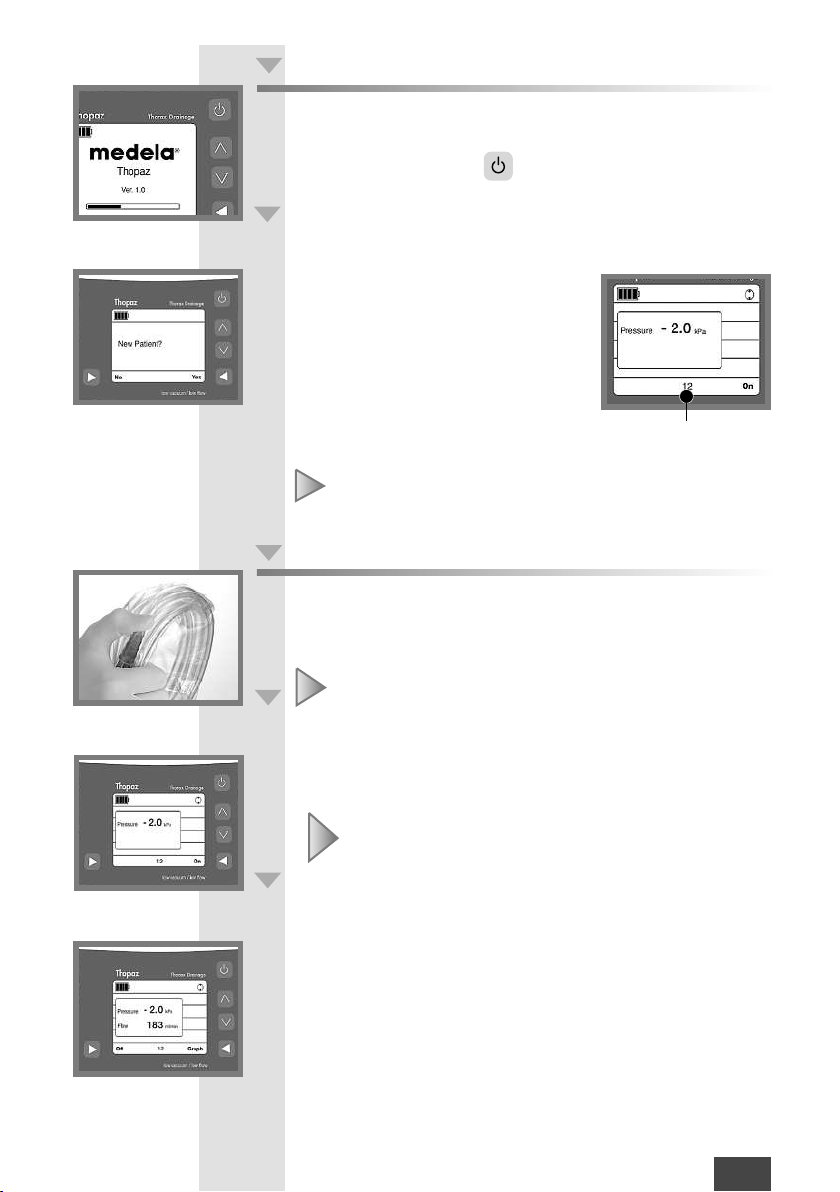
Switch on Thopaz
1. Switch on Thopaz with []–self-test starts
If the self-test is not successful, see the notes for troubleshooting
on the display(Chapter XII)
2. New patient? Yes/No
• “Yes” means that Thopazwill issue a
new therapynumber (This is recommended when achange of patient
occurs.)
“No” means that the therapynumber
•
remains unchanged (This is recommended for the continued treatment of
the same patient).
The therapy number is displayed in the middle of the
navigation field.
Therapynumber
5
Conduct functional check
1. Seal offthe conical connector of the patient tubing with your
2. •Switch on pressure with the “On” button –pressureisbuilt up
3. Change into standby mode: press “Off” button for amin. 3sec.
4. Thopas is in standby mode and is ready for use with the
(through the packaging).
thumb
Ensuretubing is not bent during the function check.
•Check flow value
Flow decreases: Thopaz is ready for use
Flow does not decrease: Leak in the system,
factory settings.
Check tubing connections,
replace canister and/or tubing
EN
9
VIII
In Use
1
2
EIN
In accordance with the physician’sdirections, connect patient catheter to the tubing
Remove the tubing from the inner packaging before
connecting to patient.
Use
1. Switch on Thopaz
2. New patient? Yes/No
see page 9
Switch on pressure with the “On” button –the pre-selected
3. •
pressureisbuilt up and kept constant
•Check flow value
The acoustic alarmfunction is deactivated for the first 30
seconds after turning on. During this time the pressureis
built up.
with []–self-test starts
10
3
EN
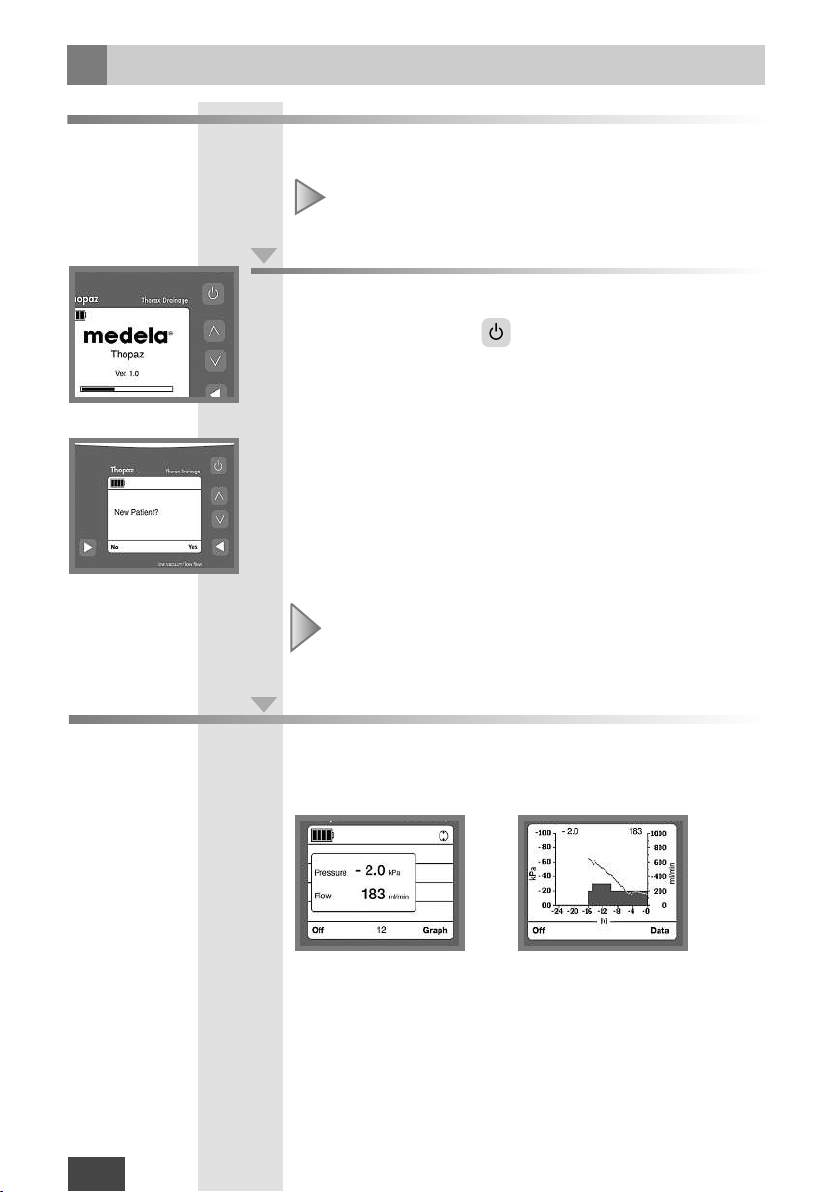
Check therapy progress
Thereare two different modes available:
Data mode and Graph mode
Data mode Graph mode
In the data mode, the set pressurevalue and the current flow
value (equivalent to parenchymal leakage) aredigitallydisplayed.
While in the data mode, the graph mode is activated with
“Graph” button. The flow and pressureprogression aredisplayed on atime line. To returntothe data mode, press the
“Data” button or after 60seconds the displaychanges to the
data mode.
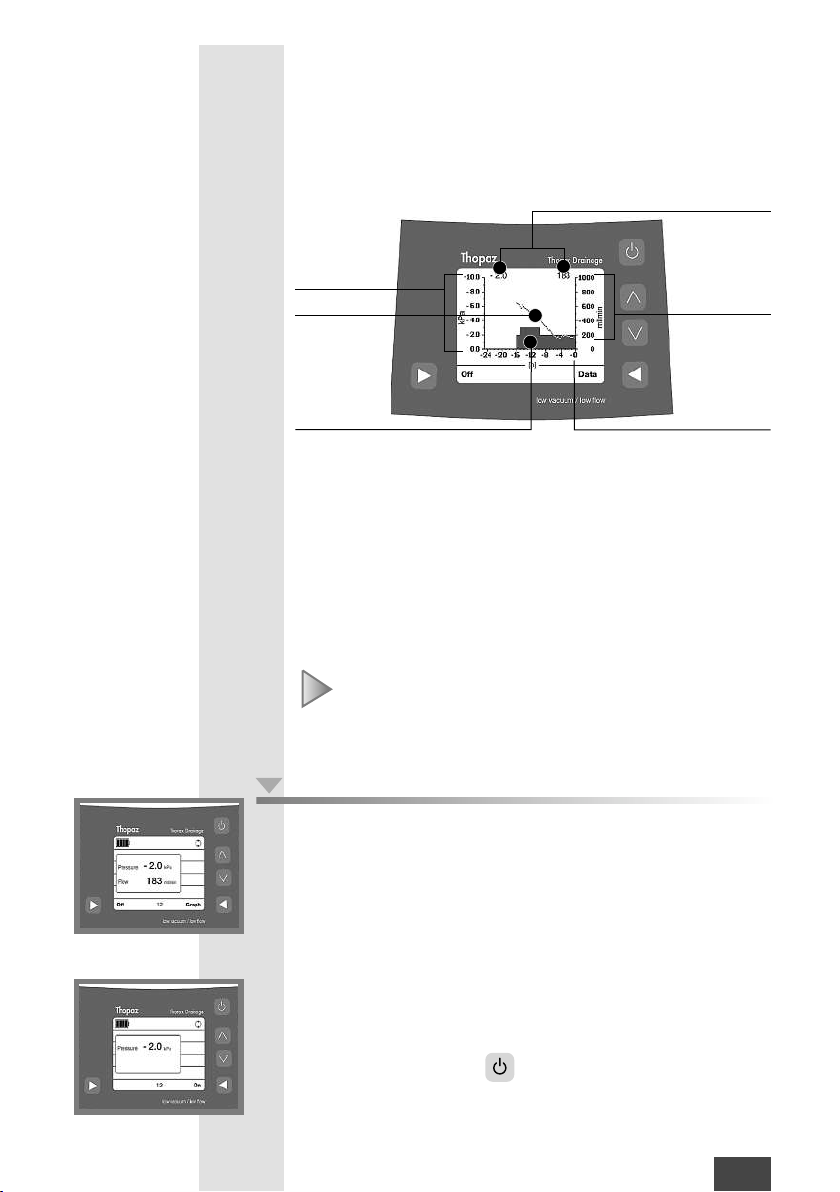
Graphic representation
The graph shows the flow and pressureover the span of time.
The graph mode offers an informative graph after 4hours of
therapyuse. The graph is updated once everyten minutes.
Current pressureand flow values
Pressurevalues
Flow
Flow values
Pressure
•The last 24 hours aredisplayed with 0corresponding to the
current time.
•The right scale shows the flow.The flow values arerepresen-
ted as aline.
•The left scale shows the pressureand represented as afilled
space.
•Current flow and pressurevalues aredisplayed in the information
field.
Up to max. 1000 ml/min or 1l/min aredisplayed in the
graph mode
4
Switch off
1. Clamp patient tubing
Switch offpressure with the “Off” button (press for >3sec)
2.
-Thopazchanges into the standbymode
3. Release, remove and seal canister
Current time
Dispose of canister and patient tubing in accordance
4.
with internal hospital guidelines
5. Switch offThopaz
Option: save data –see Chapter X
with []
EN 11
IX
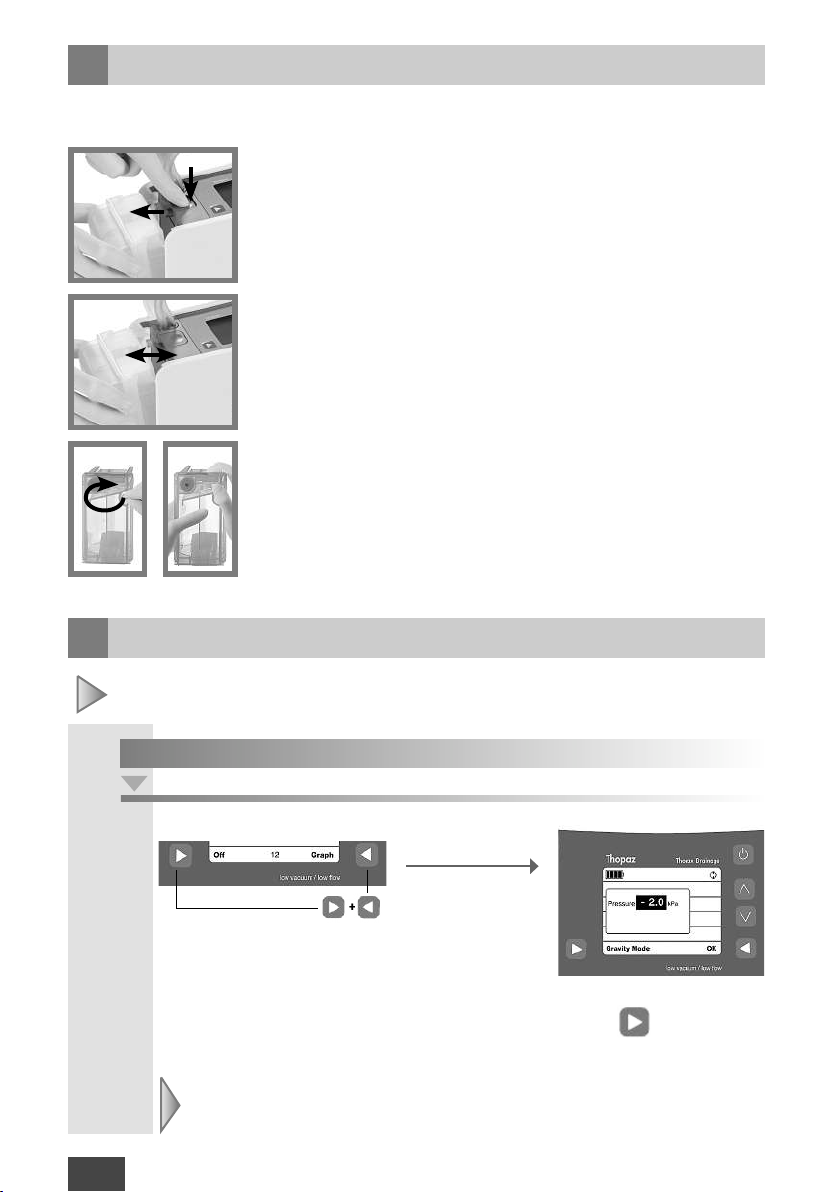
Change canister
-onthe basis of avisual check
-according to the instructions in the display /alarm signal
Retrieve sterile canister.
4
1.
2.
Clamp patient tubing.
3.
Switch offpressurewith the “Off” button (press for >3sec).
Thopazchanges into the standbymode.
5
9
X
Change settings
The settings can only be changed by the physician him/herself or physician order.
4. Release and remove canister.
5. Unpack new canister ,position and click into Thopaz.(Chapter VII)
6.
“On” Pressureisbuilt up.
7.
Unclamp tubing.
8.
Check flow value. (> 0ml/min)
9. Seal used canister and dispose of it in accordance with
internal hospital guidelines.
Operating mode
Change Pressurewhile pump is running
12
EN
Press at the same time
a) Press the “Off” and “Graph” button as the
same time. The pressurefield will be highlighted.
b) With the
c) To activate the gravitymode (=water seal), skip b) and press []and confirm
with “OK”.
selection buttons, choose the desired pressureand confirm with “OK”.
For patients who are to be treated by gravity drainage (=water seal), the
gravity mode can be activated. This mode corresponds to apressure of
0.1 kPa /1cmH2O /1mbar /0.75 mmHg.
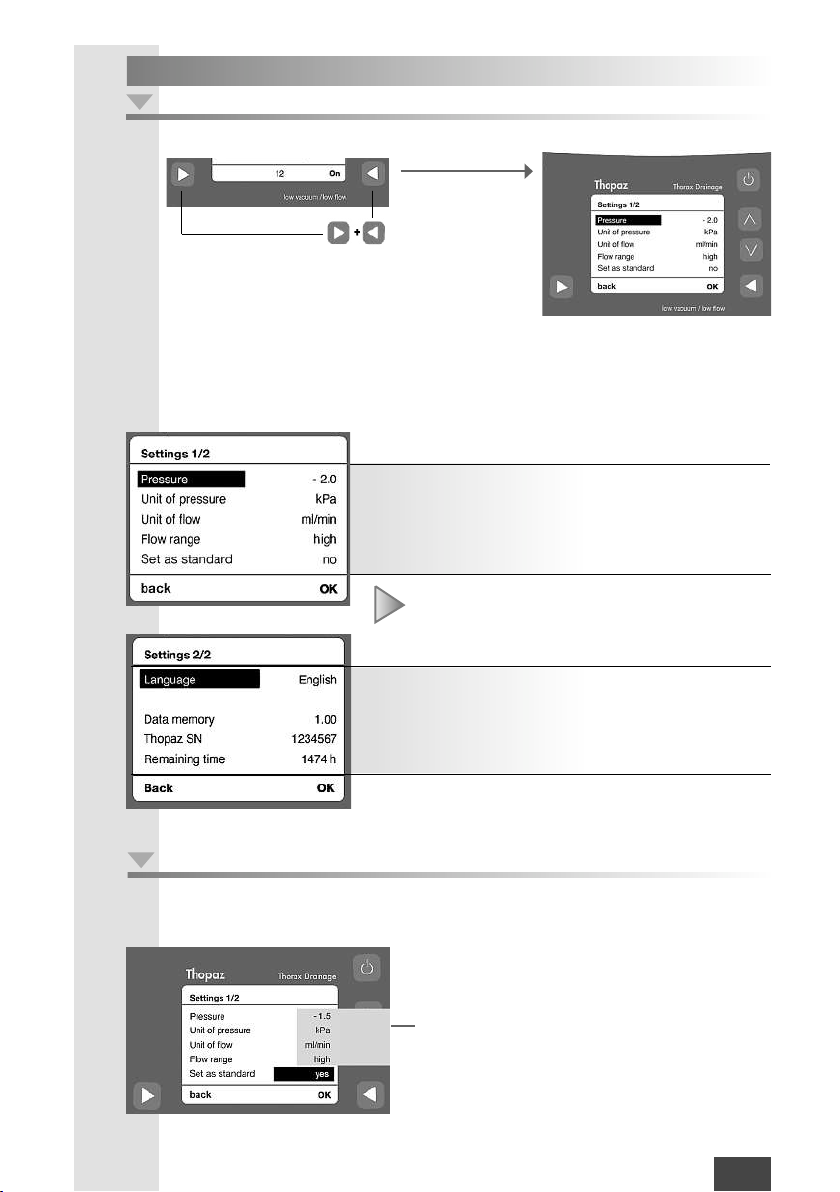
Standby mode
Adjust default settings from standby-mode
Press at the same time
a) With the
selection buttons choose the
desired parameters and confirm with “OK”.
b)
With the selection buttons choose the desired setting and confirm with “OK”.
c) With the
“Back” button the setting mode is ended, and standbymode is
activated.
max. 100 /10.0
kPa /cmH2O /mbar /mmHg
cmH2Oisnot aSIunit according
to EU Directive 80/181/EEC
Languages according to list
Selection
ml/min /l/min
low /high
No /Yes
Selection
Display
Display
Display
Set as standard
Thopazis delivered with the following factorysettings.
These settings can be changed and saved
as the new standardand areactive whenever
Thopazis switched on.
To save the selected setting parameters,
“Yes” for “Set as standard”, press “back”
key to activate standby mode.
EN 13
 Loading...