

Page 1
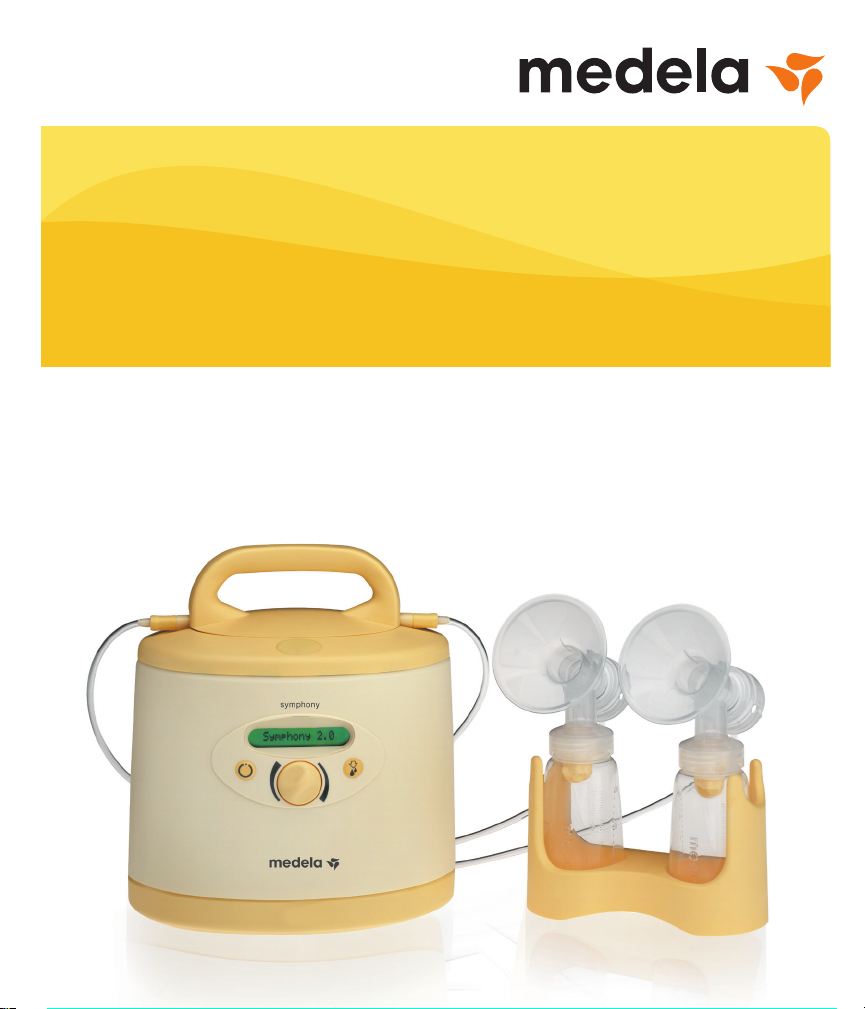
The Symphony®
Breastpump
Maintenance &
Technical Guide
Page 2

Table of Contents
Save These Instructions .................................................................................1
Symphony® Technical Description .................................................................2
Symphony® Breastpump Controls & Parts ....................................................3
Symphony Diagram ....................................................................................................................3
Symphony Kit Diagram .............................................................................................................. 3
Visual & Functionality Checklist .....................................................................4
Vacuum Check .................................................................................................5
Recommendations for Replacement ............................................................6
How to Check Pump Total Running Hours ...................................................7
Error Codes .................................................................................................. 8-9
Battery Care & Maintenance .................................................................. 10-11
Inspect & Replace Diaphragms.............................................................. 12-13
Low or No Suction ................................................................................... 14-15
Trolley Repair ........................................................................................... 16-17
No Power .................................................................................................. 18-19
Reseating Cover ...................................................................................... 20-21
Replace and Load Program Card .......................................................... 22-23
Proper Use of Vacuum Gauge ................................................................ 24-25
Inspect & Replace Power Cord .............................................................. 26-27
Correct Separated Housing .................................................................... 28-29
Cleaning ................................................................................................... 30-31
Terms of Guarantee .......................................................................................32
Page 3

Save These Instructions
The Medela® Symphony® Breastpump
has been specially developed to meet the
most stringent demands where hygiene
and mobility are concerned. The operating
principle of the Medela Symphony is
to simulate the natural, physiological
conditions encountered in breastfeeding.
The pump’s kit is separate from the
pumping mechanism and protected
from overflow by a specially designed
membrane. Kit components which could
come in contact with the milk are part of
the accessories and can be very easily
disconnected for cleaning and sterilization.
A carrying case is available, offering
ample space for the pump and the
accessory kit.
There are two different models of
Symphony with the following general
specifications:
Symphony Breastpump, article no.
0240108
n one knob control for both vacuum and
suction cycles
n powered by regular electric outlet (100-
240 VAC)
Symphony Breastpump Plus, article no.
0240208
* same as above (0240108), but with
2 internal rechargeable 6 volt batteries
Both models can be used for single
and for double pumping by using the
appropriate accessory kit. Refer to the
separate accessory kit user’s instructions
for further details.
IMPORTANT SAFEGUARDS
WARNING: To reduce the risk of burns,
electrocution, fire, or injury to persons:
1. Separation from the power outlet is only
assured through the disconnection of
the plug and socket connection.
2. This equipment is not suitable for use in
the presence of a flammable anesthetic
mixture.
3. Use only in a dust-free environment.
4. Do not place in or drop motor unit into
water or other liquid.
5. Do not reach for any electrical device
if it has fallen into water. Unplug
immediately.
6. Never operate an electrical device if it
has a damaged cord or plug, if it is not
working properly, if it has been dropped
or damaged, or if it has been dropped
into water.
7. Only use the electric cord that comes
with the Symphony Breastpump.
8. Make sure the voltage of the device is
compatible with the power source.
1
Page 4

Symphony Technical Description
Safety Instructions
Medical Equipment
With Respect to Electrical Shock, Fire and Mechanical Hazards Only
In Accordance With IEC 60601 -1 CAN/CSA 22.2 No. 601.1 22PL
Protection class II
(Double
Insulation)
Type B
Vacuum:
-50mmHg – -250mmHg
-7kPa – -33kPa
Power Supply:
Conventional Outlet:
100V - 240VAC
50/60 Hz
0.5 A
DC Connection:
12 VDC Use only with
25 W Medela® Vehicle Lighter
T=2,5A Adapter #67173
Battery:
2 x 6 V, 1.2 Ah Type: Yuasa NP 1.2-6
Battery(optional): Battery, DC powered
Charging time=12 hours
Full battery pumping
time=approx. 60 minutes
ESD—Use ESD protection when servicing pump.
Disposal:
This breastpump is made of technical plastics and metals
that cannot be separated. It must be disposed of in
accordance with local regulations.
Warranty: 3-years for the unit from the date of delivery, excluding pump set and batteries. The manufacturer is not liable
for any damage or consequential damage caused by incorrect operation, inappropriate usage or use by unauthorized
persons. Routine checks, servicing and battery exchange may only be carried out by Medela authorized personnel.
Follow Instructions
Alternating Current
Direct Current
Dimensions :
With Stand Without Stand
Length 16.1” 8.5”
Width 16.1” 6.1”
Height 35.4” 9.6”
Weight:
With Battery: 6 lbs. 7 oz.
Without Battery: 5 lbs. 1 oz.
Environmental Conditions
for Operation:
Temperature: +41°F to +104°F
Relative Humidity: 20% to 80%
Atmospheric Pressure: 70 kPa to 106 kPa
Environmental Conditions
Transport and Storage:
Temperature: -4°F to +122°F
Relative Humidity: 20% to 95%
Atmospheric Pressure: 70 kPa to 106 kPa
Standards:
FDA (GMP)
ISO 9001
ISO 13485
CE (93/42/EEC)
Electromagnetic or
Other Interference:
Complies with IEC 60601-1-2. Unlikely to
interfere with other electrical equipment.
2
Page 5
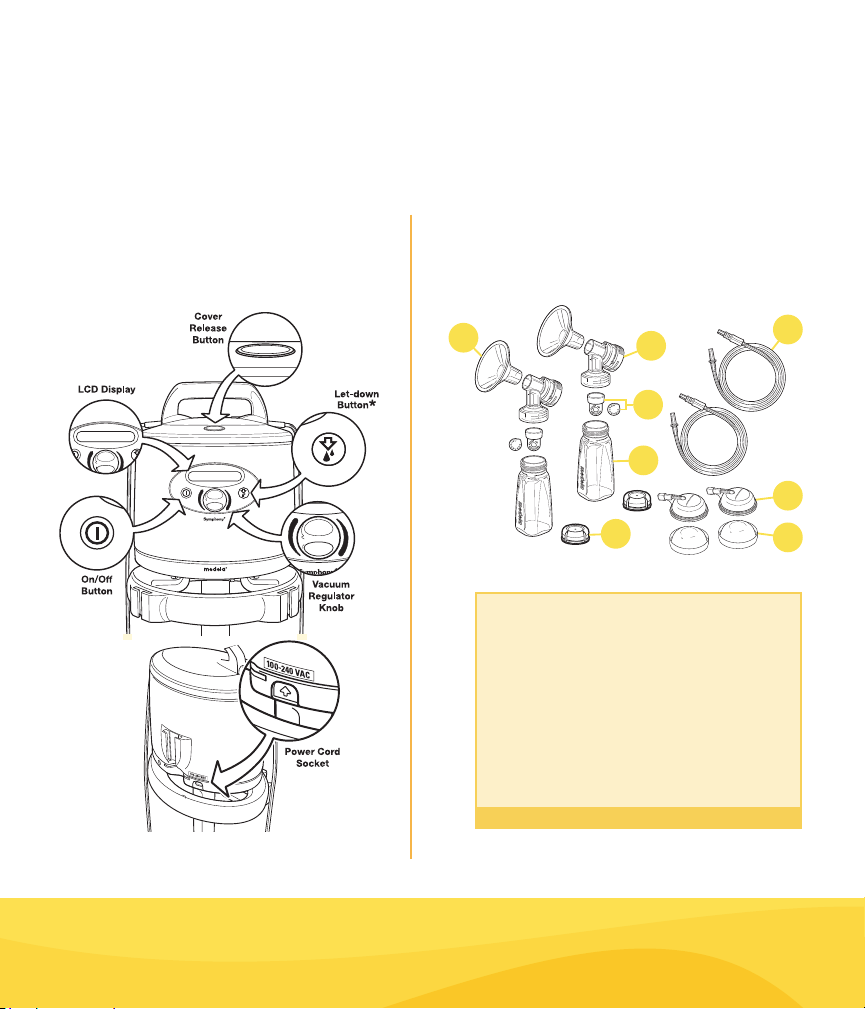
Symphony® Breastpump Controls & Parts
5
2
4
1
3
6
8
7
Symphony Diagram Symphony Kit Diagram
Kit shown is Symphony Double Pumping Kit
1. PersonalFit™ Breastshield, Standard (24mm) ............. 87073
2. PersonalFit Breastshield Connector ........................... 87071
3. Valve & Membrane ....................................................... 87089
4. Collection Connector ................................................... 8117009
5. Solid Container Lid .....................................................8107057
6. Tubing ...........................................................................8007213
7. Membrane Cap ............................................................8100769
8. Protective Membrane ..................................................8200094
9. Breastfeeding Information Guide ................................ 1907200
10. Symphony Instruction Manual..................................... 1907724
11. Symphony Container Stand ........................................ 8100552
12. Symphony Vehicle Lighter Adapter ............................. 67173
(67099S)
Call for pricing
Call Customer Service at 800.435.8316
for ordering information.
3
Page 6
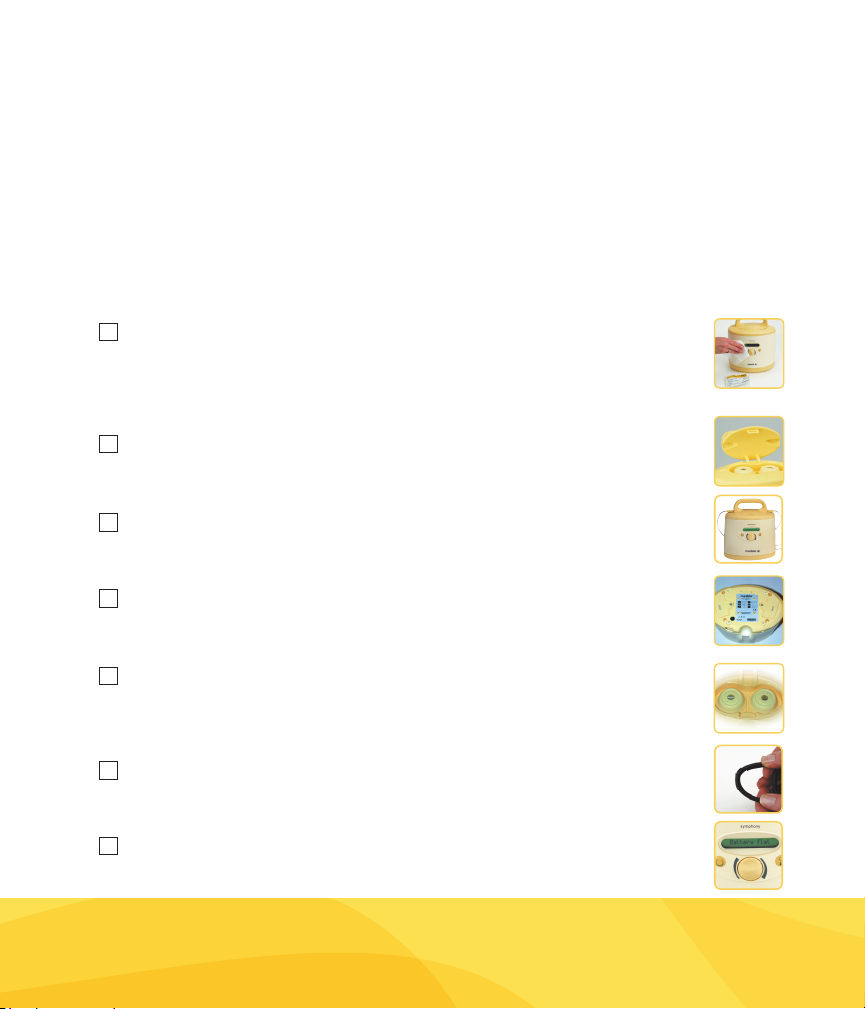
Visual & Functionality Checklist
The Symphony® Breastpump Maintenance & Technical Guide is a resource and tool to be
used to perform maintenance and troubleshoot issues on the Symphony Breastpump.
A visual and functional check of the Symphony breastpump should be performed for optimal
performance on a periodic basis. If maintenance or repairs are needed, this guide will walk
you through the steps. If you have any questions, please contact Customer Service at
800.435.8316.
Cleaning – Use a soft cloth to wipe with warm soapy water, Quick Clean™
4
Wipes may be used between uses with the same mother. Use Cavicide® to
disinfect between different mothers. (Refer to Cleaning Technical Bulletin
on pages 30-31 for detailed instructions.)
Cover – Inspect for damage and that cover closes and locks shut.
4
If cover is damaged, please send back to Medela for repairs.
Housing – Inspect for damage, cracks or if housing is separated. (Refer to Correct
4
Separated Housing Technical Bulletin on pages 28-29 for detailed instructions.)
Rubber Feet – Inspect for damage or missing rubber feet (4 total). If any
4
are missing, contact Medela Customer Service to order Part # 8000596.
Pump Diaphragms – Inspect for damaged diaphragms.
4
(Refer to Inspect/Replace Diaphragms Technical Bulletin on pages 12-13
for detailed instructions.)
Power Cord – Inspect power cord for damage.
4
(Refer to Inspect/Replace Power Cord on pages 26-27 for detailed instructions.)
4
If you have a Symphony Plus, check battery status by referring to Battery Care
& Maintenance Technical Bulletin on pages 10-11.
4
Page 7

Vacuum Check
Performing a vacuum check on your pump ensures your Symphony® is operating correctly
for breastpumping mothers. Follow the instructions in the Proper Use of Vacuum Gauge
Technical Bulletin on pages 24-25 for detailed instructions. The following values will guide
you through gauging your Symphony vacuum levels:
The following values should read:
Stimulation Expression
min* max* max* min* Elevation OFF
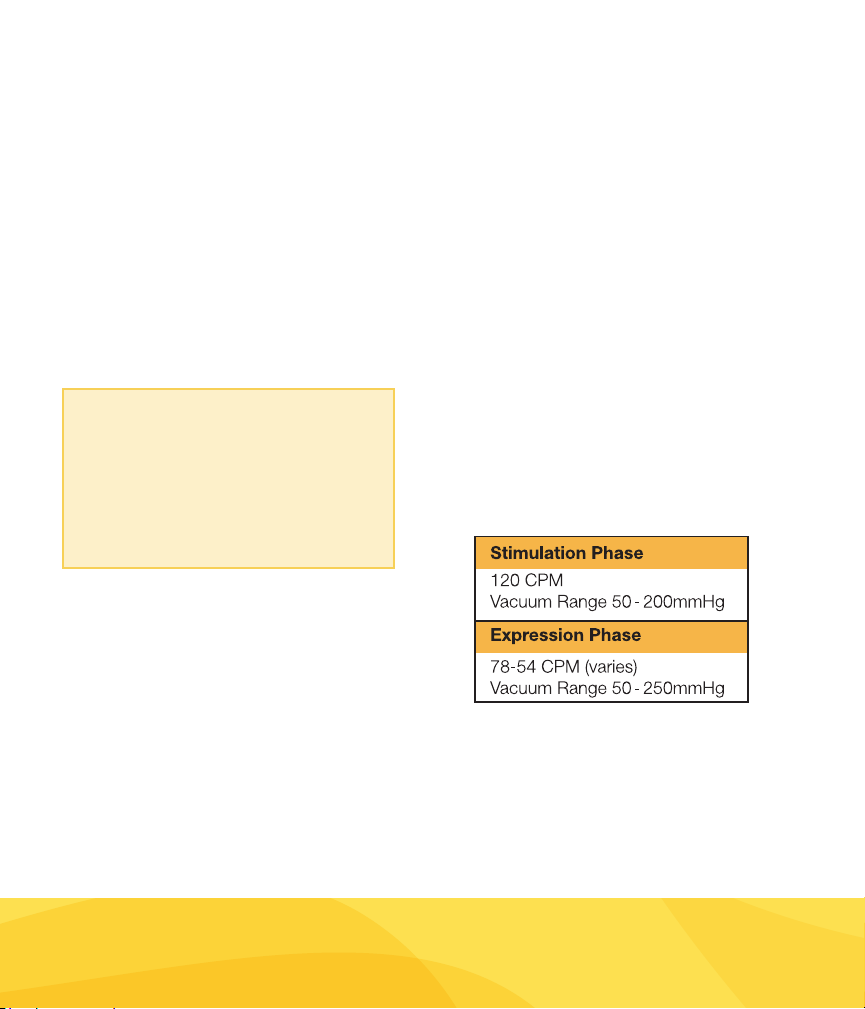
- 41 - 166 - 207 - 41 + 6600’
- 47 - 187 - 234 - 47 + 3300’
- 50 - 200 - 250 - 50 + 1600’
- 53 - 213 - 266 - 53 Sea Level
*± 20 mmHg
Stimulation mode changes to Expression mode after 2 minutes
unless the button is pushed.
If you experience values outside of the normal limits reference refer to Technical
Bulletin – Low or No Suction on pages 14-15.
5
Page 8
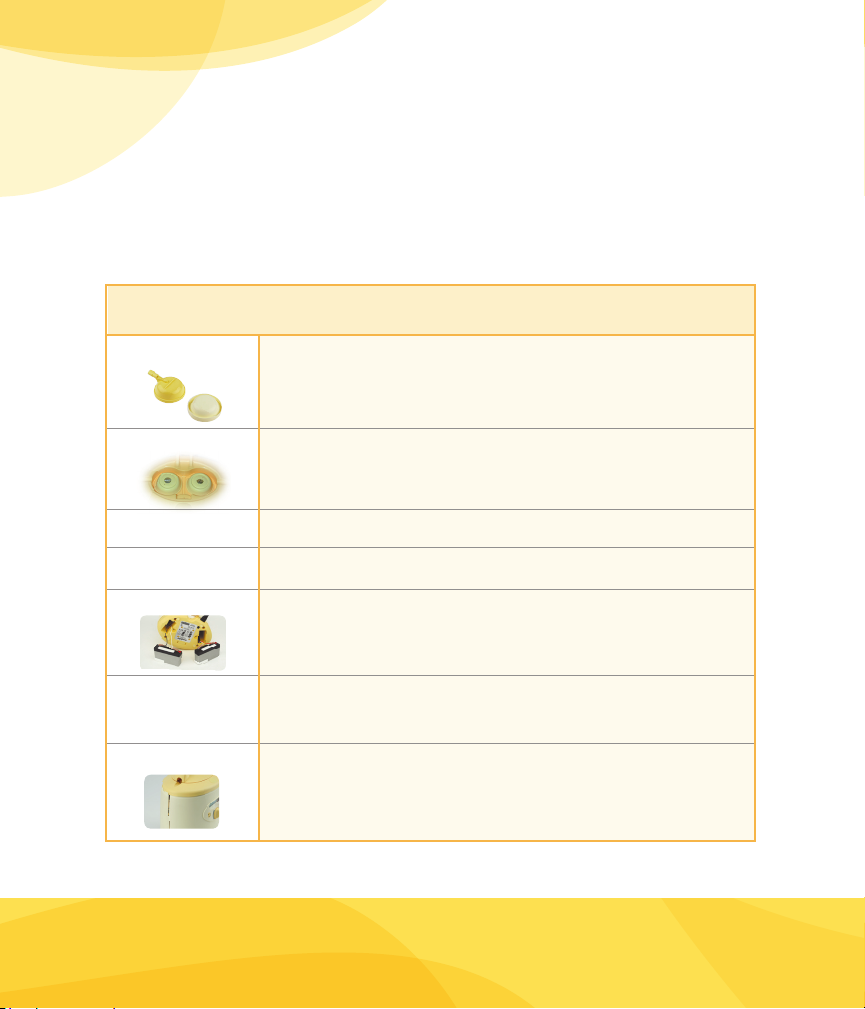
Recommendations for
Replacement
Over the life of the Symphony® it is possible that certain items may have to be replaced. The
more preventative maintenance that is conducted on the Symphony, the less parts will have
to be replaced. The following are recommended guidelines for when certain parts should
be replaced.
Item Recommendations for Replacement/Repair
Membranes As needed after inspection.
(Refer to Low or No Suction Technical Bulletin on pages
14-15 for detailed instructions.)
Diaphragms As needed after inspection or low suction.
(Refer to Inspect/Replace Diaphragms on pages 12-13
for detailed instructions.)
Motor 6,000 hrs (or as needed)*
Gear Box 6,000 hrs (or as needed)*
Battery As needed.
(Refer to Battery Care & Maintenance Technical Bulletin on pages
10-11 for detailed instructions.)
Main Boards As needed.
(If pump does not turn on and after troubleshooting*.
Refer to Error Codes Technical Bulletin on pages 8-9.)
Housing If broken or separated.
(Refer to Correct Separated Housing Technical Bulletin on pages
28-29 for detailed instructions.)
*Must be replaced or repaired at Medela.
Please contact Customer Service at 800.435.8316 for instructions on how to have your
pump repaired or replaced.
6
Page 9
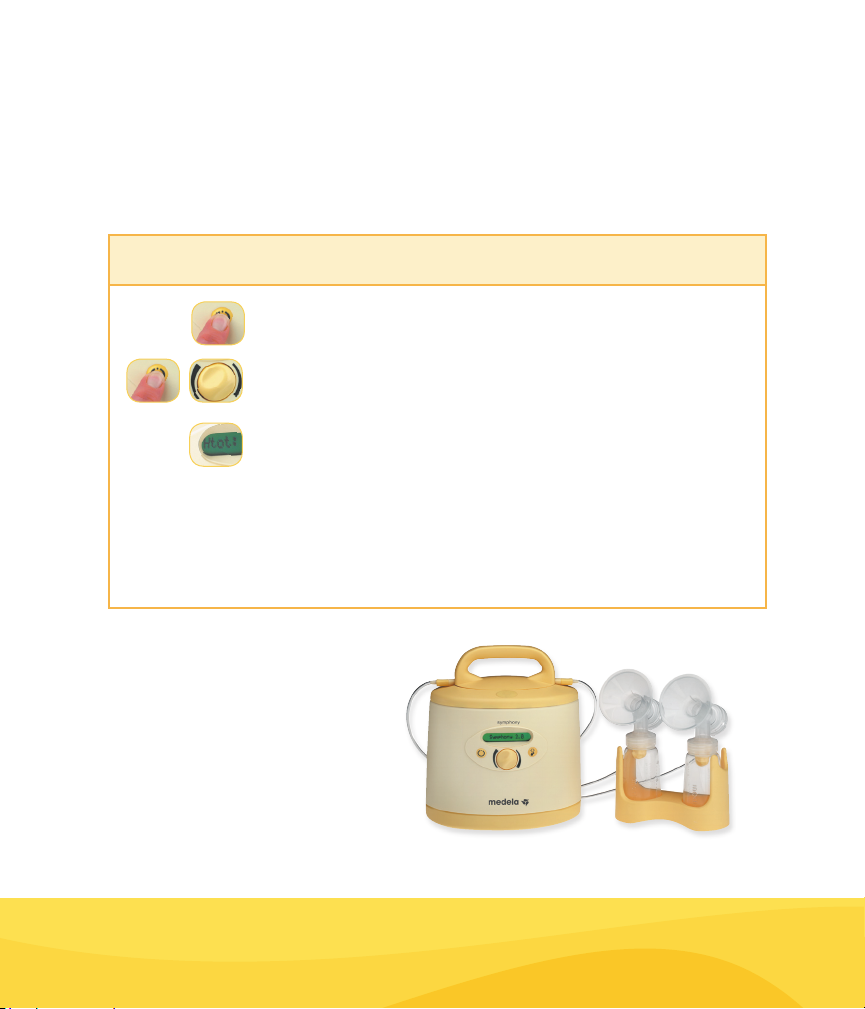
How to Check Pump Total
Running Hours
Checking Pump Total Running Hours
1. Turn the pump on.
2. Go to service menu by pushing the “On” button again while
turning the vacuum control knob.
3. Turn the vacuum control knob until you get “Htot” (hours
total). This is the total hours the pump has run throughout
its life.
4. Use these hours to check to see if maintenance is required
per recommendations on page 6.
7
Page 10
Error Codes
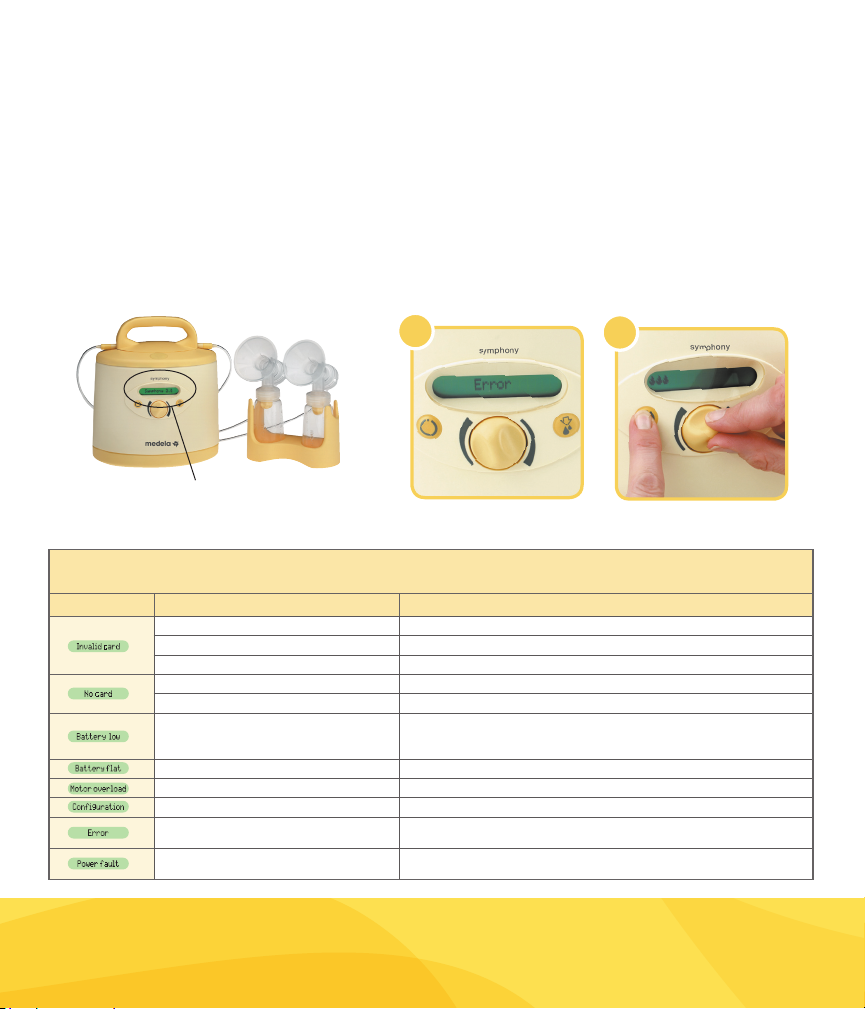
There are two ways in which a Symphony® Breastpump will communicate that the unit has
an issue. If the Symphony is experiencing an issue, an error code will be displayed on the
LCD screen (see fig. 1). Previous problems are recorded in the Menu function under “Err:”.
To retrieve a history of errors, hold down the “On” button while turning the vacuum control
knob, then continue to move the knob until you reach “Err” (see fig. 2). If you continue to
experience issues with your Symphony, please contact Customer Service at 800.435.8316.
fig. 1
fig. 2
LCD Display
The following describes LCD messages that may be displayed indicating an issue with the unit, the potential causes, and action steps to correct the issue.
Potential Issue Actions
Program card isn’t a Symphony card Check if correct program card is used (See Technical Bulletin No. 109A)
Program card is incorrectly inserted Check that card is positioned correctly (See Technical Bulletin No. 109A)
Program card is damaged and not working Replace program card (See Technical Bulletin No. 109A)
Program card isn’t inserted Insert program card (See Technical Bulletin No. 109A)
Program card isn’t completely inserted Push card in all the way (See Technical Bulletin No. 109A)
Battery needs charging soon, will beep every
20 seconds (15 minutes of pumping time
remaining from when the indication started)
Battery is completely discharged Charge the batteries, but you may continue to pump (See Technical Bulletin No. 101A)
Motor is drawing too much current Send Symphony pump to Medela® service center if this happens repeatedly
Software conguration Replace program card if experiencing error (See Technical Bulletin No. 109A)
Potential fault in electronics of gear control Send Symphony pump to Medela service center if this happens repeatedly
Potential fault in electronics of power supply Send Symphony pump to Medela service center if this happens repeatedly
LCD Display Messages
Be sure power cord is plugged into back of pump (See Technical Bulletin No. 106A)
8
Page 11
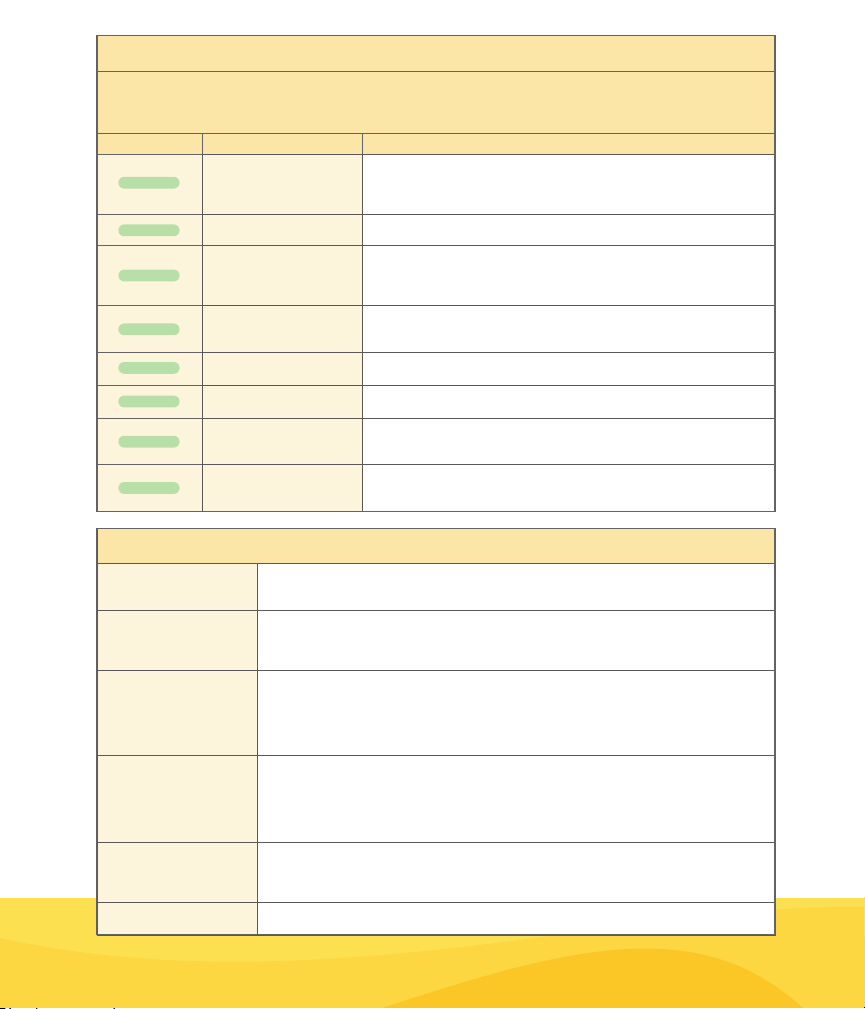
The following are Menu Codes and descriptions indicating historic error activity and steps you can take to address the issue.
Directions on how to read Menu Codes
1. Turn the pump on.
2. Push the “On” button again while turning the vacuum control knob.
3. To see Menu Codes turn the vacuum control knob and refer to the Menu Codes chart listed below.
Battery Care & Maintenance
Menu Codes
Menu Codes Description Solution
1. Unplug and plug back in.
M/F
M/O
C/I
C/N
B/F
B/L
P/F
C/F
Motor Fault
Motor Overload 1. Return to Medela, Inc. for repair if this happens repeatedly.
Invalid Card
No Card
Battery Flat
Battery Low
Power Fault
Configuration
2. Reboot pump. (see below)
3. Replace program card and reboot.
4. Send to Medela, Inc. for repair if this does not solve the issue.
1. Reboot pump. (see below)
2. Verify proper program card orientation. Correct as needed.
3. Replace program card and reboot.
4. Return to Medela, Inc. for repair if this does not solve the issue.
1. Install program card.
2. Verify that card is pushed in all the way.
3. Replace program card and reboot.
1. Charge for full 12 hours.
2. Return to Medela, Inc. for repair if this does not solve the issue.
1. Charge for full 12 hours. Pump will charge during use if plugged in.
2. Return to Medela, Inc. for repair if this does not solve the issue.
1. Verify pump plugged in properly at both ends.
2. Plug pump into another outlet.
3. Return to Medela, Inc. for repair if this does not solve the issue.
1. Reboot pump.
2. Replace program card and reboot.
3. Return to Medela, Inc. for repair if this does not solve the issue.
The following is a list of potential issues and steps you can take to readily address the issue.
Reboot Pump
Error Messages
Invalid Card
No Card
No Power
Check Battery (if present)
Quick Fixes
1. Press the let-down button and hold.
2. While holding the let-down button press the on/off button.
3. Release both buttons when pump reads “please wait”.
1. Turn off pump and restart unit.
2. Reboot pump.
3. Replace program card and reboot pump. (refer to Technical Bulletin No. 109A to replace program card)
4. Send pump to Medela, Inc if this does not solve the issue.
1. Check program card.
a. Chip side up.
b. Chip end inserted into pump rst.
2. Replace program card. Reboot pump with new card. See reboot instructions.
(refer to Technical Bulletin No. 109A to replace program card)
3. Return pump to Medela, Inc. for repair if this does not solve the issue.
1. If program card is missing:
a. Install new program card. (refer to Technical Bulletin No. 109A to replace program card)
b. Reboot pump with new card. See reboot instructions.
2. If program card is present:
a. Remove card and reseat.
b. Send to Medela Inc, for repair if reseat does not correct.
1. Check if the pump is properly connected to the electric supply or that the battery is charged.
2. Inspect power cord and replace if it is damaged. (refer to Technical Bulletin No. 111A to replace power cord)
3. Inspect fuse and replace if needed. (refer to Technical Bulletin No. 106A to replace fuse)
4. Send to Medela Inc, for repair if issue is not resolved.
1. Check battery connections by removing battery caps and inspecting wires.
2. Refer to Technical Bulletin No. 101A for further Battery Care & Maintenance instructions.
9
Page 12

Battery Care & Maintenance
Symphony® Plus needs battery care and
maintenance. If you are unable to resolve
your Symphony battery issues, please
contact Customer Service at 800.435.8316.
Charging Battery
1. The Symphony Plus should
be charged:
•uponreceiptofpump
(for approximately 12 hours).
•dailyafterhavingrunfrombattery.
•beforebatterycompletely
discharges.
•everytwo(2)monthswhenpump
is not in use. (The battery is
continually charging when the
breastpump is plugged into an
outlet, even during a pumping
session.)
Battery Status
2. “Battery Low” warning appears on
LCD display when the battery is low.
The breastpump will beep every 20
seconds. (The breastpump still has
approximately 15 minutes of pumping
time left.) The battery should be
re-charged using the above instructions.
3. “Battery Flat” appears when the
battery has been depleted. The
breastpump will issue a long beep
and the pump will switch off. The
battery should be re-charged using
the above instructions.
4. Check battery connections by
removing battery caps and
inspecting wires.
Helpful Hints
Extreme temperature, charging rates, and
state of charge play a part in the life span of
your battery.
To help maintain the life, please do the
following:
• completelyrechargethebattery
after each use.
• donotallowthebatterytofullydrain
on a regular basis.
• duringuse,theSymphonycanrun
on battery for up to one (1) hour.
10
If the above steps do not correct the issue, please contact Customer Service at 800.435.8316.
Page 13
1
2
Battery Care & Maintenance
3
4
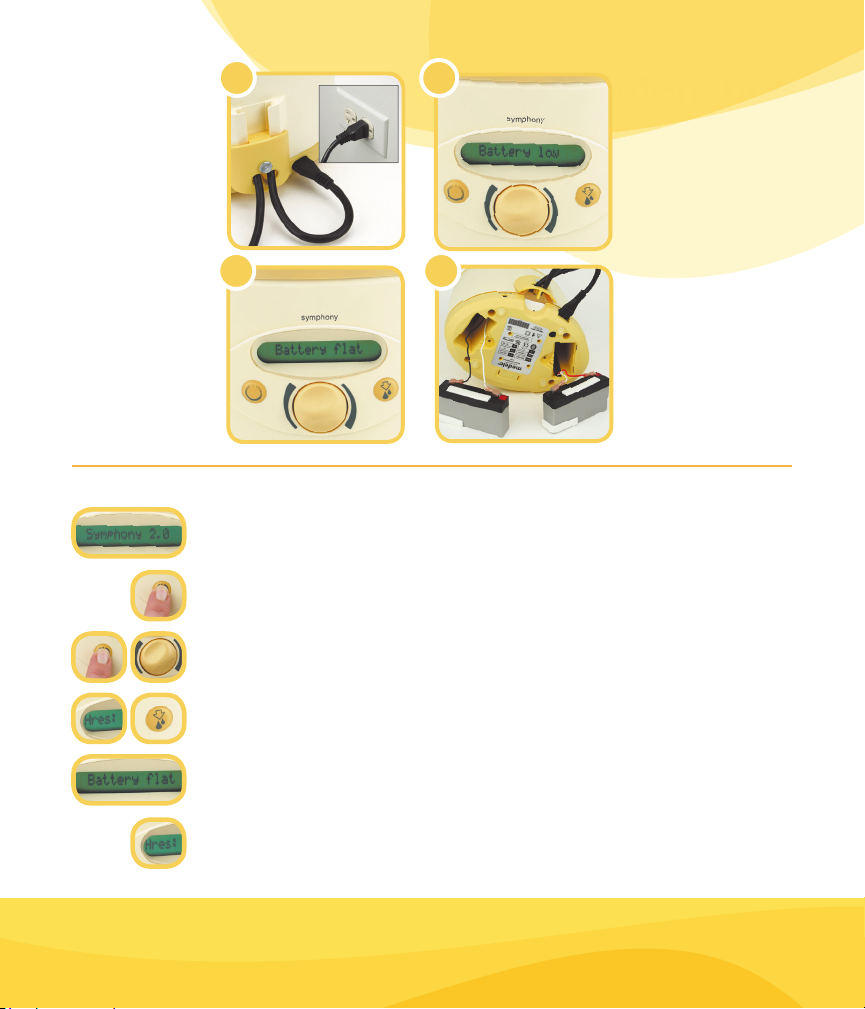
Battery Check (if battery model)
1. Charge pump for 12 hours.
*NOTE: Display switches from charging to Symphony 2.0 when battery
reaches 80% charge. It takes the full 12 hours to get 100% charge.
2. Turn the pump on.
3. Go to the service menu by pushing the “On” button again while simultaneously
turning the vacuum control knob clockwise until S/N is displayed.
4. Release the power button and continue to turn the vacuum control knob until locating
“Hres” (resettable hours) then press the let-down button to reset it back to zero.
5. Let the pump run until the batteries are drained and the screen reads “Battery flat.”
(The pump turns off automatically after 30 mins and may need to be restarted to fully
drain the batteries.)
6. Once the batteries are drained, plug the pump into a wall outlet and go back to
“Hres” on the service menu to check how long the pump ran. The time will give an
indication of the battery’s condition. A new battery lasts for about 60 minutes of
pumping time.
If the above steps do not correct the issue, please contact Customer Service at 800.435.8316.
11
Page 14

Inspect & Replace Diaphragms
Symphony® diaphragms need to be
inspected periodically to ensure proper
suction levels. If you experience issues
replacing the diaphragms, please contact
Customer Service at 800.435.8316.
Tools Required
Flathead Screwdriver
Replacement Diaphragms Kit -
Item #8007199
Cavicide (or similar product)
Soft Cloth
Warning - Please be sure to unplug
Symphony prior to troubleshooting.
Directions
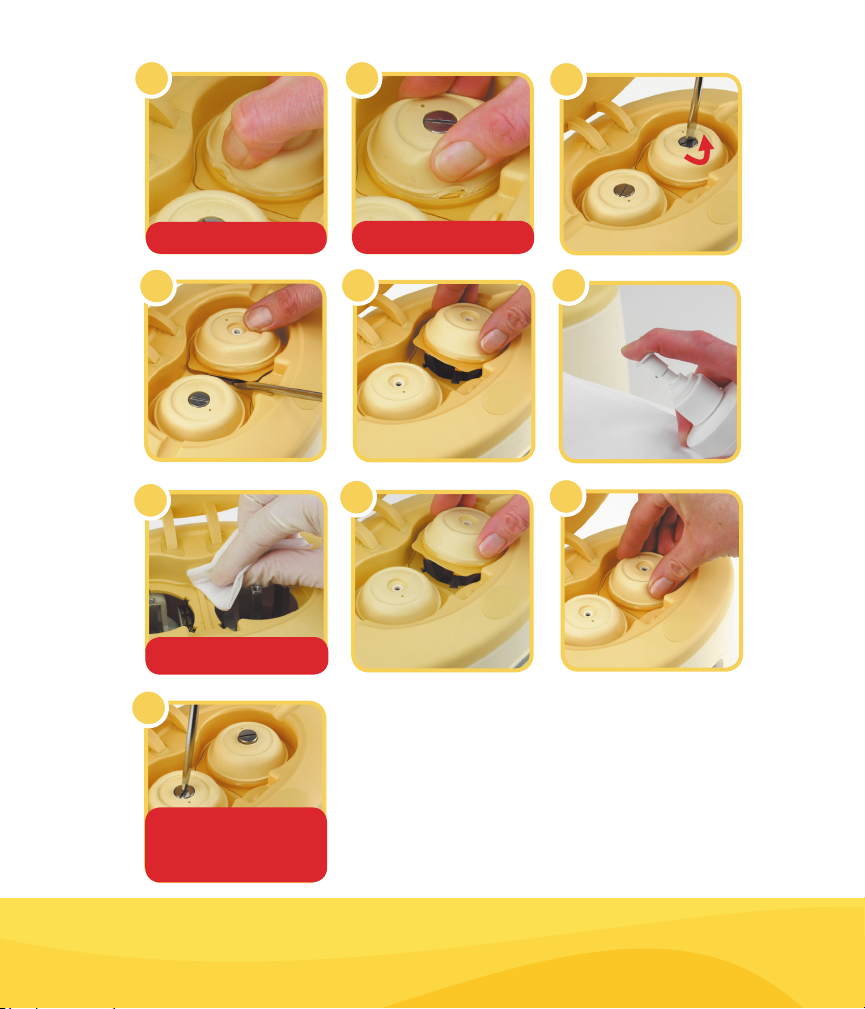
Inspect
1-2. Press gently on diaphragm. An
undamaged diaphragm will roll along
the edge, which does not affect
suction. If the rolled edge appears to
be torn, replace. If holes or tears
appear in diaphragm, suction can
be reduced and diaphragm needs
to be replaced.
Replace
3. Remove diaphragm screws with
flathead screwdriver.
4-5. Gently pry and remove each
diaphragm with flathead screwdriver.
6-7. Clean area with soft cloth and
Cavicide (or like product) by spraying
on cloth before replacing diaphragms.
8. Align new diaphragms with openings.
9. Apply equal pressure downwards to
snap diaphragm in place.
10. Install screws with flathead screwdriver.
Do not over tighten.
12
If the above steps do not correct the issue, please contact Customer Service at 800.435.8316.
Page 15
1
2
3
Battery Care & Maintenance
UNDAMAGED
4
7
DO NOT SPRAY PUMP WHILE
DIAPHRAGMS ARE REMOVED
10
Warning
•Stopwhenscrewsstopturning.
•Donotovertightenorinternal
sensor may get damaged.
DAMAGED
5
8
If you experience other issues regarding
suction reference Technical Bulletin 103A.
6
9
If the above steps do not correct the issue, please contact Customer Service at 800.435.8316.
13
Page 16

Low or No Suction
In the event that your Symphony® breastpump is producing low or no suction this
technical bulletin will guide you through
the steps to troubleshoot your issue. If you
continue experiencing issues with low or no
suction, please contact Customer Service
at 800.435.8316.
Tools Required
Technical Bulletin No. 102A
(Inspecting and Replacing Diaphragms)
Flathead Screwdriver
Symphony Diaphragm Kit -
Item #8007199 (if needed)
Symphony Membrane Cap -
Item #8100769 (if needed)
Symphony Membrane -
Item #8200094 (if needed)
Vacuum Gauge -
Item #1977005 (if needed)
Warning – Please be sure to unplug
Symphony prior to troubleshooting.
Directions
1. Inspect Symphony Membranes. If
membranes do not appear to have a rip
or tear move to next step. If membranes
do appear to be worn or have a tear,
replace prior to next step.
2. Inspect Symphony Diaphragms by
following Technical Bulletin 102A. If
diaphragms do not appear to have a rip
or tear move to next stop.
3. Make sure Symphony lid completely
closes before pump is in use.
4. Make sure the hard yellow ends of the
tubing fit securely into breastshield
connectors.
5. Make sure the yellow triangular end fits
into the membrane cap.
6. Make sure yellow valve on breastpump
kit is fitted correctly into the breastshield
connector.
14
7. Make sure white membrane is lying flat
against yellow valve head.
8. Check Symphony vacuum levels by
following Technical Bulletin 110A Proper
Use of Vacuum Gauge.
If the above steps do not correct the issue, please contact Customer Service at 800.435.8316.
Page 17
Battery Care & Maintenance
1
4
7
2
5
8
3
6
If the above steps do not correct the issue, please contact Customer Service at 800.435.8316.
15
Page 18

Trolley Repair
In the event that your Symphony® trolley
becomes loose, this technical bulletin will
guide you through methods to resolve this
issue. If you continue to experience issues
with your Symphony trolley, please contact
Customer Service at 800.435.8316.
Tools Required
3.0mm Allen Wrench
13mm Socket Wrench
Adjustable Wrench
Trolley Repair Kit -
Item #6007116 (if necessary)
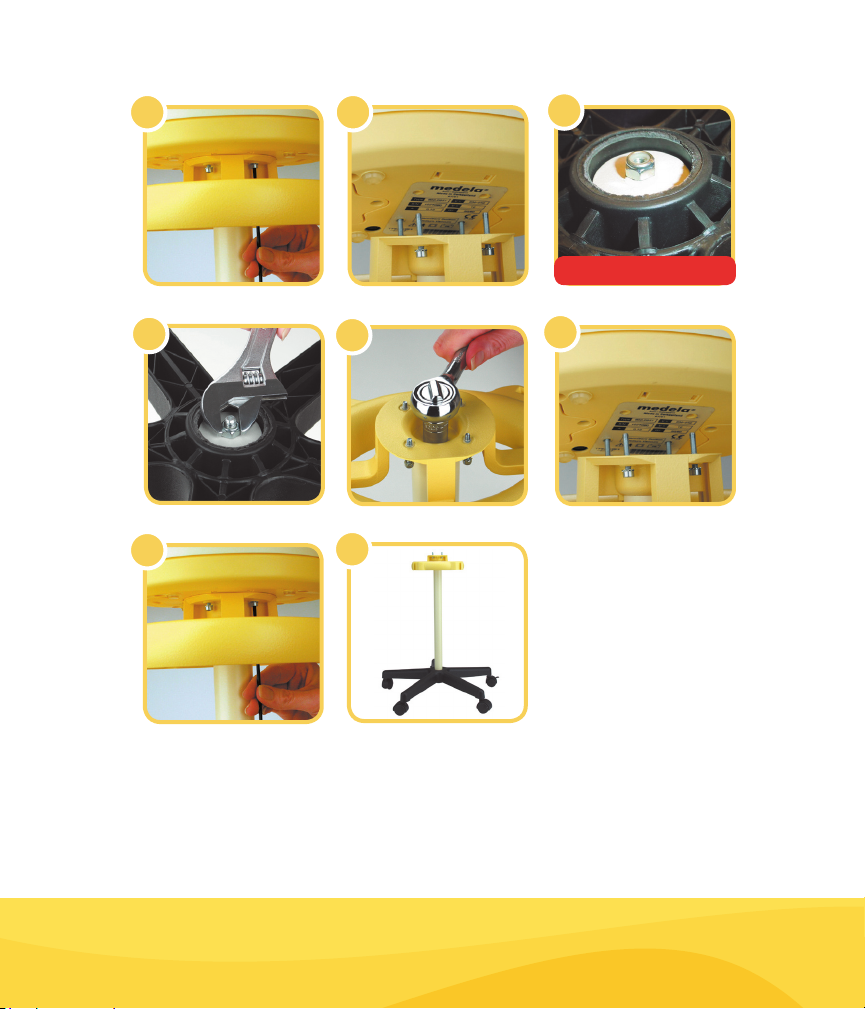
Directions
1-2. Remove Symphony from trolley by
removing four (4) screws with 3.0mm
Allen Wrench.
3-4. Turn trolley on side and hold nut by
using adjustable wrench. Nut should
be NylokTM.
(Nut provided in Repair Kit.)
5. Tighten rod by using 13mm socket
wrench while holding nut, which is
located on bottom of trolley with
adjustable wrench.
(See image #4))
6-7. Place Symphony back on trolley and
tighten four (4) screws with 3.0mm
Allen wrench.
8. Your Symphony trolley is now
tightened and ready for use.
16
If the above steps do not correct the issue, please contact Customer Service at 800.435.8316.
Page 19
1
Battery Care & Maintenance
2
3
Bottom of Trolley
4
7
5
8
6
If the above steps do not correct the issue, please contact Customer Service at 800.435.8316.
17
Page 20

No Power
In the event that your Symphony®
breastpump does not have power, this
technical bulletin will guide you through
methods to resolve the issue. If you
continue to experience issues with loss
of power, please contact Customer
Service at 800.435.8316.
Tools Required
Fuse - Item #9310035
Flathead Screwdriver (small)
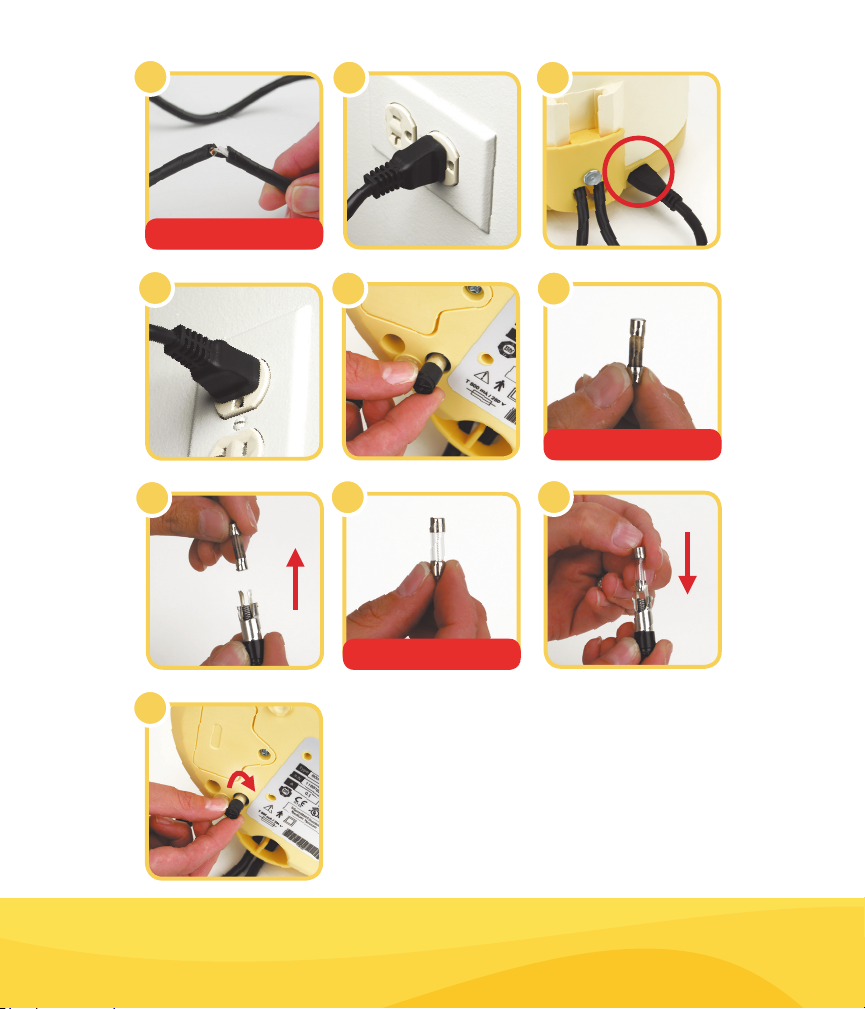
Directions
1. Inspect power cord and replace if
damaged. Refer to Technical Bulletin
No. 111A - Inspect/Replace Power Cord
if power cord needs to be replaced.
2. Make sure pump is plugged into a
wall outlet.
5. Remove fuse holder from bottom of
the Symphony using a small flathead
screwdriver and gently turn clock wise.
6-7. If the fuse appears shorted, remove
shorted fuse. (Item #9310035)
8-9. Replace with new fuse.
(Item #9310035)
10. Insert fuse holder (black round cap)
back into the bottom of the Symphony.
3. Make sure short black cord is plugged
into back of Symphony.
4. Check power outlet for functionality.
Attempt to use in another power outlet.
18
If the above steps do not correct the issue, please contact Customer Service at 800.435.8316.
Page 21
1
Battery Care & Maintenance
Replace if Damaged
2
3
7
10
4
5
8
New Fuse
6
Shorted Fuse
9
If the above steps do not correct the issue, please contact Customer Service at 800.435.8316.
19
Page 22

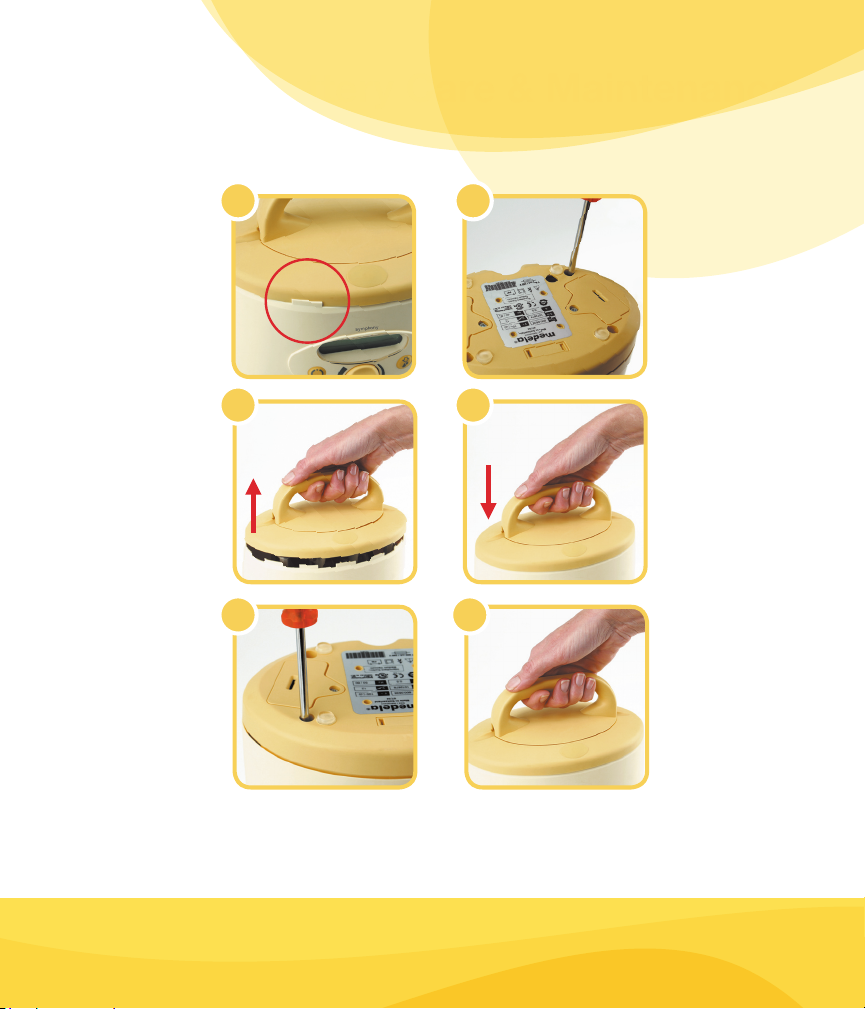
Reseating Cover
In the event that the Symphony®
breastpump cover becomes separated
or dislodged, this technical bulletin will
guide you through the steps to resolve
this issue. If you continue to experience
issues with the cover, please contact
Customer Service at 800.435.8316.
Tools Required
Phillips Screwdriver
Warning – Please be sure to unplug the
Symphony prior to troubleshooting.
Directions
1. Inspect the pump to locate the housing
ridge(s) dislodged outside of cover.
2. Remove four (4) screws at the bottom of
the pump with a Phillips Screwdriver.
4. Reseat cover over top of the housing.
Make sure ridge(s) are not showing.
5. Replace four (4) screws at the bottom of
the pump.
6. Symphony cover has been reseated and
is ready for use.
3. Pull cover straight up (just enough to
clear top of housing).
20
If the above steps do not correct the issue, please contact Customer Service at 800.435.8316.
Page 23
Battery Care & Maintenance
1
3
5
2
4
6
If the above steps do not correct the issue, please contact Customer Service at 800.435.8316.
21
Page 24

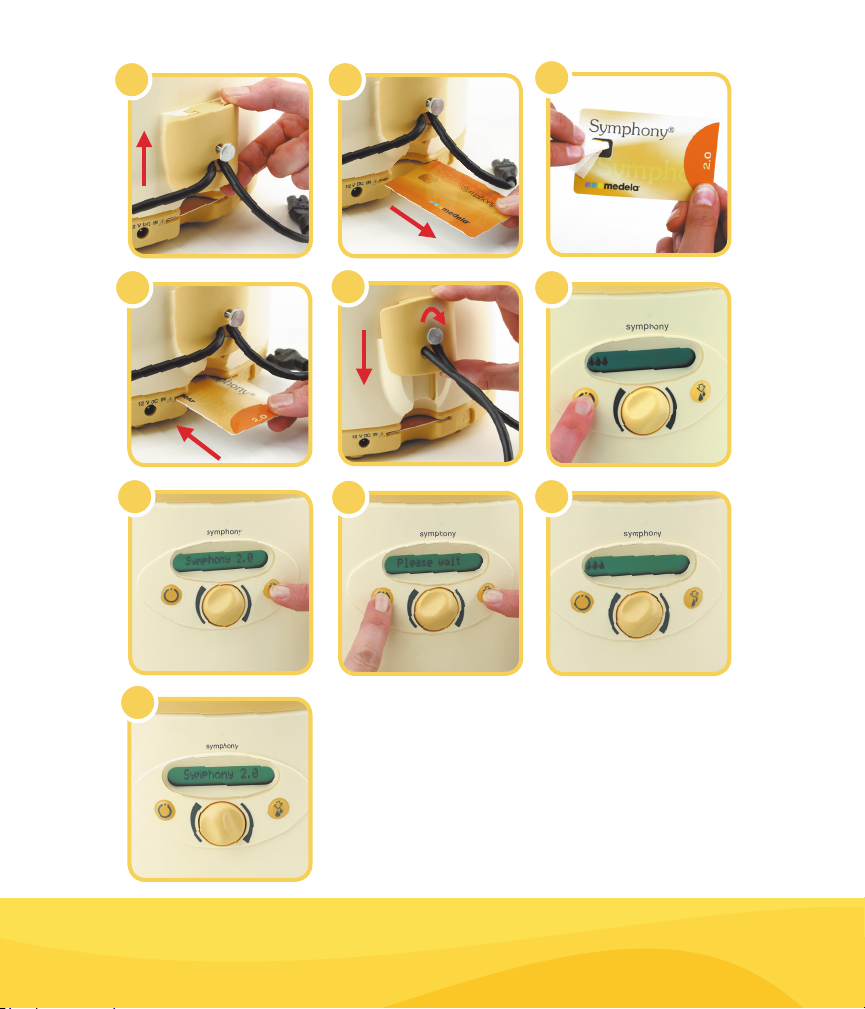
Replace and Load Program Card
In the event that your Symphony® displays
an “invalid card” or “no card” error, please
refer to the following to resolve the issue. If
you continue to experience issues with your
program card, please contact Customer
Service at 800.435.8316.
Tools Required
2.5mm Allen Wrench
(if pump does not have thumb screw)
Symphony Replacement Cards
(if needed)
TM
2.0 Card
English - 67208
French - 67209
Spanish - 67210
Preemie
English - 67227
French - 27225
Spanish - 67226
+
Card
Warning – Please be sure to unplug the
Symphony prior to troubleshooting.
Directions
1. Loosen thumb screw or 2.5mm allen
head screw. Slide cord holder up.
3. Gently wipe chip contacts with alcohol
wipe or dry towel and re-insert into the
Symphony. Hold half circle in hand
with micro-chip facing up to insert card.
4-5. If program card still does not function
or is missing, insert a new Symphony
program card. Slide cord holder
down and tighten screw.
6. Plug Symphony into wall outlet and
turn Symphony on.
7. Press and hold the (let-down)
button.
8. While holding (let-down) button press
(on/off) button until “Please wait”
displays. (This process can take up
to 45 seconds.)
9. Release buttons. Pump will start
running. Press (on/off) button
to turn off.
+
10. Symphony 2.0 or Preemie
will be displayed in LCD window.
Symphony is ready for use.
TM
/Standard
2. Remove program card by pulling
slowly and gently.
22
If the above steps do not correct the issue, please contact Customer Service at 800.435.8316.
Page 25
1
Battery Care & Maintenance
2
3
4
7
10
5
8
6
9
If the above steps do not correct the issue, please contact Customer Service at 800.435.8316.
23
Page 26
Proper Use of Vacuum Gauge
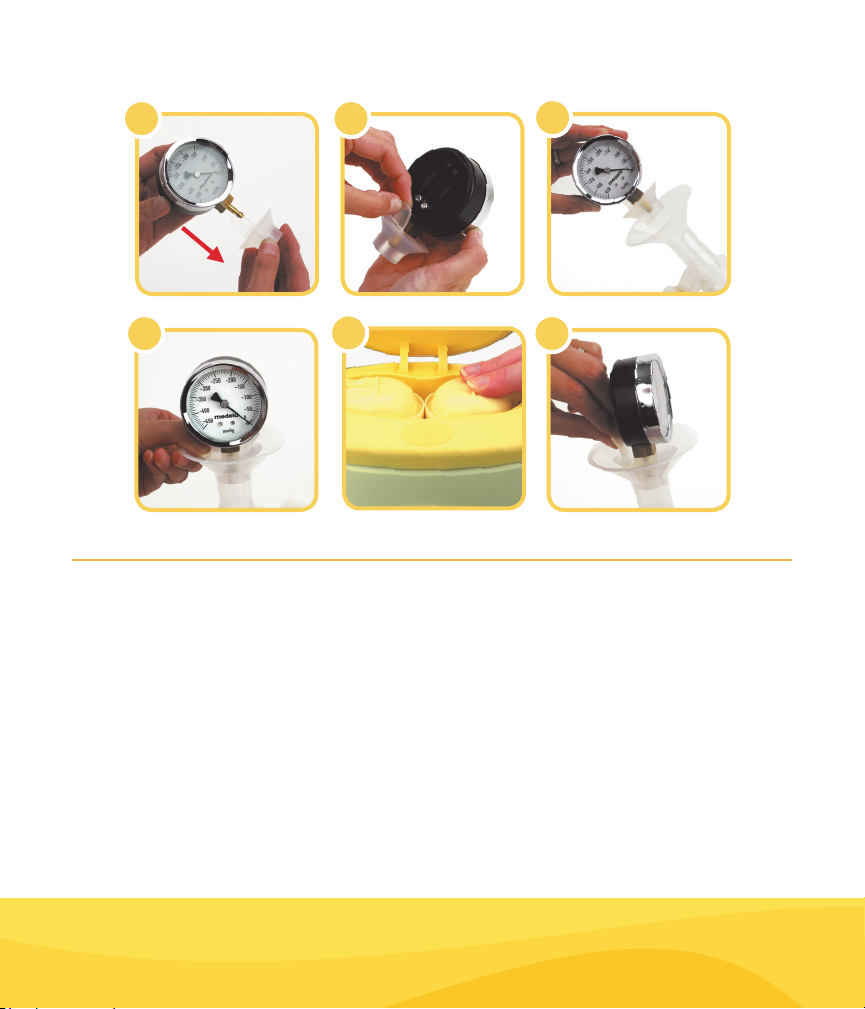
This technical bulletin will guide you
through the steps of checking the vacuum
levels of your Symphony® using a vacuum
gauge. If you are unable to resolve the
issue, please contact Customer Service
at 800.435.8316.
Tools Required
Vacuum Gauge -
Item #1977005
Symphony Double Pumping System -
Item #67099
Symphony/Lactina Double
Pumping System -
Item #67116
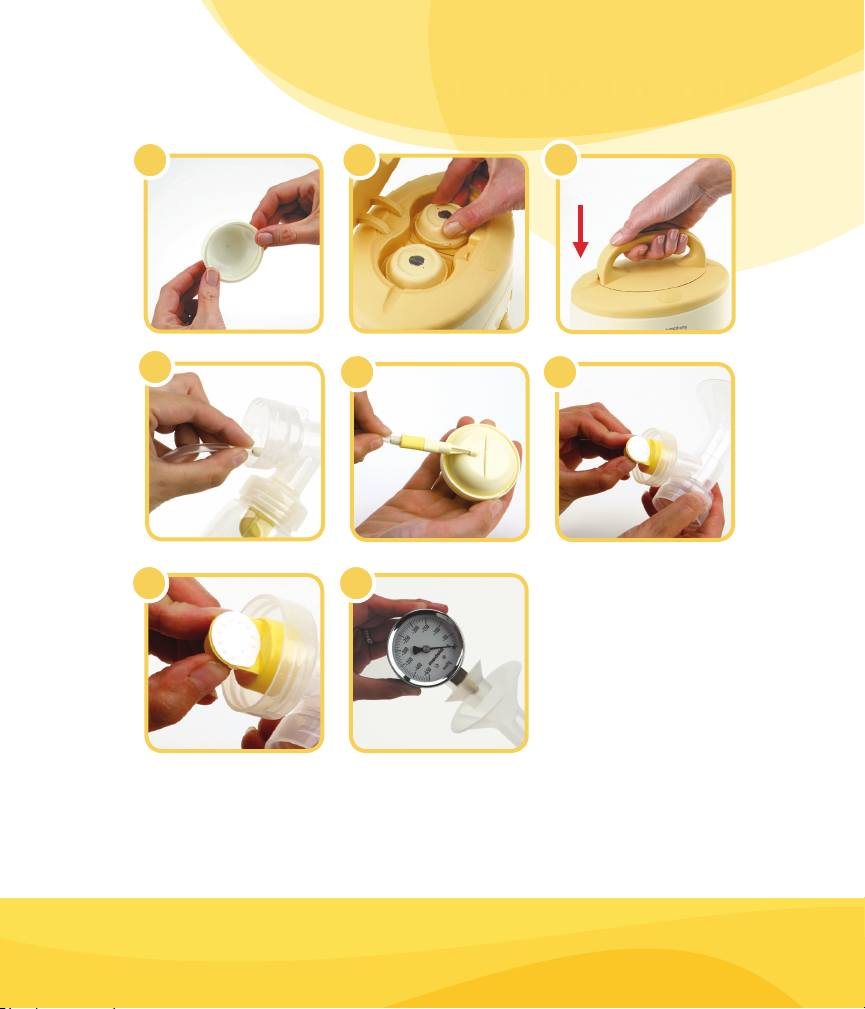
Directions
1. Insert the vacuum gauge into the hole in
the rubber stopper.
2. Pull the tab on the rubber stopper to
ensure proper fit onto gauge post. The
tab should be positioned in the back of
the vacuum gauge.
3. Insert the rubber stopper with gauge
into breastshield.
4. Ensure a complete seal by firmly
pressing on all edges of the stopper.
5. Connect only one Symphony membrane
at a time onto diaphragm before you
begin testing. Turn on the Symphony to
measure the vacuum level. (Both sides
must be tested. Each side should be
within 20mmHg or the mom will notice
a difference.)
6. After you have finished checking the
vacuum levels, grasp the gauge and
stopper tab to remove it.
Symphony Vacuum Settings
Refer to page 3 for extensive values
chart for vacuum settings.
24
If the above steps do not correct the issue, please contact Customer Service at 800.435.8316.
Page 27
Battery Care & Maintenance
1
2
3
4
5
6
Helpful Tips
•Vacuumlevelswillvarybasedonweatherandelevation.Refer to
the pump service instructions for vacuum levels based on elevation.
•Droppingordamagingthevacuumgaugemaycause
incorrect readings.
•Thisgaugeisintendedasareferencetoolonly,notasameansof
accurate measure.
If you need further assistance with troubleshooting low suction with your
Symphony, please refer to Technical Bulletin No. 103A.
If the above steps do not correct the issue, please contact Customer Service at 800.435.8316.
25
Page 28

Inspect & Replace Power Cord
In the event that the Symphony®
breastpump power cord becomes
damaged, this technical bulletin will
guide you through the steps to replace
the power cord. If you continue to have
problems replacing your power cord,
please contact Customer Service at
800.435.8316.
Tools Required
2.5 Allen Wrench
(if pump does not have a thumb screw)
Symphony Power Cord -
Item # - 9280043
Warning – Please be sure to unplug the
Symphony prior to troubleshooting.
Directions
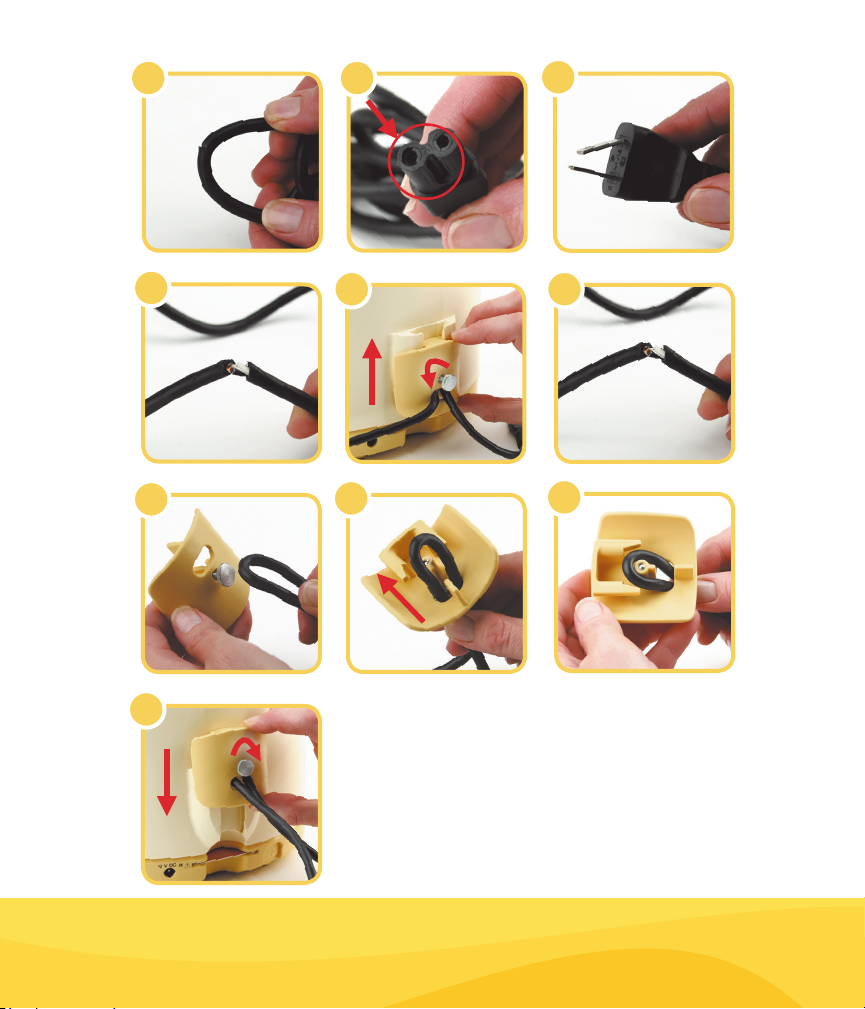
1. Inspect power cord for damage., ie
1a. Damaged Cord 1b. Damaged Plug
1c. Bent Prong 1d. Severed Cord
4-5. Insert the new cord through the
cord holder.
6. Loop the cord around inside of
screw post.
7. Place the cord holder back on the
pump and tighten the screw.
Symphony power cord has been
repaired and is ready for use.
2. Loosen screw and remove the card
holder by moving upwards.
3. Remove and discard/recycle bad cord.
26
If the above steps do not correct the issue, please contact Customer Service at 800.435.8316.
Page 29
1a
1b
1c
Battery Care & Maintenance
1d
4
7
2
5
3
6
If the above steps do not correct the issue, please contact Customer Service at 800.435.8316.
27
Page 30

Correct Separated Housing
In the event that the Symphony®
Breastpump housing becomes separated
or dislodged, this technical bulletin will
guide you through the steps to resolve the
issue. If you continue to experience issues,
please contact Customer Service
at 800.435.8316.
Tools Required
Phillips Screwdriver
Warning – Please be sure pump is
disconnected from the power cord prior
to repairing.
Directions
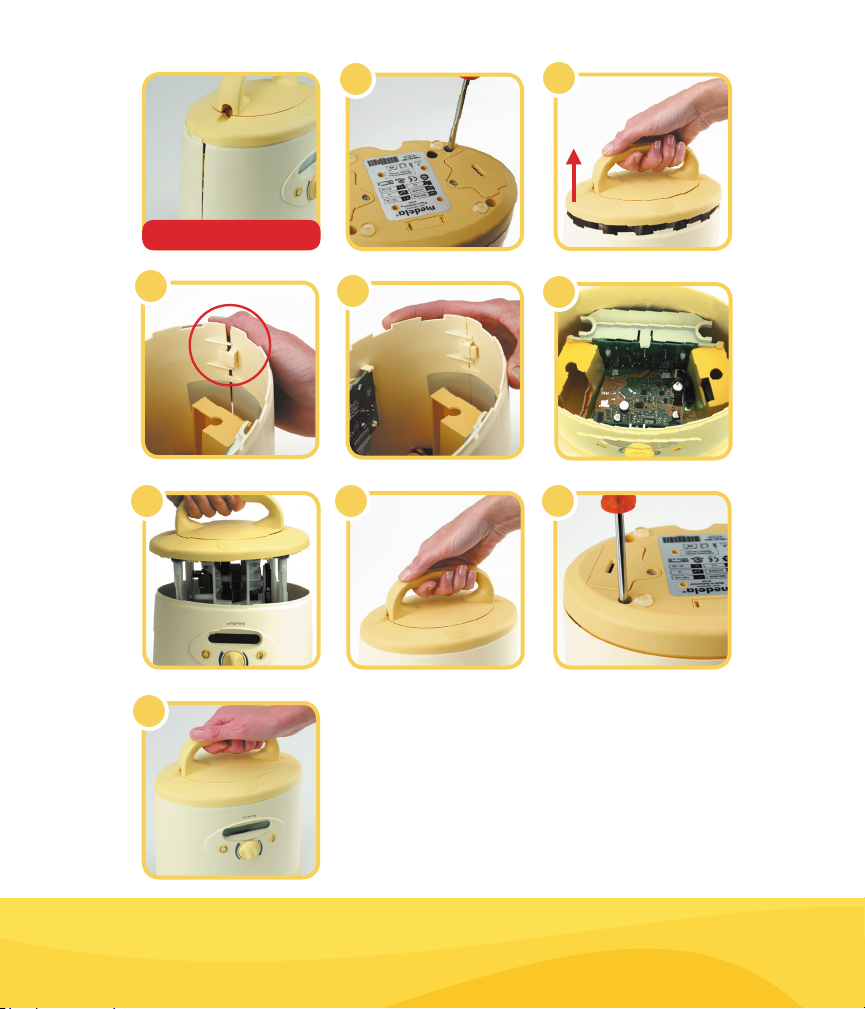
1. Remove four (4) screws at the bottom
of the pump using the Phillips
screwdriver.
5-6. Replace cover back on pump by
aligning internal posts into holes.
7. Reseat cover (making sure to cover
housing completely).
8. Replace four (4) bottom screws at the
bottom of the pump.
9. Symphony housing has been repaired
and is ready for use.
2. Carefully pull cover straight up.
(Component pieces of pump are
attached to cover.)
3-4. Snap separated halves back together
by carefully aligning tabs.
28
If the above steps do not correct the issue, please contact Customer Service at 800.435.8316.
Page 31
Battery Care & Maintenance
SEPARATED HOUSING
1
2
3
4
76
5
8
9
If the above steps do not correct the issue, please contact Customer Service at 800.435.8316.
29
Page 32

Cleaning
The Symphony® breastpump may be
cleaned with Quick Clean™ wipes or
a non-abrasive detergent for general
cleaning. However, the Symphony should
be disinfected between use by different
mothers. This technical bulletin guides
you through the steps to clean or disinfect
your Symphony Breastpump. If you
have questions regarding this technical
bulletin, please contact Customer Service
at 800.435.8316.
Tools Required
Cavicide® 8 fl oz -
Item #3007009
Soft Cloth
Quick Clean™ Wipes -
Item #87056
Warning – Please be sure to unplug
Symphony prior to cleaning.
Directions
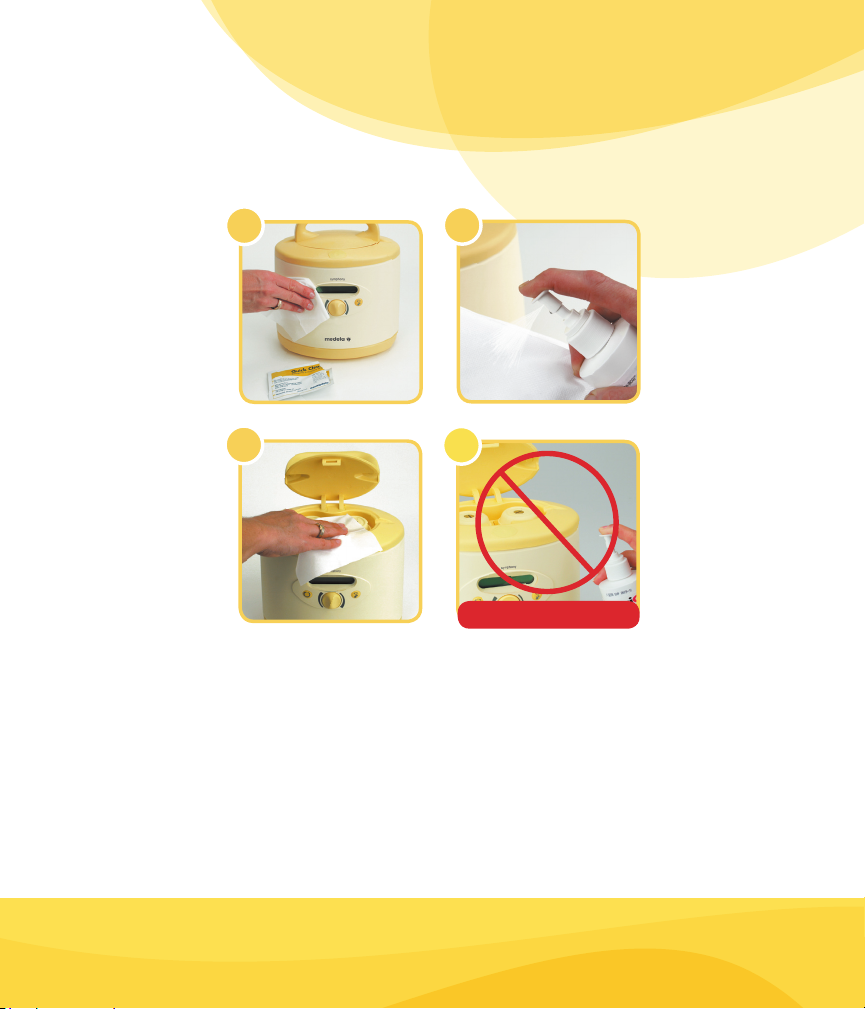
1. For cleaning in between a
mother’s own sessions
To clean the pump use a Quick
Clean™ wipe to wipe over the
breastpump. Optionally, soapy
water or a non-abrasive detergent
may be used.
2 a-b. For cleaning in between
different mothers
To disinfect the pump, we
recommend a solution called
Cavicide. Spray onto a clean cloth
and wipe the breastpump, making
sure not to spray or pour liquid
directly onto the pump.
3. Do not immerse the pump unit in
water; do not spray or pour liquid
directly onto the pump.
30
If the above steps do not correct the issue, please contact Customer Service at 800.435.8316.
Page 33
1
2a
2b
If the above steps do not correct the issue, please contact Customer Service at 800.435.8316.
3
DO NOT SPRAY OR POUR LIQUID
DIRECTLY ONTO PUMP
31
Page 34

Terms of Guarantee
The manufacturer may only be held responsible for inadequate safety,
reliability and performance of the unit if assembly, additional items,
adjustments, alterations and/or repairs have been carried out by persons
authorized by the manufacturer and:
n the electrical installation within the room concerned satisfies IEC
requirements (in the course of preparation)
n the unit is used as specified in the instructions for use
n accessory kits used on Symphony® Breastpumps are
authorized by Medela®, Inc.
32
Page 35
Symphony® Preemie
symphony
®
Preemie
+
1.0
Standard 2.0
+™
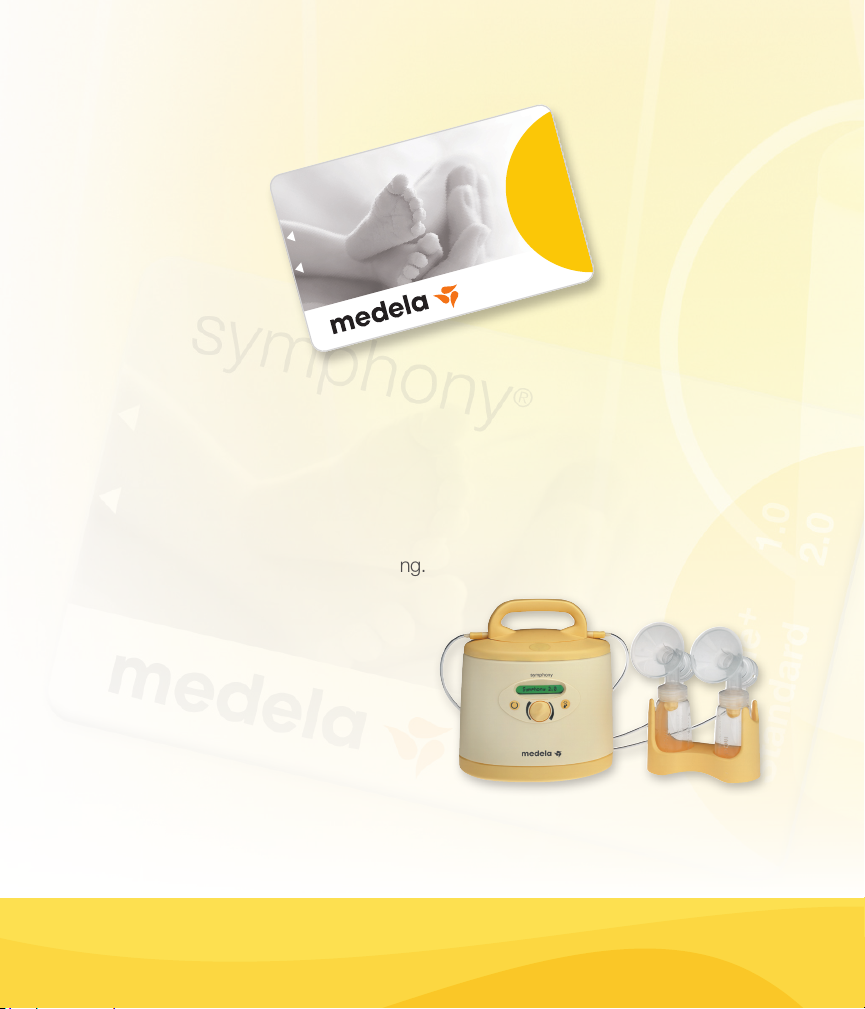
Significantly more milk in less time when premature infants need it most.
Because every drop counts.
Symphony® Preemie
+™
Preemie+ offers two breastpumping pattern programs that have been shown in clinical
trials to initiate milk supply in mothers of premature infants and produce significantly
more milk in fewer minutes spent pumping.
In addition, Preemie+ has been shown to
allow mothers of premature infants to
achieve as much milk as mothers of
exclusively breastfeeding term infants
(530ml) by day 6 of breastpumping.
33
Page 36

Medela, Inc., P.O. Box 660, 1101 Corporate Drive, McHenry, IL 60051-0660
Phone: (800) 435-8316 Fax: (815) 363-1246
Email: [email protected] www.medela.com
Symphony and Medela are registered trademarks and
Preemie+, Quick Clean and Micro-Steam are trademarks of Medela, Inc.
Cavicide is a registered trademark of Micro Aseptic Products, Inc.
1907555 E 0909 © 2009 Medela, Inc.
 Loading...