

Medela Symphony 67399S Instructions Manual
symphony
®
breastpump kit
instructions
for use with symphony breastpumps
double or single pumping kit
24 mm PersonalFit™ breastshields
67399S
DEHP and latex free
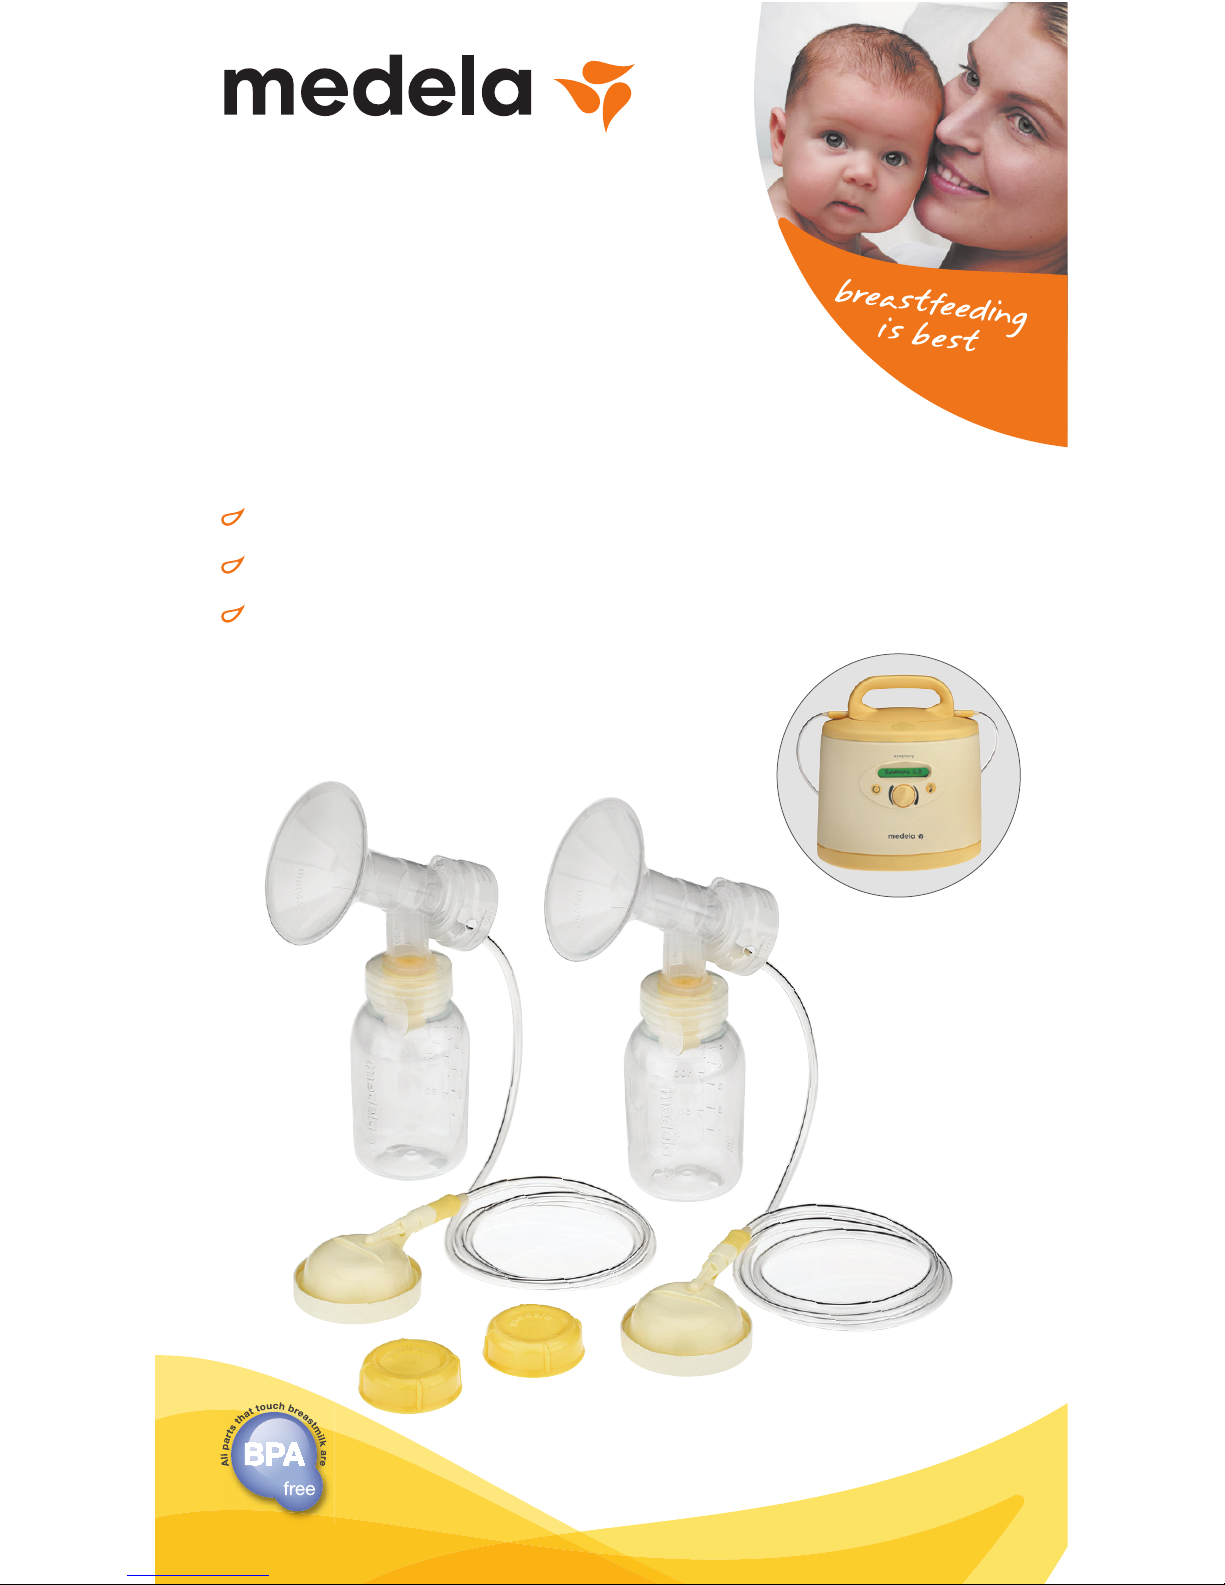
Symphony® Breastpump Kit
24 mm PersonalFit™
Breastshield (2) 87073
PersonalFit
™
Connector (2) 87071
Membrane (2)
Valve (2)
Lid (2)
Spare Membranes (2)
8107183
87088
Tubing with
Adapters (2) 8007213
Symphony Protective
Membrane (2) 8200094
Symphony
Membrane Cap (2)
8100769
Collection
Container (2) 8117018
80789
To purchase non-sterile replacement parts:
• Locate a Medela retailer at http://medela.findlocation.com
• Email customer.service@medela.com, or
• Call 1-800-435-8316

Symphony® Breastpump Kit
• To learn more about storing and caring for your breastmilk:
www.BreastmilkGuidelines.com.
• For free advice from a lactation consultant:
www.medelabreastfeedingus.com/for-expectant-mothers/
ask-the-lc.
• Go to www.medelabreastfeedingus.com/for-expectant-mothers/
tips-and-solutions for breastfeeding tips & solutions on subjects
including:
• How to breastfeed.
• Challenges & solutions.
• Going back to work.
• Breastpumping.
• Choosing the right size breastshield.
• For help with choosing a breastpump:
www.medelabreastfeedingus.com/product-selector.
Online Breastfeeding Resources
Important
This product is sterile. Package must be
inspected for any holes, broken seals, or damage
before opening. If present, you MUST wash
product prior to first use. If you have any other
questions, consult with your healthcare provider
for further cleaning instructions.
If you experience discomfort while pumping,
contact your lactation professional as you may
need a different size breastshield. To locate
Medela products, visit http://medela.findlocation.com
or call 1-800-TELL YOU.
Single User Caution:
This product is a personal care item that
should not be shared unless sterilized between users.
Refer to page 7 for instructions.
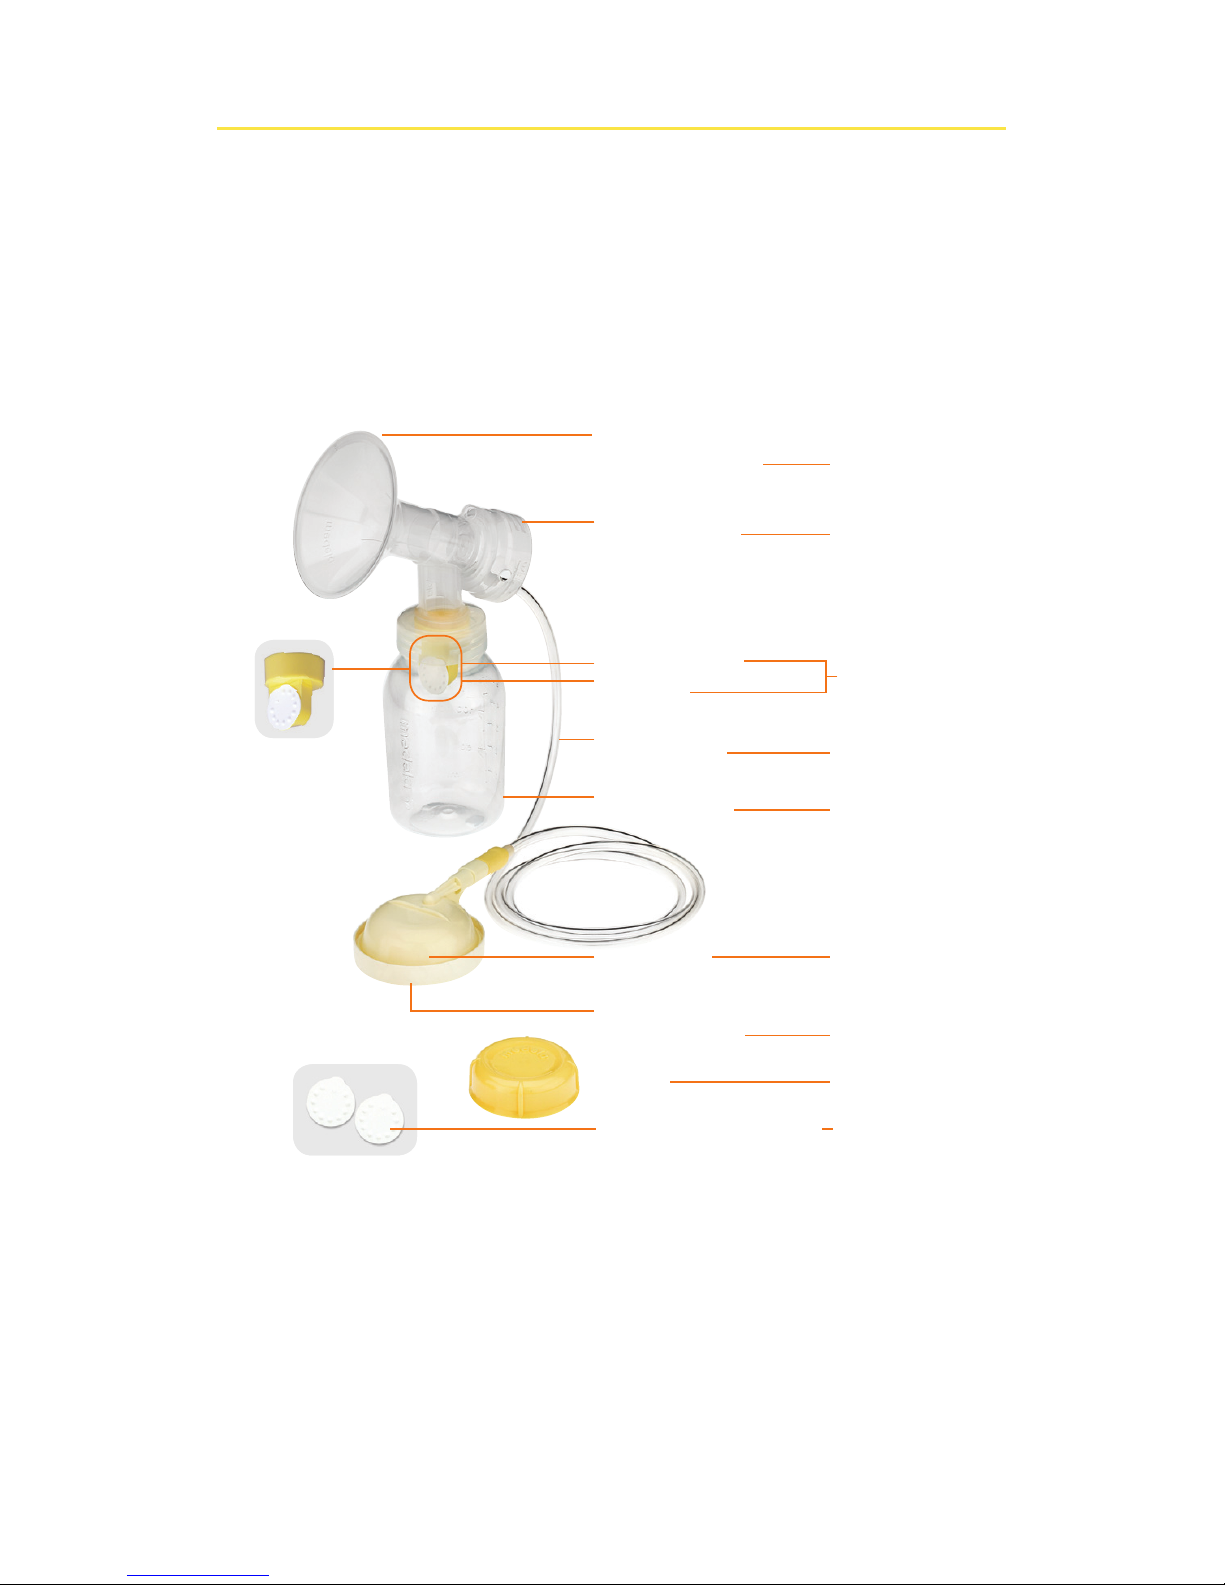
2
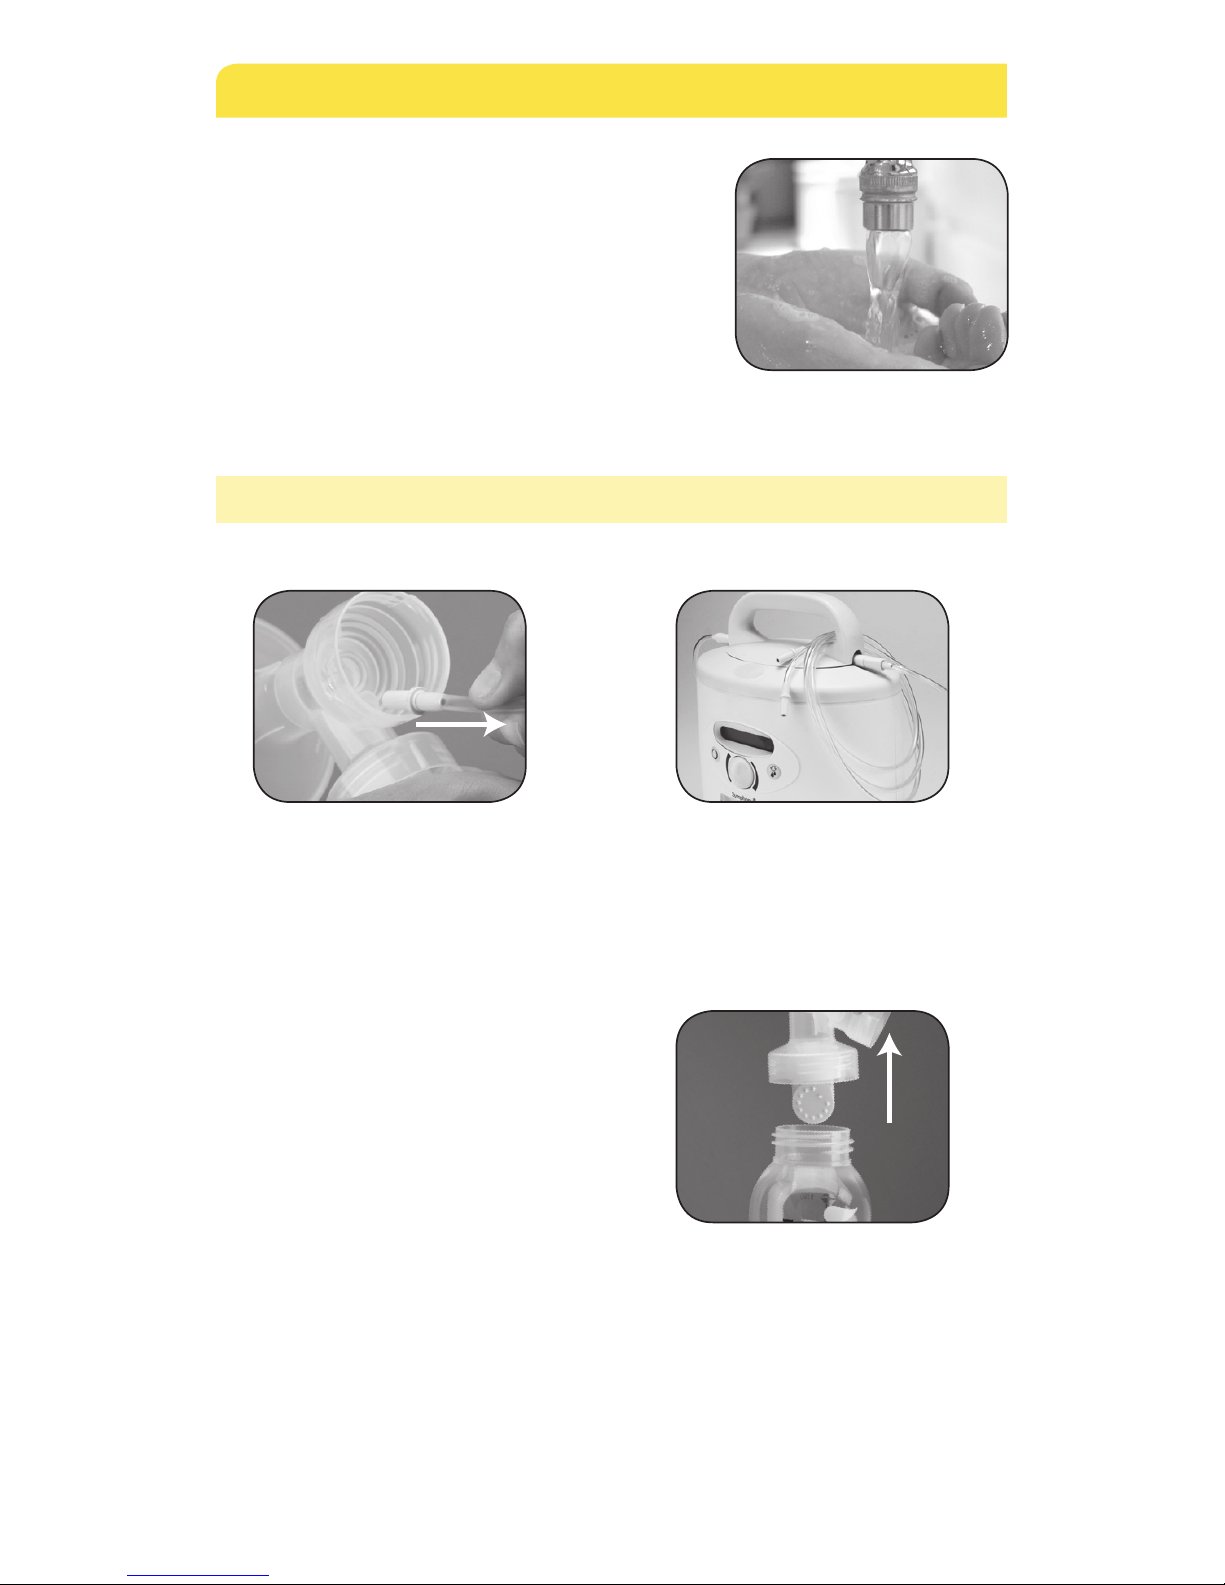
1 Securely attach
breastshields to
connectors.
2 Snap white
membranes onto
yellow valves until
membranes lie flat.
3 Push yellow valves
onto inner ring of
connector bottom.
4 Screw collection
containers onto
connector bottom.
7 Fit protective
membranes onto
membrane caps.
6 Insert the triangular
two-toned yellow
ends of tubing into
ports on membrane
caps.
5 Insert pale yellow
round ends of tubing
into openings in
back of connectors.
Symphony® Pumping Kit Assembly
Wash hands with soap and water
prior to handling your kit.
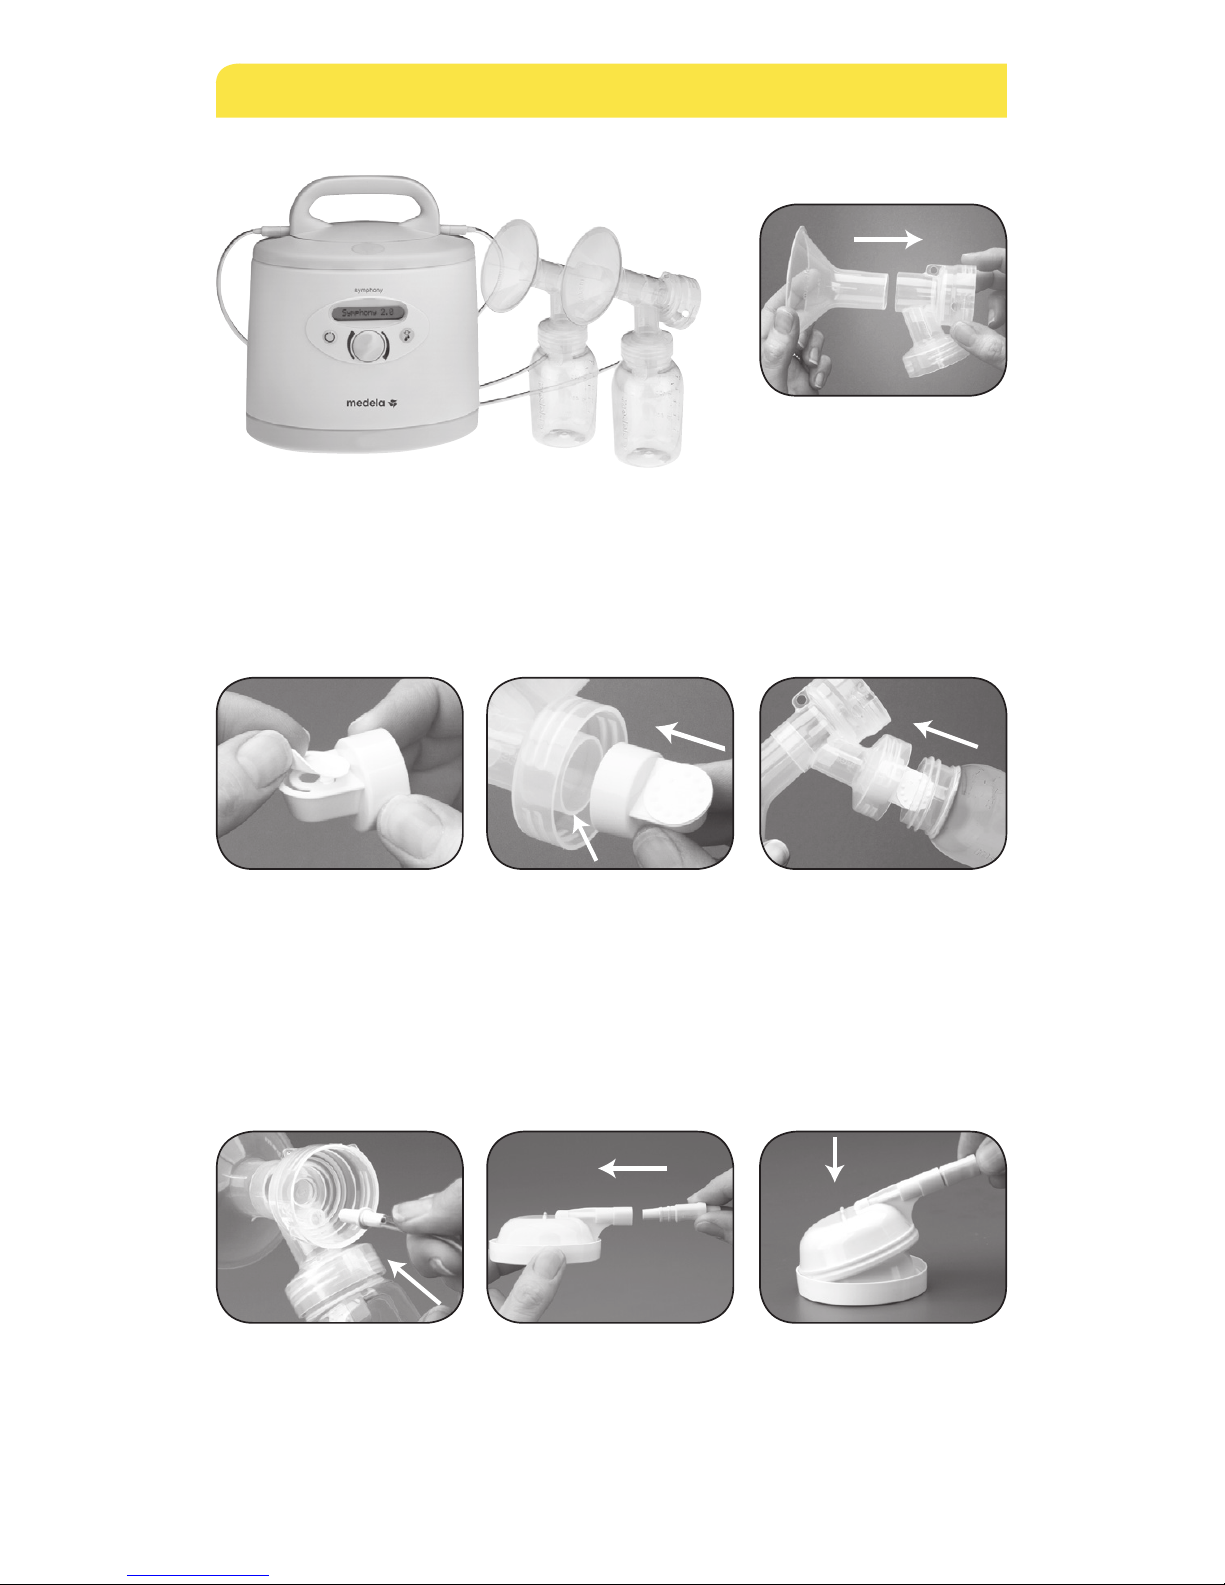
3
10 Close lid before
pumping.
(If lid does not
close, check to see
that membrane
caps are properly
seated.)
8 To open lid, hold
down the oval
button on the top of
the Symphony
breastpump and
lift up on the
handle.
9 Push membrane
caps into place on
the pump. A “click”
will be heard once
properly seated.
(Note: if single
pumping, only seat
one membrane cap.)
12 To turn the pump
on, press the power
button. You will be
starting in the
Stimulation Phase.
11 Center
breastshields over
your nipples and
start pumping.
(Caution: pushing
shields too firmly
onto breasts may
reduce milk flow.)
13 If let-down
occurs before the
Expression Phase
begins, press the
let-down button
to begin the
Expression Phase.
14 When your pumping session is over, store your
breastmilk and clean your kit. See the Breastpump Kit Care
section for cleaning instructions.
For breastmilk storage guidelines go to
www.BreastmilkGuidelines.com
Good hygiene will help protect the
breastmilk that you give to your baby. For
the best protection when handling your
breastmilk, wash your hands with soap
and water, and follow the guidelines for
cleaning, drying, and storing your kit.
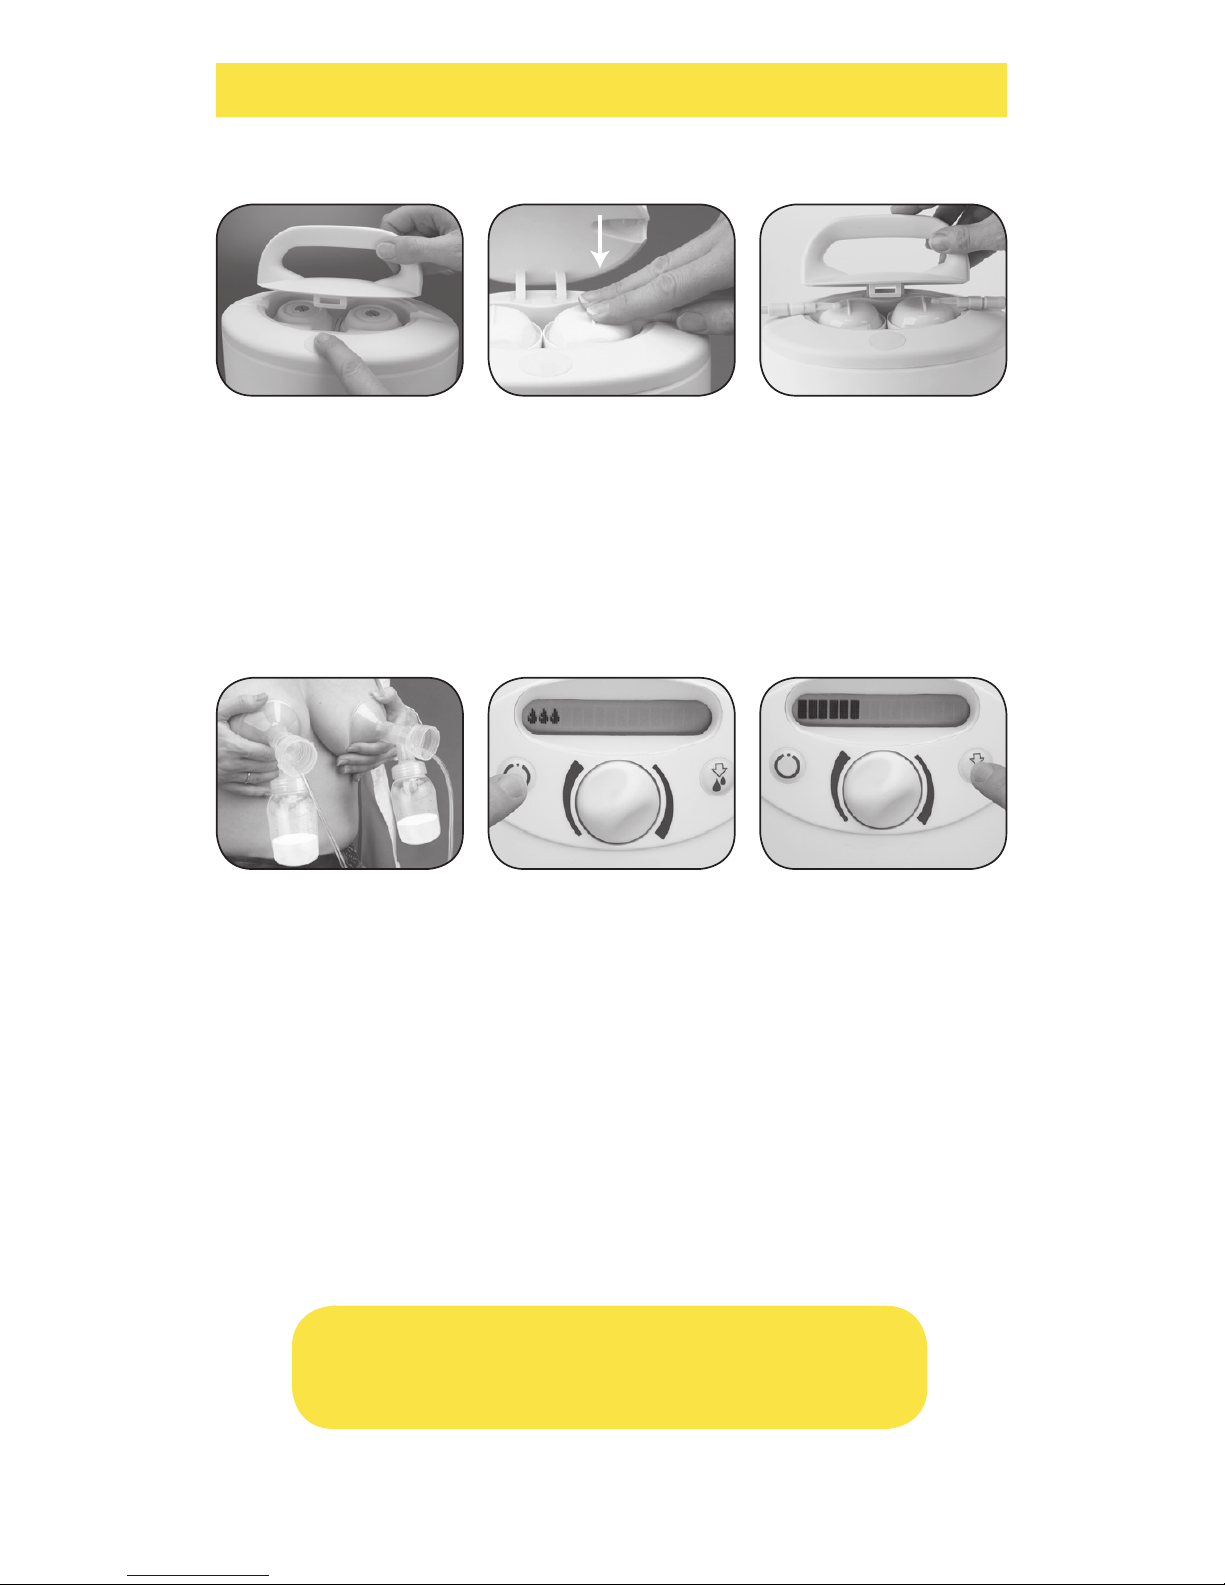
How do I disassemble my kit?
1 Finish pumping.
While the pump
is still running,
disconnect tubing from
breastshields.
(Note: It is important to let
pump run for 2minutes with
tubing attached. This will
eliminate condensation that
naturally results from humidity.)
2 Remove collection container and
store breastmilk. For breastmilk
storage guidelines go to www.
BreastmilkGuidelines.com.
Breastpump Kit Care
4
5
How do I disassemble my kit? (cont.)
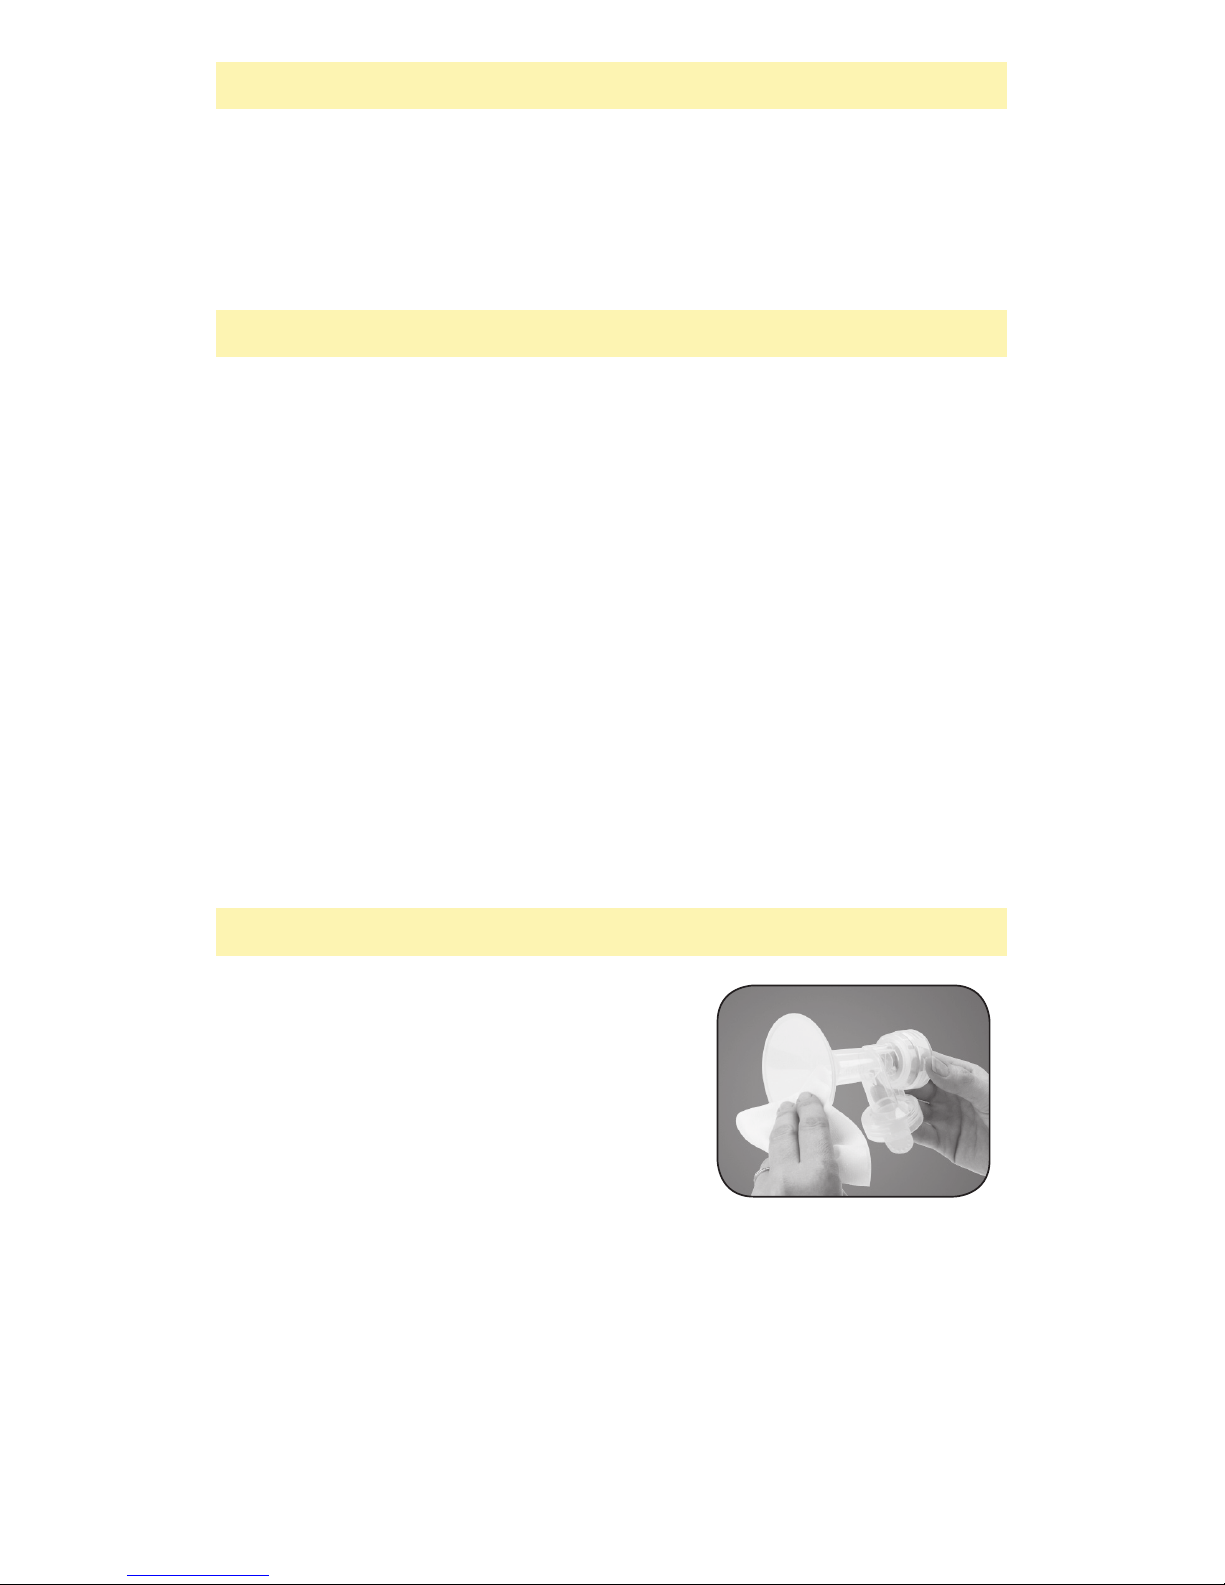
c Remove the white
membranes from the valves.
b Twist and pull the
yellow valves off the
breastshields.
a Separate breastshields.
3 Disassemble.
All parts that come in contact with your breast and breastmilk must be
disassembled and washed for the kit and pump to function efficiently.
1 Wash kit.
Rinse all separated parts in cool
water to remove breastmilk.
2 Wash and Rinse -or- Dishwasher
• Wash all separated
parts in warm,
soapy water.
• Rinse all separated
parts with clear
water.
• Wash all separated
parts on top rack
of dishwasher.
Cleaning
6
Drying & Storing
Allow all breastpump kit parts to air dry in a clean area and store dry
parts when not in use. Do NOT store wet or damp parts.
Sanitizing
In addition to washing, you may sanitize your kit parts once per day by
following the instructions on Medela’s Quick Clean™ Micro-Steam™ bag
or boiling.
If boiling your kit:
1 Separate all parts that come in contact with your breast and
breastmilk.
2 Choose a pot that is large enough so the kit parts DO NOT
rest on the sides or bottom while boiling.
3 Fill the pot with water and bring to a boil.
4 Carefully drop parts into boiling water, and boil for 10 minutes.
5 Gently remove parts from water with tongs and place on a clean
surface.
6 See Drying & Storing section (above) for further instructions.
Quicker Cleaning
You can use Medela’s QuickClean
wipes in between pumping sessions
and then clean your kit once you get
home. Follow instructions on Quick
Clean package.
 Loading...