

Page 1
Swing Flex™
Swing Maxi Flex
™
EN
Instructions for use
Petunjuk penggunaan
ID
FR
Mode d‘emploi
NL
Gebruiksaanwijzing
Page 2

Thank you for choosing the Swing Flex / Swing Maxi Flex breast pump. Breast milk is the natural choice for your
baby, but there are reasons and situations where breastfeeding is not possible. For over 50 years, it has been
Medela’s conviction that these mothers and babies can be supported. In close cooperation with breastfeeding
experts, Medela, one of the market leaders, has researched and developed breast pumps that perfectly meet
breastfeeding mother’s needs. For mothers who insist on the best for their babies and themselves. Because you
care.
Medela vous remercie d‘avoir acheté un tire-lait Swing Flex/Swing Maxi Flex. Le lait maternel est ce qu‘il y a de
plus naturel pour votre enfant, mais dans certaines situations, l‘allaitement au sein n‘est pas possible. Depuis
plus de 50 ans, Medela se donne pour mission d‘assister ces mamans et ces bébés en difficulté. En étroite
collaboration avec des experts de l’allaitement, Medela a développé des tire-laits qui répondent de façon
optimale aux besoins des mères allaitantes. Ces appareils s‘adressent aux mères qui ne veulent que le meilleur
pour leur bébé et pour elles-mêmes. Parce que votre bien-être est important pour nous.
Hartelijk dank dat u voor de Swing Flex/Swing Maxi Flex borstkolf hebt gekozen. Moedermelk is een
natuurlijke keuze voor uw baby, maar er zijn redenen en omstandigheden waarin het niet mogelijk is om
borstvoeding te geven. Medela is er al meer dan 50 jaar van overtuigd dat deze moeders en baby‘s
ondersteund kunnen worden. In nauwe samenwerking met borstvoedingsdeskundigen heeft Medela, een van
de marktleiders, borstkolven onderzocht en ontwikkeld die perfect aansluiten bij de behoeften van moeders
die borstvoeding geven. Voor moeders die het beste willen voor hun baby en voor zichzelf. Uit liefde.
Terima kasih telah memilih Pompa ASI Swing Flex / Swing Maxi Flex. ASI adalah pilihan alami bagi bayi Anda,
tetapi situasi dan kondisi kadang membuat menyusui tidak mungkin. Selama lebih dari 50 tahun, Medela yakin
ada yang dapat dilakukan untuk membantu ibu-ibu dan bayi-bayi ini. Medela, salah satu pemimpin pasar,
bekerja sama dengan pakar per-ASI-an, berhasil meneliti dan mengembangkan pompa ASI yang benarbenar memenuhi kebutuhan ibu menyusui. Untuk para ibu yang menginginkan yang terbaik bagi bayi mereka
juga mereka sendiri. Karena Anda peduli.
Page 3

EN
4–35
FR
36–67
NL
68–99
ID
100–131
Page 4

Table of Contents
44
1. Intended use / Population – Contraindication 5
2. Meaning of symbols 6
3. Important safety information 9
4. Product description Swing Flex 10
5. Product description Swing Maxi Flex 11
6. Cleaning 12
6.1 Cleaning overview 12
6.2 Disassemble
6.3 Wash
6.4 Sanitise
6.5 Cleaning tubing
6.6 Cleaning the motor unit
13
14
14
15
15
7. Preparing for pumping 16
7.1 Mains operation 16
7.2 Battery operation
7.3 Assembling the pump set
16
18
8. Expression 20
8.1 Swing Flex – Preparing for single pumping 20
8.2 Swing Maxi Flex – Preparing for single pumping
8.3 Swing Maxi Flex – Preparing for double pumping
8.4 Swing Maxi Flex – Preparing for hands-free expression with
the Easy Expression Bustier
8.5 Pumping
26
24
20
22
9. Storing and thawing breast milk 28
9.1 Storage 28
9.2 Freezing
9.3 Thawing
28
28
10. Troubleshooting 29
11. Warranty / Disposal 30
12. Spare parts and Accessories 31
13. EMC / Technical description 33
14. Technical specifications 34
Page 5

1. Intended use / Population – Contraindication
The intended use and indications of breast pumps
Breast pumps are intended to be used by lactating women in the hospital or home environment for expressing breast milk. Breast pumps are indicated to alleviate the symptoms of
engorgement by expressing milk. In case of mastitis breast pumps support the healing
process by removing breast milk from the affected breast. Breast pumps are indicated to
relieve sore and cracked nipples and to bring out flat or inverted nipples. Also breast
pumps enable mothers to provide breast milk for babies who cannot feed directly at the
breast for a variety of reasons such as latch-on problems, cleft palate or premature babies.
5
Intended patient population/user
Adolescent paediatric or adult lactating women. Many women find it convenient, or even
necessary, to use a breast pump to express and store their breast milk once they have
returned to work, are travelling or are otherwise separated from their baby. Women are
often delighted to learn that a breast pump can be used as a supplement to breastfeeding
and that some pumps are designed to mimic the suckling of a nursing baby.
Contraindications
There are no known contraindications for the Swing Flex / Swing Maxi Flex breast pump.
Page 6
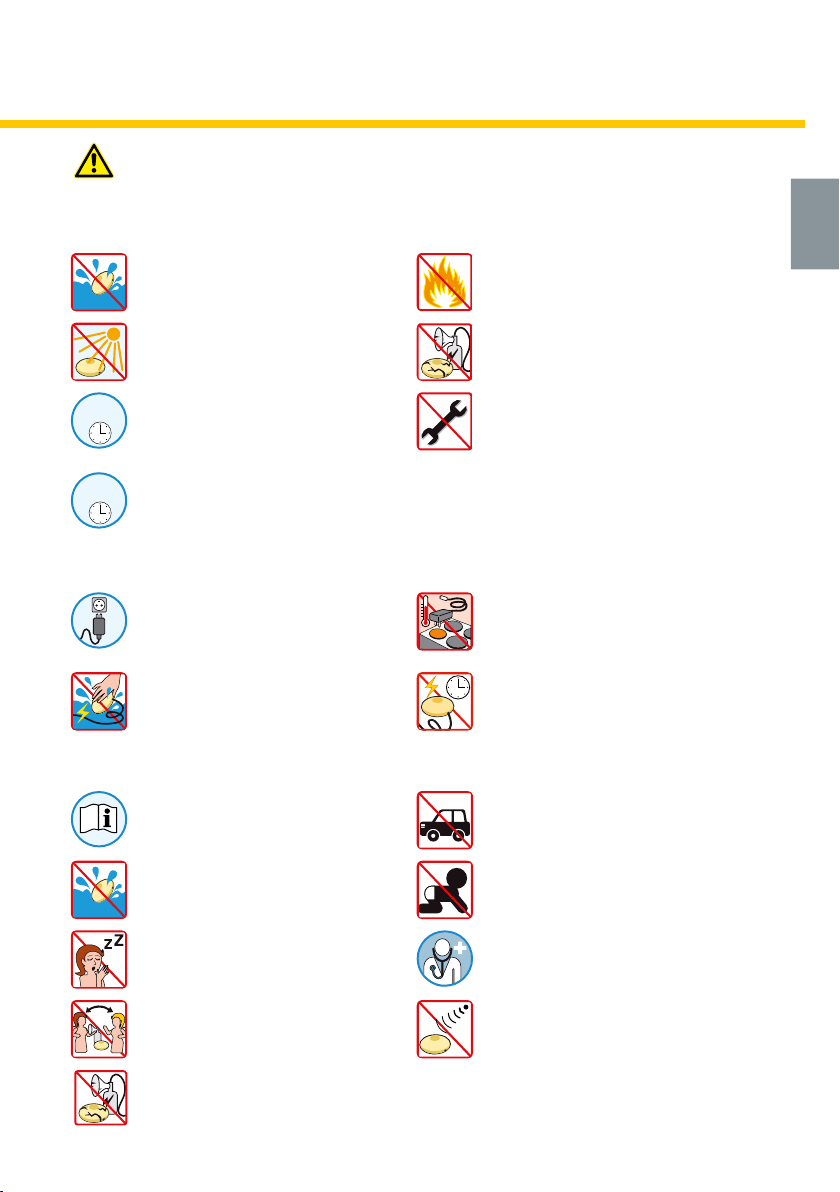
2. Meaning of symbols
The warning symbol identifies all instructions that are important for safety. Failure to
66
observe these instructions can lead to injury or damage to the breast pump!
When used in conjunction with the following words, the warning symbol stands for:
Warning
Can lead to serious injury or death.
Caution
Can lead to minor injury.
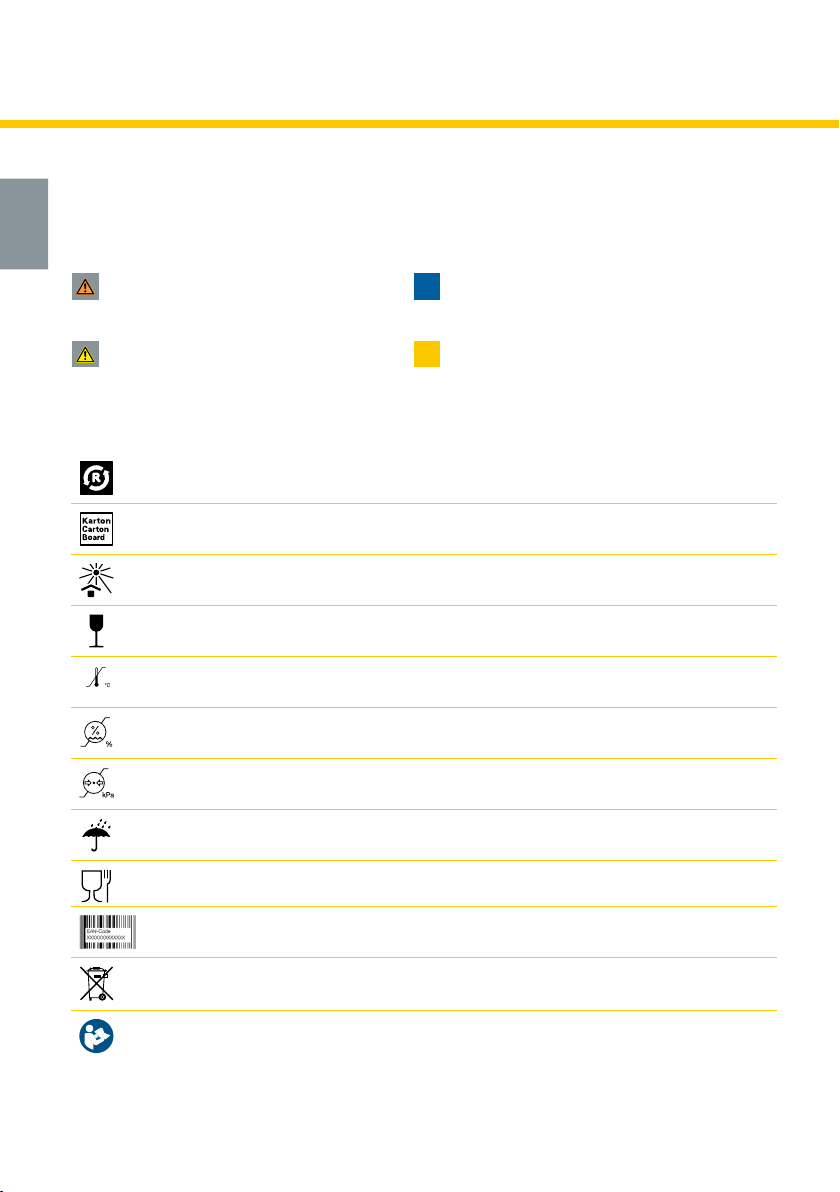
Symbols on the packaging
This symbol indicates that the material is part of a recovery/recycling process.
This symbol indicates a carton package.
This symbol indicates to keep the device away from sunlight.
This symbol indicates to handle the fragile device with care.
This symbol indicates the temperature limitation for operation, transport and storage.
This symbol indicates the humidity limitation for operation, transport and storage.
This symbol indicates the atmospheric pressure limitation for operation,
transport and storage.
This symbol indicates to keep the device dry.
i
i
Note
Can lead to material damage.
Info
Useful or important information that is
not related to safety.
This symbol indicates that the packaging contains products intended to come in contact with
food according to regulation 1935/2004.
This symbol indicates unique GSI Global Trade Item Numbers (GTIN).
This symbol indicates do not dispose the device together with unsorted municipal waste (for
EU only).
This symbol indicates to follow instructions for use.
Page 7
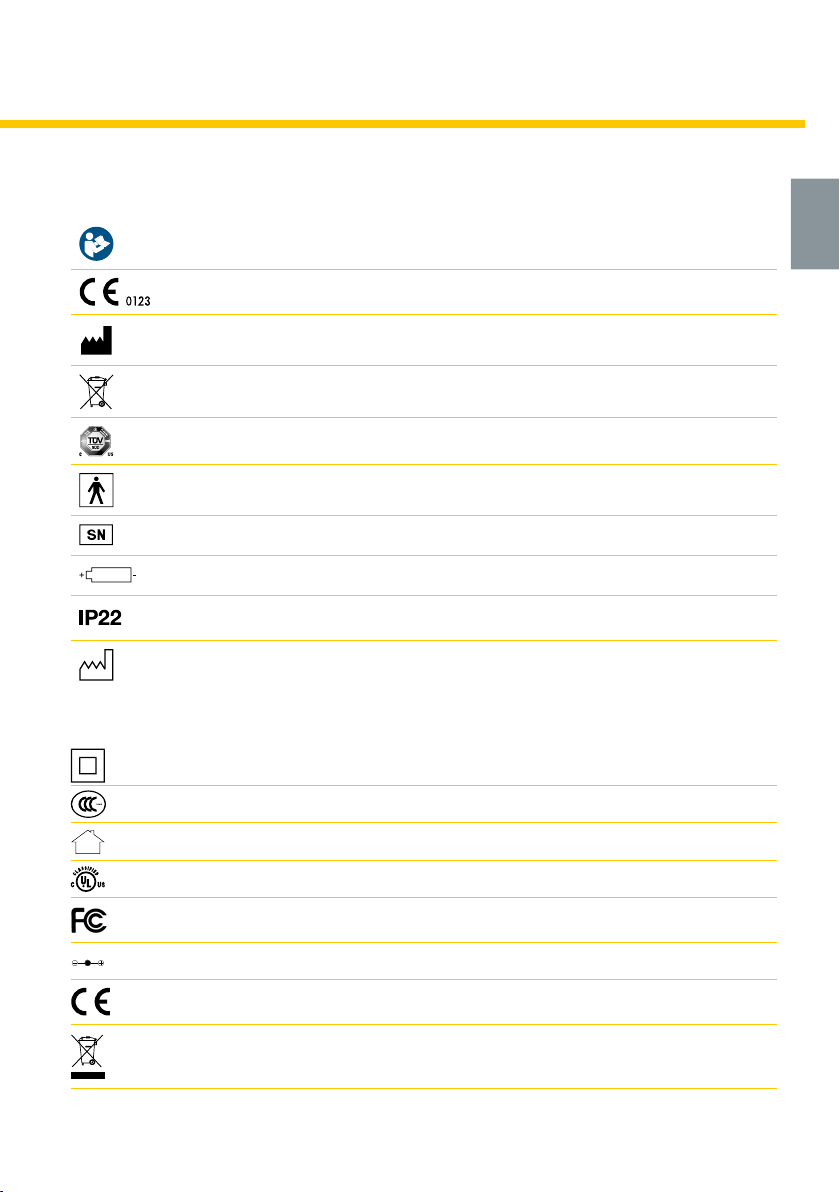
Symbols on the device
This symbol indicates to follow instructions for use.
This symbol indicates the compliance with the essential requirements of the Council Directive
93/42/EEC of 14 June 1993 concerning medical devices.
This symbol indicates the manufacturer.
This symbol indicates do not dispose the device together with unsorted municipal waste (for
EU only).
This symbol indicates the compliance with additional USA and Canada safety
requirements for medical electrical equipment.
This symbol indicates a type BF applied part.
This symbol indicates manufacturer’s serial number of the device.
This symbol indicates the positioning of battery cell.
This symbol indicates the protection against ingress of solid foreign objects and against
harmful effects due to the ingress of water.
This symbol indicates the date of manufacture (four digits for the year and
two digits for the month).
Symbols on the mains adapter
This symbol indicates that the mains adapter is a class II device.
7
This symbol indicates the compliance with China Compulsory Certification.
This symbol indicates that the mains adapter is for indoor use only.
This symbol indicates the compliance with USA and Canada safety requirements.
This symbol indicates the compliance with Federal Communications Commission requirements.
This symbol indicates polarity of d.c. power connector.
This CE-mark indicates the compliance with the low voltage and electromagnetic compatibility directive.
This symbol indicates to not dispose the device together with unsorted municipal waste (for
EU only). The solid bar symbol indicates that mains adapter is put on the market after 13
August 2005.
Page 8
88
SGS
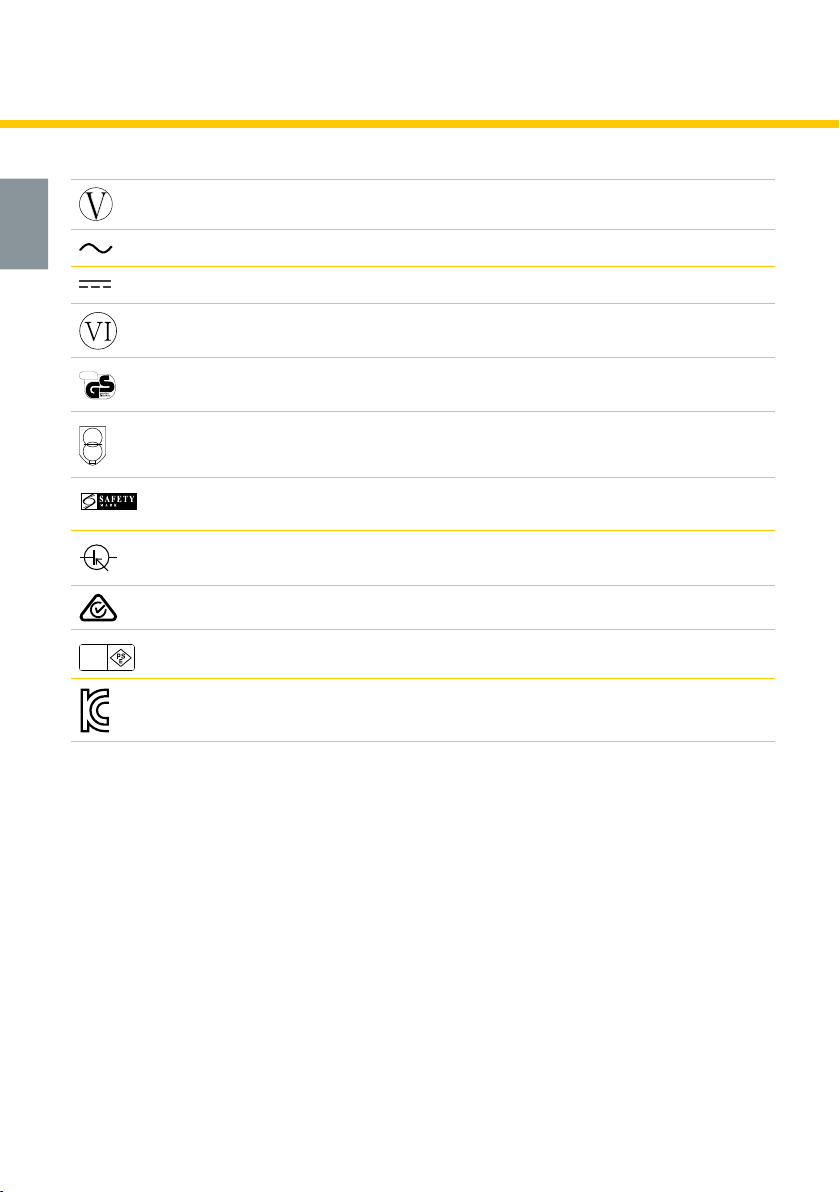
This symbol indicates the compliance with energy efficiency requirements.
This symbol indicates alternating current.
This symbol indicates direct current.
This symbol indicates the compliance with energy efficiency requirements.
This symbol indicates that the mains adapter is safety tested.
This symbol indicates a short-circuit proof safety isolating transformer.
170053-12
S
TÜV
SÜD
PSB
IP20
Singapore Consumer Protection Registration.
This symbol indicates that the electronic device incorporating transformer(s) and electronic
circuitry(ies), converts electrical power into single or multiple power outputs.
This symbol indicates the compliance with AUS/NZ requirements (regulatory compliance
mark).
This symbol indicates the compliance with PSE requirements (Japan, Product Safety Electrical
Appliance and Material Safety Law).
The KC mark indicates that the product meets Korean EMC and electric safety requirements.
This symbol indicates the protection against ingress of solid foreign objects and against
harmful effects due to the ingress of water.
Page 9
3. Important safety information
MAX.
275 h
MAX.
250 h
Failure to follow these instructions/safety information can lead to danger from the device.
Subject to technical changes.
Device
Danger of electrocution! Keep the device
dry! Never immerse in water or other
liquids!
Do not expose the motor unit to direct
sunlight.
9
The Swing Flex / Swing Maxi Flex breast
pump is not heat-resistant: Keep away
from radiators and open flames.
Never use a damaged device. Replace
damaged or worn parts.
The operating life of the Swing Flex
breast pump is 275 hours. The service
life is two years.
The operating life of the Swing Maxi Flex
breast pump is 250 hours. The service
life is two years.
Electrical use
Separation from the mains is only
assured through the disconnection of
the mains adapter from the wall socket
outlet.
Do not reach for any electrical device if it
has fallen into water.
Unplug immediately.
Use
Use the Swing Flex / Swing Maxi Flex
breast pump only for its intended use as
described in this manual.
Do not use the Swing Flex /Swing Maxi
Flex breast pump while bathing or
showering.
Do not use the Swing Flex / Swing Maxi
Flex breast pump while sleeping or
overly drowsy.
This is a single user product. Use by
more than one person may present a
health risk.
Never operate an electrical device if it has a damaged
cord or plug, if it is not working properly, if it has
been dropped or damaged, or dropped into water.
Repairs must be performed only by an
authorised service agency.
Do not repair yourself! No modifications
to the device are permitted.
Keep the mains adapter away from
heated surfaces.
The breast pump should never be left
unattended when plugged into a power
source.
Do not drive whilst hands-free pumping.
Supervision is necessary when the Swing
Flex / Swing Maxi Flex breast pump is used
in the vicinity of children.
Contact your lactation consultant or
breastfeeding specialist if you experience
problems or pain.
Portable and mobile radio frequency
communications equipment can affect the
Swing Flex / Swing Maxi Flex breast pump.
Page 10
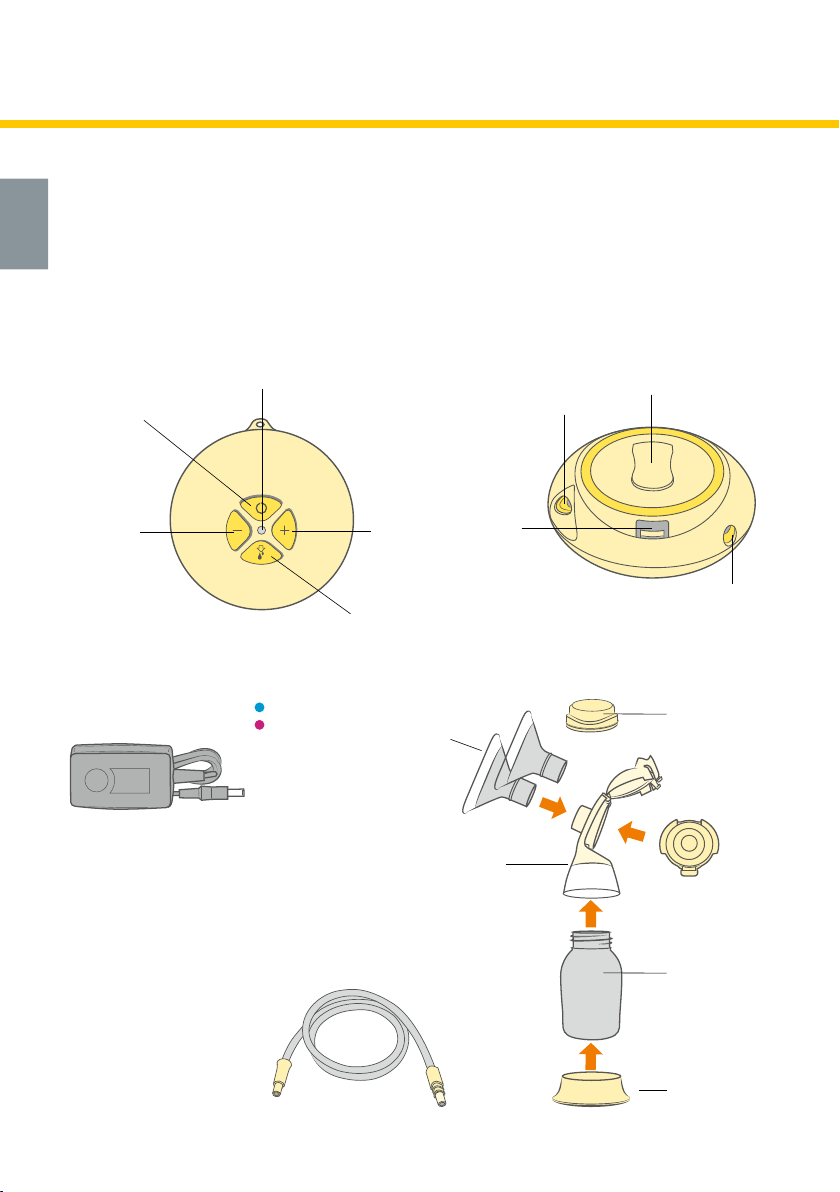
4. Product description Swing Flex
Swing Flex – single electric 2-Phase
1010
breast pump
1x motor unit:
article 600.0975
spare part 099.0015
on/off button
LED
swing
fixing clip
PVC tubing port
reduce
vacuum
breast shields:
1 x 21 mm (article 101035239)
1 x 24 mm (article 101035240)
1x mains adapter
article spare part
Euro 4.8V 201.1055 099.0016
UK 4.8V 201.1056 099.0017
AUS/NZ 4.8V 201.1057 099.0018
CN 4.8V 201.1058 099.0276
US/JP 4.8V 201.1059 101033542
KR 4.8V 101034044 101038305
1x Swing Flex tubing
ar ticl e 201.1079
spare part 1010340 02
increase
vacuum
let-down
button
battery
compartment
1x connector
article 200.9728
power adapter port
1x multi lid
ar ticle 20 0.2714
1x lid
1x membrane
1x bottle
article 811.0021
1x bottle stand
article 101033405
Spare parts and accessories available for order can be found in chapter 12.
Page 11
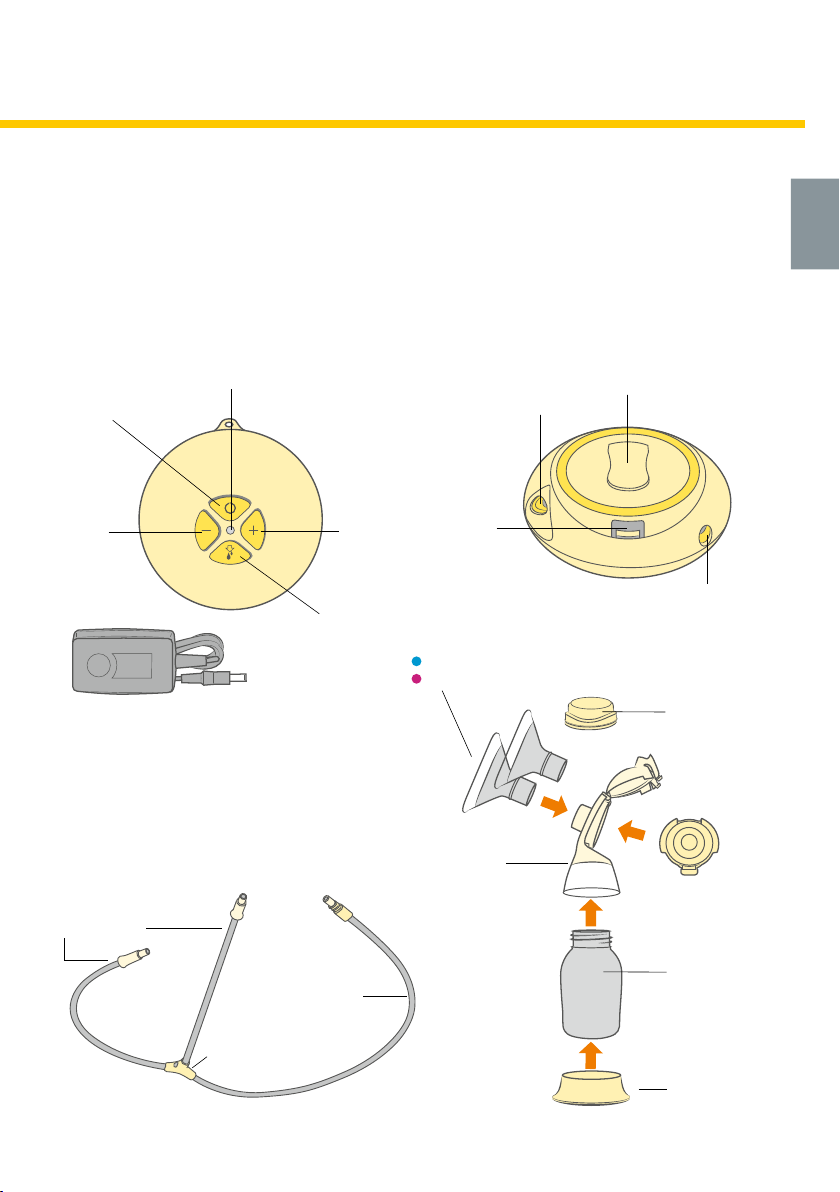
5. Product description Swing Maxi Flex
Swing Maxi Flex – double electric 2-Phase
breast pump
1x motor unit:
article 200.4932
spare part 099.0270
on/off button
reduce
vacuum
1x mains adapter
article spare part
Euro 12V 201.1146 099.0271
UK 12V 201.1147 099.0272
AUS/NZ 12V 201.1149 099.0273
CN 12V 101032865 099.0274
US/JP 12V 201.1148 101033543
KR 12V 101034045 101038303
LED
swing maxi
increase
vacuum
let-down
button
fixing clip
PVC tubing port
battery
compartment
power adapter port
breast shields:
2 x 21 mm (article 101035239)
2 x 24 mm (article 101035240)
2x connector
article 200.9728
11
2x multi lid
ar ticle 20 0.2714
2x lid
2x membrane
short tubings
tubing holder
long tubing
1x Swing Maxi Flex
tubing
ar ticl e 201.1087
spare part 1010340 03
2x bottle
article 811.0021
2x bottle stand
article 101033405
Page 12
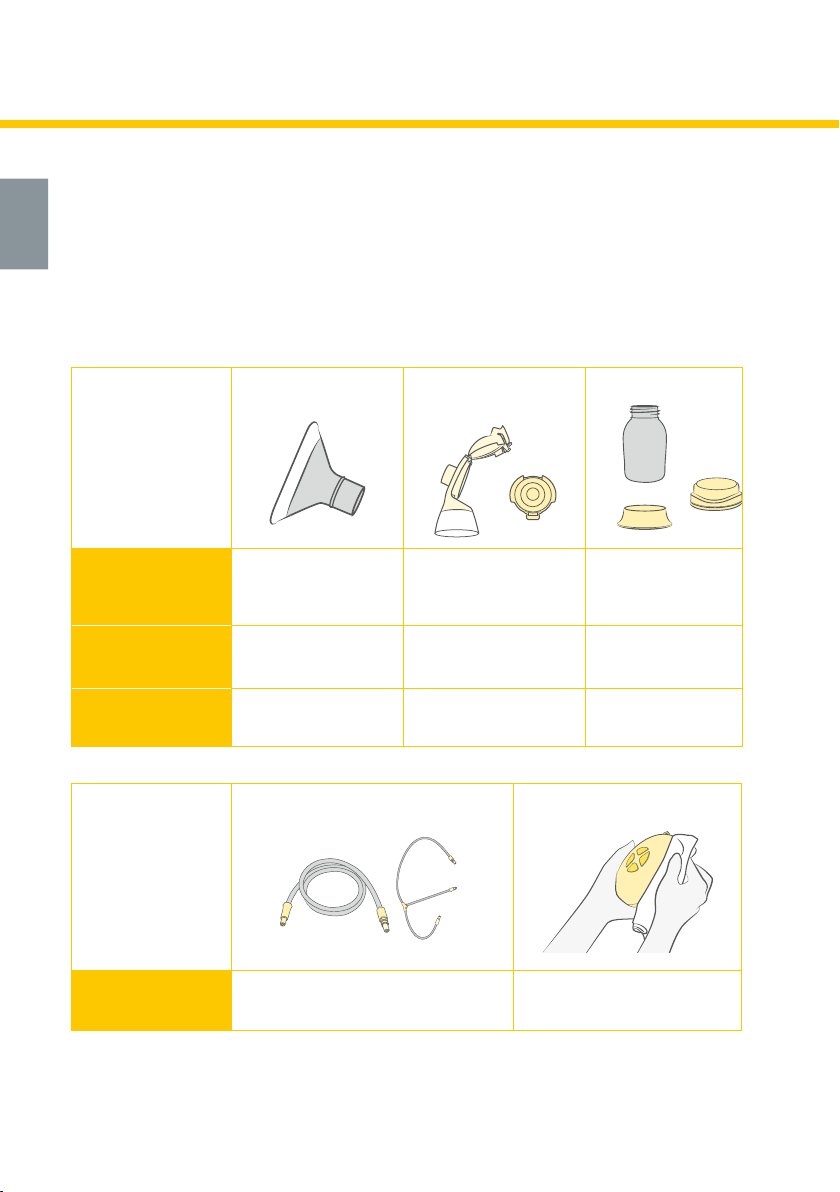
6. Cleaning
6.1 Cleaning overview
1212
Washing and sanitising are two different activities. They must be done separately to protect
you, your baby and the performance of your breast pump.
Wash – To clean the surfaces of the parts by physically removing contamination.
Sanitise – To kill living organisms, such as bacteria or viruses, that may be present
on the surfaces of the parts.
When to clean
Before 1st use
After each use
Once per day
When to clean
Breast shield(s)
✔ 6.2 disassemble
✔ 6.3 wash
✔ 6.4 sanitise
✔ 6.3 wash
✔ 6.4 sanitise
Tubing
Connector and
membrane
✔ 6.2 disassemble
✔ 6.3 wash
✔ 6.4 sanitise
✔ 6.2 disassemble
✔ 6.3 wash
✔ 6.2 disassemble
✔ 6.4 sanitise
Bottles & lids
✔ 6.2 disassemble
✔ 6.3 wash
✔ 6.4 sanitise
✔ 6.2 disassemble
✔ 6.3 wash
✔ 6.2 disassemble
✔ 6.4 sanitise
Motor unit
As needed
see chapter 6.5 see chapter 6.6
Page 13
6.2 Disassemble
*
Caution
• Do not spray or pour liquid directly onto
the pump.
• Only use drinking-quality water for
cleaning.
• Take apart and wash all parts that come
in contact with the breast and breast milk
immediately after use to avoid drying up
of milk residues and to prevent growth of
bacteria.
• Do not clean the tubing with Quick Clean
bags in the microwave.
• Unplug the breast pump before cleaning
the motor unit.
i
Note
• The pump set requires no maintenance.
• Take care not to damage parts of the
pump set during cleaning.
• Do not use the breast milk if bottles
or components become damaged.
13
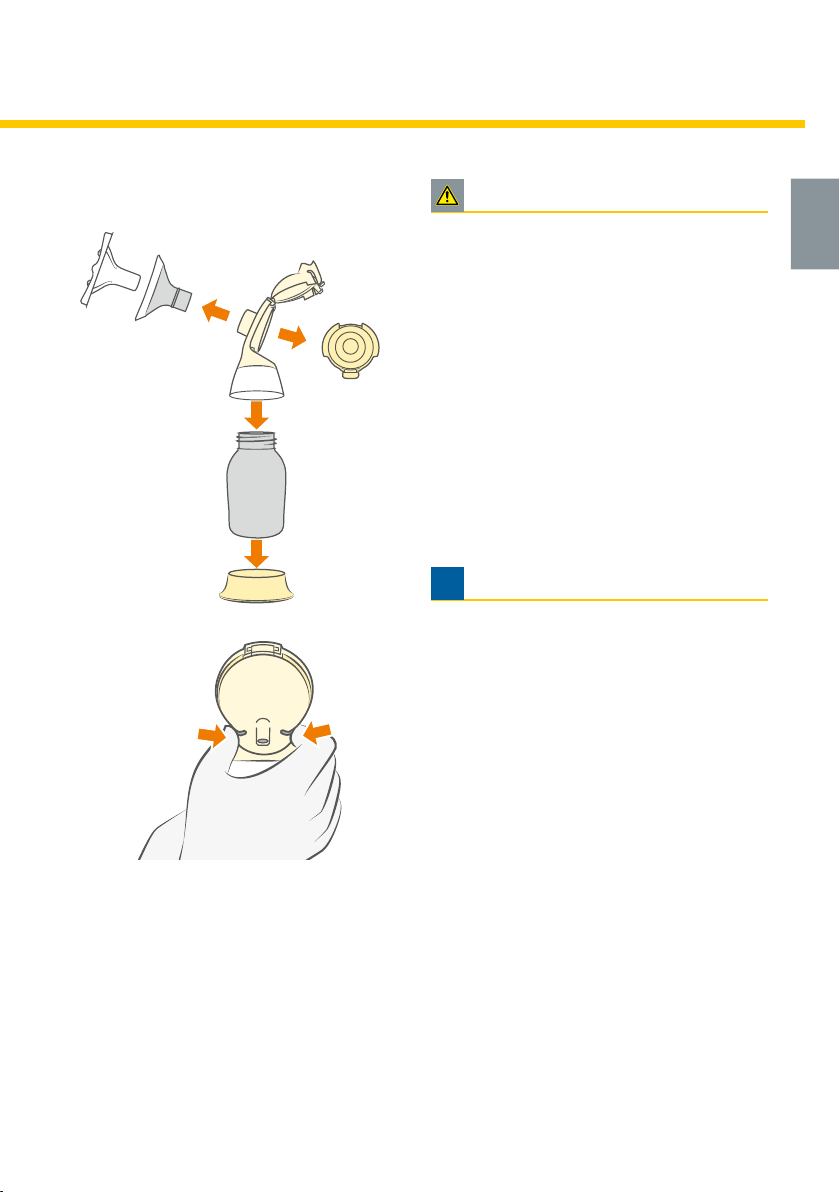
• Remove and dispose the protective cover*
from the breast shield before first use.
• Disassemble the pump set into its
individual parts (breast shield, connector,
membrane, milk bottle).
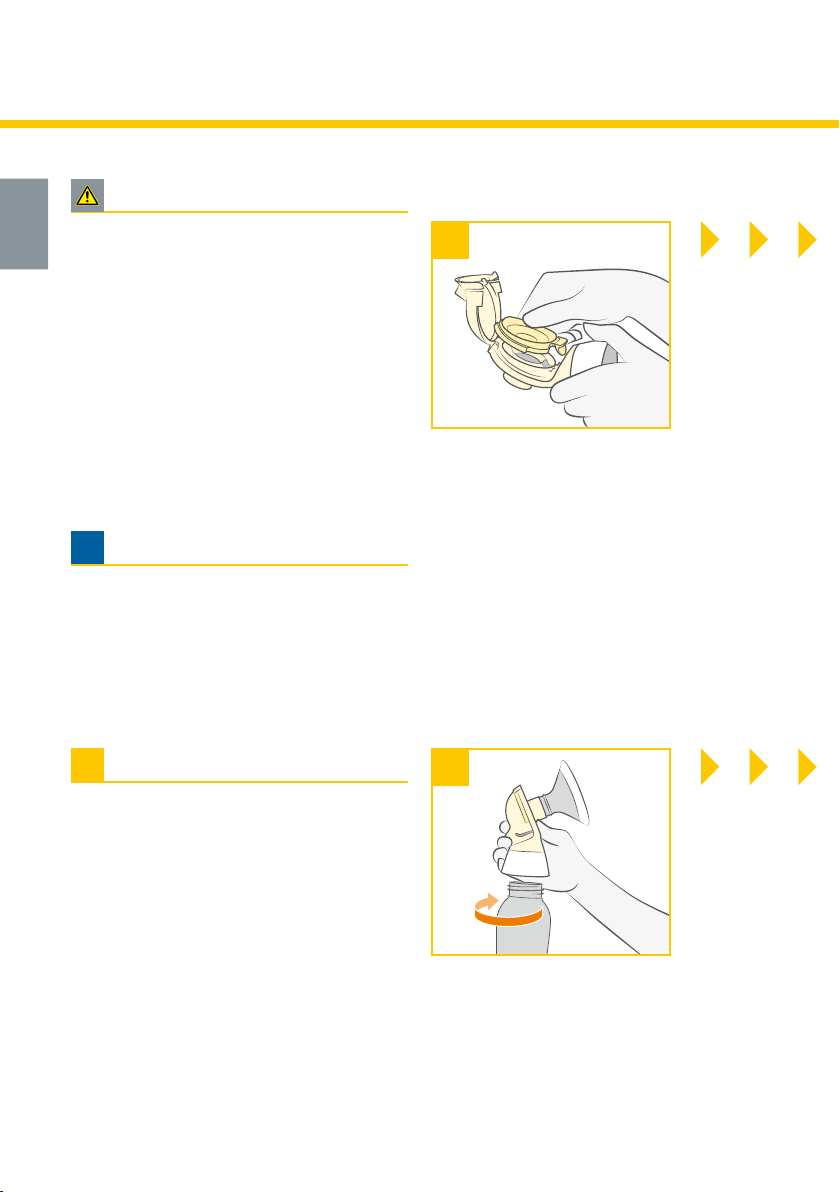
• Open back cap of the connector by
squeezing both flaps.
• Check all parts for damage.
• Replace damaged or worn parts.
Page 14
6. Cleaning
1414
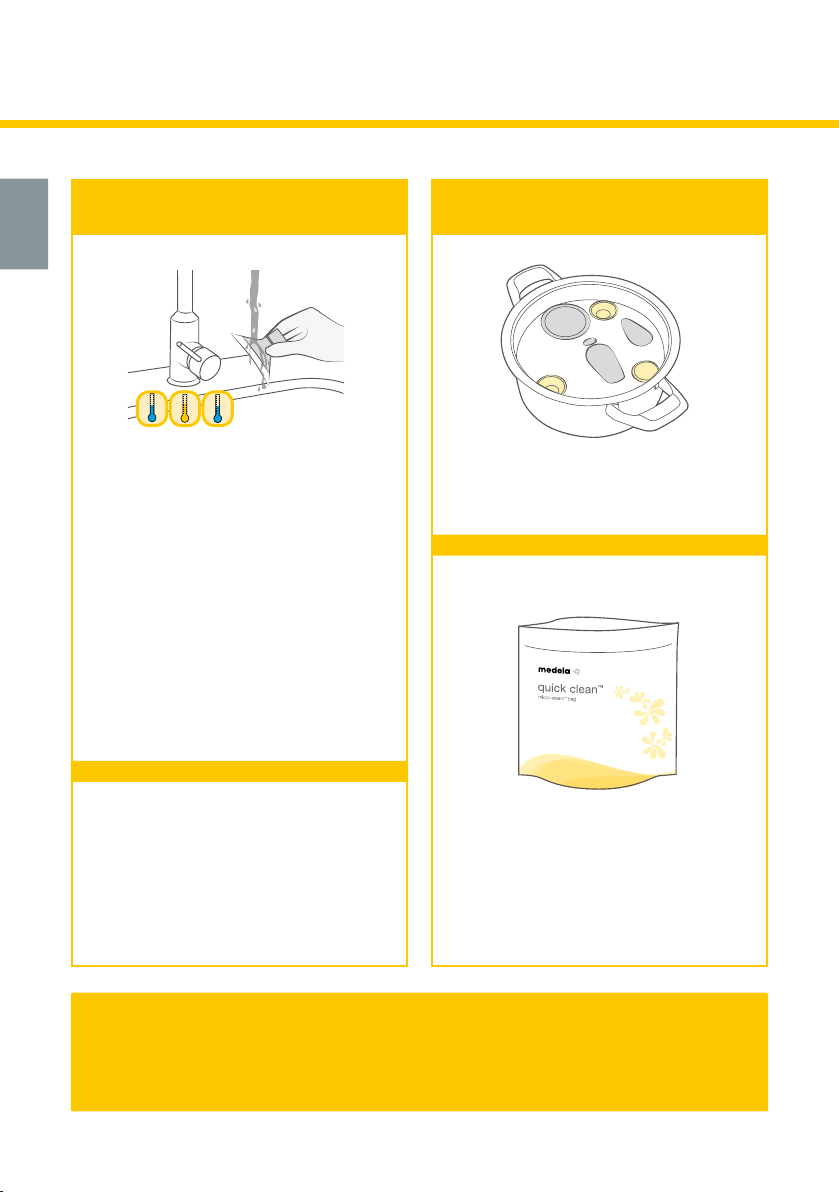
6.3 Wash
Before first use and after each use
Sink Stovetop
1. Rinse all parts with cold, clear
drinking-quality water (approx.
20 °C).
2. Clean these parts with plenty of
6.4 Sanitise
Before first use and once per day
Cover all parts, except the tubing,
with water and boil at least for
5minutes. Dry after sanitising.
warm, soapy water (approx. 30 °C).
Use a commercially available
washing-up liquid, preferably without
Microwave
artificial fragrances and colouring
(pH neutral).
3. Rinse the parts with cold, clear
drinking-quality water for
10–15seconds (approx. 20 °C).
Dry after washing.
OR
OR
Dishwasher
Place all parts, except for the tubing,
on the top rack or in the cutlery section.
Use a commercially available dishwashing detergent. Dry after washing.
Use Quick Clean* bags in the microwave in accordance with the instructions. Dry after sanitising.
* Accessories available for order:
see chapter 12. For more information,
visit www.medela.com.
Drying
Dry with a clean cloth or leave to dry on a clean cloth. Put the clean parts in a clean
storage bag or a clean environment. Do not store parts in an airtight container/bag if
moist. It is important that all residual moisture dries.
Page 15
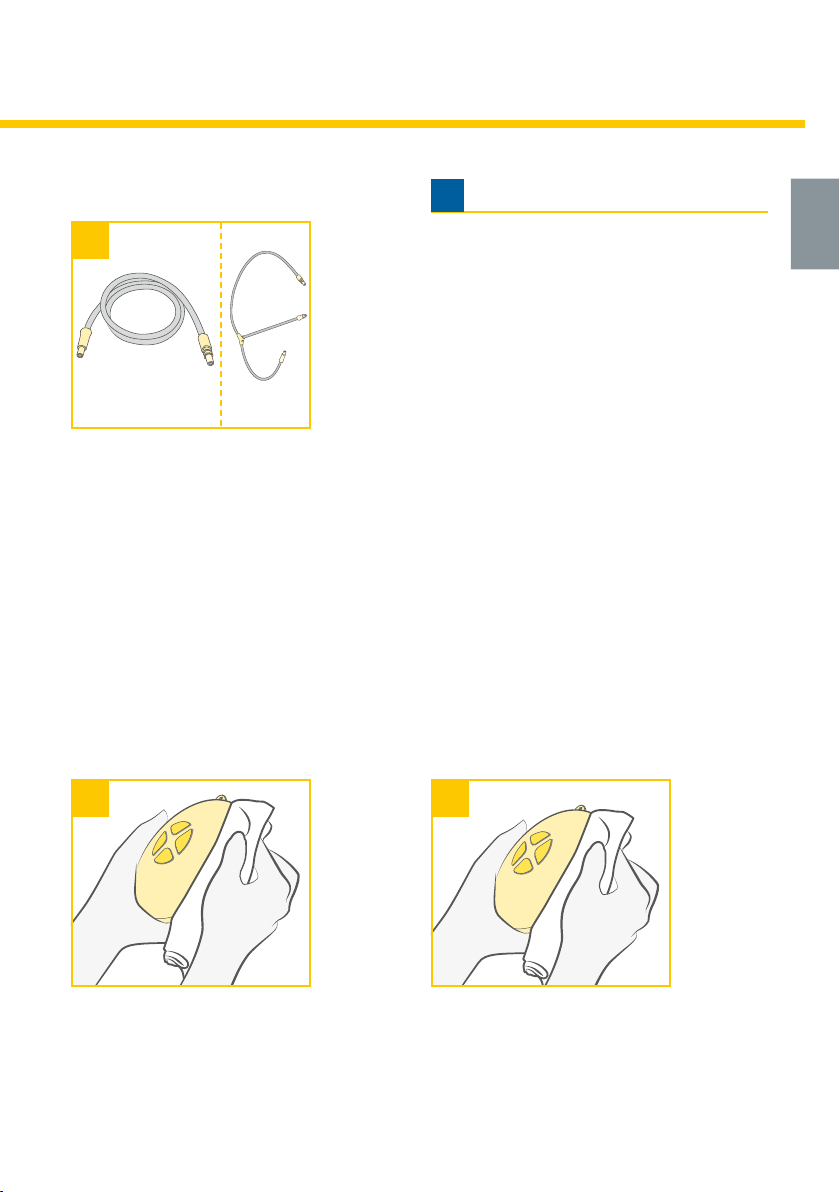
6.5 Cleaning tubing
1
• No visible residues
No cleaning needed.
• With visible residues
1. Rinse tubing in cool water
2. Wash tubing in warm, soapy water
3. Rinse tubing with clear water
4. Shake out water droplets
5. Hang to air dry
Do not sanitise the tubing.
6.6 Cleaning the motor unit
i
Note
• If the individual components of the pump
set are cleaned in a dishwasher, parts
may be discoloured by food pigments.
This has no impact on the function.
• The membrane at the connector prevents
the milk from flowing into the tubing,
however, inspect the tubing after each
pumping session for visible residues. If
there are visible residues in the tubing,
follow the instructions in chapter 6.5.
15
1
To clean the motor unit, wipe the housing
with a clean, damp (not wet) cloth. You may
use drinking-quality water and a basic
washing-up liquid or a non-abrasive
detergent.
2
Additionally you may use an alcohol-based
disinfecting agent.
Page 16

7. Preparing for pumping
1616
Warning
• Mains operation:
Follow the exact order of the steps.
• Only use the mains adapter supplied with
the Swing Flex / Swing Maxi Flex.
• Make sure the voltage of the mains
adapter is compatible with the power
source.
Info
i
• You can operate the SwingFlex / Swing
Maxi Flex breast pump via battery or
mains.
• Battery operation:
The batteries do not need to be removed
when the mains adapter is used for
pumping.
• Regularly check the condition of the
batteries in the motor unit.
• If Swing Flex / Swing Maxi Flex will remain
unused for a longer period of time,
remove the batteries from the battery
compartment.
• Batteries last for 4 – 6 pumping sessions
(approx. 1 ½ hours pumping time).
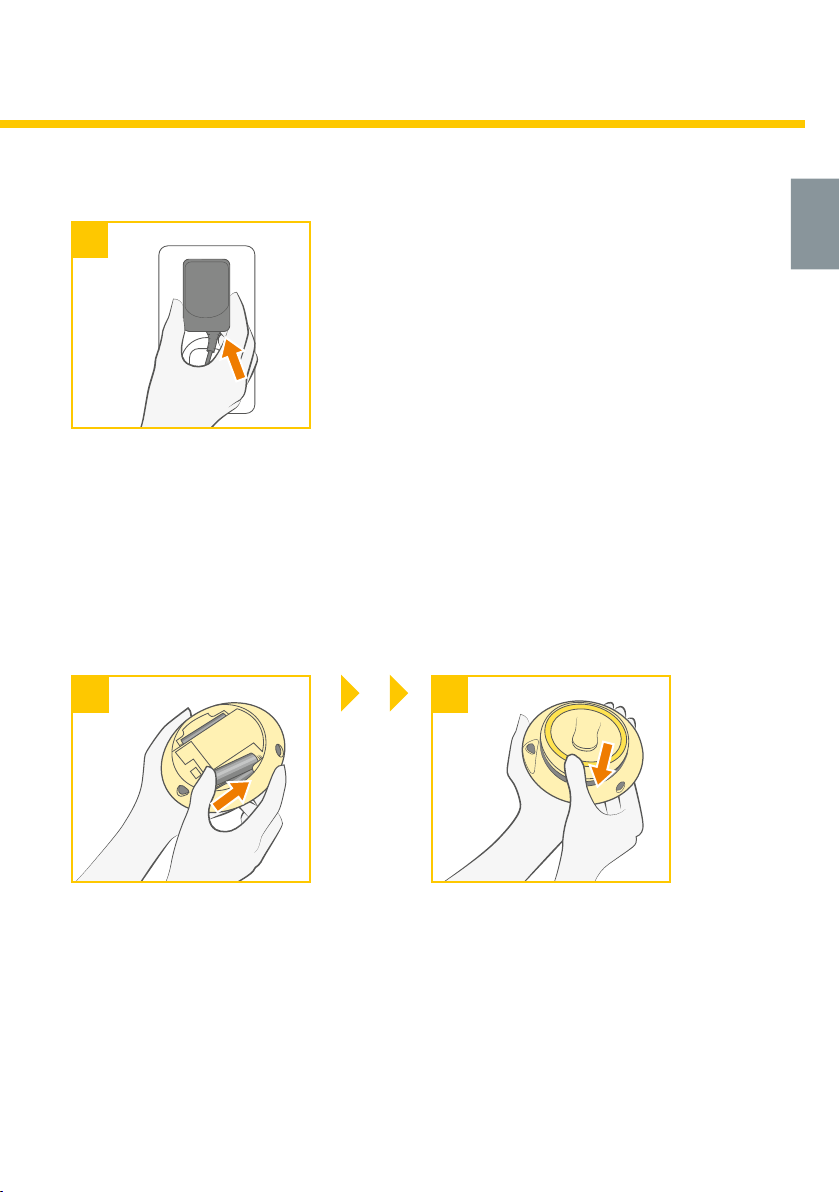
7.1 Mains operation
1
Plug the mains adapter cord into
the motor unit.
7.2 Battery operation
1
Open the battery compartment on
the back in the direction of the arrow.
Page 17
2
Plug the mains adapter into
the mains socket. The motor unit
is now ready for operation.
17
2
Insert four AA Mignon LR6 batteries
for Swing Flex .
Insert six AAA Micro 1.5 V batteries
for Swing Maxi Flex.
3
Close the battery compartment.
The pump is ready for operation
via battery.
Page 18
7. Preparing for pumping
1818
Caution
• Wash hands thoroughly (at least one
minute) with soap and water before
touching the breast and pump parts. Dry
your hands with a fresh towel or a
single-use paper towel.
• Also, bottles and component parts may
become damaged if mishandled, e.g.
dropped, over-tightened, or knocked
over.
• Take appropriate care in handling bottles
and components.
i
Note
• Use Medela original accessories only.
• Hold the tubing by the connecting piece
while attaching and detaching it.
• All components must be completely dry
before use.
i
Info
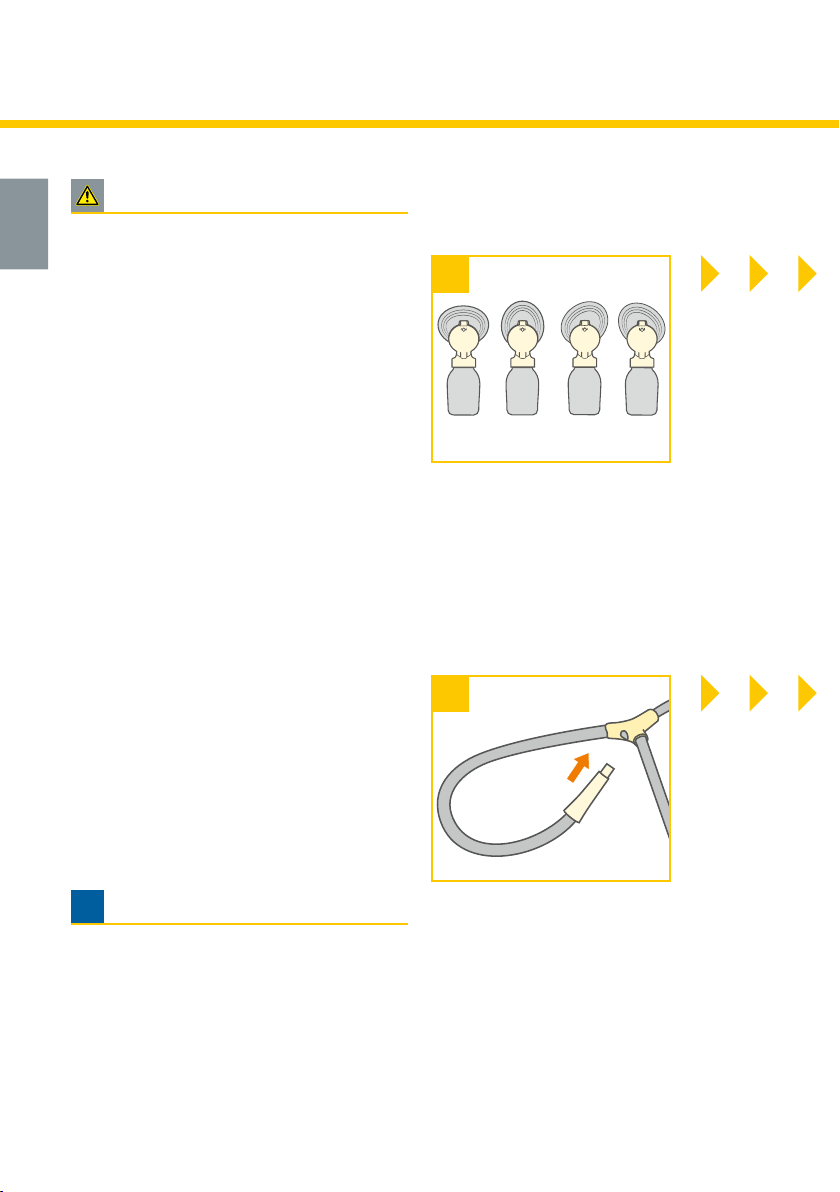
7.3 Assembling the pump set
1
Check pump set components for wear or
damage before use and replace if necessary.
Make sure parts are cleaned according to
chapter 6 before assembling the pump set.
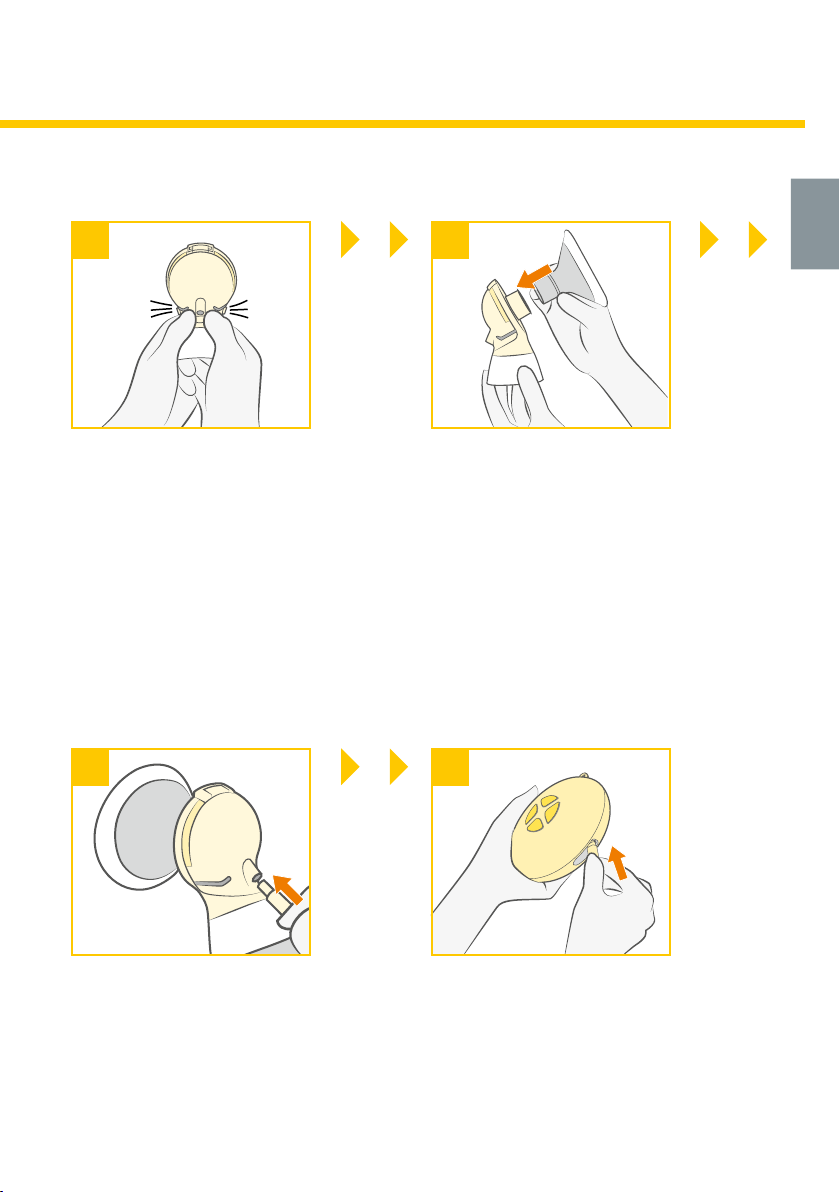
Carefully place the membrane into the
connector with the flap into the opening of
the connector.
Make sure that the membrane forms a seal
around the edge of the connector.
4
• Carry out all the steps with care and
assemble the pump set correctly. Otherwise a good vacuum may not be
achieved.
Screw bottle into connector.
Page 19
19
32
Close the lid of the connector
until it audibly clicks.
5 6
Insert the tubing into the corresponding
opening in the lid of the connector.
Insert the breast shield onto the
connector.
Insert the other end of the tubing
into the motor unit.
Page 20
8. Expression
2020
Caution
• Step 2 (chapters 8.1, 8.2, 8.3):
• The product comes with two different
breast shield sizes 21 mm and 24 mm.
• Answer the following questions
to find out whether the available breast
shield sizes fit:
• Does your nipple rub the tunnel sides to
the point of causing discomfort?
• Do you see excessive areola being pulled
into the tunnel?
• Do you see any redness?
• Is your nipple or areola turning white?
• Do you feel unexpressed milk after breast
milk pumping?
If you answered “YES” to any of these
questions, consider trying a new size by
following the measuring instructions at
www.medela.com.
If you are still unsure that you selected the
right breast shield size, contact your
lactation consultant or breastfeeding
specialist.
See brochure “Choosing your Medela
breast shield size”.
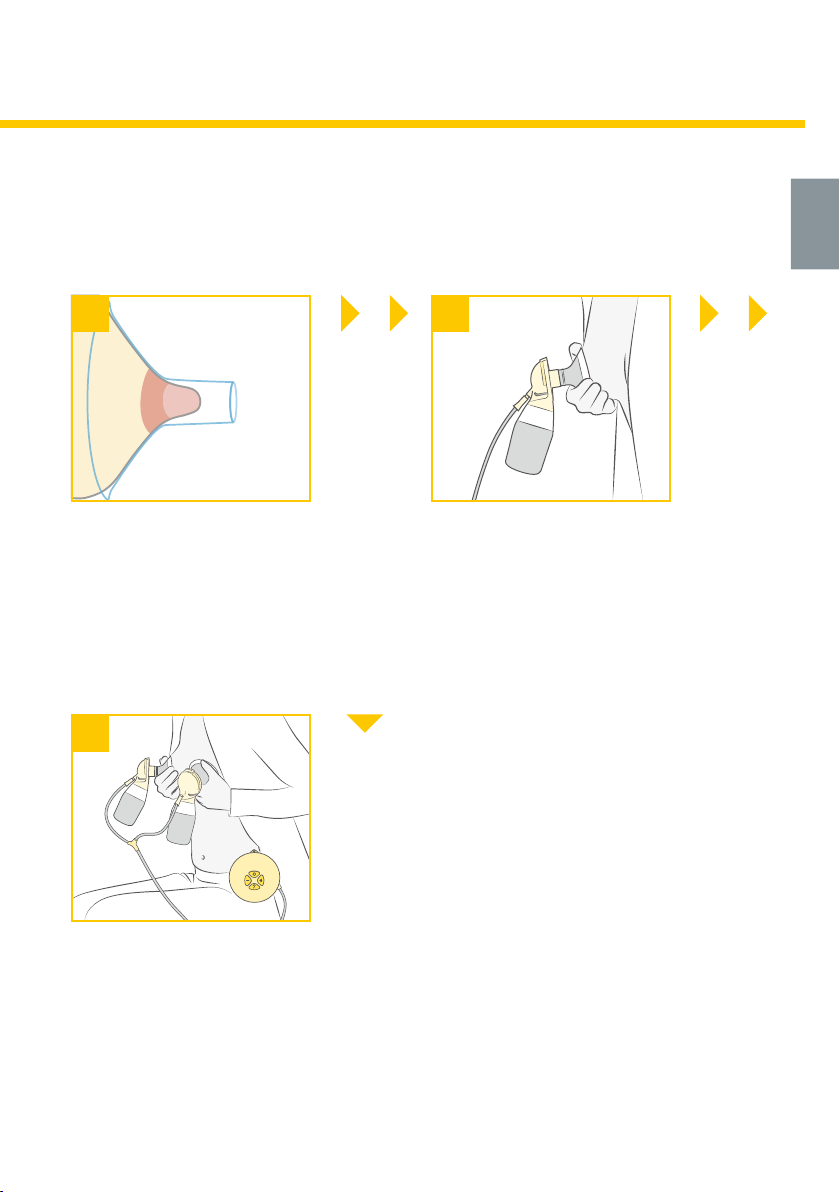
8.1 Swing Flex – Preparing for
single pumping
1
The oval breast shield can be rotated (360°)
and placed in the desired position to have
the most comfortable fit for you.
8.2 Swing Maxi Flex – Preparing
for single pumping
1
i
Note
• Step 3 (chapters 8.1, 8.2, 8.3):
Do not hold the pump set by the bottle.
This can lead to blockage of the milk
ducts and engorgement.
Insert the unused short tubing into the
tubing holder.
Page 21

Place the breast shield on your breast
so that your nipple is properly centred
in the tunnel.
2 3
32
For more information
on pumping, see
Hold the breast shield onto your breast
with your thumb and index finger. Support
your breast with the palm of your hand.
21
chapter 8.5.
Place the breast shield of one bottle
on the first breast so that the nipple is
prop erly centred in the tunnel.
For more information
on pumping, see
chapter 8.5.
Hold the breast shield onto your breast with
your thumb and index finger. Support your
breast with the palm of your hand.
Page 22
8. Expression
2222
Caution
• Step 2 (chapter 8.3):
• Wash hands thoroughly (at least one
minute) with soap and water before
touching the breast, the clean pump parts
and clean pump set. Dry your hands with
a fresh towel or a single-use paper towel.
• Do not hold the pump set by the bottle.
This can lead to blockage of the milk ducts
and engorgement.
i
Info
• Double pumping saves time and increases
the energy content of the milk.
8.3 Swing Maxi Flex –
Preparing for double
pumping
1
The oval breast shield can be rotated (360°)
and placed in the desired position to have
the most comfortable fit for you.
4
Switch on the breast pump with
.
Page 23
23
2
Place the breast shield on your breast so
that your nipple is properly centred in the
tunnel.
5
3
Hold the breast shield onto your breast
with your thumb and index finger.
Support your breast with the palm
of your hand.
1
For more information
Place the second breast shield on your
breast so that your nipple is properly
centred in the tunnel.
on pumping, see
chapter 8.5.
Page 24
8. Expression
i
2424
Note
• Easy Expression Bustier must be pur-
chased seperately. More information on
www.medela.com
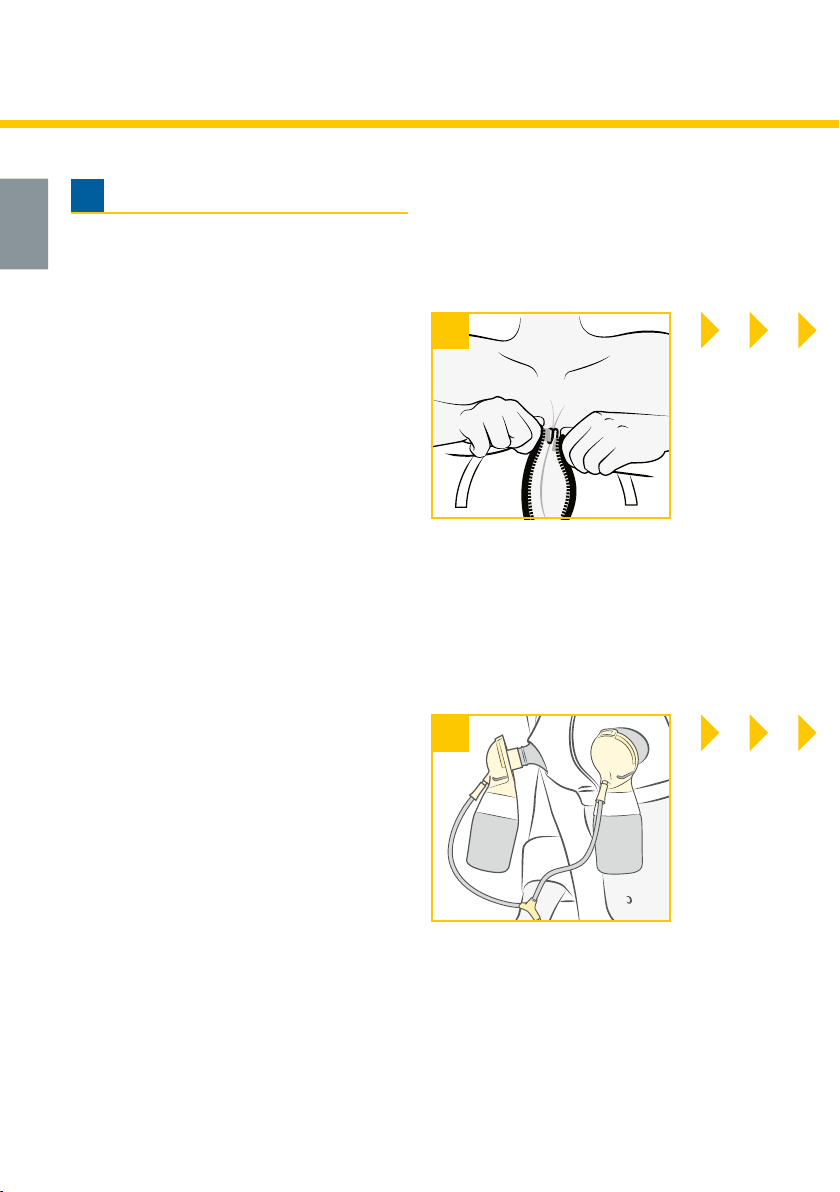
8.4 Swing Maxi Flex –
Preparing for hands-free
expression with the
Easy Expression Bustier
1
Put on the Easy Expression
Bustier and close it using the hook on top.
4
Connect the assembled pump set to the
breast shields.
Page 25
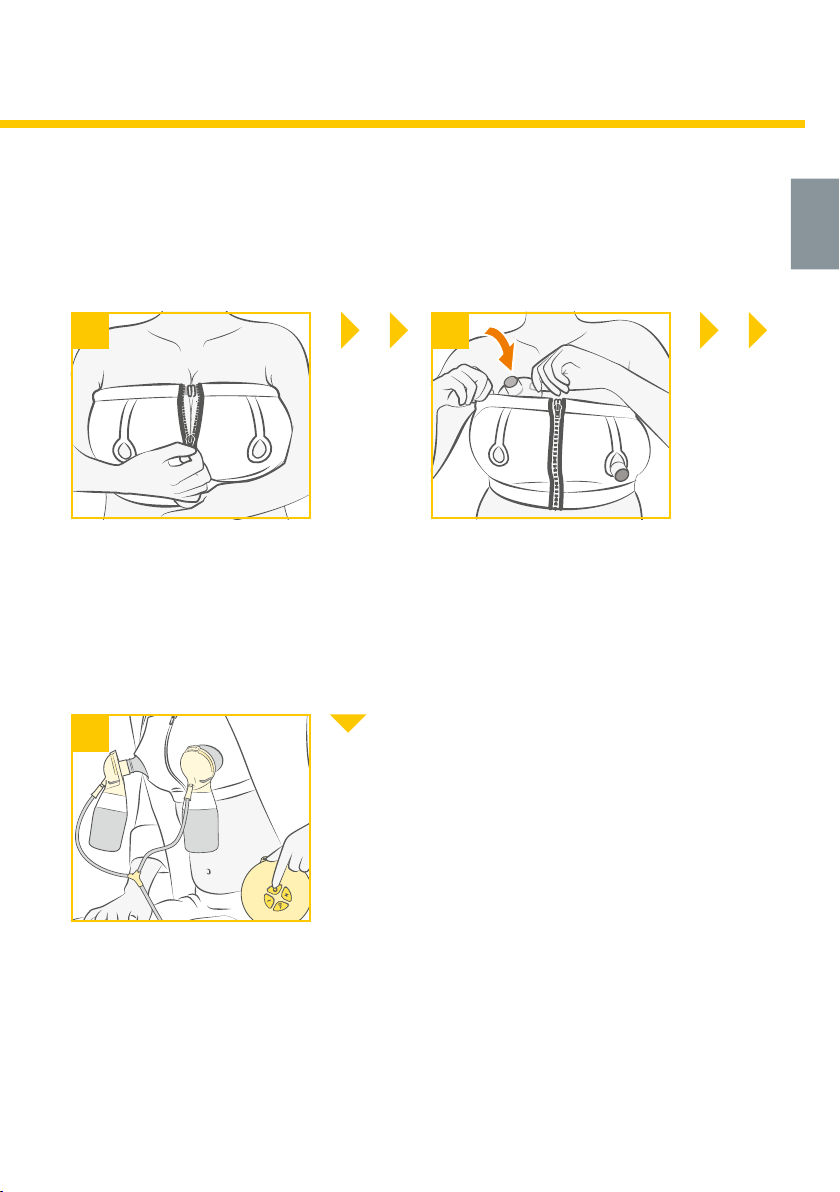
2 3
25
Leave the zip open slightly.
5
Start pumping.
Place the breast shield on your breast
under the bustier such that your nipple is
centred in the tunnel of the breast shield.
For more information
on pumping, see
chapter 8.5.
Page 26
8. Expression
2626
Caution
• Contact your your lactation consultant or
breastfeeding specialist if you can express
only minimal or no milk, or if expression is
painful.
i
Note
• Always disconnect the Swing Flex /Swing
Maxi Flex from the power source after
expression.
• Only fill the bottle to the 150 ml mark.
i
Info
• Swing Flex / Swing Maxi Flex switches off
automatically if it has been running for
30 minutes with no interaction.
• Do not kink the tubing during expression.
The following table shows the different
LED status:
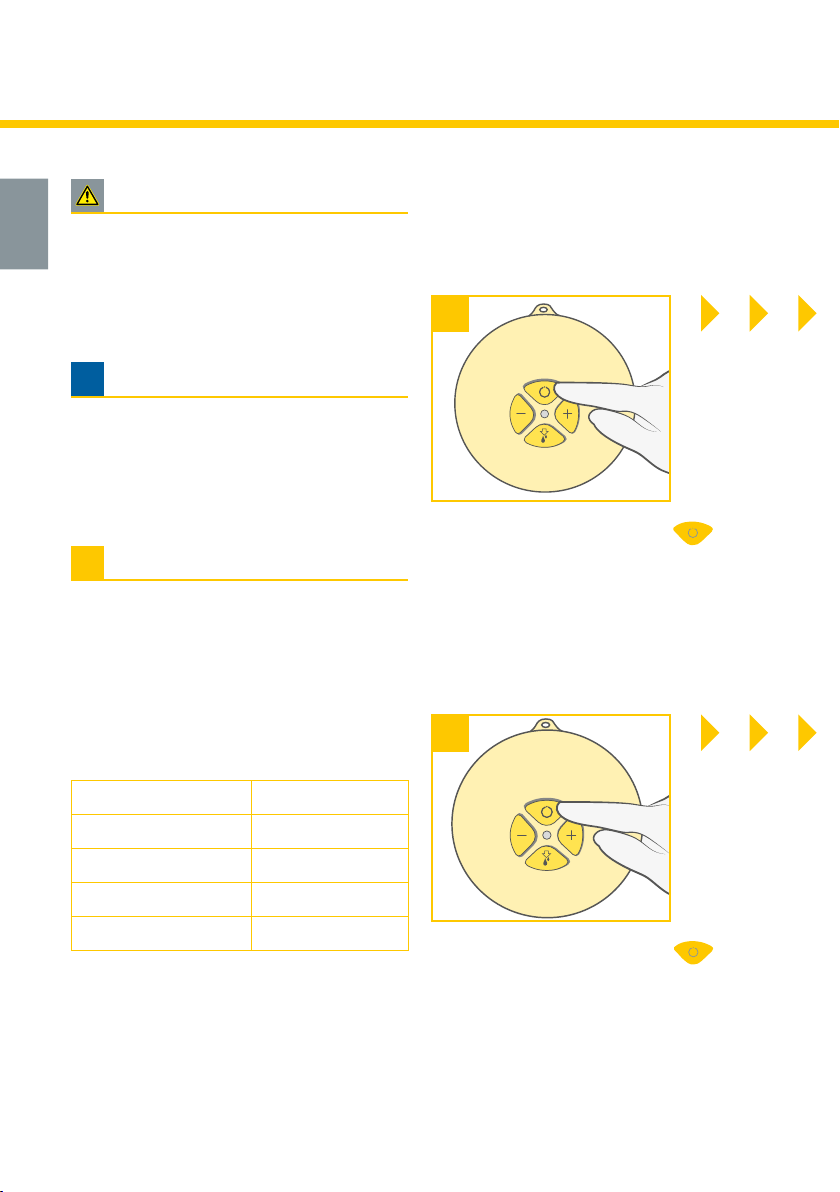
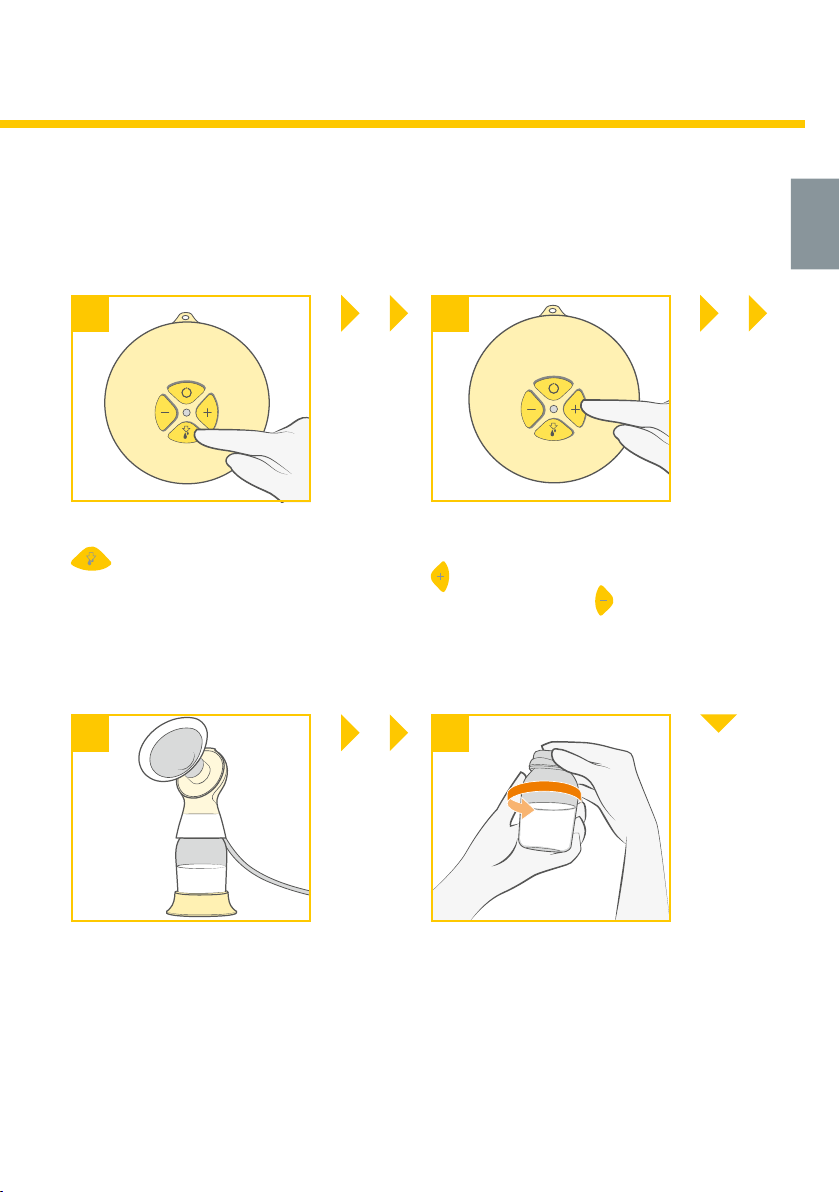
8.5 Pumping
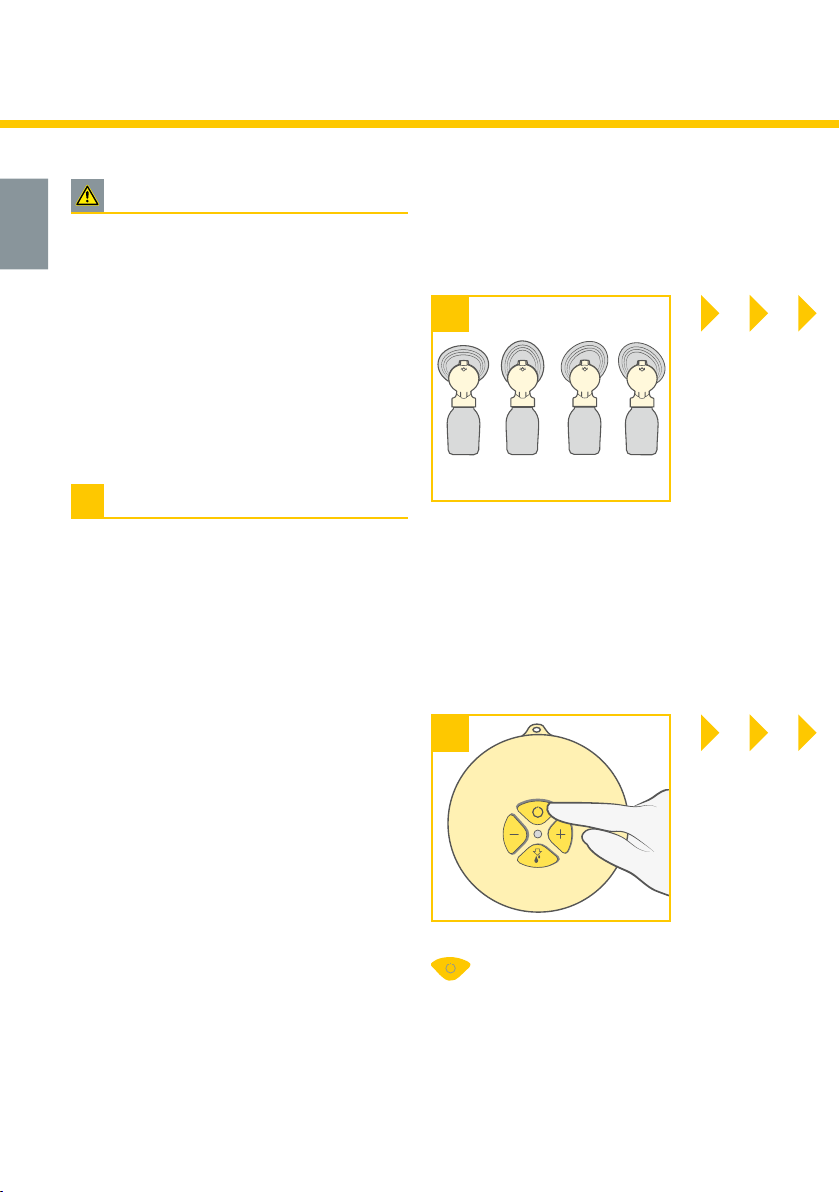
1
Switch on the breast pump with .
The stimulation phase lasts a maximum
æ
of two minutes. The stimulation phase
will then automatically change to the
expression phase.
4
Lights up On
Does not light up Off
Even, regular flashing Stimulation phase
Light constantly on Expression phase
Rapid flashing Min./Max. vacuum
Switch off the breast pump with .
Page 27
2 3
27
If your milk starts to flow earlier, press the
button to change to the expression
phase.
Make sure that the milk is flowing into
æ
the bottle properly.
5 6
Use the bottle stand to prevent the bottle
from tipping over.
The Max. Comfort vacuum can be adjusted
in every phase. Max. Comfort vacuum: Use
to increase the vacuum until it is slightly
uncomfortable. Press
vacuum, until it is comfortable again.
Close the bottle with a lid.
Follow the instructions in chapter 9
æ
“Storing and thawing breast milk”.
to reduce the
Clean in accordance
with chapter 6.
Page 28

9. Storing and thawing breast milk
9.1 Storage
2828
Storage guidelines for freshly expressed breast milk (for healthy term babies)
Room temperature
16 to 25 °C
(60 to 77 °F)
Up to 4 hours is best
*Up to 6 hours for milk
expressed under very
clean conditions
Refrigerator
4 °C (39 °F)
or colder
Up to 3 days is best
*Up to 5 days for milk
expressed under very
clean conditions
Freezer
–18 °C (0 °F )
or colder
Up to 6 months is best
*Up to 9 months for milk
expressed under very
clean conditions
*Guidelines for expressing milk under very clean conditions:
Before expressing breast milk, mothers should wash their hands with soap and water or an
alcohol-based hand sanitiser. The pump parts, bottles and pumping area must be clean.
Breasts and nipples do not need to be washed before pumping.
• These guidelines for storage and thawing of breast milk are a recommendation. Contact
your lactation consultant or breastfeeding specialist for further information.
• Store breast milk in the coldest spot of the refrigerator (at the back of the glass shelf
above the vegetable compartment).
Breast milk thawed in
the refrigerator
At room temperature:
Up to 2hours
Refrigerator:
Up to 24 hours
Do not refreeze!
9.2 Freezing
• Freeze expressed breast milk in plastic bottles or milk storage bags. Do not fill the bottles
or bags more than 3/4 full to allow space for possible expansion.
• Label the bottles or bags with the date and volume of expression.
• Plastic bottles and component parts become brittle when frozen and may break when
dropped.
• Do not use the breast milk if bottles or components become damaged.
9.3 Thawing
Caution
Do not thaw or warm breast milk in a microwave or a pan of boiling water. This helps
preserve important components and prevents burns.
• To preserve breast milk components, thaw the milk overnight in the refrigerator. Alternatively, hold the bottle or bag under warm water (max. 37 °C / 98.6 °F).
• Gently swirl the bottle or bag to mix any fat that has separated. Avoid shaking or stirring
the milk.
Page 29

10. Troubleshooting
Problem
Solution
29
If the motor is not
running
If there is low
or no suction
If condensation
appears in
the tubing
The pump
becomes wet
Check presence of mains current.
Check the position of the batteries in the battery compartment.
Verify the membrane is clean and not damaged.
Make sure that the membrane forms a seal around the edge of the
connector and the lid is firmly connected with the connector.
Check all connections.
Check if the ends of the tubing fit securely into the back of the connector
and into the port on the breast pump. During single pumping, insert the
unused tubing into the tubing holder.
There should be no water in the tubing.
Do not kink the tubing during expression.
Ensure the breast shield forms a complete seal around the breast.
All components must be completely dry.
Clean the tubing as described in chapter 6.5. Shake out any water drops.
Unplug the mains adapter from the socket.
Switch off the pump.
Do not place the pump upside down. The control panel must point upwards.
Store the pump in a dry, warm place for 24 hours.
Note:
Do not expose the pump to direct sunlight.
Do not accelerate the drying process by use of heat.
Page 30

11. Warranty / disposal
Warranty
3030
The “International Warranty” brochure contains detailed warranty information.
Disposal
This is a single user product. Use by more than one person may present a health risk.
The unit is made of metals and plastics and should be disposed of in accordance with the
European directives 2011/65/EU and 2012/19/EU. Additional, local guide-lines must also
be observed. Please take care that you dispose of the unit and its accessories in accordance with your local disposal guidelines.
Page 31

12. Spare parts and Accessories
The following accessories for Swing Flex / Swing Maxi Flex are available from Medela
distribution partners by specifying the product number.
Sales articles Swing Flex / Swing Maxi Flex
Article number
101033773 Swing Flex breast pump EN NL FR (Euro adapter)
101036226 Swing Flex breast pump EN NL FR (Euro adapter) for India
101033777 Swing Flex breast pump EN (AUS/NZ adapter)
101033793 Swing Flex breast pump EN (UK adapter) for UK
101033775 Swing Flex breast pump EN NL FR (UK adapter)
101036238 Swing Flex breast pump EN NL FR (US adapter)
101033817 Swing Maxi Flex breast pump EN NL FR (Euro adapter)
101036232 Swing Maxi Flex breast pump EN NL FR (Euro adapter) for India
101033825 Swing Maxi Flex breast pump EN (AUS/NZ adapter)
101033845 Swing Maxi Flex breast pump EN (UK adapter) for UK
101033819 Swing Maxi Flex breast pump EN NL FR (UK adapter)
101033821 Swing Maxi Flex breast pump EN NL FR (US adapter)
Product
Spare parts Swing Flex
Article number
099.0016
099.0017
099.0018
099.0276
101033542
101038305
099.0015 Swing Flex motor unit
101034002 Swing Flex tubing
101034005 PersonalFit Flex connector
Product
Swing Flex adapter (100–240 V; 4.8 V) Euro
Swing Flex adapter (100–240 V; 4.8 V) UK
Swing Flex adapter (100–240 V; 4.8 V) AUS/NZ
Swing Flex adapter (100–240 V; 4.8 V) CN
Swing Flex adapter (100–240 V; 4.8 V) US/JP
Swing Flex adapter (100–240 V; 4.8 V) KR
31
Spare parts Swing Maxi Flex
Article number
099.0271
099.0272
099.0273
099.0274
101033543
101038303
099.0270 Swing Maxi Flex motor unit
101034003 Swing Maxi Flex tubing
101034005 PersonalFit Flex connector
Product
Swing Maxi Flex adapter (100–240 V; 12 V) Euro
Swing Maxi Flex adapter (100–240 V; 12 V) UK
Swing Maxi Flex adapter (100–240 V; 12 V) AUS/NZ
Swing Maxi Flex adapter (100–240 V; 12 V) CN
Swing Maxi Flex adapter (100–240 V; 12 V) US/JP
Swing Maxi Flex adapter (100–240 V; 12 V) KR
Page 32

12. Spare parts and Accessories
Accessories for Swing Flex / Swing Maxi Flex
3232
Article number
101033953*
101033964*
101033992*
101033997*
800.0796
200.1659
008.0040 Quick Clean microwave bags
Other Medela products are available at www.medela.com
* If the result of expression is unsatisfactory or expression is painful, contact your lactation consultant or
breastfeeding specialist. A different size of breast shield may help make expression more comfortable
and successful.
Product
PersonalFit Flex breast shield S (21 mm)
PersonalFit Flex breast shield M (24 mm)
PersonalFit Flex breast shield L (27 mm)
PersonalFit Flex breast shield XL (30 mm)
150 ml breast milk bottles (3 pcs)
250 ml breast milk bottles (2 pcs)
Page 33

13. EMC / Technical description Swing Flex / Swing Maxi Flex
Swing Flex and Swing Maxi Flex are EMC-tested in conformity with the requirements
of IEC 60601-1-2:2007 3rd Edition and IEC 60601-1-2:2014 4th Edition according to
clause 7 and 8.9.
Warning – The electric breast pumps Swing Flex and Swing Maxi Flex should not be
used adjacent to or stacked with other equipment. If adjacent or stacked use is necessary,
the electric breast pumps Swing Flex and Swing Maxi Flex should be observed to verify
normal operation in the configuration in which it will be used. Wireless communications
equipment such as wireless home network devices, mobile phones, cordless telephones
and their base stations, walkie-talkies can affect the electric breast pumps Swing Flex and
Swing Maxi Flex and should be kept at least a distance 30 cm away from the equipment.
33
Page 34

3434
14. Technical specifications Swing Fl ex / Swing M axi Flex
Swing Flex
vacuum (approx.)
–35 ... –250 mmHg
Intermittent
– 5 ... – 33 kPa
45 ... 111 cpm
In Out
100–240 V~ 50/60 Hz
max 0.5 A
4 x 1.5 V, Alkaline
AA, Mignon, LR6
4.8 V
1.2 A
Operation/Transport/Storage
Operation/Transport/Storage
Operation
121 x 129 x 57 mm
300 g
200 g
Swing Maxi Flex
vacuum (approx.)
–35 ... –250 mmHg
intermittent
– 5 ... – 33 kPa
45 ... 111 cpm
In Out
100-240 V~ 50/60 Hz
max. 0.6 A
6 x 1.5 V, Alkaline
AAA, Micro, LR03
121 x 129 x 57 mm
290 g
220 g
12 V
1.5 A
Transport/Storage
Operation/Transport/Storage
Transport/Storage/Operation
Operation
Transport/Storage
Page 35

35
Page 36

Table des matières
3636
1. Utilisation prévue/Public concerné – Contre-indications
2. Signification des symboles
3. Recommandations importantes en matière de sécurité
4. Description du produit Swing Flex
5. Description du produit Swing Maxi Flex
6. Nettoyage
6.1 Résumé de nettoyage
6.2 Démonter
6.3 Nettoyer
6.4 Désinfecter
6.5 Nettoyage de la tubulure
6.6 Nettoyage du bloc-moteur
7. Préparation à la séance d’expression
7.1 Fonctionnement sur secteur
7.2 Fonctionnement sur batterie
7.3 Assemblage du set tire-lait
8. Expression
8.1 Swing Flex – Préparation à une séance d’expression simple
8.2 Swing Maxi Flex – Préparation à une séance d’expression simple
8.3 Swing Maxi Flex – Préparation à une séance de double expression
8.4 Swing Maxi Flex – Préparation de l’expression en mains libres
avec le bustier Easy Expression
8.5 Expression du lait
58
56
37
38
41
42
43
44
44
45
46
46
47
47
48
48
48
50
52
52
52
54
9. Conserver et décongeler le lait maternel 60
9.1 Conservation 60
9.2 Congélation
9.3 Décongélation
60
60
10. Dépannage 61
11. Garantie/Recyclage
12. Pièces détachées et accessoires
13. Compatibilité Electro Magnétique/Description technique
14. Caractéristiques techniques
62
63
65
66
Page 37

1. Utilisation prévue/Public concerné – Contre-indications
Utilisation prévue et conseils relatifs aux tire-laits
Les tire-laits sont prévus pour être utilisés par des femmes allaitantes à l’hôpital ou pour exprimer
le lait maternel à domicile. Ils aident à atténuer les symptômes d’engorgement en exprimant le
lait. En cas de mastite, les tire-laits facilitent le processus de guérison par l’extraction du lait
maternel du sein enflammé. Les tire-laits permettent de soulager les mamelons douloureux et
présentant des crevasses, et de faire ressortir les mamelons plats ou ombiliqués. En outre, ils
permettent aux mèresde donner leurlait maternel aux bébés qui ne peuvent pas se nourrir
directement au sein pour diverses raisons, telles que les problèmes de mise au sein, de fente
palatine ou de prématurité.
37
Public cible/utilisateur
Les femmes allaitantes, qu’elles soient adolescentes ou adultes. De nombreuses femmes trouvent
commode, ou même nécessaire, d’utiliser un tire-lait pour exprimer et conserver leur lait
lorsqu’elles ont repris le travail, sont en voyage ou séparées de quelque façon que ce soit de leur
bébé. Elles sont souvent ravies d’apprendre qu’un tire-lait peut être utilisé en tant que complément à l’allaitement et que certains sont conçus pour imiter la succion d’un bébé au sein.
Contre-indications
Il n’existe aucune contre-indication connue liée à l’utilisation du tire-lait Swing Flex/Swing Maxi
Flex.
Page 38

2. Signification des symboles
Les symboles d’avertissement renvoient à des instructions importantes en matière de sécurité. Le
non-respect de ces instructions peut provoquer des blessures ou endommager le tire-lait!
Le symbole d’avertissement peut avoir différentes significations s’il est associé à l’un des termes
ci-après :
i
Remarque
Peut endommager le matériel.
3838
Avertissement
Peut provoquer des blessures
graves ou la mort.
Prudence
Peut provoquer des blessures
légères.
Symboles présents sur l’emballage
Ce symbole indique que le matériau peut être recyclé selon les réglementations
en vigueur.
Ce symbole indique que l’emballage est en carton.
Ce symbole indique que le produit doit être conservé à l’abri de la lumière
directe du soleil.
Ce symbole indique que le produit est fragile et doit être manipulé avec précaution.
Ce symbole indique la limite de température à ne pas dépasser en cas
de fonctionnement, de transport et de stockage.
Ce symbole indique le taux d’humidité maximal à respecter pour l’utilisation,
le transport et le stockage.
Ce symbole indique la limite de pression atmosphérique à ne pas dépasser
en cas de fonctionnement, de transport et de stockage.
Ce symbole indique que le produit doit être maintenu au sec.
Ce symbole indique que l’emballage contient des produits destinés à entrer en
contact avec des denrées alimentaires conformément au règlement N° 1935/2004.
i
Info
Informations utiles ou importantes
non relatives à la sécurité.
Ce symbole indique les codes articles internationaux GSI uniques (GTIN).
Ce symbole indique que l’appareil ne peut être mis au rebut avec les déchets
ménagers non triés (UE exclusivement).
Ce symbole indique qu’il est impératif de suivre le mode d’emploi.
Page 39

Symboles présents sur l’appareil
Ce symbole indique qu’il est impératif de suivre le mode d’emploi.
Ce symbole indique la conformité aux principales exigences de la Directive
du Conseil 93/42/CEE du 14 juin 1993 portant sur les dispositifs médicaux.
Ce symbole fait référence au fabricant.
Ce symbole indique que l’appareil ne peut être mis au rebut avec les déchets
ménagers non triés (UE exclusivement).
Ce symbole indique la conformité aux exigences de sécurité supplémentaires des
États-Unis et du Canada en ce qui concerne les dispositifs médicaux électriques.
Ce symbole fait référence à une partie appliquée de type BF.
Ce symbole indique le numéro de série assigné par le fabricant à l’appareil.
Ce symbole indique le positionnement des piles.
Ce symbole fait référence à la protection électrique contre la pénétration d’objets
solides et contre les projections d’eau.
Ce symbole indique la date de fabrication (quatre chiffres pour l’année et deux
chiffres pour le mois).
Symboles présents sur l’adaptateur secteur
Ce symbole indique que l’adaptateur secteur est un dispositif de classe II.
39
Ce symbole indique la conformité à la certification chinoise obligatoire.
Ce symbole indique que l’adaptateur secteur est uniquement destiné
à un usage intérieur.
Ce symbole indique la conformité aux exigences de sécurité des États-Unis
et du Canada.
Ce symbole indique la conformité aux exigences de la commission fédérale
des communications américaine (FCC).
Ce symbole indique la polarité du connecteur d’alimentation CC.
Ce marquage CE indique la conformité aux directives sur la basse tension
et la compatibilité électromagnétique.
Ce symbole indique que l’appareil ne peut être jeté avec les déchets ménagers
non triés (en UE exclusivement). Le symbole de la barre pleine indique que
l’adaptateur secteur a été mis sur le marché après le 13 août 2005.
Page 40

4040
SGS
Ce symbole indique la conformité aux exigences d’efficacité énergétique.
Ce symbole représente le courant alternatif.
Ce symbole représente le courant continu.
Ce symbole indique la conformité aux exigences d’efficacité énergétique.
Ce symbole indique que l’adaptateur secteur a été testé quant à sa sécurité.
Ce symbole indique un transformateur de sécurité contre les courts-circuits.
170053-12
S
TÜV
SÜD
PSB
IP20
Enregistrement visant la protection des consommateurs de Singapour.
Ce symbole indique que les transformateurs et les composants électroniques
intégrés dans l’appareil électronique convertissent le courant électrique en
une sortie ou plusieurs sorties électriques.
Ce symbole indique la conformité aux exigences d’Australie/Nouvelle-Zélande
(marquage de conformité réglementaire).
Ce symbole indique la conformité aux exigences dites «PSE»
(Japon, loi régissant la sécurité des appareils et matériels électriques).
La marque KC indique que le produit est conforme aux exigences de EMC et de sécurité
électriques coréennes.
Ce symbole fait référence à la protection électrique contre la pénétration
d’objets solides et contre les projections d’eau.
Page 41

3. Recommandations importantes en matière de sécurité
MAX.
275 h
MAX.
250 h
Le non-respect de ces instructions/informations de sécurité peut rendre l’appareil
dangereux. Sous réserve de modifications techniques.
Produit
Risque d’électrocution ! Conservez l’appareil
au sec. Ne l’immergez jamais dans de l’eau
ou dans d’autres liquides.
N’exposez pas le bloc-moteur
à la lumière directe du soleil.
Le tire-lait Swing Flex/Swing Maxi Flex n’est pas
thermorésistant: maintenez-le à distance des
radiateurs et flammes nues.
N’utilisez jamais un appareil endommagé.
Remplacez les pièces abîmées ou usées.
41
La durée de vie en fonctionnement du tire-lait
SwingFlex est de 275heures. Sagarantie est
de deux ans.
La durée de vie en fonctionnement du tire-lait
Swing Maxi Flex est de 250heures.
Sagarantie est de deux ans.
Fonctionnement électrique
La déconnexion du secteur n’est assurée que
par le débranchement de l’adaptateur
secteur de la prise électrique murale.
Ne saisissez jamais un appareil électrique qui
est tombé dans l’eau.
Débranchez-le immédiatement.
Utilisation
N’utilisez le tire-lait Swing Flex/Swing Maxi
Flex que pour l’usage auquel il est destiné, tel
que décrit dans ce manuel.
N’utilisez pas le tire-lait Swing Flex/Swing
Maxi Flex lors du bain ou de la douche.
N’utilisez pas le tire-lait Swing Flex/Swing
Maxi Flex lorsque vous dormez ou si vous
vous sentez très somnolente.
Ce produit est exclusivement réservé à un
usage personnel. L’utilisation
du même produit par plusieurs personnes
peut présenter un risque pour la santé.
Ne faites jamais fonctionner un appareil électrique dont
la prise ou le cordon est endommagé, s’il ne fonctionne pas
correctement, est tombé, est endommagé ou est tombé dans l’eau.
Toute réparation doit exclusivement être
réalisée par un service technique agréé.
Ne réparez pas l’appareil vous-même ! Aucune
modification de l’appareil n’est autorisée.
Conservez l’adaptateur secteur éloigné de
toute surface chaude.
Ne laissez jamais le tire-lait sans surveillance
lorsqu’il est branché
sur une alimentation électrique.
Ne conduisez pas pendant l’expression en mains
libres.
Une surveillance est nécessaire lorsque le tire-lait
Swing Flex/Swing Maxi Flex est employé à
proximité d’enfants.
En cas de problèmes ou de douleur, contactez un
professionnel de santé (consultante en lactation,
spécialiste de l’allaitement, etc.).
Les appareils de communication portables et
mobiles peuvent avoir un impact sur le
fonctionnement du tire-lait Swing Flex/Swing
Maxi Flex.
Page 42

4. Description du produit Swing Flex
Swing Flex – Tire-lait électrique
simple à 2phases
4242
1bloc-moteur:
article 600.0975
pièce détachée 099.0015
bouton marche/arrêt
LED
swing
port de la
tubulure en PVC
attache de fixation
diminution
de la force
d‘aspiration
téterelles:
1×21mm (Article 101035239)
1×24mm (Article 101035240)
1adaptateur secteur
Article Pièce détachée
Euro 4.8V 201.1055 099.0016
UK 4.8V 201.1056 099.0017
AUS/NZ 4.8V 201.1057 099.0018
CN 4.8V 201.1058 099.0276
US/JP 4.8V 201.1059 101033542
KR 4.8V 101034044 101038305
1tuyau Swing Flex
ar ticl e 201.1079
pièce détachée 101034002
augmentation
de la force
d‘aspiration
bouton
d‘écoulement
1connecteur
article 200.9728
compartiment à
batterie
port de l‘adaptateur
secteur
1couvercle
multifonction
ar ticle 20 0.2714
1cowuvercle
1 membrane
1biberon
article 811.0021
1support de biberon
article 101033405
Les pièces détachées et accessoires disponibles à la vente sont indiqués au chapitre12.
Page 43

5. Description du produit Swing Maxi Flex
Swing Maxi Flex – Tire-lait électrique
double à 2phases
1bloc-moteur:
Article 200.4932
Pièce détachée 099.0270
bouton marche/
arrêt
LED
swing maxi
port de la
tubulure en PVC
attache de fixation
43
diminution
de la force
d‘aspiration
1adaptateur secteur
Article Pièce détachée
Euro 12V 201.1146 099.0271
UK 12V 201.1147 099.0272
AUS/NZ 12V 201.1149 099.0273
CN 12V 101032865 099.0274
US/JP 12V 201.1148 101033543
KR 12V 101034045 101038303
petits tuyaux
support pour tuyau
bouton
d‘écoulement
long tuyau
augmentation de la force
d‘aspiration
compartiment
à batterie
téterelles:
2×21mm (Article 101035239)
2×24mm (Article 101035240)
2connecteurs
article 200.9728
1tuyau Swing
Maxi Flex
ar ticl e 201.1087
pièce détachée 1010340 03
port de l‘adaptateur
secteur
2couvercles
multifonction
ar ticle 20 0.2714
2couvercles
2 membranes
2biberons
article 811.0021
2supports de
biberon
article 101033405
Page 44

6. Nettoyage
6.1 Résumé de nettoyage
Le nettoyage et la désinfection sont deux procédés différents. Ils doivent être réalisés séparément pour vous protéger ainsi que votre bébé, et pour assurer l’efficacité de votre tire-lait.
Nettoyage – Laver les surfaces des pièces en éliminant physiquement les contaminants.
Désinfection – Tuer les organismes vivants, tels que des bactéries ou des virus, qui peuvent être
présents sur les surfaces des pièces.
4444
Quand nettoyer
Avant la 1e
utilisation
Après chaque
utilisation
Une fois par jour
Quand nettoyer
Téterelle(s)
✔ 6.2 démonter
✔ 6.3 nettoyer
✔ 6.4 désinfecter
✔ 6.3 nettoyer
✔ 6.4 désinfecter
Tubulure
Connecteur
et membrane
✔ 6.2 démonter
✔ 6.3 nettoyer
✔ 6.4 désinfecter
✔ 6.2 démonter
✔ 6.3 nettoyer
✔ 6.2 démonter
✔ 6.4 désinfecter
Biberons
et couvercles
✔ 6.2 démonter
✔ 6.3 nettoyer
✔ 6.4 désinfecter
✔ 6.2 démonter
✔ 6.3 nettoyer
✔ 6.2 démonter
✔ 6.4 désinfecter
Bloc-moteur
Au besoin
voir chapitre6.5 voir chapitre6.6
Page 45

6.2 Démonter
*
Prudence
• Ne vaporisez pas et ne versez pas de liquide
directement sur le tire-lait.
• Utilisez uniquement de l’eau potable pour le
nettoyage.
• Démontez et nettoyez toutes les pièces qui
sont entrées en contact avec le sein et le lait
maternel
immédiatement après utilisation afin d’éviter
l’assèchement de résidus de lait et la
prolifération de bactéries.
• Ne nettoyez pas la tubulure au moyen de
sachets Quick Clean au micro-ondes.
• Débranchez le tire-lait avant de nettoyer le
bloc-moteur.
i
Remarque
• Le set pour tire-lait ne nécessite aucune
maintenance.
• Veillez à ne pas endommager les pièces du
set pour tire-lait lors du nettoyage.
• N’utilisez pas le lait maternel si les biberons
ou les pièces sont endommagés.
45
• Retirez et jetez l’enveloppe de protection* de la
téterelle avant la première utilisation.
• Démontez le set pour tire-lait en pièces distinctes
(téterelle, connecteur, membrane, biberon).
• Ouvrez la capsule arrière du connecteur en
pinçant les deux rabats.
• Vérifiez qu’aucune pièce n’est endommagée.
• Remplacez les pièces abîmées ou usées.
Page 46

6. Nettoyage
4646
6.3 Nettoyer
Avant la première utilisation et après
chaque utilisation
Évier
1. Rincez toutes les pièces à l’eau claire,
potable et froide (env. 20 °C).
2. Nettoyez abondamment toutes les
pièces à l’eau savonneuse et chaude
(environ 30 °C). Utilisez un produit
vaisselle disponible dans le commerce,
de préférence sans parfum ni colorant
artificiel (pH neutre).
3. Rincez les pièces à l’eau claire, potable
et froide pendant 10à 15secondes
(env. 20°C). Séchez après le nettoyage.
OU
6.4 Désinfecter
Avant la première utilisation, puis une fois
par jour
Surface de cuisson
Recouvrez toutes les pièces d’eau, à
l’exception de la tubulure, et portez à
ébullition pendant 5minutes. Séchez
après la désinfection.
OU
Micro-ondes
Lave-vaisselle
Placez toutes les pièces, à l’exception de
la tubulure, dans le panier supérieur ou
dans le bac à couverts. Utiliser un
détergent pour lave-vaisselle disponible
dans le commerce. Séchez après le
nettoyage.
Utilisez les sachets Quick Clean* dans le
micro-ondes conformément aux
instructions. Séchez après la désinfection.
* Accessoires disponibles à la vente : voir
chapitre12. Pour en savoir plus, consultez le site
www.medela.fr.
Séchage
Séchez avec un chiffon propre ou laissez sécher sur un chiffon propre. Placez les pièces
propres dans un sac de rangement propre ou dans un endroit propre. Ne stockez pas
de pièces humides dans un conteneur ou un sac hermétique. Il est important que toute
l’humidité résiduelle sèche.
Page 47

6.5 Nettoyage de la tubulure
• Si les composants du set pour tire-lait sont
1
• La membrane située au niveau du con-
• Aucun résidu visible
Aucun nettoyage nécessaire.
• Présence de résidus visibles
1. Rincez la tubulure à l’eau froide
2. Lavez la tubulure dans l’eau chaude et savonneuse
3. Rincez la tubulure à l’eau claire
4. Secouez-la afin d’éliminer les gouttes d’eau
5. Suspendez-la pour la sécher à l’air
Ne désinfectez pas la tubulure.
6.6 Nettoyage du bloc-moteur
i
Remarque
nettoyés au lave-vaisselle, ils peuvent
décolorer sous l’action de pigments
alimentaires. Ce phénomène n’a aucune
conséquence sur le fonctionnement du
produit.
necteur évite toute pénétration de lait dans
le tuyau. Assurez-vous toutefois qu’aucun
résidu visible n’est présent au niveau du
tuyau après chaque séance d’expression de
lait. En cas de présence de résidus visibles
dans la tubulure, suivez les instructions du
chapitre6.5.
47
1
Pour nettoyer le bloc-moteur, essuyez
le boîtier avec un linge propre et humide (mais
pas mouillé). Vous pouvez utiliser
de l’eau potable et un produit vaisselle
de base ou un détergent non abrasif.
2
Vous pouvez également utiliser
un désinfectant à base d’alcool.
Page 48

7. Préparation à la séance d’expression
Avertissement
• Fonctionnement sur secteur:
Respectez l’ordre exact des étapes indiquées.
• N’utilisez que l’adaptateur secteur fourni
4848
avec le Swing Flex/Swing Maxi Flex.
• Veillez à ce que la tension de l’adaptateur
secteursoit compatible avecla source
d’alimentation.
i
Info
• Vous pouvez faire fonctionner le tire-lait
Swing Flex/Swing Maxi Flex sur batterie ou
sur secteur.
• Fonctionnement sur batterie:
Il n’est pas nécessaire de retirer les piles
lorsque le tire-lait est utilisé avec
l’adaptateur secteur.
• Vérifiez régulièrement l’état des piles dans le
bloc-moteur.
• En cas de non-utilisation du Swing Flex/
Swing Maxi Flex pendant une période
prolongée, retirez les piles de leur compartiment.
• Les piles ont une autonomie de 4à 6séances d’expression (environ 1heure½
d’expression).
7.1 Fonctionnement sur secteur
1
Branchez le cordon de l’adaptateur secteur au
bloc-moteur.
7.2 Fonctionnement sur batterie
1
Ouvrez le compartimentà batteriesitué au
dos de l’appareil en suivant le sens de la
flèche.
Page 49

2
Branchez l’adaptateur secteur sur la prise
électrique. Le bloc-moteur est désormais prêt
à être utilisé.
49
2
Insérez quatre piles LR6 Mignon type AA pour
le tire-lait Swing Flex.
Insérez six micro piles de 1,5V de type AAA
pour le tire-lait Swing Maxi Flex.
3
Fermez le compartiment à batterie.
Le tire-lait est prêt à être utilisé sur batterie.
Page 50

7. Préparation à la séance d’expression
Prudence
• Lavez-vous soigneusement les mains (au
moins pendant une minute) avec de l’eau et
du savon avant de toucher le sein et les
5050
pièces du tire-lait. Séchez-vous les mains à
l’aide d’une serviette parfaitement propre
ou d’un essuie-tout à usage unique.
• Les biberons et leurs pièces peuvent
s’endommager s’ils sont mal manipulés, par
exemple s’ils tombent, sont trop serrés à la
fermetureou entrechoqués.
• Manipulez les biberons et les pièces avec
soin.
i
Remarque
• Utilisez uniquement des accessoires Medela
d’origine.
• Tenez le tuyau par le connecteur en
l’attachant et en le détachant.
• Toutes les pièces doivent être complètement
sèches avant utilisation.
7.3 Assemblage du set
tire-lait
1
Avant utilisation, vérifiez que les composants
du tire-lait ne présentent aucun signe d’usure
ou d’endomma gement et remplacez-les si
nécessaire. Avant d’assembler le set pour
tire-lait, vérifiez que les pièces sont correctement nettoyées conformément au chapitre6.
Insérez délicatement la membrane dans le
connecteur en plaçant le rabat dans
l’ouverture du connecteur. Assurez-vous que
la membrane est positionnée de façon
hermétique autour du bord du connecteur.
i
Info
• Exécutez soigneusement toutes les étapes
de la procédure afind’assembler correctement le set pour tire-lait. Autrement, vous
n’obtiendrez pas un niveau de vide adéquat.
4
Vissez le biberon sur le connecteur.
Page 51

32
51
Refermez le couvercle du connecteur
jusqu’à ce qu’il produise un déclic.
5 6
Introduisez l’embout du tuyau
dans l’orifice prévu à cet effet
sur le couvercle du connecteur.
Fixez la téterelle au connecteur.
Insérez l’autre extrémité du tuyau dans le
bloc-moteur.
Page 52

8. Expression
Prudence
• Étape2 (chapitres 8.1, 8.2, 8.3):
• Le produit est disponible avec deux téterelles
de taille différente: 21mm et 24mm.
• Répondez au questionnaire suivant pour
5252
vérifier que la taille de la téterelle est
adaptée:
• Votre mamelon « frotte »-t-il les côtés de
l’embout au point de provoquer une gêne ?
• Un surplus de tissu aréolaire est-il tiré dans
l’embout ?
• Une rougeur est-elle visible ?
• Votre mamelon ou votre aréole deviennentils blancs ?
• Avez-vous l’impression que votre lait n’a pas
été complètement tiré après l’expression?
Si vous avez répondu «OUI» à une ou
plusieurs de ces questions, essayez une
téterelle de taille différente en suivant les
instructions de mesure mentionnées sur www.
medela.fr.
Si vous n’êtes toujours pas certaine d’avoir
sélectionné la bonne taille de téterelle,
demandez conseil à votre consultante en
lactation ou à votre spécialiste de l’allaitement.
Consultez la brochure «Choisir la taille de
votre téterelle Medela».
8.1 Swing Flex –
Préparation à une séance
d’expression simple
1
Vous pouvez faire pivoter (360°) la téterelle
ovale afin de la placer dans la position la plus
confortable pour vous.
8.2 Swing Maxi Flex –
Préparation à une séance
d’expression simple
1
i
Remarque
• Étape3 (chapitres 8.1, 8.2, 8.3):
Ne tenez pas le set pour tire-lait par le
biberon. Cela peut entraîner une obstruction
des canaux galactophores et un engorgement.
Insérez le petit tuyau non utilisé dans le
support de tuyau.
Page 53

Placez la téterelle sur le sein de manière
à centrer correctement le mamelon dans
l’embout.
2 3
32
Pour plus d’informations
concernant l’expression,
reportez-vous au chapitre8.5.
Maintenez la téterelle sur le sein à l’aide de
votre pouce et de votre index. Soutenez votre
sein avec la paume de votre main.
53
Placez la téterelle d’un biberon sur un sein
de sorte que le mamelon soit correctement
centré dans l’embout.
Pour plus d’informations
concernant l’expression,
reportez-vous au chapitre8.5.
Maintenez la téterelle sur le sein à l’aide de
votre pouce et de votre index. Soutenez votre
sein avec la paume de votre main.
Page 54

8. Expression
Prudence
• Étape2 (chapitre8.3):
• Lavez-vous soigneusement les mains (durant
au moins une minute) avec de l’eau et du
5454
savon avant de toucher le sein, ainsi que le
set pour tire-lait et ses différentes pièces
propres. Séchez-vous les mains à l’aide
d’une serviette parfaitement propre ou d’un
essuie-tout à usage unique.
• Ne tenez pas le set pour tire-lait par le
biberon. Cela peut entraîner une obstruction
des canaux galactophores et un engorgement.
i
Info
• La double expression permet de gagner du
temps et accroît la teneur énergétique du
lait.
8.3 Swing Maxi Flex –
Préparation à une séance
de double expression
1
Vous pouvez faire pivoter (360°) la téterelle
ovale afin de la placer dans la position la plus
confortable pour vous.
4
Faites démarrer le tire-lait en appuyant sur le
bouton
.
Page 55

2
3
1
55
Placez la téterelle sur le sein de manière à
centrer correctement le mamelon dans
l’embout.
5
Pour plus d’informations
Placez l’autre téterelle sur le sein
de manière à centrer correctement le
mamelon dans l’embout.
Maintenez la téterelle sur le sein à l’aide de
votre pouce et de votre index. Soutenez votre
sein avec la paume de votre main.
concernant l’expression,
reportez-vous au chapitre8.5.
Page 56

8. Expression
i
Remarque
• Le bustier Easy Expression doit être acheté
séparément. Plus d’informations sur le site
www.medela.fr
5656
8.4 Swing Maxi Flex –
Préparation de l’expression
en mains libres avec le bustier
Easy Expression
1
Enfilez le bustier
Easy Expression et fermez-le à l’aide du
crochet supérieur.
4
Raccordez le set pour tire-lait monté aux
téterelles.
Page 57

2 3
57
Laissez la fermeture à glissière légèrement
ouverte.
5
Pour plus d’informations
concernant l’expression,
Commencez la séance d’expression.
Placez la téterelle sur votre sein sous le bustier
de manière à centrer votre mamelon dans
l’embout de la téterelle.
reportez-vous au chapitre8.5.
Page 58

8. Expression
Prudence
• Contactez votre consultante en lactation ou
votre spécialiste de l’allaitement si vous
n’exprimez que très peu de lait ou n’en
5858
exprimez pas du tout, ou si l’expression
s’avère douloureuse.
i
Remarque
• Déconnectez toujours le tire-lait Swing Flex/
Swing Maxi Flex de la source d’alimentation
après l’expression.
• Ne remplissez le biberon que jusqu’au
marquage 150 ml.
i
Info
• Le tire-lait Swing Flex/Swing Maxi Flex
s’éteint automatiquement s’il fonctionne
pendant 30minutes sans aucune manipulation.
• Ne pliez pas le tuyau pendant l’expression.
8.5 Expression du lait
1
Faites démarrer le tire-lait en appuyant sur le
bouton
La phase de stimulation dure deux minutes
æ
au maximum. La phase de stimulation passe
ensuite automatiquement en phase
d’expression.
.
4
Le tableau suivant indique les différents
états de la LED:
S’allume Activé
Ne s’allume pas Désactivé
Clignote lentement Phase de stimulation
Lumière constante Phase d’expression
Clignote rapidement
Force d’aspiration
min./max.
Eteignez le tire-lait en appuyant
sur le bouton
.
Page 59

2 3
59
Si le lait commence à s’écouler plus rapidement, appuyez sur le bouton
passer en phase d’expression.
Veillez à ce que le lait s’écoule correctement
æ
dans le biberon.
pour
5 6
Utilisez le support de biberon pour éviter
que celui-ci ne se renverse.
La force d’aspiration max. peut être adaptée à
chaque phase. Force d’aspiration max.:
utilisez le bouton
d’aspiration jusqu’à ce qu’elle devienne
légèrement inconfortable. Appuyez ensuite sur
pour réduire légèrement le niveau de vide
jusqu’à ce que cela soit confortable.
Fermez le biberon avec un couvercle.
Suivez les instructions du chapitre9,
æ
«Conservation et décongélation du lait
maternel».
pour augmenter la force
Nettoyez conformément
aux instructions du
chapitre6.
Page 60

9. Conserver et décongeler le lait maternel
9.1 Conservation
Instructions de conservation pour le lait maternel fraîchement exprimé
(pour les bébés en bonne santé nés à terme)
6060
Température ambiante
16 à 25°C
(60 à 77°F)
Bon pendant 4 heures
Réfrigérateur
4°C (39°F)
ou plus froid
Bon pendant 3 jours
Congélateur
-18°C (0°F)
ou plus froid
Bon pendant
6 mois
Lait maternel décongelé
dans
le réfrigérateur
À température
ambiante :
bon pendant 2 heures
*Jusqu’à 6 heures pour
du lait exprimé dans
des conditions très
propres
*Instructions pour exprimer du lait dans des conditions très propres :
Avant d’exprimer du lait maternel, les mères devraient se laver les mains avec du savon et de l’eau ou un
désinfectant pour les mains à base d’alcool. Les pièces du tire-lait, les biberons, ainsi que la zone
d’expression doivent être propres. Les seins et mamelons n’ont pas besoin d’être lavés avant l’expression.
• Ces règles de conservation et de décongélation du lait maternel sont des recommandations. Contactez
votre consultante en lactation ou spécialiste en allaitement pour obtenir plus d’informations.
• Conservez le lait maternel dans la partie la plus froide du réfrigérateur (à l’arrière de la tablette de verre
au-dessus du bac à légumes).
*Jusqu’à 5 jours pour
du lait exprimé dans
des conditions très
propres
*Jusqu’à 9 mois pour
du lait exprimé dans
des conditions très
propres
Réfrigérateur :
pendant max. 24
heures
Ne pas recongeler!
9.2 Congélation
• Congelez le lait maternel exprimé dans des biberons en plastique ou des sachets de conser-
vation pour le lait. Ne remplissez pas les biberons ou sachets à plus de 3/4 de leur capacité de
façon à laisser de l’espace pour l’expansion éventuelle du lait.
• Inscrivez la date d’expression et le volume de lait exprimé sur les biberons ou sachets.
• Les biberons en plastique et leurs composants peuvent être fragilisés par
la congélation et risquent de se casser en cas de chute.
• N’utilisez pas le lait maternel si les biberons ou les pièces sont endommagés.
9.3 Décongélation
Prudence
Ne pas décongeler ou réchauffer le lait maternel au micro-ondes ou dans une casserole d’eau
bouillante. Cela aide à préserver les composants importants et à prévenir les brûlures.
• Pour préserver les composants du lait maternel, laissez-le décongeler dans le réfrigérateur
toute la nuit. Vous pouvez également passer le biberon ou le sachet sous l’eau tiède
(37 °C / 98,6 °F max.).
• Secouez délicatement le biberon ou le sachet afin d’homogénéiser les corps gras. Évitez de
secouer vigoureusement ou d’agiter le lait.
Page 61

10. Dépannage
Problème
Le moteur ne
fonctionne pas
Si l’aspiration est
faible ou inexistante
Si de la condensation apparaît dans le
tuyau
Le tire-lait
devient humide
Solution
Vérifiez l’alimentation secteur.
Vérifiez la position des piles dans le compartiment.
Assurez-vous que la membrane est propre et n’est pas
endommagée.
Assurez-vous que la membrane est positionnée de façon hermétique
autour du bord du connecteur et que le couvercle est solidement
raccordé au connecteur.
Vérifiez toutes les connexions.
Assurez-vous que les extrémités du tuyau sont parfaitement fixées
à l’arrière du connecteur etsur la prisedu tire-lait. Lors de l’expression
simple, insérez le tuyau non utilisé dans le support de tuyau.
Vérifiez qu’il n’y a pas de résidu d’eau dans le tuyau.
Ne pliez pas le tuyau pendant l’expression.
Vérifiez que la téterelle est placée de manière hermétique sur le sein.
Toutes les pièces doivent être complètement sèches.
Nettoyez le tuyau en suivant les instructions figurant au chapitre 6.5.
Secouez-le afin d’éliminer les gouttes d’eau.
Débranchez l‘adaptateur secteur de la prise.
Éteignez le tire-lait.
Ne placez pas le tire-lait à l‘envers. Le panneau de commandes
doit être dirigé vers le haut.
Laissez le tire-lait dans un endroit sec et chaud pendant 24 heures.
Remarque :
N‘exposez pas le tire-lait à la lumière directe du soleil.
N‘accélérez pas le procédé de séchage en utilisant une source de
chaleur.
61
Page 62

11. Garantie / Recyclage
Garantie
La brochure «Garantie internationale» contient des informations détaillées relatives
à la garantie.
Mise au rebut
6262
Ce produit est exclusivement réservé à un usage personnel. L’utilisation du même produit par
plusieurs personnes peut présenter un risque pour la santé.
L’unité est constituée de métal et de plastique et doit être mise au rebut conformément aux
directives européennes 2011/65/UE et 2012/19/UE. Respectez également les instructions
complémentaires locales. Veillez à jeter le tire-lait et ses accessoires conformément aux
instructions locales de mise au rebut.
Page 63

12. Pièces détachées et accessoires
En spécifiant le numéro de produit, vous pouvez obtenir auprès des distributeurs Medela les
accessoires suivants du Swing Flex/Swing Maxi Flex.
Articles destinés à la vente Swing Flex/Swing Maxi Flex
Réf. article
101033773 Tire-lait Swing Flex EN NL FR (adaptateur Euro)
101036226 Tire-lait Swing Flex EN NL FR (adaptateur Euro) pour l'Inde
101033777 Tire-lait Swing Flex EN (adaptateur AUS/NZ)
101033793 Tire-lait Swing Flex EN (adaptateur RU) pour RU
101033775 Tire-lait Swing Flex EN NL FR (adaptateur RU)
101036238 Tire-lait Swing Flex EN NL FR (adaptateur US)
101033817 Tire-lait Swing Maxi Flex EN NL FR (adaptateur Euro)
101036232 Tire-lait Swing Maxi Flex EN NL FR (adaptateur Euro) pour l'Inde
101033825 Tire-lait Swing Maxi Flex EN (adaptateur AUS/NZ)
101033845 Tire-lait Swing Maxi Flex EN (adaptateur RU) pour RU
101033819 Tire-lait Swing Maxi Flex EN NL FR (adaptateur RU)
101033821 Tire-lait Swing Maxi Flex EN NL FR (adaptateur US)
Produit
Pièces détachées Swing Flex
Réf. article
099.0016
099. 0017
101033542
099.0018
099.0276
101038305
099.0015 Bloc-moteur Swing Flex
101034002 Tuyau Swing Flex
101034005 Connecteur PersonalFit Flex
Produit
Adaptateur Swing Flex (100–240 V; 4,8 V) Euro
Adaptateur Swing Flex (100–240 V; 4,8 V) RU
Adaptateur Swing Flex (100–240 V; 4,8 V) US/JP
Adaptateur Swing Flex (100–240 V; 4,8 V) AUS/NZ
Adaptateur Swing Flex (100–240 V; 4,8 V) CN
Adaptateur Swing Flex (100–240 V; 4.8 V) KR
63
Pièces détachées Swing Maxi Flex
Réf. article
099.0271
099.0272
101033543
099.0273
099.0274
101038303
099.0270 Bloc-moteur Swing Maxi Flex
101034003 Tuyau Swing Maxi Flex
101034005 Connecteur PersonalFit Flex
Produit
Adaptateur Swing Maxi Flex (100–240 V; 12 V) Euro
daptateur Swing Maxi Flex (100–240 V; 12 V) RU
A
Adaptateur Swing Maxi Flex (100–240 V; 12 V) US/JP
Adaptateur Swing Maxi Flex (100–240 V; 12 V) AUS/NZ
Adaptateur Swing Maxi Flex (100–240 V; 12 V) CN
Adaptateur Swing Maxi Flex (100–240 V; 12V) KR
Page 64

12. Pièces détachées et accessoires
Accessoires pour Swing Flex/Swing Maxi Flex
Réf. article
101033953*
101033964*
6464
101033992*
101033997*
800.0796
20 0.1659
008.0040
Les autres produits Medela sont disponibles sur www.medela.fr.
* Si l’expression s’avère douloureuse ou insatisfaisante, contactez votre consultante en lactation
ou votre spécialiste de l’allaitement. Une téterelle de taille différente peut contribuer à rendre
l’expression plus confortable et plus efficace.
Produit
Téterelle PersonalFit Flex S (21 mm)
Téterelle PersonalFit Flex M (24 mm)
Téterelle PersonalFit Flex L (27 mm)
Téterelle PersonalFit Flex XL (30 mm)
Set de 3biberons pour lait maternel de 150ml
Set de 2biberons pour lait maternel de 250ml
Sachets à micro-ondes Quick Clean
Page 65

13. Compatibilité Electro Magnétique/
Description technique
Swing Flex et Swing Maxi Flex ont fait l‘objet d‘une évaluation de la compatibilité
électromagnétique selon les exigences de la norme CEI 60601-1-2:2007 3e édition
et de la norme CEI 60601-1-2:2014 4e édition, conformément aux clauses 7 et 8.9.
Avertissement – Les tire-laits électriques Swing Flex et Swing Maxi Flex ne doivent
pas être utilisés à côté ou sur un autre équipement. S‘ils sont placés à côté ou sur un
autre équipement, les tire-laits électriques Swing Flex et Swing Maxi Flex doivent être
observés afin de vérifier qu‘ils fonctionnent normalement dans la configuration d‘utilisation.
Les dispositifs de communication sans fil tels que les dispositifs domestiques sans fil en
réseau, les téléphones portables, les téléphones sans fil et leurs bases, les talkies-walkies
peuvent perturber les tire-laits électriques Swing Flex et Swing Maxi Flex et doivent
se trouver à au moins 30cm de l‘appareil.
65
Page 66

14. Caractéristiques techniques
Swing Flex
force d‘aspiration (env.)
–35 ... –250mmHg
Intermittent
– 5 ... – 33kPa
45 ... 111cycles/min
Utilisation/Transport/Stockage
6666
Swing Maxi Flex
Intermittent
Entrée Sortie
100–240V~ 50/60Hz
max. 0,5 A
4 x 1,5V, alcaline
AA, Mignon, LR6
121 x 129 x 57 mm
300 g
200 g
force d‘aspiration (env.)
–35 ... –250mmHg
– 5 ... – 33kPa
45 ... 111cycles/min
Entrée Sortie
100–240 V~ 50/60 Hz
max. 0,6 A
6 x 1,5V, alcaline
AAA, Micro, LR03
4,8V
1,2A
12V
1,5A
Utilisation/Transport/Stockage
Utilisation
Transport/stockage
Utilisation/Transport/Stockage
Utilisation/Transport/Stockage
Utilisation
121 x 129 x 57 mm
290 g
220 g
Transport/stockage
Page 67

67
Page 68

Inhoudsopgave
1. Beoogd gebruik/populatie – Contra-indicatie 69
2. Betekenis van de symbolen 70
3. Belangrijke veiligheidsinformatie 73
4. Productomschrijving Swing Flex 74
5. Productomschrijving Swing Maxi Flex 75
6. Reiniging 76
6.1 Reinigingsoverzicht 76
6.2 Uit elkaar halen
68
6.3 Afwassen
6.4 Desinfecteren
6.5 De slang reinigen
6.6 De motoreenheid reinigen
7. Voorbereidingen voor het afkolven 80
7.1 Werking op netstroomadapter 80
7.2 Gebruik met batterijen
7.3 De afkolfset in elkaar zetten
8. Afkolven 84
8.1 Swing Flex – Vorbereiding voor enkel afkolven 84
8.2 Swing Maxi Flex – Voorbereiding voor enkel afkolven
8.3 Swing Maxi Flex – Voorbereiding voor dubbel afkolven
8.4 Swing Maxi Flex – Voorbereidingen voor handsfree afkolven
met de Easy Expression Bustier
8.5 Kolven
9. Moedermelk bewaren en ontdooien 92
9.1 Bewaren 92
9.2 Invriezen
9.3 Ontdooien
10. Problemen oplossen 93
11. Garantie/Afvoeren 94
12. Reserveonderdelen en accessoires 95
13. EMC/technische omschrijving 97
14. Technische specificaties 98
77
78
78
79
79
80
82
84
84
88
90
92
92
Page 69

1. Beoogd gebruik/populatie – Contra-indicatie
Het beoogde gebruik en indicaties van borstkolven
Borstkolven zijn bedoeld voor gebruik door lacterende moeders, thuis of in het ziekenhuis,
voor het afkolven van moedermelk. Borstkolven worden geïndiceerd om de symptomen
van stuwing als gevolg van het afkolven van moedermelk te verzachten. In het geval van
mastitis ondersteunen borstkolven het genezingsproces door moedermelk af te kolven van
de ontstoken borst. Door het afkolven worden tepels met wondjes en kloven minder belast,
en kunnen vlakke of ingetrokken tepels naar buiten worden gebracht. Borstkolven geven
moeders bovendien de gelegenheid om moedermelk te geven aan baby‘s die om diverse
redenen niet rechtstreeks aan de borst kunnen drinken, bijvoorbeeld premature baby‘s
of bij problemen met aanleggen of een gespleten gehemelte.
69
Beoogde patiëntenpopulatie/gebruikers
Adolescente pediatrische of volwassen lacterende moeders. Veel vrouwen vinden het
gemakkelijk, en soms ook noodzakelijk, om met behulp van een borstkolf hun moedermelk
af te kolven en te bewaren, nadat ze weer aan het werk zijn gegaan, op reis zijn, of om
andere redenen van hun baby gescheiden zijn. Vrouwen zijn vaak blij te horen dat een
borstkolf gebruikt kan worden als ondersteuning bij het geven van borstvoeding en dat
sommige kolven zo zijn ontworpen dat ze het zuigen van een baby imiteren.
Contra-indicaties
Er zijn geen contra-indicaties bekend voor de Swing Flex/Swing Maxi Flex borstkolf.
Page 70

2. Betekenis van de symbolen
Het waarschuwingssymbool geeft belangrijke veiligheidsinstructies aan. Als deze instructies
niet in acht worden genomen, kan dat letsel of schade aan de borstkolf veroorzaken. Indien
het waarschuwingssymbool wordt gebruikt in combinatie met de volgende woorden, staat
het voor:
Waarschuwing
Kan leiden tot ernstig letsel of
overlijden.
Waarschuwing
Kan leiden tot lichte verwondingen.
70
Symbolen op de verpakking
Dit symbool geeft aan dat het materiaal deel uitmaakt van een terugwinnings-/
recyclingproces.
Dit symbool geeft een kartonnen verpakking aan.
Dit symbool geeft aan dat het product niet in zonlicht geplaatst mag worden.
Dit symbool geeft aan dat het apparaat breekbaar is en met zorg behandeld moet
worden.
Dit symbool geeft de temperatuurbeperking aan bij gebruik, transport en opslag.
Dit symbool geeft de vochtigheidsbeperking aan bij gebruik, transport en opslag.
Dit symbool geeft de luchtdrukbeperking aan bij gebruik, transport en opslag.
i
i
Opmerking
Kan leiden tot materiële schade.
Info
Nuttige of belangrijke informatie die
niet aan veiligheid is gerelateerd.
Dit symbool geeft aan dat het apparaat droog gehouden moet worden.
Dit symbool geeft aan dat de verpakking goedgekeurd is om in contact te komen met
levensmiddelen conform EG-verordening 1935/2004.
Dit symbool duidt op de unieke GSI-identificatie van handelseenheden (GTIN)
(barcodes).
Dit symbool betekent dat het apparaat niet samen met ongesorteerd gemeentelijk afval
mag worden afgevoerd (geldt alleen in de EU).
Dit symbool wil zeggen dat de gebruiksaanwijzing gevolgd moet worden.
Page 71

Symbolen op het apparaat
Dit symbool wil zeggen dat de gebruiksaanwijzing gevolgd moet worden.
Dit symbool geeft de conformiteit aan met de essentiële eisen van Richtlijn 93/42/EEG
van de Raad van 14 juni 1993 betreffende medische hulpmiddelen.
Dit symbool geeft de fabrikant aan.
Dit symbool betekent dat het apparaat niet samen met ongesorteerd gemeentelijk afval
mag worden afgevoerd (geldt alleen in de EU).
Dit symbool geeft de conformiteit aan met aanvullende Amerikaanse en Canadese
veiligheidseisen voor elektrische medische hulpmiddelen.
Dit symbool duidt op toepassing van een onderdeel van het type BF.
Dit symbool geeft het serienummer van de fabrikant aan.
Dit symbool geeft aan hoe de batterij geplaatst moet worden.
Dit symbool wijst op de bescherming tegen indringing van vaste vreemde voorwerpen en
schadelijke effecten door indringing van water.
Dit symbool geeft de productiedatum aan (vier cijfers voor het jaar en twee cijfers voor
de maand).
Symbolen op de netstroomadapter
Dit symbool geeft aan dat de netstroomadapter een klasse II-apparaat is.
Dit symbool duidt op de conformiteit met de in China verplichte CCC-certificering
(China Compulsory Certification).
Dit symbool geeft aan dat de netstroomadapter alleen is bedoeld voor gebruik
binnenshuis.
Dit symbool duidt op de conformiteit met Amerikaanse en Canadese veiligheidseisen.
Dit symbool duidt op de conformiteit met de eisen van de Federale Communicatiecommissie.
Dit symbool geeft de polariteit van de gelijkstroomconnector aan.
Dit CE-keurmerk geeft de conformiteit aan met de richtlijn betreffende laag voltage en
elektromagnetische compatibiliteit.
Dit symbool geeft aan dat het apparaat niet samen met ongesorteerd gemeentelijk afval
mag worden afgevoerd (geldt alleen in de EU). Het symbool met de gesloten balk geeft
aan dat de netstroomadapter na 13 augustus 2005 op de markt is gebracht.
71
Page 72

Dit symbool duidt op de conformiteit met de eisen betreffende energie-efficiëntie.
SGS
Dit symbool betekent wisselstroom.
Dit symbool betekent gelijkstroom.
Dit symbool duidt op de conformiteit met de eisen betreffende energie-efficiëntie.
Dit symbool geeft aan dat de netstroomadapter op veiligheid is getest.
72
170053-12
S
TÜV
SÜD
PSB
IP20
Dit symbool betekent een kortsluitvaste scheidingstransformator.
Registratie consumentenbescherming Singapore.
Dit symbool geeft aan dat het elektronische apparaat met transformator(en) en elektronische circuits elektrisch vermogen omzet in enkele of meerdere voedingsuitgangen.
Dit symbool duidt op de conformiteit met de regelgeving in Australië/Nieuw-Zeeland.
Dit symbool duidt op de conformiteit met de PSE-regelgeving (Japan, wetgeving met
betrekking tot de veiligheid van elektrische apparatuur en materialen).
Het KC-teken geeft aan dat het product voldoet aan de Koreaanse EMC- en elektrische
veiligheidseisen.
Dit symbool wijst op de bescherming tegen indringing van vaste vreemde voorwerpen en
schadelijke effecten door indringing van water.
Page 73

3. Belangrijke veiligheidsinformatie
MAX.
275 h
MAX.
250 h
Als deze aanwijzingen/veiligheidsinformatie niet worden opgevolgd, kan veilig gebruik
van het apparaat niet worden gegarandeerd. Technische wijzigingen voorbehouden.
Apparaat
Gevaar voor elektrocutie! Apparaat
droog houden! Nooit onderdompelen
in water of andere vloeistoffen!
Stel de motoreenheid niet bloot aan
direct zonlicht.
De bedrijfsduur van de Swing Flex
borstkolf bedraagt 275 uur.
De levensduur die onder fabrieksgarantie valt, bedraagt twee jaar.
De bedrijfsduur van de Swing Maxi Flex
borstkolf bedraagt 250 uur.
De levensduur die onder fabrieksgarantie valt, bedraagt twee jaar.
Omgaan met elektriciteit
De stroomtoevoer is pas gegarandeerd
afgesloten als de stekker van de
netstroomadapter uit het stopcontact
verwijderd is.
Pak een elektrisch apparaat dat
in het water is gevallen niet vast.
Trek onmiddellijk de stekker
uit het stopcontact.
De Swing Flex/Swing Maxi Flex borstkolf
is niet hittebestendig: weghouden van
radiatoren en open vuur.
Gebruik nooit een beschadigd
apparaat. Vervang beschadigde of
versleten onderdelen.
Reparatiewerkzaamheden mogen alleen
door een bevoegde servicedienst
worden uitgevoerd.
Repareer het apparaat niet zelf. Aan het
apparaat mogen geen wijzigingen
worden aangebracht.
Houd de netstroomadapter uit de buurt
van verwarmde oppervlakken.
Laat de borstkolf nooit onbeheerd
achter met de stekker in het
stopcontact.
73
Gebruik
Gebruik de Swing Flex/Swing Maxi Flex
borstkolf alleen voor het doel waarvoor
deze bestemd is, zoals beschreven in
deze gebruiksaanwijzing.
Gebruik de Swing Flex/Swing Maxi Flex
borstkolf niet tijdens baden
of douchen.
Gebruik de Swing Flex/Swing Maxi Flex
borstkolf niet tijdens het slapen of als u
zeer slaperig bent.
Dit product is bestemd voor gebruik
door één persoon. Gebruik door
meerdere personen kan gezondheidsrisico‘s met zich meebrengen.
Gebruik een elektrisch apparaat niet als het snoer
of de stekker beschadigd is, niet goed werkt,
gevallen of beschadigd is of in het water is gevallen.
Bestuur geen voertuig tijdens
het handsfree afkolven.
Er is toezicht vereist als de Swing Flex/
Swing Maxi Flex borstkolf in de buurt van
kinderen wordt gebruikt.
Consulteer uw lactatiekundige of
borstvoedingsdeskundige in het geval van
problemen of pijn.
De frequenties van mobiele telefoons
en radio‘s kunnen een negatieve invloed
hebben op de Swing Flex/Swing Maxi Flex
borstkolf.
Page 74

4. Productomschrijving Swing Flex
Swing Flex – Enkele elektrische
2-Phase borstkolf
1x motoreenheid:
artikel 600.0975
reserveonderdeel 099.0015
Aan/uit-knop
74
Led
swing
Poort voor
PVC-slang
Bevestigingsclip
Vacuüm
verlagen
Vacuüm
verhogen
Druppeltoets
Batterijcompartiment
Borstschilden:
1 x 21 mm (artikel 101035239)
1 x 24 mm (artikel 101035240)
1x netstroomadapter
artikel reserveonderdeel
Euro 4.8V 201.1055 099.0016
VK 4.8V 201.1056 099.0017
AUS/NZ 4.8V 201.1057 099.0018
CN 4.8V 201.1058 099.0276
VS/JP 4.8V 201.1059 101033542
KR 4.8V 101034044 101038305
1x connector
artikel 200.9728
1x Swing Flex slang
artikel 201.1079
reserveonderdeel
101034002
Reserveonderdelen en accessoires die leverbaar zijn worden vermeld in hoofdstuk 12.
power adapter port
1x multideksel
artikel 200.2714
1x deksel
1x membraan
1x fles
artikle 811.0021
1x flessenstandaard
artikel 101033405
Page 75

5. Productomschrijving Swing Maxi Flex
Swing Maxi Flex – Dubbele elektrische
2-Phase borstkolf
1x motoreenheid:
article 200.4932
spare part 099.0270
Aan/uit-knop
Led
swing maxi
Poort voor
PVC-slang
Bevestigingsclip
75
Vacuüm
verlagen
1x netstroomadapterr
artikel reserveonderdeel
Euro 12V 201.1146 099.0271
VK 12V 201.1147 099.0272
AUS/NZ 12V 201.1149 099.0273
CN 12V 101032865 099.0274
VS/JP 12V 201.1148 101033543
KR 12V 101034045 101038303
Korte slangen
Lange slang
Y-stuk
Vacuüm
verhogen
Druppeltoets
1x Swing Maxi Flex
slang
artikel 201.1087
reserveonderdeel
101034003
Batterijcompartiment
Borstschilden:
2 x 21 mm (artikel 101035239)
2 x 24 mm (artikel 101035240)
2x connector
artikel 200.9728
Poort voor
stroomadapter
2x multideksel
artikel 200.2714
2x deksel
2x membraan
2x fles
artikel 811.0021
2x flessenstandaard
artikel 101033405
Page 76

6. Reiniging
6.1 Reinigingsoverzicht
Afwassen is niet hetzelfde als desinfecteren. Deze activiteiten moeten afzonderlijk van
elkaar worden uitgevoerd ter bescherming van u, uw baby en de prestaties van uw
borstkolf.
Afwassen – Het reinigen van de oppervlakken van de onderdelen door vervuilingen
te verwijderen.
Desinfecteren – Het doden van levende organismen die zich op de oppervlakken
van de onderdelen bevinden, zoals bacteriën of virussen.
76
Wanneer
reinigen?
Vóór het eerste
gebruik
Na elk gebruik
Eenmaal per dag
Wanneer
reinigen?
Borstschild(en)
✔ 6.2 uit elkaar halen
✔ 6.3 afwassen
✔ 6.4 desinfecteren
✔ 6.3 afwassen
✔ 6.4 desinfecteren
Slang
Connector
en membraan
✔ 6.2 uit elkaar halen
✔ 6.3 afwassen
✔ 6.4 desinfecteren
✔ 6.2 uit elkaar halen
✔ 6.3 afwassen
✔ 6.2 uit elkaar halen
✔ 6.4 desinfecteren
Flessen en deksels
✔ 6.2 uit elkaar halen
✔ 6.3 afwassen
✔ 6.4 desinfecteren
✔ 6.2 uit elkaar halen
✔ 6.3 afwassen
✔ 6.2 uit elkaar halen
✔ 6.4 desinfecteren
Motoreenheid
Wanneer nodig
zie hoofdstuk 6.5 zie hoofdstuk 6.6
Page 77

6.2 Uit elkaar halen
*
Waarschuwing
• Spuit of giet geen vloeistof direct op de
borstkolf.
• Gebruik voor het reinigen alleen water van
drinkkwaliteit.
• Haal de borstkolf uit elkaar en maak alle
onderdelen die in aanraking komen met
de borst en moedermelk onmiddellijk na
het gebruik schoon, om te voorkomen dat
melkresten opdrogen en om de groei van
bacteriën tegen te gaan.
• Reinig de slang niet met Quick Clean
zakken in de magnetron.
• Koppel voordat u de motoreenheid reinigt
de borstkolf los van de stroomvoorziening.
i
Opmerking
• De afkolfset vergt geen onderhoud.
• Pas op dat u tijdens het reinigen geen
onderdelen van de afkolfset beschadigt.
• Gebruik de moedermelk niet als de fles of
een onderdeel beschadigd is.
77
• Verwijder vóór het eerste gebruik de beschermkap* van het borstschild en gooi deze weg.
• Haal de afkolfset uit elkaar tot losse onderdelen
(borstschild, connector, membraan en fles).
• Open de kap aan de achterkant van de connector
door de beide lipjes in te drukken.
• Controleer alle onderdelen op beschadiging.
• Vervang beschadigde of versleten onderdelen.
Page 78

6. Reiniging
78
6.3 Afwassen
Vóór het eerste gebruik en na elk
Gootsteen Fornuis
1. Spoel alle onderdelen met koud,
schoon water van drinkkwaliteit
(circa 20 °C).
2. Maak deze onderdelen schoon in
ruim warm zeepwater (circa 30 °C).
Gebruik bij voorkeur afwasmiddel
zonder kunstmatige geur- en
kleurstoffen (pH-neutraal).
3. Spoel de onderdelen gedurende
10 tot 15 seconden met koud, schoon
water van drinkkwaliteit (circa 20 °C).
Na het afwassen afdrogen.
OF
6.4 Desinfecteren
Vóór het eerste gebruik en eenmaal
Zorg dat alle delen behalve de slang
onder water staan en laat minimaal
5 minuten koken. Na het desinfecteren
afdrogen.
Magnetron
OF
Afwasmachine
Leg alle onderdelen behalve de slang
op het bovenste rek of in de bestekmand. Gebruik afwasmiddel. Na het
afwassen afdrogen.
Gebruik Quick Clean* magnetronzakken volgens de voorschriften. Na het
desinfecteren afdrogen.
* Leverbare accessoires: zie hoofdstuk 12. Ga voor
meer informatie naar www.medela.com.
Afdrogen
Droog de onderdelen af met een schone doek of leg ze op een schone doek om te
drogen. Bewaar de schone onderdelen in een schone bewaarzak of in een schone
omgeving. Bewaar de onderdelen niet in een luchtdichte verpakking/zak als deze nog
vochtig zijn. Het is belangrijk dat al het achtergebleven vocht opdroogt.
Page 79

6.5 De slang reinigen
1
• Geen zichtbare resten
Geen reiniging vereist.
• Zichtbare resten
1. Spoel de slang met schoon water.
2. Was de slang af in warm zeepwater.
3. Spoel de slang met schoon water.
4. Schud de waterdruppels eruit.
5. Hang op om aan de lucht te laten drogen.
Desinfecteer de slang niet.
6.6 De motoreenheid reinigen
i
Opmerking
• Als de afzonderlijke onderdelen van de
afkolfset in een afwasmachine worden
gereinigd, kunnen ze door kleurstoffen in
voedingsmiddelen verkleuren. Dit heeft
geen invloed op de werking.
• Het membraan in de connector voorkomt
dat er melk in de slang stroomt. Inspecteer de slang echter wel na elke kolfsessie
op zichtbare resten. Als er zichtbare
resten in de slang aanwezig zijn, volgt u
de instructies in hoofdstuk 6.5.
79
1
Om de motoreenheid te reinigen, veegt u
de behuizing af met een schone, vochtige
(niet natte) doek. U kunt water van drinkkwaliteit en een standaard afwasmiddel of
een niet-schurend reinigingsmiddel
gebruiken.
2
U kunt ook een desinfecterend middel
op basis van alcohol gebruiken.
Page 80

7. Voorbereidingen voor het afkolven
Waarschuwing
• Werking op netstroomadapter:
Voer de stappen in de juiste volgorde uit.
• Gebruik alleen de netstroomadapter
die bij de Swing Flex/Swing Maxi Flex
geleverd is.
• Let erop dat de spanning van de netstroomadapter overeenkomt met die van
de spanningsbron.
80
i
Info
• U kunt de Swing Flex/Swing Maxi Flex
borstkolf gebruiken op batterijen of via
netspanning.
• Gebruik met batterijen:
De batterijen hoeven niet verwijderd te
worden wanneer de netstroom adapter
voor het kolven wordt gebruikt.
• Controleer regelmatig de staat van de
batterijen in de motoreenheid.
• Als de Swing Flex/Swing Maxi Flex
gedurende langere tijd niet wordt
gebruikt, verwijdert u de batterijen uit
het batterijcompartiment.
• De batterijen gaan vier tot zes afkolfsessies mee (ongeveer anderhalf uur
afkolftijd).
7.1 Werking op netstroomadapter
1
Sluit het snoer van de netstroomadapter
aan op de motoreenheid.
7.2 Gebruik met batterijen
1
Open het batterijcompartiment op de
achterkant in de richting van de pijl.
Page 81

2
Sluit de netstroomadapter aan op het
stopcontact. De motoreenheid is nu klaar
voor gebruik.
81
2
Plaats vier AA Mignon LR6-batterijen in de
Swing Flex.
Plaats zes AAA-microbatterijen van 1,5 V
in de Swing Maxi Flex.
3
Sluit het batterijcompartiment.
De kolf is klaar voor gebruik
op batterijen.
Page 82

7. Voorbereidingen voor het afkolven
Waarschuwing
• Was uw handen grondig (ten minste één
minuut) met water van drink kwaliteit en
zeep voordat u uw borst en onderdelen
van de afkolfset aanraakt. Droog uw
handen af met een schone, ongebruikte
handdoek of een papieren handdoek
voor eenmalig gebruik.
• Ook kunnen flessen en onderdelen
82
beschadigd raken bij verkeerde hantering,
bijvoorbeeld als ze vallen, te strak worden
dichtgedraaid of worden omgestoten.
• Ga voorzichtig om met flessen en
onderdelen.
i
Opmerking
• Gebruik alleen originele accessoires van
Medela.
• Houd de slang bij het bevestigen en
verwijderen vast aan het verbindingsstuk.
• Voor het gebruik moeten alle onderdelen
helemaal droog zijn.
i
Info
7.3 De afkolfset in elkaar zetten
1
Controleer vóór gebruik de onder delen van
de afkolfset op slijtage en beschadiging en
vervang ze zo nodig.
Zorg ervoor dat de onderdelen worden
gereinigd volgens de instructies in hoofdstuk 6 voordat u de afkolfset in elkaar zet.
Plaats het membraan voorzichtig in de
connector met het lipje in de uitsparing in
de connector.
Zorg ervoor dat het membraan een
correcte afdichting vormt rondom de rand
van de connector.
4
• Voer alle stappen zorgvuldig uit en zet de
afkolfset op de juiste wijze in elkaar.
Anders wordt er misschien geen goed
vacuüm bereikt.
Schroef de fles op de connector.
Page 83

Sluit het connectordeksel totdat
u hoort dat het vastklikt.
5 6
32
83
Plaats het borstschild op de connector.
Steek de slang in de bijbehorende opening
van het deksel van de connector.
Steek het andere uiteinde van
de slang in de motoreenheid.
Page 84

8. Afkolven
Waarschuwing
• Stap 2 (hoofdstuk 8.1, 8.2, 8.3):
• Het product wordt geleverd met twee
verschillende maten borstschilden,
te weten 21 mm en 24 mm.
• Beantwoord de volgende vragen om te
bepalen of de beschikbare borstschilden
correct passen:
• Schuurt uw tepel langs de schacht en voelt
84
dit oncomfortabel aan?
• Kunt u zien dat een overmatig deel van de
tepelhof in de schacht wordt getrokken?
• Is er sprake van zichtbare roodheid?
• Kleurt uw tepel of tepelhof wit?
• Voelt u na het afkolven dat er melk is
achtergebleven in de borst?
Als u ook maar een van deze vragen met JA
hebt beantwoord, probeer dan een andere
maat op basis van de meetinstructies op
www.medela.com.
Raadpleeg een lactatiekundige of borstvoedingsdeskundige als u nog twijfelt of u
de juiste maat borstschild hebt gekozen.
Raadpleeg de brochure “De juiste maat
Medela borstschild kiezen”.
8.1 Swing Flex – Voorbereiding
voor enkel afkolven
1
Het borstschild is ovaal en kan worden
gedraaid (360°), zodat u zelf kunt bepalen
wat voor u de meest comfortabele stand is.
8.2 Swing Maxi Flex –
Voorbereiding voor enkel
afkolven
1
4
i
Opmerking
• Stap 3 (hoofdstuk 8.1, 8.2, 8.3):
Houd de afkolfset niet vast aan de fles.
Dit kan leiden tot een blokkade van de
melkkanalen en tot stuwing.
Steek de ongebruikte korte slang in het
Y-stuk.
Page 85

Plaats het borstschild op uw borst met de
tepel in het midden van de schacht.
2 3
32
Meer informatie over
afkolven vindt u in
hoofdstuk 8.5.
Houd het borstschild met uw duim en
wijsvinger op de borst. Ondersteun de borst
met de palm van uw hand.
85
Plaats het borstschild van een enkele fles op
de eerste borst met de tepel in het midden
van de schacht.
Meer informatie over
afkolven vindt u in
hoofdstuk 8.5.
Houd het borstschild met uw duim en
wijsvinger op de borst. Ondersteun de borst
met de palm van uw hand.
Page 86

8. Afkolven
Waarschuwing
• Stap 2 (hoofdstuk 8.3):
• Was uw handen grondig (ten minste één
minuut) met water en zeep voordat u uw
borst, de schone onderdelen en de
schone afkolfset aanraakt. Droog uw
handen af met een schone, ongebruikte
handdoek of een papieren handdoek
voor eenmalig gebruik.
• Houd de afkolfset niet vast aan de fles.
86
Dit kan leiden tot een blokkade van
de melkkanalen en tot stuwing.
i
Info
• Dubbel afkolven bespaart tijd en
verhoogt de voedingswaarde van de
melk.
8.3 Swing Maxi Flex –
Voorbereiding voor dubbel
afkolven
1
Het borstschild is ovaal en kan worden
gedraaid (360°), zodat u zelf kunt bepalen
wat voor u de meest comfortabele stand is.
4
Schakel de borstkolf in met .
Page 87

2
3
1
87
Plaats het borstschild op uw borst met de
tepel in het midden van de schacht.
5
Meer informatie over
afkolven vindt u in
Plaats het tweede borstschild op uw borst
zodanig dat de tepel zich centraal in de
schacht bevindt.
Houd het borstschild met uw duim en
wijsvinger op de borst. Ondersteun de borst
met de palm van uw hand.
hoofdstuk 8.5.
Page 88

8. Afkolven
i
Opmerking
• De Easy Expression Bustier moet af-
zonderlijk worden aangeschaft. Ga voor
meer informatie naar www.medela.com.
88
8.4 Swing Maxi Flex –
Voorbereidingen voor
handsfree afkolven met de
Easy Expression Bustier
1
Trek de Easy Expression Bustier aan en sluit
deze met het haakje aan de bovenkant.
4
Sluit de afkolfset die u in elkaar hebt gezet
aan op de borstschilden.
Page 89

2 3
89
Laat de rits een stukje open.
5
Begin met afkolven.
Meer informatie over
afkolven vindt u in
hoofdstuk 8.5.
Plaats het borstschild onder de bustier op
uw borst, zodanig dat de tepel zich centraal
in de schacht van het borstschild bevindt.
Page 90

8. Afkolven
Waarschuwing
• Raadpleeg uw borstvoedingsdes kundige/
lactatiekundige als u slechts een minimale
hoeveelheid of geen melk kunt afkolven of
als het afkolven pijnlijk is.
i
Opmerking
• Haal de stekker van de Swing Flex/Swing
90
Maxi Flex na het afkolven altijd uit het
stopcontact.
• Vul de fles niet verder dan tot aan
de 150ml-markering.
i
Info
• De Swing Flex/Swing Maxi Flex schakelt
automatisch uit als de pomp 30 minuten
heeft gelopen zonder dat deze is gebruikt.
• Zorg ervoor dat de slang tijdens het
afkolven niet knikt.
In de volgende tabel ziet u de verschillende betekenissen van het led-lampje.
8.5 Kolven
1
Schakel de borstkolf in met .
De stimulatiefase duurt maximaal twee
æ
minuten. De stimulatiefase gaat vervolgens automatisch over in de afkolffase.
4
Brandt Aan
Brandt niet Ui
Knippert regelmatig Stimulatiefase
Lampje brandt constant Afkolffase
Knippert snel Min./max. vacuüm
Schakel de borstkolf uit met .
Page 91

2 3
91
Als de melk eerder begint te stromen, druk
dan op de knop
naar de afkolffase.
Zorg ervoor dat de melk op de juiste
æ
manier de fles in stroomt.
om over te schakelen
5 6
Gebruik de flesstandaard om te voorkomen
dat de fles omvalt.
Het maximaal comfortabel vacuümniveau
kan in elke fase worden aangepast.
Maximaal comfortabel vacuüm: Druk op de
knop
het enigszins oncomfortabel is. Druk op
om het vacuüm te verlagen tot het weer
comfortabel voelt.
Sluit de fles af met een deksel.
Volg de aanwijzingen in hoofdstuk 9,
om het vacuüm te verhogen totdat
Reinig zoals beschreven
æ
“Moedermelk bewaren en ontdooien”.
in hoofdstuk 6.
Page 92

9. Moedermelk bewaren en ontdooien
9.1 Bewaren
Richtlijnen voor het bewaren van pas afgekolfde moedermelk
(voor gezonde, voldragen baby‘s)
Vriezer
–18 °C (0 °F )
of kouder
Maximaal 6 maanden
is het beste
*Maximaal 9 maanden
voor moedermelk die
onder zeer schone
omstandigheden
afgekolfd is
92
Kamertemperatuur
16 tot 25 °C
(60 tot 77 °F)
Maximaal 4 uur is het
beste
*Maximaal 6 uur voor
moedermelk die onder
zeer schone omstan-
digheden afgekolfd is
Koelkast
4 °C (39 °F)
of kouder
Maximaal 3 dagen
is het beste
*Maximaal 5 dagen
voor moedermelk die
onder zeer schone
omstandigheden
afgekolfd is
*Richtlijnen voor het afkolven van moedermelk onder zeer schone omstandigheden:
Voordat de moedermelk wordt afgekolfd, moeten moeders hun handen wassen met zeep
en water of met een op alcohol gebaseerde handreiniger. Kolfonderdelen, flessen en de
plek waar wordt afgekolfd moeten schoon zijn. Borsten en tepels hoeven voor het afkolven
niet te worden gewassen.
• Deze richtlijnen voor bewaren en ontdooien van moedermelk zijn aanbevelingen. Neem
contact op met uw lactatiekundige of borstvoedingsdeskundige voor meer informatie.
• Bewaar moedermelk op de koelste plaats in de koelkast (achterin op de glazen plaat
boven de groentelade).
Moedermelk
ontdooid in de
koelkast
Bij kamertemperatuur:
maximaal 2 uur
Koelkast:
maximaal 24 uur
Niet opnieuw
invriezen!
9.2 Invriezen
• Vries afgekolfde moedermelk in plastic flessen of moedermelkbewaarzakjes in.
Vul de flesjes of zakken niet meer dan voor 3/4 zodat de melk kan uitzetten.
• Label de flesjes of moedermelkbewaarzakjes met de afkolfdatum en de hoeveelheid
afgekolfde melk.
• Ingevroren plastic flessen en de onderdelen worden broos en daardoor is er een
verhoogde kans op breken wanneer deze vallen.
• Gebruik de moedermelk niet als de fles of een onderdeel beschadigd is.
9.3 Ontdooien
Waarschuwing
Ontdooi of verwarm moedermelk niet in een magnetron of in een pan met kokend water.
Zo blijven de belangrijke bestanddelen behouden en voorkomt u brandwonden..
• Ontdooi de melk door deze gedurende een nacht in de koelkast te plaatsen. Zo blijven
de bestanddelen van de moedermelk behouden. Een andere mogelijkheid is om het
flesje of het moedermelkbewaarzakje in warm water (max. 37 °C/98,6 °F) te plaatsen.
• Draai het flesje of zakje voorzichtig rond om eventueel gescheiden vet te mengen.
Vermijd hard schudden en roeren van de melk.
Page 93

10. Problemen oplossen
Probleem
De motor loopt niet
Er is weinig of geen
zuigkracht
De slang bevat
condensatie
De borstkolf is nat
geworden
Oplossing
Controleer of de stroomvoorziening in orde is.
Controleer de plaatsing van de batterijen in het batterijcompartiment.
Controleer of het membraan schoon en onbeschadigd is.
Zorg ervoor dat het membraan een correcte afdichting vormt rondom de
rand van de connector en het deksel goed op de connector is bevestigd.
Controleer alle aansluitingen.
Controleer of de uiteinden van de slang goed in de achterkant van de
connector en in de poort van de borstkolf bevestigd zijn. Plaats tijdens
enkel afkolven de ongebruikte slang in het Y-stuk.
Er mag zich geen water in de slang bevinden.
Zorg ervoor dat de slang tijdens het afkolven niet knikt.
Zorg ervoor dat het borstschild rondom luchtdicht op de borst aansluit.
Alle onderdelen moeten volkomen droog zijn.
Reinig de slang zoals beschreven in hoofdstuk 6.5.
Schud de waterdruppels eruit.
Trek de netstroomadapter uit het stopcontact.
Schakel de borstkolf uit.
Houd de borstkolf niet ondersteboven. De bedieningsknoppen moeten
naar boven wijzen.
Plaats de borstkolf gedurende 24 uur in een droge, warme omgeving.
Opmerking:
Plaats de borstkolf niet in direct zonlicht.
Versnel het droogproces niet door verwarming.
93
Page 94

11. Garantie / Afvoeren
Garantie
De brochure “Internationale garantie” bevat gedetailleerde informatie over de garantie.
Afvalverwijdering
Dit product is bestemd voor gebruik door één persoon. Gebruik door meerdere
94
personen kan gezondheidsrisico‘s met zich meebrengen.
De eenheid is gemaakt van metalen en kunststoffen en moet worden afgevoerd in overeenstemming met de Europese richtlijnen 2011/65/EU en 2012/19/EU. Bovendien moeten
de lokale voorschriften in acht worden genomen. Houd bij het afvoeren van de eenheid
en bijbehorende accessoires rekening met de lokale voorschriften voor afvalverwijdering.
Page 95

12. Reserveonderdelen en accessoires
De volgende accessoires voor de Swing Flex/Swing Maxi Flex kunnen, onder vermelding
van het productnummer, via de Medela distributiepartners worden aangeschaft.
Verkoopartikelen Swing Flex / Swing Maxi Flex
Artikelnummer
101033773 Swing Flex borstkolf EN NL FR (Euro adapter)
101036226 Swing Flex borstkolf EN NL FR (Euro adapter) voor India
101033777 Swing Flex borstkolf EN (AUS/NZ adapter)
101033793 Swing Flex borstkolf EN (VK adapter) voor verenigd koninkrijk
101033775 Swing Flex borstkolf EN NL FR (VK adapter)
101036238 Swing Flex borstkolf EN NL FR (VS adapter)
101033817 Swing Maxi Flex borstkolf EN NL FR (Euro adapter)
101036232 Swing Maxi Flex borstkolf EN NL FR (Euro adapter) voor India
101033825 Swing Maxi Flex borstkolf EN (AUS/NZ adapter)
101033845 Swing Maxi Flex borstkolf EN (VK adapter) voor verenigd koninkrijk
101033819 Swing Maxi Flex borstkolf EN NL FR (VK adapter)
101033821 Swing Maxi Flex borstkolf EN NL FR (VS adapter)
Product
Reserveonderdelen Swing Flex
Artikelnummer
099.0 016
099.0017
101033542
099.0 018
099.0 276
101038305
099.0 015 Swing Flex motoreenheid
101034002 Swing Flex slang
101034005 PersonalFit Flex connector
Product
Swing Flex netstroomadapter (100–240 V; 4.8 V) EU
Swing Flex netstroomadapter (100–240 V; 4.8 V) VK
Swing Flex netstroomadapter (100–240 V; 4.8 V) VS/JP
Swing Flex netstroomadapter (1100–240 V; 4.8 V) AUS/NZ
Swing Flex netstroomadapter (100–240 V; 4.8 V) CN
Swing Flex netstroomadapter (100–240 V; 4.8 V) KR
95
Reserveonderdelen Swing Maxi Flex
Artikelnummer
099.0 271
099.0 272
101033543
099.0 273
099.0274
101038303
099.0 270 Swing Maxi Flex motoreenheid
101034003 Swing Maxi Flex slang
101034005 PersonalFit Flex connector
Andere producten van Medela vindt u op www.medela.com.
Product
Swing Maxi Flex netstroomadapter (100–240 V; 12 V) EU
Swing Maxi Flex netstroomadapter (100–240 V; 12 V) VK
Swing Maxi Flex netstroomadapter (100–240 V; 12 V) VS/JP
Swing Maxi Flex netstroomadapter (1100–240 V; 12 V) AUS/NZ
Swing Maxi Flex netstroomadapter (100–240 V; 12 V) CN
Swing Maxi Flex netstroomadapter (100–240 V; 12 V) KR
Page 96

12. Reserveonderdelen en accessoires
Accessoires voor de Swing Flex / Swing Maxi Flex
Artikelnummer
101033953*
101033964*
101033992*
101033997*
800.0796
20 0.1659
008.0040 Quick Clean magnetronzakken
96
Andere producten van Medela vindt u op www.medela.nl.
* Als het resultaat van het afkolven onbevredigend is of als het afkolven pijnlijk is, raadpleeg dan uw
lactatiekundige of borstvoedingsdeskundige. Wellicht kan een andere maat borstschild het comfort
en succes van het afkolven helpen vergroten.
Product
PersonalFit Flex borstschild maat S (21 mm)
PersonalFit Flex borstschild maat M (24 mm)
PersonalFit Flex borstschild maat L (27 mm)
PersonalFit Flex borstschild maat XL (30 mm)
Moedermelkflesjes 150 ml (3 stuks)
Moedermelkflesjes 250 ml (2 stuks)
Page 97

13. EMC / technische omschrijving Swing Flex / Swing Maxi Flex
De Swing Flex en Swing Maxi Flex zijn op EMC getest in overeenstemming met de eisen van
IEC 60601-1-2:2007 3e editie en IEC 60601-1-2:2014 4e editie in overeenstemming met
clausule 7 en 8.9.
Waarschuwing – De elektrische borstkolven Swing Flex en Swing Maxi Flex mogen
niet direct naast of gestapeld op andere apparatuur worden gebruikt. Is het toch
noodzakelijk apparatuur naast of op elkaar te plaatsen, controleer dan eerst of de
elektrische borstkolven Swing Flex en Swing Maxi Flex in de betreffende configuratie
normaal functioneren. Draadloze communicatieapparatuur zoals draadloze apparaten
van een thuisnetwerk, mobiele telefoons, snoerloze telefoons en bijbehorende basisstations
en walkietalkies kunnen de werking van de elektrische borstkolven Swing Flex en Swing
Maxi Flex beïnvloeden en dienen op ten minste 30 cm afstand te worden gehouden.
97
Page 98

98
14. Technische specificaties Swing Flex / Swing Maxi Flex
Swing Flex
vacuüm (ca.)
–35 ... –250 mmHg
Intermitterend
– 5 ... – 33 kPa
45 ... 111 cpm
Ingang Uitgang
100–240 V~ 50/60 Hz
max. 0.5 A
4 x 1.5 V, Alkaline
AA, Mignon, LR6
4.8 V
1.2 A
Bediening/vervoer/opslag
Bediening/vervoer/opslag
Bediening
121 x 129 x 57 mm
300 g
200 g
Swing Maxi Flex
vacuüm (ca.)
–35 ... –250 mmHg
Intermitterend
– 5 ... – 33 kPa
45 ... 111 cpm
Ingang Uitgang
100-240 V~ 50/60 Hz
max. 0.6 A
6 x 1.5 V, Alkaline
AAA, Micro, LR03
121 x 129 x 57 mm
290 g
220 g
12 V
1.5 A
Transport/opslag
Bediening/vervoer/opslag
Bediening/vervoer/opslag
Bediening
Transport/opslag
Page 99

99
Page 100

100100
Daftar Isi
1. Peruntukan / Populasi – Kontraindikasi 101
2. Arti simbol 102
3. Petunjuk keselamatan penting 105
4. Uraian produk Swing Flex 106
5. Uraian produk Swing Maxi Flex 107
6. Membersihkan 108
6.1 Penjelasan singkat tentang membersihkan alat 108
6.2 Urai
6.3 Cuci
6.4 Sanitasi
6.5 Membersihkan selang
6.6 Membersihkan unit motor
7. Persiapan memompa 112
7.1 Pengoperasian dengan listrik 112
7.2 Dengan baterai
7.3 Merakit set memompa
8. Ekspresi 116
8.1 Swing Flex – Menyiapkan pemompaan tunggal 116
8.2 Swing Maxi Flex – Menyiapkan pemompaan tunggal
8.3 Swing Maxi Flex – Menyiapkan pemompaan ganda
8.4 Swing Maxi Flex – Bersiap melakukan ekspresi tanpa menggunakan
8.5 Memompa
9. Menyimpan dan mencairkan ASI 124
9.1 Menyimpan 124
9.2 Membekukan
9.3 Mencairkan
10. Jika ada masalah 125
11. Garansi / Pembuangan 126
12. Suku cadang dan Aksesori 127
13. EMC / Informasi teknis 129
14. Spesifikasi teknis 130
109
110
110
111
111
112
114
116
118
tangandengan Easy Expression Korset
122
124
124
120
 Loading...