

Page 1
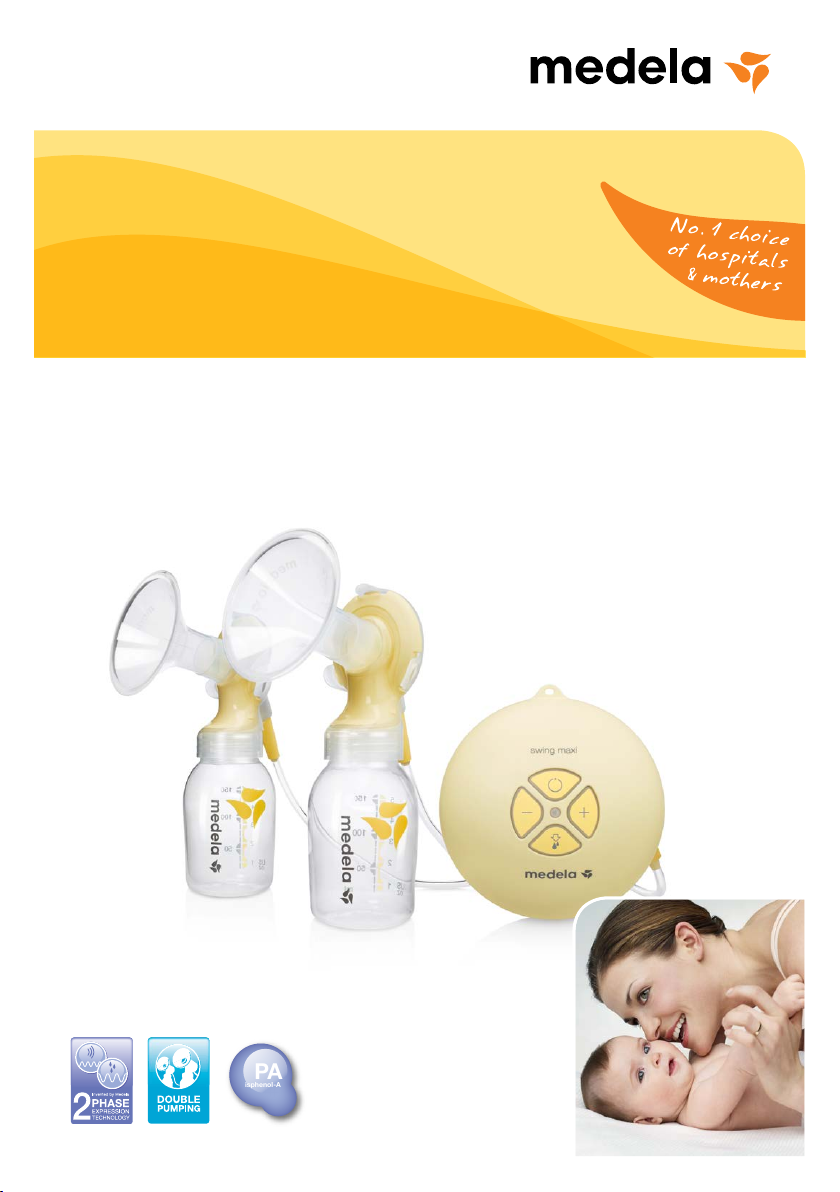
Swing Maxi
EN Instructions for use
RU Инструкция по применению | HU Használati utasítás | CS Návod k použití
™
EFFICIENCY
BPA
Bisphenol-A
free
Page 2

Thank you for choosing the Swing Maxi Breastpump. Breastmilk is the natural choice for your
baby, but there are reasons and situations where breastfeeding is not possible. For over 50 years,
it has been Medela’s conviction that these mothers and babies can be supported. In close cooperation with breastfeeding experts, Medela, one of the market leaders, has researched and
developed breastpumps that perfectly meet breastfeeding mothers needs. For mothers who insist
on the best for their babies and themselves. Because you care.
Благодарим, что Вы приобрели молокоотсос Swing Maxi. Материнское молоко —
лучшее питание для Вашего ребенка, но существует ряд причин, по которым грудное
вскармливание может быть невозможно. Medela, одна из ведущих компаний на рынке
продукции по грудному вскармливанию, уже более 50 лет заботится о з доровье мам
и малышей. В сотрудничестве с экспертами по грудному вскармливанию и ведущими
исследователями в этой области специалисты компании Medela разработали молокоотсосы, которые идеально подходят женщинам, кормящим грудью. Для матерей,
которые хотят лучшего для себя и своих детей. «Потому что вам не все равно».
Köszönjük, hogy a Swing Maxi mellszívót választotta. Gyermeke számára az anyatej a természetes választás, de adódhatnak olyan körülmények és helyzetek, amikor a szoptatás nem lehetséges. A Medelának már több mint 50 éve meggyőződése, hogy segíthet ezeknek az anyáknak
és gyermekeiknek. Az ágazat egyik piacvezető vállalata, a Medela szoptatási szakértők bevonásával kutatásokat végzett, és olyan mellszívókat fejlesztett ki, amelyek tökéletesen megfelelnek
a szoptató anyák igényeinek. Termékeinket azoknak az anyáknak alkottuk meg, akik babáiknak
és saját maguknak a legjobbat szeretnék. Mert Önnek fontos.
Děkujeme vám, že jste zvolili odsávačku mateřského mléka Swing Maxi. Mateřské mléko je
pro vaše dítě přirozenou volbou, ale existují situace, kdy kojení není možné. Již přes 50 let
společnost Medela pomáhá těmto matkám a jejich dětem. V těsné spolupráci s odborníky
na kojení společnost Medela, jako jedna z předních firem na trhu, zkoumala a vyvinula odsávačky
mateřského mléka, které dokonale vyhovují potřebám kojících matek. Pro matky, které vyžadují
pro své děti i pro sebe to nejlepší. Because you care.
Page 3

EN
4–31
RU
32–59
HU
60–87
CS
88–115
Page 4

Table of Contents
4
1. Intended Use / Contraindication / Population 5
2. Meaning of symbols 6
3. Important safety information 8
4. Product description 10
5. Cleaning 12
5.1 Before using for the rst time and after every use 12
5.2 Before using for the rst time and once a day
5.3 Cleaning the motor unit
15
14
6. Preparing for pumping 16
6.1 Mains operation 16
6.2 Battery operation
6.3 Assembling the pump set
16
18
7. Expression 20
7.1 Preparing for single pumping 20
7.2 Pumping
7.3 Preparing for hands-free expression with Easy Expression Bustier
7.4 Preparing for double pumping
20
24
8. Storing and thawing breastmilk 26
8.1 Storage 26
8.2 Freezing
8.3 Thawing
26
26
9. Feeding breastmilk 27
10. Troubleshooting 28
11. Warranty / dis posal 29
12. Complete care during breastfeeding time 30
22
13. EMC / Technica l description 88
14. Technical specications 95
Page 5

1. Intended use / Contraindication / Population
The intended use and indications of breastpumps
Breastpumps are intended to be used by lactating women in the hospital or home
environment for expressing breastmilk. Breastpumps are indicated to alleviate the
symptoms of engorgement by expressing milk. In case of mastitis breastpumps
support the healing process by removing breastmilk from the affected breast. Breastpumps are indicated to relieve sore and cracked nipples and to bring out at or
inverted nipples. Also breastpumps enable mothers to provide breastmilk for babies
who cannot feed directly at the breast for a variety of reasons such as latch-on
problems, cleft palate or premature babies.
5
Intended patient population / user
Adolescent paediatric or adult lactating women. Many women nd it convenient, or
even necessary, to use a breastpump to express and store their breastmilk once they
have returned to work, are travelling or are otherwise separated from their baby.
Women are often delighted to learn that a breastpump can be used as a supplement
to breastfeeding and that some pumps are designed to mimic the suckling of a
nursing baby.
Contraindications
There are no known contraindications for the Swing Maxi breastpump.
Page 6
°C
2. Meaning of symbols
The warning symbol identies all instructions that are important for safety. Failure to
6
observe these instructions can lead to injury or damage to the breastpump!
When used in conjunction with the following words, the warning symbol stands for:
Warning
Can lead to serious injury or death.
Caution
Can lead to minor injury.
i
Note
Can lead to material damage.
i
Symbols on the packaging
Info
Useful or important information that is not related to safety.
This symbol indicates that the material is part of a recovery/recycling process.
This symbol indicates a carton package.
This symbol indicates to keep the device away from sunlight.
This symbol indicates to handle the fragile device with care.
This symbol indicates the temperature limitation for operation, transport and storage.
This symbol indicates the humidity limitation for operation, transport and storage.
This symbol indicates the atmospheric pressure limitation for operation,
transport and storage.
This symbol indicates to keep the device dry.
This symbol indicates that the packaging contains products intended to come in
contact with food according regulation 1935/2004.
This symbol indicates unique GSI Global Trade Item Numbers (GTIN)
This symbol indicates do not dispose the device together with unsorted municipal
waste (for EU only).
This symbol indicates to follow instructions for use.
Symbols on the device
This symbol indicates to follow instructions for use.
This symbol indicates the compliance with the essential requirements of the Council
0123
Directive 93/42/EEC of 14 June 1993 concerning medical devices.
Page 7
This symbol indicates the manufacturer.
This symbol indicates do not dispose the device together with unsorted municipal
waste (for EU only).
This symbol indicates the compliance with additional USA and Canada safety
requirements for medical electrical equipment.
This symbol indicates a type BF applied part.
7
SN
+
This symbol indicates manufacturer's serial number of the device.
This symbol indicates the positioning of battery cell.
–
This symbol indicates the protection against ingress of solid foreign objects and
IP22
against harmful effects due to the ingress of water.
This symbol indicates the date of manufacture (four digits for the year and
two digits for the month).
Symbols on the mains adapter
This symbol indicates that the mains adapter is a class II device.
This symbol indicates the compliance with China Compulsory Certication.
This symbol indicates that the mains adapter is safety tested.
This symbol indicates that the mains adapter is for indoor use only.
This symbol indicates the compliance with USA and Canada safety requirements.
This symbol indicates the compliance with Federal Communications Commission
requirements.
This symbol indicates polarity of d.c. power connector.
This symbol indicates the compliance with AUS/NZ regulatory requirements
N136
(Regulaltory compliance mark).
This CE-mark indicates the compliance with the low voltage and electromagnetic
compatibility directive.
This symbol indicates to not dispose the device together with unsorted municipal
waste (for EU only). The solid bar symbol indicates that mains adapter is put on the
market after 13 August 2005.
This symbol indicates the compliance with Japanese safety requirements.
This symbol indicates the compliance with energy efciency requirements.
This symbol indicates alternating current.
This symbol indicates direct current.
Page 8
3. Important safety information
MAX.
250 h
8
Failure to follow these instructions/safety information can lead to danger
from the device. Subject to technical changes.
Device
Danger of electrocution! Keep the device dry! Never immerse in water or
other liquids!
The Swing Maxi breastpump is not heat-resistant: keep away from radiators
and open ames.
Do not expose the motor unit to direct sunlight.
Repairs must be performed only by an authorised service agency
Do not repair yourself! No modications to the device are permitted.
Never use a damaged device. Replace damaged or worn parts.
The operating life of the Swing Maxi breastpump is 250 hours.
The service life is two years.
Electrical use
Separation from the mains is only assured through the disconnection of
the mains adapter from the wall socket outlet.
Keep the mains adapter away from heated surfaces.
Do not reach for any electrical device if it has fallen into water.
Unplug immediately.
Page 9
Use
The breastpump should never be left unattended when plugged into
a power source.
Use the Swing Maxi breastpump only for its intended use as described
in this manual.
Never operate an electrical device if it has a damaged cord or plug, if it is
not working properly, if it has been dropped or damaged, or dropped into
wa te r.
Do not use the Swing Maxi breastpump while bathing or showering.
Do not use the Swing Maxi breastpump while sleeping or overly drowsy.
This is a single user product. Use by more than one person may
present a health risk.
Do not drive whilst hands-free pumping.
9
Supervision is necessary when the Swing Maxi breastpump is used
in the vicinity of children.
Contact your lactation consultant or physician if you experience
problems or pain.
Portable and mobile radio frequency communications equipment
can affect the Swing Maxi breastpump.
Important:
l Plastic bottles and component parts become brittle when frozen and
may break when dropped.
l Also, bottles and component parts may become damaged if mishandled, e.g.
dropped, over-tightened, or knocked over.
l Take appropriate care in handling bottles and components.
l Do not use the breastmilk if bottles or components become damaged.
Page 10
4. Product description
Spare parts and accessories available for order can be found
10
on page 30
2x PersonalFit™ Breastshield M (24mm)
(for other breast shield sizes
see Chapter 12, page 30)
810.7084
2x Freestyle connectors
(breast shield base, membrane,
transparent cap)
200.1513
2x bottle
811.0 021
2x bottle stand
810.0462
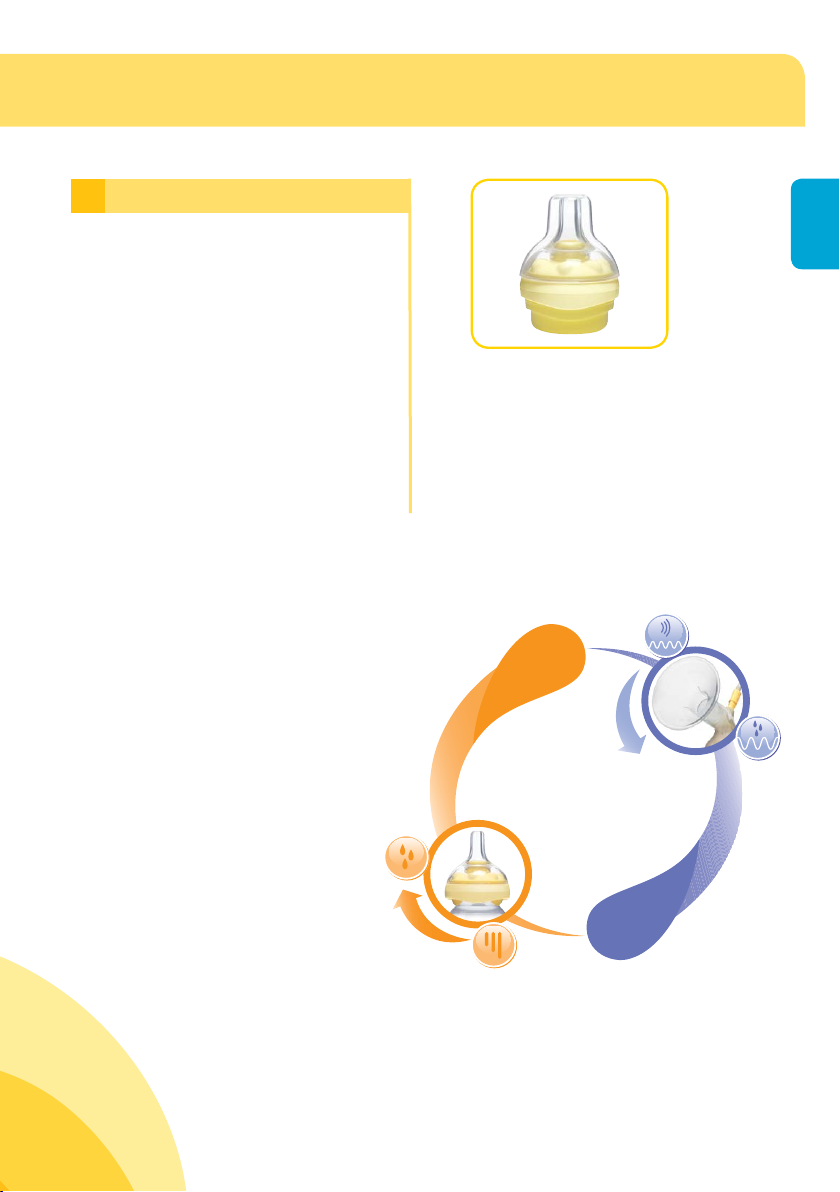
1x Calma Solitaire
200.3386
2x Calma multi lid
20 0. 2714
Page 11
Short tubing
On/Off button
1x motor unit
200.4932
LED
11
Tubing support
Reduce
vacuum
Fixing clip
PVC tubing
port
Battery
compartment
Long tubing
1x Swing Maxi tubing
200.5259
Increase
vacuum
Let-down
button
Power adapter port
1x mains adapter
200.4725 Euro 12V
200.4726 UK and US/JP 12V
200.4727 AUS/NZ 12V
200.4728 Adapter CN 12V
Page 12
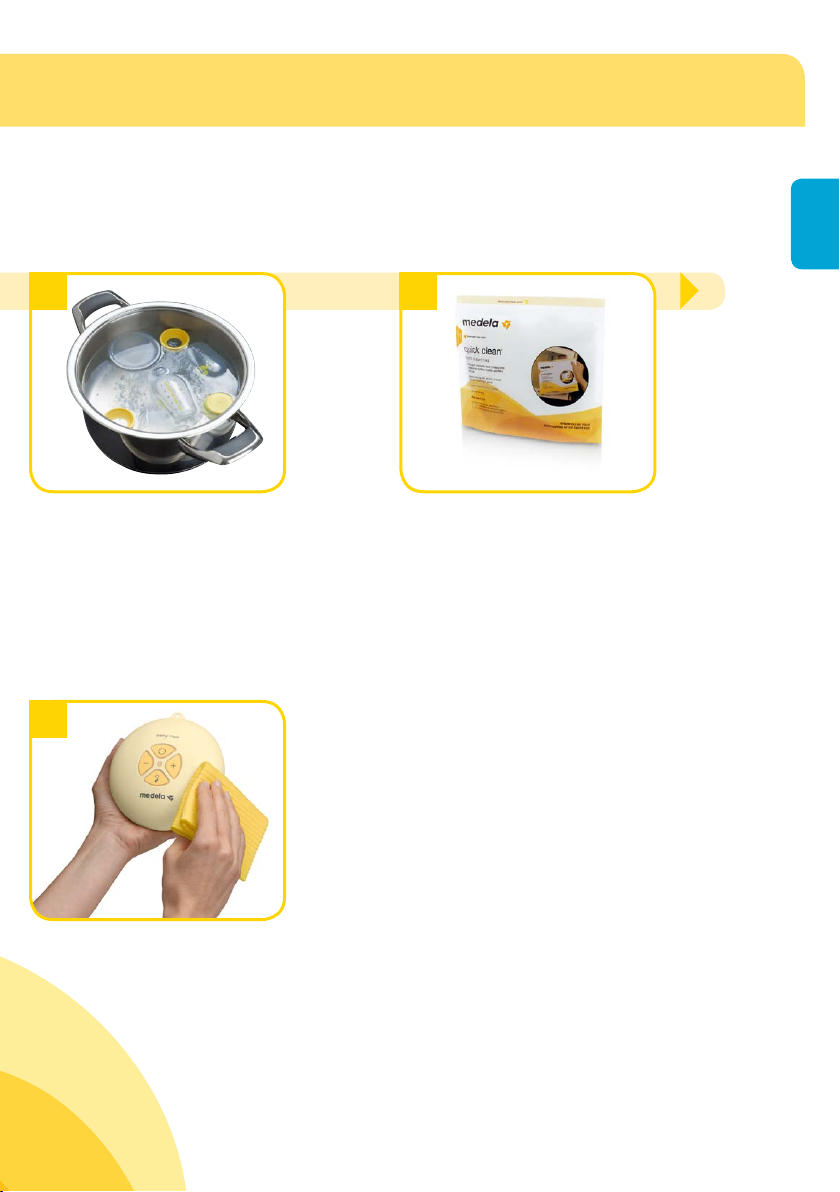
5. Cleaning
12
Caution
l Only use drinking-quality water
for cleaning.
l Take apart and wash all parts that
come in contact with the breast and
breastmilk immediately after use to
avoid dry up of milk residues and to
prevent growth of bacteria.
i
Note
l The pump set requires no main-
tenance.
l Take care not to damage parts
of the pump set during cleaning.
l If the individual components of the
pump set are cleaned in a dishwasher parts may be discoloured by
food pigments. This has no impact
on the function.
5.1 Before using for the rst
time and after every use
1
Disassemble the pump set
into individual parts.
4
Rinse all parts with cold,
clear water (approx. 20 °C)
for 10 – 15 seconds.
Page 13

13
2
Rinse all parts with cold,
clear water (approx. 20 °C).
5
or
3
Clean all parts with plenty
of warm soapy water
(approx. 30 °C).
As an alternative
to steps 2, 3 and 4.
Dry with a clean cloth or leave
to dry on a clean cloth.
If you clean the individual parts
of the pump set in the dishwasher, place them on the top
rack or in the cutlery section.
Page 14
5. Cleaning
14
Caution
l Only use drinking-quality water
for cleaning.
l Take apart and wash all parts that
come in contact with the breast and
breastmilk immediately after use to
avoid dry up of milk residues and to
prevent growth of bacteria.
i
Note
l When boiling, a tea spoon of citric
acid may be added to avoid a buildup of limescale.
l Store the pump set in a clean bag/
container until next use. Or store it in
clean paper or a cloth.
5.2 Before using for
the rst time and
once a day
1
Disassemble the pump set
into individual parts.
3
More information on
page 12, chapter 5.1
steps 2–4
Dry with a clean cloth or leave
to dry on a clean cloth.
Page 15
15
2a
Cover all parts with water
and boil for ve minutes.
5.3 Cleaning
the motor unit
1
or
2b
Use QuickClean* bags in the
microwave in accordance with
the instructions.
Wipe off with a clean, damp
cloth.
*More information at www.medela.com
Page 16
6. Preparing for pumping
16
Warning
l re 6.1 Mains operation:
Follow the exact order of the steps.
l Only use the mains adapter supplied
with the Swing Maxi.
l Make sure the voltage of the mains
adapter is compatible with the
power source.
Info
i
l re 6.2 Battery operation:
The batteries do not need to be
removed when the main adapter
is used for pumping.
6.1 Mains operation
1
Plug the mains adapter cord
into the motor unit.
6.2 Battery operation
1
l Regularly check the condition of
the batteries in the motor unit.
l If Swing Maxi will remain unused
for a longer period of time, remove
the batteries from the battery
compartment.
l Batteries last for two to three
pumping sessions
(approx. 1 ½ hours pumping time).
Open the battery compartment on the back in the
direction of the arrow.
Page 17
2
Plug the mains adapter into
the mains socket.
17
2
Insert six AAA Micro 1.5 V
batteries.
3
Close the battery compartment.
Page 18
6. Preparing for pumping
18
Caution
l Wash hands thoroughly (at least one
minute) with soap and water before
touching the breast and pump parts.
i
Note
l Use Medela original accessories
only.
l Check pump set components for
wear or damage before use and
replace if necessary.
l All components must be completely
dry before use.
Info
i
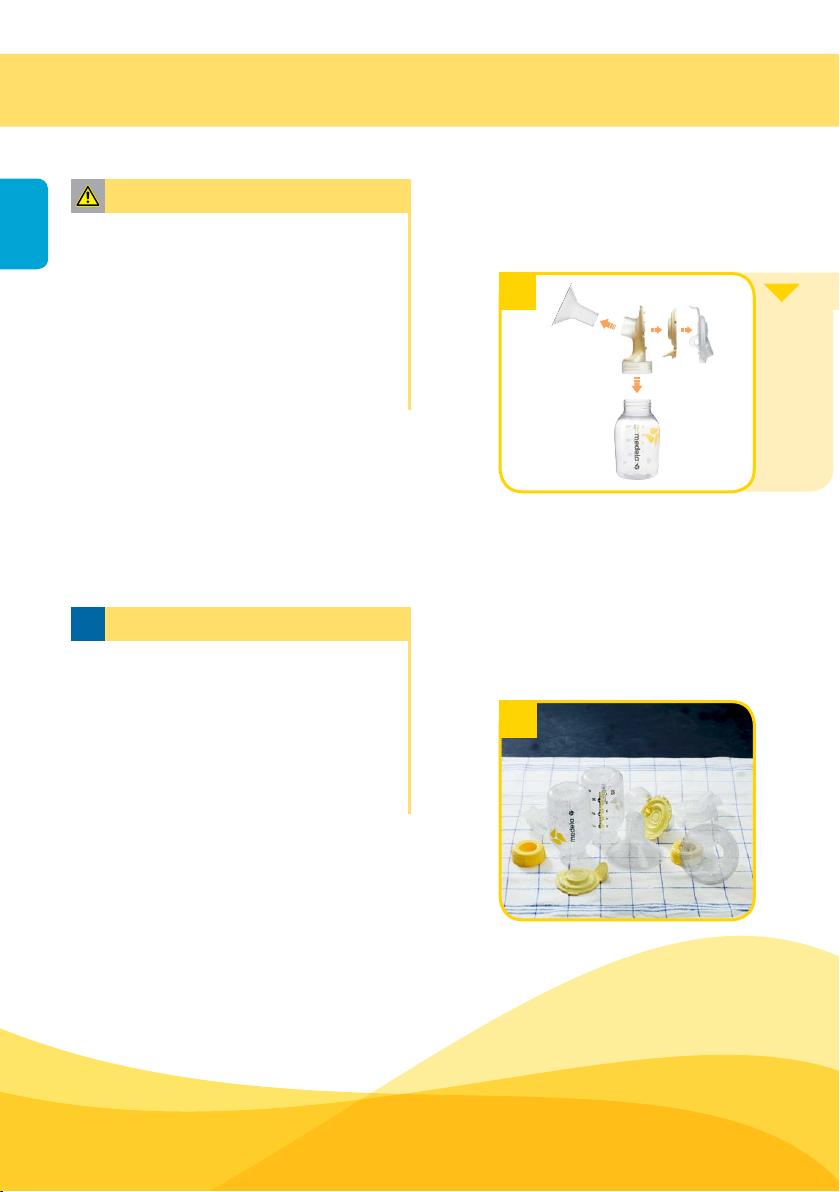
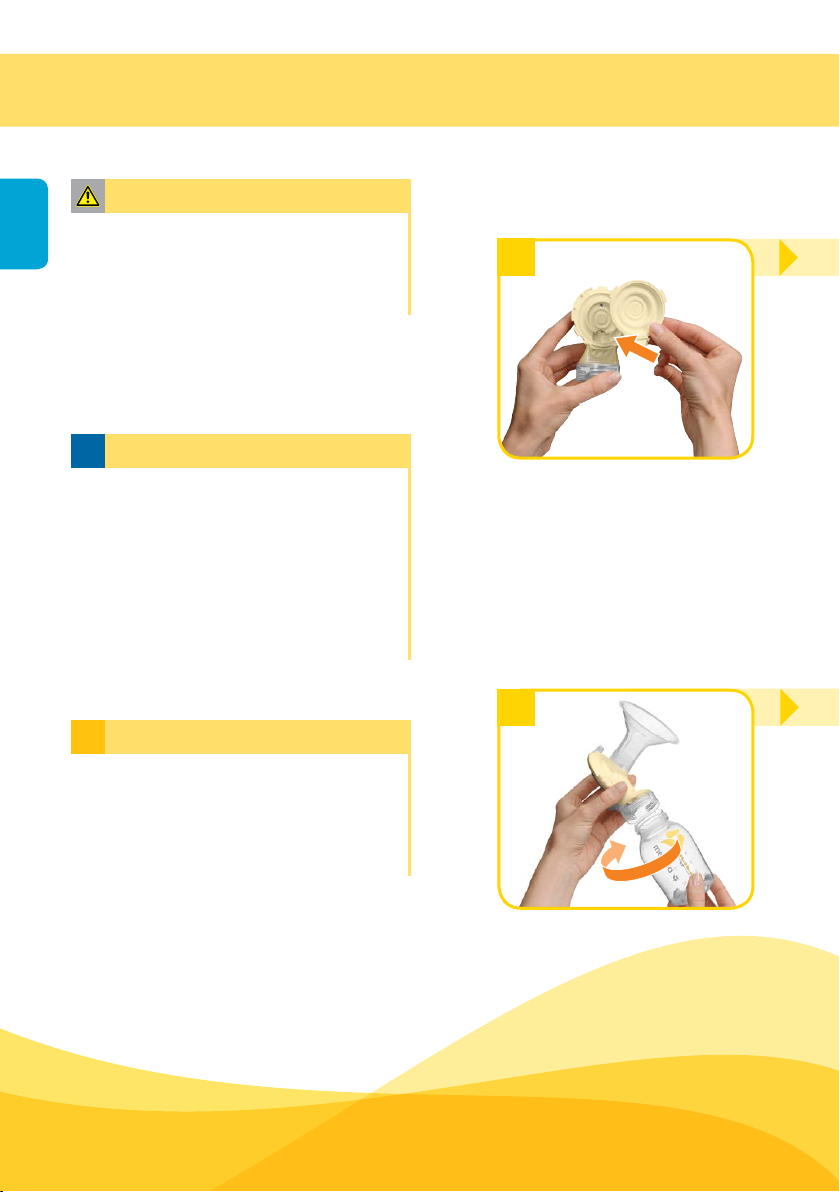
6.3 Assembling
the pump set
1
Carefully insert the light yellow
membrane into the base of the
breast shield.
4
l Carry out all the steps with care and
assemble the pump set correctly.
Otherwise a good vacuum may not
be achieved.
Screw bottle into connector.
Page 19

19
2
Fasten the transparent cap
to the connector.
➙ Make sure that all three
snaps (top and side)
are engaged.
5
3
Push the breast shield onto
the connector.
6
Insert the short tubing into
the transparent cap as far
as it will go.
Insert the long tubing into
the motor unit.
Page 20

7. Expression
20
Caution
l re step 2 (chapter 7.1):
Answer the following questions
to nd out whether the available
breast shield size will t:
l Is your nipple moving freely in
the tunnel?
l Is minimal or no areolar tissue
being pulled into the tunnel of
the breastshield?
l Do you see a gentle, rhythmical
motion in the breast with each
cycle of the pump?
l Do you feel the breast emptying
all over?
l Is your nipple pain-free?
If the answer to any of these questions is “No” or if you experience
problems or pain during expression,
consult your breastfeeding and
lactation consultant or midwife.
i
Note
7.1 Preparing for
single pumping
1
Insert the unused short tubing
into the tubing holder.
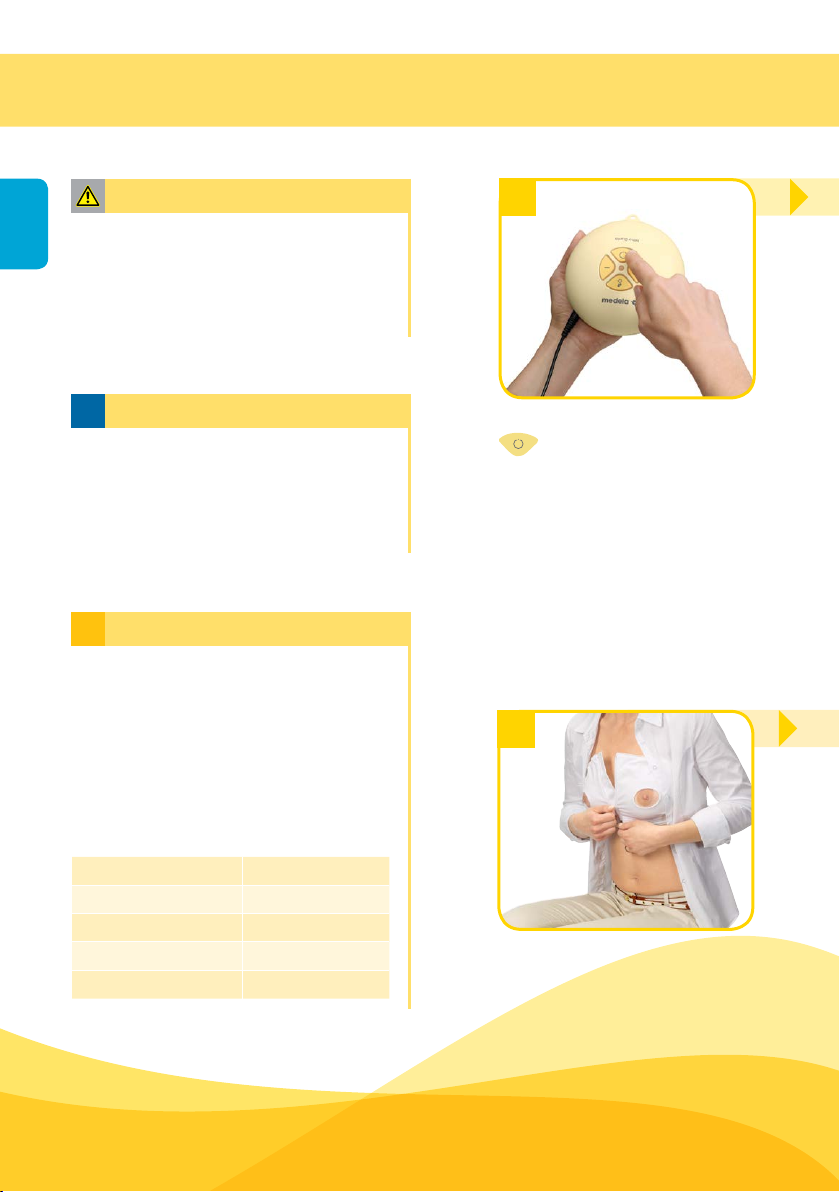
7.2 Pumping
1
l re step 3 (chapter 7.1):
Do not hold the pump set by the
bottle. This can lead to blockage of
the milk ducts and engorgement.
l Wipe the breast with a warm
washcloth (do not use alcohol).
Switch on the breast pump with
.
➙ The stimulation phase lasts
a maximum of two minutes.
The stimulation phase will
then automatically change
to the expression phase.
Page 21
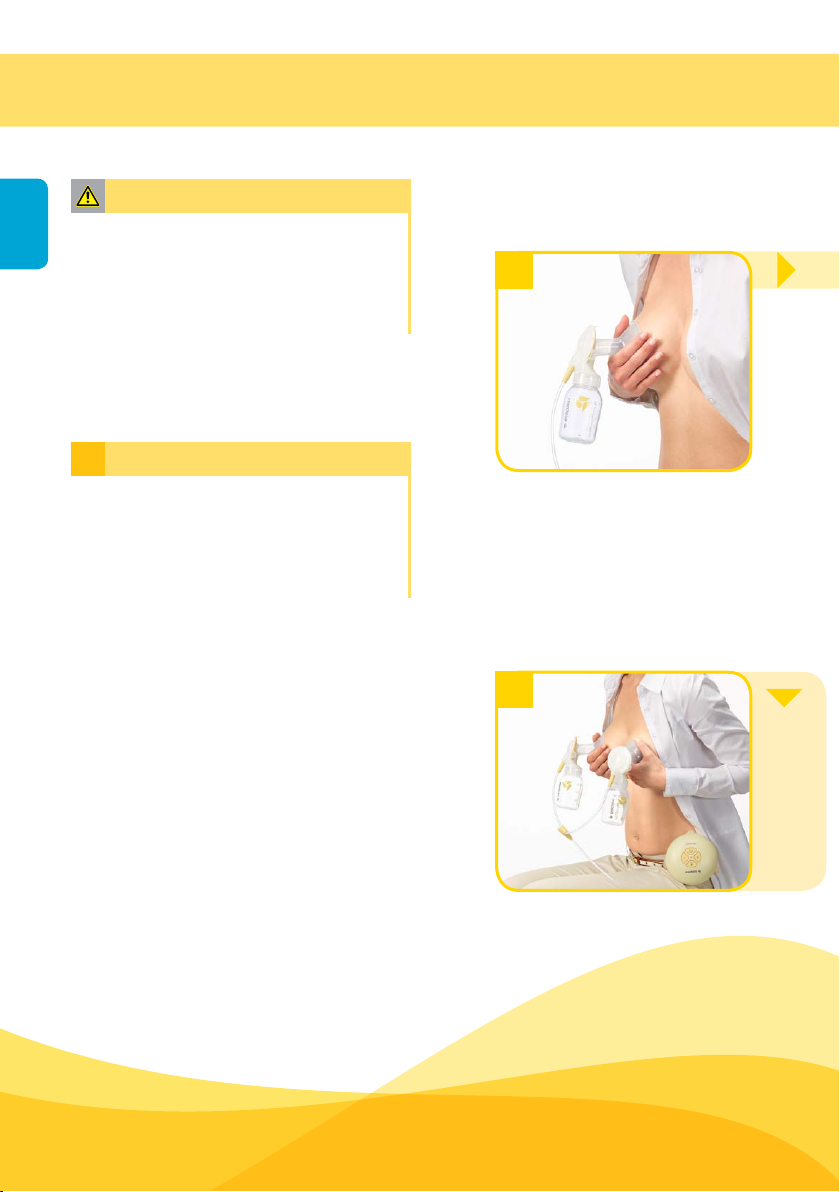
2 3
1
21
Place the breast shield on
your breast so that your
nipple is properly centred
in the tunnel.
2
1
If your milk starts to ow
earlier, press the button
to change to the expression
phase.
➙ Make sure that the milk
is owing into the bottle
properly.
Hold the breast shield onto
your breast with your thumb
and index nger.
Support your breast with the
palm of your hand.
3
The vacuum can be adjusted
in every phase. Comfort
vacuum: Use to increase
the vacuum until it is slightly
unpleasant. Then press to
dial it back minimally.
Page 22
7. Expression
22
Caution
l Contact your midwife or lactation
consultant if you can express only
minimal or no milk or if expression is
painful.
i
Note
l Always disconnect the Swing Maxi
from the power source after
expression.
l Only ll the bottle to the 150 ml mark.
Info
i
l The Swing Maxi switches off auto-
matically if the pump has been
running for 30 minutes without any
manipulations.
l Do not kink the tubing during
expression.
4
Switch off the breast pump with
.
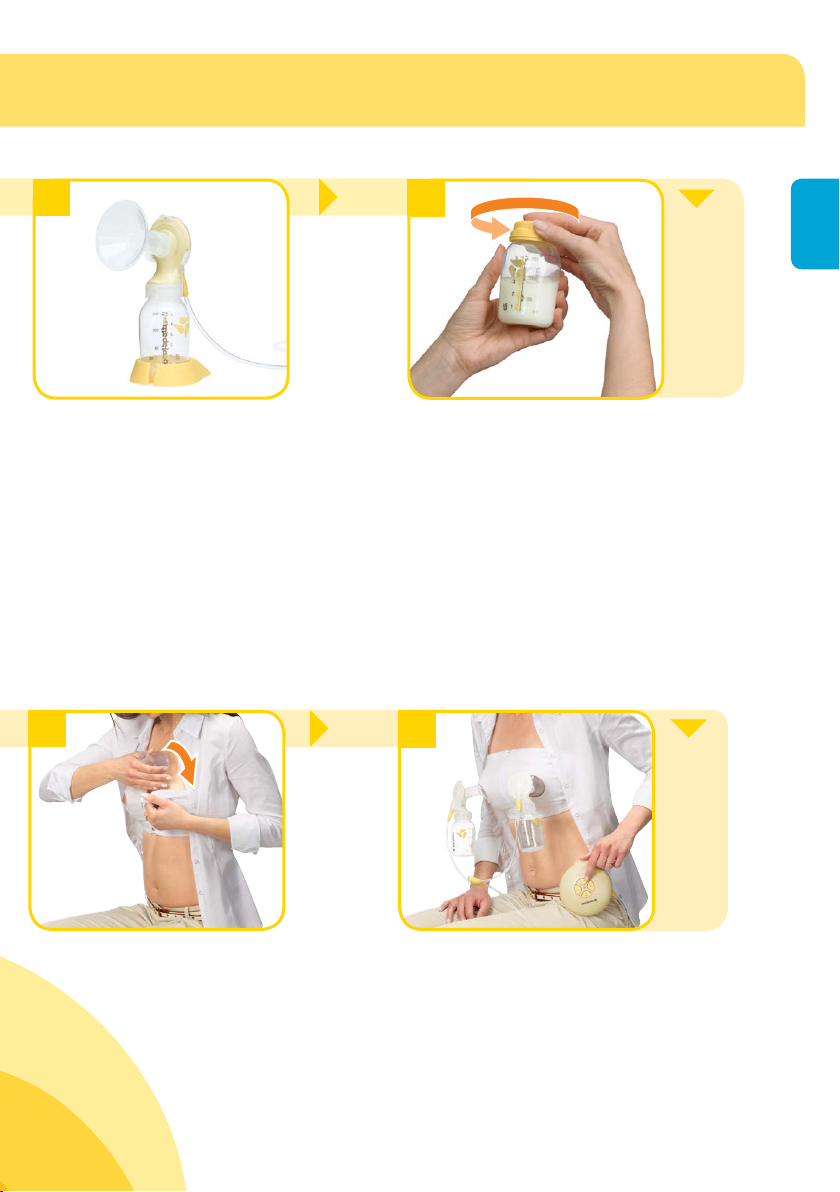
7.3 Preparing for hands-free
expression with the
Easy Expression Bustier*
1
Overview of LEDs
lights up On
does not light up Off
even, regular ashing Stimulation phase
light constantly on Expression phase
rapid ashing Min./Max. vacuum
Put on the Easy Expression
Bustier and leave the zip open
slightly.
Page 23
5
6
1
Clean in accordance
with Chapter 5,
page 12.
23
Use the stand to prevent the
bottle from tipping over.
2
Place the breast shield on your
breast under the bustier such
that your nipple is centred in
the tunnel of the breast shield.
Close the bottle with a lid.
➙ Follow the instructions in
Chapter 8 “Storing and thawing
breastmilk”.
3
Close the zip and insert the
connector onto the breast
shield.
*Optional, see Chapter 12, page 30
More information on
page 20, Chapter 7.2.
Page 24
7. Expression
24
Caution
l re step 2:
Do not hold the pump set by the
bottle. This can lead to blockage of
the milk ducts and engorgement.
Info
i
l Double pumping saves time and
increases the energy content of the
milk. Milk production is increased
and maintained long-term.
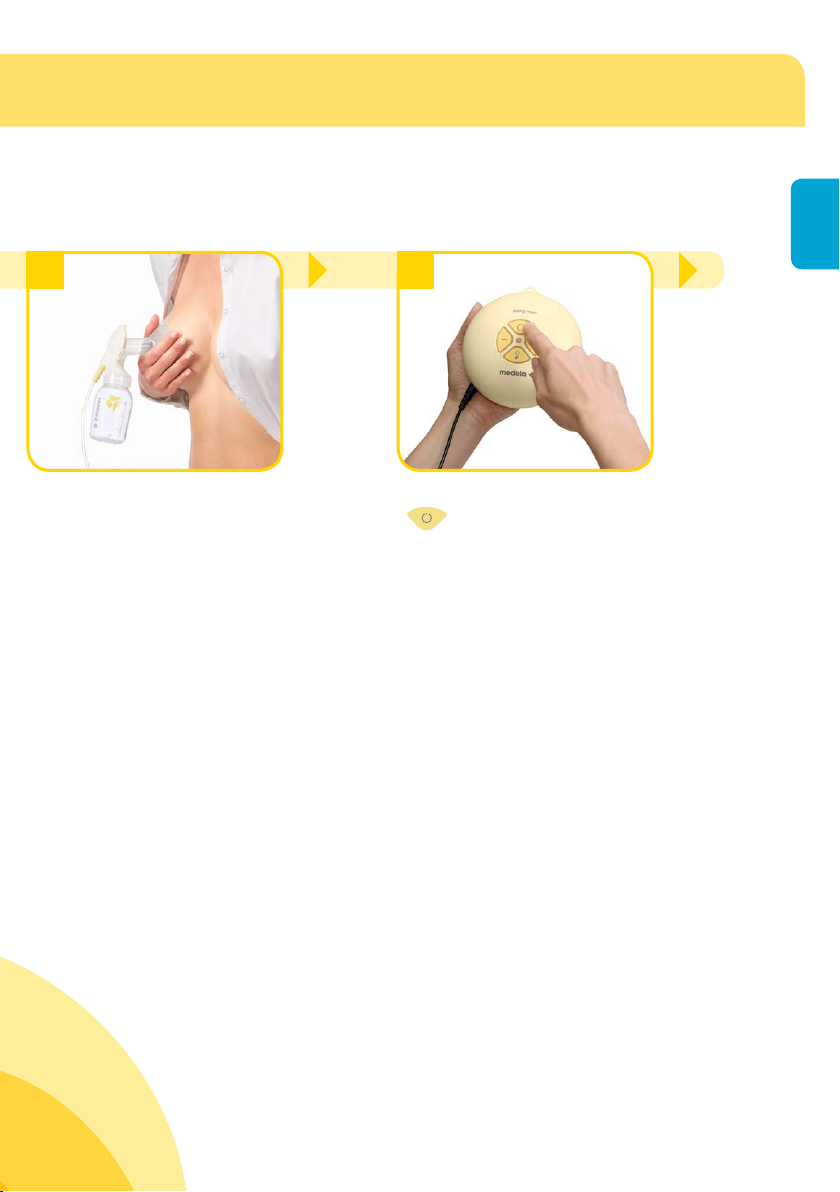
7.4 Preparing for double
pumping
1
Place the breast shield on your
breast so that your nipple is
properly centred in the tunnel.
4
Place the second breast shield
on your breast so that your
nipple is properly centred in
the tunnel.
More on page 20,
Chapter 7.2, step 3
Page 25
25
2
1
Hold the breast shield onto
your breast with your thumb
and index nger.
Support your breast with the
palm of your hand.
3
Switch on the breast pump with
.
➙ The stimulation phase lasts
a maximum of two minutes.
The stimulation phase will then
automatically change
to the expression phase.
Page 26

8. Storing and thawing breastmilk
8.1 Storage
26
Storage guidelines for freshly expressed breastmilk
( For healthy term babies )
Room
temperature
4 − 6 hours at
19 to 26 ° C
( 66 to 78 ° F )
l Do not store breastmilk in the door of the refrigerator. lnstead choose the coldest
part of the refrigerator (this is at the back of the glass shelf above the vegetable
compartment).
8.2 Freezing
l You can freeze expressed breastmilk in milk bottles or “Pump & Save” bags.
Do not ll the bottles or bags more than ¾ full to allow space for possible
expansion.
I Label the bottles or “Pump & Save” bags with the date of expression.
Refrigerator Freezer Thawed breastmilk
3 − 8 days at
4 ° C ( 39 ° F )
or lower
6 − 12 months
–18 to – 20 °C ( 0 to 4 ° F )
In refrigerator for 10 h
max. Do not refreeze !
8.3 Thawing
Caution
Do not thaw frozen breastmilk or do not warm breastmilk in a microwave
or a pan of boiling water to avoid loss of vitamins, minerals and other important
components and to prevent bums.
I ln order to preserve the components of the breastmilk, thaw the milk in the
refrigerator overnight. Alternatively, you can hold the bottle or “Pump & Save”
bag under warm water (max. 37 °C).
I Gently swirl the bottle or “Pump & Save” bag to mix any fat that has separated.
Avoid shaking or stirring the milk.
*More information at www.medela.com
Page 27
F
E
E
D
I
N
G
P
U
M
P
I
N
G
RESEARCH BASED SUPPORT FOR
BREASTFEEDING MOTHERS
Invented by Medela
Supporting
babies feeding
behavior
More
milk in
less time
S
U
C
K
L
I
N
G
2
-
P
H
A
S
E
C
A
L
M
A
S
T
I
M
U
L
A
T
I
O
N
E
X
P
R
E
S
S
I
O
N
M
I
L
K
F
L
O
W
9. Feeding breastmilk
Info
i
Medela recommends Calma for
feeding breastmilk.
With Calma
l your baby can feed, pause and
breathe regularly.
l milk will ow when a vacuum is
created.
l your baby’s natural feeding behavi-
our will be maintained, supporting
easy transition back to the breast.
As a result of its comprehensive
research work, Medela is one of the
rst com pa nies in the world to
incorporate babies’ breastfeeding
behaviour into its 2-Phase Expression
and Calma innovations. 2-Phase
Expression mimics the baby’s natural
sucking rhythm to express more milk
in less time. Short, stimulating
patterns are followed by longer ones,
providing optimal milk ow. The
uni que Calma breastmilk feeding
device allows the baby to pause and
breathe during feeding whilst maintaining the suckling behaviour learned
at the breast. Deve lo ped for a great
breast feeding experience.
27
Calma – unique feeding
solution for breastmilk.
You can nd detailed information about Calma on the Medela
website (www.medela.com).
Page 28

10. Troubleshooting
28
Problem Solution
If the motor
is not running
Check presence of mains current.
Check the position of the batteries in the battery compartment.
If there is loss
of power during
Replace batteries.
battery operation
Check all connections.
Engage cap correctly at the three connection points.
Hold the breast shield, not the connector or bottle, while expressing.
If there is low
or no suction
The pump
becomes wet
Ensure the breast shield forms a complete seal around the breast.
During single pumping, insert the unused tubing into the tubing
holder. Do not kink the tubing.
There should be no water in the tubing.
All components must be completely dry.
Unplug the mains adapter from the socket.
Switch off the pump.
Do not place the pump upside down. Control panel must point
upwards.
Store the pump in a dry, warm place for 24 hours.
Note:
Do not expose the pump to direct sunlight.
Do not accelerate the drying process by use of heat.
If condensation
appears in
the tubing
Rinse out the tubing.
Shake out any water droplets.
Hang up the tubing to air-dry.
Page 29

11. Warranty / disposal
Warranty
The “International Warranty” brochure contains detailed warranty information.
Disposal
The unit is made of various metal and plastics. Before disposal, the device is to
be rendered unusable and it must not be disposed of as unsorted municipal waste
in accordance with local regulations. Use your local return and collection system
for waste electrical and electronic equipment (incl. batteries). Improper disposal
may have harmful effects on the environment and on public health.
29
Page 30

12. Complete care during breastfeeding time
The following accessories for the Swing Maxi are available from Medela distribution
30
partners by specifying the product number.
Spare parts
Article number
099.0271
099.0272
099.0273
099.0274
800.0840
200.1693
099.0270
099.0275
Accessories
Article number
008.0337*
008.0338*
008.0339*
008.0340*
008.0341*
008.0073
20 0.1659
008.0145
200.1756
200.0625
Product
Swing maxi / Freestyle (100-240V; 12V, 50-60Hz, 0,6 A) Euro
Swing maxi / Freestyle (100-240V; 12V, 50-60Hz, 0,6 A) UK and US / JP
Swing maxi / Freestyle (100-240V; 12V, 50-60Hz, 0,6 A) AUS / NZ
Swing maxi / Freestyle (100-240V; 12V, 50-60Hz, 0,6 A) CN
Swing Battery cover 5 pcs.
Freestyle Connector with valve 5 pcs.
Swing Maxi Motor Unit
Swing Maxi Tubing
Product
PersonalFit 2 Breastshields S (21 mm)
PersonalFit 2 Breastshields M (24 mm)
PersonalFit 2 Breastshields L (27 mm)
PersonalFit 2 Breastshields XL (30 mm)
PersonalFit 2 Breastshields XXL (36 mm)
Breastmilk Bottle 150 ml
Breastmilk Bottle 250 ml
Calma Solitaire
Cooling Bag
City Style Bag
008.0217
008.0220
008.0224
008.0225
Easy Expression Bustier white S
Easy Expression Bustier white M
Easy Expression Bustier white L
Easy Expression Bustier white XL
Other Medela products are available on the www.medela.com web site.
* If the result of expression is unsatisfactory or expression is painful, contact your
midwife or lactation consultant. A different size of PersonalFit
TM
breast shield may
help make expression more comfortable and successful.
Page 31

31
Feeding
Breast Care
Education
Service
Professionals
Breastmilk Management
Evidence
Based
Research
Pumping
Expertise
Innovation
Collecting
Page 32

Содержание
1. Показания к применению / противопоказания / целевая группа 33
2. Значения символов 34
3. Важная информация по технике безопасности 36
4. Описание устройства 38
32
5. Чистка и обработка 40
5.1 Перед первым использованием и после каждой эксплуатации 40
5.2 Перед первым использованием и раз в день
5.3 Чистка мотора
6. Подготовка к сцеживанию 44
6.1 Работа от сети 44
6.2 Работа от аккумулятора
6.3 Сборка молокоотсоса
7. Сцеживание 48
7.1 Подготовка к одинарному сцеживанию 48
7.2 Сцеживание
7.3 Подготовка к сцеживанию с помощью топа для сцеживания
7.4 Подготовка к двойному сцеживанию
8. Хранение и размораживание грудного молока 54
8.1 Хранение 54
48
Easy Expression
41
43
44
46
50
52
8.2. Замораживание
8.3 Размораживание 54
54
9. Кормление грудным молоком 55
10. Устранение неполадок 56
11. Гарантия / утилизация 57
12. Комплексный уход в период кормления грудью 58
13. ЕМС / техническое описание 88
14. Технические характеристики 95
Page 33

1. Предусмотренное применение / противопоказания / целевая группа
Предусмотренное применение и показания к применению молокоотсосов
Молокоотсосы предназначены для кормящих матерей, находящихся в больнице или дома, для сцеживания молока из груди. Молокоотсосы используются для облегчения симптомов лактостаза путем сцеживания молока. При
мастите использование молокоотсосов для сцеживания молока из груди
способствует процессу выздоровления. Молокоотсосы снимают напряжение
с воспаленных и потрескавшихся сосков, а также способствуют вытягиванию
плоских или втянутых сосков. Молокоотсосы позволяют кормить грудным
молоком детей, непосредственное грудное вскармливание которых невозможно в силу таких причин, как проблемы с захватом груди или наличие
расщелины неба, а также недоношенных детей.
Целевая группа / пользователи
Кормящие женщины. Многие женщины считают удобным или даже необходимым применять молокоотсос для сцеживания и хранения грудного молока
в случаях, когда они выходят из декрета на работу, отправляются в путешествие или по иной причине разлучаются со своим ребенком. Многие женщины с радостью узнают о том, что молокоотсос можно использовать в дополнение к грудному вскармливанию, а некоторые молокоотсосы имитируют
ритм сосания малыша.
Противопоказания
Каких-либо известных противопоказаний к использованию молокоотсоса
Swing Maxi не существует.
33
Page 34

2. Значения символов
Предупреждающий символ указывает на рекомендации по технике безопасности.
Несоблюдение этих рекомендаций может привести к травме или повреждению
молокоотсоса. В сочетании со следующими словами предупредительный символ
расшифровывается таким образом:
Осторожно!
Угроза серьезной травмы или смерти.
34
Символы на упаковке
Внимание
Угроза незначительной травмы.
i
Обратите внимание
Угроза материального ущерба.
Информация
i
Полезная или важная информация, не имеющая отношения к технике безопасности.
Данный материал участвует в процессе восстановления/переработки.
Картонная упаковка.
Устройство следует защищать от прямых солнечных лучей.
Устройство имеет хрупкую конструкцию, требующую бережного обращения.
°C
Ограничения температуры воздуха в ходе эксплуатации, транспортировки и хранения устройства.
Ограничения влажности воздуха в ходе эксплуатации, транспортировки и хранения
устройства.
Ограничения атмосферного давления в ходе эксплуатации, транспортировки и хранения устройства.
Устройство следует беречь от влаги.
Упаковка содержит материалы, предназначенные для контакта с пищевыми
продуктами (согласно Регламенту 1935/2004).
Уникальный глобальный номер товара (GTIN) GSI
Устройство запрещено утилизировать вместе с несортированными бытовыми отходами (только в странах ЕС).
Следовать инструкциям по применению.
Символы на устройстве
Следовать инструкциям по применению.
Соответствие основным требованиям Директивы Совета ЕС 93/42/EEC от
0123
14 июня 1993 г. в отношении медицинского оборудования.
Page 35

Ссылка на изготовителя.
Устройство запрещено утилизировать вместе с несортированными бытовыми отходами (только в странах ЕС).
Соответствие дополнительным действующим в США и Канаде требованиям техники
безопасности в отношении медицинского электрооборудования.
Изделие типа BF.
35
SN
+
Серийный номер устройства, присвоенный изготовителем.
–
Место расположения аккумуляторной батареи.
Защита от проникновения инородных твердых предметов и от вредного воздействия
IP22
в связи с попаданием воды.
Дата изготовления (четыре цифры года и две цифры месяца).
Символы на сетевом адаптере
Блок питания представляет собой устройство класса II.
Устройство прошло сертификацию в Системе обязательной сертификации Китая.
Проведена успешная проверка сетевого адаптера.
Сетевой адаптер предназначен исключительно для применения внутри помещений.
Соответствие требованиям техники безопасности США и Канады.
Соответствие требованиям Федерального комитета.
Полярность разъема питания пост. тока.
Соответствие нормативным требованиям Австрии/Новой Зеландии
N136
(знак соответствия нормативным требованиям).
Этот знак СЕ указывает на соответствие директиве по низковольтовому
оборудованию и электромагнитной совместимости.
Устройство запрещено утилизировать совместно с несортированными бытовыми
отходами (только в странах ЕС). Сплошная черта означает, что сетевой адаптер
выпущен в продажу после 13 августа 2005 г.
Соответствие требованиям техники безопасности Японии.
Соответствие требованиям в отношении энергоэффективности.
Переменный ток
Постоянный ток
Page 36

3. Важная информация по технике безопасности
MAX.
250 h
Несоблюдение данных инструкций/рекомендаций по технике
безопасности может привести к повреждению устройства.
Конструкция устройства может подлежать техническим изменениям.
Устройство
36
Опасность поражения электрическим током! Берегите устройство
от влаги! Не погружайте устройство в воду или другие жидкости!
Молокоотсос Swing Maxi не является термостойким: держите его
вдали от батарей отопления и открытого огня.
Берегите мотор от прямых солнечных лучей.
Ремонт устройства может осуществлять только уполномоченная
служба. Самостоятельный ремонт запрещен! Внесение изменений
в конструкцию устройства запрещено.
Эксплуатация поврежденного устройства запрещена. Поврежденные
или изношенные детали подлежат замене.
Эксплуатационный ресурс молокоотсоса Swing Maxi составляет
250 часов. Срок службы составляет 2 года.
Эксплуатация устройства от сети
Отсоединение устройства от сети производится только путем извлечения сетевого адаптера из розетки.
Держите сетевой адаптер вдали от горячих поверхностей.
Не притрагивайтесь к электрическому прибору, если он упал в воду.
Немедленно отключите его от сети.
Page 37

Подключенный к сети молокоотсос не должен оставаться без
присмотра.
Эксплуатация устройства
Используйте молокоотсос Swing Maxi только по прямому
назначению, описанному в данной инструкции.
Запрещена эксплуатация электрического устройства с поврежденным
электрическим шнуром или вилкой, а также в случае его некорректной
работы, наличия механических повреждений или попадания в воду.
Не используйте молокоотсос Swing Maxi во время принятия ванны
или душа.
Не пользуйтесь молокоотсосом Swing Maxi во время сна или
подготовки ко сну.
Данный продукт предназначен только для персонального использования. Использование молокоотсоса двумя и более лицами может
быть сопряжено с риском для здоровья.
Во время сцеживания без участия рук запрещено вести машину.
При эксплуатации молокоотсоса Swing Maxi в присутствии детей необходим постоянный контроль.
В случае возникновения проблем или болевого синдрома проконсультируйтесь с лечащим врачом или консультантом по грудному
вскармливанию.
37
Портативные и мобильные устройства частотной радиосвязи могут
создавать помехи при работе молокоотсоса Swing Maxi.
Это важно:
I Пластиковые бутылочки и их составные части могут стать хрупкими в результате
заморозки и разбиться при падении.
I Кроме того, бутылочки и их составные части могут быть повреждены в результате
неправильного обращения, например, в случае падения, при слишком плотном
закручивании или опрокидывании.
I Будьте осторожны при работе с бутылочками и их составными частями.
I Не используйте грудное молоко, если бутылочки или другие детали повреждены.
Page 38

4. Описание устройства
Перечень имеющихся в ассортименте запасных частей
и принадлежностей приведен на стр. 58
Воронка PersonalFit, размер М (24 мм)
- 2 шт.
(информация о воронках других разме-
38
ров приведена в разделе 12 на стр. 58)
810.7084
Коннектор Freestyle - 2 шт.
(основание воронки, мембрана,
прозрачная крышка)
200.1513
Контейнер (бутылочка) - 2 шт.
811.0021
Подставка под контейнер
(бутылочку) - 2 шт.
810.0462
смартсоска Calma
- 1 шт.
200.3386
Многофункциональная
крышка Calma - 2 шт.
200.2714
Page 39

Кнопка
Вкл/Выкл
Мотор - 1 шт.
200.4932
Индикатор
Короткая трубка
Держатель трубок
Уменьшить
уровень
вакуума
Зажим для
крепления
Прорезь для
трубки ПВХ
Отсек для
батарей
Длинная трубка
Трубка Swing Maxi - 1 шт.
200.5259
Увеличить
39
уровень
вакуума
Кнопка
«Сцеживание»
Гнездо для
сетевого адаптера
Сетевой адаптер - 1 шт.
200.4725 Европа 12В
200.4726 Великобритания и США/Япония 12В
200.4727 Австралия/Новая Зеландия 12В
200.4728 Адаптер Канада 12В
Page 40

5. Чистка и обработка
Внимание
l Для чистки устройства следует ис-
пользовать исключительно питьевую воду.
l Во избежание засыхания остатков
40
молока и размножения бактерий
сразу же после эксплуатации молокоотсоса снимайте и промывайте
все детали устройства, контактирующие с грудью и грудным молоком.
i
Обратите внимание
l Устройство не требует технического
обслуживания.
l В ходе чистки старайтесь не повре-
дить детали молокоотсоса.
l В случае промывки отдельных дета-
лей молокоотсоса в посудомоечной
машине есть вероятность их обесцвечивания под воздействием пищевых красителей. На функциональность устройства это не влияет.
5.1 Перед первым использованием и после
каждой эксплуатации
1
Разберите молокоотсос
на части.
4
Прополощите все детали
в прохладной чистой воде
(температурой около 20°C)
в течение 10 – 15 секунд.
Page 41

2
3
41
Прополощите все детали
в холодной чистой воде
(температурой около 20°C).
5
Протрите детали устройства
чистым полотенцем либо
поместите их на чистое полотенце для высыхания.
или
Промойте все детали обильным количеством мыльной
теплой воды (температурой
около 30°C).
В случае промывки отдельных деталей молокоотсоса в
посудомоечной машине размещайте их на верхней полке
или в отделении для ножей.
В качестве альтер-
нативы шаги 2,
3 и 4.
Page 42

5. Чистка и обработка
Внимание
l Для чистки устройства следует ис-
пользовать исключительно питьевую воду.
l Во избежание засыхания остатков
42
молока и размножения бактерий
сразу же после эксплуатации молокоотсоса снимайте и промывайте
все детали устройства, контактирующие с грудью и грудным молоком.
i
Обратите внимание
l Во избежание появления извест-
кового налета во время кипячения
можно добавить чайную ложку лимонной кислоты.
l До следующего использования хра-
ните устройство в чистом пакете/
контейнере. Возможно также хранение в чистой бумаге или полотенце.
5.2 Перед первым
использованием
и раз в день
1
Разберите молокоотсос на
части.
3
Более подробная инфор-
мация приведена на
стр. 40, п. 5.1, шаги 2–4
Протрите детали устройства
чистым полотенцем либо
поместите их на чистое полотенце для высыхания.
Page 43

2a
или
2b
43
Полностью залейте детали
водой и прокипятите в
течение пяти минут.
5.3 Чистка мотора
1
Протрите чистой влажной
тряпкой.
Для паровой стерилизации в
микроволновой печи следует
использовать пакеты
QuickClean* согласно инструкции.
*Более подробная информация - на сайте www.medela.com
Page 44

6. Подготовка к сцеживанию
Осторожно!
l кас. п. 6.1. Работа от сети:
Выполняйте действия в точной последовательности, указанной ниже.
44
l Используйте только сетевой адап-
тер, входящий в комплект молокоотсоса Swing Maxi.
l Убедитесь в том, что напряжение
сетевого адаптера соответствует
напряжению сети.
Информация
i
l кас. п. 6.2. Работа от аккумулятора:
Извлекать батареи при работе
устройства от сетевого адаптера
нет необходимости.
6.1 Работа от сети
1
Подключите шнур сетевого
адаптера к мотору.
6.2 Работа от аккумулятора
1
l Регулярно проверяйте состояние
батарей в моторе.
l Если молокоотсос Swing Maxi
не планируется использовать
длительное время, следует
вынуть батареи из отсека.
l Заряда батарей хватает на два —
три сцеживания (время сцеживания
около 1,5 часов).
Откройте крышку отсека
для батарей на задней
стороне устройства в
направлении стрелки.
Page 45

2
Подключите адаптер к
сетевой розетке.
45
2
Вставьте шесть батарей
AAA Micro 1,5 В.
3
Закройте отсек для батарей.
Page 46

6. Подготовка к сцеживанию
Внимание
l Тщательно вымойте руки с мылом
(в течение минимум одной минуты), прежде чем прикасаться к
46
груди и деталям молокоотсоса.
i
Обратите внимание
l Используйте только оригинальные
аксессуары Medela.
l Проверьте детали молокоотсоса на
предмет износа или повреждения и
при необходимости замените их.
l Перед использованием молокоот-
соса следует убедиться в том, что
все его детали полностью сухие.
Информация
i
6.3 Сборка
молокоотсоса
1
Аккуратно вставьте мембрану светло-желтого цвета в
основание воронки.
4
l Аккуратно выполните все шаги и
соберите устройство правильно.
В противном случае может быть
нарушено образование вакуума.
Прикрутите бутылочку к
соединителю.
Page 47

2
3
47
Наденьте на соединитель
прозрачную крышку.
➙ Убедитесь в том, что
все три защелки (сверху
и сбоку) попали в пазы.
5
Вставьте короткую трубку
в прозрачную крышку
до упора.
Наденьте воронку на
соединитель.
6
Вставьте длинную трубку
в мотор.
Page 48

7. Сцеживание
l кас. шага 2 (п. 7.1):
Ответьте на следующие вопросы,
чтобы понять, подойдет ли вам име-
48
ющийся размер воронки:
l Сосок в туннеле воронки движет-
ся свободно?
l Ткань ареолы не попадает в тун-
нель воронки или попадает в малом объеме?
l При каждом толчке молокоотсоса
вы наблюдаете легкое ритмичное
движение соска?
l Вы чувствуете полное опорожне-
ние груди после сцеживания?
l Ваши соски не болят?
Если хотя бы на один вопрос вы даете ответ «Нет», либо если в ходе
сцеживания возникают проблемы
или болевые ощущения, обратитесь
к специалисту по грудному вскармливанию и лактации или к лечащему врачу.
i
Внимание
Обратите внимание
7.1 Подготовка к одинарному сцеживанию
1
Вставьте неиспользуемую
короткую трубку в держатель трубок.
7.2 Сцеживание
1
l кас. шага 3 (п. 7.1):
Не держите молокоотсос за
бутылочку. Это может привести к
закупорке молочных протоков и
лактостазу.
l Грудь следует вытирать теплым
махровым полотенцем (без
использования спирта).
Включите устройство, нажав
.
➙ Фаза стимуляции длится
максимум две минуты. Затем
устройство автоматически
переключается в фазу сцеживания.
Page 49

2
3
49
Приложите воронку к груди
таким образом, чтобы
сосок располагался точно
по центру туннеля.
2
Если молоко начинает течь до
завершения фазы стимуляции,
нажмите кнопку
реключения устройства в фазу
сцеживания.
➙ Убедитесь в надлежащем вы-
текании молока в бутылочку.
для пе-
Удерживайте воронку на груди
большим и указательным пальцами. Поддерживайте грудь
ладонью.
3
Уровень вакуума можно регулировать на любой фазе. Комфортный уровень вакуума: Кнопкой
увеличивайте уровень вакуума до появления минимальных
неприятных ощущений. Затем нажмите
шения уровня вакуума.
для небольшого умень-
Page 50

7. Сцеживание
Внимание
l Если при сцеживании молоко не вы-
деляется вообще или выделяется в
незначительном объеме, либо появ-
50
ляются болевые ощущения, обратитесь к своему врачу или специалисту по грудному вскармливанию.
i
Обратите внимание
l По завершении сцеживания обяза-
тельно отключите молокоотсос от
сети.
l Заполняйте контейнер (бутылочку)
только до отметки «150 мл».
Информация
i
l Если молокоотсос Swing Maxi вклю-
чен в течение 30 минут и при этом
не производится никаких действий,
он автоматически выключается.
l Во время сцеживания не допускай-
те перекручивания трубок.
4
Отключите устройство, нажав
.
7.3 Подготовка к сцеживанию без участия рук
с помощью топа для
сцеживания
Easy Expression*
1
Обзор индикаторов
горит Вкл.
не горит Выкл.
медленно ритмично
мигает
постоянно горит Фаза сцеживания
быстро мигает
Фаза стимуляции
Мин/макс уровень
вакуума
Наденьте топ для сцеживания
Easy Expression, оставив
молнию слегка расстегнутой.
Page 51

5
6
51
Выполните чистку со-
гласно рекомендациям
раздела 5 (стр. 40).
Используйте специальную
подставку для контейнера
(бутылочки), чтобы избежать ее опрокидывания.
2
Приложите воронку к груди
под топ таким образом, чтобы
сосок располагался точно
по центру туннеля воронки.
Закройте бутылочку крышкой.
➙ Следуйте рекомендациям
раздела 8 «Хранение и размораживание грудного молока».
3
Более подробная
информация приведе-
Застегните молнию и вставьте соединитель в воронку.
*По желанию; см. раздел 12, стр. 58
на на стр. 48, п. 7.2.
Page 52

7. Сцеживание
Внимание
l кас. шага 2:
Не держите молокоотсос за бутылочку. Это может привести к
52
закупорке молочных протоков и
лактостазу.
Информация
i
l Двойное сцеживание позволя-
ет экономить время и повышает объем прилива молока. Кроме того, увеличивается и долгое
время поддерживается лактация.
7.4 Подготовка к двойному
сцеживанию
1
Приложите воронку к груди
таким образом, чтобы сосок располагался точно
по центру туннеля.
4
Приложите вторую воронку
к груди таким образом,
чтобы сосок располагался
точно по центру туннеля.
Более подробная
информация приведена
на стр. 48, п. 7.2, шаг 3
Page 53

2
3
53
Удерживайте воронку на
груди большим и указательным пальцами. Поддерживайте грудь ладонью.
Включите устройство, нажав
.
➙ Фаза стимуляции длится
максимум две минуты.
После этого устройство
автоматически переходит
в фазу сцеживания.
Page 54

8. Хранение и размораживание грудного молока
8.1 Хранение
Инструкции по хранению свежесцеженного грудного молока
(для здоровых доношенных детей)
54
Комнатная темпе-
ратура
4−6 часов при
температуре от 19
до 26 °C (от 66 до
78 °F )
Холодильник Морозильная камера
3−8 дней при
температуре
4 °C ( 39 °F )
или ниже
6−12 месяцев при
температуре от
–18 до – 20 °C ( от 0 до
4 °F )
l Не храните грудное молоко в дверце холодильника. Вместо этого выберите
наиболее холодную область в холодильнике (заднюю часть стеклянной
полки над отсеком для овощей).
8.2 Замораживание
l Вы можете заморозить сцеженное грудное молоко в молочных бутылочках
или в пакетах Pump & Save*. Не заполняйте бутылочки или пакеты более
чем на ¾, чтобы оставить место для возможного расширения жидкости.
l Отмечайте на бутылочках или пакетах Pump & Save дату сцеживания.
Размороженное
грудное молоко
В холодильнике
в течение не более
10 часов. Не замора-
живать повторно!
8.3 Размораживание
Внимание!
Не подогревайте и не размораживайте замороженное грудное молоко
в микроволновой печи или в емкости с кипящей водой во избежание потери витаминов, минералов и других важных ингредиентов, а также для
предотвращения ожогов.
l Для сохранения компонентов грудного молока размораживайте его,
оставив емкость на ночь в холодильнике. Кроме того, можно поместить
бутылочку или пакет Pump & Save в теплую воду (макс. 37 °C).
l Слегка взболтайте молоко в бутылочке или пакете, чтобы перемешать
отделившийся жир. Не встряхивайте и не перемешивайте молоко.
*Более подробная информация – на сайте www.medela.com
Page 55

К
О
Р
М
Л
Е
Н
И
Е
С
Ц
Е
Ж
И
В
А
Н
И
Е
ПОМОЩЬ
КОРМЯЩИМ МАТЕРЯМ,
ОСНОВАННАЯ НА РЕЗУЛЬТАТАХ
ИССЛЕДОВАНИЙ
Изобретение
компании
Medela
Помощь
малышам в
приобретении
навыков
сосания
Больше молока
за меньшее
время
С
О
С
А
Н
И
Е
2
Ф
А
З
Ы
C
A
L
M
A
С
Т
И
М
У
Л
Я
Ц
И
Я
С
Ц
Е
Ж
И
В
А
Н
И
Е
П
О
Т
О
К
М
О
Л
О
К
А
9. Кормление грудным молоком
Информация
i
Компания Medela рекомендует
смартсоску Calma для кормления
грудным молоком.
Если вы пользуетесь
смартсоской Calma,
l ваш ребенок сможет чередовать про-
цессы сосания, глотания и дыхания;
l молоко будет выделяться при
создании вакуума;
l будет поддерживаться естественное
поведение малыша при кормлении,
что позволит легко вернуться к грудному вскармливанию.
В результате обширной исследовательской работы Medela стала одной из
первых в мире компаний, учитывающих в
своих инновационных разработках
2-Phase Expression и Calma поведение
малышей во время кормления грудью.
Технология 2-Phase Expression воспроизводит естественный ритм сосания, что
позволяет сцеживать больше молока за
меньшее время. Быстрые стимулирующие движения сменяются более продолжительными, обеспечивающими оптимальное выделение молока. Уникальное
приспособление для грудного вскармливания Calma позволяет малышу делать
перерывы и дышать во время кормления,
сохраняя тем самым навыки сосательного поведения, усвоенные при кормлении
грудью. Разработано для превосходного
грудного вскармливания.
55
Calma — уникальное решение
для кормления грудным молоком.
Подробную информацию о
смартсоске Calma Вы можете
найти на сайте компании Medela
(www.medela.com).
Page 56

10. Устранение неполадок
Неисправность Решение
56
Не работает
мотор
Потеря
энергоснабжения в ходе
эксплуатации
от батареи
Ухудшение
или отсутствие
сцеживания
Намокание
устройства
Убедитесь в подаче питания.
Проверьте расположение батарей в отсеке.
Замените батареи.
Проверьте все соединения.
Правильно наденьте крышку, чтобы все три защелки попали
в пазы.
Во время сцеживания держите только воронку, но не
соединитель или бутылочку.
Убедитесь, что воронка плотно прилегает к груди.
Во время одинарного сцеживания вставьте неиспользуемую
короткую трубку в держатель трубок. Не допускайте
перекручивания трубок.
В трубке не должно быть воды.
Все детали устройства должны быть полностью сухими.
Отключите сетевой адаптер от розетки.
Выключите молокоотсос.
Не размещайте устройство в перевернутом положении.
Панель управления должна быть вверху.
Поместите устройство в сухое теплое место на 24 часа.
Примечание.
Оберегайте устройство от прямых солнечных лучей.
Не пытайтесь ускорить процесс сушки, применяя
источники тепла.
Конденсат в
трубке
Промойте трубку.
Встряхните трубку, чтобы удалить оставшиеся капли воды.
Поместите трубку в подвешенное состояние до полного
высыхания.
Page 57

11. Гарантия / утилизация
Гарантия
Подробная информация о гарантии содержится в брошюре «Международная
гарантия».
Утилизация
Устройство изготовлено из различных металлов и пластмасс. Перед утилизацией устройство следует разобрать, после чего утилизировать отдельно от
несортированных городских отходов согласно местным требованиям.
Воспользуйтесь услугами местной службы возврата и утилизации неисправного
электрического и электронного оборудования (включая батареи). Неправильная утилизация может нанести вред окружающей среде и здоровью населения.
57
Page 58

12. Комплексный уход в период кормления грудью
У партнеров-дистрибьюторов компании Medela можно заказать следующие
аксессуары для молокоотсоса Swing Maxi, указав номер изделия.
Запасные части
Артикул Изделие
58
Аксессуары
099.0271
099.0272
099.0273
099.0274
800.0840
200.1693
099.0270
099.0275
Артикул Изделие
008.0337*
008.0338*
008.0339*
008.0340*
008.0341*
008.0073
200.1659
008.0145
200.1756
200.0625
008.0217
008.0220
008.0224
008.0225
Swing maxi / Freestyle (100-240В; 12В, 50-60Гц, 0,6А); Европа
Swing maxi / Freestyle (100-240В; 12В, 50-60Гц, 0,6А); Великобритания и США/Япония
Swing maxi / Freestyle (100-240В; 12В, 50-60Гц, 0,6А); Австралия/
Новая Зеландия
Swing maxi / Freestyle (100-240В; 12В, 50-60Гц, 0,6А); Канада
Запасная крышка отсека для батареек Swing — 5 шт.
Запасной соединитель Freestyle в комплекте с к лапаном — 5 шт.
Мотор Swing Maxi
Трубка Swing Maxi
2 воронки PersonalFit S (21 mm)
2 воронки PersonalFit M (24 mm)
2 воронки PersonalFit L (27 mm)
2 воронки PersonalFit XL (30 mm)
2 воронки PersonalFit XXL (36 mm)
Контейнер (бутылочка) для грудного молока, 150 мл
Контейнер (бутылочка) для грудного молока, 250 мл
смартсоска Calma
Сумка-холодильник
Сумка City Style
Топ для сцеживания Easy Expression белый S
Топ для сцеживания Easy Expression белый M
Топ для сцеживания Easy Expression белый L
Топ для сцеживания Easy Expression белый XL
Информация о другой продукции Medela содержится на веб-сайте www.medela.com.
*В случае неудовлетворительных результатов сцеживания либо появления
болевых симптомов во время сцеживания проконсультируйтесь с вашим лечащим врачом или специалистом по грудному вскармливанию. Повысить
удобство и эффективность сцеживания можно путем выбора другого размера воронки PersonalFit
TM
.
Page 59

59
Забота о груди
Кормление
Данные
основаны на
исследованиях
Обучение
Обслу-
живание
Профессионализм
Забота о грудном молоке
Сцеживание
Опыт
Инновации
Cбор
грудного
молока
Page 60

Tartalomjegyzék
1. Rendeltetés/Ellenjavallatok/Populáció 61
2. A szimbólumok jelentése 62
3. Fontos biztonsági információk 64
4. A termék leírása 66
5. Tisztítás 68
5.1 Az első használatot megelőzően és minden használat után 68
5.2 Az első használatot megelőzően, illetve naponta egyszer
5.3 A motoregység tisztítása
60
6. A fejés előkészítése 72
6.1 Hálózati üzemmód 72
70
71
Elemes üzemmód
6.3 A szívókészlet összeszerelése
72
74
7. Fejés 76
7.1 Egyszívófejes fejés előkészítése 76
7.2 Fejés
7.3 Szabad kezes, Easy Expression Bustier kiegészítővel végzett
7.4 Kétszívófejes fejés előkészítése
76
fejés előkészítése
78
80
8. Az anyatej tárolása és a mélyhűtött tej felengedése 82
8.1 Tárolás 82
8.2 Fagyasztás
8.3 Kiolvasztás
82
82
9. Anyatejjel táplálás 83
10. Hibakeresés 84
11. Jótállás/Ártalmatlanítás 85
12. Teljes körű gondoskodás a szoptatás során 86
13. EMC / Műszaki leírás 88
14. Műszaki jellemzők 95
Page 61

1. Rendeltetés/Ellenjavallatok/Populáció
A mellszívó rendeltetése és indikációi
A mellszívó arra szolgál, hogy a szoptatós anyák a kórházban vagy otthon leszívják az
anyatejet. A mellszívó a tejpangás tüneteinek enyhítésére szolgál az anyatej leszívása
által. Emlőgyulladás esetén a mellszívó a gyógyulást segíti elő az anyatej eltávolításával
az érintett emlőből. A mellszívó a sebes, repedezett mellbimbó okozta fájdalom
enyhítésére és a befelé forduló mellbimbó kiemelésére szolgál. Ezen kívül a mellszívó
segítségével azoknak a csecsemőknek is adható anyatej, akik más különben nem
táplálhatók közvetlenül mellről, mellre helyezési probléma, szájpadhasadék vagy
koraszülöttség miatt.
61
Kinek ajánljuk
Kamasz vagy felnőtt szoptatós anyák. Sok nő számára kényelmes, vagy akár
szükséges is, hogy mellszívót használjanak az anyatej lefejésér e, miután visszatértek
a mun - kába, utazás alatt, vagy ha más okból távol vannak gyermeküktől. Az anyák
sokszor örömmel hallják, hogy a mellszívó kiegészítheti a mellr ől történő táplálást,
és hogy bizonyos mellszívókat úgy terveztek, hogy utánozzák a szopó cse csemő
szopását.
Ellenjavallatok
A Swing Maxi mellszívónak nincsenek ismert ellenjavallatai.
Page 62

°C
2. A szimbólumok jelentése
A Figyelmeztetés szimbólum minden olyan utasítást azonosít, amely biztonsági szempontból
fontos. Az utasítások be nem tartása sérüléshez vagy a mellszívó károsodásához vezethet.
Ha a következő szavakkal együtt olvasható, a gyelmeztetés szimbólum jelentése a következő:
Figyelmeztetés
Súlyos sérüléshez vagy halálhoz vezethet.
Vigyázat
Kisebb sérüléshez vezethet.
i
Megjegyzés
Anyagi kárhoz vezethet.
62
i
A csomagoláson található szimbólumok
Információ
Hasznos vagy lényeges információ, amely nem kapcsolódik a biztonsághoz.
Ez a szimbólum azt jelzi, hogy az anyag újrahasznosítási eljárás része.
Ez a szimbólum kartoncsomagolást jelez.
Ez a szimbólum azt jelzi, hogy az eszköz napfénytől távol tartandó.
Ez a szimbólum azt jelzi, hogy a törékeny eszköz óvatosan kezelendő.
Ez a szimbólum a kezelési, szállítási és tárolási hőmérsékletkorlátokat jelzi.
Ez a szimbólum a kezelési, szállítási és tárolási páratartalom-korlátokat jelzi.
Ez a szimbólum a kezelési, szállítási és tárolási légköri nyomás korlátokat jelzi.
Ez a szimbólum azt jelzi, hogy az eszközt szárazon kell tartani.
Ez a jelzés arra gyelmeztet, hogy a csomagolás olyan termékeket tartalmaz, amelyek
az 1935/2004/EK rendeletnek megfelelően rendeltetésszerűen kerülnek érintkezésbe
élelmiszerekkel.
Ez a szimbólum az egyedi GSI globális kereskedelmi cikkszámot jelzi (GTIN).
Ez a szimbólum azt jelzi, hogy a termék nem ártalmatlanítható a szelektálatlan
kommunális hulladékkal együtt (csak az EU-ban).
Ez a szimbólum azt jelzi, hogy a használati utasítást be kell tartani.
Az eszközön található szimbólumok
Ez a szimbólum azt jelzi, hogy a használati utasítást be kell tartani.
Ez a szimbólum azt jelzi, hogy az eszköz megfelel az orvostechnikai eszközökre
0123
vonatkozó 1993. június 14-i 93/42/EGK tanácsi irányelv lényeges követelményeinek.
Page 63

Ez a szimbólum a gyártót jelzi.
Ez a szimbólum azt jelzi, hogy a termék nem ártalmatlanítható a szelektálatlan kommunális hulladékkal együtt (csak az EU-ban).
Ez a szimbólum azt jelzi, hogy az eszköz megfelel az orvostechnikai berendezésekre vonatkozó további egyesült államokbeli és kanadai biztonsági követelményeknek.
Ez a szimbólum BF típusú alkalmazott alkatrészt jelöl.
SN
+
Ez a szimbólum az eszköz gyártói sorozatszámát jelöli.
Ez a szimbólum az akkumulátor vagy szárazelem behelyezését mutatja.
–
Ez a szimbólum az eszköz szilárd idegen testek beáramlásával szembeni,
IP22
illetve a víz beáramlása okozta káros hatásokkal szembeni védelmét mutatja.
Ez a szimbólum a gyártás dátumát jelzi (négy számjegy az évet, két számjegy a hónapot).
A hálózati adapteren található szimbólumok
Ez a szimbólum azt jelzi, hogy a hálózati adapter II besorolású eszköz.
Ez a szimbólum azt jelzi, hogy az eszköz megfelel a China Compulsory Certication
tanúsítási rendszernek.
Ez a szimbólum azt jelzi, hogy a hálózati adapter biztonságilag tesztelt.
Ez a szimbólum azt jelenti, hogy a hálózati adapter csak beltéri használatra szolgál.
Ez a szimbólum azt jelzi, hogy az eszköz megfelel az egyesült államokbeli és kanadai
biztonsági követelményeknek.
Ez a szimbólum azt jelzi, hogy az eszköz megfelel a Szövetségi Bizottság követelményeinek.
Ez a szimbólum az egyenáramú csatlakozó polaritását jelzi.
Ez a szimbólum azt jelzi, hogy az eszköz megfelel az ausztrál/új-zélandi szabályozási
N136
követelményeknek (szabályozásnak való megfelelés jelzése).
Ez a CE jelzés azt jelzi, hogy az eszköz megfelel a kisfeszültségű és elektromágneses
kompatibilitásra vonatkozó irányelvnek.
Ez a szimbólum azt jelzi, hogy az eszköz nem dobható el a szelektálatlan kommunális
hulladékkal együtt (csak az EU-ban). A tömör sáv szimbólum azt jelzi, hogy ez a hálózati
adapter 2005. augusztus 13-a után került forgalomba.
Ez a szimbólum azt jelzi, hogy az eszköz megfelel a japán biztonsági követelményeknek.
Ez a szimbólum azt jelzi, hogy az eszköz megfelel az energiahatékonysági
követelményeknek.
Ez a szimbólum váltóáramot jelez.
Ez a szimbólum egyenáramot jelez.
63
Page 64

3. Fontos biztonsági információk
MAX.
250 h
Az utasítások/biztonsági információk gyelmen kívül hagyása az eszköz
használatából eredő veszélyekkel járhat. A műszaki adatok megváltozhatnak.
Az eszköz
Áramütésveszély! Tartsa az eszközt szárazon! Soha ne merítse vízbe vagy
más folyadékba!
A Swing Maxi mellszívó nem hőálló: fűtőtesttől és nyílt lángtól távol tartandó.
64
Ne tegye ki a motoregységet közvetlen napfény hatásának.
A javításokat csak arra jogosult szerviz végezheti.
Tilos saját kezűleg javítani! Az eszköz módosítása nem engedélyezett.
Soha ne használjon sérült eszközt. Cserélje ki a sérült vagy elhasználódott
részeket.
A Swing Maxi mellszívó várható élettartama 250 óra.
Működési élettartama két év.
Elektromos használat
A hálózatról történő leválasztás csak akkor biztosított, ha a hálózati adaptert
kihúzzuk a fali konnektorból.
A hálózati adaptert tartsa távol fűtött felületektől.
Ne nyúljon vízbe ejtett elektromos készülék után. Azonnal húzza ki.
Page 65

Soha ne hagyja a mellszívót felügyelet nélkül, amikor az elektromos
áramforráshoz van csatlakoztatva.
Használat
A Swing Maxi mellszívót kizárólag az ebben a kézikönyvben leírt rendeltetési célra használja.
Soha ne működtessen elektromos készüléket, ha annak hálózati vezetéke
vagy csatlakozója sérült, ha a készülék nem működik megfelelően,
ha leejtették vagy megsérült ill. ha vízbe esett.
Ne használja a Swing Maxi mellszívót fürdés vagy zuhanyozás közben.
Ne használja a Swing Maxi mellszívót alvás közben vagy félálomban.
A terméket egy személy által történő használatra tervezték. Több személy
általi használata egészségi kockázatot jelenthet.
Ne vezessen szabad kezes fejés közben.
Felügyeletre van szükség akkor, amikor a Swing Maxi mellszívót gyermekek
közelében használja.
65
Amennyiben problémák lépnek fel, vagy fájdalmat érez, forduljon szoptatási
tanácsadójához vagy orvosához.
A hordozható és mobil rádiófrekvenciás távközlési készülékek zavarhatják a
Swing Maxi mellszívó működését.
Fontos:
I A műanyag palackok és alkatrészek fagyasztáskor törékennyé válnak és
leejtéskor eltörhetnek. I Valamin a palackok és az alkatrészek megsérülhet-
nek a helytelen használat során, például leejtés, túlfeszítés, vagy fellökés.
I A palackokat és az alkatr észeket kellő óvatossággal kezelje.
I Ha a palack vagy az alkatrészek megsérülnek, ne használja az anyatejet.
Page 66

4. A termék leírása
A rendelésre kapható tartalék alkatrészek és kiegészítők a 86. oldalon
találhatók.
2x PersonalFit™ szívófej M (24 mm)
(a további szívófejméretekért lásd a 12.
fejezetet a 86. oldalon)
810.7084
2x Freestyle csatlakozó
(szívófej alap, membrán, átlátszó sapka)
200.1513
66
2x palack
811.0021
2x palackállvány
810.0462
1x Calma etetőfej
200.3386
2x Calma multifunkciós
kupak
200.2714
Page 67

Rövid szívócső
Be / ki
kapcsoló
gomb
1x motoregység
200.4932
JELZŐLÁMPA
Szívócső támaszték
Vákuum
csökkentése
Rögzítőkapocs
PVC szívócső
csatlakozó
hüvely
Akkumulátor
Akkumulátor-/
Elemtartó
Hosszú szívócső
1x Swing Maxi szívócső
200.5259
Vákuum
növelése
67
Üzemmód váltó gomb
(Stimuláció/fejés)
Hálózati adapter
csatlakozó aljzata
1x hálózati adapter
200.4725 Euro 12V
200.4726 UK és US/JP 12V
200.4727 AUS/NZ 12V
200.4728 Adapter CN 12V
Page 68

5. Tisztítás
Vigyázat
l A tisztításhoz csak ivóvíz minőségű vi-
zet szabad használni.
l Használat után azonnal szedje szét és
tisztítsa meg a mellel vagy az anyatejjel érintkező alkatrészeket. Ezzel elkerülheti a tejmaradék beszáradását és
a baktériumok elszaporodását.
68
i
Megjegyzés
l A szívókészlet nem igényel egyéb kar-
bantartást.
l Ügyeljen arra, hogy ne sérüljenek meg
a szívókészlet részei a tisztítás során.
l Ha a szívókészlet alkatrészeit mosoga-
tógépben tisztítja, az ételek színezőanyagai elszínezhetik az alkatrészeket.
Ez nem befolyásolja a működést.
5.1 Az első használatot
megelőzően és minden
használat után
1
Szerelje szét a szívókészletet
részeire.
4
Öblítse el az alkatrészeket hideg (kb. 20 °C-os), tiszta vízben
10-15 másodpercig.
Page 69

2
3
69
Öblítse le az összes alkatrészt
hideg (kb. 20 °C-os), tiszta vízzel.
5
Szárítsa meg tiszta ruhával,
vagy hagyja egy tiszta ruhán
száradni.
vagy
Tisztítsa meg az összes részt
bő, meleg (kb. 30 °C-os) szappanos vízzel.
Ha a szívó alkatrészeit mosogatógépben tisztítja, tegye azokat
a felső rácsra vagy az evőeszközrészbe.
A 2., 3. és 4. lépés
alternatívájaként.
Page 70

5. Tisztítás
Vigyázat
l A tisztításhoz csak ivóvíz minőségű
vizet szabad használni.
l Használat után azonnal szedje szét és
tisztítsa meg a mellel vagy az anyatejjel érintkező alkatrészeket. Ezzel elkerülheti a tejmaradék beszáradását és
a baktériumok elszaporodását.
70
i
Megjegyzés
l Forraláskor a vízkövesedés megelőzése
érdekében hozzáadhat egy teáskanálnyi
citromsavat is a vízhez.
l A következő használatig tartsa a szívó-
készletet tiszta zsákban/tárolóban. Tarthatja tiszta papírban vagy ruhában is.
5.2 Az első használatot
megelőzően, illetve
naponta egyszer
1
Szerelje szét a szívókészletet
részeire.
3
További információk a
68. oldalon, az 5.1 fe-
jezet 2–4. lépéseiben.
Szárítsa meg tiszta ruhával,
vagy hagyja egy tiszta ruhán
száradni.
Page 71

2a
vagy
2b
71
Öntsön a lábasba annyi hideg
vizet, hogy ellepje az alkatrészeket. Tegye a tűzhelyre és
forralja öt percig.
5.3 A motoregység
tisztítása
1
Törölje le tiszta, nedves ruhával.
A QuickClean* mikrohullámú
gőzfertőtlenítő zacskókat
használja az utasításoknak
megfelelően.
*További információk: www.medela.com
Page 72

6. A fejés előkészítése
Figyelmeztetés
l lásd 6.1 Hálózati üzemmód:
Pontosan kövesse a lépéseket.
l Kizárólag a Swing Maxi mellszívóval
együtt szállított hálózati adaptert
használja.
l Bizonyosodjon meg arról, hogy a hálózati
adapter kompatibilis-e az elektromos
hálózattal.
72
Információ
i
l lásd 6.2 Akkumulátoros üzemmód
Az elemeket nem kell kivenni, ha a fe-
jéshez a hálózati adaptert használja.
6.1 Hálózati üzemmód
1
Csatlakoztassa a hálózati
adaptert a motoregységhez.
Elemes üzemmód
1
l Rendszeresen ellenőrizze a motoregy-
ségben az elemek állapotát.
l Ha a Swing Maxit hosszabb ideig nem
használja, vegye ki az elemeket az
elemtartóból.
l Az elemek két-három fejésnyi működé-
si időt biztosítanak (kb. 1 ½ óra fejési
idő).
Nyissa ki a hátoldalon lévő
elemtartót a nyíllal jelzett
irányba.
Page 73

2
Csatlakoztassa a hálózati adaptert a hálózati dugaszolóaljzatba.
73
2
Tegyen be hat AAA Micro
1,5V-os alkáli elemet.
3
Csukja be az elemtartót.
Page 74

6. A fejés előkészítése
Vigyázat
l Alaposan mosson kezet (legalább egy
percig) szappanos vízzel, mielőtt a
mellhez és a mellszívó részeihez érne.
74
i
Megjegyzés
l Csak eredeti Medela tartozékokat
használjon.
l Használat előtt ellenőrizze a szívó-
készlet alkatrészeit, hogy nem használódtak-e el, vagy nem sérültek-e,
és szükség esetén cserélje ki azokat.
l Használat előtt minden alkatrésznek
teljesen száraznak kell lennie.
Információ
i
6.3 A szívókészlet összeszerelése
1
Óvatosan illessze be a
világossárga membránt a
szívófej alapjába.
4
l Odagyelve végezze el az összes
lépést, és megfelelően szerelje össze
a szívókészletet. Ellenkező esetben
nem érhető el kellő vákuum.
Csavarja a palackot a
könyökelemre.
Page 75

2
Húzza meg az átlátszó védősapkát a könyökelemen.
➙ Győződjön meg arról, hogy
mindhárom kapocs (fent
és oldalt) bekattant.
3
75
Nyomja a szívófejet a
könyökelembe.
5
Helyezze be a rövid szívócsövet az átlátszó védősapkába,
amíg bemegy.
6
Helyezze be a hosszú
szívócsövet a motoregységbe.
Page 76

7. Fejés
Vigyázat
l lásd 2. lépés (7.1. fejezet):
Válaszoljon a következő kérdésekre,
hogy kiderüljön, hogy a rendelkezésre
álló szívófejméret illeszkedni fog-e.
l Mellbimbója szabadon mozog a csa-
tornában?
l A mellbimbó udvara minimálisan vagy
egyáltalán nem húzódik be a szívófej
csatornájába?
76
l Tapasztalja a mell enyhe, ritmusos
mozgását a szívás minden egyes ciklusával?
l Érzi, hogy a melle mindenhol kiürül?
l Fájdalommentes a mellbimbója?
Ha bármely kérdésre nemmel válaszolt,
vagy ha problémát, fájdalmat tapasztal
a fejés során, forduljon szoptatási tanácsadójához vagy a védőnőhöz.
i
Megjegyzés
7.1 Egyszívófejes fejés előkészítése
1
A használaton kívüli rövid szívócsövet tegye a szívócsőtartóba.
7.2 Fejés
1
l lásd 3. lépés (7.1. fejezet):
Ne tartsa a szívókészletet a palacknál fogva. Ettől a tejcsatornák elzáródhatnak, vagy pangás léphet fel.
l Meleg, nedves ruhával törölje le
a mellét (ne használjon alkoholt).
Kapcsolja be a mellszívót a
gombbal.
➙ A stimulációs fázis legfeljebb
két percig tart. A stimulációs
fázis ezután automatikusan a
fejési fázisra vált.
Page 77

2 3
1
77
Helyezze a szívófejet a mellére úgy, hogy a mellbimbó pontosan a csatorna közepén helyezkedjen el.
2
1
Ha a tej áramlása korábban
megindul, a
nyomásával váltson a fejési fázisra.
➙ Győződjön meg arról, hogy
a tej a palackba folyik.
gomb meg-
Hüvelyk- és mutatóujjával tartsa
a szívófejet a mellénél. Tenyerével támassza meg a mellét.
3
A vákuum minden fázisban állítható. A vákuum kényelmessé tétele: A
tudja a vákuumot addig, amíg
kissé kellemetlen nem lesz. Ezután nyomja meg a
és kissé állítsa vissza.
gombbal növelni
gombot,
Page 78

7. Fejés
Vigyázat
l Forduljon a védőnőhöz vagy a szop-
tatási tanácsadóhoz, ha egyáltalán
nem tud vagy csak minimális tejet
tud kifejni, vagy ha a fejés fájdalmas.
i
Megjegyzés
78
l Fejés után mindig húzza ki a Swing
Maxi adapterét a hálózatból.
l Csak a 150 ml-es jelzésig töltse meg
a palackot.
Információ
i
l A Swing Maxi automatikusan kikap-
csol, ha 30 percen át úgy használták,
hogy semmit sem állítottak rajta.
l Fejés során ne csavarja meg a szívó-
csövet.
A LED-ek áttekintése
bekapcsolva Be
kikapcsolva Nem világít
egyenletes, rendszeres
villogás
a lámpa folyamatosan
világít
gyorsan villog Min./Max.
Stimulációs fázis
Fejési fázis
4
A gombbal kapcsolja ki
a mellszívót.
7.3 Előkészületek a szabad
kezes fejésre az
Easy Expression Bustier*
használatával
1
Vegye fel az Easy Expression
Bustiert, és hagyja a cipzárt
kissé nyitva.
Page 79

5
6
1
A 68. oldalon található
5. fejezet szerint
tisztítsa meg.
Használja az állványt, nehogy
a palack felboruljon.
2
Helyezze a szívófejet a mellére
a mellény alá úgy, hogy a mellbimbó a szívófej csatornájának
közepére essen.
Zárja le a palackot egy fedővel.
➙ Kövesse a 8., „Az anyatej tárolá-
sa és a mélyhűtött tej felengedése” című fejezet utasításait.
3
További információk a
7.2. fejezetben, a 76.
Húzza be a cipzárt, és csatlakoztassa a könyökcsatlakozót
a szívófejhez.
*Opcionális, lásd a 12. fejezetet a 86. oldalon.
79
oldalon.
Page 80

7. Fejés
Vigyázat
l lásd 2. lépés:
Ne tartsa a szívókészletet a palacknál fogva. Ettől a tejcsatornák elzáródhatnak, vagy pangás léphet fel.
80
Információ
i
l A kétfejes fejés időt takarít meg, és
növeli az anyatej energiatartalmát.
A tejképződés növekszik és hosszabb ideig tart.
7.4 Kétszívófejes fejés
előkészítése
1
Helyezze a szívófejet a mellére úgy, hogy a mellbimbó pontosan a csatorna közepén helyezkedjen el.
4
Helyezze a második szívófejet
a mellére úgy, hogy a mellbimbó pontosan a csatorna közepén helyezkedjen el.
További információk a 76.
oldalon, a 7.2. fejezet 3.
lépésében találhatók.
Page 81

2
1
3
81
Hüvelyk- és mutatóujjával tartsa
a szívófejet a mellénél. Tenyerével támassza meg a mellét.
Kapcsolja be a mellszívót a
gombbal.
➙ A stimulációs fázis legfeljebb
két percig tart. Ezután a stimulációs fázis automatikusan
a fejési fázisra vált.
Page 82

8. Az anyatej tárolása és a mélyhűtött tej felengedése
8.1 Tárolás
Tárolási útmutató frissen lefejt anyatejhez
(Egészséges, időre született csecsemők részére)
Szobahőmérséklet Hűtőszekrényben Mélyhűtőben Felengedett anyatej
3-8 nap 4 °C-on
4-6 óra 19-26 °C-on
(66-78 °F)
l Ne tárolja az anyatejet a hűtő ajtajában. Válassza inkább a hűtő leghidegebb pontját
82
(39 °F) vagy
alacsonyabb
hőmérsékleten
6-12 hónap -18 és -20 °C
között ( 0-4 ° F )
Hűtőszekrényben
maximum 10 óra.
Ne fagyassza le újra!
(az üvegpolc hátsó részén, a zöldségtároló fölött).
8.2 Fagyasztás
l A lefejt anyatejet anyatejes palackban vagy „Pump & Save”* zacskókban
is lefagyaszthatja. A palackokat vagy zacskókat csak ¾ részig töltse meg,
hogy a térfogat-növekedésnek maradjon hely.
l Címkézze fel a palackokat vagy a „Pump & Save” zacskókat a fejés dátumával.
8.3 Kiolvasztás
Vigyázat
Ne olvassza ki a fagyasztott anyatejet, illetve ne melegítse az anyatejet
mikrohullámú sütőben vagy forrásban lévő vízben, ezzel elkerülve a vitaminok,
ásványi anyagok és egyéb fontos összetevők elbomlását, és megelőzve az
esetleges égési sérüléseket.
l Az anyatej összetevőinek megőrzése érdekében egy éjszakára helyezze át
a mélyhűtőből a normál hűtőtérbe, és ott hagyja kiolvadni. Vagy tartsa a palackot,
illetve a „Pump & Save“ zacskót folyó meleg víz alá (legfeljebb 37 °C).
l Óvatosan rázza meg a palackot, illetve a „Pump & Save” zacskót, hogy feloldjon
minden kivált zsírt. Az anyatejet ne rázza fel és ne keverje meg.
*További információk: www.medela.com
Page 83

S
Z
O
P
T
A
T
Á
S
F
E
J
É
S
SZOPTATÓ ANYÁK
KUTATÁSON ALAPULÓ TÁMOGATÁSA
Feltaláló: Medela
Támogatja a
csecsemők
természetes
táplálkozási
viselkedését
Több
tej - rövidebb
idő alatt
S
Z
O
P
T
A
T
Á
S
2
F
Á
Z
I
S
Ú
C
A
L
M
A
S
T
I
M
U
L
Á
C
I
Ó
F
E
J
É
S
T
E
J
Á
R
A
M
L
Á
S
9. Anyatejjel táplálás
Információ
i
A Medela az anyatejjel tápláláshoz
a Calmát javasolja.
A Calmával
l kisbabája a szokásos módon tud
szopni, szünetet tartani és lélegezni.
l a tej akkor áramlik, ha vákuum jön
létre.
l a kisbaba természetes szopási
viselkedése fenntartható, ami
elősegíti a visszaállást a mellre.
Átfogó kutatásainak eredményeként
a Medela az első olyan vállalatok egyike
a világon, amely a csecsemők szopási
viselkedését veszi gyelembe termékei
fejlesztésekor, így a 2-Phase Expression
(kétfázisú fejés) és a Calma
kifejlesztésekor is.
A kétfázisú fejési technológia (2-Phase
Expression) a baba természetes szopási
ritmusát utánozza, így segítségével
rövidebb idő alatt több tejet fejhet le.
A gyorsabb ritmusú stimulálási fázist
lassabb ritmusú fejési fázis követi,
ez biztosítja az optimális tejáramlást.
Az egyedi Calma etetőeszköz lehetővé
teszi, hogy a csecsemő szünetet
tarthasson és lélegezhessen az etetés
során, miközben a mellen tanult szopási
viselkedés fenntartható. A kényelmes
szoptatásért.
Calma – egyedi etetési
megoldás anyatejhez.
A Medela honlapján
(www.medela.com) részletes
83
információkat talál a Calmáról.
Page 84

10. Hibakeresés
Probléma Megoldás
84
Ha a motor
nem működik
Ha nincs áramellátás elemes
üzemmód alatt.
Ha a mellszívó
gyengén
vagy egyáltalán
nem szív
A mellszívó
nedves lett
Ellenőrizze, van-e hálózati áram.
Ellenőrizze az elemek helyzetét az elemtartóban.
Cserélje ki az elemeket.
Ellenőrizze a csatlakozásokat.
Rögzítse rendesen a védősapkát a három csatlakozási ponton.
Fejés közben a szívófejet tartsa, ne a csatlakozót vagy a palackot.
Ellenőrizze, hogy a szívófej jól körülzárja-e a mellet.
Egyfejes fejésnél helyezze a nem használt szívócsövet a szívócsőtartóba. Ne csavarja meg a csövet.
Nem lehet víz a szívócsőben.
Minden alkatrésznek teljesen száraznak kell lennie.
Húzza ki a hálózati adaptert a dugaszolóaljzatból.
Kapcsolja ki a mellszívót.
Ne tegye le fordítva a mellszívót. A vezérlőpanelnek felfelé kell néznie.
Tartsa a mellszívót száraz, meleg helyen 24 óráig.
Megjegyzés:
Ne tegye ki a mellszívót közvetlen napfénynek.
Ne kísérelje meg meggyorsítani a száradási folyamatot hő használatával.
Ha a szívócsőben
páralecsapódás
észlelhető
Öblítse ki a szívócsövet.
Rázza ki a vízcseppeket.
Hagyja megszáradni a szívócsövet a levegőn.
Page 85

11. Jótállás/Ártalmatlanítás
Garancia
A „Nemzetközi jótállás” brosúra részletes jótállási információt tartalmaz.
Ártalmatlanítás
A készülék különböző fémekből és műanyagokból készült. Az ártalmatlanítás előtt
az eszközt használhatatlannak kell nyilvánítani, és a helyi szabályozások szerint nem
ártalmatlanítható a szelektálatlan kommunális hulladékkal együtt. Készülékét vigye
vissza az Ön lakóhelyéhez legközelebb lévő elektromos és elektronikus hulladékokat
átvevő hulladékgyűjtő helyre (az elemekkel együttí). A készülék szakszerűtlen
ártalmatlanítása káros hatással lehet a környezetre és az egészségre.
85
Page 86

12. Teljes körű gondoskodás a szoptatás során
A Swing Maxihoz a következő kiegészítők állnak rendelkezésre a Medela értékesítési
partnereinél. A kiegészítők a termékszám alapján azonosíthatók be.
Pótalkatrészek
Cikkszám A termék
86
099.0271
099.0272
099.0273
099.0274
800.0840
200.1693
099.0270
099.0275
Swing maxi / Freestyle (100-240V; 12V, 50-60Hz, 0,6 A) Euro
Swing maxi / Freestyle (100-240V; 12V, 50-60Hz, 0,6 A) UK és US / JP
Swing maxi / Freestyle (100-240V; 12V, 50-60Hz, 0,6 A) AUS / NZ
Swing maxi / Freestyle (100-240V; 12V, 50-60Hz, 0,6 A) CN
Swing elemtartó fedél 5 db.
Freestyle csatlakozó 5 darabos szeleppel
Swing Maxi motoregység
Swing Maxi Szívócső
Tartozékok
Cikkszám A termék
008.0337*
008.0338*
008.0339*
008.0340*
008.0341*
008.0073
20 0.1659
008.0145
200.1756
200.0625
PersonalFit 2 szívófej S (21 mm)
PersonalFit 2 szívófej M (24 mm)
PersonalFit 2 szívófej L (27 mm)
PersonalFit 2 szívófej XL (30 mm)
PersonalFit 2 szívófej XXL (36 mm)
Műanyag palack (150 ml)
Műanyag palack (250 ml)
Calma etetőfej
Hűtőzsák
City Style zsák
008.0217
008.0220
008.0224
008.0225
Easy Expression Bustier fehér S
Easy Expression Bustier fehér M
Easy Expression Bustier fehér L
Easy Expression Bustier fehér XL
Egyéb Medela termékek a www.medela.com weboldalon kaphatók.
* Ha a fejés eredménye nem megfelelő, vagy a fejés fájdalmas, forduljon a védőnőhöz
vagy a szoptatási tanácsadóhoz. Más méretű PersonalFit
TM
szívófej kényelmesebbé és
sikeresebbé teheti a fejést.
Page 87

Mellápolás
Oktatás
Igazolt kutatási
eredmények
Fejés
87
Szakértelem
Etetés
Szolgáltatás
Szakemberek
Az anyatej kezelése
Innováció
Az anyatej
gyűjtése
Page 88

Obsah
1. Způsob použití / Kontraindikace / Cílová skupina 89
2. Význam symbolů 90
3. Důležité bezpečnostní informace 92
4. Popis produktu 94
5. Čištění 96
5.1 Před prvním použitím a po každém použití 96
5.2 Před prvním použitím a jednou denně
5.3 Čištění motoru
99
6. Příprava na odsávání 100
6.1 Provoz na napájení ze sítě 100
98
88
6.2 Provoz na baterie
6.3 Sestavení odsávačky
100
100
7. Odsávání 104
7.1 Příprava na individuální odsávání 104
7.2 Odsávání mateřského mléka
7.3 Příprava na odsávání bez použití rukou pomocí pásu pro
snadné odsávání
7.4 Příprava na odsávání z obou prsů současně
106
104
108
8. Skladování a rozmrazování mateřského mléka 110
8.1 Skladování 110
8.2 Zmrazení
8.3 Rozmrazování
110
110
9. Podávání mateřského mléka 111
10. Řešení problémů 112
11. Záruka / likvidace 113
12. Kompletní péče během kojení 114
13. EMC / Technický popis 116
14. Technické specikace 123
Page 89

1. Způsob použití / Kontraindikace / Cílová skupina
Způsob použití a indikace odsávaček
Odsávačky jsou určeny pro odsávání mateřského mléka pro maminky v nemocničním
nebo domácím prostředí. Přinášejí úlevu při nadměr né tvorbě mléka. V případě mas titidy podporují odsávačky hojení vyprázdněním prsu. Odsávačky slouží jako úleva při
bolavých a rozpraskaných bradavkách a jako pomoc v případě plochých nebo vp
áčených bradavek. Odsávačky také umožňují podávat mateřské mléko i dětem, které
z různých důvodů nelze kojit přímo z prsu, např. kvůli potížím se správnou polohou při
kojení, kvůli rozštěpu patra nebo předčasně narozeným dětem.
89
Cílová skupina
Kojící matky. Pro mnoho matek je pohodlné, nebo dokonce nezbytné, používat odsá vačky mléka k odsávání a skladování mateřského mléka poté, co s e vrátily do práce,
během cestování nebo když jsou jinak odloučeny od svého dítěte. Matky často potěší,
když zjistí, že odsávačku je možné použít jako doplněk ke k ojení a že některé
odsávačky jsou konstruovány tak, že napodobují sání kojence.
V souvislosti s odsávačkou Swing Maxi nejsou známé žádné kontraindik ace.
Page 90

°C
2. Význam symbolů
Symbol výstrahy označuje všechny pokyny důležité z důvodu bezpečnosti. Nedodržení
těchto pokynů může vést k poranění nebo k poškození odsávačky!
Při použití s následujícími slovy má symbol výstrahy následující význam:
Výstraha
Může způsobit vážný úraz nebo smrt.
Upozornění
Může způsobit menší poranění.
i
Poznámka
Může způsobit materiální škody.
i
Symboly na obalu
90
Informace
Užitečné nebo důležité informace nesouvisející s bezpečností.
Tento symbol označuje, že materiál je recyklovatelný.
Tento symbol označuje kartónový obal.
Tento symbol označuje, že produkt nemá být vystaven slunečnímu světlu.
Tento symbol označuje, že s křehkým produktem se musí manipulovat opatrně.
Tento symbol označuje omezení teplot pro provoz, přepravu a skladování.
Tento symbol označuje omezení vlhkosti pro provoz, přepravu a skladování.
Tento symbol označuje omezení tlaku pro provoz,
přepravu a skladování.
Tento symbol označuje, že produkt musí být udržován v suchu.
Tento symbol označuje, že obal obsahuje produkty, které mohou přicházet
do kontaktu s potravinami dle nařízení 1935/2004.
Tento symbol označuje jedinečné číslo GSI GTIN (Global Trade Item Number).
Tento symbol označuje, že produkt nesmí být likvidován společně s netříděným
komunálním odpadem (pouze pro EU).
Tento symbol označuje, že je potřeba dodržovat pokyny k použití produktu.
Symboly na produktu
Tento symbol označuje, že je potřeba dodržovat pokyny k použití produktu.
Tento symbol označuje, že produkt vyhovuje základním požadavkům Směrnice rady
0123
93/42/EEC ze dne 14. června 1993 týkající se zdravotnických prostředků.
Page 91

Tento symbol označuje výrobce.
Tento symbol označuje, že produkt nesmí být likvidován společně s netříděným
komunálním odpadem (pouze pro EU).
Tento symbol označuje, že produkt vyhovuje dalším bezpečnostním požadavkům
na zdravotnická elektrická zařízení platným v USA a Kanadě.
Tento symbol označuje použitou část typu BF.
SN
+
Tento symbol označuje výrobní číslo produktu.
Tento symbol označuje umístění baterie.
–
Tento symbol označuje ochranu proti průniku pevných cizích předmětů a proti
IP22
škodlivým účinkům způsobeným vniknutím vody.
Tento symbol označuje datum výroby (čtyři číslice značí rok a dvě číslice měsíc).
Symboly na síťovém adaptéru
Tento symbol označuje, že síťový adaptér je zařízení třídy II.
Tento symbol označuje vyhovění požadavkům předpisů China Compulsory Certication.
Tento symbol označuje, že síťový adaptér byl testován z hlediska bezpečnosti.
Tento symbol označuje, že síťový adaptér je určen pouze pro použití v interiéru.
Tento symbol označuje, že adaptér vyhovuje bezpečnostním požadavkům platným v
USA a Kanadě.
Tento symbol označuje, že adaptér vyhovuje požadavkům úřadu Federal
Communications Commission.
Tento symbol označuje polaritu napájecího konektoru.
Tento symbol označuje shodu s regulačními požadavky AUS/NZ
N136
(Regulaltory compliance mark).
Značka CE označuje shodu s požadavky směrnice pro nízkonapěťová zařízení a
elmg. kompatibilitu.
Tento symbol označuje, že produkt nesmí být likvidován společně s netříděným
komunálním odpadem (pouze pro EU). Silná čára označuje, že síťový adaptér byl
uveden na trh po 13. srpnu 2005.
Tento symbol označuje shodu s japonskými bezpečnostními požadavky.
91
Tento symbol označuje shodu s požadavky na energetickou úspornost.
Tento symbol označuje střídavý proud.
Tento symbol označuje stejnosměrný proud.
Page 92

3. Důležité bezpečnostní informace
MAX.
250 h
Nedodržení těchto pokynů či bezpečnostních informací může vést k tomu,
že produkt se stane nebezpečným. Právo na změny vyhrazeno.
Zařízení
Nebezpečí usmrcení el. proudem! Udržujte zařízení v suchu! Nikdy
neponořujte do vody nebo jiné kapaliny!
Odsávačka mateřského mléka Swing Maxi není tepelně odolná: udržujte
ji mimo dosah radiátorů a otevřeného ohně.
Nevystavujte motor přímému slunečnímu světlu.
Opravy smí provádět pouze autorizovaný servis.
Neopravujte produkt sami! Žádné úpravy produktu nejsou povoleny.
Poškozený produkt nikdy nepoužívejte. Poškozené nebo opotřebované díly
vyměňte.
92
Provozní životnost odsávačky mateřského mléka Swing Maxi je 250 hodin.
Životnost je dva roky.
Použití el. zařízení
Odpojení od sítě je zaručeno pouze vytažením síťového adaptéru ze zásuvky.
Síťový adaptér nikdy nepokládejte na horkou plochu.
Pokud jakékoli elektrické zařízení spadlo do vody, nesahejte pro něj.
Okamžitě jej odpojte ze sítě.
Page 93

Použití
Odsávačku zapojenou do el. zásuvky nikdy nenechávejte bez dozoru.
Odsávačku mateřského mléka Swing Maxi používejte pouze k výše
uvedenému účelu a v souladu s tímto návodem k použití.
Nepoužívejte elektrické zařízení s poškozenou napájecí šňůrou nebo zástrčkou, zařízení poškozené, nefunkční, pokud spadne na zem nebo do vody.
Odsávačku mateřského mléka Swing Maxi nepoužívejte při koupání nebo
sprchování.
Odsávačku mateřského mléka Swing Maxi nepoužívejte během spánku
nebo v případě nadměrné únavy.
Tento výrobek je určen pouze pro jednoho uživatele. Používání více osobami
může způsobit ohrožení zdraví.
Při odsávání bez držení odsávačky neřiďte vozidlo.
Při použití odsávačky mateřského mléka Swing Maxi v přítomnosti dětí
je nutný stálý dohled.
V případě výskytu problémů či bolestivosti kontaktujte laktační poradkyni
nebo lékaře.
Funkce odsávačky mateřského mléka Swing Maxi může být ovlivněna
přenosnými a mobilními vysokofrekvenčními komunikačními zařízeními.
Důležité:
I Plastové láhve a komponenty mohou být po zmrazení kř ehké a mohou se při pádu z
výšky rozbít.
I Láhve a komponenty se také mohou poškodit při nesprávném zacház ení, například při
nárazu, po příliš silném utažení nebo př evrhnutí.
I S láhvemi i s jednotlivými díly manipulujte opatr ně.
I Nepoužívejte láhve nebo komponenty, které jsou poškozené.
93
Page 94

4. Popis produktu
Náhradní díly a příslušenství, které lze objednat, naleznete na str. 114.
Prsní nástavec PersonalFit™ M,
2 ks (24mm)
(další velikosti prsních nástavců
naleznete v kap. 12, str. 114)
810.7084
Konektory Freestyle, 2 ks
(základna prsního nástavce,
membrána, průhledný kryt)
200.1513
Láhev, 2 ks
811.0021
94
Stojánek na láhev, 2 ks
810.0462
Systém Calma, 1 ks
200.3386
Víceúčelové víčko
Calma, 2 ks
200.2714
Page 95

Krátká hadička
Spojka hadiček
SVĚTELNÝ
INDIKÁTOR
Vypínač
Snížení
intenzity
vakua
Upevňovací spona
Otvor pro
hadičku
Prostor pro
baterie
Dlouhá hadička
Hadička Swing Maxi, 1 ks
200.5259
Motor, 1 ks
200.4932
Zvýšení
intenzity
vakua
Tlačítko pro zahájení
odsávací fáze
95
Zdířka síťového
adaptéru
Síťový adaptér, 1 ks
200.4725 Euro 12V
200.4726 UK a US/JP 12V
200.4727 AUS/NZ 12V
200.4728 Adaptér CN 12V
Page 96

5. Čištění
Upozornění
l K čištění používejte výhradně pitnou
vodu.
l Odsávačku rozeberte a všechny části
odsávačky, které přicházejí do kontaktu s prsem a mateřským mlékem, čistěte ihned po použití, abyste předešli
zaschnutí zbytků mléka a následnému
množení bakterií.
i
Poznámka
l Odsávačka nevyžaduje žádnou údržbu.
96
l Dávejte pozor, abyste během čištění
nepoškodili části odsávačky.
l Pokud myjete jednotlivé komponenty
odsávačky v myčce nádobí, potravinářská barviva mnohou díly zabarvit.
Na funkci dílů to nemá žádný vliv.
5.1 Před prvním použitím
a po každém použití
1
Rozeberte odsávačku na
jednotlivé díly.
4
Oplachujte po dobu 10–15
sekund všechny díly čistou
studenou vodou (přibl.
teplota 20 °C).
Page 97

2
3
Opláchněte všechny díly
čistou studenou vodou
(přibl. teplota 20 °C).
5
Osušte čistou utěrkou nebo
nechte vyschnout na čisté
utěrce.
nebo
Umyjte důkladně všechny díly
v teplé mýdlové vodě (přibl.
teplota 30 °C).
Pokud myjete jednotlivé díly
odsávačky v myčce nádobí,
umístěte je do horního patra
nebo do přihrádky na příbory.
Alternativa ke krokům
97
2, 3 a 4
Page 98

5. Čištění
Upozornění
l K čištění používejte výhradně pitnou
vodu.
l Odsávačku rozeberte a všechny části
odsávačky, které přicházejí do
kontaktu s prsem a mateřským
mlékem, čistěte ihned po použití,
abyste předešli zaschnutí zbytků
mléka a následnému množení bakterií.
i
Poznámka
l Přidáním čajové lžičky kyseliny citróno-
98
vé do vařící vody zamezíte usazování
vodního kamene.
l Uskladněte odsávačku do čistého
sáčku nebo krabičky až do příštího
použití. Nebo ji uložte do čistého
papíru nebo utěrky.
5.2 Před prvním použitím
a jednou denně
1
Rozeberte odsávačku na
jednotlivé díly.
3
Další informace nalez-
nete na str. 96, v kap.
5.1, kroky 2–4.
Osušte čistou utěrkou nebo
nechte vyschnout na čisté utěrce.
Page 99

2a
nebo
2b
Ponořte všechny díly do vody
a nechte je 5 minut vařit.
5.3 Čištění motoru
1
Otřete čistou, navlhčenou utěrkou.
Sáčky QuickClean* používejte v mikrovlnné troubě podle
pokynů.
99
*Další informace naleznete na www.medela.com
Page 100

6. Příprava na odsávání
100
Výstraha
l re 6.1 Provoz na síťové napájení:
Přesně dodržujte pořadí kroků.
l Používejte pouze síťový adaptér
dodávaný s odsávačkou mateřského
mléka Swing Maxi.
l Zkontrolujte, zda napětí uvedené na
síťovém adaptéru odpovídá napětí
sítě.
Informace
i
l re 6.2 Provoz na baterie:
Při použití síťového adaptéru během
odsávání není potřeba baterie vyjmout.
6.1 Provoz na napájení
ze sítě
1
Zapojte šňůru síťového
adaptéru do motoru.
6.2 Provoz na baterie
1
l Pravidelně kontrolujte stav baterií v
motoru.
l Pokud nebudete odsávačku Swing
Maxi používat delší dobu, baterie
vyjměte.
l Baterie vydrží dvě až tři odsávání
(přibl. 1 ½ hodiny provozu).
Otevřete kryt baterií na
zadní straně posunutím
ve směru šipky.
 Loading...