

MEDELA Supplemental Nursing System User Manual

Supplemental
Nursing System
EN Instructions for use | DE Gebrauchsanweisung | FR Mode d’emploi
IT Istruzioni per l’uso | NL Gebruiksaanwijzing | ES Manual de instrucciones
PT Instruções de utilização | SV Bruksanvisning | PL Instrukcja obsługi
Инструкция по применению | KO 사용 설명서 | ZH 使用说明
RU
Thank you for choosing the Supplemental Nursing System (SNS). The SNS is a feeding solution
that enables more babies to breastfeed and to stay motivated to do so.
Danke, dass Sie sich für das Brusternährungsset (Supplemental Nursing System, SNS) entschieden
haben. Das Brusternährungsset ist eine Fütterungslösung, die es ermöglicht, mehr Babys zu stillen
und dazu motiviert, es weiterhin zu tun.
Merci d’avoir choisi le système de nutrition supplémentaire (SNS). Le SNS est une solution
d’alimentation permettant à davantage de bébés d’être allaités et de prolonger l’allaitement au sein.
Grazie per aver scelto il sistema di allattamento supplementare (SNS). Il sistema SNS è una soluzione
di alimentazione che permette di allattare al seno più bambini e di mantenere la motivazione a
proseguire l’allattamento al seno.
Dank u wel dat u hebt gekozen voor de Borstvoeding Hulp Set. De Borstvoeding Hulp Set is
een oplossing voor het voeden om meer baby’s borstvoeding te geven en ze daarvoor gemotiveerd
te houden.
Le agradecemos que haya elegido el sistema de alimentación suplementaria (SNS), una
solución de alimentación que permite que más bebés mamen y estén motivados para hacerlo.
Obrigado por escolher o Sistema de Nutrição Suplementar (SNS). O SNS é uma solução
de alimentação que permite amamentar mais bebés e motivá-los a mamar.
Tack för att du valt tillmatningssetet SNS (Supplemental Nursing System). SNS matningslösning
är ett hjälpmedel vid amningssvårigheter och för sugsvaga spädbarn.
Dziękujemy za wybranie systemu wspomagającego karmienie (SNS). SNS to rozwiązanie
umożliwiające dokarmianie dzieci przy piersi i motywujące je do ssania.
Спасибо за выбор дополнительной системы кормления (SNS). SNS представляет собой
систему кормления, которая позволяет обеспечить грудное вскармливание большему
числу новорожденных и поддерживает мотивацию к грудному вскармливанию.
모유생성 유도기 (SNS) 를 선택해 주셔서 감사 합니다. SNS는 더 많은 아기에게 모유 수유를 제공
하고 이를 독려하기 위한 수유 솔루 션입니다.
感谢您选择辅助哺乳系统 (SNS)。辅助哺乳系统是一种哺喂解决方案,旨在让更多婴儿得到母乳喂养
并积极 致力实现于此目标 。

EN
00 – 21
DE
22 – 39
FR
40 – 57
58 – 75
NL
76 – 93
ES
9 4 – 111
PT
112 – 12 9
SV
130 – 147
PL
148 – 165
RU
166 – 183
KO
184 – 201
IT
ZH
202 – 218

Table of Contents
1. Intende d us e / Population – Contraindications 5
4
2. Meaning of symbols 6
3. Important safety information 8
4. Product description 9
4.1 Product parts 9
4.2 Material 9
5. Cleaning 10
5.1 Cleaning at home 10
5.1.1 Before using for the rst time 10
5.1.2 After each use 11
5.1.3 Once a day 11
5.2 Cleaning in the hospital 12
5.2.1 Before using for the rst time 12
5.2.2 After each use 12
5.2.3 Once a day 12
6. Assembling the SNS / Preparing for feeding 13
7. Feeding 16
8. Disassembling the SNS 20
9. Disposal 20
10. Product variants and consumables 20
11. Technical specications 219

1. Intended use / Population – Contraindications
The intended use of the Supplemental Nursing System
The Supplemental Nursing System is designed to administer supplemental nutrition
to babies while they are being fed at the breast. Its intended use is to enable
mothers to breastfeed when they would otherwise be unable to do so. The SNS
can be used for suckling training and also to stimulate the mother’s milk production. In all cases, the SNS helps to maintain the unique skin-to-skin contact
between mother and child.
Mothers can use the system with their own expressed milk, fortied human milk or
formula.
Intended population / users
The Supplemental Nursing System is intended to be used in cases where babies
have weak suction or cannot maintain vacuum long enough. The SNS can also be
used by mothers with poor milk supply and to feed adopted babies.
Contraindications
The SNS cannot be used by mothers who are unable to breastfeed because of a
medical condition. Also, mothers who take medicines to which babies are intolerant
must not use the SNS.
More information in your language:
Yderligere information på dit sprog:
Lisätietoja omalla kielelläsi:
Mer informasjon på ditt språk:
Περισσότερες πληροφορίες στη δική σας γλώσσα:
詳細情報をお住まいの地域の言語で閲覧できます:
5
Or visit our homepage www.medela.com/sns
°C
2. Meaning of symbols
The warning symbol identies all instructions that are important for safety. Failure
6
to follow these instructions can lead to injury or material damage. There are several
warning symbols. Each symbol is used together with a specic word. The warning
symbol/word combinations stand for:
Caution
Failure to follow instructions of this type can lead to (minor) injury or
contamination/growth of bacteria.
i
i
Symbols on the packaging
Note
Failure to follow instructions of this type can lead to material damage.
Info
Useful or important information that is not related to safety.
This symbol indicates that the material is part of a recovery/recycling
process.
This symbol indicates a carton package.
This symbol indicates to keep the device away from sunlight.
This symbol indicates to handle the fragile device with care.
This symbol indicates the temperature limitation for operation,
transport and storage.
This symbol indicates the humidity limitation for operation, transport
and storage.
This symbol indicates the atmospheric pressure limitation for
operation, transport and storage.
This symbol indicates to keep the device dry.
This symbol indicates that the product material is approved for food
contact.
This symbol indicates the unique GSI Global Trade Item Numbers
(GTIN).
This symbol indicates to consult the instructions for use.
This symbol indicates the manufacturer.
7
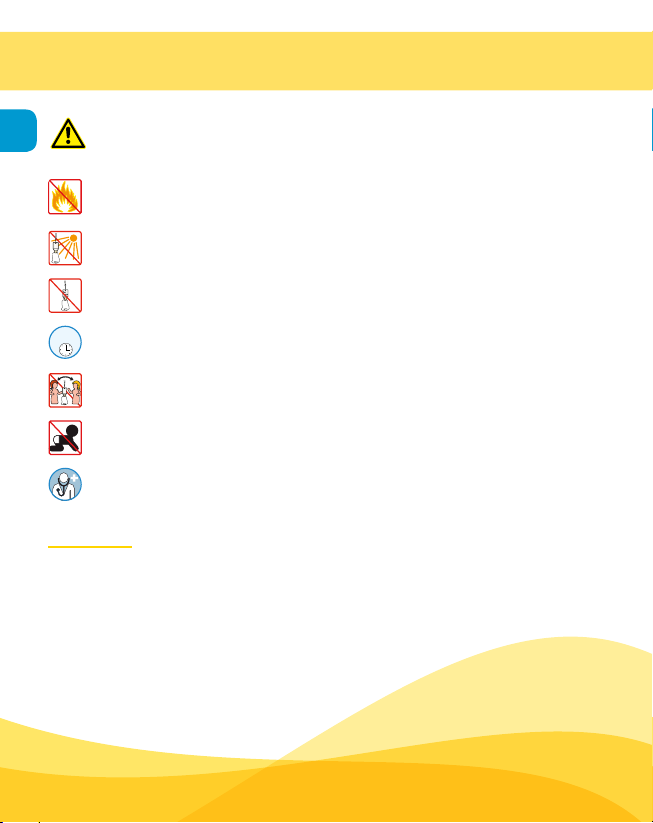
3. Important safety information
8
For your child’s safety and health
WARNING!
Failure to follow the information below can lead to danger from the device
The SNS is not heat-resistant: keep away from radiators and open
ames.
Do not expose the SNS to direct sunlight.
Check the components of the SNS for wear or damage. Never use a
defective device. Throw a part away at rst signs of damage or weakness.
MAX.
For hygiene reasons, we recommend replacing the tubing after 30 days
30 days
(home use), or every 24 hours (hospital use).
We do not recommend using the SNS by more than one person, as this
may present a health risk.
Always use this product with adult supervision. Keep all components not
in use out of reach of childern.
Contact your lactation consultant or physician if you experience problems
or pain.
Important
I The SNS is not a storage device, but a feeding device. Do not use it to store milk.
I Plastic bottles and component parts become brittle when frozen and may break
when dropped.
I Also, bottles and component parts may become damaged if mishandled, e.g.
dropped, over-tightened or knocked over.
I Take appropriate care in handling bottles and components.
l Do not use the breastmilk if bottles or components become damaged.
I Always check the food temperature before feeding (danger of burning).
I Do not warm milk in a microwave. This may cause uneven heating and could
scald your baby.
4. Product description
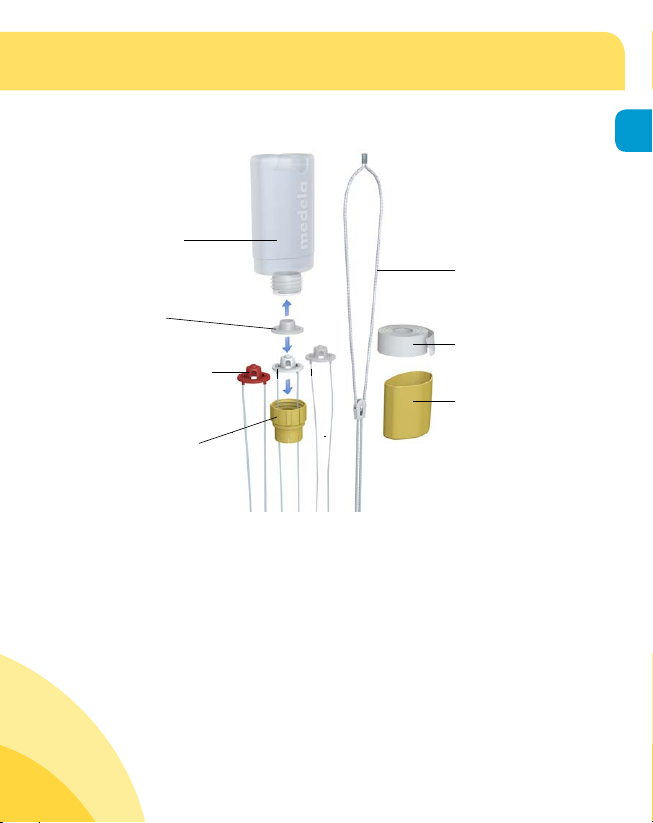
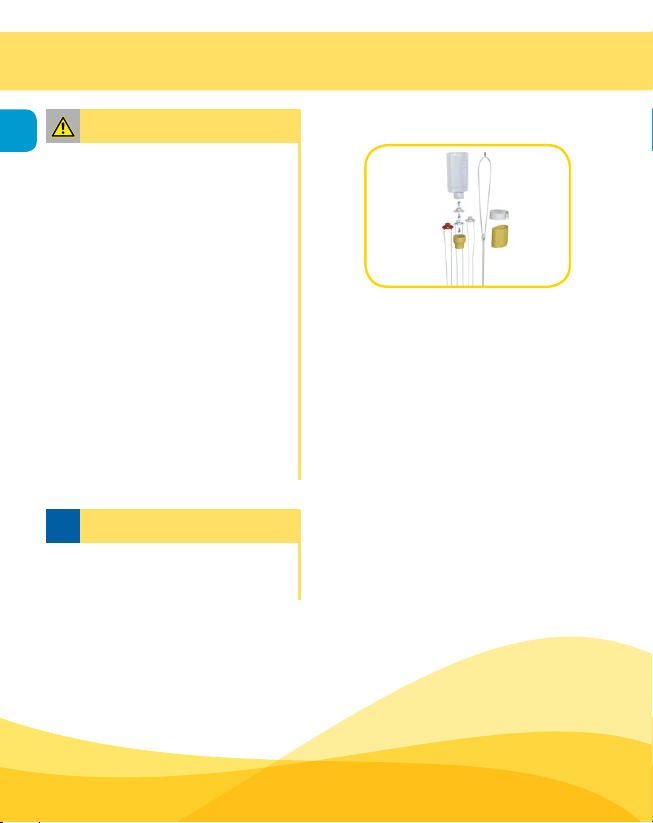
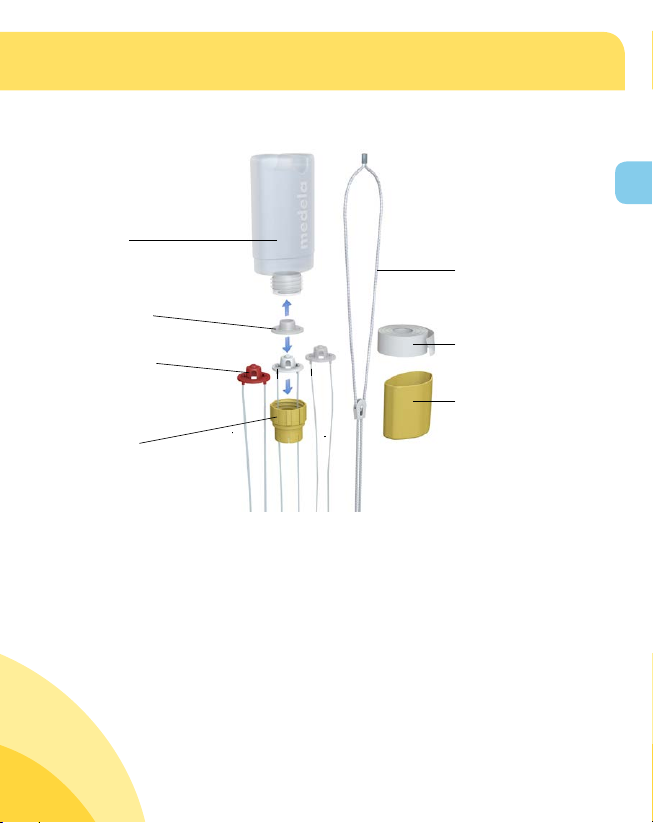
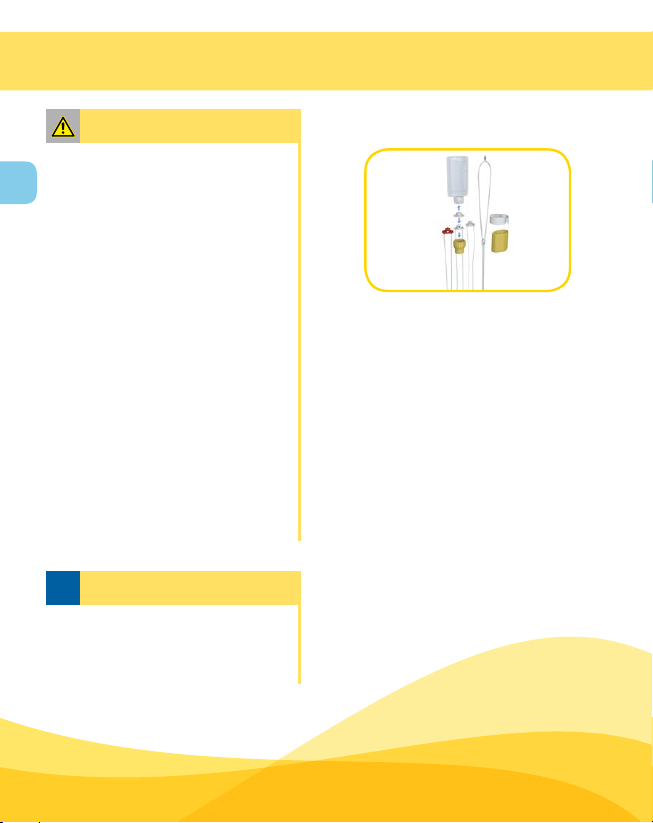
4.1 Product parts
1x Feeding Bottle
1x Valve Holder
3x Valves with Tubing
red = small, white = medium,
transparent = large
1x Attachment Ring
4.2 Material
I Neck Cord: Nylon, metal
I Feeding Bottle/Attachment Ring/Cover: Polypropylene
I Tubing: Silicone
I Valves: Polypropylene
I Valve Holder: Silicone
I Paper Tape: Paper
9
1x Neck Cord
1x Paper Tape
1x Cover
For product variants, see chapter 10
5. Cleaning
10
Caution
I Clean all parts immediately after
use to avoid drying up of milk
residues and to prevent growth
of bacteria.
I Only use drinking-quality water
for cleaning.
I If you clean the SNS parts with
boiling water, be careful not to
burn yourself.
I Store the clean parts in an air-
permeable, clean bag/container,
or in an air-permeable, clean
paper/cloth until next use.
i
Note
l When you boil the parts of the
SNS, you could add a teaspoon
of citric acid to avoid a build-up
of limescale. When you use citric
acid, minor traces might remain
on the parts. Use drinking-quality
water to wash them off. Dry the
parts with a clean cloth or leave
to dry on a clean cloth.
I Do not leave (parts of) the SNS
in direct sunlight or heat, as this
may weaken the parts.
I Do not use chemical sterilisers.
5.1 Cleaning at home
1
1
5.1.1 Before using for the rst time
I Disassemble* the SNS into its
individual parts.
I Rinse all parts with water.
I Fill the bottle with 50 ml of water.
Screw the attachment ring with
the tubing onto the bottle.* Shake
it for 5 seconds, then squeeze the
bottle for 15 seconds to force the
water through the tubing.
I Remove the valve and tubing from
the ring;* place all SNS parts in
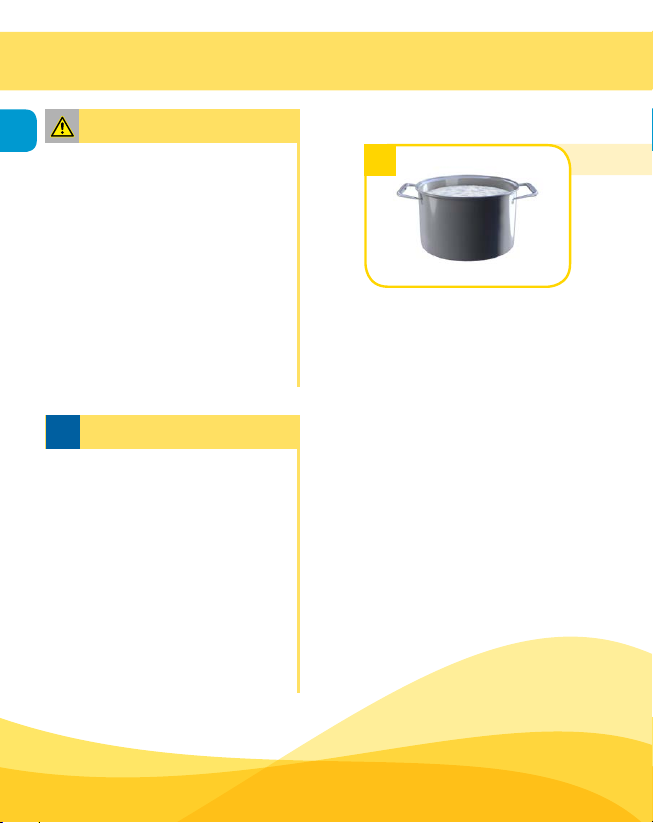
a pan; cover all parts with water
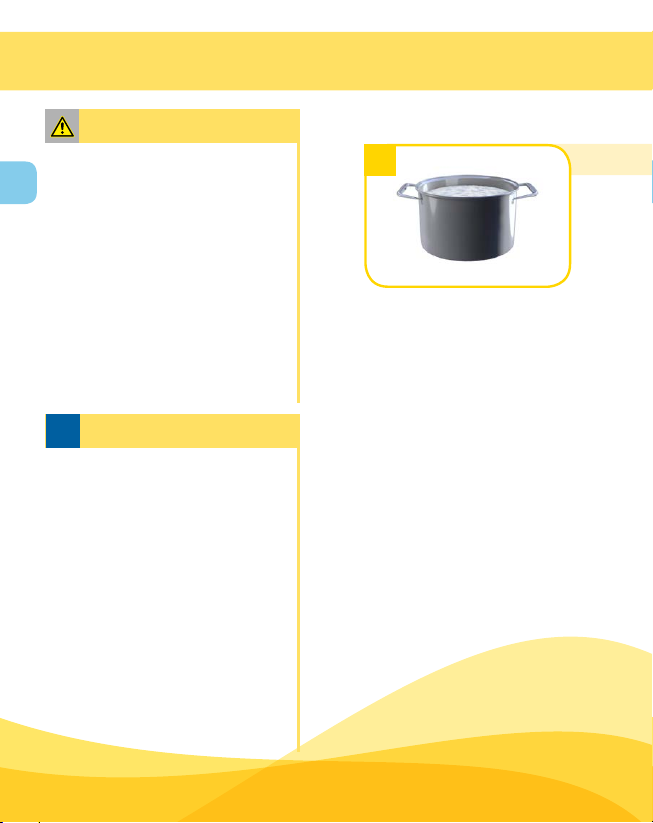
and boil for ve minutes.
I Remove the pan from the stove and
drain the hot water from the pan.
I Let the parts cool down in the pan.
I Dry the cooled-down parts with
a clean cloth or leave to dry on
a clean cloth.
or
* For more information about assembling and disassembling the SNS, see chapter 6 and 8, respectively.
2b
11
2
or
3
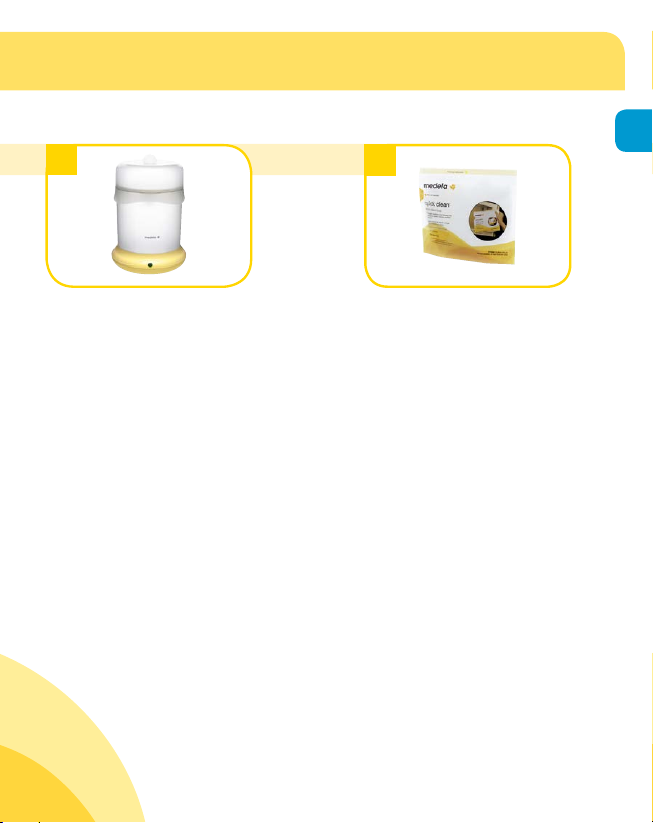
Use the B-Well Steam
Steriliser** in accordance with
the instructions.
5.1.2 After each use
I Disassemble* the SNS into its individual parts.
I Rinse all parts with warm, soapy water (approx. 50°C). Use
8 ml of dishwashing liquid per one litre tap water.
I Fill the feeding bottle with 50 ml of soapy water. Screw the attachment ring
with the tubing onto the bottle.
I Shake the bottle for 5 seconds, then squeeze it for 15 seconds to force the
soapy water through the tubing.
I Repeat steps a-d using cold tap water.
I Squeeze the empty bottle a few times to remove water droplets from the
tubing.
I Disassemble the now clean SNS into its individual parts.
I Leave to dry on a clean cloth.
5.1.3 Once a day
First clean the SNS as described in chapter 5.1.2, then clean the system as
described in chapter 5.1.1.
Use a Quick Clean Microwave
Bag** in accordance with the
instructions.
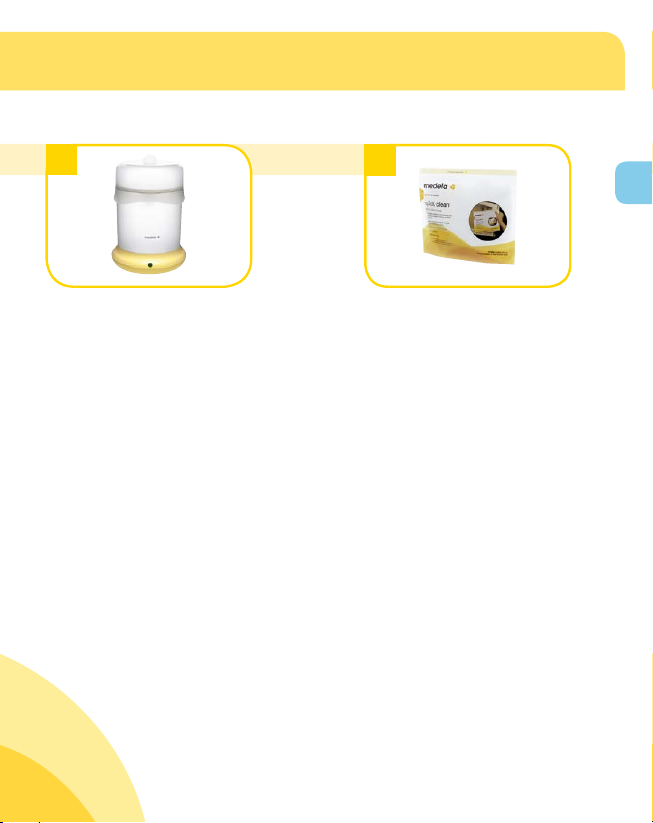
** More information at www.medela.com
5. Cleaning
12
Caution
I Clean all parts immediately after
use to avoid drying up of milk
residues and to prevent growth of
bacteria.
l Only use drinking-quality water
for cleaning.
I To avoid cross-contamination,
replace the tubing/valve set by a
new set every 24 hours. Clean the
newly assembled SNS as
described in chapter 5.2.1.
I When you are cleaning the SNS,
check all parts for damage.
Throw away at rst signs of
damage or weakness. Replace
the damaged part by a new part
and clean the SNS as described
in chapter 5.2.1.
i
Note
I Do not leave (parts of) the SNS in
direct sunlight or heat, as this may
weaken the parts.
5.2 Cleaning in the hospital
5.2.1 Before using for the rst time
I Disassemble* the SNS into its
single parts.
I Rinse all parts with water.
I Fill the bottle with 50 ml of water.
Screw the attachment ring with
the tubing onto the bottle.* Shake
the bottle for 5 seconds, then
squeeze it for 15 seconds to force
the water through the tubing.
I Remove the valve and tubing
from the ring.* Wrap all parts in
a sterilisable pouch. Sterilise all
parts by autoclaving at 134 °C
for 3 minutes or according to the
internal hygiene guidelines.
5.2.2 After each use
See chapter 5.1.2. (on page 11).
5.2.3 Once a day
You must sterilise the SNS once a
day by autoclaving. This is usually
done when you change the tubing.
* For more information about assembling and disassembling the SNS, see chapter 6 and 8, respectively.
6. Assembling the SNS / Preparing for feeding
Caution
l Wash your hands thoroughly (for
approx. one minute) with soap
and water before you touch your
breast and the SNS parts.
i
Note
l Assemble and prepare the
Supplemental Nursing System
(SNS) at the rst sign of your baby
being hungry.
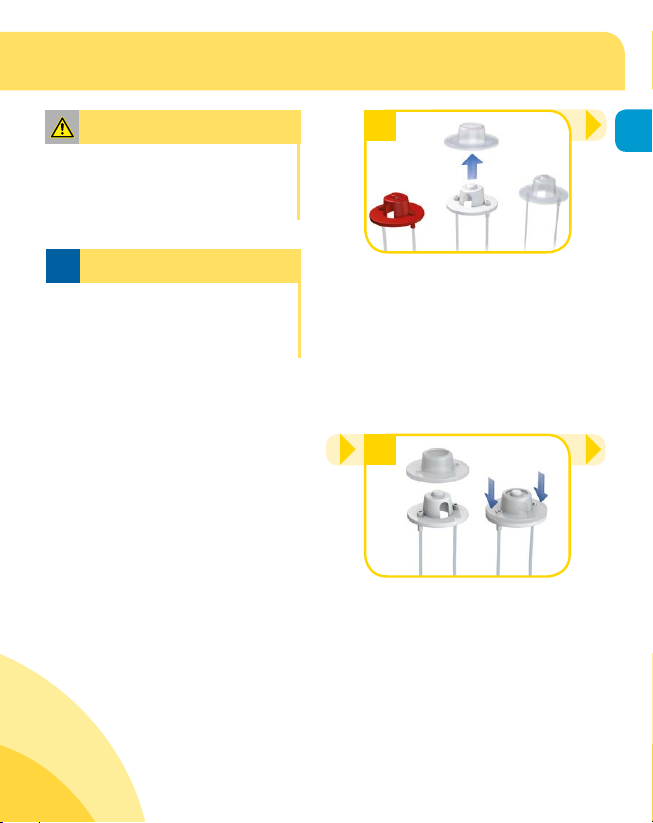
1
The SNS is supplied with three
sizes of tubing: small (red valve),
medium (white valve) and large
(transparent valve). When you use
the SNS system for the rst time,
start with the medium (white) valve.
2
Place the silicone valve holder
onto the valve.
13
6. Assembling the SNS / Preparing for feeding
Mix suppliment in separate container and then transfer it to the bottle
14
Caution
I The Supplemental Nursing
System is used to administer
supplemental nutrition to infants
while they are being fed at the
breast. Prepare the supplemental
nutrition in a separate milk container. To avoid clogging, dissolve
powdered formula thoroughly:
l Heat the supplemental nutrition to
max. 37 °C.
I Do not warm breastmilk in a
microwave or a pan of boiling
water to avoid loss of vitamins,
minerals and other important
ingredients and to prevent you
and your baby from burning
yourselves. For the same reasons,
do not thaw frozen breastmilk in
a microwave or a pan of boiling
water.
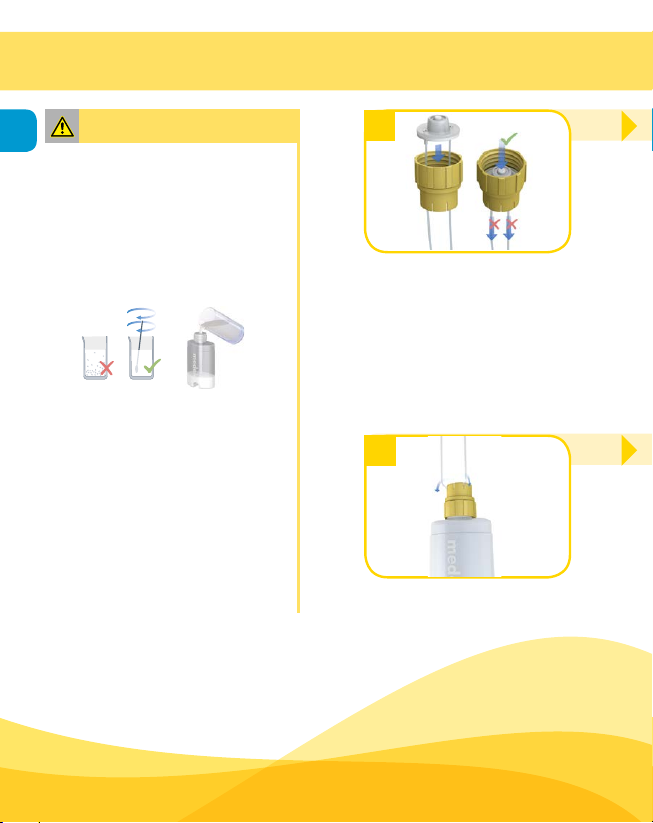
3
Slide the tubing with the valve on
top through the attachment ring.
Push the valve in until it snaps into
place. Do not pull on the tubing.
6
Lock both parts of the tubing in the
slits of the attachment ring. This is
to avoid milk leakage as you hang
the SNS around your neck.
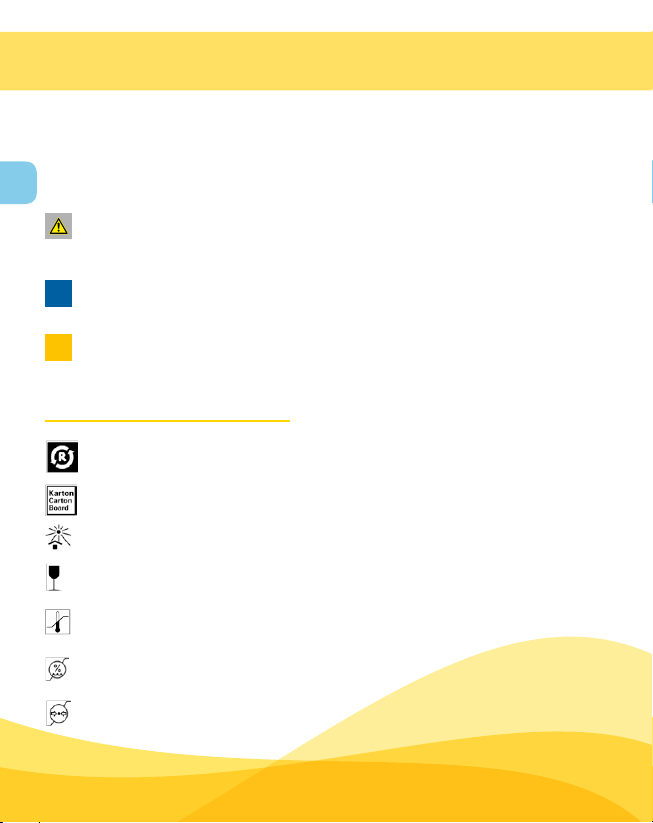
Place the SNS system around your
neck with the tubing hanging down.
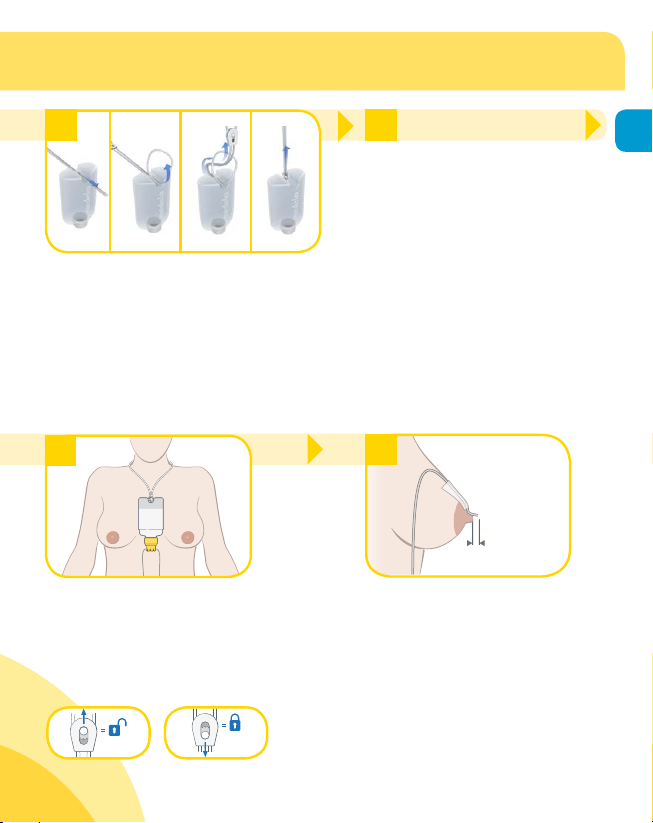
Fix the neck cord on the bottle:
approx
1 cm
Pull the cord with its soft ending (without
the clip) through the hole in the bottom
of the bottle. Pull the ending with the
metallic clip through the cord loop you
created in the previous step. Pull rmly
until the cord is xed.
54
Fill the bottle with the supplemental nutrition which you prepared and heated in a separate
container. Screw the attachment
ring with the valve and tubing
onto the bottle. Squeeze the
bottle gently, so that the milk
ows through the tubing. If you
use powdered formula, the for-
mula may be too cloggy to ow
freely. In this case, dissolve the
powder more thoroughly.
15
7
Check that the bottle shoulder is at nipple level. To raise the bottle, unlock the
lock of the cord and move the entire lock
downwards. To lower the bottle, move
the (unlocked) lock upwards. When the
bottle is in the right position, x the lock:
8
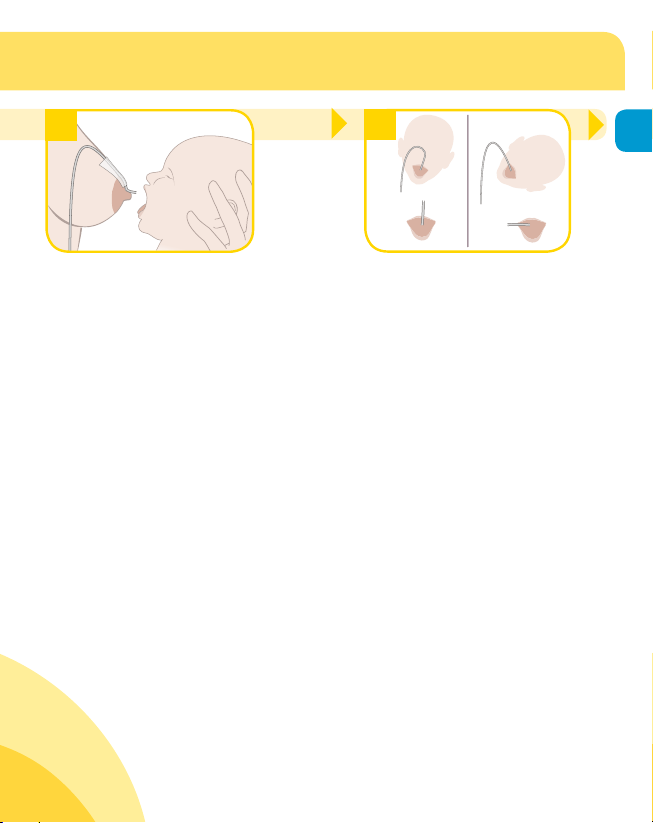
Cut off a piece of tape of approx.
6 cm. Place the tube onto the
breast such that it protrudes
from the nipple by 1 cm. This is to
prevent the (extended) nipple from
blocking the tube opening during
feeding. Repeat this step for the
other tube and the other breast.
7. Feeding
16
Caution
I Clean all parts immediately after use to
avoid drying up of milk residues and to
prevent growth of bacteria.
i
Note
I If you use the SNS at home in a private
environment, supervision by a professional
midwife or lactation consultant is
compulsory.
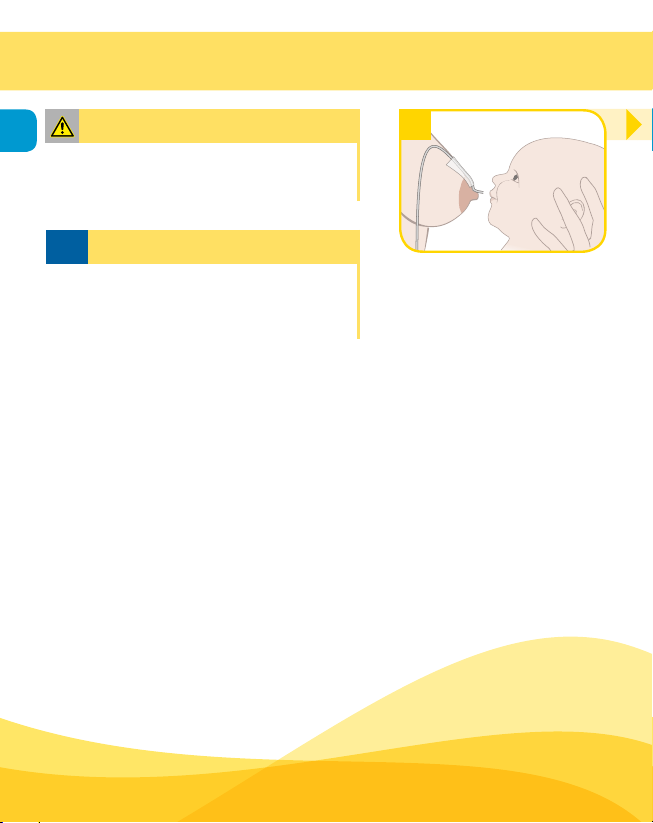
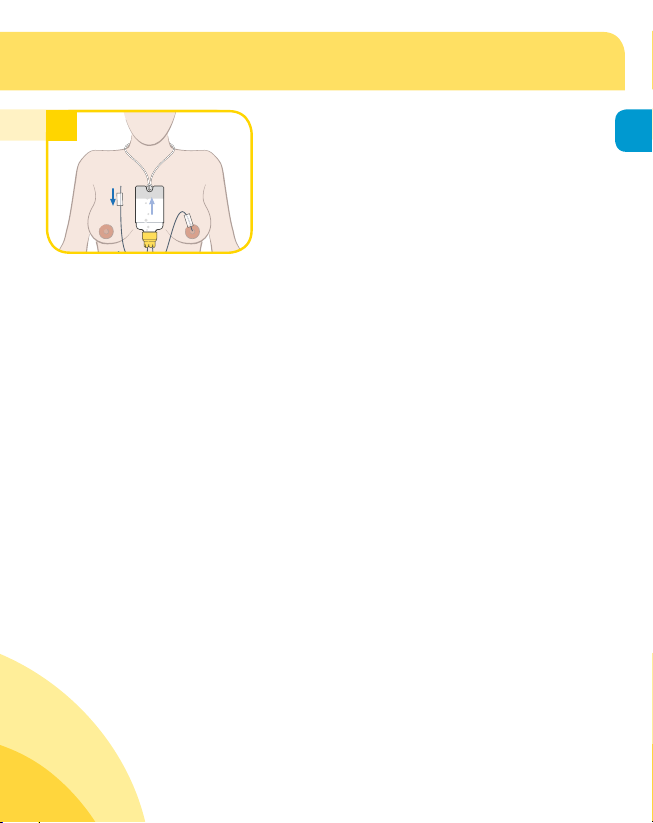
1
Assemble the SNS according
to the instructions in chapter
6. Hold your baby close to
your breast. To encourage
your baby to open its mouth,
tickle its lower lip with your
nipple. Leave a tiny space
between the nipple and your
baby’s mouth.
2
3
17
Wait until your baby opens its
mouth wide, then put your baby
onto your breast. Only when
the baby’s mouth is wide open,
allow it to latch-on. A good
latch-on position is essential for
successful feeding. This requires
your baby to accept both the
breast and the tube.
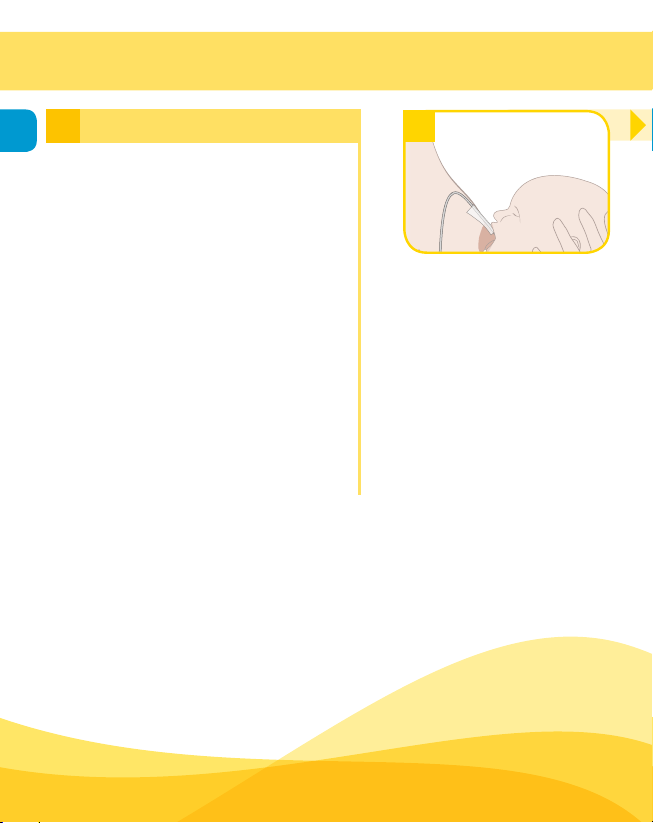
Check that the tube position in the
baby’s mouth is correct: the tube
should enter the mouth in the middle
of the upper lip or at the corner.
Note that you and your baby have
to familiarise yourselves with the
SNS. If you have difficulties in finding
the right position, release your baby
from the breast and try again. It is
important to try again and again, but
without applying pressure.
7. Feeding
Info
i
18
Flow regulation
You can regulate the milk ow as follows:
To increase the milk ow:
I Squeeze the bottle;
I Raise the bottle: unlock the cord lock at
the back of your neck. Move the entire lock
downwards. When the bottle is in the right
position, x the lock;
I Use a larger tubing size (the red valve/tubing
is small, the white one is medium and the
transparant one is large).
To decrease the milk ow:
I Lower the bottle: unlock the cord lock at
the back of your neck. Move the entire lock
upwards. When the bottle is in the right
position, x the cord lock;
I Use a smaller tubing size.
4
Once you and your baby have
found the right position, let
your baby breastfeed. When
your baby stops suckling,
release the tube from the slit
in the attachment ring. The
milk in the SNS bottle can
now ow through the tube.
Continue breastfeeding.
5
If the milk does not flow well, also
release the second tube. Attach the
tube with the opening upwards to
your body, on a level with the bottle
bottom.
Also, the milk flow might be too weak
or too strong. For information on how
to regulate the milk flow, see the ’Info’
column on the left (“Flow regulation”).
After approximately 15 minutes of
feeding, change the breast. Repeat
steps 1–5.
19

8. Disassembling the SNS
I Release the cord from the bottle.
20
I Unscrew the attachment ring from the bottle.
I Dispose of the remaining milk.
I Remove the valve and tubing from the attachment ring: push against the reverse
side of the valve (with the tubing attached) in the ring.
I Remove the valve holder from the valve.
I Clean all parts as described in chapter 5 “Cleaning”.
9. Disposal
Dispose of the SNS in accordance with the local disposal regulations.
10. Product variants and consumables
The following product variants and consumables are available from the Medela
distribution partners. To order a product, specify the name or corresponding
number.
Product variants
Article number
009.0005 SNS (EN/DE/FR/IT/NL/ES/PT/SV/PL/RU/KO/ZH)
Product
Consumables
Article number
200.7097 Tubing/Valve Set (with small, medium and large tubing)
Other Medela products are available on our website www.medela.com.
Product

21

Inhaltsverzeichnis
1. Verwendungszweck / Zielgruppe – Kontraindikationen 23
2. Bedeutung der Symbole 24
3. Wichtige Sicherheitshinweise 26
22
4. Produktbeschreibung 27
4.1 Bestandteile 27
4.2 Material 27
5. Reinigung 28
5.1 Reinigung zu Hause 28
5.1.1 Vor dem ersten Gebrauch 28
5.1.2 Nach jedem Gebrauch 29
5.1.3 Einmal am Tag 29
5.2 Reinigung im Krankenhaus 30
5.2.1 Vor dem ersten Gebrauch 30
5.2.2 Nach jedem Gebrauch 30
5.2.3 Einmal am Tag 30
6. Brusternährungsset zusammensetzen /
Vorbereitung für das Füttern 31
7. F ü t ter n 34
8. Das Brusternährungsset zerlegen 38
9. Entsorgung 38
10. Produktvarianten und Verbrauchsartikel 38
11. Technische Daten 219

1. Verwendungszweck / Zielgruppe – Kontraindikationen
Verwendungszweck des Brusternährungssets
Das Brusternährungsset wurde entwickelt, um Babys zusätzliche Nahrung zu
verabreichen, während diese gestillt werden. Sein Verwendungszweck besteht
darin, Müttern das Stillen zu ermöglichen, die sonst nicht in der Lage dazu wären.
Das Brusternährungsset kann verwendet werden um das Saugen zu trainieren
und um die Milchbildung der Mutter zu stimulieren. In jedem Fall erlaubt das
Brusternährungsset, den einzigartigen Hautkontakt zwischen Mutter und Kind
zu bewahren.
Mütter können mit dem System ihre eigene abgepumpte Muttermilch,
angereicherte Muttermilch oder künstliche Säuglingsnahrung füttern.
Zielgruppe / Benutzerinnen
Das Brusternährungsset sollte verwendet werden, wenn Babys nur schwach
saugen oder das Vakuum nicht lange genug aufrechterhalten können. Das
Brusternährungsset kann außerdem eingesetzt werden, wenn Mütter zu
wenig Milch haben und um adoptierte Babys direkt an der Brust zu füttern.
Kontraindikationen
Das Brusternährungsset darf nicht bei Müttern verwendet werden, die aufgrund
gesundheitlicher Beschwerden nicht stillen können. Mütter, die Medikamente
einnehmen, welche für Babys unverträglich sind, dürfen das Brusternährungsset
ebenfalls nicht verwenden.
Weitere Informationen in Ihrer Sprache:
Yderligere information på dit sprog:
Lisätietoja omalla kielelläsi:
Mer informasjon på ditt språk:
Περισσότερες πληροφορίες στη δική σας γλώσσα:
詳細情報をお住まいの地域の言語で閲覧できます:
23
Oder besuchen Sie unsere Website unter www.medela.com/sns
2. Bedeutung der Symbole
Das Warnsymbol kennzeichnet alle für die Sicherheit wichtigen Anweisungen.
Missachtung kann zu Verletzungen oder Sachschäden führen. Es gibt verschiedene
Warnsymbole. Jedes Symbol wird zusammen mit einem spezischen Wort
verwendet. Die Kombinationen aus Symbol und Wort bedeuten:
24
Vorsicht
Missachtung von Anweisungen dieser Art kann zu (geringfügigen)
Verletzungen oder Verunreinigungen/Entwicklung von Bakterien führen.
i
Hinweis
Missachtung von Anweisungen dieser Art kann zu Sachschäden führen.
i
Info
Nützliche und wichtige Informationen, die nicht sicherheitsrelevant sind.
Symbole auf der Verpackung
Dieses Symbol zeigt an, dass das Material Teil eines Recycling-Prozesses ist.
Dieses Symbol zeigt eine Kartonverpackung an.
Dieses Symbol zeigt an, dass das Produkt vor Sonnenlicht zu schützen ist.
Dieses Symbol zeigt an, dass das zerbrechliche Produkt mit Vorsicht
zu behandeln ist.
°C
Dieses Symbol zeigt die Temperaturbeschränkung für Betrieb, Transport
und Lagerung an.
Dieses Symbol zeigt die Luftfeuchtigkeitsbeschränkung für Betrieb,
Transport und Lagerung an.
Dieses Symbol zeigt die Luftdruckbeschränkung für Betrieb, Transport
und Lagerung an.
Dieses Symbol zeigt an, dass das Produkt trocken zu lagern ist.
Dieses Symbol zeigt an, dass das Produktmaterial für den Kontakt mit
Nahrungsmitteln zugelassen ist.
Dieses Symbol zeigt die GTIN (GS1 Global Trade Item Number) an.
Dieses Symbol zeigt an, dass in der Gebrauchsanweisung nachzuschlagen ist.
Dieses Symbol weist auf den Hersteller hin.
25
3. Wichtige Sicherheitshinweise
Für die Sicherheit und Gesundheit Ihres Kindes
ACHTUNG!
Bei Missachtung der nachstehenden Informationen können Gefahren
26
durch das Produkt entstehen.
Das Brusternährungsset ist nicht hitzebeständig: Halten Sie es von
Heizkörpern und offenem Feuer fern.
Setzen Sie das Brusternährungsset nicht direktem Sonnenlicht aus.
Überprüfen Sie die Teile des Brusternährungssets auf Abnutzung und
Beschädigung. Verwenden Sie nie ein beschädigtes Produkt. Entsorgen Sie
die Teile beim Auftreten erster Schäden oder Schwachstellen umgehend.
MAX.
Aus Gründen der Hygiene empfehlen wir die Schläuche alle 30 Tage
30 days
(Verwendung zu Hause) bzw. alle 24 Stunden (im Krankenhaus) zu ersetzen.
Wir empfehlen nicht, dasselbe Brusternährungsset durch verschiedene
Personen zu benutzen, da dies ein gesundheitliches Risiko darstellen kann.
Verwenden Sie dieses Produkt immer unter der Aufsicht von Erwachsenen.
Einzelteile, die nicht verwendet werden, dürfen nicht in die Hände von
Kindern gelangen.
Bitte wenden Sie sich bei Problemen oder Schmerzen an Ihre
Stillberaterin oder Ihren Arzt.
Wichtig
I Das Brusternährungsset ist kein Aufbewahrungsbehälter, sondern eine
Fütterungshilfe. Benutzen Sie es nicht, um Milch aufzubewahren.
I Plastikaschen und andere Bestandteile können durch Einfrieren brüchig werden
und zerbrechen, wenn sie herunterfallen.
I Zudem können Flaschen und andere Bestandteile durch unsachgemäßen Gebrauch
beschädigt werden, z.B. wenn sie fallen gelassen, zu fest zugeschraubt oder
umgestoßen werden.
I Gehen Sie mit den Flaschen und Bestandteilen entsprechend vorsichtig um.
I Verwenden Sie die Muttermilch nicht, wenn die Flasche oder Bestandteile beschädigt
wurden.
I Überprüfen Sie die Temperatur der Nahrung immer vor dem Füttern (Verbrühungsgefahr).
I Die Milch nicht in der Mikrowelle erwärmen. Dies kann zu ungleichmäßiger
Erwärmung und zu Verbrühungen bei Ihrem Baby führen.
4. Produktbeschreibung
4.1 Bestandteile
1x Flasche
1x Ventilhalter
3x Ventile mit
Schläuchen
rot = klein, weiß = mittel,
transparent = groß
1x Haltering
4.2 Material
I Kordel: Nylon, Metall
I Flasche/Haltering/Schutzkappe: Polypropylen
I Schläuche: Silikon
I Ventile: Polypropylen
I Ventilhalter: Silikon
I Heftpaster: Papier
27
1x Kordel
1x Heftpaster
1x Schutzkappe
Für Produktvarianten siehe Kapitel 10
5. Reinigung
Vorsicht
I Reinigen Sie alle Teile sofort nach der
Verwendung, um das Eintrocknen
28
von Milchresten und die Entwicklung
von Bakterien zu verhindern.
I Verwenden Sie für die Reinigung nur
Wasser in Trinkwasserqualität.
I Passen Sie auf, dass Sie sich nicht
verbrühen, wenn Sie das Bruster
nährungsset mit kochendem Wasser
reinigen.
I Bewahren Sie die sauberen Teile bis
zum nächsten Gebrauch in einem
luftdurchlässigen, sauberen Beutel/
Behälter oder eingehüllt in luftdurch
lässiges, sauberes Papier/Tuch auf.
-
-
i
Hinweis
I Beim Auskochen der Teile können
Sie dem Wasser einen Teelöffel
Zitronensäure hinzufügen, um
Kalkablagerungen zu verhindern. Bei
der Verwendung von Zitronensäure
können geringfügige Spuren auf den
Teilen zurückbleiben. Verwenden Sie
Wasser in Trinkwasserqualität, um
diese abzuwaschen. Trocknen Sie die
abgekühlten Teile mit einem sauberen
Tuch ab oder lassen Sie diese auf
einem sauberen Tuch trocknen.
I Setzen Sie das Brusternährungsset
(oder Teile davon) nicht direktem
Sonnenlicht oder Hitze aus, da dies
zu Schäden führen kann.
I Verwenden Sie keine chemischen
Sterilisierungsprodukte.
* Weitere Informationen zum Zusammensetzen und Auseinandernehmen des Brusternährungssets nden
Sie in Kapitel6 bzw. 8.
5.1 Reinigung zu Hause
1
1
5.1.1 Vor dem ersten Gebrauch
I Zerlegen* Sie das Brusternährungsset
in seine Einzelteile.
I Spülen Sie alle Teile mit Wasser ab.
I Füllen Sie 50 ml Wasser in die
Flasche. Schrauben Sie den Haltering
mit den Schläuchen auf die Flasche*.
Schütteln Sie die Flasche für fünf
Sekunden und drücken Sie sie dann
für 15Sekunden, um das Wasser
durch die Schläuche zu pressen.
I Entfernen Sie das Ventil und die
Schläuche vom Haltering*. Geben
Sie alle Teile des Brusternährungssets
in einen Topf, bedecken Sie sie mit
Wasser und kochen Sie diese fünf
Minuten lang aus.
I Nehmen Sie den Topf vom Herd und
gießen Sie das heiße Wasser ab.
I Lassen Sie die Teile im Topf abkühlen.
I Trocknen Sie die abgekühlten Teile
mit einem sauberen Tuch ab oder
lassen Sie diese auf einem sauberen
Tuch trocknen.
oder
2b
2
oder
3
29
Verwenden Sie den
B-Well-Dampfsterilisator**
gemäß Gebrauchsanweisung.
5.1.2 Nach jedem Gebrauch
I Zerlegen Sie das Brusternährungsset in seine Einzelteile*.
I Spülen Sie alle Teile mit warmem Spülwasser (circa 50°C) ab. Verwenden Sie
dabei 8 ml Geschirrspülmittel pro Liter Leitungswasser.
I Geben Sie 50 ml Seifenwasser in die Flasche. Schrauben Sie den Haltering mit
den Schläuchen auf die Flasche*.
I Schütteln Sie die Flasche fünfSekunden und drücken Sie sie dann für 15Sekun
den, um das Spülwasser durch die Schläuche zu pressen.
I Wiederholen Sie die Schritte a bis d mit kaltem Leitungswasser.
I Drücken Sie die leere Flasche einige Male zusammen, um Wassertröpfchen aus
den Schläuchen zu entfernen.
I Zerlegen Sie das nun saubere Brusternährungsset in seine Einzelteile.
I Lassen Sie es auf einem sauberen Tuch trocknen.
5.1.3 Einmal am Tag
Reinigen Sie das Brusternährungsset zuerst gemäß Kapitel 5.1.2 und reinigen
Sie das System dann gemäß Kapitel 5.1.1.
** Weitere Informationen nden Sie unter www.medela.de
Verwenden Sie den Quick
Clean-Mikrowellenbeutel**
gemäß Gebrauchsanweisung.
-
5. Reinigung
Vorsicht
I Reinigen Sie alle Teile sofort nach
der Verwendung, um das Ein-
30
trocknen von Milchresten und
die Entwicklung von Bakterien zu
verhindern.
I Verwenden Sie für die Reinigung nur
Wasser in Trinkwasserqualität.
I Ersetzen Sie das Ventil/ Schlauchset
alle 24 Stunden, um eine Kreuzkontamination zu vermeiden. Reinigen
Sie das frisch zusammengesetzte
Brusternährungsset gemäß Kapitel
5.2.1.
I Überprüfen Sie alle Teile des
Brusternährungssets während der
Reinigung auf Beschädigungen.
Entsorgen Sie die Teile beim Auftreten erster Schäden oder Schwachstellen umgehend. Ersetzen Sie
beschädigte Teile durch neue und
reinigen Sie das Brusternährungsset
gemäß Kapitel 5.2.1.
i
Hinweis
I Setzen Sie das Brusternährungsset
(oder Teile davon) nicht direktem
Sonnenlicht oder Hitze aus, da dies
zu Schäden führen kann.
* Weitere Informationen zum Zusammensetzen und Auseinandernehmen des Brusternährungssets nden
Sie in Kapitel6 bzw. 8.
5.2 Reinigung im
Krankenhaus
5.2.1 Vor dem ersten Gebrauch
I Zerlegen Sie das Brusternährungsset
in seine Einzelteile*.
I Spülen Sie alle Teile mit Wasser ab.
I Geben Sie 50 ml Wasser in die Fla-
sche. Schrauben Sie den Haltering
mit den Schläuchen auf die Flasche*.
Schütteln Sie diese fünfSekunden
und drücken Sie die Flasche dann
für 15Sekunden, um das Wasser
durch die Schläuche zu pressen.
I Entfernen Sie das Ventil und die
Schläuche vom Haltering*. Geben
Sie alle Teile des Brusternährungssets in einen sterilisierbaren
Beutel. Autoklavieren Sie alle Teile für
dreiMinuten bei 134 °C bzw. gemäß
den internen Hygienerichtlinien.
5.2.2 Nach jedem Gebrauch
Siehe Kapitel 5.1.2. (Seite 11).
5.2.3 Einmal am Tag
Das Brusternährungsset muss einmal
pro Tag im Autoklav sterilisiert werden.
Normalerweise geschieht dies, wenn
Sie die Schläuche auswechseln.
 Loading...