

Page 1
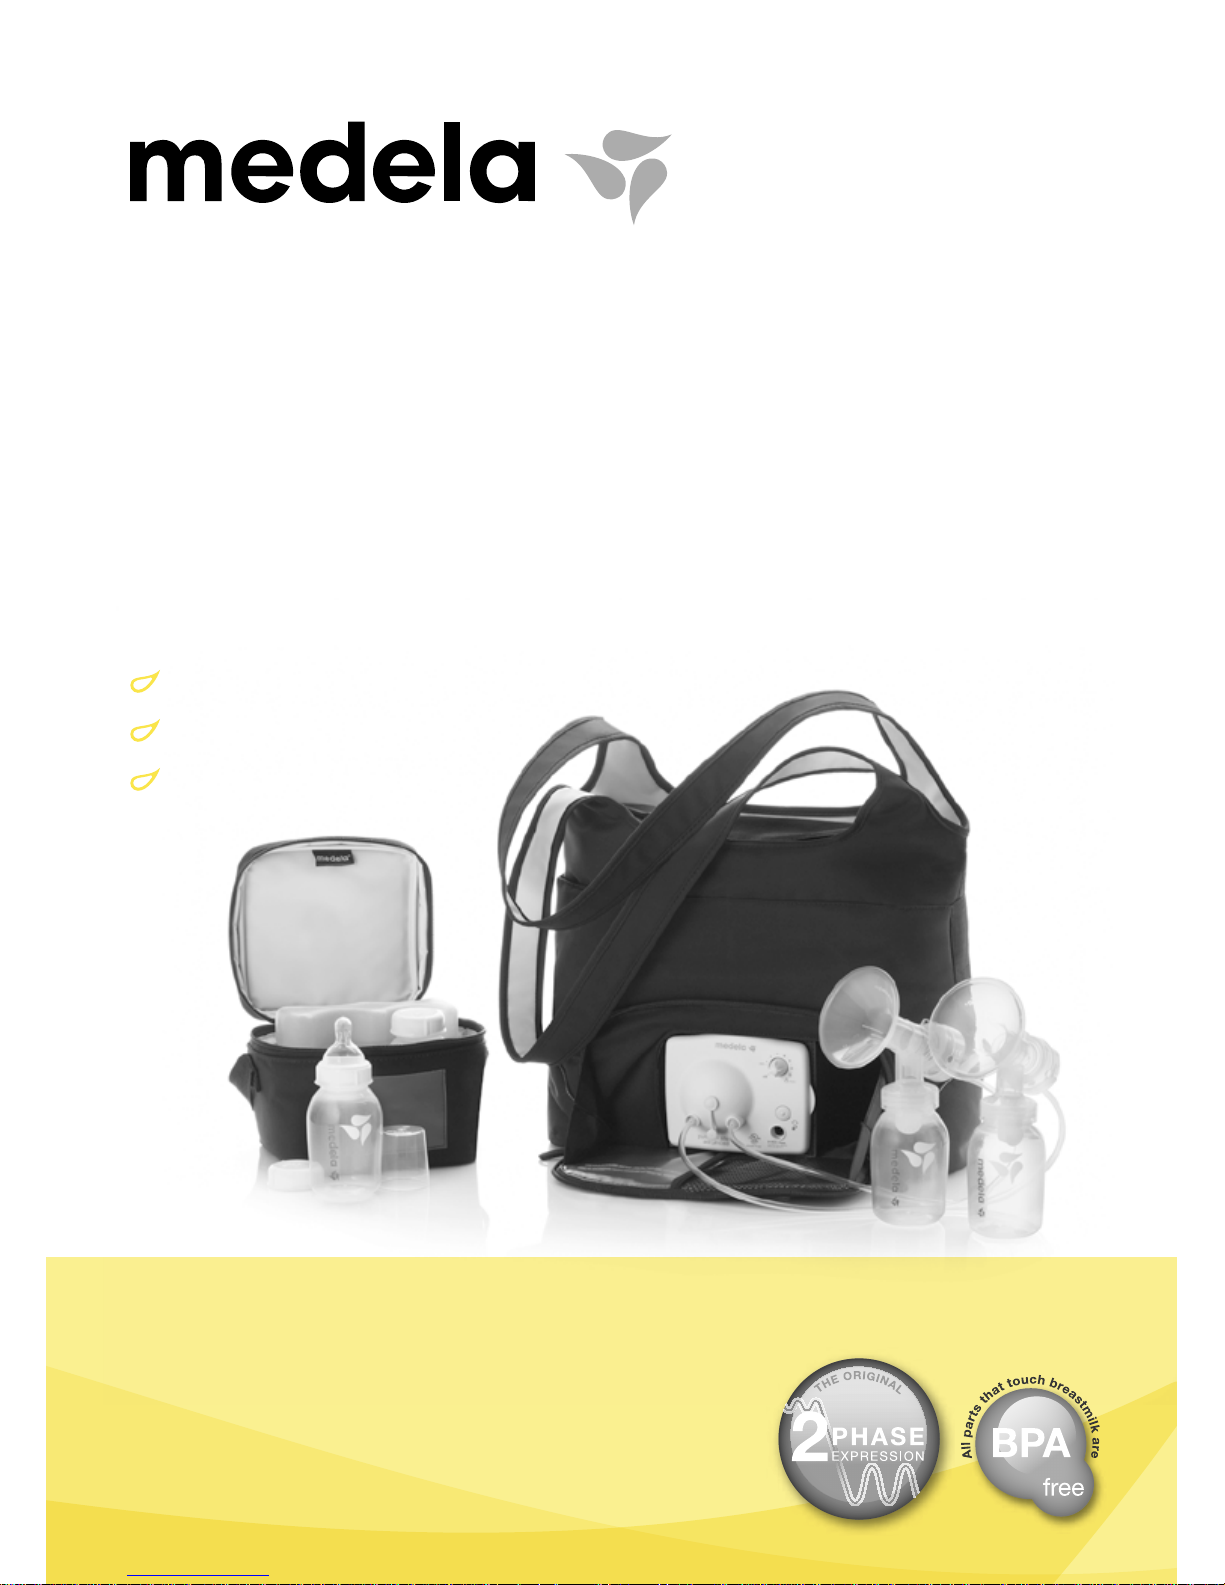
pump in style
®
advanced
breastpump
bomba de lactancia
tire-lait
instructions
instrucciones
mode d’emploi
Page 2

Table of Contents-English
Ordering parts .............................................................................................. 1
Breastpump parts list ................................................................................... 1
Parts guide ................................................................................................... 2
Warranty ....................................................................................................... 3
Health & safety information ........................................................................4-8
Hygiene, cleaning, storing breastmilk
Uses ............................................................................................................5
Troubleshooting ................................................................................ 9
Assembly instructions
Pump In Style® Advanced breastpump ......................................10-14
Pump In Style Advanced battery pack ........................................... 15
Breastfeeding accessories (sold separately) .................................................... 16
Índice-Español
Pedido de piezas........................................................................ ................. 17
Lista de piezas de la bomba de lactancia ..................................................17
Guía de piezas............................................................................................... 2
Garantía....................................................................................... ................ 18
Información sobre salud y seguridad.....................................................19-24
Higiene, limpieza y almacenamiento de la leche materna
Usos ..........................................................................................................20
Solución de problemas.....................................................................25
Instrucciones de armado
Bomba de lactancia Pump In Style® Advanced.........................26-30
Paquete de pilas de Pump In Style Advanced............................31
Accesorios para lactancia materna (se venden por separado) ..................32
Table des matières-Français
Commande de pièces....................................................................... .......... 33
Liste des pièces du tire-lait ......................................................................... 33
Guide des pièces ..........................................................................................2
Garantie ....................................................................................................... 34
Informations sur la santé et la sécurité ..................................................35-40
Hygiène, nettoyage et conservation du lait maternel
Utilisation ..................................................................................................... 36
Dépannage .......................................................................................41
Instructions d’assemblage
Tire-lait Pump In Style® Advanced ..............................................42-46
Bloc-piles Pump In Style Advanced ................................................47
Accessoires pour l’allaitement (vendus séparément) .................................48
Parts (See illustration on next page)
1. Ice pack (1) . . . . . . . . . . . . . . . . . . . . . . . . . . . . . . . . . . . . . . . . . . . . . . . . . . . . . #87092
2. Pump In Style® tubing . . . . . . . . . . . . . . . . . . . . . . . . . . . . . . . . . . . . . . . . . . . . . #8007212
3. 5 oz BPA-free breastmilk bottles (150 mL) . . . . . . . . . . . . . . . . . . . . . . . . . . . . #8117012
4. Slow flow wide base nipple (1) . . . . . . . . . . . . . . . . . . . . . . . . . . . . . . . . . . . . . . #8207060
5. Travel cap (1) . . . . . . . . . . . . . . . . . . . . . . . . . . . . . . . . . . . . . . . . . . . . . . . . . . . . . #2001686
6. Wide base nipple collar . . . . . . . . . . . . . . . . . . . . . . . . . . . . . . . . . . . . . . . . . . . . #8107182
7. Solid container lids (4) . . . . . . . . . . . . . . . . . . . . . . . . . . . . . . . . . . . . . . . . . . . . . #8107183
8. PersonalFitTM breastshields (24 mm) (2) . . . . . . . . . . . . . . . . . . . . . . . . . . . . . . . #87073
9. PersonalFitTM connectors (2) . . . . . . . . . . . . . . . . . . . . . . . . . . . . . . . . . . . . . . . . . #87071
10. Spare membranes (6) . . . . . . . . . . . . . . . . . . . . . . . . . . . . . . . . . . . . . . . . . . . . . . #87088
11. Spare valves & membranes (2) . . . . . . . . . . . . . . . . . . . . . . . . . . . . . . . . . . . . . . #87089
12. 9 volt Pump In Style transformer* (1) . . . . . . . . . . . . . . . . . . . . . . . . . . . . . . . . . #9207010
13. 8-count battery pack* (1) . . . . . . . . . . . . . . . . . . . . . . . . . . . . . . . . . . . . . . . . . . . #67553
14. Diaphragm cap assembly . . . . . . . . . . . . . . . . . . . . . . . . . . . . . . . . . . . . . . . . . . #6007105
9V Vehicle Lighter Adapter* . . . . . . . . . . . . . . . . . . . . . . . . . . . . . . . . . . . . . . . . . . . . . #67174
Breastmilk Bottle Set (8oz 3-pack) . . . . . . . . . . . . . . . . . . . . . . . . . . . . . . . . . . . . . . . #87132
Pump & SaveTM Breastmilk Bags (20-pack) . . . . . . . . . . . . . . . . . . . . . . . . . . . . . . . . . #87033
Quick CleanTM Micro-SteamTM Bags . . . . . . . . . . . . . . . . . . . . . . . . . . . . . . . . . . . . . . . . #87024
*For use with PNS Advanced versions sold after January 1, 2008
Item Part No.
Optional Accessories
Ordering Parts
If your retailer doesn’t carry the parts you need, in US and Canada, you
can call 800-435-8316 (US and Canada), 815-363-1166 (US) or 905-6088720 (Canada) and order with VISA, MasterCard, American Express, or
Discover Card. In
other countries please contact your local
distributor. Visit www.medela.com for a distributor listing.
1
Page 3
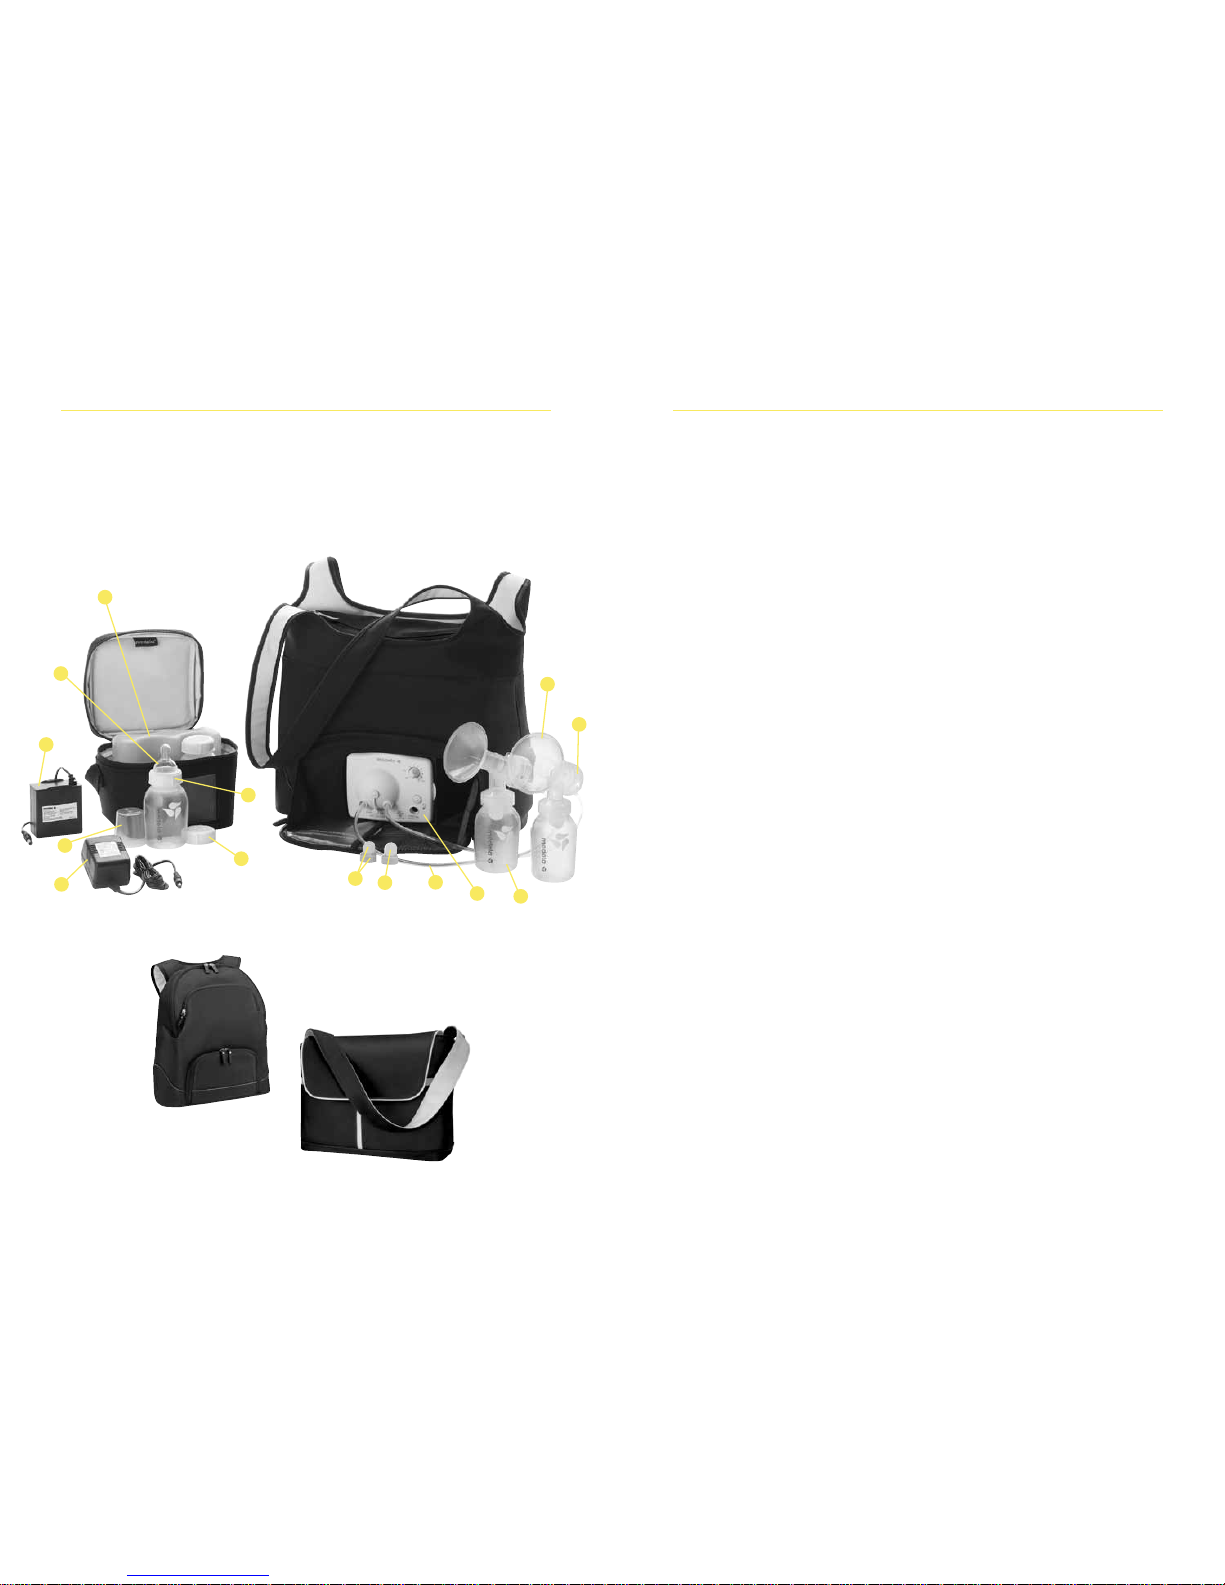
Pump In Style® Advanced Breastpump
PARTS • PIEZAS • PIÈCES
Pump In Style
Advanced
Backpack
Pump In Style
Advanced
The Metro Bag
™
Pump In Style
Advanced
Shoulder Bag
1
8
2
9
7
10
3
13
14
3
Medela Pump In Style® Advanced
Breastpumps
This is a single user product. Use by more than one
person may present a health risk and performance
questions and voids the warranty.
This product is warranted by Medela, Inc. to the original retail purchaser to be
free from defects in material and workmanship for the period of one year for
pump mechanism (90 days for parts and accessories) from the date of purchase.
In the event of a defect, Medela will repair or, at Medela’s option, replace this
product, without charge for such replacement, parts or labor. Purchaser shall
bear all expense for returning this product to Medela. This warranty does not
apply to any product used commercially or which has been subjected to misuse,
abuse or alteration.
ANY AND ALL IMPLIED WARRANTIES, INCLUDING THE WARRANTY
OF MERCHANTABILITY, ARE LIMITED TO A DURATION OF 90
DAYS FROM DATE OF PURCHASE. SOME STATES DO NOT ALLOW
LIMITATIONS ON HOW LONG AN IMPLIED WARRANTY LASTS,
SO THE ABOVE LIMITATIONS MAY NOT APPLY TO YOU. THIS
WARRANTY GIVES YOU SPECIFIC LEGAL RIGHTS AND YOU MAY
ALSO HAVE OTHER RIGHTS WHICH VARY FROM STATE TO STATE.
Before you make a claim under this warranty, it may save time and expense to
call Medela Customer Service (toll free) at 1-800-435-8316. You may also call
this number for additional information concerning this warranty. If you wish to
make a claim under this warranty, you must return this product to Medela with
a return authorization number received from Medela Customer Service, prepaid,
together with your dated bill of sale or other proof of purchase and a brief
statement of the problem to the following address:
Medela, Inc., P.O. Box 660, McHenry, IL 60051-0660
ATTENTION: SERVICE DEPARTMENT.
Call first for authorization number. Returns not accepted
without an authorization number.
12
4
6
5
11
2
Page 4
5
Uses
n
Collect breastmilk at work or during other absences from the baby.
n
Maintain a milk supply if breastfeeding is temporarily interrupted.
n Relieve engorgement with single pumping. Single pumping with
simultaneous massage is helpful to relieve engorgement.
Health & Safety Information
Important:
This product is a single user item. Use by more than one user
may pose a health risk and performance questions and voids the warranty.
Hygiene
Wash hands before touching breasts or
containers and avoid touching the inside
of containers or lids.
Cleaning
Follow these cleaning instructions unless you are told otherwise by your
healthcare professional. Prior to cleaning, take apart all parts of your
breastpump accessory kit. Especially be sure to remove the yellow valve
from the breastshield and separate the white membrane from the valve
prior to cleaning. See parts 8 - 11 on the illustration (page 2).
Prior to first use:
Disassemble all parts of your kit and breastpump that come in contact
with the breast and milk (breastshields, connectors, valves, membranes,
bottles, and caps). Sanitize in boiling water for 10 minutes. It is not nec-
essary to sanitize tubing prior to first use.
After each use:
Disassemble and wash all parts that come in contact with the breast
and milk in warm, soapy water (breastshields, connectors, valves, membranes, bottles, and caps). All parts are to be disassembled and washed
separately for the pump to function efficiently.
• Rinse in clear water.
• Use a damp (not wet) cloth to wipe the bag and diaphragm cap of
breastpump after each use. See part 14 on the illustration (page 2).
IMPORTANT
SAFEGUARDS
This is a single user product. Use by more than one
person may present a health risk and performance
questions, and voids the warranty.
When using electrical products, especially when
children are present, basic safety precautions should always
be followed, including the following:
READ ALL INSTRUCTIONS
DANGER: To reduce the risk of electrocution:
1. Always unplug electrical products immediately after using.
2. Do not use while bathing.
3.
Do not place or store product where it can fall or be pulled into a tub or sink.
4. Do not place in or drop into water or other liquid.
5. Do not reach for a product if it has fallen into water. Unplug immediately.
WARNING:
To reduce the risk of burns, electrocution, fire or injury to persons:
1.
A product should never be left unattended when plugged into an electric outlet.
2. Close supervision is necessary when this product is used by, on, or near children or
invalids.
3. Use the product only for its intended use as described in this manual. Do not use
attachments not recommended by the manufacturer.
4. Never operate this product if it has a damaged cord or plug, if it is not working properly,
if it has been dropped or damaged, or dropped into water.
5. Keep the cord away from heated surfaces.
6. Do not use outdoors, or operate where aerosol (spray) products are being used or where
oxygen is being administered.
7. Plug the transformer into Pump In Style Advanced product first and then into wall socket.
8. Only use the transformer that comes with the Pump In Style Advanced Breastpump.
9. Only use the Medela Pump In Style Advanced Battery Pak with the Medela Pump In Style
Advanced Breastpumps.
10.
This product is a personal care item and should not be shared between mothers.
11.
Make sure the voltage of the transformer is compatible with the power source.
12. Pump only with the motor in an upright position.
13. Never use while sleeping or when drowsy.
SAVE THESE INSTRUCTIONS
4
Page 5
7
5. Use a damp (not wet) cloth to wipe the diaphragm and bag. Do not
immerse the motor unit or any of the bags in water.
6. When components are completely dry, reassemble breastpump
and kit.
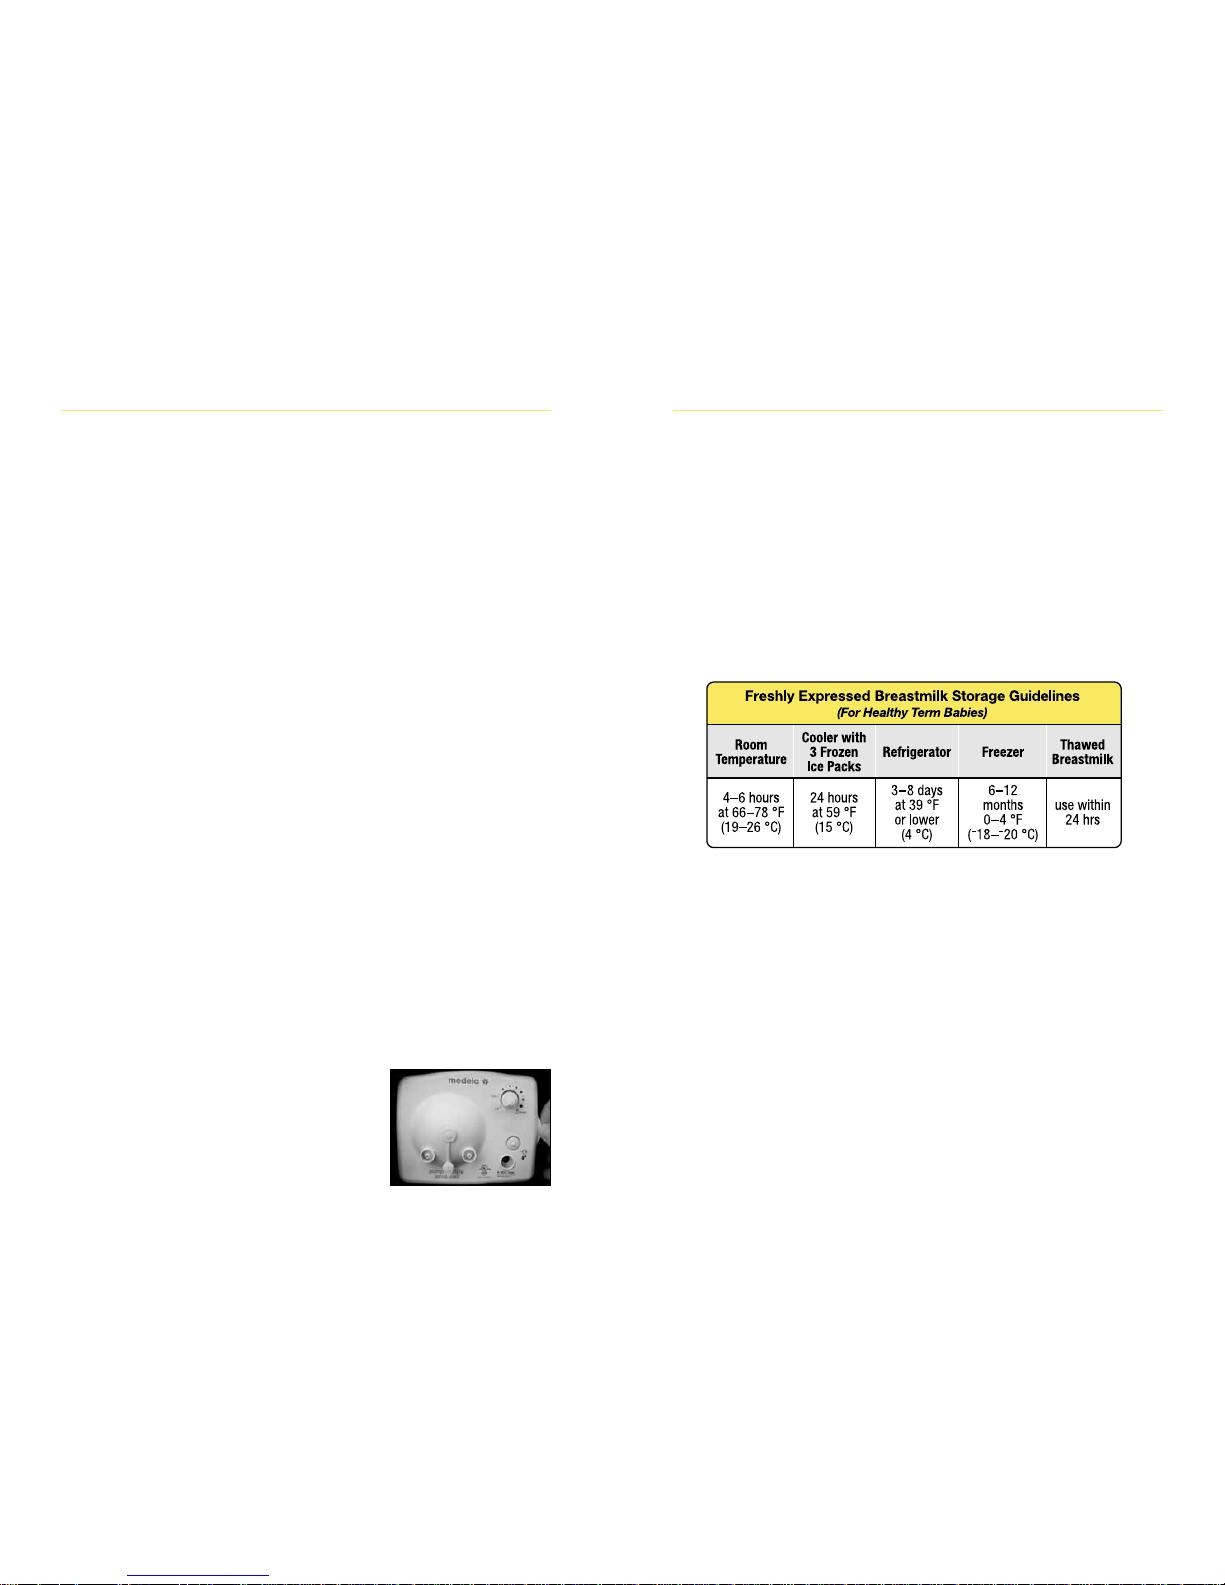
Storing Breastmilk
Check with your hospital for specific storage instructions.
When freezing, do not fill containers more than 3/4 full to allow space
for expansion. Label containers with the date of pumping.
Important Note: If the temperature in the room, car or outdoors
exceeds 77 °F / 25 °C, chill milk immediately to preserve freshness.
Reference: www.BreastmilkGuidelines.com
6
For Quicker Cleaning:
Medela offers Quick Clean
™
Micro-Steam™ bags for daily kit
disinfection. (Not recommended for use with SoftFit
™
breastshields).
Tubing Care:
Inspect tubing after each pumping session for condensation and/or milk.
It is not necessary to clean tubing after every use.
If condensation appears in tubing:
To eliminate condensation after you have completed pumping, continue
running the pump with the tubing(s) attached for another 1-2 minutes
or until dry.
If There Is An Overflow:
If milk accidentally gets into the tubings:
1. Turn off the pump and unplug from power source.
2. Remove and disassemble the tubing. Wash in soapy water, then
rinse in cold clear water.
3. Shake water droplets out and hang to air-dry. For faster drying,
attach tubings to pump and run pump 1-2 minutes or until dry, or
pour a small amount of isopropyl alcohol through the tubings to dry.
(Tubing can be cleaned using a Quick Clean Micro-Steam bag. Make
sure tubing is fully immersed in water inside of bag).
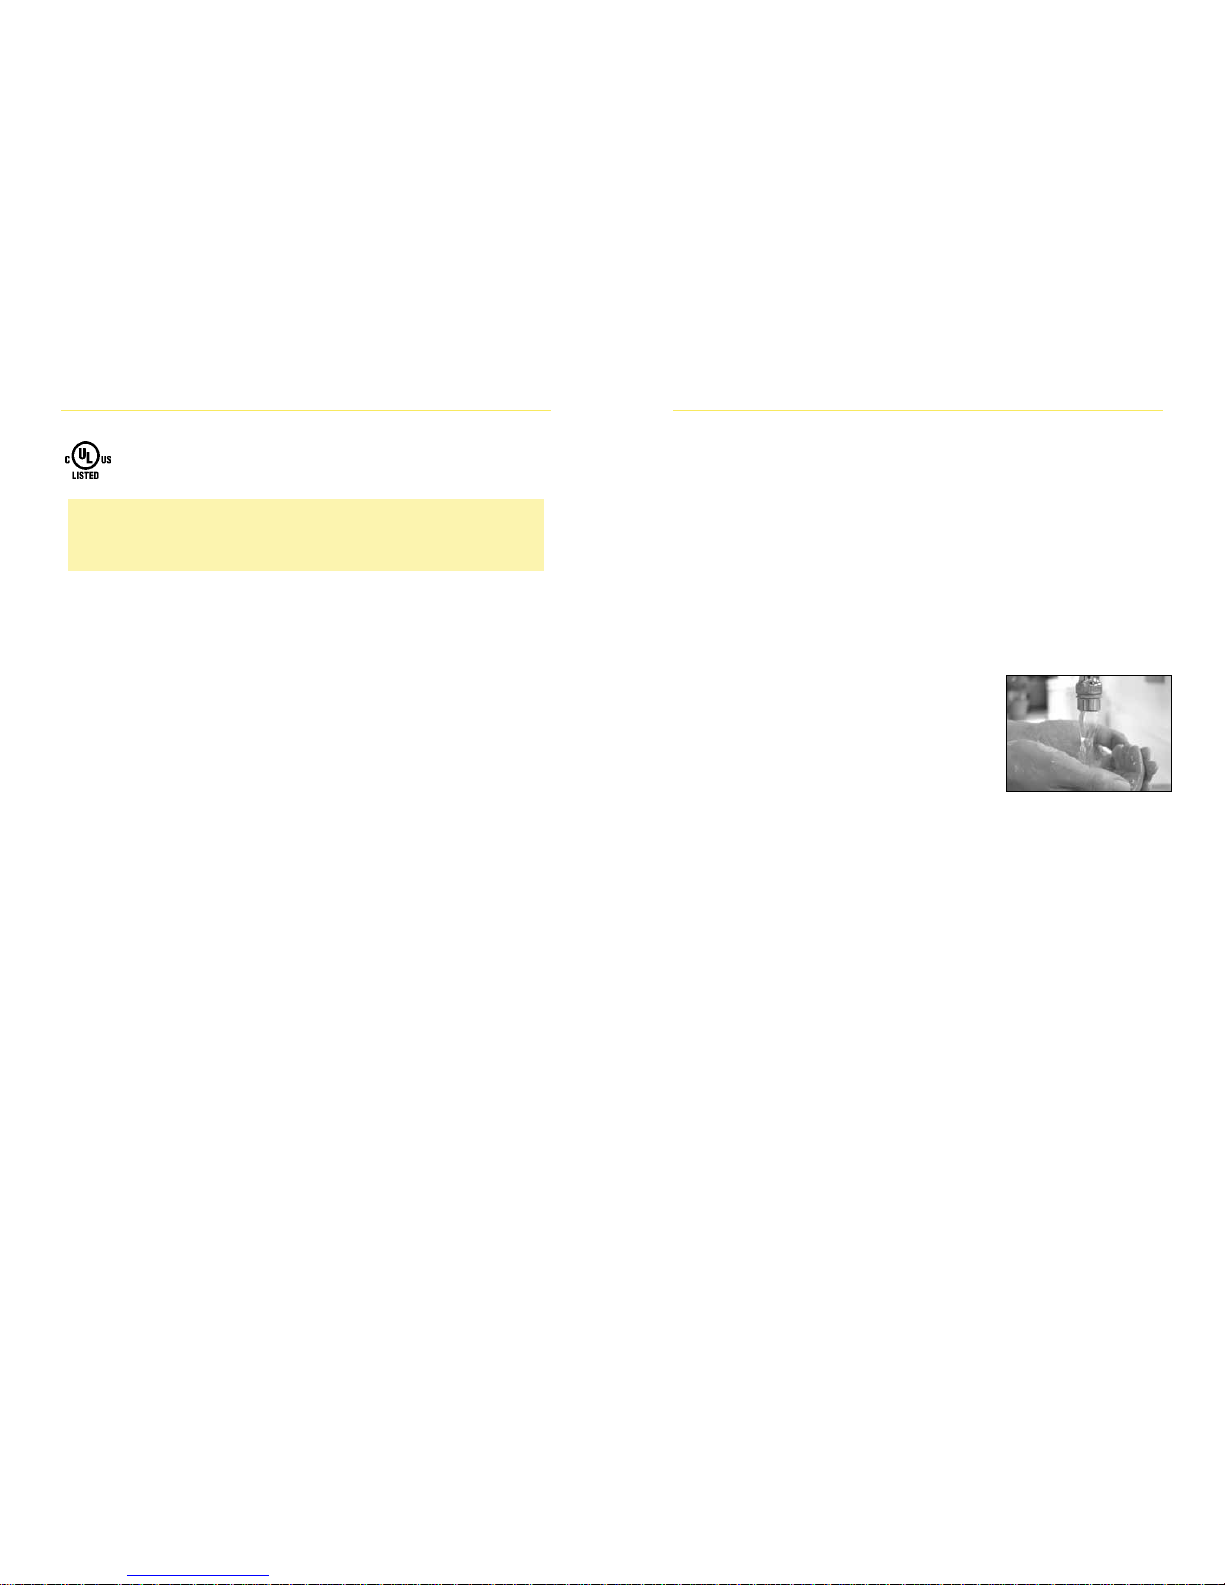
If milk accidentally gets behind the diaphragm cap:
1. Turn off the pump and unplug from power source.
2. Remove and disassemble the tubing.
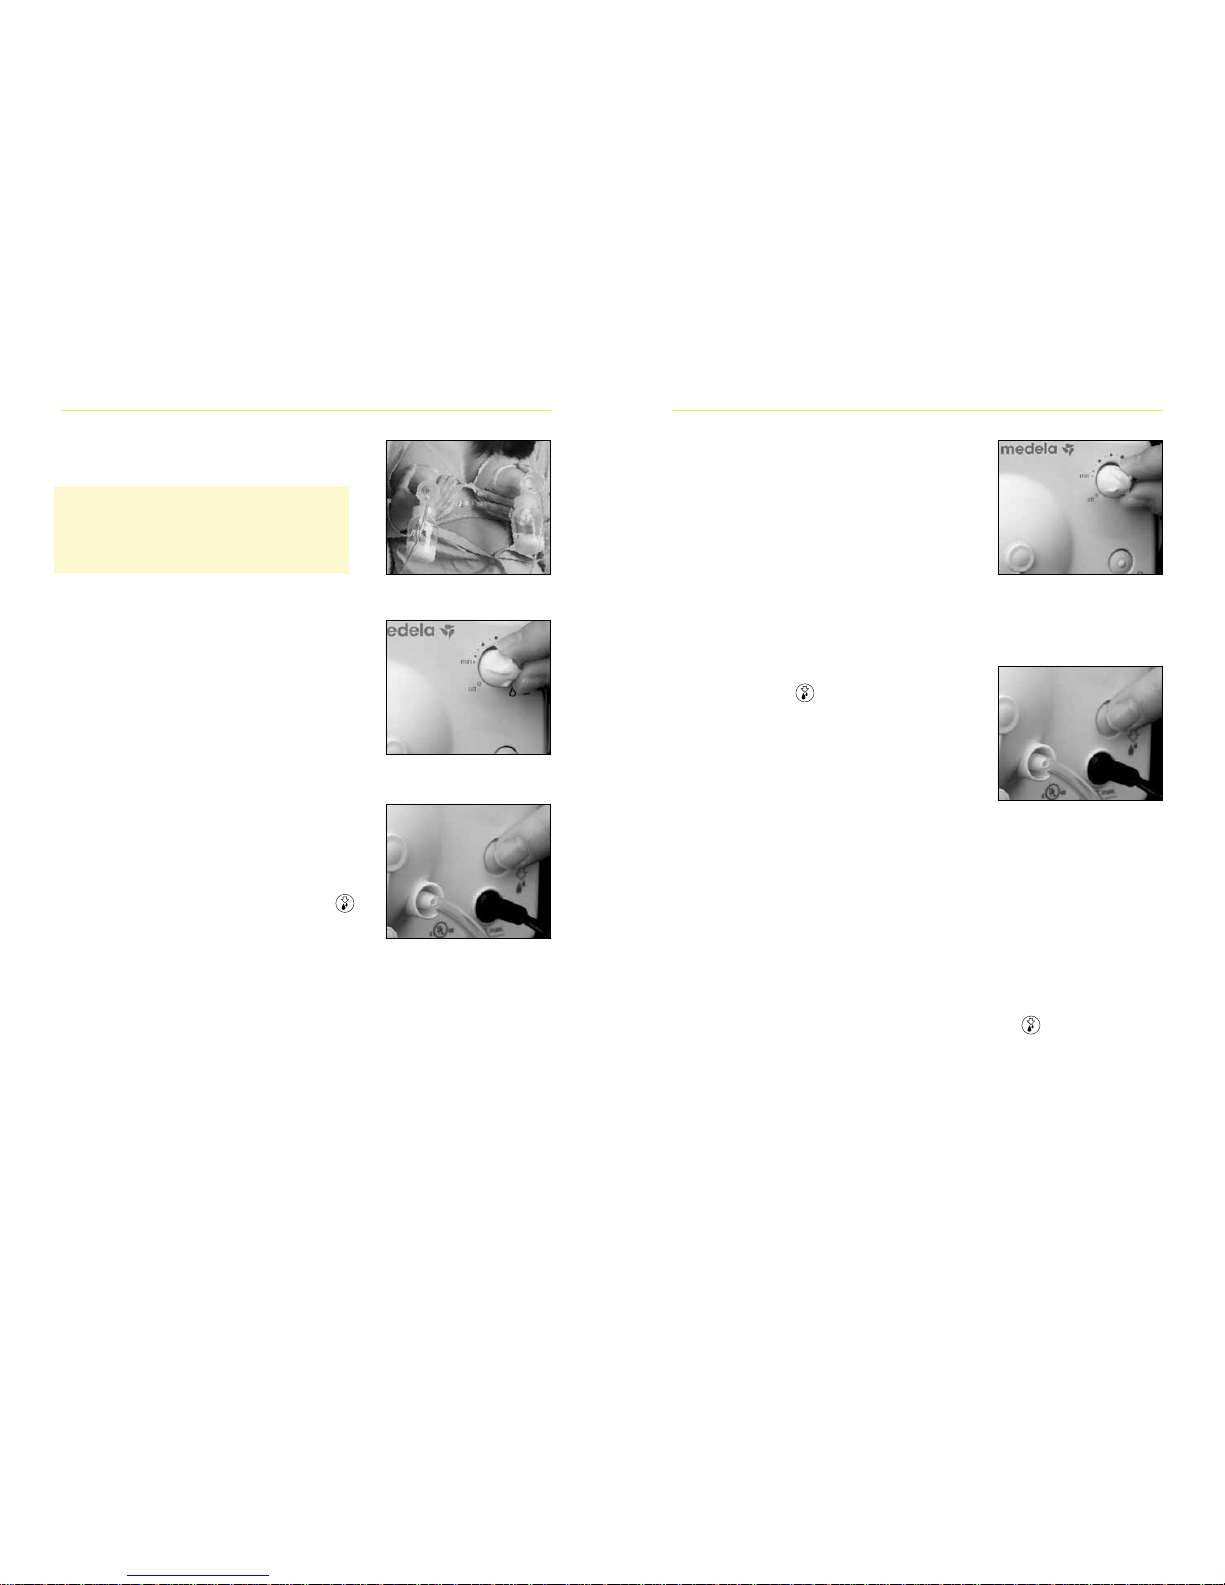
3. Snap off the diaphragm cap using
thumb tab.
4. Be sure the yellow plug is not plugged
into any ports prior to cleaning. Wash the
diaphragm cap in
soapy water, then rinse
in cold, clear water.
Page 6

9
Troubleshooting
If there is low or no suction
1. Make sure all connections of the kit and breastpump are secure.
2. If single pumping, make sure the port plug is placed into one of the
single pumping ports.
3. Make sure the white membrane is laying flat against the yellow
valve head. Check that the membrane is clean and not
damaged. Refer to the assembly instructions.
4. Make sure the diaphragm cap or faceplate on the front of the
breastpump fits evenly and securely.
5. Make sure the ends of the tubings are fit securely into the backs
of the breastshields and into the ports on the diaphragm cap
or faceplate.
Other concerns
6.
Take care not to kink tubing(s). If milk is seen backing up into tubing,
check that tubing is not kinked or pinched.
7. When traveling outside the U.S., use battery power only.
8.
If you experience discomfort while pumping contact a breastfeeding
specialist. You may need a larger size PersonalFit™ or
SoftFit™
breastshield to reduce the possibility of nipple irritation or injury. Call
1-800-TELL YOU to locate a breastfeeding
specialist in your area.
9. In the US, call Medela
®
at 800-435-8316 or 815-363-1166. In
Canada, call Medela at 800-435-8316 or 905-608-7272. In other
countries, contact your local distributor or the location where you
purchased your pump.
Storing breastmilk in the Pump In Style® Advanced cooler bag:
• The Pump In Style Advanced cooler bag
requires
one contoured ice pack
(#87092, included)
for cooling up to four
bottles of breastmilk.
As soon as breastpumping is finished, place the
breastmilk bottle or bag in the cooler bag with
the ice pack. If the ice pack is frozen solid, it
will safely cool your breastmilk for up to 12 hours.
When you return home transfer the bottles
to the refrigerator or freezer.
Defrosting
• Thaw milk overnight in the refrigerator, or hold the bottle under warm
running water to quickly thaw. You can also place the sealed
container in a bowl of warm water for 20 minutes to bring
it to body temperature.
• Thawed milk is safe in the refrigerator for 24 hours. Do not refreeze.
Caution:
• Do not thaw frozen breastmilk in a microwave or in a pan of boiling
water.
• Never microwave breastmilk. Microwaving can cause severe burns
to
baby’s mouth from hot spots that develop in the milk during
microwaving.
Microwaving can also change the composition
of breastmilk.
• If adding expressed breastmilk to container of already frozen
breastmilk, make sure to add a lesser amount than the already
frozen amount.
All Medela® breastmilk bottles and breastpump
kits are 100% Bisphenol-A (BPA) Free.
8
Page 7

5. Insert hard yellow adapter ends of tubing
into openings in breastshield connectors.
6.
Insert other ends of tubing into ports
on diaphragm cap. To remove tubing,
pull straight out of tubing ports; do not
wiggle tubing or pull at an angle.
7.
If single pumping: insert port cap into
the unused port.
8.
If double pumping: push port cap
onto post.
9.
Plug the metal fitting on end of
transformer or Battery Pack cord into
power jack on breastpump. Plug the
9 volt transformer into a standard
electrical outlet.
1110
Assembly Instructions Pump In Style
®
Advanced Breastpumps
1. Securely attach
breastshield to connector
.
2. Snap membranes onto valves until
membranes lie completely flat.
*Be sure to separate membranes & valve
heads when cleaning and completely dry
prior to assembly.
3. Push assembled valves & membranes
onto breastshield connectors.
4.
Screw bottles onto breastshield
connectors
.
Page 8
13
13. Once in the expression phase, set your
Maximum Comfort Vacuum
™
. Maximum
Comfort Vacuum is the highest vacuum
you can use and still feel comfortable.
To find your Maximum Comfort
Vacuum: increase speed/vacuum until
pumping feels slightly uncomfortable
(never painful), then decrease slightly.
14.
If you need to return to the stimulation
phase for any reason, simply press
the let-down button. You may
return back to the expression phase
quickly by pressing the let-down
button again.
*Research has shown that you will pump
more efficiently - get more milk in less
time - when pumping at Maximum Comfort
Vacuum in the expression phase.
Tip: Once you are finished pumping; unplug the tubing from the back
of the breastshield prior to setting down the bottles. Allow the pump
to continue to run while you safeguard your breastmilk. This will allow
any condensation that may have formed in the tubing to dry.
Tip: Some moms prefer going back and forth between stimulation
and expression to achieve second let-downs throughout a pumping
session. You can do this by pressing the let-down button at
any time.
12
10. Center the assembled breastshields over
your nipples.
IMPORTANT:
Do not tilt or overfill containers when pumping.
IMPORTANT:
Take care not to kink tubing(s) while pumping.
11. To begin pumping, turn the dial
clockwise from the off position.
Pump In Style
®
Advanced
will start in the stimulation phase.
Adjust the speed/vacuum to your
comfort level while pumping by turning
the dial to a cycling speed most
comfortable to you.
12.
After two minutes, the stimulation
phase will automatically change to the
expression phase. If you let-down (your
milk starts to flow) sooner than
two minutes, you may pump more
efficiently by pressing the let-down
button at that time.
Page 9
15
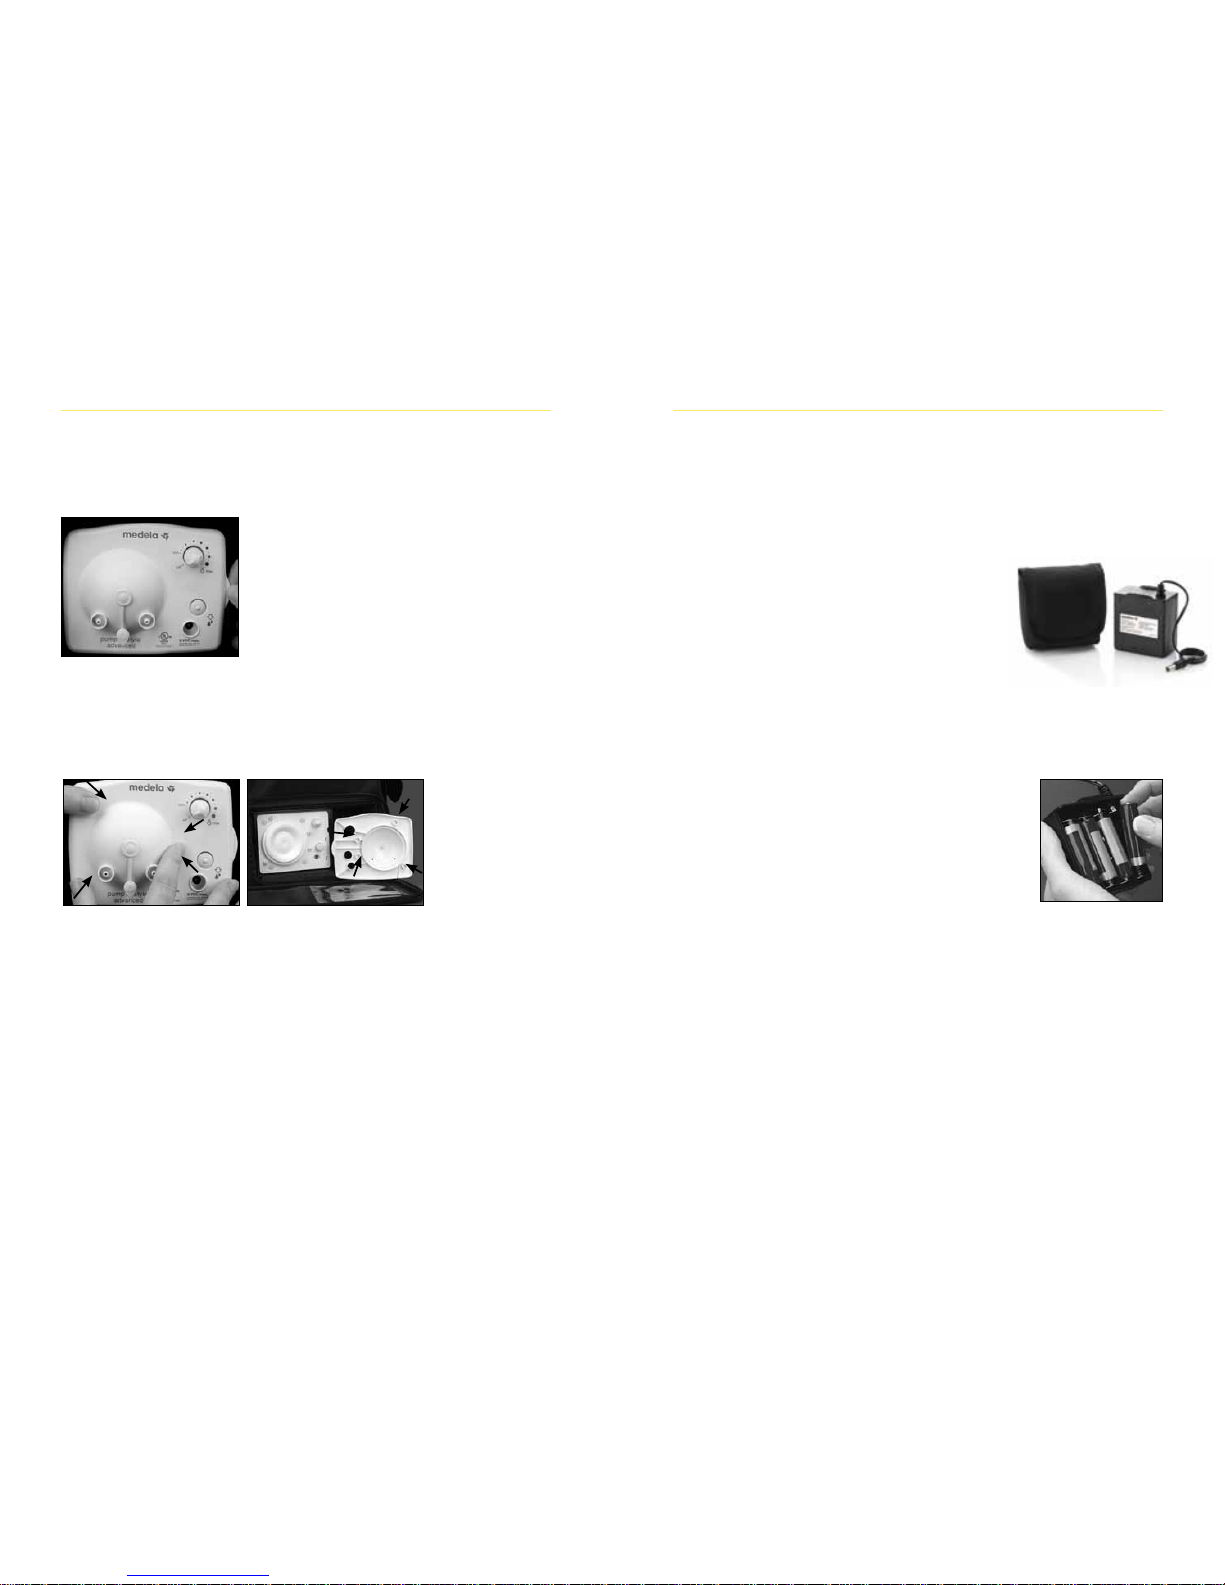
Pump In Style® Advanced Battery Pack
Instructions
The Pump In Style Advanced Battery Pack is
intended for use with the Pump In Style
Advanced breastpump (manufactured as of
January 2008 or later) ONLY. The battery
pack uses 8 AA alkaline batteries,
or, for more consistent pump performance,
use rechargeable batteries. Each set
of batteries will provide approximately 2 hours of
pumping time. It is recommended
that batteries be replaced or recharged between the
10th and 12th pumping session.
Battery Insertion
Slide off battery covers. Place the NEGATIVE (-)
end of the battery against the front of the spring.
Push the battery in and down in one motion until
the battery snaps into place. The POSITIVE (+)
end of the battery should be near the positive sign
on the battery pack. NOTE: If the battery is
inserted in the opposite direction, the battery may not
function
correctly. Four bat
teries must be inserted
on each side of the pack. Replace battery covers.
connection
points
14
Removing and securing the diaphragm cap:
Only remove diaphragm cap when cleaning is necessary. See
page 6 for detailed cleaning information.
To remove the diaphragm cap:
1. Turn off pump, and unplug from
power source.
2. Remove tubing (see instructions on
page 11).
3. Snap off the diaphragm cap using
the thumb tab (see left photo).
To secure the diaphragm cap:
Hold back of pump with one hand while pushing on the diaphragm
cap until it snaps into place.
NOTE: The diaphragm cap must be completely snapped together at
all connection points (see arrows) to ensure adequate vacuum and
optimum pump performance.
Page 10

Breastfeeding Accessories
(sold separately)
Please check with your local retailer for any of these Medela® accessories to
help make your breastfeeding experience more convenient, comfortable and
enjoyable.
Pump & Save™ Breastmilk Bags
#87033 20-pack, #87034 50-pack
Pump & Save breastmilk bags are double-walled for
safe and long-term breastmilk storage with a no-leak,
easy-to-close zipper top and no-spill, stand-up bottom.
Self-stick strap attaches directly to breastshield to pump
directly into bag for fast, easy breastmilk storage.
Quick Clean™ Micro-Steam™ Bags
#87024
For breastpump and breastmilk feeding accessories,
bottles, nipples, pacifiers and cups. Steam cleaning
eliminates 99.9% of most common bacteria and germs.
Requires just a microwave and water. Each bag can be
used up to 20 times. Ideal for storing pump parts between
pumping sessions.
Disposable Bra Pads
#89973 30-pack, #89974 60-pack
Compared to other disposable bra pads, Medela pads
are proven to absorb more, so you use less. Super
absorbent materials prevent leakage and maintain dryness.
Soft layer wicks moisture away from breast for added
comfort. Leak-resistant pocket and extra liner provide
added protection. Contouring pleats ensure a smooth,
feminine shape. Adhesive tape keeps pad in place and
prevents shifting.
For a breastfeeding specialist or to locate Medela rental or retail locations,
call the Breastfeeding National Network (BNN) at 1-800-TELL YOU; or visit
the Medela website: www.medela.findlocation.com.
The Medela Customer Service Team can be reached at 1-800-435-8316.
16 17
Pedidos de piezas
Si no puede encontrar las piezas que necesita en el centro de ventas minoristas,
en Estados Unidos y Canadá puede llamar al 800-435-8316 (Estados Unidos y
Canadá), 815-363-1166 (Estados Unidos) o 905-608-8720 (Canadá) y efectuar su
pedido con una tarjeta VISA, MasterCard, American Express o Discover. En los
demás países, sírvase comunicarse con el distribuidor de productos
Medela de su
localidad. Para obtener una lista de distribuidores, visite www.medela.com.
Partes (Vea la ilustración de la página 2)
1. Paquete de hielo (1) . . . . . . . . . . . . . . . . . . . . . . . . . . . . . . . . . . . . . . . . . . . . . . . . . . .#87092
2. Manguera de Pump In Style
®
. . . . . . . . . . . . . . . . . . . . . . . . . .. . . . . . . . . . . . . . . . #8007212
3. Biberones para leche materna, de 5 onzas (150 mL), sin bisfenol A. . . . . . . . . . . #8117012
4. Tetilla de base ancha para flujo lento (1). . . . . . . . . . . . . . . . . . . . . . . . . . . . . . . . . #8207060
5. Tapón para viajes (1). . . . . . . . . . . . . . . . . . . . . . . . . . . . . . . . . . . . . . . . . . . . . . . . #2001686
6. Collar para tetilla de base ancha. . . . . . . . . . . . . . . .. . . . . . . . . . . . . . . . . . . . . . . #8107182
7. Tapas duras para recipiente (4) . . . . . . . . . . . . . . . . . . . . . . . . . . . . . . . . . . . . . . . #8107183
8. Embudos PersonalFit
TM
(24 mm) (2) . . . . . . . . . . . . . . . . . . . . . . . . . . . . . . . . . . . . . . . #87073
9. Conectores PersonalFit
TM
(2). . . . . . . . . . . . . . . . . . . . . . . . . . . . . . . . . . . . . . . . . . . . #87071
10. Membranas adicionales (6). . . . . . . . . . . . . . . . . . . . . . . . . . . . . . . . . . . . . . . . . . . . . #87088
11. Válvulas y membranas adicionales (2). . . . . . . . . . . . . . . . . . . . . . . . . . . . . . . . . . . #87089
12. Transformador de 9 voltios para Pump In Style* (1). . . . . . . . . . . . . . . . . . . . . . . #9207010
13. Paquete de pilas con 8 unidades* (1). . . . . . . .. . . . . . . . . . . . . . . . . . . . . . . . . . . . . #67553
14. Montaje del tapón de diafragma . . . . . . . . . . . . . . . . . . . . . . . . . . . . . . . . . . . . . #6007105
Adaptador de 9 voltios para el encendedor del vehículo* . . . . .. . . . . . . . . . . . . . . . . . #67174
Juego de biberones para leche materna
(8 onzas [236.5 ml]; paquete de 3 unidades). . . . . . . . . . . . . . . . . . . . . . . . . . . . . . . . . . #87132
Bolsas para leche materna Pump & Save
TM
Breastmilk Bags
(paquete de 20 unidades). . . . . . . . . . . . . . . . . . . . . . . . . . . . . . . . . . . . . . . . . . . . . . . . . #87033
Bolsas Quick Clean
TM
Micro-SteamTM Bags. . . . . . . . . . . . . . . . . . . . . . . . . . . . . . . . . . . . #87024
*Para usar con las versiones de bombas de lactancia PNS Advanced vendidas después del 1 de enero
de 2008.
Artículo Número para pedidos
Accesorios (vendidos por separado)
Page 11

1918
Bombas de lactancia Medela
Pump In Style® Advanced
Este producto ha sido diseñado para ser utilizado por
una sola persona. El uso de este producto por más de
una persona representa riesgos para la salud, puede
afectar el funcionamiento y anula la garantía.
Medela, Inc. le garantiza al comprador minorista original que, durante 1 año (90 días para
las piezas y los accesorios) a partir de la fecha de compra, el mecanismo de extracción de la
bomba de lactancia no tendrá ningún defecto de material ni de fabricación. Caso contrario,
Medela reparará o, a discreción de Medela, reemplazará el producto sin cobrar por el
reemplazo, las piezas o la mano de obra. El comprador correrá con todos los gastos en que
incurra por devolver este producto a Medela. Esta garantía no cubre ningún producto que
se use con fines comerciales o que haya sido maltratado, utilizado en exceso o alterado.
TODAS Y CADA UNA DE LAS GARANTÍAS IMPLÍCITAS, INCLUIDA LA DE
COMERCIALIZACIÓN, ESTÁN LIMITADAS A UNA DURACIÓN DE 90 DÍAS A PARTIR
DE LA FECHA DE COMPRA. ES POSIBLE QUE USTED NO SE VEA AFECTADO POR
LAS LIMITACIONES MENCIONADAS ANTERIORMENTE, YA QUE ALGUNOS ESTADOS
PROHÍBEN QUE SE LIMITE LA DURACIÓN DE UNA GARANTÍA IMPLÍCITA. ESTA
GARANTÍA LE OTORGA DERECHOS LEGALES ESPECÍFICOS; ASIMISMO, ES POSIBLE
QUE TENGA OTROS DERECHOS SEGÚN EL ESTADO.
A fin de ahorrar tiempo y dinero, le recomendamos que, antes de presentar una
reclamación conforme a esta garantía, se comunique con el Servicio al Cliente de
Medela, llamando sin cargo al 1-800-435-8316. También puede llamar a este número
para que le brinden más información sobre esta garantía. Si desea presentar una
reclamación conforme a esta garantía, debe devolver este producto a Medela con
el número de autorización para devoluciones que le asignará el Servicio al Cliente
de Medela, en forma prepagada, junto con su contrato de venta fechado u otra
constancia de compra, y una breve explicación del problema, a la siguiente dirección:
Medela, Inc., P.O. Box 660, McHenry, IL 60051-0660
ATTENTION: SERVICE DEPARTMENT
(ATENCIÓN: DEPARTAMENTO DE SERVICIO).
Antes de hacer el envío, llame para solicitar un número de autorización,
ya que sin este número no se aceptará la devolución del producto.
MEDIDAS DE
SEGURIDAD IMPORTANTES
Este producto ha sido diseñado para ser utilizado por
una sola persona. El uso de este producto por más de
una persona representa riesgos para la salud, puede
afectar el funcionamiento y anula la garantía.
Al utilizar dispositivos eléctricos, sobre todo en
presencia de niños, debe tener presente las precauciones
básicas de seguridad, como las siguientes:
LEA TODAS LAS INSTRUCCIONES
PELIGRO: Para reducir el riesgo de electrocución:
1.
Siempre desconecte los productos eléctricos inmediatamente después de usarlos.
2. No use este producto mientras se está bañando.
3.
No coloque ni almacene el producto donde puede caer en un lavabo o en una bañera.
4. No sumerja el producto ni permita que caiga en agua u otros líquidos.
5.
No intente coger un producto eléctrico que ha caído al agua. Desconecte el producto de inmediato.
ATENCIÓN:
Para reducir el riesgo de quemaduras, electrocución, incendio o lesiones:
1. El producto nunca debe dejarse sin supervisión si está conectado a una toma eléctrica.
2. Se requiere una supervisión cuidadosa cuando el producto es usado por, con o cerca de
niños o personas inválidas.
3. Use el producto únicamente para el fin descrito en este manual. No utilice accesorios no
recomendados por el fabricante.
4. Nunca utilice este producto si la clavija o el cordón está dañado, si no funciona
correctamente, si ha tenido caídas o daños o si ha caído al agua.
5. Mantenga el cordón lejos de superficies calientes.
6. No utilice el producto al aire libre, en lugares donde se utilizan productos en aerosol ni en
lugares donde se administra oxígeno.
7. Conecte el transformador primero a la bomba de lactancia Pump In Style Advanced y
luego a la toma eléctrica de la pared.
8. Únicamente utilice el transformador entregado con la bomba de lactancia Pump In Style
Advanced.
9. Utilice el paquete de pilas Medela Pump In Style Advanced únicamente con las bombas
de lactancia Medela Pump In Style Advanced.
10. Este producto es un artículo de cuidado personal y no deberá ser compartido entre
madres.
11. Asegúrese de que el voltaje del transformador sea compatible con la fuente de
alimentación eléctrica.
12. Utilice la bomba únicamente con el motor en posición vertical. (Consulte la página 50.)
13. Nunca utilice el producto si tiene sueño o está dormida.
GUARDE ESTAS INSTRUCCIONES
Page 12

Aplicaciones
n Colecte la leche materna en el trabajo o en otros períodos
cuando esté lejos de su bebé.
n Mantenga un suministro de leche para aquellos casos en los
que se interrumpe temporalmente el amamantamiento.
n Alivie la hinchazón de los senos con el bombeo sencillo. La
combinación de bombeo sencillo con masaje simultáneo es
muy útil para aliviar la hinchazón.
Información de salud y seguridad
Importante: Este producto ha sido diseñado para ser utilizado por una
sola persona. El uso de este producto por más de una persona representa
riesgos para la salud, puede afectar el funcionamiento y anula la garantía.
Higiene
Lávese las manos antes de tocar los senos o
los recipientes y evite tocar el interior de los
recipientes y las tapas.
Limpieza
Siga estas instrucciones de limpieza, a menos
que un profesional médico le indique lo contrario.
Antes de comenzar la limpieza, desarme todas las piezas del conjunto
de accesorios de la bomba de lactancia. Tenga especial cuidado
en remover la válvula amarilla de la copa para senos y de separar la
membrana blanca de la válvula antes de iniciar la limpieza. Consulte
las piezas 6 - 8 en el diagrama de piezas de la página 2.
Antes del primer uso:
Separe todas las piezas del juego y de la bomba de lactancia que
están en contacto con el seno y la leche (embudos, conectores, válvulas, membranas, biberones y tapones). Desinféctelas dejándolas
reposar 10 minutos en agua hirviendo. No es necesario desinfectar la
manguera antes de usarla por primera vez.
20
Después de cada uso:
Separe todas las piezas que están en contacto con el seno y la leche,
y lávelas con agua tibia y jabonosa (embudos, conectores, válvulas,
membranas, biberones y tapones). Para que la bomba de lactancia
funcione correctamente, hay que desarmar todas las piezas y lavarlas
por separado.
• Enjuague con agua limpia.
• Utilice una tela húmeda (no mojada) para limpiar la bolsa y el tapón
de diafragma de la bomba después de cada uso (consulte la pieza
14 en el diagrama de piezas de la página 2).
Para una limpieza más rápida:
Medela le ofrece bolsas Quick Clean™ Micro-Steam™ para la desinfección diaria del equipo. (No se recomienda usar con los embudos
SoftFit
™
).
Cuidado de las mangueras:
Inspeccione las mangueras después de cada sesión de bombeo en
busca de condensación o leche. No es necesario limpiar la manguera
después de cada uso.
Si aparece condensación en las mangueras:
Para eliminar la condensación después del bombeo, mantenga
encendida la bomba, con las mangueras conectadas, durante uno o
dos minutos o hasta que las mangueras estén secas.
En caso de sobreflujo:
Si la leche accidentalmente entra en las mangueras:
1. Apague la bomba y desconéctela de la fuente de alimentación
eléctrica.
2. Quite y desarme las mangueras. Lávelas en agua jabonosa y luego
enjuáguelas en agua limpia fría.
21
Page 13

3. Sacuda las mangueras para eliminar las gotas de agua y cuelgue
las mangueras para secarlas al aire. Para un secado más rápido,
conecte las mangueras a
la bomba y opere la bomba durante uno
o dos minutos
o hasta que la mangueras estén secas, o bien vierta
un poco de alcohol isopropílico por las mangueras para secarlas.
(Para limpiar la manguera, puede usar una bolsa Quick Clean
Micro-Steam y asegurarse de que quede completamente
sumergida dentro de la bolsa).
Si la leche entra accidentalmente detrás del tapón del diafragma.
1. Apague la bomba y desconéctela de la fuente de alimentación
eléctrica.
2. Quite y desarme las mangueras.
3. Presione sobre la lengüeta para separar
el tapón del diafragma.
4. Antes de comenzar la limpieza,
compruebe que el tapón amarillo no esté
instalado en ninguno de los orificios.
Lave el tapón del diafragma en agua
jabonosa y luego enjuague con agua
limpia fría.
5. Use una tela húmeda (no mojada) para limpiar el diafragma y la
bolsa. No sumerja el motor ni las bolsas en agua.
6. Vuelva a armar la bomba de lactancia y el conjunto de accesorios
cuando los componentes estén totalmente secos.
22
Almacenamiento de la leche materna
Consulte con el hospital para conocer las instrucciones de
almacenamiento específicas.
Al congelar la leche, no llene los recipientes a más de 3/4 de su
capacidad, para dejar espacio libre suficiente para la expansión.
Rotule los recipientes con la fecha en que extrajo la leche.
Nota importante: Si la temperatura de la habitación, el automóvil o al
aire libre excede 77° F / 25° C, enfríe la leche de inmediato para preservar
su frescura.
Temperatura
ambiente
Enfriador con
3 paquetes
de hielo
Refrigerador
Leche
descongelada
Congelador
Pautas para el almacenamiento de la leche materna recién extraída
(para bebés sanos, nacidos a término)
4–6 horas
a 66–78 °F
(19–26 °C)
24 horas
a 59 °F
(15 °C)
3–8 días
a 39 °F
o menos
(4 °C)
usar dentro
de las
24 horas
6–12
meses
0–4 °F
(-18–-20 °C)
23
Referencia: www.BreastmilkGuidelines.com
Page 14

Cómo almacenar leche materna en el
enfriador Pump In Style® Advanced:
• Para refrigerar hasta 4 biberones con leche
materna en el enfriador Pump In Style
Advanced, hay que colocarle 1 paquete de
hielo moldeado (#87092, incluido).
En cuanto termine de extraerse leche, coloque el biberón o la bolsa
con leche materna en el enfriador con el paquete de hielo; si está
totalmente congelado, refrigerará la leche materna hasta 12 horas.
Cuando regrese a su hogar, guarde los biberones en el refrigerador
o en el congelador.
Descongelación
• Descongele la leche durante la noche en el refrigerador, o manten-
ga el biberón debajo de un chorro de agua tibia para descongelar
la leche rápidamente. También puede colocar el recipiente cerrado
herméticamente en un tazón de agua tibia durante 20 minutos para
calentarla a la temperatura del cuerpo humano.
•
La leche descongelada puede guardarse de manera segura durante 24
horas en el refrigerador. No vuelva a congelar la leche descongelada.
Atención:
• No descongele la leche materna en un horno de microondas ni en
una olla con agua hirviente.
• Nunca caliente la leche materna en un horno de microondas. La
leche calentada en un horno de microondas puede causar graves
quemaduras en la boca del bebé, como consecuencia de las zonas
calientes que se forman en la leche durante el calentamiento con
microondas. Además, las microondas pueden cambiar la composición
de la leche materna.
•
Si agrega leche recién extraída a un recipiente con leche congelada,
asegúrese de añadir una cantidad de leche menor que la ya congelada.
24
Identificación y resolución de problemas
Si no hay succión o la succión es muy débil
1. Asegúrese de que todas las conexiones de los accesorios y la
bomba de lactancia estén firmes.
2. Si utiliza el bombeo sencillo, cerciórese de que el tapón esté
colocado en uno de los orificios de bombeo sencillo.
3. Asegúrese de que la membrana blanca quede plana sobre el
cabezal de la válvula amarilla. Verifique que la membrana no esté
sucia ni dañada. Consulte las instrucciones de armado.
4. Cerciórese de que el tapón de diafragma o la placa frontal de la
bomba de lactancia esté colocado de manera firme y uniforme.
5.
Asegúrese de que los extremos de las mangueras estén firmemente
conectados a la parte trasera de las copas para senos y a los orificios
del tapón de diafragma o la placa frontal.
Otros puntos importantes
6. Tenga cuidado de no doblar las mangueras. Si hay reflujo de leche
hacia la manguera, compruebe que la manguera no está doblada u
oprimida.
7. Al viajar fuera de Estados Unidos, utilice únicamente la
alimentación con pilas.
8.
Si siente molestias durante el bombeo, consulte con un especialista
en lactancia. Usted puede necesitar un tamaño más grande de
copas para senos PersonalFit
™
o SoftFit™ para reducir la posibilidad
de que haya irritación o herida en el pezón. Llame al 1-800-TELL
YOU para obtener los datos de los especialistas en
lactancia en su región.
9. En Estados Unidos, llame a Medela al 800-435-8316 u 815-363-
1166. En Canadá, llame a Medela al 800-435-8316 o 905-608-
7272. En los demás países, comuníquese con el distribuidor de
productos Medela en su localidad o con el lugar donde compró
la bomba.
25
Ninguno de los biberones para leche materna ni los
juegos de bombas de lactancia de Medela
®
contiene bisfenol A (BPA, por sus siglas en inglés).
Page 15

1. Acople bien el embudo al conector.
2. Coloque las membranas en válvulas
y aplique presión hasta que las
membranas queden planas.
*Asegúrese de separar las membranas y los
cabezales de las válvulas durante la limpieza y
seque perfectamente las piezas
antes de volver a armarlas.
3. Coloque los conjuntos armados de las
válvulas y las membranas en los
conectores de las copas para senos.
4.
Enrosque los biberones en los
conectores del embudo.
Instrucciones de armado para la bomba
Pump In Style
®
Advanced
26
5. Inserte los extremos adaptadores duros
transparentes de la manguera en
las aberturas de los conectores de
las copas para senos.
6.
Inserte los otros extremos de la
manguera en los orificios de salida del
tapón del diafragma. Para quitar la
manguera, sáquela directamente de los
orificios de salida, no la menee/doble o
tire en ángulo de ella.
7.
Si utiliza el bombeo simple: inserte el
tapón, en el orificio que no está en uso.
8.
Para el bombeo doble: ponga el tapón
del orificio de salida en la lengüeta.
9. Inserte el conector metálico del extremo
del transformador o el cable del conjunto
tde la batería en el receptáculo de
energía de la bomba de lactancia.
Enchufe el transformador de 9 voltios en
un enchufe eléctrico estándar.
27
Page 16

28
10. Centre las copas para senos armadas
sobre sus pezones.
IMPORTANTE: No incline o llene
excesivamente los recipientes cuando
bombee
IMPORTANTE:
Tenga cuidado de no doblar la(s)
manguera(s) mientras bombea
11.
Para comenzar a bombear, haga girar
la perilla selectora desde la posición
de apagado. Pump In Style
®
Advanced
comenzará en la fase de estimulación.
Ajuste la velocidad/vacío a un nivel de
su comodidad mientras bombea al
hacer girar la perilla selectora a una
velocidad del ciclo más cómoda
para usted.
12.
Después de dos minutos, la fase de
estimulación cambiará automáticamente
a la fase de expresión. Si usted
experimenta la bajada de leche (su
leche comienza a fluir) antes de
dos minutos, puede bombear más
eficientemente al presionar el botón de
bajada de leche en ese momento.
29
13. Una vez que ha entrado a la fase
de expresión, establezca su *Maximum
Comfort Vacuum
™
. Su nivel más
cómodo de vacío es el más alto nivel de
vacío que usted puede usar y todavía
sentirse cómoda.
Para encontrar su máximo nivel de
vacío cómodo: incremente la velocidad/
vacío hasta que el bombeo se sienta
apenas incómodo (nunca doloroso),
entonces disminuya apenas el vacío.
14.
Si necesita regresar a la fase de estimu-
lación por alguna razón, simplemente
presione el botón de bajada de leche.
Puede regresar a la fase de expresión
rápidamente al presionar el botón
de bajada de leche nuevamente.
*Las investigaciones han mostrado
que usted bombeará más eficientementeobtendrá más leche en menor tiempocuando bombee al máximo nivel de vacío
cómodo en la fase de expresión.
Consejo: Una vez que haya terminado de bombear; desconecte
las mangueras de la parte trasera de la copa para senos antes de
retirar los recipientes. Permita que la bomba continúe funcionando
mientras usted guarda su leche materna. Esto permitirá secar la
condensación que pueda haberse formado en la manguera.
Consejo: Algunas mamás prefieren regresar entre la estimulación y
la expresión varias veces para obtener segundas bajadas de la leche
durante una sesión de bombeo. Usted puede hacer eso al
presionar el botón de bajada de leche en cualquier momento.
Page 17

Para quitar e instalar el tapón del diafragma:
Quite el tapón del diafragma únicamente cuando sea necesaria la
limpieza. Consulte las páginas 16 para conocer la información detallada sobre la limpieza.
Para quitar el tapón del diafragma:
1. Apague la bomba y desconéctela de
la fuente de alimentación eléctrica.
2. Quite la manguera (vea las
instrucciones en la página 27).
3. Separe el tapón del diafragma
utilizando la lengüeta. (Vea la foto
a la izquierda.)
Para instalar el tapón del diafragma:
Sostenga el dorso de la bomba con una mano, mientras con la otra
empuja el tapón del diafragma hasta que enganche en su sitio.
NOTA: El tapón del diafragma debe quedar bien enganchado en
todos los puntos de conexión (vea las flechas) para asegurar un vacío
apropiado y el funcionamiento óptimo de la bomba.
puntos de
conexión
30
Instrucciones de uso del paquete de pilas
Pump In Style
®
Advanced
El paquete de pilas Pump In Style Advanced
El paquete de pilas de Pump In Style Advanced
Battery Pack debe usarse SOLAMENTE con la
bomba de lactancia Pump In Style Advanced
Breastpump (fabricada a partir del 1 de enero
del 2008 o después). El paquete de pilas utiliza 8 pilas alcalinas tipo “AA”, aunque también
puede usar pilas
recargables para lograr un fun-
cionamiento
más constante de la bomba de lac-
tancia. En ambos casos, se obtiene un
tiempo
de bombeo de aproximadamente dos horas. Se
recomienda reemplazar
o cargar las pilas entre
la décima y duodécima sesión de bombeo.
Inserción de las pilas
Quite las tapas de los compartimientos de las pilas.
Coloque el extremo NEGATIVO (-) de la pila contra la
punta del resorte. Introduzca la pila, empujando hacia
abajo, hasta que enganche en su sitio. El extremo
POSITIVO (+) de la pila debe quedar junto al signo
positivo del paquete de pilas. NOTA: El paquete de
pilas no funcionará de manera correcta si introduce
las pilas en sentido opuesto. Puede insertar cuatro
pilas en cada lado del paquete de pilas. Vuelva a
colocar las tapas de los ompartimientos de las pilas.
31
Page 18

Accesorios para la lactancia
(vendidos por separado)
Busque en las tiendas de su localidad estos accesorios de Medela®, que harán
de la lactancia una experiencia más práctica, cómoda y agradable.
Bolsas para leche materna Pump & SaveTM
Paquete de 20 #87033, Paquete de 50 #87034
Las bolsas para leche materna Pump & Save™ Breastmilk
Bags están revestidas para almacenar y conservar la leche
materna en forma prolongada; contienen un cierre hermético fácil de desplazar, y su base permite mantenerlas en
posición vertical, lo cual contribuye a evitar derrames. El
tirante autoadherente se acopla al embudo para extraerse
leche directamente en la bolsa, de modo que el almacenamiento de la leche materna sea rápido y sencillo.
Bolsas Quick CleanTM Micro-SteamTM
#87024
Para accesorios de alimentación y de la bomba de lactancia, biberones, tetillas, chupetes y tazas. La limpieza a
vapor elimina el 99.9% de las bacterias y gérmenes más
frecuentes. Solamente se necesita un microondas y agua;
cada bolsa puede usarse hasta 20 veces. Ideales para
guardar las piezas de la bomba de lactancia entre sesiones
de extracción.
Protectores de lactancia desechables
#89973 paquete de 30 unidades,
#89974 paquete de 60 unidades
En comparación con otras almohadillas desechables para
sostenes, está comprobado que las almohadillas de Medela
absorben más para que usted use menos. El material superabsorbente previene las filtraciones y permite que los senos
se mantengan secos. La capa suave elimina la humedad de
los senos para que usted se sienta más cómoda. El bolsillo
antifiltraciones y el forro extra brindan mayor protección. Los pliegues moldeados aseguran tersura y femineidad. La cinta adhesiva mantiene las almohadillas
quietas y previene que se corran de lugar.
Para conocer los nombres y direcciones de los especialistas en lactancia y los
centros de venta y alquiler de productos Medela, llame a la Red Nacional de
Lactancia (BNN
™
, Breastfeeding National Network™) al 1-800-TELL YOU, o visite
el sitio de Medela en la Internet: www.medela.com
Para comunicarse con el Departamento de Atención al Cliente de Medela,
llame al 1-800-435-8316.
32
Pour commander des pièces
Si votre détaillant n’a pas les pièces dont vous avez besoin (pour les É.-U.
et le Canada), vous pouvez composer le 1-800-435-8316, ou 1-815-3631166 (É.-U.) ou 1-905-608-7272 (Canada) et commander avec les cartes
Visa, MasterCard, American Express ou Discover. Dans les autres pays,
veuillez communiquer avec votre distributeur local. Consultez le site
www.medela.com pour obtenir une liste de distributeurs.
Pièces (Voir illustration à la page 2)
1. Cryosac (1) . . . . . . . . . . . . . . . . . . . . . . . . . . . . . . . . . . . . . . . . . . . . . . . . . . . . . . . . . . .n° 87092
2. Tubulure Pump In Style
®
. . . . . . . . . . . . . . . . . . . . . . . . . . . . . . . . . . . . . . . . . . . . . . n° 8007212
3. Biberons sans bisphénol A (150 mL) . . . . . . . . . . . . . . . . . . . . . . . . . . . . . . . . . . . . n° 8117012
4. Tétine à embase élargie et débit lent (1) . . . . . . . . . . . . . . . . . . . . . . . . . . . . . . . . n° 8207060
5. Couvercle de transport (1) . . . . . . . . . . . . . . . . . . . . . . . . . . . . . . . . . . . . . . . . . . . . n° 2001686
6. Bague de tétine à embase élargie . . . . . . . . . . . . . . . . . . . . . . . . . . . . . . . . . . . . . . n° 8107182
7. Capuchons de récipients solides (4) . . . . . . . . . . . . . . . . . . . . . . . . . . . . . . . . . . . . n° 8107183
8. Téterelles PersonalFit
TM
(24 mm) (2) . . . . . . . . . . . . . . . . . . . . . . . . . . . . . . . . . . . . . . . n° 87073
9. Connecteurs PersonalFit
TM
(2) . . . . . . . . . . . . . . . . . . . . . . . . . . . . . . . . . . . . . . . . . . . .n° 87071
10. Membranes de rechange (6) . . . . . . . . . . . . . . . . . . . . . . . . . . . . . . . . . . . . . . . . . . . n° 87088
11. Valves et membranes de rechange (2) . . . . . . . . . . . . . . . . . . . . . . . . . . . . . . . . . . . n° 87089
12. Transformateur Pump In Style de 9 volts* (1) . . . . . . . . . . . . . . . . . . . . . . . . . . . n° 9207010
13. Bloc-piles à 8 piles* (1) . . . . . . . . . . . . . . . . . . . . . . . . . . . . . . . . . . . . . . . . . . . . . . . . n° 67553
14. Ensemble de capuchon de diaphragme . . . . . . . . . . . . . . . . . . . . . . . . . . . . . . . .n° 6007105
Adaptateur d’allume-cigare de véhicule, 9 volts* . . . . . . . . . . . . . . . . . . . . . . . . . . . . n° 67174
Ensemble de biberons pour lait maternel (3 x 230 ml) . . . . . . . . . . . . . . . . . . . . . . . . .n° 87132
Sacs pour lait maternel Pump & Save
TM
(20) . . . . . . . . . . . . . . . . . . . . . . . . . . . . . . . . . . n° 87033
Sacs Quick CleanTM Micro-SteamTM . . . . . . . . . . . . . . . . . . . . . . . . . . . . . . . . . . . . . . . . . . n° 87024
*À utiliser avec les versions PNS Advanced vendues après le 1er janvier 2008
Pièce Numéro de commande
Accessoires (vendus séparément)
33
Page 19

3534
Tire-lait Pump In Style® Advanced
de Medela
Ce produit est destiné à un usage individuel.
L’utilisation par plus d’une personne peut présenter
des risques pour la santé, affecter le fonctionnement
du tire-lait et mettre fin à la garantie.
Medela, Inc. garantit ce produit à l’acheteur au détail original contre tout défaut
de matériel et de fabrication sur une période d’un an pour le mécanisme de la
pompe (90 jours pour les pièces et les accessoires) à partir de la date d’achat.
En cas de défectuosité, Medela réparera ou, à son gré, remplacera ce produit
gratuitement, et ne facturera pas les pièces ni la main-d’œuvre. L’acheteur
doit assumer tous les frais encourus pour retourner ce produit à Medela. Cette
garantie ne s’applique pas aux produits utilisés commercialement ou qui ont été
soumis à une utilisation non adéquate, à un abus ou à une altération.
TOUTES LES GARANTIES ET TOUTES LES GARANTIES IMPLICITES, Y COMPRIS
LES GARANTIES DE QUALITÉ MARCHANDE, SONT LIMITÉES À UNE DURÉE DE
90 JOURS À PARTIR DE LA DATE D’ACHAT. CERTAINS ÉTATS NE PERMETTENT
PAS DE LIMITATION SUR LA DURÉE D’UNE GARANTIE IMPLICITE ET LES LIMITES
PRÉCITÉES PEUVENT PAR CONSÉQUENT NE PAS S’APPLIQUER DANS VOTRE
CAS. CETTE GARANTIE VOUS OCTROIE DES DROITS JURIDIQUES SPÉCIFIQUES
ET VOUS POURRIEZ ÉGALEMENT BÉNÉFICIER D’AUTRES DROITS QUI VARIENT
D’UN ÉTAT À L’AUTRE.
Avant de faire une demande quelconque au titre de cette garantie, vous pourriez
économiser du temps et de l’argent en appelant le service à la clientèle de Medela
(sans frais) au 1-800-435-8316. Vous pouvez également appeler ce numéro pour
obtenir des informations supplémentaires sur la présente garantie. Si vous souhaitez
faire une demande au titre de cette garantie, vous devez retourner ce produit à
Medela avec un numéro d’autorisation de retour du service à la clientèle de Medela,
port prépayé, en incluant votre reçu avec date d’achat ou autre preuve d’achat et
une brève description du problème à l’adresse suivante :
Medela, Inc., P.O. Box 660, McHenry, IL 60051-0660 (USA)
ATTENTION: SERVICE DEPARTMENT.
Appelez au préalable pour obtenir un numéro d’autorisation.
Les renvois ne seront pas acceptés sans numéro d’autorisation.
AVERTISSEMENTS
IMPORTANTS
Ce produit est destiné à une seule utilisatrice. Son utilisation par
plus d’une personne peut présenter un risque pour la santé, affecter
le bon fonctionnement de l’appareil et annuler la garantie.
Lorsque vous utilisez un appareil électrique, surtout en présence
d’enfants, vous devez adopter des mesures de sécurité de base y
compris celles qui suivent :
LISEZ TOUTES LES INSTRUCTIONS
DANGER : Pour réduire le risque de choc électrique :
1. Débranchez toujours l’appareil immédiatement après l’avoir utilisé.
2. N’utilisez pas l’appareil lorsque vous prenez un bain ou sous la douche.
3. Ne placez pas l’appareil dans un endroit d’où il peut tomber ou être tiré dans un évier
ou une baignoire.
4. N’immergez pas l’appareil et ne le laissez pas tomber dans l’eau ou tout autre liquide.
5. Si l’appareil est tombé à l’eau, n’essayez pas de l’en sortir. Débranchez-le immédiatement.
ATTENTION : Pour réduire le risque de brûlure, de choc électrique, d’incendie et de blessures:
1. Ne laissez jamais l’appareil sans surveillance lorsqu’il est branché dans une prise de
courant électrique.
2. Une étroite supervision est nécessaire lorsque cet appareil est utilisé par un enfant ou une
personne invalide, ou à proximité de ceux-ci.
3. N’employez l’appareil que pour l’usage auquel il est destiné, conformément à ce manuel.
N’utilisez pas d’accessoires non recommandés par le fabricant.
4.
Ne faites jamais fonctionner l’appareil si le cordon d’alimentation ou la fiche sont endommagés,
s’il ne fonctionne pas correctement, s’il est tombé par terre ou s’il est tombé dans l’eau.
5. Gardez le cordon d’alimentation éloigné des surfaces chaudes.
6. N’utilisez pas l’appareil à l’extérieur, ni dans un endroit ou des produits en aérosol sont
utilisés ou si de l’oxygène est administré.
7. Branchez le transformateur dans le tire-lait d’abord, puis ensuite dans la prise électrique.
8. N’utilisez que le transformateur fourni avec le tire-lait Pump In Style Advanced de Medela.
9. N’utilisez que le bloc-piles Pump In Style Advanced de Medela avec le tire-lait Pump In
Style Advanced de Medela.
10.
Ce produit est destiné à un usage individuel et ne doit pas être partagé par plusieurs mères.
11.
Assurez-vous que le voltage du transformateur est compatible avec la source d’alimentation.
12. N’utilisez pas ce tire-lait si vous dormez ou êtes somnolente. (voir pg 50)
13. N’utilisez pas ce tire-lait si vous dormez ou êtes somnolente.
CONSERVEZ CES INSTRUCTIONS
Page 20

Pourquoi utiliser un tire-lait
n Pour recueillir votre lait lorsque vous devez vous absenter pour
le travail ou sortir.
n
Pour maintenir votre production de lait si vous devez interrompre
temporairement l’allaitement maternel.
n
Pour soulager l’engorgement. L’expression simple avec massage
simultané aide à soulager l’engorgement.
Mesures d’hygiène et sécurité
Important: Ce produit est un article de soins personnels. Son
utilisation par plus d’une mère peut entraîner un risque pour la santé,
affecter le fonctionnement de l’appareil et annuler la garantie.
Hygiène
Vous devez vous laver les mains avant de
toucher à vos seins ou au tire-lait et vous
devez éviter de toucher l’intérieur des
couvercles et des contenants.
Désinfection et entretien
Vous devez respecter la marche à suivre
pour le nettoyage et l’entretien
de votre tire-lait, à moins que votre pro-
fessionnel de la santé ne vous
conseille de procéder autrement. Avant
de les laver, démontez chacune des pièces de l’ensemble-accessoires
du tire-lait. Il est très important d’enlever la valve jaune de la téterelle et
de séparer la membrane blanche de la tête de
valve avant de les laver.
Veuillez vous reporter aux illustrations des pièces 6 - 8 (p. 2).
Avant d’utiliser le tire-lait pour la première fois :
Désassemblez toutes les pièces de votre trousse et du tire-lait qui
entrent en contact avec le sein et le lait (téterelles, connecteurs,
valves, membranes, biberons et capuchons). Aseptisez dans de l’eau
bouillante pendant 10 minutes. Il n’est pas nécessaire d’aseptiser la
tubulure avant le premier emploi.
Après chaque utilisation :
Désassemblez et lavez toutes les pièces qui entrent en contact avec
36 37
le sein et le lait dans de l’eau chaude savonneuse (téterelles, connecteurs, valves, membranes, biberons et capuchons). Toutes les pièces
doivent être désassemblées et lavées séparément pour que la pompe
puisse fonctionner de manière efficace.
• Rincez à l’eau claire.
• Essuyez le sac et le diaphragme du tire-lait avec un linge humide
(non trempé). (Voir illustration de la pièce 14 à la page
2).
Pour une désinfection plus rapide :
Pour une désinfection quotidienne, Medela® offre les Sacs Micro-SteamTM
Quick Clean
TM
. (Utilisation déconseillée avec les téterelles SoftFit™ ).
Entretien de la tubulure :
Après chaque séance d’expression, vérifiez s’il y a de la condensation
et/ou du lait dans la tubulure. Il n’est pas nécessaire de nettoyer la
tubulure après chaque utilisation.
S’il y a de la condensation dans la tubulure :
Pour éliminer la condensation après l’utilisation du tire-lait, continuez de le faire fonctionner avec la tubulure connectée pendant 1 à 2
minutes ou jusqu’à ce que la tubulure soit sèche.
S’il y a débordement :
Si du lait se retrouve accidentellement dans la tubulure:
1. Arrêtez le tire-lait et débranchez-le de la prise de courant.
2. Enlevez et démontez la tubulure, lavez les pièces dans l’eau tiède
savonneuse et rincez-les à l’eau claire.
3. Pour éliminer les gouttelettes d’eau présentes dans les tubes,
secouez ces derniers puis suspendez-les pour les faire sécher
à l’air. Pour un séchage plus rapide, faites fonctionner le tire-lait
avec les tubes attachés pendant 1 à 2 minutes ou jusqu’à ce qu’ils
soient secs ou verser dans les tubes une petite quantité d’alcool
isopropylique. (La tubulure peut être nettoyée en utilisant un
sac Quick Clean Micro-Steam. Assurez-vous que la tubulure est
entièrement immergée dans l’eau à l’intérieur du sac).
Page 21

38
Si du lait se retrouve accidentellement à l’arrière du couvercle du
diaphragme :
1. Fermez le tire-lait et débranchez-le de la prise électrique.
2. Enlevez et démontez les tubes.
3. Enlevez le couvercle du diaphragme
en utilisant le poussoir prévu à cette fin.
4. Assurez-vous d’enlever le capuchon de
l’orifice de la tubulure sur le couvercle
du diaphragme avant de nettoyer le tirelait. Lavez le couvercle du diaphragme
avec de l’eau tiède et du détergent.
5.
Essuyez le diaphragme et le sac avec un linge humide (pas trempé).
N’immergez pas le bloc moteur ni les sacs dans l’eau.
6. Ré-assemblez le tire-lait et l’ensemble-accessoires lorsque toutes
les parties sont complètement sèches.
39
Conservation du lait maternel
Veuillez consulter votre hôpital si vous désirez obtenir des
informations plus détaillées sur la conservation du lait maternel.
Lorsque vous congelez le lait maternel, ne remplissez les contenants
qu’aux 3/4 pour permettre l’expansion du lait durant la congélation.
Identifiez chaque contenant avec une étiquette indiquant la date à
laquelle le lait a été exprimé.
Important : Si la température ambiante est supérieure à 25 °C (77 °F),
refroidissez immédiatement le lait pour en préserver la fraîcheur.
Référence : www.BreastmilkGuidelines.com
Page 22

Conservation du lait maternel dans le sac isotherme
Pump In Style® Advanced :
• Un cryosac profilé (pièce n° 87092 incluse)
peut garder un maximum de quatre biberons
de lait maternel au frais dans le sac isotherme
Pump In Style Advanced.
Dès que l’expression est terminée, placez le biberon ou le sac de lait
maternel dans le sac isotherme avec le cryosac. Si le cryosac est
entièrement congelé, il refroidit votre lait en toute sécurité jusqu’à 12
heures. Lorsque vous rentrez chez vous, transférez les biberons dans
le frigidaire ou le congélateur.
Comment décongeler le lait maternel :
• Pour décongeler le lait maternel, mettez-le au réfrigérateur pour la
nuit, ou tenez-le pendant quelques minutes sous l’eau tiède courante
si vous voulez le décongeler plus rapidement. Vous pouvez aussi
mettre le contenant hermétiquement fermé dans un bol d’eau chaude
pendant 20 minutes pour l’amener à la température du corps.
• Le lait décongelé peut être gardé en toute sécurité au réfrigérateur
pendant 24 heures. Ne jamais recongeler du lait décongelé.
Avertissement :
• Il ne faut jamais décongeler un contenant de lait maternel dans un
four à micro-ondes ou dans l’eau bouillante.
• Ne réchauffez jamais le lait maternel au four à micro-ondes.
Le bébé risque alors de se brûler gravement la bouche en raison
du réchauffement inégal du lait. En outre, les micro-ondes risquent
d’altérer la composition du lait maternel.
• Si vous ajoutez du lait frais à du lait congelé, la quantité de lait frais
que vous ajoutez doit être plus petite que la quantité de lait déjà
congelé.
40 41
Trucs de dépannage :
S’il n’y a pas de succion ou si la succion est trop faible :
1. Assurez-vous que tous les raccords de l’ensemble-accessoires et
du tire-lait sont bien assemblés.
2. Si vous exprimez d’un seul sein, assurez-vous d’avoir bien placé le
capuchon sur l’un des orifices d’expression simple.
3. Assurez-vous que la membrane blanche est à plat contre la tête de
valve jaune. Vérifiez que la membrane est propre et qu’elle n’est
pas endommagée. Consultez les instructions d’assemblage.
4. Assurez-vous que le couvercle du diaphragme et la plaque avant
du tire-lait sont bien ajustées.
5. Assurez-vous que les extrémités rigides de la tubulure sont bien
connectées à l’arrière des téterelles et que les extrémités souples
sont reliées aux orifices sur le couvercle du diaphragme ou la
plaque avant du tire-lait.
Autres précautions :
6. Vérifiez que la tubulure ne soit pas entortillée. Si vous voyez du lait
remonter dans la tubulure, vérifiez que celle-ci n’est pas entortillée
ou écrasée.
7. Lorsque vous voyagez à l’extérieur du pays, n’utilisez votre tire-lait
qu’avec des piles.
8. Si vous éprouvez de la douleur ou de l’inconfort lorsque vous
exprimez, communiquez avec une spécialiste en lactation. Il se
peut que vous ayez besoin d’une téterelle PersonalFit
TM
ou SoftFit
TM
de Medela plus grande pour réduire la possibilité d’irritation ou de
blessure des mamelons. Composez le 1-800-435-8316 pour obtenir les coordonnées d’une spécialiste en lactation près de
chez vous.
9. Aux États-Unis, appelez Medela au 1-800-435-8316 ou au
815-363-1166. Au Canada, appelez Medela au 1-800-435-8316 ou
au 905-608-7272. Dans les autres pays, communiquez avec votre
distributeur local ou avec le détaillant où vous avez acheté le
tire-lait.
Tous les biberons et toutes les trousses de
tire-lait Medela
®
sont exempts de bisphénol A
(BPA) à 100 %.
Page 23

42
1. Attachez solidement la téterelle sur le
connecteur.
2. Enclenchez la membrane sur la valve
jusqu’à ce que la membrane repose bien
à plat.
*Assurez-vous de bien séparer la membrane
de la valve avant le nettoyage et de bien les
sécher avant de les assembler.
3.
Poussez les valves et les membranes
sur les connecteurs de téterelles.
4.
Vissez les biberons sur les connecteurs
de la téterelle.
Instructions d’assemblage
Tire-lait Pump In Style® Advanced
5. Insérez les extrémités transparentes
rigides des tubes dans les orifices des
connecteurs de téterelle.
6.
Introduisez les autres extrémités de la
tubulure dans les ouvertures sur le
couvercle du diaphragme. Pour retirer la
tubulure, tirez-la tout droit à partir de son
ouverture ; ne pas remuer la tubulure ou
la tirer sur un angle.
7.
Si vous exprimez d’un seul sein, mettez
en place le capuchon sur l’ouverture non
utilisée.
8.
Si vous exprimez des deux seins, enfon-
cez le capuchon sur la petite tige prévue
à cet effet.
9. Branchez le connecteur métallique qui
se trouve à l’extrémité du cordon du
transformateur ou du cordon du
bloc-piles dans la prise du tire-lait.
Branchez le transformateur 9 volts
dans une prise de courant standard.
43
Page 24

44
10. Centrez les téterelles assemblées sur
vos mamelons.
IMPORTANT : Évitez de remplir
excessivement les contenants ou de les
incliner pendant l’expression du lait.
IMPORTANT : Faites attention de ne
pas plier ou coincer la tubulure pendant
l’expression du lait.
11.
Pour commencer l’expression de lait,
tournez le bouton de réglage dans le
sens horaire à partir de la position Off.
Le tire-lait Pump In Style
®
Advanced
commencera à la phase de stimulation. Quand vous exprimez le lait,
réglez la vitesse/l’intensité de succion
à l’intensité qui vous convient en tournant le bouton de réglage à la vitesse
de cycle la plus confortable pour vous.
12.
Après deux minutes, la phase de
stimulation passera automatiquement
à la phase d’expression. Si votre lait se
met à couler avant deux minutes, vous
pouvez exprimer votre lait plus efficacement en appuyant sur le bouton
Let-Down au moment où vous sentez
venir votre lait.
45
13. Une fois la phase d’expression en
cours, établissez votre *Maximum
Comfort Vacuum
™
(confort de succion maximal). Le réglage Maximum
Comfort Vacuum, c’est le niveau de
succion le plus élevé que vous pouvez
utiliser tout en restant confortable.
Pour trouver votre degré de confort
maximal : augmentez la vitesse/l’intensité de succion jusqu’à ce
l’expression soit légèrement désagréable (jamais douloureuse), et
réduisez ensuite légèrement le réglage.
14.
Si vous devez repasser à la phase de
stimulation pour une raison ou une
autre, il suffit d’appuyer de nouveau
sur le bouton Let-Down. Vous pouvez repasser rapidement à la phase
d’expression en appuyant encore une
fois sur le bouton Let-Down.
*D’après les recherches, vous exprimerez votre lait plus efficacement,
c-à-d. que vous obtiendrez plus de lait en moins de temps, lorsque le
tire-lait fonctionne au niveau de confort maximal en phase
d’expression.
Conseil : Quand vous avez terminé d’exprimer, déconnectez la
tubulure de l’arrière de la téterelle avant de déposer les contenants.
Laissez le tire-lait en marche pendant que vous entreposez votre lait
maternel. Ceci permettra à toute condensation qui aurait pu se
former dans la tubulure de sécher.
Conseil : Certaines mères préfèrent alterner entre les phases
stimulation et expression pendant la durée de la séance d’expression
pour faire couler leur lait une deuxième fois. Vous pouvez le faire en
appuyant sur le bouton Let-Down à n’importe quel moment.
Page 25

46
Enlever et mettre en place le couvercle du diaphragme :
Retirez le couvercle du diaphragme seulement quand un nettoyage
est nécessaire. Voir page 37 pour des informations détaillées sur le
nettoyage.
Enlever le couvercle du diaphragme :
1. Fermez le tire-lait et débranchez-le
de la prise électrique.
2. Enlevez et démontez les tubes
(voir instructions page 43).
3. Retirez le couvercle du diaphragme
en utilisant votre pouce et l’onglet
(voir photo de gauche).
Remettre en place le couvercle du diaphragme :
Tenez le tire-lait par l’arrière d’une main en poussant le couvercle
du diaphragme de l’autre jusqu’à ce qu’il soit bien en place.
Note : Tous les points de raccord (voir flèches) du couvercle du
diaphragme doivent être bien enclenchés pour assurez une succion
adéquate et optimiser la performance de votre tire-lait.
points de
raccord
47
Instructions pour le bloc-piles
Pump In Style® Advanced
Le bloc-piles Pump In Style Advanced
Le bloc-piles de l’appareil Pump In Style
Advanced est UNIQUEMENT destiné à
être utilisé avec le tire-lait Pump In Style
Advanced (fabriqué à partir de janvier 2008
ou ultérieurement). Le bloc-piles fonctionne
avec 8 piles alcalines de format AA. Pour
une performance plus constante du tire-lait,
utilisez des piles rechargeables. Le tire-lait
peut fonctionner durant environ 2 heures
avec un ensemble de piles
chargées. Nous
recommandons de changer les piles ou de les
recharger
entre la 10e et la 12e séance d’expression.
Mise en place des piles
Faites glisser les couvercles du bloc-piles.
Placez la borne NÉGATIVE (-) d’une pile contre
l’extrémité libre du ressort. Poussez la pile d’un
seul coup vers l’avant et le bas jusqu’à ce qu’elle
s’enclenche en place. La borne POSITIVE (+) de
la pile doit se trouver du côté du signe positif
(+) du bloc-piles.
ATTENTION : Si vous introduisez
la pile dans le sens contraire, le bloc-piles risque de
ne pas fonctionner correctement. Il faut introduire
quatre piles de chaque côté du bloc-piles. Replacer les
couvercles du bloc-piles.
Page 26

Accessoires d’allaitement
(Vendus séparément)
Renseignez-vous auprès d’un détaillant de votre région sur les accessoires
d’allaitement de Medela qui peuvent vous aider à vivre une expérience
d’allaitement plus pratique, confortable et agréable.
Sacs Pump & SaveTM pour le lait maternel
N
o
87033 Emballage de 20, No 87034 Emballage de 50
Les sacs pour lait maternel Pump & Save™ sont doublés
afin d’assurer une conservation en toute sécurité et à long
terme du lait maternel; ils sont munis d’une fermeture
à glissière étanche et facile à fermer dans le haut, ainsi
qu’un fond qui leur permet de tenir debout sans se renverser. Une sangle autocollante est attachée directement
sur la téterelle afin de pomper directement dans le sac
pour permettre une conservation rapide et aisée du lait
maternel.
Sacs Micro-SteamTM Quick CleanTM
N
o
87024
Pour accessoires de tire-lait et d’allaitement, biberons, tétines,
sucettes et tasses. Le nettoyage à la vapeur élimine 99,9 %
de la plupart des bactéries et germes courants. Nécessite
juste un micro-ondes et de l’eau. Chaque sac peut être utilisé
jusqu’à 20 fois. Idéal pour l’entreposage des pièces du tire-lait
entre les sessions d’extraction.
Compresses d’allaitement jetables
Pièce n° 89973, 30 par paquet,
pièce n° 89974, 60 par paquet
Comparativement aux autres coussinets jetables pour
soutien-gorge, les coussinets Medela ont prouvé absorber
davantage et, par conséquent vous en utilisez moins. Des
matériaux super-absorbants empêchent les fuites et évitent
l’humidité. Une couche souple élimine l’humidité du sein
pour un meilleur confort. Une poche anti-fuites et une doublure supplémentaire fournissent plus de protection. Des plis de contour
assurent une forme souple et féminine. Du ruban adhésif maintient le cous-
sinet en place et l’empêche de glisser.
Pour connaître l’adresse d’une spécialiste en allaitement ou les coordonnées d’un détaillant ou d’un centre de location Medela, contactez le réseau d’allaitement national (BNN
) au
1-800-TELL YOU ou visitez le site internet de Medela: www.medela.com.
Pour rejoinder le Service à la Clientèle de Medela composez le
1-800-435-8316.
48
Pump In Style®
Advanced
Backpack
Pump In Style
Advanced
The Metro Bag
™
Pump In Style
Advanced
Shoulder Bag
49
Page 27

Printed in the USA. Medela, 2-Phase Expression, Lactina and Pump In Style are registered trademarks of Medela in the USA and a trademark in other countries. Quick Clean,
Micro-Steam, Maximum Comfort Vacuum, Pump & Save, The Metro Bag, SoftFit and PersonalFit are trademarks of Medela, Inc. in the USA and in other countries.
Applications for registration of Medela is pending in other countries. All rights reserved.
Impreso en los Estados Unidos de América. Medela, 2-Phase Expression, Lactina y Pump In Style son marcas registradas de Medela en los Estados Unidos y marcas comerciales en otros
países. Quick Clean, Micro-Steam, Maximum Comfort Vacuum, Pump & Save, The Metro Bag, SoftFit y PersonalFit son marcas comerciales de Medela, Inc. en los Estados Unidos y en
otros países. Las solicitudes para el registro de Medela en otros países están en trámite. Todos los derechos reservados.
Imprimé aux États-Unis. Medela, 2-Phase Expression, Lactina et Pump In Style sont des marques déposées de Medela aux États-Unis et une marque de commerce dans d’autres pays. Quick
Clean, Micro-Steam, Maximum Comfort Vacuum, Pump & Save,
The Metro Bag,
SoftFit et PersonalFit sont des marques de commerce de Medela, Inc. aux États-Unis et dans d’autres pays.
Des demandes d’enregistrement de Medela sont en instance dans d’autres pays. Tous droits réservés.
1907776 C 0310 © 2010 Medela, Inc.
Medela, Inc.,
P.O. Box 660, 1101 Corporate Drive
McHenry, IL 60051-0660, USA
Ph/Tel./Tél.: (800) 435-8316 or (815) 363-1166
Fax/Téléc.: (815) 363-1246
Email/Correo electrónico/Courriel:
customer.service@medela.com
Medela Canada, Inc.,
4160, Sladeview Crescent
Unit #8, Mississauga, Ontario,
Canada L5L OA1
Ph/Tel./Tél.: (800) 435-8316
Fax/Téléc.: (800) 995-7867
Email/Correo electrónico/Courriel:
info@medela.ca
www.medela.com
 Loading...