

Page 1
www.medela.com
Medela, Inc.
1101 Corporate Drive
McHenry, IL 60050
e-mail: Customer.Service@medela.com
Phone: 1-800-435-8316 or
815-363-1166
Fax: 815-363-1246
SNS and Supplemental Nursing System are trademarks of Medela, Inc.
Medela is a registered trademark of Medela Holding AG.
SNS y Supplemental Nursing System son marcas comerciales de Medela, Inc.
Medela es una marca registrada de Medela Holding AG.
SNS et Supplemental Nursing System sont des marques de commerce de Medela, Inc.
Medela est une marque de commerce déposée de Medela Holding AG.
1907576 C 0811 © 2011 by Medela, Inc. Printed in the USA.
Medela Canada, Inc.
4090B Sladeview Crescent, Unit 2
Mississauga, Ontario,
Canada L5L 5Y5
e-mail: info@medela.ca
Starter SNS
™
Supplemental Nursing
System
Sistema suplementario
para la lactancia
Dispositif d’aide a
l’allaitement
Article #00902S, #0097003S (container included)
In Canada #20902, #20903 (container included)
Page 2
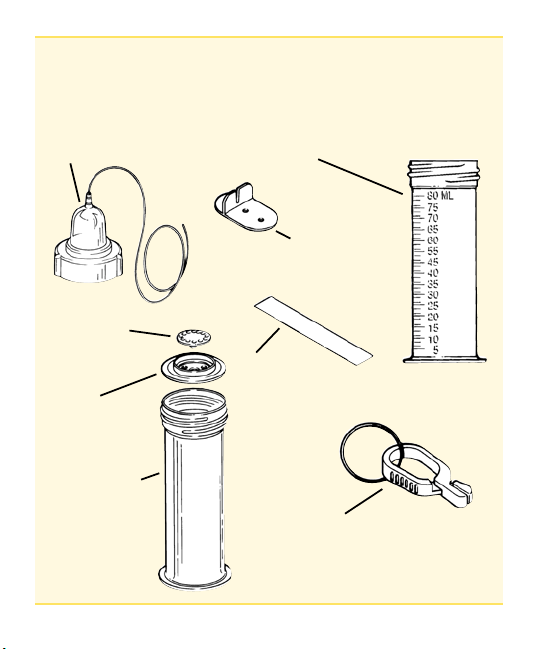
Parts • Piezas de repuesto • Pièces
Teat-Tubing Assembly
Conjunto de tetilla y
manguera
Ensemble tétine-tube
White Membrane
Membrana blanca
Membrane blanche
Disc
Disco
Disque
80ml Container
Recipiente de 80 mL
Contenant de 80 ml
Container (only with Article #0097003S and #20903)
Recipiente (incluido sólo con los artículos 0097003S y 20903)
Contenant Contenant (inclus seulement avec le produit no.
0097003S et 20903)
Tubing Clamp
Abrazadera para tubo
Presse-tube
Tape Strip
Cinta adhesiva
Bande de ruban adhésif
Quick Clip and Elastic Ring
Pinza “Quick Clip” y anillo elástico
Attache «Quick Clip» et bande élastique
1
Page 3

General Information
Contents:
Teat-Tubing Assembly; White Membrane, Disc, Quick Clip and
Elastic Ring; Tubing Clamp; Tape Strip; Container (Container included with #0097003S or #20903).
CAUTION:
You are using your Starter SNS™ to assist you in breastfeeding your
baby. Your baby should gain weight each week.
If your baby is not gaining
weight, or loses weight,
consult your healthcare
professional immediately.
Visit your healthcare professional throughout the time you use your
Starter SNS as often as he/she wishes to check the baby. Please
make sure you read this manual well, for it contains information you
need to know.
Extra assistance:
Very accurate hospital grade baby scales are available for rent at low
daily costs. Call 1-800-TELL YOU for locations in your area.
Flow Regulation:
One way to adjust the flow is by the height of the device. When the
bottom of the Starter SNS is above the level of the nipple, the supplement will flow more quickly and will continue to flow into the baby’s
mouth even when sucking has stopped. Such a non-stop flow can
be uncomfortable, so use extreme caution when the device is above
the level of the nipple, especially if the baby seems to gulp loudly or
choke. Most babies will stop and pull away if this should happen.
2
Similarly, when the SNS is placed below the level of the nipple, the
baby must suck against gravity. It could be difficult for the baby to
suck the supplement in this case. Your healthcare professional may
suggest this to promote a stronger suck. Make sure the baby swallows with every suck or every other suck if this technique is used.
The flow can also be increased by very gently squeezing on the teat.
This could be used when the infant has a very weak suck or needs
extra assistance, such as with the reluctant nurser.
Some mothers have found that warming the supplement in the
Starter SNS will increase the flow. It is usually not necessary to do
this. However, it is an additional way to increase flow.
Cleaning Instructions
After each use:
1. Fill container full of warm soapy water and force water through
tubing, teat and disc/membrane assembly by squeezing teat
(making sure disc/membrane assembly is inside teat lid while
cleaning).
2. Refill with clean water and again force water through tubing, teat
and disc/membrane assembly.
3. Squeeze the empty teat a few times to remove water droplets
from the tubings.
4. Completely disassemble and clean remaining parts with soapy
water. Squeeze teat tubing assembly until the disc/membrane
assembly falls out. Use fingernail of forefinger and thumb to
remove membrane from disc.
5. Rinse well and drain dry on a clean towel.
6. Reassemble.
This device is intended for short term use
and should be discarded after 24 hours.
3
Page 4
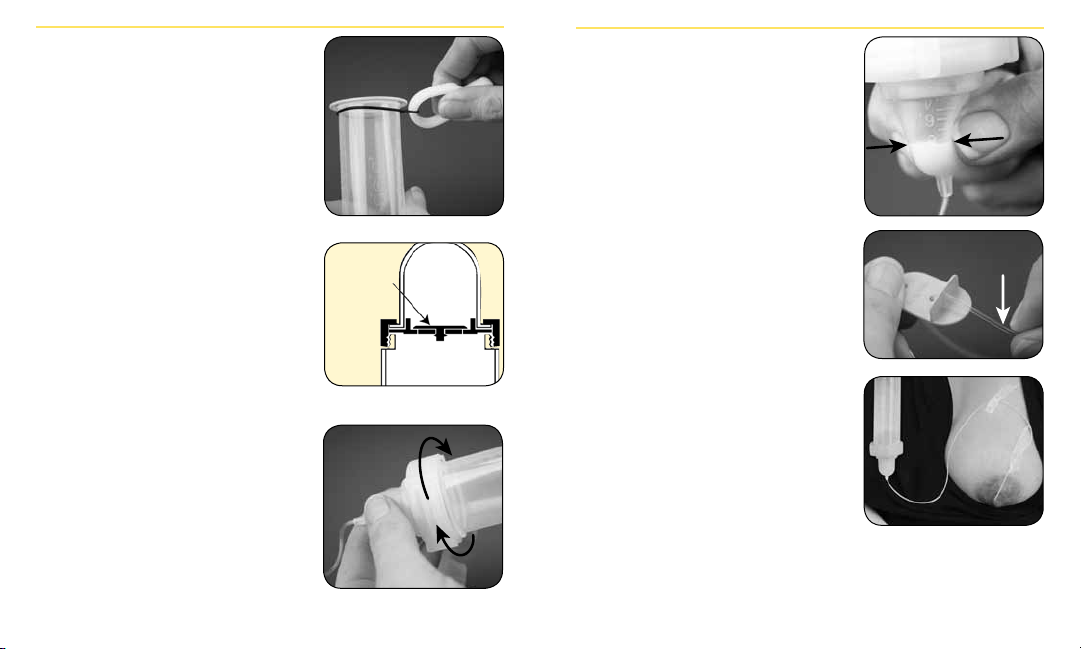
Instructions for Use
1. Place elastic ring with QuickClip
around bottom. (Container included
with #0097003S, #20903). Use
a Medela Collection and Storage
Container or other graduated feeder. Have extra paper tape available
if necessary.
2. Fill container with supplement
recommended by your physician.
Normally your body will heat the
supplement as it passes through
the tubing. However, if the supplement was taken from the refrigerator, warm it to approximately body
temperature before pouring it into
the container.
Valve
Membrane
(Silicone)
Permits only
forward flow
of feed.
5. To prime the system, hold the unit
in the upright position and, while
gently squeezing the teat, invert
the tubing assembly. Allow a small
amount of the supplement in the
teat. Next, gently squeeze the teat a
second time to fill the tubing to help
prevent the infant from swallowing
air. Only a small amount of supplement should be in the teat. Do not
fill teat completely.
6. Close off tubing using Tubing
Clamp to avoid milk flow.
7. Clip the container to the shoulder
of the gown or bra. The bottom of
the teat should be level with the
mother’s nipple.
3. Press white membrane onto the
upper side of the disc, so that the
stud goes completely through the
center hole.
8. Place tubing on the top of the
nipple making sure it extends about
1/4 inch beyond nipple and secure
it vertically with a piece of tape
extending down to the base of the
4. Screw the Teat/Tubing assembly
onto the container.
areola. Another piece of tape may
be placed horizontally at the base
of the areola if necessary. Make
4 5
Page 5

sure the tubing is positioned so the
baby keeps the tube in the center
of its upper lip and not in the corner of its mouth.
9. Position baby at breast. Place all
your fingers underneath the breast
Useful Accessories
Supplemental Nursing System™
A reusable supplemental feeding device
for extended use. Comes with three
sizes of tubing.
away from the areola. To begin milk
flow, lift tubing off Tubing Clamp.
Medications and Mother’s Milk
By Thomas W. Hale, Ph.D.
10. Tickle baby’s lower lip with your
nipple and wait until the baby
The effect of over 1000 drugs on the
nursing infant.
(US) 00901S and (Canada) 20901
Part #
opens wide. Place the tube under
the baby’s upper lip and gently
but quickly pull the baby onto your
breast. If you have difficulty, don’t
worry as this may take a little practice. Remove baby and start again.
Ordering Information
To order any of these useful accessories, contact your local authorized
Medela Rental or Retail Station.
Products may also be ordered by calling 1-800-435-8316 and ordering with
Discover Card, MasterCard, VISA,
American Express, cashier’s check or
money order.
Part #
1907248
Note: Make sure the baby keeps the tube in the center of its
upper lip and not in the corner of its mouth.
6 7
Page 6

Información general
Contenido:
Conjunto de tetilla y manguera; membrana blanca, disco, pinza
“Quick Clip” y anillo elástico; abrazadera para manguera; cinta adhesiva; recipiente (incluido sólo con los artículos 0097003S y 20903).
ATENCIÓN:
Está utilizando el sistema Starter SNS™ como auxiliar para el amamantamiento de su bebé. Su bebé debe aumentar de peso cada
semana.
Si su bebé no aumenta de peso o si pierde peso, consulte de inmediato con un médico.
Durante el tiempo que utilice el sistema Starter SNS, visite al médico
con la frecuencia que el médico desee revisar al bebé. Asegúrese
de leer detenidamente este manual, ya que contiene información de
debe saber.
Ayuda adicional:
Puede alquilar básculas para bebés muy exactas, de grado de hospital, por un costo diario muy bajo. Llame al 1-800-TELL YOU para
conocer los centros de alquiler en su región.
Regulación del flujo:
Una manera de ajustar el flujo es cambiando la altura del dispositivo.
Cuando la parte inferior del sistema Starter SNS está por encima del
nivel del pezón, el complemento alimenticio fluirá con mayor rapidez y
seguirá fluyendo a la boca del bebé incluso si deja de succionar. Este
flujo sin interrupciones puede ser incómodo; por lo tanto, debe tener
cuidado al mantener el dispositivo por encima del nivel del pezón,
sobre todo si el bebé comienza a ahogarse o a tragar de manera rui-
8 9
dosa. La mayoría de los bebés dejará de alimentarse y se alejará del
pezón cuando esto sucede.
Cuando el sistema SNS está por debajo del nivel del pezón, el bebé
debe succionar para contrarrestar la fuerza de gravedad. En este
caso, el bebé puede tener dificultades para succionar el complemento
alimenticio. Su médico puede recomendarle que coloque el sistema
a esta altura para fomentar succiones más fuertes. Si utiliza esta
técnica, compruebe que el bebé degluta en cada succión o en cada
segunda succión. También puede aumentar el flujo si oprime la tetilla
con suavidad. Puede utilizar esta técnica si el bebé succiona débilmente o si requiere ayuda adicional, como en el caso de un lactante
reacio.
Algunas madres han encontrado que el calentamiento del complemento alimenticio en el sistema Starter SNS aumenta el flujo. Esto
por lo general no es necesario. Sin embargo, es otra manera de
aumentar el flujo.
Instrucciones para la limpieza
Después de cada uso:
1. Instrucciones de limpieza la manguera, la tetilla y el conjunto de
disco y membrana (compruebe que el conjunto de disco y membrana esté dentro de la tetilla durante la limpieza).
2. Vuelva a llenar con agua limpia y fuerce nuevamente el agua por
la manguera, la tetilla y el conjunto de disco y membrana.
3. Oprima la tetilla vacía varias veces para eliminar las gotas de
agua de las mangueras.
4. Desarme por completo las demás piezas y lávelas con agua
jabonosa. Oprima la manguera de la tetilla hasta que se separe
el conjunto de disco y membrana. Use el pulgar y la uña del
índice para separar la membrana del disco.
Page 7

5. Enjuague bien las piezas y séquelas al aire sobre una toalla limpia.
6. Vuelva a armar las piezas.
Este dispositivo está diseñado para usarse durante período
breves y debe desecharse después de 24 horas.
Instrucciones parar su uso
1. Coloque el anillo elástico con la
pinza “Quick Clip” alrededor de la
parte inferior. (Recipiente incluido
con los artículos 0097003S y
20903.) Use un recipiente de
recolección y almacenamiento
Medela u otro recipiente de alimentación graduado. De ser
necesario, tenga cinta adhesiva
adicional a mano.
2. Llene el recipiente con el complemento alimenticio recomen-
dado por su médico. El cuerpo normalmente calentará el complemento alimenticio a medida que pasa por la manguera. Sin
embargo, si extrajo el complemento alimenticio del refrigerador,
caliéntelo a una temperatura aproximadamente igual a la temperatura corporal antes de colocarlo en el recipiente.
3. Coloque la membrana blanca a
presión en el lado superior del
disco, de manera que el poste
entre por completo en el orificio
central.
10 11
Membrana
de válvula
(silicona)
Permite
únicamente
el flujo del
alimento
hacia
delante.
4. Enrosque el conjunto de tetilla y
manguera en el recipiente.
5. Para cebar el sistema, sostenga
la unidad en posición vertical y
ponga de cabeza el conjunto de la
manguera a la vez que oprime la
tetilla con suavidad. Deje un poco
de complemento alimenticio en la
tetilla. Después vuelva a oprimir
la tetilla para llenar la manguera y
evitar que el bebé ingiera aire. Sólo
debe dejar un poco de complemento alimenticio en la tetilla. No
llene la tetilla.
6. Cierre la manguera con la abrazad-
era para evitar el flujo de leche.
7. Sujete el recipiente al hombre de la
bata o el sostén. La parte inferior
de la tetilla debe quedar al nivel del
pezón de la madre.
8. Coloque la manguera sobre el
pezón, asegurando que se extienda unos 6 mm (1/4 de pulgada)
más allá del pezón, y sujete la
manguera verticalmente con cinta
adhesiva hasta la base de la areola.
De ser necesario, puede colocar
otro pedazo de cinta adhesiva horizontalmente en la base de la are-
Page 8

ola. Compruebe que la manguera
esté colocada de manera que el
bebé mantenga la manguera en el
centro del labio superior y no en la
comisura de la boca.
9. Acomode al bebé contra el seno.
Ponga todos los dedos debajo
del seno, lejos de la areola. Para
iniciar el flujo de leche, saque la
manguera de la abrazadera.
10. Toque el labio inferior del bebé con
el pezón y espere a que el bebé
abra la boca. Coloque la manguera
debajo del labio superior del bebé y
acerque al bebé con rapidez y delicadez al seno. Si tiene dificultades,
no se preocupe; tal vez requiera un
poco de práctica. Separe al bebé
del seno e intente de nuevo.
Accesorios útiles
Sistema suplementario
para la lactancia
Un aparato alimentador reutilizable de
uso prolongado para la administración
de complementos alimenticios. Incluye
mangueras de tres tamaños.
Medications and Mother’s Milk
(Los medicamentos y la leche materna)
Por Thomas W. Hale, Ph.D.
Los efectos que pueden tener más de mil
medicamentos en un bebé lactante.
Información para pedidos
Si desea ordenar cualquiera de estos
útiles accesorios, comuníquese con un
centro autorizado de ventas o alquiler de
producto Medela.
(US) 00901S and (Canada) 20901
Part #
También puede ordenar productos lla-
Nota: Compruebe que el bebé mantenga la manguera en el centro
del labio superior y no en la comisura de la boca.
mando al 1-800-435-8316. Aceptamos
tarjetas de crédito Discover Card,
MasterCard, VISA y American Express,
Part #
1907248
cheques de caja y giros monetarios.
12 13
Page 9

Renseignements généraux
Contenu :
Ensemble tétine-tube; membrane blanche, disque, attache «Quick
Clip» et bande élastique; presse-tube; bande de ruban adhésif; contenant (inclus seulement avec les produits nos 0097003S et 20903)
AVERTISSEMENT:
Vous utilisez le dispositif «Starter SNS» pour aider votre bébé pendant l’allaitement maternel.
Votre bébé doit prendre du poids toutes les semaines.
Consultez immédiatement votre médecin s’il
ne grossit pas où s’il perd du poids.
Durant la période ou vous utilisez le dispositif, demandez à votre
médecin à quelle fréquence il veut examiner votre bébé. Assurezvous de lire attentivement ce manuel car il contient des renseignements dont vous avez besoin.
De l’aide additionnelle:
Vous pouvez faire la location de pèse-bébés de qualité professionnelle à des coûts économiques. Composez le 1-800-835-5968 pour
obtenir les coordonnées d’un centre de location près de chez vous.
Réglage du débit:
On peut régler le débit en changeant la hauteur à laquelle on place
le dispositif. Lorsque le bas du «Starter SNS» est situé au-dessus du
niveau du mamelon, le supplément coule plus rapidement et continue de couler dans la bouche de bébé même s’il arrête de téter. Ce
débit continu peut être inconfortable pour le bébé; il faut donc être
prudent lorsque le dispositif est plus haut que le mamelon, surtout
si le bébé avale bruyamment ou s’il s’étouffe. La plupart des bébés
cessent de téter et s’éloignent du sein lorsque cela se produit.
14
C’est un peu le même principe qui se produit lorsque le SNS est
placé au-dessous du niveau du mamelon. Le bébé doit alors téter
plus fort pour faire monter le liquide contre la force de la gravité, et
peut avoir de la difficulté à téter. Il est toutefois possible que votre
médecin vous suggére de procéder ainsi pour habituer votre bébé à
téter plus efficacement. Lorsque vous utilisez le SNS de cette façon,
assurez-vous que votre bébé avale aprés un ou deux mouvements
de succion. On peut aussi augmenter le débit en pressant doucement sur la tétine. On peut utiliser cette technique lorsque le bébé a
une succion faible ou s’il a besoin d’être encouragé comme dans le
cas d’un bébé qui refuse le sein.
Certaines méres ont remarqué que le débit augmente si le supplément utilisé dans le «Starter SNS» est réchauffé. Il n’est habituellement pas nécessaire de le faire, mais c’est une autre façon de faire
accélérer le débit en cas de besoin.
Instructions de nettoyage
Après chaque utilisation:
1. Remplissez le contenant avec de l’eau chaude savonneuse
et faites passer l’eau à travers le tube, la tétine et la valve en
pressant sur la tétine (assurez-vous que l’ensemble disquemembrane est bien à l’intérieur du capuchon de la tétine durant
le nettoyage).
2. Remplissez à nouveau le contenant, cette fois-ci avec de l’eau
claire, et faites encore une fois passer l’eau à travers le tube, la
tétine et l’ensemble disque-membrane.
3. Pressez la tétine vide à plusieurs reprises pour vous assurer qu’il
ne reste pas de gouttes d’eau dans le tube.
4. Désassemblez ensuite toutes les pièces du SNS et nettoyez-les
dans de l’eau savonneuse. Comprimez le tube de la tétine pour
15
Page 10

en faire sortir l’ensemble disque-membrane. Détachez la membrane du disque à l’aide du doigt ou d’un ongle.
5. Rincez bien toutes les pièces et laissez-les sécher sur un linge propre.
6. Assemblez à nouveau toutes les pièces.
Ce dispositif est conçu pour un usage à court terme et doit être
jeté après 24 heures d’utilisation.
Mode e’emploi
1. Placez la bande élastique avec
l’attache «Quick Clip» autour de la
base du contentant (le contenant
est inclus avec le produit no 20903
et 0097003S). Vous pouvez utiliser
un contenant de cueillette et de
conservation du lait maternel de
Medela ou un biberon gradué. Assurez-vous d’avoir du ruban
adhésif additionnel au cas ou vous en auriez besoin.
2. Remplissez le contenant avec le supplément recommandé par
votre médecin. Normalement, la chaleur de votre corps devrait
suffire à réchauffer le supplément pendant qu’il passe dans le
tube. Toutefois, s’il a été réfrigéré, réchauffez-le à la température
ambiante avant de le mettre dans le contenant.
3. Pressez la membrane blanche sur
le côté supérieur du disque, pour
que le goujon traverse complètement le trou central.
16
Membrane
de valve
(silicone)
Ne permet
que la
sortie
du liquide
de la
tétine.
4. Vissez l’ensemble tétine-tube sur le
contenant.
5. Pour amorcer le système, vous
devez premièrement tenir l’appareil
à la verticale puis le renverser tout
en pressant légèrement la tétine.
Ne laissez passer dans la tétine
qu’une petite quantité de supplément. Pressez légèrement la tétine
pour remplir le tube. Vous évitez
ainsi que le bébé avale de l’air. Il
ne devrait y avoir qu’une petite
quantité de liquide dans la tétine.
Il ne faut jamais complètement la
remplir.
6. Fermez le tube à l’aide du serre-
tube pour empêcher le lait de
s’écouler.
7. Agrafez le contenant à votre vête-
ment, près de l’épaule, ou à la
bretelle de votre soutien-gorge. Le
bas de l’ensemble tétine-tube du
SNS doit être au même niveau que
votre mamelon.
8. Placez le tube sur le bout de votre
mamelon en le laissant dépasser
d’environ 1 cm. Fixez-le avec un
morceau de ruban adhésif placé
verticalement le long du tube
jusqu’à la base de l’aréole. Si vous
17
Page 11

le jugez nécessaire, vous pouvez
ajouter un second morceau de
ruban adhésif placé horizontalement
à la base de l’aréole. Assurez-vous
que le tube est fixé de façon à ce
qu’il se place au milieu de la lèvre
supérieure du bébé, et non au coin
de sa bouche.
9. Mettez le bébé au sein. Placez vos
doigts sous votre sein, en évitant de
toucher à l’aréole. Enlevez le tube
du presse-tube pour que le lait se
mette à couler.
10. Chatouillez les lèvres du bébé avec
votre mamelon et attendez qu’il
ouvre grand sa bouche. Dirigez le
tube sous sa lèvre supérieure et
ramenez-le doucement mais rapidement vers vous. Ne vous inquiétez
surtout pas si vous avez de la difficulté, on doit s’y reprendre à plusieurs reprises. Éloignez votre bébé
et recommencez.
Remarque:
Assurez-vous que le tube est toujours placé au milieu de la lèvre
supérieure du bébé, et non au coin de sa bouche.
18
Page 12

Accessoires Utiles
Dispositif d’aide à l’allaitement
Un dispositif réutilisable qui peut être
utilisé à long terme, pour supplémenter
pendant l’allaitement. Trois tubes de
grandeur différente sont inclus.
Medications and Mother’s Milk
de Thomas W. Hale, Ph.D.
Cette publication passe en revue les
effets de plus de 1000 médicaments
sur le nourrisson.
Pour commander
Communiquez avec le centre de location ou le détaillant autorisé Medela
près de chez vous si vous voulez commander un de ces accessoires utiles.
Vous pouvez aussi commander ces
produits et ces pièces avec une carte
de crédit Discover Card, MasterCard,
Visa et American Express, avec un
mandat postal ou avec un chèque certifié en composant le 1-800-435-8316.
(US) 00901S and (Canada) 20901
Part #
Part #
1907248
19
Page 13

20
 Loading...