

Page 1
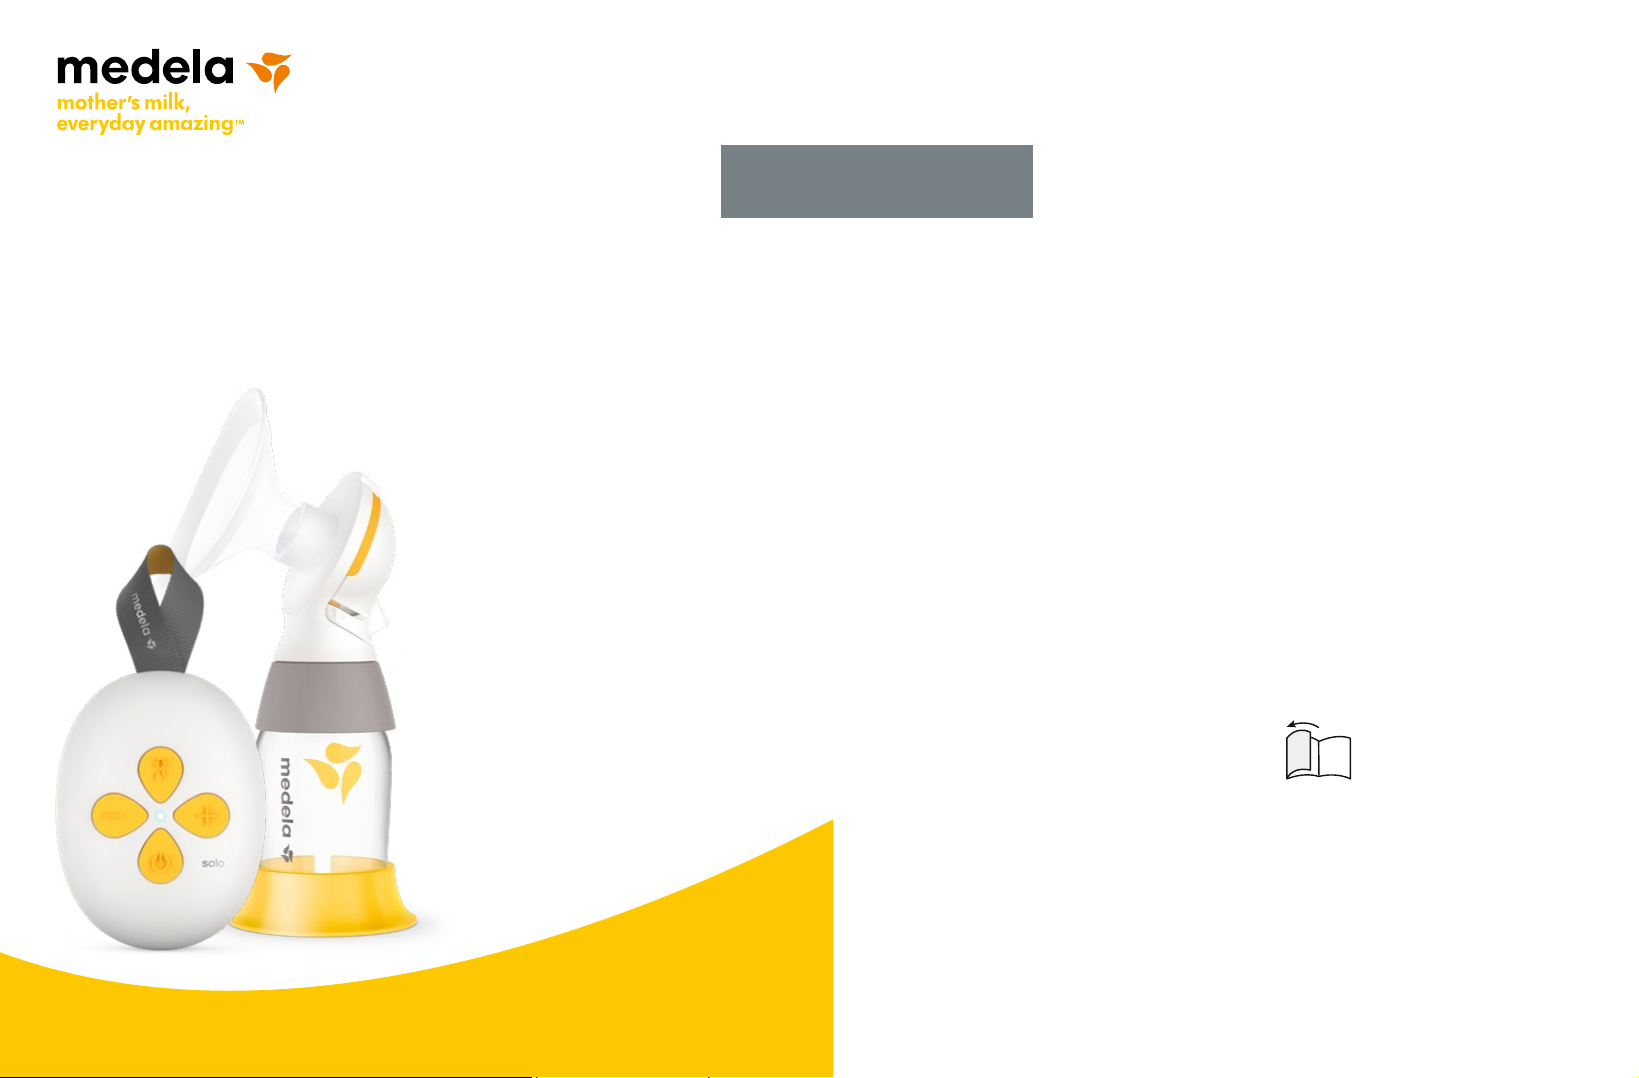
Solo
™
Electric breast pump
Instructions for use
EN
ENGLISH
3-20
EN Illustrated items or instruction steps are marked with the figure
and detail number (e.g. ¢2- 01).
EN Fold this page out.
Page 2
¢1
1-01
¢4
4-01
4-02
1-02
¢2
¢3
2-01
2-02
3- 01
2-03
5’
2-04
4-08
4-07
4-03
4-07-24-07-1
4-04
4-09
solo
4-03 -1
4-06
4- 03-2
4-05
¢5
5- 01
⌀
[mm]
5-02
…⌀17 …⌀20 …⌀23 …⌀ 26
24
21 27
S M L XL
30
Page 3
1. Important safety information
Please read all instructions before using this product.
Keep these instructions for future reference.
Warnings identify all instructions that are important for safety. Failure to observe these
instructions can lead to personal injury or damage to the product.
The following symbols and signal words show the significance of the warnings:
3
WARNING
CAUTION
NOTICE
i Information
When using electrical products, especially when children are present, basic safety precautions
must always be followed.
Can lead to serious injury or death.
Can lead to minor injury.
Can lead to material damage
(not related to personal injury).
Useful or important information that is not
related to safety.
WARNING
To avoid fire, electric shock, or serious burns:
• Only use the power adapter and cable that comes with the device. An inadequate power
source or cable may result in a fire hazard, electric shock or malfunction of the device.
• Never operate an electrical device if it has a damaged cord or plug, if it is not working
properly, if it has been dropped or damaged, or dropped into water. If damage is found,
immediately discontinue use of power adapter and call Medela Customer Service.
• Do not use an electrical product that has been exposed to water or other liquids including:
– Do not use while bathing or showering.
– Never place or drop into water or other liquids.
– Do not run water over the pump unit.
– If an electrical product has been exposed to water or other liquids, do not touch, unplug
the device from electrical outlet, turn off and contact the manufacturer.
Page 4
WARNING
To avoid health risks and reduce the risk of severe injury:
• Do not use the device while operating a moving vehicle.
• Pumping can induce labour. Do not pump until after giving birth. If you become pregnant
4
while breastfeeding or breast pumping, consult with a licensed healthcare professional
before continuing.
• If infected with Hepatitis B, Hepatitis C, or Human Immunodeficiency Virus (HIV), pumping
breast milk will not reduce or remove the risk of transmitting the virus to your baby through
your breast milk.
• Wash all parts that come into contact with your breast and breast milk after every use.
• This appliance is not intended for use by persons (including children up to 14 years) with
reduced physical, sensory or mental capabilities, or lack of experience and knowledge,
unless they have been given supervision or instruction concerning use of the appliance by
a person responsible for their safety.
• Children must not play with the appliance.
• Cleaning and maintenance must not be performed by children without supervision.
CAUTION
To avoid fire or burns:
• Make sure the voltage of the power adapter is compatible with the power source. See
chapter 15 for technical specifications.
• Always unplug electrical products immediately after use except for when charging.
• Do not place or store the product where it can fall or be pulled into a tub or sink.
• The device and its accessories are not heat-resistant. Keep away from heated surfaces or
open flames.
• Do not use near flammable materials.
Page 5

CAUTION
To avoid health risks and reduce the risk of injury:
• This is a single-user product. Use by more than one person may present a health risk and
voids the warranty.
• This product cannot be serviced or repaired. Do not repair yourself. Do not modify the
device.
• Never use a damaged device. Replace defective or worn parts.
• Use the device only for its intended purpose as described in these instruction for use.
• Do not use the device while sleeping or overly drowsy.
• If tubing becomes mouldy, discontinue use and replace tubing.
• Do not microwave or boil breast milk. Microwaving can cause severe burns to baby’s
mouth from hot spots that develop in the milk during microwaving (Microwaving can also
change the composition of breast milk).
• Clean and sanitise all parts that come into contact with your breast and breast milk prior to
first use.
• Only use Medela recommended parts with the device.
• If pumping is uncomfortable or causing pain, turn the unit off, break the seal between the
breast and the breast shield with your finger and remove the breast shield from your
breast.
• While some discomfort may be felt when first using a breast pump, it should not cause
pain. If you are unsure about correct breast shield sizing please visit www.medela.com or
see a lactation consultant/breastfeeding specialist who can help you get a proper fit.
NOTICE
Pay attention to the following:
• Take appropriate care in handling bottles and components:
• Plastic bottles and parts become brittle when frozen and may break when dropped.
• Bottles and parts may become damaged if mishandled (e.g., dropped, over-tightened, or
knocked over).
• Do not use the breast milk from bottles or components that show signs of damage.
5
Page 6

Contents
6
1. Important safety information 3
2. Intended purpose 7
3. Product description 7
3.1 Description of the device 7
3.2 The device includes 7
4. Getting started 7
4.1 Cleaning before first use 7
4.2 Charging the battery 7
5. Cleaning 8
5.1 Washing and sanitising the pump set 8
5.2 Cleaning the pump unit 10
5.3 Cleaning the tubing 10
6. Assembling the breast pump 11
6.1 Selecting the correct breast shield size 11
6.2 Assembling the pump set 11
6.3 Preparing for pumping 11
7. Operating the breast pump 12
7.1 Mimicking the baby´s rhythm (2-phase expression) 12
7.2 Buttons and status light 12
7.3 Expressing your breast milk 13
7.4 Pausing 14
7.5 Switching off 14
7.6 After pumping 14
8. Handling of breast milk 15
8.1 General storage guidelines 15
8.2 Freezing 15
8.3 Thawing 15
9. Troubleshooting 16
10. Accessories 17
11. Warranty 17
12. Disposal 17
13. Meaning of symbols 18
14. International regulations 20
14.1 Electromagnetic compatibility (EMC) 20
14.2 Drinking equipment 20
15. Technical specifications 20
Page 7

2. Intended purpose
The Solo breast pump is a powered breast pump to be used by lactating women to express
and collect milk from their breasts. The Solo breast pump is intended for a single user.
3. Product description
3.1 Description of the device
The Solo is a personal-use electric breast pump that includes 2-Phase Expression technology
and is designed for single pumping. It consists of a pump unit, a pump set (breast shield,
connector and bottle) and a tubing.
The operating life of the Solo breast pump is 250 hours.
3.2 The device includes
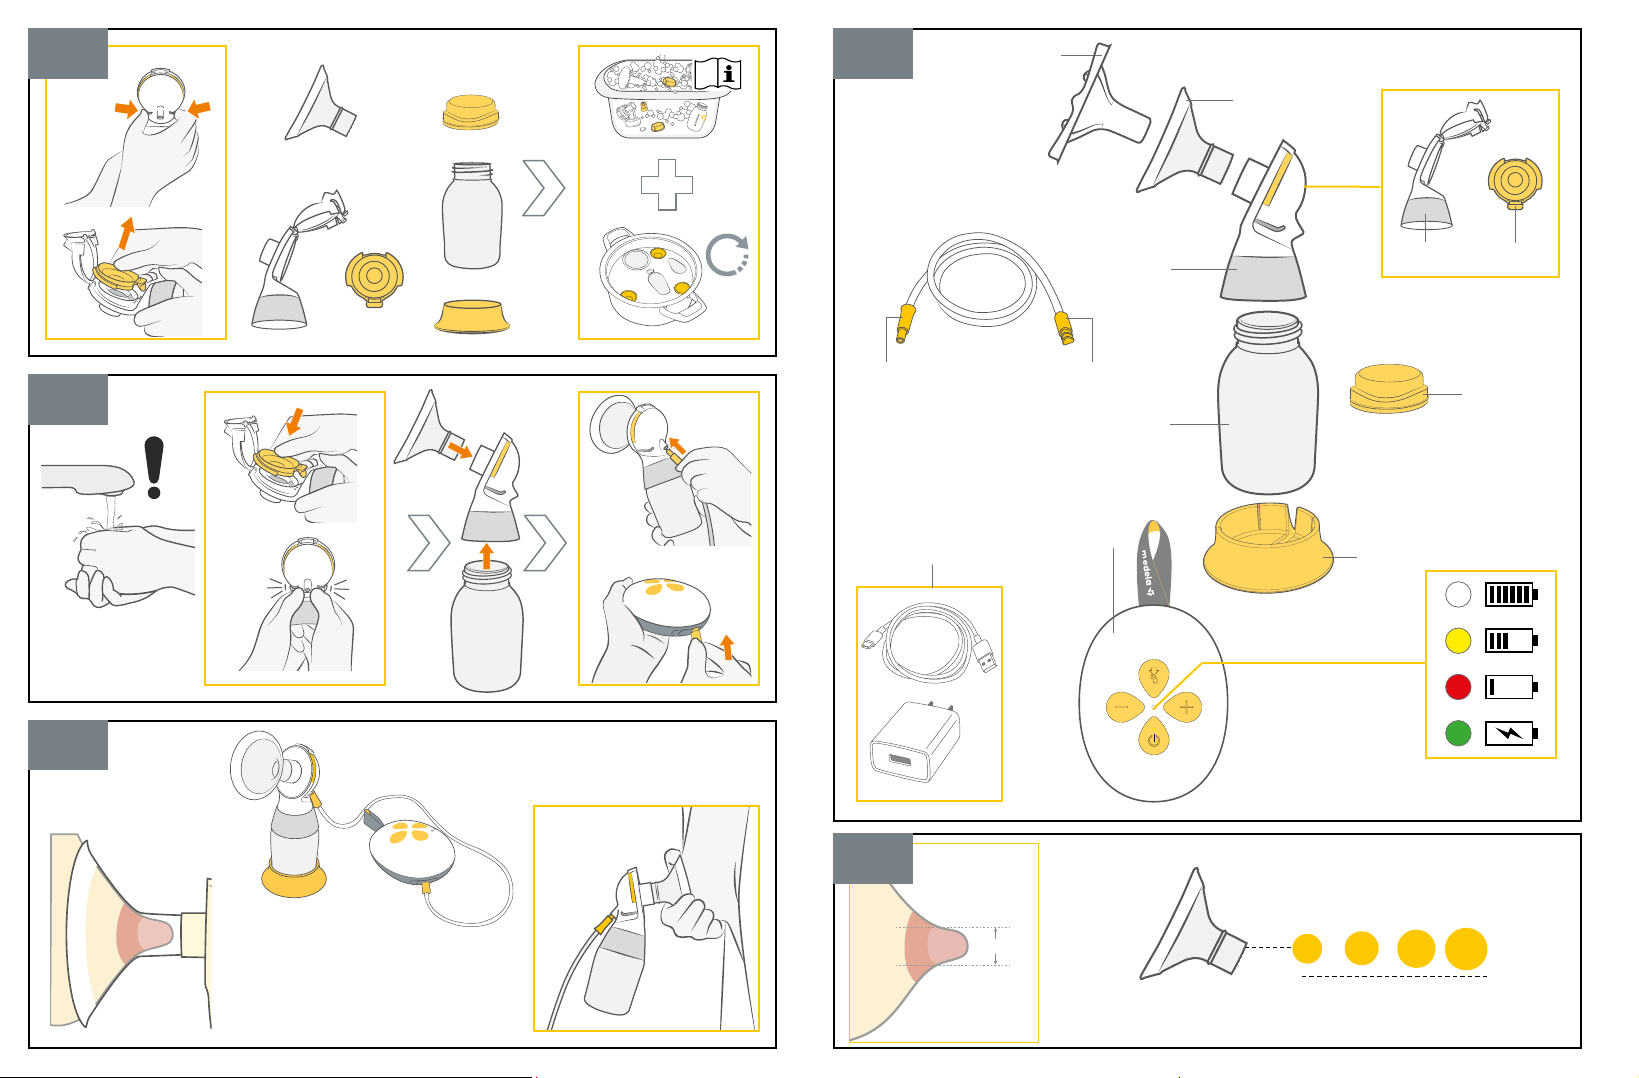
Refer to figure ¢4 on the foldout pages.
¢4-01 (Disposable) protective cover
¢4-02 PersonalFit Flex breast shield M 24 mm
¢4-03 PersonalFit Flex connector
¢4-03-1 Connector body
¢4-03-2 Membrane
¢4-04 Bottle
¢4-05 Lid
¢4-06 Bottle stand
¢4- 07 Tubing
¢4-07-1 Round end piece of tubing
(couples with the connector)
¢4-07-2 End piece with polygonal
shape
(couples with the pump unit)
¢4-08 Power adapter with cable
¢4-09 Pump unit
4. Getting started
4.1 Cleaning before first use
It is important to do the following before using the breast pump for the first time:
1. Remove the protective cover ( ¢4-01) from the breast shields ( ¢4-02).
2. Disassemble and clean all parts (except for the tubing) according to the cleaning
instructions – see section 5.1.
7
4.2 Charging the battery
Charge the battery for two hours.
1. Use the power cable to connect the pump unit with the power adapter.
2. Plug the power adapter into a wall outlet.
Æ During charging, the status light is pulsing in green colour.
Æ When charging is complete, it lights up steadily in green colour.
i Information
• You can use the breast pump while charging the battery. However, it will charge in a slower
mode when the pump is running.
Page 8
5. Cleaning
5.1 Washing and sanitising the pump set
Washing and sanitising are two different activities. They must be done separately to protect
you and your baby, and to maintain the performance of the device.
8
Wash – To clean the surfaces of the parts by physically removing contamination.
Sanitise – To kill microorganisms, such as fungi, bacteria or viruses, that may be present on
the surfaces of the parts.
CAUTION
To keep the pump parts clean and hygienic:
• Separate and wash all parts that are exposed to breast milk immediately after use. This will
help to remove breast milk residue and prevent growth of bacteria.
• Wash hands thoroughly with soap and water.
• Only use drinking-quality tap water or bottled water for cleaning.
• Do not place pump parts directly in the sink to rinse or wash. Use a clean wash basin used
only for infant feeding items.
• Do not use a dish towel to rub or pat items dry.
• Do not use disinfectants for cleaning.
NOTICE
To prevent damage to the tubing.
• Do not clean the tubing as described below. Follow the instructions in section 5.3.
NOTICE
Pay attention to the following:
• Take care not to damage parts of the pump set during cleaning.
• Store the dried pump set in a clean bag/container until next use.
• Do not store wet or damp parts as mould may develop.
• If you notice a white residue on the parts after boiling, your water may have a high mineral
content. Remove residue by wiping parts with a clean towel and allow to air dry.
• Distilled water is recommended when boiling parts to prevent substantial mineral build-up
over time, which may compromise your parts.
i Information
If using the dishwasher, parts may become discoloured. This will not impact the part function.
What to do when: See detailed instructions on the next page.
Page 9
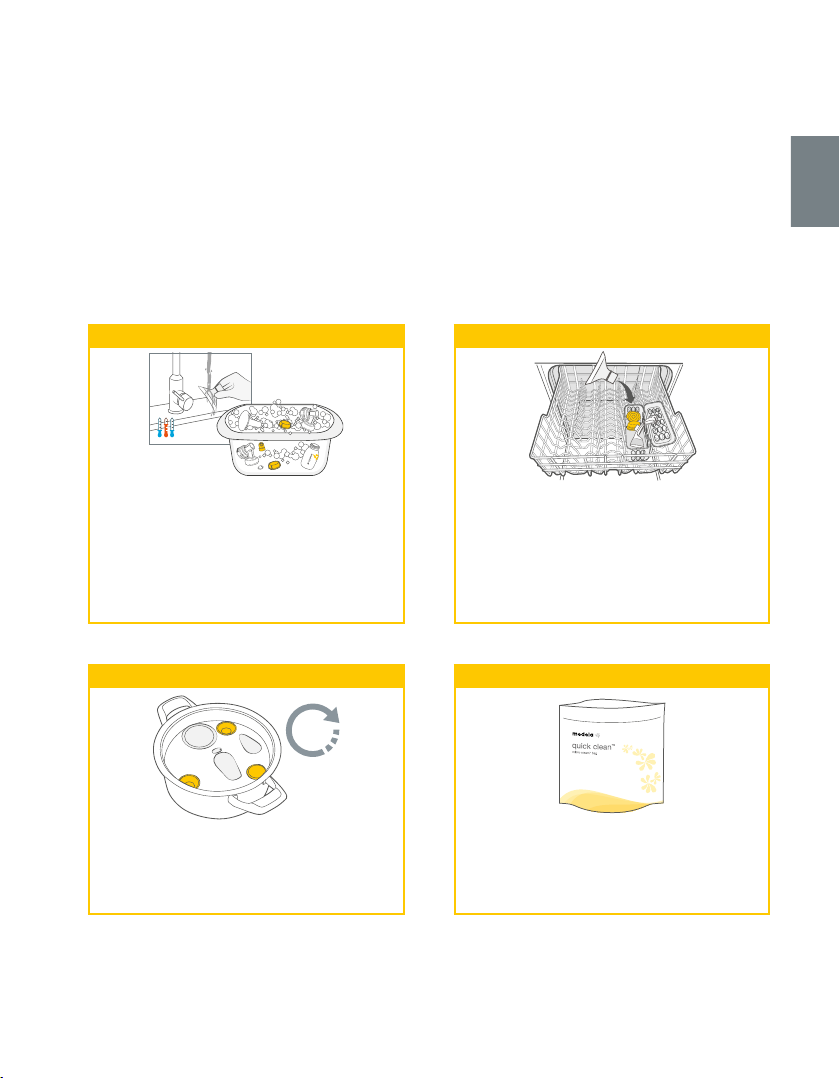
Before first use, remove and dispose of the protective cover ( ¢4-01) from the breast shield
( ¢4-02). Wash and sanitise the pump set and bottles following the steps 1 to 4 below before
using them for the first time. Wash your pump set and bottles after each use and sanitise the
parts once per day after they have been washed.
1. Disassemble
Refer to figure ¢1 on the foldout page.
i. Disassemble the pump set into its individual parts (breast shield, connector and bottle).
ii. Open the connector ( ¢1- 01) by squeezing both flaps and swivelling the lid upwards and remove the
membrane (¢1-02).
iii. Separate the bottles, lids and bottle stands.
2. Wash (before first use and after each use)
Rinse and wash by hand Wash in dishwasher
or
9
i. Rinse the disassembled parts, except for the
tubing, with cool water (approx. 20°C).
ii. Clean these parts with plenty of warm,
soapy water (approx. 30°C). Use a commercially available washing-up liquid.
iii. Rinse the parts with cool water for 10 to 15
seconds (approx. 20°C).
Place the disassembled parts, except for the
tubing, on the top rack or in the cutlery section.
Use a commercially available dishwashing
detergent.
3. Sanitise (before first use and once per day)
Sanitise on stovetop Sanitise in microwave
or
5 min
Cover the disassembled, washed parts, except
for the tubing, with water and boil at least for
5minutes.
Use Quick Clean* bags in the microwave in
accordance with the instructions on the bags.
* Refer to local website/shops for availability in
your country.
4. Dry
Allow to air-dry on a clean, unused dish towel or paper towel. Store the dry parts in a clean environment.
Do not store parts in an airtight container/bag if moist. It is important that all residual moisture dries.
Page 10
5.2 Cleaning the pump unit
CAUTION
10
To prevent electric shock and damage to the material:
• Unplug the pump unit before cleaning it.
• Do not immerse the pump unit in water.
• Do not spray or pour liquid directly onto it.
1. Wipe the pump unit with a clean towel moistened with soapy water.
2. Wipe the pump unit dry with a clean, dry towel.
5.3 Cleaning the tubing
CAUTION
If the tubing becomes mouldy, discontinue use and replace tubing.
NOTICE
Do not use the device with wet tubing; doing so will damage it.
Washing
Since the tubing only conveys an air flow (no contact with milk), normally cleaning of the
tubing is not necessary.
i Information
Inspect the tubing. If you find condensation in the air tube, wash and dry it immediately or
replace it. If you see breast milk inside the tubing do not attempt to wash or sanitise it.
Instead contact the manufacturer.
1. Separate the tubing from the device.
2. Rinse the tubing by pouring cool water into the tubing end until it flows out of the other
tubing end.
3. Wash the tubing in warm, soapy water.
4. Rinse the tubing with clear water.
Drying
1. Shake out any water droplets.
2. Hang the tubing to air dry.
3. Make sure that the tubing is completely dry before using it.
Page 11
6. Assembling the breast pump
Only use clean and dry parts for assembly. Refer to chapter 5 for cleaning.
6.1 Selecting the correct breast shield size
Refer to figure ¢5 on the foldout pages.
1. For proper sizing, measure the diameter of your nipple ( ¢5 -01).
2. Select the breast shield that is slightly larger than your nipple ( ¢5-02).
For more information on breast shield sizing, visit www.medela.com.
6.2 Assembling the pump set
CAUTION
To prevent contamination of your milk:
• Wash hands thoroughly with soap and water before touching the pump unit, parts of the
pump set and breasts.
• Dry your hands with a fresh towel or a single-use paper towel.
• Avoid touching the inside of bottles and lids.
To make sure that the device works properly and safely:
• Check pump set components for wear or damage before use. Replace if necessary.
• Always inspect all parts prior to use for cleanliness. If dirty, clean according to chapter 5.
NOTICE
To prevent damage to the pump unit all components must be completely dry before use.
Refer to figure ¢2 on the foldout pages.
1. ¢ 2-01 Carefully insert the yellow membrane with the flap into the opening of the
connector body.
Æ Make sure that the membrane forms a seal around the edge of the connector body.
2. ¢2-02 Close the connector lid until it audibly clicks.
3. Screw the connector onto the bottle.
4. Carefully push the breast shield into the connector.
5. The oval breast shields can be rotated (360°) and placed in the desired position to have
the most comfortable fit for you.
6. ¢2-03 Insert the round end piece of the tubing into the connector.
7. ¢2-04 Insert the end piece with polygonal shape into the pump unit as far as it will go.
11
6.3 Preparing for pumping
Refer to figure ¢3 on the foldout pages.
1. Assemble one pump set as described in section 6.2.
Æ ¢3-01 Correctly assembled system for pumping.
2. Place the breast shield on the breast so that the nipple is properly centred in the tunnel.
3. Hold the breast shield and connector onto your breast with your thumb and index finger.
4. Support your breast with the palm of your hand.
5. Start pumping as described in section 7.3.
Page 12
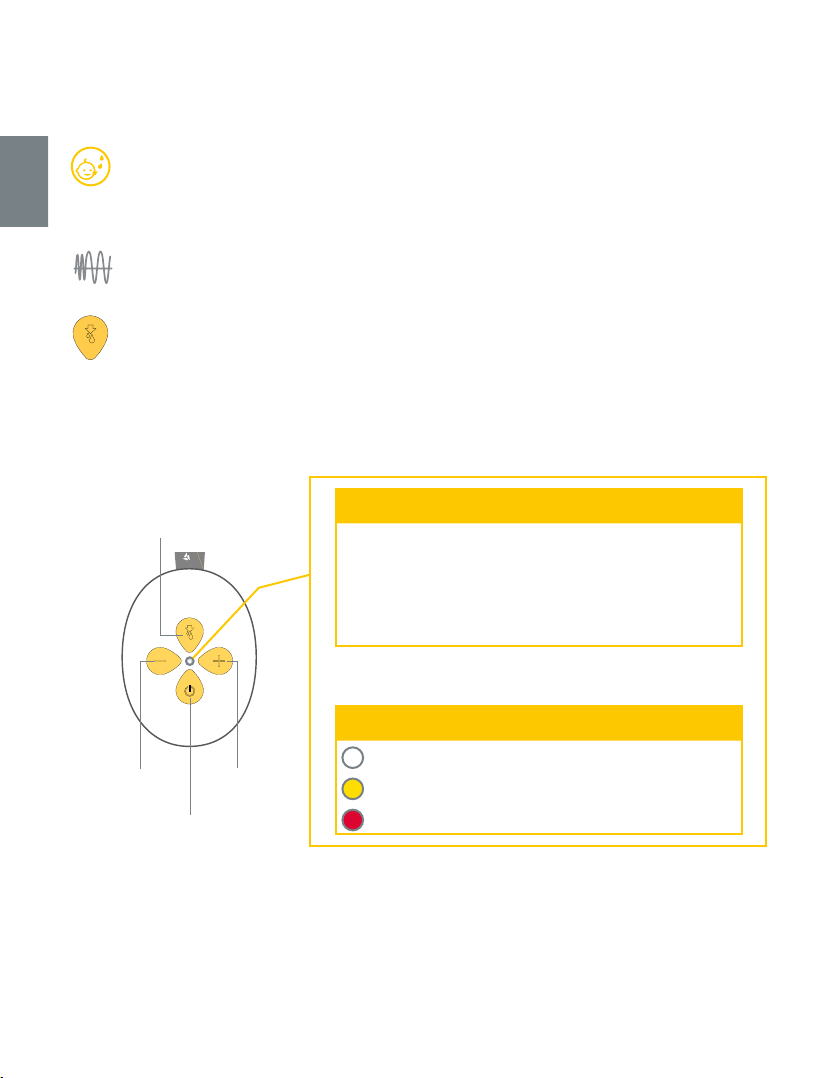
7. Operating the breast pump
7.1 Mimicking the baby´s rhythm (2-phase expression)
12
Babies use a “two-speed” sucking action. At first, they suck quickly, and then they
switch to a slower, deeper sucking rhythm once milk starts to flow. The quicker sucking
action stimulates the milk ejection reflex and triggers the milk flow; the slower sucking
draws the milk out for the feeding phase.
The pump mimics the baby´s natural sucking rhythm by using a “two-speed” pumping
action, the so called “2-Phase expression”.
The breast pump begins with a fast sucking action called the stimulation phase. When
you see milk flow or feel milk ejection, you can then press the “Let-down” button to
switch to the expression phase, which is slower than the previous one. If you do not
press the Let-down button, the expression phase will automatically start after the pump
has been running for one minute in the stimulation phase.
7.2 Buttons and status light
Let-down button
(switches between stimulation
and expression phase)
Status light Mode of pump
Light is off Pump is off
Light is flashing Pump is on, stimulation phase
Lights up steadily Pump is on, expression phase
Light is pulsing Pump is on, paused
Decrease
vacuum button
On/Pause/Off button
solo
Increase
vacuum button
When the pump is on, the status light appears in different
colours according to the battery level:
Battery level
Good
Low, enough to finish one pump session
Very low, charge the battery immediately
Page 13
7.3 Expressing your breast milk
CAUTION
In case of pain or insufficient milk expression:
• Do not hold the pump set by the bottle. This can lead to compression and blockage of the
milk ducts and engorgement.
• Do not try to express with vacuum that is too high and uncomfortable (painful). The pain,
along with potential breast and nipple trauma, may decrease milk output.
• Contact your healthcare professional or breastfeeding specialist if you can express only
minimal or no milk or if expression is painful.
NOTICE
Make sure that the tubing is not kinked or pinched while pumping.
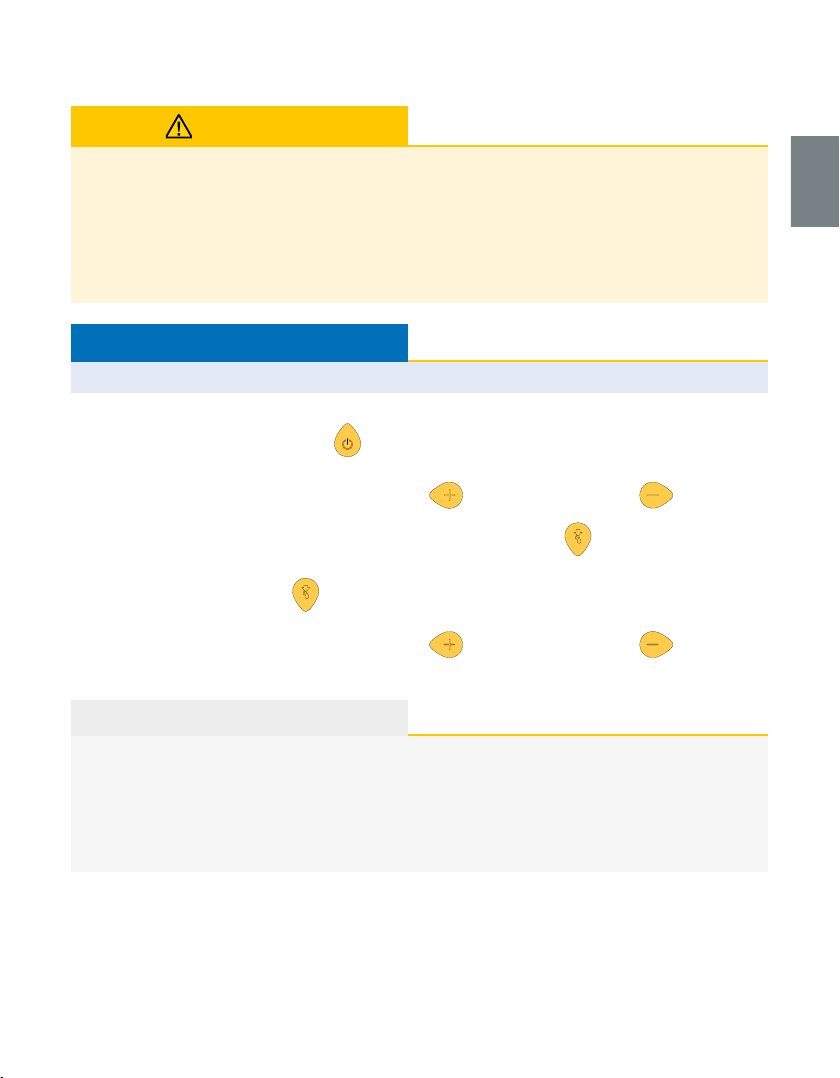
1. Place the breast shield on the breast so that the nipple is properly centred in the tunnel.
2. Press the On/Pause/Off button
Æ The stimulation phase begins and the status light is flashing.
3. Adjust the vacuum with the Increase vacuum
find a comfortable level.
4. As soon as your milk begins to flow, press the Let-down button
Æ The expression phase begins and the status light is on steadily.
Æ If the Let-down button
automatically go to expression phase.
5. Adjust the vacuum with the Increase vacuum
find your maximum comfort vacuum (see information below).
to start pumping.
and Decrease vacuum buttons to
.
is not pressed within one minute, the breast pump will
and Decrease vacuum buttons to
13
i Information
• Maximum comfort vacuum is the highest vacuum setting where pumping still feels comfortable. This is different for every mother.
• Stimulation should be at a comfortable vacuum level, striving for a maximum level is not
necessary here.
• Reassess your maximum comfort vacuum throughout your pumping experience. It can
change throughout each stage of lactation.
6. To pause pumping refer to section 7.4 and to switch the pump off refer to section 7.5.
Æ The breast pump stops automatically after 30 minutes if there is no user interaction with
the pump.
Page 14
7.4 Pausing
In both stimulation and expression phase the breast pump can be paused.
This allows you to readjust yourself or your pump set, or attend to your surroundings.
1. For pausing, press the On/Pause/Off button
14
Æ The pumping operation stops and the status light is pulsing.
2. To resume pumping, press the On/Pause/Off button
while the breast pump is running.
again.
i Information
• If pumping is not resumed within two minutes, the breast pump turns off automatically.
• If you need to pause for more than two minutes, it is recommended that you restart with
stimulation phase.
7.5 Switching off
To switch the breast pump off press and hold the On/Pause/Off button for two seconds.
7.6 After pumping
Prepare the milk for storage as follows:
1. Use the bottle stand to prevent the bottle from tipping over.
2. Close the bottle with a lid.
Page 15
8. Handling of breast milk
8.1 General storage guidelines
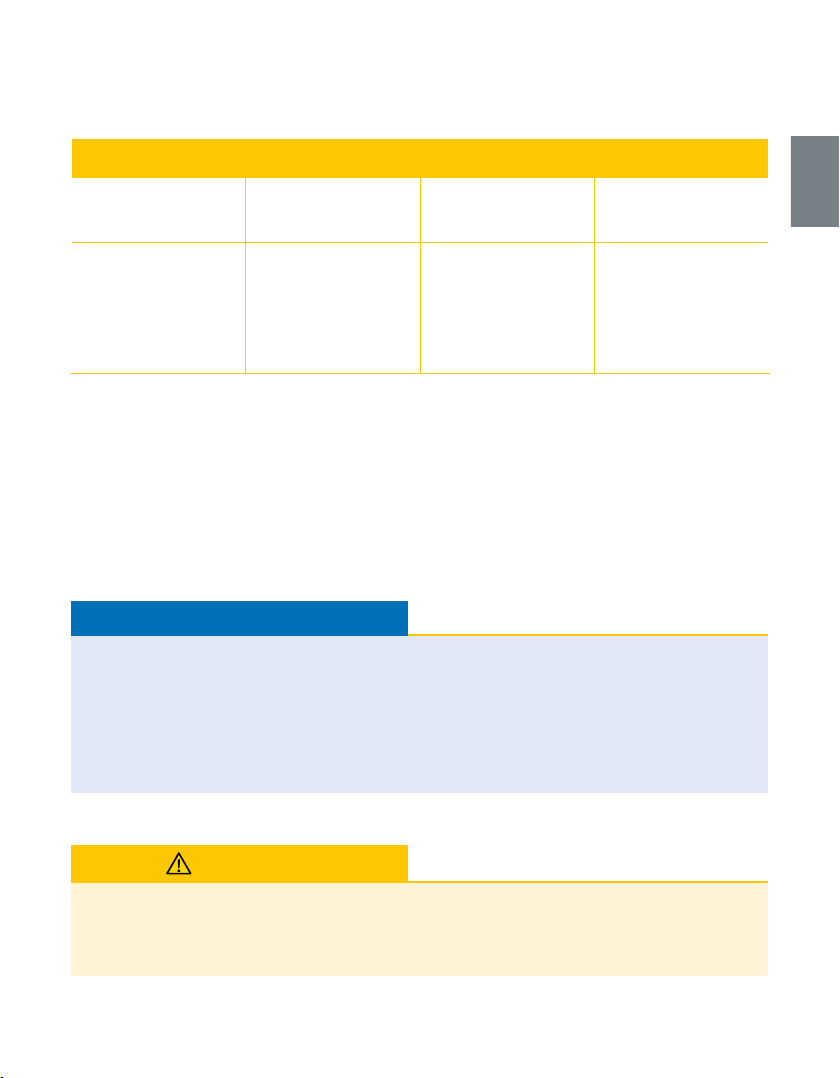
Storage guidelines for freshly expressed breast milk (for healthy term babies)
Room temperature
16 to 25 °C
(60 to 77 °F)
Up to 4 hours is best
*Up to 6 hours for milk
expressed under very
clean conditions
Refrigerator
4 °C (39 °F)
or colder
Up to 3 days is best
*Up to 5 days for milk
expressed under very
clean conditions
Freezer
–18 °C (0 °F )
or colder
Up to 6 months is best
*Up to 9 months for milk
expressed under very
clean conditions
Breast milk thawed in
the refrigerator
At room temperature:
Up to 2hours
Refrigerator:
Up to 24 hours
Do not refreeze!
*Guidelines for expressing milk under very clean conditions:
Before expressing breast milk, mothers should wash their hands with soap and water or an
alcohol-based hand sanitiser. The pump parts, bottles and pumping area must be clean.
Breasts and nipples do not need to be washed before pumping.
• These guidelines for storage and thawing of breast milk are a recommendation. Contact
your lactation consultant or breastfeeding specialist for further information.
• Store breast milk in the coldest spot of the refrigerator (at the back of the glass shelf above
the vegetable compartment).
8.2 Freezing
NOTICE
• Repeated freeze/thaw cycles destroy the structure of the milk. Therefore, never refreeze
breast milk.
• Freeze expressed breast milk in plastic bottles or milk storage bags. Do not fill the bottles
or bags more than 3/4 full to allow space for possible expansion.
• Label the bottles or bags with the date and volume of expression.
• Plastic bottles and parts become brittle when frozen and may break when dropped.
• Do not use the breast milk from bottles or components that show signs of damage.
15
8.3 Thawing
CAUTION
Do not thaw or warm breast milk in a microwave or a pan of boiling water. This helps
preserve important components and prevents burns.
• To preserve breast milk components, thaw the milk overnight in the refrigerator.
• Alternatively, hold the bottle or bag under warm water (max. 37 °C / 98.6 °F).
Page 16

NOTICE
Gently swirl the bottle or bag to mix any fat that has separated. Avoid shaking or stirring the
milk.
16
9. Troubleshooting
In case of an unexpected behaviour of the breast pump check with the troubleshooting table if
you find the issue in the column “Problem” and follow the instructions in the column “Solution”.
Troubleshooting table
Problem Solution
The breast pump is not working
after you pressed the On/Pause/
Off button
The breast pump generates only
constant vacuum instead of
sucking cycles
The status light is flashing rapidly
in red when you try to pump or
charge the breast pump
There is low or no suction Make sure that all pump set components are clean and dry and that
The breast pump is not responding as expected
The pump unit’s exterior got wet Unplug the pump unit from the power source and turn it off.
The pump unit has been
submerged in water
If you have not resolved the problem with the breast pump or you have further questions, please contact the
Medela Customer Service. For contact data visit www.medela.com. Under “Contact” choose your country.
Charge for 15 minutes before restarting the pump. Charging is
indicated by the status light pulsing in green. If the pump is still not
working contact the Medela Customer Service.
Contact the Medela Customer Service.
Charging/pumping is not possible when the battery temperature is
too high. Allow the pump unit to cool down, then resume charging/
pumping. If the status light is still flashing rapidly in red, a device fault
occurred. Contact the Medela Customer Service.
connections are secure.
While pumping, make sure the breast shields form a complete seal
around the breast.
If suction does not improve after having followed these steps,
contact the Medela Customer Service.
Press and hold the On/Pause/Off button for two seconds to switch
the breast pump off, then restart the breast pump.
If there is no change, contact the Medela Customer Service.
Dry off the exterior of the pump unit.
Unplug the pump unit from the power source and turn it off.
Contact the Medela Customer Service.
Page 17
10. Accessories
The following products are sold separately:
• PersonalFit Flex breast shield sizes S (21 mm), M (24 mm), L (27 mm), XL (30 mm)
• Tubing for Solo
• PersonalFit Flex connector
• Bottle
Depending on your region, check local website/shops for availability.
11. Warranty
Find information on the international warranty on www.medela.com/ewarranty.
12. Disposal
Disposal of the device
At the end of its operating life, separate the parts of the breast pump and dispose of according to the following instructions.
Breast shields, connector, tubing and accessories
The parts are made of plastics that are not harmful to the environment when disposed of as
household waste. Recycle or dispose of according to local regulations.
Pump unit and power adapter
Do not dispose of electric or electronic equipment together with unsorted municipal waste,
but collect it separately.
In the European Union the manufacturer or its vendor must take back waste equipment. Other
countries may have similar collection and recycling systems. Dispose of the waste equipment
according to local regulations.
Inquire at the point of sale or contact your local authority for appropriate collection points for
waste equipment.
The separate collection and recycling of your waste equipment at the time of disposal will
help conserve natural resources and ensure that it is recycled in a manner that protects
human health and the environment.
17
CAUTION
Hazardous materials present in electric/electronic equipment may harm human health and
the environment if the waste equipment is not disposed of properly.
Page 18
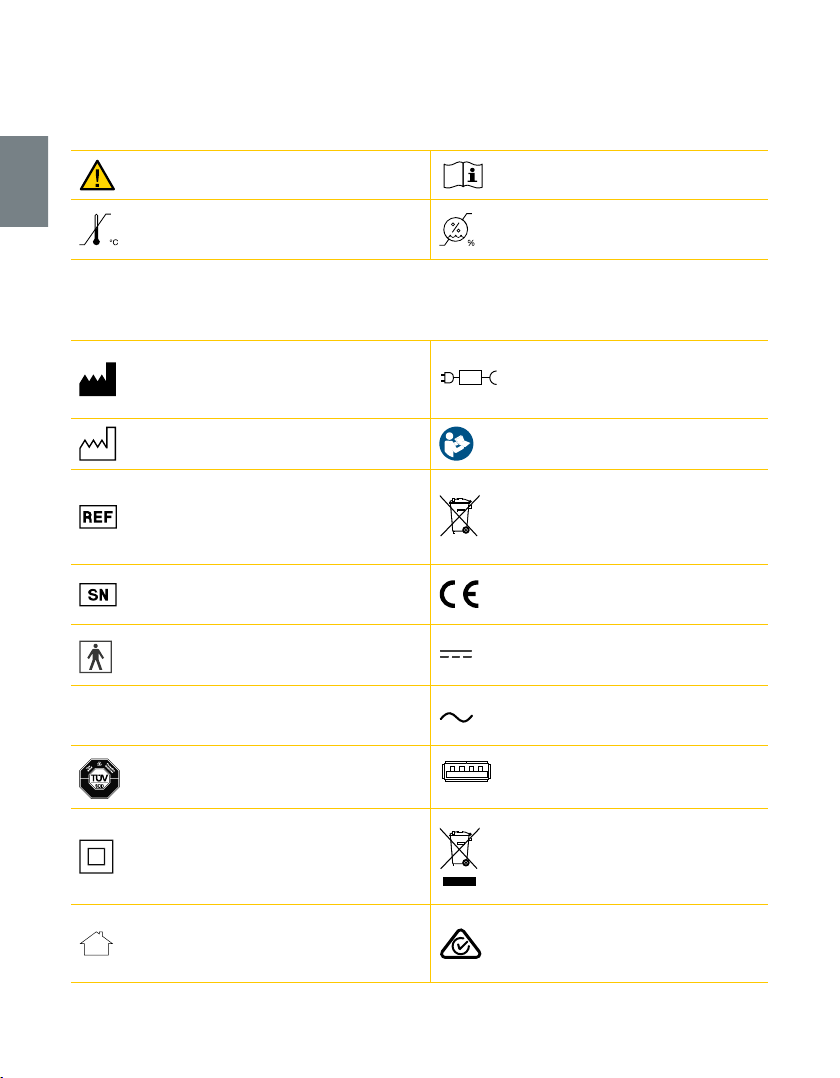
13. Meaning of symbols
4pin-/1pin+
Symbols used in these instructions
18
General safety alert symbol, points to
information related to safety.
Defines a temperature range (e.g. for
operation, transport or storage).
Read and follow the instructions for
use.
Defines a relative humidity range
(e.g. for operation, transport or
storage).
Symbols found on the product parts and its packaging.
Note: Symbols on the power adapter may vary depending on the market the unit is sold.
Indicates that a specific separate
power adapter is required for
connecting the device to the supply
mains and specifies its model/type.
Read and follow the instructions for
use.
Do not dispose of electric/electronic
devices together with unsorted
municipal waste (dispose of the
device in accordance with local
regulations).
The CE mark indicates conformity
with the applicable European
directives.
Indicates direct current.
Indicates alternating current.
Indicates the polarity of the USB
power output.
Do not dispose of electric/electronic
devices together with unsorted
municipal waste (dispose of the
device in accordance with local
regulations).
The Regulatory Compliance Mark
indicates the compliance with
Australian EMC and safety
requirements.
IP20
IP22
Identifies the manufacturer.
Indicates the date of manufacturing.
Indicates the part number of the device.
Indicates the serial number of the device.
Indicates compliance with international
requirements for protection from electric
shock (Type BF applied parts).
Indicates the degree of protection
against ingress of foreign objects and
moisture.
The TÜV SÜD mark indicates that the
product is type tested and production
sites are monitored regularly.
Indicates that the device is a Class II
electrical appliance (double insulated).
Indicates that the device is for indoor use
only.
Page 19
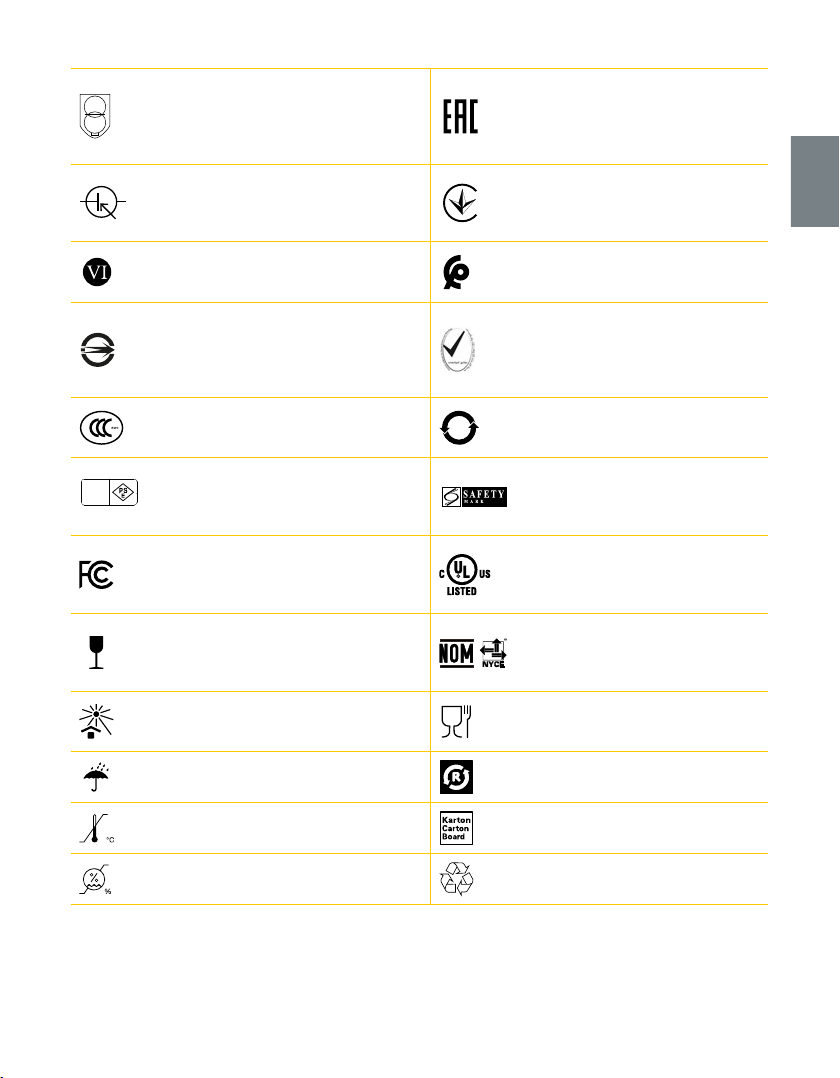
The EAC (Eurasian Conformity) mark
Indicates that the device is a short-circuit
proof safety isolating transformer.
indicates that the product complies
with the basic safety requirements
according to the technical regulations
of the Eurasian Customs Union.
Indicates that the electronic device
incorporating transformer(s) and electronic
S
circuitr y(ies), converts electrical power into
single or multiple power outputs.
Indicates the efficiency level for external
power supplies.
The BSMI (Bureau of Standard,
Metrology and Inspection) logo indicates
that the product is certified to meet
Taiwan’s requirements for safety and
electromagnetic compatibility.
Indicates the compliance with China
Compulsory Certification.
TÜV
SÜD
PSB
Indicates the compliance with PSE
requirements (Japan, Product Safety
Electrical Appliance and Material Safety
10
Law).
Indicates the compliance with the
requirements of the Federal Communications Commission.
The UA TR conformity mark indicates
compliance with the Ukrainian
technical regulations.
The conformity mark indicates that
the product meets the electric safety
and EMC requirements of Morocco.
The ECAS mark of conformity
indicates compliance with the
technical regulations of the United
Arab Emirates.
Indicates that the Environment Friendly Use Period is ten years (China
pollution control).
The SAFETY mark indicates that the
product is registered as controlled
good according to the Singapore
consumer protection regulation.
The UL LISTED mark indicates that the
product is manufactured in
compliance with UL safety requirements for USA and Canada.
19
The NOM (Norma Oficial Mexicana)
Contains fragile goods. Handle with
care.
NYCE mark indicates that the product
is found to be in compliance with the
applicable Mexican requirements.
The packaging contains products
Keep away from sunlight.
intende d to come in contact with food
according to regulation EC 1935/2004.
Keep away from rain. Keep in dry
conditions.
Defines the temperature range for
transport or storage.
Defines the relative humidity range for
transport or storage.
Indicates that the material is part of a
recovery/recycling process.
Indicates that the package is made of
cardboard.
Indicates that the package is capable
of being recycled.
Page 20
14. International regulations
14.1 Electromagnetic compatibility (EMC)
The Solo breast pump complies with all requirements of the relevant standards and regulations with regard to electromagnetic emission and immunity to interference.
20
WARNING
The electric breast pump Solo should not be used adjacent to or stacked with other
equipment. If adjacent or stacked use is necessary, the electric breast pump Solo should be
observed to verify normal operation in the configuration in which it will be used.
Wireless communications equipment such as wireless home network devices, mobile
phones, cordless telephones and their base stations, walkie-talkies can affect the electric
breast pump and should be kept at a distance of at least 30 cm away from the device.
14.2 Drinking equipment
Parts intended for infant feeding comply with the European Standard EN 14350.
15. Technical specifications
For common technical data see chapter 16.
Power adapter
Model (varies according to market location):
MS-V2000U050-010B0-DE/MS-V2000U050-010B0-GB/MS-V2000U050-010B0-US/
MS-V2000U050-010B0-CN/MS-H2000U050-010B0-AU
Input Output Average efficiency No-load power
consumption
100 … 240V~
50/60 Hz
max. 0.5 A
5V
2A
10 W
78.7 % 0.075 W
Materials touching skin or coming in contact with milk
• Breast shield: Polypropylene, thermoplastic elastomer
• Connector body: Polypropylene
• Membrane: Silicone
• Bottle: Polypropylene
• Lid: Polypropylene
All parts that come in contact with breast milk are not made with BPA (Bisphenol A).
Enter “End of document” in a paragraph with the format Pagination
End of document
Page 21
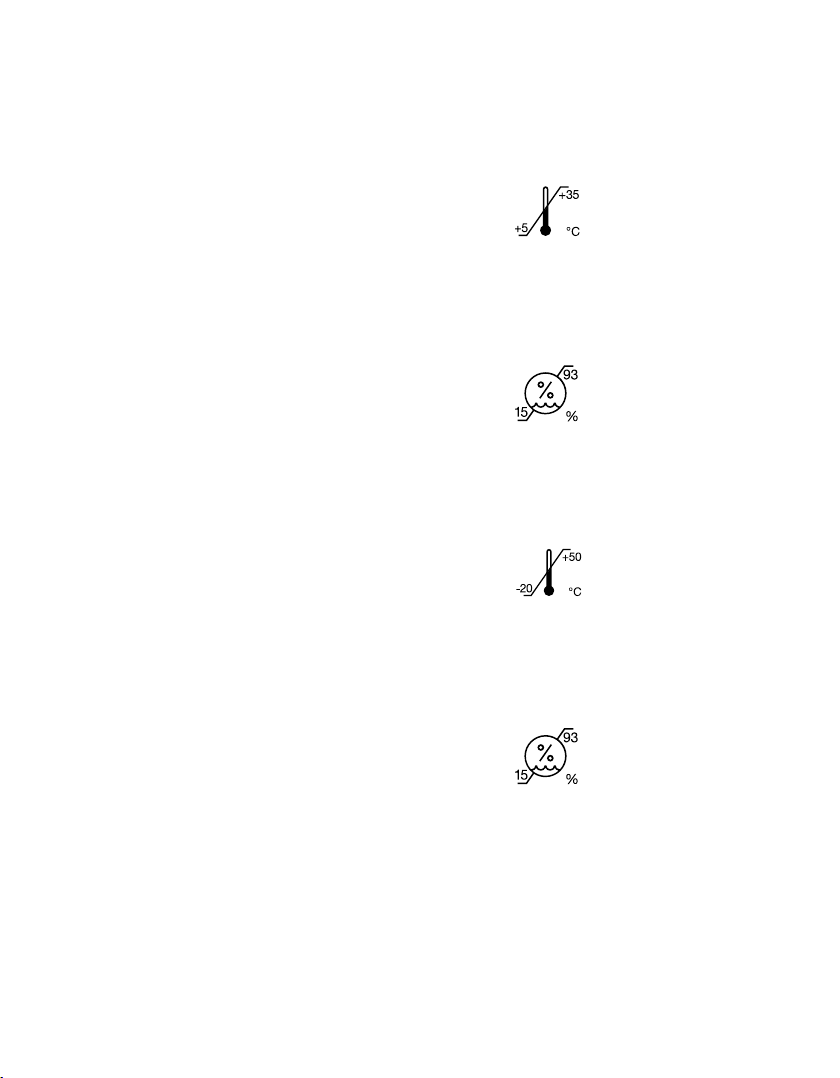
16. Common data
Vacuum performance (at 500 m above sea level
[954.62 hPa ambient pressure])
-45 … -245 mmHg
45 … 111 cpm
Pump unit
Size
120 x 90 x 54 mm
Weight
250 g
Battery capacity and type
3.6V, 2500mAh/Li-ion
Operation
Operation
Transport/storage
Transport/storage
Page 22

Page 23

Page 24
Medela AG
Lättichstrasse 4b
6340 Baar, Switzerland
www.medela.com
International Sales
Medela AG
Lättichstrasse 4b
6340 Baar
Switzerland
Phone +41 41 562 51 51
www.medela.com
Australia
Medela Australia Pty Ltd
3 Arco Lane,
Heatherton, Vic 3202
Australia
Phone +61 3 9552 8600
Fax +61 3 9552 8699
[email protected]
www.medela.com.au
United Kingdom
Medela UK Ltd.
Huntsman Drive
Northbank Industrial Park
Irlam, Manchester M44 5EG
United Kingdom
Phone +44 161 776 0400
Fax +44 161 776 0444
[email protected]
www.medela.co.uk
© Medela AG /ref. master doc.101042309/A
101041240/2020-09/A
Subject to modifications – Not intended for distribution in the USA
 Loading...