

Page 1
SoftFeeder
Article #6100018S (US)
Produit #20018 (Canada)
Artículo #6100018S (EE.UU.)
Instructions
for use
Mode
d’emploi
Instrucciones
para su uso
medela
®
Page 2
2 medela
®
Medela®SoftFeeder
M
edela supports breastfeeding as the best method
of nutrition for infants. When a healthcare professional determines that the baby cannot currently be
fed at the breast, the Medela SoftFeeder is an ideal
alternative. The Medela SoftFeeder allows the baby to
be fed without developing nipple confusion/preference
until the transition to breastfeeding can be made. If
the use of an electric breastpump to express milk is
indicated, call 1-800-TELL YOU for the name and
phone number of a Medela Rental Station or for the
name of a Breastfeeding Specialist.
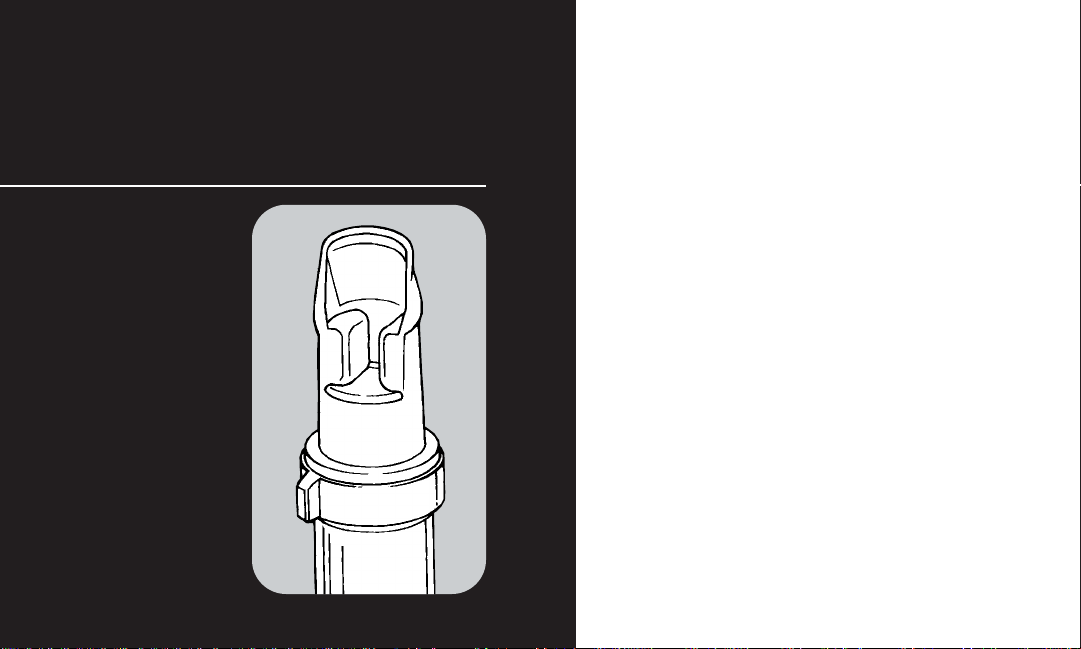
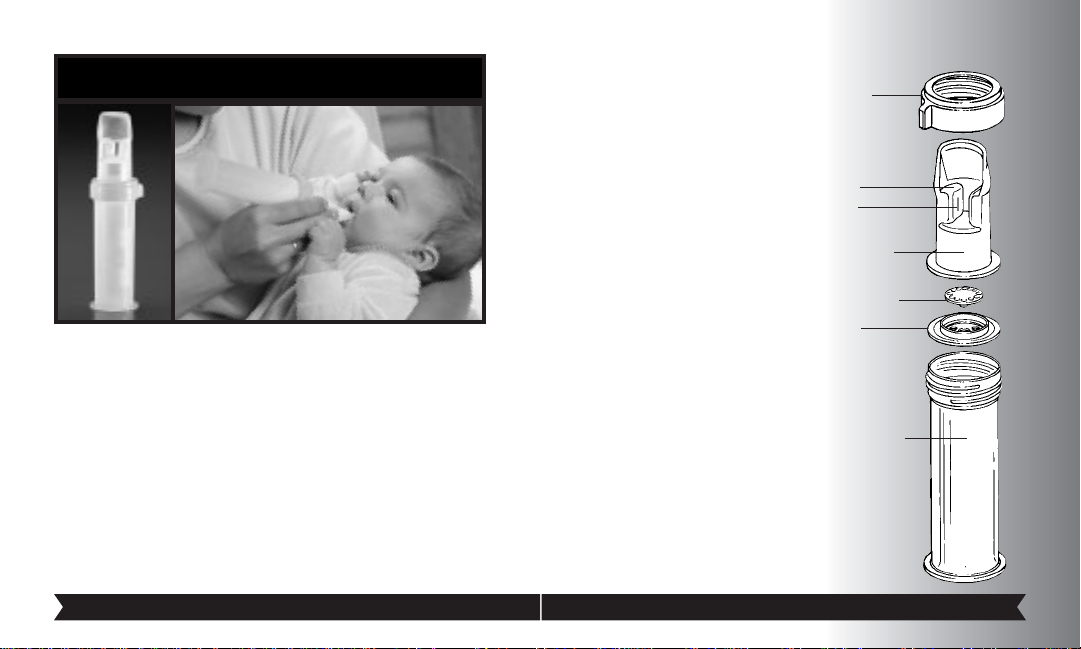
Collar
Components
The SoftFeeder includes: 180 ml Bottle, 1-Silicone
reservoir,1-Disk,1-Valve
membrane and 1-Collar.
Assembly
1. Press valve onto the
upper side of the disk so
that the stud goes completely through the center hole.
2. Fill bottle half full, or
with amount baby is presently taking, with the
supplement recommended
by your physician. Warm
supplement to room temperature before pouring it
into the bottle. The feeder is
designed for use with room
temperature supplement
and should not be used
with hot liquids.
Pad
Slit
Disk
80ml Bottle
Silicone
Reservoir
Valve
Membrane
medela®3
Page 3
4 medela
®
medela®5
Feeding Baby
1. Hold feeder horizontally, with a slight
angle upwards on the bottom of the bottle.
Positioning is very similar to holding a pencil.
Angle the feeder so the air that remains rises
to the end of the bottle. Angling the bottle in
this manner is essential to the automatic
refill feature of the reservoir.
2. Begin the flow of supplement by
gently squeezing the two pads on either
side of the reservoir. This will pool the
supplement in the feeding tip of the
reservoir.
3. Use the tip of the reservoir to tickle baby’s
mouth open. Lay the rim of the reservoir on baby’s lower lip.
4. Tip the feeder so that the supplement pooling in the reservoir is fed to baby. Or, allow the baby to lap up supplement
with his tongue.
Cleaning & Sanitizing
the Feeder
If there is some supplement left in the feeder, hold it nearly
horizontal over a sink before unscrewing the collar. The disk
should remain in the reservoir, to prevent supplement from
spilling.
3. Slip the reservoir into the collar.
4. Put assembled valve into the reservoir, making sure that
the valve and high rim of the disk are facing the inside of the
reservoir.
5. Place the reservoir assembly over the bottle and screw all
the parts together using the collar. Tighten the collar securely
to ensure a good seal.
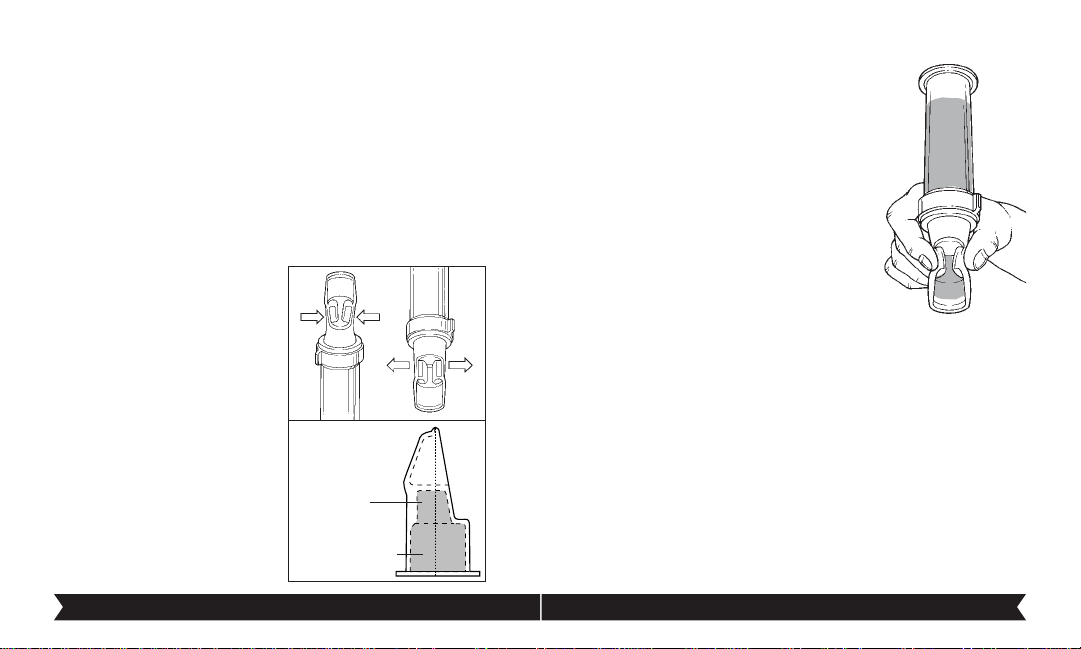
Filling The Reservoir
1. Hold the feeder upright and
remove some air from the reservoir by squeezing below the
pads.
2. Keep squeezing and tip the
feeder upside down.
3. Release the pads and some
supplement will enter the reservoir.
4. Repeat filling steps 1-3 until
the reservoir is almost filled,
approximately up to the bottom
of the pads. As baby is fed, the
reservoir will automatically
refill.
2ml per pad
11ml below pads
Page 4

6 medela
®
medela®7
Reservoir Not Refilling Automatically
If thickened supplements are used, check that the air-groove
in the disk has not become blocked.
Angle the feeder so the air that remains in the bottle rises
to the end. Angling the bottle in this manner is essential to the
automatic refill feature of the reservoir. Air may enter reservoir
through slit causing reservoir to empty. Simply follow “Filling
The Reservoir” instructions to resume feeding.
Feeder Leaking
If the feeder leaks, check that the feeder has been correctly
assembled. The stud of the valve must be properly inserted
through the hole in the disk. The collar must be firmly screwed
onto the bottle. Make sure the supplement is not too hot. The
feeder is designed for use with room temperature supplement
and should not be used with hot liquids.
Check to see if either the valve membrane or reservoir is
visibly damaged and needs replacing.
Bigger Bottles
The Medela SoftFeeder is designed to work with the Medela
80 ml polypropylene bottle. Other bottles may be used, but
you may experience some slight leakage around the collar.
After Each Feeding:
Take the feeder apart, making sure that the valve is separated
from the disk. Flush cold water through the slit in the pads of
the reservoir to remove as much supplement residue as possible. Wash all parts in luke warm soapy water. Rinse thoroughly with cold water. Do not turn the reservoir inside out or
push brushes, etc. through the slit in the reservoir.
Each Day:
(Unless you are otherwised instructed differently by
your hospital, physician or other medical professional)
The feeder should be sanitized by boiling, preferably in distilled
water, for 20 minutes. If hard water deposits occur, use distilled water or occasionally boil in a mixture of 3 parts water to
1 part vinegar. All disassembled parts can be autoclaved to a
maximum of 272°F for 3 minutes at 29 PSIG or 250°F for 15
minutes at 15 PSIG. To avoid damage during sterilization,
sterilize parts without applying external pressure on parts.
Helpful Hints
Reservoir Not Pooling Properly
Use stronger finger pressure to help the flow of
supplement.
Page 5

8 medela
®
medela®9
M
edela promouvoit l’allaitement maternel comme
êtant l’alimentation de choix pour le nourrisson.
Mais lorsqu’un professionnel de la santé décide qu’on doit
temporairement cesser l’allaitement maternel, la tasse
“SoftFeeder” de Medela est une alternative idéale. La tasse
“SoftFeeder” de Medela permet au bébé d’être nourri sans
créer de confusion ou de préférence de tétine jusqu’à ce que
l’allaitement maternel puisse être repris. Si l’utilisation
d’un tire-lait électrique est nécessaire pour extraire le lait et
que vous avez besoin du nom et du numéro de téléphone
d’un centre de location ou d’une spécialiste en lactation,
communiquez avec le 1-800-835-5968, ou avec le
1-815-363-1166 si vous êtes à l’extérieur des États-Unis.
Medela®SoftFeeder
Troubleshooting
If the SoftFeeder is not releasing fluid
Pad
Slit
1. If the SoftFeeder is not
releasing fluid, check the
slit located on one side of
the Pad. If the slit becomes
sealed it needs to be manually opened.
2. To break the seal, try
squeezing the pads tightly,
both towards the upper and
lower parts of the pads.
3. Or, use both thumbs to
pull the pads outwards, as if
you were trying to turn the
lip inside out.
Page 6

medela®11
3. Glissez le réservoir dans l’anneau.
4. Mettez la valve (assemblée) dans le réservoir, en vous
assurant que la valve et le côté élevé du disque soient orientés
vers l’intérieur du réservoir.
5. Placez le réservoir (assemblé) sur le contenant et vissez
toutes les pièces avec l’anneau. Serrez fermement celui-ci pour
vous assurer que le joint soit étanche.
Le remplissage du réservoir
1. Tenez le contenant en position verticale et faites sortir de
l’air du réservoir en pinçant
sous les coussinets.
2. Renversez le contenant tout
en continuant de pincer.
3. Relâchez les coussinets pour
que le supplément entre dans le
réservoir.
4. Répétez les étapes de remplissage 1, 2 et 3 jusqu’à ce que
le réservoir soit presque plein,
c’est-à-dire environ au bas des
coussinets. Le réservoir se remplit automatiquement au fur et
à mesure que le bébé boit.
2ml par
coussinet
11ml sous les
coussinets
Les Pièces
La tasse “SoftFeeder” comprend : un contenant de
80ml, un réservoir en silicone, un disque, une membrane-valve et un anneau.
L’assemblage
1. Enfoncez la valve dans
le côté supérieur du disque
de sorte à ce que le goujon
passe entièrement dans le
trou du centre.
2. Remplissez le contenant
à moitié ou utilisez la quantité de supplément (recommandée par votre médecin)
habituellement bue par le
bébé. Réchauf-fez le supplément à la température
ambiante avant de le verser
dans le contenant. Ce contenant est spécifiquement
conçu pour être utilisé avec
des liquides qui sont à une
température ambiante et
non avec des liquides
chauds.
Anneau
Coussinet
Fente
Disque
Contenant
de 80ml
Réservoir
en silicone
Membrane
-valve
10 medela
®
Page 7

12 medela
®
medela®13
Après chaque boire:
Déassemblez la tasse “SoftFeeder” en vous assurant de détacher la valve du disque. Rincez à l’eau froide la fente entre les
deux coussinets du réservoir pour enlever le plus de résidu
possible. Lavez soigneusement toutes les pièces à l’eau tiède
savonneuse. Ensuite, rincez abondamment à l’eau claire. Ne
retournez pas le réservoir sens dessus dessous et n’introduisez pas de brosse, etc dans la fente du réservoir.
À tous les jours:
(A moins que votre professionnel de la santé vous
conseille autrement)
La tasse “SoftFeeder” doit être sterilisée en la faisant bouillir
pendant 20 minutes, dans de l’eau distillée de préférence. Si
des dépôts calcaires se produisent, utilisez de l’eau distillée ou
faites bouillir les pièces dans un mélange de trois portions
d’eau pour une portion de vinaigre. Chaque pièce, une fois
démontée, peut être stérilisée à l’autoclave à une température
maximum de 133 degré Celsius pendant trois minutes à 200
kPa, ou à 121 degré Celsius pendant 15 minutes à 100 kPa.
Stérilisez les pièces en évitant toute pression externe pour
qu’elles ne s’abîment pas.
Des conseils de dépannage
Le réservoir ne tire pas correctement
Exercez une pression plus forte avec vos doigts pour faciliter le
débit de supplément.
Comment nourrir bébé
1. Tenez la tasse à l’horizontale avec le bas
de la tasse légèrement inclinée vers le haut,
un peu comme lorsque vous tenez un crayon.
Placez la tasse de façon à ce que l’air qui reste
monte dans le bout du contenant. Il est
essentiel d’incliner la tasse “SoftFeeder” de
cette manière pour que se produise le
remplissage automatique du réservoir.
2. Commencez à faire couler le supplément en pinçant doucement les deux
coussinets de chaque côté du réservoir.
Ceci fait avancer le supplément dans le
bout de la tasse.
3. Incitez le bébé à ouvrir la bouche en le chatouillant avec le
bout de la tasse. Placez la tasse sur la lèvre inférieure du bébé.
4. Inclinez la tasse pour que le bébé boive le supplément contenu dans le réservoir. Vous pouvez aussi permettre au bébé
de lécher le complément avec sa langue.
Le nettoyage et la stérilisation
de la tasse “SoftFeeder”
S’il reste du supplément, tenez la tasse presqu’à l’horizontale
au dessus d’un évier avant de dévisser l’anneau. Le disque doit
rester en place dans le réservoir pour éviter que le supplément
s’écoule hors du contenant.
Page 8

14 medela
®
Le réservoir ne se remplit
pas automatiquement
Si vous utilisez des suppléments épais, assurez-vous que l’ouverture pour l’air du disque n’est pas bouchée. Inclinez la
tasse “SoftFeeder” pour que l’air restant dans le contenant
monte jusqu’en haut. Il est essentiel d’incliner la tasse de cette
façon pour permettre le remplissage automatique du réservoir.
Le réservoir peut se vider s’il y a de l’air qui s’infiltre par la
fente. Suivez simplement les instructions sous “Remplissage
du réservoir” pour poursuivre le boire.
La tasse fuit
Si la tasse “SoftFeeder” fuit, vérifiez si elle a été assemblée de
la bonne façon. Le goujon de la valve doit être inséré correctement dans le trou du disque. L’anneau doit être vissé fermement sur le contenant. Assurez-vous que le supplément ne
soit pas trop chaud. La tasse “SoftFeeder” est conçu pour être
utilisée avec des suppléments à température ambiante et ne
doit pas être utilisée avec des liquides chauds.
Vérifiez si la membrane de la valve et le réservoir ne sont
pas endommagés et s’ils n’ont pas besoin d’être remplacés.
Si vous voulez utiliser
de plus grands contenants
La tasse “SoftFeeder” de Medela est conçue pour être utilisée
avec contenant de 80 ml fait de polypropylène. Certains autres
contenants peuvent aussi être utilisés, toutefois il est possible
qu’il se produise de légères fuites autour de l’anneau.
medela®15
Dépannage
Si le liquide n’arrive pas à sortir du SoftFeeder
Coussinet
Fente
1. Vérifier la fente située
sur un des côtés du
coussinet si aucun liquide
ne sort. Si la fente est
bouchée, il vous faudra la
travailler avec vos mains
pour l’ouvrir.
3. Vous pouvez aussi
essayer d’ouvrir les
coussinets avec vos deux
pouces, comme si vous
voudriez renverser la lèvre
du SoftFeeder.
2. Essayer de presser doucement sur la partie du haut et
du bas des coussinets pour
relâcher le vide d’air.
Page 9

16 medela
®
Almohadilla
Collar
Depósito
de silicón
Abertura
Membrana
de la válvula
Disco
Biberón
de 80ml
medela®17
Componentes
El Biberón SoftFeeder
incluye: 1-Biberón de 80
ml, 1-Depósito de Silicón, 1Disco, 1-Membrana de la
Válvula y 1-Collar.
Ensamblado
1. Oprima la válvula sobre
la parte superior del disco
de tal forma que el husillo
se meta completamente
através del hoyo central.
2. Llene el biberón hasta la
mitad, o con la cantidad que
el bebé está tomando
actualmente, con el suplemento recomendado por su
médico. Caliente el suplemento a la temperatura
ambiente antes de ponerlo
dentro del biberón. El
biberón está diseñado para
ser usado con suplementos
que están a la temperatura
ambiente y no debería ser
usado con líquidos
calientes.
Medela®SoftFeeder
M
edela apoya al amamantamiento como el mejor
método de nutrir a los infantes. Cuando un profesional en el cuidado de la salud determina que el bebé no
puede alimentarse en el seno, el SoftFeeder de Medela
permite que el bebé sea alimentado sin desarrollar una
confusión o una preferencia por la tetilla artificial hasta
que la transición al amamantamiento pueda ser hecha. Si
el uso de una bomba eléctrica para senos está indicado,
llame al 1-800-835-5968 para el nombre y el teléfono de
un Centro de Alquiler o el nombre de una Especialista en
la Lactancia.
Page 10

18 medela
®
medela®19
Alimentar el Bebé
1. Sostenga el biberón horizontalmente,
con un ángulo ligero hacia arriba en la parte
trasera del biberón. Esta posición es similar a
la de sostener un lápiz. Incline el biberón de
modo que el aire que aún permanece se suba
al extremo del biberón. Haciendo un ángulo con el biberón de esta manera es
esencial para el funcionamiento de la
característica de relleno automático del
depósito.
2. Comience el flujo de suplemento
apretando suavemente las dos almohadillas en ambos lados del depósito. Esto inundará con suplemento la punta del depósito alimentador.
3. Use la punta del depósito para hacer cosquillas a la boca
del bebé para que así abra la boca. Recueste la orilla del
depósito en el labio inferior del bebé.
4. Incline el biberón de tal forma que el suplemento que está
inundando al depósito se le da al bebé. O, dejar que el bebé
beba el suplemento con su lengua.
Limpiar e Higienizar el Biberón
Si queda algo de suplemento en el biberón, sosténgalo casi
horizontalmente sobre el lavabo antes de desatornillar el collar. El disco debe permanecer en el depósito, para preveer que
el suplemento se derrame.
3. Deslice el depósito adentro del collar.
4. Ponga la válvula ensamblada en el depósito, asegurándose
de que la válvula y la orilla alta del disco estén orientadas
hacia el interior del depósito.
5. Coloque el conjunto de la boquilla sobre el biberón y
atornille todas las piezas juntas usando el collar. Apriete bien
el collar asegurando que esté bien sellado.
Llenar el Depósito
1. Mantenga el biberón vertical
y saque algo de aire del depósito apretándolo abajo de las
almohadillas.
2. Siga apretando y voltée el
biberón boca abajo.
3. Suelte las almohadillas y algo
de suplemento entrará al
depósito.
4. Repita los pasos 1-3 para
llenar el depósito hasta que éste
esté casi lleno, aproximadamente hasta la parte inferior de
las almohadillas. Conforme el
bebé es alimentado, el depósito
se rellenará automáticamente.
2ml por
almohadilla
11ml abajo de
las almohadillas
Page 11

20 medela
®
medela®21
El depósito no se rellena automáticamente
Si se usan suplementos espesos, verifique que la ranura para
la entrada de aire en el disco no está bloqueada.
Incline el biberón para que el aire que permanece en él se
suba hasta el extremo. Haciendo un ángulo con el biberón de
esta manera es esencial para el funcionamiento de la característica de relleno automático del depósito. El aire puede
entrar al depósito através de la abertura causando que el
depósito se vacíe. Simplemente siga las instrucciones “Llenar
el Depósito” para reanudar la alimentación.
El biberón se escurre
Si el biberón se escurre, verifique que el biberón ha sido
ensamblado correctamente. El husillo de la válvula tiene que
estar insertado correctamente através del hoyo en el disco. El
collar debe estar atornillado firmemente en el biberón. Asegure
que el suplemento no está muy caliente. El biberón está diseñado para usarse con suplementos a la temperatura ambiente y no debe ser usado con líquidos calientes.
Verifique si la membrana de la válvula o el depósito están
visiblemente dañados o necesitan ser reemplazados.
Biberones más grandes
El Biberón SoftFeeder Medela está diseñado para trabajar con
los biberones de polipropilieno de 80 ml. Se pueden usar otros
biberones, pero Ud. puede notar un escurrimiento ligero
alrededor del collar.
Después de cada sesión de alimentación:
Desarme el biberón, asegurándose de que la válvula esté separada del disco. Corra agua fría por la abertura en las almohadillas del depósito para quitar tantos resíduos de suplemento como sea posible. Lave todas las partes en agua tibia
enjabonada. Enjuague completamente con agua fría. No voltée
el depósito al revés ni empuje cepillos, etc. através de la abertura en el depósito.
Diariamente:
(A menos que se le hayan indicado diferente por su
hospital, médico u otro profesional de la salud)
El biberón debe ser higienizado herviéndolo, de preferencia en
agua destilada, por 20 minutos. Todas las partes desensambladas pueden ser colocadas en el autoclave a un máximo de
272˚F (133˚C) durante 3 minutos a 29 PSIG o a 250˚F (121˚C)
por 15 minutos a 15 PSIG. Para evitar daño durante la esterilización, esterilice las piezas sin aplicar presión externa en las
partes.
Consejos utiles
El depósito no se inunda correctamente
Aplique más presión con los dedos para ayudar al flujo del
suplemento.
Page 12

22 medela
®
Problemas
Si el SoftFeeder no suelta el fluído
Almohadilla
Abertura
1. Si el SoftFeeder no suelta
el fluído, chequeé la abertura situada en un lado de la
Almohadilla. Si la abertura
se ha sellado, necesitará
que la abra manualmente.
3. También, puede utilizar
ambos dedos pulgar para
tirar las almohadillas hacia
afuera, como si intentara
girar el labio al revés.
2. Para romper el sello,
intente apretar firmemente
las almohadillas, de ambas
partes de arriba y abajo.
Page 13

Natural solutions for beautiful beginnings
™
...medela
®
Manufactured by/Fabriqué par/Hecho por Medela, Inc.
P. O. Box 660 McHenry, IL 60051-0660 USA
C.P. Box No. 131 Mississauga, Ontario, L4T 3B5 CANADA
PHONE 1-800-435-8316 or 1-815-363-1166
FAX 1-815-363-1246
http://www.medela.com
Made in the USA and Switzerland./Fabriqué aux Etats-Unis et Suisse./Hecho en EE.UU y Suiza. Medela is a
registered trademark of Medela./Medela est une marque de commerce déposée de Medela./Medela son
marcas registradas de Medela. Natural solutions for beautiful beginnings is a trademark of Medela, Inc./Des
solutions naturelles pour un dèbut en beautè est une marque de commerce de Medela./Soluciones natu-
rales para comienzos hermosos son marcas comerciales de Medela
Printed in the U.S.A/Imprimé aux Etats-Unis/Imprimido en los EE.UU.
U.S. Patent/Brevets américains/Patentes de EE.UU. #5,556,008
1907328 A0897 ©1997 Medela, Inc.
 Loading...