

Page 1
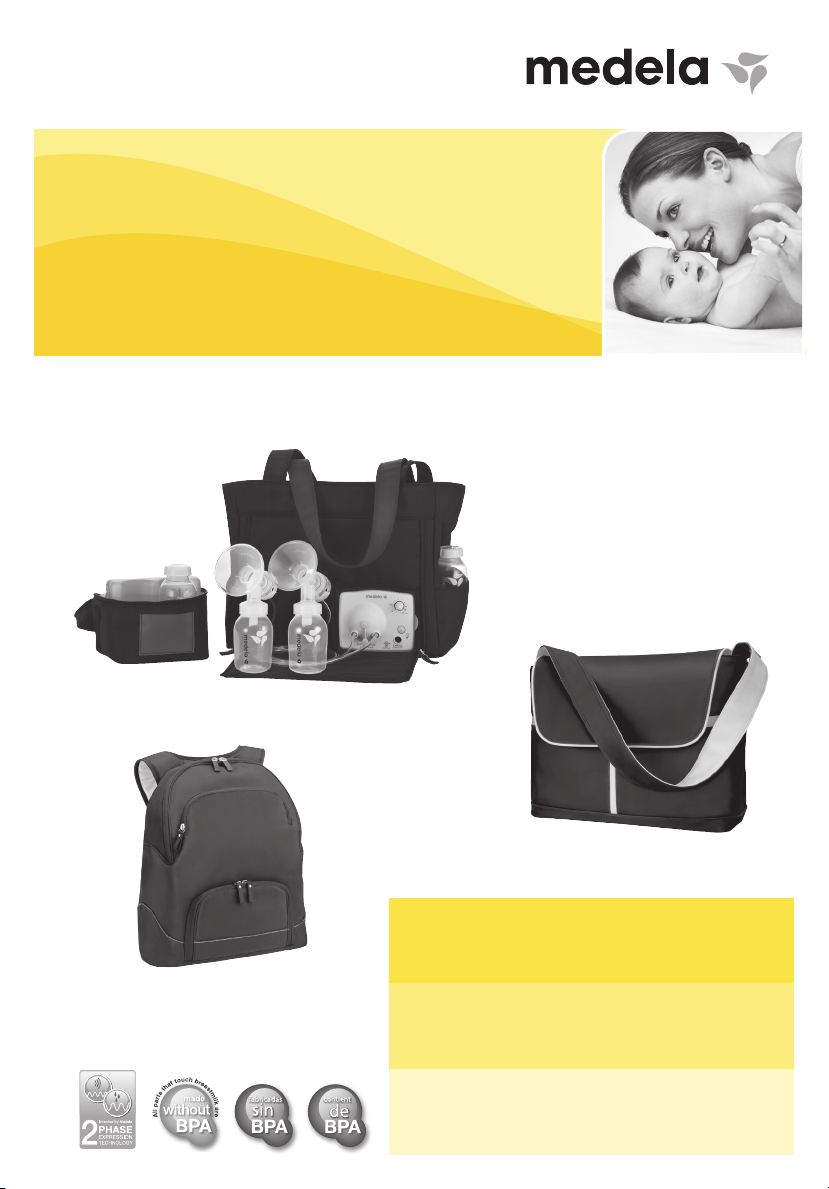
Pump In Style®
Advanced
EN Instructions for use | ES Instrucciones de uso | FR Mode d’emploi
#10103 6449
#10103 6453
s
e
t
r
a
p
s
a
l
s
a
d
o
T
#10103 6445
PLEASE READ AND SAVE THESE INSTRUCTIONS. FOR
MOST CURRENT BREAST PUMP INSTRUCTIONS VISIT
WWW.MEDELABREASTFEEDINGUS.COM
LEA Y CONSERVE ESTAS INSTRUCCIONES. PARA
VER LAS INSTRUCCIONES MÁS RECIENTES
SOBREEXTRACTORES DE LECHE, VISITE
WWW.MEDELABREASTFEEDINGUS.COM
n
a
l
c
a
o
l
t
e
c
e
h
u
q
t
c
a
a
t
v
e
n
c
o
c
l
e
m
a
t
e
r
n
a
e
e
n
l
e
a
t
i
t
n
m
e
r
a
t
t
n
e
i
u
s
t
q
á
e
n
c
è
i
p
s
e
d
e
n
u
c
u
A
VEUILLEZ LIRE ET CONSERVER CES DIRECTIVES. POUR
e
r
n
e
l
n
e
OBTENIR LES DIRECTIVES LES PLUS RÉCENTES SUR LE
TIRE-LAIT, CONSULTEZ LE SITE WWW.MEDELA.CA
Page 2

Important Safeguards
When using electrical products, especially when children are present, basic safety precautions
should always be followed.
READ ALL INSTRUCTIONS BEFORE USING THIS PRODUCT.
DANGER: To reduce the risk of electrocution:
• Always unplug electrical product immediately after use.
• Do not place or store product where it can fall or be pulled into a tub or sink.
• Do not place or drop into water or other liquid.
WARNING: To avoid fire, electrocution, or serious burns:
• Do not leave product unattended when plugged into an electrical outlet.
• Always unplug electrical product immediately after use.
• Close supervision is necessary when this product is used near children or persons with disabilities
to prevent strangulation by the tubing or power adaptor cord.
• Close supervision is necessary when this product is used near children or persons with disabilities
to prevent choking on small parts.
• Never operate this product if it has a damaged cord or plug, if it is not working properly, if it has
been dropped or damaged, or dropped into water.
• Keep cord away from heated surface.
• Never drop or insert any object into any opening or tubing.
• Do not use outdoors, or operate where aerosol (spray) products are being used or where
oxygen is being administered.
• Always inspect power adaptor and battery pack wires prior to use for damage or exposed wire. If
damage is found, immediately discontinue use of power adaptor or battery pack and call Medela
Customer Service at 1-800-435-8316.
• Do not place or store product where it can fall or be pulled into a tub or sink.
• The breast pump and accessories are not heat-resistant: keep away from heated surfaces
or open flames.
• Do not use near flammable materials.
• Do not use an electrical outlet device that has been exposed to water or
other liquids including:
- Do not use while bathing or showering.
- Never place or drop into water or other liquids.
- Do not run water over breast pump.
- If a device has been exposed to water or other liquids, do not touch,
unplug the device from electrical outlet, turn off and contact manufacturer.
2
Page 3

The defined signal words identify all instructions that are important to safety. Failure to observe these
instructions can lead to injury or damage to the breast pump or yourself. When used in conjunction
with the following words, the defined signal words stand for:
WARNING Can lead to serious injury or death.
CAUTION Can lead to minor injury.
NOTE Can lead to material damage.
INFO Useful or important information that is not related to safety.
WARNING: To avoid health risk and reduce the risk of injury:
• This product is intended for use by a single user only and should not be shared between users.
• Do not operate a moving vehicle while pumping.
• Inspect all appropriate pump components before each use.
• Do NOT continue pumping for more than 2 consecutive pumping sessions if no results
are achieved.
• If tubing becomes moldy, discontinue use and replace tubing.
• If breast milk backup occurs, you must clean tubing, faceplate and diaphragm before
your next pumping session.
• Use the product only for its intended use as described in this manual. Do not use
attachments not recommended by the manufacturer.
• Never use while sleeping or when drowsy.
• This device cannot be serviced or repaired. Do not repair yourself. Do not modify the device.
• Never use a damaged device. Replace damaged or worn parts.
• Before each use visually inspect the individual components for cracks, chips, tears, discoloration
or deterioration. In the event that damage to the device is observed, please discontinue use until
the parts have been replaced.
• Use only the power adaptor that comes with the breast pump.
• Pumping can induce labor. Do not pump until after giving birth. If you become pregnant
while breastfeeding or breast pumping, consult with a licensed healthcare professional
before continuing.
• If irritation or discomfort occurs, discontinue use and see a doctor.
• If infected with Hepatitis B, Hepatitis C, or Human Immunodeficiency Virus (HIV), pumping
breast milk will not reduce or remove the risk of transmitting the virus to your baby through your
breast milk.
• Do not microwave or boil breast milk. Microwaving can cause severe burns to baby’s mouth
from hot spots that develop in the milk during microwaving. (Microwaving can also change the
composition of breast milk.)
• Clean and sanitize all parts that come into contact with your breast and breast milk prior to
first use.
• Wash all parts that come into contact with your breast and breast milk after every use.
• Only use Medela recommended parts with your breast pump.
• Close supervision is necessary when the breast pump or accessories are used in the
vicinity of children.
Questions? Visit www.medela.com or call us at 1-800-435-8316.
3
Page 4
CAUTION: Can lead to minor injury:
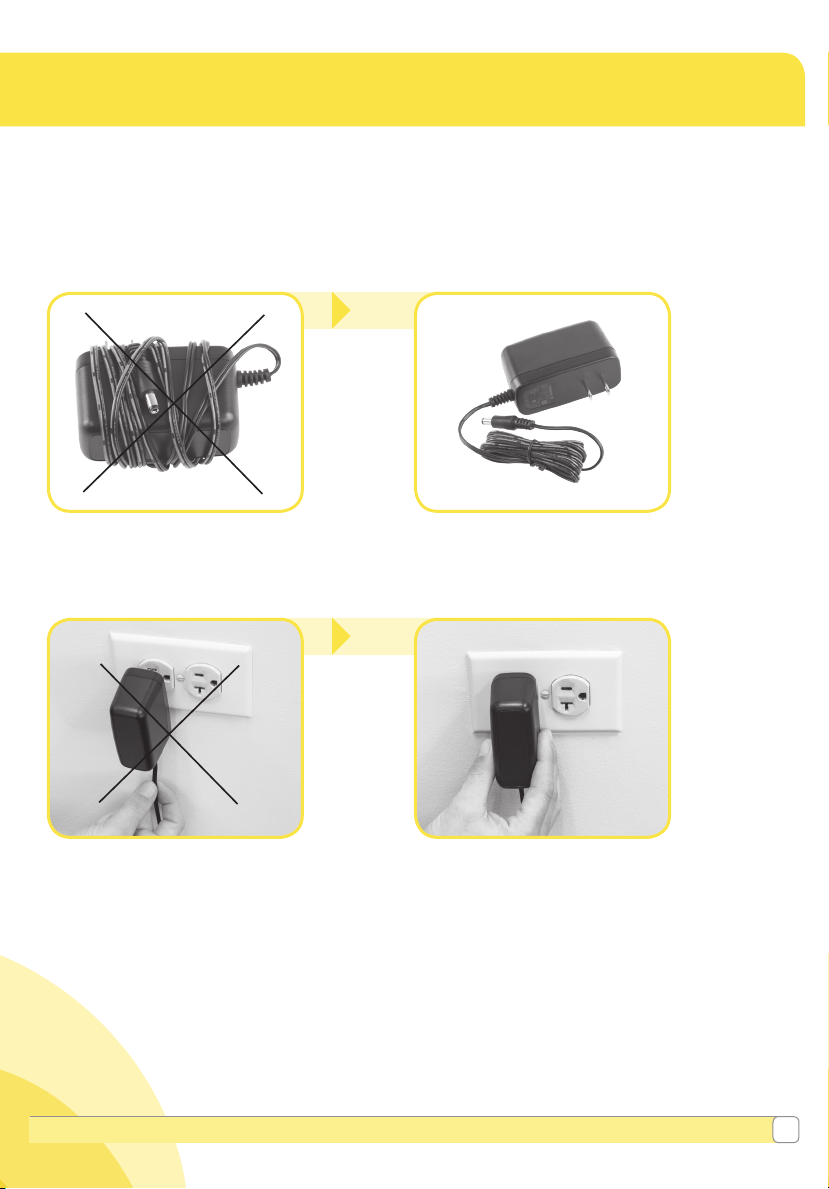
• Do NOT wrap cord around adaptor body.
• Use only the power adaptor that comes with the Pump In Style® Advanced Breast Pump.
• Use only the Pump In Style Advanced battery pack that comes with the Pump In Style
Breast Pump.
• Pump only with the breast pump in an upright position.
• Do NOT shorten tubing.
• Make sure the voltage of the power adaptor is compatible with the power source.
• Plug the power adaptor into the breast pump first and then into the wall socket.
• Do NOT use antibacterial or abrasive cleaners/detergents when cleaning breast pump or breast
pump parts.
• Never put breast pump motor in water or a sterilizer, as you can cause permanent damage to the
breast pump.
• Do not attempt to remove the breast shield from your breast while pumping. Turn the breast pump
off and break the seal between your breast and breast shield with your finger, then remove breast
shield from your breast.
• If pumping is uncomfortable or causing pain, turn the unit off, break the seal between the breast
and the breast shield with your finger and remove the breast shield from your breast.
• Contact your health care professional or breastfeeding specialist if you can express only minimal or
no milk or if expression is painful. See Section 10 & 11 for more information.
• While some discomfort may be felt when first using a breast pump, using a breast pump should
not cause pain. For assistance with correct breast shield sizing and comfort please visit www.
MedelaBreastshields.com or see a lactation consultant / breastfeeding specialist.
• Do not try to express with vacuum that is too high and uncomfortable (painful). The pain, along
with potential breast and nipple trauma, may decrease milk output.
• Make sure tubing is not kinked or pinched while pumping.
• Do not hold the pump kit by the bottle. This can lead to blockage of the milk ducts and
engorgement.
• Using a breast pump on an aircraft is not recommended. The cabin pressure may affect the breast
pumps performance.
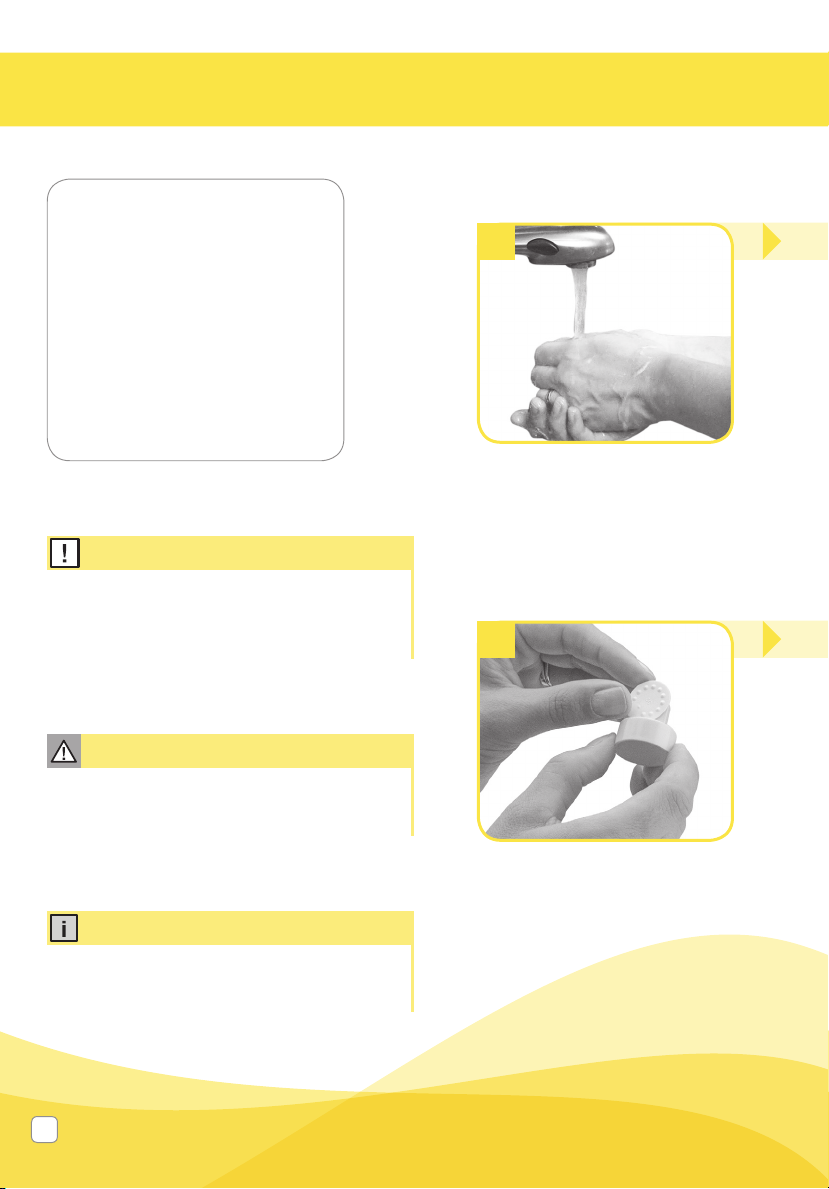
• Wash hands thoroughly with soap and water before touching breast pump, kit and breasts, and
avoid touching the inside of bottles or lids.
• Separate and wash all parts that are exposed to breast milk immediately after use. This will help
remove breast milk residue and prevent growth of bacteria.
4
Page 5
CAUTION: Can lead to minor injury: (cont.)
• Always inspect breast shields, connectors, valves, membranes, bottles, lids, and tubing prior to use
for cleanliness. Contact Medela Customer Service if cleaning does not resolve the issue.
• Only use drinking-quality tap or bottled water for cleaning your breast pump and parts.
• Do not store wet or damp parts as mold may develop.
• Do not run pump with wet tubing. Doing so may damage the breast pump.
• If you are experiencing discomfort at the base of the nipple due to rubbing of your breast tissue
against the breast shield tunnel, use of a lubricant such as Tender Care™ Lanolin may be beneficial.
For assistance with correct breast shield sizing and comfort please visit www.MedelaBreastshields.
com or see a lactation consultant/breastfeeding specialist.
SAVE THESE INSTRUCTIONS
Note
• Plastic bottles and component parts become brittle when frozen and may break when dropped.
• Bottles and component parts may become damaged if mishandled, e.g. dropped, over tightened,
or knocked over.
• Take appropriate care in handling bottles and components.
• Do not use the breast milk if bottles or components become damaged.
• Do not use Lithium batteries in the Pump in Style Advanced battery pack.
• Do not remove the breast pump from the soft case / carry bag.
Questions? Visit www.medela.com or call us at 1-800-435-8316.
5
Page 6

Table of Contents
Important Safeguards .......................................................................................................2-5
Product Description / Parts .............................................................................................. 8-9
1. Getting Started .............................................................................................................. 10
2. Cleaning Overview ........................................................................................................ 11
3. Wash - Before first use & after each use ...............................................................12-13
3.1 Before using for the first time ...................................................................................... 12
3.2 After each use ............................................................................................................ 13
4. Sanitize - Before first use & once per day .............................................................14-15
5. Breast Pump & Tubing Care ....................................................................................16-19
5.1 Tubing & faceplate care ......................................................................................... 16-19
5.2 Cleaning your motor unit ............................................................................................ 19
6. Assembly ................................................................................................................... 20-27
6.1 Assembly of pump kit ............................................................................................ 20-23
6.2 PersonalFit™ Sizing ..................................................................................................... 24
6.3 Powering your pump ............................................................................................. 25-27
6.3.1 Power adaptor care ......................................................................................... 25
6.3.2 Battery pack ............................................................................................... 26-27
6.3.3 Traveling outside of your country .................................................................26-27
7. Pumping ....................................................................................................................28-31
8. Storing Breast Milk ........................................................................................................ 32
8.1 Storing breast milk in your Pump In Style® Advanced cooler bag .............................. 32
8.2 Storage Guidelines for Freshly Expressed Breast Milk ............................................... 32
9. Preparing & Feeding Breast Milk ................................................................................. 33
9.1 Preparing breast milk ................................................................................................ 33
9.2 Feeding breast milk ................................................................................................... 33
10. Troubleshooting ............................................................................................................. 34
11. Supplemental Information ............................................................................................ 35
12. Disposal .......................................................................................................................... 36
13. Warranty ......................................................................................................................... 37
14. Meaning of Symbols ...................................................................................................... 38
15. EMC / Technical Description .................................................................................... 39-43
16. Technical Specifications ............................................................................................... 44
6
Page 7
Take a moment to read through this entire instruction manual before using this product
for the first time.
PLEASE SAVE THESE INSTRUCTIONS.
It is best to wait until your breastfeeding routine is established (approximately 4weeks)
before expressing breast milk, unless otherwise advised by your healthcare professional.
Glossary of Terms
2-Phase Expression® technology – research based technology that mimics a baby’s natural
nursing rhythm.
Expression Phase – slower sucking/pumping rhythm for gentle and efficient milk removal as
quickly as possible.
Maximum Comfort Vacuum™ – highest vacuum setting where a mother still feels comfortable
during pumping. It is different for every mother.
Stimulation Phase – fast sucking/pumping rhythm to stimulate the milk ejection reflex and to
start the milk flowing.
Indications for use:
The Pump In Style Advanced breast pump is a powered breast pump to be used by lactating
women to express and collect milk from their breast. The Pump In Style Advanced is a single
user device.
Contraindications for use:
There are no known contraindications for use with this product.
Tip
It is best to wait until your breast milk routine is established (approximately 4 weeks)
before expressing breast milk, unless otherwise advised by your healthcare professional.
If you have medical reasons or other needs for exclusively pumping, it is recommended
that you use a hospital-grade (multi-user) breast pump such as the Medela Symphony®
Breast Pump. To learn more, visit www.medelabreastfeedingus.com.
Product Description
This breast pump is a personal-use electric breast pump that includes 2-Phase Expression®
technology and is capable of single and double pumping.
The operating life of this breast pump is defined to be approximately three 15-minute sessions
per day, for one year. The operating life for the breast pump kit is 6 months.
Questions? Visit www.medela.com or call us at 1-800-435-8316.
7
Page 8
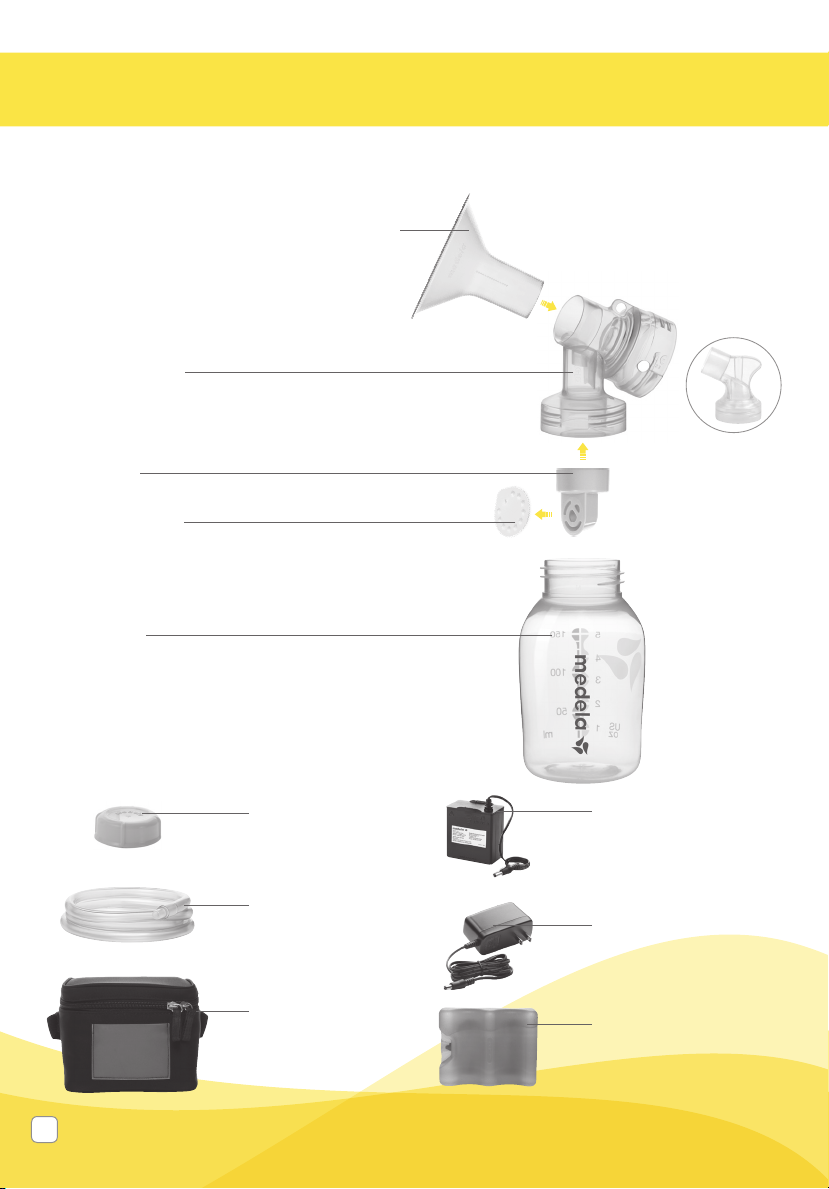
Product Description / Parts
Medela reserves the right to substitute any component or accessory with a
replacement of equivalent performance.
2x PersonalFit™ Breast Shields, 24 mm
Applied Part (for other breast shield sizes
see Section 6.2)
Replacement
2x Connectors
87071 or 8107264
Item
87073
2x Valves
87089
Item
2x Membranes
87088
Item
4x Bottles
6100050
Item
Replacement 87130
4x Lids
8107183
Item
Replacement 87165
2x Tubing
87212
Item
1x Cooler bag
Replacement 67068
(includes ice pack &
4 bottles with lids)
87071
8107264
1x Battery pack
Ite m 9 0170 0 2
Replacement 67553
1x Power adaptor
Item 101036149
Replacement
101038300 or 68030
1x Ice pack
Item 8117010
Replacement 87092
8
To nd replacement parts please visit www.shopmedela.com
Page 9
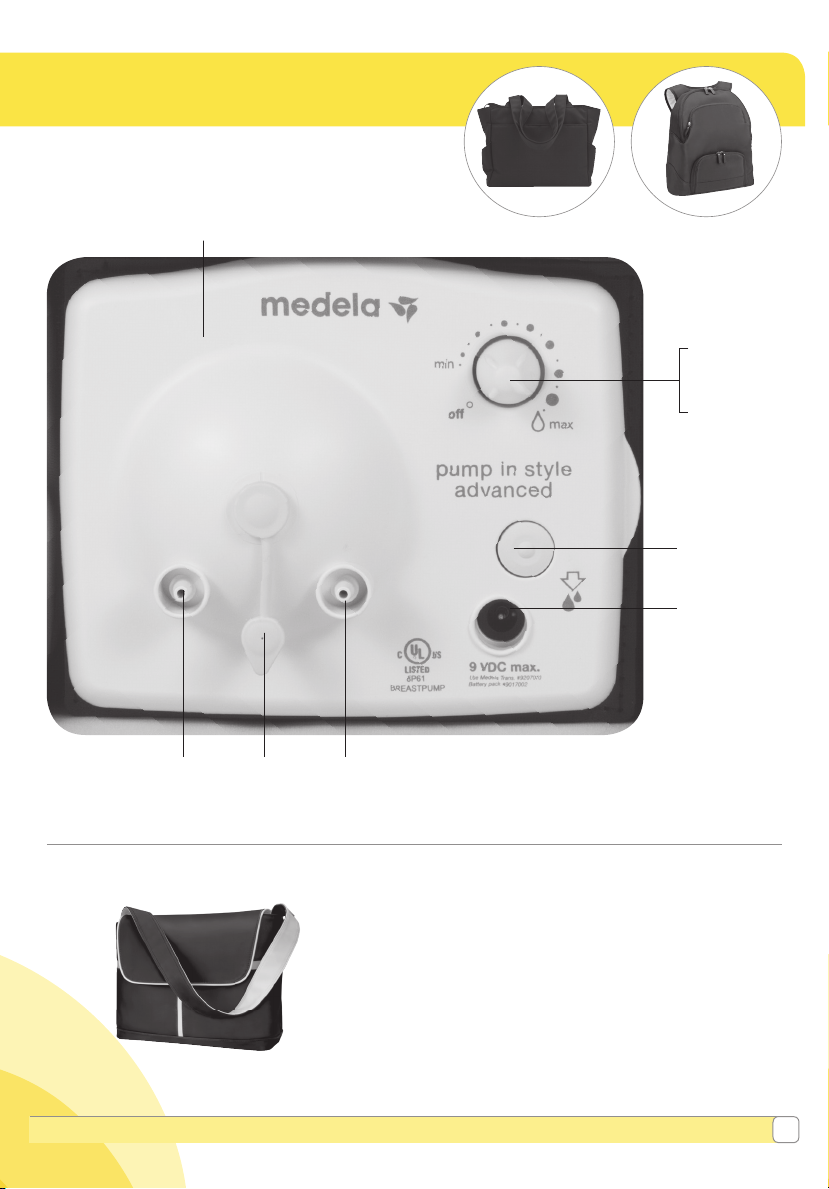
1x Faceplate
Item 6007132
Tubing port Tubing portPort plug
BackpackOn -the- go To te
On/Off knob
Increase/reduce
vacuum
Let-down
button
Power
adaptor port
Additional parts included with The Metro Bag
™
27 mm PersonalFit™ Breast shields ................. 87274
Metro Bag including:
Flexible, Plastic Workspace ........................ 3007299
2 Mesh Storage Bags
Pump In Style® Advanced
The Metro Bag
™
Questions? Visit www.medela.com or call us at 1-800-435-8316.
9
Page 10
1. Getting Started
Breast shield assemblies come assembled. Separate
all parts that will come into contact with the breast
and breast milk before cleaning.
Parts to clean:
• Breast shields
• Breast milk bottles
• Lids
• Connectors
• Membranes
• Back caps
Note
It's important for you to do the following before
using your Pump in Style Advanced Breast
Pump for the first time:
• Separate all parts
• Clean - see instructions:
• Wash - Section 3
• Sanitize - Section 4
10
Page 11
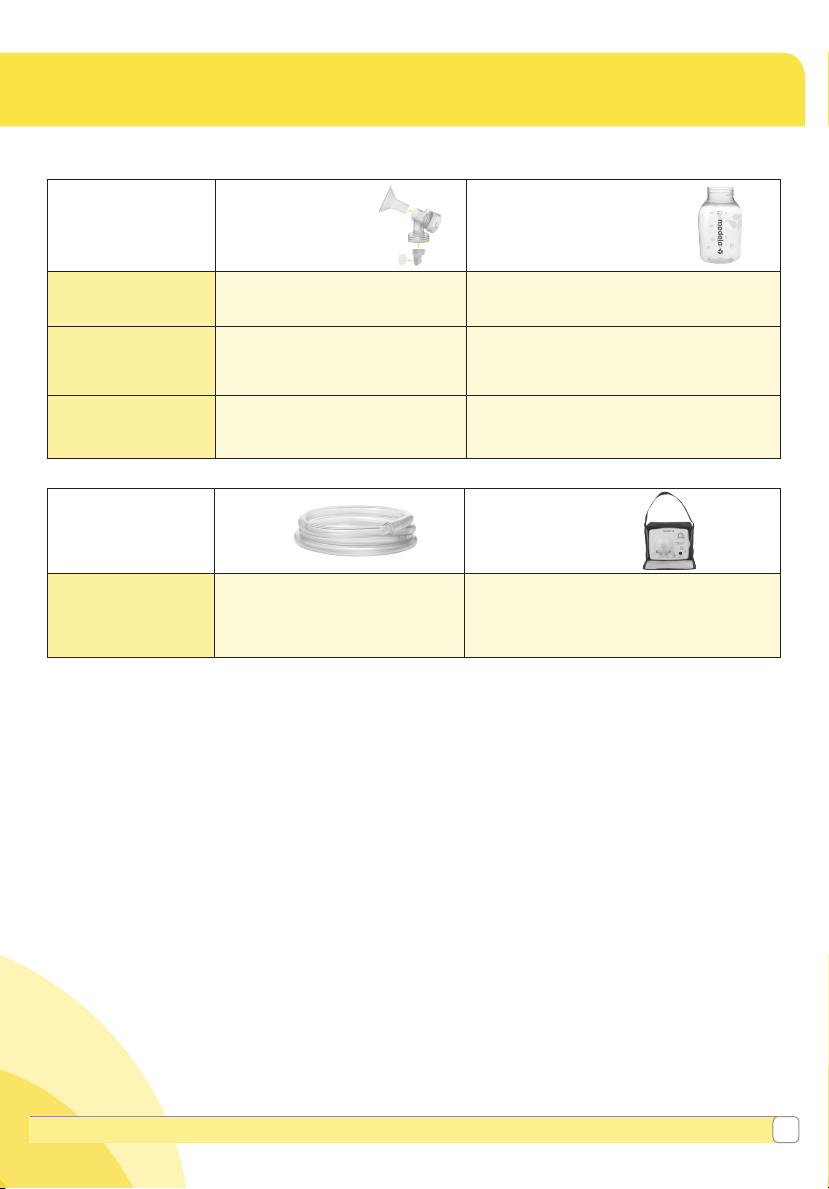
2. Cleaning Overview
When to Wash Breast pump kit Breast pump bottles
Before 1st use
After each use
Once per day
When to Wash Tubing Motor unit
As needed
3 wash only if dirty or milk
3 wash
3 sanitize
3 wash 3 wash
3 sanitize 3 sanitize
is present in tubing
3 wipe with clean, damp cloth
3 wash
3 sanitize
Detailed cleaning instructions:
• Wash – Section 3
• Sanitize – Section 4
• Breast pump & tubing care – Section 5
Washing and sanitizing are two different activities and must be done
separately to protect you and the performance of your breast pump.
Questions? Visit www.medela.com or call us at 1-800-435-8316.
11
Page 12
3. Wash - Before first use & after each use
3.1 Before using for the rst time
Clean and sanitize the parts below before
using your pump for the first time. Follow
the cleaning and sanitizing instructions in
Sections 3.2 and 4 that follow.
Supplies needed:
• Mild dish soap
• Clean dish cloth or soft brush
• Clean wash basin
• Drinking quality water
Parts to wash:
• Breast shields
• Breast shield connectors
• Membranes
• Valves
• Breast milk bottles and lids
3.2 After each use
Clean all parts that come in contact
with your breast and breast milk.
See image in Section1.
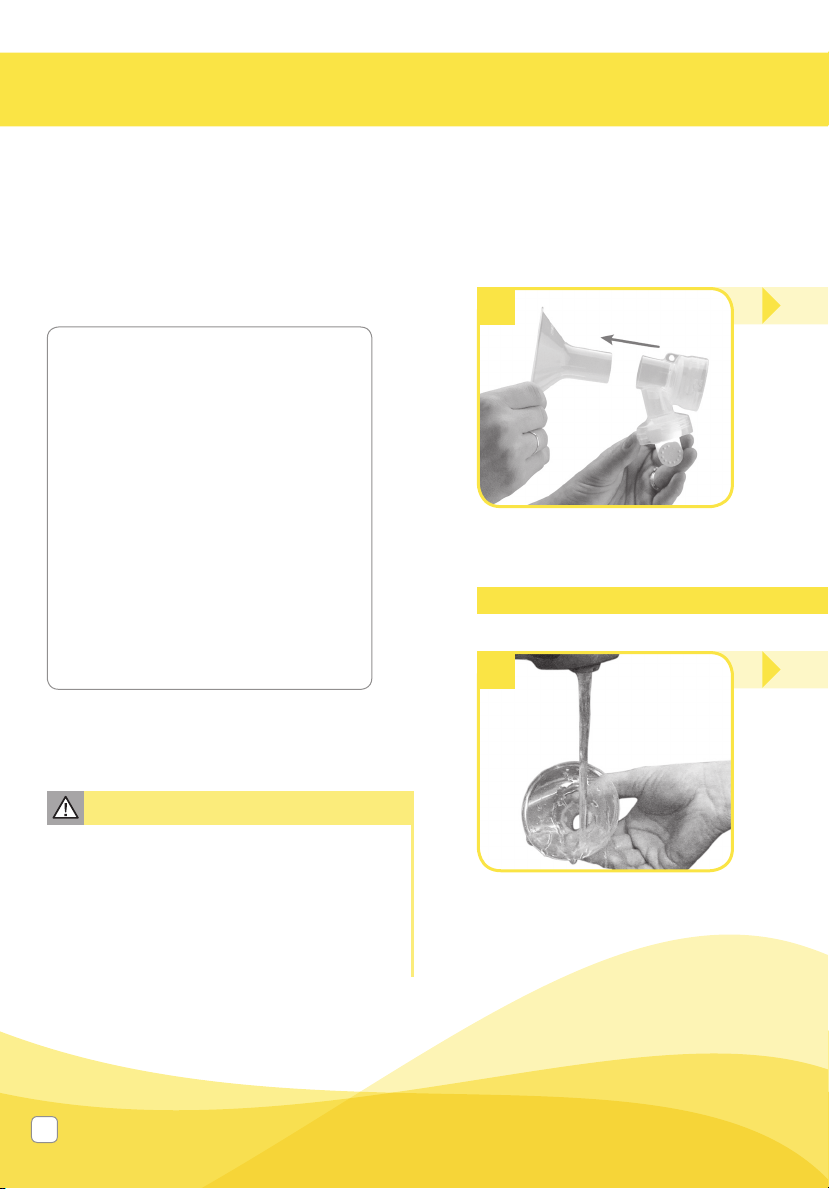
1
Separate breast shields from
breast shield connectors.
4
Caution
• Only use drinking-quality tap or bottled
water for cleaning.
• Take apart and wash all parts that come
in contact with the breast and breast
milk immediately after use to avoid
dry up of milk residues and to prevent
growth of bacteria.
12
• Rinse all separated parts that
come into contact with the
breast and breast milk in cool
water to remove breast milk
residue.
• Once rinsed, parts that have
touched the breast or breast milk
should be placed in a clean wash
basin, dedicated to only cleaning
these items. Do not place parts
directly in the sink.
Page 13
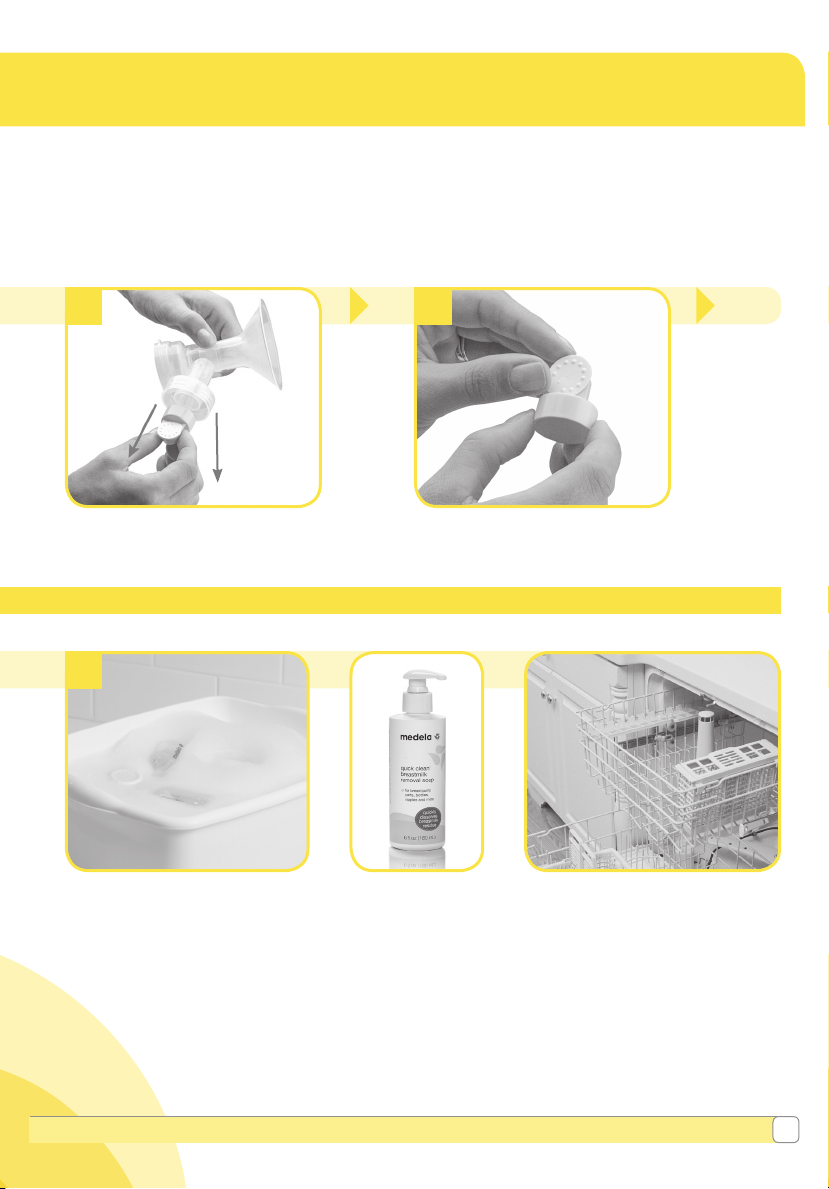
2
3
Twist and pull the yellow valves
off the breast shield connectors.
Washing Options:
Washing in a Dedicated Basin
5
• Soak with warm soapy water
for 5 minutes, wash with a
clean, unused dish cloth and
rinse with clean water.
• Place parts on a clean surface
and/ or towel. Allow parts to air
dry. Store dry parts in a cool
place when not in use. Do not
store wet or damp parts.
Remove the white membranes
from the yellow valves.
• You may wash
your kit parts
by following
the instructions
on the Quick
Clean™ Breast
Milk Removal
Soap bottle. (Sold
separately.)
Washing in Dishwasher:
or
• Wash all separated parts on
top rack of dishwasher.
• Allow all breast pump parts to
air dry in a clean area.
• Store dry parts when not in
use.
Questions? Visit www.medela.com or call us at 1-800-435-8316.
13
Page 14
4. Sanitize - Before first use & once per day
Note
• Wash breast pump kit parts after each use.
• Sanitize clean breast pump kit parts
once daily.
• Take care not to damage parts
of the pump kit during cleaning.
• If the individual components of the pump
kit are cleaned in a dish washer parts may
be discolored by food pigments. This has
no impact on the function.
• Store the pump kit in a clean bag/container
until next use.
Supplies needed:
• Clean pot for boiling water
• Clean dish cloth
• Tongs
• Drinking quality water
Sanitize daily
1
Refer to image in Section 1
Separate all clean parts that
come in contact with your
breast and breast milk.
4
Parts to sanitize:
• Breast shields
• Breast shield connectors
• Membranes
• Valves
• Breast milk bottles and lids
14
Allow water to cool and gently
remove parts from water
with tongs.
Page 15
2
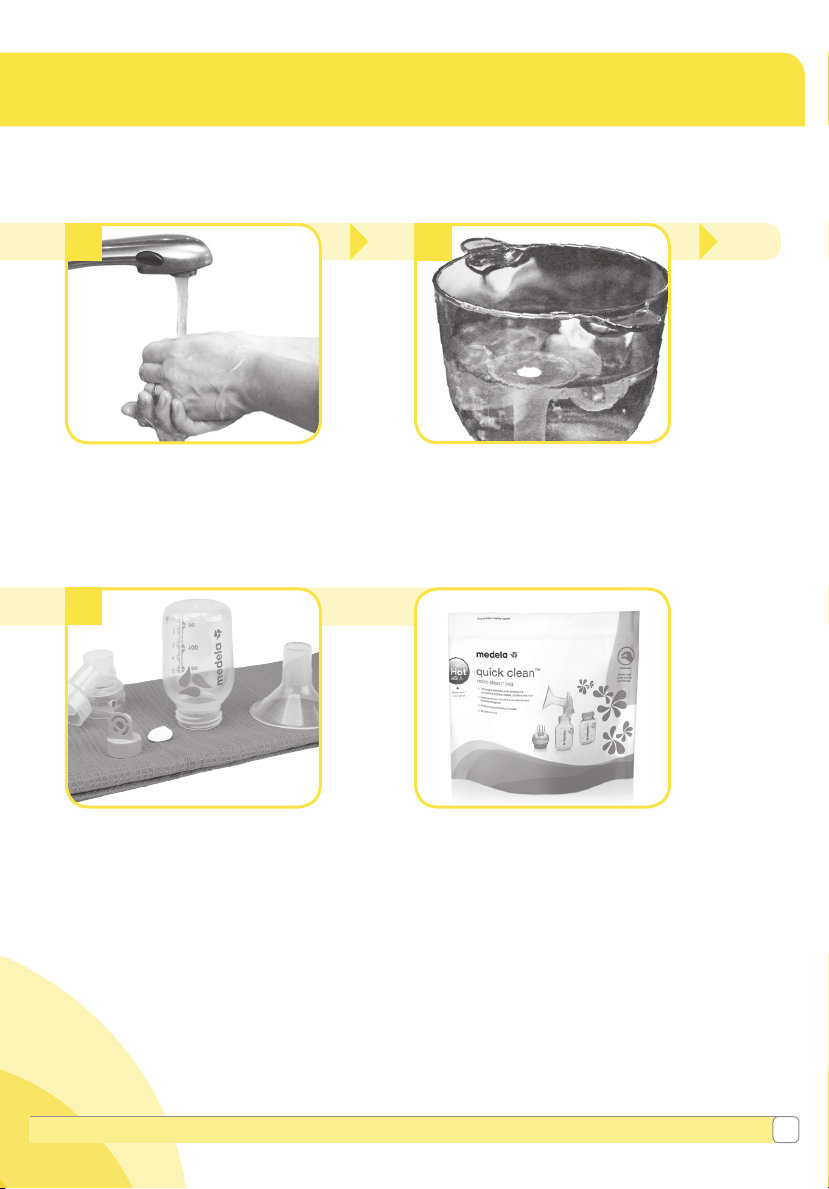
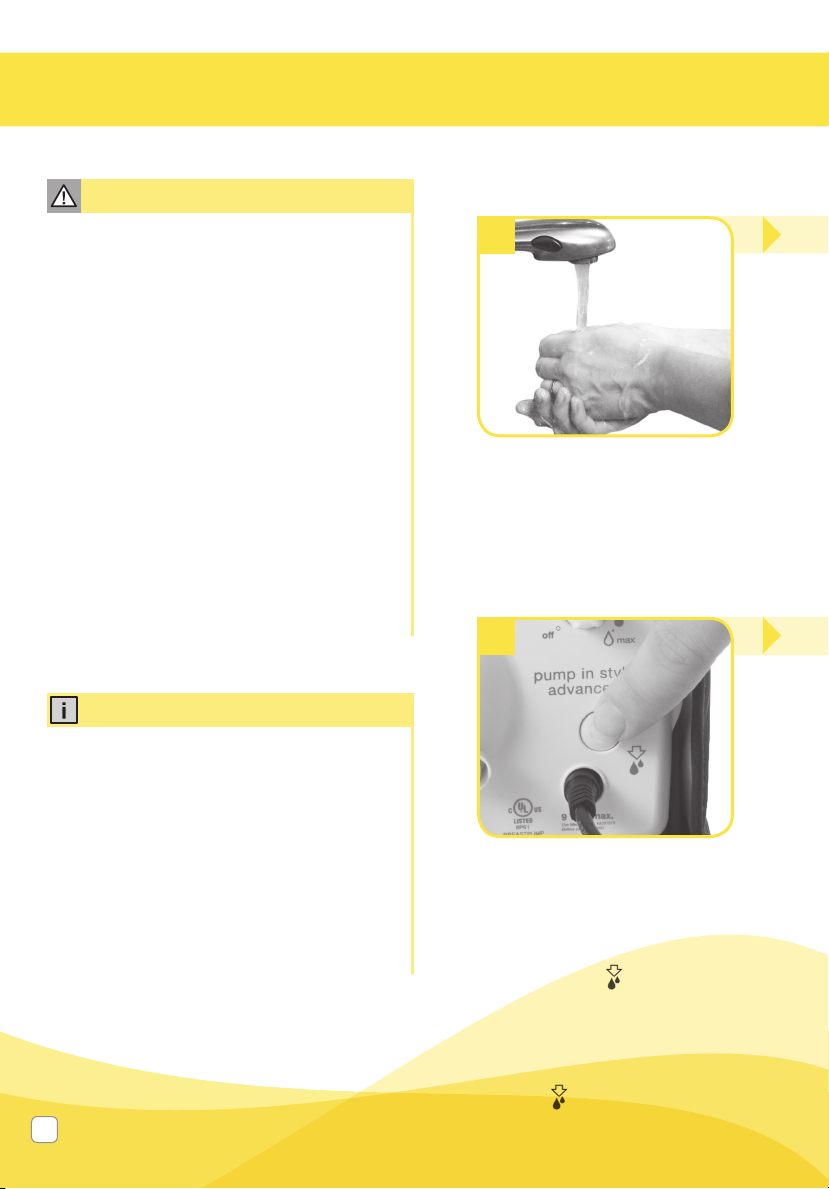
Wash hands thoroughly. • Let parts boil in water for
3
10 minutes.
5
• Place parts on a clean surface
and/or towel.
• Allow all parts to air dry.
• Store dry parts when not in use.
Do NOT store wet or damp parts.
Questions? Visit www.medela.com or call us at 1-800-435-8316.
or
You may sanitize your kit parts by
following the instructions on Medela’s
Quick Clean™ Micro-Steam™ bag.
(Sold separately.)
(Do not clean tubing in a
micro-steam bag)
15
Page 16
5. Breast Pump & Tubing Care
Caution
• Do not store wet or damp parts as mold
may develop.
• If tubing becomes moldy, discontinue use
and replace tubing. To find replacement
parts visit www.ShopMedela.com.
Note
• Tubing should be washed if dirty or milk is
present. Follow instructions in Section5.1.
• Cleaning tubing is not necessary if
condensation inside the tube is from previous
washings or atmospheric conditions. Follow
drying instructions in Section 5.1.
Supplies needed:
• Mild dish soap
• Clean dish cloth
• Clean wash basin
• Drinking quality water
Parts needed:
• Tubing
• Faceplate
• Diaphragm
• Breast pump bag
You may wash
tubing by following
the instructions on
the Quick Clean™
Breast Milk Removal
Soap bottle. (Sold
separately.)
5.1 Tubing & faceplate care
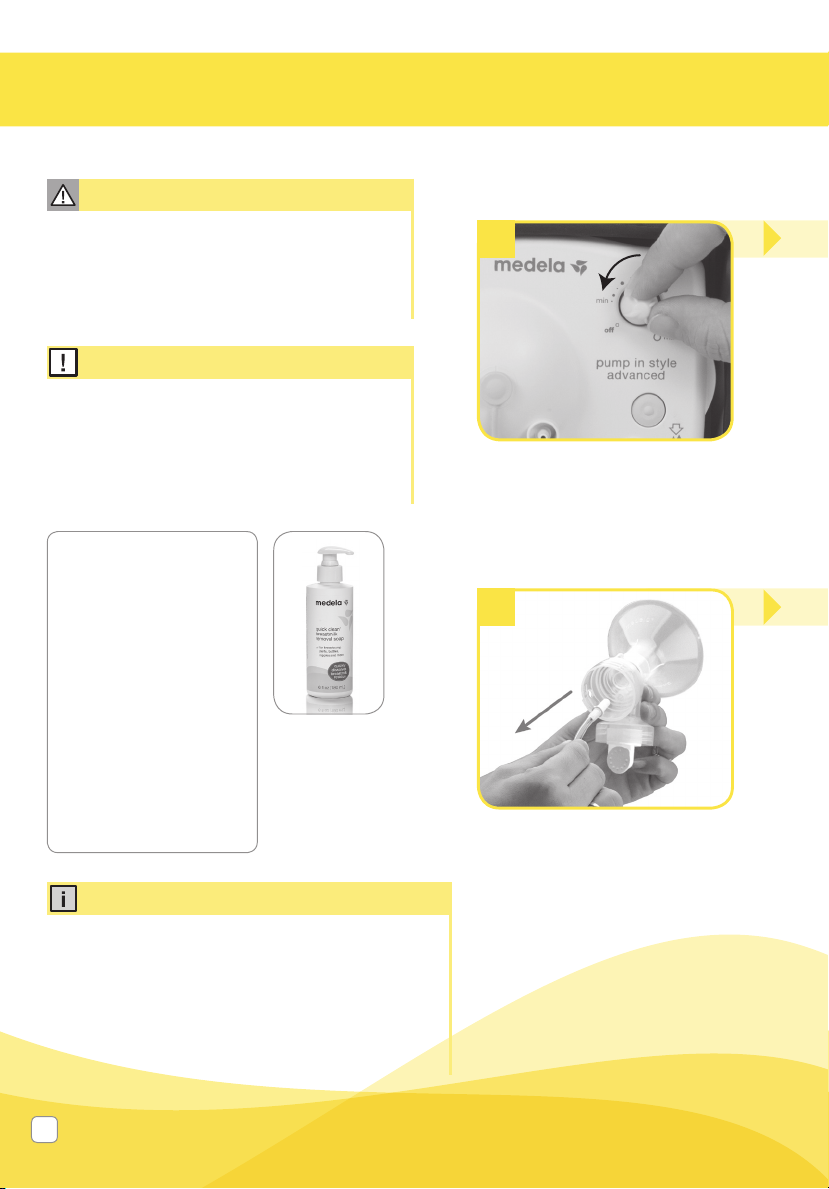
1
Turn off breast pump.
4
Remove tubing from breast shield.
Info
Common causes of milk overflow into tubing:
• Heavy let-down
• Leaning forward or lying down while pumping
• Improper cleaning of valves and membranes
• Damaged membranes
• Overfilling bottles while pumping
16
Page 17
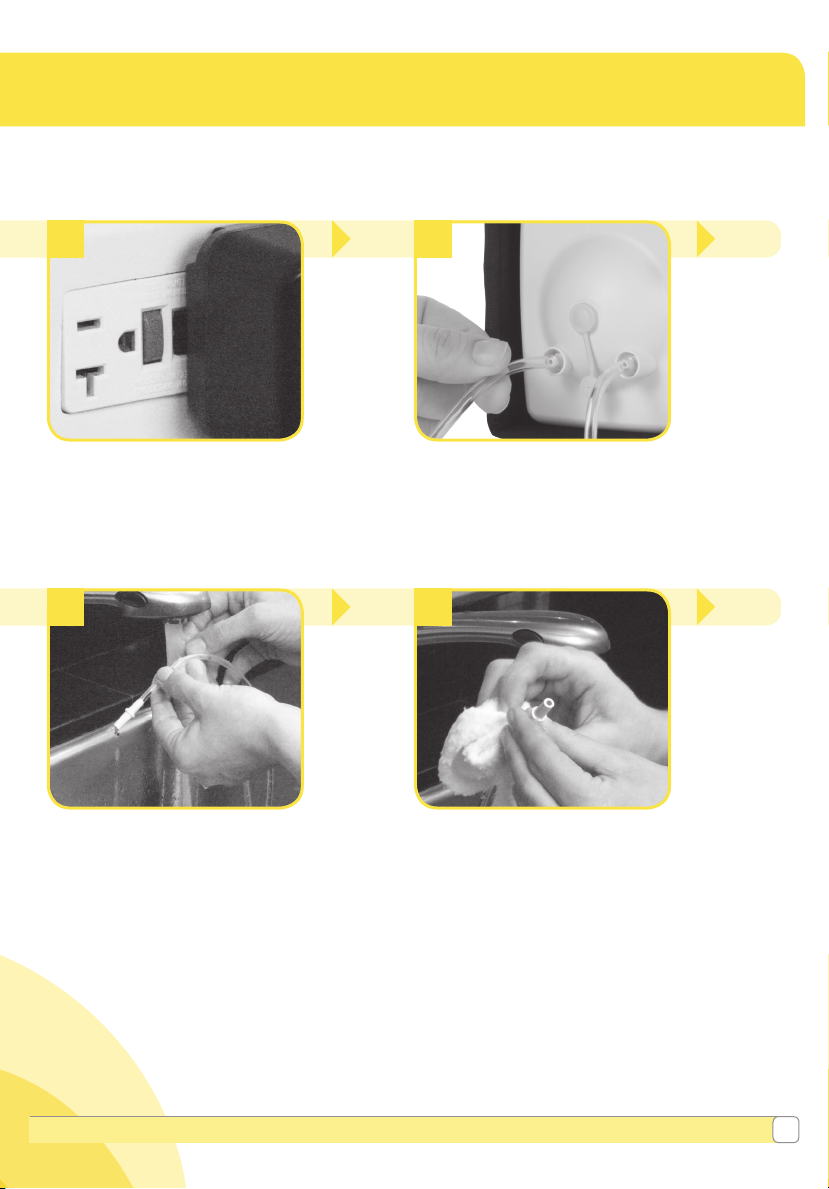
2
3
Unplug breast pump from
power source.
5
Rinse tubing in cool water to
remove breast milk.
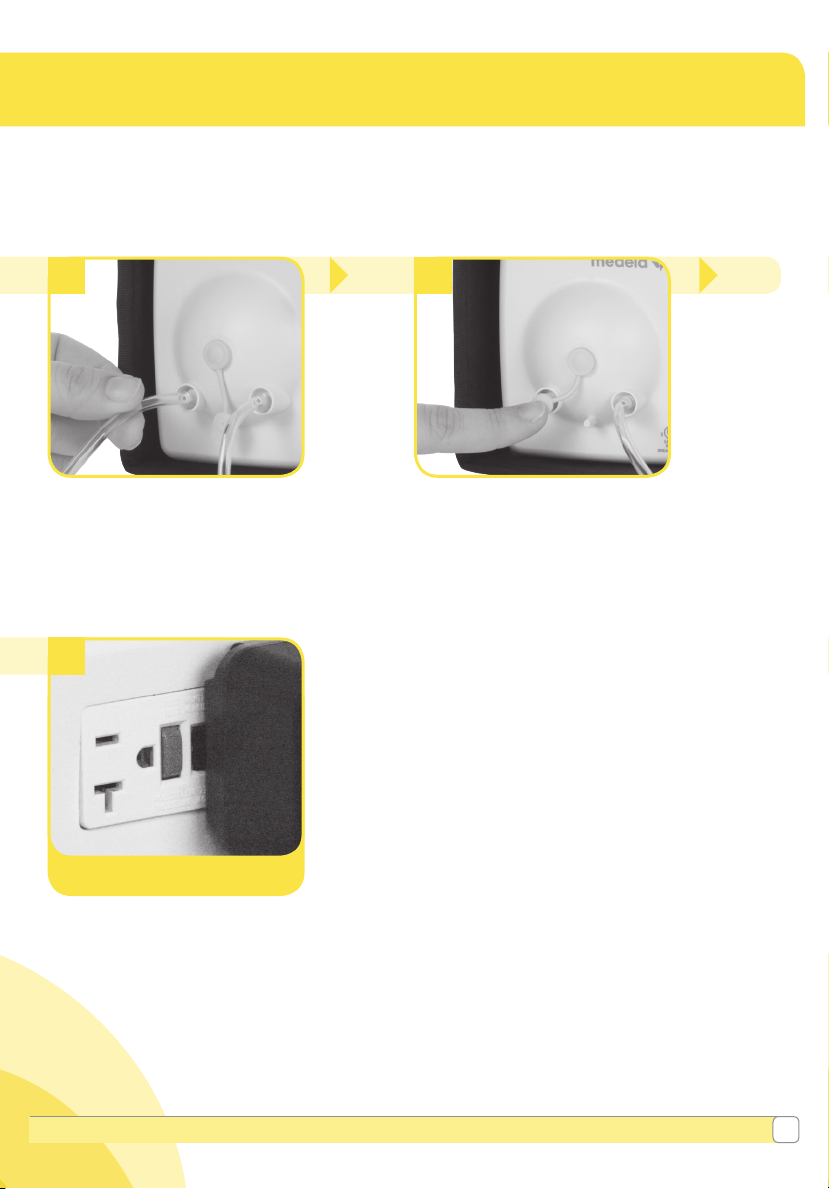
Remove tubing by pulling
straight out of tubing ports.
Do not wiggle or pull tubing
at an angle.
6
• Wash tubing in warm soapy water.
• Rinse tubing with clear water.
• Hang to air dry or connect the tubes to
the running breast pump and allow any
moisture that has formed to dry.
NOTE:
Clean the faceplate monthly. Also, inspect tubing after each pumping session.
Clean tubing, faceplate and diaphragm if there is any sign of breast milk.
Continued
next page.
Questions? Visit www.medela.com or call us at 1-800-435-8316.
17
Page 18
5. Breast Pump & Tubing Care (cont.)
Note
• Make sure faceplate and diaphragm are
completely dry before reseating.
• The faceplate must be seated correctly and
snapped together at all connection points.
This ensures the pump will have adequate
vacuum and optimum performance.
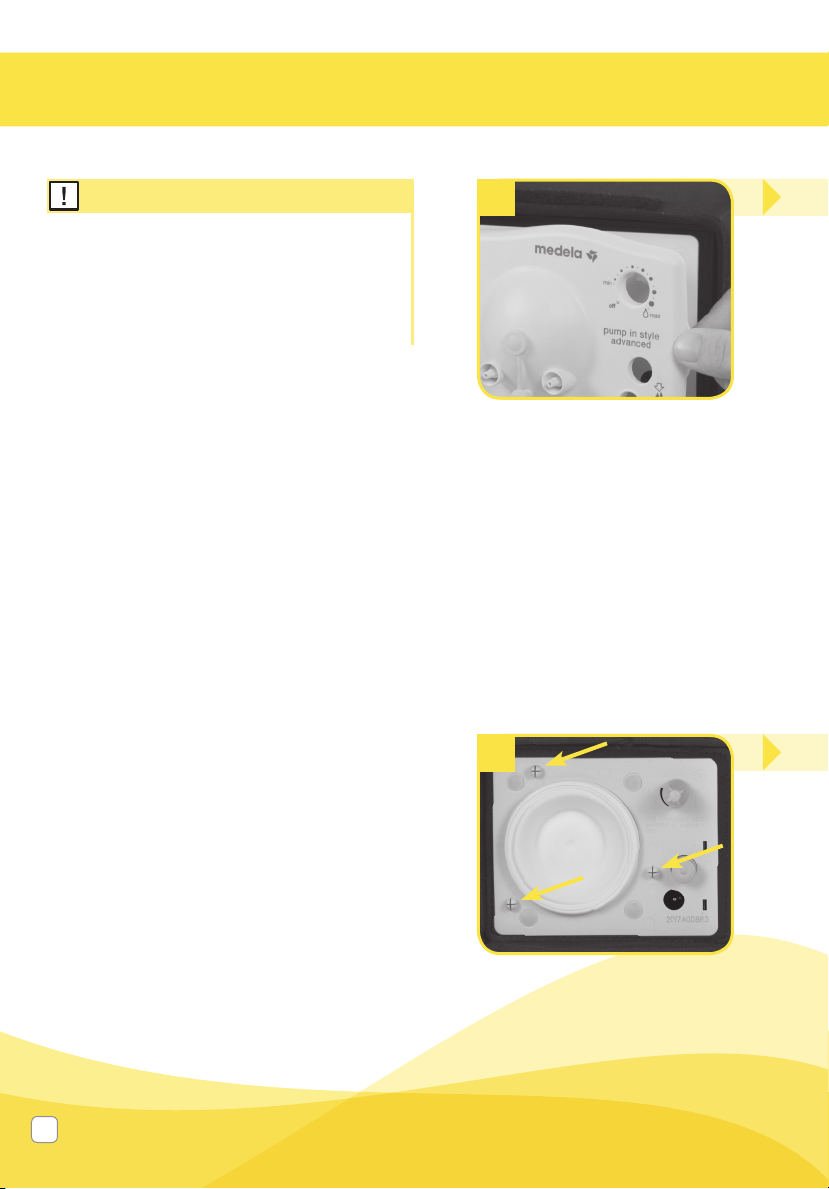
7
Snap off the faceplate using the
thumb tab.
10
Locate the 3 connection points
on the reverse side of the
faceplate and on the pump.
18
Page 19
8
9
• Soak in warm soapy water for
5 minutes.
• Clean with a clean dish-cloth or
soft brush
• Rinse parts with clear water.
• Allow to air dry in a clean area.
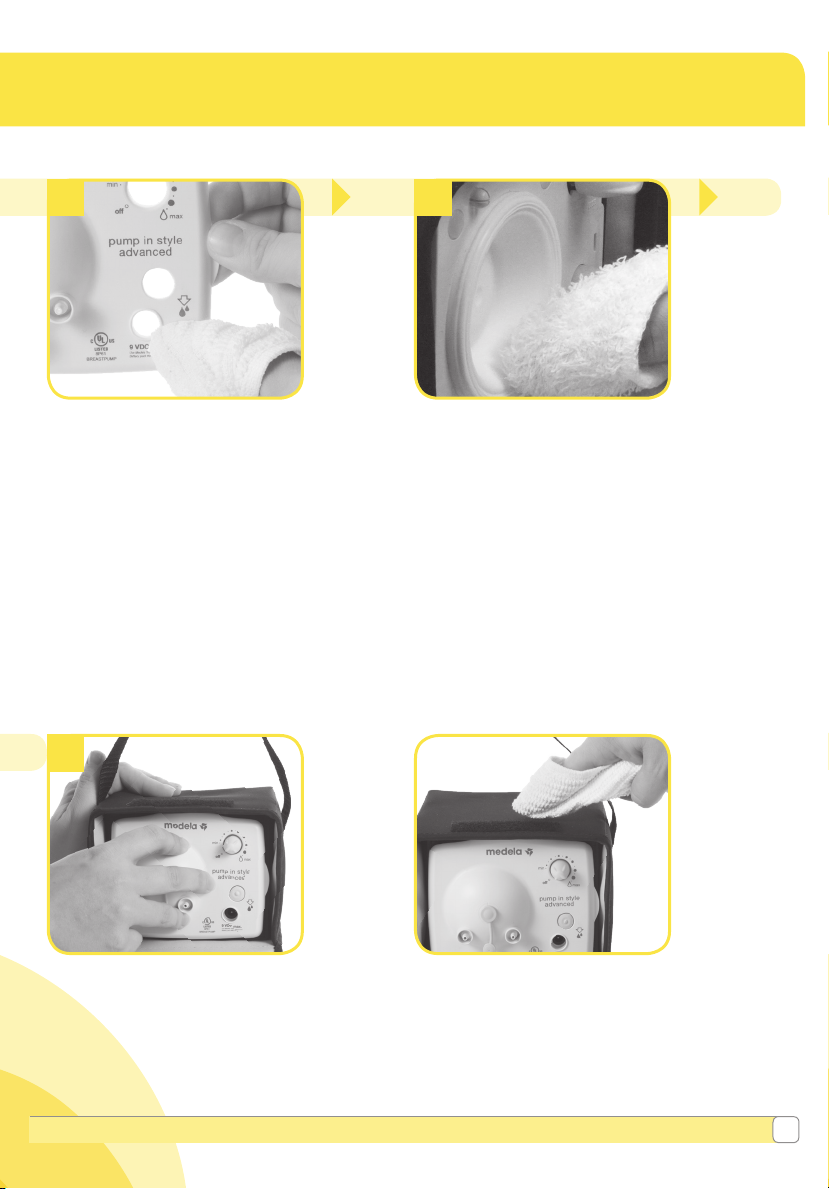
11
Align connection points and
hold the back of the pump with
one hand while pushing on the
faceplate until it snaps into place.
• Some breast pump models may have
a diaphragm that appears different
than pictured above.
• Carefully wipe the entire surface area
of the diaphragm where particles or
liquid may have accumulated, with a
clean (no soap), damp cloth.
• Allow all parts including edges to air
dr y, completely, in a clean area
before replacing the faceplate.
5.2 Cleaning your motor unit
Use a damp (not wet) cloth to wipe
the breast pump bag after each use.
Questions? Visit www.medela.com or call us at 1-800-435-8316.
19
Page 20
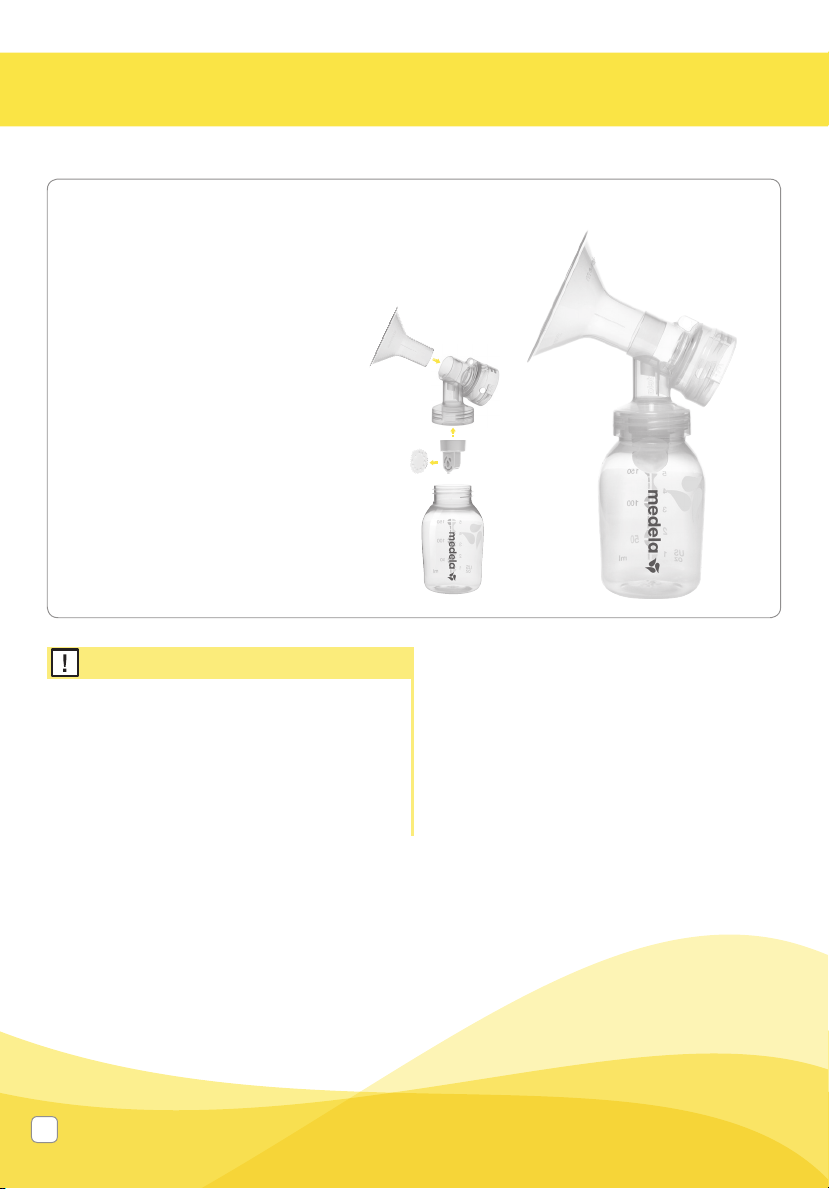
6. Assembly
Parts needed:
• Breast shields
• Breast shield connectors
• Membranes
• Valves
• Breast milk bottles and lids
• Tubing
• Breast pump
• 9 volt power adaptor
Note
• Inspect valves for cracks or chips and inspect
membranes for holes, tears or warping. If you
notice any damage to these parts, replace
them immediately.
Caution
6.1 Assembly of pump kit
1
Wash hands before touching
breast pump, kit and breasts
and avoid touching the inside of
containers or lids.
4
• Wash hands thoroughly with soap and
water before touching the breast and
pump parts.
Info
• Carry out all the steps with care and
assemble the pump kit correctly for
optimum performance.
20
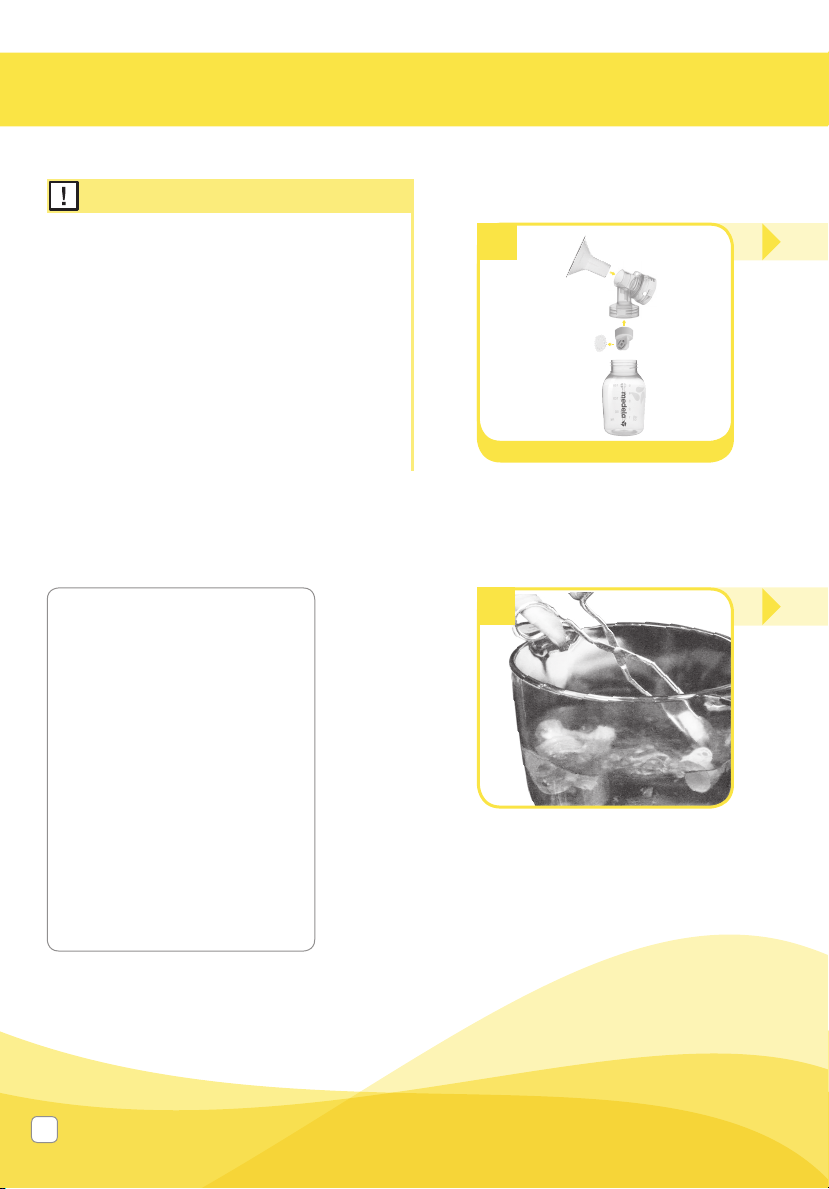
Snap membranes onto valves
until membranes lie completely
flat on valve.
Page 21

2
3
Place your breast pump on a
clean and dry surface. Ensure
that the surface is solid and
secure so your breast pump
will not tip over or fall.
5
Push assembled yellow valves and
white membranes onto the bottom
of the breast shield connectors.
Securely attach breast shield to
breast shield connector.
6
Continued
next page.
Screw bottles onto the breast
shield connectors.
Questions? Visit www.medela.com or call us at 1-800-435-8316.
21
Page 22

6. Assembly (cont.)
Warning
• Use only the power adaptor supplied with
the Pump In Style® Advanced.
• Always inspect the 9 volt power adaptor
and Battery Pack cords prior to use for
damaged, kinked, twisted, frayed or
exposed wires. If damaged, immediately
discontinue use. For replacement parts
visit www.shopmedela.com.
Twists, kinks or bends
6.1 Assembly of pump kit
(cont.)
7
810726487071
Insert the hard yellow adapter
ends of tubing into the hole on
the back of the breast shield
connectors.
10
Has bulges Exposed wires
Note
• See Section 6.3.2 Battery Pack
Assembly for instructions on the use of
the Battery Pack.
• See Section 6.3.3 Traveling Outside
the U.S. for information on using your
device internationally.
22
Plug the metal fitting on the end
of the 9 volt power adaptor or
Battery Pack cord into the power
jack on the front of the breast
pump faceplate.
Page 23
8 9
Double pumping: Insert the
free ends of tubing onto both
ports on the front of the breast
pump faceplate.
11
Refer to Power Adaptor Care
in Section 6.3.1
Plug the 9 volt power adaptor
into a standard electrical outlet.
Single pumping: Insert the free
end of tubing onto one port on
the front of the breast pump
faceplate. Place the port cap
over the unused port.
Questions? Visit www.medela.com or call us at 1-800-435-8316.
23
Page 24

6. Assembly (cont.)
Nipple
Areola
Nipple
Areola
Nipple
Areola
6.2 PersonalFit™ Sizing
1. Medela’s PersonalFit sizing
Pumping should not hurt. For maximum comfort and pumping efficiency, Medela offers five
breast shield sizes.
21
mm
24
mm
27
mm
30
mm
36
mm
Visit MedelaBreastshields.com to view the full guide to help you determine your optimal size
based on your nipple diameter.
2. Test your breast shield size
1. Start with the 24 mm that came with your pump, or the size determined by measuring.
2. Center nipple and gently hold breast shield against your breast.
3. Adjust for Maximum Comfort Vacuum™, to achieve optimum suction level.
4. Refer to images while pumping in expression.
Correct Fit
Nipple
Areola
• Nippl e is centere d
and moves f reely
Too Large
Nipple
Areola
• Nippl e and excess ive
areola a re pulled into
the tunnel
• Try a smalle r size
Too Small
Nipple
Areola
• Nipple rubs along
side of tunnel
• Try a larger s ize
3. Should you try a new size?
• Does your nipple rub sides of tunnel, to the point of causing discomfort?
• Do you see excessive areola being pulled into tunnel?
• Do you see any redness?
• Is your nipple or areola turning white?
• Do you feel unexpressed milk after pumping?
If you answered “YES” to any of these questions, consider trying a new size by following
the measuring instructions above.
If you are still unsure if you selected the correct size, see a lactation consultant,
breastfeeding specialist, or visit MedelaBreastshields.com for assistance in choosing
the right size breast shield.
Caution
• While some discomfort may be felt when first using a breast pump, using the breast pump should not
cause pain.
• If you are experiencing discomfort at the base of the nipple due to rubbing of your breast tissue with the
breast shield tunnel, use of a lubricant such as Tender Care™ Lanolin may be beneficial.
24
Page 25
6.3 Powering your pump
6.3.1 Power adaptor care
To care for your adaptor be sure to follow these storage directions.
Do not wrap the power adaptor
cord around the plug body.
Do not unplug the power
adaptor by pulling on the cord.
Correct!
Correct!
Questions? Visit www.medela.com or call us at 1-800-435-8316.
25
Page 26
6. Assembly (cont.)
Note
• Remove the batteries if the Battery Pack
is not going to be used for an extended
period of time.
• If breast pump does not turn on, make
sure the batteries have been inserted
properly. If this does not solve the
problem refer to the troubleshooting
section of this instruction booklet or
contact Medela Customer Service at
1-800-435-8316.
• Each set of batteries will provide
approximately 2hours of pumping time.
• Do not mix old and new batteries.
• Do not mix alkaline, standard
(carbon-zinc) or rechargeable batteries.
• Do not use Lithium batteries.
• Only use alkaline or Ni-MH batteries
• For information about traveling with your
breast pump and expressed breast milk,
visit www.TSA.gov.
4
6.3 Powering your pump (cont.)
6.3.2 Battery pack
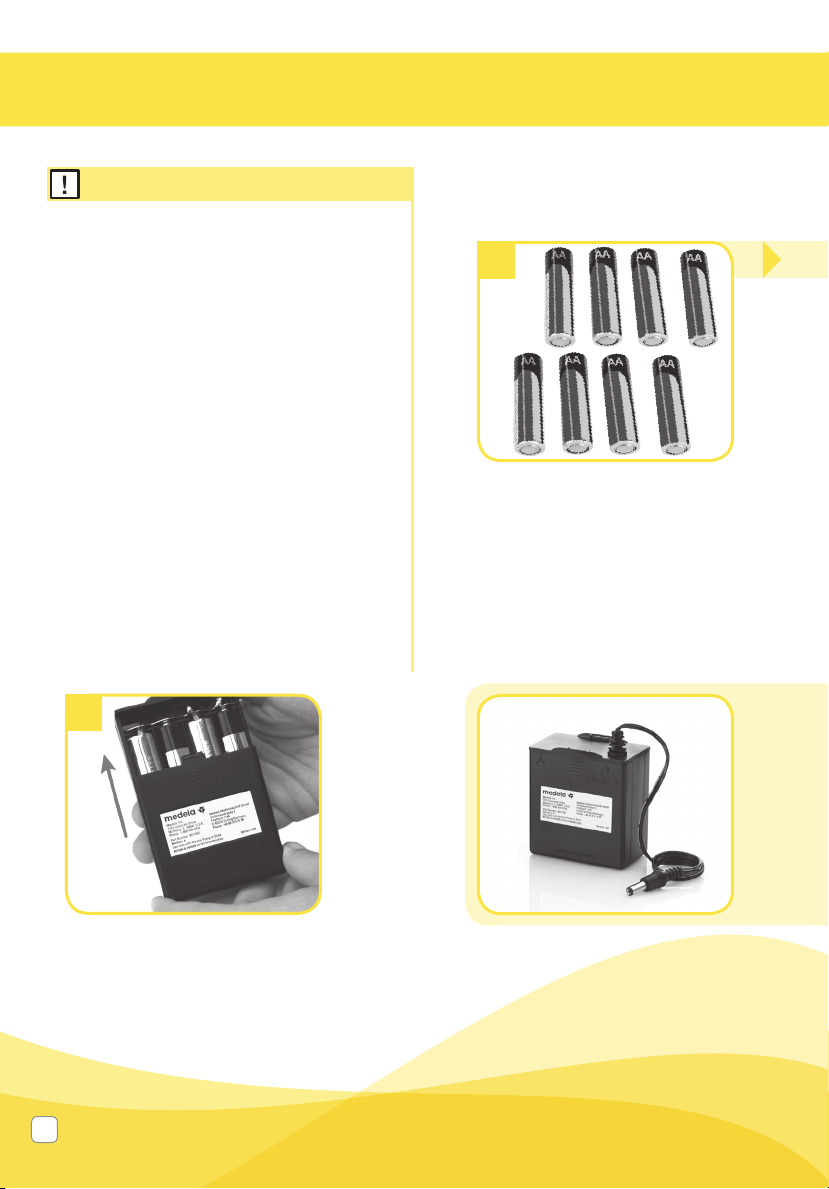
1
You will need a total of 8 AA
rechargeable batteries or alkaline
batteries.
6.3.3 Traveling outside of your country
When traveling internationally,
there are 3 power options:
Replace battery cover.
26
or
Use the Battery Pack that was
included with your Pump In Style®
Advanced breast pump.
Page 27
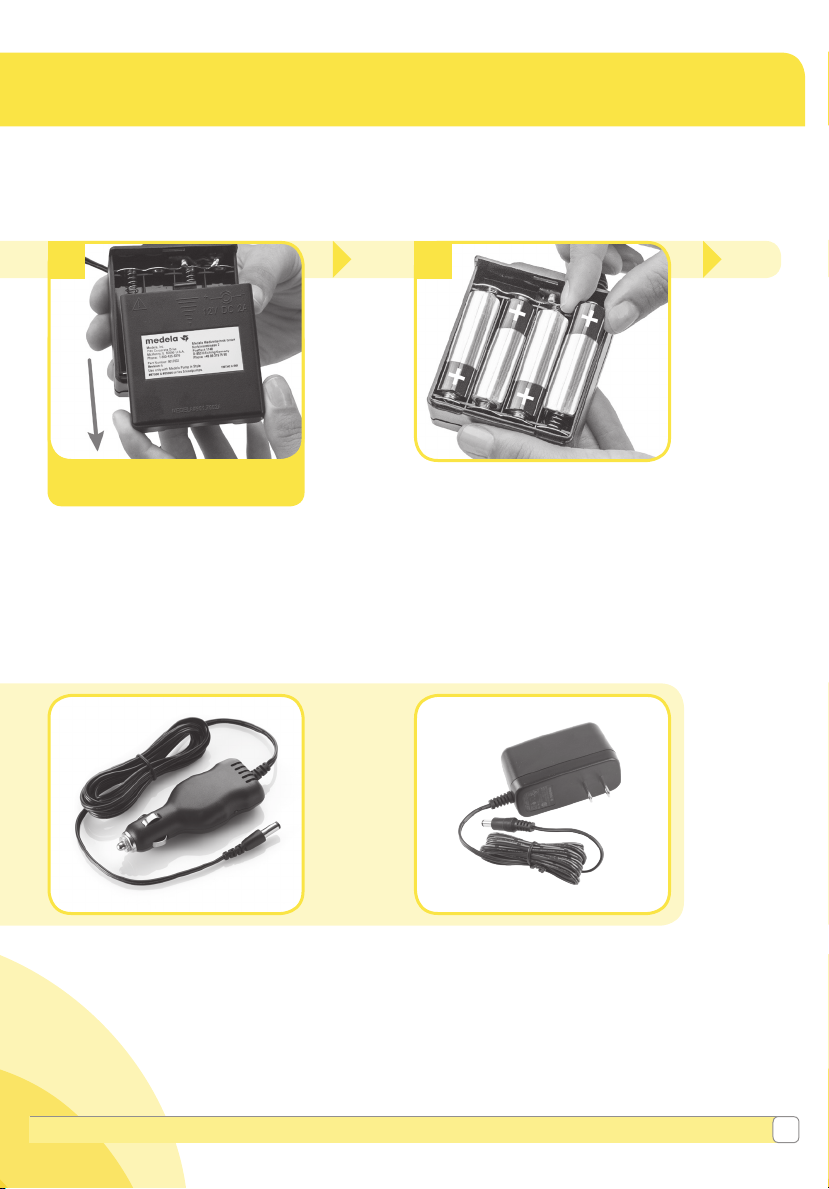
2 3
Replace all batteries at the
same time.
Slide off both battery covers.
Four (4) batteries are placed on
each side of battery pack.
Place the NEGATIVE (-) end of the battery
against the front of the spring by pushing the
battery in and down in one motion until the
battery snaps into place.
The POSITIVE (+) end of the battery should be
near the positive sign on the battery pack.
or
Purchase the 9 volt Portable Vehicle
Adaptor (sold separately) item
67174. Visit our online store at www.
shopmedela.com.
The Portable Vehicle Adaptor may not
work with all vehicles. Please check
the owner's manual for compatibility
with 12-24 volt input.
Use the power adaptor that was
included with your Pump in Style®
Advanced breast pump with
universal prong converters (sold
separately, not a Medela item)
Please note: The previous Pump in Style Advanced
power adaptor (item number 68030 or 9207010) is not
compatible outside of North America. Please call Medela
Customer Service if you have any questions.
Questions? Visit www.medela.com or call us at 1-800-435-8316.
27
Page 28
7. Pumping
Caution
• Always inspect breast shields, breast
shield connectors, white membranes,
yellow valves, and tubing prior to use for
cleanliness. If dirty, see Section 5.1.
• If you experience pain or other symptoms
while pumping seek advice from your
healthcare professional or breastfeeding
specialist. See Section 11 for more
information.
• Do not try and express with vacuum that is
too high and uncomfortable (painful). The
pain, along with potential breast and nipple
trauma may decrease milk output.
• Make sure tubing is not kinked or
pinched while pumping.
• Contact your healthcare professional or
breastfeeding specialist if you can express
only minimal or no milk, or if expression
is painful.
Info
• Research has shown that you will pump
more efficiently – get more milk in less time
– when pumping at Maximum Comfort
Vacuum™ during the Expression Phase.
• You should reassess your Maximum
Comfort Vacuum throughout your pumping
experience, because it can change during
the different stages of lactation, see step 5
in Section 7.
• Do not tilt or overfill containers
when pumping.
28
Device operation
1
Wash your hands before touching
breast pump, kit and breasts
and avoid touching the inside of
containers or lids.
4
After two minutes, the pump
will automatically change to the
Expression Phase.
a. If you let-down (your milk starts to
flow) sooner than 2 minutes, press
the let-down button.
b. If let-down has not happened
during the Stimulation Phase and
the pump has switched to the
Expression Phase, press the letdown button once to return to
the Stimulation Phase.
Page 29
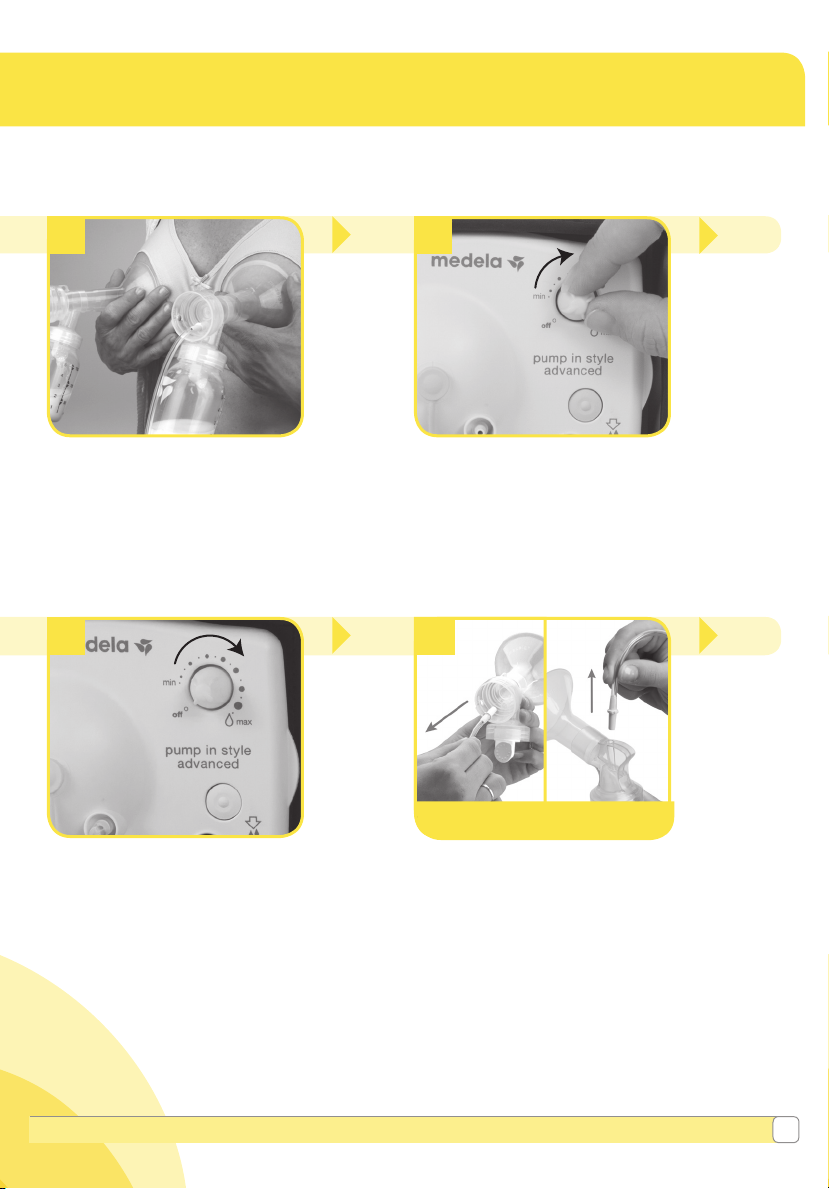
2 3
While sitting in an upright
position, center the assembled
breast shields over your nipples.
5
To find your Maximum Comfort
Vacuum, increase speed/
vacuum until pumping feels
slightly uncomfortable (not
painful), then decrease slightly.
To begin pumping, turn dial clockwise from
the off position. Your pumping session
will start in the Stimulation Phase. While
pumping, adjust the speed/vacuum by
turning the dial to your comfort level.
6
Continued
next page.
810726487071
When your pumping session
is over, unplug tubing from the
back of the breast shield(s)
before setting down the
bottles.
Questions? Visit www.medela.com or call us at 1-800-435-8316.
29
Page 30
7. Pumping (cont.)
Note
• Always disconnect Pump In Style® from
the power source after expression.
• Only fill the bottle to the 150 mL mark.
Info
• How often should you pump? A
breast pump is a replacement for when
you are separated from your baby. It is
important to pump when the baby would
be breastfeeding, which usually means a
working mother pumps 3 times during an
8 hour working day.
• How long should your pumping session
last? Pumping times can vary from
mother to mother sometimes 15 minutes,
sometimes up to 20 minutes.
• How should your breasts feel after
pumping? After pumping, your breasts
should feel soft and there should be no
firm areas. Before pumping, your breasts
will have a firm, heavy feeling. After
pumping make sure your breasts are
not firm or have lumpy areas. This could
indicate that the breast is not draining all
over. See Section11 for more information.
Device operation (cont.)
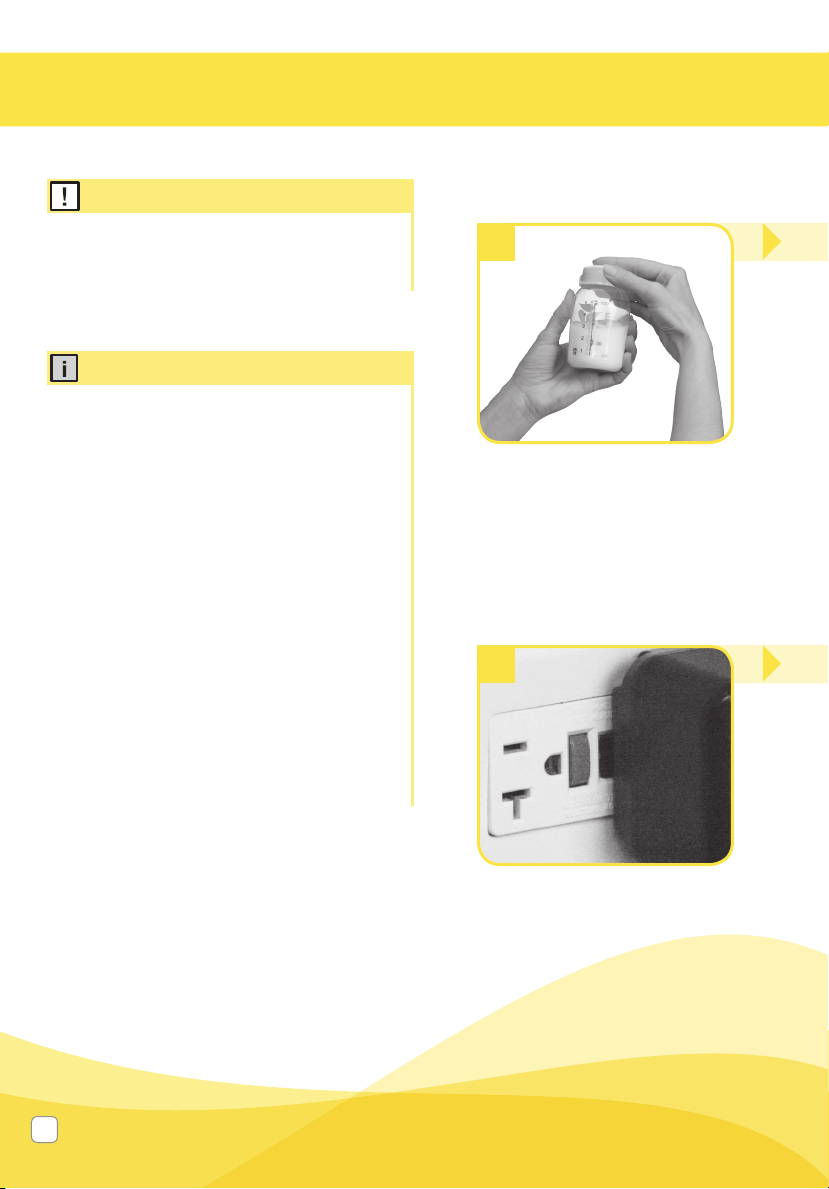
7
Close the bottle with a lid.
• Follow the instructions in
sections 8 and 9.
10
Unplug the breast pump from
the wall outlet (power source)
30
Page 31

8
9
Allow the pump to continue to run
while you store your breast milk.
This will allow any condensation
that has formed from the natural
results of humidity to dry in the
tubing.
11
Prior to storing your pump,
remove tubing by pulling straight
out of tubing ports. Do not wiggle
or pull tubing at an angle.
Turn off the breast pump.
12
Disassemble and clean following
instructions in Section 3.
Questions? Visit www.medela.com or call us at 1-800-435-8316.
31
Page 32

8. Storing Breast Milk
Warning
8.1 Storing breast milk in
your Pump In Style®
• Do not thaw frozen breast milk in a
microwave or in a pan of boiling water.
• Do not microwave breast milk. Microwaving
can cause severe burns to baby’s mouth
from hot spots that develop in the milk
during microwaving. (Microwaving can also
change the composition of breast milk.)
Note
• If the ice pack is frozen solid, it will safely
cool your breast milk for up to 10 hours in
a room temperature environment inside
your pump bag or up to 8 hours in a room
temperature environment, inside the cooler,
stored outside of the pump bag.
Advanced cooler bag
The Pump In Style Advanced cooler
bag requires one contoured ice pack
(#87092, included) for cooling up to
four 5 oz bottles of breast milk.
• As soon as you are finished
pumping, place the breast milk
bottles or breast milk storage bags
in the cooler bag with the ice pack.
• Transfer breast milk bottles or
breast milk storage bags to the
refrigerator or freezer once you are
home.
8.2
Storage Guidelines for Freshly Expressed Breast Milk
(For Healthy Term Babies)
Room
Temperature
60°F to 77°F
(16° C to 25° C)
Up to 4 hours
is best
*Up to 6 hours
for milk
expressed
under very
clean
conditions
References: www.BreastmilkGuidelines.com
32
Refrigerator
39°F (4°C)
or colder
Up to 3 days
is best
*Up to 5 days
for milk
expressed
under very
clean
conditions
Freezer
0°F (-18°C)
or colder
Up to 6 months
is best
*Up to 9 months
for milk
expressed
under very
clean
conditions
Breast Milk
Thawed in the
Refrigerator
At room
temperature:
Up to 2 hours
Refrigerator:
Up to 24 hours
DO NOT
REFREEZE
Page 33

9. Preparing & Feeding Breast Milk
9.1 Preparing breast milk
• Thaw breast milk overnight in the refrigerator. Thawed breast milk is safe in
the refrigerator for 24hours. Do not refreeze thawed breast milk.
• Quickly thaw breast milk by holding the bottle under warm running water.
• Place the sealed bottle in a bowl of warm water for 20minutes to bring it to body
temperature. Make sure water does not come up to the level of the collar of the bottle.
9.2 Feeding breast milk
It is recommended that breastfeeding is well established prior to bottle feeding your baby.
• Always inspect the bottle, nipple and other components immediately before and after
each use. If nipple appears cracked or torn, discontinue use immediately.
• To prevent possible choking hazard, test strength of nipple by pulling on bulb
portion of the nipple.
• Do not attempt to enlarge the nipple hole.
• Infants must not be bottle fed without adult supervision.
• Nipple should not be used as a pacifier.
For additional breast milk collection and storage information, please visit:
www.BreastmilkGuidelines.com
Questions? Visit www.medela.com or call us at 1-800-435-8316.
33
Page 34

10. Troubleshooting
Low or No Suction Valve and Membrane Check
• Remove and separate valve from membrane
• Inspect the valve for chips or cracks. Inspect the membrane for holes or tears. If
flawed or damaged replace valve and/or membrane prior to pumping
• Wash valve and membrane per Cleaning section
• Reassemble. Make sure the membrane lays flat on the valve, and if it does not,
replace the valve and/or membrane prior to pumping
Breast shield and Breast shield Connector Check
• Inspect breast shield and breast shield connector to make sure there are no cracks
and they securely attach to each other
Faceplate Check
• Wash faceplate and backplate per section 5.
• Reassemble faceplate and backplate, and reattach tubing to faceplate port
Connection Point Check
Inspect following connection points to ensure attachment is secure
• Tubing adapter to breast shield connector
• Tubing end to faceplate port
• Faceplate to backplate
• Test vacuum. If suction is not improved, contact Medela Customer Service at
1-800-435-8316.
Audible air coming from
port cap/faceplate
Power source • If pump is not turning on with the power adaptor try the battery pack.
Faceplate port broken/
cracked
Condensation or milk in
tubing
No “let-down” or breast
milk expression
CAUTION: Do not attempt to plug hole in cap or port with additional material.
• There is a built-in air leak for vacuum control, some audible air is normal.
• If the pump is not turning on with the battery pack, be sure the batteries have been
inserted correctly.
• If pump is still not working with the power adaptor or the battery pack, contact
Medela Customer Service at 1-800-435-8316.
CAUTION: If you are feeling a loss of suction with the broken faceplate,
do not use the pump until the new faceplate arrives.
• Contact Medela Customer Service at 1-800-435-8316 or order online at
www.shopmedela.com.
• Refer to "Breast pump & Tubing Care" section 5.
• Ensure your breast pump is assembled correctly and that there is suction.
• Relax and take a 10-15 minute break if let down is not achieved after 2 consecutive
pumping sessions.
• Consult with your healthcare provider or breastfeeding specialist if expression does
not occur.
34
Page 35

11. Supplemental Information
Supplemental Information
Following are some common breastfeeding related conditions. If you experience any of these
symptoms, contact a healthcare professional or breastfeeding specialist.
Symptom Potential Causes
Engorgement Breasts are hard and uncomfortable, possibly
Blocked/Plugged
Ducts
Mastitis It often follows on from engorgement but can
A Healthcare Professional or Breastfeeding Specialist can give you guidance in breastfeeding your baby and
using a breast pump. Their guidance is valuable in terms of the lifetime of health benefits for both you and your
baby. A listing of Lactation Professionals are available at www.medelalocator.com or call
1-800-TELL-YOU (1-800-835-5968).
with reddened areas.
Area of breast will look reddened and may be
tender to touch.
just occur suddenly. The initial symptoms are
similar to flu – fatigue, headache and muscle
aches, fever and localized breast tenderness.
It can be in one or even both breasts and
needs immediate treatment.
If you have not resolved the problem with your breast pump or your have further questions, please
contact Medela Customer Service at 1-800-435-8316 or email customer.service@medela.com.
Milk not draining properly from breast.
Milk can drain back into the tissue
causing areas to swell and become
tender.
Milk not being drained from a specific
duct. The area becomes ‘clogged’ up and
milk is then prevented from flowing.
A bacterial infection in the breast tissue
which is often accompanied by cracked
nipples.
Questions? Visit www.medela.com or call us at 1-800-435-8316.
35
Page 36

12. Disposal
Disposal
The unit is made of various metal and plastics. Before disposal, the device is to be rendered
unusable and it must not be disposed of as unsorted municipal waste in accordance
with local regulations. Use your local return and collection system for waste electrical and
electronic equipment (incl. batteries). Improper disposal may have harmful effects on the
environment and on public health.
Note
This equipment has been tested and found to comply with the limits for a Class B digital
device, pursuant to part 15 of the FCC Rules. These limits are designed to provide
reasonable protection against harmful interference in a residential installation. This
equipment generates, uses and can radiate radio frequency energy and, if not installed
and used in accordance with the instructions, may cause harmful interference to radio
communications. However, there is no guarantee that interference will not occur in a
particular installation. If this equipment does cause harmful interference to radio or
television reception, which can be determined by turning the equipment off and on,
the user is encouraged to try to correct the interference by one or more of the
following measures:
• Reorient or relocate the receiving antenna.
• Increase the separation between the equipment and receiver.
• Connect the equipment into an outlet on a circuit different from that to which the
receiver is connected.
• Consult the dealer or an experienced radio/TV technician for help.
Recycle your breast pump
Through the Medela Recycles program, Medela LLC provides customers the option to
properly recycle their breast pump after they’ve finished their breastfeeding journey. For
information on how to recycle your pump visit www.medelarecycles.com.
This program is currently only available to U.S. residents. We only accept the return of
electric breast pumps. All other breast pump kit components (connectors, breast shields,
tubing, bottles, valves, membranes, and cooling elements) can be disposed of in your
waste management recycling container at your home. Cooler bags and other soft-good
items are not recyclable.
36
Page 37

13. Warranty
Caution
This is a single user product. Use by more than one person may present a health risk
and performance questions and voids the warranty.
This product is warranted by Medela LLC to the original retail purchaser to be free from
defects in material and workmanship for the period of one year for pump mechanism (90
days for parts and accessories) from the date of purchase. Warranty can only be claimed
in the country of purchase. In the event of a defect, Medela will repair or, at Medela’s
option, replace this product, without charge for such replacement, parts or labor.
Purchaser shall bear all expense for returning this product to Medela. This warranty does
not apply to any product used commercially or which has been subjected to misuse,
abuse or alteration.
ANY AND ALL IMPLIED WARRANTIES, INCLUDING THE WARRANTY OF
MERCHANTABILITY, ARE LIMITED TO A DURATION OF 1 YEAR FROM DATE OF
PURCHASE. SOME STATES DO NOT ALLOW LIMITATIONS ON HOW LONG AN IMPLIED
WARRANTY LASTS, SO THE ABOVE LIMITATIONS MAY NOT APPLY TO YOU. THIS
WARRANTY GIVES YOU SPECIFIC LEGAL RIGHTS AND YOU MAY ALSO HAVE OTHER
RIGHTS WHICH VARY FROM STATE TO STATE.
Before you make a claim under this warranty, it may save time and expense to call Medela
Customer Service (toll free) at 1-800-435-8316. You may also call this number for additional
information concerning this warranty. If you wish to make a claim under this warranty,
you must return this product to Medela with a return authorization number received from
Medela Customer Service, prepaid, together with your dated bill of sale or other proof of
purchase and a brief statement of the problem to the following address:
Medela LLC – Returns, Door 4501
1101 Corporate Dr.
McHenry, IL 60050
ATTENTION: RETURNS
Call first for authorization number. Returns not accepted without an authorization number.
Questions? Visit www.medela.com or call us at 1-800-435-8316.
Medela Canada
4160 Sladeview Crescent Unit #8
Mississauga, ON L5L 0A1
ATTENTION: RETURNS
37
Page 38

14. Meaning of Symbols
Glossary of Symbols
Operator's Manual; Operating Instructions - To indicate that the operating
instructions should be considered when operating the device.
This symbol indicates the manufacturer.
This symbol indicates do not dispose the device together with unsorted
municipal waste (in accordance with local regulations).
This symbol indicates compliance with international requirements for
protection from electric shock. (Type BF applied parts.)
IP22
This symbol indicates the protection against entrance of solid foreign objects
and against harmful effects due to the entrance of water.
This symbol indicates the date of manufacture (four digits for the year and two
digits for the month).
This symbol indicates Class II.
This symbol indicates that the power adaptor is for indoor use only.
BREAST PUMP AS TO ELECTRICAL SHOCK, FIRE AND MECHANICAL HAZARDS
ONLY IN ACCORDANCE WITH ANSI/AAMI ES60601-1 (2005) + AMD 1 (2012), CAN/
CSA-C22.2 No. 60601-1 (2014), IEC 60601-1-6 (2010) + AMD 1 (2013), IEC 62366
(2007) + AMD 1 (2014) and IEC 60601-1-11 (2015)
This symbol indicates alternating current.
This symbol indicates direct current.
Caution Sign
UL Listed Part
Ten Pao Trademark
NOM Certified
38
Page 39

15. EMC / Technical Description
The breast pump needs special precautions regarding EMC and needs to be installed
and put into service according to the EMC information provided in the instructions for
use. Portable and mobile RF communications can affect the breast pump.
Note
This equipment has been tested and found to comply with the limits for a Class B digital
device, pursuant to part 15 of the FCC Rules. These limits are designed to provide reasonable
protection against harmful interference in a residential installation. This equipment generates,
uses and can radiate radio frequency energy and, if not installed and used in accordance with
the instructions, may cause harmful interference to radio communications. However, there is no
guarantee that interference will not occur in a particular installation. If this equipment does cause
harmful interference to radio or television reception, which can be determined by turning the
equipment off and on, the user is encouraged to try to correct the interference by one or more
of the following measures:
• Reorient or relocate the receiving antenna.
• Increase the separation between the equipment and receiver.
• Connect the equipment into an outlet on a circuit different from that to which
the receiver is connected.
• Consult the dealer or an experienced radio/TV technician for help.
Questions? Visit www.medela.com or call us at 1-800-435-8316.
39
Page 40

15. EMC / Technical Description (cont.)
Guidance and manufacturer’s declaration – electromagnetic emissions
This breast pump is intended for use in the electromagnetic environment specified below. The
customer or the user of the breast pump should assure that it is used in such an environment.
Emission tests Compliance Electromagnetic environment – guidance
The breast pump uses RF energy only for its internal
RF Emissions
CISPR 11
Group 1
function. Therefore, its RF emissions are very low
and are not likely to cause any interference in nearby
electronic equipment.
RF emissions
CISPR 11
Harmonic emissions
IEC 61000-3-2
Voltage fluctuations /
flicker emissions
Class B
Class A
Pst < 1.0
The breast pump is suitable for use in all
establishments, including domestic establishments
and those directly connected to the public low-voltage
power supply network that supplies buildings used for
domestic purposes.
IEC 61000-3-3
Warning
Warning – This breast pump should not be used adjacent to or stacked with other
equipment. If adjacent or stacked use is necessary, this breast pump should be
observed to verify normal operation in the configuration in which it will be used.
40
Page 41

Immunity test
IEC 60601
test level
Compliance
level
Electromagnetic
environment
– guidance
Electrostatic
discharge ( ESD )
IEC 61000-4-2
Electrical fast
transient/burst
IEC 61000-4-4
Surge
IEC 61000-4-5
Voltage dips, short
interruptions and
voltage variations on
power supply input
lines
IEC 61000-4-11
Power frequency
(50/60 Hz) magnetic
field
IEC 61000-4-8
+/- 2kV, +/- 4kV,
+/- 6 kV, +/- 8kV
contact discharge
+/- 2kV, +/-4kV,
+/- 6 kV, +/8kV,
+/- 15 air discharge
± 2 kV
100 kHz repetition
frequency
± 0,5 kV , ± 1 kV
Line-to-line
0 % UT ; 0,5 cycle
At 0°, 45°, 90°,
135°, 180°, 225°,
270°, and 315°
30 A/m, 50 or 60 Hz 30 A/m, 50/60 Hz
+/- 2kV, +/-4kV,
+/- 6 kV, +/- 8kV
contact discharge
+/- 2kV, +/-4kV,
+/- 6 kV, +/8kV, +/15 air discharge
± 2 kV
100 kHz repetition
frequency
± 0,5 kV , ± 1 kV
Line-to-line
0 % UT ; 0,5 cycle
At 0°, 45°, 90°,
135°, 180°, 225°,
270°, and 315°
Floors should be wood,
concrete or ceramic tile. If floors
are covered with synthetic
material, the relative humidity
should be at least 30%.
Mains power quality should be
that of a typical commercial or
hospital environment.
Mains power quality should be
that of a typical commercial or
hospital environment.
Mains power quality should be
that of a typical commercial or
hospital environment. If the user
of the breast pump requires
continued operation during
power mains interruptions, it is
recommended that the breast
pump be powered from an
uninterruptible power supply or
a battery.
It may be necessary to position
the breast pump further from
sources of power frequency
magnetic fields or to install
magnetic shielding. The power
frequency magnetic field should
be measured in the intended
installation location to assure
that it is sufficiently low.
NOTE UT is the a.c. mains voltage prior to application of the test level.
Questions? Visit www.medela.com or call us at 1-800-435-8316.
41
Page 42

15. EMC / Technical Description (cont.)
Guidance and manufacturer’s declaration – electromagnetic immunity
This breast pump is intended for use in the electromagnetic environment specified below. The
customer or the user of the breast pump should assure that it is used in such an environment.
Immunity
test
Conducted RF
IEC 61000-4-6
Radiated RF
IEC 61000-4-3
IEC 60601
test level
3 V
0,15 MHz – 80 MHz
6 V in ISM and
amateur radio
bands between 0,15
MHz and 80 MHz
80% AM at 1 kHz
10 V/m (minimum)
80 MHz – 2,7 GHz
80 % AM at 1 kHz
Compliance
level
6V
10 V/m
(minimum)
Electromagnetic
environment – guidance
Portable and mobile RF communications
equipment should be used no closer to
any part of the breast pump, including
cables, than the recommended
separation distance calculated from the
equation applicable to the frequency of
the transmitter.
Recommend separation distance
d = 1, 2√P
d = 1,2√P 80 MHz - 800 MHz
d = 2,3√P 800 MHz - 2.7 GHz
Where P is the maximum output power
rating of the transmitter in watts (W)
according to the transmitter manufacturer
and d is the recommended separation
distance in metres (m).
Field strengths from fixed RF transmitters,
as determined by an electromagnetic
site survey, a should be less than the
compliance level in each frequency range.
b
Interference may occur in the vicinity of
equipment marked with the following
symbol.
Note 1 At 80 MHz and 800 MHz, the higher frequency range applies.
Note 2 These guidelines may not apply in all situations. Electromagnetic propagation
is affected by absorption and reflection from structures, objects and people.
a
Field strengths from fixed transmitters, such as base stations for radio (cellular/cordless) telephones and land mobile
radios, amateur radio, AM and FM radio broadcast and TV broadcast cannot be predicted theoretically with accuracy.
To assess the electromagnetic environment due to fixed RF transmitters, an electromagnetic site survey should be
considered. If the measured field strength in the location in which the breast pump is used exceeds the applicable RF
compliance level above, the breast pump should be observed to verify normal operation. If abnormal performance is
observed, additional measures may be necessary, such as re-orienting or relocating the breast pump.
b
Over the frequency range 150 kHz to 80 MHz, field strengths should be less than 10 V/m.
42
Page 43

Recommended separation distances between portable and
mobile RF communications equipment and the breast pump
This electric breast pump is intended for use in an electromagnetic environment in which radiated
RF disturbances are controlled. The customer or the user of the electric breast pump can help
prevent electromagnetic interference by maintaining a minimum distance between portable and
mobile RF communications equipment (transmitters) and the electric breast pump as recommended
below, according to the maximum output power of the communications equipment.
Rated maximum
output power of
transmitter
W
0,01 0,06 0,04 0,07
0,1 0,18 0,11 0,22
1 0,58 0,35 0,22
10 1,8 4 1,11 2,21
100 5,83 3,50 7,0 0
Separation distance according to frequency of transmitter m
150 kHz to 80 MHz
d = 1.2√P
80 MHz to 800
MHz
d = 1.2√P
800 MHz to 2,7 GHz
d = 2.3√P
For transmitters rated at a maximum output power not listed above, the recommended
separation distance d in metres (m) can be estimated using the equation applicable to
the frequency of the transmitter, where P is the maximum output power rating of the
transmitter in watts (W) according to the transmitter manufacturer.
Note 1 At 80 MHz and 800 MHz, the separation distance for the higher frequency
range applies.
Note 2 These guidelines may not apply in all situations. Electromagnetic propagation is
affected by absorption and reflection from structures, objects, and people.
WARNING: Portable RF communications equipment (including peripherals such as
antenna cables and external antennas) should be used no closer than 30 cm (12 inches)
to any part of the breast pump including cables specified by the manufacturer. Otherwise,
degradation of the performance of this equipment could result.
Questions? Visit www.medela.com or call us at 1-800-435-8316.
43
Page 44

°C
°C
16. Technical Specifications
Technical Specifications
Vacuum Range
-50....-240 mmHg
54 … 120 cpm
Mode of operation: Continuous
Size
165 x 165 x 135 mm
Weight
1.0 kg
Power adapter P/N - 101036149
Power In Power Out
100-240V~ 50/60 Hz 0.7A max
Batter y Pack P/N - 9017002
9.6 - 12 VDC 2A
Portable vehicle adaptor P/N - 9287011
Power In Power Out
12 -24 VDC 1.25A 9.0 VDC 1A
Direct current = "dc"
9.0 VDC 2A
Power Out
+40
+5
-25
15
15
Operation
Temperature
+70
Transport / Storage
Temperature
93
Operation
Humidity
93
Tra nspo r t /
Storage Humidity
106
This symbol indicates
compliance with international
requirements for protection
70
Ambient Pressure
kPa
from electric shock. (Type BF
applied parts.)
This symbol indicates Class II.
44
Page 45

Questions? Visit www.medela.com or call us at 1-800-435-8316.
45
Page 46

Medidas de seguridad importantes
Al utilizar productos eléctricos, especialmente en presencia de niños, se deben seguir siempre las
precauciones de seguridad.
LEA TODAS LAS INSTRUCCIONES ANTES DE USAR ESTE PRODUCTO.
PELIGRO: para reducir el riesgo de electrocución:
• Siempre desenchufe los productos eléctricos inmediatamente después de usarlos.
• No coloque o almacene el producto donde se pueda caer o donde pueda ser empujado hacia
una tina de baño o fregadero.
• No lo coloque ni lo arroje al agua ni a otro líquido.
ADVERTENCIA: para evitar incendio, electrocución o quemaduras graves:
• No deje el producto desatendido cuando esté enchufado en un tomacorriente.
• Siempre desenchufe los productos eléctricos inmediatamente después de usarlos.
• Es necesaria una atenta supervisión cuando se usa este producto cerca de niños o personas con
discapacidades, a fin de evitar estrangulamiento con el tubo o con el cable del adaptador.
• Es necesaria una atenta supervisión cuando se usa este producto cerca de niños o personas con
discapacidades, a fin de evitar ahogamiento con piezas pequeñas.
• Nunca opere este producto si el enchufe o el cable están dañados, si no funciona adecuadamente,
si se ha caído o dañado, o si ha caído al agua.
• Mantenga el cable alejado de superficies calientes.
• Nunca deje caer esta unidad ni introduzca objetos en las aberturas o los tubos.
• No utilice esta unidad en exteriores o donde se estén usando productos en aerosol (rociadores)
o se esté suministrando oxígeno.
• Verifique siempre el adaptador de corriente y la caja de baterías antes de usarlos en busca de
daños o cables expuestos. Si encuentra daños, interrumpa de inmediato el uso del adaptador de
corriente o la caja de baterías y llame al Servicio al cliente de Medela al+1-800-435-8316.
• No coloque o almacene el producto donde se pueda caer o donde pueda ser empujado hacia una
tina de baño o fregadero.
• El extractor de leche y los accesorios no son resistentes al calor: manténgalos alejados de las
superficies calientes o las llamas abiertas
• No los utilice cerca de materiales inflamables.
• No utilice un tomacorriente eléctrico que haya estado expuesto al agua o a otros líquidos, incluido:
- No los utilice mientras toma un baño o una ducha.
- Nunca lo coloque ni lo arroje al agua ni a otros líquidos.
- No haga correr agua por el extractor de leche.
- Si un dispositivo se ha expuesto a agua o a otros líquidos, no toque el dispositivo
y desenchúfelo del tomacorriente, apáguelo y comuníquese con el fabricante.
46
Page 47

Las palabras de advertencia definidas identifican todas las instrucciones que son importantes desde el punto
de vista de la seguridad. No seguir estas instrucciones puede provocar lesiones o daños en el extractor de
leche o en usted. Cuando las palabras de advertencia definidas se utilizan junto con las siguientes palabras,
tienen el significado descrito a continuación:
ADVERTENCIA Puede causar lesiones graves o fatales.
PRECAUCIÓN Puede causar lesiones menores.
NOTA Puede causar daños materiales.
INFORMACIÓN Información útil o importante que no se relaciona con la seguridad.
ADVERTENCIA: para evitar riesgos a la salud y reducir el riesgo de sufrir lesiones:
• Este producto está diseñado para ser utilizado únicamente por una sola persona y no debe
compartirse con otros.
• No maneje vehículos mientras realiza la extracción.
• Examine todos los componentes del extractor que vaya a utilizar antes de cada uso.
• Si no logra los resultados deseados, NO continúe la extracción durante más de 2 sesiones consecutivas.
• Si aparecen hongos en el tubo, interrumpa su uso y reemplácelo.
• Si la leche materna se atasca, debe limpiar el tubo, la tapa frontal y el diafragma antes de su
siguiente sesión de extracción.
• Use el producto solo para su uso previsto según lo descrito en este manual. No utilice accesorios
no recomendados por el fabricante.
• Nunca lo utilice mientras duerme o cuando tiene sueño.
• Este dispositivo no se puede arreglar o reparar. No intente repararlo por su cuenta. No modifique el
dispositivo.
• Nunca utilice un dispositivo dañado. Reemplace las piezas dañadas o gastadas.
• Antes de cada uso, revise los componentes por separado en busca de grietas, astillas, desgarros,
cambios de color o deterioro. En caso de descubrir un daño en el aparato, interrumpa su uso hasta
que se hayan reemplazado las partes dañadas.
• Use solo el adaptador de corriente provisto con el extractor de leche.
• La extracción puede inducir el parto. No realice la extracción hasta después de haber dado a luz.
Si queda embarazada durante su lactancia o durante el tiempo que utiliza su extractor de leche,
consulte con un profesional de atención médica autorizado antes de continuar.
• Si ocurre irritación o incomodidad, interrumpa el uso y consulte a su médico.
• Si está infectada con hepatitis B, hepatitis C o el virus de inmunodeficiencia humana (VIH), la
extracción de leche materna no reducirá ni eliminará el riesgo de transmitir el virus a su bebé a
través de su leche materna.
• No caliente la leche materna en un horno de microondas ni la hierva. Calentar la leche materna en
un horno de microondas hace que algunas partes se calienten más que otras y esto puede causar
quemaduras graves en la boca del bebé. (El calentamiento en un horno de microondas también
puede modificar la composición de la leche materna).
• Limpie y desinfecte todas las piezas que estarán en contacto con el pecho y la leche materna antes
de utilizarlas por primera vez.
• Lave todas las piezas que estuvieron en contacto con el pecho y la leche materna después de cada uso.
• Solo utilice piezas recomendadas por Medela con su extractor de leche.
• Cuando se utiliza el extractor de leche o los accesorios cerca de niños, debe hacerlo bajo estricta
supervisión.
¿Alguna duda? Visite www.medela.com o llámenos al +1-800-435-8316.
47
Page 48

PRECAUCIÓN: puede causar lesiones menores:
• NO enrolle el cable alrededor del cuerpo del adaptador.
• Utilice únicamente el adaptador de corriente que recibió con el extractor de leche Pump in Style® Advanced.
• Utilice únicamente la caja de baterías que recibió con el extractor de leche Pump in Style® Advanced.
• Extraiga únicamente con el extractor de leche en
posición vertical.
• NO acorte el tubo.
• Asegúrese de que el voltaje del adaptador de corriente sea compatible con la fuente de alimentación.
• Primero enchufe el adaptador de corriente en el extractor de leche y luego, en el tomacorriente.
• NO utilice limpiadores o detergentes antibacterianos o abrasivos al limpiar el extractor de leche
o sus piezas.
• Nunca coloque el motor del extractor de leche en agua o en un esterilizador, ya que puede dañarlo
en forma permanente.
• No intente retirar el embudo del pecho mientras está extrayendo leche. Apague el extractor de
leche, use el dedo para romper el sello formado entre el pecho y el embudo, y luego separe el
embudo del pecho.
• Si la extracción es molesta o provoca dolor, apague la unidad, use el dedo para romper el sello
formado entre el pecho y el embudo, y separe el embudo del pecho.
• Comuníquese con su profesional de la salud o especialista en lactancia si solo puede extraer una
cantidad mínima o nada de leche, o si la extracción es dolorosa. Consulte las Secciones 10 y 11 para
obtener más información.
• Aunque se puede sentir un poco de molestia al utilizarlo por primera vez, el uso del extractor de
leche no debe causar dolor. Para obtener ayuda sobre el tamaño correcto del embudo y cómo
lograr la mayor comodidad, visite www.MedelaBreastshields.com o acuda a un consultor de
lactancia o especialista en amamantamiento.
• No intente extraer con vacío demasiado intenso y molesto (doloroso). El dolor, junto con los
posibles traumatismos del pecho y el pezón, pueden disminuir el volumen extraído de leche.
• Asegúrese de que el tubo no esté doblado o pellizcado mientras está realizando la extracción.
• No sostenga el kit del extractor por la botella. Podría obstruir los conductos lácteos y producir
congestión mamaria.
• No se recomienda usar un extractor de leche en un avión. La presión de la cabina puede afectar el
desempeño de los extractores de leche.
• Lávese bien las manos con agua y jabón antes de tocar el extractor de leche, el kit y sus pechos;
también evite tocar el interior de las botellas o las tapas.
• Separe y lave todas las piezas que estén expuestas al contacto con la leche materna inmediatamente
después de su uso. Esto ayudará a eliminar los restos de leche materna y a prevenir la reproducción de
bacterias.
48
Page 49

PRECAUCIÓN: puede causar lesiones menores: (cont.)
• Siempre inspeccione la limpieza de los embudos, los conectores, las válvulas, las membranas, las
botellas, las tapas y el tubo antes de usarlos. Comuníquese con Servicio al cliente de Medela si la
limpieza no resuelve el problema.
• Utilice únicamente agua corriente potable o envasada para limpiar el extractor de leche y sus piezas.
• No almacene las piezas mojadas o húmedas ya que se pueden producir hongos.
• No ponga el extractor en funcionamiento si el tubo tiene agua. Hacerlo podría dañar el extractor de leche.
• Si siente molestias en la base del pezón por la fricción del tejido del pecho contra el conducto del
embudo, el uso de un lubricante, como lanolina Tender Care™ podría ayudarle. Para obtener ayuda
sobre el tamaño correcto del embudo y cómo lograr la mayor comodidad, visite
www.MedelaBreastshields.com o acuda a un consultor de lactancia o especialista en amamantamiento.
GUARDE ESTAS INSTRUCCIONES
Nota
• Las botellas y componentes de plástico se vuelven quebradizos cuando se congelan y pueden
romperse si se caen.
• Las botellas y los componentes pueden dañarse si se manipulan incorrectamente; por ejemplo,
si se caen, se enroscan demasiado fuerte o se vuelcan.
• Tenga cuidado al manipular las botellas y los componentes.
• No utilice la leche materna si las botellas o los componentes se dañan.
• No utilice baterías de litio en la caja de baterías del extractor de leche Pump in Style Advanced.
• No retire el extractor de leche de su estuche blando o bolsa de transporte.
¿Alguna duda? Visite www.medela.com o llámenos al +1-800-435-8316.
49
Page 50

Índice
Medidas de seguridad importantes ............................................................................. 46-49
Descripción del producto y las piezas ........................................................................52-53
1. Inicio ............................................................................................................................... 54
2. Descripción general de la limpieza .............................................................................. 55
3. Lavado: antes del primer uso y después de cada uso sucesivo .........................56-57
3.1 Antes de utilizar el producto por primera vez ............................................................. 56
3.2 Después de cada uso ............................................................................................... 56
4. Desinfección: antes del primer uso y una vez por día .......................................... 58-59
5. Cuidado del extractor de leche y del tubo ............................................................. 60-63
5.1 Cuidado del tubo y de la placa frontal .................................................................. 60-63
5.2 Limpieza de la unidad del motor ............................................................................... 63
6. Armado ...................................................................................................................... 64-71
6.1 Armado del kit del extractor ................................................................................. 64-67
6.2 Selección del tamaño de los embudos PersonalFit™ ................................................ 68
6.3 Alimentación eléctrica del extractor ...................................................................... 69-71
6.3.1 Cuidado del adaptador de corriente ................................................................. 69
6.3.2 Caja de baterías ............................................................................................... 70
6.3.3 Viajes fuera de su país ................................................................................ 70-71
7. Extracción .................................................................................................................. 72-75
8. Almacenamiento de la leche materna .......................................................................... 76
8.1 Conservación de leche materna en la bolsa enfriadora de su extractor
Pump in Style® Advanced ......................................................................................... 76
8.2 Guía de conservación de leche materna recién extraída ............................................ 76
9. Preparación y alimentación con leche materna ......................................................... 77
9.1 Preparación de la leche materna ............................................................................... 77
9.2 Alimentación con leche materna ............................................................................... 77
10. Solución de problemas ................................................................................................ 78
11. Información complementaria ...................................................................................... 79
12. Desecho ........................................................................................................................ 80
13. Garantía ......................................................................................................................... 81
14. Significado de los símbolos ........................................................................................ 82
15. CEM y descripción técnica ..................................................................................... 83-87
16. Especificaciones técnicas ........................................................................................... 88
50
Page 51

Tómese un momento y lea íntegramente este manual de instrucciones antes de utilizar el
producto por primera vez.
CONSERVE ESTAS INSTRUCCIONES.
Conviene esperar hasta que la rutina de lactancia esté establecida (aproximadamente 4semanas)
antes de extraer leche materna, salvo que el profesional de la salud le indique de otro modo.
Glosario de términos
Tecnología 2-Phase Expression®: tecnología basada en investigación que imita el ritmo natural
de succión de los bebés.
Fase de extracción: ritmo de succión/extracción más lento para extraer la leche de manera
suave y eficiente en el menor tiempo posible.
Maximum Comfort Vacuum™: el ajuste de vacío más alto en el que la madre se siente cómoda
durante la extracción. Es diferente para cada madre.
Fase de estimulación: ritmo rápido de succión/extracción a fin de estimular el reflejo de eyección
deleche y su salida.
Instrucciones de uso:
El extractor de leche Pump In Style Advanced es un extractor eléctrico diseñado para que
lasmujeres lactantes extraigan y recolecten leche de sus pechos. El extractor de leche
Pump In Style Advanced es un aparato para uso personal.
Contraindicaciones de uso:
No se conocen contraindicaciones sobre el uso de este producto.
Consejo
Conviene esperar hasta que la rutina de lactancia esté establecida (aproximadamente 4semanas)
antes de extraer leche materna, salvo que el profesional de la salud le indique de otro modo.
Si existen razones de salud o tiene alguna otra necesidad para utilizar exclusivamente un
extractor de leche, recomendamos que emplee un extractor de leche de uso hospitalario
(para múltiples usuarias), por ejemplo, nuestro extractor de leche Medela Symphony®. Para
obtener más información, visite nuestra página en www.medelabreastfeedingus.com.
Descripción del producto
Este extractor de leche es un extractor de leche eléctrico para uso personal con tecnología
2-Phase Expression® y capacidad de extracción simple y doble.
La vida útil de este extractor de leche es de aproximadamente tres sesiones de 15 minutos
de duración por día, por un año. La vida útil del kit del extractor de leche es de 6 meses.
¿Alguna duda? Visite www.medela.com o llámenos al +1-800-435-8316.
51
Page 52

Descripción del producto y las piezas
Medela se reserva el derecho de sustituir cualquier componente o accesorio con un
reemplazo de desempeño equivalente.
2 embudos PersonalFit™ de 24 mm
Componente aplicado (para otros tamaños
de embudo, vea la Sección6.2)
Reemplazo 87073
2 conectores
Artículo 87071 o 8107264
2 válvulas
Artículo 87089
2 membranas
Artículo 87088
4 botellas
Artículo 6100050
Reemplazo 87130
4 tapas
Artículo 8107183
Reemplazo 87165
2 tubos
Artículo 87212
1 bolso térmico
Reemplazo 67068
(incluye un elemento
refrigerante y 4 botellas
con tapas)
87071
8107264
1 caja de baterías
Artículo 9017002
Reemplazo 67553
1 adaptador de corriente
Artículo 101036149
Reemplazo 101038300
o 68030
1 elemento refrigerante
Artículo8117010
Reemplazo 87092
52
Para encontrar piezas de reemplazo, visite www.shopmedela.com
Page 53

1 placa frontal
Artículo 6007132
Bolso de transpor te
Mochila
Perilla de apagado/
encendido
Aumentar/reducir
el vacío
Botón de
bajada de leche
Puerto para el
adaptador de
corriente
Puerto del tubo Puerto del tuboTap ón d el
Otras piezas incluidas con la bolsa The Metro Bag
puerto
™
Embudos PersonalFit™ de 27 mm ................... 87274
Bolsa Metro Bag, que incluye:
Espacio de trabajo flexible de plástico ........ 3007299
2 bolsas de red para almacenamiento
Pump In Style® Advanced
Bolsa The Metro Bag
™
¿Alguna duda? Visite www.medela.com o llámenos al +1-800-435-8316.
53
Page 54

1. Inicio
Las unidades de embudo se entregan armadas.
Separe todas las piezas que tendrán contacto con
el pecho y la leche materna antes de limpiarlas.
Piezas que se deben limpiar:
• Embudos
• Botellas para leche materna
• Tapas
• Conectores
• Membranas
• Tapas posteriores
Nota
Es importante que haga lo siguiente antes de
utilizar por primera vez su extractor de leche
Pump in Style Advanced:
• Separe todas las piezas
• Limpieza; vea las instrucciones:
• Lavado – Sección3
• Desinfección – Sección4
54
Page 55

2. Descripción general de la limpieza
Cuándo lavar
Antes del primer
uso
Después de cada
uso
Una vez al día
Cuándo lavar Tubo Unidad del motor
Según sea
necesario
Kit del extractor
de leche
3 lavar
3 desinfectar
3 lavar 3 lavar
3 desinfectar 3 desinfectar
3 lavar solo si el tubo está
sucio o tiene leche
Botellas del extractor
de leche
3 desinfectar
3 limpiar con un paño húmedo limpio
Instrucciones de limpieza detalladas:
• Lavado – Sección 3
• Esterilización – Sección 4
• Cuidado del extractor de leche y del tubo – Sección5
3 lavar
El lavado y la desinfección son dos actividades diferentes, que deben realizarse en
forma separada para su protección y el correcto desempeño de su extractor de leche.
¿Alguna duda? Visite www.medela.com o llámenos al +1-800-435-8316.
55
Page 56

3. Lavado: antes del primer uso y después de cada uso sucesivo
3.1 Antes de utilizar el producto por
primera vez
Limpie y desinfecte las piezas que se muestran a
continuación antes de utilizar el extractor de leche
por primera vez. Siga las instrucciones de limpieza
y desinfección indicadas en las Secciones 3.2 y 4
a continuación.
Suministros necesarios:
• Detergente suave para platos
• Paño para platos limpio o cepillo suave
• Lavabo limpio
• Agua potable
Piezas que deben lavarse:
• Embudos
• Conectores de embudos
• Membranas
• Válvulas
• Botellas para leche materna y tapas
3.2 Después de cada uso
Limpie todas las piezas que tengan
contacto con el pecho y la leche materna.
Consulte la imagen de la Sección1.
1
Separe los embudos de los
conectores de embudos.
4
Precaución
• Utilice únicamente agua potable
o envasada para limpiar el producto.
• Separe y lave todas las piezas que tienen
contacto con el pecho y la leche materna
inmediatamente después de cada uso
para evitar que los restos de leche se
sequen y se desarrollen bacterias.
56
• Enjuague en agua fría todas las
piezas separadas que tienen
contacto con el pecho y la leche
materna para eliminar los residuos
de leche materna.
• Después de enjuagarlas, las piezas
que han estado en contacto con
el pecho o la leche materna deben
colocarse en un lavabo limpio,
designado exclusivamente para
limpiar estos artículos. No coloque
las piezas directamente en el lavabo.
Page 57

2
3
Gire y tire de las válvulas amarillas
para separarlas de los conectores
de embudos.
Opciones de lavado:
Lavado en fregadero con lavabo exclusivo
5
• Déjelas remojar en agua
jabonosa tibia durante 5minutos
y después, lávelas con un paño
limpio nuevo y enjuáguelas con
agua limpia.
• Coloque las piezas sobre una
superficie o toalla limpia. Déjelas
secar al aire. Guarde las piezas
secas en un lugar fresco cuando
no las use. No guarde las piezas
mojadas o húmedas.
• También puede
Quite las membranas blancas
de las válvulas amarillas.
o
• Lave todas las piezas
lavar las piezas
del kit siguiendo
las instrucciones
incluidas en el envase
del jabón removedor
de leche materna
Quick Clean™. (Se
vende por separado.)
• Deje secar todas las piezas
• Guarde las piezas secas
Lavado en lavaplatos:
separadas en el estante
superior del lavaplatos.
del extractor de leche al aire
en un lugar limpio.
cuando no las utilice.
¿Alguna duda? Visite www.medela.com o llámenos al +1-800-435-8316.
57
Page 58

4. Desinfección: antes del primer uso y una vez por día
Nota
• Lave las piezas del kit del extractor de leche
después de cada uso.
• Desinfecte las piezas del kit del extractor
de leche una vez al día.
• Tenga cuidado de no dañar las piezas del
kit del extractor cuando las limpia.
• Si se lavan en lavaplatos, las piezas del
kit del extractor podrían cambiar de color
debido a los pigmentos de los alimentos.
Esto no influye en la función del producto.
• Guarde el kit del extractor en una bolsa
o recipiente limpio hasta el siguiente uso.
Suministros necesarios:
• Olla limpia para hervir agua
• Paño limpio
• Pinza
• Agua potable
Desinfección diaria
1
Consulte la imagen de la Sección1
Separe todas las piezas limpias
que tienen contacto con el
pecho y la leche materna.
4
Piezas que deben desinfectarse:
• Embudos
• Conectores de embudos
• Membranas
• Válvulas
• Botellas para leche materna
y tapas
58
Deje enfriar el agua y saque de
ella las piezas cuidadosamente
con la pinza.
Page 59

2
Lávese bien las manos. • Deje hervir las piezas en agua por
3
10minutos.
5
• Coloque las piezas sobre una
superficie o toalla limpia.
• Deje secar todas las piezas al aire.
• Guarde las piezas secas cuando
no las utilice. No guarde las piezas
mojadas o húmedas.
¿Alguna duda? Visite www.medela.com o llámenos al +1-800-435-8316.
o
Puede desinfectar las piezas siguiendo
las instrucciones incluidas en la bolsa
Quick Clean™ Micro-Steam™ de Medela.
(Se vende por separado.)
(No limpie el tubo en una bolsa
Micro-Steam.)
59
Page 60

5. Cuidado del extractor de leche y del tubo
Precaución
• No almacene las piezas mojadas o húmedas
ya que se pueden producir hongos.
• Si aparecen hongos en el tubo,
interrumpa su uso y reemplácelo. Para
encontrar piezas de reemplazo, visite
www.ShopMedela.com.
Nota
• El tubo debe lavarse si tiene suciedad o leche.
Siga las instrucciones en la Sección5.1.
• No es necesario limpiar el tubo si la
condensación presente en su interior
es resultado de lavados anteriores o de
las condiciones atmosféricas. Siga las
instrucciones de secado en la Sección5.1.
Suministros necesarios:
• Detergente suave para
platos
• Paño limpio
• Lavabo limpio
• Agua potable
Piezas que necesita:
• Tubo
• Placa frontal
• Diafragma
• Bolsa del extractor de
leche
Puede lavar el
tubo siguiendo las
instrucciones incluidas
en el envase del jabón
removedor de leche
materna Quick Clean™.
(Se vende por separado.)
5.1 Cuidado del tubo y de la
placa frontal
1
Apague el extractor de leche.
4
Separe el tubo del embudo.
Información
Las causas habituales de desbordamiento de
leche en el tubo son las siguientes:
• Bajada intensa de leche
• Se inclinó hacia adelante o se recostó durante la
extracción
• Limpieza incorrecta de válvulas y membranas
• Membranas dañadas
• Llenado excesivo de las botellas durante la extracción
60
Page 61

2
3
Desconecte el extractor de leche
de la fuente de alimentación.
5
Enjuague el tubo con agua fría
para eliminar la leche materna.
Quite el tubo tirando de él hacia afuera
en línea recta de los puertos del tubo.
No sacuda o tire del tubo en ángulo.
6
Continúa en la
página siguiente.
• Lave el tubo con agua jabonosa tibia.
• Enjuague el tubo con agua limpia.
• Cuelgue para secar al aire o conecte
los tubos al extractor de leche en
funcionamiento y deje que se seque toda
la humedad que se haya formado.
NOTA:
Limpie la placa frontal una vez al mes. Además, inspeccione el tubo después de cada sesión
de extracción.
Limpie el tubo, la placa frontal y el diafragma si tienen cualquier rastro de leche materna.
¿Alguna duda? Visite www.medela.com o llámenos al +1-800-435-8316.
61
Page 62

5. Cuidado del extractor de leche y del tubo (cont.)
Nota
• Asegúrese de que la placa frontal y el
diafragma estén completamente secos antes
de volver a colocarlos.
• La placa frontal debe estar correctamente
colocada y enganchada en todos los puntos
de conexión. Esto garantiza que el extractor
tendrá un nivel de vacío adecuado y un
desempeño óptimo.
7
Quite la placa frontal usando
la lengüeta.
10
Busque los 3 puntos de conexión
en el lado posterior de la placa
frontal y en el extractor de leche.
62
Page 63

8
9
• Sumérjala en agua jabonosa tibia
durante 5minutos.
• Límpiela con un paño limpio o un
cepillo suave.
• Enjuague las piezas con agua limpia.
• Déjelas secar al aire sobre una
superficie limpia.
11
Alinee los puntos de conexión
y sostenga la parte posterior del
extractor con una mano mientras
presiona la placa frontal hasta
que encaje en su lugar.
• Algunos modelos de extractores de leche
pueden tener un diafragma con aspecto
distinto al que se ilustra arriba.
• Limpie con cuidado toda la superficie
del diafragma donde puedan haberse
acumulado partículas o líquido utilizando
un paño húmedo y limpio (sin jabón).
• Permita que todas las piezas, incluidos los
bordes, se sequen al aire, completamente,
en un lugar limpio antes de volver a colocar
la placa frontal.
5.2 Limpieza de la unidad del motor
Utilice un paño húmedo (no mojado)
para limpiar la bolsa del extractor de
leche después de cada uso.
¿Alguna duda? Visite www.medela.com o llámenos al +1-800-435-8316.
63
Page 64

6. Armado
Piezas que necesita:
• Embudos
• Conectores de embudos
• Membranas
• Válvulas
• Botellas para leche materna y tapas
• Tubo
• Extractor de leche
• Adaptador de corriente de 9voltios
Nota
• Inspeccione las válvulas para detectar
rajaduras o astillas y revise las membranas
para detectar la presencia de orificios, roturas o
deformaciones. Si observa algún tipo de daño
en estas piezas, reemplácelas de inmediato.
Precaución
6.1 Armado del kit del extractor
1
Lávese las manos antes de tocar el
extractor de leche, el kit y el pecho;
también evite tocar el interior de los
recipientes o las tapas.
4
• Lávese bien las manos con agua y jabón
antes de tocarse el pecho y las piezas del
extractor.
Información
• Siga todos los pasos con cuidado y arme
el kit del extractor de manera correcta
para lograr un desempeño óptimo.
64
64
Calce las membranas en las válvulas
hasta que las membranas queden
completamente planas sobre la
válvula.
Page 65

2
3
Coloque el extractor de leche
sobre una superficie limpia y seca.
Asegúrese de que la superficie sea
firme y segura para que el extractor
de leche no se pueda volcar o caer.
5
Empuje las válvulas amarillas y las
membranas blancas armadas hacia
la parte inferior de los conectores
de los embudos.
Sujete el embudo firmemente
al conector.
6
Continúa en
la página
siguiente.
Enrosque las botellas en los
conectores de los embudos.
¿Alguna duda? Visite www.medela.com o llámenos al +1-800-435-8316.
65
Page 66

6. Armado (continuación)
Advertencia
• Utilice únicamente el adaptador de
corriente que recibió con el extractor de
leche Pump In Style® Advanced.
• Antes del uso, examine siempre el adaptador
de corriente de 9voltios y la caja de baterías
en busca de cables dañados, doblados,
retorcidos, deshilachados o expuestos.
En caso de daños, suspenda el uso de
inmediato. Para obtener piezas de reemplazo,
visite www.shopmedela.com.
Torceduras, dobleces o codos
6.1 Armado del kit del
extractor (continuación)
7
810726487071
Introduzca los extremos de los
adaptadores amarillos duros del tubo
en el orificio en la parte posterior de
los conectores de los embudos.
10
Tiene protuberancias
Cables expuestos
Nota
• En la Sección 6.3.2 Montaje de la caja de
baterías encontrará las instrucciones sobre
el uso de la caja de baterías.
• Consulte la Sección6.3.3 Viajes fuera
de los Estados Unidos para obtener
información sobre cómo utilizar su
dispositivo fuera del país.
66
Enchufe el conector metálico del
extremo del adaptador de corriente
de 9voltios o del cable de la caja de
baterías en el puerto de alimentación
que se encuentra en el frente de la
placa frontal del extractor de leche.
Page 67

8 9
Extracción doble: introduzca los
extremos libres del tubo en ambos
puertos en el frente de la placa
frontal del extractor de leche.
11
Consulte Cuidado del adaptador
de corriente en la Sección6.3.1
Enchufe el adaptador de corriente de
9voltios en un tomacorriente estándar.
Extracción simple: introduzca el
extremo libre del tubo en un puerto
del frente de la placa frontal del
extractor de leche. Coloque la tapa
del puerto sobre el puerto no usado.
¿Alguna duda? Visite www.medela.com o llámenos al +1-800-435-8316.
67
Page 68

6. Armado (continuación)
Pezón
Areola
Pezón
Areola
Pezón
Areola
6.2 Selección del tamaño de los embudos PersonalFit
™
1. Selección del tamaño de los embudos PersonalFit de Medela
La extracción de leche no debe doler. Para mayor comodidad y eficiencia de la extracción,
Medela ofrece embudos de cinco tamaños.
21
mm
24
mm
27
mm
30
mm
36
mm
Visite MedelaBreastshields.com para ver la guía completa que le ayudará a determinar cuál es el
tamaño óptimo para usted según el diámetro de su pezón.
2. Pruebe el tamaño de su embudo
1. Comience con el de 24mm que recibió con su extractor, o con el tamaño determinado al medirse.
2. Centre el pezón y sostenga suavemente el embudo contra su pecho.
3. Ajuste el Maximum Comfort Vacuum™, para lograr el nivel de succión óptimo.
4. Consulte las imágenes mientras se extrae la leche en la etapa de extracción.
Demasiado
grande
Pezón
Areola
• El pezón y g ran parte d e la
areola q uedan dentro del
conducto del embudo
• Pruebe un tamaño más
pequeño
Demasiado
pequeño
Pezón
Areola
• El pezón roza las
paredes del conducto
del embudo
• Pruebe un tamaño
más grande
Posición correcta
Pezón
Areola
• El pezón e stá centrado
y se mueve libremente
3. ¿Debería probar otro tamaño?
• ¿Roza el pezón las paredes del conducto del embudo hasta el punto de causar molestia?
• ¿Ve que gran parte de la areola queda dentro del conducto del embudo?
• ¿Ve alguna zona enrojecida?
• ¿Se tornan el pezón o la areola de color blanco?
• ¿Siente que aún tiene leche después de la extracción?
Si respondió “SÍ” a alguna de estas preguntas, considere probar un nuevo tamaño siguiendo
las instrucciones de medición presentadas arriba.
Si todavía no está segura de haber seleccionado el tamaño correcto, consulte a un asesor o
especialista en amamantamiento, o bien, visite MedelaBreastshields.com para obtener ayuda
en la selección del tamaño correcto de embudo.
Precaución
• Aunque puede sentir un poco de molestia cuando usa un extractor de leche por primera vez, el uso del
extractor de leche no debería causarle dolor.
• Si siente molestias en la base del pezón por la fricción del tejido del pecho contra el conducto del embudo,
el uso de un lubricante, como lanolina Tender Care™, podría ayudarle.
68
Page 69

6.3 Alimentación eléctrica del extractor
6.3.1 Cuidado del adaptador de corriente
Para cuidar su adaptador, asegúrese de seguir estas indicaciones de almacenamiento.
No enrosque el cable del
adaptador de corriente alrededor
del cuerpo del adaptador.
No tire del cable para desconectar
el adaptador de corriente.
¡Correcto!
¡Correcto!
¿Alguna duda? Visite www.medela.com o llámenos al +1-800-435-8316.
69
Page 70

6. Armado (continuación)
Nota
• Extraiga las baterías si no va a utilizarlas por
un período prolongado.
• Si el extractor de leche no se enciende,
asegúrese de que las baterías estén
insertadas correctamente. Si esto no
resuelve el problema, consulte la sección
de resolución de problemas de este folleto
instructivo o comuníquese con el Servicio al
cliente de Medela al +1-800-435-8316.
• Cada juego de baterías brindará
aproximadamente 2horas de tiempo de
extracción.
• No combine pilas viejas y nuevas.
• No combine pilas alcalinas, estándar
(carbón-zinc) o recargables.
• No utilice baterías de litio.
• Utilice solamente baterías alcalinas o de Ni-MH
• Para obtener información sobre viajes
con su extractor de leche y leche materna
extraída, visite www.TSA.gov.
4
6.3. Alimentación eléctrica del
extractor (continuación)
6.3.2 Caja de baterías
1
Necesitará un total de ocho
(8) baterías recargables o alcalinas
de tamaño AA.
6.3.3 Viajes fuera de su país
Al viajar al extranjero, hay tres
opciones para energizar el extractor:
Vuelva a colocar la tapa de las baterías.
70
o
Utilice la caja de baterías
incluida en su extractor de leche
Pump In Style® Advanced.
Page 71

2 3
Reemplace todas las baterías
al mismo tiempo.
Deslice hacia afuera ambas
tapas de la caja de baterías.
Se colocan cuatro (4) baterías de
cada lado de la caja de baterías.
Ponga el extremo NEGATIVO (-) de la batería
frente al resorte y oprima la batería hacia
adentro y abajo en un solo movimiento para
que entre en su lugar.
El extremo POSITIVO (+) de la batería debe estar
junto al signo positivo de la caja de baterías.
o
Adquiera el adaptador portátil para
vehículos de 9 voltios (se vende por
separado), artículo 67174. Visite nuestra
tienda en línea en www.shopmedela.com.
El adaptador portátil para vehículos tal
vez no funcione en todos los vehículos.
Consulte el manual del propietario para
verificar la compatibilidad con la entrada
de 12-24voltios.
Utilice el adaptador de corriente incluido en su
extractor de leche Pump In Style® Advanced
con convertidores de enchufe universal (se
venden por separado; no son un artículo
Medela).
Nota: el adaptador anterior del extractor Pump in Style Advanced
(artículo 68030 o 9207010) no es compatible fuera de América
del Norte. Sírvase llamar a Servicio al cliente de Medela si tiene
alguna duda.
¿Alguna duda? Visite www.medela.com o llámenos al +1-800-435-8316.
71
Page 72

7. Extracción
Precaución
• Siempre inspeccione la limpieza de los
embudos, los conectores de los embudos,
las membranas blancas, las válvulas
amarillas y los tubos antes de usarlos. Si
están sucios, consulte la Sección5.1.
• Si siente dolor u otros síntomas durante
la extracción de la leche, solicite
asesoramiento a su profesional de la salud
o especialista en lactancia. Consulte la
Sección11 para obtener más información.
• No intente extraer con vacío demasiado
intenso y molesto (doloroso). El dolor, junto
con los potenciales traumatismos del pecho
y el pezón pueden disminuir la salida de leche.
• Asegúrese de que el tubo no esté doblado
o pellizcado mientras está realizando la
extracción.
• Comuníquese con su profesional de la salud
o especialista en lactancia si solo puede
extraer una cantidad mínima o nada de
leche, o si la extracción es dolorosa.
Información
• Las investigaciones han demostrado que
las mujeres extraen con más eficacia – es
decir más leche en menos tiempo – cuando
lo hacen con Maximum Comfort Vacuum™
en la fase de extracción.
• Debe volver a determinar su nivel de
vacío Maximum Comfort Vacuum durante
toda la experiencia de extracción, ya que
dicho nivel puede cambiar en las distintas
etapas de la lactancia; vea el paso 5 de la
Sección 7.
• No incline ni llene demasiado los
recipientes al realizar la extracción.
72
Operación del dispositivo
1
Lávese las manos antes de tocar el
extractor de leche, el kit y el pecho;
también evite tocar el interior de los
recipientes o las tapas.
4
Después de dos minutos, el extractor
pasará automáticamente a la fase de
extracción.
a. Si la leche comienza a bajar antes
de transcurridos 2minutos, oprima
el botón de bajada de leche.
b. Si la leche no ha comenzado a bajar
durante la fase de estimulación
y el extractor pasó a la fase de
extracción, presione una vez el
botón de bajada de leche para
regresar a la fase de estimulación.
Page 73

2 3
Sentada en posición erguida,
colóquese los embudos armados
centrados sobre los pezones.
5
Para identificar su “Maximum
Comfort Vacuum”, aumente la
velocidad y el vacío hasta sentir
que la extracción es ligeramente
incómoda (no dolorosa) y luego,
redúzcala ligeramente.
Para comenzar la extracción, gire el selector
en el sentido de las manecillas del reloj
desde la posición off (apagado). La sesión
de extracción comenzará en la fase de
estimulación. Durante la extracción de leche,
ajuste la velocidad y el vacío girando el
selector al nivel que le resulte más cómodo.
6
Continúa en la
página siguiente.
810726487071
Cuando su sesión de
extracción haya finalizado,
desconecte el tubo de la parte
posterior de los embudos
antes de separar las botellas.
¿Alguna duda? Visite www.medela.com o llámenos al +1-800-435-8316.
73
Page 74

7. Extracción (continuación)
Nota
• Desconecte siempre el extractor
PumpIn Style® de la fuente de
alimentación después de la extracción.
• Llene la botella solamente hasta la marca
de 150mL.
Información
• ¿Cuán a menudo debo realizar
extracciones? Un extractor de leche
es un reemplazo para cuando tiene que
separarse de su bebé. Es importante
realizar la extracción a las horas en que el
bebé se alimentaría, lo que generalmente
significa que una mamá que trabaja se
extrae leche 3 veces durante una jornada
de trabajo de 8 horas.
• ¿Qué duración debe tener su sesión de
extracción? Los tiempos de extracción
pueden variar de una madre a otra,
a veces 15minutos, a veces hasta20.
• ¿Cómo debería sentir sus pechos
después de la extracción? Después de
la extracción, sentirá sus pechos blandos,
sin zonas duras. Antes de la extracción,
sentirá los pechos más duros y pesados.
Después de la extracción, asegúrese de
que sus pechos no estén duros ni que
tengan zonas con bultos. Esto podría
indicar que el pecho no se está vaciando
completamente. Consulte la Sección11
para obtener más información.
Operación del dispositivo
(continuación)
7
Cierre la botella con una tapa.
• Siga las instrucciones en las
Secciones 8 y 9.
10
Desconecte el extractor de
leche del tomacorriente de
pared (fuente de corriente)
74
Page 75

8
9
Permita que el extractor continúe
funcionando mientras almacena
su leche materna. Esto permitirá
que se seque cualquier tipo de
condensación que se haya formado
en el tubo por la humedad natural.
11
Antes de guardar el extractor,
quite el tubo tirándolo en forma
recta hacia fuera de los orificios
del tubo. No sacuda o tire del
tubo en ángulo.
Apague el extractor de leche.
12
Desarme y limpie conforme a las
instrucciones de la Sección 3.
¿Alguna duda? Visite www.medela.com o llámenos al +1-800-435-8316.
75
Page 76

8. Almacenamiento de la leche materna
Advertencia
8.1 Conservación de leche
materna en la bolsa
• No descongele la leche materna en un
horno de microondas ni en una olla de
agua hirviendo.
• No caliente la leche materna en un horno
de microondas. Calentar la leche materna en
un horno de microondas hace que algunas
partes se calienten más que otras y esto
puede causar quemaduras graves en la
boca del bebé. (El calentamiento en un horno
de microondas también puede modificar la
composición de la leche materna).
Nota
• Si el paquete de hielo está congelado,
conservará su leche materna hasta por
10 horas en condiciones de temperatura
ambiente dentro de la bolsa del extractor
o hasta por 8 horas en condiciones de
temperatura ambiente dentro del enfriador,
almacenado fuera de la bolsa del extractor.
enfriadora de su extractor
Pump in Style® Advanced
La bolsa térmica del extractor
Pump in Style Advanced necesita un
paquete de hielo moldeado (artículo87092)
para enfriar hasta cuatro botellas de 148ml
(5onzas) de leche materna.
• En cuanto termine la extracción,
coloque las botellas con leche materna
o las bolsas de conservación de leche
materna en la bolsa térmica con el
paquete de hielo.
• Coloque las botellas con leche
materna o las bolsas de conservación
de leche materna en el refrigerador
o congelador al llegar a su hogar.
8.2
Guía de conservación de leche materna recién extraída
(para bebés a término sanos)
Temperatura
ambiente
16°C a 25°C
(60°F a 77°F)
Lo mejor es hasta
4 horas
*Hasta 6 horas en
el caso de leche
extraída en
condiciones muy
higiénicas
Referencias: www.BreastmilkGuidelines.com
76
Refrigerador
4°C (39°F)
o menos
Lo mejor es
hasta 3 días
*Hasta 5 días
en el caso de
leche extraída
en condiciones
muy higiénicas
Congelador
-18°C (0°F)
o menos
Lo mejor es
hasta 6 meses
*Hasta 9 meses
en el caso de
leche extraída en
condiciones muy
higiénicas
Leche materna
descongelada
en el
refrigerador
A temperatura
ambiente:
Hasta 2 horas
Refrigerador:
Hasta 24 horas
NO VUELVA
A CONGELAR
Page 77

9. Preparación y alimentación con leche materna
9.1 Preparación de la leche materna
• Descongele la leche materna dejándola en el refrigerador durante toda la noche. La leche
materna descongelada puede conservarse en el refrigerador durante 24horas. No vuelva
a congelar la leche materna que ya ha sido descongelada.
• Descongele la leche materna rápidamente colocando la botella bajo un chorro de agua tibia.
• Coloque la botella cerrada en un recipiente con agua tibia durante 20minutos para que
alcance la temperatura corporal. Asegúrese de que el agua no llegue al nivel del cuello de
la botella.
9.2 Alimentación con leche materna
Se recomienda que la rutina de lactancia ya esté bien establecida antes de alimentar a su
bebé con botella.
• Siempre inspeccione la botella, la tetina y las demás piezas inmediatamente antes y
después de cada uso. Si la tetina parece estar rota o gastada, deje de usarla de inmediato.
• Para evitar todo posible riesgo de asfixia, verifique la resistencia de la tetina estirándola de
la punta.
• No intente agrandar el orificio de la tetina.
• Los lactantes no deben alimentarse con botella sin la supervisión de un adulto.
• La tetina no debe utilizarse como chupete.
Para obtener información adicional sobre la extracción y conservación de la leche materna, visite:
www.BreastmilkGuidelines.com
¿Alguna duda? Visite www.medela.com o llámenos al +1-800-435-8316.
77
Page 78

10. Solución de problemas
Succión escasa o ausente Verificación de la válvula y membrana
• Retire y separe la válvula de la membrana
• Inspeccione la válvula para detectar astillas o rajaduras. Revise la membrana para
detectar la presencia de orificios o roturas. Si observa algún tipo de daño en estas
piezas, reemplace la válvula o la membrana antes de la extracción de leche.
• Lave la válvula y la membrana de acuerdo con la sección “Limpieza”.
• Vuelva a armar. Asegúrese de que la membrana quede extendida sobre la válvula; en
caso contrario, reemplace la válvula o la membrana antes de la extracción de leche.
Revisión del embudo y del conector del embudo
• Inspeccione el embudo y el conector del embudo para comprobar que no existan
grietas y que ambas piezas se acoplen firmemente una a la otra
Verificación de la placa frontal
• Lave la placa frontal y la placa trasera conforme a la Sección 5.
• Vuelva a armar la placa frontal y la placa trasera, y acople nuevamente el tubo al
puerto en la placa frontal
Comprobación de los puntos de conexión
Inspeccione los siguientes puntos de conexión para asegurarse de que la conexión sea firme
• Adaptador del tubo al conector del embudo
• Extremo del tubo al puerto de la placa frontal
• Placa frontal a la placa trasera
• Pruebe el vacío. Si la succión no mejora, comuníquese con el Servicio al cliente de
Medela al+1-800-435-8316.
Se oye aire que sale por
el tapón del puerto o la
placa frontal
Fuente de alimentación • Si el extractor no se enciende con el adaptador de corriente, pruebe con la caja de
Puerto de la placa frontal
roto o agrietado
Condensación o leche en
el tubo
La leche materna no “baja”
o no se puede extraer
PRECAUCIÓN: no intente tapar el orificio en la tapa o el puerto con material
adicional.
•
Hay una fuga de aire incorporada para el control del vacío; es normal que oiga el aire.
baterías.
• Si el extractor no se enciende con la caja de baterías, asegúrese de que hayan
sido colocadas correctamente.
• Si el extractor sigue sin funcionar con el adaptador de corriente o la caja de
baterías, comuníquese con Servicio al cliente de Medela al+1-800-435-8316.
PRECAUCIÓN: si siente pérdida de succión con la placa frontal rota, no
use el extractor hasta que reciba la nueva placa frontal.
• Comuníquese con Servicio al cliente de Medela al +1-800-435-8316 o haga el
pedido por Internet en www.shopmedela.com.
• Consulte la Sección5, Cuidado del extractor de leche y del tubo.
• Asegúrese de que el extractor de leche materna esté correctamente armado y que
haya succión.
• Relájese y espere entre 10 y 15minutos si la leche no baja después de 2sesiones
consecutivas de extracción.
• Consulte a su profesional de la salud o especialista en lactancia si no logra extraer leche.
78
Page 79

11. Información complementaria
Información complementaria
A continuación se presentan algunas de las afecciones más comunes relacionadas con la lactancia.
Si tiene alguno de estos síntomas, comuníquese con un profesional de la salud
o especialista en lactancia.
Síntoma Causas posibles
Congestión
mamaria
Conductos
obstruidos o tapados
Mastitis Se produce a menudo después de una
Un profesional de la salud o especialista en lactancia puede enseñarle a amamantar a su bebé y a usar un
extractor de leche. Su ayuda es valiosa en términos de una vida completa de beneficios de salud para usted
y su bebé. Puede consultar la lista de especialistas en lactancia en www.medelalocator.com o bien, llamar al
+1-800-TELL-YOU (+1-800-835-5968).
Los pechos están duros y molestan, es posible
que presenten zonas enrojecidas.
Una parte del pecho parecerá enrojecida y
puede estar sensible al tacto.
congestión mamaria, pero también puede
ocurrir repentinamente. Los síntomas iniciales
son parecidos a los de la gripe: fatiga, dolor de
cabeza y dolores musculares, fiebre y sensibilidad
mamaria localizada. Puede darse en un pecho o
en ambos y debe tratarse de inmediato.
La leche no sale adecuadamente del
pecho. La leche regresa a los tejidos
provocando hinchazón y sensibilidad en
algunas zonas.
La leche no fluye desde un conducto
específico. Esta parte se “obstruye” y no
permite la salida de la leche.
Infección bacteriana en el tejido mamario
que suele acompañarse de agrietamiento
de los pezones.
Si aún no ha resuelto el problema con su extractor de leche o si tiene más consultas, comuníquese
con el Servicio al cliente de Medela llamando al+1-800-435-8316 o enviando un mensaje de correo
electrónico a customer.service@medela.com.
¿Alguna duda? Visite www.medela.com o llámenos al +1-800-435-8316.
79
Page 80

12. Desecho
Desecho
La unidad está hecha de diversos metales y plásticos. Antes de desecharse, el dispositivo
deberá volverse inutilizable y no deberá desecharse como basura municipal sin clasificar
de acuerdo con las normas locales. Utilice su sistema local de recolección y devolución de
equipos eléctricos y electrónicos de desecho (incluidas las baterías). El desecho incorrecto
puede tener efectos nocivos en el medio ambiente y la salud pública.
Nota
Este equipo ha sido probado y se ha determinado que cumple con los límites para
un dispositivo digital de clase B, conforme a la parte 15 de las normas del Código de
Reglamentaciones Federales. Estos límites están diseñados para brindar una protección
razonable contra la interferencia perjudicial en una instalación residencial. Este equipo genera,
utiliza y puede irradiar energía de radiofrecuencia y, si no se instala y utiliza de forma adecuada
según las instrucciones, puede causar interferencias perjudiciales en las comunicaciones
de radio. Sin embargo, no hay garantía de que no habrá interferencia en una instalación en
particular. Si este equipo llegara a causar interferencia perjudicial en la recepción de radio
o televisión, lo cual puede determinarse encendiendo y apagando el equipo, se recomienda al
usuario que intente corregir la interferencia utilizando una o más de las siguientes medidas:
• Reorientar o reubicar la antena de recepción.
• Aumentar la separación entre el equipo y el receptor.
• Conectar el equipo en un tomacorriente de un circuito diferente al que se encuentra
conectado el receptor.
• Consultar al distribuidor o a un técnico con experiencia en radio/TV para obtener ayuda.
Recicle su extractor de leche
A través del programa Medela Recycles, Medela LLC les ofrece a los clientes la opción
de reciclar su extractor de leche de manera apropiada una vez que hayan terminado su
período de amamantamiento. Para más información sobre cómo reciclar su extractor, visite
www.medelarecycles.com.
Este programa actualmente solo está disponible para residentes de los Estados Unidos.
Solo aceptamos la devolución de extractores de leche eléctricos. Todos los demás
componentes del kit del extractor de leche (conectores, embudos, tubo, botellas, válvulas,
membranas y elementos refrigerantes) pueden desecharse en el contenedor de reciclaje de
basura de su hogar. Las hieleras portátiles y otros artículos blandos no son reciclables.
80
Page 81

13. Garantía
Precaución
Este producto fue diseñado para ser utilizado por una sola persona. Si lo usa más de una
persona, se pueden presentar problemas relacionados con la salud e inconvenientes en
el funcionamiento del producto, y se anula la garantía.
Medela LLC garantiza al comprador minorista original que este producto está libre de
defectos en cuanto al material y a la mano de obra del mecanismo del extractor durante
un año a partir de la fecha de compra del producto (90 días en el caso de las piezas y los
accesorios). Los reclamos de la garantía únicamente se pueden realizar en el país donde se
realiza la compra. En el caso de que el producto presentara un defecto, Medela lo reparará
o, a discreción de Medela, reemplazará el producto, sin costo alguno para el comprador en
relación con dicho reemplazo, tales piezas o la mano de obra mencionada. El comprador
abonará los gastos de envío originados por la devolución a Medela de este producto. Esta
garantía no cubre los productos utilizados comercialmente o que hayan estado expuestos
a uso indebido, abuso o alteración.
TODAS Y CADA UNA DE LAS GARANTÍAS IMPLÍCITAS, INCLUIDA LA GARANTÍA
COMERCIAL, TIENEN UN PERÍODO DE VIGENCIA LIMITADO DE 1AÑO A PARTIR DE
LA FECHA DE COMPRA. EN ALGUNOS ESTADOS NO SE PERMITE ESTABLECER
LIMITACIONES EN CUANTO A LA VALIDEZ DE UNA GARANTÍA IMPLÍCITA, DE MODO QUE
LAS LIMITACIONES MENCIONADAS ANTERIORMENTE PODRÍAN NO APLICARSE EN SU
CASO. ESTA GARANTÍA LE OTORGA DERECHOS LEGALES ESPECÍFICOS, ADEMÁS DE
LOS OTROS DERECHOS QUE PODRÍA TENER Y QUE DIFIEREN DE UN ESTADO A OTRO.
Antes de presentar un reclamo en virtud de esta garantía, puede ganar tiempo y ahorrar dinero
si llama al Servicio al cliente de Medela (llamada gratis) al+1-800-435-8316. También puede
llamar a este número si necesita más información sobre esta garantía. Si deseara presentar
un reclamo en virtud de esta garantía, debe devolver el producto a Medela con el número
de autorización de devolución que le indicó el Servicio al cliente de Medela, mediante un
envío pagado por anticipado, junto con la factura donde se indique la fecha de venta u otro
comprobante de la compra y una breve descripción del problema a la siguiente dirección:
Medela LLC – Returns, Door 4501
1101 Corporate Dr.
McHenry, IL 60050
ATTENTION: RETURNS
Primero llame para obtener un número de autorización. No se aceptan devoluciones sin un
número de autorización.
¿Alguna duda? Visite www.medela.com o llámenos al +1-800-435-8316.
Medela Canada
4160 Sladeview Crescent Unit #8
Mississauga, ON L5L 0A1
ATTENTION: RETURNS
81
Page 82

14. Significado de los símbolos
Glosario de símbolos
Manual del operador; Instrucciones de operación - Indica que deben
considerarse las instrucciones de operación al manejar el dispositivo.
Este símbolo indica el fabricante.
Este símbolo indica que no se debe desechar el dispositivo con la basura
municipal sin clasificar (de acuerdo con las normas locales).
Este símbolo indica conformidad con los requisitos internacionales para la
protección por descargas eléctricas. (Piezas aplicadas de tipoBF).
IP22
Este símbolo indica la protección contra el ingreso de objetos extraños
sólidos y contra los efectos nocivos debido al ingreso de agua.
Este símbolo indica la fecha de fabricación (cuatro dígitos para el año y dos
dígitos para el mes).
Este símbolo indica Clase II.
Este símbolo indica que el adaptador de alimentación es solo para uso en interiores.
SEGURIDAD DEL EXTRACTOR DE LECHE RESPECTO A DESCARGA ELÉCTRICA,
INCENDIO Y RIESGOS MECÁNICOS SOLO CONFORME A ANSI/AAMI ES60601-1
(2005) + AMD 1 (2012), CAN/CSA-C22.2 N.º 60601-1 (2014), IEC 60601-1-6
(2010) + AMD 1 (2013), IEC 62366 (2007) + AMD 1 (2014) y IEC 60601-1-11 (2015)
Este símbolo indica corriente alterna.
Este símbolo indica corriente continua.
Signo de precaución
Pieza en la lista UL
Marca registrada Ten Pao
Certificado NOM
82
Page 83

15. CEM y descripción técnica
El extractor de leche necesita precauciones especiales en cuanto a la CEM y debe
instalarse y usarse según la información sobre CEM que se presenta en las instrucciones
de uso. Las comunicaciones de radiofrecuencia portátiles y móviles pueden afectar al
extractor de leche.
Nota
Este equipo ha sido probado y se ha determinado que cumple con los límites para un dispositivo digital
de clase B, conforme a la parte 15 de las normas del Código de Reglamentaciones Federales. Estos
límites están diseñados para brindar una protección razonable contra la interferencia perjudicial en una
instalación residencial. Este equipo genera, utiliza y puede irradiar energía de radiofrecuencia y, si no se
instala y utiliza de forma adecuada según las instrucciones, puede causar interferencias perjudiciales
en las comunicaciones de radio. Sin embargo, no hay garantía de que no habrá interferencia en una
instalación en particular. Si este equipo llegara a causar interferencia perjudicial en la recepción de radio
o televisión, lo cual puede determinarse encendiendo y apagando el equipo, se recomienda al usuario
que intente corregir la interferencia utilizando una o más de las siguientes medidas:
• Reorientar o reubicar la antena de recepción.
• Aumentar la separación entre el equipo y el receptor.
• Conectar el equipo en un tomacorriente de un circuito diferente al que se encuentra conectado
el rece pto r.
• Consultar al distribuidor o a un técnico con experiencia en radio/TV para obtener ayuda.
¿Alguna duda? Visite www.medela.com o llámenos al +1-800-435-8316.
83
Page 84

15. CEM y descripción técnica (continuación)
Orientación y declaración del fabricante: emisiones electromagnéticas
Este extractor de leche ha sido diseñado para usarse en el entorno electromagnético especificado
a continuación. El cliente o la usuaria del extractor de leche debe asegurarse de que se use en
dicho entorno.
Pruebas de emisiones Cumplimiento Entorno electromagnético, orientación
El extractor de leche utiliza energía de
Emisiones de
radiofrecuencia
CISPR11
Emisiones de
radiofrecuencia
CISPR11
Emisiones de armónicos
IEC 61000-3-2
Fluctuaciones de
voltaje y emisiones de
parpadeo de voltaje
IEC 61000-3-3
Grupo1
ClaseB
ClaseA
Ps t <1,0
radiofrecuencia (RF) solo para su funcionamiento
interno. Por tanto, sus emisiones de RF son muy
bajas, de modo que es improbable que causen
interferencia en equipos electrónicos cercanos.
El extractor de leche es adecuado para usarse
en todos los establecimientos, incluidos
los establecimientos domésticos y aquellos
directamente conectados a la red de suministro
eléctrico público de bajo voltaje que suministra
electricidad a edificios utilizados para propósitos
domésticos.
Advertencia
Advertencia: este extractor de leche no debe usarse adyacente a otros equipos ni sobre
ellos. Si es necesario usarlo adyacente a otros equipos o sobre ellos, deberá observarse el
extractor para comprobar su funcionamiento normal en la configuración en que se usará.
84
Page 85

Prueba de
inmunidad
IEC 60601
nivel de prueba
Nivel de
conformidad
Entorno electromagnético,
guía
Descarga
electrostática (ESD)
IEC 61000-4-2
Ráfaga / rápidos
transitorios eléctricos
IEC 61000-4-4
Pico de corriente
IEC 61000-4-5
Caídas de voltaje,
interrupciones
breves y variaciones
de voltaje en líneas
de entrada de
alimentación eléctrica
IEC 61000-4-11
Campo magnético de
frecuencia eléctrica
(50/60 Hz)
IEC 61000-4-8
+/- 2 kV, +/- 4 kV,
+/- 6 kV, +/- 8
kV descarga por
contacto
+/- 2 kV, +/-4 kV,
+/- 6 kV, +/8 kV,
+/- 15 descarga en
el aire
± 2 kV
100 kHz de
frecuencia de
repetición
± 0,5 kV, ± 1 kV de
línea a línea
0% UT; ciclo de 0,5
A 0°, 45°, 90°, 135°,
180°, 225°, 270° y
315°
30 A/m, 50 o 60 Hz 30 A/m, 50/60 Hz
+/- 2 kV, +/-4 kV,
+/- 6 kV, +/- 8
kV descarga por
contacto
+/- 2 kV, +/-4 kV,
+/- 6 kV, +/8 kV,
+/- 15 descarga en
el aire
± 2 kV
100 kHz de
frecuencia de
repetición
± 0,5 kV, ± 1 kV
de línea a línea
0% UT; ciclo de 0,5
A 0°, 45°, 90°,
135°, 180°, 225°,
270° y 315°
Los pisos deben ser de
madera, hormigón o baldosas
cerámicas. Si los suelos están
cubiertos de material sintético,
la humedad relativa debe ser al
menos del 30%.
La calidad de la alimentación
eléctrica debe ser la de un
entorno comercial
u hospitalario típico.
La calidad de la alimentación
eléctrica debe ser la de un
entorno comercial
u hospitalario típico.
La calidad de la alimentación
eléctrica debe ser la de un
entorno comercial u hospitalario
típico. Si la usuaria del
extractor de leche requiere un
funcionamiento continuo durante
los cortes del suministro eléctrico,
se recomienda que el extractor
de leche sea alimentado por
una fuente de alimentación
ininterrumpida o por una batería.
Puede ser necesario ubicar el
extractor de leche más lejos de
fuentes de campos magnéticos
provocados por la frecuencia de
alimentación o instalar blindaje
magnético. El campo magnético
de la frecuencia de alimentación
se debe medir en el lugar de
instalación previsto para asegurarse
de que sea lo suficientemente bajo.
NOTA UT es la tensión del suministro de CA antes de la aplicación del nivel de prueba.
¿Alguna duda? Visite www.medela.com o llámenos al +1-800-435-8316.
85
Page 86

15. CEM y descripción técnica (continuación)
Orientación y declaración del fabricante: inmunidad electromagnética
Este extractor de leche ha sido diseñado para usarse en el entorno electromagnético especificado a
continuación. El cliente o la usuaria del extractor de leche debe asegurarse de que se use en dicho entorno.
Prueba de
inmunidad
RF conducida
IEC 61000-4-6
RF radiada
IEC 61000-4-3
IEC 60601
nivel de prueba
3 V
0,15 MHz – 80 MHz
6 V en ISM y
en bandas de
radioaficionados entre
0,15 MHz y 80 MHz
80% AM a 1 kHz
10 V/m (mínimo)
80 MHz – 2,7 GHz
80 % AM a 1 kHz
Nivel de
conformidad
6 V
10 V/m
(mínimo)
Entorno
electromagnético, orientación
Los equipos portátiles y móviles de
comunicación por radiofrecuencia no
deben utilizarse más cerca de algún
componente del extractor de leche,
incluyendo los cables, que la distancia de
separación recomendada que se calcula
a partir de la ecuación aplicable a la
frecuencia del transmisor.
Distancia de separación recomendada
d = 1, 2√P
d = 1,2√P 80 MHz - 800 MHz
d = 2,3√P 800 MHz - 2,7 GHz
Donde P es la clasificación de la potencia
máxima de salida del transmisor en
vatios (W) de acuerdo con el fabricante
del transmisor y d es la distancia de
separación recomendada en metros (m).
Las intensidades de los campos de
transmisores de radiofrecuencia fijos,
según se determinan mediante un estudio
electromagnético en el lugar, a deben ser
menores que el nivel de compatibilidad en
cada rango de frecuencia.
b
Puede producirse interferencia cerca de los
equipos marcados con el siguiente símbolo.
Nota 1 A 80 y 800 MHz se aplica el rango de frecuencia más alto.
Nota 2 Es posible que estas directrices no sean de aplicación en todas las situaciones. La propagación
electromagnética es afectada por la absorción y la reflexión de estructuras, objetos y personas.
a
Las intensidades de campo de los transmisores fijos, como las estaciones de base para radioteléfonos (móviles
e inalámbricos) y radios móviles terrestres, de radioaficionados, transmisiones AM y FM de radio y transmisiones de
televisión, no pueden predecirse en forma teórica con precisión. Para evaluar el entorno electromagnético creado
por transmisores de radiofrecuencia fijos, debe considerarse un estudio electromagnético del sitio. Si la intensidad
de campo medida en el lugar de uso del extractor de leche supera el nivel de conformidad de radiofrecuencia
correspondiente antes indicado, se deberá observar el extractor de leche para comprobar que funcione normalmente.
Si se observa un funcionamiento anormal, es posible que sea preciso tomar medidas adicionales, como cambiar la
orientación o la ubicación del extractor de leche.
b
En el rango de frecuencia de 150 kHz a 80 MHz, las fuerzas de campos deben ser inferiores a 10 V/m.
86
Page 87

Distancias de separación recomendadas entre equipos portátiles y móviles de
comunicación por radiofrecuencia y el extractor de leche
Este extractor de leche eléctrico está diseñado para ser usado en un entorno electromagnético donde se
controlan las perturbaciones por radiofrecuencia radiada. El cliente o usuaria del extractor de leche eléctrico
puede ayudar a evitar la interferencia electromagnética si guarda una distancia mínima entre el equipo móvil
y portátil de comunicación por radiofrecuencia (transmisores) y el extractor de leche eléctrico, tal como se
recomienda a continuación, según la potencia de salida máxima del equipo de comunicaciones.
Potencia máxima
nominal de salida
del transmisor
W
0,01 0,06 0,04 0,07
0,1 0,18 0,11 0,22
1 0,58 0,35 0,22
10 1,8 4 1,11 2,21
100 5,83 3,50 7,0 0
Distancia de separación según la frecuencia del transmisor (m)
150 kHz a 80 MHz
d = 1,2√P
80 MHz a
800 MHz
d = 1,2√P
800 MHz a 2,7 GHz
d = 2,3√P
Para transmisores con una potencia máxima de salida que no figure en la lista anterior, la
distancia de separación recomendada d en metros (m) puede determinarse utilizando la
ecuación aplicable a la frecuencia del transmisor, donde P es la potencia máxima nominal
de salida del transmisor en vatios (W) según el fabricante del transmisor.
Nota 1 A 80 MHz y 800 MHz, se aplica la distancia de la separación para la escala de frecuencia
superior.
Nota 2 Es posible que estas directrices no sean de aplicación en todas las situaciones. La propagación
electromagnética es afectada por la absorción y la reflexión en estructuras, objetos y personas.
ADVERTENCIA: los equipos de comunicación portátiles de radiofrecuencia (incluidos
los periféricos tales como cables de antenas y antenas externas) deben usarse a una
distancia mayor que 30 cm (12 pulgadas) de cualquier parte del extractor de leche,
incluidos los cables especificados por el fabricante. De lo contrario, se podría producir la
degradación del desempeño de este equipo.
¿Alguna duda? Visite www.medela.com o llámenos al +1-800-435-8316.
87
Page 88

°C
°C
16. Especificaciones técnicas
Especificaciones técnicas
Rango de vacío
-50....-240 mmHg
54 … 120 cpm
Modo de operación: Continua
Tamaño
165 x 165 x 135 mm
Peso
1,0 kg
N.º de artículo del Adaptador de corriente: 101036149
Entrada de energía Salida de energía
100-240 V~50/60 Hz 0,7 A máx
Caja de baterías, artículo N.º 9017002
Salida de energía
9,6 - 12 VCD 2 A
N.º de artículo de adaptador portátil para auto: 9287011
Entrada de energía Salida de energía
12 -24 VCD 1,25 A 9,0 VCD 1 A
Corriente directa = "CD"
9,0 VCD 2 A
+40
+5
-25
15
15
Temperatura de
funcionamiento
+70
Temperatura de transporte
y almacenamiento
93
Humedad de
funcionamiento
93
Humedad de transporte
y almacenamiento
106
Este símbolo indica conformidad con
los requisitos internacionales para la
protección por descargas eléctricas.
+70
Presión ambiente
kPa
(Piezas aplicadas de tipoBF).
Este símbolo indica Clase II.
88
Page 89

¿Alguna duda? Visite www.medela.com o llámenos al +1-800-435-8316.
89
Page 90

Consignes de sécurité importantes
Lors de l’utilisation d’un appareil électrique, en particulier en présence d’enfants, certaines
mesures de sécurité de base doivent être observées.
VEUILLEZ LIRE TOUTES LES CONSIGNES AVANT D’UTILISER
CE PRODUIT.
DANGER: pour réduire les risques d’électrocution:
• Débrancher systématiquement un produit électrique immédiatement après l’utilisation.
• Ne pas placer ni ranger le produit dans un endroit où il pourrait tomber ou être tiré dans une
baignoire ou un évier.
• Ne pas le placer ou le laisser tomber dans l’eau ni aucun autre liquide.
AVERTISSEMENT: Pour éviter tout risque d’incendie, d’électrocution ou de
brûlure grave:
• Ne pas laisser le produit sans surveillance lorsqu’il est branché dans une prise électrique.
• Débrancher systématiquement un produit électrique immédiatement après l’utilisation.
• Surveiller le produit attentivement lorsqu’il est utilisé près d’enfants ou de personnes handicapées
afin d’éviter tout étranglement par la tubulure ou le cordon d’alimentation.
• Surveiller le produit attentivement lorsqu’il est utilisé près d’enfants ou de personnes handicapées
pour prévenir l’étouffement avec de petites pièces.
• Ne pas utiliser ce produit si son cordon d’alimentation ou sa fiche sont endommagés, s’il ne
fonctionne pas correctement, s’il est tombé sur le sol ou dans l’eau ou encore s’il est endommagé.
• Tenir le cordon d’alimentation à l’écart des surfaces chaudes.
• Ne jamais laisser tomber et ne jamais insérer des objets dans une des ouvertures ou la tubulure.
• Ne pas utiliser à l’extérieur, ni dans les endroits où l’on utilise des produits en aérosol (pulvérisateur)
ou où l’on administre de l’oxygène.
• Toujours vérifier l’état de l’adaptateur d’alimentation et des fils du bloc-piles avant de les
utiliser pour s’assurer qu’il n’y a aucun dommage ni fil exposé. En cas de dommage, arrêter
immédiatement l’utilisation de l’adaptateur d’alimentation ou du bloc-pile et communiquer avec le
service à la clientèle Medela au +1800435-8316.
• Ne pas placer ni ranger le produit dans un endroit où il pourrait tomber ou être tiré dans une
baignoire ou un évier.
• Le tire-lait et les accessoires ne sont pas thermorésistants: les maintenir à distance des surfaces
chauffées et des flammes nues.
• Ne pas utiliser ce produit près de matériaux inflammables.
• Ne pas utiliser une prise électrique qui a été exposée à l’eau ou à d’autres liquides, notamment:
- Ne pas utiliser le produit dans une baignoire ou sous la douche.
- Ne jamais le mettre ou le laisser tomber dans l’eau ni dans aucun autre liquide.
- Ne pas mettre le tire-lait sous l’eau du robinet.
- Si un dispositif a été exposé à l’eau ou à d’autres liquides, ne pas le toucher, débrancher le
dispositif de la prise de courant, l’éteindre et contacter le fabricant.
90
Page 91

Les mots-indicateurs définis spécifient toutes les consignes de sécurité importantes. Le non-respect
de ces consignes peut provoquer des blessures ou endommager le tire-lait. Voici la signification des
mots-indicateurs définis lorsqu’ils sont utilisés avec les mots suivants:
AVERTISSEMENT Peut provoquer des blessures graves ou la mort.
MISE EN GARDE Peut provoquer des blessures mineures.
REMARQUE Peut entraîner des dommages à l’appareil.
ASTUCE Informations utiles ou importantes non relatives à la sécurité.
AVERTISSEMENT: Afin d’éviter les risques pour la santé et de réduire les
risques de blessure:
• Ce produit a été conçu pour une unique utilisatrice et ne devrait pas être partagé.
• Ne pas s’en servir en conduisant un véhicule.
• Examiner tous les composants appropriés du tire-lait avant chaque utilisation.
• En l’absence de résultats, ne PAS poursuivre les efforts d’expression au-delà de deux séances
consécutives.
• Si la tubulure présente de la moisissure, cesser de l’utiliser et la remplacer.
• En cas de retour du lait maternel, il faut nettoyer la tubulure, la plaque frontale et le diaphragme
avant la prochaine utilisation du tire-lait.
• Utiliser uniquement ce produit conformément à son utilisation prévue selon le présent manuel.
Ne pas utiliser d’accessoires non recommandés par le fabricant.
• Ne jamais utiliser l’appareil lorsque vous dormez ou lorsque vous êtes somnolente.
• Cet appareil ne peut faire l’objet d’aucun entretien ou réparation. Ne pas effectuer de réparation
par vous-même. Ne pas modifier l’appareil.
• Ne jamais utiliser un appareil endommagé. Remplacer les pièces endommagées ou usées.
• Avant chaque utilisation, inspecter visuellement les composants individuels pour détecter des
fissures, des éclats, des déchirures, une décoloration ou une détérioration. Si l’appareil est
endommagé, cesser de l’utiliser jusqu’au remplacement des pièces.
• Utiliser exclusivement l’adaptateur d’alimentation fourni avec le tire-lait.
• L’expression du lait peut provoquer l’accouchement. Ne pas exprimer votre lait avant d’avoir
donné naissance à votre enfant. Si vous commencez une grossesse alors que vous allaitez ou que
vous utilisez le tire-lait, consultez un professionnel de la santé agréé avant de continuer.
• En cas d’irritation ou d’inconfort, cesser l’utilisation et consulter un médecin.
• Pour les mères atteintes de l’hépatiteB, de l’hépatiteC ou du syndrome d'immunodéficience
acquise (SIDA), il faut savoir que l’utilisation d’un tire-lait ne réduit pas et n’élimine pas le risque de
transmission du virus au bébé par le lait maternel.
• Ne pas faire chauffer le lait maternel dans un micro-ondes et ne pas le faire bouillir. L’utilisation
d’un four à micro-ondes génère des zones brûlantes dans le lait qui risquent de provoquer de
graves brûlures dans la bouche du bébé. (L’utilisation d’un four à micro-ondes risque également
de modifier la composition du lait maternel.)
• Nettoyer et désinfecter toutes les pièces qui entrent en contact avec le sein et le lait maternel
avant la première utilisation.
• Nettoyer toutes les pièces qui entrent en contact avec le sein ou le lait maternel après chaque utilisation.
• Utiliser uniquement des pièces recommandées par Medela avec votre tire-lait.
• Une surveillance étroite s’impose lorsque le tire-lait ou les accessoires sont utilisés à proximité d’enfants.
Des questions? Consultez le site www.medela.com ou appelez-nous au +1800435-8316.
91
Page 92

MISE EN GARDE: Peut provoquer des blessures mineures:
• Ne PAS enrouler le cordon autour du corps de l’adaptateur.
• Utiliser exclusivement l’adaptateur d’alimentation fourni avec le tire-lait Pump In Style® Advanced.
• Utiliser exclusivement le bloc-piles Pump In Style Advanced fourni avec le tire-lait Pump In Style.
• Exprimer votre lait uniquement lorsque le tire-lait est en
position verticale (debout).
• Ne PAS raccourcir la tubulure.
• S’assurer que la tension de l’adaptateur d’alimentation est compatible avec celle de l’alimentation
électrique.
• Brancher l’adaptateur d’alimentation d’abord dans le tire-lait, puis dans la prise murale.
• Ne PAS utiliser de produits nettoyants/détergents antibactériens ou abrasifs pour nettoyer le
tire-lait ou ses accessoires.
• Ne jamais plonger le moteur du tire-lait dans l’eau ou dans un produit de stérilisation; cela pourrait
endommager le tire-lait de manière irréversible.
• Ne pas tenter de retirer la téterelle de votre sein pendant l’expression. Éteindre le tire-lait et briser
l’étanchéité entre votre sein et la téterelle avec votre doigt, puis retirer la téterelle de votre sein.
• Si l’expression s’avère inconfortable ou provoque de la douleur, éteindre l’unité, briser l’étanchéité
entre le sein et la téterelle avec votre doigt, puis retirer la téterelle de votre sein.
• Contacter votre professionnel de la santé ou un spécialiste en allaitement si vous ne tirez que
très peu de lait ou n’en tirez pas du tout, ou si l’opération se révèle douloureuse. Consulter les
sections10 et 11 pour de plus amples renseignements.
• Bien qu’un certain inconfort puisse être ressenti lors de votre première utilisation d’un tire-lait,
son utilisation ne devrait pas causer de la douleur. Pour vous aider à choisir une téterelle de
taille appropriée et confortable, veuillez visiter www.medela.ca ou prendre conseil auprès d’un
consultant en lactation/spécialiste en allaitement.
• Ne pas tenter pas de tirer votre lait avec une succion excessive ou désagréable (douloureuse). La
douleur et les éventuelles blessures au mamelon ou au sein risquent de diminuer la production de lait.
• S'assurer que la tubulure n’est pas entortillée ni pincée lors de l’expression.
• Ne pas tenir la trousse de tire-lait par la bouteille. Cela pourrait mener à un blocage des conduits
de lait et l’engorgement mammaire.
• Il n’est pas recommandé d’utiliser un tire-lait à bord d’un avion. La pression de la cabine peut nuire
à la performance des tire-lait.
• Se laver soigneusement les mains à l’eau et au savon avant de toucher le tire-lait, l’ensembleaccessoires et vos seins, et éviter de toucher l’intérieur des bouteilles ou des couvercles.
• Démonter et laver toutes les pièces exposées au lait maternel immédiatement après l’utilisation.
Cela permet d’éliminer les résidus de lait maternel afin de prévenir la prolifération des bactéries.
92
Page 93

MISE EN GARDE: Peut provoquer des blessures mineures: (suite)
• Toujours vérifier la propreté des téterelles, connecteurs, valves, membranes, bouteilles, couvercles
et de la tubulure avant l’utilisation. Si le nettoyage ne résout pas le problème, communiquer avec le
Service à la clientèle Medela.
• N’utiliser que de l’eau potable du robinet ou embouteillée pour le nettoyage des pièces de votre tire-lait.
• Ne pas entreposer les pièces qui sont mouillées ou humides, car cela pourrait favoriser le
développement de moisissures.
• Ne pas introduire de tubes humides dans le tire-lait. Cela pourrait endommager le tire-lait.
• En cas de gêne à la base du mamelon due au frottement entre le sein et le tunnel de la téterelle,
l’utilisation d’un lubrifiant, comme la lanoline Tender Care™, pourrait s’avérer bénéfique. Pour vous
aider à choisir une téterelle de taille appropriée et confortable, veuillez visiter www.medela.ca ou
prendre conseil auprès d’une consultante en lactation/spécialiste en allaitement.
CONSERVEZ CES INSTRUCTIONS
Remarque
• Les bouteilles en plastique et les pièces des accessoires risquent d’être endommagés sous l’effet
du gel et de se casser si elles tombent.
• Les bouteilles et les pièces des accessoires risquent d’être endommagées si elles ne sont pas
manipulées correctement (p. ex., chute, serrage excessif ou renversement).
• Manipuler les bouteilles et les pièces avec soin.
• Ne pas utiliser le lait maternel si les bouteilles ou les pièces sont endommagées.
• Ne pas utiliser de piles au lithium dans le bloc-pile Pump in Style Advanced.
• Ne pas retirer le tire-lait du boîtier souple/sac de transport.
Des questions? Consultez le site www.medela.com ou appelez-nous au +1800435-8316.
93
Page 94

Table des matières
Consignes de sécurité importantes.............................................................................90-93
Description du produit et des pièces ..........................................................................96-97
1. Pour commencer ........................................................................................................... 98
2. Vue d’ensemble du nettoyage ...................................................................................... 99
3. Nettoyage – avant la première utilisation et après chaque utilisation ............100-101
3.1 Avant la première utilisation ..................................................................................... 100
3.2 Après chaque utilisation .......................................................................................... 100
4. Désinfection – avant la première utilisation et une fois par jour .....................102-103
5. Entretien de la tubulure et du tire-lait .................................................................104-107
5.1 Entretien de la tubulure et de la plaque frontale ................................................ 104-107
5.2 Nettoyage du bloc moteur ...................................................................................... 107
6. Assemblage ...........................................................................................................108-115
6.1 Assemblage de l’ensemble-accessoire du tire-lait ............................................ 108-111
6.2 Taille des téterelles PersonalFit™ .............................................................................. 112
6.3 Mise en marche du tire-lait ............................................................................... 113-115
6.3.1 Entretien de l’adaptateur d’alimentation ......................................................... 113
6.3.2 Bloc-piles ....................................................................................................... 114
6.3.3 Voyager à l’étranger ................................................................................ 114-115
7. Expression ..............................................................................................................116-119
8. Conservation du lait maternel ..................................................................................... 120
8.1 Conservation du lait maternel dans le sac isotherme Pump In Style® Advanced ...... 120
8.2 Directives pour la conservation du lait maternel fraîchement exprimé ...................... 120
9. Préparation et alimentation au lait maternel ............................................................. 121
9.1 Préparation du lait maternel .................................................................................... 121
9.2 Alimentation au lait maternel ................................................................................... 121
10. Dépannage .................................................................................................................. 122
11. Renseignements supplémentaires ........................................................................... 123
12. Mise au rebut .............................................................................................................. 124
13. Garantie ....................................................................................................................... 125
14. Signification des symboles ........................................................................................ 126
15. CEM – description technique ............................................................................. 127-131
16. Caractéristiques techniques ..................................................................................... 132
94
Page 95

Prenez le temps de lire intégralement ce manuel d’instructions avant d’utiliser ce produit pour la
première fois.
VEUILLEZ CONSERVER CES DIRECTIVES.
Il est préférable d’attendre que votre routine d’allaitement soit établie (environ 4semaines) avant
d’exprimer votre lait, sauf indication contraire de votre professionnel de la santé.
Glossaire
Technologie 2-Phase Expression® – technologie fondée sur la recherche qui imite le rythme
d’allaitement naturel du bébé.
Phase d’expression – rythme de succion plus lent pour une extraction efficace et en douceur
du lait aussi vite que possible.
Maximum Comfort Vacuum™ – puissance de succion maximale d’expression tout en restant
confortable. Elle est différente d’une mère à l’autre.
Phase de stimulation – rythme de succion rapide pour stimuler le réflexe d’éjection du lait et
le faire couler.
Mode d’emploi:
Le tire-lait Pump In Style Advanced est un appareil électrique utilisé par les femmes qui
allaitent afin d’exprimer et de recueillir le lait qui s’écoule de leurs seins. L’utilisation du tire-lait
Pump In Style Advanced est réservée à une seule personne.
Contre-indications:
Il n’existe aucune contre-indication connue concernant l’utilisation de ce produit.
Astuce
Il est préférable d’attendre que votre routine d’allaitement soit établie (environ quatre semaines)
avant d’exprimer votre lait, sauf indication contraire de votre professionnel de la santé.
Si, pour des raisons médicales ou d’autres besoins, vous devez exprimer votre
lait exclusivement, il est recommandé d’utiliser un modèle de tire-lait hospitalier
(multiutilisatrices) tel que le tire-lait Symphony® de Medela. Pour en savoir plus,
consultez le site www.medela.ca.
Description du produit
Le tire-lait est un tire-lait électrique à usage personnel équipé de la technologie 2-Phase
Expression® avec l’option d’une expression simple ou double.
La durée de vie du tire-lait correspond à environ trois séances quotidiennes de 15minutes
pendant un an. La durée de vie de l’ensemble-accessoire du tire-lait est de six mois.
Des questions? Consultez le site www.medela.com ou appelez-nous au +1800435-8316.
95
Page 96

Description du produit et des pièces
Medela se réserve le droit de substituer n’importe quel composant ou accessoire
par un autre élément de performance équivalente.
2téterelles PersonalFit™ de 24mm
Partie en contact avec la peau (pour d’autres
tailles de téterelle, consultez la section6.2)
Pièce de rechange
2connecteurs
Article87071 ou 8107264
87073
2valves
Article87089
2membranes
Article87088
4bouteilles
Article6100050
Pièce de rechange87130
96
Pour trouver des pièces de rechange, consultez le site www.medelastore.ca
4couvercles
Article8107183
Pièce de rechange87165
2tubulures
Article87212
1sac isotherme
Pièce de rechange
67068
(comprend un bloc réfrigérant
et 4bouteilles avec couvercles)
87071
8107264
1bloc-piles
Article9017002 Pièce
de rechange67553
1adaptateur d’alimentation
Article101036149 Pièce de
rechange101038300 ou
68030
1bloc réfrigérant
Article 8117010
Pièce de rechange87092
Page 97

1plaque frontale
Article6007132
Sac à dosFourre-tout
Bouton marche-arrêt
Augmenter ou
réduire la succion
Touche d’éjection
du lait
Port d’adaptateur
d’alimentation
Port de la
tubulure
Fiche du
port
Pièces supplémentaires incluses avec The Metro Bag
Port de la
tubulure
™
Téterelles PersonalFit™ de 27mm ................... 87274
Metro Bag comprenant:
Espace de travail en plastique souple ......... 3007299
2sacs de rangement en maille
Pump In Style® Advanced
Metro Bag
™
Des questions? Consultez le site www.medela.com ou appelez-nous au +1800435-8316.
97
Page 98

1. Pour commencer
Les téterelles sont vendues déjà assemblées. Avant le
nettoyage, séparez toutes les pièces qui entreront en
contact avec le sein et le lait maternel.
Pièces à nettoyer:
• Téterelles
• Bouteilles pour lait maternel
• Couvercles
• Connecteurs
• Membranes
• Capuchons arrières
Remarque
Avant d’utiliser votre tire-lait Pump in Style Advanced
pour la première fois, il est important de:
• Démonter toutes les pièces
• Nettoyer – reportez-vous aux directives:
• Nettoyage – Section3
• Désinfection – Section4
98
Page 99

2. Vue d’ensemble du nettoyage
Quand nettoyer?
Avant la 1re
utilisation
Après chaque
utilisation
Une fois par jour
Quand nettoyer? Tubulure Bloc moteur
Au besoin
Ensemble-accessoire
de tire-lait
3 Nettoyage
3 Désinfection
3 Nettoyage 3 Nettoyage
3 Désinfection 3 Désinfection
3 Nettoyer uniquement si
elle est sale ou contient du lait
Bouteilles de tire-lait
3 Essuyer avec un chiffon propre et
Directives de nettoyage détaillées:
• Nettoyage – Section3
• Désinfection – Section4
• Entretien de la tubulure et du tire-lait – Section5
3 Nettoyage
3 Désinfection
humide
Le nettoyage et la désinfection sont deux processus différents. Ils doivent être réalisés
en deux étapes pour vous protéger et pour assurer l’efficacité de votre tire-lait.
Des questions? Consultez le site www.medela.com ou appelez-nous au +1800435-8316.
99
Page 100

3. Nettoyage – avant la première utilisation et après
chaque utilisation
3.1 Avant la première utilisation
Nettoyez et désinfectez les pièces ci-dessous
avant d’utiliser votre tire-lait pour la première
fois. Suivez les consignes de nettoyage et de
désinfection décrites dans les sections 3.2
et4 qui suivent.
Matériel requis:
• Savon à vaisselle doux
• Linge à vaisselle ou brosse souple
propre
• Récipient pour lavage propre
• Eau potable
Pièces à laver:
• Téterelles
• Connecteurs de téterelles
• Membranes
• Valves
• Bouteilles pour lait maternel et
couvercles
3.2 Après chaque utilisation
Nettoyez toutes les pièces qui
entrent en contact avec votre sein
et le lait maternel. Reportez-vous
à l’image de la section1.
1
Séparez les téterelles des
connecteurs de téterelle.
4
Mise en garde
• Utiliser uniquement de l’eau potable du
robinet ou embouteillée pour le nettoyage.
• Démonter et laver toutes les pièces qui
entrent en contact avec le sein et le lait
maternel immédiatement après l’utilisation
pour éviter le dessèchement des résidus
de lait et la prolifération des bactéries.
100
• Rincez à l’eau froide toutes les
pièces démontées qui entrent en
contact avec le lait maternel afin
d’éliminer les résidus de lait.
• Après le rinçage, les pièces entrées
en contact avec le sein ou le lait
maternel doivent être placées dans
un récipient pour lavage propre,
réservé uniquement au nettoyage
de ces articles. Ne placez pas les
pièces directement dans l’évier.
 Loading...