

Page 1
Harmony
TM
EN Instructions for use | ES Instrucciones de uso
67161W2
Page 2
Questions? Visit www.medela.com or call us at 1-800-435-8316.
3
2
Important Safeguards
READ ALL INSTRUCTIONS BEFORE USING THIS PRODUCT.
The warning symbol identifi es all instructions that are important to safety. Failure to
observe these instructions can lead to injury or damage to the breastpump. When
used in conjunction with the following words, the warning symbols stand for:
WARNING Can lead to serious injury or death.
CAUTION Can lead to minor injury.
NOTE Can lead to material damage.
INFO Useful or important information that is not related to safety.
WARNING: To avoid health risk and reduce the risk of injury:
• This product is intended for use by a single user only and should not be shared
between users.
• Do not drive while pumping.
• Never use while pregnant, as pumping can induce labor.
• Clean and sanitize all parts that come in contact with your breast and breastmilk
prior to fi rst use.
• Wash all parts that come in contact with your breast and breastmilk after every use.
• Inspect all appropriate pump components before each use.
• Do NOT continue pumping for more than 2 consecutive pumping sessions if no
results are achieved.
• Do not thaw frozen breastmilk in a microwave or in a pan of boiling water.
SAVE THESE INSTRUCTIONS
IMPORTANT
• Plastic bottles and component parts become brittle when frozen and may break
when dropped.
• Bottles and component parts may become damaged if mishandled, e.g. dropped,
over-tightened, or knocked over.
• Take appropriate care in handling bottles and components.
• Do not use the breastmilk if bottles or components become damaged.
1. Cleaning Instructions ....................................................................................6-9
1.1 Before using for the fi rst time ....................................................................... 6
1.2 After each use...........................................................................................6-7
1.3 Sanitize daily .............................................................................................8-9
2. Assembly ....................................................................................................10-12
2.1 Assembly of pump kit ...........................................................................10-12
2.2 Correctly fi tting breastshields .....................................................................13
3. Pumping .....................................................................................................14-17
3.1 Device operation ...................................................................................14-15
3.1 Symphony Breastpump Setup ..............................................................16-17
4. Storing Breastmilk .......................................................................................... 18
5. Preparing & Feeding Breastmilk ................................................................... 19
5.1 Preparing breastmilk .................................................................................. 19
5.2 Feeding breastmilk ..................................................................................... 19
6. Troubleshooting .............................................................................................. 20
7. Supplemental Information/Disposal ............................................................. 21
8. Warranty .......................................................................................................... 22
Table of Contents
Page 3
Questions? Visit www.medela.com or call us at 1-800-435-8316.
5
4
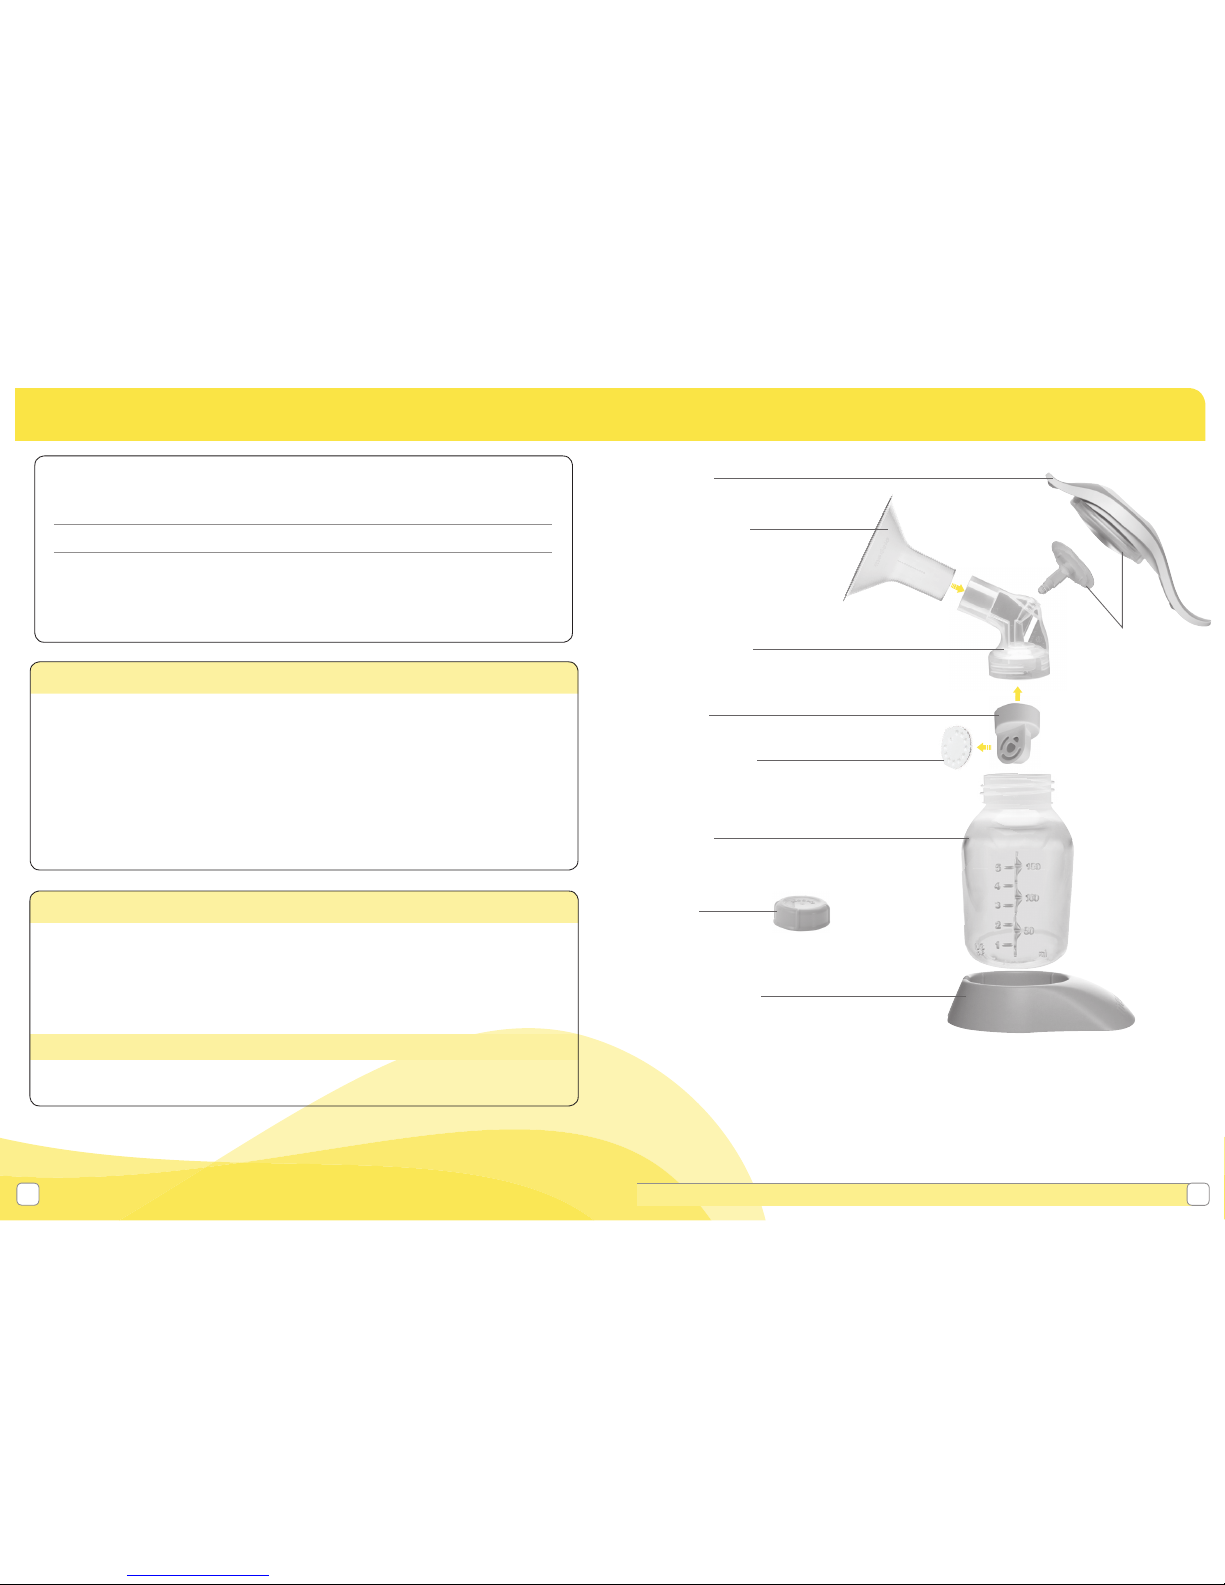
2x PersonalFit™
Breastshields
(for other breastshield sizes
see Section 2.2, page 13)
87073 (M, 24 mm) 87074 (L, 27 mm)
1x Handle
8007262
1x Pump Body
8107236
1x Va lve
8100475
2x Membranes
8207013
1x Bottle
81170 18
1x Bottle Stand
8100462
2x Lids
8107183
Product Description
Diaphragm, Stem,
O-Ring Assembly
8007234
Take a moment to read through this entire instruction manual before using this
product for the fi rst time.
PLEASE SAVE THESE INSTRUCTIONS.
It is best to wait until your breastfeeding routine is established (approximately
4weeks) before expressing breastmilk, unless otherwise advised by your
healthcare professional.
Glossary of Terms
2-Phase Expression® technology – research based technology that mimics a
baby’s natural nursing rhythm.
Expression Phase – slower sucking/pumping rhythm for gentle and effi cient milk
removal as quickly as possible.
Maximum Comfort Vacuum
™
– highest vacuum setting where a mother still feels
comfortable during pumping. It is different for every mother.
Stimulation Phase – fast sucking/pumping rhythm to stimulate the milk ejection
refl ex and to start the milk fl owing.
Intended Use
For lactating women to express and collect milk from their breasts to complement
breastfeeding.
If you have medical reasons or other needs for exclusively pumping, it is
recommended that you use a hospital grade breastpump such as our Symphony
Breastpump. To learn more, visit us at www.medelabreastfeedingus.com.
Product Description
Harmony™ is a personal use manual breastpump that includes 2-Phase Expression
technology and is capable of single pumping.
Medela reserves the right to substitute any component or accessory with
a replacement of equivalent performance.
Page 4
Questions? Visit www.medela.com or call us at 1-800-435-8316.
7
6
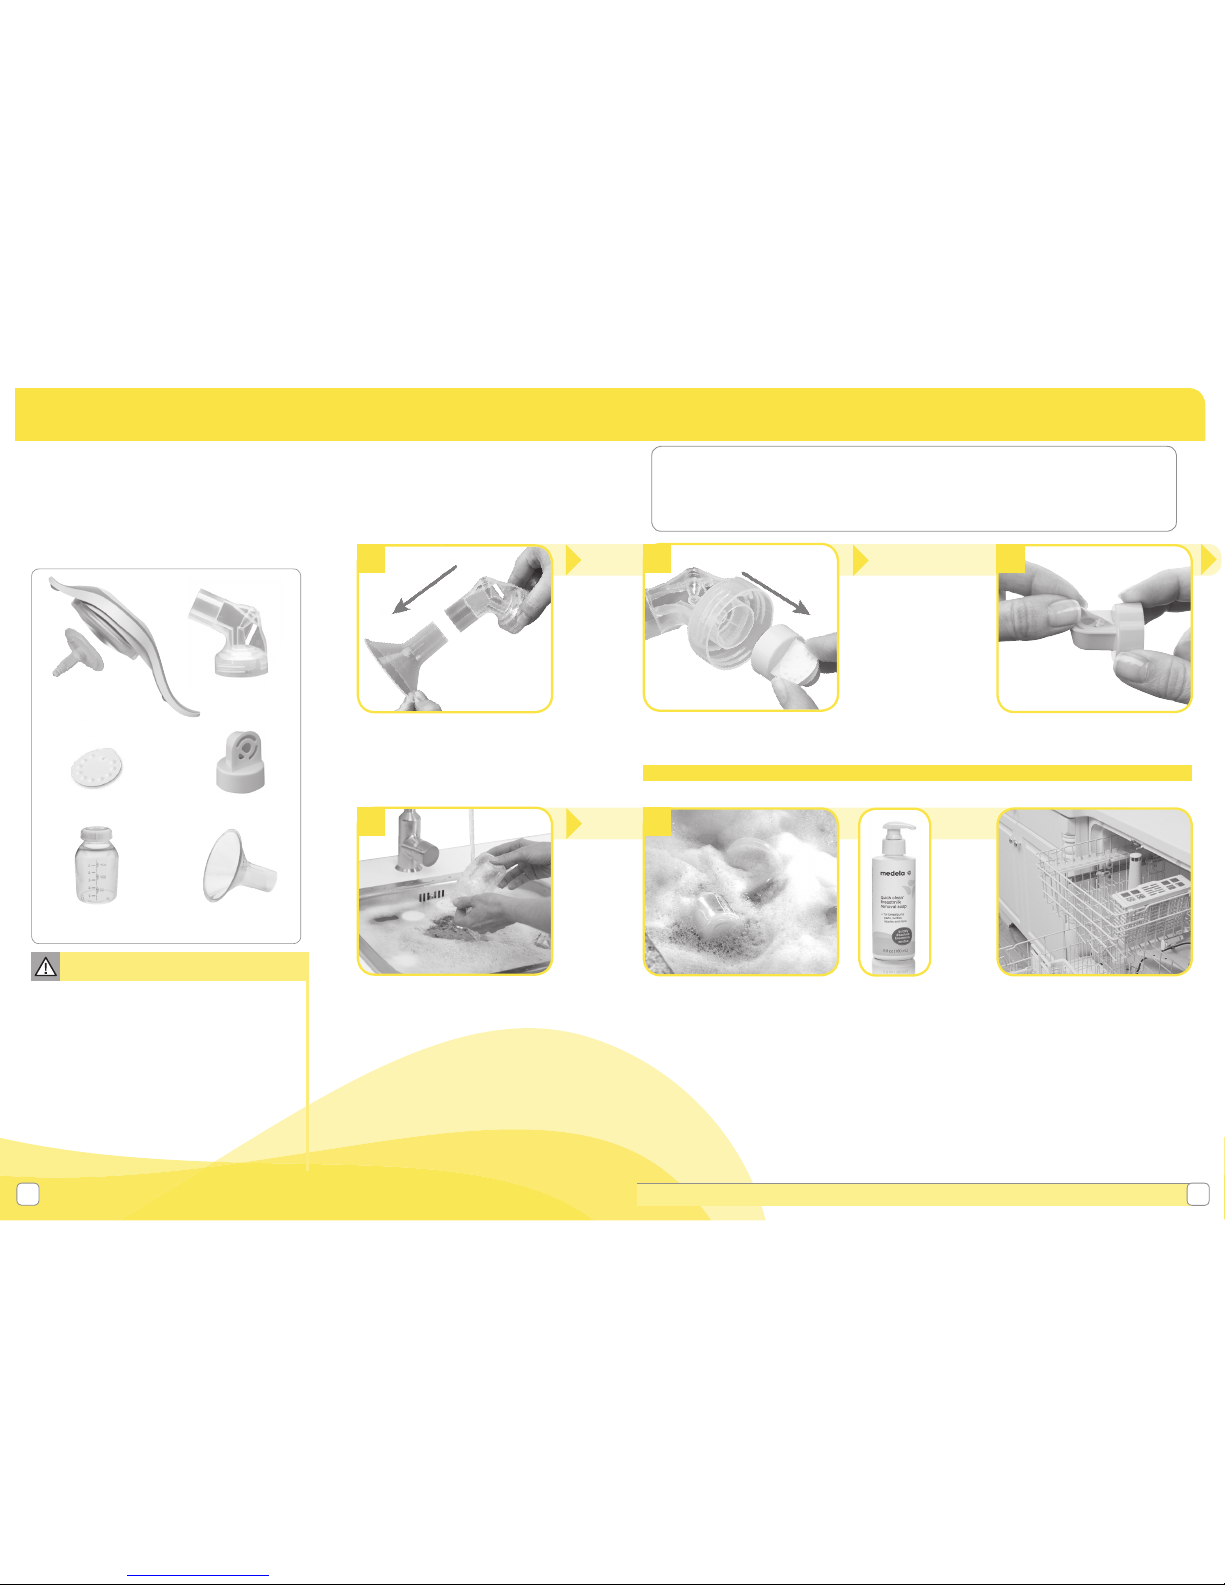
• Breastshield
• Pump Body
• White membrane • Yellow valve
• Breastmilk bottle
and lid
Supplies Needed: • Mild Dish Soap
• Clean Dish Towel or
Soft Brush
• Clean Sink or Bowl
• Drinking Quality
Water
1
3
4
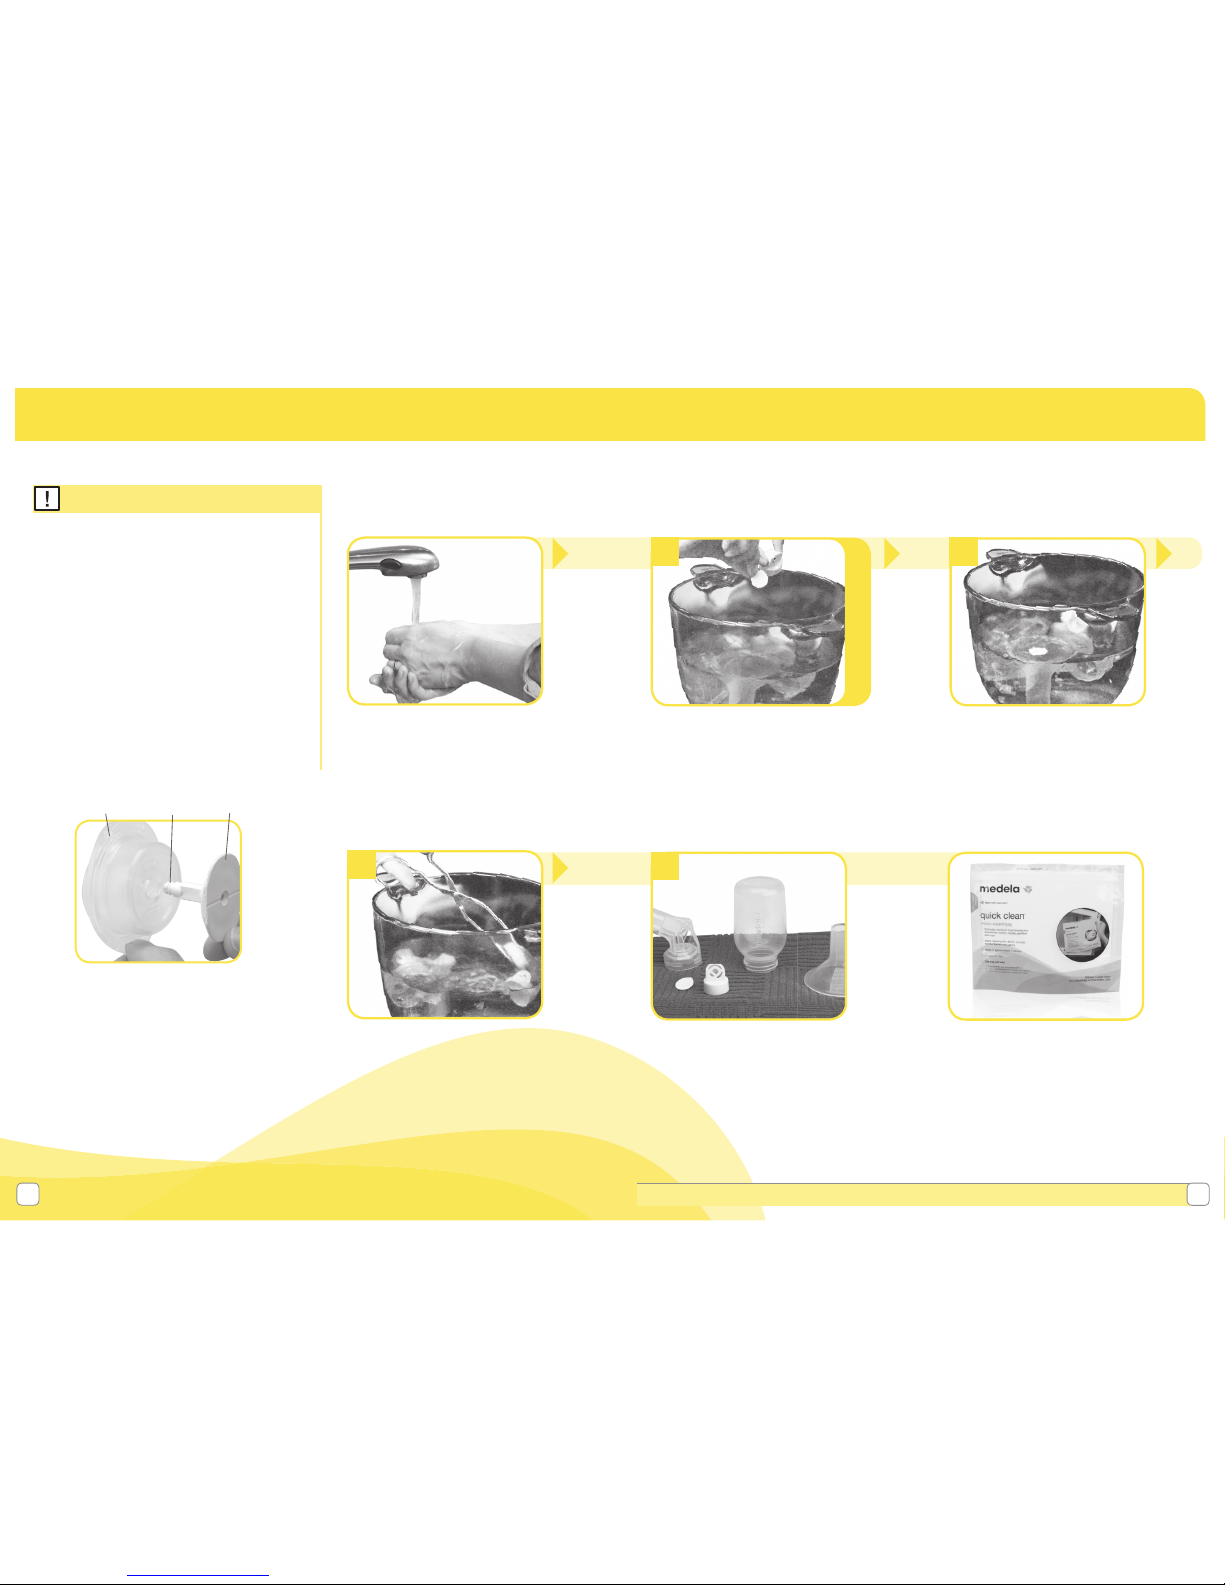
1.1 Before using for the fi rst time
Clean and sanitize the parts below before using
your pump for the fi rst time. Follow the cleaning
and sanitizing instructions in Sections 1.2
(start at step 4) and 1.3 that follow.
1. Cleaning
1.2 After each use
Clean all parts that come in contact
with your breast and breastmilk.
Twist and pull the yellow valve off
the pump body.
Separate breastshield from
pump body.
Remove the white membrane
from the yellow valve.
• Only use drinking-quality tap or bottled
water for cleaning.
• Take apart and wash all parts that
come in contact with the breast and
breastmilk immediately after use to
avoid dry up of milk residues and to
prevent growth of bacteria.
• Pay special attention to O-Ring during
disassembly and cleaning to avoid
losing or damaging.
Caution
Rinse in cool water all separated
parts that came in contact with
breast and breastmilk in order to
remove breastmilk residue.
Washing in sink:
Washing Options:
or
Washing in dishwasher:
• Soak all separated parts in
warm soapy water for
5minutes.
• Clean with a clean dish-cloth
or soft brush.
• Rinse all separated parts
with clear water.
• Allow all parts to air dry in
a clean area.
• Store dry parts when not in use.
• Wash all separated parts
on top rack of dishwasher.
• Allow all breastpump parts
to air dry in a clean area.
• Store dry parts when
not in use.
5
• You may wash
your kit parts
by following the
instructions on
the Quick Clean
™
Breastmilk
Removal Soap
bottle.
2
• Handle, Diaphragm,
Stem, O-Ring
Assembly
Page 5
Questions? Visit www.medela.com or call us at 1-800-435-8316.
9
8
Diaphragm O-Ring Stem
3
1
2
4
1.3 Sanitize daily
• Wash breastpump kit parts after each use.
• Sanitize breastpump kit parts once daily.
• The pump kit requires no maintenance.
• Take care not to damage parts
of the pump kit during cleaning.
• If the individual components of the pump
kit are cleaned in a dish washer, parts may
be discolored by food pigments. This has
no impact on the function.
• The diaphragm, stem and o-ring
assembly should not be sanitized using
the Micro-Steam bags.
Note
Wash hands thoroughly.
Allow water to cool and gently
remove parts from water with
tongs.
Separate all parts that come in
contact with your breast and
breastmilk.
Refer to image in Sec tion 1.1
• Fill a pot with enough water
to cover all parts.
• Bring water to a boil.
• Place parts in boiling water
for 10 minutes.
• Place parts on a clean surface and/
or towel.
• Allow all parts to air dry.
• Store dry parts when not in use.
Do NOT store wet or damp parts.
You may sanitize your
kit parts by following the
instructions on Medela’s
Quick Clean
™
Micro-Steam™
bag. See note page 8.
or
1. Cleaning (cont.)
Page 6
Questions? Visit www.medela.com or call us at 1-800-435-8316.
11
10
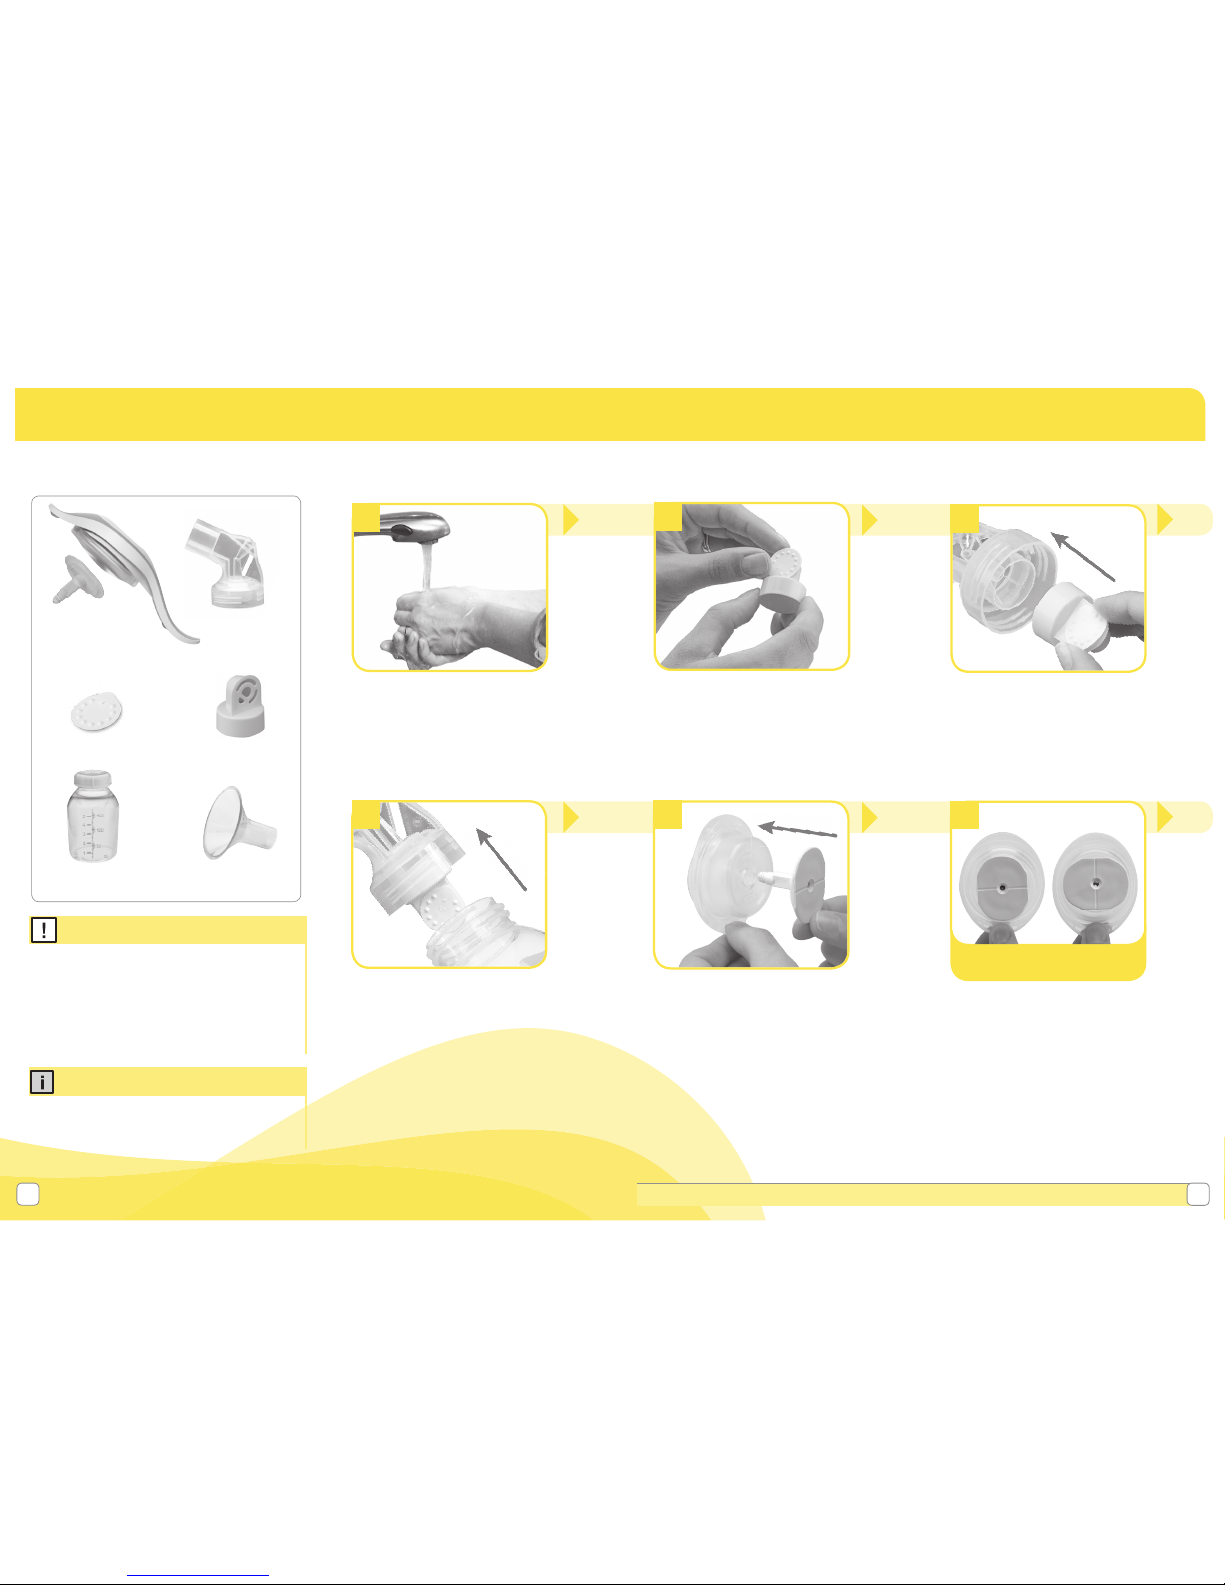
Parts you will need for this step:
1
4
3
6
• Inspect valves for cracks or chips and
inspect membranes for holes, tears or
warping. If you notice any damage to
these parts, replace them immediately.
• Check stem to make sure o-ring is
present.
Note
2.1 Assembly of pump kit
Wash hands before touching
breastpump, kit and breasts
and avoid touching the inside of
containers or lids.
Screw bottle onto pump body.
Snap membrane onto
valve until membrane lies
completely fl at on valve.
Push yellow valve securely onto
inner ring of pump body.
If the handle components
have been disassembled, place
the oval shaped base of the stem
into the diaphragm.
Hint: Make sure the oval shape
is lined up correctly in the
diaphragm.
Continued
next page.
2. Assembly
2
• Carry out all the steps with care and
assemble the pump kit correctly for
optimum performance.
Info
Correct Incorrect
• Breastshield
• Pump Body
• White membrane • Yellow valve
• Breastmilk bottle
and lid
• Handle, Diaphragm,
Stem, O-Ring
Assembly
5
Page 7
Questions? Visit www.medela.com or call us at 1-800-435-8316.
13
12
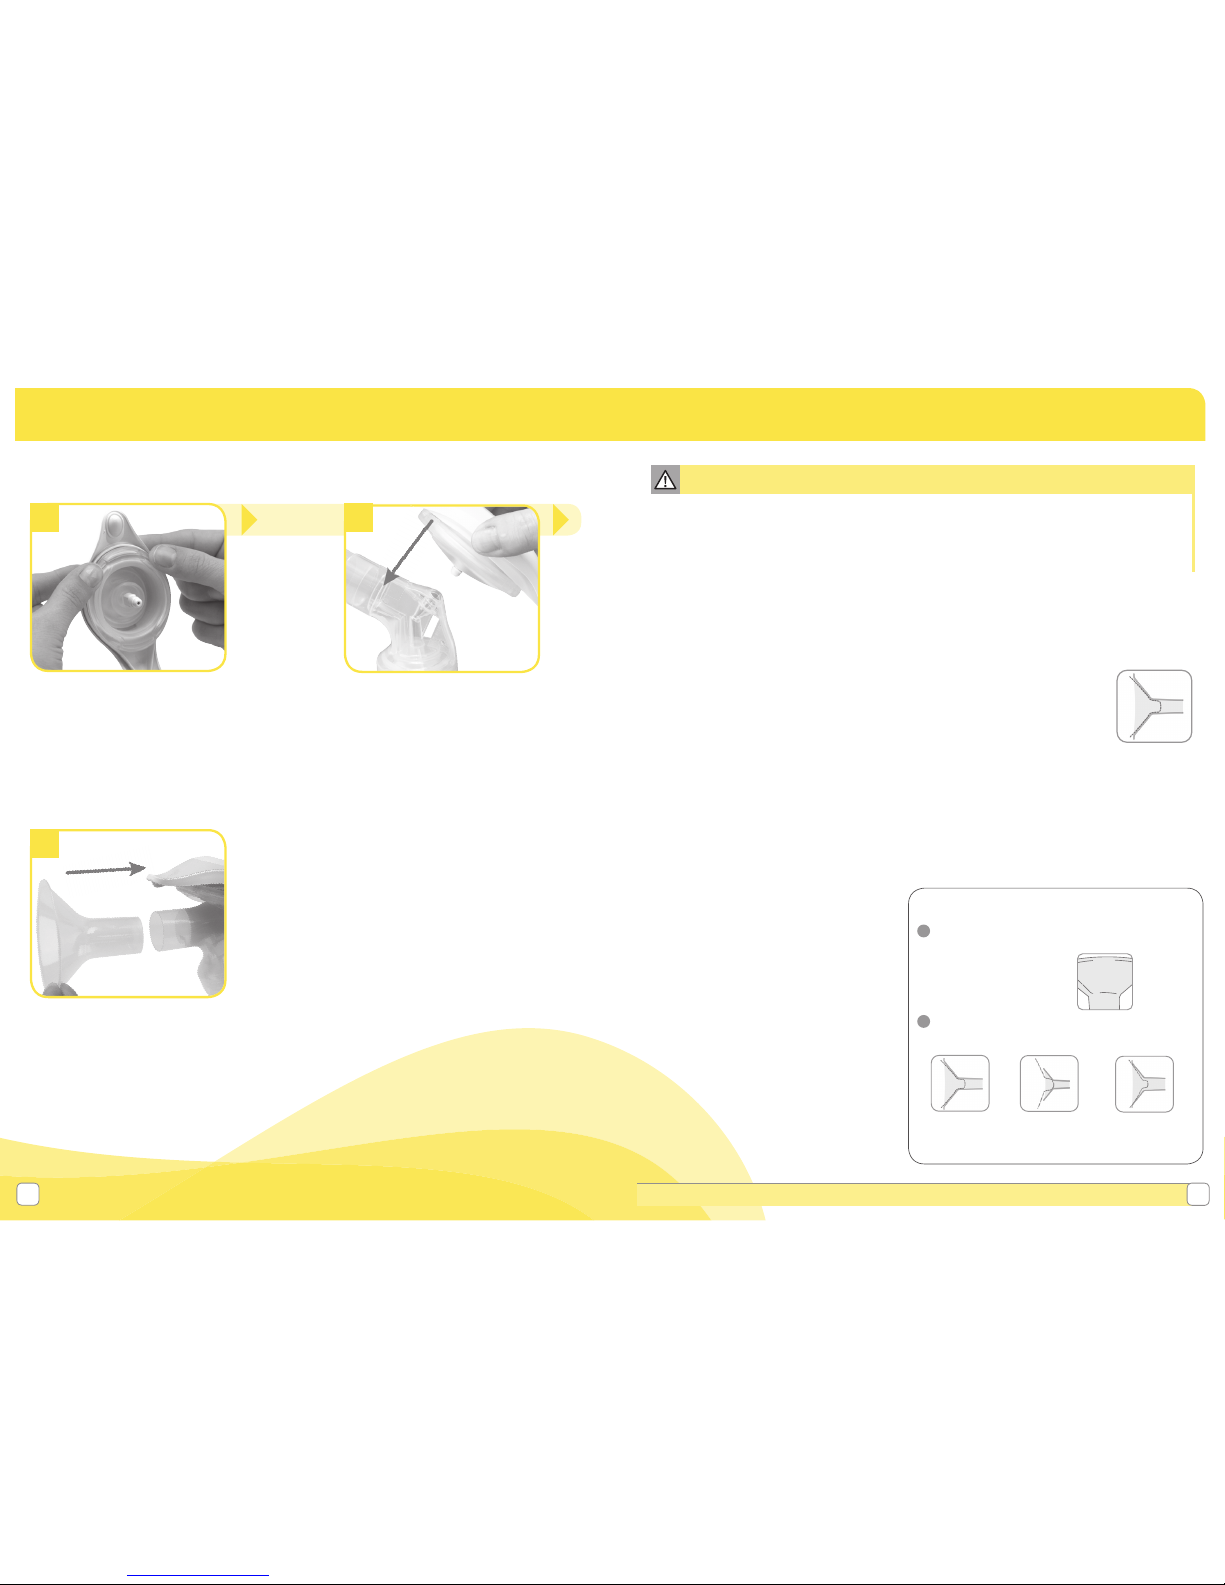
2.2 Correctly fi tting breastshields
Properly fi tting breastshields will ensure comfort and effi cient milk expression.
To determine if you have the correct size, look at the following diagram:
• The nipple should be centered in the tunnel of the shield.
• The nipple should move freely without rubbing while pumping.
• Minimal or no part of your areola should be pulled into the tunnel
of the breastshield.
• You should see a gentle, rhythmic motion in the breast
with each cycle of the pump.
• After pumping, your breast should feel much less full with no areas of
hardness.
Medela offers smaller and larger sizes which are available at many local
retailers or visit www.shopmedela.com.
PersonalFit™ Breastshields
21 mm (Small)
Item 87072
24 mm (Medium)
Item 87073 (included)
27 mm (Large)
Item 87274 (included)
30 mm (X-Large)
Item 87075
36 mm (XX-Large)
Item 87084
TM
breastshield:
Your breastshield
Correct fit
Your breastshield
24 mm
Choosing the right size PersonalFit
TM
breastshield:
1. Determine the size you’re currently using. If you’re
not sure, look for the size embossed on your
breastshield (see picture).
24 mm (M) breastshields
are provided with
Medela breastpumps.
2. While pumping, compare your fit to the images below
as a sizing guideline.
Your breastshield
is too large;
try a smaller size
Correct fit
Your breastshield
is too small;
try a larger size
24 mm
• While some discomfort may be felt when fi rst using a breastpump, using a
breastpump should not cause pain. If you are unsure about breastshield sizing,
please contact a healthcare professional or breastfeeding specialist who can help
you get a proper fi t.
Caution
2. Assembly (cont.)
7 8
9
Place silicone diaphragm/stem
into pump handle and press
down fi rmly around entire edge to
ensure proper seal. The lines on
the diaphragm should line up with
the yellow dots on the handle.
Insert stem of handle assembly
into opening on top of pump
body and push until you feel it
snap in.
Insert PersonalFit
™
breastshield
into top opening on pump body.
Page 8
Questions? Visit www.medela.com or call us at 1-800-435-8316.
15
14
1 2
3 4
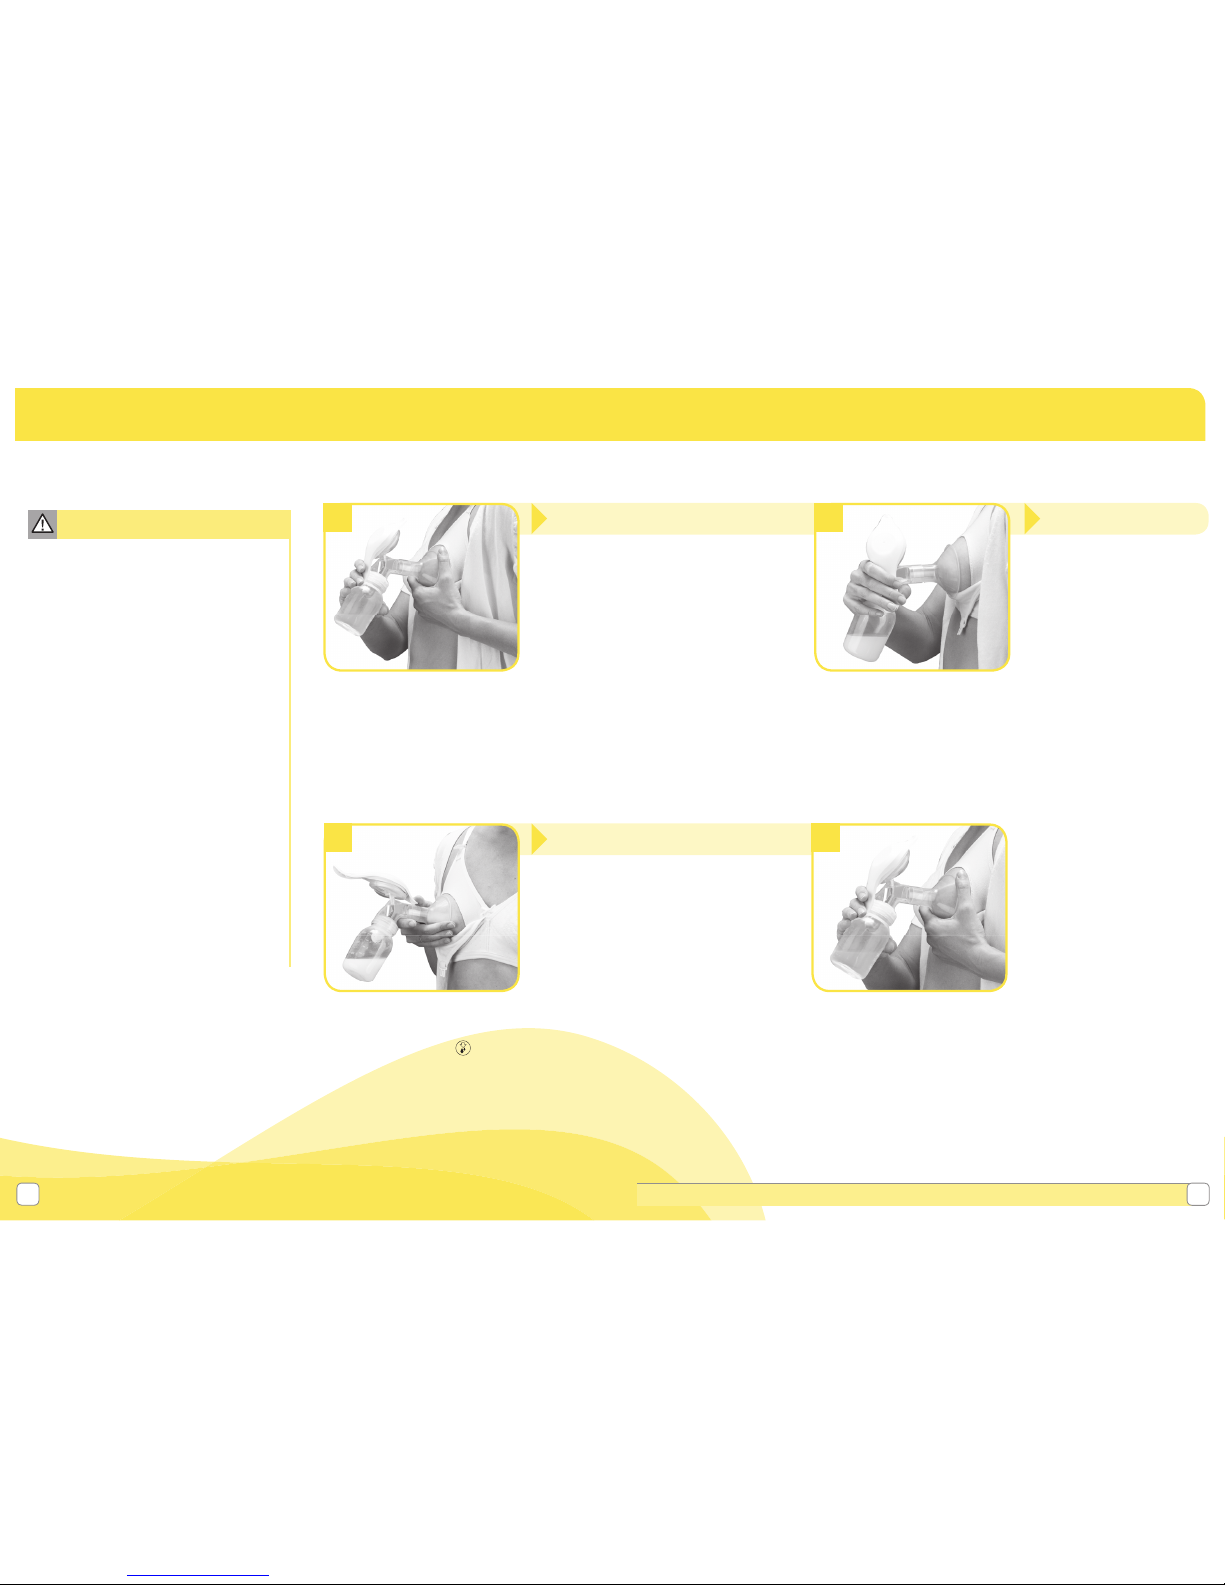
3. Pumping
3.1 Pumping
Center breastshield over
nipple. Caution: pushing
shield too fi rmly into breast
may actually reduce milk fl ow.
Start pumping in the stimulation
mode, by pressing down on the
milk drops symbol
on top
of the pump handle. Press and
release quickly until you see milk
fl ow begin. This mode mimics
baby’s initial rapid sucking and is
designed to stimulate milk
fl ow/let-down.
The adjustable handle can be positioned
for your maximum pumping comfort.
The level of vacuum is controlled by the
compression and the speed of the handle
stroke. You decide the pumping rhythm
that is best for you.
Once let-down has begun, switch
to the expression mode by
pressing the bottom of the pump
handle. This will give you a longer
stroke that mimics baby’s deeper,
more relaxed sucking and is
designed to maximize milk fl ow.
• Wash hands thoroughly with soap
and water before touching the
breast and pump parts.
• Always inspect breastshields,
valves and membranes prior to use
for cleanliness. If dirty, see
Section 1.2.
• Contact your healthcare
professional or breastfeeding
specialist if you can express only
minimal or no milk or if expression
is painful. See Section 7 for more
information.
• Do not try and express with
vacuum that is too high and
uncomfortable (painful). The pain,
along with potential breast and
nipple trauma may decrease milk
output.
• Step 2: Do not hold the pump
kit by the bottle. This can lead to
blockage of the milk ducts and
engorgement.
Caution
Page 9

Questions? Visit www.medela.com or call us at 1-800-435-8316.
17
16
1
2
3.2 Symphony Breastpump
Setup
Remove handle assembly from
Harmony
™
breastpump.
Insert end of tubing into
opening on top of Harmony
pump.
Assemble protective
membrane and membrane
cap.
3. Pumping (cont.)
• Requires membrane cap #8100769,
membrane #8200094 and tubing
#8007213. Sold separately.
Info
3
4
Insert yellow end of tubing into port
on membrane cap.
Push membrane cap fi rmly into place
on pumping mechanism. Adjust for
comfort once pumping begins.
Page 10

Questions? Visit www.medela.com or call us at 1-800-435-8316.
19
18
5.1 Preparing breastmilk
• Thaw breastmilk overnight in the refrigerator. Thawed breastmilk is safe in
the refrigerator for 24hours. Do not refreeze thawed breastmilk.
• Quickly thaw breastmilk by holding the bottle under warm running water.
• Place the sealed bottle in a bowl of warm water for 20minutes to bring it
to body temperature.
• If you are adding expressed breastmilk to a container of already frozen
breastmilk, make sure to add a lesser amount than the already frozen
amount.
5.2 Feeding breastmilk
It is recommended that breastfeeding is well established prior to bottle
feeding your baby.
• Always inspect the bottle, nipple and other components immediately
before and after each use. If nipple appears cracked or torn, discontinue
use immediately.
• To prevent possible choking hazard, test strength of nipple by pulling on
bulb portion of the nipple.
• Do not attempt to enlarge the nipple hole.
• Infants must not be bottle fed without adult supervision.
• Nipple should not be used as a pacifi er.
• As soon as you are fi nished
pumping, place the breastmilk
bottle or breastmilk storage
bag in a cooler with ice pack.
• Transfer breastmilk bottle or
breastmilk storage bag to the
refrigerator or freezer once you
are home.
• When freezing, do not fi ll
container more than 75% full
to allow space for expansion.
Label container with date of
pumping.
Room
Temperature
Cooler with
Ice Pack
Refrigerator
Thawed
Breastmilk
Freezer
Freshly Expressed Breastmilk
Storage Guidelines
(For Healthy Term Babies)
4–6 hours
at 66–78 °F
(19–26 °C)
24 hours
at 59 °F
(15 °C)
3–8 days
at 39 °F
or lower
(4 °C)
use within
24 hrs
6–12
months
0–-4 °F
(-18–-20 °C)
4. Storing Breastmilk
5. Preparing and Feeding Breastmilk
4.1 Storing breastmilk
• Do not thaw frozen breastmilk in a
microwave or in a pan of boiling water.
• Do not microwave breastmilk.
Microwaving can cause severe burns
to baby’s mouth from hot spots that
develop in the milk during microwaving.
(Microwaving can also change the
composition of breastmilk.)
Warning
References: www.BreastmilkGuidelines.com
Page 11

Questions? Visit www.medela.com or call us at 1-800-435-8316.
21
20
Low or No Suction Valve and Membrane Check
• Remove and separate valve from membrane.
• Inspect the valve for chips or cracks. Inspect the membrane
for holes or tears. If fl awed or damaged, replace valve and/or
membrane prior to pumping.
• Wash valve and membrane per Cleaning Section 1.
• Reassemble. Make sure the membrane lays fl at on the valve
and if it does not, replace the valve and/or membrane prior to
pumping.
Breastshield and Pump Body Check
• Inspect breastshield and pump body to make sure there are no
cracks and they securely attach to each other.
• Make sure the stem assembly on the pump handle is seated all
the way into the pump body until it will go no farther.
• Make sure the white o-ring is in place in the stem handle.
• Make sure the pump body is fi rmly screwed onto the bottle and
that the breastshield is fi rmly seated into the pump body.
• Make sure the oval base of the stem is properly seated in the oval
base of the diaphragm.
• Make sure the diaphragm is pushed all the way onto the circular
rim on the underside of the handle.
• Make sure the breastshield forms a complete seal around the
breast.
No “let-down” or breastmilk
expression
• Ensure your breastpump is assembled correctly and that there is
suction.
• Relax and take a 10-15 minute break if let down is not achieved
after 2 consecutive pumping sessions.
• Consult with your healthcare provider or breastfeeding specialist if
expression does not occur.
If you have not resolved the problem with your breastpump or your have further questions,
please contact Medela Customer Service at 1-800-435-8316 or email customer.service@
medela.com.
7. Supplemental Information/Disposal6. Troubleshooting
Disposal Guideline
Properly dispose of the device in accordance with local, state and federal regulations.
Supplemental Information
Following are some common breastfeeding related conditions. If you experience any of
these symptoms, contact a healthcare professional or breastfeeding specialist.
Symptom Potential Causes
Engorgement Breasts are hard and uncomfortable,
possibly with reddened areas.
Milk not draining properly from
breast. Milk can drain back
into the tissue causing areas to
swell and become tender.
Blocked/Plugged
Ducts
Area of breast will look reddened and may
be tender to touch.
Milk not being drained from
a specifi c duct. The area
becomes “clogged” up and
milk is then prevented from
fl o w i n g .
Mastitis It often follows engorgement but can just
occur suddenly. The initial symptoms
are similar to fl u – fatigue, headache and
muscle aches, fever and localized breast
tenderness. It can be in one or even both
breasts and needs immediate treatment.
A bacterial infection in the
breast tissue which is often
accompanied by cracked
nipples.
A healthcare professional or breastfeeding specialist can give you guidance in breastfeeding
your baby and using a breastpump. Their guidance is valuable in terms of the lifetime of health
benefi ts for both you and your baby. A listing of Lactation Professionals are available at www.
medelalocator.com or call 1-800-TELL-YOU (1-800-835-5968).
Page 12

Questions? Visit www.medela.com or call us at 1-800-435-8316.
23
22
This product is warranted by Medela, Inc. to the original retail purchaser to be free from
defects in material and workmanship for the period of one year for pump mechanism
(90 days for parts and accessories) from the date of purchase. In the event of a defect,
Medela will repair or, at Medela’s option, replace this product, without charge for such
replacement, parts or labor. Purchaser shall bear all expense for returning this product
to Medela. This warranty does not apply to any product used commercially or which
has been subjected to misuse, abuse or alteration.
ANY AND ALL IMPLIED WARRANTIES, INCLUDING THE WARRANTY OF
MERCHANTABILITY, ARE LIMITED TO A DURATION OF 90 DAYS FROM DATE OF
PURCHASE. SOME STATES DO NOT ALLOW LIMITATIONS ON HOW LONG AN
IMPLIED WARRANTY LASTS, SO THE ABOVE LIMITATIONS MAY NOT APPLY TO
YOU. THIS WARRANTY GIVES YOU SPECIFIC LEGAL RIGHTS AND YOU MAY ALSO
HAVE OTHER RIGHTS WHICH VARY FROM STATE TO STATE.
Before you make a claim under this warranty, it may save time and expense to call
Medela Customer Service (toll free) at 1-800-435-8316. You may also call this number
for additional information concerning this warranty. If you wish to make a claim under
this warranty, you must return this product to Medela with a return authorization
number received from Medela Customer Service, prepaid, together with your dated bill
of sale or other proof of purchase and a brief statement of the problem to the following
address:
Call fi rst for authorization number. Returns not accepted without an authorization
number.
This is a single user product. Use by more than one person may present a health risk
and performance questions and voids the warranty.
Caution
8. Warranty
Medela, Inc. – Returns, Door 4501
1101 Corporate Dr.
McHenry, IL 60050
ATTENTION: RETURNS
Page 13

25
24
¿Tiene alguna pregunta? Visite www.medela.com o llámenos al 1-800-435-8316.
1. Instrucciones de limpieza ...............................................28-31
1.1 Antes de utilizar el producto por primera vez .................... 28
1.2 Después de cada uso .................................................28-29
1.3 Esterilización diaria ...................................................... 30-31
2. Armado ..............................................................................32-35
2.1 Armado del kit del extractor ........................................32-34
2.2 Colocación correcta de los embudos ............................... 35
3. Extracción de leche .........................................................36-39
3.1 Funcionamiento del dispositivo ...................................36-37
3.2 Armado del extractor de leche Symphony ................... 38-39
4. Conservación de la leche materna ...................................... 40
5. Preparación y alimentación con leche materna ................ 41
5.1 Preparación de la leche materna ...................................... 41
5.2 Alimentación con leche materna ...................................... 41
6. Resolución de problemas..................................................... 42
7. Información complementaria/Desecho del producto ....... 43
8. Garantía ................................................................................. 44
Medidas de seguridad importantes
LEA TODAS LAS INSTRUCCIONES ANTES DE USAR ESTE PRODUCTO.
El símbolo de advertencia identifi ca todas las instrucciones que son importantes
desde el punto de vista de la seguridad. La inobservancia de estas instrucciones
puede provocar lesiones o daños en el extractor de leche. Cuando los símbolos
de advertencia se utilizan junto con los siguientes términos, tienen el signifi cado
acontinuación:
ADVERTENCIA Puede provocar lesiones graves o la muerte.
PRECAUCIÓN Puede provocar lesiones menores.
NOTA Puede provocar daños materiales.
INFORMACIÓN Información útil o importante que no se relaciona con
la seguridad.
ADVERTENCIA: Para evitar riesgos en la salud y reducir el
riesgo de sufrir lesiones:
• Este producto ha sido diseñado para ser utilizado únicamente por una sola persona
y no debe compartirse con otros.
• No conduzca mientras utiliza el extractor de leche.
• No utilice este producto durante el embarazo, ya que la extracción de leche puede
inducir el parto.
• Limpie y esterilice todas las piezas que están en contacto con el pecho y la leche
materna antes de utilizarlas por primera vez.
• Lave todas las piezas que están en contacto con el pecho y la leche materna
después de cada uso.
• Inspeccione todas las piezas del extractor que va a utilizar antes de cada uso.
• Si no logra los resultados deseados, NO continúe probando por más de 2 sesiones
consecutivas de extracción.
• No descongele la leche materna en el horno microondas o en una olla con agua
hirviendo.
IMPORTANTE
• Los biberones de plástico y las piezas se tornan frágiles cuando se congelan y
pueden romperse al caer.
• Los biberones y las piezas pueden dañarse si se manipulan incorrectamente, por
ejemplo, si se caen, se ajustan demasiado o se golpean.
• Tenga cuidado al manipular los biberones y las piezas.
• No utilice la leche materna si los biberones o las piezas presentan daños.
CONSERVE ESTAS INSTRUCCIONES
Índice
Page 14

27
26
¿Tiene alguna pregunta? Visite www.medela.com o llámenos al 1-800-435-8316.
2x embudos
PersonalFit™
(para otros tamaños
de embudos, consulte la
Sección2.2, página 35)
87073 (M, 24 mm) 87074 (G, 27 mm)
1x Mango
8007262
1x Cuerpo del
extractor
8107236
1x Válvula
8100 475
2x Membranas
8207013
1x Biber ón
8117 018
1x Sopor te
8100 462
2x Tapa s
8107183
Diafragma, pie,
baseoval
8007234
Descripción del producto
Medela se reserva el derecho de reemplazar cualquier componente
o accesorio con uno de igual rendimiento.
Glosario de términos
Tecnología 2-Phase Expression®: tecnología basada en estudios que imita el
ritmo de succión natural del bebé.
Fase de extracción: ritmo más lento de succión/extracción a fi n de obtener
leche de manera suave y efi ciente con la mayor velocidad posible.
Maximum Comfort Vacuum
™:
instancia de mayor vacío en la cual la madre no
experimenta ningún tipo de molestia durante la extracción de leche. Difi ere de
una madre a otra.
Fase de estimulación: ritmo rápido de succión/extracción a fi n de estimular el
refl ejo de eyección de leche y su salida.
Uso deseado
Para mujeres en período de lactancia que deseen extraer y guardar su propia
leche como complemento del amamantamiento.
Recomendamos el uso de un extractor de leche de uso hospitalario, por ejemplo,
nuestro modelo Symphony, en el caso que la extracción de leche materna se deba
exclusivamente a cuestiones médicas u otras necesidades. Visite nuestra página
en www.medelabreastfeedingus.com para obtener mayor información.
Descripción del producto
HarmonyTM es un extractor de leche manual para uso personal con tecnología
2-Phase Expression para extracción simple.
Tómese un momento y lea íntegramente este manual de instrucciones antes de
utilizar el producto por primera vez.
CONSERVE ESTAS INSTRUCCIONES.
Conviene esperar hasta que la rutina de amamantamiento esté establecida
(aproximadamente 4 semanas) antes de extraer leche, salvo que el profesional
de la salud le haya indicado lo contrario.
Page 15

29
28
¿Tiene alguna pregunta? Visite www.medela.com o llámenos al 1-800-435-8316.
Necesita: • Detergente suave.
• Paño de limpieza o
cepillo suave (limpios).
• Pila o recipiente (limpios).
• Agua potable.
3
Gire y extraiga la válvula amarilla
del cuerpo del extractor.
Quite la membrana blanca de
la válvula amarilla.
Lavado en pila:
Opciones de lavado:
o
Lavado en lavavajillas:
• Sumerja todas las piezas por
separado en agua jabonosa
durante 5 minutos.
• Limpie con un cepillo suave
opaño limpio.
• Enjuague todas las piezas
porseparado con agua limpia.
• Deje secar todas las piezas
sobre una superfi cie limpia.
• Guarde las piezas secas
cuando no las utiliza.
• Lave todas las piezas por
separado en el estante
superior del lavavajillas.
• Deje secar todas las
piezas del extractor de
leche sobre una superfi cie
limpia.
• Guarde las piezas secas
cuando no las utiliza.
5
• Puede lavar las
piezas del kit
siguiendo las
instrucciones
incluidas en el
envase del jabón
Quick Clean
™
para limpiar
residuos de leche.
2
1. Limpieza
• Embudo
• Cuerpo del
extractor
• Membrana
blanca
• Válvula
amarilla
• Biberón y tapa
1
4
1.1 Antes de utilizar el producto
por primera vez
Limpie y esterilice las piezas que se
muestran a continuación antes de utilizar
el extractor de leche por primera vez. Siga
las instrucciones de limpieza y esterilización
indicadas en las Secciones 1.2 (a partir
del paso 4) y 1.3 a continuación.
1.2 Después de cada uso
Limpie todas las piezas que están
en contacto con el pecho y la leche
materna.
Retire el embudo del cuerpo
del extractor.
• Utilice únicamente agua potable o envasada
para limpiar el producto.
•
Separe y lave todas las piezas que están en
contacto con el pecho y la leche materna
inmediatamente después de cada uso para
evitar que los restos de leche se sequen y se
desarrollen bacterias.
•
Preste especial atención a la base oval durante
el desarmado y la limpieza para evitar que se
pierda o dañe.
Precaución
Enjuague con agua fría todas las
piezas extraídas que estuvieron
en contacto con el pecho y la
leche materna para eliminar los
restos de leche.
• Mango, diafragma,
pie, base oval
Page 16

31
30
¿Tiene alguna pregunta? Visite www.medela.com o llámenos al 1-800-435-8316.
Diafragma Base oval Pie
1
2
4
Separe todas las piezas que
estuvieron en contacto con el
pecho y la leche materna.
Consulte la imagen de la
Sec ción 1.1.
• Llene un recipiente con
sufi ciente cantidad de agua
como para cubrir todas las
piezas.
• Haga hervir el agua.
• Coloque las piezas en agua
hirviendo por 10 minutos.
• Coloque las piezas sobre una
superfi cie y/o toalla limpia.
• Deje secar todas las piezas.
• Guarde las piezas secas cuando
no las utiliza. NO guarde piezas
húmedas o con agua.
Puede esterilizar las piezas
siguiendo las instrucciones
incluidas en la bolsa Quick
Clean
™
Micro-Steam™ de
Medela. Lea la nota en la
página 30.
o
3
1.3 Esterilización diaria
• Lave las piezas del extractor de leche
después de cada uso.
• Esterilice las piezas del extractor de leche
una vez al día.
• El extractor no requiere ningún tipo de
mantenimiento.
• Tenga cuidado de no dañar las piezas del
extractor cuando las limpia.
• Es posible que las piezas individuales del
extractor que se lavan en un lavavajillas
pierdan el color debido a los pigmentos de
los alimentos. Esto no infl uye en la función
del producto.
• El diafragma, el pie y la base oval no
deben esterilizarse utilizando las bolsas
Micro-Steam.
Nota
Lávese bien las manos.
Deje enfriar el agua y utilice pinzas
para retirar las piezas del agua con
cuidado.
1. Limpieza (continuación)
Page 17

33
32
¿Tiene alguna pregunta? Visite www.medela.com o llámenos al 1-800-435-8316.
3
6
Coloque la membrana a
presión en la válvula hasta
que la membrana encaje
perfectamente en la válvula.
Empuje la válvula amarilla con
fi rmeza hacia el aro interior del
cuerpo del extractor.
Si desarmó las piezas del mango,
coloque la base de forma ovalada
del pie en el diafragma.
Consejo: asegúrese de que la
base oval cubra correctamente el
diafragma.
Continúa en
la página
siguiente.
2
Correcto Incorrecto
5
Las piezas que necesitará en
esta instancia son:
1
4
• Inspeccione las válvulas para detectar
rajaduras o astillas y revise las
membranas para detectar la presencia
de agujeros, roturas o deformaciones.
Si observa algún tipo de daño en estas
piezas, reemplácelas de inmediato.
• Revise el pie para asegurarse de que la
base oval esté presente.
Nota
2.1 Armado del extractor
Lávese las manos antes de tocar
el extractor de leche, el kit y sus
pechos; también evite tocar el
interior de los recipientes o las
tapas.
Enrosque el biberón en el
cuerpo del extractor.
• Siga todos los pasos con cuidado y
arme el extractor de manera correcta
para lograr un rendimiento óptimo.
Información
• Embudo
• Cuerpo del
extractor
• Membrana
blanca
• Válvula
amarilla
• Biberón y tapa
• Mango, diafragma,
pie, base oval
2. Armado
Page 18

35
34
¿Tiene alguna pregunta? Visite www.medela.com o llámenos al 1-800-435-8316.
7 8
9
Coloque el pie/diafragma de silicona
en el mango del extractor y presione
fi rmemente alrededor de todo el
borde para asegurarse de que esté
correctamente sellado. Las líneas del
diafragma deben coincidir con los
puntos amarillos del mango.
Inserte el pie del mango en la
abertura de la parte superior del
cuerpo del extractor y empuje
hasta sentir que traba.
Inserte el embudo PersonalFit
™
en
la abertura superior del cuerpo del
extractor.
2. Armado (continuación)
2.2 Colocación correcta de los embudos
Los embudos colocados correctamente garantizarán comodidad y efi ciencia durante
la extracción de leche.
Consulte la imagen a continuación para determinar si el embudo que
utiliza es del tamaño adecuado para usted:
• El pezón debe quedar en el centro del conducto del embudo.
• El pezón debe moverse libremente, sin fricción, durante la extracción
de leche.
• Toda o casi toda la areola debe quedar fuera del conducto del
embudo.
• Debe sentir un movimiento rítmico y suave en el pecho
con cada ciclo del extractor.
• Una vez fi nalizada la extracción de leche, debe sentir el pecho mucho más vacío y
sin durezas.
Medela ofrece tamaños más chicos o más
grandes que pueden adquirirse en muchas
tiendas minoristas locales o a través del
sitio www.shopmedela.com
Embudos PersonalFit
™
21 mm (Pequeño)
Artículo 87072
24 mm (Mediano)
Artículo 87073 (incluido)
27 mm (Grande)
Artículo 87274 (incluido)
30 mm (X grande)
Artículo 87075
36 mm (X X grande)
Artículo 87084
Si no está segura, consulte el tamaño grabado en el
embudo (ver imagen). Los
extractores Medela están
equipados con embudos
de 24 mm (M).
pezón con la de las imágenes a continuación a
modo de guía.
El embudo es
demasiado grande;
Posición
correcta
El embudo es demasiado
pequeño; pruebe con
24 mm
Elección del embudo PesonalFit™ del
tamaño correcto:
1. Determine el tamaño que utiliza actualmente.
Si no está segura, consulte el tamaño grabado en el
embudo (ver imagen). Los
extractores Medela están
equipados con embudos
de 24 mm (M).
2. Durante la extracción, compare la posición del
pezón con la de las imágenes a continuación a
modo de guía.
El embudo es
demasiado grande;
pruebe con un tamaño
más chico.
Posición
correcta
El embudo es demasiado
pequeño; pruebe con
un tamaño
más grande.
24 mm
• Si bien puede sentir alguna molestia cuando utilice el extractor de leche por primera vez, su
uso no debe causar dolor. Si no está segura del tamaño del embudo, comuníquese con un
profesional de la salud o especialista en lactancia quienes podrán ayudarla a decidir cuál es
el tamaño adecuado para usted.
Precaución
Page 19

37
36
¿Tiene alguna pregunta? Visite www.medela.com o llámenos al 1-800-435-8316.
1
3
3.1 Funcionamiento del dispositivo
Coloque el pezón en el centro del
embudo. Precaución: si empuja
el embudo con demasiada
fuerza sobre el pecho puede, en
realidad, reducir el fl ujo de leche.
Comience la extracción de leche en el modo
de estimulación, presionando el símbolo con
las gotas de leche
en la parte superior
del mango del extractor. Presione y suelte
rápidamente hasta observar que la leche
comienza a salir. Este modo imita la succión
rápida e inicial del bebé y ha sido diseñado
para estimular el fl ujo/la bajada de leche.
• Lávese bien las manos con agua
y jabón antes de tocarse el pecho
y las piezas del extractor.
• Revise siempre los embudos, las
válvulas y las membranas antes
de utilizarlos para verifi car que
estén limpios. Si estuvieran sucios,
consulte la Sección 1.2.
• Comuníquese con su profesional
de la salud o especialista en
lactancia si solo extrae muy poca
o casi nada de leche, o si siente
dolor durante el procedimiento.
Consulte la Sección 7 para más
información.
• No intente extraer leche si tiene el
pecho vacío ya que esto es muy
riesgoso e incómodo (doloroso).
El dolor, junto con el posible daño
en el pecho y el pezón pueden
reducir la producción de leche.
• Paso 2: No sostenga el extractor
por el biberón. Esto puede obstruir
los conductos lácteos y producir
congestión mamaria.
Precaución
3. Extracción
2
4
Se puede cambiar la posición del mango ajustable
para mayor comodidad durante la extracción. El
nivel de vacío se controla a través de la compresión
y la velocidad del movimiento del mango. Usted es
quien decide el ritmo de extracción que mejor se
adecúa a sus necesidades.
Una vez que la leche ha comenzado a bajar, cambie
el modo de extracción presionando la parte inferior
del mango del extractor. Esto le permitirá un tiempo
más largo que imita la succión más profunda y más
relajada del bebé; este modo ha sido diseñado para
maximizar el fl ujo de leche.
Page 20

39
38
¿Tiene alguna pregunta? Visite www.medela.com o llámenos al 1-800-435-8316.
21
Inserte el extremo del tubo en
la abertura de la parte superior
del extractor Harmony.
Coloque la membrana
protectora y el capuchón.
4
Empuje el capuchón de la membrana
con fi rmeza hasta que encaje en el
mecanismo de extracción. Ajústelo
para mayor comodidad una vez iniciado
el proceso de extracción de leche.
3.2 Armado del extractor de
leche Symphony
Retire el mango del extractor de
leche Harmony
™
.
• Se necesita capuchón de membrana
n.°8100769, membrana n.° 8200094
y tubo n.° 8007213. Los artículos se
venden por separado.
Información
3
Inserte el extremo amarillo del tubo
en la abertura del capuchón de la
membrana.
3. Extracción (continuación)
Page 21

41
40
¿Tiene alguna pregunta? Visite www.medela.com o llámenos al 1-800-435-8316.
5. Preparación y alimentación con leche
materna
5.1 Preparación de la leche materna
• Descongele la leche materna dejándola en el refrigerador durante toda la noche. La
leche materna descongelada puede conservarse en el refrigerador durante 24 horas.
No vuelva a congelar la leche que ya ha sido descongelada.
• Descongele la leche materna rápidamente colocando el biberón debajo de un chorro
de agua tibia.
• Coloque el biberón cerrado en un recipiente con agua tibia durante 20 minutos para
que alcance la temperatura corporal.
• Si agrega leche materna extraída en un recipiente con leche descongelada,
asegúrese de agregar una cantidad inferior a la cantidad de leche congelada.
5.2 Alimentación con leche materna
Se recomienda que la rutina de amamantamiento ya esté bien establecida antes de
alimentar al bebé con biberón.
• Siempre inspeccione el biberón, la tetina y las demás piezas inmediatamente antes
y después de cada uso. Si la tetina pareciera estar rota o gastada, déjela de usar de
inmediato.
• Para evitar todo posible riesgo de asfi xia, verifi que la resistencia de la tetina
estirándola de la parte sobresaliente.
• No intente agrandar el orifi cio de la tetina.
• Los lactantes no deben alimentarse con biberón sin la supervisión de un adulto.
• La tetina no debe utilizarse como chupete.
Temperatura
ambiente
Refrigerador
portátil con hielo
Refrigerador
Leche materna
descongelada
Congelador
Pautas para la conservación de leche materna extraída recientemente
(Para bebés saludables)
4-6 horas a
19 - 26 °C
(66 - 78 °F)
24 horas a
15 °C (59 °F)
3-8 días a
4 °C o menos
(39 °F)
utilizar
dentro de las
24 horas
6-12 meses
-18- -20 °C
(0- -4 °F)
Referencias: www.BreastmilkGuidelines.com
• Una vez fi nalizada la extracción
de leche, coloque el biberón
o la bolsa con leche materna
en un refrigerador portátil con
hielo.
• Al llegar a su hogar, coloque
el biberón o la bolsa con leche
materna en el refrigerador o
congelador.
• Si congela la leche materna,
llene el envase hasta un 75%
de su capacidad para dejar
espacio para la expansión.
Coloque una etiqueta en
el envase con la fecha de
extracción.
4.1 Conservación de la
leche materna
• No descongele la leche materna en un
horno microondas o en una olla con
agua hirviendo.
• No caliente la leche materna en el
horno microondas; al hacerlo algunas
partes se calienten más que otras y
esto puede provocar quemaduras
graves en la boca del bebé. (Calentar la
leche materna en el horno microondas
también puede modifi car su
composición).
Advertencia
4. Conservación de la leche materna
Page 22

43
42
¿Tiene alguna pregunta? Visite www.medela.com o llámenos al 1-800-435-8316.
Succión - escasa o ausente Verifi cación de la válvula y membrana
• Retire y separe la válvula de la membrana.
• Inspeccione la válvula para detectar astillas o rajaduras. Revise la
membrana para detectar la presencia de agujeros o roturas. Si observa
algún tipo de daño en estas piezas, reemplace la válvula y/o membrana
antes de la extracción de leche.
• Lave la válvula y la membrana según las indicaciones de Limpieza de la
Sección 1.
• Vuelva a armar. Asegúrese de que la membrana quede extendida sobre la
válvula; en caso contrario, reemplace la válvula y/o membrana antes de la
extracción de leche.
Verifi cación del embudo y el cuerpo del extractor
• Inspeccione el embudo y el cuerpo del extractor para asegurarse de que no
existan rajaduras y que ambas partes están fi rmemente ajustadas.
• Asegúrese de que el pie del mango del extractor esté totalmente colocado
dentro del cuerpo del extractor para que no se mueva.
• Asegúrese de que la base oval blanca esté colocada en el mango del pie.
• Asegúrese de que el cuerpo del extractor esté fi rmemente enroscado en
el biberón y que el embudo esté fi rmemente ajustado en el cuerpo del
extractor.
• Asegúrese de que la base oval del pie esté correctamente colocada en la
base oval del diafragma.
• Asegúrese de que el diafragma abarque toda la superfi cie del aro en la parte
inferior del mango.
• Asegúrese de que el embudo forme un sello total alrededor del pecho.
La leche materna no "baja" o
no se la puede extraer
• Asegúrese de que el extractor de leche esté correctamente armado y
succione.
• Relájese y espere entre 10 y 15 minutos si la leche no baja después de 2
sesiones consecutivas de extracción.
• Consulte a su profesional de la salud o especialista en lactancia si no logra
extraer leche.
6. Resolución de problemas
Si aún no resolvió el problema con su extractor de leche o si tiene más consultas, comuníquese con
el Servicio de Atención al Cliente de Medela llamando al 1-800-435-8316 o enviando un mensaje de
correo electrónico a customer.service@medela.com.
Pautas para la eliminación del producto
Deseche el dispositivo correctamente de acuerdo con las normas locales, estatales y federales.
Información complementaria
A continuación se presentan algunos de los trastornos más comunes relacionados con la lactancia. Si
experimenta alguno de estos síntomas, comuníquese con un profesional de la salud o especialista en
lactancia.
Síntoma Posibles causas
Congestión
mamaria
Los pechos están du ros y molestan, es posible que
presenten zonas enrojecidas.
La leche no sale
adecuadamente del pecho.
La leche regresa a los tejidos
provocando hinchazón y
sensibilidad en algunas zonas.
Conductos
obstruidos/
tapados
Parte del pecho enrojecida y sensible al tacto. La leche no fl uye desde un
conducto específi co. Esta
parte se “obstruye”, evitando
así la salida de la leche.
Mastitis Se produce a menudo d espués de una cong estión
mamaria, pero también puede ocurrir repentinamente.
Los prime ros síntomas son similares a los de la gripe:
fatiga, dolor de cabeza, dolores musculares, fi ebre y
sensibilidad mamaria localizada. Puede presenta rse en
una o ambas mamas y se debe tratar de inmedi ato.
Infección bacteriana en el
tejido mamario que suele estar
acompañada por pezones
agrietados.
El profesi onal de la salud o especialista en lactancia puede enseñarle a amamantar a su bebé y a usar un
extracto r de leche. Su ayuda es va liosa en té rminos de los benefi cios únicos que l a lactancia tiene tanto
para su salud como pa ra la de su bebé. Puede consulta r la lista de especialistas e n lactancia en
www.medelalocator.com o llamando al 1-800-835-5968.
7. Información complementaria/Desecho
del producto
Page 23

45
44
¿Tiene alguna pregunta? Visite www.medela.com o llámenos al 1-800-435-8316.
Medela Inc. garantiza al comprador minorista original que este producto está libre de defectos
en cuanto al material y a la mano de obra del mecanismo del extractor (90 días en el caso de
las piezas y los accesorios) durante un año a partir de la fecha de compra del producto. En
el caso que el producto presentara un defecto, Medela lo reparará o, a su propia discreción,
reemplazará el producto, sin costo alguno para el comprador en relación con dicho
reemplazo, tales piezas o la mano de obra mencionada. El comprador abonará los gastos
de envío originados por la devolución a Medela de este producto. Esta garantía no cubre los
productos utilizados comercialmente o que han estado expuestos a un uso indebido, abuso o
alteración.
TODAS Y CUALESQUIERA LAS GARANTÍAS IMPLÍCITAS, INCLUIDA LA GARANTÍA
DE COMERCIABILIDAD, TIENEN UN PERÍODO DE VIGENCIA LIMITADO DE 90 DÍAS A
PARTIR DE LA FECHA DE COMPRA. ALGUNOS ESTADOS NO PERMITEN ESTABLECER
LIMITACIONES EN CUANTO A LA VALIDEZ DE UNA GARANTÍA IMPLÍCIDA, DE MODO
QUE, EN TAL CASO, ESTAS LIMITACIONES NO TENDRÁN VIGENCIA. ESTA GARANTÍA LE
OTORGA DERECHOS LEGALES ESPECÍFICOS, ADEMÁS DE LOS OTROS DERECHOS QUE
DIFIEREN DE UN ESTADO A OTRO.
Antes de presentar un reclamo en virtud de esta garantía, puede ahorrar tiempo y dinero
llamando al Servicio de Atención al Cliente de Medela (llamada gratuita) al 1-800-435-8316.
También puede llamar a este número si deseara obtener información adicional sobre esta
garantía. Si deseara presentar un reclamo en virtud de la misma, debe devolver el producto
a Medela con el número de autorización de devolución que le brindó el Servicio de Atención
al Cliente de Medela, mediante un envío pagado por anticipado, junto con la factura donde
se indique la fecha de venta u otro comprobante de la compra y una breve descripción del
problema a la siguiente dirección:
Primero llame para obtener el número de autorización. No se aceptan devoluciones sin un
número de autorización.
Se trata de un producto diseñado para ser utilizado por una sola persona. Si es usado
por más de una persona, se pueden presentar problemas relacionados con la salud e
inconvenientes en el funcionamiento del producto, y se anula la garantía.
Precaución
Medela, Inc. – Returns, Door 4501
1101 Corporate Dr.
McHenry, IL 60050
ATTENTION: RETURNS
8. Garantía
Page 24

47
46
¿Tiene alguna pregunta? Visite www.medela.com o llámenos al 1-800-435-8316.
Page 25

Printed in the USA. Medela, 2-Phase Expression and Symphony are registered trademarks of Medela Holding, AG.
Quick Clean, Harmony, Micro-Steam, Maximum Comfort Vacuum and PersonalFit are trademarks of Medela, Inc.
Impreso en los Estados Unidos de América. Medela, 2-Phase Expression y Symphony son marcas registradas de Medela Holding, AG.
Quick Clean, Harmony, Micro-Steam, Maximum Comfort Vacuum y PersonalFit son marcas comerciales de Medela, Inc.
1908246 D 0414 © 2014 Medela, Inc.
Medela, Inc.,
1101 Corporate Drive
McHenry, IL 60050, USA
Ph/Tel./Tél.: (800) 435-8316 / (815) 363-1166
Fax/Téléc.: (815) 363-1246
Email/Correo electrónico/Courriel:
customer.service@medela.com
www.medela.com
 Loading...