

Medela Freestyle Breastpump User Manual
Freestyle
EN Instructions for use
SV Bruksanvisning
DA Brugsanvisning
FI Käyttöohjeet
NO Bruksanvisning
PL Instrukcja obsługi
™
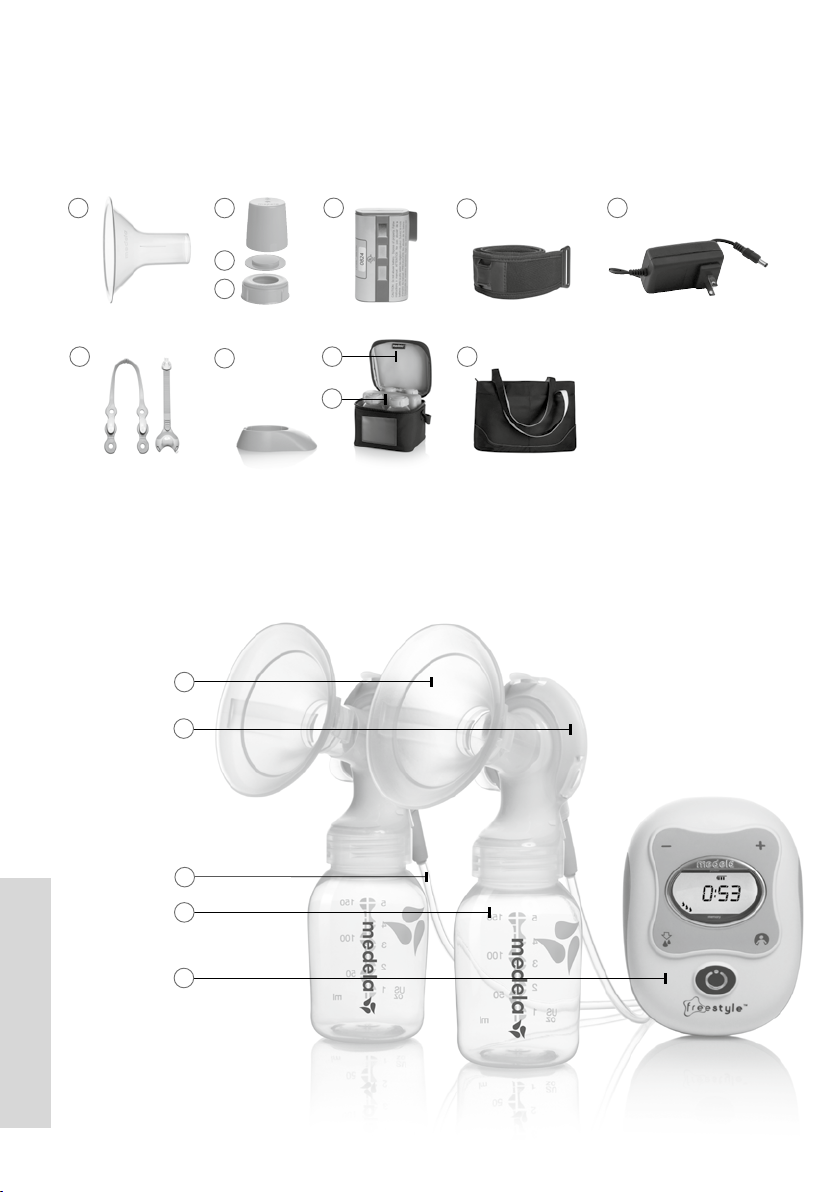
EN Parts List XV
SV Lista över delar XV
DA Reservedelsliste XV
FI Osaluettelo XV
NO Reservedelsliste XV
PL Wykaz części zamiennych XV
c2
f
l
m
k
h
g
j
i
o
n
c1
p
d
b
e
a
EN
Instructions for use
2
SV
DA
FI
NO
PL
Bruksanvisning
Brugsanvisning
Käyttöohjeet
Bruksanvisning
Instrukcja obsługi
EMC
14
26
38
50
62
76
1
Freestyle™ Breastpumpl
Mother’s milk is the best nutrition for babies. Freestyle is designed for busy mothers. It allows to
double pump and therefore saves time and addresses the needs for more pumping freedom.
The attractive breastpump is especially suitable for frequent pumping and encourages milk production in the long term, too.
120
ll
The Freestyle Breastpump is a powered breastpump:
• To be used by lactating women to express and collect milk from their breast during absences
• To initiate and maintain a milk supply if breastfeeding is temporarily interrupted.
• To relieve engorgement.
• For home use and on the go.
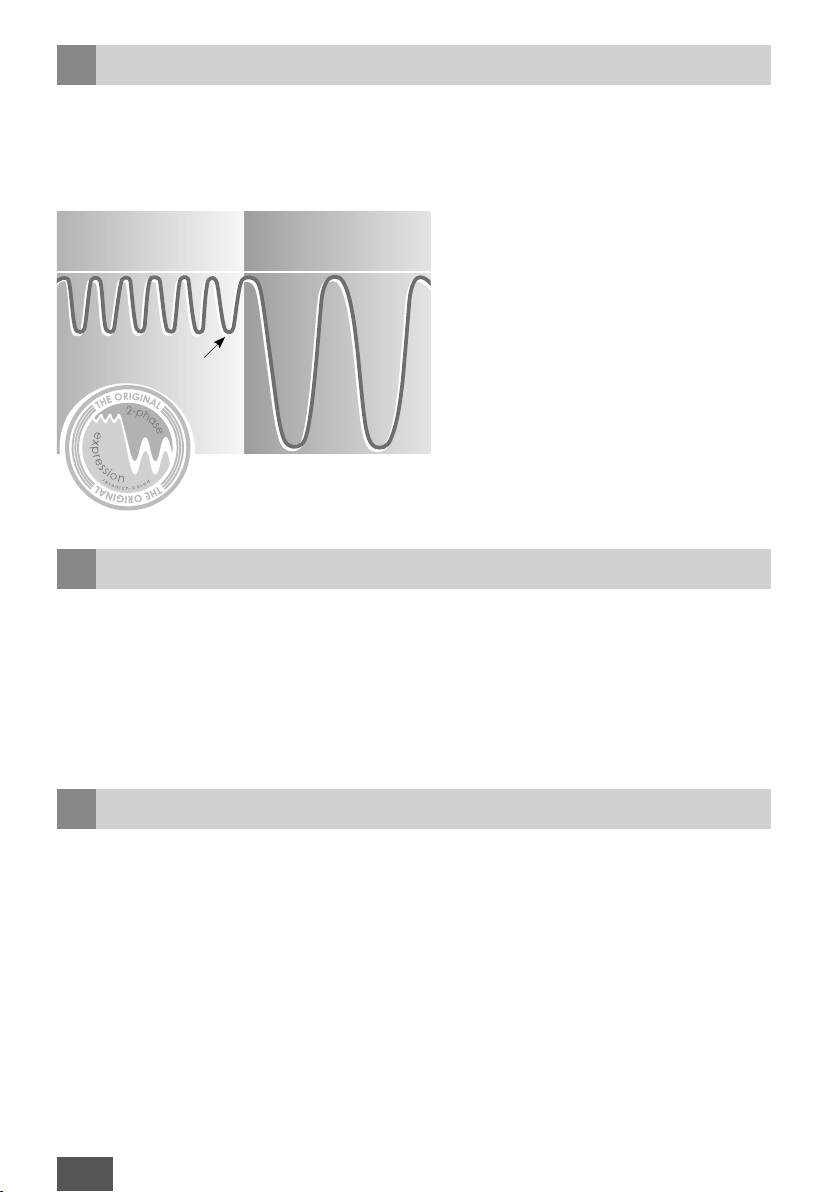
Stimulation Expression
Milk Ejection
Reflex
Indications For Use
from the baby (e.g. working part- or full-time).
60
Freestyle has 2-Phase Expression®,
the only research based breastpump
technology to mimic a baby‘s natural
nursing rhythm.
Stimulation:
Fast pumping rhythm to start your milk
flowing.
Vacuum (mmHg)
Expression:
Slower pumping rhythm to express
your milk gently and efficiently.
Proven to feel most like your baby
and to reduce your pumping time.
Important Safeguardslll
When using electrical devices, basic safety precautions should always be followed, including the
following:
Read all instructions before use.
• Use the product only for its intended use as described in this instruction manual.
• Only use the mains adapter or battery that comes with the Freestyle Breastpump.
• Make sure the voltage of the mains adapter is compatible with the power source.
• Plug the mains adapter into Freestyle Breastpump first and then into wall socket.
• Separation from the mains is only assured through the disconnection of the mains adapter
from the wall socket outlet.
• Keep the mains adapter away from heated surfaces.
• Never operate an electrical device if it has a damaged cord or plug, if it is not working
properly, if it has been dropped or damaged, or dropped into water.
2 EN
• Do not use outdoors.
• Keep appliance dry and do not place in direct sunlight.
• Do not get the product wet.
• Do not use while bathing or showering.
• Do not place in or drop motor unit into water or other liquid.
• Do not store or use this product where it can fall or be pulled into a tub or sink.
• Do not spray or pour liquid directly onto the pump.
• Do not reach for any electrical device if it has fallen into water. Unplug immediately.
• UseMedelaoriginalaccessoriesonly.
• Check pump kit components for wear or damage.
• This is a single user product. Use by more than one person may present a health risk and
voids the warranty.
• Do not use while sleeping or overly drowsy.
• Supervision is necessary when this product is used in the vicinity of children.
• If problems or pain occur, consult your lactation consultant or physician.
• Equipment not suitable for use in the presence of a flammable anaesthetic mixture with air or
with oxygen or nitrous oxide.
• Portable and mobile radio frequency communications equipment can affect the Freestyle
Breastpump.
• The Freestyle Breastpump needs special precautions regarding EMC (Electromagnetic compatibility) and needs to be installed and put into service according to the EMC information
provided in these instructions for use.
• There are no user-serviceable parts inside the Freestyle. Do not attempt to repair the Freestyle
Breastpump yourself.
SAVE THIS INSTRUCTION MANUAL
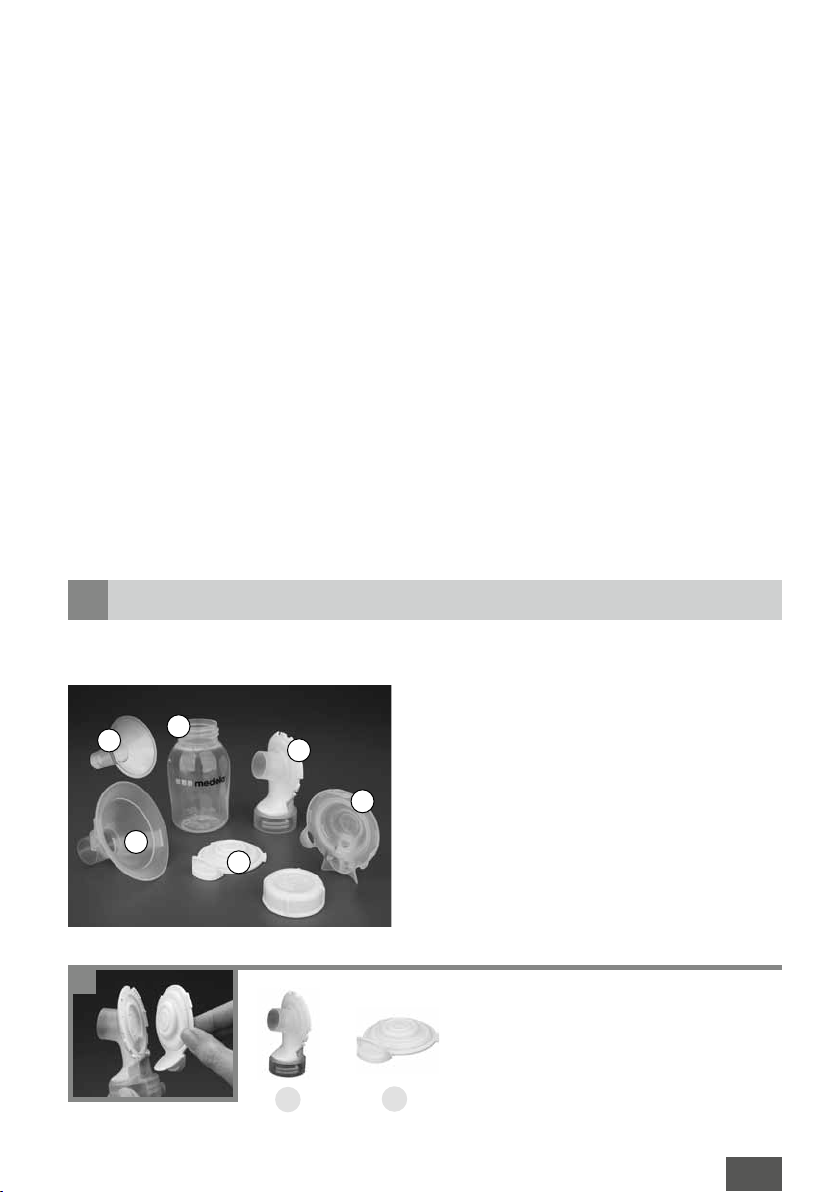
Assembly InstructionslV
Assembling the pump kit
c2
e
c1
d1
1
d2
d2
+
d3
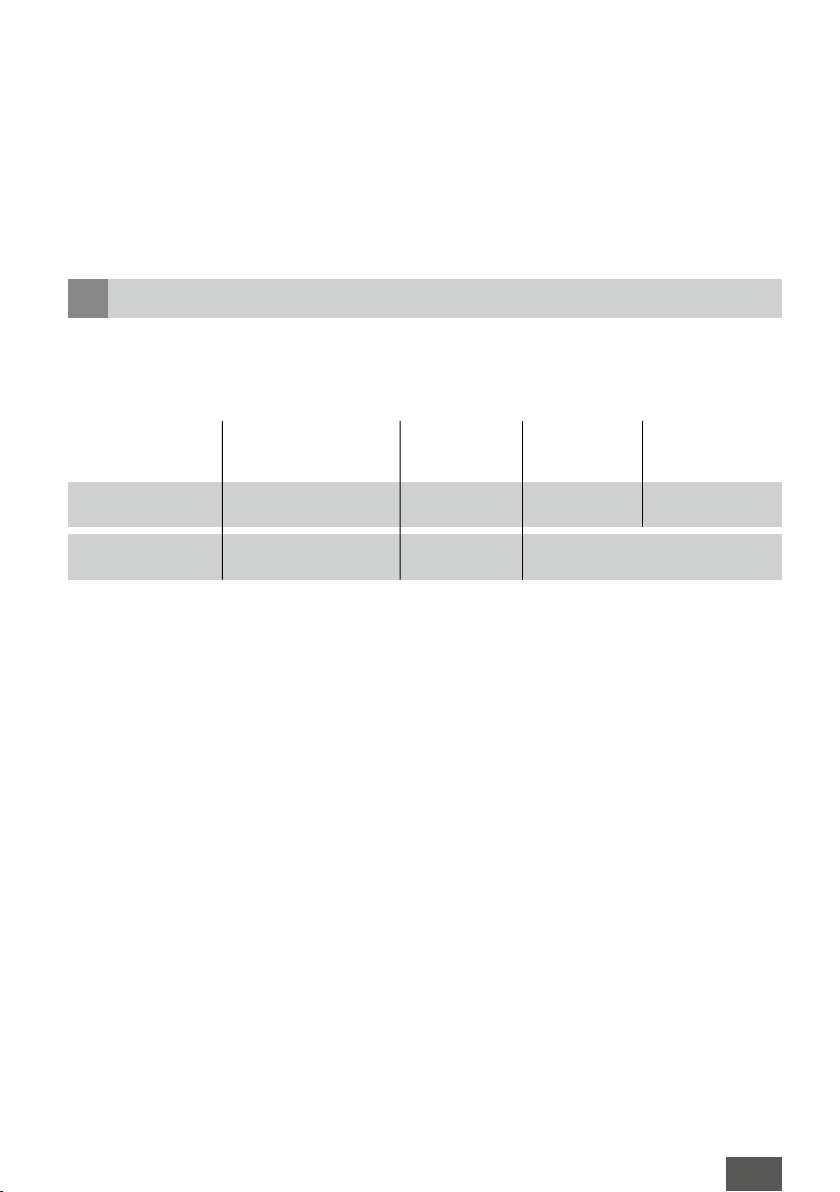
Insert pale yellow membrane into
breastshield body. If placed properly,
ridges will align.
d1
3EN

Assembly InstructionslV
2
+
d1
d2 d3
3
+
c
d1d1d2d2d3
4
Snap clear back cap onto breastshield
body enclosing membrane.
Make sure all three tabs are snapped in
place.
Make sure breastshield (PersonalFit or
SoftFit Breastshield) and connector are
securely attached.
Screw bottle into connector.
+
c e
d3
Connect tubing to the breastshields and
the pump.
+
+
Single Pumping
6
7
4 EN
d
b
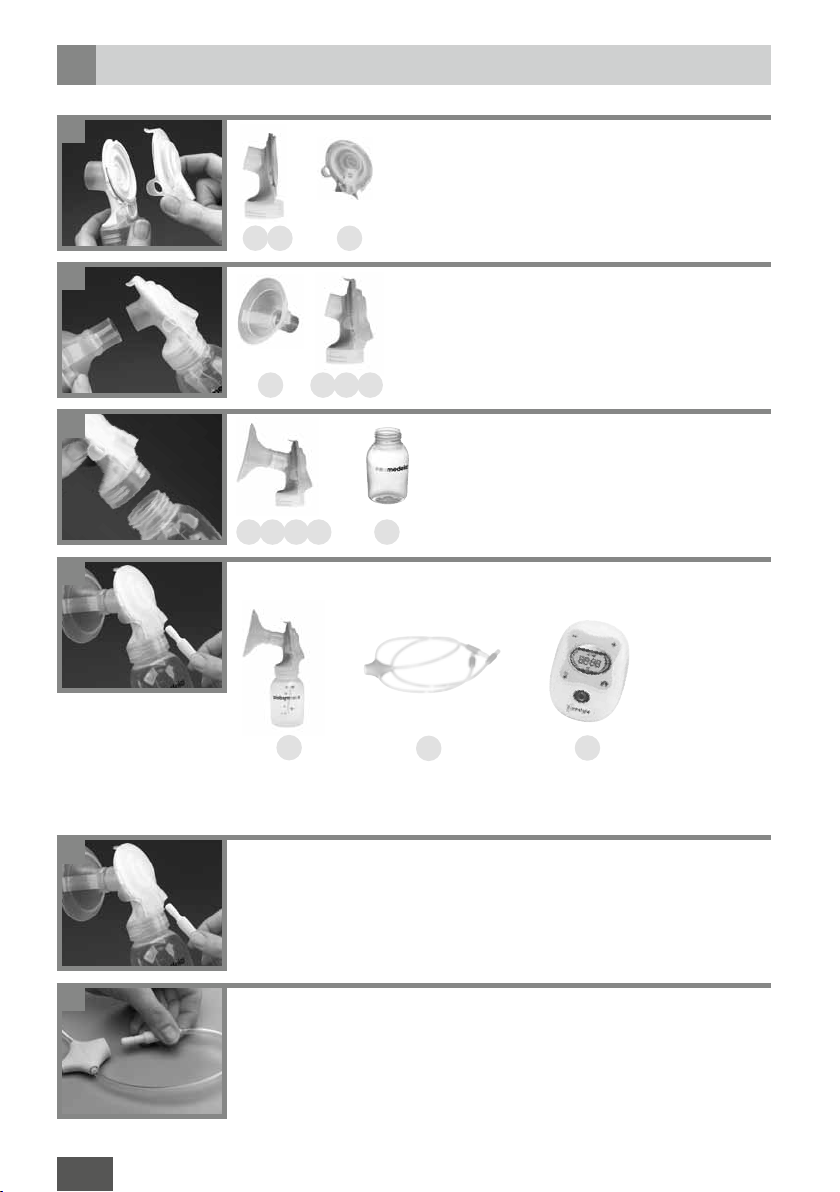
To switch from double pumping to single pumping, simply unplug tube from
one side.
Place unused tube into tubing dock.
a
V Operation
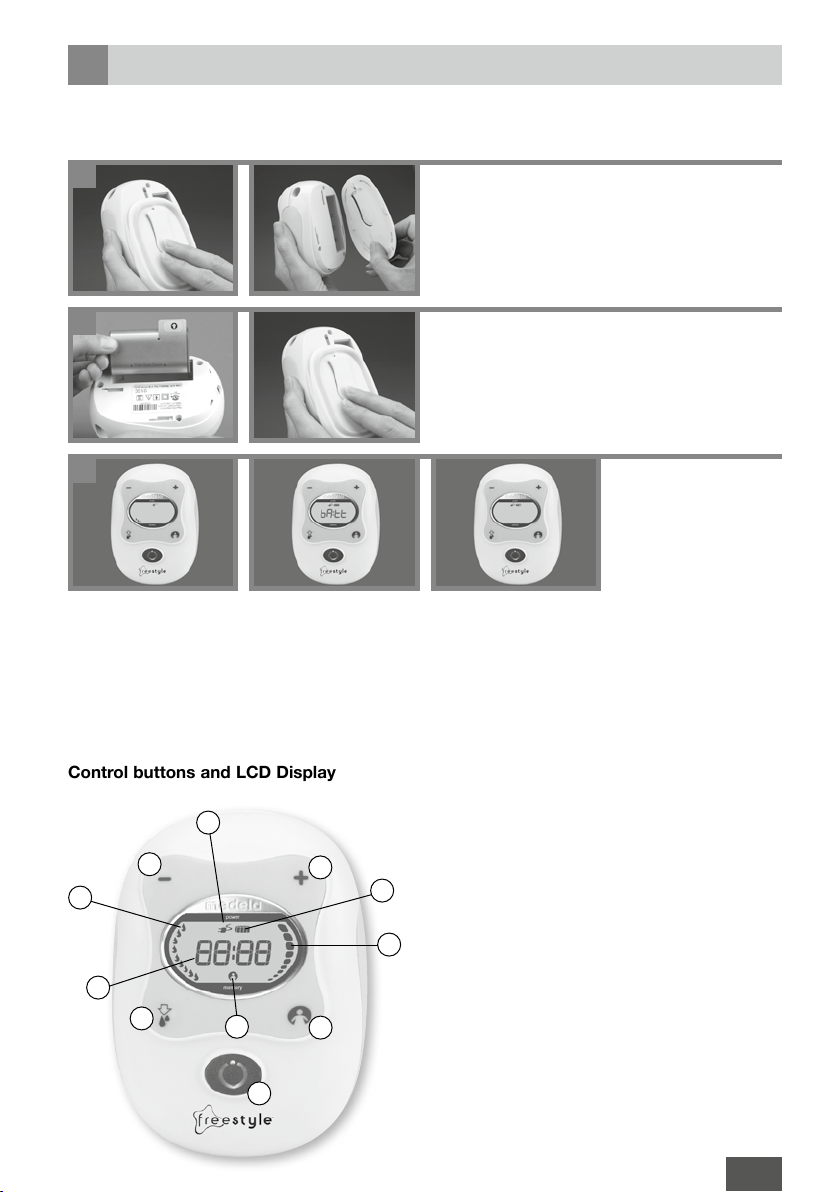
Setting up the pump
Before using for the first time:
1
2
Open the battery compartment by sliding
the back panel of the pump down and
removing.
Insert the battery into the compartment
with the arrows and the note «This Side
Down» pointing towards the pump.
Do not use force to insert the battery.
Close the battery compartment.
3
Plug in the mains adapter and charge until the battery power indicator shows four bars and
stops flashing. (this operation can last for up to 20 hours) When charging the first time or
after every removal of the battery, the display shows "BATT". Pump may be used while
charging. Do not unplug the mains adapter until the charging is completed.
Avoid removing battery. Removing the battery will reset the battery indicator. A decharging for up
to 20 hours and a new recharging time of 4 hours is required to readjust the battery indicator.
Control buttons and LCD Display
10
2a
4
7
5
8
1
3
6
9
2b
1) On / Off button
2a) Stimulation Phase
2b) Expression Phase
3) Vacuum increase button (+)
4) Vacuum decrease button (-)
5) Let-down button
Timer reset button
6) Memory button
7) Timer
8) Memory «on» indicator
9) Battery power indicator
10) AC power indicator
5EN

V Operation
Electrical operation
The pump can be mains adapter operated.
Plug the electrical connector on the end of mains adapter cord into power jack (12V DC).
The mains adapter symbol appears on the display when the pump is plugged in.
Battery operation
The battery will charge every time the pump is plugged in and when it is not in-use.
When the pump is switched on, the battery indicator on the display will show how much battery
power is left. If the battery symbol starts to flash showing just one bar, there is only power left for
approx. 20 minutes pumping time.
Pumping time (full battery) = approx. 3 hours
Charging time (empty battery) = approx. 4 hours*
* When charging the first time or after every removal of the battery, the display shows "BATT".
This operation last for up to 24 hours.
Avoid removing battery. Removing the battery will reset the battery indicator (the battery symbol
starts to flash showing just one bar) and requires a recharging time of up to 24 hours to readjust
the battery indicator.
Caution:
The battery used in this device may present a risk of fire or chemical burn if mistreated. Do not
disassemble, heat above 60º C or incinerate. Replace battery with Medela part number
200.1512 only. Use of another battery may present a risk of fire or explosion.
When storing the battery for a limited length of time, store within the following temperature range:
-4° to 140° F (-20° to 60° C). When storing the units for an extended time, store within the following temperature range: 32° to 77° F (0° to 25° C).
Dispose of used battery promptly. Keep away from children. Do not disassemble and do not dispose of in fire.
Note
If the pump has been running for 30 minutes without any manipulations (e.g. adjustment of the
vacuum), the Freestyle will automatically switch off.
VI
1
2
6 EN
Center your breastshield over your nipple.
• Do not tilt or overfill bottles when pumping.
• Take care not to kink tubing while pumping.
Switch on the breastpump by pressing the On/Off button.
The pump will begin pumping in the Stimulation Phase.
3
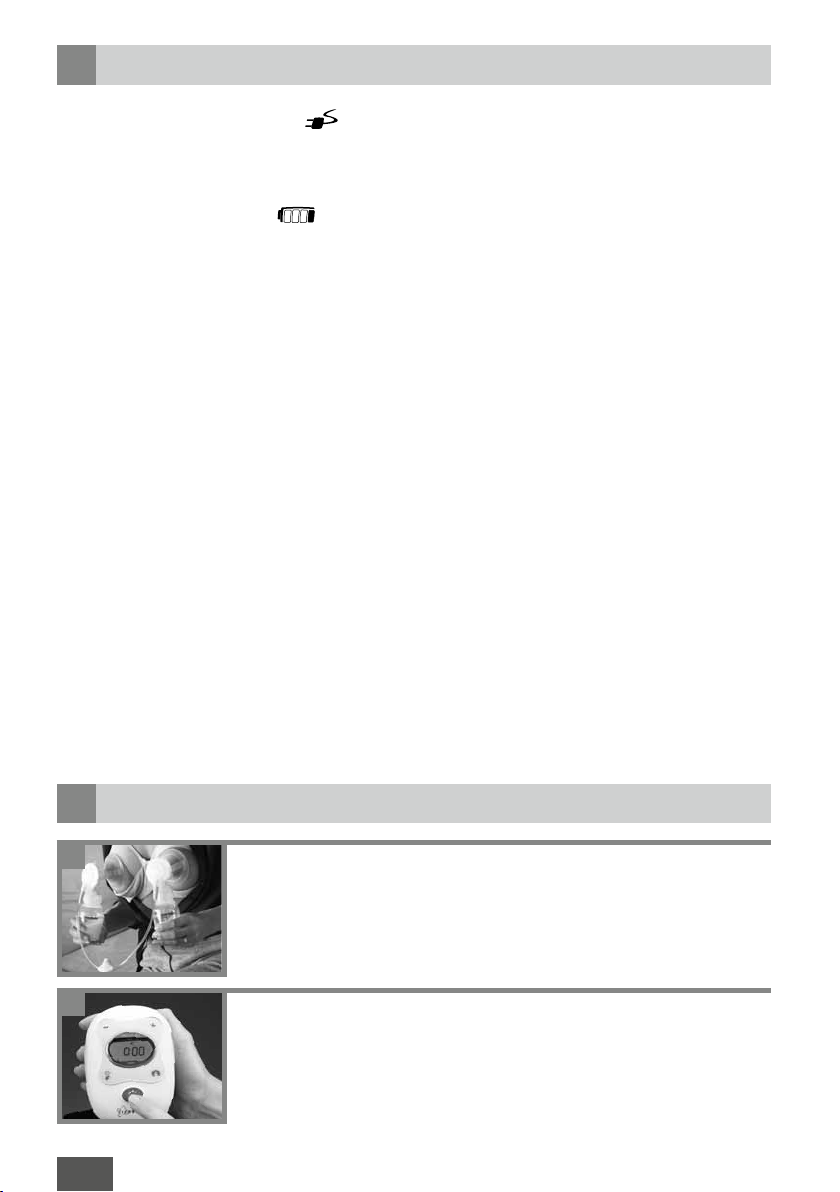
Adjust the vacuum during pumping to
your comfort level by pressing the increase (+) or decrease (-) button.
If you keep pressing the button (+ or -),
the vacuum level can be adjusted more
rapidly.
4
Once your milk starts to flow or you sense milk ejection, press the
let-down button to switch to the Expression Phase.
If you do not press the let-down button, the pump will automatically
switch to the Expression Phase after two minutes. Set your Maximum
Comfort Vacuum™ which is the highest vacuum you can use and
still feel comfortable (this is different for every mother). To find your
Maximum Comfort Vacuum increase vacuum until pumping feels
slightly uncomfortable (not painful), then decrease slightly.
Research has shown that you will pump more efficiently –
meaning get more milk in less time – when pumping at
Maximum Comfort Vacuum™ in the Expression Phase.
Once finished pumping switch off the breastpump, and disassemble
the pump kit items. Close the bottle and store it for later use.
Use bottle stand to prevent tip over.
The displays remains on for a few seconds after turning the pump off.
Some mothers prefer going back and forth between Stimulation and
Expression to achieve second let-down throughout a pumping session.
You can do this by pressing the let-down button.
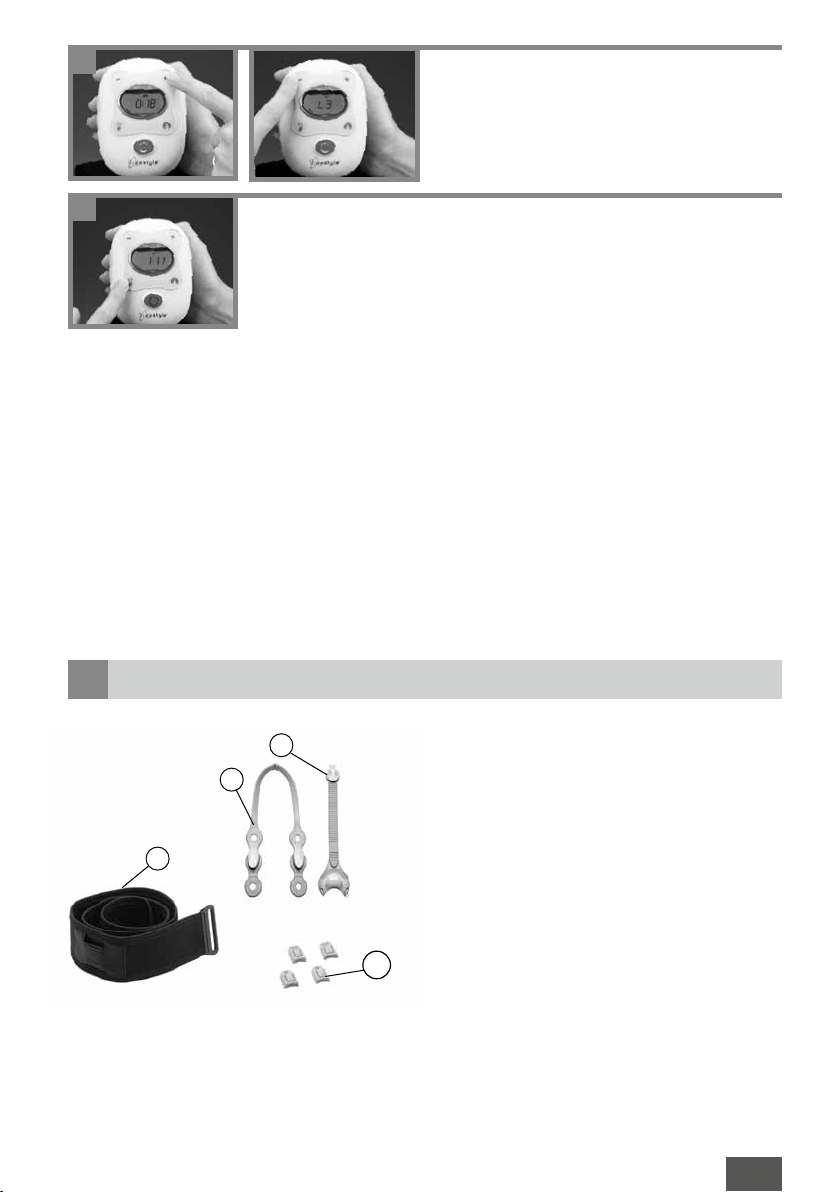
VII Hands-free pumping
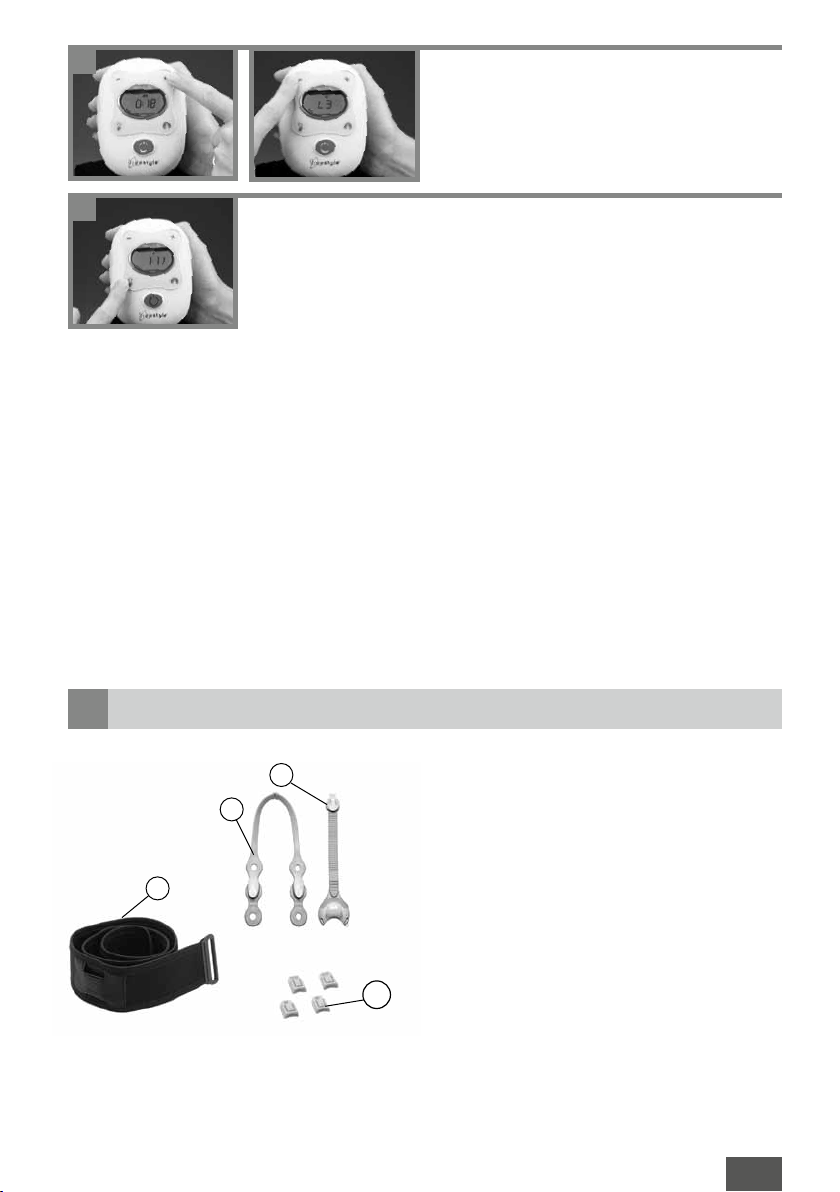
j2
j1
Freestyle comes with accessories that
enable you to be mobile while pumping.
The following instructions will explain how
you can use the hands-free accessories
to achieve the freedom you desire.
m
j3
Handsfree-Kit
j1 / j2 / j3
Belt with extension
m
7EN

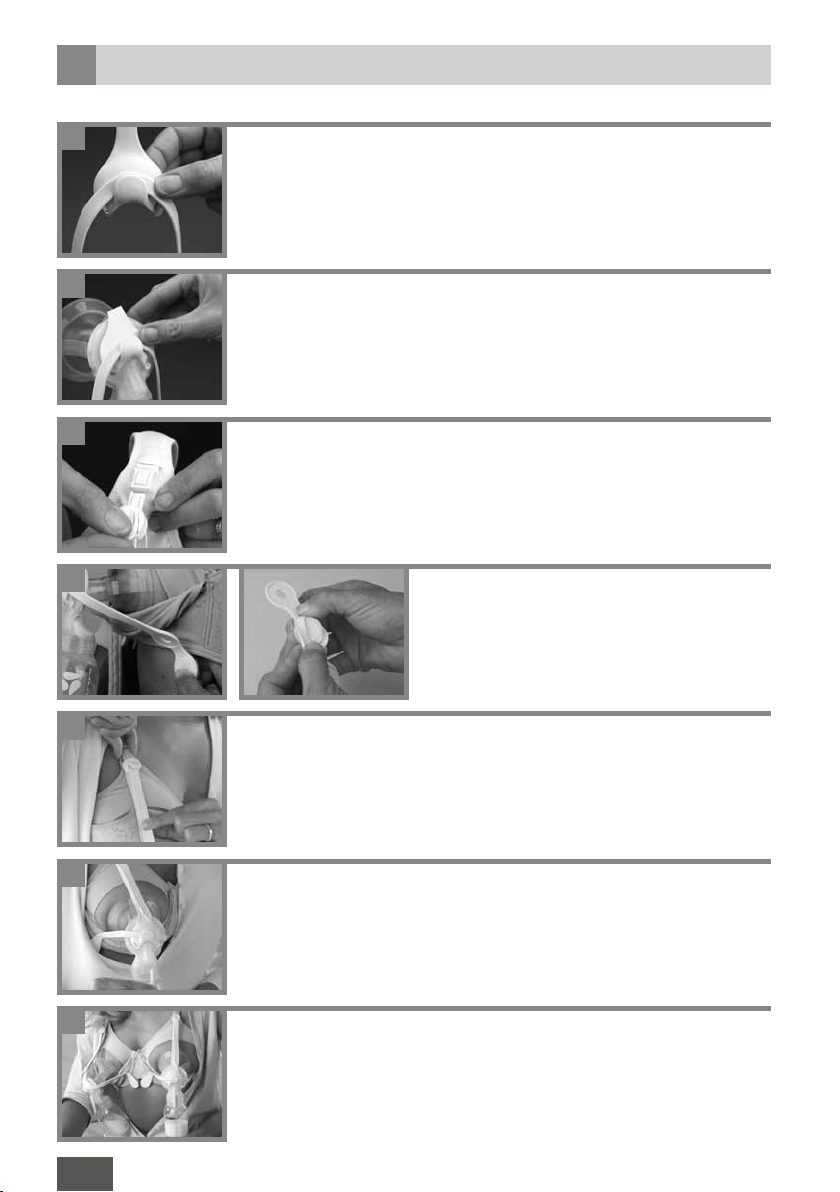
VII Hands-free pumping
Setup of Hands-free Kit
1
Connect hands-free strap (j1) to hands-free
adapter (j2).
2
3
4
5
Snap hands-free adapter (j1/j2) onto back of
each breastshield.
Open your bra flap and insert clasp into your
bra.
Use bra adapters (j3) if necessary.
Center your breastshield over your nipple.
Attach bottom clips to bra band until secure fit
is achieved. Be sure the nursing bra flap is not
trapped under the breastshield.
If necessary, adjust the fit by moving the clips
to a different strap setting.
Adjust length of top strap by pulling down on
the loose end.
6
7
8 EN
Attach tubing.
Now you are ready to pump handsfree.
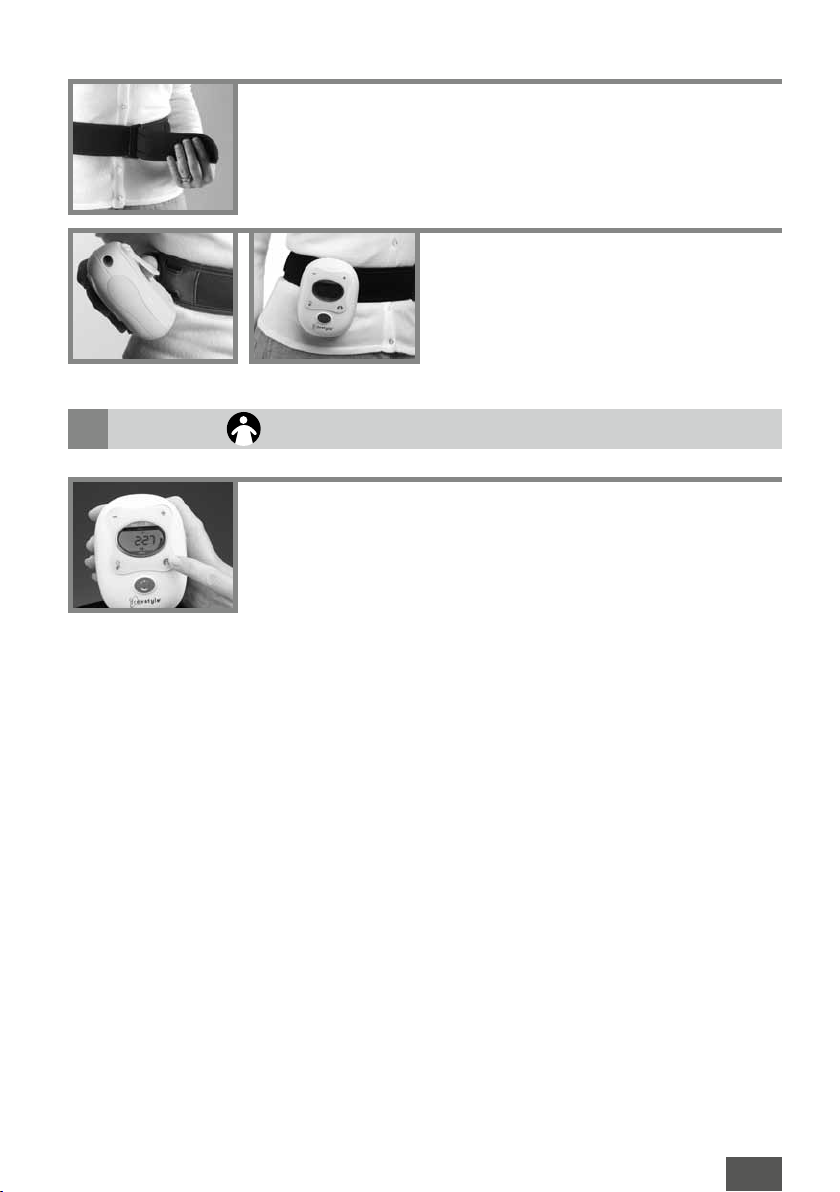
Use Belt for mobility
VIII
Memory
Wrap belt around waist, Velcro facing
away from the body.
If you want a longer belt, add the extension piece.
Slide clip of pump into the slot in the belt.
Once you have identified a pumping pattern that is comfortable and
effective for you, it is easy to program Freestyle to repeat your
personal pattern without having to reset it every time you pump.
Setting the memory allows you to duplicate:
• Length of Stimulation phase
• Vacuum level in Stimulation Phase
• Vacuum level in Expression Phase
Store your preferred setting:
• Start pumping session following usage instructions (VI Pumping).
• Press the memory button while pumping in the Expression Phase
for three seconds, until the display flashes and the pump beeps
three times.
• Finish pumping session as usual.
Activate your preferred setting:
• Start the pump and press the memory button.
Timer
The timer automatically starts when the pump is turned on.
If for any reason you want to restart the timer during a pump session, press the Let-Down button
and hold for 3 seconds. This will restart the timer, but Freestyle still continuous to pump.
9EN

IX
Breastshield Fitting
Choosing the right size of Breastshield
A correctly fitted breastshield avoids compression of any milk ducts during pumping to ensure
optimal breast emptying and maximum milk output.
Your breastshield is the right size if your answer to the following questions is «Yes»:
• Is your nipple moving freely in the tunnel?
• Is minimal or no areolar tissue being pulled into the tunnel of the breastshield?
• Do you see a gentle, rhythmical motion in the breast with each cycle of the pump?
• Do you feel the breast emptying all over?
• Is your nipple pain-free?
If your answer to any of the above questions is «No», try a larger (or smaller) breastshield.
TM
Medela PersonalFit
X
Cleaning and Hygiene
Follow these cleaning instructions unless you are told otherwise by your healthcare professional.
Breastshield: Available in five sizes – because one size does not fit all.
Important
Prior to first
use and
once daily
After each
use
• Use drinking water quality for any of the following described cleaning
procedures.
• Clean parts immediately after use to avoid dry up of milk residues and
to prevent from growth of bacteria.
• Disassemble all parts prior to cleaning.
• Disassemble, wash and rinse all parts of your pump kit that come in
contact with the breast and milk (c + d + e + f + g + h).
• Place parts in a saucepan of sufficient capacity.
• Fill with cold water until the parts are well covered. Optionally, a tea spoon
of citric acid may be added to avoid a build-upof limescale.
• Heat it up and allow to boil for 5 minutes.
• Remove from stove and drain water off.
• Dry parts with a clean towel.
Alternatively, the disassembled parts can be
- cleaned in top rack of dishwasher or
- sanitized with the Medela Quick Clean
- steam-sterilized according to manufacturer's instructions
Note: Food colorings may discolor components which will not affect
performance.
• Disassemble and handwash all parts of your pump kit that come in contact
with the breast and milk (c + d + e + f + g + h) in warm, soapy water.
• Rinse in clear water.
• Dry parts with a clean towel.
• Use a damp (not wet) cloth to wipe the motor unit after each use.
TM
Microwave Bag or
10 EN
Hints After cleaning, when parts are not in use, put in a clean zip lock bag or store
in a container with lid. Alternatively, the parts can be wrapped in a clean
paper or cloth towel.
Hygiene • Wash hands thoroughly with soap and water before touching the breast
and pump parts.
• Avoid touching the inside of bottles and lids.
• Clean the breast and surrounding area with a damp cloth.
• Do not use soap or alcohol which can dry the skin and cause cracked
nipples.
XI
Storing / Thawing Breastmilk
Check with your hospital for specific instructions.
Breastmilk Storage (For Healthy Term Babies)
Refrigerator
Freezer
Compartment
6 months at
approx. -16° C
Never refreeze
12 months at
approx. -18° C
Freshly expressed
breastmilk
Thawed breastmilk
(previously frozen)
Room
Temperature
Do not leave at room
temperature
Do not store
Refrigerator Deep Freezer
3 – 5 days at
approx. 4° C
10 hours
• When freezing do not fill bottles/bags more than 3/4 full to allow space for expansion.
• Label bottles/bags with the date of pumping.
• Do not store the breastmilk in the door of the refrigerator.
• In order to preserve the components of the breastmilk, thaw in the refrigerator overnight
or by holding the bottle/bag under running warm water (max. 37° C).
• Gently shake the bottle/bag to blend any fat that has separated.
• Do not thaw frozen breastmilk in a microwave oven or in a pan of boiling water (danger
of burning).
In the Freestyle Cooler bag
One contoured cooling element is necessary for the Freestyle Cooler bag. As soon as breastpumping is finished, place the milk bottle or bag in the compartment with the cooling element.
Milk will keep cool there until you return home later that day to transfer the bottles/bags to the
refrigerator or freezer.
11EN

TroubleshootingXII
If there is
low or no
suction
If the pump
gets wet
These
indications
show defect
of the
pump:
XlII
Warranty
Make sure
• the breastshield is assembled correctly and the back cap is firmly
attached at three connection points.
• the breastshield forms a complete seal around the breast.
• all connections of the kit and breastpump are secure.
• If single pumping, make sure the unused tube is securely connected to
the tubing dock.
Take care not to kink tubing.
• Unplug the mains adapter from the wall socket and turn the pump off.
• Make sure not to turn the pump upside down. Display has to face up.
• Store the pump for 24 hours in a dry and warm place.
Note: Do not try to speed up the drying process by applying heat or by
using any drying equipment.
Do not expose the pump to direct sunlight.
• «Err» accompanied by 3 beeps indicates a problem with the pump.
• Mains adapter symbol flashing and pump does not turn on indicates a
problem with the power supply.
• Battery power indicator flashes and shows four bars indicates a problem
with the battery.
There are no user-serviceable parts inside the Freestyle.
Do not attempt to repair the Freestyle Breastpump yourself.
Please contact local Medela distributor or location where you purchased
your pump.
This is a single user product. Use by more than one person may present a health risk and voids
the warranty. 1-year warranty for the unit from the date of purchase, excluding pump kit, freestyle
bag and cooler bag. 6 months warranty for rechargeable battery. The manufacturer is not liable
for any damage or consequential damage caused by incorrect operation, inappropriate usage
or use by unauthorized persons.
XlV
Disposal
The unit is made of various metal and plastics. Before disposal, the device is to be rendered
unusable and it must not be disposed of as unsorted municipal waste in accordance with local
regulations. Use your local return and collection system for waste electrical and electronic equipment (incl. batteries). Improper disposal may have harmful effects in the environment and on
public health.
12 EN

Parts ListXV
Article numbers
Motor unit 200.1591
a
Freestyle
b
SoftFit
c1
PersonalFit
c2
Freestyle
d
Bottle (150 ml) 811.0021
e
Cap 810.0474
f
Lid 810.7062
g
Disc 810.0473
h
Bottle stand 810.0462
i
Handsfree-Kit 200.1514
j
Mains adapter 200.1558
k
Rechargeable Battery 200.1512
l
Belt with extension 200.1548
m
Cooling element 811.7010
n
Cooler bag 200.0383
o
Freestyle
p
Does not contain Bisphenol-A, DEHP (Phthalate) or Latex.
Subject to change.
Content may vary from picture.
TM
Tubing 200.1524
TM
Breastshield 810.0402
TM
Breastshield 810.7084
TM
Connector 200.1513
TM
Bag 200.1547
13EN

Freestyle™ Bröstpump
l
Modersmjölk är den bästa näringen för en baby. Freestyle är designad för aktiva mammor. I och
med att man kan dubbelpumpa sparar man tid och ger mer frihet. Bröstpumpen är speciellt
lämpad för frekvent pumpning och upprätthåller mjölkproduktionen på lång sikt.
120
ll
Freestyle är en kraftfull bröstpump:
• Att användas av ammande kvinnor för att pumpa ur och samla upp bröstmjölk
• Kan även användas för att initiera eller upprätthålla mjölkproduktionen om amningen
• För att lindra mjölkstockning.
• För användning hemma eller på resan.
Stimulering Utdrivning
Utdrivningsreflex
Användningsområden
(t.ex. när man arbretar del- eller heltid).
avbryts tillfälligt.
60
Freestyle är försedd med 2-Phase
Expression®, den enda forskningsba-
serade bröstpumpsteknik som efterliknar barnets naturliga sugrytm.
Stimulering:
Snabb pumprytm som sätter igång ditt
mjölkflöde.
Vakuum (mmHg)
Utdrivning:
Långsam pumprytm som extraherar
din mjölk på ett skonsamt och effektivt
sätt.
Bevisad att kännas mest likt ditt
barn och att reducera pumptiden.
Viktiga säkerhetsföreskrifter
lll
Vid användning av elektriska apparater skall grundläggande säkerhetsföreskrifter alltid följas,
däribland följande:
Läs samtliga anvisningar före användning.
• Använd endast produkten för det den är avsedd i enlighet med denna bruksanvisning.
• Använd endast den tillhörande nätadaptern eller batteriet som följer med Freestyle bröstpump.
• Kontrollera att spänningen hos nätadaptern är kompatibel med strömkällan.
• Anslut nätadaptern till Freestyle Bröstpump först och stick sedan in den i vägguttaget.
• För att säkerställa att apparaten inte är kopplad till elnätet, dra ur nätadaptern ur vägguttaget.
• Se till att nätadaptern inte kommer i kontakt med de varma ytorna.
• Använd aldrig en elektrisk apparat som har en skadad sladd eller stickpropp, inte fungerar
riktigt, har blivit tappad eller skadad eller hamnat i vatten.
SV1414 SV

• Använd inte pumpen utomhus.
• Håll utrustningen torr och utsätt den inte för direkt solljus.
• Produkten får inte bli våt.
• Får inte användas i samband med bad eller dusch.
• Motorenheten får inte ställas eller tappas ned i vatten eller annan vätska.
• Häll eller spraya ej vätska direkt på pumpen.
• Använd eller lagra ej produkten där den kan ramla i eller dras ner i ett kar eller kärl.
• Stoppa inte ner händerna för att ta upp en elektrisk apparat som har hamnat i vatten utan att
först dra ur kontakten.
• AnvändendastMedelaoriginaltillbehör.
• Kontrollera att pumpens delar inte är slitna eller skadade.
• Detta är en personlig produkt. Användning av fler än en person kan innebära en hälsorisk och
gör garantin ogiltig.
• Använd aldrig apparaten medan du sover eller då du är mycket trött.
• Lämna inte produkten utan uppsikt när den används i närheten av barn.
• Om problem eller smärta uppstår, kontakta din amningsrådgivare eller läkare.
• Apparaten får ej användas i närheten av brännbara blandningar med luft eller med syre eller
nitratoxid.
• Bärbara och mobila apparater för radiokommunikation kan påverka Freestyle bröstpumpens
funktion.
• För Freestyle bröstpump gäller särskilda säkerhetsåtgärder avseende EMC. Den måste
installeras och tas i drift i enlighet med EMC-uppgifterna i denna bruksanvisning.
• Freestyle innehåller inga delar som kan servas av användaren. Försök inte själv att reparera
Freestyle bröstpump.
SPARA DENNA BRUKSANVISNING
lV
Monteringsanvisningar
Ihopsättning av pumpsetet
c2
e
c1
d1
1
d2
d2
+
d3
Sätt fast det gula membranet på brösttratten. Om det placeras rätt passar delarna
automatiskt ihop.
d1
15SV 15SV
Monteringsanvisningar
lV
2
+
d1
d2 d3
3
+
c
d1d1d2d2d3
4
Snäpp fast locket på brösttratten för att
omsluta membranet.
Se till att det sitter fast på alla tre ställena.
Se till att brösttrattarna (PersonalFit eller
SoftFit) och anslutningsdelen sitter fast
ordentligt.
Skruva fast flaskan i anslutningsenheten.
+
c e
d3
5
+
Anslut slangen till brösttratten och
pumpen.
+
Enkelpumpning
6
7
SV16 SV
d
b
För att växla mellan dubbelpumpning till
enkelpumpning, ta ur slangen ur brösttratten.
Sätt fast den oanvända slangen i det
lediga utrymmet i grenkopplingen.
a

Användning
V
Montering av pumpen
Före första användning:
1
2
Öppna luckan där batteriet ska sitta ge nom
att trycka luckan nedåt och sedan öppna.
Sätt in batteriet med texten “This Side
Down” pekande nedåt.
Tryck inte för hårt för att sätta i batteriet.
Stäng luckan.
3
Anslut nätadaptern och ladda tills batteriindikatorn visar fyra staplar och slutar att blinka. (detta
kan pågå i upp till 20 timmar) Första gången du laddar eller efter varje gång batteriet tas
bort visar displayen "BATT". Pumpen kan användas under laddningen. Koppla inte från
nätadaptern förrän laddningen är avslutad.
Undvik att ta bort batteriet. Om batteriet tas bort återställs batteriindikatorn. En urladdning på
upp till 20 timmar och en ny laddningstid på 4 timmar krävs för att återställa batteriindikatorn.
Kontrollknappar och LCD display
10
2a
4
7
5
8
1
3
6
9
2b
1) På / av-knapp
2a) Stimuleringsfas
2b) Pumpningfas
3) Knapp för vakuumökning (+)
4) Knapp för vakuumminskning (-)
5) Mjölkutdrivningsknapp
Knapp för återställning av timer
6) Minnesknapp
7) Timer
8) Indikerar minne “på”
9) Indikerar batterikapacitet
10) Indikerar att nätadaptern är
ansluten
17SVSV
Användning
V
Användning med nätadapter
Pumpen kan användas med nätadapter.
Stick in elanslutningen (i ändan av nätadaptersladden) i apparatens spänningsanslutning (12 V DC).
Symbolen för nätadaptern visas på displayen när pumpen är ansluten.
Anvädning med batteriet
Batteriet laddas varje gång pumpen är ansluten till nätadaptern och när pumpen inte används.
När pumpen är påslagen visas symbolen för batterikapaciteten på displayen. Om symbolen för
batterikapaciteten börjar blinka och visar en stapel, finns det endast kapacitet för ca 20 minuters
pumpning kvar.
Pumptid (fulladdat batteri) = ca 3 timmar.
Laddningstid (urladdat batteri) = ca 4 timmar *
* Första gången du laddar eller efter varje gång batteriet tas bort visar displayen "BATT". Detta
pågår i upp till 24 timmar.
Undvik att ta ur batteriet. Genom att ta bart batteriet återställs indikatorn på batteriet (symbolen
för batterikapaciteten börjar blinka och visar en stapel) och kräver en omladdning på upp till 24
timmar.
Varning:
Batteriet som används i denna enhet kan innebära en risk för brand eller kemisk hetta om det
används på felaktigt sätt. Montera inte isär, hetta upp över 60°C eller bränn till aska. Byt endast
batteriet till Medelas artikel nr 200.1512. Användning av något annat batteri kan innebära risk för
brand eller explosion. Vid förvaring av batteriet inom en begränsad tid, förvara inom temperaturskalan -20° till 60°C (-4° till 140° F). Vid förvaring vid längre tid, förvara inom temperaturskalan 0°
till 25°C (-32° till 77° F).
Använd ditt lokala återvinningssystem för kasserad elektrisk och elektronisk utrustning
(inkl. batterier). Håll borta från barn. Montera inte isär och kassera inte batteriet i eld.
Obs
Om pumpen används i 30 minuter utan justering (t.ex. reglering av vakuum) kommer Freestyle att
stängas av automatiskt.
Pumpning
VI
1
2
SV18
Placera brösttratten mitt över bröstvårtan.
• Se till att behållarna inte lutar eller blir överfyllda när du pumpar.
• Se till att slangen inte viks under pumpningen.
Koppla på bröstpumpen genom att trycka På/Av knappen.
Pumpen börjar pumpa i stimuleringsfasen.
3
Justera vakuumet under pumpningen så
att det passar dig genom att trycka på (+)
resp. (-) för att öka resp. minska vakuumet.
Om du håller inne (+ eller -) -knappen kan
vakuumnivån justeras snabbare.
4
Pumpa hands-free
VII
Så snart mjölken börjar rinna eller du känner att mjölk utsöndras, tryck
på mjölkutdrivningsknappen för att växla till utdrivningsfasen.
Om du inte trycker “let-down” knappen kommer pumpen automatiskt
att växla till utdrivningsfasen efter två minuter. Justera in ditt Maximum
Comfort Vacuum™ vilket är det maximala vakuumet du kan använda
så att det fortfarande känns behagligt (skiljer sig för olika mödrar).
För att hitta ditt Maximum Comfort Vacuum skall du öka vakuumet tills
pumpningen börjar kännas lätt obehaglig (ej smärtsam) och sedan
minska något.
Forskning har visat att du pumpar effektivare – vilket betyder mer
mjölk på kortare tid – om du pumpar på din Maximum Comfort
Vacuum™ nivå i utdrivningsfasen.
När pumpning är är avslutad, stäng av bröstpumpen och montera isär
pumpsetet. Stäng flaskan och förvara den till senare användning.
Använd flaskstativet för att förhindra att flaskan välter.
Displayen syns några sekunder efter att pumpen stängts av.
En del mammor föredrar att gå fram och tillbaka mellan stimuleringsoch utdrivningsfasen för att få en andra utsöndring vid ett och samma
pumptillfälle. Du kan göra detta genom att trycka på mjölkutdrivningsknappen.
j2
j1
Freestyle har tillbehör som gör att du kan
pumpa hands-free. Nedanstående instruktion förklarar hur du använder hands-free
tillbehören för att uppnå den frihet du
önskar.
m
j3
Hands-free set
j1 / j2 / j3
Bälte
m
19SV
Pumpa hands-free
VII
Montering av hands-free setet
1
Anslut hands-free bandet (j1) till hands-free hållaren (j2).
2
3
4
5
Snäpp på hands-free hållaren (j1/j2) på baksidan om varje brösttratt.
Öppna spännet på din BH och sätt fast spännet på din BH.
Använd de medföljande BH-spännena vid
behov.
Placera brösttratten mitt över bröstvårtan.
Fäst de nedre klämmorna på bh-bandet tills de
sitter säkert. Se till att fliken till amningsbh:n
inte fastnat under brösttratten.
Justera passformen vid behov genom att flytta
klämmorna till en annan bandjustering.
Justera längden på bandet genom att dra
nedåt i den lösa änden.
6
7
SV20 SV
Anslut slangen.
Nu är du redo av pumpa hands-free.

Använd bältet för rörlighet
Minne
VIII
Sätt fast bältet runt höften.
Om du behöver ett längre bälte, använd
förlängningsdelen.
Sätt fast pumpen genom att använda clipset på baksidan av pumpen i bältet.
Om du har hittat ett pumpningsmönster som är bekvämt och effektivt
för dig, är det enkelt att programmera Freestyle för att upprepa ditt
personliga pumpningsmönster utan att behöva återställa varje gång
du pumpar.
Genom att använda minnesfunktionen kan du fördubbla:
• Längden på stimuleringsfasen
• Vakuumnivån i stimuleringsfasen
• Vakuumnivån i utdrivningsfasen
Spara din favoritinställning:
• Starta pumpningen genom att följa bruksanvisningen
(VI Pumpning).
• Tryck på minnesknappen i tre sekunder när du pumpar i utdrivningsfasen tills displayen blinkar och pumpen piper tre gånger.
• Slutför pumpningen som vanligt.
Aktivera din favoritinställning:
• Starta pumpen och tryck på minnesknappen.
Timer
Timern startar automatiskt när pumpen är igång.
Om du av någon anledning vill starta om tiden under ett pumpningstillfälle, tryck på mjölkutdrivningsknappen i tre sekunder. Detta vill starta om timern men Freestyle fortsätter att pumpa.
21SVSV

IX
Utprovning av brösttrattar
Välja rätt storlek på brösttrattar
En korrekt anpassad brösttratt förhindrar tryck på mjölkgångarna under pumpningen och säkerställer därmed en optimal tömning av bröstet och maximal mjölkproduktion.
Din brösttratt är av rätt storlek om ditt svar på följande frågor är «Ja»:
• Rör sig bröstvårtan fritt i brösttrattens kanal?
• Är inget eller mycket lite av vårtgården indragen i brösttrattens kanal?
• Kan du se en lätt, rytmisk rörelse i bröstet vid varje pumptag?
• Känner du att hela bröstet töms?
• Är din bröstvårta fri från smärta?
Om du svarar «Nej» på någon av frågorna, prova en större (eller mindre) brösttratt.
Brösttratten Medela PersonalFit™: finns i fem storlekar – eftersom en storlek inte passar alla.
Rengöring och hygien
X
Följ dessa rengöringsanvisningar om du inte fått andra instruktioner av din vårdpersonal.
Viktigt
Före första
användnin-
gen och
därefter
en gång
dagligen
Efter varje
användning
• Använd dricksvatten för alla nedan beskrivna rengöringsprocedurer.
• Rengör alla delar omedelbart efter användning för att undvika att mjölkrester torkar in eller att bakterier utvecklas.
• Montera isär alla delarna före rengöring.
• Montera isär, diska och skölj de delar av ditt pumpset som kommer i
kontakt med bröst och mjölk (c+d+e+f+g+h).
• Lägg delarna i en kastrull som är tillräckligt stor och.
• Fyll den med kallt vatten så att delarna täcks helt. Om så önskas kan en
tesked citronsyra tillsättas för att motverka kalkavlagring.
• Koka upp vattnet och låt koka i 5 minuter.
• Ta den från spisen och häll av vattnet.
• Torka delarna med en ren handduk.
Alternativt kan de isärmonterade delarna
- diskas högst upp i en diskmaskin
- rengöras med Medela Quick Clean rengöringspåsar för mikrovågsugn
- ångsteriliseras enligt tillverkarens instruktioner
Obs: Delarna kan missfärgas av ämnen i maten, detta påverkar inte funktionaliteten.
• Ta isär och handtvätta alla delar av pumpsetet som kommit i kontakt med
bröstet (c + d + e + f + g + h) i varmt tvålvatten.
• Spola med kallt vatten.
• Torka delarna med en ren handduk.
• Torka bröstpumpens motorenhet med en fuktig (ej våt) trasa efter varje
användning.
SV2222 SV
 Loading...