

Medela Freestyle 27260 User Manual

EN
04 –47
FR
48-91

1. Intended Use/Population - Contraindication ..............................6
2. Product Description ................................................................ 7-9
3. Cleaning .............................................................................10-15
3.1 Before using for the fi rst time and once a day ...................10-11
3.2 After each use .................................................................12-13
3.3 Motor unit cleaning .........................................................14-15
4. Preparing for pumping .......................................................16-21
4.1 Assembly of breastpump kit .................................................17
4.2 Correctly fi tting breastshields ...........................................18-19
4.3 Powering your breastpump ..............................................20-21
4.3.1 Battery operation ....................................................20-21
4.3.2 Display ........................................................................21
4.3.3 Power operation .....................................................20-21
5. Breastpumping ...................................................................22-25
5.1 Double breastpumping ......................................................... 23
5.2 Single breastpumping ...........................................................23
5.3 Device operation .............................................................23-25
6. Hands-free ..........................................................................26-29
6.1 Hands-free setup ............................................................27-29
6.2 Top strap adjustment ...........................................................29
7. Breastmilk Handling ...........................................................30-33
7.1 Breastmilk storage ..........................................................30-31
7.1.1 Storing breastmilk in Freestyle cooler bag ....................31
7.2 Thawing breastmilk ..............................................................32
7.3 Warming breastmilk ..............................................................33
8. Troubleshooting ..................................................................34-35
9. Additional Information .............................................................36
10. Meaning of Symbols
...................................................................38-39
11. Important Safety Information ....................................................40-41
12. Technical Specifi cations .................................................................42
13. AC/DC Transformer Care ............................................................... 43
14. Warranty .............................................................................44-46
Questions? www.medela.ca, info@medela.ca or 1-800-435-8316 54
Take a moment to read through this entire instruction manual before using this
product for the fi rst time.
PLEASE SAVE THESE INSTRUCTIONS
Glossary of Terms
2-Phase Expression Technology – patented research based technology
exclusive to Medela that mimics a baby’s natural nursing rhythm.
Stimulation Phase – fast sucking/pumping rhythm to stimulate the milk
ejection refl ex and to start the milk fl owing.
Expression Phase – slower sucking/pumping rhythm for gentle and effi cient
milk removal as quickly as possible.
Maximum Comfort Vacuum
™
– highest vacuum setting where a mother still
feels comfortable during breastpumping. It is different for every mother.
The warning symbol identifi es all instructions that are important to safety. Failure to
observe these instructions can lead to injury or damage to the breastpump. When
used in conjunction with the following words, the warning symbols stand for:
WARNING – Can lead to serious injury or death.
CAUTION – Can lead to minor injury.
NOTE – Can lead to material damage.
INFO – Useful or important information that is not related to safety.
Table of Contents

Freestyle 27260
Freestyle is a personal use electric breastpump with 2-Phase Expression
technology designed to get more milk in less time and to maintain an established
breastmilk supply. Freestyle is capable of single and double breastpumping.
2. Product Descriptions
For lactating women to express and collect milk from their breasts.
Intended patient population/user
Adolescent pediatric or adult lactating women. Many women fi nd it convenient, or
even necessary, to use a breastpump to express and store their breastmilk once
they have returned to work, are traveling or are otherwise separated from their
baby. Women are often delighted to learn that a breastpump can be used as a
supplement to breastfeeding and that some breastpumps are designed to mimic
the suckling of a nursing baby.
Contraindications
There are no known contraindications for the Freestyle breastpump.
1. Intended Use / Population
Contraindication
Questions? www.medela.ca, info@medela.ca or 1-800-435-8316 76
i
l If you have medical reasons or other needs for exclusively breastpumping and
you have not established your breastmilk supply, it is recommended that you
use the hospital grade breastpump Symphony with the Initiation/Preemie+
Program Card.
To learn more, visit www.medela.ca/symphony.
NOTE
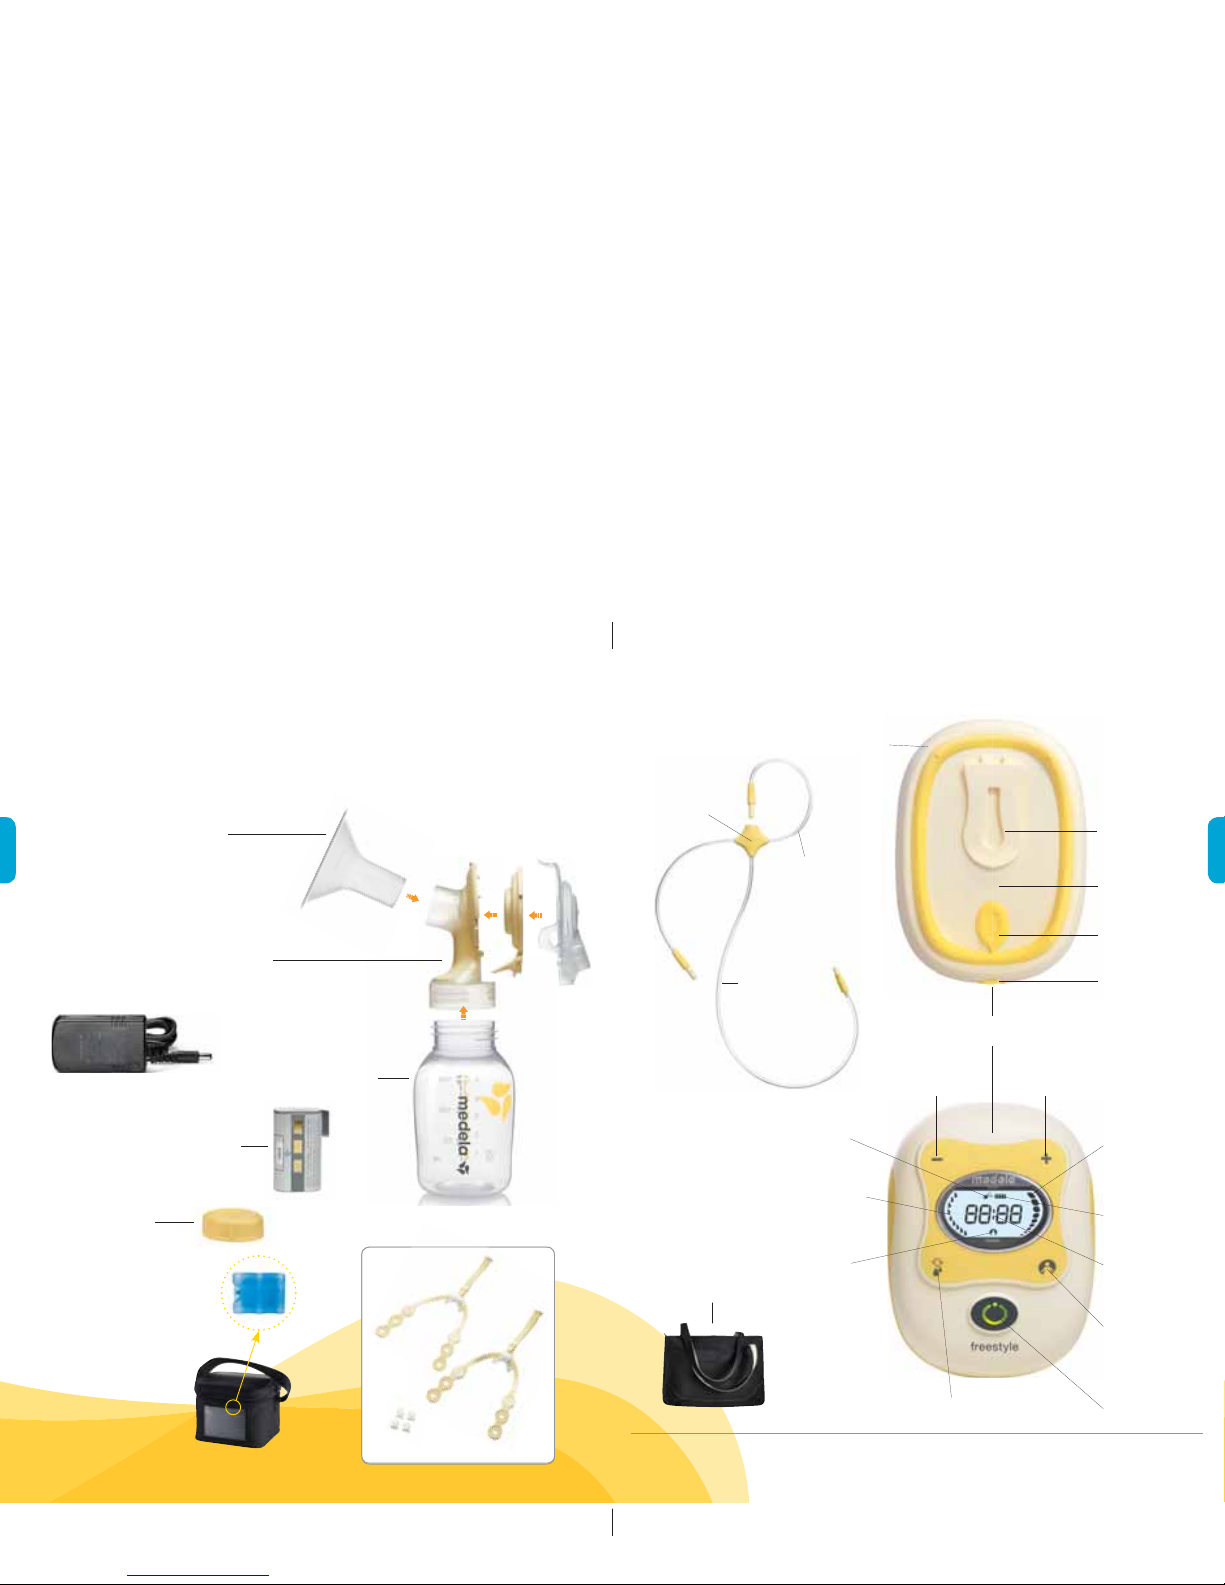
Product Description
2x PersonalFit breastshield (24mm)
(for other breastshield sizes
see Section 4.2)
Questions? www.medela.ca, info@medela.ca or 1-800-435-8316 98
1x Freestyle
tote bag
1x motor unit
belt clip
be
push
button
AC/DC
transformer
port
on/off button
reduce
vacuum
increase
vacuum
let-down button
memory
function key
memory
“on”
indicator
timer
power
indicator
battery indicator
expression
phase indicator
Freestyle
tubing port
battery
compartment
stimulation
phase
indicator
long tubing
1x Freestyle tubing
tubing
support
short tubing
1x AC/DC transformer
1x rechargeable lithium
ion battery
1x ice pack
4x solid lids
1x cooler bag
2x Freestyle connector assembly
(connector, membrane, back cap)
4x bottles
4x clasp adaptors
2x strap sets
1x hands-fr ee kit
3. Cleaning
Questions? www.medela.ca, info@medela.ca or 1-800-435-8316 1110
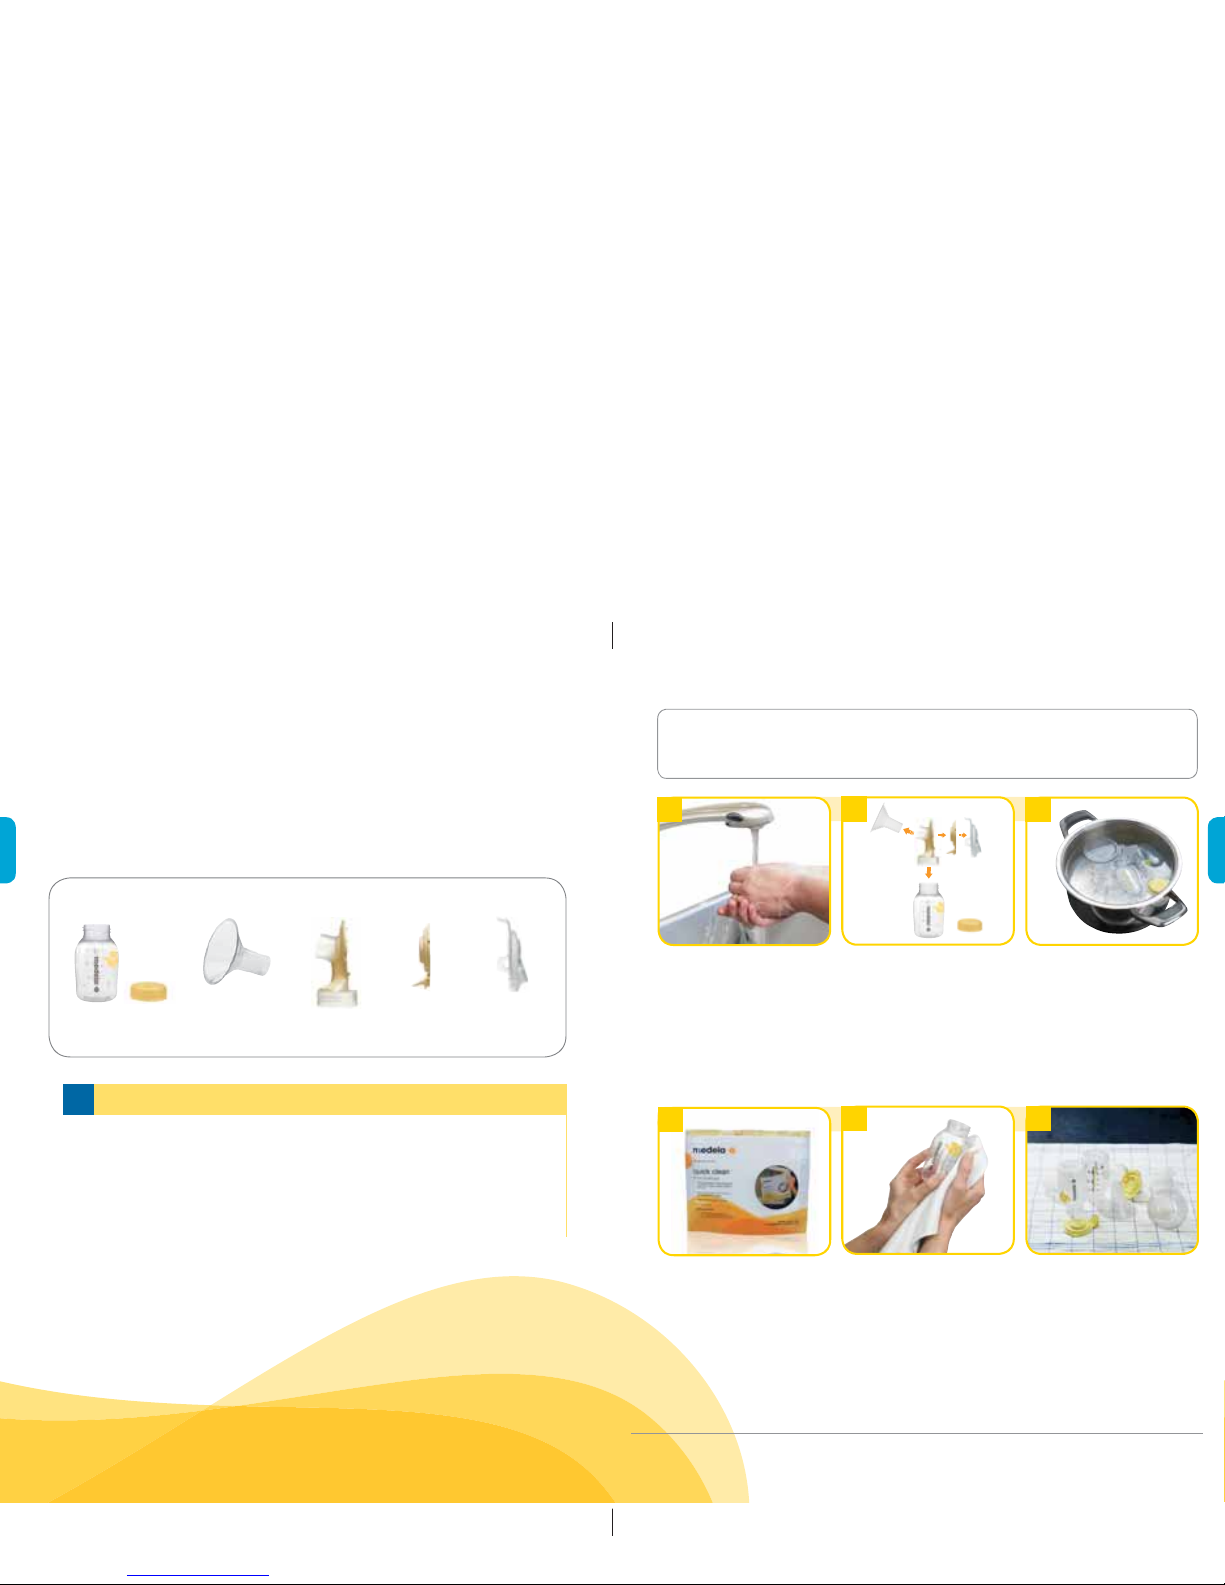
For subsequent uses,
you can use a Medela
Quick Clean Micro-Steam
bag in the microwave
in accordance with the
instructions for daily
disinfection.
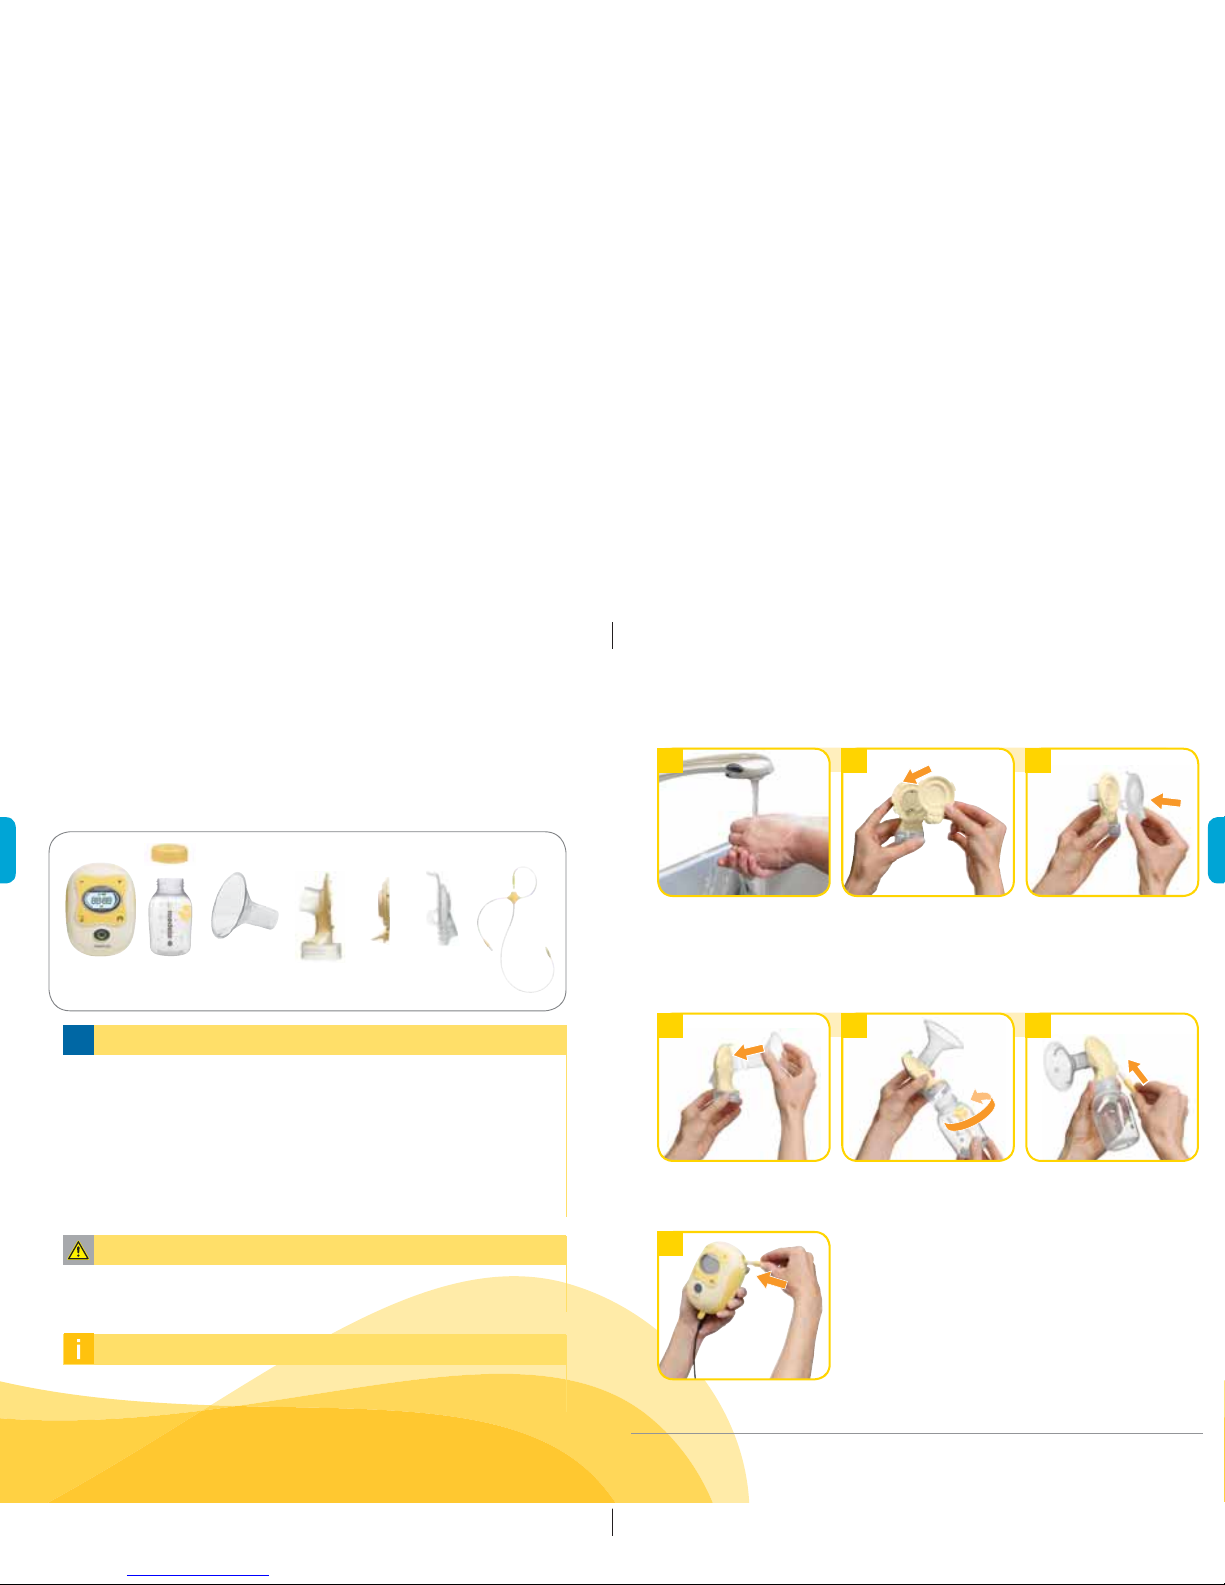
1
Wash hands thoroughly.
3a
2a
Cover all parts with water,
bring water to a boil and boil
for 5 minutes. Allow water
to cool and gently remove
parts from water with tongs.
2b
3
Dry with a clean cloth or
leave to dry on a
clean cloth.
I Allow all parts to air dry.
I Store dry parts when not
in use.
I Do NOT store wet or
damp parts.
Disassemble the
breastpump kit into
individual parts.
2
Supplies Needed: • clean dish towel or soft brush
• clean sink or bowl • drinking quality water
3.1 Before using for the fi rst time and once a day
Clean and disinfect the parts below. Ensure you clean and disinfect
these parts at least once per day.
• Membrane
• Back
cap
• Bottles and lids
• Breastshield
• Connector
i
l Freestyle tubing doesn’t require regular cleaning maintenance because
the media separation system prevents milk from entering the tubing. If you
live in an area with high humidity, you may fi nd that your tubing sometimes
has condensation after use. If this is occurring, please refer to section 8
for instructions on removing condensation from your tubing. Using your
freestyle while condensation is present may cause damage to your motor.
NOTE
Questions? www.medela.ca, info@medela.ca or 1-800-435-8316 1312
2
5
Ø
Or (as an alternative
to steps 3 and 4)
I Wash all separated
parts on top rack
of dishwasher.
I Allow all breastpump
parts to air dry in a
clean area.
I Store dry parts when
not in use.
3
Rinse all separated parts
with cold clear water for
10 - 15 seconds.
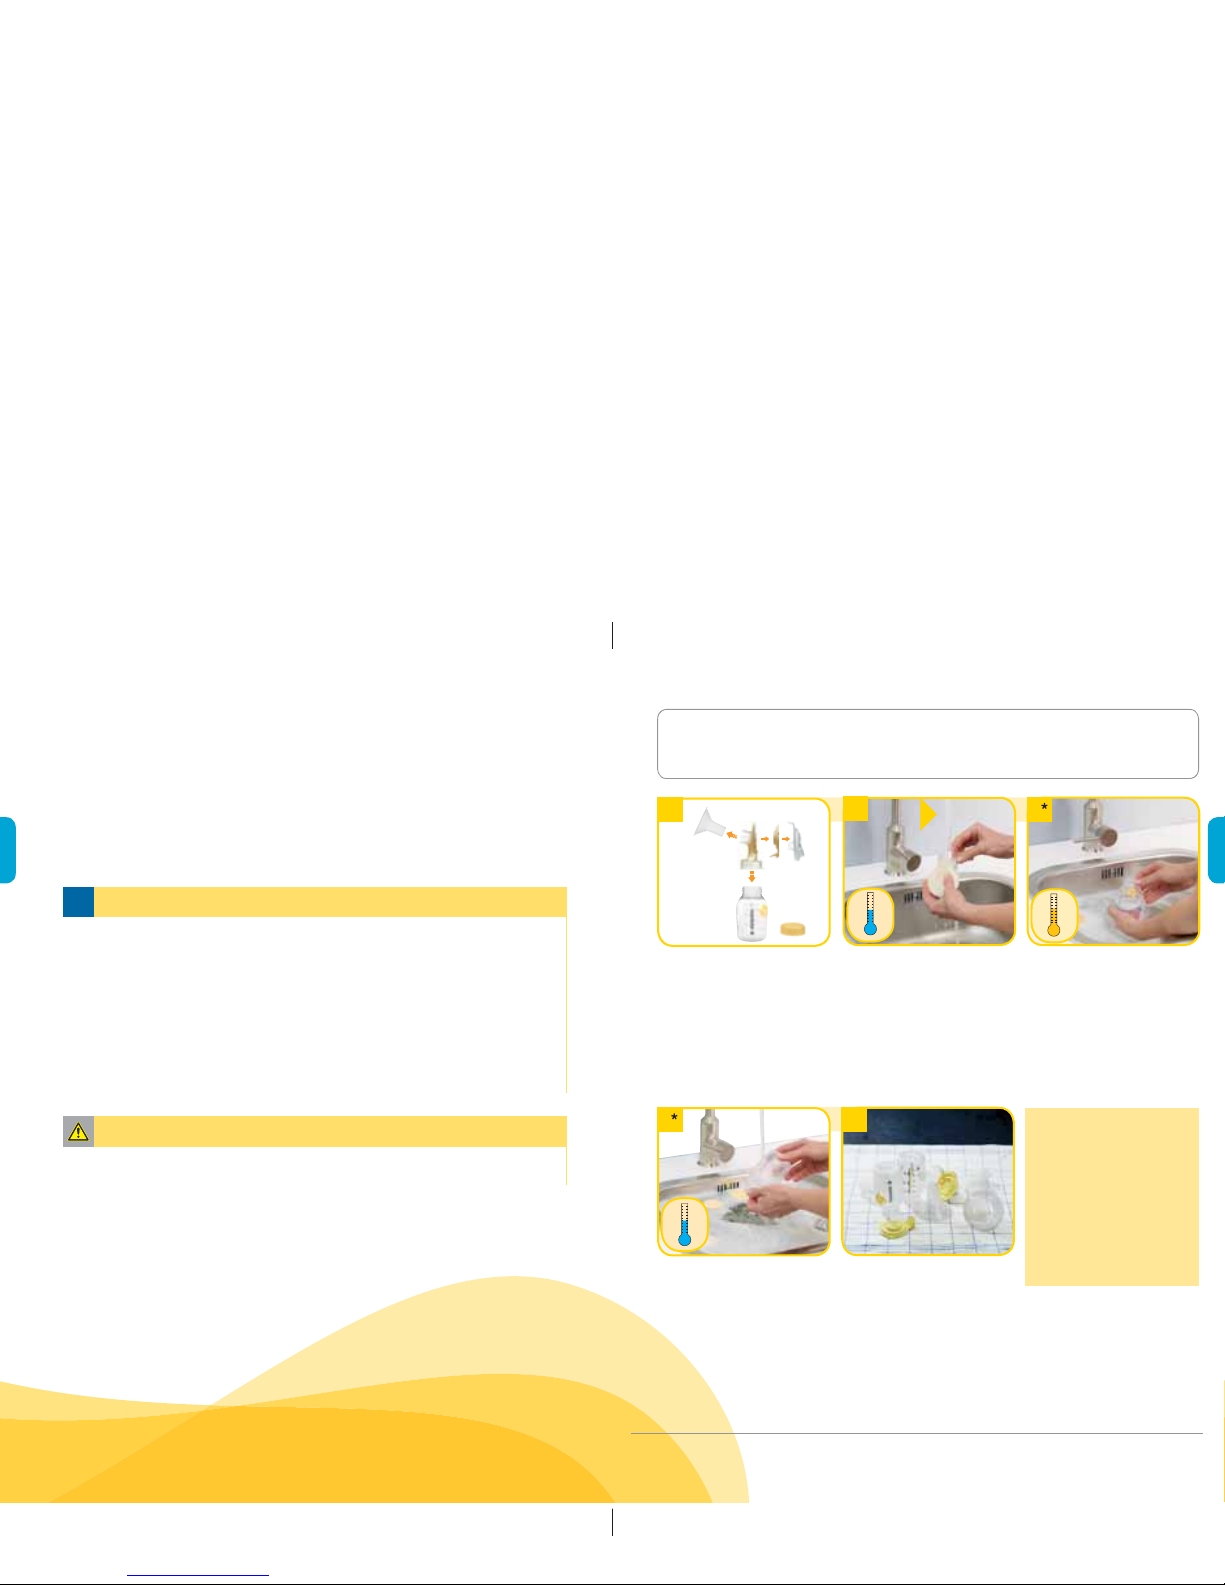
Disassemble the
breastpump kit into
individual parts.
Rinse all separated parts
with cold, clear water
(approx. 20 °C) in order
to remove breastmilk
protein residue.
Clean all parts with plenty
of warm soapy water
(approx.30 °C).
I Soak all separated parts
in warm soapy water for
5 minutes.
I Clean with a clean
dish-cloth or soft brush.
Supplies Needed: • mild dish soap • clean dish towel or soft brush
• clean sink or bowl • drinking quality water
Dry with a clean cloth or
leave to dry on a clean cloth.
I Allow all parts to air dry.
I Store dry parts when not
in use.
I Do NOT store wet or
damp parts.
1
2b
4
l Do not store wet or damp parts as mold may develop.
CAUTION
3. Cleaning (cont.)
3.2 After each use
Clean all parts that come in contact with your breast and breastmilk.
See image in Section 3.1.
i
l Wash breastpump kit parts after each use.
l Disinfect cleaned breastpump kit parts once daily.
l The breastpump kit requires no maintenance.
l Take care not to damage parts of the breastpump kit during cleaning.
l If the individual components of the breastpump kit are cleaned in a dish
washer, parts may be discoloured by food pigments. This has no impact on
the function.
l Store the dry breastpump kit in a clean bag/bottle until next use.
NOTE
Questions? www.medela.ca, info@medela.ca or 1-800-435-8316 1514
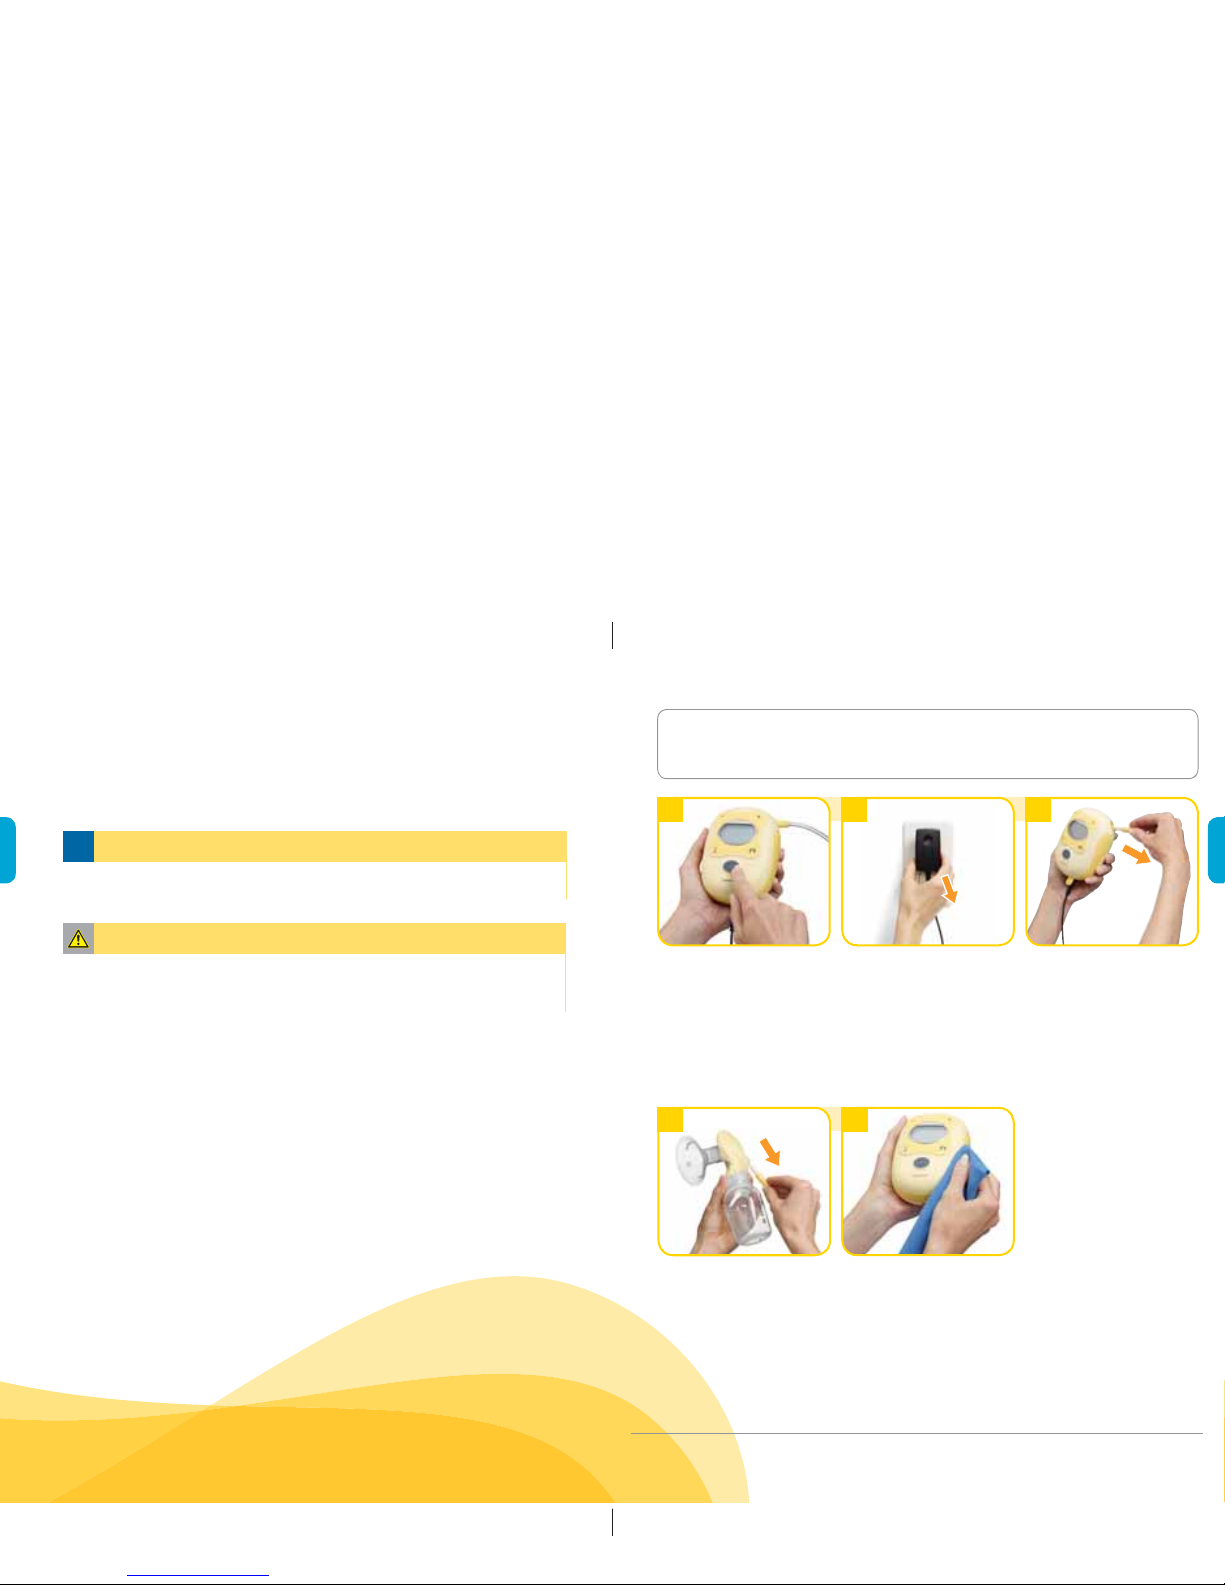
1
4
2 3
55
Remove tubing from
breastshield.
Turn off breastpump. Unplug breastpump from
power source.
Remove tubing by pulling
straight out of tubing ports.
Do not wiggle or pull tubing
at an angle.
Cleaning the motor unit:
Wipe off with a clean, damp
cloth. Do not immerse
breastpump in water
or allow breastpump to
become wet.
Supplies Needed: • clean dish towel or soft brush
• drinking quality water
3. Cleaning (cont.)
3.3 Motor unit cleaning
l Do not store wet or damp parts as mold may develop.
l Do not immerse breastpump in water or allow breastpump to become wet.
CAUTION
i
l Unplug breastpump from power source.
NOTE
Questions? www.medela.ca, info@medela.ca or 1-800-435-8316 1716
Push the breastshield onto
the connector.
Insert the long tubing into
the motor unit.
1
4
7
Wash hands before
touching breastpump, kit
and breasts and avoid
touching the inside of
bottles or lids.
4.1 Assembly of breastpump kit
Screw bottle into connector. Insert the short tubing into
the back cap as far as it
will go.
Carefully insert the light
yellow membrane into the
base of the connector.
2
5
3
6
Fasten the back cap to the
connector
I Make sure that all 3 snaps
(top & side) are engaged.
4. Preparing for Pumping
Parts you will need for this step:
• tubing• membranes
• Back
caps
• breastpump
• bottles
and lids
• breastshields
l Wash hands thoroughly with soap and water before touching the breast and
breastpump parts.
l Carry out all the steps with care and assemble the breastpump kit correctly
for optimum performance.
CAUTION
i
l Use Medela original accessories only.
Warning: Using non-Medela original accessories with your Medela
breastpump represents a health risk.
l Check breastpump kit components for wear or damage before use and
replace if necessary.
l All components must be completely dry before use for proper performance
and to prevent damage to the breastpump.
NOTE
• connectors
INFO

Questions? www.medela.ca, info@medela.ca or 1-800-435-8316 1918
Choosing the right size PersonalFit breastshield
1 Determine the size you’re currently using. If you’re
not sure, look for the size embossed on your
breastshield (see picture). 24mm breastshields
are provided with Medela breastpumps.
2 >OPSLW\TWPUNJVTWHYL`V\YÄ[[V[OLPTHNLZ
below as a sizing guideline.
24mm
&RUUHFWðW
Your breastshield
is
too small;
try a larger size
Your breastshield
is
too large;
try a smaller size
4.2 Correctly fi tting breastshields
Properly fi tted breastshields will ensure comfort and effi cient milk expression.
To determine if you have the correct size, look at the following diagram:
l The nipple should be centered in the tunnel of the shield.
l The nipple should move freely without rubbing when the
breastpump is turned on.
l No part of your breast should be pulled into the
breastshield tunnel; only your nipple should
move freely inside the tunnel.
l You should see a gentle, rhythmic motion in
the breast with each cycle of the breastpump.
l After breastpumping, your breast should feel much
less full with no areas of hardness.
Medela offers different sizes which are available at many
local retailers or visit www.medela.ca.
PersonalFit breastshields
(21mm, 24mm, 27mm, 30mm & 36 mm)
&RUUHFWðW
30 36
27
24
21
4. Preparing for Pumping (cont.)
CAUTION
l While some discomfort may be felt when fi rst using a breastpump, using a
breastpump should not cause pain.
l If you are unsure about breastshield sizing, please contact a healthcare
professional or breastfeeding specialist who can help you get a proper fi t
or call Medela at 1-800-435-8316 to fi nd a breastfeeding specialist in
your area.
Questions? www.medela.ca, info@medela.ca or 1-800-435-8316 2120
1
4.3.1 Battery operation
1
4.3.3 Power operation
4.3.2 Display
2
1
2
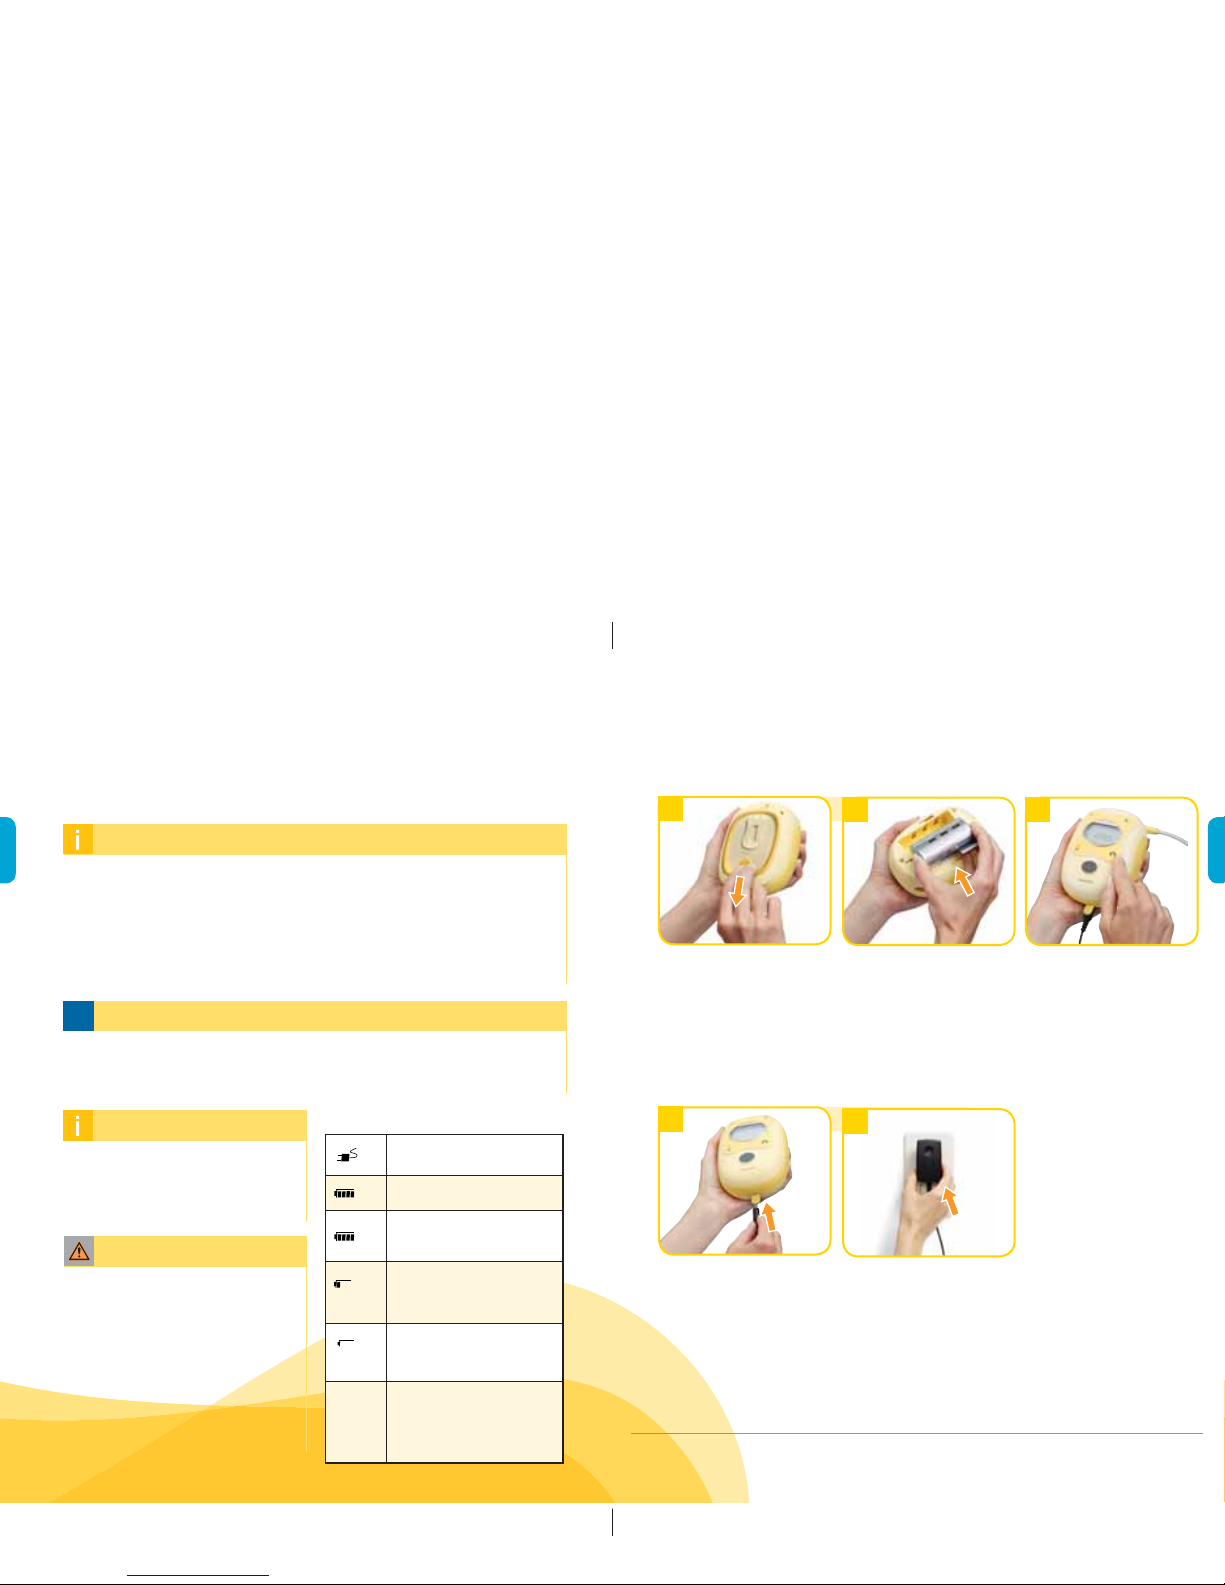
Open the yellow fl ap and
plug the AC/DC transformer
cord into the motor unit.
*Battery must be in
compartment.
Open the battery
compartment on the
back by pressing the yellow
push button and sliding in
the direction of the arrow.
Insert the battery in the
direction shown by “This
side down” so that the gold
contacts on the battery
touch the gold contacts in
the device.
Before fi rst use, “bAtt”
appears in the display. Fully
charge the battery until
the batter y indicator stops
fl a s h i n g .
Plug the AC/DC transformer
into the mains socket.
Summary of battery charge status.
AC/DC transformer
connected to socket
Battery charge status
Battery fully charged, approx.
3 hours' expression
fl ashing
20 min. expression time
remaining. Battery removed
from motor unit
fl ashing
Low battery, needs charging
“bAtt”
fl ashing
Initial charge and charging
after removing the battery
(up to 24 hours charging
time)
WARNING
4. Preparing for Pumping (cont.)
i
4.3.1 Batter y operation:
If possible, do not remove the battery from the motor unit. Removing the
battery requires a charging time of up to 24 hours.
l The breastpump can be used during charging.
l The battery is charging as soon as the breastpump is connected to a power
source (even if the breastpump is not in use).
l If the breastpump has been
running for 30 minutes without any
manipulations, the Freestyle will
automatically switch off.
4.3.3 Power operation
Follow the exact order of the steps.
l Only use the AC/DC transformer
supplied with the Freestyle
breastpump.
l Make sure the voltage of the AC/DC
transformer is compatible with the
power source.
l Do not use force to push the battery into the battery compartment.
l Do not use Freestyle without battery – this can cause permanent damage to
your Freestyle motor.
NOTE
INFO
INFO
4.3 Powering your breastpump
Questions? www.medela.ca, info@medela.ca or 1-800-435-8316 2322
3
Hold the breastshield
onto your breast with your
thumb and index fi nger.
Support your breast with
the palm of your hand.
2
1
5.3 Device operation
5.2 Single breastpumping
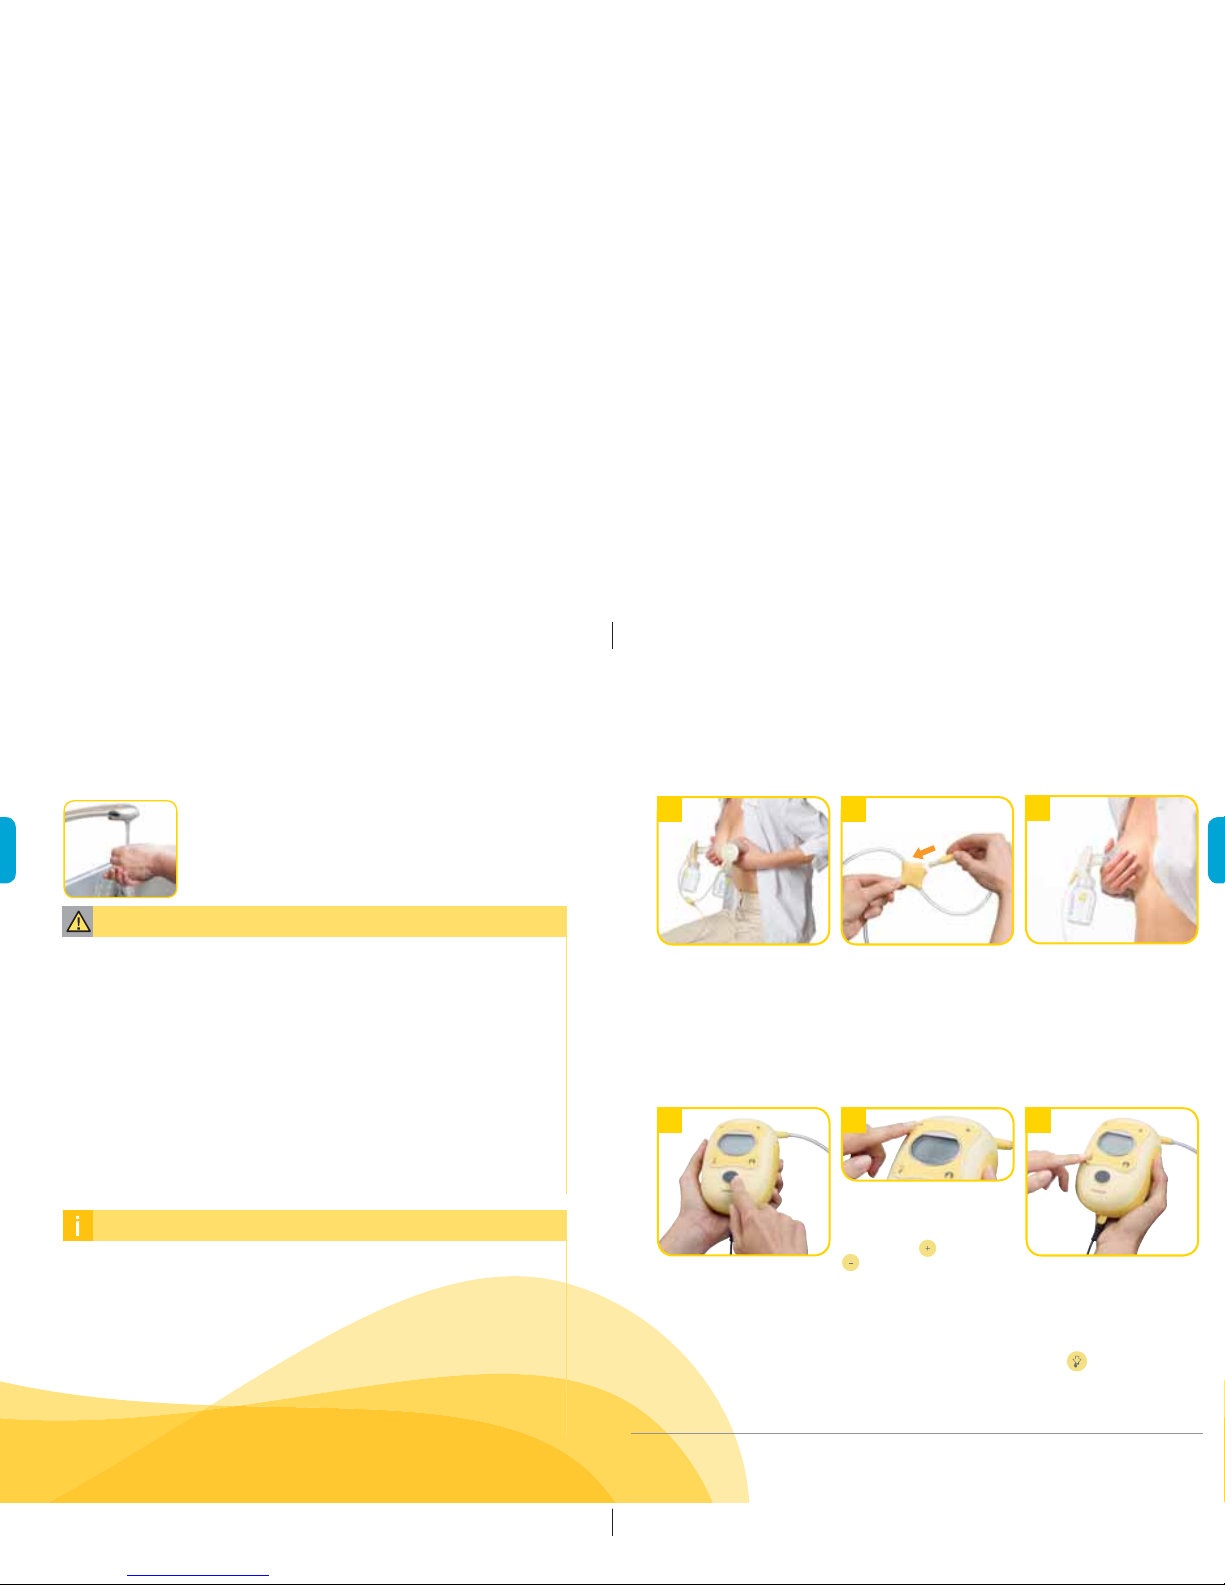
Adjust the vacuum to
your comfort level while
breastpumping by pressing
the increase or decrease
button. Holding down
these buttons will adjust
vacuum more rapidly. After
2 minutes, the Stimulation
Phase will automatically
change to the Expression
Phase, indicated on the
display as shown.
Freestyle will start in the
Stimulation Phase, indicated
on the display as shown.
Double breastpumping:
Place the breastshield on
your breast so that your
nipple is properly centered
in the tunnel.
Single breastpumping:
Insert the unused short
tubing into the tubing
holder.
If you “let-down” (your
milk starts to fl ow) sooner
than 2 minutes, you will
breastpump more effi ciently
by pressing the let-down
button at that time.
5.1 Double
breastpumping
1
1
2
Preparing for breastpumping: Wash hands before
touching breastpump, kit and breasts and avoid touching
the inside of bottles or lids.
5. Breastpumping
I Always inspect breastshields, connectors, membranes and tubing prior to
use for cleanliness and to ensure no parts are damaged/broken. If dirty, see
Section 3.2.
I Contact your healthcare professional or breastfeeding specialist if you can
express only minimal or no milk or if expression is painful. See Section 9 for
more information.
I Do not try to express with vacuum that is too high and uncomfortable
(painful). The pain, along with potential breast and nipple trauma may
decrease milk output.
I Make sure tubing is not kinked or pinched while breastpumping.
I Do not hold the breastpump kit by the bottle. This can lead to blockage of
the milk ducts and engorgement.
CAUTION
I Research has shown that you will breastpump more effi ciently – get more
milk in less time – when breastpumping at Maximum Comfort Vacuum
during the Expression Phase.
I You should reassess your Maximum Comfort Vacuum throughout your
breastpumping experience because it can change during the different
stages of lactation.
I Do not tilt or overfi ll bottles when breastpumping.
I Double breastpumping saves time and increases the energy content of the
milk. Milk production is increased and maintained long-term.
INFO

Questions? www.medela.ca, info@medela.ca or 1-800-435-8316 2524
Switch off the breastpump
with .
7
When your breastpumping
session is over, unplug
tubing from the back of
the breastshield(s) before
setting down the bottles.
Once in the Expression
Phase, set your Maximum
Comfort Vacuum. Use
to increase the vacuum
until it is slightly
uncomfortable (never
painful) then press to
dial it back minimally.
4
5
6
8
Disassemble and clean per
Cleaning Instructions in
Section3.
Press for 3 seconds
during the expression
phase to save the individual
breastpumping program.
I The indicator on the display
fl ashes and the breastpump
emits 3 beeps.
I Finish expression as usual.
Screw lid onto bottle.
I Follow the instructions
in Section 7 “Breastmilk
handling”.
9
5. Breastpumping (cont.)
I Always disconnect Freestyle from the power source after expression (except
if the battery is charging).
I Only fi ll the bottle to the 150ml mark.
I Freestyle switches off automatically if it has been running for 30 minutes with
no interruptions.
I Step 4: Memory function key
To activate your personal setting, start the breastpump and press .
I How often should you breastpump? A breastpump is a replacement for
when you are separated from your baby. It is important to breastpump when
the baby would be breastfeeding. If you are exclusively breastpumping, 6 to 8
breastpumping sessions per 24 hours is recommended.
I How long should your breastpumping session last? Breastpumping times
can vary from mother to mother, however, if you are breastpumping both
breasts simultaneously at Maximum Comfort Vacuum, your breastpumping
session should last up to 15 minutes.
I How should your breasts feel after breastpumping? After breastpumping,
your breasts should feel soft and there should be no fi rm areas. Before
breastpumping, your breasts will have a fi rm, heavy feeling. After
breastpumping, make sure your breasts are not fi rm or have lumpy areas. This
could indicate that the breast is not draining all over. See Section 9 for more
information.
INFO
INFO
Questions? www.medela.ca, info@medela.ca or 1-800-435-8316 2726
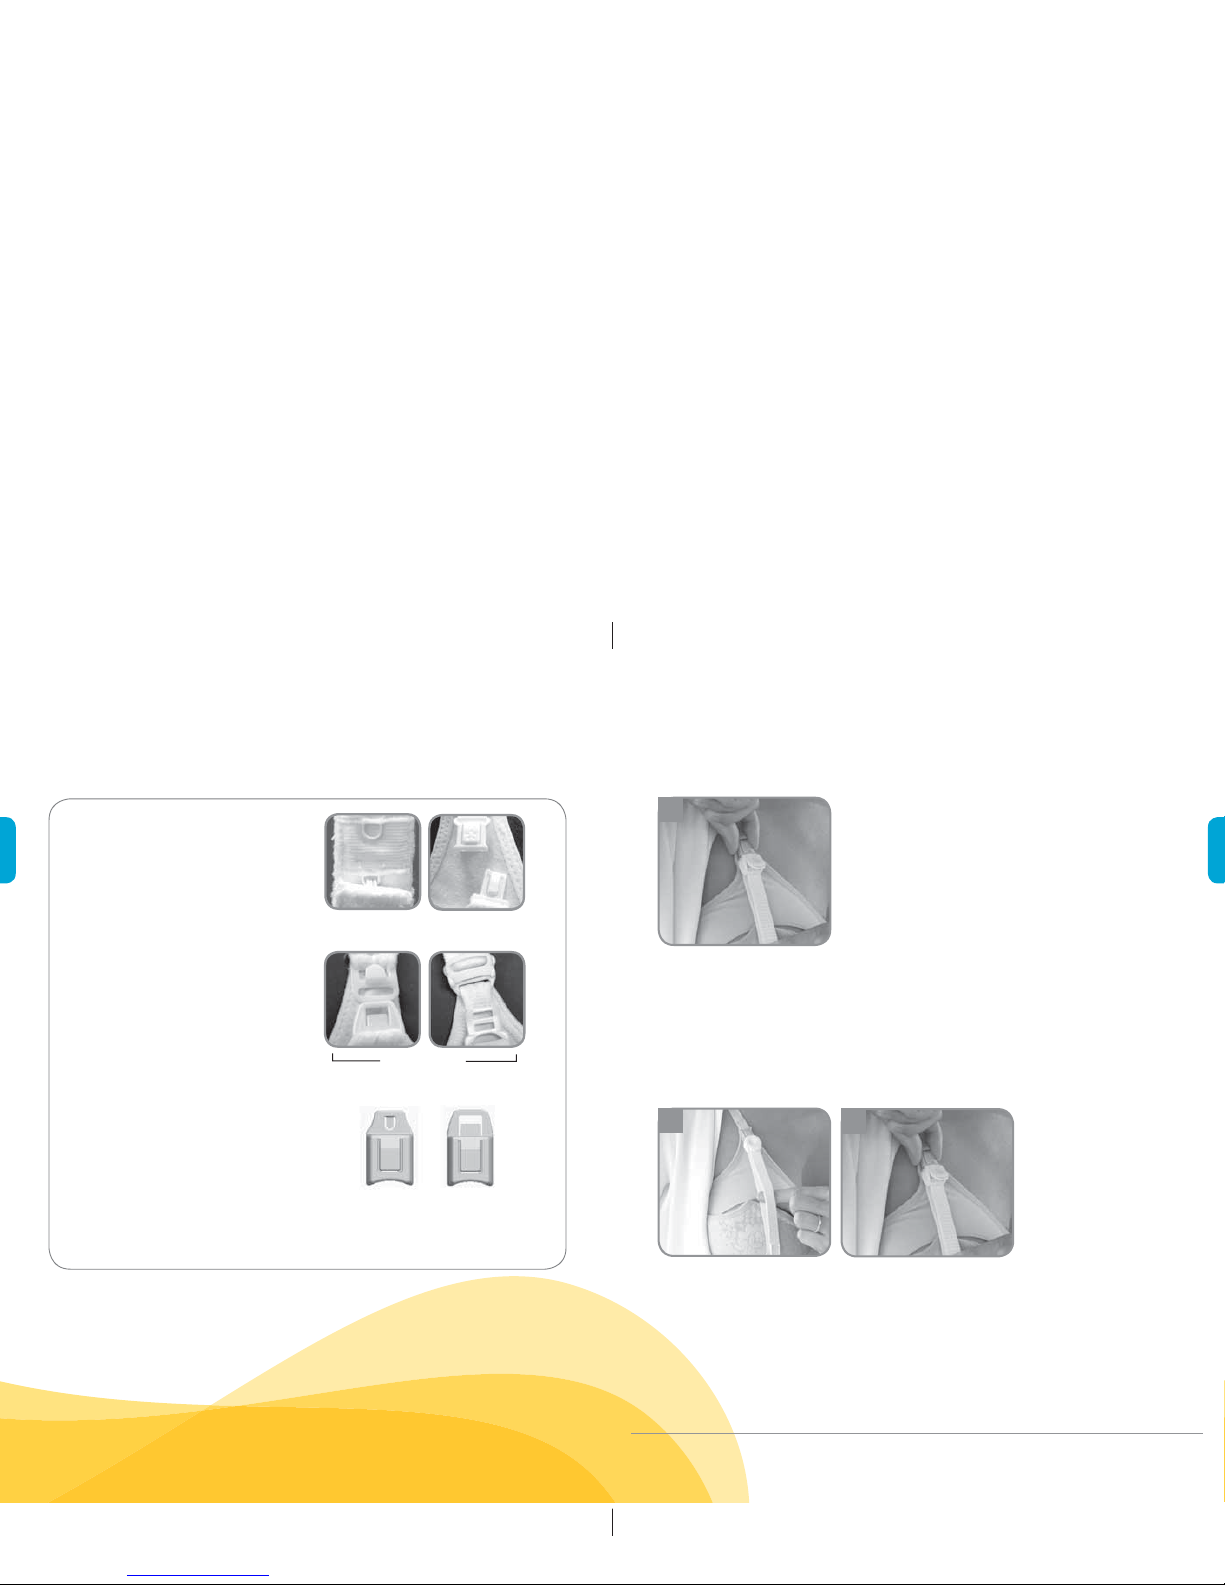
6.1 Hands-free setup
1
4
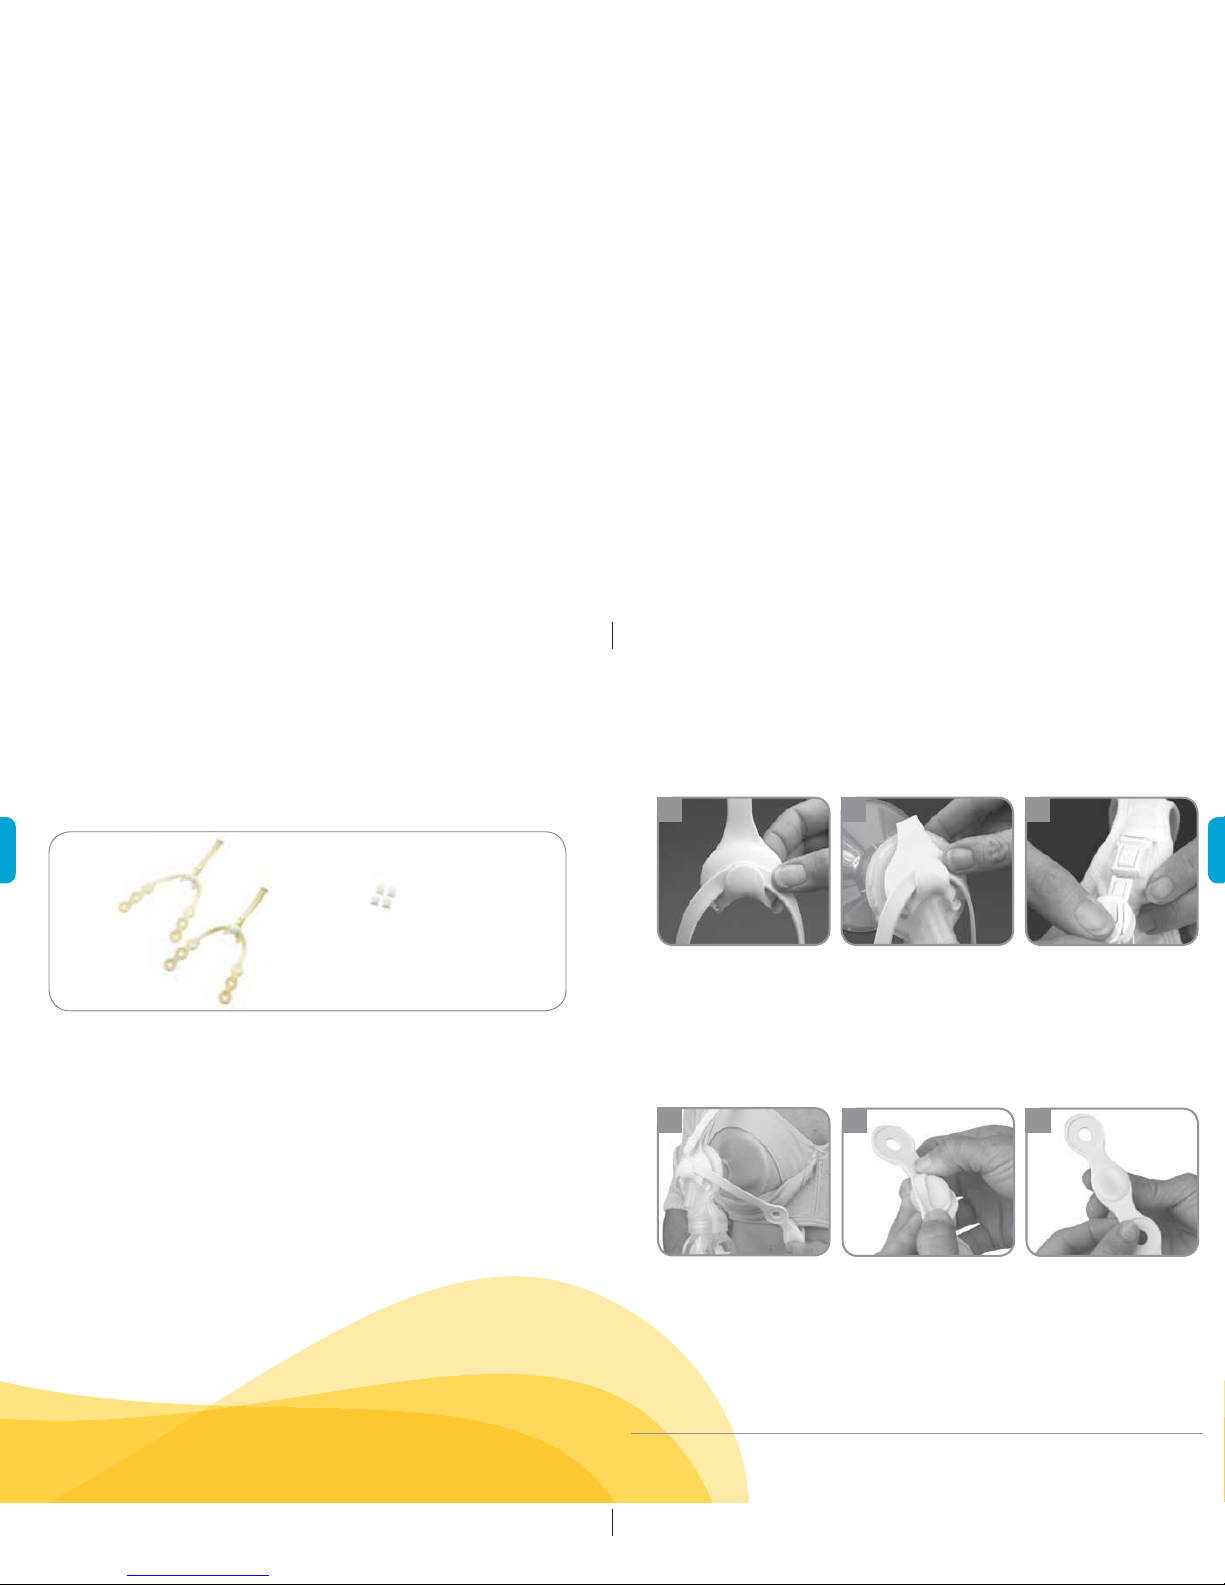
Connect hands-free top
strap to hands-free bottom
strap by sliding bottom strap
into top strap clip.
Attach bottom clips to
bra band until secure
fi t is achieved. Be sure
the nursing bra fl ap is
not trapped under the
breastshield.
2
5 6
3
Snap hands-free strap
assembly onto back of
each breastshield body.
Be sure that the hands-free
assembly snaps into the
breastshield body and is
secure.
If necessary, adjust the fi t
by moving the bottom strap
clips to a different strap
setting.
Open your bra fl ap and
insert clasp into your
bra, using bra adaptors if
necessary (see page 26).
The strap is fl exible and can
be pulled to remove and
reinser t the clip. Be sure the
round part of the clip sits on
the side of the strap with the
round indentation. After you
move the clip, repeat step 4.
• clasp adaptors
• straps
6. Hands-Free
Parts you will need for this step:
Questions? www.medela.ca, info@medela.ca or 1-800-435-8316 2928
7
Adjust length of top strap
by pulling down on the
loose end. Close clasp
when complete. Repeat
strap assembly with the
other breastshield.
6.1 Hands-free setup (cont.)
1
2
Tighten: Open clasp and
pull down on front strap until
desired length. Snap clasp
into locked position when
complete.
Loosen: Open clasp and
pull down on back part of
strap until desired length.
Snap clasp back into
locked position.
6.2 Top strap adjustment
6. Hands-Free (cont.)
No adaptor
needed
Use adaptor B
Use adaptor A
AB
Bra Adaptors
Hook & Eye Universal
The hands-free straps were
designed to work with most top
fl ap nursing bras (see below).
Refer to the pictures below to
determine which bra adapter
to use.
Bra clasp adaptors
 Loading...