

Page 1
Double Select
™
BREASTPUMP
BOMBA DE LACTANCIA
Manufactured exclusively by and for Medela, Inc.
Fabricado exclusivamente por y para Medela, Inc.
P.O. Box 660, McHenry, IL 60051-0660
1101 Corporate Drive, McHenry, IL 60050 USA
Phone/Teléfono: 800-435-8316, 815-363-1166
Fax: 815-363-1246
Email/Correo electrónico: customer.service@medela.com
www.medela.com
Instructions &
Assembly
Instructivo de
uso y armado
Printed in the USA. Medela, Lactina and Symphony are registered trademark of Medela, Inc. Double Select, Pump & Save,
Quick Clean and Micro-Steam are trademarks of Medela, Inc. in the USA and in other countries.
Impreso en los EE.UU. Medela, Lactina y Symphony son marcas registradas de Medela, Inc. Double Select, Pump & Save,
Quick Clean y Micro-Steam son marcas comerciales de Medela, Inc. en Estados Unidos y otros países.
1907672 A 0904 © 2004 Medela, Inc.
Page 2

1
IMPORTANT
SAFEGUARDS
This is a single-user pump, which cannot be autoclaved or sterilized
without destroying the product. Use by more than one person may present
a health risk and voids the warranty.
When using electrical devices, basic safety precautions should
always be followed, including the following:
READ ALL INSTRUCTIONS BEFORE USE
DANGER: To reduce the risk of electrocution:
1. Always unplug electrical devices immediately after using.
2. Do not use while bathing.
3. Do not place in or drop into water or other liquid.
4. Do not reach for any electrical device if it has fallen into water.
Unplug immediately.
WARNING:
To reduce the risk of burns, electrocution, fire or injury to persons:
1. The pump should never be left unattended when plugged into an
electric outlet.
2. Use the pump only for its intended use as described in this manual.
3. The use of accessory attachments not recommended by the manufacturer
may cause hazards.
4. Never operate an electrical device if it has a damaged cord or plug, if it is not
working properly, if it has been dropped or damaged, or dropped into water.
5. Keep the cord away from heated surfaces.
6. Do not use outdoors.
7. Plug the transformer into Double Select™first and then into wall socket.
8. Only use the transformer that comes with the Double Select
™
.
9. Do not use the Vehicle Lighter Adapter with a Double Select
™
Breastpump.
10. This product is a personal care item and should not be shared
between mothers.
SAVE THESE INSTRUCTIONS
English
Table of Contents
Important Safeguards . . . . . . . . . . . . . . . . . . . . . . . . . . . . . . . 1
Uses . . . . . . . . . . . . . . . . . . . . . . . . . . . . . . . . . . . . . . . . . . . . . 2
Health & Safety Information . . . . . . . . . . . . . . . . . . . . . . . . . . 2
Hygiene, Cleaning, Storing Breastmilk
Assembly Instructions . . . . . . . . . . . . . . . . . . . . . . . . . . . . . . . 6
Battery & Electric Operation, To Begin Pumping
Pumping Tips. . . . . . . . . . . . . . . . . . . . . . . . . . . . . . . . . . . . . . 9
Accessories . . . . . . . . . . . . . . . . . . . . . . . . . . . . . . . . . . . . . . . 9
Troubleshooting. . . . . . . . . . . . . . . . . . . . . . . . . . . . . . . . . . . 10
Warranty. . . . . . . . . . . . . . . . . . . . . . . . . . . . . . . . . . . . . . . . . 12
Ordering Parts . . . . . . . . . . . . . . . . . . . . . . . . . . . . . . . . . . . . 13
Breastpump Parts List. . . . . . . . . . . . . . . . . . . . . . . . . . . . . . 13
Parts. . . . . . . . . . . . . . . . . . . . . . . . . . . . . . . . . . . . . . . . . . . . 28
Español - Instrucciones . . . . . . . . . . . . . . . . . . . . . . . . . . . . . 14
This product has been designed for single user use and
should not be shared between mothers.
Disassemble all parts prior to cleaning and
sterilization. Especially be sure to remove the valve from
the breastshield and separate the white membrane from the
valve prior to cleaning or sterilization. See parts 1, 2 and 3
on breastpump parts lists (Page 28).
IMPORTANT
Page 3
32
Prior To First Use
To Sterilize in the Hospital:
All disassembled kit parts (parts 1-6, page 28) can be autoclaved
to a maximum of 272° F for 3 minutes at 29 PSIG or 250° F for
15-20 minutes at 15 PSIG.
To avoid damage during and immediately after sterilization:
• Sterilize parts without applying external pressure to them.
• Allow parts to cool before applying external pressure.
NOTE: A white or gray tint may appear on tubing and other parts
after sterilization. This is normal and will not affect the breastpump’s
performance.
If gas sterilization is used, residual testing is recommended to
determine the proper length of aeration.
To Sanitize at Home:
Disassemble all parts that come in contact with breast or milk,
and sanitize by boiling for 10 minutes.
After each use:
• Disassemble and wash all parts that come in contact with
the breast and milk in warm soapy water.
• Rinse in clear water.
•
Air-dry on clean towel and cover parts when not in use.
All parts may also be washed in top rack of dishwasher.
For Quicker Cleaning:
Medela offers Quick Clean™Micro-Steam™Bags for daily kit
disinfection.
Uses
• Collect breastmilk during short-term absences from the baby.
• Maintain a milk supply if breastfeeding is temporarily
interrupted.
• Relieve engorgement or sore nipples. Pumping with
simultaneous massage is helpful to relieve engorgement.
NOTE: For long-term pumping when the baby is not available to feed
at the breast at least part of the time every day (a premature baby, for
example), use of a full-size electric pump (Lactina
®
or Symphony
®
Breastpump) is suggested. These pumps can be rented inexpensively
for home use. For the names of rental stations or breastfeeding
specialists in your area, call 1-800-TELL YOU (1-800-835-5968).
Cleaning & Sterilization
Follow these cleaning instructions in the hospital or at home
unless you are otherwise instructed by your healthcare
professional.
Hygiene
Wash hands before touching breasts or
containers, and avoid touching the inside
of containers or lids.
Preparation
Prior to cleaning,
take apart all parts of your breastpump accessory kit. Be especially sure to remove the valve from the breastshield
and separate the membrane from the valve prior to cleaning.
Page 4
5
Tubing Care:
Inspect tubing after each pumping session for condensation and
or milk.
If condensation appears in tubing:
To eliminate condensation after you have completed pumping,
continue running the pump with the tubing attached for another
1-2 minutes or until dry.
If milk appears in tubing:
1. Turn off the pump and unplug from power source.
2.
Remove and disassemble the tubing, pump connector,
piston,
cylinder, membranes and membrane caps (parts vary by pump
used). Wash in soapy water, then rinse in clear cold water.
3.
Shake water droplets out of tubing and hang to air-dry. For
faster drying, attach tubing to pump and run pump 1-2 minutes
or until dry, or pour a small amount of isopropyl alcohol through
the tubing to dry.
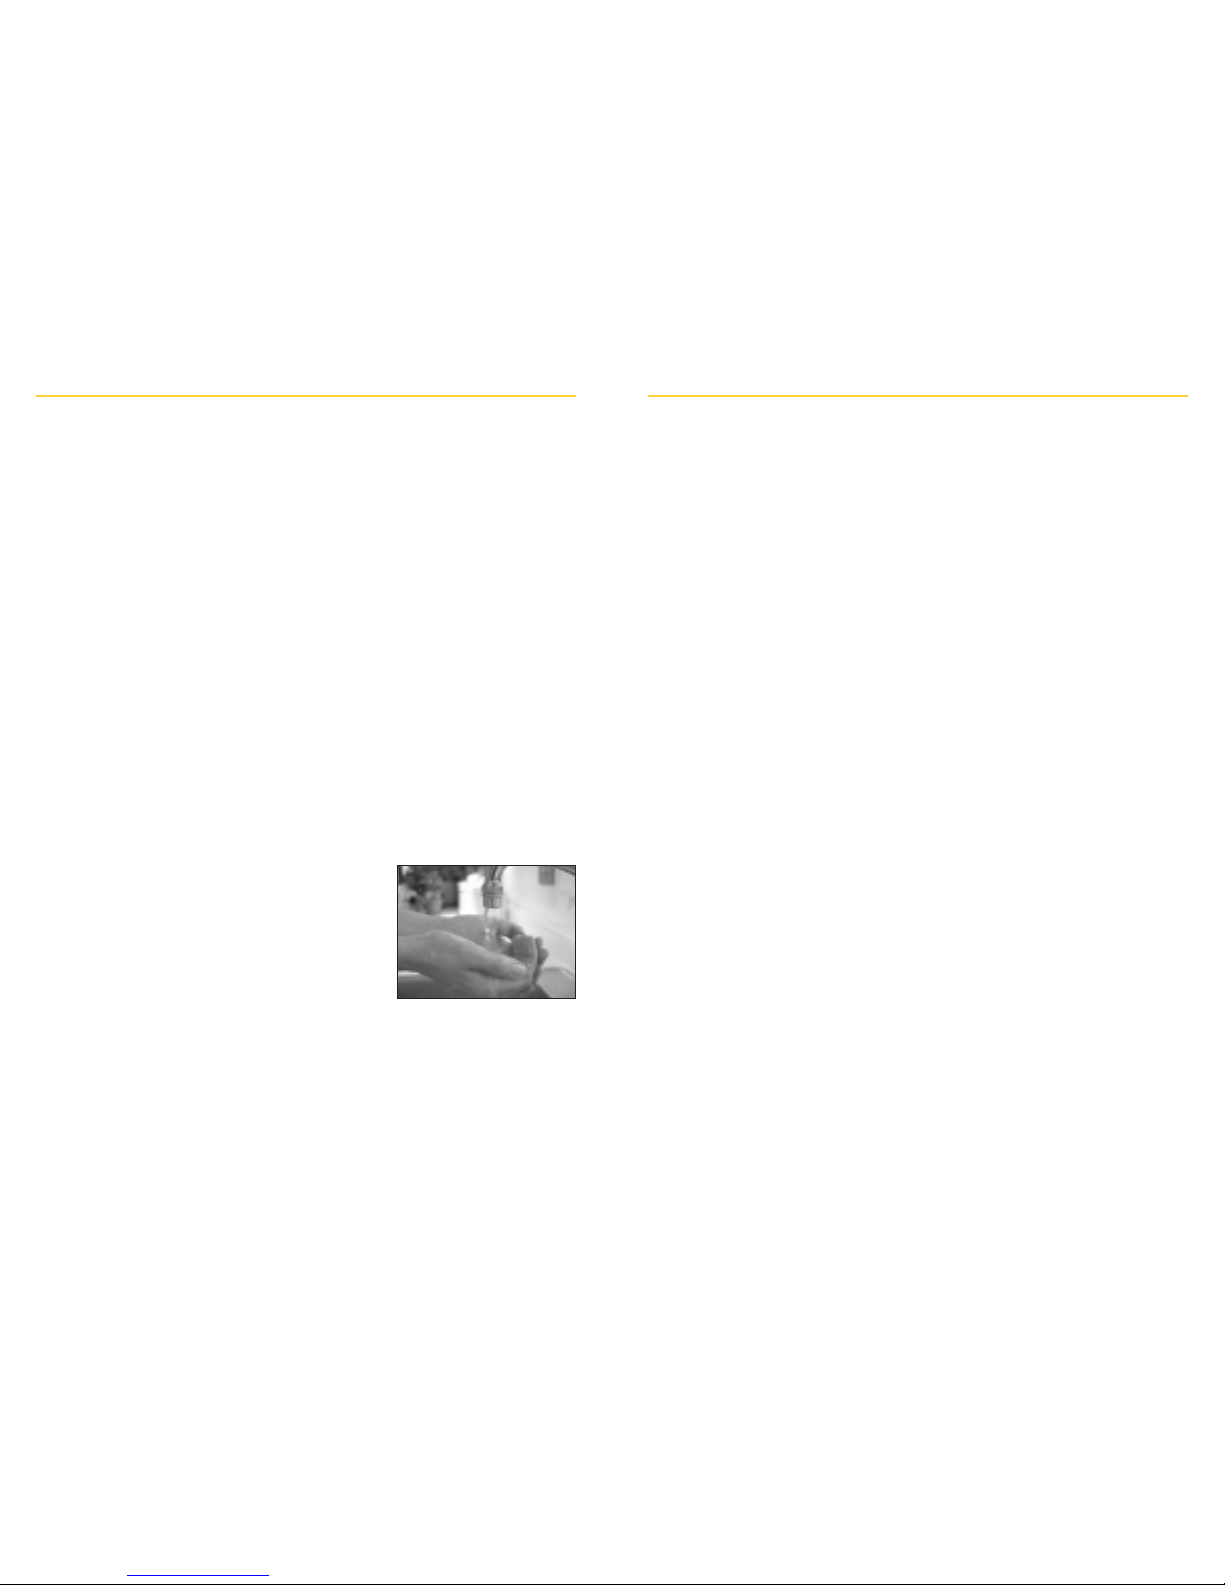
Breastmilk Storage (For Healthy Term Babies)
Room Cooler with Refrigerator Self-contained Deep
Temperature 3 Frozen Refrigerator Freezer
Ice Packs Freezer Unit
Freshly 4 hours 24 hours 5 - 7 days 3-4 6-12
expressed at 66-72°F at 59°F at 32-39°F months
3
months
breastmilk (19-22°C)
1
(15°C) 1(0°-4°C)
2
at 0°F
(-19°C)
3
Thawed Do not Do not 24 hours
4
Never Never
breastmilk store store refreeze refreeze
(previously
thawed thawed
frozen)
milk milk
1
Hamosh M, Ellis L, Pollock D, Henderson T, and Hamosh P: Pediatrics, Vol. 97, No. 4, April 1996. pp 492-
497. (4 hours at 77° F/25° C).
2
Sosa, Roberto; Barness, Lewis: AJDC, Vol. 141, Jan. 1987.
3
Lawrence R, and Lawrence R: Breastfeeding: A Guide For the Medical Profession, 1999, p.894.
4
Arnold L; Recommendations for Collection, Storage and Handling of a Mother's Milk for Her Own Infant in the
Hospital Setting, 3rd Edition.The Human Milk Banking Association of North America, Inc. 1999, p. 18.
IMPORTANT NOTE: If the temperature in the room, car or outdoors
exceeds 77° F / 25° C, chill milk immediately to preserve freshness.
4
Storing Breastmilk
Check with your hospital for specific storage instructions.
When freezing, do not fill containers more than 3/4 full to allow
space for expansion. Label containers with the date of pumping.
Page 5
76
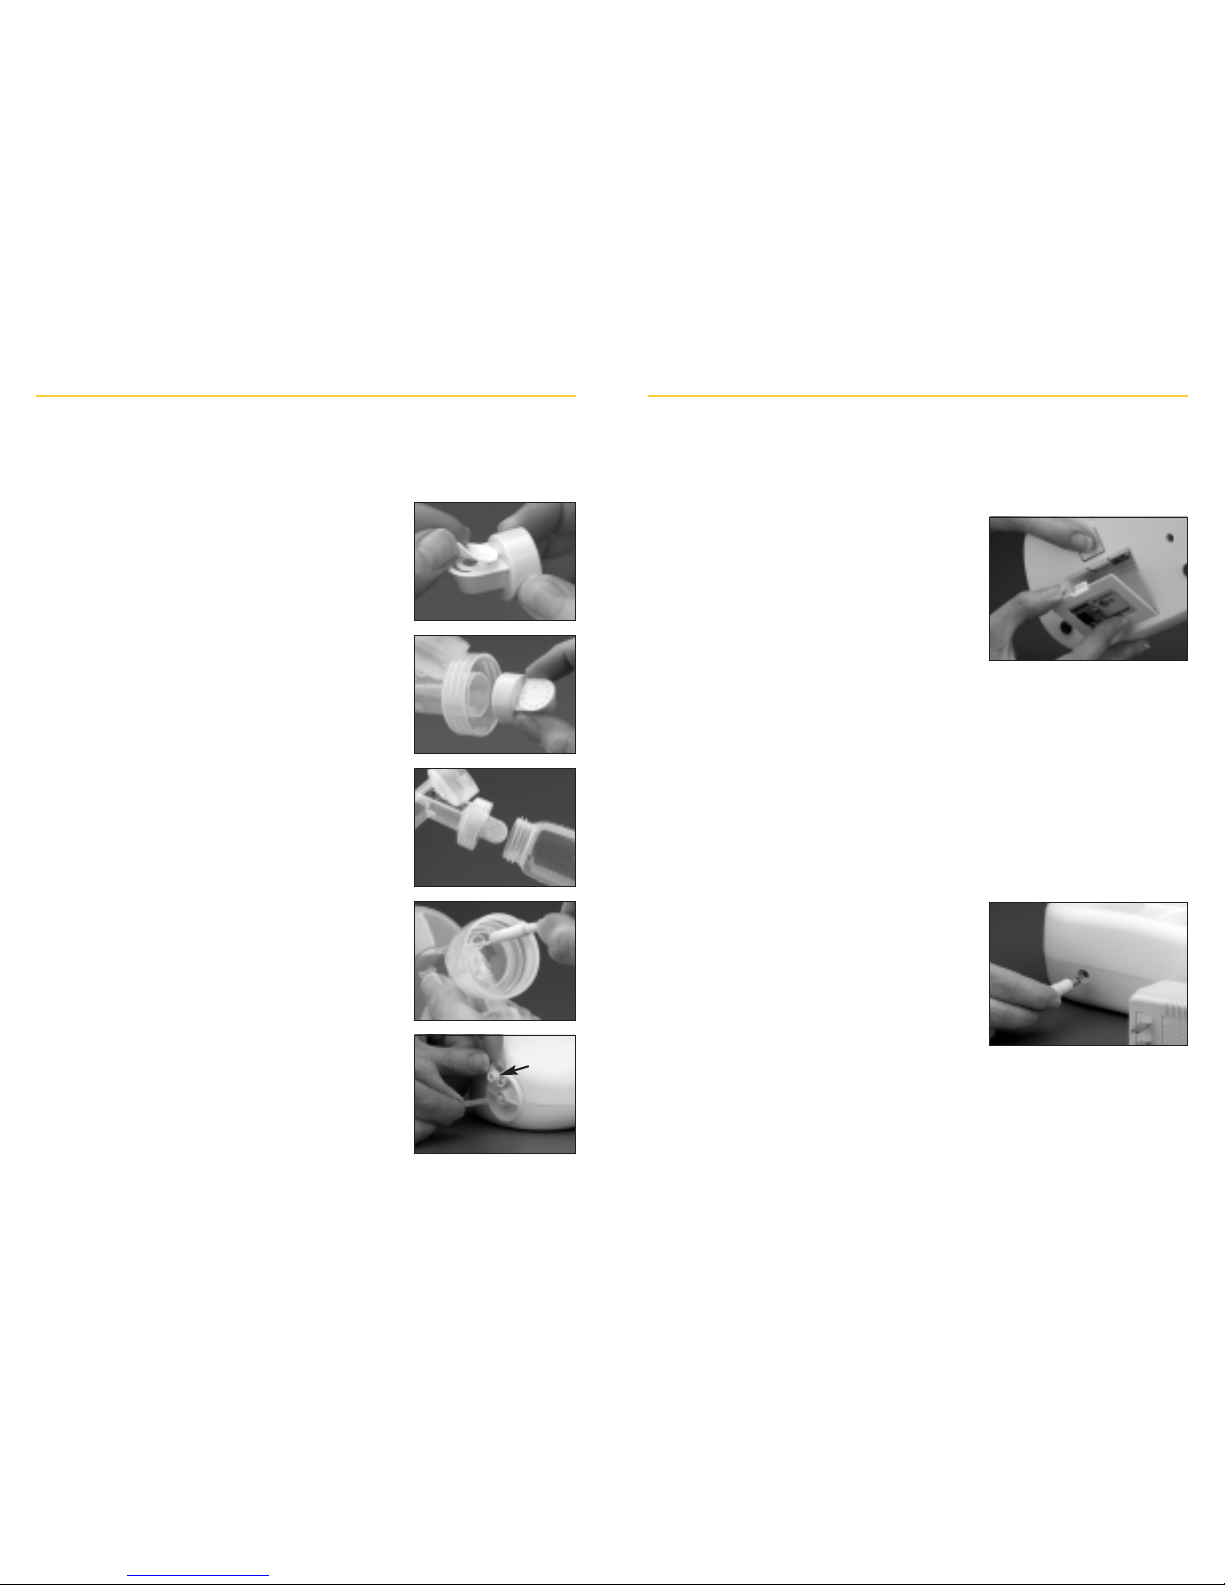
Battery Operation
The Double Select™Breastpump can be powered by two (2) C
1.5V alkaline batteries.
11
To install the batteries, press the tab
(PRESS) down to open the cover of
the battery compartment.
Insert the batteries in the correct
position (+ and -) as indicated inside
the battery compartment and snap the
cover back into place.
CAUTION: When using the pump with batteries, the pumping cycle
may slow as the batteries wear down. Slower cycles may cause some
discomfort because the vacuum will be held longer on the breast. If
this happens, reduce the vacuum with the adjustment regulator and
replace the batteries with fresh ones as soon as possible.
NOTE: The batteries do not need to be removed to use electricity to
power the pump.
Electric Operation
11
Plug the metal fitting on the end of
the transformer cord into the hole on
the back of the motor unit. (Use only
the Medela transformer #9200013)
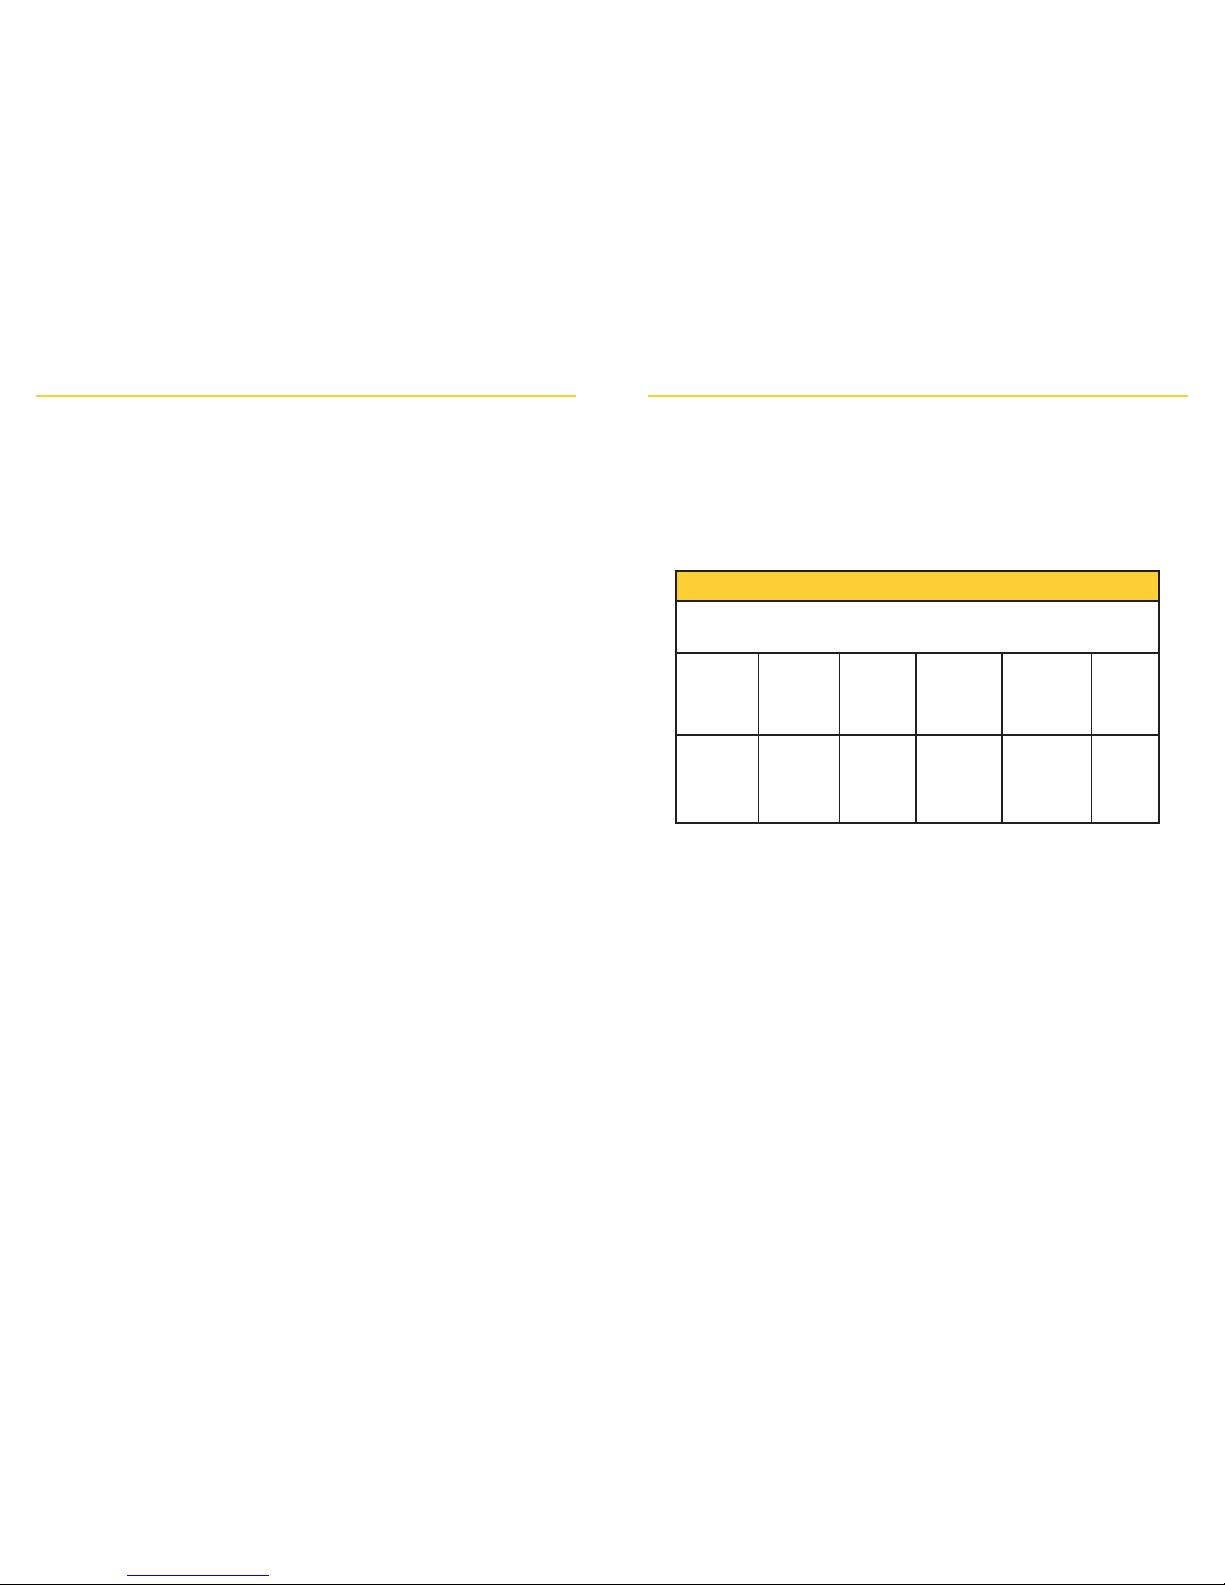
Assembly Instructions
11
Follow cleaning instructions on pages 2-4.
22
Snap white membranes onto yellow
valves
until membrane lies completely
flat.
(Prior to
cleaning, separate these two pieces.)
33
Push assembled valves and membranes
onto breastshields.
44
Screw containers onto breastshields.
55
Insert white ends of tubing into openings
in breastshields.
66
Connect the other end of the tubing to
either side of the motor unit. If single
pumping (one side), be sure the cap is
securely closed on the second side.
Cap
Page 6

Accessories
Spare Membranes
Extra membranes for all Medela Breastpumps.
6 membranes per pack.
#87088 (US)
Quick Clean™ Micro-Steam Bags
Requires just water and a microwave—
eliminates 99.9% of all harmful bacteria and
germs from most breastpump parts and feeding
accessories. 5 Micro-Steam bags per box.
#87024 (US)
98
Pumping Tips
It is important that you be as comfortable and relaxed as possible
when pumping. Learning relaxation techniques may be helpful.
Many mothers find that focusing on a photograph of their baby is
useful.
When double pumping, it may take about 10-15 minutes to
collect milk from both breasts. Single pumping may take 10-15
minutes per side.
The following steps of caution should be followed to prevent
overflowing milk into the motor:
• Care should be taken not to over fill the container(s).
• Do not tilt or lay down the container when milk is in it
and the tubing is attached.
• Remove the tubing from the breastshield before laying
down the breastshield.
To Begin Pumping
11
Adjust the vacuum to minimum
(down) to begin pumping. Increase
the vacuum during pumping as
comfort allows.
22
Press the ON (“I”) switch to begin
pumping.
33
Center the breastshields firmly over
the nipples and start pumping.
IMPORTANT: When using the pump,
do not overfill or tilt the containers.
Page 7

1110
If There Is No Vacuum
If you do not feel any vacuum at the breast or if the pumping
action is too weak:
• Check that the breastshield forms a complete seal
around the breast.
• Check to see that the membrane is securely attached to
the valve on the underside of the breastshield. Ensure that
membrane is clean and that the flap is moveable and not
dried onto the valve head.
• For single pumping, check whether the second connection
on the pump has been closed.
• Check that the gaskets are clean and dry.
• Check with fresh batteries or electrical if not powering unit
with batteries.
• Check that the connector tube is firmly plugged into the
breastshield.
* See page 4, “#3 Air-Dry” for further information on drying tubing.
Troubleshooting
If milk accidentally gets into the tubing/motor, immediately
follow these steps:
11
Remove tubing from the motor. Wipe
milk off the motor with a paper towel
or tissue. Run motor for at least 30
seconds to clear out any milk that
remains inside.
22
Take special care to clean the
vacuum ports in the front sides of
the motor.
Start by removing the covers; turning
in the direction of the arrow (counter
clockwise) and pull out.
33
Remove the gasket(s). Wash
gasket(s), tubing* and cover(s) with
warm soapy water. Rinse in clear
water and dry thoroughly.
NOTE: Only the side with potential
overflow needs to be cleaned.
44
Wipe the area on the motor unit
under the gasket and on the bottom
around the vent hole.
Replace the dried gasket(s),
tubing* and cover(s).
Put the tubing back on the breast
shield and resume pumping. When
pumping is completed, repeat
these steps.
Page 8

1312
Ordering Parts
Many Medela locations have parts available for
sale. Call the location where you purchased the
breastpump or call 1-800-TELL YOU in USA
or Canada for a location in your area, or call
1-800-435-8316 or 1-815-363-1166 extension
114 and order with VISA, MasterCard,
American Express, or Discover Card.
Prices subject to change without notice.
Breastpump Parts Lists
(See illustration on page 28)
1. Breastshield . . . . . . . . . . . . . . . . . . . . . . .#8100131
2. Valves & Membranes . . . . . . . . . . . . . . . .#87089
3. Membranes . . . . . . . . . . . . . . . . . . . . . . .#87088
4. Container Lid . . . . . . . . . . . . . . . . . . . . . .#8107057
5. 5 oz. (150 ml) Container . . . . . . . . . . . . . .#8110009
6. Tubing Assembly . . . . . . . . . . . . . . . . . . .#8087018
7. Double Select
™
Motor Unit . . . . . . . . . . . .#6000658
8. Gasket . . . . . . . . . . . . . . . . . . . . . . . . . . .#8200084
9. Cover . . . . . . . . . . . . . . . . . . . . . . . . . . . .#8100447
10. Cap . . . . . . . . . . . . . . . . . . . . . . . . . . . . . .#8100332
11. Transformer . . . . . . . . . . . . . . . . . . . . . . .#9200013
Item Order Number
90–Day Limited Warranty
This product is warranted by Medela, Inc., to the original retail
purchaser to be free from defects in material and workmanship
for 90 days (six months for pump mechanism) from the date of
purchase. In the event of a defect, Medela will repair or, at
Medela’s option, replace this product, without charge for such
replacement parts or labor. Purchaser shall bear all expense for
returning this product to Medela. This warranty does not apply
to any product used commercially or which has been subjected
to misuse, abuse or alteration.
ANY AND ALL IMPLIED WARRANTIES INCLUDING THE
WARRANTY OF MERCHANTABILITY, ARE LIMITED TO A
DURATION OF 90 DAYS FROM DATE OF PURCHASE. SOME
AREAS DO NOT ALLOW LIMITATIONS ON HOW LONG AN
IMPLIED WARRANTY LASTS, SO THE ABOVE LIMITATIONS
MAY NOT APPLY TO YOU.
THIS WARRANTY GIVES YOU SPECIFIC LEGAL RIGHTS AND
YOU MAY ALSO HAVE OTHER RIGHTS WHICH VARY FROM
STATE TO STATE.
You may call 1-800-435-8316 for additional information
concerning this warranty. If you wish to make a claim under
this warranty, you must return this product to Medela, prepaid,
together with your dated bill of sale or other proof of purchase,
a brief statement of the problem and your return authorization
number to the following address:
Attn: Medela, Inc.
P.O. Box 660
McHenry, IL 60051-0660 USA
Page 9

14
Español
Índice
Medidas de seguridad importantes . . . . . . . . . . . . . . . . . . . 15
Aplicaciones. . . . . . . . . . . . . . . . . . . . . . . . . . . . . . . . . . . . . . 16
Información de salud y seguridad. . . . . . . . . . . . . . . . . . . . . 16
Higiene, limpieza, almacenamiento de la leche materna
Instrucciones de armado. . . . . . . . . . . . . . . . . . . . . . . . . . . . 20
Operación eléctrica y con baterías; Para comenzar a bombear
Sugerencias para el bombeo . . . . . . . . . . . . . . . . . . . . . . . . 23
Accesorios . . . . . . . . . . . . . . . . . . . . . . . . . . . . . . . . . . . . . . . 23
Identificación y resolución de problemas. . . . . . . . . . . . . . . 24
Garantía . . . . . . . . . . . . . . . . . . . . . . . . . . . . . . . . . . . . . . . . . 26
Pedidos de piezas . . . . . . . . . . . . . . . . . . . . . . . . . . . . . . . . . 27
Lista de piezas de la bomba de lactancia . . . . . . . . . . . . . . 27
Piezas. . . . . . . . . . . . . . . . . . . . . . . . . . . . . . . . . . . . . . . . . . . 28
English - Instructions . . . . . . . . . . . . . . . . . . . . . . . . . . . . . . . . 1
Este producto ha sido diseñado para ser utilizado por una
sola persona y no debe compartirse entre madres.
Desarme todas las piezas antes de la limpieza y esterilización.
Tenga especial cuidado en separar la válvula de la copa para
senos y de separar la membrana blanca de la válvula antes de
iniciar la limpieza o esterilización. Consulte las piezas 1, 2 y 3
en la lista de piezas de la bomba de lactancia (página 28).
IMPORTANTE
MEDIDAS DE
SEGURIDAD IMPORTANTES
Este producto ha sido diseñado para un solo usuario y no puede
ser esterilizado en autoclave ni mediante otros métodos sin destruir
el producto. El uso de este producto por más de una persona
representa riesgos para la salud y anula la garantía.
Al utilizar dispositivos eléctricos deberá tener presente las
precauciones básicas de seguridad, como las siguientes:
LEA TODAS LAS INSTRUCCIONES ANTES DE
USAR LA BOMBA DE LACTANCIA
PELIGRO:
Para reducir el riesgo de electrocución:
1. Siempre desconecte los dispositivos eléctricos inmediatamente después de usarlos.
2. No use este producto mientras se está bañando.
3. No sumerja el producto ni permita que caiga en agua u otros líquidos.
4. No intente coger un dispositivo eléctrico que ha caído al agua. Desconecte el
producto de inmediato.
ATENCIÓN:
Para reducir el riesgo de quemaduras, electrocución, incendio o lesiones:
1.
La bomba nunca deberá dejarse sin supervisión si está conectada a una toma eléctrica.
2. Use la bomba únicamente para el fin descrito en este manual.
3. El uso de accesorios no recomendados por el fabricante puede ser peligroso.
4. Nunca utilice un dispositivo eléctrico si la clavija o el cordón está dañado, si no
funciona correctamente, si ha tenido caídas o daños o si ha caído al agua.
5. Mantenga el cordón lejos de superficies calientes.
6. No utilice este dispositivo al aire libre.
7. Conecte el transformador primero a la bomba Double Select
™
y luego a la toma
eléctrica de la pared.
8. Use este dispositivo únicamente con el transformador entregado con la bomba
Double Select
™
.
9. No utilice el adaptador para encendedor de vehículos con la bomba de lactancia
Double Select
™
.
10. Este producto es un artículo de cuidado personal y no deberá ser compartido
entre madres.
GUARDE ESTAS INSTRUCCIONES
15
Page 10

1716
Antes del primer uso
Esterilización en el hospital:
Todas las piezas desarmadas pueden esterilizarse en autoclave a una
temperatura máxima de 272° F (133° C) durante 3 minutos a 29 PSIG
(2 bar), o a 250° F (121° C) durante 15 minutos a 15 PSIG (1,03 bar).
Para evitar daños durante la esterilización e inmediatamente
después de ésta:
• Esterilice las piezas sin aplicarles presión externa.
•
Permita que las piezas se enfríen antes de aplicar presión externa.
NOTA: Después de la esterilización puede aparecer una tonalidad
blanca o gris en las mangueras y otras piezas. Esto es normal y no
afecta el funcionamiento de la bomba de lactancia.
Si utiliza esterilización con gas, es recomendable efectuar pruebas
residuales para determinar el tiempo de aireación apropiado.
Desinfección en casa:
Desarme todas las piezas que tienen contacto con el seno o con la
leche y desinfecte las piezas hirviéndolas en agua durante 10 minutos.
Después de cada uso:
• Desarme y lave en agua jabonosa tibia todas las piezas
que tengan contacto con el seno y la leche).
• Enjuague con agua limpia.
• Seque al aire sobre una toalla limpia y cubras las piezas
cuando no las use.
Todas las piezas pueden lavarse en la rejilla superior de una
máquina lavaplatos.
Para una limpieza más rápida:
Medela ofrece las bolsas Quick Clean™Micro-Steam™para la
desinfección diaria.
Aplicaciones
• Colectar leche materna durante los períodos breves que
está lejos del bebé.
• Mantener un suministro de leche para aquellos casos en los
que se interrumpe temporalmente el amamantamiento.
• Aliviar la hinchazón de los senos o el dolor de los pezones.
El bombeo con masaje simultáneo es muy útil para aliviar la
hinchazón de los senos.
NOTA: Para el bombeo durante largos períodos en los que el bebé
no está disponible para alimentarse del seno al menos parte de cada
día (por ejemplo, en el caso de bebés prematuros), se recomienda el
uso de una bomba de lactancia eléctrica más grande (Lactina
®
o
Symphony
®
). Estas bombas de lactancia pueden alquilarse a bajo
costo para uso doméstico. Llame al 1-800-TELL YOU (1-800-835-
5968) para conocer los nombres de los centros de alquiler y los especialistas en lactancia en su región.
Limpieza y esterilización
Siga estas instrucciones de limpieza en el hospital o en casa,
salvo que un profesional médico le indique
lo contrario.
Higiene
Lávese las manos antes de tocar los senos
o los recipientes y evite tocar el interior de
los recipientes y las tapas.
Preparación
Antes de comenzar la limpieza, desarme todas las piezas del
conjunto de accesorios de la bomba de lactancia. Antes de iniciar
la limpieza, asegúrese de separar la válvula de la copa para senos
y de separar la membrana de la válvula.
Page 11

1918
Cuidado de las mangueras:
Inspeccione las mangueras después de cada sesión de bombeo
para determinar si tienen condensación o leche.
Si aparece condensación en las mangueras:
Para eliminar la condensación después del bombeo, mantenga
encendida la bomba, con las mangueras conectadas, durante uno
o dos minutos o hasta que las mangueras estén secas.
Si aparece leche en las mangueras:
1. Apague la bomba y desconéctela de la fuente de
alimentación eléctrica.
2.
Quite y desarme la manguera, el conector de la bomba, el
émbolo, el cilindro, las membranas y las tapas de las membranas
(las piezas peden variar según la bomba que utilice). Lave en
agua jabonosa y enjuague con agua limpia fría.
3.
Sacuda la manguera para extraer las gotas de agua y cuélguela
para que seque al aire. Para que la manguera seque más rápido,
conéctela a la bomba y encienda la bomba durante uno o dos
minutos o hasta que la manguera quede seca, o bien vierta una
pequeña cantidad de alcohol isopropílico por la manguera para
secarla.
NOTA IMPORTANTE: Si la temperatura de la habitación, el
automóvil o al aire libre excede 77° F / 25° C, enfríe la leche de
inmediato para preservar su frescura.
Almacenamiento de la leche materna
Consulte con el hospital para conocer las instrucciones de
almacenamiento específicas.
Al congelar la leche, no llene los recipientes a más de 3/4 de su
capacidad, para dejar espacio libre suficiente para la expansión.
Rotule los recipientes con la fecha en que extrajo la leche.
Almacenamiento de leche materna
(para bebés de término saludables)
Temperatura Hielera con Refrigerador Congelador Congelador
ambiente tres paquetes independiente de baja
de hielo de refrigerador
temperature
Leche 4 horas 24 horas 5 a 7 días 3-4 6 a 12
materna a 66-72°F a 59°F a 32-39°F meses
3
meses
recién (19-22°C)1(15°C)1(0°-4°C)
2
a 0°F
extraída (-19°C)
3
Leche No la No la 24 horas4Nunca Nunca
materna almacene almacene vuelva a vuelva a
descon- congelar congelar
gelada la leche la leche
descon- descon-
gelada gelada
1
Hamosh M, Ellis L, Pollock D, Henderson T, y Hamosh P: Pediatrics, Vol. 97, Núm. 4, abril de 1996. págs.
492-497. (4 horas a 77° F/25° C).
2
Sosa, Roberto; Barness, Lewis: AJDC, vol. 141, enero de 1987.
3
Lawrence R, y Lawrence R: Breastfeeding: A Guide For the Medical Profession, 1999, pág. 894.
4
Arnold L; Recommendations for Collection, Storage and Handling of a Mother's Milk for Her Own Infant in the
Hospital Setting, 3
a
edición. The Human Milk Banking Association of North America, Inc. 1999, pág. 18.
Page 12

2120
Operación con baterías
La bomba de lactancia Double Select™puede alimentarse con dos
baterías alcalinas tipo “C” de 1.5 V.
11
Para instalar las baterías, oprima la
lengüeta hacia abajo para abrir la tapa
del compartimiento de las pilas.
Inserte las baterías en la posición
correcta (+ y -), tal como se indica en el
compartimiento de las baterías, y vuelva
a colocar la tapa del compartimiento.
ATENCIÓN: Al usar la bomba con baterías, el ciclo de bombeo
puede hacerse más lento a medida que las baterías pierden carga.
Los ciclos más lentos pueden causar molestias, ya que el vacío se
aplicará al seno durante más tiempo. Si esto llegara a suceder, use
el regulador para reducir el vacío y reemplace las baterías lo más
pronto posible.
NOTA: No es necesario extraer las baterías para utilizar la bomba
con electricidad.
Operación eléctrica
11
Inserte la clavija metálica del
extremo del cordón del transformador en el orificio localizado en la
parte trasera de la unidad del motor.
(Use únicamente el transformador
Medela 9200013)
Instrucciones de armado
11
Siga las instrucciones de limpieza de las páginas 16-18.
22
Coloque las membranas blancas sobre las
válvulas amarillas y aplique presión hasta
que las membranas queden planas. (Separe
las dos piezas antes de limpiarlas.)
33
Coloque los conjuntos armados de las
válvulas y las membranas en las copas
para senos.
44
Enrosque los recipientes en las copas
para senos.
55
Inserte los extremos blancos de las
mangueras en las aberturas de las copas
para senos.
66
Conecte el extremo opuesto de la
manguera al otro lado de la unidad del
motor. Si realizará el bombeo sencillo (en
un solo lado), cerciórese de que el tapón
esté firmemente cerrado en el otro lado.
Tapón
Page 13

Membranas de Reemplazo
Membranas extra para uso con todas las
bombas de lactancia Medela.
6 membranas por paquete.
87088 (Estados Unidos)
Bolsas Quick Clean™Micro-Steam
Sólo necesita agua y un horno de microondas.
Eliminan el 99.9% de los gérmenes y bacterias
nocivos de la mayoría de las piezas de la bomba
de lactancia y los accesorios de alimentación. 5
bolsas Micro-Steam por caja.
87024 (Estados Unidos)
2322
Sugerencias para el bombeo
Es importante que esté lo más cómoda y relajada posible al
realizar el bombeo. Las técnicas de relajamiento pueden ser útiles.
A muchas madres les ayuda centrar su atención en una fotografía
de su bebé.
En el bombeo doble, puede tardar de 10 a 15 minutos para
extraer la leche de ambos senos. El bombeo sencillo puede tardar
de 10 a 15 minutos por lado.
Observe estas precauciones para evitar que fluya leche al motor:
• Tenga cuidado de no llenar los recipientes excesivamente.
• No incline ni acueste el recipiente si contiene leche y la
manguera está conectada.
• Quite la manguera de la copa para senos antes de colocar la
copa para senos sobre una superficie.
Accesorios
Para comenzar a bombear
11
Ajuste el vacío al mínimo (hacia
abajo) para comenzar el bombeo.
Aumente el nivel de vacío durante
el bombeo la más que pueda sin
sentirse incómoda.
22
Oprima el interruptor de encendido
(“I”) para iniciar el bombeo.
33
Centre las copas para senos
firmemente
sobre los pezones
y comience a bombear.
IMPORTANTE: Al utilizar la bomba,
no incline los recipientes ni los llene
excesivamente.
Page 14

2524
Si no hay vacío
Si no siente vacío (succión) en el seno o si la acción de bombeo
es muy débil:
• Revise que la copa para senos forme un sello alrededor del
seno.
• Revise que la membrana esté bien montada en la válvula local-
izada en la parte inferior de la copa para senos. Compruebe
que la membrana esté limpia y que la solapa pueda moverse,
es decir, que no esté pegada al cabezal de la válvula.
• Para el bombeo sencillo, revise si la segunda conexión de la
bomba está cerrada.
• Revise que las juntas estén limpias y secas.
• Revise el funcionamiento con baterías nuevas o, si no está
operando la unidad con baterías, revise la conexión eléctrica.
• Compruebe que la manguera esté conectada con firmeza a la
copa para senos.
* Vea la página 18, inciso 3, “Secado al aire”, para obtener más información sobre
el secado de la manguera.
Identificación y resolución de problemas
Si la leche entra accidentalmente en la manguera o el motor, siga
de inmediato estos pasos:
11
Separe la manguera del motor.
Limpie la leche del motor con una
toalla de papel o un pañuelo desechable. Haga funcionar el motor
durante al menos 30 segundos para
expulsar la leche en el interior.
22
Tenga especial cuidado en limpiar
los orificios de vacío en el frente del
motor.
Comience por quitar las tapas,
girándolas en el sentido indicado
por la flecha (antihorario) y luego
separándolas.
33
Quite las juntas. Lave las juntas, la
manguera* y las tapas con agua
jabonosa tibia. Enjuague con agua
limpia y seque completamente.
NOTA: Sólo es necesario limpiar el
lado donde ocurrió el sobreflujo.
44
Limpie la parte del motor localizada
debajo de la junta y la parte inferior
que rodea el orificio de ventilación.
Vuelva a colocar las juntas, la
manguera* y las tapas.
Conecte la manguera de nuevo a
la copa para senos y reanude el
bombeo. Repita estos pasos al
terminar el bombeo.
Page 15

2726
Pedidos de piezas
Muchos de los centros Medela tienen piezas
para venta. Llame al lugar donde compró la
bomba de lactancia, o al 1-800-TELL YOU en
Estados Unidos o Canadá, para conocer los
centros de venta de productos Medela en su
región. También puede llamar al 1-800-4358316 o 1-815-363-1166, extensión 114, para
hacer sus pedidos con tarjeta VISA,
MasterCard, American Express o Discover
Card. Precios sujetos a cambios sin aviso previo.
Lista de piezas de la bomba de lactancia
(vea la figura en la página 28)
1. Copa para senos . . . . . . . . . . . . . . . . . . . . . . . .8100131
2. Válvulas y membranas . . . . . . . . . . . . . . . . . . . .87089
3. Membranas . . . . . . . . . . . . . . . . . . . . . . . . . . . .87088
4. Tapa del recipiente . . . . . . . . . . . . . . . . . . . . . . .8107057
5. Recipiente de 150 mL (5 onzas) . . . . . . . . . . . . .8110009
6. Conjunto de mangueras . . . . . . . . . . . . . . . . . . .8087018
7.
Unidad de motor de la bomba Double
Select™ . . .6000658
8. Gasket . . . . . . . . . . . . . . . . . . . . . . . . . . . . . . . .8200084
9. Junta . . . . . . . . . . . . . . . . . . . . . . . . . . . . . . . . . .8100447
10. Tapón . . . . . . . . . . . . . . . . . . . . . . . . . . . . . . . . .8100332
11. Transformador . . . . . . . . . . . . . . . . . . . . . . . . . .9200013
Artículo Número para pedidos
Garantía limitada por 90 días
Medela, Inc. le garantiza al comprador minorista original que este
producto estará libre de defectos de materiales y mano de obra
durante un período de 90 días (seis meses el mecanismo de la bomba)
a partir de la fecha de compra. En caso de que el producto tuviera
algún defecto, Medela reparará o reemplazará el producto, a discreción
propia, sin cargo algún por piezas de repuesto o mano de obra. El
comprador deberá cubrir los gastos de la devolución del producto a
Medela. Esta garantía no se aplica a productos utilizados comercialmente
ni a productos sujetos a uso indebido, abuso o alteraciones.
TODAS LAS GARANTÍAS IMPLÍCITAS, INCLUYENDO LA GARANTÍA
DE COMERCIABILIDAD, SE LIMITARÁN A UN PERÍODO DE 90 DÍAS
A PARTIR DE LA FECHA DE COMPRA. EN ALGUNAS REGIONES NO
SE PERMITEN LIMITACIONES A LA DURACIÓN DE UNA GARANTÍA
IMPLÍCITA, POR LO CUAL ESTAS RESTRICCIONES TAL VEZ NO SE
APLIQUEN EN SU CASO.
ESTA GARANTÍA LE OTORGA DERECHOS LEGALES ESPECÍFICOS
Y USTED TAMBIÉN PODRÁ TENER OTROS DERECHOS, LOS
CUALES VARÍAN DE UN ESTADO A OTRO.
Si desea obtener información adicional sobre esta garantía, sírvase
llamar al 1-800-435-8316. Si quiere hacer una reclamación de conformidad con esta garantía, deberá devolver el producto a Medela,
con franqueo pagado, junto con el recibo de compra fechado u otro
comprobante de compra, una explicación breve del problema y el
número de autorización de devolución. Envíe el producto a la siguiente dirección:
Attn: Medela, Inc.
P.O. Box 660
McHenry, IL 60051-0660 USA
Page 16

28
PARTS • PIEZAS
1
2
3
4
5
7
8
9
10
11
6
 Loading...