

Medela Double Deluxe breastpump User Manual [en, es]

Instructions
for use
Instructivo
de uso
Double Deluxe
™
Breastpump • Bomba extractora

1
Double Deluxe™BreastpumpXX
XDouble Deluxe™BreastpumpX XDouble Deluxe™Breastpump
Uses
■ Collect breastmilk during
short-term occasional absences
from the baby.
■ Maintain a milk supply if
breastfeeding is temporarily
interrupted.
■ Relieve engorgement or
sore nipples. Pumping with
simultaneous massage is helpful
to relieve engorgement.
Disassemble all
parts prior to cleaning
and sterilization.
Especially be sure to
remove the valve
from the breastshield
frame and
separate the white
membrane from the
valve prior to cleaning
or sterilization.
See parts 5 and 6
on breastpump
parts lists (Page 9).
English
Table of Contents
Uses . . . . . . . . . . . . . . . . . . . . . 1
Health & Safety Information . . . . 2
Cleaning, Hygiene, Storing Breastmilk
Assembly Instructions . . . . . . . . . 4
Battery & Electric Operation
To Begin Pumping
Pumping Tips . . . . . . . . . . . . . . . 6
Troubleshooting . . . . . . . . . . . . . 7
Accessories . . . . . . . . . . . . . . . . 7
Warranty . . . . . . . . . . . . . . . . . 8
Ordering Parts . . . . . . . . . . . . . . 9
Breastpump Parts List . . . . . . . . . 9
Parts . . . . . . . . . . . . . . . . . . . . 21
Español - Instrucciones . . . . . . . 10
IMPORTANT
This product has been
designed for single user
use and should not be
shared between mothers.
Double Deluxe™BreastpumpX
IMPORTANT
SAFEGUARDS
When using electrical products, especially when children are present, basic
safety precautions should always be followed, including the following:
READ ALL INSTRUCTIONS
DANGER: To reduce the risk of electrocution:
1. Always unplug electrical products immediately after using.
2. Do not use while bathing.
3.
Do not place or store product where it can fall or be pulled into a tub or sink.
4. Do not place in or drop into water or other liquid.
5. Do not reach for a product if it has fallen into water. Unplug immediately.
WARNING: To reduce the risk of burns, electrocution, fire or injury to persons:
1. A product should never be left unattended when plugged into an electric outlet.
2. Close supervision is necessary when this product is used by, on or near children
or invalids.
3. Use the product only for its intended use as described in this manual. Do not
use attachments not recommended by the manufacturer.
4. Never operate this product if it has a damaged cord or plug, if it is not working
properly, if it has been dropped or damaged, or dropped into water.
5. Keep the cord away from heated surfaces.
6. Do not use outdoors, or operate where aerosol (spray) products are being used
or where oxygen is being administered.
7. Plug the transformer into Double Deluxe first and then into wall socket.
8. Only use the transformer that comes with the Double Deluxe Breastpump.
9. This product is a personal care item and shouldn’t be shared between mothers.
10. Make sure the voltage of the transformer is compatible with the power source.
11. Never use while sleeping or drowsy.
12. Do not use the Vehicle Lighter Adapter with a Double Deluxe Breastpump.
SAVE THESE INSTRUCTIONS
This is a single user product. Use by more than one
person may present a health risk, performance
questions and voids the warranty.

3
Double Deluxe™BreastpumpXX
XDouble Deluxe™BreastpumpX
2
hung to air-dry. For faster drying, attach
tubing to the pump and run for 1-2
minutes or until dry, or pour a small
amount of isopropyl alcohol through the
tubing to dry. Carefully swinging the
tubing in a circular motion, will also
help to speed drying.
Tubing Care
Inspect tubing after each pumping
session for condensation and/or milk.
If condensation appears in tubing:
To eliminate condensation after you
have completed pumping, continue
running the pump with the tubing(s)
attached for another 1-2 minutes or
until dry.
Hygiene
Wash hands thoroughly before pumping. If your physician recommends,
clean the breast and surrounding area
with a damp cloth. Do not use soap or
alcohol which can dry the skin and
cause cracked nipples.
Storing Breastmilk
Check with your hospital for
specific storage instructions.
When freezing, do not fill containers
more than 3/4 full to allow space for
expansion. Label containers with the
date of pumping.
In a refrigerator:
•To inhibit the growth of bacteria,
breastmilk which is not used
immediately should be refrigerated. Milk can be refrigerated for up
to 5-7 days or, if longer storage is
needed, freeze the milk.
In a refrigerator freezer
compartment:
• In the freezer compartment inside
a refrigerator, breastmilk can be
stored for approximately six months.
In a separate freezer:
• In a separate -20° C freezer,
breastmilk can be stored for
approximately 12 months.
Thawing frozen breastmilk:
• Thaw frozen breastmilk by holding
the container under warm water.
Milk may be defrosted in the
refrigerator overnight. Gently
shake the container to blend any
fat that has separated.
Caution:
• Do not thaw frozen breastmilk
in a microwave or in a pan of
boiling water.
• If adding expressed breastmilk
to container of already frozen
breastmilk, make sure to add
a less amount than the already
frozen amount.
Double Deluxe™BreastpumpX
NOTE: For long-term or frequent
pumping; when the baby is not available to feed at the breast at least part of
the time every day (a premature baby,
for example), use of a full-size electric
pump (Lactina
®
or Classic
™
Breastpump) is suggested. These
pumps can be rented inexpensively for
home use. For the names of rental stations or breastfeeding specialists in
your area, call 1-800-TELL YOU
(1-800-835-5968).
IMPORTANT: When using the
pump, do not overfill or tilt the
containers.
Health & Safety
Information
Please read this section before using
any Medela Breastpump.
Cleaning & Sanitizing
Prior to first use and before use
each day, follow these cleaning
instructions at home unless you are
otherwise instructed by your physician or another medical professional from your hospital.
Disassemble, wash, and rinse all parts
(except motor unit) that come in contact
with the breast or the milk. Boil cylinder/piston assembly, including rubber
parts, weekly or when milk spots
appear.
Boil
• Place parts in a 4-5 quart pan.
• Fill to within 1 inch of rim with
cold water. The use of distilled
water will help to minimize
deposits onto components.
• Cover and boil for 20 minutes.
• Remove from stove. Drain
water off. Allow parts to cool
in open pan.
• Remove all parts and allow to
air-dry.
After each use:
Disassemble and wash all parts that
come in contact with the breast and
milk in soapy water or wash in top-rack
of dishwasher. The motor unit may be
wiped with a damp cloth.
Rinse in clear water.
Air-dry on clean towel and cover parts
when not in use. The tubing should be
Air-dry
Rinse
Wash
Use of microwave
sterilization is not
recommended and
may damage some
components.
5
Double Deluxe™BreastpumpXX
XDouble Deluxe™BreastpumpX
4
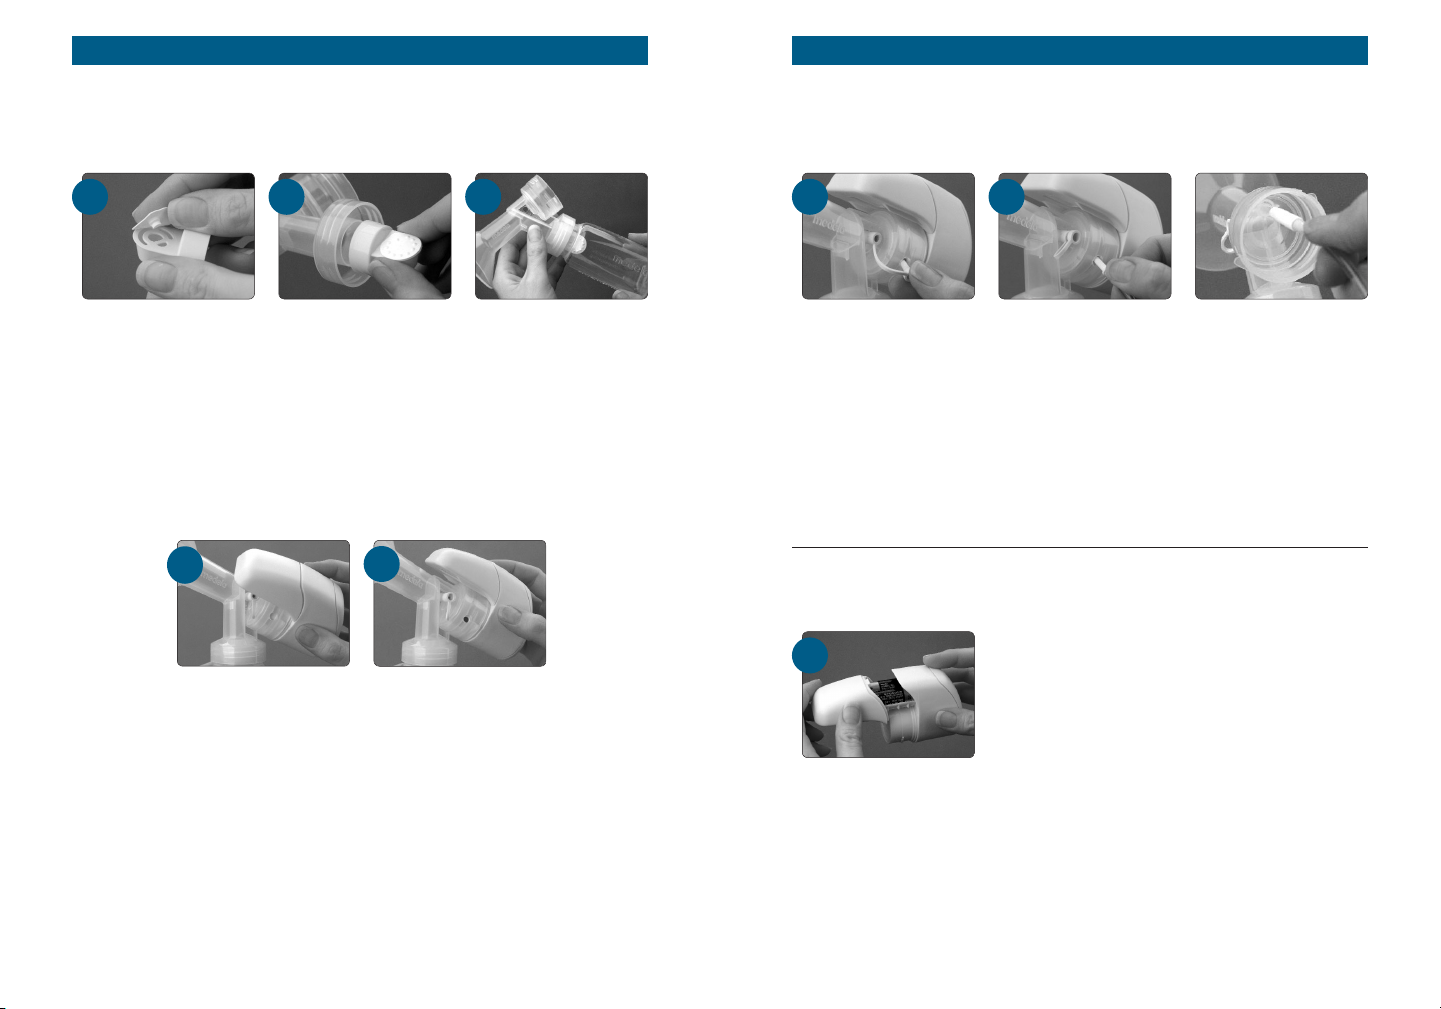
To install batteries, slide off
the battery compartment
cover. Install two fresh AA
1.5 V batteries (alkaline
preferred).
While the pump will work
with either alkaline, disposable or nicad rechargeable
batteries, alkalines are recommended; the pump will
cycle more quickly, pump
longer and run more quietly.
1
For single pumping, insert
the small plug of the single
adapter into the hole on the
breastshield and firmly
push into the plug-in port
on the motor unit. This plug
should be inserted into the
holder when not in use.
6
For double pumping, insert the smaller end of the tubing
into the plug-in on the motor unit, and the larger end of the
tubing into the second breastshield (the one not attached to
the motor unit)
7
CAUTION:
When using the pump with
batteries, the pumping cycle
may slow as the batteries wear
down. Slower cycles may cause
some discomfort because the
vacuum will be held longer on
the breast. If this happens,
reduce the vacuum with the
adjustment regulator and
replace the batteries with fresh
ones as soon as possible.
NOTE:
The batteries do not need to
be removed to use electricity to
power the pump.
Battery Operation
Assembly Instructions
Snap the white membrane
onto the valve until membrane lies completely flat.
Be sure to separate
membranes and valves
when cleaning and completely dry prior to
reassembly.
Press the valve assembly
onto the breastshield.
Screw the container onto
the breastshield or use disposable CSF™Collection,
Storage & Freezer Bags
article #87010 or #87013
(sold separately).
31 2
Lock the motor onto the
shield by rotating 1/8 turn
clockwise. The white plugin port on the motor unit
should be aligned with the
hole on the breastshield.
5
Align the raised line on the
motor unit with the raised
line on the shield and press
the motor firmly onto the
shield with the single
adapter attached.
4
 Loading...