

Medela Classic Breastpump User Manual

For the Lactina® and Classic™Breastpumps
1547433 B 1102
General
Instructions

Breastpumps come in a variety of styles. It is important that
breastpumps are safe, effective and comfortable. Always
read the manufacturer’s instructions before using your pump.
A healthy infant is far more effective at emptying the breast
than any pump. Remember, breastfeeding is a learned
process. Be patient. It may take some time before you are
comfortable and proficient.
Here are some basic tips to boost your breastpumping
know-how:
• Always wash your hands before breastpumping.
• Center your nipple in the tunnel of the breastshield.
• For relaxation purposes, drink water, juice or tea before
or during pumping.
• Start pumping on minimum vacuum setting, and
gradually increase as needed.
• If pumping is uncomfortable, decrease vacuum.
• If nipple rubs on inside of breastshield, ask your nurse
or rental station for a larger breastshield (PersonalFit
™
Breastshield) or call Medela at 1-800-435-8316.
Your ideal pumping time will depend on your baby’s
schedule. If you want to prepare a feeding, try pumping
in the morning when milk is most plentiful.
To maintain an adequate milk supply, frequent feedings at
the breast and/or pumping are essential. Fatigue, illness,
or decreased stimulation can decrease milk supply.
As stimulation increases, however, milk production
will increase.
Finally, remember to take good care of yourself! Eat well,
drink plenty of fluids and get lots of rest.
Breastpumping TipsTable of Contents
Breastpumping Tips . . . . . . . . . . . . . . . . . .1
Health, Safety & Storage
Cleaning and Sterilization . . . . . . . . . . . . . . . . .2
Hospital Sterilization . . . . . . . . . . . . . . . . . . . . .2
Home Sanitizing . . . . . . . . . . . . . . . . . . . . . . . .3
Home and Hospital Cleaning . . . . . . . . . . . . . . .3
Tubing Care . . . . . . . . . . . . . . . . . . . . . . . . . . .4
Storing Breastmilk . . . . . . . . . . . . . . . . . . . . . . .5
Thawing Breastmilk . . . . . . . . . . . . . . . . . . . . . .5
Breastmilk Storage Time Chart . . . . . . . . . . . . . .6
Assembly and Use of Breastpumps
and Accessory Kits
■
Lactina®Breastpump . . . . . . . . . . . . . . . . . . . . .7
■ Classic
™
Breastpump . . . . . . . . . . . . . . . . . . . .13
■ Manual Breastpumping . . . . . . . . . . . . . . . . . .18
Troubleshooting . . . . . . . . . . . . . . . . . . . . . . . . . . .19
To Order Parts . . . . . . . . . . . . . . . . . . . . . . . . . . . .19
Your Hospitalized Infant . . . . . . . . . . . . . . . . . . . . .20
A Critical Time for Establishing Milk Supply . . . . . . .21
Increasing Your Milk . . . . . . . . . . . . . . . . . . . . . . .21
After Baby Comes Home . . . . . . . . . . . . . . . . . . . .22
Medela, Inc., P.O. Box 660, McHenry, IL 60051-0660
P.O. Box 131, Mississauga, Ontario, Canada L4T 3B5
Phone: 800-435-8316 or 815-363-1166 Fax: 800-995-7867 or 815-363-1246
Classic is a trademark and Lactina is a registered trademark of Medela, Inc.
© 2002 Medela Printed in the U.S.A.
1

If gas sterilization is used, residual testing is recommended to determine the proper length of aeration.
2. Home Sanitizing
Prior to first use and before first use each day:
Disassemble, wash and rinse all parts of your kit and breastpump that come in contact with the breast and
milk. Tubing,
cylinder and piston,
including rubber parts, should be washed
weekly, at minimum, or when milk or condensation is visible.
*If using Classic
™
Breastpump parts, DO
NOT USE SOAP, ONLY WATER, TO CLEAN
BARRIER FILTER.
(See item #5 on Classic Breastpump parts list,
page 13)
• Place parts in a 4-5 quart pan.
• Fill to within 1 inch of rim with cold water.
• Cover and boil for 20 minutes.
• Remove from stove, drain water off and allow parts
to cool in open pan. NOTE: Do not set pan back on
hot burner.
• Remove all parts and allow to air dry on a clean
surface. Cover parts when not in use.
3. Home and Hospital Cleaning
After each use:
• Take apart and wash all parts that come in contact with
the breast and milk (except Classic breastpump
barrier/filter) in soapy water.
• Rinse in clear water.
• Air-dry on clean towel and cover parts when not in use.
GAS
Barrier Filter
Please read this section before using your Medela
breastpump.
Cleaning and Sterilization
Follow these cleaning instructions in the hospital or at home
unless you are told otherwise by your physician or another
medical professional.
1. Hospital Sterilization
Prior to first use (if kit is in non-sterile packaging) and before
first use in the morning:
All disassembled parts can be autoclaved to a maximum of 272°F for 3 minutes at 29 PSIG or 250°F for
15 minutes at 15 PSIG.
To avoid damage during and immediately
after sterilization:
- Sterilize parts without applying
external pressure to them.
- Allow parts to cool before applying
external pressure.
Autoclaving the tubing may cause clouding or
discoloration which will not affect kit performance.
Health and Safety
Information
This product has been designed for single patient use and
should not be shared between patients unless properly
sterilized between uses.
Take apart all parts of your accessory kit prior to cleaning
and sterilization. Take special care to remove the valve from
the breastshield and separate the membrane from the valve
prior to cleaning or sterilization (see parts 2, 3, and 4 on
breastpump parts lists).
IMPORTANT
AUTOCLAVE
32
Check with your hospital for specific storage
instructions.
When freezing, do not fill containers more than 3/4 full
to allow space for expansion. Label containers with the date
of pumping.
In a refrigerator:
• To inhibit the growth of bacteria, breastmilk which is not
used immediately should be refrigerated. Milk can be
refrigerated 5-7 days or, if longer storage is needed, milk
can be frozen.
In a refrigerator freezer compartment:
• In the freezer compartment inside a refrigerator, breastmilk can be stored for approximately six months.
In a separate freezer:
• In a separate -20° C freezer, breastmilk can be stored for
approximately 12 months.
Thawing frozen breastmilk:
• Thaw frozen breastmilk by holding the container under
warm water. Thawed milk is safe to use for 24 hours. Gently
shake the container to blend any fat that has separated.
Caution:
• Do not thaw frozen breastmilk in a microwave or in a
pan of boiling water.
• If adding expressed breastmilk to container of already
frozen breastmilk, make sure to add a smaller amount
than the amount that is already frozen.
Storing Breastmilk
Tubing Care:
Inspect tubing after each pumping session for condensation
and or milk.
If condensation appears in tubing:
To eliminate condensation after you have completed pumping, continue running the pump with the tubing attached for
another 1-2 minutes or until dry.
If milk appears in tubing:
1. Turn off the pump and unplug from power source.
2. Remove and disassemble the tubing, pump connector,
piston, cylinder and barrier filter (parts vary by pump
used). Except for barrier filter, wash in soapy water then
rinse in cold clear water. The barrier filter may be cleaned
by rinsing in warm water without soap.
3. Shake water droplets out of tubing and hang to air-dry.
For faster drying, attach tubing to pump and run pump
1-2 minutes or until dry, or pour a small amount of
isopropyl alcohol through the tubing to dry.
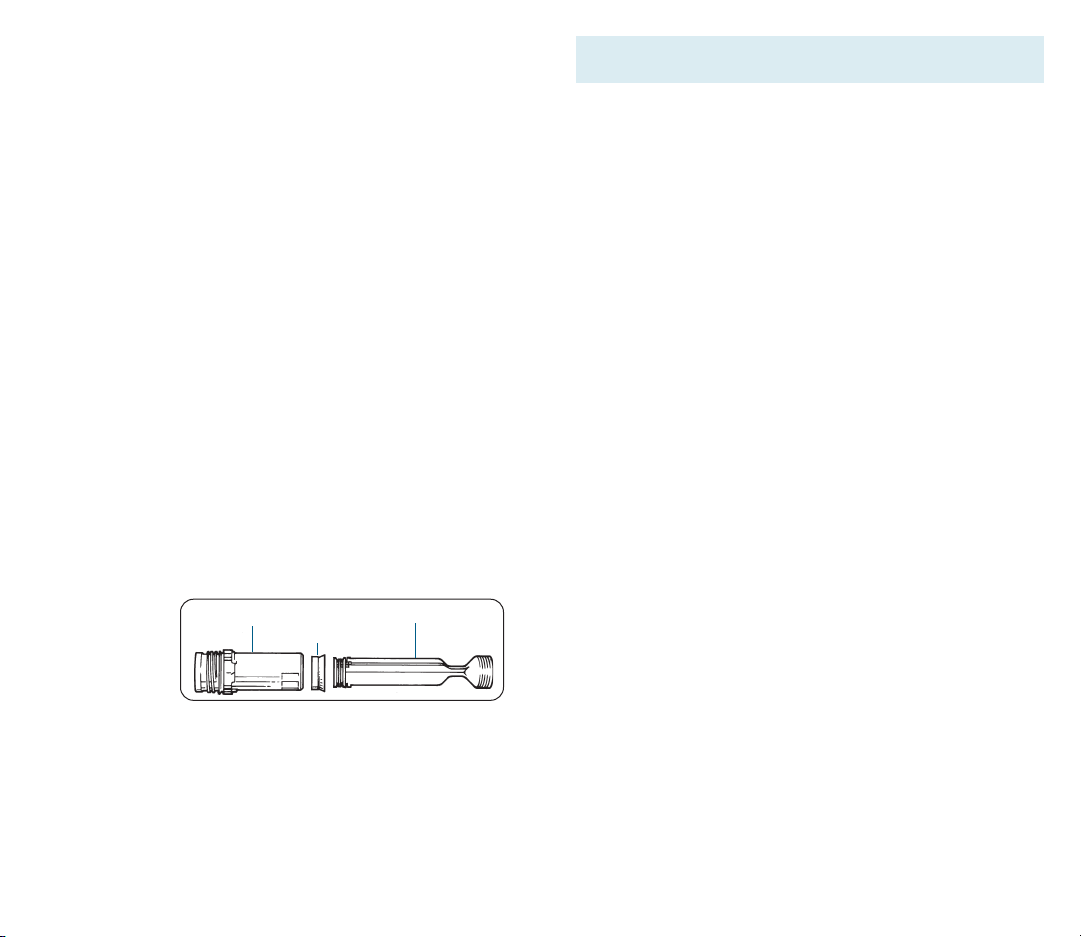
Care of piston assembly
The inside of the cylinder has to be smooth at all times. If a
buildup of mineral deposits or a white film is evident inside
the cylinder, such buildups must be removed to prevent wear
on the rubber
seal. For this purpose, clean cylinder again with
lukewarm soapy
water or a vinegar and water
solution. Rotate the piston in the cylinder every so often to
ensure that the rubber seal is worn evenly. Washing the rubber seal and the vacuum regulator ring with warm soapy
water will also prolong the life of these parts. Only
sterilize/sanitize these parts when milk is evident on them. Be
sure the rubber seal is completely dry before using.
Cylinder Rubber Piston
Seal
4 5
 Loading...