

Page 1
ASU SOFTWARE UPDATE INSTRUCTIONS - LS TELESCOPE
1. UPDATING LS TELESCOPE APPLICATION
SOFTWARE
1.1. UPDATE LS VIA USB
1.1.1. Connect your LS telescope to the PC and power on.
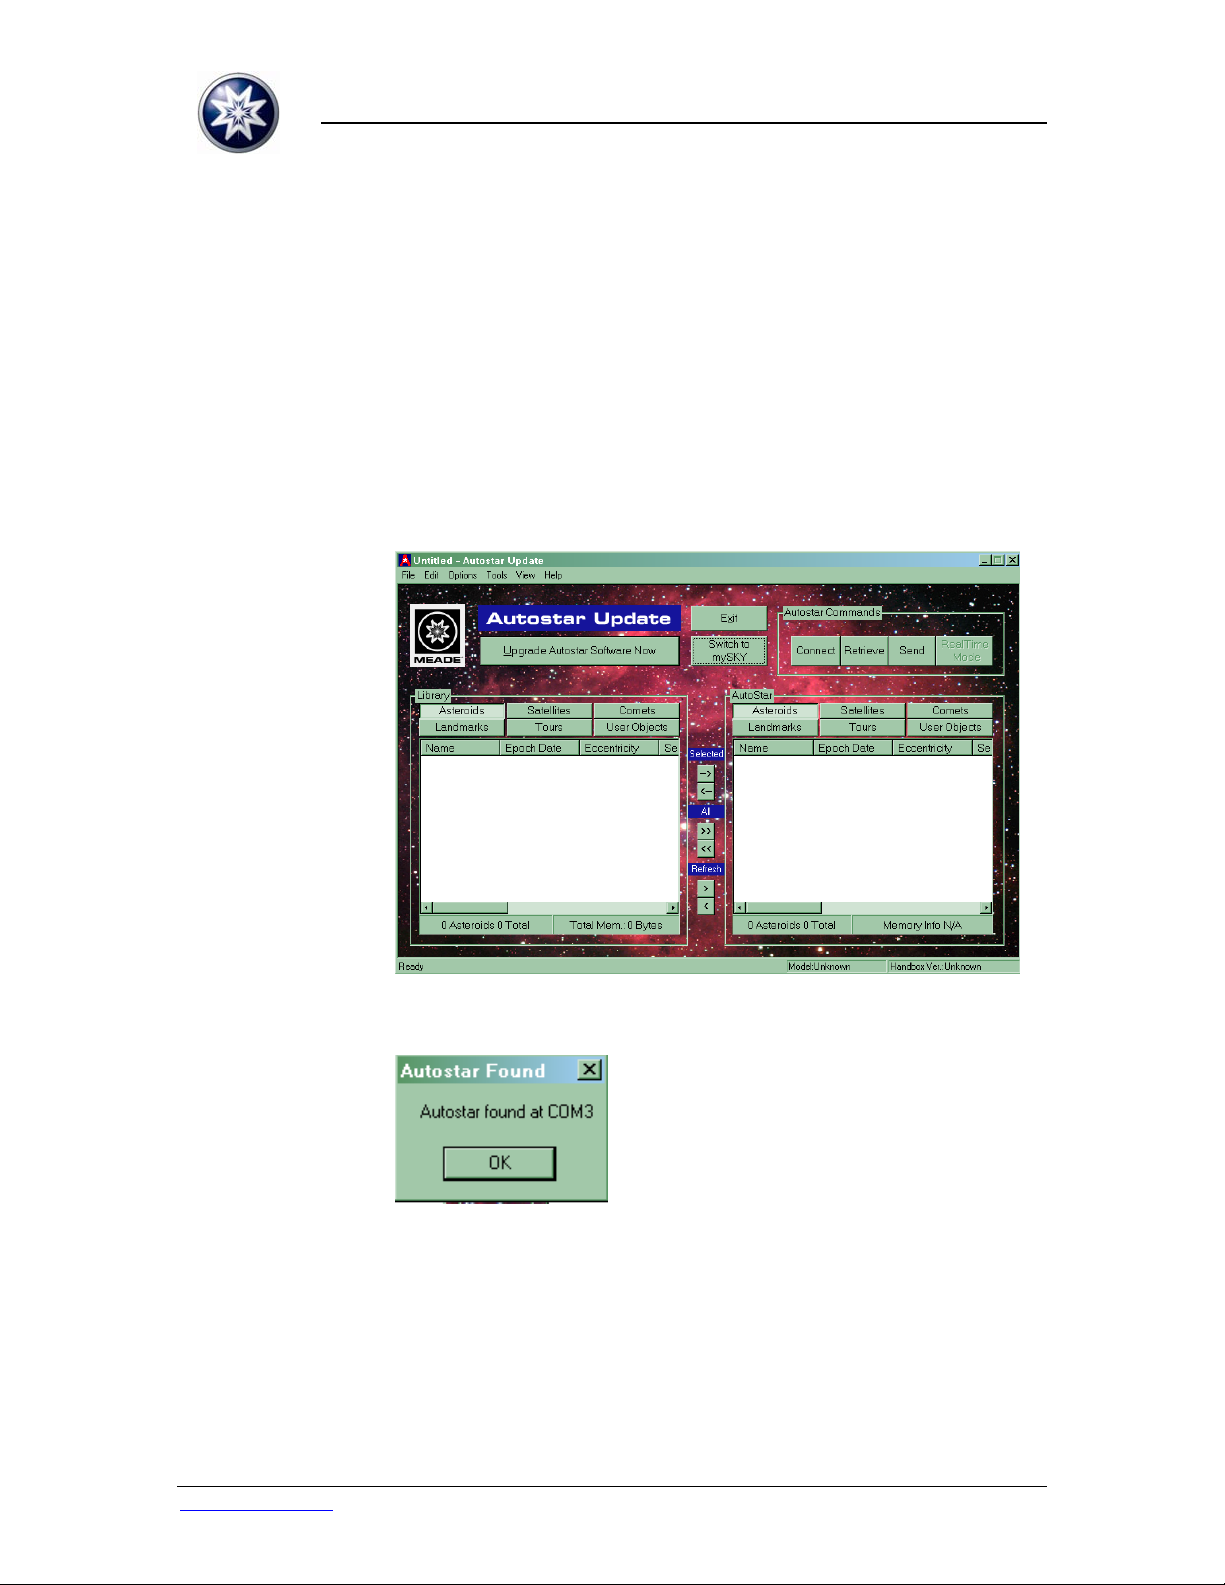
1.1.2. Run Autostar Updater (ASU) from the PC desktop
shortcut or the
Start > All Programs > Meade > Autostar Updater menu.
1.1.3.
Press “Upgrade Autostar Software Now” to update the LS
telescope application software.
1.1.4.
The Updater will report that the LS telescope is
connected. Press “OK” to continue.
www.meade.com Page 1 of 20 Rev. 26-Oct-2009
Page 2
ASU SOFTWARE UPDATE INSTRUCTIONS - LS TELESCOPE
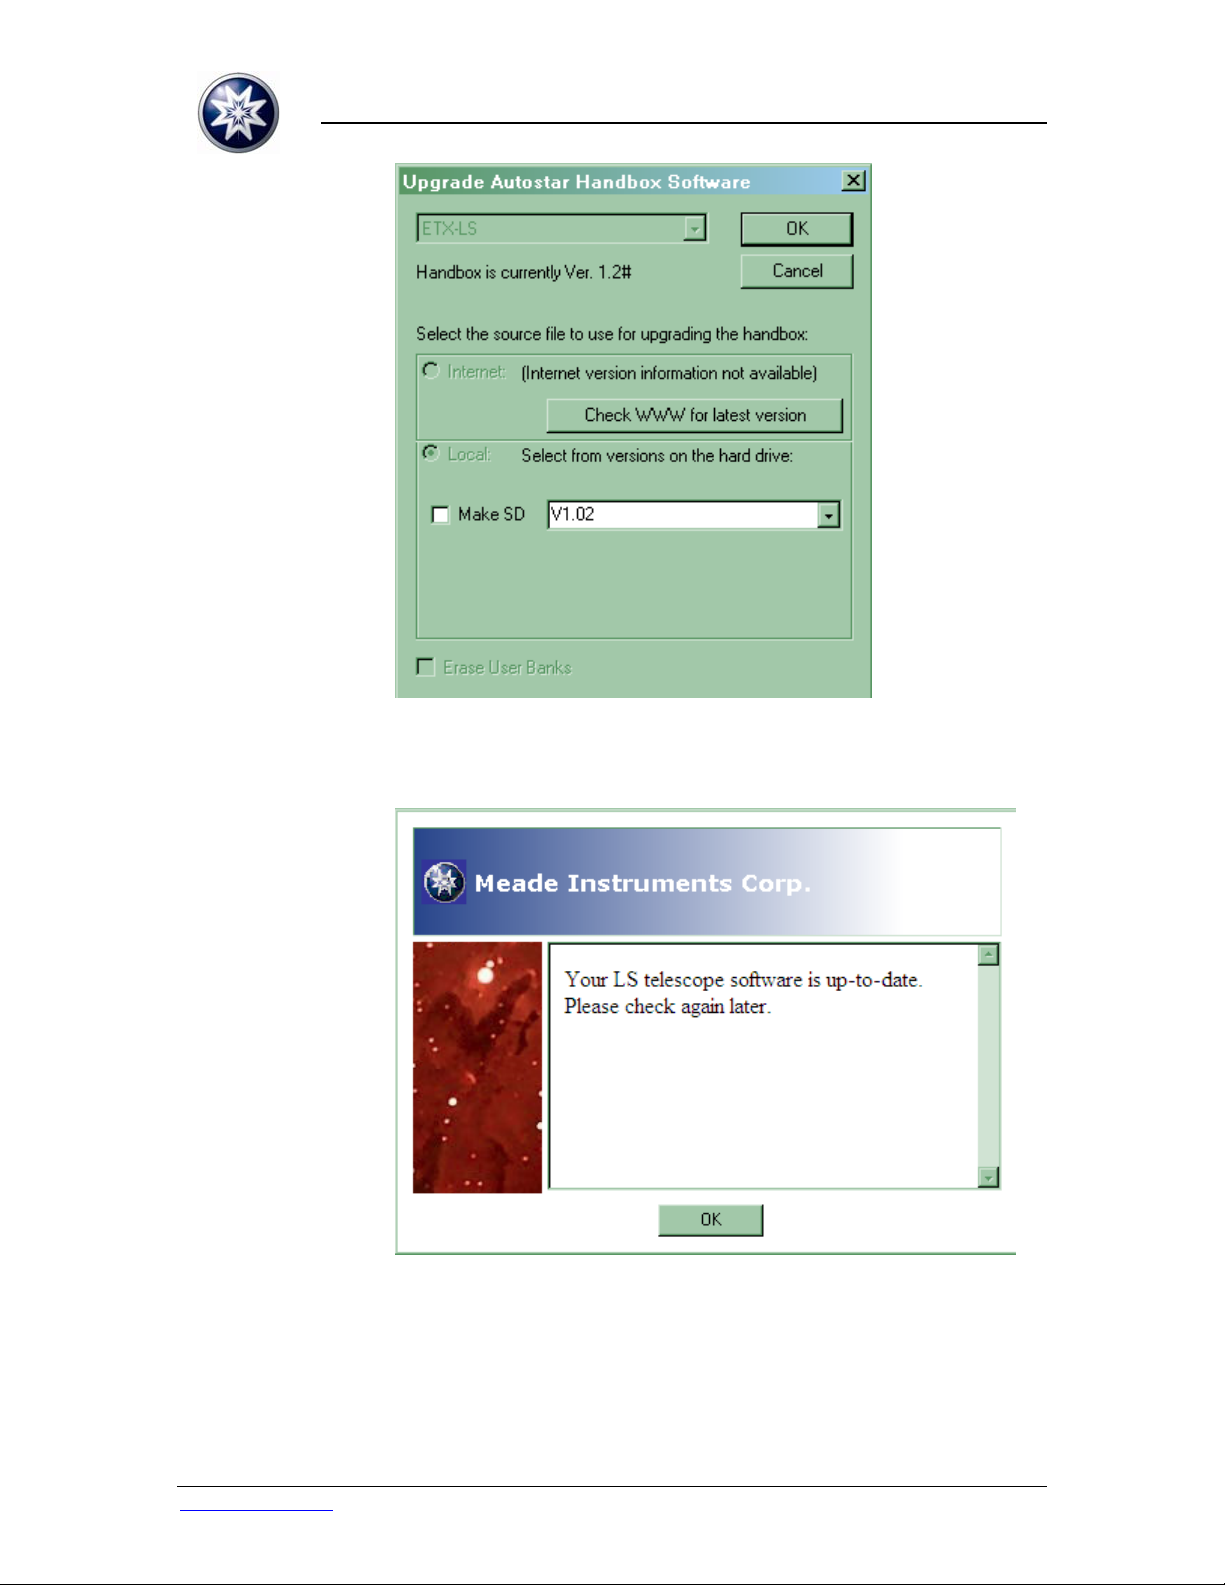
1.1.5.
Press “Check WWW for latest version.” This compares the
software on the local PC with the available updates from
the Internet.
1.1.6.
Your software on the local PC is already up-to-date when
this message is displayed.
www.meade.com Page 2 of 20 Rev. 26-Oct-2009
Page 3

ASU SOFTWARE UPDATE INSTRUCTIONS - LS TELESCOPE
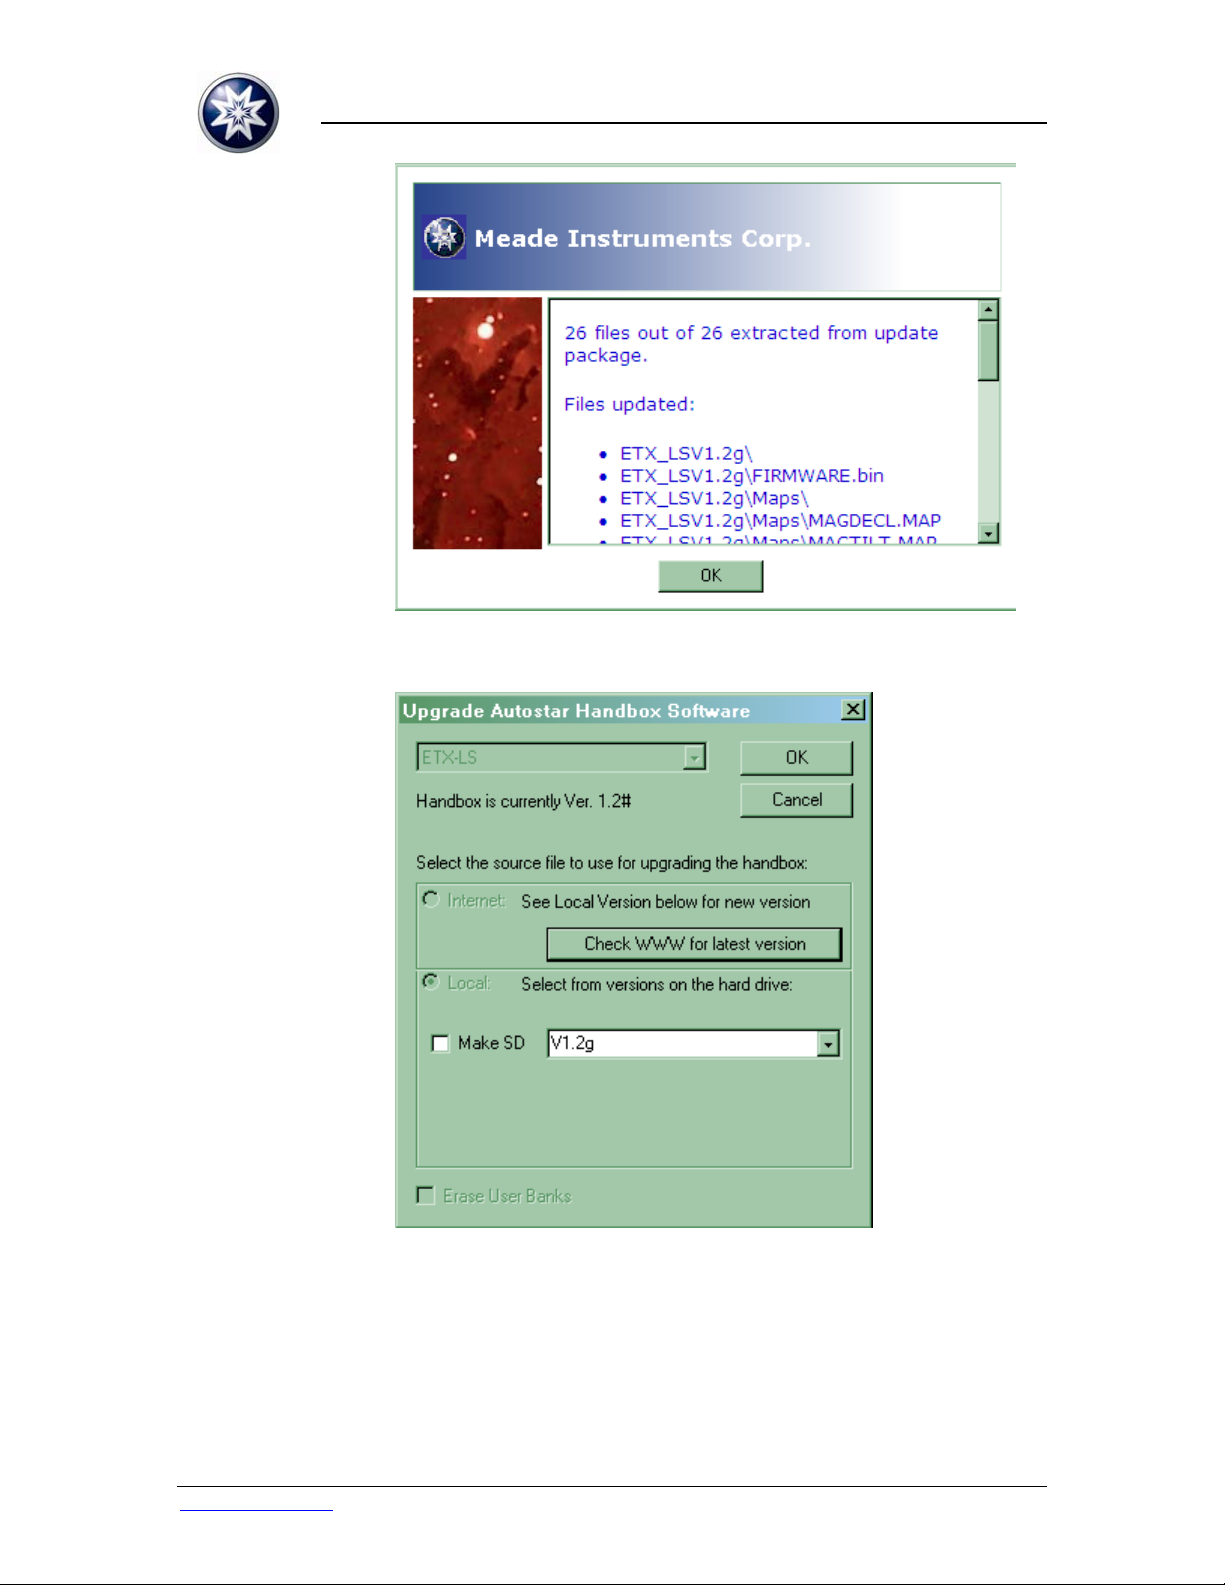
1.1.7.
A new LS application software message will be displayed.
Press “Yes” to continue.
1.1.8.
ASU will download the new software archive. Allow it to
complete with some patience.
www.meade.com Page 3 of 20 Rev. 26-Oct-2009
Page 4
ASU SOFTWARE UPDATE INSTRUCTIONS - LS TELESCOPE
1.1.9.
ASU will unzip the downloaded archive and display the
extracted file list. Press “OK” to continue.
1.1.10.
ASU displays the new application version. Press “OK” to
install the software into the LS telescope.
www.meade.com Page 4 of 20 Rev. 26-Oct-2009
Page 5
ASU SOFTWARE UPDATE INSTRUCTIONS - LS TELESCOPE
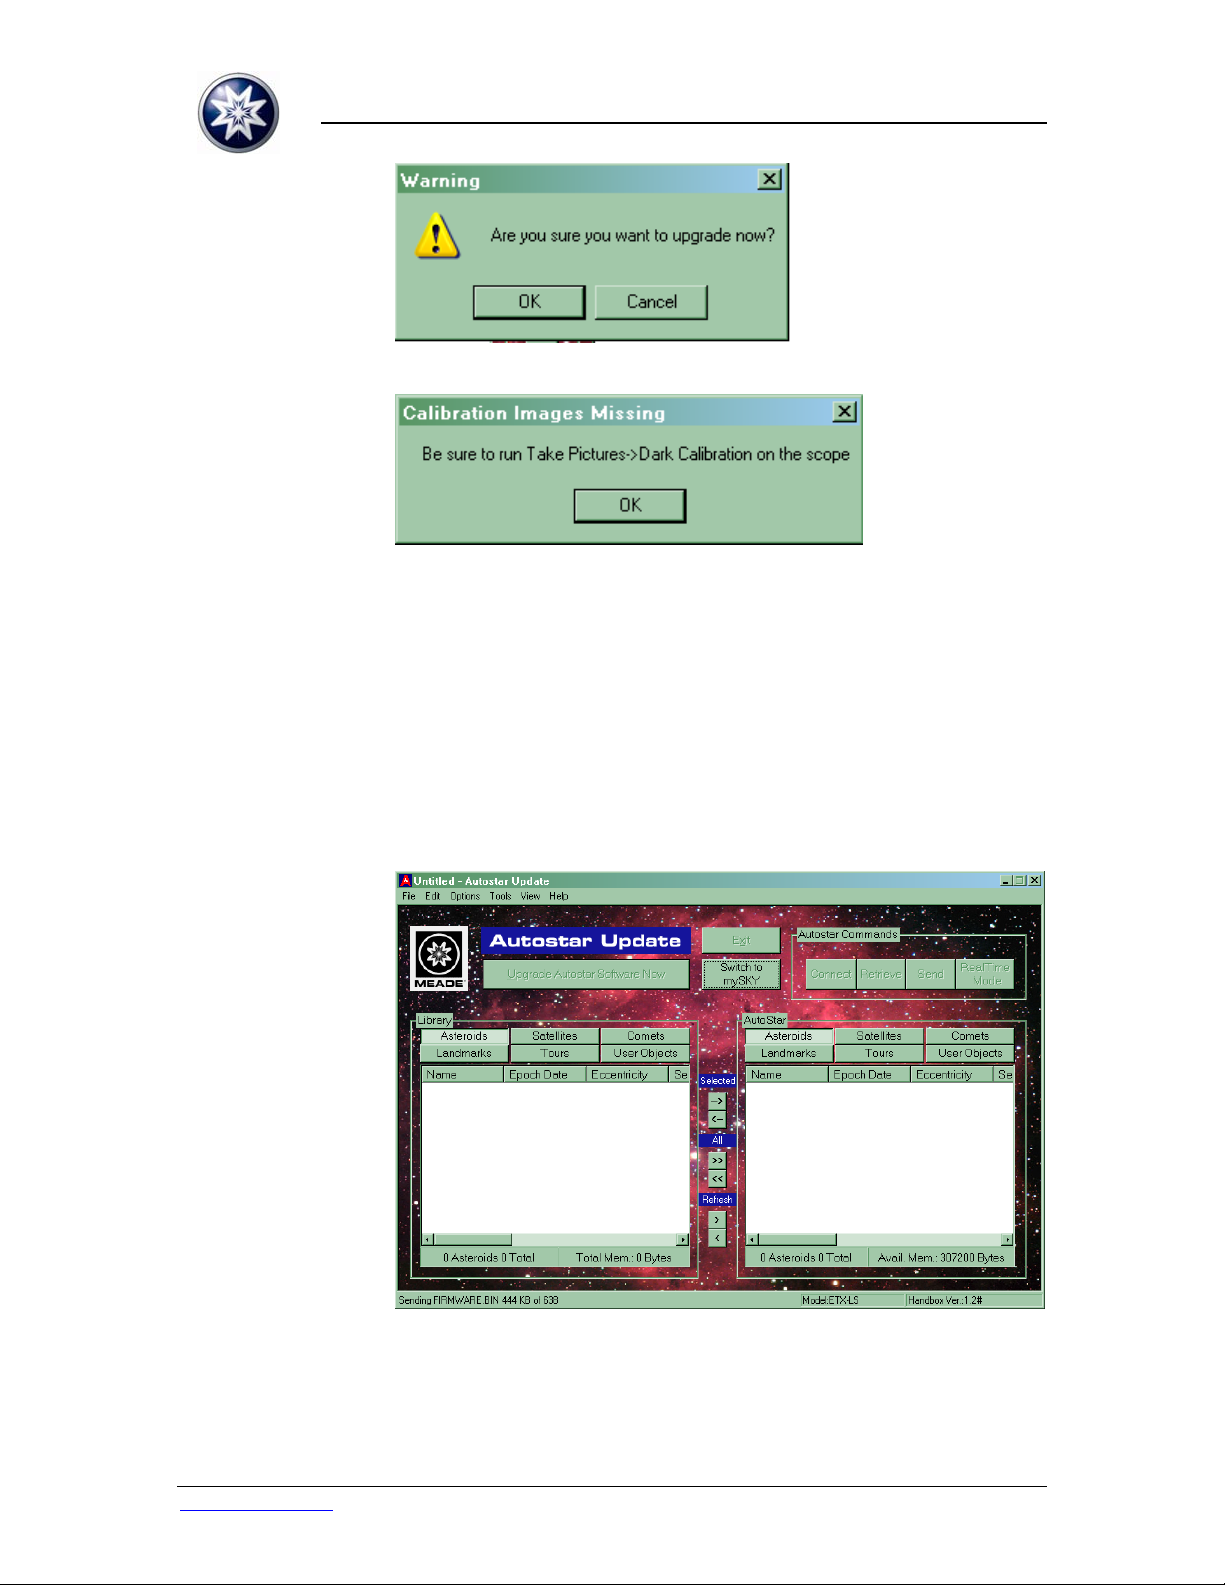
1.1.11.
Confirm the software upgrade. Press “OK” to continue.
1.1.12.
In some cases, a dark calibration reminder may be
displayed at the beginning of the software transfer.
1.1.12.1. If this advisory appears, a dark calibration is
recommended after you have completed the software
update.
1.1.12.2. Refer to the dark calibration Troubleshooting Tips, or
the Instruction Manual, for further information.
1.1.12.3. Press “OK” to continue.
1.1.13.
Progress of the software update is displayed in the
lower-left corner of the ASU screen.
www.meade.com Page 5 of 20 Rev. 26-Oct-2009
Page 6
ASU SOFTWARE UPDATE INSTRUCTIONS - LS TELESCOPE
1.1.14. The copying and validating of large files to the telescope
will take less than an hour.
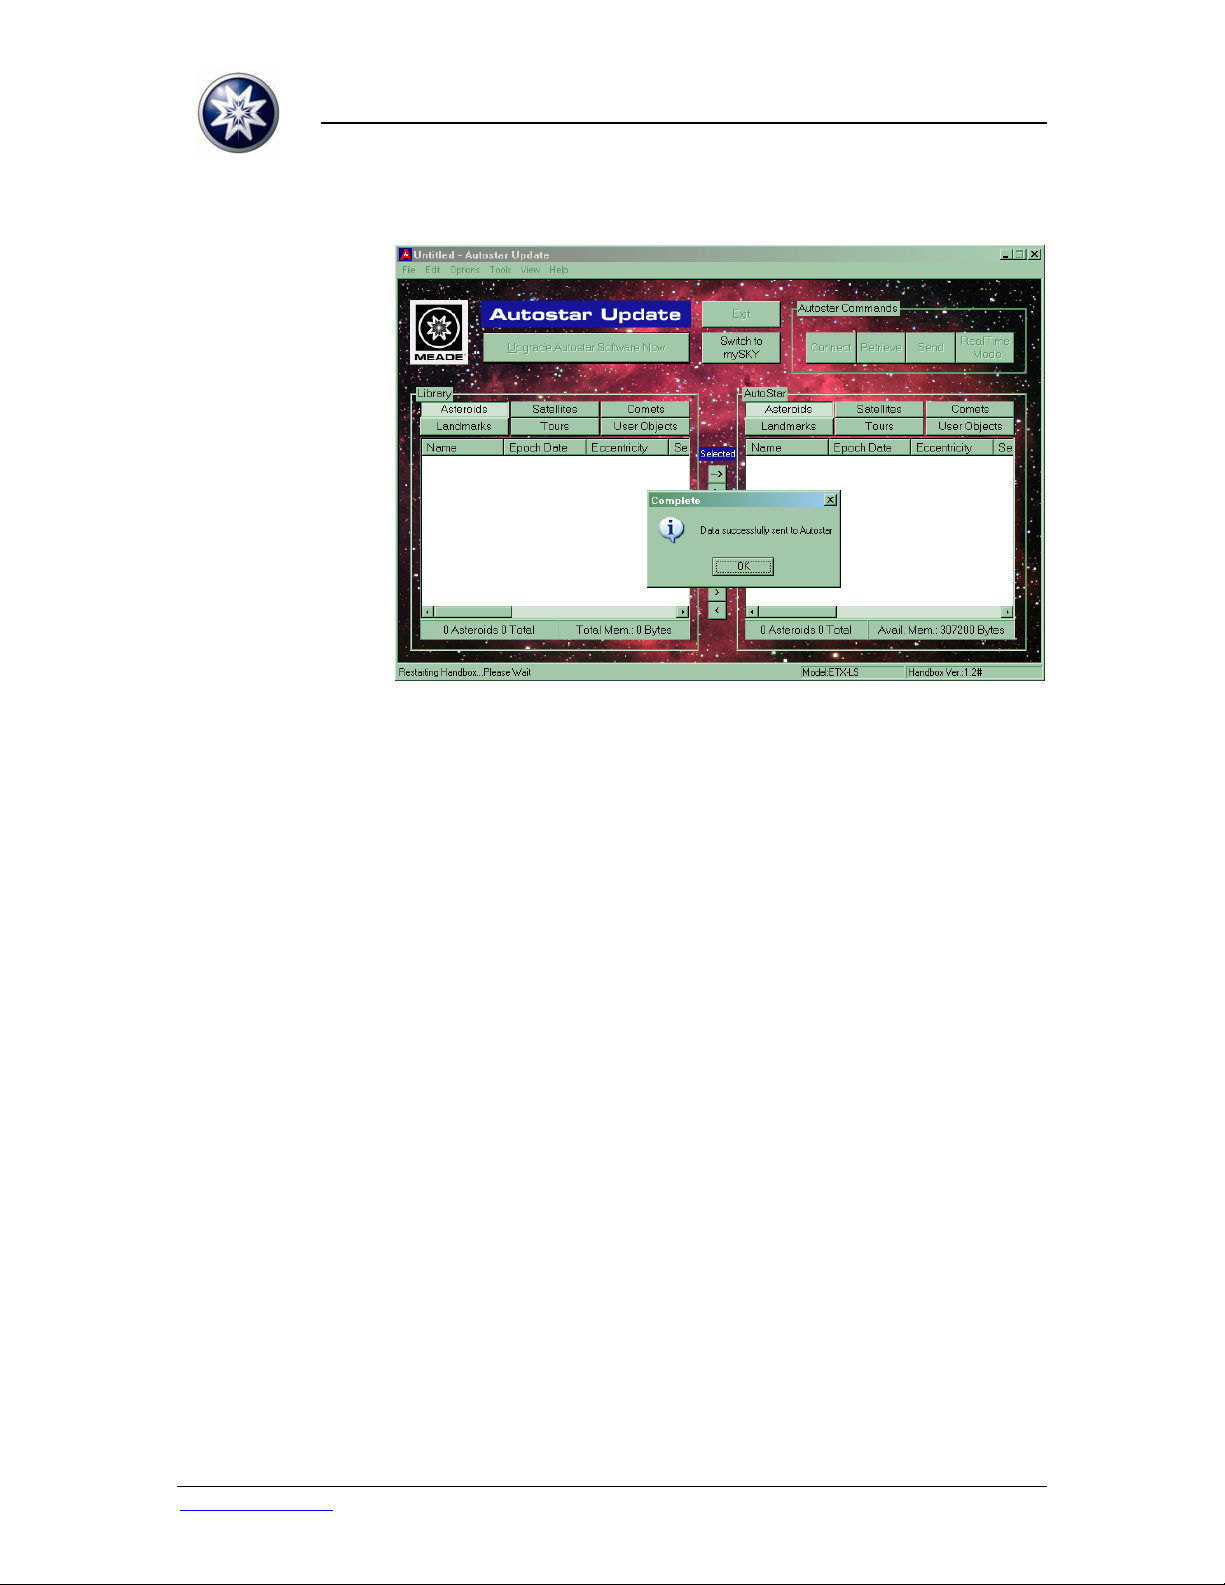
1.1.15.
The update is completed successfully. Press “OK” to
continue.
1.1.16. The LS telescope handbox will display:
“Update Complete
Cycle Power”.
1.1.17. Turn the LS telescope power off and on; the new version
will be displayed on the handbox startup screen.
1.1.18. Enjoy your updated LS telescope!
1.2. U
PDATE LS VIA MINI SD CARD
1.2.1. A mini SD Card can be used to update the LS telescope
without a nearby PC and USB connection.
1.2.2. Run Autostar Updater (ASU) from the PC desktop
shortcut or the
Start > All Programs > Meade > Autostar Updater menu.
www.meade.com Page 6 of 20 Rev. 26-Oct-2009
Page 7

1.2.3.
ASU SOFTWARE UPDATE INSTRUCTIONS - LS TELESCOPE
Press “Upgrade Autostar Software Now” to update the LS
telescope application software.
1.2.4.
Select the “Make SD” checkbox. Press “OK” to continue.
www.meade.com Page 7 of 20 Rev. 26-Oct-2009
Page 8

ASU SOFTWARE UPDATE INSTRUCTIONS - LS TELESCOPE
1.2.5.
Carefully select the correct SD Card drive letter
representing the mini SD Card.
1.2.5.1. CAUTION: Be aware of the potential of accidentally
formatting personal USB disks with important
information on them. This format cannot be undone.
To avoid accidents, it is recommended that critical
USB storage devices be removed from the PC before
formatting begins.
1.2.6.
The mini SD Card is ready when this message is
displayed.
1.2.7. Eject the mini SD Card from the PC.
1.2.8. With the telescope power off, install the loaded mini SD
Card into the slot on the telescope. Hint: the gold contacts
face the power switch.
1.2.9. Power on the LS telescope; a startup message will be
displayed on the handbox (the version displayed is not the
version of software to be loaded in the telescope).
1.2.10. “Copy SD to NAND” will be displayed on the handbox.
www.meade.com Page 8 of 20 Rev. 26-Oct-2009
Page 9

ASU SOFTWARE UPDATE INSTRUCTIONS - LS TELESCOPE
1.2.11. Press ENTER to start the software update.
1.2.12. The copying and validating of large files to the telescope
will take less than an hour.
1.2.13. “Take SD out”
Restart
1.2.14. Turn the LS telescope power off and on; the new version
will be displayed on the handbox startup screen.
1.2.15. Enjoy your updated telescope!
1.3. AUTOSTAR SUITE
1.3.1. Install the Planetarium and Telescope Control software,
“Autostar Suite” version 5.5 (or higher), from the DVD
installation disk you received with your telescope.
1.3.2. Place the DVD in your PC disk drive.
1.3.3.
Select “Install AutoStar Suite”; the Installation Wizard
will begin.
1.3.4. Follow the on-screen prompts to install several software
modules.
www.meade.com Page 9 of 20 Rev. 26-Oct-2009
Page 10

ASU SOFTWARE UPDATE INSTRUCTIONS - LS TELESCOPE
1.3.4.1. The Virtual Moon and GSC catalog are not required to
update your LS telescope application software; they
can be skipped, if desired.
1.3.5.
Autostar Suite installation is complete when this message
is displayed.
1.4. INSTALL USB DRIVER
1.4.1. Ensure the Autostar Suite DVD is placed in a PC DVD
drive.
1.4.2. Power on the LS telescope.
1.4.3. Press the handbox MODE key to abort the automatic
alignment mode (if you don’t want to wait for it to
complete); the telescope will find “home” and wait for
commands.
1.4.4. Connect a standard USB A-B peripheral cable to the
USB-B port on the telescope.
1.4.5. Connect the other end of the USB cable to an available
USB port on the PC.
www.meade.com Page 10 of 20 Rev. 26-Oct-2009
Page 11

ASU SOFTWARE UPDATE INSTRUCTIONS - LS TELESCOPE
1.4.6.
Windows Plug and Play will automatically run the
“Found New Hardware Wizard”. Select “No, not this time”
and press “Next >”.
1.4.7.
Select “Install the software automatically” and press
“Next >”.
www.meade.com Page 11 of 20 Rev. 26-Oct-2009
Page 12

ASU SOFTWARE UPDATE INSTRUCTIONS - LS TELESCOPE
1.4.8.
Windows will locate the LS Serial Port driver from the
Autostar Suite DVD.
1.4.9.
The LS USB Serial Port driver is compatible with 32-bit
Windows operating systems (2000, XP, Vista). Press
“Continue Anyway” to continue.
www.meade.com Page 12 of 20 Rev. 26-Oct-2009
Page 13

ASU SOFTWARE UPDATE INSTRUCTIONS - LS TELESCOPE
1.4.10.
This message indicates successful installation of the LS
USB Serial Port driver. Press “Finish” to complete the
installation.
1.5. AUTOSTAR UPDATER (ASU)
1.5.1. Users must be aware, in advance, that some LS software
update downloads are large and may require substantial
download time if the PC is not connected to a broadband
network.
1.5.2. Run Autostar Updater (ASU) from the PC desktop
shortcut or the
Start > All Programs > Meade > Autostar Updater menu.
www.meade.com Page 13 of 20 Rev. 26-Oct-2009
Page 14

ASU SOFTWARE UPDATE INSTRUCTIONS - LS TELESCOPE
1.5.3.
ASU can update many Meade products from this control
panel.
1.5.4.
ASU will automatically check for updates to the Updater
itself. Press “Yes” to continue.
www.meade.com Page 14 of 20 Rev. 26-Oct-2009
Page 15

ASU SOFTWARE UPDATE INSTRUCTIONS - LS TELESCOPE
1.5.5.
The current ASU will close and download an update over
the Internet. Press “OK” to continue.
1.5.6.
Press “OK” to continue.
www.meade.com Page 15 of 20 Rev. 26-Oct-2009
Page 16

ASU SOFTWARE UPDATE INSTRUCTIONS - LS TELESCOPE
1.5.7.
The new ASU has been updated successfully when this
message is displayed.
1.6. TROUBLESHOOTING TIPS
1.6.1. Autostar Suite DVD
1.6.1.1. If your PC does not support DVDs, you will not be able
to load the Autostar Suite DVD. The Autostar Suite
and Autostar Updater are available for Internet
download at:
http://www.meade.com/support/downloads.html
1.6.2. Autostar Updater
1.6.2.1. If Autostar Updater has been uninstalled and
reinstalled on the same PC, it may not look for new
software updates. Delete the
C:\WINDOWS\WebUpdateSvc4.INI file to restore
normal operation.
1.6.2.2. The C:\WINDOWS\WebUpdateSvc4.INI file can be
deleted to reset the Autostar Updater to original
conditions (new installation). A new file will be created
when Autostar Updater runs.
www.meade.com Page 16 of 20 Rev. 26-Oct-2009
Page 17

ASU SOFTWARE UPDATE INSTRUCTIONS - LS TELESCOPE
1.6.3. USB Com Ports
1.6.3.1.
The COM port that the LS USB Serial Port is
connected to may be determined by running the
Windows Device Manager from
Start > Control Panel > System > Hardware > Device
Manager. Refer to the Ports listed.
1.6.3.1.1. The LS USB Serial Port will only be indicated if the
LS telescope is connected and powered on.
1.6.3.1.2. The LS telescope driver can be uninstalled by
right-clicking on the LS USB Serial Port and
selecting “Uninstall”. Reinstall the LS telescope by
reconnecting via USB to the PC.
1.6.3.2. If all of the PC COM port configurations are not
healthy (“?” displayed in Device Manager), especially
devices like Bluetooth headsets and MODEMs, the
ASU may cause a “device driver” error. Devices which
are not operating correctly must be uninstalled.
1.6.4. PC Internet connection
1.6.4.1. If there is no apparent response when pressing the
“Check WWW for latest version” button, there may be
a problem with the PC connection to the Internet.
Rebooting the PC will close active connections and
reset the network settings. After confirming you can
www.meade.com Page 17 of 20 Rev. 26-Oct-2009
Page 18

ASU SOFTWARE UPDATE INSTRUCTIONS - LS TELESCOPE
view the www.meade.com website, run Autostar
Updater (ASU) to continue.
1.6.5. Mini SD Card
1.6.5.1.
Many original mini SD Cards are originally formatted
“FAT”. For the LS telescope, the mini SD Card must
be formatted “FAT32” with a non-blank volume label
(e.g. “LSUPDATE”).
1.6.5.2. The mini SD Card may not operate correctly in the LS
telescope if it was formatted “FAT32” with Windows
2000; Windows XP (or later) is recommended.
1.6.6. Dark calibration
1.6.6.1. This calibration maximizes the Eclips Module
camera’s night vision.
1.6.6.2. A dark frame calibration of the Eclips Module camera
may improve telescope alignment performance after a
software update via USB cable.
www.meade.com Page 18 of 20 Rev. 26-Oct-2009
Page 19

ASU SOFTWARE UPDATE INSTRUCTIONS - LS TELESCOPE
1.6.6.2.1.
This calibration is highly recommended if the
Autostar Updater displayed the “Calibration
Images Missing” advisory during the software
update.
1.6.6.3. To update the dark calibration, at any time of the day,
perform the following steps:
1.6.6.3.1. Setup your LS telescope and power on.
1.6.6.3.2. Using the handbox, go to
Select Item > Take Picture > Dark Calibration.
1.6.6.3.3. Remove the Eclips Module camera cover.
1.6.6.3.4. Press ENTER.
1.6.6.3.5. The telescope will take two (2) quick camera
exposures of the surrounding environment (do not
cover the camera lens).
1.6.6.3.6. Replace the Eclips Module camera cover over the
camera lens; no light should be visible to the
camera.
1.6.6.3.7. Press ENTER.
1.6.6.3.8. The telescope will display “Calculating…” and
process a longer (~15-second) exposure; ensure the
camera cover remains in place for this step.
1.6.6.3.9. When finished, the telescope will return to the
Take Picture > Dark Calibration menu.
1.6.6.3.10. Press BACK two (2) times to return to the top
menu.
1.6.6.4. The dark calibration will be saved in the telescope
until the next software update.
www.meade.com Page 19 of 20 Rev. 26-Oct-2009
Page 20

ASU SOFTWARE UPDATE INSTRUCTIONS - LS TELESCOPE
1.7. TABLE OF CONTENTS
1. Updating LS telescope application software......................................................................... 1
1.1. Update LS via USB........................................................................................................... 1
1.2. Update LS via mini SD Card............................................................................................. 6
1.3. Autostar Suite.................................................................................................................... 9
1.4. Install USB driver ............................................................................................................ 10
1.5. Autostar Updater (ASU).................................................................................................. 13
1.6. Troubleshooting tips........................................................................................................ 16
1.7. Table of contents............................................................................................................. 20
*** End ***
www.meade.com Page 20 of 20 Rev. 26-Oct-2009
 Loading...