

Page 1
Operating & Ma intenance Manual
0B
OMM 1008-3
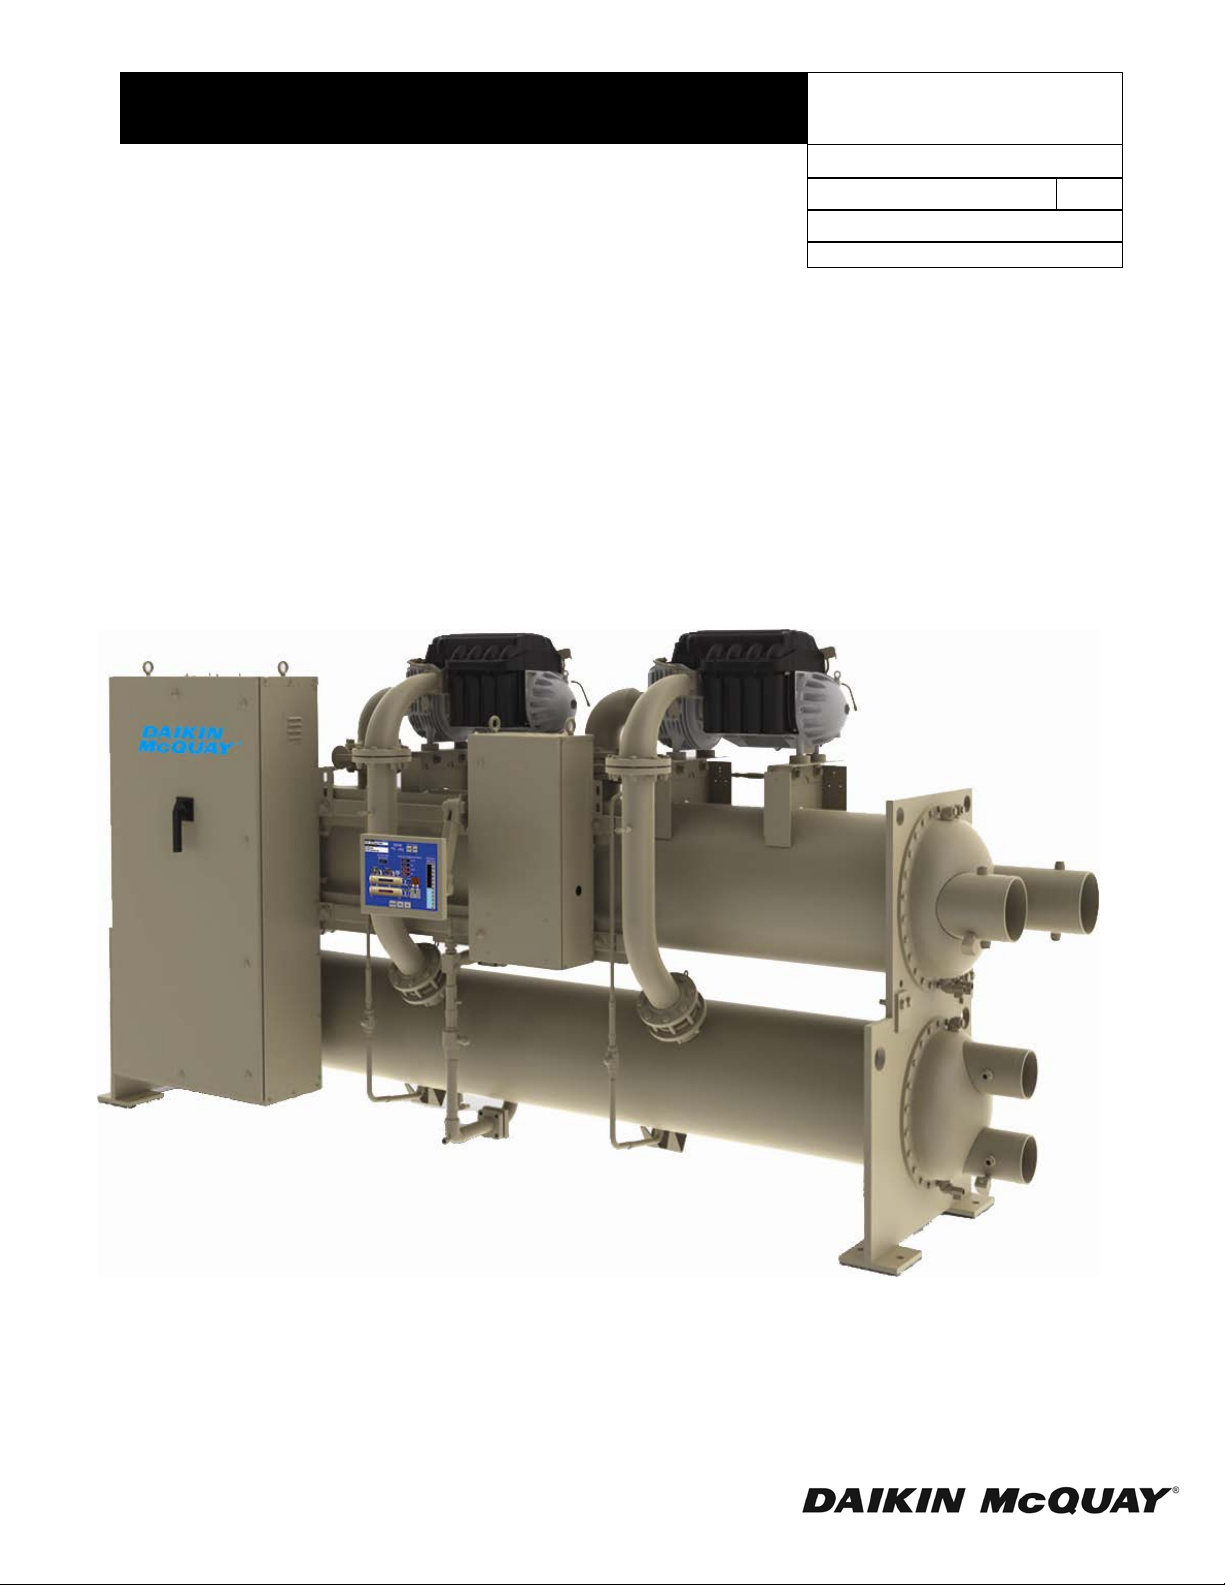
Magnitude™ Magnetic Bearing Chillers
Model WMC 145SBS – 400DBS
Model WMM 075SBS – 400DBS
Control Software Version: WMCU3UU10K
Group: Chiller
Part Number: 331374711
Effective: April 26, 2012
Supersedes: February 2012
Rev
Page 2
Table of Contents
Introduction ............................................. 3
Features of the Control Panel ................. 4
Definitions ................................................ 5
General Description................................. 8
Control Panel ........................................... 9
Use with On-Site Generators ................ 10
Multi-Chiller Setup ............................... 10
Operating the Control System .............. 14
Interface Panel On/Off ...................................... 14
Start/Stop Unit .................................................. 14
Change Setpoint s .............................................. 14
Alarms .............................................................. 14
Component Failure ........................................... 15
Component Description ........................ 15
Operator Interface Touch Screen ...................... 15
Controller Description ...................................... 15
Navigating......................................................... 16
Controller ............................................... 18
Controller Setpoints .......................................... 18
Unit Related Faults, Problems, Warnings ......... 21
Controller Functions ......................................... 22
Compressor Related Faults, Problems, Warnings23
Control Functi ons ............................................. 24
Compressor On-Board
Controllers .............................................. 28
Field Wiring Diagram ........................... 29
Operator Interface Touch
Screen ..................................................... 30
Navigation......................................................... 30
Screen Descriptions .......................................... 32
VIEW Screens .................................................. 32
SET Screens ...................................................... 37
See Field Wiring Diagram ................................ 44
See Field Wiring Diagram ................................ 46
SERVICE Screen .............................................. 50
HISTORY Screens ............................................ 51
Download Data ................................................. 52
ACTIVE ALARM Screen ................................. 53
Controller Menu Screens ...................... 55
Menu Matrix ..................................................... 56
BAS Interface ........................................ 72
Sequence of Operation ......................... 72
Annual Shutdown ................................. 74
Seasonal Startup ................................................ 74
Maintenance .......................................... 75
Pressure/Temperature Chart .............................. 75
Routine Maintenance ........................................ 75
Repair of System ............................................... 76
Maintenance Schedule .......................... 79
Service Programs .................................. 80
Operator Schools ................................... 80
Limited Warranty ................................. 80
Manufactured in an ISO Cer tified Facility
©2012 McQ uay International. Illustrat ions and data cover the McQuay Internat ional product at the tim e of publication and we reserve
the right to make changes in design and construction at anyt i me without notice.
™® The following are trademarks or registered t rademarks of their respect ive companies: BACnet from ASHRAE;
L
ONWORKS, and the LONMARK logo are managed, granted and used by LONMARK International under a license granted by Echel on
Corporation; Modbus from Schnei der E l ectric; MicroTech II, and Open Choices from McQuay Internati onal .
2 OMM 1008-3
LONMARK, LonTalk,
Page 3
!
WARNING
!
CAUTION
!
DANGER
!
WARNING
!
CAUTION
Introduction
This manual provides, operating, troubleshooting and maintenance information for Daikin McQuay WMC
Magnitude™ centrifugal chillers with the MicroTech ΙΙ® controller. It includes versions software versions F, G,
H and J.
Please refer to the current version of installation manual IM 1029 for information relating to installing the unit.
Electric shock hazard. Improper handling of this equipment can cause personal injury or equipment damage. This
equipment must be properly grounded. Connections to and service of the MicroTech II control panel must be performed
only by personnel that are knowledgeable in the operation of the equipment being controlled..
Static sensitive components. A static discharge while handling electronic circuit boards can cause damage to the
components. Discharge any static electrical charge by touching the bare metal inside the control panel before performing
any service work. Never unplug any cables, circuit board terminal blocks, or power plugs while power is applied to the
panel.
NOTICE
This equipment generates, uses and can radiate radio frequency energy and, if not installed and used in accordance with
this instruction manual, may cause interference to radio communications. Operation of this equipment in a residential area
is likely to cause harmful interference, in which case the owner will be required to correct the interference at the owner’s
own expense.
McQuay International disclaims any liability resulting from any interference or for the correction thereof.
Chiller Location
The chillers are intended only for installation in an indoor or weather protected area consistent with the NEMA 1
rating on the chiller, controls, and electrical panels. Equipment room temperature for operating and standby
conditions is 40°F to 104°F (4.4°C to 40°C).
HAZARD IDENTIFICATION INFORMATION
Dangers indicate a hazardous situation which will result in death or serious injury if not
avoided.
Warnings indicate potentially hazardous situations, which can result in property damage,
severe personal injury, or death if not avoided.
Cautions indicate potentially hazardous situations, which can result in personal injury or
equipment damage if not avoided.
OMM 1008-3 3
Page 4

Features of the Control Panel
• Control of leaving chilled water within a ±0.2°F (±0.1°C) tolerance.
• Display of the following temperatures and pressures on a 15-inch Super VGA touch-screen operator
interface
• Entering and leaving chilled water temperature
• Enter and leaving condenser water temperature
• Saturated evaporator refrigerant temperature and pressure
• Saturated condenser temperature and pressure
• Outside air temperature (optional)
• Suction line, liquid line and discharge line temperatures, calculated superheat for discharge and
suction lines, and calculated sub-cooling for liquid line
• Automatic control of primary and standby evaporator and condenser pumps.
• Control of up to 4 stages of cooling tower fans plus modulating bypass valve and/or tower fan VFD.
Although fan staging is available, continuous, modulated control of tower capacity is preferred and
recommended.
• History trend feature that will constantly log chiller functions and setpoints. The controller will store and
display all accumulated data for recall in a graphic format on the screen. Data can be downloaded for
archival purposes.
• Three levels of security protection against unauthorized changing of setpoints and other control
parameters.
• Plain language warning and fault diagnostics to inform operators of most warning or fault conditions.
Warnings, problems and faults are time and date stamped for identification of when the fault condition
occurred. In addition, the operating conditions that existed just prior to shutdown can be recalled to aid
in resolving the cause of the problem.
• Twenty-five previous faults and related operating conditions are available from the display. Data can be
exported for archival purposes via a 3.5-inch floppy drive or other device (depending on date of
manufacture).
• Soft loading feature reduces electrical consumption and peak demand charges during system loop pull-
down.
• Remote input signals for chilled water reset, demand limiting and unit enable.
• Manual control mode allows the service technician to command the unit to different operating states.
Useful for system checkout.
• BAS communication capability via L
BAS manufacturers.
• Pressure transducers for direct reading of system pressures.
• Preemptive control of low evaporator and high discharge pressure conditions to take corrective action
prior to a fault trip.
ONTALK, Modbus or BACnet standard open protocols for most
4 OMM 1008-3
Page 5

Definitions
Active Setpoint
The active setpoint is the parameter setting in effect at any given moment. This variation can occur on
setpoints that can be altered during normal operation. Resetting the chilled water leaving temperature
setpoint by one of several methods such as return water temperature is an example.
Active Capacity Limit
The active capacity setpoint is the setting in effect at any given moment. Any one of several external inputs
can limit a compressor’s capacity below its maximum value.
Active-Amp-Limit
Active amp limit is the actual amp limit imposed by an outside signal such as the load limit function.
Condenser Recirc (Recirculation) Timer
A timing function, with a 30-second default, that holds off any reading of condenser water f or the durat ion of
the timing setting. This delay allows the sensors to take a more accurate reading of the condenser water
temperature.
Dead Band
The dead band is a set of values associated with a setpoint such that a change in the variable occurring within
the dead band causes no action from the controller. For example, if a temperature setpoint is 44°F and it has
a dead band of ± 2.0 degrees F, nothing will happen until the measured temperature is less than 42°F or more
than 46°F.
DIN
Digital input usually followed by a number designating the number of the input.
Discharge Superheat
Discharge superheat is calculated using the following equation:
Discharge Superheat = Discharge Temperature – Condenser Saturated Temperature
Error
In the context of this manual, “Error” is the difference between the actual value of a variable and the target
setting or setpoint.
Evaporator Approach
The evaporator approach is calculated for each circuit. The equation is as follows:
Evaporator Approach = LWT – Evaporator Saturated Temperature
Evap Hold-loading
This is a setpoint that establishes the minimum evaporator pressure to which the chiller is allowed to go. It
signals that the unit is at full load so the no further loading will occur that would lower the pressure even
further.
Evap Recirc (Evaporation Recirculation) Timer
A timing function, with a 30-second default, that holds off any reading of chilled water for the dur ati on of t he
timing setting. This delay allows the chilled water sensors to take a more accurate reading of the chilled
water temperature.
EXV
Electronic expansion valve, used to c ontrol the flow of r efrigerant to the evaporat or, controlled by the circuit
microprocessor.
OMM 1008-3 5
Page 6

Load Limit
An external signal from the keypad, the BAS, or a 4-20 ma signal that limits the compressor loading to a
designated percent of full load. Used to limit unit power input.
Load Balance
Load balance is a technique that equally distributes the total unit load between two or more running
compressors.
Low Pressure Hold (Inhi bit) Setpoint
The psi evaporator pressure setting at which the controller will not allow further compressor loading.
“Hold” and “Inhibit” are used interchangeably.
Low Pressure Unload Setpoint
The psi evaporator pressure setting at which the controller will unload the compressor in an effort to
maintain the minimum setting.
LWT
Evaporator leaving water temperature. The “water” is any fluid used in the chiller circuit.
LWT Error
Error in the controller context is the difference between the value of a variable and the setpoint. For
example, if the LWT setpoint is 44°F and the actual temperature of the water at a given moment is 46°F,
the LWT error is +2 degrees.
LWT Slope
The LWT slope is an indication of the trend of the chilled water temperature. It is calculated by taking
readings of the temperature every few seconds and subtracting them from the previous value over a
rolling one-minute interval.
ms
Milli-second
Maximum Saturated Condenser Temperature
The maximum saturated condenser temperature allowed is calculated based on the compressor
operational envelope.
OAT
Outside ambient air temperature
Offset
Offset is the difference between the actual value of a variable (such as temperature or pressure) and the
reading shown on the microprocessor as a result of the sensor signal.
OITS
Operator Interface Touch Screen, one screen per unit provides operating data visually and accommodates
setpoint entry.
pLAN
Peco Local Area Network is the proprietary name of the network connecting the control elements.
Refrigerant Saturated Temperature
Refrigerant saturated temperature is calculated from the pressure sensor readings. The pressure is fitted
to an R-134a temperature/pressure curve to determine the saturated temperature.
Soft Load
Soft Load is a control sub-routine that allows the chiller to load up gradually. It requires setpoint inputs
of selecting it by Yes or No inputs by selecti ng the percent load to start ramping up and by selecting the
time to ramp up to full load (up to 60 minutes).
6 OMM 1008-3
Page 7

SP
Setpoint
Suction Superheat
Suction superheat is calculated for each circuit using the following equation:
Suction Superheat = Suction Temperature – Evapo rator Saturated T em perature
Stageup/Stagedown Delta-T
Staging is the act of starting or stopping a compressor or fan when another is still operat ing. Startup and Stop
is the act of starting the first compressor or fan and stopping the last compressor or fan. The Delta-T is the
“dead band” on either side the setpoint in which no action is taken.
Stage Up Delay
The time delay from the start of the first compressor to the start of the second.
Startup Delta-T
Number of degrees above the LWT setpoint required to start the first compressor.
Stop Delta-T
Number of degrees below the LWT setpoint required for the last compressor to stop.
VDC
Volts, Direct Current; sometimes noted as vdc.
VFD
Variable Frequency Drive, a device located on the compressor used to vary the compressor speed.
OMM 1008-3 7
Page 8
Compressor #2
Power Panel
Unit Control Panel
Panel (OITS)
Electronic Expansion Valve
Condenser
Behind Panel
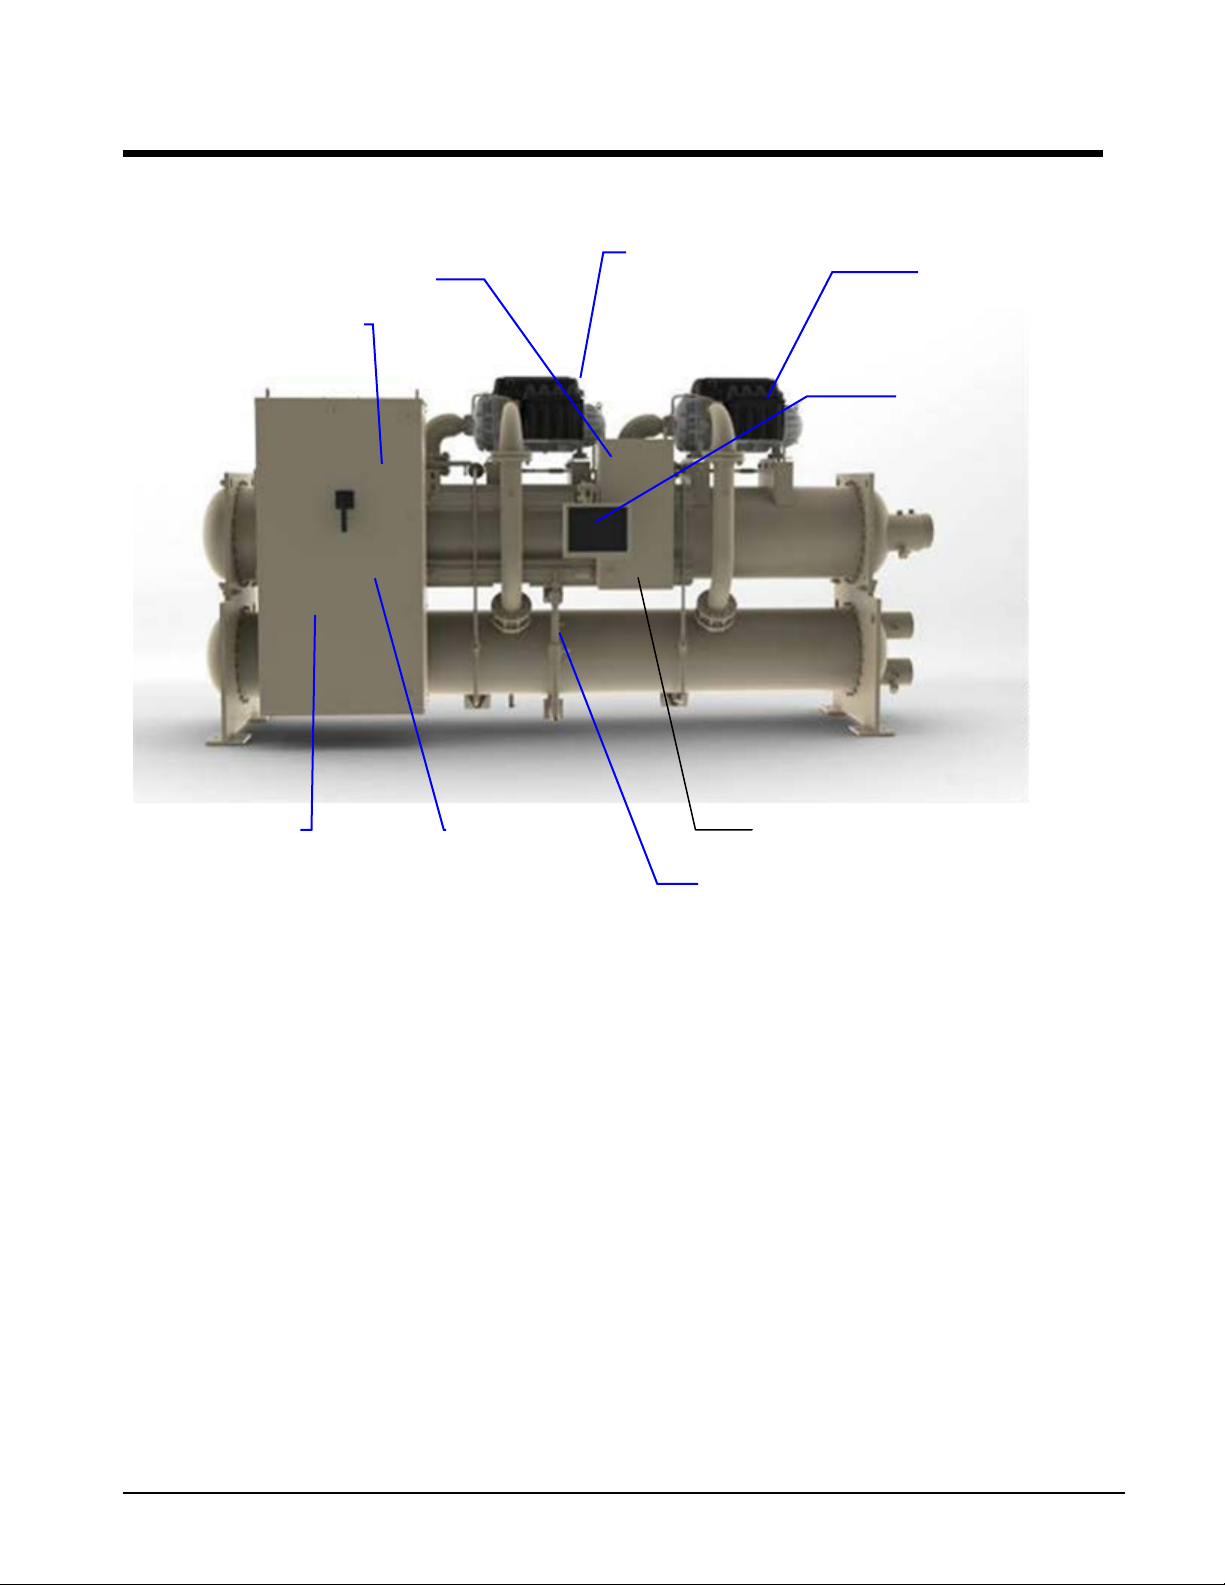
General Description
Major Components
Figure 1, Major Component Location
Evaporator Relief
Valve, Behind Panel
Compressor #1
Operator
Interface
Relief Valves
(Front End Box)
Control Panel
General Description
The centrifugal MicroTech ΙΙ control system consists of a microprocessor-based controller in the control
panel, as well as on-board the compressors, providing monitoring and control functions required for the
controlled, efficient operation of the chiller. The system consists of the following components:
• Operator Interface Touch Screen (OITS), one per unit-provides unit information and is the primary
setpoint input instrument. It has no control function.
• Controller, controls unit functions and communicates with other auxiliaries. It is the secondary location
for setpoint input if, and only if, the OITS is inoperative.
• On-board compressor controller mounted on each compressor that monitors compressor operation and
controls bearing operation.
The operator can monitor all operating conditions by using the unit-mounted OITS. In addition to providing
all normal operating controls, the MicroTech II control system monitors equipment protection devices on the
unit and will take corrective action if the chiller is operating outside of its normal design conditions. If a fault
condition develops, the controller will shut a compressor, or the entire unit, down and activate an alarm
output. Important operating conditions at the time an alarm condition occurs are retained in the controller’s
memory to aid in troubleshooting and fault analysis.
The system is password protected and only allows access by authorized personnel. The operator must enter
the password into the touch screen (or one of the controller's keypad) before any setpoints can be altered.
8 OMM 1008-3
Page 9
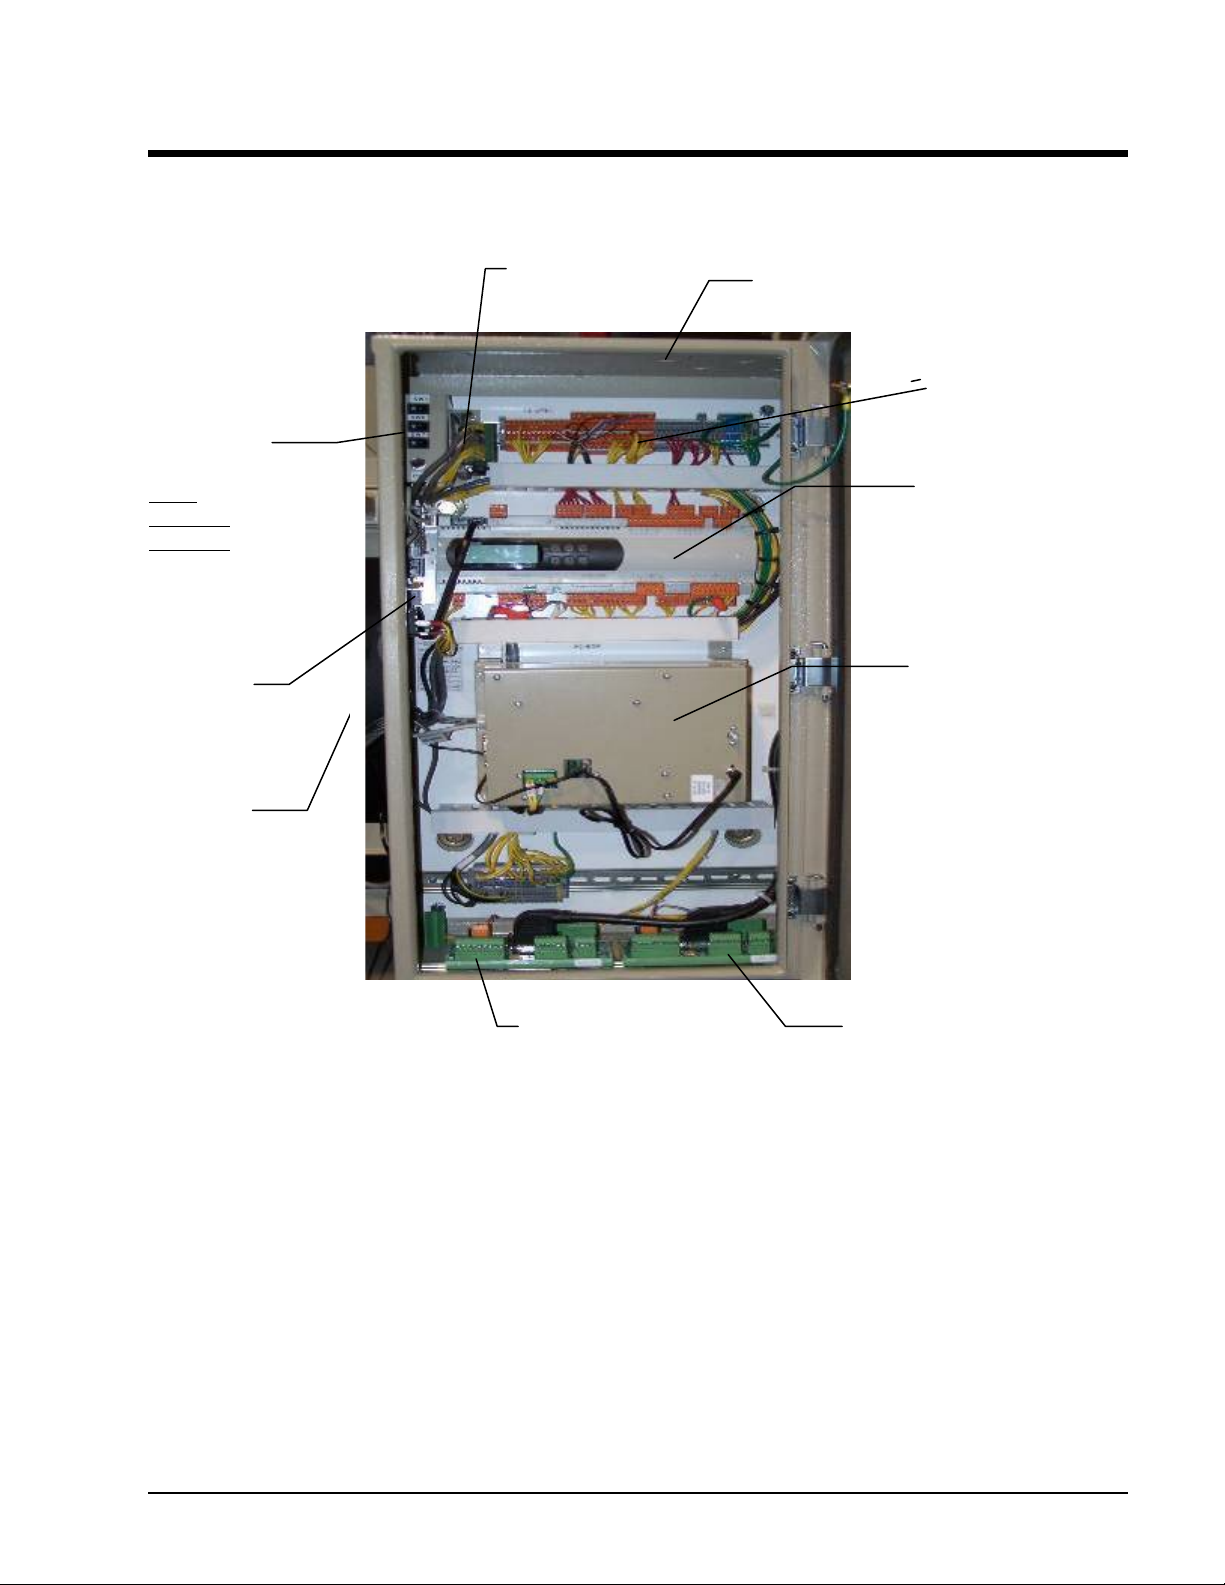
Emergency
Outside Panel
Controller
OITS PC
Universal
Field Wiring Knockouts
On/Off
Comp #2 I/O
Comp #1 I/O
Control Panel
Figure 2, Control Panel
EXV Board
Switches
UNIT
COMP #1
COMP #2
Communication
Module
Shutdown Switch,
The controller, the OITS microprocessor, the unit and compressor on/off switches and other minor
components are mounted in the control panel. The switches are designated “I” for on and “0” for off. The
compressor on/off switch should only be used when an immediate stop is required since the normal shut
down sequence is bypassed.
The switch panel also has a circuit breaker that interrupts power to the cooling tower fans, valves, and
evaporator and condenser pumps, if any of these are tied into the MicroTech II controller for control of their
operation. If these components operate independently from the chiller control, the breaker has no effect.
The controller's function is acquiring and processing data relating to the chiller operation and issuing
instructions to various components to maintain controlled operation. The controller also sends information to
the OITS for graphic display. The controller has a 4x20 LCD display and keys for accessing data and
changing setpoints. If the OITS should become inoperable, the controller LCD can display most of the same
information as the OITS and can operate the chiller independently if the OITS is not available.
Terminal Board
TB UTB1 for Field
Wiring Connections
OMM 1008-3 9
Page 10

!
WARNING
Use wi t h On-Site Generators
Magnitude chillers have their total tonnage divided between two compressors (all but single compressor Model
WMC 145S) that start sequentially and they are operated with variable frequency drives. These features make
Magnitude chillers especially appropriate for use in applications where they may be required to run with on-site
electrical generators. This is particularly true when the generators are used for temporary power when the utility
power is lost.
Starting/Stopping Procedure: The stopping of the chiller in the event of a power failure is typically
uneventful. The chiller will sense a loss of voltage and the compressors will stop, coasting down using power
generated from their dynamic braking to maintain the bearing magnetic field. The stop signal will initiate a
three-minute stop-to-start timer, effectively preventing compressor restart for three minutes. The timer is
adjustable from three to fifteen minutes, but the recommended and default value is three minutes. This interval
allows the generator sufficient time to get up to speed and stabilize. The chiller will restart automatically when
the start-to-start timer expires.
Transfer Back to Grid Power: Proper transfer from stand-by generator power back to grid power is essential to
avoid compressor damage.
Stop the chiller before transferring supply power from the generator back to the utility power grid.
Transferring power while the chiller is running can cause severe compressor damage.
The necessary procedure f or reconnecting power from the generator back to the utility grid is show below.
These procedures are not peculiar to Daikin McQuay units only, but should be observed for any chiller
manufacturer.
1. Set the generator to always run five minutes longer than the unit start-to-start timer, which could be set
from 15 to 60 minutes. The actual setting can be viewed on the operator interface panel on the
Setpoint/Timer screen.
2. Configure the transfer switch, provided with the generator, to automatically shut down the chiller before
transfer is made. The automatic shut-off function can be accomplished through a BAS interface or with
the “remote on/off” wiring connection shown in Field Wiring Diagr am
Figure 8 on page 29. A start signal can be given anytime after the stop signal since the three-minute start-tostart timer will be in effect.
Chiller Control Power: For proper operation on standby power, the chiller control power must remain as
factory-wired from a unit-mounted transformer. Do not supply chiller control power from an external power
source because the chiller may not sense a loss of power and do a normal shutdown sequence.
Multi-Chiller Setup
Component Description & Communication Setup
The communication wiring and setup required for dual compressor operation is performed in the
factory and should be reviewed when the chiller is initially started after installation or if there is any
change made in the chiller co ntrol hardware. RS485 communication wiring between chillers should
be field wired before start-up and installed as a NEC Class 1 wiring system.
10 OMM 1008-3
Page 11

!
IMPORTANT NOTE
Chillers connected via pLAN connections MUST share the same software revision. WMC B-vintage models
may not be LAN interconnected to any other models, including WMC A-vintage models, WSC, WDC, WCC or
WME chillers.
OMM 1008-3 11
Page 12
(1)
Setting
Setting
Controller
Interface (2)
A
Dec. 1 2 5 6 7 8
B
Dec. 9 10
13
14
15
16
Table 1, pLAN Address for Units Using pLAN for multi-unit interconnection.
Chiller
Comp 1
Comp 2
Unit
Reserved
Operator
Reserved
NOTES for pLAN multi-chiller communication setup:
1. Up to four Magnitude WMC units can be interconnected. (See Important Note on page 10).
2. The OITS address is selected by selecting the ‘service’ set screen. Then, with the Technician level password active,
select the ‘pLAN Comm’ button. Buttons A(7), B(15), C(23), D(31) will appear in the middle of the screen, then
select the letters for the OITS address for the chiller that it is on. T hen clo se the scr e e n. N ote that A is the default
setting from the factory.
3. For the pCo3 controller, the pLAN address can be confirmed as follows:
A) Disconnect pLAN (connectors J10 and J11) from all pCo3
controllers.
B) Cycle power to the controller and then hold down both the
Left Arrow (alarm) and the Up Arrow keys simultaneously as
the controller completes its Self-Test routine. The controller
will then show you the present pLAN address of t he
controller. Verify that the pLAN address matches the desired
address from the above table. If the address needs to be
changed, follow the instructions displayed on the pCo3
controller’s LCD display. Press enter when done.
C) Only after all controllers pLAN addresses have been set andconfirmed can the pLAN network connectors be
re-connected.
Operator Interface Touch Screen (OITS) Settings
Settings for any type of linked multiple compressor operation must be made to the MicroTech II controller.
Settings on a dual compressor unit are made in the factory prior to shipment, but must be verified in the field
before startup. Settings for multiple chiller installations are set in the field on the Operator Interface Touch
Screen as follows:
Maximum Compressors ON – SETPOINTS - MODES screen, Selection #10 = 2 for a WMC, 4 for 2 WMCs.
Sequence and Staging – SETPOINTS - MODES screen, Selection #11 & #13; #12 & #14. Sequence sets the
sequence in which compressors will start. Setting all to “1” evokes the automatic lead/lag feature and is the
preferred setting.
Nominal Capacity – SETPOINTS - MOTOR screen, Selection #10. The setting is the compressor design
tons. Compressors on dual units are always of equal capacity.
Communication Setup
1. With no communication connections between chillers, disconnect control power and set the pLan
address as shown in Table 1.
2. With all manual switches off, turn on control power to each chiller and set each OITS address (see
Note 2 above).
3. Verify correct nodes on each OITS Service Screen.
4. Connect chillers together (pLAN, RS485, between J6 connections on each unit’s isolation boards.
The boards are not furnished, separate RS485 isolators must be field supplied.
5. Verify correct nodes on each OITS Service Screen. See Figure 26 on page 50.
12 OMM 1008-3
Page 13
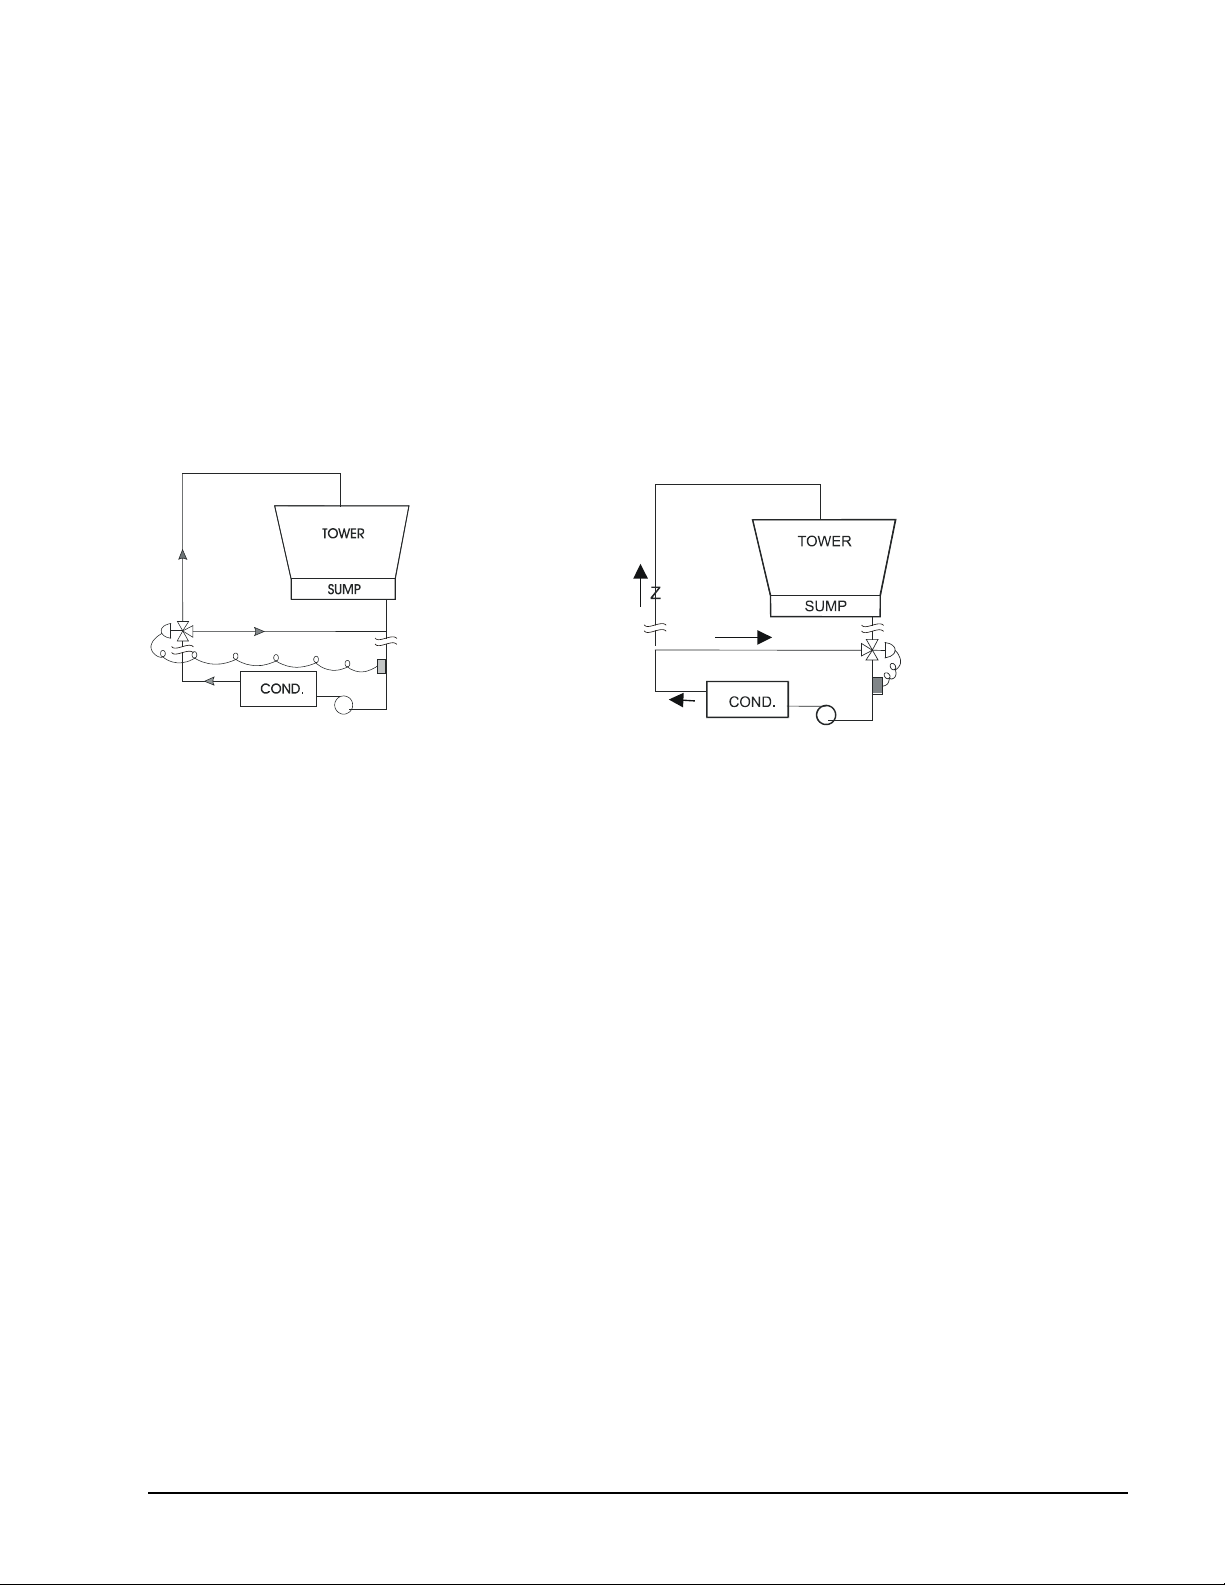
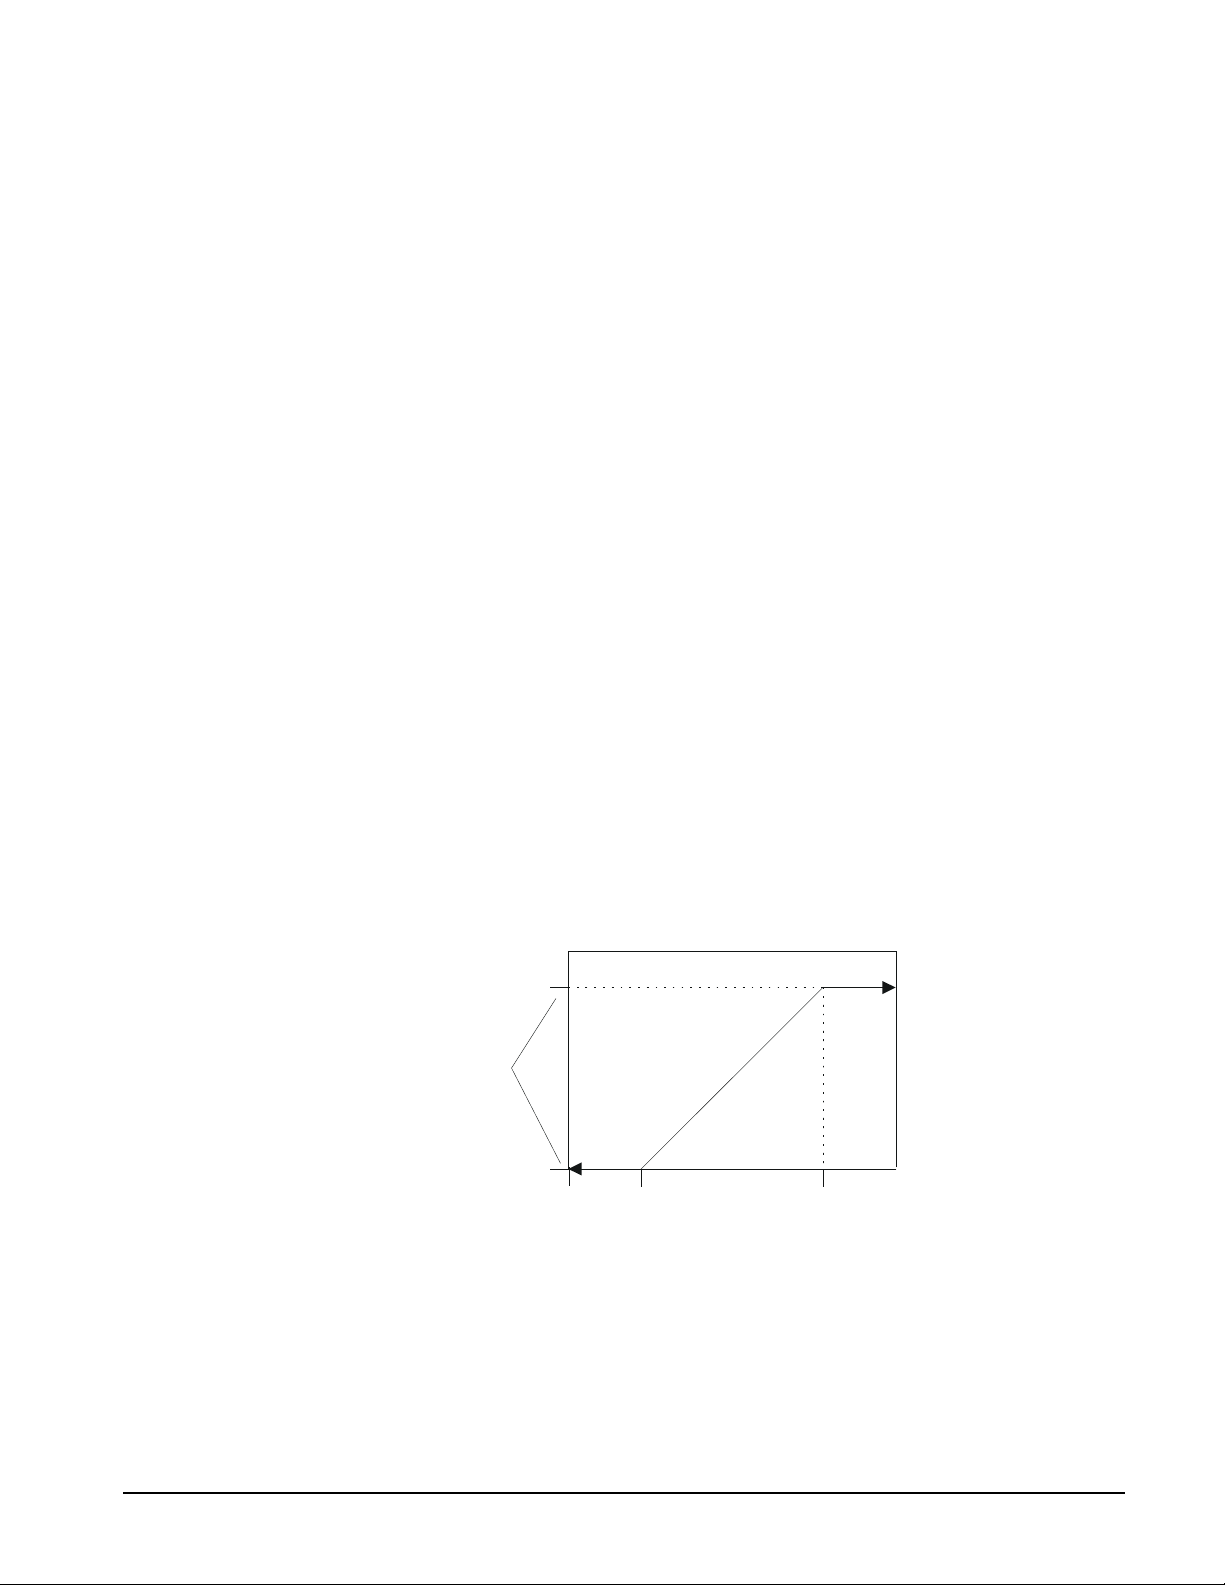
Low Condenser Water Temperature Operation
When the ambient wet bulb temperature is lower than design, the entering condenser water temperature can
be allowed to fall to improve chiller performance. This is especially true of an advanced design such as the
Daikin McQuay Magnitude chiller that features variable compressor speed.
It is an engineering fact that as the compressor discharge pressure is reduced, the amount of power to pump
a given amount of gas also is reduced. The reduction can result in significant energy savings.
However, as with most centrifugal chiller applications, a tower bypass valve must be installed and must be
controlled by the chiller MicroTech II controller. Figure 3 illustrates two temperature actuated tower
bypass arrangements. The “Cold Weather” scheme provides better startup under cold ambient air
temperature conditions. The check valve may be required to prevent entraining air at the pump inlet.
Figure 3, Bypass, Mild Weather Operation
Bypass, Cold Weather Operation
OMM 1008-3 13
Page 14

Operating the Control System
Interface Panel On/Off
The Operator Interface Panel is turned on and off with a switch located at the lower front of the panel.
Screen control buttons are located to either side of it and elicit on-screen prompts when pressed.
The screen is equipped with a screen saver that blackens the screen. Touching the screen anywhere
reactivates the screen. If the screen is black, touch it first to be sure it is on before using the ON/OFF botton.
Start/Stop Unit
There are four ways to start or stop the chiller. Three are shown below and selected in SETPOINT\
MODE\SP3; the fourth way is through panel-mounted switches:
1. Operator Interface Pane l (LOCAL)
Home Screen 1 has AUTO and STOP buttons that are only active when the unit is in "LOCAL CONTROL."
This prevents the unit from being accidentally start ed or stopped when it is normally under control from a
remote switch or BAS. When these buttons are pressed, the unit will cycle through its normal starting or
stopping sequence.
2. Remote SWITCH
Selecting SWITCH in SP3 will put the unit under the control of a r emote switch that must be wired into the
control panel (see Field Wirin g Diag ram Figure 8 on page 8).
3. BAS
BAS input is field-wired into a module that is factory-installed on the controller.
Control Panel Switches
The unit control panel, located adjacent to the Interface Panel, has switches inside the panel for stopping the
entire unit or individual compressors. When the UNIT switch is placed in the OFF position, the chiller will
shut down through the normal shutdown sequence whether one or two compressors are on.
The COMPRESSOR switches will immediately shut down the compressor without going through the
shutdown sequence when placed in the OFF position. It is equivalent to an emergency stop switch.
Change Setpoints
Setpoints are easily changed on the Operator Interface Touch Screen (OITS). A complete description of the
procedure begins on page 38. Setpoints can also be changed in the controll er, but this is not recommended
except in an emergency when the OITS is unavailable.
Alarms
A red ALARM light in the lower middle of any OITS screen is illuminated if there is an alarm. If the optional
remote alarm is wired in, it too will be energized.
There are three types of alarms:
• Fault, equipment protection alarms that shut a unit or compressor off.
• Problem, limit alarms that limit compressor loading in response to an out-of-normal condition. If the
condition that caused a limit alarm is corrected, the alarm light will be cleared automatically.
• Warning, notification only, no action taken by controller.
Any type will light the ALARM light. Procedures for dealing with alarms are shown below:
1. Press the alarm light button. This will go directly to the ACTIVE ALARMS screen.
2. The alarm description (with date stamp) will be shown.
14 OMM 1008-3
Page 15
3. Press the ACKNOWLEDGE button to recognize the alarm.
4. Correct the condition causing the alarm.
5. Press the CLEAR button to clear the alarm from the controller. If the fault condition is not fixed, the
alarm will continue to be on and the unit will not be able to be restarted.
Component Failure
Chiller Operation wi thout the O perator Interface Panel
The Operator Interface Touch Screen communicates with the controller, displaying data and transmitting
touch screen inputs to the controll ers. It does no actual controlling and the chiller can operate without it.
Should the Touch Screen become inoperable, no commands are necessary for continuing unit operation. All
normal inputs and outputs will remain functional. The controller can be used to view operational data, to
clear alarms and to change setpoints, if necessary.
Component Description
Operator Interface Touch Screen
The operator interface touch screen (OITS) is the
primary device for entering commands and entries into
the control system. (Settings can also be made directly
into the controller.) The OITS can also display
controller data and information on a series of graphic
screens. A single OITS is used per unit.
Selected information from the OITS panel can be downloaded via a USB port located in the unit control panel.
The OITS panel is mounted on a moveable arm to allow
placement in a convenient position for the operator.
There is a screen-saver programmed into the system.
The screen is reactivated by touching it anywhere.
Controller Description
Hardware Structure
The controller is fitted with a microprocessor for running the control program. There are terminals for
connection to the controlled devices (for example: solenoid valves, tower fans, pumps). The program and
settings are saved permanently in FLASH memory, preventing data loss in t he event of power fail ure without
requiring a back-up battery.
The controller c onnects to othe r control boa rds, the on-board compressor microprocessors and the OITS via a
local communications network. The controller can also have an optional module to provide communication
for a BAS using standard open protocols.
OMM 1008-3 15
Page 16
MENU Key
ARROW Keys (4)
Key-to-Screen Pathway
Keypad
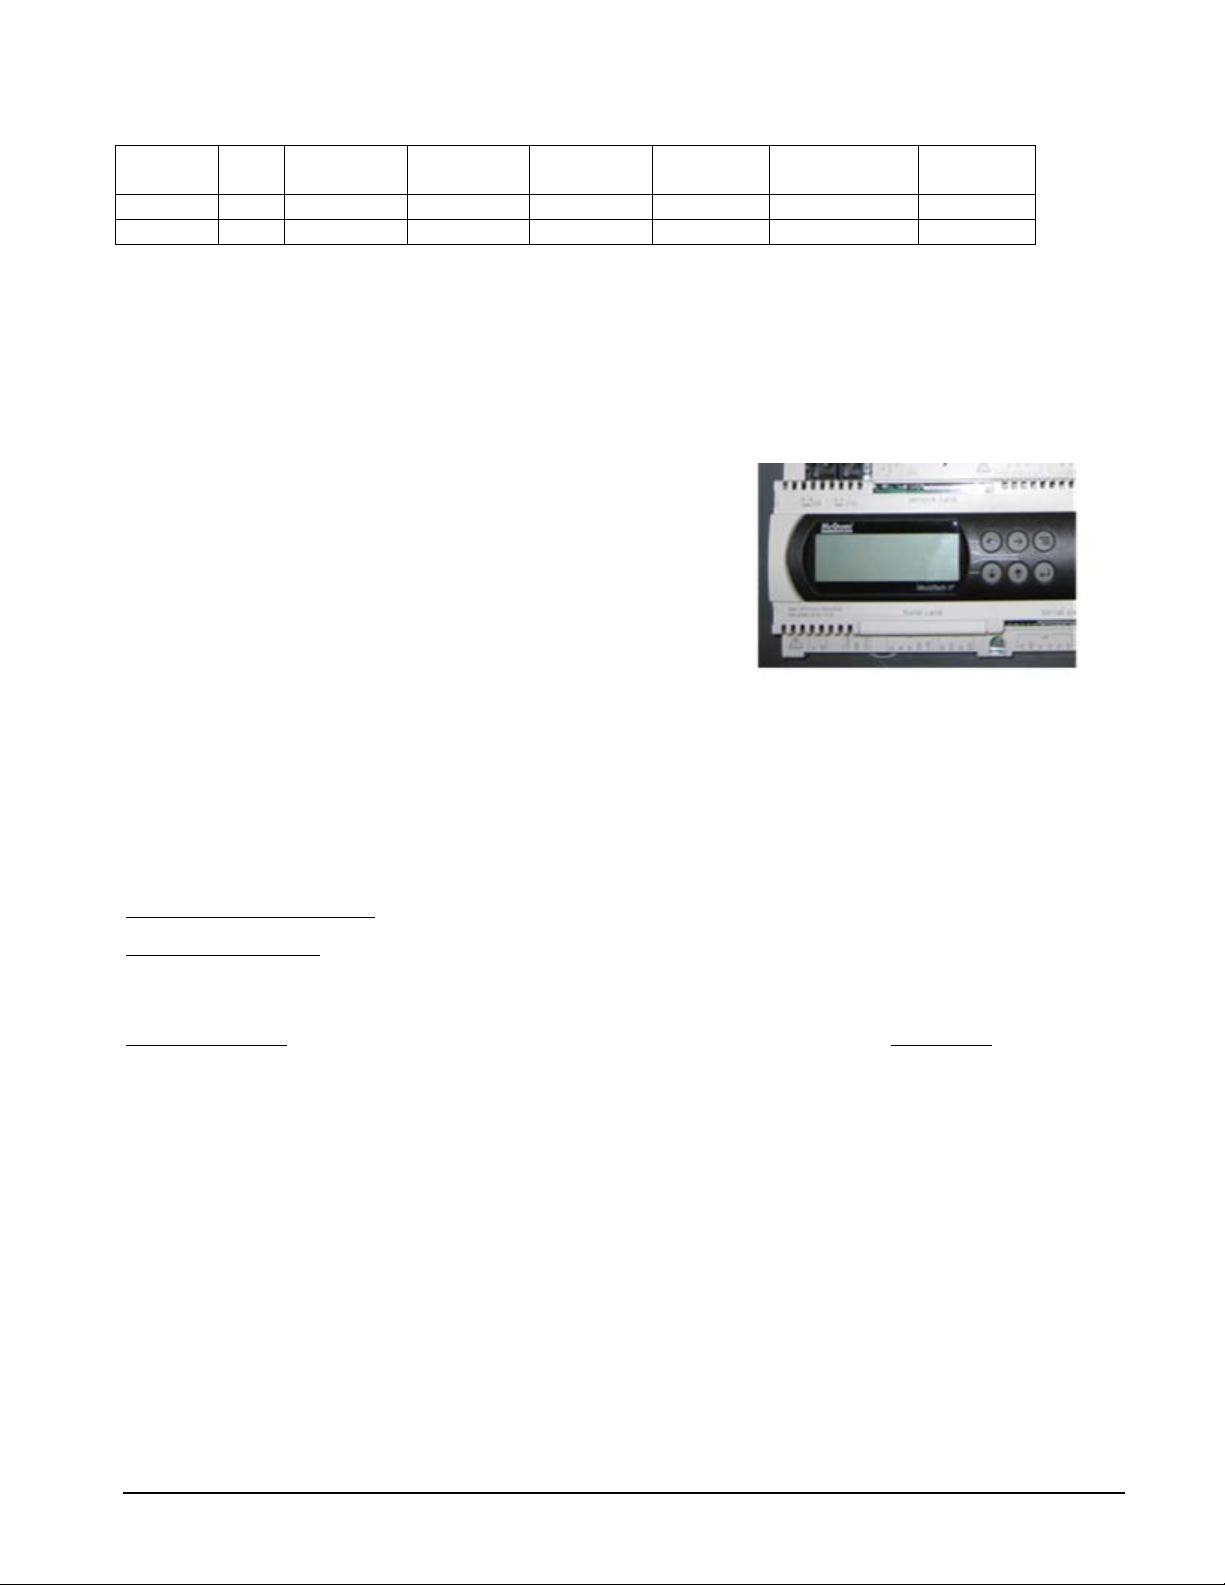
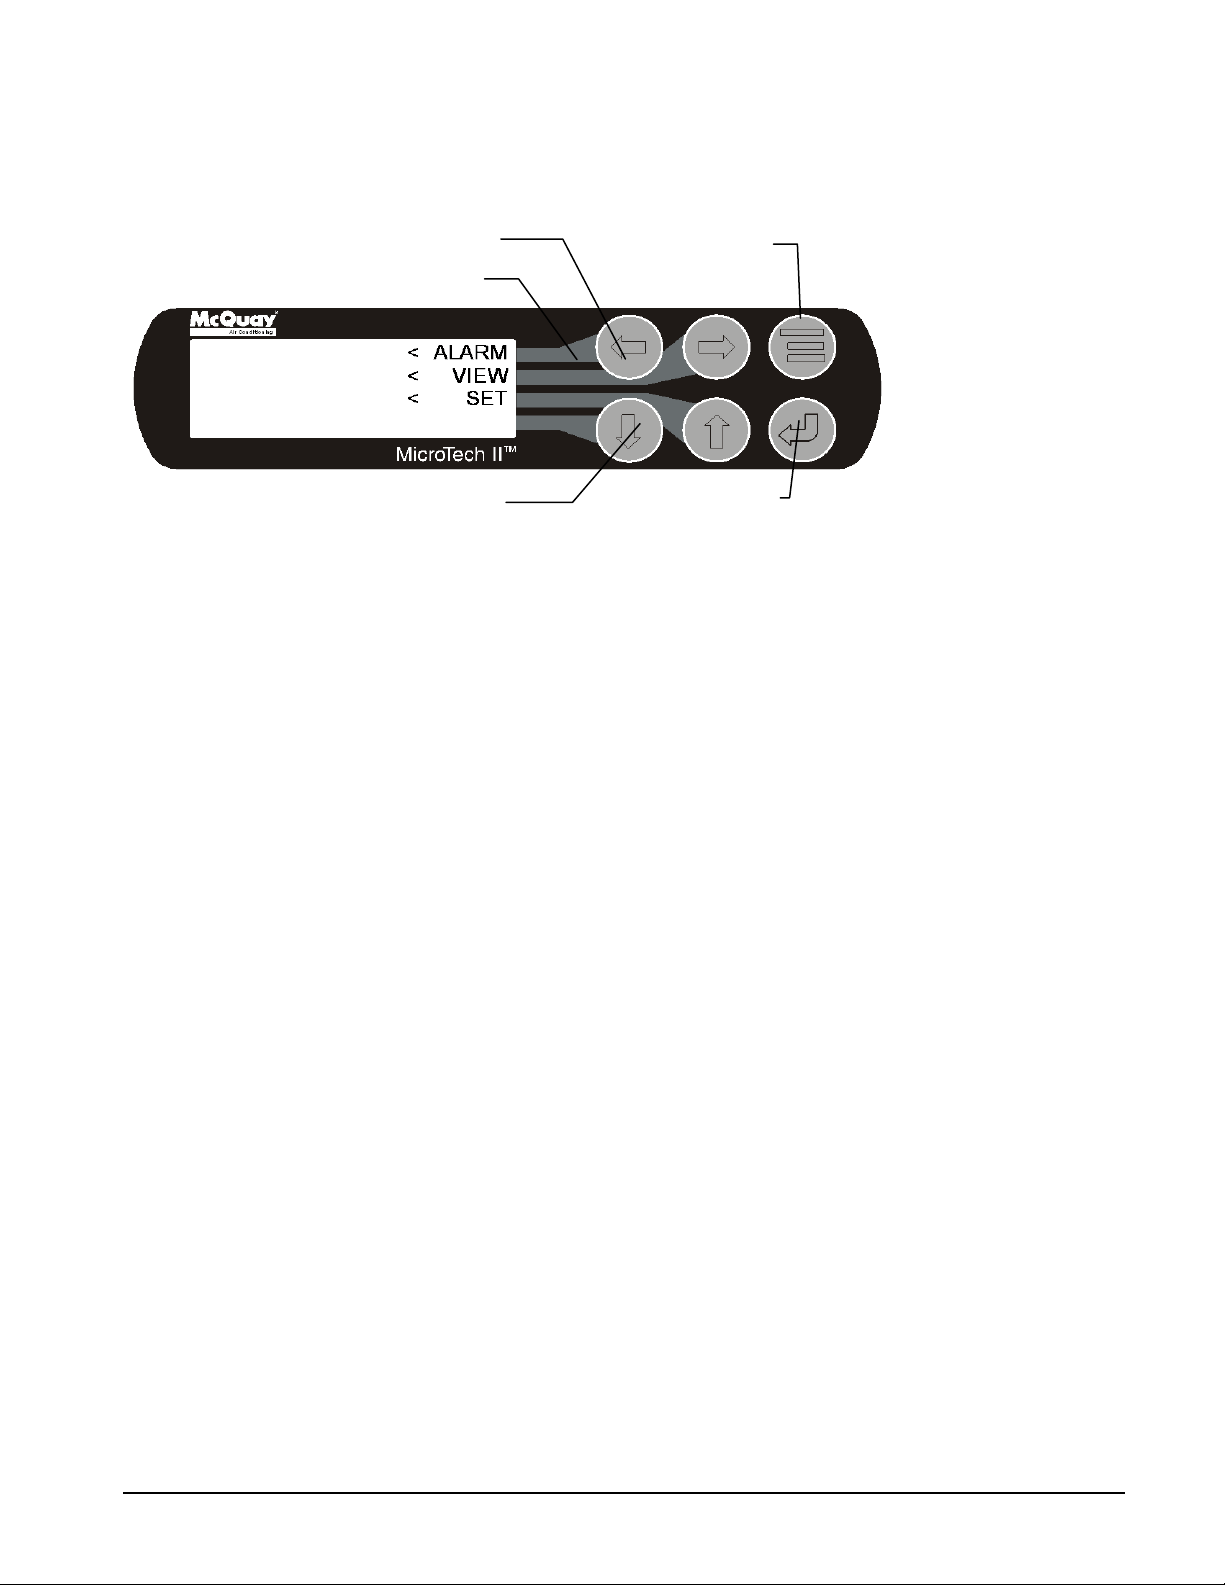
A 4-line by 20-character/line liquid crystal display and 6-button keypad is mounted on the controller. Its
layout is shown below.
Figure 4, Controller Keypad
Red Alarm Light Behind
ENTER Key with
Green Run Light
Behind
The four arrow keys (UP, DOWN, LEFT, RIGHT) have three modes of use:
• Scroll between data screens in the direction indicated by the arrows (default mode).
• Select a specific data screen in the menu matrix using dynamic labels on the right side of the display such
as ALARM, VIEW, etc (this mode is entered by pressing the MENU key). For ease of use, a pathway
connects the appropriate button to its respective label on the screen.
• Change field values in setpoint programming mode according to the following table:
LEFT key = Default RIGHT key = Cancel
UP key = Increase (+) DOWN key = Decrease (-)
These four programming functions are indicated by one-character abbreviation on the right side of the
display. This programming mode is entered by pressing the ENTER key.
Getting Started
There are two basic procedures to learn in order to utilize the MicroTech II controller:
1. Navigating through the menu matrix to reach a desired menu screen, and knowing where a particular
screen is located.
2. Knowing what is contained in a menu screen and how to read that information, or how to change a
setpoint contained in the menu screen.
Navigating
The menus are arranged in a matrix of screens across a top horizontal row. Some of these top-level screens
have sub-screens located under them.
There are two ways to navigate through the menu matrix to reach a desired menu screen.
1) One is to scroll through the matrix from one screen to another using the four ARROW keys.
2) Another way is to use shortcuts to work through the matrix hierarchy. From any menu screen,
a) Pressing the MENU key will take you to the top level of the hierarchy. The display will show
b) Depending on the top-level selected, a second level of screens will appear. For example, selecting
16 OMM 1008-3
ALARM, VIEW, and SET as shown in Figure 4. One of these choices can then be selected by
pressing the key connected to it via the pathway shown in the figure.
ALARM will go the next level of menus under ALARM (ALARM LOG or ACTIVE ALARM).
Selecting VIEW will go the next level of menus (VIEW COMPRESSOR STATUS, VIEW UNIT
STATUS, VIEW EVAPORATOR, or VIEW CONDENSER). Selecting SET will go to a series of
menus for looking at and changing setpoints.
Page 17
ALARM LOG
(data)
(data)
(data)
< ALARM
< VIEW
< SET
<
VIEW < COMPRESSOR
< UNIT
< EVAPORATOR
< CONDENSER
VIEW COMP (n)
(screen n data)
(screen n data)
(screen n data)
ENTER Key
show:
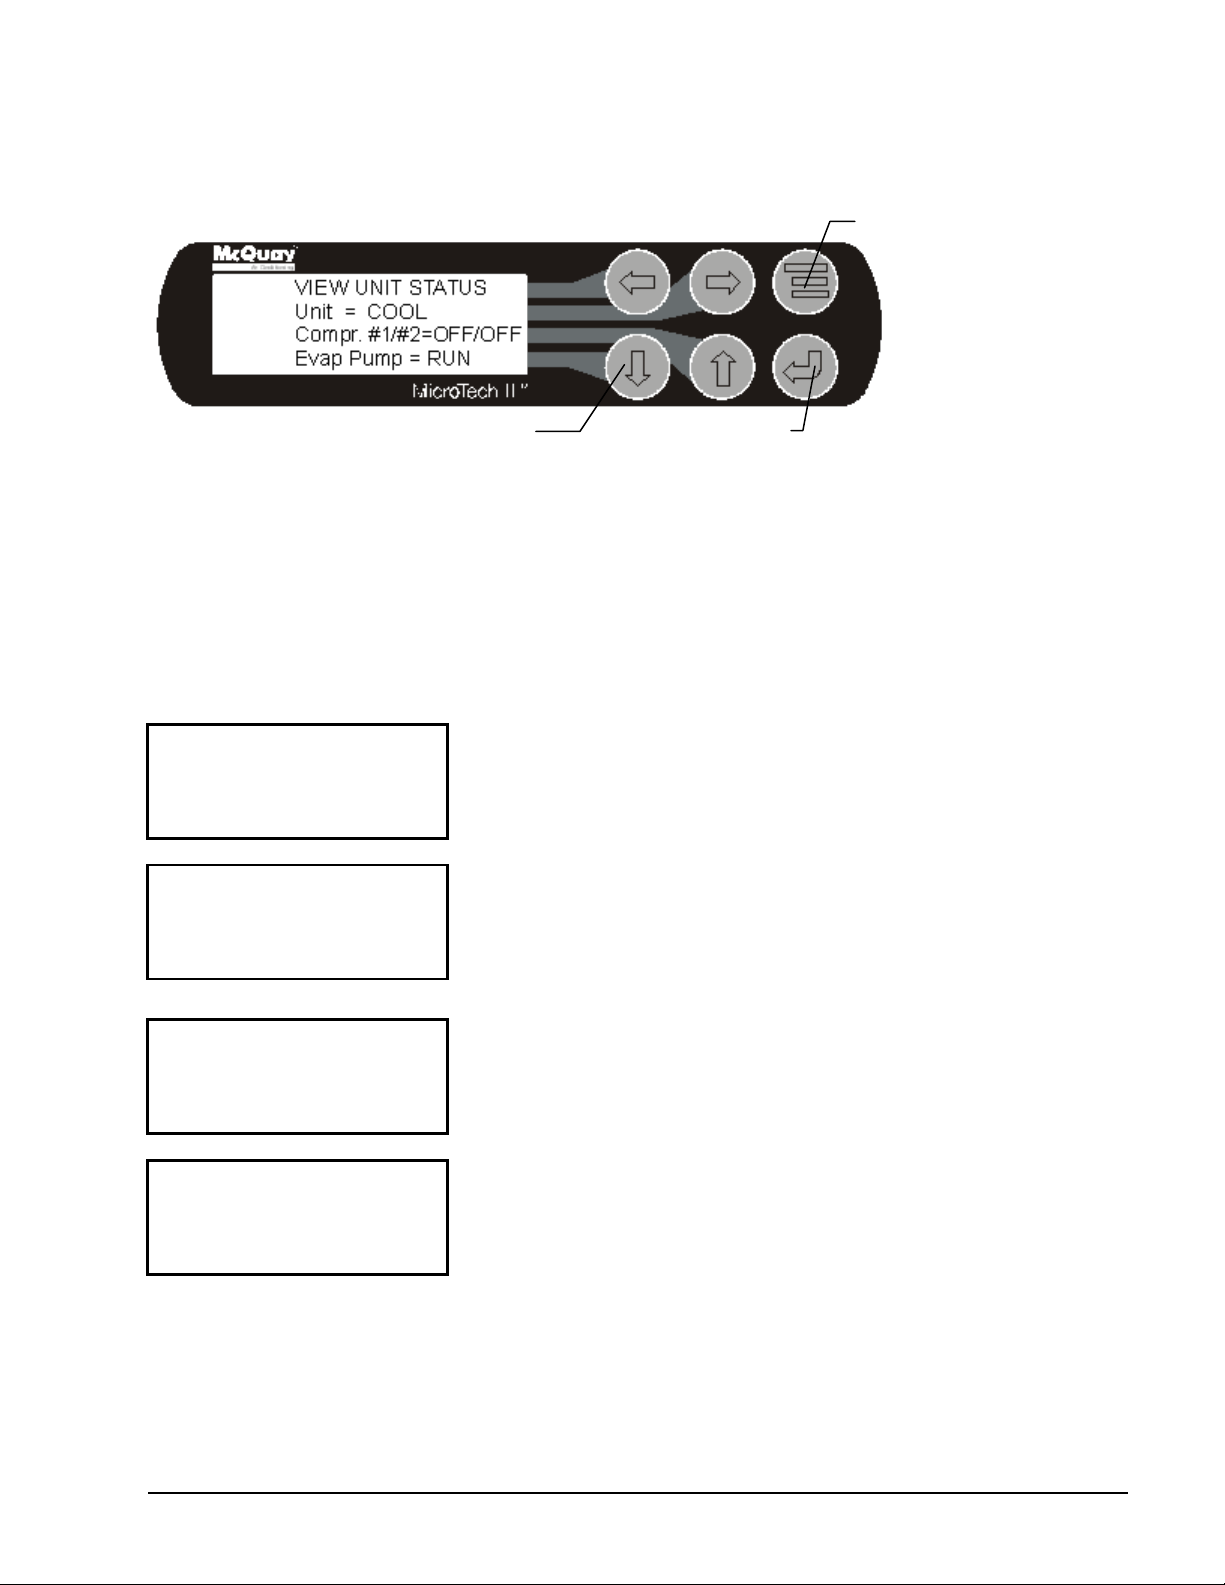
After pressing the “COMPRESSOR” menu button, the selected
Where “n” is the number of the last viewed COMPRESSOR
c) After selecting this second level, the desired screen can be acquired using the arrow keys. A typical
final screen is shown below.
Pressing the MENU key from any menu screen will automatically return you to the MENU mode.
Figure 5, Typical Menu Display and Keypad Layout
MENU Key
ARROW Keys
Menu Screens
A hierarchical menu structure is used to access the various screens. Each menu screen can have one to four
lines of information. Optionally, the last menu selection can access one of a set of screens that can be
navigated with the UP/DOWN arrow keys (see the scrolled menu structure below). Menu selection is
initiated by pressing the MENU key, which changes the display from a data screen to a menu screen. Menu
selections are then made using the arrow keys according to labels on the right side of the display (the arrows
are ignored). When the last menu item is selected, the display changes to the selected data screen. An
example follows showing the selection of the “VIEW COMPRESSOR (n) screen. Suppose the initial screen
is:
After pr essing the MENU but ton, the top-level menu screen will
show:
After pressing the “V IEW” menu button, a menu screen will
data screen will show;
screen. The arrow keys will automatically return to the
“scroll” mode at this time. Different compressor screens can
then be selected with the UP/DOWN arrow keys.
.
OMM 1008-3 17
Page 18
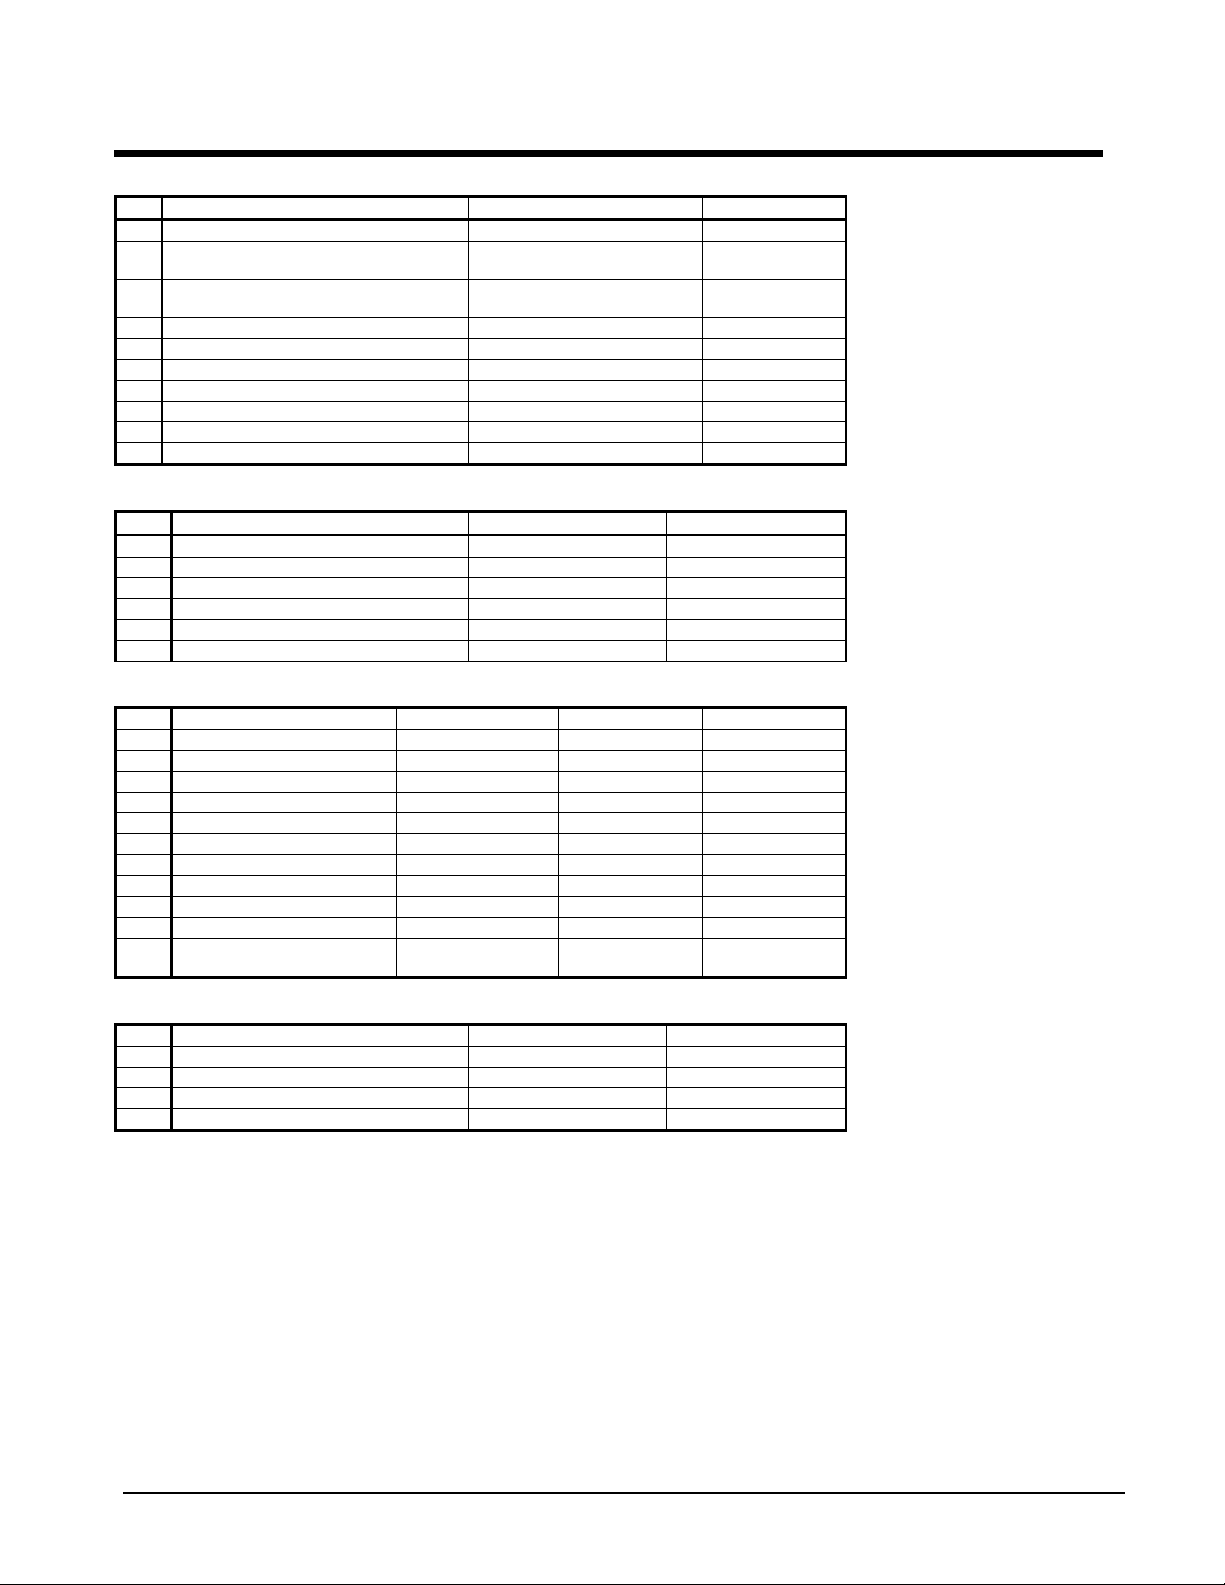
#
Description
Signal Source
Range
1
Reset of Leaving Wat er T emperature
4-20 mA Current
0-(10 to 80°F)
Entering Evaporator Water
Temperature
Entering Condenser Wat er
Temperature
4
Leaving Condenser Water Temperature
NTC Thermistor (10k@25°C)
-58 to 212°F
6
Demand Limit
4-20 mA Current
0-100 %RLA
8
Condenser Water Flow
4 to 20 mA Current
0 to 10,000 gpm
9
Refrigerant Leak Sensor
4 to 20 mA Current
0 to 100 ppm
10
Leaving Evaporator Water Temperature
NTC Thermistor (10k@25°C)
-58 to 212°F
#
Description
Signal
Signal
2
Remote Start/St op
0 VAC (Stop)
24 VAC (Start)
3
Not Used
4
Evaporator Water Flow Switch
0 VAC (No Flow)
24 VAC (Flow)
5
Condenser Water Flow Switch
0 VAC (No Flow)
24 VAC (Flow)
#
Description
Load
Output OFF
Output ON
1
Evaporator Water Pump #1
Pump Contactor
Pump OFF
Pump ON
3
Condenser Water Pump #1
Pump Contactor
Pump OFF
Pump ON
4
Condenser Water Pump #2
Pump Contactor
Pump OFF
Pump ON
5
Tower Fan #1
Fan Contactor
Fan OFF
Fan ON
6
Tower Fan #2
Fan Contactor
Fan OFF
Fan ON
8
Alarm
Alarm Indicator
Alarm OFF
Alarm ON
10
Tower Fan #4
Fan Contactor
Fan OFF
Fan ON
Circuit Breaker
ON
Circuit Breaker
OFF
#
Description
Output Signal
Range
2
Cooling Tower VFD Speed
0 to 10 VDC
0 to 100%
3
EXV signal to IB Valve Control Bd.
0 to 10 VDC
0 to 100%
4
Y3 Electronic Expansion Val ve
0 to 10 VDC
0 to 100% Open
Controller
Table 2, Controller, Analog Inputs
2
3
5 Liquid Line Refrigerant Temperature NTC Thermistor (10k@25°C) -58 to 212°F
7 Evaporator Water Flow 4 to 20 mA Current 0 to 10,000 gpm
NTC Thermistor (10k@25°C) -58 to 212°F
NTC Thermistor (10k@25°C) -58 to 212°F
Table 3, Controller, Digital Inputs
1 Unit OFF Switch 0 VAC (Stop) 24 VAC (Auto)
6 Manual Off 0 VAC (Off) 24 VAC (Auto)
Table 4, Controller, Digital Outputs
2 Evaporator Water Pump #2 Pump Contact or Pump OFF Pump O N
7 Spare
9 Tower Fan #3 Fan Contactor Fan OFF Fan ON
11 Compressor Off Emer. Solenoid
Table 5, Controller, Analog Outputs
1 Cooling Tower Bypass Valve Position 0 to 10 VDC 0 to 100% Open
Controller Setpoints
The following parameters are remembered during power off, are factory set to the Default value, and can be
adjusted to any value in the Range column.
The “Type” column defines whether the setpoint is part of a coordinated set of duplicate setpoints i n different
controllers. There are three possibilities as given below:
N = Normal setpoint - Not copied from, or copied to, any other controller.
M = Master setpoint - Setpoint is copied to all controllers in the “Sent To” column.
S = Slave setpoint - Setpoint is a copy of the master setpoint (in the controller).
18 OMM 1008-3
Page 19
Description
Default
Range
Type
PW
KEYPAD, BAS,
NONE, BACnet, LonWorks,
Leaving Water
3.0°F
0.0 to 10.0 °F
Pump #1
Pump #1 Only, Pump #2 Only, Auto
Pump #1
Pump #1 Only, Pump #2 Only, Auto
At power-up the slave node checks if the master node is operational and if so, it sets its copy of the setpoint
equal to the master’s. Otherwise, the setpoint remains unchanged. During normal operation, any time the
master setpoint changes, the slave is updated as well.
The PW (password) column indicates the password that must be active in order to change the setpoint. Codes
are as follows:
O = Operator, M = Manager, T = T echnician (not available through the 4x20 display/keypad).
The following table groups setpoints that relate to the entire unit operation and are stored in the controller.
All settings are made through the OITS.
Table 6, Controller Setpoints
Unit
Unit Enable OFF OFF, ON M O
Control Source KEYPAD
Display Units
Language ENGLISH ENGLISH, (TBD) N O
BAS Protocol NONE
Motor Amps
Demand Limit OFF OFF, ON N O
Minimum Amps 40% 20 to 80% N T
Maximum Amps 100% 40 to 100% N T
Soft Load OFF OFF, ON D M
Begin Amp Limit 40% 20 to 100% N M
Soft Load Ramp 5 min 1 to 60 min D M
Maximum Rate
Minimum Rate
Staging
Mode Normal Normal, Effici ency, Pump, Standby N M
Sequence # 1 1,2, … (# of Compressors ) N M
Maximum Compressors ON 16 1-16 G M
Stage Delta T 1.0 0.5-5.0 G M
Full Load 120 sec 30 to 300 sec N T
Absolute Capacity 100 Tons 0 to 9999 Tons D T
°F/psi °F/psi, °C/kPa
0.5 °F/min 0.1 to 5.0 °F/min
0.1 °F/min 0.0 to 5.0 °F/min
DIGITAL INPUT
MODBUS, N2
N O
N O
N M
D M
D M
Cool LWT
Startup Delta T
Shutdown Delta T
LWT Reset Type NONE NONE, RE T URN, 4-20mA N M
Max Reset Delta T
Start Reset Delta T
Timers
Evap Recirculate 30 sec 15 sec to 5 min N M
Start-Start 40 min 15 to 60 min N M
Stop-Start 3 min 3 to 20 min N M
Source No Start
Pumps
Evap Pump
Cond Pump
Cooling Tower
Tower Control None None, Temperature, Lift N M
Tower Stages 2 1 to 4 N M
Continued on next page
OMM 1008-3 19
44. 0°F 36.0 to 60.0 °F
3.0°F 0.0 to 3.0 °F
0.0°F 0.0 to 20.0 °F
10. 0°F 0.0 to 20.0 °F
70 °F 50 to 100 °F
Only
Only
Lead, #1 Primary, #2 Prim ary
Lead, #1 Primary, #2 Prim ary
M O
M O
M O
N M
N M
D T
N M
N M
Page 20
Description
Default
Range
Type
PW
70 °F
40 to 120 °F
80 °F
40 to 120 °F
None, Valve Setpoint, Valve S t age,
NC
(To Tower)
90 °F
0 to 100 °F
34.0 °F
-9.0 to 45.0 °F
High Discharge TemperatureShutdown
High Discharge TemperatureLoad
25 °F
5 to 45 °F
Stage Up Time 2 min 1 to 60 min N M
Stage Down Time 5 min 1 to 60 min N M
Stage Differential (Temp)
Stage Differential (Lift ) 6.0 psi 1.0 to 20.0 psi N M
Stage #1 On (Temp)
Stage #2 On (Temp)
Stage #3 On (Temp)
Stage #4 On (Temp)
Stage #1 On (Lift) 35 psi 10 to 130 psi N M
Stage #2 On (Lift) 45 psi 10 to 130 psi N M
Stage #3 On (Lift) 55 psi 10 to 130 psi N M
Stage #4 On (Lift) 65 psi 10 to 130 psi N M
Cooling Tower Valve / VFD
Valve/VFD Control None
Valve Setpoint (Temp)
Valve Setpoint (Lift) 30 psi 10 to 130 psi N M
Valve Deadband (Temp)
Valve Deadband (Lift) 4.0 psi 1.0 to 20.0 psi N M
Stage Down @ 20% 0 to 100% N M
Stage Up @ 80% 0 to 100% N M
Valve Control Range (Min) 10% 0 to 100% N M
Valve Control Range(Max) 90% 0 to 100% N M
Valve Type
Minimum Start P osition 0% 0 to 100% N M
Minimum Posit i on @
Maximum Start Posit i on 100% 0 to 100% N M
Maximum Position @
Error Gain 25 10 to 99 N M
Slope Gain 25 10 to 99 N M
Alarms
Evaporator Freeze
Condenser Freeze
Low Evap Pressure 26 psi 10 to 45 psi D T
Low Evap Pressure-Inhibit 38 psi 20 to 45 psi D T
Low Evap Pressure-Unload 31 psi 20 to 45 psi D T
3.0 °F 1.0 to 10.0 °F
75 °F 40 t o 120 °F
85 °F 40 t o 120 °F
VFD Stage, Valve SP/VFD Stage
65 °F 40 t o 120 °F
2.0 °F 1.0 to 10.0 °F
NC, NO N M
60 °F 0 to 100 °F
34.0 °F -9.0 to 45.0 °F
190 °F 120 to 240 °F
N M
N M
N M
N M
N M
N M
N M
N M
N M
N M
D T
D T
N T
High Condenser Pressure 140 psi 120 to 240 psi D T
Motor Current Threshold 10% 1 to 20% N T
Surge High Suction SH - Start
Surge High Suction SH - Run
Service
Vane Mode AUTO AUTO, MANUAL N T
Unload Timer 10 sec 10 to 240 sec N T
STOP Timer 1 sec 1 to 240 sec N T
These setpoints are normally viewed or changed on the OITS.
20 OMM 1008-3
170 °F 120 to 240 °F
50 °F 25 to 90 °F
N T
N T
N T
Page 21
Description
Occurs When:
Action Taken
Reset
SP) AND has not faulted]
SP) AND has not faulted]
No flow indicated for (5 sec) with Condenser Pump #1 ON
SP) AND has not faulted]
No flow indicated for (5 sec) with Condenser Pump #2 ON
Manual.
Water)
Entering Evaporator Temperature
Entering Condenser Temperature
Sensor Fault
Leaving Condenser Temperature
Sensor Fault
Liquid Line Refrigerant
Temperature Sensor Fault
Unit Related Faults, Problems, Warnings
Faults (Equipment Protection Shutdowns)
There are no Unit protection shutdown alarms; all such alarms are handled through the compressor
controllers.
Problems (Limit Alarms)
The following alarms limit operation of the chiller in some way as described in the Action Taken column.
Table 7, Controller Limit Alarms
Evaporator Pump #1
Fault
Evaporator Pump #2
Fault
Condenser Pump #1
Fault
Condenser Pump #2
Fault
Entering Evaporator
Water Temperature
Sensor Fault
No flow indicated for (5 sec) with Evaporator P ump #1 ON
AND [the other pump is availabl e (per the Evap Pump
No flow indicated for (5 sec) with Evaporator Pump #2 ON
AND [the other pump is availabl e (per the Evap Pump
AND [the other pump is availabl e (per t he Evap Pump
AND [the other pump is availabl e (per t he Evap Pump
SP) AND has not faulted]
Sensor fault AND leaving water reset is based on entering
water
Start pump #2 Manual
Start pump #1 Manual
Start pump #2 Manual
Start pump #1 Manual
Reset mode is
set to No Reset
(Reset mode
goes back to
Entering
Warnings
The following “alarms” only generate a warning message to the operator. Chiller operation is not affected.
Table 8, Controller Warnings
Description Occurs When: Action Taken Reset
Sensor Fault
Sensor is open or shorted Annunciation Automatic
Sensor is open or shorted Annunciation Automatic
OMM 1008-3 21
Sensor is open or shorted Annunciation Automatic
Sensor is open or shorted Annunciation Automatic
Page 22
20 ma
(54.0°F)
Cool LWT Set-Point
(44.0°F)
4 ma
LWT Reset (Cool mode)
(temperatures are examples only)
0 ma
Max Reset Delta T
(10.0°F)
Controller Functions
Leaving Water Temperature (LWT) Reset
The Active Leaving Water variable shall be set to the current Leaving Water Temperature (LWT) setpoint
unless modified by one of t he reset methods below. (The current LWT setpoint is Cool LWT as determined
by the chiller mode.) The type of reset in effect is determined by the LWT Reset Type setpoint.
Reset Type – NONE
The Active Leaving Water variable is set equal to the current LWT setpoint.
Reset Type – RETURN
The Active Leaving Water variable is adjusted by the return water temperature.
When the chiller mode = COOL, the Active Leaving Water variable is reset using the following parameters:
1. Cool LWT setpoint
2. Max Reset Delta T setpoint
3. Start Reset Delta T setpoint
Reset is accomplished by changing the Active Leaving Water variable from the (Cool LWT setpoint) to the
(Cool LWT setpoint + Max Reset Delta T setpoint) when the evaporator (return – leaving) water temperature
delta varies from the (Start Reset Delta T setpoint) to 0.
The Active Leaving Water variable is set equal to the Cool LWT setpoint if the reset signal is less t han or
equal to 4 mA. It is set equal to (Cool LWT setpoint + Max Reset Delta T setpoint) if the reset signal equals
or exceeds 20 mA. The Active Leaving Water variable will vary linearly between these extremes if the reset
signal is between 4 mA and 20 mA. An example of this action is shown below.
22 OMM 1008-3
Page 23
Temp > Surge High Suct SH-Start SP during first 5 m i nutes
of Compressor ON
Temp > Surge High Suct SH-Run SP after first 5 minut es of
Compressor ON
%RLA > Motor Current Threshold SP with Com pres sor OFF
for 30 sec
Starter Fault Digital I nput = Faul t AND Compressor State =
START, INTLOK , RUN, or UNLOAD
Leaving Evaporator Water
Temperature Sensor Fault
Fault
Low Evaporator Pressure
– Inhibit Loading
Pressure < Low Evap Pressure–Inhibit
setpoint
Evap Press rises above
(SP + 3psi)
– Unload
setpoint
(SP + 3psi)
Protect
setpoint
pump
SP + 2°F)
Protect
Setpoint
pump
SP + 2°F)
Suction superheat < 15°F
Superheat > 18°F
Compressor Related Faults, Problems, Warnings
Faults (Equipment Protection Shutdowns)
Equipment protection faults cause rapid compressor shutdown. The compressor is stopped i mmediately (if
the compressor was running).
The following table identifies each alarm, gives the condition that causes the alarm to occur, and states t he
action taken because of the alarm. All equipment protection alarms require a manual reset.
These faults are accessed by first selecting Comp 1 or Comp 2 on the controller screen
Table 9, Compressor Faults (Equipment Protection Shutdowns)
Description Occurs When: Action Taken
Low Evaporator Pressure Evaporator Press < Low Evap Pressure SP Rapid Stop
High Condenser Pressure Cond Press > High Condenser Pressure SP Rapid Stop
Low Motor Current I < Motor Current Thres hol d with Compressor ON for 30 sec Rapid S top
High Discharge Temperature Temp > High Discharge Temperat ure SP Rapid S top
Mechanical High Pressure (Note 1) Digital Input = High Pressure Rapid Stop
High Motor Temperature Digital Input = High Temperature Rapid S t op
Surge High Suct SH-Starting
Rapid Stop
Surge High Suct SH-Running
No Compressor Stop
Starter Fault
Sensor shorted or open Rapi d S top
Evaporator Pressure Sensor Fault Sensor shorted or open Rapid Stop
Condenser Pressure Sensor Fault Sensor shorted or open Rapid Stop
Suction Temperature Sensor Fault Sensor shorted or open Rapid Stop
Discharge Temperature Sensor
Evaporator Water Flow Loss Evaporator Flow DI = No Flow for > 10 sec Rapid Stop
Condenser Water Flow Loss Condenser Flow DI = No Flow for > 10 sec Rapid Stop
Sensor shorted or open Rapi d S top
Rapid Stop
Annunciation
Rapid Stop
NOTES:
Since there is no mechanical high pressure switch on these units, the alarm is actually triggered by a closed compressor
discharge valve. The OITS will display the fault as Mech-Press-Switch and the controller display will show Compressor n
Check Valve.
Compressor Events (Limit Alarms)
The following alarms do not cause compressor shut down but limit operati on of the chil ler as des cribed in t he
Action Taken column.
Table 10, Compressor Events
Description Occurs When: Action Taken Automatic Reset
Inhibit loading
Low Evaporator Pressure
Evaporator Freeze
Pressure < Low Evap Pressure–Unload
Evap Sat Refr Temp < Evaporator Freeze
Unload
Start evaporator
Evap Press rises above
Temp > (Evaporator Freeze
Condenser Freeze
High Discharge
Temperature
Cond Sat Refr Temp < Condenser Freeze
Temperature > High Discharge
Temperature-Load SP AND
OMM 1008-3 23
Start condenser
Load
Temp > (Condenser Freeze
Temp < (High Dsch Temp
Load SP – 3°F) OR
Page 24
%RLA
0
50
75
100
150
%RLA Factor
0
0.35
0.75
1.00
1.50
Warnings
Warnings advise that a non-catastrophic problem exists, such as failed temperature sensor that provides a
signal for information, not control purposes. There are no Warnings associated with the compressor
controllers.
Control Functions
Each compressor determines if it has reached its maximum capacity (or maximum allowed capacity) and if
so, set its Full Load flag. The flag is based on a number of conditions.
Absolute Capacity
Each compressor estimates its absolute capacity from the present value of % RLA and the Absolut e Capacity
setpoint from the equation:
Absolute Capacity = (%RLA Factor) * (Absolute Capacity setpoint)
where the %RLA Factor is interpolated from the following table.
Multiple Compressor Staging
This section defines which compressor is the next one to start or stop. The next section defines when the
start, or stop, is to occur.
Functions
1. Can start/stop compressors according to an operator defined sequence.
2. Can start compressors based on the number of starts (run hours if starts are equal) and stop on run hours.
3. The above two modes can be combined so that there are two or more groups where all compressors in the
first group are started (based on number of starts/hours) before any in the second group, etc. Conversely,
all compressors in a group are stopped (based on run hours) before any in the preceding group, etc.
4. An “efficiency priority” mode can be selected for two or more chillers where one compressor is started
on each chiller in the group before a second is started on any of them.
5. A “pump priority” mode can be selected for one or more chillers where all compressors on a given chiller
are started before going to the next chiller in the group.
6. One or more compressor can be defined as “standby” where it is never used unless one of the normal
compressors is unavailable.
Required Parameters
1. Sequence number setpoint (SQ#_SP) for all compressors. Possible settings = (1-4).
2. Compressor Staging Mode setpoint (CSM_SP) for all compressors. Possible settings are:
•
NORMAL
•
•
EFFICIENCY PRIORITY
•
•
PUMP PRIORITY
•
•
STANDBY
•
3. Maximum Number of compressors ON setpoint (MAX_ON_SP). Possible settings = (1-4). This setpoint
is the same for all compressors.
4. Number of starts for all compressors.
5. Number of run hours for all compressors.
6. Status of all compressors (On-line, A vailable/Unavailable, Starting, Running, etc.)
24 OMM 1008-3
Page 25
OFF
InterLock
RUN
UNLOAD
VaneCloseDelay
InterLok Timer Ex pired
OR Unload Timer Expired OR Safety Alarm
& STOP Timer Expired
Power ON
Configuration Rules
1. Each standby compressor must have a sequence number greater than or equal to all non-standby
compressors for which it is in standby.
2. All compressors in an “efficiency priority” or “pump priority” group must be set to the same sequence
number.
Compressor State Control (Comp State)
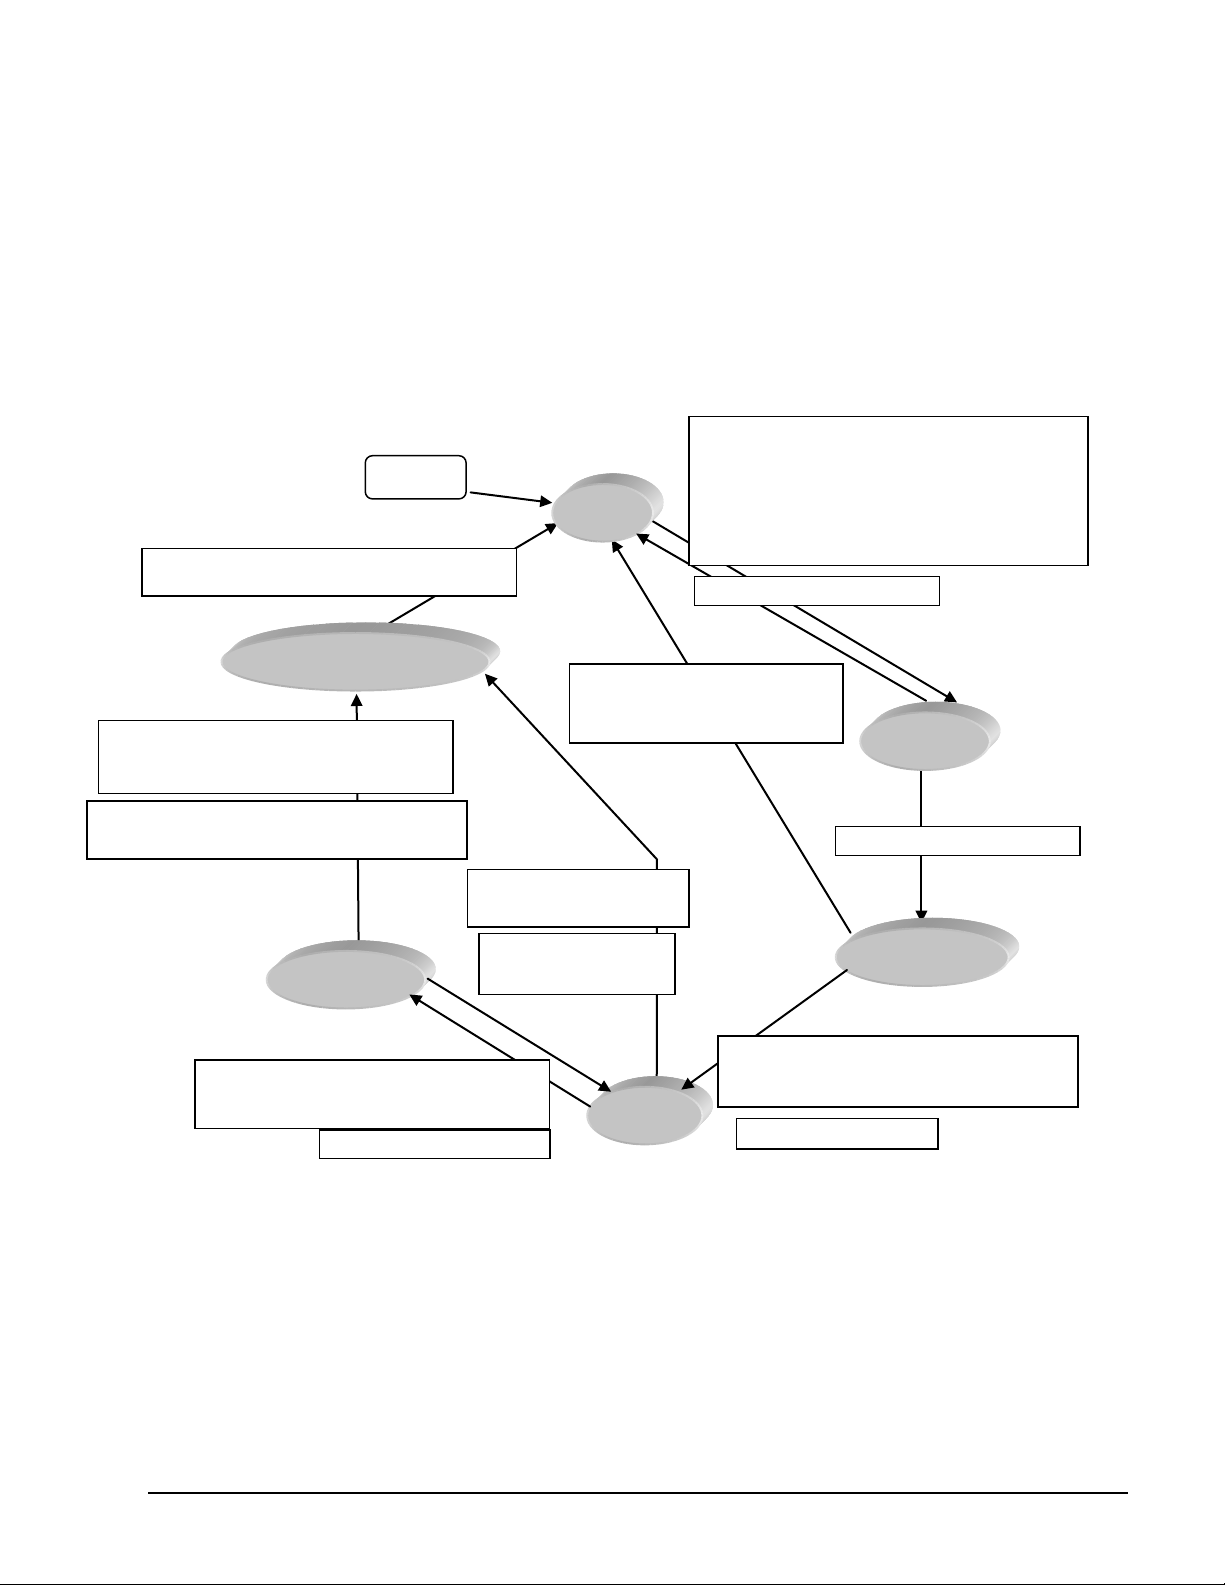
Operation of the compressor is controlled by the state-transition diagram shown below. A state variable
(Comp State) shall be used to maintain the current state (OFF, START, INTLOK, RUN, UNLOAD, or STOP).
Transitions from one state to another are controlled by the condi tion statements in the TEST boxes. TASK
boxes indicate actions that must be performed.
Figure 6, Compressor State
TEST: Motor Current < Motor Current Threshold SP
TEST: Manu al OFF DI = OFF OR
Vanes Closed OR Unit State = OFF
TEST: Manu al OFF DI = OFF OR
Unit State = (OFF OR SHUTDOWN)
OR Safety Alarm
TEST:
Unit State=AUTO & Evap State=RUN & Next On = Yes &
Stage Up Now = YES & (Unit Mode NOT= HEAT OR
EvLWT Temperature > Source No Start SP) &
Start-Start Timer Expired & Stop-Start Timer Expired &
No Safety Alarms
TASK: Restart Start-Start Timer
START
TASK: Start STOP Timer
Start Stop-Start Timer & Update Run Hours
TEST: Unit State = SHUTDOWN OR
[Next Off = Yes & Stage Down Now = Yes]
TASK: Start Unload Timer
TASK: Start Interlok Timer (10sec)
TEST: Manu al OFF DI = OFF
OR Unit State = OFF
TEST: Unit State = AUTO
& Next Off = No
TEST: Unit State= AUTO & Evap State=R UN &
Cond State = RUN & Vanes Closed &
TASK: Increment # of starts
OMM 1008-3 25
Page 26

Compressor Capacity Control
Leaving Water Control Mode
Compressor capacity is determined by the status of the leaving chilled water temperature (LWT), which i s a
direct indicator of whether the c hiller is producing enough cooling to satisfy the cooling load. The LWT is
compared to the active chilled water setpoint, and compressor loading or unloading ensues, considering any
capacity overrides that may be in effect.
Capacity Overrides
The conditions descr ibed i n the foll owing subparagraphs override normal capacity control when t he chiller is
in the COOL mode. These overrides are not in effect for loading and unloading when the Vane Mode is set to
MANUAL. Of the following limits, the one creating the lowest amp limit is in effect. The resulting present
limit value for compressor current is stored in the Active Demand Limit variable.
Low Evaporator Pressure
If the evaporator pressure drops below the Low Evaporator Pressure – Inhibit setpoint, the unit will inhibit
capacity increase. If the evaporator pressure drops below the Low Evaporator Pressure - Unload setpoint, the
unit will begin capacity decrease.
High Discharge Temperature - Load
If the discharge temperature rises above the High Discharge Temperature - Load setpoint and the motor
current is < 50% RLA, the unit will begin capacity increase.
Soft Load
Soft Loading is a confi gurable func tion used at compressor startup t o limit the maximum current draw on the
compressor in a ramp-up type manner. It is only active on the first compressor to start. The setpoints that
control this function are:
•
Soft Load – (ON/OFF)
•
•
Begin Am p Limit – (%RLA)
•
•
Maximum Amps – (%RLA)
•
•
Soft Load Ramp – (seconds)
•
The active soft load limit value (in % RLA) increases linearly from the Begin Amp Limit setpoint to the
Maximum Amps setpoint over the amount of time specified by the Soft Load Ramp setpoint. If the amp draw
rises above the currently active soft load limit value, the unit will inhibit capacity increases. If the amp draw
rises to 5% or more above this value, the unit will begin capacity decrease.
Maximum LWT Rate
The maximum rate at which the leaving water temperature can drop (chiller mode = COOL) is limited at all
times by the Maximum Rate setpoint. If the rate exceeds this setpoint, capacity increases is inhibited.
Demand Limit
The maximum amp draw of the compressor can be limited by a 4 to 20 mA signal on the Demand Limit
analog input. This function is only enabled if the Demand Limit setpoint is set to ON. The amp limit
decreases linearly from the Maximum Amp Limit setpoint (at 4 mA) to the Minimum Amp Limit setpoint (at
20mA). If the amp draw rises above the limit value, the unit will inhibit capacity increases. If the amp draw
rises to 5% or more above this value, the unit will begin capacity decrease.
Network Limit
The maximum amp draw of the compressor can be limited by a value sent through a BAS network connection
and stored in the Network Limit variable. If the amp draw rises above the limit value, the unit will inhibit
capacity increases. If the amp draw rises to 5% or more above this value, the unit will begin capacity
decrease.
26 OMM 1008-3
Page 27

Minimum Amp Limit
The minimum amp draw of the compressor can be limited by the Minimum Amps setpoint. If the amp draw
drops below the limit value, the unit will inhibit capacity decrease.
Maximum Amp Limit
The maximum amp draw of the compressor is always limited by the Maximum Amps setpoint. This limit has
priority over all other functions including manual capacity control. If the amp draw rises above the limit
value, the unit will inhibit capacity increases. If the amp draw rises to 5% or more above this value, the unit
will begin capacity decrease.
OMM 1008-3 27
Page 28

Refrigerant pressures and temperatures
Line voltage
Phase failure detection
Motor temperature
Silicone Rectifier (SCR) temperature
Speed
Line currents
Guide vane position
Compressor On-Board Controllers
Each compressor is equipped with microprocessor controllers and sensors that provide control and data
acquisition. The data is transmitted to other controllers and the OITS via the multi-unit communication
network. The on-board controllers consist of:
• Compressor Control: the on-board compressor controller is the central processor of the compressor. It is
continually updated with critical data from the motor/bearing controller and external sensors. An
important function is t o control the compressor speed and guide vanes operation in order to sat isfy load
requirements, to avoid surge and to provide for optimum efficiency. The controller monitors over 60
parameters, including:
• Soft-Start Controller: the soft-start controller limits current inrush by temporarily inserting a charging
resistor between the ac line and the +DC bus. It works in conjunction with the variable-speed function.
• Motor/Bearing Controller: the motor/bearing system provides the measurements and control to calculate
and maintain the desired shaft position. An RS-485 link connects the bearing controller and the
compressor-mounted controller.
• Backplane: although not a controller, the backplane connects the on-board control modules with the soft-
start controller, power electronics, motor cooling solenoids and pressure/temperature sensors.
Figure 7, Compressor Electric/El ect r oni c Com ponent s
1. Rectifiers
2. Main Power Block
3. Soft Start Controller
4. Insulated-gate Bipolar Transistor
5. I.G.B.T Inverter
6. High Voltage DC-DC Co nverter
7. Compressor, Beari ng/Motor
Controllers
8. Interstage pressure /
temperature sensor
9. Suction Pr essu re / temperature
sensor
28 OMM 1008-3
Page 29

FIELDCONNECTIONDIAGRAM
EXCERPTFROMSCHEM.330387903REV.0D
CENTRIFUGALUNITS
*FIELDSUPPLIEDITEM
FORDCVOLTAGEAND4-20MA
CONNECTIONS(SEENOTE3)
FORDETAILSOFCONTROLREFERTO
UNITCONTROLSCHEMATIC330342103
COMPRESSORCONTROLSCHEMATIC
:3303
42203
LEGEND:330343003
80
* CHILLED
WATER
PUMP
STARTERS
EWI-2
CP2
CP1
NOTE11
NOTE11
NOTE11
*
NOTE8
NOTE8
NOTE9
H
O
A
C4
* COOLING
TOWER
FIRST
STAGE
STARTER
* COOLING
TOWER
SECOND
STAGE
STARTER
* COOLING
TOWER
THIRD
STAGE
STARTER
* COOLING
TOWER
FOURTH
STAGE
STARTER
*
NOTE10
H
A
O
C3
*
NOTE10
H
A
O
NOTE10
NOTE10
79
78
77
74
73
* REMOTE
ON/OFF
(NOTE5)
54
86
86
C
CWI-2
CWI-1
(115V) (24V)
MICROTECHCONTROL
BOXTERMINALS
55
70
H
A
O
H
A
O
H
O
A
C
H
O
A
C
H
O
A
C
NOTE11
NOTE9
EWI-1
C2
C1
*
*
*
*
*
*
MODESWITCH
76
75
PE
85
86
POWER
NEUTRAL
NOTE7
*
* CONDENSER
WATER
PUMP
STARTERS
EP2
EP1
70
70
CF1
CF1
EF1
EF1
(NOTE6)
EVAP.
DELTAP.
ORFLOW
SWITCH
(NOTE6)
COND.
DELTAP.
ORFLOW
SWITCH
NOTE11
NOTE11
MJ
MJ
UTB1
GND
81
84
COMMON
POWER
A
82(NO)
83(NC)
NOTE4
*
*ALARM RELAY
(NOTE4)
71
71
53
52
0-10VDC
0-10VDC
*COOLINGTOWERVFD
*COOLINGTOWERBYPASSVALUE
Field Wiring Diagram
Figure 8, Field Wiring Diagram
NOTE: Complete notes are on the following page.
OMM 1008-3 29
Page 30

Field Wiring Diagram Notes
1. Compressor terminal boxes are factory-mounted and wired. All line-side wiring must be in accordance with the NEC and be
made with copper wire and copper lugs only. Power wiring between the terminal box and compressor terminals is factory
installed.
2. Minimum wire size for 115 VAC is 12 ga. for a maximum length of 50 feet. If greater than 50 feet refer to McQuay
International for recommended wire size minimum. Wire size for 24 VAC is 18 ga. All wiring to be installed as NEC Class 1
wiring system. All 24 VAC wiring must be run in separate conduit from 115 VAC wiring. Wiring must be wired in
accordance with NEC and connection to be made with copper wire and copper lugs only.
3. Voltage unbalance not to exceed 2% with a resultant current unbalance of 6 to 10 times the voltage unbalance per NEMA MG-
1, 1998 Standard. Supply voltage must be +/- 10% of compressor nameplate voltage.
4. A customer furnished 24 or 120 VAC power for alarm relay coil may be connected between UTB1 terminals 84 power and 81
neutral of the control panel. For normally open contacts wire between 82 & 81. For normally closed wire between 83 & 81.
The alarm is operator programmable. Maximum rating of the alarm relay coil is 25VA.
5. Remote on/off control of unit can be accomplished by installing a set of dry contacts between terminals 70 and 54.
6. If field supplied pressure differential switches are used, they must be installed across the vessel and not the pump. They must
be suitable for 24 VAC and low current application.
7. Customer supplied 115 VAC 20 amp power for optional evaporator and condenser water pump control power and tower fans
is supplied to unit control terminals (UTB1) power (terminal 85), neutral (terminal 86), equipment ground, (terminal PE)
8. Optional customer supplied 115 VAC, 25-VA maximum coil rated, chilled water pump relay (EP1 & 2) may be wired as
shown. This option will cycle the chilled water pump in response to chiller demand.
9. The condenser water pump must cycle with the compressor. A customer supplied 115 VAC 25 VA maximum coil rated,
condenser water pump relay (CP1 & 2) is to be wired as shown. Units with free-cooling must have condenser water above
60°F before starting.
10. Optional customer supplied 115 VAC 25 VA maximum coil rated cooling tower fan relays (C1 - C2 standard, C3-C4 optional)
may be wired as shown. This option will cycle the cooling tower fans in order to maintain unit head pressure.
11. WMC units have a facto r y-mounted and wired flow switch on each vessel that provides sufficient protection from flow loss.
Additional protection can be provided with a field-supplied, mounted and wired, two-wire, flow switch, pressure differential
switch or pump starter auxiliary contact. Auxiliary 24 VAC rated contacts in both the chilled water and condenser water pump
starters must be wired as shown.
12. 4-20mA external signal for chilled water reset are wired to terminals 71 and 51 on the controller; load limit is wired to
terminals 71 and 58 on the controller.
13. Optional Control Inputs. The following 4-20 ma optional inputs are connected as shown:
• Demand Limit; Terminals 58 and 71 common
• Chilled Water Reset; Terminals 51 and 71 common
• Evaporator Water Flow; Terminals 59 and 71 common
• Condenser Water Flow; Terminals 60 and 71 common
14. Optional Control Power Source. 115 volt control power can be supplied from a separate circuit and fused at 20 amps inductive
load. Connection is to terminals 85 and 86 common.
15. 4-20 mA external signal for chilled water reset are wired to terminals 71 and 51 on the controller; load limit is wired to
terminals 71 and 58 on the controller.
Operator Interface Touch Screen
Navigation
The home-view scr een shown on page 32 is usually left on (there is a screen-saver built in that is reactivated
by touching the screen anywhere). This VIEW screen contains the STOP and AUTO buttons used to start and
stop the unit when in Local control. Other groups of screens can be accessed from the Home screen by
pressing one of three buttons on the bottom of the screen: HISTORY, VIEW, SET.
• HISTORY will go to the last history screens viewed and can toggle between the Trend or Alarm History
screens.
• VIEW will go to the home View screen. Pressing again will go to the detail View screen used to look in
detail at settings and the operation of the chiller. Pressing VIEW from any other screen will return to the
last displayed View screen. A new button called MENU will appear when in the View mode. See page
35 for details.
• SET will go to the last Set screen used.
30 OMM 1008-3
Page 31

HOME
SCREEN
SETPOINTS
HOME
SCREEN
TREND
OR
ALARM
HISTORY
TIMERS
ALARMS
VALVE (TOWER)
TOWER (FANS)
MOTOR
MODES
WATER
SET
PRESS SET
PRESS VIEW
SEE FIGURE 22
EACH GROUP OF
SETPOINTS HAVE
SETTING AND RANGE
EXPLAINED ON SCREEN
HISTORY
PRESS HISTORY
PRESS VIEW
SET SCREENS
HOME
SCREEN
VIEW
SCREEN
COMPRESSOR STATE
COMPRESSOR I/O
UNIT I/O
EVAPORATOR
CONDENSER
VIEW
PRESS VIEW
PRESS VIEW
SEE FIGURE 13
BAR GRAPHS
SCHEMATIC
SEE FIGURE 19
SEE FIGURE 20
SEE FIGURE 21
Pressing VIEW from any sub-menu will toggle back to the home
Pressing MENU when in any sub-menu will return to the view
Pressing SET or HISTORY will go to these groups of
VIEW SCREENS
HISTORY
SEE FIGURE 12
PRESS VIEW
PRESS MENU
MENU
LABELS
ON/OFF
SEE FIGURE 18
POWER
Figure 9 illustrates the arrangement of the various screens available on the OITS. A few minutes practice on
an actual OITS should provide an acceptable level of confidence in navigating through the screens.
Figure 9, OITS Screen Layout
OMM 1008-3 31
Page 32

Complete STATUS Text
(in priority sequence)
Screen Descriptions
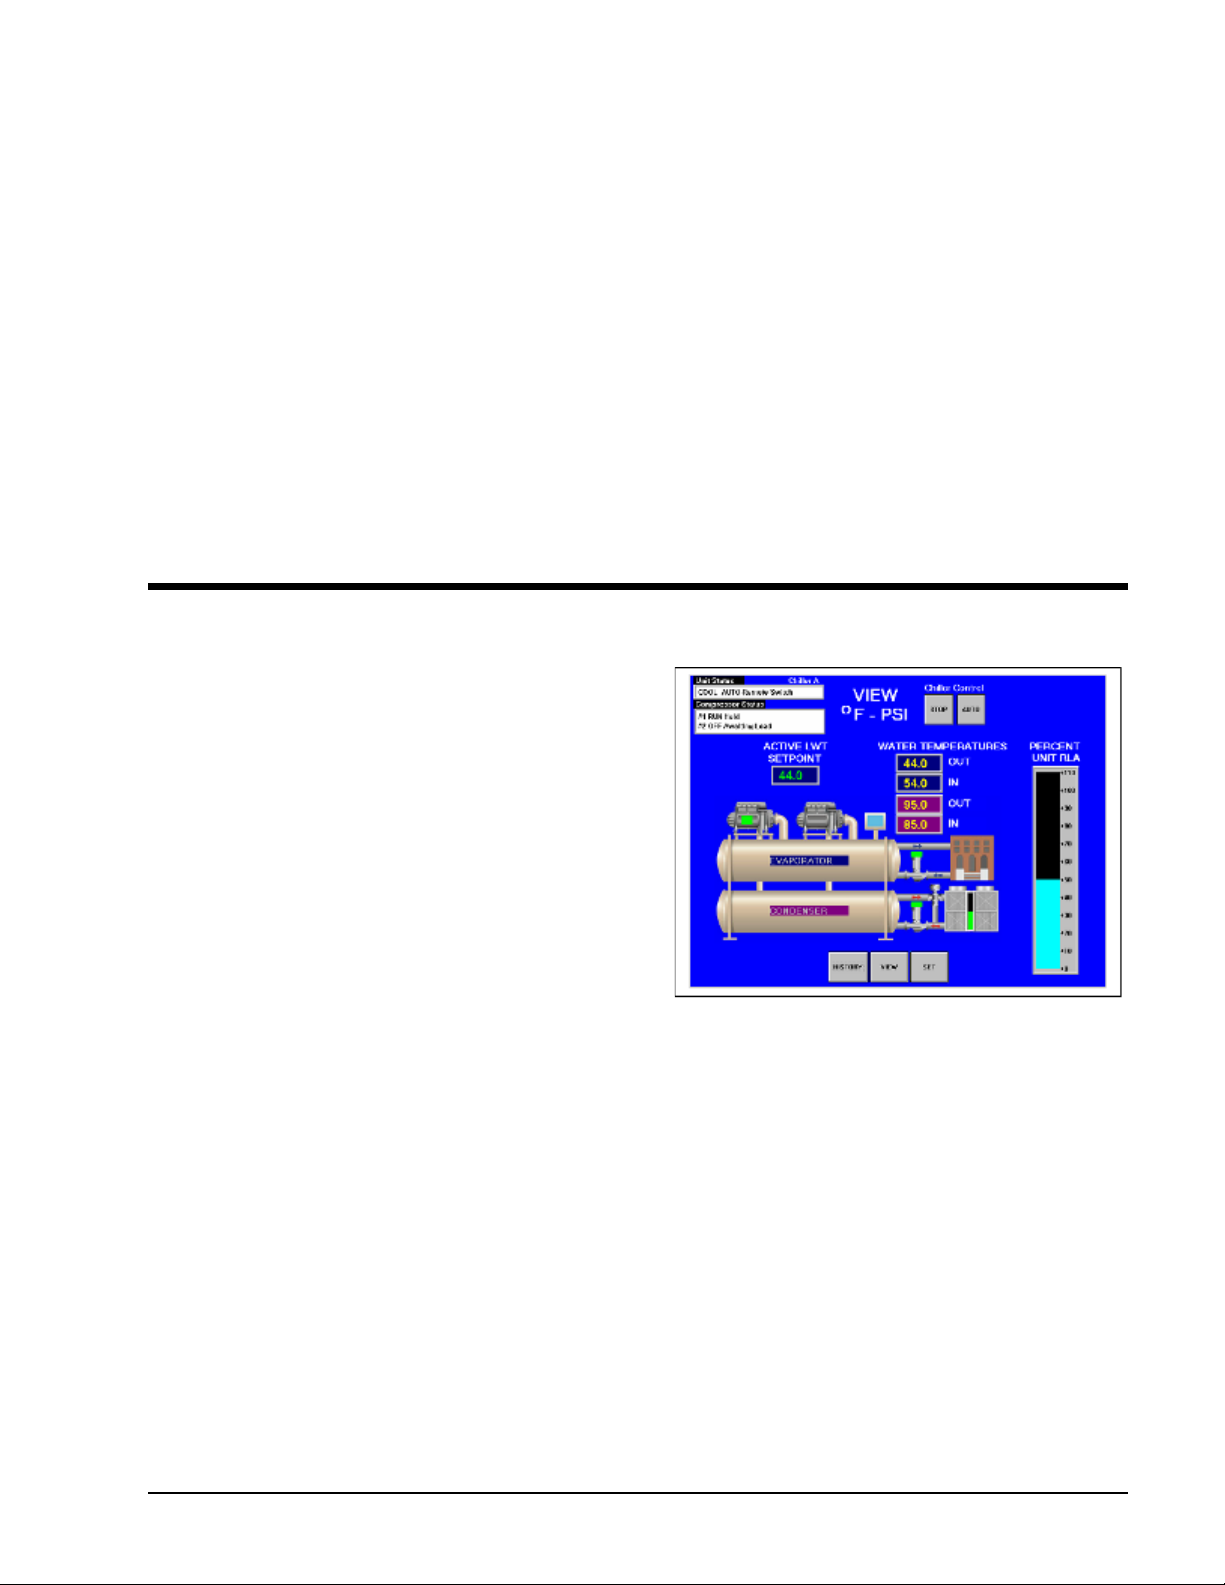
Figure 10, Home View Screen
VIEW Screens
View screens are used for looking at
unit status and conditions.
Home View Screen
The Home View Screen shows the
basic operating condition of the
chiller and is the screen that is
normally left on. Superimposed on a
chiller schematic drawing is:
Alarm
A red “ALARM” light will appear to
the right of the “SET” button should
an alarm occur. Pressing it will
bring up the active alarm screen to
view the alarm details.
Information
• Chilled water setpoint (ACTIVE
LWT SETPOINT)
• Entering and leaving chilled
water temperatures
• Entering and leaving condenser water temperatures
• Percent motor amps
• UNIT STATUS is MODE followed by STATE followed by the SOURCE that is the device or signal that
created the STATE. The possible combinations are in the following table:
Table 11, UNIT STATUS Combinat ions
MODES STATES SOURCES
COOL OFF Manual Switc h
SHUTDOWN (Note 1) Remote Switch
AUTO Local
BAS Network
Note 1: Shutdown is the state of shutting down; vane close, etc.
• COMPRESSOR STATUS is MODE followed by STATE followed by the SOURCE that is the device or
signal that created the STATE. The possible combinations are in the following table:
Table 12, COMPRESSOR STATUS Possibilities
OFF Manual Switch
OFF Compressor Alarm
OFF Unit State
OFF Evap Flow/Re-circulate
OFF Start to Start Tim er=xxx
OFF Stop to Start Timer=xxx
OFF Staging (Next ON)
OFF Awaiting Load
RUN Unload Vanes-Max Amps
RUN Hold Vanes-Max Amps
Continued next p age.
32 OMM 1008-3
Notes
Reason for the compressor being off
Overrides water temperature command
Page 33

SHUTDOWN Unload
Unloading during the shutdown sequence
RUN Manual Vanes & Speed
RUN Load Vanes-Manual Speed
RUN Hold Vanes-Manual Speed
RUN Unload Vanes-Manual Speed
RUN Load Speed-Manual Vanes
RUN Hold Speed-Manual Vanes
RUN Unload Speed-Manual Vanes
RUN Unload Vanes-Lag Start
RUN Hold Vanes-Evap Press
RUN Unload Vanes-Evap Press
RUN Unload Vanes-Soft Load
RUN Hold Vanes-Soft Load
RUN Load Vanes-Disch Temp
RUN Hold Vanes-Pull-down Rate
RUN Unload Vanes-Demand Limit
RUN Hold Vanes-Min Amps
RUN Load Vanes
RUN Hold Vanes
RUN Unload Vanes
NOTES:
1. Timer countdown values will be shown where “(xxx)” is shown below.
2. “Vanes” or “Speed” is shown in t he RUN state to indicate if the capacity is controlled by speed from the VFD or by vane
control.
Used for service purposes; "T" password required
Overrides water temperature command
Normal operation
Action Buttons for:
• Chiller Control: normal start (AUTO button) and STOP button. The STOP button activates the normal
shutdown sequence. These buttons are only active when the control is in the "Local" mode. This
eliminates the possibility of inadvertently shutting off the unit locally when it is under control of a remote
signal such as a BAS.
• HISTORY, toggles between the Trend History screen and the Alarm History screen.
• SET, toggles between the Setpoints screen that are used for changing setpoints and the Service screen.
Returning
Pressing the VIEW button from any screen will return to this screen
OMM 1008-3 33
Page 34

Figure 11, Detail View Screen
Data for one compressor is shown at a time on this screen. Pressing the COMPRESSOR button in the screen
lower-left hand corner will toggle between #1 and #2 compressor.
Pressing the VIEW button on the bottom of the Home View screen accesses the Detail View Screen shown
above. This screen gives additional information on the refrigerant pressures and temperatures.
Pressing the STATE button will bring up a display of the compressor state as described on page 35.
Pressing the I/O button displays the status of the compressor inputs and outputs as described in Figure 14 on
the same page. Magnitude units will have a COMP button that will toggle between the two compressors'
data, allowing the STATE and I/O detail screens to be viewed for either compressor.
Pressing the UNIT I/O button displays the unit inputs and outputs as described in Figure 15 on page 36.
Pressing the EVAP or COND button will give detailed information on the evaporator or condenser pressure s
and temperatures.
Pressing the ACTIVE LWT SETPOINT button will show a window from which the leaving water setpoints
can be changed. However, it is recommended that the SETPOINT screens described later be used for t his
purpose.
Pressing the MENU button on the bottom of the screen will go to a menu (see Figure 12) from which the
above listed screens can also be accessed.
This screen will be superimposed on the right side of the VIEW screen. This screen will remain
visible until another display button (such as STATE, I/O, etc.) is pressed.
The AUTO and STOP buttons are only active when the Unit Status is in the "Local" mode. This eliminates
the possibility of inadvertently shutting off the unit locally when it is under control of a remote signal such as
a BAS. The buttons are shown on this screen (in this Status) for general information only
34 OMM 1008-3
Page 35

Figure 12, View Menu
This View Menu is accessed by pressing the MENU button from the Detail View Screen. The menu screen
accesses several informational screens as shown in the above figure.
Figure 13, View Compressor State Screen
For example, pressing the Compressor-State button on the Menu
screen in Figure 12 will displa y the screen shown in Figure 13 on the
right side of both the Menu screen and the Detail View screen. The
Compressor State screen is basically a compilation of the events that
the chiller sequences through at start up. A green light (light gray in
the figure) indicates that a particular sequence requirement has been
satisfied. It is recommended that this screen be viewed during the
start up sequence. One can see the requirements light up as they are
met and quickly see why a non-start may have occurred. For
example, The Evap Flow OK will light when the evaporator flow
switch is closed by flow.
The bottom sections (from "RUN" down) are in effect during the shut
down process. The sequence transitions back to OFF at this point
and the OFF light will be illuminated.
OMM 1008-3 35
Page 36

Figure 14, View Compressor Input/Output Status
Pressing the I/O button adjacent to the compressor on the VIEW-MENU screen
will access the screen shown in Figure 14. It is superimposed on the right side of
the Detail View Screen. It gives the status of the compressor digital inputs and
outputs. Many of these I/Os also appear in the Compressor State screen since
they are part of the start up sequence and define the compressor state at any
given time. Magnitude units will have two of any compressor screen.
A COMP button will appear in the lower left-hand corner of the Detail View
Screen. This button will toggle compressor data from #1 compressor to #2
compressor.
Figure 15, Unit Input/Out put Screen
The screen shown in Figure 15 to the left gives the status of the controller digital
inputs and outputs and analog outputs. The controller in concerned with the
operation of the entire unit and i ts I/Os reflect t his. Note that operation of condenser
and evaporator water pumps and tower operation constitute most of the data flow.
An illuminated block (gray in the figure) indicated that either an input or output
signal exists.
Pressing the Evaporator or Condenser buttons on Detail View Screen will display
pertinent vessel temperatures and pressures. The screens are very simple, selfexplanatory, and not shown here.
36 OMM 1008-3
Page 37

Figure 16, Labeled Bar Graphs
The bar chart screen is accessed from the MENU screen (Figure 12) by selecting Labeled Bar Graphs for the
graphs with labels attached as shown above or select Bar Graphs for charts without labels.
Pressing “COMP” on the lower left corner of the screen will toggle between the unit’s two compressors.
Pressing “MENU,” HISTORY,” “VIEW,” or “SET” buttons will forward to those respective screens.
SET Screens
The set screens on the Interface Panel are used to input the many setpoints associated with equipment of this
type. MicroTech II provides an extremely simple method for accomplishing this. (NOTE: If the Interface
Panel is unavailable, the controller can be used to change setpoints.) Appropriate setpoints are factory set and
checked by McQuay Factory Service or Factory Authorized Service Company during commissioning.
However, adjustments and changes are often required to meet job conditions. Certain settings involving
pumps and tower operation are field set.
Pressing the SET button found on almost every screen accesses the last SET screen used or the SERVICE
screen, whichever of the two was used last.
When in any SET screen, pressing the SET button again will toggle to the SERVICE screen shown on page 50.
OMM 1008-3 37
Page 38

Groups
Compressor
Unit Status
Buttons
Numeric
Setpoints
Setpoint
Setpoint
Range of
Figure 17, A Typical SETPOINT Screen
Status
Description
Settings
Keypad
Action
NOTE: Grayed-out setpoints do not apply to this model.
Selection
Buttons
Initiate
Change
Button
Setpoint
The above figure shows the Water screen with Leaving Water Temp setpoint selected. The various setpoint
groups are in a column on the right side of the screen. Each button contains a number of setpoints grouped
together by similar content. The WATER button (as shown) contains various setpoints relating to water
temperature setpoints.
NOTE: Some setpoints that do not apply to a particula r unit application may still be listed on the s creen but
will be grayed out. They will be inactive and can be ignored.
The numbered buttons in the second from right column are pressed to select a particular setpoint. The selected
setpoint will appear in blue on the screen and a description of it (with the range of available settings) will
appear in the upper left-hand box.
Procedure for Changing a Setpoint
A list of setpoints, their default value, their available setting range, and password authority are in Table 6 on
page 19.
1. Press the applicable Setpoint Group). (A complete explanation of setpoint content of each group
follows this section.)
2. Select the desired setpoint by pressing the numbered button.
38 OMM 1008-3
Page 39

3. Pre ss the CHANGE button i ndicat ing t hat you wis h to change a set point value. The KEYBOARD screen
will be turned on automatically to facilitate entering the password.
• O = Operator level password is 100
• M = Manager level password is 2001
• T = Technician level password
4. Press the appropriate numbers in the numeric keyboard to enter the password. There is a small delay
between pressing the keypad and recording the entry. Be sure that an asterisk appears in the window
before pressing the next number. Press ENTER to return to the SETPOINT screen. The password will
remain open for 15 minutes after initiation and does not need to be re-entered.
5. Press CHANGE again. The right side of the screen will turn blue (inactive).
6. T he numeric keypad and action buttons in the lower left-hand corner of the screen will be activated (the
background will turn green). Setpoints with numeric values can be changed in two ways:
• Select the desired value by pressing the numbered buttons. Press ENTER to enter the value or
CANCEL to cancel the transaction.
• Press the UP or DOWN button to increase or decrease the value displayed. Press ENTER to enter the
value or CANCEL to cancel the transaction.
Some setpoints are text rather than numeric values. For example, LWT Reset Type can be "None" or
"4-20 ma." The selection can be made by toggling between choices using the UP or Down button. If
dashed lines appear in the setpoint window, it indicates that you have toggled too far and need to
reverse direction. Press ENTER to enter the choice or CANCEL to cancel the transaction.
Once CHANGE is selected, the CANCEL or ENTER buttons must be pressed before another setpoint
can be selected.
7. Additional setpoints can be changed by selecting another setpoint on the screen or by selecting an entirely
new group of setpoints.
Explanation of Setpoints
Each of the seven setpoint group of screens are detailed in the following section.
1. TIMERS, for setting timers such as start-to-start, etc.
2. ALARMS, for setting the limit and shutdown alarms.
3. VALVE, sets the parameters for operation of an optional field-installed tower bypass valve.
4. TOWER, selects the method of controlling the cooling tower and sets the parameters for fan
staging/VFD.
5. MOTOR, selects motor related setpoints such as amp limits. Also has maximum and minimum rate of
change of chilled water temperature.
6. MODES, selects various modes of operation such as control source, multiple compressor staging, pump
staging, BAS protocol, etc.
7. WATER, leaving water temperature setpoint, start and stop delta-T, resets, etc.
OMM 1008-3 39
Page 40

word
0 to 999
sec.
Time compress or must load (without unloading) before
vanes are considered fully open.
10 to 240
seconds
Maximum time allowed before interl ock confirmation
from compress or
restart
min
again
Timer
compressor start
TIMERS Setpoint
Figure 18, TIMERS Setpoint Screen
Note: Grayed out setpoints do not apply to this model chiller.
Table 13, TIMER Setpoints
Description No. Default Range
Full Load Timer 6 300 sec
Interlock Timer 5 10 sec
Prelub Timer 4 N.A.
Stop-Start Timer 3 3 min 3 to 20 min M
Start-Start Tim er 2 40 min
Evap Recirculate
1 30 sec 0.2 to 5 min M
15 to 60
Pass-
M
M
M
Time from when compressor stops to when it can
Time from when compressor starts to when it can st art
Time that evaporator pump must run before
Comments
40 OMM 1008-3
Page 41

word
Surge temperature (ST) slope value above
at start
At start, Surge Temp (ST) is compared to
this SP. Alarm at ST>2x SP.
Max discharge temp to shut down
Sets discharge temp above which a forced
capacity increase occ urs .
ALARMS Setpoint
Figure 19, ALARMS Setpoint Screen
Table 14, ALARM Setpoints
Description No. Default Range
Condenser Freeze 11
Evaporator Freeze 10
Motor Current Threshold 9 10% 1 to 20% T Min %RLA to consider that the is motor off
Surge Slope Limit 8
Surge Temperature Limit 7
High Discharge Temp-Stop 6
High Discharge Temp-Load 5
High Condenser Pressure 4 140 psi 120 to 240 psi T Max discharge press ure, stop compressor
Low Evap Pressure, Stop 3 26 psi 10 to 45 psi T Min evap press ure – stop compressor
Low Evap Pressure-Unload 2 31 psi 20 t o 45 psi T Min evap pressure – unload compressor
Low Evap Pressure-Inhibit 1 33 psi 20 to 45 psi T Min evap press ure – i nhi bi t loading
34.0 °F -9.0 to 45.0 °F
34.0 °F -9.0 to 45.0 °F
20 deg
F/min
50 °F 2 to 45 °F
190 °F 120 to 240 °F
170 °F 120 to 240 °F
1 to 99
deg F/min
Pass-
T Minimum cond. sat. temp. to start pump
T Minimum evap. sat. temp. to start pum p
T
which alarm occurs. Active only if ST>SP7
T
T
compressor
T
Comments
OMM 1008-3 41
Page 42

Pass-
word
Temp - Maximum Start
Position
Condenser EWT at which valve s houl d be open to tower.
Valve position is set to SP8
Setpoint # 9
Condenser EWT at which ini tial valve position is set t o
Setpoint # 6
Initial position of valve when condens er E WT is at or
Valve position below which the fans can s t age down
(Tower - Setpoint # 2 = valve/VFD
(Tower - Setpoint # 2 = valve/VFD
2.0 °F
1.0 to 10.0 °F
Target for lift pressure (Tower - Setpoi nt #1= Lift), Work s
with Setpoint # 5
Target for condenser EWT (Tower Setpoint #1= Temp),
Works with Set poi nt # 4
NC (To
Tower)
Normally closed (NC) or normal open (NO)
to tower
Cooling Tower Bypass VALVE Settings
Figure 20, Tower Bypass VALVE Setpoint Screen
Table 15, Tower Bypass VALVE Setpoints (See page 44 for complete explanation.)
Description No. Default Range
Slope Gain 15 65 10 to 99 M Control gain for temperature (or lift) slope
Error Gain 14 55 10 to 99 M Control gai n for temperature (or lift) error
Valve Control Range(Max) 13 45% 0 to 100% M Maximum valve position, overrides all other settings
Valve Control Range (Min) 12 35% 0 to 100% M Minimum valve position, overrides all other settings
11
85 °F 0 to 100 °F
Maximum Start Posit i on 10 80% 0 to 100% M
Temp - Minimum Position 9
Minimum Start P osition 8 10% 0 to 100% M
Stage Down @ 7 20% 0 to 100% M
Stage Up @ 6 80% 0 to 100% M
75 °F 0 to 100 °F
M
Initial valve position when condenser E WT is at or above
M
below Setpoint # 7
(Tower - Setpoint #2 = Valve Stage Down
VFD speed below which the next fan speed can turn off
Valve position above which the fans can stage up (Tower
- Setpoint #2 = Valve Stage Down
VFD speed above which the next fan speed can turn on
Comments
Valve Deadband (Lift) 5 4.0 psi 1. 0 t o 20.0 psi M Control deadband, Tower - Setpoint #1= Li f t
Valve Deadband (Temp) 4
Valve Target (Lift) 3 30 psi 10 to 130 psi M
Valve Setpoint (Temp) 2
Valve Type 1
42 OMM 1008-3
65 °F 40 to 120 °F
M Control deadband, Tower Setpoint #1=Tem p
M
NC, NO M
Page 43

Pass-
word
Stage Differential
(Temp)
Time delay between stage up/down event and
next stage down
Time delay between stage up/down event and
next stage up
Valve Setpoint/VFD St age: Both valve and VFD
Lift
Lift: Fan and valve controlled by lif t pressure
Cooling TOWER Fan Settings
Figure 21, Cooling TOWER Fan Setpoint Screen (See page 44 for c om plet e explanation.)
Table 16, Tower Fan Settings
Description No. Default Range
Stage #4 On (Lift) 15 35 psi 10 to 130 ps i M Lift pressure for fan stage #1 on
Stage #3 On (Lift) 14 45 psi 10 to 130 ps i M Lift pressure for f an stage #2 on
Stage #2 On (Lift) 13 55 psi 10 to 130 ps i M Lift pressure for f an stage #3 on
Stage #1 On (Lift) 12 65 psi 10 to 130 ps i M Lift pressure for f an stage #4 on
Stage #4 On (Temp) 11
Stage #3 On (Temp) 10
Stage #2 On (Temp) 9
Stage #1 On (Temp) 8
Stage Differential (Lift ) 7 6.0 psi 1.0 to 20.0 psi M Fan staging deadband with Setpoint # 1=Lift
Stage Down Time 5 5 min 1 to 60 min M
Stage Up Time 4 2 min 1 to 60 min M
Tower Stages 3 2 1 to 4 M Number of fan stages used
Valve/VFD Control 2 None
70 °F 40 to 120 °F
75 °F 40 to 120 °F
80 °F 40 to 120 °F
85 °F 40 to 120 °F
6
3.0 °F 1.0 to 10.0 °F
None, Valve
Setpoint, Valve
Stage, VFD
Stage, Valve
SP/VFD Stage
M Temperature for fan stage #1 on
M Temperature for fan stage #2 on
M Temperature for fan stage #3 on
M Temperature for fan stage #4 on
M Fan staging deadband with Setpoint #1=Temp
None: No tower valve or VFD
Valve Setpoint: Valve cont rol s to VALVE SP3(4)
& 5(6)
Valve Stage: Valve control s etpoint changes to
M
fan stage setpoint
VFD Stage: 1
Comments
st
fan is VFD controll ed, no val ve
Tower Control 1 None
OMM 1008-3 43
None,
Temperature,
None: No tower fan control
M
Temperature: Fan and valve controlled by E WT
Page 44

Explanation of Tower Control Settings
The MicroTech II controller can control cooling tower fan stages, a tower bypass valve, and/or a tower fan
VFD if the chiller has a dedicated cooling tower.
The Tower Bypass Valve position will always control the Tower Fan Staging if Valve Setpoint or Stage
Setpoint is selected.
There are five possible tower control strategies as noted below and explained in detail later in this section.
They are selected from SETPOINT TOWER SP2.
1. NONE, Tower fan staging only, which is not recommended. In this mode the tower fan staging (up to 4
stages) is controlled by either the condenser Entering Water Temperature (EWT) or LIFT pressure (difference
between the condenser and evaporator pressure). Tower bypass or fan speed are not controlled.
2. VALVE SP, Tower staging with low-limit controlled bypass valve. In this mode the tower fans are
controlled as in #1, plus a tower bypass valve is controlled to provide a minimum condenser EWT. There is
no interconnection between the fan control and the valve control.
3. VALVE STAGE, Tower staging with stage controlled bypass valve. In this mode the bypass valve
controls between fan stages to smooth the control and reduce fan cycling.
4. VFD STAGE, In this mode a VFD controls the first fan. Up to 3 more fans are staged on and off and
there is no bypass valve.
5. VALVE/VFD, Tower fan control with VFD plus bypass valve control.
1. Tower Fan Staging Only (NONE); This is not a recommended control strategy.
The following settings are used for the Tower Fan Staging Only mode, (SP= setpoint)
a) TOWER SETPOINT Screen
i) SP1. Select TEMP if control is based on condenser EWT or LIFT if based on compressor lift
expressed in degrees.
ii) SP2. Select NONE for no bypass valve or fan VFD control.
iii) SP3. Select one to four fan outputs depending on the number of fan stages to be used. More than
one fan can be used per stage through the use of relays.
iv) SP4. Select STAGE UP TIME from 1 to 60 minutes. The default value of 2 minutes is probably a
good starting point. The value may need to be adjusted later depending on actual system operation.
v) SP5. Select STAGE DOWN TIME from 1 to 60 minutes. The default value of 5 minutes is
probably a good starting point. The value may need to be adjusted later depending on actual
system operation.
vi) If TEMP is selected in SP1, use
(1) SP6. Select STAGE DIFFERENTIAL in degrees F, start with default of 3 degrees F.
(2) SP8-11. Set the STAGE ON temperatures consistent with the temperature range over which the
condenser EWT is desired to operate. The default values of 70°F, 75°F, 80°F and 85°F are a
good place to start in climates with moderate wet bulb temperatures. The number of STAGE
ON setpoints used must be the same as SP3.
b) If LIFT is selected in SP1, use
i) SP7. Select STAGE DIFFERENTIAL in PSI. Start with default of 6 PSI.
ii) SP12-15. Start with default setpoints. The number of STAGE ON setpoints used must be the same
as SP3.
See Field Wiring Diagram
Figure 8 on page 8 for fan staging field wiring connection points.
44 OMM 1008-3
Page 45

!
CAUTION
2. Tower Fan Staging With Bypass Valve Controlling Minimum EWT (VALVE SP).
1) TOWER SETPOINT Screen
a) SP1. Select TEMP if control is based on condenser EWT or LIFT if based on compressor lift
expressed in pressure.
b) SP2. Select Valve SP for control of bypass valve based on temperature or lift.
c) SP3. Select one to four fan outputs depending on the number of fan stages to be used. More than one
fan can be used per stage through the use of relays.
d) SP4. Select STAGE UP TIME from 1 to 60 minutes. The default value of 2 minutes is probably a
good starting point. The value may need to be adjusted later depending on actual system operation.
e) SP5. Select STAGE DOWN TIME from 1 to 60 minutes. The default value of 5 minutes is probably
a good starting point. The value may need to be adjusted later depending on actual system operation.
f) If TEMP is selected in SP1, use
i) SP6. Select STAGE DIFFERENTIAL in degrees F, start with default of 3 degrees F.
ii) SP8-11. Set the STAGE ON temperatures consistent with the temperature range over which the
condenser EWT is desired to operate. The default values of 70°F, 75°F, 80°F and 85°F are a good place to
start in climates with moderate wet bulb temperatures. The number of STAGE ON setpoints used must be the
same as SP3.
g) If LIFT is selected in SP1, use
i) SP7. Select STAGE DIFFERENTIAL in PSI. Start with default of 6 PSI.
ii) SP12-15. Start with default setpoints. The number of STAGE ON setpoints used must be the
same as SP3.
2) VALVE SETPOINT Screen
a) SP1, Select NC or NO depending if valve is closed to tower with no control power or open to tower
with no control power.
b) If TEMP was selected for fan control above, use
i) SP2, Set the VALVE TARGET (setpoint), usually 5 degrees below the minimum fan stage
setpoint established in TOWER SP11. This keeps full flow through the tower until the last fan is staged off.
ii) SP4, Set VALVE DEADBAND, the default of 2 degrees F is a good place to start.
iii) SP8, Set MINIMUM VALVE POSITION when EWT is at or below SP9. Default is 0%.
iv) SP9, Set the EWT at which the valve position will be at (SP8). Default is 60°F.
v) SP10, Set the initial valve position when EWT is at or above SP11. Default is 100%.
vi) SP11, Set the EWT at which initial valve position is set to SP10. Default is 90°F.
vii) SP12, Set the minimum position to which the valve can go. Default is 10%.
viii) SP13, Set the maximum position to which the valve can go. Default is 100%.
ix) SP14, Set the control gain for error. Default is 25.
x) SP15, Set the control gain for slope. Default is 25.
Setpoints 14 and 15 are site specific, dealing with system fluid mass, component size and other
factors affecting the reaction of the system to control inputs. These setpoints should be set by
personnel experienced with setting up this type of control to avoid possible equipment damage.
OMM 1008-3 45
Page 46

Initial Valve Position
Max Start Position
Set Point (90%)
Min Start Position
Set Point (10%)
Max Position
@ Setpoint
(90°F)
Min Position
@ Setpoint
(65°F)
c) If LIFT was selected for fan control, use:
i) SP3, Set the VALVE TARGET (setpoint), usually 30 psi below the minimum fan stage setpoint
established in TOWER SP15. This keeps full flow through the tower until the last fan is staged off.
ii) SP5, Set VALVE DEADBAND, the default of 6 psi is a recommended initial setting.
iii) SP12, Set the minimum position to which the valve can go. Default is 10%.
iv) SP13, Set the maximum position to which the valve can go. Default is 100%.
v) SP14, Set the control gain for error. Default is 25.
vi) SP15, Set the control gain for slope. Default is 25.
NOTE: Setpoints 14 and 15 are site specific dealing with system fluid mass, component size and other factors
affecting the reaction of the system to control inputs. These setpoints should be set by personnel experienced
with setting up this type of control.
Figure 22, Bypass Valve Positions
See Field Wiring Diagram
Figure 8 on page 8 for fan staging and bypass valve field wiring connection points.
3. Tower staging with bypas s valve controlled by fan stage (VALVE STAGE)
This mode is similar to #2 above except that the bypass valve setpoint changes to be set at the same point of
whatever fan stage is active rather than just maintaining a single minimum condenser EWT. In this mode the
valve controls between fan stages and tries to maintain the fan stage setting in effect. When it is max open or
max closed (staging up or down) and the temperature (or lift) moves to the next fan stage, the valve will go
the opposite max setting. This mode reduces fan cycling.
This mode is programmed the same as Mode #2 above except that in SETPOINT, TOWER, SP2, VALV E
STAGE is selected instead of VALVE SP and:
• SP6, Set the valve position (% open) above which the first fan can stage on (fan stage ON temperature
and STAGE UP TIMER must also be satisfied). Default is 80%.
• SP7, Set the valve position (% closed) below which the first fan can stage off (the fan stage temperature
and STAGE DOWN TIMER must also be satisfied). Default is 20%.
4. Fan VFD, no bypass valve (VF D STAGE) The fan VFD mode assumes the tower is driven by one large
fan. Set up is as above except in SETPOINT, TOWER, SP2, VALVE/VFD is selected.
46 OMM 1008-3
Page 47

Pass-
word
F/min
F/min
value.
Time period to go from i ni t i al l oad poi nt (% RLA) set
in SP 5 to 100% RLA
Initial Soft Load Amp
Limit
% RLA above which loading is inhibited (Load Limit)
SP + 5% unloads compressor
OFF – signal is ignored
MOTOR Setpoint Screen
Figure 23, MOTOR Setpoint Screen
Table 17, MOTOR Setpoint Settings
Description No. Default Range
Nominal Capacity 10 100 0 to 9999 Tons Determines when to shut off a compressor
Maximum LWT Rate 9
Minimum LWT Rate 8
Soft Load Ramp Time 7 5 min 1 to 60 min M
6 40% 10 to 100% M Initial amps as % of RLA uses SP4 & 6
Soft Load Enable 5 OFF OFF, ON M S oft load on or off Uses SP6 & 7
Nameplate RLA 4 52 to 113 Amps T RLA value from compressor nameplate
Maximum Amps 3 100% 10 to 100% T
Minimum Amps 2 40% 5 to 80% T % RLA below which unloading is inhibited
Demand Limit Enable 1 OFF OFF, ON O
0.5
°
0.1
°F/min
0.1 to 5.0
°
0.1 to 5.0
°F/min
Inhibits loading if LWT change exceeds the setpoint
M
Additional compressor can start if LWT change is
M
below setpoint.
ON sets %RLA at 0% for 4 mA external signal and
at 100% RLA for 20 mA si gnal
Comments
OMM 1008-3 47
Page 48

Pass-
word
Sequence
Compressors)
always first to start, i f 2 is always second (Note 1)
Normal uses standard sequencing
Standby uses this compressor only if another fails.
Comp #1 Stage
Sequence
1,2, … (# of
Compressors)
Sets sequence number for # 1 compressor, if 1 it i s
always first to start, i f 2 is always second (Note 1)
Mode
Pump, Standby
Max. Comp. ON
10
1
1-8
M
Total number of com pres sors minus standby
None, Local, BACnet,
Remote
#1 Primary, #2 Primary, if primary fails, use other
#1 Primary, #2 Primary, if primary fails, use other
Control Source
3
LOCAL
LOCAL, BAS, SWITCH
O
Sets control source
OFF, everything is off. A UTO , Evap pump on,
meet LWT
MODES Setpoints
Figure 24, MODES Setpoint Screen
Note: Grayed out setpoints do not apply to this model chiller.
Table 18, MODES Setpoint Settings
Description No. Default Range
Comp # 2 Stage
Comp # 2 Stage
Mode
Comp #1 Stage
BAS Protocol 9 MODBUS
Cond Pump 6
Evap Pump 5
14 1
13 Normal
12 1
11 Normal
Pump #1
Only
Pump #1
Only
1,2, … (# of
Normal, Effici ency,
Pump, Standby
Normal, Effici ency,
LonWorks, MODBUS ,
Pump #1 Only, Pump #2
Only, Auto Lead, #1
Primary, #2 Primary
Pump #1 Only, Pump #2
Only, Auto Lead, #1
Primary, #2 Primary
M
M
M
M Ditto No. 9.
M
M
M
Comments
Sets sequence number for # 2 compressor, if 1 it is
Efficiency starts one compressor on each unit
Pump starts all c ompressors on one chiller fi rs t
Sets BAS Standard P rot ocol to be used, or LOCAL
if none.
Pump #1 Only, Pump #2 Only, use only these
pumps
AUTO, balance hours between #1 and #2
Pump #1 Only, Pump #2 Only, use only these
pumps
AUTO, balance hours between #1 and #2
Unit Enable 1 OFF OFF, AUTO O
1. If both compressors have the same sequence number, they will automatically balance starts and run-hours.
2. See page 68 for further details on pump operation.
3. Setpoints 11 through 15 display compressor staging strategy. See page 64 for d e ta ils.
48 OMM 1008-3
comp, cond pump and t ower on as required t o
Page 49

at 20 mA input if 4-20 m A is selected in SP7
Sets the evap delta-T above which Return reset
water, or 4-20 mA for external analog signal
Sets the temperature t he l eavi ng water must be
WATER Setpoints
Figure 25, WATER Setpoint Screen
Note: Grayed out setpoints do not apply to this model chiller.
Table 19, WATER Setpoint Settings
Description N0. Default Range
Max Reset Delta-T 9
Start Reset Delta-T 8
LWT Reset Type 7 NONE
Stage Delta-T 6 1.0
Startup Delta-T 5
Shutdown Delta-T 4
Cool LWT 1
0.0°F 0.0 to 20.0 °F
10. 0°F 0.0 to 20.0 °F
NONE, RETURN,
3.0°F 0.0 to 10.0 °F
3.0°F 0.0 to 3. 0 °F
44. 0°F 40.0 to 80.0 °F
4-20mA
0.5 to 5°F
Pass-
word
Set the maximum reset that can occur, in
degrees F if LWT reset is selected or max reset
M
M
begins.
Select reset type, NONE f or none, RETURN for
resetting chilled water based on the ent eri ng
M
M
above setpoint for next compress or to start.
M Degrees above setpoint for compressor to start .
M Degrees below setpoint for compressor to stop.
M Evaporator LWT setpoint in COOL mode
Comments
OMM 1008-3 49
Page 50

SERVICE Screen
Figure 26, Service Screen
Active
pLAN
Nodes
The SERVICE screen is accessed by pressing SET from any SET screen. In other words, it is the second
"SET" screen. While containing information and activity buttons for the service technician, it also has
valuable information for the operator.
The upper left corner contains compressor information such as number of starts and operating hours for
each compressor. "Spare Capacity" is used to set the compressor stopping increments.
The Active pLAN Nodes matrix shows active control components on the pLAN. A, B, C, D are individual
chillers. 1 and 2 are not used on “B” vintage chillers, 5 is t he controller and 7 is the interface panel. pLAN
Comm is used for setting up multiple chillers and is set at startup by the McQuay startup technician as is
LOAD UCM.
CHANGE UNITS button allows selection of Inch-Pounds or Metric units of measure on the OITS.
SELECT LANGUAGE allows toggling between the available languages. The language can be set
separately for display or history, which is used for alarm and trend files.
The version numbers shown in the lower left corner are the contr oll ers' software ide nti fication. The number
in the upper right corner is the Operator Interface Panel software identifica tion number. These numbers
may be required by McQuay International to answer questions about unit operation or to assist in possible
future upgrades of software.
The PASSWORD button is used to access the Keyboard screen to enter a password.
The Alarm ON/OFF button is usually only found on demonstration software.
The red ALARM light appears on this, and many other screens, when an alarm becomes active. There is no
alarm active on this demonstration screen, so the Alarm shows as dark blue.
OPERATING MANUAL displays the manual in Adobe. It can be downloaded via the USB port.
The RUN AS Single/Dual box will only appear on some prototype units.
50 OMM 1008-3
Page 51

HISTORY Screens
Figure 27, History Trend Graph
The Trend History Overview allows the user to view the various parameters listed on the right side of the
screen. The temperature scale in °F is on the left. Pressure in psi and % RLA are represented by the righthand scale. The screen can display history for 8-hour, 2-hour or 20-minute periods by pressing 8, 2, or 1/3
respectively.
Pressing NOW for any time period will start the display for the current time beginning on the right of the
screen with history flowing to the left.
The arrow buttons scroll the time period f orward or backward. Obviously if NOW is selected, the forward
button > will not go into the future.
The COMP button toggles between compressors one and two.
OMM 1008-3 51
Page 52

Figure 28, Alarm History/Floppy Download
The Alarm History lists the alarms with the most current on top with date stamp, action taken and the cause of
the alarm. It is accessed from the history screen by pressing HISTORY again.
The alarms have a color code as follows:
• Faults (shutdowns) = Red
• Problems (limit alarms) = Yellow
• Warnings (notifications) = Dark Blue
Download Data
This screen is also used to download the Trend History (Figure 27) selected by date or the Alarm History
shown above. Download is via a USB port located in the control panel.
• For Alarms, press the ALARMS button on the screen, then press the COPY to USB button.
• For Trend History, select the desired History File by date using the PREV or NEXT buttons, then press
the COPY to USB button.
52 OMM 1008-3
Page 53

ACTIVE A LA RM Screen
Figure 29, Active Alarms
The Active Alarm screen i s only accessible when an active alarm exists on the unit. Pressing the red alarm
signal on any screen will access this screen. It can also be accessed from the SERVICE screen by pressing
the dark blue button (where the Alarm indicator normally appears). There are no alarms active on this
demonstration screen.
Alarms are arranged in order of occurrence, with the most recent on top.. Once the abnormal condition is
corrected, pressing the "CLEAR" key will clear the alarm.
The current active alarms (there may be more than one) are displayed. Note that the alarms are color-coded
red for FAULT (equipment protection control) that causes a rapid compressor shutdown, yellow for
PROBLEM (limit alarm) that will inhibit loading, or load or unload the compressor, and blue for WARNING
which is information only and takes no action. These problem indicators detailed on pages 21 and 23.
The date/time and cause of the alarm are displayed.
After eliminating the cause of the alarm, clear the alarm by pressing the CLEAR button. This will clear the
alarm from the register and allow the unit to restart after going through the start sequence. The alarm notice
will be deleted from the screen.
However, if the cause of the alarm is not remedied, the alarm is still active and the alarm message will remain
open. The unit will not begin its starting sequence.
Alarm Detail
Pressing any alarm line will sequence to the next screen (not shown here) that shows details on unit operating
conditions at the time of failure.
OMM 1008-3 53
Page 54

Figure 30, Keyboard
The keyboard is only used to enter the password when att empting to enter or change a setpoint. Input the
number (100 for operator, 2001 for manager level) and press Enter to enter the password. The screen will
automatically revert back to the previous Set screen.
This screen will appear automatically when a password is required for changing a setpoint. It can also be
access from the service screen (second set screen) by pressing PASSWORD.
54 OMM 1008-3
Page 55

ALARM LOG
(data)
(data)
(data)
< ALARM
< VIEW
< SET
<
VIEW < COMPRESSOR
< UNIT
< EVAPORATOR
< CONDENSER
VIEW COMP (n)
(screen n data)
(screen n data)
(screen n data)
Controller Men u Screens
The controller is located in the control panel adjacent to the OITS. Unit, compressor, evaporator and
condenser information is viewable on it, and all setpoints can be accessed from it.
Unit of Measure
SI units of measure can be selected with the appropriate set point screen but will appear only on the OITS.
The controller LCD screens read only in inch-pounds unit of measure.
Menu Structure (Hierarchical)
A hierarchical menu structure is used to access the various screens. Each menu screen can have one to four
lines of information. Optionally, the last menu selection can access one of a set of screens that can be
navigated with the UP/DOWN arrow keys (see the scrolled menu structure below). Menu selection is
initiated by pressing the MENU key, which changes the display from a data screen to a menu screen. Menu
selections are t hen made using the arrow keys according to labels on the right side of the display (the arrows
are ignored). When the last menu item is selected, the display changes to the selected data screen. An
example follows showing the selection of the “VIEW COMPRESSOR” (n) screen.
Suppose the current screen is:
After pressing the MENU button, the top-level menu screen will show:
After pressing the “VIEW” menu button, a menu screen will show:
After pressing the “COMPRESSOR” menu button, the selected data screen will show:
Where “n” is the number of the last viewed COMPRESSOR screen. The arrow keys will automatically return
to the “scroll” mode at this time. Different compressor screens can then be selected with the UP/DOWN
arrow keys.
The complete menu structure follows. Data screens are shown as [data] when a single screen is at the bottom
of the menu structure and as [data n] when multiple screens are available (using UP/DOWN keys).
OMM 1008-3 55
Page 56

Evaporator
Ev/Cn Pmps=OFF/OFF
Cond 00.0 00.0 00.0
Sat Cond 000.0 000.0
See NOTE 1
Lift Press = 000.0
Inhibits None
Cond = XXXXX GPM
Lift Temp = 00.0°F
Lift Temp = 00.0°F
Discharge 000.0 00.0
Discharge 000.0 00.0
SatCond 000.0 000.0
SatCond 000.0 000.0
Starts = 00000
Menu Structure (Scrolled)
As an alternate t o sel ecti ng screens wit h the menu function, i t i s be possi ble to scr oll through all of the m with
the 4 arrow keys. For this use, the screens are arranged logically in a matrix as shown in Figure 31.
Menu Matrix
Figure 31, Controller Menu Mat r ix
View Unit Information View Compressor Information
View
VIEW UNIT
STATUS(1)
UNIT= OFF
COMP#1 OFF #2RUN
VIEW UNIT
STATUS(2)
Comp#1 OFF
Start-Start Tmr Clr
Inhibits None
VIEW UNIT
STATUS(3)
Comp#2 RUN
Start-Start Tmr Clr
VIEW COMP (4) oF
VIEW COMP (5) oF
VIEW UNIT
WATER(1)oF
In Out Delta
Evap 00.0 00.0 00.0
VIEW UNIT
WATER (2)
IN OUT DELTA
HtRc NA NA NA
Cond NA
VIEW UNIT
WATER (3)
Water Flow Rates
Evap = XXXXX GPM
VIEW UNIT REFRG (1)
psi oF
Sat Evap 000.0 000.0
VIEW UNIT REFRG (2)
Suct Line = 000.0oF
Liquid Line = 000.0oF
Lift Press = 000.0psi
VIEW COMP (3) psi
VIEW UNIT TOWER (1)
Stages ON= 0 of 2
Setpoint= XXX °F
VIEW UNIT TOWER (2)
Bypass Valve= XXX%
VFD Speed = XXX%
VIEW COMP (6)
VIEW COMP 31 (1)
State = OFF
% RLA = 000%
Evap LWT = 054.0oF
VIEW COMP (2) psi
Cond Press = 000.0
Evap Press = 000.0
WMC Compressor
Oilless Design
(blank mask page)
Cavity Temp=000.0°F
Invert Temp=000.0°C
Temp SH
Suction 000.0 00.0
psi oF
SatEvap 000.0 000.0
VIEW COMP (7)
Hours = 00000 x10
Starts = 00000
VIEW COMP#2 (1)
State = RUN
% RLA = 095%
Evap LWT = 054.0oF
VIEW COMP#2 (2) psi
Cond Press = 000.0
Evap Press = 000.0
Lift Press = 000.0
VIEW COMP#2 (3) psi
WMC Compressor
Oilless Design
(blank mask page)
VIEW COMP#2 (4) oF
Cavity Temp=000.0°F
Invert Temp=000.0°C
VIEW COMP#2 (5) oF
. Temp SH
Suction 000.0 00.0
VIEW COMP#2 (6)
psi oF
SatEvap 000.0 000.0
VIEW COMP#2 (7)
Hours = 00000 x10
VIEW EVAPORATOR
Suct SH = 000.0oF
Approach = 00.0oF
The right half of the matrix is continued on next page
NOTE: There is a VIEW CONDENSER menu to the right of VIEW EVAPORATOR with basically the same
information, but omitted from this matrix due to space limitations.
56 OMM 1008-3
Page 57

VIEW ALARMS
SET SETPOINTS
PASSWORD
HH:MM:SS MM/DD/YY
Source = SWITCHES
Maximum Amps=100%
Maximum Amps=100%
LowEvPrStop=25psi
StageUP/Dn=080/020
No Access Given
HH:MM:SS MM/DD/YY
Max Compr ON = 01
No Access Given
HH:MM:SS MM/DD/YY
Start-Start = 05 min
Start-Start = 40 min
(blank mask page)
StageUp=02Dn=05 min
^
StrtResetDT = 10.0oF
HG Bypass=30% RLA
HG Bypass=30%
Sensor=ECWT-B3)
SoftLoadRamp=05min
Max Str LWT=10.0oF
Max Str LWT=10.0oF
Max=100% @ 090oF
CondPump = #1 ONLY
Lag Str Spd=020%
(blank mask page)
K1500 Db01Tc 1000mS
Ignore this menu
CondWF=03000GPM
24 hr time day of wk
Baud Rate = 19200
Prs Ctrl DOut 10.0oF
Table Continued
Alarm Log: 01
description
SET UNIT SPs (1)
Unit Enable = OFF
Unit Mode = COOL
SET COMP#1 SPs (1)
Demand Limit=OFF
Minimum Amps=010%
SET COMP#2 SPs (1)
Demand Limit=OFF
Minimum Amps=010%
SET ALARM LMTs (1)
LowEvPrHold=27psi
LowEvPrUnld=26psi
SET TOWER SPs (1)
TowerControl=(type?)
Tower Stages=4
SET PASSWORD
Enter
Password:00000
Alarm Log: 02
description
.
Alarm Log: 03 to 25
description
^
^
Alarm Log: 25
description
HH:MM:SS
MM/DD/YY
SET UNIT SPs (2)
Available Modes
= COOL
Select w/Unit Off
SET UNIT SPs (3)
Cool LWT = 44.0°F
SET UNIT SPs (4)
Leaving Water Temp
StartDelta = 3.0°F
StopDelta = 3.0°F
SET UNIT SPs (5)
Rest Type = NONE
MaxResetDT =00.0oF
SET UNIT SPs (6)
Soft Load = OFF
InitialSLAmps=020%
SET UNIT SPs (7)
Max/Min LWT Rates
Max = 0.5oF/min
Min = 0.1oF/min
SET UNIT SPs (8)
EvapRecTmr = 0.5min
EvapPump = #1 ONLY
SET COMP SPs (2)
StageMode =Normal
StageSequence# = 01
SET COMP SPs (3)
StageDeltaT = 1.0oF
Stop-Start = 03 min
SET COMP SPs (4)
UL Surg Ofs=200RPM
Name Plate RLA 140
SET COMP SPs (5)
Lead Staging=030%
Nom Capacity = 0100T
SET COMP SPs (6)
InterLokTmr= 010sec
UnloadTimer = 120 sec
SET COMP SPs (7)
Vane Control
Lead Start=045%
Lag Start=050%
SET COMP SPs (8)
Start Speed
Lead Str Spd=050%
SET COMP#2 SPs (2)
StageMode =Normal
StageSequence# = 01
Max Compr ON = 01
SET COMP#2 SPs (3)
StageDeltaT = 1.0oF
Stop-Start = 03 min
SET COMP#2 SPs (4)
Name Plate RLA 140
SET COMP#2 SPs (5)
Nom Capacity = 0100T
SET COMP#2 SPs (6)
InterLokTmr= 010sec
UnloadTimer = 120 sec
SET COMP SPs (7)
WMC Automatic
Vane Control
(blank mask page)
SET COMP SPs (8)
WMC Automatic
Vane Control
SET ALARM LMTs (2)
HighCondPr =140psi
HiDschT-Load=170oF
HiDschT-Stop=190oF
SET ALARM LMTs (3)
WMC Compressor
Oilless Design
SET ALARM LMTs (4)
Surge Slp Str=20oF
Surge Tmp Run=20oF
MtrCurThrshld=05
SET ALARM LMTs (5)
Evap Freeze= 34.0°F
Cond Freeze= 34.0°F
SET TOWER SPs (6)
SET TOWER SPs (7)
SET TOWER ByP (8)
SET TOWER SPs (2)
Stage ON
#1 #2 #3 #4
xxx xxx xxx xxx
SET TOWER SPs (3)
VFD Min Spd=020%
StageDiff=(type Psi/F)
SET TOWER SPs (4)
Valve/VFD Control=
None
Valve Type=NC
SET TOWER SPs (5)
Valve Sp= 065F
Reset=20.0psi
ValveStartPosition
Min=010% @ 060oF
Valve Control Range
Min = 010%
Max = 100%
FB +075.4 Intg Derv
Trg +075.0 010s 010s
SET PASSWORD
(2)
Tech Password
00000 00000
SET UNIT SPs (9)
Templifier Src Water
No Start = 070oF
Delta Reset = 055oF
SET UNIT SPs (10)
VFD = YES
SET UNIT SPs (11)
Max Wtr Flow Rates
Evap WF=02400GPM
SET UNIT SPs (12)
Time
Day/Mon/Yr
SET UNIT SPs (13)
Refriigerant=R134a
Units = oF/psi (IP)
Lang = English
SET UNIT SPs (14)
Protocol = MODBUS
Id #= 001 Units =IP
SET UNIT SPs (15)
Ex-Val Gain-078
Offset (Slope)=700
SET COMP SPs (9)
Protocol=M-BUS MSTR
Ident Number= 001
Baud Rate = 19200
SET COMP SPs (10)
Refrg Sat Pressure
Evp Offset =+00.0 psi
Cnd Offset = +00.0psi
SET COMP SPs (11)
ELWT Offset = +0.0 oF
SET COMP SPs (9)
Protocol =M-BUS MSTR
Ident Number= 001
Baud Rate = 19200
SET COMP#2 SPs (10)
Refrg Sat Pressure
Evp Offset =+00.0 psi
Cnd Offset = +00.0psi
SET COMP#2 SPs (11)
ELWT Offset = +0.0 oF
SET TOWER VFD (9)
FB +075.4 Intg Derv
Trg +075.0 030s 030s
K1500 Db01 Tc 0500mS
SET TOWER SPs (10)
CAF*+013 +012 UT250
Spd 120 000% S0200
RLA-05 CsP+002 m1000
NOTE: The notation “blank mast page” indicates that the screen does not apply to this unit.
OMM 1008-3 57
Page 58

VIEW UNIT STATUS (1)
Unit=COOL
COMP#1 OFF #2 RUN
Ev/Cn Pmps=STRT/RUN
VIEW UNIT STATUS (2)
COMP#1 = OFF
Start-Start Tmr Cir
Inhibits-None
VIEW UNIT STATUS (3)
COMP#2 = OFF
Start-Start Tmr Cir
Inhibits-None
VIEW UNIT WATER°F(1)
In Out Delta
Evap XX.X XX.X XX.X
Cond XX.X XX.X XX.X
VIEW UNIT WATER°F(2)
In Out Delta
HtRC
Cond XX.X XX.X XX.X
VIEW UNIT WATER°F(3)
Selection can then be made by using the LEFT/RIGHT keys to move between columns and the UP/DOWN
keys to move between rows.
If the VIEW COMP#2 (3) screen is being viewed and the RIGHT arrow key is pressed, the display will show
VIEW EVAP. If the LEFT arrow key is then pressed, the display will show VIEW COMP#2 (3) again (not
VIEW COMP (1).
Attempts to scroll past the limits of the matrix are ignored.
Screen Definitions – VIEW
The following screens are shown in °F/psi. When the Display Units setpoint is set to °C/kPa, the units of
measure on the OITS will change accordingly. The controller will always be in inch-pounds.
View Unit Status
Unit states can be OFF, COOL, SHUTDOWN, and ALARM as determined from the Unit State variable, the
Unit Mode setpoint, and the presence of a unit shutdown alarm.
Compressor states can be OFF, START, HOLD, LOAD, UNLOAD, SHUTDN, and ALARM as determined
from the Comp State variable, the Load and Unload outputs, and the presence of a compressor shutdown
alarm.
Evap and Cond Pump states can be OFF, STRT (start), & RUN.
Inhibits are s ignals that prevent further loading such as Load Limit, High Di s charge Pressure , etc.
Inhibits are signals that prevent further loading such as Load Limit, High Discharge Pressure, etc.
View Water Status
This screen deals with a heat recovery option not currently available on Magnitude chillers.
58 OMM 1008-3
Page 59

Water Flow Rates
Evap = XXXXX GPM
Cond = XXXXX GPM
VIEW UNIT REFRG (1)
psi °F
Sat Evap XXX.X XX.X
Sat Cond XXX.X XX.X
VIEW UNIT REFRG (2)
Suct Line = XXX.X°F
Liquid Line= XXX.X°F
Lift Press =XXXX psi
VIEW UNIT TOWER (1)
VIEW UNIT TOWER (1)
Stages ON = 2 of 4
Stages ON = 2 of 4
Setpoint = XXX °F
Setpoint = XXXX psi
VIEW UNIT TOWER (2)
Bypass Valve = XXX%
VFD Speed = XXX%
VIEW COMP#N (1)
State = RUN
% RLA = XXX %
Evap LWT =000.0°F
View Refrigerant Status
View Tower Status
Tow er Control = Temp/None Tower Control = Lift
The first Stages ON value is the number of fan stages ON. The second number is the Tower Stages setpoint
(0 if Tower Control = None).
The Bypass Valve value is “None” (in place of XXX% ) if the Valve/VFD Control setpoint = None or VFD
Stage. The VFD Speed value shall be “None” if the Valve/VFD Control setpoint = None, Valve Setpoint, or
Valve Stage.
View Compressor Status
NOTE: In the following VIEW COMP screens, the #N field indicates which compressor (#1, or #2,) is bei ng
viewed. There are two columns of menus, the first for compressor #1, the second for #2.
State settings can be OFF, START, INTLOK, HOLD, LOAD, UNLOAD, SHUTDOWN, STOP, and ALARM
as determined from the Comp State variable, the Load and Unload outputs, and the presence of a compressor
shutdown alarm.
OMM 1008-3 59
Page 60

VIEW COMP#N (2)psi
Cond Press =XXXX
Evap Press =XXXX
Lift Press = XXX
VIEW COMP#N (3) psi
WMC Compressor
Oilless Design
(blank menu)
VIEW COMP#N (4) °F
Cavity Temp=XXX.X°F
Invert Temp=XXX.X°C
Lift Temp = XX.X°F
VIEW COMP#N (5) °F
Temp SH
Suction XXX.X XX.X
DischargeXXX.X XX.X
VIEW COMP#N (6)
psi °F
SatEvap XXX.X XXX.X
SatCond XXX.X XX.X
VIEW COMP#N (7)
Hours = XXXXX
Starts = XXXXX
VIEW COMP#N (8)
WMC Compressor Rdy
Mode3 Unit0 Float0
Auto Demand 000.0KW
VIEW COMP#N (9)RPM
Min=00000 Act=00000
Max=00000 Des=00000
Ver=419 Serial=0000
VIEW COMP#N(10)Alrms
Ctl-----------------
BearingF-00000A00000
Motor F-00000A00000
The following menus are found on the controller and contain detailed information on the compressor
operation, used only by trained compressor technicians.
60 OMM 1008-3
Page 61

VIEW COMP#N (11)Pwr
L1=458V 000.0Amps
L2=458V 000.0Amps
L3=458V 000.0Amps
VIEW COMP#N(12)Bear
FX 00000 RX 00000
FY 00000 RY 00000
AX 00000 Ver3939 Off
VIEW COMP#N(13)S-Str
UpTrp=0530 Vdrp 0000
DnTrp=0380 RxV 0654
Ver=00136 Ok SCR-On
VIEW COMP#N (14) Psi
IGV=020.0 DisC=082.6
024.9 Suct=081.9
00000Alr Intr=000.0
VIEW COMP#N(15)Temps
Suct=89.4 Cav=093.9
SCR=090.8 Ent=077.4
Disc=090.7 Lev=077.4
VIEW COMP#N(16)Motor
S_SP 0017
Spdly 0000
Inv_Temp 031.0 deg C
VIEW EVAPORATOR
Suct SH = XXX.X °F
Approach = XX.X °F
View Vessel Status
Press right arrow to view the condenser data.
OMM 1008-3 61
Page 62

VIEW CONDENSER
Disch SH = XXX.X °F
Approach = XX.X °F
Subcooling= XX.X °F
ALARM LOG 01
Description
hh:mm:ss dd/mmm/yyyy
ALARM LOG 02 to 25
Description
hh:mm:ss dd/mmm/yyyy
ACTIVE ALARM
Time Date
Fault Description
SET UNIT SPs (1)
Unit Enable = OFF
Unit Mode = COOL
Source = SWITCHES
SET UNIT SPs (2)
Available Modes
= COOL
Select w/Unit Off
SET UNIT SPs (3)
Cool LWT = XX.X°F
Ice LWT = XX.XF
Heat LWT = XX.XF
View Alarms
Set Unit Setpoints
The following screens are only shown in °F/psi. Setpoint default vales and available setting range can be
found in Table 6 on page 19. Values/selections shown on the following screens are typical values.
Unit Enable settings can be OFF and ON as determined from the Unit Enable setpoint.
Unit Mode settings can be COOL or TEST as determined from the Unit Mode setpoint (TEST mode is not be
selectable from the 4x20 display/keypad although it may be displayed if already set).
Source settings can be KEYPAD, SWITCHES, or NETWORK as determined from the Mode Source setpoint.
Available Modes settings for Magnitude chil lers can be COOL. The unit must be turned off to change this
setpoint.
Ignore any setting other than COOL LWT should they appear on this menu.
62 OMM 1008-3
Page 63

SET UNIT SPs (4)
Leaving Water Temp
StartDelta= 03.0°F
StopDelta = 03.0°F
SET UNIT SPs (5)
Reset Type =none
MaxResetDT =XX.X°F
StrtResetDT=XX.X°F
SET UNIT SPs (6)
Soft Load = OFF
BeginAmpLimit=40%
SoftLoadRamp=05min
SET UNIT SPs (7)
Max/Min LWT Rates
Max = 0.5°F/min
Min = 0.1°F/min
SET UNIT SPs (8)
EvapRecTmr =X.Xmin
EvapPump = #1 ONLY
CondPump = #1 PRIM
SET UNIT SPs (9)
Templifier Scr Water
No Start =070°F
Delta Reset=055°F
Reset Type settings can be NONE, RETURN, or 4-20 as determined by the LWT Reset Type setpoint.
Soft Load settings can be OFF or ON as determined from the Soft Load setpoint.
Pump Selection
The Evaporator Water Pump outputs will be controlled in a Primary/Standby manner according to the Evap
Pump setpoint which may be set to #1 Only, #2 Only, Auto, #1 Primary/#2 Standby, or #2 Primary/#1
Standby.
• If #1 Only is selected, only pump #1 will be started even in event of a failure.
• If #2 Only is selected, only pump #2 will be started.
• If Auto is desired, the unit will try to balance oper ati ng hours on each pump by starting the pump with the
least amount of operating hours first. In case of pump failure, the unit will start the backup pump.
• In standby mode, the primary pump will always be started first. The standby pump will only be started if
there is a failure indicated on the primary pump.
An Evaporator Wat er Pump output will be ON if the Evap State is set to START or RUN. Both outputs will
be OFF if the Evap State is set to OFF.
This menu does not apply to Magnitude chillers and should be ignored.
OMM 1008-3 63
Page 64

SET UNIT SPs (10)
VFD = Yes
SET UNIT SPs (11)
Max Wtr Flow Rates
Evap WF = 02400 GPM
Cond WF = 03000 GPM
SET UNIT SPs (12)
STD/Day Light Time
dd/mmm/yyyy
hh:mm:ss Day of week
SET UNIT SPs (13)
Display Format
Units = °F/psi (IP)
Lang = English
SET UNIT SPs (14)
Protocol = Modbus
Id#= 001 Units=IP
Baud Rate = 19200
SET UNIT SPs (15)
Ex-Val Gain-078
Offset (Slope)=700
Prs Ctrl DOut 10.0oF
SET COMP#N SPs (1)
Demand Limit = OFF
Minimum Amps = 010%
Maximum Amps = 100%
SET COMP#N SPs (2)
StageMode = NORMAL
StageSequence# =01
Max Comprs ON =02
VFD settings are controlled by the compressor on-board microprocessor and these settings are not used.
These settings are used to calibrate customer-supplied flow switches.
Set Compressor Setpoints
NOTE: In the following SET COMP screens, the #N field indicates which compressor (#1 or #2 ) is being
set. There is basically a column of menu screens for each compressor.
Demand Limit settings can be OFF or ON as determined from the Demand Limit setpoint.
64 OMM 1008-3
Page 65

SET COMP#N SPs (3)
StageDeltaT =1.0°F
Stop-Start =03min
Start-Start =05min
SET COMP#1 SPs (4)
SET COMP#2 SPs (4)
UL Surge Ofs=200RPM
Name Plate RLA 140
Name Plate RLA 140
SET COMP# SP1 (5)
SET COMP# SP2 (5)
Lead Staging=030%
Nom Capacity=0100T
Nom Capacity=0100T
Hotgasbypass=30%
Hotgasbypass=30%
SET COMP#N SPs (6)
IntrLokTmr=010sec
UnloadTimer=030sec
Max Str LWT = XXX°F
StageMode can be NORMAL, HI EFF, PUMP, and STANDBY determined by the Stage Mode setpoint.
NORMAL has the auto-balance sequence that starts compressors with least starts and stops compressors with
most hours, in sequence, providing all compressors have the same sequence number. If they have different
sequence numbers, say 1, 2, 3, 4; they will always start in that sequence. That is, sequence number will take
precedence over auto-balance sequencing.
HI EFF is used with multiple chillers and runs one compressor per chiller whenever possible.
PUMP starts all compressors on the same chiller first, starting with the chiller with the compressor with the
least starts (or by sequence number if they are different).
STANDBY is used in multi-compressor systems and reserves a compressor to come on only if there is a
failure of another compressor in the system and the standby compressor capacity is required to maintain
chilled water temperature.
StageSequence is set for each compressor:
•
In NORMAL or STANDBY Mode, all compressors can have the same number or a number from 1 up to
•
the total number of compressors. Sequence number has priority over other considerations. If four
compressors in a system are given the sequence numbers 1 through 4, they will always start in that order.
With the same number they will auto-sequence.
•
In HI EFF or PUMP Mode, all compressors must have the same sequence number.
•
•
Max Comprs ON limits the number of compressors allowed to run in multi-compressor systems. It
•
provides a "floating standby" compressor. All controllers must have the same setting for this setpoint.
Full Load timing is one of several “full load flags,” parameters that indicate a compressor is at full load.
Ignore hot gas bypass setting. Magnitude chillers are not so equipped.
InterLok Timer = 10 Sec - Time allotted for the compressor to detect the Interlock switch is closed and report
status to controller.
Unload Timer = 60 sec - Time allotted for lead compressor to Unload to provide condenser relief, before
starting lag comp.
Max Start LWT = 10.0F - If ELWT is higher than setpoint above Evap Target Temp, then Comp will be
commanded to start with the Max Starting Demand value of 80%. (800). This softens the start routine for
starts close to target temperature.
OMM 1008-3 65
Page 66

SET COMP#1 (7)
SET COMP#2 (7)
Vane Control
Vane Control
Lead Start=045%
Lead Start=045%
Lag Start=050%
Lag Start=050%
SET COMP#1 (8)
SET COMP#2 (8)
Start Speed
Start Speed
Lead Str Spd=050%
Lead Str Spd=050%
Lag Str Spd=020%
Lag Str Spd=020%
SET COMP#N (9)
Protocol =M-BUS MSTR
Ident Number= 001
Baud Rate = 19200
Ignore this menu on Magnitude chillers.
Staging Parameters
Full Load Determination
Each compressor determines if it is at its maximum capacity (or maximum allowed capacity) and, if so, set its
Full Load flag. The flag advises other components that the compressor is fully loaded. The flag is set (full
load) when one or more of the following conditions are met.
• The compressor is at its physical limit of capacity which means:
For VFD Set Point = NO: The load output has been pul sed ON for a cummulative time equal to or greater
than the Full Load set point (menu #4). Any unload pulse will reset the cumulative time to zero.
For VFD Set Point = YES: Load pulsing has exceeded the Full Load se t point (as descr ibed above) AND the
VFD speed = 100%
OR
The Vanes Open digital input is On AND the VFD speed = 100%.
• The % RLA is above or equals the Maximum Amp limit set point.
• The % RLA is above or equals the Demand Limit analog input value
• The % RLA is above or equals the Network Limit value
• The evaporator pressure is below the Low Evap Pressure-Inhibit set point.
When none of the above conditions are met, the Full Load flag is cleared.
Absolute Capacity
Each compressor estimates its absolute capacity from the present value of %RLA and the Absolute Capacity
set point from the equation:
Absolute Capacity = (% RLA Factor) * (Absolute Capacity set point)
Where the % RLA Factor is interpolated from the following table.
% RLA 0 50 75 100 150
% RLA Factor 0 0.35 0.75 1.00 1.50
66 OMM 1008-3
Page 67

SET COMP#N (10)
Refrg Sat Pressure
Evp Offset=+00.0psi
Cnd Offset=+00.0psi
SET COMP#N (11)
ELWT Offset=+00.0°F
SET ALARM LMTS (1)
LowEvPrHold=27psi
LowEvPrUnld=26psi
LowEvPrStop=25psi
SET ALARM LMTS (2)
HighCondPr = 140psi
HiDschT-Load=170°F
HiDschT-Stop=190°F
SET ALARM LMTS (3)
WMC Compressor
Oilless Design
(blank mask page)
SET ALARM LMTS (4)
Surge Slp Str=20oF
Surge Tmp Run=20oF
MtrCurThrshld=05
!
CAUTION
SET ALARM LMTS (5)
Evap Freeze=34.0°F
Cond Freeze=34.0°F
SET TOWER SPs (1)
TowerControl = None
Tower Stages = 2
StageUP/DN=080/020%
Set Alarm Limits
Only trained compressor technicians should set these setpoints.
Set Tower Setpoints
Tower fan control settings can be None, Temp, or Lift.
OMM 1008-3 67
Page 68

SET TOWER SPs (2)
SET TOWER SPs (2)
Stage ON (Temp)°F
Stage ON (Lift)psi
#1 #2 #3 #4
#1 #2 #3 #4
XXX XXX XXX XXX
XXX XXX XXX XXX
SET TOWER SPs (3)
SET TOWER SPs (3)
VFD Min Spd=20.0%
VFD Min Spd=20.0%
StageDiff=type psi/F
StageDiff=type psi/F
Stg Up=02 Dn=05 min
Stg Up=02 Dn=05 min
SET TOWER SPs (4)
Valve/VFD Control=
None
Valve Type = NC
SET TOWER SPs (5)
SET TOWER SPs (5)
Reset = 05F
Valve SP = 20.0 psi
Sensor=ECWT-B3
Sensor=ECWT-B9
SET TOWER SPs (6)
ValveStartPosition
Min = 010% @ 060°F
Max = 100% @ 090°F
SET TOWER SPs (7)
Valve Control Range
Min = 010%
Max = 100%
Tower Fan Control=Temp/None Tower Control = Lift
Tower Fan Control=Temp/None Tower Control = Lift(psi)
VFD Min Spd - Tower Fan Minimum VFD Speed (%)
StageDiff - Fan staging deadband (type? psi/° F)
StageUp - Time between a fan stage event and the next fan stage up event.
StageDown - Time between a fan stage event and the next fan stage down event.
Tower Configuration
Bypass Valve/ Fan VFD combination
Bypass Valve Type - Nornally Open / Closed
Tow er Control = Temp/None Tower Control = Lift
Valve Sp - Bypass Valve Non-st aging Control Target
Reset - sets the amount of Tower reset (Lift/Temp) to coax more capacity from the
compressor if needed.
Sensor - Tower water return sensor (Ain-B3 or B9)
Sets tower bypass valve
68 OMM 1008-3
Page 69

SET TOWER ByP (8)
FB +075.4 Intg Derv
Trg +075.0 010s 010s
K1500 Db01Tc 1000mS
SET TOWER VFD (8)
FB +075.4 Intg Derv
Trg +075.0 010s 010s
K1500 Db01Tc 1000mS
Db Tower R06.5 F0653
CAF*+013 +012 UT250
Spd 120 000% S0200
RLA-05 CsP+002 m1000
FB - Feedback of control parameter.
Trg - Control Target (Selected type Lift/Temp)
Intg - Integral time period (seconds)
Derv - Derivative time period (seconds)
K - Proportional constant
Db - Dead band of the control target
Tc - Time constant of the output correction.
Figure 32, Bypass Valve Position
Initial Valve Pos ition
Max Position @
(values are examples only)
Set Point
(90°F)
Min Position @
Set Point
(60°F)
Min Start Position
Set Point (10%)
Normal Operation
When the condenser pump is in the RUN state, the valve output is controlled in one of two modes as
specified by the Valve/VFD Control setpoint. The controlled parameter (CP) is either ECWT or Lift as
Max Start Position
Set Point (90%)
OMM 1008-3 69
Page 70

# Of Fans ON
Active Setpoint
0
Valve Setpoint (Temp OR Lift as appropriate)
1
Stage #1 ON (Temp OR Lift as appropriate)
2
Stage #2 ON (Temp OR Lift as appropriate)
3
Stage #3 ON (Temp OR Lift as appropriate)
4
Stage #4 ON (Temp OR Lift as appropriate)
specified by the Tower Control setpoint. When the desired output signal varies from 0 to 100%, the output
voltage will vary as follows.
• 0 to 10 VDC (Valve Type = NC to tower)
• 10 to 0 VDC (Valve Type = NO to tower)
Valve Setpoint Mode
This mode is operational when the Valve/VFD Control setpoint is set to Valve Setpoint OR Valve SP/VFD
Stage. In this mode the valve output is varied with a proportional-derivative (PD) algorithm (with deadband)
in order to maintain the contr oll ed parameter (CP) at the desir ed value. The output is al ways limited between
the Valve Control Range (Min) setpoint and the Val ve Control Range (Max) setpoint. A valve increment is
computed once every 5 seconds according to the following equation.
• Increment = [(Error) * (Error Gain setpoint)] + [(Slope) * (Slope Gain setpoint)]
• Where: Error = ECWT – Valve Setpoint (Temp), (only if Tower Control setpoint = Temperature)
• Error = Lift – Valve Setpoint (Lift), (only if Tower Control setpoint = Lift)
• Slope = (Present CP) – (Previous CP)
When the Error is > the Valve Deadband (Temp OR Lift as appropriate) setpoint, the valve position analog
output (% of full scale) is updated according to the following equation.
• New %Position = Old %Position + Increment/10.
Valve Stage Mode
This mode is only operational when the Va lve/VFD Control setpoint is set to Valve Stage. In this mode the
valve output is controlled as for Valve Setpoint mode (above), except that the active setpoint for the
controlled parameter is selected according to the following table.
Table 20, Valve Staging
Cooling Tower Fan VFD
Normal Operation
When the Va lve/VFD Control s etpoint is set to None, Valve Setpoint, OR Valve Stage, this output is set to 0.
Otherwise, it shall be controlled in a manner identical to Valve Stage Mode (above) except that (1) it is kept
at zero until the first fan stage is ON and (2) the following setpoints do not apply.
• Valve Control Range (Min)
• Valve Control Range (Max)
• Valve Type
Editing
Editing is accomplished by pressing the ENTER (lower-right key) key until the desired field is selected. This
field is indicated by a blinking cursor under it. The arrow keys then operate as follows:
CANCEL (⇒ Key) Reset the current field to the value it had when editing began.
DEFAULT (⇐ Key) Set value to original factory setting.
INCREMENT (⇑ Key) Increase the value or select the next item in a list.
DECREMENT (⇓ Key) Decrease the value or select the previous item in a list.
During edit mode, the display shows a two-character wide menu pane on the right as shown below.
70 OMM 1008-3
Page 71

SET UNIT SPs (X) <D
(data) <C
(data) <+
(data) <-
Additional fields can be edited by pressing the ENTER key until the desired field is selected. When the last
field is selected, pressing the ENTER key switches the display out of “edit” mode and returns the arrow keys
to “scroll” mode.
Alarms
When an alarm occurs, the alarm type, date, and time are stored in the active alarm buffer corresponding to
that alarm (viewed on the Alarm Active screens) and also in the alarm log buffer (viewed on the Alarm Log
screens). The active alarm buffers hold a record of the last occurrence of each alarm and whether or not it has
been cleared. The alarm can be cleared by pressing the Edit key. A separate buffer is available for each alarm
(High Cond Pressure, Evaporator Freeze Protect, etc.) The alarm history buffer holds a chronological
account of the last 25 alarms of any type.
Display Languages
Languages currently available are:
• English
Units of Measure
It is possible to select units of measure directly from the keypad. Systems available are:
• °F / psi: controller, touch screen
• °C / kPa: touch screen only
Security
Two four-digit passwords provide OPERATOR and MANAGER levels of access to changeable parameters.
Either password can be entered using the ENTER PASSWORD screen which can be accessed in one of three
ways:
1. The SET UNIT SPs menu
2. Scrolling to it (last screen in the SET UNIT SPs column)
3. By simply pressing the UP ARROW, DOWN ARROW, or DEFAULT keys while on the desired field
on one of the SET screens. The password can then be entered by pressing the ENTER key, scrolling
to the correct value with the UP and DOWN arrow keys, and pressing ENTER again. The length of
the password shall not be indicated. Once the correct password has been entered (cases 1 and 2
above), the PASSWORD screen shall show the active password level. For case 3 above, the
previously selected screen shall reappear (still in edit mode) with the cursor on the previously
selected field. Once a password has been entered, it shall remain valid for 15 minutes after the last
key-press. It shall be possible to change the passwords through multi-chiller communications.
Parameters and screens that require the MANAGER password shall not be displayed unless the
MANAGER password is active.
OMM 1008-3 71
Page 72

BAS Interface
The MicroTech II controller is available with the optional Open Choices feature, an exclusive Daikin
McQuay feature that provides easy integration with a building automation system (BAS). If the unit will be
tied into a BAS, the controller shoul d have been purchased with the cor rect factory-installed communication
module. The modules can also be added in the field during or after installation.
If an interface module was ordered, one of the following BAS interface installation manuals was shipped with
the unit. Contact your local Daikin McQuay sales office for a replacement, if necessary.
• IM 735, L
• IM 736, BACnet Communication Module Installation
• IM 743, Modbus Communication Module Installation
ONWORKS Communication Module Installation
Connection to Chiller
Connection to the chiller for all BAS protocols will be at the controller. An interface card will have to be
installed in the controller depending on the protocol being used.
Sequence of Operation
Determine “Next compressor on”; If none of the “OFF” conditions are true, then all the MicroTech II
compressor controls in a network of up to three units (six compressors) will pole the status of each
compressor to determine the one having “Next On” status, which is usually the compressor with the least
starts. This takes about one minute.
After Next-On status has been determined the expansion valve for that chiller will drive full close to reset its
step counter to zero. It will then open to a near full open position. The exact position will be determined
by conditions on the chiller.
Evaporator Pump Start; the controller of the chiller with the “Next On” compressor (when there are two or
three chillers) will start the evaporator pump and determine if there is load based on the water
temperature. This is determined if the leaving evaporator water is above the “LWT Setpoint” plus
“Startup Delta T”. If there is no load, based on the temperature, the unit is in the state of ‘Awaiting Load’.
Interlock On; if there is load; the unit waits for the Evaporator Recirculation Timer period to prove chilled
water flow (default value of 30 seconds) and starts the Interlock Timer for 10 seconds.
Condenser Pump Start. After Interlock is confirmed, the controller starts the Condenser Pump and checks for
condenser flow before starting the first compressor.
Lead Compressor Start
1. Compressor Start Speed is set.
2. Inlet Guide Vanes (IGV) Start Position is set. .
3. As the compressor loads up it will hold (stop loading) if it runs into a limit (Amps, Evap Press, or
LWT Slope limits.
4. Compressor Start Speed is reset to the Minimum Speed. .
5. IGV opens to 110%.
Lead compressor at full load. Full Load status is determined when any one of the following tests is true:
1. Percent RLA exceeds 100% or the Active-Amp-Limit from an external source.
2. Evap Saturation pressure drops below the Evap Inhibit Loading pressure set point.
3. This third test is the one that normally triggers the full load flag: Compressor is running with IGV
fully open (110%), and actual compressor RPM exceeds 96% of Max RPM limit from compressor,
and both have been true for 20 seconds.
Lag Compressor Staging Up.
1. Full Load indication from the Lead compressor is available.
72 OMM 1008-3
Page 73

2. Stage Up Delta Temperature – Evap LWT is above minimum staging setpoint, default is 1°F.
3. Pull Down Rate – ELWT slope is less than minimum rate, default is 0.1oF.
4. Before Lag start, the lead compressor may unload briefly and lower condenser pressure to
generate condenser relief, assisting the lag compressor start. .
Managing the Load
1. Compressors are controlled through a demand signal from 0 to1000.
2. The controller looks at the difference between the ELWT and the target leaving setpoint temperature
to determine the error.
3. During operation the vanes are controlled by internal compressor logic and can not be manually set.
Staging Off
1. Once the Next-Off determination has been made, normally based on run-hours is selected, it will
monitor the combined spare capacity of the other compressors. When the combined spare capacity
exceeds the next-off compressor capacity, then that compressor will shutdown.
2. The running compressor(s) will be allowed to ramp up and cover the capacity lost by the compressor
that staged off.
3. If there are more than two compressors running (multiple chillers), then the process described above
is repeated until only one compressor remains running .
4. As the heat load continues to drop off the last compressor will shut off at the ‘Shutdown Delta T’
below ‘LWT Setpoint.
Condenser Pump off after one minute.
OMM 1008-3 73
Page 74

Annual Shutdown
Seasonal Shutdown
Prior to shutdown periods and before starting up again, the following service procedures must be completed.
Where the chiller can be subject to freezing temperatures, the condenser and chiller must be drained of all
water. Dry air blown through the condenser will aid in forcing all water out. Removal of condenser heads is
also recommended. The condenser and evaporator are not self-draining and tubes must be blown out. Water
permitted to remain in the piping and vessels can rupture these parts if subjected to freezing temperature.
Except for freezing conditions, it is desirable to leave water in the vessels to avoid long term exposure to air.
Continuous forced circulation of antifreeze through the vessels is one method of avoiding freeze up.
1. If a cooling tower is used, and if the water pump will be exposed to freezing temperatures, be sure to
remove the pump drain plug and leave it out so any water that can accumulate will drain away.
2. Check for corrosion and clean and paint rusted surfaces.
3. Clean and flush water tower for all units operating on a water tower. Make sure tower blowdown or
bleed-off is operating. Set up and use a good maintenance program to prevent “liming up” of both tower
and condenser. It should be recognized that atmospheric air contains many contaminants that increase
the need for proper water treatment. The use of untreated water can result in corrosion, erosion, sliming,
scaling or algae formation. It is recommended that the service of a reliable water treatment company be
used. McQuay International assumes no responsibility for the results of untreated or improperly treated
water.
4. Remove condenser heads at least once a year to inspect the condenser tubes and clean if required.
5. Leak check the chiller to avoid a minor leak losing significant refrigerant during the shutdown
Seasonal Startup
1. Leak test the unit.
2. Check and tighten all electrical connections.
3. Replace the drain plugs (including cooling tower pump and tower drain) if they were removed at
shutdown the previous season.
74 OMM 1008-3
Page 75

!
DANGER
6
9.7
46
41.1
86
97.0
126
187.3 8 10.8
48
43.2
88
100.6
128
192.9
12
13.2
52
47.7
92
108.1
132
204.5
14
14.4
54
50.0
94
112.0
134
210.5
18
17.1
58
54.9
98
120.0
138
222.8
20
18.4
60
57.4
100
124.1
140
229.2
22
19.9
62
60.0
102
128.4
142
235.6
24
21.3
64
62.7
104
132.7
144
242.2
26
22.9
66
65.4
106
137.2
146
249.0
28
24.5
68
68.2
108
141.7
148
255.8
30
26.1
70
71.1
110
146.3
150
262.8
34
29.5
74
77.1
114
155.9
154
277.3
36
31.3
76
80.2
116
160.9
156
284.7
40
35.0
80
86.7
120
171.1
160
299.9
42
37.0
82
90.0
122
176.4
162
307.8
44
39.0
84
93.5
124
181.8
164
315.8
Maintenance
Wait 10 minutes after compressor shutdown before opening any compressor access panel.
°F PSIG °F PSIG °F PSIG °F PSIG
10 12.0 50 45.4 90 104.3 130 198.7
16 15.7 56 52.4 96 115.9 136 216.6
The DC link capacitors store enough energy to cause electrocution.
Pressure/Temperature Chart
R-134a Temperature Pressure Chart
32 27.8 72 74.0 112 151.1 152 270.0
38 33.1 78 83.4 118 166.0 158 292.2
Routine Maintenance
Refrigerant Cycle
Maintenance of the refrigerant cycle includes maintaining a log of the operating conditions and
checking that the unit has the proper refrigerant charge.
At every inspection, the suction, and discharge pressures should be noted and recorded, as well as
condenser and chiller water temperatures.
The suction line temperature at the compressor should be taken at least once a month. Subtracting the
saturated temperature equivalent of the suction pressure from this will give the suction superheat.
Extreme changes in subcooling and/or superheat over a period of time will indicate losses of refrigerant
or possible deterioration or malfunction of the expansion valve. The evaporator
(0.5º C) of superheat (at suction connection) through most of the load range. The refrigerant used for
compressor cooling dumps at the compressor suction, where the suction temperature sensor is located.
This results in a warming of the suction gas and superheat readings of 4º to 5º F (2º to 3º C), which is
the significant superheat reading as it indicates sufficiently dry suction gas entering the compressor.
The discharge superheat should be between 16º and 18º F (9º to 10º C) and remains fairly constant
through most of the load range.
Liquid subcooling is in the range of 8º to 9º F (4.5º to 5.0º C).
The MicroTech II operator interface touch-screen panel can display all superheat and subcooling
temperatures.
operates at 0º to 1º F
OMM 1008-3 75
Page 76

Electrical System
Maintenance of the electrical system involves the general requirement of keeping contacts clean
and connections tight and checking on specific items as follows:
The compressor current draw should be checked and compared to nameplate RLA value.
Normally, the actual current will be lower, since the nameplate rating represents full load
operation. Also check all pump and fan motor amperages, and compare with nameplate ratings.
At least once a quarter, all equipment protection controls, except compressor overloads, should be
made to operate and their operating points checked. A control can shift its operating point as it
ages, and this must be detected so the controls can be adjusted or replaced. Pump interlocks and
flow switches should be checked to be sure they interrupt the control circuit when tripped.
Cleaning and Preserving
A common cause of service calls and equipment malfunction is dirt. This can be prevented with normal
maintenance. The system components most subject to dirt are:
1. Permanent or cleanable filters in the air handling equipment must be cleaned in accordance with the
manufacturer’s instructions; throwaway filters should be replaced. The frequency of this service will
vary with each installation.
2. Remove and clean strainers in the chilled water system and condenser water system at every
inspection.
3. Inspect the condenser tubes annually for fouling and clean if required. The dished water heads (aka
end-bells, water boxes) should be removed with care due to their weight. One method follows:
• After draining water, remove all but two head bolts at roughly 10 and 2 o’clock.
• Loosen the remaining two bolts to enable the head to be separated from the tube sheet
sufficiently for a clevis pin or hook to be inserted into an open bolt hole at the top of the head.
• Attach a hoist to the pin or hook, lift the head to remove weight from the two remaining bolts,
remove the bolts and carefully remove the head.
• Do not try to install a machine thread eyebolt into the head vent fitting, which has pipe threads.
• Reverse this procedure to mount the head, using a new gasket.
Water Treatment
Make sure tower blowdown or bleed-off is operating. Set up and use a good maintenance program to
prevent “liming up” of both tower and condenser. It should be recognized that atmospheric air
contains many contaminants that increase the need for proper water treatment. The use of untreated
water can result in corrosion, erosion, sliming, scaling or algae formation. It is recommended that the
service of a reliable water treatment company be used. McQuay International assumes no
responsibility for the results of untreated or improperly treated water.
Repair of System
Pressure Relief Valve Replacement
Current condenser designs use two relief valves separated by a three-way shutoff valve (one set). This
three-way valve allows either relief valve to be shut off, but at no time can both be shut off. In the
event one of the relief valves are leaking in the two-valve set, these procedures must be followed:
See Figure 33 on the following page for operation of the three-way valve that determines which relief
valve is active.
The refrigerant must be pumped down into the condenser before the evaporator relief valve can be
removed.
76 OMM 1008-3
Page 77

!
WARNING
Figure 33, Relief Three-Way Valve Positions
Pumping Down
If it becomes necessary to pump the system down, extreme care must be used to avoid damage to the
evaporator from freezing. Always make sure that full water flow is maintained through the chiller and
condenser while pumping down. To pump the system down, close the main liquid line valve. Start the
compressor and pump the unit down until the controller cuts out at the low pressure cutoff setting. It is
desirable to have low temperature condenser water in order to reduce compressor head and reduce the
possibility of surge.
It is possible that the unit might experience a mild surge condition prior to cutout. The compressor
should take corrective action to avoid this but should surge continue, shut off the compressor.
Use a portable condensing unit to complete the pump down, condense the refrigerant, and pump it into
the condenser or pumpout vessel using approved procedures.
Pressure Testing
No pressure testing is necessary unless some damage was incurred during shipment. Damage can be
determined by a visual inspection of the exterior piping, checking that no breakage occurred or
fittings loosened. Service gauges should show a positive pressure. If no pressure is evident on the
gauges, a leak may have occurred, discharging the entire refrigerant charge. In this case, the unit
must be leak tested to determine the location of the leak.
Leak Testing
In the case of loss of the entire refrigerant charge, the unit must be checked for leaks prior to charging
the complete system. This can be done by charging enough refrigerant into the system to build the
pressure up to approximately 10 psig (69 kPa) and adding sufficient dry nitrogen to bring the pressure
up to a maximum of 125 psig (860 kPa). Leak test with an electronic leak detector. Halide leak
detectors do not function with R-134a. Water flow through the vessels must be maintained anytime
refrigerant is added or removed from the system.
Do not use oxygen or a mixture of a refrigerant and air to build up pressure as an explosion can
occur causing serious personal injury.
If any leaks are found in welded or brazed joints, or it is necessary to replace a gasket, relieve the test
pressure in the system before proceeding. Brazing is required for copper joints.
After making any necessary repair, evacuate the system as described in the following section.
OMM 1008-3 77
Page 78

!
CAUTION
Evacuation
After it has been determined that there are no refrigerant leaks, the system must be evacuated using a
vacuum pump with a capacity that will reduce the vacuum to at least 1000 microns of mercury.
A mercury manometer or an electronic or other type of micron gauge must be connected at the
farthest point from the vacuum pump. For readings below 1000 microns, an electronic or other
micron gauge must be used.
The triple evacuation method is recommended and is particularly helpful if the vacuum pump is
unable to obtain the desired 1 millimeter of vacuum. The system is first evacuated to approximately
29 inches of mercury. Dry nitrogen is then added to the system to bring the pressure up to zero
pounds.
Then the system is once again evacuated to approximately 29 inches of mercury. This is repeated
three times. The first pulldown will remove about 90% of the noncondensables, the second about
90% of that remaining from the first pulldown and, after the third, only 1/10-1% noncondensables
will remain.
Charging the System
Daikin McQuay water chillers are leak tested at the factory and shipped with the correct charge of
refrigerant as indicated on the unit nameplate. In the event the refrigerant charge was lost due to
shipping damage, charge system as follows after first repairing the leaks and evacuating the system.
1. Connect the refrigerant drum to the gauge port on the liquid line shutoff valve and purge the
charging line between the refrigerant cylinder and the valve. Then open the valve to the midposition.
2. Turn on both the cooling tower water pump and chilled water pump and allow water to circulate
through the condenser and the chiller. (It may be necessary to manually close the condenser pump
starter.)
3. If the system is under a vacuum, stand the refrigerant drum with the connection up, and open the
drum and break the vacuum with refrigerant gas to a saturated pressure above freezing.
4. With a system gas pressure higher than the equivalent of a freezing temperature, invert the charging
cylinder and elevate the drum above the condenser. With the drum in this position, valves open,
water pumps operating, liquid refrigerant will flow into the condenser. Approximately 75% of the
total requirement estimated for the unit can be charged in this manner.
5. After 75% of the required charge has entered the condenser, reconnect the refrigerant drum and
charging line to the service valve on the bottom of the evaporator. Again purge the connecting line,
stand the drum with the connection up, and place the service valve in the open position.
IMPORTANT: At this point, the charging procedure should be interrupted and prestart
checks made before attempting to complete refrigerant charge. The compressor must not
be started at this time.
(Preliminary check must first be completed.)
NOTE: It is of utmost importance that all local, national, and international regulations
concerning the handling and emission of refrigerants are observed.
78 OMM 1008-3
Page 79

I. Compressor
B. Motor
• Ampere Balance (within 10%)
X
• Motor Cooling (check temperature)
C. Vane Operation
• Compressor Loads:
Operate Manual Switch
X
Record Motor Amps
X
• Compressor Unloads:
Operate manual Switch
X
Record Motor Amps
X
• Vanes Will Hol d (pl ace manual switch in "hold")
Observe Water Temp and Record Amps
X
D. Internal Compressor Check
X
II. Controls
A. Operating Controls
• Check Settings and Operati on
X
• Check Vane Control Setting and O perat i on
X
• Verify Motor Load Limit Control
X
• Verify Load Balance Operation
X
B. Protective Controls
• Test Operation of:
Alarm Relay
X
Pump Interlocks
X
III. Condenser
B. Test W ater Quality
X
C. Clean Condenser Tubes
X
D. Eddy current Test - Tube Wall Thickness
X
E. Seasonal Protecti on
X
IV. Evaporator
A. Performance Evaluat i on (Log Condi t i ons And Analysis)
O
B. Test W ater Quality
X
C. Clean Evaporator Tubes (as required)
X
E. Seasonal Protecti on
X
V. Expansion Valve
A. Performance Evaluat i on (Superheat Control)
X
VI. Compressor - Chiller Unit
A. Performance Evaluat i on
O
B. Leak Test:
• Compressor Fittings and Terminal
• Piping Fittings
X
X
C. Vibration Isolati on T est
X
D. General Appearance:
• Paint
X
• Insulation
X
bar. Consult McQuay International for parts and instructions .
Maintenance Sched ule
A. Performance Evaluat i on (Log & Analysis) * O
X
• Terminal Check (tight connections, porcelain cl ean)
X
A. Performance Evaluat i on O
D. Eddy current Test - Tube Wall thickness (as requi red) X
X
• Vessel Relief Valves
VII. Electrical
A. Capacitors, Replace every 10 years f rom startup, include bus
Key: O = Performed by in-house personnel X = Performed by Daikin McQuay Service personnel
OMM 1008-3 79
Page 80

Service Programs
It is important that an air conditioning system receive adequate maintenance if the full equipment
life and full system benefits are to be realized.
Maintenance should be an ongoing program from the time the system is initially started. A full
inspection should be made after 3 to 4 weeks of normal operation on a new installation and on a
regular basis thereafter.
McQuay International offers a variety of maintenance services through the local McQuay Factory
Service office, its worldwide service organization, and can tailor these services to suit the needs of
the building owner. Most popular among these services is the McQuay International
Comprehensive Maintenance Contract.
For further information concerning the many services available, contact your local McQuay
Factory Service office.
Operator Schools
Training courses for Magnitude Centrifugal Maintenance and Operation are held through the year at
the International Training Center in Staunton, Virginia. The school duration is three and one-half days
and includes instruction on basic refrigeration, MicroTech II controllers, enhancing chiller efficiency
and reliability, MicroTech II troubleshooting, system components, and other related subjects. Further
information can be found by visiting International
Training link, or by calling McQuay International at 540-248-0711 and speaking to the Training
Department.
www.daikinmcquay.com and clicking on the
Limited Warranty
Consult your local Daikin McQuay Representative for warranty details. Refer to Form 933-43285Y.
To find your local Daikin McQuay Representative, go to www.daikinmcquay.com.
80 OMM 1008-3
Page 81

Page 82

Page 83

Page 84

Daikin McQuay Learning Institute
Now that you have made an investment in modern, efficient Daikin McQuay equipment, its care should be a
high priority. For training information on all Daikin McQuay HVAC products, please visit us at
www.daikinmcquay.com/Training, or call 540-248-9646 to speak to the Training Department.
Warranty
All Daikin McQuay equipment is sold pursuant to McQuay International standard terms and conditions of sale,
including Limited Product Warranty. Consult your local Daikin McQuay Representative for warranty details. To
find your local Daikin McQuay Representative, go to
This document contains the most current product information as of this printing. For the most up-to-date
product information, please go to
www.daikinmcquay.com.
www.daikinmcquay.com.
(800) 432-1342 • www.daikinmcquay.com OMM 1008-3 (4/12)
 Loading...