

Page 1

MODE
P1 P2
Before using your air conditioner, please read this operating manual carefully and keep it
for future reference.
Part Number: R08019029996
Date: JANUARY 2007
OM-G17-0107-McQuay
© 2007 McQuay International
OPERATION MANUAL
OM-G17-0107-McQuay 8/29/08, 3:21 PM17
Page 2

G17 Remote Control Indication / Indication De
Télécommande G17 / G17-Fernbedienungsanzeige /
Indicazioni Telecomando G17 / Indicación Del Mando A
Distancia G17 / Индикация пульта
дистанционного управления G17 /
G17 UzaktanG17 Uzaktan
G17 UzaktanG17 Uzaktan
G17 Uzaktan
Kumanda GöstergeleriKumanda Göstergeleri
Kumanda GöstergeleriKumanda Göstergeleri
Kumanda Göstergeleri
Part No.: R08019029996 OM-G17-0107-McQuay
i
MODE
P1 P2
SLEEP
SET
CANCEL
ON TIMER
SET
CANCEL
OFF TIMER
1
2
3
4
5
6
8
9(a)
7
11
12
13
10
14
MODE
P1 P2
SLEEP
SET
CANCEL
ON TIMER
SET
CANCEL
OFF TIMER
1
2
3
4
5
6
8
9(b)
7
11
12
13
10
14
With Silent Function With Ioziner Function
OM-G17-0107-McQuay 8/29/08, 3:21 PM18
Page 3
1
23
MODE
P1 P2
ii
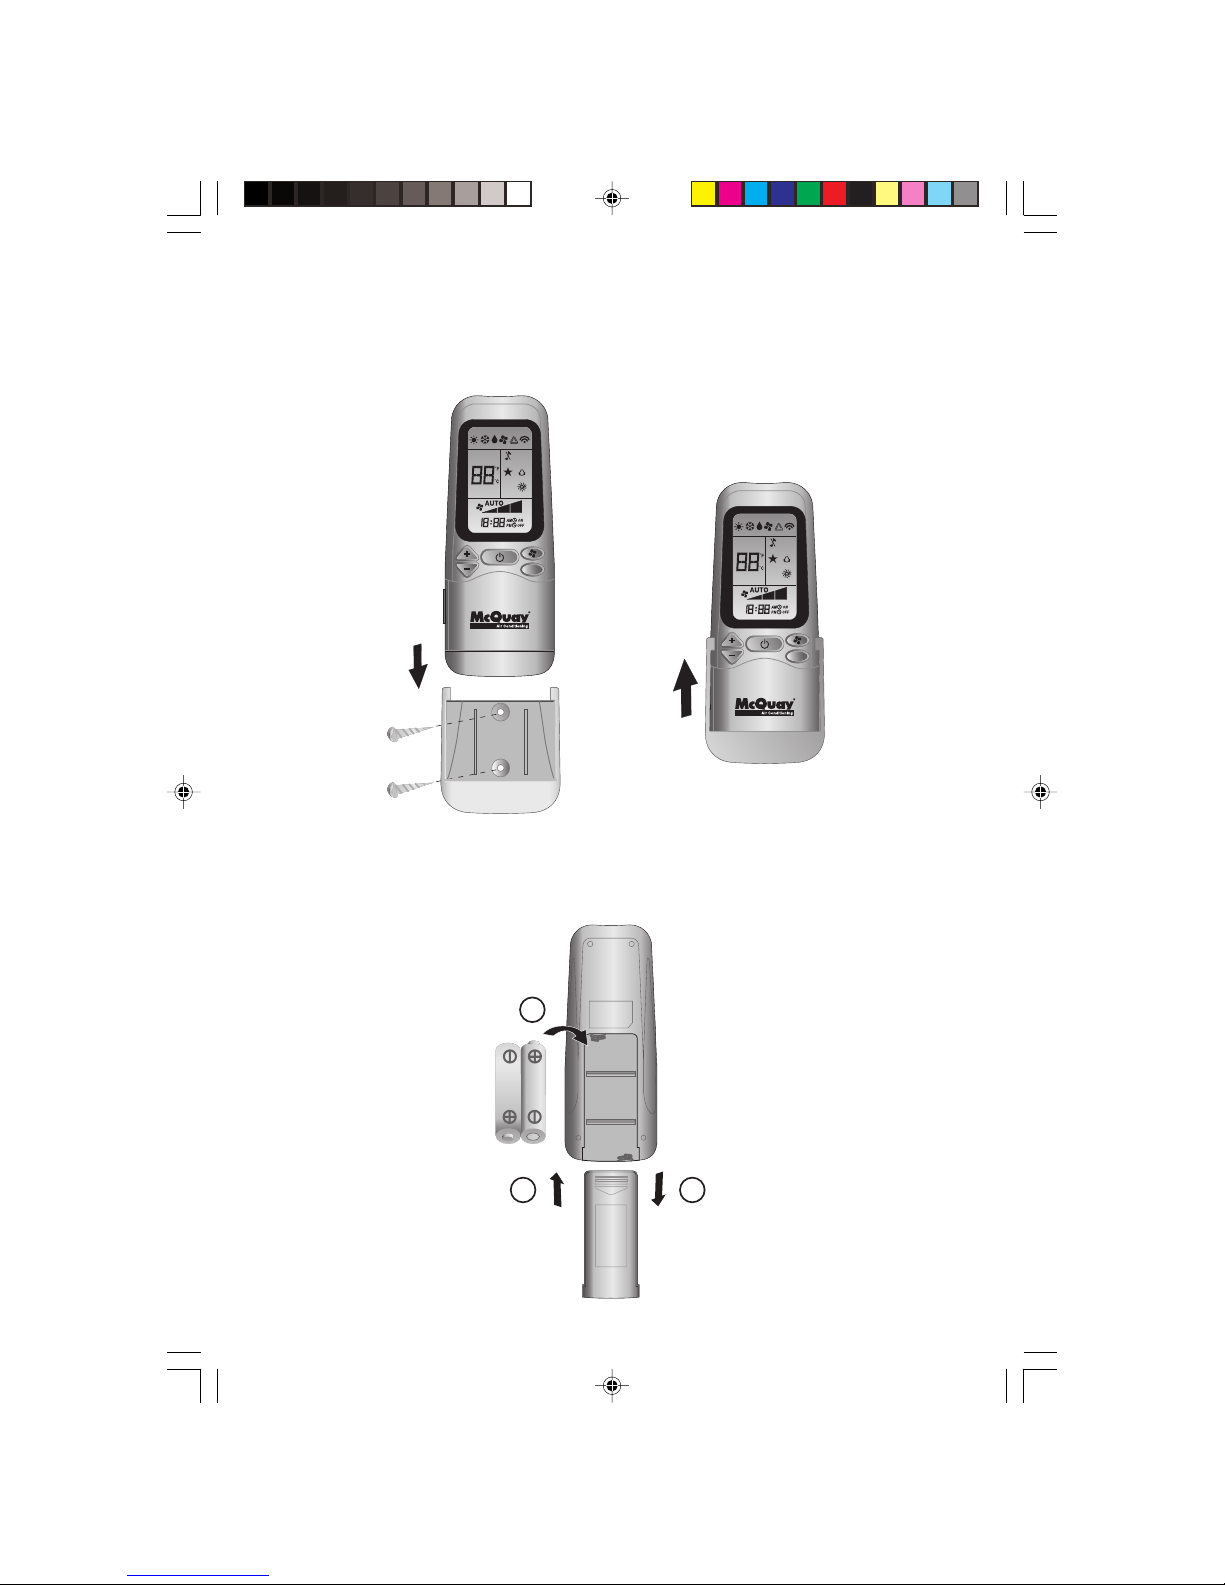
HOW TO MOUNT ONTO THE WALL / COMMENT INSTALLER SUR LE MUR /
ANBRINGEN DER FERNSTEUERUNG AN DER WAND /
COME FISSARE L’ASTUCCIO DEL TELECOMANDO ALLA PARETE /
MONTAJE SOBRE LA PARED / КАК УСТАНОВИТЬ НА СТЕНУ /
DUVARA NASIL YERLEfiT‹R‹L‹RDUVARA NASIL YERLEfiT‹R‹L‹R
DUVARA NASIL YERLEfiT‹R‹L‹RDUVARA NASIL YERLEfiT‹R‹L‹R
DUVARA NASIL YERLEfiT‹R‹L‹R
TO INSERT BATTERIES (AAA.R03) / INTRODUIRE LES PILES (AAA.R03) /
EINSETZEN DER BATTERIEN (AAA.R03)/ INSERIMENTO DELLE BATTERIE
(AAA.R03) / INSERTE LAS PILAS (AAA.R03) / УСТАНОВКА БАТАРЕЙ
(AAA.R03) /
P‹LLER NASIL TAKILIR (AAA.R03)P‹LLER NASIL TAKILIR (AAA.R03)
P‹LLER NASIL TAKILIR (AAA.R03)P‹LLER NASIL TAKILIR (AAA.R03)
P‹LLER NASIL TAKILIR (AAA.R03)
MODE
P1 P2
OM-G17-0107-McQuay 8/29/08, 3:21 PM19
Page 4

iii
OM-G17-0107-McQuay 8/29/08, 3:21 PM20
Page 5
1
1. Transmission source
• The source where the signal will be transmitted.
2. Signal transmission indication
• Blink to confirm that the last setting has been transmitted to the unit.
3. “ON/OFF” Button
• Press once to start the air conditioner unit.
• Press again to stop the unit.
4. Fan speed selection
• Press the button continuously will toggle the fan speed in the following
order:
Low –––: Med –––: High –––: Auto
• Stop pressing when the desired fan speed appears on the display screen.
5. Operation mode
• Press the MODE button to select the type of operating mode.
• For cooling only unit, the available modes are: COOL ( ), DRY ( ) and
FAN ( ).
• For heat pump unit, the available modes are: AUTO ( ), COOL ( ),
DRY ( ), FAN ( ) and HEAT ( ).
• The AUTO ( ) mode is unavailable for chilled water 2-pipe system.
6. Automatic air swing (optional)
• Press the SWING button to activate the automatic air swing function.
• To distribute the air to a specific direction, press the SWING button and
wait until the louver move to the desired direction and press the button once
again.
7. Turbo function
• Press for fast cooling or heating operation.
• Fan speed turn to maximum speed.
• Press again to deactivate the function.
• Available under HEAT, COOL and DRY modes only.
• The Turbo function ( ) is unavailable for chilled water system.
8. OFF timer setting
• Press the SET button will activate the off timer function.
• Set the desired off time by pressing the SET button continuously.
• Press the CANCEL button to cancel the off timer setting.
9(a). Silent function
• Press for quiet operation.
• Fan speed turn to minimum speed.
• Press again to deactivate the function.
• The Silent function ( ) is unavailable for chiller water system.
OPERATING GUIDE
OM-G17-0107-McQuay 8/29/08, 3:20 PM1
Page 6

2
9(b). Ionizer setting (model dependant)
• Press will activate the ionizer function.
• Press again to deactivate the function.
10. Clock time setting
• Press and hold button to set the clock time.
11. ON timer setting
• Press the SET button will activate the on timer function.
• Set the desired on time by pressing the SET button continuously. If the timer is
set to 7.30am, the air conditioner will turn on at 7.30am sharp.
• Press the CANCEL button to cancel the on timer setting.
12. Sleep mode setting
• Press the SLEEP button will activate the sleep mode function.
• This is an energy saving option. When the
unit is operating under cooling mode, the
set temperature is increased by 0.5°C after
the first half an hour, another 0.5°C after
the second half an hour and 1°C after the
following 1 hour.
• When the unit is operating under heating
mode, the set temperature is decreased by
1°C after the first half an hour, another 1°C
after the second half an hour and 1°C after
the following 1 hour.
• This function is available under COOL, HEAT and AUTO mode.
13. Personalize setting
• Press and hold for 3s, then will blink. Press again to cycle between
and .
• Set the desire setting, then leave the handset for 4s without pressing any key
and it will save the setting into the programme.
• Press once to activate the P1 setting, press again to cycle between P1 and P2.
• Press any key to deactivate the personalize setting.
14. Temperature setting
• To set the desired room temperature, press the + or -- button to increase or
decrease the set temperature.
• The temperature setting range is from 16°C to 30°C (Optional setting 20°C
to 30°C).
• Press both buttons simultaneously to toggle + and -- from °C to °F setting.
+2 C
+1 C
- 1 C
- 2 C
0 0.5 1 1.5 2
- 3 C
ENGLISH
OM-G17-0107-McQuay 8/29/08, 3:20 PM2
Page 7

3
MODE D’EMPLOI
1. Source de transmission
• La source d’où le signal sera transmis.
2. Indication de transmission de signal
• Clignotement pour confirmer que le dernier réglage ait été transmis à l’unité.
3. Bouton “ON/OFF” (MARCHE’/ARRÊT)
• Appuyez une fois pour mettre le climatiseur en marche.
• Appuyez de nouveau pour éteindre le climatisateur.
4. Sélection de la vitesse du ventilateur
• Appuyez de façon continue sur le bouton pour transformer successivement
la vitesse du ventilateur comme suit:
Lent –––: Moyen –––: Rapide –––: Auto
• Cessez d’appuyer lorsque la vitesse désirée apparaît sur l’écran d’affichage.
5. Mode opérationnel
• Appuyez sur le bouton MODE pour sélectionner le type de mode opérationnel.
• Pour l’unité de refroidissement, les modes disponibles comprennent
COOL ( ) (FROID), DRY ( ) (SEC) et FAN ( ) (VENTILATION).
• Pour l’unité de thermopompe, les modes disponibles comprennent:
AUTO ( ) (AUTO), COOL ( ) (FROID), DRY ( ) (SEC), FAN ( )
(VENTILATION) et HEAT ( ) (CHAUD).
• Le mode AUTO ( ) (AUTO) n’est pas disponible pour le circuit d’eau
réfrigérée à double tuyau.
6. Oscillation automatique de la ventilation (en option)
• Appuyez sur le bouton SWING pour activer la fonction d’oscillation
automatique de la ventilation.
• Pour orienter la ventilation dans une direction précise, appuyez sur le bouton
SWING , attendez ensuite que le volet de ventilation souffle dans la direction
désirée puis appuyez de nouveau sur le bouton.
7. Fonction turbo
• Appuyez sur le bouton pour refroidissement ou réchauffement rapide.
• Le ventilateur tourne à sa vitesse maximale.
• Pressez de nouveau pour désactiver la fonction.
• Disponible seulement sur le mode HEAT (CHAUD), COOL (FROID) et
DRY (SEC).
• Le mode Turbo ( ) n’est pas disponible pour le circuit d’eau réfrigérée.
8. Programmer la minuterie d’arrêt
• Appuyez sur le bouton SET pour activer la minuterie d’arrêt.
• Programmez l’heure désirée en appuyant continuellement sur le bouton SET.
• Appuyez sur le bouton CANCEL pour annuler le programmation d’arrêt.
9(a). Fonction silence
• Appuyez sur pour un fonctionnement silencieux.
• Le ventilateur tourne à sa vitesse minimale.
• Pressez de nouveau pour désactiver la fonction.
• Le mode Silencieux ( ) n’est pas disponible pour le circuit d’eau réfrigérée.
OM-G17-0107-McQuay 8/29/08, 3:20 PM3
Page 8

4
9(b). Réglage ioniseur (dépendant du modèle)
• Enfoncer active la fonction ioniseur.
• Pressez de nouveau pour désactiver la fonction.
10. Mettre l’horloge à l’heure
• Maintenez le bouton enfoncé pour mettre l’horloge à l’heure.
11. Programmer la minuterie de mise en marche
• Appuyez sur le bouton SET pour activer la minuterie de mise en marche.
• Programmez l’heure désirée en appuyant continuellement sur le bouton SET.
Si la minuterie est programmée à 7h30, le climatiseur se mettra en marche à
7h30 pile.
• Appuyez sur le bouton CANCEL pour annuler le programmation de la
minuterie.
12. Réglage du mode de nuit
• Appuyez sur le bouton SLEEP pour activer la fonction de mode de nuit.
• Ceci est une option anti-gaspillage
d’énergie. Lorsque l’unité fonctionne en
mode de refroidissement, la température
réglée augmente de 0,5°C au bout de la
première demi-heure, d’encore 0,5°C au
bout de la deuxième demi-heure et d’1°C
au bout de l’heure suivante.
• Lorsque l’unité fonctionne en mode de
chauffage, la température réglée diminue
d’1°C au bout de la première demi-heure,
d’encore 1°C au bout de la deuxième demiheure et d’1°C au bout de l’heure suivante.
• Cette fonction est disponible en mode COOL (FROID), HEAT (CHAUD) et
AUTO (AUTO).
13. Réglage personnaliser
• Tenez enfoncée pendant 3s; clignotera. Appuyez encore dessus pour com
muter entre et .
• Effectuez le réglage désiré, et ne pressez aucune touche du combiné pendant
4s; le réglage sera mémorisé dans le programme.
• Pressez une fois pour activer le réglage P1; pressez de nouveau pour commuter
entre P1 et P2.
• Pesez sur n’importe quelle touche pour désactiver le réglage personnaliser.
14. Réglage de la température
• Pour régler la température au niveau que vous souhaitez, appuyez sur le bouton
+ ou -- pour l’augmenter ou la baisser.
• La température se régle de 16°C à 30°C (Possibilité de régler de 20°C à 30°C).
• Appuyez sur les boutons + et -- simultanément pour passer des °C aux °F.
+2 C
+1 C
- 1 C
- 2 C
0 0,5 1 1,5
2
- 3 C
FRANÇAIS
OM-G17-0107-McQuay 8/29/08, 3:20 PM4
Page 9
5
GEBRAUCHSANWEISUNG
1. Sendungsquelle
• Die Ausgangsquelle des Signals.
2. Signalübertragungsanzeige
• Blinkt auf, um anzuzeigen, dass das letzte Signal an das Gerät übertragen wurde.
3. “AN/AUS” schalter
• Einmal betätigen - das Gerät schaltet sich ein.
• Nochmals betätigen - das Gerät schaltet sich aus.
4. Wahl der drehzahl-Stufe des kühlgebläses
• Wird der Knopf kontinuierlich betätigt, dann ändert sich jeweils die
Drehzahlstufe des Kühlgebläses in dieser Reihenfolge:
Niedrig –––: Mittel –––: Hoch –––: Automatisch
• Den Knopf nicht weiter betätigen, wenn die gewünschte Drehzahlstufe des
Kühlgebläses angezeigt wird.
5. Betrieb
• Zur Wahl der verschiedenen Arten des Betriebs wird der MODE Knopf betätigt.
• Für die Kühlung kann man COOL ( ), DRY ( ) und FAN ( ) wählen.
• Für den Betrieb der Wärmepumpe hat man die Wahl zwischen: AUTO ( ),
COOL ( ), DRY ( ), FAN ( ) und HEAT ( ).
• Der AUTO ( )-Modus steht für das 2-Leitungs-Kühlwassersystem nicht zur
Verfügung.
6. Automatische Luftschwingung (wahlweise)
• Durch Betätigen des SWING Knopfs wird die automatische
Luftschwingungsfunktion aktiviert.
• Damit die Luft in eine bestimmte Richtung bläst, wird der SWING Knopf
betätigt, danach warten, bis sich die Lüftungsschlitze in die gewünschte
Richtung bewegen und dann den Knopf nochmals betätigen.
7. Turbofunktion
• Zum schnellen Kühlen oder Erwärmen die Taste betätigen.
• Gebläsedrehzahl wird auf Höchstgeachwindigkeit gebracht.
• Drücken Sie erneut, um diese Funktion zu deaktivieren.
• Erhältlich nur für HEAT (WÄRME), COOL (KÜHL) und DRY (TROCKEN)
betrieb.
• Die Turbo-Funktion ( ) steht für das Kühlwassersystem nicht zur Verfügung.
8. AUS - Zeitschalter-einstellung
• Die Funktion des AUS - Zeitschalters wird durch Betätigen des SET-Knopfes
aktiviert.
• Den SET-Knopf solange betätigen, bis die gewünschte Ausschaltungszeit
angezeigt und somit eingestellt ist.
• Zum Löschen der Einstellung des AUS - Zeitschalters wird der CANCEL-
Knopf betätigt.
9(a). Geräuschlose Funktion
• Für leisen Betrieb drücken.
• Gebläsedrehzahl wird auf Mindestgeschwindigkeit gebracht.
• Drücken Sie erneut, um diese Funktion zu deaktivieren.
• Die Still-Funktion ( ) steht für das Kühler-Wassersystem nicht zur Verfügung.
OM-G17-0107-McQuay 8/29/08, 3:20 PM5
Page 10

6
9(b). Einstellung der Anionenanreicherung (von Model abhängig)
• Drücken Sie , um die Funktion der Anionenanreicherung zu aktivieren.
• Drücken Sie erneut, um diese Funktion zu deaktivieren.
10. Einstellen der Uhrzeit
• Drücken Sie zur Einstellung der Uhrzeit die -Taste und halten Sie sie gedrückt.
11. EIN - Zeitschalter-einstellung
• Die Funktion des EIN - Zeitschalters wird durch Betätigen des SET-Knopfes
aktiviert.
• Den SET-Knopf solange betätigen, bis die gewünschte Zeit angezeigt und somit
eingestellt wird. Ist der Zeitschalter auf 7.30 Uhr eingestellt, so schaltet sich
die Klimaanlage genau um diese Zeit ein.
• Zum Löschen der Einstellung des EIN - Zeitschalters wird der CANCEL-
Knopf betätigt.
12. Einstellen des Nachtbetriebs
• Durch Betätigen des SLEEP Knopfs wird der Nachtbetrieb aktiviert.
• Dabei kann man Energie sparen. Befindet
sich das Gerät im Kühlmodus, steigt die
eingestellte Temperatur nach der ersten
halben Stunde um 0,5°C. Nach der zweiten
halben Stunde steigt die Temperatur um
weitere 0,5°C und um 1°C nach der
folgenden Stunde.
• Befindet sich das Gerät im Heizmodus,
sinkt die eingestellte Temperatur nach der
ersten halben Stunde um 1°C. Nach der
zweiten halben Stunde sinkt die Temperatur
um weitere 1°C und um 1°C nach der
folgenden Stunde.
• Diese Funktion gibt es bei COOL, HEAT und AUTO Betrieb.
13. Personalisierte Einstellung
• Behalten Sie für 3 Sekunden gedrückt, dann wird aufleuchten. Drücken
Sie erneut , um zwischen und zu wechseln.
• Nehmen Sie die gewünschte Einstellung vor, drücken Sie für 4 Sekunden auf
keine Taste des Handapparats und die Einstellung wird in das Programm
gespeichert.
• Drücken Sie einmal, um die P1-Einstellung zu aktivieren. Drücken Sie erneut
um zwischen P1 und P2 zu wechseln.
• Drücken Sie eine beliebige Taste, um die personalisierte Einstellung zu
deaktivieren.
14. Temperatureinstellung
• Um die gewünschte Temperatur einzustellen, den + oder den – Knopf betätigen,
so wird die eingestellte Temperatur höher oder niedriger gestellt.
• Der Temperatur-Einstellbereich liegt zwischen 16°C zu 30°C (Die optimale
Einstellung liegt zwischen 20°C zu 30°C).
• Die beiden Knöpfe + und – zugleich betätigen, um die Gradeinstellung von
Celsius auf Fahrenheit zu bringen.
+2 C
+1 C
- 1 C
- 2 C
0 0,5 1 1,5
2
- 3 C
DEUTSCH
OM-G17-0107-McQuay 8/29/08, 3:20 PM6
Page 11

7
1. Fonte di trasmissione
• La fonte dalle quale viene trasmesso il segnale.
2. Indicatore di trasmissione
• L’indicatore lampeggia per confermare l’invio dell’ultimo valore al
condizionatore.
3. Tasto “ON/OFF”
• Premere una volta per accendere il condizionatore.
• Premere ancora per spegnerlo.
4. Selezione velocità ventola
• Tenendo premuto il tasto la velocità della ventola cambiera’ nel seguente
ordine:
Bassa –––: Media –––: Alta –––: Automatica
• Deprimete il tasto una volta che la velocità desiderata appare sul display.
5. Funzioni
• Premere il tasto MODE per selezionare la funzione desiderata.
• Per condizionatori con la sola funzione rinfrescante “cooling”, le funzioni
disponibili sono: COOL ( ) (FRESCO), DRY ( ) (SECCO) e FAN ( )
(VENTOLA).
• Per unità con funzione di riscaldamento, le funzioni disponibili sono:
AUTO ( ) (AUTOMATICO), COOL ( ) (FRESCO), DRY ( ) (SECCO),
FAN ( ) (VENTOLA) e HEAT ( ) (CALDO).
• La modalità AUTO ( ) (AUTOMATICO) non è disponibile per i sistemi di
raffreddamento ad acqua con 2 condutture.
6. Deviatore di flusso orientabile automatico (opzionale)
• Premere il tasto SWING per attivare l’oscillazione dell’aria.
• Per distribuire il flusso d’aria in una direzione specifica, premere il tasto
SWING ed aspettare fino a che le alette dei ventilazione si posizionano
nella direzione desi-erata quindi premere nuovamente il tasto.
7. Funzione turbo
• Premere per un reffreddamento o riscaldamento veloce.
• Velocità ventola impostata su massimo.
• Premerlo nuovamente per disattivare la funzione.
• Disponibile solo nelle funzioni HEAT (CALDO), COOL (FRESCO) e
DRY (SECCO).
• La funzione Turbo ( ) non è disponibile per i sistemi di raffreddamento ad
acqua.
8. Impostazione del temporizzatore per lo spegnimento automatico
• Premere il tasto SET per annullare il settaggio del temporizzatore.
• Impostare l’orario prescelto tenendo premuto il tasto SET.
• Premere il tasto CANCEL per annullare l’orario impostato.
9(a). Funzionamento silenzioso
• Premere per selezionare il funzionamento silenzioso.
• Velocità ventola impostata su minimo.
• Premerlo nuovamente per disattivare la funzione.
• La funzione Silent ( ) non è disponibile per i sistemi di raffreddamento ad
acqua.
GUIDA ALL’USO
OM-G17-0107-McQuay 8/29/08, 3:20 PM7
Page 12

8
+2 C
+1 C
- 1 C
- 2 C
0 0,5 1 1,5
2
- 3 C
9(b). Impostazione dello ionizzatore (a seconda del modello)
• Premere per attivare la funzione ionizzatore.
• Premerlo nuovamente per disattivare la funzione.
10. Settaggio dell’orario
• Premi e mantieni premuto il tasto per regolare l’ora dell’orologio.
11. Impostazione del temporizzatore per l’accensione automatica
• Premere il tasto SET per attivare il temporizzatore.
• Impostare l’ora prescelta tenendo premuto il tasto SET. Se il temporizzatore
viene settato per le 0730 del mattino, il condizionatore si accendera’
automaticamente a quest’ora.
• Premere il tasto CANCEL per annullare l’orario impostato.
12. Funzione di “riposo”
• Premere il tasto SLEEP per attivare la funzione di “riposo”.
• Questa èuna funzione per risparmio
energetico. Quando l’unità funziona in
modalità di raffreddamento, la temperatura
impostata viene aumentata di 0,5°C dopo
la prima mezz’ora, di altri 0,5°C dopo la
seconda mezz’ora, e di 1°C dopo l’ora
seguente.
• Quando l’unità funziona in modalità di
riscaldamento, la temperatura impostata
viene ridotta di 1°C dopo la prima
mezz’ora, di un altro grado dopo la seconda
mezz’ora, e di 1°C dopo l’ora seguente.
• Questa funzione opera nelle funzioni COOL (FRESCO), HEAT (CALDO) ed
AUTO (AUTOMATICO).
13. Impostazione personalizzata
• Tenere premuto per 3 secondi, quando lampeggia . Premerlo nuovamente
per commutare tra e .
• Inserire l’impostazione desiderata, quindi lasciare l’headset per 4 secondi senza
premere alcun tasto per salvare l’impostazione nel programma.
• Premere una volta per attivare l’impostazione P1, premerlo nuovamente per
commutare tra P1 e P2.
• Premere un tasto qualsiasi per disattivare l’impostazione personalizzata.
14. Valori di temperatura
• Per selezionare la temperatura desiderata premere i tasti + o -- rispettivameñte
per aumentare o diminuire la temperatura.
• I valori di temperatura sono compresi tra i 16°C a 30°C (Valori opzionali da
20°C a 30°C).
• Premere contemporaneamente i tasti + e -- per passare da °C a °F.
ITALIANO
OM-G17-0107-McQuay 8/29/08, 3:20 PM8
Page 13

9
GUÍA DE UTILIZACIÓN
1. Fuente de transmisión
• La fuente donde la señal será transmitida.
2. Indicación de transmisión de la señal
• Parpadea para confirmar que el último ajuste ha sido transmitido a la unidad.
3. Botón “ON/OFF”
• Presione una vez para iniciar la unidad de aire acondicionado.
• Presione otra vez para parar la unidad.
4. Selección de la velocidad del ventilador
• Presione el botón continuamente dispondrá la velocidad del ventilador en el
siguiente orden:
Bajo –––: Medio –––: Alto –––: Auto
• Presione Stop cuando la velocidad del ventilador deseada aparece en la pantalla
de visualización.
5. Modo de operación
• Presione el botón MODE para seleccionar el tipo de modo de operación.
• En las unidades de refrigeración solamente, los modos disponibles son:
COOL ( ) (FRIO), DRY ( ) (SECO) y FAN ( ) (VENTILACIÓN).
• Para la unidad de bomba de calor, los modos disponibles son: AUTO ( )
(AUTO), COOL ( ) (FRIO), DRY ( ) (SECO), FAN ( ) (VENTILACIÓN)
y HEAT ( ) (CALOR).
• El modo AUTO ( ) (AUTO) no está disponible para el sistema de agua
refrigerada de dos tubos.
6. Oscilación de aire automática (opcional)
• Presione el botón SWING para activar la función de oscilación automática
de aire.
• Para distribuir el aire en una dirección específica, presione el botón
SWING y espere hasta que la paleta se mueva a la dirección deseada y
presione de nuevo el botón.
7. Función del turbo
• Apriete para una operación de refrigeración o calefacción rápida.
• Velocidad de ventilación al máximo.
• Pulse de nuevo para desactivar la función.
• Válido sólo en los modos de HEAT (CALOR), COOL (FRIO) y DRY (SECO).
• La función del Turbo ( ) no está disponible para el sistema de agua refrigerada.
8. Ajuste del temporizador en OFF
• Presione el botón SET activará la función del temporizador desconectado.
• Ajuste la hora de desconexión deseada presionando el botón SET
continuamente.
• Presione el botón CANCEL para cancelar el ajuste del temporizador
desconectado.
9(a). Función de silencio
• Pulse para funcionamiento silencioso.
• Velocidad de ventilación al mínimo.
• Pulse de nuevo para desactivar la función.
• La función de Silencio ( ) no está disponible para el sistema de agua refrigerada.
OM-G17-0107-McQuay 8/29/08, 3:20 PM9
Page 14

10
9(b). Selección del ionizador (depende del modelo)
• Pulse para activar la función del ionizador.
• Pulse de nuevo para desactivar la función.
10. Ajuste de la hora del reloj
• Presione y sostenga el botón para programar la hora.
11. Ajuste del temporizador en ON
• Presione el botón SET activará la función del temporizador conectado.
• Adjuste la hora deseada presionando el botón SET continuamente. Si el
temporizador se ajusta a las 7.30 a.m. el acondicionador de aire se conectará a
las 7.30 a.m. en punto.
• Presione el botón CANCEL para cancelar el ajuste del temporizador conectado.
12. Ajuste del modo de dormir
• Presione el botón SLEEP activará la función del modo de dormir.
• Esta es una opción de ahorro de energía.
Cuando la unidad funciona bajo el modo
de refrigeración, la temperatura programada
aumenta en 0,5°C después de la primera
media hora, otro 0,5°C después de la
segunda media hora y 1°C después de la
hora siguiente.
• Cuando la unidad funciona bajo el modo
de calefacción, la temperatura programada
disminuye en 1°C después de la primera
media hora, otro 1°C después de la segunda
media hora y 1°C después de la hora
siguiente.
• Esta función está disponible en los modos COOL (FRIO), HEAT (CALOR) y
AUTO (AUTO).
13. Personalización de los ajustes
• Mantenga pulsado durante 3 seg, comenzará a parpadear. Entonces, pulse
de nuevo para realizar un ciclo entre y .
• Introduzca el valor deseado y deje el aparato durante 4 seg sin pulsar ninguna
tecla y se memorizará el valor introducido en el programa.
• Pulse de nuevo para activar el ajuste P1, y pulse de nuevo para realizar un
ciclo entre P1 y P2.
• Pulse cualquier tecla para desactivar el ajuste personalizado.
14. Ajuste de la temperatura
• Para ajustar la temperatura deseada de la habitación, presione el botón + o -para incrementar o disminuir la temperatura ajustada.
• El alcance de ajuste de la temperatura es de 16°C a 30°C (Ajuste opcional de
20°C a 30°C).
• Presione los botones + y -- simultáneamente para cambiar el ajuste de °C a °F.
+2 C
+1 C
- 1 C
- 2 C
0 0,5 1 1,5
2
- 3 C
ESPAÑOL
OM-G17-0107-McQuay 8/29/08, 3:20 PM10
Page 15

11
1. Источник сигналов
• Источник, откуда сигнал будет передаваться.
2. Индикация передачи сигнала
• Мигает для подтверждения того, что последняя установка была
передана на модуль.
3. Кнопка “ВКЛ/ВЫКЛ” (ON/OFF)
• Нажмите один раз для включения кондиционера.
• Вновь нажмите для остановки модуля.
4. Выбор скорости вентилятора
• Нажмите кнопку для непрерывного переключения скорости
вентилятора в следующем порядке:
Низк –––: Сред –––: Высок –––: Авто
• Прекратите нажимание, как только на дисплее экрана появится
желаемая скорость вентилятора.
5. Режим работы
• Нажмите кнопку MODE (РЕЖИМ) для выбора типа режима работы.
• Только для охлаждения, возможные режимы: COOL ( ) (ХОЛОД),
DRY ( ) (ОСУШЕНИЕ) и FAN ( ) (BЕНТИЛЯЦИЯ).
• Для обогревательного насоса возможные режимы: AUTO ( )
(АВТО), COOL ( ) (ХОЛОД), DRY ( ) (ОСУШЕНИЕ), FAN ( )
(ВЕНТИЛЯЦИЯ) и HEAT ( ) (ОБОГРЕВ).
• Режим AUTO ( ) (АВТО) недоступен для кондиционеров с
2-контурным водяным охлаждением.
6. Автоматический поворот направления жалюзи (дополнительно)
• Нажмите кнопку SWING (ПОВОРОТ) для включения функции
автоматического поворота жалюзи.
• Для распространения воздуха в определенном направлении,
нажмите кнопку SWING (ПОВОРОТ) и ждите до тех пор, пока
жалюзи не установится в желаемом направлении, и вновь нажмите
кнопку один раз.
7. Функция турбо
• Нажмите для быстрого охлаждения или операции обогрева.
• Установите максимальную скорость вентилятора.
• Для отключения данной функции нажмите эту кнопку еще раз.
• Возможны только при режимах HEAT (ОБОГРЕВ), COOL (ХОЛОД)
и DRY (ОСУШЕНИЕ).
• Функция турбо ( ) недоступна для кондиционеров с водяным
охлаждением.
8. Установка выключения таймера
• Нажмите кнопку SET для запуска функции выключения таймера.
• Установите желаемое время выключения беспрерывным
нажатием кнопки SET.
• Нажмите кнопку СANCEL для отмены установки выключения
таймера.
9(a). Бесшумная работа
• Нажмите кнопку для включения режима бесшумной работы.
• Установите минимальную скорость вентилятора.
• Для отключения данной функции нажмите эту кнопку еще раз.
• Функция бесшумной работы ( ) недоступна для кондиционеров с
водяным охлаждением.
РУКОВОДСТВО ПО ИСПОЛЬЗОВАНИЮ
OM-G17-0107-McQuay 8/29/08, 3:21 PM11
Page 16

12
9(b). Ионизатор (в зависимости от модели)
• Для активации функции ионизатора нажмите кнопку
.
• Для отключения данной функции нажмите эту кнопку еще раз.
10. Установка времени часов
• Нажмите и удерживайте кнопку для установки времени часов.
11. Установка включения таймера
• Нажмите кнопку SET для запуска функции включения таймера.
• Установите желаемое время включения беспрерывным нажатием
кнопки SET. Если таймер установлен на 7:30 утра, то кондиционер
включится ровно в 7:30 утра.
• Нажмите кнопку СANCEL для отмены установки включения
таймера.
12. Установка режима сна
• Нажмите кнопку SLEEP для включения функции режима сна.
• Эта опция служит для
энергосбережения. Когда блок
работает в режиме охлаждения,
начальная температура
увеличивается на 0,5°C после
первого получаса, затем еще на
0,5°C после следующего получаса и
на 1°C после следующего 1 часа.
• Когда блок работает в режиме
обогрева, начальная температура
уменьшается на 1°C после первого
получаса, затем еще на 1°C после
следующего получаса и на 1°C после
следующего 1 часа.
• Эта функция возможна в режимах COOL (ХОЛОД),
HEAT (ОБОГРЕВ) и AUTO (АВТО).
13. Персонализация
• Нажмите кнопку и удерживайте ее 3 сек, начнет мигать
индикатор . Нажмите еще раз для переключения между и .
• Установите требуемый параметр, после чего не нажимайте
никакие кнопки в течение 4 сек. Параметр будет сохранено в
программе.
• Нажмите кнопку один раз для активации параметра P1; нажмите
еще раз для переключения между P1 и P2.
• Нажмите любую кнопку для отключения персонализации.
14. Установка температуры
• Для установки желаемой температуры в комнате, нажмите +
или -- для повышения или понижения установленной температуры.
• Диапазон установленной температуры варьируется от 16°С до 30°С
(При наличии от 20°С до 30°С).
• Одновременно нажмите обе кнопки для переключения + и -- от
установки °С к °F.
+2 C
+1 C
- 1 C
- 2 C
0 0,5 1 1,5
2
- 3 C
РУCCKИЙ
OM-G17-0107-McQuay 8/29/08, 3:21 PM12
Page 17

13
KULLANIM KILAVUZUKULLANIM KILAVUZU
KULLANIM KILAVUZUKULLANIM KILAVUZU
KULLANIM KILAVUZU
1.
‹letim kayna¤›‹letim kayna¤›
‹letim kayna¤›‹letim kayna¤›
‹letim kayna¤›
• Sinyalin iletilece¤i kaynak.
2.
Sinyal iletim göstergesiSinyal iletim göstergesi
Sinyal iletim göstergesiSinyal iletim göstergesi
Sinyal iletim göstergesi
• Son ayar›n üniteye iletildi¤ini bildirmek için yan›p söner.
3.
“ON/OFF” (AÇMA/KAPAMA) Dü¤mesi“ON/OFF” (AÇMA/KAPAMA) Dü¤mesi
“ON/OFF” (AÇMA/KAPAMA) Dü¤mesi“ON/OFF” (AÇMA/KAPAMA) Dü¤mesi
“ON/OFF” (AÇMA/KAPAMA) Dü¤mesi
• Klima ünitesini çal›flt›rmak için bir kez bas›n.
• Üniteyi durdurmak için tekrar bas›n.
4.
Fan h›z›n›n seçilmesiFan h›z›n›n seçilmesi
Fan h›z›n›n seçilmesiFan h›z›n›n seçilmesi
Fan h›z›n›n seçilmesi
• Afla¤›daki s›rada fan h›z›n› de¤ifltirmek için dü¤mesine sürekli bas›n:
Düflük –––: Orta –––: Yüksek –––: Otomatik
• ‹stenen fan hızı ekranda görünürken basmaya devam etmeyin.
5.
Çal›flt›rma moduÇal›flt›rma modu
Çal›flt›rma moduÇal›flt›rma modu
Çal›flt›rma modu
• Çal›flt›rma modu tipini seçmek için
MODEMODE
MODEMODE
MODE dü¤mesine bas›n.
• Yaln›zca so¤utmal› ünite için, kullan›labilen modlar:
COOL (COOL (
COOL (COOL (
COOL (
))
))
),
DRY (DRY (
DRY (DRY (
DRY (
))
))
) ve
FAN ( FAN (
FAN ( FAN (
FAN (
)’d›r)’d›r
)’d›r)’d›r
)’d›r.
• Is›tmal›-So¤utmal› ünite için, kullan›labilen modlar :
AUTO (AUTO (
AUTO (AUTO (
AUTO (
))
))
),
COOL (COOL (
COOL (COOL (
COOL (
))
))
),
DRY (DRY (
DRY (DRY (
DRY (
))
))
),
FAN (FAN (
FAN (FAN (
FAN (
))
))
) ve
HEAT (HEAT (
HEAT (HEAT (
HEAT (
))
))
).
•
AUTO (AUTO (
AUTO (AUTO (
AUTO (
) )
) )
) mod 2 borulu so¤uk su sisteminde mevcut de¤ildir.
6.
Otomatik Hava Yönlendirme (iste¤e ba¤l›)Otomatik Hava Yönlendirme (iste¤e ba¤l›)
Otomatik Hava Yönlendirme (iste¤e ba¤l›)Otomatik Hava Yönlendirme (iste¤e ba¤l›)
Otomatik Hava Yönlendirme (iste¤e ba¤l›)
• Otomatik hava yönlendirme fonksiyonunu harekete geçirmek için
SWINGSWING
SWINGSWING
SWING dü¤mesine bas›n.
• Havay› belirli bir yönde da¤›tmak için,
SWINGSWING
SWINGSWING
SWING dü¤mesine bas›n ve
kanat istenilen yöne hareket edene kadar bekleyin ve dü¤meye tekrar
bir kez bas›n.
7.
Turbo ‹flleviTurbo ‹fllevi
Turbo ‹flleviTurbo ‹fllevi
Turbo ‹fllevi
• H›zl› so¤utma veya ›s›tma ifllemi için bas›n.
• Fan h›z› maksimum h›za geçer.
• ‹fllevi devre d›fl› b›rakmak için tekrar bas›n.
• Yaln›zca
HEATHEAT
HEATHEAT
HEAT,
COOLCOOL
COOLCOOL
COOL ve
DRYDRY
DRYDRY
DRY modlar›nda kullan›labilir.
• Turbo ifllevi ( ) so¤uk su sisteminde mevcut de¤ildir.
8.
KAPAMA zaman› ayar›KAPAMA zaman› ayar›
KAPAMA zaman› ayar›KAPAMA zaman› ayar›
KAPAMA zaman› ayar›
• Kapama zaman› fonksiyonunu etkin hale getirmek için
SETSET
SETSET
SET dü¤mesine
bas›n.
•
SETSET
SETSET
SET dü¤mesine sürekli basarak, istenilen kapama zaman›n› ayarlay›n.
• Kapama zaman› ayar›n› iptal etmek için
CANCELCANCEL
CANCELCANCEL
CANCEL dü¤mesine bas›n.
9(a).
Sessiz iflleviSessiz ifllevi
Sessiz iflleviSessiz ifllevi
Sessiz ifllevi
• Sessiz çal›flt›rma için dü¤mesine bas›n.
• Fan h›z› minimum h›za geçer.
• ‹fllevi devre d›fl› b›rakmak için tekrar bas›n.
• Sessiz ifllevi ( ) so¤uk su sisteminde mevcut de¤ildir.
OM-G17-0107-McQuay 8/29/08, 3:21 PM13
Page 18

14
9(b).
‹yonlaflt›r›c› ayar› (modele ba¤l›d›r)‹yonlaflt›r›c› ayar› (modele ba¤l›d›r)
‹yonlaflt›r›c› ayar› (modele ba¤l›d›r)‹yonlaflt›r›c› ayar› (modele ba¤l›d›r)
‹yonlaflt›r›c› ayar› (modele ba¤l›d›r)
• ‹yonlaflt›r›c› ifllevini etkinlefltirmek için dü¤mesine bas›n.
• ‹fllevi devre d›fl› b›rakmak için tekrar bas›n.
10.
Saat zaman ayar›Saat zaman ayar›
Saat zaman ayar›Saat zaman ayar›
Saat zaman ayar›
• Saati ayarlamak için dü¤mesine bas›l› tutun.
11.
AÇILMA zaman› ayar›AÇILMA zaman› ayar›
AÇILMA zaman› ayar›AÇILMA zaman› ayar›
AÇILMA zaman› ayar›
• Aç›lma zaman› fonksiyonunu etkin hale getirmek için
SETSET
SETSET
SET dü¤mesine
bas›n.
•
SETSET
SETSET
SET dü¤mesine sürekli basarak istenilen aç›lma zaman›n› ayarlay›n.
Zamanlay›c› 7.30am’e(sabah) ayarlan›rsa, klima tam 7.30am’da (sabah)
çal›flacakt›r.
• Aç›lma zaman› ayar›n› iptal etmek için
CANCELCANCEL
CANCELCANCEL
CANCEL dü¤mesine bas›n.
12.
Uyku modu ayar›Uyku modu ayar›
Uyku modu ayar›Uyku modu ayar›
Uyku modu ayar›
• Uyku modu ifllevini etkin hale getirmek için
SLEEPSLEEP
SLEEPSLEEP
SLEEP dü¤mesine bas›n.
• Bu bir enerji tasarrufu seçene¤idir.
Ünite so¤utma modunda çal›fl›rken, ilk
yar›m saat geçtikten sonra ayarl›
s›cakl›k 0,5°C art›r›l›r, ikinci yar›m saat
geçtikten sonra bir 0,5°C daha art›r›l›r
ve bunun üzerinden 1 saat daha
geçtikten sonra ise 1°C daha art›r›l›r.
• Ünite ›s›tma modunda çal›fl›rken, ilk
yar›m saat geçtikten sonra ayarl›
s›cakl›k 1°C azalt›l›r, ikinci yar›m saat
geçtikten sonra bir 1°C daha azalt›l›r
ve bunun üzerinden 1 saat daha
geçtikten sonra ise 1°C daha azalt›l›r.
• Bu ifllev
COOLCOOL
COOLCOOL
COOL,
HEATHEAT
HEATHEAT
HEAT ve
AUTOAUTO
AUTOAUTO
AUTO modlar›nda kullan›labilir.
13.
Kiflisel ayarKiflisel ayar
Kiflisel ayarKiflisel ayar
Kiflisel ayar
• ’e bas›n ve 3sn bas›l› tutun, o zaman yan›p sönecektir. ve
aras›nda ilerletmek için tekrar bas›n.
• ‹stenilen ayar› yap›n daha sonra 4sn kadar hiç bir tufla basmay›n,
program içerisine ayar› kaydedecektir.
• P1 ayar›n› etkin hale getirmek için ’e bir kez bas›n, P1 ve P2 aras›nda
ilerlemek için yeniden bas›n.
• Kiflisel ayar› devre d›fl› b›rakmak için her hangi bir tufla bas›n.
14.
S›cakl›k ayar›S›cakl›k ayar›
S›cakl›k ayar›S›cakl›k ayar›
S›cakl›k ayar›
• ‹stenilen oda s›cakl›¤›na ayarlamak üzere, ayarlanan s›cakl›¤› artt›rmak
ya da azaltmak için + ya da -- dü¤mesine bas›n.
• S›cakl›k ayar aral›¤› 16°C’dan 30°C ’a kadard›r. (‹ste¤e ba¤l› ayar 20°C
ile 30°C aras›ndad›r.)
• + ve -- ’yi °C’tan °F ayar› geçirmek için her iki dü¤meye ayn› anda
bas›n.
+2 C
+1 C
- 1 C
- 2 C
0 0,5 1 1,5
2
- 3 C
TÜRKÇETÜRKÇE
TÜRKÇETÜRKÇE
TÜRKÇE
OM-G17-0107-McQuay 8/29/08, 3:21 PM14
Page 19

15
MEMO / LE MÉMO / MITTEILUNG / PROMEMORIA /
EL MEMORÁNDUM / ПАМЯТКА /
NOTNOT
NOTNOT
NOT
OM-G17-0107-McQuay 8/29/08, 3:21 PM15
Page 20

• In the event that there is any conflict in the interpretation of this manual and any translation of the same in any
language, the English version of this manual shall prevail.
• The manufacturer reserves the right to revise any of the specification and design contain herein at any time without
prior notification.
OM-G17-0107-McQuay 8/29/08, 3:21 PM16
Page 21

•
Æ…bzU« w¼ W¹eOKJ½ô« WM« ÊuJð ¨X½U WG W¹QÐ UNH½ WLłd²« w ·ö²š« Í«Ë VO²J« «c¼ dOHð w ÷—UFð Í« ÀbŠ «–«
•
Æo³ —UFý≈ ÊËœ s XË Í« w UM¼ …œułu UH«u W¹«Ë rOLB²« q¹bFð o×Ð lMB*« kH²×¹
OM-G17-0107-McQuay_AR 8/29/08, 4:37 PM7
Page 22

…dc
≥
OM-G17-0107-McQuay_AR 8/29/08, 4:37 PM1
Page 23

≤
Æπ©»®©“«dD« VŠ® s¹R*« W¾ONð
•
jG{«Æs¹R*« WHOþË jOAM²
•
ÆWHOþu« qODF² Èdš« …d jG{«
Ʊ∞WŽU« XË W¾ONð
•
—e« vKŽ jGC« lÐUðË jG{«ÆWŽU« XË j³C
Ʊ± XR W¾ONð
ON
•
—e« jG{«
SET
ÆqOGA²« XR WHOþË jOAM²
•
—“ jGCÐ —«dL²ÝôUÐ »užd*« qOGA²« XË j³{«
SET
vKŽ XR*« j³{ - «–« Æ
7.30
UŠU³ ηuÝ ¨
WŽU« w ¡«uN« WHOJ qG²Að
7.30
UŠU³ ÎÆj³CUÐ
•
—e« jG{«
CANCEL
ÆqOGA²« XR W¾ONð ¡UGô
Ʊ≤ÂuM« l{Ë W¾ONð
•
—“ jG{«
SLEEP
ÆÂuM« l{Ë WHOþË jOAM²
•
ÆW?U?D?U?Ð œU?B²ô« —UOš u¼ «c¼w? …b?Šu?« ÊuJð UbMŽ
—«b?I?0 j?³?C?« …—«d?Š Wł—œ œ«œeð ¨b¹d³²« qOGAð l{Ë
—«b?I?0 œ«œeðË ¨‰Ëô« WŽU« nB½ bFÐ W¹u¾ Wł—œ ∞\µ
œ«œe?ðË w?½U?¦?« WŽU« nB½ bFÐ Èdš« W¹u¾ Wł—œ ∞[µ
ÆWOU²« WŽU« bFÐ W¹u¾ Wł—œ ± —«bI0
•
Wł—œ iHMð ¨W¾b²« qOGAð l{Ë w …bŠu« ÊuJð UbMŽ
W?ŽU??« n?B?½ b?F?Ð W?¹u?¾ Wł—œ ± —«bI0 j³C« …—«dŠ
n?B?½ b?F?Ð Èd?š« W?¹u?¾ Wł—œ ± —«bI0 iHMðË ¨‰Ëô«
WŽU« bFÐ W¹u¾ Wł—œ ± —«bI0 iHMðË w½U¦« WŽU«
ÆWOU²«
•
l{Ë X% WHOþu« Ác¼ du²ð
COOL
¨
HEAT
Ë
AUTO
Æ
Ʊ≥WOBA« W¾ON²«
•
jG{«UÞuGC tÐ kH²Š«Ë Î WöF« iuð rŁ ¨w½«uŁ ≥ …b* …d jG{« Æ
Î
5Ð Ê«—ËbK Èdš√ Ë Æ
•
W¾ON²« kHŠ r²¹ ·uÝË ÕU²H Í√ jG{ ÊËœ s w½«uŁ ¥ …b* ÍËbO« “UN'« „dð« rŁ ¨WÐužd*« W¾ON²« j³{«
ÆZU½d³« w
•
jG{« W¾ONð jOAM²
P1
5Ð Ê«—ËbK Èdš√ …d jG{« rŁ ¨
P1
Ë
P2
Æ
•
ÆWOBA« W¾ON²« qODF² ÕU²H Í« jG{«
Ʊ¥…—«d(« Wł—œ W¾ONð
•
—“ jG{« ¨WdGK WÐužd*« …—«d(« Wł—œ j³C
+
Ë«
--
ÆWÞu³C*« …—«d(« Wł—œ qOKIð Ë« …œU¹e
•
±∂ 5ÐU …—«d(« Wł—œ Èb ÕË«d²¹
°
≥∞ v« Â
°
≤∞ s W¹—UO²šô« W¾ON²«® ÆÂ
°
≥∞ v« Â
°
©ÆÂ
•
q¹uײ bŠ«Ë ʬ w ULNOK s¹—e« jG{«
+
Ë
--
s
°C
v«
°F
Æ
+2 C
+1 C
- 1 C
- 2 C
0 0.5 1 1.5 2
- 3 C
«FdÐOW
OM-G17-0107-McQuay_AR 8/29/08, 4:37 PM2
Page 24

±
Ʊ‰UÝ—ô« —bB
•
ÆtÐ …—Uýô« qI½ r²¹ Íc« —bB*«
Æ≤…—Uýô« ‰UÝ—« WöŽ
•
Æ…bŠuK UNKI½ - b …dOšô« W¾ON²« ÊQÐ bOu² iuð
Æ≥ —“
“ON/OFF”
•
Æ¡«uN« WHOJ qOGA² …bŠ«Ë …d jG{«
•
Æ…bŠu« ·UI¹ô Èdš« …d jG{«
Æ¥WŠËd*« WŽdÝ —UO²š«
•
—“ jG{«∫wU²« VOðd²UÐ WŠËd*« WŽdÝ q¹uײ —«dL²ÝUÐ
iHM
;
–––
jÝu²
;
–––
wUŽ
;
–––
wzUIKð
•
ÆWýUA« W{—UŽ vKŽ WŠËd*« WŽdÝ dNEð UbMŽ jGC« sŽ nuð
ƵqOGA²« l{Ë
•
—“ jG{«
MODE
ÆqOGA²« l{Ë Ÿu½ —UO²šô
•
∫w¼ …du²*« ŸU{Ëô« Ê« ¨jI b¹d³²« …bŠu
COOL ( )
¨
)DRY (
Ë
FAN ( )
Æ
•
∫w¼ …du²*« ŸU{Ëô« ¨W¾b²« a{ …bŠu
)AUTO (
¨
COOL ( )
¨
)DRY (
¨
FAN ( )
Ë
)HEAT (
Æ
•
wzUIK²« l{u«
)AUTO (
d³*« ¡U*« ÂUEM du² dOž
Ò
Æ»u³½« ‡ ≤ œ
Æ∂©Í—UO²š«® ¡«uNK wzUIK²« Ê«—Ëb«
•
—“ jG{«
SWING
Æ¡«uN« Ê«—Ëœ WHOþË jOAM²
•
—“ jG{« ¨5F ÁU&UÐ ¡«uN« l¹“u²
SWING
jG{«Ë »užd*« ÁU&ôUÐ oA« „dײ¹ Ê« v« dE²½«Ë
ÆÈdš« …d —e«
Æ∑WOMOÐd²« WHOþu«
•
jG{«ÆW¾b²« qOGAð Ë« l¹d« b¹d³²K
•
ÆÈuBI« WŽd« vKŽ WŠËd*« WŽdÝ ‰uײð
•
ÆWHOþu« qODF² Èdš« …d jG{«
•
ŸU{Ë« w du²¹
HEAT
Ë
COOL
Ë
DRY
ÆjI
•
® uÐd²« WHOþË©d³*« ¡U*« ÂUEM …du² dOž
Ò
Ɯ
Æ∏ XR W¾ONð
OFF
•
—e« jG{«
SET
Æ·UI¹ô« XR WHOþË jOAM²
•
—“ jGCÐ —«dL²ÝôUÐ »užd*« ·UI¹ô« XË j³{«
SET
Æ
•
—“ jG{«
CANCEL
Æ·UI¹ô« XR W¾ONð ¡UGô
Æπ©«®¡ËbN« WHOþË
•
—e« jG{«Æ∆œUN« qOGA²« qł« s
•
Æv½œô« WŽd« vKŽ WŠËd*« WŽdÝ ‰uײð
•
ÆWHOþu« qODF² Èdš« …d jG{«
•
® ∆œUN« l{u« WHOþËd³*« ¡U*« ÂUEM …du² dOž ©
Ò
Ɯ
qOGA²« qOœ
OM-G17-0107-McQuay_AR 8/29/08, 4:37 PM3
Page 25

(
>0,004
%
)
AAA.R
03
iii
OM-G17-0107-McQuay_AR 8/29/08, 4:37 PM4
Page 26

—«b'« vKŽ XO³¦²« WOHO
U¹—UD³« ‰Ušœ≈
(AAA.R03)
ii
MODE
P1 P2
MODE
P1 P2
1
23
±
≥
≤
OM-G17-0107-McQuay_AR 8/29/08, 4:37 PM5
Page 27

MODE
P1 P2
SLEEP
SET
CANCEL
ON TIMER
SET
CANCEL
OFF TIMER
MODE
P1 P2
SLEEP
SET
CANCEL
ON TIMER
SET
CANCEL
OFF TIMER
bFÐ sŽ rJײ« …bŠË ÊUOÐ
G17
i
≤
≥
¥
µ
∂
∑
∏
±≥
±≤
±±
OM-G17-0107-McQuay Part No.: R08019029996
±
π ©«®
±¥
±∞
≤
≥
¥
µ
∂
∑
∏
±≥
±≤
±±
±
π ©«®
±¥
±∞
≤
≥
¥
µ
∂
∑
∏
±≥
±≤
±±
±
π ©»®
±¥
±∞
OM-G17-0107-McQuay_AR 8/29/08, 4:37 PM6
Page 28

Æq³I²LK lłdL tÐ ÿUH²Šô«Ë W¹UMFÐ «c¼ ULOKF²« VO² …¡«d vłd¹ ¨¡«uN« WHOJ ‰ULF²Ý« q³
OM-G17-0107-McQuay
© 2007 McQuay International
VOd²« VO²
¡e'« r— ∫
R08019029996
a¹—Uð ∫
JANUARY 2007
MODE
P1 P2
OM-G17-0107-McQuay_AR 8/29/08, 4:37 PM8
 Loading...