

Page 1
RST & RXT Street Twin Clutch Installation Instructions
Congratulations! You have just purchased the finest Street Twin clutch system on the market today. The
RST and RXT Street Twin clutch systems are capable of handling extremely high horsepower engines in
street driven vehicles. The key benefits with this system are low rotating mass, lighter than stock pedal
effort and dual discs for extreme holding capacity with exceptional release qualities. Properly installed,
this clutch system will provide the strength and durability you have come to rely on in all of the McLeod
Racing family of products.
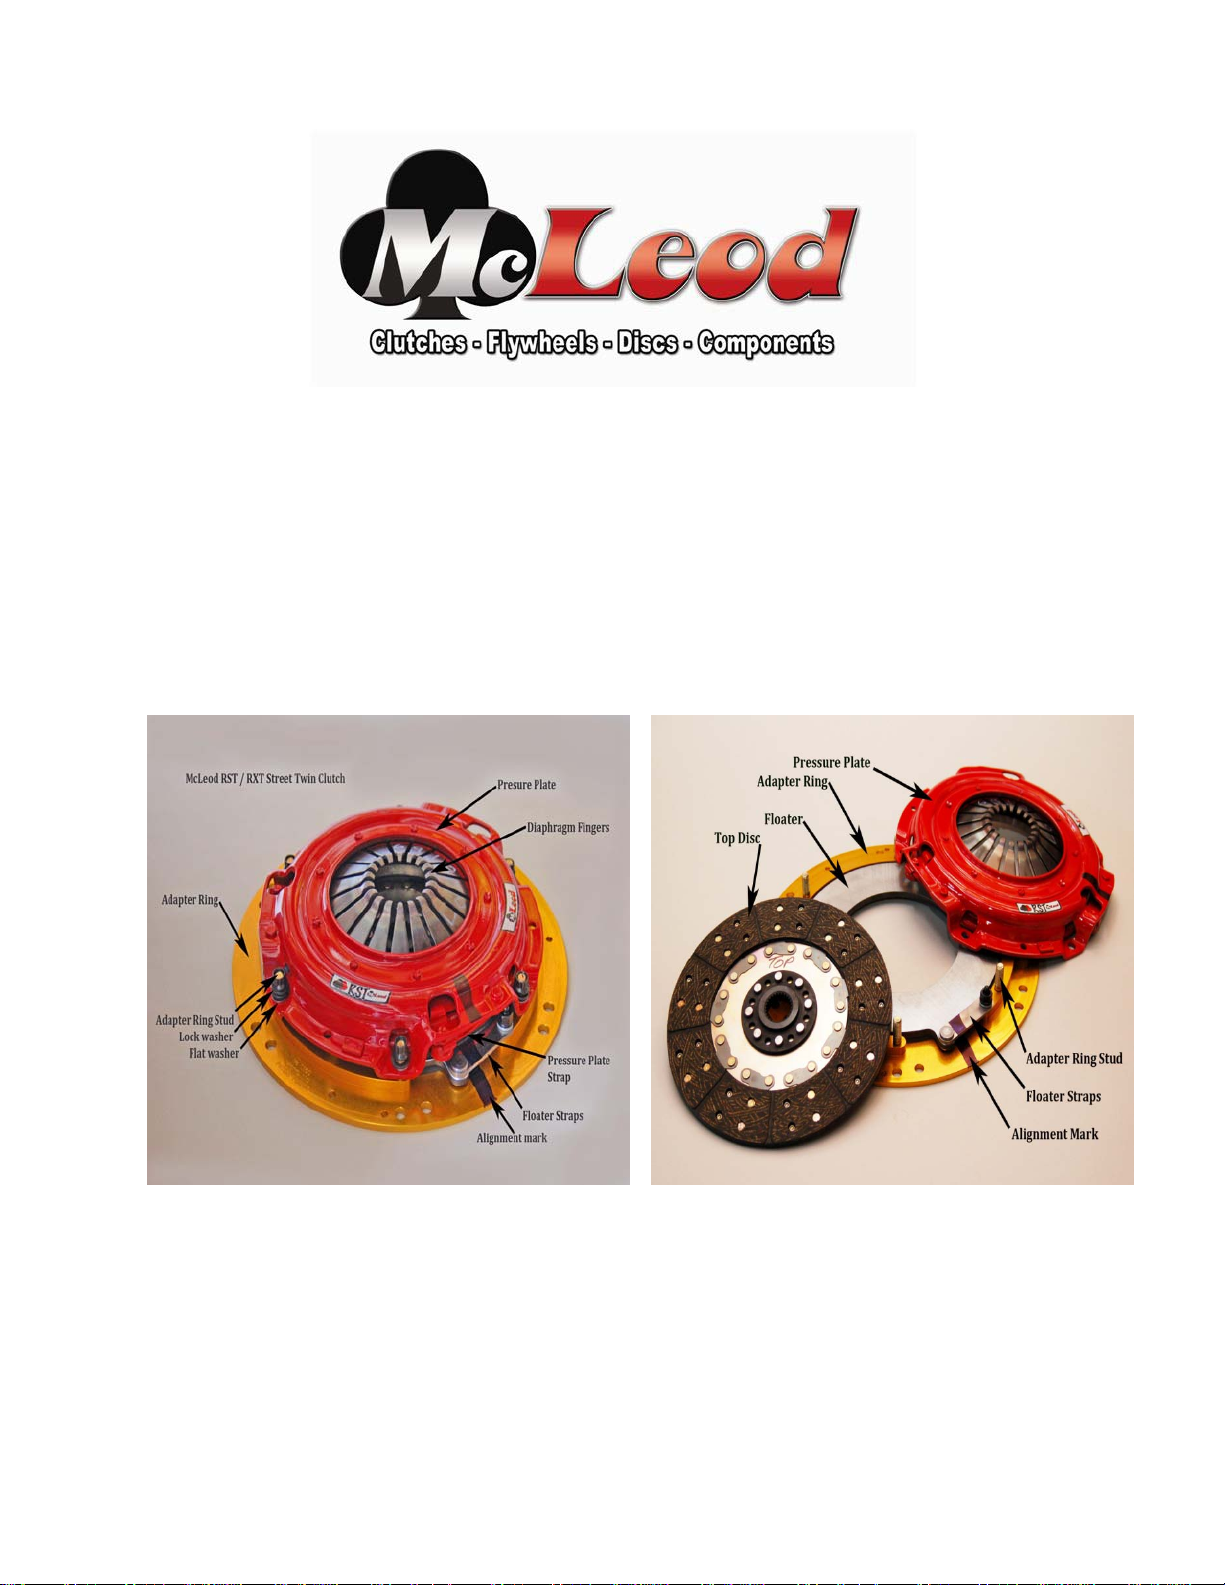
1) See Figure 1 for component parts identification and alignment mark!
Figure 1 Figure 2
2) Remove six pressure plate nuts, lock washers and flat washers and set aside.
3) Lift off pressure plate and top disc from the adapter ring and set aside. Figure 2.
4) Inspect flywheel for chipped teeth on Ring Gear and be certain the flywheel/disc engagement
surface is clean, flat and free of oil and/or grease. Be certain the pilot bearing is in place and is
clean and free of nicks and burrs. If damaged, replace the pilot bearing. Test fit the pilot tool to see
how far the tool engages the pilot bearing. See Figure 3.
I0004
Page 2
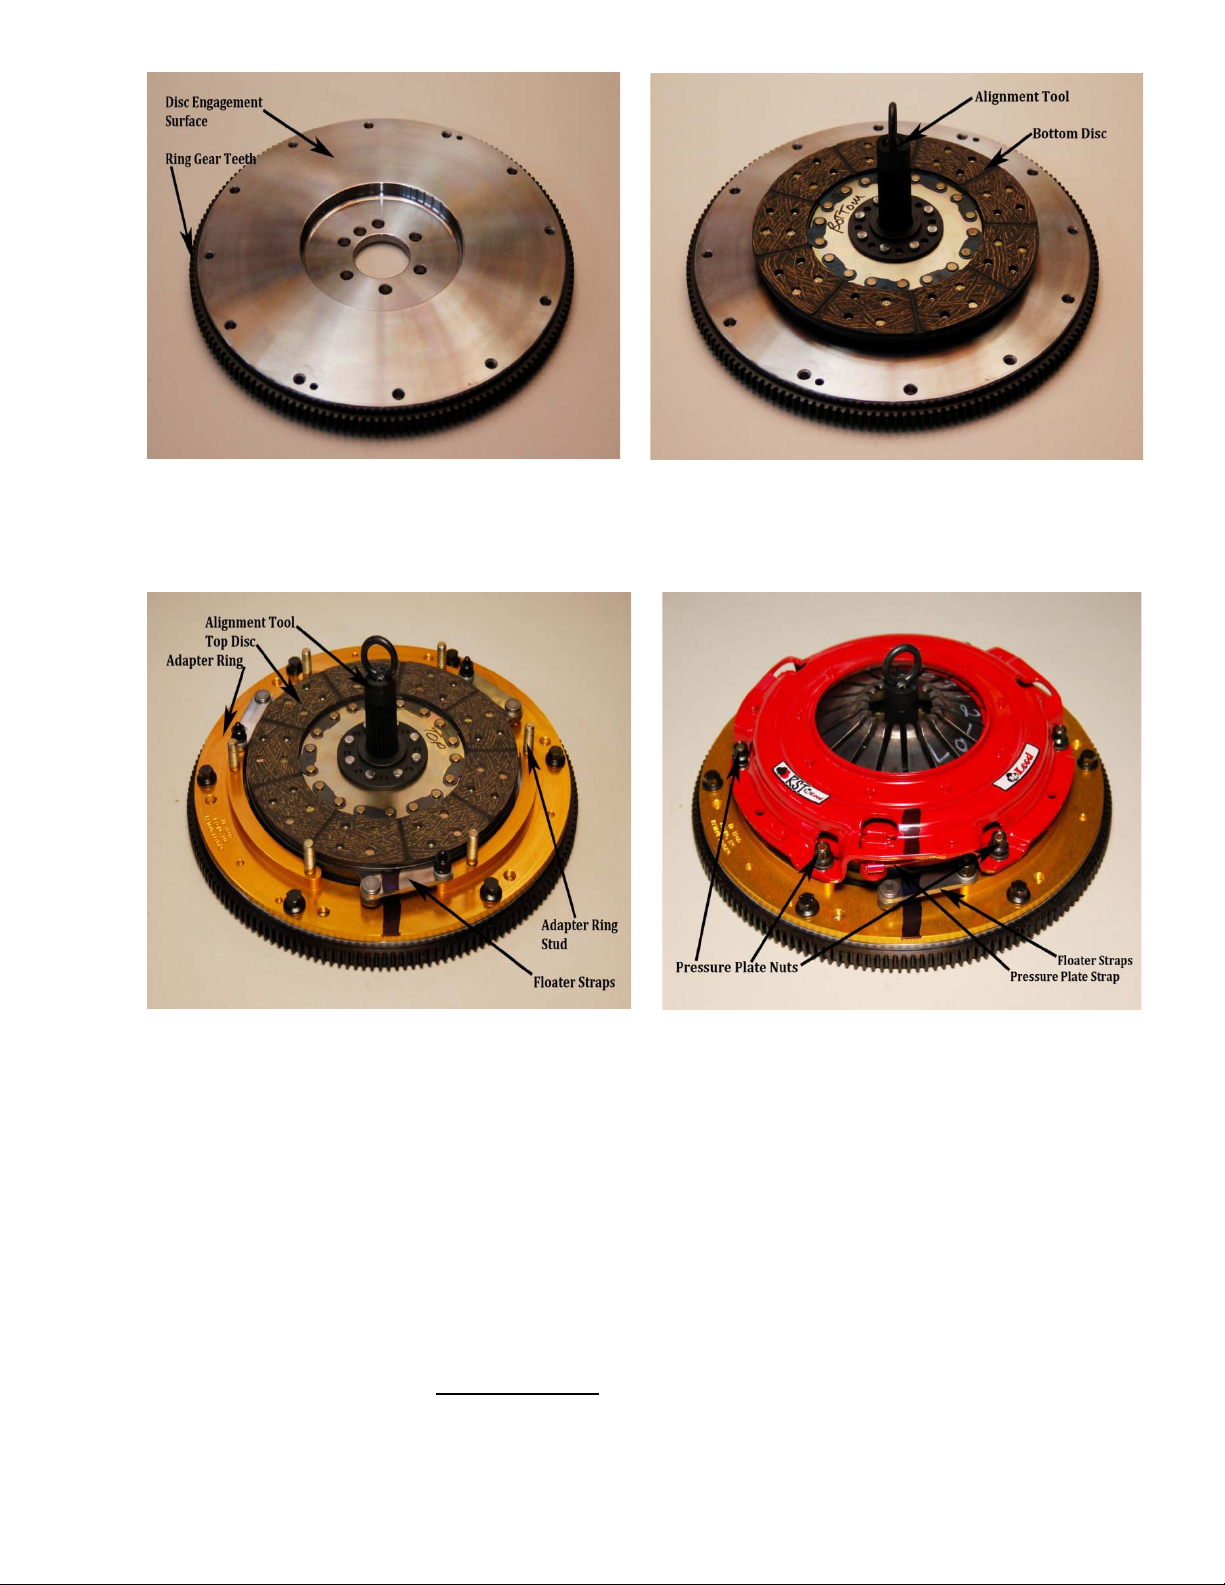
Figure 3 Figure 4
5) Install disc labeled “bottom” to the flywheel using the supplied alignment tool. Be sure the disc is
installed with the label indicating ‘flywheel side’ is forward toward the flywheel. Figure 4
Figure 5 Figure 6
6) 4.6L and 5.4L Ford Modular engines require the installation of the supplied dowel pins (3) into the
factory flywheel. GM LS engines require the installation of 2 of the supplied dowel pins into the
factory flywheel. Place adapter ring on flywheel, with the floater attached, using OEM pressure
plate bolts. (Some kits are supplied with new bolts for attaching adapter ring. In these cases
use these bolts as they provide necessary clearance.) (Do not use LocTite!) Do not add any
washers to any locations if they were not present with the McLeod clutch assembly! Torque
these bolts to factory specs. Note: If the floater was removed from the adapter ring re-torque all
5/16” nuts to 25 ft/lbs.
7) At this point the “bottom” disc should rotate freely without any drag. If the disc will not rotate call
McLeod’s Tech Service Line.
8) Install the top disc using the alignment tool and be certain it fully engages the pilot bearing to
correctly center the discs. Figure 5
Do not proceed!
Page 3
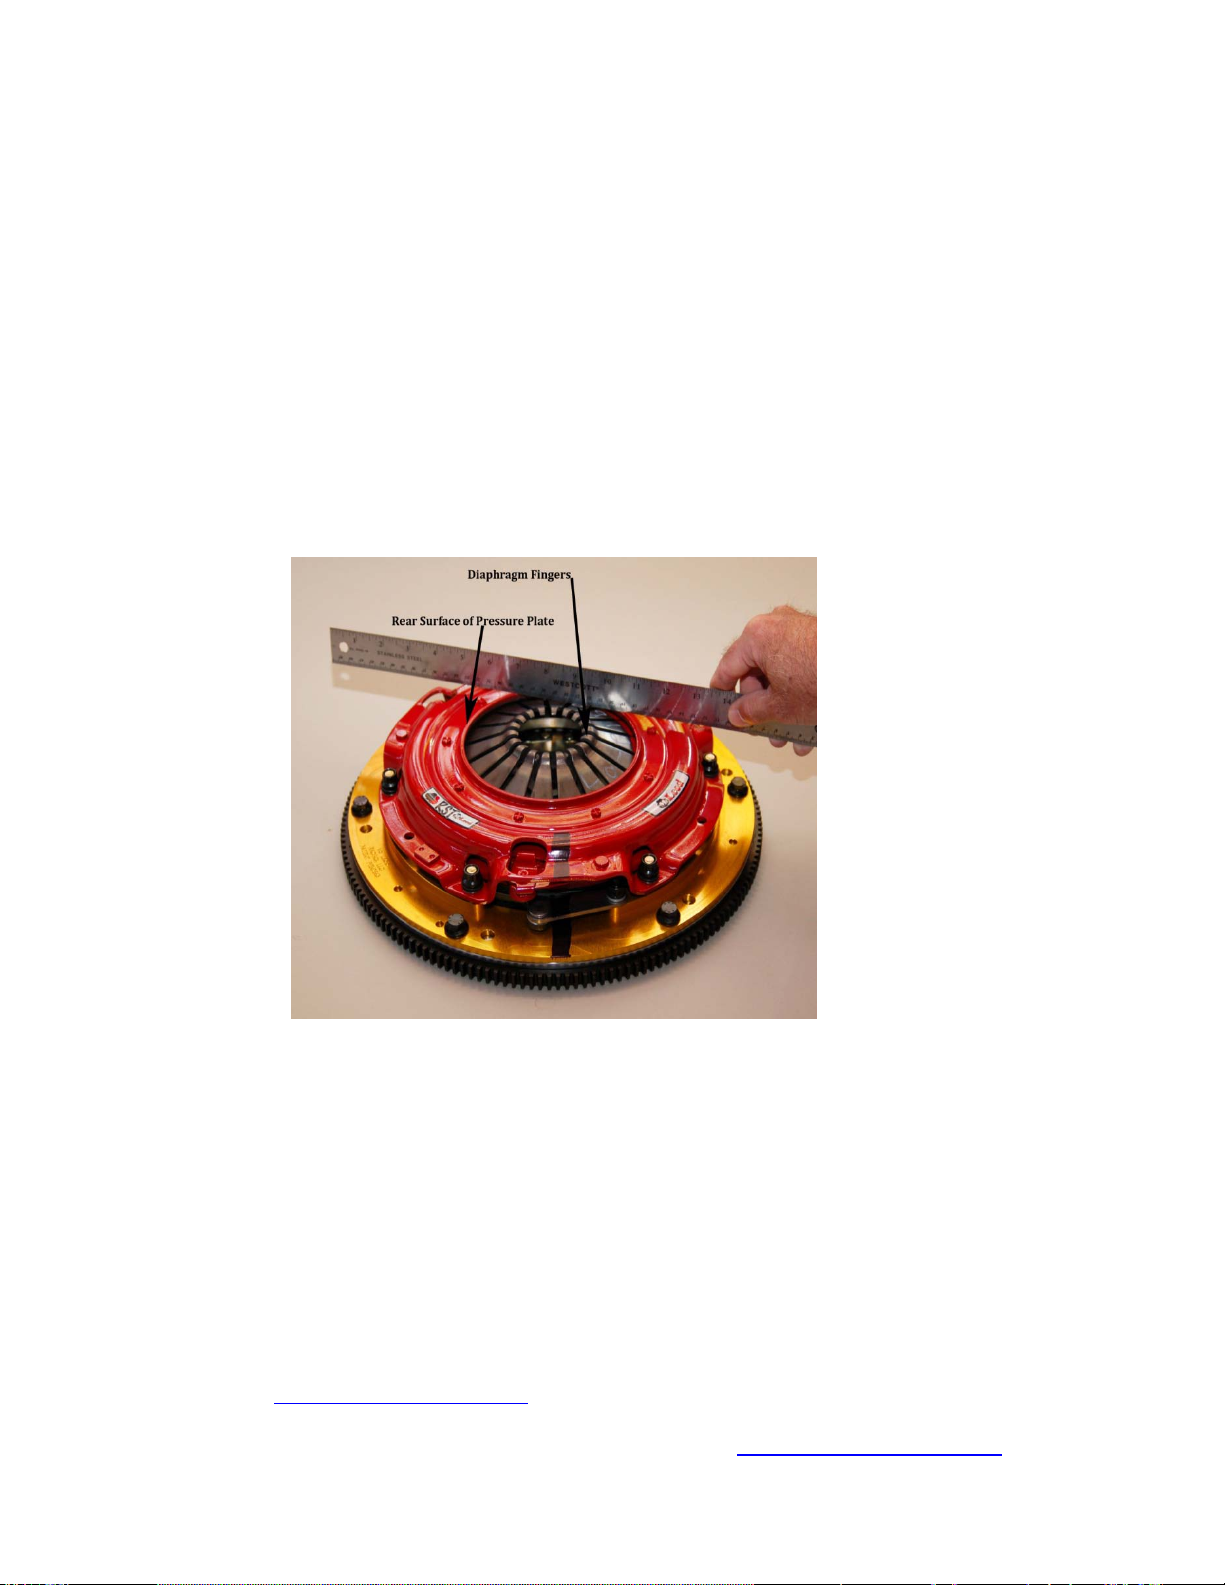
9) Install the pressure plate onto the studs on the adapter ring, pay special attention to the alignment
of the drive straps on the floater and the drive straps on the pressure plate! Both drive straps
must be seen in the same raised opening on the side of the pressure plate. Alignment mark on
Adapter ring and pressure plate must line up at this time. Do not offset the drive straps!! Figure 6
10) Install, in this order, six flat washers, six lock washers and six nuts onto the studs finger tight. Do
not use thread adhesive (LocTite) on the studs or nuts! Rotate the alignment tool in either
direction to make sure the discs are aligned properly.
11) Pressure Plate tightening sequence is critical at this point. Tighten pressure plate nuts to 25
ft/lbs in a star pattern (1 o’.clock, 7, 3, 9, 5, 11). Final torque is determined when the diaphragm
fingers stop pulling towards the flywheel. This should be at 35 ft/lbs…again tightening in the star
pattern. The lock washers should now be completely collapsed.
12) Check diaphragm finger height at this time by placing a straight edge onto the pressure plate
across the finger opening. All of the fingers should be below the rear surface of the pressure plate.
Figure 7.
Figure 7
13) Continue with the bell-housing, throw-out bearing and transmission installation.
14) Clutch release clearance can be checked at this point, you should have .020” - .025” clearance
between each disc at full clutch release.
15) Break-in period…Do not break-in this clutch system on a chassis dyno!! Normal street driving
is best for the break-in period. Drive the car for about 500 city miles (1200 clutch cycles) while
normally shifting the car up and down through the gears (Traction Control must be off!). After
the break-in period you can then drive the car aggressively to enjoy the additional performance
without clutch slippage.
16) To see the McLeod instruction video on how to install the RST/RXT Street Twin go to the McLeod
TV website. http://youtu.be/rWX6zKIGLaI
For McLeod Warranty Information please visit www.mcleodracing.com
 Loading...