

Page 1
C04
FORM NO. 769-01071
MTD Products Aktiengesellschaft • Saarbrücken • Germany
Page 2
7
1
1
2
11
1
10
2
4
3
9
5
3
6
8
Optional
4
5
1
2
6a
6b
7
1
2
1
Page 3
8
9
10
11
1.
2.
12
1
Page 4
k
k
English
Français
Deutsch
Nederlands
Italiano
Español
Svenska
1
7
14
21
28
36
43
Dans
Nors
Suomi
Portguês
6esky
37
49
55
61
68
75
Page 5

MTD Products Aktiengesellschaft
Industriestraße 23
D-66129 Saarbrücken
Germany
* ++ 49-6 80 57 90 • ++ 49-6 80 57 94 42
jqa=e~еЗЙдлЦЙлЙддлЕЬ~Сн=гДe
tЙдлЙк=pнк~Й=NOO
QSNQ=j~кЕЬнкЙев
* MT=OQ=OS=MR=RR
MT=OQ=OS=MR=RQ
jqa=_ЙеЙдмс=kKsK
mкбел=^дДЙкнд~~е=VS
_JUUTM=fтЙЦЙг
* HHPOJRN=QM=OQ=QN
HHPOJRN=QM=PT=TR
jqa=jзнзкЦЙк®нЙ=dгДe
fеЗмлнкбЙлнк~Й=VУNN
TPMRQ=bблдбеЦЙе=L=cбдл
* M=TN=SN=UR=MR=M
M=TN=SN=UR=MR=TM
jqa=aÉåã~êâ=^ép
jЙллбеЦоЙа=PM=^
UVMM=o~еЗЙкл
* UT=NN=VN=MM
UT=NN=VS=MM
jqa=fенЙке~нбзе~д=cк~еЕЙ
_KmK=QRP=p~бенJbнбЙееЙ=Зм=oзмок~у
TSUMS=`ЙЗЙс
* MO=PO=VN=VQ=PO
MO=PO=VN=VQ=PS
bKmK_~êêìë=iqa
i~мензе=oз~З
luS=Mro=_бЕЙлнЙкI=lсСзкЗлЬбкЙ
* M=NU=SV=PS=PS=PS
M=NU=SV=PS=PS=OM
jqa=eìåÖ•êá~=hÑí
aµòë~=dóÕêÖó=Ñн=N
UOQU=kЙгЙло•гзл
* MS=UU=RN=RR=MM
MS=UU=RM=RR=OM
jqa=qк®ЗЦ™кЗлг~лвбеЙк
p®íìå~î®ÖÉå=P
RONQN=c~äâÕéáåÖ
* M=RN=RN=TN=MM
M=RN=RT=NN=QN=Q
jqa=pЕЬпЙбт=^d
^ддгЙеЗлнк~Й=NQ
RSNO=sбддгЙкЦЙе
* MR=SS=NU=QS=MM
MR=SS=NU=QS=MV
jqa=mçä~åÇ=ëéK=ò=çKçK
riK=lЦкзЗебЕт~=N
UQJORO=lкдЙ
* MRU=RT=OM=TMN
MRU=RT=OM=SVV
© 2007 MTD Products AG
Page 6

Information on the
identification plate
This information is very
important for identification
purposes when ordering
replacement parts and for your
service dealer.
You will find the identification
plate near the engine.
Enter all the information shown
on the identification plate of your
unit in the space provided below.
Proper disposal for the sake of
our environment
Danger
Environmental hazard due to
engine oil.
Dispose of used engine oil at a
used oil collecting point or hand it
over to an approved disposal
company.
Avoid endangering small
animals
It is your responsibility to protect
hedgehogs and other small
animals. Make sure that there are
no small animals on the area to be
mown before you start.
For your safety
Correct use of the unit.
This unit is approved to be used:
– As an edger in a residential or
recreational environment,
– According to the descriptions
and safety instructions
specified in this operating
manual.
Any further use of the unit is not
permitted. The operator is liable
for any damage suffered by other
people or their property.
Any modifications to the unit
carried out by the operator
exclude the liability of the
manufacturer for resulting
damage or injury.
General safety instructions
Before attempting to operate the
unit, read and follow carefully the
instructions in this manual.
Familiarize other operators with
the operating instructions.
The unit must not be used unless
it conforms to the technical
standards prescribed by the
manufacturer.
Keep this manual in a safe place
for future and regular reference.
If the unit changes hands, make
sure the new owner is given the
operating manual.
Children
Tragic accidents can happen if
you do not pay attention to the
presence of children. Children
often feel attracted by motordriven machines. You must never
assume that children will remain
standing in the place where you
saw them last.
The unit must never be operated
by children.
Before operating the unit
Do not operate the machine under
the influence of intoxicants such
as, for example, alcohol, narcotics
or medicine.
The unit must not be operated by
any person under the age of 16.
Before starting work, familiarize
yourself with all equipment,
controls and associated functions.
Only
store fuel in approved
containers and never store fuel
near sources of ignition (e.g. gas
hot water heater or furnace).
Replace exhaust, fuel tank and
tank lid, if damaged.
English
Replacement parts must meet
the manufacturer´s
requirements. Only use
original replacement parts or
replacement parts approved by
the manufacturer. Repairs are
only to be carried out by an
authorized service dealer.
While the unit is in use
Make sure that there are no other
people, especially children, or
animals anywhere near the
operating area of the unit. Never
leave the unit unattended with
engine running.
Operate the unit at normal
walking speed. While working
with the unit always wear:
protective goggles
work shoes close-fitting clothes
which can´t become entangled in
the unit. Always wear closefitting gloves without hanging
shafts or laces.
To avoid risk of fire, keep the
engine and exhaust free of grass,
leaves or leaking fuel and oil. The
area to be mown should be made
completely free of stones, toys,
wires etc., which could be caught
up in the cutting blades and
thrown out.
Overlooked objects could
unintentionally be flung out in
any direction and injure you and
other people nearby.
Never run the engine in closed
rooms; danger of poisoning !
Never allow your hands, feet,
face or clothes to get anywhere
near the cutting blades or other
rotating parts of the unit. Only
operate the unit in daylight or
with adequate artificial lighting.
Turn off the engine when the unit
is not in use.
Never use the unit on slippery,
wet, loose or frozen ground. To
prevent accidents, it is essential
that the unit should be standing
securely. If the unit tips over or
1
Page 7

the operator slips over, accidents
p
p
can happen.
Ensure that all the safety devices
are in full working order and
correctly attached to the unit at all
times. Do not make any
unauthorized adjustments to the
safety devices. The unit must not
be used unless it conforms to the
technical standards prescribed by
the manufacturer.
Avoid open fire, sparks and do
not smoke.
Before working on the unit:
Protect yourself from injury.
Before working on the unit:
-
Stop the engine
-
Wait until all moving parts
have come to a complete
standstill
-
Remove wire from spark plug
to avoid accidental starting
Transporting the unit
Never transport the unit with
engine running.
After operating the unit
Do not get off the unit until you
have turned the engine off
Safety devices
For the protection of the operator
the unit is equipped with safety
devices which must always be in
full working order.
You should never make any
unauthorized adjustments to the
safety devices or bypass them.
Safety devices:
Safety bar
The safety bar is designed to
protect the operator by bringing
the engine and the cutting blades
to an immediate standstill in the
case of an emergency. Do not
ever try to bypass this function.
Blade cover
The blade cover is designed to
protect you against injury. The
unit is only to be operated with
the cover in place.
Symbols on the unit
Stickers with various symbols are
attached to the unit They have the
following specific meanings:
Injury hazard, or
ossibility of damage
to property.
Before using the unit
read and observe the
information in the
user’s guide, in
articular the section
„ For your safety“
Injury hazard due to
rotating blade.
Keep hands and feet
away from the blade.
Injury hazard.
Wear goggles.
Keep the area of
operation clear
(at least 15 m) of all
persons, especially
small children and
animals.
Injury hazard.
The unit is only to be
operated with the
blade-cover in place
Ensure that the symbols on the
unit are legible at all times.
Symbols in this manual
The following symbols are used
in this manual:
Warning / Danger
The symbol is intended to point
out hazards related to the activity
described, which could endanger
the personal safety of the operator
or others and cause damage to
property.
References to positions
To determine positions (e.g. left,
right) stand behind the handle in
the operating position.
Assembly
Always remove wire from spark
plug to avoid accidental starting
Danger
This unit is shipped without
gasoline or oil in the engine.
See engine manual.
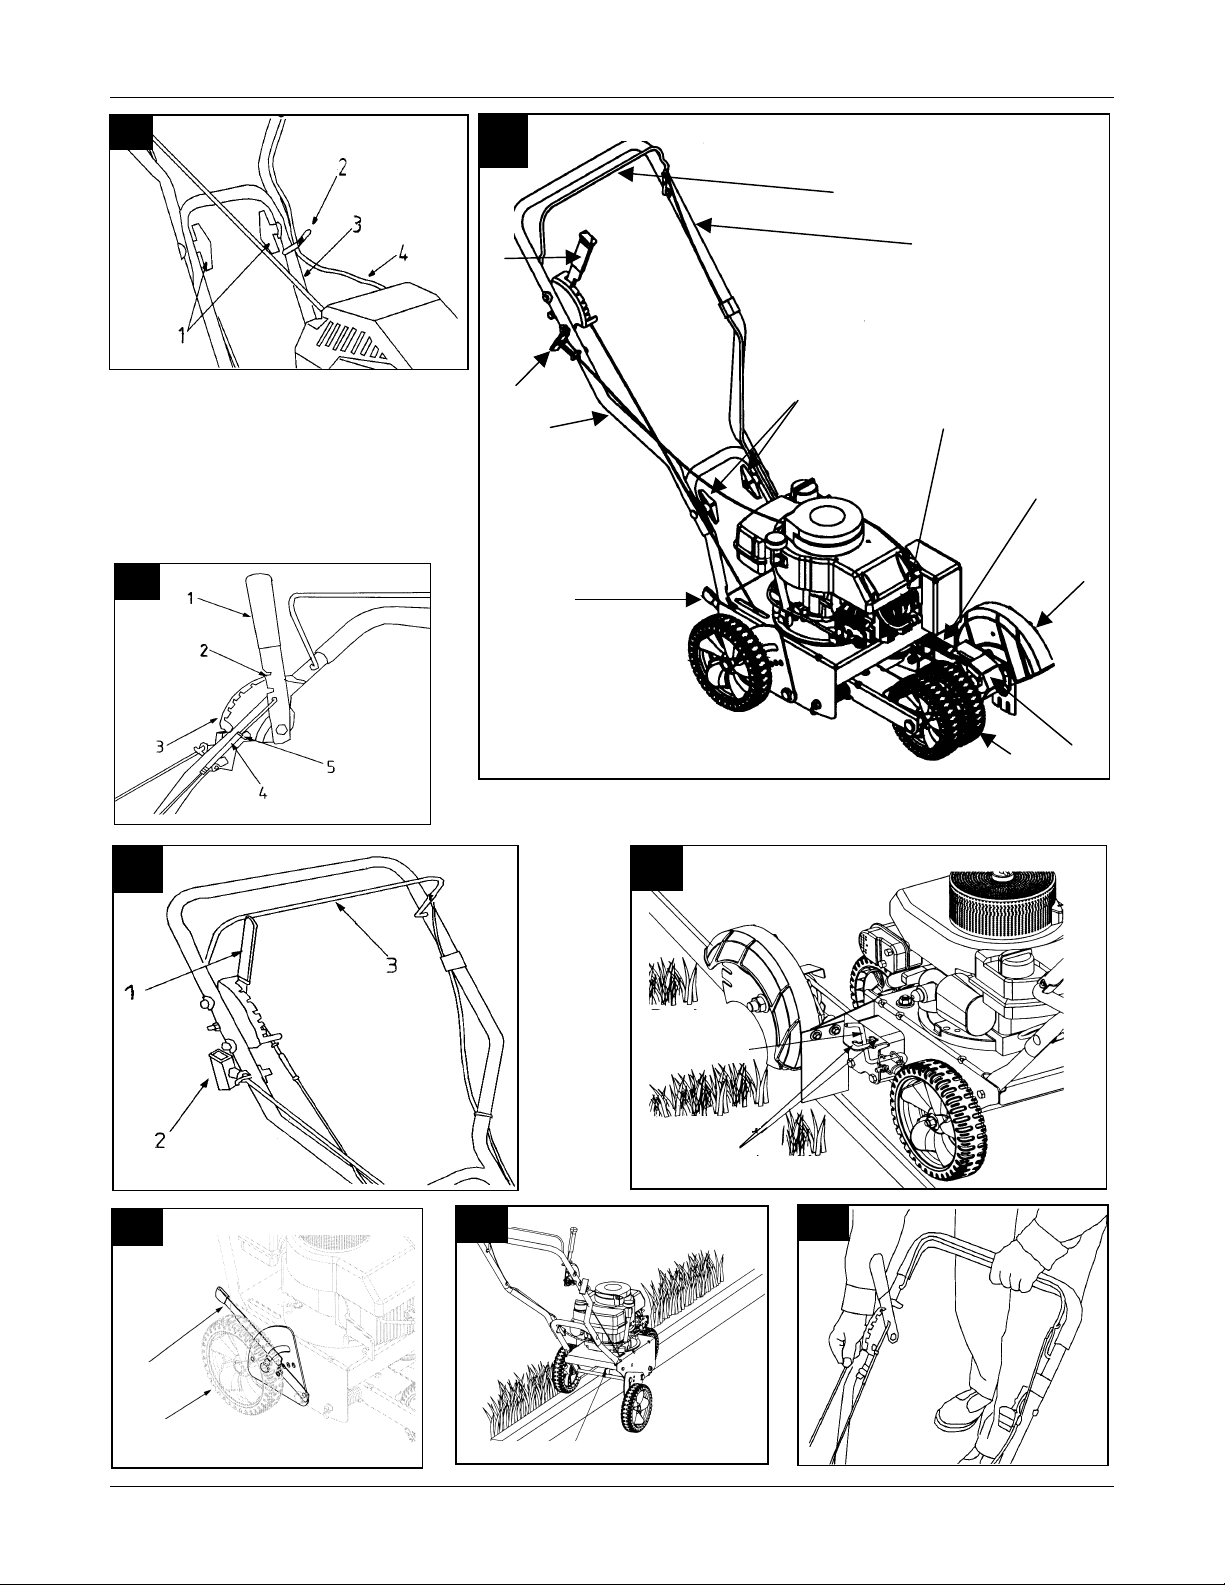
Attaching the handle
Figure 1
1. Wing nuts
2. Rope guide
3. Lower handle
4. Bowden cable
Raise the upper handle until it
snaps into place. Tighten the wing
nuts (1). Do not crimp the starter
rope nor the Bowden cable.
Attaching the starter rope
The rope guide is already
attached to the right side of the
upper handle (optional) of your
unit. See Figure 2.
1. Push the safety bar (11) and
pull the starter rope out of the
engine.
2. Slip the rope through the rope
.
guide. Tighten the wing nut
holding the rope guide.
Adjusting the blade depth
control
Figure 3:
1. Depth control lever
2. Start position
3. Lowest edging position
4. Hex lock nut (otional)
5. Control cable
English
2
Page 8

General view of the unit
Figure 2:
1. Blade depth control
2. Starter rope
3. Wing nuts
4. Lower handle
5. Tilt blade control lever
(optional)
6. Curb wheel control lever
(optional)
7. Belt guard
8. Blade cover
9. Spark plug connector
10. Upper handle
11. Safety bar
Controls
Throttle control lever (optional)
The throttle control lever is
located on the engine. It regulates
the engine speed and stops the
engine.(See engine manual).
Safety bar
Figure 4
The safety bar (3) must be
depressed against the upper
handle in order to operate the
unit. Release the safety bar to
stop the engine and the blade.
Recoil starter
Figure 4
Stand behind the unit and pull the
recoil starter (2) to start the unit
Blade depth control
Figure 4
Danger
Do not under any circumstances
attempt to defeat the function of
the blade depth control. Use unit
only with properly adjusted
control. (see section Adjusting
the blade depth control)
The function of the blade depth
control (1) is to control the depth
of the cut. To lower the blade to
the cutting position, move the
handle lever to the left and move
it forward to select the cutting
depth. The further forward the
control lever is moved, the deeper
or lower the cut.
Figure 4:
1. Blade depth control lever
2. Recoil starter
3. Safety bar
Primer
The primer is used to pump gas
into the carburetor. Use it to start
a cold engine.
(See engine manual)
Blade tilt control (optional)
Figure 5
1. Blade tilt control lever
2. Notches
Danger
Never make any adjustments
while engine is running
The cutting blade can be adjusted
to 3 positions . From beveling to
edging to trenching.
Adjusting the curb wheel
control (optional)
Figure 6a/b
1. curb wheel control handle
2. normal operation position
3.
Danger
Never make any adjustments
while engine is running
The right rear wheel can be
adjusted to edge along a curb.
Operation
Also follow the instructions in
the engine handbook.
Danger
People, particularly children, or
animals must be kept away from
the mower during operation. They
can be injured by stones or
similar objects being thrown out.
Children must never be allowed
to operate the mower.
Falling over
– Push the lawn mower along at
no faster than walking pace.
English
– Take particular care when
mowing backwards and
pulling the lawn mower
towards you.
– When cutting grass on a steep
slope, the lawn mower could
tip over and cause an injury.
Always cut at right angles to
the slope. Take particular care
when changing the direction
of travel.
– Injury hazards occur when
mowing around the fringes. It
can be dangerous to mow at
the lawn edges and in the
vicinity of hedges or steep
banks. Always maintain a
safe distance from such
hazards.
– When cutting wet grass, the
lawn mower can slip due to
reduced traction and cause
you to fall over. Only cut
grass when it is dry.
– Only operate the lawn mower
during daylight
Injuries
– Stop engine before moving
the unit across surfaces such
as paths or drives.
– Inspect the area to be mown
and remove all objects that
could be picked up by the
unit and thrown out.
– Do not make any adjustments
to the unit while the engine is
running. For safety purposes
disconnect the spark plug
wire.
Danger of suffocation through
carbon monoxide
Only run the engine in well- aired
rooms and outdoors.
Danger of explosion and fire.
Fuel and gasoline vapours are
highly explosive and fuel is
extremely flammable.
Always add fuel before starting
the engine. Do not remove the
fuel cap and expose the fuel tank
while the engine is running or
hot. Stop the engine and allow it
to cool before refueling. Avoid
3
Page 9

open fire and sparks and do not
smoke. Always refuel the
machine outdoors.
Do not start the engine if fuel has
been spilled. Remove the unit
from the area with spilled fuel
and wait until the fuel vapours
have evaporated.
To avoid fire hazard keep the
following parts of the machine
free of grass or oil: engine,
exhaust pipe, fuel tank.
Danger
Danger of injury through faulty
machine
Only operate the unit in perfect
working order. Visually inspect
the unit before each operation.
It is particularly important to
check that the safety devices, the
cutting blades with their holders,
the controls and all nuts & bolts
are undamaged and securely
fitted.
Replace damaged parts before
operation.
Warning
Lack of engine oil can cause
possible damage to the engine.
The unit is shipped without
engine oil and fuel. Fill up with
engine oil and fuel before putting
the unit into operation for the first
time (see engine manual).
Warning
Do not lower the cutting blade
over concrete, asphalt surfaces or
rocks. This could cause injury or
damage to property.
Before each operation
‚" Check engine oil level
‚" Check fuel level, refuel if
necessary (see engine
manual)
‚" Check that unit is in perfect
working order
Starting the engine
Figure 7
Warning
-
To avoid injury, only start the
engine when standing behind
the unit.
-
Keep feet away from the
cutting deck.
-
Do not ever put hands, feet or
other parts of the body on or
under rotating parts.
-
Do not lift or carry the unit
with the engine running.
To prevent an accidental starting
of the engine, stop engine and
disconnect the spark plug wire:
– Before you inspect the unit,
clean and make adjustments
to it or before you carry out
any other work on the unit.
– When you hit an object.
Check the unit for damages
and carry out any necessary
repairs before you continue
operating the unit.
– If the unit starts to vibrate in
an unusual way. Inspect the
unit immediately.
Before starting the engine, move
the blade depth control handle
back to the start position.
‚" Set the throttle lever in the
FAST position (rabbit)
‚" When starting a cold engine,
push the primer bulb in two
or three times. Wait two to
three seconds between each
push. In cold weather (below
50 degrees F/19 degrees C)
push five times.(see engine
manual)
‚" Standing behind the unit,
depress the safety bar and
hold it
‚" Grasp starter handle and pull
rope out slowly until it gets
harder to pull, then pull rope
with a rapid full arm stroke.
Let the rope rewind slowly
and do not let it shoot back.
English
Stopping the engine
‚" Release the safety bar
‚" Move throttle control lever
(optional) to the SLOW
position (turtle).
‚" Disconnect spark plug wire
(after end of work).
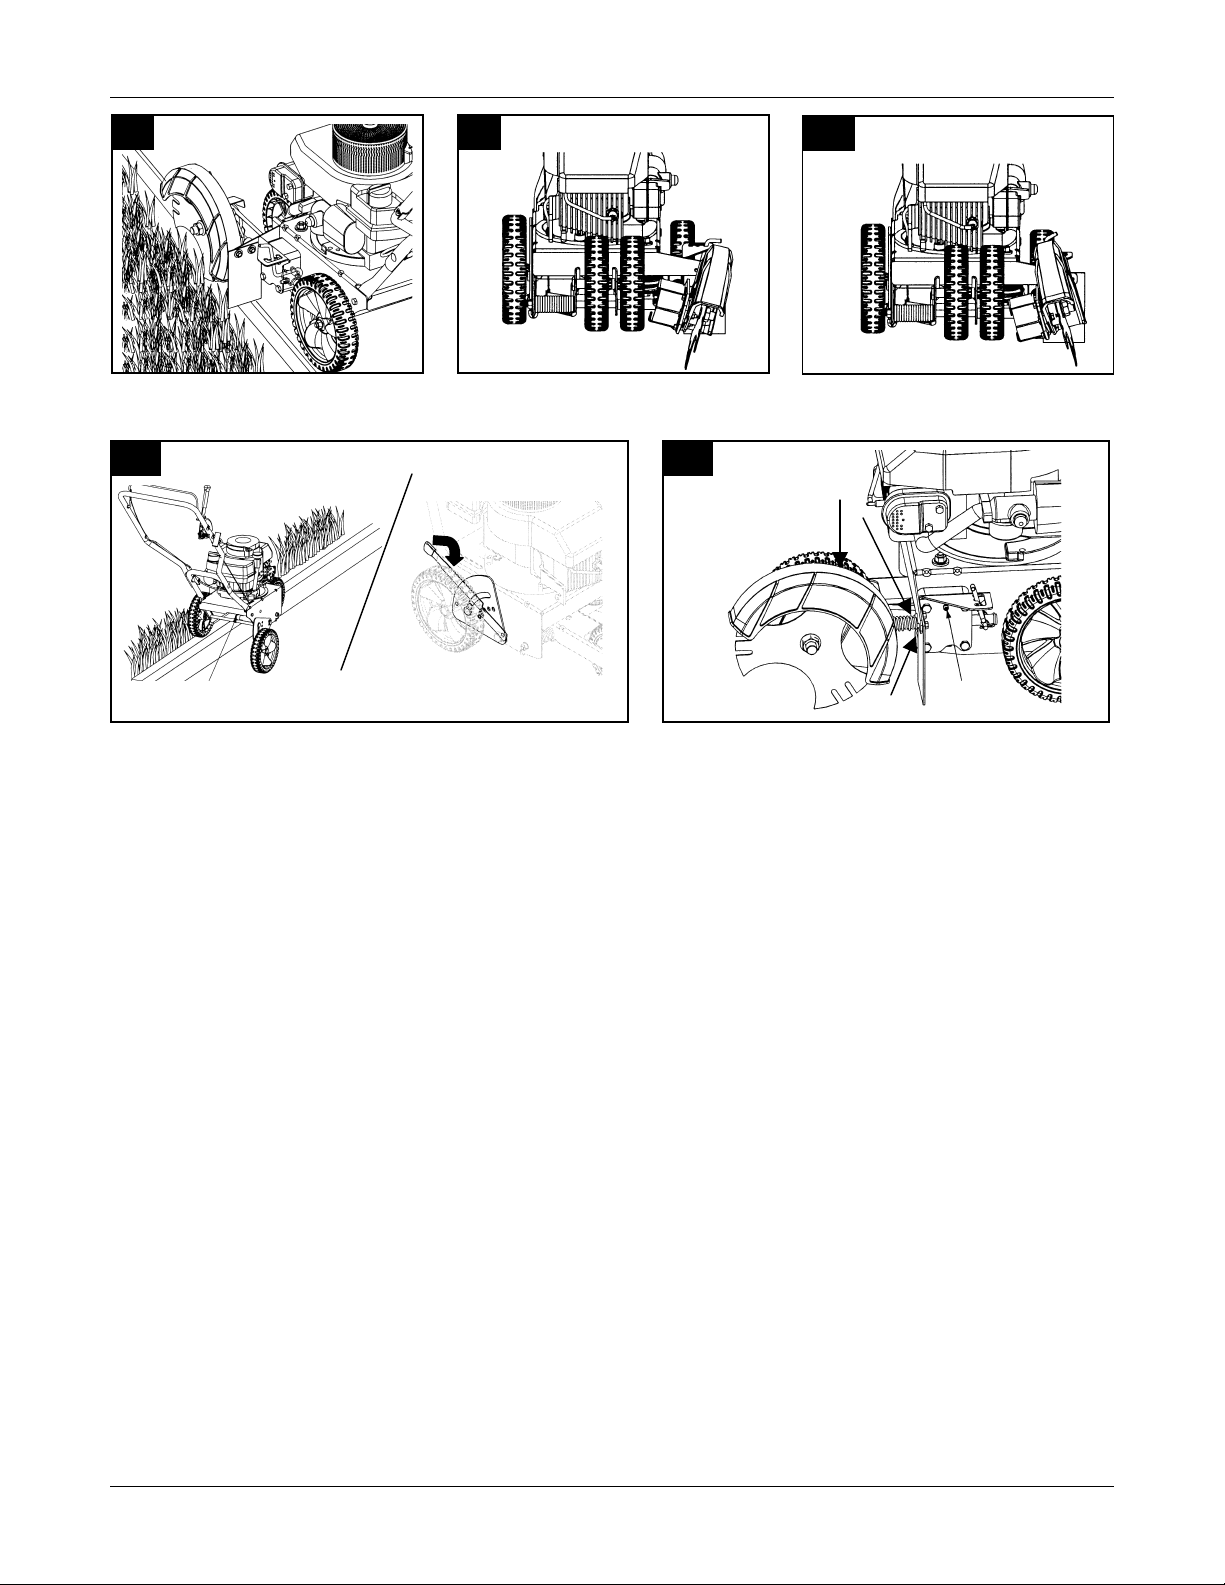
Operating the Unit
Adjusting the cutting blades
(optional)
Figure 8, 9, 10
‚" Set the adjustment lever (see
figure 5) in the middle notch
to edge vertically (figure 8)
‚" Set the adjustment lever (see
figure 5) in the 1.or 3. notch
(top) for beveling
(figure 9/10).
Edging along curb (optional)
Figure 11
To edge along a curb, lower the
right rear wheel by moving the
height adjustment lever toward
the rear of the unit.
When edging the grass along a
curb, the unit will ride on the two
rear wheels and the wheel at the
front.
Maintenance
Cleaning, maintenance,
installation, removal,
adjustments and storage
Danger
Danger of injury due to
accidental starting of the engine.
Protect yourself against injury.
Before carrying out any work on
this unit:
‚" Stop the engine
‚" Wait until all moving parts
have come to a complete
standstill
‚" Disconnect the spark plug wire
from the engine to prevent an
accidental starting of the
engine
‚" Wait until the engine and all
other hot parts have cooled
down
4
Page 10

Cleaning
Warning
Danger of damage to unit.
Do not use a steam jet to clean the
unit.
‚" Clean unit if possible after
each use.
‚" Place the unit on hard level
ground and make sure it
cannot roll away.
Danger of injury
Wear protective gloves.
Warning
Possible danger of damage to
engine.
Do not tip the unit at an angle of
more than 30 degrees. Fuel can
flow into the combustion chamber
and cause damage to the engine.
Clean unit with a scrubbing
brush, hand brush or rag. Remove
grass debris from under the belt
guard.
Lubricating
Wheels
Lubricate wheels, axle bolts and
bearings at least once a season
with light oil or engine oil.
Pivot points
Lubricate the pivot points on the
blade handle, Bowden cable and
the cutting adjustment lever with
light oil at least once a season
Shaft
Figure 12
Lubricate the bearings and the
spring with light oil frequently
during the season.
1. Lube fitting ((optional)
Lubricate all other moving parts
with engine oil.
Information
Please contact your local service
dealer for replacement of the
cutting blade or assembly of the
trenching accessory (optional).
Maintenance of the engine
Refer to the engine manual for
appropriate instructions.
Storage
Warning
Danger of explosion and fire
If the fuel tank still contains fuel
(gasoline), never store the unit in
rooms in which the fuel vapors
could come into contact with fire
or sparks.
Warning
Risk of damage to unit
Only store the unit in an area
which is clean and dry.
Protect the unit when it is to be
stored for longer periods of time,
e.g. winter, but in all cases
against rust.
E.g. at the end of the season, or if
the unit is not to be used for
longer than a month:
‚" Clean the unit.
‚" Wipe over all metal surfaces
with an oil-impregnated cloth
(non-resinous oil) or spray a
fine coat of oil onto them, to
protect them from corrosion.
‚" Follow the instructions in the
engine manual for storing the
engine.
English
Warranty
The warrantee conditions that
apply in each country are
published by either our company
or the importer of our products.
Faults will be repaired free of
charge within the framework of
the guarantee, provided that they
have been caused by a material
defect or manufacturing error. In
the event of a guarantee claim,
please contact your dealer or our
nearest branch office.
Information on engine
The engine manufacturer is
responsible for all engine-related
issues with regards to
performance, powerrating,
specifications, warranty and
service. Please refer to the engine
manufacturer's
Owner's/Operator's Manual
packed separately with your unit
for more information.
5
Page 11

What to do in the case of
p
difficulties with the unit
Danger
Risk of injury due to accidental
starting of the engine.
Protect yourself from injury.
Before working on the unit:
‚" Stop the engine
Problem Possible cause(s) Corrective Action
Engine fails to start Empty fuel tank or stale fuel. Fill tank with clean, fresh fuel.
Throttle control lever in wrong
osition
Spark plug wire disconnected.
Faulty spark plug.
Loss of power, operation
erratic
Spark plug wire loose
Stale fuel Fill tank with clean, fresh gasoline
Unit running on CHOKE Move CHOKE back
‚" Wait until all moving parts
have come to a complete stop
‚" Remove spark plug wire to
prevent accidental starting
Problems that arise with the
operation of the unit often result
from simple causes , which you
should be aware of and partly be
Move throttle control lever to RABBIT / or
CHOKE position (use primer)
Connect wire to spark plug.
Clean, adjust gap or replace
Connect and tighten spark plug wire.
able to resolve yourself. If there is
any doubt, your dealer will be
pleased to provide further
assistance.
For repairs, see your authorized
service dealer.
English
Vent in gas cap plugged
Water or dirt in fuel system.
Air filter dirty.
Carburetor not adjusted.
Excessive vibration Spindle bent
Ball bearings worn out
Engine attachment loose
Belt slips Belt worn or stretched Adjust or have belt replaced
Clear vent
Drain fuel tank, refuel. (See engine manual)
Clean air filter. (See engine manual)
Have carburetor adjusted
Have spindle replaced
Have ball bearings replaced
Have engine fixed securely
6
 Loading...