

Page 1

GB
SE
DK
FI
NO
FR
NL
IT
DE
ES
PT
HU
PL
RU
EE
LV
LT
SK
HR
BA
RS
CZ
BG
UA
Operator’s manual 6-27
Bruksanvisning 28-49
Brugsanvisning 50-71
Käyttöohje 72-94
Bruksanvisning 95-116
Manuel d’utilisation 117-140
Gebruiksaanwijzing 141--164
Istruzioni per l’uso 165-187
Bedienungsanweisung 188-211
Manual de instrucciones 212-235
Instruções para o uso 236-259
Használati utasítás 260-281
Instrukcja obs∏ugi 282-305
эксплуатации 504-531
Käsitsemisõpetus 306-327
Lieto‰anas pamÇc¥ba 328-349
Naudojimosi instrukcijos 350-371
Návod na obsluhu 372-393
Priruãnik 394-415
Uputstvo o upotrebi 416-437
Priruãnik 438-459
SI Navodila za uporabo 460-481
Návod k pouÏití 482-502
експлоатациЯ 532-559
RO Instrucöiuni de utilizare 586-607
GR √‰ËÁ›Â˜ ¯Ú‹Ûˆ˜ 608-631
TR Kullanım kılavuzu 632-653
користувача 560-585
.
CS 35
CS 35S
Page 2
2
1
1
2
17
21
18
19
9
10
8
20
3
11
6
7
5
27
15
14
13
16
4
2
2
5
A
8
min 4mm
(0,16’’)
24
21
12
23
22
3
6
A
B
9
25
4
7
10
26
A
C
B
– English
Page 3
11
12
13
14 15 16
17
20
18 19
21
22
A
B
23
26
24 25
B
English – 3
Page 4
27
30
32
28
A
E
C
D
G
H
B
F
I
J
29
31
33
34
4 – English
A
E
B
D
C
Page 5
35
37
39
41
36
38
Retreat path
40
42
D
a
n
g
e
nger zone
a
D
0,6 mm
r z
o
n
e
Felling directio
D
a
n
g
e
r
zo
Retreat path
n
1
2
n
e
1
3
1
2
43
English – 5
Page 6
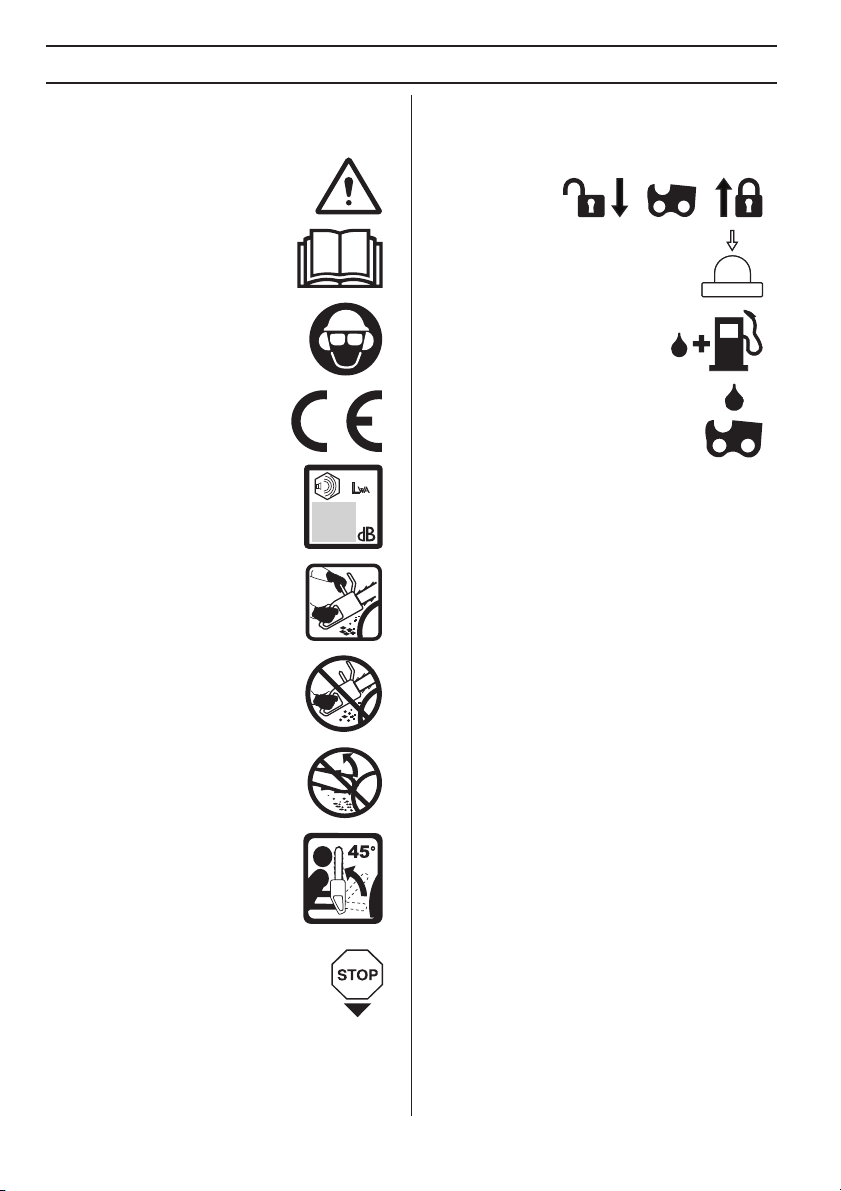
Symbols on the machine:
ARNING! Chain saws can be
dangerous! Careless or incorrect use can
result in serious or fatal injury to the
operator or others.
Please read the operator’s manual
carefully and make sure you
understand the instructions before
using the machine.
Always wear:
• Approved protective helmet
• Approved hearing protection
• Protective goggles or a visor
This product is in accordance with
applicable EC directives.
INTR ODUCTION
Chain brake, activated (front)
Chain brake, not activated (back)
Air purge
Refuelling.
Chain oil fill.
6
W
Noise emission to the environment
according to the European
Community’s Directive. The machine’s
emission is specified in the Technical
data chapter and on the label.
Both of the operator ′ s hands must be
used to operate the chain saw.
Never operate a chain saw holding it
with one hand only.
Contact of the guide bar tip with any
object must be avoided.
WARNING! Kickback may occur when
the nose or tip of the guide bar touches
an object, and cause a lightning fast
reverse reaction, kicking the guide bar
up and towards the operator. May
cause serious personal injury.
The engine is stopped by switching the
ignition off using the stop switch.
The rating plate
showing serial number.
yyyy
is the production
year, ww is the
productionweek and
xxxxx
is the sequential
number.
Other symbols/decals on the mac
certification requirements for certain markets.
yyyywwxxxxx
hine refer to special
– English
Page 7

INTR ODUCTION
1
Dear Customer ,
Thank y ou for choosing a McCulloch product. You are
thereby part of a story that started long ago, when the
McCulloch Corporation started its manufacturing of
engines during World War II. In 1949, when McCulloch
introduced its first light one-man chainsaw, woodworking
would never be the same again.
The line of innovative chainsaws would continue over the
decades, and business was expanded, first by airplane
and kart engines in the 1950s, then by mini chainsaws in
the 1960s. Later, in the 1970s and 80s, trimmers and
blower vacs were added to the range.
Today, as a part of the Husqvarna group, McCulloch
continues the tradition of powerful engines, technical
innovations, and strong designs that have been our
hallmarks for more than half a century. Lowering fuel
consumption, emissions and noise levels are of top
priority to us, as is improving safety and user-friendliness.
We certainly hope that you will be satisfied with your
McCulloch product, as it is designed to be your
companion for a long time. By following this operators
manual’s advice on usage, service, and maintenance, its
lifespan can be extended. If you should need professional
help with repair or service, please use the Service Locator
at www.mcculloch.com.
McCulloch has a policy of continuous product
development and therefore reserves the right to modify
the design and appearance of products without prior
notice.
This manual can also be downloaded at
www.mcculloch.com.
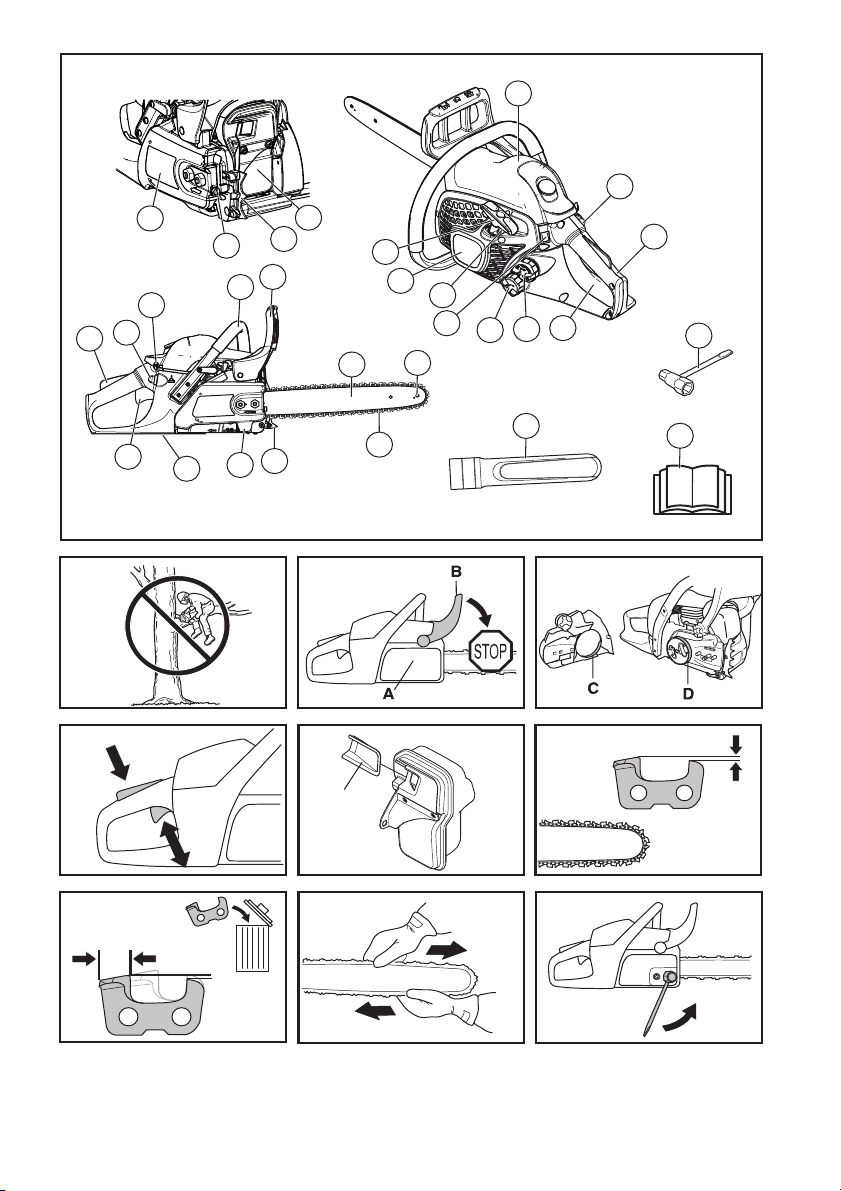
What is what on the c hain saw?
(1)
Cylinder cover
2 Air purge
3 Stop switch (Ignition on/off switch.)
4 Choke control/Start throttle lock
5 Rear handle with right hand guard
6 Information and warning decal
7 Fuel tank
8 Adjuster screws carburettor
9 Starter handle
10 Starter housing
11 Chain oil tank
12 Rating plate
13 Chain tensioning screw
14 Clutch cover
15 Throttle lockout (Prevents accidental operation of
throttle trigger.)
16 Front handle
17 Front hand guard
18 Muffler
19 Guide bar
20 Bar tip sprocket
21 Saw chain
22 Spiked bumper
23 Chain catcher
24 Throttle trigger
25 Guide-bar cover
26 Operator′s manual
27 Combi-tool
English
7
–
Page 8

CONTENTS
Contents
INTRODUCTION
Symbols on the machine: ...................................... 5
INTRODUCTION
Dear Customer, ..................................................... 7
What is what on the chain saw? ........................... 7
CONTENTS
Contents ............................................................... 8
GENERAL SAFETY PRECAUTIONS
Before using a new chain saw .............................. 9
Important .............................................................. 9
Always use common sense .................................. 9
Personal protective equipment ............................. 10
Machine′s safety equipment ................................. 10
Cutting equipment ................................................. 12
ASSEMBLY
Fitting the bar and chain ....................................... 15
FUEL HANDLING
Fuel ....................................................................... 16
Fueling .................................................................. 17
Fuel safety ............................................................ 17
STARTING AND STOPPING
Starting and stopping ............................................ 18
WORKING TECHNIQUES
Before use: ............................................................ 19
General working instructions ................................ 19
How to avoid kickback ........................................... 22
MAINTENANCE
General ................................................................. 23
Carburettor adjustment ......................................... 23
Checking, maintaining and servicing chain saw
safety equipment ..................................................
Muffler ................................................................... 24
Air filter .................................................................. 24
Spark plug ............................................................. 24
Maintenance schedule .......................................... 25
TECHNICAL DATA
Technical data ....................................................... 26
Guide bar and saw chain combinations ................ 27
EC Declaration of Conformity ............................... 27
23
8 – English
Page 9
GENERAL SAFETY PRECAUTIONS
Before using a new chain saw
• Please read this manual carefully.
• (1) - (43) refer to figures on p. 2-5.
• Check that the cutting equipment is correctly fitted and
adjusted. See instructions under the heading
Assembly.
• Refuel and start the chain saw. See the instructions
under the headings Fuel Handling and Starting and
Stopping.
• Do not use the chain saw until sufficient chain oil has
reached the chain. See instructions under the heading
Lubricating cutting equipment.
• Long-term exposure to noise can result in permanent
hearing impairment. So always use approved hearing
protection.
WARNING! Under no circumstances may
the design of the machine be modified
!
without the permission of the
manufacturer. Always use original
accessories. Non-authorized
modifications and/or accessories can
result in serious personal injury or the
death of the operator or others.
WARNING! A chain saw is a dangerous
tool if used carelessly or incorrectly and
!
can cause serious, even fatal injuries. It
is very important that you read and
understand the contents of this
operator’s manual.
Important
IMPORTANT!
This chain saw for forest service is designed for forest
work such as felling, limbing and cutting.
You should only use the saw with the bar and chain
combinations we recommend in the chapter Technical
data.
Never use the machine if you are fatigued, while under
the influence of alcohol or drugs, medication or anything
that could affect your vision, alertness, coordination or
judgement.
Wear personal protective equipment. See instructions
under the ”Personal protective equipment” heading.
Do not modify this product or use it if it appears to have
been modified by others.
Never use a machine that is faulty. Carry out the safety
checks, maintenance and service instructions
described in this manual. Some maintenance and
service measures must be carried out by trained and
qualified specialists. See instructions under the
Maintenance heading.
Never use any accessories other than those
recommended in this manual. See instructions under
the headings Cutting equipment and Technical data.
CAUTION! Always wear protective glasses or a face
visor to reduce the risk of injury from thrown objects. A
chain saw is capable of throwing objects, such as wood
chips, small pieces of wood, etc, at great force. This can
result in serious injury, especially to the eyes.
WARNING! The inside of the muffler
contain chemicals that may be
!
carcinogenic. Avoid contact with these
elements in the event of a damaged
muffler.
WARNING! Long term inhalation of the
engine’s exhaust fumes, chain oil mist
!
and dust from sawdust can represent a
health risk.
WARNING! This machine produces an
electromagnetic field during operation.
!
This field may under some
circumstances interfere with active or
passive medical implants. To reduce the
risk of serious or fatal injury, we
recommend persons with medical
implants to consult their physician and
the medical implant manufacturer before
operating this machine.
WARNING! Running an engine in a
confined or badly ventilated area can
!
result in death due to asphyxiation or
carbon monoxide poisoning.
WARNING! Faulty cutting equipment or
the wrong combination of bar and saw
!
chain increases the risk of kickback!
Only use the bar/saw chain combinations
we recommend, and follow the filing
instructions. See instructions under the
heading Technical data.
Always use common sense (2)
It is not possible to cover every conceivable situation you
can face when using a chain saw. Always exercise care
and use your common sense. Avoid all situations which
you consider to be beyond your capability. If you still feel
uncertain about operating procedures after reading these
instructions, you should consult an expert before
continuing. Do not hesitate to contact your dealer or us if
you have any questions about the use of the chain saw.
We will willingly be of service and provide you with advice
as well as help you to use your chain saw both efficiently
English – 9
Page 10
GENERAL SAFETY PRECAUTIONS
and safely. Attend a training course in chain saw usage if
possible. Your dealer, forestry school or your library can
provide information about which training materials and
courses are available. Work is constantly in progress to
improve the design and technology - improvements that
increase your safety and efficiency. Visit your dealer
regularly to see whether you can benefit from new
features that have been introduced.
Personal protective equipment
WARNING! Most chain saw accidents
happen when the chain touches the
!
operator. You must use approved
personal protective equipment whenever
you use the machine. Personal protective
equipment cannot eliminate the risk of
injury but it will reduce the degree of
injury if an accident does happen. Ask
your dealer for help in choosing the right
equipment.
• Approved protective helmet
• Hearing protection
• Protective goggles or a visor
• Gloves with saw protection
• Trousers with saw protection
• Boots with saw protection, steel toe-cap and non-slip
sole
• Always have a first aid kit nearby.
• Fire Extinguisher and Shovel
Generally clothes should be close-fitting without
restricting your freedom of movement.
IMPORTANT! Sparks can come from the muffler, the bar
and chain or other sources. Always have fire
extinguishing tools available if you should need them.
Help prevent forest fires.
Machine′′′′s safety equipment
In this section the machine’s safety features and their
function are explained. For inspection and maintenance
see instructions under the heading Checking, maintaining
and servicing chain saw safety equipment. See
instructions under the heading, What is what?, to find
where these parts are located on your machine.
The life span of the machine can be reduced and the risk
of accidents can increase if machine maintenance is not
carried out correctly and if service and/or repairs are not
carried out professionally. If you need further information
please contact your nearest service workshop.
WARNING! Never use a machine with
defective safety components. Safety
!
equipment must be inspected and
maintained. See instructions under the
heading Checking, maintaining and
servicing chain saw safety equipment. If
your machine does not pass all the
checks, take the saw to a servicing
dealer for repair.
Chain brake and front hand guard
Your chain saw is equipped with a chain brake that is
designed to stop the chain if you get a kickback. The chain
brake reduces the risk of accidents, but only you can
prevent them.
Take care when using your saw and make sure the
kickback zone of the bar never touches any object.
• The chain brake (A) can either be activated manually
(by your left hand) or automatically by the inertia
release mechanism.
• The brake is applied when the front hand guard (B) is
pushed forwards.
• This movement activates a spring-loaded mechanism
that tightens the brake band (C) around the engine
drive system (D) (clutch drum).
• The front hand guard is not designed solely to activate
the chain brake. Another important feature is that it
reduces the risk of your left hand hitting the chain if
you lose grip of the front handle.
• The chain brake must be engaged when the chain
saw is started to prevent the saw chain from rotating.
• Use the chain brake as a ”parking brake” when
starting and when moving over short distances, to
reduce the risk of moving chain accidentally hitting
your leg or anyone or anything close by.
• To release the chain brake pull the front hand guard
backwards, towards the front handle.
• Kickback can be very sudden and violent. Most
kickbacks are minor and do not always activate the
chain brake. If this happens you should hold the chain
saw firmly and not let go.
• The way the chain brake is activated, either manually
or automatically by the inertia release mechanism,
depends on the force of the kickback and the position
of the chain saw in relation to the object that the
kickback zone of the bar strikes.
If you get a violent kickback while the kickback zone of
the bar is farthest away from you the chain brake is
designed to be activated by the inertia in the kickback
direction.
If the kickback is less violent or the kickback zone of
the bar is closer to you the chain brake will be
activated manually by the movement of your left hand.
(3)
(3)
(4)
10 – English
Page 11
GENERAL SAFETY PRECAUTIONS
• In the felling position the left hand is in a position that
makes manual activation of the chain brake
impossible. With this type of grip, that is when the left
hand is placed so that it cannot affect the movement
of the front hand guard, the chain brake can only be
activated by the inertia action.
Will my hand always activate the chain
brake during a kickback?
No. It takes a certain force to move the hand guard
forward. If your hand only lightly touches the front guard
or slips over it, the force may not be enough to trigger the
chain brake. You should also maintain a firm grip of the
chain saw handles while working. If you do and
experience a kickback, your hand may never leave the
front handle and will not activate the chain brake, or the
chain brake will only activate after the saw has swung
around a considerable distance. In such instances, the
chain brake might not have enough time to stop the saw
chain before it touches you.
There are also certain positions in which your hand
cannot reach the front hand guard to activate the chain
brake; for example, when the saw chain is held in felling
position.
Will my inertia activated chain brake
always activate during kickback in the
event of a kickback?
No. First your brake must be in working order. Testing the
brake is simple, see instructions under the heading
Checking, maintaining and servicing chain saw safety
equipment. We recommend you do before you begin each
work session. Second the kickback must be strong
enough to activate the chain brake. If the chain brake is
too sensitive it would activate all the time which would be
a nuisance.
Will my chain brake always protect me
from injury in the event of a kickback?
No. First, the chain brake must be in working order to
provide the intended protection. Second, it must be
activated during the kickback as described above to stop
the saw chain. Third, the chain brake may be activated but
if the bar is too close to you the brake might not have
enough time to slow down and stop the chain before the
chain saw hits you.
Only you and proper working technique can eliminate
kickback and its danger.
Throttle trigger lockout
The throttle lockout is designed to prevent accidental
operation of the throttle control. When you press the lock
(A) (i.e. when you grasp the handle) it releases the throttle
control (B). When you release the handle the throttle
control and the throttle lockout both move back to their
original positions. This arrangement means that the
throttle control is automatically locked at the idle setting.
(5)
Chain catcher
The chain catcher is designed to catch the chain if it snaps
or jumps off. This should not happen if the chain is
properly tensioned (see instructions under the heading
Assembly) and if the bar and chain are properly serviced
and maintained (see instructions under the heading
General working instructions).
Right hand guard
Apart from protecting your hand if the chain jumps or
snaps, the right hand guard stops branches and twigs
from interfering with your grip on the rear handle.
Vibration damping system
Your machine is equipped with a vibration damping
system that is designed to minimize vibration and make
operation easier.
The machine′s vibration damping system reduces the
transfer of vibration between the engine unit/cutting
equipment and the machine
chain saw, including the cutting equipment, is insulated
from the handles by vibration damping units.
Cutting hardwoods (most broadleaf trees) creates more
vibration than cutting softwoods (most conifers). Cutting
with cutting equipment that is blunt or faulty (wrong type
or badly sharpened) will increase the vibration level.
WARNING! Overexposure to vibration
can lead to circulatory damage or nerve
!
damage in people who have impaired
circulation. Contact your doctor if you
experience symptoms of overexposure
to vibration. Such symptoms include
numbness, loss of feeling, tingling,
pricking, pain, loss of strength, changes
in skin colour or condition. These
symptoms normally appear in the
fingers, hands or wrists. These
symptoms may be increased in cold
temperatures.
′s handle unit. The body of the
Stop switch
Use the stop switch to switch off the engine. (26)
Muffler
The muffler is designed to reduce noise levels and to
direct exhaust fumes away from the user.
WARNING! The exhaust fumes from the
engine are hot and may contain sparks
!
which can start a fire. Never start the
machine indoors or near combustible
material!
In areas with a hot, dry climate there is a high risk of fires.
These areas are sometimes subject to government rules
requiring among other things the muffler must be
equipped with an approved type of spark arrestor mesh
(A).
(6)
English – 11
Page 12
GENERAL SAFETY PRECAUTIONS
CAUTION! The muffler gets very hot during and after
use. This also applies during idling. Be aware of the fire
hazard, especially when working near flammable
substances and/or vapours.
WARNING! Never use a saw without a
muffler, or with a damaged muffler. A
!
damaged muffler may substantially
increase the noise level and the fire
hazard. Keep fire fighting equipment
handy. If a spark arrestor screen is
required in your area, never use the saw
without or with a broken spark arrestor
screen.
Cutting equipment
This section describes how to choose and maintain your
cutting equipment in order to:
• Reduce the risk of kickback.
• Reduce the risk of the saw chain breaking or jumping
off the bar.
• Obtain optimal cutting performance.
• Extend the life of cutting equipment.
• Avoid increasing vibration levels.
General rules
• Only use cutting equipment recommended by us!
See instructions under the heading Technical data.
• Keep the chain’s cutting teeth properly
sharpened! Follow our instructions and use the
recommended file gauge.
sharpened chain increases the risk of accidents.
• Maintain the correct depth gauge setting! Follow
our instructions and use the recommended depth
gauge clearance.
the risk of kickback.
• Keep the chain properly tensioned! If the chain is
slack it is more likely to jump off and lead to increased
wear on the bar, chain and drive sprocket.
• Keep cutting equipment well lubricated and
properly maintained!
more likely to break and lead to increased wear on the
bar, chain and drive sprocket.
A damaged or badly
Too large a clearance increases
A poorly lubricated chain is
Cutting equipment designed to reduce
kickback
WARNING! Faulty cutting equipment or
the wrong combination of bar and saw
!
chain increases the risk of kickback!
Only use the bar/saw chain combinations
we recommend, and follow the filing
instructions. See instructions under the
heading Technical data.
The only way to avoid kickback is to make sure that the
kickback zone of the bar never touches anything.
By using cutting equipment with ”built-in” kickback
reduction and keeping the chain sharp and wellmaintained you can reduce the effects of kickback.
Guide bar
The smaller the tip radius the lower the chance of
kickback.
Saw chain
A chain is made up of a number of links, which are
available in standard and low-kickback versions.
IMPORTANT! No saw chain design eliminates the
danger of kickback.
WARNING! Any contact with a rotating
saw chain can cause extremely serious
!
injuries.
Some terms that describe the bar and chain
To maintain the safety features of the cutting equipment,
you should replace a worn or damaged bar or chain with
a bar and chain combinations recommended by
Husqvarna. See instructions under the heading Technical
Data for a list of replacement bar and chain combinations
we recommend.
Guide bar
• Length (inches/cm)
• Number of teeth on bar tip sprocket (T).
• Chain pitch (inches). The spacing between the drive
links of the chain must match the spacing of the teeth
on the bar tip sprocket and drive sprocket.
• Number of drive links. The number of drive links is
determined by the length of the bar, the chain pitch
and the number of teeth on the bar tip sprocket.
• Bar groove width (inches/mm). The groove in the bar
must match the width of the chain drive links.
• Chain oil hole and hole for chain tensioner. The bar
must be matched to the chain saw design.
Saw chain
• Chain pitch (inches)
• Drive link width (mm/inches)
• Number of drive links.
12 – English
Page 13
GENERAL SAFETY PRECAUTIONS
Sharpening your chain and adjusting
depth gauge setting
General information on sharpening cutting teeth
• Never use a blunt chain. When the chain is blunt you
have to exert more pressure to force the bar through
the wood and the chips will be very small. If the chain
is very blunt it will produce wood powder and no chips
or shavings.
• A sharp chain eats its way through the wood and
produces long, thick chips or shavings.
• The cutting part of the chain is called the cutter and
consists of a cutting tooth (A) and the depth gauge
(B). The cutters cutting depth is determined by the
difference in height between the two (depth gauge
setting).
When you sharpen a cutting tooth there are four important
factors to remember.
1 Filing angle
2 Cutting angle
3 File position
4 Round file diameter
It is very difficult to sharpen a chain correctly without the
right equipment. We recommend that you use our file
gauge. This will help you obtain the maximum kickback
reduction and cutting performance from your chain.
See instructions under the heading Technical data for
information about sharpening your chain.
WARNING! The risk of kickback is
increased if the depth gauge setting is
!
too large!
Adjustment of depth gauge setting
• The cutting teeth should be newly sharpened before
adjusting the depth gauge setting. We recommend
that you adjust the depth gauge setting every third
time you sharpen the cutting teeth. NOTE! This
recommendation assumes that the length of the
cutting teeth is not reduced excessively.
• You will need a flat file and a depth gauge tool. We
recommend that you use our depth gauge tool to
acheive the correct depth gauge setting and bevel for
the depth gauge.
• Place the depth gauge tool over the chain. Detailed
information regarding the use of the depth gauge tool,
will be found on the package for the depth gauge tool.
Use the flat file to file off the tip of the depth gauge that
protrudes through the depth gauge tool. The depth
gauge setting is correct when you no longer feel
resistance as you draw the file along the depth gauge
tool.
Tensioning the chain
WARNING! A slack chain may jump off
and cause serious or even fatal injury.
!
WARNING! Departure from the
sharpening instructions considerably
!
increases the risk of kickback.
Sharpening cutting teeth
To sharpen cutting teeth you will need a round file and a
file gauge. See instructions under the heading Technical
data for information on the size of file and gauge that are
recommended for the chain fitted to your chain saw.
• Check that the chain is correctly tensioned. A slack
chain will move sideways, making it more difficult to
sharpen correctly.
• Always file cutting teeth from the inside face. Reduce
the pressure on the return stroke. File all the teeth on
one side first, then turn the chain saw over and file the
teeth on the other side.
• File all the teeth to the same length. When the length
of the cutting teeth is reduced to 4 mm (5/32") the
chain is worn out and should be replaced.
General advice on adjusting depth gauge setting
• When you sharpen the cutting tooth (A) the depth
gauge setting (C) will decrease. To maintain optimal
cutting performance the depth gauge (B) has to be
filed down to achieve the recommended depth gauge
setting. See instructions under the heading Technical
data to find the correct depth gauge setting for your
particular chain.
(7)
(8)
The more you use a chain the longer it becomes. It is
therefore important to adjust the chain regularly to take up
the slack.
Check the chain tension every time you refuel. NOTE! A
new chain has a running-in period during which you
should check the tension more frequently.
Tension the chain as tightly as possible, but not so tight
that you cannot pull it round freely by hand.
• Loosen the bar nut that holds the clutch cover and
chain brake. Use the combination spanner. Then
retighten the bar nut as tightly as you can by hand.
(10)
• Raise the tip of the bar and stretch the chain by
tightening the chain tensioning screw using the
combination spanner. Tighten the chain until it does
not sag from the underside of the bar.
• Use the combination spanner to tighten the bar nut
while holding up the tip of the bar. Check that you can
pull the saw chain round freely by hand, and that there
is no slack on the underside of the bar.
The position of the chain tensioning screw on our chain
saws varies from model to model. See instructions under
the heading What is what? to find out where it is on your
model.
(9)
(11)
(12)
English – 13
Page 14
GENERAL SAFETY PRECAUTIONS
Lubricating cutting equipment
WARNING! Poor lubrication of cutting
equipment may cause the chain to snap,
!
which could lead to serious, even fatal
injuries.
Chain oil
Chain oil must demonstrate good adhesion to the chain
and also maintain its flow characteristics regardless of
whether it is warm summer or cold winter weather.
IMPORTANT! When using vegetable based saw chain
oil, dismantle and clean the groove in the bar and saw
chain before long-term storage. Otherwise there is a risk
of the saw chain oil oxidizing, which will result in the saw
chain becoming stiff and the bar tip sprocket jamming.
Filling with chain oil
• All our chain saws have an automatic chain lubrication
system. On some models the oil flow is also
adjustable.
• The saw chain oil tank and the fuel tank are designed
so that the fuel runs out before the saw chain oil.
However, this safety feature requires that you use the
right sort of chain oil (if the oil is too thin it will run out
before the fuel), and that you adjust the carburetor as
recommended (a lean mixture may mean that the fuel
lasts longer than the oil) and that you also use the
recommended cutting equipment (a bar that is too
long will use more chain oil).
Checking chain lubrication
• Check the chain lubrication each time you refuel.
Aim the tip of the bar at a light coloured surface about
20 cm (8 inches) away. After 1 minute running at 3/4
throttle you should see a distinct line of oil on the light
surface.
If the chain lubrication is not working:
• Check that the groove in the edge of the bar is clean.
Clean if necessary.
• Check that the bar tip sprocket turns freely and that
the lubricating hole in the tip sprocket is not blocked.
Clean and lubricate if necessary.
If the chain lubrication system is still not working after
carrying out the above checks and associated measures
you should contact your service agent.
Chain drive sprocket
The clutch drum is fitted with a spur sprocket (the chain
sprocket is welded on the drum).
Regularly check the degree of wear on the drive sprocket.
Replace if wear is excessive. Replace the drive sprocket
whenever you replace the chain.
Checking wear on cutting equipment
Check the chain daily for:
• Visible cracks in rivets and links.
• Whether the chain is stiff.
• Whether rivets and links are badly worn.
Replace the saw chain if it exhibits any of the points
above.
We recommend you compare the existing chain with a
new chain to decide how badly the existing chain is worn.
When the length of the cutting teeth has worn down to
only 4 mm the chain must be replaced.
Guide bar
Check regularly:
• Whether there are burrs on the edges of the bar (A).
Remove these with a file if necessary.
• Whether the groove in the bar has become badly worn
(B). Replace the bar if necessary.
• Whether the tip of the bar is uneven or badly worn. If
a hollow forms on the underside of the bar tip this is
due to running with a slack chain.
• To prolong the life of the bar you should turn it over
regularly.
WARNING! Most chain saw accidents
happen when the chain touches the
!
operator.
Wear personal protective equipment. See
instructions under the ”Personal
protective equipment” heading.
Do not tackle any job that you feel you
are not adequately trained for. See
instructions under the headings
Personal protective equipment, How to
avoid kickback, Cutting equipment and
General working instructions.
Avoid situations where there is a risk of
kickback. See instructions under the
heading Machine
Use the recommended protective
equipment and check its condition. See
instructions under the heading General
working instructions.
Check that all the chain saw safety
features are working. See instructions
under the headings General working
instructions and General safety
precautions.
′′′′s safety equipment.
(13)
(13)
14 – English
Page 15

ASSEMBLY
Fitting the bar and chain
WARNING! Switch off the engine before
carrying out any checks or maintenance.
!
Always wear gloves, when working with
the chain, in order to protect your hands
from injury.
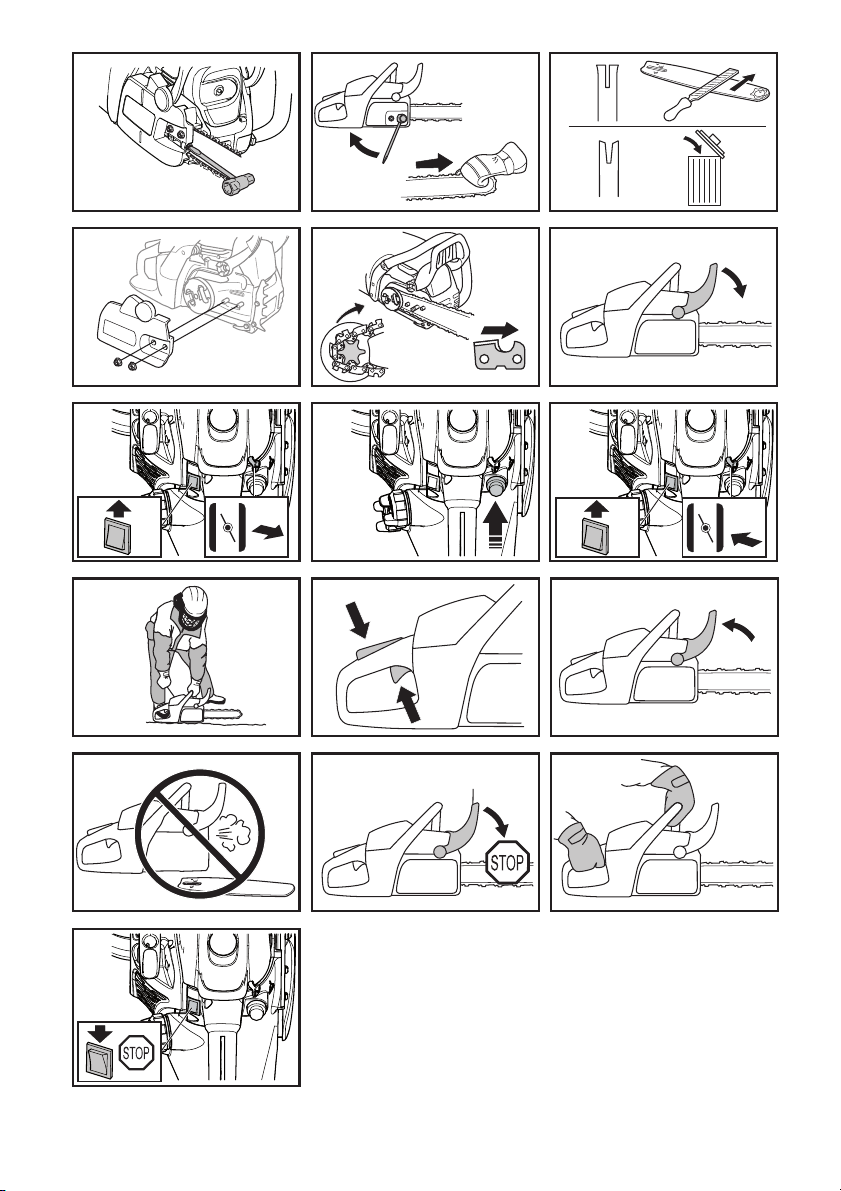
Check that the chain brake is in disengaged position by
moving the front hand guard towards the front handle.
Unscrew the bar nuts and remove the clutch cover. (14)
Fit the bar over the bar bolts. Place the bar in its rearmost
position. Place the chain over the drive sprocket locate it
in the groove on the bar. Begin on the top edge of the bar.
(15)
Make sure that the edges of the cutting links are facing
forward on the top edge of the bar.
Mount the clutch cover and remember to fit the chain
adjuster pin in the hole in the bar. Check that the drive
links of the chain fit correctly over the drive sprocket and
that the chain is correctly located in the groove in the bar.
Tighten the bar nut with your fingers.
Tension the chain by turning the chain tensioning screw
clockwise using the combination spanner. The chain
should be tensioned until it does not sag from the
underside of the bar.
The chain is correctly tensioned when there is no slack on
the underside of the bar, and it can still be turned easily
by hand. Tighten the bar nut with the combination spanner
while holding up the tip of the bar.
When fitting a new chain, the chain tension has to be
checked frequently until the chain is run-in. Check the
chain tension regularly. A correctly tensioned chain
ensures good cutting performance and long life.
Fitting a spiked bumper
To fit a spiked bumper – contact your service agent.
(11)
(12)
(9)
English – 15
Page 16
FUEL HANDLING
Fuel
Note! The machine is equipped with a two-stroke engine
and must always be run using a mixture of petrol and twostroke oil. It is important to accurately measure the
amount of oil to be mixed to ensure that the correct
mixture is obtained. When mixing small amounts of fuel,
even small inaccuracies can drastically affect the ratio of
the mixture.
WARNING! Always ensure there is
adequate ventilation when handling fuel.
!
Petrol
• Use good quality unleaded or leaded petrol.
• The lowest recommended octane grade is 90 (RON).
If you run the engine on a lower octane grade than 90
so-called knocking can occur. This gives rise to a high
engine temperature and increased bearing load,
which can result in serious engine damage.
• When working with continuous high revs (e.g. limbing)
a higher octane is recommended.
Running-in
Avoid running at a too high speed for extended periods
during the first 10 hours.
Two-stroke oil
• For best results and performance use Universal,
Universal powered by McCULLOCH two-stroke
engine oil, which is specially formulated for our aircooled two-stroke engines.
• Never use two-stroke oil intended for water-cooled
engines, sometimes referred to as outboard oil (rated
TCW).
• Never use oil intended for four-stroke engines.
• A poor oil quality and/or too high oil/fuel ratio may
jeopardise function and decrease the life time of
catalytic converters.
Mixing ratio
1:40 (2,5%) with Universal, Universal powered by
McCULLOCH two-stroke oil.
Petrol, litre Two-stroke oil, litre
2,5% (1:40)
5 0,125
10 0,25
15 0,375
20 0,5
Mixing
• Always mix the petrol and oil in a clean container
intended for fuel.
• Always start by filling half the amount of the petrol to
be used. Then add the entire amount of oil. Mix
(shake) the fuel mixture. Add the remaining amount of
petrol.
• Mix (shake) the fuel mixture thoroughly before filling
the machine’s fuel tank.
• Do not mix more than one month’s supply of fuel at a
time.
• If the machine is not used for some time the fuel tank
should be emptied and cleaned.
Chain oil
• We recommend the use of special oil (chain oil) with
good adhesion characteristics.
• Never use waste oil. This results in damage to the oil
pump, the bar and the chain.
• It is important to use oil of the right grade (suitable
viscosity range) to suit the air temperature.
• In temperatures below 0°C (32°F) some oils become
too viscous. This can overload the oil pump and result
in damage to the oil pump components.
• Contact your service agent when choosing chain oil.
16 – English
Page 17
FUEL HANDLING
Fueling
WARNING! Taking the following
precautions, will lessen the risk of fire:
!
Do not smoke and do not place any hot
objects in the vicinity of fuel.
Always stop the engine and let it cool for
a few minutes before refuelling.
When refuelling, open the fuel cap slowly
so that any excess pressure is released
gently.
Tighten the fuel cap carefully after
refuelling.
Always move the machine away from the
refuelling area and source before
starting.
Clean the area around the fuel cap. Clean the fuel and
chain oil tanks regularly. The fuel filter must be replaced
at least once a year. Contamination in the tanks causes
malfunction. Make sure the fuel is well mixed by shaking
the container before refuelling. The capacities of the chain
oil tank and fuel tank are carefully matched. You should
therefore always fill the chain oil tank and fuel tank at the
same time.
WARNING! Fuel and fuel vapour are
highly flammable. Take care when
!
handling fuel and chain oil. Be aware of
the risks of fire, explosion and those
associated with inhalation.
Transport and storage
• Always store the chain saw and fuel so that there is no
risk of leakages or fumes coming into contact with
sparks or naked flames from electrical equipment,
electric motors, relays/switches, boilers and the like.
• Always store fuel in an approved container designed
for that purpose.
• For longer periods of storage or for transport of the
chain saw, the fuel and chain oil tanks should be
emptied. Ask where you can dispose of waste fuel and
chain oil at your local petrol station.
• Ensure the machine is cleaned and that a complete
service is carried out before long-term storage.
• The guide bar cover must always be fitted to the
cutting attachment when the machine is being
transported or in storage, in order to prevent accident
contact with the sharp chain. Even a non-moving
chain can cause serious cuts to yourself or persons
you bump into with an exposed chain.
• Secure the machine during transport.
Long-term storage
Empty the fuel/oil tanks in a well ventilated area. Store the
fuel in approved cans in a safe place. Fit the guide bar
cover. Clean the machine. See instructions under the
heading Maintenance schedule.
Fuel safety
• Never refuel the machine while the engine is running.
• Make sure there is plenty of ventilation when refuelling
or mixing fuel (petrol and 2-stroke oil).
• Move the machine at least 3 m from the refuelling
point before starting it.
• Never start the machine:
1 If you have spilt fuel or chain oil on the machine. Wipe
off the spillage and allow remaining fuel to evaporate.
2 If you have spilled fuel on yourself or your clothes,
change your clothes. Wash any part of your body that
has come in contact with fuel. Use soap and water.
3 If the machine is leaking fuel. Check regularly for leaks
from the fuel cap and fuel lines.
WARNING! Never use a machine with
visible damage to the spark plug guard
!
and ignition cable. A risk of sparking
arises, which can cause a fire.
English – 17
Page 18
STARTING AND STOPPING
Starting and stopping
WARNING! Note the following before
starting:
!
The chain brake must be engaged when
the chain saw is started to reduce the
chance of contact with the moving chain
during starting.
Never start a chain saw unless the bar,
chain and all covers are fitted correctly.
Otherwise the clutch can come loose and
cause personal injuries.
Place the machine on firm ground. Make
sure you have a secure footing and that
the chain cannot touch anything.
Keep people and animals well away from
the working area.
Starting
The chain brake must be engaged when the chain saw is
started. Activate the brake by moving the front hand guard
forwards.
(16)
Cold engine
Start position, 1: Move the ON/OFF switch to ON ”I”
position.
(17)
Choke, 2: Set the choke control in the choke position.
When the choke/fast idle lever is pulled out to the full
extent, the correct throttle setting is set automatically.
Air purge, 3: Press the air purge diaphragm repeatedly
until fuel begins to fill the diaphragm (about 10 times). The
diaphragm need not be completely filled.
Pull the starter handle, 4: Grip the front handle with your
left hand. Hold the chain saw on the ground by placing
your right foot through the rear handle. Pull the starter
handle with your right hand and pull out the starter cord
slowly until you feel a resistance (as the starter pawls
engage) then pull firmly and rapidly until the engine fires.
(20)
Choke, 5: Push in the choke control as soon as the
engine fires which can be heard through a "puff" sound.
Pull the starter handle, 6: Keep on pulling the cord
powerfully until the engine starts.
Never twist the starter cord around your hand.
CAUTION! Do not pull the star ter cord all the way out and
do not let go of the starter handle when the cord is fully
extended. This can damage the machine.
As the chain brake is still engaged the speed of the engine
must be set to idling as soon as possible, this is achieved
by quickly disengaging the throttle lock. This prevents
unnecessary wear to the clutch, clutch drum and brake
band. Then let the machine idle for a few seconds before
you apply full throttle.
(21)
(18)
(17)
Note! Reactivate the chain brake by pushing the front
hand guard back towards the front handle. The chain saw
is now ready for use. There is a simplified start reminder
with illustrations to describe each step on the rear edge of
the saw (A).
Warm engine
Use the same starting procedure as for a cold engine but
without setting the choke control in the choke position.
(19)
• Never start a chain saw unless the bar, chain and
• The chain brake should be activated when starting.
• Never start the machine indoors. Exhaust fumes can
• Observe your surroundings and make sure that there
• Always hold the saw with both hands. The right hand
(22)
WARNING! Long term inhalation of the
engine’s exhaust fumes, chain oil mist
!
and dust from sawdust can represent a
health risk.
clutch cover are fitted correctly. See instructions under
the heading Assembly. Without a bar and chain
attached to the chain saw the clutch can come loose
and cause serious injury.
See instructions under the heading Start and stop. Do
not drop start. This method is very dangerous
because you may lose control of the saw.
be dangerous if inhaled.
is no risk of people or animals coming into contact with
the cutting equipment.
should be on the rear handle, and the left hand on the
front handle. All people, whether right or left handed,
should use this grip. Use a firm grip with thumbs and
fingers encircling the chain saw handles.
(23)
(24)
(25)
Stopping
The engine is stopped by moving the stop switch to the
stop position.
(26)
18 – English
Page 19
WORKING TECHNIQUES
Before use: (27)
A - Check that the chain brake works correctly and is not
damaged.
B - Check that the rear right hand guard is not damaged.
C - Check that the throttle lockout works correctly and is
not damaged.
D - Check that the stop switch works correctly and is not
damaged.
E - Check that all handles are free from oil.
F - Check that the anti vibration system works and is not
damaged.
G - Check that the muffler is securely attached and not
damaged.
H - Check that all parts of the chain saw are tightened
correctly and that they are not damaged or missing.
I - Check that the chain catcher is in place and not
damaged.
J - Check the chain tension.
General working instructions
IMPORTANT!
This section describes basic safety rules for using a
chain saw. This information is never a substitute for
professional skills and experience. If you get into a
situation where you feel unsafe, stop and seek expert
advice. Contact your chain saw dealer, service agent or
an experienced chain saw user. Do not attempt any task
that you feel unsure of!
Before using a chain saw you must understand the
effects of kickback and how to avoid them. See
instructions under the heading How to avoid kickback.
Before using a chain saw you must understand the
difference between cutting with the top and bottom
edges of the bar. See instructions under the headings
How to avoid kickback and Machine’s safety equipment.
Wear personal protective equipment. See instructions
under the ”Personal protective equipment” heading.
Basic safety rules
1 Look around you:
• To ensure that people, animals or other things cannot
affect your control of the machine.
• To make sure that none of the above might come
within reach of your saw or be injured by falling trees.
CAUTION! Follow the instructions above, but do not use a
chain saw in a situation where you cannot call for help in
case of an accident.
2 Do not use the machine in bad weather, such as
dense fog, heavy rain, strong wind, intense cold, etc.
Working in bad weather is tiring and often brings
added risks, such as icy ground, unpredictable felling
direction, etc.
3 Take great care when removing small branches and
avoid cutting bushes (i.e. cutting many small branches
at the same time). Small branches can be grabbed by
the chain and thrown back at you, causing serious
injury.
4 Make sure you can move and stand safely. Check the
area around you for possible obstacles (roots, rocks,
branches, ditches, etc.) in case you have to move
suddenly. Take great care when working on sloping
ground.
5 Take great care when cutting a tree that is in tension.
A tree that is in tension may spring back to its normal
position before or after being cut. If you position
yourself incorrectly or make the cut in the wrong place
the tree may hit you or the machine and cause you to
lose control. Both situations can cause serious
personal injury.
6 Before moving your chain saw switch off the engine
and lock the chain using the chain brake. Carry the
chain saw with the bar and chain pointing backwards.
Fit a guard to the bar before transporting the chain
saw or carrying it for any distance.
7 When you put the chain saw on the ground, lock the
saw chain using the chain brake and ensure you have
a constant view of the machine. Switch the engine off
before leaving your chain saw for any length of time.
WARNING! Sometimes chips get stuck in
the clutch cover causing the chain to
!
jam. Always stop the engine before
cleaning.
General rules
1 If you understand what kickback is and how it happens
then you can reduce or eliminate the element of
surprise. By being prepared you reduce the risk.
Kickback is usually quite mild, but it can sometimes be
very sudden and violent.
2 Always hold the chain saw firmly with your right hand
on the rear handle and your left hand on the front
handle. Wrap your fingers and thumbs around the
handles. You should use this grip whether you are
right-handed or left-handed. This grip minimises the
effect of kickback and lets you keep the chain saw
under control.
3 Most kickback accidents happen during limbing. Make
sure you are standing firmly and that there is nothing
in the way that might make you trip or lose your
balance.
Lack of concentration can lead to kickback if the
kickback zone of the bar accidentally touches a
branch, nearby tree or some other object.
Have control over the workpiece. If the pieces you
intend to cut are small and light, they can jam in the
saw chain and be thrown towards you. This is not
necessarily dangerous in itself, but you may be
surprised and lose control of the saw. Never saw
Do not let go of the handles!
English – 19
Page 20
WORKING TECHNIQUES
stacked logs or branches without first separating
them. Only saw one log or one piece at a time.
Remove the cut pieces to keep your working area
safe.
4 Never use the chain saw above shoulder height
and try not to cut with the tip of the bar. Never use
the chain saw one-handed!
5 You must have a steady stance in order to have full
control over the chain saw. Never work standing on a
ladder, in a tree or where you do not have firm ground
to stand on.
6 Always use a fast cutting speed, i.e. full throttle.
7 Take great care when you cut with the top edge of the
bar, i.e. when cutting from the underside of the object.
This is known as cutting on the push stroke. The chain
tries to push the chain saw back towards the user. If
the saw chain is jamming, the saw may be pushed
back at you.
8 Unless the user resists this pushing force there is a
risk that the chain saw will move so far backwards that
only the kickback zone of the bar is in contact with the
tree, which will lead to a kickback.
Cutting with the bottom edge of the bar, i.e. from the
top of the object downwards, is known as cutting on
the pull stroke. In this case the chain saw pulls itself
towards the tree and the front edge of the chain saw
body rests naturally on the trunk when cutting. Cutting
on the pull stroke gives the operator better control over
the chain saw and the position of the kickback zone.
9 Follow the instructions on sharpening and maintaining
your bar and chain. When you replace the bar and
chain use only combinations that are recommended
by us. See instructions under the headings Cutting
equipment and Technical data.
(29)
Basic cutting technique
WARNING! Never use a chain saw by
holding it with one hand. A chain saw is
!
not safely controlled with one hand.
Always have a secure, firm grip around
the handles with both hands.
(28)
(30)
Terms
Cutting = General term for cutting through wood.
Limbing = Cutting branches off a felled tree.
Splitting = When the object you are cutting breaks off
before the cut is complete.
There are five important factors you should consider
before making a cut:
1 Make sure the cutting equipment will not jam in the
cut.
2 Make sure the object you are cutting will not split.
3 Make sure the chain will not strike the ground or any
other object during or after cutting.
4 Is there a risk of kickback?
5 Do the conditions and surrounding terrain affect how
safely you can stand and move about?
Two factors decide whether the chain will jam or the object
that you are cutting will split: the first is how the object is
supported before and after cutting, and the second is
whether it is in tension.
In most cases you can avoid these problems by cutting in
two stages; from the top and from the bottom. You need to
support the object so that it will not trap the chain or split
during cutting.
IMPORTANT! If the chain jams in the cut: stop the
engine! Don’t try to pull the chain saw free. If you do you
may be injured by the chain when the chain saw
suddenly breaks free. Use a lever to open up the cut and
free the chain saw.
The following instructions describe how to handle the
commonest situations you are likely to encounter when
using a chain saw.
Limbing
When limbing thick branches you should use the same
approach as for cutting.
Cut difficult branches piece by piece.
Cutting
General
• Always use full throttle when cutting!
• Reduce the speed to idle after every cut (running the
engine for too long at full throttle without any load, i.e.
without any resistance from the chain during cutting,
can lead to serious engine damage).
• Cutting from above = Cutting on the pull stroke.
• Cutting from below = Cutting on the push stroke.
Cutting on the push stroke increases the risk of kickback.
See instructions under the heading How to avoid
kickback.
20 – English
WARNING! Never attempt to cut logs
while they are in a pile or when a couple
!
of logs are lying together. Such
procedures drastically increase the risk
of kickback which can result in a serious
or fatal injury.
If you have a pile of logs, each log you attempt to cut
should be removed from the pile, placed on a saw horse
or runners and cut individually.
Remove the cut pieces from the cutting area. By leaving
them in the cutting area, you increase the risk for
inadvertently getting a kickback, as well as increasing the
risk of losing your balance while working.
Page 21

WORKING TECHNIQUES
The log is lying on the ground. There is little risk of the
chain jamming or the object splitting. However there is a
risk that the chain will touch the ground when you finish
the cut.
Cut all the way through the log from above. Avoid letting
the chain touch the ground as you finish the cut. Maintain
full throttle but be prepared for what might happen.
If it is possible (can you turn the log?) stop cutting about
2/3 of the way through the log.
Turn the log and finish the cut from the opposite side.
The log is supported at one end. There is a high risk
that it will split.
Start by cutting from below (about 1/3 of the way through).
Finish by cutting from above so that the two cuts meet.
The log is supported at both ends. There is a high risk
that the chain will jam.
Start by cutting from above (about 1/3 of the way through).
Finish by cutting from below so that the two cuts meet.
Tree felling technique
IMPORTANT! It takes a lot of experience to fell a tree.
Inexperienced users of chain saws should not fell trees.
Do not attempt any task that you feel unsure of!
Safe distance
The safe distance between a tree that is to be felled and
anyone else working nearby is at least 2 1/2 tree lengths.
Make sure that no-one else is in this ”risk zone” before or
during felling.
Felling direction
The aim is to fell the tree in a position where you can limb
and cross-cut the log as easily as possible. You want it to
fall in a location where you can stand and move about
safely.
Once you have decided which way you want the tree to fall
you must judge which way the tree would fall naturally.
Several factors affect this:
• Lean of the tree
• Bend
• Wind direction
• Arrangement of branches
• Weight of snow
• Obstacles within the reach of the tree: for example,
other trees, power lines, roads and buildings.
• Look for signs of damage and rot in the stem, this
makes it more probably that the tree will break and
start to fall before you expect it to.
You may find you are forced to let the tree fall in its natural
direction because it is impossible or dangerous to try to
make it fall in the direction you first intended.
(37)
(31)
Another very important factor, which does not affect the
felling direction but does affect your safety, is to make sure
the tree has no damaged or dead branches that might
break off and hit you during felling.
The main point to avoid is letting the tree fall onto another
tree. It is very dangerous to remove a trapped tree and
there is high accident risk. See instructions under the
heading Freeing a tree that has fallen badly.
IMPORTANT! During critical felling operations, hearing
protectors should be lifted immediately when sawing is
completed so that sounds and warning signals can be
heard.
Clearing the trunk and preparing your retreat
Delimb the stem up to shoulder height. It is safer to work
from the top down and to have the tree between you and
the saw.
Remove any undergrowth from the base of the tree and
check the area for obstacles (stones, branches, holes,
etc.) so that you have a clear path of retreat when the tree
starts to fall. Your path of retreat should be roughly 135
degrees away from the intended felling direction.
1 Danger zone
2 Retreat path
3 Felling direction
Felling
WARNING! Unless you have special
training we advise you not to fell trees
!
with a diameter larger than the bar length
of your saw!
Felling is done using three cuts. First you make the
directional cuts, which consist of the top cut and the
bottom cut, then you finish with the felling cut. By placing
these cuts correctly you can control the felling direction
very accurately.
Directional cuts
To make the directional cuts you begin with the top cut.
Stand to the right of the tree and cut on the pull stroke.
Next make the bottom cut so that it finishes exactly at the
end of the top cut.
The directional cuts should run 1/4 of the diameter
through the trunk and the angle between the top cut and
bottom cut should be 45
The line where the two cuts meet is called the directional
cut line. This line should be perfectly horizontal and at
right angles (90
Felling cut
The felling cut is made from the opposite side of the tree
and it must be perfectly horizontal. Stand on the left side
of the tree and cut on the pull stroke.
Make the felling cut about 3-5 cm (1.5-2 inches) above the
bottom directional cut.
(39)
°.
°) to the chosen felling direction. (40)
(38)
English – 21
Page 22
WORKING TECHNIQUES
Set the spiked bumper (if one is fitted) just behind the
felling hinge. Use full throttle and advance the chain/bar
slowly into the tree. Make sure the tree does not start to
move in the opposite direction to your intended felling
direction. Drive a wedge or breaking bar into the cut as
soon as it is deep enough.
Finish the felling cut parallel with the directional cut line so
that the distance between them is at least 1/10 of the
trunk diameter. The uncut section of the trunk is called the
felling hinge.
The felling hinge controls the direction that the tree falls in.
(42)
All control over the felling direction is lost if the felling
hinge is too narrow or non-existent, or if the directional
cuts and felling cut are badly placed.
When the felling cut and directional cut are complete the
tree should start to fall by itself or with the aid of a felling
wedge or breaking bar.
We recommend that you use a bar that is longer than the
diameter of the tree, so that you can make the felling cut
and directional cuts with single cutting strokes. See
instructions under the heading Technical data section to
find out which lengths of bar are recommended for your
saw.
There are methods for felling trees with a diameter larger
than the bar length. However these methods involve a
much greater risk that the kickback zone of the bar will
come into contact with the tree.
Freeing a tree that has fallen badly
Freeing a ”trapped tree”
It is very dangerous to remove a trapped tree and there is
high accident risk.
Never try to fell the tree that is trapped.
Never work in the risk zone of the hanging trapped tree.
The safest method is to use a winch.
• Tractor-mounted
• Portable
Cutting trees and branches that are in tension
Preparations: Work out which side is in tension and where
the point of maximum tension is (i.e. where it would break
if it was bent even more).
Decide which is the safest way to release the tension and
whether you are able to do it safely. In complicated
situations the only safe method is to put aside your chain
saw and use a winch.
General advice:
Position yourself so that you will be clear of the tree or
branch when the tension is released.
Make one or more cuts at or near the point of maximum
tension. Make as many cuts of sufficient depth as
necessary to reduce the tension and make the tree or
branch break at the point of maximum tension.
(41)
Never cut straight through a tree or branch that is in
tension!
If you must cut across tree/limb, make two to three cuts,
one inch apart, one to two inches deep.
Continue to cut deeper until tree/limb bends and tension
is released.
Cut tree/limb from outside the bend, after tension has
been released.
How to avoid kickback
WARNING! Kickback can happen very
suddenly and violently; kicking the chain
!
saw, bar and chain back at the user. If
this happens when the chain is moving it
can cause very serious, even fatal
injuries. It is vital you understand what
causes kickback and that you can avoid
it by taking care and using the right
working technique.
What is kickback?
The word kickback is used to describe the sudden
reaction that causes the chain saw and bar to jump off an
object when the upper quadrant of the tip of the bar,
known as the kickback zone, touches an object.
Kickback always occurs in the cutting plane of the bar.
Normally the chain saw and bar are thrown backwards
and upwards towards the user. However, the chain saw
may move in a different direction depending on the way it
was being used when the kickback zone of the bar
touched the object.
Kickback only occurs if the kickback zone of the bar
touches an object.
Limbing
!
Make sure that you can stand and move about safely.
Work on the left side of the trunk. Work as close as
possible to the chain saw for maximum control. If possible,
let the weight of the chain saw rest on the trunk.
Keep the trunk between you and the chain saw as you
move along the trunk.
Cutting the trunk into logs
See instructions under the heading Basic cutting
technique.
(43)
WARNING! A majority of kickback
accidents occur during limbing. Do not
use the kickback zone of the guide bar.
Be extremely cautious and avoid
contacting the log, other limbs or objects
with the nose of the guide bar. Be
extremely cautious of limbs under
tension. They can spring back toward
you and cause loss of control resulting
in injury.
(30)
22 – English
Page 23

MAINTENANCE
General
The user must only carry out the maintenance and
service work described in this Operator's Manual. More
extensive work must be carried out by an authorized
service workshop.
Carburettor adjustment
Your McCulloch product has been designed and
manufactured to specifications that reduce harmful
emissions.
Function
• The carburettor governs the engine’s speed via the
throttle control. Air and fuel are mixed in the
carburettor. The air/fuel mixture is adjustable. Correct
adjustment is essential to get the best performance
from the machine.
• The T-screw regulates the throttle setting at idle
speed. If the T-screw is turned clockwise this gives a
higher idle speed; turning it anti-clockwise gives a
lower idle speed.
Basic settings and running in
The basic carburettor settings are adjusted during testing
at the factory. Fine adjustment should be carried out by a
skilled technician.
Rec. idle speed: See the Technical data section.
Fine adjustment of the idle speed T
Adjust the idle speed with the T-screw. If it is necessary to
re-adjust, turn the T-screw clockwise while the engine is
running, until the chain starts to rotate. Then turn anticlockwise until the chain stops. When the idle speed is
correctly adjusted the engine should run smoothly in
every position and the engine speed should be safely
below the speed at which the chain starts to rotate.
WARNING! Contact your servicing
dealer, if the idle speed setting cannot be
!
adjusted so that the chain stops. Do not
use the chain saw until it has been
properly adjusted or repaired.
Checking, maintaining and
servicing chain saw safety
equipment
Note! All service and repair work on the machine
demands special training. This is especially true of the
machine’s safety equipment. If your machine fails any of
the checks described below we recommend that you
take it to your service workshop. Any maintenance
other than that described in this manual must be carried
out by your servicing dealer (retailer).
Switch off the engine and take off the ignition cable
before repairs or maintenance
Chain brake and front hand guard
Checking brake band wear
Brush off any wood dust, resin and dirt from the chain
brake and clutch drum. Dirt and wear can impair operation
of the brake.
Regularly check that the brake band is at least 0,6 mm
thick at its thinnest point.
Checking the front hand guard
Make sure the front hand guard is not damaged and that
there are no visible defects such as cracks.
Move the front hand guard forwards and back to make
sure it moves freely and that it is securely anchored to the
clutch cover.
Checking the inertia brake release
Place the chain saw, with the engine switched off, on a
stump or other stable surface. Release the front handle
and let the saw fall by its own weight, rotating around the
rear handle towards the stump.
When the bar hits the stump the brake should be
activated. (35)
Checking the brake trigger
Place the chain saw on firm ground and start it. Make sure
the chain does not touch the ground or any other object.
See instructions under the heading Starting and stopping.
Grasp the chain saw firmly, wrapping your fingers and
thumbs around the handles.
Apply full throttle and activate the chain brake by tilting
your left wrist forward onto the front hand guard. Do not let
go of the front handle.
immediately.
(32)
(33)
The chain should stop
English – 23
Page 24

MAINTENANCE
Throttle trigger lockout
• Make sure the throttle control is locked at the idle
setting when the throttle lockout is released.
• Press the throttle lockout and make sure it returns to
its original position when you release it.
• Check that the throttle trigger and throttle lockout
move freely and that the return springs work properly.
• Star t the chain saw and apply full throttle. Release the
throttle control and check that the chain stops and
remains stationary. If the chain rotates when the
throttle control is in the idle position you should check
the carburettor idle adjustment.
Chain catcher
Check that the chain catcher is in place and not damaged.
Right hand guard
Check that the right hand guard is not damaged and that
there are no visible defects, such as cracks.
Vibration damping system
Regularly check the vibration damping units for cracks or
deformation.
Make sure the vibration damping units are securely
attached to the engine unit and handle unit.
Stop switch
Start the engine and make sure the engine stops when
you move the stop switch to the stop setting.
Muffler
Never use a machine that has a faulty muffler. Regularly
check that the muffler is securely attached to the machine.
Note: The spark arrestor screen (A) on this machine is
serviceable. The mesh must be replaced if it is damaged.
If the mesh is blocked the machine will overheat and this
will cause damage to the cylinder and piston. Never use a
machine with a muffler that is in poor condition.
use a muffler if the spark arrestor mesh is missing or
defective.
After 75 hours of use, we recommend that your muffler be
replaced by your servicing dealer (retailer).
(6)
Air filter
The air filter must be regularly cleaned to remove dust and
dirt in order to avoid:
• Carburettor malfunctions.
• Starting problems.
• Loss of engine power.
• Unnecessary wear to engine parts.
• Excessive fuel consumption.
Never
To clean the air filter: (34)
1 Remove the knob (A) holding the cylinder cover and
remove the cylinder cover (B).
2 Remove the air filter (D).
3 Clean the air filter.
- Wash the filter in clean, warm soapy water.
- Rinse in clean, cool water.
- Air dry completely.
4 Reassemble in reverse order. Make sure latch (E),
latch (F) and cylinder cover fit properly. Tighten the
knob securely.
An air filter that has been in use for a long time cannot be
cleaned completely. The filter must therefore be replaced
with a new one at regular intervals.
must always be replaced.
NOTE! It is advisable to have a supply of spare filters.
A damaged air filter
Spark plug
The spark plug condition is influenced by:
• Incorrect carburettor adjustment.
• An incorrect fuel mixture (too much or incorrect type of
oil).
• A dirty air filter.
These factors cause deposits on the spark plug
electrodes, which may result in operating problems and
starting difficulties.
If the machine is low on power, difficult to start or runs
poorly at idle speed: always check the spark plug first
before taking any further action. If the spark plug is dirty,
clean it and check that the electrode gap is 0,6 mm. The
spark plug should be replaced after about a month in
operation or earlier if necessary.
Note! Always use the recommended spark plug type! Use
of the wrong spark plug can damage the piston/cylinder.
Check that the spark plug is fitted with a suppressor.
(36)
24 – English
Page 25

MAINTENANCE
Maintenance schedule
The following is a list of the maintenance steps that must be performed on the machine. Most of the items are described
in the Maintenance section.
Daily maintenance Weekly maintenance Monthly maintenance
Check the brake band on the chain
Clean the outside of the machine.
Check that the components of the
throttle trigger work safely. (Throttle
lockout and throttle trigger.)
Clean the chain brake and check that
it operates safely. Make sure that the
chain catcher is undamaged, and
replace it if necessary.
The bar should be turned daily for
more even wear. Check the
lubrication hole in the bar, to be sure
it is not clogged. Clean the bar
groove.
Check that the bar and chain are
getting sufficient oil.
Check the saw chain with regard to
visible cracks in the rivets and links,
whether the saw chain is stiff or
whether the rivets and links are
abnormally worn. Replace if
necessary.
Sharpen the chain and check its
tension and condition. Check the
drive sprocket for excessive wear
and replace if necessary.
Clean the starter units air intake. Check all cables and connections.
Check that nuts and screws are tight.
Check that the stop switch works
correctly.
Check that there are no fuel leaks
from the engine, tank or fuel lines.
Check the starter, the starter cord
and the recoil spring.
Check that the vibration damping
elements are not damaged.
File off any burrs from the edges of
the bar.
Clean the carburettor compartment. Clean the outside of the carburettor.
Clean the air filter. Replace if
necessary.
brake for wear. Replace when less
than 0.6 mm (0.024 inch) remains at
the most worn point.
Check the clutch centre, clutch drum
and clutch spring for wear.
Clean the spark plug. Check that the
electrode gap is 0.6 mm.
Check the fuel filter and the fuel
hose. Replace if necessary.
Empty the fuel tank and clean the
inside.
Empty the oil tank and clean the
inside.
English – 25
Page 26

TECHNICAL DATA
Technical data
CS 35 CS 35S
Engine
Cylinder displacement, cm
Stroke, mm 31,1 31,1
Idling speed range, min-1 2700-3300 2700-3300
Power, kW 1,44/9000 1,44/9000
Ignition system
Spark plug CMR7H CMR7H
Electrode gap, mm 0,6 0,6
Fuel and lubrication system
Fuel tank capacity, litre/cm
Oil pump capacity at 9,000 rpm, ml/min 7-9 7-9
Oil tank capacity, litre 0,15 0,15
Type of oil pump Automatic Automatic
Weight
Chain saw without bar, chain and with empty tanks, kg 4.6 4.6
Noise emissions (see note 1)
Sound power level, measured dB(A) 109 109
Sound power level, guaranteed LWA dB(A) 111 111
Sound levels (see note 2)
Equivalent sound pressure level at the operator’s ear, dB(A) 99 99
Equivalent vibration levels, a
Front handle, m/s
Rear handle, m/s
Chain/bar
Standard bar length, inch/cm 14-16 / 35-40 14/35
Recommended bar lengths, inch/cm 14-16 / 35-40 14/35
Usable cutting length, inch/cm 13-15 / 33-38 13-15 / 33-38
Pitch, mm 3/8 / 9,52 3/8 / 9,52
Thickness of drive links, inch/mm 0,050/1,3 0,050/1,3
Type of drive sprocket/number of teeth Spur/6 Spur/6
Chain speed at 133% of maximum engine power speed, m/s. 22,8 22,8
Note 1: Noise emissions in the environment measured as sound power (LWA) in conformity with EC directive 2000/14/
EC.
Note 2: Equivalent sound pressure level, according to ISO 22868, is calculated as the time-weighted energy total for
different sound pressure levels under various working conditions. Typical statistical dispersion for equivalent sound
pressure level is a standard deviation of 2,5 dB (A).
Note 3: Equivalent vibration level, according to ISO 22867, is calculated as the time-weighted energy total for vibration
levels under various working conditions. Reported data for equivalent vibration level has a typical statistical dispersion
(standard deviation) of 1,5 m/s
3
3
(see note 3)
2
hveq
.
2
2
35 35
0,25/250 0,25/250
6,673 6,673
5,792 5,792
26 – English
Page 27
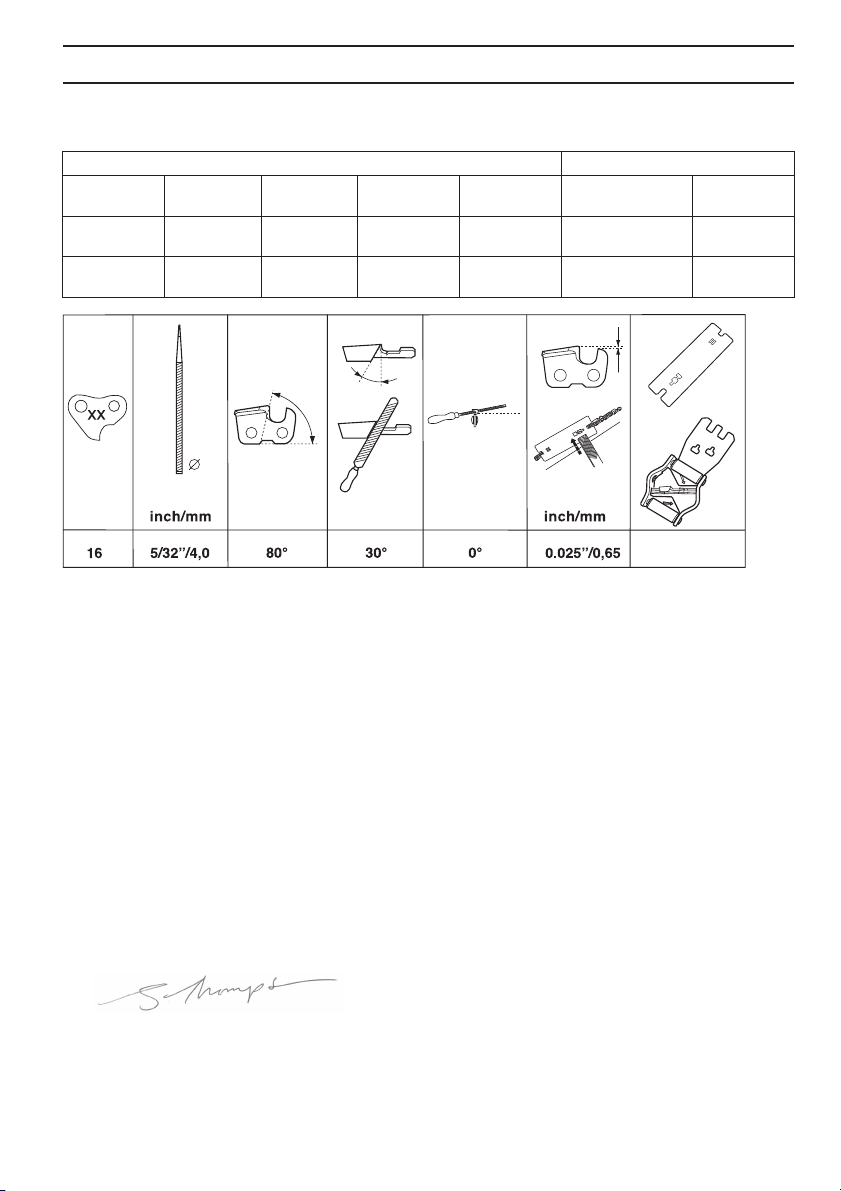
TECHNICAL DATA
Guide bar and saw chain combinations
The following cutting attachments are approved for the models McCulloch CS 35 and CS 35S.
Guide bar Saw chain
Length, inch Pitch, inch Gauge, mm
14 3/8" 1,3 7T 14” 91-52 DC
16 3/8" 1,3 7T 16” 91-56 DC
Max. nose
radius
Type Type
91PJ052X
(Oregon)
91PJ056X
(Oregon)
Length, drive
links (no.)
52
56
EC Declaration of Conformity
(Applies to Europe only)
Husqvarna AB , SE-561 82 Huskvarna, Sweden, tel: +46-36-146500, declares under sole responsibility that the chain
saws for forest service McCulloch CS 35 and CS 35S from 2016’s serial numbers and onwards (the year is clearly
stated in plain text on the type plate with subsequent serial number), are in conformity with the requirements of the
COUNCIL’S DIRECTIVES:
- of May 17, 2006 ”relating to machinery” 2006/42/EC .
- of February 26, 2014 ”relating to electromagnetic compatibility” 2014/30/EU .
- of May 8, 2000 ”relating to the noise emissions in the environment” 2000/14/EC .
Conformity assessment procedure according to Annex V of the above directive has been used.
For information relating to noise emissions, see the Technical data chapter. The following standards have been applied:
EN ISO 11681-1:2011, EN ISO 14982:2009,CISPR 12:2013
Notified body: TÜV Rheinland LGA Products GmbH, Tillystrasse 2, D-90431 Nuernberg, Germany, 0197, has carried out
EC type examination in accordance with the machinery directive’s (2006/42/EC) article 12, point 3b. The certificate for
EC type examination in accordance with annex IX, has the number: The certificates for EC type examination in
accordance with annex IX, have the numbers: BM 50351057
The supplied chain saw conforms to the example that underwent EC type examination.
Changzhou, China. July 8 2016
John Thompson, Product and Marketing director EUAP. (Authorized representative for Husqvarna AB and responsible
for technical documentation.)
English – 27
Page 28
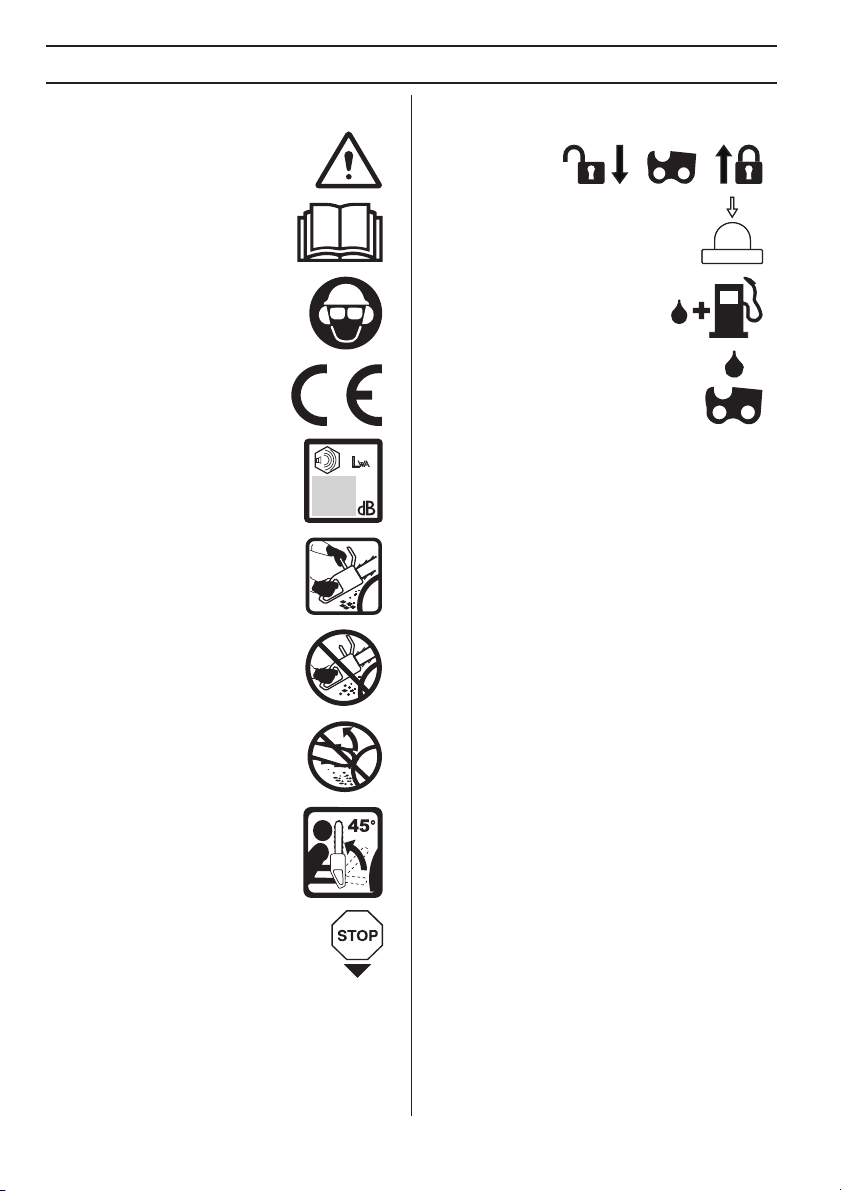
Symboler på maskinen:
yyyywwxxxxx
VARNING! Motorsågar kan vara farliga!
Slarvigt eller felaktigt användande kan
resultera i allvarliga skador eller dödsfall
för föraren eller andra.
Läs igenom bruksanvisningen
noggrant och förstå innehållet innan
du använder maskinen.
Använd alltid:
• Godkänd skyddshjälm
• Godkända hörselskydd
• Skyddsglasögon eller visir
Denna produkt överensstämmer
med gällande EG-direktiv.
INLEDNING
Kedjebroms, aktiverad (fram)
Kedjebroms, ej aktiverad (bak)
Bränslepump
Bränslepåfyllning.
Kedjeoljepåfyllning.
Bulleremissioner till omgivningen
enligt Europeiska Gemenskapens
direktiv. Maskinens emission anges i
kapitel Tekniska data och på dekal.
Håll alltid motorsågen med båda
händerna.
Använd aldrig motorsågen med endast
en hand.
Tillåt aldrig svärdsspetsen att komma i
kontakt med ett föremål.
VARNING! Kast kan uppstå när
svärdsspetsen kommer i kontakt med
ett föremål och orsakar en reaktion
som kastar svärdet uppåt och bakåt
mot användaren. Detta kan orsaka
allvarlig personlig skada.
Motorn stannas genom att tändningen slås
ifrån med stoppkontakten.
Serienumret visas på
typskylten.
produktionsår,
vecka och
löpnummer.
Övriga på maskinen angivna symboler/dekaler avser
specifika krav för certifieringar på vissa marknader.
yyyy är
ww är
xxxxx är
28 – Svenska
Page 29

INLEDNING
Bäste kund!
Tack för att du använder en McCulloch-produkt! Du är
därmed en del av en historia som tog sin början för länge
sedan, när McCulloch Corporation startade sin
tillverkning av motorer under andra världskriget. Från och
med 1949, när McCulloch lanserade den första lätta
enmansmotorsågen, skulle skogsarbetet aldrig bli sig likt
igen.
Utvecklingen av innovativa motorsågar skulle fortsätta
genom årtiondena, och verksamheten utökades, först
med motorer för flygplan och gokarts på 1950-talet, och
sedan med minimotorsågar på 1960-talet. På 1970- och
80-talet utökades sortimentet med trimmers och
lövblåsare.
Idag bygger McCulloch som en del av Husqvarnakoncernen vidare på den tradition av kraftfulla motorer,
tekniska innovationer och utmärkande design som varit
vårt kännetecken i mer än ett halvsekel. Minskad
bränsleförbrukning, minskade utsläpp och lägre
ljudnivåer är av högsta prioritet för oss, på samma sätt
som att förbättra säkerheten och användarvänligheten.
Vi hoppas att du kommer att vara nöjd med din
McCulloch-produkt, som är utformad för att vara din
följeslagare under en lång tid framöver. Genom att följa
råden i bruksanvisningen gällande användning, service
och underhåll kan produktens livslängd utökas. Om du
behöver professionell hjälp med reparation eller service,
kan du använda dig av vår Service Locator på
www.mcculloch.com.
McCulloch arbetar ständigt med att vidareutveckla sina
produkter och förbehåller sig därför rätten till ändringar
beträffande bl.a. form och utseende utan föregående
meddelande.
Den här bruksanvisningen kan också laddas ned från
www.mcculloch.com.
Vad är vad på motorsågen? (1)
1 Cylinderkåpa
2 Bränslepump
3 Stoppkontakt (Till- och frånslagning av tändning.)
4 Chokereglage/Startgasspärr
5 Bakre handtag med högerhandsskydd
6 Informations- och varningsdekal
7 Bränsletank
8 Justerskruvar förgasare
9 Starthandtag
10 Startapparat
11 Kedjeoljetank
12 Typskylt
13 Kedjespännarskruv
14 Kopplingskåpa
15 Gasreglagespärr (Förhindrar ofriviligt gaspådrag.)
16 Främre handtag
17 Kastskydd
18 Ljuddämpare
19 Sågsvärd
20 Noshjul
21 Sågkedja
22 Barkstöd
23 Kedjefångare
24 Gasreglage
25 Svärdsskydd
26 Bruksanvisning
27 Kombiverktyg
Svenska – 29
Page 30

INNEHÅLL
Innehåll
INLEDNING
Symboler på maskinen: ........................................ 28
INLEDNING
Bäste kund! ........................................................... 29
Vad är vad på motorsågen? .................................. 29
INNEHÅLL
Innehåll ................................................................. 30
ALLMÄNNA SÄKERHETSINSTRUKTIONER
Åtgärder före användning av ny motorsåg ............ 31
Viktigt .................................................................... 31
Använd alltid sunt förnuft ...................................... 31
Personlig skyddsutrustning ................................... 32
Maskinens säkerhetsutrustning ............................ 32
Skärutrustning ...................................................... 34
MONTERING
Montering av svärd och kedja ............................... 37
BRÄNSLEHANTERING
Drivmedel .............................................................. 38
Tankning ............................................................... 38
Bränslesäkerhet .................................................... 39
START OCH STOPP
Start och stopp ..................................................... 40
ARBETSTEKNIK
Före varje användning: ......................................... 41
Allmänna arbetsinstruktioner ................................ 41
Kastförebyggande åtgärder .................................. 44
UNDERHÅLL
Allmänt .................................................................. 45
Förgasarjustering .................................................. 45
Kontroll, underhåll och service av motorsågens
säkerhetsutrustning ..............................................
Ljuddämpare ......................................................... 46
Luftfilter ................................................................. 46
Tändstift ................................................................ 46
Underhållsschema ................................................ 47
TEKNISKA DATA
Tekniska data ........................................................ 48
Svärd och kedjekombinationer .............................. 49
EG-försäkran om överensstämmelse ................... 49
45
30 – Svenska
Page 31

ALLMÄNNA SÄKERHETSINSTRUKTIONER
!
!
Åtgärder före användning av ny
motorsåg
• Läs igenom bruksanvisningen noggrant.
• (1) - (43) hänvisar till illustrationer på sid. 2-5.
• Kontrollera skärutrustningens montering och
justering. Se anvisningar under rubrik Montering.
• Tanka och starta motorsågen. Se anvisningar under
rubrikerna Bränslehantering och Start och Stopp.
• Använd inte motorsågen förrän tillräckligt med
kedjesmörjolja har nått sågkedjan. Se anvisningar
under rubrik Smörjning av skärutrustningen.
• Långvarig exponering för buller kan ge bestående
hörselskador. Använd därför alltid godkända
hörselskydd.
VARNING! Under inga förhållanden får
maskinens ursprungliga utformning
!
ändras utan tillstånd från tillverkaren.
Använd alltid originaltillbehör. Icke
auktoriserade ändringar och/eller
tillbehör kan medföra allvarliga skador
eller dödsfall för föraren eller andra.
VARNING! En motorsåg kan felaktigt
eller slarvigt använd vara ett farligt
!
redskap, som kan orsaka allvarlig, till
och med livshotande, skada. Det är
mycket viktigt att du läser och förstår
innehållet i denna bruksanvisning.
VARNING! Ljuddämparen innehåller
kemikalier som kan vara
!
cancerframkallande. Undvik kontakt med
dessa kemikalier ifall ljuddämparen
skulle gå sönder.
Viktigt
VIKTIGT!
Denna motorsåg för skogsbruk är konstruerad för
skogsarbete såsom trädfällning, kvistning och kapning.
Du bör endast använda de svärd/
sågkedjekombinationer vi rekommenderar i kapitel
Tekniska data.
Använd aldrig maskinen om du är trött, om du har
druckit alkohol eller om du tar mediciner, som kan
påverka din syn, ditt omdöme eller din kroppskontroll.
Använd personlig skyddsutrustning. Se anvisningar
under rubrik ”Personlig skyddsutrustning”.
Modifiera aldrig denna maskin så att den ej längre
överensstämmer med originalutförandet, och använd
den inte om den verkar ha blivit modifierad av andra.
Använd aldrig en maskin som är felaktig. Följ
underhålls-, säkerhetskontroll- och serviceinstruktioner i
denna bruksanvisning. Vissa underhålls- och
serviceåtgärder skall utföras av tränade och
kvalificerade specialister. Se anvisningar under rubrik
Underhåll.
Använd aldrig andra än i denna bruksanvisning
rekommenderade tillbehör. Se anvisningar under
rubrikerna Skärutrustning och Tekniska data.
OBS! Använd alltid skyddsglasögon eller ansiktsvisir för
att minska risken för skador från slungande föremål. En
motorsåg är kapabel till att slunga iväg föremål, såsom
sågspån, små trästycken, etc, med stor kraft. Detta kan
orsaka allvarlig skada, speciellt på ögonen.
VARNING! Att köra en motorsåg i ett
instängt eller dåligt ventilerat utrymme
kan orsaka dödsfall genom kvävning
eller kolmonoxidförgiftning.
VARNING! Långvarig inandning av
motorns avgaser, kedjeoljedimma och
!
damm från sågspån kan utgöra en
hälsorisk.
VARNING! Denna maskin alstrar under
drift ett elektromagnetiskt fält. Detta fält
!
kan under vissa omständigheter ge
påverkan på aktiva eller passiva
medicinska implantat. För att reducera
risken för allvarliga eller livshotande
skador rekommenderar vi därför
personer med implantat att rådgöra med
läkare samt tillverkaren av det
medicinska implantatet innan denna
maskin används.
Använd alltid sunt förnuft (2)
Det är omöjligt att täcka alla tänkbara situationer du kan
ställas inför vid användande av motorsåg. Var alltid
försiktig och använd sunt förnuft. Undvik situationer som
du anser dig otillräckligt kvalificerad för. Om du efter att ha
läst dessa instruktioner fortfarande känner dig osäker
angående tillvägagångssätt, skall du rådfråga en expert
innan du fortsätter. Tveka inte att kontakta din
återförsäljare eller oss om du har frågor angående
användning av motorsåg. Vi står gärna till tjänst och ger
VARNING! En felaktig skärutrustning
eller en felaktig svärd/
sågkedjekombination ökar risken för
kast! Använd endast de svärd/
sågkedjekombinationer vi
rekommenderar, samt följ
filningsinstruktionen. Se anvisningar
under rubrik Tekniska data.
Svenska – 31
Page 32

ALLMÄNNA SÄKERHETSINSTRUKTIONER
!
dig råd som hjälper dig att använda din motorsåg på ett
bättre och säkrare sätt. Gå gärna en utbildning i
motorsågsanvändning. Din återförsäljare,
skogsvårdskola eller ditt bibliotek kan upplysa dig om
vilket utbildningsmaterial och vilka kurser som finns
tillgängliga. Det pågår ett ständigt arbete med att förbättra
design och teknik - förbättringar som ökar din säkerhet
och effektivitet. Besök din återförsäljare regelbundet för
att se vilken nytta du kan ha av de nyheter som
introduceras.
Personlig skyddsutrustning
VARNING! Merparten av olyckor med
motorsåg inträffar när sågkedjan träffar
!
användaren. Vid all användning av
maskinen skall godkänd personlig
skyddsutrustning användas. Personlig
skyddsutrustning eliminerar inte
skaderisken, men den reducerar effekten
av en skada vid ett olyckstillbud. Be din
återförsäljare om hjälp vid val av
utrustning.
• Godkänd skyddshjälm
• Hörselskydd
• Skyddsglasögon eller visir
• Handskar med sågskydd
• Byxor med sågskydd
• Stövlar med sågskydd, stålhätta och halkfri sula
• Första förband ska alltid finnas till hands.
• Brandsläckare och spade
Klädseln i övrigt bör vara åtsittande utan att begränsa
dina rörelsemöjligheter.
VIKTIGT! Gnistor kan komma från ljuddämparen,
svärdet och kedjan eller annan källa. Ha alltid verktyg
för brandsläckning tillgängliga ifall du skulle behöva
dem. På så sätt hjälper du till att förhindra skogsbränder.
Maskinens säkerhetsutrustning
I detta avsnitt förklaras vilka maskinens säkerhetsdetaljer
är, samt deras funktion. För kontroll och underhåll se
anvisningar under rubrik Kontroll, underhåll och service
av motorsågens säkerhetsutrustning. Se anvisningar
under rubrik Vad är vad?, för att hitta var dessa detaljer är
placerade på din maskin.
Maskinens livslängd kan förkortas och risken för olyckor
kan öka om underhåll av maskinen inte utförs på rätt sätt
och om service och/eller reparationer inte utförs
fackmannamässigt. Om du behöver ytterligare
upplysningar kontakta närmaste serviceverkstad.
VARNING! Använd aldrig en maskin med
defekt säkerhetsutrustning.
Säkerhetsutrustningen ska kontrolleras
och underhållas. Se anvisningar under
rubrik Kontroll, underhåll och service av
motorsågens säkerhetsutrustning. Om
din maskin inte klarar alla kontrollerna
ska serviceverkstad uppsökas för
reparation.
Kedjebroms med kastskydd
Din motorsåg är utrustad med kedjebroms, vilken är
konstruerad att stoppa sågkedjan vid kast. En kedjebroms
reducerar risken för olyckor, men det är endast Du som
användare som kan förhindra dem.
Var försiktig vid användning och se till att svärdets
kastrisksektor aldrig kommer i kontakt med ett föremål.
• Kedjebromsen (A) aktiveras antingen manuellt (via
vänsterhanden) eller med tröghetsfunktionen.
• Aktivering sker när kastskyddet (B) förs framåt. (3)
• Den rörelsen aktiverar en fjäderspänd mekanism som
spänner bromsbandet (C) runt motorns
kedjedrivningssystem (D) (kopplingstrumman).
• Kastskyddet är inte enbart konstruerat för att aktivera
kedjebromsen. En annan mycket viktig funktion är att
det reducerar risken för att vänsterhanden skall träffa
sågkedjan om man tappar greppet om främre
handtaget.
• Kedjebromsen skall vara tillslagen när motorsågen
startas för att förhindra kedjan från att rotera.
• Använd kedjebroms som ”parkeringsbroms” vid start
samt vid kortare förflyttning, för att förhindra olyckor
där användare eller omgivning ofrivilligt kan komma i
kontakt med sågkedjan i rörelse.
• Kedjebromsen frikopplas genom att kastskyddet förs
bakåt, mot främre handtaget.
• Kast kan vara blixtsnabba och mycket våldsamma. De
flesta kast är små och resulterar inte alltid i att
kedjebromsen aktiveras. Vid sådana kast gäller att
hålla motorsågen i ett stadigt grepp och att inte släppa
det.
• Hur kedjebromsen aktiveras, manuellt eller via
tröghetsfunktionen, styrs av hur våldsamt kastet är
samt motorsågens position i förhållande till det
föremål svärdets kastrisksektor kommit i kontakt med.
Vid våldsamma kast och där svärdets kastrisksektor
befinner sig så långt bort från användaren som
möjligt, är kedjebromsen konstruerad så att den
aktiveras via kedjebromsens motvikt (tröghet) i
kastriktningen.
Vid mindre våldsamma kast eller under
arbetssituationer där kastrisksektorn befinner sig nära
användaren, aktiveras kedjebromsen manuellt via
vänsterhanden.
• Vid fälläge är vänsterhanden i ett läge som omöjliggör
manuell aktivering av kedjebromsen. Vid denna typ av
grepp, dvs när vänsterhanden är placerad så den ej
kan påverka kastskyddets rörelse, kan kedjebromsen
endast aktiveras via tröghetsfunktionen.
(3)
(4)
32 – Svenska
Page 33

ALLMÄNNA SÄKERHETSINSTRUKTIONER
!
!
Kommer min hand alltid att aktivera
kedjebromsen vid kast?
Nej. Det krävs en viss kraft för att föra kastskyddet framåt.
Om din hand endast lätt snuddar vid kastskyddet eller
slinter över det, kan det hända att kraften inte är tillräckligt
stark för att utlösa kedjebromsen. Du skall även hålla ett
stadigt grepp om motorsågens handtag när du arbetar.
Om du gör det och får ett kast, släpper du kanske aldrig
handen om det främre handtaget och aktiverar inte
kedjebromsen, eller också aktiveras kedjebromsen först
när sågen har hunnit svänga runt en bra bit. I en sådan
situation kan det hända att kedjebromsen inte hinner
stoppa kedjan innan den träffar dig.
Det förekommer också vissa arbetsställningar som gör att
din hand inte kan nå kastskyddet för att aktivera
kedjebromsen; t.ex. när sågen hålls i fällningsposition.
Kommer tröghetsaktivering av
kedjebromsen alltid ske om ett kast
inträffar?
Nej. För det första måste din broms fungera. Att testa
bromsen är lätt, se anvisningar under rubrik Kontroll,
underhåll och service av motorsågens
säkerhetsutrustning. Vi rekommenderar att du gör detta
innan du påbörjar varje arbetspass. För det andra måste
kastet vara tillräckligt kraftigt för att aktivera
kedjebromsen. Om kedjebromsen vore för känslig skulle
den ständigt aktiveras, vilket skulle vara besvärande.
Kommer kedjebromsen alltid att skydda
mig från skador om ett kast inträffar?
Nej. För det första måste din broms fungera för att ge det
avsedda skyddet. För det andra måste den aktiveras så
som beskrivs ovan för att stoppa sågkedjan vid ett kast.
För det tredje kan kedjebromsen aktiveras, men om
svärdet är för nära dig kan det hända att bromsen inte
hinner sakta ner och stoppa kedjan innan motorsågen
träffar dig.
Endast du själv och en korrekt arbetsteknik kan
eliminera kast och dess risker.
Gasreglagespärr
Gasreglagespärren är konstruerad att förhindra ofrivillig
aktivering av gasreglaget. När spärren (A) trycks ner i
handtaget (= när man håller om handtaget) frikopplas
gasreglaget (B). När greppet om handtaget släpps
återställes både gasreglaget samt gasreglagespärren till
sina respektive ursprungslägen. Detta läge innebär att
gasreglaget automatiskt låses på tomgång.
Kedjefångare
Kedjefångaren är konstruerad att fånga upp en avhoppad
eller brusten kedja. Dessa händelser undvikes i de flesta
fall genom en korrekt kedjespänning (se anvisningar
under rubrik Montering) samt korrekt underhåll och
service av svärd och kedja (se anvisningar under rubrik
Allmänna arbetsinstruktioner).
(5)
Högerhandsskydd
Högerhandsskyddet skall förutom att skydda handen vid
ett kedjeavhopp eller när en kedja går av, se till att grenar
och kvistar inte påverkar greppet om bakre handtaget.
Avvibreringssystem
Din maskin är utrustad med ett avvibreringssystem, vilket
är konstruerat att ge en så vibrationsfri och behaglig
användning som möjligt.
Maskinens avvibreringssystem reducerar överföringen av
vibrationer mellan motorenhet/skärutrustning och
maskinens handtagsenhet. Motorsågkroppen, inklusive
skärutrustning, hänger i handtagsenheten via s.k.
avvibreringselement.
Sågning i ett hårt trädslag (de flesta lövträd) ger mer
vibrationer än sågning i ett mjukt (de flesta barrträd).
Sågning med en oskärpt eller felaktig (fel typ eller felaktigt
filad) skärutrustning ökar vibrationsnivån.
VARNING! Överexponering av vibrationer
kan leda till blodkärls- eller nervskador
hos personer som har
blodcirkulationsstörningar. Uppsök
läkare om ni upplever kroppsliga
symptom som kan relateras till
överexponering av vibrationer. Exempel
på sådana symptom är domningar,
avsaknad av känsel, ”kittlingar”,
”stickningar”, smärta, avsaknad eller
reducering av normal styrka,
förändringar i hudens färg eller dess yta.
Dessa symptom uppträder vanligtvis i
fingrar, händer eller handleder. Dessa
symptom kan öka vid kalla temperaturer.
Stoppkontakt
Stoppkontakten ska användas för att stänga av motorn.
(26)
Ljuddämpare
Ljuddämparen är konstruerad för att reducera ljudnivån
samt för att leda bort motorns avgaser från användaren.
VARNING! Motorns avgaser är heta och
kan innehålla gnistor vilka kan orsaka
brand. Starta därför aldrig maskinen
inomhus eller nära eldfängt material!
I områden med varmt och torrt klimat kan risken för
bränder vara påtaglig. Det förekommer att dessa
områden regleras med lagstiftning och krav på att
ljuddämparen bland annat skall vara utrustad med
godkänt gnistfångarnät (A).
OBS! Ljuddämparen blir mycket het såväl vid
användning som efter stopp. Detta gäller även vid
tomgångskörning. Var uppmärksam på brandfaran,
speciellt vid hantering nära brandfarliga ämnen och/
eller gaser.
(6)
Svenska – 33
Page 34

ALLMÄNNA SÄKERHETSINSTRUKTIONER
!
VARNING! Använd aldrig en motorsåg
utan eller med defekt ljuddämpare. En
!
defekt ljuddämpare kan öka ljudnivån
och brandrisken avsevärt. Ha verktyg för
brandsläckning tillgängliga. Använd
aldrig en motorsåg utan eller med defekt
gnistfångarnät om gnistfångarnät är
obligatoriskt i ditt arbetsområde.
Sågsvärd
Ju mindre nosradie desto lägre kastbenägenhet.
Sågkedja
En sågkedja är uppbyggd av ett antal olika länkar vilka
finns både i standard och i kastreducerat utförande.
VIKTIGT! Inga sågkedjor eliminerar risken för kast.
Skärutrustning
Detta avsnitt behandlar hur du genom korrekt underhåll
samt genom användning av korrekt typ av skärutrustning:
• Reducerar maskinens kastbenägenhet.
• Minskar förekomsten av sågkedjeavhopp samt
sågkedjebrott.
• Erhåller optimal skärprestanda.
• Ökar skärutrustningens livslängd.
• Undviker ökning av vibrationsnivåer.
Grundregler
• Använd endast den skärutrustning vi
rekommenderar!
Tekniska data.
• Håll sågkedjans skärtänder väl och korrekt
skärpta! Följ våra instruktioner och använd
rekommenderad filmall.
sågkedja ökar risken för olyckor.
• Håll korrekt underställning! Följ våra instruktioner
och använd rekommenderad underställningsmall.
En för stor underställning ökar risken för kast.
• Håll sågkedjan sträckt! En otillräckligt sträckt
sågkedja ökar risken för sågkedjeavhopp samt ökar
slitage på svärd, sågkedja och sågkedjedrivhjul.
• Håll skärutrustningen välsmord och korrekt
underhållen!
ökar risken för sågkedjebrott samt ökar slitaget på
svärd, sågkedja och sågkedjedrivhjul.
Kastreducerande skärutrustning
!
Kast kan endast undvikas genom att du som användare
ser till att svärdets kastrisksektor aldrig kommer i kontakt
med ett föremål.
Genom att använda skärutrustning med ”inbyggd”
kastreduktion och genom att skärpa och underhålla
sågkedjan korrekt kan effekten av ett kast reduceras.
Se anvisningar under rubrik
En felskärpt eller skadad
En otillräcklig smörjning av sågkedja
VARNING! En felaktig skärutrustning
eller en felaktig svärd/
sågkedjekombination ökar risken för
kast! Använd endast de svärd/
sågkedjekombinationer vi
rekommenderar, samt följ
filningsinstruktionen. Se anvisningar
under rubrik Tekniska data.
VARNING! Varje kontakt med en
roterande sågkedja kan orsaka mycket
svåra skador.
Några uttryck som specificerar svärd och sågkedja
För att bibehålla alla säkerhetsdetaljer på
skärutrustningen, bör du ersätta slitna och skadade
svärd-/kedjekombinationer mot ett svärd och en kedja
som Husqvarna rekommenderar. Se anvisningar under
rubrik Tekniska data för information om vilka svärd-/
kedjekombinationer vi rekommenderar.
Sågsvärd
• Längd (tum/cm)
• Antal tänder i noshjulet (T).
• Sågkedjedelning (=pitch) (tum). Svärdets noshjul och
motorsågens kedjedrivhjul måste vara anpassad till
avståndet mellan drivlänkarna.
• Antal drivlänkar (st). Varje svärdslängd ger i
kombination med sågkedjedelning samt antal tänder i
noshjulet ett bestämt antal drivlänkar.
• Svärdsspårbredd (tum/mm). Svärdspårets bredd
måste vara anpassad till sågkedjans drivlänksbredd.
• Sågkedjeoljehål och hål för kedjesträckartapp.
Svärdet måste vara anpassat till motorsågens
konstruktion.
Sågkedja
• Sågkedjedelning (=pitch) (tum)
• Drivlänksbredd (mm/tum)
• Antal drivlänkar (st)
Skärpning och justering av
underställning hos sågkedja
Allmänt angående skärpning av skärtand
• Såga aldrig med en slö sågkedja. Tecken på att
sågkedjan är slö är att du måste pressa
skärutrustningen genom träet och att träspånorna är
mycket små. En mycket slö sågkedja ger inga
träspånor alls. Det enda resultatet blir träpuder.
• En välskärpt sågkedja äter sig själv ner genom träet
och ger träspånor som är stora och långa.
• Den sågande delen hos en sågkedja kallas skärlänk
och består av en skärtand (A) och en
underställningsklack (B). Avståndet i höjd mellan
dessa avgör skärdjupet.
34 – Svenska
Page 35

ALLMÄNNA SÄKERHETSINSTRUKTIONER
!
Vid skärpning av skärtand finns fyra mått att ta hänsyn till.
1 Filningsvinkel
2 Stötvinkel
3 Filläge
4 Rundfilsdiameter
Det är mycket svårt att skärpa en sågkedja korrekt utan
hjälpmedel. Därför rekommenderar vi att du använder vår
filmall. Den säkerställer att sågkedjan skärps för optimal
kastreduktion och skärkapacitet.
Se anvisningar under rubrik Tekniska data angående vilka
data som gäller vid skärpning av din motorsågs sågkedja.
VARNING! Avsteg från
skärpningsinstruktionen ökar
!
sågkedjans kastbenägenhet avsevärt.
Skärpning av skärtand
För skärpning av skärtand behövs en rundfil och en
filmall. Se anvisningar under rubrik Tekniska data
angående vilken rundfilsdiameter samt vilken filmall som
rekommenderas till din motorsågs sågkedja.
• Kontrollera att sågkedjan är sträckt. En otillräcklig
sträckning gör sågkedjan instabil i sidled vilket
försvårar en korrekt skärpning.
• Fila alltid från skärtandens insida och utåt. Lätta filen
på returdraget. Fila alla tänderna på ena sidan först,
vänd därefter motorsågen och fila den återstående
sidans tänder.
• Fila så att alla tänder blir lika långa. När endast 4 mm
(5/32") återstår av skärtandens längd är sågkedjan
utsliten och skall slängas.
Allmänt angående justering av underställning
• Vid skärpning av skärtanden minskar
underställningen (=skärdjupet). För att behålla
maximal skärkapacitet måste underställningsklacken
sänkas till rekommenderad nivå. Se anvisningar
under rubrik Tekniska data angående hur stor
underställningen skall vara på din motorsågs
sågkedja.
(7)
VARNING! För stor underställning ökar
sågkedjans kastbenägenhet!
!
(8)
underställningsmått och rätt vinkel på
underställningsklacken.
• Lägg filmallen över sågkedjan. Information om
användning av filmallen finns på förpackningen.
Använd flatfilen för att fila bort överskottet på den
överskjutande delen av underställningsklacken.
Underställningen är korrekt då inget motstånd känns
när du drar filen över mallen.
Sträckning av sågkedjan
VARNING! En otillräckligt sträckt
sågkedja kan resultera i sågkedjeavhopp
vilket kan orsaka allvarlig, till och med
livshotande skada.
Ju mer du använder en sågkedja desto längre blir den.
Det är viktigt att man justerar skärutrustningen efter
denna förändring.
Sågkedjesträckningen skall kontrolleras vid varje
tankningstillfälle. OBS! En ny sågkedja kräver en
inkörningsperiod under vilken man skall kontrollera
sågkedjesträckningen oftare.
Generellt gäller att man skall sträcka sågkedjan så hårt
som möjligt, men inte hårdare än att den lätt kan dras runt
för hand.
(9)
• Lossa svärdsmuttern som låser kopplingskåpan/
kedjebromsen. Använd kombinyckeln. Drag sedan åt
svärdsmuttern med handkraft så hårt du kan.
• Lyft upp svärdsspetsen och sträck sågkedjan genom
att skruva sågkedjesträckarskruven med hjälp av
kombinyckeln. Sträck sågkedjan ända tills den inte
hänger slak på svärdets undersida.
• Använd kombinyckeln och drag åt svärdsmuttern
samtidigt som du håller upp svärdsspetsen.
Kontrollera att sågkedjan lätt kan dras runt för hand
och att den inte hänger ner på svärdets undersida.
(12)
Bland våra motorsågsmodeller förekommer olika
placeringar av sågkedjesträckarskruven. Se anvisningar
under rubrik Vad är vad?, angående var den sitter på din
modell.
(11)
(10)
Justering av underställning
• När justering av underställningen görs, måste
skärtänderna vara nyskärpta. Vi rekommenderar att
underställningen justeras efter var tredje
sågkedjeskärpning. OBS! Denna rekommendation
förutsätter att skärtändernas längd inte filats ner
onormalt.
• För justering av underställningen behövs en flatfil och
en underställningsmall. Vi rekommenderar att du
använder vår filmall för underställning, för att få rätt
Svenska – 35
Page 36

ALLMÄNNA SÄKERHETSINSTRUKTIONER
!
Smörjning av skärutrustningen
VARNING! Otillräcklig smörjning av
skärutrustningen kan resultera i
!
sågkedjebrott vilket kan orsaka allvarlig,
till och med livshotande skada.
Sågkedjeolja
En sågkedjeolja skall ha god vidhäftning vid sågkedjan
samt ha goda flytegenskaper oavsett om det är varm
sommar eller kall vinter.
VIKTIGT! Vid användning av vegetabilisk sågkedjeolja,
demontera och rengör svärdsspår och sågkedja innan
långtidsförvaring. Annars finns risk att sågkedjeoljan
oxiderar, vilket medför att sågkedjan blir stel och
svärdets noshjul kärvar.
Påfyllning av sågkedjeolja
• Samtliga våra motorsågsmodeller har automatisk
sågkedjesmörjning. En del av modellerna kan även
fås med justerbart oljeflöde.
• Sågkedjeoljetanken och bränsletanken är
dimensionerade så att bränslet ska ta slut innan
sågkedjeoljan tar slut.
Dock förutsätter denna säkerhetsfunktion att man
använder korrekt sågkedjeolja (en för tunn och
lättflytande olja tömmer sågkedjeoljetanken innan
bränslet tar slut), att man följer vår rekommendation
angående förgasarinställning (en för ”mager”
inställning gör att bränslet räcker längre än
sågkedjeoljan) samt att man följer våra
rekommendationer när det gäller skärutrustning (ett
för långt svärd kräver mer kedjeolja).
Kontroll av sågkedjesmörjning
• Kontrollera sågkedjesmörjningen vid varje
tankningstillfälle.
Rikta på ca 20 cm (8 tum) avstånd svärdsspetsen mot
ett fast ljust föremål. Efter 1 minuts körning på 3/4 gas
ska en tydlig oljerand synas på det ljusa föremålet.
Om sågkedjesmörjningen inte fungerar:
• Kontrollera att svärdspåret är rent. Rengör vid behov.
• Kontrollera att svärdets noshjul går lätt samt att
noshjulets smörjhål är öppet. Rengör och smörj vid
behov.
Om sågkedjesmörjningen inte fungerar efter genomgång
av ovan listade kontroller och tillhörande åtgärder ska du
uppsöka din serviceverkstad.
Kedjedrivhjul
Kopplingstrumman är försedd med ett spur-drivhjul
(kedjedrivhjulet fastlött på trumman).
Kontrollera regelbundet slitagenivån hos kedjedrivhjulet.
Byt om det är onormalt slitet. Kedjedrivhjul ska bytas vid
varje sågkedjebyte.
Slitagekontroll av skärutrustningen
Kontrollera sågkedjan dagligen med avseende på:
• Synliga sprickor i nitar och länkar.
• Om sågkedjan är stel.
• Om nitar och länkar är onormalt slitna.
Kassera sågkedjan om den uppvisar någon eller några av
ovanstående punkter.
Vi rekommenderar att ni använder en ny sågkedja som
mått på hur sliten den sågkedja ni använder är.
När endast 4 mm återstår av skärtandens längd är
sågkedjan utsliten och ska slängas.
Sågsvärd
Kontrollera regelbundet:
• Om grader bildats på svärdsbommarnas utsidor (A).
Fila bort vid behov.
• Om svärdsspåret är onormalt slitet (B). Byt svärd vid
behov.
(13)
• Om svärdsnosen är onormalt eller ojämnt slitet. Om
en ”grop” bildats där svärdsnosens radie slutar på
svärdets undersida, har du kört med otillräckligt
sträckt sågkedja.
• För maximal livslängd bör svärdet vändas
regelbundet.
VARNING! Merparten av olyckor med
motorsåg inträffar när sågkedjan träffar
användaren.
Använd personlig skyddsutrustning. Se
anvisningar under rubrik ”Personlig
skyddsutrustning”.
Undvik all användning du anser dig
otillräckligt kvalificerad för. Se
anvisningar under rubrikerna Personlig
skyddsutrustning, Kastförebyggande
åtgärder, Skärutrustning och Allmänna
arbetsinstruktioner.
Undvik situationer där kastrisk
föreligger. Se anvisningar under rubrik
Maskinens säkerhetsutrustning.
Använd rekommenderad skärutrustning
och kontrollera dess skick. Se
anvisningar under rubrik Allmänna
arbetsinstruktioner.
Kontrollera funktionen hos motorsågens
säkerhetsdetaljer. Se anvisningar under
rubrikerna Allmänna arbetsinstruktioner
och Allmänna säkerhetsinstruktioner.
(13)
36 – Svenska
Page 37

MONTERING
Montering av svärd och kedja
VARNING! Kontroll och/eller underhåll
skall utföras med motorn frånslagen.
!
Bär alltid handskar när du arbetar med
kedjan så att du skyddar dina händer
från skador.
Kontrollera att kedjebromsen ej är i utlöst läge genom att
föra kedjebromsens kastskydd mot främre
handtagsbygeln.
Lossa svärdsmuttrarna och tag bort kopplingskåpan. (14)
Montera svärdet över svärdsbultarna. Placera svärdet i
sitt bakersta läge. Placera kedjan över kedjedrivhjulet och
i svärdsspåret. Börja på svärdets ovansida.
Kontrollera att eggen på skärlänkarna är riktade framåt på
ovansidan av svärdet.
Montera kopplingskåpan och tänk på att passa in
kedjespännartappen i svärdets urtag. Kontrollera att
kedjans drivlänkar passar på kedjedrivhjulet och att
kedjan ligger rätt i svärdsspåret. Drag åt svärdsmuttern
med fingrarna.
Spänn kedjan genom att med hjälp av kombinyckeln
skruva kedjespännarskruven medurs. Kedjan skall
sträckas tills den inte hänger slak på svärdets undersida.
(11)
Kedjan är korrekt spänd när den inte hänger slak på
svärdets undersida och fortfarande kan dras runt lätt för
hand. Drag fast svärdsmuttern med kombinyckeln
samtidigt som svärdsspetsen hålls upp.
På en ny kedja måste kedjespänningen kontrolleras ofta
tills kedjan är inkörd. Kontrollera kedjespänningen
regelbundet. Rätt kedja betyder bra skärkapacitet och
lång livslängd.
(9)
Montering av barkstöd
För att montera ett barkstöd – kontakta er
serviceverkstad.
(15)
(12)
Svenska – 37
Page 38

BRÄNSLEHANTERING
!
!
Drivmedel
Observera! Maskinen är försedd med en tvåtaktsmotor
och måste alltid köras på en blandning av bensin och
tvåtaktsolja. För att säkerställa rätt blandningsförhållande
är det viktigt att noggrant mäta den oljemängd som skall
blandas. Vid tillblandning av små bränslemängder
inverkar även små felaktigheter i oljemängden kraftigt på
blandningsförhållandet.
VARNING! Sörj för god luftventilation vid
bränslehantering.
!
Bensin
• Använd blyfri eller blyad kvalitetsbensin.
• Rekommenderat lägsta oktantal är 90 (RON). Om
man kör motorn på bensin med ett lägre oktantal än
90 kan så kallad spikning uppträda. Detta leder till
ökad motortemperatur och ökad lagerbelastning, som
kan orsaka svåra motorhaverier.
• Vid arbete med kontinuerligt höga varvtal (t ex
kvistning) rekommenderas högre oktantal.
Inkörning
Körning på alltför högt varvtal under längre perioder skall
undvikas under de första 10 timmarna.
Tvåtaktsolja
• För bästa resultat och funktion använd Universal,
Universal powered by McCULLOCH tvåtaktsolja, som
är speciellt tillverkad för våra luftkylda
tvåtaktsmotorer.
• Använd aldrig tvåtaktsolja avsedd för vattenkylda
utombordsmotorer, s.k. outboardoil (benämnd TCW).
• Använd aldrig olja avsedd för fyrtaktsmotorer.
• En låg oljekvalitet eller för fet olje/bränsle blandning
kan äventyra katalysatorns funktion och minska dess
livstid.
Blandningsförhållande
1:40 (2,5%) med Universal, Universal powered by
McCULLOCH tvåtaktsolja.
Bensin, liter Tvåtaktsolja, liter
2,5% (1:40)
5 0,125
10 0,25
15 0,375
20 0,5
Blandning
• Blanda alltid bensin och olja i en ren behållare
godkänd för bensin.
• Börja alltid med att fylla i hälften av bensinen som skall
tillblandas. Fyll därefter i hela oljemängden. Blanda
(skaka) bränsleblandningen. Fyll återstående mängd
bensin.
• Blanda (skaka) bränsleblandningen omsorgsfullt
innan maskinens bränsletank fylls.
• Blanda inte bränsle för mer än max 1 månads behov.
• Om maskinen inte används under en längre tid skall
bränsletanken tömmas och rengöras.
Kedjeolja
• Som smörjning rekommenderas en speciell olja
(kedjesmörjolja) med god vidhäftningsförmåga.
• Använd aldrig spillolja. Detta medför skador på
oljepumpen, svärdet och kedjan.
• Det är viktigt att använda rätt oljetyp i förhållanden till
lufttemperaturen (lämplig viskositet).
• Lufttemperaturer under 0°C gör en del oljor
trögflytande. Detta kan orsaka överbelastning av
oljepumpen med skador på pumpdelar som följd.
• Kontakta din serviceverkstad vid val av
kedjesmörjolja.
Tankning
VARNING! Följande försiktighetsåtgärder
minskar brandrisken:
Rök inte och placera heller inte något
varmt föremål i närheten av bränsle.
Stanna motorn och låt den svalna några
minuter före tankning.
Öppna tanklocket sakta vid
bränslepåfyllning så att eventuellt
övertryck sakta försvinner.
Drag åt tanklocket noga efter tankning.
Flytta alltid maskinen från
tankningsplatsen och bensindunken före
start.
Torka rent runt tanklocken. Rengör bränsle- och
kedjeoljetanken regelbundet. Bränslefiltret skall bytas
minst en gång per år. Föroreningar i tankarna orsakar
driftstörningar. Se till att bränslet är väl blandat genom att
skaka behållaren innan tanken fylls. Volymen av
kedjeolje- och bränsletanken är väl avpassade till
varandra. Fyll därför alltid kedjeolje- och bränsletanken
samtidigt.
VARNING! Bränsle och bränsleångor är
mycket brandfarliga. Var försiktig vid
hantering av bränsle och kedjeolja. Tänk
på brand-, explosions- och
inandningsrisker.
38 – Svenska
Page 39

BRÄNSLEHANTERING
Bränslesäkerhet
• Tanka aldrig maskinen när motorn är i drift.
• Sörj för god ventilation vid tankning och blandning av
bränsle (bensin och 2-taktsolja).
• Flytta maskinen minst 3 m från tankningsstället innan
du startar.
• Starta aldrig maskinen:
1 Om du spillt bränsle eller kedjeolja på maskinen.
Torka av allt spill och låt bensinresterna avdunsta.
2 Om du spillt bränsle på dig själv eller dina kläder, byt
kläder. Tvätta de kroppsdelar som varit i kontakt med
bränsle. Använd tvål och vatten.
3 Om maskinen läcker bränsle. Kontrollera regelbundet
efter läckage från tanklock och bränsleledningar.
VARNING! Använd aldrig en maskin med
synliga skador på tändstiftsskydd och
!
tändkabel. Risk för gnistbildning
förekommer, vilka kan orsaka brand.
Transport och förvaring
• Förvara motorsågen och bränslet så att eventuellt
läckage och ångor inte riskerar att komma i kontakt
med gnistor eller öppen låga. Exempelvis elmaskiner,
elmotorer, elkontakter/strömbrytare, värmepannor
eller liknande.
• Vid förvaring av bränsle skall för ändamålet speciellt
avsedda och godkända behållare användas.
• Vid längre tids förvaring och transport av motorsåg
skall bränsle- och sågkedjeoljetankarna tömmas. Hör
med närmaste bensinstation var du kan göra dig av
med bränsle och sågkedjeoljeöverskott.
• Se till att maskinen är väl rengjord och att fullständig
service är utförd innan långtidsförvaring.
• Skärutrustningens transportskydd ska alltid vara
monterat under transport eller förvaring av maskinen,
för att undvika kontakt med den vassa kedjan av
misstag. Även en kedja som inte rör sig kan orsaka
allvarliga skador på användaren eller andra personer
som kommer åt kedjan.
• Säkra maskinen under transport.
Långtidsförvaring
Töm bränsle- och oljetankarna på ett väl ventilerat ställe.
Förvara bränslet i godkända dunkar på ett säkert ställe.
Montera svärdsskyddet. Rengör maskinen. Se
anvisningar under rubrik Underhållsschema.
Svenska – 39
Page 40

START OCH STOPP
!
Start och stopp
VARNING! Innan start måste följande
observeras:
!
Kedjebromsen skall vara tillslagen när
motorsågen startas, för att minska risken
för kontakt med den roterande kedjan vid
start.
Starta ej motorsågen utan att svärd,
kedja och samtliga kåpor är monterade.
Kopplingen kan annars lossna och
orsaka personskador.
Placera maskinen på ett fast underlag.
Se till att du står stadigt och att kedjan ej
kan ta i något föremål.
Se till att inga obehöriga finns inom
arbetsområdet.
Start
Kedjebromsen skall vara tillslagen när motorsågen
startas. Aktivera bromsen genom att föra kastskyddet
framåt.
(16)
Kall motor
Startposition,1: Ställ START/STOPP-knappen i
startposition ”I”.
Choke, 2: Ställ chokereglaget i chokeläge. När
chokereglaget är fullt utdraget, ställs automatisk ett
korrekt startgasläge in.
Bränslepump, 3: Tryck på bränslepumpens gummiblåsa
upprepade gånger tills bränsle börjar fylla blåsan (ca 10
gånger). Blåsan behöver ej fyllas helt.
Dra i starthandtaget, 4: Fatta om främre handtaget med
vänster hand. Placera höger fot på underdelen av bakre
handtaget och tryck motorsågen mot marken. Grip
starthandtaget, drag med höger hand långsamt ut
startlinan tills ett motstånd känns (starthakarna griper in)
och gör därefter snabba och kraftfulla ryck tills motorn
tänder.
Choke, 5: Tryck in chokereglaget omedelbart när motorn
tänder vilket hörs genom att en ”puff” ljuder.
Dra i starthandtaget, 6: Fortsätt att dra med snabba ryck
i linan tills motorn startar.
Vira aldrig startlinan runt handen.
OBS! Drag inte ut startlinan helt och släpp inte heller
starthandtaget från helt utdraget läge. Detta kan orsaka
skador på maskinen.
Eftersom kedjebromsen fortfarande är tillslagen måste
motorns varvtal så snart som möjligt ner till tomgång,
vilket uppnås genom att snabbt koppla ur gasspärren.
Därigenom undviker du onödigt slitage på koppling,
kopplingstrumma och bromsband. Låt sedan maskinen
gå på tomgång några sekunder innan du ger full gas.
(17)
(17)
(18)
(20)
(21)
Observera! Återställ kedjebromsen genom att föra
kastskyddet mot handtagsbygeln. Motorsågen är härmed
klar för användning. På sågens bakkant (A) finns en
förenklad startpåminnelse med bilder som beskriver
respektive steg.
Varm motor
Använd samma startförfarande som för kall motor men
utan att ställa chokereglaget i chokeläge.
• Star ta aldrig motorsågen utan att svärd, sågkedja och
kopplingskåpa är korrekt monterade. Se anvisningar
under rubrik Montering. Utan svärd och kedja
monterad på motorsågen, kan kopplingen lossna och
orsaka allvarliga skador.
• Kedjebromsen skall vara tillslagen när motorsågen
startas. Se anvisningar under rubrik Start och stopp.
Droppstarta aldrig motorsågen. Denna metod är
mycket farlig eftersom det är lätt att tappa kontrollen
över motorsågen.
• Starta aldrig maskinen inomhus. Var medveten om
faran med inandning av motorns avgaser.
• Iaktta omgivningen och var säker på att det inte finns
risk att människor eller djur kan komma i kontakt med
skärutrustningen.
• Håll alltid motorsågen med båda händerna. Håll den
högra handen på det bakre handtaget och den
vänstra handen på det främre handtaget.
användare, både höger- och vänsterhänta, skall
använda detta grepp.
tummarna och fingrarna omsluter motorsågens
handtag.
(22)
(19)
VARNING! Långvarig inandning av
motorns avgaser, kedjeoljedimma och
damm från sågspån kan utgöra en
hälsorisk.
(23)
(24)
Alla
Håll ett stadigt grepp så att
(25)
Stopp
Motorn stannas genom att stoppreglaget sätts i
stoppläge.
(26)
40 – Svenska
Page 41

ARBETSTEKNIK
!
Före varje användning: (27)
A - Kontrollera att kedjebromsen fungerar ordentligt och
är oskadad.
B - Kontrollera att bakre högerhandsskyddet inte är
skadat.
C - Kontrollera att gasreglagespärren fungerar ordentligt
och är oskadad.
D - Kontrollera att stoppkontakten fungerar ordentligt och
är oskadad.
E - Kontrollera att samtliga handtag är fria från olja.
F - Kontrollera att avvibreringssystemet fungerar och är
oskadat.
G - Kontrollera att ljuddämparen sitter fast och är
oskadad.
H - Kontrollera att motorsågens samtliga detaljer är
åtdragna och att de inte är skadade eller saknas.
I - Kontrollera att kedjefångaren sitter på plats och är
oskadad.
J - Kontrollera kedjespänningen.
Allmänna arbetsinstruktioner
VIKTIGT!
Detta avsnitt behandlar grundläggande säkerhetsregler
för arbete med motorsåg. Given information kan aldrig
ersätta den kunskap en yrkesman besitter i form av
utbildning och praktisk erfarenhet. När du råkar ut för en
situation som gör dig osäker angående fortsatt
användning skall du rådfråga en expert. Vänd dig till din
motorsågsaffär, din serviceverkstad eller en erfaren
motorsågsanvändare. Undvik all användning du anser
dig otillräckligt kvalificerad för!
Före användning av motorsågen måste du förstå vad
kast innebär och hur de kan undvikas. Se anvisningar
under rubrik Kastförebyggande åtgärder.
Före användning av motorsågen måste du förstå
skillnaden i att såga med svärdets undersida respektive
dess översida. Se anvisningar under rubrik
Kastförebyggande åtgärder och Maskinens
säkerhetsutrustning.
Använd personlig skyddsutrustning. Se anvisningar
under rubrik ”Personlig skyddsutrustning”.
Grundläggande säkerhetsregler
1 Iaktta omgivningen:
• För att säkerställa att inte människor, djur eller annat
kan påverka din kontroll över maskinen.
• För att förhindra att de förutnämnda inte riskerar att
komma i kontakt med sågkedjan eller träffas av ett
fallande träd och skadas.
OBS! Följ ovannämnda punkter men använd aldrig en
motorsåg utan möjlighet att kunna påkalla hjälp i
händelse av olycka.
2 Undvik användning vid ogynnsamma
väderleksförhållanden. Exempelvis tät dimma, kraftigt
regn, hård vind, stark kyla, osv. Att arbeta i dåligt
väder är tröttsamt och kan skapa farliga
omständigheter, exempelvis halt underlag,
påverkande på trädets fallriktning, m.m.
3 Var ytterst försiktig vid avsågning av smågrenar och
undvik att såga i buskar (= många smågrenar
samtidigt). Smågrenar kan efter avsågning fastna i
sågkedjan, slungas mot dig och orsaka allvarlig
personskada.
4 Se till att du kan gå och stå säkert. Titta efter
eventuella hinder vid en oväntad förflyttning (rötter,
stenar, grenar, gropar, diken, osv.). Iaktta stor
försiktighet vid arbete i sluttande terräng.
5 Var ytterst försiktig vid sågning i träd som är spända.
Ett spänt träd kan både före och efter genomsågning
sprätta tillbaka till sitt normalläge. Felaktig placering
av dig och sågsnittet kan leda till att trädet träffar dig
eller maskinen så att du tappar kontrollen. Båda
omständigheterna kan orsaka allvarlig personskada.
6 Vid förflyttning skall sågkedjan låsas med
kedjebromsen och motorn stängas av. Bär
motorsågen med svärd och sågkedja bakåt. Vid
längre förflyttningar samt transporter skall
svärdsskyddet användas.
7 När du ställer ner motorsågen på marken, lås
sågkedjan med kedjebromsen och se till att ha uppsikt
över maskinen. Vid längre tids ”parkering” skall
motorn stängas av.
VARNING! Ibland fastnar spån i
kopplingskåpan vilket kan leda till att
kedjan kör fast. Stanna alltid motorn vid
rengöring.
Grundregler
1 Genom att förstå vad kast innebär och hur det
uppkommer, kan du reducera eller eliminera
överraskningsmomentet. Överraskning ökar
olycksrisken. De flesta kast är små, men en del är
blixtsnabba och mycket våldsamma.
2 Håll alltid motorsågen i ett stadigt grepp med höger
hand på bakre handtaget och vänster hand på främre
handtaget. Tummar och fingrar skall omsluta
handtagen. Alla användare oavsett vänster- eller
höger-fattade, ska använda detta grepp. Genom detta
grepp kan du bäst reducera effekten av ett kast och
samtidigt behålla kontrollen över motorsågen.
inte handtagen!
3 De flesta kastolyckor inträffar vid kvistning. Se till att
du står stadigt och att inga föremål på marken kan få
dig att snubbla eller att tappa balansen.
Genom oaktsamhet kan svärdets kastrisksektor
oavsiktligt träffa en gren, ett närliggande träd eller ett
annat föremål, och framkalla ett kast.
Släpp
Svenska – 41
Page 42

ARBETSTEKNIK
!
Ha kontroll över arbetsstycket. Om styckena du sågar
är små och lätta, kan de fastna i sågkedjan och
slungas mot dig. Även om detta i sig inte behöver vara
farligt, kan du bli överraskad och tappa kontrollen över
sågen. Såga aldrig staplade stockar eller grenar utan
att först dra isär dem. Såga endast en stock eller ett
stycke åt gången. Ta bor t de avsågade styckena för att
hålla ditt arbetsområde säkert.
4 Använd aldrig motorsågen över skulderhöjd och
undvik att såga med svärdsspetsen. Använd
aldrig motorsågen med enhandsfattning!
5 För att ha full kontroll över din motorsåg krävs att du
står stabilt. Arbeta aldrig stående på en stege, uppe i
ett träd eller där du inte har ett stabilt underlag att stå
på. (29)
6 Såga med hög kedjehastighet, dvs. med fullgas.
7 Var ytterst försiktig när du sågar med svärdets
översida, dvs. när du sågar från sågobjektets
undersida. Detta kallas att såga med skjutande
sågkedja. Sågkedjan skjuter då motorsågen bakåt
mot anvädaren. Om sågkedjan kläms fast kan
motorsågen kastas bakåt mot dig.
8 Om inte användaren håller emot motorsågens
strävan, finns det en risk att motorsågen skjuts så
långt bakåt att svärdets kastrisksektor är den enda
kontakten med trädet, vilket leder till ett kast.
Att såga med svärdets undersida, dvs. att såga från
sågobjektets ovansida och ner, kallas att såga med
dragande sågkedja. Då dras motorsågen mot trädet
och motorsågkroppens framkant blir ett naturligt stöd
mot stammen. Sågning med dragande sågkedja ger
användaren bättre kontroll över motorsågen samt
över var svärdets kastrisksektor befinner sig.
9 Följ filnings- och underhållsinstruktioner för svärd och
sågkedja. Vid byte av svärd och sågkedja får endast
av oss rekommenderade kombinationer användas. Se
anvisningar under rubrikerna Skärutrustning och
Tekniska data.
Grundläggande sågningsteknik
VARNING! Använd aldrig en motorsåg
genom att hålla den med ena handen. En
!
motorsåg är inte säkert kontrollerad med
en hand. Ha alltid ett fast, stadigt grepp
om handtagen med båda händerna.
Allmänt
• Ha alltid fullgas vid all sågning!
• Släpp ner motorn på tomgångsvarvtal efter varje
sågsnitt (längre tids fullvarv utan att motorn belastas,
dvs. utan motståndet som motorn upplever via
sågkedjan vid sågning, ger allvarlig motorskada).
• Att såga ovanifrån = Att såga med ”dragande”
sågkedja.
• Att såga underifrån = Att såga med ”skjutande”
sågkedja.
Sågning med ”skjutande” sågkedja innebär ökad kastrisk.
Se anvisningar under rubrik Kastförebyggande åtgärder.
(28)
(30)
Benämningar
Kapning = Generell benämning för genomsågning av trä.
Kvistning = Kapa av grenar från ett fällt träd.
Spjälkning = När det objekt som du skall kapa bryts av
innan sågsnittet är fullbordat.
Inför varje kapning finns det fem mycket viktiga
faktorer att ta hänsyn till:
1 Skärutrustningen får inte klämmas fast i sågsnittet.
2 Sågningsobjektet får inte spjälkas.
3 Sågkedjan får inte träffa marken eller annat föremål
under och efter genomsågningen.
4 Föreligger kastrisk?
5 Kan terrängen och omgivnings utseende påverka hur
stabilt och säkert du kan gå och stå?
Att sågkedjan kläms fast eller att sågobjektet spjälkas
orsakas av två faktorer: Vilket stöd sågobjektet har före
och efter kapning samt om sågobjektet befinner sig i
spänning.
Förutnämnda oönskade företeelser kan i de flesta fall
undvikas genom att utföra kapningen i två steg, både från
över- resp. undersidan. Det gäller att neutralisera
sågobjektets ”vilja” att klämma fast sågkedjan eller att
spjälkas.
VIKTIGT! Om sågkedjan klämts fast i sågsnittet: stanna
motorn! Försök inte rycka loss motorsågen. Om du gör
det kan du skada dig på sågkedjan när motorsågen
plötsligt lossnar. Använd en hävarm för att få loss
motorsågen.
Den listning som nu följer är en teoretisk genomgång av
hur de vanligaste situationerna en motorsågsanvändare
kan råka ut för skall hanteras.
Kvistning
Vid kvistning av tjockare grenar skall samma principer
som för kapning tillämpas.
Kapa besvärliga grenar bit för bit.
Kapning
VARNING! Försök aldrig såga stockar när
de är travade eller när ett par stockar
ligger tätt ihop. Sådana tillvägagångssätt
ökar drastiskt risken för kast som kan
resultera i en allvarlig eller livshotande
skada.
Om du har en trave stockar, skall varje stock som du
tänker kapa tas bort från traven, placeras på en sågbock
eller löpare och kapas för sig.
Ta bort de kapade styckena från arbetsområdet. Genom
att lämna dem i arbetsområdet, ökar du både risken för att
av misstag få ett kast, och risken för att tappa balansen
när du arbetar.
Stocken ligger på marken. Ingen risk för fastklämning av
sågkedjan eller spjälkning av sågobjektet föreligger.
42 – Svenska
Page 43

ARBETSTEKNIK
!
Risken är dock stor att sågkedjan träffar marken efter
genomsågning.
Såga ovanifrån genom hela stocken. Var försiktig under
slutet av sågsnittet för att undvika att sågkedjan träffar
marken. Behåll fullgas men var beredd på vad som
kommer att hända.
Om möjlighet finns (= kan stocken roteras?) bör sågsnittet
avslutas 2/3 in i stocken.
Rotera stocken så att resterande 1/3 kan avslutas
ovanifrån.
Stocken har stöd i ena änden. Stor risk för spjälkning.
Börja med att såga underifrån (ca 1/3 av stockdiametern).
Avsluta ovanifrån så att sågskären möts.
Stocken har stöd i båda ändar. Stor risk för
fastklämning av sågkedjan.
Börja med att såga ovanifrån (ca 1/3 av stockdiametern).
Avsluta underifrån så att sågskären möts.
Trädfällningsteknik
VIKTIGT! Det krävs mycket erfarenhet för att fälla ett
träd. En oerfaren motorsågsanvändare skall inte fälla
träd. Undvik all användning du anser dig otillräckligt
kvalificerad för!
Säkerhetsavstånd
Säkerhetsavståndet mellan trädet som skall fällas och
närmsta arbetsplats skall vara 2 1/2 trädlängder. Se till att
ingen befinner sig inom denna ”riskzon” före och under
fällning.
(37)
Fällriktning
Målsättningen vid trädfällning är att placera trädet på ett
sådant sätt att efterföljande kvistning samt uppkapning av
stock kan utföras i så ”enkel” terräng som möjligt. Man
skall kunna gå och stå säkert.
Efter att ha fattat beslut angående i vilken riktning du vill
att trädet skall falla måste du göra en bedömning
angående trädets naturliga fallriktning.
De faktorer som styr detta är:
• Lutning
• Krokighet
• Vindriktning
• Koncentration av grenar
• Eventuell snötyngd
• Hinder inom trädets räckvidd: t.ex. andra träd,
kraftledningar, vägar och byggnader.
• Titta efter skador och röta i stammen, vilket gör det
mer troligt att trädet går av och börjar falla innan du
förväntar dig detta.
Efter denna bedömning kan man vara tvungen att låta
trädet falla i sin naturliga fallriktning eftersom det är
omöjligt eller för riskfyllt att försöka placera det i den
riktning man planerat från början.
En annan mycket viktig faktor, som inte påverkar
fallriktningen, men din personliga säkerhet, är att
(31)
kontrollera så att trädet inte har några skadade eller
”döda” grenar som kan brytas av och skada dig under
fällningsarbetet.
Det som främst skall undvikas är att det fallande trädet
fastnar i ett annat. Att ta ner ett fastfällt träd är mycket
farligt och innebär en mycket stor olycksrisk. Se
anvisningar under rubrik Hantering av ett misslyckat
fällningsresultat.
VIKTIGT! Vid kritiska fällningsmoment bör
hörselskydden vara uppfällda så snart sågningen
upphört, så att ljud och varningssignaler kan
uppmärksammas.
Underkvistning och reträttväg
Kvista av stammen upp till axelhöjd. Det är säkrast att
arbeta uppifrån och ned och att ha stammen mellan dig
och motorsågen.
Rensa upp undervegetationen runt trädet och ge akt på
eventuella hinder (stenar, grenar, gropar, osv.) så att du
har en lättframkomlig reträttväg när trädet börjar falla.
Reträttvägen bör ligga ca 135
planerade fallriktning.
1 Riskzon
2 Reträttväg
3 Fällriktning
Fällning
VARNING! Vi avråder otillräckligt
kvalificerade användare från att fälla ett
träd med en svärdslängd som är mindre
än stamdiametern!
Fällningen utförs med tre sågsnitt. Först görs riktskäret,
som består av ett överskär och ett underskär, och sedan
avslutas fällningen med fällskäret. Genom korrekt
placering av dessa sågskär kan man styra fallriktningen
mycket exakt.
Riktskär
Vid utsågning av riktskäret börjar man med överskäret.
Stå på höger sida om trädet och såga med dragande
sågkedja.
Såga sedan underskäret så att det avslutas exakt där
överskäret avslutats.
Riktskärsdjupet skall vara 1/4 av stamdiametern och
vinkeln mellan över- och underskär minst 45
De båda skärens möte kallas riktskärslinje.
Riktskärslinjen skall ligga exakt horisontalt och samtidigt
bilda en rät vinkel (90
Fällskär
Fällskäret sågas från andra sidan av trädet och måste
ligga absolut horisontalt. Stå på vänster sida om trädet
och såga med dragande sågkedja.
Placera fällskäret ca 3-5 cm (1,5-2 tum) över riktskärets
horisontalplan.
° snett bakåt från trädets
(38)
(39)
°.
°) mot vald fallriktning. (40)
Svenska – 43
Page 44

ARBETSTEKNIK
!
!
Sätt i barkstödet (om något är påmonterat) bakom
brytmånen. Såga med fullgas och för sågkedjan/svärdet
sakta in i trädet. Var observant på om trädet rör sig i
motsatt riktning till vald fallriktning. Sätt i en fällkil eller ett
brytjärn i fällskäret så snart skärdjupet tillåter.
Fällskäret skall avslutas parallellt med riktskärslinjen så
att avståndet mellan de båda är minst 1/10 av
stamdiametern. Den icke genomsågade delen av
stammen kallas brytmån.
Brytmånen fungerar som ett gångjärn som styr riktningen
av det fallande trädet.
All kontroll över trädets fallriktning förloras om brytmånen
är för liten eller genomsågad eller om riktskär och fällskär
är felplacerade.
När fällskäret och riktskäret är fullbordade skall trädet
börja falla av sig själv eller med hjälp av fällkilen eller
brytjärnet.
Vi rekommenderar användande av en svärdslängd som
överstiger trädets stamdiameter, så att fäll- och riktskär
kan utföras med ett s.k. ”enkelt sågsnitt”. Se anvisningar
under rubrik Tekniska data angående vilka svärdslängder
som rekommenderas för din motorsågsmodell.
Det finns metoder för fällning av träd med stamdiametrar
större än svärdslängden. Dessa metoder medför en
mycket stor risk att svärdets kastrisksektor kommer i
kontakt med ett föremål.
(42)
Hantering av ett misslyckat
fällningsresultat
Nedtagning av ett ”fastfällt träd”
Att ta ner ett fastfällt träd är mycket farligt och innebär en
mycket stor olycksrisk.
Försök aldrig att såga ner det påfällda trädet.
Arbeta aldrig inom riskområdet för hängande fastfällda
träd.
Den säkraste metoden är att använda en vinsch.
• Traktormonterad
• Bärbar
Sågning i träd och grenar som befinner sig i spänning
Förberedelser: Bedöm i vilken riktning spänningen
strävar samt var den har sin brytpunkt (dvs. det ställe där
den skulle brytas av om den spändes ytterligare).
Avgör hur du säkrast frigör spänningen och om du klarar
av att göra det. Vid extra komplicerade situationer är den
enda säkra metoden att avstå från motorsågsanvändning
och använda en vinsch.
Generellt gäller:
Placera dig så att du inte riskerar att träffas av trädet/
grenen när spänningen frigörs.
Gör ett eller flera sågsnitt på eller i närheten av
brytpunkten. Såga så djupt in i och med så många
sågsnitt som krävs för att spänningen i trädet/grenen skall
frigöras så lagom att trädet/grenen ”bryts” av vid
brytpunkten.
(41)
Såga aldrig helt igenom ett objekt som befinner sig i
spänning!
Om du måste såga igenom trädet/kvisten, gör två eller tre
skär med 3 cm mellanrum och 3-5 cm djup.
Fortsätt att såga djupare tills trädets/kvistens bändning
och spänning frigörs.
Såga trädet/kvisten från den motsatta sidan, efter att
spänningen har frigjorts.
Kastförebyggande åtgärder
VARNING! Kast kan vara blixtsnabba,
plötsliga och våldsamma och kan kasta
motorsåg, svärd och sågkedja mot
användaren. Är sågkedjan i rörelse när
och om den träffar användaren kan
mycket allvarlig, till och med livshotande
skada uppstå. Det är nödvändigt att
förstå vad som orsakar kast och att de
kan undvikas genom försiktighet och rätt
arbetsteknik.
Vad är kast?
Kast är benämningen på en plötslig reaktion där motorsåg
och svärd kastas från ett föremål som kommit i kontakt
med svärdsspetsens övre kvadrant, den s.k.
kastrisksektorn.
Kast färdas alltid i svärdsplanets riktning. Vanligast är att
motorsåg och svärd kastas uppåt och bakåt mot
användaren. Dock förekommer andra kastriktningar
beroende på vilket läge motorsågen har i det ögonblick
svärdets kastrisksektor kommer i kontakt med ett föremål.
Kast kan endast inträffa när svärdets kastrisksektor
kommer i kontakt med ett föremål.
Kvistning
Se till att du kan gå och stå säkert! Arbeta från den
vänstra sidan av stammen. Arbeta så nära motorsågen
som möjligt för bästa kontroll. När så tillåtes skall du låta
sågens tyngd vila på stammen.
Förflytta dig endast då du har stammen mellan dig och
motorsågen.
Uppkapning av stammen till stock
Se anvisningar under rubrik Grundläggande
sågningsteknik.
(30)
(43)
VARNING! De flesta kastolyckor inträffar
vid kvistning. Använd inte svärdets
kastrisksektor. Var ytterst försiktig och
undvik att svärdsspetsen kommer i
kontakt med stocken, andra grenar eller
föremål. Var ytterst försiktig med grenar
som befinner sig i spänning. De kan
fjädra tillbaka mot dig och orsaka att du
tappar kontrollen, vilket kan resultera i
skador.
44 – Svenska
Page 45

UNDERHÅLL
Allmänt
Användaren får endast utföra sådana underhålls- och
servicearbeten som beskrivs i denna bruksanvisning. Mer
omfattande ingrepp skall utföras av en auktoriserad
serviceverkstad.
Förgasarjustering
Din McCulloch-produkt har konstruerats och tillverkats
enligt specifikationer som reducerar de skadliga
avgaserna.
Funktion
• Via gasreglaget styr förgasaren motorns varvtal. I
förgasaren blandas luft/bränsle. Denna luft/
bränsleblandning är justerbar. För att utnyttja
maskinens maximala effekt måste justeringen vara
korrekt.
• T-skruven reglerar gasreglagets läge vid tomgång.
Skruvas T-skruven medurs fås högre tomgångsvarvtal
och skruvas den moturs fås lägre tomgångsvarvtal.
Grundinställning och inkörning
Vid provkörning på fabrik grundinställes förgasaren.
Finjustering skall utföras av utbildad kunnig person.
Rek. tomgångsvarvtal: Se kapitel Tekniska data.
Finjustering av tomgång T
Inställning av tomgång göres med skruven märkt T. Är
justering nödvändig skruva in (medurs) tomgångsskruv T
med motorn igång tills kedjan börjar rotera. Öppna
(moturs) därefter tills kedjan står stilla. Korrekt inställt
tomgångsvarvtal är när motorn arbetar jämnt i alla
positioner med god marginal till det varvtal där kedjan
börjar rotera.
VARNING! Kan tomgångsvarvtalet ej
justeras så att kedjan står stilla, kontakta
!
serviceverkstad. Använd inte
motorsågen förrän den är korrekt inställd
eller reparerad.
Kontroll, underhåll och service av
motorsågens
säkerhetsutrustning
Observera! All service och reparation av maskinen
kräver specialutbildning. Detta gäller särskilt maskinens
säkerhetsutrustning. Om maskinen inte klarar någon av
nedan listade kontroller rekommenderar vi dig att
uppsöka din serviceverkstad. Allt underhåll utöver vad
som nämnts i denna bok ska åtgärdas av servande
fackhandel (återförsäljare).
Stäng av motorn och ta av tändkabeln före reparation
eller underhåll
Kedjebroms med kastskydd
Kontroll av bromsbandsslitage
Rengör kedjebroms och kopplingstrumma från spån,
kåda och smuts. Nedsmutsning och slitage påverkar
bromsfunktionen.
Kontrollera regelbundet att minst 0,6 mm av
bromsbandets tjocklek återstår på det mest slitna stället.
Kontroll av kastskydd
Kontrollera att kastskyddet är helt och utan synbara
defekter, t ex materialsprickor.
För kastskyddet fram och åter för att kontrollera att det går
lätt samt att det är stabilt förankrat vid dess led i
kopplingskåpan.
Kontroll av tröghetsfunktionen
Håll motorsågen, med motorn avstängd, över en stubbe
eller över ett annat stabilt föremål. Släpp främre
handtaget och låt motorsågen falla av egen tyngd,
roterande runt bakre handtaget, mot stubben.
Då svärdsspetsen träffar stubben ska bromsen lösa
ut.
(35)
Kontroll av bromsverkan
Placera motorsågen på ett stabilt underlag och starta
den. Se till att sågkedjan ej kan komma i kontakt med
marken eller annat föremål. Se anvisningar under rubrik
Start och stopp.
Håll motorsågen i ett stadigt grepp med tummar och
fingrar slutna om handtagen.
Ge fullgas och aktivera kedjebromsen genom att vrida
vänster handled mot kastskyddet. Släpp inte främre
handtaget.
(32)
(33)
Kedjan ska omedelbart stoppas.
Svenska – 45
Page 46

UNDERHÅLL
Gasreglagespärr
• Kontrollera att gasreglaget är låst i tomgångsläge när
gasreglagespärren är i sitt ursprungsläge.
• Tryck in gasreglagespärren och kontrollera att den
återgår till sitt ursprungsläge när den släpps.
• Kontrollera att gasreglaget och gasreglagespärren
går lätt samt att deras returfjädersystem fungerar.
• Starta motorsågen och ge fullgas. Släpp gasreglaget
och kontrollera att kedjan stannar och att den förblir
stillastående. Om kedjan roterar med gasreglaget i
tomgångsläge skall förgasarens tomgångsjustering
kontrolleras.
Kedjefångare
Kontrollera att kedjefångaren sitter på plats och är
oskadad.
Högerhandsskydd
Kontrollera att högerhandsskyddet är helt och utan
synbara defekter, t ex materialsprickor.
Avvibreringssystem
Kontrollera regelbundet avvibreringselementen efter
materialsprickor och deformationer.
Kontrollera att avvibreringselementen är fast förankrade
mellan motorenhet respektive handtagsenhet.
Stoppkontakt
Starta motorn och kontrollera att motorn stängs av när
stoppkontakten förs till stoppläget.
Ljuddämpare
Använd aldrig en maskin som har en defekt ljuddämpare.
Kontrollera regelbundet att ljuddämparen sitter fast på
motorn.
Notera: Gnistfångarnätet (A) på denna maskin är
utbytbart. Vid eventuella skador på nätet skall detta bytas.
Med ett igensatt nät överhettas maskinen med skador på
cylinder och kolv som följd. Använd aldrig maskinen med
en ljuddämpare som är i dåligt skick.
ljuddämpare utan eller med defekt gnistfångarnät.
Efter 75 timmars användning, rekommenderar vi att
ljuddämparen byts av servande fackhandel
(återförsäljare).
Luftfilter
Luftfiltret skall regelbundet rengöras från damm och
smuts för att undvika:
• Förgasarstörningar.
• Startproblem.
• Sämre effekt.
• Onödigt slitage på motorns delar.
• Onormalt hög bränsleförbrukning.
Använd aldrig en
(6)
Rengöring av luftfiltret: (34)
1 Ta bort vredet (A) som håller fast cylinderkåpan och ta
bort cylinderkåpan (B).
2 Lyft bort luftfiltret (D).
3 Rengör luftfiltret.
- Tvätta filtret i rent, ljummet tvålvatten.
- Skölj i rent kallt vatten.
- Lufttorka helt.
4 Återmontera i omvänd ordning. Se till att spärren (E),
spärren (F) och cylinderkåpan passar. Dra åt vredet
ordentligt.
Ett länge använt luftfilter kan aldrig bli fullständigt rent.
Därför måste filtret med jämna mellanrum ersättas med
Ett skadat luftfilter måste alltid bytas ut.
ett nytt.
OBSERVERA! Det är lämpligt att ha reservfilter.
Tändstift
Tändstiftets kondition påverkas av:
• En felaktigt inställd förgasare.
• En felaktig oljeblandning i bränslet (för mycket eller
felaktig olja).
• Ett smutsigt luftfilter.
Dessa faktorer orsakar beläggningar på tändstiftets
elektroder och kan förorsaka driftstörningar och
startsvårigheter.
Om maskinens effekt är låg, om den är svår att starta eller
om tomgången är orolig: kontrollera alltid först tändstiftet
innan ytterligare åtgärder vidtages. Om tändstiftet är
igensatt, rengör det och kontrollera samtidigt att
elektrodgapet är 0,6 mm. Tändstiftet bör bytas efter
ungefär en månad i drift eller om nödvändigt tidigare.
Observera! Använd alltid rekommenderad tändstiftstyp!
Felaktigt tändstift kan förstöra kolv/cylinder. Se till att
tändstiftet har s.k. radioavstörning.
(36)
46 – Svenska
Page 47

UNDERHÅLL
Underhållsschema
Nedan följer en lista över den skötsel som skall utföras på maskinen. De flesta av punkterna finns beskrivna i avsnittet
Underhåll.
Daglig tillsyn Veckotillsyn Månadstillsyn
Kontrollera bromsbandet på
Rengör maskinen utvändigt.
Kontrollera att gasreglagets
ingående delar fungerar
säkerhetsmässigt. (Gasreglagespärr
och gasreglage.)
Rengör kedjebromsen och
kontrollera dess funktion ur
säkerhetssynpunkt. Kontrollera att
kedjefångaren är oskadad, byt om
erforderligt.
Svärdet skall dagligen vändas för
jämnare slitage. Kontrollera att hålet
för smörjningen i svärdet inte är
igensatt. Rengör kedjespåret.
Kontrollera att svärd och kedja får
tillräckligt med olja.
Kontrollera sågkedjan med
avseende på synliga sprickor i nitar
och länkar, om sågkedjan är stel eller
om nitar och länkar är onormalt
slitna. Byt om det behövs.
Skärp kedjan och kontrollera dess
spänning och kondition. Kontrollera
att kedjedrivhjulet inte är onormalt
slitet, byt om erforderligt.
Rengör startapparatens luftintag.
Kontrollera att skruvar och muttrar är
åtdragna.
Kontrollera att stoppkontakten
fungerar.
Kontrollera att inget bränsleläckage
finns från motor, tank eller
bränsleledningar.
Kontrollera startapparaten, dess lina
och returfjäder.
Kontrollera att vibrations-isolatorerna
inte är skadade.
Fila bort eventuella grader på
svärdets sidor.
Rengör förgasarutrymmet. Rengör förgasaren utvändigt.
Rengör luftfiltret. Byt om det behövs.
kedjebromsen med avseende på
slitage. Byt när mindre än 0,6 mm
återstår på det mest slitna stället.
Kontrollera kopplingscentrumet,
kopplingstrumman och
kopplingsfjädern med avseende på
slitage.
Rengör tändstiftet. Kontrollera att
elektrodavståndet är 0,6 mm.
Kontrollera bränslefiltret och
bränsleslangen. Byt om det behövs.
Töm bränsletanken och rengör den
invändigt.
Töm oljetanken och rengör den
invändigt.
Kontrollera alla kablar och
anslutningar.
Svenska – 47
Page 48

TEKNISKA DATA
Tekniska data
CS 35 CS 35S
Motor
Cylindervolym, cm
Slaglängd, mm 31,1 31,1
Tomgångsvarvtal intervall, min-1 2700-3300 2700-3300
Effekt, kW 1,44/9000 1,44/9000
Tändsystem
Tändstift CMR7H CMR7H
Elektrodgap, mm 0,6 0,6
Bränsle-/smörjsystem
Volym bränsletank, liter/cm
Kapacitet oljepump vid 9000 r/min, ml/min 7-9 7-9
Volym oljetank, liter 0,15 0,15
Typ av oljepump Automatisk Automatisk
Vikt
Motorsåg utan svärd, kedja samt med tomma tankar, kg 4,6 4,6
Bulleremissioner (se anm. 1)
Ljudeffektnivå, uppmätt dB(A) 109 109
Ljudeffektnivå, garanterad LWA dB(A) 111 111
Ljudnivåer (se anm. 2)
Ekvivalent ljudtrycksnivå vid användarens öra, dB(A) 99 99
Ekvivalenta vibrationsnivåer, a
Främre handtag, m/s
Bakre handtag, m/s
Kedja/svärd
Standard svärdslängd, tum/cm 14-16 / 35-40 14/35
Rekommenderade svärdslängder, tum/cm 14-16 / 35-40 14/35
Effektiv skärlängd, tum/cm 13-15 / 33-38 13-15 / 33-38
Delning, mm 3/8 / 9,52 3/8 / 9,52
Tjocklek på drivlänk, tum/mm 0,050/1,3 0,050/1,3
Typ av drivhjul/antal tänder Spur/6 Spur/6
Kedjehastighet vid 133% av motorns maxeffektvarvtal, m/s. 22,8 22,8
Anm. 1: Emission av buller till omgivningen uppmätt som ljudeffekt (LWA) enligt EG-direktiv 2000/14/EG.
Anm. 2: Ekvivalent ljudtrycksnivå, enligt ISO 22868, beräknas som den tidsviktade energisumman för ljudtrycksnivåerna
vid olika driftstillstånd. Typiskt spridningsmått för ekvivalent ljudtrycksnivå är en standardavvikelse på 2,5 dB (A).
Anm. 3: Ekvivalent vibrationsnivå, enligt ISO 22867, beräknas som den tidsviktade energisumman för vibrationsnivåerna
vid olika driftstillstånd. Redovisade data för ekvivalent vibrationsnivå har ett typiskt spridningsmått (standardavvikelse)
på 1,5 m/s
3
3
(se anm. 3)
2
2
2
.
hveq
35 35
0,25/250 0,25/250
6,673 6,673
5,792 5,792
48 – Svenska
Page 49

TEKNISKA DATA
Svärd och kedjekombinationer
Nedanstående skärutrustningar är typgodkända för modellerna McCulloch CS 35 och CS 35S.
Sågsvärd Sågkedja
Längd, tum Delning, tum
14 3/8" 1,3 7T 14” 91-52 DC
16 3/8" 1,3 7T 16” 91-56 DC
Spårbredd,
mm
Max antal
tänder,
noshjul
Typ Typ
91PJ052X
(Oregon)
91PJ056X
(Oregon)
Längd,
drivlänkar
(st)
52
56
EG-försäkran om överensstämmelse
(Gäller endast Europa)
Husqvarna AB , SE-561 82 Huskvarna, Sverige, tel: +46-36-146500, försäkrar härmed att motorsågarna för skogsbruk
McCulloch CS 35 och CS 35S från 2016 års serienummer och framåt (året anges i klartext på typskylten plus ett
efterföljande serienummer) motsvarar föreskrifterna i RÅDETS DIREKTIV:
- av den 17 maj 2006 ”angående maskiner” 2006/42/EG .
- av den 26 februari 2014 ”angående elektromagnetisk kompatibilitet” 2014/30/EU .
- av den 8 maj 2000 ”angående emission av buller till omgivningen” 2000/14/EG .
Bedömning av överensstämmelse enligt bilaga V i ovan nämnda direktiv har använts.
För information angående bulleremissionerna, se kapitel Tekniska data. Följande standarder har tillämpats: EN ISO
11681-1:2011, EN ISO 14982:2009
Anmält organ: TÜV Rheinland LGA Products GmbH, Tillystrasse 2, D-90431 Nürnberg, Tyskland, 0197, har utfört en EGtypkontroll enligt maskindirektiv (2006/42/EG), artikel 12, punkt 3b. Intyget om EG-typkontroll enligt bilaga IX, har
nummer: Intygen om EG-typkontroll enligt bilaga IX, har nummer: BM 50351057
Den levererade motorsågen överensstämmer med det exemplar som genomgick EG-typkontroll.
Changzhou, China. 8 juli 2016
John Thompson, Product and Marketing director EUAP. (Bemyndigad representant för Husqvarna AB samt ansvarig för
tekniskt underlag.)
Svenska – 49
Page 50

Symboler på maskinen:
ADVARSEL! Motorsave kan være farlige!
Skødesløs eller forkert brug kan resultere
i alvorlige skader eller medføre døden for
brugeren eller andre.
Læs brugsanvisningen omhyggeligt
igennem og forstå indholdet, inden du
bruger maskinen.
Brug altid:
• Godkendt beskyttelseshjelm
• Godkendt høreværn
• Beskyttelsesbriller eller ansigtsværn
Dette produkt er i overensstemmelse
med gældende CE-direktiv.
INDLEDNING
Kædebremse, aktiveret (foran)
Kædebremse, ikke aktiveret (bagved)
Brændstofpumpe
Påfyldning af brændstof.
Kædeoliepåfyldning.
Støjemissioner til omgivelserne i
henhold til EF-direktiv. Maskinens
emission fremgår af kapitlet Tekniske
data og af en mærkat.
Operatøren skal bruge begge hænder
til at håndtere motorsaven.
Anvend aldrig en motorsav med én
hånd.
Undgå, at sværdspidsen kommer i
kontakt med andre genstande.
ADVARSEL! Der kan opstå kast, hvis
sværdspidsen kommer i kontakt med
genstande og forårsager en reaktion,
så sværdet kastes opad og tilbage mod
brugeren. Dette kan medføre alvorlig
personskade.
Motoren stoppes ved at dreje
tændingsafbryderen om på slukket position
ved hjælp af stopkontakten.
Typeskiltet viser
serienummeret.
er produktionsåret,
ww er
produktionsugen, og
xxxxx er løbenummeret.
Andre symboler/etiketter på maskinen gælder
specifikke krav for certificering på visse markeder.
yyyy
yyyywwxxxxx
50 – Danish
Page 51

INDLEDNING
Til vore kunder!
Tak, fordi du har valgt et produkt fra McCulloch. Du er
dermed blevet en del af en historie, der tog sin
begyndelse, da McCulloch Corporation begyndte at
producere motorer under anden verdenskrig. I 1949, da
McCulloch introducerede sin første lette motorsav til
enmandsbetjening, skulle skovbruget aldrig blive det
samme igen.
Udvalget af innovative motorsave udviklede sig op
igennem årtierne, og omsætningen tog til i omfang, først
med fly- og kartmotorer i 1950'erme og siden med
minimotorsave i 1960'erne. Senere, i 1970'erne og
80'erne, kom trimmere og løvblæsere/-sugere med i
sortimentet.
I dag fortsætter McCulloch som en del af Husqvarnakoncernen sin tradition for stærke motorer, tekniske
innovationer og stærke designs, som har været vores
varemærker i mere end et halvt århundrede. Reduktion af
brændstofforbruget, emissioner og støjniveauer har
højeste prioritet hos os, hvilket også gælder forbedring af
sikkerheden og brugervenligheden.
Vi håber, at du vil blive tilfreds med dit McCulloch-produkt,
da det er udviklet til at være din ledsager i lang tid
fremover. Hvis du følger denne brugervejlednings
anbefalinger vedr. anvendelse, service og
vedligeholdelse, kan du forvente, at produktet når den
anførte levetid. Hvis du får brug for professionel
assistance til reparation eller service, bedes du benytte
servicesøgeren på www.mcculloch.com.
McCulloch forsøger hele tiden at videreudvikle sine
produkter og forbeholder sig derfor ret til ændringer af
bl.a. form og udseende uden forudgående varsel.
Denne vejledning kan også downloades på
www.mcculloch.com.
Hvad er hvad på motorsaven? (1)
1 Cylinderdæksel
2 Brændstofpumpe
3 Stopkontakt. (Til at tænde og slukke for tændingen.)
4 Choker/Startgaslås
5 Bageste håndtag med højrehåndsbeskyttelse
6 Informations- og advarselsmærkat
7 Brændstoftank
8 Justeringsskruer karburator
9 Starthåndtag
10 Startaggregat
11 Kædeolietank
12 Typeskilt
13 Kædestrammerskrue
14 Koblingsdæksel
15 Gasreguleringslås (Forhindrer uhensigtsmæssig
gas.)
16 Forreste håndtag
17 Kastbeskyttelse
18 Lyddæmper
19 Savsværd
20 Næsehjul
21 Savkæde
22 Barkstøtte
23 Kædefanger
24 Gasregulering
25 Sværdbeskyttelse
26 Brugsanvisning
27 Kombinøgle
Danish – 51
Page 52

Indhold
INDLEDNING
Symboler på maskinen: ........................................ 50
INDLEDNING
Til vore kunder! ..................................................... 51
Hvad er hvad på motorsaven? .............................. 51
INDHOLD
Indhold .................................................................. 52
GENERELLE SIKKERHEDSINSTRUKTIONER
Forberedelser, inden en ny motorsav tages i brug 53
Vigtigt .................................................................... 53
Brug altid din sunde fornuft ................................... 53
Personligt beskyttelsesudstyr ............................... 54
Maskinens sikkerhedsudstyr ................................. 54
Skæreudstyr ......................................................... 56
MONTERING
Montering af sværd og kæde ................................ 59
BRÆNDSTOFHÅNDTERING
Drivmiddel ............................................................. 60
Tankning ............................................................... 60
Brændstofsikkerhed .............................................. 61
START OG STOP
Start og stop ......................................................... 62
ARBEJDSTEKNIK
Før hver anvendelse: ............................................ 63
Generelle arbejdsinstruktioner .............................. 63
Kastforebyggende foranstaltninger ....................... 66
VEDLIGEHOLDELSE
Generelt ................................................................ 67
Karburatorjustering ............................................... 67
Kontrol, vedligeholdelse og service af
motorsavens sikkerhedsudstyr .............................
Lyddæmper ........................................................... 68
Luftfilter ................................................................. 68
Tændrør ................................................................ 68
Vedligeholdelsesskema ........................................ 69
TEKNISKE DATA
Tekniske data ........................................................ 70
Sværd- og kædekombinationer ............................ 71
EF-overensstemmelseserklæring ......................... 71
INDHOLD
67
52 – Danish
Page 53

GENERELLE SIKKERHEDSINSTRUKTIONER
!
!
Forberedelser, inden en ny
motorsav tages i brug
• Læs brugsanvisningen omhyggeligt igennem.
• (1) - (43) henviser til illustrationer på side 2-5.
• Kontrollér skæreudstyrets montering og justering. Se
instruktionerne i afsnittet Montering.
• Tank motorsaven op, og begynd. Se anvisningerne i
afsnittene Brændstofhåndtering og Start og stop.
• Brug ikke motorsaven, før en tilstrækkelig mængde
kædesmøreolie har nået savkæden. Se
instruktionerne i afsnittet Smøring af skæreudstyr.
• Langvarig eksponering for støj kan medføre
permanente høreskader. Brug derfor altid godkendt
høreværn.
ADVARSEL! Maskinens oprindelige
udformning må under ingen
!
omstændigheder ændres uden
producentens samtykke. Brug altid
originaltilbehør. Ikke-autoriserede
ændringer og/eller ikke-godkendt
tilbehør kan medføre alvorlige skader
eller døden for brugeren eller andre.
ADVARSEL! En motorsav kan være et
farligt redskab, som kan forårsage
!
alvorlige, ja endog livsfarlige skader,
hvis den bruges forkert eller uforsigtigt.
Det er meget vigtigt, at du læser og
forstår indholdet i denne
brugsanvisning.
Vigtigt
VIGTIGT!
Denne motorsav til skovbrug er beregnet til skovarbejde
som f.eks. fældning, afgrening og savning.
Brug kun det sværd/den savkædekombination, der er
anbefalet i afsnittet Tekniske data.
Brug aldrig maskinen, hvis du er træt, hvis du har
drukket alkohol, eller hvis du tager medicin, som kan
påvirke dit syn, dit overblik eller din kropskontrol.
Brug personligt beskyttelsesudstyr. Se instruktionerne i
afsnittet ”Personligt beskyttelsesudstyr”.
Foretag aldrig ændringer på maskinen, så den ikke
længere svarer til originaludførelsen, og undlad at bruge
maskinen, hvis den ser ud til at være blevet ændret af
andre.
Brug aldrig en maskine, som er behæftet med fejl. Følg
sikkerhedskontrol-, vedligeholdelses- og
serviceinstruktionerne i denne brugsanvisning. Visse
vedligeholdelses- og serviceforanstaltninger må kun
udføres af erfarne og kvalificerede specialister. Se
anvisningerne under overskriften Vedligeholdelse.
Brug aldrig andet tilbehør end det, som er anbefalet i
denne brugsanvisning. Se instruktionerne i afsnittene
Skæreudstyr og Tekniske data.
BEMÆRK! Anvend altid sikkerhedsbriller og
ansigtsværn for at reducere risikoen for skader fra
genstande, der slynges ud. En motorsav kan slynge
genstande såsom savspåner, små træstykker etc. ud
med stor kraft. Dette kan medføre alvorlig skade, især
på øjnene.
ADVARSEL! Lyddæmperen indeholder
kemikalier, som kan være
!
kræftfremkaldende. Undgå kontakt med
disse elementer, hvis lyddæmperen
bliver beskadiget.
ADVARSEL! Langvarig indånding af
motorens udstødningsgas, kædeolietåge
!
og støv fra savspåner kan være
sundhedsskadelig.
ADVARSEL! Denne maskine skaber et
elektromagnetisk felt under brug. Dette
!
felt kan i nogle tilfælde påvirke aktive
eller passive medicinske implantater. For
at reducere risikoen for alvorlige eller
dødbringende skader anbefaler vi, at
personer med medicinske implantater
kontakter deres læge og producenten af
det medicinske implantat, før de tager
maskinen i brug.
Brug altid din sunde fornuft (2)
Det er ikke muligt at tage højde for alle de situationer, du
kan tænkes at komme ud for, når du bruger en motorsav.
Udvis derfor altid forsigtighed, og brug din sunde fornuft.
Undgå situationer, som du ikke synes, du er tilstrækkeligt
kvalificeret til. Hvis du stadig føler dig usikker med hensyn
til fremgangsmåden, efter at du har læst disse
anvisninger, skal du kontakte en ekspert, før du
fortsætter. Du er velkommen til at kontakte din forhandler
eller os, hvis du har spørgsmål til brugen af motorsaven.
ADVARSEL! At køre en motor i et lukket
eller dårligt udluftet rum kan medføre
døden som følge af kvælning eller
kulilteforgiftning.
ADVARSEL! Forkert skæreudstyr eller et
forkert sværd/en forkert
kædekombination øger risikoen for kast!
Brug kun det sværd/den
savkædekombination, der er anbefalet,
og følg filningsanvisningerne. Se
anvisningerne i afsnittet Tekniske data.
Danish – 53
Page 54

GENERELLE SIKKERHEDSINSTRUKTIONER
!
Vi står altid til disposition og giver gerne gode råd, som
kan hjælpe dig med at anvende motorsaven på en bedre
og mere sikker måde. Du kan også tage et kursus i brug
af motorsav. Din forhandler, skovbrugsskolen eller det
lokale bibliotek kan give dig yderligere oplysninger om
tilgængelige kurser og kursusmaterialer. Der udføres
løbende arbejde med henblik på at forbedre design og
teknik - forbedringer, som øger sikkerheden og
effektiviteten. Besøg din forhandler jævnligt for at se de
nyheder, som du kan få glæde af.
Personligt beskyttelsesudstyr
ADVARSEL! De fleste ulykker med
motorsave sker, når savkæden rammer
!
brugeren. Ved enhver anvendelse af
maskinen skal der bruges godkendt
personligt beskyttelsesudstyr. Det
personlige beskyttelsesudstyr udelukker
ikke risikoen for skader, men det
mindsker effekten af en skade ved en
ulykke. Bed din forhandler om hjælp ved
valg af udstyr.
• Godkendt beskyttelseshjelm
• Høreværn
• Beskyttelsesbriller eller ansigtsværn
• Handsker med gennemsavningsbeskyttelse
• Bukser med gennemsavningsbeskyttelse
• Støvler med gennemsavningsbeskyttelse, stålnæser
og skridsikre såler
• Forbindingskasse skal altid findes i nærheden.
• Brandslukker og spade
Beklædningen bør i øvrigt være tætsiddende, dog uden at
hæmme din bevægelsesfrihed.
VIGTIGT! Der kan komme gnister ud af lyddæmperen,
sværdet, kæden og andre kilder. Hav altid værktøj til
brandslukning inden for rækkevidde, når du bruger
saven. På den måde er du med til at forebygge
skovbrand.
Maskinens sikkerhedsudstyr
I dette afsnit kan du læse om maskinens sikkerhedsdele
og deres funktion. Du kan finde oplysninger om kontrol og
vedligeholdelse i afsnittet Kontrol, vedligeholdelse og
service af motorsavens sikkerhedsudstyr. Se
anvisningerne i afsnittet Hvad er hvad? for at se, hvor
disse dele sidder på din maskine.
Maskinens levetid kan forkortes, og risikoen for ulykker
kan øges, hvis maskinen ikke vedligeholdes korrekt, og
hvis service og/eller reparation ikke udføres fagligt
korrekt. Hvis du har brug for yderligere oplysninger, kan
du kontakte nærmeste serviceværksted.
54 – Danish
ADVARSEL! Brug aldrig en maskine med
defekt sikkerhedsudstyr.
Sikkerhedsudstyret skal kontrolleres og
vedligeholdes. Se anvisningerne i afsnittet
Kontrol, vedligeholdelse og service af
motorsavens sikkerhedsudstyr. Hvis
maskinen ikke klarer alle kontroller, skal
du kontakte serviceværkstedet for at få
den repareret.
Kædebremse med kastbeskyttelse
Motorsaven er forsynet med en kædebremse, der er
konstrueret til at standse savkæden i tilfælde af kast. En
kædebremse reducerer risikoen for ulykker, men det er
kun dig som bruger, der kan forhindre dem.
Vær forsigtig ved anvendelse, og sørg for, at sværdets
kastrisikoområde aldrig kommer i kontakt med et objekt.
•
Kædebremsen (A) aktiveres enten manuelt (med venstre
hånd) eller ved hjælp af træghedsfunktionen.
• Kastbeskyttelsen (B) aktiveres, når den føres fremad. (3)
• Denne bevægelse aktiverer en fjederspændt
mekanisme, som spænder bremsebåndet (C) rundt om
motorens kædedrivsystem (D) (koblingstromlen).
• Kastbeskyttelsen er ikke kun konstrueret med henblik
på en aktivering af kædebremsen. En anden meget
vigtig funktion er, at den reducerer risikoen for, at
venstre hånd skal ramme savkæden, hvis man mister
grebet om det forreste håndtag.
• Kædebremsen skal være aktiveret, når motorsaven
startes, så kæden ikke roterer.
• Brug kædebremsen som 'parkeringsbremse', når du
starter saven eller flytter den over kortere afstand, så
der ikke opstår ulykker, hvor brugeren og
omgivelserne kan komme i kontakt med savkæden,
mens den kører.
• Kædebremsen frikobles ved at kastbeskyttelsen føres
bagud, mod det forreste håndtag.
• Kast kan være lynhurtige og meget voldsomme. De
fleste kast er små og resulterer ikke altid i, at
kædebremsen aktiveres. Ved sådanne kast gælder
det om at holde motorsaven i et fast greb og ikke
slippe det.
• Om kædebremsen aktiveres manuelt eller via
træghedsfunktionen, bestemmes af, hvor voldsomt
kastet er, samt hvor motorsaven befinder sig i forhold
til det objekt, sværdets kastrisikoområde er kommet i
kontakt med.
Ved voldsomme kast og i tilfælde, hvor sværdet
kasterisikoområde befinder sig så langt væk fra
brugeren som muligt, aktiveres kædebremsen af via
kædebremsens modvægt (træghed) i kastretningen.
Ved mindre voldsomme kast eller i arbejdssituationer,
hvor kastrisikoområdet befinder sig nærmere
brugeren, aktiveres kædebremsen manuelt via
venstre hånd.
• Når motorsaven er i fældestilling, er venstre hånd
anbragt, så du ikke kan aktivere kædebremsen
manuelt. Når du bruger dette greb, dvs. når venstre
(3)
(4)
Page 55

GENERELLE SIKKERHEDSINSTRUKTIONER
!
!
hånd er placeret, så den ikke kan påvirke
kastebeskyttelsens bevægelse, kan kædebremsen
kun aktiveres via træghedsfunktionen.
Vil min hånd altid aktivere kædebremsen
i tilfælde af kast?
Nej. Der kræves en vis kraft for at føre kastbeskyttelsen
fremad. Hvis din hånd kun lige rører ved kastbeskyttelsen
eller glider hen over den, er det muligvis ikke tilstrækkeligt
til at udløse kædebremsen. Du skal altid holde godt fast
om motorsavens håndtag, når du arbejder. Hvis du gør
det og oplever et kast, slipper du muligvis aldrig hånden
om det forreste håndtag og aktiverer dermed ikke
kædebremsen, eller også aktiveres kædebremsen først,
når saven har kørt rundt et stykke tid. I en sådan situation
kan det forekomme, at kædebremsen ikke kan stoppe
kæden, før den rammer dig.
Der forekommer også visse arbejdsstillinger, som gør, at
din hånd ikke kan nå kastbeskyttelsen og dermed aktivere
kædebremsen, for eksempel når saven holdes i
fældestilling.
Vil træghedsaktiveringen af
kædebremsen altid forekomme, hvis der
indtræder et kast?
Nej. For det første skal bremsen fungere. Det er let at
teste bremsen; se anvisningerne under afsnittet Kontrol,
vedligeholdelse og service af motorsavens
sikkerhedsudstyr. Vi anbefaler, at du gør dette, før du
begynder hver arbejdsopgave. For det andet skal kastet
være tilstrækkeligt kraftigt til at aktivere kædebremsen.
Hvis kædebremsen er for følsom, aktiveres den konstant,
hvilket besværer arbejdet.
Beskytter kædebremsen mig konstant
mod skader i tilfælde af kast?
Nej. For det første skal bremsen fungere for at give den
tilsigtede beskyttelse. For det andet skal bremsen
aktiveres som beskrevet ovenfor, så savkæden standses
i tilfælde af kast. For det tredje kan kædebremsen
aktiveres, men hvis sværdet befinder sig for tæt på dig,
kan det forekomme, at bremsen ikke tager farten af
kæden og standser den, før motorsaven rammer dig.
Det er kun dig, der kan eliminere kast og tilsvarende
risici ved at anvende en korrekt arbejdsteknik.
Gasreguleringslås
Gasreguleringslåsen er beregnet til at forhindre ufrivillig
aktivering af gasreguleringen. Når du trykker låsen (A)
ned i håndtaget (= når du holder om håndtaget), frigøres
gasreguleringen (B). Når du slipper grebet om håndtaget,
stilles både gasreguleringen og gasreguleringslåsen
tilbage til deres udgangspositioner. I udgangspositionen
låses gasreguleringen automatisk i tomgang.
Kædefanger
Kædefangeren er konstrueret til at opfange en afhoppet
eller knækket kæde. Disse hændelser undgås i de fleste
tilfælde ved en korrekt kædespænding (se instruktionerne
(5)
i afsnittet Montering) samt en korrekt vedligeholdelse og
service af sværd og kæde (se instruktionerne i afsnittet
Generelle arbejdsinstruktioner).
Højrehåndsbeskyttelse
Højrehåndsbeskyttelsen skal ud over at beskytte hånden
ved et kædeafhop, eller når en kæde knækker, sørge for
at grene eller kviste ikke påvirker grebet om det bageste
håndtag.
Vibrationsdæmpningssystem
Din maskine er udstyret med et
vibrationsdæmpningssystem, som er konstrueret med
henblik på at give en så vibrationsfri og behagelig brug
som muligt.
Maskinens vibrationsdæmpningssystem reducerer
overførslen af vibrationer mellem motorenheden/
skæreudstyret og maskinens håndtagsenhed.
Motorsavens krop, inklusive skæreudstyr, hænger i
håndtagsenheden via de såkaldte vibrationsdæmpningselementer.
Savning i en hård træsort (de fleste løvtræer) giver flere
vibrationer end savning i en blød træsort (de fleste
nåletræer). Savning med sløvt eller forkert skæreudstyr
(forkert type eller forkert filet) øger vibrationsniveauet.
ADVARSEL! Overeksponering af
vibrationer kan medføre
kredsløbsforstyrrelser eller skader på
nervesystemet hos personer med
kredsløbsforstyrrelser. Hvis du oplever
fysiske symptomer, som kan relateres til
overeksponering af vibrationer, skal du
straks søge læge. Som eksempler på
sådanne symptomer kan nævnes
følelsesløshed, mangel på følesans,
'kildren', 'stikken', smerte, manglende
eller reduceret styrke, forandringer i
hudens farve eller i dens overflade. Disse
symptomer opleves almindeligvis i
fingre, hænder eller håndled.
Symptomerne kan forværres i koldt vejr.
Stopkontakt
Stopkontakten skal bruges til at slukke for motoren. (26)
Lyddæmper
Lyddæmperen er konstrueret med henblik på at mindske
lydniveauet og lede motorens udstødningsgasser væk fra
brugeren.
ADVARSEL! Motorens
udstødningsgasser er varme og kan
indeholde gnister, som kan forårsage
brand. Start derfor aldrig maskinen
indendørs eller i nærheden af
brandfarligt materiale!
I områder med varmt og tørt klima kan risikoen for
antændelse af brandbart materiale være overhængende.
Danish – 55
Page 56

GENERELLE SIKKERHEDSINSTRUKTIONER
!
Disse områder kan være reguleret ved lov med krav om,
at lyddæmperen skal være forsynet med godkendt
gnistfangernet (A).
BEMÆRK! Lyddæmperen bliver meget varm både
under og efter brug. Dette gælder også ved kørsel i
tomgang. Vær opmærksom på brandfaren, specielt ved
håndtering i nærheden af brandfarlige emner og/eller
gasser.
!
Skæreudstyr
Dette afsnit behandler, hvordan du med korrekt
vedligeholdelse og ved brug af korrekt type skæreudstyr:
• Reducerer maskinens kasttilbøjelighed.
• Reducerer forekomsten af savkædeafhop samt
savkædebrud.
• Bevarer en optimal skarphed.
• Øger skæreudstyrets levetid.
• Forebygger forøgelse af vibrationsniveauet.
Grundregler
• Brug kun det skæreudstyr vi anbefaler! Se
anvisningerne i afsnittet Tekniske data.
• Hold savkædens skæretænder godt og korrekt
filede! Følg vores instruktioner, og brug anbefalet
fileholder.
øger risikoen for ulykker.
• Hold korrekt rytterhøjde! Følg vores instruktioner,
og brug det anbefalede ryttermål.
er for stort, øges risikoen for kast!
• Hold kæden stram! En utilstrækkeligt strammet
kæde øger risikoen for kædeafhop og øger slitagen på
sværd, savkæde og savkædedrivhjul.
• Hold skæreudstyret velsmurt og korrekt
vedligeholdt!
øger risikoen for savkædebrud og øger slitagen på
sværd, savkæde og savkædedrivhjul.
Kastreducerende skæreudstyr
!
(6)
ADVARSEL! Brug aldrig en motorsav uden
lyddæmper eller med defekt lyddæmper.
En defekt lyddæmper kan forøge
lydniveauet og brandrisikoen markant.
Hav altid brandslukningsudstyr inden for
rækkevidde. Brug aldrig en motorsav
uden gnistfangernet eller med defekt
gnistfangernet, hvis gnistfangernet er
påbudt i dit arbejdsområde.
En forkert filet eller beskadiget savkæde
Hvis ryttermålet
En utilstrækkelig smøring af savkæden
ADVARSEL! Forkert skæreudstyr eller et
forkert sværd/en forkert
kædekombination øger risikoen for kast!
Brug kun det sværd/den
savkædekombination, der er anbefalet,
og følg filningsanvisningerne. Se
anvisningerne i afsnittet Tekniske data.
Kast kan kun undgås ved, at du som bruger passer på, at
sværdet kastrisikoområde aldrig kommer i kontakt med et
objekt.
Ved at bruge skæreudstyr med en ”indbygget”
kastreduktion og ved at file og vedligeholde savkæden
korrekt, kan effekten af et kast reduceres.
Sværd
Jo mindre næseradius, desto mindre kastrisiko.
Savkæde
En savkæde er opbygget af et antal forskellige led, som
fås både i standard og i kastreduceret udførelse.
VIGTIGT! Ingen savkæder eliminerer risikoen for kast.
ADVARSEL! Enhver berøring af en
roterende savkæde kan forårsage meget
alvorlige skader.
Nogle udtryk, som specificerer sværd og savkæde
For at bevare alle sikkerhedsdele på skæreudstyret bør
du udskifte slidte og defekte sværd- og
kædekombinationer med et sværd og en kæde, som
Husqvarna anbefaler. Se anvisningerne under afsnittet
Tekniske data for at få yderligere oplysninger om de
sværd- og kædekombinationer, vi anbefaler.
Sværd
• Længde (tommer/cm)
• Antal tænder i næsehjulet (T).
• Savkædedeling (=pitch) (tommer). Sværdets og
motorsavens kædedrivhjul skal være tilpasset
afstanden mellem drivleddene.
• Antal drivled (stk.). Hver sværdlængde giver i
kombination med savkædedelingen og antallet af
tænder i næsehjulet et bestemt antal drivled.
• Sværdsporsbredde (tommer/mm). Sværdsporets
bredde skal være tilpasset savkædens
drivledsbredde.
• Savkædeoliehul og hul til kædestrammer tap. Sværdet
skal være tilpasset motorsavens konstruktion.
Savkæde
• Savkædedeling (=pitch) (tommer)
• Drivledsbredde (mm/tommer)
• Antal drivled (stk.)
Filning og justering af ryttermål på
savkæde
Generelt angående filning af en skæretand
• Sav aldrig med en sløv savkæde. Tegn på en sløv
savkæde er, at du er nødt til at trykke skæreudstyret
ned gennem træet, og at træspånerne er meget små.
En meget sløv savkæde giver slet ingen træspåner.
Det eneste resultat bliver savsmuld.
• En skarp savkæde æder sig selv gennem træet og
giver træspåner, som er store og lange.
56 – Danish
Page 57

GENERELLE SIKKERHEDSINSTRUKTIONER
!
• Den savende del af en savkæde kaldes et skæreled
og består af en skæretand (A) og en rytter (B).
Højdeafstanden mellem disse bestemmer
skæredybden.
Ved filning af en skæretand er der fire mål at tage hensyn
til
1 Filevinkel
2 Støttevinkel
3 Filestilling
4 Rundfilsdiameter
Det er meget svært at file en savkæde korrekt uden
hjælpemidler. Derfor anbefaler vi, at du bruger vores
fileholder. Den sikrer, at savkæden files, så den giver
optimal kastreduktion og skærekapacitet.
Se anvisningerne i afsnittet Tekniske data for at få
oplysninger om, hvilke data der gælder ved filning af din
motorsavs savkæde.
ADVARSEL! Følgende fejl ved filningen
øger savkædens kasttilbøjelighed i
!
betydelig grad.
Filning af skæretand
Til filning af skæretand kræves en rundfil og en fileholder.
Se i afsnittet Tekniske data for at få oplysninger om,
hvilken rundfilsdiameter og hvilken fileholder der
anbefales til din motorsavs savkæde.
• Kontrollér, at savkæden er stram. En utilstrækkelig
stramning medfører, at savkæden bliver ustabil i
sideled, hvilket gør en korrekt filning svær.
• Fil altid fra skæretandens inderside og udad. Tryk ikke
hårdt på filen på returtrækket. Fil altid tænderne på
den ene side først, og vend derefter motorsaven, og fil
den anden sides tænder.
• Fil på en sådan måde, at alle tænder bliver lige lange.
Når der kun er 4 mm (5/32") tilbage af skæretandens
længde, er savkæden slidt ned og skal smides væk.
(8)
Generelt angående justering af ryttermål
• Ved filning af skæretanden mindskes rytterhøjden
(=skæredybden). For at bevare en maksimal
skærekapacitet skal ryttermålet sænkes til anbefalet
niveau. Se anvisningerne i afsnittet Tekniske data for
at få oplysninger om, hvor stort ryttermålet skal være
på din motorsavs savkæde.
(7)
• Ved justering af rytterhøjden kræves en fladfil og et
ryttermål. Vi anbefaler, at du anvender vores
slibeskala, så du er sikker på at få de korrekte
ryttermål og den rigtige vinkel på rytteren.
• Læg slibeskalaen over savkæden. Du kan finde
yderligere oplysninger om brug af slibeskalaen på
pakken. Læg fladfilen over den overskydende del af
rytteren, og fil overskuddet væk. Rytterhøjden er
korrekt, når der ikke føles nogen modstand, når filen
trækkes over slibeskalaen.
Stramning af savkæden
ADVARSEL! En utilstrækkeligt strammet
savkæde kan resultere i savkædeafhop,
hvilket kan forårsage alvorlige, ja endog
livsfarlige personskader.
Jo mere du bruger en savkæde, desto længere bliver den.
Det er vigtigt, at man justerer skæreudstyret i takt med
denne forandring.
Savkædestramningen skal kontrolleres efter hver
tankning. BEMÆRK! En ny savkæde kræver en
indkøringsperiode, hvor man skal kontrollere
savkædestramningen oftere.
Generelt gælder det, at man skal stramme savkæden så
meget som muligt, men ikke mere end, at den let kan
trækkes rundt med hånden.
• Løsn den sværdmøtrik, som låser koblingsdækslet/
kædebremsen. Brug kombinøglen. Spænd derefter
sværdmøtrikken med håndkraft, så hårdt du kan.
• Løft sværdspidsen op, og stram savkæden ved at
spænde savkædestrammerskruen ved hjælp af
kombinøglen. Stram savkæden, indtil den ikke
længere hænger slapt ned på sværdets underside.
(11)
• Brug kombinøglen, og spænd sværdmøtrikken,
samtidig med at du holder sværdspidsen op.
Kontrollér, at savkæden let kan trækkes rundt ved
håndkraft, og at den ikke hænger ned på sværdets
underside.
På vores motorsavsmodeller er savkædestrammerskruen
placeret forskellige steder. Se anvisningerne i afsnittet
Hvad er hvad? for at få oplysninger om, hvor den sidder
på din model.
(12)
(9)
(10)
ADVARSEL! Hvis ryttermålet er for stort,
øges savkædens kasttilbøjelighed!
!
Justering af ryttermål
• Når ryttermålet justeres, skal skæretænderne være
nyfilede. Vi anbefaler, at ryttermålet justeres efter hver
tredje savkædefilning. BEMÆRK! Denne anbefaling
forudsætter, at skæretændernes længde ikke er
blevet filet unormalt ned.
Danish – 57
Page 58

GENERELLE SIKKERHEDSINSTRUKTIONER
!
Smøring af skæreudstyr
ADVARSEL! Utilstrækkelig smøring af
skæreudstyret kan resultere i
!
savkædebrud, hvilket kan medføre
alvorlige, ja endog livsfarlige
personskader.
Savkædeolie
En savkædeolie skal have en god vedhæftning til
savkæden samt en god flydeevne, uanset om det er varm
sommer eller kold vinter.
VIGTIGT! Hvis du anvender vegetabilsk savkædeolie,
skal du afmontere og rengøre sværdbeskyttelsen og
savkæden inden langtidsopbevaring. I modsat fald er
der risiko for, at savkædeolien oxiderer, så savkæden
bliver sløv, og sværdets næsehjul går trægt.
Påfyldning af savkædeolie
• Alle vores motorsavsmodeller har automatisk
savkædesmøring. En del af modellerne kan også fås
med justerbar olietilførsel.
• Savkædeolietanken og brændstoftanken er
dimensionerede, så brændstoffet slipper op før
savkædeolien.
Denne sikkerhedsfunktion forudsætter dog, at man
bruger korrekt savkædeolie (en for tynd og letflydende
olie tømmer savkædeolietanken, inden brændstoffet
slipper op), at man følger vores anbefalede
karburatorindstilling (en for 'sparsom' indstilling
bevirker, at brændstoffet varer længere end
savkædeolien), samt at man følger vores anbefalinger
vedrørende skæreudstyr (et for langt sværd kræver
mere kædeolie).
Kontrol af savkædesmøring
• Kontrollér savkædesmøringen ved hver tankning.
Ret sværdspidsen mod et fast, lyst objekt i en afstand
af ca. 20 cm (8 tommer). Efter 1 minuts kørsel på 3/4
gas skal man kunne se et tydeligt oliespor på det lyse
objekt.
Hvis savkædesmøringen ikke fungerer:
• Kontrollér, at sværdsporet er rent. Rens det om
nødvendigt.
• Kontrollér, at sværdets næsehjul går let, og at
næsehjulets smørehul er åbent. Rens og smør om
nødvendigt.
Hvis savkædesmøringen ikke fungerer, efter at
ovennævnte kontroller og tilhørende foranstaltninger er
gennemført, skal du kontakte dit serviceværksted.
Kædedrivhjul
Koblingstromlen er forsynet med et spur-drivhjul
(kædedrivhjulet er fastloddet på tromlen).
Kontrollér regelmæssigt slitageniveauet for
kædedrivhjulet. Udskift det, hvis det er unormalt slidt.
Kædedrivhjulet skal udskiftes ved hver
savkædeudskiftning.
Slitagekontrol af skæreudstyr
Kontrollér dagligt savkæden for:
• Synlige revner i nitter og led.
• Om savkæden er stiv.
• Om nitter og led er unormalt slidte.
Kassér savkæden, hvis den viser et eller flere af
ovenstående tegn.
Vi anbefaler, at du bruger en ny savkæde til at måle, hvor
slidt din savkæde er.
Når der kun er 4 mm tilbage af skæretandens højde, er
savkæden slidt og skal kasseres.
Sværd
Kontrollér regelmæssigt:
• Hvis der dannes ujævnheder på sværdbommenes
ydre sider (A). File væk om nødvendigt.
• Hvis sværdsporet er unormalt slidt (B). Sværdet
udskiftes om nødvendigt.
• Hvis sværdnæsen er unormalt eller ujævnt slidt. Hvis
der er dannet en ”fordybning”, hvor sværdnæsens
radius slutter på sværdets underside, har du kørt med
utilstrækkeligt opstrammet savkæde.
• For at opnå en maksimal levetid bør sværdet vendes
regelmæssigt.
ADVARSEL! De fleste ulykker med
motorsave sker, når savkæden rammer
brugeren.
Brug personligt beskyttelsesudstyr. Se
instruktionerne i afsnittet ”Personligt
beskyttelsesudstyr”.
Undgå at udføre opgaver, som du ikke
føler dig tilstrækkeligt kvalificeret til. Se
instruktionerne i afsnittene Personligt
beskyttelsesudstyr, Kastforebyggende
foranstaltninger, Skæreudstyr og
Generelle arbejdsinstruktioner.
Undgå situationer, hvor der foreligger
kastrisiko. Se instruktionerne i afsnittet
Maskinens sikkerhedsudstyr.
Brug anbefalet skæreudstyr, og
kontrollér dets tilstand. Se
instruktionerne i afsnittet Generelle
arbejdsinstruktioner.
Kontrollér funktionen af motorsavens
sikkerhedsdetaljer. Se instruktionerne i
afsnittet Generelle arbejdsinstruktioner
og Generelle sikkerhedsinstruktioner.
(13)
(13)
58 – Danish
Page 59

MONTERING
Montering af sværd og kæde
ADVARSEL! Kontrol og/eller
vedligeholdelse skal udføres med
!
slukket motor.
Brug altid handsker, når du arbejder med
kæden, for at beskytte hænderne.
Kontrollér, at kædebremsen ikke er i udløst stilling ved at
føre kædebremsens kastbeskyttelse mod den forreste
håndtagsbøjle.
Skru sværdmøtrikkerne af, og fjern koblingsdækslet. (14)
Montér sværdet over sværdboltene. Placér sværdet i dets
bagerste stilling. Placér kæden over kædedrivhjulet og i
sværdsporet. Begynd på sværdets overside.
Kontrollér, at æggen på skæreleddene er peger fremad
på sværdets overside.
Monter koblingskappen og sørg for, at
kædespændetappen passer i sværdets udtag. Kontroller,
at kædens drivled passer på kædedrivhjulet, og at kæden
ligger rigtigt i sværdsporet. Spænd sværdmøtrikken med
fingrene.
Spænd kæden ved at bruge kombinøglen til at skrue
kædestrammerskruen med uret. Kæden skal strammes
til, så den ikke hænger slapt ned på sværdets underside.
(11)
Kæden er korrekt spændt, når den ikke hænger løst på
sværdets underside og stadig kan trækkes rundt ved
håndkraft. Spænd sværdmøtrikken fast med
kombinøglen, samtidig med at sværdspidsen holdes op.
(12)
På en ny kæde skal kædestramningen kontrolleres ofte,
indtil kæden er kørt til. Kontrollér kædestramningen
regelmæssigt. Korrekt kæde betyder god skærekapacitet
og lang levetid.
(9)
Montering af barkstøtte
Kontakt nærmeste serviceværksted for at få monteret en
barkstøtte.
(15)
Danish – 59
Page 60

BRÆNDSTOFHÅNDTERING
!
Drivmiddel
Bemærk! Maskinen er forsynet med en totaktsmotor og
skal altid anvendes med en blanding af benzin og
totaktsolie. Det er vigtigt, at du nøje afmåler den
oliemængde, der skal blandes, for at sikre et korrekt
blandingsforhold. Ved blanding af små
brændstofmængder påvirker selv små unøjagtigheder i
oliemængden blandingsforholdet kraftigt.
ADVARSEL! Sørg for god luftventilation
ved al brændstofhåndtering.
!
Benzin
• Brug blyfri eller blyholdig kvalitetsbenzin.
• Det lavest anbefalede oktantal er oktan 90 (RON).
Hvis motoren køres på benzin med et lavere oktantal
end oktan 90, kan der forekomme bankning. Dette
medfører en højere motortemperatur og en øget
lejebelastning, som kan forårsage alvorlige
motorhaverier.
• Ved arbejde med kontinuerligt høje omdrejningstal
(f.eks. ved kvistning) anbefales højere oktantal.
Indkøring
Kørsel ved alt for høj hastighed i længere perioder ad
gangen skal undgås i løbet af de første 10 driftstimer.
Totaktsolie
• For at opnå det bedste resultat og en optimal funktion
skal Universal, Universal powered by McCULLOCH
totaktsolie, som er specielt udviklet til vores
luftafkølede totaktsmotorer, anvendes.
• Brug aldrig totaktsolie beregnet til vandafkølede
udenbordsmotorer, såkaldt outboardolie (kaldes
TCW).
• Brug aldrig olie beregnet til firetaktsmotorer.
• En lav oliekvalitet eller en for fed olie/
brændstofblanding kan forværre katalysatorens
funktion og reducere dens levetid.
Blandingsforhold
1:40 (2,5 %) med Universal, Universal powered by
McCULLOCH totaktsolie.
Benzin, liter Totaktsolie, liter
2,5% (1:40)
5 0,125
10 0,25
15 0,375
20 0,5
Blanding
• Bland altid benzin og olie i en ren beholder, der er
godkendt til benzin.
• Begynd altid med at hælde halvdelen af benzinen i.
Hæld derefter al olien i. Bland (ryst)
brændstofblandingen. Hæld den resterende mængde
benzin i.
• Bland (ryst) brændstofblandingen omhyggeligt, inden
maskinens brændstoftank fyldes.
• Bland ikke brændstof til mere end maks. 1 måneds
behov.
• Hvis maskinen ikke bruges i længere tid, skal
brændstoftanken tømmes og rengøres.
Kædeolie
• Til smøring anbefales en speciel olie (kædesmøreolie)
med god vedhæftningsevne.
• Brug aldrig spildolie. Dette medfører skader på
oliepumpen, sværdet og kæden.
• Det er vigtigt at bruge korrekt olietype i forhold til
lufttemperaturen (passende viskositet).
• Lufttemperaturer under 0° C gør en del olier trægt
flydende. Dette kan give overbelastning af
oliepumpen med skader på pumpedele til følge.
• Kontakt dit serviceværksted ved valg af
kædesmøreolie.
Tankning
ADVARSEL! Følgende
sikkerhedsforskrifter mindsker risikoen
for brand:
Ryg ikke, og anbring aldrig varme
genstande i nærheden af brændstoffet.
Stands motoren, og lad den afkøle nogle
minutter før tankning.
Åbn tankdækslet langsomt ved
brændstofpåfyldning, så et eventuelt
overtryk langsomt forsvinder.
Spænd tankdækslet omhyggeligt efter
tankning.
Flyt altid maskinen væk fra
tankningsstedet og -kilden, inden den
startes.
Tør rent rundt om tankdækslet. Rens brændstof- og
kædeolietanken regelmæssigt. Brændstoffilteret skal
udskiftes mindst en gang årligt. Forureninger i tankene
forårsager driftsforstyrrelser. Sørg for, at brændstoffet er
godt blandet ved at ryste beholderen, inden tanken fyldes.
Kædeolie- og benzintankens volumen er tilpasset efter
hinanden. Fyld derfor altid kædeolie- og brændstoftanken
op samtidigt.
60 – Danish
Page 61

BRÆNDSTOFHÅNDTERING
ADVARSEL! Brændstof og
brændstofdampe er meget brandfarlige.
!
Vær forsigtig ved håndtering af
brændstof og kædeolie. Tænk på brand-,
eksplosions- og indåndningsrisici.
Brændstofsikkerhed
• Fyld aldrig brændstof på maskinen, når motoren
kører.
• Sørg for god ventilation ved tankning og blanding af
brændstof (benzin og totaktsolie).
• Flyt maskinen mindst 3 m væk fra tankningsstedet,
inden du starter.
• Start aldrig maskinen:
1 Hvis du har spildt brændstof eller kædeolie på
maskinen. Aftør alt det spildte brændstof, og lad
benzinresterne fordampe.
2 Hvis du har spildt brændstof på dig selv eller dit tøj,
skift tøj. Vask de legemsdele, som har været i kontakt
med brændstoffet. Brug vand og sæbe.
3 Hvis maskinen lækker brændstof. Kontrollere
regelmæssigt for lækage fra tankdæksel og
brændstofslanger.
ADVARSEL! Anvend aldrig en maskine
med synlige skader på tændrørshætten
!
og tændkablet. Der er risiko for
gnistdannelse, der kan forårsage brand.
Langtidsopbevaring
Tøm brændstof- og olietankene på et sted med god
udluftning. Opbevar brændstoffet i godkendte dunke på
en sikker måde. Monter sværdbeskyttelsen. Rengør
maskinen. Se anvisningerne i afsnittet
Vedligeholdelsesskema.
Transport og opbevaring
• Opbevar motorsaven og brændstoffet, så en eventuel
lækage og eventuelle dampe ikke risikerer at komme
i nærheden af gnister og åben ild. F.eks. elmaskiner,
elmotorer, elkontakter/afbrydere, varmeapparater
eller lignende.
• Ved opbevaring af brændstof skal særligt egnede og
godkendte beholdere bruges.
• Ved længere tids opbevaring og transport af
motorsaven skal brændstof- og savkædeolietankene
tømmes. Spørg på den nærmeste benzinstation, hvad
du skal gøre med overskydende brændstof og
savkædeolie.
• Sørg for, at maskinen er ordentligt rengjort, og at der
er udført fuldstændig service, inden
langtidsopbevaring.
• Skæreudstyrets transportbeskyttelse skal altid være
monteret under transport og opbevaring af maskinen,
så du ikke kommer til at røre ved den skarpe kæde ved
et uheld. Også en kæde, der ikke er i bevægelse, kan
forårsage alvorlige skader på brugeren eller andre
personer, som kommer i kontakt med den.
• Fastgør maskinen under transport.
Danish – 61
Page 62

START OG STOP
!
Start og stop
ADVARSEL! Inden start skal du være
opmærksom på følgende:
!
Kædebremsen skal være aktiveret, når
motorsaven startes, så kæden ikke
roterer og forårsager skade.
Start ikke motorsaven, uden at sværd,
kæde og alle dæksler er monteret
korrekt. Koblingen kan i modsat fald
løsne sig og forårsage personskader.
Placér maskinen på et stabilt underlag.
Sørg for, at du står stabilt, og at kæden
ikke kan gribe fat i noget.
Sørg for, at ingen uvedkommende
opholder sig inden for arbejdsområdet.
Start
Kædebremsen skal være aktiveret, når motorsaven
startes. Aktivér bremsen ved at føre kastbeskyttelsen
fremad.
(16)
Kold motor
Startposition, 1: Sæt ON/OFF-kontakten på 'I'. (17)
Choker, 2: Stil chokeren i chokestilling. Når
chokerreguleringen er trukket helt ud, indstilles den
korrekte startgasposition automatisk.
Brændstofpumpe, 3: Tryk flere gange på
brændstofpumpens gummiblære, indtil den fyldes med
brændstof (ca. 10 gange). Det er ikke nødvendigt at fylde
blæren helt.
Træk i starthåndtaget, 4: Grib om det forreste håndtag
med venstre hånd. Sæt højre fod på underdelen af de
bageste håndtag og pres motorsaven ned mod jorden.
Tag fat i starthåndtaget, træk startsnoren langsomt ud
med højre hånd, indtil der kan mærkes modstand
(startkrogene går i indgreb), og foretag derefter hurtige og
kraftige ryk, indtil motoren tænder.
Choker, 5: Tryk chokerregulatoren ind med det samme,
når motoren tænder, hvilket kan høres ved, at der lyder et
”puf”.
Træk i starthåndtaget, 6: Bliv ved med at trække kraftigt
i startsnoren, indtil motoren starter.
Vikl aldrig startsnoren rundt om hånden.
BEMÆRK! Træk ikke startsnoren helt ud, og slip heller
ikke starthåndtaget fra udstrakt stilling. Dette kan give
skader på maskinen.
Da kædebremsen stadig er slået til, skal motorens
omdrejningstal hurtigst muligt ned i tomgang, hvilket
opnås ved hurtigt at koble gaslåsen ud. Derved undgår du
unødig slitage på kobling, koblingstromle og bremsebånd.
Lad maskinen gå i tomgang nogle sekunder, før du giver
fuld gas
(18)
(21)
(17)
(20)
Bemærk! Sæt kædebremsen tilbage ved at føre
kastbeskyttelsen mod håndtagsbøjlen. Motorsaven er
dermed klar til brug. På savens bagkant (A) findes en
forenklet startbeskrivelse med billeder, som beskriver de
forskellige trin.
Varm motor
Brug samme startfremgangsmåde som ved kold motor,
men uden at stille chokeren i chokerstilling.
• Start aldrig motorsaven, medmindre sværd, savkæde
og koblingsdæksel er korrekt monteret. Se
instruktionerne i afsnittet Montering. Hvis sværd og
kæde ikke er monteret på motorsaven, kan koblingen
løsnes og forårsage alvorlige skader.
• Kædebremsen skal være aktiveret, når motorsaven
startes. Se anvisningerne i afsnittet Start og stop.
Dropstart aldrig motorsaven. Denne metode er meget
farlig, fordi det er let at miste kontrollen over
motorsaven.
• Start aldrig maskinen indendørs. Vær bevidst om
faren ved indånding af motorens udstødningsgasser.
• Hold øje med omgivelserne, og kontrollér, at der ikke
er nogen risiko for, at mennesker eller dyr kan komme
i kontakt med skæreudstyret.
• Hold altid fast om motorsaven med begge hænder.
Hold højre hånd på det bageste håndtag og venstre
hånd på det forreste håndtag.
højre- og venstrehåndede, skal bruge dette
håndgreb.
tommelfingrene og de øvrige fingre griber om
håndtaget på motorsaven.
(22)
(19)
ADVARSEL! Langvarig indånding af
motorens udstødningsgas, kædeolietåge
og støv fra savspåner kan være
sundhedsskadelig.
(23)
(24)
Alle brugere, både
Hold godt fast om motorsaven, så
(25)
Stop
Motoren standses ved at sætte stopknappen i
stopposition.
(26)
62 – Danish
Page 63

Før hver anvendelse: (27)
!
A - Kontrollér, at kædebremsen fungerer ordentligt og er
intakt.
B - Kontrollér, at bageste højrehåndsbeskyttelse ikke er
beskadiget.
C - Kontrollér, at gasreguleringslåsen fungerer ordentligt
og er intakt.
D - Kontrollér, at stopknappen fungerer korrekt og er
intakt.
E - Kontrollér, at alle håndtag er fri for olie.
F - Kontrollér, at vibrationsdæmpningssystemet fungerer
og er intakt.
G - Kontrollér, at lyddæmperen sidder godt fast og er
intakt.
H - Kontrollér, at alle motorsavens detaljer er
fastspændte, og at de ikke er beskadigede eller mangler.
I - Kontrollér, at kædefangeren er på plads og er intakt.
J - Kontrollér kædespændingen.
Generelle arbejdsinstruktioner
VIGTIGT!
Dette afsnit behandler grundlæggende sikkerhedsregler
for arbejde med motorsave. Informationen kan aldrig
erstatte den kundskab, en faguddannet bruger har i form
af uddannelse og praktisk erfaring. Når du kommer ud
for en situation, som du er usikker på, skal du spørge en
ekspert til råds. Henvend dig i din motorsavsforretning,
på dit serviceværksted eller til en erfaren
motorsavsbruger. Undgå at udføre opgaver, som du ikke
føler dig tilstrækkeligt kvalificeret til!
Inden motorsaven tages i brug, skal du forstå, hvad et
kast er for noget, og hvordan det kan undgås. Se
instruktionerne i afsnittet Kastforebyggende
foranstaltninger.
Inden motorsaven tages i brug, skal du forstå forskellen
mellem at save med sværdets underside og dets
overside. Se anvisningerne i afsnittene
Kastforebyggende foranstaltninger og Maskinens
sikkerhedsudstyr.
Brug personligt beskyttelsesudstyr. Se instruktionerne i
afsnittet ”Personligt beskyttelsesudstyr”.
Grundlæggende sikkerhedsregler
1 Hold øje med omgivelserne:
• For at du kan være sikker på, at hverken mennesker,
dyr eller andet kan påvirke din kontrol over maskinen.
• For at forhindre, at førnævnte ikke risikerer at komme
i kontakt med savkæden eller blive ramt af et faldende
træ og derved komme til skade.
BEMÆRK! Følg ovennævnte punkter, men brug aldrig en
motorsav, hvis det ikke er muligt at tilkalde hjælp i tilfælde
af en ulykke.
ARBEJDSTEKNIK
2 Undgå anvendelse i dårligt vejr. F.eks. i tæt tåge,
kraftig regn, hård vind og kraftig kulde osv. At arbejde
i dårligt vejr er trættende og kan skabe farlige
situationer, f.eks. ved glat underlag, påvirkning af
træets faldretning m.m.
3 Vær yderst forsigtig ved afsavning af smågrene, og
undgå at save i buske (= mange smågrene samtidigt).
Smågrene kan efter afsavning sætte sig fast i
savkæden, slynges mod dig og forårsage alvorlig
personskade.
4 Sørg for, at du kan gå og stå sikkert. Kig efter
eventuelle forhindringer ved en uventet retræte
(rødder, sten, grene, huller, grøfter osv.). Vær meget
forsigtig ved arbejde i skrånende terræn.
5 Vær yderst forsigtig ved savning i træer, som ligger i
spænd. Et spændt træ kan efter gennemsavning
svippe tilbage til sin normale stilling. Hvis du placerer
dig forkert, og lægger savsnittet forkert, kan det
betyde, at træet rammer dig eller maskinen, så du
mister kontrollen. Begge omstændigheder kan
forårsage alvorlig personskade.
6 Ved kortere transporter skal savkæden låses med
kædebremsen, og motoren slukkes. Bær motorsaven
med sværd og savkæde bagudvendt. Ved længere
transporter skal sværdbeskyttelsen bruges.
7 Når du anbringer motorsaven på jorden, skal du låse
savkæden med kædebremsen og holde øje med
maskinen. Ved længere tids 'opbevaring' skal motoren
slukkes.
Grundregler
1 Ved at forstå, hvad et kast kan medføre, og hvordan
det opstår, kan du reducere eller eliminere
overraskelsesmomentet. Overraskelsen øger
ulykkesrisikoen. De fleste kast er små, men en del er
lynhurtige og meget voldsomme.
2 Hold altid motorsaven i et fast greb med højre hånd på
det bageste håndtag og venstre hånd på det forreste
håndtag. Tommelfingrene og de andre fingre skal
omslutte håndtagene. Alle brugere - uanset om man
er venstre- eller højrehåndet - skal bruge dette greb.
Ved at anvende dette greb kan du bedst reducere
effekten af et kast og samtidigt bevare kontrollen over
motorsaven.
3 De fleste kastulykker sker ved kvistning. Sørg derfor
for, at du står stabilt, og at ingen genstande på jorden
kan få dig til at snuble eller miste balancen.
Ved uagtsomhed kan sværdets kastrisikoområde
utilsigtet ramme en gren, et nærliggende træ eller
noget andet og fremkalde et kast.
Sørg for at have god kontrol over arbejdsemnet. Hvis
de emner, du saver, er små og lette, kan de gå fast i
savkæden og slynges mod dig. Selvom dette ikke i sig
ADVARSEL! Nogle gange sætter spåner
sig fast i koblingsdækslet, så kæden
klemmes fast. Stands altid motoren ved
rengøring.
Slip ikke håndtagene!
Danish – 63
Page 64

ARBEJDSTEKNIK
!
selv behøver at være farligt, kan du blive overrasket og
miste kontrollen over saven. Sav aldrig stablede pinde
eller grene uden at skille dem ad. Sav kun en pind
eller gren ad gangen. Fjern de afsavede stykker, så
arbejdsområdet forbliver sikkert.
4 Brug aldrig motorsaven over skulderhøjde, og
undgå at save med sværdspidsen. Brug aldrig
motorsaven kun med én hånd.
5 For at have fuld kontrol over din motorsav skal du stå
stabilt. Arbejd aldrig stående på en stige, oppe i et
træ, eller når du ikke står på et stabilt underlag.
6 Sav med høj kædehastighed, dvs. med fuld gas.
7 Vær yderst forsigtig, når du saver med sværdets
overside, dvs. når du saver fra saveobjektets
underside. Dette kaldes at save med skubbende
savkæde. Savkæden skubber da motorsaven bagud
mod brugeren. Hvis savkæden klemmes fast, kan
motorsaven kastes bagud mod dig.
8 Hvis brugeren ikke holder imod motorsavens kraft, er
der risiko for, at motorsaven slår så langt bagud, at
sværdets kastrisikoområde er den eneste kontakt
med træet, hvilket medfører til et kast.
At save med sværdets underside, dvs. save fra
objektets overside og ned, kaldes at save med
trækkende savkæde. Da trækkes motorsaven mod
træet og motorsavskroppens forkant bliver en naturlig
støtte mod stammen. Savning med trækkende
savkæde giver brugeren bedre kontrol over
motorsaven, og man ved, hvor sværdets
kastrisikoområde befinder sig.
9 Følg file- og vedligeholdelsesinstruktionerne for
sværd og savkæde. Ved udskiftning af sværd og
savkæde må kun de af os anbefalede kombinationer
benyttes. Se instruktionerne i afsnittet Skæreudstyr
og i afsnittet Tekniske data.
Grundlæggende saveteknik
ADVARSEL! Anvend aldrig en motorsav
ved at holde den i én hånd. Du kan ikke
!
håndtere motorsaven sikkert med én
hånd. Hav altid et fast, sikkert greb om
håndtagene med begge hænder.
Generelt
• Brug altid fuld gas ved al savning!
• Lad motoren gå ned på tomgangsomdrejninger efter
hvert savsnit (længere tid med fulde omdrejninger,
uden at motoren belastes, dvs. uden den modstand,
som motoren arbejder med via savkæden ved
savning, kan give alvorlige motorskader).
• At save oppefra og ned = At save med ”trækkende”
savkæde.
• At save nedefra og op = At save med ”skubbende”
savkæde.
Savning med ”skubbende” savkæde medfører en øget
kastrisiko. Se instruktionerne i afsnittet Kastforebyggende
foranstaltninger.
(28)
(29)
(30)
Betegnelser
Kapning = Generel betegnelse for gennemsavning af træ.
Kvistning = Kapning af grene fra fældet træ.
Spaltning = Når det objekt, som du skal kappe, brækkes
af, inden gennemsavningen er færdig.
Inden hver kapning er der fem meget vigtige faktorer
at tage hensyn til:
1 Skæreudstyret må ikke klemmes fast i savsnittet.
2 Savobjektet må ikke spaltes.
3 Savkæden må ikke slå ned i jorden eller andet under
og efter gennemsavningen.
4 Foreligger der kastrisiko?
5 Kan terrænet og omgivelsernes udseende påvirke,
hvor stabilt og sikkert du kan gå og stå?
At savkæden klemmes fast, eller at savobjektet spaltes
skyldes to faktorer: Hvilken støtte savobjektet har før og
under kapning, og om objektet er i spænd.
Førnævnte uønskede foreteelser kan i de fleste tilfælde
undgås ved at udføre kapningen i to trin, både fra over- og
undersiden. Det gælder om at neutralisere saveobjektets
”vilje” til at klemme savkæden fast eller til at spaltes.
VIGTIGT! Hvis savkæden bliver klemt fast i savsnittet,
skal motoren standses! Prøv ikke at rykke motorsaven
løs. Hvis du gør det, kan du komme til skade på
savkæden, når motorsaven pludselig løsnes. Brug en
løftestang til at få motorsaven fri.
Følgende punkter er en teoretisk gennemgang af,
hvordan man håndterer de mest almindelige situationer,
som en motorsavsbruger kan komme ud for.
Kvistning
Ved kvistning af tykkere grene skal man følge de samme
principper som ved kapning.
Afkap besværlige grene stykke for stykke.
Kapning
ADVARSEL! Forsøg aldrig at save pinde,
når de er stablede eller ligger tæt
sammen. Sådanne fremgangsmåder
forøger risikoen for kast markant,
hvorved der kan opstå alvorlig eller
livstruende skade.
Hvis du har en stabel pinde, skal hver enkelt af de pinde,
du vil save, fjernes fra stablen, placeres på en savbuk og
saves for sig.
Fjern de afsavede pinde fra arbejdsområdet. Hvis du
lader dem ligge i arbejdsområdet, forøger du både
risikoen for kast og for at miste balancen, når du arbejder.
Stammen ligger på jorden. Der er ingen risiko for
fastklemning af savkæden eller spaltning af savobjekt.
Der er dog stor risiko for, at savkæden rammer jorden
efter gennemsavning.
64 – Danish
Page 65

ARBEJDSTEKNIK
!
Sav oppefra og ned gennem hele stammen. Vær forsigtig
ved slutningen af savsnittet for at undgå at savkæden
rammer jorden. Behold fuld gas, men vær forberedt på
det, der kan ske.
Hvis det er muligt (= kan stammen drejes?), bør savsnittet
afsluttes 2/3 ned i stammen.
Drej stammen, så den resterende 1/3 kan afsluttes
oppefra.
Stammen har støtte i den ene ende. Stor risiko for
spaltning.
Begynd med at save nedefra og op (ca. 1/3 af stammens
diameter).
Afslut oppefra, så savsporene mødes.
Stammen har støtte i begge ender. Stor risiko for
fastklemning af savkæden.
Begynd med at save oppefra (ca. 1/3 af stammens
diameter).
Afslut savningen nedefra, så savsporene mødes.
Træfældningsteknik
VIGTIGT! Det kræver stor erfaring at fælde et træ. En
uerfaren motorsavsbruger skal ikke fælde træer. Undgå
at udføre opgaver, som du ikke er tilstrækkelig
kvalificeret til!
Sikkerhedsafstand
Sikkerhedsafstanden mellem det træ, der skal fældes, og
den nærmeste arbejdsplads skal være 2 1/2 trælængde.
Sørg for, at der ikke befinder sig nogen inden for denne
”risikozone” før og under fældning.
Faldretning
Hensigten ved træfældning er at placere træet på en
sådan måde, at den efterfølgende kvistning samt
afkapning af stammen kan udføres i så ”enkelt” terræn
som muligt. Man skal kunne gå og stå sikkert.
Når du har besluttet, i hvilken retning du vil fælde træet,
skal du vurdere, hvad træets naturlige faldretning er.
De faktorer, som styrer dette, er:
• Hældning
• Krogethed
• Vindretning
• Koncentration af grene
• Eventuel snetyngde
• Forhindringer i nærheden af træet: f.eks. andre træer,
kraftkabler, veje og bygninger.
• Kig efter skader og råd i stammen, da det øger
risikoen for, at træet knækker og begynder at falde,
når du ikke regner med det.
Efter denne vurdering kan man være tvunget til at lade
træet falde i sin naturlige faldretning, da det er umuligt
eller for farligt at placere det i den retning, man havde
planlagt fra begyndelsen.
En anden vigtig faktor, som ikke påvirker faldretningen,
men har med din personlige sikkerhed at gøre, er at
kontrollere, at træet ikke har nogle beskadigede eller
(31)
(37)
”døde” grene, som kan falde ned og skade dig under
fældningsarbejdet.
Først og fremmest skal det undgås, at det faldende træ
sætter sig fast i et andet. At tage et fastfældet træ ned er
meget farligt og er forbundet med meget stor
ulykkesrisiko. Se instruktionerne i afsnittet Håndtering af
et mislykket fældningsforsøg.
VIGTIGT! Ved kritiske fældningsmomenter bør
høreværnet fældes op, så snart savningen er ophørt, så
lyde og advarselssignaler kan høres.
Underkvistning og retrætevej
Afgren stammen op til skulderhøjde. Det er sikrest at
arbejde oppefra og ned og at have stammen mellem dig
og motorsaven.
Ryd undervegetationen rundt om træet, og vær
opmærksom på eventuelle forhindringer (sten, grene,
huller osv.), så du får en let fremkommelig retrætevej, når
træet begynder at falde. Retrætevejen bør ligge ca. 135
skråt tilbage fra træets planlagte faldretning.
1 Risikoområde
2 Retrætevej
3 Faldretning
Fældning
ADVARSEL! Vi fraråder utilstrækkeligt
kvalificerede brugere at fælde et træ med
en sværdlængde, som er kortere end
stammediameteren!
Fældningen udføres med tre savsnit. Først laves
retningssnittet, som består af et oversnit og et undersnit,
og derefter afsluttes fældningen med fældesnittet. Ved
korrekt placering af disse savsnit, kan man styre
faldretningen meget præcist.
Retningssnit
Ved udsavningen af retningssnittet begynder man med
oversnittet. Stå til højre for træet, og sav med trækkende
savkæde.
Sav derefter undersnittet, så det afsluttes præcis, hvor
oversnittet slutter.
Retningssnitdybden skal være 1/4 af stammens diameter,
og vinklen mellem over- og undersnit skal være mindst
45
°.
De to snit mødes i den såkaldte retningssnitlinje.
Retningssnitlinjen skal ligge præcist horisontalt og
samtidig danne en ret vinkel (90
faldretning.
Fældesnit
Fældesnittet saves fra den anden side af træet og skal
ligge absolut horisontalt. Stå på venstre side af træet og
sav med trækkende savkæde.
Placér fældesnittet ca. 3-5 cm (1,5-2 tommer) over
retningssnittets horisontalplan.
(39)
°) i forhold til den valgte
(40)
(38)
°
Danish – 65
Page 66

ARBEJDSTEKNIK
!
!
Placer barkstøtten (hvis den er monteret) bag
brudpunktet. Sav med fuld gas, og før savkæden/sværdet
langsomt ind i træet. Vær opmærksom på, om træet
bevæger sig i modsat retning i forhold til den valgte
faldretning. Sæt en fældekile i eller et brækjern i
fældesnittet, så snart snitdybden tillader det.
Fældesnittet skal afsluttes parallelt med
retningssnitlinjen, så afstanden mellem de to er mindst 1/
10 af stammens diameter. Den ikke gennemsavede del af
stammen kaldes brudpunktet.
Brudpunktet fungerer som et hængsel, som styrer
retningen af det faldende træ.
Al kontrol over træets faldretning mistes, hvis brudpunktet
er for lille eller gennemsavet, eller hvis retningssnit og
fældesnit er forkert placeret.
Når fældesnittet og retningssnittet er færdigsavet, skal
træet begynde at falde af sig selv eller ved hjælp af
fældekilen eller brækjernet.
Vi anbefaler at bruge en sværdlængde, som er længere
end træets diameter, så fælde- og retningssnit kan
udføres med et såkaldt 'enkelt savsnit'. Se anvisningerne
i afsnittet Tekniske data for at få oplysninger om, hvilke
sværdlængder der anbefales til din motorsavsmodel.
Der findes metoder til fældning af træer med en
stammediameter, der er større end sværdlængden. Disse
metoder medfører en meget stor risiko for, at sværdets
kastrisikoområde kommer i nærheden af et objekt.
(42)
Håndtering af et mislykket
fældningsforsøg
Nedtagning af et ”fastfældet træ”
At tage et fastfældet træ ned er meget farligt og er
forbundet med meget stor ulykkesrisiko.
Forsøg aldrig at save det fældede træ ned.
Undgå at arbejde inden for risikoområdet af det
hængende og næsten fældede træ.
Den sikreste metode er at bruge et spil.
• Traktormonteret
• Bærbar
Savning i træer og grene, som befinder sig i spænd
Forberedelser: Bedøm, i hvilken retning spændingen er
rettet, samt hvor den har sit brudpunkt (dvs. det sted, hvor
den ville brække over, hvis den blev spændt endnu mere).
Afgør, hvordan du på den sikreste måde kan frigøre
spændingen, og om du kan klare det. Ved særligt
komplicerede situationer er den eneste sikre metode helt
at undlade at bruge motorsaven og i stedet bruge et spil.
Generelt gælder:
Placér dig, så du ikke risikerer at blive ramt af træet /
grene, når spændingen udløses.
Lav et eller flere savsnit på eller i nærheden af
brudpunktet. Sav så dybt ind og med så mange snit, som
der kræves, for at spændingen i træet/grenen skal
udløses så meget, at træet ”brækker af” ved brudpunktet.
Sav aldrig helt igennem et objekt, der er i spænd!
(41)
Hvis du skal save igennem træet/grenen, skal du lave to
eller tre snit med en afstand på 3 cm og en dybde på 3-5
cm.
Fortsæt med at save dybere, indtil spændingen i træet/
grenen fjernes.
Sav træet/grenen fra den modsatte side, når spændingen
er fjernet.
Kastforebyggende
foranstaltninger
ADVARSEL! Kast kan være lynhurtige,
pludselige og voldsomme og kan kaste
motorsav, sværd og savkæde mod
brugeren. Er savkæden i bevægelse, når
og hvis den rammer brugeren, kan der
opstå meget alvorlige, ja endog
livsfarlige personskader. Det er
nødvendigt at forstå, hvad der forårsager
kast, og at de kan undgås ved
forsigtighed og korrekt arbejdsteknik.
Hvad er kast?
Kast er betegnelsen på en pludselig reaktion, hvor
motorsav og sværd kastes fra et objekt, som er kommet i
kontakt med sværdspidsens øverste kvadrant, det
såkaldte kastrisikoområde.
Kast slår altid i sværdplanets retning. Det mest
almindelige er, at motorsav og sværd kastes opad og
bagud mod brugeren. Dog forekommer der andre
kastretninger afhængigt af, hvor motorsaven befandt sig i
det øjeblik, sværdets kastrisikoområde var i kontakt med
et objekt.
Kast kan kun ske, når sværdets kastrisikoområde
kommer i kontakt med et objekt.
Kvistning
ADVARSEL! De fleste kastulykker sker
ved afgrening. Anvend aldrig sværdet i
kastrisikoområdet. Vær yderst forsigtig,
og undgå, at sværdspidsen kommer i
kontakt med pinden samt andre grene og
genstande. Vær yderst forsigtig ved
savning af grene, som befinder sig i
spænd. De kan fjedre tilbage mod dig og
resultere i, at du mister kontrollen, så der
opstår skade.
Sørg for, at du kan gå og stå sikkert! Arbejd fra venstre
side af stammen. Arbejd så tæt ved motorsaven som
muligt for at få den bedste kontrol. Når det er muligt, skal
du lade savens vægt hvile på stammen.
Flyt dig kun, når du har stammen mellem dig og
motorsaven.
Kapning af stammen til tømmerstokke
Se instruktionerne i afsnittet Grundlæggende saveteknik.
(30)
(43)
66 – Danish
Page 67

VEDLIGEHOLDELSE
Generelt
Brugeren må kun udføre den form for vedligeholdelsesog servicearbejde, der beskrives i denne brugsanvisning.
Mere omfattende arbejde skal udføres af et autoriseret
serviceværksted.
Karburatorjustering
Dit McCulloch-produkt er konstrueret og fremstillet i
henhold til specifikationer, som reducerer de skadelige
udstødningsgasser.
Funktion
• Via gasreguleringen styrer karburatoren motorens
omdrejningstal. I karburatoren blandes luft/brændstof.
Denne luft/brændstofblanding er justerbar. For at
udnytte maskinens maksimale effekt, skal justeringen
være korrekt.
• T-skruen regulerer gasreguleringens stilling ved
tomgang. Skrues T-skruen med uret fås et højere
tomgangsomdrejningstal, og skrues den mod uret fås
lavere tomgangsomdrejningstal.
Grundindstilling og tilkøring
Ved tilkøring på fabrikken foretages en grundindstilling af
karburatoren. Finjustering skal udføres af en fagmand.
Anbefalet omdrejningstal i tomgang: Se kapitlet Tekniske
data.
Finjustering af tomgang T
Indstilling af tomgang gøres med skruen, der er afmærket
T. Hvis justering er nødvendig, skrues tomgangsskruen T
ind (med uret) med motoren i gang, indtil kæden
begynder at rotere. Skru derefter ud (mod uret) igen, indtil
kæden står stille. Korrekt indstillet
tomgangsomdrejningstal er, når motoren arbejder jævnt i
alle positioner med god marginal til det omdrejningstal,
hvor kæden begynder at rotere.
ADVARSEL! Hvis
tomgangsomdrejningstallet ikke kan
!
justeres, så kæden står stille, skal du
kontakte serviceværkstedet. Brug ikke
motorsaven, før den er korrekt indstillet
eller repareret.
Kontrol, vedligeholdelse og
service af motorsavens
sikkerhedsudstyr
Bemærk! Al service og alle reparationer af maskinen
kræver specialuddannelse. Dette gælder især
maskinens sikkerhedsudstyr. Hvis maskinen ikke klarer
nogen af følgende kontroller, anbefaler vi, at du
kontakter dit serviceværksted. Al vedligeholdelse ud
over det, som tidligere er nævnt i denne bog, skal
foretages af servicepartneren (forhandleren).
Sluk motoren og fjern tændkablet før reparation eller
vedligeholdelse
Kædebremse med kastbeskyttelse
Kontrol af bremsebåndsslitage
Rens kædebremsen og koblingstromlen for spåner,
harpiks og snavs. Snavs og slitage påvirker
bremsefunktionen.
Kontrollér regelmæssigt, at der er mindst 0,6 mm af
bremsebåndets tykkelse tilbage på det mest slidte sted.
Kontrol af kastbeskyttelse
Kontrollér, at kastbeskyttelsen er hel og uden synlige
defekter, f.eks. materialerevner.
Før kastbeskyttelsen frem og tilbage for at kontrollere, at
den går let, og at den er stabilt forankret ved dens led i
koblingsdækslet.
Kontrol af træghedsfunktionen
Sluk motoren, og hold motorsaven over en stub eller over
et andet stabilt underlag. Slip det forreste håndtag, og lad
motorsaven falde ned af sig selv mod stubben, mens det
bageste håndtag drejer rundt.
Når sværdspidsen rammer stubben, skal bremsen
udløses.
(35)
Kontrol af bremsevirkning
Anbring motorsaven på et stabilt underlag, og start den.
Sørg for, at savkæden ikke kan komme i kontakt med
jorden eller noget andet. Se anvisningerne under
overskriften Start og stop.
Hold motorsaven i et fast greb med tommelfingre og fingre
rundt om håndtagene.
Giv fuld gas, og aktivér kædebremsen ved at dreje
venstre håndled mod kastbeskyttelsen. Slip ikke det
forreste håndtag.
(32)
(33)
Kæden skal stoppe øjeblikkeligt.
Danish – 67
Page 68

VEDLIGEHOLDELSE
Gasreguleringslås
• Kontrollér, at gasreguleringen er låst i
tomgangsstilling, når gasreguleringslåsen befinder
sig i udgangsstilling.
• Tryk gasreguleringslåsen ind, og kontrollér, at den
vender tilbage til udgangsstillingen, når den slippes.
• Kontrollér, at gasreguleringen og gasreguleringslåsen
går let, og at returfjedersystemet fungerer.
• Start motorsaven, og giv fuld gas. Slip
gasreguleringen, og kontrollér, at kæden standser, og
at den bliver stående stille. Hvis kæden roterer med
gasreguleringen i tomgangsstilling skal karburatorens
tomgangsjustering kontrolleres.
Kædefanger
Kontrollér, at kædefangeren er på plads og er intakt.
Højrehåndsbeskyttelse
Kontrollér, at højrehåndsbeskyttelsen er intakt og uden
synlige defekter, f.eks. materialerevner.
Vibrationsdæmpningssystem
Kontrollér regelmæssigt
vibrationsdæmpningselementerne for materialerevner og
deformationer
Kontrollér, at vibrationsdæmpningselementerne er fast
forankrede mellem henholdsvis motorenhed og
håndtagsenhed.
Stopkontakt
Start motoren, og kontrollér, at motoren slukkes, når
stopkontakten sættes i stopposition.
Lyddæmper
Brug aldrig en maskine med en defekt lyddæmper.
Kontrollér regelmæssigt, at lyddæmperen sidder fast i
maskinen.
Bemærk: Gnistfangernettet (A) på denne maskine kan
udskiftes. Ved eventuelle skader på nettet skal dette
udskiftes. Ved et tilstoppet net overopvarmes maskinen
med skader på cylinder og stempel til følge. Brug aldrig
maskinen med en lyddæmper, der er i dårlig stand.
aldrig en lyddæmper uden eller med defekt
gnistfangernet.
Det anbefales, at lyddæmperen udskiftes på
serviceværkstedet (forhandleren), når maskinen har
været i drift i 75 timer.
(6)
Luftfilter
Luftfilteret skal rengøres regelmæssigt for støv og snavs
for at undgå:
• Karburatorforstyrrelser.
• Startproblemer.
• Dårlig effekt.
• Unødvendig slitage på motorens dele.
• Unormalt højt brændstofforbrug.
Brug
Rengøring af luftfilteret: (34)
1 Fjern knappen (A), der holder cylinderdæksel, og fjern
cylinderdækslet (B).
2 Fjern luftfilteret (D).
3 Rengør luftfilteret.
- Vask filteret i rent, varmt sæbevand.
- Skyl med rent, koldt vand.
- Lufttør helt.
4 Saml i modsat rækkefølge. Sørg for, at låsen (E),
låsen (F) og cylinderdækslet passer korrekt. Stram
knappen.
Et længe brugt luftfilter kan aldrig blive helt rent. Derfor
skal filteret regelmæssigt udskiftes med et nyt.
beskadiget luftfilter skal altid udskiftes.
BEMÆRK! Det anbefales at have en forsyning af
reservefiltre.
Et
Tændrør
Tændrørets tilstand påvirkes af:
• En forkert indstillet karburator.
• En forkert olieblanding i brændstoffet (for meget eller
forkert olie).
• Et snavset luftfilter.
Disse faktorer forårsager belægninger på tændrørets
elektroder og kan forårsage driftsforstyrrelser og
startproblemer.
Hvis maskinens effekt er for lav, hvis den er svær at starte,
eller hvis tomgangen er urolig, skal du altid først
kontrollere tændrøret, inden der gøres noget andet. Hvis
tændrøret er tilstoppet, skal det renses, og samtidig skal
det kontrolleres, at elektrodeafstanden er 0,6 mm.
Tændrøret bør udskiftes efter ca. en måneds drift, eller
hvis det er nødvendigt, endnu tidligere.
Bemærk! Brug altid anbefalet tændrørstype! Forkert
tændrør kan ødelægge stempel/cylinder. Kontrollér, at
tændrøret har såkaldt radiostøjdæmpning.
(36)
68 – Danish
Page 69

VEDLIGEHOLDELSE
Vedligeholdelsesskema
Nedenfor vises en oversigt over det vedligeholdelsesarbejde, der skal udføres på maskinen. De fleste af punkterne er
beskrevet i afsnittet Vedligeholdelse.
Dagligt eftersyn Ugentligt eftersyn Månedligt eftersyn
Kontrollér bremsebåndet på
Rengør maskinen udvendigt.
Kontrollér, at gasreguleringens
indgående dele fungerer
sikkerhedsmæssigt korrekt
(Gasreguleringslås og
gasregulering.)
Rens kædebremsen, og kontrollér
dens funktion ud fra et
sikkerhedsmæssigt synspunkt.
Kontrollér, at kædefangeren ikke er
defekt, og udskift om nødvendigt.
Sværdet skal vendes dagligt for at få
en mere jævn slitage. Kontrollér, at
smørehullet i sværdet ikke er
tilstoppet. Rens kædesporet.
Kontrollér, at sværd og kæde får
tilstrækkelig med olie.
Kontrollér savkæden for synlige
revner i nitter og led, hvis savkæden
er sløv, eller nitter og led er unormalt
slidte. Skift dem om nødvendigt.
Fil kæden, og kontrollér dens
stramning og tilstand. Kontrollér, at
kædedrivhjulet ikke er unormalt slidt,
udskift i nødvendige tilfælde.
Rengør luftindtaget i startaggregatet. Kontrollér alle kabler og tilslutninger.
Kontrollér, at skruer og møtrikker er
spændte.
Kontrollér, at stopkontakten fungerer.
Kontrollér, at hverken motor, tank
eller brændstofrør lækker brændstof.
Kontrollér startmotoren, startsnoren
og returfjederen.
Kontrollér, at vibrationsisolatorerne
ikke er beskadigede.
Fil eventuelle ujævnheder væk på
sværdets sider.
Rengør karburatorrummet. Rengør karburatoren udvendigt.
Rens luftfilteret. Udskift om
nødvendigt.
kædebremsen med hensyn til
slitage. Udskift bremsebåndet, når
der er mindre end 0,6 mm tilbage på
det mest slidte sted.
Kontrollér koblingscentrumet,
koblingstromlen og koblingsfjederen
med hensyn til slitage.
Rens tændrøret. Kontrollér, at
elektrodeafstanden er 0,6 mm.
Kontrollér brændstoffilteret og
brændstofslangen. Udskift om
nødvendigt.
Tøm brændstoftanken, og rengør
den indvendigt.
Tøm olietanken, og rengør den
indvendigt.
Danish – 69
Page 70

TEKNISKE DATA
Tekniske data
CS 35 CS 35S
Motor
Cylindervolumen, cm
Slaglængde, mm 31,1 31,1
Interval for tomgangshastighed, min-1 2700-3300 2700-3300
Effekt, kW 1,44/9000 1,44/9000
Tændingssystem
Tændrør CMR7H CMR7H
Elektrodeafstand, mm 0,6 0,6
Brændstof-/smøresystem
Brændstoftankvolumen, liter/cm
Kapacitet oliepumpe ved 9000 o/min., ml/min. 7-9 7-9
Volumen olietank, liter 0,15 0,15
Type af oliepumpe Automatisk Automatisk
Vægt
Motorsav uden sværd, kæde samt med tomme tanke, kg 4,6 4,6
Støjemissioner (se anm. 1)
Lydeffektniveau, målt dB(A) 109 109
Lydeffektniveau, garanteret LWA dB(A) 111 111
Lydniveauer (se anm. 2)
Ækvivalent lydtryksniveau ved brugerens øre, dB(A) 99 99
Ækvivalente vibrationsniveauer, a
Forreste håndtag, m/s
Bageste håndtag, m/s
Kæde/sværd
Standard sværdlængde, tommer/cm 14-16 / 35-40 14/35
Anbefalede sværdlængder, tommer/cm 14-16 / 35-40 14/35
Effektiv skærelængde, tommer/cm 13-15 / 33-38 13-15 / 33-38
Deling, mm 3/8 / 9,52 3/8 / 9,52
Tykkelse på drivled, tommer/mm 0,050/1,3 0,050/1,3
Type af drivhjul/antal tænder Spur/6 Spur/6
Kædehastighed på 133 % af motorens maksimale
omdrejningstal, m/s.
Anm.1: Emission af støj til omgivelserne målt som lydeffekt (LWA) i henhold til Rådets direktiv 2000/14/EF.
Anm. 2: Ækvivalent lydtryksniveau i henhold til ISO 22868 beregnes som den tidsvægtede energisum for forskellige
lydtryksniveauer ved forskellige driftstilstande. Typisk statistisk spredning for et ækvivalent lydtryksniveau er en
standardafvigelse på 2,5 dB (A).
Anm. 3: Ækvivalent vibrationsniveau i henhold til ISO 22867 beregnes som den tidsvægtede energisum for
vibrationsniveauer ved forskellige driftstilstande. Rapporterede data for et ækvivalent vibrationsniveau har en typisk
statistisk spredning (standardafvigelse) på 1,5 m/s
3
3
(se anm. 3)
2
2
hveq
2
35 35
0,25/250 0,25/250
6,673 6,673
5,792 5,792
22,8 22,8
.
70 – Danish
Page 71

TEKNISKE DATA
Sværd- og kædekombinationer
Følgende skæreudstyr er godkendt til modellerne McCulloch CS 35 og CS 35S.
Sværd Savkæde
Længde,
tommer
14 3/8" 1,3 7T 14” 91-52 DC
16 3/8" 1,3 7T 16” 91-56 DC
Deling,
tommer
Sporbredde,
mm
Maks. antal
tænder,
næsehjul
Type Type
91PJ052X
(Oregon)
91PJ056X
(Oregon)
Længde,
drivled (stk.)
52
56
EF-overensstemmelseserklæring
(Gælder kun Europa)
Husqvarna AB , SE-561 82 Huskvarna, Sverige, tlf. +46-36-146500, erklærer hermed og påtager sig det fulde ansvar
for, at motorsavene til skovbrug McCulloch CS 35 og CS 35S fra 2016 årgangsserienummer og fremad (året er angivet
i klartekst på typeskiltet plus et efterfølgende serienummer) opfylder forskrifterne i RÅDETS DIREKTIV:
- af den 17. maj 2006 "angående maskiner" 2006/42/EF .
- af den 26. februar 2014 ”angående elektromagnetisk kompatibilitet” 2014/30/EU .
- af den 8. maj 2000 ”angående emission af støj til omgivelserne” 2000/14/EF .
Procedure for evaluering af overensstemmelse i henhold til bilag V i ovenstående direktiv har fundet anvendelse.
Oplysninger om støjemissioner fremgår af kapitlet Tekniske data. Følgende standarder er opfyldt: EN ISO 11681-1:2011,
EN ISO 14982:2009
Udpeget organ: TÜV Rheinland LGA Products GmbH, Tillystrasse 2, D-90431 Nürnberg, Tyskland, 0197, har udført EFtypegodkendelse i overensstemmelse med maskindirektivets (2006/42/EC) artikel 12, punkt 3b. Typegodkendelsen for
EF-typeafprøvning i henhold til Bilag IX har nummer: Attester vedrørende EF-typegodkendelse i henhold til bilag IX har
numrene: BM 50351057
Den leverede motorsav er i overensstemmelse med det produkt, der er godkendt i henhold til EF-typegodkendelse.
Changzhou, China. 8. juli 2016
John Thompson, produkt- og marketingchef EUAP. (Autoriseret repræsentant for Husqvarna AB og ansvarlig for teknisk
dokumentation.)
Danish – 71
Page 72

JOHDANTO
Koneessa esiintyvät tunnukset:
VAROITUS! Moottorisahat saattavat olla
vaarallisia! Huolimaton tai virheellinen
käyttö saattaa aiheuttaa käyttäjälle tai
sivullisille vakavia vammoja tai
kuoleman.
Lue käyttöohje huolellisesti ja
ymmärrä sen sisältö, ennen kuin alat
käyttää konetta.
Käytä aina:
• Hyväksyttyä suojakypärää
• Hyväksyttyjä kuulonsuojaimia
• Suojalasit tai visiiri
Tämä tuote täyttää voimassa olevan
CE-direktiivin vaatimukset.
Melupäästöt ympäristöön Euroopan
yhteisön direktiivin mukaisesti. Koneen
päästöt ilmoitetaan luvussa Tekniset
tiedot ja arvokilvessä.
Käyttäjän on käytettävä moottorisahaa
molemmin käsin.
Älä koskaan käytä moottorisahaa
pitämällä sitä vain yhdellä kädellä.
Ketjujarru, aktivoitu (etu)
Ketjujarru, ei aktivoitu (taka)
Polttoainepumppu
Polttonesteen täyttö.
Teräketjuöljyn täyttö.
Tuotteen
arvokilvessä näkyy
tuotteen
sarjanumero.
tarkoittaa tuotteen
valmistusvuotta ja
ww valmistusviikkoa.
xxxxx on tuotteen
sarjanumero.
Muita koneen tunnuksia/tarroja tarvitaan tietyillä
markkina-alueilla ilmaisemaan erityisiä
sertifiointivaatimuksia.
yyyy
yyyywwxxxxx
Vältä terälevyn kärjen osumista
mihinkään esineeseen.
VAROITUS! Terälevyn kärjen
osuminen esineeseen voi synnyttää
takapotkun ja aiheuttaa terälevyn
sinkoutumisen ylöspäin ja kohti
käyttäjää. Se voi aiheuttaa vakavia
henkilövahinkoja.
Moottori pysäytetään katkaisemalla sytytys
pysäyttimellä.
72 – Finnish
Page 73

JOHDANTO
Hyvä asiakas!
Kiitos, että valitsit McCulloch-tuotteen! Olet siten osa
kauan sitten alkanutta tarinaa, sillä McCulloch
Corporation aloitti moottorien valmistuksen jo Toisen
maailmansodan aikaan. Vuonna 1949, kun McCulloch
esitteli ensimmäisen, kevyen yhden miehen kannettavan
moottorisahan, puuteollisuus muuttui lopullisesti.
Innovatiivisten moottorisahojen valikoima täydentyi
vuosikymmenten aikana ja liiketoimintaa laajennettiin.
Ensin mukaan tulivat lentokoneiden ja mikroautojen
moottorit 1950-luvulla ja sitten pienet moottorisahat 1960luvulla. Myöhemmin 1970- ja 80-luvuilla valikoimaan
lisättiin trimmerit ja puhallusputket.
Nykyisin Husqvarna-konserniin kuuluva McCulloch jatkaa
tehokkaiden moottorien, teknisten innovaatioiden ja
kestävien mallien perinnettään, joka on ollut meille
leimallista jo yli puolen vuosisadan ajan. Matalampi
polttoaineenkulutus, pienemmät päästöt ja alhaisempi
melutaso ovat meille erityisen tärkeitä samoin kuin
turvallisuuden parantaminen ja käyttäjäystävällisyys.
Toivomme, että olet tyytyväinen McCulloch-tuotteeseesi,
sillä se on suunniteltu kestämään pitkäksi aikaa
eteenpäin. Noudattamalla käyttöoppaan käyttöä, huoltoa
ja kunnossapitoa koskevia neuvoja, tuotteen käyttöikää
voidaan pidentää entisestään. Jos tarvitset korjauksiin tai
huoltoon ammattilaisen apua, käytä osoitteessa
www.mcculloch.com olevaa Service Locator -palvelua.
McCulloch kehittää jatkuvasti tuotteitaan ja pidättää siksi
itselleen oikeuden mm. muotoa ja ulkonäköä koskeviin
muutoksiin ilman ennakkoilmoitusta.
Tämän käyttöoppaan voi ladata myös osoitteesta
www.mcculloch.com.
Moottorisahan osat (1)
1 Sylinterikotelo
2 Polttoainepumppu
3 Pysäytin (Sytytyksen päälle- ja päältäkytkentä.)
4 Rikastin/Puolikaasun lukitsin
5 Takakahva oikean käden suojuksella
6 Huomio- ja varoitustarra
7 Polttoainesäiliö
8 Kaasuttimen säätöruuvit
9 Käynnistyskahva
10 Käynnistin
11 Ketjuöljysäiliö
12 Arvokilpi
13 Teräketjun kireydensäätöruuvi
14 Kytkinkotelo
15 Kaasuliipasimen varmistin (Estää tahattoman
kaasutuksen.)
16 Etukahva
17 Takapotkusuojus
18 Äänenvaimennin
19 Terälevy
20 Kärkipyörä
21 Teräketju
22 Kuorituki
23 Ketjusieppo
24 Kaasuliipasin
25 Teräsuojus
26 Käyttöohje
27 Yhdistelmätyökalu
Finnish – 73
Page 74

Sisältö
JOHDANTO
Koneessa esiintyvät tunnukset: ............................. 72
JOHDANTO
Hyvä asiakas! ....................................................... 73
Moottorisahan osat ............................................... 73
SISÄLTÖ
Sisältö ................................................................... 74
YLEISET TURVAOHJEET
Toimenpiteet ennen uuden moottorisahan käyttöä 75
Tärkeää ................................................................. 75
Käytä aina tervettä järkeä ..................................... 75
Henkilökohtainen suojavarustus ........................... 76
Koneen turvalaitteet .............................................. 76
Terälaite ................................................................ 78
ASENNUS
Terälevyn ja ketjun asennus .................................. 81
POLTTOAINEEN KÄSITTELY
Polttoaine .............................................................. 82
Tankkaus ............................................................... 82
Polttoaineturvallisuus ............................................ 83
KÄYNNISTYS JA PYSÄYTYS
Käynnistys ja pysäytys .......................................... 84
PERUSTEKNIIKKA
Aina ennen käyttöä: .............................................. 85
Yleiset työohjeet ................................................... 85
Takapotkua ehkäisevät toimenpiteet ..................... 89
KUNNOSSAPITO
Yleistä ................................................................... 90
Kaasuttimen säätö ................................................ 90
Moottorisahan turvalaitteiden tarkastus,
kunnossapito ja huolto ..........................................
Äänenvaimennin ................................................... 91
Ilmansuodatin ....................................................... 91
Sytytystulppa ........................................................ 91
Huoltokaavio ......................................................... 92
TEKNISET TIEDOT
Tekniset tiedot ....................................................... 93
Terälevy- ja ketjuyhdistelmät ................................. 94
EY-vaatimustenmukaisuusvakuutus ...................... 94
SISÄLTÖ
90
74 – Finnish
Page 75

YLEISET TURVAOHJEET
!
!
Toimenpiteet ennen uuden
moottorisahan käyttöä
• Lue käyttöohje huolellisesti.
• (1) - (43) viittaa kuviin sivulla 2-5.
• Tarkasta terälaitteen asennus ja säätö. Katso otsikon
Asennus alla annetut ohjeet.
• Lisää polttoainetta ja käynnistä moottorisaha. Katso
otsikoiden Polttoaineen käsittely, Käynnistys ja
Pysäytys alla annetut ohjeet.
• Älä käytä moottorisahaa, ennen kuin teräketjuun on
päässyt riittävästi ketjuöljyä. Katso otsikon
Terälaitteen voitelu alla annetut ohjeet.
• Pitkäaikainen altistuminen melulle saattaa aiheuttaa
pysyviä kuulovammoja. Käytä siksi aina hyväksyttyjä
kuulonsuojaimia.
VAROITUS! Koneen alkuperäistä
rakennetta ei missään tapauksessa saa
!
muuttaa ilman valmistajan lupaa. Käytä
aina alkuperäisiä varaosia.
Hyväksymättömien muutosten ja/tai
lisävarusteiden käyttö voi aiheuttaa
käyttäjälle tai muille vakavia vahinkoja tai
kuoleman.
VAROITUS! Moottorisaha voi
huolimattomasti tai virheellisesti
!
käytettynä olla vaarallinen työväline, joka
voi aiheuttaa vakavan tai jopa
hengenvaarallisen tapaturman. On
erittäin tärkeää, että luet ja ymmärrät
tämän käyttöohjeen sisällön.
VAROITUS! Äänenvaimennin sisältää
kemikaaleja, jotka saattavat olla
!
karsinogeenisiä. Vältä kosketusta näihin
osiin, mikäli käsittelet vaurioitunutta
äänenvaimenninta.
VAROITUS! Moottorin pakokaasujen,
ketjuöljysumun ja sahanpurupölyn
!
pitkäaikainen sisäänhengittäminen voi
olla terveydelle vaarallista.
VAROITUS! Kone muodostaa käytön
aikana sähkömagneettisen kentän.
!
Kenttä saattaa joissakin tapauksissa
häiritä aktiivisten tai passiivisten
lääketieteellisten implanttien toimintaa.
Vakavien tai kohtalokkaiden
onnettomuuksien ehkäisemiseksi
kehotamme lääketieteellisiä implantteja
käyttäviä henkilöitä neuvottelemaan
lääkärin ja lääketieteellisen implantin
valmistajan kanssa ennen koneen
käyttämistä.
Tärkeää
TÄRKEÄÄ!
Tämä metsäkäyttöön tarkoitettu moottorisaha on
suunniteltu metsätöihin, kuten puiden kaatamiseen,
karsimiseen ja katkomiseen.
Sahassa tulee käyttää ainoastaan kappaleessa
Tekniset tiedot suositeltuja terälevy/
teräketjuyhdistelmiä.
Älä koskaan käytä konetta, jos olet väsynyt tai nauttinut
alkoholia, tai käytät lääkkeitä, jotka voivat vaikuttaa
näkökykyysi, harkintakykyysi tai kehosi hallintaan.
Käytä henkilökohtaisia suojavarusteita. Katso otsikon
Henkilökohtainen suojavarustus alla annetut ohjeet.
Älä tee tähän koneeseen koskaan sellaisia muutoksia,
jotka muuttavat sen alkuperäistä rakennetta, äläkä
käytä sitä, mikäli epäilet jonkun muun muuttaneen
konetta.
Älä koskaan käytä viallista konetta. Noudata tässä
käyttöohjeessa annettuja turvallisuustarkastuksia,
kunnossapitoa ja huoltoa koskevia ohjeita. Tietyt
kunnossapito- ja huoltotyöt on annettava koulutettujen
ja pätevien asiantuntijoiden tehtäviksi. Katso ohjeet
kohdasta Kunnossapito.
Älä koskaan käytä muita kuin tässä käyttöohjeessa
suositeltuja lisävarusteita. Katso otsikoiden Terälaite ja
Tekniset tiedot alla annetut ohjeet.
HUOM! Käytä aina suojalaseja tai kasvovisiiriä, jotta
sinkoavien kappaleiden aiheuttamia vahinkoriski olisi
pienempi. Moottorisaha voi singota suurella voimalla
liikkeelle sahanpurun, pienien puunpalojen ja vastaavan
kaltaisia kappaleita. Ne voivat aiheuttaa vakavia
vahinkoja, etenkin silmille.
VAROITUS! Moottorin käyttäminen
suljetussa tai huonosti ilmastoidussa
tilassa voi aiheuttaa tukehtumisesta tai
hiilimonoksidimyrkytyksestä johtuvan
kuoleman.
VAROITUS! Väärä terälaite tai väärä
terälevy/teräketjuyhdistelmä lisää
takapotkun vaaraa! Käytä vain
suosittelemiamme terälevy/
teräketjuyhdistelmiä ja noudata
teroitusohjeita. Katso ohjeita
kappaleessa Tekniset tiedot.
Käytä aina tervettä järkeä (2)
On mahdotonta kuvata kaikkia mahdollisia tilanteita, joita
moottorisahan käytössä voi ilmetä. Ole aina varovainen ja
käytä tervettä järkeä. Vältä tilanteita, mihin et katso taitosi
riittävän. Mikäli olet vielä näiden ohjeiden lukemisen
jälkeen epävarma menettelytavoista, sinun on kysyttävä
neuvoa asiantuntijalta ennen jatkamista. Älä epäröi ottaa
Finnish – 75
Page 76

YLEISET TURVAOHJEET
!
yhteyttä jälleenmyyjääsi tai meihin, mikäli sinulla on
kysyttävää moottorisahan käytöstä. Olemme
mielellämme avuksi ja annamme neuvoja, joiden avulla
voit käyttää moottorisahaasi paremmin ja turvallisemmin.
Moottorisahan käyttöön kannattaa hankkia opetusta.
Jälleenmyyjäsi, metsäopistot tai kirjastot voi antaa tietoja
saatavilla olevista koulutusmateriaaleista ja kursseista.
Työ rakenteiden ja tekniikan parantamiseksi on jatkuvasti
käynnissä - parannuksilla halutaan lisätä sinun
turvallisuuttasi ja tehokkuuttasi. Käy jälleenmyyjäsi luona
säännöllisesti kuulemassa, millaista hyötyä voit saada
kulloinkin esitteillä olevista uutuuksista.
Henkilökohtainen suojavarustus
VAROITUS! Suurin osa
moottorisahaonnettomuuksista tapahtuu
!
niin, että teräketju osuu käyttäjään.
Konetta käytettäessä on aina pidettävä
hyväksyttyjä henkilökohtaisia
suojavarusteita. Henkilökohtaiset
suojavarusteet eivät poista tapaturmien
vaaraa, mutta lieventävät vaurioita
onnettomuustilanteessa. Pyydä
jälleenmyyjältä apua varusteiden
valinnassa.
• Hyväksyttyä suojakypärää
• Kuulonsuojaimet
• Suojalasit tai visiiri
• Viiltosuojalla varustetut käsineet
• Viiltosuojalla varustetut housut
• Viiltosuojalla, teräksisellä varvassuojalla ja
luistamattomalla pohjalla varustetut saappaat
• Ensiapulaukun on aina oltava lähellä.
• Palonsammutin ja lapio
Vaatteiden pitää olla ihonmyötäisiä, mutta ne eivät saa
vaikeuttaa liikkumista.
TÄRKEÄÄ! Äänenvaimentimesta, terälevystä ja ketjusta
tai muista lähteistä saattaa syntyä kipinöitä. Pidä
palonsammutuskalusto aina saatavilla mahdollista
tarvetta varten. Niin voit olla avuksi metsäpalojen
ehkäisemisessä.
Koneen turvalaitteet
Tässä luvussa selvitetään koneen turvalaitteet ja niiden
toiminta. Katso tarkastus- ja kunnossapito-ohjeet otsikon
Koneen turvalaitteiden tarkastus, kunnossapito ja huolto
alta. Katso luvusta Koneen osat, missä nämä laitteet
koneessasi sijaitsevat.
Koneen käyttöikä voi lyhentyä ja onnettomuusriski
kasvaa, jos koneen kunnossapitoa ei suoriteta oikealla
tavalla ja jos huoltoa ja/tai korjauksia ei tehdä
ammattitaitoisesti. Jos tarvitset lisäohjeita, ota yhteys
huoltokorjaamoon.
VAROITUS! Älä koskaan käytä konetta,
jos sen turvalaitteet ovat rikki.
Turvalaitteet on tarkastettava ja
huollettava. Katso ohjeet otsikon Koneen
turvalaitteiden tarkastus, kunnossapito
ja huolto alta. Jos koneessasi ilmenee
tarkastettaessa puutteita, se on
toimitettava huoltoliikkeeseen
korjattavaksi.
Takapotkusuojuksella varustettu
ketjujarru
Moottorisahasi on varustettu ketjujarrulla, joka pysäyttää
teräketjun takapotkun sattuessa. Ketjujarru vähentää
onnettomuusriskiä, mutta vain sinä käyttäjänä voit estää
ne.
Käytä sahaa varovasti äläkä koskaan päästä terälevyn
takapotkuille altista aluetta osumaan esineisiin.
• Ketjujarru (A) laukaistaan joko käsin (vasemmalla
kädellä) tai automaattisella pysäytystoiminnolla.
• Ketjujarru laukeaa, kun takapotkusuojusta (B)
työnnetään eteenpäin.
• Liike käynnistää jousikuormitteisen koneiston, joka
kiristää jarruhihnan (C) moottorin ketjupyörän (D)
(kytkinrummun) ympärille.
• Takapotkusuojusta ei ole tarkoitettu vain ketjujarrun
laukaisemiseen. Sen toinen erittäin tärkeä tehtävä on
vähentää vaaraa, että vasen käsi osuu teräketjuun,
jos ote irtoaa etukahvasta.
• Ketjujarrun on oltava kytkettynä estämässä ketjun
pyöriminen, kun moottorisaha käynnistetään
• Käytä ketjujarrua "seisontajarruna" käynnistyksessä
sekä lyhyiden siirtymien aikana, jotta käyttäjä tai
ympäristö ei joutuisi tekemisiin liikkuvan teräketjun
kanssa.
• Ketjujarru vapautetaan työntämällä takapotkusuojus
taaksepäin etukahvaan päin.
• Takapotkut voivat olla salamannopeita ja erittäin
voimakkaita. Useimmat takapotkut ovat heikkoja,
eivätkä ne aina laukaise ketjujarrua. Näissä
tilanteissa moottorisaha on pidettävä tukevassa
otteessa eikä sitä saa päästää käsistä.
• Se, laukaistaanko ketjujarru käsin vai automaattisella
pysäytystoiminnolla, riippuu takapotkun
voimakkuudesta ja moottorisahan asennosta siihen
esineeseen nähden, johon terälevyn takapotkusektori
on osunut.
Rajuissa takapotkuissa ja kun terälevyn
takapotkusektori on mahdollisimman kaukana
käyttäjästä, ketjujarru laukeaa automaattisella
pysäytystoiminnolla, jonka ketjujarrun vastavoima
(hitaus) aktivoi takapotkun suunnassa.
Lievemmissä takapotkuissa, tai kun takapotkusektori
on lähellä käyttäjää, laukeaa ketjujarru vasemman
käden vaikutuksesta.
• Kaatoasennossa vasen käsi on sellaisessa
asennossa, että ketjujarrun aktivointi käsin on
mahdotonta. Pidettäessä sahasta tällaisella otteella,
(3)
(4)
(3)
76 – Finnish
Page 77

YLEISET TURVAOHJEET
!
!
ts. kun vasen käsi on asetettu niin, ettei se pysty
vaikuttamaan takapotkusuojuksen liikkeeseen, voi
ketjujarru laueta vain automaattisen
pysäytystoiminnon vaikutuksesta.
Aktivoiko käteni aina ketjujarrun
takapotkun yhteydessä?
Ei. Takapotkusuojan viemiseksi eteen tarvitaan tietyn
suuruista voimaa. Jos kätesi hipaisee vain kevyesti
takapotkusuojaa tai luiskahtaa sen yli, saattaa voima olla
liian pieni ketjujarrun laukaisuun. Moottorisahan kahvasta
on myös pidettävä tukevasti kiinni työskentelyn aikana.
Kun teet niin, et ehkä koskaan irrota otetta etukahvasta ja
aktivoi ketjujarrua, tai ketjujarru voi mennä päälle vasta
kun saha on ehtinyt liikkua melkoisen matkan. Tällaisessa
tapauksessa saattaa käydä niin, ettei ketjujarru ehdi
pysäyttää ketjua ennen kuin se osuu sinuun.
Myös tietyissä työasennoissa kätesi ei ylety
takapotkusuojaan ketjujarrun aktivoimiseksi, esim. kun
sahaa pidetään kaatoasennossa.
Pysäyttääkö automaattinen
pysäytystoiminto ketjun aina, jos
takapotku tapahtuu?
Ei. Ensinnäkin jarrun on toimittava. Jarrun testaaminen on
helppoa, katso ohjeet otsikon Koneen turvalaitteiden
tarkastus, kunnossapito ja huolto alta. Suosittelemme,
että teet sen ennen jokaista työrupeamaa. Toiseksi
takapotkun on oltava riittävän voimakas, jotta se aktivoisi
ketjujarrun. Jos ketjujarru olisi hyvin herkkä, se aktivoituisi
tämän tästä, ja se olisi melko vaivalloista.
Suojaako ketjujarru minua vahingoilta
aina, jos takapotku tapahtuu?
Ei. Ensinnäkin jarrun on toimittava, jotta se suojaisi
tarkoitetulla tavalla. Toiseksi se on aktivoitava yllä
kuvatulla tavalla, jotta se pysäyttäisi teräketjun
takapotkun yhteydessä. Kolmanneksi ketjujarru voi kyllä
aktivoitua, mutta jos terälevy on liian lähellä sinua, voi
käydä niin ettei jarru ehdi hidastamaan ja pysäyttämään
ketjua ennen kuin moottorisaha osuu sinuun.
Vain sinä itse ja oikea työtekniikka voitte eliminoida
takapotkun ja sen aiheuttamat vaaratilanteet.
Kaasuliipasimen varmistin
Varmistin on suunniteltu estämään tahaton
kaasuliipaisimen käyttäminen. Kun varmistin (A)
painetaan kahvan sisään (= kun kahvasta tartutaan
kiinni), kaasuliipaisin (B) vapautuu. Kun ote kahvasta
irrotetaan, palautuvat sekä kaasuliipaisin että varmistin
lähtöasentoonsa. Lähtöasennossa kaasuliipaisin on siis
aina lukittuna joutokäynnille.
Ketjusieppo
Ketjusieppo pyydystää terälevystä irronneen tai
katkenneen ketjun. Nämä tilanteet voidaan useimmiten
välttää kiristämällä ketju oikein (ks. otsikon Asennus alla
annetut ohjeet) sekä terälevyn ja ketjun oikealla
(5)
kunnossapidolla ja huollolla (ks. otsikon Yleiset työohjeet
alla annetut ohjeet).
Rystyssuojus
Rystyssuojuksen on paitsi suojattava kättä ketjun
irrotessa tai katketessa, myös varmistettava, etteivät
oksat ja risut vaikuta käden otteeseen takakahvasta.
Tärinänvaimennus
Koneesi on varustettu tärinänvaimentimilla, jotka tekevät
sen käytöstä mahdollisimman tärinätöntä ja miellyttävää.
Koneen tärinänvaimennus vähentää tärinöiden siirtymistä
moottoriyksiköstä/terälaitteesta koneen kahvoihin.
Moottorisahan runko ja terälaite on eristetty kahvaosista
nk. vaimennuselementeillä.
Kovat puulajit (useimmat lehtipuut) aiheuttavat enemmän
tärinöitä kuin pehmeät (useimmat havupuut). Tylsällä tai
väärällä (väärä tyyppi tai väärä viilaus) terälaitteella
sahaaminen lisää tärinää.
VAROITUS! Liiallinen altistuminen
tärinöille saattaa aiheuttaa verisuoni- tai
hermovaurioita verenkiertohäiriöistä
kärsiville henkilöille. Hakeudu lääkäriin,
jos havaitset oireita, jotka voivat liittyä
liialliseen tärinöille altistumiseen.
Esimerkkejä tällaisista oireista ovat
puutumiset, tunnottomuus, kutinat,
pistelyt, kipu, voimattomuus tai
heikkous, ihon värin tai pinnan
muutokset. Näitä oireita esiintyy
tavallisesti sormissa, käsissä tai
ranteissa. Nämä oireet voivat voimistua
alhaisissa lämpötiloissa.
Pysäytin
Moottori on pysäytettävä pysäyttimellä. (26)
Äänenvaimennin
Äänenvaimennin on suunniteltu alentamaan äänitasoa ja
ohjaamaan moottorin pakokaasut käyttäjästä poispäin.
VAROITUS! Moottorin pakokaasut ovat
kuumia ja voivat sisältää kipinöitä jotka
voivat aiheuttaa tulipalon. Älä koskaan
käynnistä konetta sisätiloissa tai lähellä
tulenarkaa materiaalia!
Alueilla, joissa on lämmin ja kuiva ilmasto, voi
tulipalovaara olla ilmeinen. Näillä alueilla lait ja säädökset
voivat määrätä, että äänenvaimentimessa on oltava muun
muassa hyväksytty kipinänsammutusverkko (A).
HUOM! Äänenvaimennin kuumentuu erittäin
voimakkaasti sekä käytön aikana että pysäyttämisen
jälkeen. Tämä koskee myös joutokäyntiä. Ota
palonvaara huomioon, erityisesti palonarkojen aineiden
ja/tai kaasujen läheisyydessä.
(6)
Finnish – 77
Page 78

YLEISET TURVAOHJEET
!
VAROITUS! Älä koskaan käytä
äänenvaimenninta ilman
!
kipinänsammutusverkkoa, tai jos
kipinänsammutusverkko on rikki.
Rikkoutunut äänenvaimennin voi nostaa
äänitasoa ja palonvaaraa merkittävästi.
Pidä palonsammutuskalusto saatavilla.
Älä koskaan käytä moottorisahaa ilman
kipinänsammutusverkkoa, tai jos
kipinänsammutusverkko on rikki, mikäli
kipinänsammutusverkko on pakollinen
varuste työskentelyalueellasi.
Terälaite
Tässä osassa kerrotaan, miten oikealla kunnossapidolla
ja oikeantyyppisiä terälaitteita käyttämällä:
• Vähennät koneen takapotkualttiutta.
• Vähentää ketjun irtoamis- ja katkeamisvaaraa.
• Saavuttaa parhaan sahaustehon.
• Pidennät terälaitteen kestoikää.
• Estää tärinätason kasvamista.
Perussäännöt
• Käytä vain suosittelemiamme terälaitteita! Katso
ohjeita kappaleessa Tekniset tiedot.
• Pidä teräketjun leikkuuhampaat hyvin ja oikein
teroitettuina! Noudata ohjeitamme ja käytä
suositeltua viilausohjainta.
vaurioitunut teräketju lisää onnettomuuksien vaaraa.
• Pidä kouru- ja säätöhampaan korkeusero oikeana!
Noudata ohjeitamme ja käytä suositeltua
säätöhampaan viilausohjainta.
korkeusero lisää takapotkun vaaraa.
• Pidä teräketju kireällä! Liian löysä teräketju lisää
teräketjun irtoamisvaaraa sekä lisää terälevyn,
teräketjun ja ketjupyörän kulumista.
• Voitele terälaite hyvin ja huolla se oikein!
Riittämättömästi voideltu teräketju lisää teräketjun
katkeamisvaaraa sekä lisää terälevyn, teräketjun ja
ketjupyörän kulumista.
Takapotkuja ehkäisevä terälaite
VAROITUS! Väärä terälaite tai väärä
terälevy/teräketjuyhdistelmä lisää
!
takapotkun vaaraa! Käytä vain
suosittelemiamme terälevy/
teräketjuyhdistelmiä ja noudata
teroitusohjeita. Katso ohjeita
kappaleessa Tekniset tiedot.
Takapotkut voidaan välttää vain siten, että sinä käyttäjänä
huolehdit siitä, että terälevyn takapotkusektori ei koskaan
osu mihinkään esineeseen.
Käyttämällä terälaitetta, jossa on ”sisäänrakennettu”
takapotkusuoja, sekä teroittamalla ja huoltamalla
teräketjun oikein voidaan takapotkun voimakkuutta
vähentää.
Väärin teroitettu tai
Liian suuri
Terälevy
Mitä pienempi kärkisäde, sitä pienempi takapotkualttius.
Teräketju
Teräketju koostuu erilaisista lenkeistä, joiden rakenne voi
olla joko vakio tai takapotkuja ehkäisevä.
TÄRKEÄÄ! Yksikään teräketju ei eliminoi
takapotkuvaraa.
VAROITUS! Jokainen pyörivän teräketjun
kosketus voi aiheuttaa erittäin vakavia
vahinkoja.
Terälevyn ja teräketjun määritteleviä käsitteitä
Kaikkien terälaitteen turvalaitteiden pitäminen
toimintakelpoisena edellyttää, että kuluneet ja
vaurioituneet terälevy/teräketjuyhdistelmät vaihdetaan
Husqvarnan suosittelemiin terälevyihin ja teräketjuihin.
Katso tiedot suosittelemistamme terälevy/
ketjuyhdistelmistä otsikon Tekniset tiedot alta.
Terälevy
• Pituus (tuumaa/cm)
• Kärkipyörän hampaiden lukumäärä (T).
• Teräketjun jako (=pitch) (tuumaa). Terälevyn
kärkipyörän ja moottorisahan ketjupyörän on oltava
sovitettu vetolenkkien välisen etäisyyden mukaan.
• Vetolenkkien lukumäärä (kpl). Vetolenkkien
lukumäärä riippuu terälevyn pituudesta, ketjujaosta ja
kärkipyörän hampaiden lukumäärästä.
• Terälevyn ohjausuran leveys (tuumaa/mm).
Ohjausuran leveyden on oltava sovitettu teräketjun
vetolenkkien vahvuuden mukaan.
• Teräketjun öljyreikä ja ketjunkiristystapin reikä.
Terälevyn on oltava sovitettu moottorisahan rakenteen
mukaan.
Teräketju
• Teräketjun jako (=pitch) (tuumaa)
• Vetolenkin vahvuus (mm/tuumaa)
• Vetolenkkien lukumäärä (kpl)
Teräketjun teroitus ja kouru- ja
säätöhampaan korkeuseron säätö
Yleistä kouruhampaan teroittamisesta
• Älä koskaan sahaa tylsällä teräketjulla. Teräketju on
tylsä, jos sinun täytyy painaa terälaitetta puuhun ja jos
sahanpuru on erittäin hienoa. Jos teräketju on erittäin
tylsä, ei lastuja synny lainkaan. Tuloksena on vain
sahajauhoa.
• Hyvin teroitettu teräketju painuu itsestään puun läpi ja
tekee suuria ja pitkiä lastuja.
• Teräketjun leikkaavaa osaa kutsutaan
hammaslenkiksi ja sen osat ovat kouruhammas (A) ja
säätöhammas (B). Näiden korkeusero ratkaisee
leikkuusyvyyden.
78 – Finnish
Page 79

YLEISET TURVAOHJEET
!
!
Kouruhampaan teroituksessa on otettava huomioon neljä
mittaa.
1 Viilauskulma
2 Etukulma
3 Viilan asento
4 Pyöröviilan halkaisija
Teräketjua on erittäin vaikea teroittaa oikein ilman
apuvälineitä. Siksi suosittelemme viilausohjaimemme
käyttöä. Ohjain varmistaa, että teräketju teroitetaan niin,
että se ehkäisee mahdollisimman hyvin takapotkuja ja
antaa mahdollisimman hyvän sahaustehon.
Katso luvusta Tekniset tiedot, mitkä arvot pätevät sinun
moottorisahasi teräketjun teroittamiseen.
viilausohjaintamme, jotta säätöhampaan mitta ja
kulma tulevat oikeiksi.
• Paina viilausohjain teräketjun päälle. Ohjeita
viilausohjaimen käytöstä löytyy pakkauksesta. Hio
lattaviilalla pois liika materiaali säätöhampaan
ylityöntyvästä osasta. Korkeusero on oikea, kun viilaa
ohjaimen yli vedettäessä ei tunnu lainkaan vastusta.
Teräketjun kiristäminen
VAROITUS! Riittämätön kiristys voi
aiheuttaa teräketjun irtoamisen, mikä voi
aiheuttaa vakavan, jopa
hengenvaarallisen tapaturman.
VAROITUS! Teroitusohjeista
poikkeaminen lisää teräketjun
!
takapotkualttiutta merkittävästi.
Kouruhampaan teroitus
Kouruhampaan teroitusta varten tarvitaan pyöröviila ja
viilausohjain. Katso luvusta Tekniset tiedot, mitä
pyöröviilan halkaisijaa ja viilausohjainta suositellaan
moottorisahasi teräketjulle.
• Tarkasta, että teräketju on kireällä. Riittämätön kiristys
tekee teräketjusta epävakaan sivusuunnassa, mikä
vaikeuttaa oikeaa teroitusta.
• Viilaa aina kouruhampaan sisäsivulta ulospäin.
Kevennä otetta paluuvedon ajaksi. Viilaa kaikki
hampaat ensin toiselta sivulta, käännä sen jälkeen
moottorisaha ja viilaa hampaat myös toiselta sivulta.
• Viilaa kaikki hampaat yhtä pitkiksi. Kun
kouruhampaan pituudesta on jäljellä enää 4 mm (5/
32"), on teräketju loppuunkulunut ja se on vaihdettava.
(8)
Yleistä kouru- ja säätöhampaan korkeuseron
säädöstä
• Kouruhammasta teroitettaessa pienenee kouru- ja
säätöhampaan korkeusero (= leikkuusyvyys).
Parhaimman leikkuutehon säilyttämiseksi täytyy
säätöhammas alentaa suositellulle tasolle. Katso
luvusta Tekniset tiedot, kuinka suuri korkeusero sinun
moottorisahasi teräketjussa tarvitaan.
VAROITUS! Liian suuri korkeusero lisää
teräketjun takapotkualttiutta!
!
Kouru- ja säätöhampaan korkeuseron säätäminen
• Kun kouru- ja säätöhampaan korkeuseroa säädetään,
täytyy kouruhampaiden olla vastateroitetut.
Suosittelemme, että korkeusero säädetään joka
kolmannella teräketjun teroituskerralla. HUOM! Tämä
suositus edellyttää, ettei kouruhampaita ole viilattu
poikkeuksellisen lyhyiksi.
• Kouru- ja säätöhampaan säätöä varten tarvitaan
lattaviila ja säätöhampaan viilausohjain.
Suosittelemme, että käytät säätämisessä
(7)
Mitä enemmän käytät teräketjua, sitä pitemmäksi se
venyy. On tärkeää säätää terälaitetta ketjun
pituusmuutoksen mukaan.
Teräketjun kireys tulee tarkastaa aina tankkauksen
yhteydessä. HUOM! Uusi teräketju vaatii sisäänajon,
jonka aikana teräketjun kireys on tarkastettava
useammin.
Teräketju on kiristettävä mahdollisimman tiukalle, ei
kuitenkaan niin kireälle, ettei se pyöri kevyesti käsin
pyöritettäessä.
• Löysää terälevyn mutteri, joka lukitsee kytkinkotelon/
ketjujarrun. Käytä yhdistelmäavainta. Kiristä sen
jälkeen terälevyn mutteri käsin niin tiukalle kuin voit.
(10)
• Nosta terälevyn kärjestä ja kiristä teräketju kier tämällä
teräketjun kiristysruuvia yhdistelmäavaimella. Kiristä
teräketjua, kunnes se ei enää riipu löysällä terälevyn
alapuolella.
• Kir istä terälevyn mutteri yhdistelmäavaimella, samalla
kun pidät terälevyn kärkeä ylhäällä. Tarkasta, että
teräketjua on helppo pyörittää käsin ja ettei se roiku
löysänä terälevyn alapuolella.
Teräketjun kiristysruuvin paikka vaihtelee
moottorisahamalleissamme. Katso luvusta Koneen osat,
missä se on sinun mallissasi.
(9)
(11)
(12)
Terälaitteen voitelu
VAROITUS! Riittämätön terälaitteen
voitelu voi aiheuttaa teräketjun
katkeamisen, mikä voi aiheuttaa vakavan,
jopa hengenvaarallisen tapaturman.
Teräketjuöljy
Teräketjuöljyn ketjuun tarttuvuuden ja
juoksevuusominaisuuksien on oltava hyvät huolimatta
siitä, onko lämmin kesä tai kylmä talvi.
TÄRKEÄÄ! Kun käytät kasvipohjaista teräketjuöljyä,
pura ja puhdista terälevyn ohjausura ja teräketju ennen
kuin siirrät sahan pitkäaikaissäilytykseen. Muuten
teräketjuöljy voi hapettua, jolloin teräketju jäykistyy ja
terälevyn kärkipyörä ei toimi kunnolla.
Finnish – 79
Page 80

YLEISET TURVAOHJEET
!
Teräketjuöljyn lisääminen
• Kaikissa moottorisahamalleissamme on
automaattinen teräketjuvoitelu. Osaan malleista on
saatavana myös öljynvirtauksen säätö.
• Teräketjuöljysäiliö ja polttoainesäiliö on mitoitettu niin,
että polttoaine loppuu ennen teräketjuöljyä.
Tämä turvatoiminto edellyttää kuitenkin
oikealaatuisen teräketjuöljyn käyttämistä (liian ohut ja
juokseva öljy loppuu ennen polttoainesäiliön
tyhjentymistä), kaasuttimen säätösuositustemme
noudattamista (liian "laihalla" säädöllä polttoaine
kestää pitempään kuin teräketjuöljy) ja terälaitetta
koskevien suositustemme noudattamista (liian pitkä
terälevy vaatii enemmän ketjuöljyä).
Teräketjuvoitelun tarkastus
• Tarkasta teräketjuvoitelu aina tankkauksen
yhteydessä.
Aseta terän kärki noin 20 cm:n (8 tuuman) päähän
kiinteästä vaaleapintaisesta esineestä. Kun
moottorisahaa käytetään 3/4-kaasulla 1 minuutin
ajan, on vaaleaan esineeseen jäätävä selvästi
erottuva öljyvana.
Jos teräketjuvoitelu ei toimi:
• Tarkasta, että ohjausura on puhdas. Puhdista
tarvittaessa.
• Tarkasta, että terälevyn kärkipyörä pyörii kevyesti ja
että kärkipyörän voitelureikä on auki. Puhdista ja
voitele tarvittaessa.
Jos teräketjuvoitelu ei toimi edellä lueteltujen tarkastusten
ja korjaustoimenpiteiden jälkeenkään, on sinun otettava
yhteys huoltoliikkeeseen.
Ketjupyörä
Kytkinrumpu on varustettu kiinteällä vetopyörällä
(kärkipyörä on hitsattu rumpuun).
Tarkasta säännöllisesti ketjupyörän kuluneisuus. Vaihda,
jos se on epätavallisen kulunut. Ketjupyörä on vaihdettava
aina teräketjun vaihdon yhteydessä.
Terälaitteen kulumisen tarkastus
Tarkasta teräketjusta päivittäin:
• Onko niiteissä ja lenkeissä näkyviä säröjä.
• Onko teräketju jäykkä.
• Ovatko niitit ja lenkit epätavallisen kuluneet.
Poista teräketju käytöstä, mikäli siinä on havaittavissa
yksi tai useampi yllä mainituista kohdista.
Suosittelemme, että tarkastat teräketjun kuluneisuuden
vertaamalla sitä uuteen teräketjuun.
Kun kouruhampaan pituudesta on jäljellä enää 4 mm, on
teräketju loppuunkulunut ja se on vaihdettava.
Terälevy
Tarkasta säännöllisesti:
• Onko ohjauskiskojen ulkosivuilla kierrettä (A). Poista
tarvittaessa viilaamalla.
• Onko ohjausura epätavallisen kulunut (B). Vaihda
terälevy tarvittaessa.
• Onko terälevyn kärki kulunut epätavallisesti tai
epätasaisesti. Jos terälevyn kärkisäteen päähän
terälevyn alapuolelle on tullut ”kuoppa”, olet sahannut
liian löysällä teräketjulla.
• Terälevy on käännettävä päivittäin mahdollisimman
pitkän käyttöiän varmistamiseksi.
VAROITUS! Suurin osa
moottorisahaonnettomuuksista tapahtuu
niin, että teräketju osuu käyttäjään.
Käytä henkilökohtaisia suojavarusteita.
Katso otsikon Henkilökohtainen
suojavarustus alla annetut ohjeet.
Älä tee mitään sellaista, mihin et katso
taitosi riittävän Katso otsikoiden
Henkilökohtainen suojavarustus,
Takapotkua ehkäisevät toimenpiteet,
Terälaite ja Yleiset työohjeet alla annetut
ohjeet.
Vältä tilanteita, joihin liittyy
takapotkuvaara. Katso otsikon Koneen
turvalaitteet alla annetut ohjeet.
Käytä suositeltua terälaitetta ja tarkasta
sen kunto. Katso otsikon Yleiset
työohjeet alla annetut ohjeet.
Tarkasta moottorisahan turvalaitteiden
toiminta. Katso otsikoiden Yleiset
työohjeet ja Yleiset turvaohjeet alla
annetut ohjeet.
(13)
(13)
80 – Finnish
Page 81

ASENNUS
Terälevyn ja ketjun asennus
VAROITUS! Tarkastus- ja/tai huoltotöiden
aikana moottorin on oltava
!
sammutettuna.
Suojaa kätesi vahingoilta käyttämällä
aina käsineitä, kun käsittelet ketjua.
Tarkasta, että ketjujarru ei ole lauenneessa asennossa
siirtämällä ketjujarrun takapotkusuojusta etukahvaan
päin.
Ruuvaa terämutterit irti ja irrota kytkinkotelo. (14)
Asenna terälevy teräpultteihin. Aseta terälevy
takimmaiseen asentoonsa. Aseta ketju ketjupyörälle ja
terälevyn ohjausuraan. Aloita terälevyn yläpuolelta.
Tarkasta, että hammaslenkkien teräsärmät ovat
eteenpäin terälevyn yläpuolella.
Asenna kytkentäkuori ja suunnittele ketjunkiristystapin
sovittaminen terän syvennykseen. Tarkista, että ketjun
lenkit sopivat ketjun käyttöpyörään ja että ketju sijaitsee
oikein terän urassa. Kiristä terän mutteri sormilla.
Kiristä ketju kiertämällä ketjun kiristysruuvia
yhdistelmäavaimella myötäpäivään. Ketjua on kiristettävä
sen verran, ettei se roiku löysällä terälevyn alapuolella.
(11)
Ketjun kireys on oikea, kun se ei roiku löysällä terän
alapuolella ja liikkuu kevyesti käsin pyöritettäessä. Kiristä
terälevyn mutteri yhdistelmäavaimella pitäen samalla
terälevyn kärkeä ylhäällä.
Uuden ketjun kireys on tarkastettava usein ketjun
sisäänajon aikana. Tarkasta ketjun kireys säännöllisesti.
Oikein kiristetty ketju takaa hyvän leikkuutehon ja pitkän
kestoiän.
(9)
(12)
Kuorituen asennus
Ota yhteys huoltoliikkeeseen kuorituen asentamiseksi.
(15)
Finnish – 81
Page 82

POLTTOAINEEN KÄSITTELY
!
Polttoaine
Huom! Kone on varustettu kaksitahtimoottorilla, jota on
aina käytettävä bensiinin ja kaksitahtimoottoriöljyn
sekoituksella. Oikean seossuhteen varmistamiseksi on
tärkeää mitata sekoitettava öljymäärä tarkasti. Pieniä
polttoainemääriä sekoitettaessa öljymäärän pienetkin
virheellisyydet vaikuttavat voimakkaasti seossuhteeseen.
VAROITUS! Huolehdi hyvästä
ilmanvaihdosta polttoaineita
!
käsiteltäessä.
Bensiini
• Käytä lyijytöntä tai lyijyllistä laatubensiiniä.
• Suositeltu alin oktaaniluku on 90 (RON). Jos
moottoria käytetään bensiinillä, jonka oktaaniluku on
pienempi kuin 90, voi seurauksena olla nk. nakutus.
Tämä nostaa moottorin lämpötilaa ja lisää
laakereiden kuormitusta, mistä voi seurata vakavia
moottorivaurioita.
• Työhön, jossa sahaa käytetään jatkuvasti suurella
pyörimisnopeudella (esim. karsinta), suositellaan
suurempaa oktaanilukua.
Sisäänajo
Pitkäaikaista käyttämistä liian korkeilla kierrosnopeuksilla
tulee välttää ensimmäisten 10 tunnin aikana.
Kaksitahtiöljy
• Parhaan tuloksen ja suorituskyvyn saavuttamiseksi
suositellaan Universal, Universal powered by
McCULLOCH kaksitahtiöljyä, joka on suunniteltu
erityisesti meidän ilmajäähdytteisille
kaksitahtimoottoreillemme.
• Älä koskaan käytä kaksitahtiöljyä, joka on tarkoitettu
vesijäähdytteisille ulkolaitamoottoreille, eli nk.
outboardoil-öljyä (nimitetään TCW:ksi).
• Älä koskaan käytä nelitahtimottoreille tarkoitetta öljyä.
• Alhainen öljynlaatu tai liian rasvainen öljy/
polttoainesekoitus voivat vaarantaa katalysaattorin
toiminnan ja lyhentää sen käyttöikää.
Seossuhde
1:40 (2,5 %) Universal, Universal powered by
McCULLOCH kaksitahtiöljy.
Bensiini, litraa Kaksitahtiöljy, litraa
2,5% (1:40)
5 0,125
10 0,25
15 0,375
20 0,5
Sekoitus
• Sekoita bensiini ja öljy aina puhtaassa bensiinille
hyväksytyssä astiassa.
• Lisää aina ensin puolet sekoitettavasta bensiinistä.
Lisää sen jälkeen koko öljymäärä. Sekoita (ravista)
polttoaineseosta. Lisää loput bensiinistä.
• Sekoita (ravista) polttoaineseos huolellisesti ennen
koneen polttoainesäiliön täyttämistä.
• Sekoita polttoainetta enintään 1 kuukauden tarvetta
vastaava määrä.
• Jos konetta ei käytetä pitkään aikaan, on
polttoainesäiliö tyhjennettävä ja puhdistettava.
Ketjuöljy
• Voiteluun suositellaan erikoisöljyä (ketjuvoiteluöljyä),
jolla on hyvä tarttuvuus.
• Älä koskaan käytä jäteöljyä. Se vaurioittaa
öljypumppua, terälevyä ja ketjua.
• On tärkeää käyttää ilman lämpötilaan sopivaa
öljytyyppiä (oikea viskositeetti).
• Osa öljyistä menettää juoksevuuttaan, kun ilman
lämpötila laskee alle 0
öljypumpun ylikuormittuminen ja pumpun osien
vaurioituminen.
• Kysy huoltoliikkeestäsi neuvoa ketjuvoiteluöljyn
valinnassa.
°C:n. Tästä voi aiheutua
Tankkaus
VAROITUS! Seuraavat turvatoimet
vähentävät tulipalon vaaraa:
Älä tupakoi tankattaessa äläkä aseta
kuumia esineitä polttoaineen lähelle.
Pysäytä moottori ja anna sen jäähtyä
muutamia minuutteja ennen tankkausta.
Avaa polttoainesäiliön korkki hitaasti
tankkauksen yhteydessä, niin että
mahdollinen ylipaine häviää hitaasti.
Kiristä polttoainesäiliön korkki
huolellisesti tankkauksen jälkeen.
Siirrä aina kone pois tankkauspaikalta ja
polttoaineen läheisyydestä ennen
käynnistämistä.
Pyyhi polttoainesäiliön korkin ympäristö puhtaaksi.
Puhdista polttoaine- ja ketjuöljysäiliö säännöllisesti.
Polttoainesuodatin on vaihdettava vähintään kerran
vuodessa. Säiliöissä olevat epäpuhtaudet aiheuttavat
käyntihäiriöitä. Varmista, että polttoaine on sekoittunut
hyvin, ravistamalla astiaa ennen tankkausta. Ketjuöljy- ja
polttoainesäiliön tilavuudet on sovitettu huolellisesti
toisiinsa. Täytä siksi aina ketjuöljy- ja polttoainesäiliö
samanaikaisesti.
82 – Finnish
Page 83

POLTTOAINEEN KÄSITTELY
VAROITUS! Polttoaine ja
polttoainehöyryt ovat erittäin
!
tulenarkoja. Käsittele polttoainetta ja
ketjuöljyä varovasti. Muista palo-,
räjähdys- ja sisäänhengitysvaarat.
Polttoaineturvallisuus
• Älä koskaan tankkaa konetta moottorin käydessä.
• Huolehdi hyvästä ilmanvaihdosta tankattaessa ja
polttoainetta sekoitettaessa (bensiini ja 2-tahtiöljy).
• Siirrä kone vähintään 3 metrin päähän
tankkauspaikalta ennen käynnistämistä.
• Älä koskaan käynnistä konetta:
1 Jos koneen päälle on roiskunut polttoainetta tai
teräketjuöljyä. Poista kaikki roiskeet ja anna bensiinin
jäännösten haihtua.
2 Jos olet läikyttänyt polttoainetta itsesi päälle tai
vaatteillesi, vaihda vaatteet. Pese ne ruumiinosat,
jotka ovat olleet kosketuksissa polttoaineeseen. Käytä
saippua ja vettä.
3 Jos koneesta vuotaa polttoainetta. Tarkasta
säännöllisesti, etteivät säiliön korkki ja
polttoainejohdot vuoda.
VAROITUS! Älä käytä koskaan konetta,
jonka sytytystulpan suojuksessa tai
!
sytytyskaapelissa on näkyviä vikoja. Ne
saattavat aiheuttaa kipinöintiä, joka voi
johtaa tulipaloon.
Pitkäaikaissäilytys
Tyhjennä polttoaine- ja öljysäiliöt hyvin ilmastoidussa
paikassa. Säilytä polttoaineet hyväksytyissä astioissa
turvallisessa paikassa. Asenna terälevyn suojus.
Puhdista kone. Katso otsikon Kunnossapitokaavio alla
annetut ohjeet.
Kuljetus ja säilytys
• Säilytä moottorisahaa ja polttoainetta niin, että
mahdolliset vuodot ja höyryt eivät pääse kosketuksiin
kipinöiden tai avotulen kanssa. Esimerkiksi
sähkökoneet, sähkömoottorit, sähkökytkimet/
virtakatkaisimet, lämpökattilat tai vastaavat.
• Polttoaine on säilytettävä siihen erityisesti
tarkoitetuissa ja hyväksytyissä astioissa.
• Moottorisahan pitkäaikaisen säilytyksen tai
kuljetuksen aikana on sekä polttoaine- että
teräketjuöljysäiliö tyhjennettävä. Kysy lähimmältä
bensiiniasemalta, mihin voit hävittää polttoaineen ja
ylimääräisen teräketjuöljyn.
• Varmista, että kone on puhdistettu hyvin ja että
täydellinen huolto on tehty ennen
pitkäaikaissäilytystä.
• Terälaitteen kuljetussuojuksen on aina oltava
asennettuna koneen kuljetuksen tai säilytyksen
aikana, jotta terävä teräketju ei vahingossa osu
mihinkään. Myös liikkumaton ketju voi aiheuttaa
vakavia vammoja käyttäjälle tai henkilöille, jotka
koskevat ketjuun.
• Varmista koneen kiinnitys kuljetuksen aikana.
Finnish – 83
Page 84

KÄYNNISTYS JA PYSÄYTYS
!
Käynnistys ja pysäytys
VAROITUS! Ennen käynnistystä on
huomioitava seuraavaa:
!
Ketjujarrun on oltava kytkettynä, kun
moottorisaha käynnistetään, jotta
pyörivään teräketjuun kosketuksen riski
käynnistyksen aikana pienentyy.
Älä koskaan käynnistä moottorisahaa
ilman, että terälevy, sahaketju ja kaikki
kotelot on asennettu. Muussa
tapauksessa kytkin saattaa irrota ja
aiheuttaa henkilövahinkoja.
Aseta kone tukevalle alustalle. Seiso
tukevasti ja varmista, ettei terälevy pääse
koskettamaan esineisiin.
Varmista, ettei työalueella ole
asiaankuulumattomia.
Käynnistys
Ketjujarrun on oltava kytkettynä, kun moottorisaha
käynnistetään. Aktivoi jarru työntämällä takapotkusuojus
eteenpäin.
Kylmä moottori
Käynnistysasento, 1: Siirrä virtakytkin
käynnistysasentoon I.
Rikastin 2: Aseta rikastin rikastusasentoon. Kun
rikastussäädin on vedetty kokonaan ulos, oikea
käynnistyskaasuasento säädetään automaattisesti.
Polttoainepumppu, 3: Paina polttoainepumpun
kumirakkoa useita kertoja, kunnes polttoainetta alkaa
valua rakkoon (noin 10 kertaa). Rakon ei tarvitse olla
aivan täynnä.
Vedä käynnistyskahvasta, 4: Tartu etukahvasta
vasemmalla kädellä. Työnnä vasen jalkaterä takakahvan
sisään ja paina moottorisahaa maata vasten. Tartu
käynnistyskahvaan, vedä oikealla kädellä hitaasti
käynnistysköysi ulos, kunnes tunnet vastusta
(käynnistyshakaset tarttuvat kiinni) ja tee sen jälkeen
nopeita ja voimakkaista nykäisyjä, kunnes moottori syttyy.
(20)
Rikastin 5: Paina kuristinsäädin sisään välittömästi, kun
moottori syttyy, minkä merkkinä kuulet pamauksen.
Vedä käynnistyskahvasta, 6: Jatka narusta vetämistä,
kunnes moottori käynnistyy.
Älä koskaan kiedo käynnistysnarua kätesi ympärille.
HUOM! Älä vedä käynnistysnarua täysin ulos äläkä irrota
otetta käynnistyskahvasta, kun naru on täysin ulkona.
Tämä voi vaurioittaa konetta.
Koska ketjujarru on edelleen kytkettynä, on moottorin
pyörimisnopeus alennettava mahdollisimman nopeasti
joutokäynnille, mikä tehdään kytkemällä kaasuliipasimen
(16)
(17)
(17)
(18)
varmistin nopeasti toiminnasta. Näin vältät kytkimen,
kytkinrummun ja jarruhihnan turhan kulumisen. Anna
sitten koneen käydä tyhjäkäynnillä muutaman sekunnin
ennen kuin annat täyttä kaasua.
Huom! Palauta ketjujarru siirtämällä takapotkusuojus
etusankaa vasten. Moottorisaha on tällöin käyttövalmis.
Sahan takareunassa (A) on yksinkertaistettu
käynnistysmuistutus, jonka kuvat kuvaavat kutakin
vaihetta.
(22)
Lämmin moottori
Käynnistä samalla tavalla kuin kylmä moottori, mutta älä
aseta rikastinta rikastusasentoon.
VAROITUS! Moottorin pakokaasujen,
ketjuöljysumun ja sahanpurupölyn
pitkäaikainen sisäänhengittäminen voi
olla terveydelle vaarallista.
• Älä koskaan käynnistä moottorisahaa, jos sen
terälevyä, teräketjua ja kytkinkoteloa ei ole asennettu
oikein. Katso otsikon Asennus alla annetut ohjeet. Jos
moottorisahaan ei ole asennettu terälevyä ja ketjua,
kytkin saattaa irrota ja aiheuttaa vakavia vahinkoja.
(23)
• Ketjujarrun on oltava kytkettynä, kun moottorisaha
käynnistetään. Katso otsikon Käynnistys ja pysäytys
alla annetut ohjeet. Älä koskaan käynnistä
moottorisahaa pudottamalla. Tämä menetelmä on
erittäin vaarallinen, sillä moottorisahan hallinta on
helppo menettää.
• Älä koskaan käynnistä konetta sisätiloissa. Tiedosta
moottorin pakokaasujen sisäänhengittämiseen liittyvä
vaara.
• Tarkkaile ympäristöä ja varmista, ettei terälaite pääse
osumaan ihmisiin tai eläimiin.
• Pidä moottorisahasta aina kiinni molemmilla käsillä.
Pidä oikea käsi takakahvalla ja vasen käsi
etukahvalla.
vasenkätisten, tulee käyttää tätä otetta.
tukeva ote niin, että peukalot ja sormet ovat
moottorisahan kahvan ympärillä.
(24)
Kaikkien käyttäjien, sekä oikea- että
(21)
(19)
Pidä
(25)
Pysäytys
Moottori pysäytetään asettamalla pysäytin
pysäytysasentoon.
(26)
84 – Finnish
Page 85

PERUSTEKNIIKKA
!
Aina ennen käyttöä: (27)
A - Tarkasta, että ketjujarru toimii kunnolla ja että se on
ehjä.
B - Tarkasta, että takimmainen rystyssuojus on ehjä.
C - Tarkasta, että kaasuliipasimen varmistin toimii
kunnolla ja että se on ehjä.
D - Tarkasta, että pysäytyskosketin toimii kunnolla ja että
se on ehjä.
E - Tarkasta, että kaikki kahvat ovat öljyttömät.
F - Tarkasta, että tärinänvaimennus toimii kunnolla ja että
se on ehjä.
G - Tarkasta, että äänenvaimennin on kiinni ja että se on
ehjä.
H - Tarkasta, että moottorisahan kaikki osat on kiristetty
ja etteivät ne ole vioittuneet tai puutu.
I - Tarkasta, että ketjusieppo on paikallaan ja että se on
ehjä.
J - Tarkasta ketjun kireys.
Yleiset työohjeet
TÄRKEÄÄ!
Tässä osassa käsitellään moottorisahan käyttöön
liittyviä yleisiä turvamääräyksiä. Annetut tiedot eivät voi
koskaan korvata osaamista, jonka ammattimies on
hankkinut koulutuksessa ja käytännön työssä. Kun
joudut tilanteeseen, jossa moottorisahan käytön
jatkaminen tuntuu epävarmalta, on sinun kysyttävä
neuvoa asiantuntijalta. Käänny moottorisahaliikkeen,
huoltoliikkeen tai kokeneen moottorisahan käyttäjän
puoleen. Älä tee mitään sellaista, mihin et katso taitosi
riittävän!
Ennen moottorisahan käyttöä sinun täytyy ymmärtää,
mitä takapotku tarkoittaa ja miten se voidaan välttää.
Katso otsikon Takapotkua ehkäisevät toimenpiteet alla
annetut ohjeet.
Ennen moottorisahan käyttöä sinun täytyy ymmärtää
terälevyn ala- ja yläosalla sahaamisen ero. Katso
otsikoiden Takapotkua ehkäisevät toimenpiteet ja
Koneen turvalaitteet alla annetut ohjeet.
Käytä henkilökohtaisia suojavarusteita. Katso otsikon
Henkilökohtainen suojavarustus alla annetut ohjeet.
Yleiset turvamääräykset
1 Tarkkaile ympäristöä:
• Varmistaaksesi, etteivät ihmiset, eläimet tai muut
tekijät pääse vaikuttamaan koneen hallintaan.
• Estääksesi, etteivät edellämainitut pääse koskemaan
teräketjuun tai jää kaatuvan puun alle.
HUOM! Noudata edellä annettuja määräyksiä, mutta älä
koskaan käytä moottorisahaa niin, ettei sinulla
onnettomuustapauksissa ole mahdollisuutta kutsua apua.
2 Vältä käyttöä epäsuotuisissa sääoloissa. Esimerkiksi
tiheässä sumussa, rankkasateessa, kovassa
tuulessa, pakkasessa jne. Huonossa säässä
työskentely on väsyttävää ja voi aiheuttaa
vaaratekijöitä, esimerkiksi tehdä alustasta liukkaan,
vaikuttaa puun kaatosuuntaan ym.
3 Ole erittäin varovainen pieniä oksia katkoessasi ja
vältä sahaamasta pensaita (= paljon pikkuoksia
yhdellä kertaa). Katkotut pikkuoksat voivat tarttua
teräketjuun, sinkoutua itseäsi päin ja aiheuttaa
vakavan tapaturman.
4 Varmista, että voit siirtyä ja seisoa turvallisesti. Katso,
onko äkilliselle siirtymiselle esteitä (juuria, kiviä, oksia,
kuoppia, ojia jne.). Noudata suurta varovaisuutta
viettävässä maastossa työskennellessäsi.
5 Ole erittäin varovainen jännityksessä olevia puita
sahatessasi. Jännittynyt puu voi sekä ennen
läpisahausta että sen jälkeen sinkoutua takaisin
normaaliasentoonsa. Jos olet väärin sijoittunut tai
sahaat puun väärästä kohdasta, se voi osua sinuun tai
koneeseen niin, että menetät koneen hallinnan.
Molemmat tilanteet voivat aiheuttaa vakavan
tapaturman.
6 Siirtymisen ajaksi on teräketju lukittava ketjujarrulla ja
moottori sammutettava. Kanna moottorisahaa niin,
että terälevy ja teräketju ovat taaksepäin. Pitempiä
matkoja siirryttäessä ja kuljetuksen aikana on
käytettävä teräsuojusta.
7 Kun asetat moottorisahan maahan, lukitse teräketju
ketjujarrulla ja varmista, että kone on valvonnassasi
koko ajan. Pitempään "pysäköitäessä" moottori on
sammutettava.
VAROITUS! Joskus rouhe jumittuu
kytkinkoteloon ja saa ketjun
jumittumaan. Pysäytä aina moottori
ennen puhdistusta.
Perussäännöt
1 Ymmärtämällä, mitä takapotku tarkoittaa ja miten se
syntyy, pystyt vähentämään yllättäviä tilanteita tai
kokonaan poistamaan ne. Yllättävä tilanne lisää
onnettomuusvaaraa. Useimmat takapotkut ovat
pieniä, mutta osa on salamannopeita ja erittäin rajuja.
2 Pidä moottorisaha aina tukevassa otteessa oikea käsi
takakahvassa ja vasen käsi etukahvassa.
Peukaloiden ja sormien on oltava kahvan ympärillä.
Kaikkien käyttäjien, olivatpa he oikea- tai
vasenkätisiä, on käytettävä tätä otetta. Tällä otteella
pystyt parhaiten pienentämään takapotkun vaikutusta
ja samalla pitämään moottorisahan hallinnassasi.
irrota käsiä kahvoista!
3 Useimmat takapotkuonnettomuudet sattuvat
karsinnassa. Seiso tukevasti ja varmista, ettet pääse
kompastumaan tai menettämään tasapainoasi
maassa olevien esteiden vuoksi.
Älä
Finnish – 85
Page 86

PERUSTEKNIIKKA
Huolimattomasti toimittaessa takapotkusektori voi
osua tahattomasti esimerkiksi oksaan tai lähellä
olevaan puuhun ja aiheuttaa takapotkun.
Valvo työkappaletta. Jos sahattavat kappaleet ovat
pieniä ja kevyitä, ne voivat juuttua teräketjuun ja
sinkoutua sinua kohti. Vaikka se ei itsessään olisikaan
vaarallista, saatat yllättyä ja menettää sahan
hallinnan. Älä koskaan sahaa pinottuja pöllejä tai
oksia ottamatta niitä ensin erilleen. Sahaa vain yksi
pölli tai kappale kerrallaan. Siirrä sahatut kappaleet
pois, jotta työalue pysyy turvallisena.
4 Älä koskaan pidä moottorisahaa olkapäittesi
yläpuolella ja vältä sahaamasta terälevyn kärjellä.
Älä koskaan käytä moottorisahaa vain yhdellä
kädellä! (28)
5 Voidaksesi täysin hallita moottorisahaasi sinun on
seisottava tukevassa asennossa. Älä koskaan
työskentele seisoen tikkailla, puussa tai paikassa,
jossa et voi seisoa tukevalla alustalla.
6 Sahaa suurella ketjunopeudella, ts. täydellä kaasulla.
7 Ole erittäin varovainen, kun sahaat terälevyn
yläosalla, ts. sahattavan alapuolelta. Tätä kutsutaan
työntävällä teräketjulla sahaamiseksi. Teräketju
työntää tällöin moottorisahaa taaksepäin käyttäjään
päin. Jos teräketju juuttuu kiinni, saattaa moottorisaha
lennähtää taaksepäin sinua kohti.
8 Jos käyttäjä ei pidä paina moottorisahaa
työntösuuntaa vastaan, on vaara, että moottorisaha
työntyy niin kauas taaksepäin, että terästä osuu
puuhun vain takapotkusektori, mistä seuraa
takapotku.
Terälevyn alaosalla sahaamista, ts. sahattavan
yläpuolelta sahaamista, kutsutaan vetävällä
teräketjulla sahaamiseksi. Tällöin teräketju vetää
moottorisahaa puuta kohti ja moottorisahan rungon
etureuna tukee luonnollisella tavalla runkoon.
Vetävällä teräketjulla sahattaessa käyttäjä pystyy
paremmin hallitsemaan moottorisahaa ja näkee
paremmin, missä terälevyn takapotkusektori
kulloinkin on.
9 Noudata terälevyn ja teräketjun viilaus- ja
kunnossapito-ohjeita. Sahassa saa käyttää vain
suosittelemiamme terälevy- ja teräketjuyhdistelmiä.
Katso otsikoiden Terälaite ja Tekniset tiedot alla
annetut ohjeet.
(30)
Sahauksen perustekniikka
VAROITUS! Älä koskaan käytä
moottorisahaa pitämällä sitä yhdellä
!
kädellä. Moottorisahaa ei voi hallita
turvallisesti yhdellä kädellä. Pidä aina
kahvoista molemmin käsin lujalla ja
tukevalla otteella.
(29)
Yleistä
• Sahaa aina täydellä kaasulla!
• Päästä kaasu joutokäynnille aina sahauksen jälkeen
(pitkäaikainen käyttö täydellä kaasulla moottoria
kuormittamatta, ts. ilman vastusta, jonka moottori
sahattaessa saa teräketjun välityksellä, aiheuttaa
vakavan moottorivaurion).
• Sahaus päältä = Sahaus ”vetävällä” teräketjulla.
• Sahaus alta = Sahaus ”työntävällä” teräketjulla.
Sahaus ”työntävällä” teräketjulla lisää takapotkuvaaraa.
Katso otsikon Takapotkua ehkäisevät toimenpiteet alla
annetut ohjeet.
Nimitykset
Katkonta = Puun läpisahauksen yleisnimitys.
Karsinta = Oksien katkonta kaadetusta puusta.
Repeäminen = Katkaistava puu repeää poikki, ennen kuin
sahaus on lävistänyt sen.
Ennen katkontaa on aina otettava huomioon viisi
erittäin tärkeätä seikkaa:
1 Terälaite ei saa juuttua kiinni sahausrakoon.
2 Sahattava puu ei saa revetä.
3 Teräketju ei saa osua maahan tai mihinkään
esineeseen läpisahauksen aikana tai sen jälkeen.
4 Onko olemassa takapotkun vaara?
5 Voivatko maasto ja ympäristöolosuhteet vaikuttaa
siihen, kuinka vakaasti pystyt kävelemään ja
seisomaan?
Teräketjun kiinnijuuttuminen tai sahattavan puun
repeäminen johtuu kahdesta tekijästä: Miten sahattava
puu on tuettu ennen ja jälkeen katkaisun, ja onko
sahattava puu jännityksessä.
Edellä mainitut epätoivotut ilmiöt voidaan useimmissa
tapauksissa välttää suorittamalla katkonta kahdessa
vaiheessa, sekä ylä- että alapuolelta. On pystyttävä
estämään sahattavan puun ”taipumus” tarttua teräketjuun
tai haljeta.
TÄRKEÄÄ! Jos teräketju on juuttunut sahausrakoon:
pysäytä moottori! Älä yritä nykäistä moottorisahaa irti.
Jos teet niin, voit loukata itsesi teräketjuun, kun
moottorisaha yhtäkkiä irtoaa. Käytä vääntörautaa
moottorisahan irrottamiseen.
Seuraavassa on annettu teoreettiset toimintaohjeet
tavallisimpien moottorisahan käytössä eteen tulevien
tilanteiden varalta.
Karsinta
Paksujen oksien karsintaan on sovellettava samaa
periaatetta kuin katkontaan.
Katko hankalat oksat osissa.
86 – Finnish
Page 87

PERUSTEKNIIKKA
!
Katkonta
VAROITUS! Älä yritä koskaan sahata
pinossa olevia pöllejä, tai kun useampi
!
pölli on tiiviisti yhdessä. Sellainen
menettely lisää dramaattisesti
takapotkun vaaraa, josta voi aiheutua
vakavia tai hengenvaarallisia vahinkoja.
Jos pöllit ovat pinossa, on jokainen sahattavaksi
tarkoitettu pölli otettava pois pinosta, sijoitettava
sahapukille tai juoksuttimelle ja katkaistava erikseen.
Siirrä katkaistut kappaleet pois, jotta työalue pysyy
turvallisena. Jos jätät ne työalueelle, kasvatat sekä
vahingossa tapahtuvan takapotkun vaaraa että
tasapainosi menettämisen vaaraa työskentelyn aikana.
Tukki on maassa. Vaaraa teräketjun juuttumisesta tai
puun repeämisestä ei ole. Vaara, että teräketju osuu
maahan läpisahauksen jälkeen, on kuitenkin suuri.
Sahaa päältä tukin läpi. Sahaa loppuosa varovasti
estääksesi teräketjua osumasta maahan. Sahaa täydellä
kaasulla, mutta ole varuillasi.
Jos mahdollista (= voiko tukkia pyörittää?), sahaa tukin
läpimitasta vain 2/3.
Pyöräytä tukkia niin, että loput 1/3 voidaan sahata päältä.
Tukki on tuettu toisesta päästään. Repeämisvaara on
suuri.
Sahaa ensin alapuolelta (noin 1/3 tukin läpimitasta).
Sahaa lopuksi päältä tarkasti alasahauksen kohdalle.
Tukki on tuettu molemmista päistään. Teräketjun
juuttumisen vaara on suuri.
Aloita sahaamalla päältä (noin 1/3 tukin läpimitasta).
Sahaa lopuksi alapuolelta tarkasti yläsahauksen
kohdalle.
Puunkaatotekniikka
TÄRKEÄÄ! Puun kaatamiseen tarvitaan paljon
kokemusta. Kokemattoman moottorisahankäyttäjän ei
tule kaataa puita. Älä tee mitään sellaista, mihin et katso
taitosi riittävän!
Turvaetäisyys
Kaadettavan puun ja lähimmän työskentelypaikan välille
on jätettävä turvaväliksi 2,5 x puun pituus. Varmista, ettei
tällä ”vaaravyöhykkeellä” ole ketään ennen kaatoa ja sen
jälkeen.
(37)
Kaatosuunta
Puunkaadossa pyritään puu saamaan sellaiseen
paikkaan, että tukin karsinta ja katkonta voidaan tehdä
niin ”helpossa” maastossa kuin mahdollista. Kävelyn ja
seisomisen on oltava turvallista.
Kun olet päättänyt, mihin suuntaan haluat kaataa puun,
sinun on arvioitava puun luonnollinen kaatosuunta.
(31)
Tähän vaikuttavat:
• Puun kaltevuus
• Puun vääryys
• Tuulen suunta
• Oksisto
• Mahdollinen lumikuorma
• Puun ulottuman alueella olevat esteet: esim. muut
puut, voimajohdot, tiet ja rakennukset.
• Tarkasta, onko rungossa vaurioita tai lahoja kohtia,
jotka saattavat aiheuttaa puun murtumisen ja
ennenaikaisen putoamisen.
Tämän arvioinnin jälkeen saattaa olla pakko kaataa puu
luonnolliseen kaatosuuntaansa, koska voi olla
mahdotonta tai liian vaarallista yrittää kaataa se
alunpitäen suunniteltuun suuntaan.
Toinen hyvin tärkeä tekijä, joka ei vaikuta kaatosuuntaan,
mutta kylläkin henkilökohtaiseen turvallisuuteesi, on
tarkastaa, ettei puussa ole vaurioituneita tai ”kuolleita”
oksia, jotka saattavat katketa ja vahingoittaa sinua
kaadon aikana.
Ennen kaikkea on vältettävä kaatuvan puun tarttuminen
toiseen puuhun. Kiinni kaadetun puun pudottaminen on
erittäin vaarallista. Tilanteessa on erittäin suuri
onnettomuusvaara. Katso otsikon Epäonnistuneiden
kaatojen käsittely alla annetut ohjeet.
TÄRKEÄÄ! Kriittisen kaatovaiheen aikana on
kuulonsuojaimet käännettävä ylös heti sahauksen
jälkeen, jotta äänet ja varoitussignaalit voidaan
huomioida.
Alaoksien karsinta ja väistämistie
Karsi runko hartiatasoon asti. Turvallisinta on
työskennellä ylhäältä alaspäin ja niin, että runko on aina
itsesi ja moottorisahan välissä.
Raivaa alakasvillisuus ja huomioi mahdolliset esteet
(kivet, oksat, kuopat jne.), niin että sinulla on esteetön
väistämistie, kun puu alkaa kaatua. Väistämistie on
tehtävä noin 135
kaatosuuntaan nähden.
1 Vaaravyöhyke
2 Väistämistie
3 Kaatosuunta
Kaato
Kaato tehdään kolmella sahauksella. Ensin sahataan
kaatolovi, joka käsittää yläsahauksen ja alasahauksen,
minkä jälkeen tehdään lopullinen kaato
kaatosahauksella. Tekemällä nämä sahaukset oikeisiin
kohtiin voidaan puun kaatosuunta ohjata erittäin tarkasti.
° takaviistoon puun suunniteltuun
(38)
VAROITUS! Kehotamme käyttäjiä, joilla ei
ole riittävää pätevyyttä, luopumaan
kaadosta, jos terälevyn pituus on
pienempi kuin kaadettavan rungon
läpimitta!
Finnish – 87
Page 88

PERUSTEKNIIKKA
Kaatolovi
Kaatoloven sahaus aloitetaan tekemällä tyveen
yläsahaus. Seiso puun oikealla puolella ja sahaa
vetävällä teräketjulla.
Sahaa sen jälkeen alasahaus tarkasti yläsahauksen
kärkeen.
(39)
Kaatoloven syvyyden tulee olla 1/4 rungon läpimitasta ja
ylä- ja alasahauksen välisen kulman vähintään 45
Ylä- ja alasahauksen kohtaamispistettä kutsutaan
kaatolovilinjaksi. Kaatolovilinjan on oltava tarkasti
vaakasuorassa ja muodostettava samalla suora kulma
(90
°) valittuun kaatosuuntaan nähden. (40)
Kaatosahaus
Kaatosahaus tehdään puun toiselta puolelta ja
ehdottomasti vaakasuoraan. Seiso puun vasemmalla
puolella ja sahaa vetävällä teräketjulla.
Tee kaatosahaus noin 3-5 cm (1,5-2 tuumaa)
vaakasuoraan kaatoloven pohjatason yläpuolelle.
Työnnä kuorituki (jos sellainen on asennettu) pitopuun
taakse. Sahaa täydellä kaasulla ja työnnä teräketju/
terälevy hitaasti puuhun. Ole varuillasi siltä varalta, että
puu liikkuu valitun kaatosuunnan päinvastaiseen
suuntaan. Pane kaatokiila tai kaatorauta
kaatosahausrakoon heti, kun se on riittävän syvä.
Kaatosahauksen on päätyttävä samansuuntaisesti
kaatolovilinjaan nähden, niin että niiden väliin jää
vähintään 1/10 rungon läpimitasta. Läpisahaamatonta
rungon osaa kutsutaan pitopuuksi.
Pitopuu toimii saranana, joka ohjaa puun oikeaan
kaatosuuntaan.
Puun kaatosuunta ei pysy hallinnassa, jos pitopuu on liian
pieni tai jos kaatolovi ja kaatosahaus on tehty väärään
paikkaan.
Kun kaatolovi ja kaatosahaus on tehty, on puun
kaaduttava itsestään tai kaatokiilan tai kaatoraudan
avulla.
Suosittelemme rungon läpimittaa pitemmän terälevyn
käyttämistä, jolloin kaatosahaus ja -lovi voidaan tehdä nk.
"yksinkertaisella pistosahauksella". Katso luvusta
Tekniset tiedot, mitä terälevypituutta suositellaan sinun
moottorisahamallillesi.
Käytössä on menetelmiä, joilla voidaan kaataa terälevyn
pituutta paksumpia puita. Näitä menetelmiä käytettäessä
on erittäin suuri vaara, että terälevyn takapotkusektori
osuu johonkin.
(42)
°.
(41)
Epäonnistuneiden kaatojen käsittely
”Kiinni kaadetun” puun pudottaminen
Kiinni kaadetun puun pudottaminen on erittäin vaarallista.
Tilanteessa on erittäin suuri onnettomuusvaara.
Älä yritä koskaan sahata toisen puun alle jäänyttä puuta.
Älä työskentele koskaan toisen puun päälle riippumaan
jääneen puun vaara-alueella.
Turvallisin tapa on käyttää vinssiä.
• Traktoriin asennettu
• Siirrettävä
Jännityksessä olevien puiden ja oksien sahaus
Valmistelut: Arvioi, mihin suuntaan jännitys vaikuttaa ja
missä katkaisupiste on (ts. se kohta, jossa puu katkeaisi,
jos se jännittyisi vielä enemmän).
Päätä, miten parhaiten laukaiset jännityksen ja pystytkö
tekemään sen. Erittäin vaikeissa tilanteissa ainoa
turvallinen menetelmä on luopua moottorisahan käytöstä
ja käyttää vinssiä.
Yleissääntö:
Sijoitu niin, ettei ole vaaraa, että puu/oksa osuu sinuun,
kun jännitys laukeaa.
Tee yksi tai useampia sahausviiltoja lähelle
katkaisupistettä. Sahaa niin syvälle ja niin monta viiltoa,
että puun/oksan jännitys laukeaa ja puu/oksa ”katkeaa”
katkaisupisteestä.
Älä koskaan sahaa jännityksessä olevaa puuta
kokonaan poikki!
Jos sahaat puun/oksan läpi, tee kaksi tai kolme
sahausrakoa 3 cm välein, syvyys 3-5 cm.
Jatka sahaamista syvemmälle kunnes puun/oksan
vääntyminen ja jännitys vapautuvat.
Sahaa puu/oksa vastakkaiselta puolelta, kun jännitys on
vapautunut.
88 – Finnish
Page 89

PERUSTEKNIIKKA
Takapotkua ehkäisevät
toimenpiteet
VAROITUS! Takapotkut voivat olla
salamannopeita, yllättäviä ja rajuja ja
!
voivat singota moottorisahan, terälevyn
ja teräketjun päin käyttäjää. Jos teräketju
pyörii osuessaan käyttäjään, saattaa
seurauksena olla erittäin vakava, jopa
hengenvaarallinen tapaturma. On tärkeää
ymmärtää, mikä aiheuttaa takapotkut ja
että ne voidaan välttää varovaisuudella ja
oikealla työtekniikalla.
Mikä takapotku on?
Takapotkuksi kutsutaan äkillistä ilmiötä, jossa
moottorisaha ja terälevy sinkoutuvat esineestä, johon
terälevyn kärjen ylin neljännes, nk. takapotkusektori, on
osunut.
(30)
Takapotkut suuntautuvat aina terätason suuntaan.
Tavallisimmin moottorisaha ja terälevy sinkoutuvat ylös
taaksepäin käyttäjää kohti. Kuitenkin takapotku voi
suuntautua myös muihin suuntiin riippuen siitä, missä
asennossa moottorisaha on sillä hetkellä, kun terälevyn
takapotkusektori osuu esineeseen.
Takapotku voi tapahtua vain, kun terälevyn
takapotkusektori osuu johonkin esineeseen.
Karsinta
VAROITUS! Useimmat
takapotkuonnettomuudet sattuvat
!
karsinnassa. Älä käytä terälevyn
takapotkusektoria. Ole äärimmäisen
varovainen ja vältä terälevyn kärjen
osumista pölliin, muihin oksiin tai
esineisiin. Ole äärimmäisen varovainen
jännitteessä olevien oksien kohdalla. Ne
voivat joustaa takaisin sinuun päin ja
aiheuttaa kontrollin menettämisen,
jolloin seurauksena voi olla vahinkoja.
(43)
Varmista, että voit liikkua ja seisoa turvallisesti! Seiso
rungon vasemmalla puolella. Ole mahdollisimman lähellä
moottorisahaa voidaksesi hallita sitä mahdollisimman
hyvin. Aina kun mahdollista tulee sahan painon antaa
levätä runkoa vasten.
Siirry vain silloin, kun runko on sinun ja moottorisahan
välissä.
Rungon katkonta
Katso otsikon Sahauksen perustekniikka alla annetut
ohjeet.
Finnish – 89
Page 90

KUNNOSSAPITO
Yleistä
Käyttäjä saa tehdä ainoastaan sellaisia huolto- ja
kunnostustehtäviä, jotka on kuvattu tässä
käyttöohjeessa. Laajemmat toimenpiteet tulee antaa
valtuutetun huoltokorjaamon tehtäväksi.
Kaasuttimen säätö
McCulloch-tuotteesi on suunniteltu ja valmistettu niin, että
se vähentää haitallisia pakokaasuja.
Toiminta
• Kaasutin ohjaa kaasuliipasimen välityksellä moottorin
pyörimisnopeutta. Kaasuttimessa ilma ja polttoaine
sekoittuvat keskenään. Tätä ilman ja polttoaineen
seosta voidaan säätää. Jotta koneen suurin teho
saataisiin hyödynnetyksi, säädön on oltava oikea.
• T-ruuvi säätelee kaasuläpän perusasentoa
joutokäynnillä. Kiertämällä T-ruuvia myötäpäivään
saadaan suurempi joutokäyntinopeus ja kiertämällä
sitä vastapäivään saadaan hitaampi
joutokäyntinopeus.
Perussäätö ja sisäänajo
Kaasuttimelle tehdään perussäätö tehtaalla koekäytön
yhteydessä. Hienosäätö on annettava pätevän henkilön
suoritettavaksi.
Suositeltu joutokäyntinopeus: Katso luku Tekniset tiedot.
Joutokäynnin hienosäätö T
Joutokäynnin säätö suoritetaan ruuvilla, joka on merkitty
T-kirjaimella. Jos säätö on tarpeen, kierrä T-ruuvia
myötäpäivään moottorin käydessä, kunnes ketju alkaa
pyöriä. Kierrä T-ruuvia sen jälkeen vastapäivään, kunnes
ketju pysähtyy. Joutokäyntipyörimisnopeus on oikea, kun
moottori käy tasaisesti kaikissa asennoissa ja säädössä
on hyvä marginaali siihen kierroslukuun, jolla ketju alkaa
pyöriä.
VAROITUS! Jos joutokäyntiä ei voi
säätää niin, ettei ketju pyöri, ota yhteys
!
huoltoliikkeeseen. Älä käytä
moottorisahaa, ennen kuin se on
säädetty oikein tai korjattu.
Moottorisahan turvalaitteiden
tarkastus, kunnossapito ja huolto
Huom! Kaikki koneen huolto- ja korjaustyöt vaativat
erikoiskoulutusta. Tämä koskee erityisesti koneen
turvalaitteita. Jos koneessa havaitaan puutteita alla
luetelluissa tarkastuksissa, suosittelemme että otat
yhteyttä huoltoliikkeeseen. Kaikki muu kuin tässä
kirjassa mainittu kunnossapito on annettava
huoltoliikkeen (jälleenmyyjän) suoritettavaksi.
Pysäytä moottori ja irrota sytytyskaapeli ennen
korjausta tai huoltoa
Takapotkusuojuksella varustettu
ketjujarru
Jarruhihnan kuluneisuuden tarkastus
Puhdista ketjujarru ja kytkinrumpu sahanpurusta,
pihkasta ja liasta. Lika ja kuluminen vaikuttavat jarrun
toimintaan.
Tarkasta säännöllisesti, että jarruhihnan paksuus sen
kuluneimmassa kohdassa on vähintään 0,6 mm.
Takapotkusuojuksen tarkastus
Tarkasta, että takapotkusuojus on ehjä eikä siinä ole
näkyviä vikoja, esim. materiaalihalkeamia.
Siirrä takapotkusuojusta edestakaisin tarkastaaksesi, että
se liikkuu kevyesti ja että se on tukevasti kiinni
nivelessään kytkinkotelossa.
Automaattisen pysäytystoiminnon tarkastus
Pidä moottorisahaa, moottori sammutettuna, kannon tai
muun kiinteän esineen päällä. Irrota ote etukahvasta ja
anna moottorisahan pyörähtää takakahvan ympäri omalla
painollaan alas kantoa kohden.
Kun terälevyn kärki osuu kantoon, on jarrun
lauettava.
Jarrutustehon tarkastus
Aseta moottorisaha tukevalle alustalle ja käynnistä se.
Varmista, että teräketju ei pääse osumaan maahan tai
mihinkään esineeseen. Katso ohjeet otsikon Käynnistys
ja pysäytys alla annetut ohjeet.
Pidä moottorisahasta tukevalla otteella peukalot ja sormet
kierrettyinä kahvojen ympärille.
Anna täyskaasu ja laukaise ketjujarru kääntämällä vasen
ranne takapotkusuojusta vasten. Älä päästä otetta irti
etukahvasta.
(32)
(33)
(35)
Ketjun on pysähdyttävä välittömästi.
90 – Finnish
Page 91

KUNNOSSAPITO
Kaasuliipasimen varmistin
• Tarkasta, että kaasuliipasin on lukittu
joutokäyntiasentoon, kun kaasuliipasimen varmistin
on lähtöasennossaan.
• Paina varmistin sisään ja tarkasta, että se palautuu
lähtöasentoonsa, kun se vapautetaan.
• Tarkasta, että kaasuliipasin ja varmistin liikkuvat
kevyesti ja että niiden palautusjouset toimivat.
• Käynnistä moottorisaha ja anna täyskaasu. Vapauta
kaasuliipasin ja tarkasta, että ketju pysähtyy ja pysyy
liikkumattomana. Jos ketju pyörii, kun kaasuliipasin on
joutokäyntiasennossa, on kaasuttimen
joutokäyntisäätö tarkastettava.
Ketjusieppo
Tarkasta, että ketjusieppo on paikallaan ja että se on ehjä.
Rystyssuojus
Tarkasta, että rystyssuojus on ehjä ja ettei siinä ole
näkyviä vikoja, esim. halkeamia.
Tärinänvaimennus
Tarkasta säännöllisesti, ettei vaimentimissa ole
halkeamia tai vääntymiä.
Tarkasta, että vaimentimet ovat tukevasti kiinni
moottoriyksikön ja kahvaosan välissä.
Pysäytin
Käynnistä moottori ja tarkasta, että moottori pysähtyy, kun
pysäytin siirretään pysäytysasentoon.
Äänenvaimennin
Älä koskaan käytä konetta, jonka äänenvaimennin on
rikki. Tarkasta säännöllisesti, että äänenvaimennin on
kunnolla kiinni koneessa.
Huom! Tämän koneen kipinänsammutusverkko (A)
voidaan vaihtaa. Jos verkko on vioittunut, se on
vaihdettava. Tukkeutunut verkko aiheuttaa moottorin
ylikuumenemisen, mistä seuraa sylinteri- ja
mäntävaurioita. Älä koskaan käytä konetta, jonka
äänenvaimennin on huonossa kunnossa.
käytä äänenvaimenninta ilman
kipinänsammutusverkkoa, tai jos
kipinänsammutusverkko on rikki.
Suosittelemme, että huoltoteknikko (myyjä) vaihtaa
äänenvaimentimen 75 käyttötunnin jälkeen.
Ilmansuodatin
Puhdistamalla ilmansuodatin säännöllisesti pölystä ja
liasta vältetään seuraavat ongelmat:
• Kaasutinhäiriöt.
• Käynnistysongelmat.
• Tehon heikkeneminen.
• Moottorin osien turha kuluminen.
Älä koskaan
(6)
• Epätavallisen korkea polttoaineenkulutus.
Ilmansuodattimen puhdistaminen: (34)
1 Irrota sylinterin kotelon nuppi (A) ja irrota sylinterin
kotelo (B).
2 Irrota ilmansuodatin (D).
3 Puhdista ilmansuodatin.
- Pese suodatin puhtaalla, lämpimällä saippuavedellä.
- Huuhtele puhtaassa, viileässä vedessä.
- Anna kuivua kokonaan luonnollisesti.
4 Kokoa käänteisessä järjestyksessä. Varmista, että
salpa (E), salpa (F) ja sylinterin kotelo asettuvat oikein
paikoilleen. Kiristä nuppi tiukkaan.
Pitkään käytössä ollutta ilmansuodatinta ei saa koskaan
täysin puhtaaksi. Siksi ilmansuodatin on vaihdettava
säännöllisin väliajoin.
aina vaihdettava.
HUOM! On suositeltavaa pitää varasuodattimia
varastossa.
Vaurioitunut ilmansuodatin on
Sytytystulppa
Sytytystulpan kuntoa heikentävät:
• Väärin säädetty kaasutin.
• Polttoaineen öljymäärä virheellinen (liian paljon tai
väärää öljyä).
• Likainen ilmansuodatin.
Nämä tekijät aiheuttavat sytytystulpan kärkien
karstoittumisen, mistä voi seurata käyntihäiriöitä ja
käynnistysongelmia.
Jos koneen teho on heikko, jos sitä on vaikea käynnistää,
tai jos joutokäynti on levotonta: tarkasta aina ennen muita
toimenpiteitä sytytystulppa. Jos sytytystulppa on
karstoittunut, puhdista se ja tarkasta samalla, että
kärkiväli on 0,6 mm. Sytytystulppa on vaihdettava
suunnilleen kuukauden käytön jälkeen, tarvittaessa
aikaisemmin.
Huom! Käytä aina suositeltua sytytystulppaa! Väärä
sytytystulppa voi tuhota männän/sylinterin. Varmista, että
sytytystulppa on varustettu nk. radiohäiriöiden poistolla.
(36)
Finnish – 91
Page 92

KUNNOSSAPITO
Huoltokaavio
Seuraavassa on esitetty luettelo koneelle suoritettavista huoltotoimista.Useimmat kohdista on kuvattu kappaleessa
Huolto.
Päivittäiset toimenpiteet Viikoittaiset toimenpiteet Kuukausittaiset toimenpiteet
Tarkasta ketjujarrun jarruhihnan
Puhdista kone ulkopuolelta.
Tarkasta, että kaasuliipasimen osat
(liipasin ja varmistin) ovat
turvallisessa käyttökunnossa.
Puhdista ketjujarru ja tarkasta, että
se toimii turvallisesti. Tarkasta, että
ketjusieppo on ehjä, vaihda
tarvittaessa.
Terälevy on käännettävä päivittäin,
jotta se kuluu tasaisesti. Tarkasta,
että terälevyn voitelureikä ei ole
tukossa. Puhdista ketjun ohjausura.
Tarkasta, että terälevy ja ketju saavat
riittävästi öljyä.
Tarkasta, ettei teräketjun niiteissä tai
lenkeissä ole näkyviä halkeamia,
ettei teräketju ole jäykkä tai etteivät
niitit ja lenkit ole epänormaalisti
kuluneet. Vaihda tarvittaessa.
Teroita ketju ja tarkasta sen kireys ja
kunto. Tarkasta, ettei ketjupyörä ole
epätavallisen kulunut, vaihda
tarvittaessa.
Puhdista käynnistimen
ilmanottoaukot.
Tarkasta, että ruuvit ja mutterit ovat
kireällä.
Tarkasta, että pysäytin toimii.
Tarkasta, ettei moottorissa, säiliössä
tai polttoaineputkissa ole vuotoja.
Tarkasta käynnistinlaite,
käynnistysnaru ja palautusjousi.
Tarkasta, etteivät tärinänvaimentimet
ole vioittuneet.
Viilaa mahdollinen kierre pois
terälevyn sivuilta.
Puhdista kaasuttimen tila. Puhdista kaasuttimen ulkopuoli.
Puhdista ilmansuodatin. Vaihda
tarvittaessa.
kuluminen. Vaihda, kun
kuluneimman kohdan paksuus on
alle 0,6 mm.
Tarkasta kytkinkeskiön,
kytkinrummun ja kytkinjousen
kuluminen.
Puhdista sytytystulppa. Tarkasta,
että kärkiväli on 0,6 mm.
Tarkasta polttoainesuodatin ja
polttoaineletku. Vaihda tarvittaessa.
Tyhjennä polttoainesäiliö ja puhdista
se sisäpuolelta.
Tyhjennä öljysäiliö ja puhdista se
sisäpuolelta.
Tarkasta kaikki kaapelit ja liitännät.
92 – Finnish
Page 93

TEKNISET TIEDOT
Tekniset tiedot
CS 35 CS 35S
Moottori
Sylinteritilavuus, cm
Iskunpituus, mm 31,1 31,1
Joutokäyntinopeus, min-1 2700-3300 2700-3300
Teho, kW 1,44/9000 1,44/9000
Sytytysjärjestelmä
Sytytystulppa CMR7H CMR7H
Kärkiväli, mm 0,6 0,6
Polttoaine-/voitelujärjestelmä
Polttoainesäiliön tilavuus, litraa/cm
Öljypumpun tuotto/9 000 r/min, ml/min 7-9 7-9
Öljysäiliön tilavuus, litraa 0,15 0,15
Öljypumpun tyyppi Automaattinen Automaattinen
Paino
Moottorisaha ilman terälaitetta ja säiliöt tyhjinä, kg 4,6 4,6
Melupäästöt (ks. huom. 1)
Äänentehotaso, mitattu dB(A) 109 109
Äänentehotaso, taattu LWA dB(A) 111 111
Äänitasot (ks. huom. 2)
Ekvivalentti äänenpainetaso käyttäjän korvaan, dB (A) 99 99
Vastaavat tärinätasot, a
Etukahva, m/s
Takakahva, m/s
Ketju/terälevy
Vakio terälevypituus, tuumaa/cm 14-16 / 35-40 14/35
Suositeltavat terälevypituudet, tuumaa/cm 14-16 / 35-40 14/35
Tehokas leikkuupituus, tuumaa/cm 13-15 / 33-38 13-15 / 33-38
Jako, mm 3/8 / 9,52 3/8 / 9,52
Vetolenkin vahvuus, tuumaa/mm 0,050/1,3 0,050/1,3
Ketjupyörän tyyppi/hampaiden lkm Spur/6 Spur/6
Ketjun nopeus (m/s), kun moottorin pyörimisnopeus on 133 %
enimmäisarvosta.
Huom. 1: Melupäästö ympäristöön äänentehona (LWA) EY-direktiivin 2000/14/EY mukaisesti mitattuna.
Huom. 2: Standardin ISO 22868 mukainen ekvivalentti äänenpainetaso lasketaan eri äänenpainetasojen
aikapainotteisena energiasummana eri käyttötiloissa. Tyypillinen ekvivalentin äänenpainetason tilastollinen hajonta on
2,5 dB:n (A) vakiopoikkeama.
Huom. 3: Standardin ISO 22867 mukainen ekvivalentti tärinätaso lasketaan tärinätasojen aikapainotteisena
energiasummana eri käyttötiloissa. Ilmoitetuilla tiedoilla ekvivalentista tärinätasosta tyypillinen tilastollinen hajonta
(vakiopoikkeama) on 1,5 m/s
3
3
(ks. huom. 3)
2
hveq
2
2
.
35 35
0,25/250 0,25/250
6,673 6,673
5,792 5,792
22,8 22,8
Finnish – 93
Page 94

TEKNISET TIEDOT
Terälevy- ja ketjuyhdistelmät
Seuraavat terälaitteet on hyväksytty McCulloch-malleille CS 35 ja CS 35S.
Terälevy Teräketju
Pituus,
tuumaa
14 3/8" 1,3 7T 14” 91-52 DC
16 3/8" 1,3 7T 16” 91-56 DC
Jako,
tuumaa
Ohjausuran
leveys, mm
Kärkipyörän
hampaiden
maks. lkm
Tyyppi Tyyppi
91PJ052X
(Oregon)
91PJ056X
(Oregon)
Pituus,
vetolenkit
(kpl)
52
56
EY-vaatimustenmukaisuusvakuutus
(Koskee ainoastaan Eurooppaa)
Husqvarna AB , SE-561 82 Huskvarna, Ruotsi, puh. +46-36-146500, vakuuttaa täten, että metsäkäyttöön tarkoitetut
moottorisahat McCulloch CS 35 ja CS 35S alkaen vuoden 2016 sarjanumeroista (vuosi on ilmoitettu arvokilvessä
ennen sarjanumeroa) on valmistettu noudattaen seuraavaa NEUVOSTON DIREKTIIVIÄ:
- 17. toukokuuta 2006 ”koskien koneita” 2006/42/EY .
- 26. helmikuu 2014 ”sähkömagneettista yhteensopivuutta koskeva” direktiivi 2014/30/EU .
- 8. toukokuuta 2000 ”koskien melupäästöä ympäristöön” 2000/14/EY .
Yllä mainitun direktiivin Liitteen V mukaista vaatimustenmukaisuuden arviointimenettelyä on käytetty.
Katso melupäästöjä koskevat tiedot luvusta Tekniset tiedot. Seuraavia standardeja on sovellettu: EN ISO 11681-1:2011,
EN ISO 14982:2009
Ilmoitettu elin: TÜV Rheinland LGA Products GmbH, Tillystrasse 2, D-90431 Nürnberg, Saksa, 0197, on suorittanut EYtyyppitarkastuksen konedirektiivin (2006/42/EC) artiklan12, kohdan 3b mukaisesti. Liitteen IX mukaisesti suoritetun EYtyyppitarkastuksen sertifikaatin numero on Liitteen IX mukaisen EY-tyyppitarkastuksen todistusten numerot ovat: BM
50351057
Toimitettu moottorisaha vastaa EY-tyyppitarkastettua sahaa.
Changzhou, China. 8.7. 2016
John Thompson, tuote- ja markkinointipäällikkö, EUAP. (Husqvarna AB:n valtuutettu ja teknisestä dokumentaatiosta
vastaava edustaja.)
94 – Finnish
Page 95

Symboler på maskinen:
yyyywwxxxxx
ADVARSEL! Motorsager kan være
farlige! Uforsiktig eller feilaktig bruk kan
resultere i alvorlige skader eller dødsfall
for brukeren eller andre.
Les nøye gjennom bruksanvisningen
og forstå innholdet før du bruker
maskinen.
Bruk alltid:
• Godkjent vernehjelm
• Godkjent hørselsvern
• Vernebriller eller visir
Dette produktet er i
overensstemmelse med gjeldende
CE-direktiv.
Støyutslipp til omgivelsene ifølge EFs
direktiv. Maskinens utslipp angis i
kapitlet Tekniske data og på
klistremerke.
Brukeren må alltid bruke begge
hendene til å betjene motorsagen.
Bruk aldri en motorsag ved å holde den
bare med én hånd.
INNLEDNING
Kjedebrems, aktivert (foran)
Kjedebrems, ikke aktivert (bak)
Brennstoffpumpe
Drivstoffpåfylling.
Påfylling av kjedeolje.
Typeskiltet viser
serienummeret.
er produksjonsåret,
ww er
produksjonsuken og
xxxxx er sekvensielt
nummer.
Øvrige symboler/klistremerker angitt på maskinen
gjelder spesifikke krav for sertifiseringer på visse
markeder.
yyyy
Sverdspissen må ikke komme i kontakt
med noen gjenstander.
ADVARSEL! Kast kan oppstå når
sverdspissen kommer i kontakt med en
gjenstand og forårsaker en reaksjon
som kaster sverdet oppover og bakover
mot brukeren. Dette kan forårsake
alvorlig personskade.
Motoren stanses ved at tenningen slås av
med stoppbryteren.
Norwegian – 95
Page 96

INNLEDNING
Kjære kunde
Takk for at du valgte et McCulloch-produkt. Med dette tar
du del i en historie som startet for lenge siden, da
McCulloch Corporation startet produksjonen av motorer
under andre verdenskrig. Da McCulloch lanserte sin
første lette enmanns motorsag i 1949, skulle
tømmerhogst aldri bli det samme igjen.
Serien av nyskapende motorsager fortsatte gjennom
tiårene, og virksomheten utvidet først med motorer til fly
og go-karter på 1950-tallet, senere med minimotorsager i
1960-årene. Senere, i 1970- og 80-årene, ble trimmere og
løvblåsere lagt til i sortimentet.
I dag er McChulloch en del av Husqvarna-gruppen, og
fortsetter tradisjonen med kraftige motorer, tekniske
nyskapninger og sterke konstruksjoner som har vært vårt
varemerke i mer enn et halvt århundre. Redusert
drivstofforbruk, utslipp og støynivå har førsteprioritet hos
oss, det samme har bedre sikkerhet og brukervennlighet.
Vi håper du vil bli fornøyd med ditt nye McCullochprodukt, som er konstruert for å være din følgesvenn i
lang tid fremover. Ved å følge brukerhåndbokens råd om
bruk, service og vedlikehold sikrer du maksimal levetid for
produktet. Hvis du trenger profesjonell hjelp til reparasjon
eller service, kan du bruke Service Locator-tjenesten på
www.mcculloch.com.
McCulloch arbeider løpende med å videreutvikle sine
produkter, og forbeholder seg derfor retten til endringer
vedrørende bl.a. form og utseende uten varsel.
Denne brukerhåndboken kan også lastes ned fra
www.mcculloch.com.
Hva er hva på motorsagen? (1)
1 Sylinderdeksel
2 Brennstoffpumpe
3 Stoppbryter (På- og avslagning av tenning.)
4 Chokespak/Startgassperre
5 Bakre håndtak med høyrehåndsbeskyttelse
6 Informasjons- og advarselsetikett
7 Brennstofftank
8 Justeringsskruer forgasser
9 Starthåndtak
10 Startmotor
11 Kjedeoljetank
12 Typeskilt
13 Kjedestrammerskrue
14 Koplingsdeksel
15 Gassregulatorsperre (Hindrer ufrivillig gasspådrag.)
16 Fremre håndtak
17 Kastbeskyttelse
18 Lyddemper
19 Sagsverd
20 Nesehjul
21 Sagkjede
22 Barkstøtte
23 Kjedefanger
24 Gassregulator
25 Sverdbeskyttelse
26 Bruksanvisning
27 Kombiverktøy
96 – Norwegian
Page 97

INNHOLD
Innhold
INNLEDNING
Symboler på maskinen: ........................................ 95
INNLEDNING
Kjære kunde ......................................................... 96
Hva er hva på motorsagen? ................................. 96
INNHOLD
Innhold .................................................................. 97
GENERELLE SIKKERHETSINSTRUKSJONER
Tiltak før bruk av en ny motorsag ......................... 98
Viktig ..................................................................... 98
Bruk alltid sunn fornuft .......................................... 98
Personlig verneutstyr ............................................ 99
Maskinens sikkerhetsutstyr .................................. 99
Skjæreutstyr ......................................................... 101
MONTERING
Montering av sverd og kjede ................................ 104
BRENNSTOFFHÅNDTERING
Brennstoff ............................................................. 105
Fylling av brennstoff ............................................. 105
Brennstoffsikkerhet ............................................... 106
START OG STOPP
Start og stopp ....................................................... 107
ARBEIDSTEKNIKK
Før hver gangs bruk: ............................................ 108
Generelle arbeidsinstruksjoner ............................. 108
Kastforebyggende tiltak ........................................ 111
VEDLIKEHOLD
Generelt ................................................................ 112
Forgasserjustering ................................................ 112
Kontroll, vedlikehold og service på motorsagens
sikkerhetsutstyr ....................................................
Lyddemper ........................................................... 113
Luftfilter ................................................................. 113
Tennplugg ............................................................. 113
Vedlikeholdsskjema .............................................. 114
TEKNISKE DATA
Tekniske data ....................................................... 115
Sverd og kjedekombinasjoner .............................. 116
EF-erklæring om samsvar .................................... 116
112
Norwegian – 97
Page 98

GENERELLE SIKKERHETSINSTRUKSJONER
!
!
Tiltak før bruk av en ny motorsag
• Les nøye gjennom bruksanvisningen.
• (1) - (43) viser til illustrasjoner på side 2-5.
• Kontroller skjæreutstyrets montering og justering. Se
anvisninger under overskriften Montering
• Fyll bensin og star t motorsagen. Se anvisninger under
overskriftene Håndtyering av brennstoff og Satrt og
Stopp.
• Bruk ikke motorsagen før nok kjedesmøreolje har
nådd sagkjedet. Se anvisninger under overskriften
Smøring av skjæreutstyret.
• Langvarig eksponering overfor støy kan gi varige
hørselsskader. Bruk derfor alltid godkjent hørselsvern.
ADVARSEL! Maskinens opprinnelige
konstruksjon må ikke under noen
!
omstendighet endres uten produsentens
tillatelse. Bruk alltid originalt
tilleggsutstyr. Uautoriserte endringer og/
eller tilleggsutstyr kan medføre alvorlige
skader eller dødsfall for brukeren eller
andre.
ADVARSEL! En motorsag som brukes
skjødesløst eller galt kan være et farlig
!
redskap som kan forårsake alvorlige, til
og med livstruende skader. Det er meget
viktig at du leser og forstår innholdet i
denne bruksanvisningen.
ADVARSEL! Lyddemperen inneholder
kjemikalier som kan være
!
kreftfremkallende. Unngå kontakt med
disse elementene dersom lyddemperen
blir skadd.
Viktig
VIGTIG!
Denne kjedesagen for skogbruk er konstruert for
skogsarbeid som felling, kvisting og kapping.
Du bør kun bruke de sverd/sagkjedekombinasjoner vi
anbefaler i kapitlet Tekniske data.
Bruk aldri maskinen hvis du er trett, har drukket alkohol
eller bruker medisiner som kan påvirke syn,
vurderingsevne eller kroppskontroll.
Bruk personlig verneutstyr. Se anvisninger under
overskriften ”Personlig verneutstyr”.
Modifiser aldri denne maskinen slik at den ikke lenger
stemmer overens med originalutførelsen, og bruk den
ikke hvis den synes å ha blitt modifisert av andre.
Bruk aldri en maskin som det er noe galt med. Utfør
sikkerhetskontrollene og vedlikeholds- og
serviceinstruksjonene i denne bruksanvisningen. Noen
vedlikeholds- og servicetiltak må utføres av erfarne og
kvalifiserte spesialister. Se instruksjonene under
overskriften Vedlikehold.
Bruk aldri annet tilleggsutstyr enn det som er anbefalt i
denne bruksanvisningen. Se avnvisninger under
ovrskriftene Skjæreutstyr og Tekniske data.
OBS! Bruk alltid vernebriller eller ansiktsvisir for å
redusere risikoen for skader fra gjenstander som
slynges ut. En motorsag kan slynge i vei gjenstander
som sagspon, små trebiter osv. med stor kraft. Dette
kan forårsake alvorlig skade, spesielt på øynene.
ADVARSEL! Å kjøre en motor i et
innestengt eller dårlig ventilert rom kan
forårsake dødsfall ved kveling eller
karbonmonoksidforgiftning.
!
!
98 – Norwegian
ADVARSEL! Langvarig innånding av
motorens avgasser, kjedeoljetåke og
støv fra sagspon kan utgjøre en
helsefare.
ADVARSEL! Denne maskinen skaper et
elektromagnetisk felt når den er i bruk.
Dette feltet kan under visse
omstendigheter forstyrre aktive eller
passive medisinske implantater. For å
redusere risikoen for alvorlig eller
livstruende skade, anbefaler vi at
personer med medisinske implantater
rådfører seg med sin lege og
produsenten av det medisinske
implantatet før denne maskinen tas i
bruk.
ADVARSEL! Feil skjæreutstyr eller feil
sverd/sagkjedekombinasjon øker
risikoen for kast! Bruk bare de sverd/
sagkjedekombinasjonene vi anbefaler,
og følg instruksjonene for filing. Se
anvisninger under overskriften Tekniske
data.
Bruk alltid sunn fornuft (2)
Det er umulig å dekke alle tenkelige situasjoner du kan
stilles overfor ved bruk av motorsag. Vær alltid forsiktig og
bruk sunn fornuft. Unngå situasjoner du ikke føler deg
tilstrekkelig kvalifisert for. Hvis du etter å ha lest disse
instruksjonene fortsatt føler deg usikker vedrørende
bruken, skal du rådføre deg med en ekstert før du
fortsetter. Ikke nøl med å kontakte din forhandler eller oss
dersom du har spørsmål vedørende bruk av motorsag. Vi
står gjerne til tjeneste og gir deg råd som hjelper deg å
bruke din motorsag på en bedre og sikrere måte. Ta
gjerne opplæring i bruk av motorsag. Din forhandler,
Page 99

GENERELLE SIKKERHETSINSTRUKSJONER
skogpleieskole eller ditt bibliotek kan opplyse deg om
hvilket opplæringsmateriell og hvilke kurs som er
tilgjengelige. Det pågår et løpende arbeid med å forbedre
design og teknikk - forbedringer som øker din sikkerhet og
efefktivitet. Besøk din forhandler jevnlig for å se hvilken
nytte du kan ha av de nyhetene som lanseres.
Personlig verneutstyr
ADVARSEL! De fleste motorsagsulykker
inntreffer når sagkjedet treffer brukeren.
!
Ved all bruk av maskinen skal det brukes
godkjent personlig verneutstyr.
Personlig verneutstyr eliminerer ikke
skaderisikoen, men det reduserer
virkningen av en skade hvis ulykken
skulle være ute. Be forhandleren om
hjelp ved valg av utstyr.
• Godkjent vernehjelm
• Hørselsvern
• Vernebriller eller visir
• Hansker med sagvern
• Bukser med sagvern
• Støvler med sagvern, ståltupp og sklisikker såle
• Førstehjelpsutstyr må alltid finnes for hånden.
• Brannslokkingsapparat og spade
Klærne bør ellers være ettersittende uten å begrense
bevegelsesfriheten.
VIGTIG! Det kan kome gnister fra lyddemperen, sverdet
og kjedet eller annen kilde. Ha alltid verktøy for
brannslokking for hånden i tilfelle du skulle trenge det.
På den måten hjelper du til å forhindre skogbrann.
Maskinens sikkerhetsutstyr
I dette avsnittet forklares hva maskinens
sikkerhetsdetaljer er, samt deres funksjon. For kontroll og
vedlikehold, se anvisninger under overskriften Kontroll,
vedlikehold og service av motorsagens sikkerhetsutstyr.
Se anvisninger under overskriften Hva er hva? for å se
hvor disse detaljene er plassert på din maskin.
Maskinens levetid kan forkortes og risikoen for ulykker
kan øke dersom vedlikehold av maskinen ikke utføres på
riktig måte og dersom service og/eller reparasjoner ikke
er fagmessig utført. Kontakt nærmeste serviceverksted
dersom du trenger ytterligere opplysninger.
ADVARSEL! Bruk aldri en maskin med
defekt sikkerhetsutstyr.
!
Sikkerhetsutstyret skal kontrolleres og
vedlikeholdes. Se anvisninger under
overskriften Kontroll, vedlikehold og
service av motorsagens sikkerhetsutstyr.
Hvis maskinen ikke består alle
kontrollene, må serviceverksted
oppsøkes for reparasjon.
Kjedebrems med kastbeskyttelse
Din motorsag er utstyrt med kjedebrems som er
konstruert slik at den stanser sagkjedet ved kast. En
kjedebrems reduserer faren for ulykker, men det er bare
du som bruker som kan hindre at de oppstår.
Vær forsiktig ved bruk og påse at sverdets
kastrisikosektor aldri kommer i berøring med noe.
• Kjedebremsen (A) aktiveres enten manuelt (via
vendtrehånden) eller med treghetsfunksjonen.
• Aktivering skjer når kastbeskyttelsen (B) føres
fremover.
(3)
• Denne bevegelsen aktiverer en fjærspent mekanisme
som spenner bremsebåndet (C) rundt motorens
kjededriftssystem (D) (koplingstrommelen).
• Kastbeskyttelsen er ikke bare konstruert for å aktivere
kjedebremsen. En annen meget viktig funksjon er at
den reduserer faren for at venstrehånden skal treffe
sagkjedet hvis man mister taket rundt det fremste
håndtaket.
• Kjedebremsen skal alltid være på når motorsagen
startes for å hindre kejdet i å rotere.
• Bruk kjedebrems som 'parkeringsbrems' ved start
samt ved kortere fortlytting for å hindre ulykker der
bruker eller omgivelser ufrivillig kan komme i kontakt
med sagkjedet i bevegelse.
• Kjedebremsen frikoples ved at kastbeskyttelsen føres
bakover, mot det fremste håndtaket.
• Kast skje lynraskt og meget voldsomt. De fleste kast
er små og fører ikke alltid til at kjedebremsen
aktiveres. Ved slike kast gjelder det å holde
motorsagen i et fast grep og ikke slippe den.
• Om kjedebremsen aktiveres manuelt eller via
treghetsfunksjonen styres av hvor voldsomt kastet er,
og av motorsagen posisjon i forhold til det som
kastrisikosektoren på sverdet har kommet i kontakt
med.
Ved voldsomme kast og når sverdets kastrisikosektor
befinner seg så langt borte fra brukeren som mulig, er
kjedebremsen konstruert slik at den aktiveres av
kjedebremsens motvekt (treghet) i kastretningen.
Ved mindre voldsomme kast eller i arbeidssituasjoner
hvor kastrisikosektoren befinner seg nær brukeren,
aktiveres kjedebremsen manuelt med venstre hånd.
• Ved felling er venstrehånden i en stilling som
umuliggjør aktivering av kjedebremsen. Ved denne
typen grep, dvs. når venstre hånd er plassert slik at
den ikke kan utløse kastbeskyttelsen, kan
kjedebremsen bare aktiveres via treghetsfunksjonen.
(3)
(4)
Vil min hånd alltid aktivere kjedebresmen
ved kast?
Nei. Det kreves en viss kraft for å føre kastbeskyttelsen
forover. Hvis hånden din bare streifer lett borti
kastbeskyttelsen eller glir over den, kan det hende at
kraften ikke er tilstrekkelig sterk til å utløse kjedebremsen.
Norwegian – 99
Page 100

GENERELLE SIKKERHETSINSTRUKSJONER
!
!
Du skal også ha et fast grep om motorsagens håndtak når
du arbeider. Hvis du gjør det og får et kast, slipper du
kanskje taket i det fremre håndtaket og aktiverer ikke
kjedebremsen, eller så aktiveres kjedebremsen først når
sagen har rukket å svinge et godt stykke rundt. I en slik
situasjon kan det hende at kjedebremsen ikke rekker å
stanse kjedet før det treffer deg.
Det forekommer også visse arbeidsstillinger som gjør at
hånden din ikke kan nå kastbeskyttelsen for å aktivere
kjedebremsen, f.eks. når sagen holdes i fellingsstilling.
Vil treghetsaktivering av kjedebremsen
alltid skjer hvis det inntreffer et kast?
Nei. For det første må bremsen din fungere. Det er lett å
teste bremsen, se anvisninger under overskriften Kontroll,
vedlikehold og service av motorsagens sikkerhetsutstyr.
Vi anbefaler at du gjør dette før du påbegynner hver
arbeidsøkt. For det andre må kastet være tilstrekkelig
kraftig for å aktivere kjedebremsen. Hvis kjedebremsen
hadde vært for følsom, ville den aktiveres stadig vekk, og
det ville være tungvint.
Vil kjedebremsen alltid beskytte meg mot
skader hvis et kast inntreffer?
Nei. For det første må bremsen din fungere for å gi den
tiltenkte beskyttelsen. For det andre må den aktiveres
som beskrevet over for å stanse sagkjedet ved et kast. For
det tredje kan kjedebremsen aktiveres, men hvis sverdet
er for nær deg, kan det hende at bremsen ikke rekker å
bremse og stanse kjedet før motorsagen treffer deg.
Det er bare du selv og en korrekt arbeidsteknikk som
kan eliminere kast og dets farer.
Gassregulatorsperre
Gassregulatorsperren er konstruert for å hindre at
gassregulatoren aktiveres ufrivillig. Når sperren (A)
trykkes ned i håndtaket (= når man holder rundt
håndtaket), frikoples gassregulatoren (B). Når grepet
rundt håndtaket slippes, tilbakestilles både
gassregulatoren og sperren til sin opprinnelige posisjon.
Denne posisjonen innebærer at gassregulatoren
automatisk låses på tomgang.
Kjedefanger
Kjedefangeren er konstruert for å fange opp et avhoppet
eller avslitt kjede. Dette unngås i de fleste tilfeller ved
korrekt kjedespenning (se anvisninger under overskriften
Montering) og korrekt vedlikehold og service på sverd og
kjede (se anvisninger under overskriften Generelle
arbeidsinstruksjoner).
Høyrehåndsvern
Høyrehåndsvernet skal beskytte hånden hvis kjedet
hopper av eller ryker, og sørge for at greiner og kvister
ikke påvirker grepet rundt det bakerste håndtaket.
(5)
Avvibreringssystem
Din maskin er utstyrt med et avvibreringssystem som er
konstruert for å gi en mest mulig vibrasjonsfri og
behagelig bruk.
Maskinens avvibreringssystem reduserer overføringen av
vibrasjoner mellom motorenhet/skjæreutstyr og
maskinens håndtak. Motorsagkroppen, inklusive
skjæreutstyr, er opphengt i håndtaksdelen med såkalte
avvibreringselementer.
Saging i harde treslag (de fleste løvtrær) gir mer
vibrasjoner enn saging i myke treslag (de fleste bartrær).
Saging med uskarpt eller feil skjæreutstyr (feil type eller
feil filt), øker vibrasjonsnivået.
ADVARSEL! Overeksponering for
vibrasjoner kan føre til blodkar- eller
nerveskader hos personer som har
blodsirkulasjonsforstyrrelser. Oppsøk
lege hvis du opplever fysiske symptomer
som kan relateres til overeksponering for
vibrasjoner. Eksempel på slike
symptomer er dovning, manglende
følelse, ”kiling”, ”stikk”, smerte,
manglende eller redusert styrke,
forandringer i hudens farge eller
overflate. Disse symptomene opptrer
vanligvis i fingrer, hender eller håndledd.
Disse symptomene kan øke ved lave
temperaturer.
Stoppbryter
Stoppbryteren skal brukes for å slå av motoren. (26)
Lyddemper
Lyddemperen er konstruert for å redusere lydnivået samt
for å lede bort motorens avgasser fra brukeren.
ADVARSEL! Motorens avgasser er varme
og kan inneholde gnister som kan
forårsake brann. Start derfor aldri
maskinen innendørs eller i nærheten av
lettantennelig materiale!
I områder med varmt og tørt klima kan faren for brann
være stor. Det forekommer at disse områdene er regulert
ved lovgivning og forskrifter om at lyddemperen blant
annet skal være utstyrt med godkjent gnistfangernett (A).
(6)
OBS! Lyddemperen blir meget varm både under bruk og
etter stopp. Dette gjelder også tomgangskjøring. Vær
oppmerksom på brannfaren, spesielt ved håndtering
nær brannfarlige stoffer og/eller gasser.
100 – Norwegian
 Loading...