

Page 1

M A X X S O N I C S US A, INC.
1290 Ensell Road
Lake Zurich, Illinois 60047 USA
E-Mail info@maxxsonics.com
Website www.maxxsonics.com
M AXXSONICS EUROPE GM B H
Neckarstrasse 20
74847 Obrigheim, Germany
Phone +49 (0) 62 61 - 6 38-0
FAXX +49 (0) 62 61 - 6 38-129
E-Mail info@mbquart.de
Website www.mbquart.de
PAB 2100 / PAB 4100 / PAB 5400 / PAB 1200.1 D
Congratulations!
Vous venez d‘acquérir en achetant un amplifi cateur de la maison
Acquistando un amplifi catore della MB QUART avete scelto un pro-
P R E M I U M
Amplifier
Verstärker
Amplificateurs
Amplificador
Amplificatore
Усилитель
Page 2

AMPLIFIER FEATURE DESCRIPTION
AB 2100
AB 4100
AB 5400
AB 1200.1 D
APPLICATIONS
AB 2100
AB 4100
channel full range system
AB 5400
AB 1200.1 D
AFTER INSTALLATION
Troubleshooting a system
TECHNICAL DATA
ENGLISH
As the manufacturer of MB QUART
This product meets the current EU minimum warranty requirements,
To ensure your warranty policy keep your original receipt proofi ng
All other part and accessories of the system are warrantied to be
Warranty
A photo copy of the original receipt must accompany the product
year from date of manufacture.
Any damage to the product as a result of misuse, abuse, accident,
This warranty is limited to defective parts and specifi cally excludes
Page 3

English
GENERAL INSTALLATION NOTES
The success of any car stereo system relies on several factors, such as the system design, execution of the installation, and system setup.
This section is intended to assist the installer by offering several tips and hints about good installation practice. Please remember that any
The ground connection integrity to the chassis is very important, and the best way to achieve a good, solid electrical and mechanical contact is to
TIP:
Use the same approach when installing head units, equalizers or any audio equipment for that matter - run short individual grounds from each
All power, ground and speaker connections should be crimped and soldered for reliability. Make sure that none of the cable insulation can chafe
After all cables are run, connect speaker wires to the speakers and amplifi ers, then run and plug in RCA cables. Next, connect all power grounds
The following procedure may seem like overkill, but there is nothing more frustrating than turning on a system for the fi rst time, and it does not
Turn the head unit on, insert a CD, or select a radio station, and increase the head unit volume control. If the system sounds fi ne, turn off the head
Page 4
AMPLIFIER FEATURE DESCRIPTION
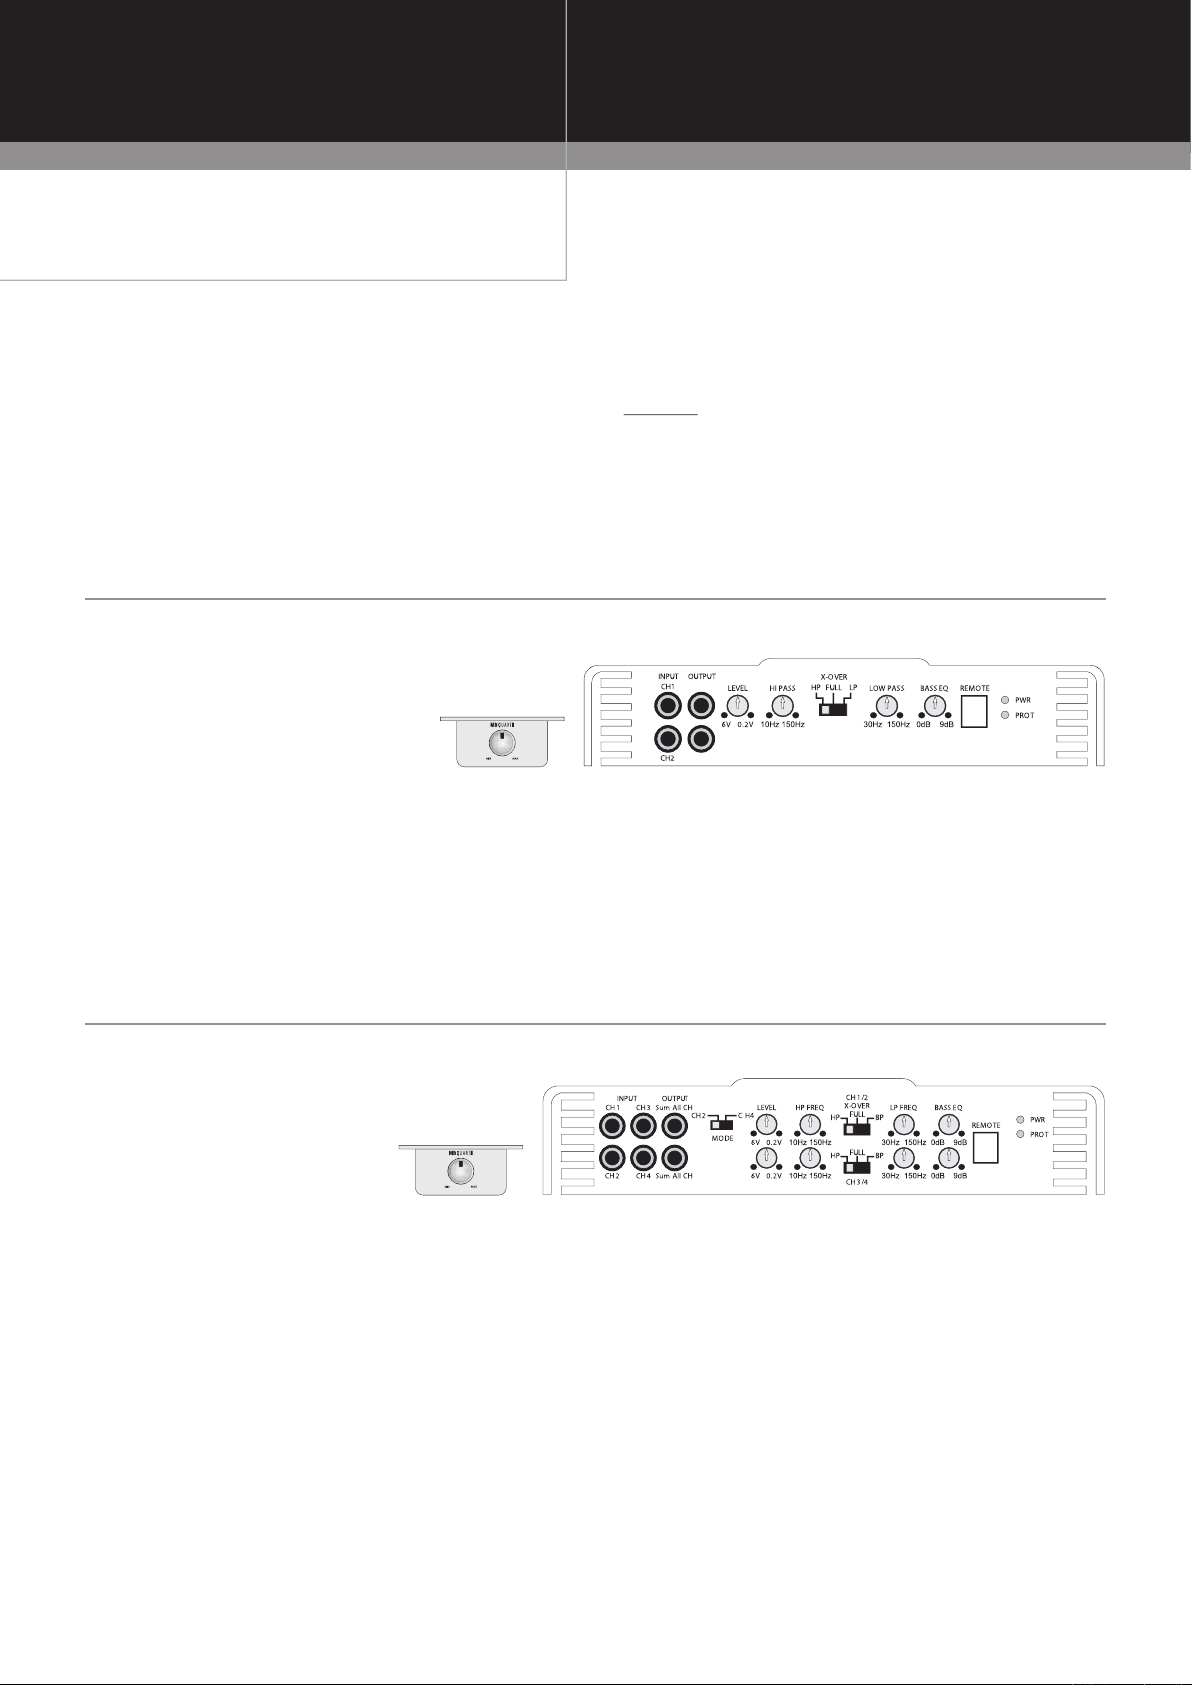
MBQR-1
MBQR-1
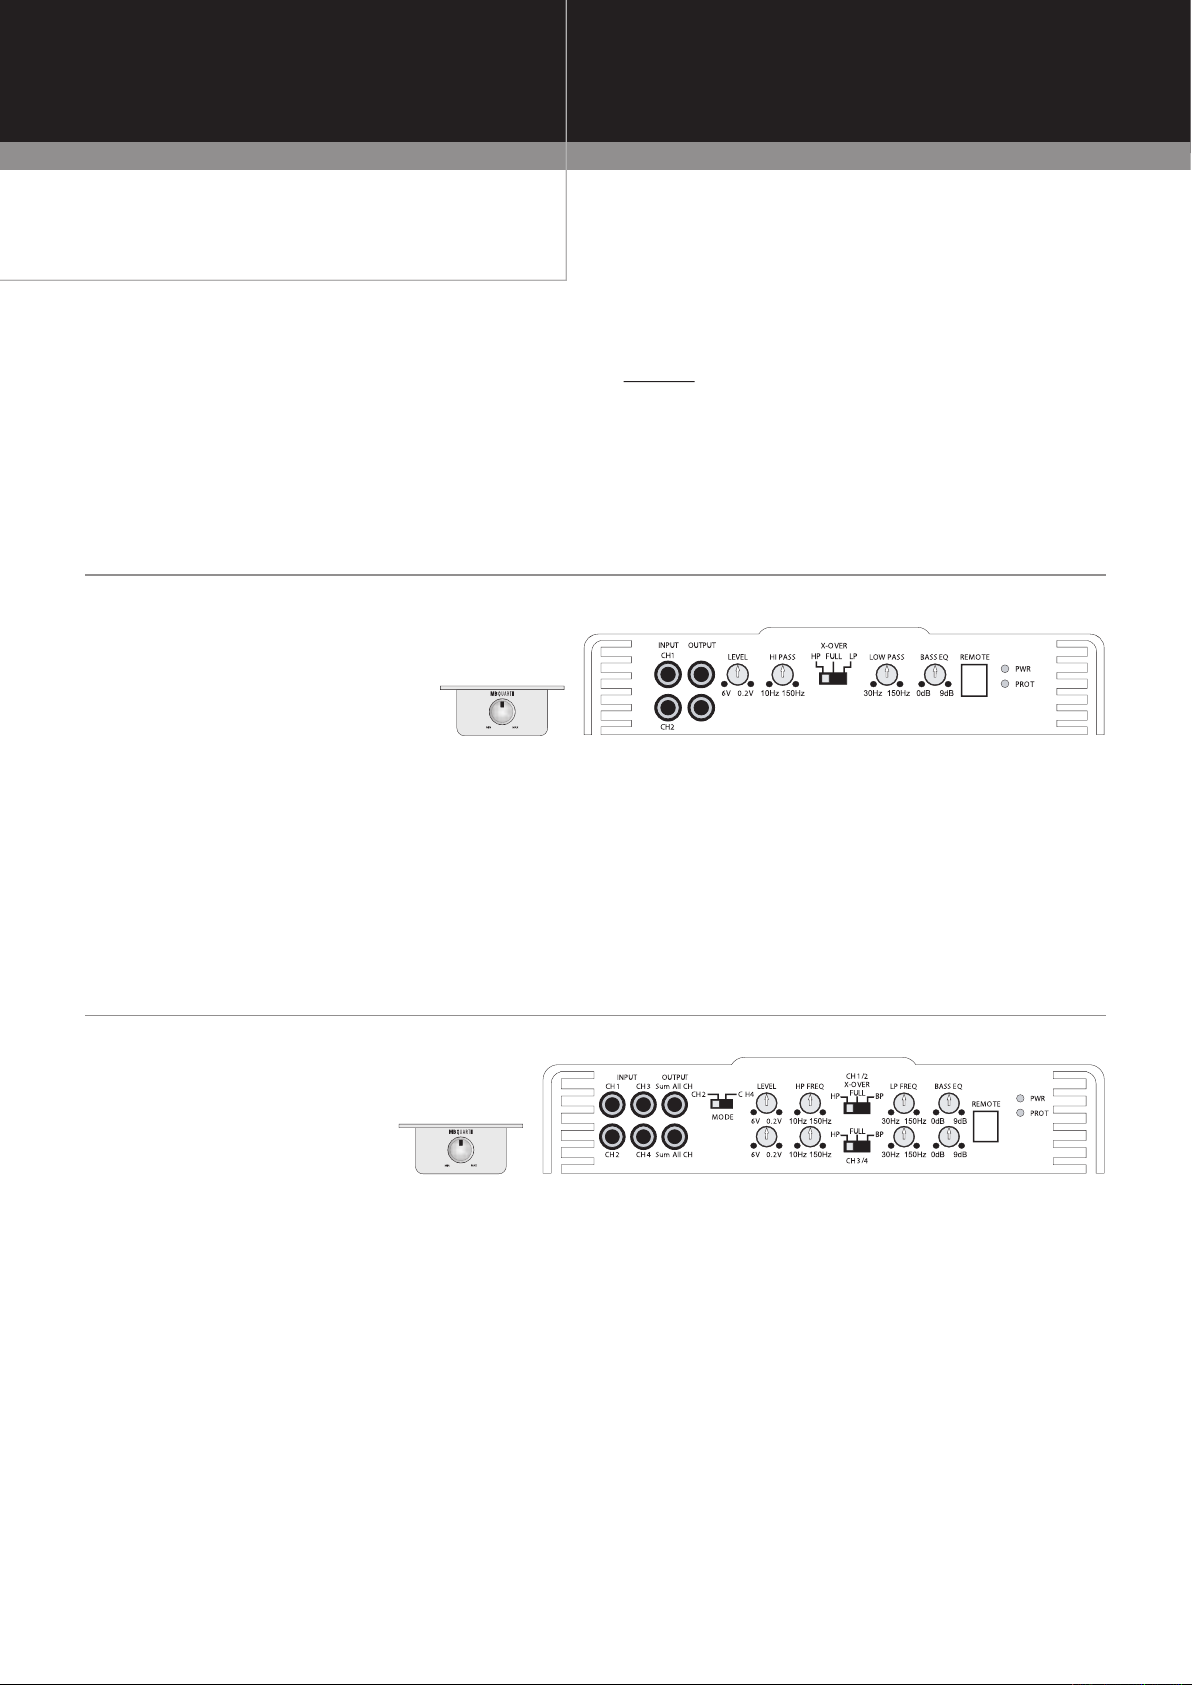
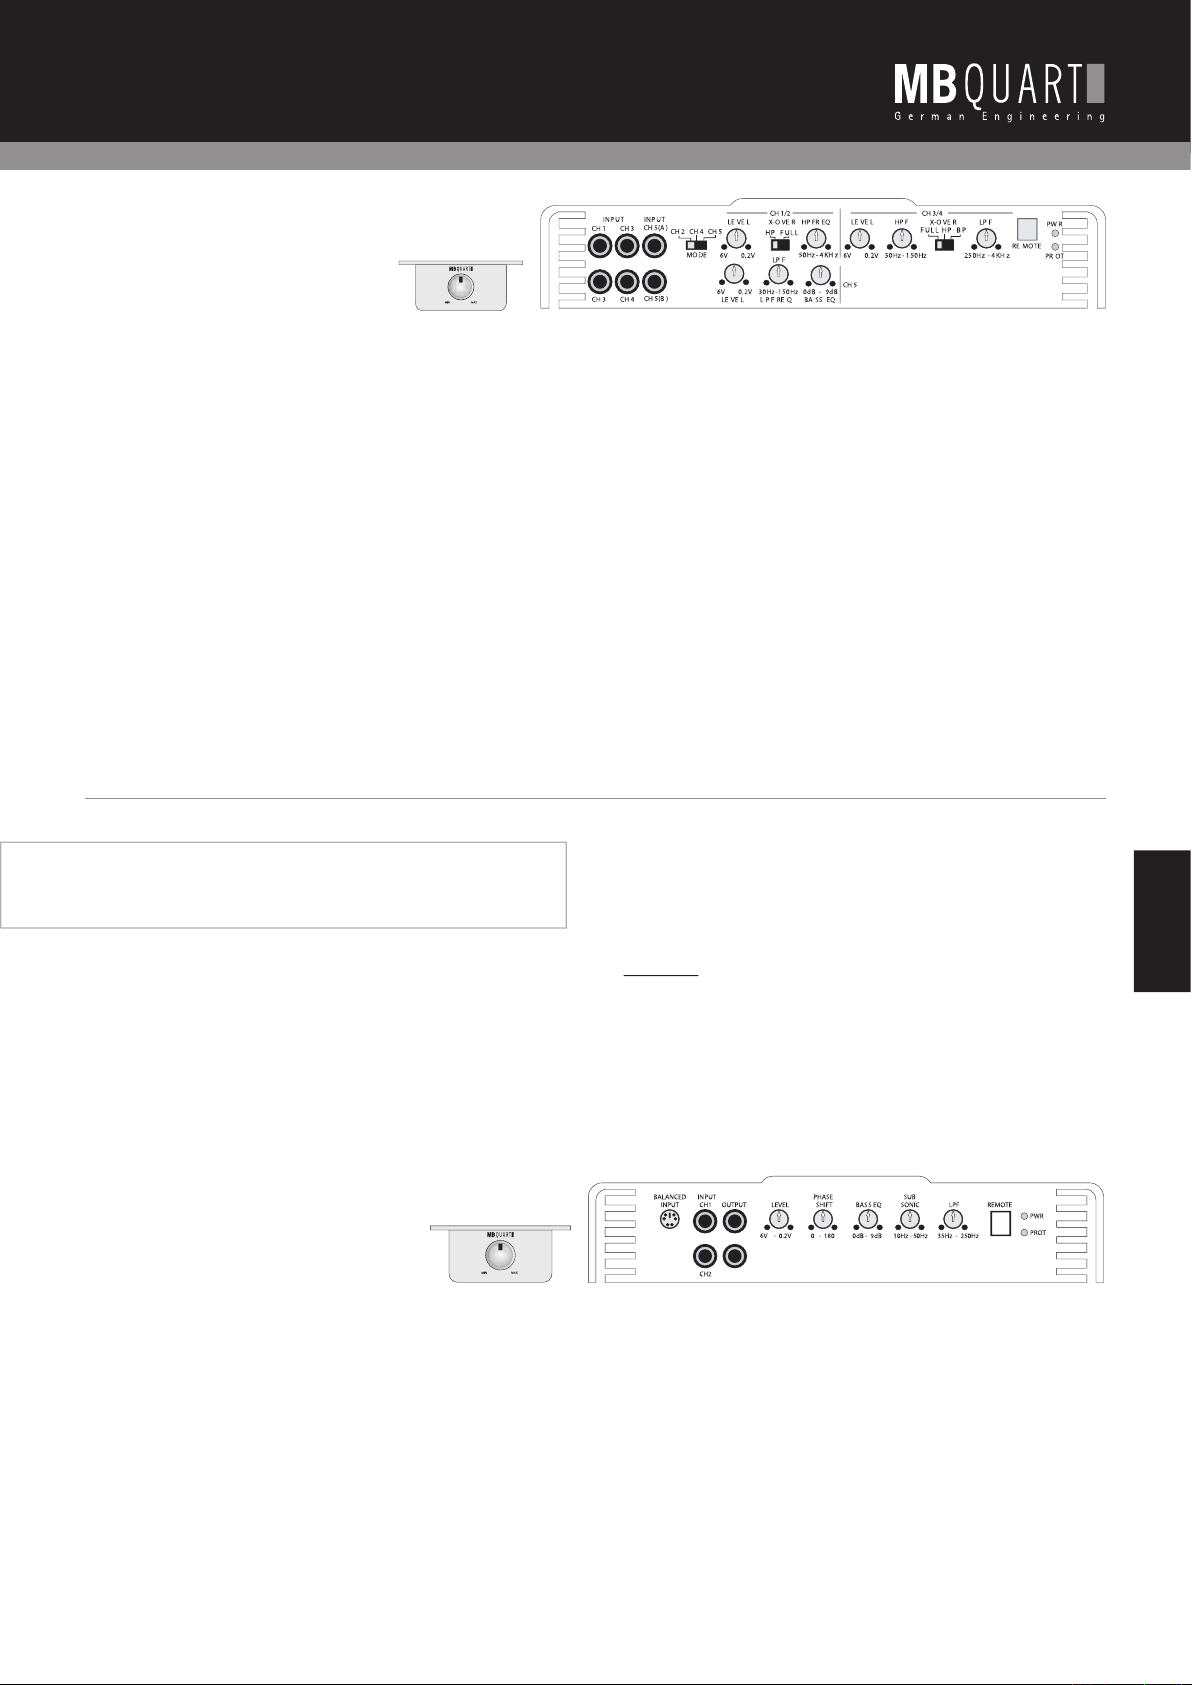
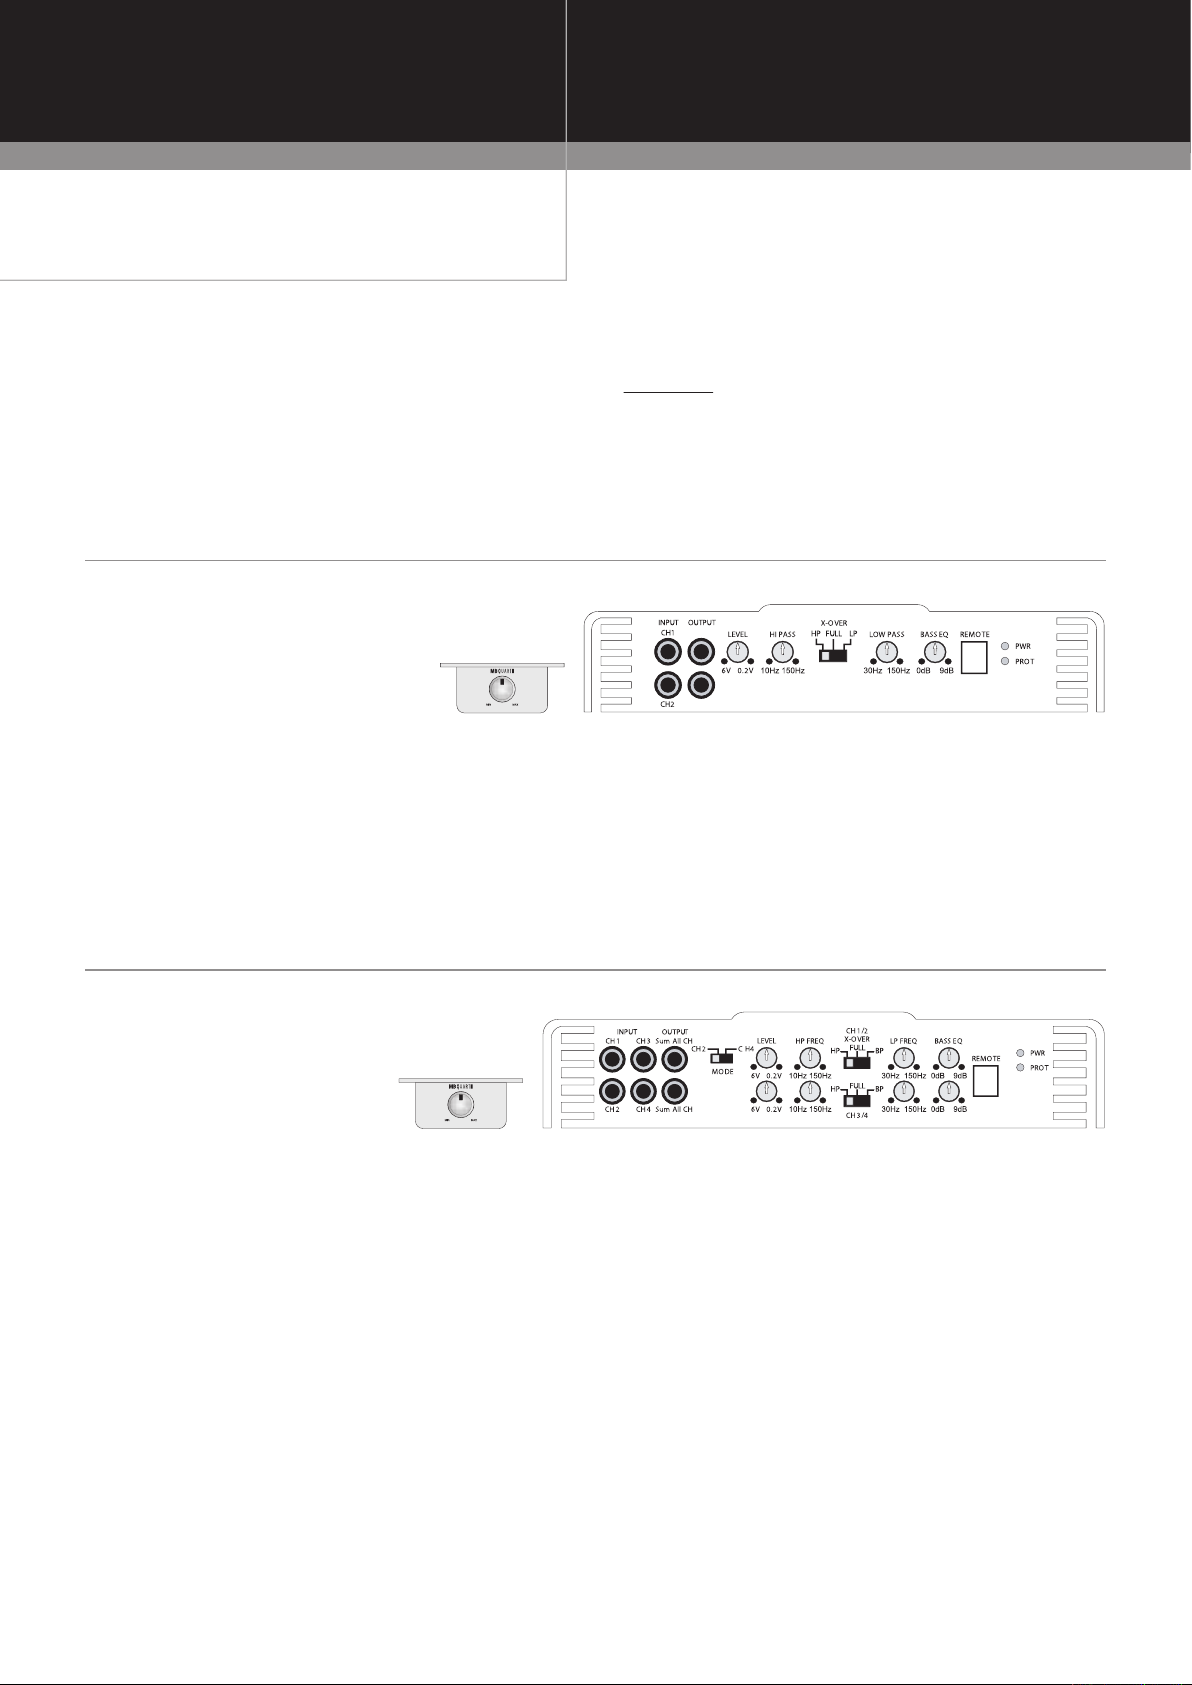
The AMPLIFIER CH 1/2CH X-OVER slide switch selects the input
The X-OVER slide switch selects the internal crossover functions:
The AMPLIFIER CH 3/CH 4 X-OVER slide switch selects the input
Page 5

AMPLIFIER FEATURE DESCRIPTION
English
MBQR-1
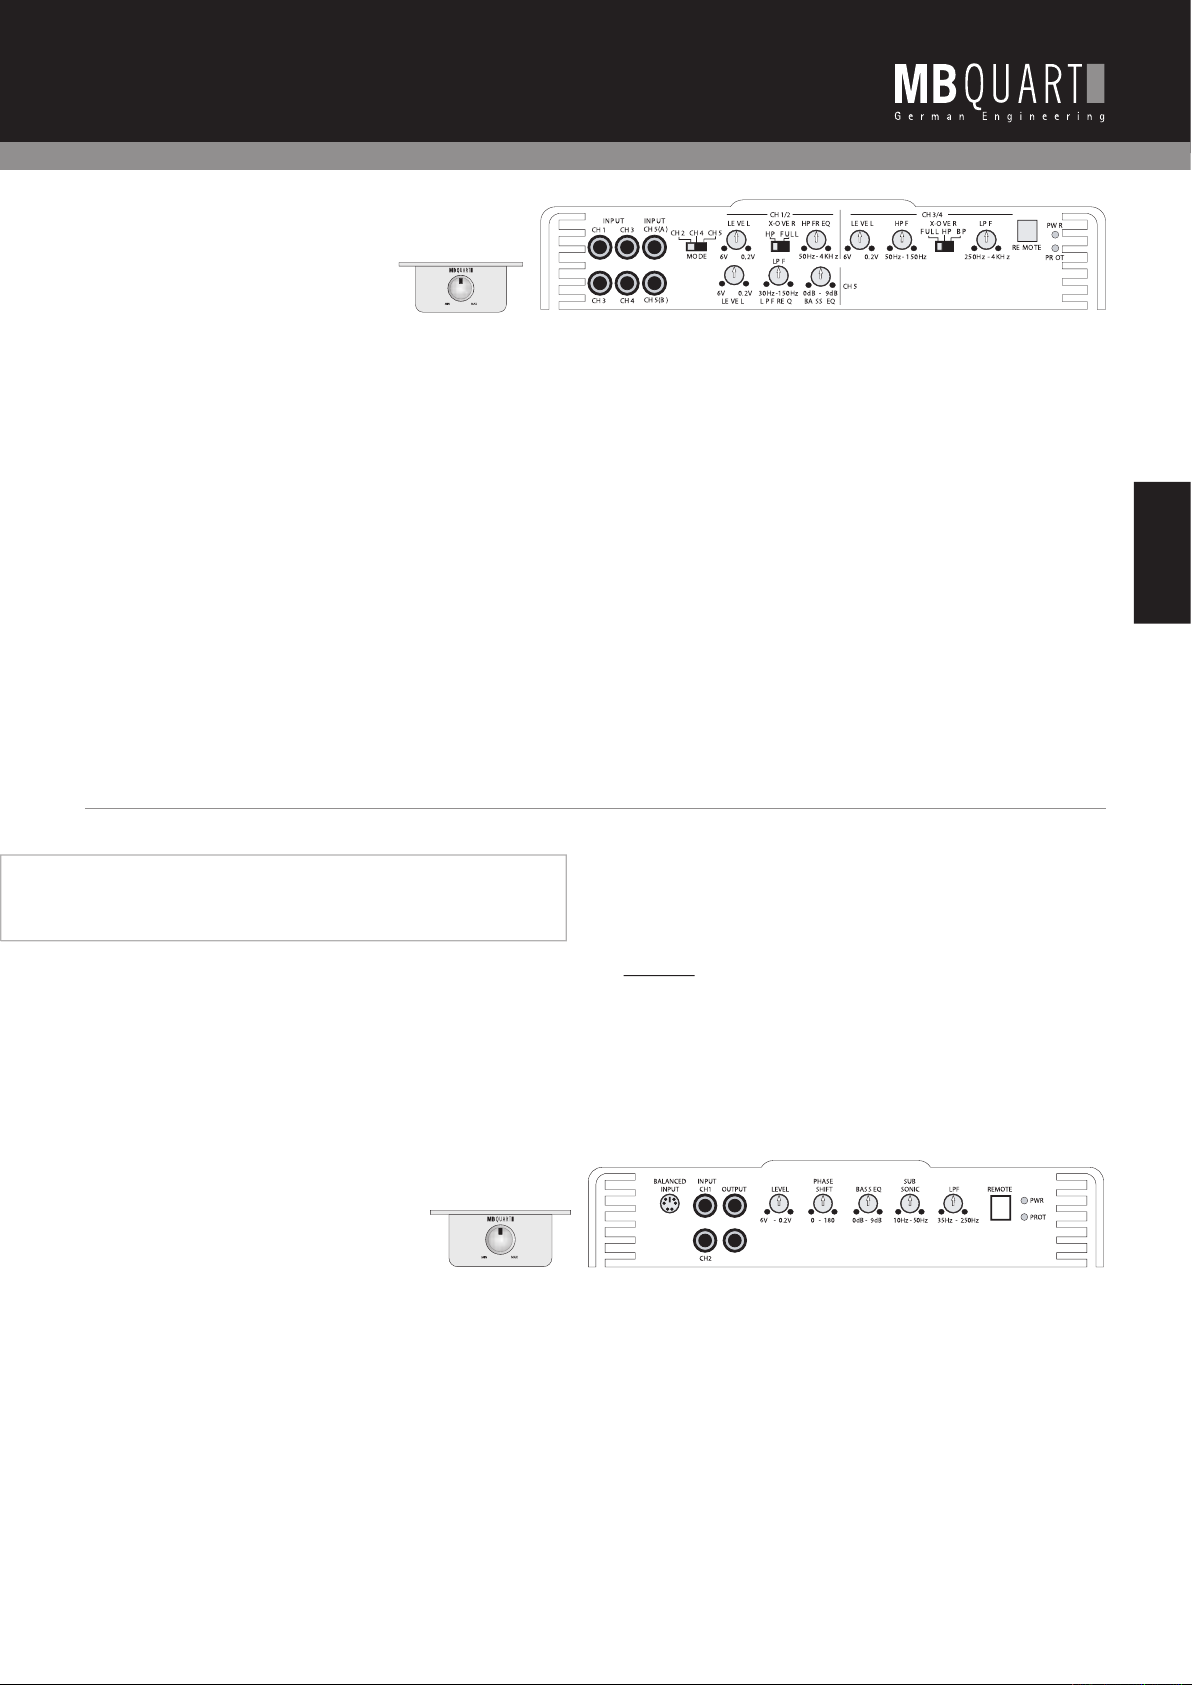
The PAB 5400
jacks CH1 and CH2, and channel pair 3&4 receive input signal from
jacks are also fed to channel 5.
variable from 50 Hz to 4 KHz, are selected to form a BANDPASS
The 1 channel mono amplifi ers are capable of 4, 2 & 1 ohm loads and
The line input signal is routed directly to the line output RCA’s jacks
The REMOTE jack allows the addition of the Bass Remote module
MBQR-1
Page 6

AMPLIFIER APPLICATIONS
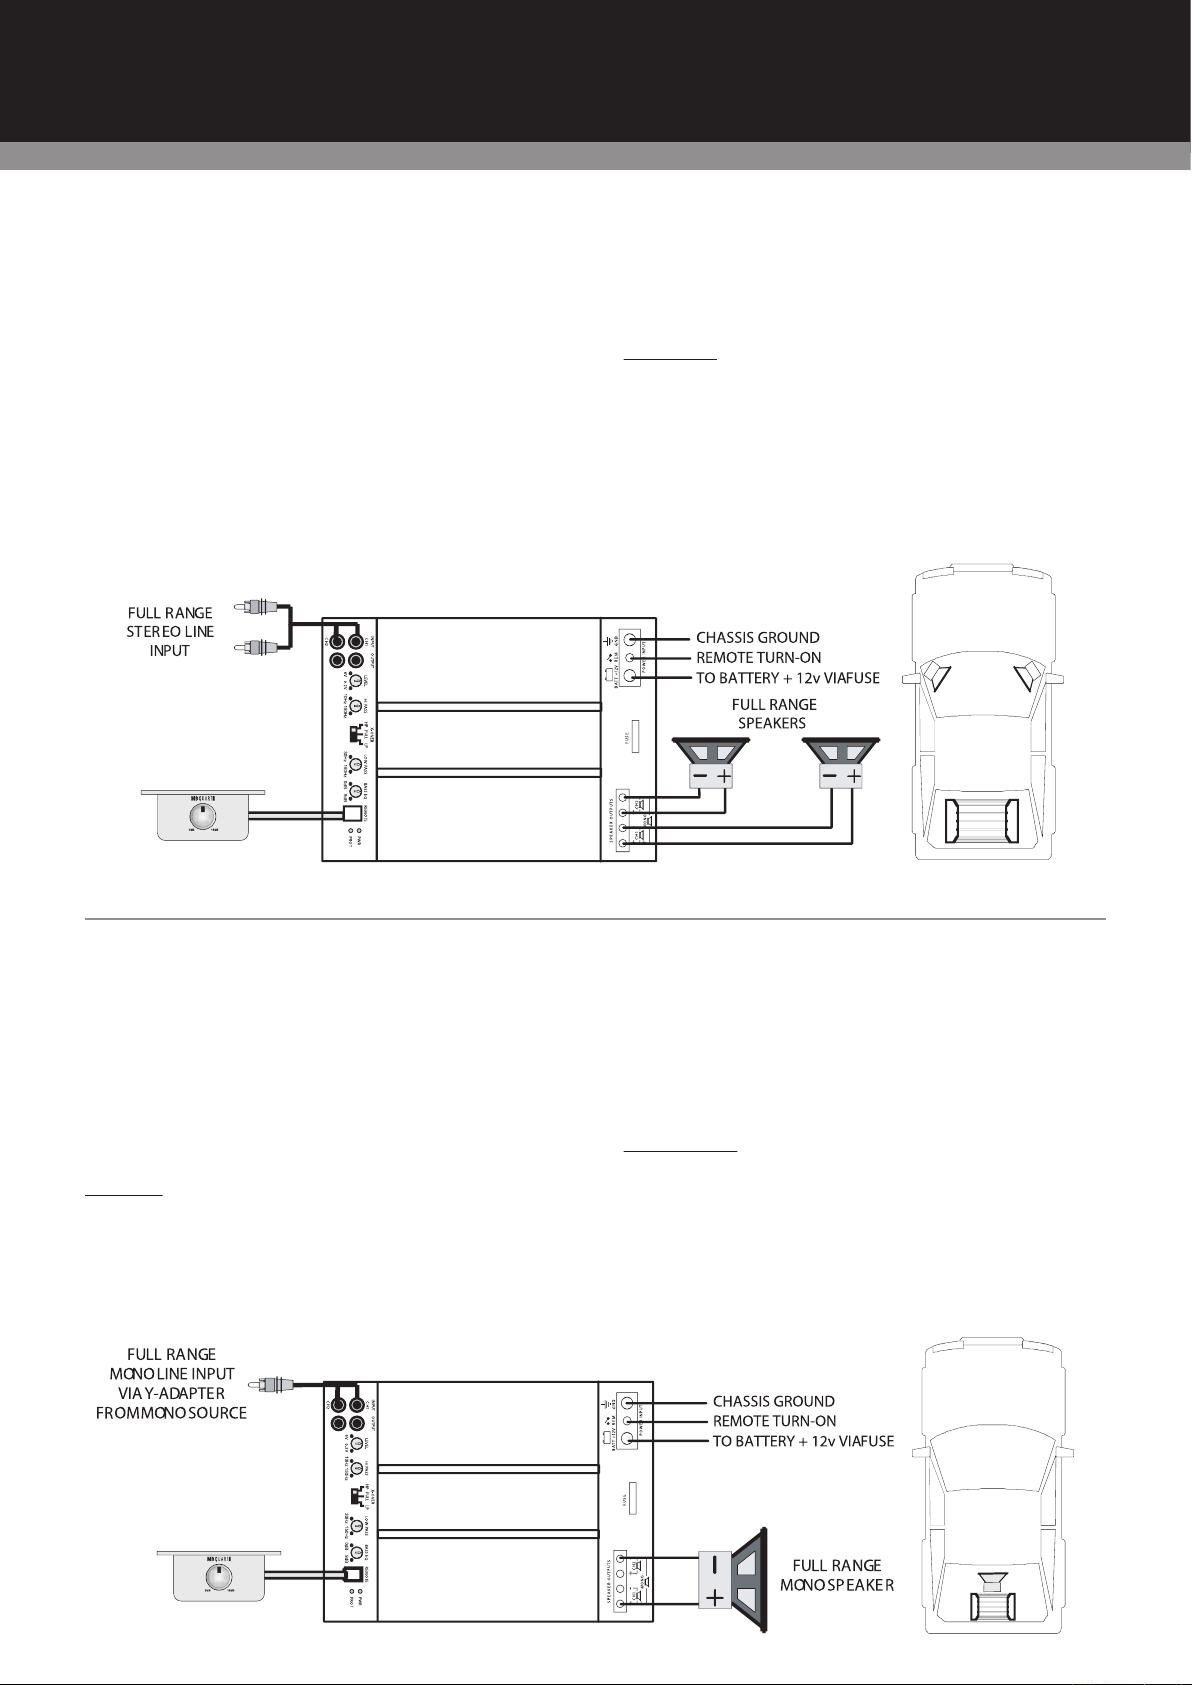
PAB 2100 2-Channel Amplifi er
MBQR-1
tereo
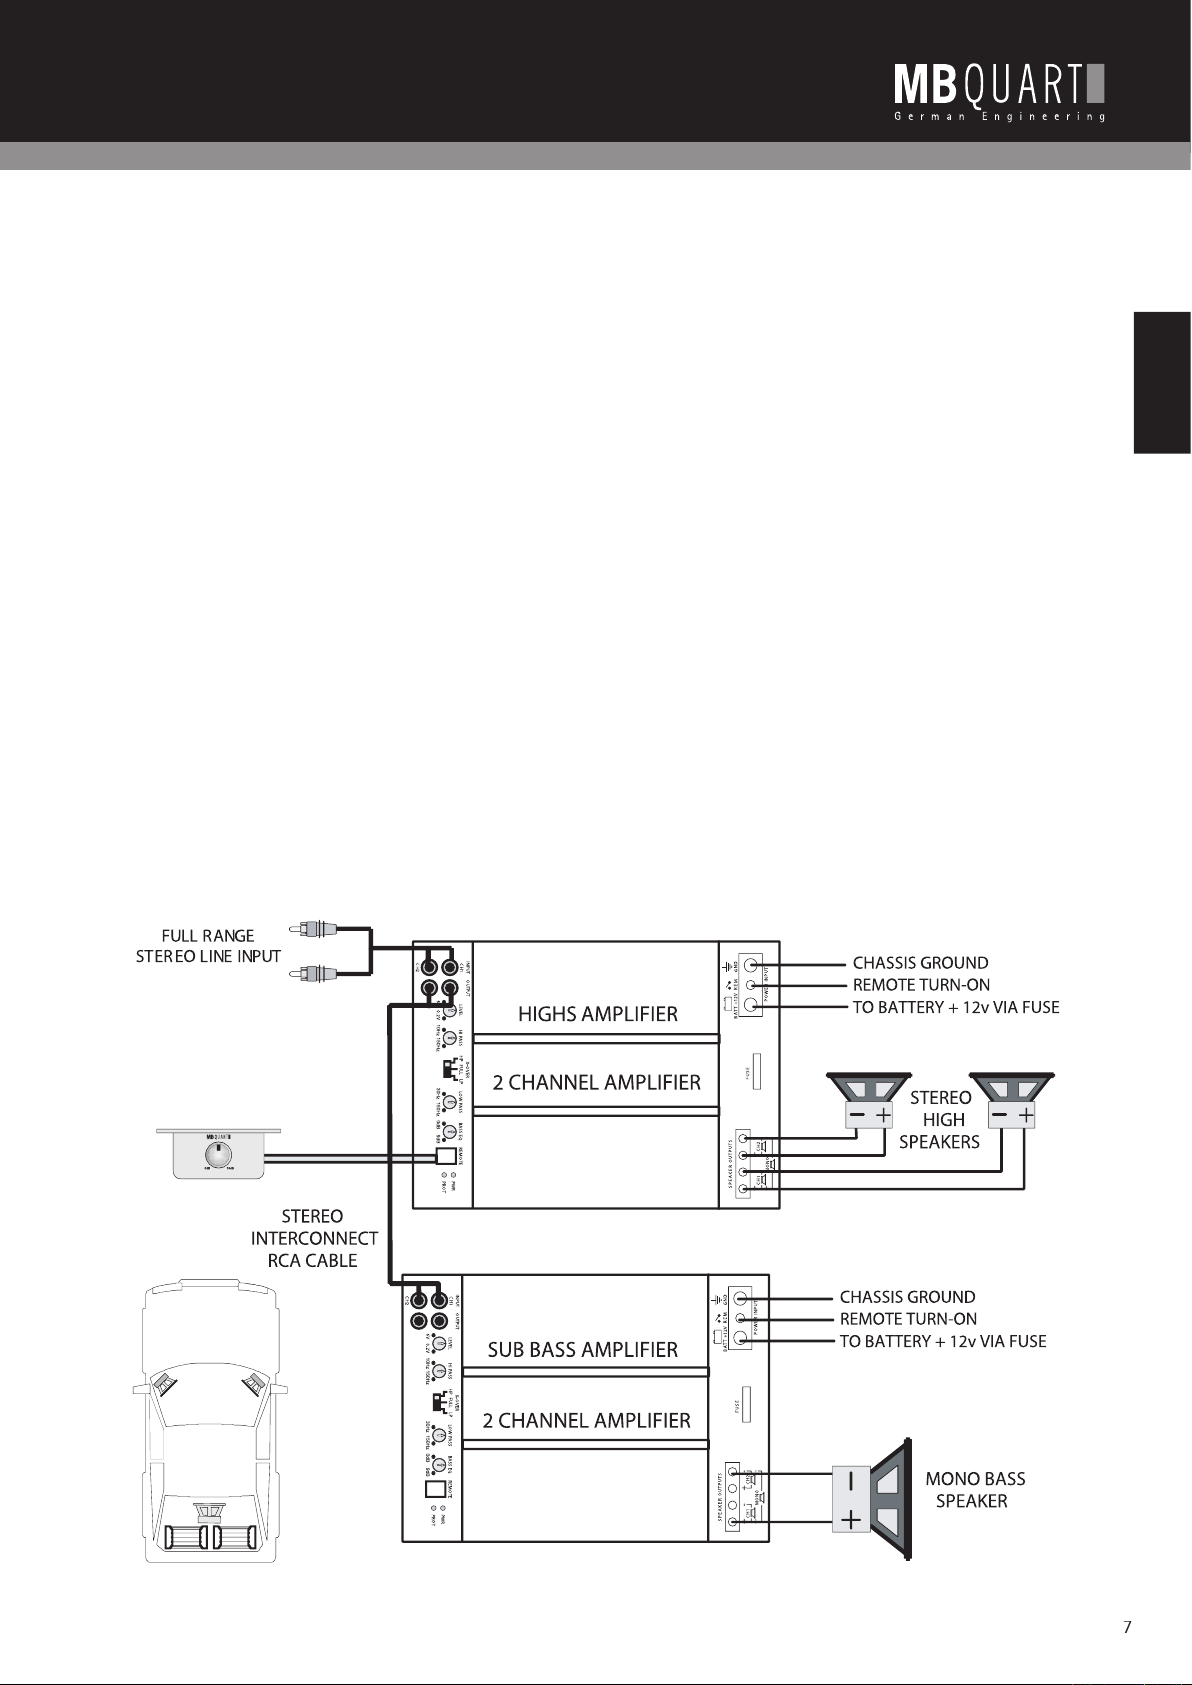
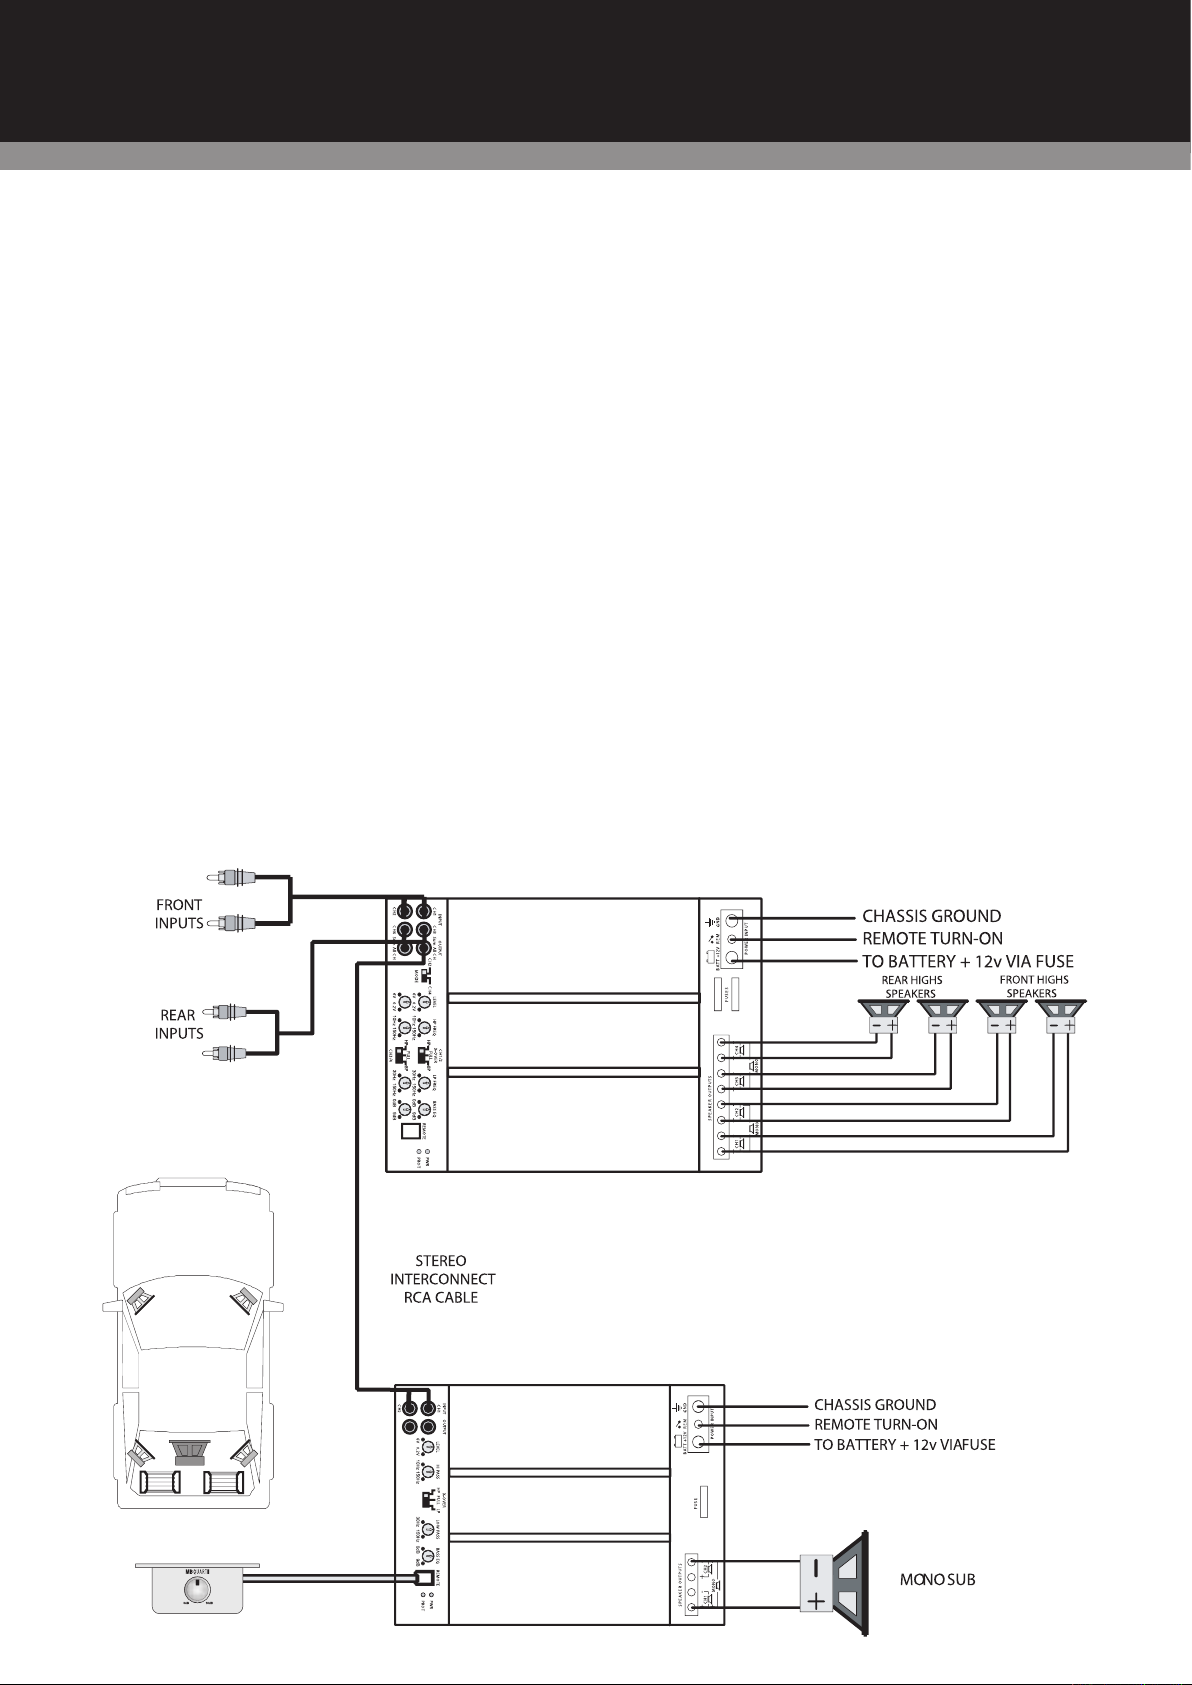
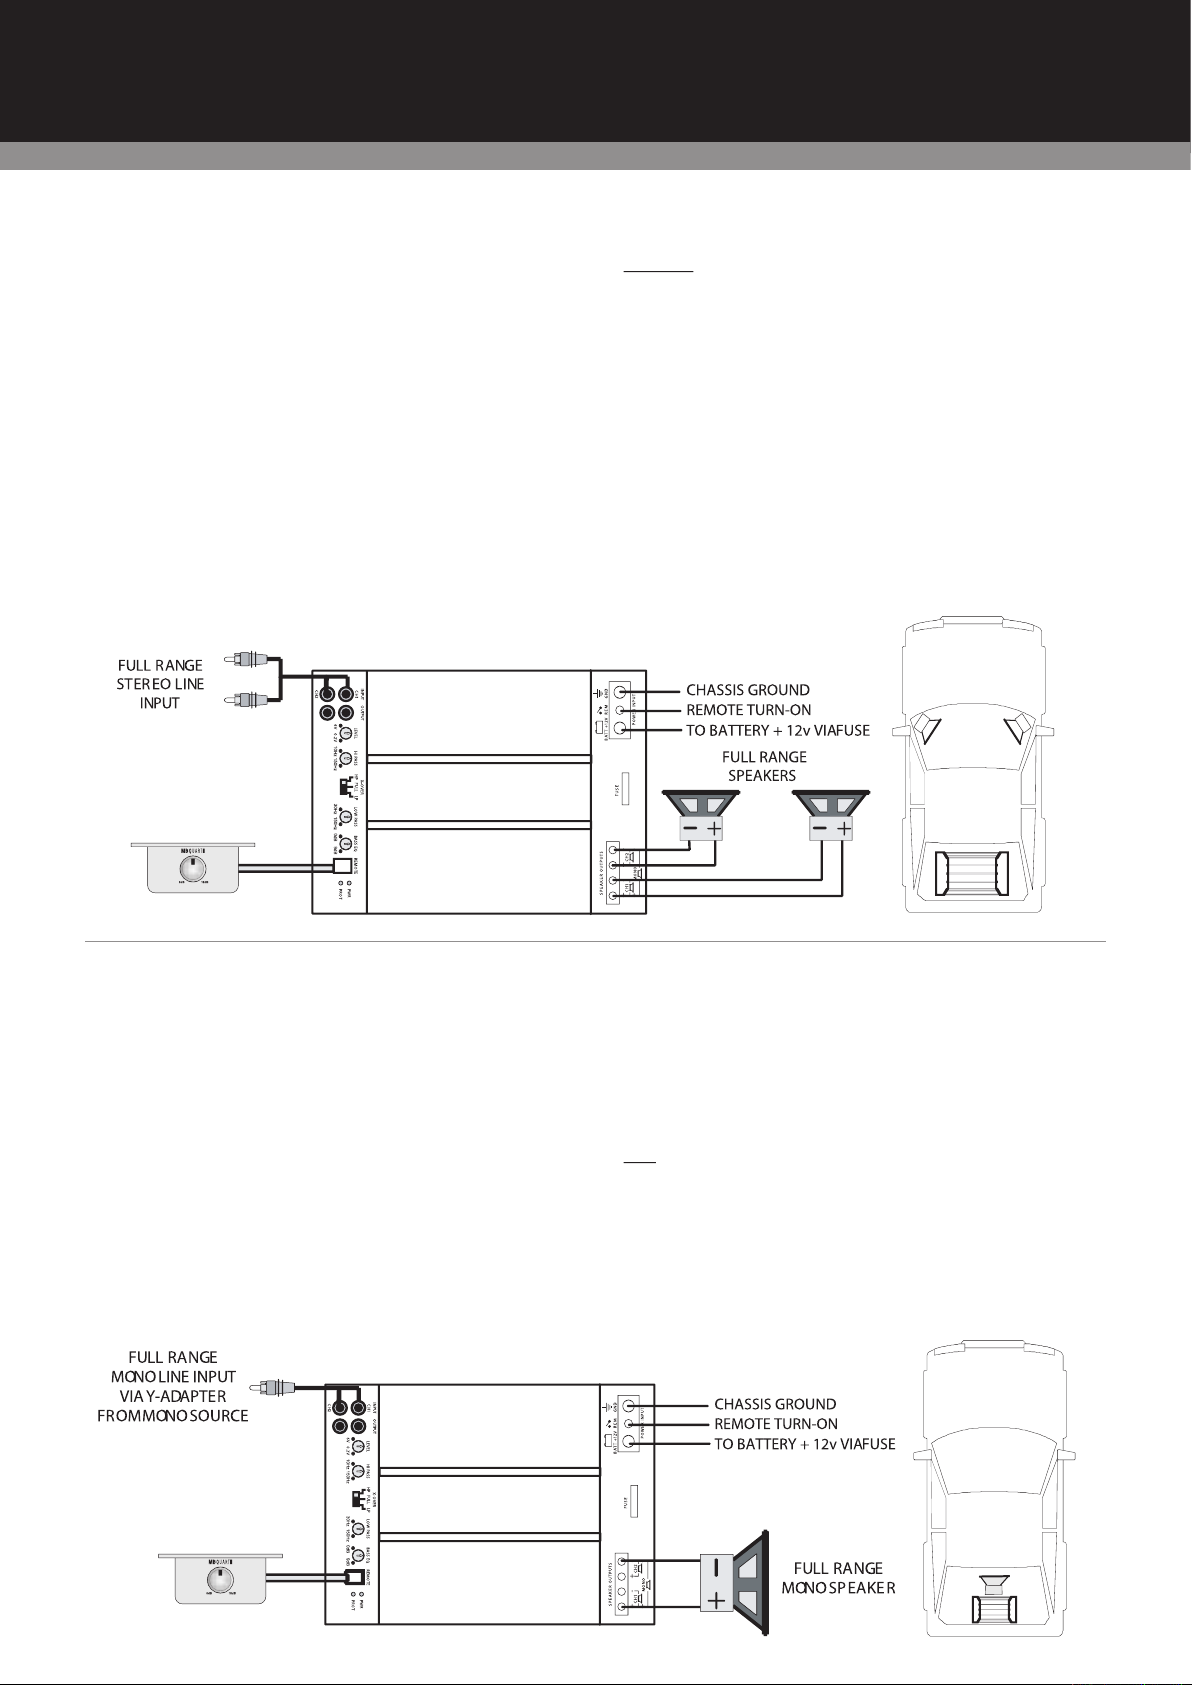
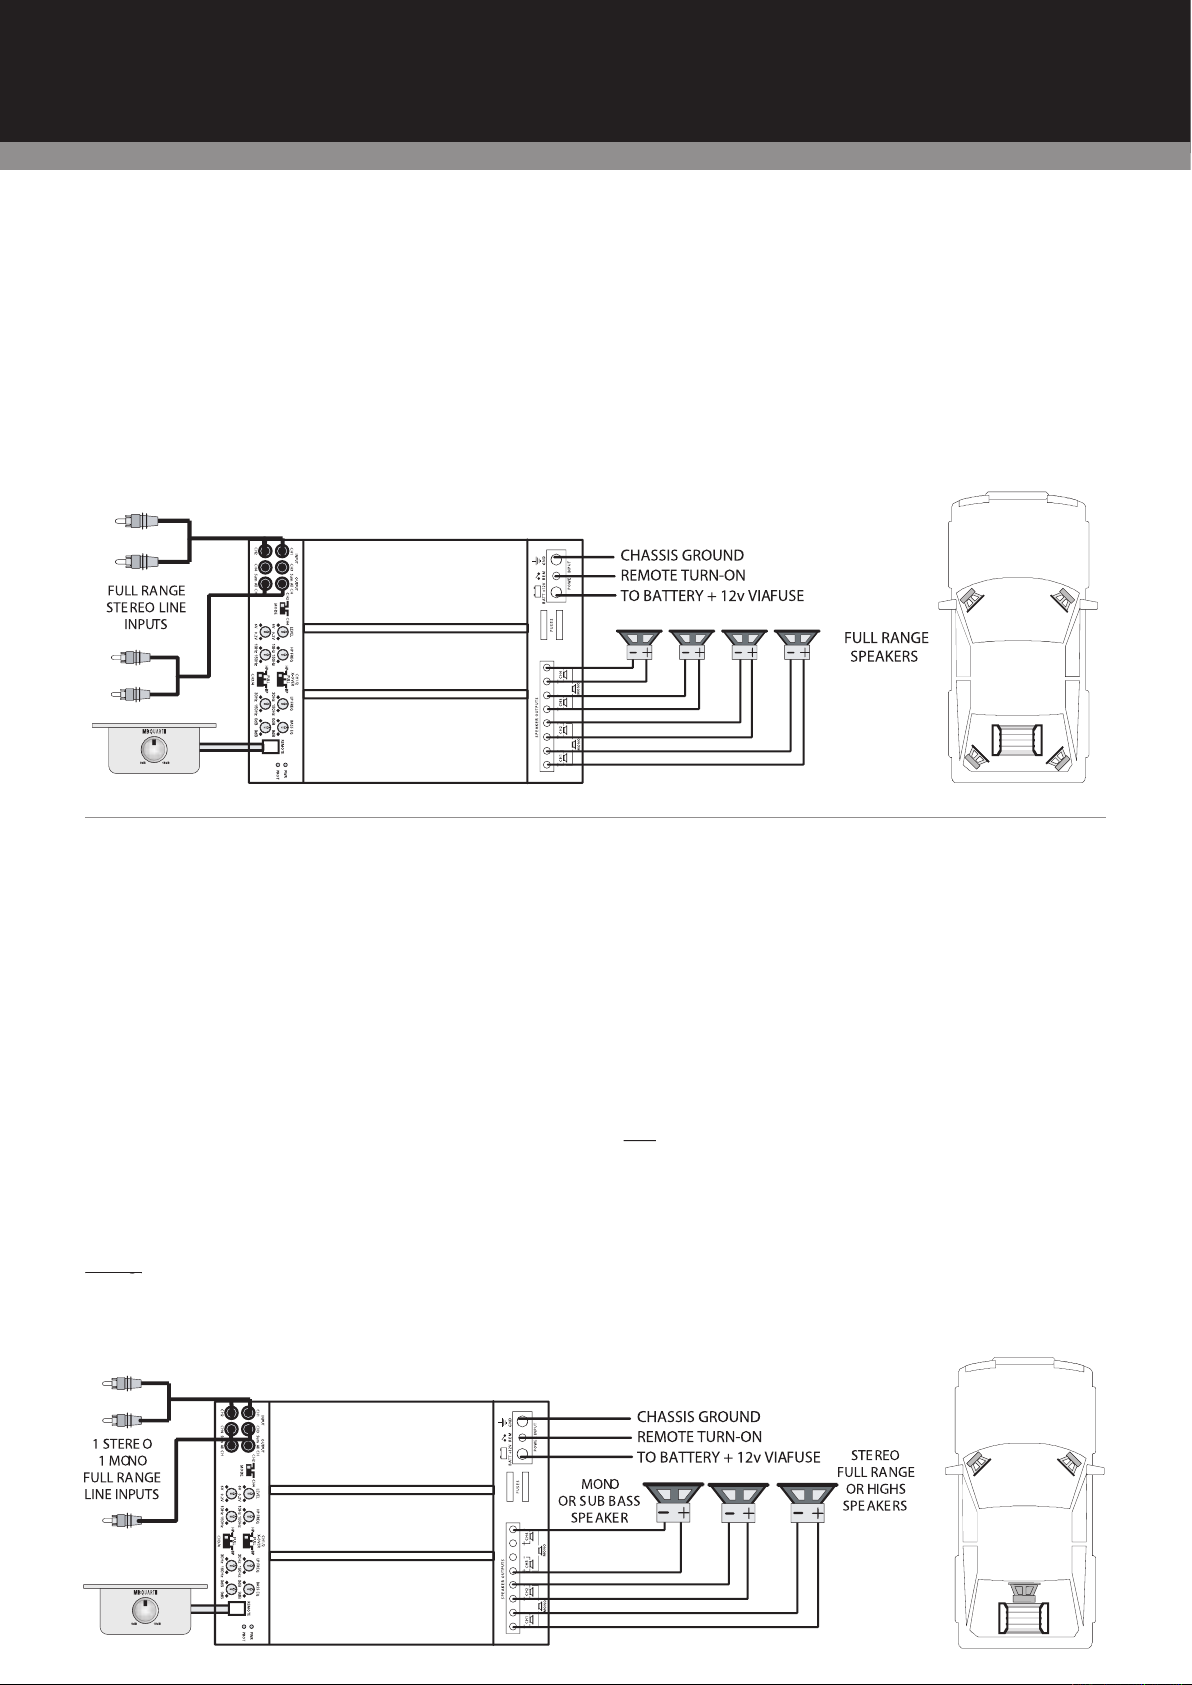
This is the most basic application for the Premium Series 2 channel
The X-OVER switch must be in the FULL position.
This amplifi er will not do 1 Ohm stereo or 2/1 Ohm mono
MBQR-1
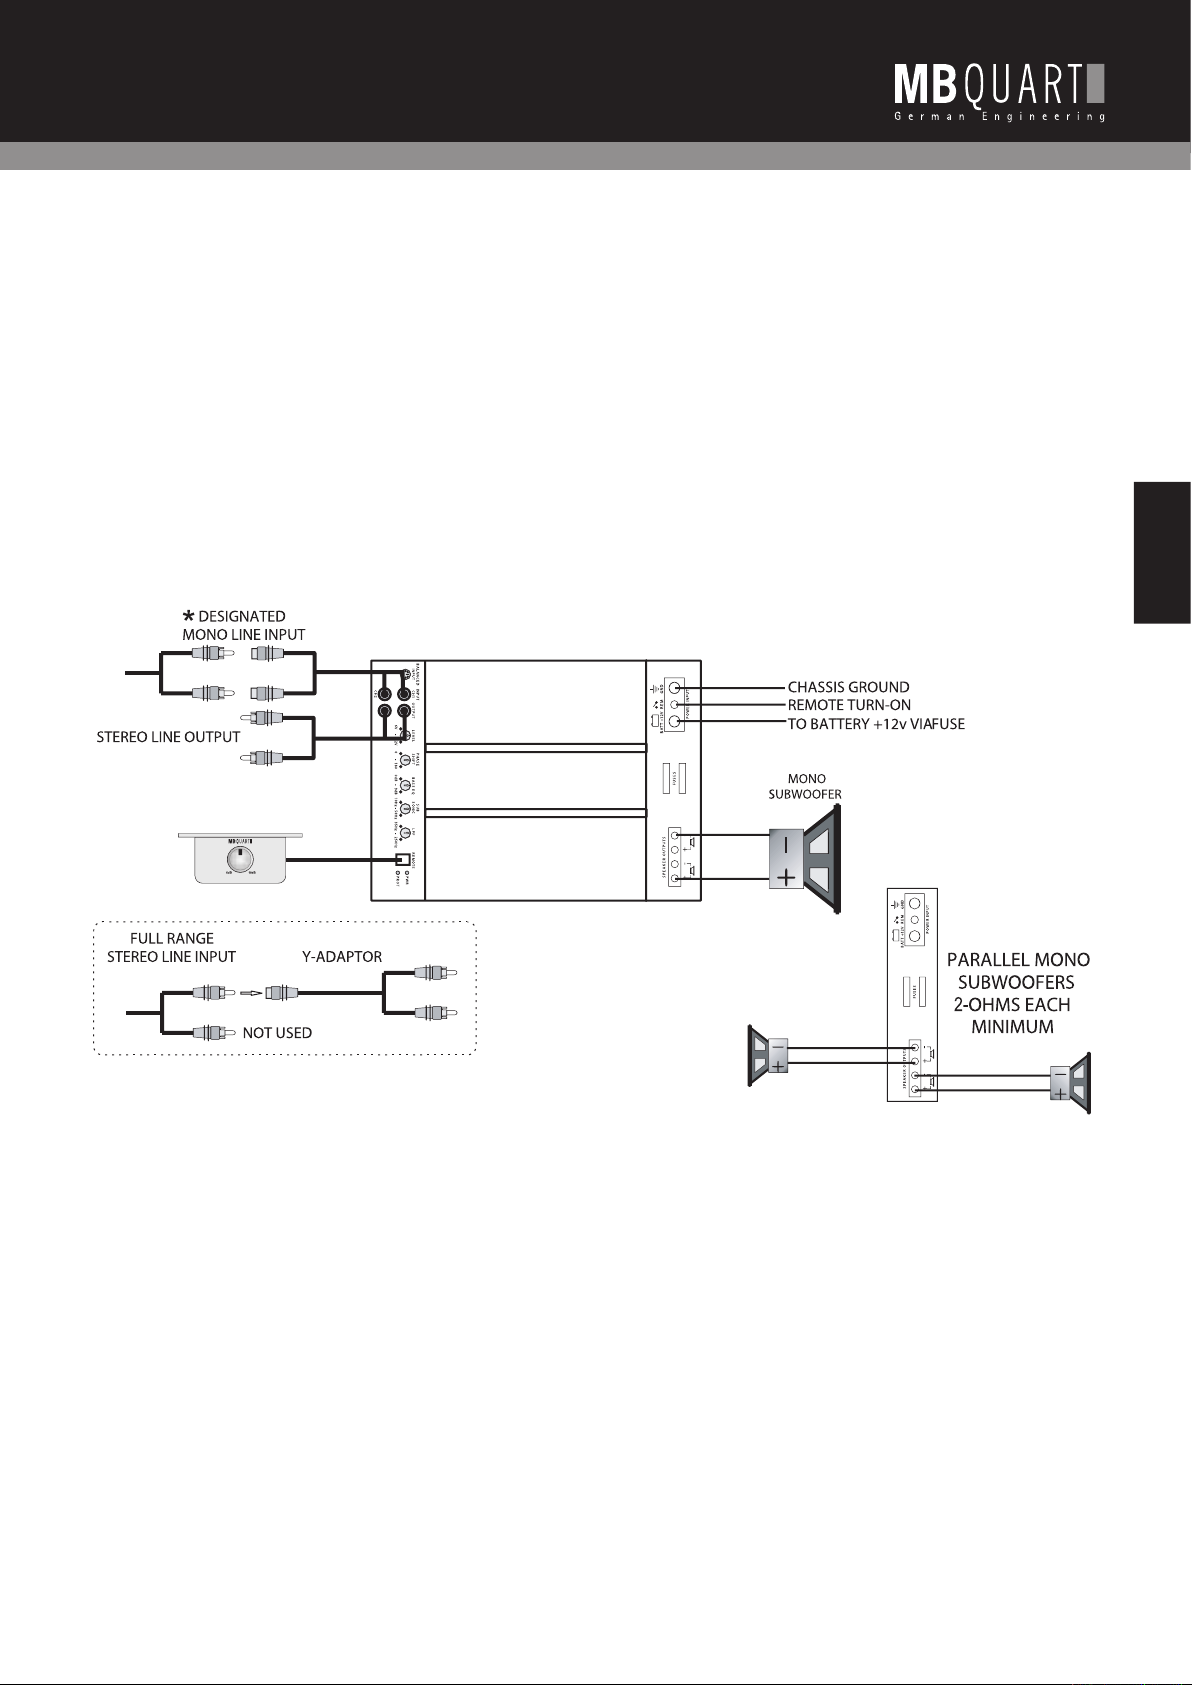
This application illustrates the basic mono bridging method for all
A MONO signal source is required, such as would be available from
via a Y-adapter RCA cable. Connect the mono speaker positive termi-
The AMPLIFIER X-OVER switch must be in the FULL position.
TIP:
If you are using the mono sub bass output of an active crossover,
Page 7
English
MBQR-1
AMPLIFIER APPLICATIONS
PAB 2100 2-Channel Amplifi er
Page 8
MBQR-1
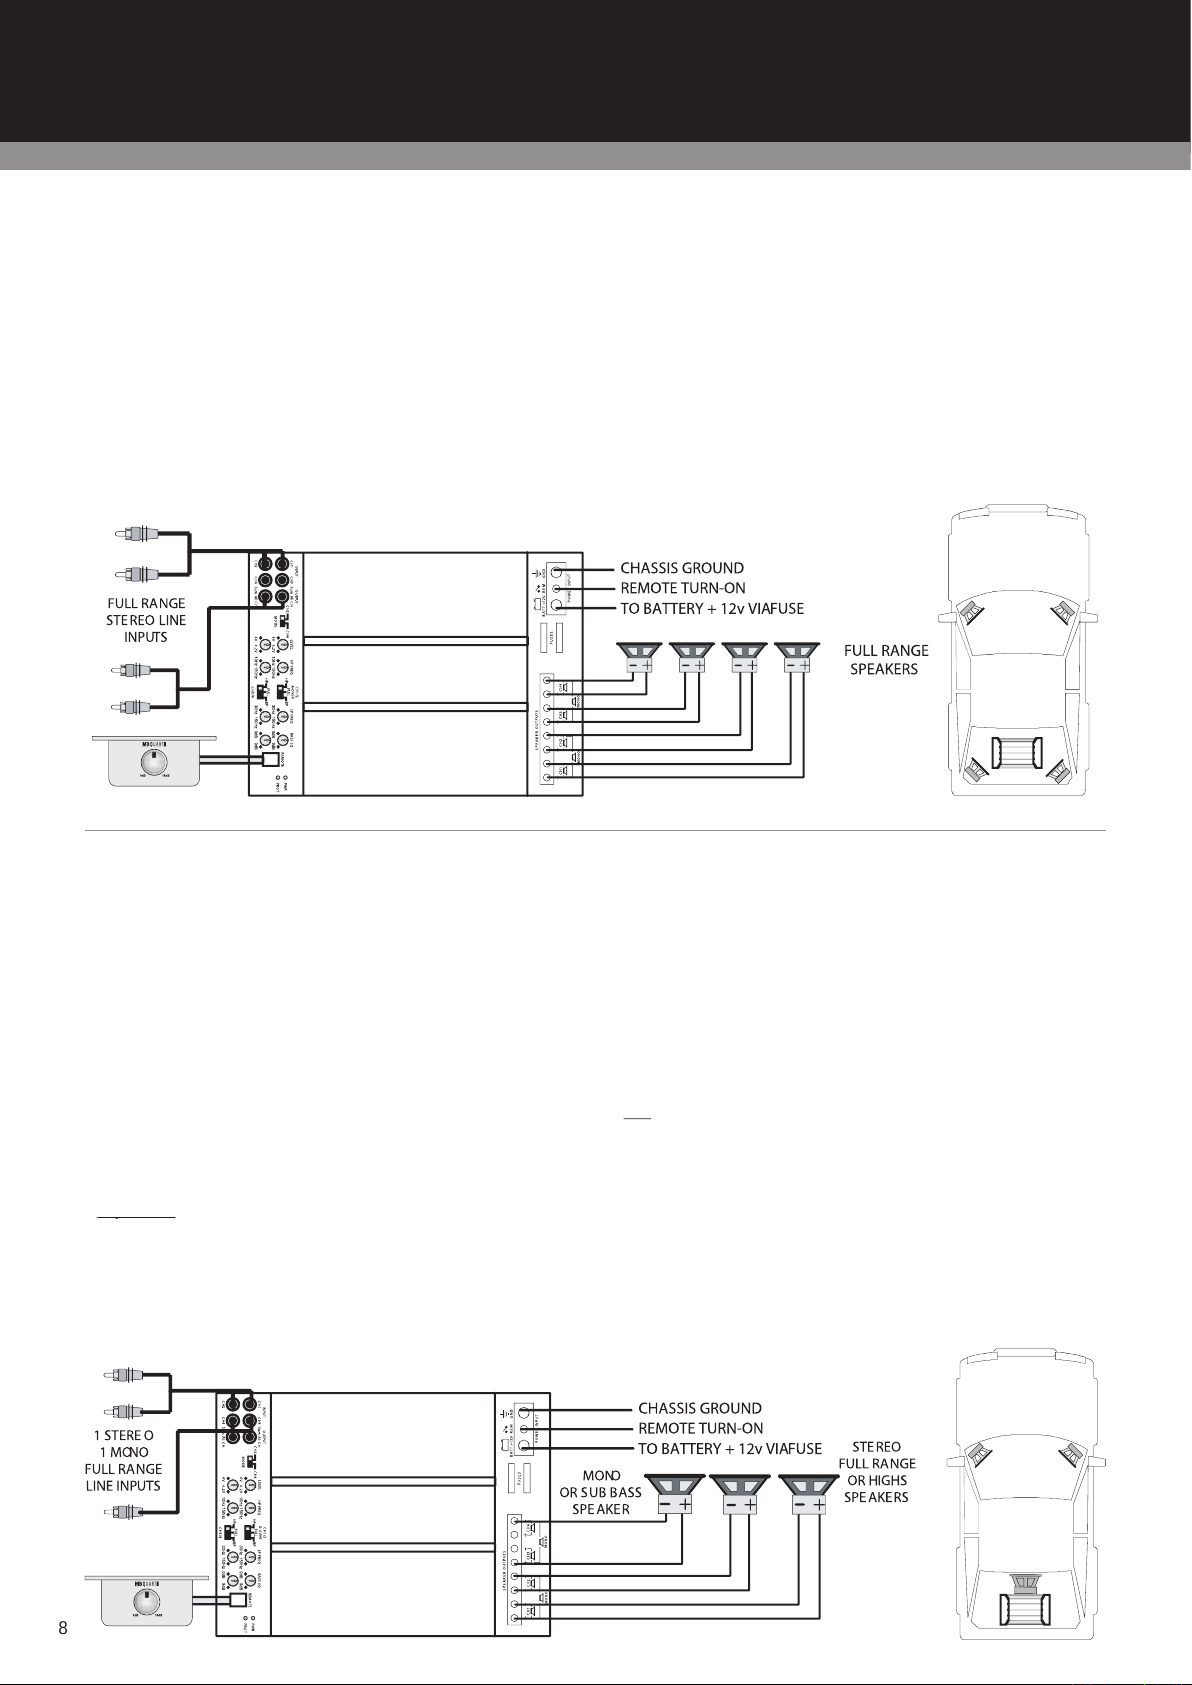
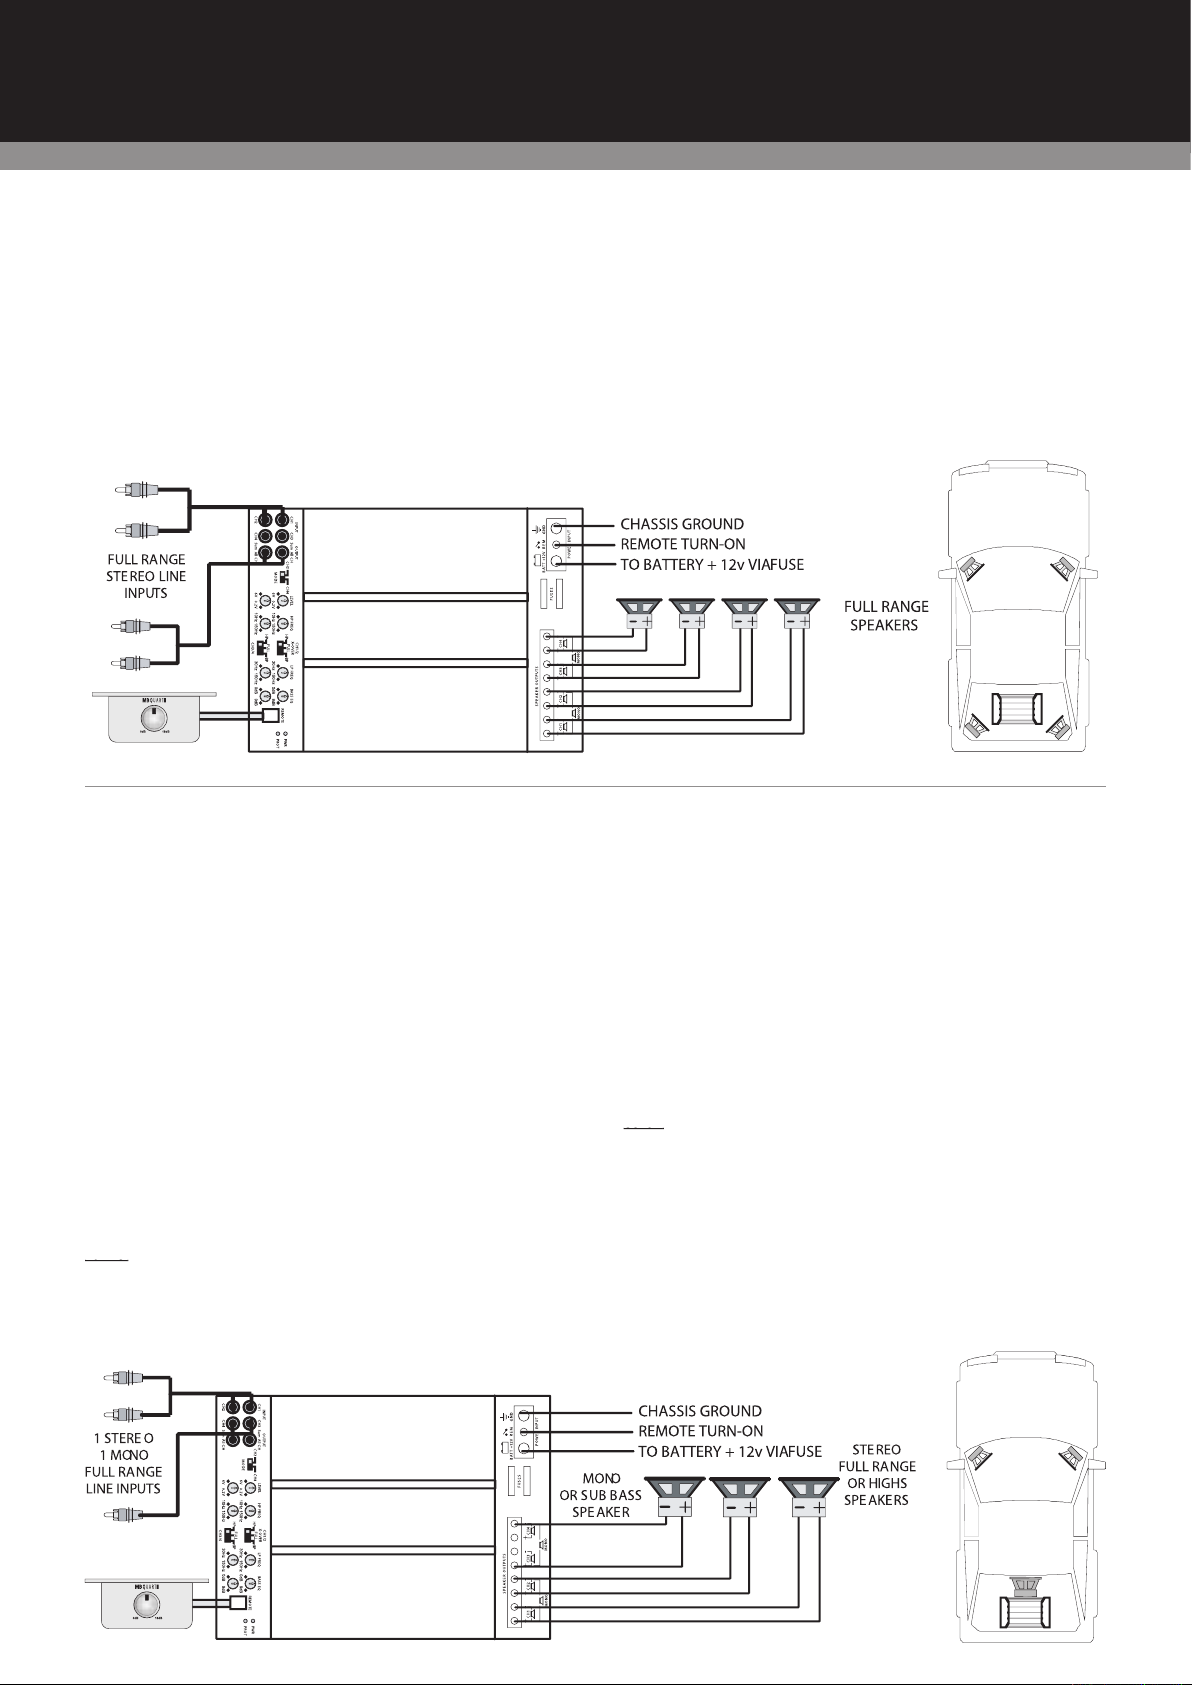
channel full range
ystem
2 ohm per channel
MBQR-1
ystem
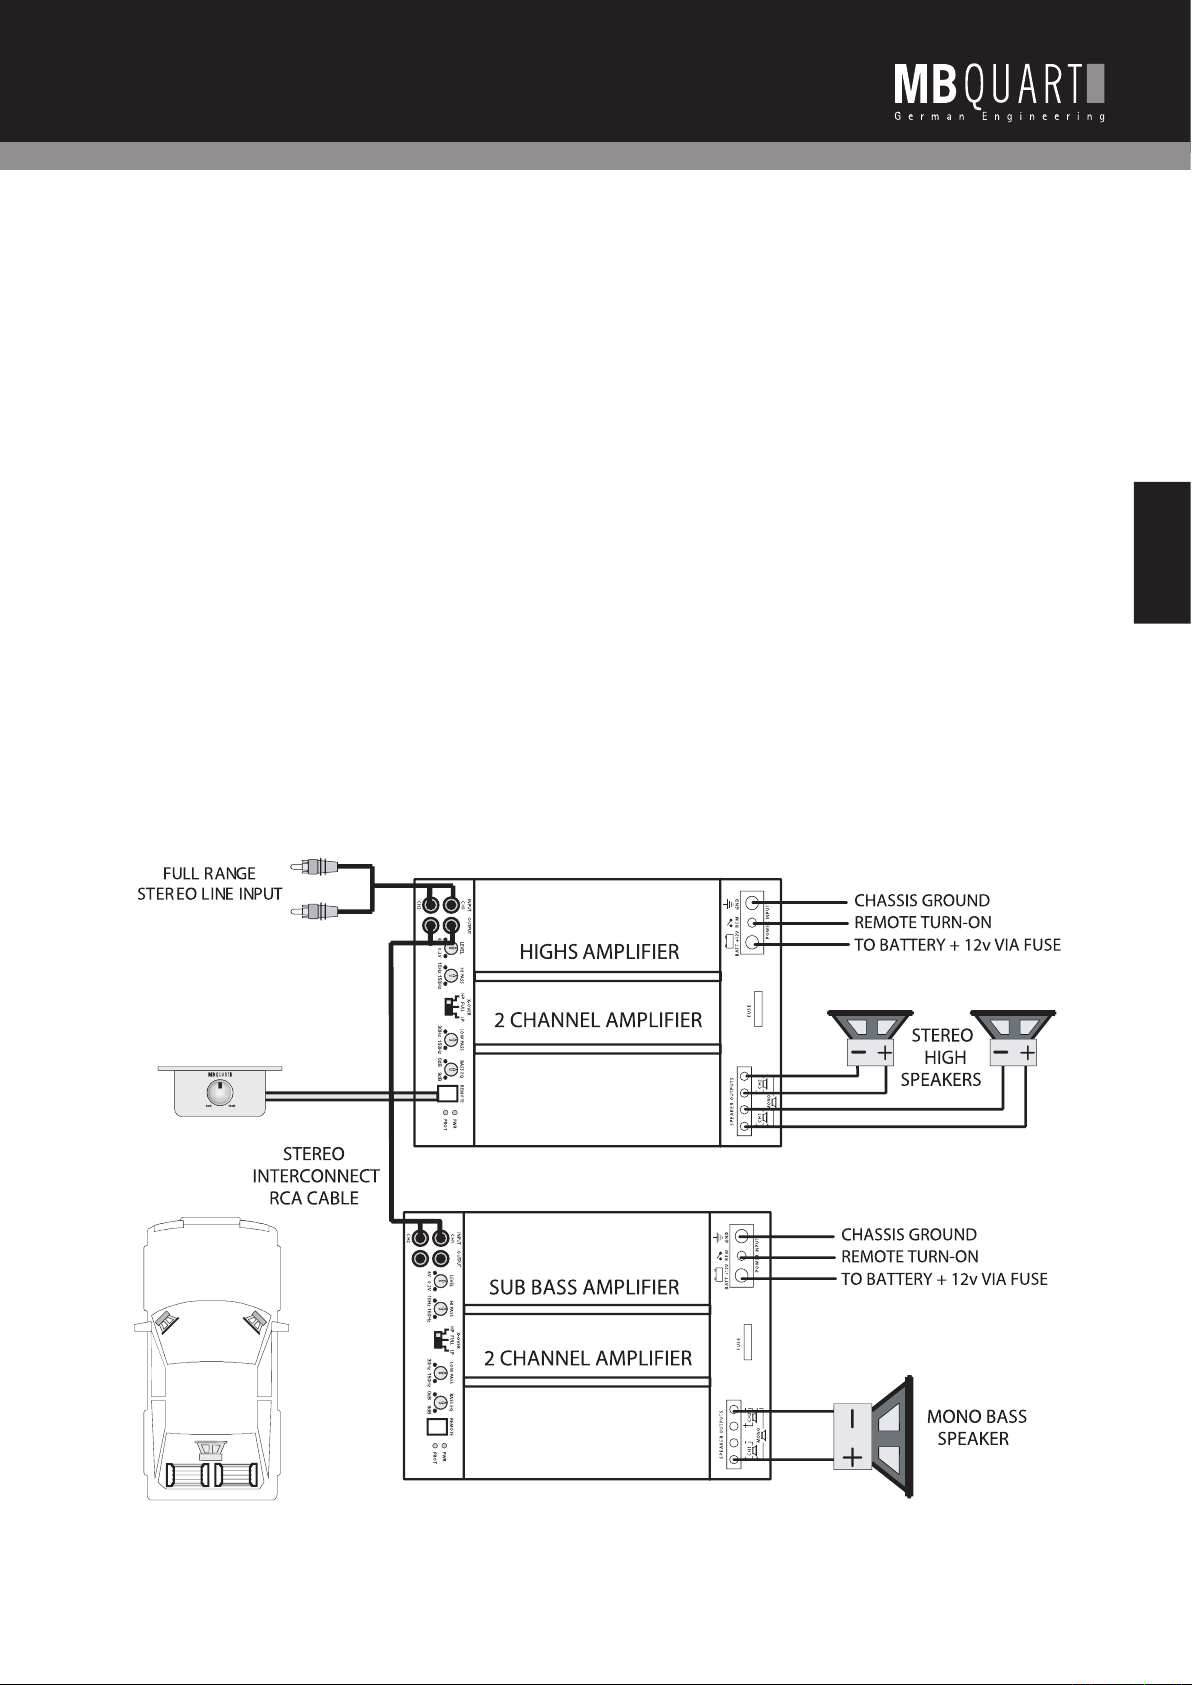
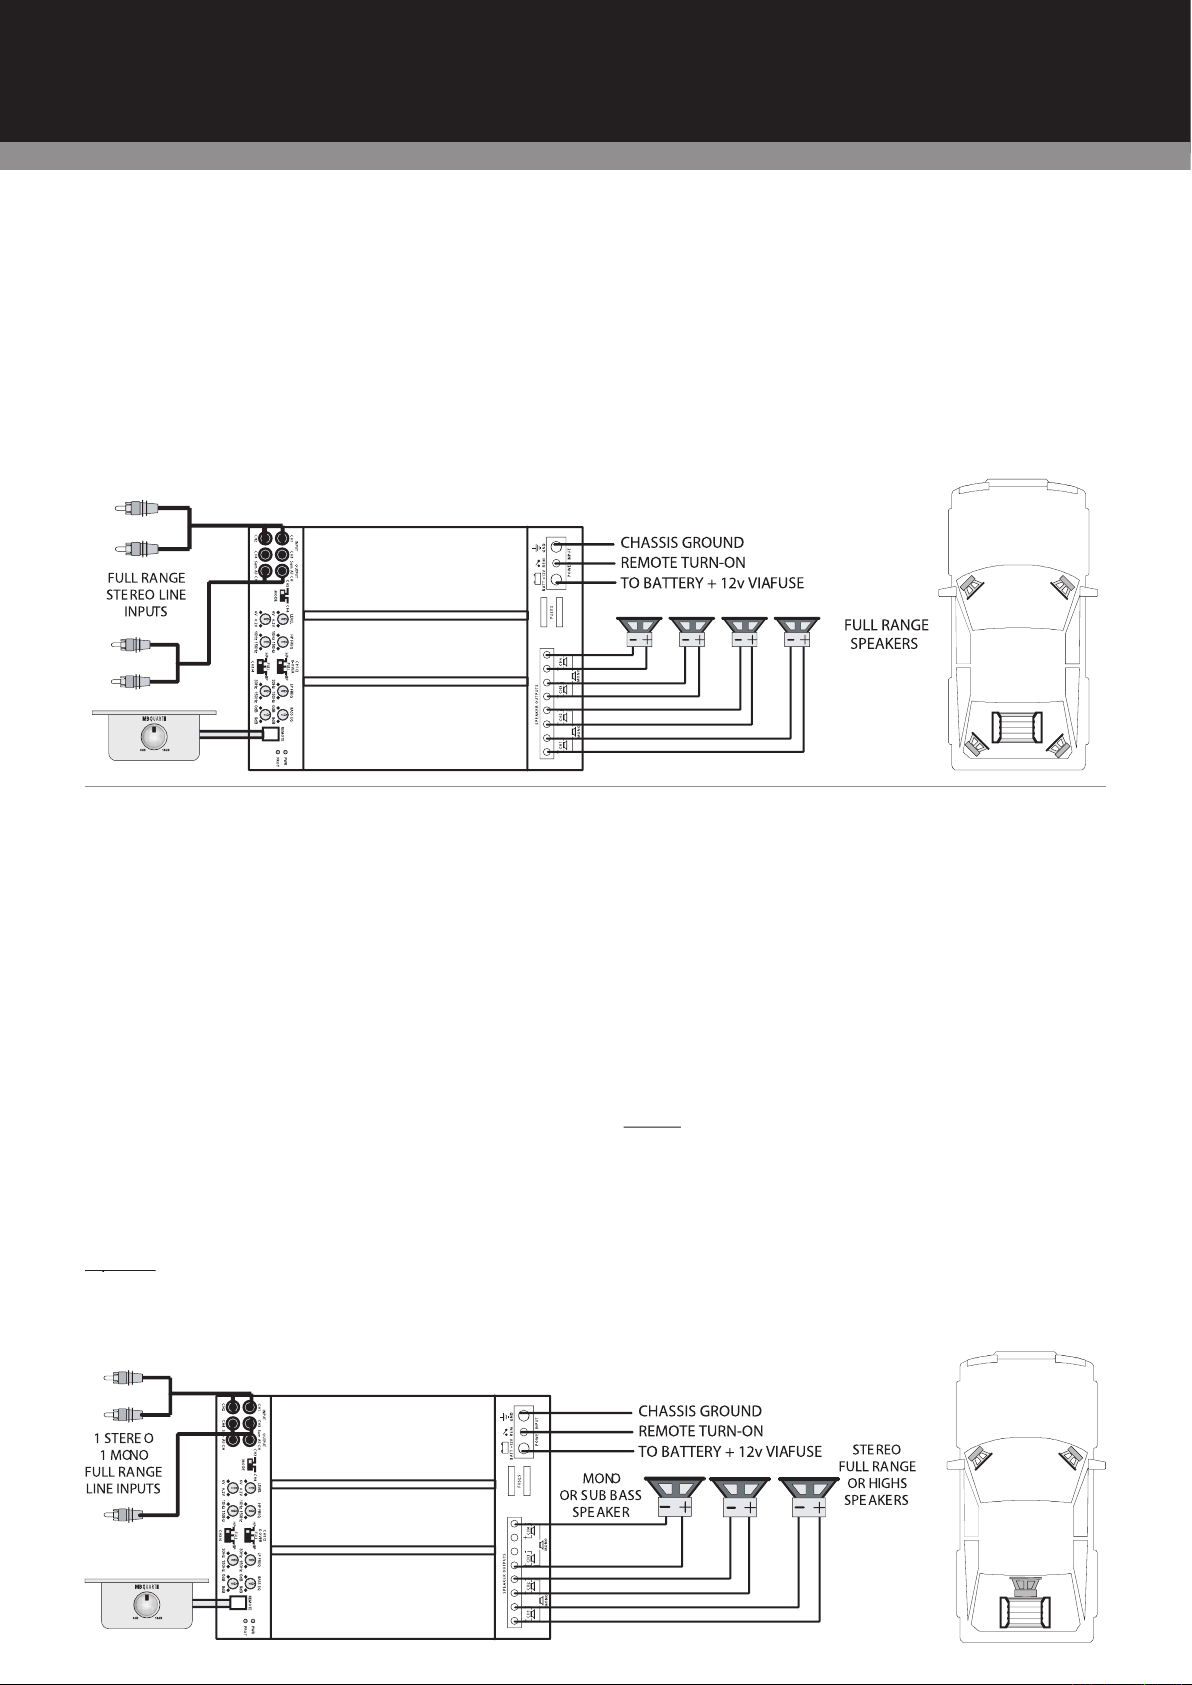
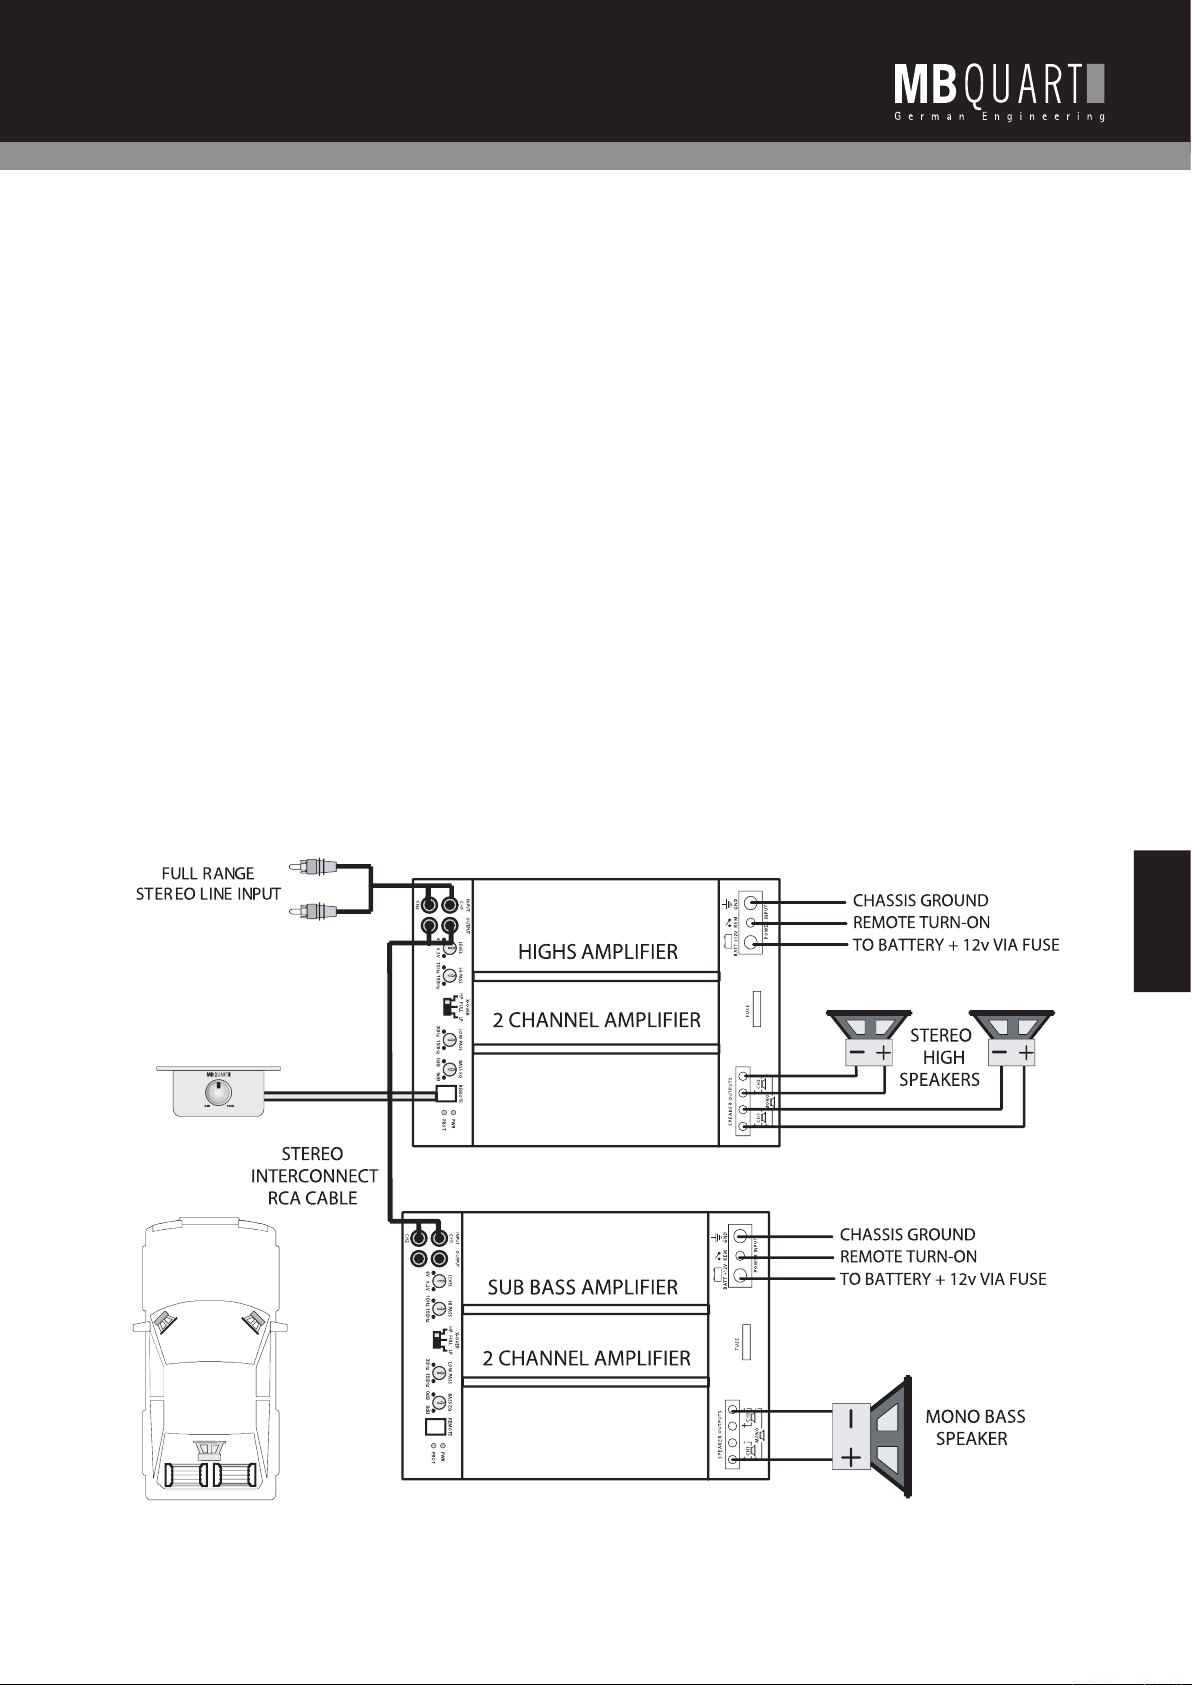
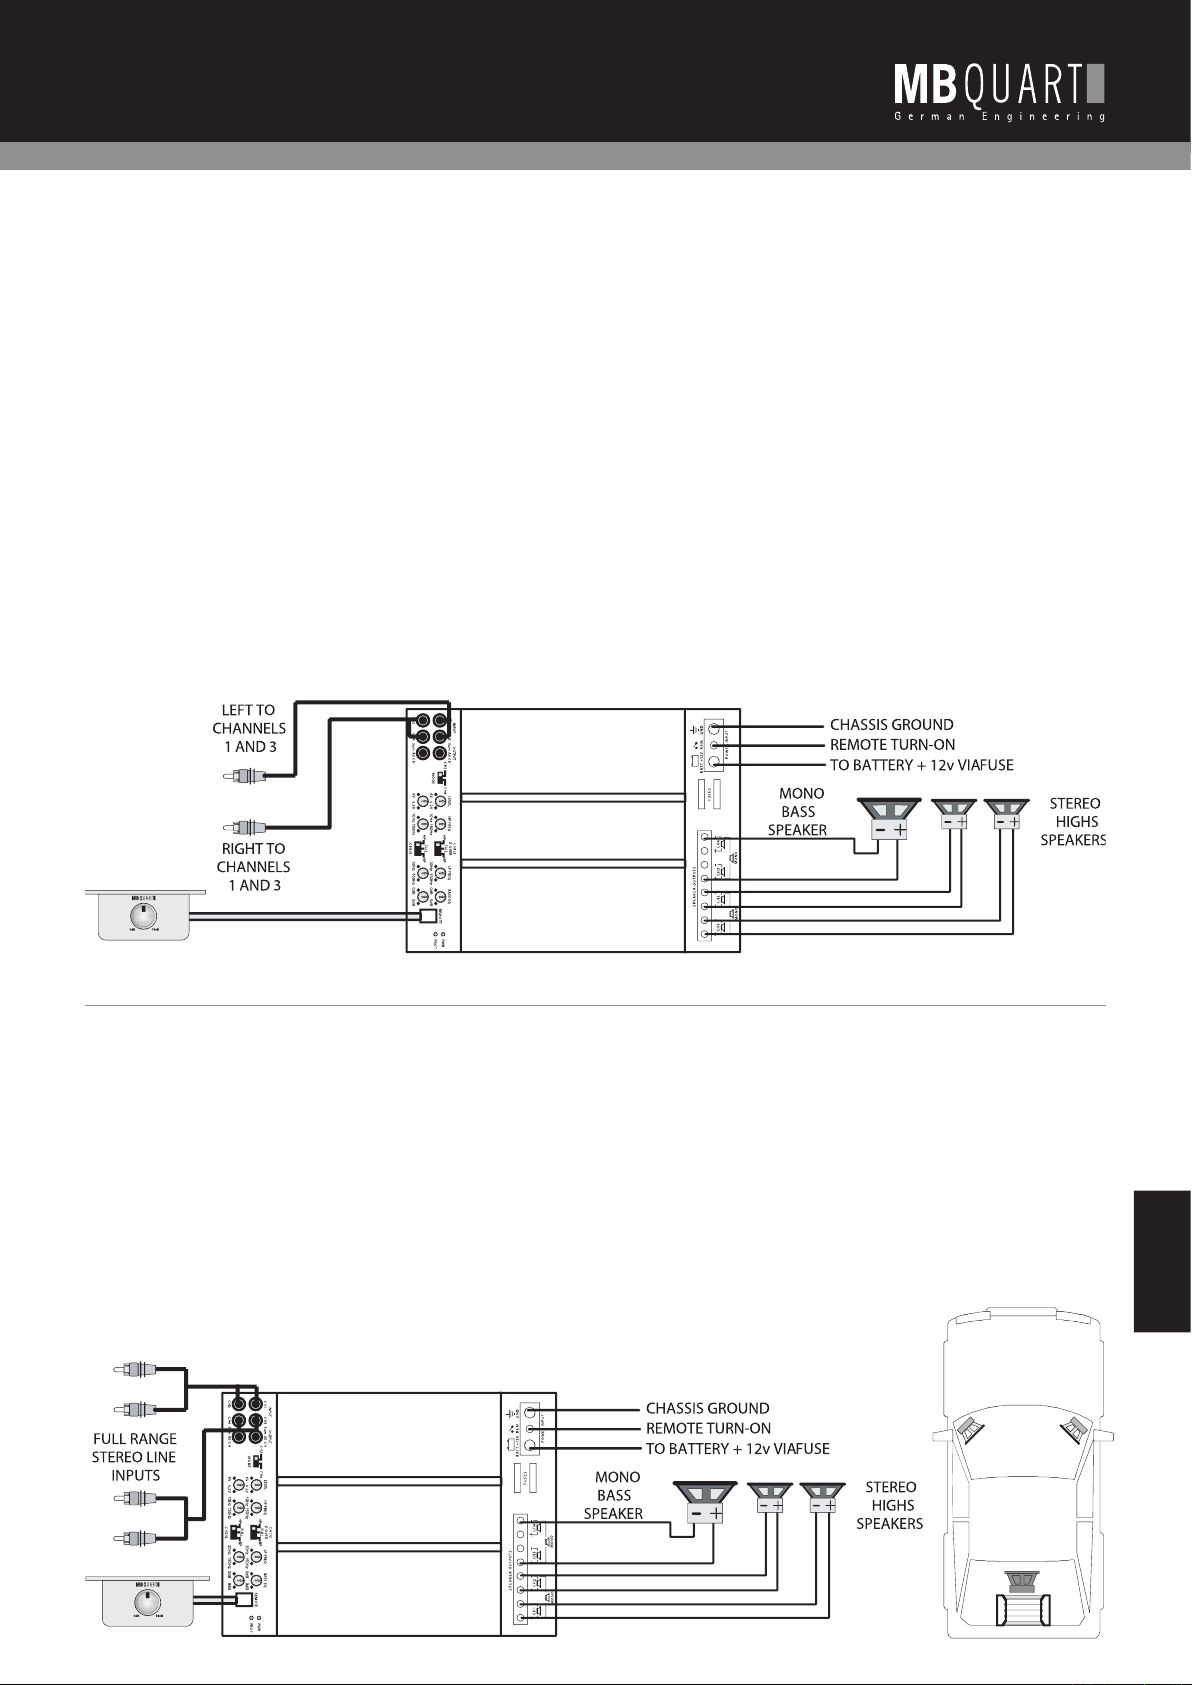
The following example shows how to create a 3 channel system by
Do not be tempted to connect the hot, or positive out-
via a Y-adapter RCA cable.
If you are using the mono sub bass output of an active crossover,
AMPLIFIER APPLICATIONS
PAB 4100 4-Channel Amplifi er
Page 9
English
MBQR-1
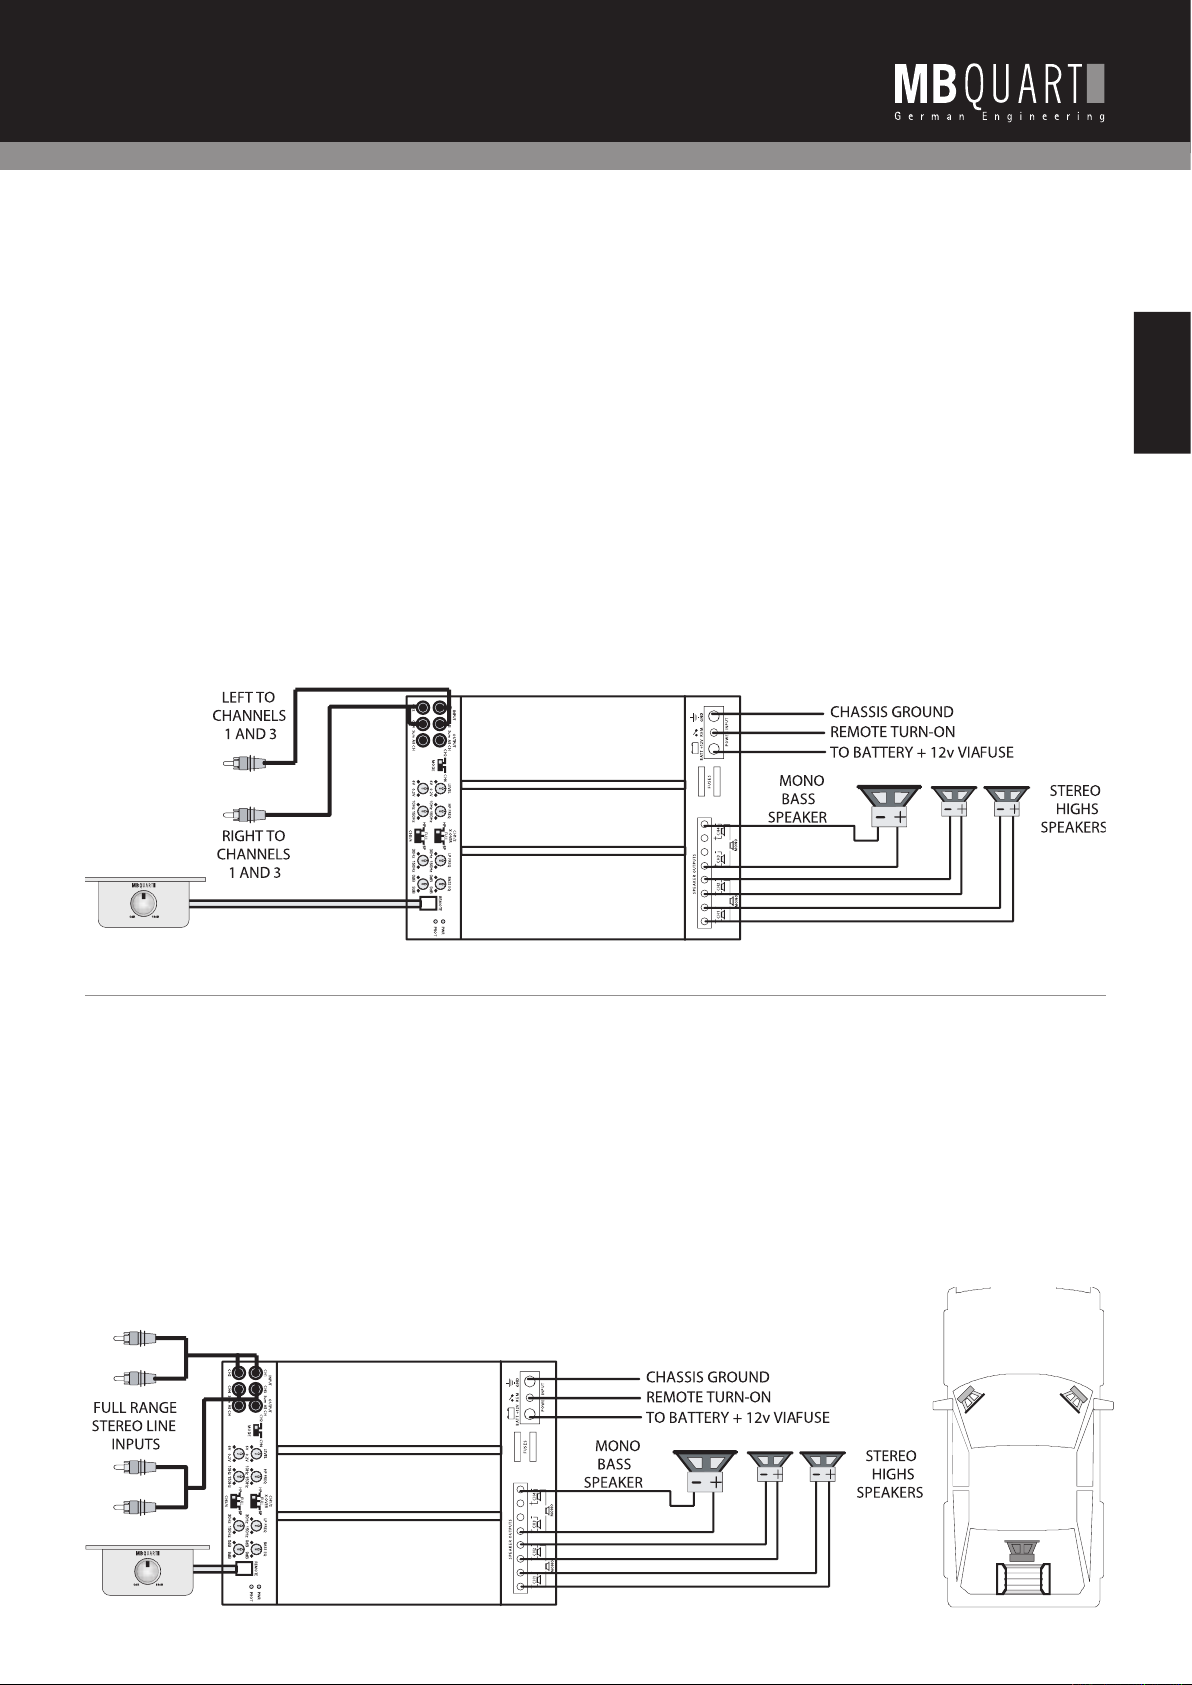
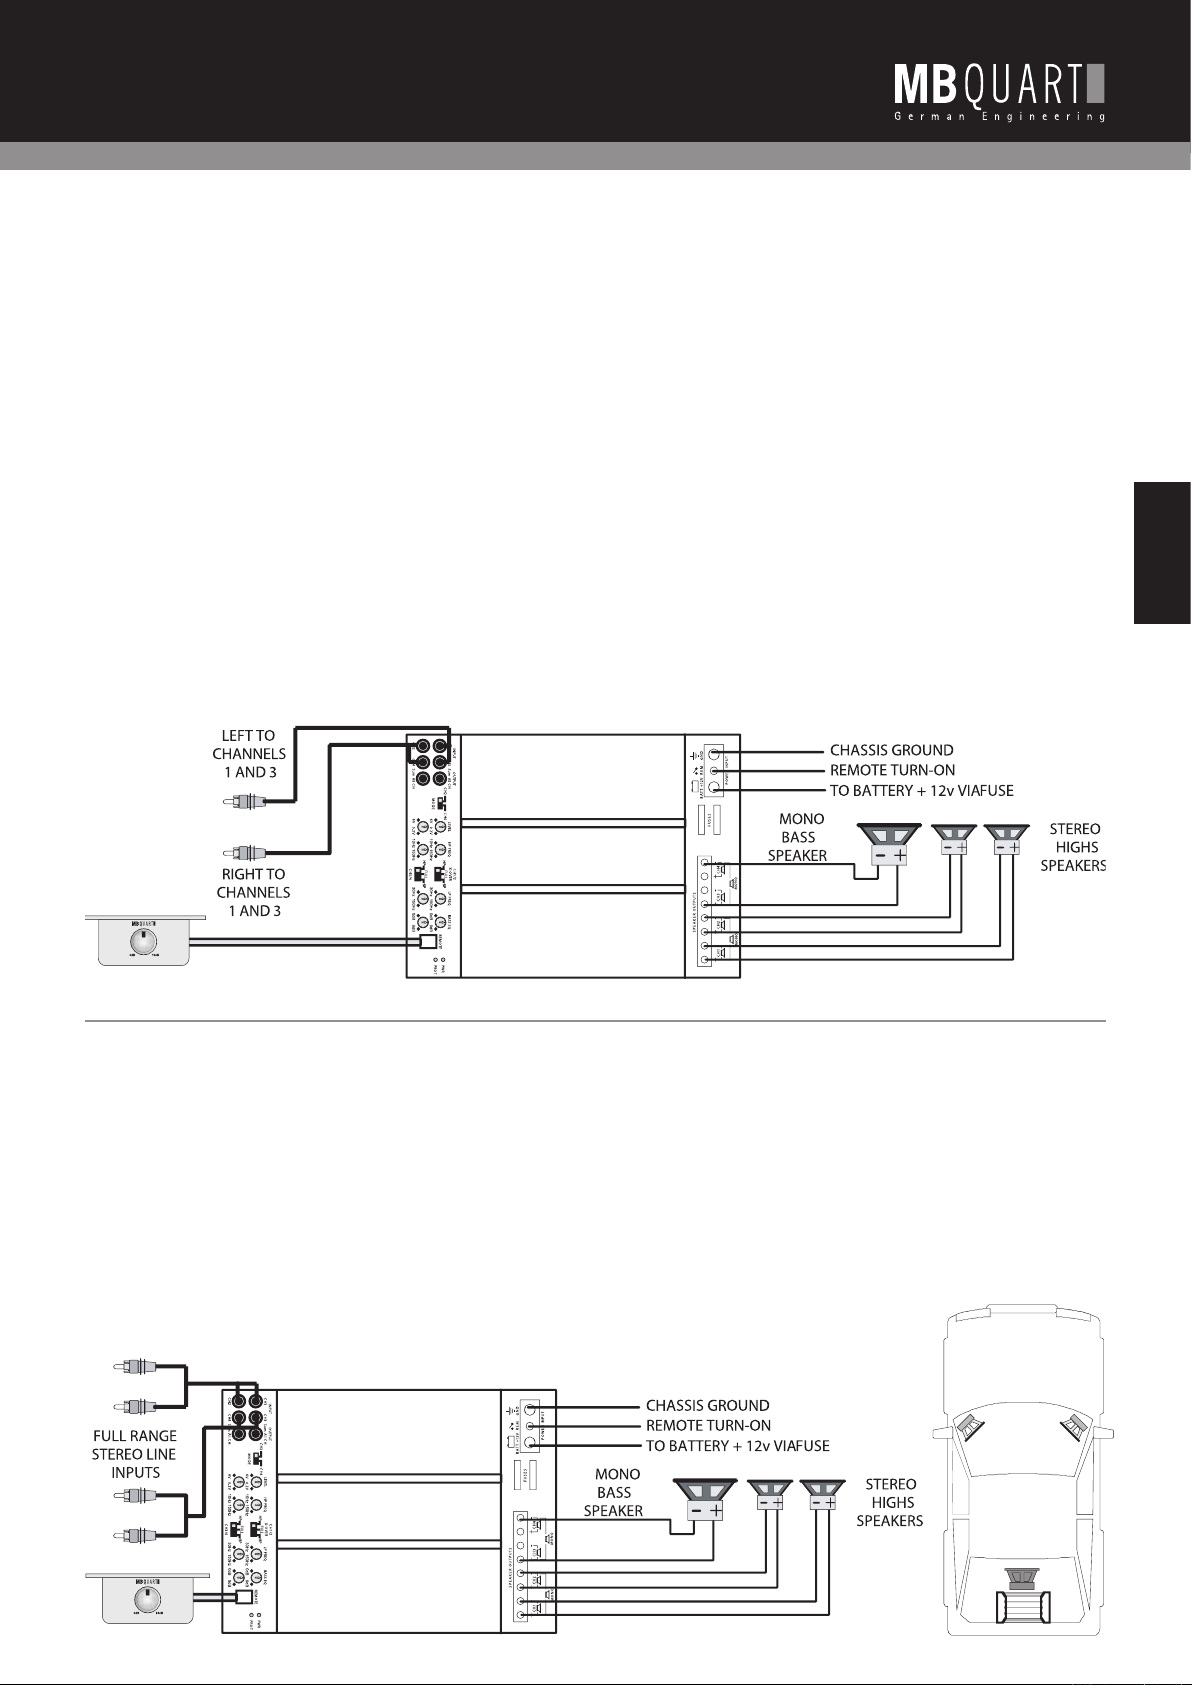
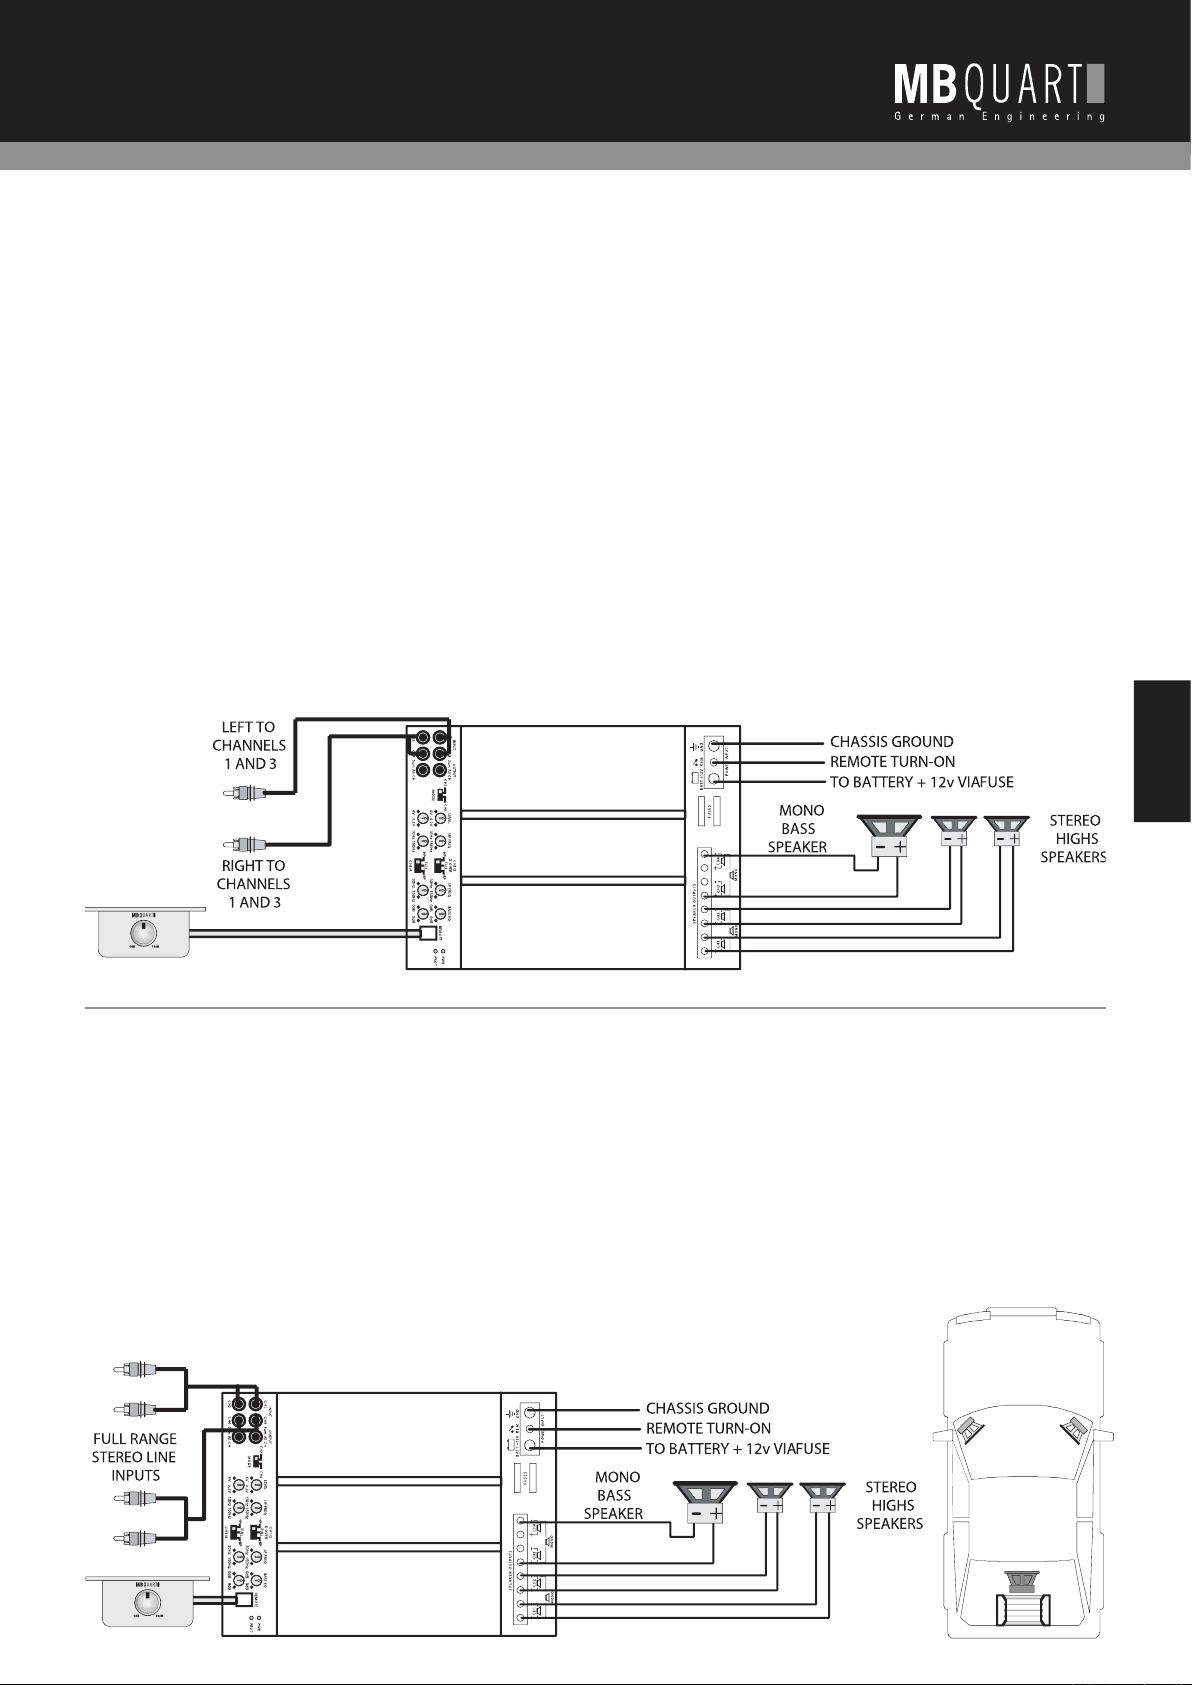
with mono bass
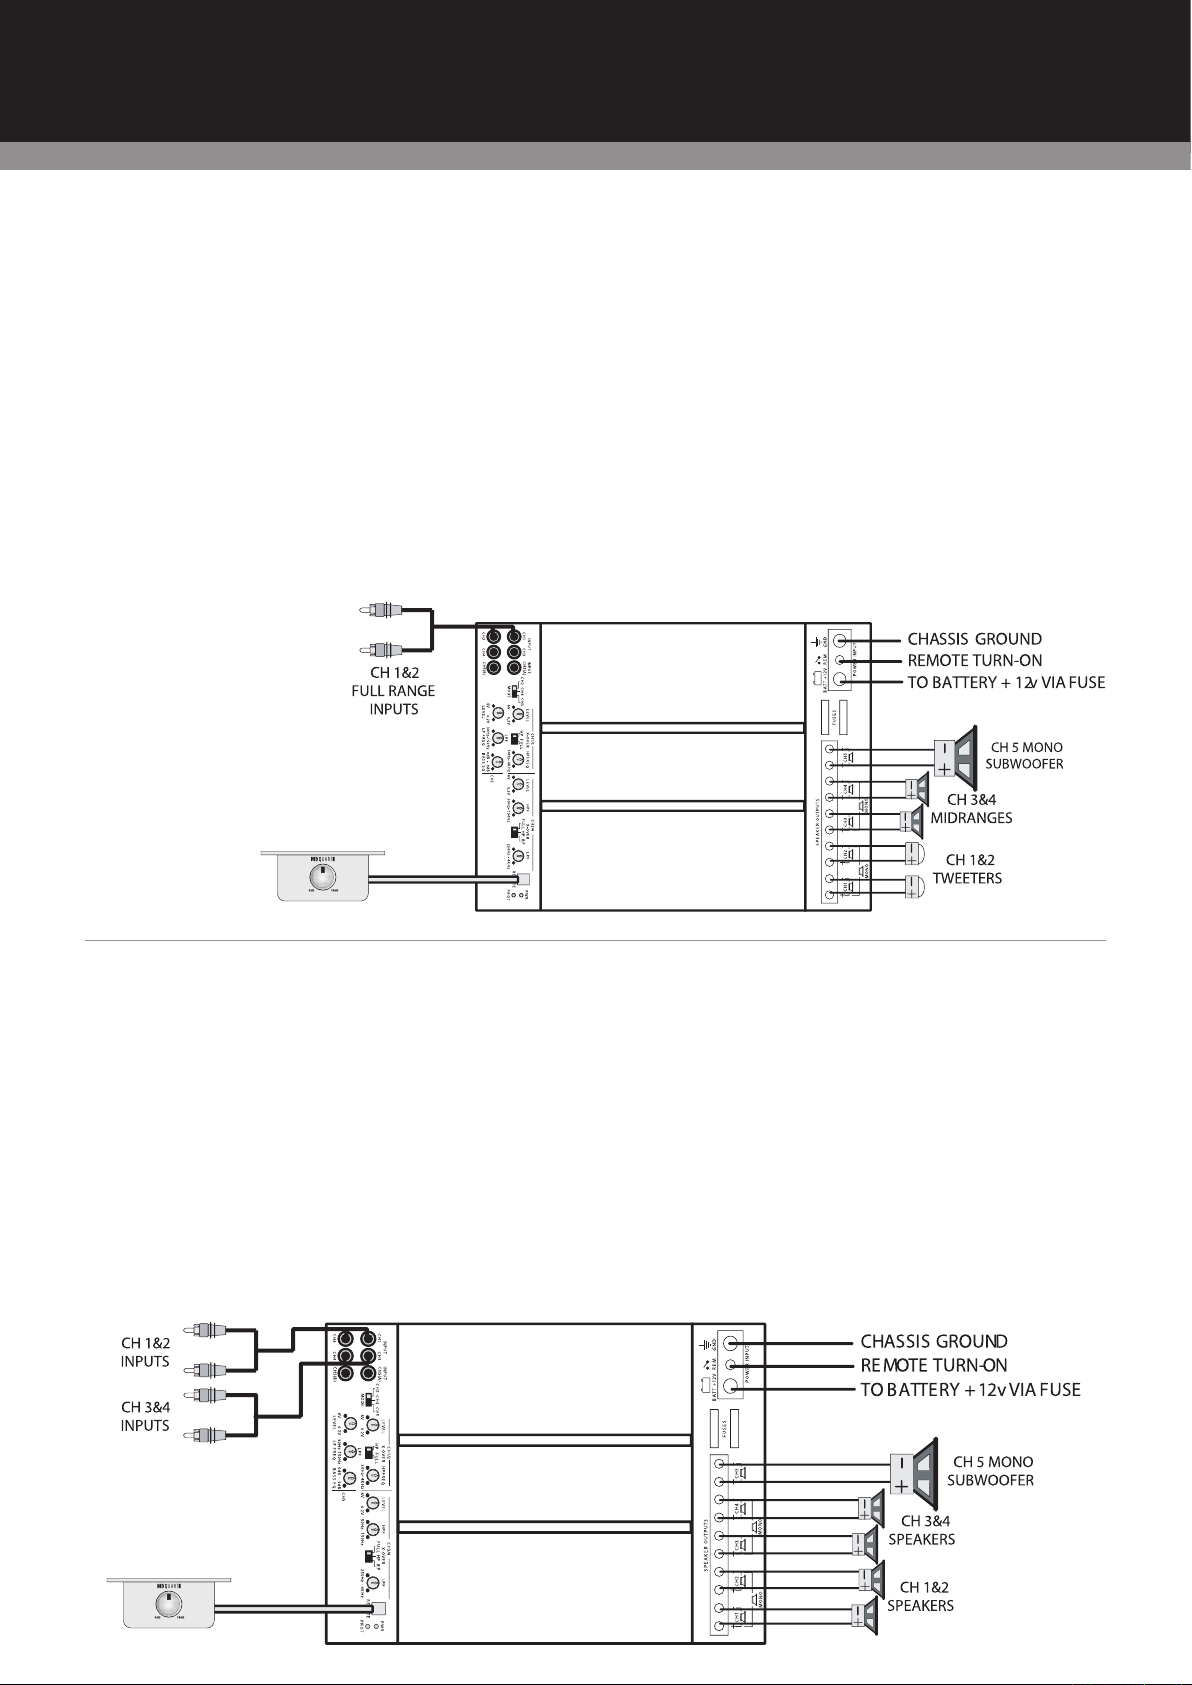
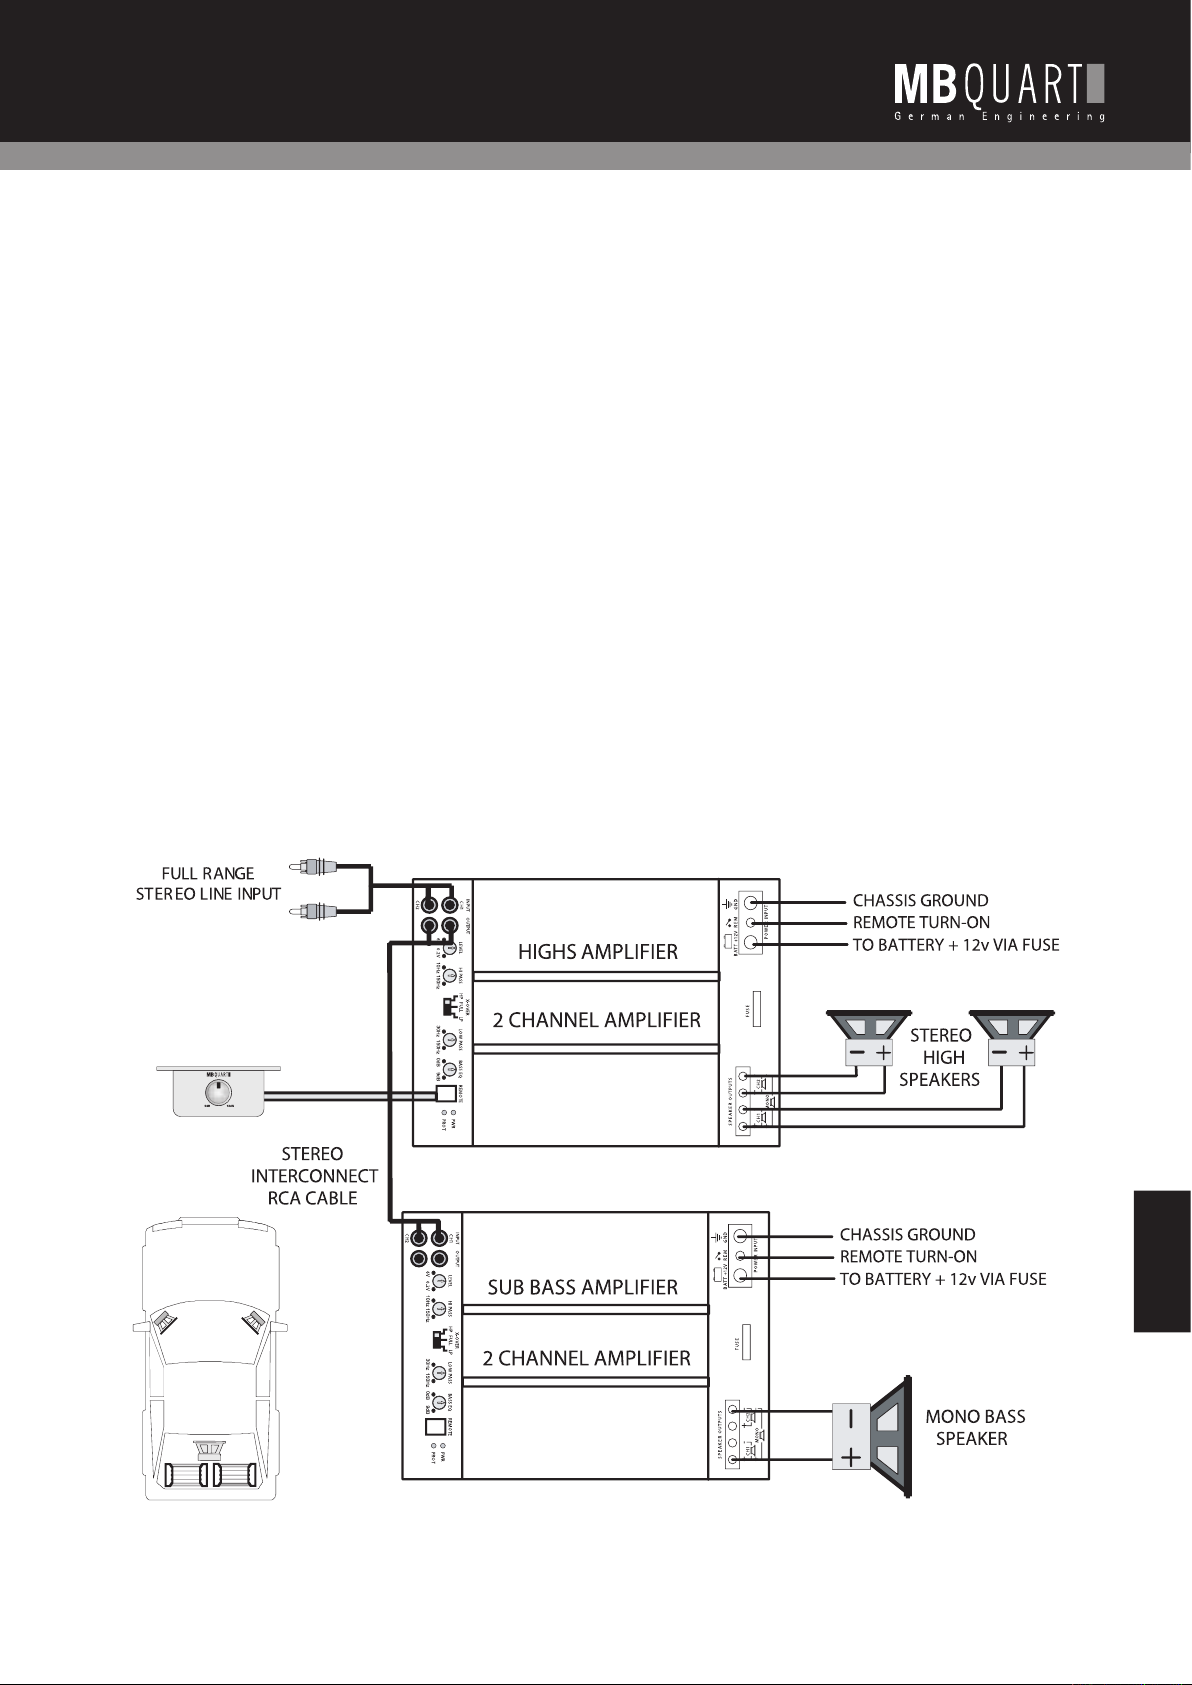
This application shows how easily a 2 way active system can be imp-
MBQR-1
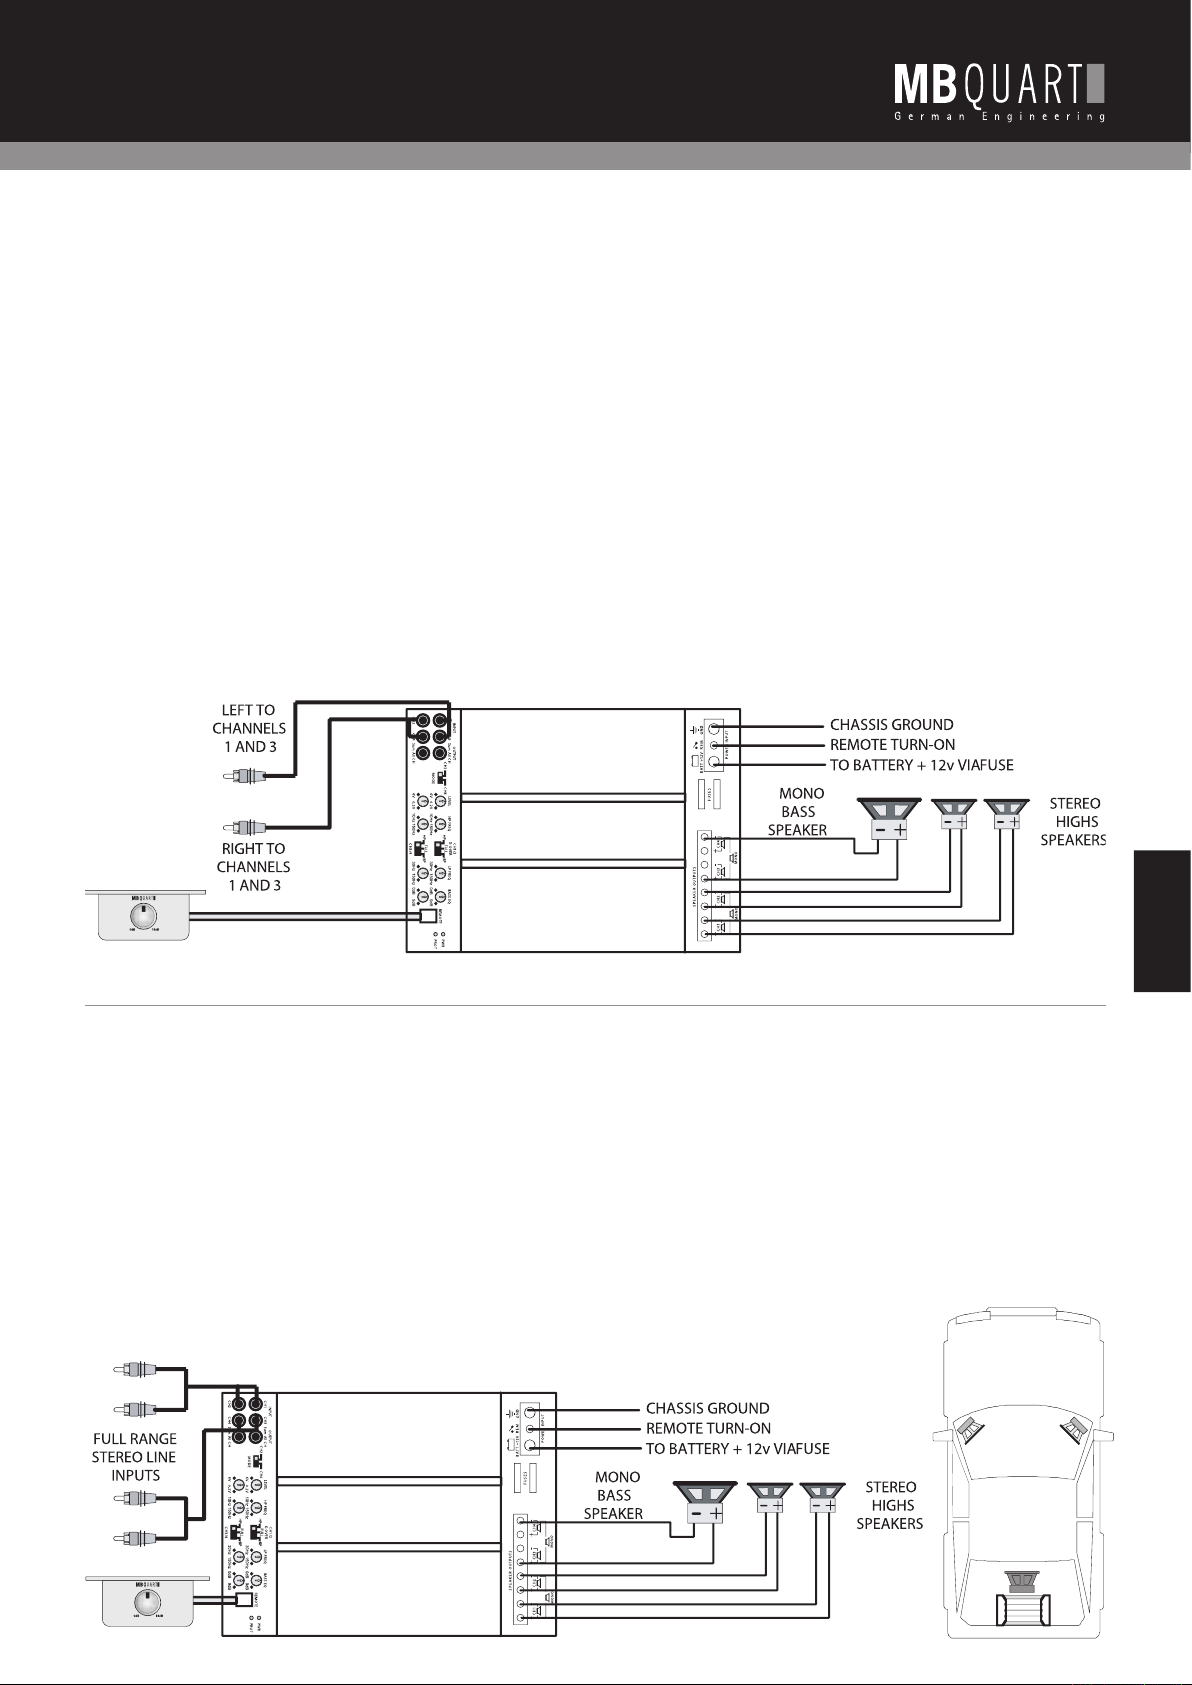
with mono bass, and faded highs/lows
AMPLIFIER APPLICATIONS
PAB 4100 4-Channel Amplifi er
Page 10
MBQR-1
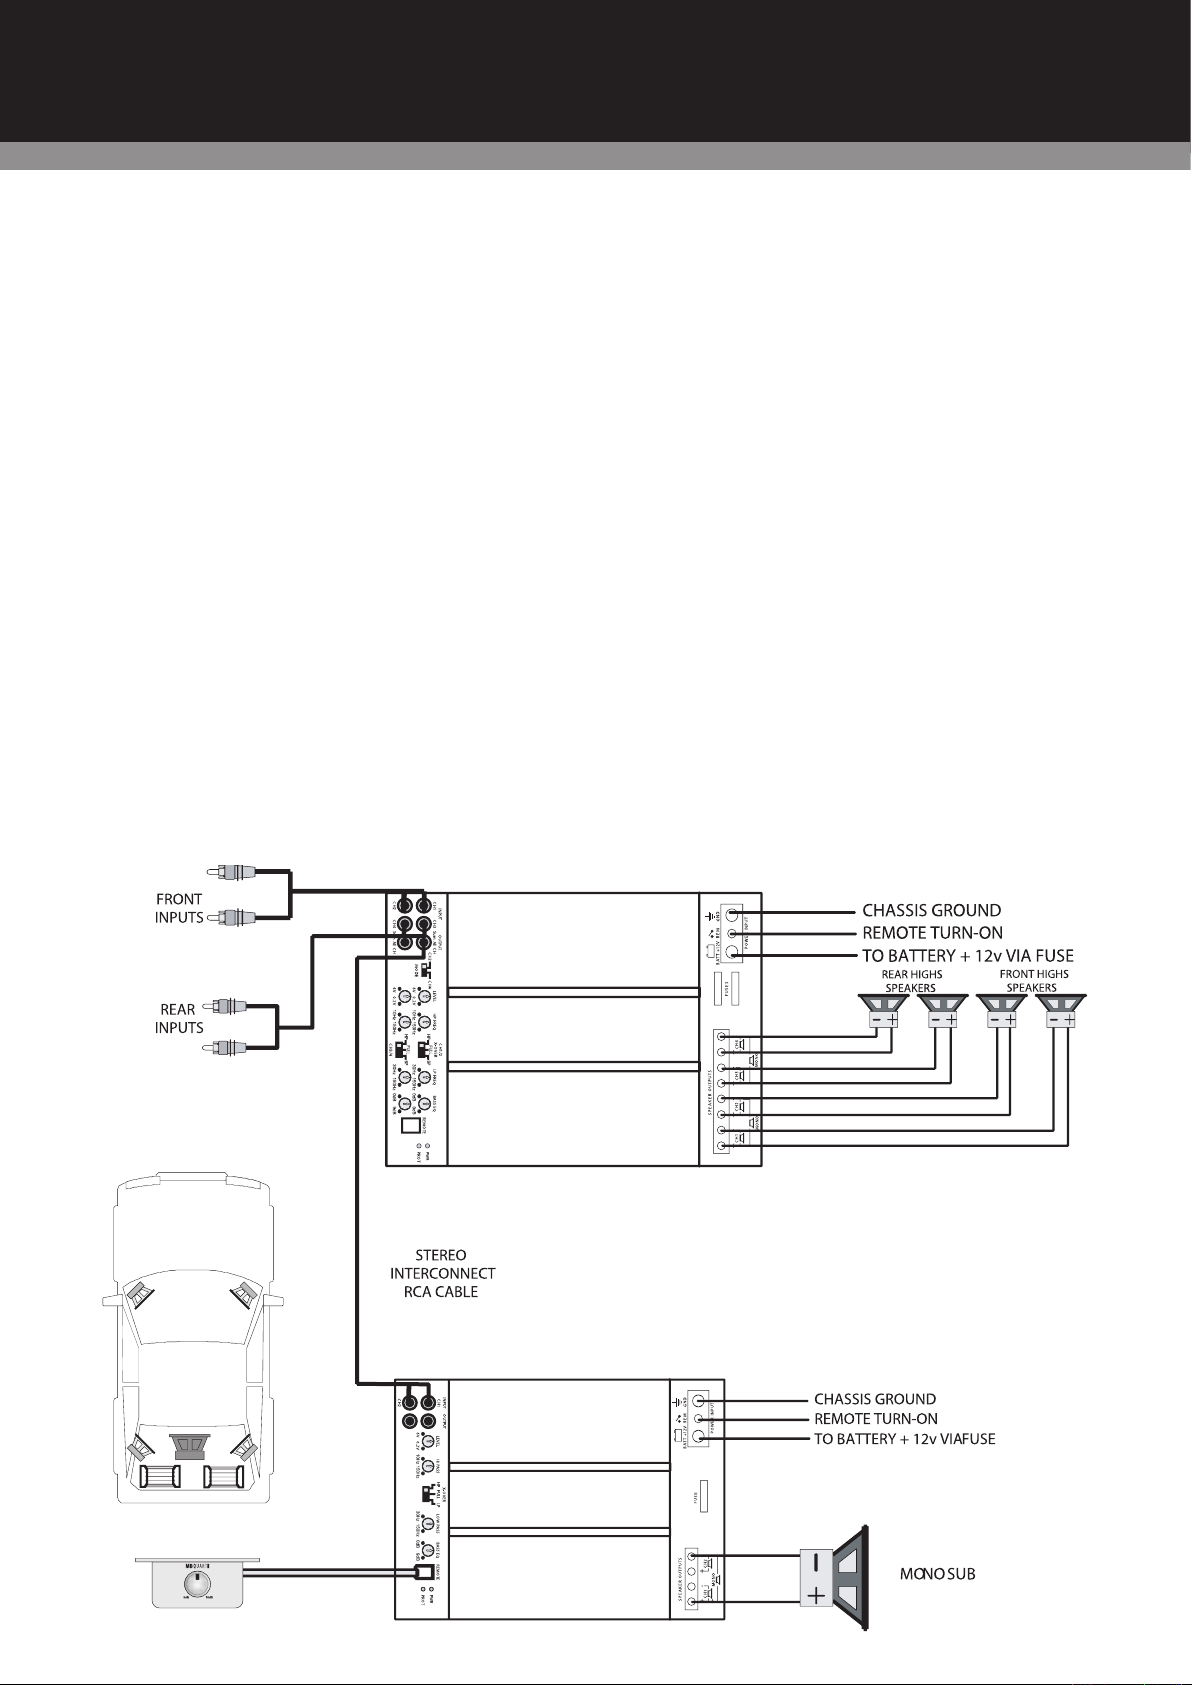
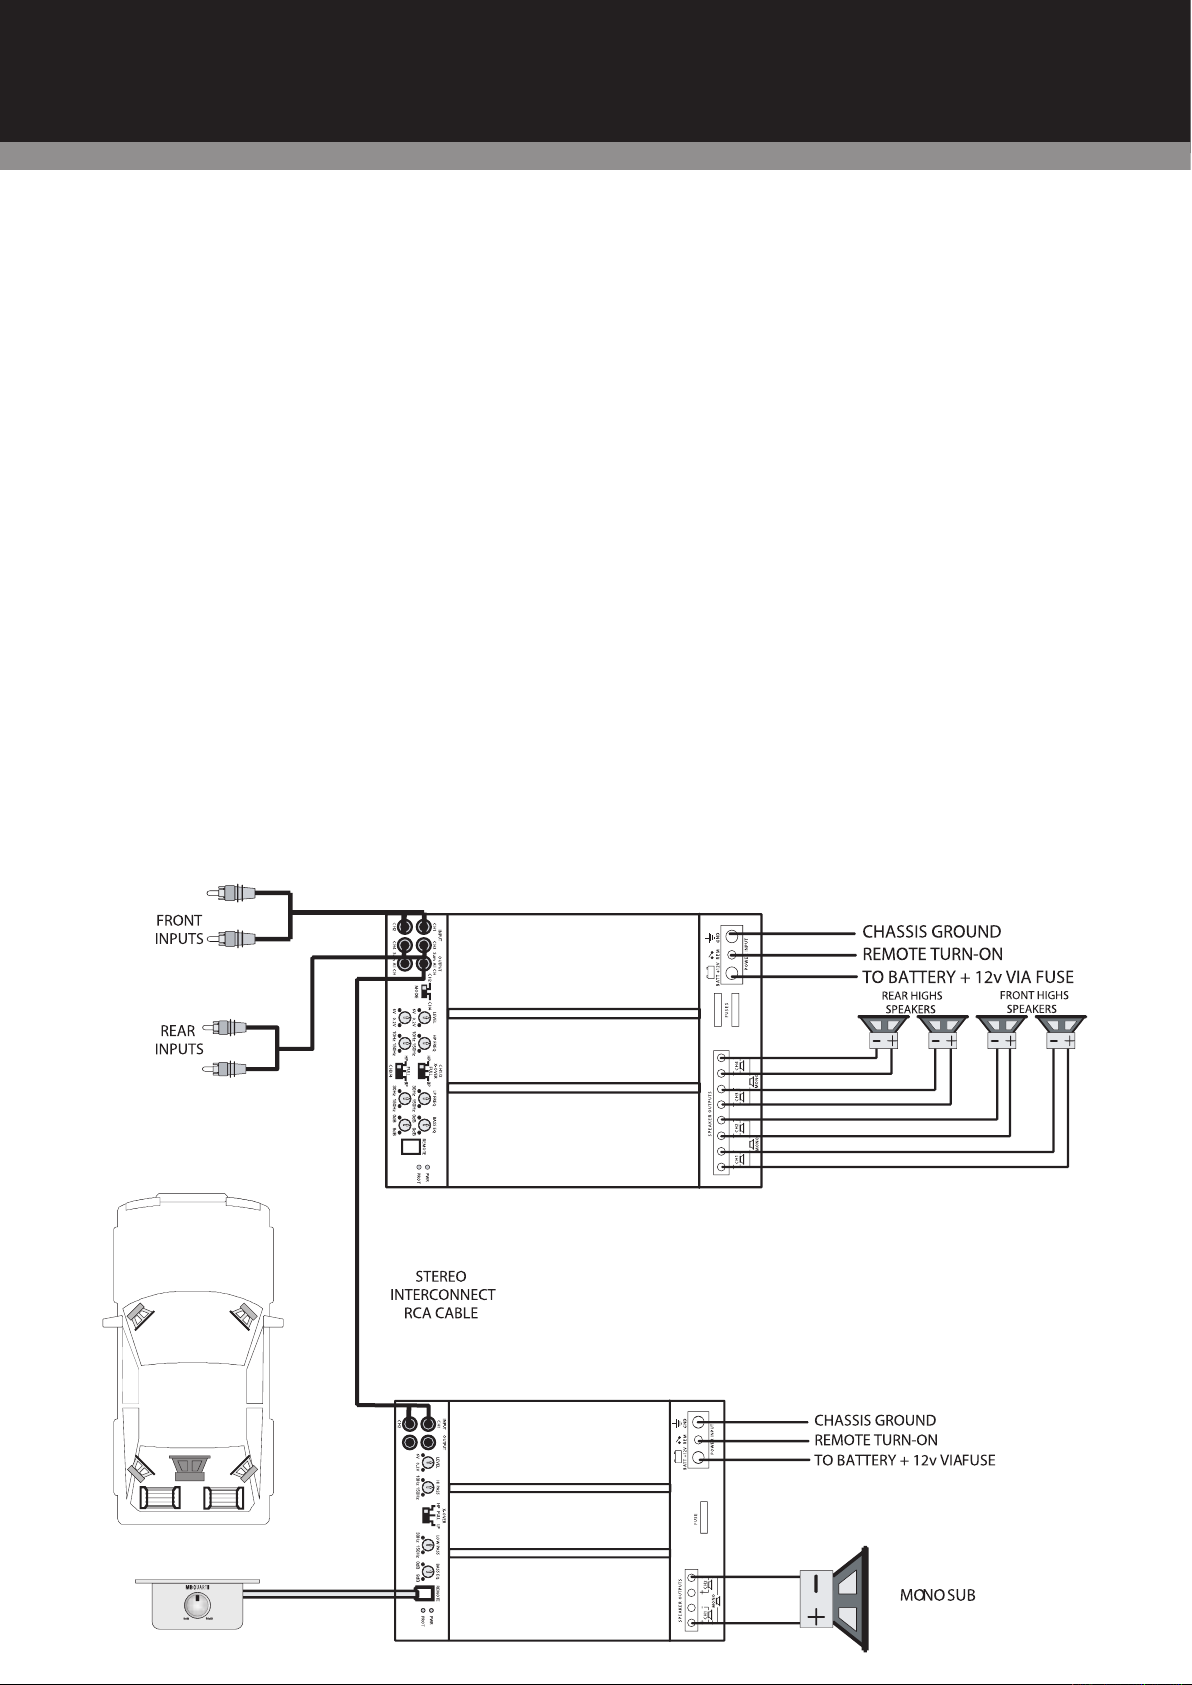
The combination of a 2 and a 4 channel amplifi er, utilizing their built
AMPLIFIER APPLICATIONS
PAB 4100 4-Channel Amplifi er
Page 11
English
MBQR-1
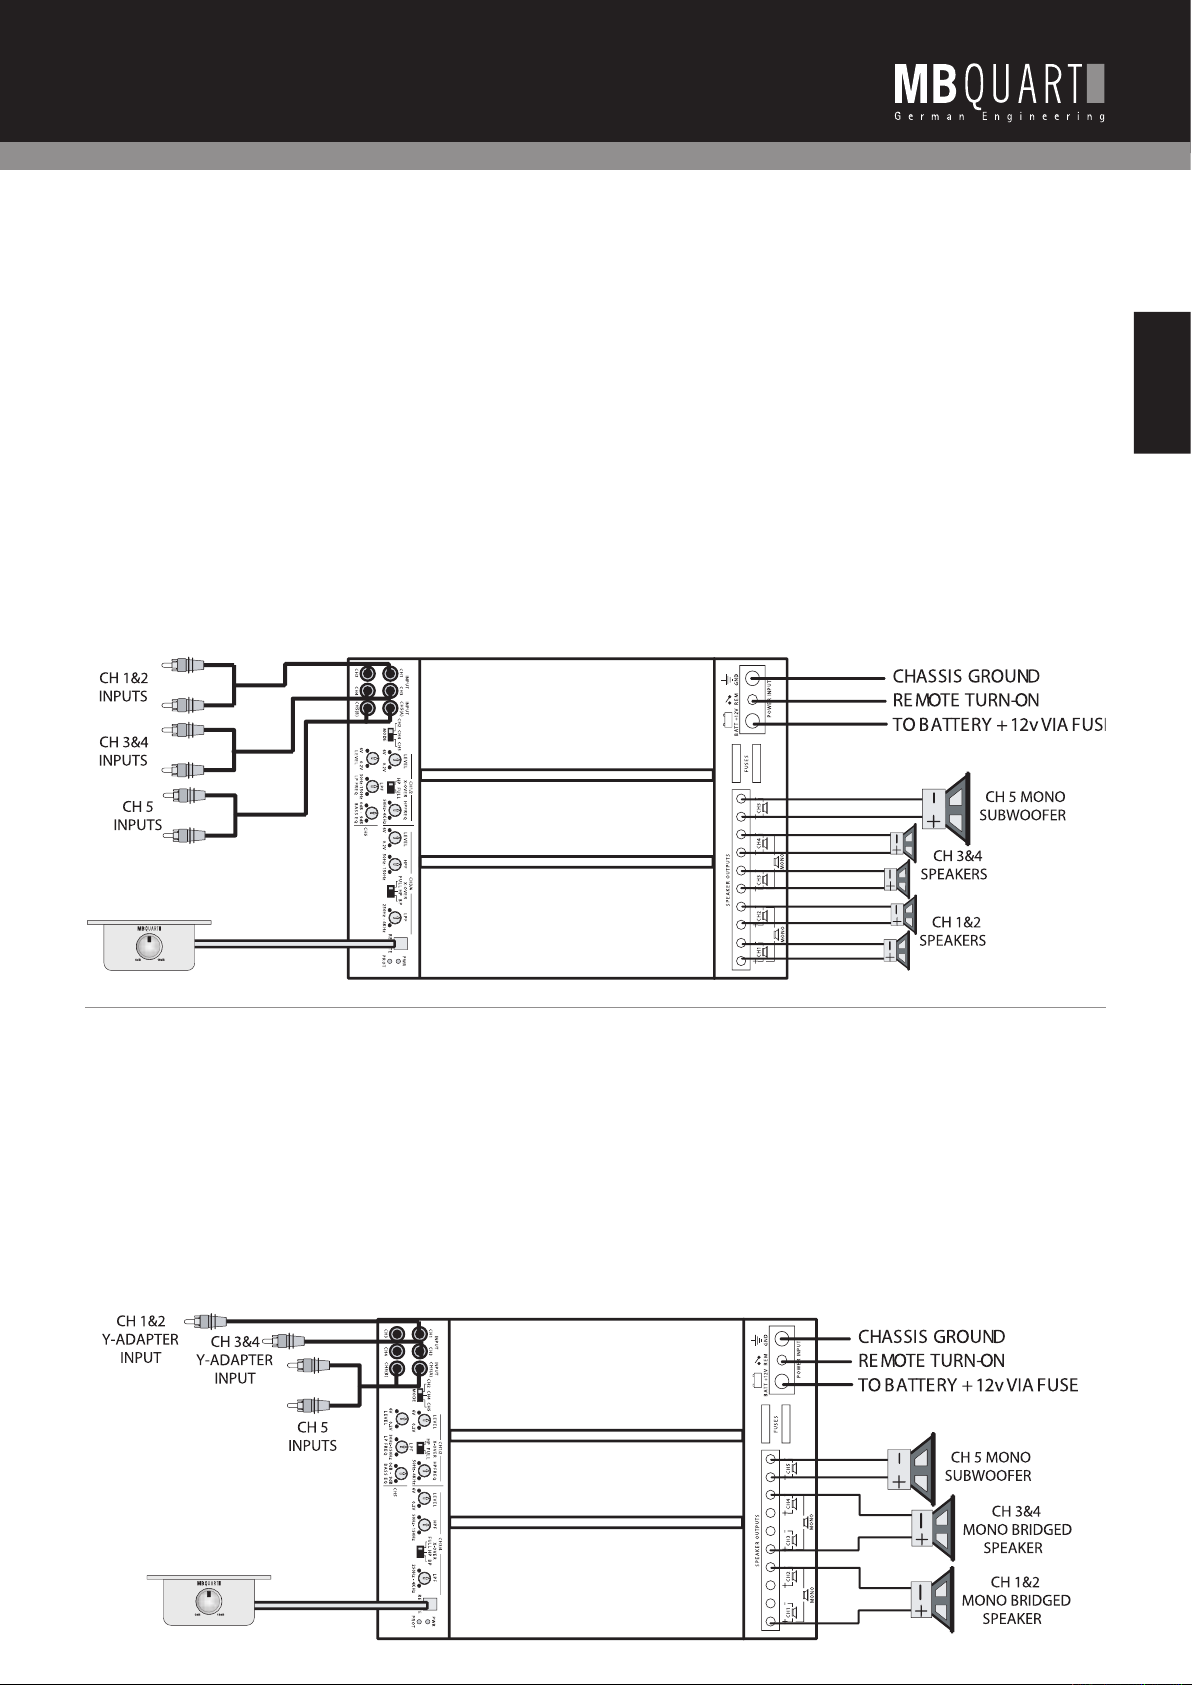
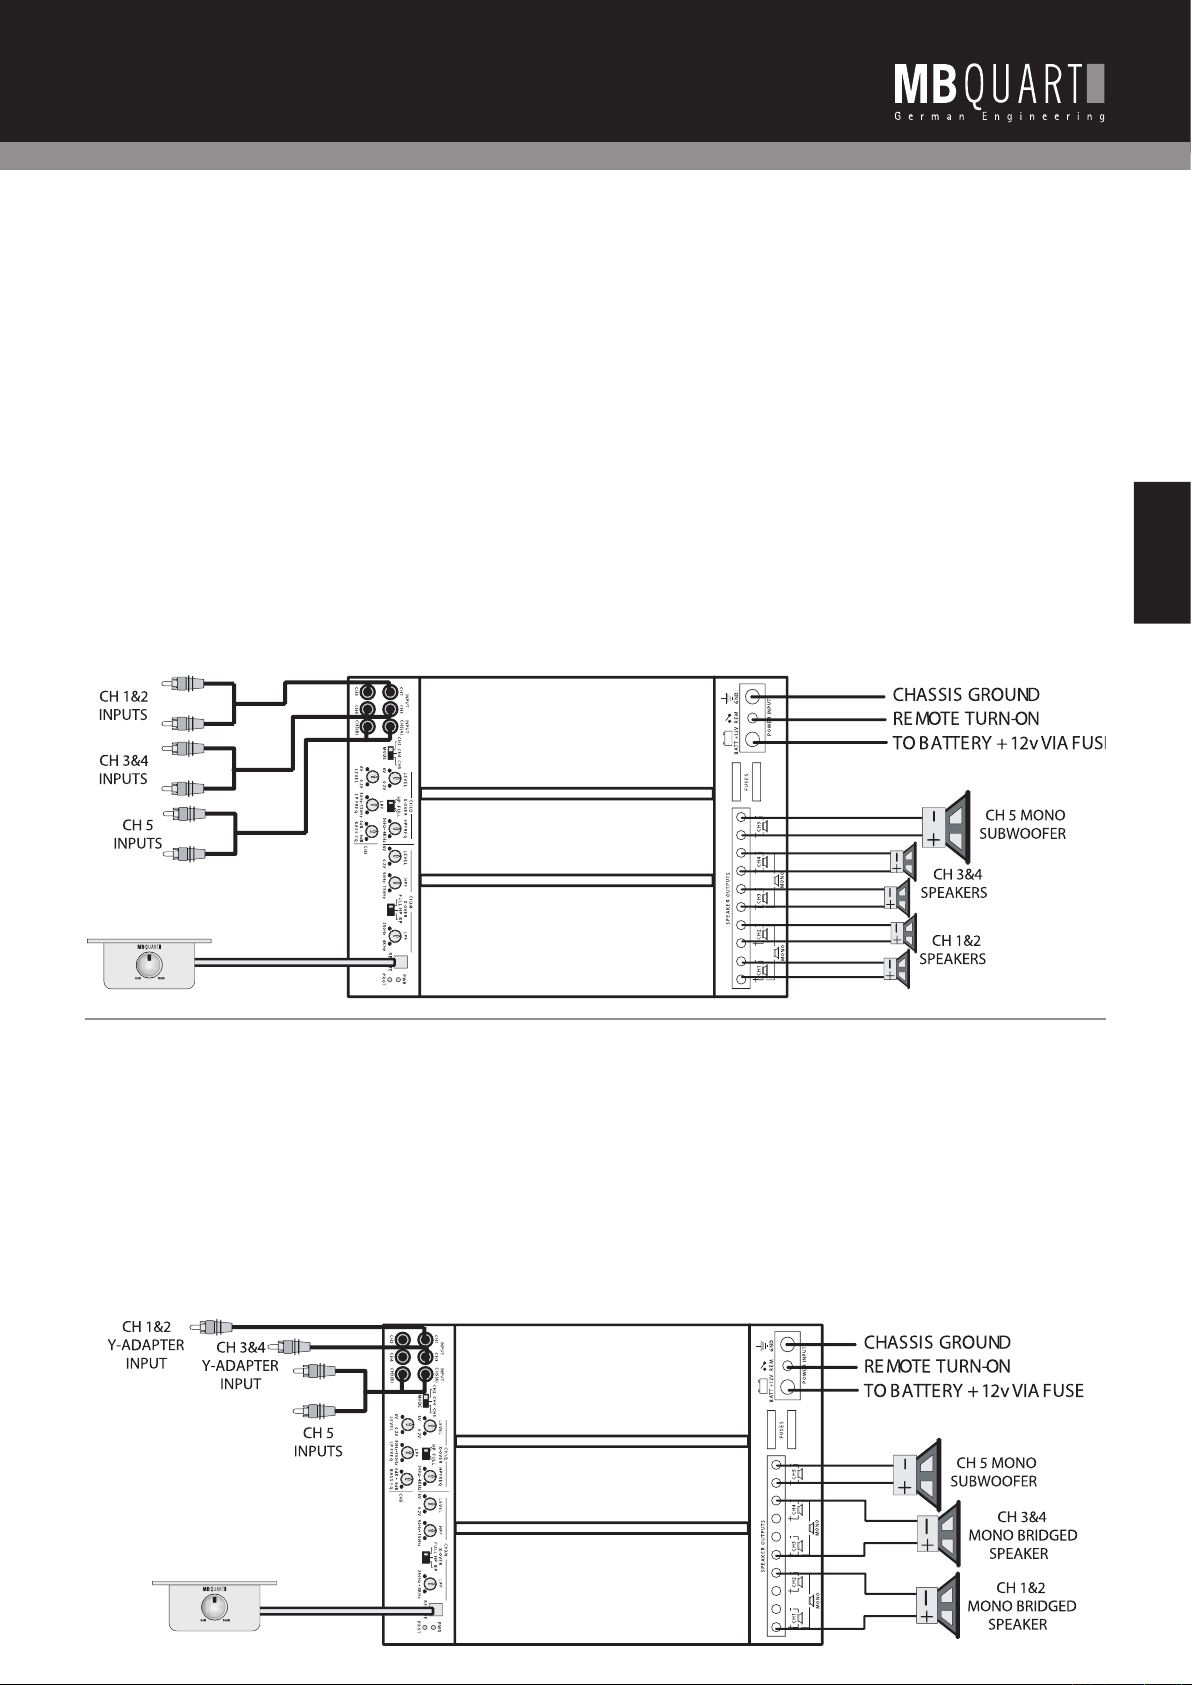
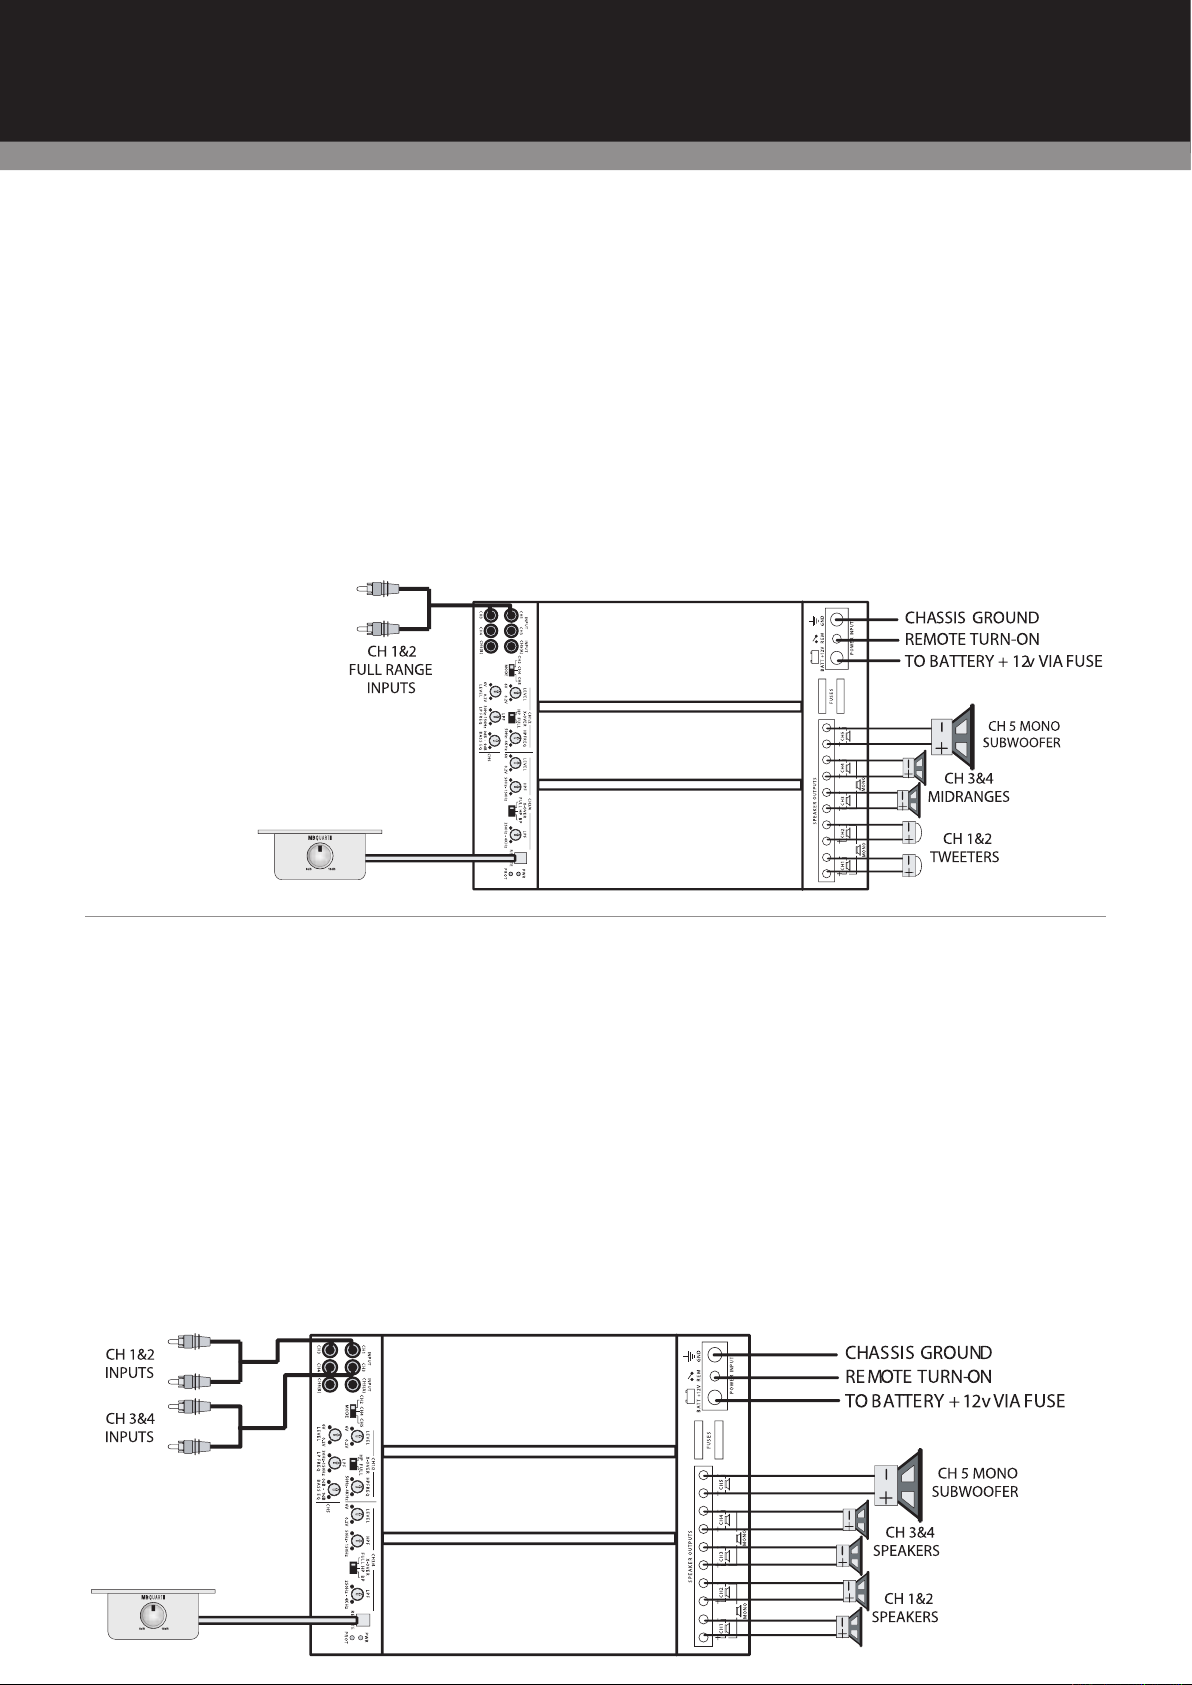
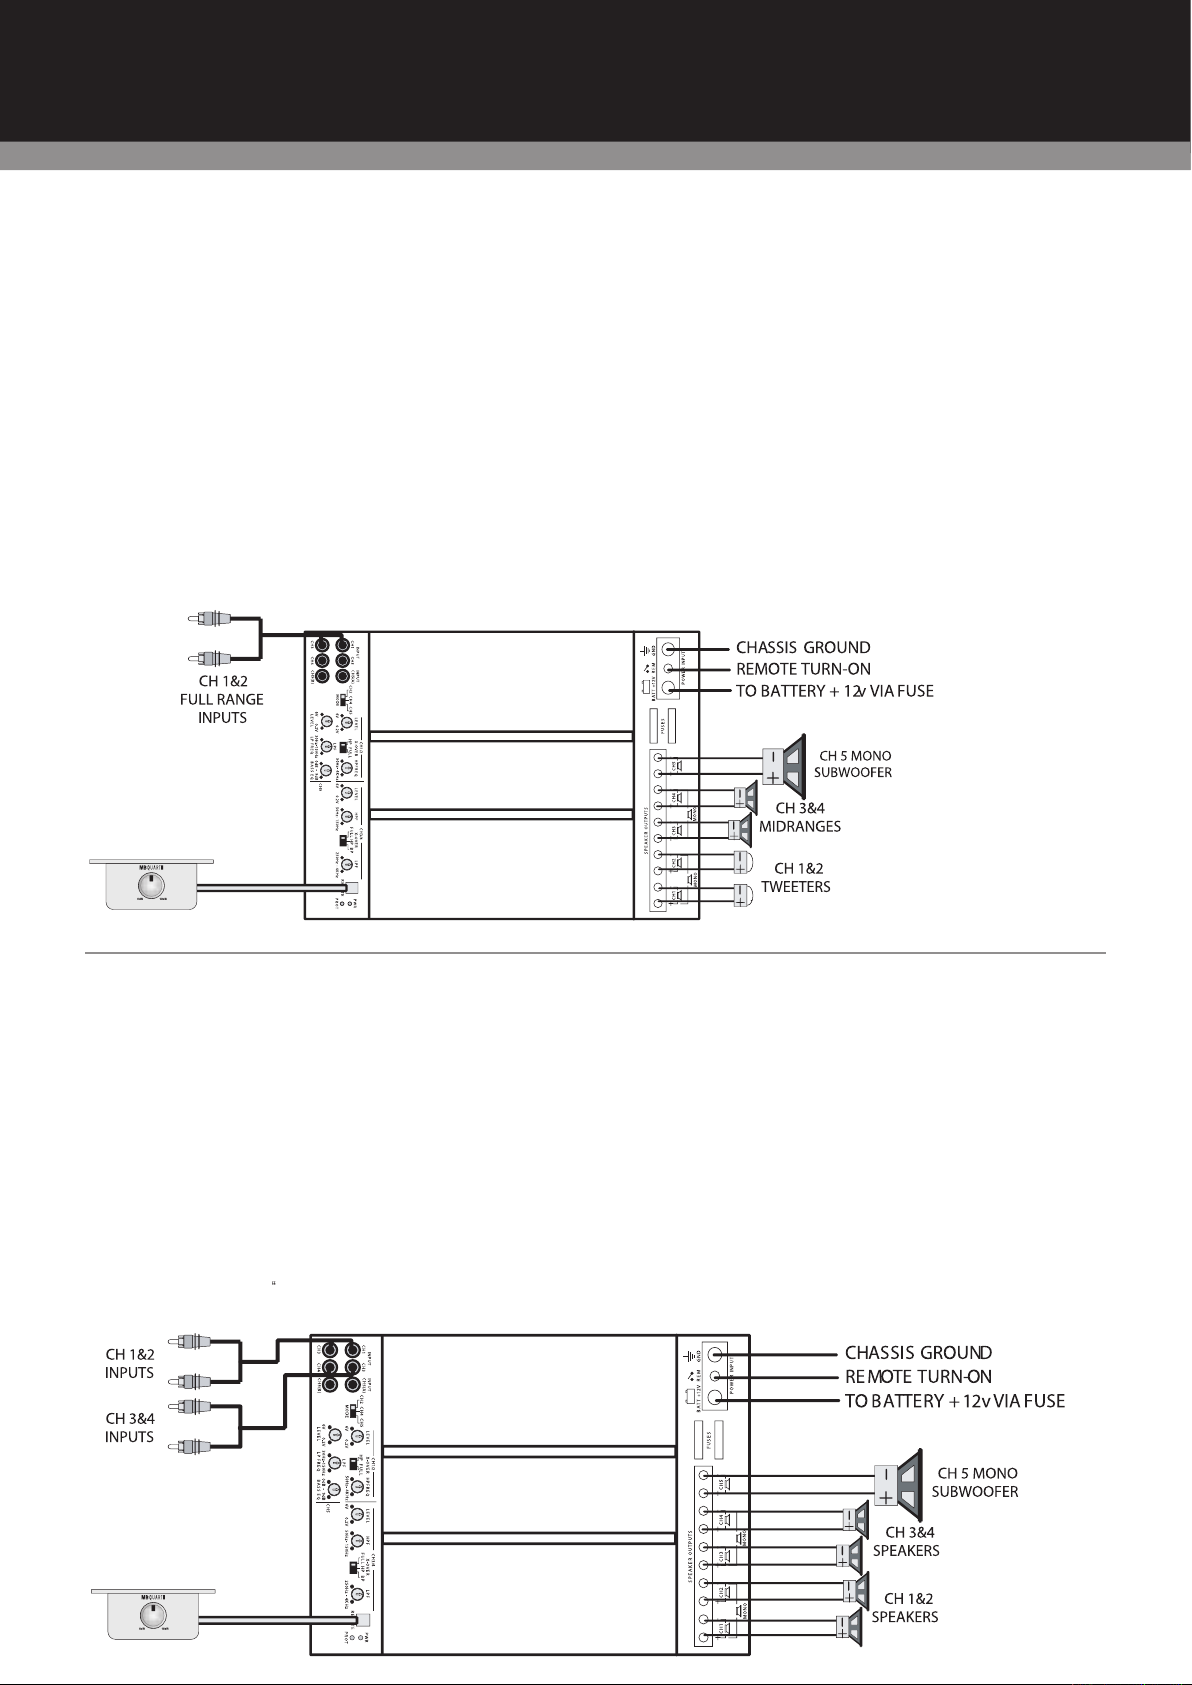
You can use this confi guration simply as 4 discrete full range chan-
2 ohm per channel
MBQR-1
AMPLIFIER APPLICATIONS
PAB 5400 5-Channel Amplifi er
Page 12
MBQR-1
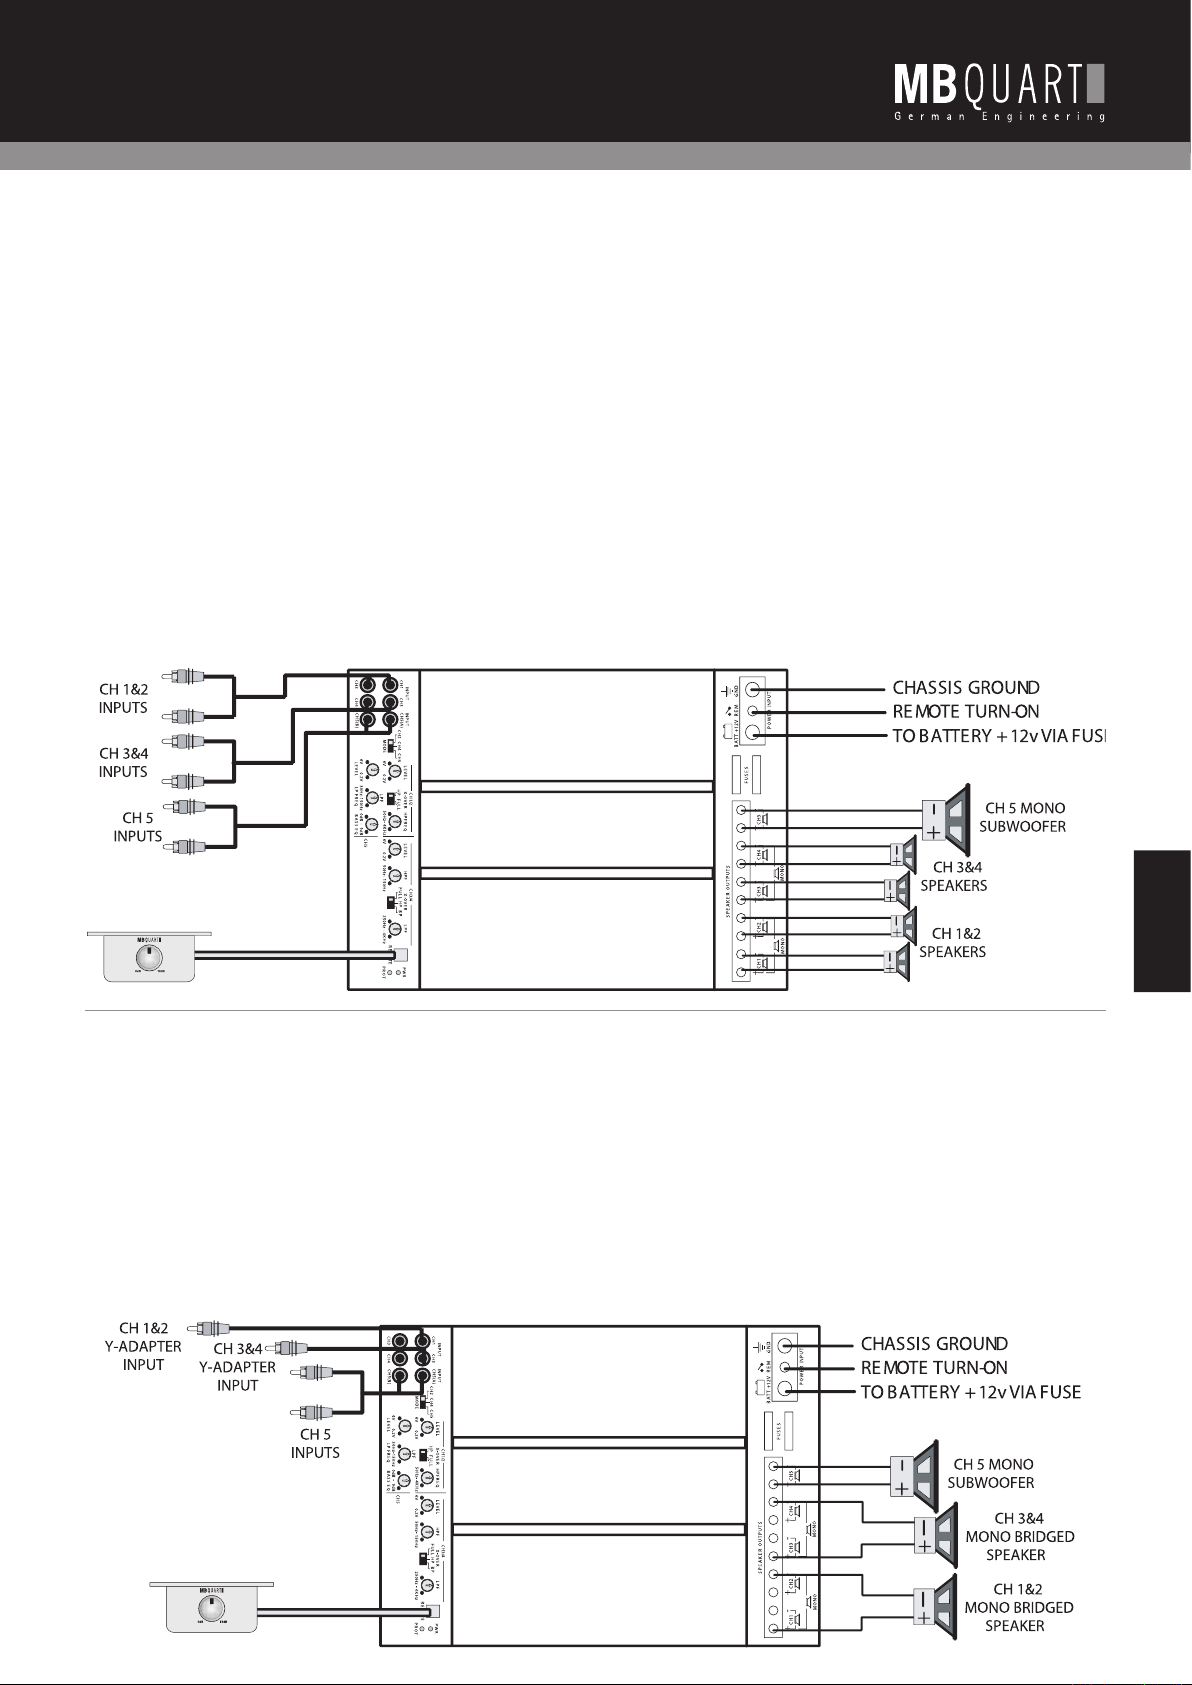
The PAB 5400 5 channel amplifi er contains all the functions neces-
2 ohm per channel
MBQR-1
Another obvious application for the PAB5400 is to use 4 channels for
2 ohm per channel
AMPLIFIER APPLICATIONS
PAB 5400 5-Channel Amplifi er
Page 13
English
MBQR-1
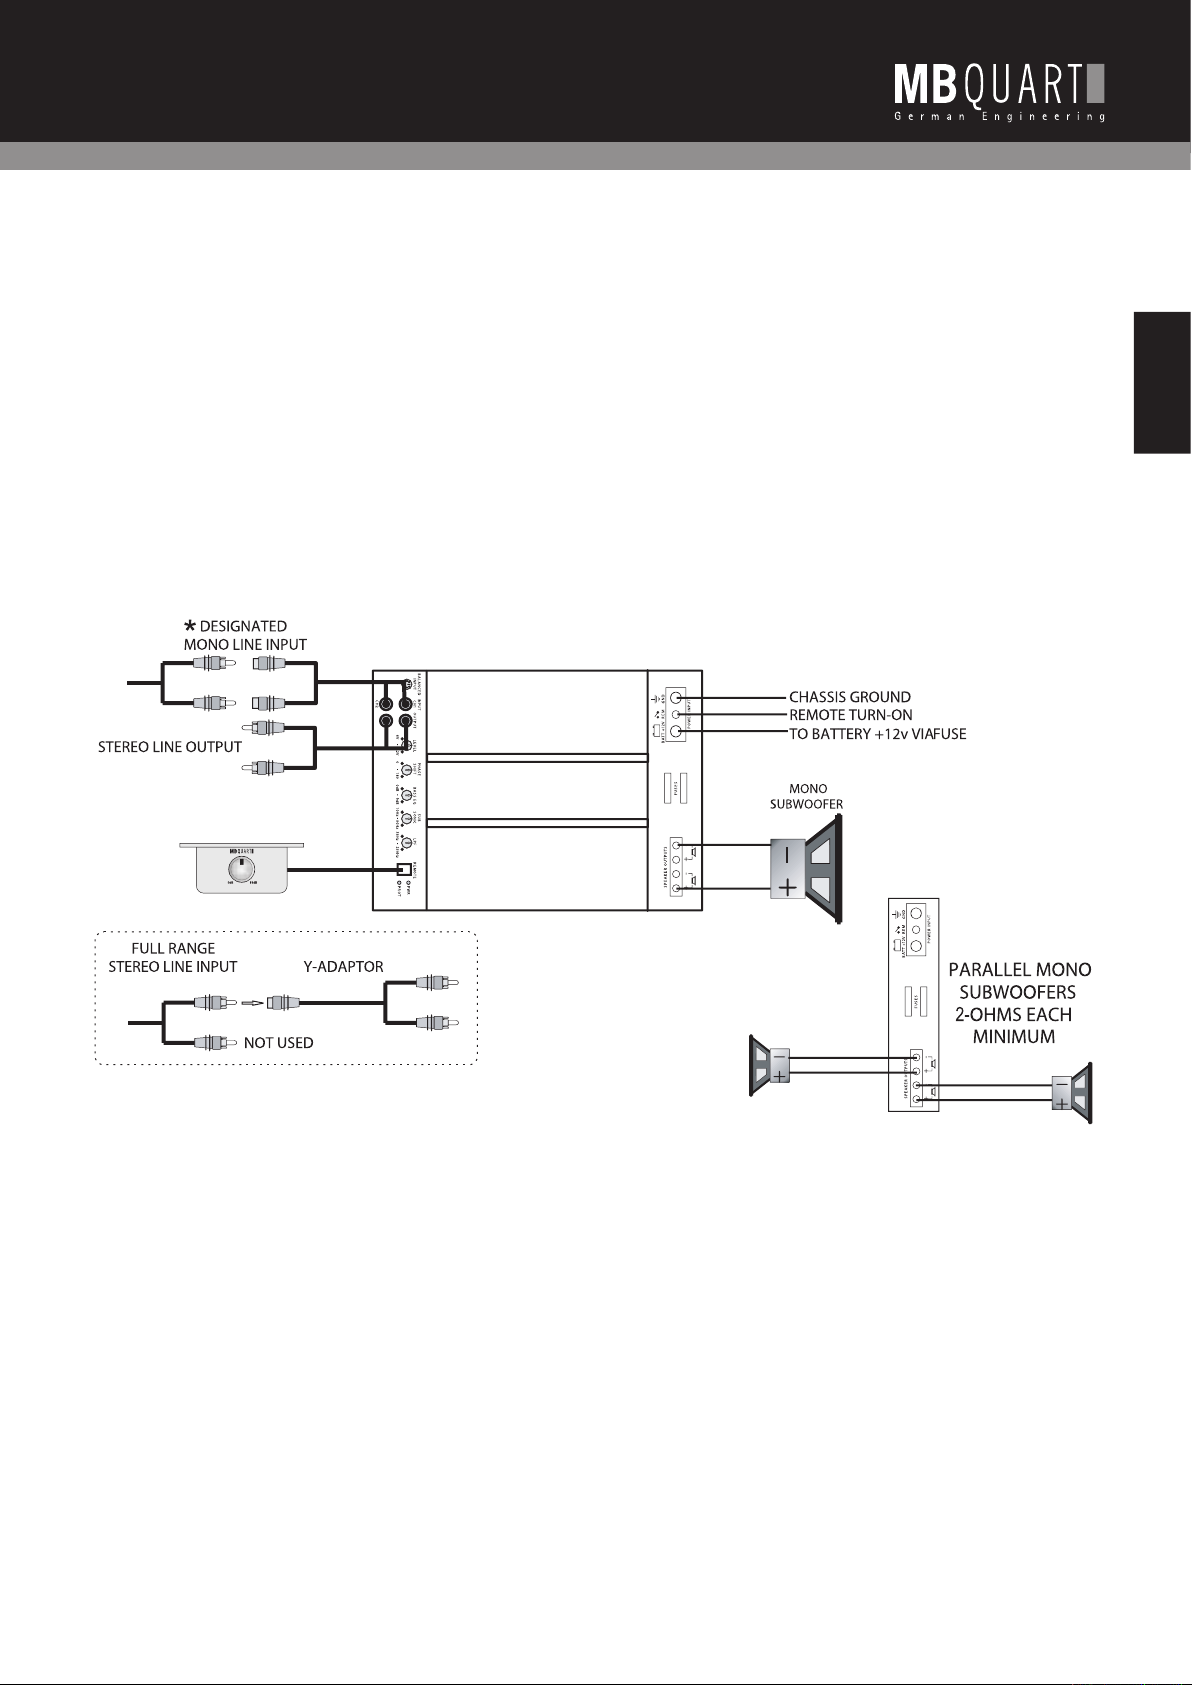
*Note: You can use the Radio/CD designated mono line output or a full range stereo line output.
AMPLIFIER APPLICATIONS
PAB 1200.1 D Mono Amplifi er
Page 14

As mentioned in the “General Installation Notes” section, the system should now be powered up, and working. At this point, all crossover frequency
Turn the level control up slowly, till you hear distortion, then back off a few degrees on the control.
Turn the channel 1&2 level control up slowly, till you hear distortion, then back off a few degrees on the control.
Always start with the bass, or low frequency amplifi er as a reference, by turning its control up to the point where distortion is audible, and back
The key to fi nding the problem in a misbehaving sound system is to isolate parts of that system in a logical fashion to track down the fault.
The diagnostic system will shut down the amplifi er, until reset by turning the head unit off, and back on. This state of affairs will be indicated by
Troubleshooting a system
AFTER INSTALLATION
for best performance
Page 15

AFTER INSTALLATION
Amplifi er heatsink overheating:
The amplifi ers will shut down when the heatsink temperature reaches 80 degrees centigrade, and turn back on once the unit has cooled down
The inside of an automobile is a very hostile electrical environment. The multitude of electrical systems, such as the ignition system, alternator, fuel
A ticking or whine that changes with engine RPM:
A constant whine:
This type of noise can be more diffi cult to pinpoint, but is usually caused by some kind of instability, causing oscillations in the system.
English
Page 16

DEUTSCH
Als Hersteller von MB QUART Car Audio-Geräten garantieren Maxxsonics
Verstärker hinsichtlich Material und Verarbeitung für die Dauer von einem
Verarbeitung eine mängelfreie Garantiezeit von einem (1) Jahr ab Kaufdatum.
Verarbeitung unter normalen Installationsbedingungen bei normaler Nutzung
Jeglicher Schaden an dem Produkt, der auf falsche bzw. unsachgemäße Ver-
ALLGEMEINE INSTALLATIONSANWEISUNGEN
AB 2100
AB 4100
AB 5400
AB 1200.1 D
Vers
APPLICATIONS
AB 2100
Vollbereich-Stereo-Betrieb
Vollbereich-Mono-Betrieb
AB 4100
AB 5400
AB 1200.1 D
Vers
TECHNISCHE DATEN
Page 17

Deutsch
ALLGEMEINE
INSTALLATIONSANWEISUNGEN
Tipps und Hinweisen zu guten Installationspraktiken Hilfestellung geben.
Allgemeines:
Verwenden Sie ausreichend dimensionierte Netzkabel, mindestens Kabelquer-
für den Verstärker. Bei einer Anlage mit Mehrfachverstärker ist
V-Endklemmen jedes Verstärkers an den Verteilerblock anschließen.
Jeden Verstärker direkt über das Fahrzeugchassis mit einem möglichst kur-
TIPP:
Gehen Sie bei der Installation der Hauptgeräte, Equalizer bzw. jegli-
Alle Netz-, Masse- und Lautsprecheranschlüsse müssen zwecks Zuverläs-
Verteilerblöcke sowie Sicherungsfassungen anschließen. Zum Schluss noch
Page 18
MBQR-1
MBQR-1
von 30 Hz bis 150 Hz variabel einstellbar ist.
von 30 Hz bis 150 Hz variabel einstellbar ist.
Armaturenbrett montierten Regler besteht die Möglichkeit der Pegelsteue-
Verstärkergleichstromfehler durch Aufl euchten der DIAGNOSE bzw. PRO-
TECT-LED-Anzeige angezeigt werden.
ACHTUNG:
VERSTÄRKER DÜRFEN GRUNDSÄTZLICH NICHT UNTERHALB
BESCHREIBUNG DER
VERSTÄRKERKENNDATEN
Page 19
Deutsch
MBQR-1
variabel einstellbar ist.
Tiefpassfi lter (LOW), die beide
variabel einstellbar ist.
ACHTUNG:
VERSTÄRKER DÜRFEN GRUNDSÄTZLICH NICHT UNTERHALB
Armaturenbrett montierten Regler besteht die Möglichkeit der Steuerung
Verstärker einen Fehler aufweist und nicht betriebsbereit ist. Es gibt
MBQR-1
BESCHREIBUNG DER
VERSTÄRKERKENNDATEN
Page 20
VERSTÄRKERANWENDUNGEN
PAB 2100 2-Kanal-Verstärker
MBQR-1
Vollbereich-Stereo-Betrieb
MBQR-1
Vollbereich-Mono-Betrieb
Ausgang einer Aktivweiche, unabhängig davon, ob diese in Form eines sepa-
Terminal mit Anschluss „RIGHT -“ verbinden.
TIPP:
Wenn Sie den Mono-Subwoofer-Ausgang einer Aktivweiche benutzen,
Page 21
Deutsch
MBQR-1
Anschluss des Mono-Subwoofers:
VERSTÄRKERANWENDUNGEN
PAB 2100 2-Kanal-Verstärker
Page 22
MBQR-1
4-Kanal-Vollbereichssystem
MBQR-1
Aktivweiche zur Verfügung steht, sei es als Einzelgerät oder auch als in ein
Versuchen Sie nicht, die aktiven bzw. positiven Ausgänge irgendei-
Abbildung an Anschluss „LEFT +“ anschließen, und das negative Terminal an
Anschluss „RIGHT -“.
Wenn Sie den Mono-Subwoofer-Ausgang einer Aktivweiche benutzen,
VERSTÄRKERANWENDUNGEN
PAB 4100 4-Kanal-Verstärker
Page 23
MBQR-1
Deutsch
Anschluss des Mono-Subwoofers:
MBQR-1
Ausgänge, um den Bass anzusteuern. Durch dieses Verfahren kann der Hörer
Verfahren Sie hinsichtlich der Einstellung der Frequenzweichenschalter
VERSTÄRKERANWENDUNGEN
PAB 4100 4-Kanal-Verstärker
Page 24
MBQR-1
Anschluss des Mono-Subwoofers:
VERSTÄRKERANWENDUNGEN
PAB 4100 4-Kanal-Verstärker
Page 25
Deutsch
MBQR-1
Abschnitt „Einstellung der Systeme nach Installation zum Erzielen der besten
2 Ohm je Kanal
MBQR-1
Anordnung darzustellen, indem wir die Stereo-Kanalpaare 1&2 und 3&4 in
Anschlussterminal von Kanal 3&4 des Mono-Lautsprechers an Kanal 3+,
VERSTÄRKERANWENDUNGEN
PAB 5400 5-Kanal-Verstärker
Page 26

MBQR-1
Aktivweiche erforderlich sind.
Vollbereichsausgänge des Steuergeräts anschließen.
Abschnitt „Einstellung der Systeme nach Installation zum Erzielen der besten
2 Ohm je Kanal
MBQR-1
Abschnitt „Einstellen der Systeme nach Installation zum Erzielen der besten
2 Ohm je Kanal
VERSTÄRKERANWENDUNGEN
PAB 5400 5-Kanal-Verstärker
Page 27
Deutsch
MBQR-1
von mindestens 1,5 mm². Diese Verstärker verfügen über Dual-
1 Ohm
* Hinweis: Sie können den am Radiogerät/CD-Player als Monoanschluss gekennzeichneten Ausgang oder einen Vollbereichs-Stereoausgang benutzen. Wie
VERSTÄRKERANWENDUNGEN
PAB 1200.1 D Mono-Verstärker
Page 28

zum Erzielen der besten Leistung
NACH DER INSTALLATION
Allgemeines:
Anwendung eingestellt sein und sämtliche Lautstärke-, Stufen- und Equali-
Ausgangssignalpegel des Hauptgerätes einzustellen.
Aktive 2- oder 3-Wege-Anlagen:
Page 29

Deutsch
NACH DER INSTALLATION
Aufl euchten der LED-Anzeige PROTECT angezeigt, sofern eine der folgenden
Volt-, Masse- und Einschaltsteuerungsleitungen (REM) angeschlossen
Anlage lässt sich nicht einschalten:
Verfahren in Abschnitt „Einstellen der Anlage nach Installation zum
verursacht, die zu Systemschwankungen führt.
Page 30

FRANÇAIS
Afi n de pouvoir bénéfi cier de la protection de la garantie, veuillez conserver
vais branchement, une installation inappropriée, une modifi cation du code de
TIQUES
Amplificateur 2 canaux
AB 2100
Amplificateur 4 canaux
AB 4100
Amplificateur 5 canaux
AB 5400
Amplificateur mono
AB 1200.1 D
AMPLIFIER
APPLICATIONS
Amplificateur 2 canaux
AB 2100
Amplificateur 4 canaux
AB 4100
Amplificateur 5 canaux
AB 5400
Amplificateur mono
AB 1200.1 D
Application de base
APRÈS L‘INSTALLATION
Page 31

Français
CONSIGNES D‘INSTALLATION
GÉNÉRALES
véhicule doit être intégralement garantie et la meilleure manière de créer un
Appliquer un produit anticorrosif sur la liaison boulon-cosse afi n d‘éviter tout
ASTUCE:
Lors de l‘installation des appareils de commande, qu’il s’agisse par
Tous les connecteurs 12 V, de mise à la terre et de haut-parleur doivent être
Après avoir posé l‘ensemble des câbles, brancher le câble correspondant sur les
Page 32

MBQR-1
MBQR-1
Amplifi cateur 4 canaux PAB 4100
Amplificateur multicanal Premium
Amplifi cateur 2 canaux PAB 2100
ATTENTION:
IL EST INTERDIT EN PRINCIPE DE METTRE EN MARCHE LES
AMPLIFICATEURS EN-DESSOUS DE L‘IMPEDANCE POUR LAQUELLE ILS
Amplifi cateur multicanal: mode stéréo 4 & 2 ohms, mode mono ponté
DESCRIPTION DES DONNÉES CARACTÉRISTIQUES DE L‘AMPLIFICATEUR
Page 33

Français
Amplificateur mono Premium
MBQR-1
Amplifi cateur 5 canaux PAB 5400
variable dans une plage comprise entre 50 Hz et 4 KHz.
variable dans une plage comprise entre 50 Hz et 4 KHz.
variable entre 30 Hz et 150 Hz.
ATTENTION:
IL EST INTERDIT EN PRINCIPE DE METTRE EN MARCHE LES
AMPLIFICATEURS EN-DESSOUS DE L‘IMPEDANCE POUR LAQUELLE ILS
Amplifi cateur mono: conçu pour 4, 2 et 1 ohms.
Amplifi cateur mono PAB 1200.1 D
MBQR-1
DESCRIPTION DES DONNÉES CARACTÉRISTIQUES DE L‘AMPLIFICATEUR
Page 34

APPLICATIONS DE L‘AMPLIFICATEUR
Amplifi cateur 2 canaux PAB 2100
MBQR-1
MBQR-1
N‘essayez pas de connecter ensemble les sorties actives ou posi-
ASTUCE:
Si vous utilisez la sortie subwoofer mono d‘un fi ltre actif, il est
4 ohms mono.
Page 35

Français
MBQR-1
Amplifi cateur d‘aiguës:
Amplifi cateur de graves:
Veuillez tenir compte du fait que ces fréquences de coupure constituent
APPLICATIONS DE L‘AMPLIFICATEUR
Amplifi cateur 2 canaux PAB 2100
Page 36
MBQR-1
MBQR-1
N‘essayez pas de connecter ensemble les sorties actives voire
ASTUCE:
Si vous utilisez la sortie subwoofer mono d‘un fi ltre actif, il est
APPLICATIONS DE L‘AMPLIFICATEUR
Amplifi cateur 4 canaux PAB 4100
Page 37
Français
MBQR-1
Vous devez alimenter le même signal aux deux entrées (LINE IN), c‘est pour-
Veuillez tenir compte du fait que ces fréquences de coupure constituent
MBQR-1
APPLICATIONS DE L‘AMPLIFICATEUR
Amplifi cateur 4 canaux PAB 4100
Page 38

MBQR-1
voies, il est facile d‘assembler, en utilisant les fi ltres intégrés, un système
Amplifi cateur d‘aiguës 4 canaux: Amplifi cateur de graves 2 canaux:
Amplifi cateur d‘aiguës 4 canaux:
Amplifi cateur de graves 2 canaux:
Veuillez tenir compte du fait que ces fréquences de coupure constituent
APPLICATIONS DE L‘AMPLIFICATEUR
Amplifi cateur 4 canaux PAB 4100
Page 39

Français
MBQR-1
Vous pouvez utiliser cette confi guration simplement sous forme d‘un sys-
Veuillez tenir compte du fait que ces fréquences de coupure constituent
MBQR-1
APPLICATIONS DE L‘AMPLIFICATEUR
Amplifi cateur 5 canaux PAB 5400
Page 40

MBQR-1
Veuillez tenir compte du fait que les régulateurs de passe-haut et de passe-
Veuillez tenir compte du fait que ces fréquences de coupure constituent
MBQR-1
Veuillez tenir compte du fait que ces fréquences de coupure constituent
APPLICATIONS DE L‘AMPLIFICATEUR
Amplifi cateur 5 canaux PAB 5400
Page 41

Français
MBQR-1
Application de base
* Remarque: Vous pouvez utiliser la sortie indiquée raccord mono sur le poste de radio/ lecteur de CD ou une sortie stéréo large bande.
Ainsi que le montre l‘illustration, il vous faut également un adaptateur Y pour les sorties stéréo large bande.
APPLICATIONS DE L‘AMPLIFICATEUR
Amplifi cateur mono PAB 1200.1 D
Page 42

APRÈS L‘INSTALLATION
Amplifi cateurs 2 canaux simples:
Tourner lentement en avant le régulateur de niveau jusqu‘à ce que vous
Amplifi cateurs 4 canaux simples:
Tourner lentement en avant le régulateur de niveau pour les canaux 1&2
jusqu‘à ce que vous entendiez des distorsions puis le tourner légèrement en
volume en fonction de vos goûts personnels. Retournez ensuite à l‘ajustage
Page 43

Français
V, de mise à la terre et de la télécommande branchés. Remettre maintenant
on distingue deux catégories de bruit: un siffl ement et
V et la mise à la terre. Comme toujours, il convient de circonscrire ici aussi
Vérifi er par conséquent s‘ils sont en parfait état, notamment les liaisons de
Page 44

ESPAÑOL
volqueo, catástrofes naturales o cualquier intervención, reparación o modifi -
Amplificador de 2 canales
AB 2100
Amplificador de 4 canales
AB 4100
Amplificador de 5 canales
AB 5400
Amplificador Mono
AB 1200.1 D
APLICACIONES DEL AMPLIFICADOR
Amplificador de 2 canales
AB 2100
Amplificador de 4 canales
AB 4100
Amplificador de 5 canales
AB 5400
Amplificador Mono
AB 1200.1 D
Aplicación básica
Ajuste del equipo después de la instalación para obtener
Page 45

Español
INSTRUCCIONES GENERALES
PARA LA INSTALACIÓN
Tenga en cuenta que los sistemas de mayor potencia no necesariamente sir-
ven sólo para generar un mayor nivel de presión acústica sino también para
Aspectos generales:
Tienda las conexiones de forma que los cables Cinch estén separados como
Alimentación eléctrica y conexión a tierra:
Proceda de la misma forma en la instalación de los equipos de
vección de refrigeración y evitar un sobrecalentamiento.
Todas las conexiones de 12 voltios, las conexiones a tierra y las conexiones de
Asegure que los aislamientos de cables en el vehículo no se puedan desgastar
Asegure primero que el equipo de mando como p. ej. el sintonizador de CD
y coloque el fusible principal en la batería. Si no se funde el fusible puede
yor volumen. Si la instalación suena bien, desconecte el equipo principal y
Page 46

MBQR-1
MBQR-1
Amplifi cador de 4 canales PAB 4100
A través del selector de diplexor superior (1/2CH X-OVER) se puede
Tenga en cuenta que la señal LOW PASS (paso bajo) es una señal
Amplificador multicanal Premium
Amplifi cador de 2 canales PAB 2100
A través del selector de diplexor (X-Over) se pueden seleccionar las
A través del selector de diplexor inferior (3/4CH X-OVER) se puede ajus-
T
y de errores de corriente continua del amplifi cador se iluminan las lámparas
ATENCIÓN:
Amplifi cador multicanal: Servicio estéreo de 4 y 2 ohmios, servicio mono
DESCRIPCIÓN DE LOS DATOS CARACTERÍSTICOS DEL AMPLIFICADOR
Tenga en cuenta que la señal LOW PASS (paso bajo) es una señal
Page 47
Español
Amplificador mono Premium
MBQR-1
Amplifi cador de 5 canales
variable en la gama de 50 Hz a 4 KHz.
variable en la gama de 50 Hz a 4 KHz.
ATENCIÓN:
Amplifi cador mono: concebido para 4, 2 y 1 ohmios.
Amplifi cador mono PAB 1200.1 D
A través de un regulador que se puede montar p. ej. debajo del tablero de
MBQR-1
DESCRIPCIÓN DE LOS DATOS CARACTERÍSTICOS DEL AMPLIFICADOR
Page 48

APLICACIONES DEL AMPLIFICADOR
Amplifi cador de 2 canales PAB 2100
MBQR-1
Véase capítulo “Ajuste del sistema después de la instalación para obtener el
Valores mínimos para las impedancias de altavoz totales:
MBQR-1
No trate de interconectar las salidas activas o positivas de una
Y. Conecte el terminal de conexión positivo del altavoz mono con el borne
Si se utiliza la salida de un atavoz de graves mono de un
Valores mínimos para las impedancias de altavoz totales:
4 ohmios mono.
Page 49
Español
MBQR-1
Amplifi cador de altos:
Amplifi cador de bajos:
Tenga en cuenta que estas frecuencias de separación son sólo sugerencias.
Véase capítulo “Ajuste de los sistemas después de la instalación para obtener
Valores mínimos para las impedancias de altavoz totales:
APLICACIONES DEL AMPLIFICADOR
Amplifi cador de 2 canales PAB 2100
Page 50

MBQR-1
Aquí mostramos cómo se pueden emplear los amplifi cadores de 4 canales en
Véase capítulo: “Ajuste de los sistemas después de la instalación para obte-
Valores mínimos para las impedancias de altavoz totales:
MBQR-1
Aquí mostramos cómo se puede emplear el amplifi cador de 4 canales como
No trate de interconectar las salidas activas o positivas de una
Si se utiliza la salida de un atavoz de graves mono de un
Véase capítulo “Ajuste de los sistemas después de la instalación para obtener
Valores mínimos para las impedancias de altavoz totales:
APLICACIONES DEL AMPLIFICADOR
Amplifi cador de 4 canales PAB 4100
Page 51
Español
MBQR-1
Tenga en cuenta que estas frecuencias de separación son sólo sugerencias.
Véase capítulo “Ajuste de los sistemas después de la instalación para obtener
Valores mínimos para las impedancias de altavoz totales:
MBQR-1
Aquí le presentamos una variante del sistema arriba descrito. Ya que se trata
APLICACIONES DEL AMPLIFICADOR
Amplifi cador de 4 canales PAB 4100
Page 52

MBQR-1
Amplifi cador de altos de 4 canales: Amplifi cador de bajos de 2 canales:
Amplifi cador de altos de 4 canales:
Amplifi cador de bajos de 2 canales:
Tenga en cuenta que estas frecuencias de separación son sólo sugerencias.
Véase capítulo “Ajuste de los sistemas después de la instalación para obtener
Valores mínimos para las impedancias de altavoz totales:
APLICACIONES DEL AMPLIFICADOR
Amplifi cador de 4 canales PAB 4100
Page 53
Español
MBQR-1
Tenga en cuenta que estas frecuencias de separación son sólo sugerencias.
Véase capítulo “Ajuste de los sistemas después de la instalación para obtener
Valores mínimos para las impedancias de altavoz totales:
MBQR-1
Aquí empleamos el mismo ajuste básico como arriba descrito para represen-
Valores mínimos para las impedancias de altavoz totales:
APLICACIONES DEL AMPLIFICADOR
Amplifi cador de 5 canales PAB 5400
Page 54
MBQR-1
Tenga en cuenta que los reguladores de paso alto y paso bajo para el canal
Tenga en cuenta que estas frecuencias de separación son sólo sugerencias.
Véase capítulo “Ajuste de los sistemas después de la instalación para obtener
Valores mínimos para las impedancias de altavoz totales:
MBQR-1
Tenga en cuenta que estas frecuencias de separación son sólo sugerencias.
Véase capítulo “Ajuste de los sistemas después de la instalación para obtener
Valores mínimos para las impedancias de altavoz totales:
APLICACIONES DEL AMPLIFICADOR
Amplifi cador de 5 canales PAB 5400
Page 55

Español
MBQR-1
Aplicación básica
Véase capítulo “Ajuste de los sistemas después de la instalación para obtener
Valores mínimos para las impedancias de altavoz totales:
* Nota: Vd. puede emplear la salida marcada como borne mono en el equipo de radio/reproductor de CD o una salida estéreo de gama completa.
APLICACIONES DEL AMPLIFICADOR
Amplifi cador mono PAB 1200.1 D
Page 56

Ajuste del equipo después de
DESPUÉS DE LA INSTALACIÓN
Aspectos generales:
Ajuste de los reguladores de nivel:
Aumente lentamente el regulador de nivel hasta que se escuchen distor-
Aumente lentamente el regulador de nivel para el canal 1 y 2 hasta que se
Ajuste ahora el regulador de nivel para los canales de agudos o tonos altos
Ajuste de precisión de la frecuencia de transición:
Ajuste del ecualizador:
Tan pronto se hayan ajustado todos los niveles y las frecuencias de transi-
Page 57

Español
voltios cuando se mida en los terminales de +12 voltios y las conexiones a
DESPUÉS DE LA INSTALACIÓN
y del mando a distancia del equipo principal para localizar el problema.
Aullido permanente:
Page 58

ITALIANO
Tutte le altre parti ed accessori dell’impianto sono garantite esenti da difet-
vuta originale la garanzia è di un anno (1) dalla data di produzione.
vale come polizza d’assicurazione.
Amplificatore PAB 2100 a due canali
Amplificatore a quattro canali PAB 4100
Amplificatore a 5 canali PAB 5400
Amplificatore Mono PAB 1200.1 D
Amplificatore PAB 2100 a due canali
Amplificatore a quattro canali PAB 4100
Amplificatore a 5 canali PAB 5400
Amplificatore Mono PAB 1200.1 D
Applicazione base
Page 59

Italiano
ISTRUZIONI GENERALI
PER L’INSTALLAZIONE
Attacchi alla rete e massa:
procedere nello stesso modo per l’installazione delle unità di co-
Acquistare i migliori cavi cinch possibili per una maggiore affi dabilità e una
Tutti gli attacchi di massa e degli altoparlanti devono essere pinzati e saldati
Togliere tutte le protezione degli amplifi catori ed inserire la protezione prin-
Accendere l’unità di comando, inserire un CD o selezionare una stazione
Page 60
MBQR-1
MBQR-1
Amplifi catore a quattro canali
Amplificatore a più canali
Amplifi catore PAB 2100 a due canali
ATTENZIONE:
GLI AMPLIFICATORI NON VANNO NORMALMENTE MESSI
Amplifi catore a più canali:
funzionamento in Stereo a 4 & 2 Ohm, fun-
DESCRIZIONE DELLE CARATTERISTICHE
DELL’AMPLIFICATORE
Page 61

Italiano
Amplificatore Mono Premium
MBQR-1
Amplifi catore a 5 canali
Interruttore a scorrimento per la selezione del modo d’entrata (MODE):
ATTENZIONE:
Amplifi catore Mono:
predisposto per 4,
Amplifi catore Mono PAB 1200.1 D
MBQR-1
Page 62
MODALITÀ D’USO DELL’AMPLIFICATORE
Amplifi catore PAB 2100 a due canali
MBQR-1
Vedere il capitolo „Impostazione del sistema dopo l’installazione per ottenere
MBQR-1
non cercare di collegare insieme le uscite attive o positive di
Se si utilizza l’uscita del Subwoofer Mono di un taglio
4 Ohm Mono.
Page 63

Italiano
MBQR-1
Attacco del Subwoofer Mono:
Amplifi catore alti:
Amplifi catore bassi:
Vedere il capitolo „ Impostazione del sistema dopo l’installazione per ottene-
MODALITÀ D’USO DELL’AMPLIFICATORE
Amplifi catore PAB 2100 a due canali
Page 64

MBQR-1
Vedere capitolo: „Impostazione del sistema dopo l’installazione per ottenere
MBQR-1
non cercare di collegare le uscite attive o positive di una fonte
Se si utilizza l’uscita del Subwoofer Mono di un attivo è
Vedere il capitolo „Impostazione del sistema dopo l’installazione per ottenere
MODALITÀ D’USO DELL’AMPLIFICATORE
Amplifi catore a quattro canali PAB 4100
Page 65

Italiano
MBQR-1
Attacco del Subwoofer Mono:
Verifi care le specifi che del produttore relative agli altoparlanti e
Vedere il capitolo „Impostazione del sistema dopo l’installazione per
MBQR-1
MODALITÀ D’USO DELL’AMPLIFICATORE
Amplifi catore a quattro canali PAB 4100
Page 66

MBQR-1
Attacco del Subwoofer Mono:
Amplifi catore degli alti a 4 canali:
Amplifi catore dei bassi a due canali:
Amplifi catore alti a 4 canali:
Amplifi catore bassi a due canali:
Vedere il capitolo „Impostazione del sistema dopo l’installazione per ottenere
MODALITÀ D’USO DELL’AMPLIFICATORE
Amplifi catore a quattro canali PAB 4100
Page 67

Italiano
MBQR-1
Vedere il capitolo „Impostazione del sistema dopo l’installazione per ottenere
MBQR-1
MODALITÀ D’USO DELL’AMPLIFICATORE
Amplifi catore a 5 canali PAB 5400
Page 68

MBQR-1
Vedere il capitolo „Impostazione del sistema dopo l’installazione per ottenere
MBQR-1
Vedere il capitolo „Impostazione
MODALITÀ D’USO DELL’AMPLIFICATORE
Amplifi catore a 5 canali PAB 5400
Page 69

Italiano
MBQR-1
Applicazione base
Vedere il capitolo „Impostazione del sistema dopo l’installazione per ottenere
* Indicazione: È possibile utilizzare l’uscita identifi cata come attacco Mono dell’apparecchio radio/riproduttore CD oppure un’uscita Stereo a gamma
MODALITÀ D’USO DELL’AMPLIFICATORE
Amplifi catore Mono PAB 1200.1 D
Page 70

DOPO L’INSTALLAZIONE
Alzare lentamente il livello fi nché non si avvertono distorsioni, quindi ritorna-
Alzare lentamente il livello del canale 1&2 fi nché non si avvertono distorsioni,
Page 71

Italiano
DOPO L’INSTALLAZIONE
i rumori prodotti dall’impianto possono essere
Page 72

PУССКИЙ
ТЕХНИЧЕСКИЕ ДАННЫЕ
Page 73

Pусский
ОБЩИЕ УКАЗАНИЯ ПО МОНТАЖУ
Page 74

MBQR-1
MBQR-1
усиления 1&2:
– 150 Гц.
усиления 3&4:
стереорежим 4 & 2 Ом, монорежим 4 Ом
ОПИСАНИЕ ПАРАМЕТРИЧЕСКИХ
ДАННЫХ УСИЛИТЕЛЕЙ
Page 75

Pусский
MBQR-1
Ползунковый переключатель для выбора входного режима (MODE):
150 Гц.
6 В.
рассчитан на 4, 2 & 1 Ом.
180
18 В.
MBQR-1
ОПИСАНИЕ ПАРАМЕТРИЧЕСКИХ
ДАННЫХ УСИЛИТЕЛЕЙ
Page 76

ПРИМЕНЕНИЯ УСИЛИТЕЛЕЙ
2-КАНАЛЬНЫЙ УСИЛИТЕЛЬ PAB 2100
MBQR-1
усилителя.
MBQR-1
не пытайтесь соединить вместе активные или положительные выходы
Если вы используете моновыход сабвуфера активного разделительного
Page 77
Pусский
MBQR-1
ПРИМЕНЕНИЯ УСИЛИТЕЛЕЙ
2-КАНАЛЬНЫЙ УСИЛИТЕЛЬ PAB 2100
Page 78
MBQR-1
2 Ом на канал
MBQR-1
Не пытайтесь соединить вместе активные или пассивные выходы какого
Если вы используете выход на сабвуфер активного разделительного
ПРИМЕНЕНИЯ УСИЛИТЕЛЕЙ
4-КАНАЛЬНЫЙ УСИЛИТЕЛЬ PAB 4100
Page 79
Pусский
MBQR-1
MBQR-1
ПРИМЕНЕНИЯ УСИЛИТЕЛЕЙ
4-КАНАЛЬНЫЙ УСИЛИТЕЛЬ PAB 4100
Page 80
MBQR-1
- переключатель X-OVER: положение „LP/BP
ПРИМЕНЕНИЯ УСИЛИТЕЛЕЙ
4-КАНАЛЬНЫЙ УСИЛИТЕЛЬ PAB 4100
Page 81

Pусский
MBQR-1
MBQR-1
ПРИМЕНЕНИЯ УСИЛИТЕЛЕЙ
5-КАНАЛЬНЫЙ УСИЛИТЕЛЬ PAB 5400
Page 82
MBQR-1
MBQR-1
ПРИМЕНЕНИЯ УСИЛИТЕЛЕЙ
5-КАНАЛЬНЫЙ УСИЛИТЕЛЬ PAB 5400
Page 83

Pусский
MBQR-1
- 180
ПРИМЕНЕНИЯ УСИЛИТЕЛЕЙ
МОНО-УСИЛИТЕЛЬ PAB 1200.1
Page 84

Тонкая настройка переходной частоты:
ПОСЛЕ МОНТАЖА
эквалайзерам и регуляторам
Page 85

Pусский
С, и снова
ПОСЛЕ МОНТАЖА
системные шумы можно разделить на две
-
Тиканье или свист, которые меняются в зависимости от частоты вращения
Page 86

TECHNICAL DATA
4-CHANNEL
Yes
Yes
Yes
Yes
Variable Input Level Control
Input Impedance
Yes
Yes
Yes
Yes
Variable Hi-Pass/Subsonic Filter
Variable Low-Pass (Mono 24dB)
Variable Subsonic Filter
Bass Boost at 45Hz
Variable Hi-Pass
Variable Low-Pass (Mono 24dB)
Variable Subsonic Filter
Bass Boost at 45Hz
Variable Low-Pass
Bass Boost at 45Hz
Yes
Yes
Yes
Yes
Yes
Yes
Yes (3+4CH)
Yes (CH-5)
Yes
Yes
Yes
Yes
Yes
Page 87

TECHNISCHE DATEN
4-
Ausgangsleistung Watt RMS bei 14,4V
JaJaJa
Ja
JaJaJa
Ja
Tiefpass/Vollbereich/
Variabler Hochpass-/ Subsonic Filter
Variabler Tiefpass (Mono 24dB)
Variabler Subsonic Filter
Bass Boost bei 45Hz
Variabler Hochpass
Variabler Tiefpass (Mono 24dB)
Variabler Subsonic Filter
Bass Boost bei 45Hz
Variabler Tiefpass
Bass Boost bei 45Hz
Vollbereich
Vollbereich
Vollbereich
Vollbereich
JaJaJa
Ja
Ja
Ja
Ja (Kanal 3+4)
Ja (Kanal 5)
Ja
JaJaJa
Ja
Abmessungen in cm (L/H/B)
x 5,7 x 26,3
Page 88

PAB 2100 / PAB 4100 / PAB 5400 / PAB 1200.1 D
M A X X S O N I C S US A, INC.
1290 Ensell Road
Lake Zurich, Illinois 60047 USA
E-Mail info@maxxsonics.com
Website www.maxxsonics.com
M AXXSONICS EUROPE GM B H
Neckarstrasse 20
74847 Obrigheim, Germany
Phone +49 (0) 62 61 - 6 38-0
FAXX +49 (0) 62 61 - 6 38-129
E-Mail info@mbquart.de
Website www.mbquart.de
 Loading...