

Page 1
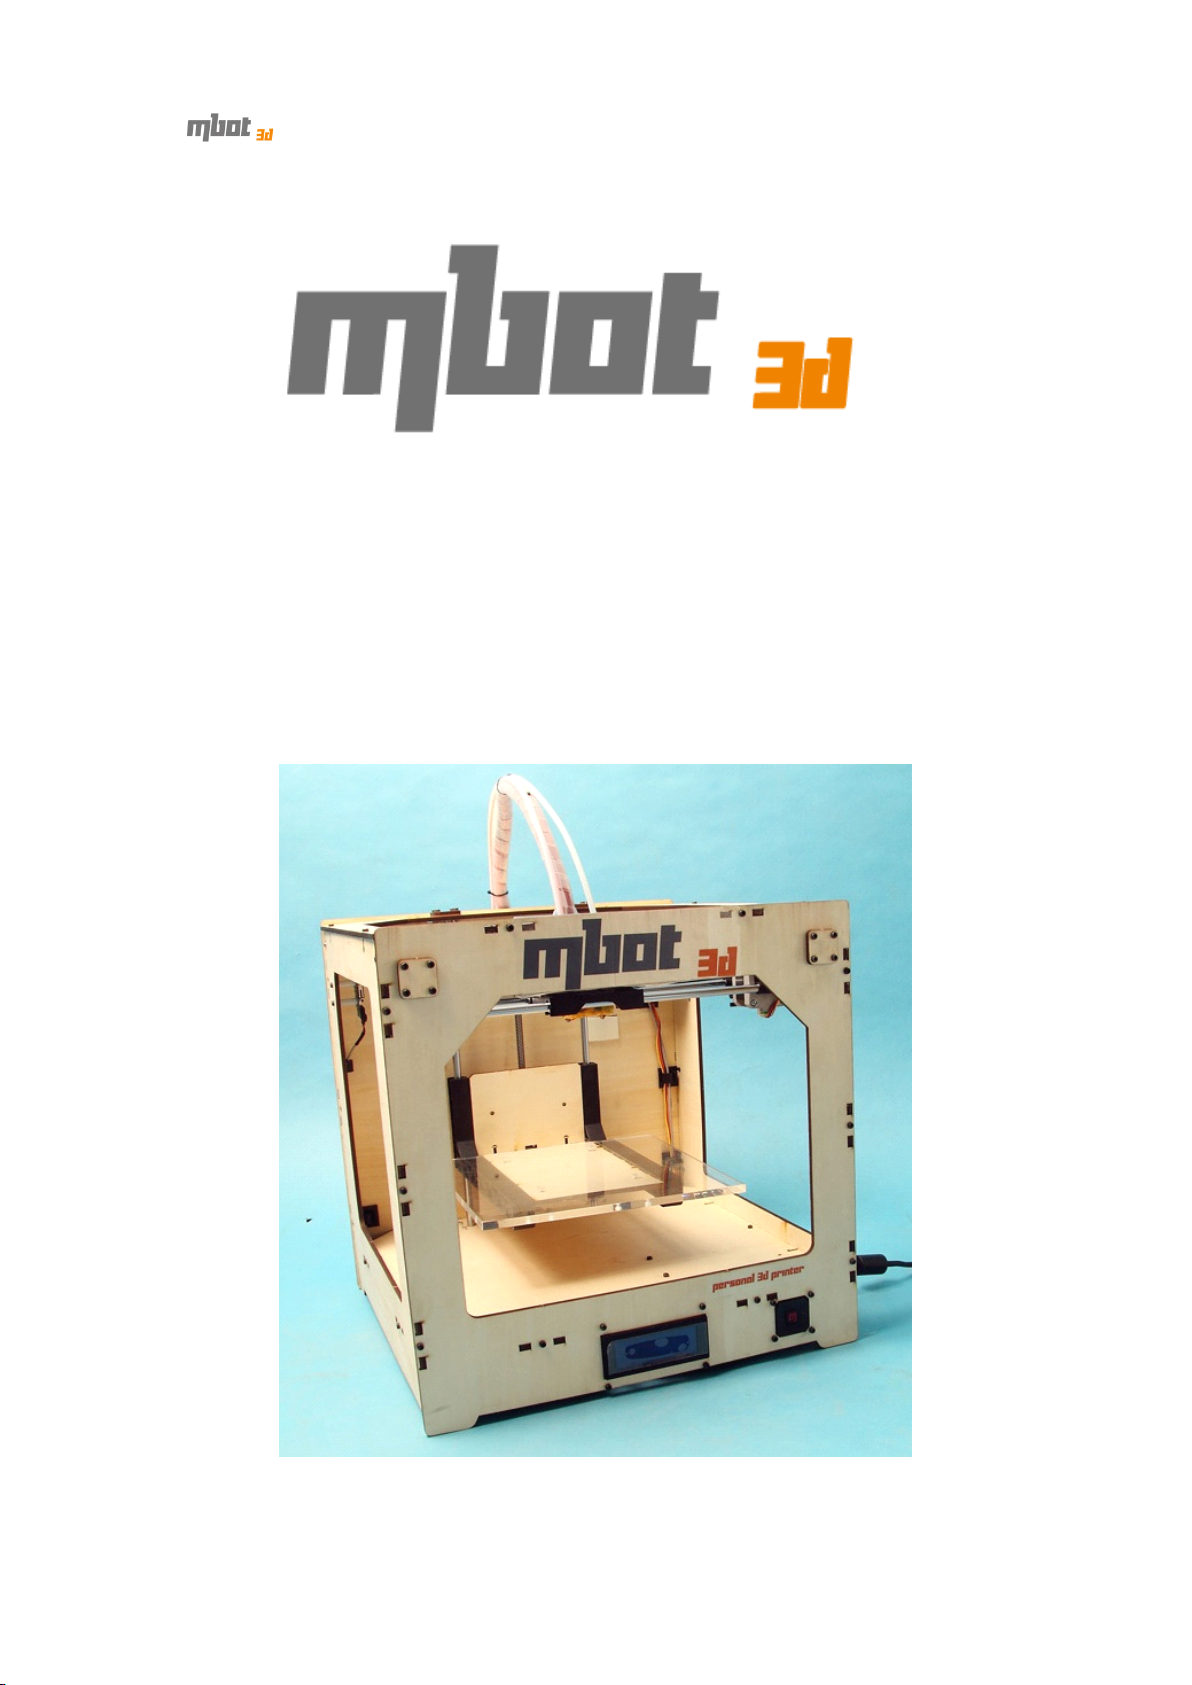
CUBE
CUBE
CUBE
CUBE
THE
THE
THE
THE DESKTOP
DESKTOP
DESKTOP
DESKTOP 3D
USER
USER
USER
USER MANUAL
3D
3D
3D PRINTER
MANUAL
MANUAL
MANUAL
PRINTER
PRINTER
PRINTER
2012-12-05
1
Page 2

Contents
1 Installing s oftware ................................................................................................................... 3
1.1 Installing Python ....................................................................................................... 3
1.2 Installing ReplicatorG ............................................................................................... 5
2 Pre-print checks ...................................................................................................................... 9
2.1 Power up .................................................................................................................... 9
2.2 Connect to computer ............................................................................................... 10
2.3 Setting up software .................................................................................................. 10
3 Setting up model data .......................................................................................................... 14
3.1 Importing model file into ReplicatorG .................................................................... 14
3.2 Move, scale, rotate and estimated build time .......................................................... 15
3.3 Generating GCode ( Slicing ) ................................................................................ 16
4 T est printing ( If plastic stop coming out the nozzle during printing, please read
this chapter ) ................................................................................................................................. 19
5 Printing .................................................................................................................................... 21
5.1 Printing from computer ........................................................................................... 21
5.2 Printing from SD card ............................................................................................. 23
5.3 3D outputs ............................................................................................................... 27
6 Two-color printing ................................................................................................................. 30
7 Contact Us ............................................................................................................................. 33
2
Page 3
To
get a better printing experience, we suggest you to take time reading this manual.
It is designed to illustrate the procedures from the installment of software to
operation , and get you up and running as quickly as possible.
1
Installing
1
Installing
1
1 Installing
Installing s
1.1
Installing
1.1
Installing
1.1
1.1 Installing
Installing Python
1 ) Go to http://www.mbot3d.com/pages/software , and download replicatorg
and python2.6
s
oftware
s
oftware
s oftware
oftware
Python
Python
Python
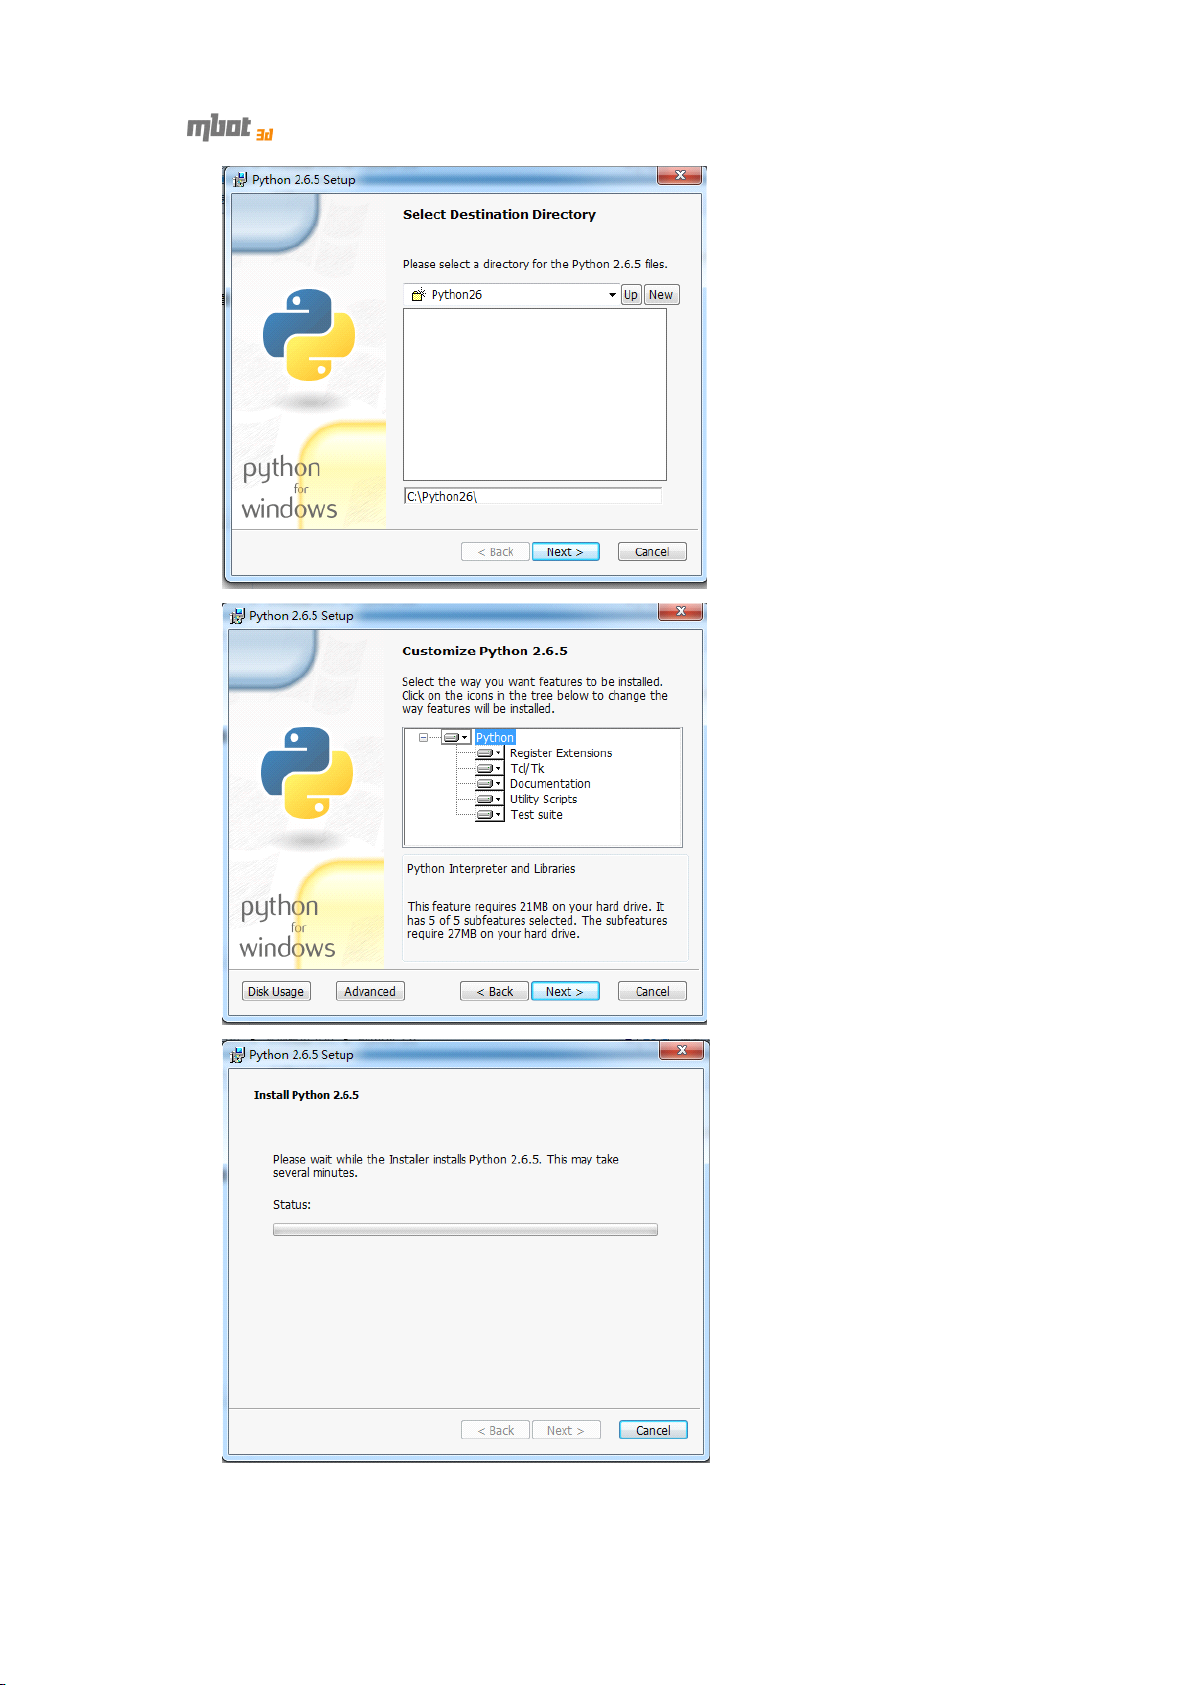
2) For Windows
installer with administrator rights . (How? Right click on the installer to get the 'Run as
Administrator' option .)
3) Keep clicking the “ Next ” button to finish installing.
NOTE: Use the default installation directory.
XP,
double-click python2.6.5 to install. For Windows 7, run the
3
Page 4
Page 5
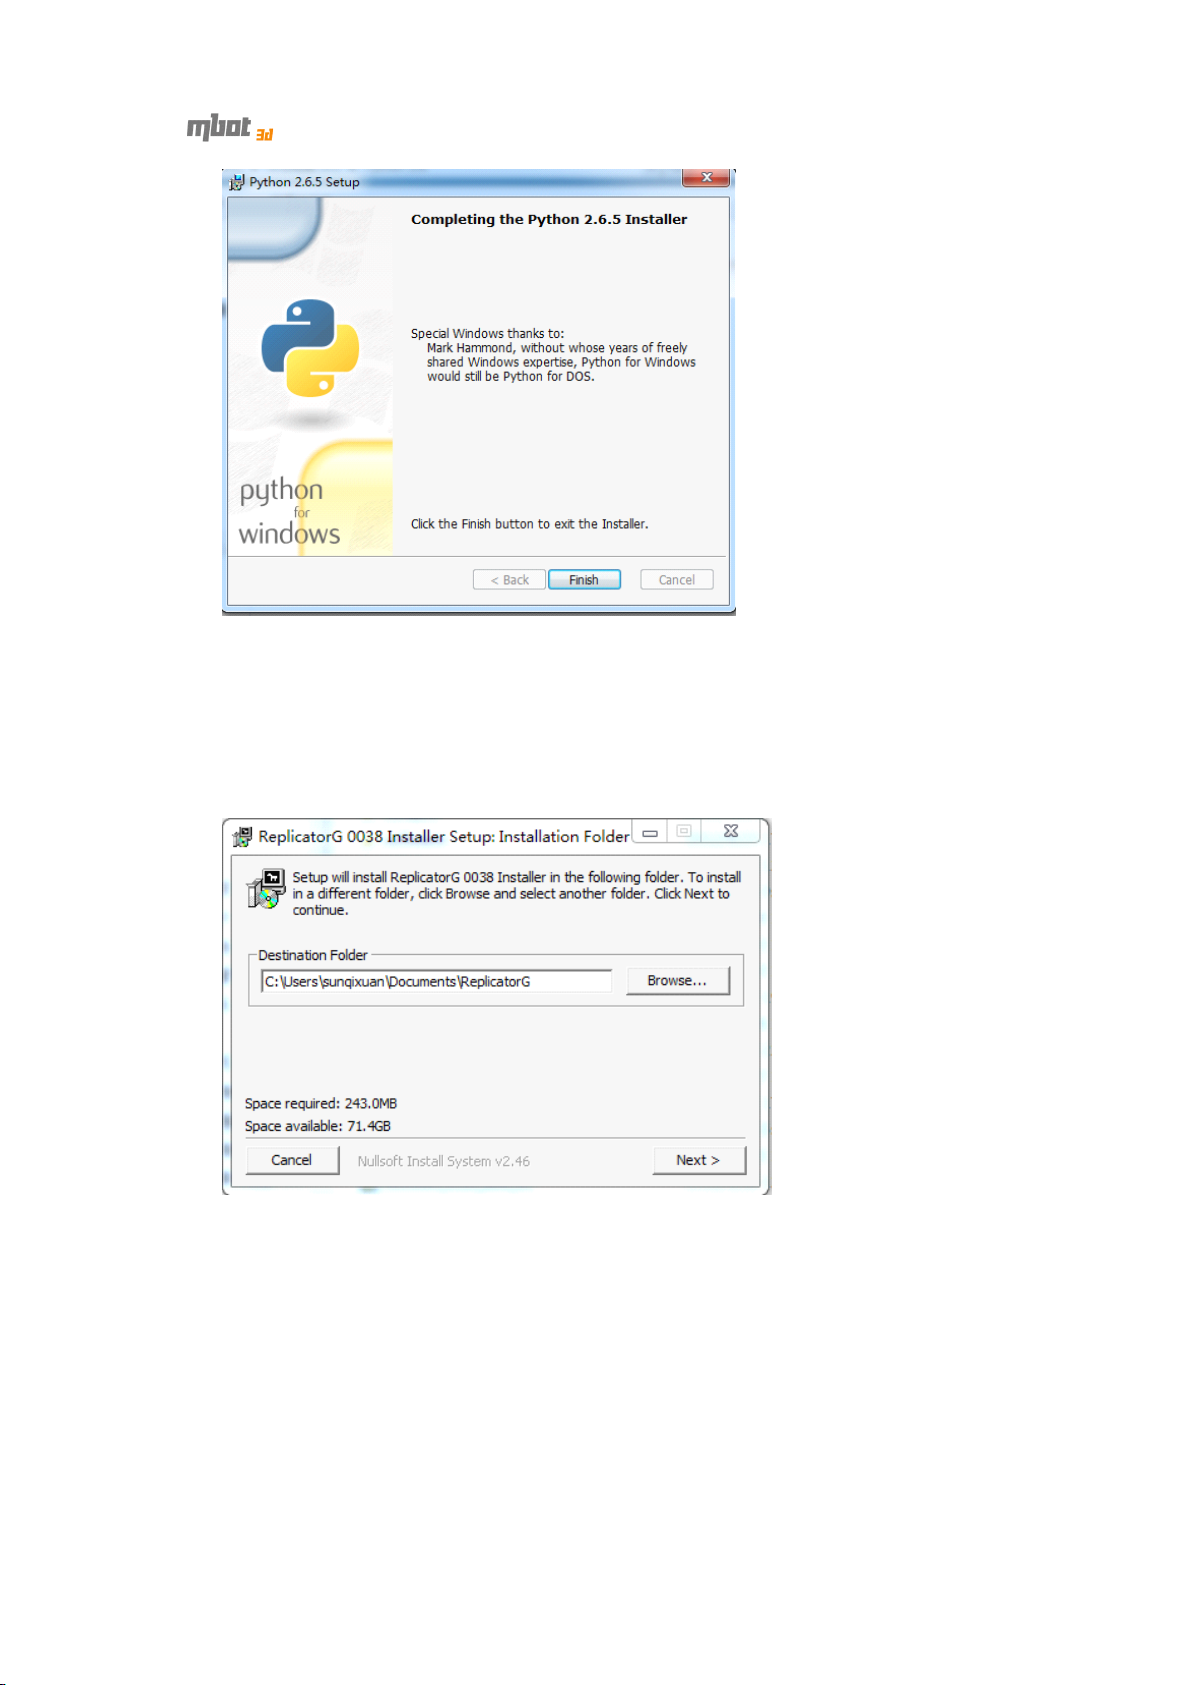
Click the “ Finish ” button to exit the installer .
1.2
Installing
1.2
Installing
1.2
1.2 Installing
Installing ReplicatorG
ReplicatorG
ReplicatorG
ReplicatorG
1) Double-click ReplicatorG, and you ’ ll see the following window.
2) Click the “ Next ” button. Then on the following window, click the “ Install ”
button.
Suggest using the default destination folder .
5
Page 6
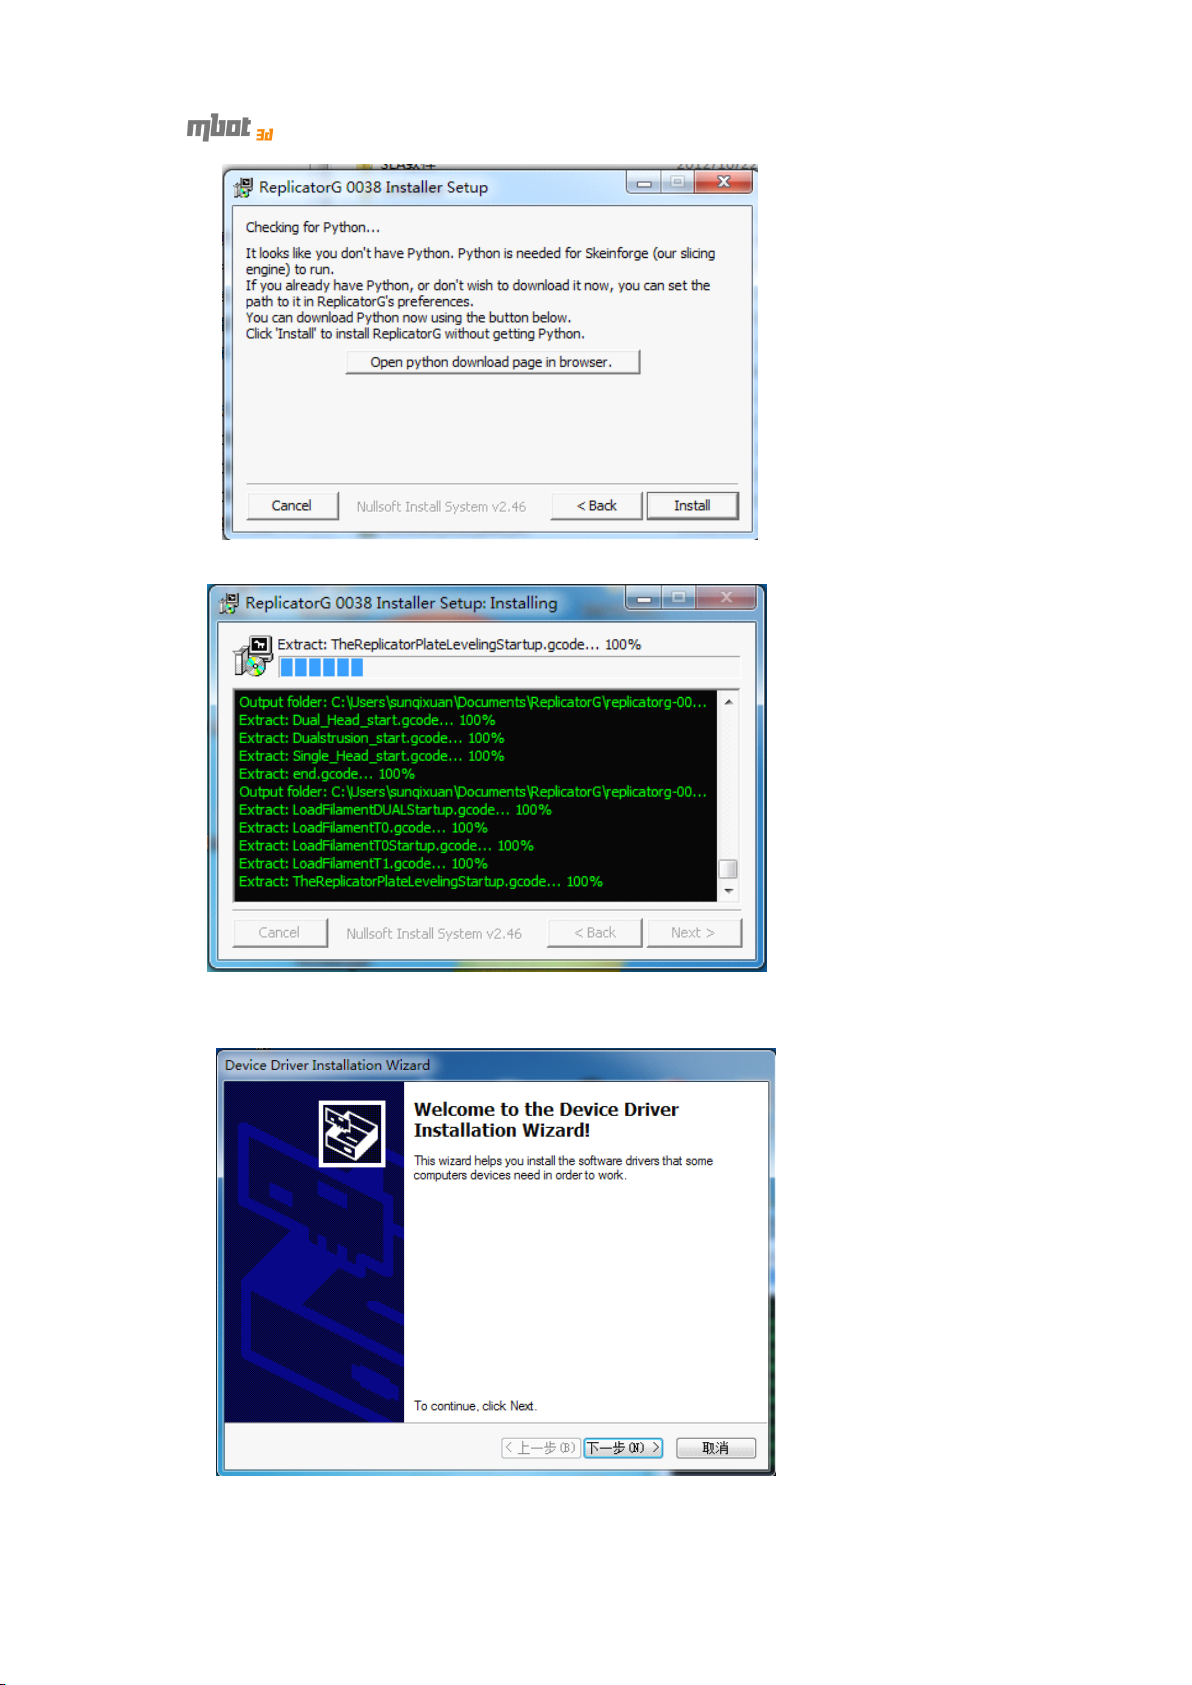
3) On the following window, click the “ Next ” button.
At the same time, the driver installation wizard pops up. Click the “ Next ”
button.
4) Click the “ Install ” button on the “ Windows Security ” pop-up to install the
6
Page 7
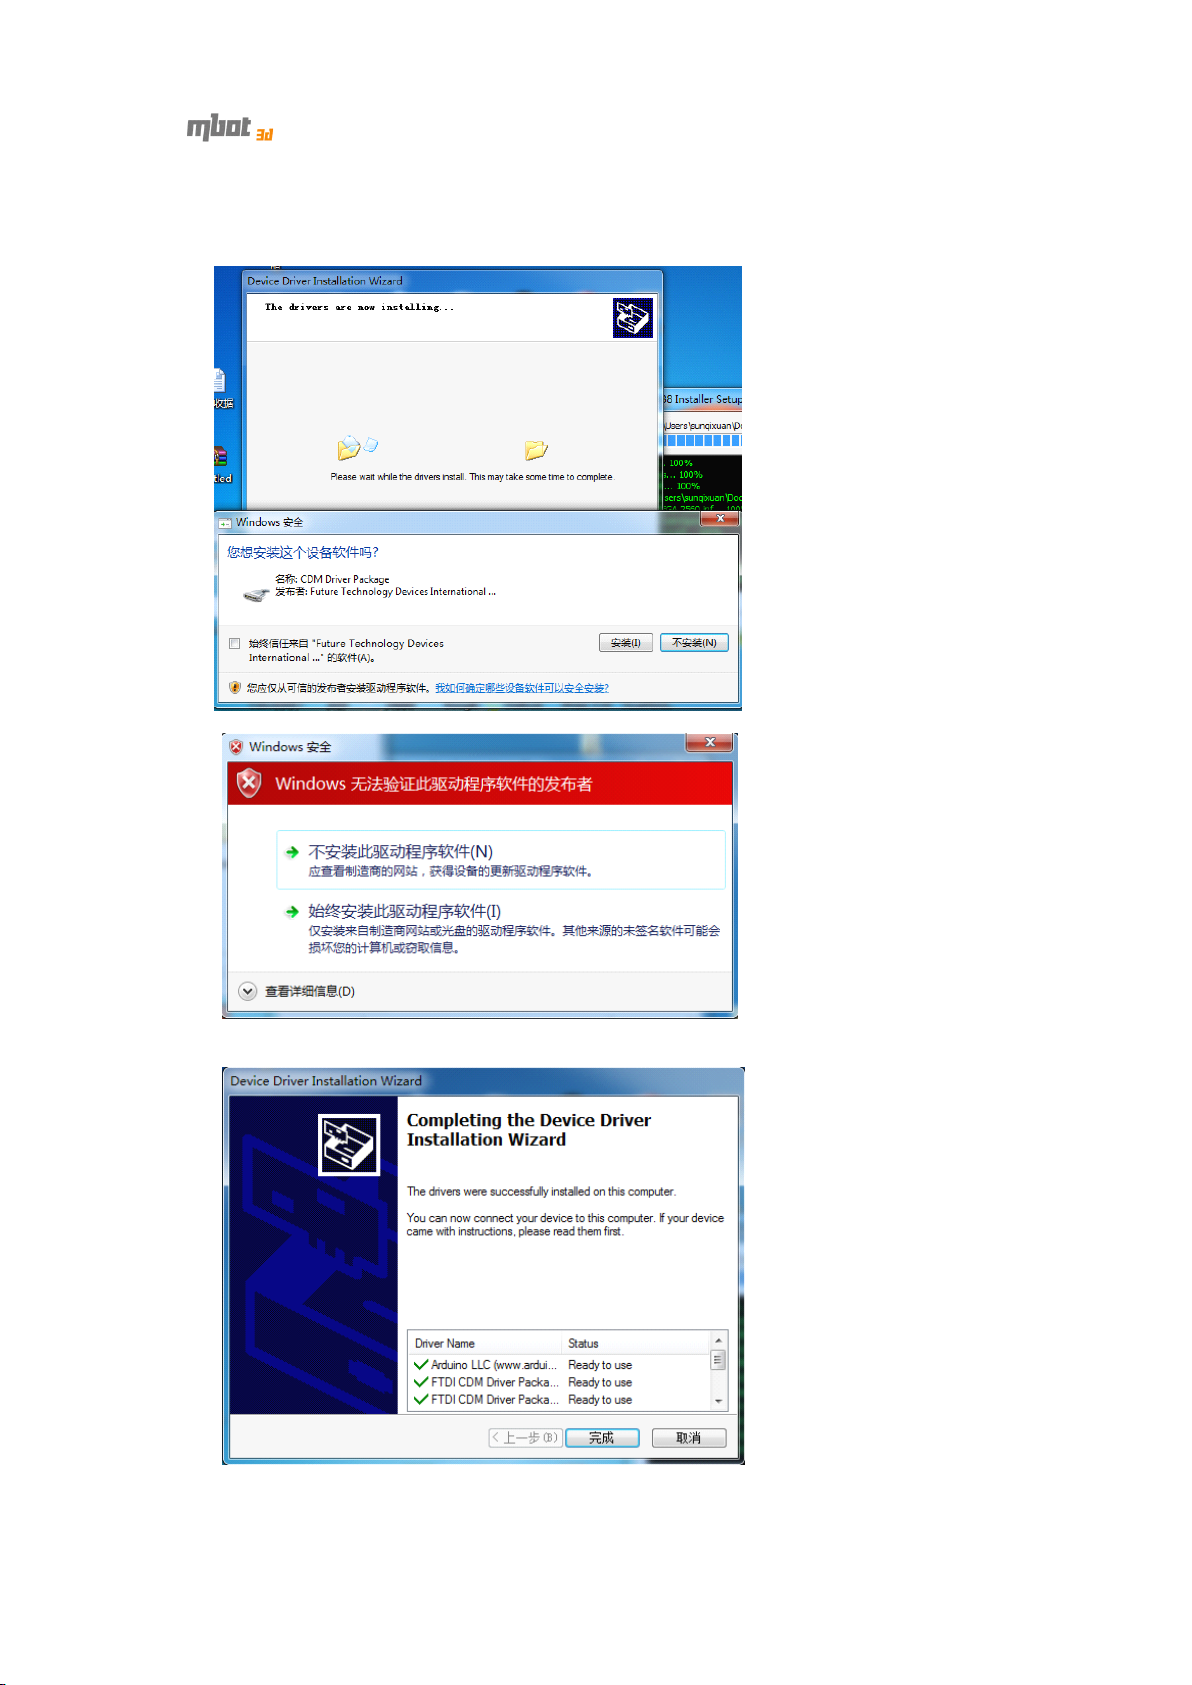
printer driver . When another “ Windows Security ” pop - up appears, click on
install th e driver (I)”.
“
Always
5) Click the “ Finish ” button to complete driver installation.
While on the “ ReplicatorG Installer ” window, click the “ Next ” button to finish
the installation of ReplicatorG .
7
Page 8
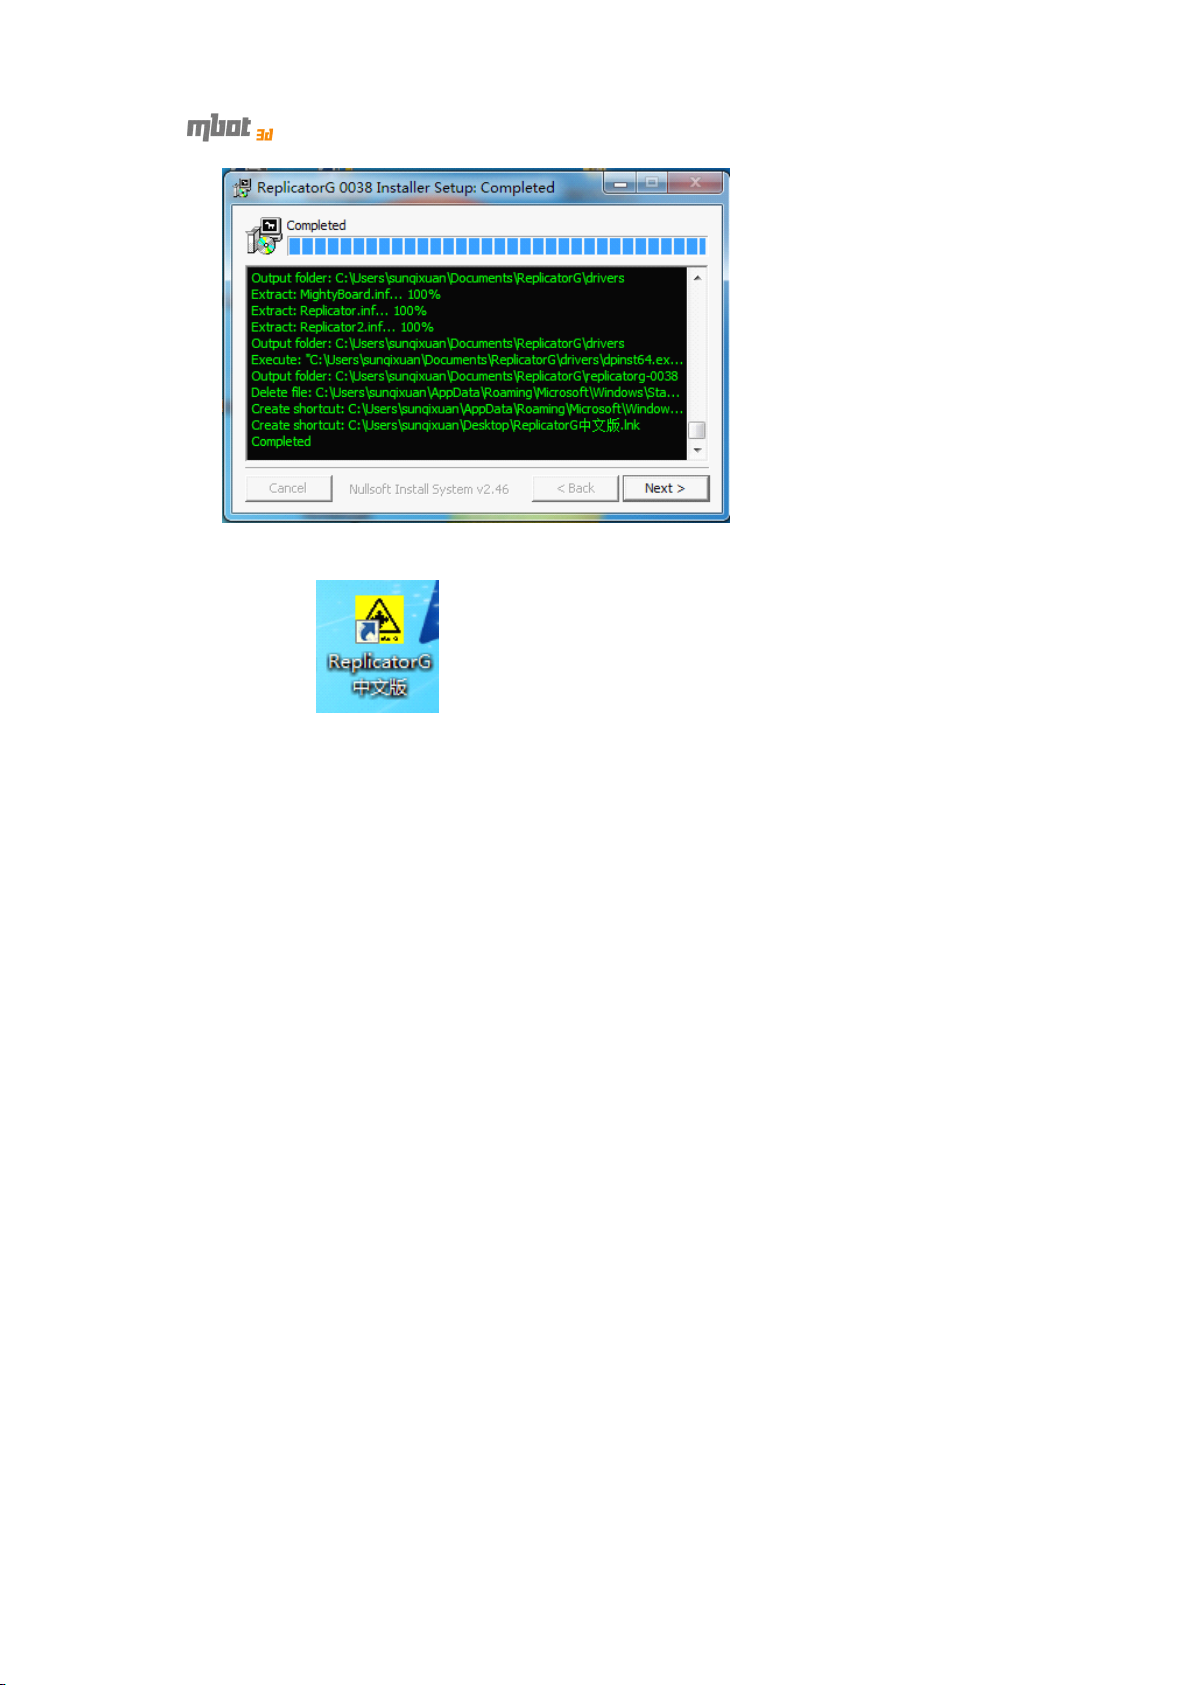
6) A short cut icon of ReplicatorG is created on the desktop of your computer.
8
Page 9
2
Pre-print
2
Pre-print
2
2 Pre-print
Pre-print checks
2.1
Power
2.1
Power
2.1
2.1 Power
Power up
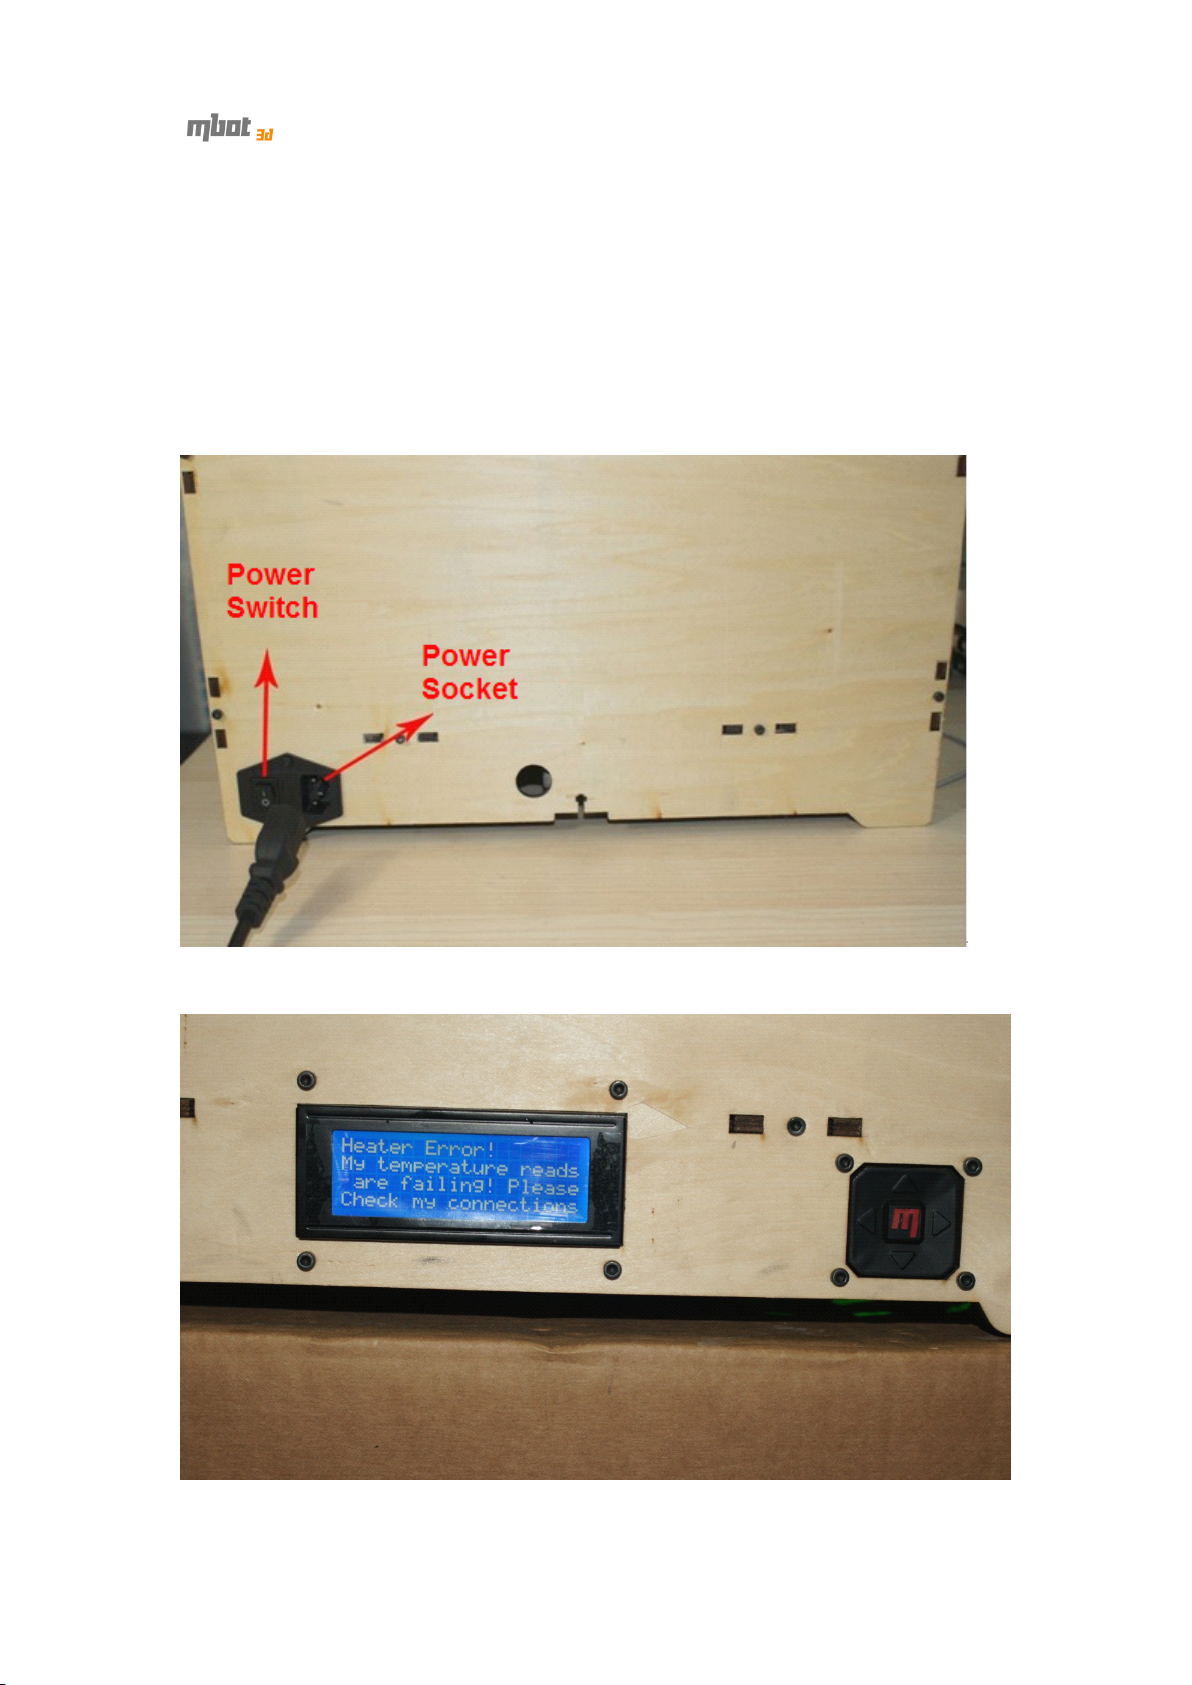
1) Ensure the power cable is attached (see the picture below), and then switch
on.
up
up
up
checks
checks
checks
2) The LCD screen reads “ Heater Error!”, which can be fixed by heating up
through software.
Press any botton at the right hand and you ’ ll see the messge changes on the LCD,
9
Page 10
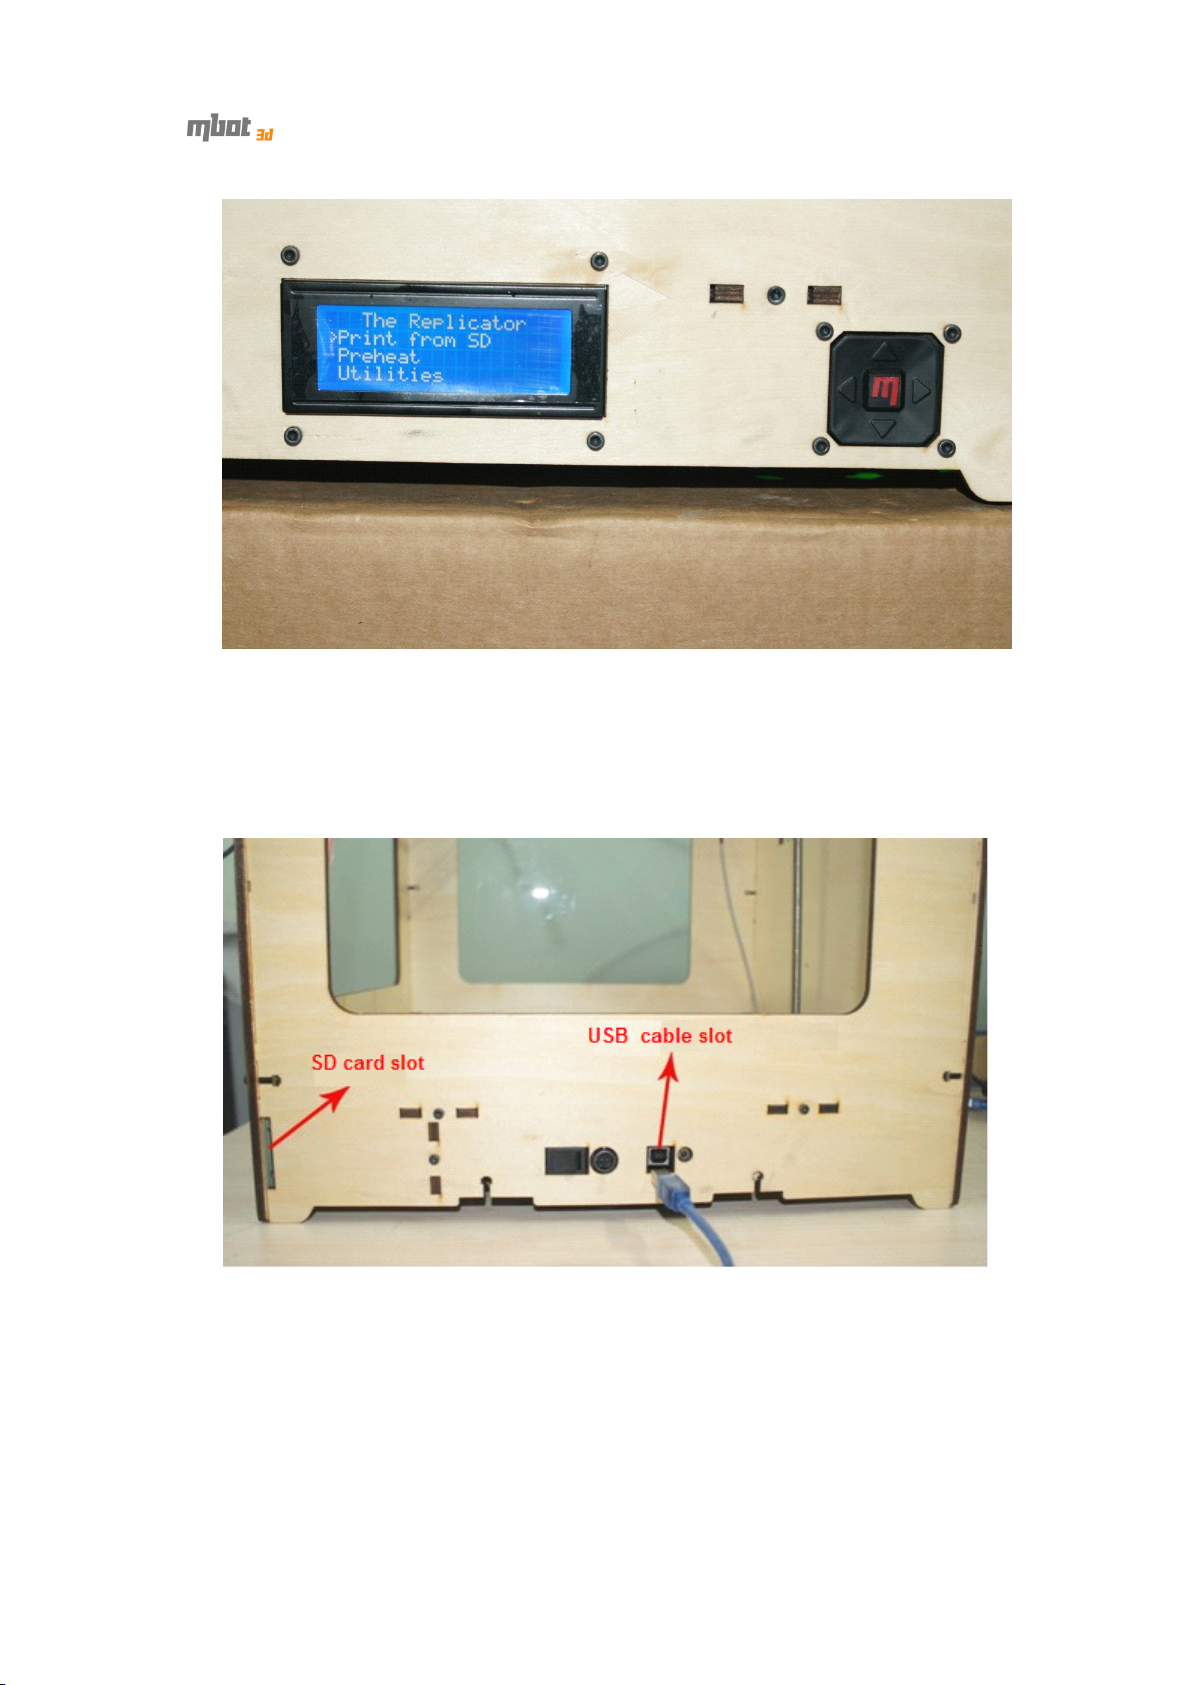
which means the machine is OK.
2.2
Connect
2.2
Connect
2.2
2.2 Connect
Connect to
to
computer
to
computer
to computer
computer
Make sure your computer is connected to your MBot with the supplied USB
cable .
2.3
Setting
2.3
Setting
2.3
2.3 Setting
Setting up
up
software
up
software
up software
software
1. Double-click the desktop icon to run ReplicatorG.
10
Page 11
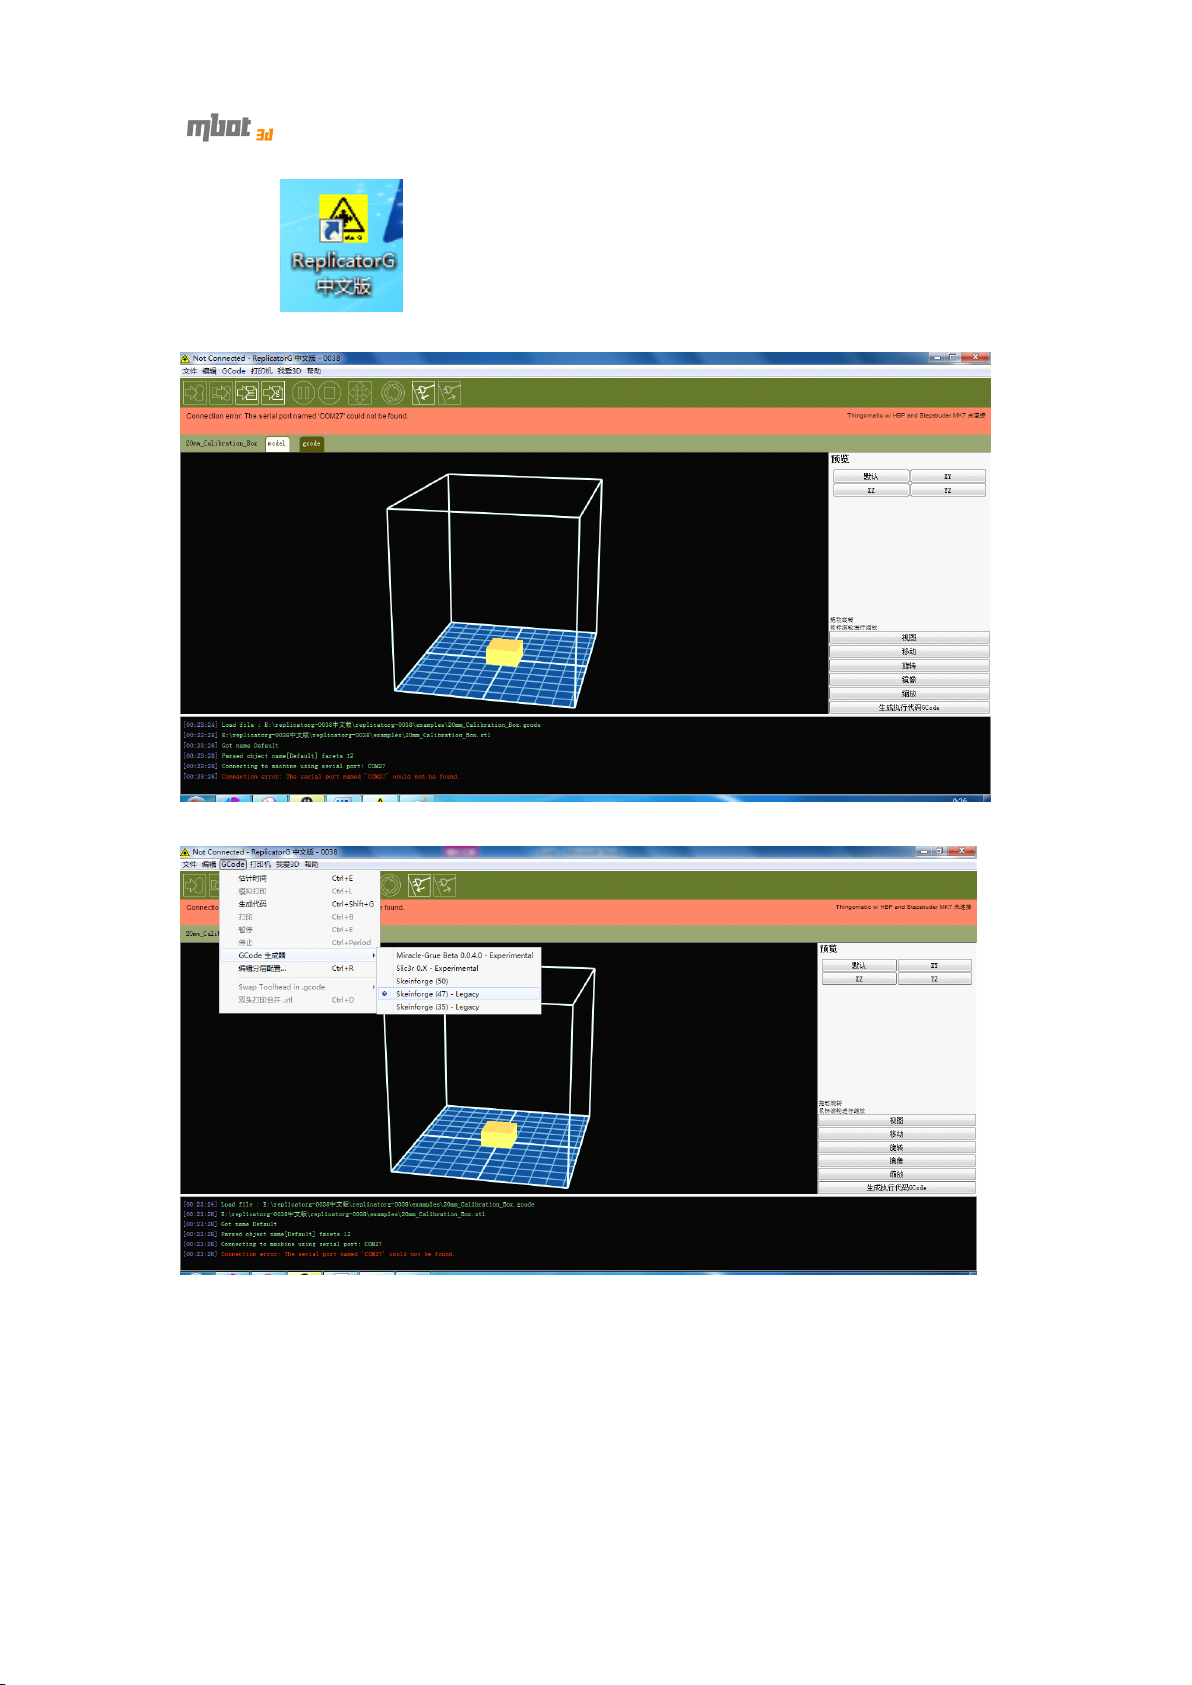
2.Choose extruder nozzle and connection serial port.
1) Click GCode->GCoder Generator, and select “ Skeinforge(47)-Legacy”.
2) Click Machine->Machine Type (Driver) . If your printer is dual-extruder , select
“ The MBot Cube Dual”. If it’s a single-extruder machine, select “ The MBot Cube
Single”.
11
Page 12
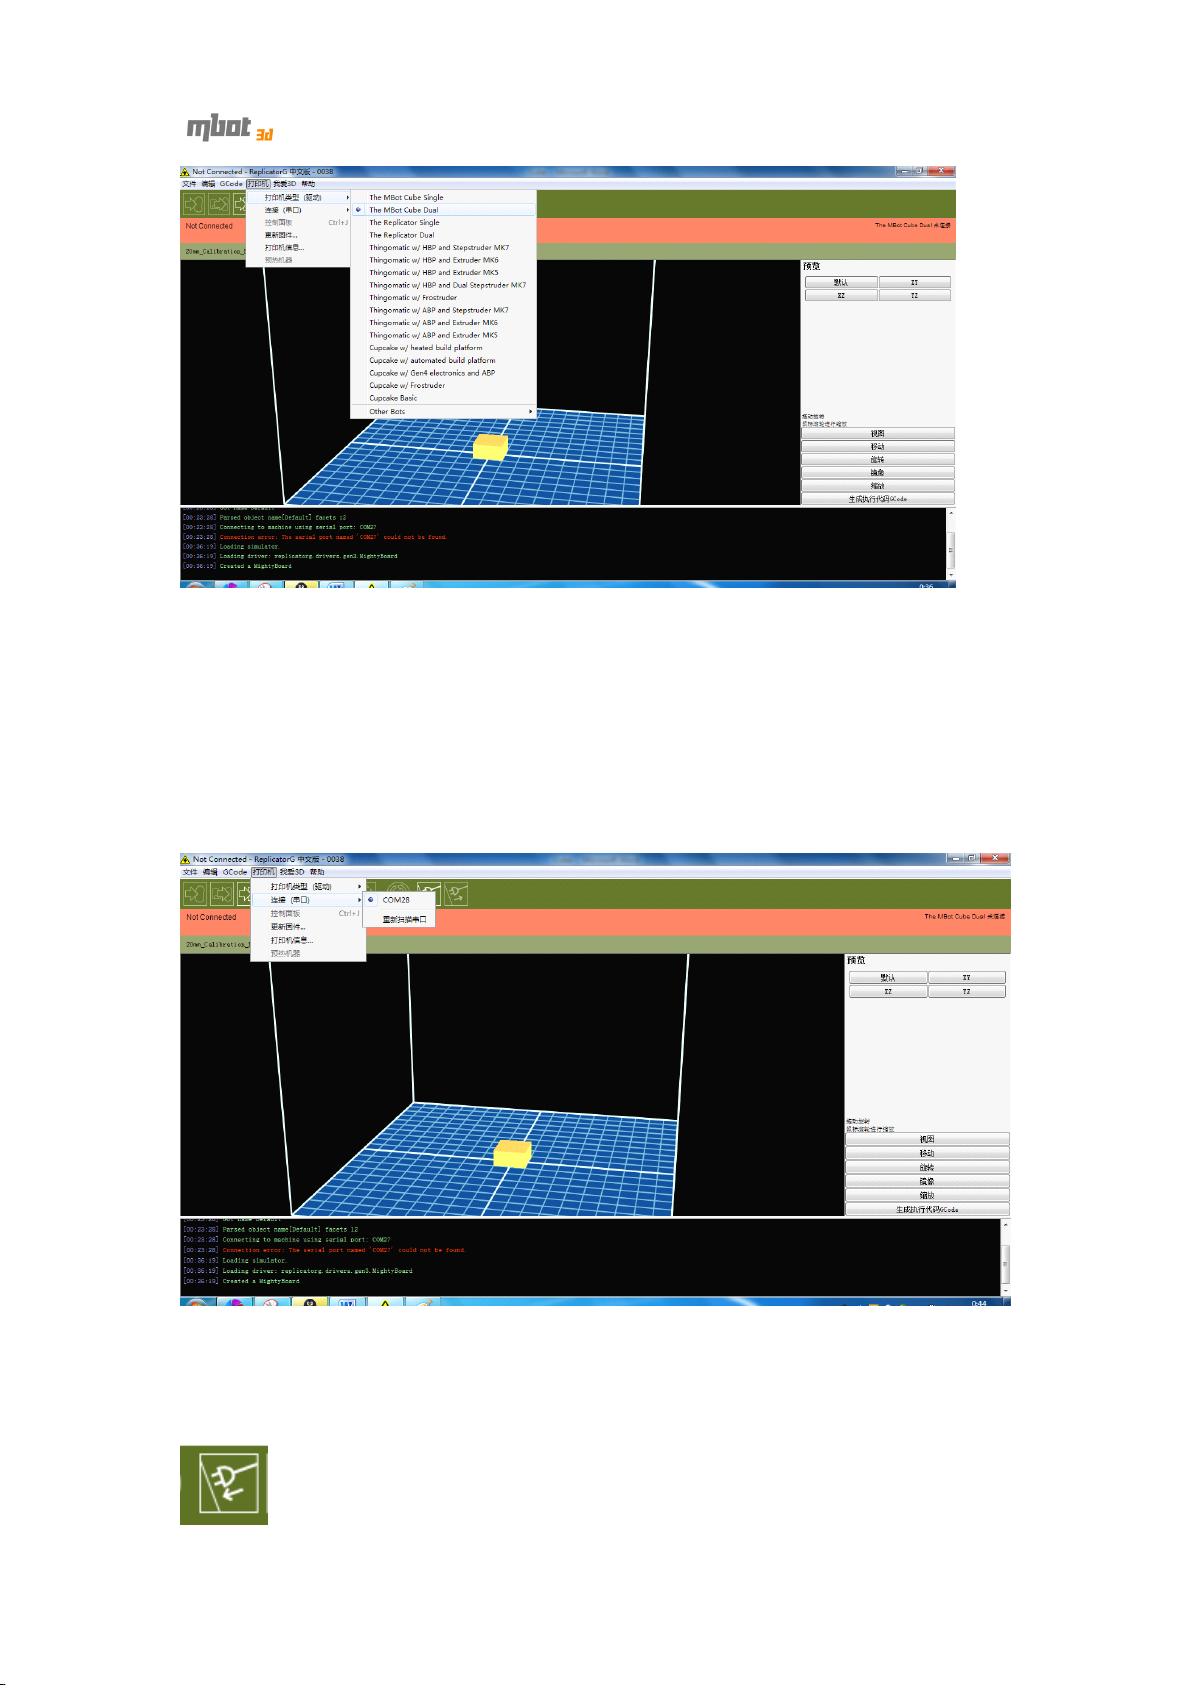
3) Click Machine->Connection (Serial Port) ->COM(Number). If you have only
one printer, select the latest port. If you have more than one printer , please select
the port according to your printer.
If there’s no s erial p ort on the menu, please click Machine->Connection (Serial
Port) ->Res can S erial Port. If it doesn ’ t work, please close ReplicatorG , disconnect the
USB cable from your computer, and wait for 5 seconds. Then connect the USB cable
to the computer, run ReplicatorG , and click Machine->Connection (Serial
Port) ->Res can S erial Port. Wait for 10 seconds, and you ’ ll be able to select serial port.
4) Make sure you select the corresponding serial port. Then click the “ Connect
to Machine ” button (a s shown below ). Once connected, GCode generator and
connection serial port can ’ t be changed. If you want to change, please click
“ Disconnect from Machine ” button (at the right side of the following icon).
12
Page 13

5) When the machine is connected succesfully, the message area below toolbar
turns green. Otherwise, red. When the machine is running safely, it turns yellow.
Helpful Hint: When the machine can ’ t be connected, please check :
� P ower is being supplied to the printer .
�
Y
our computer is connected to your MBot with the supplied USB cable .
� Driver is installed successfully.
13
Page 14
3
Setting
3
Setting
3
3 Setting
Setting up
3.1
I
3.1
3.1
3.1 I
design software (such as Rhinoceros , Solidworks, Sketchup, UG, etc.) to convert file
format.
3.2
3.2
3.2
3.2 Move,
area
area
area
area (i.e.the
blue platform) stands for the build bed (with blue tape) in your printer.
rotated by holding the mouse wheel and moving.
mporting
I
mporting
I mporting
mporting model
1)The machine supports STL, OBJ, Gcode and collada model files. Y ou can use 3D
Click “ File->Open ” to open the model file.
Move,
Move,
Move, s
1) After opening the model file, you can position it as follows.
When
NOTE: When
(i.e.the
(i.e.the
(i.e.the blue
The model can be zoomed by scrolling the mouse wheel. The view can be
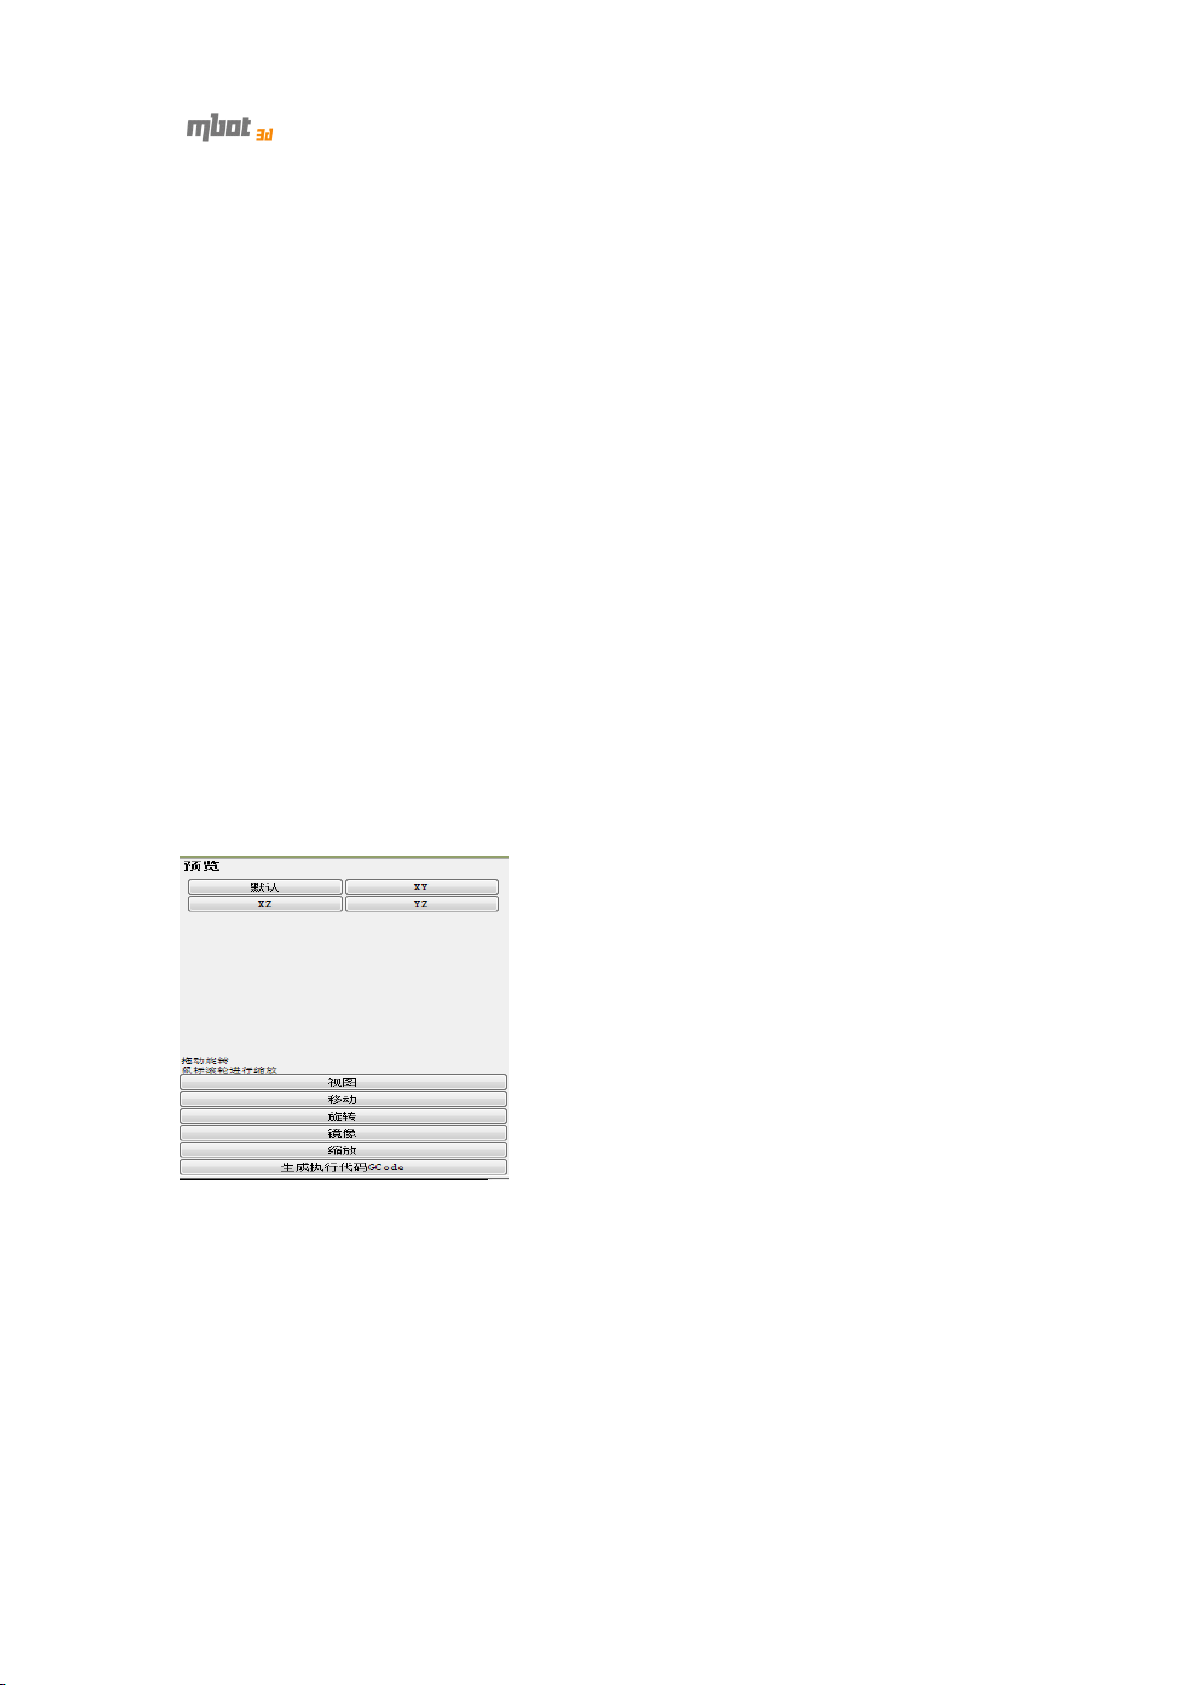
There ’ re five buttons at the lower right corner of the window.
When
When adjusting,
blue
blue
blue box
up
up
up model
model
model
model file
s
cale,
s
cale,
s cale,
cale, r
adjusting,
adjusting,
adjusting, please
box
box
box on
r
r
r otate
on
the
on
the
on the
the model
model
model
model data
file
file
file into
otate
otate
otate and
please
please
please make
model
model
model view
data
data
data
into
into
into ReplicatorG
and
and
and estimated
estimated
estimated
estimated build
make
make
make sure
view
view
view window).
ReplicatorG
ReplicatorG
ReplicatorG
build
build
build time
sure
the
sure
sure the
window).
window).
window). The bottom of the box (i.e.the
model
the
model
the model
model is
is
inside
is
inside
is inside
inside the
time
time
time
the
the
the printable
printable
printable
printable
a 、 View
model
model
model
model in
printing
printing
printing
printing .)
b 、 Move
model
model
model
model can
be
be
be
be far
far
far
far from
Default:
Default:
Default:
Default: The
in
view
in
view
in view
view is
.)
.)
.)
XY :
XZ : Front view
YZ : Right view
Center : Place the model in the middle of the platform. If
can
’
t
be
can
’
t
be
can ’
’ t
t be
be seen
from
the
from
the
from the
the printable
The
build
The
build
The build
build area
is
exactly
is
exactly
is exactly
exactly the
Top
view
seen
after
seen
seen after
printable
printable
printable area,
opening
after
opening
after opening
opening the
area,
area,
area, please
area
area
area is
the
same
the
same
the same
same as
please
please
please click
is
facing
is
facing
is facing
facing us.(i.e.
as
in
as
in
as in
in build
the
model
the
model
the model
model file,
click
click
click the
us.(i.e.
us.(i.e.
us.(i.e. The
build
build
build bed
file,
file,
file, which
the
“
Center
the
“
Center
the “
“ Center
Center ”
The
position
The
position
The position
position of
bed
when
bed
when
bed when
when finishing
which
which
which means
”
button.
”
button.
” button.
button.
finishing
finishing
finishing
means
means
means it
of
of
of the
If
If
If the
it
may
it
may
it may
may
the
the
the
the
the
the
14
Page 15
Put on Platform: T he model is resting on the surface of the
Check
platform, not suspended in air or below the platform . Check
printing.
printing.
printing.
printing.
X — 、 X+ : Move left or right.
Lock Hight: When it’s checked, the height won ’ t change while
holding mouse to move the model.
c 、 Rotate
Z+ 、 Z — : R otate your model by 90 degrees in z .
Flat on Platform: It keeps the model in balance, which is very
Strongly
helpful for i nclined model s. Strongly
before
before
before
before printing.
around z-axis by holding the mouse and moving.
d 、 Mirror Image
e 、 Scale
model is zoomed in. When it’s greater than 1, the model is zoomed out.
and millimeter .
is the maximum print size.
2)
To
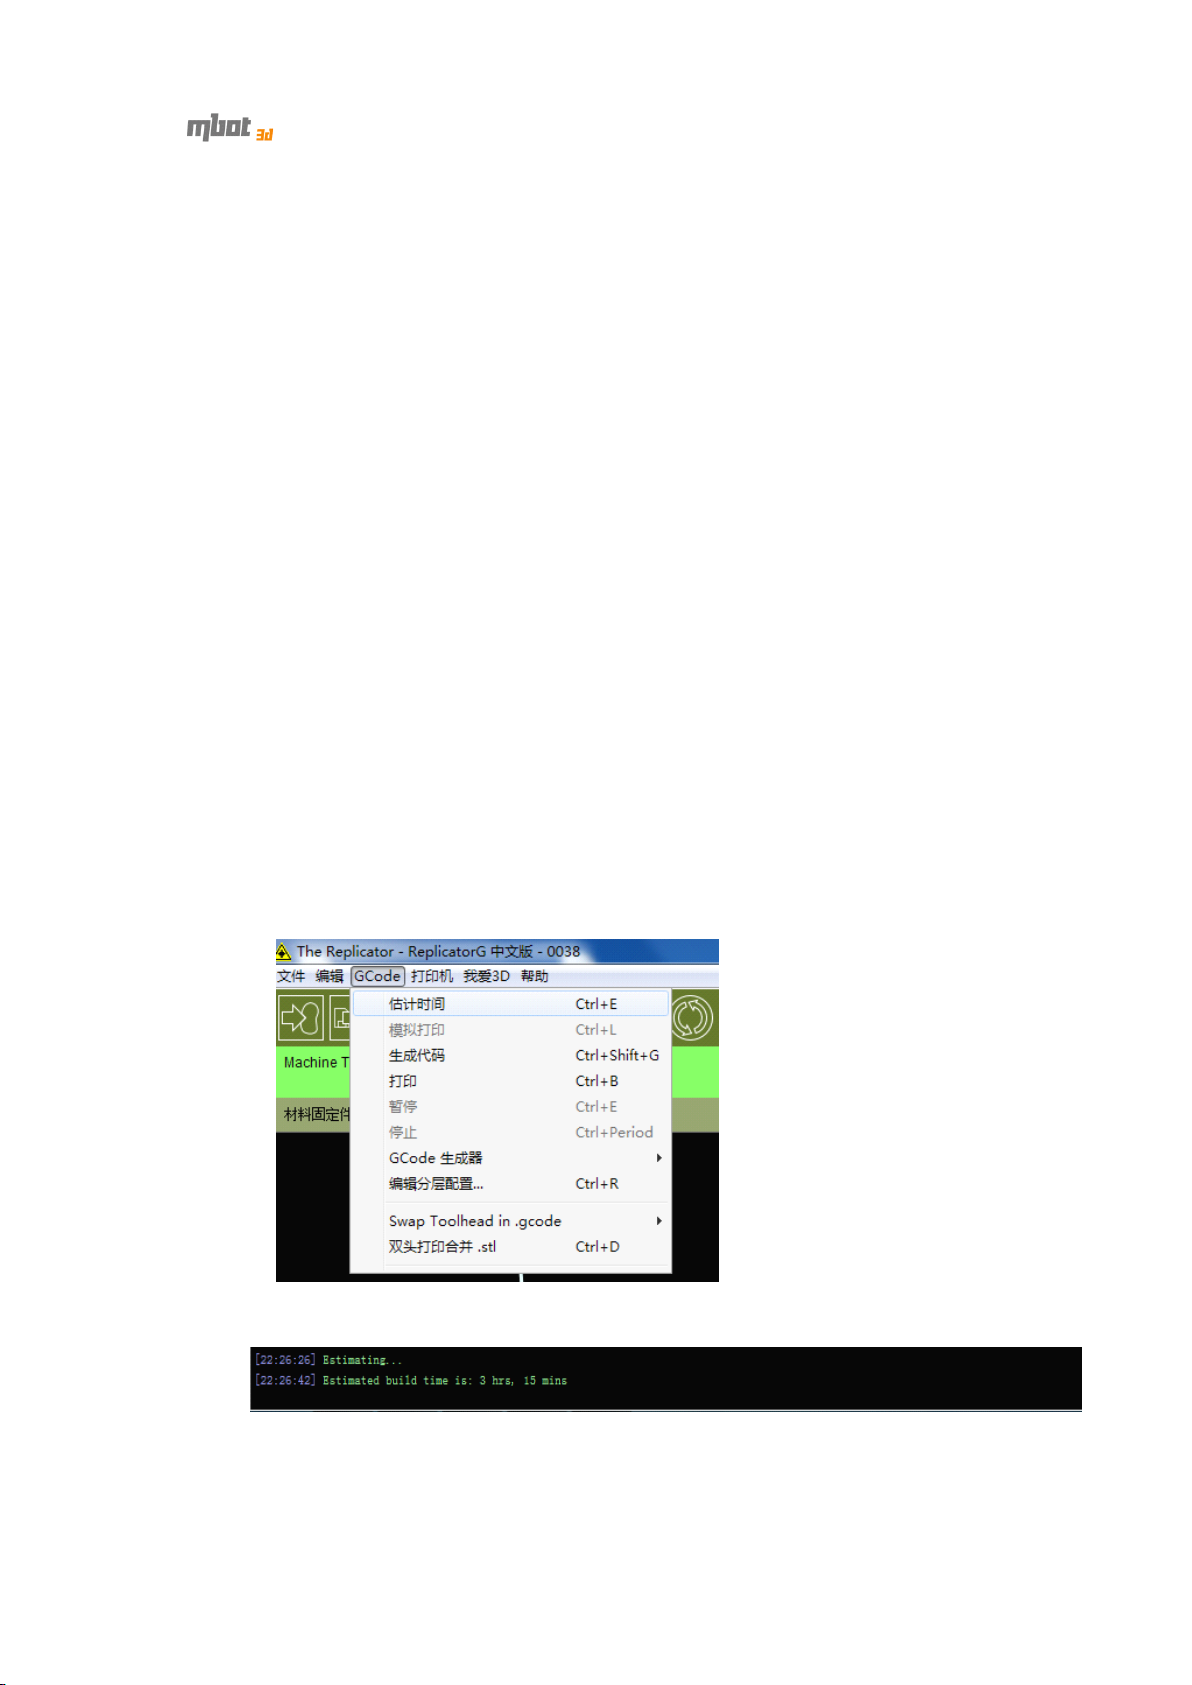
estimate time for printing, click GCode-> Time Estimate (as shown below).
printing.
printing.
printing.
Rotate around z-axis: When it’s checked, the model rotates
Reverse X: Right mirror image.
Reverse
Reverse Z: Bottom mirror image.
Input numbers to scale. When the number is less than 1, the
The options below is to convert model dimension between inch
Click the “ Fill the B uild Area ” button to maximize the model, which
Y:
Back mirror image.
Strongly
Strongly recommend
recommend
recommend
recommend using
Check
Check it
using
using
using this
it
before
it
before
it before
before
this
function
this
function
this function
function
After about 30 seconds, the estimation is displayed at the bottom of the
window (as shown below). Usually, it takes longer than estimated.
15
Page 16
3.3
Generating
3.3
Generating
3.3
3.3 Generating
Generating GCode
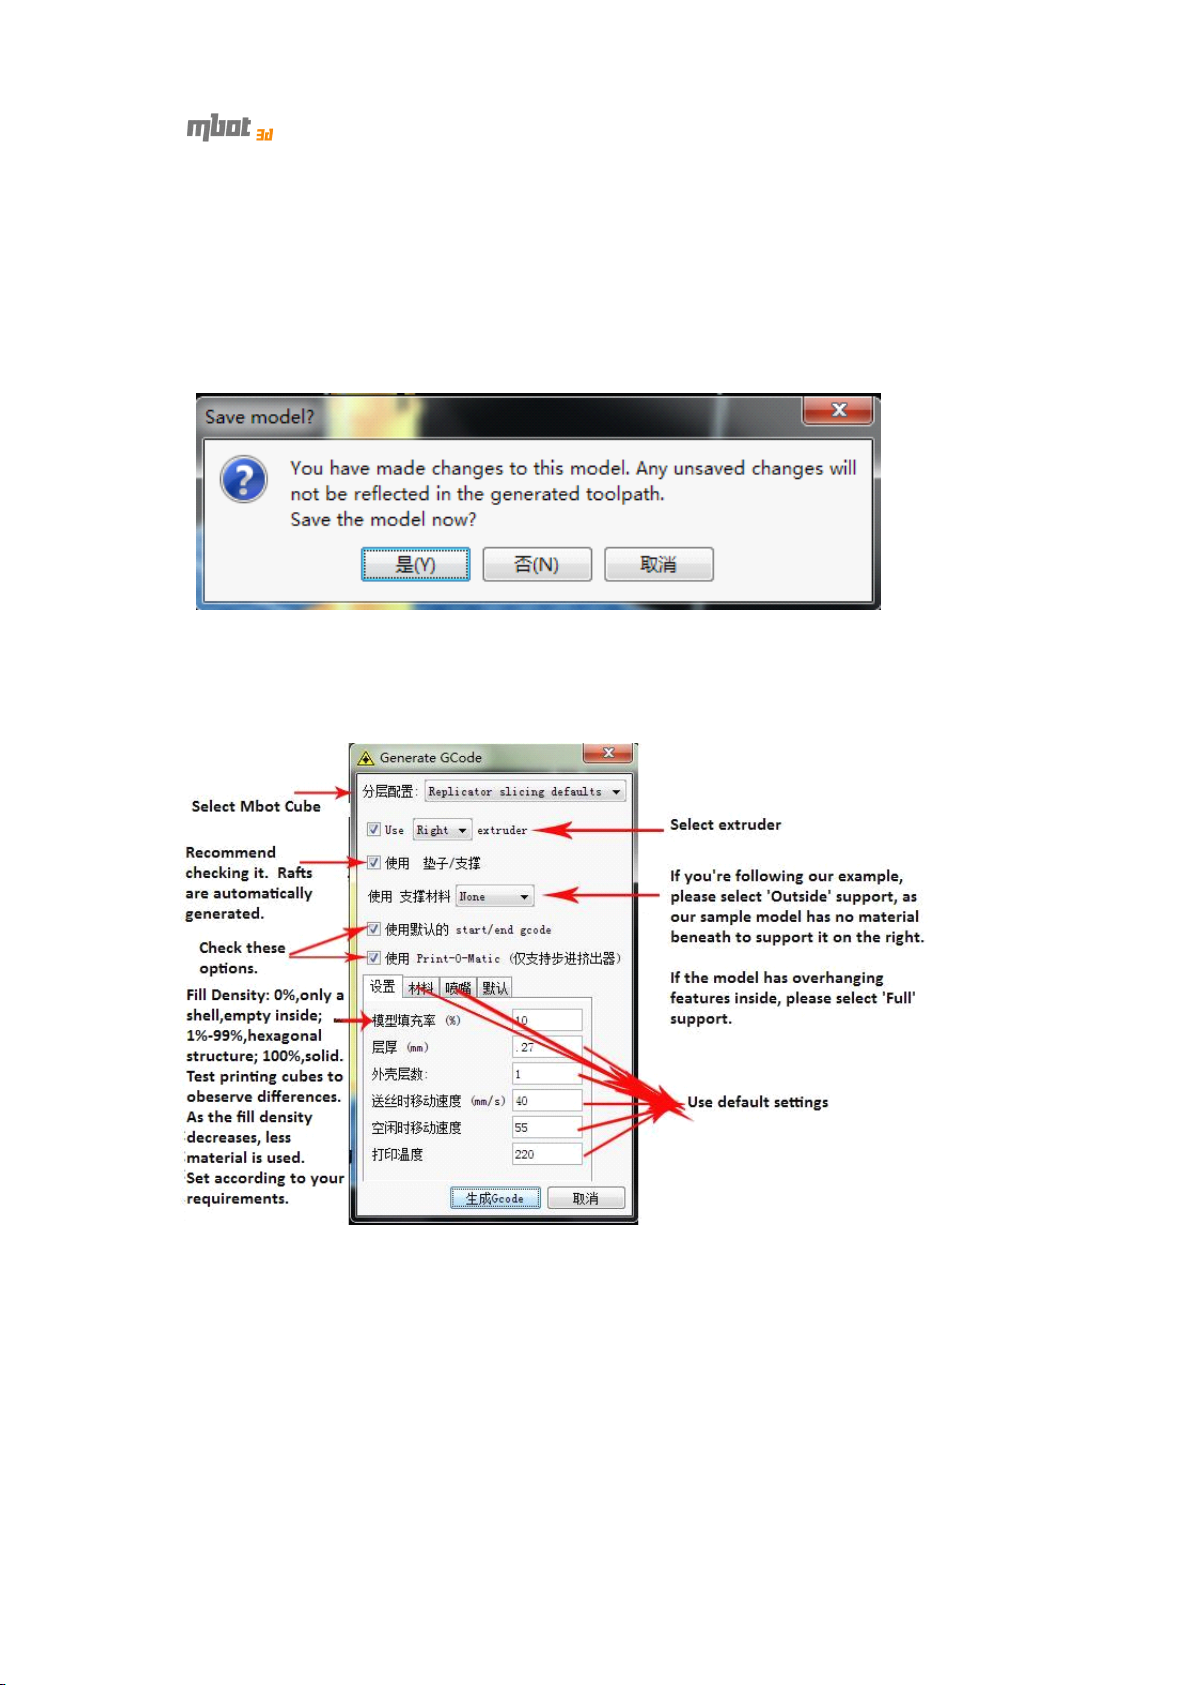
1) Click the “ Generate GCode ” button at the lower right corner of the window.
Then the following prompt pops up, if the model is adjusted but not saved. Click
“ Yes ” to save changes. Otherwise, click “ No”.
But
please
But
please
But
But please
please click
example.We
example.We
example.We
example.We have
2) After clicking “ Generate GCode”, the following window pops up. Red arrows
point to our helpful hints.
have
have
have to
click
click
click “
“
“
“ Cancel
to
make
to
make
to make
make sure
GCode
GCode
GCode
Cancel
Cancel
Cancel ”
sure
sure
sure the
(
(
(
(
”
and
”
and
” and
and reopen
the
the
the model
Slicing
Slicing
Slicing
Slicing
reopen
reopen
reopen the
model
model
model size
)
)
)
)
the
sample
the
sample
the sample
sample file,
size
is
size
is
size is
is proper
proper
proper
proper for
file,
if
file,
if
file, if
if you
for
holding
for
holding
for holding
holding ABS
you
’
re
you
’
re
you ’
’ re
re following
ABS
ABS
ABS material.
following
following
following our
material.
material.
material.
our
our
our
Set up as shown above. Then click “ Default ” tab to set up as shown below.
16
Page 17
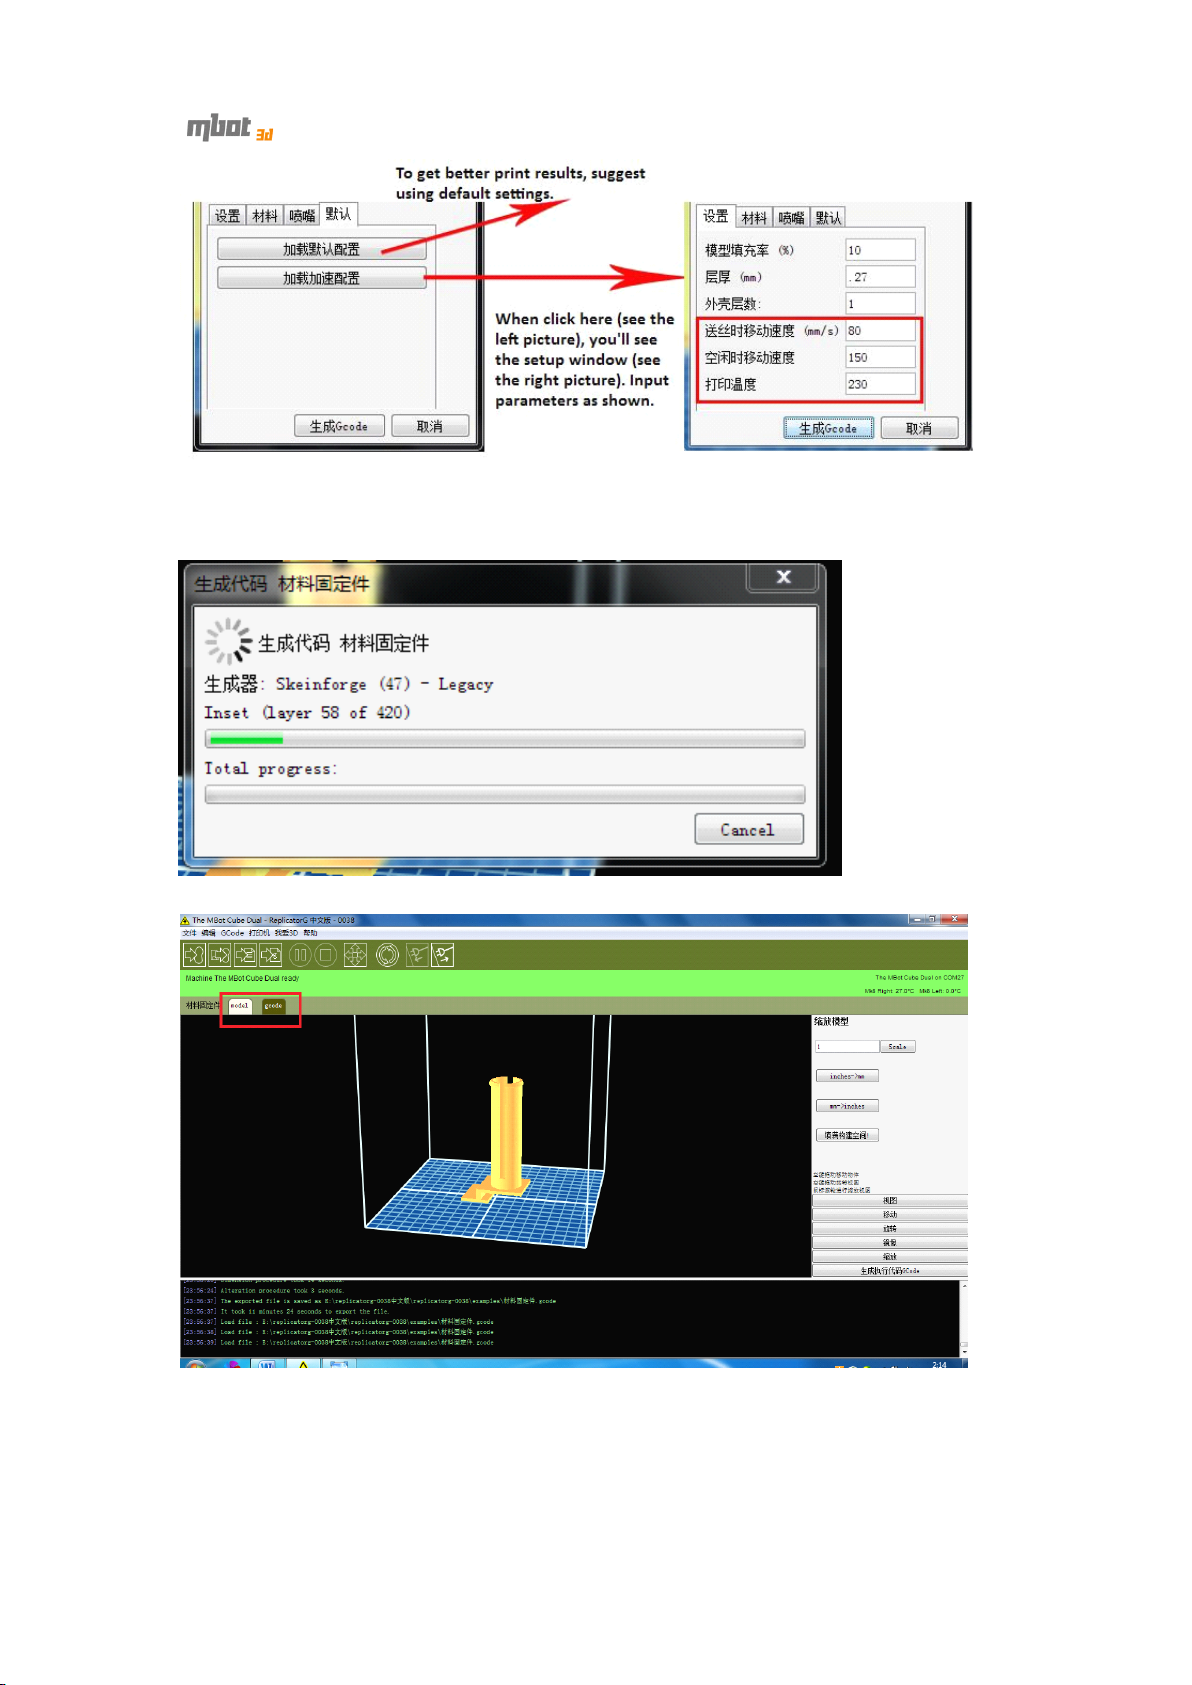
3) When finishing setting up, click the “ Generate Gcode ” button and you ’ ll see
the following window showing progress bars.
4) After GCode is generated, you ’ ll see the“gcode ” tab next to the “ model ” tab.
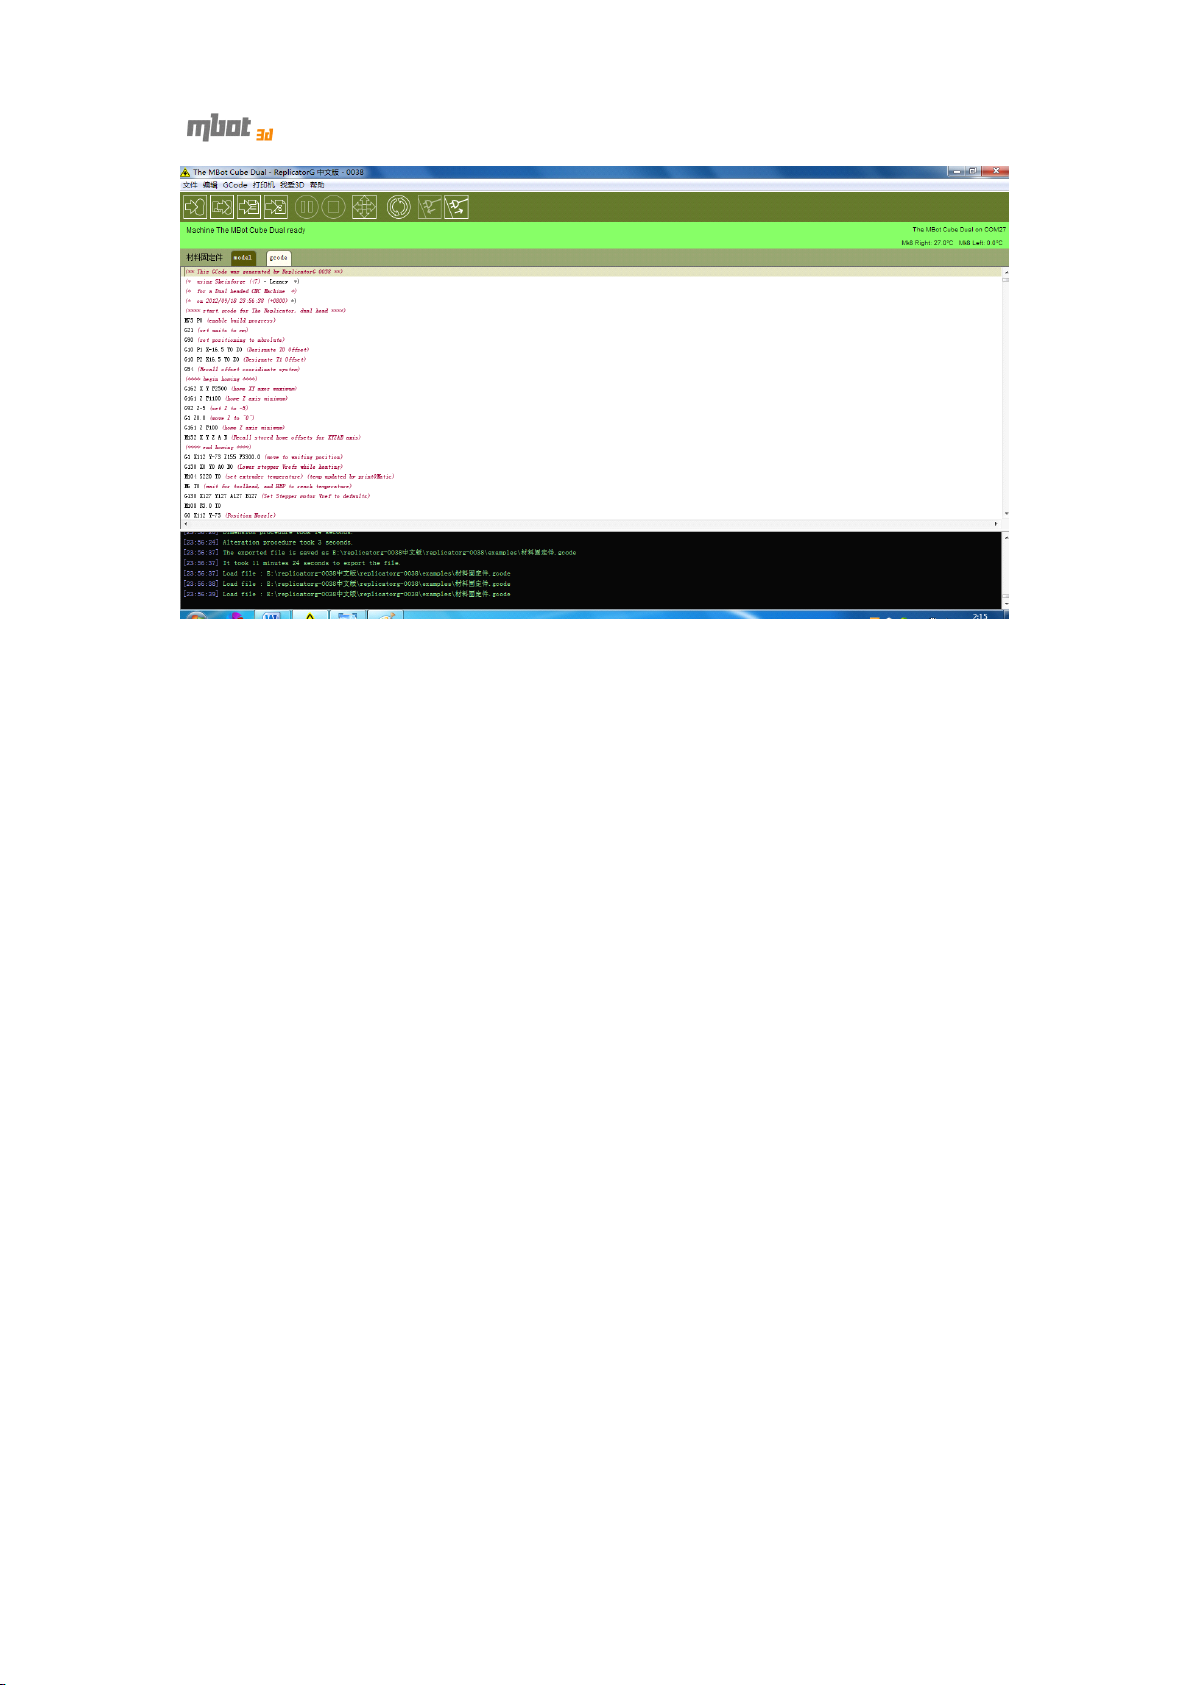
5) Click the”gcode ” tab and you ’ ll see the window as shown below.
17
Page 18
Page 19
4
Test
4
Test
4
4 Test
Test print
printing,
printing,
printing,
printing, please
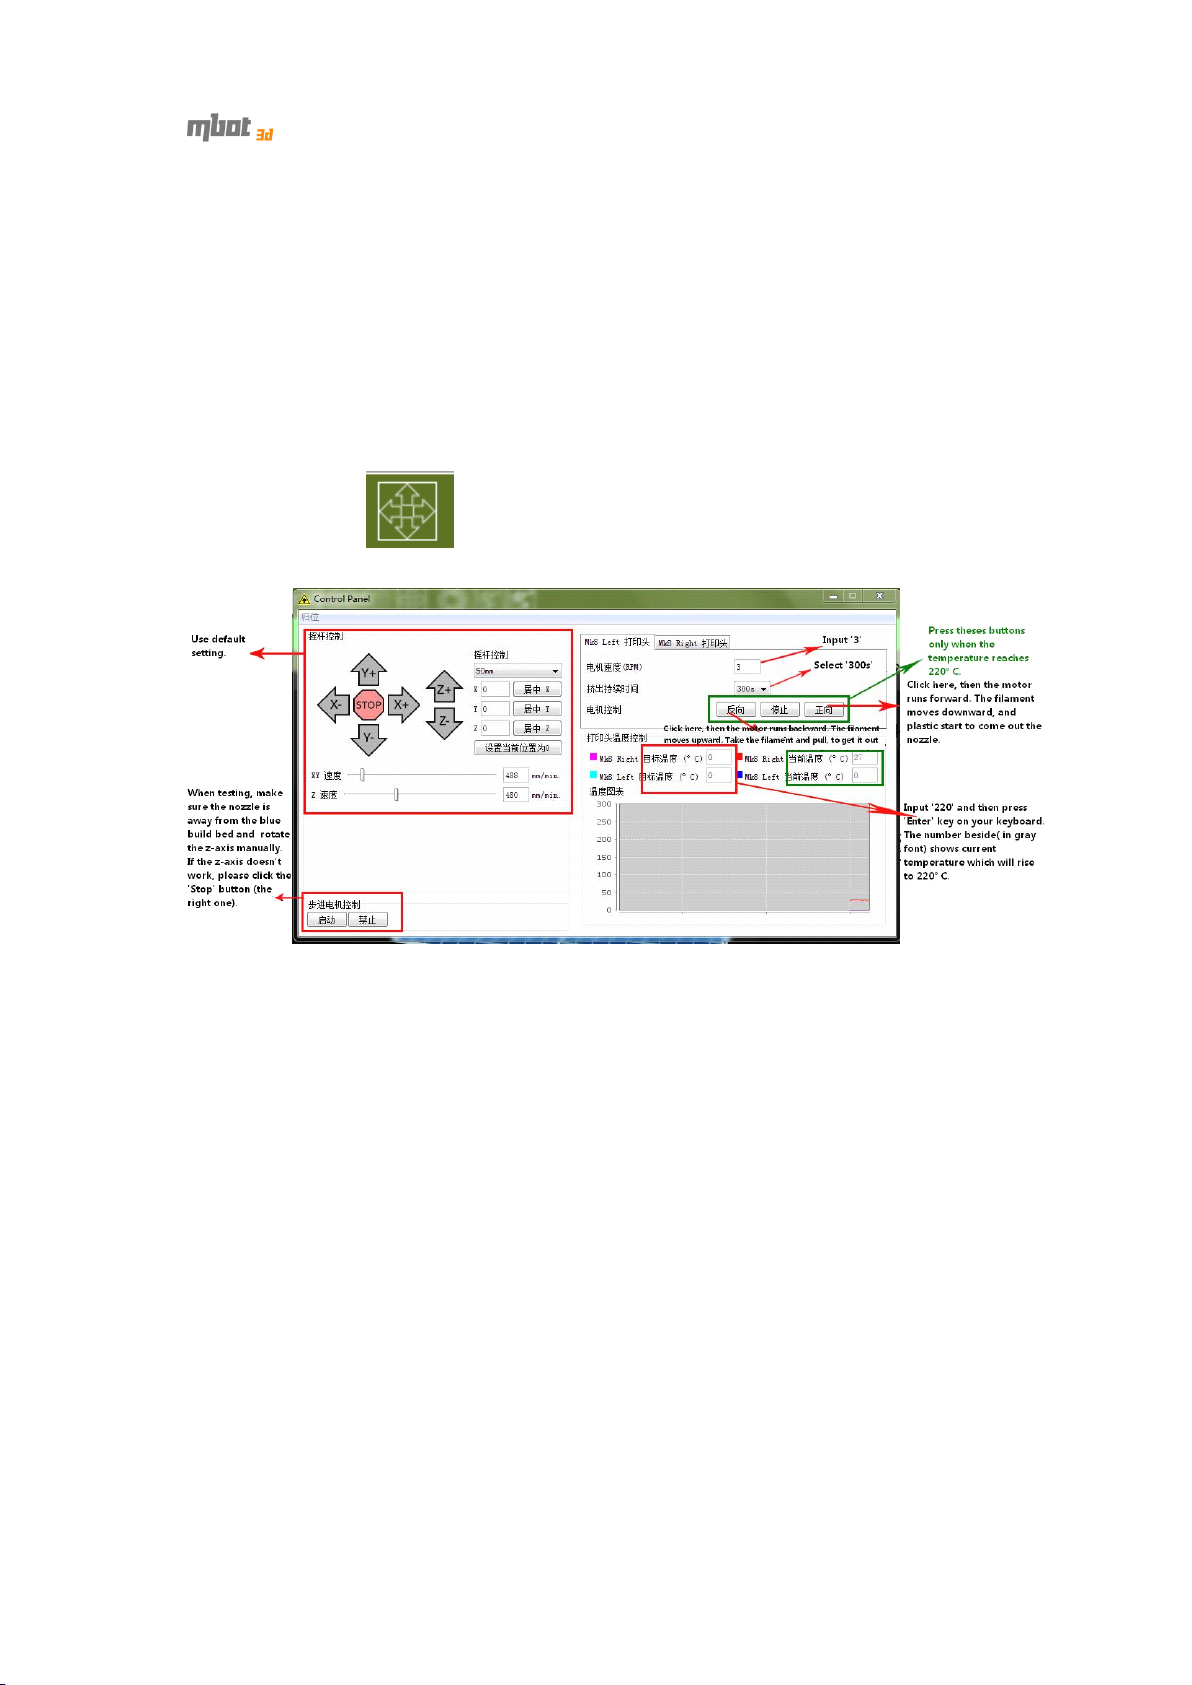
Please test nozzles before your first printing, which is required for first printing
only.
1) Click the button as shown below, to open the control panel.
The control panel pops up.
print
print
print ing
please
please
please read
read
read
read this
ing
ing
ing (
this
this
this chapter
(
If
plastic
(
If
plastic
( If
If plastic
plastic stop
chapter
chapter
chapter
)
)
)
)
stop
stop
stop com
com
com
com ing
ing
out
ing
out
ing out
out the
the
nozzle
the
nozzle
the nozzle
nozzle during
during
during
during
2) Once the nozzle is at temperature ( 2 20 ° C ), load filament as shown below.
Click “ Forward ” button, and then take the filament and push it . You'll have to use
some force . A fter a few moments you should feel the motor pulling it in . Then let go.
Y
ou ’ ll see some plastic start to come out the nozzle.
When that happens,. you may hear the noise like “ tah-tah-tah ” . Please m aintain
pressure on the filament for 25 seconds. Then the noise will disappear. It also works
when changing material.
19
Page 20
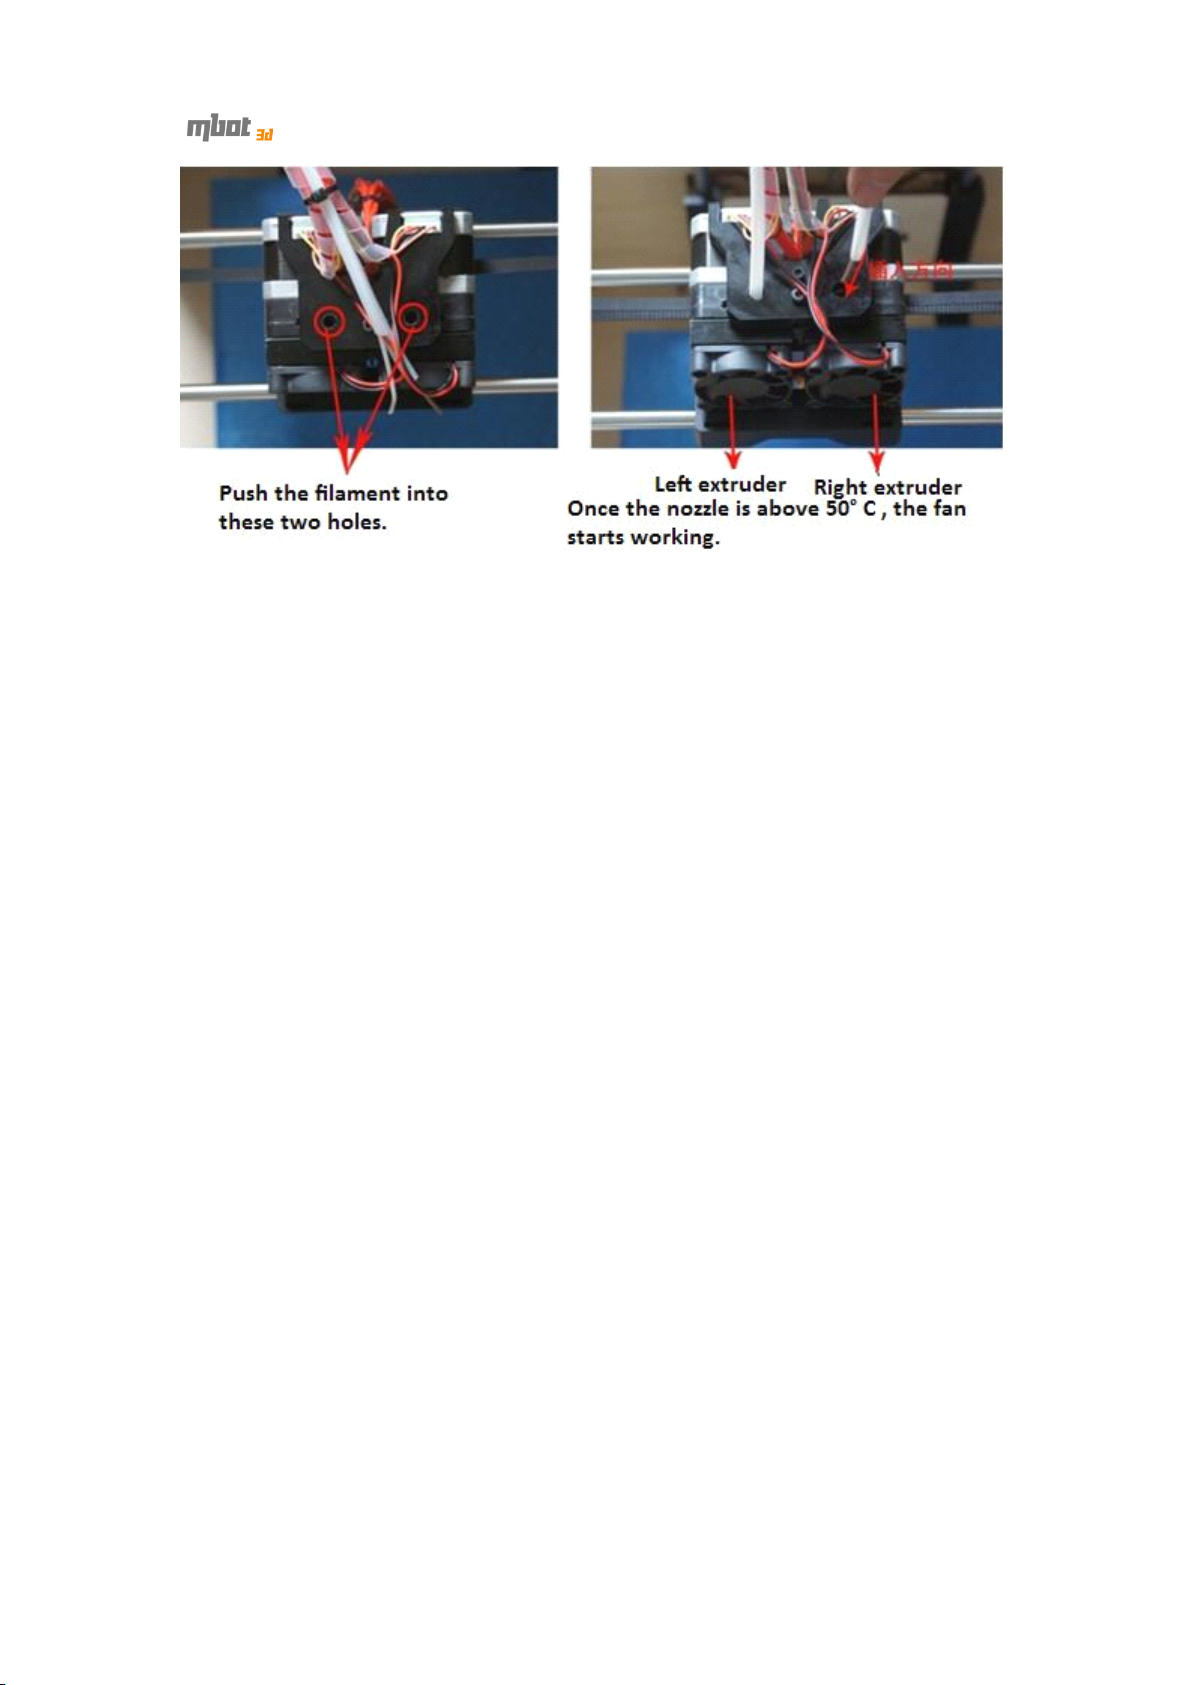
3) If the noise doesn ’ t disappear, please check if anything is stuck. Then, click
the “ Backward ” button on the control panel, to pull the filament out. Cut off the
used segment. Input “ 230 ” as target temperature and press “ Enter ” on keyboard.
When current temperature rises to 2 30 ° C , click the “ Forward ” button. Then take the
filament and push it with some force until some plastic comes out the nozzle. Close
the control panel if the machine works well.
If plastic stop com ing out the nozzle or the noise reappear during printing,
please stop printing and rotate z-axis manually to keep the nozzle from the build bed.
Then take the measures described above .
20
Page 21
5
Printing
5
Printing
5
5 Printing
Printing
5.1
Printing
5.1
Printing
5.1
5.1 Printing
Printing from
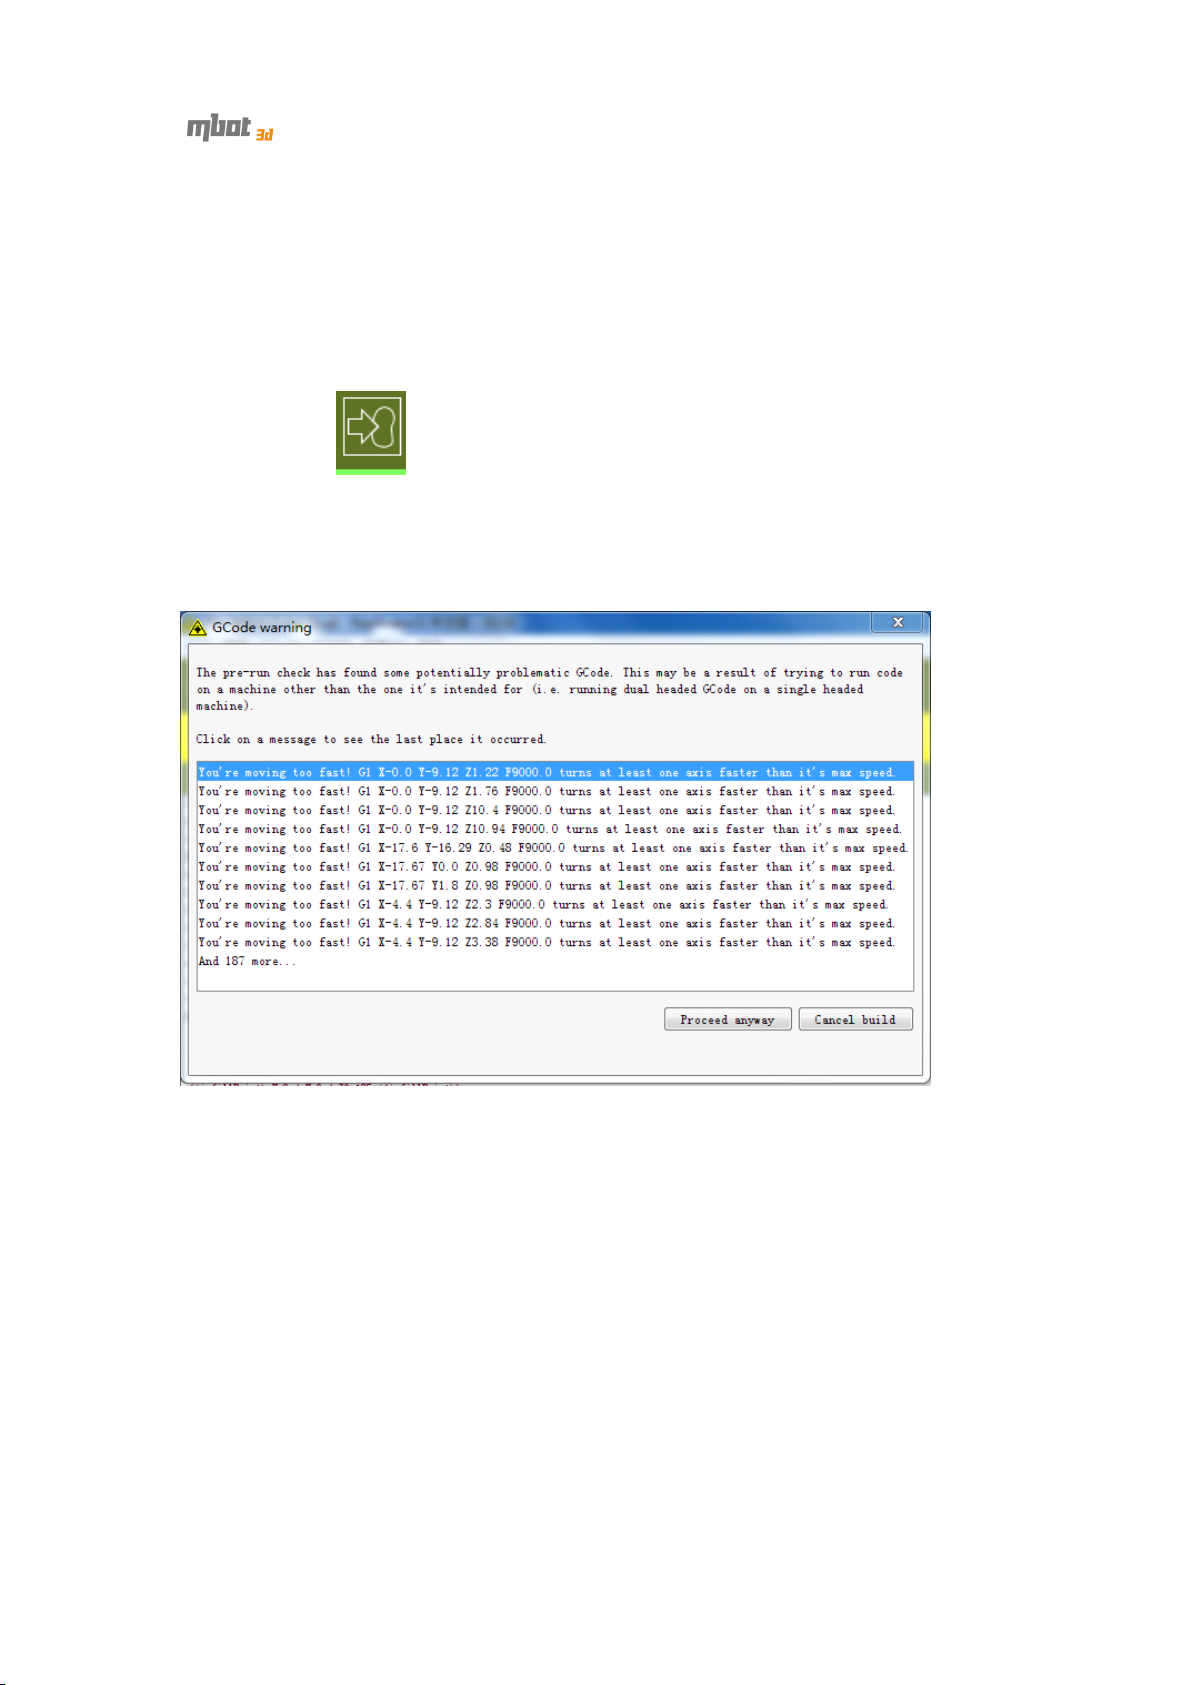
1) Clear the blue build bed. Then click the “ Print ” button (as shown above) at
the upper left corner of the window.
If a prompt pops up warning “ You ’ re moving too fast!”, never mind. Click
the “ Proceed anyway ” button to keep printing. The machine can handle that.
from
from
from computer
computer
computer
computer
2) The window shows as below and the printer starts running. It may stay at one
position for a while to heat up. When the nozzle is at 220 ° C ( current temperature
shows at the top right corner of the window), plastic start to come out the pinter.
21
Page 22
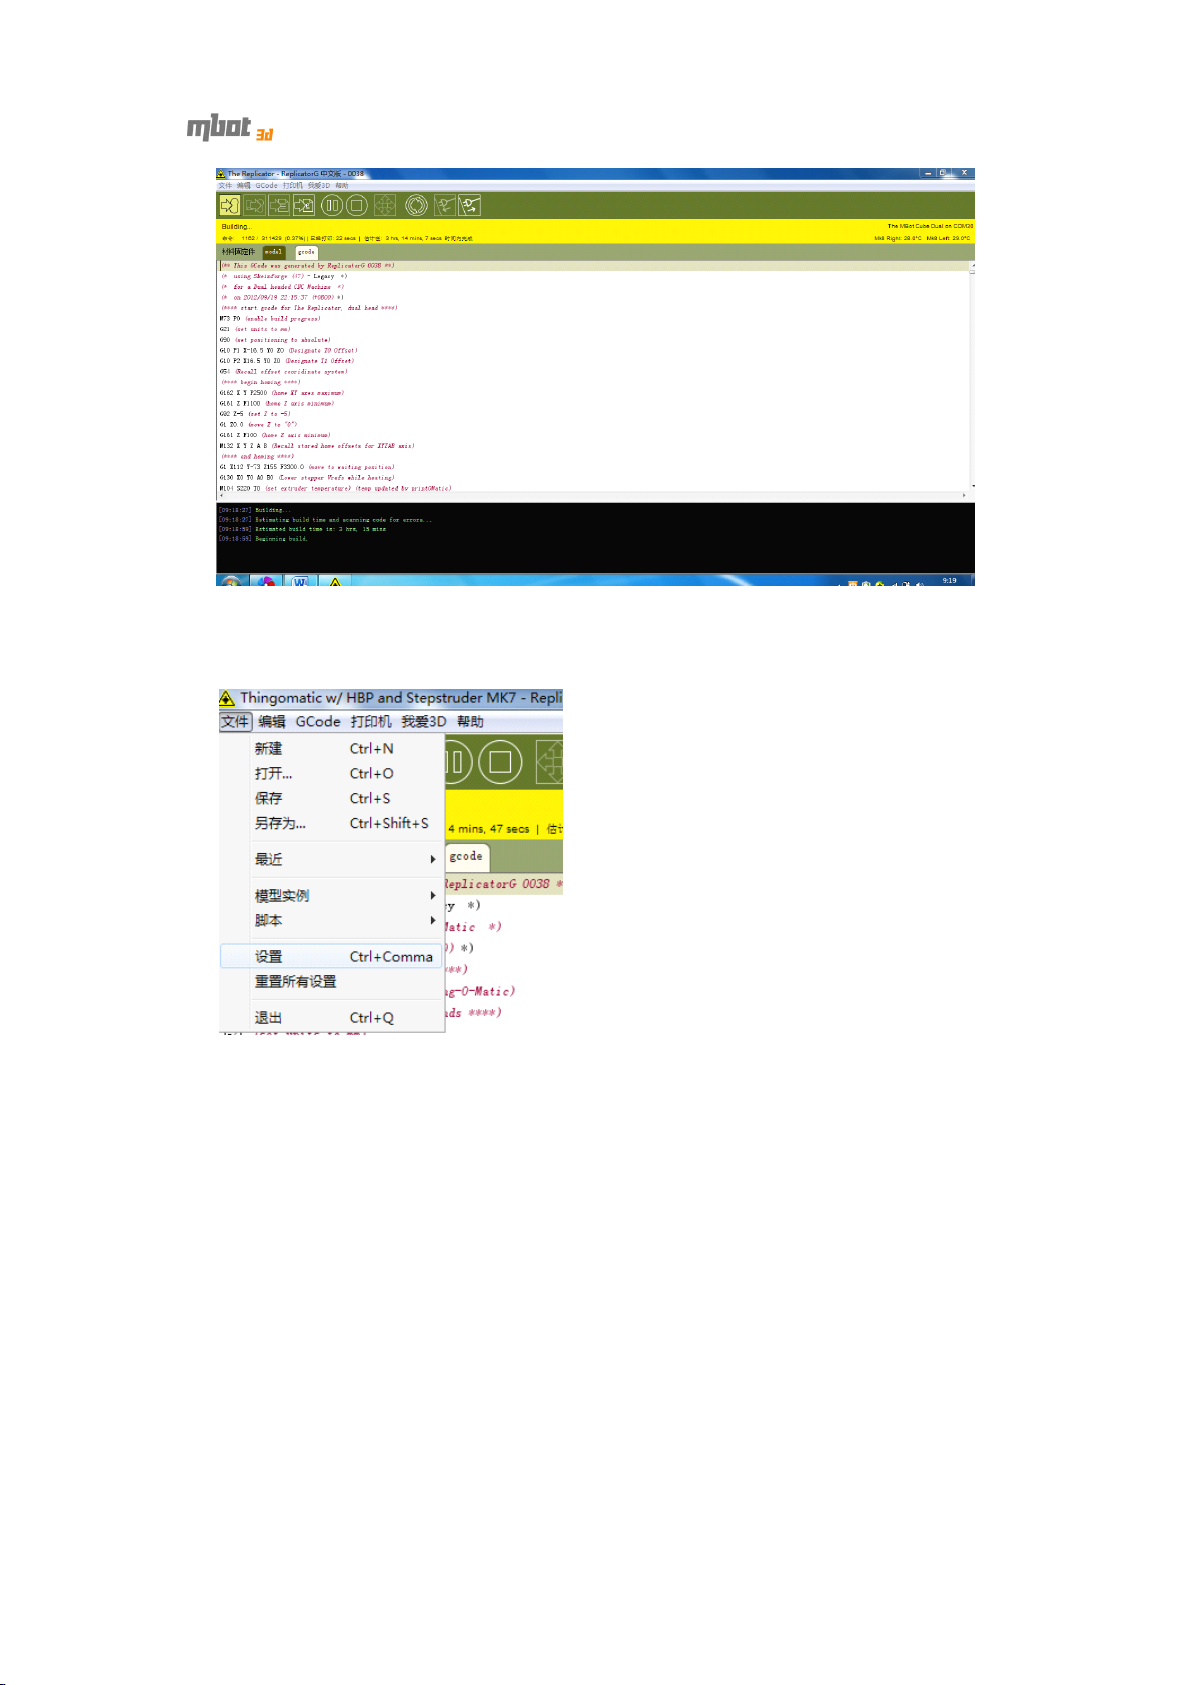
3) If a prompt appears “ Monitor print temperature: Closed ” at the top right
corner of the window, click File->Preferences.
On the “ Preferences ” window, check the “ Monitor print temperature ” option
and then close the pop-up window.
22
Page 23
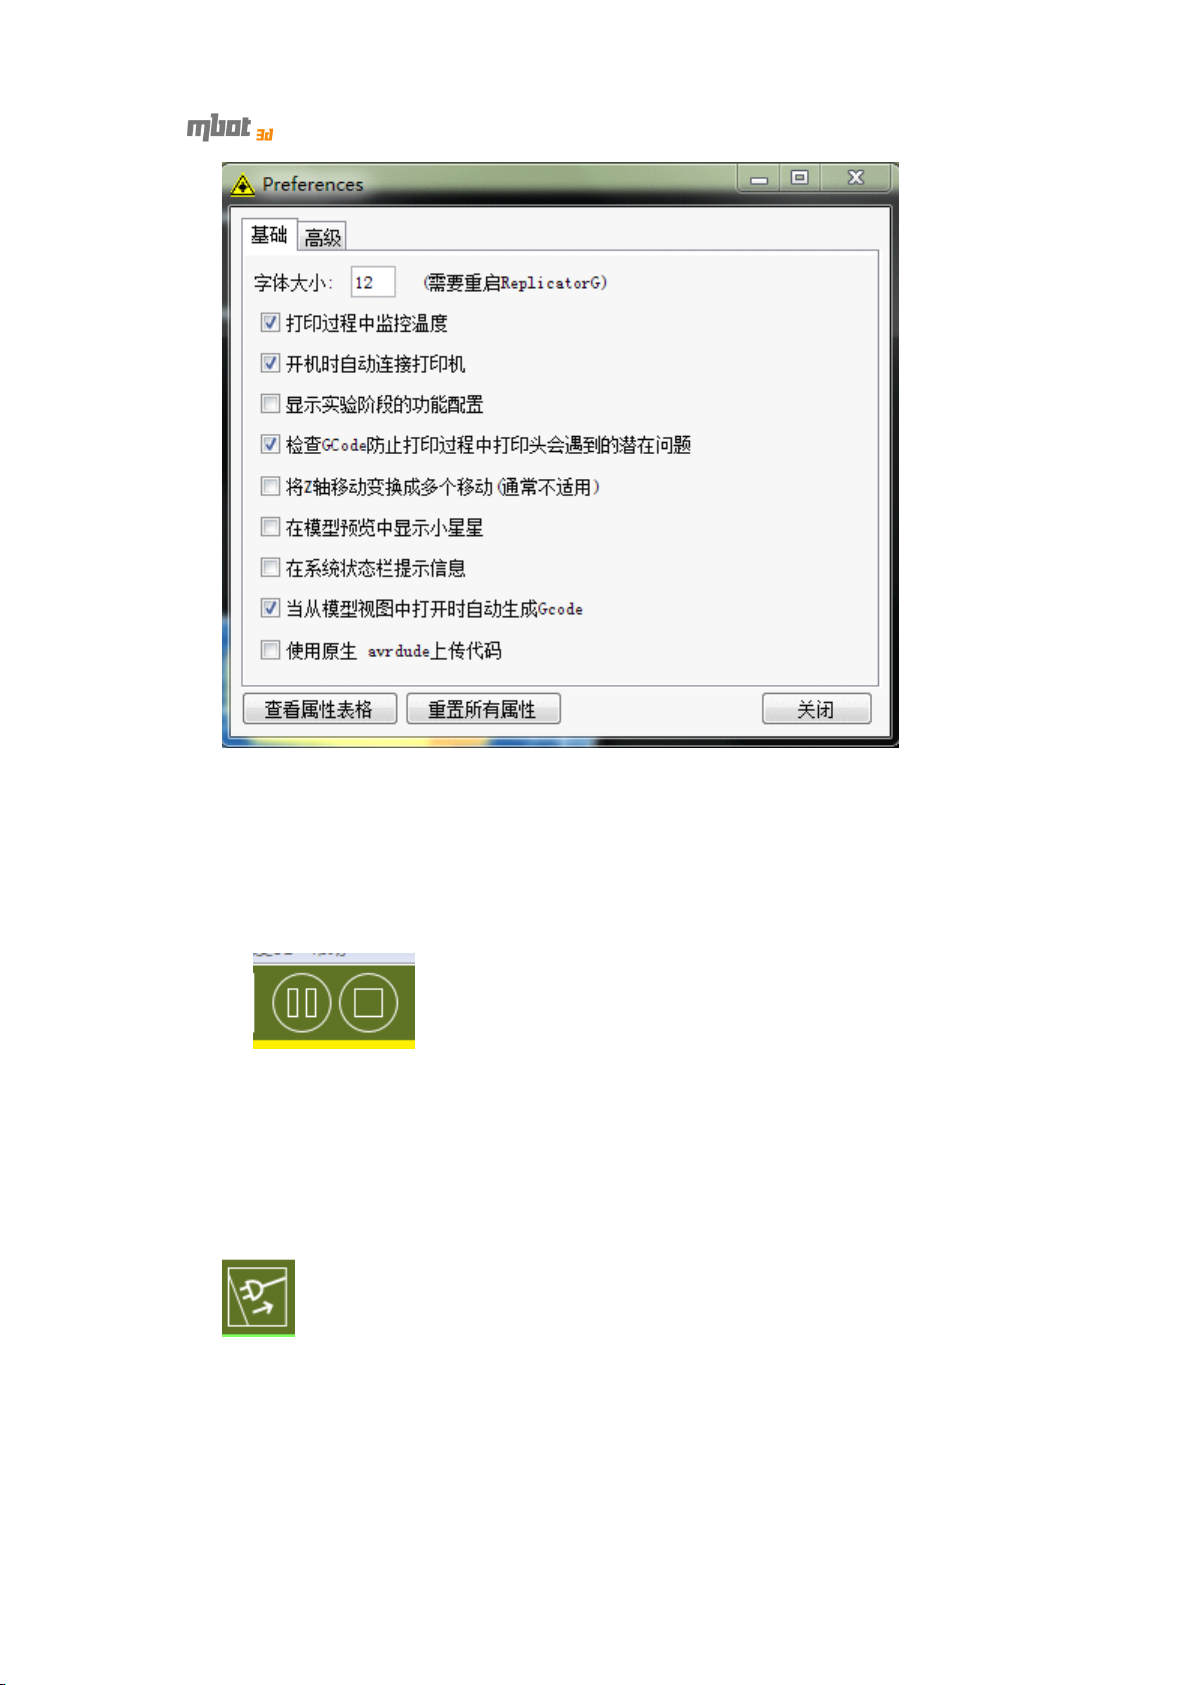
4) If you want to pause or stop printing, click the buttons as shown below.
NOTE: I n the initial phase of printing (when the message area below toolbar is
yellow), the Pause and Stop buttons are disable. You can close ReplicatorG to pause
printing.
While printing, it may take 30 seconds to pause after clicking the Pause button,
which depends on c omputer c onfiguration s. DON ’ T hit the Pause button again.
5) When finishing printing, you ’ ll see the icon below.
hand or shoveler . Don ’ t break the blue tape while using shoveler . If the blue tape is
broken, do remember to stick a piece of new one. Make sure the tape is sticked to
the build bed tightly. It’s required!
NOTE: Before power off the printer, click the “ Disconnect ” button (as shown
below).
Take
the model out by
5.2
Printing
5.2
Printing
5.2
5.2 Printing
Printing from
NOTE: The printer can recognize 1G SD card only.
from
from
from SD
SD
card
SD
card
SD card
card
23
Page 24
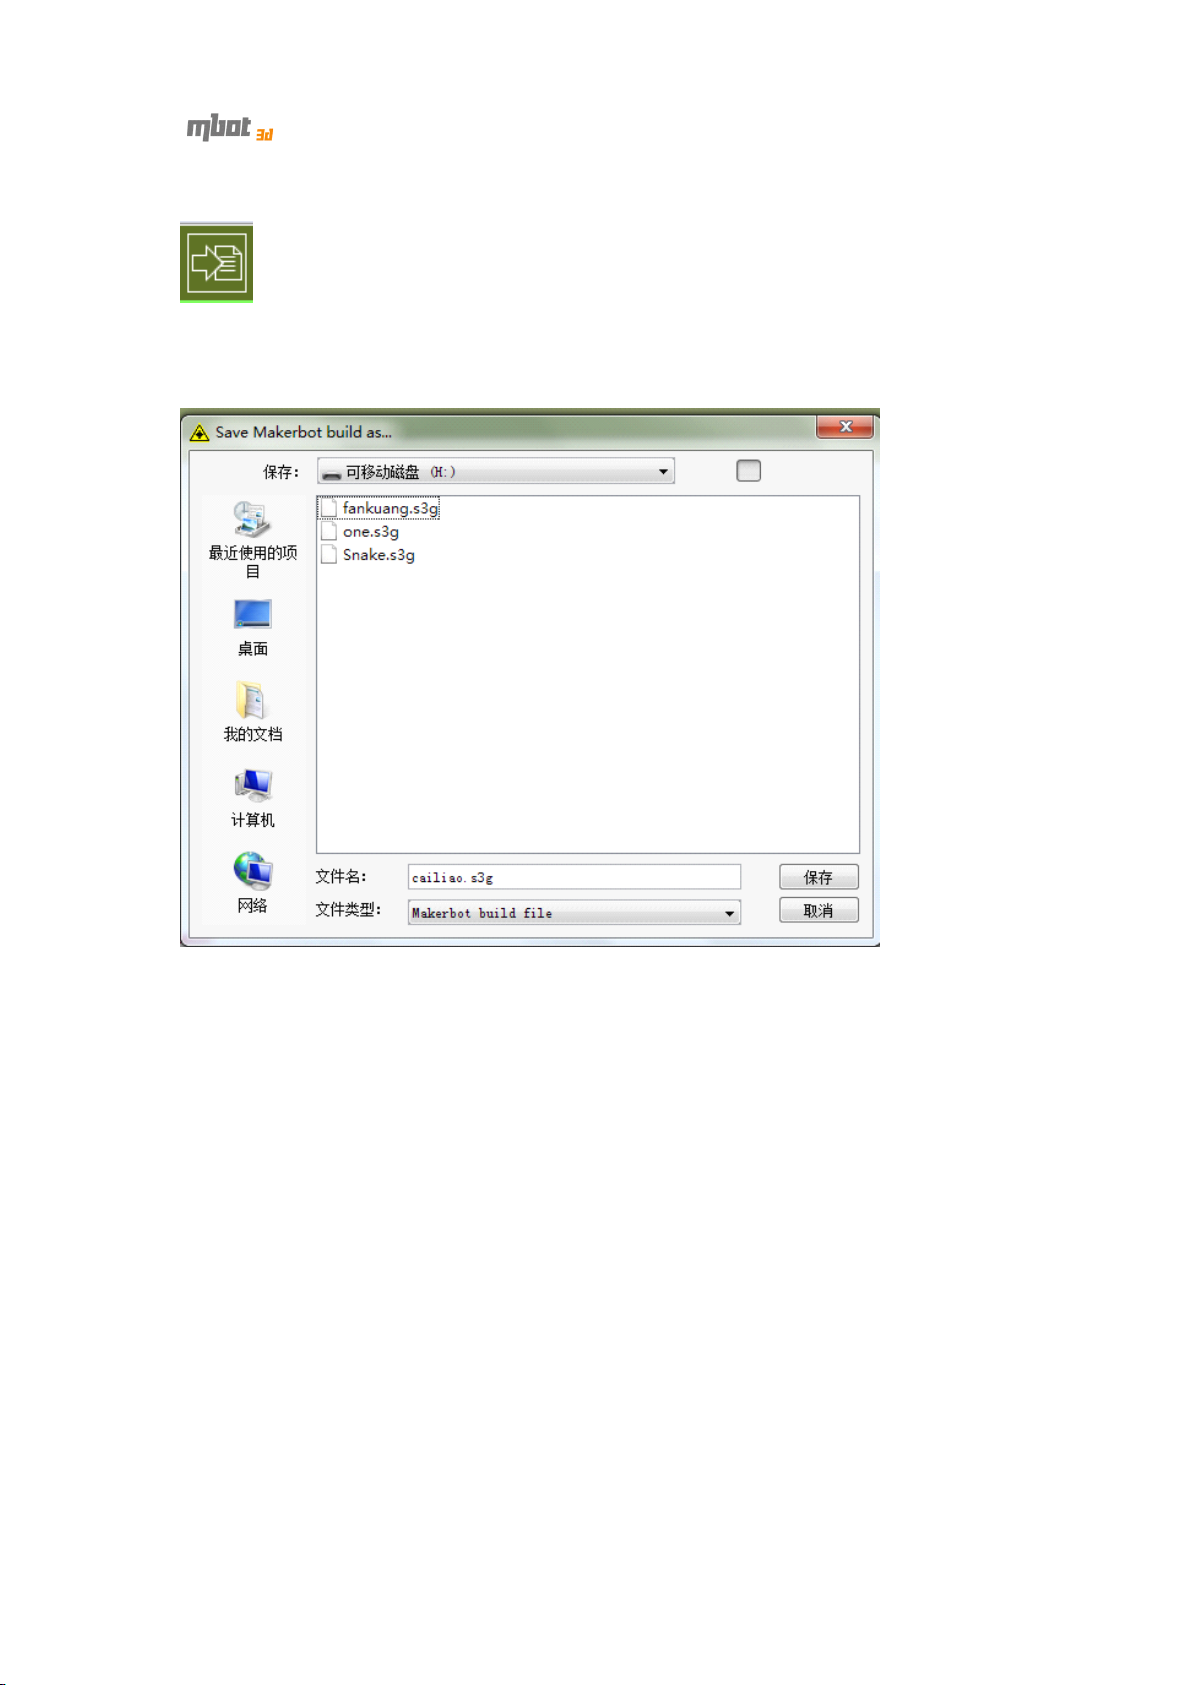
1) Make sure your SD card is in the SD card slot of your computer . After GCode is
generated, click the button as shown below.
On the pop-up window , find and open SD card.
Input file name and save in s3g format. The printer can read s3g file only. Make
sure the file name isn ’ t in Chinese or too long. Otherwise, the pinter may make errors
or can ’ t read .
Then click the “ Save ” button, and you ’ ll see the window as shown below. The
message reads “ Building”, but actually the file is saving to the SD card.
24
Page 25
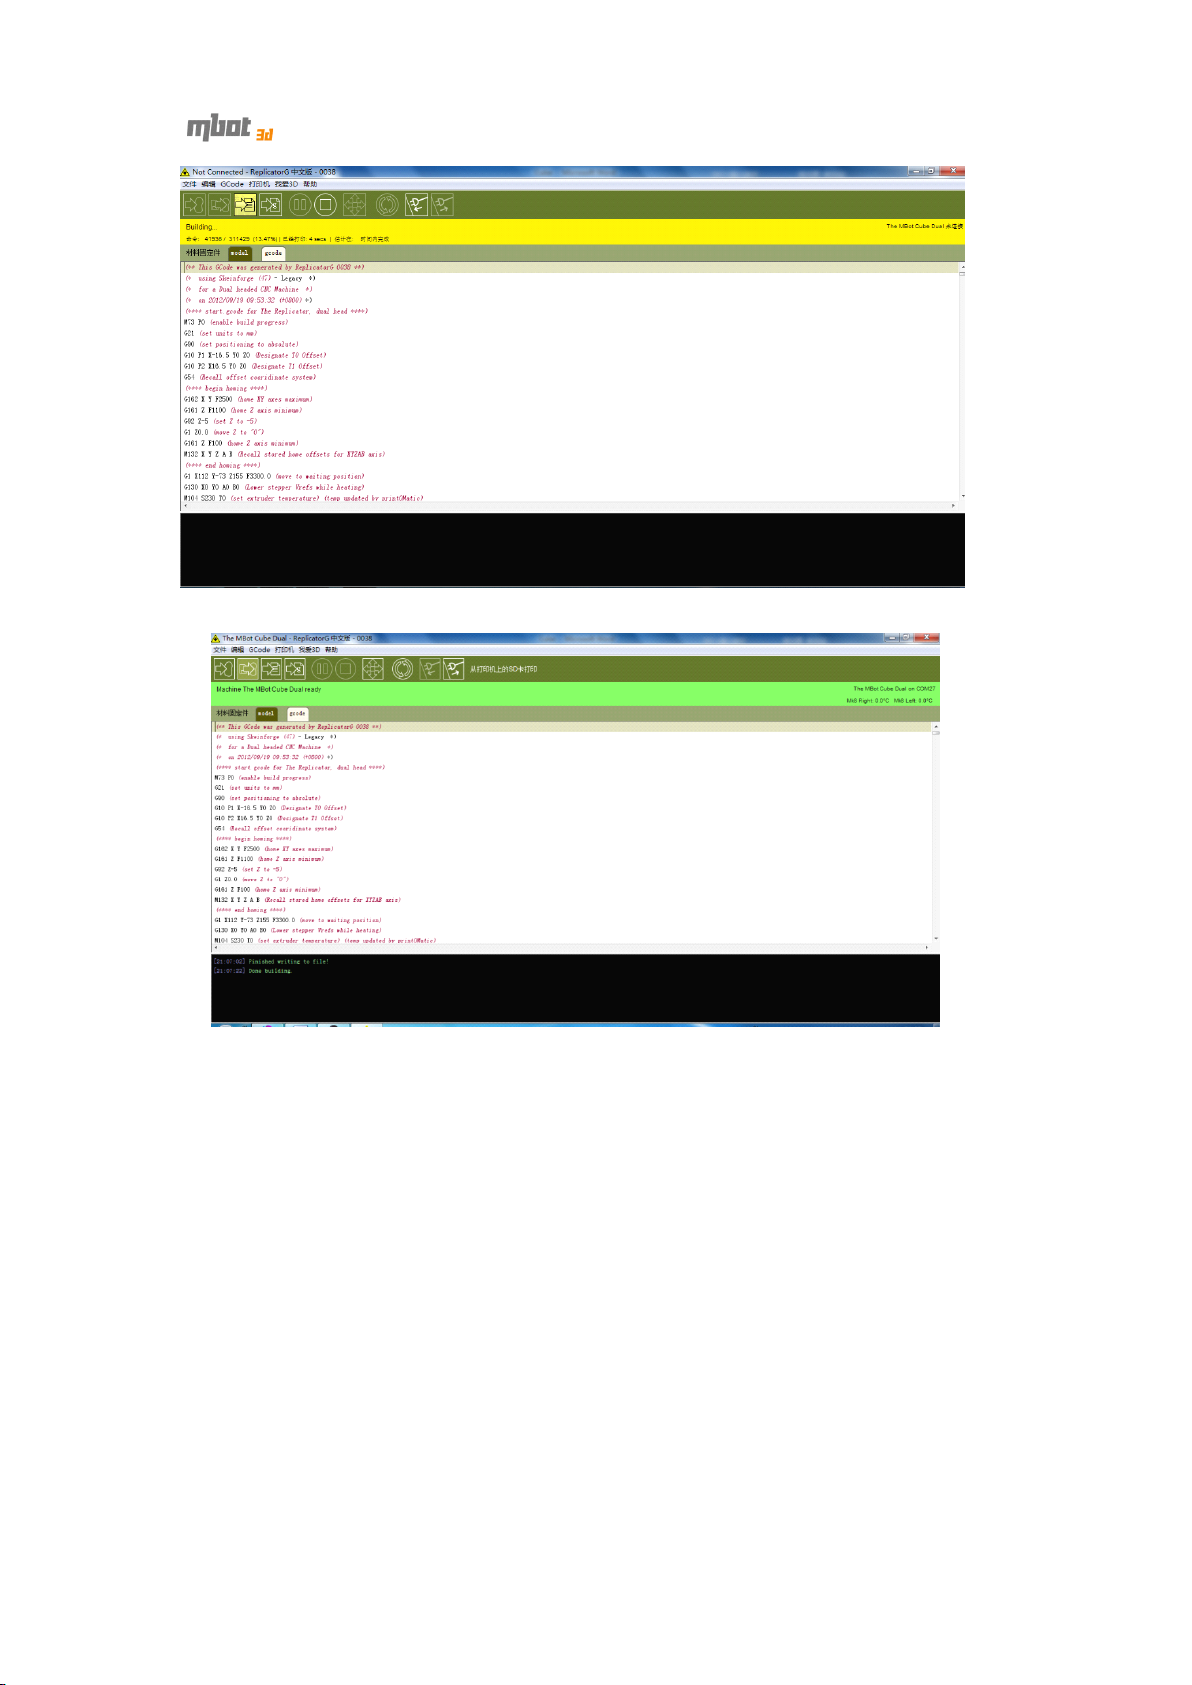
2) After the Gcode file is saved, the window shows as below.
3)
Take
out the SD card from your computer and insert it into the printer . Then
Select “ Print from SD ” and choose the model file, by up and down arrow keys beside
the LCD screen. Press the center key to enter after selecting.
25
Page 26
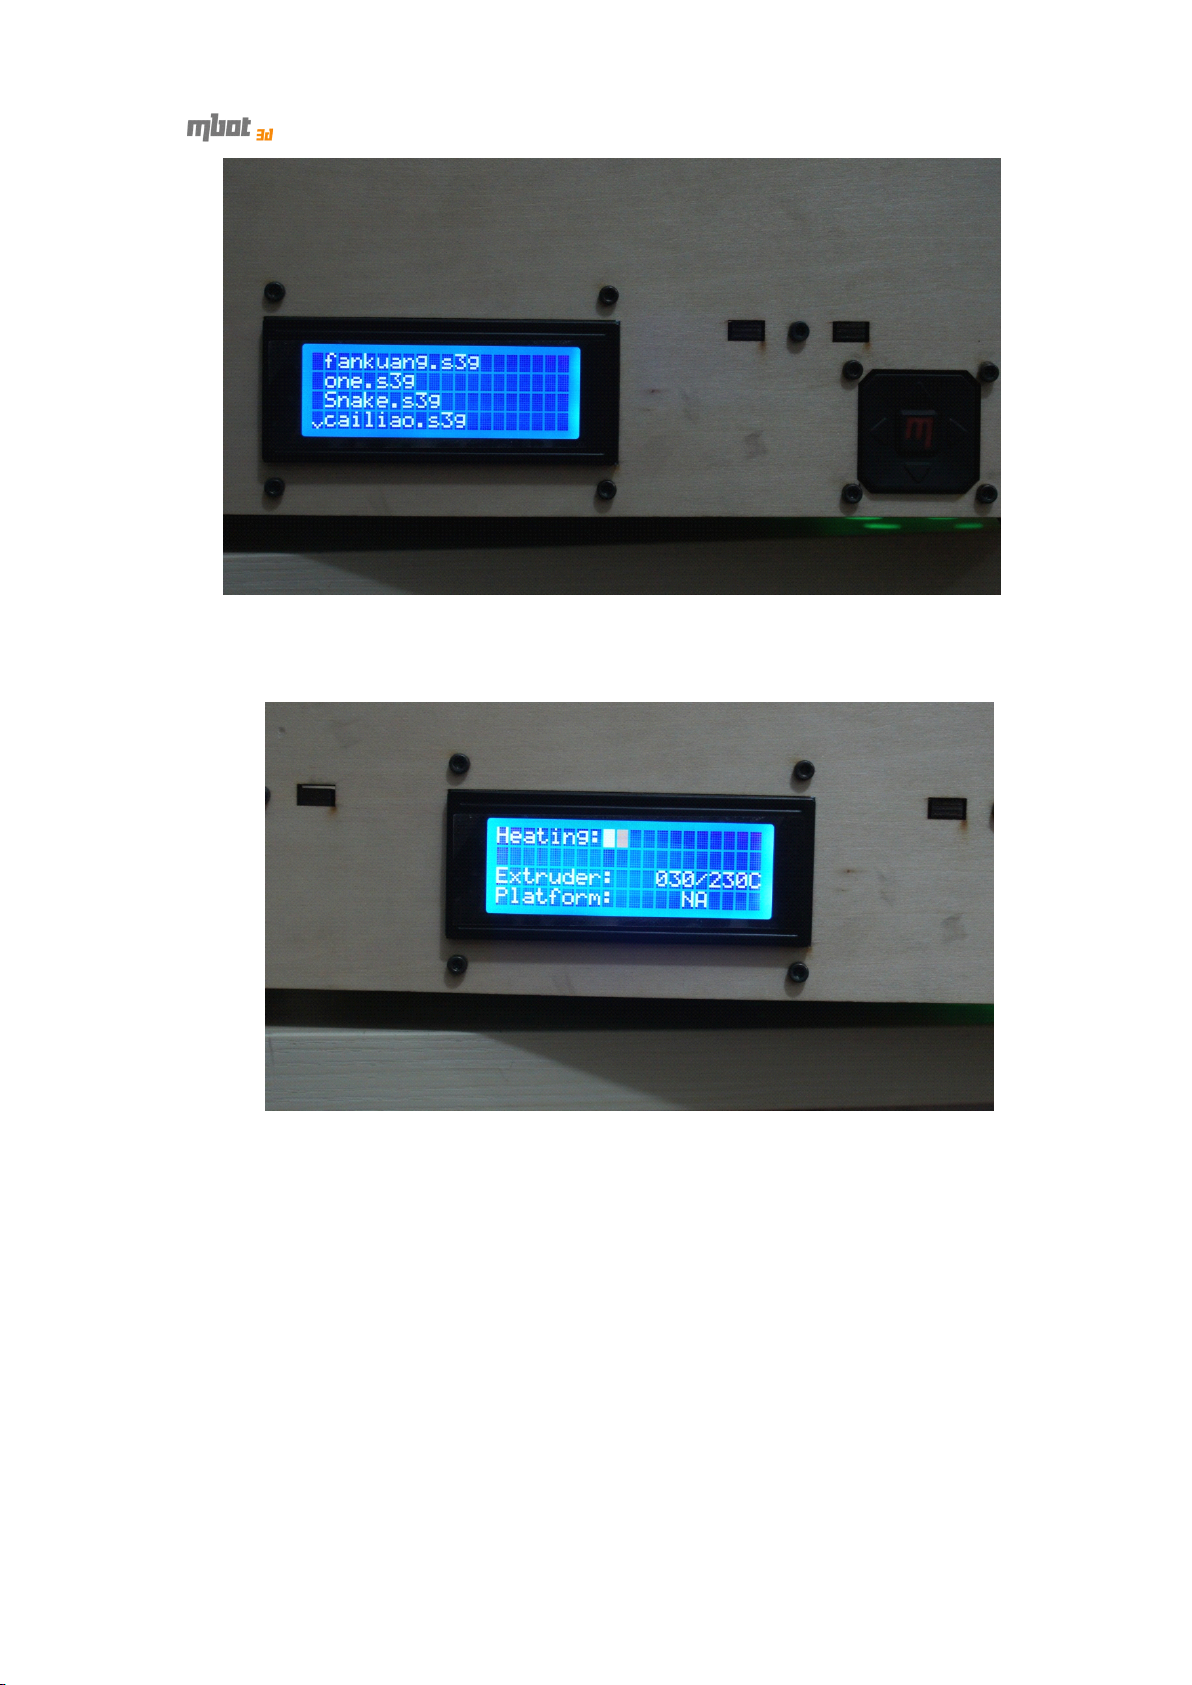
2) After selecting file and pressing the center
key,
the printer starts to heat up.
The LCD screen shows as below.
3)If you want to cancel printing, please press the left arrow key (i.e. the back
button). A message appears as below.
26
Page 27
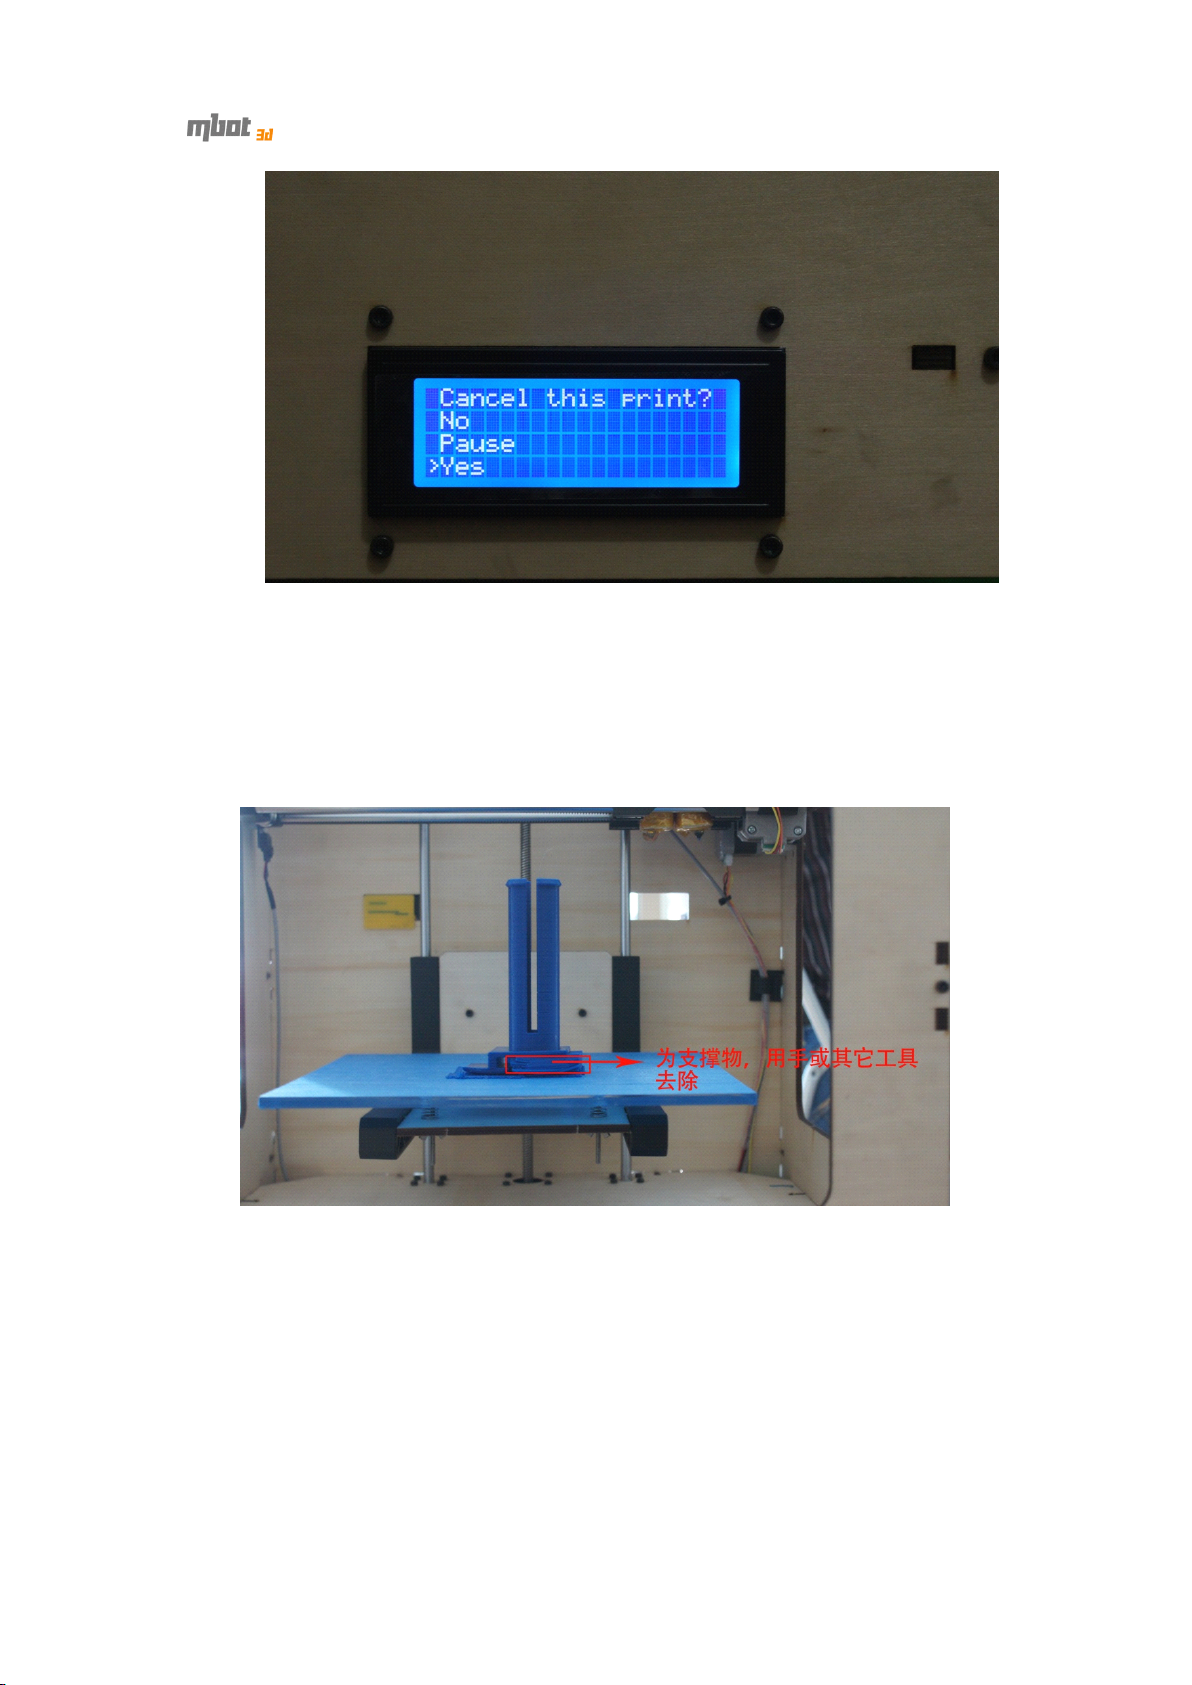
4) Select “ Yes ” and press the center key , to stop printing. The LCD screen resets
itself.
5.3
3D
5.3
5.3
5.3 3D
outputs
3D
outputs
3D outputs
outputs
Support structure can be moved by hand or other tools.
27
Page 28
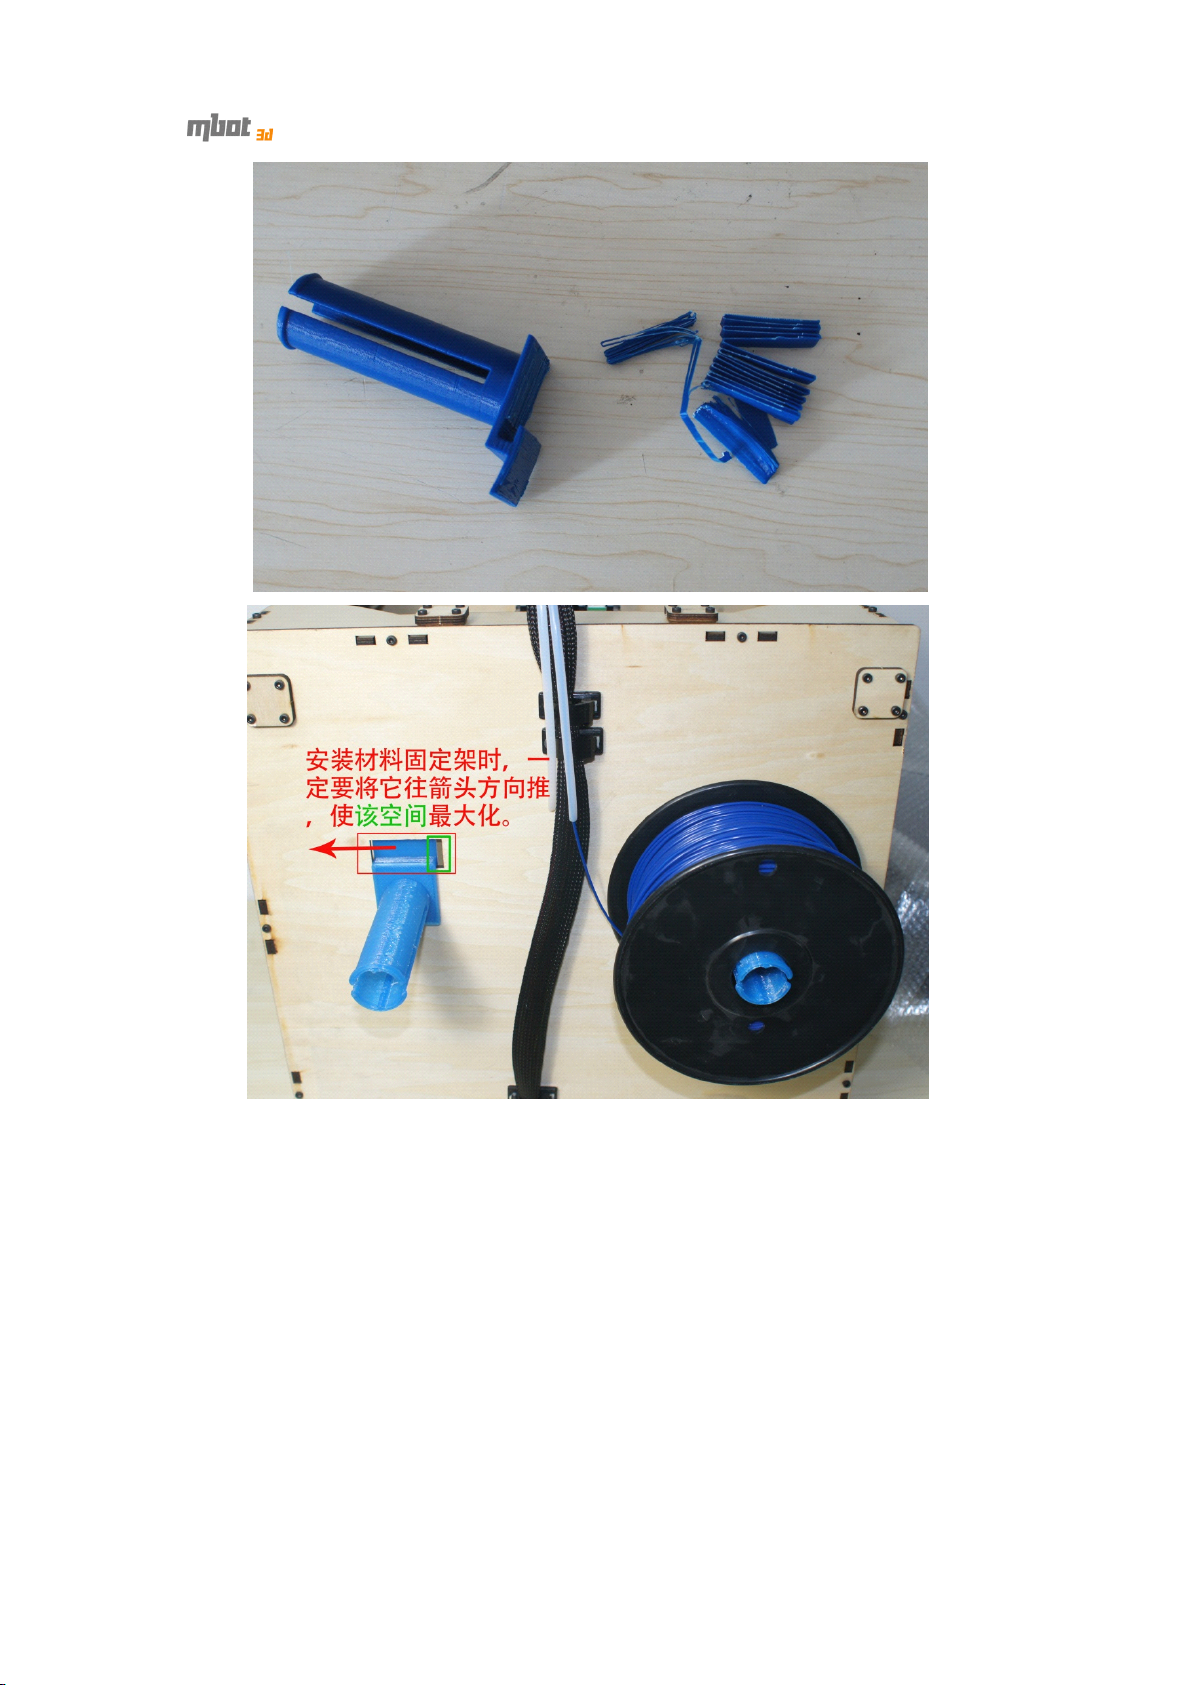
When assembling the bracket (i.e. our printing example since chapter 3) to hold
material, please push in the direction as the red arrow points, in order to get the
maximum space.
28
Page 29
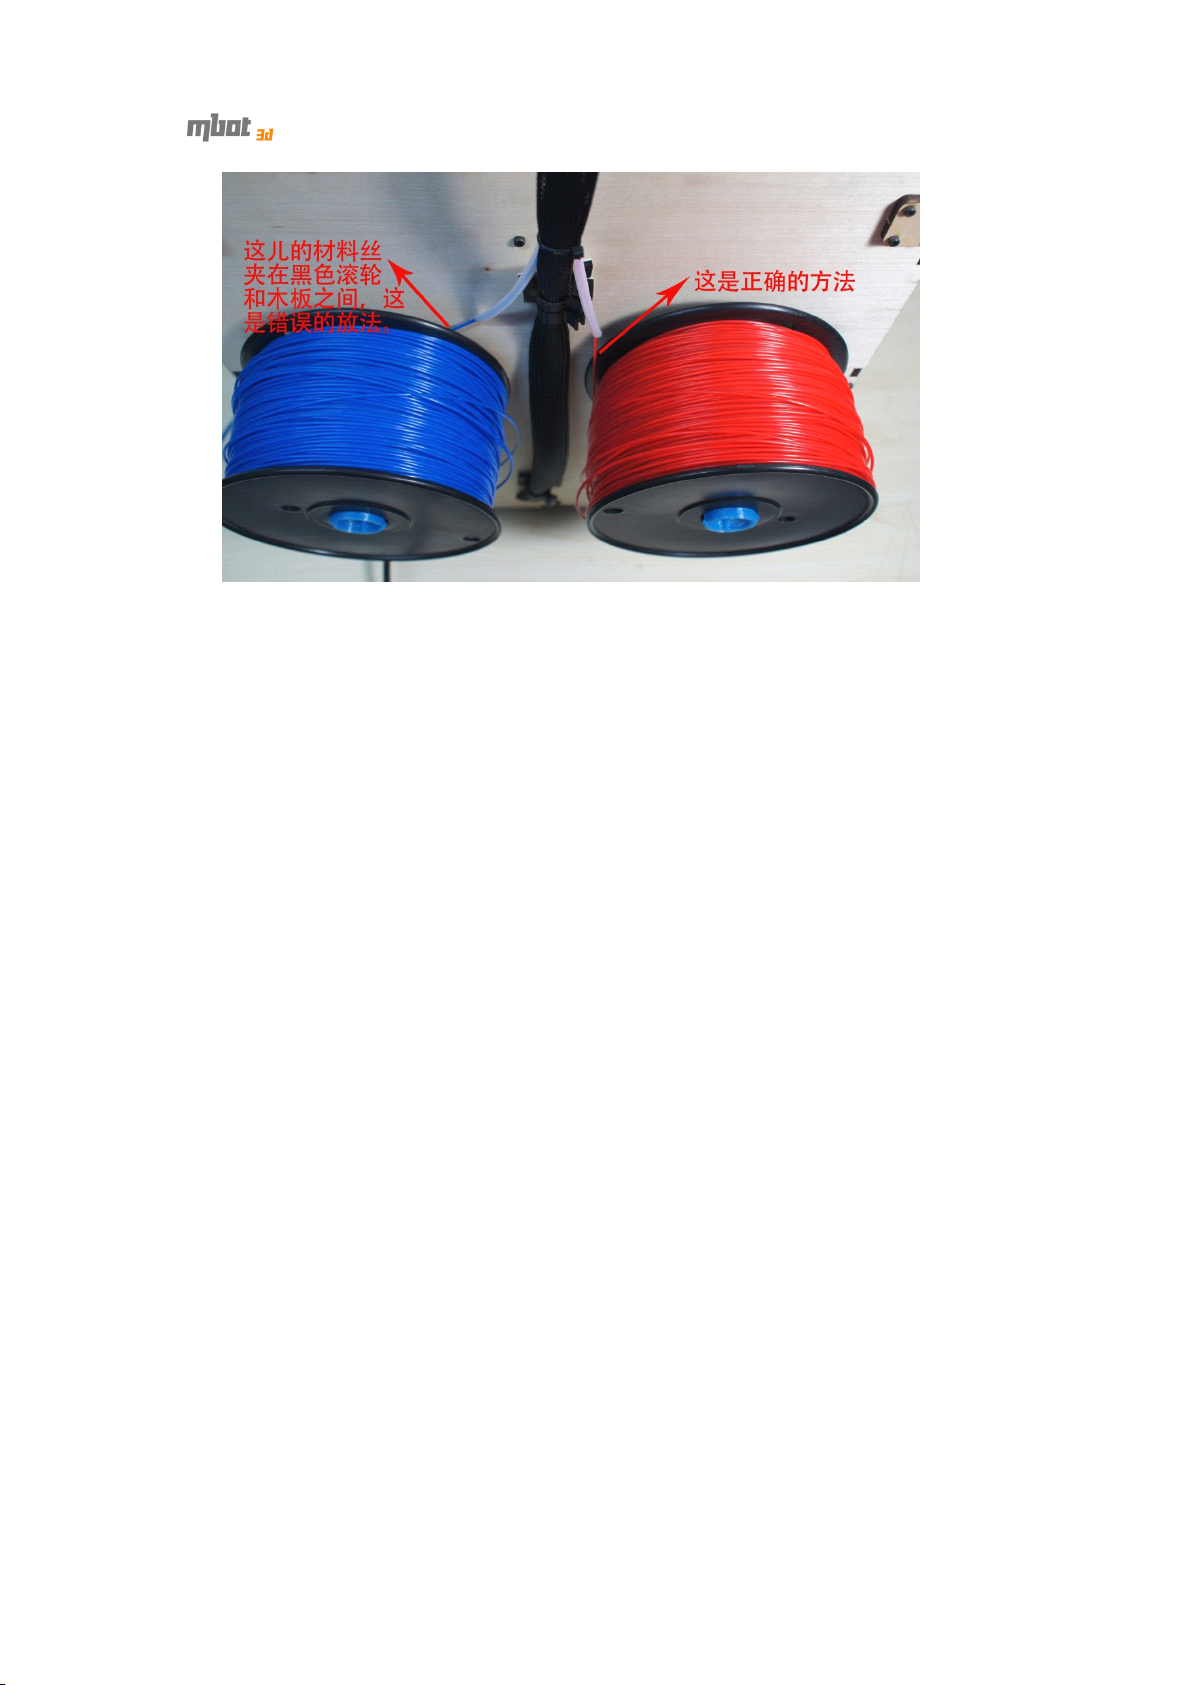
The blue filament is stuck between the black wheel and board, which gives a
wrong example.
The red filament shows the right example.
29
Page 30
6
Two-color
6
Two-color
6
6 Two-color
Two-color printing
To
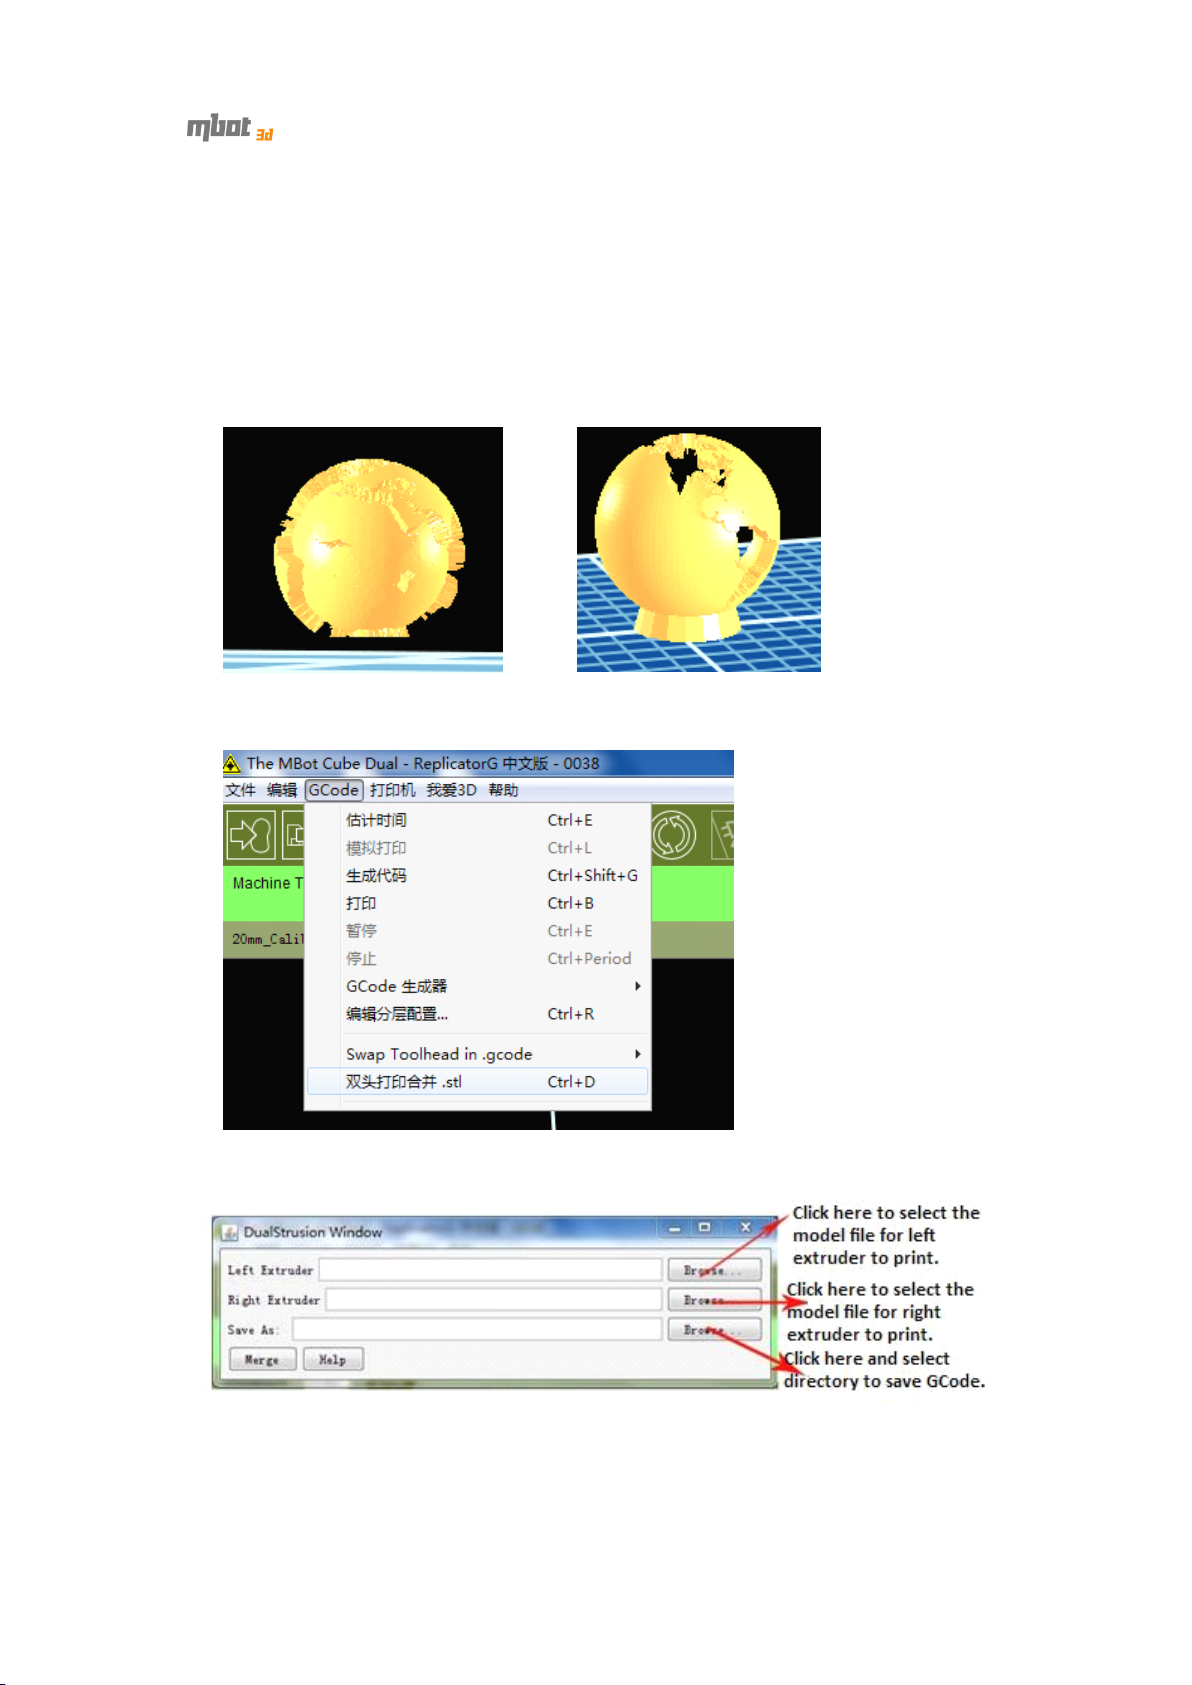
print a model with two colors, you ’ ll have to slice the model file. Build models
for each color. Then generate GCode by ReplicatorG.
Take
two-color Earth for example. The picutre below shows the model after
slicing.
1) Click the “ File ” menu and choose the file. (Here, we open “ 双头打印合
并 .stl”.)
printing
printing
printing
The pop-up window shows as below.
2) Click the “ Merge ” button and you ’ ll see three pop-up windows as shown
below.
On the two setting windows for GCode generator, uncheck the “ use
30
Page 31
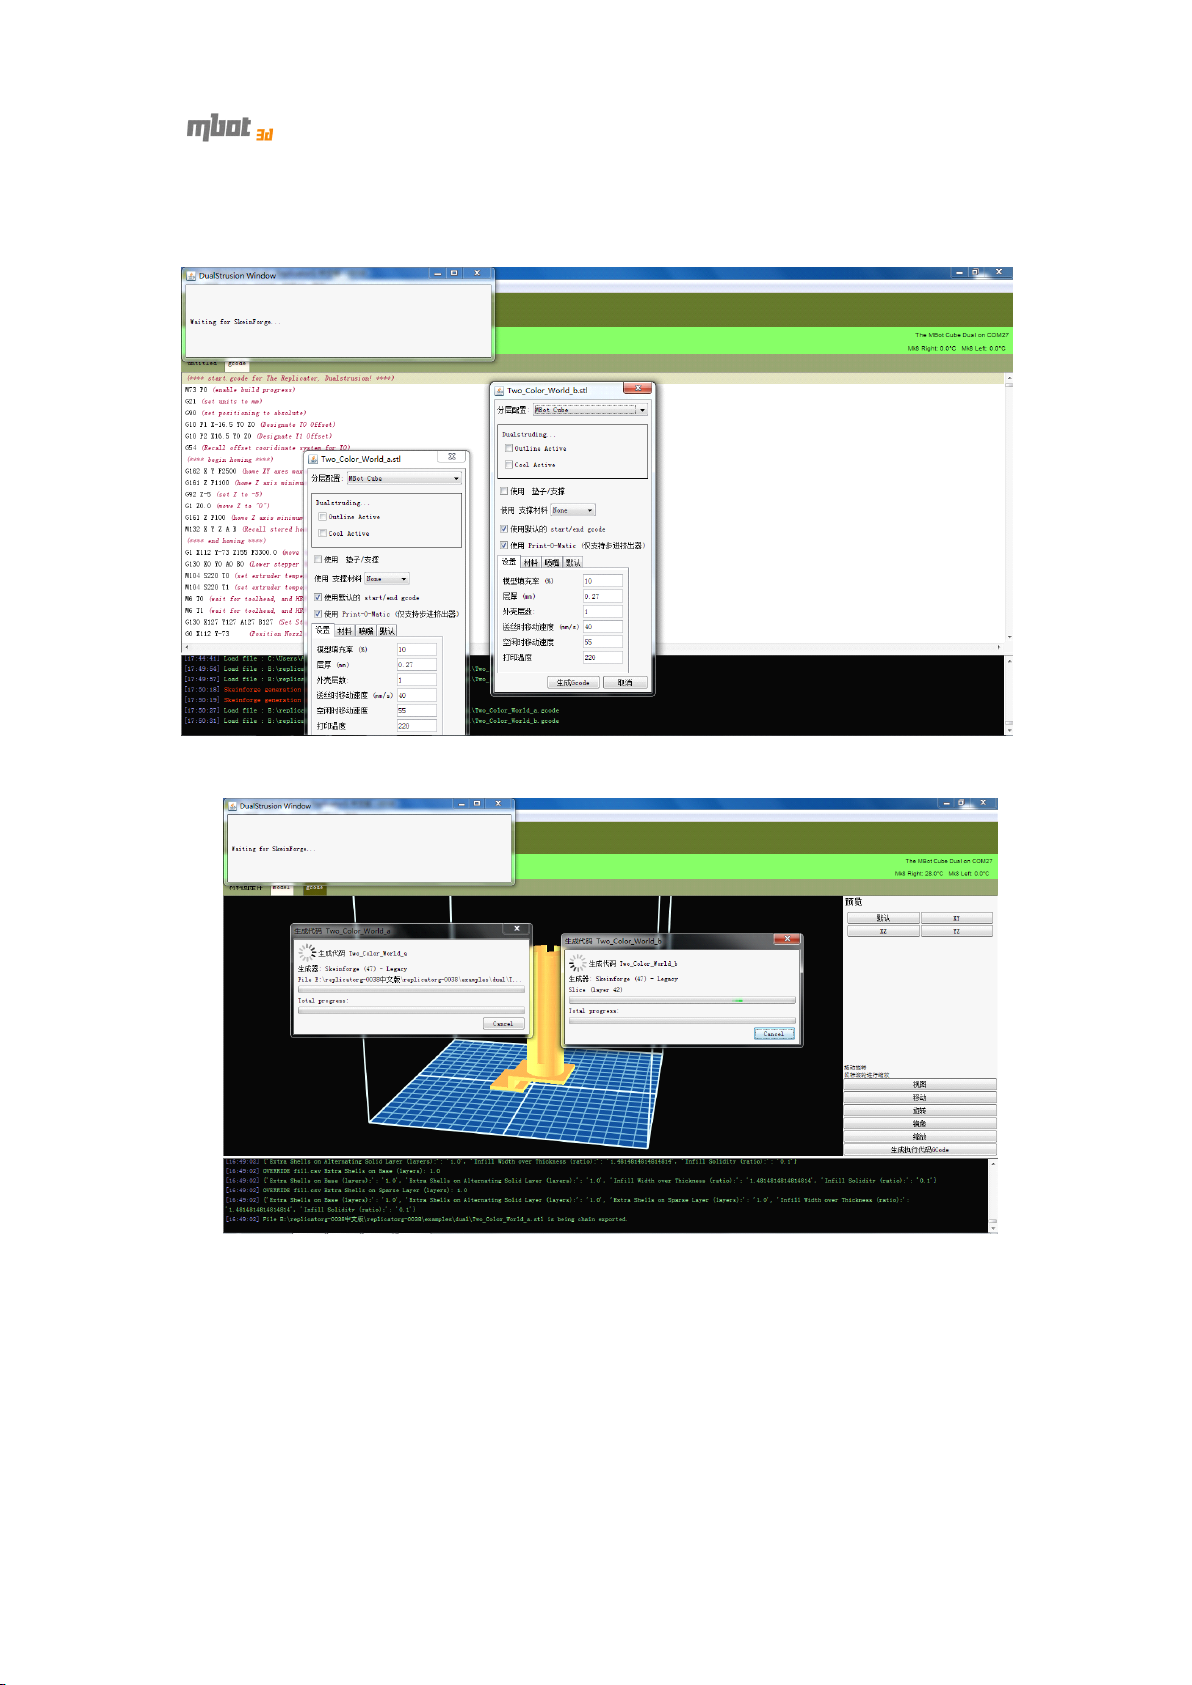
raft/support ” option and select “ None ” in the “ Support Material ” list. Because two
models can support each other.
Strongly recommend using default settings in other options.
3) Click “ Generate Gcode ” on the two windows. Then the windows show as
below.
4) It takes about 30 minutes to generate GCode. When finishing generating, the
window shows as below.
31
Page 32
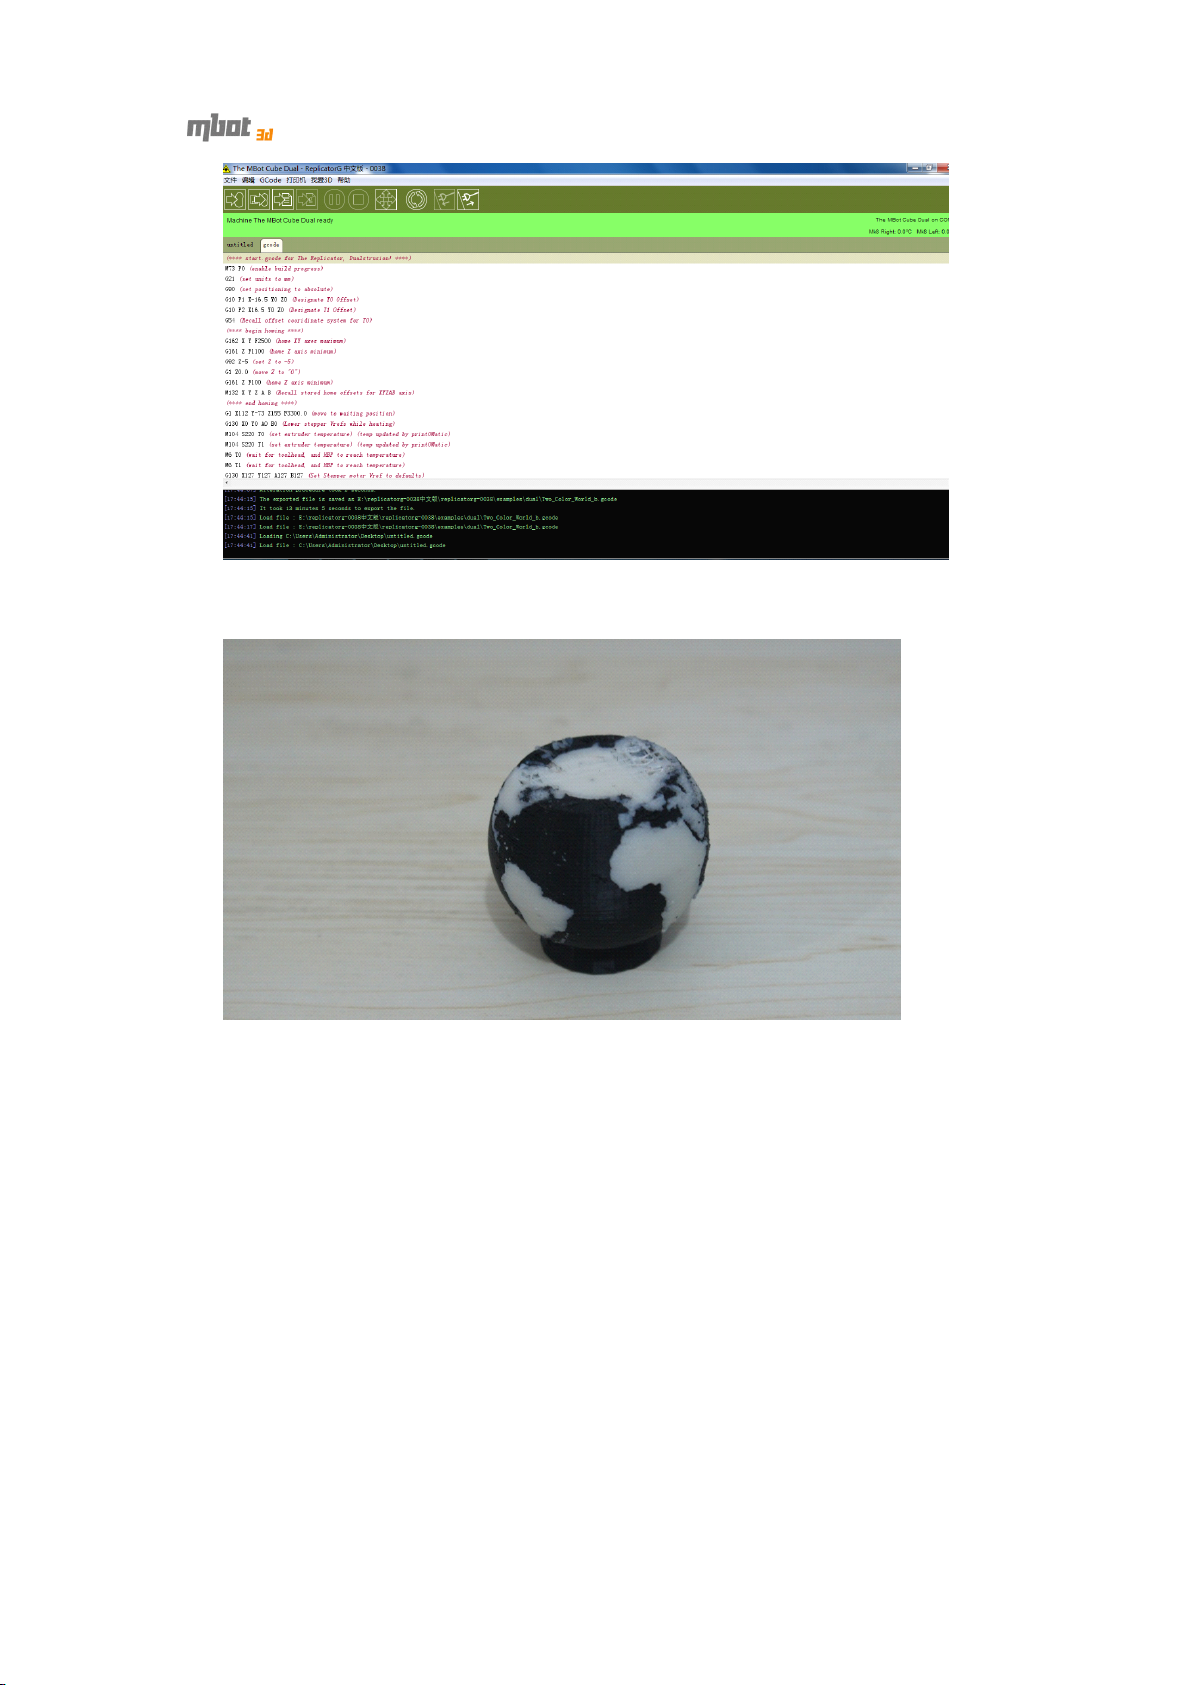
5) Click the “ Print ” button to start printing. The picture below is the printed
two-color earth.
32
Page 33

7
Contact
7
Contact
7
7 Contact
Contact Us
Us
Us
Us
Thank
Thank
Thank
Thank you
you
you
you for
for
choosing
for
choosing
for choosing
choosing MBot
MBot
MBot
MBot desktop
desktop
desktop
desktop 3D
3D
printer!
3D
printer!
3D printer!
printer!
http://www.mbot3d.c om
33
 Loading...