

Page 1

Operation Manual
Large-Capacity Stacker ST-31
Read this “Operation Manual” carefully before use.
Keep it at a specific place for handy reference.
27.03.2002
Page 2

- 1 -
Page 3

Safety Instructions
Definition of Symbols and Notes
In this manual following names and signs stand for possible dangers.
Danger
This Symbol stands for immediate danger threatening the life and health of persons.
Disregarding these instructions may cause severe damage to health and even serious
injuries.
Caution
This symbol stands for an endangering situation that may occur. Disregarding these
instructions may lead to slight injuries or damage to property.
Note
This symbol stands for notes, operational hints and other useful information. They are
convenient for exploiting the machine’s functional abilities.
Danger
Do not damage, destroy or process the power plug and cord. Placing heavy things on the cord,
pulling it, or bending it forcibly may damage the plug and cord and cause fire or an electrical shock.
Do not plug or unplug the power cord from an outlet with a wet hand; it can result in an electrical
shock.
Operate the collator with the indicated current and voltage only. Use an exclusive outlet, as
overloading may cause fire.
Do not repair, dismantle, or remodel the machine by yourself. It may cause fire or an electrical
shock.
Do not put your hand inside the machine. It may make your hand caught in it and cause an injury.
Caution
Never unplug the power cord from the outlet by gripping the cord itself. Doing so may damage the
cord, causing fire or injury.
Do not put your fingers or articles in any revolving part of the machine during operation. It may
cause an injury.
Do not install the machine in a humid or dusty place; excessive humidity and dust can cause fire.
Do not use the outlet if the plug is not fixed but loose. It may cause fire or an electrical shock.
Do not use inflammable liquid such as gasoline, benzine, thinner, etc. It may cause an explosion or
fire.
Do not place the machine near flammable materials. It may cause fire.
When inserting the power plug in the outlet, insert it fully into the outlet. Otherwise, it may cause
fire.
When the machine body becomes hot after being used for a long time, turn off the switch and restart
it after temporary pause. Otherwise it may cause fire.
In case of irregularities, such as overheating, smoking and unusual odor, turn off the power switch
and remove the plug from the outlet. It may cause fire or an electrical shock.
When the machine will not be used for a long time, or in case of power failure, be sure to turn off the
power switch and remove the plug from the outlet. Otherwise, it may cause fire.
- 2 -
Page 4

INTRODUCTION
Read this “Operation Manual” carefully before use.
Keep it at a specific place for handy reference.
Since the specifications of this machine are subject to change, be sure not to mistake this manual for one of
a different mode, descriptions of may differ.
CONTENTS
1. PRECAUTIONS BEFORE INSTALLATION AND USE .................................................4
1.1 PLACE FOR INSTALLATION..................................................................................................4
1.2 INSTALLATION....................................................................................................................4
1.3 CONFIRMATION OF CONTENTS AND ATTACHMENTS.............................................................4
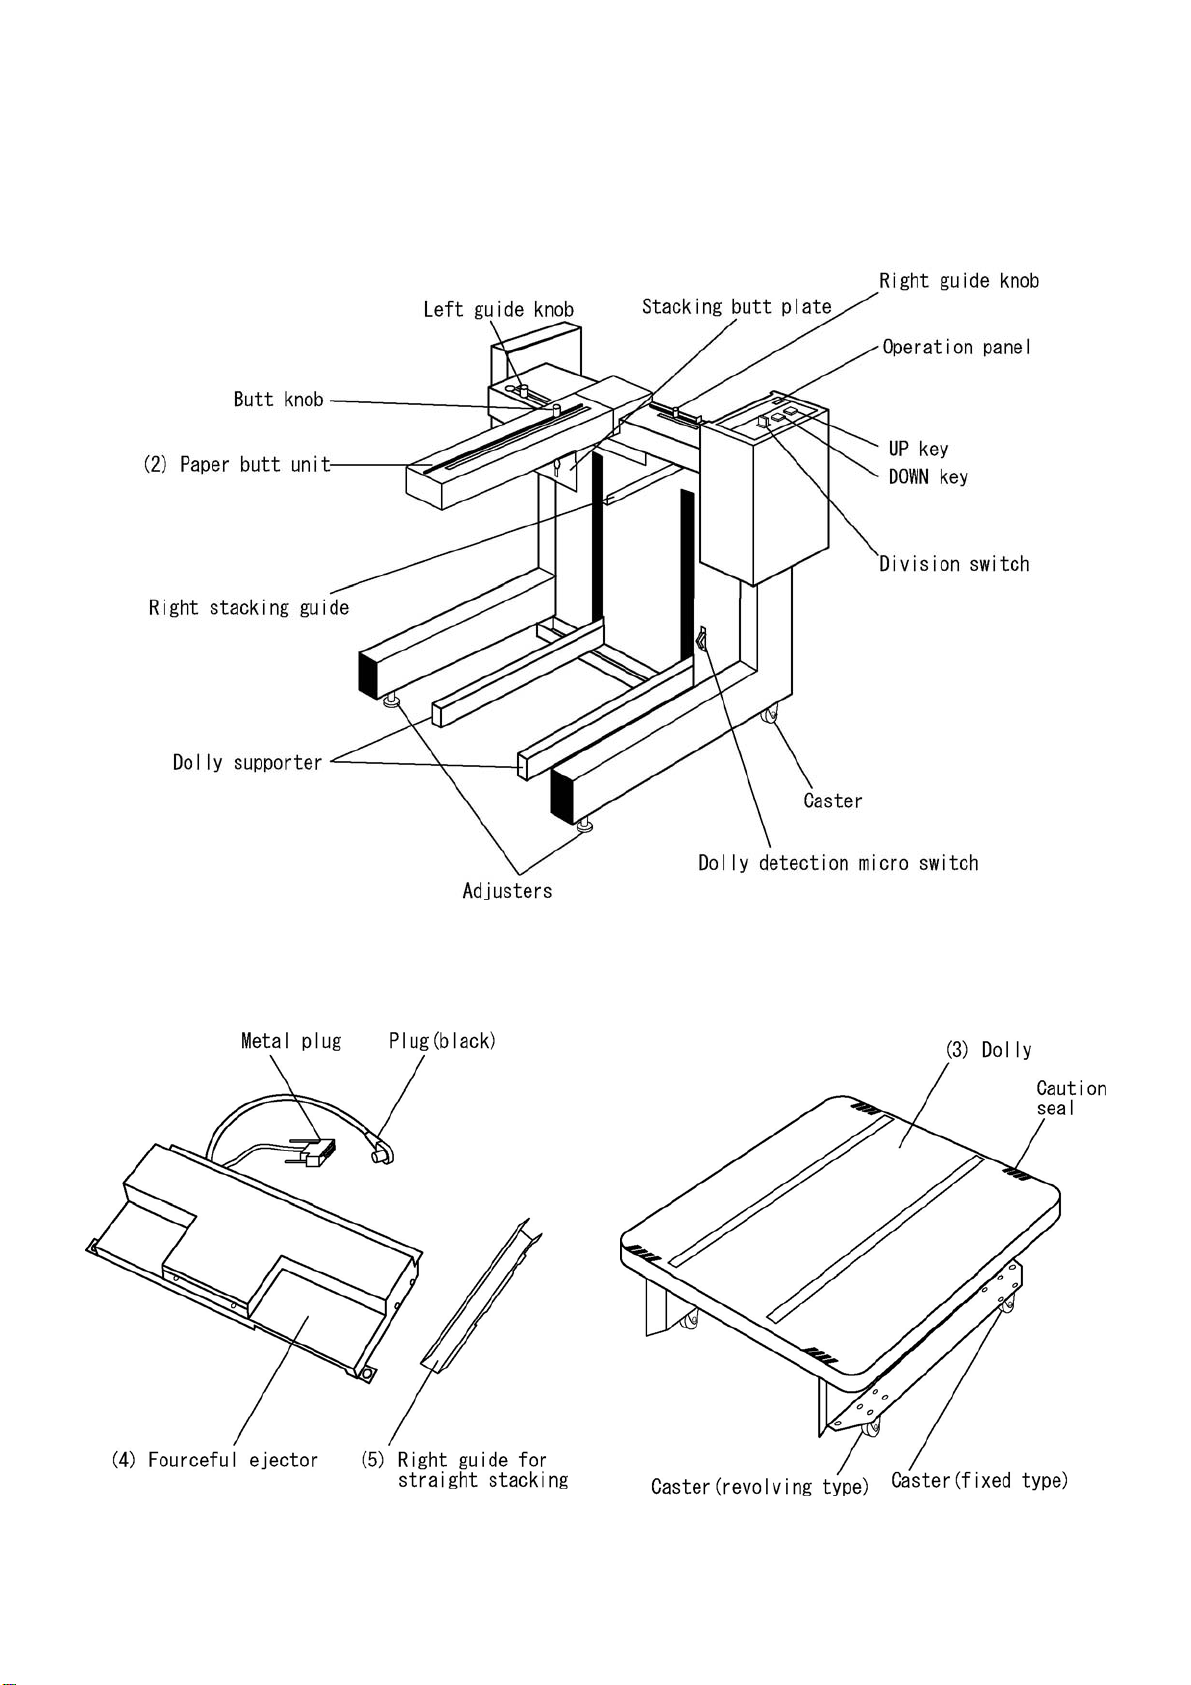
2. COMPONENT NAME..........................................................................................................5
2.1 OVERVIEW .........................................................................................................................5
3. MATTERS FOR SPECIAL NOTE......................................................................................6
3.1 WHEN NOT IN USE..............................................................................................................6
4. PREPARATIONS BEFORE USE........................................................................................6
4.1 ASSEMBLY AND INSTALLATION OF STACKER.......................................................................6
4.2 INSTALLATION AND DISMANTLING OF FORCEFUL EJECTOR .................................................7
5. OPERATION .........................................................................................................................8
5.1 WHEN THE DIVISION OPTION IS SET TO ON..........................................................................8
5.2 W
6. MAINTENANCE, INSPECTION, EXPENDABLES ......................................................12
6.1 I
6.2 DAILY MAINTENANCE ......................................................................................................12
7. RELOCATION OR DISPOSAL ........................................................................................13
7.1 RELOCATION....................................................................................................................13
7.2 DISPOSAL.........................................................................................................................13
HEN THE DIVISION OPSION IS SET TO OFF.......................................................................10
MPORTANT FOR MAINTENANCE AND INSPECTION ............................................................12
8. PRODUCT SPECIFICATIONS.........................................................................................13
8.1 SPECIFICATIONS ...............................................................................................................13
- 3 -
Page 5

1. Precautions before installation and use
1.1 Place for installation
Avoid installing the machine in the following places for the sake of safety and to prevent mechanical
problems.
[Precautions for installation]
・Locations with extremely high or low temperatures. Room temperature should be between 5 and 35
degrees centigrade.
・Locations with the potential for producing electrical leaks, for example, owing to splashing water.
・Near hear sources
・Places exposed to wind
・Narrow spots with poor ventilation, or dark places
1.2 Installation
Caution
Install the machine on a stable and level place. Otherwise, it may cause mechanical troubles.
A void installing the machine in humid and/or dusty places. It may cause fire or an electrical shock.
Set the collator on the collator table at a position about 55 mm from
its left edge (as viewed from the operator’s side).
Caution!
・The position of the collator’s rubber legs will be deviated from
the round slot for setting the rubber legs on the machine table.
・In case two connected collators are used, place UC-1100L (Left
tower) in the position shown on the drawing on the right and
place UC-1100 (Right tower) in the normal position (round
dent on the cover panel of the collator table).
1.3 Confirmation of contents and attachments
After unpacking the collator, check the attachments. Should any part be missing, contact your dealer
immediately.
(1) Machine body (2) Paper butt unit (3) Dolly (4) Forceful ejector (5) Right guide for straight stacking
- 4 -
Page 6
2. Component Name
2.1 Overview
- 5 -
Page 7

3. Matters for special note
3.1 When not in use
・Be sure to remove the power plug from the outlet.
4. Preparations before use
4.1 Assembly and installation of stacker
(1) Assembly
Insert the paper butt unit in the square hole on the stacking
slide cover, and insert the gray connector into the plug of
the stacking slide cover.
(2) Installation
Set the stacker on the collator table at a position about 55
mm from its left edge.
(As for the exact position, fine adjustment should be made
when the forceful ejector is installed.)
- 6 -
Page 8

4.2 Installation and dismantling of forceful ejector
(1) Switch the stacking switch lever to the connection side.
(2) Firmly hook the pins (one black pin each on right and
left sides) set at the lower part of the collator on the hook
on the forceful ejector (on the stacker side).
(3) Put the round holes (12mm in diameter on both sides) of
the forceful ejector over the pins (two plated) on the
slide plate cover.
Caution!
Fit the holes into the pins while moving the stacker
from side to side.
(4) Of two connectors of the forceful ejector, insert the
black one in the black plug on the stacker, and the other
metal one in the metal plug on the collator (on its back
side), and insert the power cord into the plug of collator .
(5)In case it is removed, raise the forceful ejector while
pulling the hook levers on both sides toward you.
- 7 -
Page 9

5. Operation
5.1 When the division option is set to ON
(1) Set the dolly on the dolly support.
The “UP” lamp lights.
Caution!
Push the dolly deep into the end and set it in the
correct position. The lamp will not light unless it is
properly set.
Danger
Do not your hand in the long hole of the slide plate and the machine while the dolly is moving up or
down. There is a danger that your hand may be caught in it.
(2) Loosen the adjusting knobs on the
right and left guides, and the butt
guide, and set them at appropriate
positions.
The drawing on the right shows the
case in which A4 size paper is used.
(3) Press the UP key and the dolly will automatically
move up to the prescribed position.
- 8 -
Page 10

(4) Press the CHECK key on the collator’s operation
panel to collate a set of paper and check the position
of each guide.
Caution!
・Set the guides in the position w here an opening 2 to 3
mm wide will be left between the paper and each of
the right and left guides, as well as an opening 5 to
20mm wide between the paper and the butt guide.
When the stacker is connected with a single
collator, leave an opening about 5 to 20mm and set
the position where the paper is neatly collated.
・In case the right and left edges of collated sheets are
not aligned sheet by sheet, set the paper guides to
closely fit the paper.
(5) Press the START/STOP key on the collator to start
collation.
(6) When collation is finished, press the DOWN
key to lower the dolly.
- 9 -
Page 11

Danger
Do not operate the left stacking guide adjusting knob while the machine is in operation.
Operating the adjusting knob while the machine is collating may cause an injury by making your
fingers caught in the machine.
Do not put your hand on the paper butt unit.
As the unit is detachable, it may be removed, causing an injury.
5.2 When the division option is set to OFF
(1) Set the left guide for straight stacking at the left
stacking guide of the stacker.
Caution!
T ake care that the point of he left g uide for straight
stacking will not touch the paper holding lever.
(2) Turn the division switch off.
- 10 -
Page 12

(3) Set both right and left stacking guides and the butt at
appropriate positions.
Press the CHECK key of the collator to collate one set
of paper and check if the paper is neatly collated.
Caution!
Set the guides in the position where an opening 2 to
3 mm wide will be left between the paper and each
guide, as well as an opening 5 to 20 mm wide
between the paper and the stacking butt.
(4) Press the ST AR T/STOP key of the collator to start
collation
・In case paper is taken out while suspending the collation
Press the START/STOP key of the collator to stop the
collation, and press the DOWN key to lower the dolly.
Stop lowering the dolly at the prescribed position and
press the DOWN key again to stop the dolly. Then
take out the paper.
- 11 -
Page 13

・When starting to collate again
(1) After removing the paper stacked on the dolly, raise the dolly again.
If the dolly is raised with the paper left on it, detection of rising dolly edge cannot be correctly
performed and it may cause the machine out of order.
(2) Start collation after setting the paper neatly on the paper feed table of the collator. If the paper is
not neatly set, the edges of the back end of the paper will not be aligned and paper jam at the
stacker will be liable to occur.
・Raising and lowering of the dolly
(1) When raiding it
When it is at the bottom: Press the UP key and the dolly will move up to the prescribed
position.
When raising it from halfway: It will keep moving up while the UP key is pressed.
(2) When lowering it
Press the DOWN key and the dolly will move down. When the DOWN key is pressed again, the
dolly will stop on the spot.
・How to load the paper when the stacker is used while connected with a single collator . Load the paper
on the paper feed table from the uppermost station.
Should the machine need repair, contact your dealer.
6. Maintenance, inspection, expendables
6.1 Important for maintenance and inspection
Danger
When conducting inspections and maintenance, be sure to remove the power plug from the outlet.
If not, it may cause injury or electric shock.
6.2 Daily maintenance
・Cleaning the exterior
Wipe off any stains using a cloth dampened with diluted neutral detergent and wrung tightly.
Caution!
Do not use solvent cleaning liquids as they may cause discoloring.
- 12 -
Page 14

7. Relocation or Disposal
7.1 Relocation
7.1.1 Removal of the machine from its present location
Be sure to pull out the power plug from the collator.
Remove the stapler-puncher from the collator.
7.1.2 Transport
・Transport the removed parts, attachments and Operation Manual together with the machine.
・Take care not to expose the collator to strong vibration or shock.
7.1.3 Installation
When installing the collator at its new location, observe the same procedure as when first installing it.
7.2 Disposal
When disposing of the collator, ask a contractor specialized in industrial waste disposal to handle it in
accordance to the ordinance of each municipality.
8. Product Specifications
8.1 Specifications
Paper stacking method Crisscross and straight stacking (to be switched)
Stacking capacity 320 mm (about 3,200 sheets of woodfree 55kg paper)
Paper size A5 to A3SR
148 × 210 mm to 320 × 450 mm
Paper quality Woodfree paper, medium-quality paper, woodfree perforated paper (788 ×
1,091, 45 –110 kg)
Crisscross method 25 mm transverse slide crisscross
Processing capacity In case A4 paper is used (with the shorter side at the top)
When connected with a single collator:
High-speed = 42 sets /low-speed = 32 sets per minute
When connected with connected collators:
High-speed = 27 sets /low-speed = 20 sets per minute
Power consumption 0.6A 50W
Dimensions 698(W) × 615(D) × 805(H) mm
Weight Machine body: 51 kg
Forceful ejector: 2.7 kg
Additional functions Detection of stacking paper jam
Stacking full detection
Enable to position the table at any height
Detection of dolly
Instant stop in case of irregularity in the collator
NOTE: Specifications and appearance are subject to change without notice for improvement
- 13 -
Page 15

- 14 -
Page 16

- 15 -
 Loading...