

Page 1
Air Feed Collator Model 100
Set Stacker Model 101
High Capacity Stacker Model 101
Operator Manual
November 2001
Part No. 14447
Page 2

Page 3

1. Introduction
Table of contents
1.1 Operational Safety
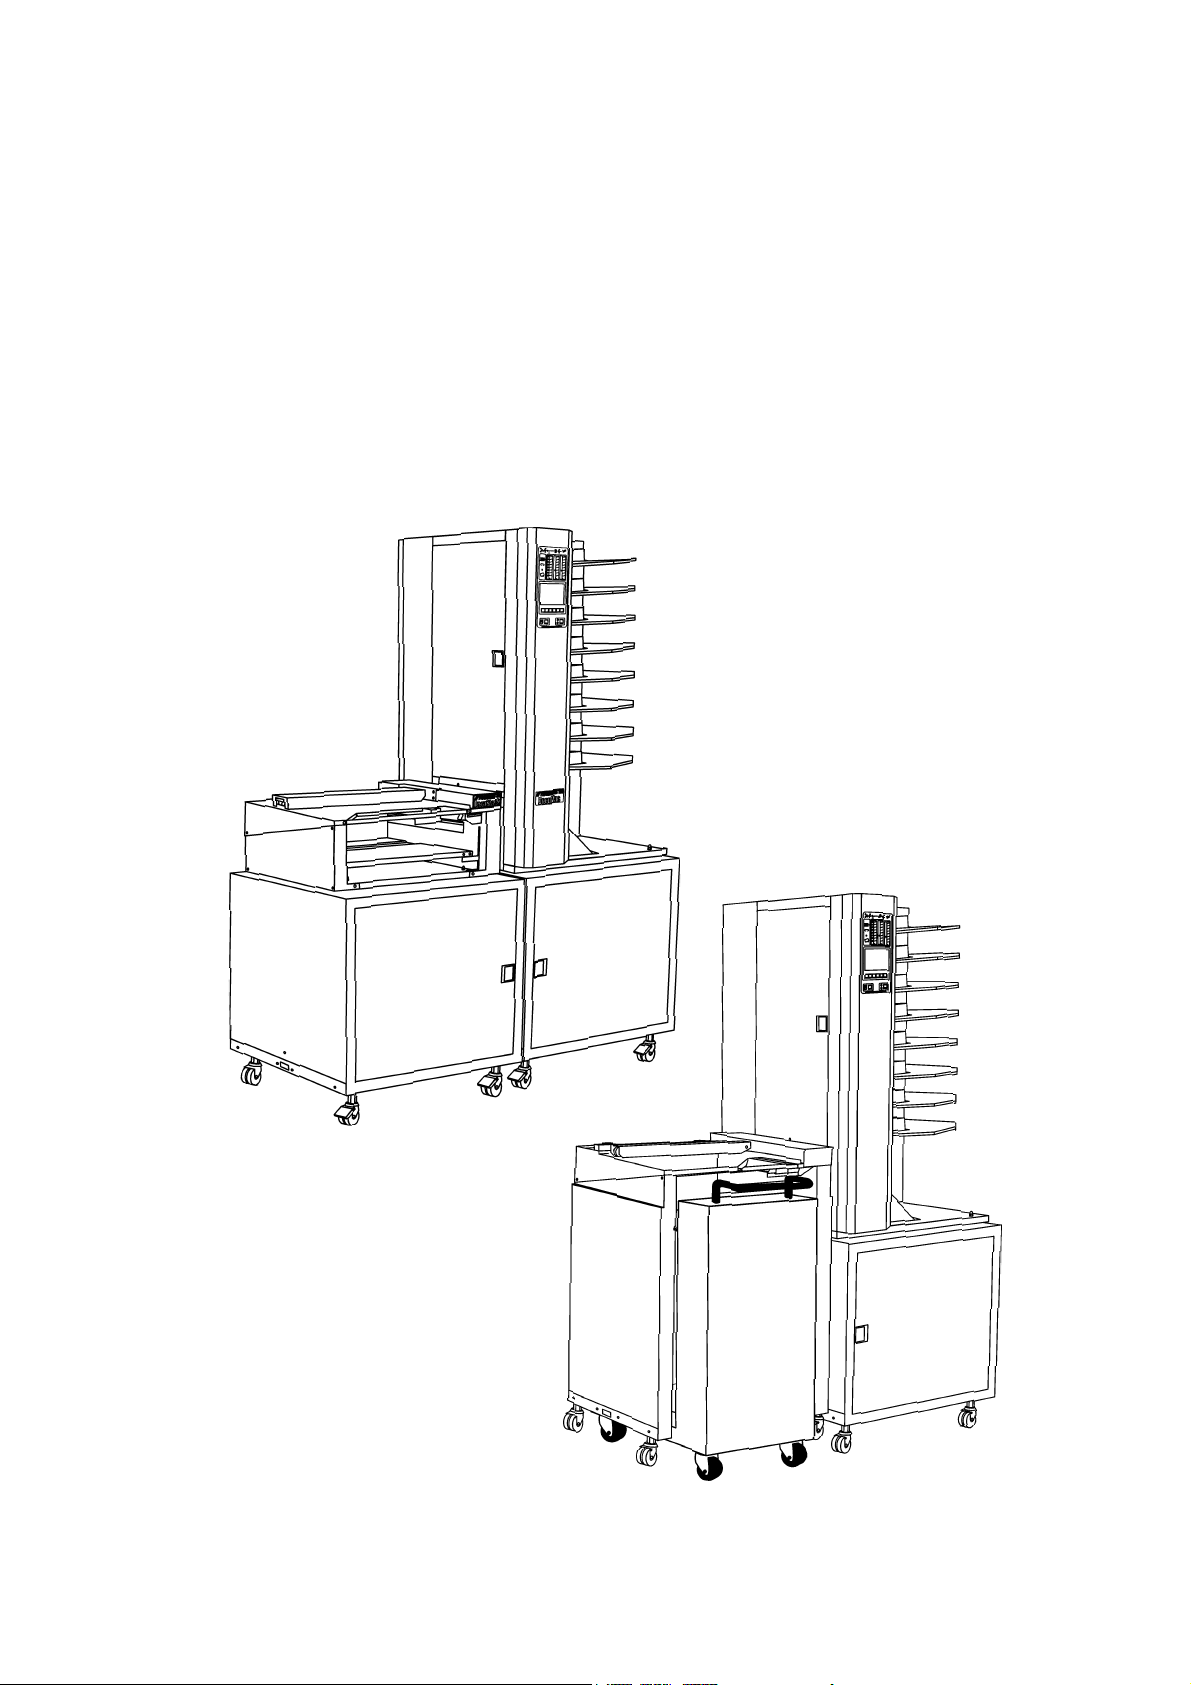
2. Getting to know the Model 100, 101, 101 HCS
2.1 Main Components, Model 100
2.2 Main Components, Model 101
2.3 Main Components, Model 101 HCS
3. Operator instructions
3.1 Adjusting the LCD display contrast
3.2 One, two or three collators
3.3 Setting up and loading Model 100
3.4 Docking the Lift
3.5 Using the fan
3.6 Running a job
4. The Menus
4.1 Programs
4.1.1 Alternate bin 1+2
4.1.2 Alternate bin mode
4.1.3 Block mode
4.1.4 Insertion sheet mode
4.1.5 Bin select mode
4.2 Statistics
4.3 Stored jobs
4.4 Preset counter
4.5 Reset
4.6 Added features
4.7 Select calibration mode
4.8 Error screens
1-1
2-1
2-4
2-5
3-1
3-1
3-2
3-4
3-4
3-5
4-1
4-1
4-2
4-2
4-3
4-3
4-4
4-4
4-5
4-6
4-6
4-7
4-8
5. Troubleshooting
5.1 Trouble shooting
6. Specifications
6.1 Specifications
Air Feed Collator Model 100, Stacker Model 101, Model 101 HCS Operator Manual
T10127 November 2001
5-1
6-1
i
Page 4

1. Introduction
1.1 Operational safety
Attention to the following notes ensures the continued safe operation of your
equipment.
Always connect the equipment to a
properly grounded power source receptacle. In doubt, have the receptacle
checked by a qualified electrician.
WARNING: Improper connection of the
equipment grounding conductor can
result in electrical shock.
Always follow all warnings marked on,
or supplied with, the equipment.
Always locate the equipment on a
solid support surface with adequate
strength for the weight of the machine.
Always exercise care in moving or
relocating the equipment.
Always keep magnets and all devices
with strong magnetic field away from
the machine.
Never use a ground adapter plug to
connect the equipment to a power
source receptacle that lacks a ground
connection terminal.
Never attempt any maintenance function that is not specifically described in
this documentation.
Never remove the covers or guards
that are fastened with screws.
Never install the unit near a radiator or
any other heat source.
Never override or “cheat” electrical or
mechanical interlock devices.
Never operate the equipment if you
notice unusual noises or odours. Disconnect the power cord from the power
source receptacle and call your customer service engineer to correct the
problem.
Air Feed Collator Model 100, Stacker Model 101, Model 101 HCS Operator Manual
T10127 November 2001
1-1
Page 5
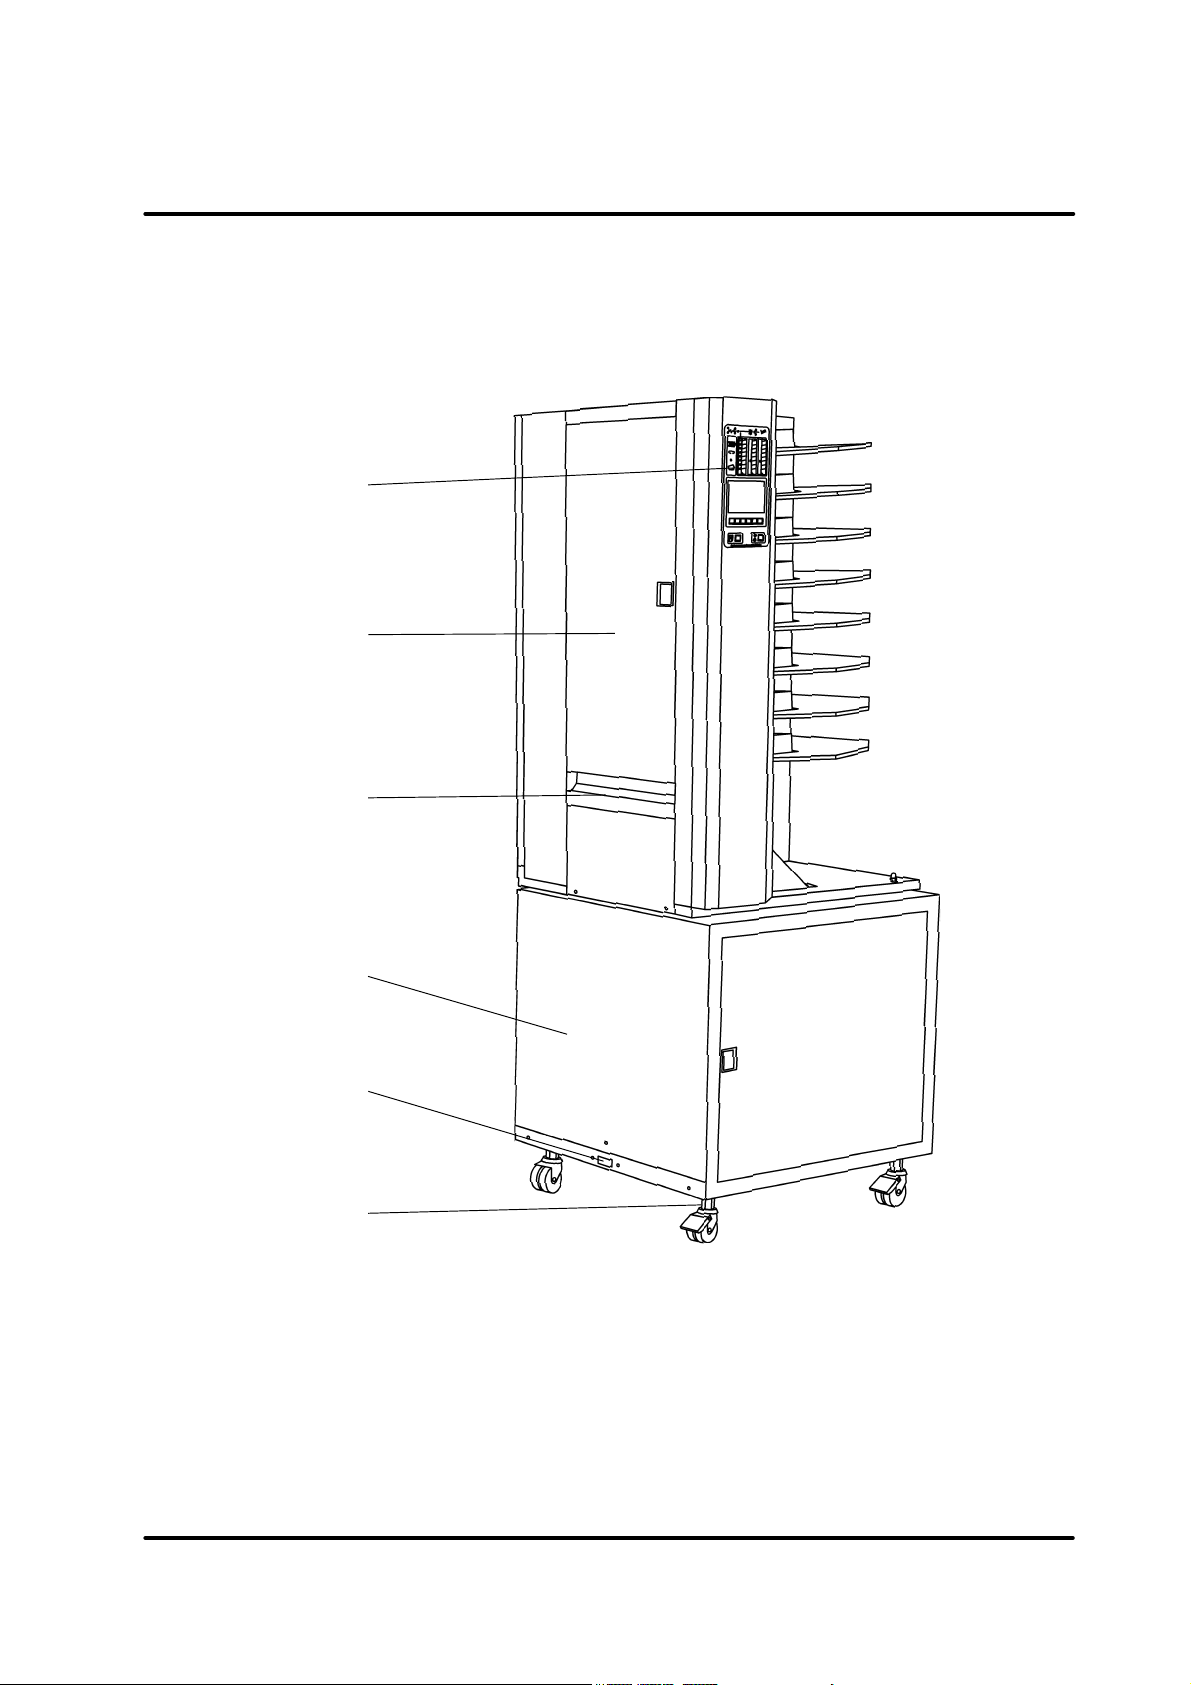
2. Getting to know the Model 100, 101
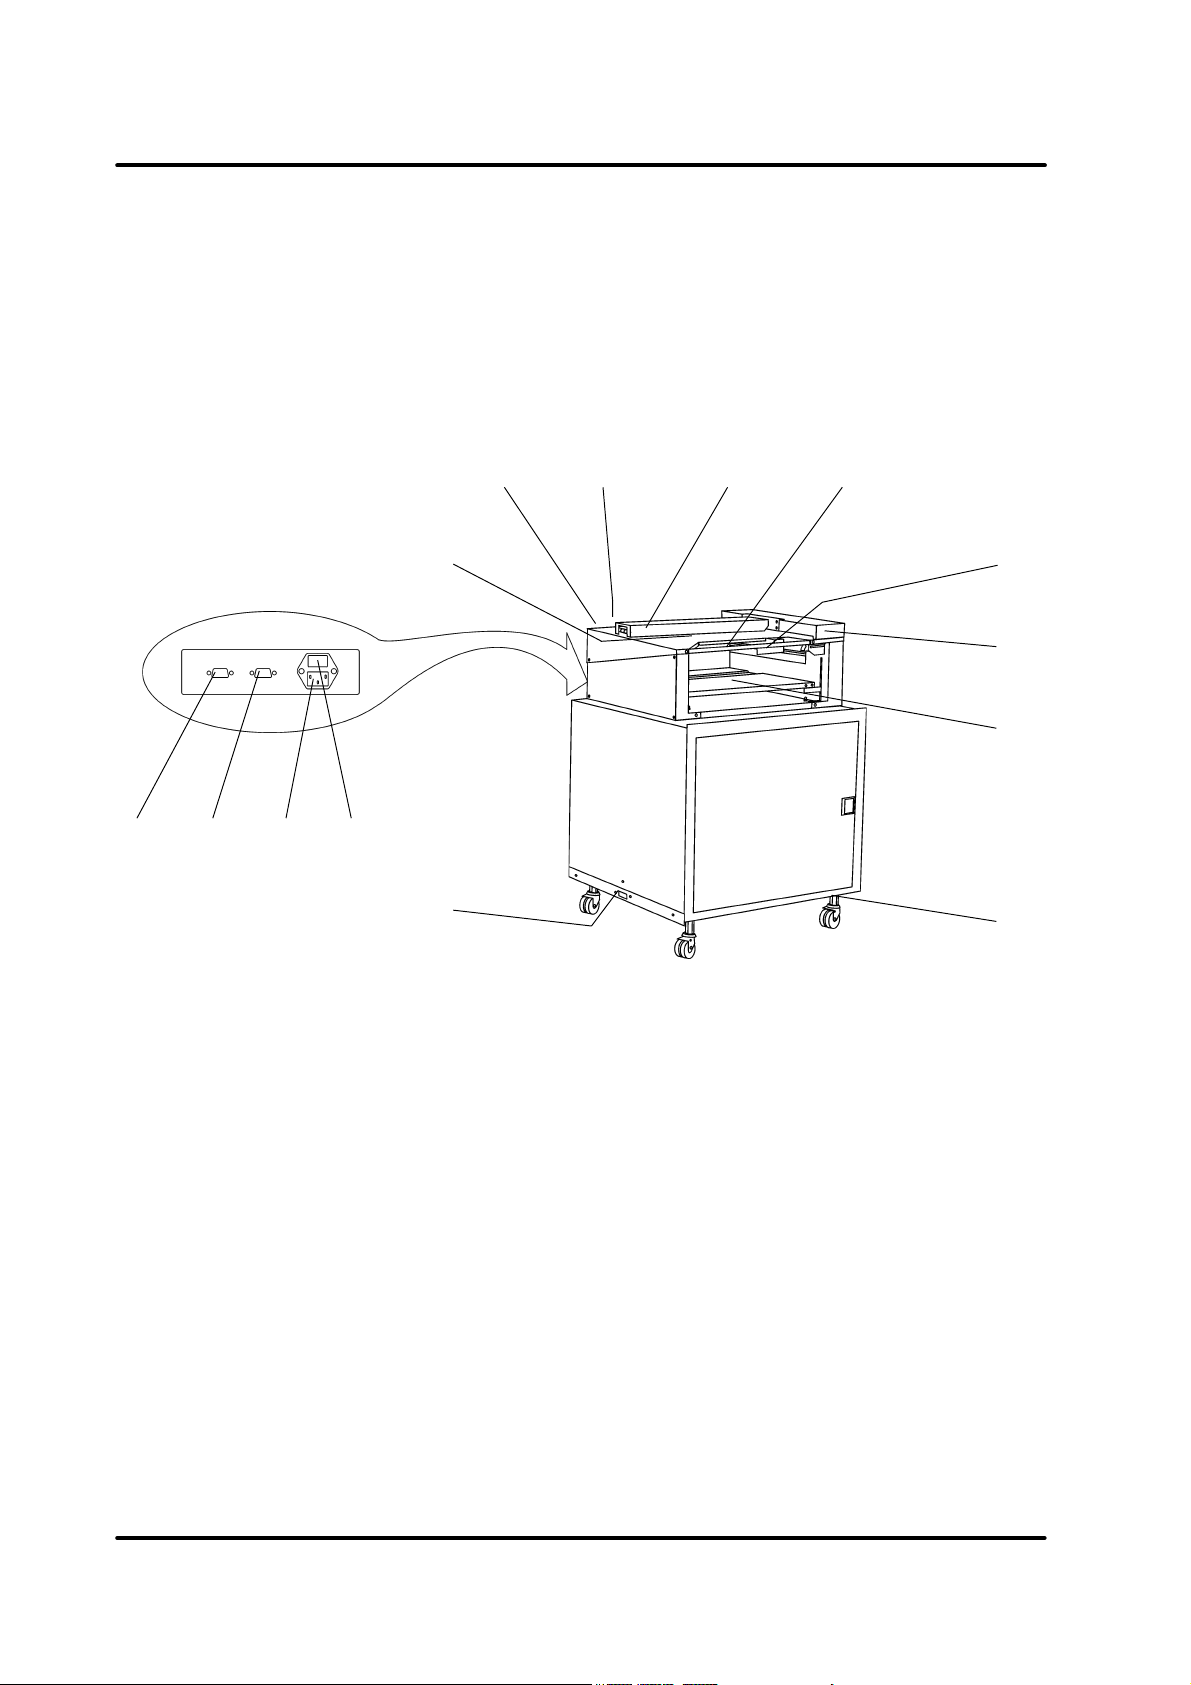
2.1 Main components, Model 100
1
2
3
4
5
6
1 Control panel (not present on second or third collator)
2 Conveyor door
3 Outfeed area
4 Base (optional)
5 Docking latch
6 Height adjustment
Air Feed Collator Model 100, Stacker Model 101, Model 101 HCS Operator Manual
T10127 November 2001
2-1
Page 6
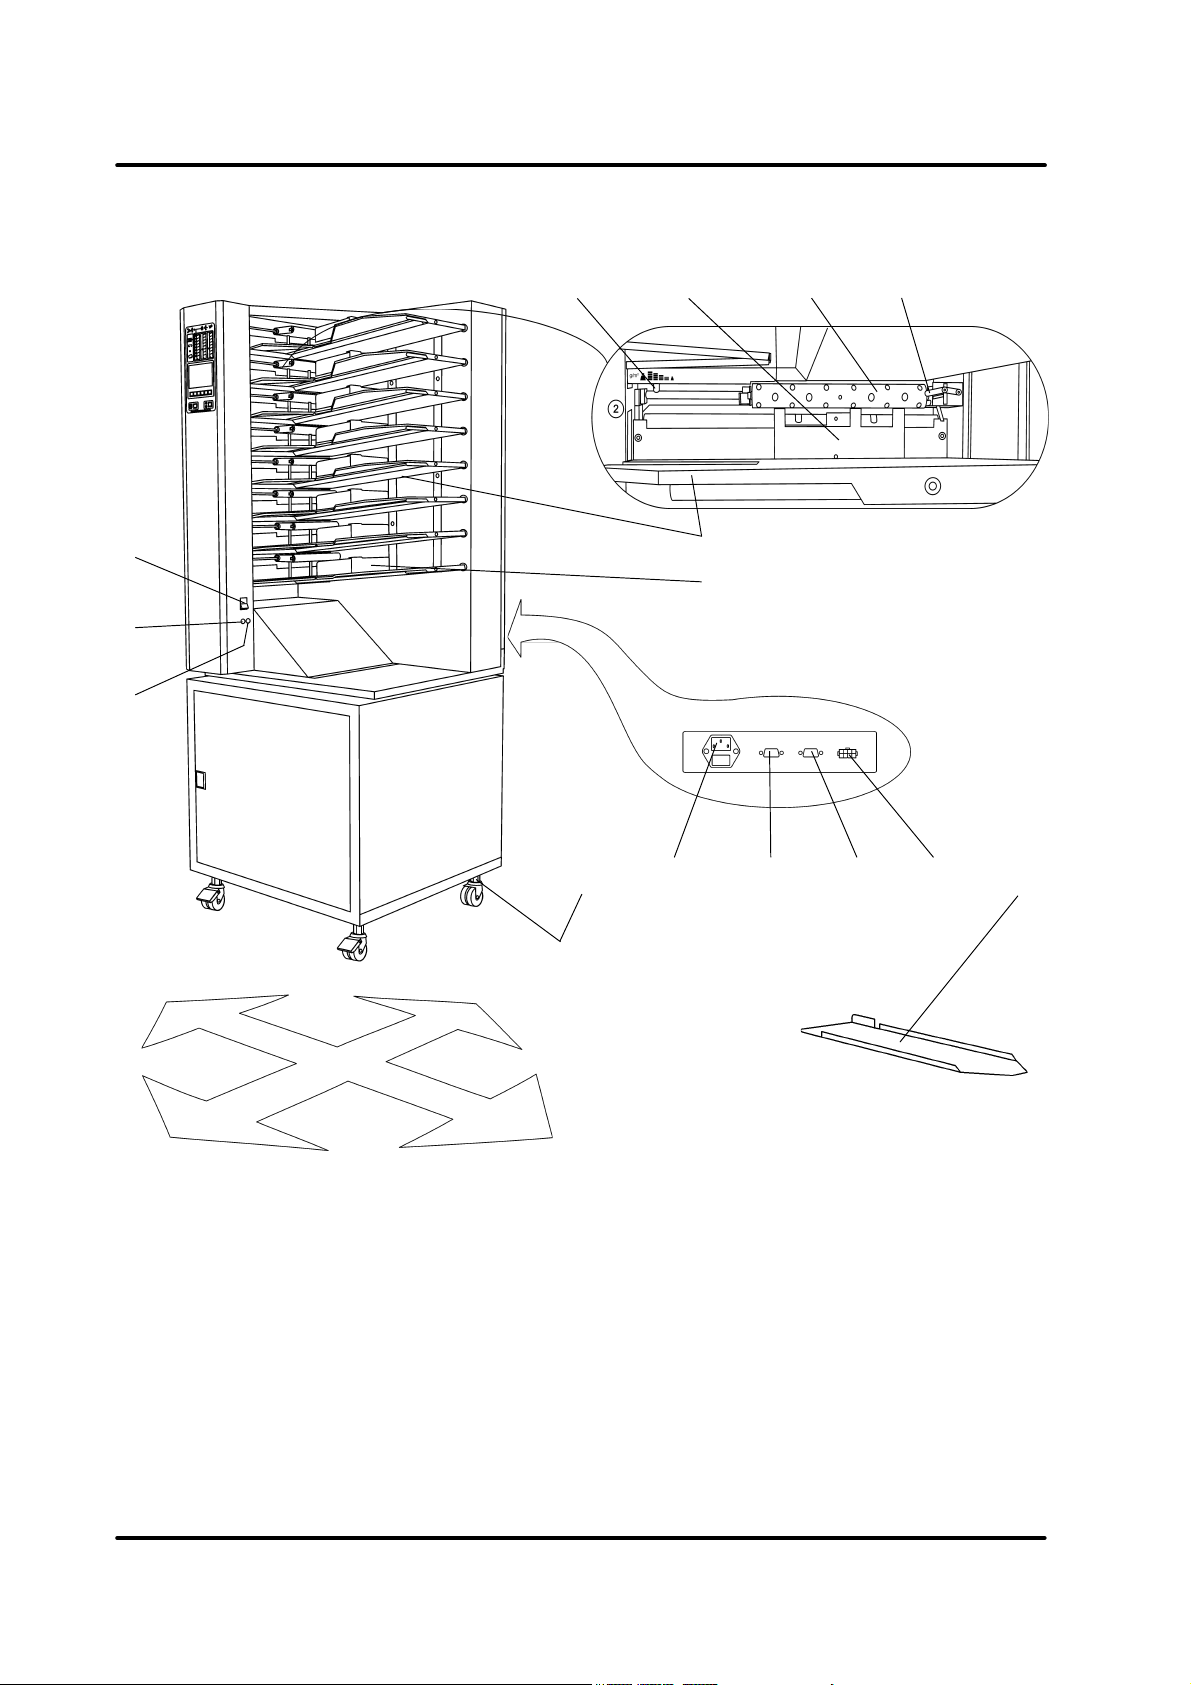
2.1 Main components, Model 100, cont.
465 7
1
2
3
left side
rear side
11
8
9
12 13
14 1510
front side
1 Main power switch
2 Fuse
3 Fuse
4 Stop fingers adjustment lever
5 Stop finger assembly
6 Suction belt
7 Bin height switch lever
8 Bin
9 Paper positioning stop
10 Height adjustment
11 Power cord receptacle
right side
12 Secondary unit connector
(i.e. secondary unit collator)
NOTE: If no secondary unit is used, jumper plug
part No. 140226 (female) has to be connected.
13 Third party device connector
(i.e. stacker, stapler/folder)
14 Power receptacle for conveyor bridge
(only on B and C collators in double or
tripple collator systems)
15 A5 (5.5”) plate
Air Feed Collator Model 100, Stacker Model 101, Model 101 HCS Operator Manual
T10127 November 2001
2-2
Page 7
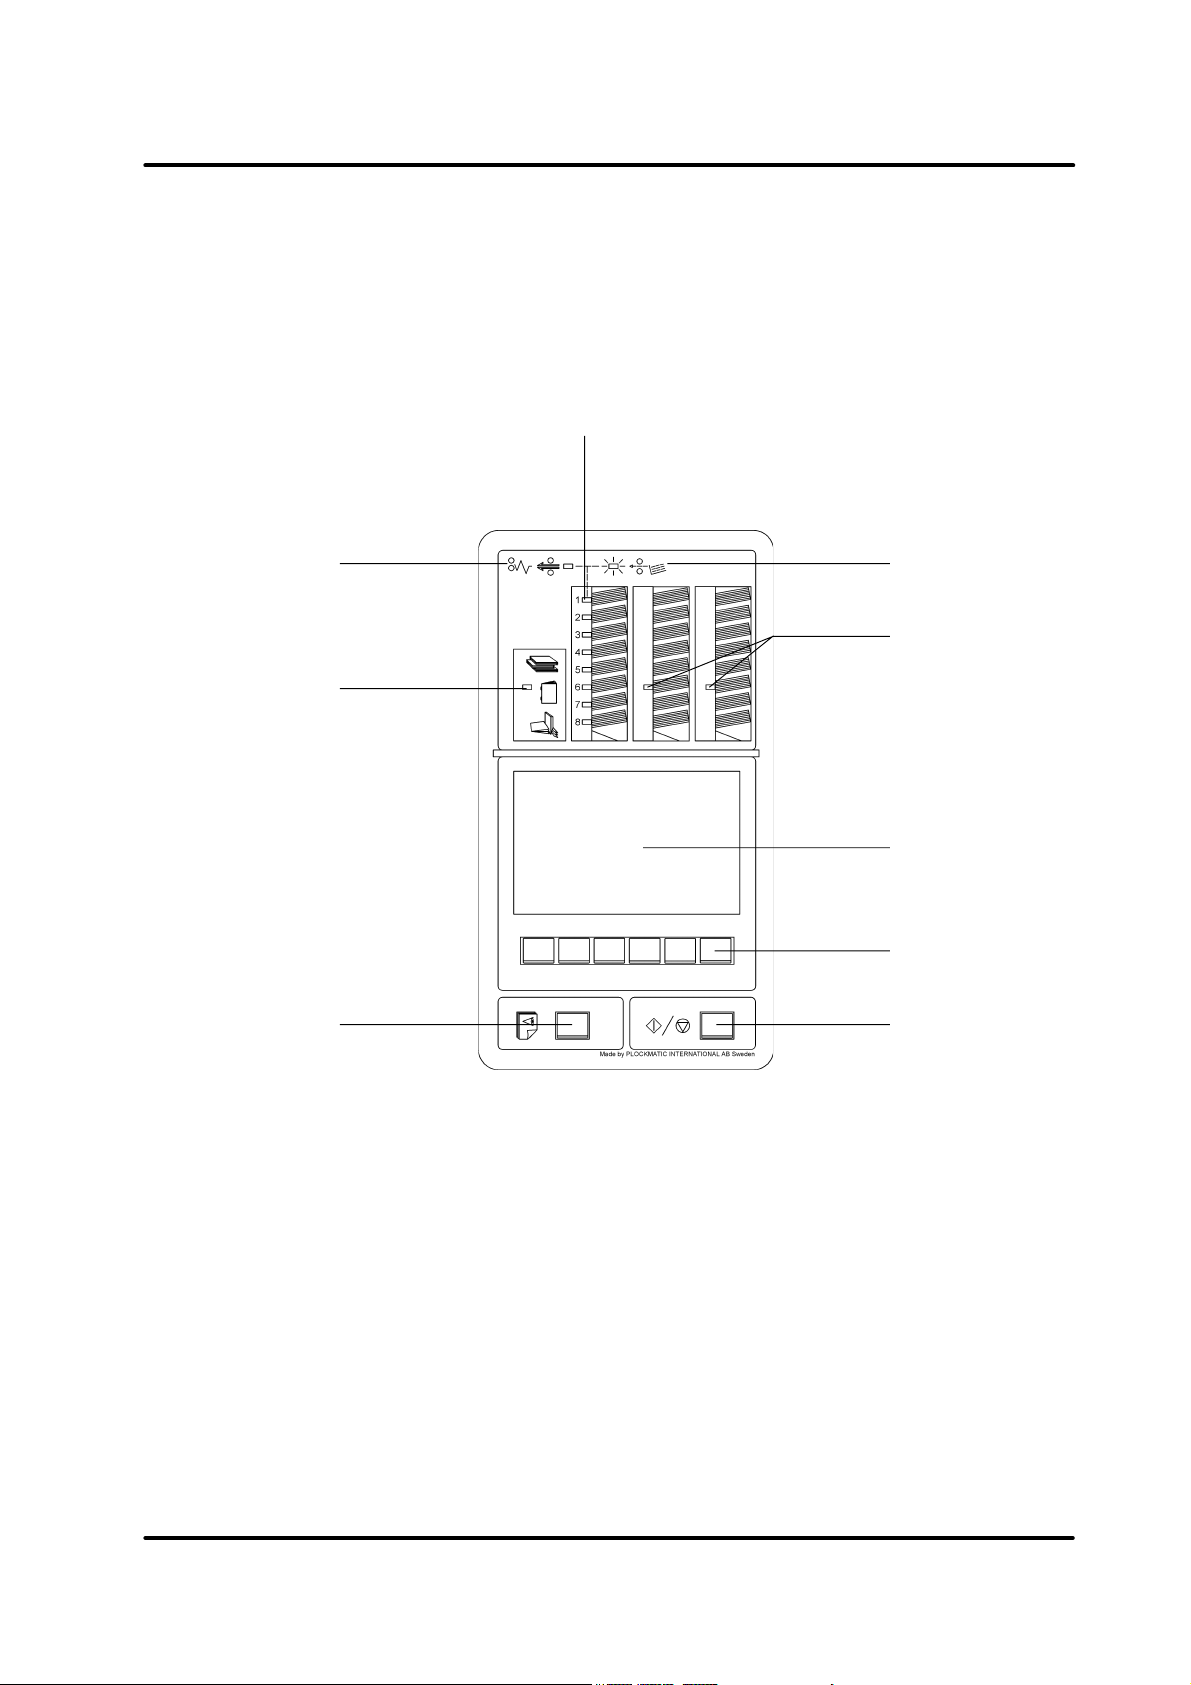
2.1 Main components, Model 100, cont.
4
3
2
1
5
6
7
8
9
1 Set up guide button
2 Third party device error message
indicator
3 Double feed / paper jam symbol
(shown by bin indicator - firm light)
4 Bin indicator
5 Misfeed / empty bin symbol
(shown by bin indicator - flashing)
Air Feed Collator Model 100, Stacker Model 101, Model 101 HCS Operator Manual
T10127 November 2001
6 Second / third collator error
message indicator
7 LCD display
8 Multi function buttons
9 Start / stop button
2-3
Page 8
2.2 Main components, Model 101
132 4
7
6
9810
11
12
13
5
14
1 Collator connector
2 Third party device connector
(i.e. stapler/folder)
NOTE: If no third party device unit is used,
jumper plug part No. 140227 (male)
has to be connected.
3 Power cord receptacle
4 Fuse
5 Docking latch
6 Bypass paper path
7 Bar
8 Main power switch
9 Idler roller bar
10 Opening handle
11 Paper guide (man. adjust.)
12 Top cover
13 Document table
14 Height adjustment
Air Feed Collator Model 100, Stacker Model 101, Model 101 HCS Operator Manual
T10127 November 2001
2-4
Page 9
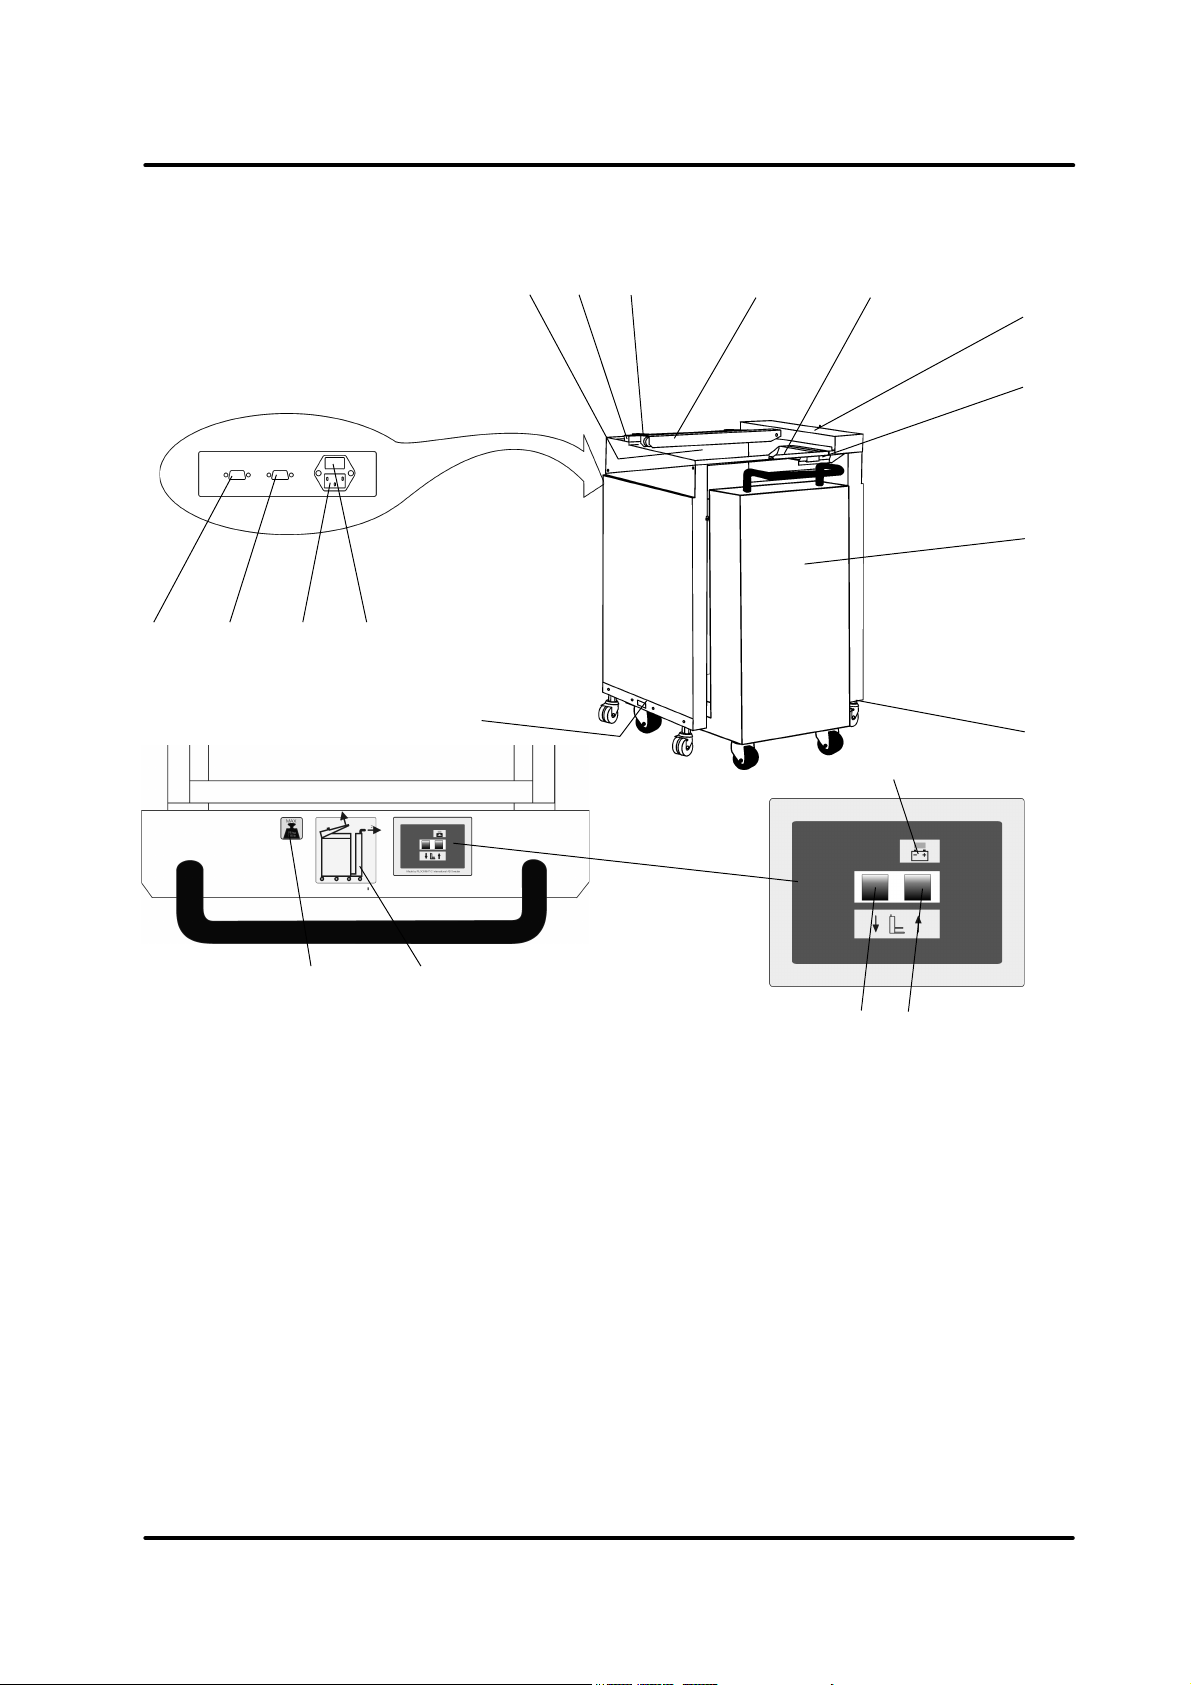
2.3 Main components, High Capacity Stacker Model 101
7
6
132 4
8
9
10
11
12
13
5
15
16
1 Collator connector
2 Third party device connector
(i.e. stapler/folder)
NOTE: If no third party device unit is used,
jumper plug part No. 140227 (male)
has to be connected.
3 Power cord receptacle
4 Fuse
5 Docking latch
6 Bypass paper path
7 Bar
8 Main power switch
17
19
18
9 Idler roller bar
10 Opening handle
11 Top cover
12 Paper guide (man. adjust.)
13 Lift, document table including
14 Height adjustment
15 Maximum load sign
16 Docking instruction sign
17 Lowering Lift button
18 Elevating Lift button
19 Battery indicator
14
Air Feed Collator Model 100, Stacker Model 101, Model 101 HCS Operator Manual
T10127 November 2001
2-5
Page 10

3. Operator instructions
Most settings and adjustments are operated from the control panel using the multi function
buttons. The actual function of the buttons in each menu will be indicated by an icon above the
corresponding button.
Note: The settings for the last job will be erased when switching off the power or changing to a
different job. Store the job in order to easily recover your settings.
3.1 Adjusting the LCD display contrast
Switch on the power with the main power switch. The Main
Menu will appear in the LCD display. Increase/decrease the
contrast of the LCD display by pressing the contrast adjustment buttons.
contrast adjustment
buttons
3.2 One, two or three collators
Several menus, for example the BLOCK MODE menu,
shows that there is a possibility to use two or three collators.
Until additional collators are installed in the system, these
options will be displayed in grey to show that they are not
accessible.
The collator closest to the stacker or bookletmaker is called
the A tower. All programming, for the two or three collator
system, is done from this A tower that is the only collator in
the system with a display.
Air Feed Collator Model 100, Stacker Model 101, Model 101 HCS Operator Manual
T10127 November 2001
3-1
Page 11

3.3 Setting up and loading Model 100
Before loading the bins make sure that the sheets are well
fanned, aligned and that the ink has dried out. Load the
sheets into the bins so that all the sheets are in contact with
the stop finger assembly (left side) and the main frame (rear
side). Place the paper positioning stops as shown in the
figure.
bi n sheets paper positioning
stop
A5 plate
Stop finger adjustment lever
The suction area should be limited when running A5 (5.5” x 8.5”)
by inserting the A5 plate inbetween the suction belt and the
suction belt assembly on the bottom side.
132
Air Feed Collator Model 100, Stacker Model 101, Model 101 HCS Operator Manual
T10127 November 2001
3-2
Page 12

3.3 Setting up and loading Model 100, cont.
Recommendations in table below are only guide lines to get started. The adjustments can vary a
lot depending on paper quality, print quality, air humidity etc.
senilediuGpu-teS
ezisrepaPytilauQthgiewrepaPolfriAw noitisopregnifpotShctiwsthgiehniB
5ArepapypoCmsg08%561 lamroN
4ArepapypoCmsg08%061 lamroN
epacsdnaL4ArepapypoCmsg08%561 lamroN
3AkcotskcihTmsg042%0014 reppU
3ARSrepapypoCmsg08%061 lamroN
-dnaL"11x"5.8
dnoBbl02%551 lamroN
tiartrop/epacs
"41x"5.8repapypoCmsg08%061 lamroN
"71x"11repapypoCmsg06%551 lamroN
"71x"11kcotsdetaoCmsg001%0012/11lamroN
If miss or double feeding occurs when a job is set up according to table, adjust according to
below:
Air flow
• Increase if miss feeding
• Decrease if double feeding
Stop finger position
• Increase gap by moving the lever to the left if misfeeding
• Decrease gap by moving the lever to the right if
doublefeeding
stop fingers in position 3
For mixed jobs
papers are loaded
* - move lever to the left in bins where thicker
Bin height switch
• Move lever upwards if misfeeding
• Move lever downwards if doublefeeding
For mixed jobs
papers are loaded
bin height switch in normal position
Air Feed Collator Model 100, Stacker Model 101, Model 101 HCS Operator Manual
T10127 November 2001
*The difference in paper weight between cover sheets and
bodysheets should not exceed 100 gsm.
* - move lever upwards in bins where heavier
3-3
Page 13

3.4 Docking the Lift
When pushing the lift into the Model 101 HCS, it is not
necessary to open the top cover. The lift will automatically lock to the Model 101 HCS while pushed in.
However, make sure that the lift is not in the uppermost position to avoid damaging the paper guide in
the cover. Also be careful while pushing in the lift in to
avoid damaging the electrical connector located on
the right leg of the lift.
To pull out the lift,first lift the top cover on the Model
101 HCS.
Note: When not using the
Model 101 HCS for longer
time, leave the Lift docked
to the Model 101 HCS. Do
not disconnect the power
cord, otherwise the compensation charge does not
work.
3.5 Using the fan
Normally the fan should be switched off.
Switch on the fan to facilitate stacking of static
sheets.
Lift the top cover to access the switch located on the
right side (1) of the Model 101 HCS.
The fan only operates when the system is running.
1
Air Feed Collator Model 100, Stacker Model 101, Model 101 HCS Operator Manual 3-4
T10127 November 2001
Page 14

3.6 Running a job
To ensure that any earlier program settings does not interfere
with your job, reset according to section 4.5.
Note: Do not reset if you have started programming according to
section 4.1 or loaded a stored job according to section 4.3.
To start a job - just press the yellow set up guide button from
the main menu.
Select calibrate mode by using the arrow buttons and press
the ”OK” button. For details, see section 4.7.
Note: The calibration set does not affect the insertion sheet
counter, preset counter or set counter.
Select standard format by using the left/right arrow buttons.
To use custom format or to change direction between landscape/portrait, select item with the up/down arrow buttons
and adjust with the left/right arrow buttons.
Press the ”OK” button.
If calibrate mode “STRAIGHT STACKING” or “OFFSET
STACKING” is selected calibration will start.
If calibrate mode ”STRAIGHT STACKING” or ”OFFSET STACKING” was selected
The calibrated set will stop on the bypass paper path of the
Model 101/101 HCS.
Viewed from above, slide the paper guide so that there will
bee a slight gap between the innermost edge of the paper
guide and the outermost edge of the set.
Remove the set and check that it is OK .
Note 1 : If the calibrated set does not have the correct number
of sheets, restart the calibration by pressing the yellow
setup guide button.
Note 2: When the job is started and the sets are fed into the
stacker, the gap should be minimized, but not to
narrow to avoid paper jam.
paper guide
If calibrate mode ”BOOKLET MAKING” was selected
A message on the display will appear asking:
”IS BOOKLETMAKER SETUP PERFORMED?”. Check that
the booklet maker is adjusted to correct paper size. If necessary, check booklet maker operator manual for details. Press
the ”OK” button to start calibration.
Air Feed Collator Model 100, Stacker Model 101, Model 101 HCS Operator Manual
T10127 November 2001
3-5
Page 15

3.6 Running a job, cont.
If calibrate mode ”BOOKLET MAKING” was selected, cont.
The calibrated set will stop in the bookletmaker before it has been stapled and folded. You have
two ways to check the calibrated set.
A Press the purge button on the display of the Model 100. The set will be stapled,
folded and ejected from the booklet maker. Check the calibrated set.
B Open the top cover of the booklet maker to check/remove the calibrated set.
Note: If the calibrated set does not have the correct number of sheets, restart the calibration
by pressing the yellow setup guide button.
Regardless of which calibrate mode was selected
If running a slightly absorbing paper, such as a thick paper, a
message “CHECK SET. IS SET OK?” can appear on the
display. Check the calibrated set according to above. If the
set is OK, press the “YES” button and a second calibration
will be performed. Check the second calibrated set according
to above. If the set is not OK, press the “NO” button and the
calibration will be repeated.
Note: The message “DSD Off”can be displayed if an extremely
light absorbing and/or thick paper is used. This means that the
optical double sheet detection now is limited. However, the
lengthwise double sheet detection is still fully functional.
After a successfully performed calibration the message
”CALIBRATION DONE” will be shown. Press the ”ST” button
if you want to store the calibrated job now. You can also store
the job later after the job is finished or during* the job, until
the “ESC” button is pressed.
To run the job, press the green start/stop button.
*To store the running job, first press the green button to stop
the job.
Frequently used settings can be stored as “jobs”. Up to 100
different jobs can be stored. This menu shows you jobs that
are already programmed and positions that still are free. Use
the arrow buttons to select “EMPTY” to store or “PROGRAMMED” to overwrite an old job. Press the “OK” button to
confirm. If you want to see information about a certain job,
press the “info” button. Press the “info” button again to return
to the previous menu. To delete a stored job, press the “C”
button.
Air Feed Collator Model 100, Stacker Model 101, Model 101 HCS Operator Manual
T10127 November 2001
3-6
Page 16

4. The menus
4.1 Programs
To access the different programming possibilities select
“PROGRAMS” menu from the MAIN MENU and press the
“OK” button.
From the PROGRAMS
menu you can select
which actions you want
to use. Select and
press the “OK” button
to enter the corresponding submenu.
4.1.1 Alternate bin 1+2
Note: After selecting/changing any action the yellow or the
green button can be pressed to calibrate or to start the
job.
Enter the ALTERNATE BIN MODE 1+2 menu.
This program doubles the loading capacity of covers by
allowing you to load the cover sheets in both bin 1 and bin 2.
Use this program when the covers have a higher paper
weight than the body sheets. Select alternate bin mode 1+2
with the arrow buttons. Press the “OK” button to confirm.
Follow the procedure in “3.6 Running a job” to calibrate and
start the job.
Air Feed Collator Model 100, Stacker Model 101, Model 101 HCS Operator Manual
T10127 November 2001
4-1
Page 17

4.1.2 Alternate bin mode
Enter the ALTERNATE BIN MODE menu.
This program allows you to reload the collator while running
by loading the same sheet in two bins. As soon as any bin is
empty the collator automatically switches to the alternate
bins. With one collator it is possible to load up to 4 sheets per
set (with two collators - 8 sheets and with three collators up
to 12 sheets). Mark the total No. of bins to be used with the
arrow buttons. The marked bins will be shown inverted.
Press the “OK” button to confirm. Follow the procedure in
“3.6 Running a job” to calibrate and start the job.
Note 1: Load sheet one in bin 1 and bin 2, sheet two in bin 3
Note 2: After reloading, press the up arrow button to activate
and bin 4 and so on.
the reloaded bin/s to achieve continuous running.
4.1.3 Block mode
Enter the BLOCK MODE menu.
This program allows you to reload the collator while running
by loading the set twice in two separate blocks. When any of
the bins in one block become empty, the collator automatically switches to the other block. With one collator it is possible load up to 4 sheets per set (with two collators - 8 sheets
and with three collators up to 12 sheets).
Mark the number of bins to be used (i.e. the No. of sheets in
the set) in the first block with the arrow buttons. The marked
bins will be shown inverted. Press the “OK” button to confirm.
When the “OK” button is pressed the collator will suggest the
next bins to be used by showing them inverted. You may
select other bins than the suggested by moving the block
with the arrow buttons. Press the “OK” button to confirm.
Follow the procedure in “3.6 Running a job” to calibrate and
start the job.
Note 1: The example is shows how to run a set of two sheets.
Load sheet one in bin 1 (first block) and bin 3 (second
block). Sheet two should consequently be loaded in
bin 2 and bin 4.
Note 2: After reloading, press the up arrow button to activate
the reloaded bin/s and achieve continuous running.
Air Feed Collator Model 100, Stacker Model 101, Model 101 HCS Operator Manual
T10127 November 2001
4-2
Page 18

4.1.4 Insertion sheet mode
Enter the INSERTION SHEET MODE menu.
This program allows you to separate a stack of sets by using
an insertion sheet. Select the digit you want to change with
the left/right arrow buttons. The selected digit will be shown
inverted. With the up/down arrow buttons you can enter a
number between 0 - 9. Press the “OK” button to confirm.
Follow the procedure in “3.6 Running a job” to calibrate and
start the job. The calibration set does not affect the insertion
sheet mode counter. Insertion sheet mode can be combined
with any other program.
Note 1: The insertion sheets must be loaded in the next bin
Note 2: If “BLOCK MODE” is selected two bins with insertion
below the loaded set.
sheets must be used. Load the insertion sheets in the
next following bins of each block.
4.1.5 Bin select mode
cross button tick button
Enter the BIN SELECT MODE menu.
This program allows you to use empty bins for new jobs
without removing already loaded sheets. Use the arrow
buttons and press the “tick” button to activate the bins you
want to use for the new job. Selected bins will be shown
inverted. To deselect a bin, use the arrow buttons and press
the “cross” button. Load the sheets into the empty bins.
Press the “OK” button to confirm. Follow the procedure in
“3.6 Running a job” to calibrate and start the job.
Air Feed Collator Model 100, Stacker Model 101, Model 101 HCS Operator Manual
T10127 November 2001
4-3
Page 19

4.2 Statistics
Enter the STATISTICS menu.
This menu shows
statistics of the last
job.
Press the “ESC”
button to return to the
MAIN MENU. Each
calibration resets the
statistics.
4.3 Stored jobs
Enter the STORED JOBS menu.
Frequently used settings can be stored as “jobs”. Up to 100
different job can be
stored. This menu
shows you which
jobs that are already
programmed and
which positions that
still are free. Select
job with the arrow
buttons. Press the
“OK” button to load a
job. Follow the
procedure in “3.6
Running a job” to
calibrate and start the job.Press the “C” button to delete a
stored job.
Air Feed Collator Model 100, Stacker Model 101, Model 101 HCS Operator Manual
T10127 November 2001
4-4
Page 20

4.3 Stored jobs, continues
If you want to see information about a certain job, press the
“info” button from the STORED JOBS menu.
Press the “info”
button again to return
to the STORED
JOBS MENU or the
“C” button to erase
the job.
4.4 Preset counter
info button
To erase the job, confirm by pressing the ”OK” button.
Enter the PRESET COUNTER menu.
This program allows
you to stop the collator
after a certain number
of sets. Select the
digit you want to
change with the left/
right arrow buttons.
The digit subject to
change will be shown
inverted. With the up/
down arrow buttons
you can enter a
number between 0 - 9.
The calibration set does not affect the preset counter.
Press the “OK” button to confirm.
Air Feed Collator Model 100, Stacker Model 101, Model 101 HCS Operator Manual
T10127 November 2001
4-5
Page 21

4.5 Reset
4.6 Added features
Enter the “RESET” menu.
From this menu you
can choose to reset
”PROGRAMS”, ”PRESET COUNTER”, ”SET
COUNTER” or all three.
Press the ”ESC” button
to return to the MAIN
MENU or select item to
reset and press the
”OK” button.
To reset according to
selection, confirm by
pressing the ”OK” button.
Note 1: Do not reset if you have started programming accord-
ing to section 4.1 or loaded a stored job according to
section 4.3.
Note 2: Resetting “PROGRAMS” will erase the currently loaded
job or programmed settings.
Note 3: Resetting “PROGRAMS or resetting “ALL” does not
affect stored jobs.
Enter the ADDED FEATURES menu.
From this menu you can
adjust the speed, the air
flow, the overlap, change
the user interface language
and select double sheet
detection ON or OFF.
Select the item you want to
adjust with the up/down
arrow buttons. Change
setting with the left/right
arrow buttons. Collating
speed can be adjusted
from 1000 sph (sets per hour) to 3800 sph. Check the specification for the connected machines before changing the
speed. Air flow can be adjusted from 30% to 100%. If “AIR
FLOW A” is selected, also tower B and C will be adjusted.
Select “AIR FLOW B” and/ or “AIR FLOW C” to set the B and
C collators air flow individually.
NOTE: Also see section 3.6 and 5.1 for recommendations and
trouble shooting .
Air Feed Collator Model 100, Stacker Model 101, Model 101 HCS Operator Manual
T10127 November 2001
4-6
Page 22

4.6 Added features, continues
Overlap can be adjusted from -2 to 50, where 50 gives the
largest length in the set. Default value is 0. If problems are
experienced when jogging the sets in the booklet maker or
external unit, the overlap value can be changed.
For static sheets run into stacker, decrease value to -2 to get
a better stacking result.
For static sheets run into booklet maker, increase value if
sheets are not properly jogged.
small overlap value
large overlap value
If the opacity of the sheets varies so much that the Model 100
indicates false doubles, the detection can be switched OFF. If
switched OFF all bin are effected. The length double
detection are still functioning though.
NOTE: If a thin line is located exactly at the position of the
4.7 Select calibration mode
This menu appears when the yellow Setup Guide button is
pressed
sensor (17mm from inner edge) the Model 100 can also
indicate false double. In that case the sheets in the bin
can be turned 180 degrees, rather than switing the
double detection OFF.
Select “BOOKLETMAKING” to deliver the set to the booklet
maker.
Select “STRAIGHT STACKING” or “OFFSET STACKING” to
deliver the set to the stacker.
“EXTERNAL UNIT” should be selected to deliver the set to
any other, to the system not connected unit.
Air Feed Collator Model 100, Stacker Model 101, Model 101 HCS Operator Manual
T10127 November 2001
4-7
Page 23

4.8 Error screens
This example error screen shows that at collator No. 1 (the A
tower), a number of errors has occurred.
Double feed from bin 1, misfeed from bin 3 and jam in bin 5.
See section 5.1 for how to correct these problems before the
the system is restarted.
You can also see that bin 8 is empty and need to be reloaded.
This error screen tells you that the stacker is full. Open the
top cover, empty the stacker before the system is restarted.
This error screen tells you that there is a jam in the stacker.
Open the top cover and clear the stacker from jammed
sheets.
• Check that the stacker is properly set up according to
section 3.6 and restart the system.
• If the problem persists, the machines may have been
misaligned (moved) after installation and therefore causes
the set to jam. Call service to have the system aligned
according to the installation instruction.
This error screen tells you that there is jam at the booklet
maker or trimmer. Check the control panels at the booklet
maker and trimmer to see what caused the problem. If necessary, consult the booklet maker and/or trimmer operator
manual for how to correct the problem.
Air Feed Collator Model 100, Stacker Model 101, Model 101 HCS Operator Manual 4-8
T10127 November 2001
Page 24

4.8 Error screens cont.
This error message will be displayed if the Model 100 or
Model 101 has a malfunction.
Note which machine has the malfunction (i.e. PL100) and the
malfunction code (i.e. 030).
• Malfuntion code 009-014 can be generated by a temporar-
ily low voltage supply. Switch off the machines and try
switching them on later on or try using another wall outlet.
• Malfunction code 040-047 can be generated by strong
incoming light. Block or redirect light sources such as sun
light, spot lights etc.
If above does not correct the problem - call service and
report which machine and malfunction code that was
displayed.
This error screen tells you that the Lift is not docked into
Model 101 HCS. Check that the Lift is correctly docked to the
Model 101 HCS.
Air Feed Collator Model 100, Stacker Model 101, Model 101 HCS Operator Manual
T10127 November 2001
4-9
Page 25

5. Trouble shooting
5.1 Trouble shooting
melborPesuacelbissoPnoitcA
rognideefsiM
.maj
.dedaol
.wol
.wolfriawolooTehtniriafotnuomaehtesaercnI SERUTAEFDEDDA
.unem
sregnifpotS
ootdetsujda
ehtotesolc
.tlebnoitcus
.setalp5A5Agninnurnehwdesuebtsumsetalp5AehT
repaphcumooT
kcotsrepaP
.dedaolylroop
.srepapdelkcuBtnereffidneewtebkcotsrepapehtgnivomdoivA
ootthgiehniB
.tfelehtotrevel
.decuder
.ecivresdeenyam
tnemtsujdasregnifpotSehtgnivomybpagehtesaercnI
nehwdevomerebtsumdnatamrofrepap)"5.8x"5.5(
.repap)rediw(regralgninnur
thgiewyvaehyllaicepse,seitilauqrepapemosroF
ebotdeenyamdedaolrepapfotnuomaehtrepap
erasteehsllatahtosdengilallewkcotsrepapehtdaoL
ehtdna)tfel(ylbmessasregnifpotsehthtiwtcatnocni
.ecalpnisipotsrepapehterusekaM.)raer(emarfniam
ledoMehT.gnitnirpehtretfadnaerofebhtobsetamilc
retnirpehtsamooremasehtnidetacolebdluohs001
retnirpeht,seunitnocmelborpfI.melborpsihtdoivaot
.sdrawpurevelhctiwsthgiehnibehtevoM
gnideefelbuoD.wolfriahgihooTehtniriafotnuomaehtesaerceD SERUTAEFDEDDA
.unem
sregnifpotS
rafootdetsujda
ehtmorftrapa
.tlebnoitcus
repaptnereffiD
dedaolseitilauq
.nibemasehtni
kcotsrepaP
dedaolylroop
ootthgiehniB
.hgih
dekcodnutfiL
detacidni
.dekcod
yltcerroctontfiL
.thgirehtotrevel
.teehsotteehsmorfdengilalleweboslatsum
.sdrawnwodrevelhctiwsthgiehnibehtevoM
noitcennocoN
tfiLneewteb
.gnikcodnehw
tnemtsujdasregnifpotsehtgnivomybpagehtesaerceD
emasehtfoeranibehtnisrepapehttahterusekaM
tnirpehT.tnirpemasehtsahdnathgiewrepap,ezis
erasteehsllatahtosdengilallewkcotsrepapehtdaoL
ehtdna)tfel(ylbmessasregnifpotsehthtiwtcatnocni
.ecalpnisipotsrepapehterusekaM.)raer(emarfniam
kcehC.dekcodyltcerrocsitfiLehttahterusekaM
.tfiLehtfogelthgirehtnorotcennocehttaegamad
gnithgilsipmalrotacidniyrettabehttahtkcehC
SCHdna
tcerrocnI
ehtrognikcats
tonodsteehs
laicepsgnisU
rokciht,repap
.edisdnah
thgirehtnonafehtnonrutdnarevocehtnepO
.repapniht
repapehthcaer
.pots
Air Feed Collator Model 100, Stacker Model 101, Model 101 HCS Operator Manual
T10127 November 2001
5-1
Page 26

6. Specifications
6.1 Specifications
SNOITACIFICEPS001LEDOM
snibforebmuN 8
yticapacniB "1mm04
ezisteehSniM
xaM
thgiewrepaPniM
xaM
deepS otpuelbatsujdA
rotceteddeefelbuoD seY
rotceteddeefssiM seY
rotcetednibytpmE seY
rotcetedmajrepaP seY
retnuocteS stigid5
retnuocteserP seY
sdomrotalloC 5
msinahcemgnideeF tlebmuucaV
)DxWxH(snoisnemiD mm716x946x9001
thgieW bl022gk001
SNOITACIFICEPSSCH101/101ledoM
gnikcatS thgiarts/tesffO
9
/
61
1
"5mm012x041
/2"8x1/
4
3
"11mm074x523
/
"81x1/
4
2
msg05
msg042
ruoh/stes0083
3
/
"52x1/2"42x5/
"93
4
61
yticapaC
101ledoM
SCH101ledoM
ezisrepaPniM
xaM
thgiewrepaPniM
xaM
noitcnufssapyB seY
yllacitamotuA
gnidiecer
)DxWxH(snoisnemiD
101ledoM
SCH101ledoM
dekcodnutfiL
dekcodtfiL
thgieW
101ledoM
SCH101ledoM
egatloV zH06-05V521/511/001
msg06
seY
3
"73
/4"32x5/
3
"73
/4"32x5/
3
"73
/4"32x5/
"4mm001
3
"51mm044-004
3
"5mm012x841
/4"8x1/
5
"21mm754x023
5
/
"71-
/
4
/
8
61
4
"81x
msg042
mm515x006x052
"02x5/
8
61
mm515x006x069
"02x5/
8
61
mm017x006x069
"82x
8
bl55gk52
tfiL.lcnibl091gk68
zH06-05V042/032/022
egatloV zH06-05V521/511/001
zH06-05V042/032/022
Air Feed Collator Model 100, Stacker Model 101, Model 101 HCS Operator Manual
T10127 November 2001
6-1
Page 27

 Loading...