

Page 1
Mailer/inserter Model 45
Operator Manual
Mar 2000
Part No. 45866
Page 2

Table of contents
1. Introduction page
1.1 Operational safety 1-1
2. Getting to know the Model 45
2.1 Main components 2-1
2.2 The menus, flow chart 2-4
2.3 Explanation of the menus 2-5
3. Operator instructions
3.1 Setting up the Model 45 for different insert sizes 3-1
3.2 Adjusting the envelope feeder 3-3
3.3 Loading envelopes 3-4
3.4 Filling water 3-4
3.5 Setup a new job 3-5
3.6 Start inserting 3-6
4. Added features
5. Maintenance
6. Problem solving
7. Specifications
4.1 How to adjust the amount of sealing water 4-1
4.2 How to select language 4-1
4.3 Diagnosis 4-2
5.1 Cleaning the water tray 5-1
5.2 Cleaning the envelope sealing flap 5-2
5.3 Cleaning the envelope feed belts 5-3
5.4 GFI function test and resetting 5-3
6.1 Problem solving 6-1
7.1 Specifications 7-1
7.2 Insert and envelope specifications 7-2
Mailer/inserter Model 45 Operator Manual i
T10113 Mar 2000
Page 3

1. Introduction
The Model 45 is a mailer/inserter that can be
used on-line with the collators Model 306/310
and/or booklet feeder Model 46 or for handfeeding. This operator manual covers the
operation of the Model 45 both as a standalone unit or connected to the above mentioned collators. For on-line operation with
Model 46, also see Model 46 operator manual.
1.1 Operational safety
Attention to the following notes ensures the continued safe operation of your equipment.
Always connect the equipment to a properly
grounded power source receptacle. In doubt,
have the receptacle checked by a qualified
electrician.
WARNING: Improper connection of the equipment grounding conductor can result in electrical shock.
Always follow all warnings marked on, or
supplied with, the equipment.
Always locate the equipment on a solid support surface with adequate strength for the
weight of the machine.
Always exercise care in moving or relocating
the equipment.
Always keep magnets and all devices with
strong magnetic field away from the machine.
Never use a ground adapter plug to connect
the equipment to a power source receptacle
that lacks a ground connection terminal.
Never attempt any maintenance function that
is not specifically described in this documentation.
Never remove the covers or guards that are
fastened with screws.
Never install the unit near a radiator or any
other heat source.
Never override or “cheat” electrical or mechanical interlock devices.
Never operate the equipment if you notice
unusual noises or odours. Disconnect the
power cord from the power source receptacle
and call your customer service engineer to
correct the problem.
Mailer/inserter Model 45 Operator Manual 1-1
T10113 Mar 2000
Page 4
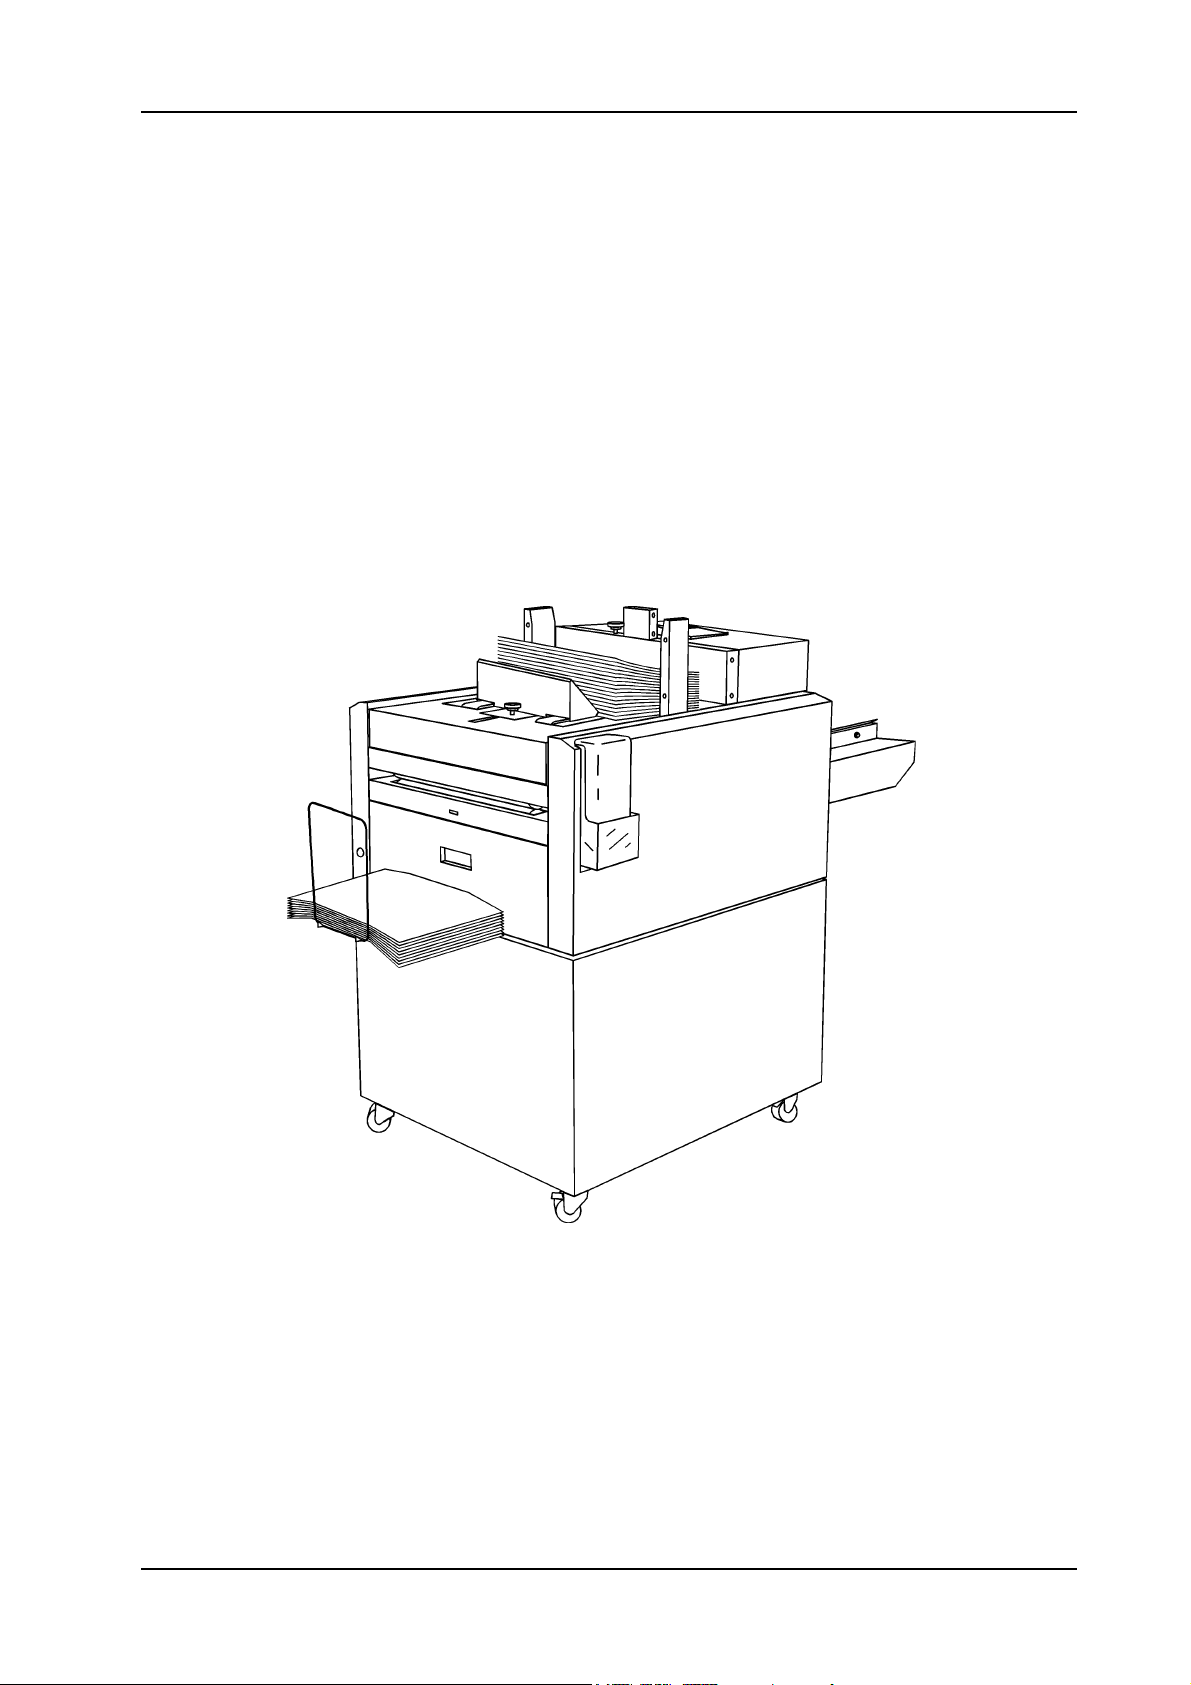
2.1 Main components
1
2. Getting to know the Model 45
The Model 45 is easy to use thanks to a fully microprocessor controlled operation. With the 4 buttons on
the control panel you can choose between the different
menus shown on the LCD display and do your settings.
Take a few minutes to become familiar with components of the Model 45.
2
3
4
rear side
left side
1 Outfeed area
2 Outfeed cover
3 Receiving tray
4 Water bottle
right side
front side
Mailer/inserter Model 45 Operator Manual 2-1
T10113 Mar 2000
Page 5
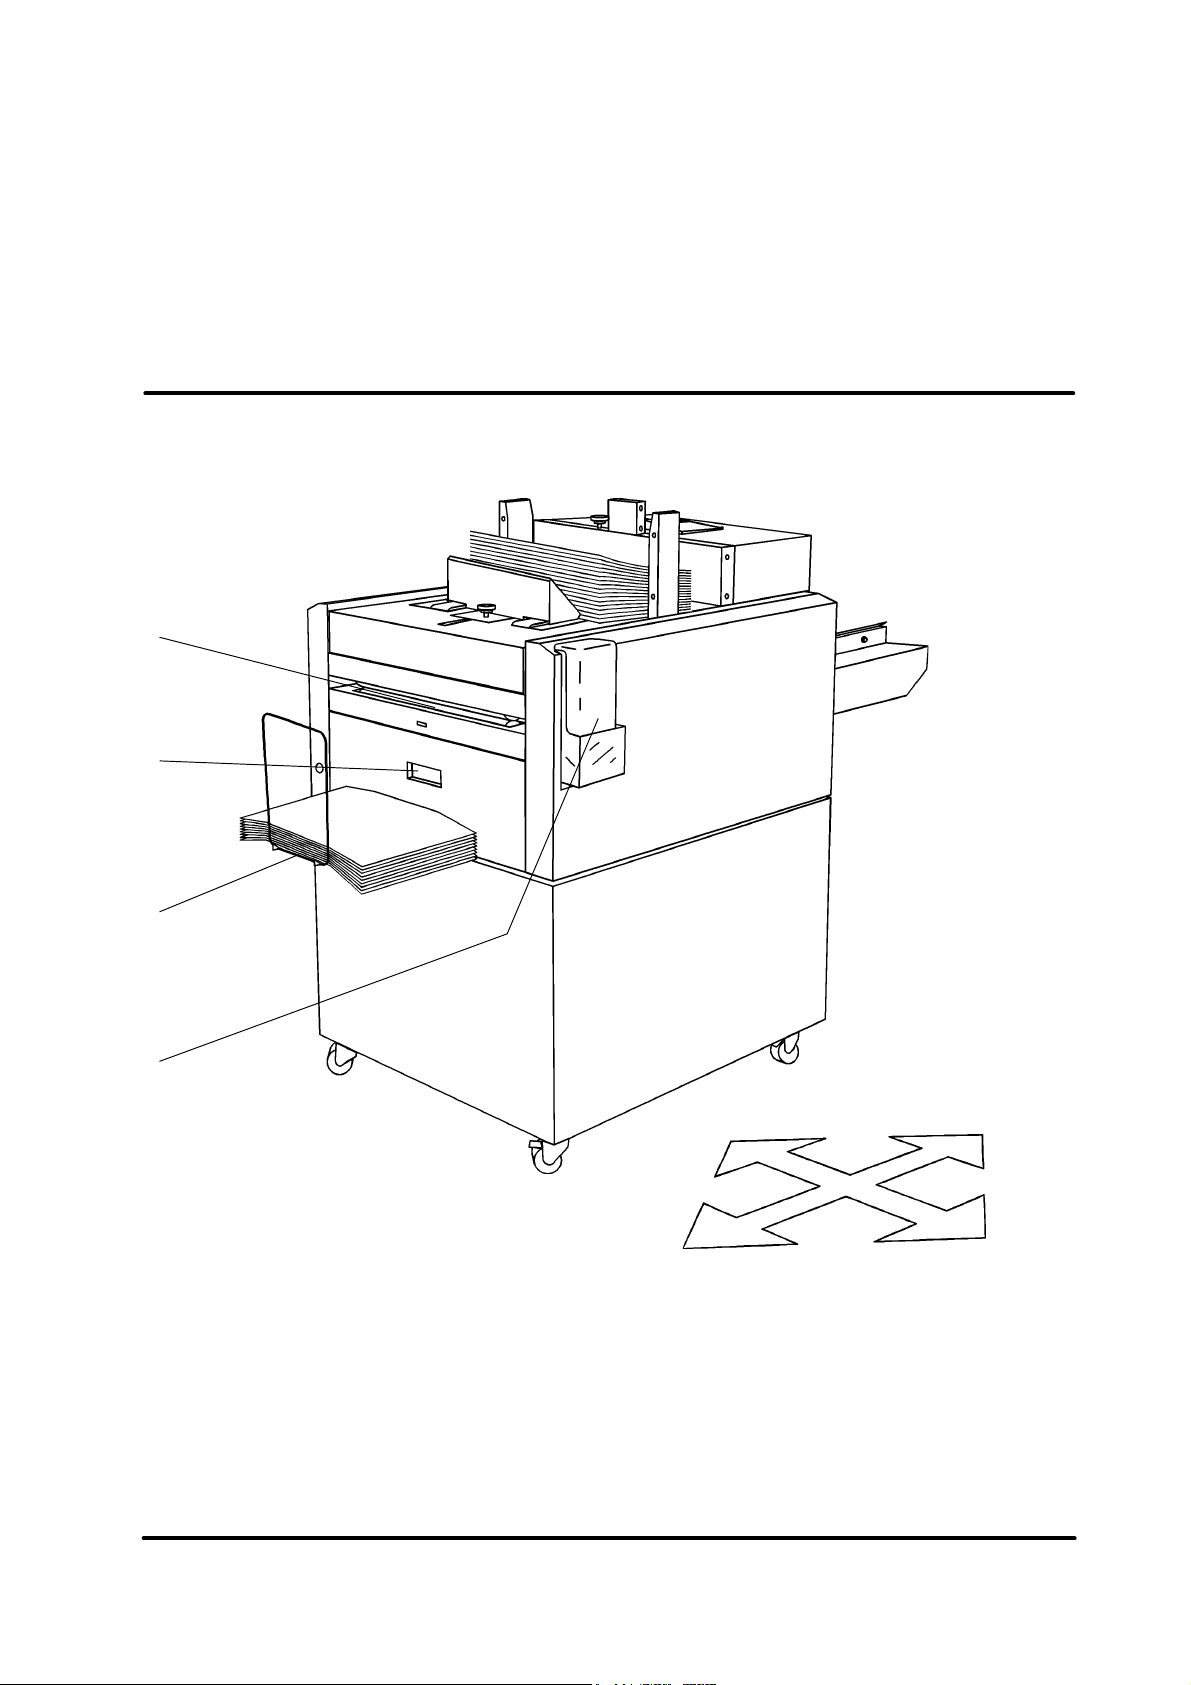
2.1 Main components, continues
1
2
3
4
5
6
7
8
1 Envelope feeding cover
2 Plastic cover
3 Document table side guides
4 Document table
5 Insert feed belts
6 Oversize envelope (B4) adjustment knobs
7 Ground fault interrupter (GFI)
8 Main power switch, power cord receptacle
and main fuse
Mailer/inserter Model 45 Operator Manual 2-2
T10113 Mar 2000
Page 6
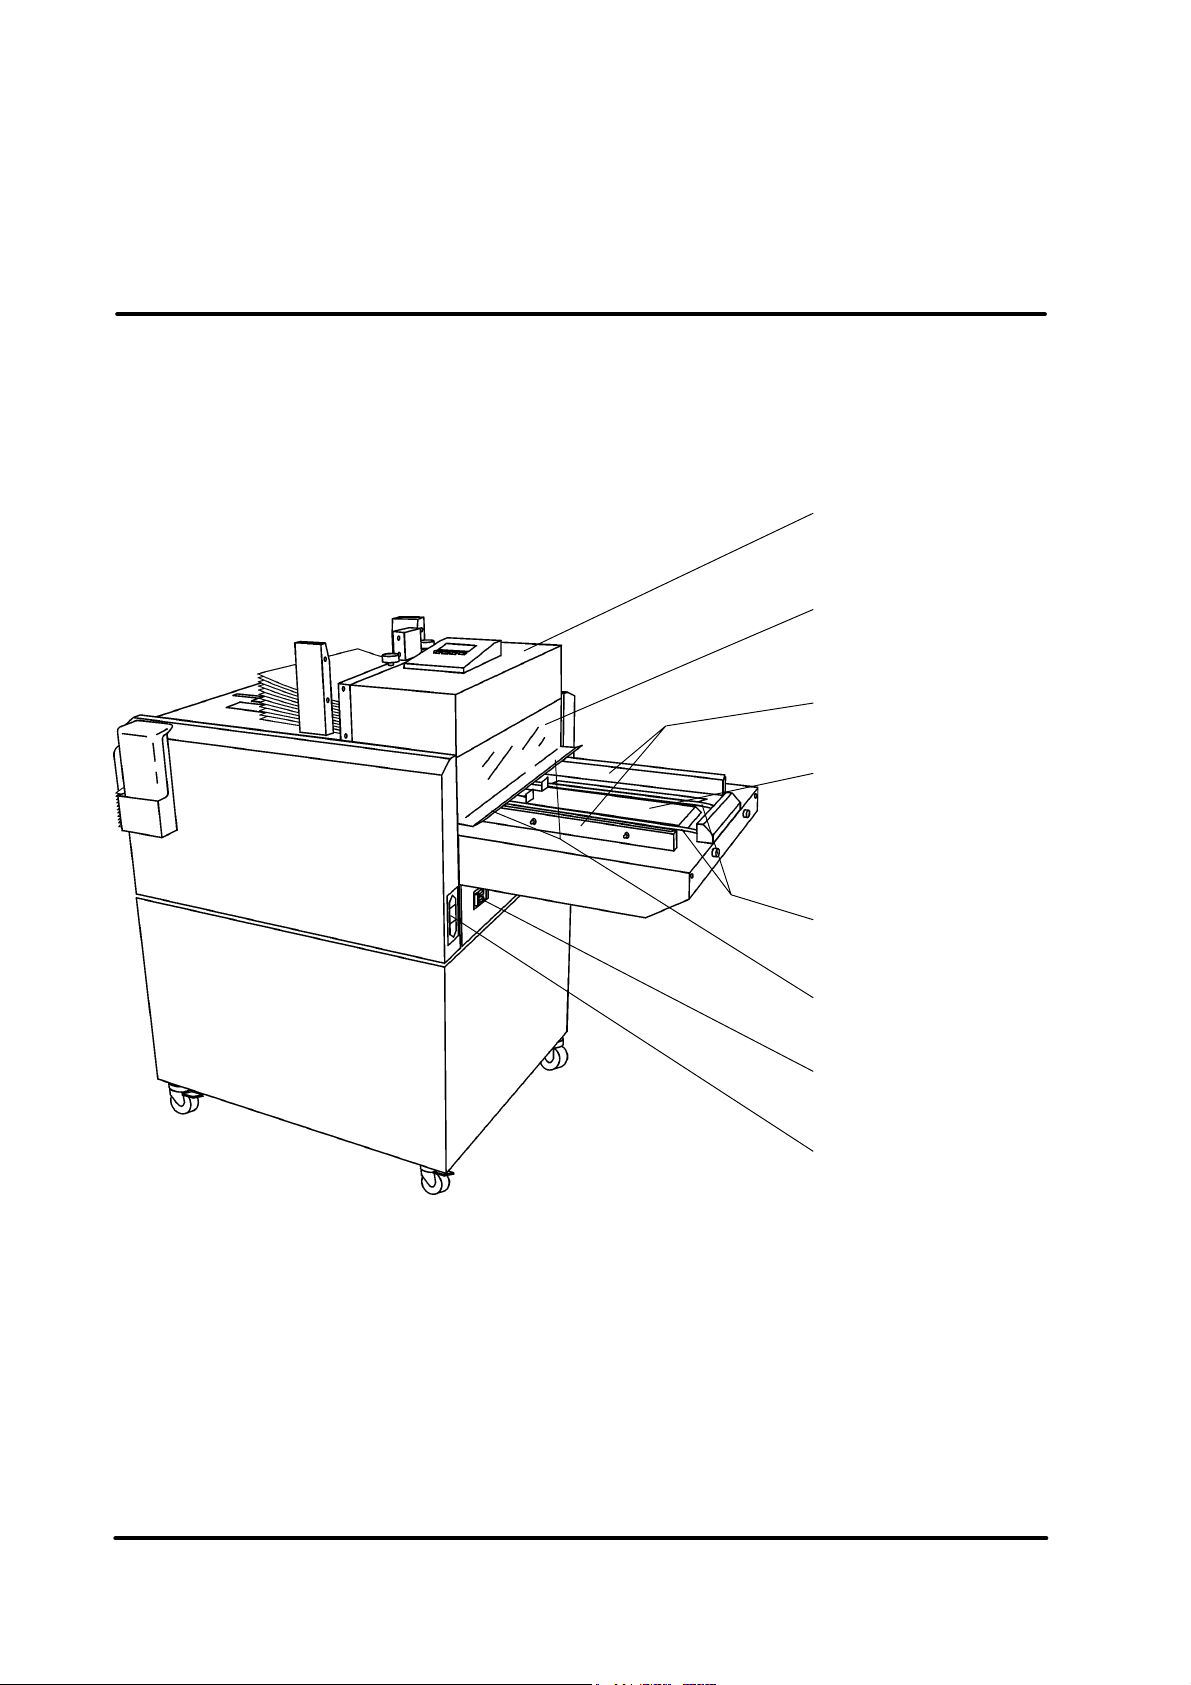
2.1 Main components, continues
1
2
37
4
5
6
1 Studs
2 Connection cable jacks
3 Envelope side guides
4 Envelope rear guide
5 Envelope feed belts
6 Envelope feeding table
8
9
10
11
12
13
7 Envelope separator pads adjustment knobs
8 Control Panel
9 LCD display
10 Control buttons, multi function
11 Maximum load mark (red)
12 Envelope separator pads
13 Out of envelope sensor
Mailer/inserter Model 45 Operator Manual 2-3
T10113 Mar 2000
Page 7
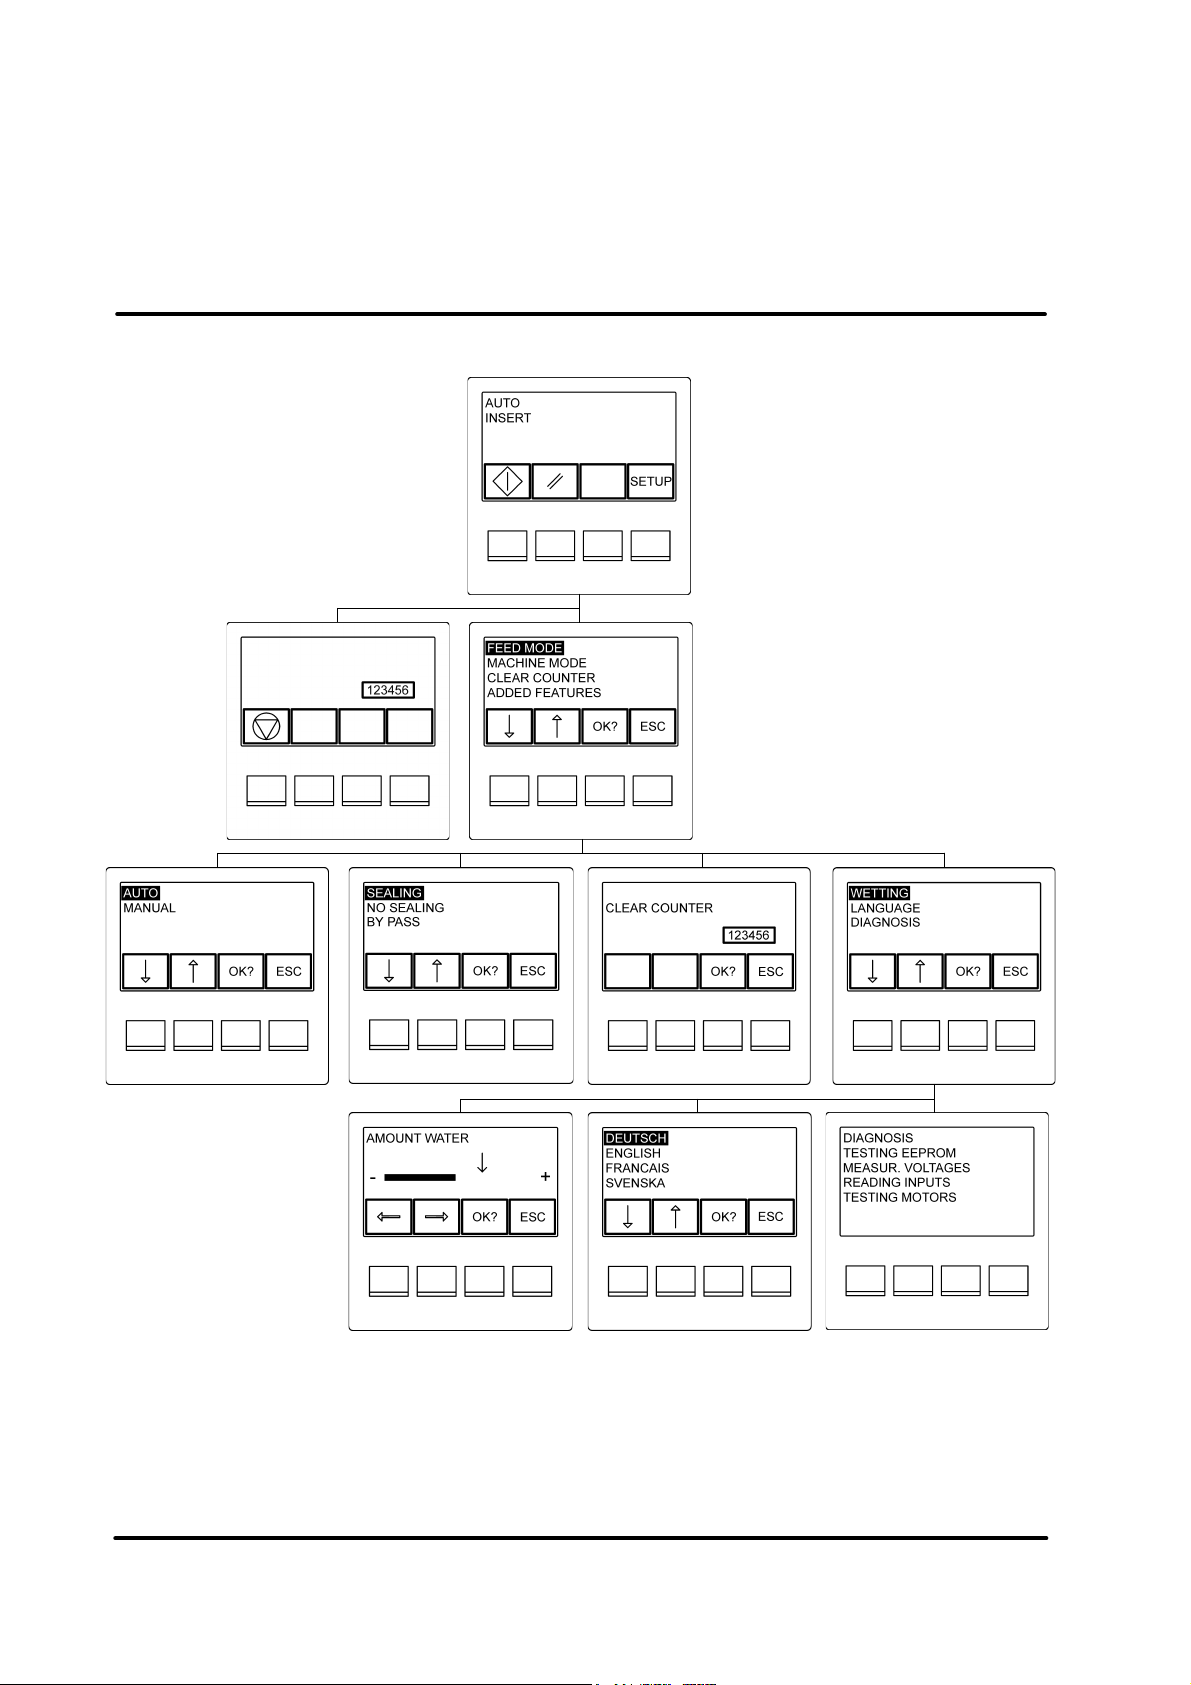
2.2 The menus, flow chart
Main Menu
Feed Mode Menu
Run Mode
Setup Menu
Machine Mode Menu Added Features Menu
Clear Counter Menu
Language MenuWater Amount Adjustment Menu
Diagnosis Menu
Mailer/inserter Model 45 Operator Manual 2-4
T10113 Mar 2000
Page 8
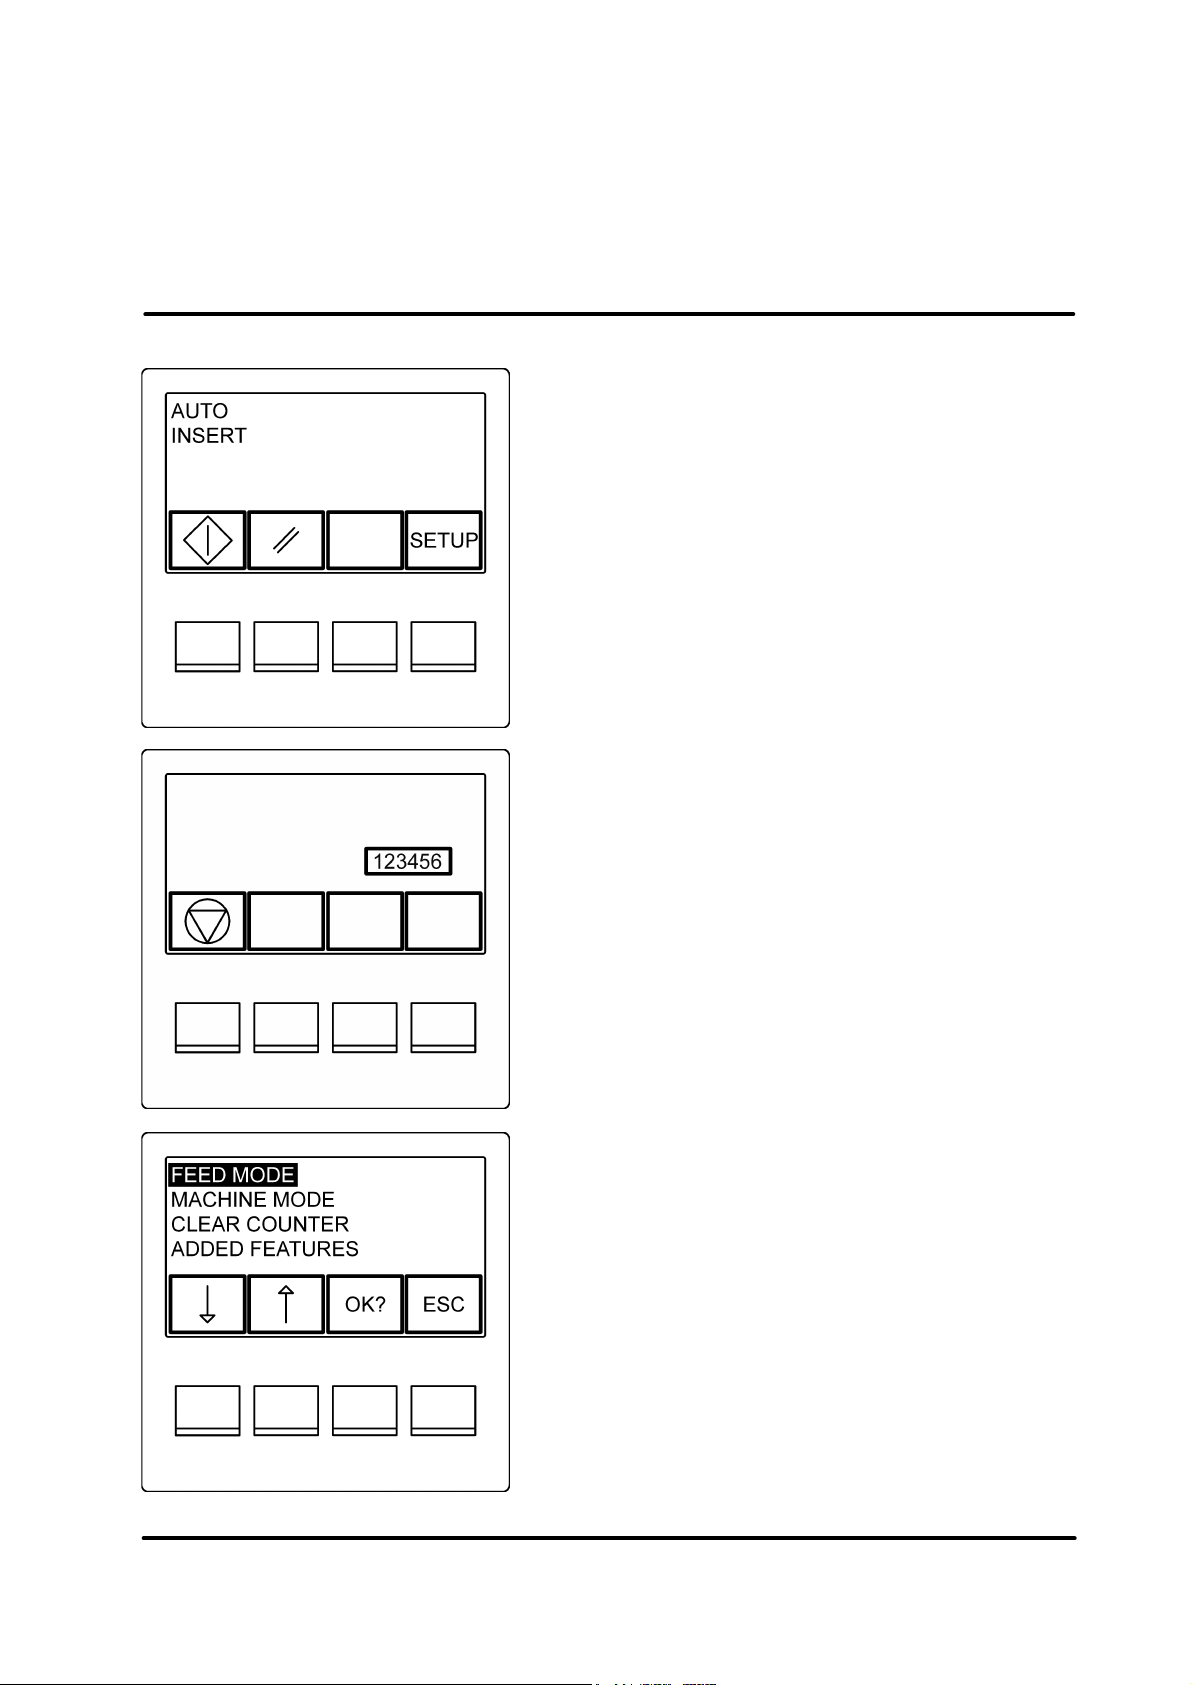
2.3 Explanation of the menus
The Main Menu appears after switching on the power.
This is also where you return before starting the job
after changing any settings. Use the left button (below
the start symbol) to initialize Run Mode. The next
button is the reset button which allows you to reset the
machine i.e. clear the machine from envelopes and
inserts. With the right button you can enter the Setup
Menu.
Start Reset
The Run Mode indicates that the Model 45 is ready for
use. Press the stop button to stop inserting and to
return to the Main Menu. If manual mode is chosen
from the Feed Mode Menu and no inserts are fed to
the document table within 15 seconds the Model 45 will
automatically return to the Main Menu.
Stop
In the Setup Menu you can scroll up and down with the
buttons below the arrow symbols. The chosen submenu will be shown with the text inverted. Confirm your
choice by pressing the “OK?” button.
To return to the Main Menu press the “ESC” button.
Mailer/inserter Model 45 Operator Manual 2-5
T10113 Mar 2000
Page 9
2.3 Explanation of the menus, continues
In the Feed Mode Menu you can choose between
manual feeding or automatic feeding from a collator
and/or booklet feeder. The chosen item will be shown
with the text inverted. Confirm your choice by pressing
the “OK?” button or cancel with the “ESC” button to
return to the Setup Menu.
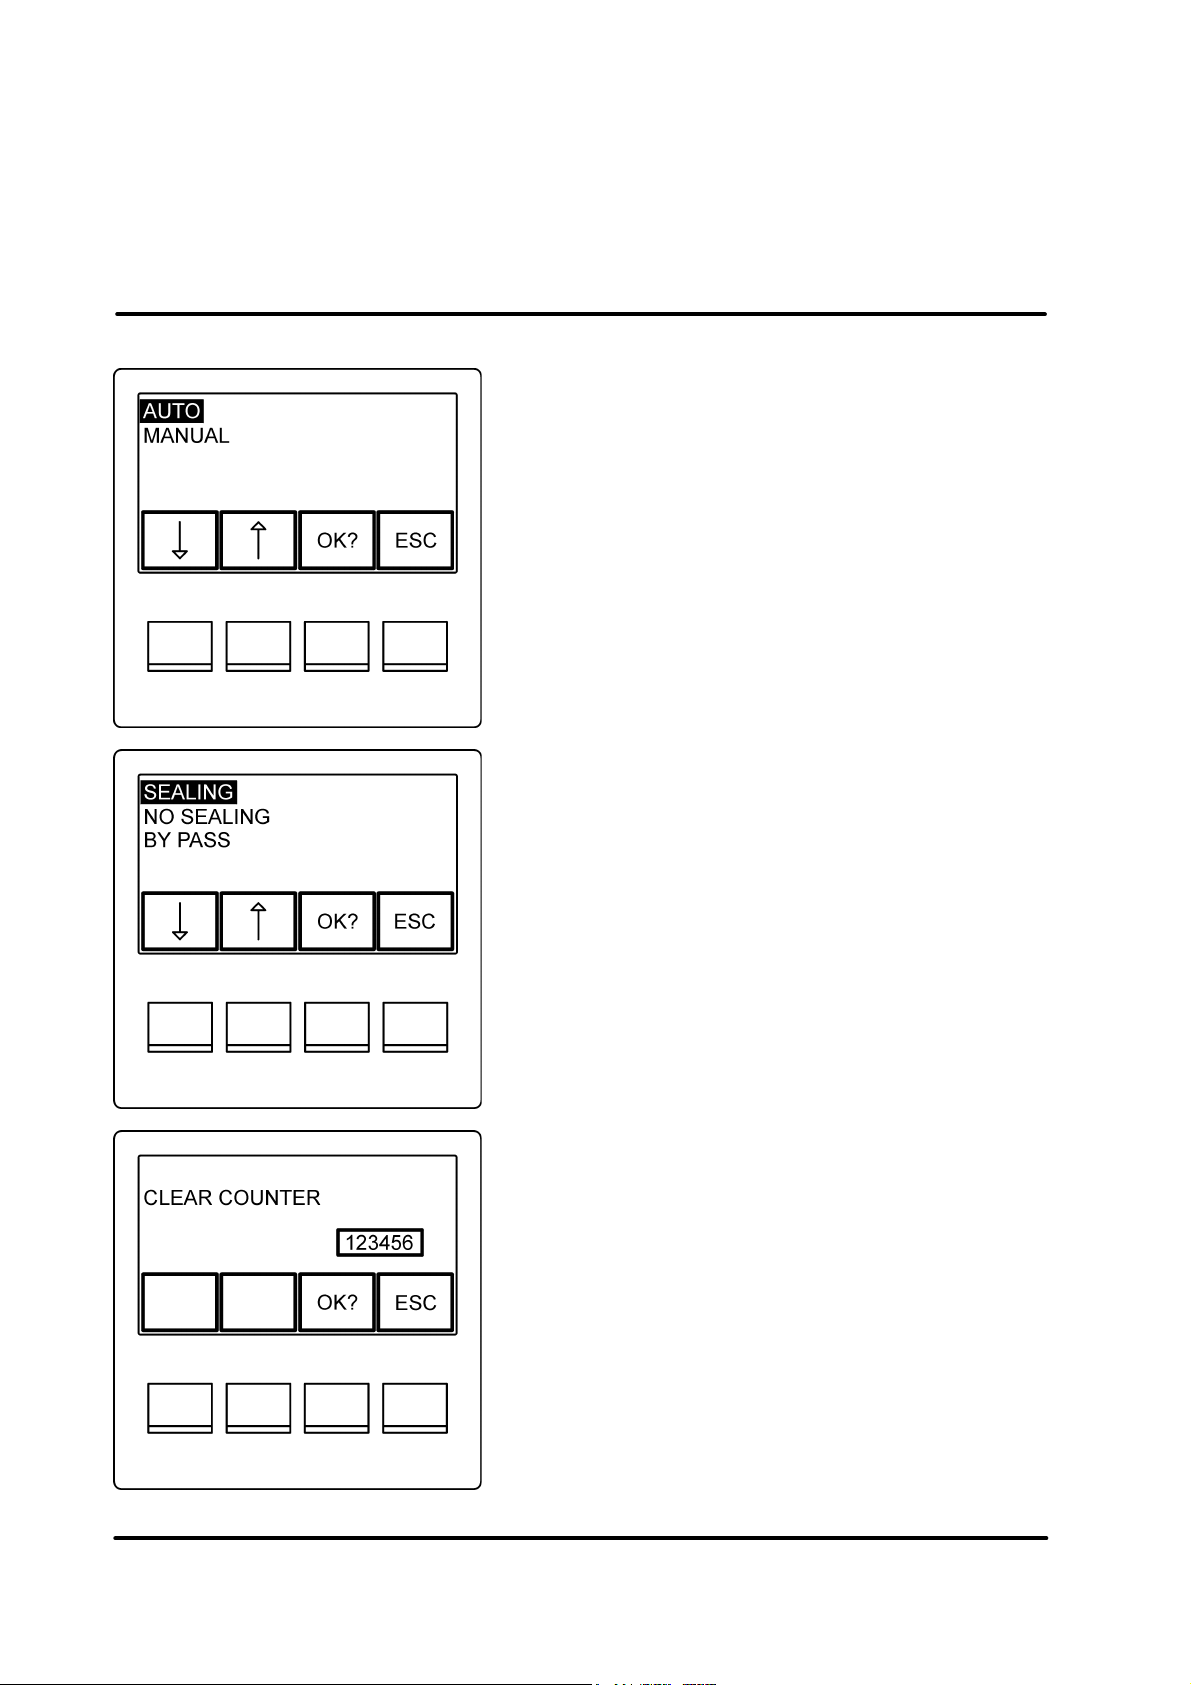
In the Machine Mode Menu you can choose between
inserting with sealing, inserting and no sealing or just to
let the Model 45 feed your inserts through the machine
(without any envelopes as a bypass function). The
chosen mode will be shown with the text inverted.
Confirm your choice by pressing the “OK?” button or
cancel with the “ESC” button to return to the Setup
Menu.
In the Clear Counter Menu you can reset the counter.
Confirm your choice by pressing the “OK?” button or
cancel with the “ESC” button to return to the Setup
Menu.
Mailer/inserter Model 45 Operator Manual 2-6
T10113 Mar 2000
Page 10

2.3 Explanation of the menus, continues
In the Added Features Menu you can access the
Water Amount Adjustment Menu, the Language
Menu or start the self test program, Diagnosis. The
chosen item will be shown with the text inverted. Confirm your choice by pressing the “OK?” button or cancel
with the “ESC” button to return to the Setup Menu.
NOTE: Choosing “DIAGNOSIS” will immediately start
the built in self test program. Before performing
a diagnosis it is very important to read “4.3
Diagnosis” in the section “4 Added Features”.
In the Water Amount Adjustment Menu you can
adjust the amount of sealing water in the wetting system by pressing the corresponding arrow button. The
previous setting is indicated by an arrow. Confirm your
choice by pressing the “OK?” button or cancel with the
“ESC” button to return to the Added Features Menu.
In the Language Menu you can scroll/select which
language you want to be displayed using the arrow
buttons. The chosen language will be shown with the
text inverted. Confirm your choice by pressing the
“OK?” button or cancel with the “ESC ” button to return
to the Added Features Menu.
Mailer/inserter Model 45 Operator Manual 2-7
T10113 Mar 2000
Page 11

2.3 Explanation of the menus, continues
After choosing “DIAGNOSIS” the display will show what
type of self test that is currently performed. During the
test you will hear sounds when components are tested.
NOTE: Before performing a diagnosis it is very impor-
tant to read “4.3 Diagnosis” in the section “4
Added Features”.
Normally the message “NO FAULTS FOUND” should
be displayed. Press the reset button (
the Added Features Menu.
If the self test program would find any errors the display will show the faulty component, its actual status
and a fault code. In case of multiple errors there will be
an arrow button and a cancel button visible. Scroll with
the arrow button and press the “ESC” button to return
to the Added Features Menu.
) to return to
Mailer/inserter Model 45 Operator Manual 2-8
T10113 Mar 2000
Page 12

3. Operator instructions
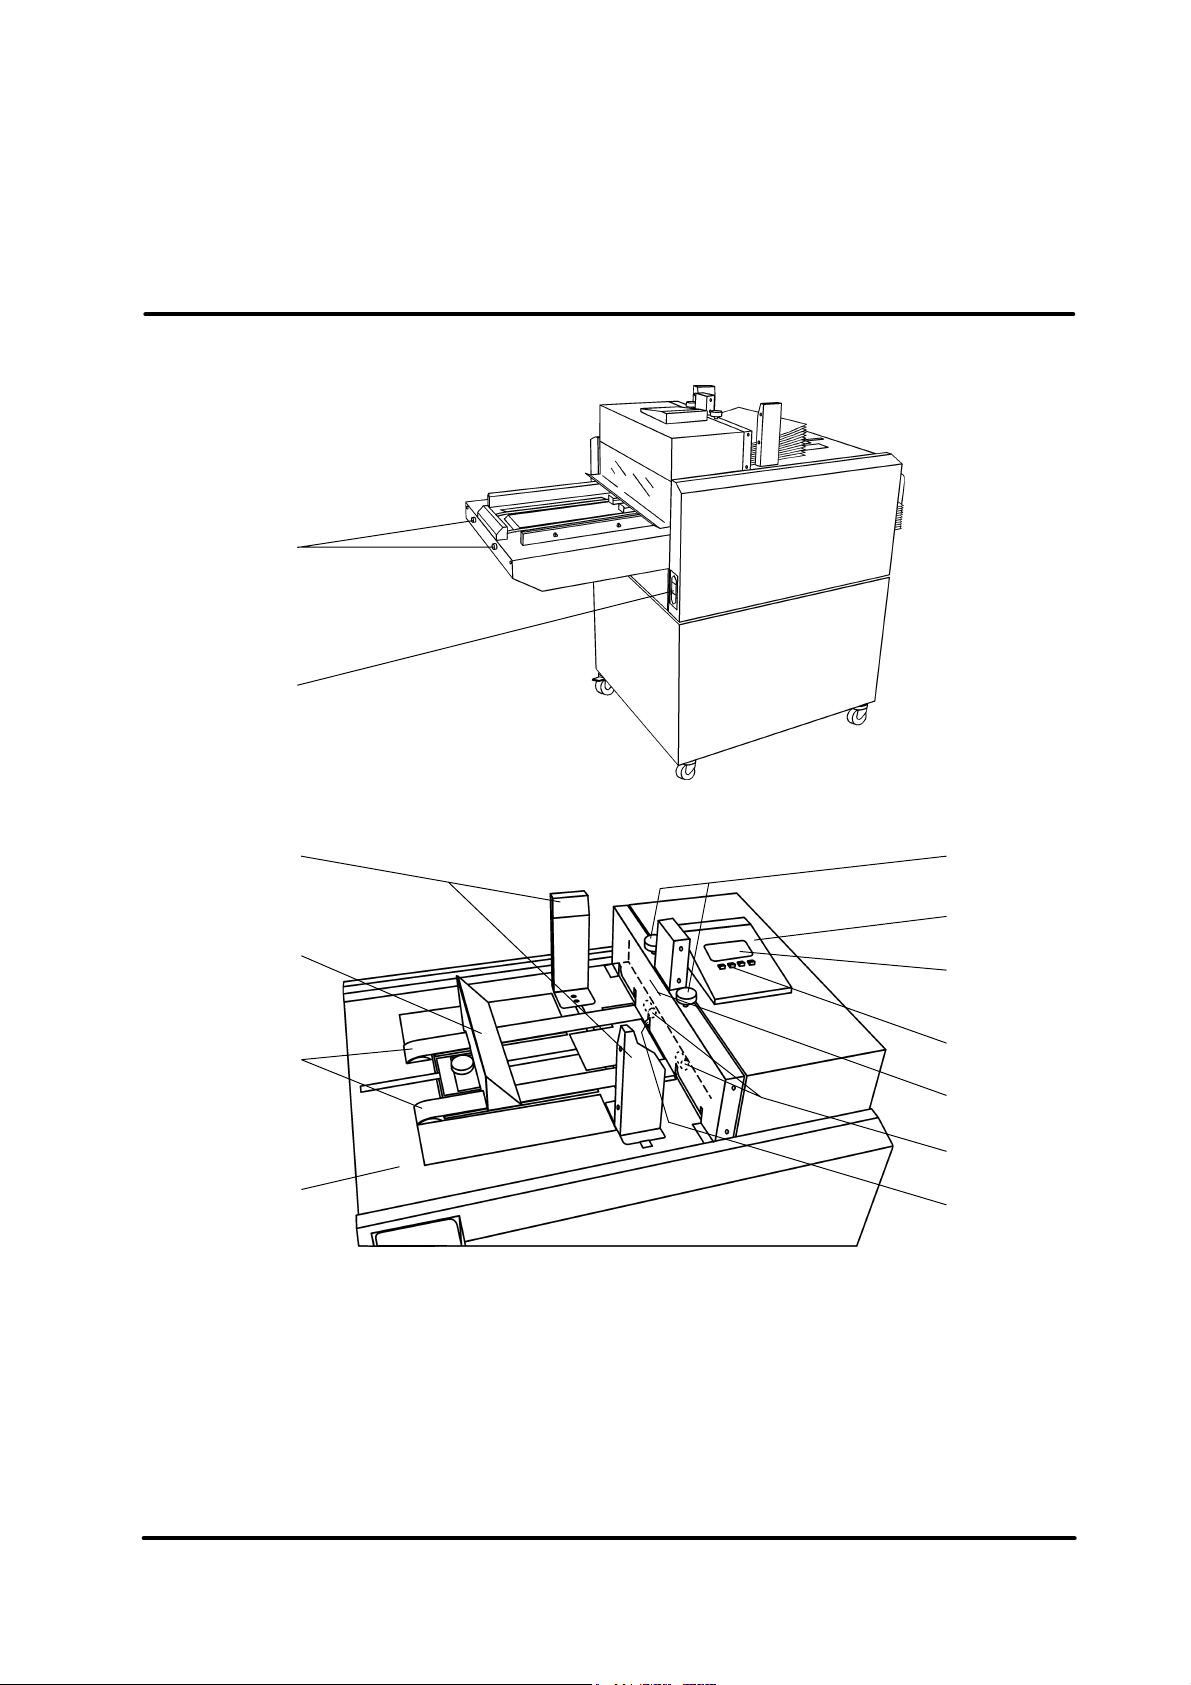
3.1 Setting up the Model 45 for different insert sizes
The holes in the docking plate allows you to move the
Model 45 to the front or to the rear depending on the
size of the inserts.
A5 Landscape
A4 Portrait
A4 Landscape
Move the Model 45 to the front for portrait A4 size
inserts and to the rear for landscape A4 or portrait A5
size inserts.
Adjust the document table side guides by sliding them
towards or from each other by gripping the side guides
by the green dots. Adjust them to the scale mark corresponding the insert size. Normal setting is a 2-3 mm
play between the inserts and the side guides. If measurement “C” (see section 7.2) is large, a larger play has
to be accepted, otherwise the envelopes will not be
opened for insertion.
CAUTION • Before adjusting the side guides press
the reset button from the Main Menu to
avoid damages on the inserting tools.
Mailer/inserter Model 45 Operator Manual 3-1
T10113 Mar 2000
Page 13

3.1 Setting up the Model 45 for different insert sizes, continues
When B4 envelopes (extra wide) is used to
accomodate a large packing thickness, the oversize
envelope adjustment knobs should be set to their
outermost positions to aviod damages to the envelopes. Loosen the knobs to adjust.
CAUTION • Only perform the adjustment when the
document table side guides are in their
outermost position.
NOTE • If B4 envelopes (extra wide) not is used,
the oversize envelope adjustment knobs
oversize envelope adjustment knobs
shown in their outermost position
Depending on the actual packing thickness, the outfeed
rollers need to be adjusted. Open the outfeed cover and
position the two levers, one on each side, to the required position as shown in the figure.
should be set to their innermost positions.
0 - 7 mm
position
5 - 12 mm
position
Mailer/inserter Model 45 Operator Manual 3-2
T10113 Mar 2000
Page 14

3.2 Adjusting the envelope feeder
NOTE: It is important for the envelope feeding that the
gap between the envelope separator pads and the
envelope feed belts is correct and equal!
Default setting:
Press the envelope feed belt downwards at the arrow
and thighten the envelope separation adjustment knob
envelope
feed belt
envelope
separator pad
until there is no gap between the separator pad and the
feed belt. Then loosen the adjustment knob one and a
half turn. To facilitate adjustment, use a flash light and/
or a 0.05 mm feeler gauge.
If double feed occurs: Thighten the adjustment knobs.
If miss feed occurs: Loosen the adjustment knobs.
B
A
NOTE: The friction between the envelopes and the
envelope feed belts is also essential for proper
envelope feeding. Therefore the rear envelope
guide (B) must be adjusted properly.
Envelopes
Place one envelope on the envelope feeder so the right
edge stops against the envelope separator pads (A).
Loosen the knob on the rear envelope guide (B) and
slide it so that it is in line with the left edge of the envelope.
Bags
Place one bag on the envelope feeder so the right edge
stops against the envelope separator pads (A). Loosen
the knob on the rear envelope guide (B) and slide it so
that the left edge of the bag reaches the top of the
slope.
Mailer/inserter Model 45 Operator Manual 3-3
T10113 Mar 2000
Page 15

3.3 Loading envelopes
envelope low symbol
Slide the envelope feeder side guides away from each
other. Load the rest of the envelopes, not higher than up
to the red mark, with the flap up and to the left. Slide
the envelope feeder side guides towards each other
against the envelopes without squeezing.
The right side of the envelope stack should be straight
and make sure the envelope low symbol disappears
from the display.
NOTE: • Before loading the envelopes, fan them
properly to make sure they are not glued
together.
3.4 Filling water
• Also bend the envelopes perpendicular to
the feed direction, to make sure the
envelopes have proper contact with the
envelope feed belts.
• When running, make sure one or two
envelopes falls down to the feed belts and
the rest of the stack should lay onto the
rear envelope guide. Adjust the rear guide
if necessary.
The water bottle is mounted upside down and fills water
into the wetting system through holes in the cap.
Press down the water bottle slightly. Remove the bottle
by turning it over and lifting it out. Fill the bottle with
fresh water and tighten the cap. Put the bottle back in
the same position.
Mailer/inserter Model 45 Operator Manual 3-4
T10113 Mar 2000
Page 16

3.5 Setup a new job
Switch on the power and enter the Setup Menu.
Enter the Feed Mode Menu.
Choose “AUTO” to feed your inserts from a collator or a
booklet feeder. Follow instructions in the collator and/or
booklet feeder operator manual to setup the collator
and/or booklet feeder properly. Choose “MANUAL” to
feed your inserts manually. Confirm your choice by
pressing the “OK?” button.
Enter the Machine Mode Menu.
Choose the desired machine mode; “INSERT”, “NO
SEALING” or “BY PASS”.
Confirm your choice by pressing the “OK?” button
If you wish to clear the counter, choose “CLEAR
COUNTER” and confirm by pressing the “OK?” button.
Press the “ESC” button to return to the Main Menu.
Mailer/inserter Model 45 Operator Manual 3-5
T10113 Mar 2000
Page 17

3.6 Start inserting
Start the Model 45 by pressing the start button.
The Run Mode indicates that the Model 45 is ready for
use. Depending of the chosen machine mode continue
as follows:
Insert
sensor
“AUTO” mode: Press the calibration test button on
the collator. One set will be fed to
the document table and the system
will stop. Check that the inserts fed
to the document table are correct
and put them back. Make sure that
the inserts blocks the infeed sensor.
Press the start button on the Model
45 and then the start button on the
collator.
“MANUAL” mode: Begin inserting by feeding your
inserts manually to the document
table. Make sure that the inserts
blocks the infeed sensor.
Inserts can be “married together” by choosing “AUTO”
mode combined with hand feeding. Reduce the speed
on the collator (1000 sets per hour). Feed the document you want to add before the inserts are fed from
the collator.
To stop inserting press the stop button on the Model 45.
CAUTION: The insert feed belts will start to travel in
about 0.7 seconds after the insert sensor is
blocked.
NOTE: If the insert sensor is not blocked within 15
seconds in “MANUAL” mode the Model 45
will return from run mode to the Main Menu.
Mailer/inserter Model 45 Operator Manual 3-6
T10113 Mar 2000
Page 18

4. Added features
4.1 How to adjust the amount of sealing water
• Enter the Setup Menu.
• Enter the Added Features Menu.
• Enter the Water Amount Adjustment Menu.
Adjust the amount of sealing water by pressing the
corresponding arrow button. The previous setting is
indicated by an arrow. Confirm your choice by pressing
the “OK?” button or cancel with the “CANCEL” button to
return to the Added Features Menu.
• Press the “CANCEL” button to return to the Setup
Menu.
4.2 How to select language
• Press the “ESC” button to return to the Main Menu.
• Enter the Setup Menu.
• Enter the Added Features Menu.
• Enter the Language Menu.
Select language by scrolling with the arrow buttons.
The chosen language will be shown with the text inverted. Confirm your choice by pressing the “OK?”
button or cancel with the “CANCEL” button to return to
the Added Features Menu.
• Press the “CANCEL” button to return to the Setup
Menu.
• Press the “ESC” button to return to the Main Menu.
Mailer/inserter Model 45 Operator Manual 4-1
T10113 Mar 2000
Page 19

4.3 Diagnosis
The diagnosis is a self test program the operator can
run in order to verify the status of the Model 45 if some
problems are experienced. The self test program will
perform a test of the EEPROM, sensors, motors and
circuits as well as checking of different voltages.
NOTE: Choosing “DIAGNOSIS” will immediately start
the self test program. Before performing a
diagnosis it is very important to:
• Remove all envelopes from the envelope
feeding table.
• Remove all inserts from the document table.
• Press the reset button from the Main Menu to
clear the Model 45 from envelopes and in
serts inside.
• Empty the receiving tray
Reset
CAUTION: Do not attempt to stop the self test program
before it is finished.
To start the self test program from the Main Menu:
• Enter the Setup Menu.
• Enter the Added Features Menu.
• Choose “DIAGNOSIS” and press the “OK” button.
After choosing “DIAGNOSIS” the display will show what
type of self test that is currently performed. During the
test you will hear sounds when components are tested.
Normally the message “NO FAULTS FOUND” should
be displayed. If the self test program would find any
errors the display will show the faulty component, its
actual status and a fault code. In case of multiple errors
you can scroll with the arrow button.
• Press the “CANCEL” button to return to the Added
Features Menu.
• Press the “CANCEL” button to return to the Setup
Menu.
• Press the “ESC” button to return to the Main Menu.
Mailer/inserter Model 45 Operator Manual 4-2
T10113 Mar 2000
Page 20

4.3 Diagnosis, continues
Fault code Error message Explanation
1 EEPROM ERROR The EEP ROM is defective.
The unregulated voltage supplied to the
2 UNR. VOLTA GE LOW
3 UNR. VOLTA GE HIGH
4 REG. VOLTAGE LOW The regulated voltage is too low.
5 REG. VOLTAGE HIGH The regulated voltage is too high.
Model 45 is too low and/or the
transformer is defective.
The unregulated voltage supplied to the
Model 45 is too high a nd/or the
transformer is defective.
6 - 19 SENSOR S# ACTUATED
20 COVER OPEN The envelope feeding table is open.
21 INTERLOCK
22 SENSOR S17 ACTUATED Water level low.
31 - 49
(odd No.s only)
32 - 50
(even No.s only)
51 - 56 SE NSOR S# NOT RES PONDING
57 INTERLOCK RE LAY Int er lock relay defec tive.
MOTOR M# OPEN CIRCUIT
MOTOR M# SHORT CIRCUIT
Foreign object is covering the mentioned
sensor.
The interlock switch in the envelope
feeding cover is actuated.
Interruptio n in the mentioned motor
circuit.
Sho rt circuit in the mentio ned motor
circuit.
Interrup ti on in the mentioned sensor
circuit.
Mailer/inserter Model 45 Operator Manual 4-3
T10113 Mar 2000
Page 21

5.1 Cleaning the water tray
open
closed
5. Maintenance
The water tray should be cleaned at least every other
week.
• Remove the water bottle.
• Pull out and remove the receiving tray.
• Open and remove the outfeed cover.
• Pull out the hose, open the tap and empty the water
tray.
• Close the tap and put the hose back in position.
• Unlock the water tray by pushing it to the left and fold
it downwards.
• Clean the water tray.
• Hold the guide plate in the correct position (see
picture on next page) while folding the water tray
upwards until it snaps into locked position.
Caution: Check that the guide plate behind the water
tray is in the correct position. Incorrect position causes sealing jam.
Mailer/inserter Model 45 Operator Manual 5-1
T10113 Mar 2000
Page 22

5.1 Cleaning the water tray, continues
guide plate
correct position
water tray
5.2 Cleaning the envelope sealing flap
lift painted
plate here
envelope
sealing flap
1
2
The envelope sealing flap (stainless steel) and a guide
plate (stainless steel) under it, aswell as the painted
plate under the two leftmost rollers will eventually need
cleaning due to glue build-up.
• Clean the envelope sealing flap and the guide plate
by lifting app. 10mm at the green dot. To facilitate
cleaning, the rightmost roller can be removed. Press
down the envelope sealing flap and remove the roller
by pushing it to the rear (1) and lifting the front end (2).
• Clean the painted plate under the rollers. If neces-
sary remove the painted plate by lifting the rightmost
edge as shown in figure (and same place opposite
side). Close the envelope feeding table and pull the
plate out towards the receiving tray.
incorrectly positioned
guide plate
Mailer/inserter Model 45 Operator Manual 5-2
T10113 Mar 2000
Page 23

5.3 Cleaning the envelope feed belts
Clean the envelope feed belts using a mild soap detergent every 10 000 feeds or earlier if needed.
envelope feed belts
5.4 GFI function test and resetting
WARNING: DO NOT use the Model 45 if the following
test fails. No additional testing should be
performed. Call for service.
window
black
button
red
button
When testing the Ground Fault Interruptor (GFI ), the
Model 45 power cord must be connected to the wall
receptacle and the main power switch in the ON (1)
position.
• Press the red ”TEST”- button.
• Press the black ”RESET”-button. A red flag should
appear in the window of the GFI.
• Press the red ”TEST”- button. The red flag should
disappear.
• Press the black ”RESET”-button again. The Model
45 should now be ready to use.
Mailer/inserter Model 45 Operator Manual 5-3
T10113 Mar 2000
Page 24

6.1 Problem solving
6. Problem solving
This section explains possible causes and what actions to take if an error message should appear in the
display.
Allways remove envelopes and inserts in the same
direction as they travel through the Model 45.
If problem could not be solved - call for service.
Displayed message/symbol Explanation/Possible
causes
Water level low Fill water according to section 3.4.
Stacker full. Stop signal
sent to collator and/or
booklet feeder (if
attached).
Envelope feeder empty.
Stop si gnal sent to
collator and/or booklet
feed er (if a ttached) .
Envelope co uld not be
fed fr om envelo pe feed er.
Envelope miss occurs
when the envelope s does
not have proper contact
wi th the envelo pe feed
belts (i.e. when the
ENVELOPE MISS
REMOVE SET FROM
INFEED TABLE
friction is to low).
The collator has stopped
due to some error or
calibration.
Actio n
Empty the receiving tray.
Load more envelopes.
1. Check that the envelope s are bent
according to section 3.3.
2. Check adjustment of the envelope
separation pads according to section 3.2.
3. C heck the ad justme nt of the envelope
rear guide according to section 3.2.
Check/clean the feed belts a ccord ing to
section 5.3.
See collator operator manual and Model
45 operator manual 3.6.
The interlock switch in the
plastic cover is actuated.
INTERLOC K
NOTE: These symbols can appear allthough action as above is not
necessary. For instance, an air buble in the water hose could
cause the water level symbol to appear intermittently. Once the
air buble disappears, water level warning symbol extinguishes
automatically. If problem percists for certain amount of time,
the machine stops.
Above means when attending a stoped machine, fault message
may already have been corrected.
1. Re move obstac le. If nece ss a ry slide t he
envelope feeding table open and open the
envelope feeding cover.
2. If a collator is attached, check that the
paper feeder on the collator does not have
contact with the plastic cover on the Model
45.
3. After obstacle is removed, follow on
screen instruction.
Mailer/inserter Model 45 Operator Manual 6-1
T10113 Mar 2000
Page 25

6.1 Problem solving, continues
Disp layed message/symbo l Explanation/Possible
causes
The interlock switch in the
plastic cover was
actuated but obstacle is
INTERLOC K
RESET SYSTEM
THE TOP C OV E R IS
OPEN
FLAP OPENER MISS
SEALING JAM
no longer actuating the
interlock switch.
The envelope feeding
table i s open.
1. The flap on the
envelope could not be
opened when the
envelope was positi oned
before i nserting.
2. The flap on the
envelope was already
open when the envelope
was fed.
Malfunction when sealing. Slide the envelope feeding table open.
Actio n
Press the reset button. Press the start
button. Start the collator (if attached).
Close the envelope feeding table.
Slide the envelope feeding table open.
Remove the envelope . Close the envelope
feeding table. Press the reset button.
1. Check that the envelopes are loaded
with the flap up, closed and towards the
envelope rear guide according to section
3.3.
2. Check that the envelopes not already
are accidentally sealed.
3. Check that the flap not is to he avi ly
curved .P ress the start b utton. Start the
collator (if attached).
Remove the envelope . Close the envelope
feeding table. Press the reset button.
1. Check/fill water according to section 3.4.
2. Check that the gui de plate is in the
correct po s i ti on according to s e ctio n 5.1 .
3. Check/clean according to sections 5.1
and 5.2.
P ress the start button. Start the c ollator (i f
attached).
Mailer/inserter Model 45 Operator Manual 6-2
T10113 Mar 2000
Page 26

6.1 Problem solving, continues
Displayed message/symbol Explanation/Possible
causes
Malfuncti on when
inserting.
INSERTER ERROR
Envelope jam under the
envelope
feeding cover.
FEED ERROR
Insert(s) or e nvelope
inside the machine .
REMOVE PAPER
Actio n
Clear the d o cument table. Slide the
envelope feeding table open. Remove
envelope and i nserts. Close the envelope
feeding table. Press the reset button.
Check the ad justme nt of the document
table side guides according to section 3.1.
If the inserts a re clos e t o mi nimum
recommended specifi ca ti ons for actual
envelope size (see section 7.2) you might
have to exceed the recommended play of
2-3 mm.
Press the start button. Start the collator (if
attached).
Slide the envelope feeding table open.
Open the envelope feedi ng cover. Remo ve
the envelope. Close the envelop e feeding
cover. Close the envelope feeding table.
Press the reset button. Press the start
button. S tart the collator (if attached).
Slide the envelope feeding table open.
Remove envelope and inse rts. Close the
envelope feeding table. Press the reset
button. S tart the collator (if attached).
If problem continues, check that the
enve lope s fed not are to heavily curved .
1. Envelope is not
removed after a feed
error.
2. Double feed ing of
envelopes.
REMOVE ENVELOPE
Jam in unit feeding Model
45.
FEEDER JAM
Slide the envelope feeding table open.
Open the envelope feedi ng cover. Remo ve
the envelope. Close the envelop e feeding
cover. Close the envelope feeding table.
Press the reset button. Press the start
button. S tart the collator (if attached).
Follow actual operator manual to clear jam.
Press the reset button. Press the start
button. S tart the collator (if attached).
Mailer/inserter Model 45 Operator Manual 6-3
T10113 Mar 2000
Page 27

7.1 Specifications
SPE CIFICATIONS MODEL 45
Envelope size Min. See next page
Envelope loading c a pa city 100 mm
Paper size Min. See next page
Paper weight Min. 60 gsm
7. Specifications
Max. See next page
Max. See next page
Max. -
Maximum speed Up to 3600 e nvelopes/hour
Max packing thickness 12 mm
Misfee d d etecti on Yes
Jam detection Yes
Envelope low detection Yes
Stacker full detection Yes
Availibility factor
Height 560 mm
Width 1150 mm
Depth 640 mm
80% at 36 00 envelope s/hour
(2 minutes stop / 10 minute period)
Weight 83 kg
Volta ge 105 /115 /1 25/220 /2 30 /2 40 volt, 50-60 Hz
Mailer/inserter Model 45 Operator Manual 7-1
T10113 Mar 2000
Page 28

7.2 Insert and envelope specifications
Mailer/inserter Model 45 Operator Manual 7-2
T10113 Mar 2000
Page 29

7.2 Insert and envelope specifications, continues
OK!
OK!
AVOID
OK!
OK!
mailpoint or pointed type flap with window
positioned off center of envelope
The envelopes should have edge-tight gluing on windows to avoid jam and inserts getting caught
between the edge of the patch and the window. Use envelopes where the window is positioned
off centre of the envelope to avoid the pointed part of the flap to getting caught in the window.
Avoid using envelopes with square types of flaps, the
straight edge of the flap could easily get caught in the
window.
mailpoint or pointed type flap with window
positioned across center of envelope
AVOID
AVOID
AVOID
wallet or square type flap
Mailer/inserter Model 45 Operator Manual 7-3
T10113 Mar 2000
 Loading...