

Page 1
OPERATION MANUAL
for
Scoring unit & Perforating unit
Read this operation manual carefully before
use. Keep this booklet handy for your
reference anytime.
A PRODUCT OF
CORPORATION
The Leader in Paper Handling Equipment
1-800-223-2508
www.mbmcorp.com
Nov.24 2009
1265-0043-00
Page 2

Before use
Read this operation manual carefully before use.
Keep this booklet handy for your reference anytime.
Specifications are subject to change without notice for product improvement.
Always refer the original manual which came with the delivered unit.
Index
1. Names of Parts
2. Preparation before use
3. How to use
1) Perforating Unit
3.1 Setting Perforating Block
3.2 Trial Perforation
3.3 Fine Adjustment of Perforating Line
3.4 Perforation, continues
3.5 Replacing Perforating Blade(with frame)
2) Scoring Unit
3.6 Setting Scoring Block
3.7 Trial Scoring
3.8 Fine Adjustment of Scoring Line
3.9 Scoring, continues
4. Adding 2nd Perforating or Scoring Unit to the same mounting shaft (= transport
shaft).
5. Installing Perforating Block in replacement of Scoring Block and vice versa
6. Replacing Transport Rubber Ring
7. Troubleshooting
8. Product Specifications
1
Page 3
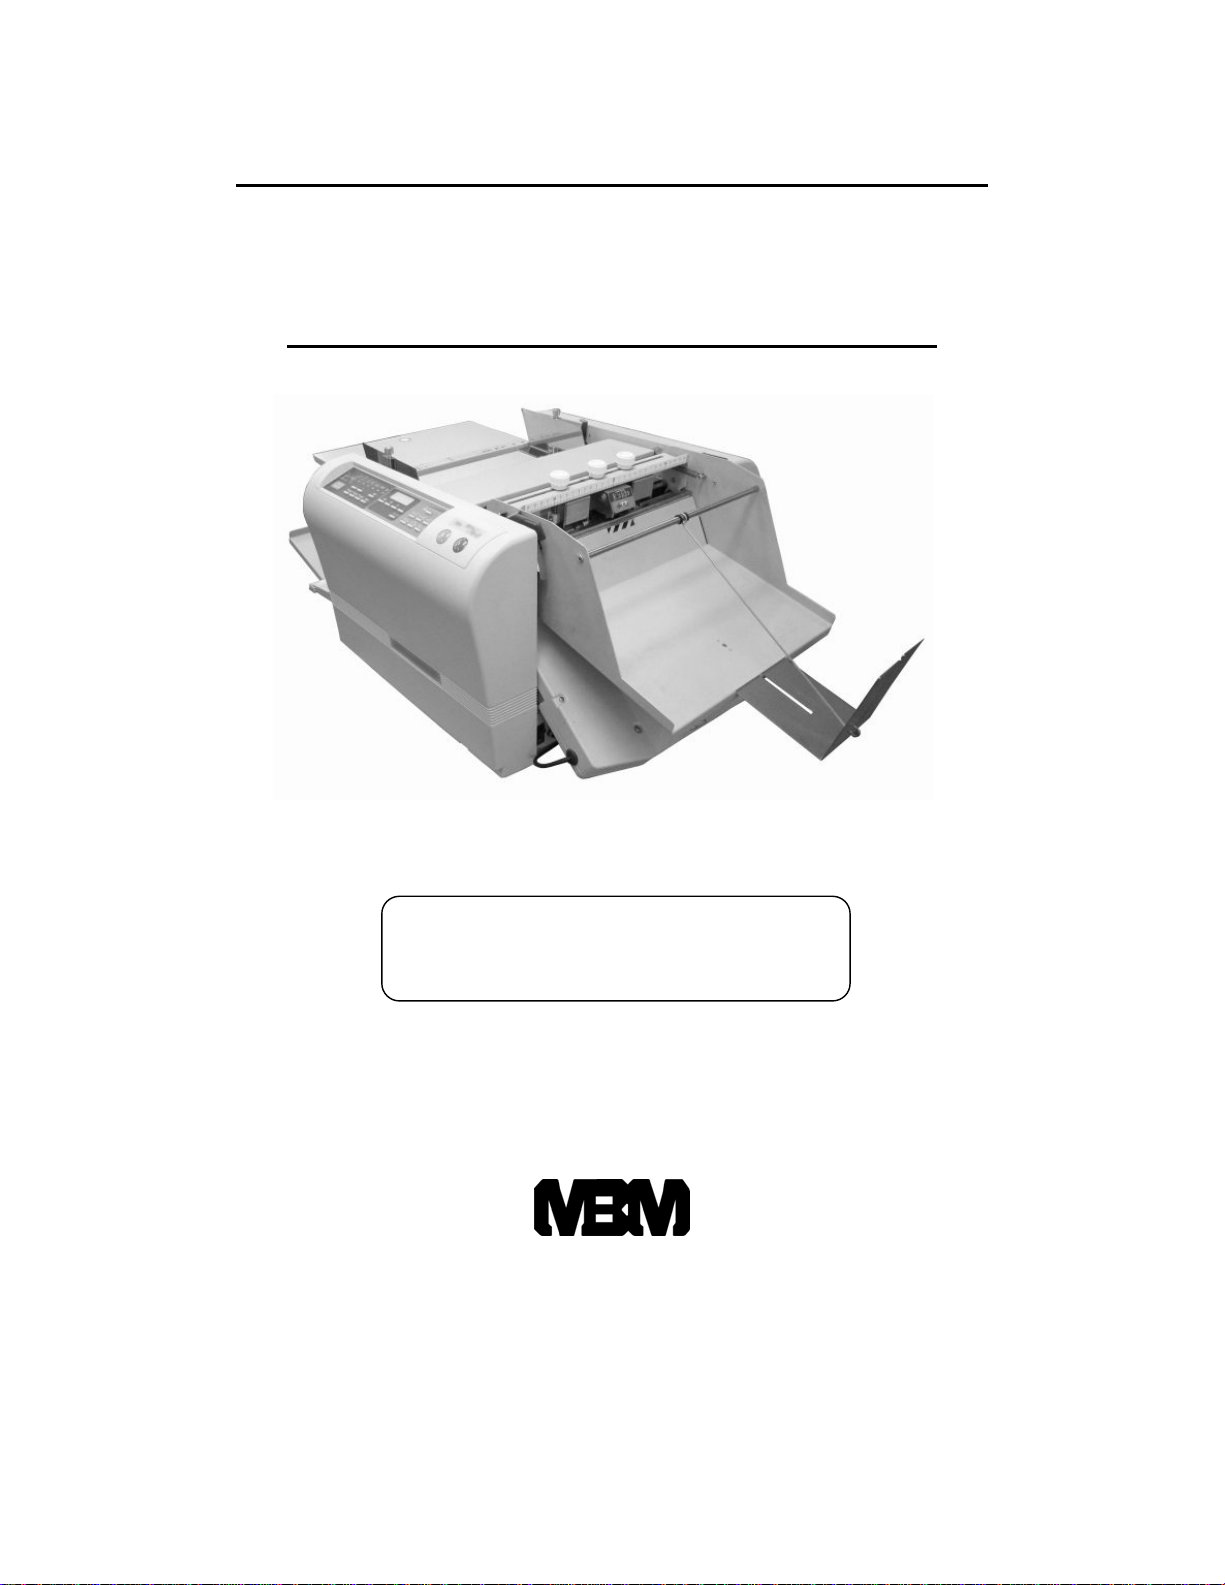
1. Name of Parts
1) Perforating Unit
Block Mounting Arm
Scale
Perforating Block
Block Mounting Arm
Transportation Shaft
Transport Roller Unit
Upper Transport Roller
Blade Receipt Roller
Lower Transport Roller
Perforating Blade
2
Page 4
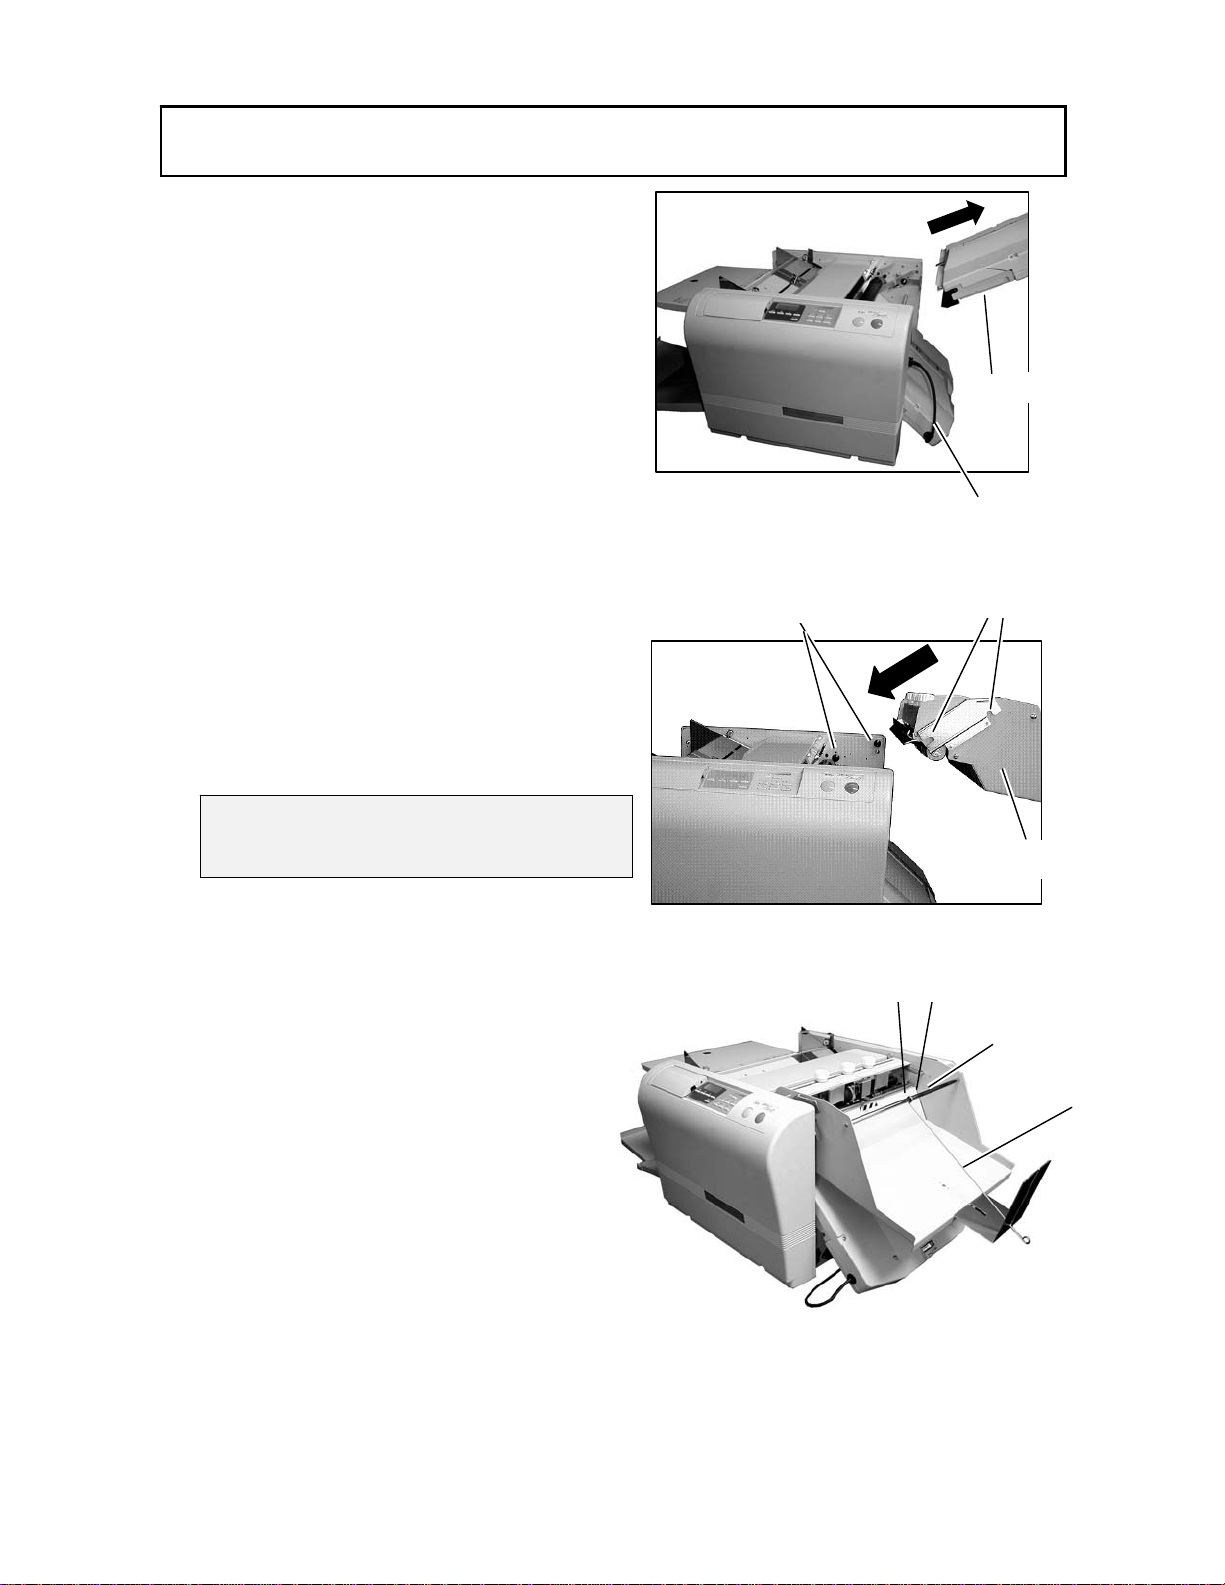
2. Preparation before use
(1) Remove 1st Folding Table to the
direction of arrow.
(2) Remove the connector of 2nd Folding
Table.
(3) Install Perforating / Scoring Unit to
the place where 1st Folding Table
was mounted.
NOTE:
Fit the notches on the perforating unit to
the pins on the both sides of the folder
(4) Set the paper control wire onto the
bail and place the black rubber ring
on the both sides of the wire.
Pins
1st Folding Table
Connector
Notches
Perforating Unit
Black Rubber Rings
Bail
Paper Control
Wire
(5) Fix the bail on the body of perforating
unit with screws.
View after Perforating unit is mounted
3
Page 5
3. How to use
- PERFORATION UNIT
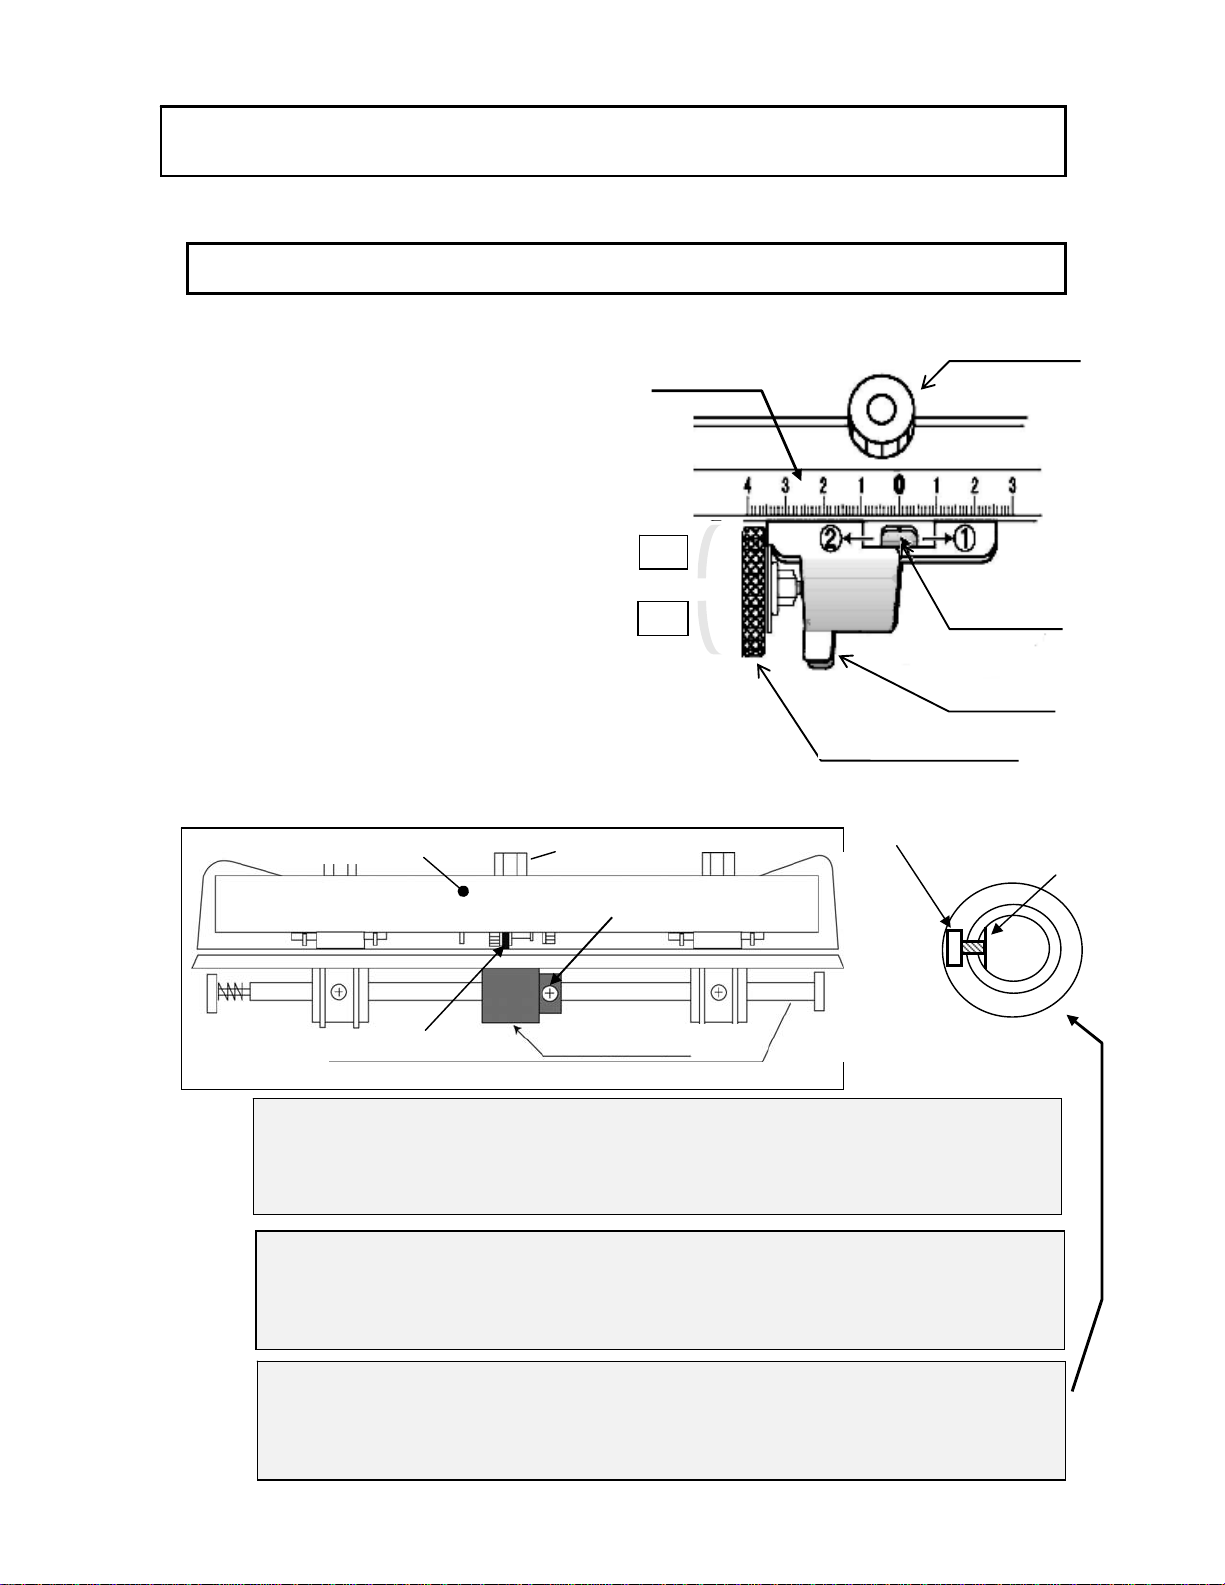
3.1 Setting Perforating Block
((1) Loosen Thumb Screw and squeeze
Release Levers with fingers to slide
Perforating Block right or left.
Refer to guide scale.
NOTE:
Before setting Perforating Block, make
sure to place Blade Position Reference at
center position so that fine adjustment
may be possible after the Block is
installed. Refer [3.3.1 Fine Adj. Dial]
(2) Fitting and fixing Blade Receipt Roller
- Loosen Roller Fixing Screw by Phillips Screw
Driver and place Blade Receipt Roller fit to the
Perforating Blade. Then fix Roller Fixing Screw.
Transportation
Shaft
Block Mounting Arm
Perforating Blade
CAUTION:
While fixing Thumb Screw, press Thumb Screw towards Block Mounting Arm so
that Perforating Block sets square to Block Mounting Arm. This helps the paper
to be fed straight.
CAUTION:
Perforating Blade is designed always to be pressed against Blade Receipt Roller.
Do not move the Roller without squeezing Release Levers. When Levers are
squeezed, they create a distance between Blade and Roller.
CAUTION:
Roller Fixing Screw must be fixed at the position where Transportation Shaft has
flat spot. Otherwise, the Blade Receipt Roller will not be fixed to the Shaft and
the Roller may be damaged.
Thumb Screw
Roller Fixing Screw
Blade Receipt Roller
Thumb Screw
Guide Scale
1
Blade Position
Reference
Release Lever
Fine Adjustment Dial
Fine Adjustment Dial
Roller Fixing Screw
Transportation Shaft
4
Page 6

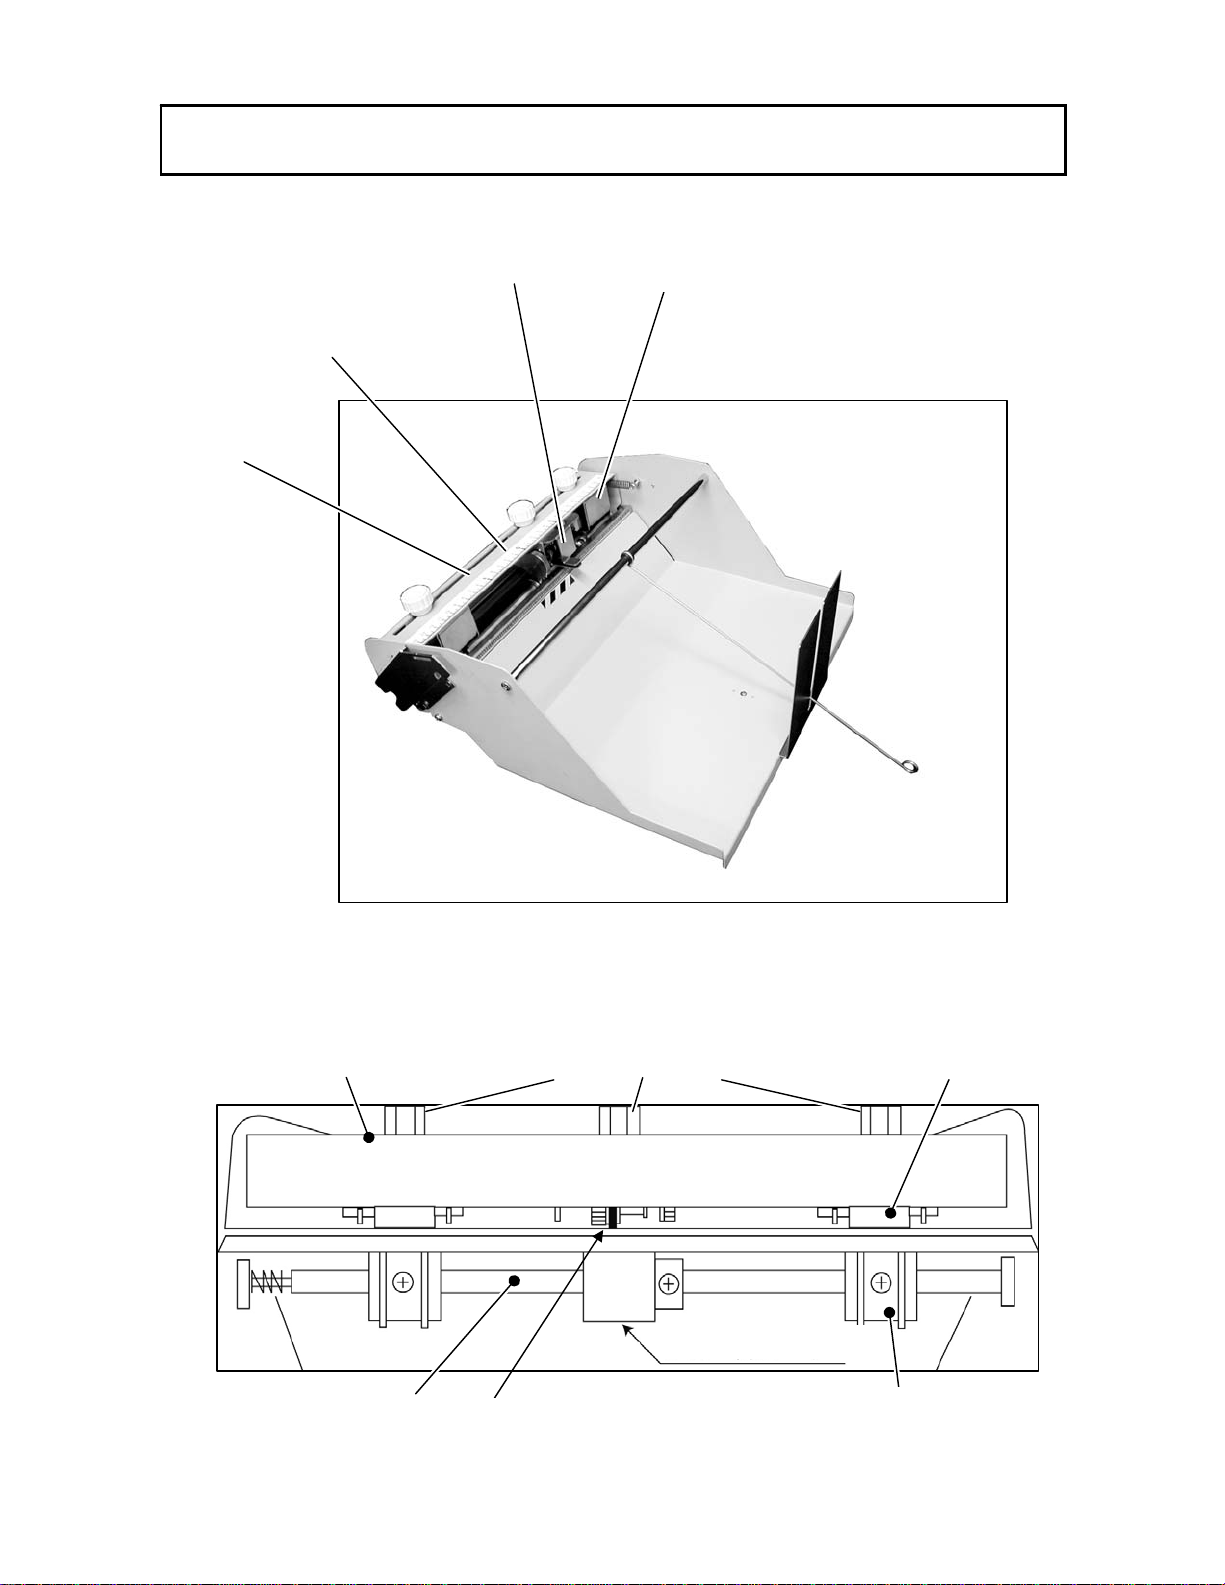
(3) Setting Paper Transport Rollers, Upper and Lower, at proper position
Place the Paper Transport Roller where they can grip paper positively.
Firstly, loosen Lower Philips Fixing Screws on both sides. Slide and position
them to the appropriate location and fix them.
Then, loosen Thumb Screws of Upper Transport Rollers on both sides. Slide and
position them so that Upper Transport Rollers ride on the Lower Transport Rubber
Rings.
Block Mounting Arm
Thumb Screw
Upper Transport Roller
Transportation
Shaft
Transport Rubber Rings
Lower Transport Roller
CAUTION:
Press Thumb Screw to Block Mounting Arm when fixing the Perforating Block.
This helps the paper to be fed straightly.
CAUTION:
Depending location of perforating line, it may not always be possible to place
Upper Transport Roller riding on the two Rubber Rings. In this case, use single
Rubber Ring. However, as much as possible, try to use two Rubber Rings at both
sides for stable paper feeding.
(Perforation Examples )
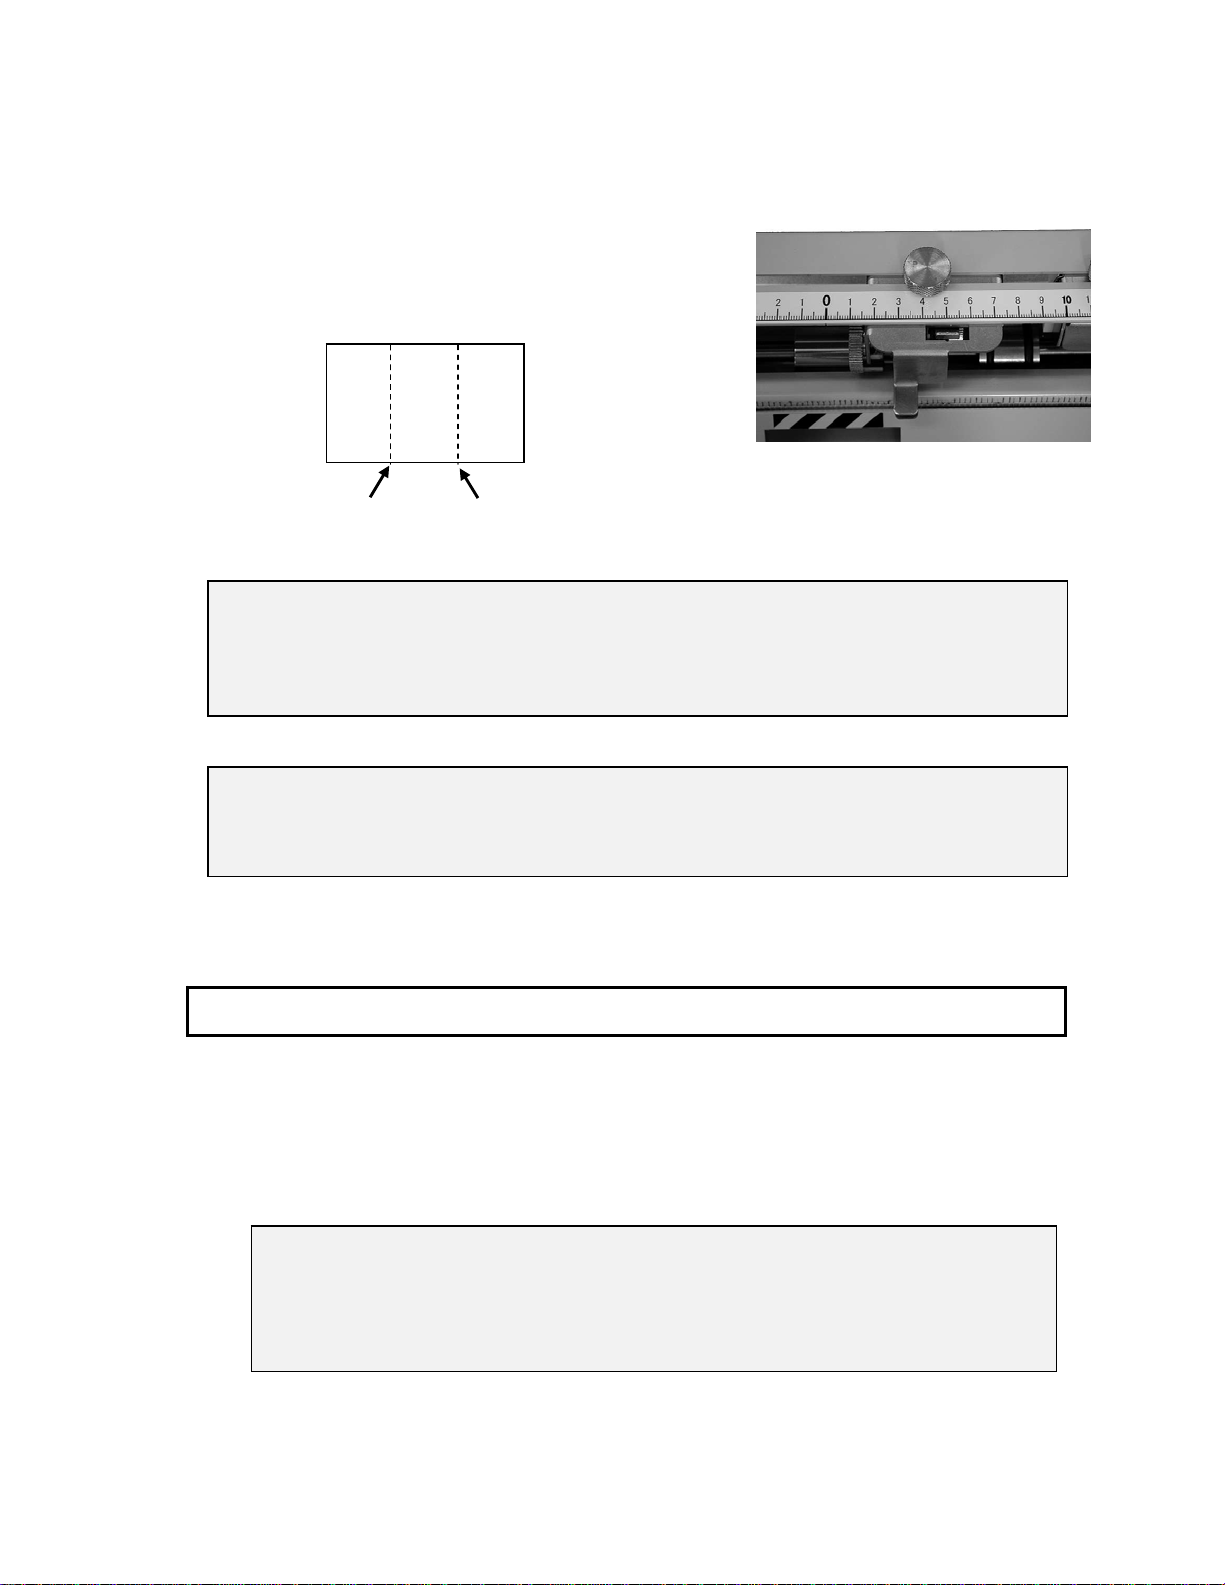
(1) Perforating at the center of a sheet
Place Blade Position Reference to 0 (Zero)
position of the scale
Blade Position Reference
Roller Fixing
Screw
5
Page 7
(2) Perforating two lines on a sheet by single
perforation block.
- Place Blade Position Reference to adequate
position and perforate.
- After first perforation done, reload the sheet
to Paper Feed Tray reversing the paper
position. Then perforate 2nd line again.
1st Perforation 2nd Perforation
Further information:
If desired to perforate two lines by one operation, add one additional perforating block
(optional) to the transport shaft. Note due to frame size of perforating block,
perforating too closed lines or too far apart lines may be limited.
Refer page 13, how to add another perforating unit.
NOTE:
Scale graduation and Blade Position Reference are for guidance only. To perforate at
the accurate position, use fine adjustment mechanism. Refer page 8, fine adjustment
of perforating blade location.
3.2 Trial Perforation
(1) To activate Perforation Unit, turn on the Power Switch while pressing the SELECT
Key. Release the Key as “PERFORATION MODE LAMP” is illuminated.
To operate with normal Folding Mode, Turn power switch off. Install Folding
Table and connect Folding Table Plug to Machine. Then, turn on Power Switch.
CAUTION:
When the machine is turned on, it automatically sets for medium running speed.
Use the machine middle to lower speed. For perforation/scoring, machine is
designed to be used at middle to lower speed to avoid possibility of tearing the
perforating paper.
(2) Set papers on Paper Feed Tray, set Counter to “1” and press “START” Key.
(3) Evaluate if the perforation is done properly as desired.
6
Page 8

y
3.3 Fine Adjustment of Perforating Line
3.3.1 Adjusting line location
– If the line is extremely out of desired location,
Perforating Unit must be relocated.
- If the line is away for approximately 5mm or
less from desired position, fine adjustment
may be possible without changing Perforating
Block set up.
NOTE:
Before fixing Perforating Block, make sure
to place Blade Position Reference to center
position so that fine adjustment may be
possible after the Block is fixed.
Fine Adjustment Dial:
While squeezing release levers, turn Fine Adjustment Dial to direction (1) and
Perforation position moves to right.
When it is turned towards direction (2), Perforator position moves to left.
3.3.2 Adjustment of perforating angle
CAUTION:
Before making any adjustment, make
sure that the paper is tightly placed
without play between the Paper Guides
in the Paper Feed Tray of Folder.
Otherwise, right angle of perforation is
not available in an
event.
In case perforation is not performed in the
right angle, adjustment of angle may be
possible.
- In case finishing of perforation is angled
to right A, turn Slant Adjustment Dial to
the direction of 1.
- In case finishing of perforation is angled
to left B, turn Slant Adjustment Dial to
the direction of 2.
1
2
Slant Adjust Dial
Angled to right
Angled to left
A
Paper
direction
B
Thumb Screw
Blade Position
Fine Adjustment Dial
Reference
Release Lever
Indicator
2
Slant Adjust Dial
1
7
Page 9

3.4 Perforation, continuous
(1) Press “C” Key and clear the counter setting to “0 (Zero)”.
(2) Perforate all the sheets loaded:
Load paper to Paper Feed Tray and press “START” Key.
Machine perforates up to the end of paper stack.
(3) Perforate designated number of sheets:
Load paper to Paper Feed Tray and preset quantity of sheet desired to perforate.
Then, press “START”.
Machine perforates up to the designated quantity of sheet and stops.
3.5 Replacing Perforating Blade (with frame)
(1) While squeezing levers, loosen Thumb Screw and remove Perforating Block.
Thumb Screw
Perforating Block
Release Levers
Rubber Ring
(2) While holding Rubber Ring, loosen Fixing Wheel.
(3) Remove Fixing Wheel, Washer and framed Perforating Blade.
(4) Replace the Framed Perforating Blade with new one and fix the parts in order.
Blade Mount Boss
Washer
Fixing
Wheel
CAUTION:
1) Fit Blade Hole to Blade Mount Boss when
setting Framed Perforating Blade.
2) Also make sure that UP DIRECTION
indicated on Frame of Perforating Blade
directs upward.
3) While tighten Fixing Wheel, hold Rubber
Ring so that the Framed Perforating
Blade is fixed tightly.
Fixing Wheel
Framed Perforating Blade
Framed Perforating Blade
with UP DIRECTION
8
Page 10

SCORING UNIT
3.6 Setting Scoring Block
Upper Scoring Roller
Lower Scoring Roller
(1) Scoring Position
Move V-Groove of Lower Scoring Roller to the place where scoring. Then, fix the Roller
by Philips Screw Driver. Press “Test” Key as leading edge of paper comes close to Lower
Scoring Roller so that scoring position is determined. Do not feed paper yet to the
rollers.
(2) Positioning of Upper Scoring Roller
Loosen (turn) Release/Fix screw (left) on the left side for 2 to 3 rounds. Turn
Shallow/Deeper screw counterclockwise 2 to 3 rounds. Slide the Upper Scoring Roller
right above the lower V-Groove. Turn Shallow/Deeper screw clockwise till Roller comes
down in to the bottom of V-Groove. Then, Fix the Scoring Block turning Release/Fix
screw clockwise. Now, Upper Blade and Lower Groove position is mechanically matched.
(3) Adjusting shallowness/depth of Upper Scoring Roller
Turn Shallower/Deeper screw counterclockwise for 2 to 3 turns. Then, fix the height by
Fix/Release screw.
Fix / Release
Height
V-Groove
Scoring Block
BLADE HEIGHT CONTROL
(Screw on right side)
Shallower
Deeper
9
Page 11

(4) Adjusting positions of Feed Rollers
Place Lower Transport Rollers to the positions where both of them stay on the paper
positively. Then, fix Upper Transport Rollers by Phillips Screw Driver where Upper
Rollers fit on the 2 Rubber Bands of Lower Transport Rollers.
Upper Transport
搬送ローラー 搬送ローラー
Roller
3.7 Trial Scoring
(1) To activate Scoring Unit, turn on the Power Switch while pressing the SELECT
Key. Release the Key as “PERFORATION MODE LAMP” is illuminated.
To operate with normal Folding Mode, Turn power switch off. Install Folding
Table and connect Folding Table Plug to Machine. Then, turn on Power Switch.
CAUTION:
When the machine is turned on, it automatically sets for medium running speed.
Use the machine middle to lower speed. For scoring/perforating, machine is
designed to be used at middle to lower speed to avoid possibility of tearing the
scoring paper.
(2) Set papers on Paper Feed Tray, set Counter to “1” and press “START” Key.
(3) Evaluate if the scoring is done properly as desired.
3.8 Fine Adjustment of Scoring Line
3.8.1 Shallower/Deeper Fine Adjustment
By turning Shallower/Deeper Screw, scoring depth is adjustable. Loosen Release/Fix
Screw first and make shallower/deeper adjustment. After adjustment, fix it by
Release/Fix Screw.
スジ入れキット
Scoring Block
Upper Transport
Roller
10
Page 12

3.8.2 Adjusting scoring line location
Slide and move Lower Scoring Roller first, then slide Upper Scoring Roller. Make
sure to fix both Rollers by Phillips Screw Driver after moved.
3.8.3 Adjusting scoring Angle
In case scoring is not made in square, refer [3.3.2 Adjustment of perforating angle]
(page 8.).
3.9 Scoring, continuous
(1) Press “C” Key and clear the counter setting to “0 (Zero)”.
(2) Perforate all the sheets loaded:
Load paper to Paper Feed Tray and press “START” Key.
Machine scores up to the end of paper stack.
(3) Perforate designated number of sheets:
Load paper to Paper Feed Tray and preset quantity of sheet desired to scores.
Then, press “START”.
Machine scores up to the designated quantity of sheets and stops.
11
Page 13

4.Adding Perforation Unit
(1) Remove Transportation Shaft from Perforation Unit
(2) Remove a Phillips screw from the end of Transportation Shaft.
Transportation Shaft
(3) Remove Lower Transportation Roller from the Shaft after loosening Lower Fixing Screw.
NOTE:
When removing Transportation
Shaft, rotate Block Mounting Arm
toward the direction of arrow. It
makes wider opening and easier to
take out Transportation Shaft.
Lower Transport Roller
Blade Receipt Roller
Roller Fixing Screw
Block Mounting Arm
Transportation Shaft
12
Page 14

(4) Add another Blade Receipt Roller to the Shaft and re-mount Lower Transportation
Roller. Then, fix Rollers by screws. Fix the Phillips Screw at end of the Shaft.
(5) Add another Perforation Unit to the Block Mounting Arm and fix by Thumb Screw.
(6) Place Transportation Rollers where they grip perforating sheet positively.
The two Perforation Units should not touch each other.
NOTE:
Position where perforation can be done is only between the two Lower
Transportation Rollers.
Seen as two Perforation Units are mounted.
Seen as two Perforation Units are mounted.
13
Page 15

5. Exchanging Perforation Unit to Scoring Unit.
Perforation Unit can be exchanged to Scoring Unit and Scoring Unit can be exchanged to
Perforating Unit.
(1) Remove Transportation Shaft from Perforation Unit
(2) Remove a Phillips screw from the end of Transportation Shaft.
Transportation Shaft
NOTE:
When removing Transportation
Shaft, rotate Block Mounting Arm
toward the direction of arrow. It
makes wider opening and easier to
take out Transportation Shaft.
Blade Receipt Roller
Roller Fixing Screw
Block Mounting Arm
14
Transportation Shaft
Lower Transport Roller
Page 16

(3) Remove Lower Transport Roller from the Shaft after loosening Lower Fixing Screw.
(4) Replace with Lower Transport Roller, Blade Receipt Roller, etc. Fix the Phillips screw
at end of the Shaft.
Seen as two Perforation Units are mounted.
(5) Mount Lower Transport Roller and fix it. Then, re-mount Transportation Shaft to
the Perforation Unit.
(6) Place Scoring Block or Perforating Block as desired.
The two Perforation Units, if any, should not touch each other.
(7) Refer [3. How to use]( page 5.)
NOTE:
Position where perforation can be done is only between the two Lower Transport
Rollers.
15
Page 17

6. Replacing Transport Rubber Ring
(1) Remove Transportation Shaft from Perforation/Scoring Unit
(2) Remove a Phillips screw from the end of Transportation
Transportation Shaft
Blade Receipt Roller
NOTE:
When removing Transportation
Shaft, rotate Block Mounting Arm
toward the direction of arrow. It
makes wider opening and easier to
take out Transportation Shaft.
Lower Transport Roller
Roller Fixing Screw
Transportation Shaft
Block Mounting Arm
16
Page 18

(3) Remove Lower Transport Roller from the Shaft after loosening Roller Fixing Screw.
(4) Remove worn/old Rubber Rings from the Lower Transport Roller.
(5) Mount new Rubber Ring
(6) Re-mount Lower Transport Roller in the reversed procedures.
17
Page 19

y
p
g
g sp
y
j
g
g
p
p
7. Troubleshooting
Symptom
Paper Slippage
Paper Jam
Slanting
Not sufficient
perforation
Torn scoring
Not sufficient
scoring
8. Specifications
- Replace Paper Separator.
- Re
lace Paper Feed Roller.
- Remove jammed paper by removing Perforation/Scoring Unit from
Foldin
- Remove jammed paper. Then adjust mounting location of
Roller. Make the Transport Rollers grip perforating/scoring paper
at the both sides.
- Slow down runnin
- Make no play to the paper placed between the Paper Guides in the Paper
Feed Tra
- Ad
- Adjust mounting location of Transport Roller.
Make the Transport Rollers grip perforating/scoring paper at the both
sides.
- Re-mount Perforatin
- Make sure to ride Perforatin
- Re
- Upper Scoring Roller is too deep. Lift the Scoring Roller by
Shallower/Dee
- Upper Scoring Roller is not matching with V-Grooved Lower Scoring
Roller. Match the Upper Scoring Roller to V-Groove by Fine Adjustment
Dial.
- Upper Scoring Roller is too shallow against V-Grooved Lower Scoring
Roller. Lower the Scoring Roller by Height Adjustment Screw.
Machine.
of the Folding Machine.
ust by Slant Adjustment Dial.
lace used/old Framed Perforating Blade to new one.
Remed
eed.
/Scoring Unit firmly to Block Mounting Arm.
Blade on Blade Receipt Roller.
er Adjustment Screw.
Paper Weight
Paper Quality Offset paper / Coated paper Offset paper / Coated paper
Running speed
Location of perforation
and scoring line
Perforating pitch
Machine Dimensions
(Both Perforation and
Scoring Units)
Unit Weight
(Both Perforation and
Scoring Units)
Perforation
Scoring
60 to 85 sheets/minute
(3600 to 5100 sheets/hour)
Centering
0.35mm(perforation),
0.20mm(non-perforation),
continuous
W480 x D380 x H200 mm (In
Use)
W380 x D380 x H200 mm (Not in
Use)
Approx. 4.8 kg Approx. 10.6 lbs
: 64~127.9 g/㎡
: 64~157 g/㎡
18
lbs (Bond)
lbs (Bond)
A4 landscape
In case A4 paper, landscape,
+ or - 50mm (1.96")
when transportation rollers
are
placed at paper sides
0.014"(perforation),
0.008"(non-perforation),
continuous
W18.9 x D15.0 x H7.9" (In Use)
W15.0 x D15.0 x H7.9" (Not in
Use)
Page 20

Intentionally left blank
JaCIcOn
19
Page 21

MBM Corporation
20
 Loading...