

Page 1
OPERATION MANUAL
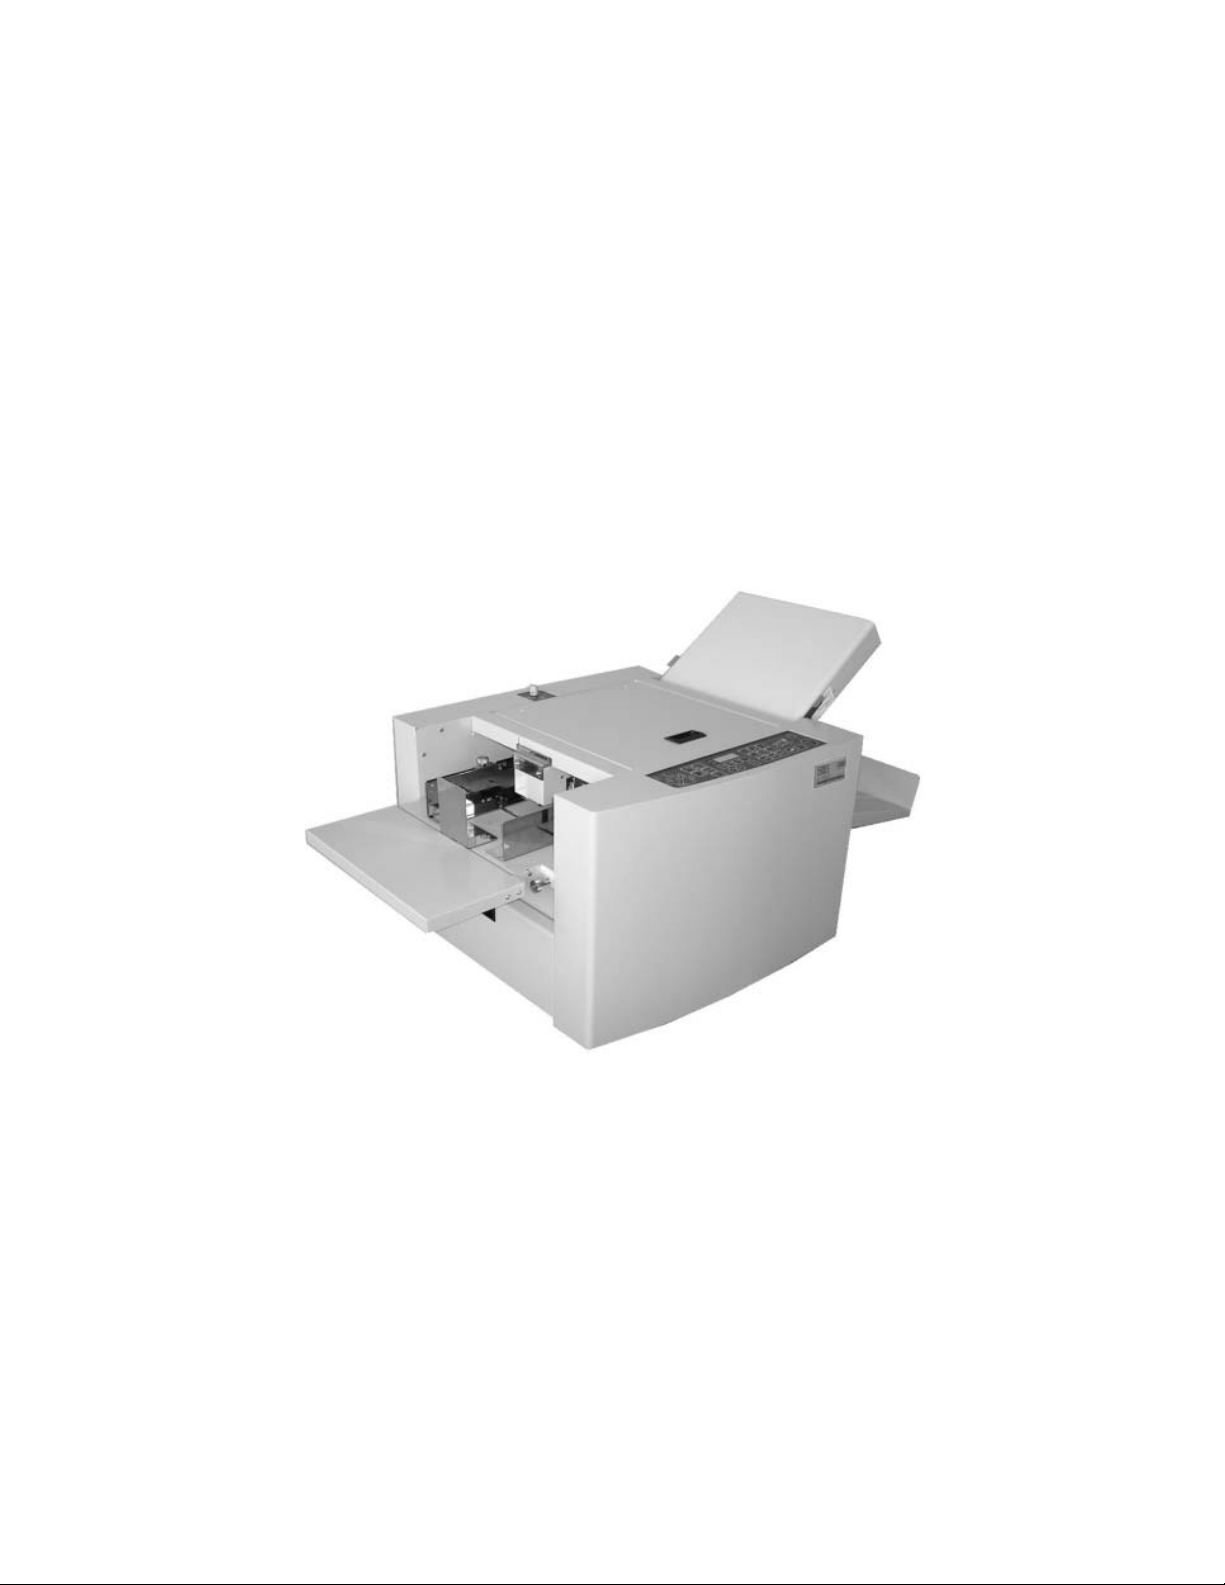
MBM Air Suction Folder
Model 1500S
MBM Corporation
Version: 100910E(MBM)
Page 2

Introduction
Thank you for purchasing UCHIDA Model “AeroFold” Air Suction Paper Folder. You should receive
many years of reliable service from this machine. Compact and easy to use,
streamline your paper folding tasks, saving you valuable time. Please read the Operation Manual
thoroughly before using this machine.
“AeroFold” is sure to
Contents
Safety Instructions .................................................................................... 4
(1) Specifications ........................................................................................ 7
(2) Accessories ............................................................................................ 8
(3) Part Names ......................................................................................... 10
(4) Designation and Functions of Operations Panel ............................. 1 1
(5) Setup ................................................................................................... 12
(A) Setting of the Paper Ejection Table .......................................................................................... 12
(B) Setting of Table 1 ..................................................................................................................... 13
(C) Setting of Table 2 ..................................................................................................................... 14
(D) Setting of the Auxiliary Paper Feed Table ............................................................................... 16
(E) Connecting Power Cabler ......................................................................................................... 17
(6)Preparation of Paper .......................................................................... 18
(7) Directions for use ............................................................................... 19
(A) Standard folding of standard-size paper ............................................................................. 19
(B) Standard Folding of Non-standard-size Paper ......................................................................... 26
(C) How to Use the Interval Function ............................................................................................ 27
(8) Adjustment ......................................................................................... 29
(A) Fine Adjustment ....................................................................................................................... 29
(D) Paper Height Adjustment ......................................................................................................... 38
(E) Standard of Suction Air and Paper Feed Table Height ............................................................. 39
(F) Separator Height Adjustment .................................................................................................... 40
G) Changing Location of Paper Ejection Roller ............................................................................ 40
2
Page 3

(9) Memory .............................................................................................. 40
(A) Fold Position Memory of Non-standard Papers....................................................................... 40
(B) Fold Position Memory of Standard Papers .............................................................................. 41
(C) Clearing Memory ..................................................................................................................... 42
(D) Clearing all the memorized patterns ........................................................................................ 42
(10) Check Lamps, Error Codes and Troubles ..................................... 43
(1 1) Troubleshooting and Cleaning ........................................................ 46
(A) Troubleshooting of Paper jam .................................................................................................. 46
(B) Cleaning of Sensors.................................................................................................................. 47
(C) Cleaning of Fold Roller and Paper Feed Belt .......................................................................... 48
3
Page 4
Safety Instructions
Definition of Symbols and Notes
The following names and signs stand for possible dangers.
Danger
This symbol stands for immediate danger. Disregarding these instructions may cause severe injury.
Caution
This symbol stands for a potentially dangerous situation. Disregarding these instructions may lead to
injuries or damage to property.
Danger
Make sure that the machine is electrically grounded to prevent electrical shock.
Operate the machinery within reasonable voltage range. There is a risk of electrical shock or fire if a higher or
lower voltage is used, or if an electric current is utilized with a frequency not within the range stated
above.
Do not place any object on top of this machine. There is a risk of electrical shock or fire if water or any
foreign object enters the machine.
Handle the power cord with care. There is a risk of electrical shock or fire if the cord is damaged, broken,
or placed under a heavy object.
Do not insert or remove the power plug when water is present.
Do not remove the cover of this machine. There is a risk of an electrical shock.
Do not reconfigure the electronics of this machine. There is a risk of an electrical shock or fire.
Do not operate the machine if it is emitting smoke or a strange odor. Turn off the machine, unplug it from
the outlet and contact your dealer.
Do not operate the machine if the power cord is generating heat or emits a strange smell. Turn off the
machine, unplug it from the outlet and contact your dealer.
If a foreign object enters into the machine, turn off the power switch and unplug the power plug, then
consult your dealer.
In the event of a thunderstorm, unplug the machine.
Caution
Keep hair, clothing, and jewelry away from the machine while operating. Serious injury may result.
Do not put the machine on an unstable or slanted surface. Doing so may cause the machine to drop or fall
over, causing damage and possible injury.
Store and operate the machine in a clean, dust-free environment with low humidity. Avoid areas with high
moisture, extreme temperatures and excessive dust, as these conditions may cause machine failure or
electrical shock.
Be sure to grasp the power cord by the plug when unplugging it from the electrical outlet. Not doing so may
cause damage to the cord and possible electrical shock or fire.
Be sure to pull the power plug out of the electric outlet before moving the machine. Not doing so may cause
damage to the cord and possible electrical shock or fire.
Unplug the power plug from the electrical outlet when this machine is not in use.
The socket-outlet shall be installed near the equipment and shall be easily accessible.
Operate the machine at the temperature of 5 degrees to 35 degrees C.
4
Page 5
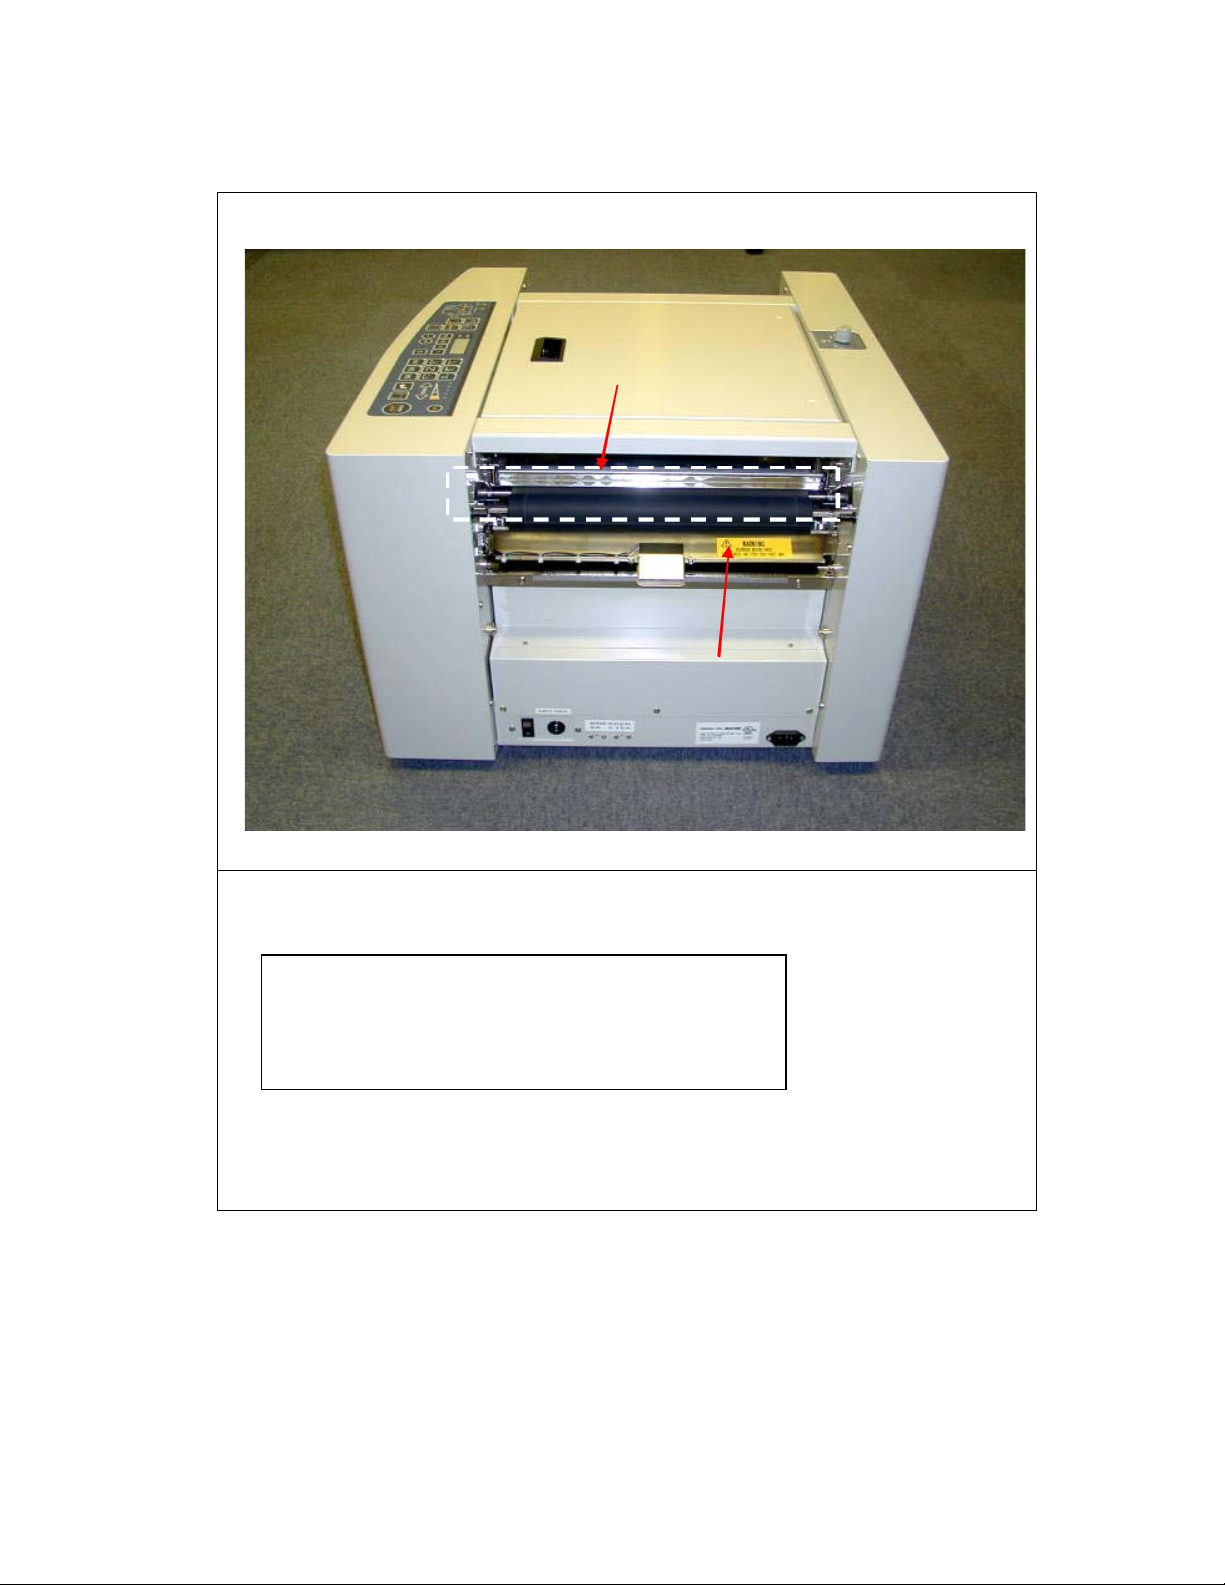
WA RN I NG _1
①
②
①:Moving Parts
②:Warni ng Label
WARNING
HAZARDOUS MOVING PARTS
KEEP FINGERS AND OTHER BODY PARTS AWAY.
5
Page 6

WARNING_2
①
②
①:Moving Parts
②:Warni ng Label
WARNING
HAZARDOUS MOVING PARTS
KEEP FINGERS AND OTHER BODY PARTS AWAY.
6
Page 7
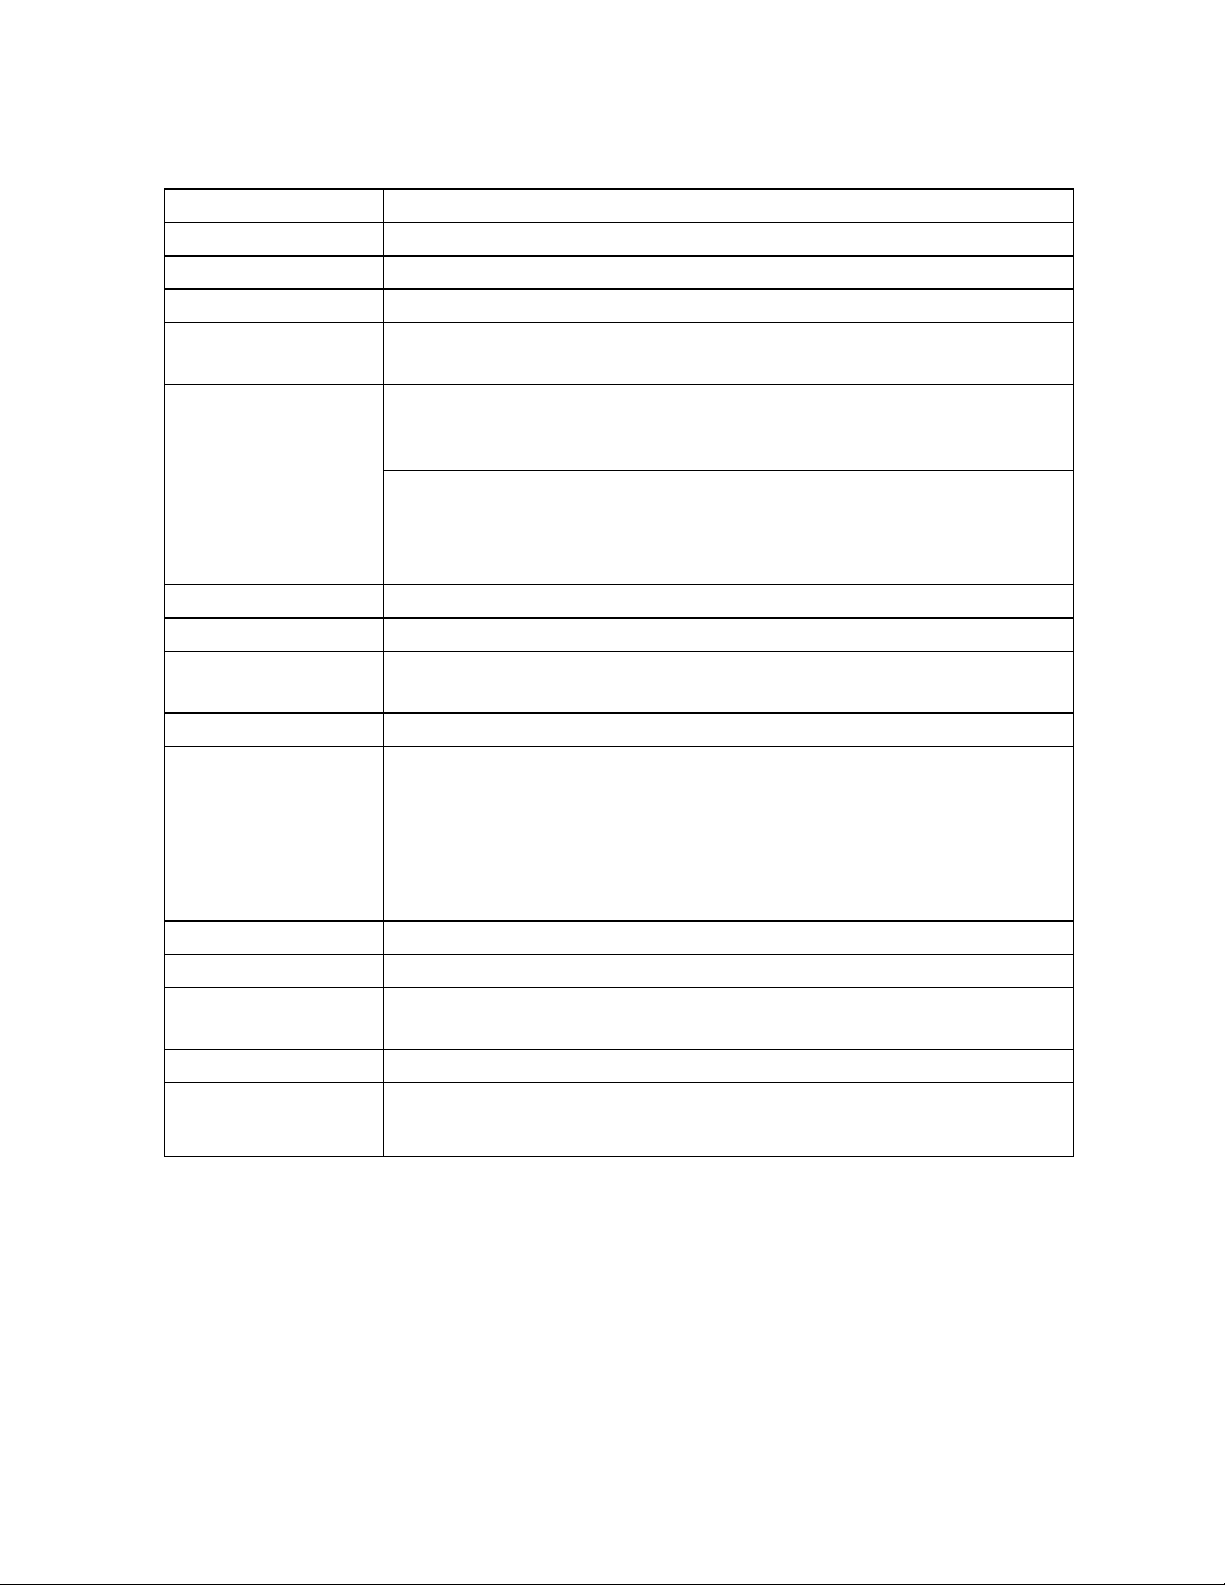
(1) Specifications
Model: MBM 1500S Air Suction Folder
Paper sizes: 4.72 x 8.27 – 13.00 x 19.21 inch
Paper weight: Bond 13.9 to 42.5 lbs (Bond 42.5 – 61.1 lbs for single fold with limited paper)
Paper quality: Offset paper, Coated Paper
Folding patterns: Single, Letter, Zigzag, Double Parallel, Fold-out and Gate*
(*Gate is limited to certain papers)
Folding dimensions: Maximum folding dimensions
Table 1: 14.4 inch
Table 2: 9.6 inch
Minimum folding dimensions
Table 1: 2.1 inch
Table 2: 2.1 inch
Smallest adjustment increment: 0.004 inch
Paper feed system: Belt Suction Feed system
Maximum capacity: 500 sheets, 20 lbs Bond
Folding speed: 2,500 to 15,000 sheets per hour (single fold using Letter size paper)
Speed adjustable in 5 steps.
Control system: Automatic setting by built-in microcomputer
Other functions: Automatic paper size detector (Ledger, Legal and Letter)
Four-digit counter with addition/subtraction modes
Paper Jam detector/indicator
Skew correction
18 memories for standard paper size (fine adjusted)
3 special memories for out of standard paper size
Noise 86dB, 20 lbs Bond, double parallel at the highest speed level 5
Power source: 100 thru 120 VAC, 2.6A/240W, 50/60Hz
Dimensions: 51.2 (W)×23.6 (D)×23.2 (H) inch (in use)
46.1 (W)×27.6 (D)×25.6 (H) inch (in storage)
Weight: Net: 154.3 lbs Shipping (Approx.): 198.4 lbs
Options: Perforation unit
Scoring unit
7
Page 8
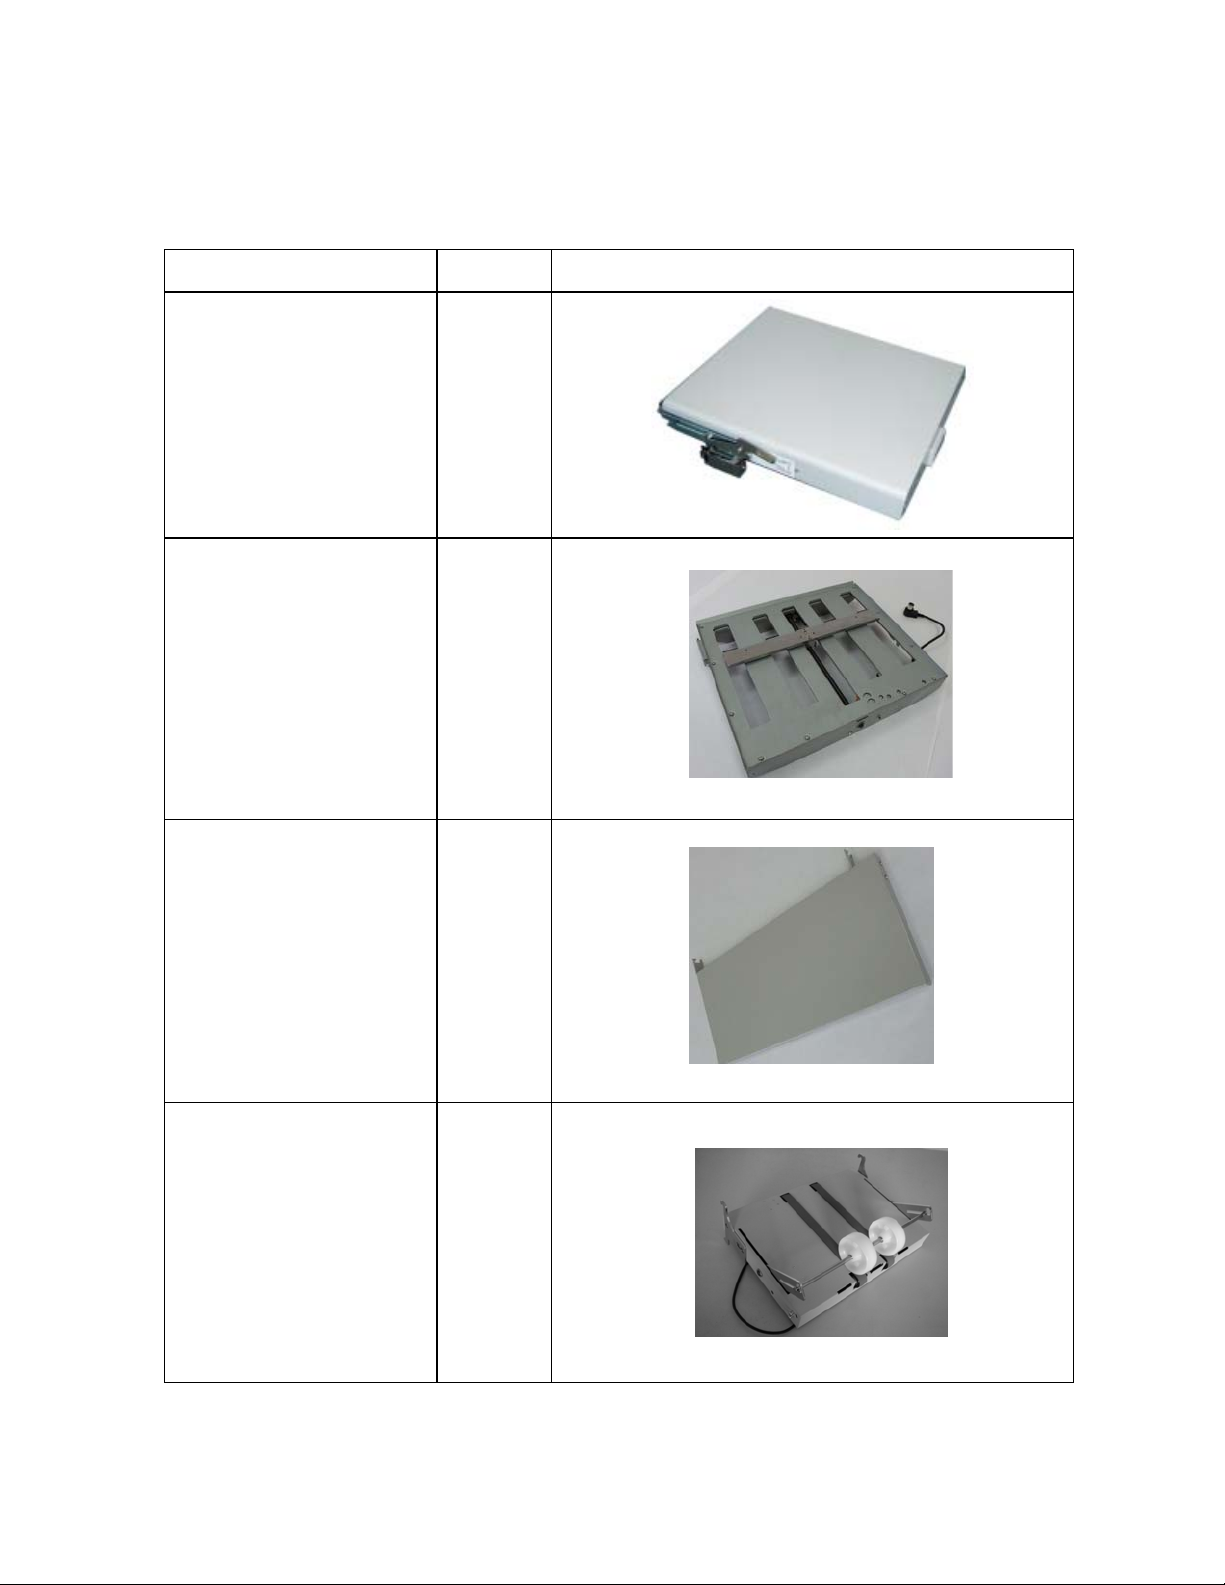
(2) Accessories
After un-boxing, make sure that the following accessories are present. Please contact your local dealer
immediately if anything is missing.
Accessories Number
Table 1 1
Table 2 1
Auxiliary paper feed table 1
Paper ejection table 1
8
Page 9
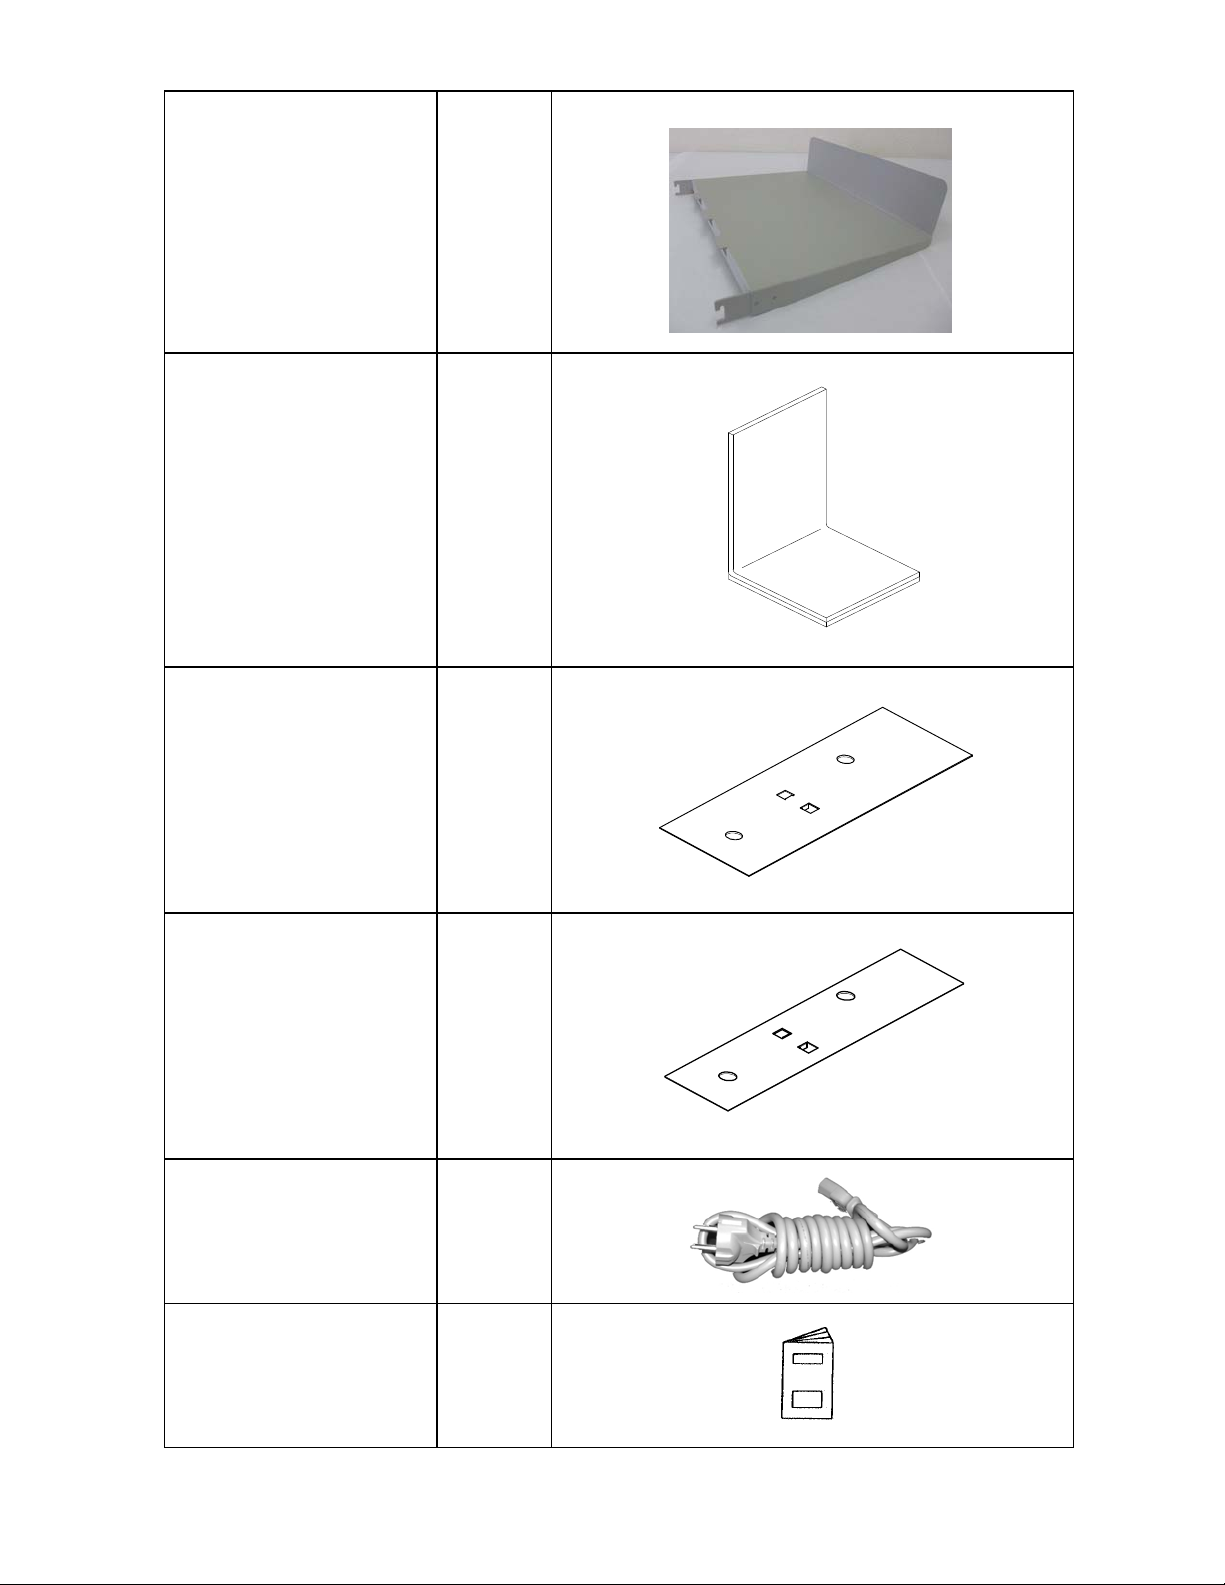
Auxiliary paper ejection table
L Stopper Guide 1
Paper Spacer
for Ledger and larger
1
1
Paper Spacer
for Letter and smaller
Power cable 1
Operation Manual 1
1
9
Page 10
∗
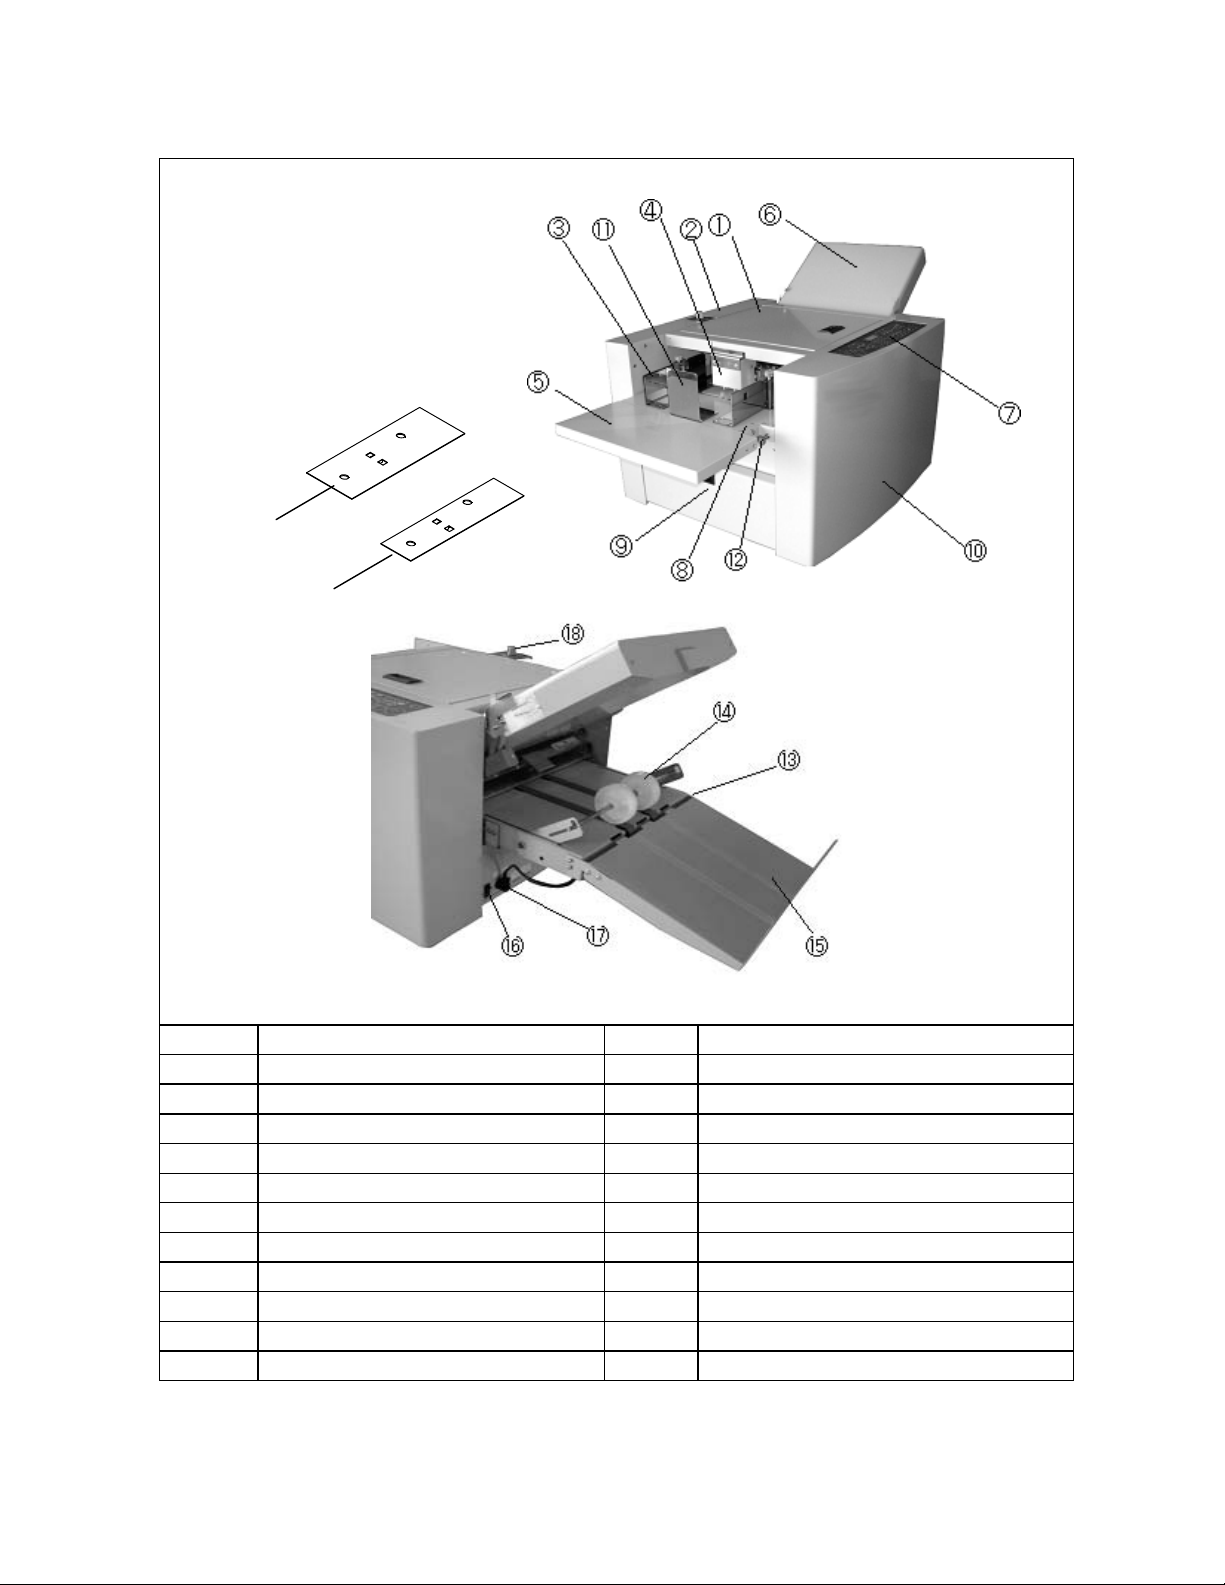
(3) Part Names
⑲
Name Number Name
① Top cover ⑫ Skew adjustment knob
② Left side cover ⑬ Paper ejection table
③ Paper guide(L w/spring loaded & R ) ⑭ Paper ejection roller
④ Paper height detection sensor ⑮ Auxiliary paper ejection table
⑤ Auxiliary feed table ⑯ Power switch
⑥ Tabl e 1 ⑰ Paper ejection table socket
⑦ Control panel ⑱ Air adjustment knob
⑧ Paper feed table ⑲ Paper Spacer for Ledger and larger
⑨ Door for the table 2 ⑳ Paper Spacer for Letter and smaller
⑩ Right side cover
⑪ L Stopper guide
∗ Table 2 is set under the paper feed table in the machine, which you find when opening the door for the table 2, ⑨.
By placing ⑲ or ⑳ Paper Spacer on the paper feed table, make the paper stack flat.
⑳
Tabl e 2
10
Page 11
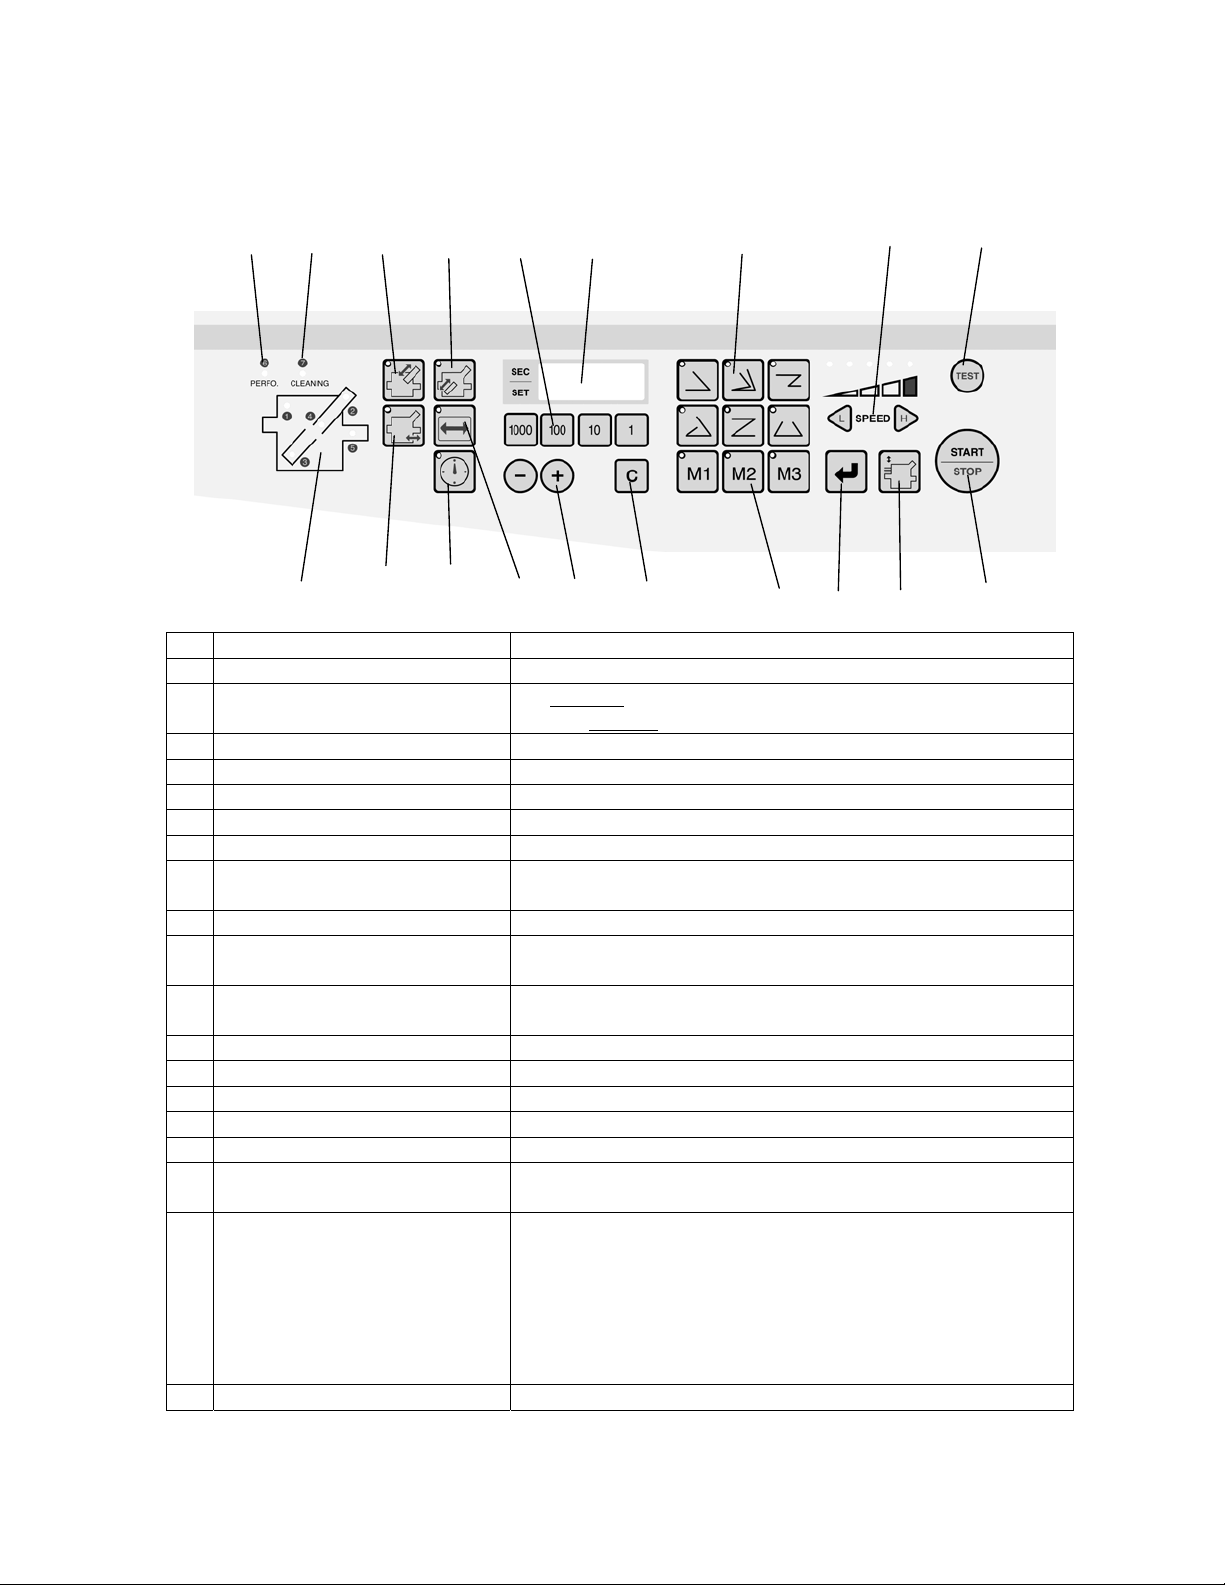
(4) Designation and Functions of Operations Panel
⑬
⑲
⑱
⑫
⑪
⑧
⑦
③
②
⑯
⑰
No.
①
START/STOP key Starts and stops machine.
②
TEST key
③
Speed adjustment key Adjusts speed.
④
Paper feed table up/down key Moves up and down the paper feed shelf.
⑤
Store key Fold position after adjustment is stored.
⑥
Memory 1/2/3 key
⑦
Fold type key Six fold types can be input and stored.
⑧
Counter
⑨
Clear/Reset key
⑩
+/- key
⑪
Numerical key
⑫
Table 2 stopper move mode key Indicates when the position of stopper of Table 2 is adjusted.
⑬
Table 1 stopper move mode key Indicates when the position of stopper of Table 1 is adjusted.
⑭
Paper length input mode key Indicates when paper length is input
⑮
Interval key Sets a certain time of interval to stop paper feed.
⑯
Paper ejection roller move key Indicates when the position of the paper ejection roller is adjusted.
⑰
Check lamp
⑱
Cleaning lamp
⑲
Perforation mode lamp Indicates when the optional perforating unit is installed.
Designation/Indication Function
⑮
⑩
⑭
1) Test folds two sheets without counting.
2) Also test blow
Three special fold types are stored.
Shows the number of sheets, the position of the
stopper pin of Table 1 and 2, and paper size.
Clears the counter / resets after an error.
Used for adjusting the position of the stopper of Table 1 and 2, the
position of paper ejection roller, and paper length
Used for inputting the number of sheets to be folded and the length of
non-standard size paper
Indicates when paper stock runs short, or the location of paper feed
trouble.
Indicates when cleaning of the FEED section (belt, roller) is necessary.
It lights every after 10,000 peaces of paper are fed.
For reset, turn on the machine holding down – key.
You can disable this function when you turn up the machine keep
pushing [single (Fold type)] key.
You can activate this function again when you turn up the machine
with[gate(Fold type)] key pushed.
⑨
without folding, when pressed more than 2 seconds.
⑥
⑤
④
①
11
Page 12
A
y
pap
(5) Setup
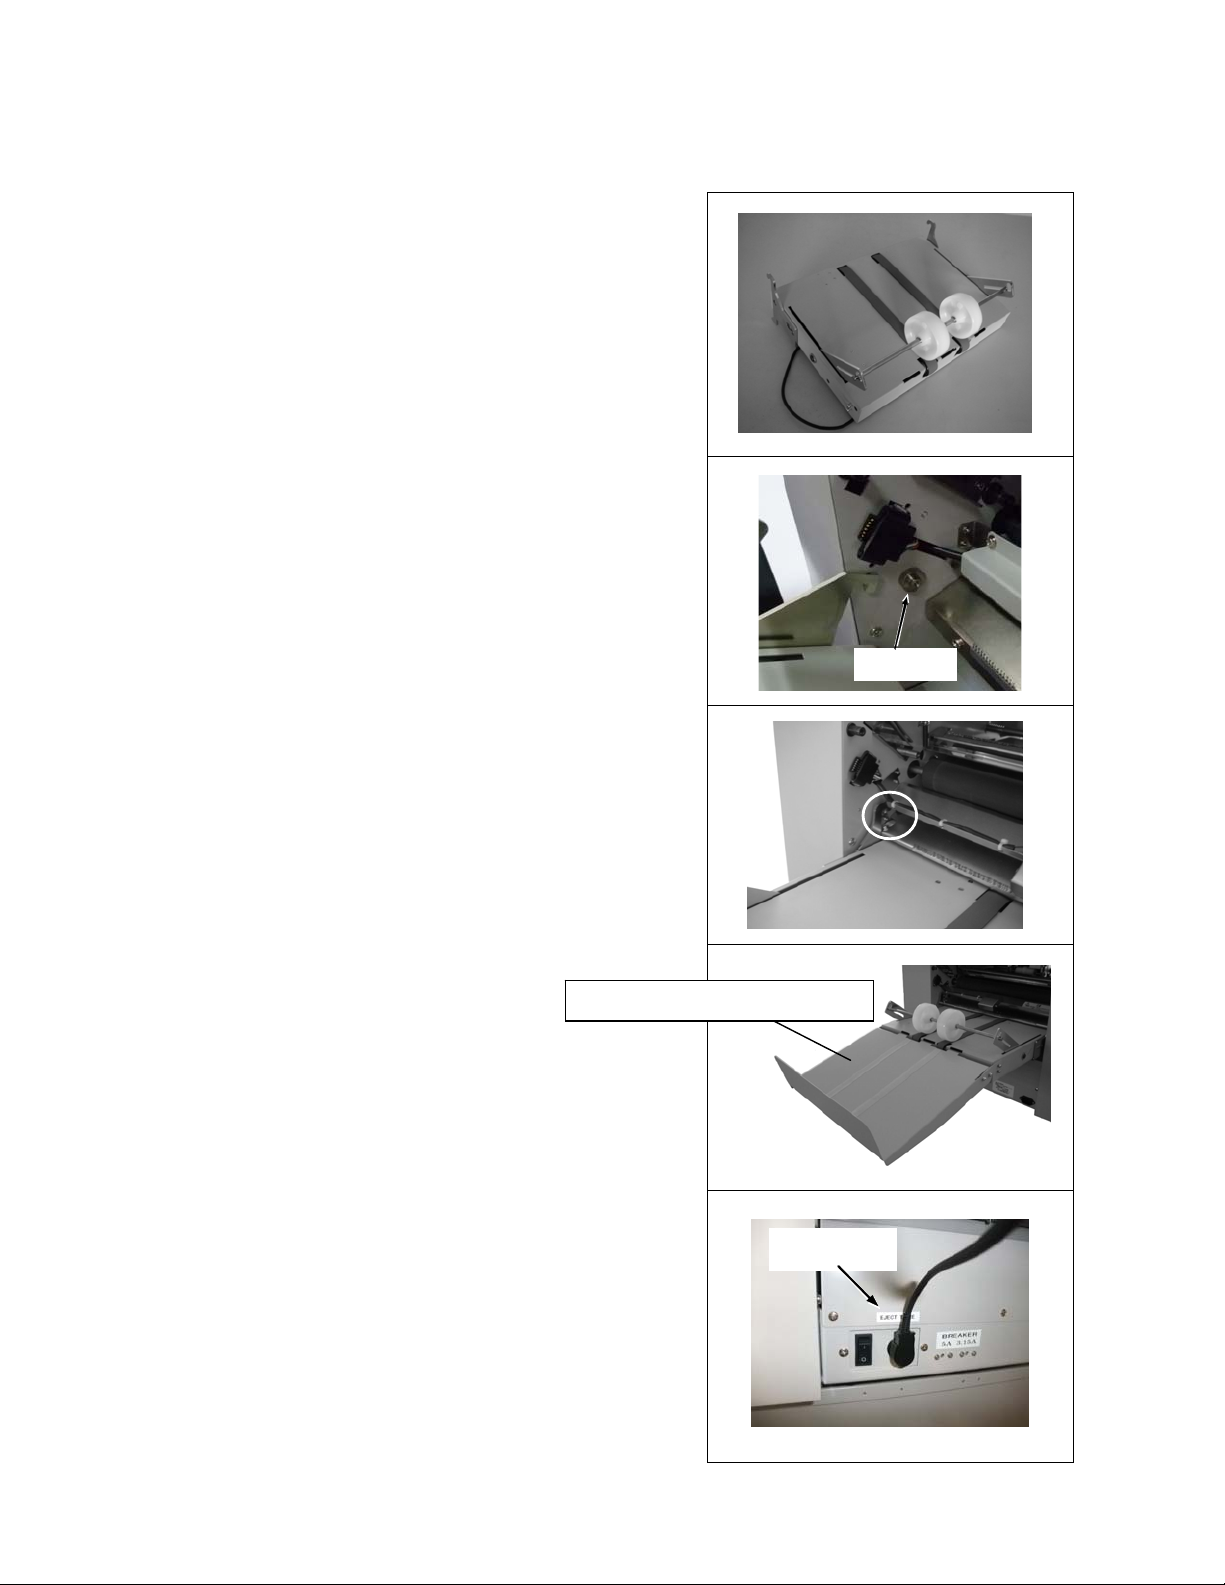
(A) Setting of the Paper Ejection Table
Install the paper ejection table to the main machine body.
Install the table by putting its hook on the guide pins at two
sides.
Make sure that the hooks are securely put on the guide pins.
uxiliar
Install the auxiliary paper ejection table to the paper ejection
table.
Guide pin
er ejection table
Connector
Join the connector of the paper ejection table to the machine.
12
Page 13
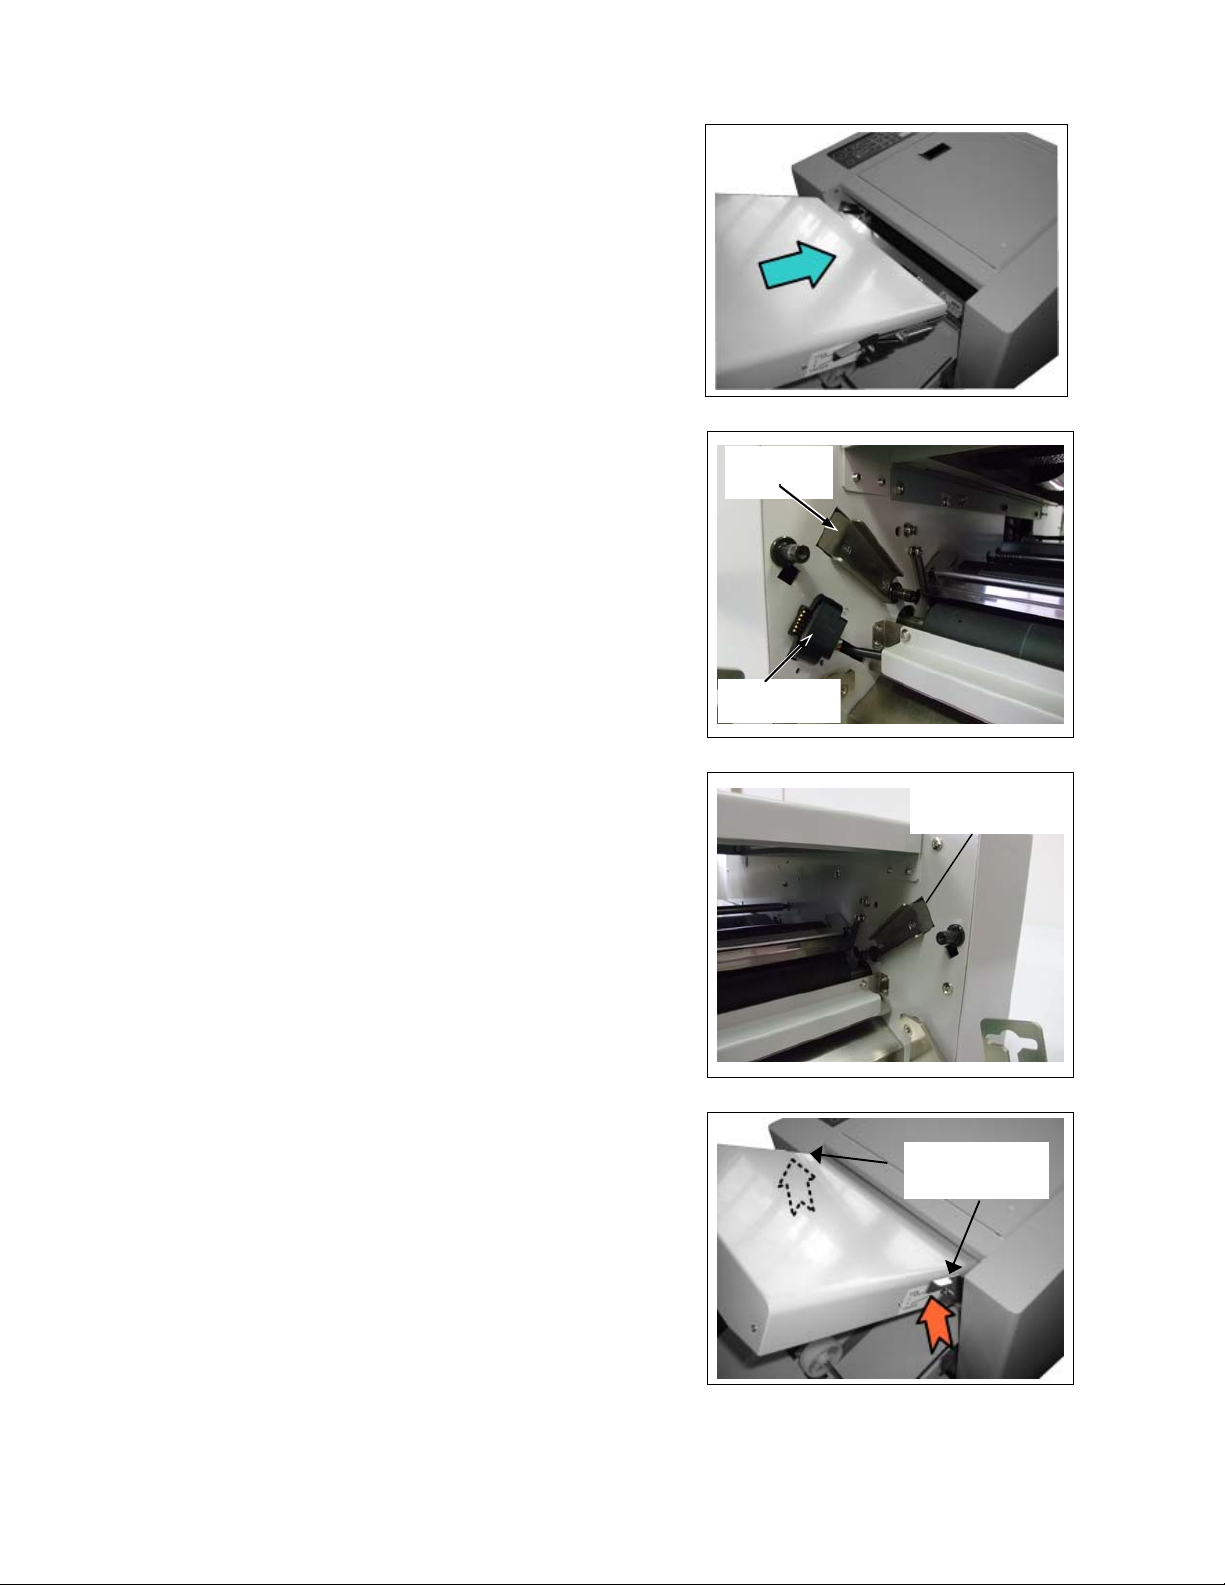
(B) Setting of Table 1
Slide Table 1 bracket (RH&LH) slowly to diagonal direction
along the guide of the main machine body.
Table 1 guide on the operator side
The Table 1 connector is set on the operator’s side. Give
caution not to damage the connector when installing the
Table 1.
Guide
Table 1 guide on the opposite side of the operator.
Install Table 1 to the main machine body securely and fix it
using the lock levers located on both sides. (Move top of the
lock lever to the arrow direction as shown in the right figure.)
Connector
Table 1 Guide
Lock Lever
13
Page 14
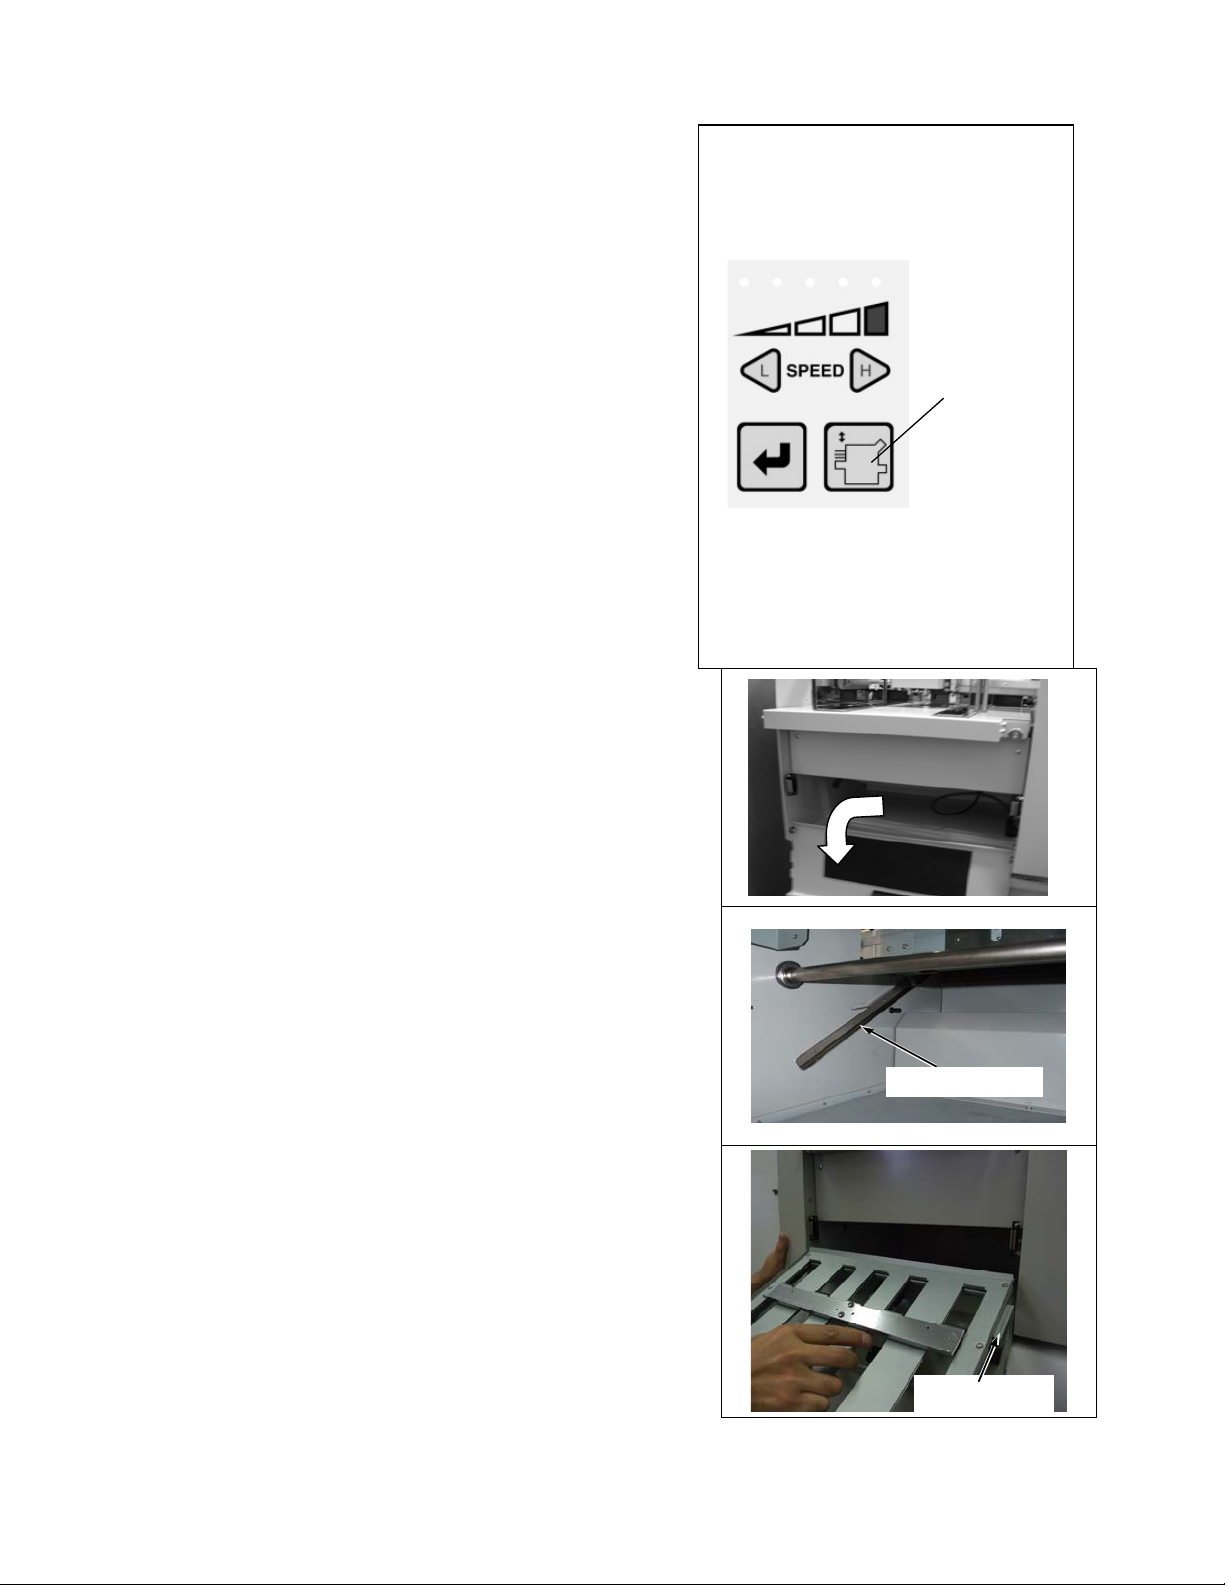
(C) Setting of Table 2
Make sure that no paper is loaded on the paper feed table, and
press the paper feed table Up and Down Key so as to raise the table
until it stops at the uppermost point.
For installing or removing table 2, do it after raising the paper
feed table up to the highest point using the paper feed table Up and
Down Key.
In case the paper feed table is located at any place other than
the lowermost point, if the paper feed table Up and Down Key is
pressed, it moves down to the lowermost point. Therefore, press the
paper feed table Up and Down Key again to raise it to the
uppermost point.
In case the paper feed table is located at the lowest point, if
the paper feed table Up and Down Key is pressed, the table moves
up.
If the paper feed table Up and Down Key is pressed while the
paper feed table is in operation, the paper feed table stops motion.
Table up and down key
Open the door for the table 2.
Place the Guide Bracket of Table 2 on the Table Guide 2 on both
sides.
Table2 G uide
Guide Bracket
14
Page 15

Push Table 2 in the direction of arrow and along Table Guide 2.
Push Table 2 until it is securely locked.
Make sure that Table 2 is securely locked.
Insert the connector of Table 2.
Close the door for the table 2.
15
Page 16
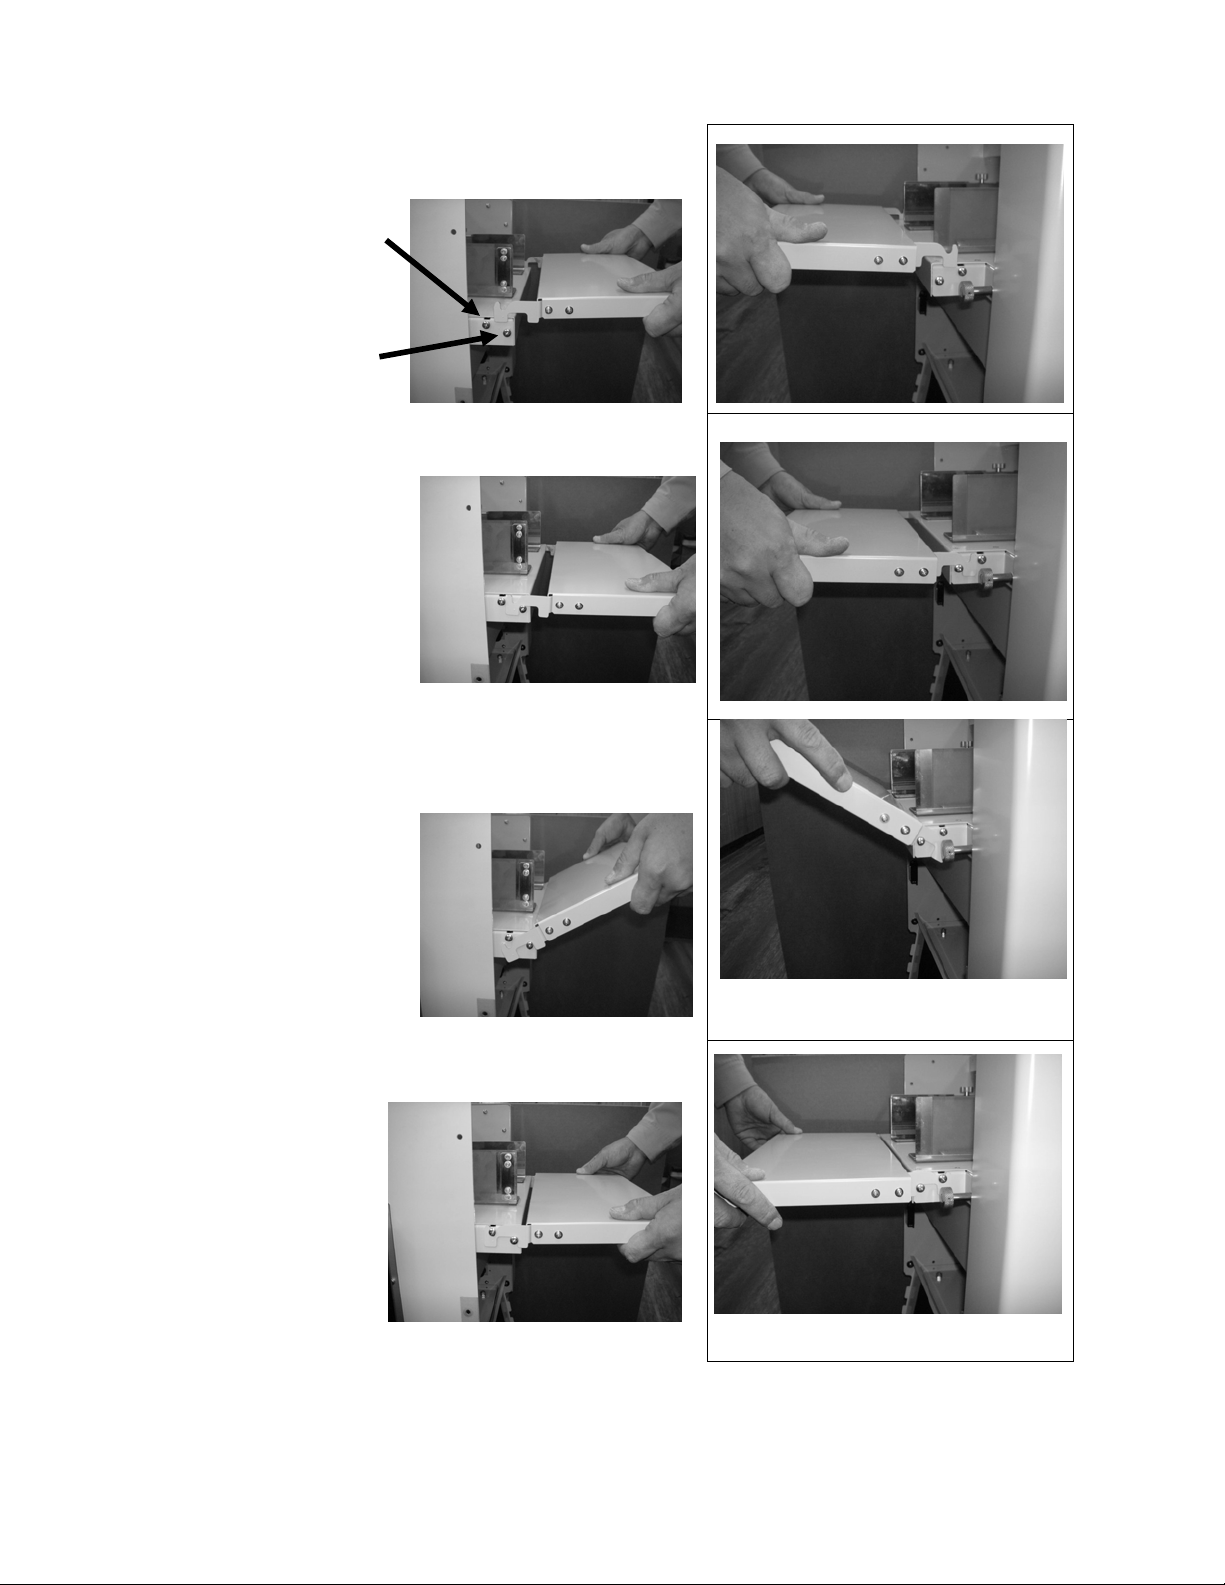
(D) Setting of the Auxiliary Paper Feed Table
Have the Paper feed side table parallel and set the tip of metal fitting
of that between fixed pin No.1 and No.2
Fixed Pin No. 2
Fixed Pin No. 1
Put the Paper feed side table down as it is and catch the fixed pin
No.1
Put the Paper feed side table up diagonally, the tip of them should be
below fixed pin No.2 and pull down the paper feed side table.
Please check the tip of the paper feed side table catch the fixed pin
No.1 and No.2.
16
Page 17

(E) Connecting Power Cabler
Insert the power cable into inlet for machine and the other end to
power outlet.
Caution:
Do not use a power cable other than the one provided.
Power Switch
17
Page 18

(6)Preparation of Paper
Fan out the paper sufficiently. Jog the paper. If there is a sheet of paper whose edge
is bent or warped, it must be straightened.
Use dry paper. Keep the stacking capacity.
Max. 500 sheets (20 lbs Bond)
(20 lbs Bond)
It should be noted that when paper as thick as 1.97 inch or more is stacked on the station,
smooth collation will not be done. Also it may cause damages to the machine.
18
Page 19

(7) Directions for use
Single Fold at medium speed 3. This introductory operation makes the user to operate the machine
easier for applied applications.
weights, folding patterns and different speeds.
(A) Standard folding of standard-size paper
Prepare approximately 200 sheets of Ledger, 11 x 17 inch, 20 lbs Bond. Paper corners must be
exactly 90 degree angles.
1. Turn power switch on.
2.
NOTE: Skew Adjustment Knob is used for the paper which weighs
more than 34.3 lbs Bond unless otherwise needed.
Paper Spacer
To start using this machine, following is described for paper size A3 and 80g/m2 offset paper with
As the user becomes familiar with the machine, it is recommended to use other paper sizes, paper
Skew Adjustment Knob for Feed Table
Make Paper Feed Table square to machine Front Wall by rotating Skew Adjustment Knob.
Center the scale indicator.
Machine
Front Wall
Thumb
Screw L
L Paper Guide
Spring loaded inside
Thumb
Screw R
R Paper
Guide
L Paper Guide
Scale
L Stopper Guide
Indicator
Paper Feed Table
Skew Adjustment Knob for Feed Table
3. Feed Roller Direction Adjustment Dial
Loosen Thumb Screw. Rotate Feed Roller Direction Adjustment Dial and let Pin centered to the Scale.
Tighten Thumb Screw.
NOTE: Feed Roller Direction Adjustment Dial is used for the paper which weighs less than 34.3 lbs Bond
unless otherwise needed. Use Skew Adj. Knob when Feed Roller Direction Adj. Dial is not effective.
Pin and Gauge
Thumb Screw
Feed Roller Direction
Adjustment Dial
19
Page 20

4. Set sheets of paper on the paper Feed Table. By pressing Up and Down Key, lower the Feed Table before placing
Paper Spacer
5. Loosen the paper guide set screws and adjust the L and R
6. Set the paper spacer matching to the size of paper on
the paper feed table. (In this case Ledger Size)
7. Neatly arrange paper and place it on the feed table.
8. Adjust Paper Side Guides fit to the paper and tighten
the Set Thumb Screw. Make sure that the Spring loaded
Paper Guide which is installed inner of the L Paper Guide
(opposite side from control panel) slightly push paper edge with its spring. Push paper stack against machine
Front Wall to leave no gap.
paper stack.
When setting sheets of paper on the paper feed
table, press the paper feed table Up and Down Key. In
case the paper feed table is located at any place other
then the lowest point, it moves down to the lowest point.
Also, in case the paper feed table is located at the
lowest point, if the paper feed table Up and Down Key
is pressed, the table moves up.
If the paper feed table Up and Down Key is
pressed while the paper feed table is operating, the table
stops.
Note: In case of installing or removing table 2, do it
after raising the paper feed table up to the highest point
using the paper feed table Up and Down Key.
Thumb
Screw L
L Paper Guide
Spring loaded inside
L Paper Guide
L Stopper Guide
Paper Feed Table
paper guide to fit the width of the paper.
Table up and down key
Machine
Front Wall
Skew Adjustment Knob for Feed Table
Paper Spacer
Thumb
Screw R
R Paper
Guide
Scale
Indicator
20
Page 21

9. Place L Stopper Guide at the back end of the paper stack.
Note:
Make sure that there is no space among the paper, Machine Front Wall and the paper guides.
Otherwise it may originate paper skew. If gap is observed due to incorrect cutting of paper etc., adjust it by the
Skew Feed Table Adjustment Knob.
.
10. Press Single Fold Key and the Key lights.
11. Select Speed at Medium (3).
12. Select 3 rows for Suction Belt.
13. Set Suction Strength Window at 3.
14. Set Paper Feed Table Height Adjustment Knob
at M position.
15. Press Test Mode Key for more than 2 seconds until buzzer sounds.
Then air starts to blow without feeding paper and Paper Feed Table rises.
15. Adjust Air Blow Control Knob so as that the top 7 to 10 sheets flies
in the air with stability/steadily and without sticking two
sheet together. Dial is set more or less at fine line (week blow)
as right picture for 20 lbs Bond paper.
Air Blow Control Knob
16. Press Test Key again and two sheets come out with single fold.
NOTE: (1) By pressing Test Key during blow test mode, machine test folds and automatically goes out of
blow test mode.
(2) Or, by pressing START/STOP Key, blow test mode ends.
21
Page 22

17. Check 2nd sheet to see if there is any skew.
Leading Feed Edge
(1) Skewed to the right.
(a) Loosen Thumb Screw and slightly turn Feed Roller Direction Adjustment Dial
counter-clockwise. Tighten Thumb Screw again.
(b) Press Test Key and check 2nd sheet if there is still any skew.
(c) Repeat (a) and (b) above, and any skew should be corrected by Feed Roller Direction
Adjustment Dial.
Skewed to right
Upper side when paper was placed
on Feed Table
Leading Feed Edge
(2) Skewed to the left
(a) Loosen Thumb Screw and slightly turn Feed Roller Direction Adjustment Dial clockwise.
Tighten Thumb Screw again.
(b) Press Test Key and check 2nd sheet if there is still any skew.
(c) Repeat (a) and (b) above and any skew should be corrected by Feed
Roller Direction Adjustment Dial.
Skewed to left
Upper side when paper was placed
on Feed Table
17. After skew is corrected, make trial fold of 10 sheets and make sure that obviously apparent skew is not found for
2nd sheet till 10th sheet.
Note 1st sheet is not checked because it is folded before machine is in stabilized motion.
Feed Roller Direction Adjustment Dial
22
Page 23

Through above procedures, basic operation of the machine has been learnt. Now, we try in applied applications.
8. Selection of fold type
Illuminating
Eliminating
One of the six folding types (Single, Double Parallel, Fold-out,
Letter, Zigzag, and Gate) can be selected. Press the desired
fold type key.
Example:
When selecting the Single folding type, the button illuminates
as shown in the right figure.
9. Setting of the number of sheets of paper to be folded
When inputting the number of sheets of paper (preset counter):
Press the C Key to display “0” on the counter.
Input the value of necessary number using the numerical keys
from “1” to “1000”.
Then, the machine operates until the input value becomes “0”
(zero).
Counter
If the value displayed on the counter is “0”, the machine
operates until there is no paper loaded on the paper feed shelf.
10. Setting of the speed
When setting the speed:
The speed can be changed by using “H” key or “L” key.
The third lamp from the left (lamp in the middle) shows the
standard speed.
Note that the lamp further on the right side from the middle
shows the higher speed is set while the lamp further on the left
side shows the slower speed is set.
Set the speed according to the type of paper or fold.
Note: When folding thicker paper, machine may not fold at lower
speed. In this case, increase folding speed.
When paper shows wrinkle after folding, lower folding speed.
23
Numerical k ey
Speed
adjustment key
Page 24

13. Press Test Mode Key for more than 2 seconds until buzzer sounds.
Then air starts to blow without feeding paper and Paper Feed Table rises.
14. Adjust Air Blow Control Knob so as that the top 7 to 10 sheets flies
in the air with stability/steadily and without sticking two
sheet together. Dial is set more or less at fine line (week blow)
as right picture for 20 lbs Bond paper.
Heavier the paper is the more air blow is needed.
15. Press Test Key again and two sheets come out with single fold.
NOTE: (1) By pressing Test Key during blow test mode, machine test folds and automatically goes out of
16. Check 2nd sheet to see if there is any skew.
Leading Feed Edge
(1) Skewed to the right.
(b) Press Test Key and check 2nd sheet if there is still any skew.
Skewed to right
Upper side when paper was placed
on Feed Table
Air Blow Control Knob
blow test mode.
(2) Or, by pressing START/STOP Key, blow test mode ends.
(a) Loosen Thumb Screw and slightly turn Feed Roller Direction Adjustment Dial
counter-clockwise. Tighten Thumb Screw again.
(c) Repeat (a) and (b) above, and any skew should be corrected by Feed Roller Direction
Adjustment Dial.
Feed Roller Direction Adjustment Dial
24
Page 25

Leading Feed Edge
(2) Skewed to the left
(a) Loosen Thumb Screw and slightly turn Feed Roller Direction Adjustment Dial
clockwise. Tighten Thumb Screw again.
(b) Press Test Key and check 2nd sheet if there is still any skew.
(c) Repeat (a) and (b) above and any skew should be corrected by Feed
Roller Direction Adjustment Dial.
Skewed to left
Upper side when paper was placed
on Feed Table
17. After skew is corrected, make trial fold of 10 sheets and make sure that obviously apparent skew is not found for
2nd sheet till 10th sheet. Note 1st sheet is not checked because it is folded before machine is in stabilized motion.
Note:
When folding line does not match as desired, it is required to adjust the stopper position of Table 1 or Table 2.
(Refer (A) Fine Adjustment page 28
When double feed occurs or paper is not fed, it is required to adjust air blow strength and paper height.
(Refer to (C) Air adjustment of page 37 or (D) Paper height adjustment of page 38)
9. Start folding
.)
Continuous folding:
When the START / STOP key is pressed, the machine
will continuously fold.
STRAT/STO P k ey
When the START / STOP key is pressed while the
machine is in operation, the machine will stop, but addition on
the counter will continuous.
If you wish to fold only the number of sheets desired,
use the subtraction counter function.
25
Page 26

N
(B) Standard Folding of Non-standard-size Paper
1. Selecting a fold type.
2. Input of the total paper length
Measure the paper length.
The arrow indicates the direction of paper feed.
Press Paper Length Input Mode Key.
Input the paper length using the numerical keys.
The unit for input is inch.
For example: Input paper length of 11.42 inch
Press [1000] key 1 time. (Input unit of 10 inch)
Press [100] key 1 time. (Input unit of 1 inch)
Press [10] key 4 times. (Input unit of 0.1 inch)
Press [1] key 2 times. (Input unit of 0.01 inch)
Note: Units of numerical keys are one unit higher than
the unit of length
The available input range is 13.0 to 19.25 inch.
After the length is set, press the Paper Length Input Mode
Key again to fix it. When any value other than standard
ones is input, the lamp flashes. To clear the input value,
press the Length Input Mode key and press the “C” key.
Max input for Table 1 is 14.4inch and Table 2 is 9.6inch.
Paper length
input mode key
umerical key
Note:
Stopper position of Table1 and Tables2. Also refer page 31.
Example)
11.0 inch × 2/3 = 7.33 inch
Tabl e1
Tabl e2 11.0 inch × 1/3 = 3.67 inch
26
SINGLE
DOUBLE
PARA LLEL
FOLD-OUT 1/4 1/4
LETTER 2/3 1/3
ZIGZAG 1/3 1/3
GATE
Table 1 Table 2
―
1/2. 1/4
3/4 1/2
1/2
Page 27

(C) How to Use the Interval Function
After selecting a fold type,
Press the Interval key.
The lamp on the Interval Key illuminates.
The bar on the display right beside “SEC” flashes.
Using the numerical keys “1” or “10”, input a desired interval
time for intermittent operation.
∗ 1 to 99 seconds can be set as the interval time.
Interval key
Press the Interval key again.
The bar on the display right beside “SET” flashes.
Using the numerical keys “1”, “10” or “100”, input a desired
number of sheets of paper to be folded for each interval.
∗ 1 to 999 sheets can be set for interval operation.
Press the Interval key again.
Then, the lamp on the Interval key flashes indicating the function is
set.
Press the TEST key or START key to start paper folding. (When
pressing the TEST key first, then the counter function is not effective,
i.e, test sheets are not counted.)
Flashing
Interval key
∗ How to clear Interval Mode
Press the Interval Key and press the Clear Key or input “0”. Then, the interval function is cleared.
27
Page 28

Example:
How to set 8 seconds as interval time and 50 sheets fold as number of sheets for interval operation.
By this setting, the machine will stop for 8 seconds after folding 50 sheets, and start folding again automatically.
How to set:
Press the Interval key.
The bar beside “SEC” flashes. Using the numerical key, input “8”.
Press the
The bar right beside “SET” flashes. Using the numeral key, input “50”.
Interval key.
Press the
Interval key. The lamp on the Interval key flashes.
Set the speed according to the paper quality and fold type.
After setting, press the TEST key or START key to start folding.
In case of making preset number of folds with the Interval function is set,
input the desired preset number while the lamp on the Interval key is flashing.
Then, the machine stops after the preset number of sheets of paper are processed.
Incidentally, when the dot below the units digit is lit, it shows
that the preset value is input and valid.
When it is not lit, it is not valid and the machine continues to process
until there is no paper loaded on the paper feed shelf.
28
Page 29

(8) Adjustment
(A) Fine Adjustment
Adjusting Table 1 or Table 2
Select the Stopper Move Mode key (Table 1or 2). The
lamp of the selected Stopper Move Mode key illuminates.
The present stopper position is shown on the [Counter].
In case of standard-size paper, the stopper moves automatically to
the suitable position according to the paper size and fold type.
Apply this adjustment when fine adjustment is in need for
the folding position.
Values input manually return to standard values if any one
of other fold type keys is pressed.
Press the +/- key and move the stopper to the desired position.
The value displayed to the [Counter] shows the position of the
stopper. (Unit: inch)
Example: When display of the [Counter] is 11.38, the stopper
position is 11.38 inch.
The position can be moved based on a unit of 0.003 inch.
Note indicator shows lowest of 2nd digits from decimal point.
Press the Stopper Move Mode key (Table 1 or 2) again.
The lamp on the selected Stopper Move Mode key flashes.
Regarding the adjustment, refer to the table of page 31.
The length of the arrow for each fold type is set based on the
stopper position of Table 1 or 2.
Example, In case of Double Parallel,
Table 1: Fold a half of the overall length
Table 2: Fold one fourth of the overall length
Note: To prevent damage to the Interceptor Push Bar at Stopper of Table 1, it does not come into contact with
Interceptor when stopper is moved by manual mode to avoid enforced pushing.
With automatic mode only, it comes to contact with Interceptor to make by-pass the Table 1.
Depending on environmental humidity, paper stretches or shrinks. Adjust Table 1 or 2 as it is needed.
By changing speed, folding position may move. Adjust Table 1 or 2 as it is needed.
Tab le 1
stopper move
mode key
Counter
+/- key
Tab le 2
stopper move
mode key
29
Page 30

Fine Adjustment for Table 1 or Table 2
Fol d Type Tabl e 1 Table2
SINGLE
DOUBLE PARA LLEL
FOLD-OUT
LETTER
Table2
ZIGZAG
GATE
■Indicates leading edge when paper is fed from feed
― 1/2
Table2
Table1
1/2 1/4
Table2
Table2
1/4 1/4
Table1
Table1
2/3 1/3
Table2
1/3 1/3
Table1
Table1
3/4 1/2
Table2
Feed Out Direction of Folded Paper
30
Page 31

Skew Adjustment by folding pattern
Bold line indicates leading edge when paper is place on feed try.
Shadow indicates upper surface when paper is on feed tray.
For less
than
34.31 lbs
Bond
For
more
than
34.31 lbs
Bond or
Feed
Roller
Direct.
Adjust.
Dial is
not
effective
.
Fold Type
Single
Skew
Feed Roller Direction Adj. Dial
(Less than 34.31 lbs Bond
)
Skew Adj. Knob
(More than 34.31 lbs Bond or
Feed Roller Direct. Adj. Dial is not
effective)
NOTE: Do not use, at the same time, Feed Roller Direction Dial and Skew Adjustment
Knob unless really needed.
Turn Metallic Thumb Screw
Counterclockwise ( - )
Turn Thumb Screw
Clockwise ( - )
Turn Metallic Thumb Screw
Clockwise ( + )
Turn Thumb Screw
Counterclockwise ( + )
How stacked and folded
Paper Feed Direction
給紙方向
Bold line indicates leading
feed edge when paper is place
on feed try.
Shadow indicates upper surface when
paper is on feed tray
31
Page 32

Skew Adjustment by folding pattern
Bold line indicates leading edge when paper is place on feed try.
Shadow indicates upper surface when paper is on feed tray.
For less
than
34.31
lbs Bond
For
more
than
34.31 lbs
Bond or
Feed
Roller
Direct.
Adjust.
Dial is
not
effective
.
Fold Type
Double Parallel
Skew
Feed Roller Direction Adj. Dial
(Less than 34.31 lbs Bond
)
Skew Adj. Knob
(More than 34.31 lbs Bond or
Feed Roller Direct. Adj. Dial is not
effective)
Turn Metallic Thumb Screw
Counterclockwise ( - )
Turn Thumb Screw
Clockwise ( - )
Turn Metallic Thumb Screw
Clockwise ( + )
Turn Thumb Screw
Counterclockwise ( + )
NOTE: Do not use, at the same time, Feed Roller Direction Dial and Skew Adjustment
Knob unless really needed.
32
Page 33

Skew Adjustment by folding pattern
Bold line indicates leading edge when paper is place on feed try.
Shadow indicates upper surface when paper is on feed tray.
For less
than
34.31 lbs
Bond
For
more
than
34.31 lbs
Bond or
Feed
Roller
Direct.
Adjust.
Dial is
not
effective
.
Fold Type
Fold-out
Skew
Feed Roller Direction Adj. Dial
(Less than 34.31 lbs Bond
)
Skew Adj. Knob
(More than 34.31 lbs Bond or
Feed Roller Direct. Adj. Dial is not
effective)
Turn Metallic Thumb Screw
Counterclockwise ( - )
Turn Thumb Screw
Clockwise ( - )
Turn Metallic Thumb Screw
Clockwise ( + )
Turn Thumb Screw
Counterclockwise ( + )
NOTE: Do not use, at the same time, Feed Roller Direction Dial and Skew Adjustment
Knob unless really needed.
How stacked and folded
33
Page 34

Skew Adjustment by folding pattern
Bold line indicates leading edge when paper is place on feed try.
Shadow indicates upper surface when paper is on feed tray.
For less
than
34.31 lbs
Bond
For more
than
34.31 lbs
Bond or
Feed
Roller
Direct.
Adjust.
Dial is
not
effective.
Fold Type
Letter
Skew
Feed Roller Direction Adj. Dial
(Less than 34.31 lbs Bond
)
Skew Adj. Knob
(More than 34.31 lbs Bond or
Feed Roller Direct. Adj. Dial is not
effective)
Turn Metallic Thumb Screw
Counterclockwise ( - )
Turn Thumb Screw
Clockwise ( - )
Turn Metallic Thumb Screw
Clockwise ( + )
Turn Thumb Screw
Counterclockwise ( + )
NOTE: Do not use, at the same time, Feed Roller Direction Dial and Skew Adjustment
Knob unless really needed.
How stacked and folded
34
Page 35

Skew Adjustment by folding pattern
Bold line indicates leading edge when paper is place on feed try.
Shadow indicates upper surface when paper is on feed tray.
For less
than
34.31 lbs
Bond
For more
than
34.31 lbs
Bond or
Feed
Roller
Direct.
Adjust.
Dial is
not
effective.
Fold Type
Zigzag
Skew
Feed Roller Direction Adj. Dial
(Less than 34.31 lbs Bond
)
Skew Adj. Knob
(More than 34.31 lbs Bond or
Feed Roller Direct. Adj. Dial is not
effective)
Turn Metallic Thumb Screw
Counterclockwise ( - )
Turn Thumb Screw
Clockwise ( - )
Turn Metallic Thumb Screw
Clockwise ( + )
Turn Thumb Screw
Counterclockwise ( + )
NOTE: Do not use, at the same time, Feed Roller Direction Dial and Skew Adjustment
Knob unless really needed.
How stacked and folded
35
Page 36

Skew Adjustment by folding pattern
Bold line indicates leading edge when paper is place on feed try.
Shadow indicates upper surface when paper is on feed tray.
For less
than
34.31 lbs
Bond
For more
than
34.31 lbs
Bond or
Feed
Roller
Direct.
Adjust.
Dial is
not
effective.
Fold Type
Gate
Skew
Feed Roller Direction Adj. Dial
(Less than 34.31 lbs Bond
)
Skew Adj. Knob
(More than 34.31 lbs or
Feed Roller Direct. Adj. Dial is not
effective)
Turn Metallic Thumb Screw
Counterclockwise ( - )
Turn Thumb Screw
Clockwise ( - )
Turn Metallic Thumb Screw
Clockwise ( + )
Turn Thumb Screw
Counterclockwise ( + )
NOTE: Do not use, at the same time, Feed Roller Direction Dial and Skew Adjustment
Knob unless really needed.
How stacked and folded
36
Page 37

(C) Air Adjustment
[Air Blow Strength Adjustment]
Air Adjustment Knob
The air blow strength can be adjusted
by turning the air adjustment knob from low, per finer line,
to high, per thicker line.
General information:
When double feed occurs, turn the air adjustment knob
towards lower position slightly.
When paper is not fed, turn the air adjustment knob
towards higher position slightly
Note: Do not change position of Air Adjustment Knob extremely
From the original position.
13. Press Test Mode Key for more than 2 seconds until buzzer sounds.
Then air starts to blow without feeding paper and Paper Feed Table Rises.
14. Adjust Air Blow Control Knob so as that the top 7 to 10 sheets flies
in the air with stability/steadily and without sticking two
sheet together. Dial is set more or less at fine line (week blow)
as right picture.
15. Press Test Key again and two sheets come out with single fold.
NOTE: (1) By pressing Test Key during blow test mode, machine test folds and automatically goes out of
5
.
Strong
Air Blow Control Knob
blow test mode.
(2) Or, by pressing START/STOP Key, blow test mode ends.
4
1
2
3
Weakest
Weak
Midium
37
Page 38

[Adjustment of Suction Air Strength]
When using thin papers like copy paper, double feed may tend to occur with stronger suction power.
Set Suction Strength Window at 4, i.e., opened fully.
Refer (E) at page 39.
The position of No. 0 is the closed condition of window, i.e., strongest suction by belt.
Suction Belt in effect can be switched between 3 rows and 2 rows, stronger and weaker suction respectfully.
Normally, 3 rows are used.
Suction Belt Control 3 or 2 rows
Suction Strength Window
(D) Paper Height Adjustment
Adjust paper height by opening the top cover.
In case of adjusting the position of paper height according to the paper quality, loosen the paper
feed table height adjustment knob and while holding the knob, set the point to “H”, “M” or “L”.
Recommended Position : Set to “H” side when paper cannot be sucked.
Set to “L” side when double feeding frequently occurs.
Paper Feed Table Height
Adjustment Knob
Paper Feed Table Height Adjustment Knob
Point
38
Page 39

(E) Standard of Suction Air and Paper Feed Table Height
Adjustment of suction air and paper feed table height depend on paper quality, print condition or other environment. So
adjust them by referring to the following table as approximate guidance.
Blow Air (Air Adj.
Knob, P37)
Letter
17.0 lbs Bond
70.9 lbs Coated Paper
86.5 lbs Coated Paper
106.1 lbs Coated Paper
Ledger
17.0 lbs Bond
70.9 lbs Coated Paper
86.5 lbs Coated Paper
106.1 lbs Coated paper
Refer Air Blow Adjustment
(P37). Test Blow is always
effective tool for adjustment.
1. Offset Paper
Weight ( lbs )
Less than 17 lbs
Bond
17 thru 22 lbs Bond
27.9 lbs Bond 0 3R
D o o n e o f fo llow ings and see how it w orks. D o n o t m a k e tw o a d justm ents at one time.
Frequent D ouble Feed
Frequent Em pty
Feed
Strong
Air Blow Control Knob
Suction Strength Window
Opening
4 3R
2 3R
Suction Air is too strong
O pen S uction W indow for
one graduation
Suction Air is too w eak
Close Suction W indow for
Weakest M
Weak M
Weak M-H
Weak H
Weakest M
Medium M
Medium M-H
Medium H
Weak est
Weak
Midium
Suction Belt Control 3 or 2 rows
one graduation
39
Paper Feed Table Height
P38
Suction Belt Row Control
Suction Strength Window
Top P aper H eight, i.e., Paper
Feed Table H eight is too high
or
Low er 1/2 graduation
Top P aper H eight, i.e., Paper
Feed Table H eight is too low .
or
Rise 1/2 graduztion
Page 40

(F) Separator Height Adjustment
When adjusting the separator height, turn the separator adjustment knob using a flathead screwdriver
adjustment the height so that the tip of the separator rubber touches the paper feed belt.
If empty feed frequently occurs when thick paper is used, open about a 0.5mm space between the paper feed belt
and separator rubber. Use several sheets of paper to be used for filler gauge.
By turning the Separator Height Adjustment Knob clockwise, the separator raises to direction of paper feed belt. By
turning the Separator Adjustment Knob counterclockwise, the separator comes down to opposite direction of paper feed
belt.
Separator
Separator Positioning
Standard Line
Separator Height Adjustment Knob
Separator
Bottom Line of Paper Feed
G) Changing Location of Paper Ejection Roller
Roller automatically sets at the preset position as long as
Paper ejection
Roller move key
paper size is standard norm.
In case of out of standard norm paper, press Paper Ejection Roller Move Key.
By pressing + or - Key, move the Roller and position where roller effectively
Works for specific folds. After position is selected, press Paper Ejection Roller
Move Key again.
Depending folding speed and pattern, the Roller need to be relocated.
Smaller numeral shows location of Roller closer to machine body.
(9) Memory
(A) Fold Position Memory of Non-standard Papers
Memory of Non-standard folds can be input with the
memory 1/2/3 keys and the fold type keys.
The positions of the stoppers of the Table 1 and 2, position
of the ejection roller, and folding speed are all together saved
in memory.
Counter
+/- key
40
Page 41

Select the Memory Key in which the fold will be input.
Press the Store Key and release immediately when you hear
a beep sounds.
The lamp of the key in which the fold has been memorized
will flash. Memory remains storing specific setting
Even main Power Switch is turned off, i.e., when Power
Switch is turned on again, memorized pattern can be used
again.
(B) Fold Position Memory of Standard Papers
When folding line(s) is not as desired for standard paper, the
fold position after adjustment can be stored to the Fold Type
key.
Memory of 18 kinds of setting is available as follows:
18 kinds of papers (
fold type keys
= 18 kinds of settings
Note: For each folding patter or one Memory Key, one
Each folding pattern can be stored.
Positions of stoppers of the Table 1 and 2, position of the
ejection roller, and folding speed are all saved in memory.
Ledger, Legal and Letter) × 6 kinds of
Store key
Memory 1/2/3 key
Fold type key
After adjustment of fold position folding line(s), press the
Store Key. (Regarding the adjustment method, refer to
Adjusting Table 1 or Table 2 of Page 26.)
Press Store Key and release immediately when you hear a
beep sounds.
The lamp of the key in which the fold has been memorized
will flash.
41
Store key
Page 42

(C) Clearing Memory
Clear the storage input in the memory 1/2/3 keys and the fold type keys
Press first a desired Memory 1/2/3 Key or Fold Type Key
being stored first and then keep pressing the C Key. Release
immediately the C Key when you hear a beep sound.
The lamp of the key in which the storage has been cancelled
will light.
Note:
The lamp of the key in which the fold pattern is stored
flashes.
(D) Clearing all the memorized patterns
Clear key
Turn off the power and while pressing the C Key, turn on the
power.
Note:
All the stored pattern including custom fold you memorized is
cleared. No chance to recall after cleared.
Clear key
42
Page 43

(10) Check Lamps, Error Codes and Troubles
If Check lamp (1) is flashing it may indicate:
1) No paper
2) The paper feed shelf does not work.
3) Failure of the paper height sensor
4) Empty feed
5)Excess loading of paper
If Check lamp (2) is flashing it may indicate:
1) Improper setting of Table 1
2) Stopper lock of Table 1
(1)
6
PERFO.
6
PERFO.
7
CLEANING
1
3
7
CLEANING
1
3
4
2
5
(2)
4
2
5
If Check lamp (3) is flashing it may indicate:
1) The electric plug of Table 2 is not inserted
2) Stopper lock of Table 2
If Check lamp (4) is flashing it may indicate:
1) Paper Jam
(3)
(4)
6
PERFO.
6
PERFO.
7
CLEANING
4
1
3
7
CLEANING
1
3
2
5
4
2
5
43
Page 44

If Check lamp (5) is flashing it may indicate:
1) The electric plug of the paper ejection unit is not inserted
2) Ejected paper is full
3) Ejected paper jam
4) Paper ejection sensor is dirty dust or ink
If Check lamp (6) is lit, it may indicate:
Perforator(Option) is installed
(6)
6
PERFO.
6
PERFO.
7
CLEANING
1
3
7
CLEANING
1
3
4
2
5
(5)
4
2
5
If Check lamp (7) is lit, it may indicate:
It lights after every 10,000 sheets of paper folded.
・For reset, turn on the machine while pressing – Key.
・You can disable this function when you turn on the machine
keep pushing [single (Fold type)] key.
・You can activate this function again when you turn on the
machine with[gate(Fold type)] key pushed.
Clean the belt as frequently as needed depend on the printing
6
PERFO.
7
CLEANING
1
3
(7)
4
2
5
condition and paper quality before the cleaning lamp is lit.
Regarding the cleaning method, refer to Cleaning of Sensors
of page 47 and Cleaning of Fold Roller/Paper Feed Belt of
Page 48.
Note:
If paper is loaded immediately after printing, problems such as jamming, double feed, slipping, and
wrinkling may occur. Make sure that the printing ink is completely dry, statics are gone and paper is well fanned
out before loading.
If the machine is placed in the vicinity of a fluorescent lamp and it operates irregularly, the paper size
detection sensor may not be functioning properly because of light from the fluorescent lamp.
In such a case, place the machine farther from the fluorescent lamp.
44
Page 45

For each error symptom, the following error code will be displayed.
Error code Symptom
E-01 No paper
E-02 Neither Table 1 nor the perforating/scoring unit is installed to the position of Table 1 unit.
E-03 Paper left in the paper ejection sensor unit, or the paper ejection sensor is dirty.
E-04 Internal paper jam
E-05 Ejected paper jam
E-06 Excess loading of paper
E-07 Sensors require cleaning or rollers require cleaning.
E-08 Paper ejection table connector is not connected.
E-09 Empty feed
E-10 Table 2 is not installed
E-11 Remove the paper ejection table to use perforator unit.
E-12 Out of standard size. Use Paper Length Manual Input Mode.
E-51 The door of the Table 2 is open, or the top cover is open
E-52 Paper left in the paper feed sensor unit, or the paper feed sensor is dirty.
E-53 Failure of the paper height sensor.
E-54 Failure of the feed table up and down motor
E-55 Failure of the main motor, or the encoder is dirty
E-56 The paper ejection roller is locked, or the motor is disconnected, or the home position
micro SW for ejection roller is disconnected or dislocated.
E-57 The table 1 stopper is locked, or the motor is disconnected, or the sensor is disconnected.
E-58 The table 2 stopper is locked, or the motor is disconnected, or the sensor is disconnected.
Note: To clear Error Code, press C Key after cause of trouble is eliminated.
45
Page 46

(1 1) Troubleshooting and Cleaning
CUTION: Make sure to disconnect power cable before starting the troubleshooting.
(A) Troubleshooting of Paper jam
Remove the Table-1 and remove the paper or pieces of paper.
Open the table-2 door, remove the Table-2 and remove the paper or torn pieces of paper.
Paper Jam
When paper jammed using less than 27.9 lbs Bond paper, eject jammed paper by force as follows:
(In case paper cannot be ejected by this method, remove jammed paper manually per the above steps.)
(1) By pressing the Plus Key for a while, the motor stats to rotate
and paper in the folding rollers is ejected.
(2) By pressing the Plus Key further, the fold stopper moves
towards the closest position of folding rollers and jammed paper
in the fold table is ejected.
46
Plus key
Page 47

(B) Cleaning of Sensors
Excersize cleaning each sensor periodically.
(1) Open the top cover and remove paper powder or dust by cotton swab, etc. from the window
Circled position as shown in the following figure.
(2) Clean the paper eject sensor (circled position as shown in the following figure) by cotton Q-tips, etc.
(The paper eject sensor is emitter/receiver photo cells. Clean both upper and lower photo cells. Especially
lower photo cell tends to get dust accumulated.
(3) Clean the paper detection sensor by Q-tips. Locations of photocell on the Paper Feed Table are circled.
47
Page 48

(C) Cleaning of Fold Roller and Paper Feed Belt
When paper feed slips, folding line does not match as desired, wrinkled paper or inner paper jam occur
frequently, it may be caused from paper dust or ink accumulation.
Clean the fold roller as shown in the below figures.
Open the top cover, remove the Table 1 and clean each Folding Roller and Paper Feed Belt.
Fold Roller
To clean Rollers located inside machine, remove paper stack on the Paper Feed Table and move the Paper Feed
Table to the highest position.
Open Table-2 cover and remove the Table 2. Clean the folding roller installed in the depth of machine body.
Open the top cover and clean the paper feed belt.
48
Page 49

MEMO
49
Page 50

MEMO
50
Page 51

51
Page 52

MBM Corporation
52
 Loading...