

Page 1

Page 2

Page 3

Thank you for choosing a Xedos 6.
To help ensure the enjoyable and
trouble-free operation of your new
Xedos 6, we urge you to read this manual
carefully and follow its recommendations.
When service is necessary, remember that
your Authorised Xedos Dealer
knows your vehicle best and is ready to
help you with all your service and maintenance needs.
We assure you of our continuing interest in
your motoring pleasure and
complete satisfaction.
Mazda Motor Corporation
HIROSHIMA, JAPAN
FOREWORD
DEFINITIONS used in this Owner’s Manual
“Mazda” means Mazda Motor Corporation, 3-1 Shinchi, Fuchu-cho, Hiroshima, Japan.
“Xedos Vehicle” means a Xedos Series motor vehicle manufactured by Mazda
“Authorised Xedos Dealer” means a person authorised by a Mazda Distributor to service Xedos Vehicles or perform repairs as
shown on the Authorised Xedos Dealer List.
“Genuine Xedos Parts” means a spare part authorised by Mazda to be used for Xedos Vehicle.
Page 4

Page 5

• Keep this manual in the glove box
as a permanent and convenient
reference.
• Throughout this manual, you will
find WARNINGS, CAUTIONS, and
NOTES.
The WARNING!s remind you to be
especially careful to avoid possible
personal injury.
The CAUTIONs are given to prevent
you from making an error that could
damage the vehicle or cause personal injury.
The NOTEs are suggestions that
will help you make full use of your
vehicle.
• The specifications and descriptions
in this manual are accurate at the
time of printing. Because improvement is a constant goal at Mazda,
we reserve the right to make
changes in specifications at any
time without notice and without
incurring any obligation. Please
note that this manual applies to all
models in this series and explains
all equipment, including options.
You may therefore find explanations for equipment not installed on
your vehicle.
• When you resell your Xedos vehicle
leave this manual in the vehicle.
The next owner will also need the
information.
• Right-hand and left-hand references
in this manual are made as if facing in
the same direction as the vehicle.
• This manual mainly explains the righthand drive models, though it is applicable to both right-hand and lefthand drive models.
How to Use This Manual
Page 6

TABLE OF CONTENTS
Your Vehicle at a Glance 1-1
This section shows the location of each control and attachment
of your vehicle
Knowing Your Xedos Vehicle 2-1
This section contains information to fully acquaint the driver with
the vehicle.
Protecting Your Xedos Vehicle 3-1
This section contains information necessary for the safety, care,
and operating economy of the vehicle.
Driving Your Xedos Vehicle 4-1
This section explains starting and driving the vehicle and how
to operate its many controls and attachments.
In Case of Emergency 5-1
This section recommends ways to deal with the most common
emergencies.
1
2
3
4
5
Page 7
Appearance Care 6-1
This section shows how to maintain the interior and exterior of
the vehicle for pleasant use and longer life.
Maintenance 7-1
This section explains easily executed user maintenance and
scheduled maintenance that is best performed only by an Authorised Xedos Dealer.
Customer Information 8-1
This section contains information to help ensure the complete
satisfaction of all owners of Xedos vehicles.
Specifications 9-1
This section contains essential data concerning your new Xedos
vehicle.
Index 10-1
6
1
2
3
4
5
6
7
8
9
10
7
8
9
10
Page 8

Page 9

1-1
1
Your Vehicle at a Glance
YOUR VEHICLE AT A GLANCE 1-2
GRAPHIC SYMBOLS 1-8
Page 10
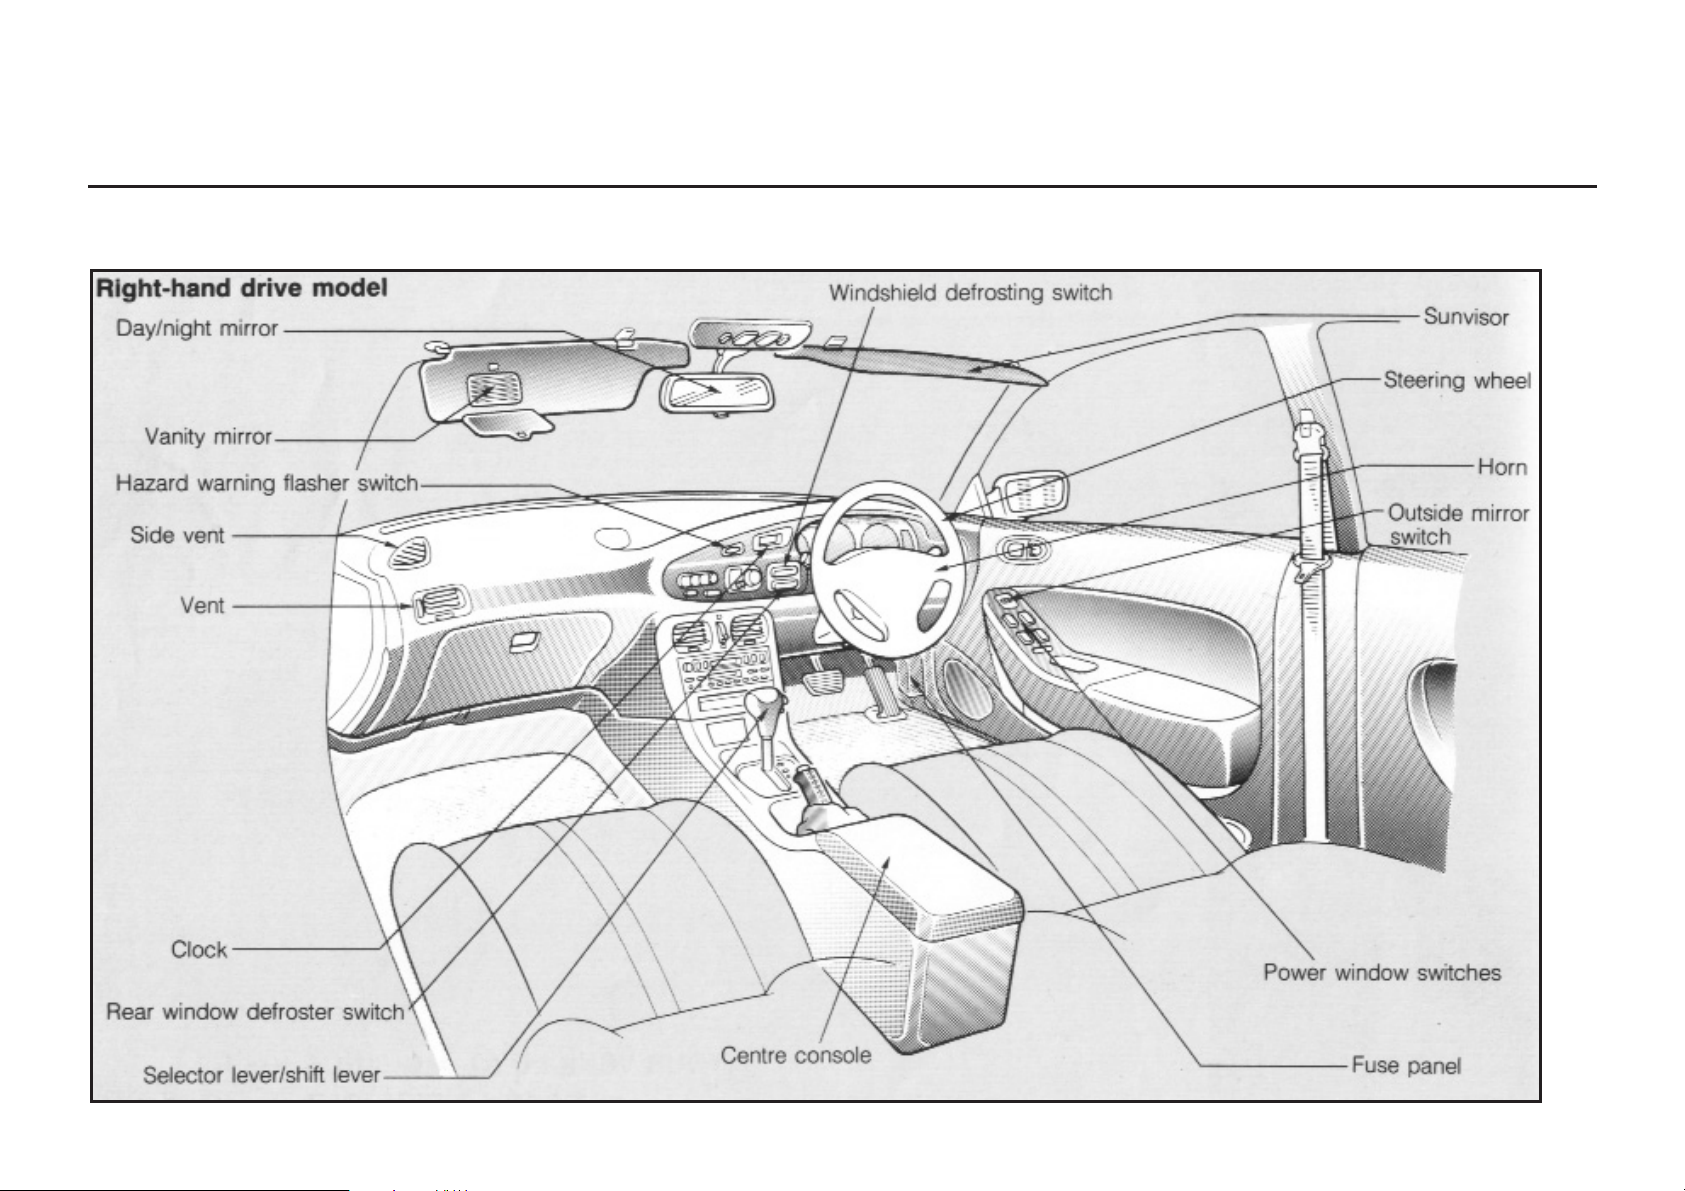
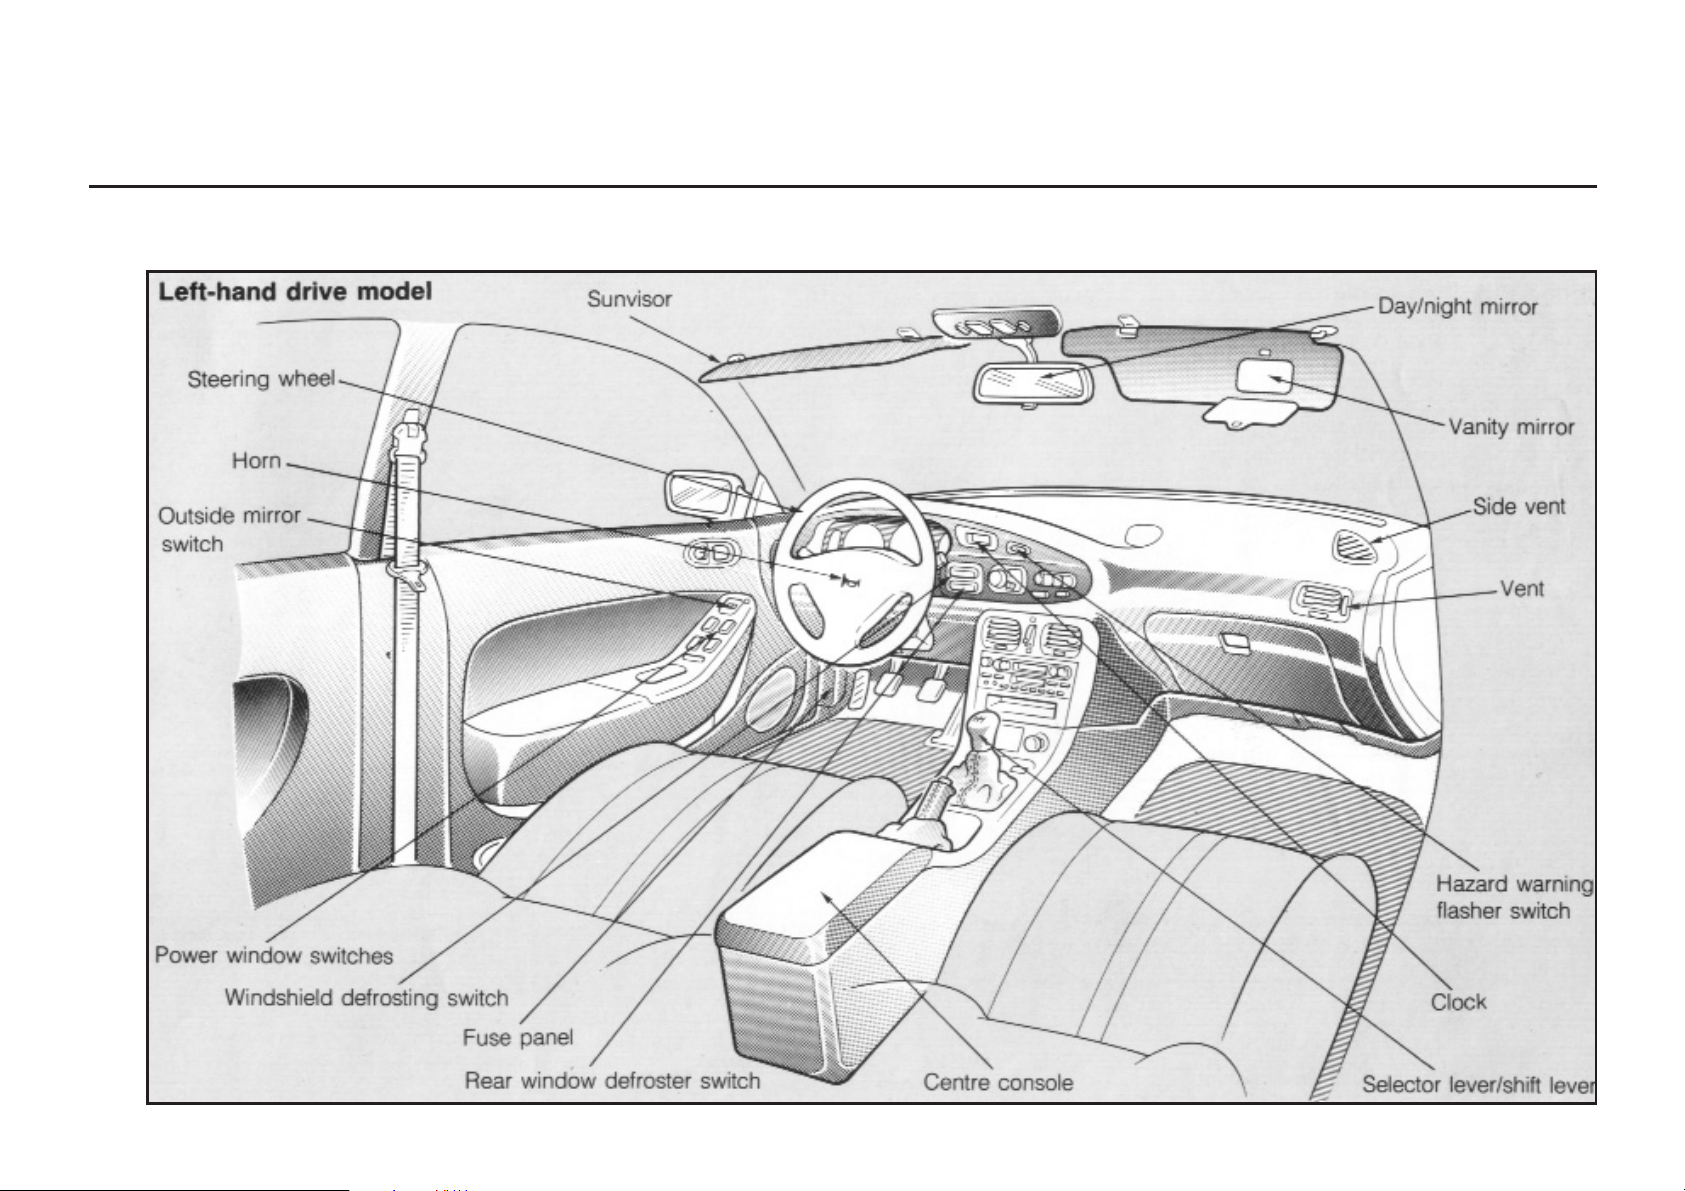
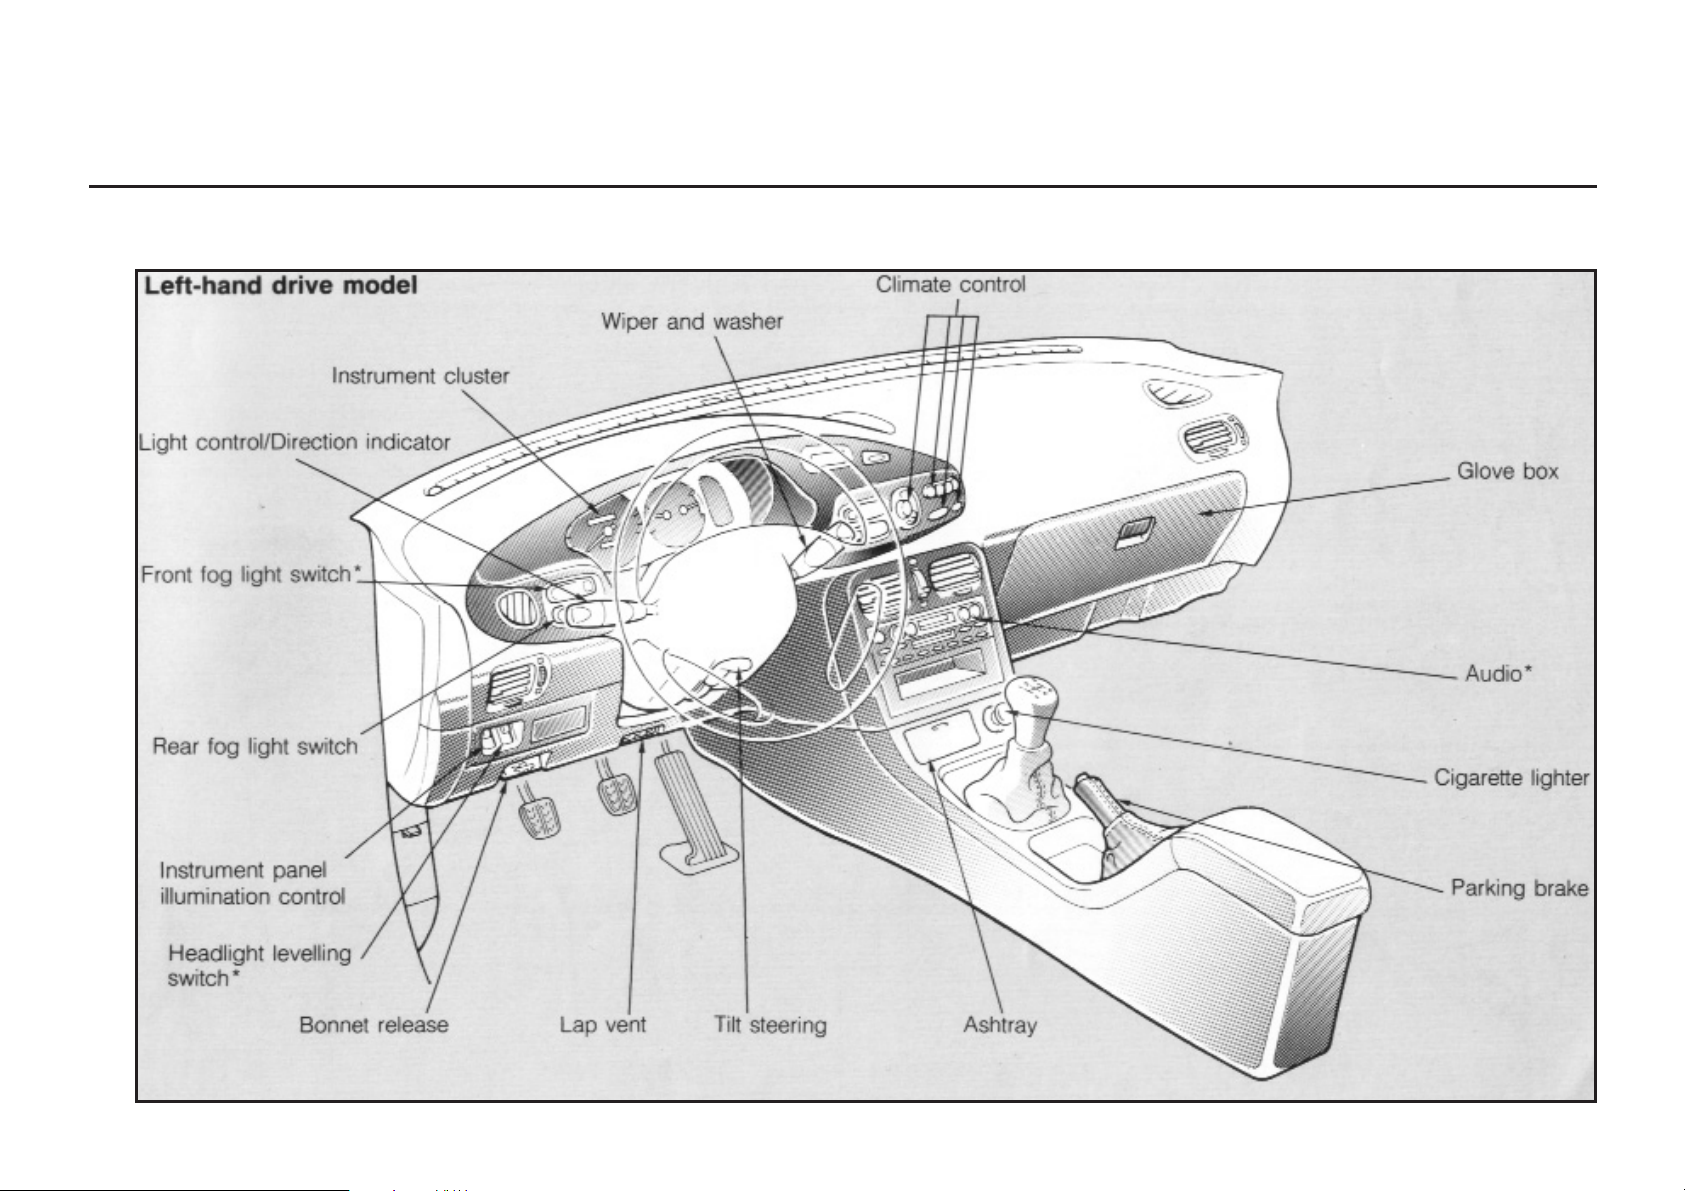
1-2
YOUR VEHICLE AT A GLANCE
Interior Overview
Page 11
1-3
YOUR VEHICLE AT A GLANCE
Page 12
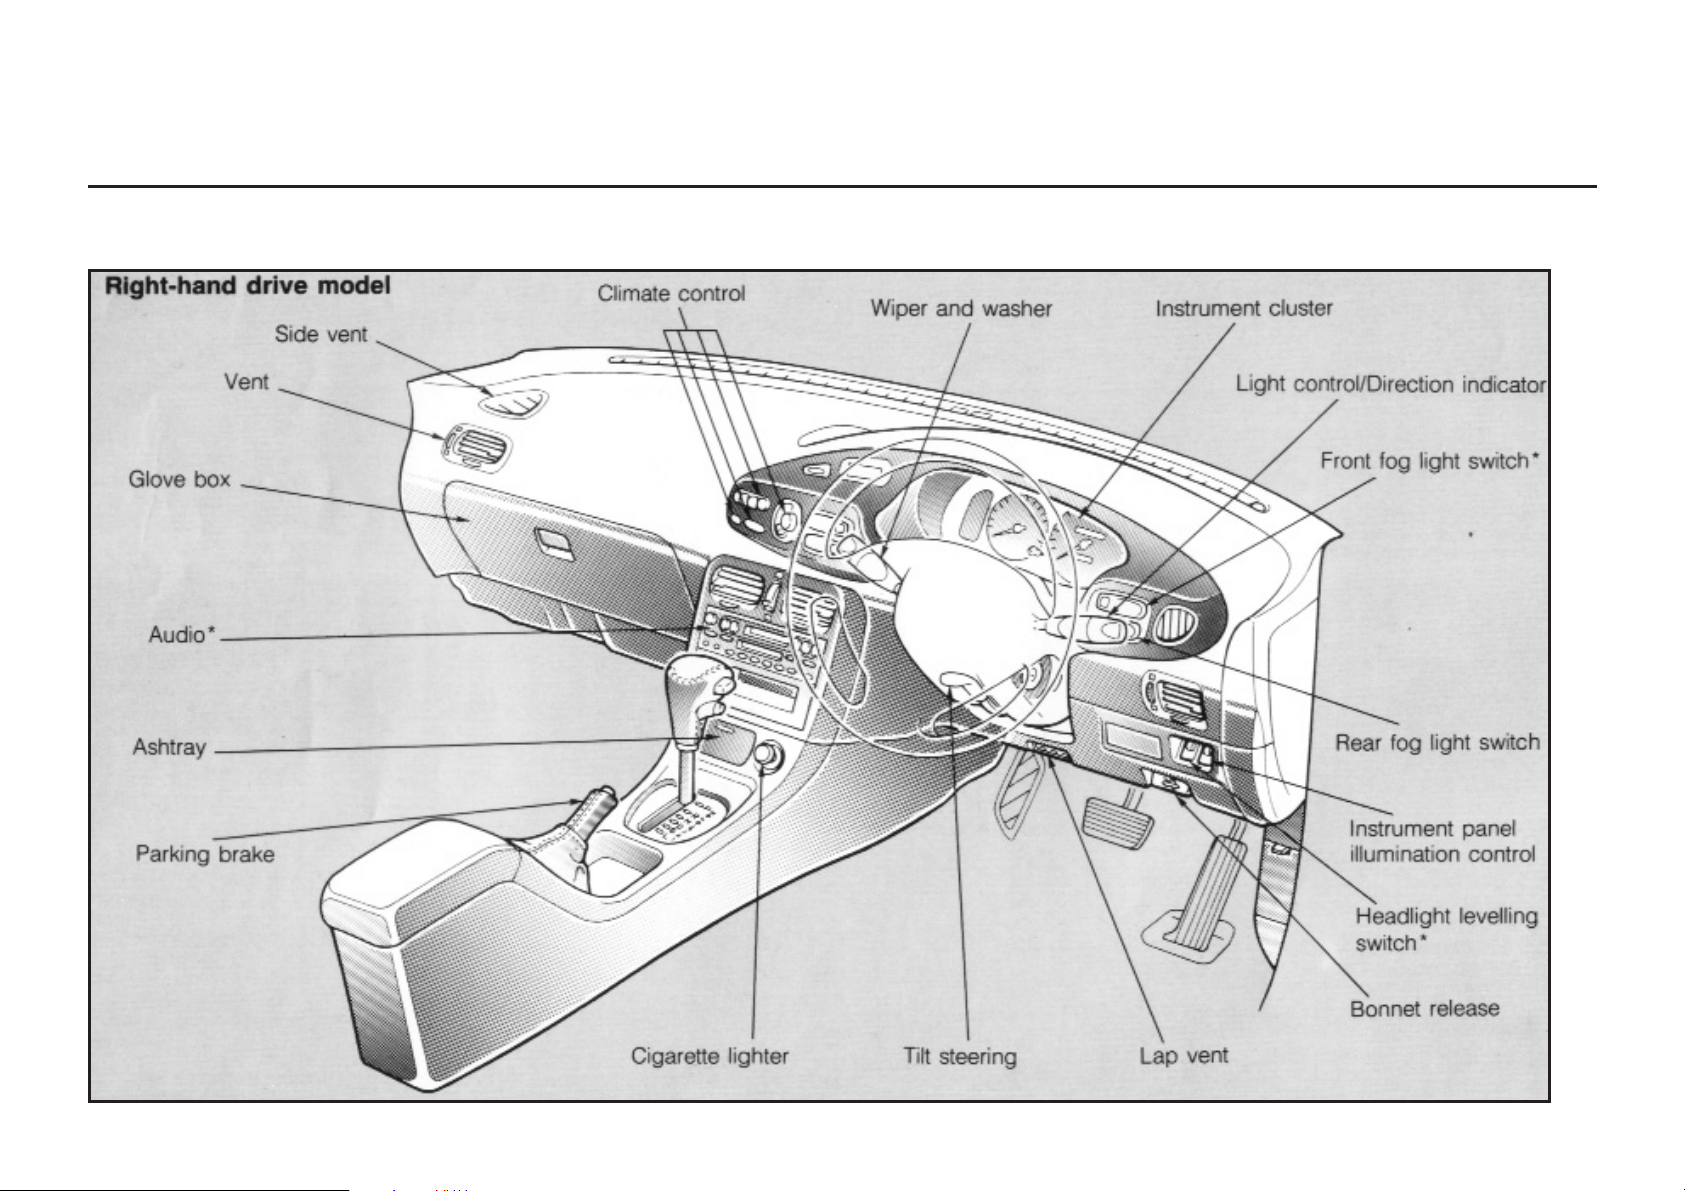
1-4
YOUR VEHICLE AT A GLANCE
Instrument Panel Overview
*Some models.
Page 13
1-5
YOUR VEHICLE AT A GLANCE
*Some models.
Page 14
1-6
YOUR VEHICLE AT A GLANCE
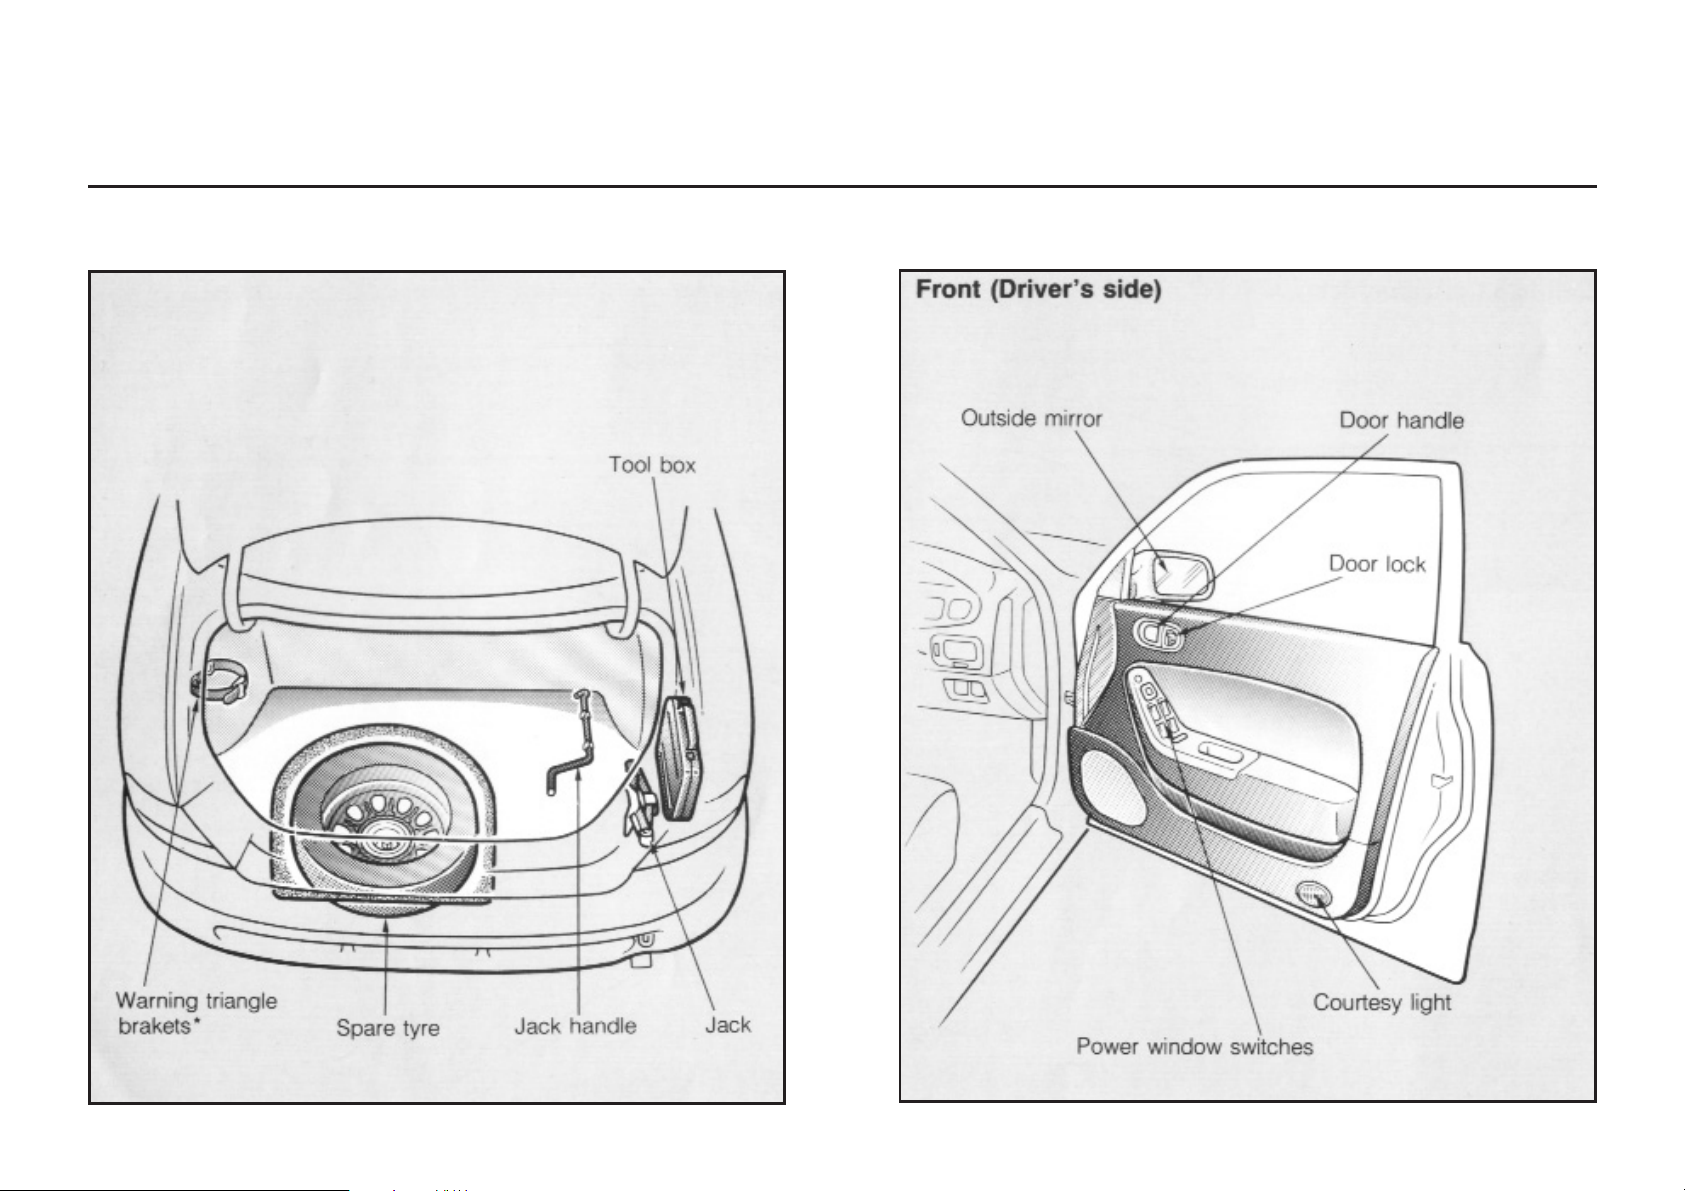
Luggage Compartment
Doors
*Some models.
Page 15
1-7
YOUR VEHICLE AT A GLANCE
Page 16
1-8
YOUR VEHICLE AT A GLANCE
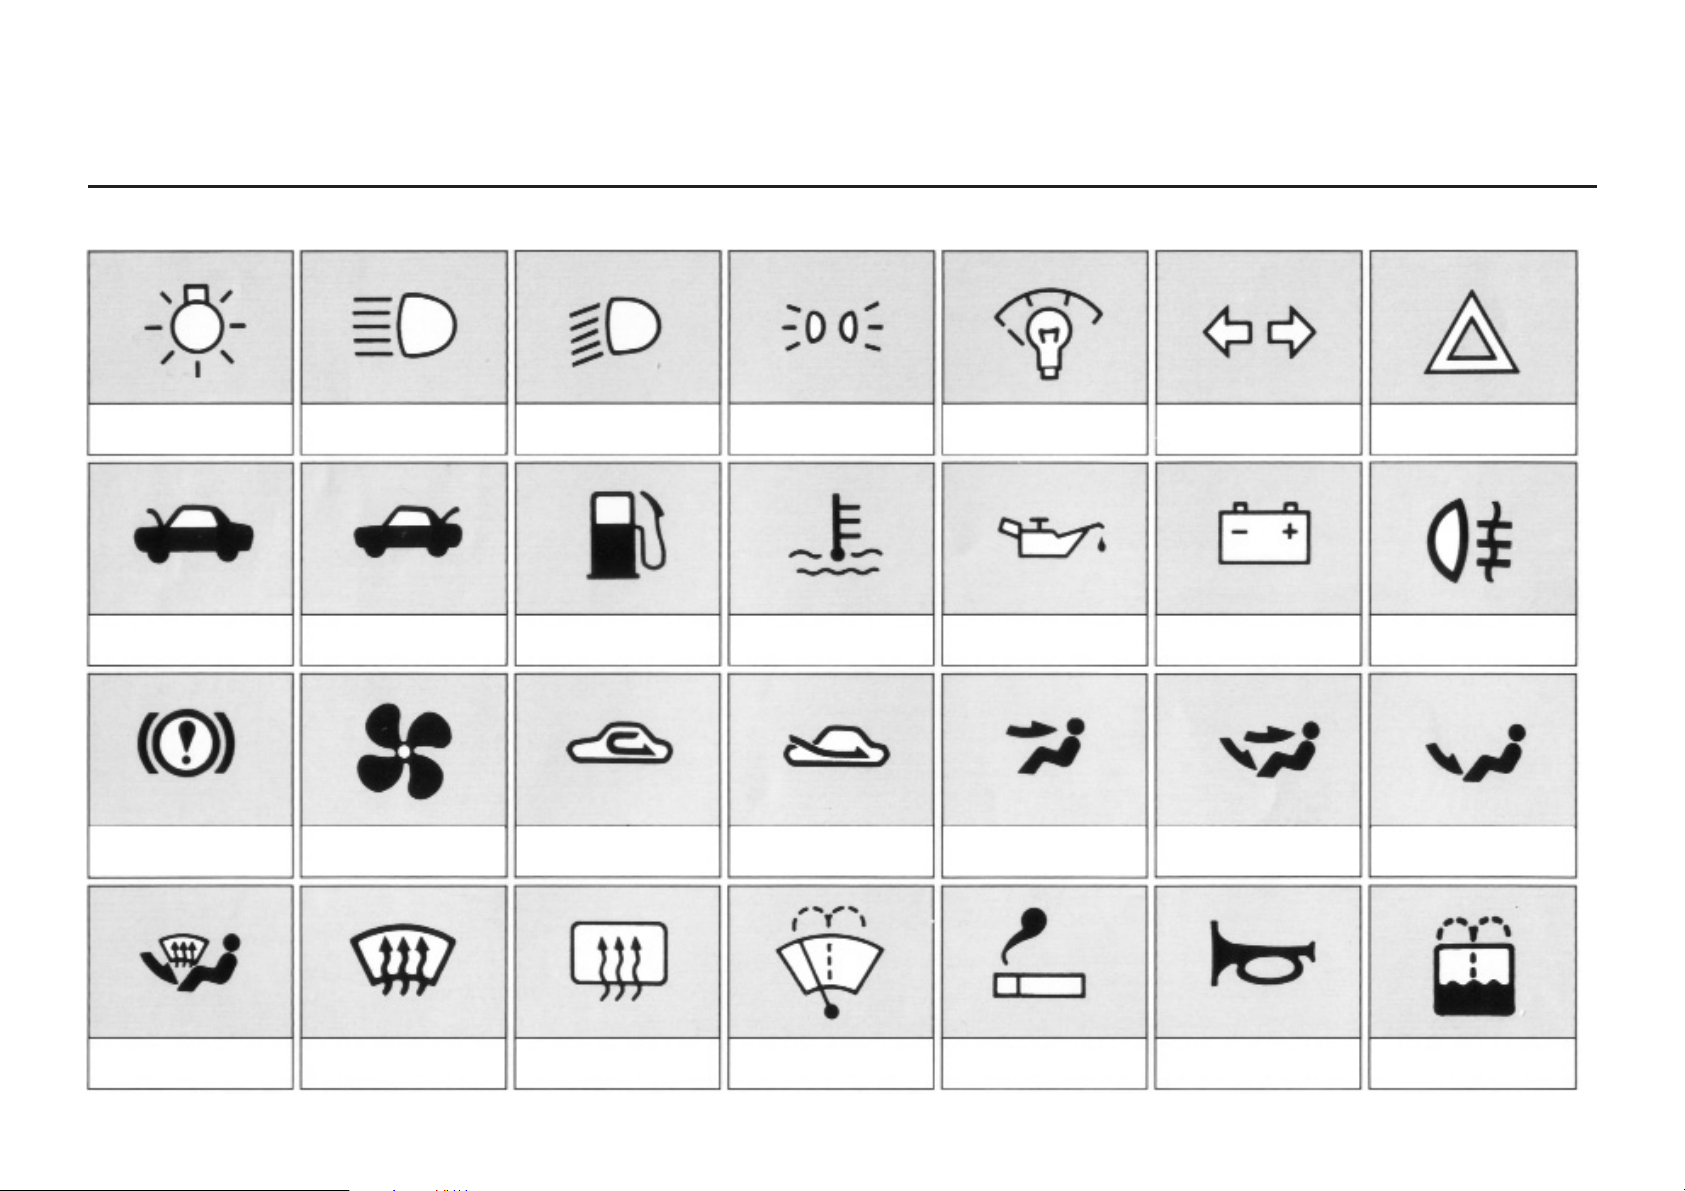
LIGHTS
HEADLIGHT HIGH BEAM
hEADLIGHT LOW BEAM
POSITION LIGHT
ILLUMINATION
CONTROL
DIRECTION INDICATORS
HAZARD WARNING
FLASHER
BONNET RELEASE
BOOT RELEASE
FUEL
ENGINE COOLANT
TEMPERATURE
ENGINE OIL
BATTERY CHARGING
SYSTEM
REAR FOG LIGHT
BRAKE SYSTEM
VENTILATION FAN
AIR RECIRCULATION
FRESH AIR
VENT
VENT-FLOOR
FLOOR
FLOOR-DEFROSTING
DEFROSTING
REAR WINDOW
DEFROSTER
WINDSHIELD
WIPER & WASHER
LIGHTER
HORN
WASHER FLUID
Some of the following symbols are used to
identify controls and displays on your vehicle.
Page 17

1-9
MEMO
Page 18

Page 19

2-1
2
Knowing Your Xedos Vehicle
KEYS
DOORS
WINDOWS
BOOT LID
BONNET
FUEL-FILLER CAP
SEATS
SEAT BELTS
SUPPLEMENTAL DRIVER AIR BAG RESTRAINT SYSTEM
STEERING WHEEL
MIRRORS
SUNROOF
INTERIOR LIGHTS
LUGGAGE COMPARTMENT
2-2
2-3
2-8
2-10
2-12
2-13
2-15
2-20
2-25
2-28
2-29
2-31
2-33
2-34
Page 20

Your vehicle has two primary keys and a
secondary key.
Operation of each key
When you must leave the key with a
parking attendant:
• Leave the seconday key, which
cannot open the boot lock.
• Use the boot security system
(page 2-11).
The plate attached to the keys has key
code numbers. If you should lose your
keys, these numbers will enable an
Authorised Xedos Dealer to replace them
more easily. Detach the plate and store it
in a safe place, not in the vehicle. You
should also file a copy of the key code
numbers with your important papers.
2-2
KEYS
Keys
Key
Lock Operates
Primary
key
Ye s
Ye s
Ye s
Secondary
key
Ye s
Ye s
No
Ignition switch and
steering column lock
Door locks
Boot lid lock
Page 21

FROM OUTSIDE
Front door
• Either front door can be locked or unlocked with the key.
• Once a door is unlocked, it may be
opened by lifting a door handle.
NOTE
If the driver’s door is open and you try to
lock it by pushing the lock down, it will automatically pop back up. Be sure to lock the
door with the key.
Rear door
To lock the rear door, depress the door
lock and close the door.
CAUTION
Always remove the ignition key, close
all windows, and lock all doors and the
boot when leaving your vehicle unattended.
FROM INSIDE
• To lock the doors, depress the door
lock.
• To unlock, pull the door lock up.
2-3
Door Locks
DOORS
Page 22

• To open, pull the door handle
rearward.
WARNING!
Never leave children or animals
unattended in the vehicle.
NOTE
Squirt deicer or glycerine into the locks to
keep them from freezing. To open a frozen
lock, try heating the key before inserting it.
DOOR LOCK ILLUMINATION
To assist key insertion at night, a light
inside the door panel illuminated for a
short time after the driver’s door or passenger’s door handle has been lifted.
With door lock
All doors can be simultaneously
locked or unlocked by depressing or lifting
the driver’s door lock.
The boot lid can also be unlocked at the
same time.
2-4
DOORS
Power Door Locks
Page 23

NOTE
Power door locks will not work when the
driver’s door is open.
With key
All doors lock or unlock automatically
when the driver’s or front passenger’s
door is locked from the outside with key.
The boot lid can also be locked or
unlocked at the same time.
Operates the locking and unlocking of all
doors.
Direct the beam toward the centre of the
vehicle.
Push the L switch to lock the doors. To unlock them, push the U switch. After locking
the doors (with the remote controller) make
sure they are locked.
CAUTION
To avoid damaging the remote controller, don’t drop it, keep it dry and
keep it away from heat (such as hot
dashboard) above 60º C (140ºF).
2-5
DOORS
Keyless Entry System*
*some models
Page 24

NOTE
• The keyless entry system will operate
up to about 5 metres from the centre of
the vehicle, but this may vary because
of local conditions.
• You have 30 seconds to open a door
after unlocking it with the remote unlock
device. After that, all doors automatically
relock.
• This system will not operate when the ignition switch is at ACC(I) or LOCK (0) or
when a door is open.
• If the remote controller doesn’t work, inspect its battery.
Battery Replacement
If the keyless entry system won’t work at normal range in any location, the battery probably needs changing. Consult your
Authorised Xedos Dealer to find the correct
replacement battery for your unit.
1. Turn the cap counterclockwise to remove
it.
2. Insert the battery with plus side up.
3. Turn the cap clockwise to reinstall it.
NOTE
If you lose the remote controller, consult your
Authorised Xedos Dealer.
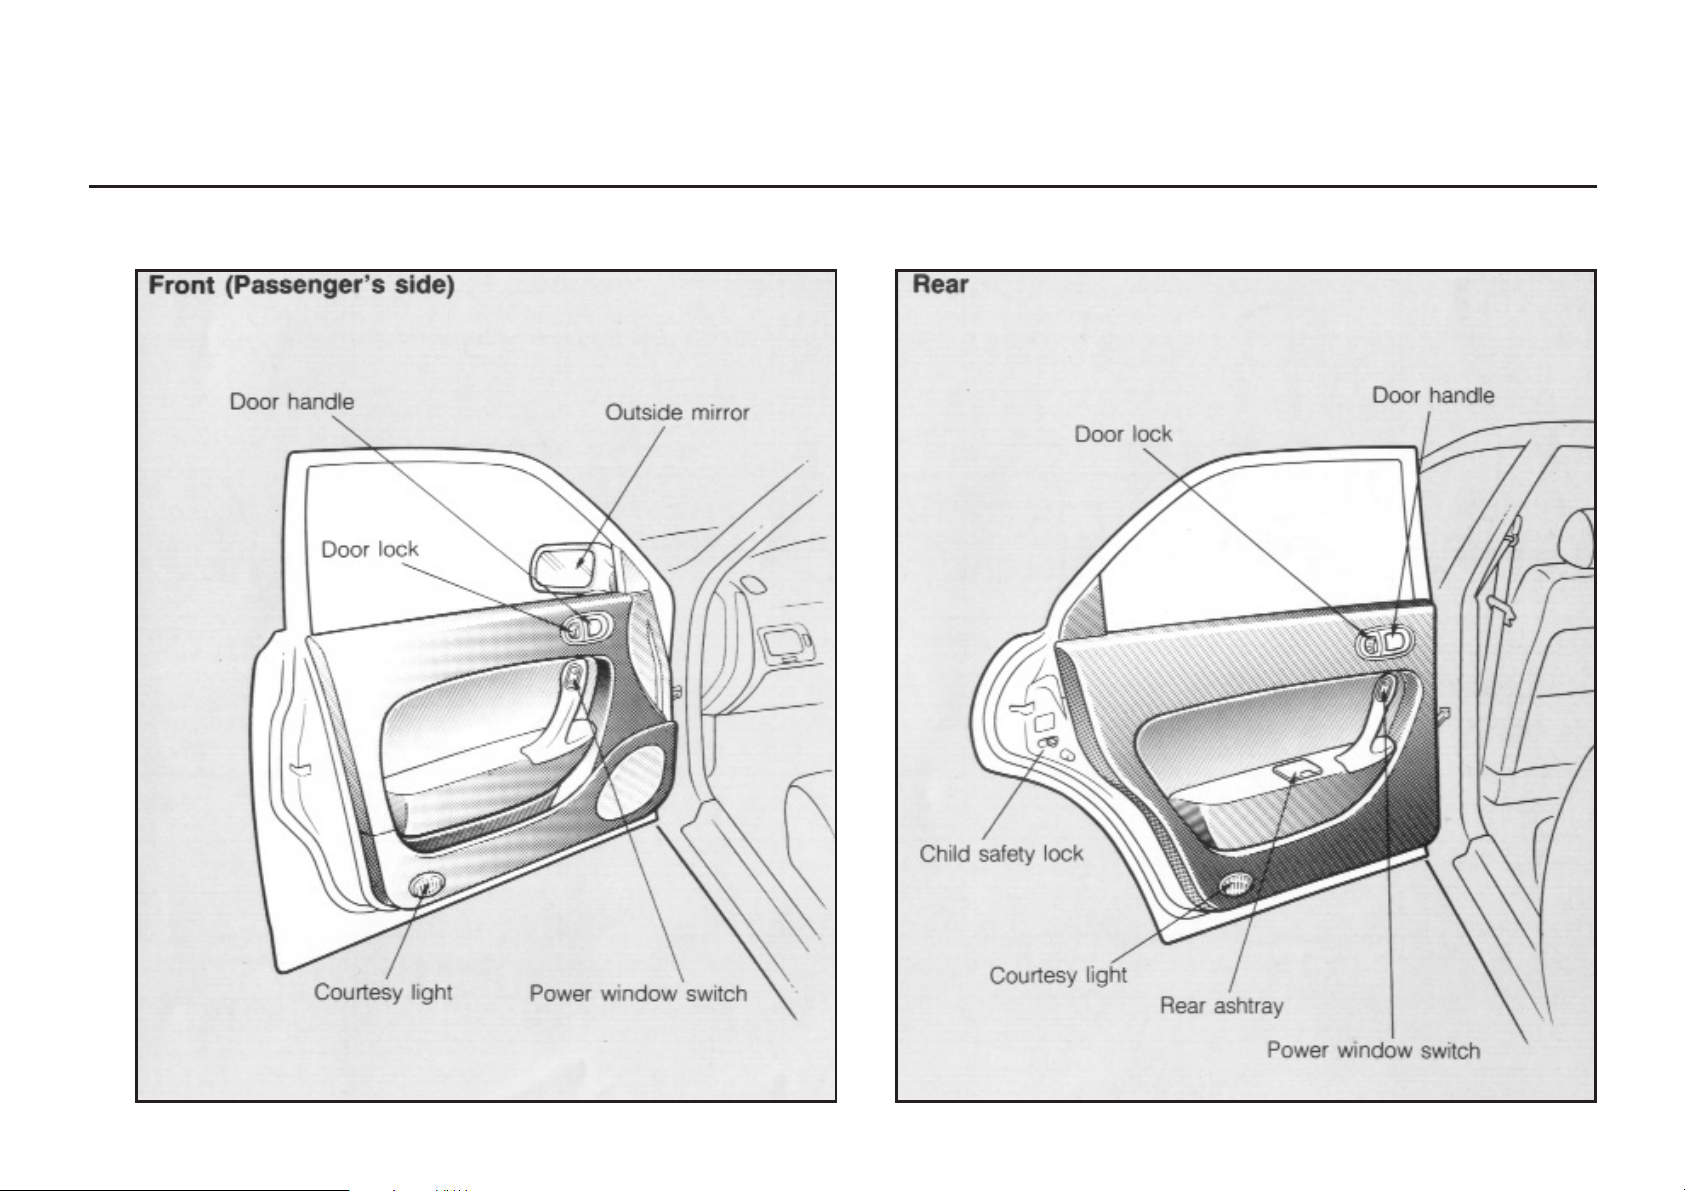
This lock is intended to help prevent children
from accidentally opening the rear doors and
they should be used whenever they are in the
vehicle.
• To lock the rear door so that it cannot be
opened from the inside, slide the child
safety lock to the lock position before
closing the door.
• To open it, lift the door lock and lift the outside door handle.
2-6
DOORS
Rear Door Child Safety Lock
Page 25

This panel helps to prevent an unpleasant
shock from static electricity. Open the door
and touch the panel lightly after rising from
the seat.
NOTE
• Only a light touch on the panel is
necessary.
• The amount of static shock depends
mainly on humidity and clothes.
• The panel will have no effect if you first
touch another part of the vehicle body.
2-7
DOORS
Static Electricity Earth
Page 26

The ignition switch must be in the ON (II)
position for the power windows to operate.
NOTE
The power window can still be operated for
about 5 minutes, after the ignition switch
has been turned to LOCK (0) or ACC (I).
But it cannot be operated once you open
and close a door.
WARNING!
Use caution when closing windows.
Make sure all arms, hands, and other obstructions are safely out of the
way.
MASTER CONTROL/DRIVER’S SIDE
All windows may be opened or closed by
the power window master control on the
driver’s door. Each door’s switch opens
and closes its corresponding window.
To open or close a window, depress the
power window switch.
CAUTION
To prevent the fuse from burning out
and the power window system from becoming damaged, do not open or close
more than two windows at the same
time.
2-8
WINDOWS
Power Windows
Page 27

2-9
WINDOWS
One-Touch Power Window
(driver’s window)
When the lower part of the switch is
pushed firmly, the window will move to its
fully open position.
Power Lock Switch
With the power lock switch in the
UNLOCK position, all of the power window switches may be used.
With the power lock switch in the LOCK
position, only the driver’s window can be
operated.
WARNING!
Keep the power lock switch in the
LOCK position except when a power window is being operated at a passenger’s door. Injury may result from
unintentional window operation.
PASSENGER’S SIDE
Press the lower part of the switch to open
a window.
Press the upper part to close a window.
WARNING!
Do not allow children to play with
the power windows. They may injure themselves, perhaps seriously.
Page 28

• To unlock the boot lid insert the primary
key into the key slot and turn it counterclockwise. Then return the key to the
centre position and remove it.
NOTE (Power Door Locks)
All doors simultaneously unlock when the
boot lid is unlocked with the primary key.
• To open the boot lid push the key
cylinder.
• To close, use both hands to push the
boot lid down until the lock snaps shut.
Do not slam it. Pull up the boot lid to
make sure it is secure.
WARNING!
To avoid drawing dangerous exhaust gases into the vehicle, do not
drive with the boot lid open.
• To lock the boot lid insert the primary key
into the key slot and turn it clockwise.
then return the key to the centre position
and remove it.
NOTE (Power Door Locks)
All doors simultaneously lock when the boot
lid is locked with the primary key.
CAUTION
Always lock the boot lid and all doors
when leaving your vehicle unattended.
2-10
BOOT LID
Boot lid
Page 29

Boot Security System
The security system is provided to safeguard
valuables.
Should it be necessary to leave your vehicle with a parking attendant, etc., you may
still protect your valuables by using this system.
To use the boot security system:
1. Lock the rear seat backs (page 2-19).
2. Close the boot lid.
3. Insert the primary key into the key slot.
4. Turn it clockwise and remove it.
NOTE (Power Door Locks)
In this condition, the boot lid cannot be unlocked by the power door locks.
To cancel the boot security system:
1. Insert the primary key into the key slot.
2. Return it to centrew position and remove it.
3. If necessary, unlock the rear seatbacks.
2-11
BOOT LID
Page 30

1. Pull the release handle to unlatch the
bonnet.
2. Pull the safety catch up and lift the
bonnet.
3. Hold the bonnet open with the support
rod.
Before closing the bonnet, secure the support rod in its clip to prevent it from rattling.
To close the bonnet:
• Check the underbonnet area to make
certain that all filler caps are in place
and that all loose items have been
removed
• Close the bonnet firmly so that it latches
securely. Do not slam it shut.
2-12
BONNET
Bonnet Release
Page 31

2-13
To open the fuel filler lid, pull up on the remote fuel-filler lid release.
• To remove the cap, first turn it counterclockwise.
• To install the cap, turn it clockwise until
it clicks. This signals that the cap is securely tightened.
The removed cap can be placed on the inside of the fuel-filler lid when refuelling.
FUEL-FILLER CAP
Fuel-Filler Cap Release
Page 32

2-14
WARNING!
• Fuel may be under pressure. Always remove the fuel cap carefully and slowly. If the cap is venting
fuel or if a hissing sound is heard,
wait until the condition stops before removing the cap. If these
precautions are not followed, fuel
may spray out and cause personal injury.
• Fuel vapor can be extrememly hazardous. When refuelling, always
stop the engine and never allow
sparks or open flames near the
filler neck.
NOTE
• If the fuel tank cap requires replacement,
use only a Genuine Xedos cap or the
equivalent specified for your vehicle.
An incorrect fuel cap can result in a
serious malfunction of the fuel system or
emission control system. Correct
replacement caps are available at
Authorised Xedos Dealers.
• If the fuel filler lid will not open in cold
weather because the area around it is frozen, push or tap lightly on the lid.
CAUTION
Do not spill fuel on the exterior surfaces
of the vehicle. Any type of fuel on painted surfaces may dull or soften paint.
Manual override
If the fual filler lid does not openwith the remote fuel-filler release, use the override
release.
The override release is behind the panel inside the boot on the left side. Remove the
boot side trim, reach into the opening and
pull the filler-lid latch toward the back of the
vehicle.
FUEL-FILLER CAP
Page 33

2-15
FUEL-FILLER CAP, SEATS
Front Seat AdjustmentFront Seat
WARNING!
To avoid possible injury by sharp
objects, it is advisable to wear protective gloves when attempting to
open the fuel-filler lid manually.
WARNING!
• Do not adjust the driver’s seat
while the vehicle is in motion. Doing so could cause loss of control, accident, and personal
injury.
• Rear-seat passengers should not
lean on the back of the front seat
while the vehicle is in motion. A
seat back that is folded forward
even slightly may not lock properly during a sudden stop or a collision.
• Do not allow packages or other
objects to interfere with the normal position of a seat back. This
may prevent it from locking in the
event of a sudden stop or collision.
SEAT SLIDE
To move the seat forward or backward,
move the lever upward, slide the seat to
the desired position, and release the lever.
CAUTION
Place nothing under a front seat. Loose
objects might interfere with the seatslide mechanism.
Page 34

SEAT RECLINER
To change the seat-back angle, lean forward
slightly and raise the lever. Then lean back
to the desired angle and release the lever.
After adjustment, make sure the lever is
returned to its original position; otherwise, the
seat back could unlatch while the vehicle is
in motion, causing the driver to lose control
of the vehicle.
WARNING!
To reduce the risk of sliding under
the lap belt and thereby suffering
personal injury in the event of a collision, do not recline the seat back
more than necessary for comfort.
The seat belts are designed to provide optimum protection when the
front passenger and driver are sitting well back and upright in their
seats. During a collision, especially
a front-end collision, the risk of personal injury may increase with the
increasing recline angle of the seat
back because the front passenger
and driver may slide uner the lap
belt and have restraint forces applied directly to their abdominal
areas. Therefore, try to keep the
seat back in a fairly upright position
whenever possible.
HEADREST
• To raise the headrest, pull it up.
• To lower the headrest, press the stopcatch release and press the headrest
down.
2-16
SEATS
Page 35

2-17
WARNING!
• To reduce the risk of head and
neck injuries, do not operate
the vehicle with the headrest
removed.
• Adjust the top of the headrest so
that it is closest to the top of your
ears (and never behind your neck)
to reduce the chance of injury in
the event of a collision.
Headrest angle (Driver’s Seat)*
To adjust headrest angle, apply pressure to
the top of the headrest.
CUSHION TILT (Driver’s Seat)
The seat cushion angle can be adjusted by
rotating the dial.
SEATS
*Some models.
Page 36

2-18
The front seats are electrically heated by
turning on the respective switch with the ignition switch ON (II). The thermostat regulates
the seat temperature by turning the current
on and off.
WARNING!
• If the rear seat back is not securely
latched, passengers and objects
could be thrown forward and injury could occur in the event of a
sudden stop or collision.
• To avoid the possibility of burns,
do not remove the carpet in the
cargo area. Emission controls beneath this area generate high exhaust temperatures.
• Luggage and other cargo should
not be piled higher than the seat
backs because they may become
projectiles during a sudden stop
or collision.
• To help prevent injury in the
event of sudden acceleration, a
quick stop, or a collision, passengers should not ride in the
cargo area or sit or recline on
folded seat backs while the vehicle is in motion.
• Do not allow children around folded sat backs to avoid their being
trapped inside the boot.
CAUTION
When resetting the seat back to the upright position, make sure it is securely
latched by pushing it forward and
rearward.
SEATS
Seat Warmer*
Rear Seat
*Some models.
Page 37

SPLIT-FOLDING SEAT
The rear-seat backs fold forward to increase
the size of the boot.
• Push the button to unlock the seat back,
then fold it forward and down.
• To raise the seat back, lift it and push it
firmly into place.
The split-folding seat is lockable from inside
the boot.
If you must leave the vehicle with someone,
you may protect valuables by locking the
rear seat back and boot lid. Surrender only
the seconday key. This key will operate only
the door locks and ignition switch.
To lock or unlock the seat backs, move the
lever in the direction of the arrow.
2-19
SEATS
Rear Seat Adjustment
*Some models.
Page 38

2-20
To help decrease the possibility or severity
of injury during accidents and sudden stops,
we recommend that the driver and passengers be properly restrained at all times
by using the seat belts provided. The lapshoulder belts have retractors with inertia
locks.
The retractors keep the belts out of the way
while passengers enter or exit the vehicle.
Inertia locks allow the belts to remain slack
on the passengers for comfort until a deceleration force occurs (such as a sudden
stop or collision). At that time the belts will
automatically lock in position, and you and
your passengers will be restrained.
WARNING!
• Lap/shoulder-belt assemblies
maybe damaged when subjected
to stress.
Replace all belts, retractors, and
hardware in use during any collision except a minor one.
Replace all restraint systems and
properly repair all anchorages in
areas damaged by a collision.
• Passengers should not be allowed to ride in the cargo area of
a vehicle. Persons not riding in a
seat with a fastened seat belt are
much more likely to suffer serious
bodily injury during a collision.
WARNING!
• Never wear the shoulder belt under the arm
• Never swing it around your neck and
over the inside shoulder.
• Never use a single belt for more
than one person at a time.
• Be sure the lap portion of the belt
is fitted snugly around the hips,
not the waist.
• Use the shoulder belt on the outside shoulder only.
Failure to follow these precautions
could increase the chance and
severity of injury.
NOTE
If the belt locks when being pulled out, rewind it completely into the retractor then
pull it out to the desired length.
SEAT BELTS
Seat Belt Restraint System
Page 39

2-21
To fasten seat belt
1. Grasp the buckle and tongue plate.
2. Slowly pull out the lap/shoulder belt.
3. Insert the tongue plate into the open end
of the buckle until a click is heard, indicating the belt is locked.
Position the lap belt across your lap as LOW
ON THE HIPS as possible to reduce the risk
of sliding under it during an accident. Adjust the belt to a SNUG FIT by pulling it. The
belt retractor is designed to take up excess
webbing automatically and to maintain tension on the belt.
To unfasten seat belt
Depress the button on the buckle.
SEAT BELTS
Page 40

2-22
Shoulder belt adjuster
This adjusts the shoulder belt angle to five
positions for a more comfortable fit. To adjust, simply push the button and move to
the desired position, and then release the
button.
CAUTION
Make sure that the belt is positioned
across your shoulder near your neck,
not on your neck or upper arm. Failure
to do so could reduce the amount of protection in an accident and increase the
chance of injury.
SEAT-BELT WARNING LIGHT/BEEP
When you turn the ignition switch ON (II) without first having fastened driver’s seat, a warning light will come on and a beep will sound.
(For more detailed information, refer to Warnings and indicators on page 4-17.)
SEAT BELTS
Rear Seat Belts
Two kinds of belts are equipped.
• Lap/shoulder belts,
for people who sit next to the side
windows.
• Lap belt,
for people who sit in the centre of the
rear
seat.
WARNING!
• Never wear the shoulder belt under the arm
• Never swing it around your neck and
over the inside shoulder.
• Never use a single belt for more
than one person at a time.
• Be sure the lap portion of the belt
is fitted snugly around the hips,
not the waist.
• Use the shoulder belt on the outside shoulder only.
Failure to follow these precautions
could increase the chance and
severity of injury.
NOTE
If the belt locks when being pulled out, rewind it completely into the retractor then
pull it out to the desired length.
Page 41

2-23
Lap/shoulder belt
To fasten:
1. Grasp the buckle and tongue plate.
2. Slowly pull out the lap/shoulder belt.
3. Insert the tongue plate into the open end
of the buckle until a click is heard, indicating the belt is locked.
To unfasten:
Depress the button on the buckle.
Position the lap belt across your lap as LOW
ON THE HIPS as possible to reduce the risk
of sliding under it during an accident.
Adjust the belt to a SNUG FIT by pulling it.
The belt retractor is designed to take up excess webbing automatically and to maintain
tension on the belt.
Lap Belt
To fasten:
1. Grasp the buckle end.
2. Insert the tongue plate into the open end
of the buckle until a click is heard, indicating the belt is locked. Make sure the belt
is not twisted.
SEAT BELTS
Page 42

2-24
3. If necessary, lengthen or shorten the belt.
To adjust, hold the tongue at right angles
to the webbing and pull to lengthen, or
pull the loose end of the belt webbing to
shorten.
To unfasten:
Depress the button on the buckle.
Position the lap belt across your lap as LOW
ON THE HIPS as possible.
WARNING!
Be sure the lap belt is fitted snugly
around the hips, not on the waist.
Failure to do so may increase the
chance of injury in the event of a collision.
To gain maximum effectiveness from the
seat-belt system, follow these suggestions:
• Use the belts at all times-even on short
trips.
• Never use the same belt for more than
one person at a time.
• Keep sharp edges and damaging objects
away from the belts and other parts of the
restraint system.
• Periodically inspect belt webbing, anchors, buckles and all other parts for
signs of wear, damage, and weakness.
Replace questionable parts immediately.
• To clean the belt webbing, use any mild
soap solution recommended for cleaning
upholstery and carpets; follow the instructions provided with the soap. Do not
bleach or redye the webbing because
this may weaken it.
• No modifications or additions should be
made by the user.
• After wearing a seat belt, make sure it is
not caught on the adjusting levers or
elsewhere.
SEAT BELTS
Proper Use and Care of the
Seat-Belt System
Page 43

2-25
WARNING!
All seat-belt assemblies, including
retractors and attaching harness,
should be inspected after any collision. We recommend that all seatbelt assemblies in use during a collision be replaced unless the collision was minor and the seat belts
show no damage and continue to
operate properly. Seat-belst assemblies not in use during a collision
should also be inspected and
replaced if damage or improper
operation is noted.
The Supplemental Driver Air Bag Restraint
System is designed to provide protection for
the driver in a frontal accident in addition
to that provided to the driver by the threepoint seat belt system. However, the Supplemental Air Bag Restraint System
is not designed to deploy in any accident except a moderate to severe frontal collision,
and is not designed to assist the driver in a
side impact, rear impact, or roll-over accident. Seat belts, whixh are designed to help
decrease the possibility or severity of injury
in accidents or sudden stops, must be used
to obtain the best ocupant protection of
which the vehicle is capable. We recom-
mend the use of seat belts by all vehicle occupants to reduce the risk of injury
in an accident. Use of a seat belt by the
driver is particularly important to keep the
driver in the proper position for maximum air
bag protection.
SYSTEM DESCRIPTION
The Supplemental Driver Air Bag Restraint
System consists of two basic sub-systems:
the driver air bag system, with the inflator
and air bag; and the electrical system, including crash sensors and diagnostic module. The air bag is mounted in the centre of
the steering wheel, but is designed to stay
out of sight until activated by a moderate to
severe frontal collision.
WARNING!
To avoid any accidental activation of
the system or rendering the system
inoperative, which may result in
SEAT BELTS, SUPPLEMENTAL DRIVER AIR BAG RESTRAINT SYSTEM
Supplemental Driver Air Bag
Restraint System*
*Some models.
Page 44

2-26
SUPPLEMENTAL DRIVER AIR BAG RESTRAINT SYSTEM
serious injury, no modifications
should be made to any components
or wiring of the Supplemental Driver Air Bag Restraint System as illustrated. This includes the installation
of additional trim material, or
badges or similar items over the
steering wheel hub and installation
of additional electrical/electronic
equipment on or near Supplemental
Driver Air Bag Restraint System
components and/or wiring.
The Supplemental Driver Air Bag Restraint
System is designed to rapidly inflate after
receiving a signal from the crash sensors.
Upon inflation, the rubber coated nylon bag
helps prevent the driver’s face and chest
from striking the steering wheel or windshield, supplementing the restraint provided by the seat belt. The bag then rapidly
deflates.
NOTE
During a severe frontal impact, a sudden,
fairly loud inflation noise will be heard and
a small quantity of smaoke will be released,
neither of which is injurios. The smoke does
not indicate a fire in the vehicle.
The air bag is designed to function on a onetime-only basis. In the event that the air bag
is deployed, the air bag module will not
function again and must be replaced.
Only Authorised Xedos Dealers should repair or replace the system.
Please contact an Authorised Xedos Dealer.
WARNING!
If the vehicle has been in a collision
that was not great enough to activate the Supplemental Driver Air
Bag Restraint System, a careful inspection should be made to check
for deformation of the parts on
which the sensors are mounted, and
repairs must be made if necessary.
See you Authorised Xedos Dealer;
otherwise the Supplemental Driver
Airbag Restraint System may not
function properly in the event of an
accident.
Page 45

DRIVER INFORMATION FEATURES
A diagnostic module continually monitors the
readiness of the Supplemental Driver Airbag
Restraint System. Monitoring begins when
the ignition swith is turned to ON (II) and
continues when the vehicle is being driven.
The following components are monitored by
the supplmental driver air bag restraint system warning light or beep.
• Crash sensors
• Backup battery
• Air bag module
• Diagnostic module
• Related wiring
• Warning light
Supplemental Driver Air Bag Restraint
System warning light
If the Supplemental Driver Air Bag Restraint
System is operating properly, the warning
light comes ON when turning the ignition
switch ON (II) or after cranking the engine,
then goes out after approximately 6 seconds. A system malfunction is indicated by
the flashing or continuous illumination of the
warning light or failure of the light to turn on.
If the warning light fails to light, or stays on
continuously or flashes, the Supplemental
Driver Air Bag Restraint System is in need
of service and should be taken to your
nearest Authorised Xedos Dealer as soon
as possible. Unless serviced, the Supplemental Driver Air Bag Restraint System
may not function properly in the event of an
accident.
Supplemental Driver Air Bag Restraint
System warning beep
The Supplemental Driver Air Bag Restraint
System warning light is the prime means of
determining the air bag system condition.
However, a series of beeps will be heard if
the warning light is out and malfunction occurs in the system. This also means that the
Supplemental Driver Air BAg Restraint System is in need of service. See your Authorised Xedos Dealer as soon as possible. The
beeps will repeat each time the ignition is
turned to ON(II) until the cause of
the light outage is rectified. Unless serviced, the Supplemetal Driver Air Bag Restraint System may not function properly in
the event of an accident.
2-27
SUPPLEMENTAL DRIVER AIR BAG RESTRAINT SYSTEM
Page 46

WARNING!
• Do not attempt any self-servicing
of the Supplemental Driver Air
Bag Restraint System; tampering
could cause activation of the
system and the risk of personal
injury. For servicing of the Supplemental Air Bag System, see your
Authorised Xedos Dealer.
• Please refer to safety instructions
available at an Authorised Xedos
Dealer when the air bag module
is disposed or youe vehicle is
scrapped. Failure to follow these
instructions could increase the
risk of personal injury.
MAINTENANCE
The Supplemental Driver Air Bag Restraint
System is maintenance free. But in the event
of a malfunction indicated by any of the following, the vehicle should be taken promptly
to your nearest Authorised Xedos Dealer to
have the system checked. Unless checked
and repaired, theSupplemental Driver Air
Bag Restraint System will not function reliably:
• Flashing of the warning light.
• Continuous illumination of the warning
light.
• Failure of the warning light to illuminate,
when the ignition switch is turned to
ON(II) and warning beeps sound.
• The air bag has been inflated.
NOTE
When you sell the vehicle we urge you to
give notice to the subsequent owner that it
is equipped with a Supplemental Driver Air
Bag Restraint System by alerting him to the
applicable section in the Owner’s Manual.
To change the steering wheel angle, pull
down the lock release, adjust the steering
wheel to the desired angle then push up the
lock-release lever to lock the steering
column.
WARNING!
Never adjust the tilt position of the
steering wheel while the vehicle is
in motion.
After adjusting, push up and down
against the steering wheel to be certain it is locked in position.
2-28
SUPPLEMENTAL DRIVER AIR BAG RESTRAINT SYSTEM, STEERING WHEEL
Tilt Steering
Page 47

Push the pad to sound the horn. Check the
horn regularly for proper operation.
Be sure to adjust any mirror angles before
driving.
WARNING!
If the outside mirrors are convex,
objects seen in the mirror are closer than
they appear.
The mirror should be used carefully to estimate distances of following
vehicles when changing lanes.
Use your inside mirror to determine
the size and distance of objects
seen in the convex mirror.
CAUTION
Do not scrape ice off the mirror face; this
may damage the surface of the glass. If
ice should restrict movement of the mirror, do not force the mirror to adjust it.
To remove ice, use a deicer (spray or
blower for example), sponge, or soft
cloth.
This switch controls the adjustments for both
right and left outside mirrors. To adjust the
position of either mirror:
1. Move the selector switch to the right or
left to activate the adjusting mechanism
for the corresponding mirror.
2. Adjust the mirror angle by depressing the
appropriate perimeter switch.
NOTE
Return the selector switch to the OFF (centre)
position when not in use.
2-29
STEERING WHEEL, MIRRORS
Page 48

CAUTION
The mirrors stop moving when they
reach the maximum adjusting angles,
but the motor continues rotating while
the switch is on. Do not leave the switch
on unnecessarily.
The rear window defroster switch also controls the mirror defrosters.
(Refer to page 4-25.)
Adjust the mirror to centre on the view
through the rear window. Make this adjustment while the day/night lever is in the day
position.
Pull the day/night lever toward you to reduce
glare from the headlights of vehicle behind
you during night driving.
NOTE
Remember that you lose some rearview clarity in the night position.
2-30
MIRRORS
Mirror Defroster*
Day/Night Mirror
*Some models.
Page 49

WARNING!
Do not put large objects on the flat
area behind the rear seat or pile luggage or other cargo higher than the
seat backs because they may obscure vision and could become dangerous projectiles during a sudden
stop or collision.
The sunroof may be opened or closed electrically. Power operation works only with the
ignition switch in the ON(II) position.
• To open, press the rear end of the slide
switch on the right of the overhead console. The sunroof can be opened to any
position desired by pressing and releasing this switch.
• To close, press the opposite end of the
switch.
The sunroof may also be tilted open. The
rear of the sunroof will raise to provide additional ventilation.
• To open thesunroof to the tilted position,
Push the rear end of the tilt switch.
• To close, push the opposite end.
WARNING!
• Do not extend anything, especially head and hands, through the
open sunroof while the vehicle is
in motion.
• When closing the sunroof, keep
everything, especially head and
hands, clear of the opening.
NOTE
• Make sure the sunroof is fully closed
when leaving the vehicle unattended.
• Periodically remove any dirt that may
have accumulated on the guide rail.
2-31
MIRRORS, SUNROOF
Sunroof*
*Some models.
Page 50

SUNSHADE
The sunshade can be opened by hand while
the glass sunroof remains closed.
When the glass sunroof is opened, the sunshade also opens.
The sunshade cannot be closed while the
sunroof remains open.
Close the sunroof; the sunshade may then
be close by hand.
CAUTION
The sunshade does not tilt. Do not push
on the sunshade. it may cause damage.
MANUAL OVERRIDE
If the sunroof will not operate by the
switches, it can be opened or closed manually withthe emergency hadle (allen
wrench) furnished in the glove box.
Turn it counterclockwise to open and clockwise to close.
When tilted, turn it counterclockwise to close
and clockwise to open.
Have the system checked by an Authorised
Xedos Dealer as soon as possible.
2-32
SUNROOF
Page 51

OFF -Lights off.
DOOR -Lights on when a door is open.
ON -Lights on.
NOTE
When the switch is in the door position, the
interior light:
• Comes on for about 15 seconds when
the driver’s door is unlocked, or when the
key is used to unlock the passenger’s
door.
• Comes on for about 30 seconds after the
ignition key is removed.
The light goes out if the ignition key is turned
to ON(II), or the driver’s door is locked.
The map lights are switched on or off
individually by pushing the buttons.
2-33
INTERIOR LIGHTS
Interior Light Map Light*
*Some models.
Page 52

When a door is opened, the courtesy lights
come on automatically.
Closing the door turns them off automatically.
When the boot lid is opened, the boot light
will be turned on automatically.
Closing the boot lid will automatically turn the
light off.
2-34
INTERIOR LIGHTS, LUGGAGE COMPARTMENT
Courtesy Lights Boot Light
Page 53

2-35
MEMO
Page 54

Page 55

3-1
3
Protecting Your Xedos Vehicle
FUEL REQUIREMENTS
EMISSION CONTROL SYSTEM
BEFORE DRIVING
RUNNING-IN
ECONOMICAL OPERATION
SPECIAL DRIVING CONDITIONS
LABEL INFORMATION
3-2
3-2
3-3
3-4
3-4
3-5
3-8
Page 56

3-2
FUEL REQUIREMENTS, EMISSION CONTROL SYSTEM
Fuel Requirements Engine Exhaust Gas
Precautions
(Carbon Monoxide)
Operating Precautions for
Catalytic Converters
Use only unleaded petrol with an octane rat-
ing of at least 95 (Research Octane Number) conforming to DIN 51 607.
You may use unleaded petrol with an octane
rating of at least 90 (Research Octane Number) at slightly reduced performance.
WARNING!
Never use leaded petrol in your
Xedos Vehicle if it has a catalytic
converter. The lead will accumulate
on the oxygen sensor and the catalyst within the converter. This will
result in a malfunction of the emission control system, causing poor
performance.
If you believe the engine is not functioning properly, consult an Authorised Xedos Dealer as soon as possible.
Engine exhaust gases contain carbon
monoxide. Though colourless and odourless, it is dangerous, even lethal, if inhaled.
• Carbon monoxide can be present with
other exhaust fumes. Therefore, if you
smell exhaust fumes of any kind inside
your vehicle, have it inspected and
repaired immediately by an Authorised
Xedos dealer. Do not drive with exhaust
fumes present,but if you must, do so only
with all windows fully open.
• Do not operate the engine in confined or
closed areas (such as garages) any more
than is necessary to move the vehicle to and from the area.
• When the vehicle is stopped in an unconfined area for more than a short time with
the engine running, adjust the heating or
cooling system to draw outside air into
the vehicle.
• Never sit in a parked or stopped vehicle
for any length of time with the engine
running.
Your vehicle is equipped with a catalytic converter emission control device.
Therefore, the following precautions must be
observed:
• Use only UNLEADED FUEL
• Do not park the vehicle over or near flammable objects, such as dry grass. Under
certain conditions, they could be ignited
by a hot exhaust system.
• Do not operate the vehicle when there are
signs of engine malfunction, such as misfire or other noticeable loss of performance.
• Do not misuse or abuse the engine. Examples of misuse are coasting with the
ignition off and descending steep grades
in gear with the ignition off.
• Do not operate the engine at high idle
speeds for extended periods (5 minutes
or more).
• Do not modify or tamper with any part of
the engine or emission control system. All
inspections and adjustments must be
made by a qualified technician.
Page 57

Failure to observe the above precautions
could result in damage to the catalytic converter and to your vehicle.
BEFORE ENTERING VEHICLE
• Be sure that all windows, outside mirror(s), and outside lights are clean.
• Check the condition of the tyres.
• Check under the vehicle for any sign of
leaks.
• Be sure there are no obstacles behind
you if you intend to back up.
Necessary inspections
Fluid levels, such as engine oil, engine coolant, brake/clutch fluid, and washer fluid,
should be checked daily, weekly, or whenever you refuel, depending on the fluid. Further details are provided in Maintenance,
Section 7.
BEFORE STARTING
• Close all doors.
• Position the seat so that all controls are
easily reached.
• Adjust the inside and outside mirrors.
• Fasten seat belts of occupied seats.
• Be sure that all lights work.
• check all gauges.
• Check the operation of warning lights
when the ignition switch is turned to the
ON(II) position.
• Release the parking brake and make
sure the (parking*) brake warning light
goes out.
For safe operation, be sure that you are
familiar with your vehicle and its equipment.
*Left hand drive models
3-3
EMISSION CONTROL SYSTEM, BEFORE DRIVING
Page 58

No special running-in period is needed. But
by following a few simple precautions for the
first 1,000km (600 miles), you may add to
the performance, economy, and life of your
vehicle.
• Do not race the engine.
• Do not maintain a single speed for long
periods of time, either fast or slow.
• Avoid hard stops, except in emergencies,
to allow the brakes to seat properly.
• Avoid full-throttle starts.
Your vehicle’s fuel economy is mainly dependent on your style of driving: how you
drive, where you drive, and when you drive.
These have an effect on how many kilometres (miles) you can get from a litre (gallon)
of fuel. To operate your vehicle as economically as possible, use the following driving
suggestions to help save money in both fuel
and repairs:
• Avoid lengthy warm-up idling. Once the
engine is running smoothly, begin drivingbut gently. Remember, though,
that on cold days, warm-up may take a
little longer.
• Save fuel by avoiding fast starts.
• Keep the engine in tune and follow the
recommended periodic maintenance
schedule. This will increase the life of all
parts and lower operating costs.
• Use the air conditioner only when
necessary.
• Slow down when driving on rough roads.
• For longer tyre life and better fual economy, always keep the tyres inflated to the
correct pressures.
• Maintain a safe distance from other vehicles to avoid sudden stops. This will reduce wear on brake linings and pads and
save fuel because extra fuel is required
to accelerate back to driving speed.
• Do not carry unnecessary weight in the
vehicle.
• Do not rest your foot on the brake pedal
while driving. this can cause needless
wear, possible damage to the brakes,
and poor fuel economy.
• Improper wheel alignment cause the
tyres to roll at excessive angles, which
results in faster tyre wear. It takes more
power to overcome this improper alignment, which wastes fuel.
• Open windows at high speeds can lessen fuel economy.
• Fuel economy is less in cross winds and
headwinds. To help offset some of this
loss, slow down when driving in these
conditions.
Keeping a vehicle in good operating condition is important for both economy and safety. Therefore, have an Authorised Xedos
Dealer perform scheduled inspections and
3-4
RUNNING IN, ECONOMICAL OPERATION
Page 59

maintenance.
CAUTION
Never turn off the engine to coast down
hills. The power steering and power
brakes will not function without the engine running. Instead, downshift to an
appropriate gear for engine braking
effect.
When hazardous driving is encountered because of water, snow, ice, mud, sand, or
similar hazard, follow these suggestions.
• Drive cautiously and allow extra distance
for braking.
• Avoid sudden movements in braking or
steering.
• When braking, depress the brake pedal
with a light up-and-down motion until the
vehicle is stopped.
• If stalled in snow, mud, or sand, use second gear and accelerate slowly. Low
gear may be used, if necessary. Accelerate slowly to avoid spinning the front
wheels.
• Use sand, rock salt, tyre chains or other
nonslip material under the fromnt wheels
to provide traction when stalled in ice,
snow, or mud.
WARNING!
On slippery surfaces, do not downshift inot 1 (First) with a manual
transaxle or, L (Low) with an automatic transaxle.
This may cause skidding.
NOTE
Use snow chains only on front wheels.
3-5
ECONOMICAL OPERATION, SPECIAL DRIVING CONDITIONS
Hazardous Driving
Page 60

If it is necessary to rock the vehicle to free
it from snow, sand, or mud, move the selector lever of an automatic transaxle from D
(Drive) to R (Reverse) in a repeat pattern
while depressing the accelerator gently. With
a manual transaxle, move the shift lever back
and forth from 1 (First) to R (Reverse). Do
not race the engine. if you are still stuck after a couple of minutes of rocking, have the vehicle pulled out to avoid engine overheating
and possible danage to the transaxle.
CAUTION
Prolonged rocking may cause engine
overheating, transaxle damage or failure, and tyre damage.
WARNING!
Do not spin the wheels too much,
because increased wear and damage to the drive components may
result.
• We recommend that you carry emergency equipment. Some things you might include are tyre chains, a window scraper,
a bag of sand or salt, flares, a small shovel and jump leads.
• Make sure you have sufficient ethyleneglycol coolant in the radiator.
• Check the battery condition and cables.
Cold temperatures reduce the capacity
of any battery, so it must be in top shape
to provide enough winter starting power.
• Make sure the engine oil viscosity is suitable for cold weather.
• Check the ignition system for loose connections and damage.
• Use antifreeze-formulated washer fluid.
(Do not use engine coolant antifreeze.)
• Do not use the parking brake when it
might freeze. When parking, shift to P
(Park) with on an automatic transaxle,and
to 1 (First) or R (Reverse) on a manual
transaxle and block the rear wheels.
SNOW TYRES
When snow tyres are used, select the
size and construction specified on the
tyre pressure label. It is strongly recommended that snow tyres be used on all
four wheels, or ppor handling may result. Please also note the inflation pressure
recommended from the tyre maker.
WARNING!
Snow tyres should be equivalent in size
and type to the vehicle’s standard tyres. Otherwise, the safety
and handling of your vehicle may be
affected.
NOTE
Do not install studded tyres without first
checking local regulations fpr possible restrictions.
3-6
SPECIAL DRIVING CONDITIONS
Rocking the Vehicle Winter Driving
Page 61

TYRE CHAINS
Tyre Chain Selection
Regulations regarding the use of tyre chains
vary according to location or type of road.
so always check them before installing
chains.
Chain installation
When installing chains on your tyres, carefully follow the instructions of the chain
manufacturer.
The chain bands will scratch the wheel
covers. Remove the covers before installing
the chains.
Install the chains on the front tyres as tightly
as possible. The use of chains on the rear
tyres is not recommended. Retighten the
chains after driving 0.5-1.0km (1/4-1/2
mile.)
CAUTION
• The use of chains may adversely affect vehicle handling.
• Do not exceed 50km/h (30mph) or
the chain manufacturer’s recommended speed limit, whichever is
lower.
• Drive carefully and avoid bumps,
holes, and sharp turns, which may
cause the vehicle to bounce.
• Avoid sharp turns or locked-wheel
braking.
Avoid driving through flooded areas unless
you are sure the water is no higher than the
bottom of the wheel rims. Drive through any
water slowly. Allow adequate stopping distance because wet brakes do not grip well.
After driving through water, dry the brakes
by gently applying them several times while
the vehicle is moving slowly.
3-7
SPECIAL DRIVING CONDITIONS
Driving in Flooded Areas
Page 62

3-8
LABEL INFORMATION
Label Information
Page 63

3-9
LABEL INFORMATION
*Some models.
 Loading...