

Page 1
1
GENUINE MUD FLAP (REAR)
INSTALLATION AND USER’S INSTRUCTIONS
Thank you for purchasing a genuine Mazda accessory.
Before removal and installation, be sure to thoroughly read these instructions.
Please read the contents of this booklet in order to properly install and use the mud flap.
Your safety depends on it.
Keep these instructions with your vehicle records for future reference.
• There are several WARNING and CAUTION sections in this booklet concerning
safety when installing or removing the mud flap. Always read and follow them in order
to prevent injuries, accidents, and possible damage to the vehicle.
WARNING: Indicates a situation in which serious injury or death could result if
the warning is ignored.
CAUTION : Indicates a situation in which bodily injury or damage to the vehicle
could result if the caution is ignored.
• Do not modify the mud flap.
• Do not install the mud flap in any way other than described in the following instructions.
• If in any doubt, please ask your Mazda dealer to install the accessory in order to
prevent errors in installation.
• If you have any questions about the use of the accessory, ask your Mazda dealer for
proper advice before using it.
• Mazda and its suppliers are not responsible for injuries, accidents, and damage to
persons and property that arise from the failure of the dealer or installer to follow these
instructions.
• To ensure safety and reliability of the work, installation, removal and disposal work
must carried out by an Authorized Mazda Dealership.
•
Be careful not to lose removed parts, and be sure that they are kept free from
scratches, grease or other dirt.
PART NAME: MUD FLAP (REAR)
PART NUMBER: TD11 V3 460F
VEHICLE:
CX-9
To the dealer
• Please turn over these instructions to the customer after installation.
To the customer
• Keep these instructions after installation. The instructions may be necessary
for installing other optional parts or removal of this accessory.
• Should the vehicle or this accessory be resold, always leave these instructions
with it for the next owner.
KBTD11V3460FX00
WARNING
NOTE
Page 2
2
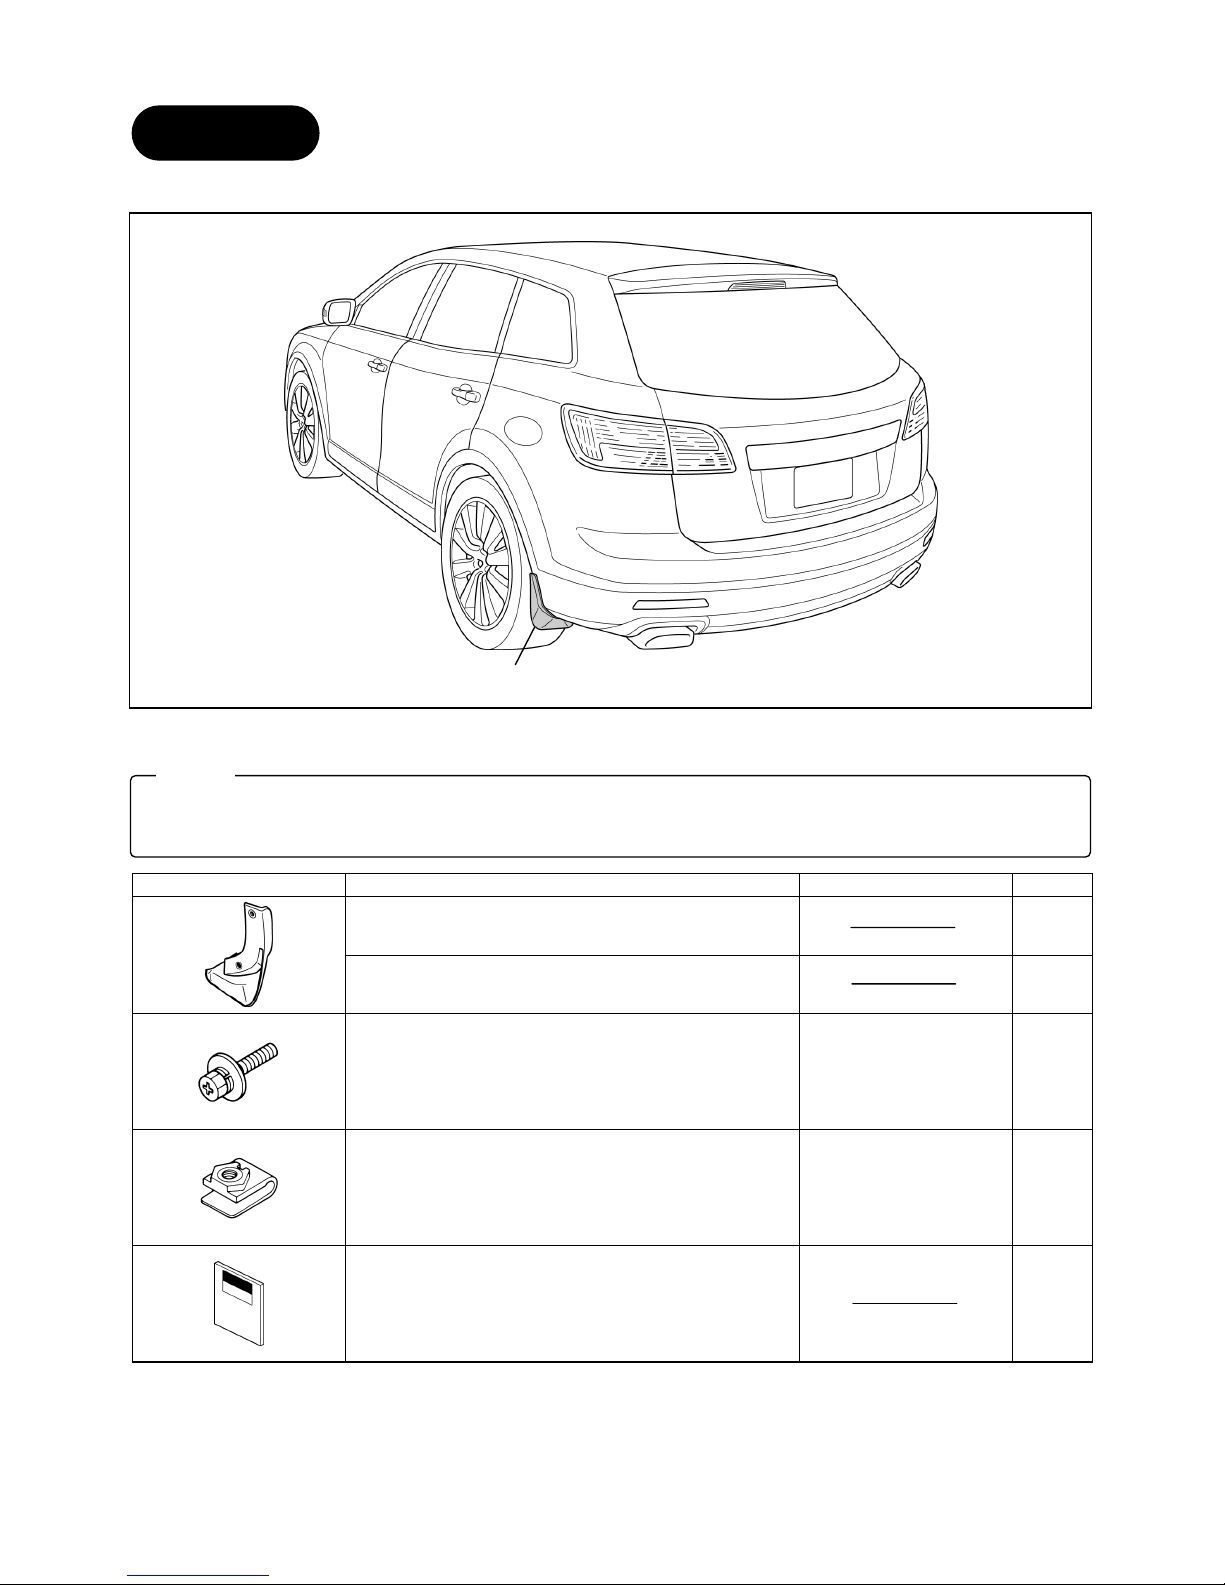
▼ Installation view
▼ Parts list
Part Part name Part number Qty
Mud flap (Rear)
(RH)
1
Mud flap (Rear)
(LH)
1
Bolt 9YA01 0502
6
Clip nut B092 51 861
6
Installation and user’s instructions
1
1. PARTS
• Before installation, verify that the kit includes all the following parts and that they are free of dirt,
scratches, or damage.
NOTE
Mad flap (Rear)
Page 3

3
REQUIRED TOOLS
☆Screwdriver (Phillips) ☆Torque wrench ☆Nipper ☆Jack ☆Protective sheet
CAUTION
Use the most appropriate
(size, use) tool for each task and
perform the may be damaged.
Place the removed parts and kit
accessories on a protective sheet
to prevent scratches.
2.BEFORE INSTALLATION
• Refer to the applicable Workshop Manual for removal and installation of vehicle parts. Not following the
procedures for removal/installation in the Workshop Manual could result in an accident or vehicle
malfunction.
NOTE
• Always use a torque wrench when tightening bolts and tighten to the specified torque. If tightened outside
the specified torque, it could result in poor fit, part damage, or other damage.
• The mud flap (Rear) is made of hard plastic. Handle it with care, as it may be deformed or discolored if i
t
contacts solvents such as paint thinner or comes close to flame.
CAUTION
• Park the vehicle on a flat, level surface, set the selector lever to P (AT vehicles), apply the parking brake an
d
block the wheels so that the vehicle does not move during installation.
WARNING
Page 4

4
1. Remove the splash shield installation bolt A (2), fastener B (1)
and bolt C (1).
2. Pull the splash shield inward and disengage the tabs
(7 locations), and then remove the splash shield.
3. Cut off the splash shield shown in the figure using nipper
(2 locations).
4. Align the rear bumper holes, and install the kit clip nuts (3).
3.MUD FLAP (REAR) INSTALLATION
• The removed bolt A (2), fastener B (1) and bolt C (1) are to
be reused. Be careful not to damage or lose them
CAUTION
• The figure shows the left side, however, perform the same procedure for the right side.
NOTE
Bolt A
Bolt C
Fastener B
Splash shield
Splash shield
Tab
Splash shield
Cut out
Rear bumper
Clip nut
Page 5

5
5. Place the splash shield back in its original position and install
the bolt A (2), fastener B (1) and bolt C (1).
Tightening torque
Bolt A:0.6-0.9 N・m {6.2-9.1 kgf・cm・5.3 – 7.9 in・lbf }
Bolt C:0.8-1.2 N・m {8.2-12.2 kgf・cm・7.1 – 10.6 in・lbf }
6. Align the mud flap (rear) with the rear bumper and splash shield
installation holes.
7. Temporarily tighten the kit bolts (3).
8. Install the mud flap (rear) in the order shown in the figure on the
left while pressing it against the rear bumper.
Tightening torque
Bolt:0.8-1.2 N・m {8.2-12.2 kgf・cm・7.1 – 10.6 in・lbf }
1. Be sure that here are no excessive gaps.
2.Be sure that all bolts are securely tightened.
• Make sure the bolt is tightened securely.
Make sure to tighten to the specified torque. If tightened
outside the specified torque, the mud flap (rear) could be
damaged or fall off.
CAUTION
5.MUD FLAP (REAR) PRECAUTIONS
4.CONFIRMATION AFTER INSTALLATION
• If gasoline, engine coolant, or battery fluid adheres to the painted surface of the resin parts, it will cause
discoloration, stains, or paint peeling. Wipe it off with a soft cloth immediately.
• Don’t drive through an automatic car wash; it may damage the mud flap (rear).
• Do not use car polish containing wax compounds. Otherwise, the paint could be damaged.
• If the vehicle height is lowered due to the vehicle being at maximum passenger or cargo capacity,
decrease the vehicle speed when parking on a road shoulder or entering/leaving a road shoulder or bump.
Otherwise, the mud flaps (rear) could be damaged.
CAUTION
• If there are any gaps, loosen all the bolts and then retighten them in the order of top, middle, and bottom while pressing
the mud flap (rear) against the vehicle.
Bolt A
Bolt C
Fastener B
Splash shield
Splash shield
Tab
Bolt
Mad flap (Rear)
Bolt
①
②
③
Rear bumper
Page 6

MUD FLAP (REAR)
TD11 V3 460F
Inspection after installation
• Inspect the installed / reinstalled parts for the following items.
Check Item
(○)
Inspection Parts
Clearance/Fit Scratches / Dirt
Installation /
Engagement
Fastener, bolt
tightening
Mud flap (Rear)
○ ○ ○ ○
Splash shield
○ ○ ○ ○
Installation inspection sheet for mud flap (Rear)
Date , ,
VIN.
Approved
Checked
Person in
charge
The term of validity for this sheet: 12 months
CX-9
INSTALLATION
INSPECTION
SHEET
 Loading...