

Page 1
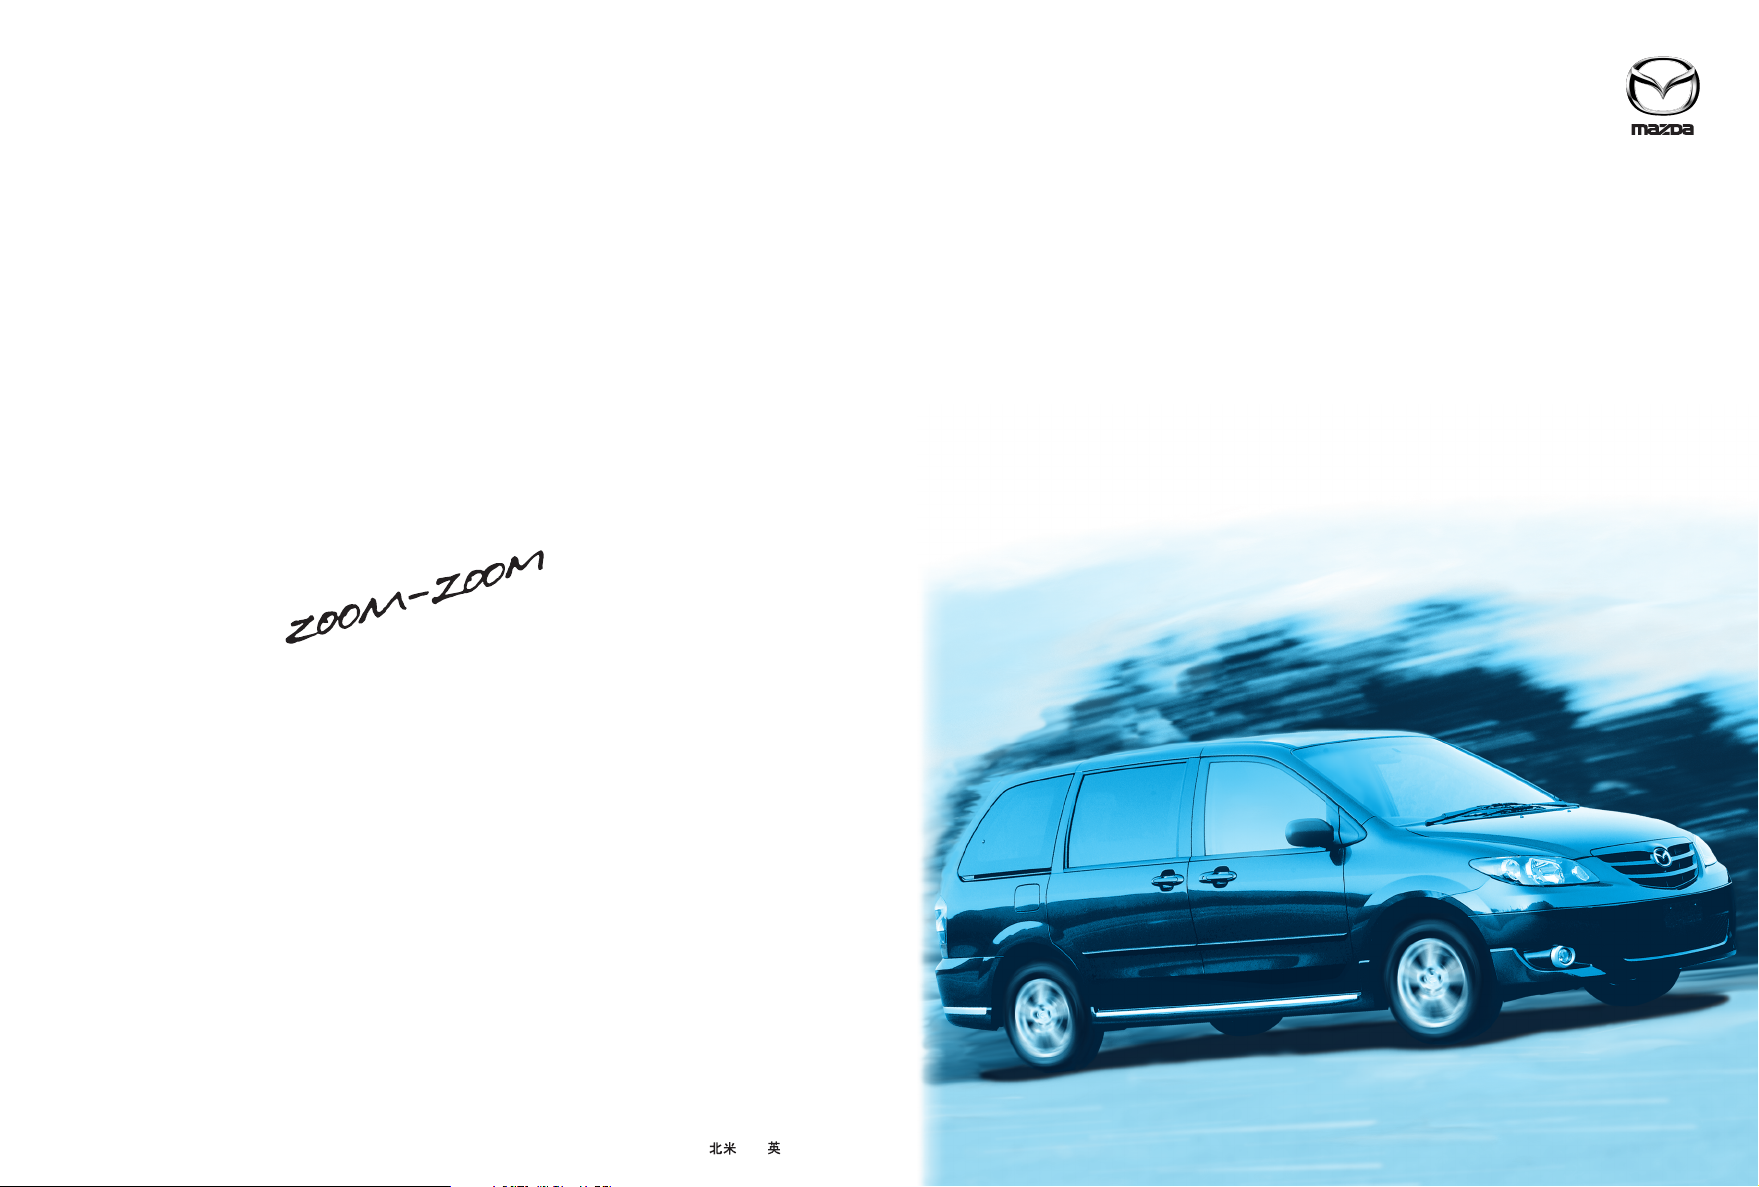
Mazda MPV
2004
Owner's Manual
Mazda MPV
Owner's Manual
8S06
2004
Form No. 8S06-EA-03H (Part No. 9999-95-029C-04)
Page 2
A Word to Mazda Owners
Thank you for choosing a Mazda. We at Mazda design and build vehicles with complete
customer satisfaction in mind.
To help ensure enjoyable and trouble-free operation of your Mazda, read this manual
carefully and follow its recommendations.
An Authorized Mazda Dealer knows your vehicle best. So when maintenance or service is
necessary, that’s the place to go.
Our nationwide network of Mazda professionals is dedicated to providing you with the best
possible service.
We assure you that all of us at Mazda have an ongoing interest in your motoring pleasure
and in your full satisfaction with your Mazda product.
Mazda Motor Corporation
HIROSHIMA, JAPAN
Important Notes About This Manual
Keep this manual in the glove box as a handy reference for the safe and enjoyable use of
your Mazda. Should you resell the vehicle, leave this manual with it for the next owner.
All specifications and descriptions are accurate at the time of printing. Because
improvement is a constant goal at Mazda, we reserve the right to make changes in
specifications at any time without notice and without obligation.
Air Conditioning and the Environment
Your Mazda’s genuine air conditioner is filled with HFC134a (R134a), a refrigerant that
has been found not to damage the earth’s ozone layer. If the air conditioner does not
operate properly, consult an Authorized Mazda Dealer.
Please be aware that this manual applies to all models, equipment and options. As a
result, you may find some explanations for equipment not installed on your vehicle.
©2003 Mazda Motor Corporation
Printed in Japan Aug. 2003(Print1)
Page 3
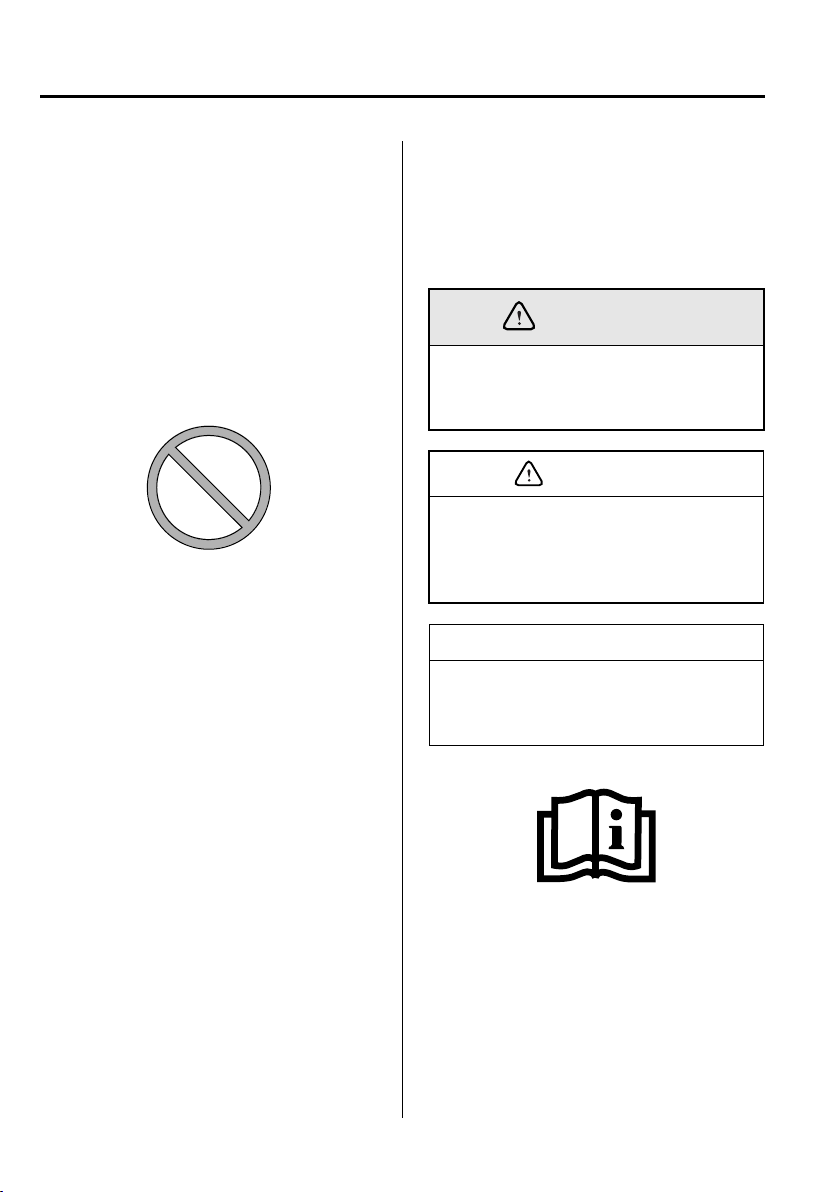
How to Use This Manual
WARNING
CAUTION
We want to help you get the most driving
pleasure from your vehicle. Your owner’s
manual, when read from cover to cover,
can do that in many ways.
Illustrations complement the words of the
manual to best explain how to enjoy your
Mazda. By reading your manual, you can
find out about the features, important
safety information, and driving under
various road conditions.
The above symbol in this manual means
"Do not do this " or "Do not let this
happen".
Index:
A good place to start is the Index,
an alphabetical listing of all information
in your manual.
You’ll find several WARNINGs,
CAUTIONs, and NOTEs in the manual.
A WARNING indicates a situation in
which serious injury or death could
result if the warning is ignored.
A CAUTION indicates a situation in
which bodily injury or damage to your
vehicle, or both, could result if the
caution is ignored.
NOTE
A NOTE provides information and
sometimes suggests how to make
better use of your vehicle.
The above symbol, located on some parts
of the vehicle, indicates that this manual
contains information related to the part.
Please refer to the manual for a detailed
explanation.
Page 4
Table of Contents
Your Vehicle at a Glance
Interior, exterior views and part identification of your Mazda.
Essential Safety Equipment
Use of safety equipment, including seats, seat belt system, SRS air bags and
child-restraint systems.
Knowing Your Mazda
Explanation of basic operations and controls; opening/closing and adjustment
of various parts.
Before Driving Your Mazda
Important information about driving your Mazda.
Driving Your Mazda
Explanation of instruments and controls.
Interior Comfort
Use of various features for drive comfort, including climate control and audio
system.
In Case of an Emergency
Helpful information on what to do in an emergency.
Maintenance and Care
How to keep your Mazda in top condition.
1
2
3
4
5
6
7
8
Customer Information and Reporting Safety Defects
Important consumer information including warranties and add-on equipment.
Specifications
Technical information about your Mazda.
Index
9
10
11
Page 5

Page 6

1
Your Vehicle at a Glance
Interior, exterior views and part identification of your Mazda.
Dashboard Overview
Interior Overview
Exterior Overview
.......................................................................... 1-3
.........................................................................1-4
....................................................................1-2
1-1
Page 7
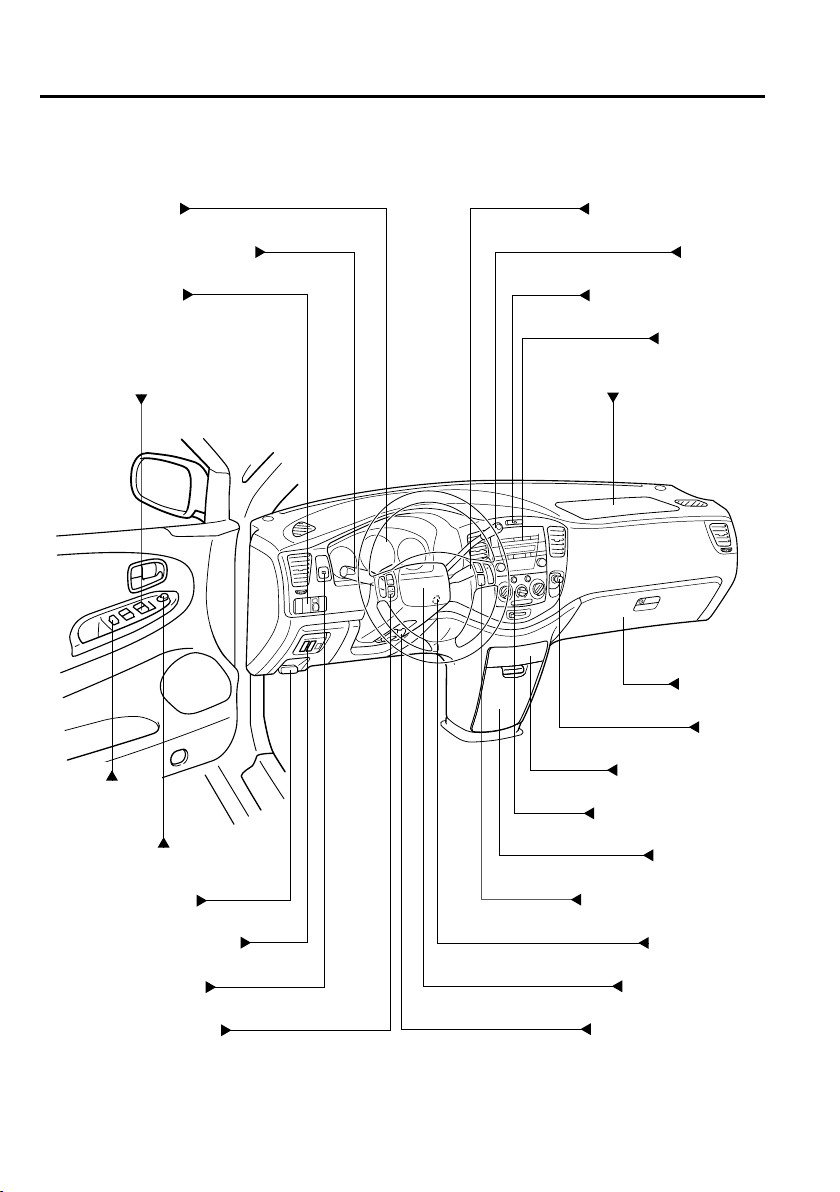
Your Vehicle at a Glance
Dashboard Overview
Instrument cluster
(page 5-20)
Lighting control/Turn signals
(page 5-34)
TCS OFF switch*
(page 5-18)
Power window switches*
(page 3-19)
Power window
lock switch*
(page 3-21)
Power door lock switch*
(page 3-8)
Hood release handle
(page 3-24)
Power sliding door switch*
(page 3-13)
Outside mirror switch
(page 3-33)
Audio control switches*
(page 6-38)
Wiper and washer lever
(page 5-36)
Shift lever
(page 5-9)
Hazard warning flasher
(page 5-39)
Audio system
(page 6-14)
Passenger-side air bag
(page 2-56)
Glove box
(page 6-50)
Lighter
(page 6-44)
Cup holder/Ashtray
(page 6-46)/(page 6-45)
Climate control system
(page 6-2)
Front console
(page 6-50)
Cruise control switches*
(page 5-14)
Ignition switch
(page 5-2)
Driver-side air bag
(page 2-56)
Tilt wheel release lever
(page 3-33)
1-2
*Some models.
Page 8
Your Vehicle at a Glance
Interior Overview
Sunvisors
(page 6-41)
Rearview mirror
(page 3-34)
Power seat
switches
(page 2-8)
Front seats
(page 2-3)
Parking brake
(page 5-5)
Side air bags*
(page 2-56)
Seat belts
(page 2-30)
Interior light
(page 6-42)
Rear vents*
(page 6-10)
Third-row seat
(page 2-20)
Rear climate control panel*
(page 6-12)
Second-row seat
(page 2-13)
*Some models.
1-3
Page 9
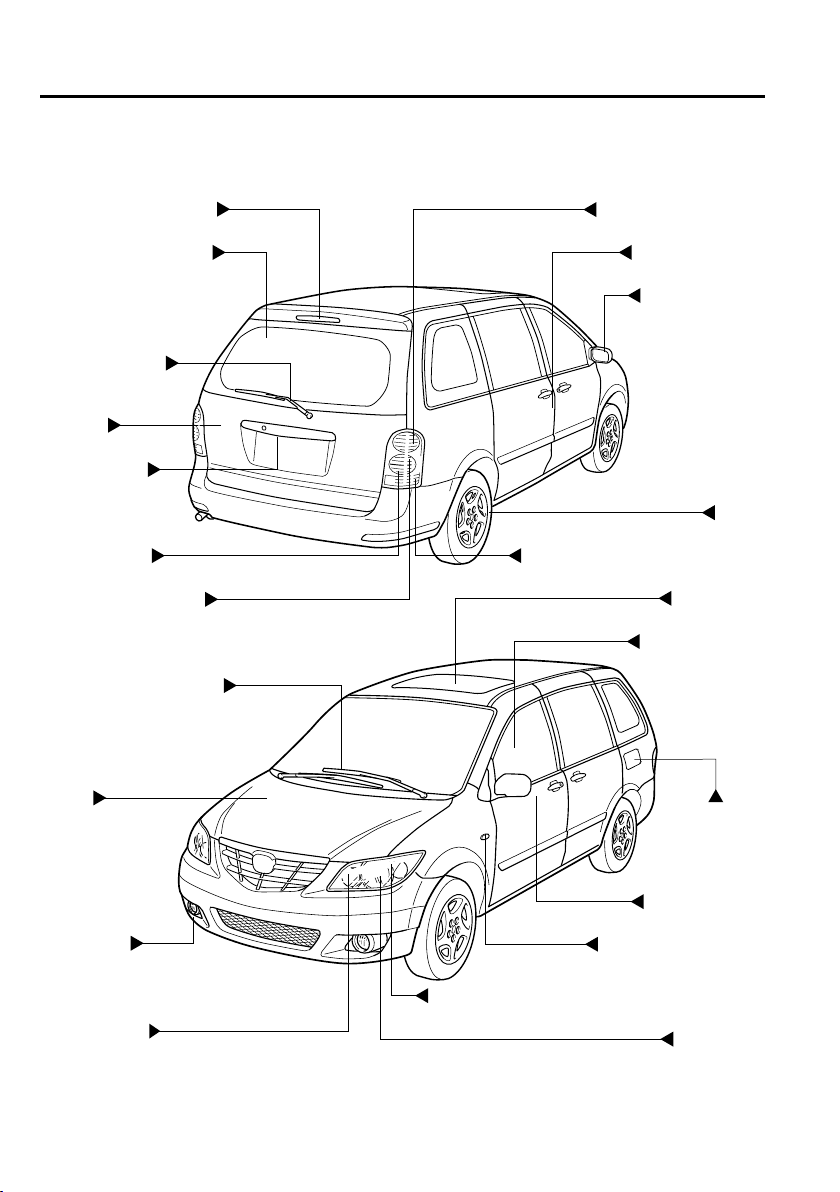
Your Vehicle at a Glance
Exterior Overview
High-mount brake light
(page 8-31)
Rear window defroster
(page 5-38)
Rear windshield
wiper blades
(page 8-22)
Liftgate
(page 3-18)
License plate
lights
(page 8-31)
Reverse lights
(page 8-31)
Rear turn signal lights
(page 8-31)
Windshield wiper blades
(page 8-20)
Brake lights/Taillights
(page 8-31)
Child safety lock
(page 3-12)
Outside mirrors
(page 3-33)
Tires
(page 8-27)
Taillights/Rear side-marker lights
(page 8-31)
Moonroof*
(page 3-25)
Power windows
(page 3-19)
Hood
(page 3-24)
Fog lights*
(page 8-31)
Parking lights
(page 8-31)
1-4
Fuel-filler lid
(page 3-23)
Doors and keys
(page 3-2)
Side turn signal lights
(page 8-31)
Front turn signal lights/Front side-marker lights
(page 8-31)
Headlights
(page 8-31)
*Some models.
Page 10

2
Essential Safety Equipment
Use of safety equipment, including seats, seat belt system, SRS air bags and
child-restraint systems.
Seats
................................................................................................ 2-2
Seat Arrangements ....................................................................2-2
Front Seats (Manually Operated Seats) ..................................... 2-3
Front Seats (Electrically Operated Seats) .................................. 2-8
Second-Row Seats ...................................................................2-13
Third-Row Seat ....................................................................... 2-20
Flat Folding .............................................................................2-28
Seat Belt Systems
Seat Belt Precautions ............................................................... 2-30
3-Point Type Seat Belt ............................................................. 2-33
Front Seat Belt Pretensioner and Load Limiting Systems ...... 2-35
2-Point Type Seat Belt ............................................................. 2-37
Seat Belt Extender ................................................................... 2-39
Seat Belt Warning Light .......................................................... 2-40
Seat Belt Warning Beep ........................................................... 2-40
Child Restraint
Child Restraint Precautions ..................................................... 2-41
Installing Child-Restraint Systems .......................................... 2-45
LATCH Child-Restraint Systems ............................................ 2-53
SRS Air Bags
Supplemental Restraint Systems (SRS) Precautions ............... 2-56
Supplemental Restraint System Components .......................... 2-60
How the Air Bags Work .......................................................... 2-63
......................................................................... 2-30
............................................................................ 2-41
............................................................................... 2-56
2-1
Page 11
Essential Safety Equipment
Seats
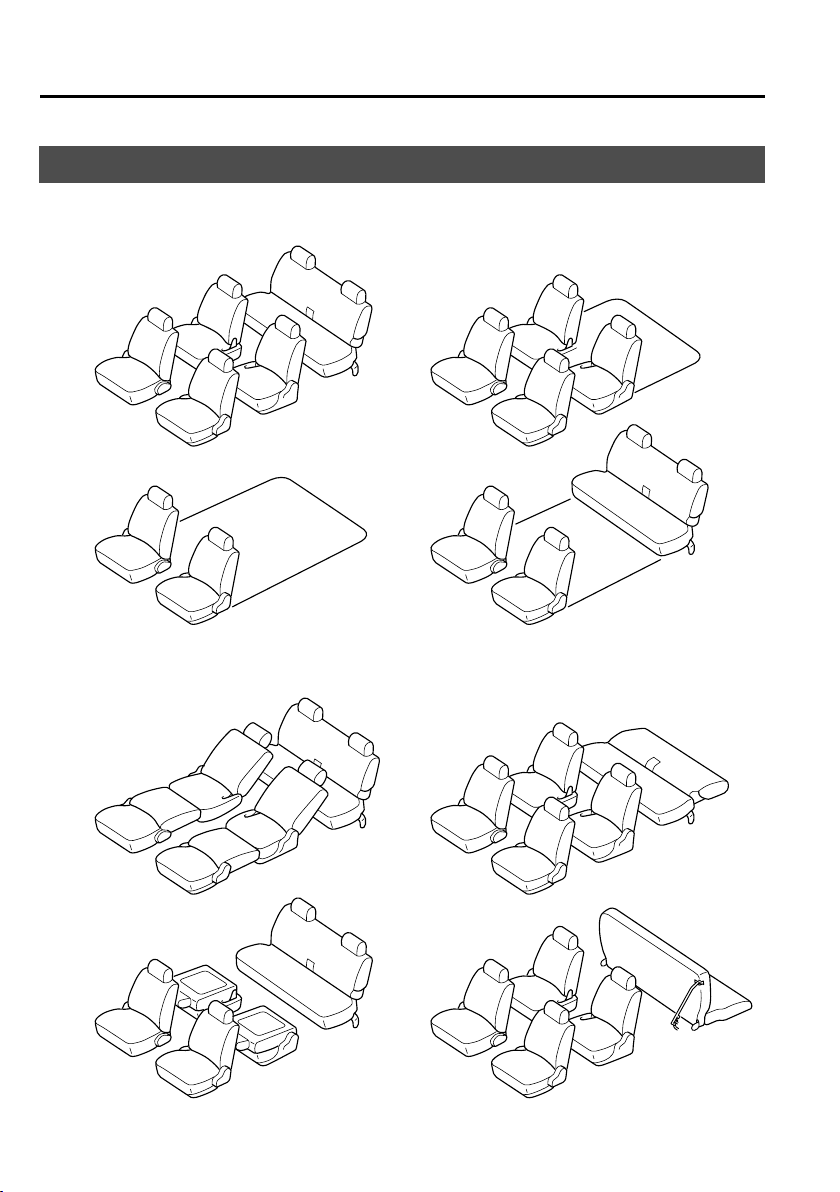
Road positions (while driving)
Seat Arrangements
Non-road positions (Parking/Camping)
2-2
Page 12
Front Seats (Manually
WARNING
WARNING
Operated Seats)
WARNING
Modification of the Front Seats:
Modifying or replacing the front seats
such as replacing the upholstery or
loosening any bolts is dangerous. The
front seats contain air bag
components essential to the
supplemental restraint system. Such
modification could damage the
supplemental restraint system and
result in serious injury. Consult an
Authorized Mazda Dealer if there is
any need to remove or reinstall the
front seats.
Damaged Front Seats:
Driving with damaged front seats is
dangerous. A collision, even one not
strong enough to inflate the air bags,
could damage the front seats which
contain essential air bag components.
If there was a subsequent collision,
the air bag may not deploy which
could lead to injuries. Always have an
Authorized Mazda Dealer inspect the
front seats, front seat belt
pretensioners and air bags after a
collision.
Essential Safety Equipment
Seats
Securing the Seats:
Adjustable seats and seatbacks that
are not securely locked are
dangerous. In a sudden stop or
collision, the seat or seatback could
move, causing injury. Make sure the
adjustable components of the seat are
locked in place by attempting to slide
the seat forward and backward and
rocking the seatback.
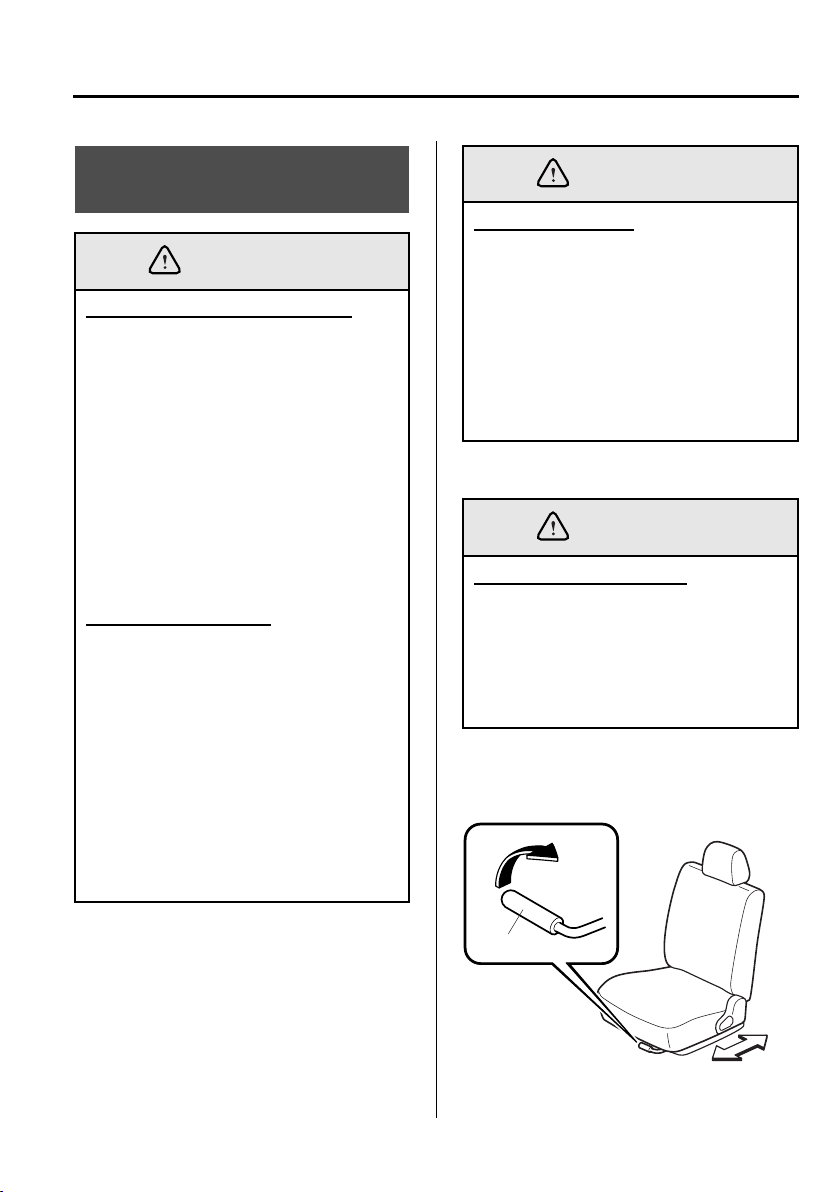
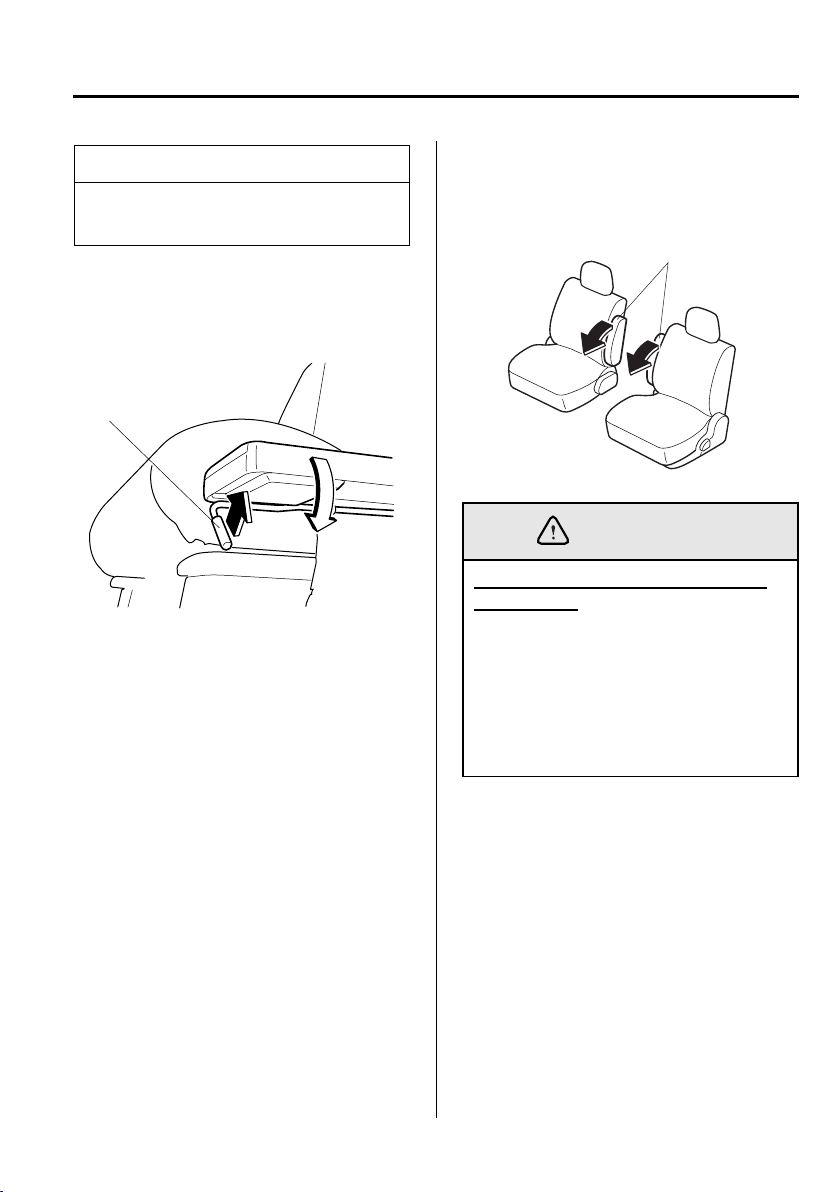
Seat Slide
▼
Driver’s Seat Adjustment:
Adjusting the driver’s seat while the
vehicle is moving is dangerous. The
driver could lose control of the vehicle
and have an accident. Adjust the
driver’s seat only when the vehicle is
stopped.
To move a seat forward or backward, raise
the lever and slide the seat to the desired
position and release the lever.
Lever
2-3
Page 13
Essential Safety Equipment
CAUTION
Seats
Make sure the lever returns to its original
position and the seat is locked in place by
attempting to push it forward and
backward.
Seat Recline
▼
WARNING
Reclining:
Sitting in a reclined position while the
vehicle is moving is dangerous
because you don’t get the full
protection from seat belts. During
sudden braking or a collision, you
can slide under the lap belt and suffer
serious internal injuries. For
maximum protection, sit well back
and upright.
Unlocked Seatback:
The seatback plays an important role
in your protection in a vehicle.
Leaving the seatback unlocked is
dangerous as it can allow passengers
to be ejected or thrown around and
baggage to strike occupants in a
sudden stop or collision, resulting in
severe injury. After adjusting the
seatback at any time, even when there
are no other passengers, rock the
seatback to make sure it is locked in
place.
To change the seatback angle, lean
forward slightly while raising the lever.
Then lean back to the desired position and
release the lever.
Lever
Make sure the lever returns to its original
position and the seatback is locked in
place by attempting to push it forward and
backward.
When returning a rear-reclined
seatback to its upright position, make
sure you support the seatback while
operating the seatback lever. If the
seatback is not supported, it will flip
forward suddenly and could cause
injury.
2-4
Page 14
Essential Safety Equipment
WARNING
Seats
Height Adjustment (Driver’s
▼
Seat)
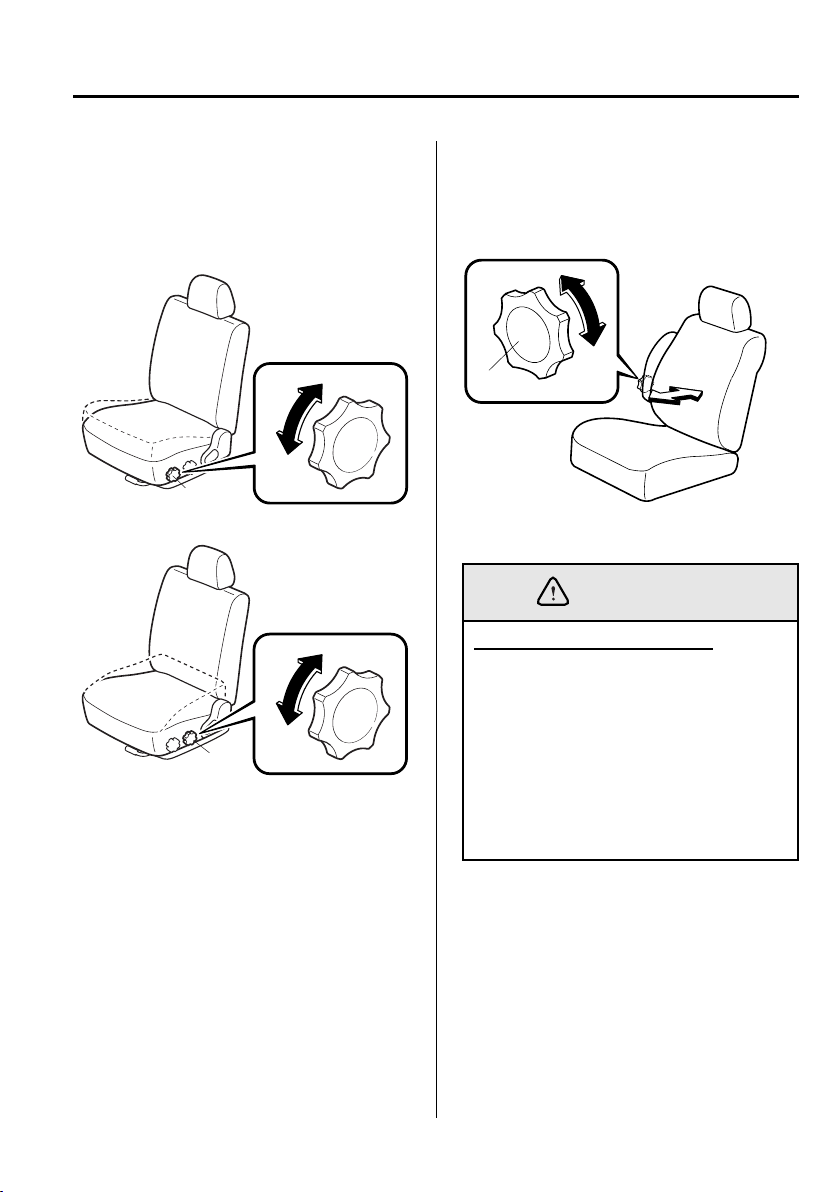
The seat-bottom angle can be adjusted by
rotating the dial.
Front of seat bottom
Up
Down
Dial
Rear of seat bottom
Up
Down
Dial
Lumber Support Adjustment
▼
(Driver’s Seat)*
The amount of lumber support can be
adjusted by rotating dial.
Dial
Head Restraint
▼
Head Restraints Adjustment:
Driving with the head restraints
adjusted too low or removed is
dangerous. With no support behind
your head, your neck could be
seriously injured in a collision.
Always drive with the head restraints
inserted when seats are being used
and make sure they are properly
adjusted.
*Some models.
2-5
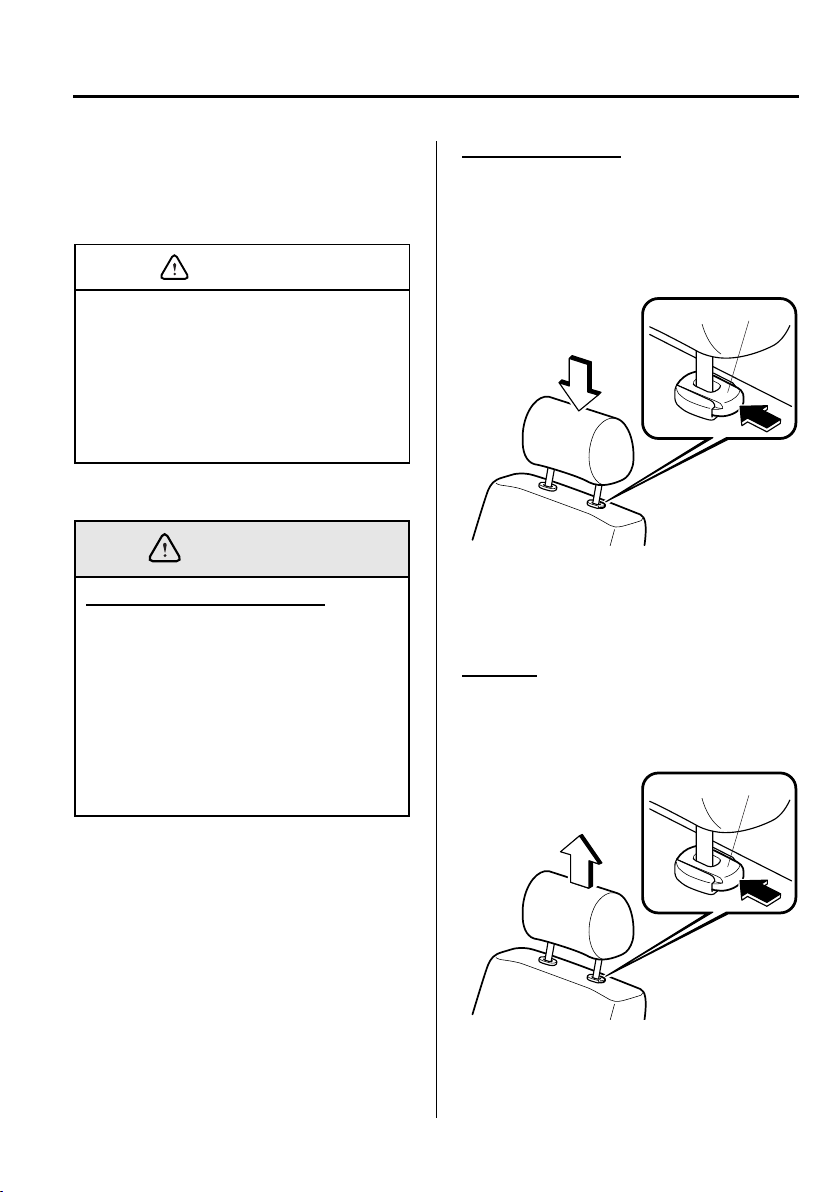
Page 15
Essential Safety Equipment
WARNING
Seats
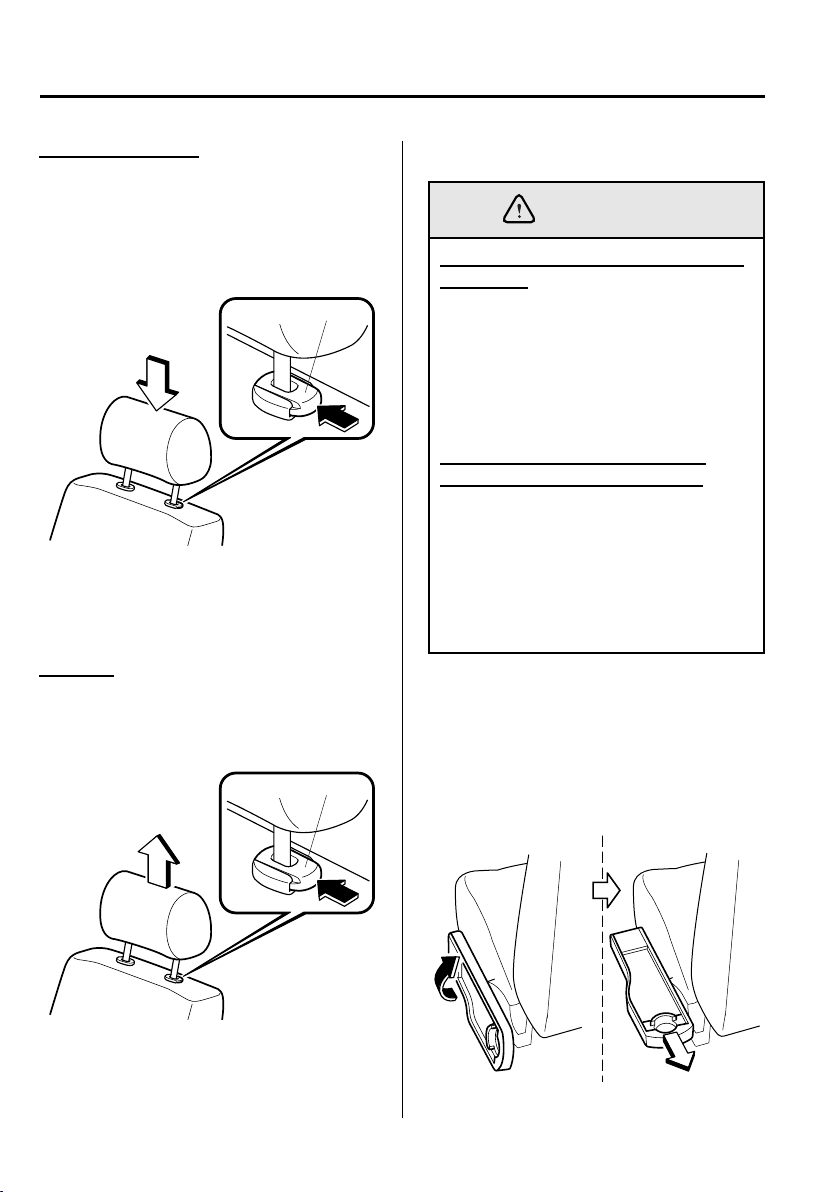
Height adjustment
To raise a head restraint, pull it up to the
desired position.
To lower the head restraint, press the stopcatch release, then push the head restraint
down.
Stop-catch release
Adjust the head restraint so that the top is
parallel with the top of the passenger’s
ears, never the passenger’s neck.
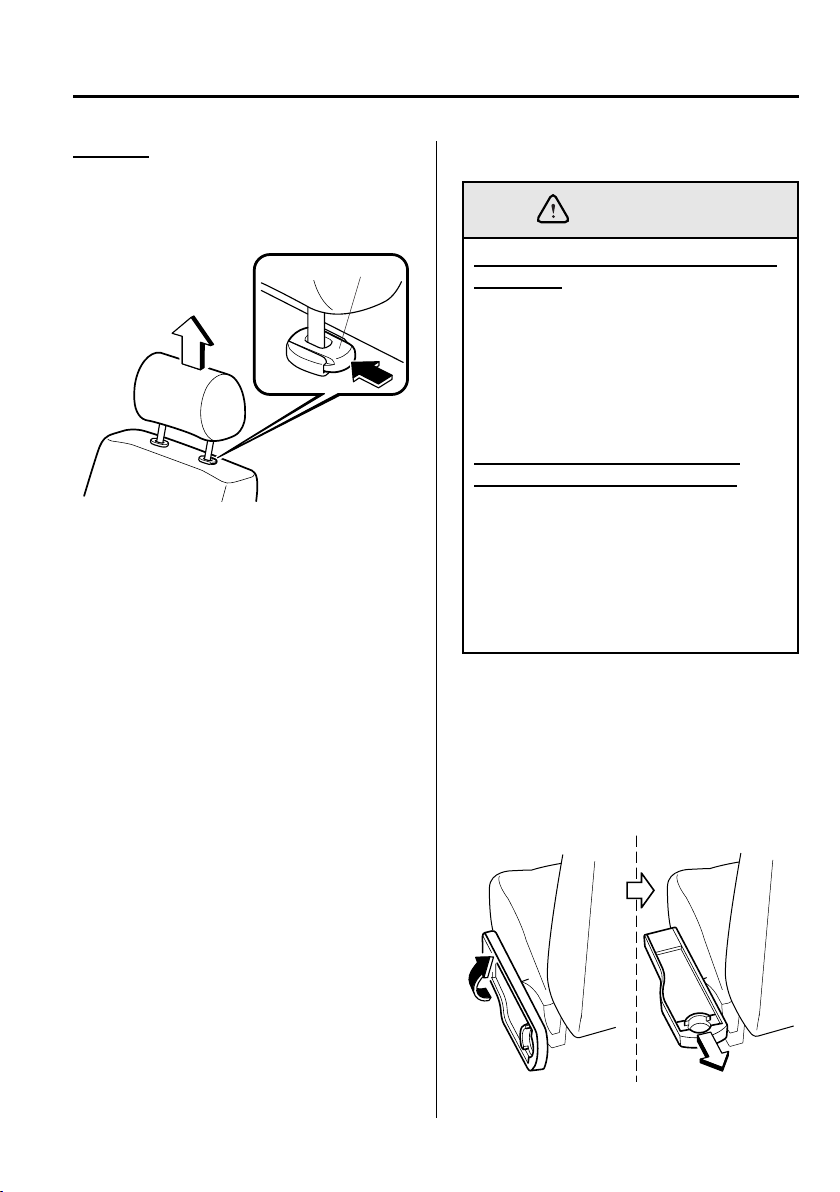
Removal
To remove the head restraint, press the
stop-catch release, then pull up on the
head restraint.
Stop-catch release
Front Passenger Seat Side Table
▼
Using Seat Side Table While Vehicle
is Moving:
Using the seat side table while the
vehicle is moving is dangerous. Hot
liquids could cause scalding if spilled,
or objects could fall causing injury.
Do not use the seat side table while
the vehicle is moving.
Adjusting Front Passenger Seat
While Seat Side Table is in Use:
Adjusting the front passenger seat
forward or rearward while the seat
side table is in use is dangerous. Hot
liquids could cause scalding if spilled,
or objects could fall causing injury.
Do not adjust the front passenger seat
while the seat side table is in use.
The pull-up table on the side of the front
passenger seat is collapsible. The table
can be used when the vehicle is safely
parked.
Pull up the table to use it. After pulling
the table up, push the table downward and
verify that it is locked.
2-6
Page 16
NOTE
WARNING
The table can be expanded rearward by
pulling out the rear end.
When collapsing the table, pull the lever
under the table. After the table is
collapsed, press the table surface to lock it
in place.
Lever
Essential Safety Equipment
Seats
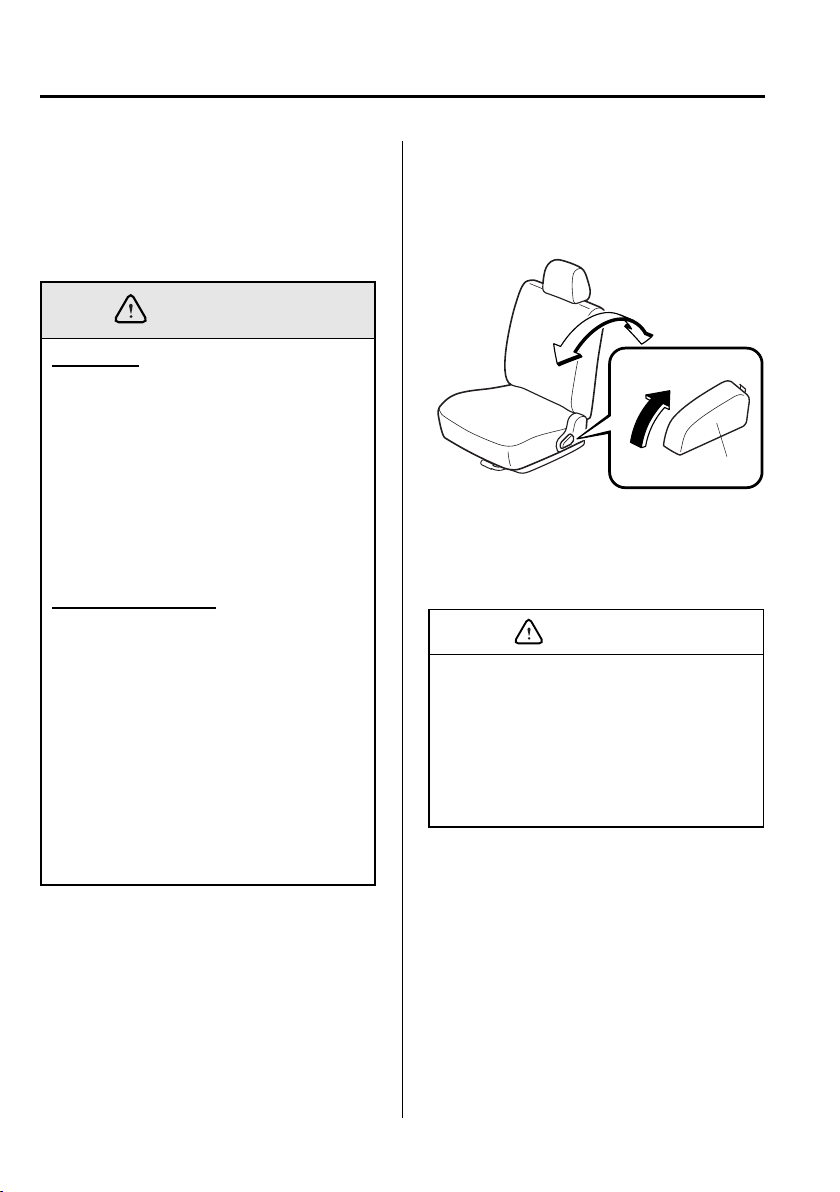
Armrest
▼
The armrest can be used or placed
upright.
Armrests
Positioning the Shoulder Belt Over
the Armrest:
Positioning the shoulder portion of a
front seat belt over the armrest is
dangerous as it cannot provide
adequate protection in a collision and
could result in serious injuries. Never
position the shoulder portion of a
front seat belt over the armrest.
2-7
Page 17
Essential Safety Equipment
CAUTION
Seats
Front Seats (Electrically
Operated Seats)
WARNING
Modification of the Front Seats:
Modifying or replacing the front seats
such as replacing the upholstery or
loosening any bolts is dangerous. The
front seats contain air bag
components essential to the
supplemental restraint system. Such
modification could damage the
supplemental restraint system and
result in serious injury. Consult an
Authorized Mazda Dealer if there is
any need to remove or reinstall the
front seats.
Damaged Front Seats:
Driving with damaged front seats is
dangerous. A collision, even one not
strong enough to inflate the air bags,
could damage the front seats which
contain essential air bag components.
If there was a subsequent collision,
the air bag may not deploy which
could lead to injuries. Always have an
Authorized Mazda Dealer inspect the
front seats, front seat belt
pretensioners and air bags after a
collision.
The seat-bottom power adjustment
•
is operated by motors. Avoid
extended operation because
excessive use can damage the
motors.
To prevent the battery from running
•
down, avoid using the power
adjustment when the engine is
stopped. The adjuster uses a large
amount of electric power.
Don’t use the switch to make more
•
than one adjustment at a time.
Seat Slide (Driver’s Seat)
▼
To slide the seat, move the slide lifter
switch on the outside of the seat to the
front or back and hold it. Release the
switch at the desired position.
2-8
Page 18
Essential Safety Equipment
Seats
Seat Recline (Driver’s Seat)
▼
WARNING
Reclining:
Sitting in a reclined position while the
vehicle is moving is dangerous
because you don’t get the full
protection from seat belts. During
sudden braking or a collision, you
can slide under the lap belt and suffer
serious internal injuries. For
maximum protection, sit well back
and upright.
Change the seatback angle by pressing the
front or rear side of the reclining switch.
Release the switch at the desired position.
Height Adjustment (Driver’s
▼
Seat)
Front height adjustment
To adjust the front height of the seatbottom, raise or lower the front of the
slide lifter switch on the left side of the
seat.
Rear height adjustment
Raise or lower the back of the switch to
adjust the rear height of the seat-bottom.
2-9
Page 19
Essential Safety Equipment
WARNING
Seats
Height adjustment
Raise the seat-bottom by pulling up on the
center of the switch. Release the switch at
the desired position.
Lower the seat-bottom by pressing down
on the center of the switch. Release the
switch at the desired position.
Head Restraint
▼
Head Restraints Adjustment:
Driving with the head restraints
adjusted too low or removed is
dangerous. With no support behind
your head, your neck could be
seriously injured in a collision.
Always drive with the head restraints
inserted when seats are being used
and make sure they are properly
adjusted.
Height adjustment
To raise a head restraint, pull it up to the
desired position.
To lower the head restraint, press the stopcatch release, then push the head restraint
down.
Stop-catch release
2-10
Adjust the head restraint so that the top is
parallel with the top of the passenger’s
ears, never the passenger’s neck.
Page 20
Essential Safety Equipment
WARNING
Seats
Removal
To remove the head restraint, press the
stop-catch release, then pull up on the
head restraint.
Stop-catch release
Front Passenger Seat Side Table
▼
Using Seat Side Table While Vehicle
is Moving:
Using the seat side table while the
vehicle is moving is dangerous. Hot
liquids could cause scalding if spilled,
or objects could fall causing injury.
Do not use the seat side table while
the vehicle is moving.
Adjusting Front Passenger Seat
While Seat Side Table is in Use:
Adjusting the front passenger seat
forward or rearward while the seat
side table is in use is dangerous. Hot
liquids could cause scalding if spilled,
or objects could fall causing injury.
Do not adjust the front passenger seat
while the seat side table is in use.
The pull-up table on the side of the front
passenger seat is collapsible. The table
can be used when the vehicle is safely
parked.
Pull up the table to use it. After pulling
the table up, push the table downward and
verify that it is locked.
2-11
Page 21
Essential Safety Equipment
WARNING
Seats
NOTE
The table can be expanded rearward by
pulling out the rear end.
When collapsing the table, pull the lever
under the table. After the table is
collapsed, press the table surface to lock it
in place.
Lever
Armrest
▼
The armrest can be used or placed
upright.
Armrests
Positioning the Shoulder Belt Over
the Armrest:
Positioning the shoulder portion of a
front seat belt over the armrest is
dangerous as it cannot provide
adequate protection in a collision and
could result in serious injuries. Never
position the shoulder portion of a
front seat belt over the armrest.
2-12
Page 22
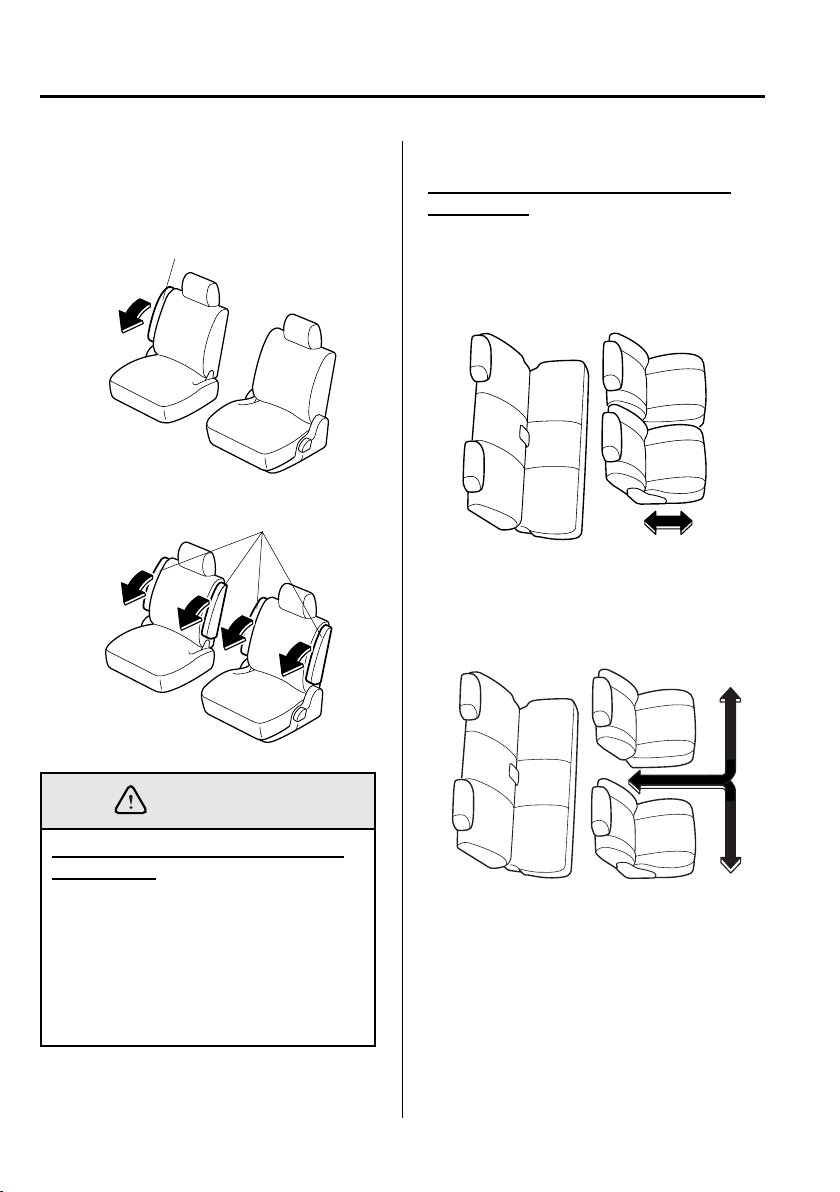
Second-Row Seats
WARNING
Essential Safety Equipment
Seats
WARNING
Stacking Cargo:
Stacking luggage or other cargo
higher than the seatback is
dangerous. During a sudden stop or
collision, objects can fly around and
become projectiles that could hit and
injure passengers. Don’t stack cargo
higher than the seatback.
Not Securing Luggage and Cargo:
Not securing cargo while driving is
dangerous as they could move or be
crushed in sudden braking or a
collision and cause injury. Make sure
luggage and cargo is secured before
driving.
Securing Seats:
Adjustable seats that are not securely
latched are dangerous. In a sudden
stop or collision, the seat or seatback
could move, causing injury. Make
sure the adjustable components of the
seat are locked in place by attempting
to slide the seat forward and
backward and rocking the seatback.
Seat Adjustment:
Adjusting the seat while the vehicle is
moving is dangerous. Sudden braking
or a collision could cause serious
injury. Adjust the seat only when the
vehicle is stopped.
Unlocked Seatback:
The seatback plays an important role
in your protection in a vehicle.
Leaving the seatback unlocked is
dangerous as it can allow passengers
to be ejected or thrown around and
baggage to strike occupants in a
sudden stop or collision, resulting in
severe injury. After adjusting the
seatback at any time, even when there
are no other passengers, rock the
seatback to make sure it is locked in
place.
Passenger on the Folded Seatback:
Driving with a passenger on the
folded seatback is dangerous.
Allowing a child to sit on the folded
seatback while the vehicle is moving
is particularly dangerous. During
sudden braking or even a minor
collision, a child not restrained in a
proper seat or child-restraint system
and seat belt could be thrown
forward, back or even out of the car
resulting in serious injuries or death.
The child or other objects in the cargo
area could be thrown into other
occupants and cause serious injury.
Never allow a passenger to sit or
stand on the folded seatback while the
vehicle is moving.
NOTE
When returning a second-row seat to
its original position, also replace the
seat belt to its normal position. Verify
that the seat belt pulls and retracts.
2-13
Page 23
Essential Safety Equipment
WARNING
Seats
Seat Slide
▼
To move the seat forward or backward,
raise the lever and slide the seat to the
desired position and release the lever.
Lever
Make sure the lever returns to its original
position and the seat is locked in place by
attempting to push it forward and
backward.
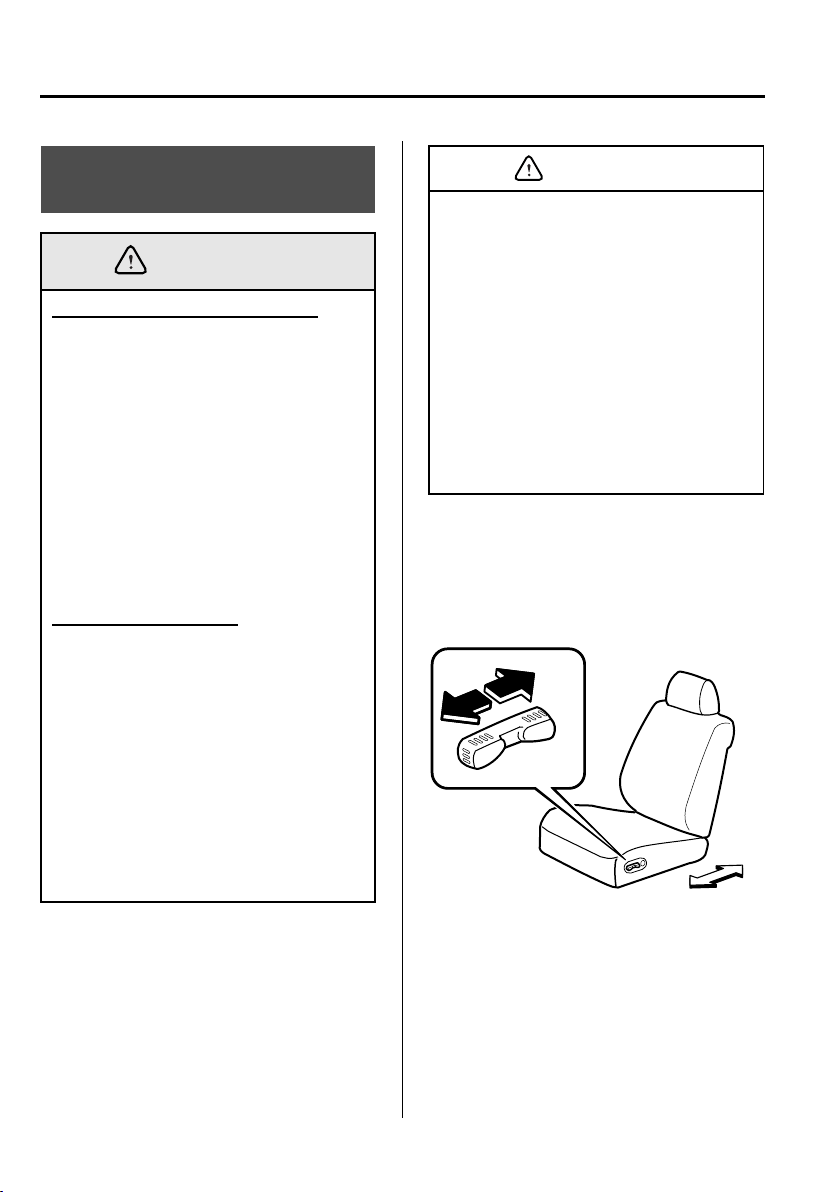
Side-Sliding Seat (right side)
▼
The second-row seats can be put together
and used as a bench seat. Raise the side
seat-slide lever and slide the seat
sideways.
Seat Recline
▼
Reclining:
Sitting in a reclined position while the
vehicle is moving is dangerous
because you don’t get the full
protection from seat belts. During
sudden braking or a collision, you
can slide under the lap belt and suffer
serious internal injuries. For
maximum protection, sit well back
and upright.
Reclining the Second-Row Seatback:
Reclining the second-row seatback
when the third-row seat is occupied is
dangerous. The second-row seatback
may hit and injure the occupants in
the third-row seat. Don’t recline the
second-row seatback when the thirdrow seat is occupied.
To change the seatback angle, lean
forward slightly while raising the lever.
Then lean back to the desired position and
release the lever.
Side seat-slide lever
Make sure the lever returns to its original
position and the seat is locked in place by
attempting to push it from side to side.
2-14
Lever
Page 24
Essential Safety Equipment
Seats
Make sure the lever returns to its original
position and the seatback is locked in
place by attempting to push it forward and
backward.
CAUTION
When returning a rear-reclined
seatback to its upright position, make
sure you support the seatback while
operating the seatback lever. If the
seatback is not supported, it will flip
forward suddenly and could cause
injury.
Head Restraint
▼
WARNING
Head Restraints Adjustment:
Driving with the head restraints
adjusted too low or removed is
dangerous. With no support behind
your head, your neck could be
seriously injured in a collision.
Always drive with the head restraints
inserted when seats are being used
and make sure they are properly
adjusted.
Height adjustment
To raise a head restraint, pull it up to the
desired position.
To lower the head restraint, press the stopcatch release, then push the head restraint
down.
Stop-catch release
Adjust the head restraint so that the top is
parallel with the top of the passenger’s
ears, never the passenger’s neck.
Removal
To remove the head restraint, press the
stop-catch release, then pull up on the
head restraint.
Stop-catch release
2-15
Page 25
Essential Safety Equipment
Seats
Armrest
▼
The armrest can be used or placed
upright.
Type A
Type B
Armrest
Armrest
Third-Row Seat Access
▼
Access to the third-row seat via the
sliding door
When the second-row seats are together,
move along the path between the sliding
door and the side sliding seat.
When the second-row seats are separated,
pass between them and move to the rear of
the vehicle.
WARNING
Positioning the Shoulder Belt Over
the Armrest:
Positioning the shoulder portion of a
second-row seat belt over the armrest
is dangerous as it cannot provide
adequate protection in a collision and
could result in serious injuries. Never
position the shoulder portion of a
second-row seat belt over the armrest.
2-16
Page 26
Folding the Second-Row Seats
CAUTION
▼
Essential Safety Equipment
Seats
WARNING
Using Folded Seatback as a Table
While the Vehicle is Moving:
Using the folded seatback as a table
while driving is dangerous. During
sudden braking or a collision, objects
placed on the folded seatback could
become projectiles that could hit and
injure someone. Never use the folded
seat as a table while the vehicle is
moving.
The second-row seatbacks can be folded
down and used as tables when the vehicle
is not moving.
To fold the seatback
1. If your vehicle is equipped with an
armrest, return the armrest to the
upright position.
2. Put the buckle in the pocket of the seat
bottom.
Lowering the seatback without
stowing the seat belt buckle could
damage the seatback.
3. Raise the reclining lever and lower the
seatback forward. Make sure the
seatback is locked.
To return the seatback to the upright
position
Raise the reclining lever and lift the
seatback upright. Attempt to move the
seatback forward and backward to make
sure it is locked.
2-17
Page 27
Essential Safety Equipment
WARNING
CAUTION
Seats
Removal of Second-Row Seats
▼
The second-row seats can be removed to
create a more comfortable space between
the third-row and front seats. Additional
cargo space is available with the removal
of the second-row seats and stowing of the
third-row seat.
WARNING
Seat Removal or Installation While
Vehicle is Moving or on a Slope:
Removing or installing the secondrow seats while the vehicle is moving
or on a slope is dangerous. The seats
are heavier than they appear and
could suddenly detach causing
serious injury. Remove or install the
seats with the vehicle parked on a
level surface.
Lifting the Seat-Anchor Bar:
Lifting the seat-anchor bar without
firmly supporting the seat with your
hand is dangerous. Lifting the seat
unlocks the front clamps
automatically and could cause the
seat to fall. Support the seat firmly
while lifting the seat-anchor bar.
To r e move the sea t
1. Put the buckle in the pocket of the seat
bottom.
Riding on the Floor Space:
Riding on the floor space created by
the removal of the second-row seat is
dangerous. Sudden braking or a
collision could cause serious injury.
Do not sit or lie in the floor space for
the second-row seat while the vehicle
is moving. Never ride in a vehicle
where you can’t sit in the seat and
wear the seat belt.
Pinching Fingers or Hands:
Placing your hands around the seat
anchors when removing or installing
the second-row seats is dangerous.
You could pinch your hands or
fingers between the seat anchor and
the seat. Hold the edge of the seat
when lowering it into place. Never
place your hands between the seat
anchor and the seat.
2-18
Lowering the seatback without
stowing the seat belt buckle could
damage the seatback.
2. Lower the head restraint all the way
down.
3. Slide the seat all the way back.
Page 28
Essential Safety Equipment
Seats
4. Raise the reclining lever and lower the
seatback forward.
Make sure the seatback is locked.
5. Work only on one seat at a time to
avoid one seat falling while working on
another.
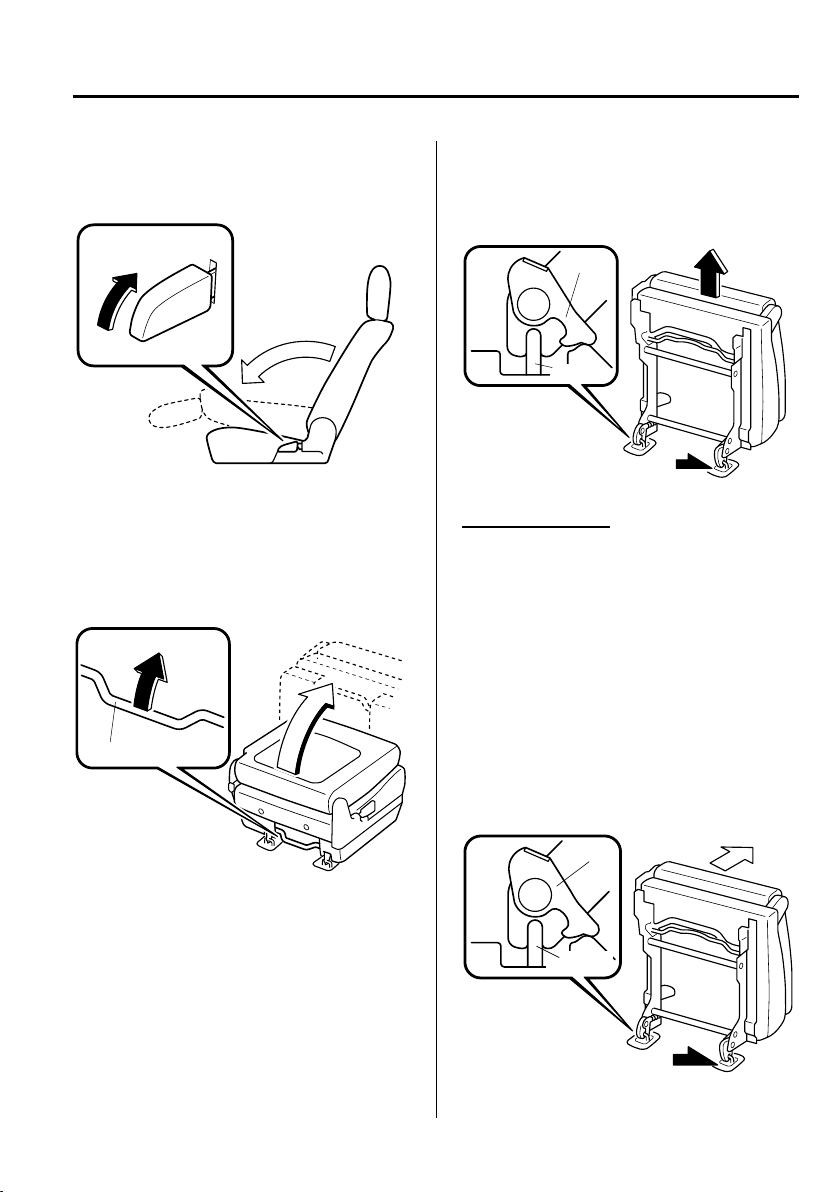
6. Lift and hold the seat-anchor bar and
raise the entire seat up and forward.
Seat-anchor bar
7. The seat is heavier than it looks,
carefully pull up and detach the seat.
Get assistance to lift it out of the
vehicle.
Clamp
Loops
To install the seat
1. First identify which seat fits which
position by verifying that the seat belt
buckles are located nearest the center
of the vehicle.
2. Align the clamps on the front underside
of the seat with the forward loop
anchors on the floor and support the
seat so that it doesn’t fall (the rear
portion of the seat cannot be mounted
first). The clamps on the front of the
seat automatically lock into the floor
loop anchors after lowering the seat.
Clamp
Loops
Front
2-19
Page 29
Essential Safety Equipment
WARNING
Seats
3. Supporting the seat with your hands,
slowly lower the seat rearwards to lock
it in place.
Front
4. Raise the reclining lever and lift the
seatback upright. Attempt to move the
seatback forward and backward to
make sure it is locked.
5. Buckle the seat belts once just to
confirm the seat belt buckles are
inboard which means each seat is on
the correct side of the vehicle.
WARNING
Unsecured Seat:
Driving with the seat unsecured is
dangerous. The seat may become
detached while the vehicle is moving
causing serious injury. After
installing the seat, push it forward
and backward to make sure it is
securely locked.
CAUTION
Third-Row Seat
Stacking Cargo:
Stacking luggage or other cargo
higher than the seatback is
dangerous. During a sudden stop or
collision, objects can fly around and
become projectiles that could hit and
injure passengers. Don’t stack cargo
higher than the seatback.
Not Securing Luggage and Cargo:
Not securing cargo while driving is
dangerous as they could move or be
crushed in sudden braking or a
collision and cause injury. Make sure
luggage and cargo is secured before
driving.
Securing Seats:
Adjustable seats that are not securely
latched are dangerous. In a sudden
stop or collision, the seat or seatback
could move, causing injury. Make
sure the adjustable components of the
seat are locked in place by attempting
to rock the seatback.
Seat Adjustment:
Adjusting the seat while the vehicle is
moving is dangerous. Sudden braking
or a collision could cause serious
injury. Adjust the seat only when the
vehicle is stopped.
Do not move the side seat-slide lever
with the seat removed. The lever could
be damaged resulting in loss of
functionality.
2-20
Page 30
Essential Safety Equipment
WARNING
Seats
WARNING
Unlocked Seatback:
The seatback plays an important role
in your protection in a vehicle.
Leaving the seatback unlocked is
dangerous as it can allow passengers
to be ejected or thrown around and
baggage to strike occupants in a
sudden stop or collision, resulting in
severe injury. After adjusting the
seatback at any time, even when there
are no other passengers, rock the
seatback to make sure it is locked in
place.
Passenger on the Folded Seatback:
Driving with a passenger on the
folded seatback is dangerous.
Allowing a child to sit up on the
folded seatback while the vehicle is
moving is particularly dangerous. In
a sudden stop or even a minor
collision, a child not in a proper seat
or child-restraint system and seat belt
could be thrown forward, back or
even out of the car resulting in
serious injuries or death. The child or
other objects in the baggage area
could be thrown into other occupants
and cause serious injury. Never allow
a passenger to sit or stand on the
folded seatback while the vehicle is
moving.
NOTE
The third-row seat cannot be
•
removed.
When returning the third-row seat
•
to its original position, also place
the seat belt in its normal position.
Verify that the seat belt pulls and
retracts.
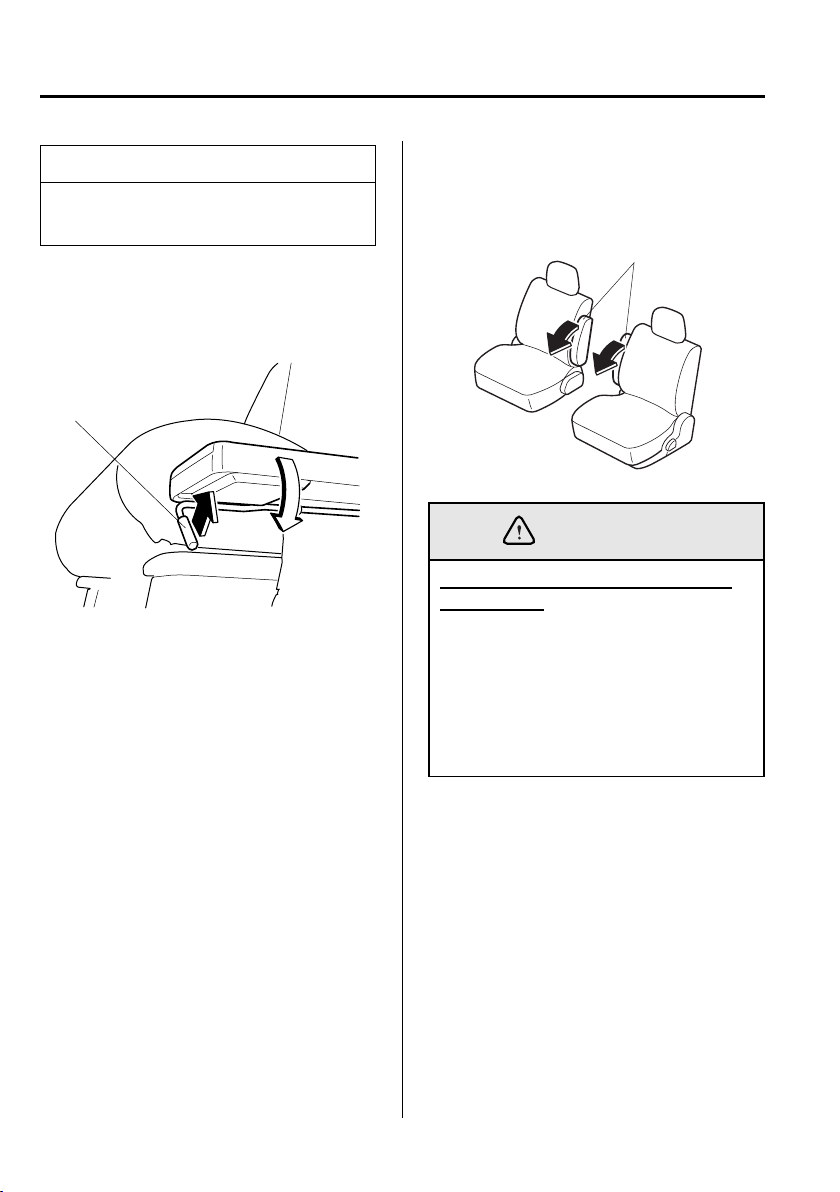
Seat Recline
▼
Reclining:
Sitting in a reclined position while the
vehicle is moving is dangerous
because you don’t get the full
protection from seat belts. During
sudden braking or a collision, you
can slide under the lap belt and suffer
serious internal injuries. For
maximum protection, sit well back
and upright.
To change seatback angle, lean forward
slightly while pulling the flat-folding
strap. Then lean back to the desired
position and release the strap. Make sure
the seat is securely latched.
Flat-folding strap
2-21
Page 31

Essential Safety Equipment
WARNING
Seats
Head Restraint
▼
WARNING
Head Restraints Adjustment:
Driving with the head restraints
adjusted too low or removed is
dangerous. With no support behind
your head, your neck could be
seriously injured in a collision.
Always drive with the head restraints
inserted when seats are being used
and make sure they are properly
adjusted.
Height adjustment
To raise a head restraint, pull it up to the
desired position.
To lower the head restraint, press the stopcatch release, then push the head restraint
down.
Stop-catch release
Removal
To remove the head restraint, press the
stop-catch release, then pull up on the
head restraint.
Stop-catch release
Folding the Third-Row Seat
▼
Riding on Folded Flat Third-Row
Seat:
Riding on the third-row seat when it’s
folded is dangerous. During sudden
braking or a collision, passenger’s
could be thrown around inside the
vehicle and seriously injured. Always
ride with the third-row seat in the
forward-facing, upright position and
seat belt securely fastened.
Adjust the head restraint so that the top is
parallel with the top of the passenger’s
ears, never the passenger’s neck.
2-22
1. Remove the head restraints from the
third-row seat (page 2-22).
Page 32

2. Pull the third-row seat’s flat-folding
WARNING
strap and push the seatback down until
it locks.
Flat-folding strap
Stowing the Third-Row Seat
▼
More storage space can be created by
folding away the third-row seat into the
rear seat well. With the second-row seats
removed and the third-row seat stowed,
even more space is available.
Essential Safety Equipment
Seats
Riding in the Seat Well:
Riding in the seat well for the thirdrow seat is dangerous. Sudden
braking or a collision could cause
serious injury. Do not sit or lie in the
seat well while the vehicle is moving.
Never ride in a vehicle where you
can’t sit in the seat and wear the seat
belt.
Pinching Fingers or Hands:
Placing your hands around the seat
stowage well when stowing the thirdrow seat is dangerous. You could
pinch your hands or fingers between
the seat and the well. Hold the handle
when lowering the seat into place.
Never place your hands between the
seat and the seat well.
Unlocked Seatback:
An unlocked seatback is dangerous.
While stowing the seat, the seatback
could suddenly move causing serious
injury. Push the seatback forward and
backward to make sure it is locked in
place.
NOTE
Remove any items from the seat well
for the third-row seat before stowing
the seat. Anything in the baggage area
when the seat is set into the well can
damage the seatback material and
prevent a flat cargo area.
2-23
Page 33

Essential Safety Equipment
Seats
Stowing the third-row seat
1. Insert the seat belts in the retainers.
Retainer
2. Remove the head restraint and set them
aside temporarily (page 2-22).
3. Pull strap A and ease the seatback
toward the front of the vehicle with
your other hand and be sure it locks
with a click.
4. Pull strap B and lift the combined
seatback and seat bottom up to vertical
with your other hand. Gently lower the
seat into the seat well.
Strap B
5. Insert the head restraints between the
floor and seat at the positions indicated
on the labels.
2-24
Strap A
Labels
Page 34

Essential Safety Equipment
Seats
Raising the third-row seat upright for
road use
1. Clear the entire cargo floor.
2. Remove the head restraints.
3. Carefully reverse the procedures used
to lower the seat into the seat well. Use
the handle and ease the combined
seatback and seat bottom up to vertical.
4. Carefully lower the seat forward and
make sure it’s latched to the floor.
5. Pull strap A and raise the seatback
upright. Attempt to move the seatback
forward and backward to make sure it
is locked.
Strap A
6. Insert the head restraints.
7. Place the seat belt buckles face up.
Handle
2-25
Page 35

Essential Safety Equipment
Seats
Third-Row Seat and Open
▼
Liftgate Position
WARNING
Rear Facing Third-Row Seat and a
Moving Vehicle:
Driving with the third-row seat facing
rearward is dangerous because the
liftgate cannot be securely closed.
During sudden braking or a collision,
passengers could be thrown out of the
vehicle resulting in serious injury or
death. Passengers seated facing
rearward may suffer leg and foot
injury even down a driveway or with a
minor dip in the road. Place the thirdrow seat in the forward-facing
position with the seatback upright
before driving the vehicle.
Support Bar:
Sitting in the rear-facing, third-row
seat position without installing the
support bar is dangerous. Without the
support of the bar, the seatback could
collapse resulting in injury.
Always install the support bar before
sitting in the rear-facing, third-row
seat position.
NOTE
Remove cargo from the seat well
•
area before placing the third-row
seat in the rear-facing position to
avoid damaging the back of the
seatback when it is folded down.
Adjust the seatback to the upright
•
position when the third-row seat is
facing rearward.
To put the third-row seat in the rear
facing position:
1. Open the liftgate.
2. Clean the rear bumper so that dirt the
seat does not get soiled.
3. Clear away all cargo from the seat well.
4. Remove the head restraints.
5. Pull strap B while supporting the
seatback with the other hand and
carefully ease the seatback rearward
and carefully ease the seatback
rearward onto the rear bumper.
Third-Row Seat and the Flat-Folding
Strap:
Pulling the flat-folding strap with the
third-row seat facing rearward is
dangerous. The seatback will collapse
into the seat bottom and could result
in injury. Do not pull the flat-folding
strap with the third-row seat facing
rearward.
2-26
Strap B
6. Go inside the vehicle and to the rear.
Page 36

Essential Safety Equipment
Seats
7. Remove the support bar from the
pocket.
Support bar
Pocket
8. Set the hook on the support bar in the
rear of the seatback.
9. Pull the seatback towards the front of
the vehicle until the opposite end of the
support bar hooks onto the anchor loop
in the side trim. Attempt to push the
seatback towards the rear (liftgate) to
make sure the support bar is securely
latched.
2-27
Page 37

Essential Safety Equipment
WARNING
Seats
To return the third-row seat to the road
position (forward facing)
1. Make sure to stow the shoulder belts
away from the seat bottom as it is
lowered.
2. Detach the support bar by following
the reverse procedure for installation.
3. From inside the vehicle, carefully
lower the seat towards the front until it
locks in place. Attempt to move the
seat forward and backward to make
sure it’s securely locked in place.
4. Reinsert the head restraints.
5. Place the seat belt buckles face up.
6. Fasten the shoulder belts and check
that they are routed properly for
passenger use.
Flat Folding
All seats can be folded down for use as
beds when the vehicle is safely parked.
Folded-Flat Seats:
Sitting or lying on seats folded flat is
a dangerous way to ride. During
sudden braking or a collision you
could be thrown around inside the
vehicle and seriously injured. Don’t
ride on seatbacks folded flat.
2-28
Page 38

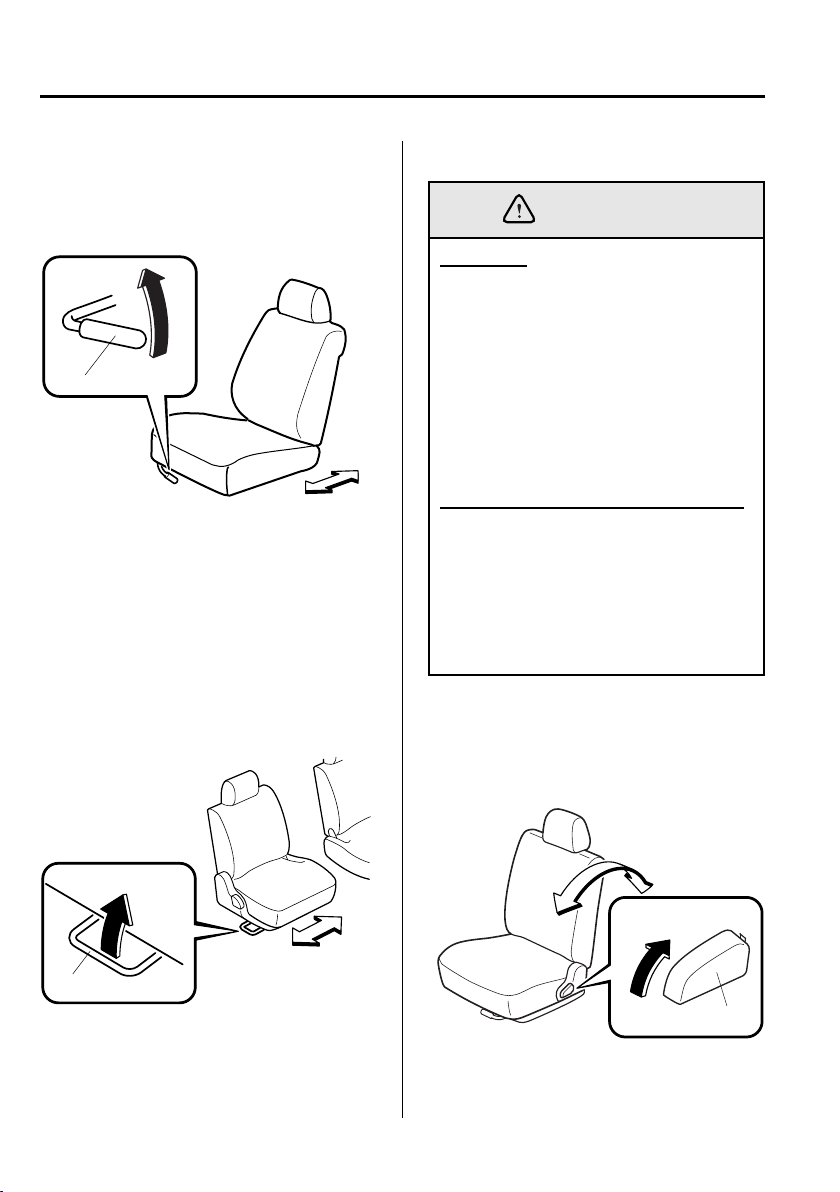
To Fold the Seats Flat
▼
1. Slide the second-row seat all the way
back (page 2-14).
2. Fold down the second-row seatbacks
rearward until they lock (page 2-14).
3. Remove the head restraints from the
front seats. Refer to Head Restraint
(Manually Operated Seats)(page 2-5)
Refer to Head Restraint (Electrically
Operated Seats)(page 2-10)
4. Slide the front seats all the way
forward. Refer to Seat Slide (Manually
Operated Seats)(page 2-3)
Refer to Seat Slide (Electrically
Operated Seats)(page 2-8)
5. Fold down the front seatbacks rearward
until they lock. Refer to Seat Recline
(Manually Operated Seats)(page 2-4)
Refer to Seat Recline (Electrically
Operated Seats)(page 2-9)
Essential Safety Equipment
Seats
To return the seats to their road positions,
reverse the procedures for folding the
second-row and front seats back.
2-29
Page 39

Essential Safety Equipment
Seat Belt Systems
Seat Belt Precautions
Seat belts help to decrease the possibility of severe injury during accidents and sudden
stops. Mazda recommends that the driver and all passengers always wear seat belts.
All of the outboard seat belt retractors are designed to keep the lap/shoulder belts out of the
way when not in use.
The driver’s seat belt has no provisions for child-restraint systems and has only an
emergency locking mode. The driver may wear it comfortably, and it will lock during a
collision.
However, the front passenger’s seat and all rear outboard lap/shoulder belt retractors
operate in two modes: emergency locking mode, and for child-restraint systems, automatic
locking mode. While we recommend you put all children in the rear seats, if you must use
the front passenger seat for a child, slide the front passenger seat as far back as possible and
make sure the child-restraint system is secured properly.
The third-row center seat positions have a lap belt with manual adjustment.
WARNING
Not Wearing Seat Belts:
Not wearing a seat belt is extremely dangerous. During a collision, occupants not
wearing seat belts could hit someone or things inside the vehicle or even be thrown
out of the vehicle. They could be seriously injured or even killed. In the same
collision, occupants wearing seat belts would be much safer. Always wear your seat
belt and make sure all occupants are properly restrained.
Seat Belt Damaged During an Accident:
Using a damaged seat belt is dangerous. An accident could damage the belt webbing
of the seat belt in use. A damaged seat belt cannot provide adequate protection in a
collision. Whether a front seat was occupied or not, if the front air bags deployed the
seat belt pretensioners also deployed and both front seat belts must be replaced. Have
an Authorized Mazda Dealer inspect all seat belt systems in use during an accident
before they are used again.
Twisted Seat Belts:
Twisted seat belts are dangerous. In a collision, the full width of the belt isn’t
available to absorb the impact. This puts more force on the bones beneath the belt,
which could cause serious injury or death. Don’t wear twisted seat belts.
2-30
Page 40

Essential Safety Equipment
Seat Belt Systems
WARNING
One Belt, One Passenger:
Using one seat belt for more than one person at a time is dangerous. A seat belt used
in this way can’t spread the impact forces properly and the two passengers could be
crushed together and seriously injured or even killed. Never use one belt for more
than one person at a time.
CAUTION
Belt retraction may become difficult if the belts and rings are soiled, so try to keep them
clean.
Ring
Pregnant Women and Persons with Serious Medical Conditions
▼
Pregnant women should wear seat belts. Ask your doctor for specific recommendations.
The lap belt should be worn SNUGLY AND AS LOW AS POSSIBLE OVER THE HIPS.
The shoulder belt should be worn across your shoulder properly, but never across the
stomach area.
Persons with serious medical conditions also should wear seat belts. Check with your
doctor for any special instructions regarding specific medical conditions.
2-31
Page 41

Essential Safety Equipment
Seat Belt Systems
Emergency Locking Mode
▼
If the belt has fully retracted, it will always be in the emergency locking mode until you
move it into automatic locking mode by pulling the belt all the way out to its full length. In
the emergency locking mode, the belt remains comfortable on the occupant and the
retractor will lock in position during a collision.
If the belt feels tight and hinders comfortable movement while the vehicle is stopped or in
motion, you may be in the automatic locking mode because you have pulled the belt too far
out. To return to the more comfortable emergency locking mode, wait until you can stop
the vehicle in a safe level area, retract the belt fully to convert it back to emergency locking
mode and then again extend it around you.
Automatic Locking Mode
▼
Always use the automatic locking mode to keep the child-restraint system from shifting to
an unsafe position in the event of an accident. To get the seat belt into the automatic
locking mode, pull it all the way out and connect it as instructed on the child-restraint
system. It will retract down to the child-restraint system and stay locked on it. See the
section on child restraint (page 2-41).
2-32
Page 42

3-Point Type Seat Belt
WARNING
WARNING
Fastening the Seat Belts
▼
1. Grasp the buckle and tongue.
2. Slowly pull out the lap/shoulder belt.
Belt
Essential Safety Equipment
Seat Belt Systems
Positioning the Shoulder Portion of
the Seat Belt:
Improper positioning of the shoulder
portion of the seat belt is dangerous.
Always make sure the shoulder
portion of the seat belt is positioned
across your shoulder and near your
neck, but never under your arm, on
your neck, or on your upper arm.
Tongue
3. Insert the tongue into the buckle until
you hear a click.
Tongue
Buckle
4. Make sure the shoulder belt is snugly
fitted against your body.
Take up slack
Too high
Positioning the Lap Portion of the
Seat Belt:
The lap portion of the seat belt worn
too high is dangerous. In a collision,
this would concentrate the impact
force directly on the abdominal area,
causing serious injury. Wear the lap
portion of the belt snugly and as low
as possible.
Keep low on
hip bone
2-33
Page 43

Essential Safety Equipment
WARNING
Seat Belt Systems
Unfastening the Seat Belts
▼
Depress the button on the buckle.
NOTE
If a belt does not fully retract, inspect it
for kinks and twists. If it is still not
retracting properly, have it inspected at
an Authorized Mazda Dealer.
To secure the outboard-rear seat belts
when not in use, insert the belts in their
seat belt retainers.
Retainer
Shoulder Belt Adjuster*
▼
Adjust the height of the shoulder belt if
the seat belt touches your neck, or if it
crosses your arm instead of your shoulder.
To raise the shoulder belt adjuster, push
the adjuster up. To lower the shoulder belt
adjuster, push the button and slide it
down. Make sure the adjuster is locked.
Sholder belt
adjuster
Positioning the Shoulder Portion of
the Seat Belt:
Improper positioning of the shoulder
portion of the seat belt is dangerous.
Always make sure the shoulder
portion of the seat belt is positioned
across your shoulder and near your
neck, but never under your arm, on
your neck, or on your upper arm.
2-34
*Some models.
Page 44

Front Seat Belt
WARNING
Pretensioner and Load
Limiting Systems
For optimum protection, the driver and
front passenger seat belts are equipped
with pretensioner and load limiting
systems.
In moderate or greater frontal or nearfrontal accidents, the front air bag and
pretensioner systems deploy
simultaneously. The pretensioners take up
slack in the front seat belts as the air bags
are expanding. The seat belt pretensioner
system will not activate if the seat belt is
not fastened, only you can be sure it is
worn properly. The load limiting system
releases belt webbing in a controlled
manner to reduce belt force on the
occupant’s chest.
Essential Safety Equipment
Seat Belt Systems
Incorrect Positioning of the Driver
and Front Passenger Seat Belts:
Incorrect positioning of the driver
and passenger seat belts is dangerous.
Without proper positioning, the
pretensioner and load limiting
systems cannot provide adequate
protection in an accident and this
could result in serious injury. Wear
seat belts only as recommended in
this owner’s manual.
Expended Seat Belt Pretensioners:
Use of front seat belts with the
pretensioner system expended is
dangerous.
The seat belt pretensioners will only
function once. After they are
expended, they will not work again
and must be replaced immediately.
If the seat belt pretensioners are not
replaced, the risk of injury in a
collision will increase.
Always have an Authorized Mazda
Dealer inspect the seat belt
pretensioners and air bags after any
collision. The seat belt pretensioners
and air bags must be replaced after
any collision, which causes them to
deploy.
2-35
Page 45
Essential Safety Equipment
Seat Belt Systems
WARNING
Modification or Testing of the
Pretensioner System:
Modifying the components or wiring
of the pretensioner system, including
the use of electronic testing devices is
dangerous. You could accidentally
activate it or make it inoperable which
would prevent it from activating in an
accident. The occupants or repairers
could be seriously injured. Never
modify the components or wiring, or
use electronic testing devices on the
pretensioner system.
Pretensioner System Disposal:
Improper disposal of the pretensioner
system or a vehicle with nondeactivated pretensioners is
dangerous. Unless all safety
procedures are followed, injury could
result. Ask an Authorized Mazda
Dealer how to safely dispose of the
pretensioner system or how to scrap a
pretensioner-equipped vehicle.
NOTE
The pretensioner system will only
•
activate in a moderate or greater
frontal or near-frontal collision. It
will not activate in most rollovers,
side or rear impacts.
Some smoke (non-toxic gas) will be
•
released when the air bags and
pretensioners deploy. This does not
indicate a fire. This gas normally
has no effect on occupants,
however, those with sensitive skin
may experience light skin irritation.
If residue from the deployment of
the air bags or the front pretensioner
system gets on the skin or in the
eyes, wash it off as soon as possible.
2-36
Page 46

Air Bag/Front Seat Belt
▼
Pretensioner System Warning
Light
If the air bag/front seat belt pretensioner
system is OK, the warning light
illuminates when the ignition switch is
turned to the ON position or after the
engine is cranked. After about 6 seconds it
goes out.
A system malfunction is indicated when
the warning light constantly flashes, stays
on or doesn’t illuminate at all when the
ignition switch is turned to the ON
position. If any of these occur, consult an
Authorized Mazda Dealer as soon as
possible. The system may not work in an
accident.
Essential Safety Equipment
Seat Belt Systems
2-Point Type Seat Belt
Fastening the Seat Belt
▼
1. Pull the tongue to the desired length.
2. Insert it into the buckle until you hear a
click.
Tongue
Buckle
3. Adjust the belt length.
• To lengthen the belt, hold the tongue
at a right angle to the webbing and
pull.
Lengthen
WARNING
Self-Servicing the Air Bag/
Pretensioner Systems:
Self-servicing or tampering with the
systems is dangerous. An air bag/
pretensioner could accidentally
activate or become disabled. This
could cause serious injuries. Never
tamper with the systems and always
have an Authorized Mazda Dealer
performs all servicing and repairs.
2-37
Page 47

Essential Safety Equipment
Seat Belt Systems
• To shorten, pull the loose end of the
webbing.
Shorten
4. Make sure the lap belt is snugly fitted
against your body.
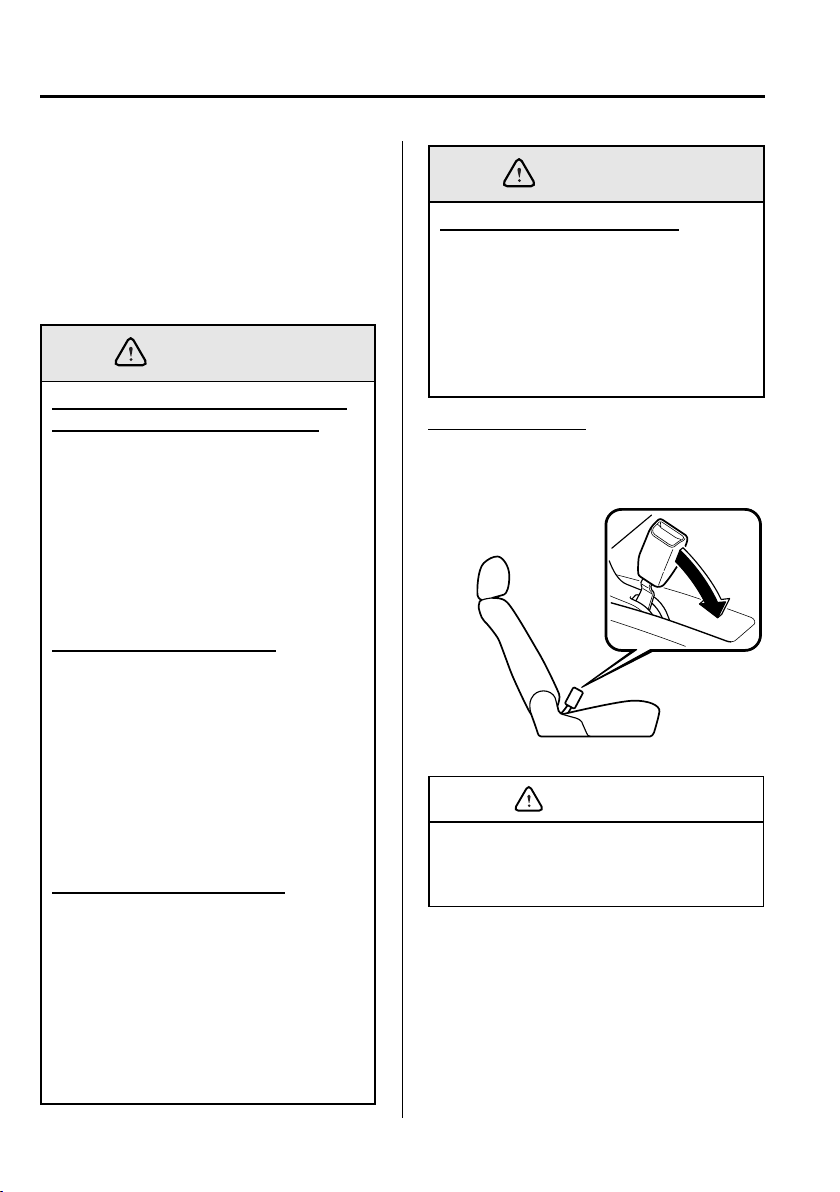
Unfastening the Seat Belt
▼
Depress the button on the buckle.
WARNING
Wearing the Lap Belt:
A lap belt worn too high is dangerous.
In a collision, this would concentrate
the impact force directly on the
abdominal area, causing serious
injury. Wear the lap belt snugly and
as low as possible.
2-38
Page 48

Seat Belt Extender
WARNING
Essential Safety Equipment
Seat Belt Systems
If your seat belt is not long enough, even
when fully extended, a seat belt extender
may be available to you at no charge from
your Authorized Mazda Dealer.
This extender will be only for you and for
the particular vehicle and seat. Even if it
plugs into other seat belts, it may not hold
in the critical moment of a crash.
When ordering an extender, only order
one that provides the necessary additional
length to fasten the seat belt properly.
Please contact your Authorized Mazda
Dealer for more information.
WARNING
Unnecessary Use of an Extender:
Using a seat belt extender when not
necessary is dangerous. The seat belt
will be too long and not fit properly.
In an accident, the seat belt will not
provide adequate protection and you
could be seriously injured. Only use
the extender when it is required to
fasten the seat belt properly.
Using an Extender That is Too Long:
Using an extender that is too long is
dangerous. The seat belt will not fit
properly. In an accident, the seat belt
will not provide adequate protection
and you could be seriously injured.
Don’t use the extender or choose one
shorter in length if the distance
between the extender’s buckle and the
center of the user’s body is less than
15cm (6 in).
NOTE
When not in use, remove the seat belt
extender and store it in the vehicle. If
the seat belt extender is left connected,
the seat belt warning light will not
illuminate and function properly.
Using an Improper Extender:
Using a seat belt extender that is for
another person or a different vehicle
or seat is dangerous. The seat belt will
not provide adequate protection and
the user could be seriously injured in
an accident. Only use the extender
provided for you and for the
particular vehicle and seat. NEVER
use the extender in a different vehicle
or seat.
2-39
Page 49

Essential Safety Equipment
Seat Belt Systems
Seat Belt Warning Light Seat Belt Warning Beep
If the driver’s seat belt is not fastened
when the ignition switch is turned to the
ON position, a beep sound will be heard
for about 6 seconds.
If the driver’s seat belt is not fastened
when the ignition switch is turned to the
ON position, the seat belt warning light
will remain on until the belt is fastened.
If the system does not operate correctly,
consult an Authorized Mazda Dealer.
2-40
Page 50

Essential Safety Equipment
Child Restraint
Child Restraint Precautions
Mazda strongly urges the use of child-restraint systems for children small enough to use
them.
You are required by law to use a child-restraint system for children in the U.S. and Canada.
Check your local and state or provincial laws for specific requirements regarding the safety
of children riding in your vehicle.
Whatever child-restraint system you consider, please pick the appropriate one for the age
and size of the child, obey the law and follow the instructions that come with the individual
child-restraint system.
A child who has outgrown child-restraint systems should sit in the rear and use seat belts,
both lap and shoulder. If the shoulder belt crosses the neck or face, move the child closer to
the center of the vehicle.
Statistics confirm that the rear seats are the best place for all children up to 12 years of age,
and more so with a supplemental restraint system (air bags).
A rear-facing child-restraint system should
bag system activated. The front passenger’s seat is also the least preferred seat for other
child-restraint systems.
To reduce the chance of injuries caused by deployment of the front passenger air bag, your
vehicle is equipped with the front passenger seat weight sensors as a part of the
supplemental restraint system. This system deactivates the front passenger front and side
air bags and also the front passenger seat belt pretensioner system when the total seated
weight on the front passenger seat is less than approximately 30 kg (66 lb).
When an infant or small child sits on the front passenger seat, the system shuts off the front
passenger front and side air bags and seat belt pretensioner system, so make sure the front
passenger air bag deactivation indicator light illuminates.
Even if the front passenger air bag is shut off, Mazda strongly recommends that children be
properly restrained and child-restraint systems of all kinds are properly secured on the rear
seats which are the best place for children.
For more details, refer to "Front passenger seat weight sensors (page 2-63)".
NEVER
be used on the front seat with the air
2-41
Page 51

Essential Safety Equipment
Child Restraint
WARNING
Proper Size of Child-Restraint System:
For effective protection in vehicle accidents and sudden stops, a child must be
properly restrained using a seat belt or child-restraint system depending on age and
size. If not, the child could be seriously injured or even killed in an accident.
Follow the Manufacturer’s Instructions and Always Keep the Child-Restraint System
Buckled Down:
An unsecured child-restraint system is dangerous. In a sudden stop or a collision it
could move causing serious injury or death to the child or other occupants. Make sure
the child-restraint system is properly secured in place according to the child-restraint
system manufacturer’s instructions. When not in use, remove it from the vehicle or
fasten it with a seat belt, or latch it down to BOTH LATCH lower anchors for LATCH
child-restraint systems.
Holding a Child While the Vehicle is Moving:
Holding a child in your arms while the vehicle is moving is extremely dangerous. No
matter how strong the person may be, he or she cannot hold onto a child in a sudden
stop or collision and it could result in serious injury or death to the child or other
occupants. Even in a moderate accident, the child may be exposed to air bag forces
that could result in serious injury or death to the child, or the child may be slammed
into the adult, injuring the adult. Always secure a child in a proper child-restraint
system.
Rear-Facing Child-Restraint System:
Rear-facing child-restraint systems on the front seat are particularly dangerous.
The child-restraint system can be hit by a deploying air bag and moved violently
backward resulting in serious injury or death to the child. Even though you may feel
assured that the front passenger air bag will not deploy based on the fact that the front
passenger air bag deactivation indicator light illuminates, NEVER use a rear-facing
child-restraint system in the front seat with an air bag that could deploy even in a
moderate collision.
Deploying air bag
2-42
Page 52

Essential Safety Equipment
Child Restraint
WARNING
Seating Children in a Child-Restraint System on the Front Passenger Seat:
If your vehicle is equipped with front passenger seat weight sensors, a front passenger
air bag deactivation indicator light is also equipped (page 2-51). Even with the front
passenger seat weight sensors, if you must use the front passenger seat for children,
seating a child in a child-restraint system on the front passenger seat under the
following conditions increases the danger of the front passenger air bag deploying
and could result in serious injury or death to the child.
• The total seated weight of the child with the child-restraint system on the front
passenger seat is approximately 30 kg (66 lb) or more.
• Luggage or other items are placed on the seat with the child in the child-restraint
system.
• A rear passenger or luggage push or pull down on the front passenger seatback.
• A rear passenger steps on the front passenger seat rails with the feet.
• Luggage or other items are placed on the seatback or hung on the assist grip, head
restraint or armrest.
• The seat is washed.
• Liquids are spilled on the seat.
• The front passenger seat is moved backward, pushing into luggage or other items
placed behind it.
• The front passenger seatback contacts the second-row seat.
• Luggage or other items are placed between the front passenger seat and front
passenger seat side table.
• Any accessories such as increasing the total seated weight on the front passenger
seat are attached to the front passenger seat.
The designated positions with seat belts on the rear seats are the safest places for
children. Always use seat belts and child restraints.
Children and Seating Position with Side Air Bag:
Allowing anyone to lean over or against the front door is dangerous. If the vehicle is
equipped with side air bags, the impact of an inflating side air bag could cause serious
injury or death to the person. Children are more likely to sleep in the vehicle; when
they do, they are more at risk in the front passenger’s seat that has a side air bag
because they may slump over into the path of the seatback-mounted air bag.
Furthermore, leaning over or against the doors could block the side air bag and
eliminate the advantages of supplemental protection. With the front air bag and the
additional side air bag that comes out of the front seat, the rear seat is always a better
location for children who are prone to sleeping. If a child can’t be seated in the rear,
do not allow the child to lean over or against the front door, even if the child is seated
in a child-restraint system.
2-43
Page 53

Essential Safety Equipment
Child Restraint
WARNING
One Belt, One Passenger:
Using one seat belt for more than one person at a time is dangerous. A seat belt used
in this way can’t spread the impact forces properly and the two passengers could be
crushed together and seriously injured or even killed. Never use one belt for more
than one person at a time.
CAUTION
A seat belt or child-restraint system can become very hot in a closed vehicle during
warm weather. To avoid burning yourself or a child, check them before you or your child
touches them.
NOTE
Your Mazda is equipped with LATCH lower anchors for attachment of specially
designed LATCH child-restraint systems in the rear seats. When using these anchors to
secure a child-restraint system, refer to "LATCH Child-Restraint Systems" (page 2-53).
2-44
Page 54

Installing Child-Restraint
WARNING
Systems
Accident statistics reveal that a child is
safer in the rear seats (both second-row
seats and third-row center seat). The front
passenger’s seat is clearly the worst
choice for any child under 12, and with
rear-facing child-restraint systems it is
clearly unsafe due to air bags.
Some child-restraint systems now come
with tethers and therefore must be
installed on the seats that take tethers to
be effective. In your Mazda, tethered
child-restraint systems can only be
accommodated in the three specific
seating positions on the rear seats (both
second-row seats and third-row center
seat).
Some child-restraint systems also employ
specially designed LATCH attachments;
refer to "LATCH Child-Restraint
Systems" (page 2-53).
Essential Safety Equipment
Child Restraint
Tethered Child-Restraint Systems
Work Only on Tether-Equipped Rear
Seats:
Installation of a tether equipped
child-restraint system in the front
passenger’s seat or the third-row
outboard seats defeats the safety
design of the system and will result in
an increased chance of serious injury
if the child-restraint system goes
forward without benefit of being
tethered.
Place tether equipped child-restraint
systems where there are tether
anchors.
Second-Row Seats Child-
▼
Restraint System Installation
Follow these instructions when using a
child-restraint system, unless you are
attaching a LATCH-equipped childrestraint system to the rear LATCH lower
anchors. Refer to "LATCH ChildRestraint Systems" (page 2-53).
NOTE
Follow the child-restraint system
manufacturer’s instructions carefully.
If you are not sure whether you have a
LATCH system or tether, check in the
child-restraint system manufacturer’s
instructions and follow them
accordingly. Depending on the type of
child-restraint system, it may not
employ seat belts which are in
automatic locking mode.
2-45
Page 55

Essential Safety Equipment
Child Restraint
1. If the seat in which you install a childrestraint system has a seat slide
function, slide the seat as far back as
possible.
2. Secure the child-restraint system with
the lap portion of the lap/shoulder belt.
See the instructions on the childrestraint system for belt routing
instructions.
3. To get the retractor into the automatic
locking mode, pull the shoulder belt
portion of the seat belt until the entire
length of the belt is out of the retractor.
4. Push the child-restraint system firmly
into the vehicle seat. Be sure the belt
retracts as snugly as possible. Adjust
the angle of the seat belt buckle so that
the belt is not loose. Clicking from the
retractor will be heard during retraction
if the system is in the automatic
locking mode. If the belt does not lock
the seat down tight, repeat this step.
NOTE
Inspect this function before each use of
the child-restraint system. You should
not be able to pull the shoulder belt out
of the retractor while the system is in
the automatic locking mode. When
you remove the child-restraint system,
be sure the belt fully retracts to return
the system to emergency locking mode
before occupants use the seat belts.
2-46
Page 56

5. If your child-restraint system requires
WARNING
the use of a tether strap, hook and
tighten the tether strap by following the
manufacturer’s instructions.
Anchor bracket
location
Tether strap position
Tether strap
Essential Safety Equipment
Child Restraint
Child-Restraint Tether Usage:
Using the tether or tether anchor to
secure anything but a child-restraint
system is dangerous. This could
weaken or damage the tether or tether
anchor and result in injury. Use the
tether and tether anchor only for a
child-restraint system.
Incorrect Positioning of the Tether
Strap:
Positioning the tether strap on top of
the head restraint is dangerous. In a
collision, the head restraint could
bend or break. This will cause the
strap to loosen. The child-restraint
system could move and injure the
child or someone else. Always
position the tether strap between the
head restraint and the seatback.
Anchor
bracket
Third-Row Center Seat Child-
▼
Restraint System Installation
In the third-row seat, tether equipped
child-restraint systems belong only in the
center seat where there is a tether anchor
available.
Follow these instructions when using a
child-restraint system.
1. Secure the child-restraint system with a
lap belt. Adjust for a snug fit by pulling
on the loose end of the belt webbing.
2-47
Page 57

Essential Safety Equipment
WARNING
Child Restraint
2. If your child-restraint system requires
the use of a tether strap, peel back the
carpeting in the rear luggage
compartment to expose the anchor
bracket (above the marking).
Anchor bracket
location
Marking
3. Hook the tether strap by following the
child-restraint system manufacturer’s
instructions.
Tether strap position
Tether
strap
Child-Restraint Tether Usage:
Using the tether or tether anchor to
secure anything but a child-restraint
system is dangerous. This could
weaken or damage the tether or tether
anchor and result in injury. Use the
tether and tether anchor only for a
child-restraint system.
Third-Row Outboard Seats
▼
Child-Restraint System
Installation
The third-row outboard seats cannot
accommodate LATCH-type childrestraint systems or tethers, therefore
these systems must be installed on the
other seat positions such as the secondrow or third-row center seat. If this not
possible, LATCH-type child-restraint
systems or tethers should be installed
using seat belts depending on whether the
child-restraint manufacturer allows their
use without LATCH attachments and
tether anchors.
2-48
Anchor
bracket
Follow these instructions when using a
child-restraint system.
NOTE
Follow the child-restraint system
manufacturer’s instructions carefully.
Depending on the type of childrestraint system, it may not employ
seat belts which are in automatic
locking mode.
Page 58

Essential Safety Equipment
Child Restraint
1. Secure the child-restraint system with
the lap portion of the lap/shoulder belt.
See the instructions on the childrestraint system for belt routing
instructions.
2. To get the retractor into the automatic
locking mode, pull the shoulder belt
portion of the seat belt until the entire
length of the belt is out of the retractor.
3. Push the child-restraint system firmly
into the vehicle seat. Be sure the belt
retracts as snugly as possible. Clicking
from the retractor will be heard during
retraction if the system is in the
automatic locking mode. If the belt
does not lock the seat down tight,
repeat this step.
NOTE
Inspect this function before each use of
the child-restraint system. You should
not be able to pull the shoulder belt out
of the retractor while the system is in
the automatic locking mode. When
you remove the child-restraint system,
be sure the belt fully retracts to return
the system to emergency locking mode
before occupants use the seat belts.
If You Must Use the Front Seat
▼
for Children
If you cannot put all children in the rear
seats, at least put the smallest children in
the rear and be sure the largest child up
front uses the shoulder belt over the
shoulder.
Do not put rear-facing child-restraint
systems on the front passenger’s seat.
This seat is also not set up for tethered
child-restraint systems, put them in one of
the rear seat positions set up with tether
anchors.
Likewise the LATCH child-restraint
system cannot be secured in the front
passenger’s seat and should be used in the
second-row seats.
Don’t allow anyone to sleep against the
right front door if you have an optional
side air bag, it could cause serious injuries
to an out of position occupant. As
children more often sleep in cars, it is
better to put them in the rear seat. If
installing the child-restraint system on the
front seat is unavoidable, follow these
instructions when using a front-facing
child-restraint system in the front
passenger’s seat.
2-49
Page 59

Essential Safety Equipment
WARNING
Child Restraint
NOTE
To check if your Mazda front seats
have side air bags:
Every Mazda side air bag will have a
"SRS-Air Bag" label on the outboard
shoulder of the front seats.
WARNING
Front Passenger’s Seat Position:
As your vehicle has front air bags and
doubly so if your vehicle has side air
bags, a front-facing child-restraint
system should be put on the front seat
only when it is unavoidable.
Even if the front passenger air bag
deactivation indicator light
illuminates, always move the seat as
far back as possible, because the force
of a deploying air bag could cause
serious injury or death to the child.
Rear-Facing Child-Restraint System:
Rear-facing child-restraint systems
on the front seat are particularly
dangerous.
The child-restraint system can be hit
by a deploying air bag and moved
violently backward resulting in
serious injury or death to the child.
Even though you may feel assured
that the front passenger air bag will
not deploy based on the fact that the
front passenger air bag deactivation
indicator light illuminates, NEVER
use a rear-facing child-restraint
system in the front seat with an air
bag that could deploy even in a
moderate collision.
Children and Seating Position with
Side Air Bag:
Allowing anyone to lean over or
against the front door is dangerous. If
the vehicle is equipped with side air
bags, the impact of an inflating side
air bag could cause serious injury or
death to the person. Children are
more likely to sleep in the vehicle;
when they do, they are more at risk in
the front passenger’s seat that has a
side air bag because they may slump
over into the path of the seatbackmounted air bag. Furthermore,
leaning over or against the doors
could block the side air bag and
eliminate the advantages of
supplemental protection. With the
front air bag and the additional side
air bag that comes out of the front
seat, the rear seat is always a better
location for children who are prone to
sleeping. If a child can’t be seated in
the rear, do not allow the child to lean
over or against the front door, even if
the child is seated in a child-restraint
system.
2-50
Page 60

Front Passenger’s Seat Child-
WARNING
▼
Restraint System Installation
Essential Safety Equipment
Child Restraint
1. Make sure the front passenger air bag
deactivation indicator light illuminates
after installing a child-restraint system
on the front passenger seat.
Seating a Child in a Child-Restraint
System on the Front Passenger Seat
With the Front Passenger Air Bag
Deactivation Indicator Light Not
Illuminated:
Seating a child in a child-restraint
system installed on the front
passenger seat with the front
passenger air bag deactivation
indicator light not illuminated is
dangerous. If the front passenger air
bag deactivation indicator light does
not illuminate even when the total
seated weight is less than
approximately 30 kg (66 lb), this
means that the front passenger front
and side air bags, and seat belt
pretensioner are ready for
deployment. If an accident were to
deploy an air bag, a child sitting in
the front passenger seat could be
seriously injured or killed. If the front
passenger air bag deactivation
indicator light does illuminate after
installing a child-restraint system on
the front passenger seat, install the
child-restraint system on the rear seat
and consult an Authorized Mazda
Dealer as soon as possible. While it is
always better to install any childrestraint system on the rear seat, it is
essential to do so if the front
passenger air bag deactivation
indicator light does not illuminate.
For further details, refer to "Front
passenger seat weight sensors (page
2-63).
2-51
Page 61

Essential Safety Equipment
Child Restraint
2. Slide the seat as far back as possible.
3. Secure the child-restraint system with
the lap portion of the lap/shoulder belt.
See the instructions on the childrestraint system for belt routing
instructions.
4. To get the retractor into the automatic
locking mode, pull the shoulder belt
portion of the seat belt until the entire
length of the belt is out of the retractor.
5. Push the child-restraint system firmly
into the vehicle seat. Be sure the belt
retracts as snugly as possible. Clicking
from the retractor will be heard during
retraction if the system is in automatic
locking mode. If the belt does not lock
the seat down tight, repeat this step.
NOTE
Inspect this function before each
•
use of the child-restraint system.
You should not be able to pull the
shoulder belt out of the retractor
while the system is in the automatic
locking mode. When you remove
the child-restraint system, be sure
the belt fully retracts to return the
system to emergency locking mode
before occupants use the seat belts.
Follow the child-restraint system
•
manufacturer’s instruction carefully.
Depending on the type of childrestraint system, it may not employ
seat belts which are in automatic
locking mode.
2-52
Page 62

Essential Safety Equipment
Child Restraint
LATCH Child-Restraint Systems
Your Mazda is equipped with LATCH lower anchors for attachment of specially designed
LATCH child-restraint systems in the second-row seats. Both anchors must be used,
otherwise the seat will bounce around and put the child in danger. Some LATCH childrestraint systems must also be used in conjunction with a tether to be effective. If they have
a tether you must use it to better assure your child’s safety.
WARNING
Manufacturer’s Instructions for Child-Restraint System:
An unsecured child-restraint system is dangerous. In a sudden stop or a collision it
could move causing serious injury or death to the child or other occupants. Make sure
the child-restraint system is properly secured in place according to the child-restraint
system manufacturer’s instructions.
Unsecured Child-Restraint System:
An unsecured child-restraint system is dangerous. In a sudden stop or a collision it
could move causing serious injury or death to the child or other occupants. Follow the
child-restraint system manufacturer’s instructions on belt routing to secure the seat
just as you would with a child in it so that nobody is tempted to put a child in an
improperly secured seat later on. When not in use, remove it from the vehicle or fasten
it with a seat belt, or latch it down to BOTH LATCH lower anchors for LATCH childrestraint systems.
LATCH Child-Restraint Systems:
Not following the child-restraint system manufacturer’s instructions when installing
the child-restraint system is dangerous. If seat belts or a foreign object prevent the
child-restraint system from being securely attached to the LATCH lower anchors and
the child-restraint system is installed improperly, the child-restraint system could
move in a sudden stop or collision causing serious injury or death to the child or other
occupants. When installing the child-restraint system, make sure there are no seat
belts or foreign objects near or around the LATCH lower anchors. Always follow the
child-restraint system manufacturer’s instructions.
2-53
Page 63

Essential Safety Equipment
Child Restraint
LATCH Child-Restraint System
▼
Installation Procedure (SecondRow Seats)
1. Slide the second-row seat as far back as
possible.
2. Raise the reclining lever and lower the
seatback forward.
3. Raise the seatback to the most upright
position. Make sure the seatback is
securely latched by rocking the
seatback.
4. Expand the area between the seat
bottom and the seatback slightly to
verify the locations of the LATCH
lower anchors.
For left seat
LATCH lower
anchor
Second-row
seat
For right seat
5. Secure the child-restraint system using
BOTH LATCH lower anchors,
following the child-restraint system
manufacturer’s instruction.
6. If your child-restraint system came
equipped with a tether, that probably
means it is very important to properly
secure the tether for child safety, please
carefully follow the child-restraint
system manufacturer’s instructions
when installing tethers.
2-54
Anchor bracket
location
Page 64

Tether strap position
Tether strap
Anchor
bracket
WARNING
Child-Restraint Tether Usage:
Using the tether or tether anchor to
secure anything but a child-restraint
system is dangerous. This could
weaken or damage the tether or tether
anchor and result in injury. Use the
tether and tether anchor only for a
child-restraint system.
Essential Safety Equipment
Child Restraint
Incorrect Positioning of the Tether
Strap:
Positioning the tether strap on top of
the head restraint is dangerous. In a
collision, the head restraint could
bend or break. This will cause the
strap to loosen. The child-restraint
system could move and injure the
child or someone else. Always
position the tether strap between the
head restraint and the seatback.
2-55
Page 65

Essential Safety Equipment
SRS Air Bags
Supplemental Restraint Systems (SRS) Precautions
The front and side supplemental restraint systems (SRS) include up to 4 air bags (verify
"SRS AIRBAG" location indicator marks).
They are located in:
The steering wheel hub (driver air bag)
•
The front passenger dashboard (front passenger air bag)
•
The outboard sides of the front seatbacks (side air bags)
•
These systems operate independently depending on the type of accident encountered; if
you have side air bags, the side air bags are not likely to deploy on both sides in the same
accident because a vehicle is not often hit from both sides. The side air bags and the frontal
air bag system will not normally deploy during the same type of accident unless a
combination of frontal and side impacts occur.
The air bag supplemental restraint systems are designed to provide supplemental protection
only in the front seats in certain situations, so seat belts become important in the following
ways:
*
Without seat belt usage, the air bags cannot provide adequate protection during an accident.
Seat belt usage is necessary to:
Keep the passenger away from an inflating air bag.
•
Reduce the possibility of injuries during an accident that is not designed for air bag
•
inflation, such as roll-over or rear impact.
Reduce the possibility of injuries in frontal or side collisions that are not severe enough
•
to activate the air bags.
Reduce the possibility of being thrown from your vehicle.
•
Reduce the possibility of injuries to lower body and legs during an accident because the
•
air bags provide no protection to these parts.
Hold the driver in a position which allows better control of the vehicle.
•
Small children should be protected by a child-restraint system. In certain regions, larger
children must use a child-restraint system (page 2-41).
Carefully consider which child-restraint system is necessary for your child and follow the
installation directions in this Owner’s Manual as well as the child-restraint system
manufacturer’s instructions.
2-56
*Some models.
Page 66

Essential Safety Equipment
SRS Air Bags
WARNING
Air Bags without Seat Belts:
Depending only on the air bags for protection during an accident is dangerous.
Alone, air bags may not prevent serious injuries. The appropriate air bags can be
expected to inflate only in collisions with frontal, near frontal or side forces that are at
least moderate. Vehicle occupants should always wear seat belts.
Child in the Front Seat:
Placing a child, 12 years or under, in the front seat is dangerous. The child could be
hit by a deploying air bag and be seriously injured or even killed. Even if the front
passenger air bag deactivation indicator light illuminates, always move the front
passenger seat as far back as possible. A sleeping child is more likely to lean against
the door and be hit by the side air bag in a moderate, right-side collision. Whenever
possible, always secure a child 12 years and under on the rear seats with an
appropriate child-restraint system for the child’s age and size.
Rear-Facing Child-Restraint System:
Rear-facing child-restraint systems on the front seat are particularly dangerous.
The child-restraint system can be hit by a deploying air bag and moved violently
backward resulting in serious injury or death to the child. Even though you may feel
assured that the front passenger air bag will not deploy based on the fact that the front
passenger air bag deactivation indicator light illuminates, NEVER use a rear-facing
child-restraint system in the front seat with an air bag that could deploy even in a
moderate collision.
Deploying air bag
Seating Position with Front Air Bags:
Sitting too close to the air bag modules or placing hands or feet on them is extremely
dangerous. Front air bags inflate with great force and speed. Serious injuries could
occur if someone is too close. The driver should always hold onto only the rim of the
steering wheel. The front seat passenger should keep both feet on the floor. Front seat
occupants should adjust their seats as far back as possible and always sit upright
against the seatbacks with seat belts worn properly.
2-57
Page 67

Essential Safety Equipment
SRS Air Bags
WARNING
Seating Position with Side Air Bags:
Sitting too close to the side air bag modules or placing hands on them is extremely
dangerous. A side air bag inflates with great force and speed directly out of the
outboard shoulder of the front seat and expands along the front door on the side the
car is hit.
Serious injury could occur if someone is sitting too close to the door or leaning
against a window in the front seats or if rear seat occupants grab the sides of the front
seatbacks. Furthermore, sleeping up against the door or hanging out the driver’s-side
window while driving could block the side air bag and eliminate the advantages of
supplemental protection. Give the side airbags room to work by sitting in the center of
the seat while the vehicle is moving with seat belts worn properly.
Front Air Bag Modules:
Attaching an object to a front air bag modules or placing something in front of them
is dangerous. In an accident, the object could interfere with front air bag inflation
and injure the occupants.
Always keep the front air bag modules free of objects.
Side Air Bag Modules:
Attaching things to the front seat in such a way as to cover the outboard side of the
seat in any way is dangerous. In an accident the object could interfere with the side
air bag, which inflates from the outboard side of the front seats, impeding the added
protection of the side air bag system or redirecting the air bag in a way that is
dangerous. Furthermore, the bag could be cut open spewing exhaust.
Do not hang net bags, map pouches or backpacks with side straps on the front seats.
Never use seat covers on the front seats. Always keep the side air bag modules in your
front seats free to deploy in the event of a side collision.
Hot Air Bag Inflators:
Hot air bag inflators are dangerous. Immediately after inflation, the inflators in the
steering wheel, dashboard or the seatbacks are very hot. You could get burned. Don’t
touch the internal components of the air bag modules after the bags have inflated.
2-58
Page 68

Essential Safety Equipment
SRS Air Bags
WARNING
Installation of Front-End Equipment:
Installation of front-end equipment, such as frontal protection bar (kangaroo bar,
bull bar, push bar, etc.), snowplow, or winches, is dangerous. The air bag crash sensor
system could be affected. This could cause air bags to inflate unexpectedly, or it could
prevent the air bags from inflating during an accident. Front occupants could be
seriously injured. Never install any front-end equipment to your vehicle.
Suspension Adjustment:
Adjusting the vehicle suspension is dangerous. If the vehicle’s height or the
suspension is changed, the vehicle will be unable to accurately detect a collision
resulting in incorrect or unexpected air bag deployment and the possibility of serious
injuries.
Modification of the Supplemental Restraint System:
Modifying the components or wiring of the supplemental restraint system is
dangerous. You could accidentally activate it or make it inoperable. Don’t make any
modifications to the supplemental restraint system. This includes installing trim,
badges, or anything else over the air bag modules. It also includes installing extra
electric equipment on or near system components or wiring. An Authorized Mazda
Dealer can provide the special care needed in the removal and installation of front
seats. It is important to protect the air bag wiring and connections to assure that the
bags do not accidentally deploy, the driver seat slide position sensor and front
passenger seat weight sensors are not damaged and that the seats retain an
undamaged air bag connection.
NOTE
When an air bag deploys, a loud inflation noise can be heard and some smoke will be
•
released. Neither is likely to cause injury, however, the texture of the air bags may
cause light skin injuries on body parts not covered with clothing through friction.
Should you sell your Mazda, we urge you to tell the new owner of its air bag systems
•
and that familiarization with all instructions about them, from the Owner’s Manual, is
important.
2-59
Page 69

Essential Safety Equipment
SRS Air Bags
Supplemental Restraint System Components
The supplemental restraint systems (SRS) have two basic subsystems:
The air bag system with inflators and air bags.
•
The electric system with crash sensors and diagnostic module.
•
The air bags are mounted in the following locations:
The steering wheel hub
•
The front passenger dashboard
•
The outboard sides of the front seatbacks
•
The air bags are out of sight until activated.
2-60
Page 70

Front Air Bag System Components
▼
Essential Safety Equipment
SRS Air Bags
(6)
(4)
(8)
(7)
(5)
(8)
(1) Front dual stage inflators and air bags
(2) Crash sensors and diagnostic module (SAS unit)
(3) Front air bag sensor
(4) Driver seat slide position sensor (page 2-63)
(5) Front passenger seat weight sensors (page 2-63)
(6) Front seats
(7) Driver and front passenger seat belt buckle switches (page 2-63)
(8) Front seat belt pretensioner and load limiting systems (page 2-35)
(9) Front passenger air bag deactivation indicator light (page 2-63)
(1)
(3)
(9)
(2)
2-61
Page 71

Essential Safety Equipment
SRS Air Bags
Side Air Bag System Components*
▼
Put children in the rear seats, they do not have side air bag systems.
(4)
(1)
(2)
(3)
(1) Side inflators and air bags
(2) Side crash sensor
(3) Crash sensors and diagnostic module (SAS unit)
(4) Front seats
2-62
*Some models.
Page 72

Essential Safety Equipment
SRS Air Bags
How the Air Bags Work
How the Front Air Bags Work
▼
When air bag crash sensors detect a frontal impact of greater than moderate force, an
electrical current is sent to the inflators.
Gases are produced to inflate the front air bags and after the inflation, the front air bags
quickly deflate.
The front air bags will function only once. After that,
again and must be replaced.
Only an Authorized Mazda Dealer can replace the systems.
The front, dual stage air bags control air bag inflation in two energy stages. During an
impact of moderate severity the front air bags deploy with lesser energy, whereas during
more severe impacts, they deploy with more energy. Deployment of the front air bags may
differ between the driver and the front passenger depending on the driver seat position,
front passenger weight and front seat belt usage, which allow for further controlling of the
system.
the front air bags will not work
The front air bags will deploy only
in a frontal or frontal offset impact.
Driver seat slide position sensor
Your vehicle is equipped with a driver seat slide sensor as a part of the supplemental
restraint system. The sensor is located under the driver seat. The sensor determines whether
the driver seat is fore or aft of a reference position and sends the seat position to the crash
sensors and diagnostic module (SAS unit). The sensor is also designed to control the
deployment of the driver air bag depending on how close the driver seat is to the steering
wheel.
The air bag/front seat belt pretensioner system warning light flashes if the sensor has a
possible malfunction (page 2-72).
2-63
Page 73

Essential Safety Equipment
SRS Air Bags
Front passenger seat weight sensors
Your vehicle is equipped with front passenger seat weight sensors as a part of the
supplemental restraint system. These sensors are located under both of the front passenger
seat rails. These sensors determine the total seated weight on the front passenger seat. The
sensors are also designed to prevent the front passenger air bag from inflating if the total
seated weight is less than approximately 30 kg (66 lb).
To reduce the chance of injuries caused by deployment of the front passenger air bag, the
system deactivates the front passenger front and side air bags and also the seat belt
pretensioner system when:
There is no passenger in the front passenger seat. (The front passenger air bag
•
deactivation indicator light does not illuminate.)
The total seated weight on the front passenger seat is less than approximately 30 kg (66
•
lb). (The front passenger air bag deactivation indicator light illuminates.)
This system shuts off the front passenger front and side air bags and seat belt pretensioner
system, so make sure the front passenger air bag deactivation indicator light illuminates
according to the chart below.
The air bag/front seat belt pretensioner system warning light flashes and the front
passenger air bag deactivation indicator light illuminates if the sensors have a possible
malfunction. If this happens, the front passenger front and side air bags and seat belt
pretensioner system will not deploy.
Front passenger air bag deactivation indicator light
This indicator light illuminates to remind you that the front passenger front and side air
bags and seat belt pretensioner will not deploy during a collision.
If the front passenger weight sensors are normal, the indicator light illuminates when the
ignition switch is turned to the ON position. After about 6 seconds it goes out.
2-64
Page 74

Essential Safety Equipment
SRS Air Bags
The front passenger air bag deactivation indicator light illuminates or is off under the
following conditions:
Total seated weight on the
front passenger seat
Empty (Not occupied)
Less than approx. 30 kg
(66 lb)
Approx. 42 kg (93 lb) or
more
*
If the front passenger seat belt is buckled, the front passenger air bag deactivation
Front passenger air bag
deactivation indicator light
*
Front passenger front and
side air bags
OFF OFF OFF
ON OFF OFF
OFF ON ON
Seat belt pretensioner
system
indicator light illuminates, however this does not indicate a malfunction.
If the front passenger air bag deactivation indicator light does not illuminate when the
ignition switch is turned to the ON position and does not illuminate as indicated in the
above chart, do not allow a child to sit in the front passenger seat and consult an Authorized
Mazda Dealer as soon as possible. The system may not work properly in an accident.
WARNING
Decreasing the Total Seated Weight on the Front Passenger Seat:
When an adult or large child sits on the front passenger seat, decreasing the total
seated weight on the front passenger seat from the total seated weight of
approximately 42 kg (93 lb) required for air bag deployment is dangerous. The front
passenger seat weight sensors will detect the reduced total seated weight condition and
the front passenger front and side air bags and seat belt pretensioner system will not
deploy during an accident. The front passenger will not have the supplementary
protection of the air bag, which could result in serious injury. Decreasing the total
seated weight on the front passenger seat from the total seated weight of
approximately 42 kg (93 lb) could result in an air bag not deploying under the
following conditions, for example:
• A rear passenger pushes up on the front passenger seat with the feet.
• Luggage or other items placed under the front passenger seat or between the front
passenger seat and front passenger seat side table that push up the front passenger
seat bottom.
• The front passenger seat occupant sits in a manner that does not place the entire
weight of the occupant on the seat such as by sitting too close to the door, grasping
the assist grip or the rim of the sunroof.
• The front passenger seatback contacts the second-row seat.
• Any accessories such as decreasing the total seated weight on the front passenger
seat are attached to the front passenger seat.
2-65
Page 75

Essential Safety Equipment
SRS Air Bags
WARNING
Increasing the Total Seated Weight on the Front Passenger Seat:
When an infant or small child sits on the front passenger seat, increasing the total
seated weight on the front passenger seat from the total seated weight of
approximately 30 kg (66 lb) is dangerous. The front passenger seat weight sensors will
detect the increased total seated weight, which could result in the unexpected
deployment of the front passenger front and side air bags and seat belt pretensioner
system in an accident and serious injury. Increasing the total seated weight on the
front passenger seat from the total seated weight of approximately 30 kg (66 lb) could
result in the front passenger front and side air bags and seat belt pretensioner system
deployment in an accident under the following conditions, for example:
• Luggage or other items are placed on the seat with the child in the child-restraint
system.
• A rear passenger or luggage push or pull down on the front passenger seatback.
• A rear passenger steps on the front passenger seat rails with the feet.
• Luggage or other items are placed on the seatback or hung on the assist grip, head
restraint or armrest.
• The seat is washed.
• Liquids are spilled on the seat.
• The front passenger seat is moved backward, pushing into luggage or other items
placed behind it.
• The front passenger seatback contacts the second-row seat.
• Luggage or other items are placed between the front passenger seat and front
passenger seat side table.
• Any accessories such as increasing the total seated weight on the front passenger
seat are attached to the front passenger seat.
CAUTION
To assure proper deployment of the front air bag and to prevent damage to the sensors
•
in the front seat bottoms:
• Do not place sharp objects on the front seat bottoms or leave heavy luggage on them.
• Do not spill any liquids on the front seats or under the front seats.
To allow the sensors to function properly, always perform the following:
•
• Adjust the front seats as far back as possible and always sit upright against the
seatbacks with seat belts worn properly.
• If you place your child on the front passenger seat, secure the child-restraint system
properly and slide the front passenger seat as far back as possible (page 2-51).
2-66
Page 76

Essential Safety Equipment
SRS Air Bags
NOTE
The system requires about 10 seconds to alternate between turning the front
•
passenger front and side air bags and seat belt pretensioner system on or off.
The front passenger air bag deactivation indicator light may illuminate repeatedly if
•
luggage or other items are put on the front passenger seat, or if the temperature of the
vehicle’s interior changes suddenly.
The front passenger air bag deactivation indicator light may illuminate for 10 seconds
•
if the total seated weight on the front passenger seat changes.
If the front passenger air bag deactivation indicator light does not illuminate after
•
installing a child-restraint system on the front passenger seat, install the childrestraint system on the rear seat and consult an Authorized Mazda Dealer as soon as
possible.
Driver and front passenger buckle switches
The buckle switches on the front seat belts detect whether or not the front seat belts are
securely fastened and further control the deployment of the air bags on the front seats.
How the Side Air Bags Work*
▼
When air bag crash sensors detect a side impact of greater than moderate force, an
electrical current is sent to the inflators.
Gases are produced to inflate the side air bags and after the inflation, the side air bags
quickly deflate.
The side air bags will function only once. After that,
and must be replaced.
Only an Authorized Mazda Dealer can replace the systems.
the side air bags will not work again
The side air bag will deploy
only on the side the vehicle receives
the force of the impact.
CAUTION
To prevent damage to the side air bag wiring, don’t place luggage or other objects under
the front seats.
*Some models.
2-67
Page 77

Essential Safety Equipment
SRS Air Bags
Air Bag Activation/Deactivation
▼
CAUTION
If the front passenger seat weight sensors detect a total seated weight on the front
passenger seat of less than approximately 42 kg (93 lb), the front passenger front and
side air bags and seat belt pretensioner may not inflate (page 2-63).
Front air bag activation
A greater than moderate impact will cause the front air bags to inflate in the following
cases:
Hitting a solid wall straight on at greater
than about 22 km/h (14 mph).
Hitting a curb, pavement edge or hard
object.
Landing hard or the vehicle falling.
Frontal impact within about a 30 degree
range from head-on to the vehicle.
Driving into a big hole or hitting the far
side of a hole.
2-68
Page 78

Essential Safety Equipment
SRS Air Bags
Limitations to front air bag activation
Depending on the severity of impact, the front air bags may not inflate in the following
cases:
Impacts involving trees or poles cause severe
cosmetic damage but may not have enough
impact to activate the air bag.
Frontal offset impact to the vehicle may not
provide the stopping force necessary for air
bag deployment.
Rear-ending or running under a truck's tail
gate may not provide the stopping force
necessary for air bag deployment.
Non-activation of front air bags
Front air bags will not normally inflate in the following cases:
Collision from the rear.
Vehicle roll-over, may deploy the side air
bag(s) but not the front air bags.
Impact to the side, but it may deploy a side
air bag.
2-69
Page 79

Essential Safety Equipment
SRS Air Bags
Side air bag* activation
Greater than moderate impact to one side of the vehicle (driver or passenger side areas) will
cause a side air bag to inflate, but it will not normally deploy the front air bags.
Limitations to side air bag* activation
Depending on the severity of impact, a side air bag may not inflate in the following cases:
Frontal offset impact may not provide
enough side impact to deploy a side air bag.
Side impacts involving trees or poles can
cause severe cosmetic damage but may not
have enough impact force to activate a side
air bag.
Vehicle roll-over may not provide enough
side force to deploy the side air bags.
Side impacts with two-wheeled vehicles
may not provide enough force to deploy a
side air bag.
2-70
*Some models.
Page 80

Essential Safety Equipment
SRS Air Bags
Non-activation of side air bag*
A side air bag will not normally inflate in the following cases:
Collision from the rear. Collision from the front, but it may deploy
the front air bags.
*Some models.
2-71
Page 81

Essential Safety Equipment
WARNING
SRS Air Bags
Constant Monitoring
▼
The following components of the air bag
systems are monitored by a diagnostic
system:
SAS unit
•
Front air bag sensor
•
Air bag modules
•
Side crash sensor
•
Front seat belt pretensioners
•
Related wiring
•
Driver seat slide position sensor
•
Front passenger seat weight sensors
•
Driver and front passenger seat belt
•
buckle switches
The diagnostic module continuously
monitors the system’s readiness. This
begins when the ignition switch is turned
to the ON position and continues while
the vehicle is being driven.
*
Air Bag/Front Seat Belt
▼
Pretensioner System Warning
Light
If the air bag/front seat belt pretensioner
system is normal, the warning light
illuminates when the ignition switch is
turned to the ON position or after the
engine is cranked. After about 6 seconds it
goes out.
A system malfunction is indicated when
the warning light constantly flashes,
illuminates or doesn’t illuminate at all
when the ignition switch is turned to the
ON position. If any of these occur, do not
allow a person to sit on the front
passenger seat and consult an Authorized
Mazda Dealer as soon as possible. The
system may not work in an accident.
2-72
*Some models.
Self-Servicing the Air Bag/
Pretensioner Systems:
Self-servicing or tampering with the
systems is dangerous. An air bag/
pretensioner could accidentally
activate or become disabled. This
could cause serious injuries. Never
tamper with the systems and always
have an Authorized Mazda Dealer
perform all servicing and repairs.
Page 82

Maintenance
WARNING
▼
The air bag systems do not require regular
maintenance. But if any of the following
occurs, take your vehicle to an Authorized
Mazda Dealer as soon as possible:
The air bag system warning light
•
flashes.
The air bag system warning light
•
illuminates.
The air bag system warning light does
•
not illuminate when the ignition switch
is turned to the ON position.
The air bags inflate.
•
Front passenger air bag deactivation
•
indicator light does not illuminate
when the ignition switch is turned to
the ON position or does not illuminate
as indicated in the chart. For more
details about this indicator light and
this chart, refer to "Front passenger
seat weight sensors (page 2-63)".
Essential Safety Equipment
SRS Air Bags
Damaged Air Bag System
Components:
Driving with damaged air bag system
components is dangerous. A collision,
even one not strong enough to inflate
the air bags, could damage the system
components. If there was a
subsequent collision, a damaged
component would not inflate the air
bags. Always have an Authorized
Mazda Dealer inspect the air bag
systems after a collision.
Removing Interior Parts:
Removing any components such as
the front seats (if side air bags are
equipped), front dashboard, the
steering wheel or parts containing air
bag parts or sensors is dangerous.
These parts contain essential air bag
components. The air bag could
accidentally activate and cause
serious injuries. Always have an
Authorized Mazda Dealer remove
these parts.
Air Bag Disposal:
Improper disposal of an air bag or a
vehicle with live air bags in it can be
extremely dangerous. Unless all
safety procedures are followed, injury
can result. Ask an Authorized Mazda
Dealer how to safely dispose of an air
bag or how to scrap an air bag
equipped vehicle.
2-73
Page 83

Essential Safety Equipment
SRS Air Bags
NOTE
If it becomes necessary to have the
components or wiring system for the
supplementary restraint system
modified to accommodate a person
with certain medical conditions in
accordance with a certified physician,
contact an Authorized Mazda Dealer,
refer to "Customer Assistance
(U.S.A.)" (page 9-2).
2-74
Page 84

3
Knowing Your Mazda
Explanation of basic operations and controls; opening/closing and adjustment
of various parts.
Doors and Locks
Keys ........................................................................................... 3-2
Keyless Entry System* .............................................................. 3-3
Door Locks ................................................................................3-8
Liftgate .................................................................................... 3-18
Power Windows* .....................................................................3-19
Rear Quarter Windows ............................................................3-22
Fuel-Filler Lid and Cap ...........................................................3-23
Hood ........................................................................................ 3-24
Moonroof* ............................................................................... 3-25
Security System
Immobilizer System* .............................................................. 3-28
Theft-Deterrent System* ......................................................... 3-31
Steering Wheel and Mirrors
Steering Wheel ........................................................................ 3-33
Mirrors ..................................................................................... 3-33
............................................................................ 3-2
........................................................................... 3-28
...................................................... 3-33
*Some models.
3-1
Page 85

Knowing Your Mazda
Doors and Locks
Keys
WARNING
Keys and Children:
Leaving children in a vehicle with the
key is dangerous. This could result in
someone being badly injured or even
killed. They could play with power
windows or other controls, or even
make the vehicle move. Don’t leave
the keys in your vehicle with children.
NOTE
(With immobilizer system)
Refer to Immobilizer System (page
3-28) for information regarding keys
and engine starting on vehicles
equipped with the immobilizer
system.
The keys operate all locks.
A code number is stamped on the plate
attached to the key set; detach this plate
and store it in a safe place (not in the
vehicle) for use if you need to make a
replacement key.
Also write down the code number and
keep it in another safe and handy place,
but not in the vehicle.
If your key is lost, consult your
Authorized Mazda Dealer with the code
number ready.
3-2
Key code number plate
Page 86

Knowing Your Mazda
Doors and Locks
Keyless Entry System*
This system locks and unlocks the doors
and the liftgate.
It can also help you signal for attention in
an emergency.
Opening and closing of the power sliding
doors with the keyless entry system
transmitter is also possible on power
sliding door-equipped vehicles.
Press the button slowly and accurately.
CAUTION
To avoid damage to the transmitter, do
not:
Drop it.
•
Get it wet.
•
Disassemble it.
•
Expose it to heat or sunlight.
•
NOTE
The keyless entry system is
•
designed to operate up to about 2.5
m (8 ft) from the center of the
vehicle, but this may vary because
of local conditions.
The system doesn’t operate when
•
the ignition switch is in the ON
position.
If the transmitter does not operate
•
when pressing a button or the
operation range becomes too small,
the battery may be dead. To install a
new battery, refer to Maintenance
(page 3-6).
Additional transmitters can be
•
obtained at an Authorized Mazda
Dealer. Up to 3 transmitters can be
used with the keyless entry system
per vehicle. Bring all transmitters to
an Authorized Mazda Dealer when
the electronic codes need to be
reset.
*Some models.
3-3
Page 87

Knowing Your Mazda
Doors and Locks
Transmitter
▼
With power sliding doors
Lock button
Unlock button
Left sliding door button
Without power sliding doors
Unlock button
Right sliding door button
Panic button
Lock button
Panic button
NOTE
(U.S.A.)
•
This device complies with part 15
of the FCC Rules. Operation is
subject to the following two
conditions: (1) This device may not
cause harmful interference, and (2)
this device must accept any
interference received, including
interference that may cause
undesired operation.
(CANADA)
•
This device complies with RSS-210
of Industry CANADA. Operation is
subject to the following two
conditions: (1) this device may not
cause interference, and (2) this
device must accept any interference,
including interference that may
cause undesired operation of the
device.
NOTE
3-4
If the LOCK and UNLOCK button are
pressed sequentially, the hazard
warning lights may not flash correctly.
Page 88

Knowing Your Mazda
WARNING
Doors and Locks
Lock button
To lock the doors and the liftgate, press
the LOCK button and the hazard warning
lights will flash once.
To confirm that all the doors and the
liftgate have been locked, press the LOCK
button again within 5 seconds. If they are
closed and locked, the horn will sound
and the hazard warning lights will flash
once.
NOTE
Confirm that all the doors and the
liftgate are locked visually or aurally
by use of the double click.
Unlock button
To unlock the driver’s door, press the
UNLOCK button and the hazard warning
lights will flash twice.
To unlock all the doors and the liftgate,
press the UNLOCK button again within 5
seconds and the hazard warning lights
will flash twice.
NOTE
After unlocking with the transmitter,
all doors and the liftgate will
automatically lock if one of the doors
or the liftgate is not opened within
about 30 seconds.
Sliding door transmitter buttons
If your Mazda has power sliding doors
(page 3-13), the transmitter can open/
close the sliding doors.
Operating Power Sliding Doors with
Transmitter:
Opening or closing the power sliding
doors with the keyless entry system
transmitter while not watching the
doors move is dangerous. People or
animals could be injured when the
doors open along the rear sides and
back to the rear fender, or in closing.
Allowing children to use the
transmitter could result in serious
injuries despite the jam-safe feature.
Always be sure that the doorway and
rear fender area are clear before
activating the power sliding doors and
be particularly careful when using
the keyless entry system transmitter.
Be sure to view the doors opening or
closing and do not operate a door on
either side if you can’t fully see it.
Always make sure that you watch the
power sliding doors close completely
and be sure your children do not have
access to the transmitter.
When a power sliding door is completely
closed/opened and a power sliding door
open/close transmitter button is pressed
for 1 second or more, the door opens/
closes after the beep sounds.
3-5
Page 89

Knowing Your Mazda
CAUTION
Doors and Locks
NOTE
When a power sliding door is not
•
completely closed, pressing the
power sliding door open/close
transmitter button for 1 second or
more will open the door completely.
Press the button to stop the power
•
sliding doors while they are
opening/closing.
Panic button
You can use the button to turn on the
alarm, which allows you to signal for
attention in an emergency.
NOTE
The alarm will work whether any door
or the liftgate is open or closed.
Turning on the alarm
Pressing the button once will trigger the
alarm for about 2 minutes and 30 seconds,
and do the following:
The horn sounds intermittently.
•
The hazard warning lights flash.
•
Turning off the alarm
Press any button on the transmitter.
Transmitter Maintenance
▼
Make sure the battery is installed
•
with the correct pole facing upward.
Battery leakage could occur if it is
not installed correctly.
When replacing the battery, be
•
careful not to bend the electrical
terminals or get oil on them. Also
be careful not to get dirt in the
transmitter as it could damage it.
Danger of battery explosion if it is
•
incorrectly replaced.
Replace only with the same type
•
battery (CR2025 or the equivalent).
Dispose of used batteries according
•
to the following instructions.
• Insulate the plus and minus
terminals of the battery using
cellophane or equivalent tape.
• Never disassemble.
• Never throw the battery into fire
and/or water.
• Never deform or crush.
3-6
Page 90

Knowing Your Mazda
L
O
C
K
U
N
LO
C
K
CAUTION
Doors and Locks
Replacing the transmitter battery
1. Insert a small screwdriver into the slot
and gently pry open the transmitter.
Slot
Back cover
2. Remove the battery.
3. Put in the new battery (CR2025 or the
equivalent) with the positive pole ( )
facing down.
Do not press any buttons when
replacing the battery. The electronic
code could be altered and cause the
keyless entry system to malfunction.
If the keyless entry system fails to
operate, contact an Authorized Mazda
Dealer.
4. Align the front and back covers and
snap the transmitter shut.
3-7
Page 91

Knowing Your Mazda
WARNING
Doors and Locks
Service
▼
If you have a problem with the keyless
entry system, consult an Authorized
Mazda Dealer.
Door Locks
If your transmitter is lost or stolen, bring
all remaining transmitters to an
Authorized Mazda Dealer as soon as
possible for a replacement and to make
the lost or stolen transmitter inoperative.
CAUTION
Changes or modifications not
expressly approved by the party
responsible for compliance could void
the user’s authority to operate the
equipment.
Unattended Children and Pets:
Leaving a child or an animal
unattended in a parked vehicle is
dangerous. In hot weather,
temperatures inside a vehicle can
become high enough to cause brain
damage or even death. Always take all
children and animals with you or
leave a responsible person with them.
Keys and Children:
Leaving children in a vehicle with the
key is dangerous. This could result in
someone being badly injured or even
killed. They could play with power
windows or other controls, or even
make the vehicle move. Don’t leave
the keys in your vehicle with children
and keep them in a place where your
children will not find or play with
them.
Unlocked Doors:
Unlocked doors in a moving vehicle
are dangerous. Passengers can fall
out if a door is accidentally opened
and can more easily be thrown out in
an accident. So keep all doors locked
when driving.
3-8
NOTE
Always remove the key from the
ignition switch, close all windows, and
lock all doors when leaving your
vehicle unattended. This discourages
intruders and thieves.
Page 92

Knowing Your Mazda
Lock
Unlock
Doors and Locks
Locking, Unlocking with Key
▼
Either front door can be locked/unlocked
with the key.
Turn the key toward the front to unlock,
toward the back to lock.
Unlock
Lock
Locking, Unlocking with
▼
Transmitter*
The doors can be locked/unlocked by
operating the keyless entry system
transmitter, refer to keyless entry system
(page 3-3).
Locking, Unlocking with Door-
▼
Lock Knob
Front doors
To lock either front door from the inside,
push its door-lock knob.
To unlock, pull it out.
To lock either front door with the doorlock knob from the outside, push its doorlock knob to the lock position and close
the door.
NOTE
When locking the doors this way, be
careful not to leave the key inside the
vehicle.
*Some models.
3-9
Page 93

Knowing Your Mazda
Doors and Locks
Sliding doors
To lock a sliding door from the inside,
push down its door-lock knob.
To unlock, pull it up.
Unlock
Lock
To lock a sliding door with the door-lock
knob from the outside, push down its
door-lock knob and close the door.
NOTE
The left-side sliding door cannot be
opened when the fuel-filler lid is open.
Close the fuel-filler lid to open the
sliding door.
Power Door Locks*
▼
Locking, unlocking with key
All doors and the liftgate lock
automatically when any front door is
locked with the key. All doors and the
liftgate unlock when the driver’s door is
unlocked and the key is held in the unlock
position a second longer. Also, all doors
and the liftgate unlock when the
passenger’s door is unlocked.
Unlock
Lock
NOTE
Holding the key in the unlocked
position in the driver’s door lock for
about a second unlocks all doors and
the liftgate. To unlock only the driver’s
door, insert the key into the driver’s
door lock and turn the key briefly to
the unlock position and then
immediately return it to the center
position.
3-10
*Some models.
Page 94

Knowing Your Mazda
Doors and Locks
Locking, unlocking with door-lock
switch
All doors and the liftgate lock
automatically when LOCK is pushed.
They all unlock when the unmarked part
of the door-lock switch is pushed.
Unlock
Sliding Door Open/Close
▼
Lock
(Manual Operation)
To open, pull the inner door handle or the
outer door handle.
To close, pull the inner door handle or
outer door handle.
NOTE
(Without power sliding doors)
When closing the sliding door from the
fully-opened position and from outside
the vehicle, pull the outside door
handle outward to release the latch and
slide the door in the forward direction.
NOTE
The left-side sliding door cannot be
opened when the fuel-filler lid is open.
Close the fuel-filler lid to open the
sliding door.
3-11
Page 95

Knowing Your Mazda
WARNING
CAUTION
Doors and Locks
Rear Door Child Safety Locks
▼
These locks are intended to help prevent
children from accidentally opening the
sliding doors. Use them both whenever a
child rides in the vehicle.
To lock the sliding doors, slide the child
safety locks to the lock position before
closing the doors.
Unlock
Lock
With power sliding doors
The doors cannot be opened using the
interior door handles or the power sliding
door switches in the rear.
To open a door, pull the door-lock knob
and do any one of the following:
Pull the exterior door handle.
•
Push the power sliding door button on
•
the transmitter for one second or more.
Push the power sliding door switch
•
located at the driver’s seat for one
second or more (page 3-13).
Without power sliding doors
The doors cannot be opened from the
inside whether the door-lock knobs are in
the lock position or the unlock position.
Easy Closure (With Power
▼
Sliding Doors)
The Easy Closure system automatically
closes the doors completely from the
near-shut position.
This system also operates when the doors
are closed manually.
Hands and Fingers Pinched in
Closing Sliding Doors:
Placing hands or fingers around a
sliding door is dangerous because the
door closes automatically from the
near-shut position, hands and fingers
could get pinched and injured. When
closing a sliding door, always keep
hands and fingers away from the
door.
When closing a door, do not use
excessive force as it may damage the
system.
To open a door, pull the door-lock knob
and pull the exterior handle.
3-12
Page 96

Power Sliding Doors*
WARNING
▼
The power sliding doors open/close
electrically by operating switches in the
vehicle or on the keyless entry system
transmitter.
To operate the power sliding doors with
the keyless entry system transmitter, refer
to Keyless Entry System (page 3-3).
Electric power to the power sliding doors
can be switched on and off with the power
sliding doors main switch.
Power sliding
doors main switch
ON
OFF
Knowing Your Mazda
Doors and Locks
Operating Power Sliding Doors:
Opening or closing the power sliding
doors while not watching the doors
move is dangerous. People or animals
could be injured when the doors open
along the rear sides and back to the
rear fender, or in closing. Because of
unseen obstacles and the jam-safe
feature a door may not close
completely and, if left unnoticed,
could result in serious injury or death
if an occupant were to fall out of the
vehicle.
Always be sure that the doorway and
rear fender area is clear before
activating the power sliding doors. Be
sure to view the power sliding doors
opening or closing and make sure
that you watch them close completely.
ON: Switches on electric power to power
sliding doors.
OFF: Switches off electric power to
power sliding doors.
Moving the Vehicle while Closing
Power Sliding Doors:
Shifting out of Park (P) while the
doors are moving is dangerous. The
doors will not close completely and
this could result in serious injury or
death if an occupant were to fall out
of the vehicle. Occupants in the
vehicle will also not have full
protection in a collision. Always be
sure the doors completely close before
you shift into gear and move the
vehicle.
*Some models.
3-13
Page 97

Knowing Your Mazda
Doors and Locks
WARNING
Children and the Power Sliding Door
Switches:
Allowing children to operate the
power sliding door switches and the
keyless entry system is dangerous.
Children are not aware of the dangers
of people getting fingers and hands
caught in moving doors. Never allow
children to operate the power sliding
door system.
Open Windows and Power Sliding
Doors:
It is dangerous to stick your head or
hands out the power sliding door
windows while the doors are opening/
closing. A head or hands could be
caught resulting in serious injury.
Never stick your head or hands out
the power sliding door windows.
Entering or Exiting the Vehicle
Parked on a Steep Downward Slope:
Entering or exiting a vehicle parked
on a steep downward slope before the
door has completely opened is
dangerous. The door could
unexpectedly move down resulting in
serious injury. Make sure that the
door has completely opened before
exiting or entering the vehicle on a
steep downward slope.
NOTE
Do not apply unnecessary force to
•
the doors when they are opening/
closing electrically. Unnecessary
force on the doors may cause them
to reverse direction of movement
automatically.
When the vehicle is parked on a
•
slope, electrical opening/closing of
the doors may not operate. When
the doors cannot be opened/closed
electrically, press the power sliding
doors main switch to the OFF
position and open/close the doors
manually.
If there is a malfunction in the
•
power sliding door system, a beep
sound will be heard continuously. If
this happens, press the power
sliding doors main switch to the
OFF position and the beep sound
will stop. Consult an Authorized
Mazda Dealer to have the power
sliding doors checked.
The power sliding doors will not
•
operate unless they are unlocked,
and the power sliding doors main
switch is in the ON position.
The sliding doors can be opened
•
using the power sliding door
switches located at the driver’s seat,
the transmitter, or the exterior door
handles even when the child safety
locks are in the lock position (page
3-12).
The fuel-filler lid does not open
•
when the left power sliding door is
opening.
3-14
Page 98

Knowing Your Mazda
Doors and Locks
NOTE
The left power sliding door cannot
•
fully open when the fuel-filler lid is
open. To fully open the left power
sliding door in this situation, carry
out the following procedure:
1. Close the left power sliding door.
2. Close the fuel-filler lid.
3. Open the left power sliding door.
When the ABS warning light
•
remains illuminated, the power
sliding doors cannot be opened
electrically (page 5-29).
Opening/Closing with Switches
1. Bring the vehicle to a complete stop.
2. Put the shift lever in park (P).
3. Set the parking brake.
4. Unlock the sliding doors.
5. Look to be sure that the area around the
door is clear of people.
6. Press the power sliding doors main
switch to the ON position.
If you attempt to operate the vehicle in
any way other than the above conditions
(except step 4) while the power sliding
doors are opening/closing electrically, the
beep sound will be heard. Moreover, a
door that is sliding open will stop.
When the above conditions are satisfied,
you can resume power sliding door open/
close operation with the switches.
Operation from the driver’s seat
Operate the left/right power sliding door
switch to open/close the left/right door.
When either power sliding door switch is
pressed for 1 second or more, the door
controlled by that switch will open/close
automatically after the beep sound is
heard.
Left and right power
sliding door switches
NOTE
If a power sliding door switch is
•
pressed again while the beep sound
is being heard, the operation can be
canceled.
Press a power sliding door switch to
•
stop the power sliding doors while
they are opening/closing.
3-15
Page 99

Knowing Your Mazda
Doors and Locks
Operation from the rear seats
When the power sliding doors are
completely closed/open and either rear
power sliding door switch is pressed for 1
second or more, the door where the switch
was pressed opens/closes automatically
after the beep sound is heard.
NOTE
When a power sliding door is not
completely closed and a rear power
sliding door switch is pressed for 1
second or more, the door completely
opens automatically.
Right power sliding
door switch
NOTE
If a rear power sliding door switch
•
is pressed again while the beep
sound is being heard, the operation
can be canceled.
Press a rear power sliding door
•
switch to stop the power sliding
doors while they are opening/
closing.
Opening/closing with door handles
When the power sliding doors are
completely closed and a door is slid by the
handle slightly in the direction of
opening, the door completely opens
automatically after the beep sound is
heard.
Exterior door handle
3-16
Left power sliding
door switch
Interior door handle
Page 100

Knowing Your Mazda
Doors and Locks
When the doors are completely open and
a door is slid by the handle 5 cm (2 in) in
the direction of closing, the doors will
completely close automatically after the
beep sound is heard.
Jam-safe equipment
While a door is opening/closing
electrically and the system detects a
person or an object in the sliding door’s
path, the door will slide in the reverse
direction automatically.
WARNING
When the power sliding doors are sliding
in the opening direction and an
obstruction is detected in its path, the
beep sound will be heard and the doors
slide in the opposite direction
approximately 10 cm (4 in) and stop.
When the doors are sliding in the closing
direction and an obstruction is detected,
the beep sound will be heard and the
doors open completely.
NOTE
If the power sliding door system
repeatedly detects an obstruction in the
open/close directions for a number of
times, the door will be stopped.
Power sliding doors main switch
When the power sliding doors main
switch is pressed to the OFF position,
electrical open/close operation is not
possible. The power sliding doors can still
be opened/closed manually.
Power sliding
doors main switch
Check Area Around Power Sliding
Doors Before Operating:
Not checking for occupants and
objects around a power sliding door
before opening/closing it is
dangerous. The jam-safe equipment
is designed to prevent jamming in the
event an obstruction is in the sliding
door’s path. However, if the jam-safe
function detects an obstruction and
slides the door in the reverse
direction, an occupant in the door’s
path could be seriously injured.
Always check the area around the
power sliding doors before opening/
closing them.
ON
OFF
3-17
 Loading...