

Page 1

Table of contents
1 Warnings and Safety information .......................................................................... 6
2 Getting started ......................................................................................................... 7
2.1 Before using the navigation system .................................................................................. 7
2.2 Navigation menu .............................................................................................................8
2.3 Buttons and other controls on the screen ........................................................................9
2.3.1 Using keyboards .....................................................................................................................9
2.3.2 Press and Hold .........................................................................................................................9
2.4 Map screen ....................................................................................................................10
2.4.1 Navigating on the map ..........................................................................................................10
2.4.2 Position markers ...................................................................................................................11
2.4.2.1 Selected map location (Cursor) and selected map object ............................................................ 11
2.4.3 Objects on the map ...............................................................................................................11
2.4.3.1 Streets and roads ........................................................................................................................... 11
2.4.3.2 Turn preview and Next street ........................................................................................................12
2.4.3.3 Lane information and Signposts ................................................................................................... 13
2.4.3.4 Junction view .................................................................................................................................14
2.4.3.5 Highway/Freeway exit services .................................................................................................... 14
2.4.3.6 Elements of the active route .......................................................................................................... 15
2.4.4 Manipulating the map ............................................................................................................16
2.4.5 Checking the details of the current position (Where Am I?) ................................................18
3 On-road navigation ............................................................................................... 19
3.1 Selecting the destination of a route ...............................................................................19
3.1.1 Entering an address or a part of the address ..........................................................................20
3.1.1.1 Entering an address ......................................................................................................................20
3.1.1.2 Entering the midpoint of a street as the destination ..................................................................... 23
3.1.1.3 Selecting an intersection as the destination ................................................................................. 25
3.1.1.4 Selecting a city center as the destination ...................................................................................... 27
3.1.2 Selecting the destination from the POI (point of interest) .....................................................29
3.1.2.1 Quick search for a POI (point of interest) ..................................................................................... 29
3.1.2.2 Searching for Help nearby ............................................................................................................ 32
3.1.2.3 Searching for a POI (point of interest) by category ...................................................................... 33
3.1.2.4 Searching for a POI (point of interest) by name ............................................................................ 36
3.1.3 Searching for a Place using Local Search (Only some countries and regions) .....................39
3.1.4 Selecting a map location as the destination ..........................................................................40
3.1.5 Selecting the destination from your Favorites ......................................................................42
3.1.6 Selecting a recent destination from the History .................................................................... 43
3.1.7 Entering the coordinate of the destination ............................................................................44
3.2 Checking route parameters and accessing route related functions ...............................46
3.3 Modifying the route ........................................................................................................47
3.3.1 Selecting a new destination when already having a route:
New Route, Waypoint or Final Destination ...........................................................................47
3.3.2 Editing the list of destinations (Edit Route) ..........................................................................48
3.3.3 Checking route alternatives when planning the route ...........................................................49
3
Page 2

3.3.4 Changing the road types used in route planning ................................................................... 50
3.4 Saving a location as a Favorite destination ..................................................................51
3.4.1 Editing the details of a Favorite destination .........................................................................51
4 Reference Guide ..................................................................................................... 52
4.1 Concepts ........................................................................................................................52
4.1.1 Smart Zoom ..........................................................................................................................52
4.1.2 Route calculation and recalculation ......................................................................................52
4.1.3 Road safety cameras and other proximity alert points (Only some countries and regions) ..53
4.1.4 Speed limit warning (Only some countries and regions) .......................................................54
4.1.5 Traffi c information in route planning (Only some countries and regions) ............................54
4.1.5.1 Historical traffi c ............................................................................................................................ 54
4.1.5.2 Online traffi c information (Only some countries and regions)...................................................... 55
4.2 Settings menu .................................................................................................................56
4.2.1 Guidance Settings ..................................................................................................................57
4.2.2 Warning S ettings ....................................................................................................................57
4.2.3 Traffi c settings .......................................................................................................................58
4.2.4 Route settings ........................................................................................................................59
4.2.5 Map settings ..........................................................................................................................60
4.2.6 Visual Guidance settings .......................................................................................................61
4.2.7 Connected Settings (Only some countries and regions) ........................................................61
5 Wi-Fi™ (Only some countries and regions) ........................................................ 62
5.1 What is Wi-Fi™*? ..........................................................................................................62
5.2 Connecting to Wi-Fi™ ...................................................................................................63
5.2.1 Turning Wi-Fi™ on................................................................................................................63
5.2.2 Adding a network ...................................................................................................................63
5.2.3 Stopping connection to network ............................................................................................64
6 Glossary ................................................................................................................. 65
7 End-User Terms...................................................................................................... 67
4
Page 3

Page 4

1 Warnings and Safety information
The navigation system guides you to your destination using the GPS receiver. The navigation
system does not transmit your GPS position and you cannot be tracked.
It is important that you look at the display only when it is safe to do so. If you are the
driver of the vehicle, we recommend that you operate the navigation system before you
start your journey. Plan the route before your departure and stop if you need to change
the route.
Drive the vehicle according to the road signs and the road shape. If you deviate from the
recommended route, the navigation system changes the instructions accordingly.
For more information, consult the End-User Terms (page 67).
6
Page 5
2 Getting started
2.1 Before using the navigation system
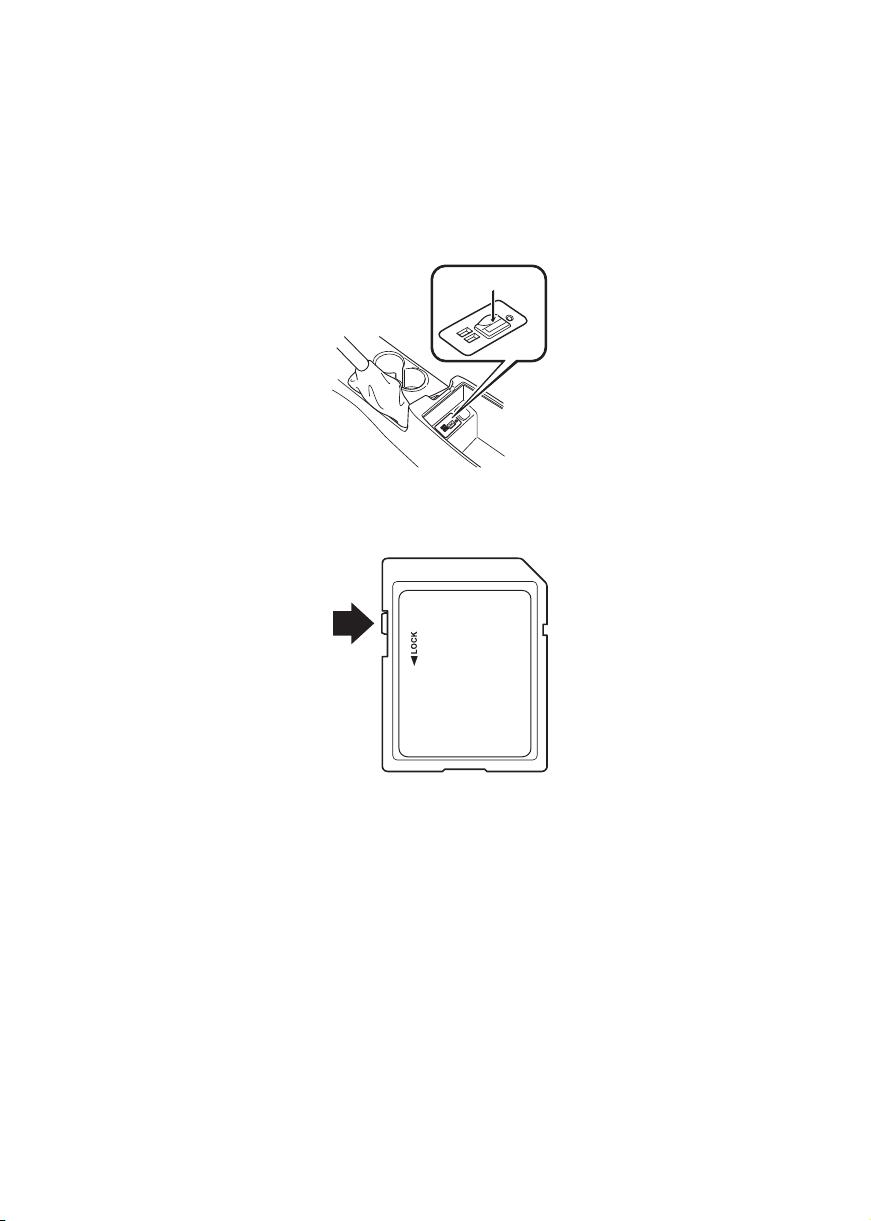
To use the navigation system, the SD card containing the map information needs to be inserted
in the SD card slot.
SD card slot
When inserting the SD card, never move the slider on the side of the SD card to the LOCK
position. If the slider is set to LOCK, the SD card cannot be read and the navigation system will
not operate.
This SD card is valid for use in only one vehicle. Never use it in another vehicle. If the SD card
is used fi rst in one vehicle and then in another, the navigation system for either one of the
vehicles may become inoperable.
7
Page 6
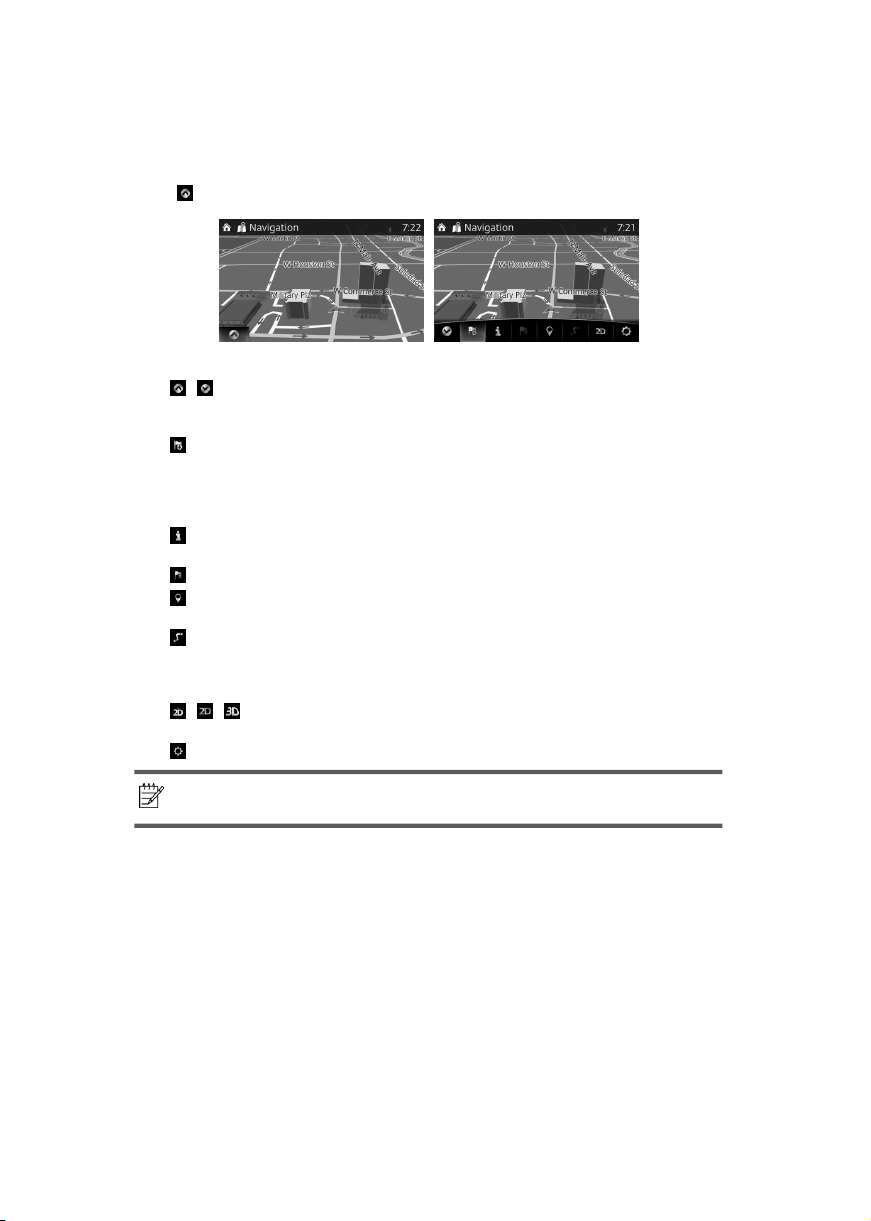
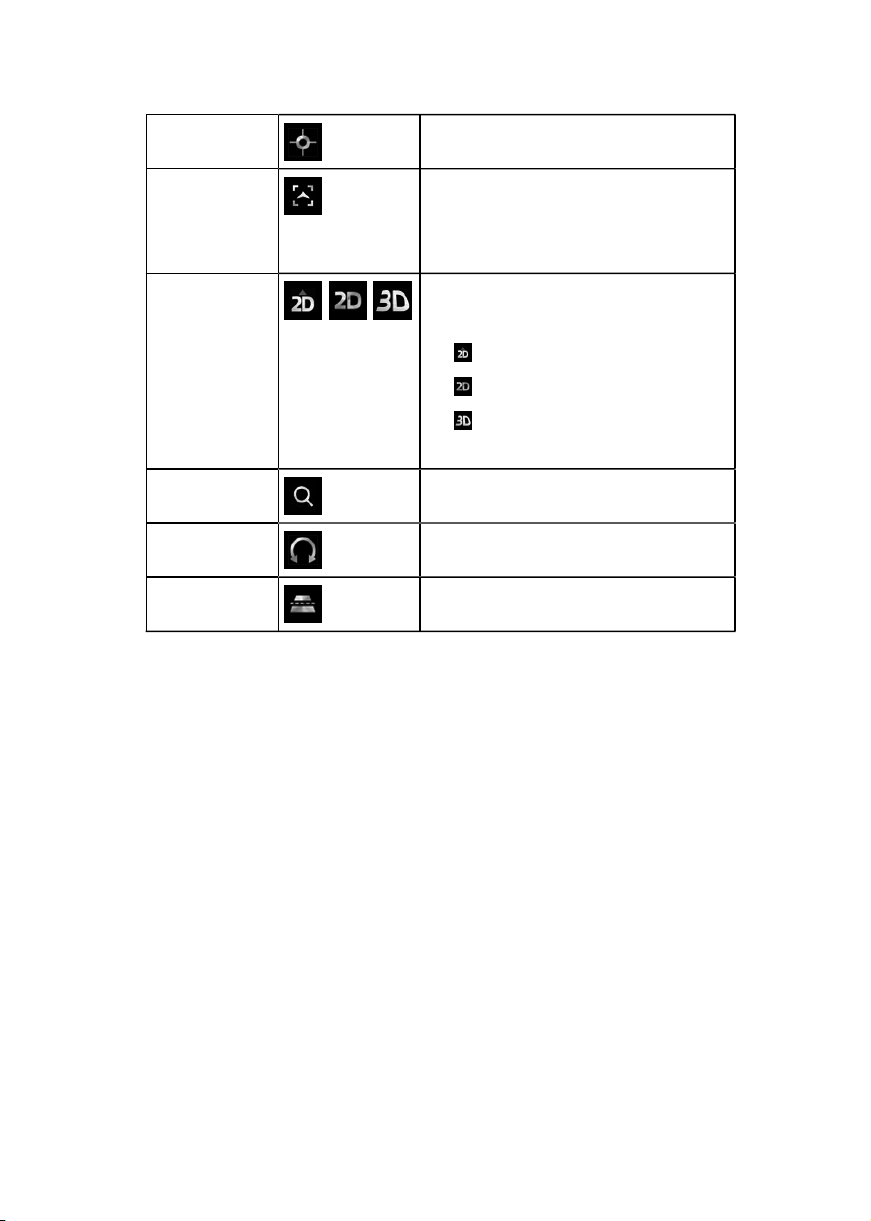
2.2 Navigation menu
You can reach all parts of the navigation system from the Navigation menu.
Select
and open the navigation menu.
You have the following options:
•
/ : Open/close
Opens and closes the UMP (menu bar).
The UMP (menu bar) is displayed on the lower part of the screen.
•
: Adds a destination.
Select your destination by entering an address or selecting a POI (point of interest), a
location on the map or one of your Favorite destinations. You can also look up your recent
destinations from the Smart History by entering the coordinates. If an Internet connection
is available, Local Search can be of further help to fi nd your destination.
•
: Displays the screen where traffi c information and the GPS reception conditions can
be set and verifi ed.
•
: Cancels waypoint/route
•
: Finds Places nearby
You can search for points of interest (POI) near the vehicle position.
•
: Displays the route parameters and the route in its full length on the map. You can
also perform route-related actions such as editing or canceling your route, picking route
alternatives, avoiding parts of the route, simulating navigation or adding the destination to
your Favorites.
•
/ / : Changes View mode
The map view mode can be changed (2D north up/2D heading up/3D).
•
: Switches to the Settings screen where you change navigation settings.
Note!
Some functions are not available depending on some countries and
regions.
8
Page 7
2.3 Buttons and other controls on the screen
2.3.1 Using keyboards
You only need to enter letters or numbers when you cannot avoid it. You can type with your
fi ngertips on the full-screen keyboards and you can switch between various keyboard layouts,
for example English, Greek or numerical.
Task Instruction
Correcting your entry on the
keyboard
Entering a space, for
example between a fi rst
name and a family name or
in multi-word street names
Entering upper and lower
case letters
Finalizing the keyboard entry
Canceling the keyboard
entry (returning to the
previous screen)
Select
hold the button to delete several characters or the entire input
string.
Select the
of the screen.
When entering a text, the fi rst character appears in upper case
while the rest of the text is in lower case. Select
upper case letter or select twice to turn on Caps Lock. Select
again and lower case letters return.
Select
• Accepting the suggested search result
• Saving your input
Select
• Opening the list of search results
Select
to remove the unneeded character(s). Select and
button at the bottom center
to enter an
.
.
.
2.3.2 Press and Hold
You usually need to select the screen only once, however, some useful features can be
accessed with combined touch screen selecting. Those are as follows:
Action Button(s) Details
Continue
pressing the
button.
,
,
,
Touching the button on the map screen once changes
the scale in one step. Continuously touching the button
changes the scale sequentially.
Touching the button on the map screen once changes
the point of view in one step. Continuously touching the
button changes the point of view sequentially.
Touching the button on the map screen once rotates the
map. Continuously touching the button rotates the map
sequentially.
Touching the button on the keyboard screen once erases
one character. Continuously touching the button erases
several characters rapidly.
9
Page 8
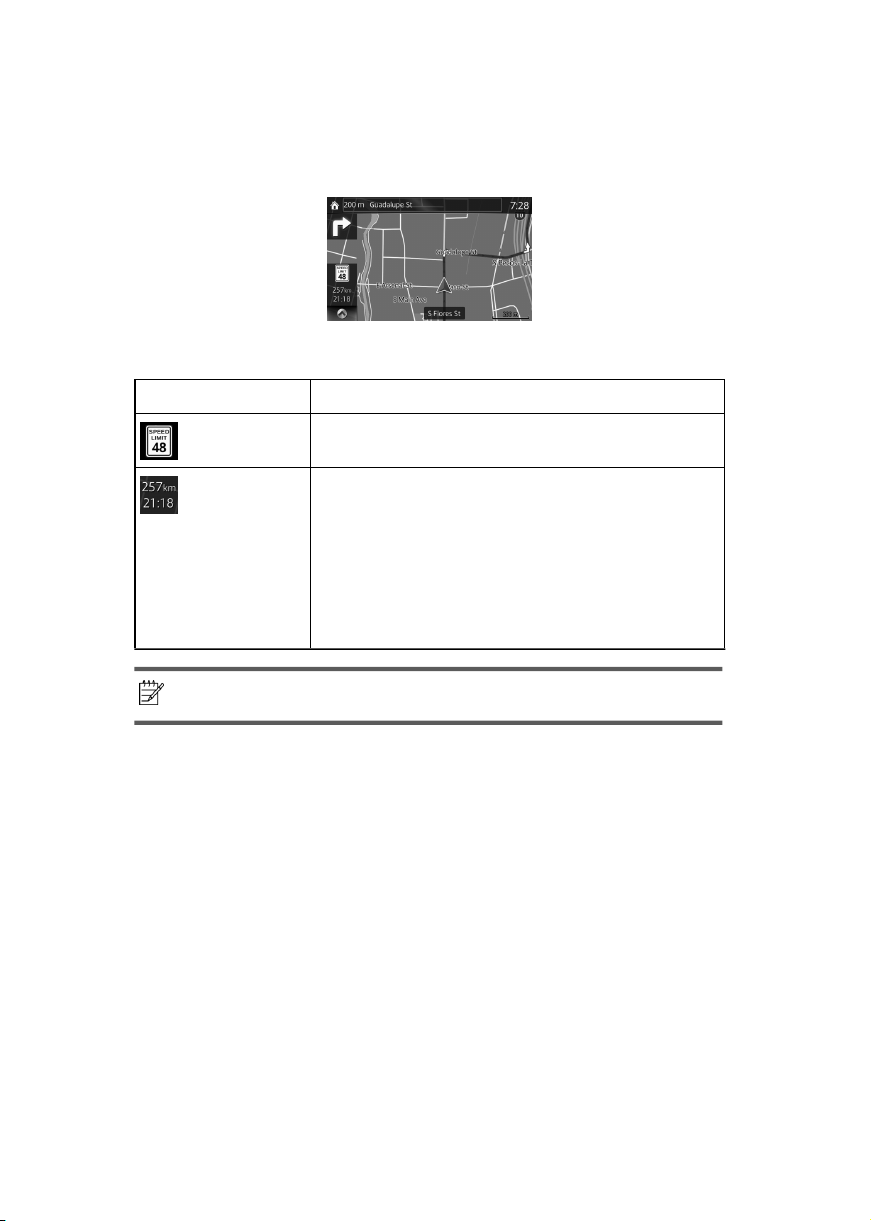
2.4 Map screen
2.4.1 Navigating on the map
The data fi elds are different when you are navigating an active route and when you have no
specifi ed destination (the burgundy line is not displayed).
Field Description
Shows the speed limit of the current road if the map contains it.
Note!
Shows the distance you need to travel on the route before
reaching your fi nal destination.
Shows the estimated arrival time at the fi nal destination of the
route.
If the navigation system is capable of receiving live traffi c
information, the calculation takes into account traffi c delays
affecting your route.
This estimation can be inaccurate at times.
Some functions are not available depending on some countries and
regions.
10
Page 9

2.4.2 Position markers
2.4.2.1 Selected map location (Cursor) and selected map object
You can mark a map location in the following ways:
• Select the map during route guidance.
• Select the map when asked so that the destination can be confi rmed after the search is
completed.
• Select the destination from the map. (page 40)
When a map location is selected, the Cursor appears at the selected point on the map. A
symbol
scale size.
The location of the Cursor can be used as the destination of the route.
You can search for a POI (point of interest), or you can save it as one of your Favorites
destinations.
You can also select some of the objects on the map. If you select the map at the icon of a POI
(point of interest) or a traffi c event, the object will be selected. You can then get information
about this object or use it as a route point.
with a combined crosshair and red circle is displayed for easy visibility of any map
Note!
Some functions are not available depending on some countries and
regions.
2.4.3 Objects on the map
2.4.3.1 Streets and roads
The navigation system shows the roads in different widths and colors so that they can be easily
identifi ed. A highway/freeway will be thicker and a different color than a small street.
11
Page 10
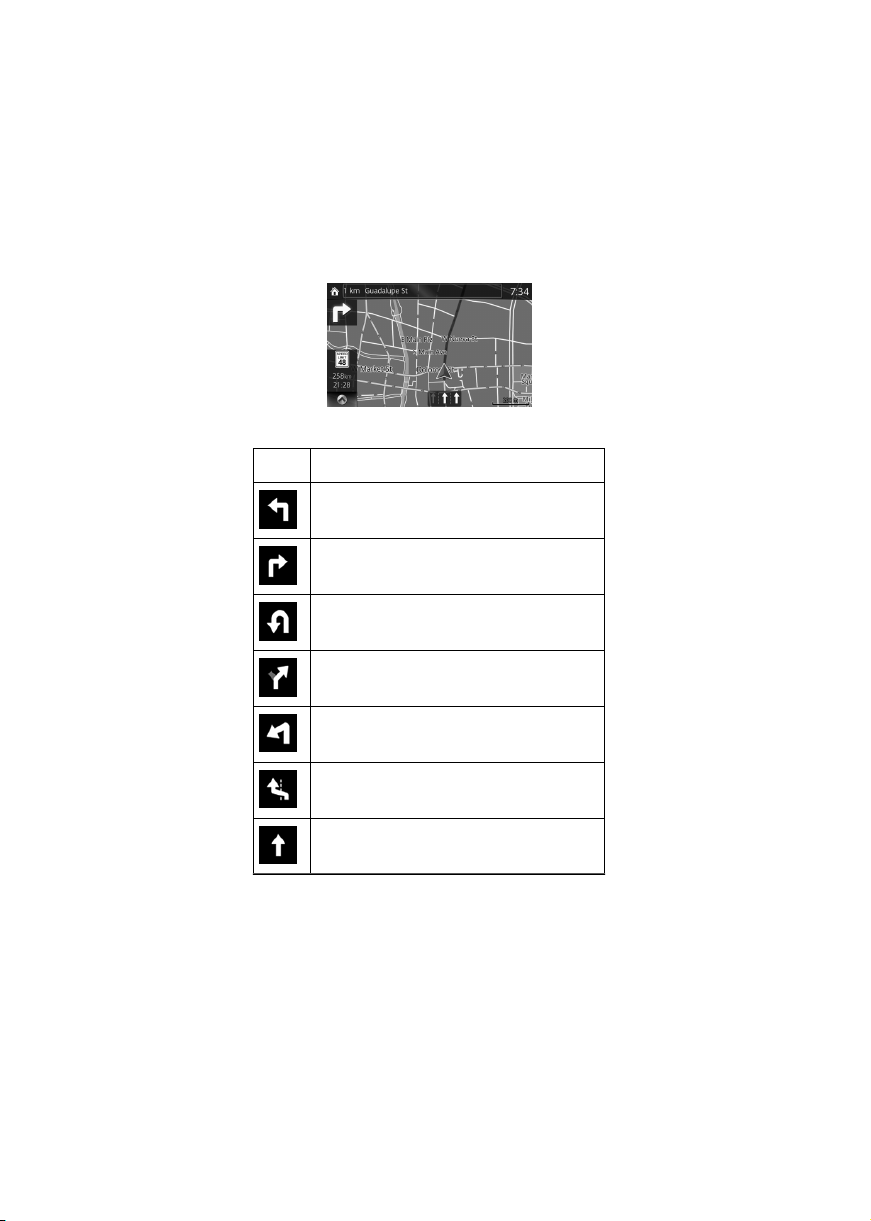
2.4.3.2 Turn preview and Next street
When navigating a route, the top section of the Map screen shows information about the next
maneuver, street or city.
There is an area at the top left part of screen which indicates the next operation. Displays both
the event type (such as turning, detouring, exiting expressways) and the distance from the
current position.
When the next event approaches, the second event is displayed using a small icon. If there is
no second event, only the next event is displayed.
Most of these icons are very intuitive. The same symbols are used in both fi elds:
Icon Description
Turn left.
Turn right.
Turn back.
Bear right.
Turn sharp left.
Keep left.
Continue straight in the intersection.
12
Page 11
Go left on the roundabout, 3rd exit (next
maneuver).
Enter highway/freeway.
Exit highway/freeway.
Board ferry.
Leave ferry.
Approaching a waypoint.
Approaching the destination.
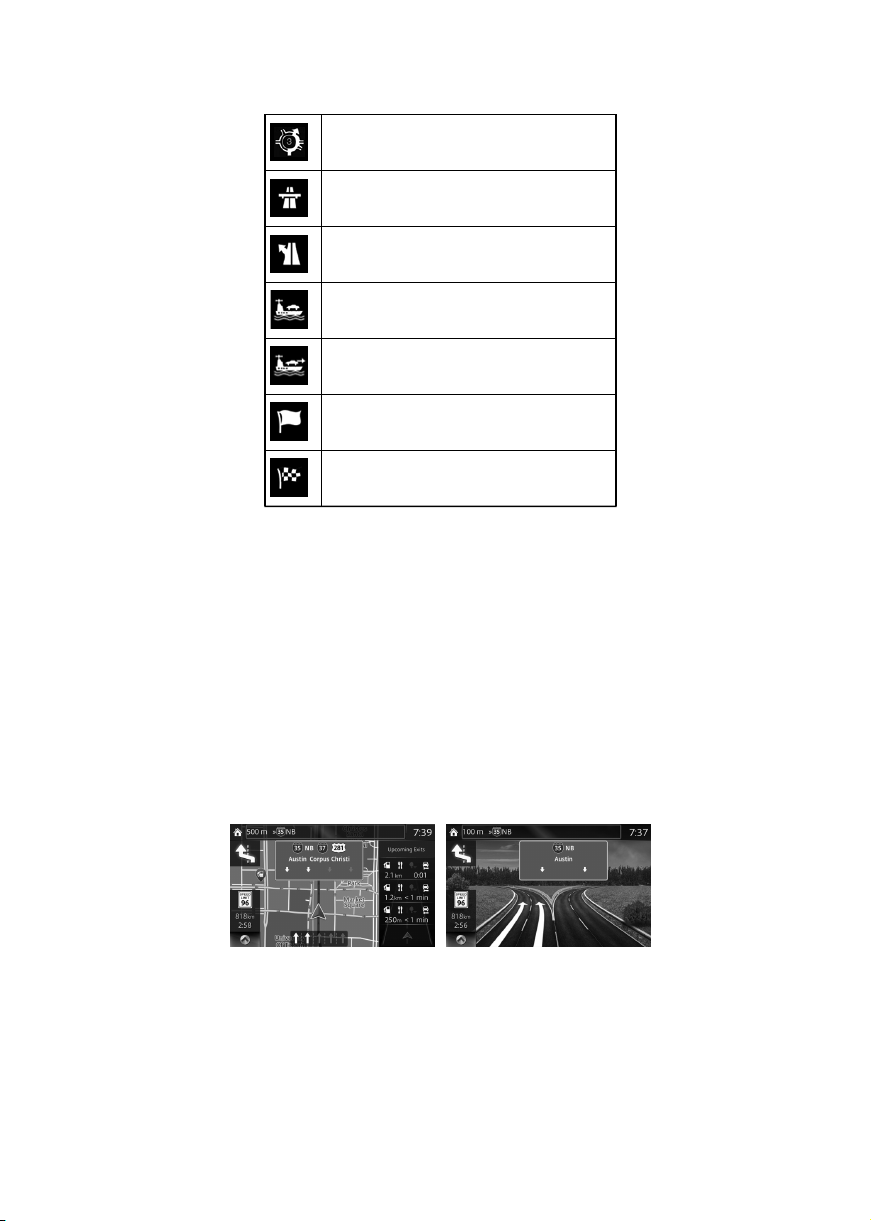
2.4.3.3 Lane information and Signposts
When navigating on multilane roads, it is important to take the appropriate lane in order to
follow the recommended route. If lane information is available in the map data, the navigation
system displays the lanes and their directions using small arrows at the bottom of the map.
Highlighted arrows represent the lanes and direction you need to take.
Lane guidance is provided constantly if there is map information. Signposts are displayed at the
top of the map. The color and style of the signposts are similar to the real ones you see above
road or by the roadside. They show the available destinations and the number of the road the
lane leads to.
When navigating a route, only the signpost that points to the lane(s) to be taken is displayed
in bright colors; all others are darker. All signposts and lane guidance arrows are displayed in
vivid colors while driving (when there is no recommended route).
If you want to hide the currently displayed signposts, touch anywhere and the normal Map
screen returns until new signpost information is received.
13
Page 12

2.4.3.4 Junction view
If you are approaching a highway/freeway exit or a complex intersection and the needed
information exists, the map is replaced with a 3D view of the junction. The optimum driving lane
is indicated by an arrow, and road signs are displayed as additional information at the top of the
screen.
2.4.3.5 Highway/Freeway exit services
You may need a gasoline station or a restaurant during your journey. This feature displays a
new button on the map when you are driving on highways/freeways.
Select this Open button to open a panel with the details of the next few exits or service stations.
Applicable only when the setting is “Only when menu is open”.
Select any of them to display the exit area on the map. You can now easily add this exit as a
waypoint to your route if needed.
There are two types of settings for displaying the next expressway exit; one which constantly
displays the next expressway exit while traveling on an expressway, or the other which displays
the next expressway exit only when the menu panel is open.
You can change the settings in Visual Guidance settings (page 61).
14
Page 13
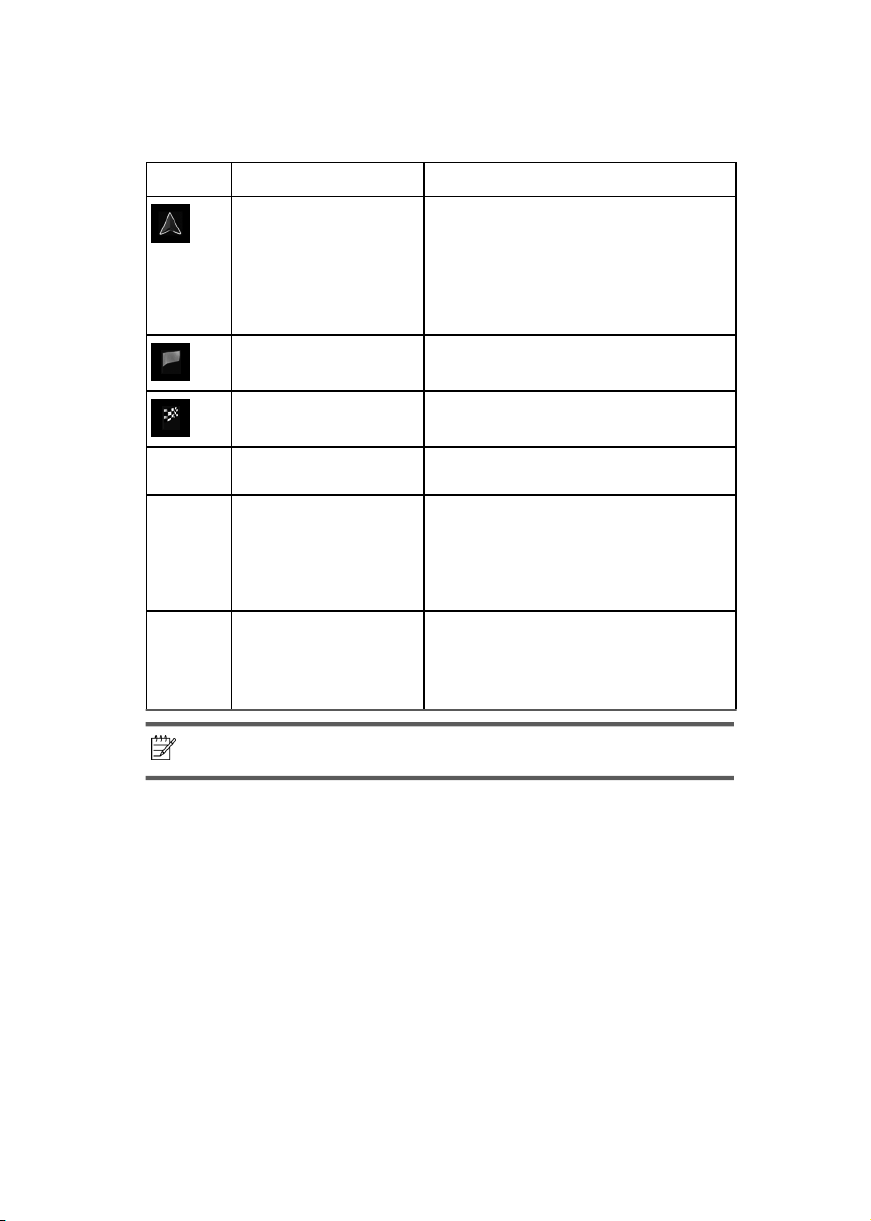
2.4.3.6 Elements of the active route
The navigation system shows the route in the following way:
Symbol Name Description
Current car position marker If there is a road close by, a blue-colored arrow
Waypoint (intermediate
destination)
Destination (end point) The fi nal destination of the route.
symbol moves to the road which is the closest.
The red mark present around a blue-colored
arrow symbol indicates the correct GPS
information. It may be indicated away from
the road because there is no existing road
information.
An intermediate destination of the route before
reaching the fi nal destination.
Note!
Route color The route always stands out with its color on the
Streets and roads that are
excluded from the navigation
Streets and roads that are
affected by traffi c events
Some functions are not available depending on some countries and
regions.
map, both in daytime and in nighttime mode.
You can choose whether you want to use or
avoid certain road types (page 59). However,
when the navigation system cannot avoid such
roads, the route will include them and it will
show them in a color that is different from the
route color.
Road segments may be affected by traffi c
events received. These streets and roads
are displayed in an alternate color, and small
symbols displayed along the route show the
type of traffi c event.
15
Page 14
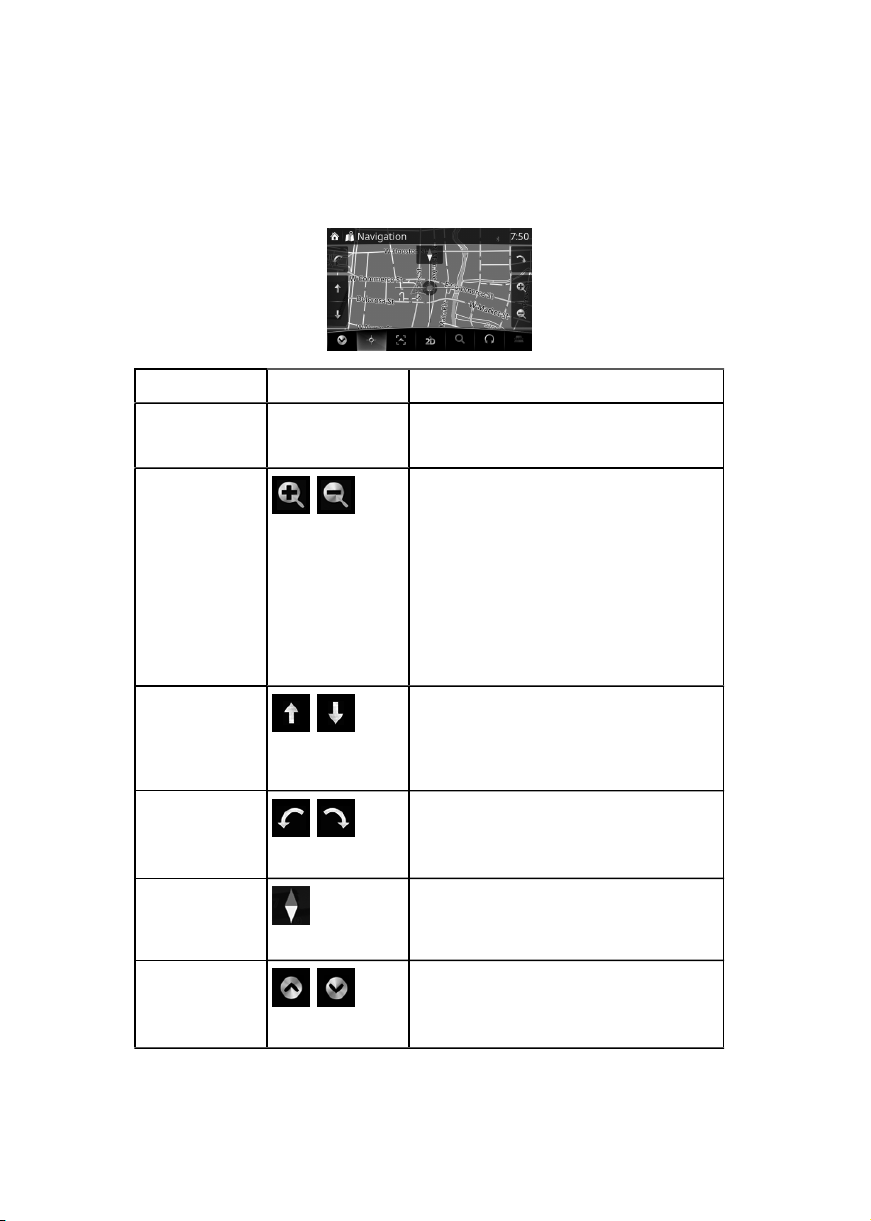
2.4.4 Manipulating the map
By touching and dragging any part of the map screen, it can be moved to a location close to
the currently displayed map.
In addition, the map operation button is displayed, and by touching each of the buttons, you
can zoom in and out of maps, change the map perspective and select a destination.
Action Button(s) Description
Map movement
using touch and
drag
Zooming in and out
Tilting up and down
Rotating left and
right
Compass
Open/close
No buttons You can move the map in any direction: select
,
,
,
,
and hold the map, and move your fi nger towards
the direction you want to move the map.
Changes how much of the map is displayed on
the screen.
The navigation system uses high-quality vector
maps that let you examine the map at various
zoom levels, always with optimized content.
Map scaling has a limit in 3D map view mode.
If you zoom out further, the map switches to 2D
view mode.
Select the button once to modify the view in large
steps, or select and hold the button to modify it
continuously and smoothly.
Changes the vertical view angle of the map in 3D
mode.
Select the button once to modify the view in large
steps, or select and hold the button to modify it
continuously and smoothly.
Changes the horizontal view angle of the map.
Select the button once to modify the view in large
steps, or select and hold the button to modify it
continuously and smoothly.
The direction of the compass shows North.
Select the button to switch to North-up view,
and then select again to rotate the map in the
previous direction.
The UMP (menu bar) is displayed on the lower
part of the screen.
Hides the displayed UMP if the UMP has been
displayed.
16
Page 15
Select destination
Select this button to select the Cursor as a new
destination. The route is automatically calculated.
Return to normal
navigation
2D or 3D view
Zoom-in/zoom-out
mode
Rotate mode
Perspective angle
mode
, ,
Select this button to move the map back to follow
the current GPS position. Automatic map rotation
is also re-enabled.
The map manipulation buttons disappear and
navigation continues.
When this button is selected, the map view mode
can be changed.
: The map is displayed so that north is up
•
regardless of the direction of travel.
•
: The map is rotated so that the direction
of travel is displayed in the upward direction.
•
: Displays things such as actual
construction sites three dimensionally on the
map.
You can zoom-in/zoom-out of maps.
Rotates maps.
You can change the angle of perspective on a
map.
17
Page 16

2.4.5 Checking the details of the current position (Where Am I?)
This screen contains information about the current position (or about the last known position if
GPS reception is not available).
You can access this screen from the map in one of the following ways:
1. Select
2. Select the Where Am I? screen.
after selecting on the MAP screen.
18
Page 17

3 On-road navigation
You can set up your route in different ways:
If you need a route for immediate navigation, you can select the destination and start navigating
to it right away (normal navigation).
You can plan routes with multiple destinations. Select the fi rst destination. Then select a
second destination and add it to your route to create a multi-point route. You can add as many
destinations to your route as you like.
3.1 Selecting the destination of a route
The navigation system offers you several ways of choosing your destination:
• Enter a full address or a part of an address (page 20).
• Select a POI (point of interest) from a database as your destination (page 29).
• Searches the destination from the map (page 40).
• Use a previously saved Favorite destination (page 42).
• Select a location from the History of previously used destinations (page 43).
• Enter the coordinate of the destination (page 44).
Note!
There are other convenient functions.
19
Page 18
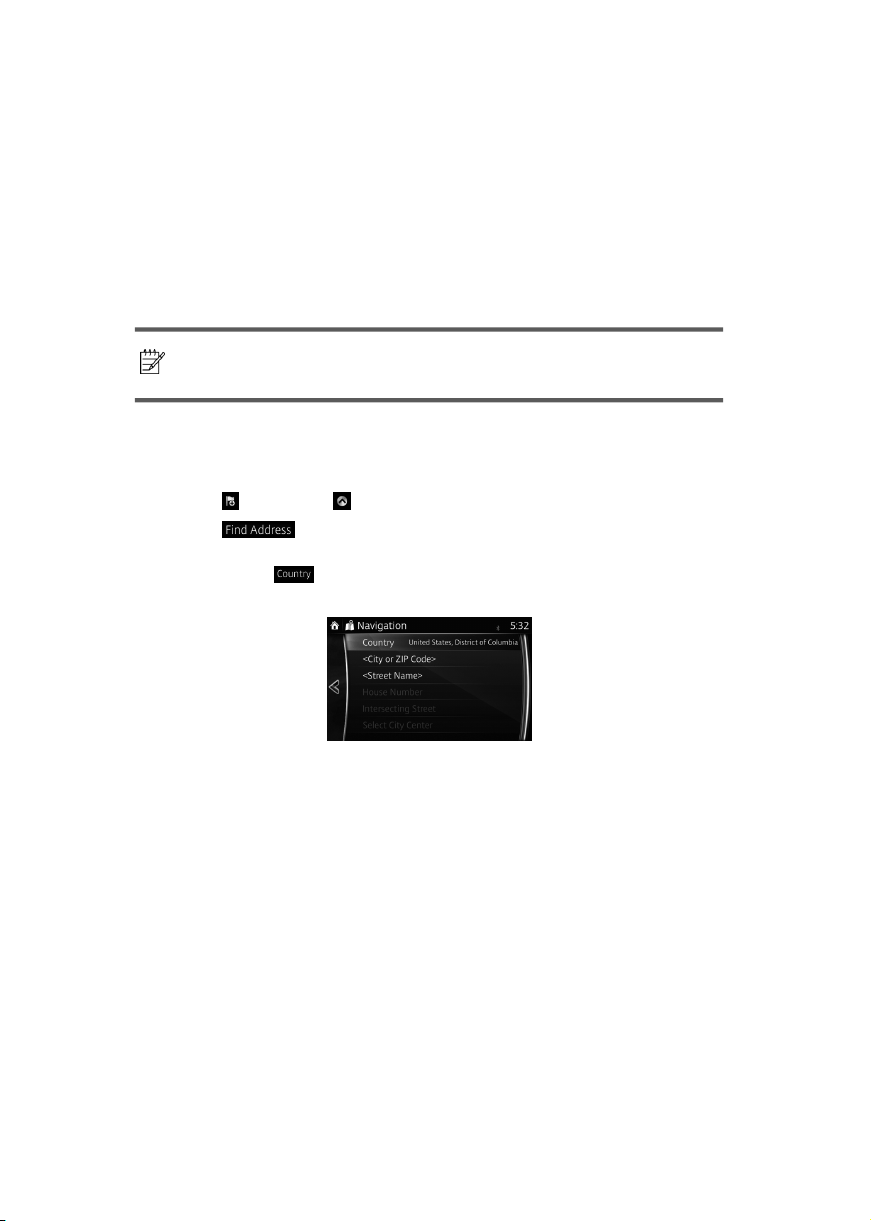
3.1.1 Entering an address or a part of the address
If you know at least a part of the address, it is the quickest way to select the destination of the
route.
Using the same screen, you can fi nd an address by entering:
• Destination address
• The center of a city
• An intersection
• The midpoint of a street
Note!
If an address or part of a facility name is input, a search candidate list
including the input characters is displayed. The greater the number of
characters input the more the list is refi ned.
3.1.1.1 Entering an address
To enter an address as the destination, do as follows:
1. Select
2. Select
3. By default, the navigation system proposes the country and city where you are. If
after selecting on the MAP screen.
.
needed, select
and select one country from the list of results.
, enter the fi rst few letters of the country name on the keyboard,
20
Page 19
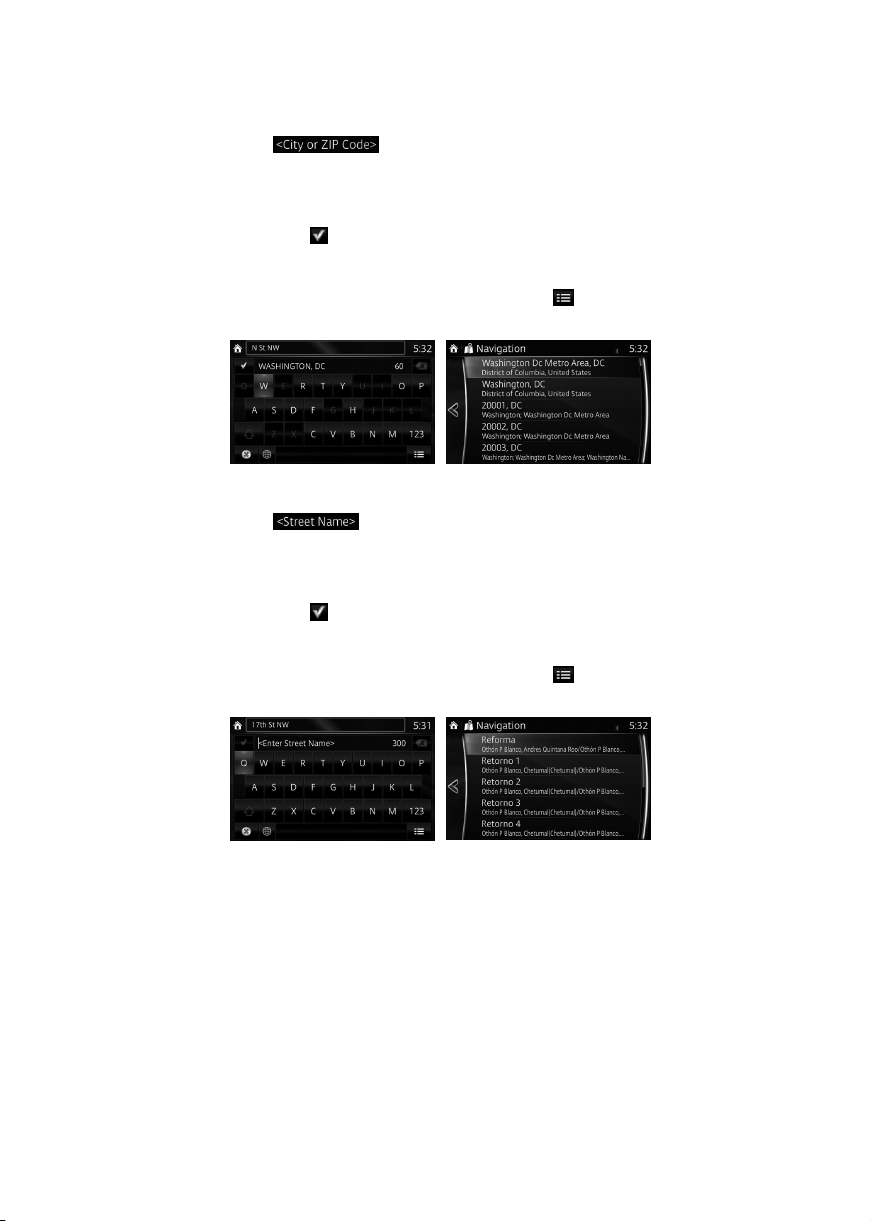
4. If needed, select a new city:
a. Select
b. Start entering the name of the city on the keyboard.
c. Find the city you need:
• The most likely city name is always shown in the input fi eld. To accept it,
select .
• If the desired name does not show up, the names that match the string
appear in a list after entering a couple of characters (to open the list of
results before it appears automatically, select
list.
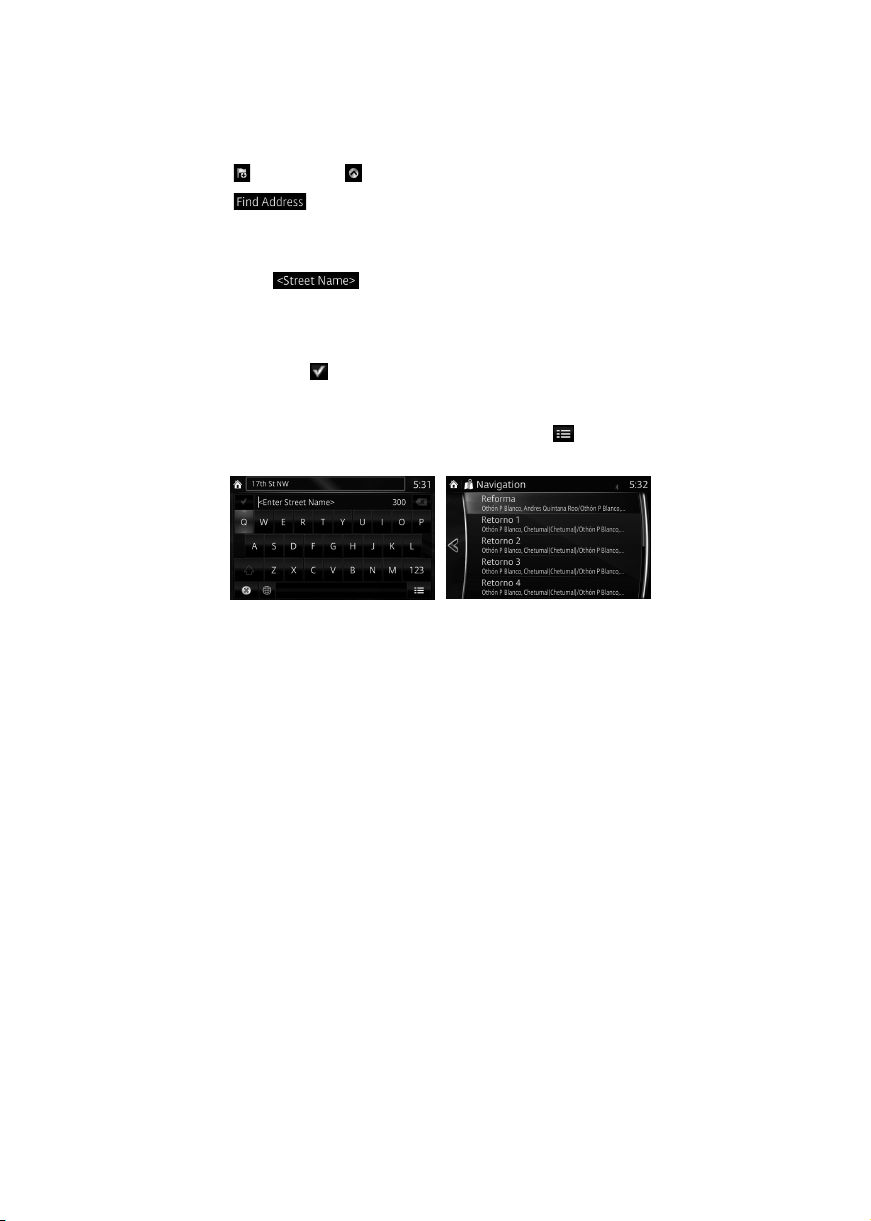
5. Enter the street name:
a. Select
b. Start entering the street name on the keyboard.
c. Find the street you need:
• The most likely street name is always shown in the input fi eld. To accept it,
select .
• If the desired name does not show up, the names that match the string
appear in a list after entering a couple of characters (to open the list of
results before it appears automatically, select
the list.
.
.
). Select the city from the
). Select the street from
21
Page 20
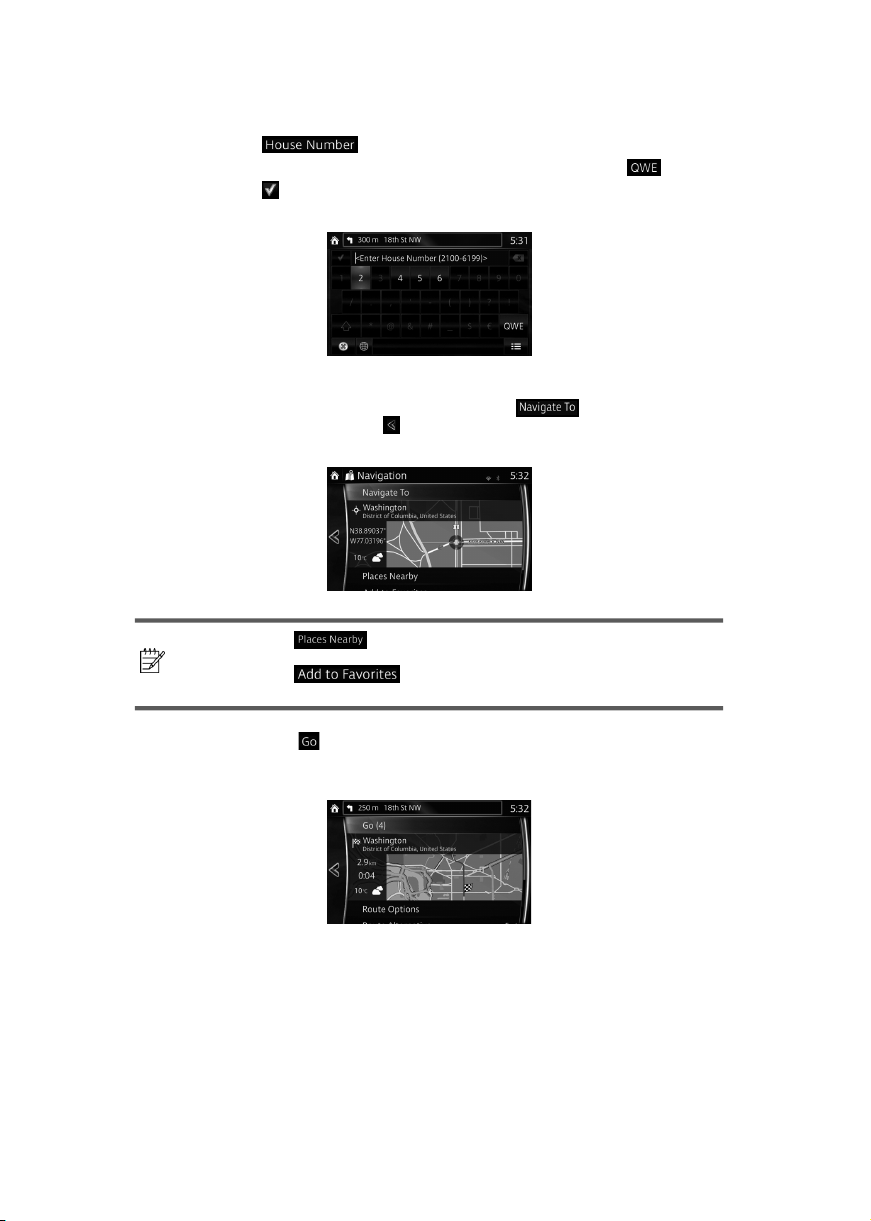
6. Enter the house number:
a. Select
b. Enter the house number on the keyboard. (To enter letters, select
c. Select
to fi nish entering the address. (If the entered house number cannot be
found, the midpoint of the street is selected as the destination.)
.
.)
7. The selected location is shown on the map.
The system transitions to the next screen by selecting
previous screen by selecting the
screen, you can change the destination to anywhere on the map.
•
Note!
8. Navigation starts if
By touching the location displayed on the screen, you can verify the route. Additionally,
the route can be revised by selecting other options.
selected location.
•
Favorites.
is selected, or after 10 seconds of no user interaction.
button. By touching the location displayed on the
: You can search for POI (point of interest) around the
: The selected location can be registered to
, or it returns to the
22
Page 21
3.1.1.2 Entering the midpoint of a street as the destination
You can navigate to the midpoint of a street if the house number is not available:
1. Select
2. Select
3. If necessary, modify the country and city as described earlier (page 20).
4. Enter the street name:
after selecting on the MAP screen.
.
a. Select
b. Start entering the street name on the keyboard.
c. Find the street you need:
• The most likely street name is always shown in the input fi eld. To accept it,
select
• If the desired name does not show up, the names that match the string
appear in a list after entering a couple of characters (to open the list of
results before it appears automatically, select
the list.
.
.
). Select the street from
23
Page 22

5. Instead of entering the house number, select
selected as the destination.
. The midpoint of the street is
6. The selected location is shown on the map.
The system transitions to the next screen by selecting
previous screen by selecting the
screen, you can change the destination to anywhere on the map.
• : You can search for POI (point of interest) around the
Note!
7. Navigation starts if
By touching the location displayed on the screen, you can verify the route. Additionally,
the route can be revised by selecting other options.
selected location.
•
Favorites.
is selected, or after 10 seconds of no user interaction.
button. By touching the location displayed on the
: The selected location can be registered to
, or it returns to the
24
Page 23

3.1.1.3 Selecting an intersection as the destination
To enter an address as the destination, do as follows:
1. Select
2. Select
3. If necessary, modify the country and city as described earlier (page 20).
4. Enter the street name:
5. Enter the intersecting street name:
after selecting on the MAP screen.
.
a. Select
b. Start entering the street name on the keyboard.
c. Find the street you need:
• The most likely street name is always shown in the input fi eld. To accept it,
select
• If the desired name does not show up, the names that match the string
appear in a list after entering a couple of characters (to open the list of
results before it appears automatically, select
the list.
1. Select
• If only a few intersecting streets exist, their list appears immediately.
• In case of a longer street, the keyboard screen appears. Start entering
the name of the intersecting street on the keyboard. As soon as the street
names that match the entered string can be shown on one screen, their list
appears automatically. Select the street from the list.
.
.
). Select the street from
.
25
Page 24

6. The selected location is shown on the map.
The system transitions to the next screen by selecting
previous screen by selecting the
screen, you can change the destination to anywhere on the map.
button. By touching the location displayed on the
, or it returns to the
•
Note!
7. Navigation starts if
By touching the location displayed on the screen, you can verify the route. Additionally,
the route can be revised by selecting other options.
selected location.
•
Favorites.
: You can search for POI (point of interest) around the
: The selected location can be registered to
is selected, or after 10 seconds of no user interaction.
26
Page 25

3.1.1.4 Selecting a city center as the destination
The city center is not the geometric center of the city but an arbitrary point on the map the
creators have chosen. In cities and villages, it is usually the most important intersection; in
larger cities, it is one of the important intersections.
1. Select
2. Select
3. If necessary, modify the country and city as described earlier (page 20).
4. Enter the street name:
5. Instead of entering the street name, select . This way the center of the
after selecting on the MAP screen.
.
a. Select
b. Start entering the street name on the keyboard.
c. Find the street you need:
• The most likely street name is always shown in the input fi eld. To accept it,
select
• If the desired name does not show up, the names that match the string
appear in a list after entering a couple of characters (to open the list of
results before it appears automatically, select
the list.
displayed city becomes the destination of the route.
.
.
). Select the street from
27
Page 26

6. The selected location is shown on the map.
The system transitions to the next screen by selecting
previous screen by selecting the
screen, you can change the destination to anywhere on the map.
button. By touching the location displayed on the
, or it returns to the
•
Note!
7. Navigation starts if
By touching the location displayed on the screen, you can verify the route. Additionally,
the route can be revised by selecting other options.
selected location.
•
Favorites.
: You can search for POI (point of interest) around the
: The selected location can be registered to
is selected, or after 10 seconds of no user interaction.
28
Page 27

3.1.2 Selecting the destination from the POI (point of interest)
You can select your destination from the POI (point of interest) included with the navigation
system.
Using the same screen, you can fi nd a POI (point of interest) in different ways:
• You can quickly fi nd a nearby POI (point of interest) by its name using the Quick search
feature.
• You can fi nd frequently searched types of POI (point of interest) with only a few screen
selects using the Preset search feature.
• You can search for a POI (point of interest) by its category.
• You can search for a POI (point of interest) by its name.
3.1.2.1 Quick search for a POI (point of interest)
If the name for a POI (point of interest) is input, a search candidate list is displayed. One
destination among the candidates can be selected.
• Along the recommended route if it exists or
• Around your current location if there is no destination given.
Start the Quick search function:
1. Select
2. Select
after selecting on the MAP screen.
.
3. Select .
29
Page 28

4. Using the keyboard, enter the name of the POI (point of interest).
Note!
5. After entering a few letters, select
names containing the entered character sequence.
6. The selected location is shown on the map.
The system transitions to the next screen by selecting
previous screen by selecting the
screen, you can change the destination to anywhere on the map.
Note!
If an address or part of a facility name is input, a search candidate list
including the input characters is displayed. The greater the number of
characters input the more the list is refi ned.
to open the list of POI (point of interest) with
button. By touching the location displayed on the
•
selected location.
•
Favorites.
: You can search for POI (point of interest) around the
: The selected location can be registered to
, or it returns to the
30
Page 29

7. Navigation starts if
By touching the location displayed on the screen, you can verify the route. Additionally,
the route can be revised by selecting other options.
is selected, or after 10 seconds of no user interaction.
31
Page 30

3.1.2.2 Searching for Help nearby
The Preset search feature lets you quickly fi nd the most frequently selected types of Places.
1. Select
2. In the Navigation menu, select
3. Preset search categories appear, all for searching around the current position (or
4. Select any of the quick search buttons to get an instant list of Places.
after selecting on the MAP screen.
Or, select
around the last known position if the current position is not available):
after selecting as an alternative method.
.
5. The selected location is shown on the map.
The system transitions to the next screen by selecting
previous screen by selecting the
screen, you can change the destination to anywhere on the map.
•
Note!
selected location.
•
Favorites.
button. By touching the location displayed on the
: You can search for POI (point of interest) around the
: The selected location can be registered to
32
, or it returns to the
Page 31

6. Navigation starts if
By touching the location displayed on the screen, you can verify the route. Additionally,
the route can be revised by selecting other options.
is selected, or after 10 seconds of no user interaction.
3.1.2.3 Searching for a POI (point of interest) by category
You can search for Places of Interest by their categories and subcategories.
1. Select
2. Select
3. Select
4. Select the area around which the Place should be searched for:
after selecting on the MAP screen.
.
.
• Select
around the last know position. (The result list will be ordered by the distance
from this position.)
• Select
point. This is useful when you search for a later stopover that results in a
minimal detour only, such as searching for upcoming gasoline stations or
restaurants. (The result list will be ordered by the length of the necessary
detour.)
• Select
of the active route. (The result list will be ordered by the distance from the
destination.)
• Select
ordered by the distance from the center of the selected city.)
to search around the current position or if it is not available,
to search along the active route, and not around a given
to search for a place around the destination
to search for a place within a selected city. (The result list will be
33
Page 32

5. (optional) If you have selected
6. Select one of the main Place categories (e.g. Accommodation) or select
to list all Places around the selected location or along the route.
7. Select one of the Place subcategories (e.g. Hotel or Motel) or select to
list all Places in the selected main category around the selected location or along the
route.
, select the city to search in.
8. Sometimes the list of brands in the selected Place subcategory appears. Select one
brand or select
selected location or along the route.
9. Select .
to list all Places in the selected subcategory around the
34
Page 33

10. The selected location is shown on the map.
The system transitions to the next screen by selecting
previous screen by selecting the
screen, you can change the destination to anywhere on the map.
button. By touching the location displayed on the
, or it returns to the
•
Note!
11. Navigation starts if
By touching the location displayed on the screen, you can verify the route. Additionally,
the route can be revised by selecting other options.
selected location.
•
Favorites.
: You can search for POI (point of interest) around the
: The selected location can be registered to
is selected, or after 10 seconds of no user interaction.
35
Page 34

3.1.2.4 Searching for a POI (point of interest) by name
You can search for Places of Interest by their names. You can search around different locations
or along your route in the whole Place database or in one Place category or subcategory only.
1. Select
2. Select
3. Select
4. Select the area around which the Place should be searched for:
after selecting on the MAP screen.
.
.
• Select
around the last know position. (The result list will be ordered by the distance
from this position.)
• Select
point. This is useful when you search for a later stopover that results in a
minimal detour only, such as searching for upcoming gasoline stations or
restaurants. (The result list will be ordered by the length of the necessary
detour.)
• Select
of the active route. (The result list will be ordered by the distance from the
destination.)
• Select
ordered by the distance from the center of the selected city.)
to search around the current position or if it is not available,
to search along the active route, and not around a given
to search for a place around the destination
to search for a place within a selected city. (The result list will be
5. (optional) If you have selected
6. (optional) Select one of the main Place categories (e.g. Accommodation) to search in or
select
to search among all Places.
, select the city to search in.
36
Page 35

7. Select one of the Place subcategories (e.g. Hotel or Motel) to search in or select
8. Select if you have not done it before.
9. Using the keyboard, start entering the name of the Place.
10. After entering a few letters, select to open the list of Places with names containing
the entered character sequence.
to search in the selected Place category.
37
Page 36

11. The selected location is shown on the map.
The system transitions to the next screen by selecting
previous screen by selecting the
screen, you can change the destination to anywhere on the map.
button. By touching the location displayed on the
, or it returns to the
•
Note!
12. Navigation starts if
By touching the location displayed on the screen, you can verify the route. Additionally,
the route can be revised by selecting other options.
selected location.
•
Favorites.
: You can search for POI (point of interest) around the
: The selected location can be registered to
is selected, or after 10 seconds of no user interaction.
38
Page 37

3.1.3 Searching for a Place using Local Search (Only some countries and regions)
If you have an Internet connection, you can search for places using the Local Search service.
1. Select
2. Select
3. Using the keyboard, start entering the text to search for. This text can be a type of Place
4. After entering the text, select to open the list of results:
after selecting on the MAP screen.
.
(like “Hotel”), a type of goods you are looking for (like “Pizza” or “Vacuum cleaner”) or
even a street name followed by the city.
(optional) The local search is carried out around your current location. To search around
a different location, enter the name of the city after the word you are looking for. You can
enter up to 25 characters.
5. The selected location is shown on the map.
The system transitions to the next screen by selecting
previous screen by selecting the
screen, you can change the destination to anywhere on the map.
•
Note!
selected location.
•
Favorites.
button. By touching the location displayed on the
: You can search for POI (point of interest) around the
: The selected location can be registered to
39
, or it returns to the
Page 38

6. Navigation starts if
By touching the location displayed on the screen, you can verify the route. Additionally,
the route can be revised by selecting other options.
is selected, or after 10 seconds of no user interaction.
3.1.4 Selecting a map location as the destination
1. Touch anywhere on the map.
2. Drag the cursor and release it at the desired point.
3. Select .
40
Page 39

4. The selected location is shown on the map.
The system transitions to the next screen by selecting
previous screen by selecting the
screen, you can change the destination to anywhere on the map.
button. By touching the location displayed on the
, or it returns to the
•
Note!
5. Navigation starts if
By touching the location displayed on the screen, you can verify the route. Additionally,
the route can be revised by selecting other options.
selected location.
•
Favorites.
: You can search for POI (point of interest) around the
: The selected location can be registered to
is selected, or after 10 seconds of no user interaction.
41
Page 40

3.1.5 Selecting the destination from your Favorites
1. Select after selecting on the MAP screen.
2. In the Navigation menu, select
When
registered favorite.
is selected, the screen transfers to the Favorites screen. Select your
.
3. The selected location is shown on the map.
The system transitions to the next screen by selecting
previous screen by selecting the
screen, you can change the destination to anywhere on the map.
•
Note!
4. Navigation starts if
By touching the location displayed on the screen, you can verify the route. Additionally,
the route can be revised by selecting other options.
selected location.
•
Favorites.
is selected, or after 10 seconds of no user interaction.
button. By touching the location displayed on the
: You can search for POI (point of interest) around the
: The selected location can be registered to
, or it returns to the
42
Page 41

3.1.6 Selecting a recent destination from the History
1. Select after selecting on the MAP screen.
2. In the Navigation menu, select
3. The list of recent destinations appears. Smart History promotes three destinations to
the fi rst page based on your previous routes (most likely destinations). The rest of the
destinations are ordered by time they were last selected. If necessary, scroll the list to
see earlier destinations.
4. Select a destination from the list.
5. The selected location is shown on the map.
The system transitions to the next screen by selecting
previous screen by selecting the
screen, you can change the destination to anywhere on the map.
.
, or it returns to the
button. By touching the location displayed on the
Note!
•
selected location.
•
Favorites.
: You can search for POI (point of interest) around the
: The selected location can be registered to
43
Page 42

6. Navigation starts if
By touching the location displayed on the screen, you can verify the route. Additionally,
the route can be revised by selecting other options.
is selected, or after 10 seconds of no user interaction.
3.1.7 Entering the coordinate of the destination
You can also select a destination by entering its coordinate as follows:
1. Select
2. In the Navigation menu, select
3. Input map coordinate value of and .
after selecting on the MAP screen.
.
4. When fi nished, select .
5. Select .
44
Page 43

6. The selected location is shown on the map.
The system transitions to the next screen by selecting
previous screen by selecting the
screen, you can change the destination to anywhere on the map.
button. By touching the location displayed on the
, or it returns to the
•
Note!
7. Navigation starts if
By touching the location displayed on the screen, you can verify the route. Additionally,
the route can be revised by selecting other options.
selected location.
•
Favorites.
: You can search for POI (point of interest) around the
: The selected location can be registered to
is selected, or after 10 seconds of no user interaction.
45
Page 44

3.2 Checking route parameters and accessing route related functions
You can check different parameters of the route recommended by the navigation system.
1. Select
2. The following pieces of information are displayed:
3. You have the following options on this screen (for detailed instructions on how to use
after selecting on the MAP screen.
• The name and/or address of the destination.
• The total time of the route.
• The total length of the route.
• The route planning method (e.g. Fast).
them, see the next chapter):
• Select
to edit the route.
• Select
• Select to bypass a part of the route.
Note!
• Select
There are other convenient functions.
to delete the active route.
to display the entire route on the map.
46
Page 45

3.3 Modifying the route
When navigation is already started, there are several ways to modify the active route. The
following sections show some of those options.
3.3.1 Selecting a new destination when already having a route:
New Route, Waypoint or Final Destination
If you already have a recommended route and you select a new destination as described in the
above sections, the application will ask you whether to start a new route, add a new waypoint
(intermediate destination) to the route or append the newly selected destination at the end of
the current route.
• Select to plan a new route to the newly selected location. The previous
destination and waypoint(s) are deleted.
• Select
route. The other destinations of the route remain intact. Note: the new waypoint is placed
among destinations to keep the route optimal. To decide where a waypoint to appear, use
the Edit Route feature.
• Select
The other destinations of the route remain intact. The previous fi nal destination is now the
last waypoint.
to add the newly selected location as an intermediate destination to your
to append the newly selected destination at the end of the route.
47
Page 46

3.3.2 Editing the list of destinations (Edit Route)
You can edit the route by modifying the list of destinations.
1. Select
2. Select
3. Edit the destination or waypoint.
4. Select the destination or waypoint to display the menu.
after selecting on the MAP screen.
.
: Add the new destination or waypoint.
: Start the route plan in consideration of the selected destination or waypoint.
: Close the menu.
: Delete the selected destination or waypoint from the list.
: Move the selected destination or waypoint forward one by one.
: Move the selected destination or waypoint rearward one by one.
48
Page 47

3.3.3 Checking route alternatives when planning the route
You can select from different route alternatives or change the route planning method after you
have selected a new destination.
1. Select
2. Select .
3. The four route alternatives are displayed next to the selected route planning method.
after selecting on the MAP screen.
Select one to view it on the map.
4. Details of a route can be checked by selecting .
5. Select one of the route alternatives or select to return to the previous screen.
The navigation system recalculates the route. The orange line now shows the new
recommended route.
49
Page 48

3.3.4 Changing the road types used in route planning
To recalculate the active route with different road type preferences, do as follows. These
changes can also be made in Settings (page 59).
1. Select
2. Select
3. Select any of the listed road types to modify the route. If needed, scroll the list for all
4. The route has already been recalculated. Select
after selecting on the MAP screen.
.
road types. You have the following options (their order depends on the selected vehicle
type):
•
another vehicle.
•
or vignette to use the road for a longer period of time. They can be enabled or
disabled separately from toll roads.
•
there is a per-use charge) in the routes by default. If you disable toll roads, the
navigation system plans the best toll-free route.
•
default. However, a map does not necessarily contain information about the
accessibility of temporary ferries. You might also need to pay a fare on ferries.
•
created.
•
unpaved roads can be in a bad condition and usually you cannot reach the
speed limit on them.
•
route. For this function, you can select whether or not to cross a border when
planning the route.
- You might need to avoid highways/freeways if you are towing
- Charge roads are pay roads where you can purchase a pass
- The navigation system includes toll roads (pay roads where
- The navigation system includes ferries in a planned route by
- Setting in which routes with carpool lanes can be created or not
- The navigation system excludes unpaved roads by default:
- A border crossing may be a shorter route depending on the
to return to the Map screen.
50
Page 49

3.4 Saving a location as a Favorite destination
You can add any location to Favorites, the list of frequently used destinations. Planning a route
to one of the Favorite destinations is described on page 42.
1. Select a destination as described before. It can be an address, a Place, any location on
the map, a previously used destination from History, etc.
2. A searched destination can be registered to Favorites by selecting
the verifi cation screen of the destination search results.
3.4.1 Editing the details of a Favorite destination
You can select a location that you have already saved as a Favorite and edit its details. Adding
a location to the list of Favorite destinations is described on page 51.
1. Press the Favorites button on the commander switch.
2. Select the Navigation tab.
3. The list of Favorite destinations is displayed.
on
The following functions can be used by selecting Add/Edit Navigation Favorite.
Add Current Location: Set the current location to Favorites.
Add Current Destination: Register the current destination to Favorites.
Add from Contact: Register an address registered to the contacts list.
Move: Switch the Favorites order.
Delete: Delete the registered Favorites.
Your home address can be registered/changed by selecting Home.
The following functions can be used by selecting the registered Favorites.
Replace with Current Location: Set the current location to Favorites.
Replace with Current Destination: Register the current destination to Favorites.
Replace with Address from Contacts:
Move: Switch the Favorites order.
Rename: Edit the registered Favorites name.
Delete: Delete the selected Favorites.
Register an address registered to the contacts list
51
.
Page 50

4 Reference Guide
4.1 Concepts
4.1.1 Smart Zoom
Smart Zoom provides much more than just a usual automatic zoom feature:
• While following a route: when approaching a turn, it will zoom in and raise the view
angle to let you easily recognize your maneuver at the next junction. If the next turn is at
a distance, it will zoom out and lower the view angle to be fl at so you can see the road in
front of you.
• While driving without an active route: Smart Zoom will zoom in if you drive slowly and
zoom out when you drive at high speed.
• Off: Turns the Smart Zoom setting off.
4.1.2 Route calculation and recalculation
The navigation system calculates the route based on your preferences:
• Route planning methods:
•
: Gives a quick route if you can travel at or near the speed limit on all
roads.
•
•
•
• Road type used for route plan:
•
•
•
•
•
•
•
Whenever data exist, route calculation takes into account historical traffi c data for the given day
of week and time of day (page 54).
If the setting for Traffi c Settings is valid, Real-time Traffi c events are taken into account and the
route is largely modifi ed.
The navigation system automatically recalculates the route if you deviate from the proposed
itinerary or if a newly received Traffi c event concerns a part of the recommended route.
For further information about Route settings, see page 59.
: Gives a route that has the smallest total distance of all possible routes.
The navigation system makes a calculation for the Fast route, but it also
includes other roads in the calculation in consideration of fuel economy.
option, you can make the navigation system take, for example, the highway/
freeway instead of a series of smaller roads or streets.
: This method combines the merits of the Fast and Short routes:
: Results in a route with fewer turns and no diffi cult maneuvers. With this
Note!
Some functions are not available depending on some countries and
regions.
52
Page 51

4.1.3 Road safety cameras and other proximity alert points (Only some countries
and regions)
There is a special proximity warning for road safety cameras (like speed or red light cameras)
and other proximity alert points (like schools or railroad crossings).
The application can warn you when you approach road safety cameras like speed cameras
or dangerous areas like school zones or railroad crossings. You can set up the different alert
types individually in Warning settings (page 57).
The following alert types are available:
• Audio warning: When approaching one of these points, a beep sound (regular sound) can
be used or the type of warning can be announced (TTS), and an extra alert can warn you
if you exceed the given speed limit while approaching the point.
• Always: The type of the alert point, its distance, and the related speed limit appear on the
Map screen while you are approaching one of these points.
For some of the alert points, the enforced or expected speed limit is available. For these points,
the audio alert can be different if you are below or above the given speed limit.
Setting can be selected using Warning Settings:
• Only when speeding: The audio alert is only played when you exceed the given speed
limit.
• When approaching: The audio alert is always played when approaching one of these alert
points. To draw you attention, the alert may differ if you exceed the speed limit.
The warning for road safety cameras is disabled when you are in a
Note!
country where road safety camera warning is prohibited. However, you
must ensure on your own liability that using this feature is legal in the
country where you intend to use it.
53
Page 52

4.1.4 Speed limit warning (Only some countries and regions)
Maps may contain information about the speed limits of the roads. The navigation system is
able to warn you if you exceed the current limit. This information may not be available for your
region (ask your local dealer), or may not be fully correct for all roads on the map.
The speed warning can be set from the Warning Settings (page 57).
Setting can be selected using Warning Settings:
• Audio warning: You will hear a warning beep if you exceed the speed limit by a certain
percentage.
• Visual warning: If you exceed the speed limit on a road, the speed limit for the current
road is shown on the map.
You can also choose to see the speed limit sign on the map all the time.
4.1.5 Traffi c information in route planning (Only some countries and regions)
The recommended route is not always the same between two points. Offl ine historical traffi c
information (historical speed information or traffi c patterns) can be taken into account in the
route calculation based on the time of day and the day of week whenever suitable data exists.
In addition, real-time traffi c information can help you avoid current traffi c events like temporary
road closures or a traffi c jam caused by an accident. Both functions are subject to data
availability.
Select
on the map. A 2D map is displayed with road segments colored by the density of the traffi c in
the given period. The current information is shown when you open the screen. Modify the day
of week and the time of day to see the desired period.
after selecting on the MAP screen to display the historical traffi c information
4.1.5.1 Historical traffi c
If historical traffi c information is available with the map data, the navigation system can use it
when planning a route. In normal cases, these statistics help you avoid usual traffi c jams on
the given day of week in the given hour but in some cases like on public holidays that fall on
normal weekdays, they can be misleading. You can disable this feature in Traffi c settings (page
58).
Select
on the map.
after selecting on the MAP screen to display the historical traffi c information
54
Page 53

4.1.5.2 Online traffi c information (Only some countries and regions)
Unlike historical traffi c information, online traffi c can provide you with the real-time status of
the traffi c. Route calculation can avoid road blocks or unexpected traffi c jams caused by an
accident.
Note!
The application automatically takes into account the traffi c events received. You do not need to
set anything in the program. When the navigation system receives traffi c information that may
affect your route, the program will warn you that it is recalculating the route, and navigation will
continue with a new route that is optimal considering the most up-to-date traffi c conditions.
To fi ne-tune this recalculation, you can set the minimum delay that can trigger a route
recalculation, or you can instruct the navigation system to have you confi rm the new
recommended route before it takes effect. You can do these in Traffi c settings (page 58).
Road segments affected by traffi c events are displayed with an alternate color on the map, and
small symbols above the road show the nature of the event:
1. Select
2. Select
3. Select the traffi c category you are interested in, or select
all events:
4. Now select any of the list items to see its details, and to display the affected road
segment in its full length on the map:
This feature needs an active Internet connection.
after selecting on the MAP screen.
.
to see the list of
55
Page 54

4.2 Settings menu
You can confi gure the program settings, and modify the behaviour of the navigation system.
after selecting on the MAP screen.
Select
Button Description
You can fi ne-tune the appearance of the Map screen. Adjust the map
view to your needs, show or hide 3D buildings, and manage POI (point of
interest) display settings (which POI to show on map).
A guidance-related setting is available during route guidance.
A setting related to warnings is available.
Refer to Changing the road types used in route planning (page 50).
A setting for traffi c information is available.
A setting for on-line service is available.
Note!
Some functions are not available depending on some countries and
regions.
56
Page 55

4.2.1 Guidance Settings
Button Description
The guidance audio volume can be changed during route guidance.
4.2.2 Warning Settings
Warning and alert settings are available.
Button Description
The following alert types are available:
: No display and sound
: Only display
: Both sound and display
The speed limit warning display can be changed.
: No display and sound
: Only display
: Both sound and display
A setting is available which sounds a beep at alert points, and it can be
set to on or off. In addition, detailed settings concerning the warning can
be made.
: No display and sound
: Only display
: Both sound and display
The speed camera warning setting can be changed.
: No display and sound
: Only display
: Both sound and display
Note!
Some functions are not available depending on some countries and
regions.
57
Page 56

4.2.3 Traffi c settings
Button Description
Use this switch to enable or disable historical traffi c data and traffi c
patterns. This locally stored information can be very useful in normal
circumstances but for example on public holidays it may be better to turn
off in order not to take into account normal weekday traffi c jams.
Use this switch to enable or disable receiving real-time traffi c information
online. The rest of the buttons below are all related to this real-time
information and are available only if receiving is enabled.
You can also defi ne whether to receive online traffi c only when connected
to a WiFi network.
Alternative routes are offered for detours.
An appropriate alternative route is determined provided by the navigation
system in consideration of traffi c conditions.
You can select how much time delay on the alternative route you are
willing to accept.
The alternative route is offered based on the set time.
Note!
Some functions are not available depending on some countries and
regions.
58
Page 57

4.2.4 Route settings
These settings determine how routes will be calculated.
Button Description
The route calculation can be optimized for different situations. See below
for details.
You might need to avoid highways/freeways if you are towing another
vehicle.
Charge roads are pay roads where you can purchase a pass or vignette to
use the road for a longer period of time. They can be enabled or disabled
separately from toll roads.
The navigation system includes toll roads (pay roads where there is a
per-use charge) in the routes by default. If you disable toll roads, the
navigation system plans the best toll-free route.
The navigation system includes ferries in a planned route by default.
However, a map does not necessarily contain information about the
accessibility of temporary ferries. You might also need to pay a fare on
ferries.
Setting in which routes with carpool lanes can be created or not created.
The navigation system excludes unpaved roads by default: unpaved roads
can be in a bad condition and usually you cannot reach the speed limit on
them.
A border crossing may be a shorter route depending on the route. For this
function, you can select whether or not to cross a border when planning
the route.
59
Page 58

4.2.5 Map settings
You can fi ne-tune the appearance of the Map screen, adjust the map view to your needs, show
or suppress 3D buildings, and manage Place visibility settings (which Places to show on the
map).
The map is always shown on the screen so that you can see the effect when you change a
setting. Scroll the screen downward to display the setting behind the lower part of the screen.
Button Description
When this button is selected, the map view mode can be changed.
•
•
•
Adjust the basic zoom and tilt levels to your needs. Three levels are
available.
During route guidance in any map view mode, the function for zooming in
on approaching intersections turns on/off automatically.
Show or hide 3D city models, 3D artistic or block representation of all city
building data containing actual building sizes and positions on the map.
When enabled, the map zooms out to show an overview of the
surrounding area if the next route event (maneuver) is far away. The
system goes back to the normal map view when you approach the next
event.
Select which Places to show on the map while navigating. Too many
Places make the map crowded, so it is a good idea to show as few as
possible. You have the following possibilities:
• Select the checkbox to show or hide the Place category.
• Select the name of the Place category to open the list of its
: Displays things such as actual construction sites three
dimensionally on the map.
: The map is rotated so that the direction of travel is displayed
in the upward direction.
: The map is displayed so that north is up regardless of the
direction of travel.
subcategories.
60
Page 59

4.2.6 Visual Guidance settings
Adjust how the software helps you navigate with different kinds of route related information on
the Map screen.
Whenever adequate information is available, lane information similar to
the real ones on road signs above the road is displayed at the top of the
map. You can turn this feature on or off.
If you are approaching a highway/freeway exit or a complex intersection
and the needed information exists, the map is replaced with a 3D view of
the junction. You can turn this feature on or let the map be displayed for
the whole route.
When entering tunnels, the surface roads and buildings can be disturbing.
This feature shows a generic picture of a tunnel instead of the map. A topdown overview of the tunnel and remaining distance are also displayed.
4.2.7 Connected Settings (Only some countries and regions)
Set the weather forecast automatic download on/off.
Set the traffi c information automatic download on/off.
61
Page 60

5 Wi-Fi™ (Only some countries and regions)
5.1 What is Wi-Fi™*?
Wi-Fi™ is the brand name which indicates the interconnection between IEEE 802.11 standardized
devices and certifi ed by Wi-Fi Alliance
surrounding environment (such as a mobile Wi-Fi™ router or a public Wi-Fi™ area).
By connecting the audio unit with a Wi-Fi™ compatible device, the Real Time Traffi c function of
the navigation system can be used.
* Wi-Fi™, Wi-Fi Alliance
Wi-Fi Alliance
®
.
Supported standard
IEEE 802.11 b/g/n
Supported security type
None
WEP
WPA (WPA-Personal)
WPA2
WPA/WPA2 (WPA+AES&TKIP)
®
. Wireless Internet access is possible according to the
®
, and the logo are the trademark or registered trademark of
Note!
For enhanced communication safety, a WPA, WPA2, or WPA/WPA2
security type setting is recommended. Follow the security setting
procedure in the device's instruction manual.
62
Page 61

5.2 Connecting to Wi-Fi™
Connection is possible under conditions in which an Internet connection using Wi-Fi™ is
possible, and the Wi-Fi™ setting for the device is on.
5.2.1 Turning Wi-Fi™ on
1. Select the icon on the home screen and display the Settings screen.
2. Select the
3. Select
4. Turn the Wi-Fi™ setting on.
5. Available networks are displayed.
6. Select a desired network.
tab.
or .
icon
Note!
• When the connection to a Wi-Fi™ network is successful, the
is displayed.
• If there is no available network when connecting to Wi-Fi™ for the
fi rst time, you need to fi rst add a network.
• When entering in a network area previously connected to, reconnection to the network is automatic.
• The
• The network name and its security type, and the radio wave
• If the connection to a network is lost, connection to another available
icon is displayed on the network name currently connected.
reception level are displayed.
network is automatic.
5.2.2 Adding a network
To connect to a network except for the public Wi-Fi™ area, a network needs to be added
manually. By adding the network, the security certifi cation information of the network is
recorded, and automatic connection is possible when entering an available area. A maximum of
20 networks can be stored.
1. Turn on Wi-Fi™ if it is off.
2. Select
3. Select
4. Input a network name (SSID) and select
5. Select
6. Select a security type.
7. Select
8. Input the password then select
9. Select
.
. The keyboard screen is displayed.
.
.
. The keyboard screen is displayed.
.
to connect to the network.
Note!
• If “None” is selected during the security type selection, the password
cannot be input.
• If 20 networks have already been stored and another network is
newly stored, the oldes network (oldest access) is deleted.
63
Page 62

Selecting a connecting network
1. Turn on Wi-Fi™ if it is off.
2. The available networks are displayed.
3. Select a desired network.
Note!
If a public Wi-Fi™ network is selected, password input may be required.
5.2.3 Stopping connection to network
1. Select the currently connected network.
2. Select
.
64
Page 63

6 Glossary
Active route
The currently navigated route. Whenever a destination is set, the route is active until you delete
it or reach your destination. See also: Route.
City Center
The city center is not the geometric center of the city but an arbitrary point the map creators
have chosen. In cities and villages, it is usually the most important intersection; in larger cities,
it is one of the important intersections.
Color theme
The navigation system has different color themes for daytime and nighttime which can be
selected as desired.
One daytime scheme and one nighttime scheme is always selected for the map and for the
menus.
The navigation system uses them when it switches from day to night and back.
GPS accuracy
Several factors have impact on the deviation between your real position and the one given by
the GPS device. For example, signal delay in the ionosphere or refl ecting objects near the GPS
device have a different and varying impact on how accurately the GPS device can calculate
your position.
65
Page 64

Map
The navigation system works with digital maps which are not simply the computerized versions
of traditional paper maps. Similarly to paper road maps, the 2D mode of digital maps show you
streets, roads, and elevation by colors.
In 3D mode, you can see the altitude differences, for example valleys and mountains, elevated
roads, and in selected cities 3D landmarks and 3D buildings are also displayed.
You can use digital maps interactively: you can zoom in and out (increase or decrease the
scale), you can tilt them up and down, and rotate them left and right. In GPS-supported
navigation, digital maps facilitate route planning.
North-up map orientation
In North-up mode the map is rotated so its top always faces North. This is the orientation for
example in Find on Map.
Road Safety Camera
This function is not available in some countries and regions.
Special alert points for speed, red light or bus lane cameras. Different data sources are
available. You can confi gure the navigation system to warn you when you approach one of
these cameras.
Detecting the location of Road Safety Cameras is prohibited in certain countries. It is the sole
responsibility of the driver to check whether this feature can be used during the trip.
The software is capable of showing and warning for more than just cameras. Various other
types of proximity alert points like school zones and railway crossings are also available.
Route
A sequence of maneuvers (for example, turns and roundabouts) to reach the destination. The
route contains one start point and one or more destinations.
Track-up map orientation
In Track-up mode the map is rotated so its top always points in the current driving direction.
This is the default orientation in 3D map view mode.
Vehicle marker
The current position is indicated by a blue arrow on the map. The direction the blue arrow is
pointed indicates the current heading.
66
Page 65

7 End-User Terms
The data (“Data”) is provided for your personal, internal use only and not for resale. It is
protected by copyright, and is subject to the following terms and conditions which are agreed to
by you, on the one hand, and [CLIENT] (“[CLIENT]”) and its licensors (including their licensors
and suppliers) on the other hand.
© 200X NAVTEQ [Insert any applicable copyright notices as required for the country-specifi c
Data being used]. All rights reserved.
The Data for areas of Canada includes information taken with permission from Canadian
authorities, including: © Her Majesty the Queen in Right of Canada, © Queen's Printer for
Ontario, © Canada Post Corporation, GeoBase
®
, © Department of Natural Resources Canada.
NAVTEQ holds a non-exclusive license from the United States Postal Service
sell ZIP+4
©United States Postal Service
United States Postal Service
®
information.
®
200X. Prices are not established, controlled or approved by the
®
. The following trademarks and registrations are owned by the
®
to publish and
USPS: United States Postal Service, USPS, and ZIP+4.
Terms and Conditions
Personal Use Only. You agree to use this Data together with [insert name of CLIENT’s
authorized Application] for the solely personal, non-commercial purposes for which you were
licensed, and not for service bureau, time-sharing or other similar purposes. Accordingly, but
subject to the restrictions set forth in the following paragraphs, you may copy this Data only as
necessary for your personal use to (i) view it, and (ii) save it, provided that you do not remove
any copyright notices that appear and do not modify the Data in any way. You agree not to
otherwise reproduce, copy, modify, decompile, disassemble, create any derivative works of, or
reverse engineer any portion of this Data, and may not transfer or distribute it in any form, for
any purpose, except to the extent permitted by mandatory laws.
Restrictions. Except where you have been specifi cally licensed to do so by [CLIENT], and
without limiting the preceding paragraph, you may not (a) use this Data with any products,
systems, or applications installed or otherwise connected to or in communication with vehicles,
capable of vehicle navigation, positioning, dispatch, real time route guidance, fl eet management
or similar applications; or (b) with or in communication with any positioning devices or any
mobile or wireless-connected electronic or computer devices, including without limitation
cellular phones, palmtop and handheld computers, pagers, and personal digital assistants or
PDAs.
Warning. The Data may contain inaccurate or incomplete information due to the passage
of time, changing circumstances, sources used and the nature of collecting comprehensive
geographic data, any of which may lead to incorrect results.
No Warranty. This Data is provided to you “as is,” and you agree to use it at your own
risk. [CLIENT] and its licensors (and their licensors and suppliers) make no guarantees,
representations or warranties of any kind, express or implied, arising by law or otherwise,
including but not limited to, content, quality, accuracy, completeness, effectiveness, reliability,
fi tness for a particular purpose, usefulness, use or results to be obtained from this Data, or that
the Data or server will be uninterrupted or error-free.
67
Page 66

Disclaimer of Warranty: [CLIENT] AND ITS LICENSORS (INCLUDING THEIR LICENSORS
AND SUPPLIERS) DISCLAIM ANY WARRANTIES, EXPRESS OR IMPLIED, OF QUALITY,
PERFORMANCE, MERCHANTABILITY, FITNESS FOR A PARTICULAR PURPOSE OR
NON-INFRINGEMENT. Some States, Territories and Countries do not allow certain warranty
exclusions, so to that extent the above exclusion may not apply to you.
Disclaimer of Liability: [CLIENT] AND ITS LICENSORS (INCLUDING THEIR LICENSORS AND
SUPPLIERS) SHALL NOT BE LIABLE TO YOU: IN RESPECT OF ANY CLAIM, DEMAND
OR ACTION, IRRESPECTIVE OF THE NATURE OF THE CAUSE OF THE CLAIM, DEMAND
OR ACTION ALLEGING ANY LOSS, INJURY OR DAMAGES, DIRECT OR INDIRECT,
WHICH MAY RESULT FROM THE USE OR POSSESSION OF THE INFORMATION; OR
FOR ANY LOSS OF PROFIT, REVENUE, CONTRACTS OR SAVINGS, OR ANY OTHER
DIRECT, INDIRECT, INCIDENTAL, SPECIAL OR CONSEQUENTIAL DAMAGES ARISING
OUT OF YOUR USE OF OR INABILITY TO USE THIS INFORMATION, ANY DEFECT IN THE
INFORMATION, OR THE BREACH OF THESE TERMS OR CONDITIONS, WHETHER IN AN
ACTION IN CONTRACT OR TORT OR BASED ON A WARRANTY, EVEN IF [CLIENT] OR
ITS LICENSORS HAVE BEEN ADVISED OF THE POSSIBILITY OF SUCH DAMAGES. Some
States, Territories and Countries do not allow certain liability exclusions or damages limitations,
so to that extent the above may not apply to you.
Export Control. You agree not to export from anywhere any part of the Data provided to you
or any direct product thereof except in compliance with, and with all licenses and approvals
required under, applicable export laws, rules and regulations.
Entire Agreement. These terms and conditions constitute the entire agreement between
[CLIENT] (and its licensors, including their licensors and suppliers) and you pertaining to the
subject matter hereof, and supersedes in their entirety any and all written or oral agreements
previously existing between us with respect to such subject matter.
Governing Law. The above terms and conditions shall be governed by the laws of the State
of Illinois [insert “Netherlands” where European NAVTEQ Data is used], without giving effect
to (i) its confl ict of laws provisions, or (ii) the United Nations Convention for Contracts for the
International Sale of Goods, which is explicitly excluded. You agree to submit to the jurisdiction
of the State of Illinois [insert “The Netherlands” where European NAVTEQ Data is used] for any
and all disputes, claims and actions arising from or in connection with the Data provided to you
hereunder.
Government End Users. If the Data is being acquired by or on behalf of the United States
government or any other entity seeking or applying rights similar to those customarily claimed
by the United States government, this Data is a “commercial item” as that term is defi ned at 48
C.F.R. (“FAR”) 2.101, is licensed in accordance with these End-User Terms, and each copy of
Data delivered or otherwise furnished shall be marked and embedded as appropriate with the
following “Notice of Use,” and shall be treated in accordance with such Notice:
68
Page 67

NOTICE OF USE
CONTRACTOR (MANUFACTURER/SUPPLIER) NAME: NAVTEQ
CONTRACTOR (MANUFACTURER/SUPPLIER) ADDRESS: 425 West Randolph Street,
Chicago, Illinois 60606
This Data is a commercial item as defi ned in FAR 2.101 and is subject to these End-User
Terms under which this Data was provided.
© 200X NAVTEQ – All rights reserved.
If the Contracting Offi cer, federal government agency, or any federal offi cial refuses to use the
legend provided herein, the Contracting Offi cer, federal government agency, or any federal
offi cial must notify NAVTEQ prior to seeking additional or alternative rights in the Data.
69
 Loading...