

Page 1

Robotic Pool Cleaner BASIC 2
Operating Instructions
Contents
1. INTRODUCTION .............................................................................2
2. SPECIFICATIONS ............................................................................2
3. WARNINGS AND CAUTIONS ........................................................2
3.1. Warnings ................................................................................2
3.2. Cautions .................................................................................2
4. POOL CLEANER PARTS ..................................................................3
5. USING THE POOL CLEANER .........................................................4
5.1. Setup ......................................................................................4
5.2. Putting the Pool Cleaner into the pool ...............................4
5.3. Removing the Pool Cleaner from the pool .........................5
5.4. Maintenance ..........................................................................6
5.4.1. Cleaning the filtration system.....................................6
5.4.2. Cleaning the impeller..................................................8
5.5. Off-season storage ...............................................................9
6. STAND ASSEMBLY.........................................................................55
Robotic Pool Cleaner BASIC 2 | Operating Instructions
1
Page 2
Robotic Pool Cleaner BASIC 2
Operating Instructions
1. INTRODUCTION
Thank you for purchasing a Maytronics Pool Cleaner.
We are sure that your Maytronics Robotic Pool Cleaner will provide you with reliable, convenient and
cost effective pool cleaning. Its reliable filtration in all pool conditions and all-surface climbing brush
enhance maximum pool hygiene.
The Robotic Pool Cleaner by Maytronics deliver advanced cleaning technologys, long lasting
performance and easy maintenance.
2. SPECIFICATIONS
Motor protection: IP 68
Minimum depth: 0.80m / 2.6ft
Maximum depth: 5m / 16.4ft
Power Supply
Digital “Switch-Mode” Power Supply
•Input-100-250ACVolts
•50-60Hertz
•180Watt
•Output-<30VDC
•IP54
3. WARNINGS AND CAUTIONS
3.1. Warnings
•Use the originally supplied power supply only
•Ensure the electrical outlet is protected by a ground fault interrupter (GFI) or an earth
leakage interrupter (ELI)
•Keep the power supply out of standing water
•Position the power supply at least 3m / 10ft away from the edge of the pool
•Do not enter the pool while the pool cleaner is working
•Unplug the power supply before servicing
3.2. Cautions
Use the Pool Cleaner in the following water conditions only:
Chlorine Max 4 ppm
pH 7.0 - 7.8
Temperature 6 – 34°C / 43-93°F
NaCl Maximum = 5000 ppm
2
Robotic Pool Cleaner BASIC 2 | Operating Instructions
Page 3
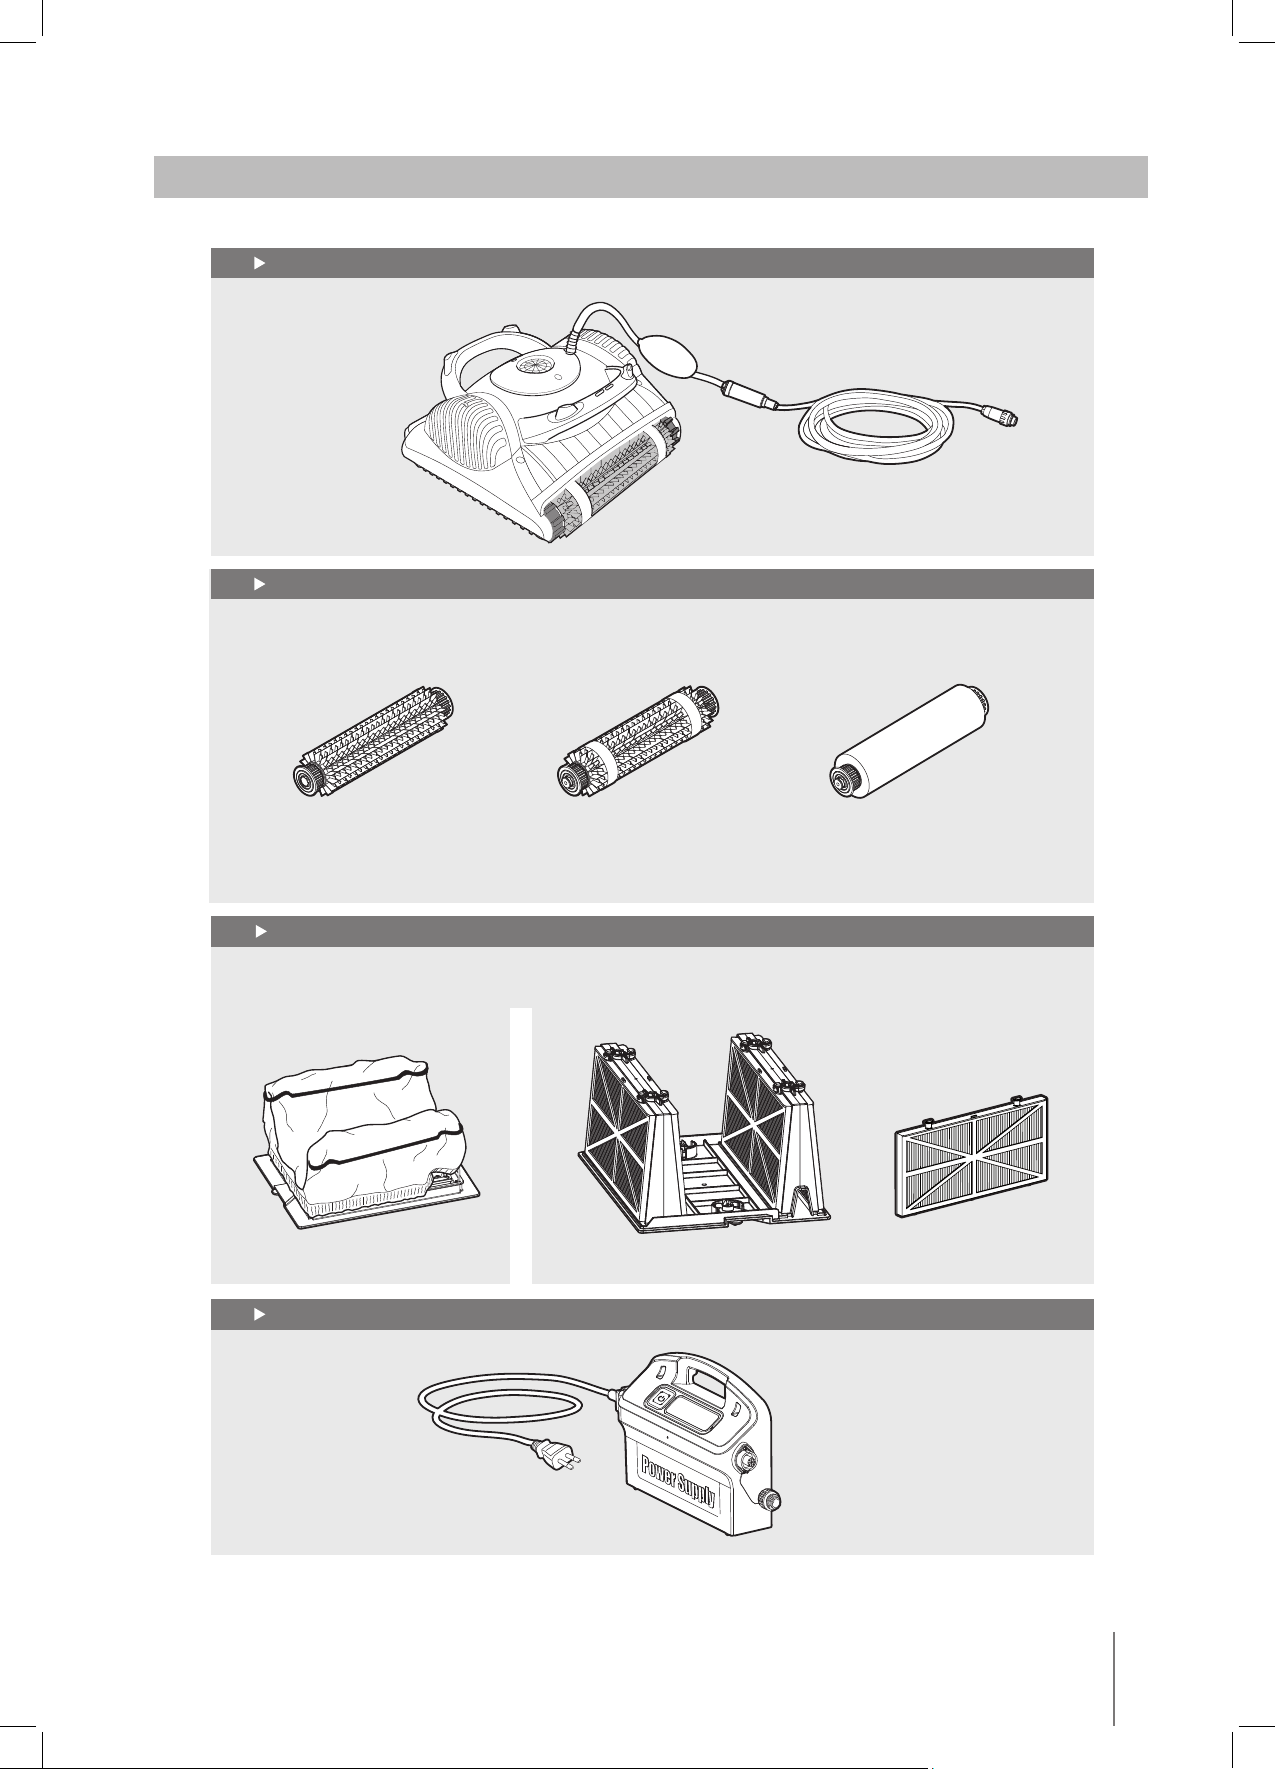
4. POOL CLEANER PARTS
Robotic Pool Cleaner BASIC 2
Brushes
There are three types of optional brushes, each designed to provide optimal traction on different
pool surfaces. Only one type set is provided with your robot Pool Cleaner.
PVC Bru sh
For concrete, PVC,
fiberglass and liner
Combin e d Bru sh
All surface climbing brush
ideal for most pool surfaces
Won de r (foam) Bru sh
For smooth ceramic tiles
Filtration
There are two options of filtration system: filter bag or cartridge. Only one system type is provided with
your robot pool cleaner.
Bottom lid an d fi lte r Bag
Cartridge with n e t fi lte rs (x4 )
or
u ltra-fi n e fi lte r (x4 )
Power Supply Unit
Robotic Pool Cleaner BASIC 2 | Operating Instructions
3
Page 4

5. USING THE POOL CLEANER
5.1. Set Up
40°C Max
104°F Max
Position the power supply so
that it is approximately in the
middle of the long side
of the pool at a distance of
3m / 10ft.
Attach the floating cable to the
power supply by inserting it
with the notch on the
connector (1) lined up with
the groove in the socket on
the power supply and turning
clockwise (2).
GFI/ELI
✤
2
1
5.2. Putting the Pool Cleaner into the pool
If Wonder (foam) brush/ Wonder rings are dry,
.
soak them in water until soft
Shake the Pool Cleaner from side to side or
turn it upside down to release trapped air.
Let it sink to the pool floor.
4
Robotic Pool Cleaner BASIC 2 | Operating Instructions
Page 5

Turn the power supply ON.
5.3. Removing the Pool Cleaner from the pool
The Pool Cleaner will perform automatic shut-off at
the end of the cleaning cycle.
Turn OFF and unplug the power supply.
Using the floating cable, bring the
Pool Cleaner to the pool’s edge.
OFF
DO NOT PULL THE POOL CLEANER FROM THE POOL USING THE CABLE.
Robotic Pool Cleaner BASIC 2 | Operating Instructions
5
Page 6

5.4. Maintenance
Click
5.4.1. Cleaning the filtration
system:
Cleaning the filter bag
Unplug the power supply.
Turn the Pool Cleaner upside-down.
Open the bottom lid.
Remove the filter bag.
Clean the filter bag with a hose.
We recommend that you periodically wash the filter
bag in a washing machine using the gentle cycle
program.
Periodically clean the brushes with a hose.
Replacing the filter bag
Put the filter bag over the frame so that the strap
is in the middle of the shortest side.
Make sure that filter bag is positioned
properly on the frame.
6
Robotic Pool Cleaner BASIC 2 | Operating Instructions
Page 7

Cleaning the cartridge filters
Click
Note: Don’t let the cartridge filters dry out before cleaning.
Unplug the power supply.
With the pool cleaner upside down
open the bottom lid and pull it out.
Open the clips and remove the filters.
Clean the filters with a hose.
Robotic Pool Cleaner BASIC 2 | Operating Instructions
7
Page 8

Insert the filters with the plastic backing
facing out.
Insert the cartridge unit.
5.4.2. Cleaning the impeller
Unplug the power supply.
If you notice debris trapped in the
impeller open the impeller and remove
the debris.
Place the impeller cover at an angle so that
the notch is on the second ring of the spring.
Press down on the impeller cover in the
direction of the spring, pushing it into place.
Replace the screws.
8
Robotic Pool Cleaner BASIC 2 | Operating Instructions
Page 9

Cable
To remove the
kinks, stretch
the cable out
completely and let
it sit for at least a
day in the sun.
5.5. Off-season storage
If the pool cleaner will not be in use for an extended
period, perform the following storage steps:
•Make sure that no water is left in the pool cleaner.
•Thoroughly clean the filter bag or cartridge and insert in
place.
•Roll up the cable so that it has no kinks.
•Store the pool cleaner upright on the Stand in
a protected area out of direct sun/rain/frost at a
temperature of between 5˚-45˚C / 41˚-113˚F.
Robotic Pool Cleaner BASIC 2 | Operating Instructions
9
 Loading...