

Maytag RFC1500AAW, RFC1000AAW Owner's Manual
Q.MAYFAG
Freezer
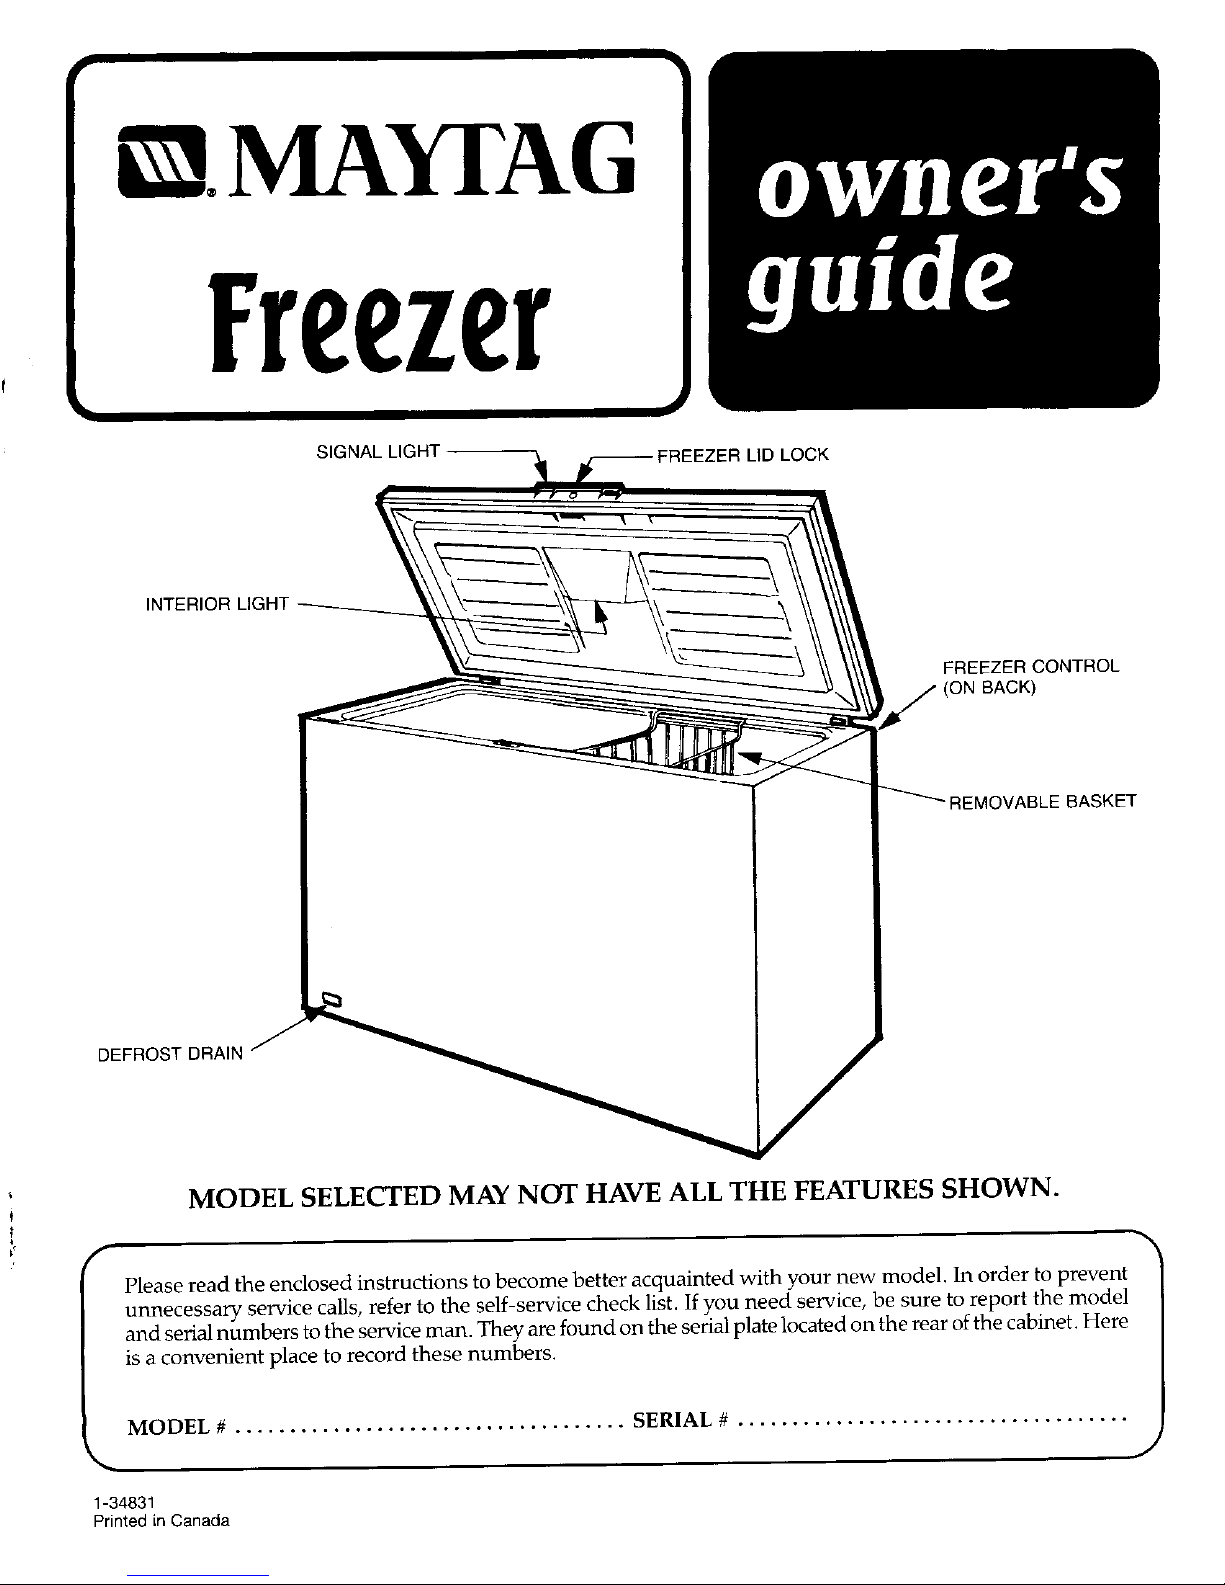
SIGNA_
INTERIOR LIGHT _ / (oNFREEZERBAcK)CONTROLREMOVABLE BASKET
DEFROST DRAIN
MODEL SELECTED MAY NOT HAVE ALL THE FEATURES SHOWN.
Please read the enclosed instructions to become better acquainted with your new model In order to prevent
unnecessary service calls, refer to the self-service check list. If you need service, be sure to report the model
and serial numbers to the service man. They are found on the serial plate located on the rear of the cabinet. Here
is a convenient place to record these numbers.
MODEL # .................................... SERIAL # ....................................
_,. .,
1-34831
Printedin Canada
INSTALLATION OPERATION
Location Setting Control
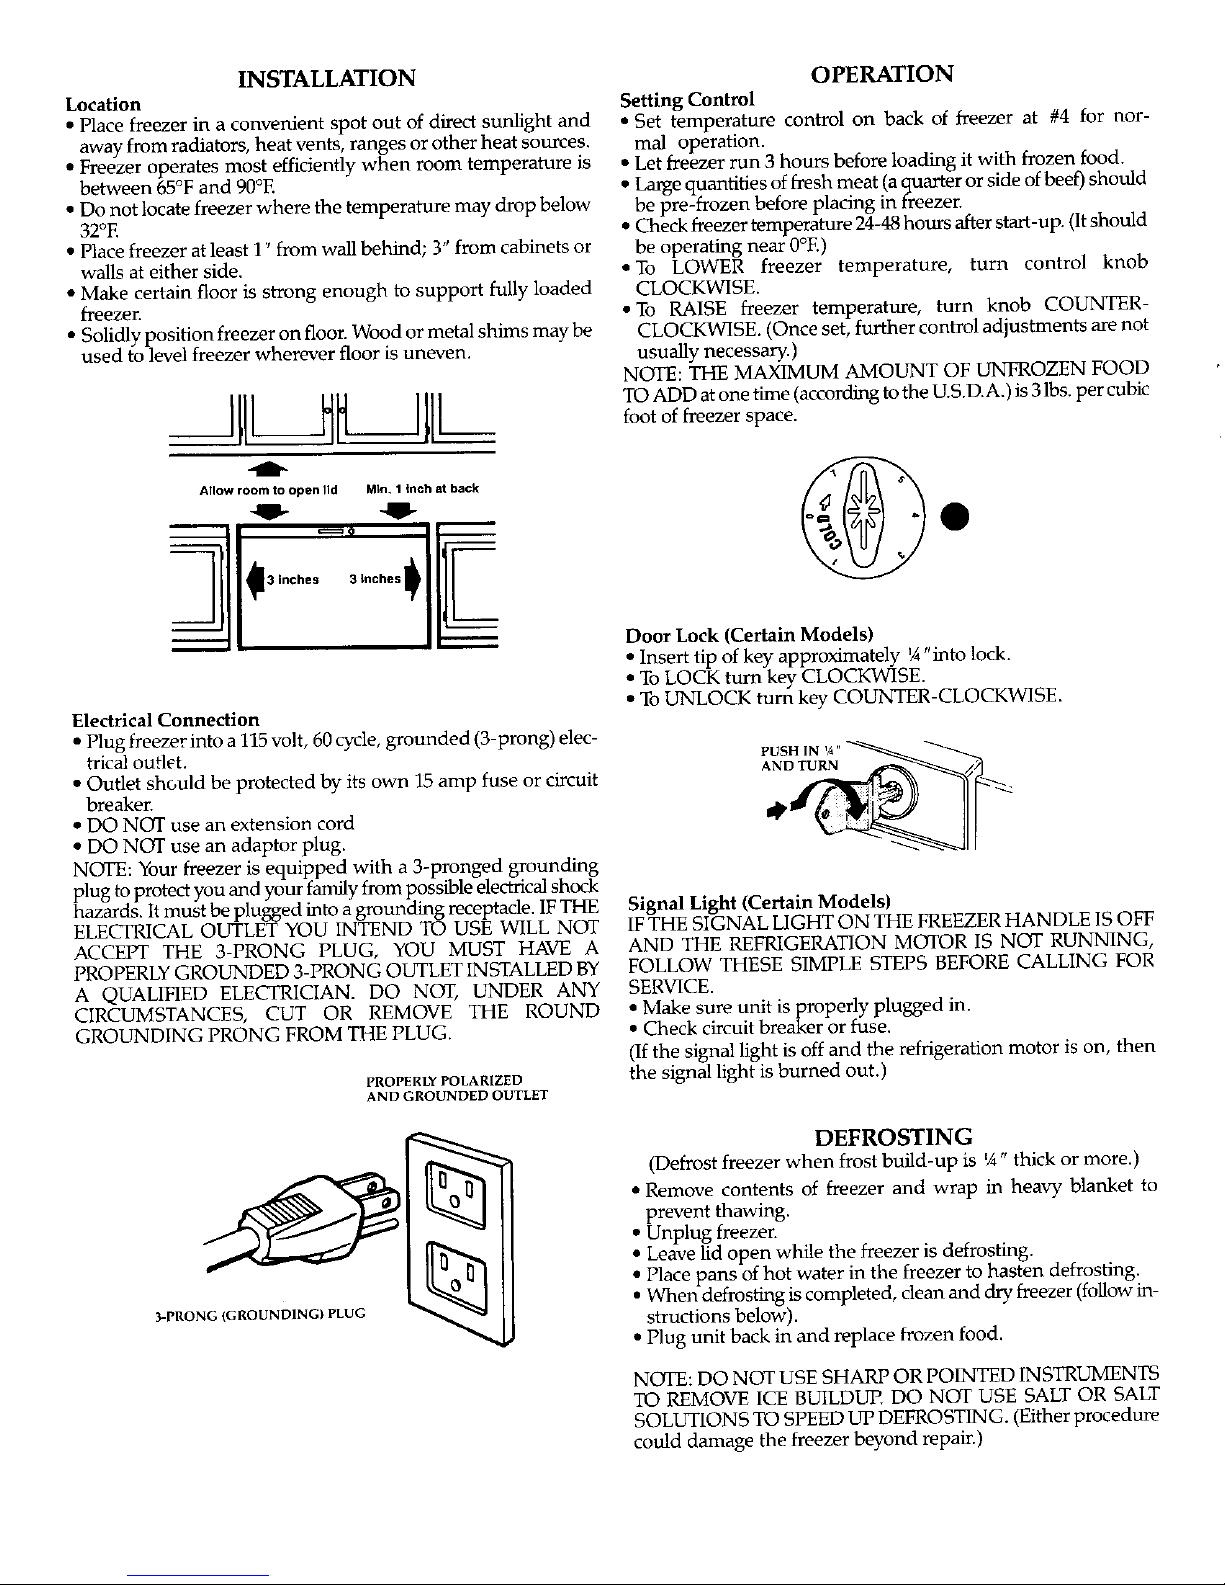
• Place freezer in a convenient spot out of direct sunlight and • Set temperature control on back of freezer at #4 for nor-
away from radiators, heat vents, ranges or other heat sources, mal operation.
• Freezer operates most efficiently when room temperature is * Let freezer run 3 hours before loading it with frozen food.
between 65°F and 90°E " Large quantities of fresh meat (a quarter or side of beef) should
• Do not locate freezer where the temperature may drop below be pre-frozen before placing in freezer.
32°E • Check freezer temperature 24-48 hours after start-up. (It should
• Place freezer at least I _from wall behind; 3" from cabinets or be operating near 0°E )
walls at either side. • To LOWER freezer temperature, turn control knob
• Make certain floor is strong enough to support fully loaded CLOCKWISE.
freezer. * To RAISE freezer temperature, turn knob COUNTER-
. Solidly position freezer on floor. Wood or metal shims may be CLOCKWISE. (Once set, further control adjustments are not
used to level freezer wherever floor is uneven, usually necessary.)
NOTE: THE MAXIMUM AMOUNT OF UNFROZEN FOOD
III _ __ll I footTO ADD at one time (according to the U.S.D.A.) is 3 lbs. percubiCoffreezer space.
- %
Allow room Io open lid MIn, 1 tnch a_back
Ill'=,lll
3 inches 3 Inches
Door Lock (Certain Models)
• Insert tip of key approximately r/_"into lock.
• ToLOCK turn key CLOCKWISE.
• ToUNLOCK turn key COUNTER-CLOCKWISE.
Electrical Connection
• Plug freezer into a 115 volt, 60 cycle, grounded (3-prong) dec-
PUSH IN _A"
AND TURN /,,"
• Outlet should be protected by its own 15 amp fuse or circuit
breaker.
• DO NOT use an extension cord a_'
• DO NOT use an adaptor plug.
NOTE: Your freezer is equipped with a 3-pronged grounding
plug to protect you and your family from possible electrical shock
hazards. It must be plugged into a grounding receptade. IF THE Signal Light (Certain Models)
ELECTRICAL OUTLET YOU INTEND TO USE WILL NOT IFTHE SIGNAL LIGHT ON THE FREEZER HANDLE IS OFF
ACCEPT THE 3-PRONG PLUG, YOU MUST HAVE A AND THE REFRIGERATION MOTOR IS NOT RUNNING,
PROPERLY GROUNDED 3-PRONG OUTLET INSTALLED BY FOLLOW THESE SIMPLE STEPS BEFORE CALLING FOR
A QUALIFIED ELEctRICIAN. DO NOT, UNDER ANY SERVICE.
CIRCUMSTANCES, CUT OR REMOVE THE ROUND • Make sure unit is properly plugged in.
GROUNDING PRONG FROM THE PLUG. • Check circuit breaker or fuse.
(If the signal light is off and the refrigeration motor is on, then
PROPERLYPOLARIZED the signal light is burned out.)
AND GROUNDED OUTLET
DEFROSTING
(Defrost freezer when frost build-up is _" thick or more.)
• Remove contents of freezer and wrap in heavy blanket to
prevent thawing.
• Unplug freezer.
t]_"_,,_ • Leave lid open while the freezer is defrosting.
• Place pans of hot water in the freezer to hasten defrosting.
O • When defrosting is completed, clean and dry freezer (follow in-
3-PRONG (GROUNDING} PLUG structions below).
• Plug unit back in and replace frozen food.
NOTE: DO NOT USE SHARP OR POINTED INSTRUMENTS
TO REMOVE ICE BUILDUP. DO NOT USE SALT OR SALT
SOLUTIONS TO SPEED UP DEFROSTING. (Either procedure
could damage the freezer beyond repair.)
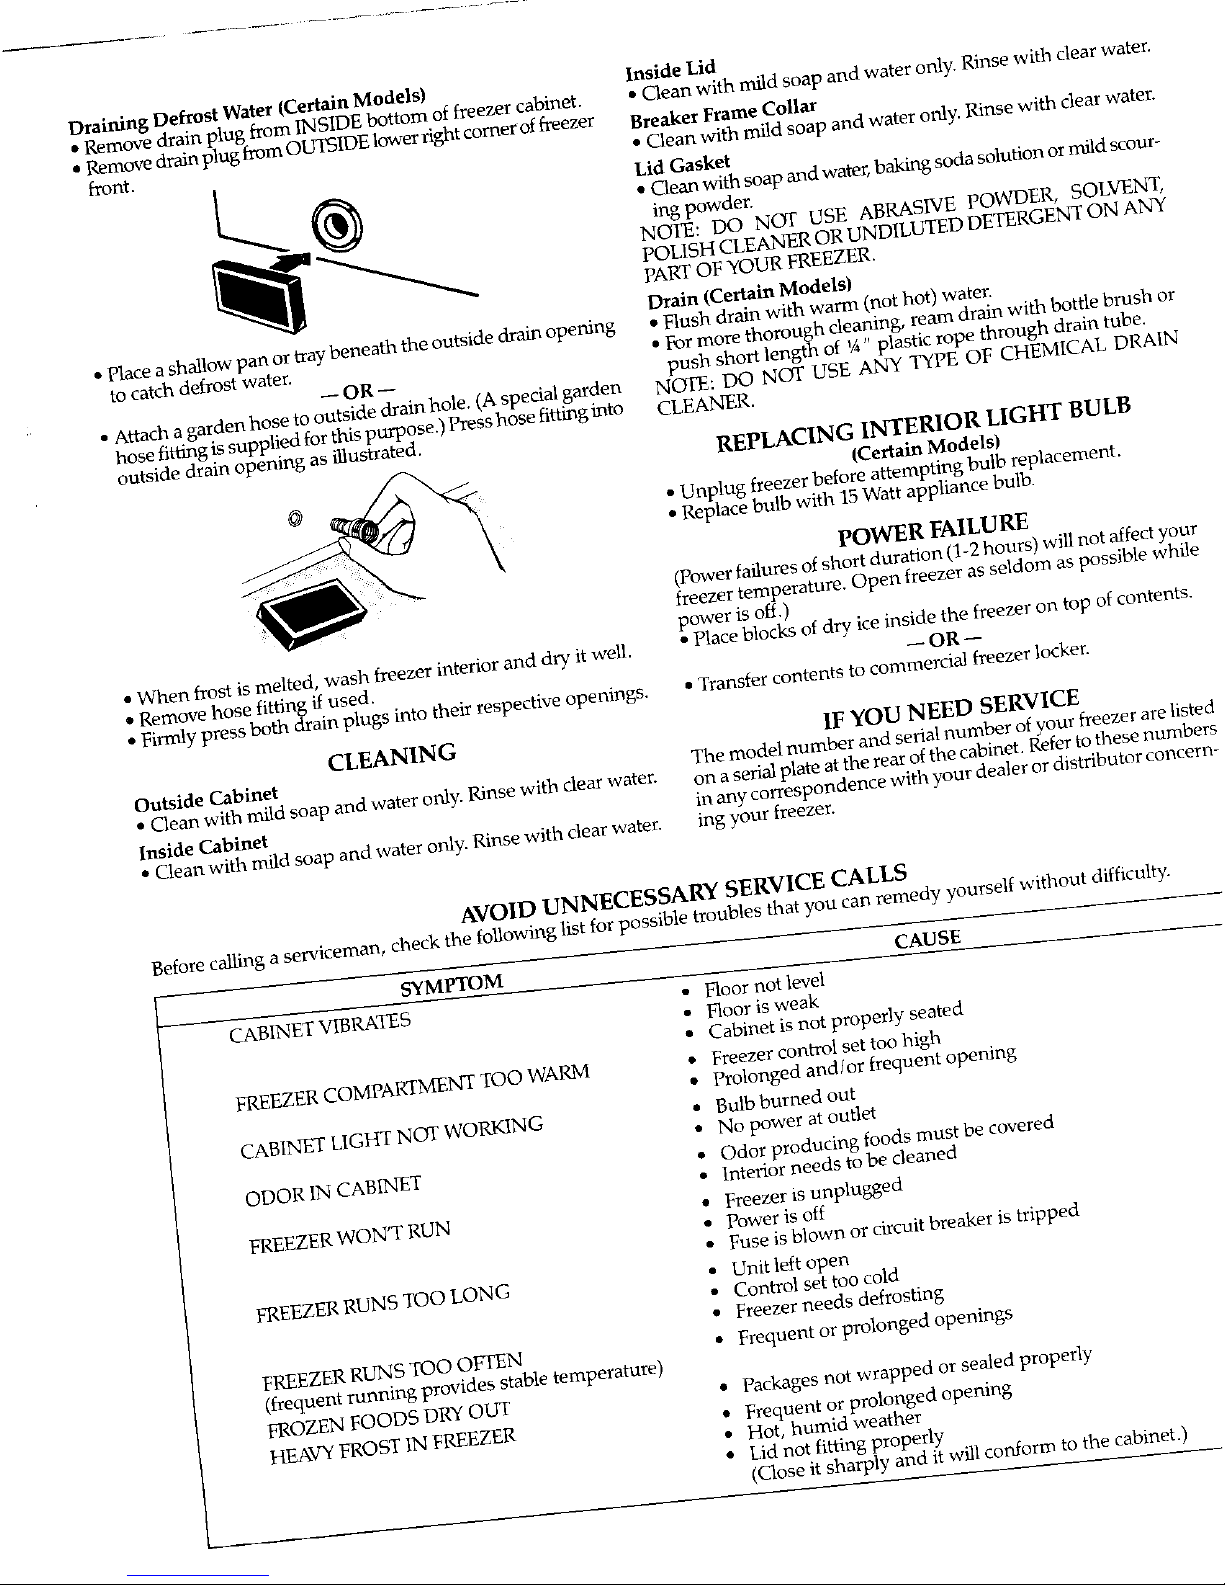
Draining Defrost Water (Certain Models) Inside Lid
• Remove drain plug from INSIDE bottom of freezer cabinet. • Clean with mild soap and water only. Rinse with clear water.
• Remove drain plug from OUTSIDE lower light comer of freezer Breaker Frame Collar
front. • Clean with mild soap and water only. Rinse with clear waten
__ Lid Gasket
• Clean _th soap and water, baking soda solution or mild scour-
ing powder.
NOTE: IX) NOT USE ABRASIVE POWDER, SOLVENT,
POLISH CLEANER OR UNDILUTED DETERGENT ON ANY
PART OF YOUR FREEZER.
Drain (Certain Models)
• Place a shallow pan or tray beneath the outside drain opening • Flush drain with warn1 (not hot) water.
to catch defrost water. • For more thorough cleaning, ream drain with bottle brush or
-- OR -- push short length of *a" plastic rope through drain tube.
• Attach a garden hose to outside drainhole, (A specialgarden NOTE: DO NOT USE ANY TYPE OF CHEMICAL DRAIN
hose fitting is supplied for this purpose.) Press hose fitting into CLEANER.
outside drain opening as illustrated.
REPLACING INTERIOR LIGHT BULB
(Certain Models)
@ • Unplug freezer before attempting bulb replacement.
• Replace bulb with 15 Watt appliance bulb.
POWER FAILURE
(Power failures of short duration (1-2 hours) will not affect your
freezer temperature. Open freezer as seldom as possible while
power is off.)
• When frost is melted, wash freezer interior and dry, it well. ° Place blocks of dry, ice inside the freezer on top of contents.
• Remove hose fitting if used. -- OR --
• Firmly press both drain plugs into their respective openings. • Transfer contents to commercial freezer locker.
CLEANING IF YOU NEED SERVICE
Outside Cabinet The model number and serial number of your freezer are liste
• Clean with mild soap and water only. Rinse with clear water, on a serial plate at the rear of the cabinet. Refer to these numbc
Inside Cabinet in any correspondence with your dealer or distributor concer
• Clean with mild soap and water only. Rinse with clear water, ing your freezer.
AVOID UNNECESSARY SERVICE CALLS
Before calling a serviceman, check the following list for possible troubles that you can remedy yourself without difficulty.
SYMPTOM CAUSE
CABINET VIBRATES • Hoor not level
• Floor is weak
• Cabinet is not properly seated
FREEZER COMPARTMENT TOO WARM • Freezer control set too high
• Prolonged and/or frequent opening
CABINET LIGHT NOT WORKING • Bulb burrted out
• No power at outlet
ODOR 1N CABINET .b Oclor producing foods must be covered
._ Interior needs to be cleaned
FREEZER WON'T RUN • Freezer is unplugged
• Power is off
• Fuse is blown or circuit breaker is tripped
FREEZER RUNS TOO LONG • Unit left open
• Control set too cold
• Freezer needs defrosting
FREEZER RUNS TOO Ok 11_N • Frequent or prolonged openings
(frequent running provides stable temperature)
FROZEN FOODS DRY OUT • Packages not wrapped or sealed properly
HEAVY FROST IN FREEZER • Frequent or prolonged opening
• Hot, humid weather
• Lid not fitting properly
(Close it sharply and it will conform to the cabinet.)
 Loading...